

ClassicFlame 39EB364GRS User Manual [en, es, fr]
BUILT IN ELECTRIC FIREPLACE
USER’S GUIDE
MODEL NUMBERS:
33EB304GRS
39EB364GRS
45EB424GRS
CONSUMER SAFETY INFORMATION
PLEASE READ THIS MANUAL BEFORE USING THIS APPLIANCE
WARNING
IF THE INFORMATION IN THIS MANUAL IS NOT FOLLOWED. AN ELECTRIC
SHOCK OR FIRE MAY RESULT CAUSING PROPERTY
DAMAGE, PERSONAL INJURY OR LOSS OF LIFE.
DO NOT STORE OR USE GASOLINE OR OTHER FLAMABLE VAPORS AND
LIQUIDS IN THE VICINITY OF THIS OR ANY
OTHER APPLIANCE.
Thank you and congratulations on your purchase of a Classic Flame fireplace.
Please read the installation instructions before installing and operating this
appliance.
IMPORTANT: Read all instructions and warnings carefully before using.
Failure to follow these instructions may result in a possible e
and/ or injury and will void the warranty.
For Customer Service:
E-Mail: parts@twinstarhome.com
In English Call: 866-661-1218
En Français Call: 866-374-9203
En Español Call: 866-661-1218
E-1
lectric shock, fire hazzard
Twin-Star International, Inc.
Delray Beach, FL 33483
Made in China
Printed in China

SECTION 1: BEGINNING
E-2
QUICK START GUIDE
1) Prior to first use verify that the circuit breakers are
on.
3) If your heater does not emit heat, verify the wall
thermostat (not included) is set above the current
room temperature. If this does not work, switch the
main Power Button off for 5 minutes and try again.
2) The heating element on this unit may emit a slight,
harmless odor when first used. This odor is a
normal reaction to heating the internal heater parts
for the first time. This odor will dissapate and should
not happen again.
4) The information regarding the model number and
other specifics about this electric fireplace can be
found under the emberbed in the lightbulb area.
Follow the direction for changing the lightbulbs to
access this area (Page 5).
IMPORTANT - INSTRUCTIONS - WARNINGS
The following instructions and precautions should be followed when using this or any heating
appliance to reduce the risk of fire, electric shock, and injury to persons.
1) read all instructions before using this fireplace.
2) This fireplace can become hot when in use.
To avoid burns do not allow bare skin to come in
contact the hot surfaces. The trim around the heater
opening becomes hot during operation. Keep
combustible materials, such as furniture, pillows,
bedding, papers, clothes, and curtains at least 3
feet (.9m) from the front of the unit.
3) Extreme caution is necessary when any heater is
used by or near children or invalids and whenever
the fireplace is left operating and unattended.
9) All electric heaters have hot and arcing or
sparking parts inside. Do not use this appliance in
areas where gasoline, paint or flammable liquids
are stored or anywhere the unit will be exposed to
flammable liquids.
10) Do not modify this fireplace, use it only as
decribed in this manual. Any other use not
recomended by the manufacturer may cause fire,
electric shock or injury to persons.
11) Do not burn wood or other materials in this
fireplace.
4) Do not operate any fireplace if the heater has
malfuntioned, or if the fireplace has been dropped or
damaged in any manner.
5) Do not use outdoors.
6) This firplace is not intended for use in bathrooms,
laundry areas and similar locations.
7) Do not insert or allow foreign objects to enter any
ventilation or exhaust opening as this may cause an
electric shock or fire, or damage to the heater.
8) To prevent a possible fire, do not block air intakes
or exhaust in any manner.
IMPORTANT SAVE THESE INSTRUCTIONS
12) Do not strike fireplace glass
13) Always use a certified electricion for installation.
14) Disconnect all power coming to the fireplace at
the main service panel before performing any
cleaning, or maintenence.
15) When transporting or storing the fireplace, keep
in a dry place, free from excessive vibration and
store as to avoid damage.
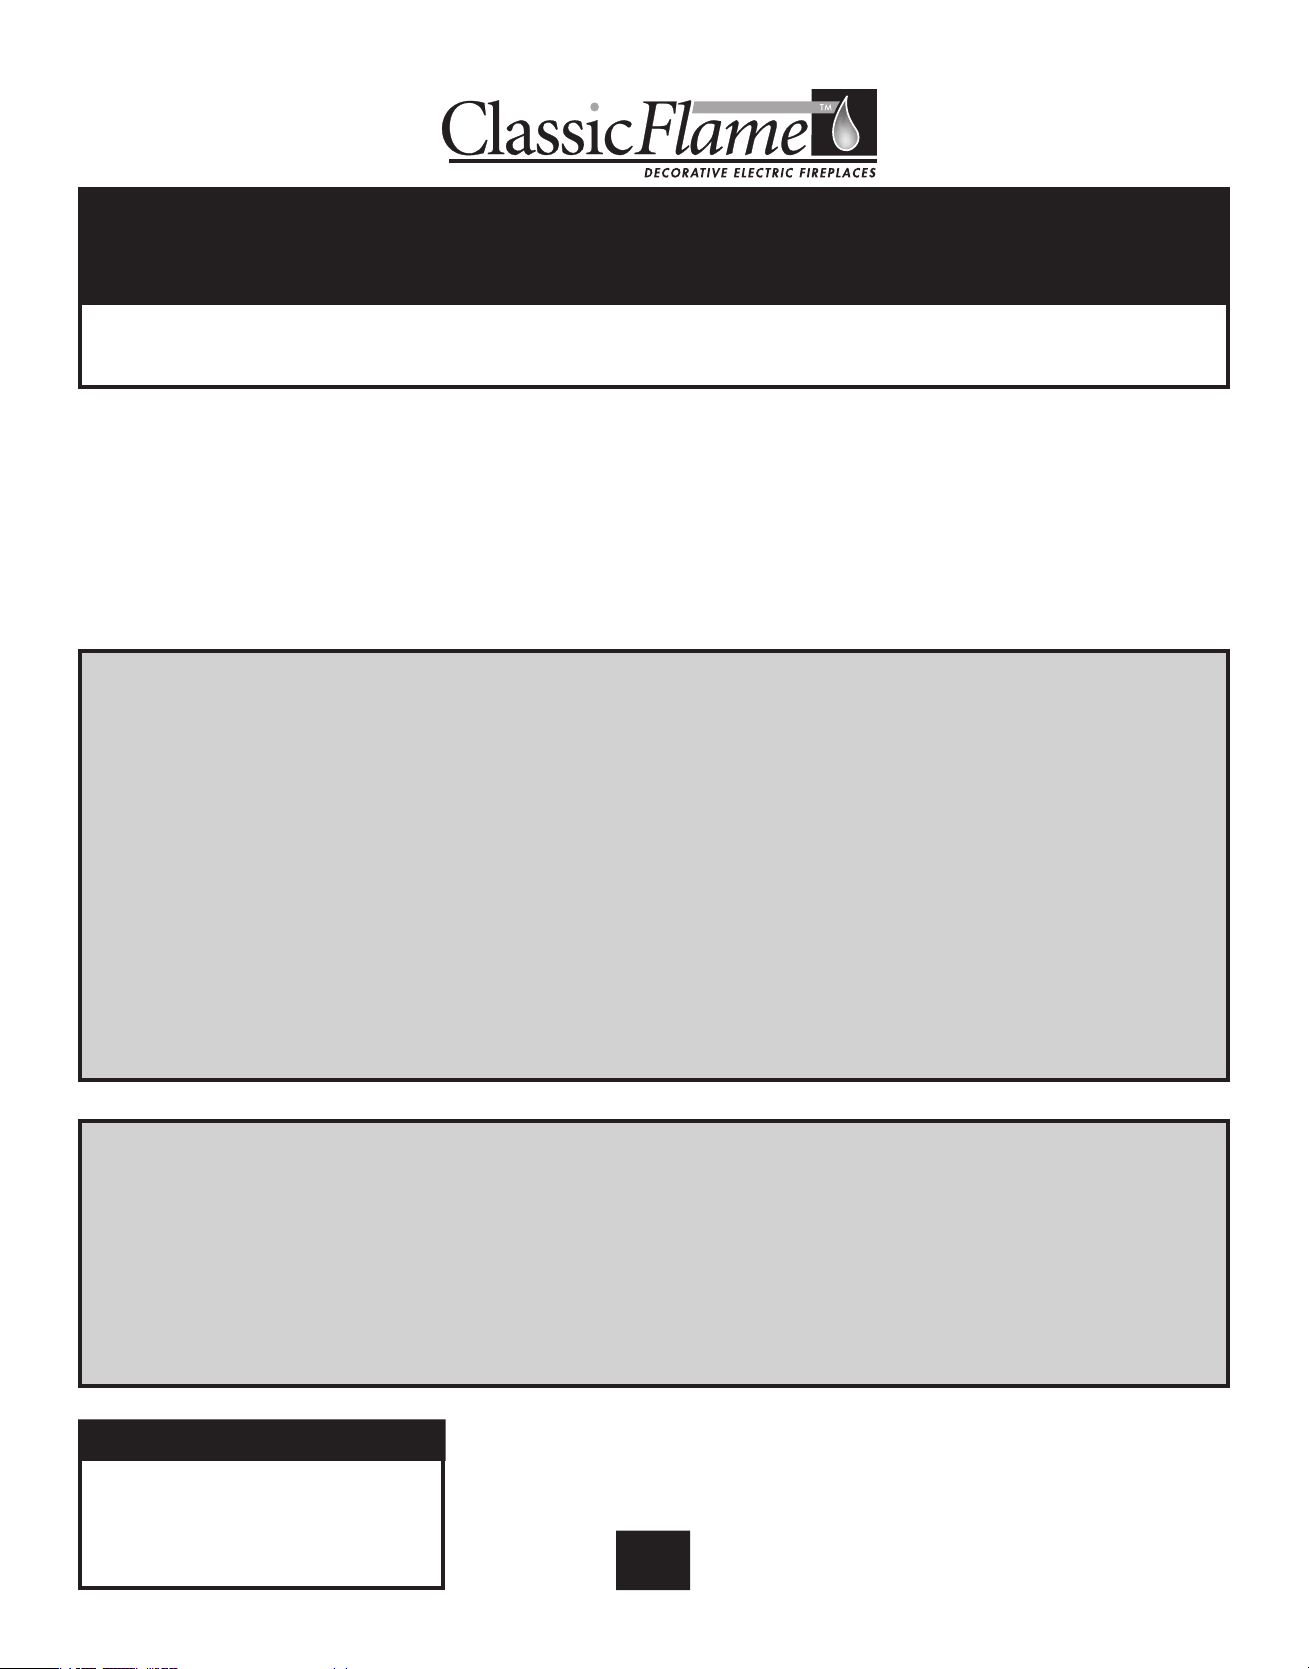
are the mesh curtains. Please use scissors
or wire cutters and carefully remove the zip
ties that are securing the curtains.
3) The cur
tains are inside of plastic bags,
please remove these bags carefully as they
may have oil on the surface. This oil is
used in the manufacturing process to help
the curtains inhibit rust.
4) Inside the curtain bag on the left side is
a smaller bag which contains a box. This
box contains the remote control
transmitter.
5) Remove the remote control transmitter
from the box and install the included
batteries. Follow the instructions in the
next section to operate the controls of
your electric fireplace.
CAUTION: Oil residue from the mesh curtains and the
packaging bags they are in can stain clothes, fabric
and carpet. Please take care when handling these
bags and dispose of them properly.
SECTION 2: PREPARING FIREPLACE FOR USE
Pre-Installation Diagram: Figure 1
REMOTE CONTROL
MESH CURTAIN IN PLASTIC BAGS
ZIP TIE
E-3
If the protective clear plastic film covering the front of
the eclectic fireplace has not been removed, please
carefully remove it at this time.
1)
open the front glass doors.
2)
Attached to each side of the inside walls
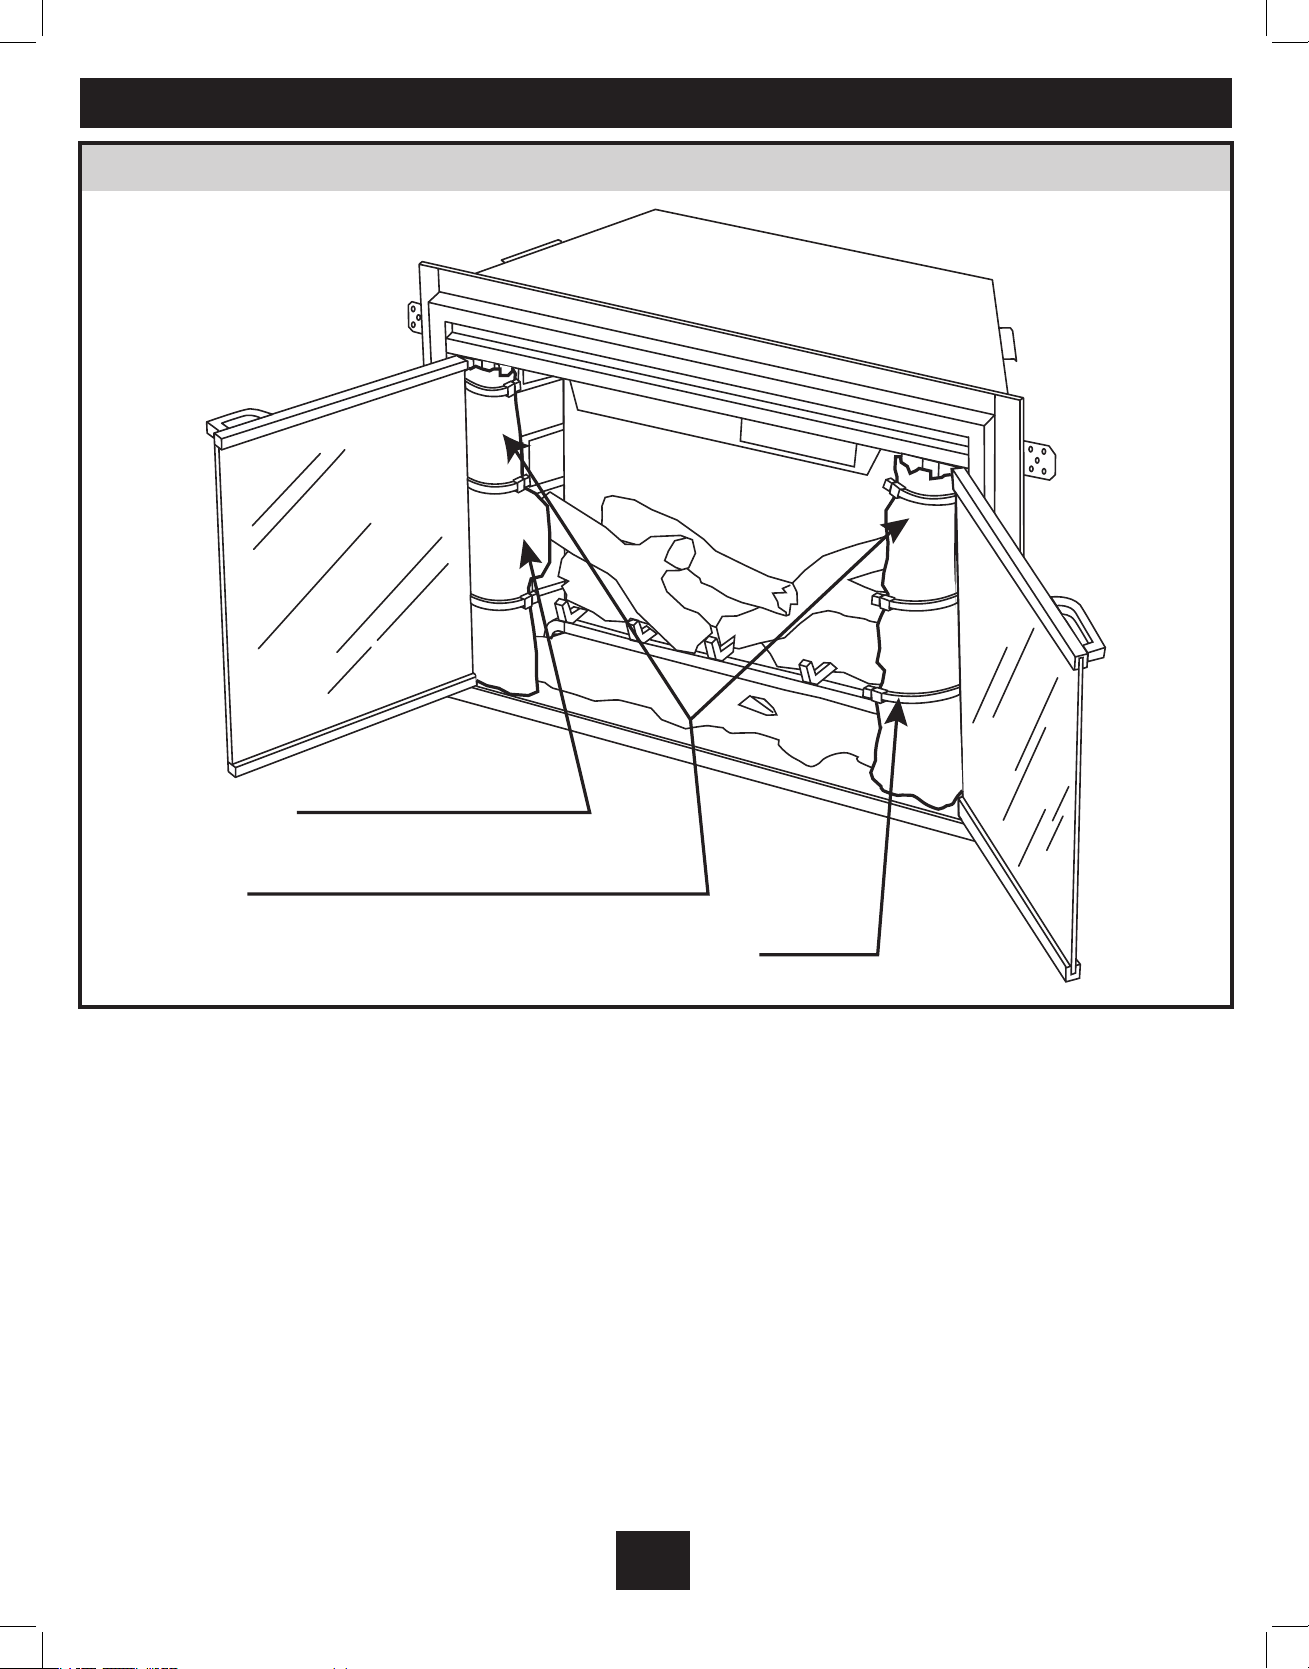
SECTION 3: PRODUCT ORIENTATION
E-4
LOGS AND EMBERBED
CONTROL PANEL
MESH CURTAINS
GLASS DOORS
Figure 2
Some of the following illustrations are shown without the glass doors and mesh curtain.
This is only to help the illustrations print more clearly.
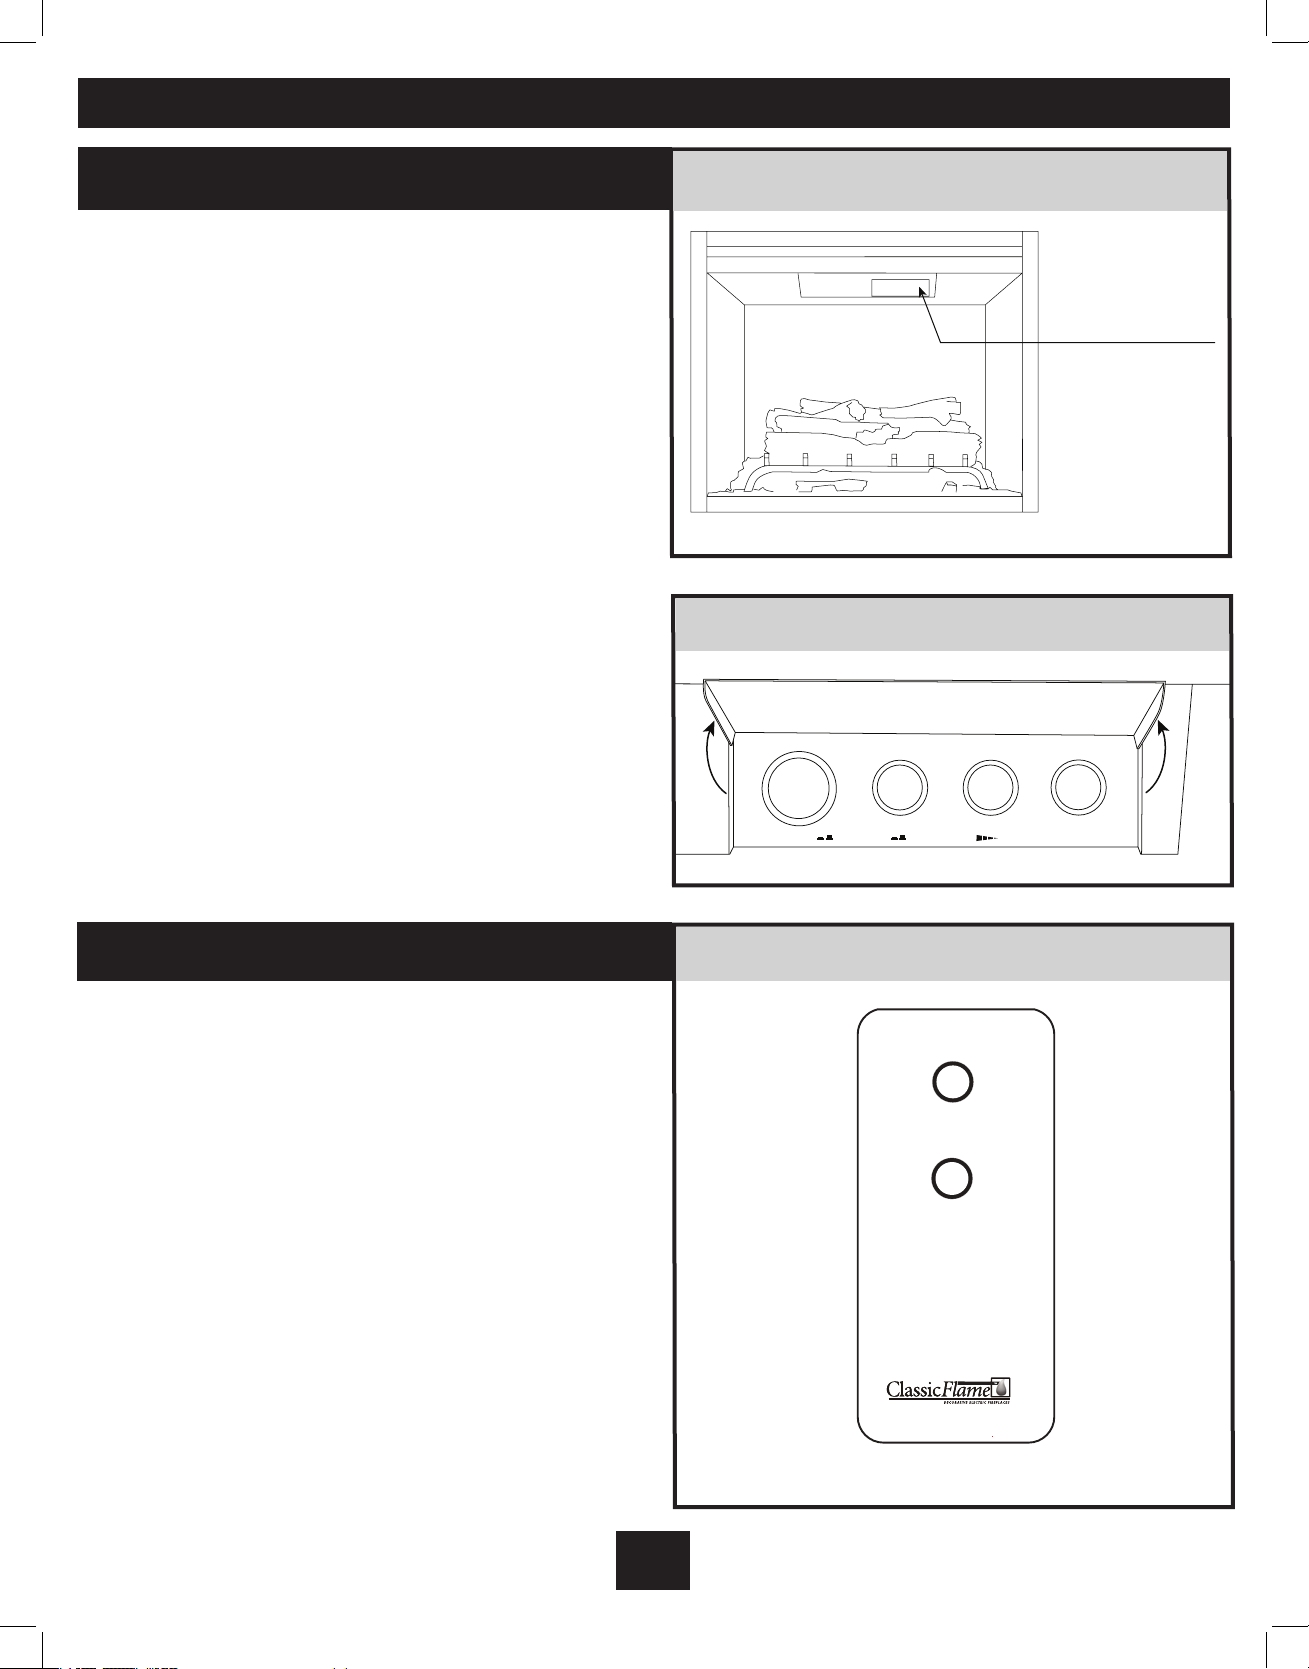
Figure 3
E-5
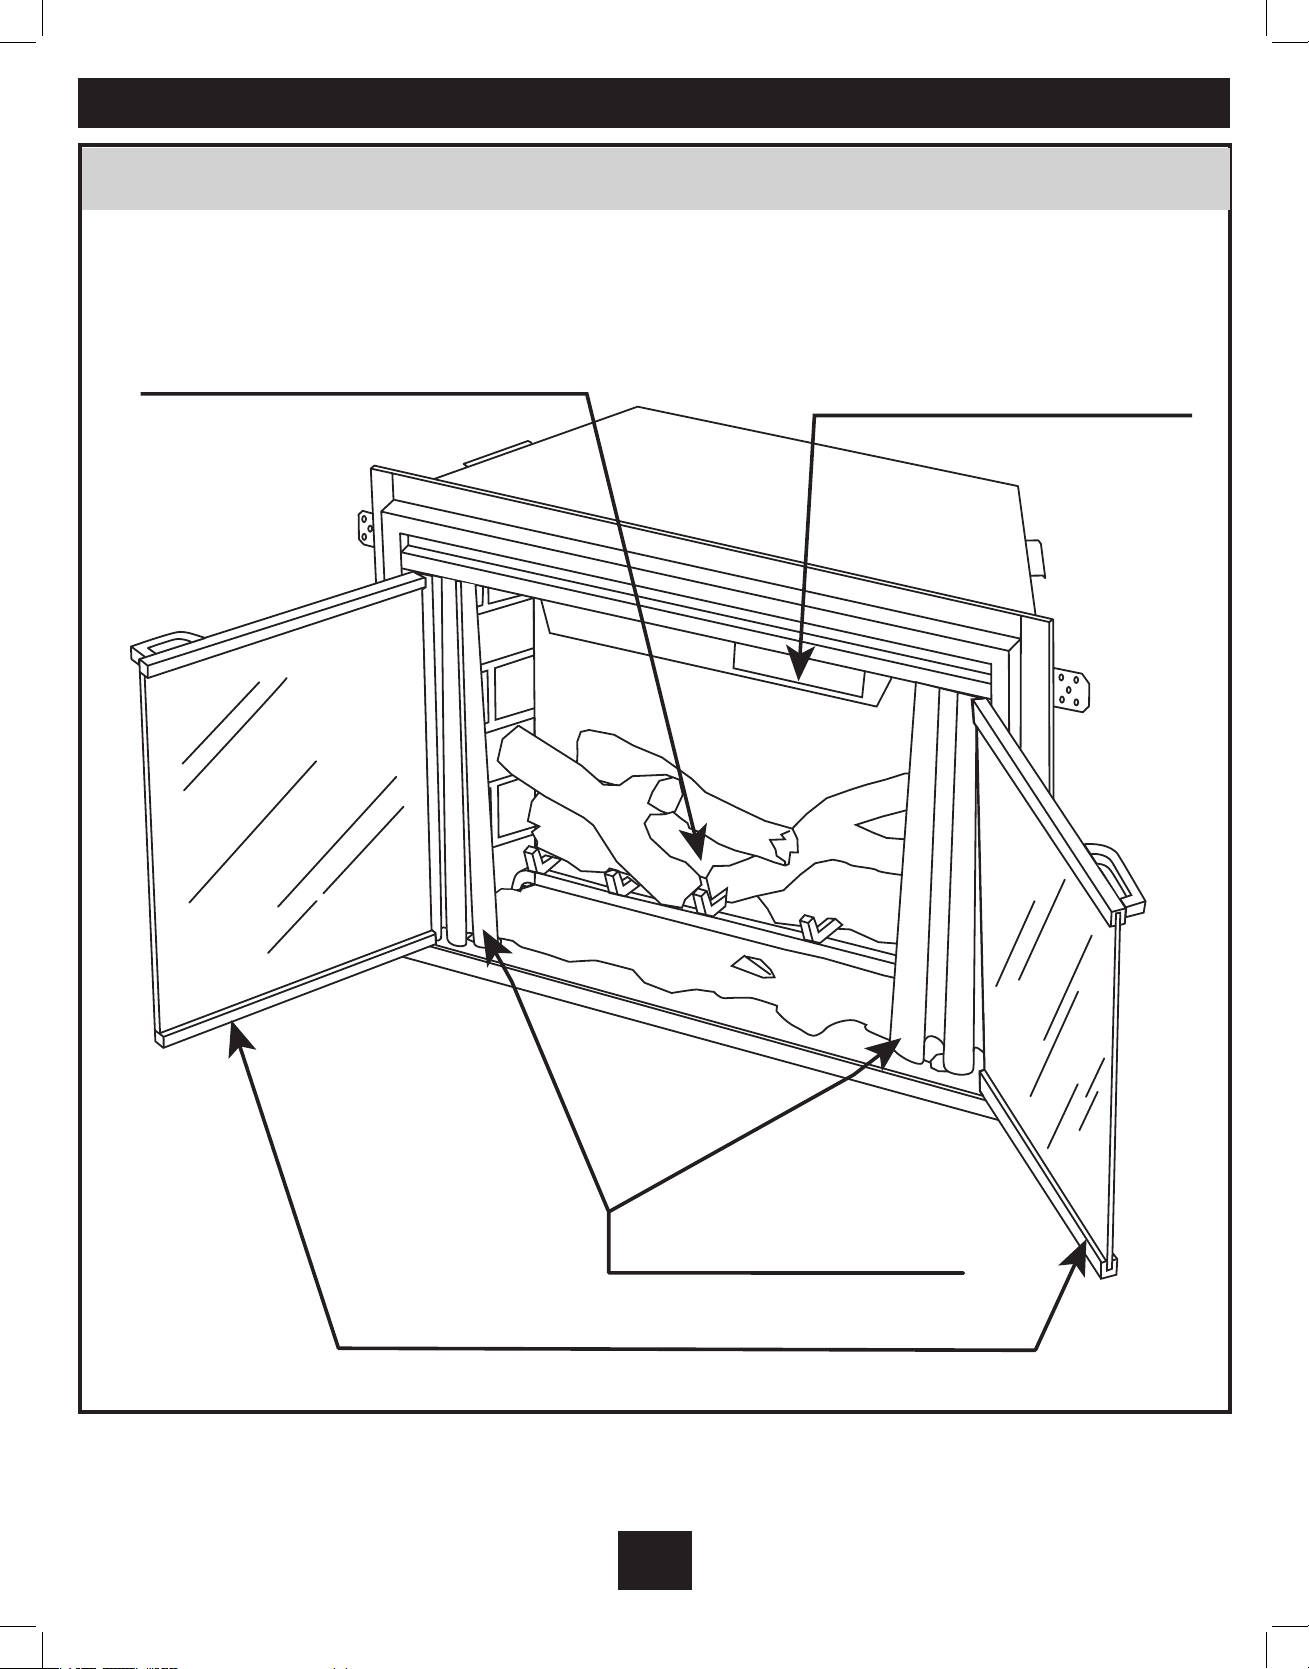
SECTION 4: OPERATION
TO ACCESS CONTROL PANEL- Open the front glass
doors, then slide the mesh curtains to the sides. Lift the
hinged door that covers the control panel (figure 3).
MAIN POWER- The MAIN POWER button supplies
power to all of the functions of the fireplace. This
button must be in the ON position for any of the
functions to work including the remote.
HEATER- The Heater button supplies power to the
heater and blower. If a wall thermostat (not included)
is installed, the MAIN POWER button must be ON,
then the temperature can be controlled by the wall
thermostat.
FLAME- Each time the FLAME button is pressed, the
intensity of the flame decreases. There are five
brightness levels you can cycle through including the
OFF setting. This function can also be controled with
the remote control.
DOWNLIGHT- The DOWNLIGHT button switch turns
on the downlights that illuminate inside the firebox.
This function can also be controlled with the
remote control.
REMOTE CONTROL FUNCTIONS
CONTROL PANEL FUNCTIONS
CONTROL PANEL
MAIN POWER
HEATER
FLAME
DOWNLIGHT
ON
OFF
OFF
ON / OFF
ON
OFF
Figure 4
Figure 5
THE REMOTE CONTROL FEATURES WORK SEAMLESSLY
WITH THE CONTROL PANEL FEATURES.
DOWNLIGHT- The DOWNLIGHT button turns the
downlights on and off that illuminate inside the
firebox.
FLAME- Each time the FLAME button is pressed, the
intensity of the flame decreases. There are five
brightness levels you can cycle through including the
OFF setting.
The remote transmitter must be aimed towards the
front of the fireplace. If the remote transmitter is not
working, please replace the batteries with new ones.
FLAME
DOWNLIGHT
SECTION 5: SERVICE
E-6
LIGHT BULBS
This electric fireplace uses (4) clear120V, 40 watt,
E12 socket base light bulbs (candelabra base, B bulb).
The 33EB304GRS only requires (3) clear 120V, 40
watt chandelier candle type bulb.
For your convenience, if a bulb burns out, it is a good
idea to replace all the bulbs at the same time. These
bulbs are available at most home centers, hardware
stores or grocery stores.
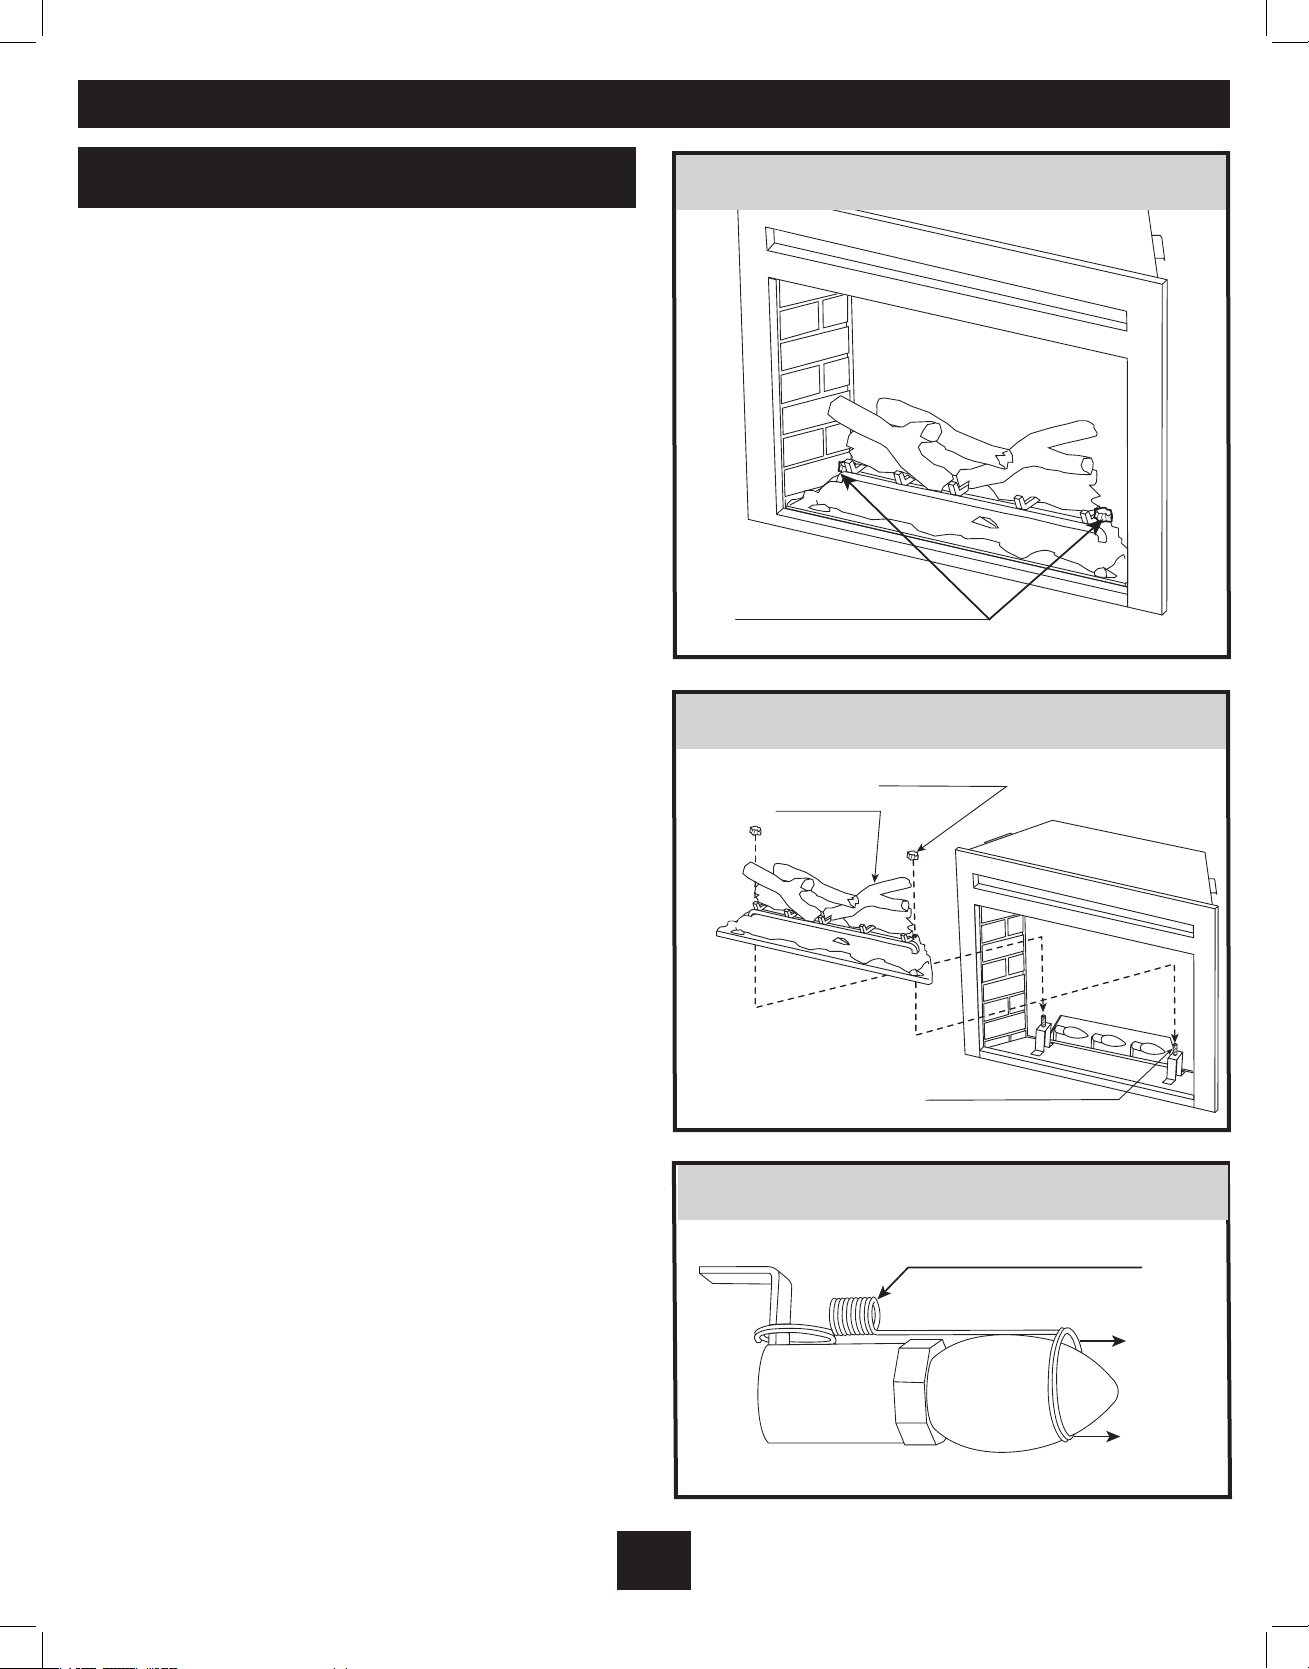
1) Turn the Main Power button off.
Figure 6
2) If fireplace has been operating, let the unit cool at
least 2 hours.
3) Open the front glass doors, then slide the mesh
curtains to the sides.
4) Locate the 2 ember bed sucuring nuts on the left
and right sides of the log set. These securing nuts are
disguised as wooden embers (Figure 6). Turn nuts
counter clockwise to loosen, remove and set aside.
5) Securely grab the logs on left and right side and
lift log/emberbed assembly straight up. Once the
emberbed has cleared the support brackets and
threaded rods, bring the log/ember bed assembly
forward and out of the unit and set aside in a safe
place (figure 7).
6) Unhook light bulb spring clips from the bulbs and
unscrew the bulbs (Figure 8). After replacing the light
bulbs make sure to replace the light bulb spring clip.
Remember to replace both of the bulbs at the same
time with clear 120V, 40 watt, E12 socket base bulbs.
WOODEN EMBER NUTS
Figure 7
WOODEN EMBER NUT
EMBERBED & LOGS
EMBERBED MOUNTING POST
Figure 8
LIGHT BULB HOLDING SPRING
PULL
PULL

SECTION 6: DOWN LIGHT
E-7
This fireplace uses 1 frosted 120V, 7 watt, E12 socket
base bulb (open, small base, night light type).
1) Follow steps 1 through 3 in the above section
2) Locate the down light diffuser on the inside ceiling
of the firebox (Figure 9).
3) Remove the screws securing the down light
diffuser (Figure 10).
There are 2 screws in the 33EB304GRS
and 3 screws in the 39EB364GRS and 45EB424GRS.
4) Set the screws and the diffuser in a safe place as
the diffuser needs to be reinstalled after changing
the light bulb.
5) Unhook the light bulb spring clip from the bulb
(Figure 8), then unscrew and discard the bulb.
6) Replace with the proper bulb listed above.
7) After replacing the bulb make sure to replace the
spring clip. Then reinstall the downlight diffuser
with the included screws.
Figure 9
DOWN LIGHT DIFFUSER
Figure 10
SECTION 7: MAINTENANCE
E-8
WARNING: Make sure the power is turned off before proceeding. Any electrical repairs or
rewiring of this unit should be carried out by a licensed electrician in accordance with
national and local codes.
WARNING: Electrical outlet wiring must comply with local building codes and other applicable regulations to reduce the risk of fire, electrical shock and injury to persons.
WARNING: Do not use this fireplace if any part of it has been under water. Immediately call
a qualified service technician to inspect the fireplace and replace any part of the electrical
system.
WARNING: Disconnect power before attempting any maintenance or cleaning to reduce
the risk of fire, electrical shock or personal injury.
The motors used on the fan and the flame generator assembly are pre-lubricated for extended
bearing life and require no further lubrication.
However, periodic cleaning/vacuuming of the
fan/heater unit is recommended. The vent in the
for the heat output should be cleaned periodically.
The area around the controls should also be kept
clean. Make sure the unit is turned OFF whenever
you are cleaning the heater or fireplace.
If repairing or replacing any electrical component or wiring, the original wire routing, color coding
and securing locations must be followed.

TWO YEAR LIMITED WARRANTY
(PROFESSIONALLY INSTALLED AND/OR BUILT IN ELECTRIC INSERTS)
Twin-Star International, Inc. (the “Company”) warrants to
the original purchaser of a new professionally installed
and/or built in ClassicFlame Electric Fireplace Insert
(the “Fireplace Insert”) is free from manufacturing defects
in materials and workmanship for a period of two (2)
years from the date of original retail purchase from a
qualified/authorized Twin-Star dealer, subject to the
following terms, conditions and limitations. This warranty
is for the USA and Canada only.
I. What this limited warranty covers and for
how long
The Company warrants the Fireplace Insert to be free
from defects in material and workmanship for a period
of two (2) years from the date of original retail purchase,
as follows: replacement of defective products or parts
(with no in-home services) as further described in Part
IV below.
II. What this limited warranty does not cover
This limited warranty does not apply to
(a) replacement of Fireplace Insert light bulbs,
(b) Fireplace Insert components that have been repaired
(except by the Company or its authorized service
representatives) or otherwise altered or modified,
(c) damage, malfunction or defects resulting from
shipping or transit, misuse, abuse, accident, neglect,
incorrect installation, improper maintenance or handling,
or operation with an incorrect power source,
(d) damage from fire, water, lightning, power surges,
abnormal environmental conditions or other acts of
nature, and
(e) normal wear and tear.
The Company reserves the right to assess all warranty
claims and to determine if the claimed defects or
damages are covered by this limited warranty.
This limited warranty applies only to the original
purchaser of the Fireplace Insert from a qualified/
authorized Twin-Star dealer in the USA or Canada,
and is not transferable.
III. What you must do to get service under this
limited warranty
For warranty service, please contact the Company by
phone at 1-866-661-1218, or by mail at 115 SE 4th
Avenue, Delray Beach, FL 33483, USA. Please have
proof of purchase, catalogue/model, manufacturer’s
date code and serial numbers available when calling.
Proof of purchase showing the original purchase
date and location is required to obtain warranty service.
IV. What the Company will do in the event of
a covered warranty claim
For valid warranty claims made prior to the second
anniversary of the date of original retail purchase, the
Company will elect in its sole discretion to either repair or
replace the covered defective product or part without charge.
If the Company is unable to repair or replace the covered
defective product or part, or if repair or replacement is not c
ommercially practicable or cannot be timely made, the
Company may elect in its sole discretion, in lieu of
replacement, to refund the purchase price for the defective
product or part. Warranty services under this paragraph do
not include on-site or in-home warranty services, and you will
be solely responsible for all expenses incurred for the removal
of the defective product or part and installation of the
replacement product or part, including, without limitation,
all labor costs and all shipping and transportation costs to
and from the Company and/or its authorized dealer or
service agent.
All warranty services will be performed solely by the
Company’s authorized dealers or service agents. On-site
or in-home services not covered by this limited warranty
may be performed at your specific request and expense,
at the Company’s customary rates for such services.
V. DISCLAIMER OF WARRANTIES AND LIABILITY
LIMITATIONS
THERE ARE NO EXPRESS WARRANTIES MADE BY THE
COMPANY OTHER THAN THOSE LIMITED WARRANTIES
DESCRIBED ABOVE. THE COMPANY DISCLAIMS ALL IMPLIED
WARRANTIES, INCLUDING, WITHOUT LIMITATION, ANY
IMPLIED WARRANTIES OF MERCHANTABILITY AND FITNESS
FOR A PARTICULAR PURPOSE. TO THE EXTENT THAT ANY
APPLICABLE JURISDICTION PROHIBITS DISCLAIMER OF
IMPLIED WARRANTIES, SUCH IMPLIED WARRANTIES
SHALL BE LIMITED IN DURATION TO THE APPLICABLE
PERIODS OF TIME SET FORTH IN THE EXPRESS LIMITED
WARRANTIES DESCRIBED ABOVE.
E-9
 Loading...