


INSTRUCTION MANUAL ENCLOSED MANUEL D’INSTRUCTION À L’INTÉRIEUR MANUAL DE INSTRUCCIONES ADJUNTO
STOP ATTENTION
STOP
IF YOU HAVE ANY PROBLEMS OR QUESTIONS, EMAIL OR CALL CUSTOMER SERVICE BEFORE YOU RETURN
THIS PRODUCT TO THE STORE WHERE IT WAS PURCHASED.
For Customer Service: www.twinstarhome.com in English Call: 866-661-1218
in Spanish Call: 866-661-1218
in French Call: 866-374-9203
PARE |
ATENCIÓN |
PARE |
|
SI TIENE ALGÚN PROBLEMA O PREGUNTAS,
ENVÍE UN MENSAJE DE CORREO ELECTRÓNICO O LLAME AL SERVICIO
DE ATENCIÓN AL CLIENTE ANTES DE DEVOLVER
ESTE PRODUCTO A LA TIENDA EN LA QUE LO COMPRÓ.
Servicio de atención al cliente: www.twinstarhome.com Línea para llamadas en inglés: 866-661-1218 Línea para llamadas en español: 866-661-1218 Línea para llamadas en francés: 866-374-9203
ARRÊT |
ATTENTION |
ARRÊT |
|
SI VOUS AVEZ DES PROBLÈMES OU DES QUESTIONS, ENVOYEZ UN COURRIEL AU SERVICE À LA CLIENTÈLE OU APPELEZ LE
SERVICE À LA CLIENTÈLE AVANT DE RETOURNER
CE PRODUIT OÙ VOUS L’AVEZ ACHETÉ.
Pour le service à la clientèle : www.twinstarhome.com pour le service en anglais, appelez au: 866-661-1218 pour le service en espagnol, appelez au: 866-661-1218 pour le service en français, appelez au: 866-374-9203
INSTRUCTION MANUAL ENCLOSED MANUEL D’INSTRUCTION À L’INTÉRIEUR MANUAL DE INSTRUCCIONES ADJUNTO
E L E C T R I C F I R E P L A C E
I N S E R T
V E N T F R E E F I R E P L A C E W I T H H E A T E R
OWNERS OPERATING MANUAL
MODEL: 28II200GRA
CONSUMER SAFETY INFORMATION
PLEASE READ THIS MANUAL BEFORE INSTALLING AND OPERATING THIS APPLIANCE
WARNING!!
IF THE INFORMATION IN THIS MANUAL IS NOT FOLLOWED EXACTLY, AN ELECTRIC SHOCK OR FIRE MAY RESULT CAUSING PROPERTY DAMAGE, PERSONAL INJURY OR LOSS OF LIFE.
DO NOT STORE OR USE GASOLINE OR OTHER FLAMMABLE VAPORS AND LIQUIDS IN THE VICINITY OF THIS OR ANY OTHER APPLIANCE.
Thank you and congratulations on your purchase of a Twin-Star International, Inc. fireplace. Please read the Installation & Operating Instructions before using this appliance.
IMPORTANT: Read all instructions and warnings carefully before starting installation. Failure to follow these instructions may result in a possible electric shock, fire hazard and/or injury and will void the warranty.
Installation of Electric Fireplace Insert, should take 15 minutes. The only tool required is a Phillips head screwdriver, not supplied with this unit.
For Customer Service:
www.twinstarhome.com
In English Call: 866-661-1218 In French Call: 866-374-9203 In Spanish Call: 866-661-1218
Twin-Star International, Inc.
Delray Beach, FL 33445
U.S.A.
Made in China
Printed in China
WARNING: THIS IS AN UNVENTED, ELECTRIC APPLIANCE. DO NOT ATTEMPT TO BURN WOOD OR MANUFACTURED FIRELOGS IN OR ON THIS APPLIANCE OR GRATE.
AT T E N T I O N
ALSO Requires-
Wood Fireplace Mantel
E-1

For product warranty registeration please visit:
www.twinstarhome.com/registration
Before setting up this product please record the model number and serial number of this product in the spaces below for in registration and warranty reference.
Mantel Model Number
|
Insert Model Number |
|
Serial Number |
|
|
|
|
|
|
|
|
|
|
|
|
|
|
|
|
For product warranty registeration please visit:
www.twinstarhome.com/registration
Before setting up this product please record the model number and serial number of this product in the spaces below for in registration and warranty reference.
Mantel Model Number
Insert Model Number |
|
Serial Number |
|
|
|
|
|
|
E-2
IMPORTANT INSTRUCTIONS
When using electrical appliances, basic precautions should always be followed to reduce the risk of fire, electrical shock, and injury to persons including the following:
1.Read all instructions before using this appliance.
2.This appliance is hot when in use. To avoid burns, do not let bare skin touch hot surfaces. If provided, use handles when moving this appliance. Keep combustible materials, such as furniture, pillows, bedding, papers, clothes and curtains at least 3 feet (0.9 m) from the front of this appliance. WARNING: In order to avoid overheating, do not cover the heater. It cannot be used in a wardrobe.
3.CAUTION: Whenever the heater is left operating and unattended, extreme caution is necessary if children or invalids are nearby.
4.The appliance is not to be used by children or persons with reduced physical, sensory or mental capabilities, or lack of experience and knowledge, unless they have been given supervision or instruction.
5.Children being supervised not to play with the appliance.
6.If possible, always unplug this appliance when not in use.
7.Do not operate any heater with a damaged cord or plug or after the appliance malfunctions, or if it has been dropped or damaged in any manner.
8.If the supply cord is damages, it must be replaced by the manufacture, its service agent or similarly qualified persons in order to avoid a hazard.
9.Any repairs to this fireplace should be carried out by a qualified service person.
10.Under no circumstances should this fireplace be modified. Parts having to be removed for
servicing must be replaced prior to operating this fireplace again.
11.Do not use outdoors.
12.This heater is not intended for use in bathrooms, laundry areas and similar indoor locations. Never locate this appliance where it may fall into a bathtub or other water container.
13.Do not run cord under carpeting. Do not cover cord with throw rugs, runners or the like. Arrange cord away from traffic areas and where it will not be tripped over.
14.To disconnect this appliance, turn controls to the off position, then remove plug from outlet.
15.Connect to properly grounded outlets only.
16.This appliance, when installed, must be electrically grounded in accordance with local codes or, in the absence of local codes, with the current CSA C22.1 Canadian Electrical Code or for U.S.A. installations, follow local codes and the National Electrical Code, ANSI/NFPA NO.70.
17.There is a thermostat limiter inside the heater. When the inner temperature over heating or occurs abnormal heating, the thermostat protective device would cut off power supply to avoid the fireplace damaged or risk of fire.
18.The heaters must not be located immediately below a socket-outlet.
19.Do not insert or allow foreign objects to enter any ventilation or exhaust opening as this may cause an electric shock or fire, or damage the appliance.
20.To prevent a possible fire, do not block air intakes or exhaust in any manner. Do not use on soft surfaces, like a bed, where opening may become blocked.
21.This appliance has hot and arcing or sparking parts inside. Do not use it in areas where gasoline, paint or flammable liquids are used or stored. This fireplace should not be used as a drying rack for clothing. Christmas stockings or decorations should not be hung in the area of it.
22.Use this appliance only as described in the manual. Any other use not recommended by the manufacturer may cause fire, electric shock or injury to persons.
23.Avoid the use of an extension cord because the extension cord may overheat and cause risk of fire. However, if you have to use an extension cord, the cord must be No.14 AWG minimum size and rated not less than 1875 Watts. The extension cord must be a three wire cord with grounding type plug and cord connection. The extension cord shall not be more than 20 feet (6 m) in length.
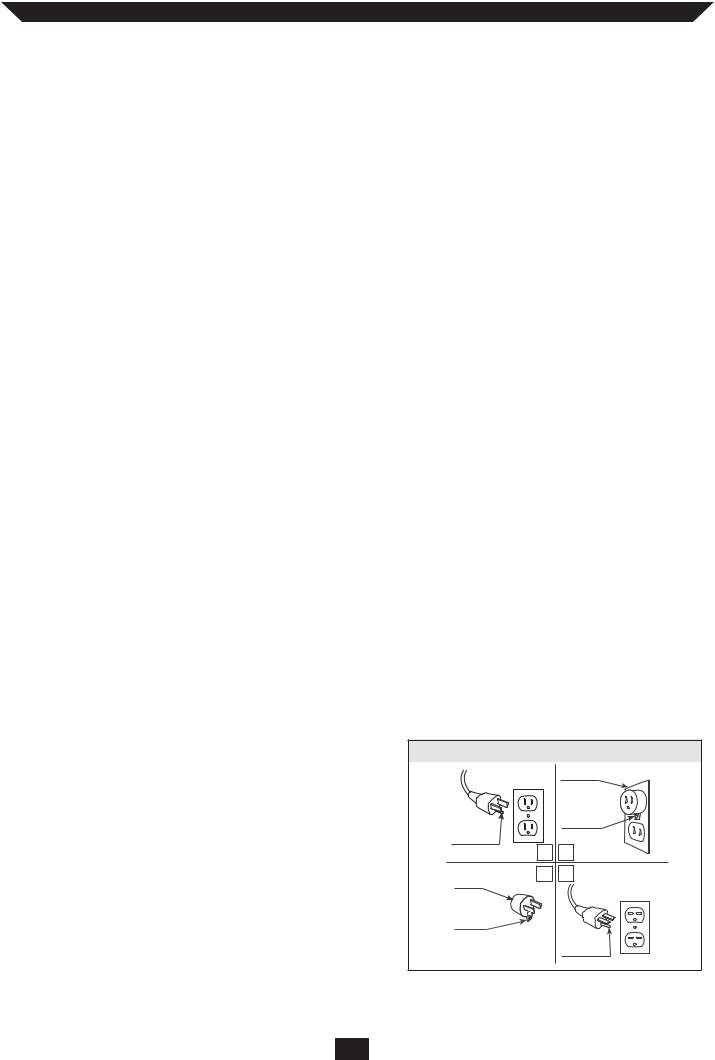
24.See directions in Figure 1.
This heater is for use on 120 volts. The cord has a plug as shown in figure 1. See Figure 1 for grounding instruction. An adapter as shown at C is available for
connecting three-blade grounding type plugs to two-slot receptacles. The green grounding plug extending from the adapter must be connected to a permanet ground such as a properly gounnded outlet box. The adapter should not be used if a three-slot grounded receptacle is available.
Figure 1
|
COVER OF GROUNDED |
|
OUTLET BOX |
|
METAL SCREW |
GROUNDING PIN |
|
A |
B |
C |
D |
ADAPTER |
|
GROUNDING |
|
MEANS |
|
|
GROUNDING PIN |
SAVE THESE
E-3 INSTRUCTIONS

INSTALLATION INSTRUCTION
Position your completed mantel close to its
final location. Make sure you can access the back of the mantel as your Electric Fireplace Insert will be installed from the back.
Using a Phillips head screwdriver, remove the screws and the metal mounting brackets attached on either side of the fireplaces center opening. Next unpack
the Electric Fireplace Insert carefully. Position the insert behind the fireplace with front facing the wood mantel. With the help of an adult assistant, lift the Insert and gently slide it into the opening in the mantel until the flange is flush against the inside of the mantel. Make sure insert is centered left and right in the opening. Be careful when placing insert and adjusting, bottom of insert could scratch the finish of the base/hearth
of your fireplace. Re-attach the mounting brackets with the Phillips head screwdriver, and supplied screws. DO NOT OVER TIGHTEN.
With the help of an assistant, carefully lift completed unit and place it with the front facing out in the final location you have chosen for your fireplace.
Make sure to secure the electrical cord before lifting or moving completed fireplace. When choosing a final location, make sure you will have clear access to a grounded electrical outlet.
Read and follow all instructions in this manual before operating your new fireplace.
|
Figure 2 |
INSERT |
|
MOUNTING |
|
BRACKET |
|
ELECTRIC |
|
FIREPLACE |
|
INSERT |
REAR VIEW OF FIREPLACE |
|
PARTS LIST
Part Name |
28II200GRA |
Emberbed
Blower Assembly
Infrared Heater Assembly
Control Panel - 7 Buttons
Main PCBA
Control Panel Circuit Board
Front Projection Screen
Flame Generator Drive Motor
Flame Generator/Spinner
Decorative Brick Panels
Remote Control - 7 Buttons
E-4
MANTEL LOCATION
When choosing a location for your new fireplace, ensure that the general instructions are followed. Also, for best effect, install the fireplace out of direct sunlight.
Cold climate installation recommendation: when installing this unit against a non-insulated exterior wall or chase, it is mandatory that the outer walls be insulated to conform to applicable insulation codes.
ELECTRICAL CONNECTION
A 15 AMP, 120 Volt, 60 Hz circuit with a
properly grounded outlet is required. Preferably, the fireplace will be on a dedicated circuit as other appliances on the same circuit may cause the circuit breaker to trip or the fuse to blow when the heater is in operation. The unit comes standard with 6 feet (1.8 m) three wire cord, exiting from the rear of the fireplace. Plan the installation to avoid the use of
an extension cord. If an extension cord must be used, it must be a minimum 14 AWG , three wires
with grounding type plug connector and rated not less than 1875 Watts. The cord shall not be
more than 20 feet (6 m) in length.
ELECTRICAL SPECIFICATIONS
Voltage: |
120 V~, 60Hz |
Amps: |
12.5 Amps (with heater) |
Amps: |
<0.1 Amps (without heater) |
Watts: |
1500 Watts (with heater) |
Watts: |
< 10 Watts (without heater) |
CLEARANCE TO COMBUSTIBLES
Keep electrical cords, drapery, furniture and other combustibles at least 3 feet (0.9 m) from the front of the heater and away from the sides.
CLEANING TRIM
Clean the metal trim using a soft cloth, slightly dampened with citrus oil based product and buff with a clean soft cloth. DO NOT use brass polish or household cleaners as these products will damage the metal trim. Citrus oil based products can be obtained at supermarkets or hardware stores.
MAINTENANCECE
The motors used on the fan and the flame generator assembly are pre-lubricated for extended bearing life and require no further lubrication. However, periodic cleaning/vacuuming of the fan/heater unit is recommended. Make sure the unit is turned OFF and unplugged whenever you are cleaning the heater or fireplace.
WARNING: Make sure the power is turned off before proceeding. Any electrical repairs or rewiring of this unit should be carried out by a licensed electrician in accordance with
national and local codes.
TROUBLE SHOOTING GUIDE
If repairing or replacing any electrical component or wiring, the original wire routing, color
coding and securing locations must be followed.
WARNING: Electrical outlet wiring must comply with local building codes and other applicable regulations to reduce the risk of fire, electrical shock and injury to persons.
WARNING: Do not use this fireplace if any part of it has been under water. Immediately call a qualified service technician to inspect the fireplace and replace any part of the electrical system.
Warning: Disconnect power before attempting any maintenance or cleaning to reduce the risk of fire, electrical shock or personal injury.
Warning: During any service of this appliance, the power to the unit must be turned off. First turn the main power switch to the “OFF” position. Then remove the electrical plug from the wall outlet.
E-5

OPERATING INSTRUCTIONS  CONTROL FUNCTIONS


 - POWER
The POWER button supplies power to all of the functions |
|
Figure 3 |
|||
of the fireplace. The POWER button will put the insert in a |
|
|
|
|
|
standby mode. This will turn off all functions and hold |
|
|
|
|
|
the settings in memory. By pressing the POWER button |
|
|
|
|
|
|
|
|
|
||
again the unit will turn onto the same settings. |
|
|
|
|
|
NOTE: Holding the POWER button on the control panel for 10 second will disable the heater function.

 -FLAME
1. To change the flame brightness press the flame button, the current flame setting will display on the digital display. Press the UP and DOWN arrows to change the flame brightness.
2.In addition the fireplace also has two flame settings that cause the fireplace to gently undulate. Pressing the flame button a second time will enter undulation mode. There are two settings HI and LOW intensity undulation; use the UP and DOWN arrows to switch between the settings.
1. |
-HEATER |
|
To set the thermostat press the HEATER button then |
|
|
|
use the UP and DOWN arrows to select the |
NOTE: PLEASE OPERATE REMOTE TRANSMITTER AT A SLOW |
2. |
thermostat setting temperature. |
MEASURED PACE. PRESS THE REMOTE CONTROL BUTTONS |
The thermostat range is 62°F - 82°F (17°C - 27°C). |
WITH AN EVEN MOTION AND GENTLE PRESSURE. REPEATEDLY |
|
|
|
PRESSING BUTTONS IN RAPID SUCCESSION MAY CAUSE THE |
|
-TIMER |
TRANSMITTER TO MALFUNCTION. |
|
|
1.Press the TIMER button to set the time then select the desired setting. Timer settings are 30 minutes, 1 hour, 2H, 3H, 4H, 5H, 6H, 7H, 8H, 9H.
2.When the timer expires the fireplace will shut off.


 - DOWNLIGHT
1.To set the DOWNLIGHT press the DOWNLIGHT button and use the UP and DOWN arrows to select the setting. Setting 1 is constantly on and setting 2 causes the downlight to undulate slowly to mimic the light given off by flickering flames.
Figure 4 |
REPLACING THE REMOTE CONTROL BATTERY
When the remote control stops operating or its range seems reduced, it is time to replace the battery with a new one. Need to remove the battery if consumed or if product is to be left unused for a long time.
1. The battery compartment is located on the back end of the remote.
2. Press the small tab inwards as you slide the battery door open and remove the old battery.
3. Insert 2 AAA batteries, checking that the “+” and “-” terminals of the battery matches the inside of the battery compartment.
4. Replace the battery compartment door.
E-6
DISPOSAL OF USED BATTERIES
Battery may contain hazardous substances which could endanger the environment and human health.
This symbol marked on the battery and/ or packaging indicates that used battery shall
not be treated as municipal waste. Batteries should be disposed of at an appropriate collection
point for recycling.
By ensuring the used batteries are disposed of correctly, you will help preventing potential negative consequences for the environment and human health. The recycling of materials
will help to converse natural resources.
For more information about recycling of used batteries, please contact your local municipality waste disposal service.
This product contains a button battery. If swallowed it could cause severe injury or death in just 2 hours. Seek medical attention immediately.
NOTE: This equipment has been tested and found to comply with the limits for Class B digital device, pursuant to part 15 of the FCC Rules. These limits are designed to provide reasonable protection against harmful interference in a residential installation. This equipment generates, uses, and can radiate radio frequency energy and, if not installed and used in accordance with the instructions, may cause harmful interference to radio or television reception, which can be determined by turning the equipment off and on, the user is encouraged to try to correct the interference by one or more of the following measures:
•Reorient or relocate the receiving antenna.
•Increase the separation between the equipment and the receiver.
•Connect the equipment into an outlet on a circuit different from that to which the receiver is connected.
•Consult the dealer or an experienced radio/TV technician for help.
This device complies with Part 15 of the FCC Rules. Operation is subject to the following two conditions:
(1)This device may not cause harmful interference, and
(2)this device must accept any interference received, including interference that may cause undesired operation. Modifications not approved by the party responsible for compliance could void user’s authority to operate the equipment.
This Class B digital apparatus complies with Canadian ICES-003.
TROUBLE SHOOTING GUIDE
|
MODEL: 28II200GRA |
|
|
|
|
PROBLEM |
SOLUTION |
|
1. No power, logs do not glow. |
1a. Check that unit is plugged into a standard 120V outlet. |
|
|
1b. Press power button several times, make sure power is set at "ON" position. |
|
2. Logs glow, but no flame effect. |
2a. Press flame button several times. |
|
|
|
|
3. Heater does not blow warm air. |
3a. Adjust the temperature settings to ensure that the thermostat is set higher |
|
than the current room temperature. |
||
|
||
|
|
|
4. Heater doesn’t work, but Power |
4a.Turn the POWER to "OFF" and unplug the unit from the wall outlet for 5 |
|
and Heater settings are "ON" and |
minutes. After 5 minutes plug the unit back into wall outlet, |
|
thermostat is set (see solution 3a.) |
and operate as normal. |
|
|
||
|
|
|
5. Flame effect works but heater |
5a. Heater function is locked. Press and hold the POWER button to unlock the |
|
function does not and the emberbed |
||
flashes when the heater button is |
heater function. |
|
pressed. |
|
|
|
|
E-7
 Loading...