

Classic Flame 26MM9404E451 User Manual
A Twin-Star International Br and
MODELS/ MODELOS/ MODÈLES :
23II042FGL, 23II042FSL, 26II042FGL, 26II042FSL, 28II042FGL, 28II042FSL
32II042FGL, 32II042FSL, 33II042FGL, 33II042FSL, 42II042FGL, 42II042FSL
Español P.11
Français P.20
www.tsicustomerservice.com
1-866-661-1218
Twin-Star International, Inc; Delray Beach, FL 33445
Made in China • Hecho en China • Fabriqué en Chine
www.tsicustomerservice.comA585
1
IMPORTANT INSTRUCTIONS
When using electrical appliances, basic precautions should always be followed to reduce the risk of re, electrical shock, and injury to
persons including the following:
1. Read all instructions before using this appliance.
2. DANGER – High temperatures may be generated under certain abnormal conditions. Do not partially or fully cover or obstruct
the front of this heater. WARNING: In order to avoid overheating, do not cover the heater.
3. CAUTION: Never leave the heater operating unattended. Extreme caution is necessary if unsupervised children or invalids are
nearby.
4. e appliance is not to be used by children or persons with reduced physical, sensory or mental capabilities, or lack of experience
and knowledge, unless they have been given supervision or instruction.
5. Always unplug this appliance when not in use.
6. Do not operate any heater with a damaged cord or plug or aer the appliance malfunctions, or if it has been dropped or damaged
in any manner.
7. If the supply cord is damaged, it must be replaced by the manufacturer, its service agent or similarly qualied persons in order to
avoid a hazard.
8. Do not use outdoors.
9. is heater is not intended for use in bathrooms, laundry areas and similar indoor locations. Never locate this appliance where it
may fall into a bathtub or other water container.
10. Do not run cord under carpeting. Do not cover cord with throw rugs, runners or the like. Arrange cord away from trac areas and
where it will not be tripped over.
11. To disconnect this appliance, turn controls to the o position, then remove plug from outlet.
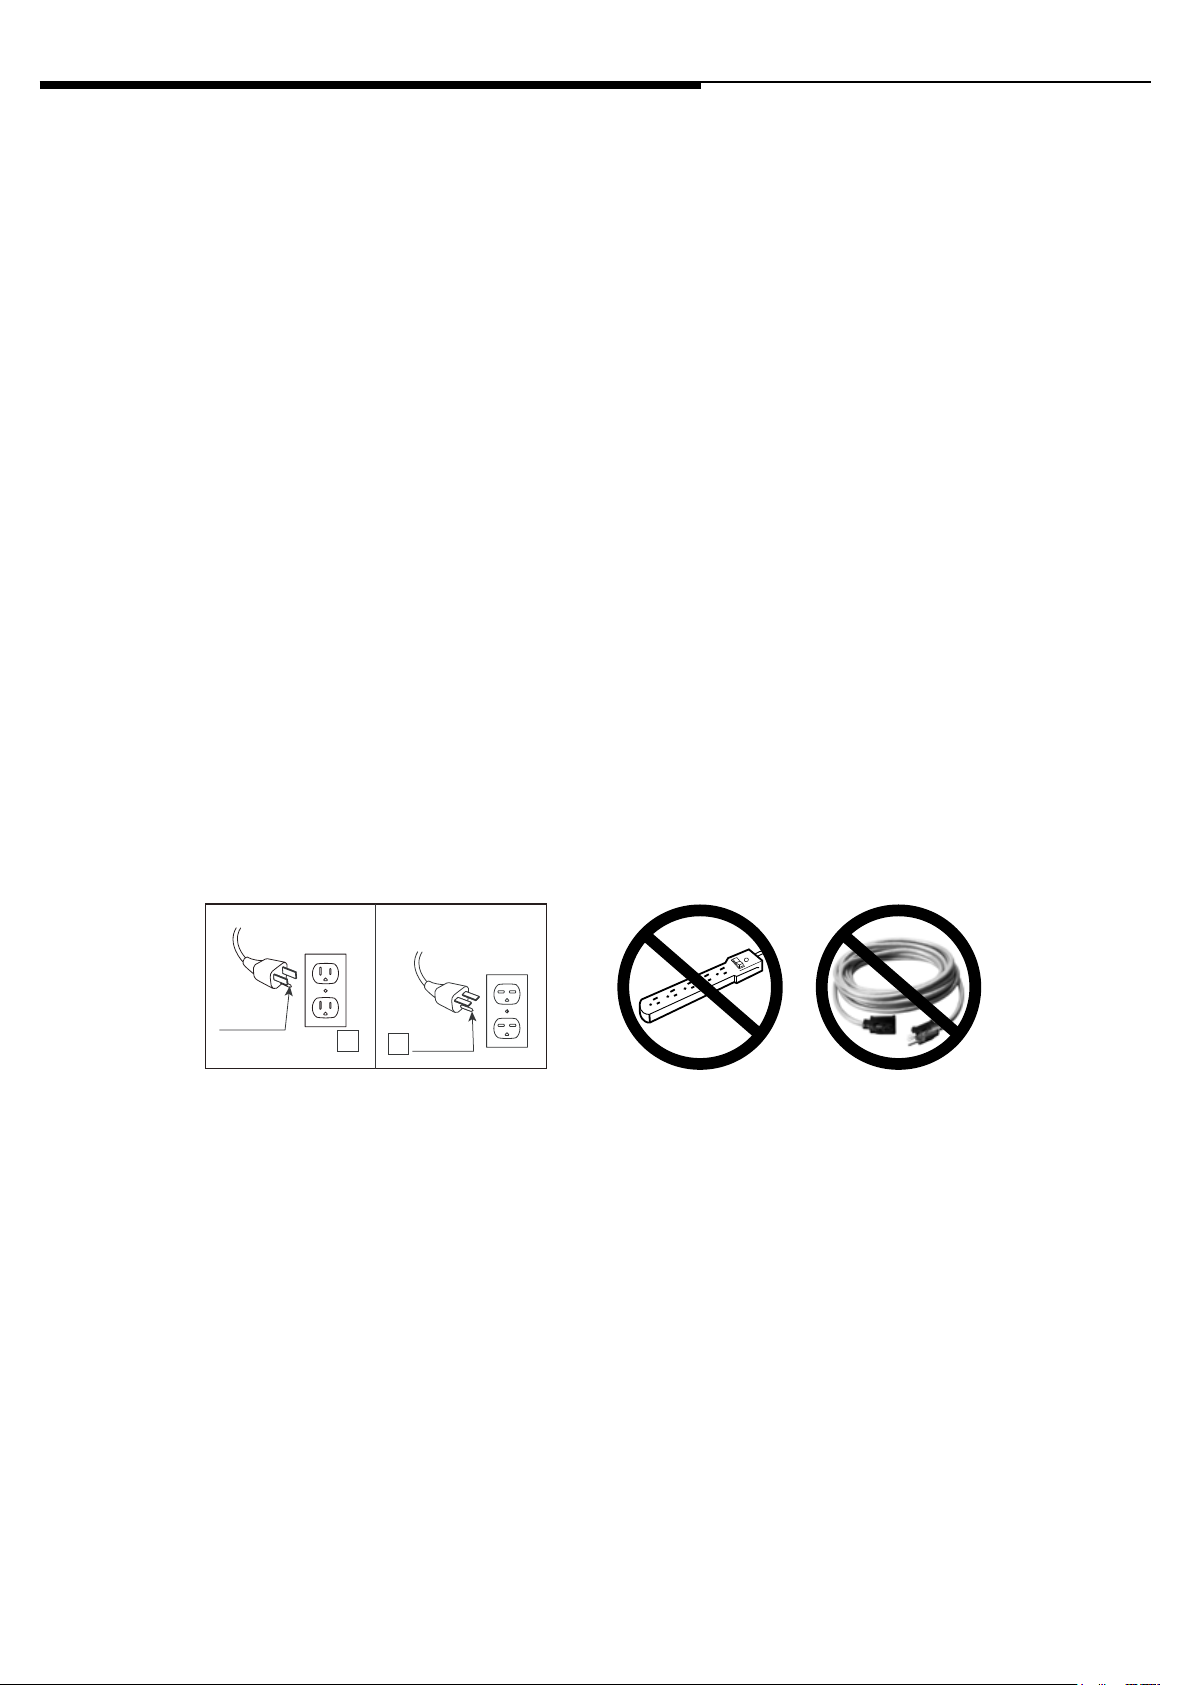
12. Connect to properly grounded outlets only. is heater is for use on 120 volts. e cord has a plug as shown at A in Fig.1 Do not
use a 2 prong adapters. Never use with an extension cord or relocatable power tap (outlet/power strip).
A
B
13. is appliance, when installed, must be electrically grounded in accordance with local codes or, in the absence of local codes, with
the current CSA C22.1 Canadian Electrical Code or for U.S.A. installations, follow local codes and the National Electrical Code,
ANSI/NFPA NO.70.
14. Do not insert or allow foreign objects to enter any ventilation or exhaust opening as this may cause an electric shock or re, or
damage the appliance.
Fig.1
15. To prevent a possible re, do not block air intakes or exhaust in any manner. Do not use on so surfaces, like a bed, where opening
may become blocked.
16. is appliance has hot and arcing or sparking parts inside. Do not use it in areas where gasoline, paint or ammable liquids are
used or stored. is replace should not be used as a drying rack for clothing. Christmas stockings or decorations should not be
hung in the area of it.
17. Use this appliance only as described in the manual. Any other use not recommended by the manufacturer may cause re, electric
shock or injury to persons.
18. is heater may include a visual alarm to warn that parts of the heater are getting excessively hot. If the alarm ashes immediately
turn the heater o and inspect for any objects on or adjacent to the heater that may cause high temperatures.
DO NOT OPERATE THE HEATER WITH THE ALARM FLASHING!
SAVE THESE INSTRUCTIONS
A585
2
www.tsicustomerservice.com
GETTING STARTED
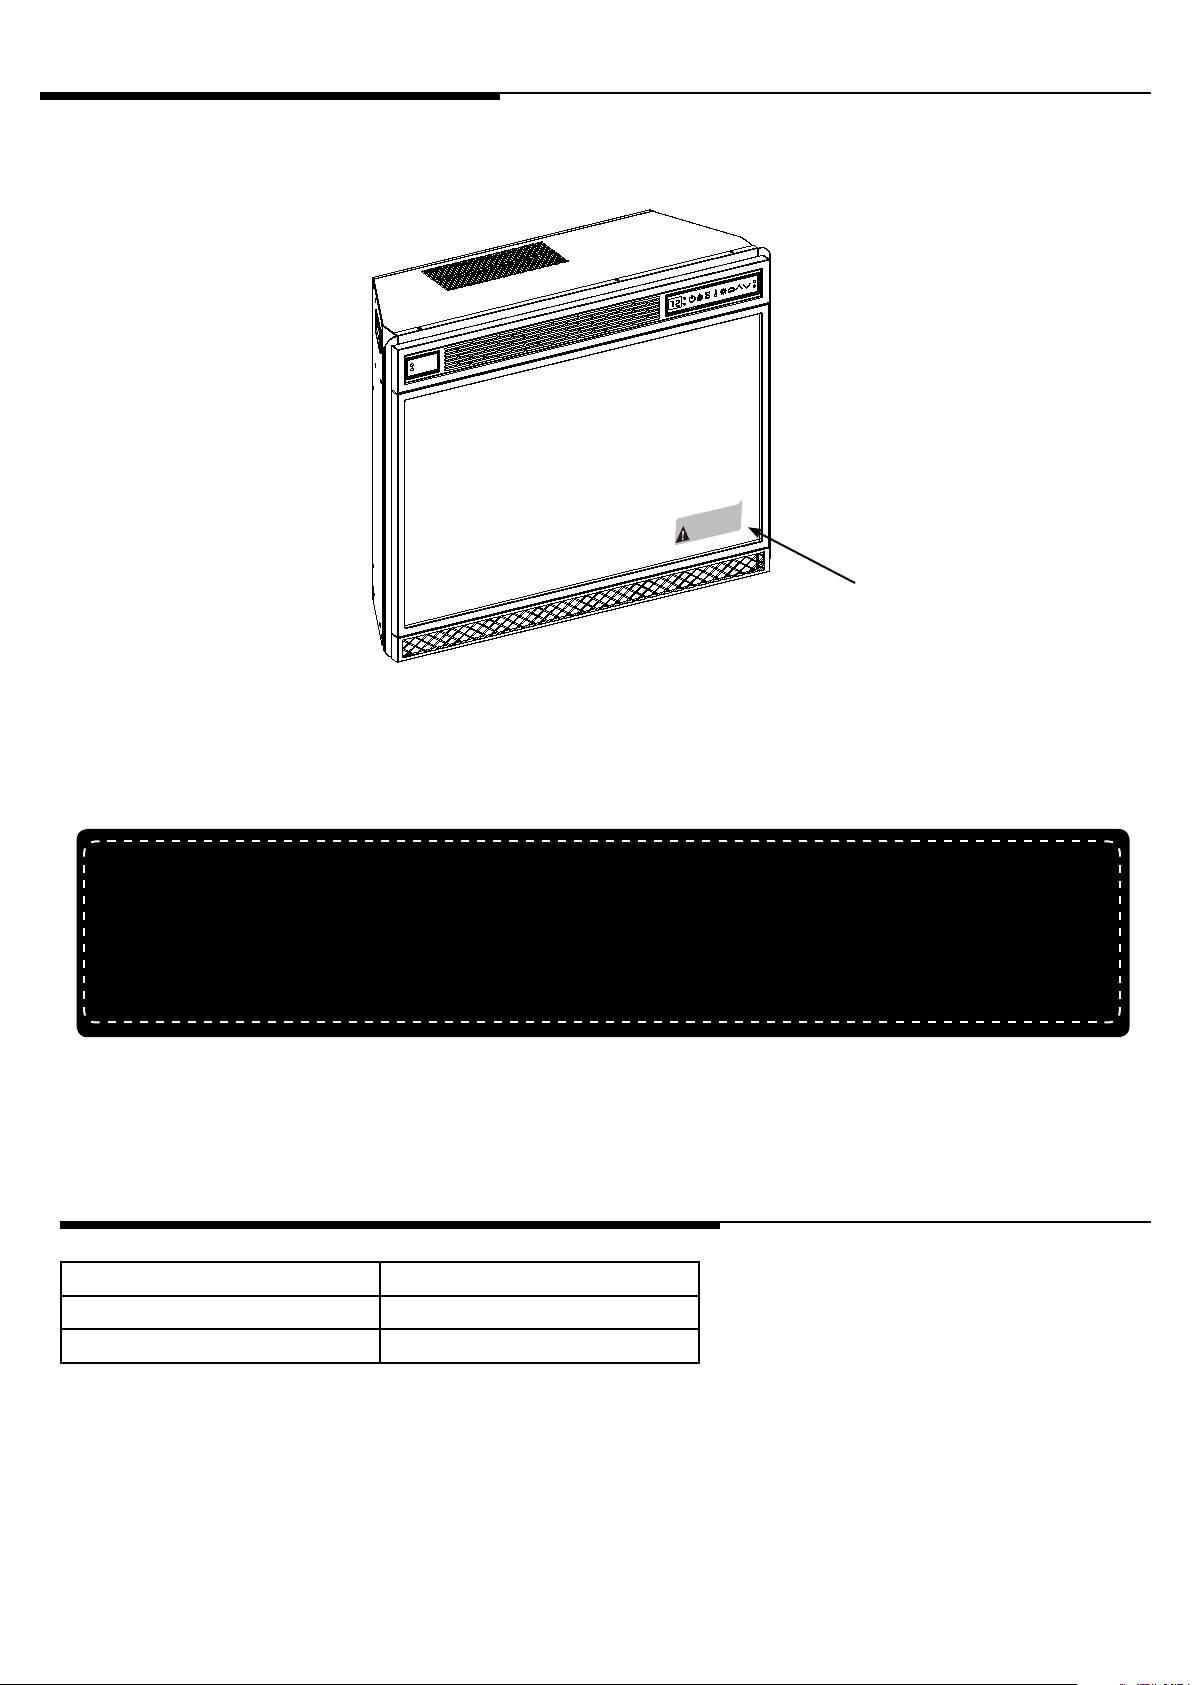
1. Remove the product identication sticker from the front of the insert.
Model / Modèle / Modelo: 28II042FGL
SN #: AB-12345-A
Keep this number for service!
Gardez ce numéro pour le service!
Mantega este número para servicio!
Product Identication
Sticker
2. Attach the Product Identication Sticker to the Manual below for future reference. is information is
used for product registration and also is necessary for customer service.
Attach Product Identication Sticker Here
3. Go to www.tsicustomerservice.com for product warranty registration. If you are unable to complete
registration save your proof of purchase for warranty purposes.
PRODUCT SPECIFICATIONS
VOLTAGE 120VAC, 60 Hz
AMPS 12.5 Amps
WATT S 1500 Watts
A585
3
www.tsicustomerservice.com
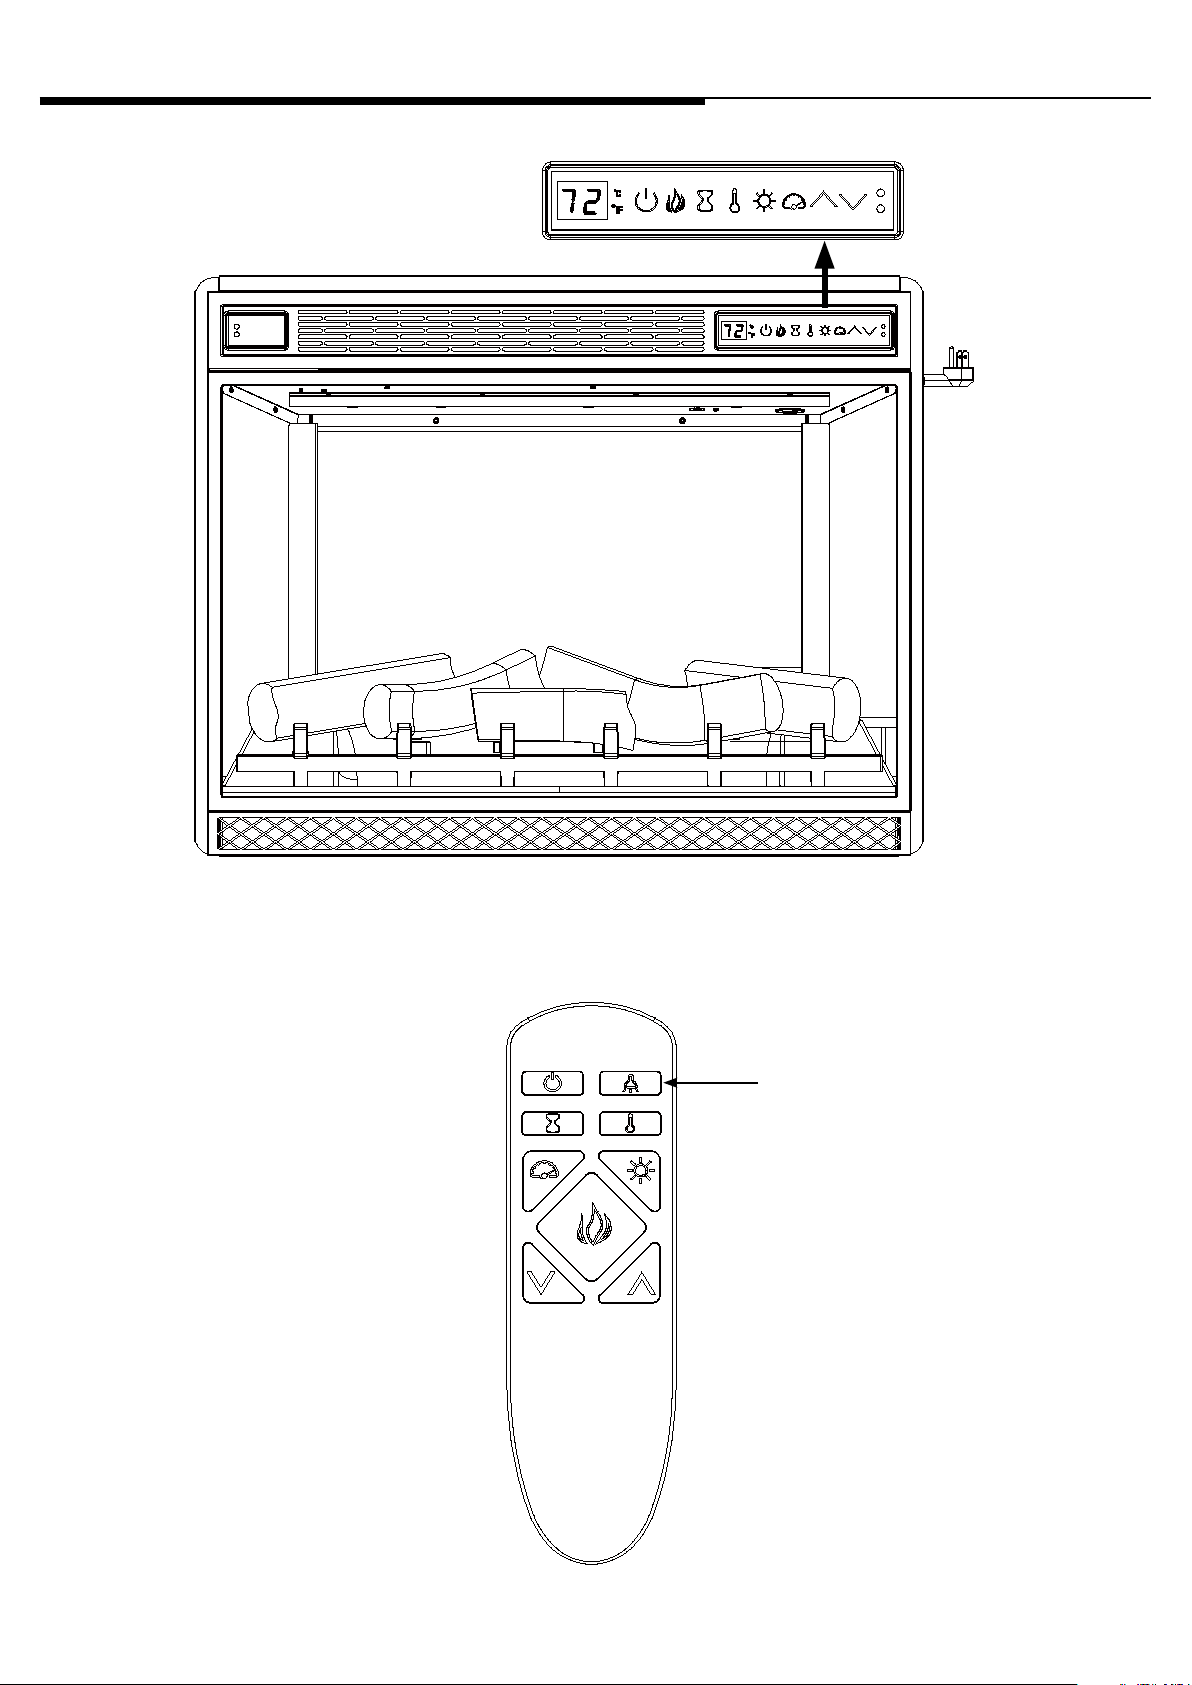
OPERATION INSTRUCTIONS
e heater can be operated by either the remote control or the control panel.
is button will only be used if
the wood cabinet model has the
lighting included; not all wood
cabinets include lighting.
A585
www.tsicustomerservice.com
4
OPERATION INSTRUCTIONS
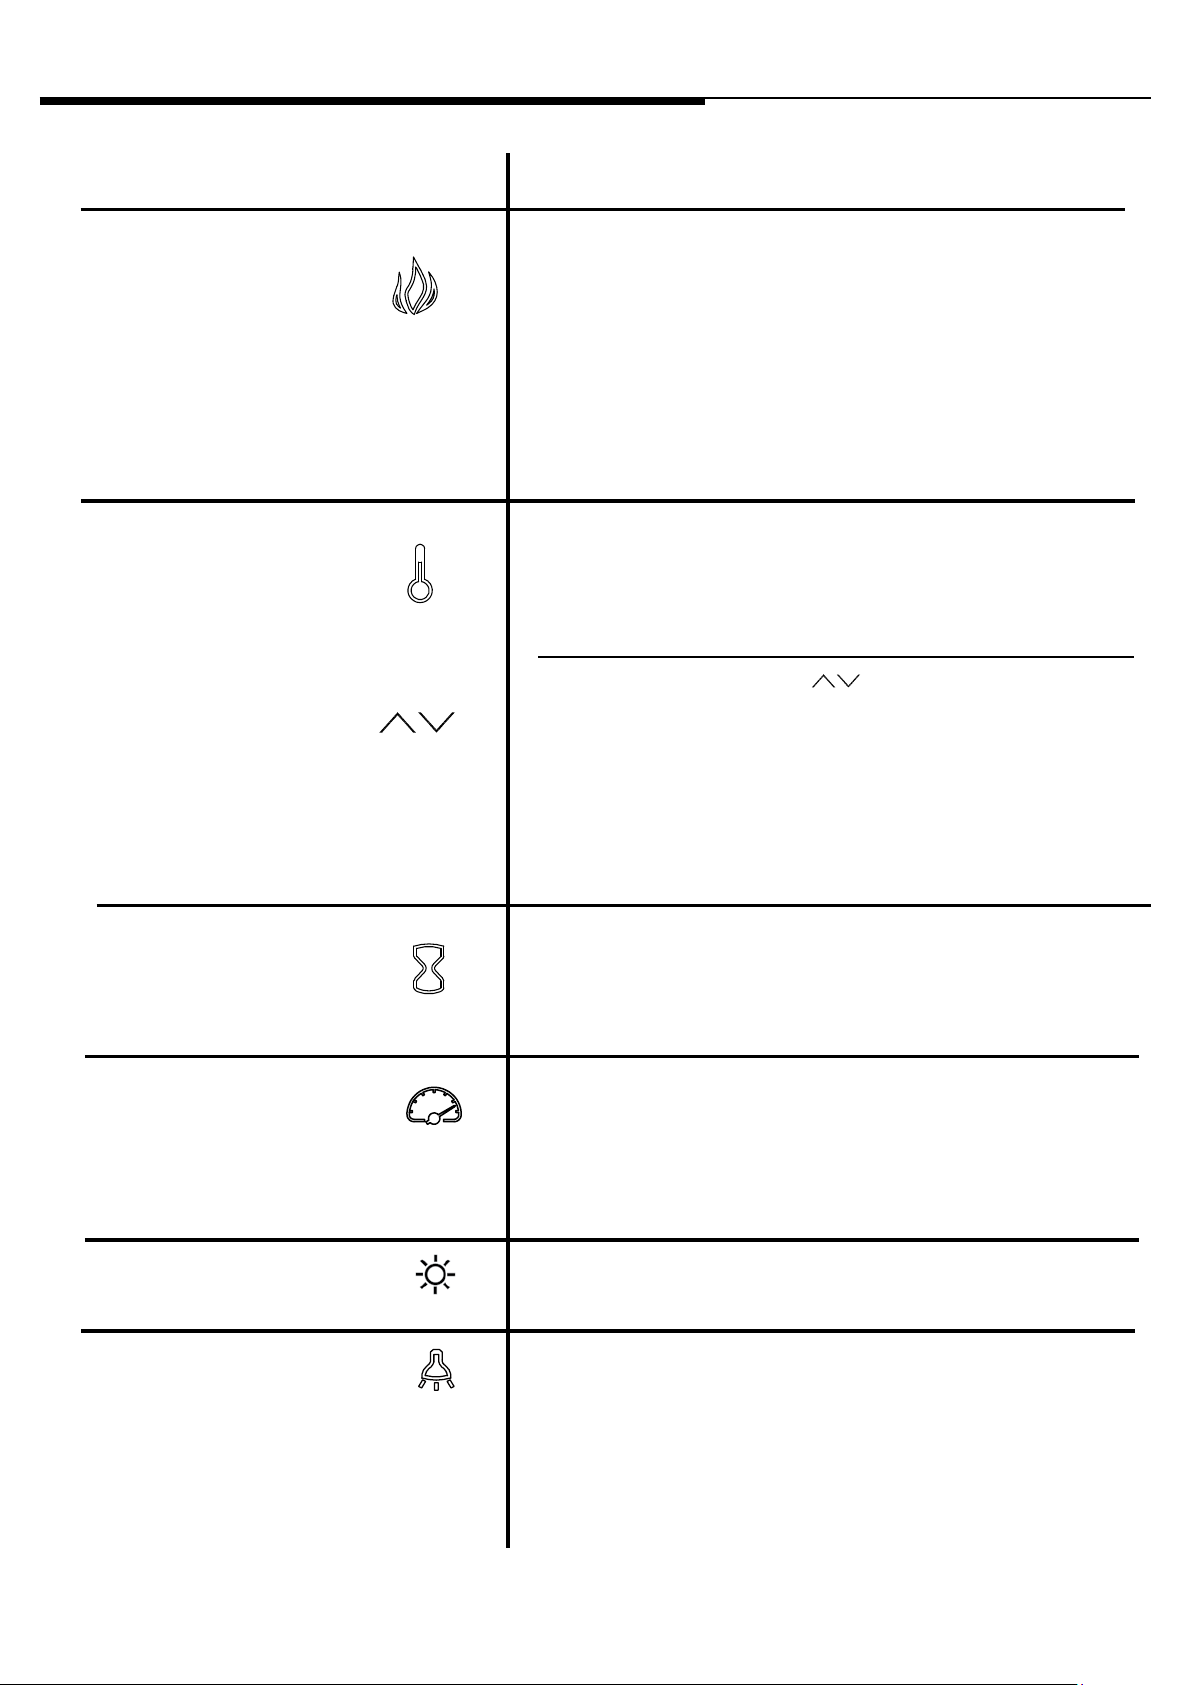
FUNCTION
FLAME
HEATER
ICON DESCRIPTION
ere are 5 unique Spectrare ame eects that can be
selected.
1: Spectrare
2: Sapphire
3: Amethyst
4: Campre
5: Midnight Fire
AU: Auto Cycle which will automatically fade in and fade out
a new color ame eect periodically.
Press the heater button to turn on/ o the heater setting.
To change between °F and °C press and hold the HEATER
button on the control panel for 3 seconds.
e up and down buttons “ ” will increase / decrease
temperature setting.
TIMER
FLAME SPEED
FLAME INTENSITY
CABINET LIGHT (Only
applicable to select models)
e thermostat setting range is 62°F - 82°F or 17°C - 27°C or
continously ON.
e thermostat is adjustable by 2°F or 1°C increments.
Pressing the timer button will cycle through the timer
settings; 30 minutes, 1 Hour, 2H, 3H, 4H, 5H, 6H, 7H, 8H,
9H and OFF (00).
Each Spectrare ame color option has speed options
available.
Setting S1 is slowest ranging up to setting S5 which is the
fastest.
Each Spectrare ame color option has 5 intensity options
available.
Pressing the light button on the remote control will cycle the
LED cabinet lights through the dierent brightness
settings; 1, 2, 3, 4 and OFF. Settings 1-4 will decrease the
LED brightness.
A585
Press and hold the ame button on the control panel for 3
seconds to turn on/o the lights in the mantel.
www.tsicustomerservice.com
5
OPERATION INSTRUCTIONS
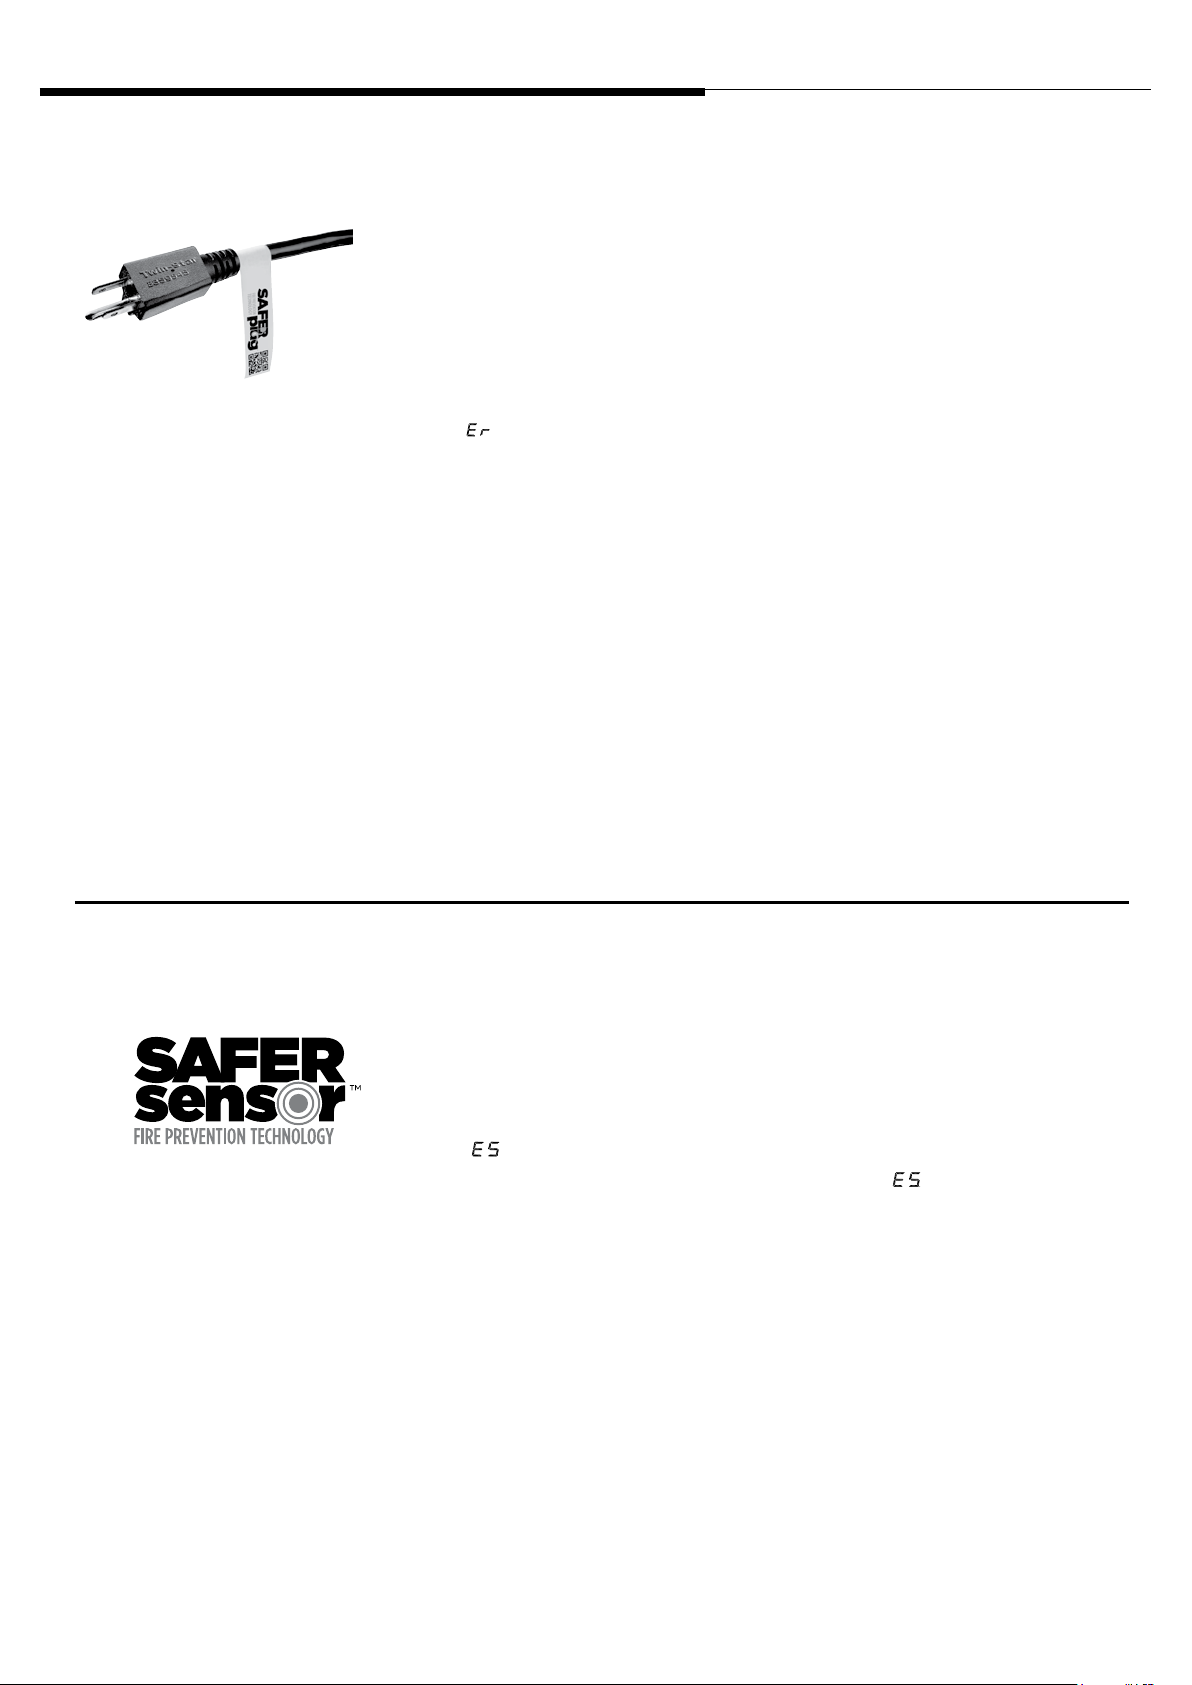
is product is equipped with a safer Plug; an advanced safety device that
SAFER PLUG
helps detect electrical res caused from faulty outlets.
Overloading of outlet, adapters and surge protectors may cause overheating,
damage, and increase risk of res. Safer Plug continuously monitors the temperature in the plug and outlet and will turn o the heater to prevent unsafe
outlet overheating.
If the Safer Plug cuts the power due to unsafe conditions it will show an
“ ”message on the screen. If this occurs the Safer Plug has prevented a
potentially unsafe condition.
To reset the device if this occurs, rst allow the plug to cool down. Once the
plug has cooled down, unplug the device and wait 5 seconds, then plug back
in and continue to use normally.
If the Safer Plug continues to activate your outlet may be faulty. Check your
heater cord and plug connections. Faulty wall outlet connections or loose
plugs can cause the outlet or plug to overheat. Be sure the plug ts tight in the
outlet. Heaters draw more current than small appliances, overheating of the
outlet may occur even if it has not occurred with the use of other appliances.
During use check frequently to determine if your plug outlet or faceplate is
HOT! If so, discontinue use of the heater and have a qualied electrician
check and/or replace the faulty outlet(s).
SAFER SENSOR
is product is equipped with a Safer Sensor; an advanced safety device that
helps prevent heaters from being accidently covered or blocked causing a
potentially unsafe condition.
e SAFER SENSOR detects if an object is too close to the front of the heater
potentially obstructing the air outlet. If blocked, the control panel will ash
“ ” icon and the heater will be turned o. Once the object has been
moved and aer user presses the power button, “ ” will disappear and the
unit will be back on the previous setting with the heat on.
A585
www.tsicustomerservice.com
6
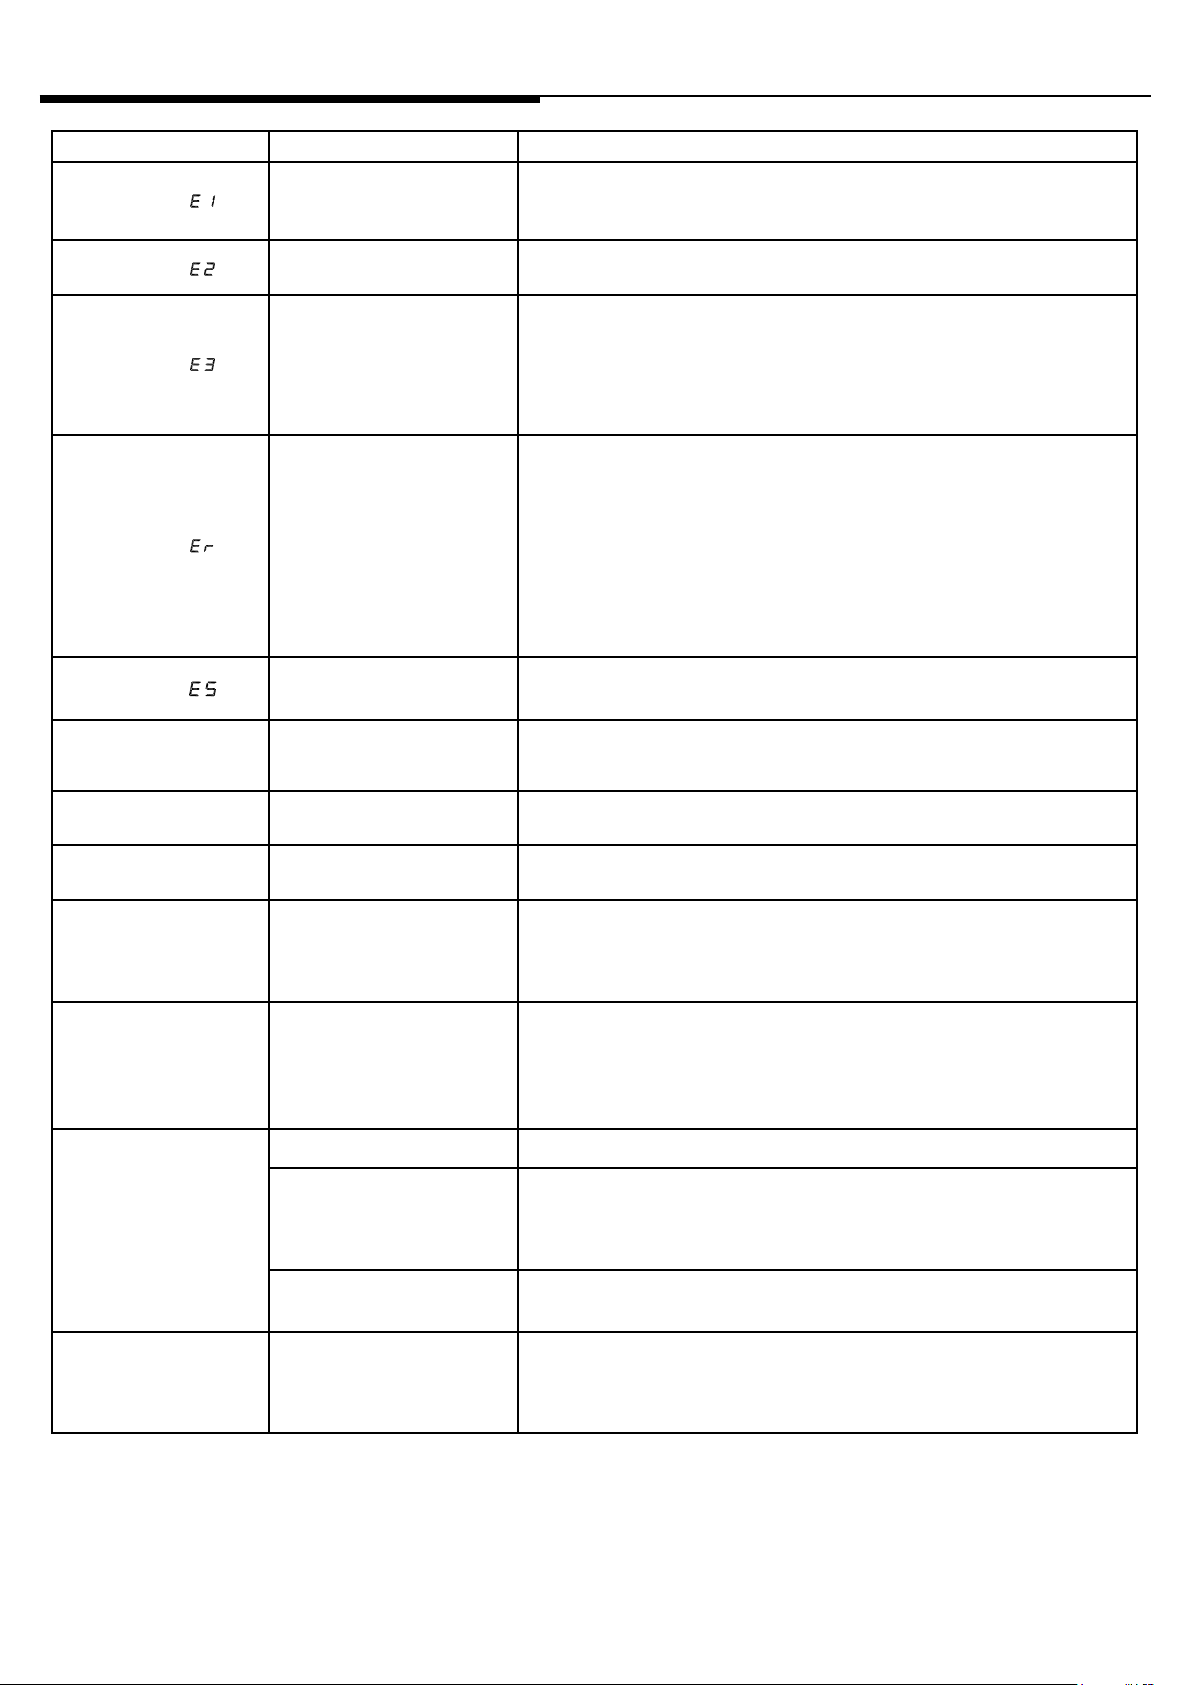
TROUBLESHOOTING
Problem Root Cause Corrective Action
Display shows “ ”
Display shows “ ”
Display shows “ ”
Display shows “ ” Normal operation.
e thermostat sensor is
broken or disconnected.
e thermostat sensor is
broken.
Manual Reset overheat
protection has triggered.
Unplug the replace, remove the back panel of the replace and check that
the thermostat is plugged into the main circuit board. If this does not solve
the problem contact customer service for a replacement thermostat sensor.
Contact customer service for a replacement thermostat sensor.
Inspect the heater and check that the air inlets and outlets are not blocked
as this may cause overheating. Unplug the heater for 30 minutes and allow
it to cool down. Replug and operate, monitor the heater for signs of
overheating, if the problem persist discontinue use of the heater and
contact customer service.
Check your heater cord and plug connections. Faulty wall outlet
connections or loose plugs can cause the outlet or plug to overheat. Be
sure the plug ts tight in the outlet. Heaters draw more current than small
appliances, overheating of the outlet may occur even if it has not occurred
with the use of other appliances. During use check frequently to determine
if your plug outlet or faceplate is HOT! If so, discontinue use of the heater
and have a qualied electrician check and/or replace the faulty outlet(s).
Display shows “ ”
Heater does not blow
warm air.
No power, logs do not
glow.
Logs glow, but no
ame eect.
Heater does not blow
warm air.
Flame eect works but
heater function does
not and the emberbed
ashes when the heater
button is pressed.
Remote Control is not
working.
e heater air outlet is
blocked.
Cool down cycle.
No power to the unit
Flame eect turned o Press ame button several times.
ermostat setting is
preventing heater from
turning on.
e heater is disabled.
No batteries Change the remote batteries.
Poor Signal
Verify there is a 3 foot clear space in front of the heater air outlet.
Normal operation, will continue to run for several minutes before shutting
down. Times will vary based on temperatures. During this time cool air
will blow.
Check that unit is plugged into a standard 120V outlet. Press power button
several times, make sure power is set at “ON”position.
Adjust the temperature settings to ensure that the thermostat is set higher
than the current room temperature.
With the power on press and hold the POWER button on the control panel
for 10 seconds. Once re-enabled the emberbed lights will ash multiple
times.
Operate remote transmitter at a slow measured pace.
Press the remote control buttons with an even motion and gentle pressure.
Repeatedly pressing buttons in rapid succession may cause the transmitter
to malfunction.
Can not turn on/o
cabinet lights (select
models).
A585
Distance
e remote is not available.
Operate the remote at a distance less than 20 feet from the front of the
appliance; point the remote at the control panel.
Press and hold the ame button on the control panel for 3 seconds to turn
on/o the lights in the mantel.
www.tsicustomerservice.com
7
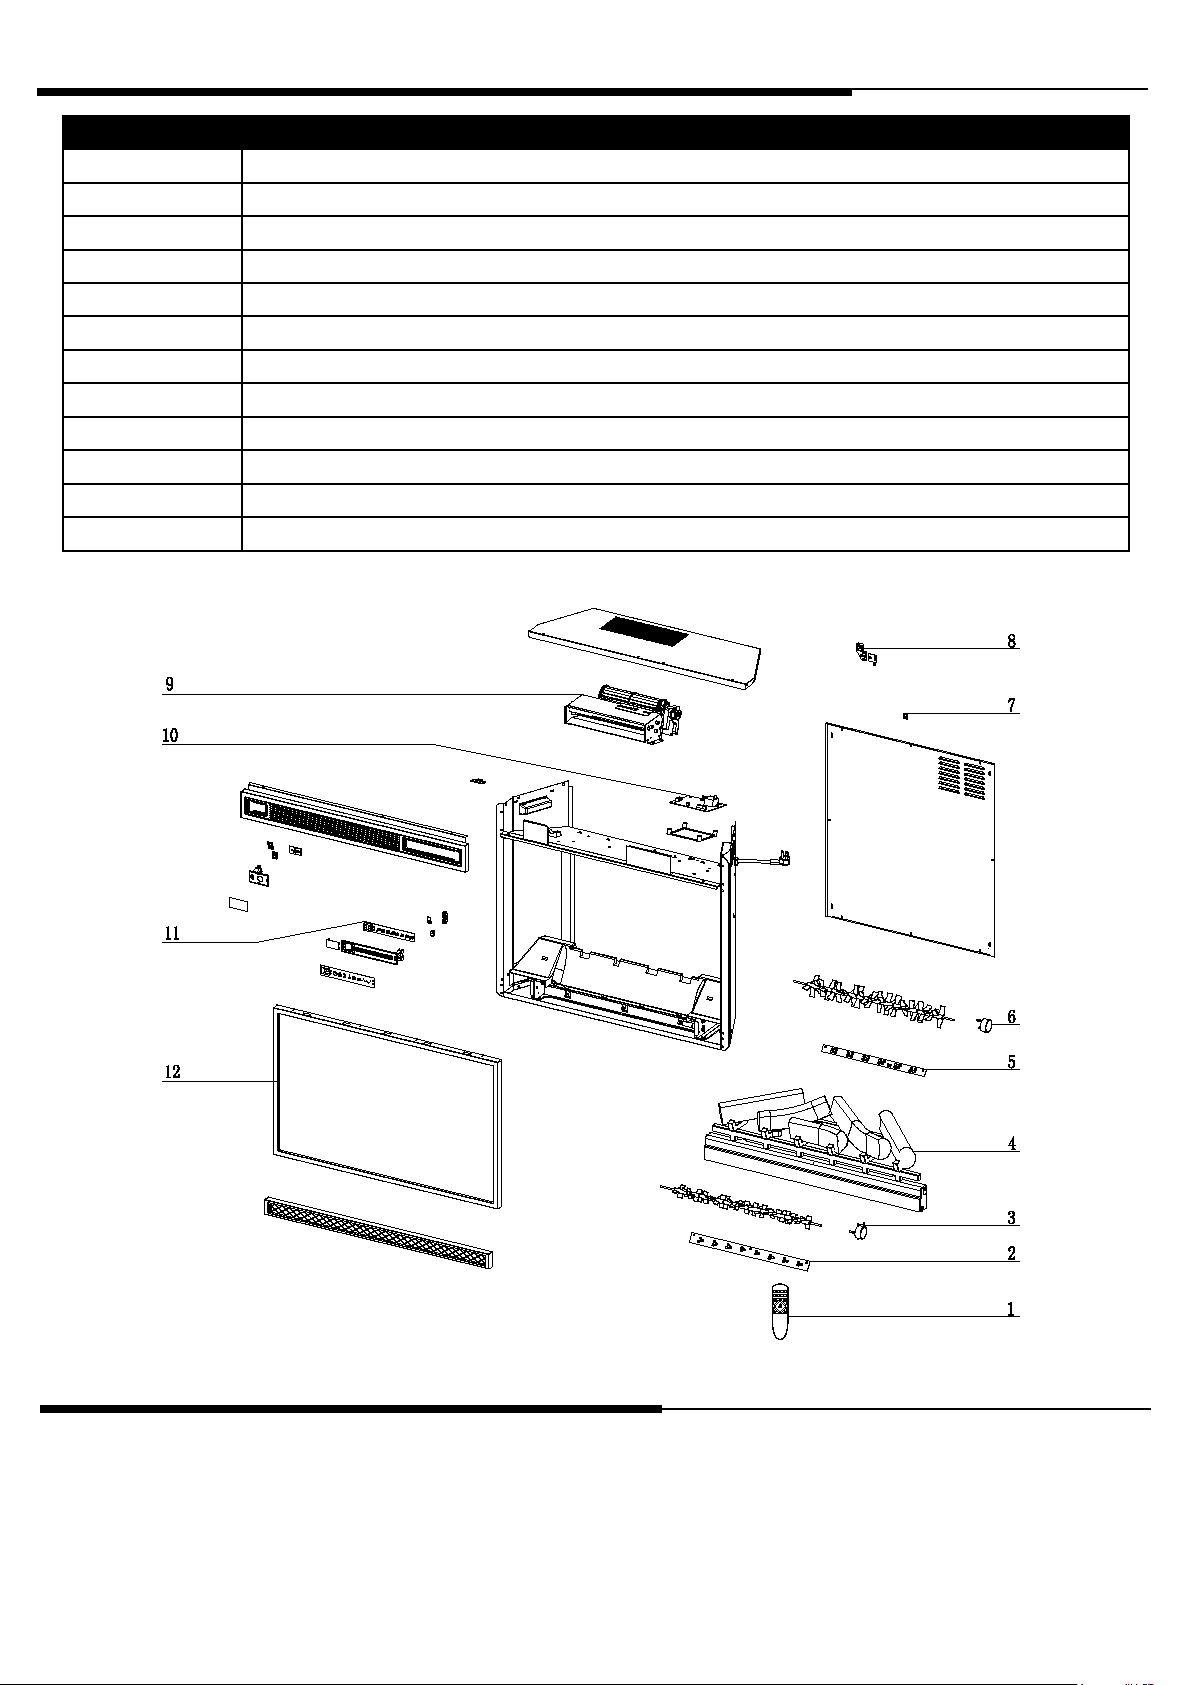
REPLACEMENT PARTS
Part Part Name
1 Remote Control
2 Front Flame Circuit Board
3 Front Flame Generator Drive Motor
4 Logset Assembly
5 Back Flame Circuit Board
6 Back Flame Generator Drive Motor
7 DC-Jack
8 ermostat Sensor
9
10
11
12
Blower/ Heater assembly
Main Circuit Board
Control Panel Circuit Board
Front Panel with Frame
Note, the scale and size of your parts may be dierent depending on your exact model.
CARE AND MAINTENANCE
• e motors used on the fan and the ame generator assembly are pre-lubricated for extended bearing life and require no
further lubrication. However, we recommend periodic cleaning/vacuuming of the fan/heater.
• Clean the trim using a so cloth, slightly dampened with citrus oil based product and bu with a clean so cloth.
DO NOT use brass polish or household cleaners as these products will damage the metal trim. Citrus oil based products
can be obtained at supermarkets or hardware stores.
• Make sure the unit is turned OFF and unplugged before cleaning the heater or replace.
A585
8
www.tsicustomerservice.com
FCC/IC INFORMATION
Warning: Changes or modications to this unit not expressly approved by the party responsible for compliance could
void user’s authority to operate the equipment.
NOTE: is equipment has been tested and found to comply with the limits for Class B digital device, pursuant to part
15 of the FCC Rules. ese limits are designed to provide reasonable protection against harmful interference in a
residential installation. is equipment generates, uses, and can radiate radio frequency energy and, if not installed and
used in accordance with the instructions, may cause harmful interference to radio communications.
However, there is no guarantee that interference will not occur in a particular installation. If this equipment does cause
harmful interference to radio or television reception, which can be determined by turning the equipment o and on, the
user is encouraged to try to correct the interference by one or more of the following measures:
• Reorient or relocate the receiving antenna.
• Increase the separation between the equipment and the receiver.
• Connect the equipment into an outlet on a circuit dierent from that to which the receiver is connected.
• Consult the dealer or an experienced radio/TV technician for help.
is device complies with Part 15 of the FCC Rules. Operation is subject to the following two conditions:
(1) is device may not cause harmful interference, and
(2) this device must accept any interference received, including interference that may cause undesired operation.
is Class B digital apparatus complies with Canadian ICES-003.
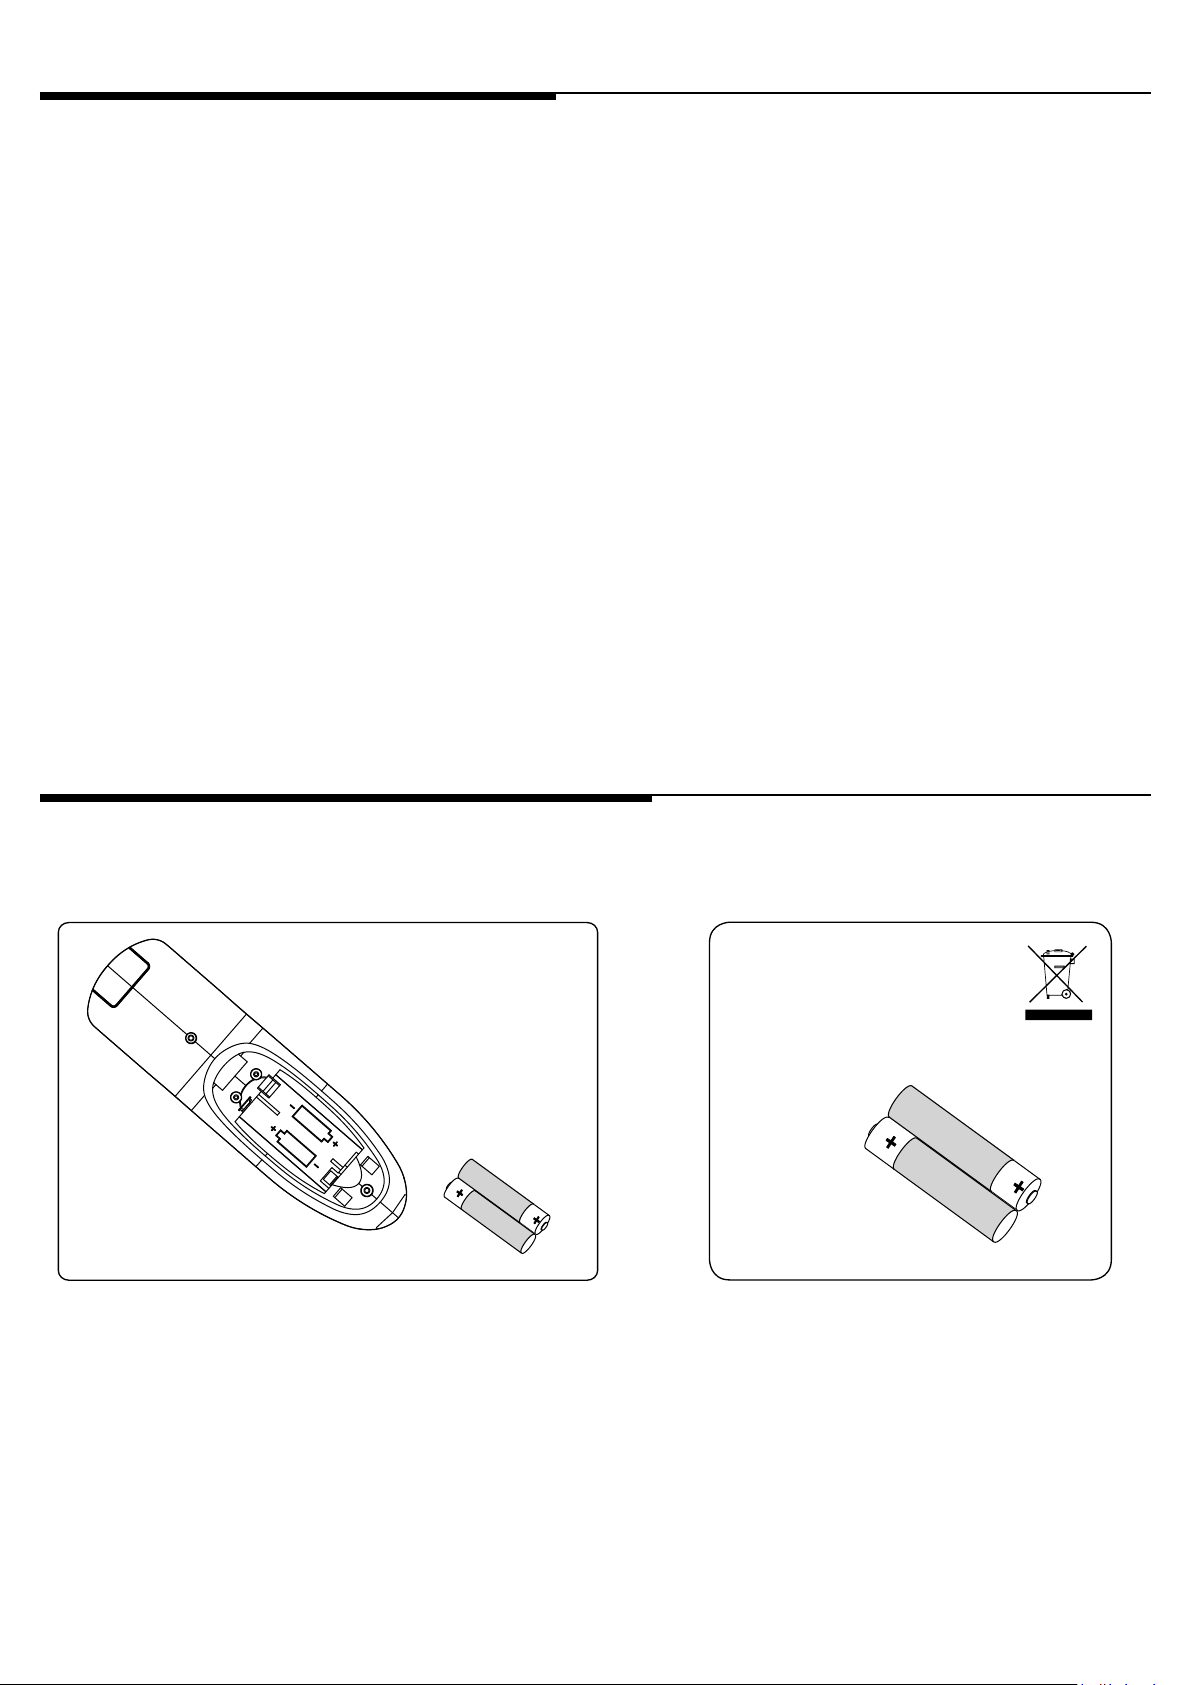
BATTERY REPLACEMENT
NOTE: Do not mix old and new batteries.
Do not mix alkaline, standard (carbon zinc), or rechargable (nicad, ni-mh, etc.) batteries.
Note:
Battery disposal
Please always dispose of batteries
at a suitable recycling point.
AAA 1.5V
AAA 1.5V
CAUTION:
• Do not ingest batteries.
• Non-rechargeable batteries are not to be recharged.
• Batteries are to be inserted with the correct polarity.
• Exhausted batteries are to be removed from the product.
• Always purchase the correct size and grade of battery most suitable for the intended use.
• Replace all batteries of a set at the same time.
• Clean the battery contacts and also those of the device prior to battery installation.
• Remove used batteries promptly.
A585
9
www.tsicustomerservice.com
 Loading...