

Page 1

OWNER’S MANUAL
Omega Monaural
power amplifier
V1.0
ENGLISH..........................................................................1
DEUTSCH
........................................................................4
ΕΛΛΗΝΙΚΑ
....................................................................7
SPECIFICATIONS
........................................................10
Page 2
L N
E
A.C. INLET
OUTPUTS
-+
INPUTS
FUSE
IR
IN OUT
LINE
BALANCED
DISCONNECT A.C. LINE BEFORE
WITH SAME TYPE AND RATING ONLY
OPENING UNIT REPLACE FUSE
WARNING
ALWAYS TURN OFF UNIT BEFORE
BEFORE CONNECTING TO A.C. LINE
CHECK OPERATING VOLTAGE
AND CONNECTIONS
ACTIVATING ALL SWITCHES
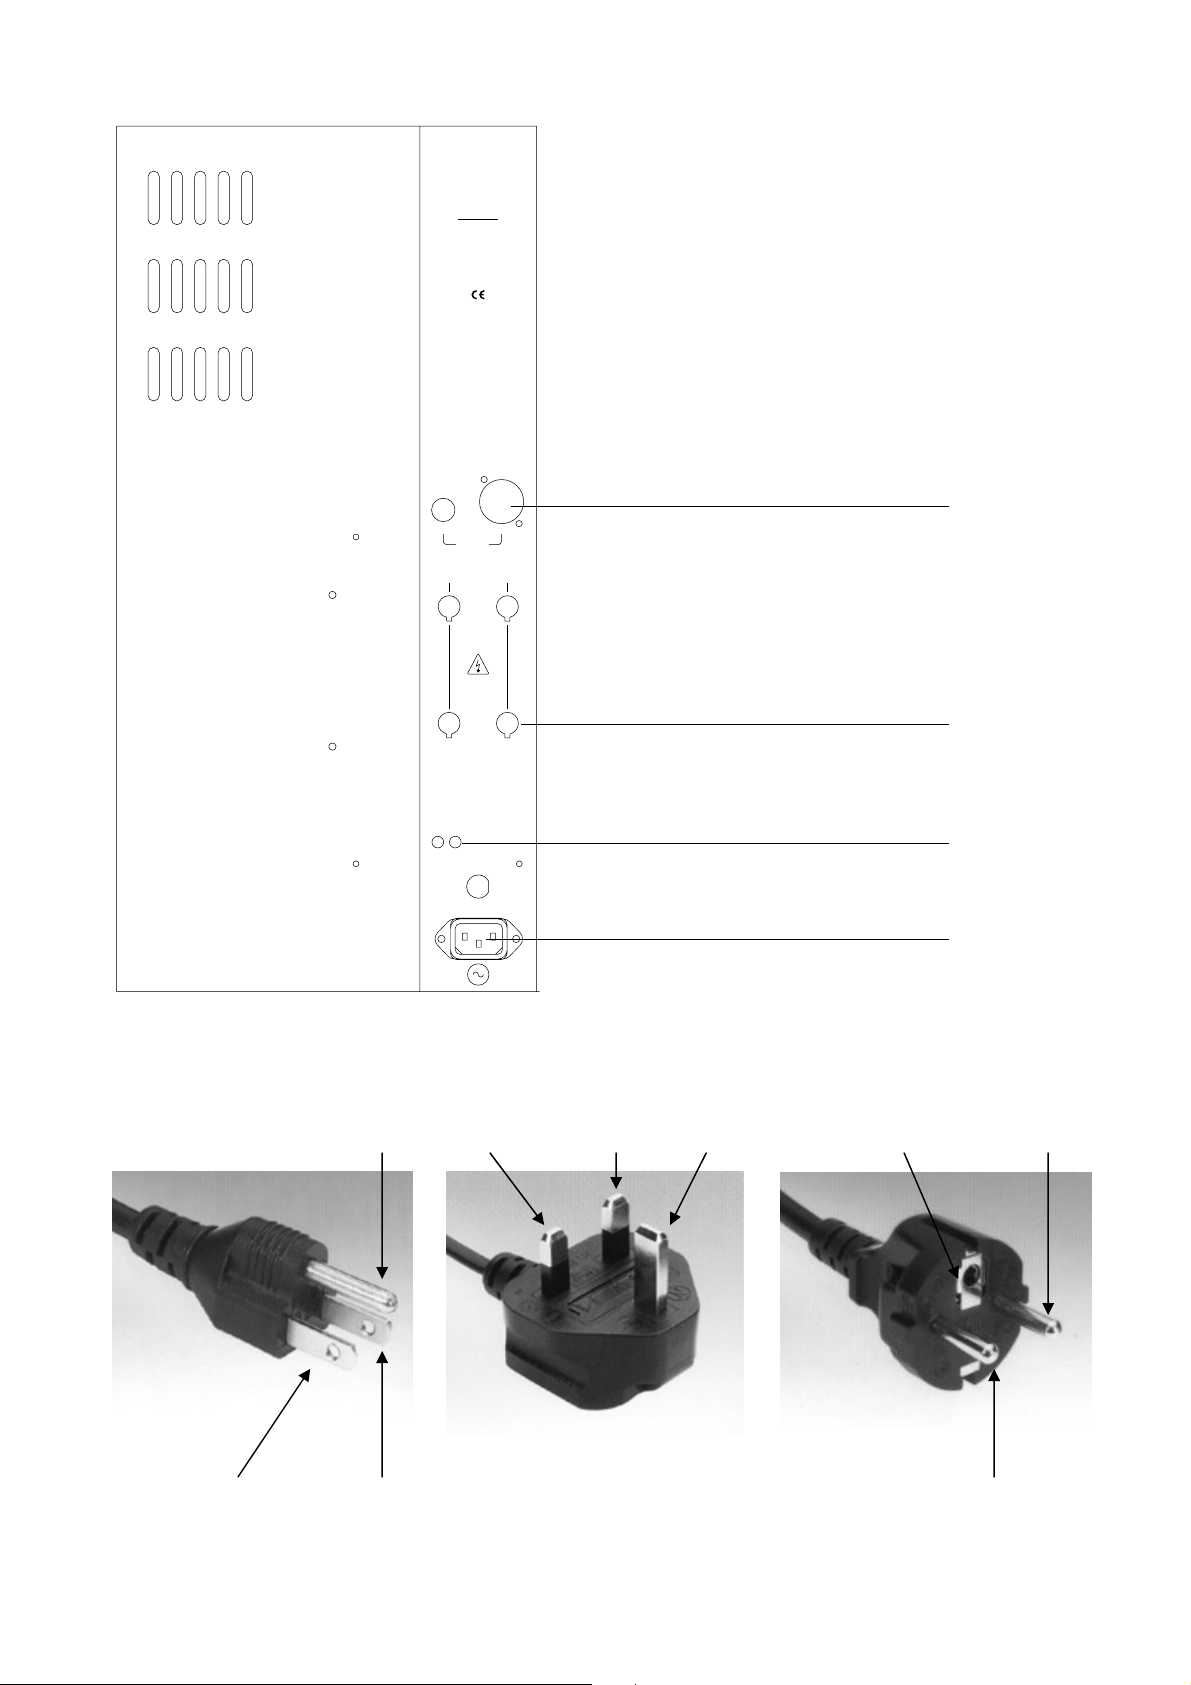
Figure 1 – Omega monaural amplifier – rear view
Figure 2 – Omega monaural amplifier – wall plug
Analog Inputs
Speaker Outputs
IR Input and Output
AC Power Input
Earth pin Live pin Neutral pin Live pin
Earth Earth pin
Live pin Neutral pin
Neutral pin
Page 3

SAFETY PRECAUTIONS
Warning: failure to comply with these safety
instructions can cause serious injury or death, or
cause your Classé Omega Monaural Power
Amplifier to be severely damaged or destroyed.
Do not operate the Classé Omega Monaural Power
Amplifier with any portion of the chassis removed
or open. Dangerous voltages may be encountered.
Connecting this unit to AC voltages other than that
specified on the rear of the unit may cause
extensive damage and increase risk of shock. Check
to make sure your local AC voltage matches the
voltage specified on the rear of your Classé Omega
Monaural Power Amplifier.
Do not operate this product near sources of heat
such as radiators, fireplaces, or heat registers.
Extreme heat may damage this unit.
To reduce the risk of electric shock or fire do not
expose this unit to water or moisture.
Use only the correct size fuse:
— 100-110 Volts
15 Amp, 3AG Slo-Blo
— 220-240 Volts
12 Amp, 3AG Slo-Blo
Do not open this unit. There are no user serviceable
parts inside. Please refer service to an authorised
service technician.
Unplug this unit when unused for long periods or
during lightning storms.
INTRODUCTION
Congratulations
Congratulations on your new purchase. From all of
us at Classé, we hope you enjoy many years of
musical satisfaction from your new Classé Omega
Monaural Power Amplifier.
How to use this manual
The symbol at left indicates a section of the manual
that is of particular importance for safety or to
prevent damage to your Omega Monaural Power
Amplifier.
Please make note of all safety precautions described
in the previous section of this manual.
It is highly recommended that you familiarize
yourself with all aspects of the operation of your
Omega Monaural Power Amplifier. However, if you
want to begin listening to your Omega Monaural
Power Amplifier immediately, skip to the section
titled Connections.
Classé Omega Monaural Power Amplifier:
Design Overview
The Classé Omega Monaural Power Amplifier is the
result of repeated listening design sessions. The
sound is fine tuned by the exchanging and mixing
of parts and the adjusting of many specific
operating voltages. The result of these sessions is a
sonic recipe that yields a natural harmonic realism
typical of instruments in a live performance.
Unique Circuit Design
The Classé Omega Monaural Power Amplifier
circuitry design is a completely new design by
Classé Audio. This unique design utilizes 64 output
devices in a special arrangement designed to
maintain internal rail voltage under the most
adverse conditions. The 64 output devices are
divided evenly, 32 being utilized to maintain rail
voltage, and the other 32 utilized as output power
devices. The result of this unique design is an
amplifier which offers uncompromised performance
even under the most adverse conditions.
1
!
Page 4

2
UNPACKING AND POSITIONING
Unpack your Omega Monaural Power Amplifier
carefully. If you notice any shipping damage,
contact your dealer immediately. Saving the
packaging material is advised in case the unit needs
to be shipped for service. If you choose to dispose
of the packaging, please recycle.
Contents
Included in the carton should be the following
items:
1. Main unit
2. AC cord
3. Warranty card
4. This manual
If any of these items are missing, contact your
dealer immediately.
Positioning the Omega Monaural
Power Amplifier
For best performance, place your Omega Monaural
Power Amplifier on a solid, non-resonant surface.
Do not place the Omega Monaural Power Amplifier
directly on top of another component.
Place the Omega Monaural Power Amplifer near its
final set-up position, allowing 8 inches of clearance
at the rear for tightening the speaker output
connectors.
The power transformer in the Omega Monaural
Power Amplifier is located at the bottom of the
chassis and just behind the front plate. Ideally a few
feet should separate this area from any components
which are susceptible to hum. These include
preamplifers, turntables and interconnect cables.
Allow 6 inches above and on each side of the unit
to provide adequate cooling.
CONNECTIONS
AC power
Check that the AC voltage for which this unit is
configured matches your local AC line voltage. The
correct operating voltage is indicated on the rear of
the chassis, adjacent to the AC power inlet.
Operating this unit on AC voltage other than that
specified on the rear of the unit can damage or
destroy this unit and increase the risk of electric
shock.
Connect the AC power cord to the rear of the unit
and directly to an AC outlet – See Fig 1. For best
results, do not use extension cords or multipleoutlet “power strips”. Also, do not disable the
ground pin as this can increase the risk of electric
shock.
Pictured below is the wall plug of the Omega
Monaural Power Amplifier showing the live and
neutral pins. For optimum performance make sure
the pins maintain proper polarity.
Analog inputs
The Omega Monaural Power Amplifier has both
balanced (XLR) and single-ended (RCA) inputs – See
Fig 1. Both types of inputs have been carefully
optimized to give best possible performance.
However, the most realistic and natural sonic quality
is obtained by connecting the balanced outputs to
the balanced inputs on your amplifier.
The balanced (XLR) and single-ended (RCA) inputs
must be used separately. Ensure that your new
Omega Monaural Power Amplifier is OFF before
changing any connections. When the amplifier is
shipped from Classé there is a jumper between pins
1 and 3 of the balanced (XLR) inputs. To use your
amplifier in single-ended mode simply connect the
single-ended interconnects from the preamplifier to
the RCA inputs of your Omega Monaural Power
Amplifier. To use your amplifier in balanced mode,
remove the single-ended interconnects if attached.
Remove the jumper between pins 1 and 3 of the
balanced (XLR) input and save them for later use.
Connect the balanced interconnects from the
preamplifier to the XLR inputs of your Omega
Monaural Power Amplifier.
The XLR connector on your Omega Monaural Power
Amplifier is configured as follows:
PIN 1: Ground
PIN 2: Positive (Non-inverted) Signal, “hot”
PIN 3: Negative (Inverted) Signal
All Classé products share the same balanced (XLR)
pin out. Other manufacturers may use a different
balanced (XLR) pin out configuration. Please contact
the manufacturer if you wish to maintain absolute
phase throughout your system when connecting
Classé products with equipment from other
manufacturers.
Infrared (IR) input and output
The Omega Monaural Power Amplifier is equipped
with 1/8“ mini-plug connectors that allow the unit
to directly receive and transmit remote IR
commands. These connectors can be used with
equipment that receives IR commands and converts
them for transmission on copper wire. This is
especially useful for situations where the Omega
Monaural Power Amplifier is outside of the line-ofsight of your listening location. Contact your Classé
dealer for information on installing and using
remote IR repeating equipment.
!
Page 5

3
OPERATION
This section describes the operation of the Omega
Monaural Power Amplifier.
Turning on AC power
The Omega Monaural Power Amplifier is turned on
by means of a power switch located on the left side
of the unit. Do not turn the AC power on until all
connections have been made. When AC power is
applied, the Omega symbol on the front of your
Omega Monaural Power Amplifier will FLASH in
blue for 10 seconds, which indicates a normal
initialization. When the Omega symbol switches to
a solid blue indicator your Omega Monaural Power
Amplifier is in normal operational mode.
Protection mode
The protection circuitry in the Omega Monaural
Power Amplifier is a completely new design by
Classé Audio. This unique design utilizes current
sensors for all internal power supplies. This new
arrangement removes fuses from the Mosfet predriver stage and the result is a new level of
uncompromised sonic performance. The Omega
Monaural Power Amplifier also has a protection
circuit designed to detect unusual distortion and DC
content at the amplifiers output.
Protection mode continued
When the Omega Monaural Power Amplifiers
protection circuitry is triggered the unit will enter
protection mode. The Omega LED indicator on the
amplifier front panel will FLASH red. Power OFF the
amplifier by unplugging the unit. Please note that
once your Omega Monaural Power Amplifier enters
protection mode the Power Switch will not
function. Verify all connections and restart your
amplifier. If the amplifier re-enters protection mode
immediately unplug it and contact your dealer for
assistance.
CE CERTIFICATION
As of July 18, 1996, Classé Audio has been
granted:
Certificate Number: C401CLA1.MGS
This indicates CE approval for all models of the
Classé product line.
This means that your Classé product has been
subjected to the most rigorous manufacturing and
safety tests in the world, and has proven to meet or
exceed all European Community CE requirements.
WARRANTY AND SERVICE
For warranty service, contact your Classé dealer or
Classé Audio directly at:
Classé Audio
5070 Francois-Cusson
Lachine, Québec
Canada H8T 1B3
Telephone: +1 514 636 6384
Fax: +1 514 636 1428
Email: cservice
@
classeaudio.com
Web site: http://www.classeaudio.com
SPECIFICATIONS
Main Unit Dimensions
Width: 11-12” 43.2cm
Height: 19-1/2” 49.5cm
Depth: 23-3/4” 60.3cm
Weight: 87.3kg 192lbs
Shipping Box Dimensions
Width: 17” 43.2cm
Height: 24-1/2” 62.2cm
Depth: 29-1/2” 74.9cm
Weight: 101.8kg 224lbs
Frequency Response 20Hz to 20Khz
+/- 0.1dB
Sensitivity 2.25 volts for rated
output
Input Impedance 100 Kohms
Output Impedance 0.05 ohms
Gain 29 dB
S/N Ratio 135 dBR
THD+N 0.003%
Rated Output 500 Watts@8Ohms
1000 Watts
@
4Ohms
2000 Watts
@
2Ohms
Page 6

DEUTSCH
SICHERHEITSHINWEISE
Warnung: Die Nichtbeachtung dieser
Sicherheitshinweise kann zu gesundheitlichen
Schäden führen oder sogar lebensgefährlich sein.
Ferner kann Ihre Classé-Omega-Mono-Endstufe
stark beschädigt oder zerstört werden.
Nehmen Sie die Classé-Omega-Mono-Endstufe
nicht bei geöffnetem Chassis in Betrieb. Durch
Öffnen des Gehäuses setzen Sie sich gefährlichen
Spannungen aus.
Bevor Sie das Gerät in Betrieb nehmen, prüfen Sie,
ob die Betriebsspannung mit der örtlichen
Netzspannung übereinstimmt. Die
Betriebsspannung ist an der Rückseite der ClasséOmega-Mono-Endstufe angegeben.
Stellen Sie das Gerät nicht in die Nähe von
Wärmequellen (Heizkörper, Wärmespeicher, Öfen
oder sonstige wärmeerzeugende Geräte).
Dieses Gerät darf nur in trockenen Räumen
betrieben werden. Um die Gefahr von Feuer oder
eines elektrischen Schlags auszuschließen, dürfen
keine Flüssigkeiten oder Feuchtigkeit in das Gerät
gelangen.
Verwenden Sie nur Sicherungen mit dem korrekten
Wert:
— 100 - 110 Volt
15 A, 3AG träge
— 220 - 240 Volt
12 A, 3AG träge
Öffnen Sie das Gerät nicht. Im Innern befinden sich
keine vom Bediener zu wartenden Teile. Wenden
Sie sich an einen autorisierten Fachhändler.
Ziehen Sie den Netzstecker bei Gewitter oder wenn
das Gerät für längere Zeit nicht in Betrieb
genommen wird aus der Steckdose.
EINLEITUNG
Herzlichen Glückwunsch
Wir gratulieren Ihnen zum Kauf dieses
Classé-Gerätes. Alle Classé-Mitarbeiter wünschen
Ihnen in den nächsten Jahren viel Hörvergnügen mit
Ihrer neuen Classé-Omega-Mono-Endstufe.
Zu dieser Bedienungsanleitung
Das rechts abgebildete Symbol finden Sie in
Abschnitten dieser Bedienungsanleitung, die für die
Sicherheit von besonderer Bedeutung sind oder
Hinweise enthalten, die einer Beschädigung Ihrer
Classé-Omega-Mono-Endstufe vorbeugen.
Bitte berücksichtigen Sie alle Sicherheitshinweise,
die am Anfang dieser Bedienungsanleitung
beschrieben sind.
Wir empfehlen, dass Sie sich mit allen Aspekten des
Betriebs Ihrer Omega-Mono-Endstufe vertraut
machen. Möchten Sie sich Ihre Mono-Endstufe
sofort anhören, lesen Sie sich zunächst den
Abschnitt „Anschlussmöglichkeiten“ durch.
Classé-Omega-Mono-Endstufe: Aufbau
Die Classé-Omega-Mono-Endstufe ist nach
intensiven Hörtests entwickelt worden. Es wurden
verschiedene Bauteile eingesetzt, ausgetauscht und
miteinander kombiniert und bei bestimmten
Betriebsspannungen innerhalb der technischen
Grenzen aufeinander abgestimmt. Das Ergebnis
unserer Hörtests ist eine Klangqualität, die durch
eine unglaubliche Natürlichkeit und äußerst
realistische Klangfarben fasziniert und
charakteristisch für Live-Konzerte mit feinsten
Musikinstrumenten ohne Verstärkereinsatz ist.
Einzigartiges Platinenlayout
Das Platinenlayout der Classé-Omega-MonoEndstufe ist von Classé Audio komplett überarbeitet
worden. Bei diesem einzigartigen Design werden in
einer speziellen Anordnung 64 bipolare Transistoren
eingesetzt: 32 dieser Transistoren werden zur
Spannungsverstärkung und als leistungsstarke
Ausgangstransistoren mit hoher Stromlieferfähigkeit
eingesetzt. Die restlichen 32 bilden die Basis eines
Netzteilschaltkreises und sorgen hier für ein hohes
Maß an Stabilität. Dank dieses einzigartigen
Aufbaus ist eine Endstufe entstanden, die selbst
unter schwierigsten Bedingungen mit einer
unglaublichen Leistungsstärke aufwartet.
4
!
Page 7

AUSPACKEN UND AUFSTELLEN
Packen Sie Ihre Omega-Mono-Endstufe vorsichtig
aus. Sollten Sie einen Versandschaden feststellen,
setzen Sie sich umgehend mit Ihrem Fachhändler
in Verbindung. Wir empfehlen, das
Verpackungsmaterial für einen eventuellen späteren
Transport aufzubewahren. Entscheiden Sie sich für
eine Entsorgung des Verpackungsmaterials, recyceln
Sie es bitte.
Inhalt des Versandkartons
Im Versandkarton ist Folgendes enthalten:
1. Gerät
2. Netzkabel
3. Garantiekarte
4. Diese Bedienungsanleitung
Sollte eine der oben aufgeführten Positionen
fehlen, setzen Sie sich bitte umgehend mit Ihrem
Fachhändler in Verbindung.
Aufstellen der Omega-Mono-Endstufe
Um eine optimale Klangqualität zu erzielen, stellen
Sie Ihre Omega-Mono-Endstufe waagerecht auf
eine feste, ebene Unterlage. Setzen Sie die
Omega-Mono-Endstufe nicht direkt auf eine andere
Komponente.
Stellen Sie die Omega-Mono-Endstufe in die Nähe
ihrer endgültigen Position. Lassen Sie an der
Rückseite einen Freiraum von 20 cm, um die
Lautsprecheranschlüsse festziehen zu können.
Der Leistungstransformator befindet sich unten auf
dem Chassis, direkt hinter der Frontplatte. Dieser
Bereich sollte sich in sicherem Abstand zu
störanfälligen Komponenten befinden. Dazu
gehören Vorverstärker, Plattenspieler und
Verbindungskabel. Um eine ausreichende
Luftzirkulation zu gewährleisten, sollte oben und an
beiden Seiten ein Freiraum von 15 cm gelassen
werden.
ANSCHLUSSMÖGLICHKEITEN
Netzspannung
Bevor Sie das Gerät in Betrieb nehmen, prüfen Sie,
ob die Betriebsspannung mit der örtlichen
Netzspannung übereinstimmt. Die
Betriebsspannung ist an der Rückseite des Gerätes
angegeben. Entspricht die Netzspannung nicht der
auf der Rückseite angegebenen Betriebsspannung,
so kann dies zu einer Beschädigung oder
Zerstörung des Gerätes führen. Die Gefahr eines
elektrischen Schlags ist dabei sehr groß.
Verbinden Sie das Netzkabel mit dem Netzeingang
an der Geräterückseite und mit der Wandsteckdose.
Siehe Abbildung 1: Die besten Ergebnisse erzielen
Sie, wenn Sie das Gerät weder an
Verlängerungskabel noch an Mehrfachsteckdosen
anschließen. Klemmen Sie den Schutzkontakt auf
keinen Fall ab, da dies zu einem elektrischen Schlag
führen kann.
In Abbildung 2 ist der Netzstecker der
Omega-Mono-Endstufe mit dem stromführenden
und dem neutralen Stift abgebildet. Um eine
optimale Leistung zu gewährleisten, stellen Sie eine
korrekte Polarität sicher.
Analoge Eingänge
Die Omega-Mono-Endstufe verfügt über einen
symmetrischen XLR- und einen unsymmetrischen
Cinch-Eingang. – Siehe Abbildung 1: Beide
Eingänge sind optimiert worden, um eine
erstklassige Klangqualität zu gewährleisten. Sollte
der Vorverstärker jedoch ebenfalls über einen
XLR-Anschluss verfügen, empfehlen wir, die
symmetrischen Anschlüsse zu nutzen.
Der symmetrische und der unsymmetrische Eingang
sind getrennt, niemals gleichzeitig zu nutzen.
Stellen Sie sicher, dass Ihre neue Omega-MonoEndstufe abgeschaltet ist, bevor die Verbindungen
geändert werden. Beim Versand befindet sich
zwischen Pin 1 und Pin 3 des symmetrischen
XLR-Eingangs ein Jumper. Möchten Sie Ihre
Endstufe über den unsymmetrischen Eingang mit
dem Vorverstärker verbinden, so schließen Sie
einfach das entsprechende Verbindungskabel an.
Möchten Sie die symmetrischen
Anschlussmöglichkeiten nutzen, entfernen Sie, falls
angeschlossen, das unsymmetrische Anschlusskabel.
Entfernen Sie nun den Jumper zwischen Pin 1 und
Pin 3 des symmetrischen XLR-Eingangs. Bewahren
Sie ihn für einen späteren Einsatz auf. Verbinden Sie
das vom Vorverstärker kommende symmetrische
Anschlusskabel mit dem XLR-Eingang Ihrer OmegaMono-Endstufe.
Der XLR-Anschluss Ihrer Omega-Mono-Endstufe ist
folgendermaßen belegt:
PIN 1: Masse
PIN 2: Positives (nicht-invertiertes) Signal
PIN 3: Negatives (invertiertes) Signal
Alle Classé-Produkte haben am symmetrischen XLREingang dieselbe Pinbelegung. Bei den Geräten
anderer Hersteller kann die Pinbelegung anders
sein. Möchten Sie Classé-Produkte mit Geräten
anderer Hersteller verbinden, setzen Sie sich bitte
mit dem jeweiligen Hersteller in Verbindung, um
eine absolute Phasengleichheit im gesamten System
zu gewährleisten.
Infrarot (IR)-Ein- und -Ausgang
Die Classé-Omega-Mono-Endstufe ist mit 3,5-mmMinianschlüssen bestückt, die es dem Gerät
ermöglichen, Infrarot-Fernbedienungsbefehle direkt
zu senden und zu empfangen. Dies ist besonders
nützlich in Situationen, in denen die Omega-MonoEndstufe von Ihrer Hörposition aus nicht sichtbar ist.
Lassen Sie sich diesbezüglich von Ihrem ClasséFachhändler beraten.
5
!
Page 8

BETRIEB
In diesem Abschnitt erhalten Sie Informationen zum
Betrieb der Omega-Mono-Endstufe.
Einschalten
Die Omega-Mono-Endstufe wird über den links am
Gerät befindlichen POWER-Schalter eingeschaltet.
Zuvor sind erst alle Verbindungen ordnungsgemäß
herzustellen. Ist das Gerät eingeschaltet, BLINKT das
Omega-Symbol an der Gerätefront Ihrer OmegaMono-Endstufe 10 Sekunden lang blau. Auf diese
Weise wird eine normale Inbetriebnahme angezeigt.
Leuchtet das Omega-Symbol blau, befindet sich die
Omega-Mono-Endstufe im normalen
Betriebsmodus.
Schutzmodus
Bei der Schutzschaltung in der Omega-MonoEndstufe handelt es sich um ein komplett neues
Design. Hierbei werden für die internen Netzteile
Stromsensoren eingesetzt, wodurch Sicherungen
zum Schutz der in der Treiberstufe für die
Ausgangstransistoren genutzten MOS-FETs
überflüssig werden. Das Ergebnis ist eine
unvergleichliche Klangqualität. Die Omega-MonoEndstufe verfügt ferner über eine Schaltung, die auf
Störungen und/oder Gleichspannungsanteile am
Verstärkerausgang reagiert.
Reagiert die Schutzschaltung der Omega-MonoEndstufe, schaltet das Gerät in den Schutzmodus.
Die Omega-LED-Anzeige an der Gerätefront blinkt
rot. Ziehen Sie den Netzstecker aus der Steckdose.
Bitte beachten Sie, dass der POWER-Schalter nicht
funktioniert, wenn Ihre Omega-Mono-Endstufe in
den Schutzmodus schaltet. Prüfen Sie alle
Anschlüsse. Stecken Sie den Netzstecker in die
Steckdose und nehmen Sie die Endstufe wieder in
Betrieb. Schaltet sie erneut in den Schutzmodus,
ziehen Sie sofort den Netzstecker und setzen sich
mit Ihrem autorisierten Fachhändler in Verbindung.
CE-ZERTIFIZIERUNG
Am 18. Juli 1996 erhielt Classé Audio die
Zertifizierungs-Nr.: C401CLA1.MGS.
Diese steht für eine CE-Zertifizierung aller Modelle
der Produktlinie von Classé Audio.
Damit haben alle Classé-Produkte die weltweit
strengsten Herstellungs- und Sicherheitsprüfungen
erfolgreich bestanden und sind offiziell für das
CE-Zeichen der Europäischen Gemeinschaft
zertifiziert.
GARANTIE UND SERVICE
Im Garantiefall setzen Sie sich bitte mit Ihrem
autorisierten Fachhändler oder direkt mit Classé
Audio in Verbindung:
Classé Audio
5070 Francois-Cusson
Lachine, Québec
Canada H8T 1B3
Telefon: +1 514 636 6384
Fax: +1 514 636 1428
Email: cservice@classeaudio.com
Website: http://www.classeaudio.com
6
Page 9

ΕΛΛΗΝΙΚΑ
Ο∆ΗΓΙΕΣ ΓΙΑ ΤΗΝ ΑΣΦΑΛΕΙΑ ΣΑΣ
Προσοχή: Αν δεν τηρηθούν απλυτα οι πιο
κάτω οδηγίες ασφαλείας υπάρχει σοβαρς
κίνδυνος τραυµατισµού ή θανάτου, αλλά
και πρκλησης ανεπανρθωτης ζηµιάς στη
συσκευή.
Σε καµία περίπτωση µην ανοίξετε
οποιοδήποτε τµήµα του εξωτερικού
καλύµµατος του OMEGA γιατί θα εκτεθείτε
σε υψηλές τάσεις ηλεκτρικού ρεύµατος και
υπάρχει κίνδυνος ηλεκτροπληξίας. ∆εν
υπάρχει στο εσωτερικ της συσκευής
κανένα τµήµα που µπορεί να επισκευαστεί
απ το χρήστη.
Η πρίζα στην οποία θα συνδέσετε τον
ενισχυτή θα πρέπει να έχει τα ίδια
χαρακτηριστικά ρεύµατος µε αυτά που
αναγράφονται στην πίσω πλευρά του. Σε
διαφορετική περίπτωση θα προκληθεί
ζηµιά στη συσκευή και υπάρχει κίνδυνος
ηλεκτροπληξίας. Βεβαιωθείτε τι η τάση και
η συχντητα εναλλασσµενου ρεύµατος της
πρίζας είναι ίδια µε αυτή που αναγράφεται
στην πίσω πλευρά του ενισχυτή (για την
Ελλάδα: 220V / 50Hz).
Μην χρησιµοποιείτε τη συσκευή κοντά σε
πηγές θερµτητας (καλοριφέρ, σµπες,
τζάκια κ.λπ.) γιατί µπορεί να προκληθεί
ζηµιά.
Για να ελαχιστοποιήσετε το ενδεχµενο
ηλεκτροπληξίας ή φωτιάς, µην εκθέτετε
τη συσκευή σε νερ ή υγρασία.
Ανάλογα µε την τάση λειτουργίας, τα
χαρακτηριστικά της ασφάλειας θα πρέπει
να είναι τα εξής:
— 100-110 Volts
15 Amp, 3AG Slo-Blo
— 220-240 Volts
12 Amp, 3AG Slo-Blo
Μην ανοίξετε το κάλυµµα της συσκευής.
∆εν υπάρχουν στο εσωτερικ µέρη που
µπορούν να επισκευαστούν απ το χρήστη.
Για οποιαδήποτε εργασία επισκευής ή
συντήρησης απευθυνθείτε στο τµήµα
service της αντιπροσωπείας της Classé.
Αν δεν σκοπεύετε να χρησιµοποιήσετε τη
συσκευή για µεγάλο χρονικ διάστηµα
βγάλτε την απ την πρίζα. Κάντε το ίδιο
σε περίπτωση καταιγίδας.
ΕΙΣΑΓΩΓΗ
Συγχαρητήρια
Συγχαρητήρια για τη νέα σας αγορά. Pλοι
εµείς στην Classé σας ευχµαστε να
απολαύσετε πολλά µουσικά χρνια µε το
µονοφωνικ τελικ ενισχυτή OMEGA.
Πως να χρησιµοποιήσετε αυτ# το φυλλάδιο
Το σύµβολο µε το τρίγωνο και το
θαυµαστικ σηµαίνει τι στο συγκεκριµένο
σηµείο του φυλλαδίου υπάρχουν
σηµαντικές οδηγίες που αφορούν την
ασφάλειά σας και την καλή λειτουργία του
ενισχυτή.
Παρακαλούµε ακολουθήστε λες τις
οδηγίες ασφαλείας που αναφέρονται στην
προηγούµενη εντητα.
Πριν θέσετε σε λειτουργία και
χρησιµοποιήσετε για πρώτη φορά τον
OMEGA, συνιστούµε να διαβάσετε
ολκληρο το φυλλάδιο των οδηγιών για να
αποκτήσετε µία γενική ιδέα για τον τρπο
λειτουργίας του.
Μονοφωνικ#ς Τελικ#ς Ενισχυτής Classé
OMEGA: Βασικά σχεδιαστικά στοιχεία
Ο µονοφωνικς τελικς ενισχυτής OMEGA
της Classé είναι το αποτέλεσµα ενς
εξαιρετικού σχεδιασµού και µίας σειράς
εξονυχιστικών ακουστικών δοκιµών. Ο ήχος
του έχει τελειοποιηθεί µε τη χρήση πολλών
και διαφορετικών εξαρτηµάτων υψηλής
ποιτητας, και µε πολλαπλές ρυθµίσεις των
εσωτερικών τάσεων λειτουργίας. Το τελικ
αποτέλεσµα είναι µία θαυµάσια ηχητική
συσκευή, που αποδίδει τη µουσική µε έναν
φυσικ και αρµονικ ρεαλισµ, εφάµιλλο
του ήχου των οργάνων σε µία ζωντανή
συναυλία.
Κοιν#ς σχεδιασµ#ς κυκλωµάτων
Ο σχεδιασµς των κυκλωµάτων του OMEGA
είναι µία εντελώς νέα καινοτοµία της
Classé. Η µοναδική αυτή υλοποίηση
περιλαµβάνει 64 στάδια εξδου σε µία
ειδική διάταξη που διατηρεί σταθερές τις
εσωτερικές τάσεις της συσκευής, ακµα
και κάτω απ τις πιο αντίξοες συνθήκες. Τα
64 στάδια εξδου είναι κατανεµηµένα
ισοµερώς, µε τα 32 να χρησιµοποιούνται για
να διατηρούν τις εσωτερικές τάσεις, και
τα υπλοιπα 32 να χρησιµοποιούνται ως
στάδια ισχύος εξδου. Το αποτέλεσµα αυτού
του θαυµάσιου σχεδιασµού είναι ένας
τελικς ενισχυτής που αποδίδει άψογη
ηχητική ποιτητα, ακµα και στις πιο
δύσκολες συνθήκες λειτουργίας.
7
!
Page 10

ΑΠΟΣΥΣΚΕΥΑΣΙΑ ΚΑΙ ΤΟΠΟΘΕΤΗΣΗ
Βγάλτε τον OMEGA απ τη συσκευασία
προσεκτικά. Αν διαπιστώσετε τι έχει
υποστεί οποιαδήποτε ζηµιά κατά τη
µεταφορά επικοινωνήστε αµέσως µε το
κατάστηµα απ που τον αγοράσατε.
Συνιστούµε να κρατήσετε τα υλικά
συσκευασίας για την περίπτωση που θα
χρειαστεί στο µέλλον να µεταφέρετε τον
ενισχυτή. Αν αποφασίσετε να πετάξετε τη
συσκευασία, χρησιµοποιήστε τους ειδικούς
κάδους ανακύκλωσης.
Περιεχ#µενα
Στο κιβώτιο θα πρέπει να περιλαµβάνονται
τα ακλουθα:
1. Ο ενισχυτής
2. Ένα καλώδιο τροφοδοσίας
3. Η κάρτα εγγύησης
4. Το φυλλάδιο µε τις οδηγίες χρήσης
Αν λείπει οποιοδήποτε απ τα παραπάνω,
επικοινωνήστε αµέσως µε το κατάστηµα
απ που αγοράσατε τη συσκευή.
Τοποθέτηση
Τοποθετήστε τον ενισχυτή σε µία επίπεδη
και σταθερή επιφάνεια που αντέχει τους
κραδασµούς. Μην τον τοποθετήσετε
απευθείας επάνω ή κάτω απ κάποια άλλη
συσκευή του συστήµατς σας.
Βάλτε προσωρινά τον OMEGA κοντά στην
τελική του θέση, αφήνοντας πίσω του κεν
20 περίπου εκατοστών για να µπορέσετε να
συνδέσετε τα καλώδια των ηχείων.
Ο µετασχηµατιστής ισχύος του OMEGA
βρίσκεται στην κάτω πλευρά του, πίσω
ακριβώς απ τη µάσκα της εµπρσθιας
ψης. Ο ενισχυτής θα πρέπει να απέχει
αρκετά απ συσκευές που µπορεί να
επηρεαστούν απ το τροφοδοτικ του και
να “βγάλουν” θρυβο (η ιδανική απσταση
είναι γύρω στα 50 εκατοστά). Τέτοιες
συσκευές είναι οι προενισχυτές, τα πικάπ,
αλλά και τα καλώδια διασύνδεσης µεταξύ
των συσκευών του συστήµατος.
Αφήστε κεν 15 περίπου εκατοστών επάνω
και γύρω απ τον ενισχυτή για να γίνεται
καλή κυκλοφορία του αέρα και να ψύχεται
επαρκώς η συσκευή.
ΣΥΝ∆ΕΣΕΙΣ
Τροφοδοσία ρεύµατος
Βεβαιωθείτε τι η τάση λειτουργίας της
συσκευής είναι ίδια µε αυτήν της πρίζας
στην οποία θα την συνδέσετε (για την
Ελλάδα 220V/50Hz). Η σωστή τάση
λειτουργίας αναγράφεται στην πίσω πλευρά
της συσκευής, δίπλα στην υποδοχή του
καλωδίου τροφοδοσίας. Αν χρησιµοποιήσετε
τη συσκευή µε διαφορετική τάση απ αυτή
για την οποία είναι ρυθµισµένη θα της
προκαλέσετε σοβαρή ζηµιά, ενώ υπάρχει
και υψηλς κίνδυνος ηλεκτροπληξίας.
Συνδέστε το καλώδιο τροφοδοσίας πρώτα
στην υποδοχή που υπάρχει στην πίσω
πλευρά του OMEGA (“AC INLET” – βλ. και
Εικνα 1), και στη συνέχεια στην πρίζα.
Αποφύγετε να χρησιµοποιήσετε
προεκτάσεις (µπαλαντέζες) ή πολύπριζα.
Μην απενεργοποιήσετε την ακίδα της
γείωσης γιατί θα αυξήσετε το ενδεχµενο
ηλεκτροπληξίας.
Στην πιο κάτω εικνα φαίνεται το φις του
καλωδίου τροφοδοσίας του OMEGA, µε τον
ενεργ και τον ουδέτερο ακροδέκτη. Για
καλύτερη απδοση της συσκευής συνδέστε
τις ακίδες µε τη σωστή πολικτητα.
Αναλογικές είσοδοι
Ο OMEGA έχει εισδους RCA και XLR
(balanced – βλ. Εικνα 1). Και οι δύο τύποι
εισδων είναι προσεκτικά ρυθµισµένες
ώστε να έχουν την καλύτερη δυνατή
απδοση. Ωστσο, οι είσοδοι XLR δίνουν
την πιο ρεαλιστική και φυσική ηχητική
ποιτητα. Έτσι, αν έχει και ο προενισχυτής
σας αντίστοιχες εξδους, χρησιµοποιήστε
τα κατάλληλα καλώδια για να συνδέσετε τις
δύο συσκευές µέσω των υποδοχών αυτών.
Οι είσοδοι RCA και XLR δεν µπορούν να
χρησιµοποιηθούν ταυτχρονα (δηλαδή θα
πρέπει να χρησιµοποιήσετε είτε τον ένα
είτε τον άλλο τύπο εισδων).
Πριν κάνετε ή αλλάξετε οποιαδήποτε
σύνδεση, βεβαιωθείτε τι ο OMEGA είναι
εκτς λειτουργίας, και ακµα καλύτερα
βγάλτε τον απ την πρίζα.
Για να χρησιµοποιήσετε τις εισδους RCA
συνδέστε τις απλά µε τις αντίστοιχες
εξδους του προενισχυτή, χρησιµοποιώντας
υψηλής ποιτητας καλώδια µε βύσµατα
RCA. Για να χρησιµοποιήσετε τις εισδους
XLR θα πρέπει πρώτα να αφαιρέσετε τα
jumpers που έχουν τοποθετηθεί απ το
εργοστάσιο µεταξύ των ακίδων 1 και 3 κάθε
εισδου (αν έχετε συνδέσει τις εισδους
RCA θα πρέπει να τις αποσυνδέσετε).
Χρησιµοποιήστε καλώδια µε βύσµατα XLR,
για να συνδέσετε τις εισδους XLR του
OMEGA στις αντίστοιχες εξδους του
προενισχυτή σας. Τα καλώδια επηρεάζουν
την τελική ηχητική ποιτητα και γι’ αυτ θα
πρέπει να τα επιλέξετε προσεκτικά.
Απευθυνθείτε στο κατάστηµα απ που
αγοράσατε τον OMEGA ή στην
αντιπροσωπεία της Classé.
Η διάταξη των ακίδων στις υποδοχές XLR
του OMEGA είναι η εξής:
ΑΚΙ∆Α 1: Γείωση
ΑΚΙ∆Α 2: Θετικ σήµα (µη αντεστραµµένο
“hot”)
ΑΚΙ∆Α 3: Αρνητικ σήµα (αντεστραµµένο)
Pλες οι συσκευές της Classé έχουν την ίδια
διάταξη ακίδων στις υποδοχές XLR. Ωστσο,
αν χρησιµοποιείτε και συσκευές άλλων
κατασκευαστών η διάταξη των ακίδων
µπορεί να είναι διαφορετική. Αν θέλετε να
διατηρήσετε απλυτη φάση σε ολκληρο το
σύστηµά σας, επικοινωνήστε µε τον
κατασκευαστή της άλλης συσκευής και
βεβαιωθείτε για τη διάταξη που
χρησιµοποιεί.
IR IN και OUT
Ο OMEGA έχει υποδοχές “IR” (που δέχονται
βύσµα 1/8 της ίντσας – µικρ “καρφί”) οι
οποίες αν συνδεθούν µε τις αντίστοιχες
υποδοχές άλλων συσκευών του συστήµατος
επιτρέπουν στη συσκευή να δεχτεί και να
στείλει σήµατα τηλεχειρισµού.
Οι υποδοχές αυτές δέχονται το σήµα απ το
τηλεχειριστήριο και το µετατρέπουν ώστε
να µπορεί να µεταδοθεί µέσω του καλωδίου.
Η δυναττητα αυτή είναι ιδιαίτερα χρήσιµη
γιατί επιτρέπει τον τηλεχειρισµ πολλών
συσκευών του συστήµατος µε ένα µνο
τηλεχειριστήριο, δίνοντας έτσι ευελιξία ως
προς το σηµείο τοποθέτησής τους (για
παράδειγµα, θα µπορούσε ο OMEGA να
βρίσκεται εκτς της εµβέλειας του
τηλεχειριστηρίου ή ακµα και σε άλλο
δωµάτιο, και παρ’ λα αυτά να µπορείτε να
τον ενεργοποιήσετε ή να τον
απενεργοποιήσετε µέσω κάποιας άλλης
συσκευής).
Για περισστερες πληροφορίες σχετικά µε
τον τρπο σύνδεσης και τη διάταξη
συσκευών συνδεδεµένων µέσω των
υποδοχών IR απευθυνθείτε στο κατάστηµα
απ που αγοράσατε τον ενισχυτή ή στην
αντιπροσωπεία της Classé.
8
!
Page 11

ΧΡΗΣΗ ΤΟΥ ΕΝΙΣΧΥΤΗ
Η εντητα αυτή περιγράφει τον τρπο
χρήσης του OMEGA.
Ενεργοποίηση
Ο OMEGA ενεργοποιείται απ τον διακπτη
λειτουργίας (power switch) που υπάρχει
στην αριστερή πλευρά της εµπρσθιας
ψης της συσκευής. Μην θέσετε σε
λειτουργία τον ενισχυτή πριν κάνετε λες
τις συνδέσεις. Pταν πιέσετε τον διακπτη,
το σύµβολο “Ω” θα αρχίσει να αναβοσβήνει
σε µπλε χρώµα για 10 δευτερλεπτα, και
στη συνέχεια θα παραµείνει αναµµένο,
δείχνοντας τι ο ενισχυτής λειτουργεί
κανονικά.
Κύκλωµα προστασίας
Το σύστηµα προστασίας του OMEGA είναι
εντελώς καινούργιο, σχεδιασµένο απ την
Classé Audio. Ο µοναδικς σχεδιασµς του
περιλαµβάνει αισθητήρες ρεύµατος για λα
τα εσωτερικά τροφοδοτικά του ενισχυτή.
Πλέον δεν υπάρχουν ασφάλειες στα στάδια
προ-οδήγησης Mosfet, µε αποτέλεσµα η
ηχητική ποιτητα να είναι αισθητά
καλύτερη. Ο OMEGA διαθέτει επίσης ένα
κύκλωµα προστασίας που εντοπίζει
οποιαδήποτε ασυνήθιστη παραµρφωση ή
την παρουσία συνεχούς ρεύµατος στην
έξοδο του ενισχυτή.
Αν ενεργοποιηθεί το κύκλωµα προστασίας
του ενισχυτή, η φωτεινή ένδειξη
λειτουργίας (led) της εµπρσθιας ψης θα
αρχίσει να αναβοσβήνει µε ΚΟΚΚΙΝΟ χρώµα,
δείχνοντας τι υπάρχει κάποιο πρβληµα
στη λειτουργία του. Αν συµβεί αυτ, ο
διακπτης λειτουργίας του OMEGA θα
πάψει να λειτουργεί. Βγάλτε τον ενισχυτή
απ την πρίζα, ελέγξτε λες τις συνδέσεις
και στη συνέχεια θέστε τον πάλι σε
λειτουργία. Αν το κύκλωµα προστασίας
ενεργοποιηθεί πάλι, δείχνοντας τι το
πρβληµα παραµένει, βγάλτε αµέσως τη
συσκευή απ την πρίζα και επικοινωνήστε
µε την αντιπροσωπεία της Classé. Σε καµία
περίπτωση µην επιχειρήσετε να λύσετε το
πρβληµα µνος/η σας.
ΠΙΣΤΟΠΟΙΗΣΗ CE
Απ τις 18 Ιουλίου του 1996 η Classé έχει
λάβει έγκριση CE για λα τα µοντέλα της.
Αυτ σηµαίνει τι η συσκευή που
αγοράσατε έχει περάσει απ τους πιο
αυστηρούς ελέγχους κατασκευής και
ασφαλείας που υπάρχουν στον κσµο, και
έχει αποδειχτεί τι καλύπτει και ξεπερνάει
λες τις προδιαγραφές λειτουργίας και
ασφαλείας CE που έχει θέσει η Ευρωπαϊκή
Ένωση.
Αριθµς πιστοποιητικού: C401CLA1.MGS
ΕΓΓΥΗΣΗ ΚΑΙ SERVICE
Αν η συσκευή χρειαστεί επισκευή στα
πλαίσια της εγγύησης, µπορείτε να
επικοινωνήσετε µε τον πωλητή σας ή
απ’ ευθείας µε την Classé Audio:
Classé Audio
5070 François-Cusson
Lachine, Quebec
Canada H8T 1B3
Telephone: +1 514 636 6384
Fax: +1 514 636 1428
Email: cservice@classeaudio.com
Web site: http://www.classeaudio.com
9
Page 12

SPECIFICATIONS
Main Unit Dimensions
Width: 11-12” 43.2cm
Height: 19-1/2” 49.5cm
Depth: 23-3/4” 60.3cm
Weight: 87.3kg 192lbs
Shipping Box Dimensions
Width: 17” 43.2cm
Height: 24-1/2” 62.2cm
Depth: 29-1/2” 74.9cm
Weight: 101.8kg 224lbs
Frequency Response 20Hz to 20Khz
+/- 0.1dB
Sensitivity 2.25 volts for rated output
Input Impedance 100 Kohms
Output Impedance 0.05 ohms
Gain 29 dB
S/N Ratio 135 dBR
THD+N 0.003%
Rated Output 500 Watts
@
8Ohms
1000 Watts
@
4Ohms
2000 Watts
@
2Ohms
10
 Loading...