

Page 1

Owner’s Manual
CP-700
中文
ENGLISH
Page 2
ENGLISH
CAUTION
TO REDUCE THE RISK OF ELECTRICAL SHOCK, DO NOT
All of us at Classé take extreme care to ensure that your purchase will remain a prized investment. We are proud to
will be posted on our web site at http://www.classeaudio.com.
The lightning —ash with arrowhead symbol, within an equilateral triangle, is intended to alert
Marking by the ≈CE∆ symbol (shown left) indicates compliance of this device with the
Classe products are designed to comply with international directives on the Restriction
Page 3

ENGLISH
Important Safety Instructions
1. Do not attempt to service this product yourself.
Do not open the cover for any reason. There are no
2. To prevent –re or shock hazard, do not expose the unit to water or moisture.
If a liquid does enter
your component, immediately disconnect it from the AC mains and take it to your Classé dealer for a
3. Do not place your component near any heat-producing device
such as a radiator, stove, etc., Keep
4. Connect your component only to an AC source of the proper voltage.
The shipping container and
5. AC cords should be routed so that they are not likely to be walked on or pinched by items
Do not stress the AC cord by stretching it to reach a plug. If damage
6. If your component will be out of use for an extended period of time
(vacation, etc.), you may wish
7. NEVER
wet the inside of this product with any liquid.
8. NEVER
pour or spill liquids directly onto this unit.
9. NEVER
block air —ow through ventilation slots or heatsinks.
10. NEVER
bypass any fuse.
11. NEVER
replace any fuse with a value or type other than that speci–ed.
12. NEVER
attempt to repair this product. If a problem occurs, contact your Classé dealer.
13. NEVER
expose this product to extremely high or low temperatures.
14. NEVER
operate this product in an explosive atmosphere.
15. ALWAYS
unplug sensitive electronic equipment during lightning storms.
Page 4

ENGLISH
.......................................................................
......................................................................
............................................................................
.........................................................................
..................................................................................
......................................................................
.....................................................................
.......................................................................
..........................................................
...................................................................................................
....................................................................................................
........................................................................................
2
..............................................................................
.........................................................................................
...........................................................................................
2
startup volume
phono gain
....................................................................................
2
..........................................................................................
2
.................................................................................................
........................................................................................
.........................................................
....................................................................................................
....................................................................................
2
sensors
............................................................................................
2
...............................................................................................
...................................................................................................
Page 5

ENGLISH
years of continuous re–nement, and we are sure that you will enjoy it for many
years to come.
We value our relationship with our customers. Please allow us to stay in touch
with you by returning your warranty card now, before you pack up the shipping
warranty service can be obtained easily and quickly, even if you have mislaid
your original sales slip.
Please, take a few minutes to fi ll out the warranty
You will –nd the warranty registration card at the end of the separate warranty
with your preampli–er. All of these factors in—uence the ultimate performance of
your system.
For this reason, we strongly encourage you to have your
Page 6

ENGLISH
Important! Keep all packing materials for future transport of your
As with any preampli–er, it is best to place the CP-700 centrally within your
you generally interact with your preampli–er more than any other component
Your Classé preampli–er generates a certain amount of heat in the course of
Page 7

ENGLISH
AC mains operation, as appropriate for the country in which it is to be sold
voltage setting may not be changed by the user.
Warning: The voltage setting of your preamplifi er may not be
At startup:
the AC mains voltage must be within a range of
if the AC mains voltage surges
will
will —ash to indicate the condition.
Page 8

ENGLISH
Your new Classé preampli–er will deliver outstanding performance immediately.
you should expect a brief warm-up period before the preampli–er»s sound
you should never have to repeat the initial 300 hour break-in period.
your new preampli–er. We understand that you are anxious to plug everything
Page 9

ENGLISH
All Classé analog ampli–cation stages are based on circuits that have been
we are able to discover the many small re–nements that add up to superlative
Page 10

ENGLISH
As an example, we may listen to half a dozen 0.1% tolerance –lm resistor
Another bene–t of having worked with highly re–ned circuit designs so
We are con–dent that your new Classé preampli–er will give you many years of
Page 11
ENGLISH
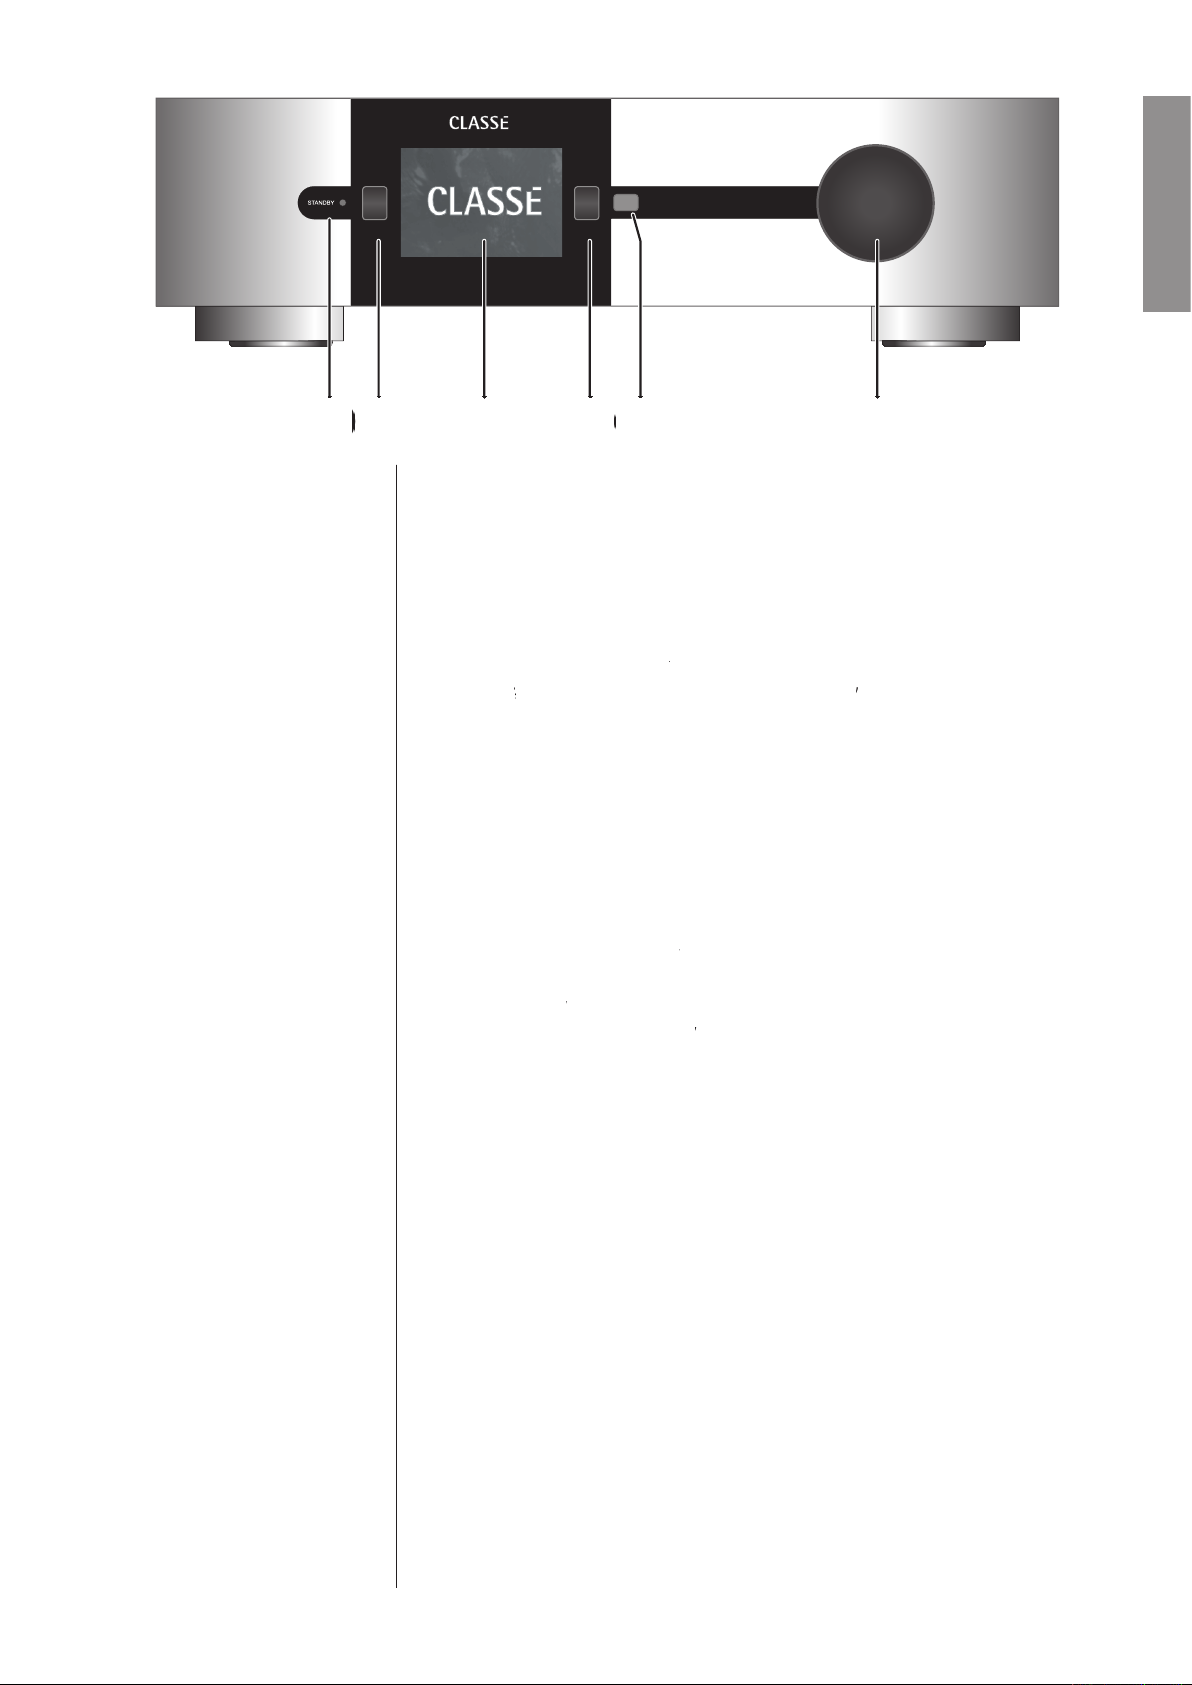
MENU
CP-700
MUTE
button will toggle the preampli–er between
mode that leaves the
indicator in
AC mains voltage out of range
AC mains. Please be certain that the preampli–er is turned off prior to
Also, it is a good practice to physically disconnect any and all valuable
well designed and protected. The best protection in the case of severe
with the power grid.
Page 12

ENGLISH
button will call up the
(and the CP-700»s supplied remote control). It will usually
buttons you would use in day-to-day
button, you can also call up the
of the
options, various
in which the menu system itself displays), and
later in this
button reduces the volume of the preampli–er to
volume
or the
button is engaged, the mute
(IR)
and
are located behind this
window. Ordinarily, your Classé CP-700 must be able to ≈see∆ the
and
mini-jacks and
to solve the problem. For more information about
later in this manual, or contact your local
Page 13

ENGLISH
and
commands in addition to the normal
on the right side of the front panel of the CP-700 is used
At extremely low volumes, the step size is increased somewhat to make it
Page 14

ENGLISH
connectors. You may select to hear the output of your
button on the main operational
input connectors become your
inputs, and the
control in the menu system becomes
for all moving-magnet (MM)
for standard
for more
XLR
jacks accept right-channel and left-channel balanced signals
Page 15

ENGLISH
Pin 1: Signal ground
Pin 2: Signal + (non-inverting)
Pin 3: Signal √ (inverting)
Connector ground lug: chassis ground
jacks to the right-channel and left-channel recording
when the preampli–er is placed into
you will connect one pair only to corresponding balanced inputs on your
you choose to biamplify your speakers, you may need to use both outputs.
Your Classé dealer can provide assistance in selecting appropriate balanced
Page 16

ENGLISH
Pin 1: Signal ground
Pin 2: Signal + (non-inverting)
Pin 3: Signal √ (inverting)
Connector ground lug: chassis ground
Audio Engineering Society (AES14-1992).
you»re all set – just take standard balanced interconnect cables and plug
connector has two purposes:
and Crestron
Page 17
ENGLISH
connectors are reserved for future control and
Your Classé preampli–er includes two 1/8th-inch
in
the preampli–er
and
(chains of commands strung together) to operate —awlessly. If this
your authorized Classé dealer.
and
is a bit of a misnomer: the input and
in nature, not infrared. They are used
with standard IR receivers, distribution ampli–ers, and emitters (available
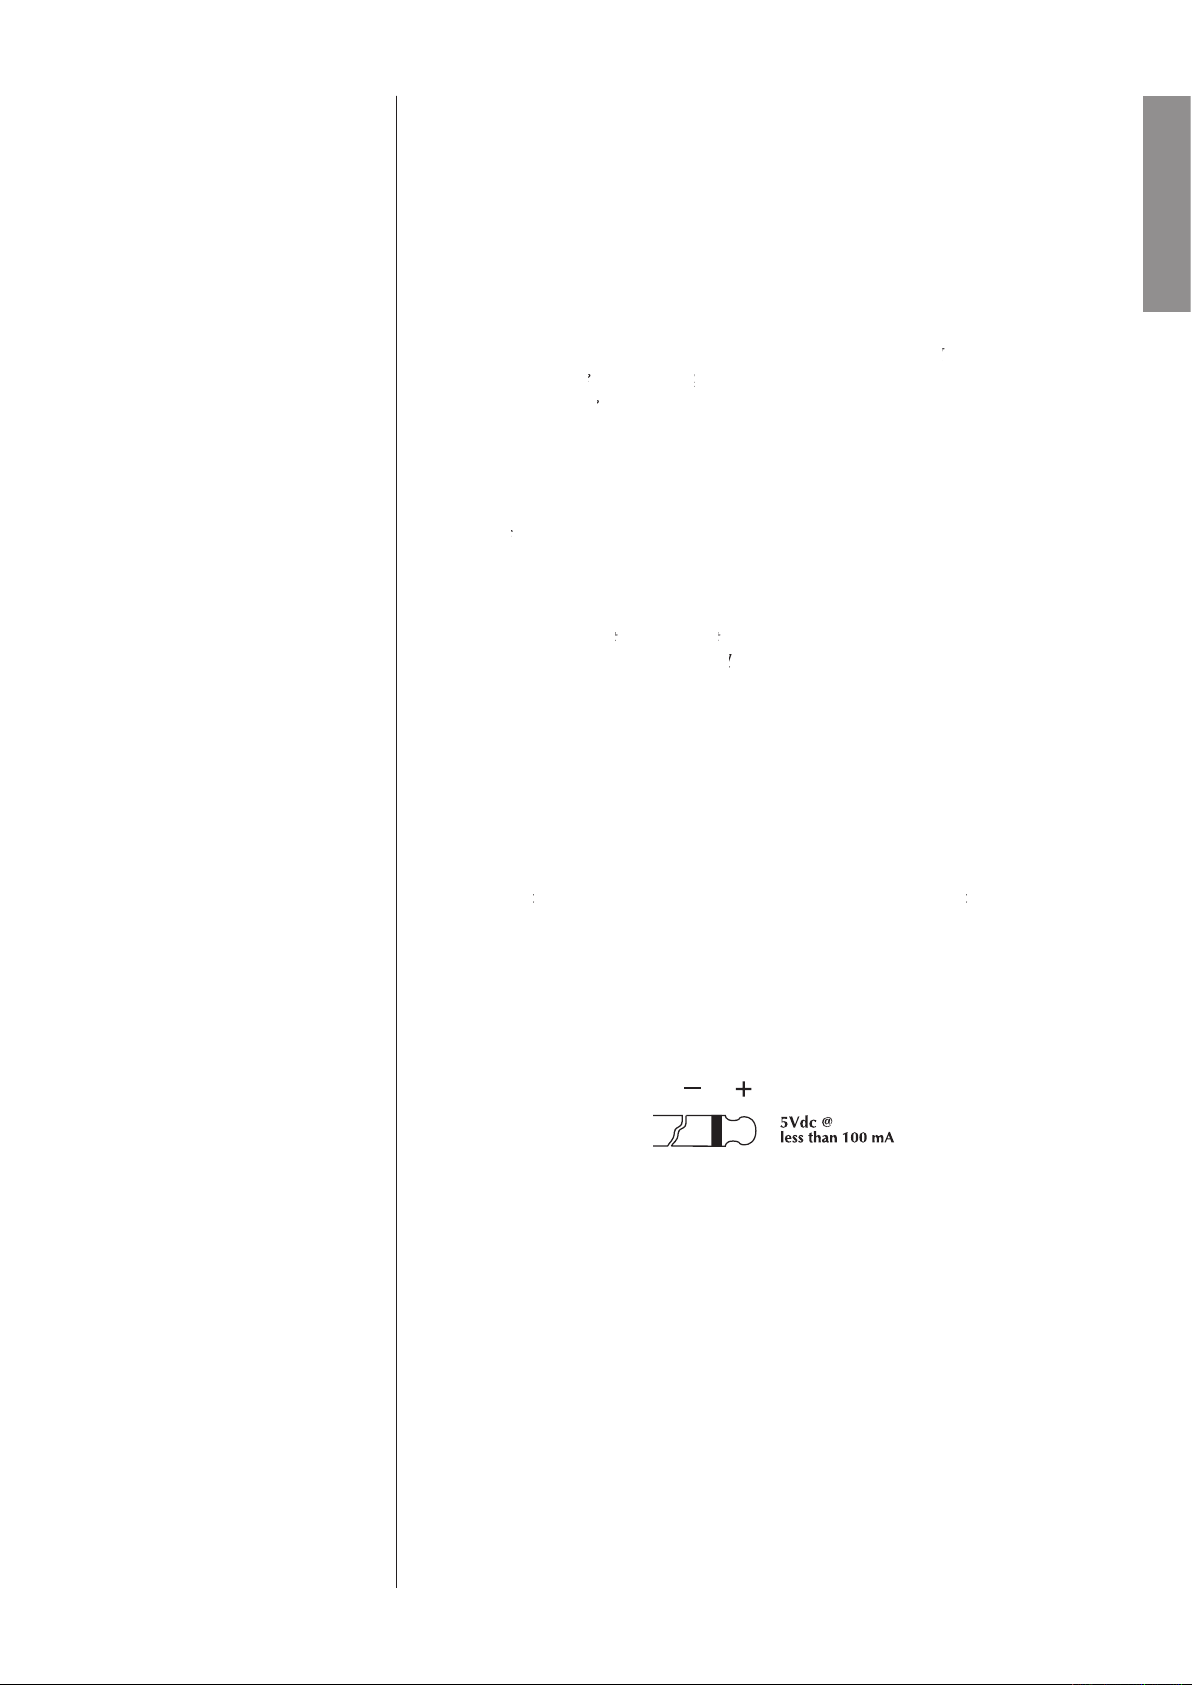
(for the control of this product) and an
(so as to
with the tip of the mini-plug de–ned to be positive relative to the shank of
Page 18

ENGLISH
and
automatically, usually in concert with the A/V
provides for remote-controlled
and
to toggle your Classé power ampli–er between operate and
for the CP-700 is located near the middle of the
mode.
before power is switched off.
Danger! Potentially dangerous voltages and current capabilities
Page 19
ENGLISH
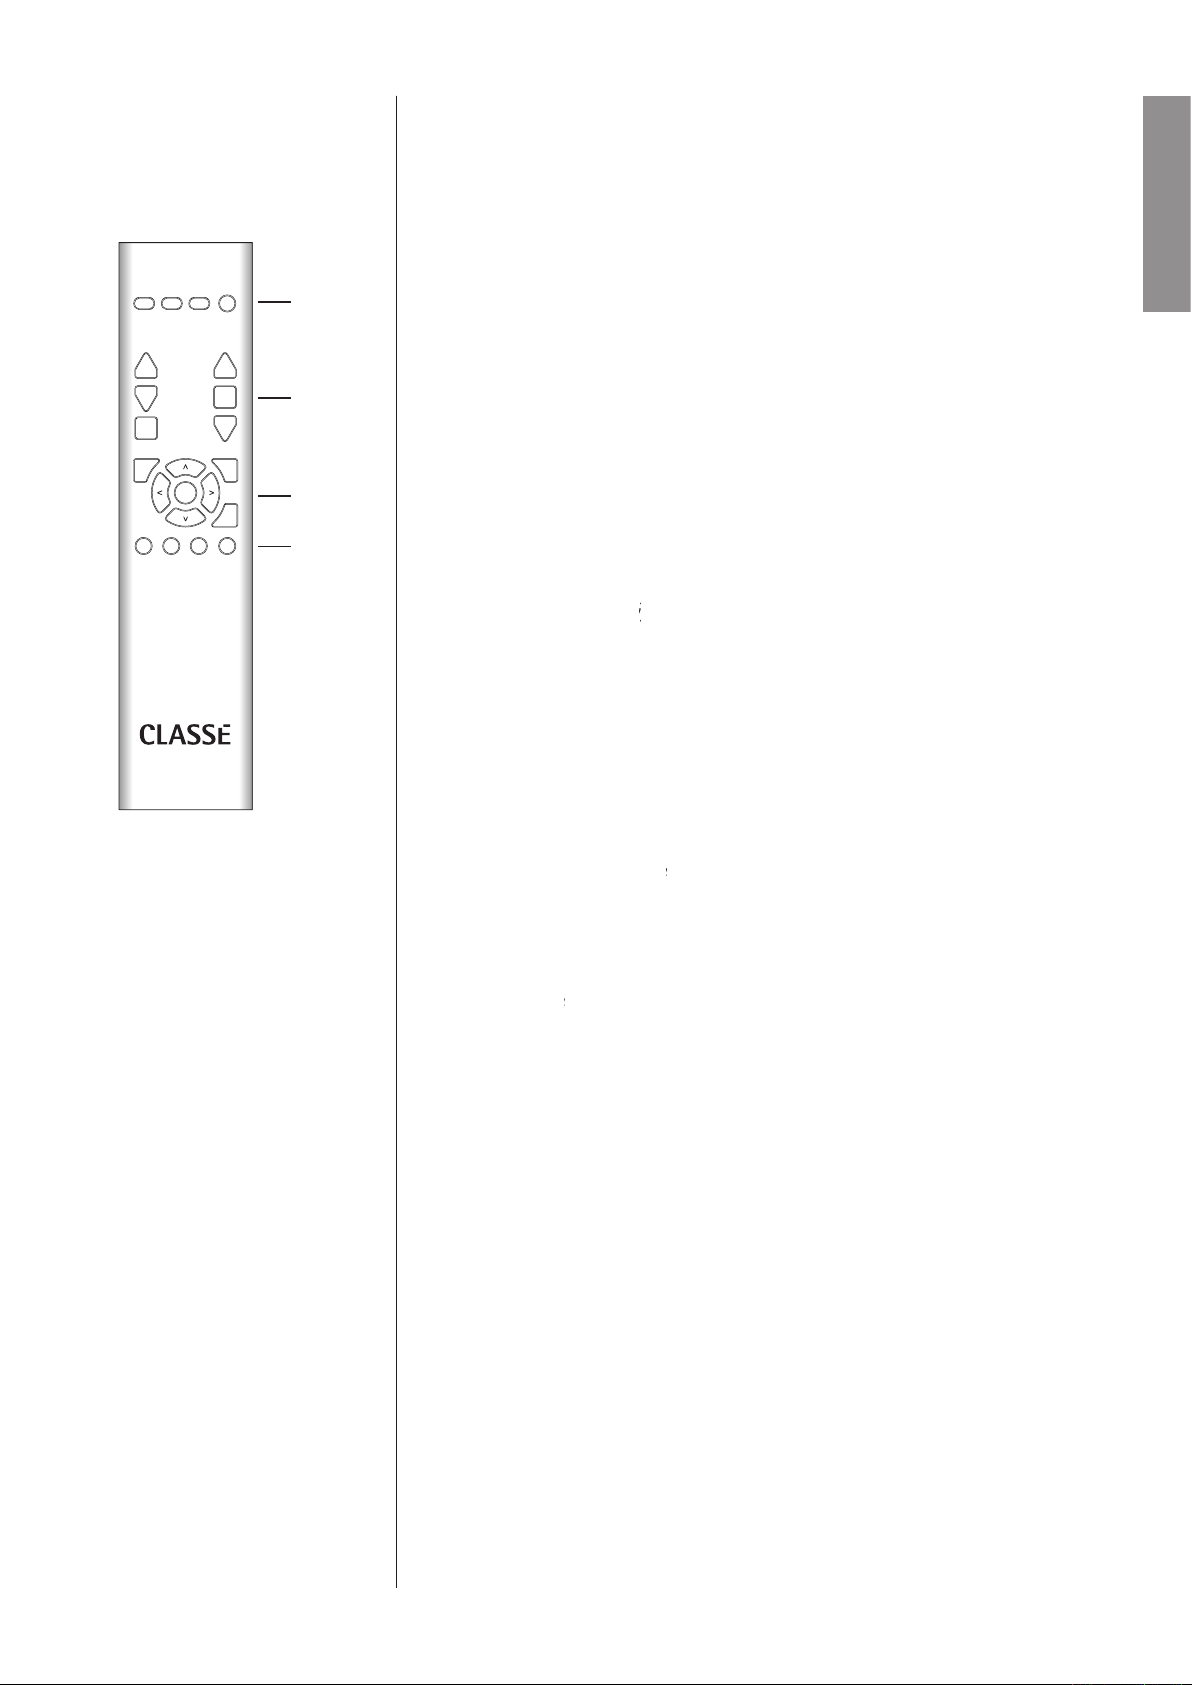
Your new preampli–er comes with a versatile
which can control
takes you directly to the status screen in the LCD menu
and
arrow keys on the left side of the remote control will
for information on how to do this.)
and
arrow keys on the right side of the remote control
will raise and lower volume; the square key between them will activate the
function of the CP-700 (as de–ned in the menu system; see
for more on your mute options).
returns you to the normal input selection controls
serves two functions: it calls up the menu system when
you need it in order to adjust something to your preference;
returns you to the
when at
Page 20

ENGLISH
(balance) key takes you directly to the
screen
buttons on the
key on the remote to ≈press∆ the appropriate
keys allow you to move within a
key allows you to select the highlighted item, having
key is not a navigation key, per se, but allows you
well. The
keys are available for controlling aspects of the
You are able to choose what the CP-700 should do in response to receiving
has been pressed. The list of
Note: The Fkeys on all Classé remote controls issue the same
Page 21
ENGLISH
Your CP-700 includes a versatile
which supports both an
provides easy access to the most basic functions of the
and
volume
setting.
inputs (meaning single-
your system, you can elect to deactivate the unused inputs. Doing so removes
for use with sources that
When you touch the
button to highlight it, you will notice that the
When you select the
Page 22
ENGLISH
button to the left of the
Page 23

ENGLISH
volume
button takes you to the volume setup menu, which in turn
You can see the problem in these scenarios: Person A wants extremely –ne
Page 24

ENGLISH
at which the knob is being turned. We all naturally tend to move
volume knobs more quickly when we need to make a bigger change, and we
will actually increase the resolution of the steps, which slows down the action
factory default
settings for these behaviors are generally found to be intuitive
All of the
settings are interactive. You can set the value, and then
determines the degree to which the responsiveness of
determines the responsiveness of the control when the
Page 25

ENGLISH
determines the responsiveness of the control
when the knob is being turned at a moderate speed. A setting of
determines the responsiveness of the control when the
establishes a maximum rotary speed, beyond which
will be ignored completely until it is –rst stopped, and then
if after experimenting with various settings you
screen allows you to establish a maximum volume setting for
your system. This scale runs from 0 to 100, with 100 indicating that you do
startup volume
screen allows you to de–ne how the CP-700 handles its
volume of your choosing. Select the speci–c button, and then set
your preference by clicking the
button beside it. The
you do not accidentally disturb anyone when –rst turning on the
Page 26

ENGLISH
button allows you to select one of three different
you want used when you engage
you might have been using the moment before.
works as most
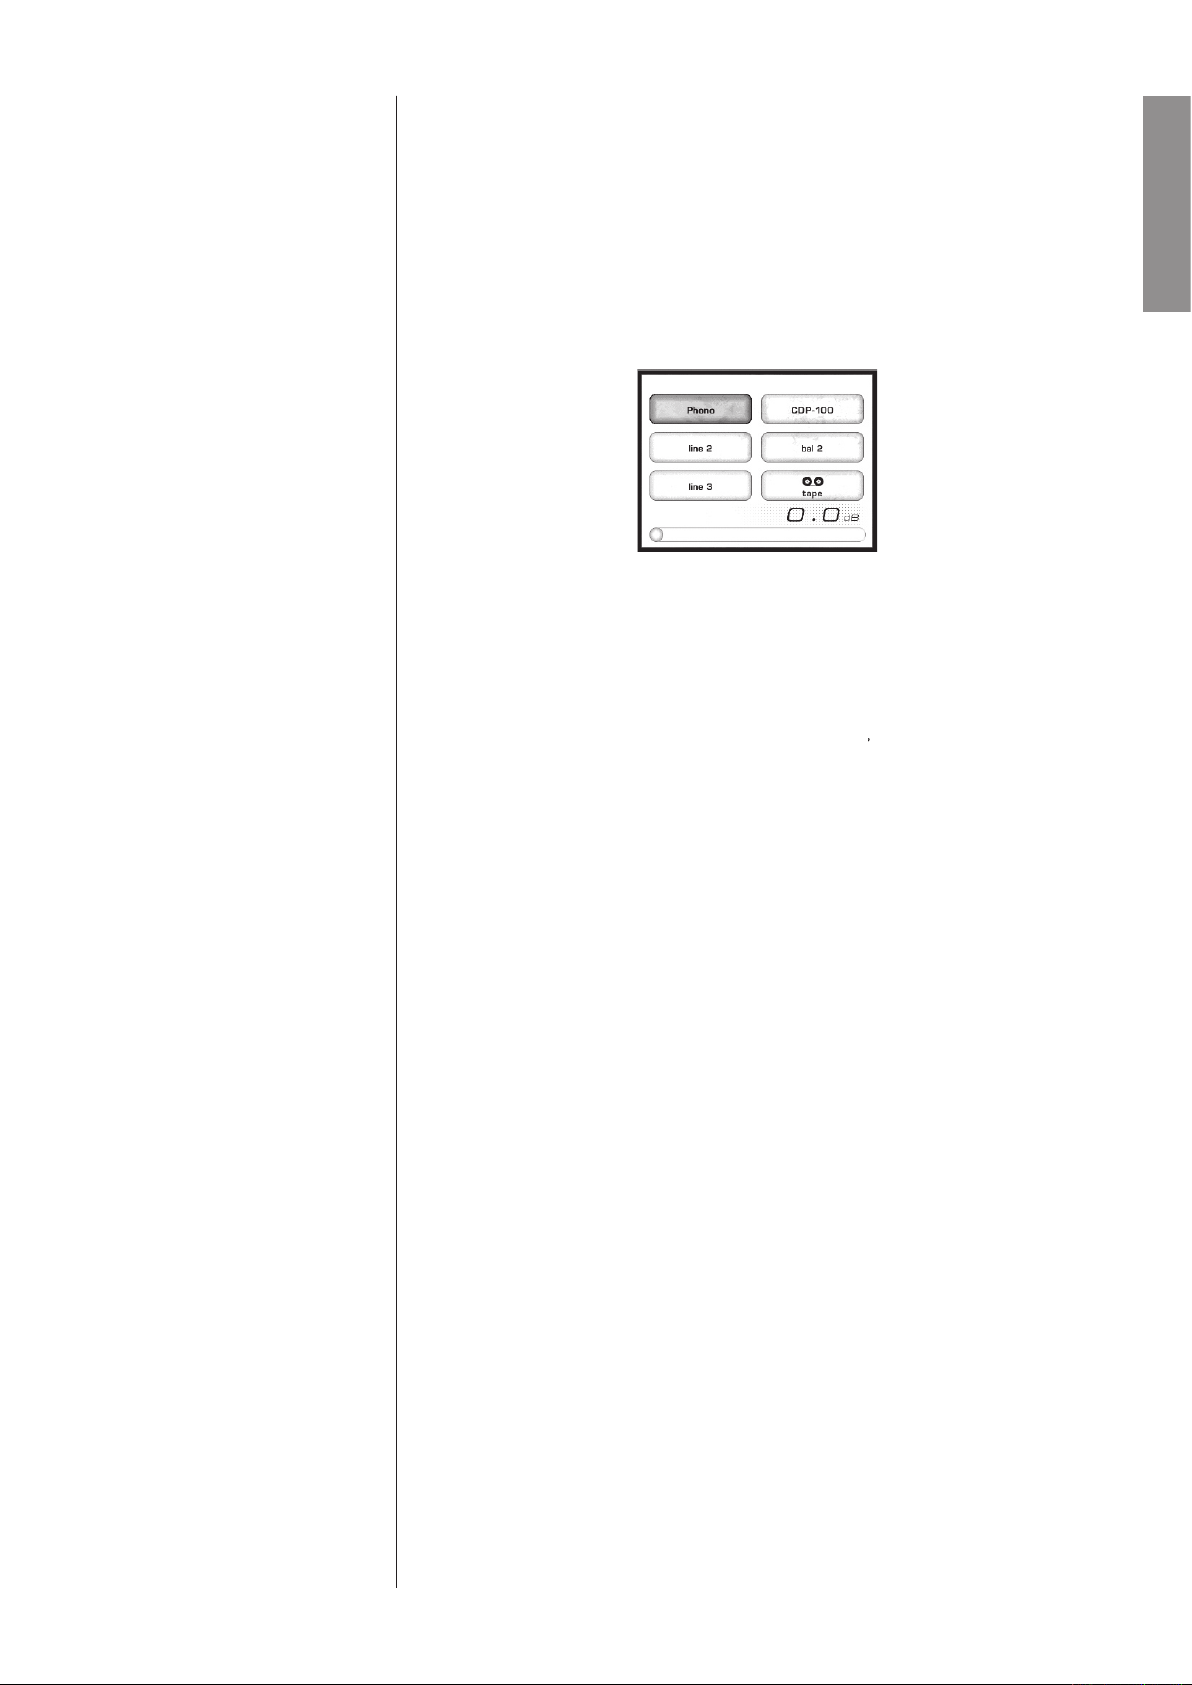
determines whether the selected input is displayed on the
provides a way to customize the names of the inputs as
input ≈CDP-100∆ for the Classé
menu to
Page 27

ENGLISH
button acts like the backspace key on a computer
button moves the cursor to the right, adding characters
and
buttons.)
and
When done, your main display might look like this (note the
input).
Warning! When an input is renamed ‘SSP’, it becomes a unity
adjusts an input-speci–c balance adjustment to
provides a way to compensate for differences in
volume encountered when switching between different source
Page 28

ENGLISH
phono gain
menu is only active if the optional
is installed;
input to
for most moving
gain
for low output moving coil cartridges. Your Classé dealer can assist you
may be programmed as to its ≈logic level,∆
which is to say, whether its voltage is
(essentially 0V), or
(approximately
screen provides a scrolling list of all the available IR codes in
button, the CP-700 will
your authorized Classé dealer.
Page 29

ENGLISH
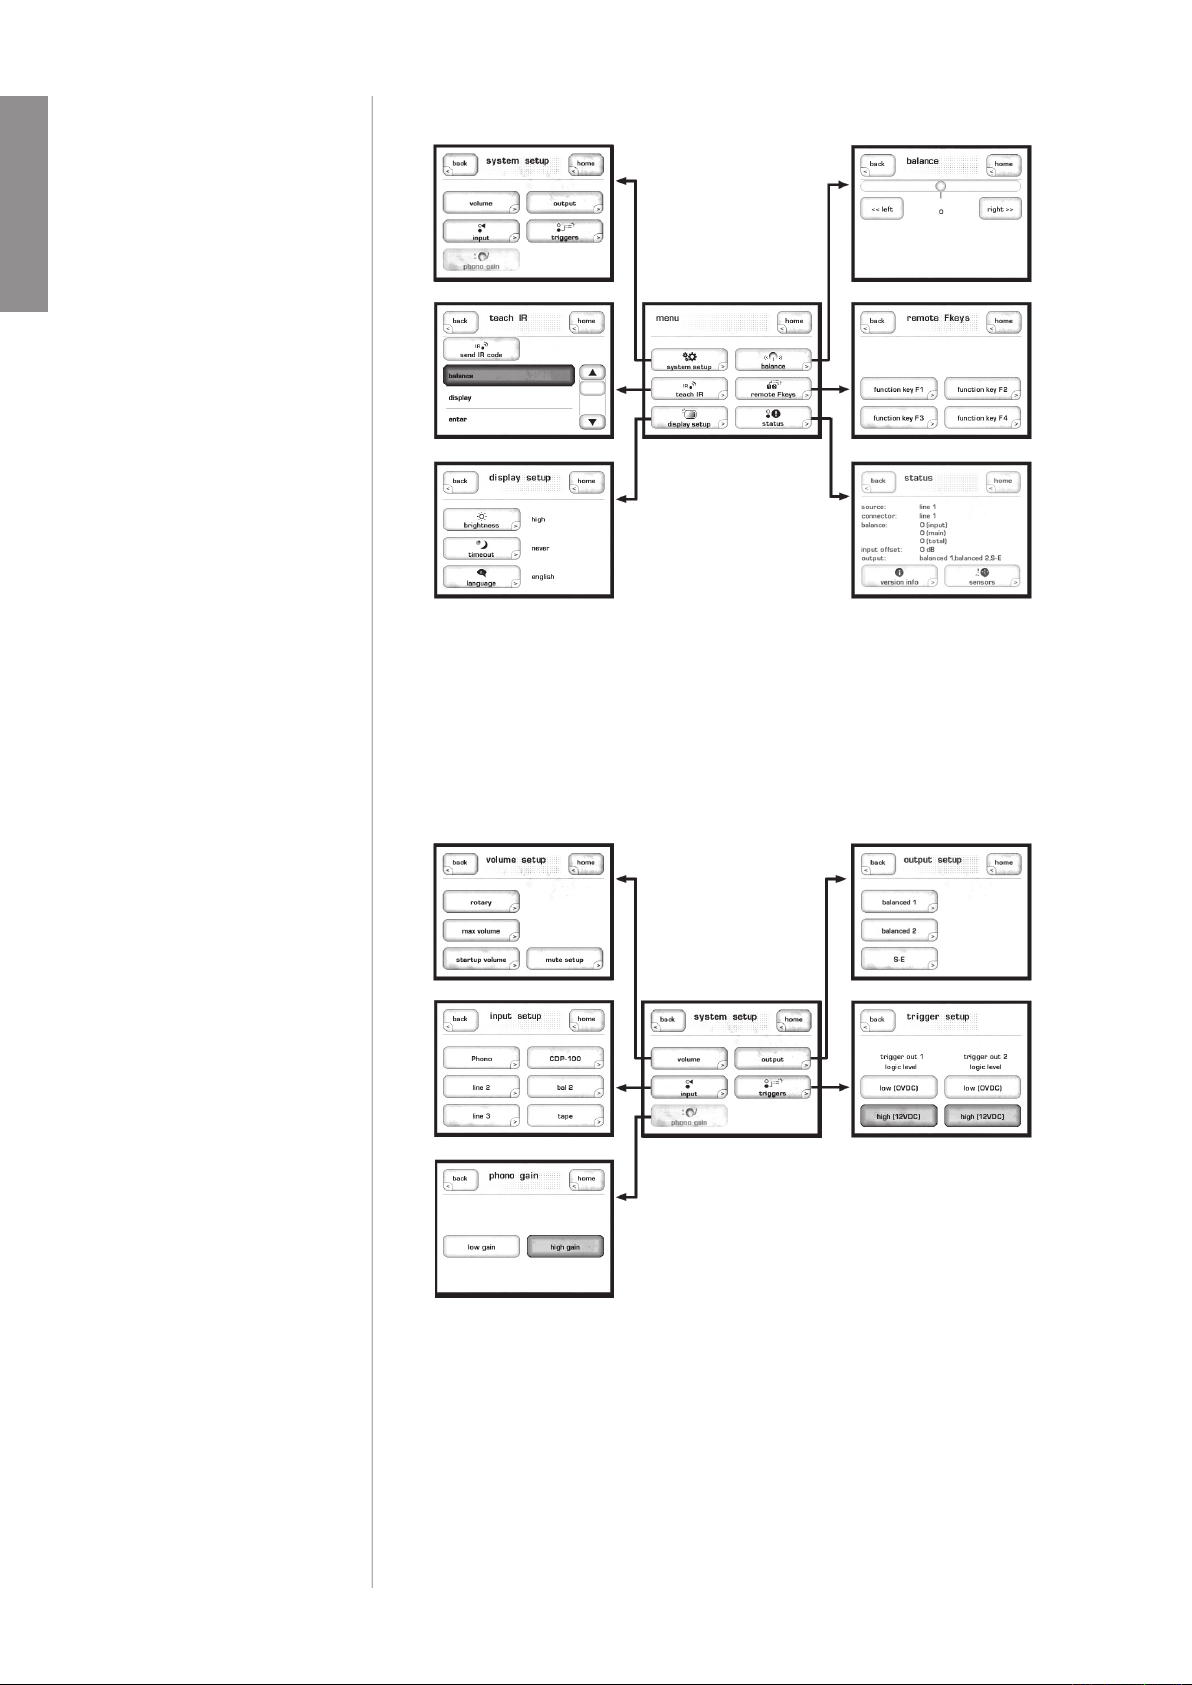
menu. It allows you to con–gure the
used in
setting of the CP-700 has three possible values:
brightness
brightness setting of the display somewhat distracting. If so, you
of the backlighting so as to turn it off entirely after a
will illuminate the display as soon as you interact with any of the CP-700
Page 30

ENGLISH
timeout setting. The lamp in the LCD display was
menu offers you any of the different languages supported by
control gives you both a numeric and a graphic indication of
weighted to the left (for example), you can restore a more natural perspective
with the balance control. To shift the image to the right, touch the
Page 31

ENGLISH
to take you straight to that screen.
button
menu has four buttons, one each for the four
on your
to perform.
on the
on the CD
While this is intended to minimize confusion amongst different remotes (since
could set the preampli–er to the
input, and
Page 32

ENGLISH
screen provides several items of information about the current
version info
button on the status screen takes you to the
version
screen, which displays information on various pieces of software
sensors
button on the status screen takes you to the
screen, which
Page 33

ENGLISH
mode.
mode. This is
with a bar through it. Press
to disengage.
Important! Check that the power amplifi er is off before checking
AC mains voltages by not powering up. Make sure your power
power might require a restart.)
Important! Make sure to power down your power amplifi er BEFORE
Page 34

ENGLISH
button, followed by the
button (or
on the remote control).
Important! Be certain that the power amplifi er is off before checking
where
name is the particular input in question.
Page 35

ENGLISH
your AC mains line. Try connecting to another AC circuit (not
where
is the input which needs to be adjusted.
you are using the proper gain setting for the type of cartridge
you are using. If in doubt, consult with your authorized Classé
Page 36

ENGLISH
Caution! At no time should liquid cleaners be applied directly to
Important!
Page 37

ENGLISH
All speci–cations are accurate at the time of printing. Classé reserves the right to
20 Hz √ 200kHz Ø 0.1dB
-86dB to +14dB
100k
200k
100
120dB
130dB at 1kHz
better than -120dB @ 1kHz
42W
29W
determined by the needs of country for which
the unit was manufactured;
cannot be reset by dealer or user
Width: 17.5∆ (445mm)
Depth: 16.5∆ (419mm)
Height: 4.75∆ (121mm)
Width: 5∆ (127mm)
Depth: 12∆ (305mm)
Height: 5.5∆ (140mm)
23lbs (10.5kg)
10lbs (4.6kg)
45lbs (20.5kg)
AMX
is a registered trademark of AMX Corporation of Richardson, TX. All rights reserved.
Page 38

ENGLISH
Page 39

Page 40

注 意
Classé
C401CLA1.MGS
1996
7
Classé
FCC
15
B
http://www.classeaudio.com.
EMC
Classé
Restriction of Hazardous Substances (RoHS)
Waste Electrical and Electronic Equipment (WEEE)
中文
Page 41

重要安全说明
1.
2.
Classé
3.
4.
5.
Classé
6.
7.
8.
9.
10.
11.
12.
Classé
13.
14.
15.
Classé
__________________
中文
Page 42

.........................................................................................
................................................................................................
....................................................................................................
...................................................................................................
............................................................................................
................................................................................................
.....................................................................................
.....................................................................................
................................................................................................
.....................................................................................
.....................................................................................
...........................................................................................................
...........................................................................................................
.........................................................................................
.........................................................................................
............................................................................................
................................................................................................
.................................................................................................
.................................................................................................
.........................................................................................
............................................................................................
IR
...................................................................................................
................................................................................................
............................................................................................
.......................................................................
.......................................................................................................
.........................................................................................
.............................................................................................
.....................................................................................
.......................................................................................................
...........................................................................................................
中文
Page 43

CP-700
中文
Page 44

CP-700
CP-700
8
3
3
中文
Page 45

100V
240V
CE
15
15%
10%
95V-
10%
LED
LCD
15%
LED
中文
Page 46

300
300
中文
Page 47

LCD
CP-700
中文
Page 48

135VA
100%
CP-700
中文
Page 49

MENU
CP-700
MUTE
IR
RS-232
=
=
=
中文
Page 50

LCD
CP-700
Tape
CP-700
CP-700
CP-700
Classé
中文
Page 51

IR
CP-700
IR
IR
0.5dB
中文
Page 52

CD
CP-700
RCA
RCA
Classé
LCD
XLR
LCD
中文
Page 53

XLR
1
2
+
3
Classé
RCA
RCA
RCA
Classé
XLR
Classé
中文
Page 54

Classé
6dB
EMI
Classé
XLR
1
2
3
√
(Audio Engineering Society
AES14-1992)
Classé
Classé
CP-700
i-Command
AMX
Crestron
中文
Page 55

Classé Audio
Classé
1/8
输入
输出
IR
IR
5 VDC
IR
100mA
中文
Page 56

Classé
A/V
1/8
CP-700
Classé
5-12VDC
100mA
12VDC
Classé
Classé
Classé
100mA
中文
Page 57

CP-700
CP-700
LCD
CP-700
CP-700
CP-700
CP-700
DVD
CP-700
CP-700
LCD
中文
Page 58

LCD
LCD
CP-700
CP-700
Fkeys
Fkeys
中文
Page 59

RCA
CP-700
CP-700
CD
中文
Page 60

CP-700
CP-700
DC
中文
Page 61

够以一分贝的量来轻易调节音量设置。
中文
Page 62

CP-700
100
100
中文
Page 63

100
0
100
100
100
CP-700
CP-700
中文
Page 64

CD
中文
Page 65

0-9
CP-700
SSP-300
中文
Page 66

1
CP-700
12
IR
IR
CP-700
IR
IR
中文
Page 67

CP-700
LCD
CP-700
中文
Page 68

CP-700
CP-700
CP-700
CP-700
中文
Page 69

LCD
CD
CD
中文
Page 70

CP-700
CP-700
CP-700
中文
Page 71

AC
AC
AC
AC
30
中文
Page 72

CP-700
( ( (
输入名称
(
(
IR
IR
AC
12
AC
中文
Page 73

AC
AC
( ( (
输入名称
(
(
中文
Page 74

LCD
LCD
LCD
AA
中文
Page 75

20 Hz √ 200kHz Ø 0.1dB
0.0012%
5Vrms
10Vrms
10Vrms
20Vrms
-86dB
+14dB
100k
200k
100
120dB
130dB at 1kHz
-120dB @ 1kHz
42W
29W
23lbs (10.5kg)
10lbs (4.6kg)
45lbs (20.5kg)
AMX
AMX
AMX Corporation
中文
Page 76

中文
Page 77

Page 78

© 2005 Classé Audio Inc.
v1.3
 Loading...