

Page 1

CD/MP3 Record Player
with cassette and radio
Skivspelare med CD, MP3, kassettdäck och radio
Platespiller med cd, mp3, kassett-spiller og radio
Levysoitin, jossa on CD-, MP3- ja kasettisoitin sekä radio
Plattenspieler mit CD, MP3, Kassettenspieler und Radio
EnglishSvenskaNorskSuomiDeutsch
EnglishSvenskaNorskSuomi
Art.no. Model
38-4173 TCD-983WEC
Ver. 20131001
Page 2

2
Page 3

CD/MP3 Record Player with cassette
and radio
Art. no 38-4173 Model TCD-983WEC
Please read the entire instruction manual before using the product and save it for future reference.
We reserve the right for any errors in text or images and any necessary changes made to technical data.
If you have any questions regarding technical problems please contact Customer Services.
Contents
1. Safety
2. Product description
3. Contents
4. Buttons and functions
5. Assembly & installation
6. Radio
7. CD player
8. Cassette deck
9. Record player
10. Playing MP3 files from a USB memory or memory card
11. Recording MP3 files from the CD/record player/cassette deck
12. Deleting files on the USB/SD memory card
13. Care and maintenance
14. Specifications
English
3
Page 4
English
1. Safety
• The product should only be repaired by qualified service personnel.
• The product should not be taken apart or modified.
• Do not place the product where it could fall into water or other type of liquid. Do not place any
objects containing liquid on top of the product, e.g. flower vases or fizzy drinks.
• Shut off the stand-by function at night or when you travel away.
• Do not cover the product. Adequate ventilation with a distance of at least 15 cm between ventilation holes
and the surrounding area is necessary to prevent the device from becoming too warm.
• Do not place the record player in damp, dusty environments or where there are strong vibrations.
• Prolonged exposure to high volume can damage your hearing.
CAUTION
RISK OF ELECTRIC
SHOCK DO NOT OPEN
CLASS 1
LASER PRODUCT
!
CLASS 1 LASER PRODUCT
Warning! Do not open the casing! The product contains invisible laser beams
that can cause eye damage. Do not look directly into the laser beam or look
directly at it using an optical instrument.
Warning! Do not open the casing!
Certain parts inside the casing carry dangerous currents.
Touching these can lead to fire or electric shock.
2. Product description
• CD/MP3 Record Player with cassette deck, radio and USB/SD memory card slots.
• Built-in amplifier and external speakers.
• Records to the USB memory or SD card from the record player or CD/MP3 player.
• Speed selector: 33/45 rpm.
• Record player auto stop.
• Built-in RIAA amplifier and line out socket.
• Comes with remote control.
• Stereo headphone socket.
3. Contents
• Record player
• 2 speakers
• Remote control
• Instruction manual
4
Page 5
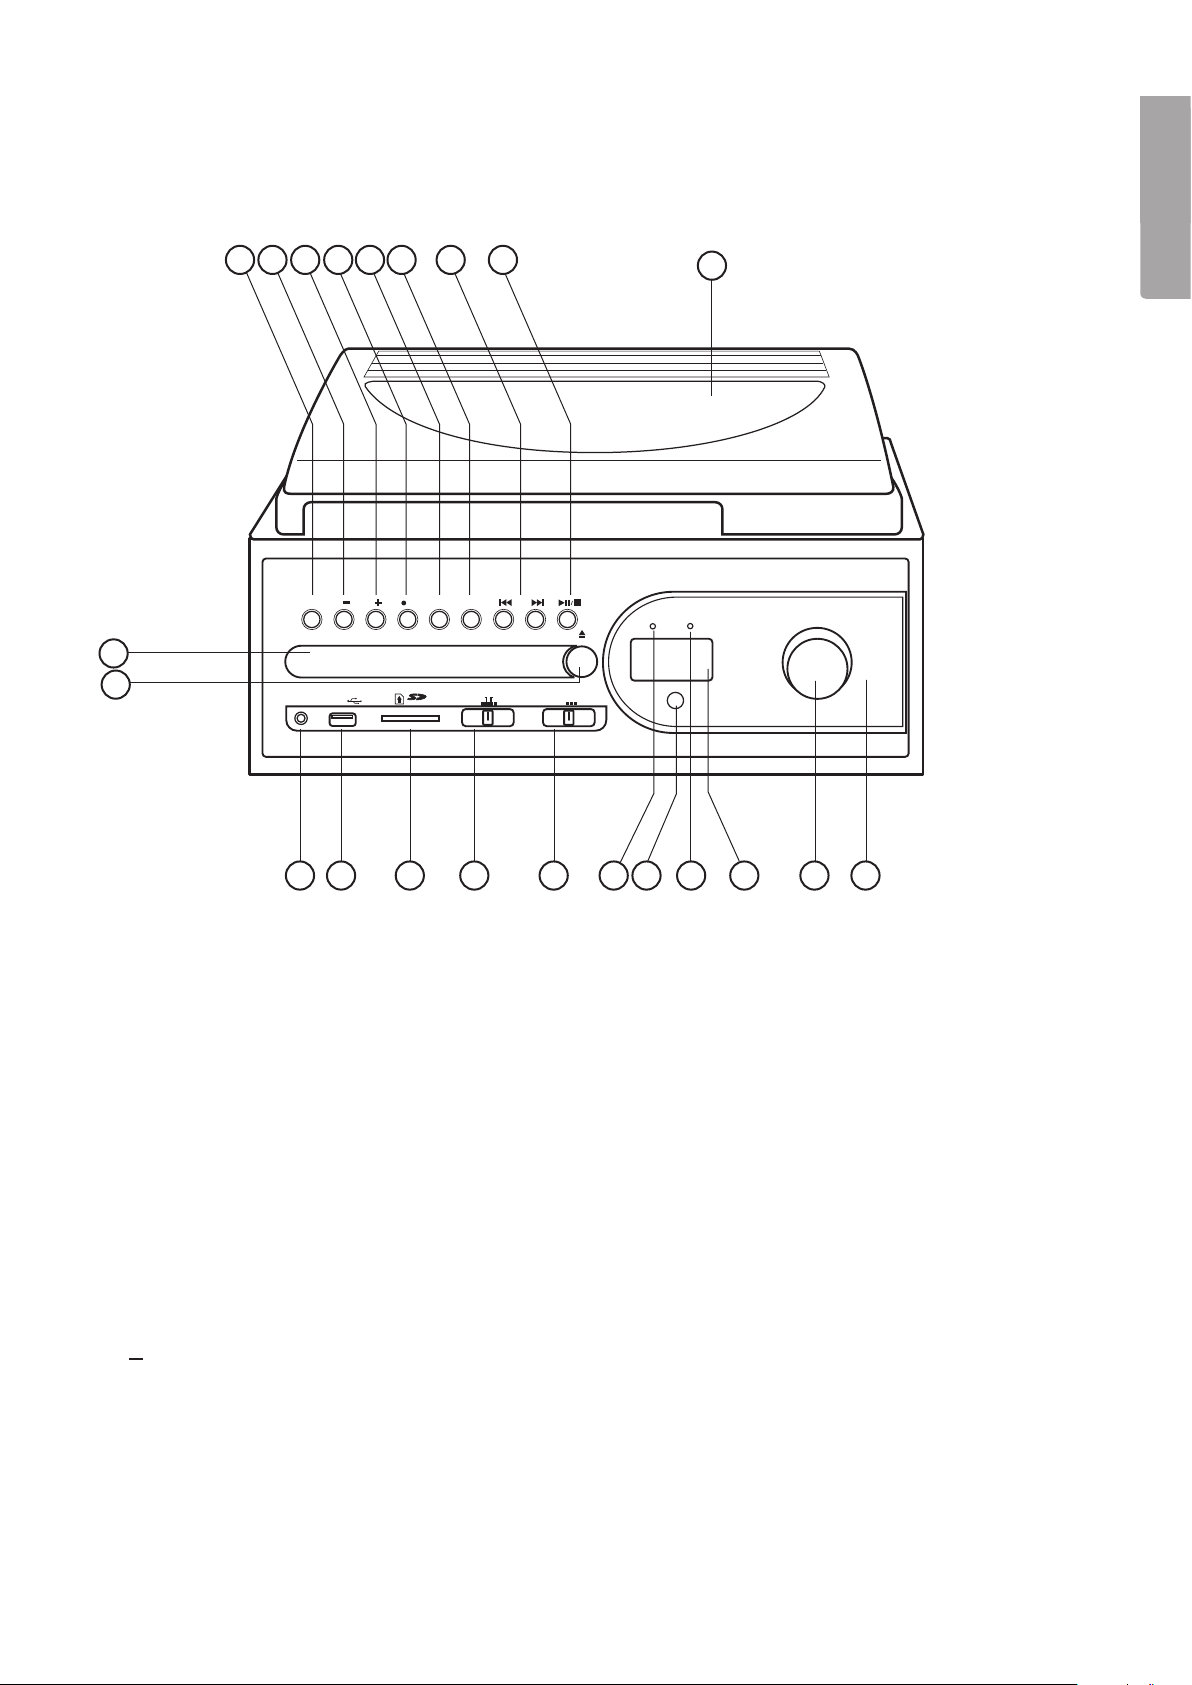
4. Buttons and functions
Record player
9 8 7 6 5 4 3 2
English
1
ON/OFF VOLUME REC SOURCE FOLDER UP
10
11
USB
SD/MMC TAPE TUNER AM FM-ST
FUNKTION BAND
PHONO CD/USB/SD FM
12 13 14 15 16 1817 19 20 21 22
1. Lid.
2. [►II/■ ] – Start playback/pause/stop playback.
3. [►►I] [I◄◄] – Previous track/next track.
4. [FOLDER UP] – Move up a folder (MP3).
5. [SOURCE] – Select USB memory or SD card.
6. [• REC] – Record.
POWER FM-ST
4
9
2
0
9
6
0
9
4
5
8
8
M
M
A
F
1
0
0
8
0
1
0
7
2
0
1
1
0
4
6
0
1
6
0
x
M
1
0
H
H
z
z
2
1
0
0
1
4
1
8
0
9
6
15. [FUNCTION] – Function selector: TAPE (cassette)
– PHONO (record player) – CD/USB/SD –
TUNER (radio).
16. [AM/FM] – Radio band selector: AM – FM
– FM Stereo.
17. “POWER” – Power indicator lamp.
18. IR sensor for remote control.
7. [VOLUME +] – Increase volume.
8. [VOLUME -] – Decrease volume.
9. [ON/OFF] – On/off switch.
10. CD tray.
▲
11. [
] – Open/close CD tray.
12. Headphone jack.
13. USB port.
14. SD/MMC memory card slot.
19. “FM ST” - FM-stereo indicator lamp.
20. LCD display.
21. TUNING – Tuning knob.
22. Frequency scale.
5
Page 6
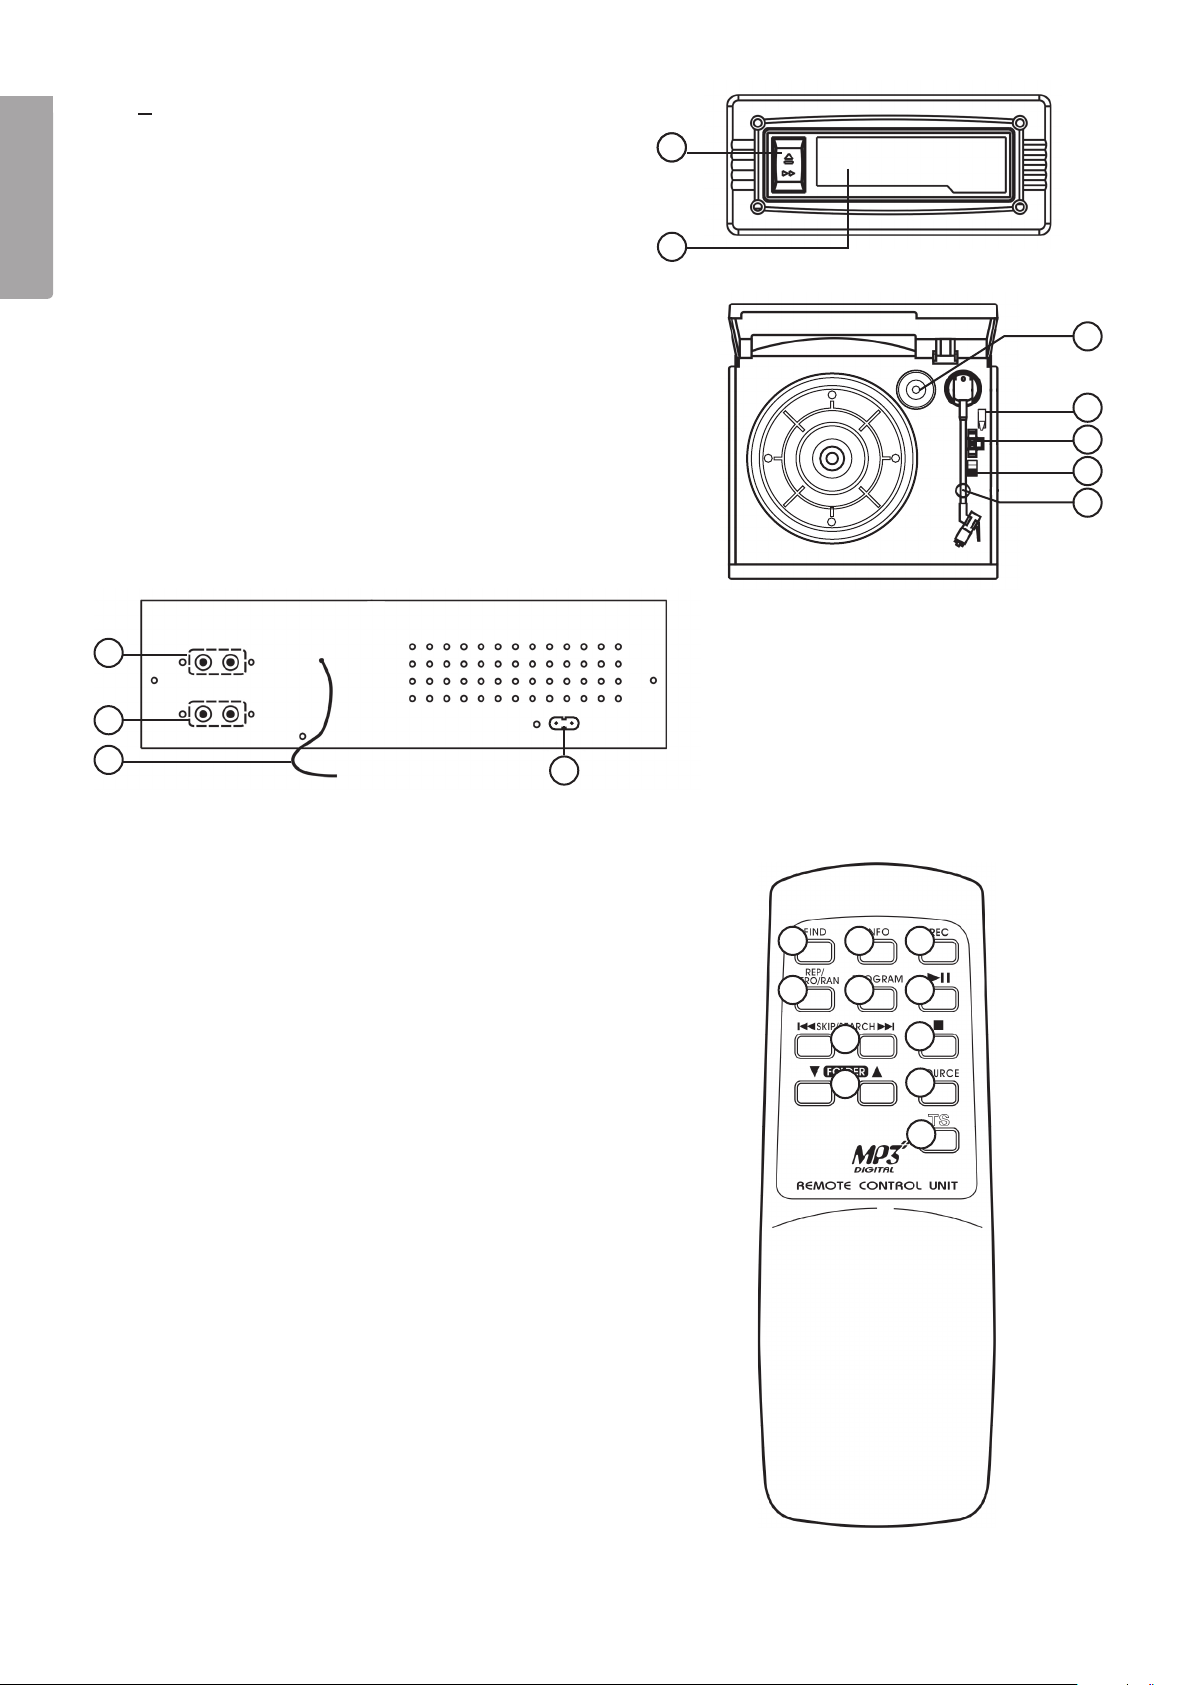
▲
] – Cassette fast forward/eject cassette.
23. [
24. Cassette holder.
25. Spindle adaptor for 45 rpm records.
26. Tone arm lift lever – Lifts/lowers tone arm.
English
27. 33/45 RPM – Record player speed selector.
28. AUTO STOP ON/OFF – Record player
29. Tone arm seat (with lock).
30. Line Out L/R – Low level outputs (left, right).
31. SPEAKER L/R – Speaker outputs (left, right).
32. FM aerial.
33. Mains lead socket.
30
31
AutoStop switch.
23
23
24
25
26
27
28
29
32
Remote Control
34. [FIND] – Search for file name
(during MP3 playback).
35. [INFO] – Select recording quality (Encoding
Bitrate) and display ID3 tags (MP3 info).
36. [REC] – Recording or copying button.
37. [REP/INTRO/RAN] – Repetition/intro (plays
the first 10 seconds of each track)/random
playback (during CD/MP3 playback).
38. [PROGRAM] – Programmed playback from
CD, MP3, memory card or USB.
39. [►II] – Start playback/pause.
40. [I◄] – [►I] – Previous/next track.
41. [■] – Stops CD/MP3 playback/deletes
saved program.
33
34 35
37 38 39
40
42
36
41
43
44
42. [FOLDER ▼] [FOLDER ▲] – Browses folders
(during MP3 playback).
43. [SOURCE] – Select CD, USB memory
or SD card.
44. [TS] (Track Separation) – Divides a recording
into several files.
6
Page 7
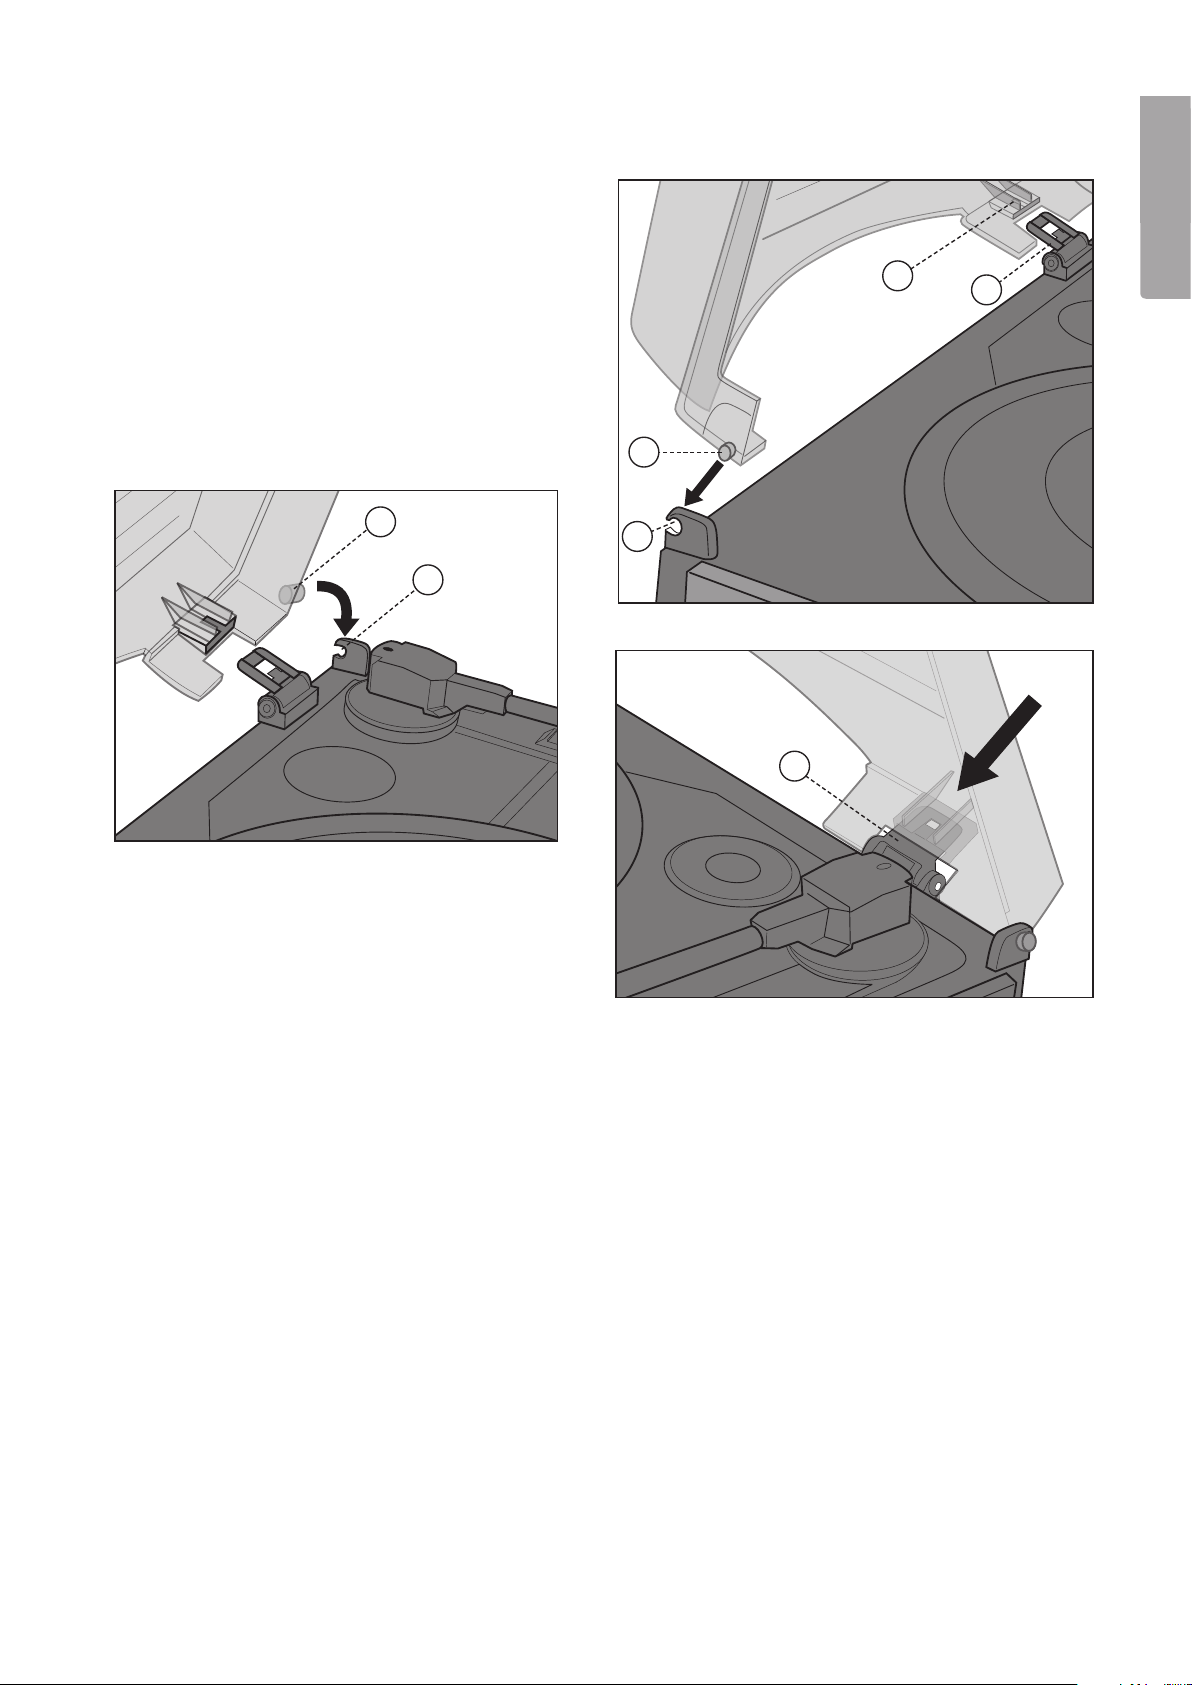
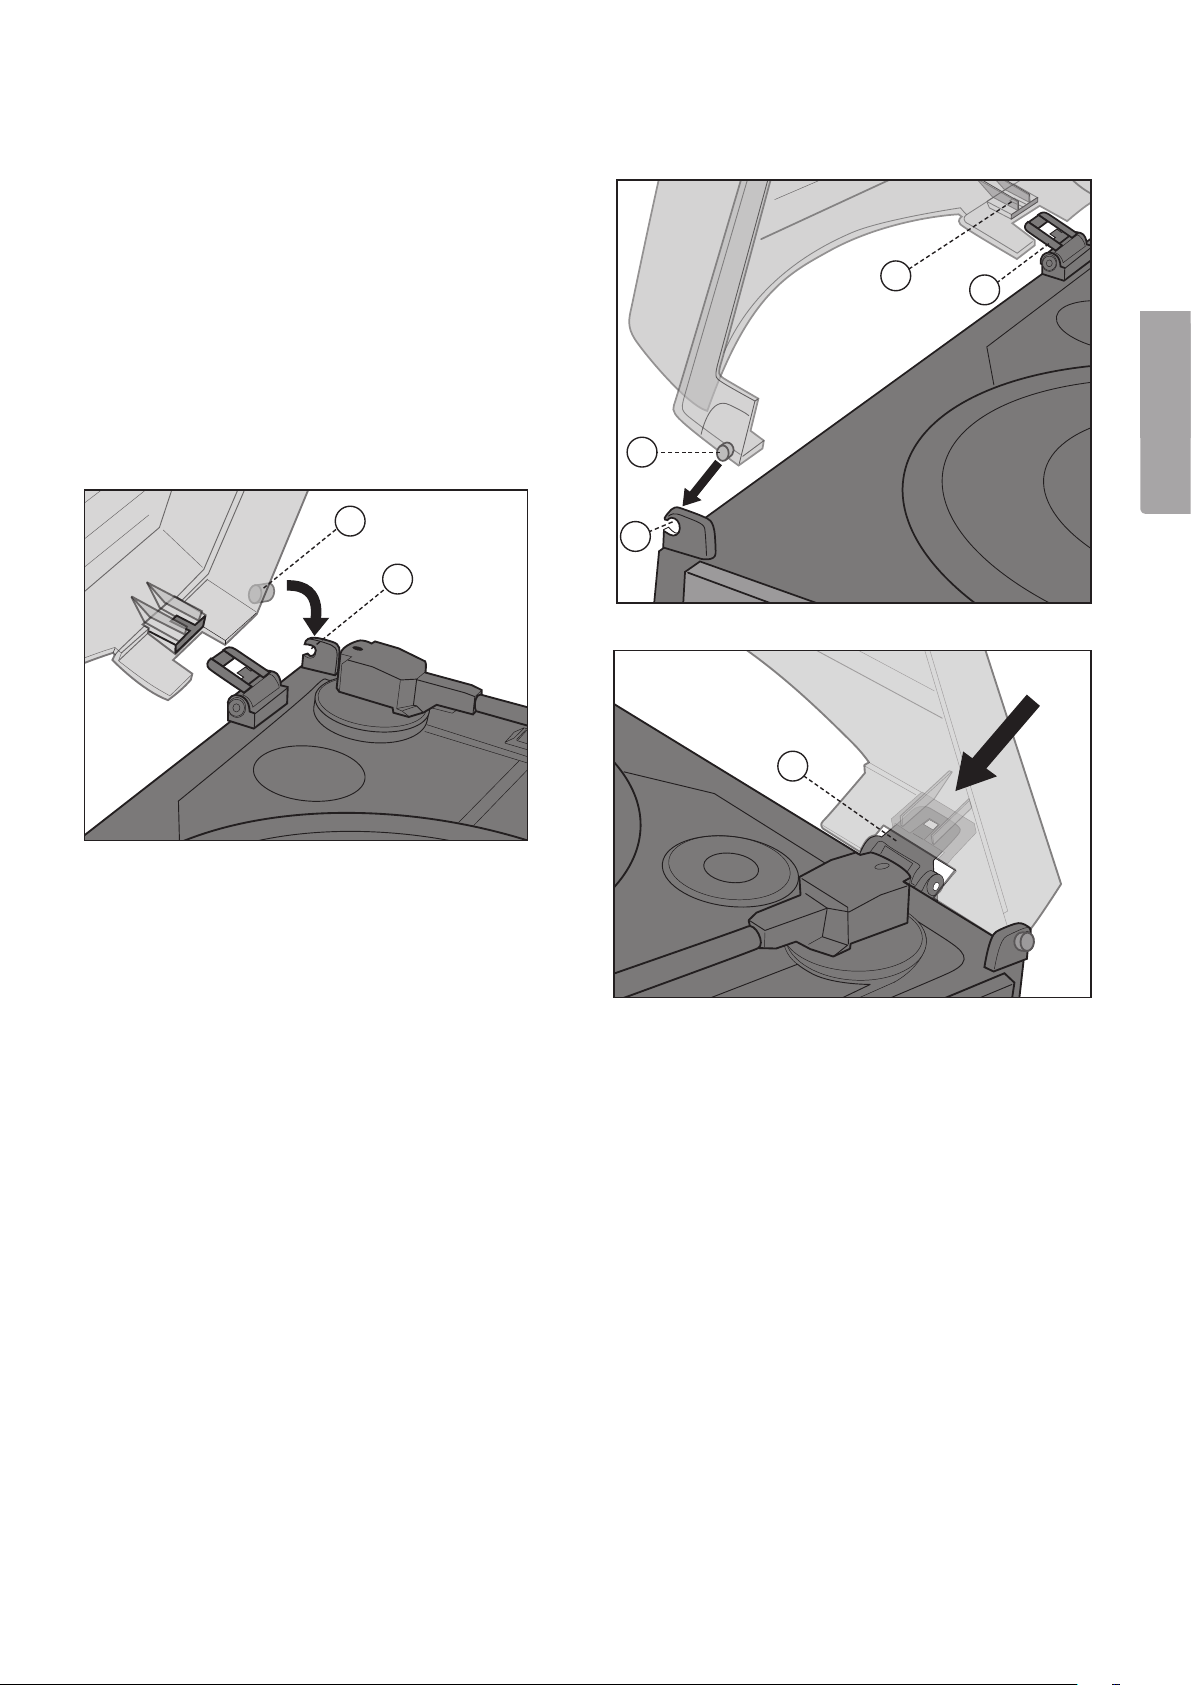
5. Assembly & installation
5.1 Mounting the lid
N.B. Figures (1 – 6) only refer to the illustrations
in this section.
1. Make sure the hinge fitting (2) is completely
folded outwards.
2. Slide the lid (1) onto the hinge fitting (2), but not
all the way down.
3. First push the lid’s left pin (3) into the record player’s
left bracket (4) and then push the lid’s right pin (5)
carefully into the record player’s right bracket to
secure it (6).
English
1
2
3
5
6
4. At the same time, push the hinge fitting (2) into
the slot on the lid until it clicks into place.
N.B.
Be careful when pushing the pins into the lid brackets.
Incorrect mounting or excessive force can damage
the pins or brackets.
5.2 Connecting the speakers
Connect the right and the left speaker wires to the right
(R) and left (L) speaker outlets (31) on the back panel.
N.B. Always have the speakers connected before
turning on the stereo system.
5.3 Connecting to the mains
1. Connect the mains lead to the mains socket on the
back of the record player (33) and plug the other
end into a power point. Check that the voltage (V),
on the rating plate on back of the device
corresponds to your local electrical network
(230 V AC, 50 Hz). Ask for advice from your
retailer or a service centre if that is not the case.
2. To completely shut off the power: Pull out the plug
from the wall socket. The device should also be
unplugged during heavy thunder storms to protect
the stereo.
4
Click!
2
Power-save mode
The record player automatically switches to powersave mode after 15 minutes when the last track on
an LP, CD, USB flash drive, SD card or cassette has
been played. The record player automatically switches
to power-save mode after 15 minutes when it is in
pause mode (CD, USB flash drive, SD card). To start
the record player when it is in power-save mode,
press the [ON/OFF] button twice.
5.4 Inserting batteries
1. Remove the remote’s battery cover.
2. Insert (2 × AAA/R03, 1.5 V) batteries according
to the polarity markings.
3. Push the battery cover securely back into the remote.
5.5 Placement
Place the record player on an even, hard surface.
Place it in an area where it is not exposed to possible
vibrations or knocks.
7
Page 8

6. Radio
FM och AM (medium wave)
1. Set the [FUNCTION] selector [15] to the TUNER position.
2. Set the band selector [16] to the AM, FM (mono) or FM-ST (stereo) position.
English
3. Set the desired frequency with the tuning knob (21).
4. Place the aerial (32) in a position where you receive the best possible reception.
5. Adjust the volume level by using the volume buttons, [VOLUME +] (7) and [VOLUME -] (8).
Receiving the best reception
AM: The player has a built-in aerial for AM reception. Reception can be altered by
either turning or moving the player.
FM: The aerial should be completely unravelled to receive the best reception.
7. CD player
7.1 CD playback
1. Set the [FUNCTION] selector (15) to the CD/USB/SD position.
2. Open the CD tray by pressing [OPEN/CLOSE] (11).
3. Place a CD (Audio disc or CD-R/CD-RW) with the label side upwards into the CD tray.
4. Press [OPEN/CLOSE] (11) to close the CD tray.
5. The display will show the total number of tracks once the CD info has been read.
6. Press [►II/■] (2) or (39) to start playback. The first track should then begin playback.
7. To pause playback, press [►II/■ ] (2) or (39) again. The display will then begin flashing the current
8. To stop playback: Depress [►II/■ ] (2) or (41) for 2 seconds.
track number. Press [►II/■] (2) or (39) again to resume playback.
7.2 Selecting a different track
During playback or in pause mode you can use [►►I] [I◄◄] (3) or (40) to select another track.
1. Press [►►I] [I◄◄] (3) or (40) briefly to move to the next track, or press repeatedly until the desired
track number is shown in the display.
2. Press [►►I] [I◄◄] (3) or (40) briefly to return to the start of the previous track. Press several times
to return to previous tracks.
7.3 Searching for a section during playback.
1. Press and hold [►►I] [I◄◄] (3) or (40) to search within a track. The CD will play at high speed and low volume.
2. Release the button when you have reached the desired section. Normal playback should now resume.
7.4 Playing a CD containing MP3 files
1. Set the [FUNCTION] selector (15) to the CD/USB/SD position.
2. Open the CD tray by pressing [OPEN/CLOSE] (11).
3. Place a CD (Audio or CD-R/CD-RW containing MP3 files) with the text side upwards in the CD compartment.
4. Close the CD tray by pressing [OPEN/CLOSE] (11).
5. After a moment the track total will be shown in the display.
6. Press [FOLDER] (4) or (42) once or several times to select a folder for playback. The folder number
will be displayed.
7. Use [►►I] [I◄◄] (3) or (40) to select the desired track within the selected folder.
8. Press [►II/■] (2) or (39) to start playback.
9. To pause playback: Press [►II/■] (2) or (39) again to pause. The display will then begin flashing
the current track number. Press [►II/■] (2) or (39) again to resume playback.
10. To stop playback: Depress [►II/■] (2) or (39) for 2 seconds.
8
Page 9
N.B.
• The sound quality of MP3 files can vary depending on the source quality of the CD or recording.
• The time it takes for the device to load a CD with MP3 files usually takes longer than for a regular CD.
7.5 Displaying music info (via the remote control)
1. During playback of MP3 files, press the [INFO] (35) button once on the remote to display
or hide the current track’s ID3 information.
2. If no information is available for the track “NONE” or “UNKNOWN” will be displayed.
7.6 Searching for tracks by title (via the remote)
You can search for a track by title/name.
1. When stopped press the remote’s [FIND] (34) button once.
2. Use [►►I] [I◄◄] (3) or (40) to search through all tracks in alphabetical order.
3. Press [►II/■] (2) twice to start playback of the selected track.
7.7. Searching by folder (via the remote control)
You can search for a folder by title/name.
1. When stopped press the remote’s [FIND] (34) button twice.
2. Use [►►I] [I◄◄] (3) or (40) to search through all folders in alphabetical order.
3. Press [►II/■] (2) or (39) to start playback of the tracks in the selected catalogue.
N.B. The display can only show characters from the English alphabet.
7.8 Advanced functions
Repeated playback (CD)
English
Repeat 1 → Repeat All → Intro → Random → Off
A. Repeat (Repeat current track)
Press [REP/INTRO/RAN] (37) once or the required number of times to activate random playback.
The
B. Repeat All (Repeat all tracks)
Press [REP/INTRO/RAN] (37) once or the required number of times to repeat the entire disc.
The
C. INTRO (plays the beginning of each track)
To save time when searching for a track, the first 10 seconds of each track are played in sequence.
Press [REP/INTRO/RAN] (37) once or the required number of times to start the intro function. “INTRO”
appears in the display when the function is activated.
D. RANDOM (random playback)
Press [REP/INTRO/RAN] (37) once or the required number of times to activate random playback.
“RANDOM” is shown on the display when this function is activated. Press [REP/INTRO/RAN] (37)
or [■] (41) to turn off random playback.
icon shows when Repeat 1 is activated.
ALL icon shows when Repeat All is activated.
E. OFF (No repetition)
Press [REP/INTRO/RAN] (37) the required number of times to deactivate repetition. No icons will be displayed.
9
Page 10
Repeated playback (MP3)
Repeat 1 → Repeat All → Repeat Folder → Intro → Random → Off
English
A. Repeat 1 (Repeat current track)
Press [REP/INTRO/RAN] (37) once or the required number of times to repeat the current track. The
shows when Repeat 1 is activated.
B. Repeat All (Repeat all tracks)
Press [REP/INTRO/RAN] (37) once or the required number of times to repeat all tracks. The
icon shows when Repeat All is activated.
C. Repeat Folder (Repeat all tracks in folder)
Press [REP/INTRO/RAN] (37) once or the required number of times to repeat all folders (and tracks).
The
D. INTRO (plays the beginning of each track)
To save time when searching for a track, the first 10 seconds of each track are played in sequence.
Press [REP/INTRO/RAN] (37) once or the required number of times to start the intro function. “INTRO”
appears in the display when the function is activated.
F. RANDOM (random playback)
Press [REP/INTRO/RAN] (37) once or the required number of times to activate random playback. “RANDOM”
is shown on the display when this function is activated. Press [REP/INTRO/RAN] (37) or [■] (41) to turn off
random playback.
icon shows when Repeat Folder is activated.
ALL
icon
F. OFF (No repetition)
Press [REP/INTRO/RAN] (37) the required number of times to deactivate repetition. No icons will be displayed.
7.9 Programmed playback (via the remote control)
Up to 32 tracks can be programmed in any chosen order.
1. Stop playback by pressing [■] (41).
2. Press [PROGRAM] (38) once on the remote control. “PROG” and both program number
and track number will be shown in the display.
3. Use [I◄] [►I] (40) to select a track for playback for the programmed playlist.
4. Confirm by pressing [PROGRAM] (38) once. The track number will flash in the display.
5. Repeat steps 3 and 4 to programme in more tracks.
6. Press [►II] (39) to start playback of your programmed playlist.
7. Press [■] (41) to stop playback and depress [■] (41) until “PROG” disappears from the display
to clear the programme memory.
10
Page 11
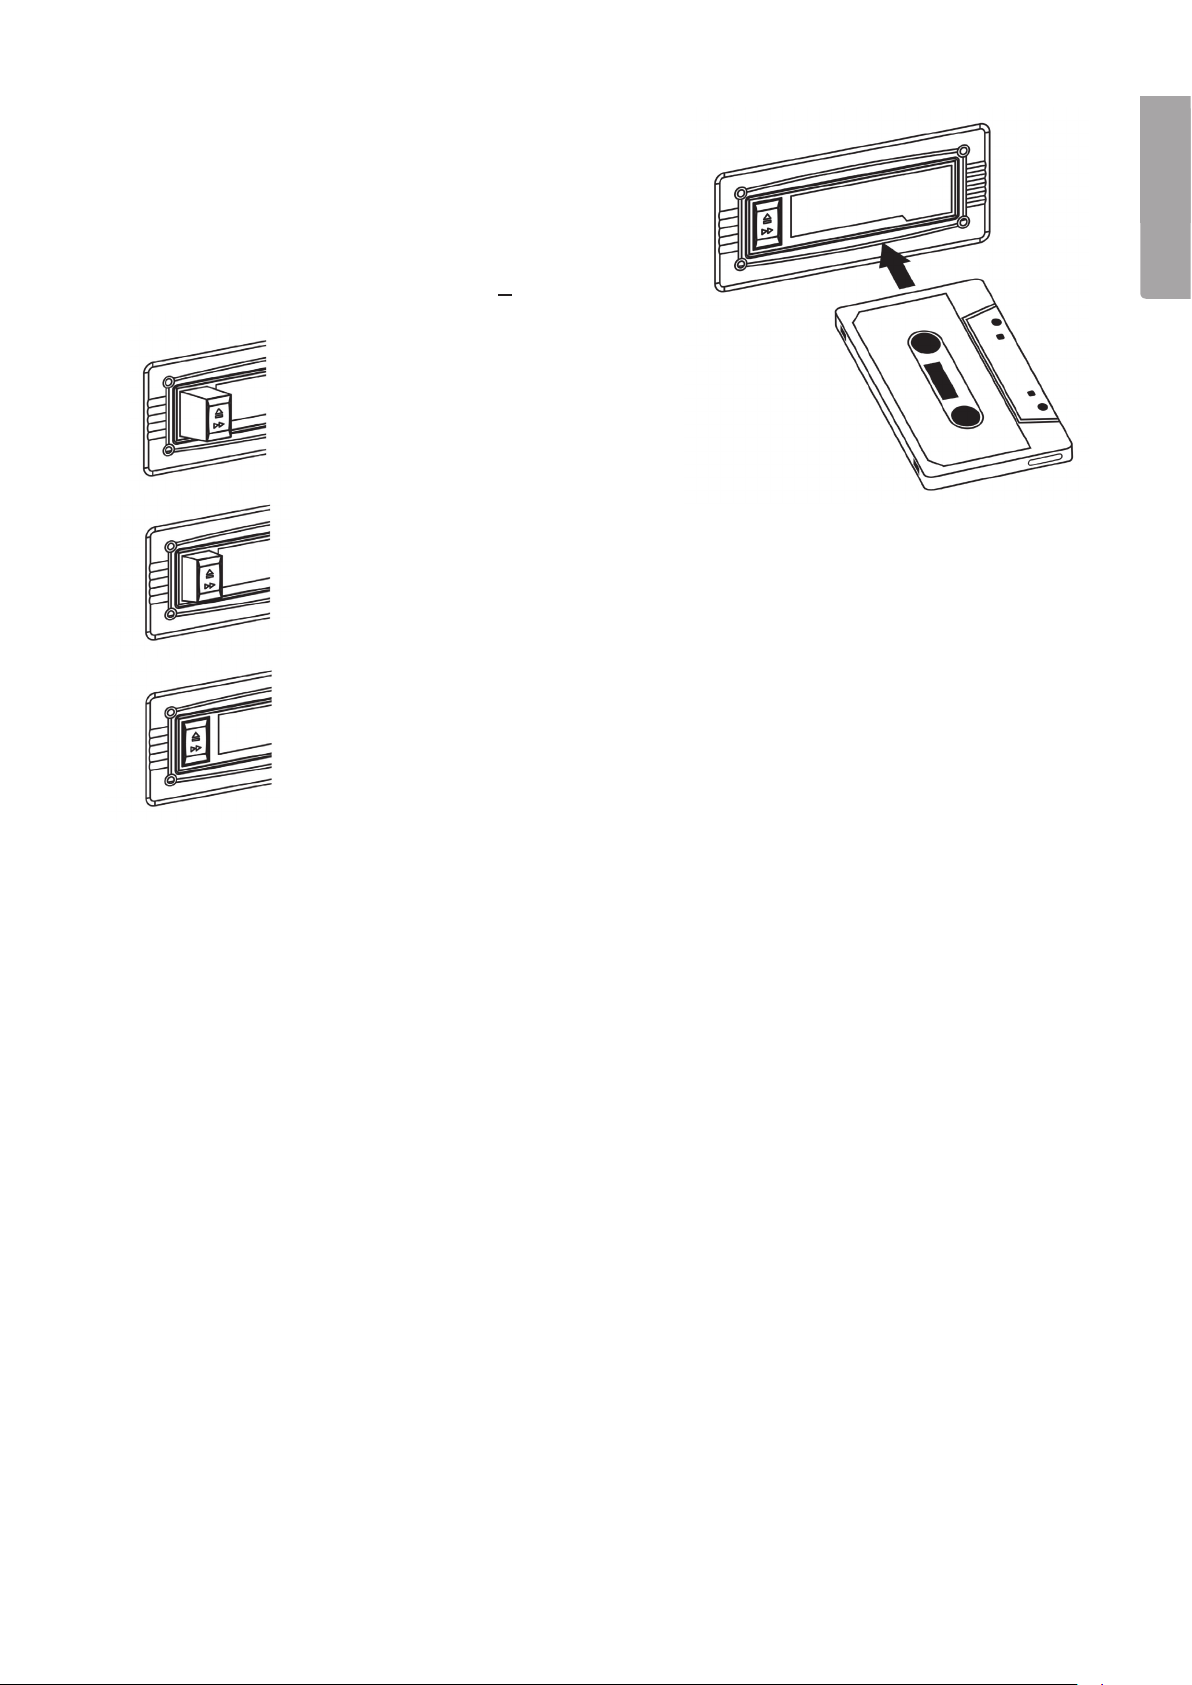
8. Cassette deck
1. Set the [FUNCTION] (15) selector in TAPE mode.
2. Push the cassette into the slot as shown below. The side that
is facing up is the one that will be played.
3. The cassette deck will start automatically once the cassette
has been pushed in.
4. The cassette deck is controlled with the [
PLAY - Playback (button is
completely extended).
FAST FORWARD – Fast forward (button is semi-
depressed), repress the button to deactivate fast forward
and return to playback mode.
▲
] (23) button:
English
EJECT – Completely depress the button.
N.B.
It is normal that noise may be heard from the cassette when using (FAST FORWARD).
Always remove the cassette when you are not using the cassette deck.
9. Record player
1. Remove the pick-up protector and release the tone arm from the lock (29).
2. Set the [FUNCTION] selector (15) to the PHONO position to turn on the record player.
3. Place a record onto the turntable. Some 45 rpm records have larger spindle holes and you will then
need to use the spindle adaptor (25).
4. Use the speed selector to choose the correct record speed (27).
5. Lift the tone arm using the tone arm lift lever (26) and move the tone arm over the record. The turntable
will begin spinning.
6. Carefully lower the tone arm at the beginning of the desired track (26).
7. The record will then begin playback. Adjust the volume level by using the volume buttons, [VOLUME +] (7)
and [VOLUME -] (8).
8. Return the tone arm to the pickup holder when playback has finished. The turntable will then stop spinning.
N.B. Some records end outside of the record player’s “Auto-stop” – range. This means that some records may stop
playing even before finishing the last track. This can be remedied by switching [AUTO STOP] (28) to the OFF position.
N.B. The record will continue spinning even after the last track has been played.
To stop the turntable: Turn the [AUTO STOP] (28) switch back to the ON position.
11
Page 12
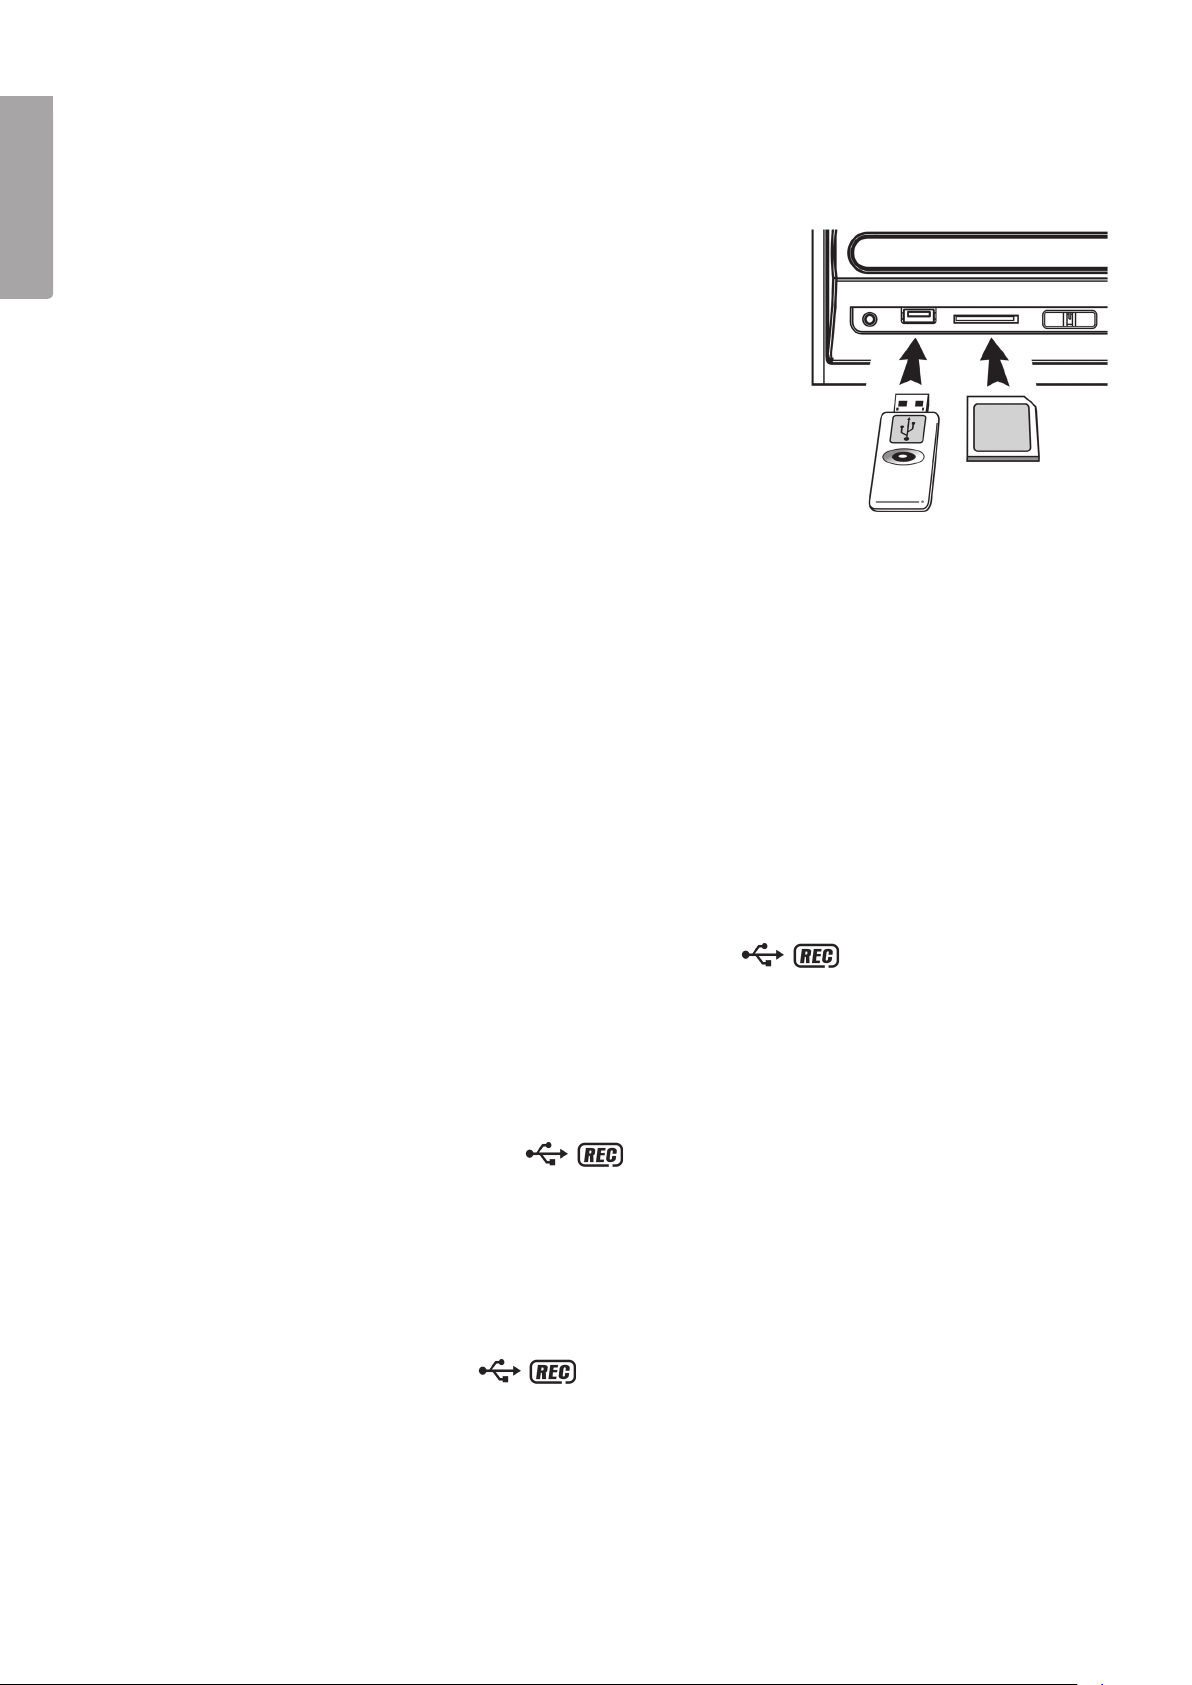
10. Playing MP3 files from the USB or memory card
The device can play MP3 files from a USB memory stick or SD/MMC memory card.
1. Insert a USB memory stick/memory card according to the figure. Make
English
2. Set the [FUNCTION] (15) selector to the CD/USB/SD position and push
3. After a moment the track total will be shown in the display.
4. Press [FOLDER] (4) or (42) once or several times to select a folder for
5. Use [►►I] [I◄◄] (3) or (40) to select the desired track within the
6. Press [►II/■] (2) or (39) to start playback.
7. Pausing playback: Press [►II/■] (2) or (39) again to pause. The display will then begin flashing the current track
8. To stop playback: Depress [►II/■] (2) or (41) for 2 seconds.
N.B. The method of operating the remaining functions are the same as for “7.4 Playing a CD containing MP3 files”
points 7.5, 7.6, 7.7, 7.9 and 7.10.
sure to insert the USB memory stick/memory card the right way round
to ensure that the connectors are not damaged. Always push the USB
memory stick/memory card straight in without twisting.
SOURCE (5) or (43) to select the USB (USB memory stick) or CARD
(memory card). The display will show the selected source, audio format
and total number of tracks.
playback. The folder name will be shown on the display.
selected folder.
number. Press [►II/■] (2) or (39) again to resume playback.
11. Recording MP3 files from the CD/record player/cassette
The stereo system can record in MP3 format onto the memory card or USB from a CD or record.
A. Recording from CD
I. Recording a CD track
1. Start CD playback as usual.
2. Press [REC] (6) or (36) to start recording (during normal playback). The
will flash during recording.
3. Recording shuts off automatically once complete.
4. Press [REC] (6) or (36) if you want to prematurely stop recording.
II. Recording an entire CD
1. Insert a CD into the CD tray and wait until its info has been read.
2. Press [REC] (6) or (36) to start recording. The
3. Recording shuts off automatically once complete.
4. Press [REC] (6) or (36) if you want to prematurely stop recording.
icons will flash during recording.
III. Recording selected CD tracks
1. Insert a CD and wait until its info has been read.
2. Select desired tracks and save them according to the steps in: 7.10 Programmed playback
(via the remote control).
3. Press [REC] (6) or (36) to start playback
4. Recording shuts off automatically once complete.
5. Press [REC] (6) or (36) if you want to prematurely stop recording.
icons will flash during recording.
icons
12
Page 13

N.B.
• Recording time occurs in real time e.g. the same as playback time.
• A folder named “AUDIO” will be created where all recordings are saved.
• The recording format is preset to MP3 with a 128 kbps bit rate and a 44.1 kHz sampling rate.
• Song titles are not saved during recording.
• In order to save a file the entire track must be recorded. If the recording is prematurely stopped then
no file will be saved onto the memory card or USB.
IV. Copying MP3 files
Copying from CD.
• If the CD only contains MP3 files any copied files will also be in this format. The steps for copying files
are the same as: “Recording from CD” (See 11.1.)
Copying between memory card and USB.
• Press [REC] (6) or (36) during playback from the memory card or USB to start copying from memory card
to USB or vice-versa.
B. Recording from the record player
1. Set the [FUNCTION] selector [15] to the PHONO position.
2. Press [REC] (6) or (36).
3. “USB” will be displayed first and then the
When the icons begin flashing recording will have started.
4. Start playback of the record track you wish to record.
5. When you’ve finished recording: Depress [REC] (6) or (36) until the display stops flashing.
N.B. If you wish to start recording directly: Press [REC] (6) or (36) twice quickly.
icons .
English
C. Recording from the cassette deck
1. Set the [FUNCTION] (15) selector in TAPE mode.
2. Press [REC] (6) or (36).
3. The display will first show “USB” or “CARD” and then
4. Start playback of the cassette track you wish to record.
5. Depress [REC] (6) or (36) until the display stops flashing once you’ve finished recording.
N.B. If you wish to start recording directly: Press [REC] (6) or (36) twice quickly.
N.B. Files will be saved to the USB (if both a memory cards and USB is connected).
. When the icon starts flashing recording has started.
D. Manually setting the “Bit Rate” during CD, record player or cassette
recording.
1. Set the [FUNCTION] (15) selector to the PHONO or TAPE position.
2. Pressing [INFO] (35) will show the set (128 kbps) “Bit Rate”.
3. Press [►►I] [I◄◄] (3) or (40) to change the bit rate: 32 – 64 – 96 – 128 – 192 – 256 kbps
4. Press [INFO] (35) to confirm.
E. Track separation (TS)
To divide the recordings from the record or cassette player into several files, do the following: Press [TS] (44) once
to add a pause and create a new file where the next track will be recorded. Repeat this procedure in your recording
wherever you wish to divide your recording into several files. Every time a new file is created, the “PHONO”
or “TAPE” symbol will flash once on the display.
N.B. This must be done during the recording process.
13
Page 14
English
12. Deleting files on the USB/SD memory card
Deleting a file
1. Insert a USB or a memory card. Set the function selector to USB or SD.
2. Depress [INFO] (35) for 3 seconds. The display will show “DEL -001”.
3. Select the file to be deleted with [►►I] [I◄◄] (3) or (40).
4. Press [REC] (36). “YES” and “NO” will begin to flash. Press [►►I] [I◄◄] (3) or (40) to select
YES (to delete the selected file) or NO to cancel.
5. Press [REC] (6) or (36) to confirm. Press [<] (41) once to cancel the deleting process.
Deleting all files:
1. Insert a USB or a memory card. Set the function selector to USB or SD.
2. Depress [INFO] (35) for 3 seconds. The display will show “DEL -001”.
3. Press [REC] (36). “YES” and “NO” will begin to flash. Press [►►I] [I◄◄] (3) or (40) to select
YES (to delete all selected files) or NO to cancel.
4. Push [REC] (36) to confirm the setting.
5. Press [■] (41) once to cancel the deleting process.
N.B. All file on the USB memory or memory card will be deleted if you confirm by pressing “YES”.
Removing the USB memory/memory card
Always turn off the device before you remove the USB memory/memory card.
USB memory stick: Remove the USB memory by hand.
Memory cards: Gently push the memory card in, the card will spring out and can then be removed by hand.
13. Care and maintenance
• Clean dusty records using a record brush.
• Always close the lid when the record player is not in use. This prevents dust from collecting on
the turntable and pickup needle.
• The record player can be wiped with a lightly moistened cloth.
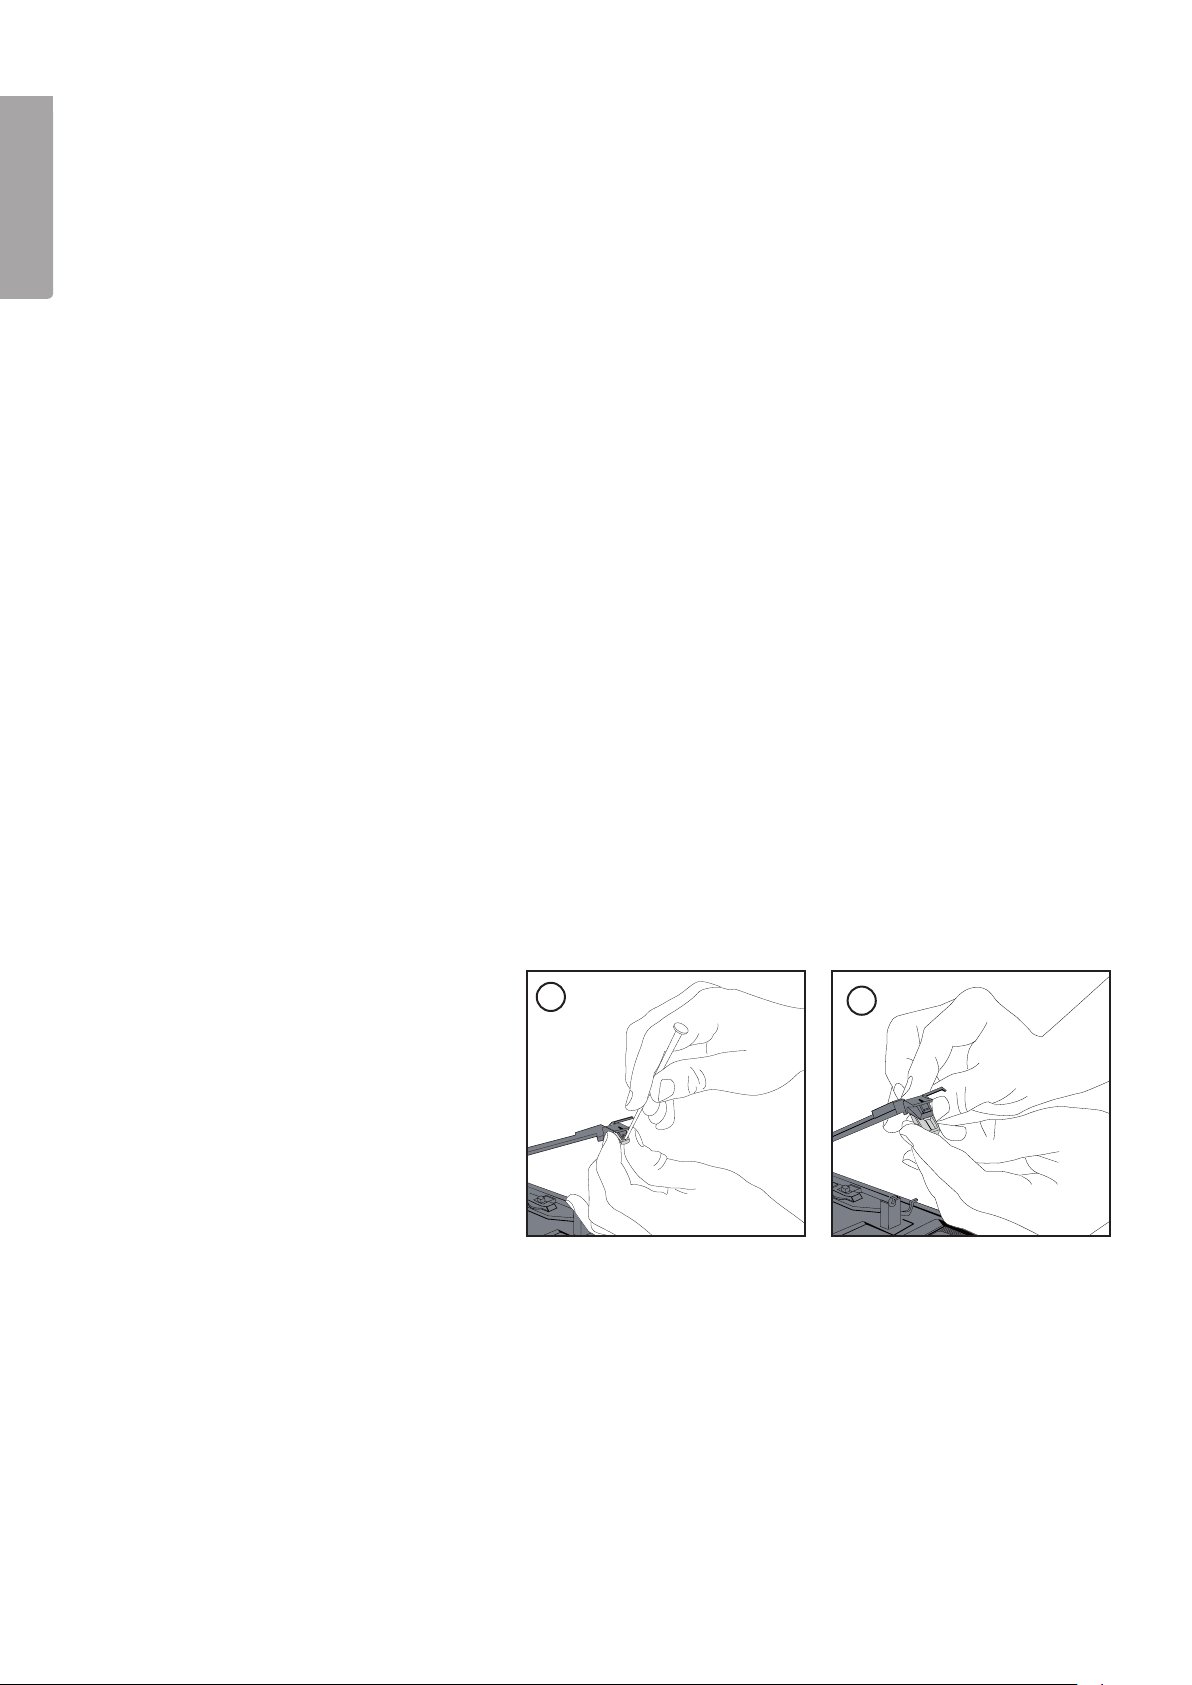
Changing the pickup needle
1. Hold the pickup needle with one hand
and wedge a small screwdriver in the
front edge of the pickup between the
pickup and the needle. Carefully prize
the needle out using the screwdriver as
shown in the figure below.
2. Insert a new needle by first pushing it
against the rear edge. Then carefully
push in the front edge.
1
2
14. Specifications
Mains supply: 230 V AC, 50 Hz
Record player speeds: 33/45 rpm
Radio frequency range: 87.5 – 108 MHz (FM), 540 – 1600 kHz (AM)
Bitrate, MP3: 32 – 256 kbps
Output power: 2 × 2 W
Size (record player): 318 × 285 × 178 mm (W×D×H)
Size (speakers): 120 × 140 × 195 mm (W×D×H)
Weight: 4.7 kg
14
Page 15

Skivspelare med CD, MP3, kassettdäck
och radio
Art. nr 38-4173 Modell TCD-983WEC
Läs igenom hela bruksanvisningen före användning och spara den sedan för framtida bruk.
Vi reserverar oss för ev. text- och bildfel samt ändringar av tekniska data. Vid tekniska problem
eller andra frågor, kontakta vår kundtjänst (se adressuppgifter på baksidan).
Innehåll
1. Säkerhet
2. Produktbeskrivning
3. Förpackningens innehåll
4. Knappar och funktioner
5. Montering och installation
6. Radio
7. CD-spelare
8. Bandspelare
9. Skivspelare
10. Spela upp MP3- filer från ett minneskort eller USB-minne
11. Spela in MP3 från CD/skivspelare/kassettbandspelare
12. Radera filer på USB-minne/SD-minneskort
13. Skötsel och underhåll
14. Specifikationer
Svenska
15
Page 16
1. Säkerhet
• Produkten får endast repareras av kvalificerad servicepersonal.
• Produkten får inte demonteras eller ändras.
• Placera inte produkten så att den kan falla ner i vatten eller annan vätska.
Ställ inte några föremål som innehåller vätska på produkten, t.ex. blomvas eller läskedryck.
• Stäng av eventuell standbyfunktion om natten eller när du reser bort.
• Täck inte över anläggningen. Tillräcklig ventilation, med ett minsta avstånd på 15 cm mellan
ventilationsöppningar och omgivande ytor, är nödvändig för att förhindra att anläggningen blir för varm.
• Placera inte anläggningen i en fuktig, dammig miljö eller där det förekommer starka vibrationer.
• Långvarig exponering av hög ljudvolym från hörlurar kan orsaka skador på din hörsel.
Svenska
CAUTION
RISK OF ELECTRIC
SHOCK DO NOT OPEN
CLASS 1
LASER PRODUCT
!
KLASS 1 LASERAPPARAT
Varning! Öppna inte höljet! Osynlig laserstrålning som kan orsaka ögonskador
finns innanför höljet. Rikta inte blicken in mot strålen och titta inte direkt på
den genom optiska instrument.
Varning! Öppna inte höljet!
Farlig spänning finns oskyddat på komponenter inuti produktens
hölje. Kontakt med dessa kan leda till brand eller ge elektriska stötar.
2. Produktbeskrivning
• Skivspelare med CD/MP3-spelare, kassettdäck, radio samt anslutning för USB-minne och SD-kort.
• Inbyggd förstärkare och externa högtalare.
• Inspelning på USB-minne eller SD-kort från skivspelaren, kassettdäck eller CD/MP3-spelaren.
• Omkopplare för 33/45 rpm.
• Auto-Stop när skivan är färdigspelad.
• Inbyggd RIAA-förstärkare och lågnivåutgång.
• Levereras med fjärrkontroll.
• Uttag för stereohörlurar.
3. Förpackningens innehåll
• Skivspelare
• 2 st. högtalare
• Fjärrkontroll
• Bruksanvisning
16
Page 17

4. Knappar och funktioner
Skivspelaren
10
11
9 8 7 6 5 4 3 2
ON/OFF VOLUME REC SOURCE FOLDER UP
FUNKTION BAND
USB
PHONO CD/USB/SD FM
SD/MMC TAPE TUNER AM FM-ST
POWER FM-ST
1
Svenska
2
1
0
0
1
4
1
8
0
9
6
4
9
2
0
9
6
0
9
4
5
8
8
M
M
A
F
1
0
0
8
0
1
0
7
2
0
1
1
0
4
6
0
1
6
0
x
M
1
0
H
H
z
z
12 13 14 15 16 1817 19 20 21 22
1. Lock
2. [►II/■ ] – Starta uppspelning/paus/
stoppa uppspelning.
3. [►►I] [I◄◄] – Föregående/nästa spår.
4. [FOLDER UP] – Gå till nästa mapp (MP3).
5. [SOURCE] – Väljer USB-minne, SD-minneskort
eller CD.
6. [• REC] – Inspelning.
7. [VOLUME +] – Öka volym.
8. [VOLUME -] – Sänk volym.
9. [ON/OFF] – Strömbrytare.
10. CD-fack.
▲
11. [
] – Öppna/stäng CD-fack.
12. Hörlursuttag.
13. USB-uttag.
14. Uttag för SD/MMC -minneskort.
15. [FUNCTION] – Funktionsväljare: TAPE (kassett) –
PHONO (skivspelare) – CD/USB/SD –
TUNER (radio).
16. [AM/FM] – Funktionsväljare för radio:
AM – FM – FM Stereo.
17. POWER – Indikatorlampa som lyser när
anläggningen är tillslagen.
18. IR-sensor till fjärrkontroll.
19. FM ST - Indikatorlampa som lyser när radion
tar emot FM-stereo.
20. LCD display.
21. TUNING – Frekvensratt.
22. Frekvensskala.
17
Page 18
23. [▲] – Snabbspolning framåt/mata ut kassettband.
24. Lock till kassettfack.
25. Singeladapter (skivpuck) till skivtallrik.
26. Tonarmslyft – Lyft/sänk tonarmen.
27. 33/45 RPM – Hastighetsväljare till skivspelare.
28. AUTO STOP ON/OFF – Strömbrytare till
29. Tonarmsstöd (med transportlås).
30. Line Out L/R – Lågnivåutgång (vänster, höger).
31. SPEAKER L/R – Högtalaranslutning (vänster, höger.
Svenska
32. FM-antenn.
33. Uttag för nätkabel.
30
23
24
skivspelarens AutoStop-funktion.
25
26
27
28
29
31
32
Fjärrkontrollen
34. [FIND] – Sök filnamn (vid MP3-uppspelning).
35. [INFO] – Välj inspelningskvalitet (Encoding Bitrate)
och visa ID3-tag.
36. [REC] – Tryck för att starta inspelning
eller kopiering.
37. [REP/INTRO/RAN] – Repetition/intro (spela de
första 10 sekunderna på varje spår)/slumpmässig
uppspelning (vid CD/MP3-uppspelning).
38. [PROGRAM] – Programmerad uppspelning från
CD, MP3, minneskort eller USB.
39. [►II] – Starta uppspelning/gör paus
i uppspelningen.
40. [I◄] – [►I] - Föregående/nästa spår.
33
34 35
37 38 39
40
42
36
41
43
44
41. [■] – Stoppar CD/MP3-uppspelning/tar bort
sparat program.
42. [FOLDER ▲] [FOLDER ▼] – Byt katalog
(vid MP3-uppspelning).
43. [SOURCE] – Välj CD, USB-minne eller
SD-minneskort.
44. [TS] (Track Separation) – Delar upp en inspelning
i flera filer.
18
Page 19
5. Montering & installation
5.1 Montera locket
Obs! Nummerhänvisningarna (1 – 6) gäller endast
bilderna i detta avsnitt.
1. Se till att gångjärnet (2) är vikt helt bakåt.
2. Passa in spåret i locket (1) på gångjärnet (2),
men inte hela vägen ner.
3. Sätt först lockets vänstra styrtapp (3) i skivspelarens vänstra fäste (4) och tryck sedan
fast lockets högra styrtapp (5) försiktigt i skivspelarens högra fäste (6).
5
6
1
3
2
Svenska
4
Klick!
2
4. Tryck samtidigt ner locket på gångjärnet (2) tills
gångjärnet låst fast och ett klick hörs.
Obs!
Tryck försiktigt fast locket på skivspelarens sidofästen.
Felaktig montering kan skada skivspelarens sidofästen.
5.2 Anslut högtalare
Anslut höger och vänster högtalare till höger (R) och
vänster (L) högtalarutgång (31) på apparatens baksida.
Obs! Anslut alltid högtalarna innan du slår på musikanläggningen.
5.3 Anslutning till elnätet
1. Anslut nätsladdens lilla kontakt till uttaget (33)
på skivspelaren och stickproppen till ett eluttag .
Kontrollera att spänningen (V), som finns angiven
på märkskylten på baksidan av anläggningen är
densamma som i ditt lokala elnät (230 V AC,
50 Hz). Rådfråga återförsäljaren eller ett
serviceställe om så inte är fallet.
2. För att helt stänga av strömmen: Dra ur stickproppen ur vägguttaget. Dra även ur stickproppen ur
vägguttaget vid kraftiga åskväder för att skydda
anläggningen.
Strömsparläge
Skivspelaren går automatisk över till strömsparläge
efter 15 minuter när sista låten har spelats på en
LP-skiva, CD-skiva, USB-minne , SD-kort eller kassett.
Skivspelaren går även automatisk över till ström-
sparläge efter 15 minuter när den står i pause-läge
(CD-skiva, USB-minne , SD-kort). För att starta
skivspelaren från strömsparläget tryck två gånger
på [ON/OFF] – strömbrytaren.
5.4 Sätt i batterier i fjärrkontrollen
1. Ta bort fjärrkontrollens batterilock.
2. Sätt i batterierna (2 st. AAA/R03, 1,5 V) enligt
märkningen i batterifacket.
3. Tryck fast batterilocket.
5.5 Placering
Placera skivspelaren på ett plant och hårt underlag.
Se till att den inte utsätts för vibrationer eller stötar.
19
Page 20

6. Radio
FM och AM (mellanvåg)
1. Sätt [FUNCTION] (15) i läge TUNER.
2. Sätt funktionsväljaren (16) i läge AM, FM (mono) eller FM-ST (stereo).
3. Ställ in önskad frekvens med frekvensratten (21).
4. Placera antennen (32) på lämpligt sätt så att du har bästa möjliga mottagning.
5. Justera volymen till önskad nivå med volymknapparna [VOLUME +] (7) och [VOLUME –] (8).
Tips för bättre mottagning
AM: Apparaten har en inbyggd antenn för AM-mottagning. Mottagningen kan påverkas genom att vrida
eller flytta på skivspelaren.
FM: Antennen bör vara fullt utrullad och utsträckt för bästa mottagning.
Svenska
7. CD-spelare
7.1 Lyssna på CD-skiva
1. Sätt [FUNCTION] (15) i läge CD/USB/SD.
2. Öppna CD-facket genom att trycka på [OPEN/CLOSE] (11).
3. Placera en CD-skiva (ljud eller CD-R/CD-RW) med etiketten vänd uppåt i CD-facket.
4. Tryck på [OPEN/CLOSE] (11) för att stänga CD-facket.
5. När skivan är inläst visar displayen det totala antalet spår på skivan.
6. Tryck på [►II/■] (2) eller (39) för att starta uppspelningen. Det första spåret spelas upp.
7. För att tillfälligt göra paus i uppspelningen, tryck igen på [►II/■] (2) eller (39). Aktuellt spårnummer
8. För att stoppa avspelningen: Tryck och håll in [►II/■] (2) eller (39) i 2 sekunder.
blinkar i displayen. Tryck åter på [►II/■] (2) eller (39) för att fortsätta uppspelningen.
7.2 Välj ett annat spår
Under uppspelningen eller i pausläget kan du använda [►►I] [I◄◄] (3) eller (40) för att välja ett annat spår.
1. Tryck en gång kort på [►►I] [I◄◄] (3) eller (40) för att komma till nästa spår, eller tryck upprepade gånger tills
det önskade spårnumret visas på displayen.
2. Tryck en gång kort på [►►I] [I◄◄] (3) eller (40) för att återgå till början på det spår som just spelas.
Tryck kort upprepade gånger för att komma till tidigare spår.
7.3 Sök ett avsnitt i spåret som spelas nu
1. Tryck och håll in [►►I] [I◄◄] (3) eller (40) för att söka ett avsnitt i ett spår. Spåret spelas nu med
hög hastighet och låg volym.
2. Släpp knappen när du hör det avsnitt du söker. Den normala avspelningen fortsätter.
7.4 Spela en CD-skiva med MP3-filer
1. Sätt [FUNCTION] (15) i läge CD/USB/SD.
2. Öppna CD-facket genom att trycka på [OPEN/CLOSE] (11).
3. Placera en CD-skiva (ljudskiva eller CD-R/CD-RW innehållande MP3-filer) med etiketten vänd uppåt i CD-facket.
4. Stäng CD-facket genom att trycka på [OPEN/CLOSE] (11).
5. Efter en kort stund visar displayen det totala antalet spår på skivan.
6. Tryck en eller flera gånger på [FOLDER] (4) eller (42) för att välja den katalog du vill spela upp.
Katalognumret visas i displayen.
7. Använd [►►I] [I◄◄] (3) eller (40) för att välja önskat spår i den valda katalogen.
8. Tryck på [►II/■] (2) eller (39) för att starta uppspelningen.
9. För att tillfälligt göra paus i uppspelningen: Tryck igen på [►II/■] (2) eller (39). Aktuellt spårnummer
blinkar i displayen. Tryck åter på [►II/■] (2) eller (39) för att fortsätta uppspelningen.
10.För att stoppa avspelningen: Tryck och håll in [►II/■] (2) eller (39) i 2 sekunder.
20
Page 21

Anm.
• Ljudkvaliteten på MP3-filer kan variera beroende på skivans eller inspelningens kvalitet.
• Tiden för apparaten att läsa in en MP3-skiva tar vanligtvis längre tid än en vanlig audioskiva.
7.5 Visa musikinformation (via fjärrkontrollen)
1. Under uppspelning av MP3-filer, tryck en gång på knappen [INFO] (35) på fjärrkontrollen för att visa eller
dölja ID3-informationen om det aktuella spåret.
2. Finns ingen information tillgänglig för det aktuella spåret visas istället texten ”NONE” eller ”UNKNOWN” i displayen.
7.6 Sök låt efter titel (via fjärrkontrollen)
Du kan söka en låt efter dess titel/namn.
1. Vid stoppad uppspelning, tryck en gång på knappen [FIND] (34) på fjärrkontrollen.
2. Använd [►►I] [I◄◄] (3) eller (40) för att bläddra bland låtarna i alfabetisk ordning.
3. Tryck på [►II/■] (2) eller (39) två gånger för att starta uppspelningen av den valda låten.
7.7 Sök katalog (via fjärrkontrollen)
Du kan söka en katalog efter dess titel/namn.
1. Vid stoppad uppspelning, tryck två gånger på knappen [FIND] (34) på fjärrkontrollen.
2. Använd [►►I] [I◄◄] (3) eller (40) för att bläddra bland katalogerna i alfabetisk ordning.
3. Tryck på [►II/■] (2) eller (39) för att starta uppspelningen av låtarna i den valda katalogen.
Anm. Displayen kan endast visa tecken ur det engelska alfabetet.
Svenska
7.8 Avancerade funktioner
Repeterad avspelning (CD)
Repeat 1 → Repeat All → Intro → Random → Off
A. Repeat 1 (Repetera pågående spår)
Tryck en eller upprepade gånger på [REP/INTRO/RAN] (37) för att repetera ett spår.
Symbolen
B. Repeat All (Repetera alla spår)
Tryck en eller upprepade gånger på [REP/INTRO/RAN] (37) för att repetera en hel skiva.
Symbolen
C. INTRO (spela upp början på spår)
För att spara tid när du söker en viss låt spelas de 10 första sekunderna från alla spår upp i följd. Tryck en
eller upprepade gånger på [REP/INTRO/RAN] (37) för att starta uppspelningen med intro-funktionen aktiverad.
”INTRO” visas i displayen när funktionen är aktiverad.
D. RANDOM (Slumpmässig avspelning)
Tryck en eller upprepade gånger på [REP/INTRO/RAN] (37) för att aktivera slumpmässig avspelning.
”RANDOM” visas i displayen när funktionen är aktiverad. Tryck åter på [REP/INTRO/RAN] (37) eller
på [■] (41) för att stänga av slumpmässig avspelning.
visar att Repeat 1 är aktiverad.
ALL visar att Repeat All är aktiverad.
E. OFF (Ingen repetition)
Tryck upprepade gånger på [REP/INTRO/RAN] (37) för att stänga av repetition. Ingen symbol visas på displayen.
21
Page 22

Repeterad avspelning (MP3)
Repeat 1 → Repeat All → Repeat Folder → Intro → Random → Off
A. Repeat 1 (Repetera pågående spår).
Tryck en eller upprepade gånger på [REP/INTRO/RAN] (37) för att repetera pågående spår.
Symbolen
B. Repeat All (Repetera alla spår på skivan).
Tryck en eller upprepade gånger på [REP/INTRO/RAN] (37) för att repetera alla spår på skivan.
Symbolen
visar att Repeat 1 är aktiverad.
visar att Repeat All är aktiverad.
Svenska
C. Repeat Folder (Repetera alla spår i mappen).
Tryck en eller upprepade gånger på [REP/INTRO/RAN] (37) för att repetera alla mappar (och spår).
Symbolen
D. INTRO (Spela upp början på spår)
För att spara tid när du söker en viss låt spelas de 10 första sekunderna från alla spår upp i följd av alla spår.
Tryck en eller upprepade gånger på [REP/INTRO/RAN] (37) för att starta uppspelningen med intro-funktionen
aktiverad. ”INTRO” visas i displayen när funktionen är aktiverad.
E. RANDOM (Slumpmässig avspelning)
Tryck en eller upprepade gånger på [REP/INTRO/RAN] (37) för att aktivera slumpmässig avspelning. ”RAN-
DOM”
visas i displayen när funktionen är aktiverad. Tryck åter på [REP/INTRO/RAN] (37) eller på [■] (41) för att
stänga av slumpmässig avspelning.
F. OFF (Ingen repetition)
Tryck upprepade gånger på [REP/INTRO/RAN] (37) för att stänga av repetition, ingen symbol visas på
displayen.
visar att Repeat Folder är aktiverad.
7.9 Programmerad uppspelning (via fjärrkontrollen)
Upp till 32 spår kan programmeras i valfri ordning.
1. Stoppa uppspelningen genom att trycka på [■] (41).
2. Tryck en gång på [PROGRAM] (38) på fjärrkontrollen. ”PROG”, programnummer samt spårnummer
visas i displayen.
3. Använd [I◄] [►I] / (40) för att välja det spår som ska programmeras.
4. Bekräfta genom att trycka en gång på [PROGRAM] (38). Spårnumret blinkar nu i displayen.
5. Repetera steg 3 och 4 för att spara flera spår i minnet.
6. Tryck på [►II] (39) för att starta avspelningen i den ordning du nyss programmerat.
7. Tryck på [■] (41) för att stoppa avspelningen och tryck och håll in [■] (41) till ”PROG” försvinner ifrån
displayen för att radera programminnet.
22
Page 23

8. Bandspelare
1. Ställ [FUNCTION] (15) i läge TAPE.
2. Tryck in ett kassettband med kortsidan före. Den sida som
vänds uppåt spelas upp.
3. Bandspelaren startar automatiskt när kassetten trycks in.
4. Bandspelarens funktioner styrs med knappen [
PLAY - Uppspelning pågår
(knappen är helt ute).
FAST FORWARD – Snabbspolning framåt
(knappen är delvis intryckt), tryck in knappen
lite för att avsluta snabbspolningen och återgå
till uppspelning.
▲
] (23):
Svenska
EJECT – Mata ut kassetten (tryck in knappen helt).
OBS!
Under snabbspolning framåt (FAST FORWARD) kan oljud höras från kassetten.
Ta alltid ur kassettbandet när det inte används.
9. Skivspelare
1. Ta bort nålskyddet från pickupen och vik ut tonarmens transportlås (29).
2. Sätt [FUNCTION] (15) i läge PHONO för att slå på skivspelaren.
3. Placera en skiva på skivtallriken. Vissa 45-varvsskivor har stort centrumhål och
behöver då singeladaptern (25) för att kunna spelas.
4. Välj rätt hastighet för skivan med hastighetsväljaren (27).
5. Lyft tonarmen med tonarmslyften (26) och för in tonarmen över skivan. Skivtallriken börjar snurra.
6. Sänk försiktigt ner tonarmen vid början på önskat spår med tonarmslyften (26).
7. Avspelningen av skivan börjar. Justera volymen till önskad nivå med [VOLUME +] (7) och [VOLUME -] (8).
8. Lyft tonarmen tillbaka till pickuphållaren när avspelningen är avslutad. Tallriken slutar att snurra.
OBS!:
Vissa skivor har slutindikeringen utanför skivspelarens auto-stop-område. Detta medför att vissa skivor slutar spela
redan innan skivans sista spår. Detta avhjälps genom att sätta omkopplaren [AUTO STOP] (28) i läge OFF.
OBS! Skivan kommer att fortsätta snurra även när sista spåret har spelats. För att stoppa skivan: Sätt omkopplaren
[AUTO STOP] (28) i läge ON.
23
Page 24

10. Spela upp MP3-filer från ett minneskort
eller USB-minne
Musikanläggningen kan spela upp MP3-filer från ett USB-minne eller ett minneskort av typen SD eller MMC.
1. Sätt i ett USB-minne/minneskort i enligt bilden. Se till att vända USB-
2. Sätt [FUNCTION] (15) i läge CD/USB/SD och tryck sedan på
3. Efter en kort stund visar displayen det totala antalet låtar på skivan.
4. Tryck en eller flera gånger på [FOLDER] (4) eller (42) för att välja den
Svenska
5. Använd [►►I] [I◄◄] (3) eller (40) för att välja önskat spår i den
6. Tryck på [►II/■] (2) eller (39) för att starta uppspelningen.
7. För att tillfälligt stoppa uppspelningen: Tryck igen på [►II/■] (2) eller (39). Aktuellt spårnummer blinkar i displayen.
8. För att stoppa avspelningen: Tryck och håll in [►II/■] (2) eller (41) i 2 sekunder.
Obs! Tillvägagångssättet för övriga funktioner är lika som ” 7.4 Spela en CD-skiva med MP3-filer” punkterna 7.5,
7.6, 7.7, 7.9 och 7.10.
minnet/minneskortet rätt för att inte skada kontakten. Skjut alltid USBminnet/minneskortet rakt in utan att böja det.
[SOURCE] (5) eller (43) för att välja USB (USB-minne) eller CARD
(minneskort). Displayen indikerar vald källa, typ av ljudformat samt
totala antalet spår.
katalog du vill spela upp. Katalognamnet visas på displayen.
valda katalogen.
Tryck åter på [►II/■] (2) eller (39) för att fortsätta uppspelningen.
11. Spela in MP3 från CD/skivspelare/kassettbandspelare
Musikanläggningen kan spela in ljudfiler som MP3-format på minneskort eller USB-minne från CD-skiva, skivspelare eller
kassettspelare.
A. Spela in från CD-skiva.
I. Spela in ett spår från CD-skivan.
1. Starta uppspelning av CD-skivan som vanligt.
2. Tryck på [REC] (6) eller (36) för att starta inspelningen (under tiden som uppspelningen av spåret pågår).
På displayen visas
3. När inspelningen är klar avbryts den automatiskt.
4. Tryck på [REC] (6) eller (36) om du vill stoppa inspelningen i förväg.
II. Spela in hela CD-skivan
1. Lägg i CD-skivan, stäng CD-facket och vänta tills skivan har blivit inläst.
2. Tryck på [REC] (6) eller (36) för att starta inspelningen. På displayen visas
under tiden som inspelningen pågår.
3. När inspelningen är klar avbryts den automatiskt.
4. Tryck på [REC] (6) eller (36) om du vill stoppa inspelningen i förväg.
III. Spela in valda spår från CD-skivan.
1. Lägg i CD-skivan och vänta tills den har blivit inläst.
2. Välj de önskade spåren och spara dem enligt avsnittet: 7.10 Programmerad uppspelning (via fjärrkontrollen).
3. Tryck på [REC] (6) eller (36) för att starta inspelningen, på displayen visas
inspelningen pågår.
4. När inspelningen är klar avbryts den automatiskt.
5. Tryck på [REC] (6) eller (36) om du vill stoppa inspelningen i förväg.
blinkande under tiden som inspelningen pågår.
blinkande
blinkande under tiden som
24
Page 25

Obs!
• Inspelningstiden blir lika lång som speltiden.
• En ”AUDIO” -mapp skapas och där sparas inspelningen.
• Inspelningsformatet är förinställt som MP3 med Bit Rate 128 kbps och Sampling Rate 44.1 kHz.
• Sångtitlarna kommer inte att sparas vid inspelningen.
• För att en musikfil ska sparas måste hela spåret spelas in. Avbryts inspelningen i förtid sparas ingen fil
på minneskort eller USB-minne.
IV. Kopiera MP3-filer
Kopiering från CD-skiva.
• Om CD-skivan endast innehåller MP3-filer kommer filerna att kopieras i detta format.
Tillvägagångssättet att kopiera är lika som: ”Spela in från CD-skiva” (Se under 11.A.)
Kopiering mellan minneskort och USB-minne
• Tryck på [REC] (6) eller (36) under uppspelning från minneskort eller USB-minne för att starta kopiering
från minneskort till USB-minne eller från USB-minne till minneskort.
B. Spela in från skivspelare
1. Sätt [FUNCTION] (15) i läge PHONO.
2. Tryck på [REC] (6) eller (36).
3. På displayen visas först ”USB” och sedan visas
När symbolerna börjar blinka startar inspelningen.
4. Starta uppspelningen av vinylskivan med det spår som du vill spela in.
5. När inspelningen är färdig: Tryck och håll in [REC] (6) eller (36) tills displayen slutar blinka.
OBS! Vill du starta inspelningen direkt: Tryck på [REC] (6) eller (36) snabbt 2 gånger.
.
Svenska
C. Spela in från kassettbandspelare
1. Sätt [FUNCTION] (15) i läge TAPE.
2. Tryck på [REC] (6) eller (36).
3. På displayen visas först ”USB” eller ”CARD” och sedan visas
börjar blinka startar inspelningen.
4. Starta uppspelningen från kassettbandet med det spår som du vill spela in.
5. Tryck och håll in [REC] (6) eller (36) tills displayen slutar blinka när inspelningen är färdig.
OBS! Vill du starta inspelningen direkt: Tryck på [REC] (6) eller (36) snabbt 2 gånger.
OBS! Filerna sparas på USB-minnet (om både minneskort och USB-minne är anslutna).
. När symbolen
D. Manuell inställning av ”Bit Rate” vid inspelning från CD,
skivspelare eller bandspelare
1. Sätt [FUNCTION] (15) i läge PHONO eller TAPE.
2. Tryck på [INFO] (35). Det inställda värdet (128 Kbps) för ”Bit Rate” visas på displayen.
3. Tryck på [►►I] [I◄◄] (3) eller (40) för att ställa in önskat värde: 32 – 64 – 96 – 128 – 192 – 256 kbps
4. Tryck på [INFO] (35) för att bekräfta.
E. Track separation (TS)
För att dela upp en inspelning från skivspelare eller kassettbandspelare i flera filer, gör enligt följande:
Tryck en gång på [TS] (44) för att infoga en paus och skapa en ny fil där nästa spår kommer att spelas in.
Gör lika på alla ställen där du vill dela upp inspelningen i flera filer. Varje gång en ny fil skapas blinkar
”PHONO”- eller ”TAPE” -symbolen en gång på displayen.
OBS! Detta måste göras under inspelningen.
25
Page 26

12. Radera filer på USB-minne/SD-minneskort
Radera en fil
1. Sätt i ett USB-minne eller ett minneskort. Sätt sedan funktionsomkopplaren i läge USB eller SD.
2. Tryck och håll in [INFO] (35) i ca 3 sekunder. Displayen visar ”DEL -001”.
3. Välj vilken fil som ska raderas med [►►I] [I◄◄] (3) eller (40).
4. Tryck på [REC] (36). ”YES” och ”NO” blinkar. Tryck på [►►I] [I◄◄] (3) eller (40) för att välja YES
5. Tryck igen på [REC] (6) eller (36) för att bekräfta valet. Tryck en gång till på [■] (41) för att avbryta raderingen.
Radera alla filer
1. Sätt i ett USB-minne eller ett minneskort. Sätt sedan funktionsomkopplaren i läge USB eller SD.
Svenska
2. Tryck och håll in [INFO] (35) i ca 3 sekunder. Displayen visar ”DEL -001”.
3. Tryck på [REC] (36). ”YES” och ”NO” blinkar. Tryck på [►►I] [I◄◄] (3) eller (40) för att välja YES
4. Tryck på [REC] (36) för att bekräfta valet.
5. Tryck en gång på [■] (41) för att avbryta raderingen.
Obs! Alla filer på USB-minnet eller minneskortet kommer att raderas när du bekräftar med YES.
Ta ur USB-minnet/minneskortet
Stäng alltid av enheten innan du tar bort ur USB-minne/SD-minneskort.
USB-minne: Dra USB-minnet rakt ut för hand.
Minneskort: Tryck försiktigt in minneskortet lite, kortet fjädrar sedan utåt och kan dras ut för hand.
(för att radera den valda filen) eller NO för att avbryta raderingen.
(för att radera alla filer) eller NO för att avbryta raderingen.
13. Skötsel och underhåll
• Gör ren dammiga skivor med en skivborste.
• Fäll alltid ned locket när skivspelaren inte används. Detta för att förhindra att damm samlas på skivtallrik och nål.
• Skivspelaren kan vid behov torkas med en lätt fuktad trasa.
Byte av nål
1. Håll i pickupen med ena handen
och tryck ner en liten spårmejsel
i framkanten mellan pickupen och
nålen. Bänd mejseln försiktigt bakåt enligt bilden så att nålen lossnar.
2. Sätt i en ny nål genom att trycka
fast nålen i bakkanten först. Tryck
därefter fast den i framkanten.
1
2
14. Specifikationer
Nätspänning: 230 V AC, 50 Hz
Hastighet skivspelare: 33/45 v/min
Frekvensområde radio: 87,5 – 108 MHz (FM), 540 – 1600 kHz (AM)
Bitrate, MP3: 32 – 256 kbps
Uteffekt: 2×2 W
Storlek (skivspelare): 318 × 285 × 178 mm (B×D×H)
Storlek (högtalare): 120 × 140 × 195 mm (B×D×H)
Vikt: 4,7 kg
26
Page 27

Platespiller med cd, mp3, kassett-spiller
og radio
Art.nr. 38-4173 Modell TCD-983WEC
Les bruksanvisningen nøye før produktet tas i bruk, og ta vare på den for framtidig bruk.
Vi reserverer oss mot ev. tekst- og bildefeil, samt forandringer av tekniske data. Ved tekniske problemer eller
spørsmål, ta kontakt med vårt kundesenter. (Se opplysninger om kundesenteret i denne bruksanvisningen).
Innhold
1. Sikkerhet
2. Produktbeskrivelse
3. Forpakningens innehold
4. Knapper og funksjoner
5. Montering og installasjon
6. Radio
7. CD-spiller
8. Kassettspiller
9. Platespiller
10. Spill mp3-filer fra et USB-minne eller minnekort
11. Spill inn mp3 fra cd-/plate-/kassettspiller
12. Radere filer på USB-minne/SD minnekort
13. Stell og vedlikehold
14. Spesifikasjoner
Norsk
27
Page 28

1. Sikkerhet
• Produktet må kun repareres av kvalifisert servicepersonell.
• Produktet må ikke demonteres eller endres på.
• Plasser ikke produktet slik at det kan komme i kontakt med vann eller annen væske. Plasser aldri produktet
nær gjenstander, som kan forårsake at vann eller annen væske skylles over produktet. Dette gjelder
blomstervaser, leskedrikk etc.
• Skru av en eventuell standby-funksjon om natten og når du reiser bort.
• Produktet må ikke tildekkes. Sørg for tilstrekkelig ventilasjon. Avstand fra ventilasjonsåpninger
på anlegget og tilstøtende flater bør være min. 15 cm. Dette for å hindre at anlegget blir for varmt.
• Plasser ikke anlegget i fuktig eller støvete miljø, eller der det forekommer sterke vibrasjoner.
• Langvarig eksponering av høy lyd fra headset/hodetelefoner, kan føre til kroniske hørselsskader.
Norsk
CAUTION
RISK OF ELECTRIC
SHOCK DO NOT OPEN
CLASS 1
LASER PRODUCT
!
KLASSE 1 LASERAPPARAT
Advarsel! Dekselet må ikke åpnes. Usynlig laserstråler som kan føre til øyeskader.
Vend ikke blikket mot strålen, og se ikke rett på den gjennom optiske instrumenter.
Advarsel! Dekselet må ikke åpnes.
Farlig spenning ligger ubeskyttet på visse komponenter under produktets
deksel. Kontakt med disse kan føre til brann eller gi elektriske støt.
2. Produktbeskrivelse
• Platespiller med cd/mp3-spiller, kassettspiller, radio og tilkobling for usb-minne og sd-kort.
• Innebygd forsterker og eksterne høyttalere.
• Innspilling på usb-minne eller sd-kort fra platespiller, kassettspiller cd/mp3-spiller.
• Justerbar hastighet, 33 eller 45 rpm.
• Auto-stopp når platen er ferdigspilt.
• Innebygd RIAA-forsterker og lavnivåuttak.
• Leveres med fjernkontroll.
• Uttak for stereohodetelefoner.
3. Forpakningens innehold
• Platespiller
• 2 stk. høyttalere
• Fjernkontroll
• Bruksanvisning
28
Page 29

4. Knapper og funksjoner
Platespiller
10
11
9 8 7 6 5 4 3 2
ON/OFF VOLUME REC SOURCE FOLDER UP
FUNKTION BAND
USB
PHONO CD/USB/SD FM
SD/MMC TAPE TUNER AM FM-ST
POWER FM-ST
1
2
1
0
0
1
4
1
8
0
9
6
4
9
2
0
9
6
0
9
4
5
8
8
M
M
A
F
1
0
0
8
0
1
0
7
2
0
1
1
0
4
6
0
1
6
0
x
M
1
0
H
H
z
z
Norsk
12 13 14 15 16 1817 19 20 21 22
1. Lokk.
2. [►II/■ ]– Starte avspilling/pause/stoppe avspilling.
3. [►►I] [I◄◄] – Foregående/neste spor.
4. [FOLDER UP] – Gå til neste mappe (MP3).
5. [SOURCE] – Velger USB-minne eller
SD-minnekort eller CD.
6. [• REC] – Spill inn.
7. [VOLUME+] - Heve volumet.
8. [VOLUME-] - Redusere volumet.
9. [ON/OFF] - Strømbryter.
10. CD-skuff.
▲
11. [
] – Åpne/stenge CD-skuff.
12. Hodetelefonuttak.
14. Uttak for minnekort (SD/MMC).
15. [FUNCTION] – Funksjonsvelger: TAPE (kassett) –
PHONO (platespiller) – CD/USB/SD –
TUNER (radio).
16. [AM/FM] – Funksjonsvelger for radio: AM, FM
eller FM Stereo.
17. POWER – Indikatorlampe som lyser
når anlegger er skrudd på.
18. IR-sensor for fjernkontroll.
19. FM ST - Indikatorlampe som lyser
når radioen tar imot FM-stereo.
20. LCD-display.
21. TUNING – Frekvensvelger.
22. Frekvensskala.
13. Usb-uttak.
29
Page 30

▲
23. [
] – Hurtigspoling framover/mate ut kassettbånd.
Norsk
24. Lokk til kassettskuff.
25. Singeladapter.
26. Spake for heve/senke pick-up-arm.
27. 33/45 RPM – Hastighetsjustering.
28. AUTO STOP ON/OFF – Strømbryter til
platespillerens Auto-stop-funksjon.
29. Støtte for arm med transportlås.
30. Line Out L/R – Lavnivåutgang (venstre, høyer).
31. SPEAKER L/R – Høynivåtilkobling (venstre, høyer).
32. FM-antenne.
33. Uttak for strømkabel.
30
23
24
25
26
27
28
29
31
32
33
Fjernkontrollen
34. [FIND] – Søk filnavn (ved MP3-avspilling).
35. [INFO] – Velg innspillingskvalitet (Encoding Bitrate)
og vis ID3-tag.
36. [REC] – Trykk for å starte innspilling eller kopiering.
37. [REP/INTRO/RAN] – Repetisjon/intro (spill de første
10 sekundene på hvert spor)/tilfeldig rekkefølge på
avspilling (ved CD/mp3-avspilling).
38. [PROGRAM] – Programmert avspilling fra CD, MP3,
minnekort eller USB.
39. [►II] – Start avspilling/ta en pause i avspillingen.
40. [I◄] – [►I] – Foregående/neste spor.
41. [■] – Stopper MP3-avspilling/Sletter lagret program.
42. [FOLDER ▲] [FOLDER ▼] – Skifte katalog
(ved MP3-avspilling).
34 35
37 38 39
40
42
36
41
43
44
43. [SOURCE] – Velger USB-minne eller SD-minnekort
eller CD.
44. TS (Track Separation) – Deler opp en innspelning
i flere filer.
30
Page 31

5. Montering og installasjon
5.1 Montere dekselet
OBS! Nummerhenvisningene (1 – 6) gjelder kun
bildene i dette avsnittet.
1. Påse at hengslet (2) er bøyd helt bakover.
2. Tilpass sporet på dekselet (1) til hengslet (2),
men press den ikke helt sammen.
3. Sett først dekselets venstre styretapp (3) i platespillerens venstre feste (4) og trykk deretter forsiktig
fast dekselets høyre styretapp (5) på platespillerens
høyre feste (6).
4. Trykk dekselet ned på hengslet til hengslet festes
og du hører ett lite klikk.
5
6
1
2
3
4
Klikk!
Norsk
2
OBS!
Trykk dekselet forsiktig fast på platespillerens sidefester. Feil montering kan skade platespillerens sidefeste.
5.2 Tilkobling av høyttalere
Koble høyre og venstre høyttaler til høyre (R) og venstre
(L) høyttalerutgang (31) på apparatets bakside.
OBS! Høyttalerne kobles før musikkanlegget skrus på.
5.3 Kobling til strømnettet
1. Den lille kontakten på strømkabelen kobles til
uttaket (33) på platespilleren og støpselet plugges
i et strømuttak. Kontroller at spenningen (V), som er
angitt på merkeskiltet på baksiden av anlegget, er
den samme som i ditt lokale strømnett (230 V AC,
50 Hz). Spør forhandleren eller ett serviceverksted
hvis dette ikke er tilfelle.
2. For å skru helt av strømmen: Trekk ut støpselet fra
uttaket. Trekk også ut støpselet fra strømuttaket ved
kraftig tordenvær, for å beskytte anlegget.
Strømsparemodus
Produktet går automatisk over til strømsparemodus
15 minutter etter siste låten på LP-en, CD-en, USB-
minnet eller kassetten er spilt. Produktet går også automatisk over til strømsparemodus etter 15 minutter
når det står innstilt på pause.
For å starte opp spilleren igjen fra strømsparemodus, trykk to ganger på [ON/OFF]-strømbryteren.
5.4 Sette batterier i fjernkontrollen
1. Ta bort lokket på fjernkontrollens batteriholder.
2. Sett i 2 stk. 1,5 V, R03/AAA-batteri med polene
vendt som merkingen i batteriholderen viser.
3. Trykk batterilokket på plass igjen.
5.5 Plassering
Plasser platespilleren på et plant og horisontalt underlag.
Pass på at den ikke blir utsatt for vibrasjoner eller støt.
31
Page 32

Norsk
6. Radio
FM og AM (mellombølge)
1. Sett [FUNCTION] (15) på TUNER.
2. Sett funksjonsvelgeren (16) på AM, FM (mono) eller FM-ST (stereo).
3. Still inn ønsket frekvens med frekvensvelgeren (21).
4. Plasser antennen (32) på et passende sted sånn at mottaksforholdene er best mulig.
5. Juster volumet til ønsket nivå med volumkontrollene (7) og (8).
Tips for beste mulige mottak
AM: Anlegget har en innebygd antenne for AM-mottaking. Mottaksforholdet kan påvirkes
ved å dreie på platespilleren eller flytte den til et annet sted.
FM: Antennen bør være rullet og strukket helt ut for best mulig mottak.
7. CD-spiller
7.1 Høre på CD-plater
1. Sett funksjonsvelgeren (15) på CD/USB/SD.
2. CD-lokket åpnes ved å trykke på [OPEN/CLOSE] (11).
3. Plasser en cd-plate (lydplate eller CD-R/CD-RW) med etiketten vendt oppover i cd-luken.
4. Trykk på [OPEN/CLOSE] (11) for å stenge CD-luken.
5. Når platen er lastet inn vil displayet vise det totale antallet med spor som platen inneholder.
6. Trykk på [►II/■] (2) eller (39) for å start avspillingen. Det første sporet spilles av.
7. For å ta en midlertidig pause i avspillingen, trykk en gang til på [►II/■] (2) eller (39). Aktuelt spornummer
blinker i displayet. Trykk på [►II/■ ] (2) eller (39) en gang til for å restarte avspillingen.
8. For å stoppe spillingen: Trykk inn [►II/■] (2) eller (41) og hold inne i ca. 2 sekunder.
7.2 Velg et annet spor
Under avspillingen eller i pausemodus, kan du bruke [►►I] [I◄◄] (3) eller (40) for å velge et annet spor.
1. Trykk kort en gang på [►►I] [I◄◄] (3) eller (40) for å komme til neste spor, eller trykk gjentatte ganger til det
ønskede spornummeret vises i displayet.
2. Trykk kort en gang på [I◄◄], for å gå tilbake til begynnelsen av det sporet du nettopp har spilt.
Trykk flere ganger for å komme til tidligere spor.
7.3 Søk etter et avsnitt i sporet som spiller nå.
1. Trykk og hold inne [►►I] [I◄◄] (3) eller (40) for å søke et avsnitt i et spor. Sporet spilles nå med
høy hastighet og lavt volum.
2. Slipp knappen når du hører det avsnittet du søker. Den normale avspillingen fortsetter.
7.4 Spill av en CD-plate som inneholder MP3-filer
1. Sett funksjonsvelgeren (15) på CD/USB/SD.
2. CD-lokket åpnes ved å trykke på [OPEN/CLOSE] (11).
3. Plasser en CD-plate (lydplate eller CD-R/CD-RW som inneholder MP3-filer) med etiketten vendt oppover i CD-luken.
4. CD-lokket lukkes ved å trykke på [OPEN/CLOSE] (11).
5. Etter en kort stund viser displayet det totale antallet spor på platen.
6. Trykk en eller flere ganger på [FOLDER] (4) eller (42) for å velge den katalogen du vil spille fra.
Katalognummeret vises i displayet.
7. Benytt [►►I] [I◄◄] (3) eller (40) for å velge ønsket spor i katalogen.
8. Trykk på [►II/■] (2) eller (39) for å starte avspillingen.
9. Ønsker man en midlertidig pause i avspillingen, så trykk igjen på [►II/■](2) eller (39). Aktuelt spornummer
blinker i displayet. Trykk på [►II/■ ] (2) eller (39) en gang til for å restarte avspillingen.
10.For å stoppe spillingen: Trykk inn [►II/■ ] (2) eller (39) og hold inne i ca. 2 sekunder.
32
Page 33

Anm.
• Lydkvaliteten på MP3-filer kan variere avhengig av platens og innspillingens kvalitet.
• Vanligvis tar det litt lenger tid å lese av en MP3-plate for spilling enn det det tar å lese en vanlig Audio-plate.
7.5 Vise musikkinformasjon via fjernkontrollen
1. Under spilling av en MP3-fil kan du trykke en gang på knappen INFO (35) på fjernkontrollen for å vise
eller skjule ID3-informasjonen om det aktuelle sporet.
2. Dersom det ikke finnes informasjon tilgjengelig for det aktuelle sporet, vil i stedet teksten ”NONE” eller
”UNKNOWN” komme opp på displayet.
7.6 Å søke etter låt via fjernkontrollen
Du kan søke en låt etter dens tittel/navn.
1. Når spillingen er stoppet, trykk en gang på knappen FIND (34) på fjernkontrollen.
2. Bruk [►►I] [I◄◄] (3) eller (40) for å bla igjennom albumet i alfabetisk rekkefølge.
3. Trykk på [►II/■] (2) to ganger for å starte avspillingen av den valgte låten.
7.7 Søk katalog via fjernkontrollen
Du kan søke en katalog etter dens tittel/navn.
1. Når spillingen er stoppet, trykk to ganger på knappen FIND (34) på fjernkontrollen.
2. Bruk [►►I] [I◄◄] (3) eller (40) for å bla igjennom albumet i alfabetisk rekkefølge.
3. Trykk på [►II/■] (2) eller (39) for å starte avspillingen.
Anm. Displayet kan kun vise tegn/bokstaver fra det engelske alfabetet.
Norsk
7.8 Avanserte funksjoner
Repetert spilling (CD)
Repeat 1 → Repeat All → Intro → Random → Off
A. Repeat 1 (Repetere pågående spor)
Trykk en eller gjentatte ganger på REP/INTRO/RAN (37) for å repetere et spor. Symbolet
Repeat 1 er aktivert.
B. Repeat All (Repeterer alle spor)
Trykk en eller gjentatte ganger på REP/INTRO/RAN (37) for å repetere en hel plate. Symbolet
viser at Repeat All er aktivert.
C. INTRO (spille starten på spor)
For å spare tid når du søker etter en spesiell låt, spilles de 10 første sekundene av låtene av. Trykk en eller gjentatte
ganger på REP/INTRO/RAN (37) for å starte avspillingen med intro-funksjonen aktivert. ”INTRO” vises i displayet når
funksjonen er aktivert.
D. RANDOM (avspelning i tilfeldig rekkefølge)
Trykk en eller gjentatte ganger på REP/INTRO/RAN (37) for å aktivere tilfeldig rekkefølge på låtene som spilles.
”RANDOM” vises i displayet når denne funksjonen er aktiv. Trykk en gang til på [REP/INTRO/RAN] (37) eller på
[■] (41) for å skru av tilfeldig avspilling.
viser at
ALL
E. OFF (Ingen repetisjon)
Trykk gjentatte ganger på [REP/INTRO/RAN] (37) for å skru av repetisjon. Det er da ikke noe symbol på skjermen.
33
Page 34

Repetert spilling (MP3)
Repeat 1 → Repeat All → Repeat Folder → Intro → Random → Off
A. Repeat 1 (Repetere pågående spor)
Trykk en eller gjentatte ganger på [REP/INTRO/RAN] (37) for å repetere pågående spor. Symbolet
viser at Repeat 1 er aktivert.
B. Repeat All (Repeterer alle spor på platen)
Norsk
Trykk en eller gjentatte ganger på [REP/INTRO/RAN] (37) for å repetere pågående spor. Symbolet
viser at Repeat All er aktivert.
C. Repeat Folder (Repetere alle spor i mappen)
Trykk en eller gjentatte ganger på [REP/INTRO/RAN] (37) for å repetere alle mapper og spor.
Symbolet
D. INTRO (spille starten på spor)
For å spare tid når du søker etter en spesiell låt, spilles de 10 første sekundene av låtene av. Trykk en eller
gjentatte ganger på [REP/INTRO/RAN] (37) for å starte avspillingen med intro-funksjonen aktivert. ”INTRO”
vises i displayet når funksjonen er aktivert.
E. RANDOM (avspelning i tilfeldig rekkefølge)
Trykk en eller gjentatte ganger på [REP/INTRO/RAN] (37) for å aktivere tilfeldig rekkefølge på låtene som spilles.
”RANDOM” vises i displayet når denne funksjonen er aktiv. Trykk en gang til på [REP/INTRO/RAN] (37) eller
på [■] (41) for å skru av tilfeldig avspilling.
F. OFF (Ingen repetisjon)
Trykk gjentatte ganger på [REP/INTRO/RAN] (37) for å skru av repetisjon. Det er da ikke noe symbol på displayet.
viser at Repeat Folder er aktivert.
ALL
7.9 Programmert avspilling via fjernkontrollen
Opp til 32 spor kan programmeres i valgfri rekkefølge.
1. Stopp avspillingen ved å trykke på [■] (41).
2. Trykk en gang på [PROGRAM] (38) på fjernkontrollen. ”PROG”, programnummer
samt spornummer vises i displayet.
3. Bruk [I◄] [►I] (40) for å velge det sporet som skal programmeres.
4. Bekreft med ett trykk på [PROGRAM] (38). Spornummeret blinker nå i displayet.
5. Repeter trinn 3 og 4 for å lagre flere spor i minnet.
6. Trykk på [►II] (39) for å starte avspillingen i den rekkefølgen du nettopp har programmert.
7. Trykk på [■] (41) for å stoppe avspillingen og trykk og hold inne [■] (41) til ”PROG” forsvinner fra displayet,
for å slette programminnet.
34
Page 35

8. Kassettspiller
1. Sett [FUNCTION] (15) på TAPE.
2. Skyv inn en kassett med kortsiden inn først, (se fig.). Den siden
som vender oppover spilles av.
3. Kassettspilleren starter automatisk når kassetten trykkes inn.
4. Kassettspillerens funksjoner styres med knappen [
PLAY - Avspilling pågår (knappen
er helt ute).
FAST FORWARD – Hurtigspoling framover
(knappen er delvis trykket inn). Trykk knappen
litt inn for å avslutte hurtigspolingen og å gå
tilbake til avspillingsmodus.
EJECT – Trykk denne helt inn for å mate ut kassetten.
▲
] (23):
Norsk
OBS!
Ved hurtigspoling kan det komme ulyd i spilleren. Dette er helt normalt.
Ta alltid ut kassetten når den ikke er i bruk.
9. Platespiller
1. Ta bort beskyttelsen foran stiften på pickupen og ta av transportlåsen (29) på armen.
2. Sett [FUNCTION] (15) på PHONO for å starte platespilleren.
3. Plasser en plate på platetallerkenen. Noen singler har stort senterhull. De trenger singleadapteren (25)
for å kunne spilles.
4. Velg riktig hastighet for platen med hastighetsvelgeren (27).
5. Løft opp pickup-armen (26) med spaken og før den inn over platen. Platetallerkenen begynner å snurre.
6. Senk pickupen forsiktig ned på begynnelsen av ønsket spor.
7. Avspillingen av platen starter. Juster volumet til ønsket nivå med volumkontrollene (7) og (8).
8. Løft armen tilbake til pickupholderen når avspillingen er avsluttet. Tallerken slutter å snurre rundt.
OBS!
Noen plater har sluttindikasjonen utenfor platespillerens ”Auto-stop” – område. Dette medfører at noen plater slutter å
spille allerede før platens siste spor. Dette kan hindres ved at du setter omkobleren [AUTO STOP] (28) i OFF-posisjon.
OBS!
Platen vil fortsette å snurre selv når det siste sporet er ferdig spilt. For å stoppe spillingen: Sett bryteren [AUTO STOP]
(28) på ON.
35
Page 36

Norsk
10. Spill MP3-filer fra et USB-minne
eller minnekort
Apparatet kan spille av mp3-filer fra et usb-minne eller et minnekort av typen SD eller MMC.
1. Sett i et usb-minne/minnekort som vist på bildet. Påse at du plasserer
usb-minnet/minnekortet riktig, så ikke kontakten blir skadet. Sett alltid
usb-minnet/minnekortet rett inn uten å bøye på det.
2. Sett [FUNCTION] (15) i posisjon CD/USB/SD og trykk deretter på
[SOURCE] (5) eller (43) for å velge minne, USB (usb-minne) eller
CARD (minnekort). Displayet vil nå indikere valgt kilde, type lydformat
og det totale antall spor.
3. Etter en kort stund viser displayet det totale antallet låter på platen.
4. Trykk en eller flere ganger på [FOLDER] (4) eller (42) for å velge den
katalogen du vil spille fra. Katalognavnet vises i displayet.
5. Benytt [►►I] [I◄◄] (3) eller (40) for å velge ønsket spor i katalogen.
6. Trykk på [►II/■] (2) eller (39) for å starte avspillingen.
7. For å stoppe spillingen midlertidig: trykk igjen på [►II/■] (2) eller (39). Aktuelt spornummer blinker i displayet.
Trykk på [►II/■] (2) eller (39) en gang til for å restarte avspillingen.
8. For å stoppe spillingen: Trykk inn [►II/■] (2) eller (41) og hold inne i ca. 2 sekunder.
OBS! Framgangsmåten for de øvrige funksjonene er lik følgende punkter ovenfor, som ” 7.4 Spille en CD-plate
med MP3-filer” og punktene 7.5, 7.6, 7.7, 7.9 og 7.10.
11. Spill inn mp3 fra cd-/plate-/kassettspiller
Man kan kopiere lydfiler fra cd-plater eller vinylplater til mp3-format eller til usb-minne.
A. Spill inn fra CD-plate
I. Spill inn et spor fra CD-platen
1. Start avspillingen av cd-platen som vanlig.
2. Trykk på [REC] (6) eller (36) for å starte innspillingen (mens avspillingen pågår). På displayet vises
blinkende mens innspillingen pågår.
3. Når innspillingen er ferdig avbrytes denne automatisk.
4. Trykk på [REC] (6) eller (36) hvis du ønsker å stoppe innspillingen.
II. Spill inn hele CD-platen
1. Legg cd-platen i cd-rommet og vent til den er lastet inn.
2. Trykk deretter på [REC] (6) for å starte innspillingen. På displayet vises
mens innspillingen pågår.
3. Når innspillingen er ferdig avbrytes denne automatisk.
4. Trykk på [REC] (6) eller (36) hvis du ønsker å stoppe innspillingen.
blinkende
III. Spille inn valgte spor fra CD-platen
1. Legg i cd-platen og vent til den er lastet inn i anlegget.
2. Velg ønskede spor og lagre dem som beskrevet i avsnittet: ”7.10 Programmert avspilling via fjernkontrollen”.
3. Trykk på [REC] (6) eller (36) for å starte innspillingen. I displayet vises
mens innspillingen pågår.
4. Når innspillingen er ferdig avbrytes denne automatisk.
5. Trykk på [REC] (6) eller (36) hvis du ønsker å stoppe innspillingen.
blinkende
36
Page 37

OBS!
• Innspillingstiden er like lang som spilletiden.
• En AUDIO-mappe lages og det er der innspillingen lagres.
• Innspillingsformatet er forhåndsinnstilt som MP3 med Bit Rate 128 kbps og Sampling Rate 44.1 kHz.
• Sangtitlene vil ikke bli lagret ved innspillingen.
• For at en musikkfil skal lagres må hele sporet spilles inn. Hvis innspillingen avbrytes, vil det ikke bli lagret noe.
IV. Kopiere MP3-filer
Kopiering fra CD-plate.
Hvis cd-platen kun inneholder mp3-filer, vil filene også kopieres i dette formatet. Framgangsmåten
for å kopiere er som i følgende avsnitt: ”Spill inn fra CD-plate” (Se under 11.A.)
Kopiering mellom minnekort og usb-minne
Trykk på [REC] (6) eller (36) under avspilling fra minnekort eller USB-minne for å starte kopiering fra minnekort
til usb-minne eller fra usb-minne til minnekort.
B. Spill inn fra platespiller
1. Sett [FUNCTION] (15) på PHONO.
2. Trykk på [REC] (6) eller (36).
3. På displayet vises først "USB" og deretter
4. Start avspillingen av det sporet på vinylplaten, som du vil spille inn.
5. Når innspillingen er fullført: Trykk på [REC] (6) eller (36) og hold inne til displayet slutter å blinke.
Obs! Dersom du ønsker å starte innspillingen direkte: Trykk på [REC] (6) eller (36) raskt to gang.
. Når symbolene begynner å blinke starter innspillingen.
Norsk
C. Spille inn fra kassettspilleren
1. Sett [FUNCTION] (15) på TAPE.
2. Trykk på [REC] (6) eller (36).
3. På displayet vises først "USB" eller "CARD" og deretter
når symbolene begynner å blinke.
4. Start avspillingen av det sporet på kassetten, som du vil spille inn.
5. Trykk på [REC] (6) eller (36) og hold inne til displayet slutter å blinke når innspillingen er ferdig.
Obs! Dersom du ønsker å starte innspillingen direkte: Trykk på [REC] (6) eller (36) raskt to ganger.
Obs! Filene lagres på usb-minnet (hvis både minnekort og usb-minne er koblet til).
. Innspillingen starter
D. Manuell innstilling av ”Bit Rate” ved innspilling fra cd, platespiller
eller kassettspiller
1. Sett [FUNCTION] (15) på PHONO eller TAPE.
2. Trykk på [INFO] (35). Den innstilte verdien (128 kbps) for "Bit Rate" vises i displayet.
3. Trykk på [►►I] [I◄◄] (3) eller (40) for å stille inn ønsket verdi: 32, 64, 96, 128, 192 eller 256 kbps.
4. Trykk på [INFO] (35) for å bekrefte.
E. Track separation (TS)
For å dele opp en innspilling fra platespiller eller kassettspiller i flere filer, gjør følgende: Trykk en gang på [TS] (44)
for å legge inn en pause og å lage en ny fil der neste spor kommer til å bli spilt inn. Gjør likedan på alle stedene der
du ønsker å spille inn flere filer. For hver gang en ny fil lages vil ”PHONO” eller ”TAPE” blinke en gang på skjermen.
OBS! Dette må gjøres under innspillingen.
37
Page 38

12. Radere filer på USB-minne/SD minnekort
Slette en fil
1. Sett inn et usb-minne og et minnekort. Sett deretter funksjonsvelgeren på USB eller SD.
2. Trykk og hold inne [INFO] (35) i ca. 3 sekunder. Displayet viser ”DEL - 001”.
3. Velg hvilken fil som skal slettes med [►►I] [I◄◄] (3) eller (40).
4. Trykk på [REC] (36). ”YES” og ”NO” blinker. Trykk på [►►I] [I◄◄] (3) eller (40) for å velge YES
(for å slette den valgte filen) eller NO for å avbryte operasjonen.
5. Trykk deretter på [REC] (6) eller (36) for å bekrefte valget. Trykk en gang til på [■] (41) for å avbryte slettingen.
Slette alle filer:
1. Sett inn et usb-minne og et minnekort. Sett deretter funksjonsvelgeren på USB eller SD.
2. Trykk og hold inne [INFO] (35) i ca. 3 sekunder. Displayet viser ”DEL - 001”.
3. Trykk på [REC] (36). ”YES” og ”NO” blinker. Trykk på [►►I] [I◄◄] (3) eller (40) for å velge YES
(for å slette den valgte filen) eller NO for å avbryte operasjonen.
4. Trykk på [REC] (36) for å bekrefte valget.
5. Trykk en gang til på [■] (41) for å avbryte slettingen.
OBS! Alle filer på usb-minnet eller minnekortet kommer til å slettes når du bekrefter med YES.
Norsk
Ta ut USB-minne/minnekortet
Skru alltid av enheten før du fjerner USB-minnet/minnekortet.
USB-minne: Trekk USB-minnet rett ut for hånd.
Minnekort: Trykk minnekortet lett innover. Kortet fjærer utover og kan deretter trekkes ut for hånd.
13. Stell og vedlikehold
• Rengjør støvete plater med en platebørste.
• Lukk alltid dekselet når platespilleren ikke er i bruk. Dette for å forhindre at støv samler seg
på platetallerkenen og stiften.
• Platespilleren kan tørkes med en lett fuktet klut.
Bytte av stift
1. Hold i pickupen med den ene hånden
og trykk ned en liten skrutrekker
i framkanten mellom pickupen og
stiften. Bøy skrutrekkeren forsiktig
bakover som vist på bildet så
stiften løsner.
2. Sett inn en ny stift ved å trykke den
ned i bakkant først. Trykk den deretter
fast i framkant.
1
2
14. Spesifikasjoner
Spenning: 230 V AC, 50 Hz
Hastighet platespiller: 33 eller 45 o/min
Frekvensområde radio: 87,5 – 108 MHz (FM), 540 – 1600 kHz (AM)
Bitrate, MP3: 32 - 256 kbps
Uteffekt: 2 × 2 W
Dimensjon platespiller: 318 × 285 × 178 mm (b × d × h)
Dimensjon høyttalere: 120 × 140 × 195 mm (b × d × h)
Vekt: 4,7 kg
38
Page 39

Levysoitin, jossa on CD-, MP3- ja
kasettisoitin sekä radio
Tuotenro 38-4173 Malli TCD-983WEC
Lue käyttöohje kokonaan ennen käyttöä ja säästä se myöhempää tarvetta varten. Emme vastaa tekstissä
ja kuvissa mahdollisesti esiintyvistä virheistä. Pidätämme oikeuden teknisten tietojen muutoksiin.
Ota yhteyttä asiakaspalveluumme, jos sinulla on kysyttävää tai tarvitset apua teknisissä asioissa (katso
osoitetiedot takaa).
Sisältö
1. Turvallisuus
2. Tuotteen kuvaus
3. Pakkauksen sisältö
4. Painikkeet ja toiminnot
5. Kokoaminen ja asentaminen
6. Radio
7. CD-soitin
8. Kasettisoitin
9. Levysoitin
10. MP3-tiedostojen toistaminen muistikortilta tai USB-muistitikulta
11. MP3-tiedostojen tallentaminen CD-, levy- tai kasettisoittimelta
12. Tiedostojen poistaminen USB-muistitikulta/SD-muistikortilta
13. Kunnossapito
14. Tekniset tiedot
Suomi
39
Page 40

1. Turvallisuus
• Tuotteen saa korjata vain koulutettu huoltohenkilöstö.
• Tuotetta ei saa purkaa eikä siihen saa tehdä muutoksia.
• Älä sijoita tuotetta paikkaan, jossa se saattaa pudota veteen tai muuhun nesteeseen.
Älä aseta tuotteen päälle nestettä sisältäviä esineitä, esimerkiksi kukkamaljakkoa tai juomalasia.
• Sammute laite kokonaan yöksi tai lähtiessäsi matkoille (älä jätä laitetta valmiustilaan).
• Älä peitä laitetta. Laitteen tuuletusaukkojen ja ympäröivien pintojen väliin on jätettävä vähintään
15 cm tyhjää tilaa, jotta ilmanvaihto on riittävää eikä laite kuumene.
• Älä sijoita laitetta kosteisiin tai pölyisiin tiloihin tai paikkaan, jossa esiintyy voimakasta värinää.
• Pitkään jatkuva altistuminen kuulokkeiden suurille äänenvoimakkuuksille voi aiheuttaa kuulovaurioita.
Suomi
CAUTION
RISK OF ELECTRIC
SHOCK DO NOT OPEN
CLASS 1
LASER PRODUCT
!
LUOKAN 1 LASERLAITE
Varoitus! Älä avaa koteloa! Kotelon sisällä oleva näkymätön lasersäde voi aiheuttaa
silmävaurioita. Älä katso sädettä suoraan äläkä optisen välineen läpi.
Varoitus! Älä avaa koteloa!
Tuotteen kotelon sisällä on suojaamattomia osia, joissa on vaarallinen jännite. Näiden osien koskettaminen voi aiheuttaa tulipalovaaran tai sähköiskuja.
2. Tuotteen kuvaus
• Levysoitin, jossa on CD-/MP3-soitin, kasettisoitin ja radio sekä liitännät USB-muistitikkua ja SD-muistikorttia varten.
• Sisäinen vahvistin ja ulkoiset kaiuttimet.
• Tallennus USB-muistitikulle tai SD-muistikortille levysoittimelta, kasettisoittimelta tai CD-/MP3-soittimelta.
• Nopeudenvalitsin: 33/45 kierr./min.
• Automaattinen pysäytys vinyylilevyn toiston loputtua.
• Sisäinen RIAA-vahvistin ja linjalähtö.
• Pakkaukseen sisältyy kaukosäädin.
• Stereokuulokeliitäntä.
3. Pakkauksen sisältö
• Levysoitin
• 2 kaiutinta
• Kaukosäädin
• Käyttöohje
40
Page 41

4. Painikkeet ja toiminnot
Levysoitin
10
11
9 8 7 6 5 4 3 2
ON/OFF VOLUME REC SOURCE FOLDER UP
FUNKTION BAND
USB
PHONO CD/USB/SD FM
SD/MMC TAPE TUNER AM FM-ST
POWER FM-ST
1
2
1
0
0
1
4
1
8
0
9
6
4
9
2
0
9
6
0
9
4
5
8
8
M
M
A
F
1
0
0
8
0
1
0
7
2
0
1
1
0
4
6
0
1
6
0
x
M
1
0
H
H
z
z
12 13 14 15 16 1817 19 20 21 22
1. Kansi.
2. [►II/■ ] – Toiston aloittaminen / keskeytys / toiston
lopettaminen.
3. [►►I] [I◄◄] – Edellinen/seuraava kappale.
4. [FOLDER UP] – Siirtyminen seuraavaan
kansioon (MP3).
5. [SOURCE] – Lähteen valinta: USB-muistitikku,
SD-muistikortti tai CD.
6. [• REC] – Tallennus.
7. [VOLUME +] – Äänenvoimakkuuden lisääminen.
8. [VOLUME +] – Äänenvoimakkuuden vähentäminen.
9. [ON/OFF] – Virtakytkin.
10. CD-kelkka.
▲
11. [
] – CD-kelkan avaaminen/sulkeminen.
12. Kuulokeliitäntä.
Suomi
13. USB-liitäntä.
14. SD-/MMC-muistikorttiliitäntä.
15. [FUNCTION] – Tilanvalitsin: TAPE (kasetti) –
PHONO (levysoitin) – CD/USB/SD – TUNER (radio).
16. [AM/FM] – Radion tilanvalitsin: AM – FM –
FM Stereo.
17. ”POWER” – Virran merkkivalo; palaa, kun
laitteeseen on kytketty virta.
18. Kaukosäätimen infrapunatunnistin
19. ”FM ST” – Merkkivalo; palaa, kun radio
vastaanottaa FM-stereosignaalia.
20. Nestekidenäyttö.
21. TUNING – Taajuussäädin.
22. Taajuusasteikko.
41
Page 42

▲
] – Kelaus eteenpäin / kasetin poisto.
23. [
24. Kasettipesän kansi.
25. Levylautasen single-sovitin.
26. Äänivarren nostin – nostaa/laskee äänivarren.
27. 33/45 RPM – levysoittimen nopeudenvalitsin.
28. AUTO STOP ON/OFF – Levysoittimen
AutoStop-toiminnon säädin.
29. Äänivarren tuki (sis. kuljetuspidikkeen).
30. Line Out L/R – Linjalähtö (vasen, oikea).
31. SPEAKER L/R – Kaiutinliitäntä (vasen, oikea).
32. FM-antenni.
33. Virtajohdon liitäntä.
30
23
24
25
26
27
28
29
31
32
Suomi
Kaukosäädin
34. [FIND] – Tiedostonimen haku (MP3-toistossa).
35. [INFO] – Tallennuslaadun valinta (Encoding Bitrate)
36. [REC] – Tallennuksen tai kopioinnin aloittaminen.
37. [REP/INTRO/RAN] – Uudelleentoisto / intro (soittaa
38. [PROGRAM] – CD-levyn tai MP3-tiedostojen
39. [►II] – Toiston aloittaminen/keskeyttäminen.
40. [I◄ ] – [►I] – Edellinen/seuraava raita.
41. [■ ] – CD/MP3-toiston lopettaminen /
33
ja ID3-merkinnän näyttö.
kunkin raidan alusta 10 sekuntia) / sekoitus (CD/
MP3-toistossa).
(muistikortilta tai USB-muistitikulta) ohjelmoitu toisto.
tallennetun ohjelmoinnin poistaminen.
34 35
37 38 39
40
42
36
41
43
44
42. [FOLDER ▲] [FOLDER ▼] – Hakemiston
vaihtaminen (MP3-toistossa).
43. [SOURCE] – Lähteen valinta: CD, USB-muistitikku
tai SD-muistikortti.
44. [TS] (Track Separation) – Tallennuksen jakaminen
useiksi tiedostoiksi.
42
Page 43

5. Kokoaminen ja asentaminen
5.1 Kannen kokoaminen
Huom. Numerot (1–6) koskevat vain tämän osion kuvia.
1. Varmista, että sarana (2) on taitettu kokonaan taakse.
2. Työnnä kannen ura (1) saranaan (2), mutta älä työnnä
sitä vielä pohjaan asti.
3. Aseta kannen vasemmanpuoleinen ohjaintappi (3)
ensin levysoittimen vasempaan kiinnikkeeseen (4) ja
paina sen jälkeen kannen oikeanpuoleinen ohjaintappi (5) varovasti levysoittimen oikeaan
kiinnikkeeseen (6).
4. Paina kansi samalla paikalleen, kunnes sarana (2)
lukittuu ja kuulet napsahduksen.
1
2
3
5
6
Huom.
Ole varovainen kiinnittäessäsi kantta levysoittimen
sivukiinnikkeisiin. Virheellinen kiinnitys voi vaurioittaa
levysoittimen sivukiinnikkeitä.
5.2 Kaiuttimien liittäminen
Kytke oikea kaiutin laitteen takana olevaan oikean (R)
kaiuttimen liitäntään ja vasen kaiutin vasemman (L)
kaiuttimen liitäntään (31).
Huom.
Liitä kaiuttimet laitteeseen ennen virran kytkemistä.
5.3 Liittäminen verkkovirtaan
1. Kiinnitä virtajohdon liitin levysoittimen liitäntään (33)
ja työnnä pistoke pistorasiaan. Tarkista, että laitteen
takapaneelin arvokilvessä oleva jännitemerkintä (V)
vastaa paikallisen sähköverkon jännitettä (230 V AC,
50 Hz). Jos näin ei ole, kysy neuvoa jälleenmyyjältä
tai huoltoliikkeestä.
2. Virran katkaiseminen kokonaan: Irrota pistoke
pistorasiasta. Suosittelemme pistokkeen irrottamista
pistorasiasta myös voimakkaalla ukkosella, jotta
laite ei vaurioidu.
4
Klik!
2
Suomi
Virransäästötila
Soitin siirtyy automaattisesti virransäästötilaan 15 minuuttia LP-levyn, CD-levyn, USB-muistin, SD-kortin tai
kasetin viimeisen kappaleen päättymisen jälkeen.
Soitin siirtyy automaattisesti virransäästötilaan myös
15minuuttia sen jälkeen, kun se on asetettu pausetilaan (CD-levy, USB-muisti, SD-kortti).
Käynnistä soitin virransäästötilassa painamalla
virta kytkintä [ON/OFF] kaksi kertaa.
5.4 Paristojen asettaminen
1. Avaa kaukosäätimen paristolokeron kansi.
2. Aseta paristot (2 kpl AAA/R03, 1,5 V) paristokotelon
merkintöjen mukaisesti.
3. Paina paristolokeron kansi paikalleen.
5.5 Laitteen sijoittaminen
Aseta levysoitin kovalle, tasaiselle alustalle. Huolehdi,
ettei levysoitin altistu tärinälle tai iskuille.
43
Page 44

6. Radio
FM ja AM (keskiaallot)
1. Aseta [FUNCTION]-valitsin (15) TUNER-asentoon.
2. Aseta tilanvalitsin (16) asentoon AM, FM (mono) tai FM-ST (stereo).
3. Valitse haluamasi taajuus taajuussäätimellä (21).
4. Sijoita antenni (32) paikkaan, joka on vastaanoton kannalta mahdollisimman hyvä.
5. Säädä äänenvoimakkuus haluamallesi tasolle äänenvoimakkuuspainikkeilla [VOLUME +] (7) ja [VOLUME -] (8).
Vihjeitä vastaanoton parantamiseksi
AM: Laitteessa on sisäinen AM-antenni. Vastaanottoa voidaan säätää kääntämällä tai siirtämällä levysoitinta.
FM: Paras vastaanotto saavutetaan, kun antenni avataan täyteen pituuteensa ja vedetään suoraksi.
7. CD-soitin
7.1 CD-levyn toistaminen
1. Aseta [FUNCTION]-valitsin (15) CD/USB/SD-asentoon.
2. Avaa CD-kelkka painamalla [OPEN/CLOSE]-painiketta (11).
3. Aseta CD-levy (audiolevy tai CD-R-/CD-RW-levy) CD-kelkkaan etikettipuoli ylöspäin.
4. Sulje CD-kelkka painamalla [OPEN/CLOSE]-painiketta (11).
5. Kun laite on lukenut levyn, näytössä näkyy levyn raitojen kokonaismäärä.
6. Aloita toisto painamalla [►II/■]-painiketta (2 tai 39). Levyn ensimmäinen raita alkaa soida.
7. Voit keskeyttää toiston hetkeksi painamalla [►II/■ ]-painiketta (2 tai 39) uudelleen. Toistettavan raidan
numero alkaa vilkkua näytössä. Voit jatkaa toistoa painamalla jälleen [►II/■]-painiketta (2 tai 39).
8. Toiston lopettaminen: Paina [►II/■ ]-painiketta (2 tai 41) kahden sekunnin ajan.
Suomi
7.2 Siirtyminen tiettyyn raitaan
Painamalla [►►I]- tai [I◄◄]-painiketta (3 tai 40) voit valita toisen raidan joko toiston aikana tai toiston ollessa keskeytetty.
1. Siirry seuraavaan raitaan painamalla lyhyesti [►►I]- tai [I◄◄]-painiketta (3 tai 40), tai paina painiketta useita
2. Voit palata parhaillaan toistettavana olevan raidan alkuun painamalla lyhyesti [►►I]- tai [I◄◄]-painiketta (3 tai 40).
7.3 Siirtyminen raidan tiettyyn kohtaan
1. Voit siirtyä toistettavan raidan tiettyyn kohtaan pitämällä [►►I]- tai [I◄◄] -painiketta (3 tai 40) painettuna.
2. Vapauta painike, kun kuulet haluamasi kohdan. Laite jatkaa toistoa normaalisti.
7.4 MP3-tiedostojen toistaminen CD-levyltä
1. Aseta [FUNCTION]-valitsin (15) CD/USB/SD-asentoon.
2. Avaa CD-kelkka painamalla [OPEN/CLOSE]-painiketta (11).
3. Aseta CD-levy (audiolevy tai MP3-tiedostoja sisältävä CD-R-/CD-RW-levy) CD-kelkkaan etikettipuoli ylöspäin.
4. Sulje CD-kelkka painamalla [OPEN/CLOSE]-painiketta (11).
5. Hetken kuluttua näytössä näkyy levyllä olevien raitojen kokonaismäärä.
6. Valitse haluamasi hakemisto painamalla [FOLDER]-painiketta (4 tai 42) kerran tai useita kertoja.
7. Valitse hakemistosta haluamasi raita painamalla [►►I]- tai [I◄◄]-painiketta (3 tai 40).
8. Aloita toisto painamalla [►II/■]-painiketta (2 tai 39).
9. Toiston keskeyttäminen tilapäisesti: Paina [►II/■ ]-painiketta (2 tai 39) uudelleen. Toistettavan raidan numero
10. Toiston lopettaminen: Paina [►II/■]-painiketta (2 tai 39) kahden sekunnin ajan.
kertoja, kunnes näyttöön tulee haluamasi raidan numero.
Voit siirtyä edeltäviin raitoihin painamalla painiketta useita kertoja.
Laite alkaa toistaa raitaa nopeasti ja alhaisella äänenvoimakkuudella.
Näyttöön tulee hakemiston numero.
alkaa vilkkua näytössä. Voit jatkaa toistoa painamalla jälleen [►II/■ ]-painiketta (2 tai 39).
44
Page 45

Huomaa:
• MP3-tiedostojen äänenlaatu voi vaihdella levyn tai tallennuksen laadun mukaan.
• MP3-tiedostoja sisältävän levyn lukeminen kestää yleensä kauemmin kuin tavallisen audiolevyn lukeminen.
7.5 Raidan tietojen näyttäminen (kaukosäätimellä)
1. MP3-tiedoston toiston aikana voit näyttää tai piilottaa toistettavan raidan ID3-tiedot painamalla kaukosäätimen
[INFO]-painiketta (35).
2. Jos kyseistä raitaa koskevia tietoja ei ole, näytössä näkyy teksti “NONE” (ei tietoja) tai “UNKNOWN” (tuntematon).
7.6 Kappaleen etsiminen nimen perusteella (kaukosäätimellä)
Voit etsiä kappaleita tiedostonimen/nimen perusteella.
1. Kun toisto ei ole käynnissä, paina kaukosäätimen [FIND]-painiketta (34) kerran.
2. Selaa aakkosjärjestyksessä olevia kappaleiden nimiä [►►I]- tai [I◄◄]-painikkeella (3 tai 40).
3. Valitse kappale ja aloita sen toisto painamalla [►II/■ ]-painiketta (2) kaksi kertaa.
7.7 Hakemistojen etsiminen (kaukosäätimellä)
Voit etsiä hakemistoja nimen perusteella.
1. Kun toisto ei ole käynnissä, paina kaukosäätimen [FIND]-painiketta (34) kaksi kertaa.
2. Selaa aakkosjärjestyksessä olevia hakemistojen nimiä [►►I]- tai [I◄◄]-painikkeella (3 tai 40).
3. Aloita valitussa hakemistossa olevien kappaleiden toisto painamalla [►II/■]-painiketta (2 tai 39).
Huomaa: Näyttö tunnistaa vain englannin kielessä käytettyjä merkkejä.
7.8 Lisätoiminnot
Uudelleentoisto (CD)
Repeat 1 → Repeat All → Intro → Random → Off
A. Repeat 1 (parhaillaan toistettava raita toistetaan uudelleen)
Voit toistaa raidan uudelleen painamalla [REP/INTRO/RAN]-painiketta (37) kerran tai useita kertoja.
-merkki osoittaa, että Repeat 1 on käytössä.
B. Repeat All (kaikki raidat toistetaan uudelleen)
Voit toistaa koko levyn uudelleen painamalla [REP/INTRO/RAN]-painiketta (37) kerran tai useita kertoja.
-merkki osoittaa, että Repeat All on käytössä.
C. INTRO (raidan alku toistetaan)
Voit nopeuttaa tietyn raidan etsimistä toistamalla kunkin peräkkäisen raidan alusta 10 sekuntia. Ota introtoiminto käyttöön ja käynnistä toisto painamalla [REP/INTRO/RAN]-painiketta (37) kerran tai useita kertoja.
Näytössä näkyy teksti ”INTRO”, kun toiminto on käytössä.
D. RANDOM (satunnaistoisto)
Voit ottaa satunnaistoiston käyttöön painamalla [REP/INTRO/RAN]-painiketta (37) kerran tai useita kertoja.
Näytössä näkyy teksti “RANDOM”, kun toiminto on käytössä. Voit lopettaa satunnaistoiston painamalla
[REP/INTRO/RAN]-painiketta uudelleen (37) tai [■]-painikkeella (41).
Suomi
E. OFF (ei uudelleentoistoa)
Voit poistaa uudelleentoiston käytöstä painamalla [REP/INTRO/RAN]-painiketta (37) useita kertoja.
Näytössä ei näy tällöin merkkejä.
45
Page 46

Uudelleentoisto (MP3)
Repeat 1 → Repeat All → Repeat Folder → Intro → Random → Off
A. Repeat 1 (parhaillaan toistettava raita toistetaan uudelleen)
Voit toistaa parhaillaan soivan raidan uudelleen painamalla [REP/INTRO/RAN]-painiketta (37) kerran tai useita kertoja.
-merkki osoittaa, että Repeat 1 on käytössä.
B. Repeat All (kaikki levyn raidat toistetaan uudelleen)
Voit toistaa kaikki levyllä olevat raidat uudelleen painamalla [REP/INTRO/RAN]-painiketta (37) kerran tai useita kertoja.
ALL-merkki osoittaa, että Repeat All on käytössä.
C. Repeat Folder (kaikki kansion raidat toistetaan uudelleen)
Voit toistaa kaikki kansiot (ja raidat) uudelleen painamalla [REP/INTRO/RAN]-painiketta (37) kerran tai useita kertoja.
-merkki osoittaa, että Repeat Folder on käytössä.
D. INTRO (raidan alku toistetaan)
Voit nopeuttaa tietyn raidan etsimistä toistamalla kunkin peräkkäisen raidan alusta 10 sekuntia. Ota intro-toiminto
käyttöön ja käynnistä toisto painamalla [REP/INTRO/RAN]-painiketta (37) kerran tai useita kertoja. Näytössä näkyy
teksti ”INTRO”, kun toiminto on käytössä.
Suomi
E. RANDOM (satunnaistoisto)
Voit ottaa satunnaistoiston käyttöön painamalla [REP/INTRO/RAN]-painiketta (37) kerran tai useita kertoja.
Näytössä näkyy teksti “RANDOM”, kun toiminto on käytössä. Voit lopettaa satunnaistoiston painamalla [REP/INTRO/
RAN]-painiketta (37) uudelleen tai painamalla [■]-painiketta (41).
F. OFF (ei uudelleentoistoa)
Voit poistaa uudelleentoiston käytöstä painamalla [REP/INTRO/RAN]-painiketta (37) useita kertoja.
Näytössä ei näy merkkejä.
7.9 Toiston ohjelmoiminen (kaukosäätimellä)
Laite voidaan ohjelmoida toistamaan enintään 32 raitaa valinnaisessa järjestyksessä.
1. Lopeta toisto painamalla [■]-painiketta (41).
2. Paina kaukosäätimen [PROGRAM]-painiketta (38) kerran. Näytössä näkyy teksti "PROG",
ohjelman numero ja raidan numero.
3. Valitse ohjelmoitava raita painamalla [I◄]- tai [►I] [9]-painiketta (40).
4. Vahvista valinta painamalla kaukosäätimen [PROGRAM]-painiketta (38) kerran. Raidan numero
alkaa vilkkua näytössä.
5. Voit ohjelmoida useampia raitoja toistamalla vaiheet 3 ja 4.
6. Aloita raitojen toisto ohjelmoidussa järjestyksessä painamalla [►II]-painiketta (39).
7. Lopeta toisto painamalla [■]-painiketta (41). Voit tyhjentää ohjelmointimuistin pitämällä [■]-painiketta (41)
painettuna, kunnes "PROG"-teksti poistuu näytöstä.
46
Page 47

8. Kasettisoitin
1. Aseta [FUNCTION]-valitsin (15) TAPE-asentoon.
2. Työnnä kasetti kasettipesään lyhyt pääty edellä. Laite toistaa
kasetin ylöspäin olevan puolen.
3. Kasettisoitin käynnistyy automaattisesti, kun kasetti
työnnetään sisään.
4. Kasettisoittimen toimintoja käytetään painikkeella [
PLAY – toisto on käynnissä (painike
on kokonaan ulkona).
FAST FORWARD – kelaus eteenpäin
(painike on osittain sisällä). Lopeta
kelaus ja jatka toistoa painamalla
painiketta kevyesti.
EJECT – kasetin poistaminen pesästä
(paina painike kokonaan sisään).
▲
] (23):
Huom.
Kasetista saattaa kuulua poikkeavaa ääntä eteenpäinkelauksen (FAST FORWARD) aikana.
Poista kasetti kasettipesästä aina käytön jälkeen.
9. Levysoitin
1. Irrota neulansuojus äänipäästä ja avaa äänivarren kuljetuspidike (29).
2. Ota levysoitin käyttöön asettamalla [FUNCTION]-valitsin (15) PHONO-asentoon.
3. Aseta levy levylautaselle. Joissakin 45 kierroksen levyissä on suuri keskireikä, joten niiden toistamiseen
tarvitaan single-sovitin (25).
4. Valitse nopeudenvalitsimella (27) levylle sopiva soittonopeus.
5. Nosta äänivarsi äänivarren nostimella (26) ja siirrä äänivarsi levyn yläpuolelle. Levylautanen alkaa pyöriä.
6. Laske äänivarsi varovasti äänivarren nostimella (26) haluamasi raidan kohdalle.
7. Levy alkaa soida. Säädä äänenvoimakkuus haluamallesi tasolle [VOLUME +] (7)- ja [VOLUME -] (8)
-painikkeilla.
8. Kun levyn toisto on loppunut, siirrä äänivarsi takaisin äänipään pitimeen. Levylautanen lakkaa pyörimästä.
Huom.
Joidenkin levyjen lopetusmerkintä on levysoittimen AutoStop-alueen ulkopuolella. Tämän vuoksi näiden
levyjen toisto loppuu automaattisesti ennen levyn viimeistä raitaa. Ongelman voi ratkaista asettamalla
[AUTO STOP] -valitsimen (28) OFF-asentoon.
Suomi
Huom. Levy jatkaa pyörimistä viimeisen raidan loputtua. Voit lopettaa levyn pyörimisen asettamalla
[AUTO STOP] -valitsimen (28) ON-asentoon.
47
Page 48

10. MP3-tiedostojen toistaminen muistikortilta tai
USB-muistitikulta
Laite voi toistaa MP3-tiedostoja USB-muistitikulta tai SD- ja MMC-tyyppisiltä muistikorteilta.
1. Aseta USB-muistitikku/muistikortti paikalleen kuvan mukaisesti.
Käännä USB-muistitikku/muistikortti oikein päin, jotta liitin ei
vaurioidu. Työnnä USB-muistitikku/muistikortti aina suoraan
liitäntään. Älä taivuta tallennusvälinettä.
2. Aseta [FUNCTION]-valitsin (15) CD/USB/SD-asentoon ja paina
[SOURCE]-valitsinta (5 tai 43). Valitse vaihtoehto USB (USBmuistitikku) tai CARD (muistikortti). Näytössä näkyy valittu lähde,
äänitiedoston tyyppi ja raitojen kokonaismäärä.
3. Hetken kuluttua näytössä näkyy tallennusvälineellä olevien raitojen
kokonaismäärä.
4. Valitse haluamasi hakemisto painamalla [FOLDER]-painiketta (4 tai
42) kerran tai useita kertoja. Näyttöön tulee hakemiston numero.
5. Valitse hakemistosta haluamasi raita painamalla [►►I]- tai [I◄◄]-painiketta (3 tai 40).
6. Aloita toisto painamalla [►II/■] -painiketta (2 tai 39).
7. Toiston keskeyttäminen: Paina [►II/■] -painiketta (2 tai 39) uudelleen. Toistettavan raidan numero
alkaa vilkkua näytössä. Voit jatkaa toistoa painamalla jälleen [►II/■]-painiketta (2 tai 39).
8. Toiston lopettaminen: Paina [►II/■] -painiketta (2 tai 41) kahden sekunnin ajan.
Huom. Lisätoimintoja käytetään samalla tavoin kuin toistettaessa MP3-tiedostoja CD-levyltä. Katso osion
7.4 MP3-tiedostojen toistaminen CD-levyltä kohdissa 7.5, 7.6, 7.7, 7.9 ja 7.10 annetut ohjeet.
Suomi
11. MP3-tiedostojen tallentaminen CD-, levy- tai
kasettisoittimelta
Laitteella voidaan tallentaa MP3-äänitiedostoja muistikortille tai USB-muistitikulle CD-levyltä, vinyylilevyltä tai kasetilta.
A. Tallentaminen CD-levyltä
I. Raidan tallentaminen CD-levyltä
1. Aloita CD-levyn toisto normaaliin tapaan.
2. Aloita tallennus painamalla [REC]-painiketta (6 tai 36), kun raidan toisto on käynnissä.
-merkit vilkkuvat näytössä, kun tallennus on käynnissä.
3. Tallennus loppuu automaattisesti, kun se on valmis.
4. Paina [REC]-painiketta (6 tai 36), jos haluat lopettaa tallennuksen aiemmin.
II. Koko CD-levyn tallentaminen
1. Aseta CD-levy kelkkaan, sulje kelkka ja odota, kunnes laite on lukenut levyn.
2. Aloita tallennus painamalla [REC]-painiketta (6 tai 36). -merkit vilkkuvat näytössä,
kun tallennus on käynnissä.
3. Tallennus loppuu automaattisesti, kun se on valmis.
4. Paina [REC]-painiketta (6 tai 36), jos haluat lopettaa tallennuksen aiemmin.
III. Valittujen raitojen tallentaminen CD-levyltä
1. Aseta CD-levy sisään ja odota, kunnes laite on lukenut levyn.
2. Valitse tallennettavat raidat ja ohjelmoi ne. Katso ohjeet kohdasta 7.10 Toiston ohjelmoiminen (kaukosäätimellä).
3. Aloita tallennus painamalla [REC]-painiketta (6 tai 36).
tallennus on käynnissä.
4. Tallennus loppuu automaattisesti, kun se on valmis.
5. Paina [REC]-painiketta (6 tai 36), jos haluat lopettaa tallennuksen aiemmin.
-merkit vilkkuvat näytössä, kun
48
Page 49

Huom.
• Tallennus kestää yhtä kauan kuin levyn soittoaika.
• Laite luo AUDIO-kansion, jonne tiedostot tallentuvat.
• Tallennusmuoto on oletusasetuksena MP3, jonka Bit Rate on 128 kbps ja Sampling Rate 44,1 KHz.
• Kappaleiden nimet eivät tallennu.
• Raita on tallennettava kokonaan, jotta siitä voidaan muodostaa musiikkitiedosto. Jos tallennus keskeytetään
ennenaikaisesti, tiedosto ei tallennu muistikortille tai USB-muistitikulle.
IV. MP3-tiedostojen kopioiminen
Kopioiminen CD-levyltä
Jos CD-levy sisältää pelkästään MP3-tiedostoja, tiedostot kopioidaan kyseisessä muodossa.
Tiedostot kopioidaan kohdassa ”Tallentaminen CD-levyltä” annettujen ohjeiden mukaan (ks. kohta 11. 1).
Kopiointi muistikortin ja USB-muistitikun välillä
Aloita kopiointi painamalla [REC]-painiketta (6 tai 36), kun raitoja toistetaan muistikortilta tai USB-muistitikulta.
Voit kopioida muistikortilta USB-muistitikulle tai toisinpäin.
B. Tallentaminen levysoittimelta
1. Aseta [FUNCTION]-valitsin (15) PHONO-asentoon.
2. Paina [REC]-painiketta (6 tai 36).
3. Näyttöön tulee ensin teksti ”USB” ja sen jälkeen merkit
4. Aloita vinyylilevyn toisto siitä raidasta, jonka haluat tallentaa.
5. Kun tallennus on valmis: paina [REC]-painiketta (6 tai 36), kunnes näyttö lakkaa vilkkumasta.
Huom. Jos haluat aloittaa tallennuksen suoraan: paina [REC]-painiketta (6 tai 36) nopeasti kaksi kertaa.
. Merkit alkavat vilkkua, kun tallennus alkaa.
C. Tallentaminen kasettisoittimelta
1. Aseta [FUNCTION]-valitsin (15) TAPE-asentoon.
2. Paina [REC] painiketta (6 tai 36).
3. Näyttöön tulee ensin teksti ”USB” tai ”CARD” ja sen jälkeen merkki
tallennus alkaa.
4. Aloita kasetin toisto siitä raidasta, jonka haluat tallentaa.
5. Kun tallennus on valmis, paina [REC]-painiketta (6 tai 36), kunnes näyttö lakkaa vilkkumasta.
Huom. Jos haluat aloittaa tallennuksen suoraan: paina [REC]-painiketta (6 tai 36) nopeasti kaksi kertaa.
Huom.Tiedostot tallentuvat ensisijaisesti USB-muistitikulle, jos laitteeseen on liitetty sekä muistikortti että
USB-muistitikku.
. Merkki alkaa vilkkua, kun
D. Bit Rate -asetuksen valinta tallennettaessa CD-levyltä, vinyylilevyltä
tai kasetilta
1. Aseta [FUNCTION]-valitsin (15) PHONO- tai TAPE-asentoon.
2. Paina [INFO]-painiketta (35). Näyttöön tulee Bit Rate -asetuksen oletusarvo (128 kbps).
3. Voit asettaa haluamasi arvon painamalla [►►I]- tai [I◄◄]-painiketta (3 tai 40): 32 – 64 – 96 – 128 –
192 – 256 kbps.
4. Vahvista valinta painamalla [INFO]-painiketta (35).
E. Raitojen erottelu (Track separation, TS)
Vinyylilevyn tai kasetin tallennus voidaan jakaa useisiin tiedostoihin seuraavasti. Paina [TS]-painiketta (44) kerran,
kun haluat luoda tallennukseen tauon ja muodostaa uuden tiedoston, kun seuraavan raidan toisto alkaa. Toista
tämä toimenpide jokaisessa kohdassa, jossa haluat jakaa tallennuksen erillisiin tiedostoihin. ”PHONO”- tai ”TAPE”teksti välähtää kerran näytössä aina, kun laite luo uuden tiedoston.
Huom. Raitojen erottelu on tehtävä tallennuksen aikana.
Suomi
49
Page 50

12. Tiedostojen poistaminen USB-muistitikulta/
SD-muistikortilta
Tiedoston poistaminen
1. Aseta USB-muistitikku/muistikortti paikalleen. Aseta tilanvalitsin USB- tai SD-asentoon.
2. Paina [INFO]-painiketta (35) noin kolmen sekunnin ajan. Näyttöön tulee teksti ”DEL -001”.
3. Valitse poistettava tiedosto [►►I]- tai [I◄◄]-painikkeella (3 tai 40).
4. Paina [REC]-painiketta (36). Näytössä vilkkuvat vaihtoehdot YES (kyllä) ja NO (ei). Valitse YES painamalla [►►I]tai [I◄◄]-painiketta (3 tai 40), jos haluat poistaa valitun tiedoston, tai valitse NO, jos haluat peruuttaa poiston.
5. Vahvista valinta painamalla [REC]-painiketta (6 tai 36) uudelleen. Paina [■]-painiketta (41) uudelleen, jos haluat
peruuttaa poiston.
Kaikkien tiedostojen poistaminen
1. Aseta USB-muistitikku/muistikortti paikalleen. Aseta tilanvalitsin USB- tai SD-asentoon.
2. Paina [INFO]-painiketta (35) noin kolmen sekunnin ajan. Näyttöön tulee teksti ”DEL-001”.
3. Paina [REC]-painiketta (36). Näytössä vilkkuvat vaihtoehdot YES (kyllä) ja NO (ei). Valitse YES painamalla [►►I]tai [I◄◄]-painiketta (3 tai 40), jos haluat poistaa kaikki tiedostot, tai valitse NO, jos haluat peruuttaa poiston.
4. Vahvista valinta painamalla [REC]-painiketta (36) uudelleen.
5. Paina [■]-painiketta (41) uudelleen, jos haluat peruuttaa poiston.
Huom. Kaikki USB-muistitikulla tai muistikortilla olevat tiedostot poistetaan, kun vahvistat YES-vaihtoehdon valinnan.
Suomi
USB-muistitikun/muistikortin poistaminen
Sammuta laite aina ennen USB-muistitikun/SD-muistikortin poistamista.
• USB-muistitikku: Vedä USB-muistitikku suoraan irti liitännästä.
• Muistikortti: Paina muistikorttia varovasti sisään, kunnes se ponnahtaa ulos ja voidaan poistaa käsin.
13. Kunnossapito
• Puhdista pölyiset levyt levyharjalla.
• Pidä levysoittimen kansi aina suljettuna, kun soitinta ei käytetä. Näin levylautaseen ja neulaan
ei pääse kertymään pölyä.
• Levysoitin voidaan tarvittaessa pyyhkiä kevyesti kostutetulla liinalla.
Neulan vaihtaminen
1. Pidä toisella kädellä äänipäästä ja
työnnä pieni ruuvitaltta etureunasta
äänipään ja neulan väliin. Taivuta
ruuvitalttaa varovasti taaksepäin,
kunnes neula irtoaa (ks. kuva).
2. Aseta uusi neula työntämällä se ensin
kiinni takareunaan. Paina se sitten
kiinni etureunasta.
1
2
14. Tekniset tiedot
Verkkojännite: 230 V AC, 50 Hz
Levysoittimen nopeus: 33/45 kierr./min
Radion taajuusalue: 87,5–108 MHz (FM), 540–1 600 kHz (AM)
Bitrate, MP3: 32–256 kbps
Lähtöteho: 2 × 2 W
Mitat (levysoitin): 318 × 285 × 178 mm (L × S × K)
Mitat (kaiutin): 120 × 140 × 195 mm (L × S × K)
Paino: 4,7 kg
50
Page 51

Plattenspieler mit CD, MP3,
Kassettenspieler und Radio
Art.Nr. 38-4173 Modell TCD-983WEC
Vor Inbetriebnahme die Bedienungsanleitung vollständig durchlesen und für künftigen Gebrauch aufbewahren.
Irrtümer, Abweichungen und Änderungen behalten wir uns vor. Bei technischen Problemen oder anderen
Fragen freut sich unser Kundenservice über eine Kontaktaufnahme (Kontakt siehe Rückseite).
Inhalt
1. Sicherheitshinweise
2. Produktbeschreibung
3. Verpackungsinhalt
4. Tasten und Funktionen
5. Montage und Installation
6. Radio
7. CD-Spieler
8. Kassettenspieler
9. Plattenspieler
10. MP3-Dateien von Speicherkarte oder USB-Speicher abspielen
11. MP3 von CD/Plattenspieler/Kassettenspieler aufnehmen
12. Dateien auf USB-Speicher/SD-Speicherkarte löschen
13. Pflege und Wartung
14. Technische Daten
51
Deutsch
Page 52

1. Sicherheitshinweise
• Reparaturen unbedingt qualifizierten Servicetechnikern überlassen.
• Das Gerät darf nicht demontiert oder anderweitig verändert werden.
• Das Gerät immer so aufstellen, dass es nicht in Wasser oder andere Flüssigkeiten fallen kann.
Niemals Gegenstände mit Flüssigkeiten (z. B. Blumenvase oder Getränk) auf dem Gerät abstellen.
• Eventuelle Standby-Funktion über Nacht und vor Reisen abschalten.
• Die Anlage nicht zudecken. Sicherstellen, dass zwischen den Lüftungsöffnungen und den umliegenden
Flächen mindestens 15 cm Platz für eine ausreichende Belüftung ist, damit die Anlage sich nicht erhitzt.
• Die Anlage nicht in feuchter, staubiger Umgebung oder in Umgebung mit starken Erschütterungen aufstellen.
• Längeres Hören über Kopfhörer mit hoher Lautstärke kann das Gehör schädigen.
CAUTION
RISK OF ELECTRIC
SHOCK DO NOT OPEN
CLASS 1
LASER PRODUCT
!
Lasergerät Klasse 1
Achtung: Niemals versuchen, das Gehäuse zu öffnen. Innerhalb des Gehäuses
befindet sich unsichtbare Laserstrahlung, die zu Augenverletzungen führen
kann. Niemals in den Laserstrahl blicken und niemals direkt auf das optische
Gerät blicken.
Achtung: Niemals versuchen, das Gehäuse zu öffnen.
Im Inneren des Produktes befinden sich nicht isolierte Komponenten
mit gefährlicher Spannung. Bei Kontakt können diese zu Bränden
oder Stromschlägen führen.
2. Produktbeschreibung
• Plattenspieler mit CD-/MP3-Spieler, Kassettenspieler, Radio sowie Anschlussmöglichkeit für USB-Speicher
und SD-Speicherkarte.
• Eingebauter Verstärker und externe Lautsprecher.
• Aufnehmen auf USB-Speicher oder SD-Speicherkarte von Plattenspieler, Kassettenspieler und/oder
CD/MP3-Spieler.
• Umschalter für 33/45 /min.
• Autostop-Funktion, wenn die Schallplatte abgespielt ist.
• Eingebauter RIAA-Verstärker und Low-Level-Ausgang.
• Inklusive Fernbedienung.
Deutsch
• Anschluss für Stereokopfhörer.
3. Verpackungsinhalt
• Plattenspieler
• 2 × Lautsprecher
• Fernbedienung
• Bedienungsanleitung
52
Page 53

4. Tasten und Funktionen
Plattenspieler
10
11
9 8 7 6 5 4 3 2
ON/OFF VOLUME REC SOURCE FOLDER UP
FUNKTION BAND
USB
PHONO CD/USB/SD FM
SD/MMC TAPE TUNER AM FM-ST
POWER FM-ST
1
2
1
0
0
1
4
1
8
0
9
6
4
9
2
0
9
6
0
9
4
5
8
8
M
M
A
F
1
0
0
8
0
1
0
7
2
0
1
1
0
4
6
0
1
6
0
x
M
1
0
H
H
z
z
12 13 14 15 16 1817 19 20 21 22
1. Abdeckung
2. [►II/■] – Abspielen Start/Pause/Stopp.
3. [►►I] [I◄◄] – Vorheriger/nachfolgender Titel.
4. [FOLDER UP] – Zum nächsten Ordner (MP3).
5. [SOURCE] – Umschalten zwischen USB-Speicher,
SD-Karte oder CD.
6. [• REC] – Aufnahme.
7. [VOLUME +] – Lautstärke höher.
8. [VOLUME -] – Lautstärke niedriger.
9. [ON/OFF] – Ein-/Ausschalter.
10. CD-Fach.
▲
11. [
] – CD-Fach öffnen/schließen.
12. Kopfhörerausgang.
14. Anschlüsse für SD/MMC-Speicherkarte.
15. [FUNCTION] – Funktionswahlschalter:
TAPE (Kassette) – PHONO (Plattenspieler) –
CD/USB/SD – TUNER (Radio).
16. [AM/FM] – Funktionswahlschalter für Radio:
MW – UKW – UKW Stereo.
17. POWER – Anzeigeleuchte, die leuchtet,
wenn die Anlage eingeschaltet ist.
18. IR-Sensor für Fernbedienung.
19. FM ST – Anzeigeleuchte, die bei UKWStereoempfang des Radios leuchtet.
20. LCD-Display.
21. TUNING – Frequenzwähler.
22. Fequenzwahlskala.
Deutsch
13. USB-Anschluss.
53
Page 54

23. [▲] – Vorspulen/Kassettenauswurf.
24. Kassettenfachabdeckung.
25. Single-Adapter (Puck) für Plattenteller.
26. Tonarmheber – Tonarm anheben/absenken.
27. 33/45 RPM – Drehzahlwähler für Plattenspieler.
28. AUTO STOP ON/OFF – Ein-/Ausschalter für
die Autostop-Funktion des Plattenspielers.
29. Tonarmstütze (mit Transportsicherung).
30. Line Out L/R – Low-Level-Ausgang (links, rechts).
31. SPEAKER L/R – Lautsprecheranschluss (links/rechts).
32. UKW-Antenne.
33. Buchse für Netzkabel.
30
23
24
25
26
27
28
29
31
32
Fernbedienung
34. [FIND] – Dateinamen suchen (bei MP3-Wiedergabe).
35. [INFO] – Aufnahmequalität (Encoding Bitrate) wählen
36. [REC] – Aufnahme oder Kopiervorgang starten.
37. [REP/INTRO/RAN] – Wiederholung/Intro (Wiedergabe
Deutsch
38. [PROGRAM] – Programmierte Wiedergabe von CD,
39. [►II] – Wiedergabe starten/Wiedergabepause.
40. [I◄] – [►I] - Vorheriger/nächster Titel.
41. [■] – CD/MP3-Aufnahmen stoppen/gespeicherte
33
und ID3-Tag anzeigen.
der ersten 10 Sekunden jedes Titels/Zufallswiedergabe
(bei CD/MP3-Wiedergabe).
MP3, Speicherkarte oder USB-Speicher.
Programmierung entfernen.
34 35
37 38 39
40
42
36
41
43
44
42. [FOLDER ▲] [FOLDER ▼] – Verzeichnis wechseln
(bei MP3-Aufnahme).
43. [SOURCE] – CD, USB-Speicher oder
SD-Speicherkarte wählen.
44. [TS] (Track Separation) – Aufnahme in mehrere
Dateien aufteilen.
54
Page 55

5. Montage und Installation
5.1 Abdeckung montieren
Achtung: Die Hinweisnummern (1–6) beziehen sich
nur auf die Abbildungen in diesem Abschnitt.
1. Sicherstellen, dass das Scharnier (2) ganz nach
hinten geklappt ist.
2. Die Nut in der Abdeckung (1) in das Scharnier (2)
einpassen, aber nicht vollständig einschieben.
3. Zuerst den linken Führungszapfen (3) der
Abdeckung in die linke Befestigung (4) des
Plattenspielers einsetzen, dann den rechten
Führungszapfen (5) der Abdeckung vorsichtig
in die rechte Befestigung (6) am Plattenspieler
drücken.
1
2
3
4
5
6
2
4. Gleichzeitig die Abdeckung auf das Scharnier (2)
drücken, bis das Scharnier hörbar einschnappt.
Achtung:
Die Abdeckung vorsichtig auf die seitlichen Befestigungen des Plattenspielers drücken. Bei fehlerhafter
Montage können die Seitenbefestigungen des Plattenspielers beschädigt werden.
5.2 Lautsprecher anschließen
Rechten und linken Lautsprecher an den rechten (R) bzw.
linken (L) Lautsprecherausgang (31) an der Rückseite des
Geräts anschließen. Achtung: Die Lautsprecher immer
vor dem Einschalten der Musikanlage anschließen.
5.3 Elektrischer Anschluss
1. Den kleinen Stecker des Netzkabels in den
Anschluss (33) am Plattenspieler einstecken,
den Netzstecker in eine Steckdose. Sicherstellen,
dass die Spannungsangabe (V) auf dem
Typenschild an der Rückseite der Anlage mit der
Spannung des lokalen Stromnetzes übereinstimmt
(230 V AC, 50 Hz). Anderenfalls hilft der Händler
oder der Kundenservice gerne weiter.
2. Stromversorgung vollständig abschalten:
Den Netzstecker ziehen. Zum Schutz der Anlage
den Netzstecker auch bei starkem Gewitter aus
der Steckdose ziehen.
Stromsparmodus
Der Plattenspieler geht automatisch 15 Minuten nach
dem letzten abgespielten Titel (von Schallplatte, CD, USBSpeicher, SD-Karte oder Kassette) in den Stromsparmodus
über. Der Plattenspieler geht auch automatisch nach
15Minuten in den Stromsparmodus, wenn er auf Pause
steht (CD, USB-Minne, SD-Karte). Um den Plattenspieler
vom Stromsparmodus aus zu starten, zweimal auf
[ON/OFF] – den Ein-/Ausschalter – drücken.
5.4 Batterien in Fernbedienung einlegen
1. Batteriefachabdeckung der Fernbedienung entfernen.
2. Batterien (2×AAA/R03, 1,5 V) entsprechend
der Kennzeichnung im Batteriefach einlegen.
3. Batteriefachabdeckung aufdrücken.
5.5 Aufstellung
Den Plattenspieler auf einer ebenen und harten Fläche aufstellen. Er muss vor Erschütterungen und Stößen geschützt sein.
Klick!
Deutsch
55
Page 56

6.Radio
FM (UKW) und AM (MW)
1. Funktionswahlschalter [FUNCTION] (15) in Position TUNER stellen.
2. Funktionswahlschalter (16) in Position AM, FM (mono) oder FM-ST (stereo) stellen.
3. Am Frequenzwähler (21) die gewünschte Frequenz einstellen.
4. Die Antenne (32) so auslegen, dass bestmöglicher Empfang erreicht wird.
5. An den Lautstärketasten [VOLUME +] (7) und [VOLUME –] (8) die Lautstärke einstellen.
Tipps für besseren Empfang
MW: Die Mittelwelleantenne ist eingebaut. Der Empfang kann durch Drehen oder Versetzen
des Plattenspielers beeinflusst werden.
UKW: Für bestmöglichen Empfang muss die Antenne vollständig abgewickelt und gestreckt sein.
7. CD-Spieler
7.1 CD hören
1. Funktionswahlschalter [FUNCTION] (15) in Position CD/USB/SD stellen.
2. Durch Drücken auf [OPEN/CLOSE] (11) das CD-Fach öffnen.
3. Eine CD (Audio-CD oder CD-R/CD-RW) mit dem Etikett nach oben in das CD-Fach einlegen.
4. Durch Drücken auf [OPEN/CLOSE] (11) das CD-Fach schließen.
5. Wenn die CD eingelesen wurde, zeigt das Display die Gesamtzahl der Titel auf der CD an.
6. Durch Drücken auf [►II/■] (2) oder (39) die Wiedergabe starten. Der erste Titel wird wiedergegeben.
7. Um eine Wiedergabepause einzulegen, erneut auf [►II/■] (2) oder (39) drücken. Die aktuelle Titelnummer blinkt
im Display. Zum Fortsetzen der Wiedergabe erneut auf [►II/■] (2) oder (39) drücken.
8. Wiedergabe beenden: Die Tasten [►II/■] (2) oder (39) ca. 2 Sekunden lang gedrückt halten.
7.2 Zu anderem Titel springen
Während der Wiedergabe oder einer Wiedergabepause kann mit den Tasten [►►I] [I◄◄] (3) oder (40) zu einem
anderen Titel gesprungen werden.
1. Einmal kurz auf [►►I] [I◄◄] (3) oder (40) drücken, um zum nächsten Titel zu springen. Oder mehrmals drücken,
2. Einmal kurz auf [►►I] [I◄◄] (3) oder (40) drücken, um zum Anfang des gerade wiedergegebenen Titels
Deutsch
7.3 Im gerade wiedergegebenen Titel eine bestimmte Stelle suchen
1. [►►I] [I◄◄] (3) oder (40) gedrückt halten, um eine bestimmten Stelle im titel zu spulen. Der Titel wird dabei mit
2. Taste loslassen, wenn die gewünschte Stelle zu hören ist. Die normale Wiedergabe wird fortgesetzt.
7.4 CD mit MP3-Dateien abspielen
1. Funktionswahlschalter [FUNCTION] (15) in Position CD/USB/SD stellen.
2. Durch Drücken auf [OPEN/CLOSE] (11) das CD-Fach öffnen.
3. Eine CD (Audio-CD oder CD-R/CD-RW mit MP3-Dateien) mit dem Etikett nach oben in das CD Fach einlegen.
4. Durch Drücken auf [OPEN/CLOSE] (11) das CD-Fach schließen.
5. Nach kurzer Zeit zeigt das Display die Gesamtzahl der Titel auf der CD an.
6. Durch einmaliges oder mehrmaliges Drücken auf [FOLDER] (4) oder (42) das Verzeichnis mit
7. Mit [►►I] [I◄◄] (3) oder (40) den gewünschten Titel im gewählten Verzeichnis markieren.
8. Durch Drücken auf [►II/■] (2) oder (39) die Wiedergabe starten.
9. Vorübergehende Wiedergabepause: Erneut auf [►II/■] (2) oder (39) drücken. Die aktuelle Titelnummer blinkt
10. Wiedergabe beenden: Die Tasten [►II/■] (2) oder (39) ca. 2 Sekunden lang gedrückt halten.
bis die gewünschte Titelnummer angezeigt wird.
zurückzukehren. Mehrmals drücken, um zu vorherigen Titeln zurückzukehren.
hoher Geschwindigkeit und geringer Lautstärke wiedergegeben.
den wiederzugebenden Dateien auswählen. Die Verzeichnisnummer wird angezeigt.
im Display. Zum Fortsetzen der Wiedergabe erneut auf [►II/■] (2) oder (39) drücken.
56
Page 57

Hinweis:
• Die Tonqualität der MP3-Dateien kann abhängig von der Qualität der CD oder der Aufnahme variieren.
• Das Einlesen einer CD mit MP3-Dateien dauert normalerweise länger als bei einer normalen Audio-CD.
7.5 Titelinformationen anzeigen (über Fernbedienung)
1. Durch Drücken der Taste [INFO] (35) auf der Fernbedienung während der Wiedergabe von MP3-Dateien
können ID3-Informationen zum aktuellen Titel ein- und ausgeblendet werden.
2. Sind zum aktuellen Titel keine Informationen vorhanden, wird stattdessen der Text „NONE“ oder
„UNKNOWN“ angezeigt.
7.6 Lied nach Titel suchen (über Fernbedienung)
Es ist möglich, Lieder anhand des Titels/Namens suchen.
1. Bei unterbrochener Wiedergabe an der Fernbedienung einmal auf [FIND] (34) drücken.
2. Mit [►►I] [I◄◄] (3) oder (40) in alphabetischer Reihenfolge durch die Titel blättern.
3. Zweimal auf [►II/■] (2) oder (39) drücken, um die Wiedergabe des gewählten Titels zu starten.
7.7 Verzeichnis suchen (über Fernbedienung)
Verzeichnisse können anhand des Verzeichnisnamens gesucht werden.
1. Bei unterbrochener Wiedergabe an der Fernbedienung zweimal auf [FIND] (34) drücken.
2. Mit [►►I] [I◄◄] (3) oder (40) in alphabetischer Reihenfolge durch die Verzeichnisse blättern.
3. Durch Drücken auf [►II/■] (2) oder (39) die Wiedergabe der Titel im gewählten Verzeichnis starten.
Hinweis: Das Display zeigt nur Zeichen des englischen Alphabets an.
7.8 Erweiterte Funktionen
Wiederholte Wiedergabe (CD)
Repeat 1 → Repeat All → Intro → Random → Off
A. Repeat 1 (aktuellen Titel wiederholen)
Einmal oder mehrmals auf [REP/INTRO/RAN] (37) drücken, um einen Titel zu wiederholen.
Das Symbol
B. Repeat All (alle Titel wiederholen)
Einmal oder mehrmals auf [REP/INTRO/RAN] (37) drücken, um eine ganze CD zu wiederholen.
Das Symbol
C. INTRO (Wiedergabe der Titelanfänge)
Zur Zeitersparnis bei der Suche nach einem bestimmten Titel werden nacheinander die ersten 10 Sekunden
aller Titel wiedergegeben. Einmal oder mehrmals auf [REP/INTRO/RAN] (37) drücken, um die Wiedergabe
der Titelanfänge zu starten. Ist die Funktion aktiv, wird im Display „INTRO“ angezeigt.
D. RANDOM (Zufallswiedergabe)
Einmal oder mehrmals auf [REP/INTRO/RAN] (37) drücken, um die Titel in zufälliger Reihenfolge abzuspielen.
Ist die Funktion aktiv, wird im Display „RANDOM“ angezeigt. Durch erneutes Drücken von [REP/INTRO/RAN]
(37) oder durch Drücken von [■] (41) wird die Zufallswiedergabe beendet.
zeigt an, dass Repeat 1 aktiviert ist.
ALL zeigt an, dass Repeat All aktiviert ist.
Deutsch
E. OFF (keine Wiederholung)
Durch mehrmaliges Drücken auf [REP/INTRO/RAN] (37) wird die Zufallswiedergabe beendet.
Im Display wird kein Symbol mehr angezeigt.
57
Page 58

Wiederholte Wiedergabe (MP3)
Repeat 1 → Repeat All → Repeat Folder → Intro → Random → Off
A. Repeat 1 (aktuellen Titel wiederholen).
Einmal oder mehrmals auf [REP/INTRO/RAN] (37) drücken, um den aktuellen Titel zu wiederholen.
Das Symbol
B. Repeat All (alle Titel wiederholen).
Einmal oder mehrmals auf [REP/INTRO/RAN] (37) drücken, um alle Titel zu wiederholen.
Das Symbol
C. Repeat Folder (alle Titel im Ordner wiederholen).
Einmal oder mehrmals auf [REP/INTRO/RAN] (37) drücken, um alle Ordner (und Titel) zu wiederholen.
Das Symbol
D. INTRO (Wiedergabe der Titelanfänge)
Zur Zeitersparnis bei der Suche nach einem bestimmten Titel werden nacheinander die ersten 10 Sekunden
aller Titel wiedergegeben. Einmal oder mehrmals auf [REP/INTRO/RAN] (37) drücken, um die Wiedergabe
der Titelanfänge zu starten. Ist die Funktion aktiv, wird im Display „INTRO“ angezeigt.
zeigt an, dass Repeat 1 aktiviert ist.
zeigt an, dass Repeat All aktiviert ist.
zeigt an, dass Repeat Folder aktiviert ist.
Deutsch
E. RANDOM (Zufallswiedergabe)
Einmal oder mehrmals auf [REP/INTRO/RAN] (37) drücken, um die Titel in zufälliger Reihenfolge abzuspielen.
Ist die Funktion aktiv, wird im Display „RANDOM“ angezeigt. Durch erneutes Drücken von [REP/INTRO/RAN]
(37) oder durch Drücken von [■] (41) wird die Zufallswiedergabe beendet.
F. OFF (keine Wiederholung)
Durch mehrmaliges Drücken auf [REP/INTRO/RAN] (37) wird die Zufallswiedergabe beendet. Im Display wird
kein Symbol mehr angezeigt.
7.9 Programmierte Wiedergabe (über Fernbedienung)
Es können bis zu 32 Titel in beliebiger Reihenfolge programmiert werden.
1. Durch Drücken von [■] (41) die Wiedergabe beenden.
2. Einmal an der Fernbedienung auf [PROGRAM] (38) drücken. Im Display werden „PROG“,
die Programmnummer und die Titelnummer angezeigt.
3. Mit [I◄] [►I] / (40) den zu programmierenden Titel auswählen.
4. Zum Bestätigen einmal auf [PROGRAM] (38) drücken. Im Display blinkt nun die Titelnummer.
5. Um weitere Titel zu speichern, Schritt 3 und 4 wiederholen.
6. Mit [►II] (39) die Wiedergabe in der programmierten Reihenfolge starten.
7. Um den Programmspeicher zu löschen, mit [■] (41) die Wiedergabe beenden und [■] (41) gedrückt halten,
bis die Anzeige von „PROG“ im Display erlischt.
58
Page 59

8. Kassettenspieler
1. Funktionswahlschalter [FUNCTION] (15) in Position TAPE stellen.
2. Die Kassette mit der Schmalseite voraus in das Fach
einschieben. Die abzuspielende Seite muss nach oben zeigen.
3. Der Kassettenspieler startet automatisch, wenn die Kassette
eingedrückt wird.
4. Die Funktionen des Kassettenspielers werden mit der Taste
▲
[
] (23) gesteuert:
PLAY – Wiedergabe läuft
(Taste steht vollständig heraus).
FAST FORWARD – Vorspulen (Taste ist leicht
eingedrückt). Leicht auf die Taste drücken,
um das Vorspulen zu beenden und
die Wiedergabe fortzusetzen.
EJECT – Kassette auswerfen (Taste vollständig eindrücken).
Achtung:
Beim Vorspulen (FAST FORWARD) kann die Kassette ungewöhnliche Geräusche von sich geben.
Die Kassette immer entnehmen, wenn der Kassettenspieler nicht benutzt wird.
9. Plattenspieler
1. Den Nadelschutz vom Tonabnehmer entfernen und die Transportsicherung (29) des Tonarms nach außen klappen.
2. Zum Einschalten des Plattenspielers den Funktionswahlschalter [FUNCTION] (15) in Position PHONO stellen.
3. Eine Schallplatte auf den Plattenteller legen. Manche Schallplatten für 45 Umdrehungen haben ein großes
Mittelloch. Zum Abspielen dieser Schallplatten wird der Single-Adapter (25) benötigt.
4. Mit dem Umdrehungsumschalter (27) die für die Schallplatte richtige Umdrehungszahl wählen.
5. Den Tonarm mit dem Tonarmheber (26) anheben und über die Platte führen. Der Plattenteller beginnt sich
zu drehen.
6. Den Tonarm mit dem Tonarmheber (26) vorsichtig am Beginn der gewünschten Tonspur aufsetzen.
7. Das Abspielen der Schallplatte beginnt. Mit [VOLUME +] (7) und [VOLUME -] (8) die Lautstärke auf den
gewünschten Pegel einstellen.
8. Ist das Abspielen beendet, den Tonarm anheben und zur Tonarmstütze zurückführen. Der Plattenteller hört auf,
sich zu drehen.
Deutsch
Achtung:
Bei manchen Schallplatten liegt die Endeanzeige außerhalb des Auto-Stop-Bereichs des Plattenspielers.
Dies führt dazu, dass manche Schallplatten schon vor Erreichen des letzten Titels stehen bleiben. In diesem Fall
den Wahlschalter [AUTO STOP] (28) in Position OFF stellen.
Achtung: Der Plattenteller dreht sich dann auch nach Abspielen des letzten Titels weiter. Zum Anhalten der Platte:
Den Wahlschalter [AUTO STOP] (28) in Position ON stellen.
59
Page 60

10. MP3-Dateien von Speicherkarte oder
USB-Speicher abspielen
Die Musikanlage kann MP3-Dateien von einem USB-Speicher oder einer SD- oder MMC-Speicherkarte wiedergeben.
1. Einen USB-Speicher bzw. eine Speicherkarte wie abgebildet
einstecken. Sicherstellen, dass der USB-Speicher/die Speicherkarte
korrekt herum eingesteckt werden, um Schäden an den Kontakten zu
vermeiden. Den USB-Speicher/die Speicherkarte gerade einschieben,
ohne ihn/sie zu biegen.
2. Den Funktionswahlschalter [FUNCTION] (15) in Position CD/USB/
SD stellen. Dann mit [SOURCE] (5) oder (43) USB (USB-Speicher)
bzw. CARD (Speicherkarte) wählen. Im Display werden die gewählte
Tonquelle, das Audioformat und die Gesamtzahl der Titel angezeigt.
3. Nach kurzer Zeit zeigt das Display die Gesamtzahl der Titel auf
dem Speichermedium an.
4. Durch einmaliges oder mehrmaliges Drücken auf [FOLDER] (4) oder
(42) das Verzeichnis mit den wiederzugebenden Dateien auswählen.
Im Display wird das Dateiverzeichnis angezeigt.
5. Mit [►►I] [I◄◄] (3) oder (40) den gewünschten Titel im gewählten Verzeichnis markieren.
6. Durch Drücken auf [►II/■] (2) oder (39) die Wiedergabe starten.
7. Wiedergabepause: Erneut auf [►II/■] (2) oder (39) drücken. Die aktuelle Titelnummer blinkt im Display.
Zum Fortsetzen der Wiedergabe erneut auf [►II/■] (2) oder (39) drücken.
8. Wiedergabe beenden: Die Tasten [►II/■] (2) oder (41) ca. 2 Sekunden lang gedrückt halten.
Achtung: Die übrigen Funktionen entsprechen „7.4 CD mit MP3-Dateien abspielen“, Punkt 7.5, 7.6, 7.7,
7.9 und 7.10.
11. MP3 von CD/Plattenspieler/Kassettenspieler aufnehmen
Die Musikanlage kann von einer CD, dem Plattenspieler oder dem Kassettenspieler Titel aufnehmen und als
Audiodateien im Format MP3 auf der Speicherkarte oder dem USB-Speicher ablegen.
A. Aufnehmen von CD
I. Einen Titel von der CD aufnehmen.
1. Wiedergabe von CD wie gewohnt starten.
2. Zum Starten der Aufnahme auf [REC] (6) oder (36) drücken (während der Wiedergabe des Titels).
3. Ist die Aufnahme abgeschlossen, wird sie automatisch beendet.
Deutsch
4. Um die Aufnahme schon vorher zu beenden, auf [REC] (6) oder (36) drücken.
II.Ganze CD aufnehmen
1. CD einlegen, CD-Fach schließen und warten, bis die CD eingelesen wurde.
2. Zum Starten der Aufnahme auf [REC] (6) oder (36) drücken.
3. Ist die Aufnahme abgeschlossen, wird sie automatisch beendet.
4. Um die Aufnahme schon vorher zu beenden, auf [REC] (6) oder (36) drücken.
III. Ausgewählte Titel der CD aufnehmen.
1. CD einlegen und warten, bis die CD eingelesen wurde.
2. Die gewünschten Titel auswählen und gemäß Abschnitt: 7.10 Programmierte Wiedergabe
3. Zum Starten der Aufnahme auf [REC] (6) oder (36) drücken.
4. Ist die Aufnahme abgeschlossen, wird sie automatisch beendet.
5. Um die Aufnahme schon vorher zu beenden, auf [REC] (6) oder (36) drücken.
Im Display wird während der Aufnahme
Im Display wird während der Aufnahme
(über Fernbedienung) speichern.
Im Display wird während der Aufnahme
blinkend angezeigt.
blinkend angezeigt.
blinkend angezeigt.
60
Page 61

Achtung:
• Die Aufnahmezeit wird genauso lang wie die Wiedergabezeit.
• Es wird ein „AUDIO“-Ordner erstellt, in dem die Aufnahme gespeichert wird.
• Voreingestelltes Aufnahmeformat ist MP3 mit Bitrate 128 kbit/s und Sampling-Rage 44,1 kHz.
• Die Liedtitel werden bei der Aufnahme nicht gespeichert.
• Damit eine Musikdatei gespeichert wird, muss der gesamte Titel aufgenommen werden.
Wird die Aufnahme vorzeitig unterbrochen, wird auf der Speicherkarte bzw. dem USB-Speicher
keine Datei gespeichert.
IV. MP3-Dateien kopieren
Kopieren von CD.
• Enthält eine CD nur MP3-Dateien, werden die Dateien in diesem Format kopiert.
Das Vorgehen entspricht demjenigen beim: „Aufnehmen von CD“ (siehe unter 11. A).
Kopieren zwischen Speicherkarte und USB-Speicher
• Um das Kopieren von der Speicherkarte auf den USB-Speicher oder umgekehrt zu starten, während
der Wiedergabe von der Speicherkarte bzw. dem USB-Speicher auf [REC] (6) oder (36) drücken.
B. Aufnehmen vom Plattenspieler
1. Funktionswahlschalter [FUNCTION] (15) in Position PHONO stellen.
2. Auf [REC] (6) oder (36) drücken.
3. Im Display wird zuerst „USB“ angezeigt, danach
Wenn die Symbole anfangen zu blinken, startet die Aufnahme.
4. Das Abspielen der Schallplatte mit dem aufzunehmenden Titel starten.
5. Nach erfolgter Aufnahme: [REC] (6) oder (36) gedrückt halten, bis das Display nicht mehr blinkt.
Achtung: Um die Aufnahme direkt zu starten: Zweimal kurz hintereinander auf [REC] (6) oder (36) drücken.
.
C. Aufnehmen von Kassette
1. Funktionswahlschalter [FUNCTION] (15) in Position TAPE stellen.
2. Auf [REC] (6) oder (36) drücken.
3. Im Display wird zuerst „USB“ oder „CARD“ angezeigt, danach
zu blinken, startet die Aufnahme.
4. Das Abspielen der Kassette mit dem aufzunehmenden Titel starten.
5. Nach erfolgter Aufnahme [REC] (6) oder (36) gedrückt halten, bis das Display nicht mehr blinkt.
Achtung: Um die Aufnahme direkt zu starten: Zweimal kurz hintereinander auf [REC] (6) oder (36) drücken.
Achtung: Wenn sowohl Speicherkarte als auch USB-Speicher angeschlossen sind, werden die Dateien auf
dem USB-Speicher abgelegt.
. Wenn das Symbol anfängt
D. Manuelle Einstellung von „Bit Rate“ bei Aufnahme von CD,
Plattenspieler oder Kassettenspieler
1. Funktionswahlschalter [FUNCTION] (15) in Position PHONO oder TAPE stellen.
2. Auf [INFO] (35) drücken. Der eingestellte Wert (128 kbit/s) für „Bit Rate“ wird im Display angezeigt.
3. Mit [►►I] [I◄◄] (3) oder (40) den gewünschten Wert einstellen: 32 – 64 – 96 – 128 – 192 – 256 kbps
4. Zum Bestätigen auf [INFO] (35) drücken.
E. Track separation (TS)
Aufteilen der Aufnahme vom Plattenspieler oder Kassettenspieler in mehrere Dateien: Durch einmaliges
Drücken auf [TS] (44) eine Pause einfügen und eine neue Datei erstellen, in die der nächste Titel geschrieben
wird. An allen Stellen wiederholen, wo die Aufnahme in mehrere Dateien aufgeteilt werden soll. Jedes Mal,
wenn eine neue Datei erstellt wird, blinkt das „PHONO“- bzw. „TAPE“-Symbol im Display einmal.
Achtung: Dies muss während der Aufnahme erfolgen.
Deutsch
61
Page 62

12. Dateien auf USB-Speicher/SD-Speicherkarte löschen
Eine Datei löschen
1. Einen USB-Speicher oder eine Speicherkarte einstecken. Dann den Funktionswahlschalter in Position USB bzw.
SD stellen.
2. Ca. 3 Sekunden lang [INFO] (35) gedrückt halten. Im Display wird „DEL -001“ angezeigt.
3. Mit [►►I] [I◄◄] (3) oder (40) die zu löschende Datei wählen.
4. Auf [REC] (36) drücken. „YES“ und „NO“ blinken. Mit [►►I] [I◄◄] (3) oder (40) YES (Datei löschen) bzw.
NO (abbrechen ohne zu löschen) wählen.
5.
Zum Bestätigen erneut auf [REC] (6) oder (36) drücken. Zum Abbrechen des Löschvorgangs einmal auf [■] (41) drücken.
Alle Dateien löschen
1. Einen USB-Speicher oder eine Speicherkarte einstecken. Dann den Funktionswahlschalter in Position USB bzw.
SD stellen.
2. Ca. 3 Sekunden lang [INFO] (35) gedrückt halten. Im Display wird „DEL -001“ angezeigt.
3. Auf [REC] (36) drücken. „YES“ und „NO“ blinken. Mit [►►I] [I◄◄] (3) oder (40) YES (alle Dateien löschen) bzw.
NO (abbrechen ohne zu löschen) wählen.
4. Zum Bestätigen auf [REC] (36) drücken.
5. Zum Abbrechen des Löschvorgangs einmal auf [■] (41) drücken.
Achtung: YES bewirkt, dass alle Dateien auf dem USB-Speicher bzw. auf der Speicherkarte gelöscht werden.
USB-Speicher/Speicherkarte entfernen
Vor dem Entfernen des USB-Speichers/der Speicherkarte immer erst das Gerät abschalten.
USB-Speicher: Den USB-Speicher gerade herausziehen.
Speicherkarte: Die Speicherkarte vorsichtig etwas eindrücken.
Die Karte federt dann heraus und kann herausgezogen werden.
Deutsch
62
Page 63

13.Pflege und Wartung
• Staubige Schallplatten mit einer Schallplattenbürste reinigen.
• Wird der Plattenspieler nicht benutzt, die Abdeckung immer zuklappen um Staubansammlungen auf
dem Plattenteller und an der Nadel zu vermeiden.
• Bei Bedarf den Plattenspieler mit einem leicht befeuchteten Tuch abwischen.
Nadel austauschen
1. Den Tonabnehmer mit einer
Hand festhalten und an der
Vorderkante ein kleines Nuteisen
zwischen Tonabnehmer und
Nadel hineindrücken. Mit dem
Nuteisen die Nadel vorsichtig
herausstemmen.
2. Zum Einsetzen einer neuen Nadel
diese zuerst mit der Hinterkante
festdrücken. Dann an der
Vorderkante festdrücken.
1
14.Technische Daten
Netzspannung: 230 V AC, 50 Hz
Drehzahl Plattenspieler: 33/45 /min
Frequenzbereich Radio: 87,5 – 108 MHz (UKW), 540 – 1600 kHz (MW)
Bitrate, MP3: 32 – 256 kbit/s
Ausgangsleistung: 2 × 2 W
Abmessungen (Plattenspieler): 318 × 285 × 178 mm (B×T×H)
Abmessungen (Lautsprecher): 120 × 140 × 195 mm (B×T×H)
Gewicht: 4,7 kg
2
63
Deutsch
Page 64

Sverige
Kundtjänst tel: 0247/445 00
fax: 0247/445 09
e-post: kundservice@clasohlson.se
Internet www.clasohlson.se
Post Clas Ohlson AB, 793 85 INSJÖN
Norge
Kundesenter tlf.: 23 21 40 00
faks: 23 21 40 80
e-post: kundesenter@clasohlson.no
Internett www.clasohlson.no
Post Clas Ohlson AS, Postboks 485 Sentrum, 0105 OSLO
Suomi
Asiakaspalvelu puh.: 020 111 2222
sähköposti: asiakaspalvelu@clasohlson.fi
Internet www.clasohlson.fi
Osoite Clas Ohlson Oy, Maistraatinportti 4 A, 00240 HELSINKI
Great Britain
Customer Service contact number: 08545 300 9799
e-mail: customerservice@clasohlson.co.uk
Internet www.clasohlson.com/uk
Postal 10 – 13 Market Place
Kingston Upon Thames
Surrey
KT1 1JZ
Deutschland
Kundenservice Unsere Homepage www.clasohlson.de besuchen
und auf Kundenservice klicken.
 Loading...