

Page 1

Time-Lapse Remote
Shutter Release
Time-lapse-fjärrutlösare
Time-lapse-fjernutløser
Kaukolaukaisin
Time-Lapse-Fernauslöser
EnglishSvenskaNorskSuomiDeutsch
Art.no Model
38-6236 TC-C1 (Canon)
38-6237 TC-N3 (Nikon)
Ver. 20140507
Page 2

2
Page 3

Time-Lapse Remote Shutter Release
Art.no 38-6236 Model TC-C1 (Canon)
38-6237 TC-N3 (Nikon)
Please read theentire instruction manual before using theproduct and then save
it for future reference. We reserve theright for any errors in text or images and any
necessary changes made to technical data. If you have any questions concerning
technical problems please contact our Customer Services.
Contents
1. Description ................................................................................ 4
1.1 Remote Shutter Release ...........................................................................................4
1.2 Display .......................................................................................................................5
2. Inserting thebattery .................................................................. 5
2.1 Battery check ............................................................................................................5
3. Connecting theremote shutter release to thecamera ............ 6
4. Settings ...................................................................................... 6
4.1 Selecting amode .......................................................................................................6
4.2 Setting thetime and exposure count .......................................................................7
4.3 Starting and stopping thetimer ................................................................................8
4.4 Backlight ....................................................................................................................8
4.5 Key lock .....................................................................................................................8
4.6 Useful tips ..................................................................................................................8
5. Self-timer ................................................................................... 9
5.2 Sound .........................................................................................................................9
5.3 Starting thecountdown .............................................................................................9
6. Long exposures ......................................................................... 9
6.1 Setting .......................................................................................................................9
6.2 Starting along exposure .........................................................................................10
7. Interval timer ............................................................................ 10
7.1 Setting .....................................................................................................................10
7.2 Starting theinterval timer ........................................................................................10
8. Example ................................................................................... 11
8.1 Situation ..................................................................................................................11
8.2 Preparations ............................................................................................................11
8.3 Settings ....................................................................................................................11
8.4 Starting theset timer function ................................................................................11
9. Mode combinations ................................................................ 12
10. Manual remote shutter release operation ............................13
11. Care and maintenance .......................................................... 13
12. Specifications ........................................................................ 13
13. Models supported ................................................................. 13
English
3
Page 4
English
1. Description
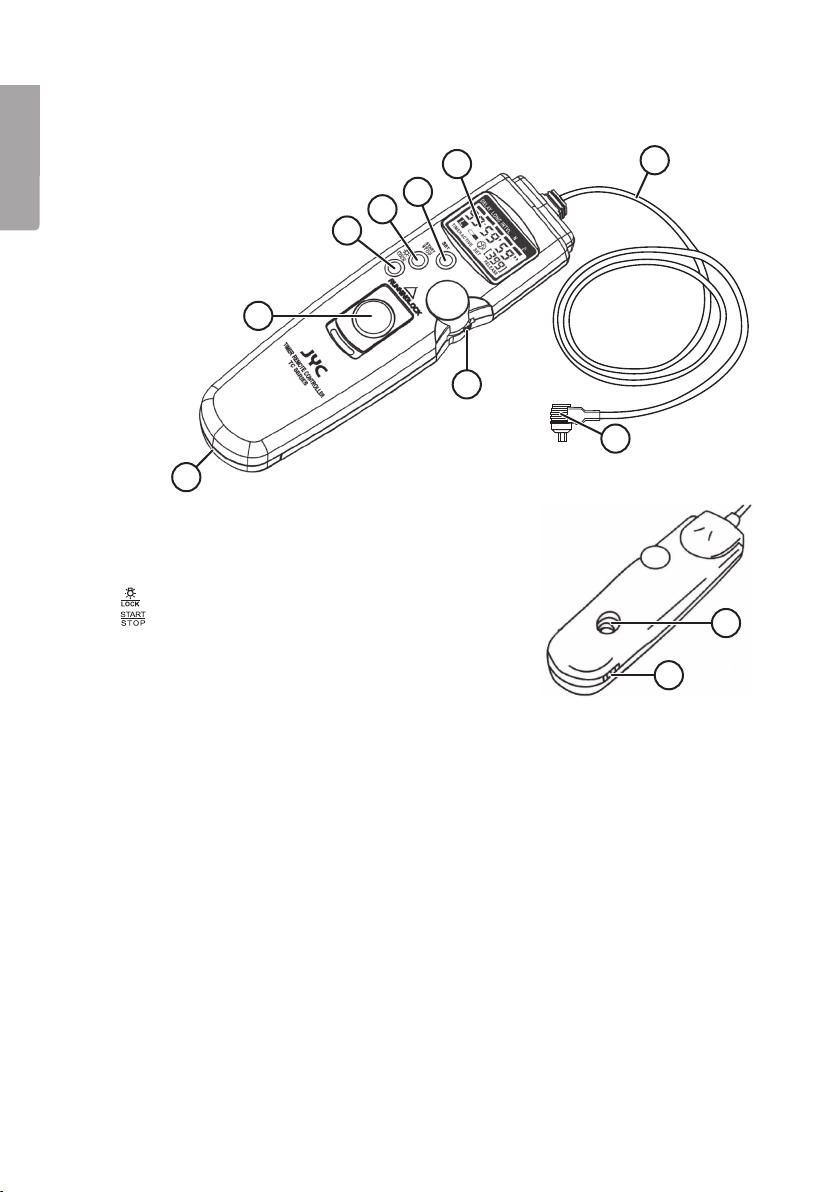
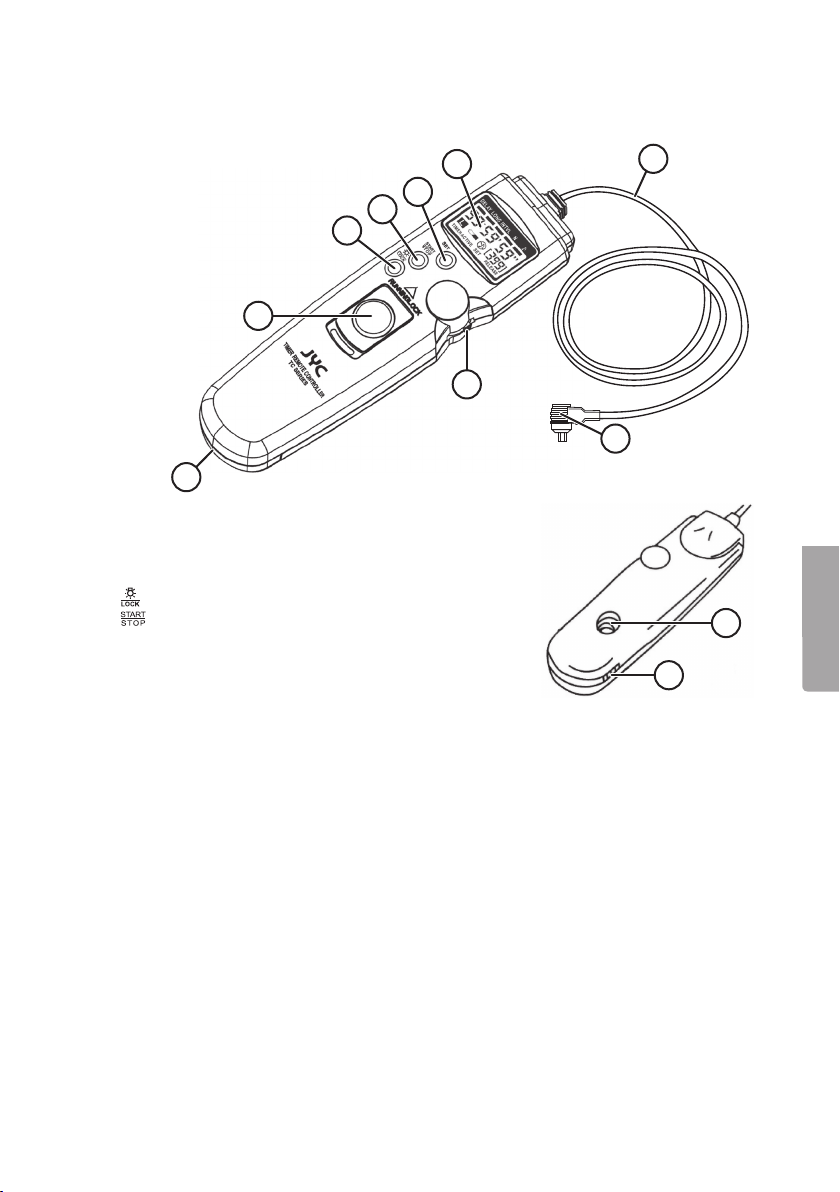
1.1 Remote Shutter Release
6
5
4
3
2
1. Mode button, press up/down to scroll in
themenu – press in to confirm
2. Battery compartment
3. Release button with lock
4. [ ] Backlight for thedisplay/lock
5. [ ] Start or stop theselected timer function
6. [ SET ] Enter settings mode or save setting
7. Display
8. Cable
9. Contacts
10. Holder for thecamera connection cap
7
8
1
9
10
2
4
Page 5
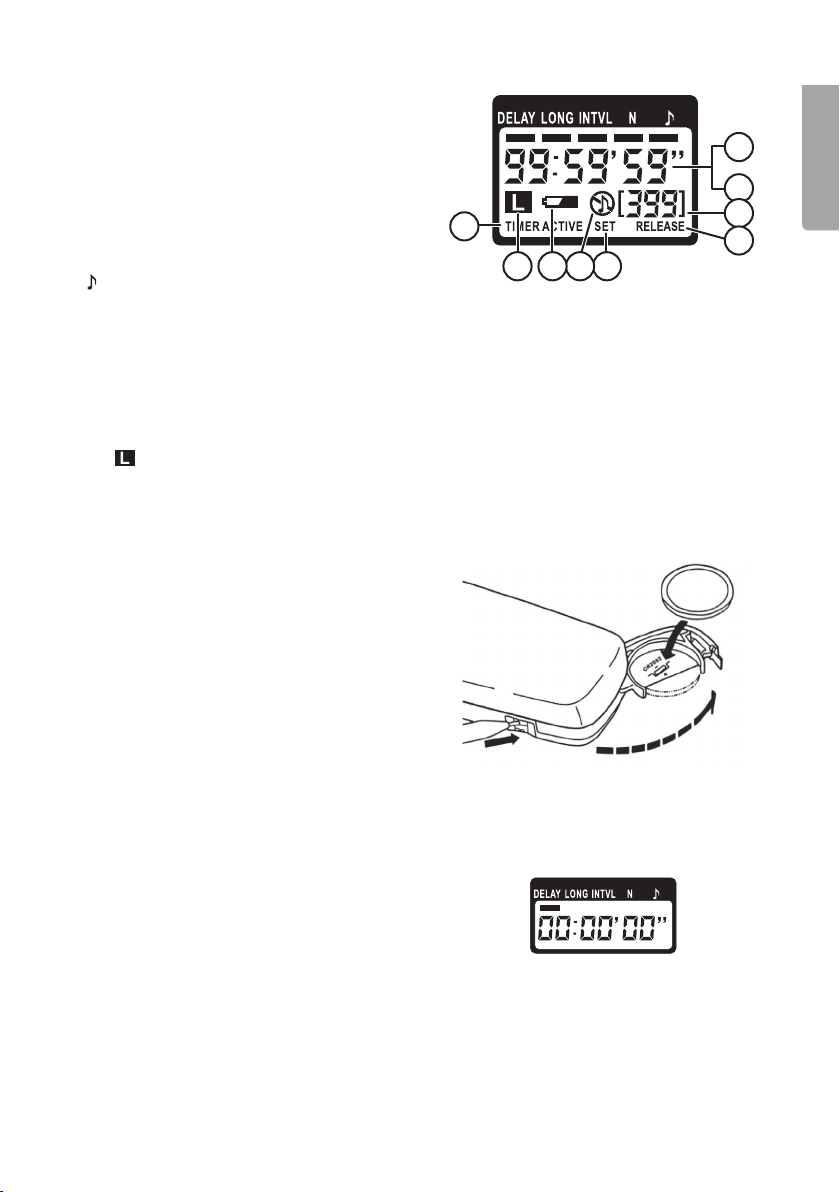
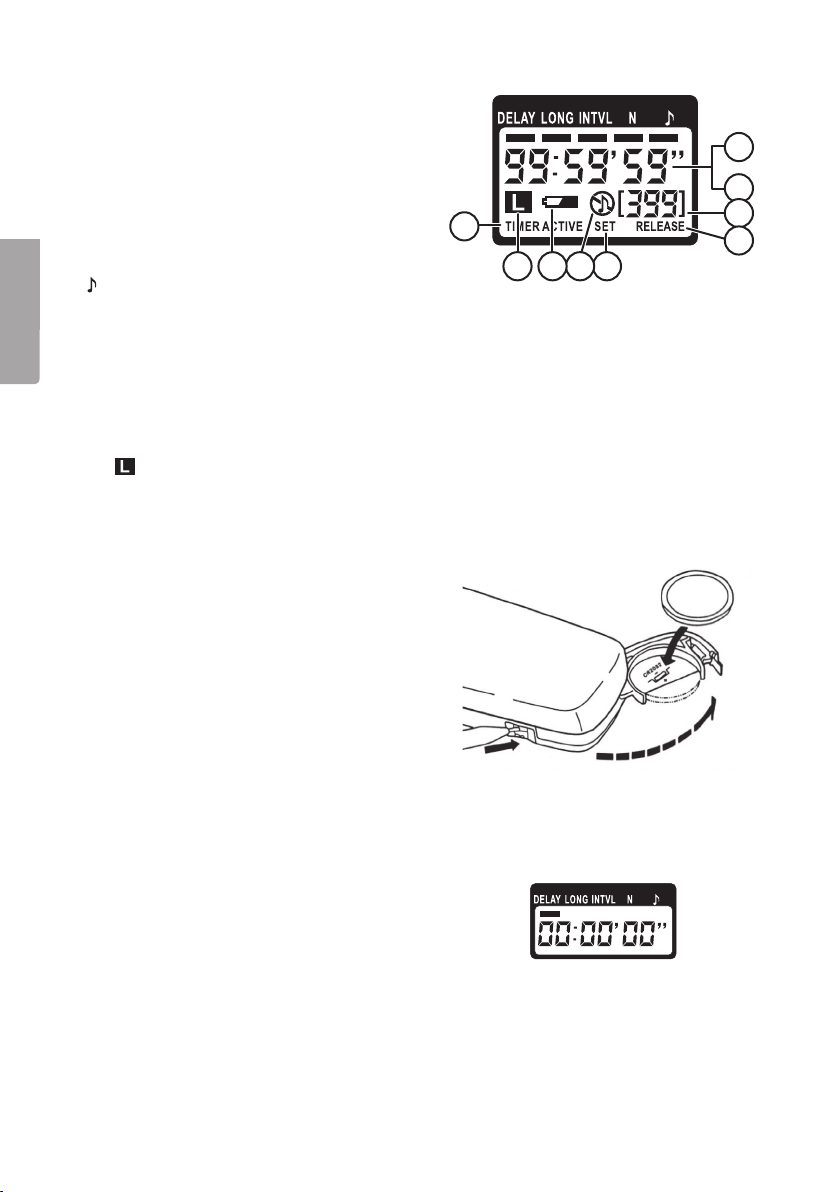
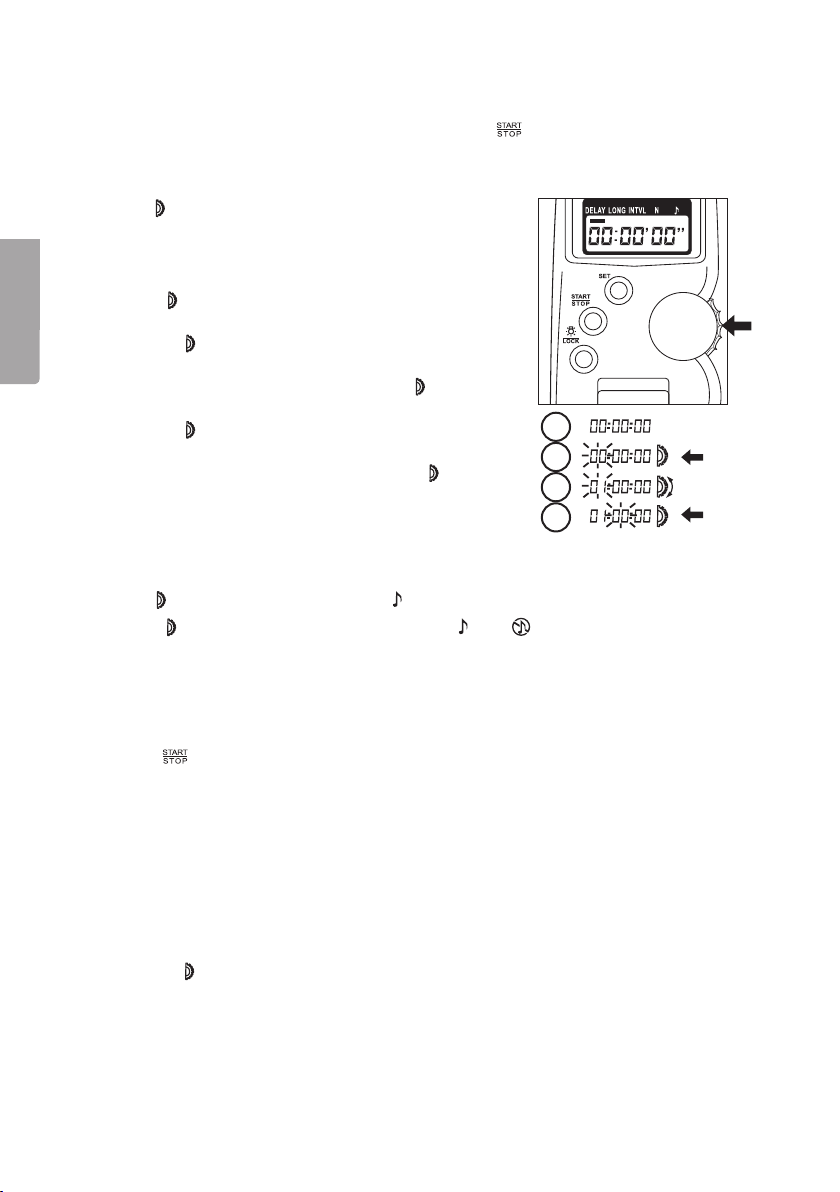
1.2 Display
Functions
Press themode button (1) until you come to
thedesired mode (see section 4. Settings).
DELAY Self-timer
LONG Timer for long exposure
INTVL Interval timer (time-lapse)
N Exposure count setting
Speaker on/off
a. 99:59′:59″ Shows thetime to thenext exposure (shutter closed, “TIMER ACTIVE” flashes)
b. 99:59′:59″ (“RELEASE” flashes) shows thetime until theshutter closes (shutter open)
c. [ 399 ] Number of remaining exposures
d. “RELEASE” Flashes when theshutter is open
e. “SET” Flashes in settings mode
f. Speaker off (sound switched off)
g. Battery symbol (shows only when battery power is low)
h. (locked) Shows when thekey lock is activated
i. “TIMER ACTIVE” Flashes all thetime when thetimer is activated
i
efgh
a
b
c
d
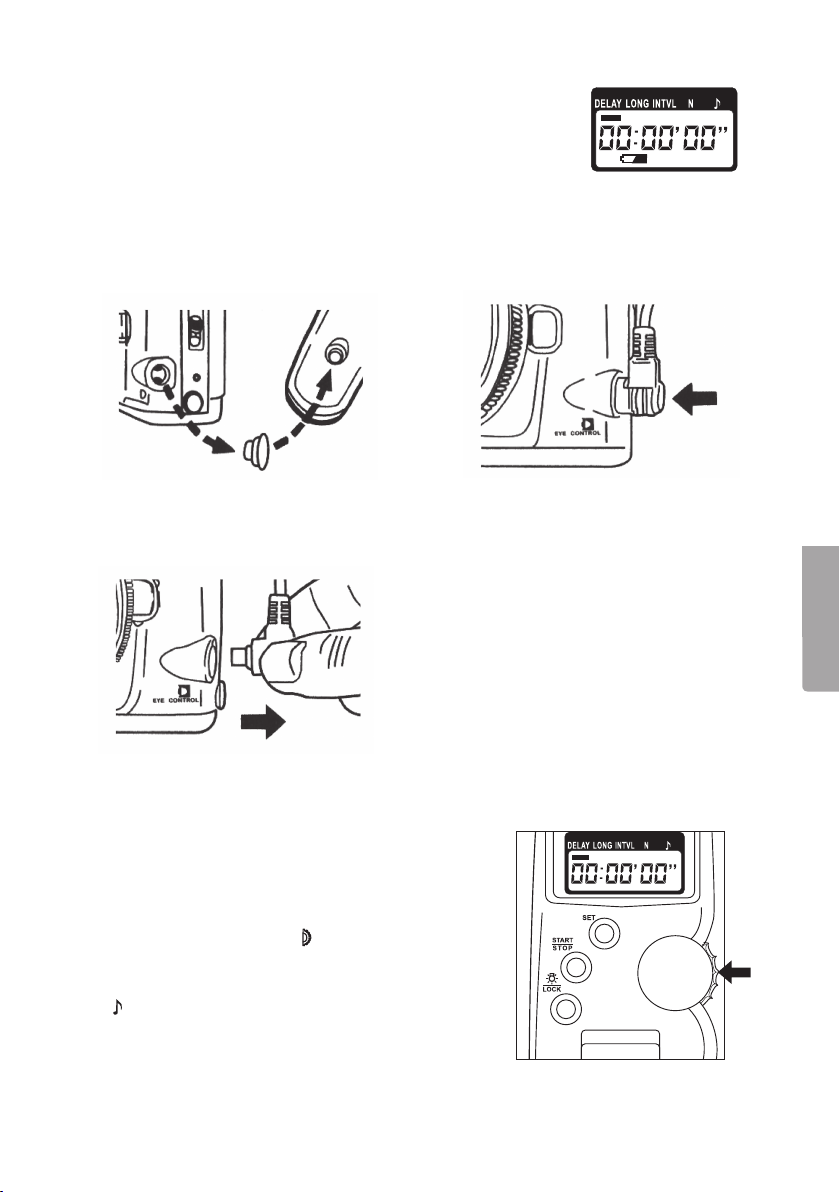
2. Inserting thebattery
Insert aCR20132 battery.
Note: Remove theremote shutter release
connection cable from thecamera before
inserting thebattery.
1. Pry open thebattery compartment using
asmall tool as shown in thepicture.
Wipe thebattery terminals inside
thethebattery compartment to remove
any oxide before inserting thebattery.
2. Insert thebattery according to
themarkings in thebattery compartment.
If thebattery is upside down, theremote
shutter release will not work.
3. Close thebattery compartment.
English
2.1 Battery check
• Thebattery can last for up to 3 years.
• Theremote shutter release has no switch
to turn thedisplay off. Thedisplay will
be on continuously, but uses very little
power.
• If thebattery capacity is good, thebattery
symbol will not be displayed.
5
Page 6
English
When thebattery symbol flashes on thedisplay, thebattery
should be changed. If you continue to use theremote shutter
release when thebattery symbol is flashing, it will stop working
without warning.
• If thebattery is removed, all theremote shutter release
settings will be erased.
• Thecapacity of thebattery will temporarily drop at lower
temperatures and return to normal level at normal temperatures.
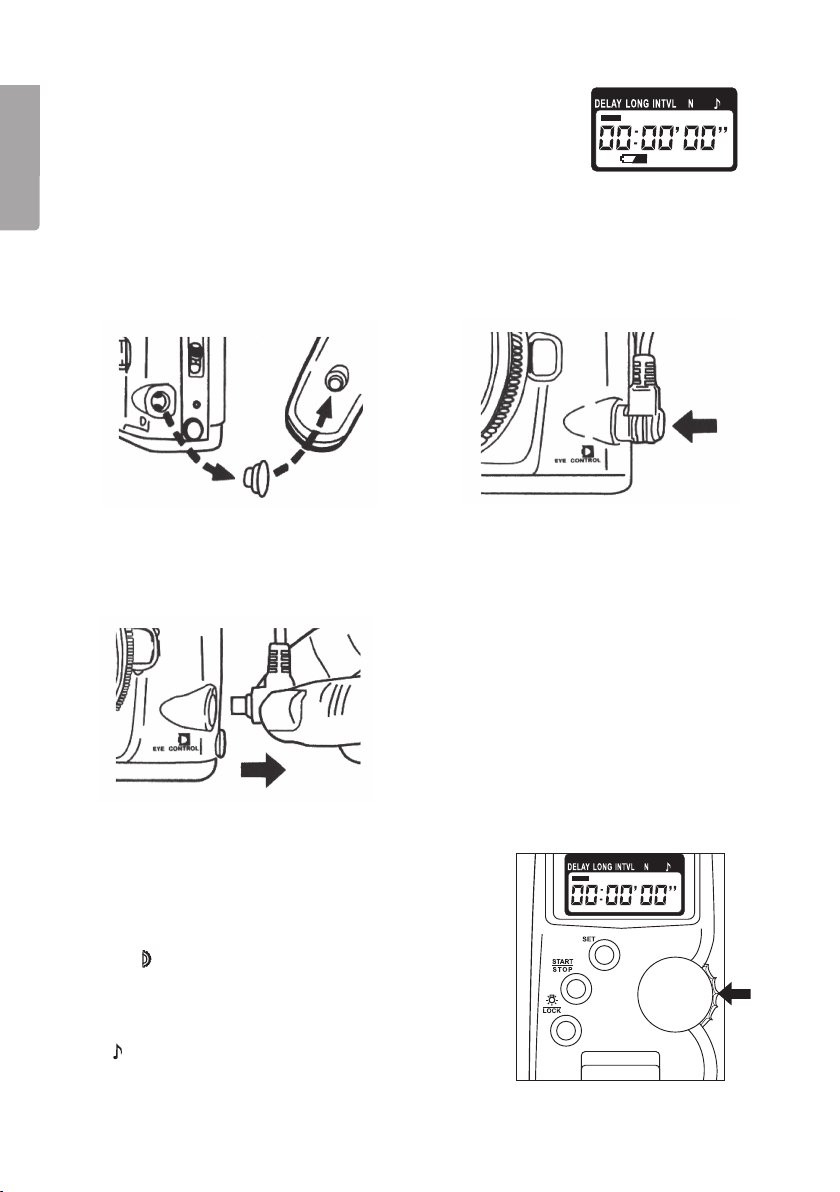
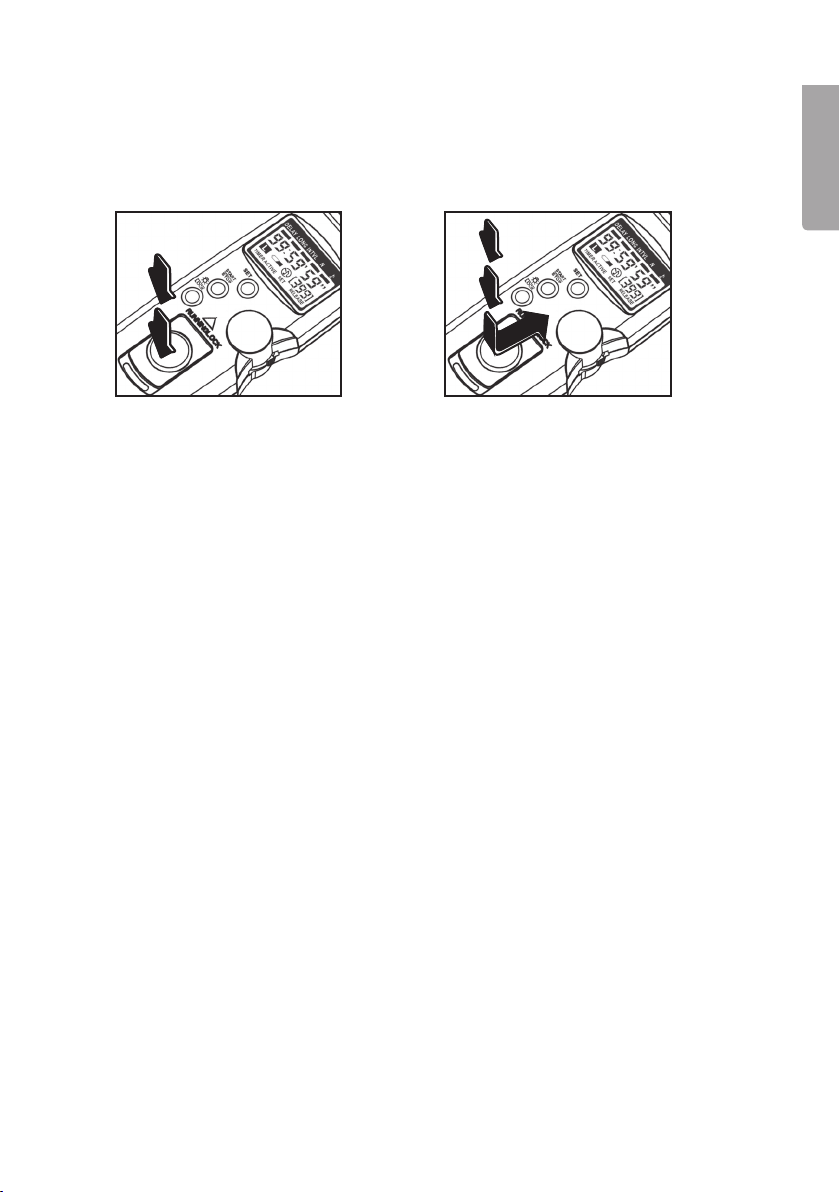
3. Connecting theremote shutter release to thecamera
1. Remove thecap covering theremote
shutter release connection socket.
Place thecap into theholder (10) on
theremote shutter release.
3. Grip theconnector and pull it straight out when
disconnecting thecable from thecamera.
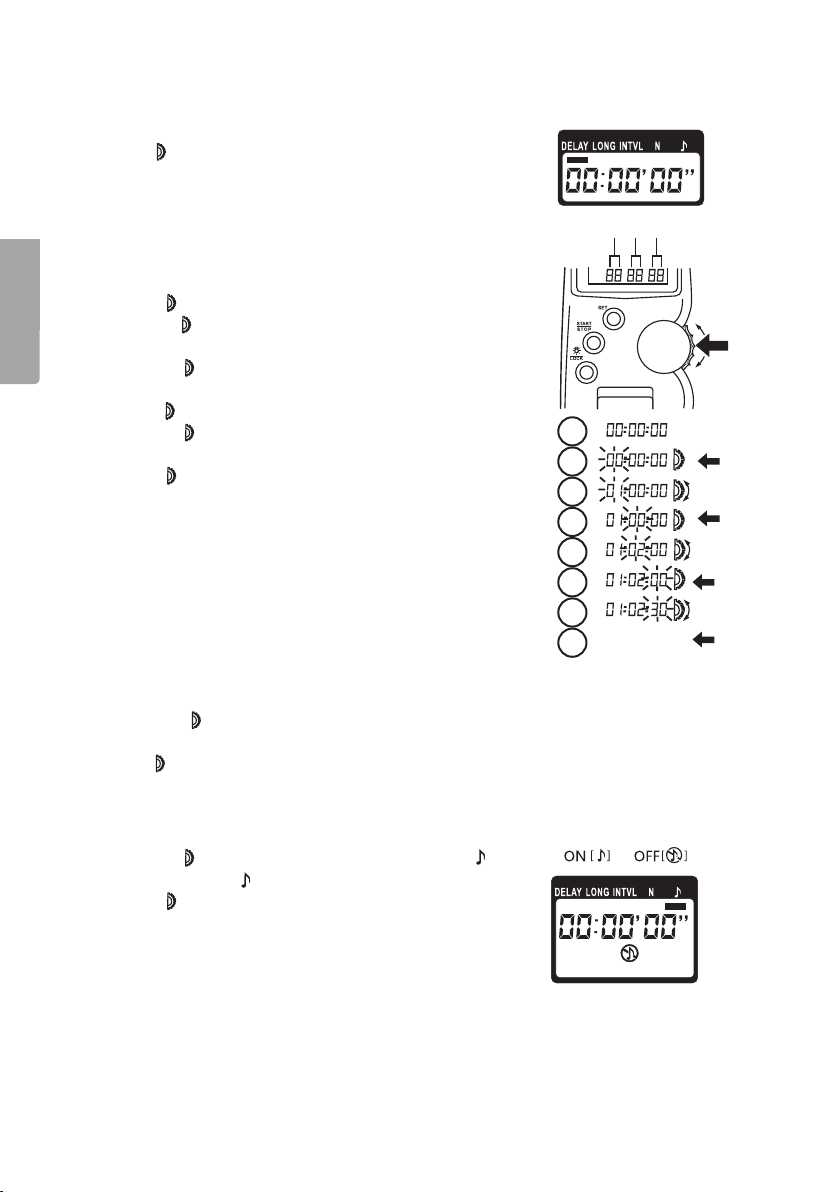
4. Settings
4.1 Selecting amode
Press [ ] therequired number of times to select
thedesired mode:
DELAY (self-timer) –> LONG (long exposure)
–> INTVL (interval timer) –> N (exposure count)
(speaker ON/OFF) –> DELAY…
–>
2. Press on theback of theconnector
when connecting theremote
shutter release cable to
thecamera.
6
Page 7
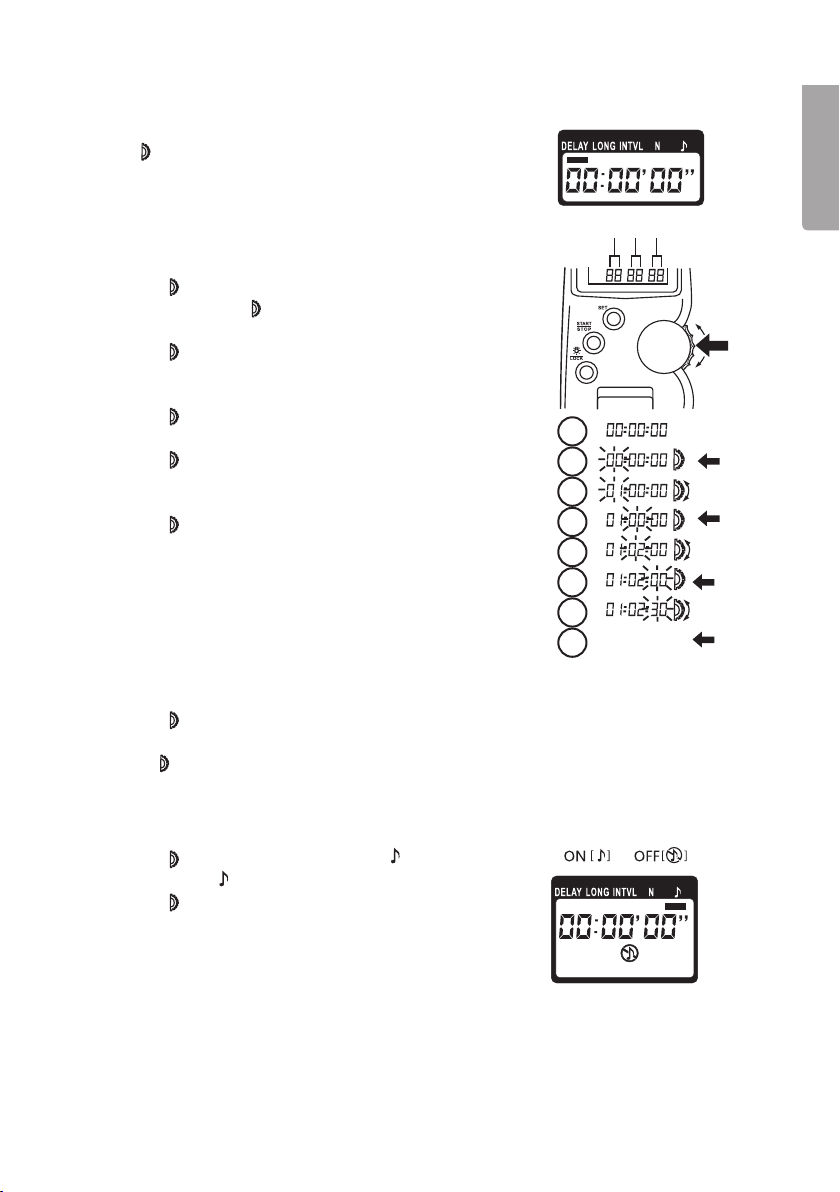
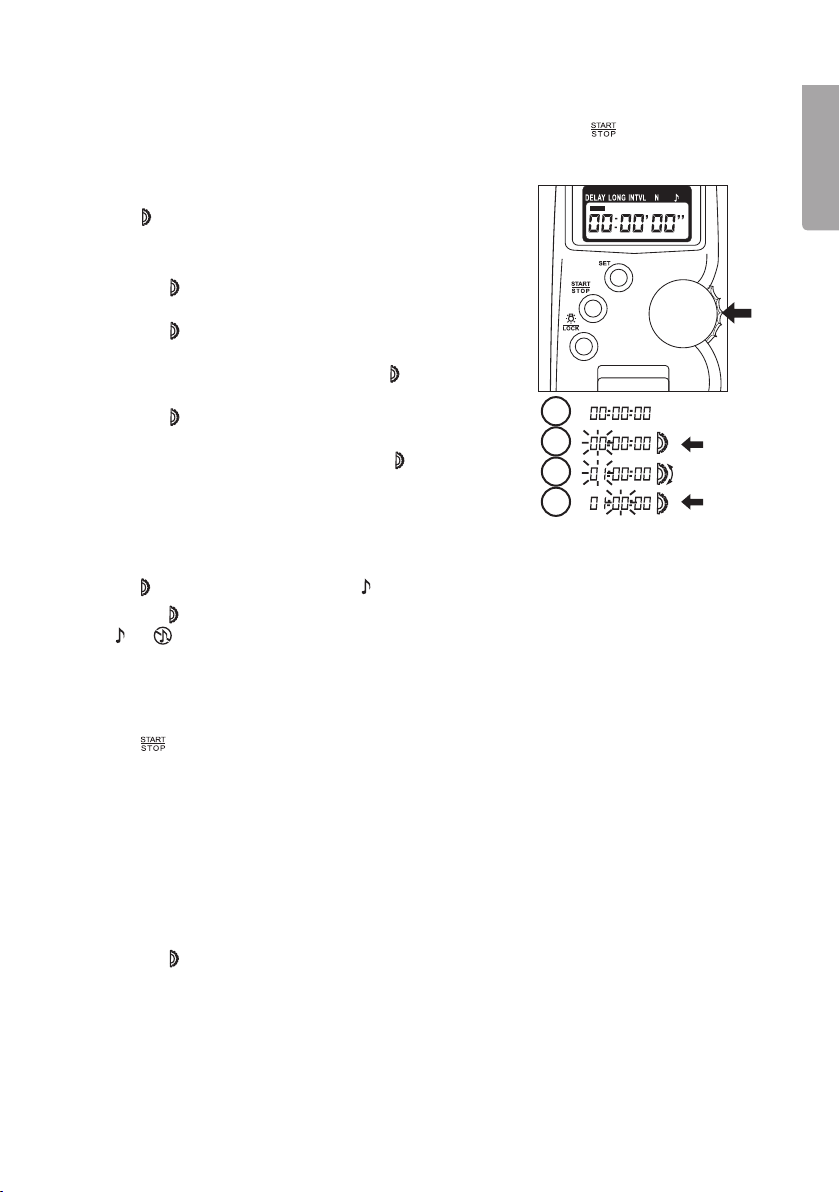
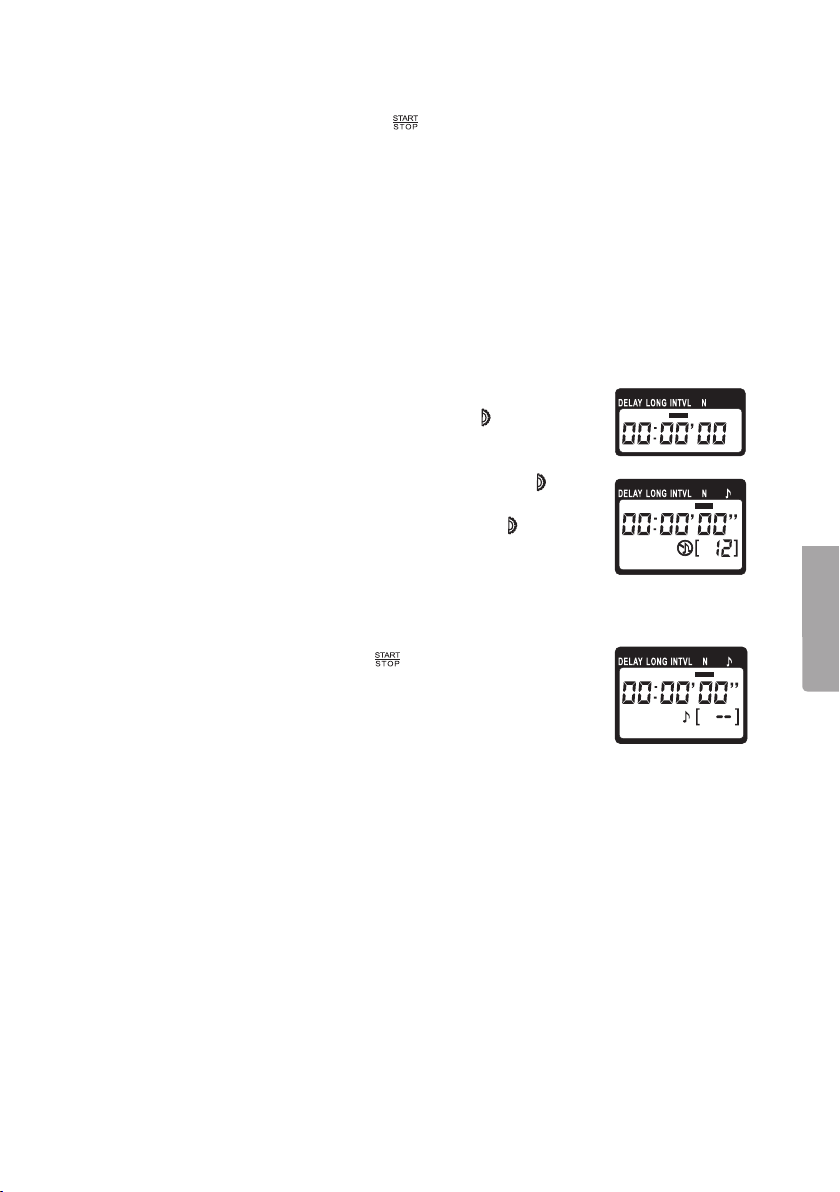
4.2 Setting thetime and exposure count
Setting thetime
Press [ ] repeatedly to advance to: DELAY, LONG
or INTVL.
1. Thesettings mode is entered. “ 00:00′00″ ”
(hours: minutes: seconds) is displayed.
2. Press [ SET ] to start making settings, thehours
will flash.
3. Press [
hour (or press in [ ] to go directly to
thesettings for minutes or seconds).
4. Press [ ] to confirm your setting and go to
theminutes setting. Theminutes display will
then begin to flash.
5. Press [ ] upwards/downwards to thedesired
minutes setting.
6. Press [ ] to confirm your setting and go to
theseconds setting. Theseconds display will
then begin to flash.
7. Press [ ] upwards/downwards to thedesired
seconds setting.
8. Press [ SET ] to confirm thetime setting.
Thetime setting range is from 1 second to 99 hours,
59 minutes and 59 seconds.
] upwards/downwards to thedesired
1
2
3
4
5
6
7
8
English
H M S
[ SET ]
Setting theexposure count
1. Press [ ] repeatedly to advance to N for theexposure count.
2. Press [ SET ], [ – – ] (anumber) flashes.
3. Turn [ ] to thedesired exposure count (max 399).
4. Press [ SET ] to confirm.
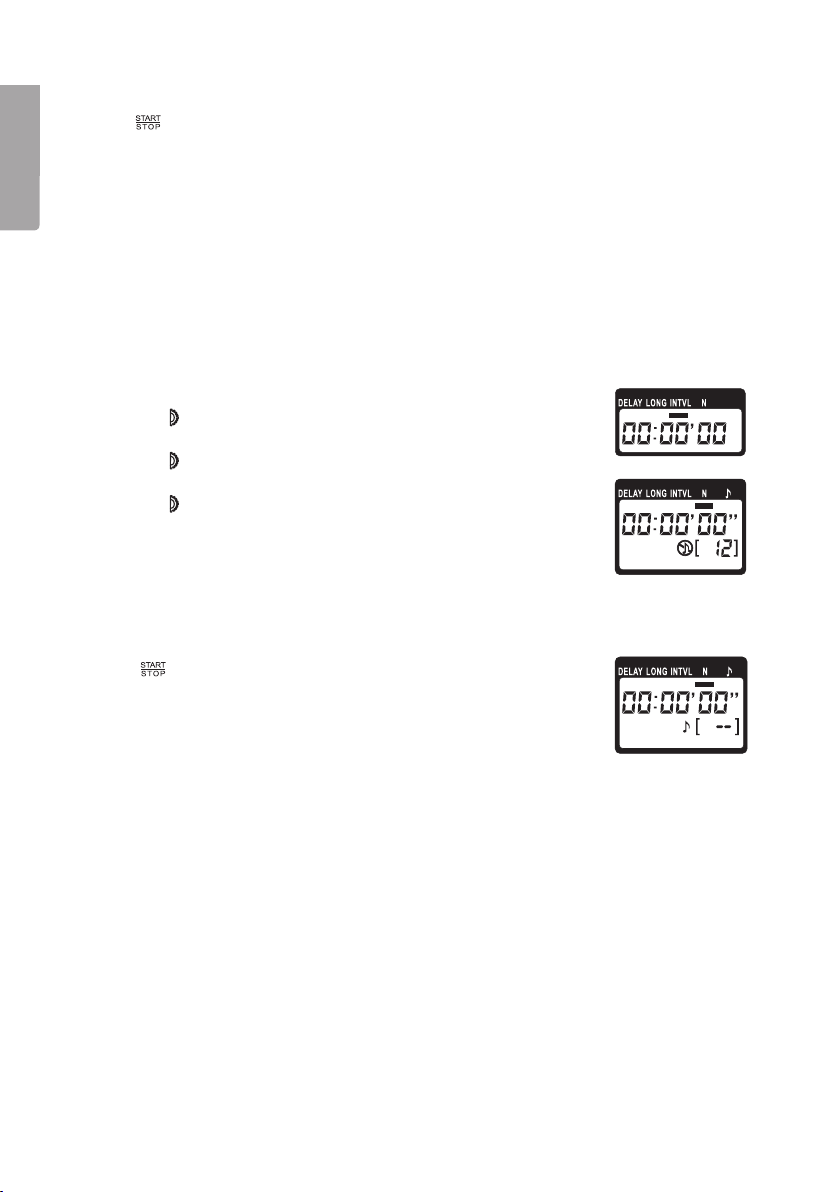
Setting theaudio (speaker)
1. Press [ ] repeatedly to advance to .
2. Press [ SET ], will begin to flash.
3. Press [ ] upwards/downwards to
thedesired setting: ON or OFF.
7
Page 8
English
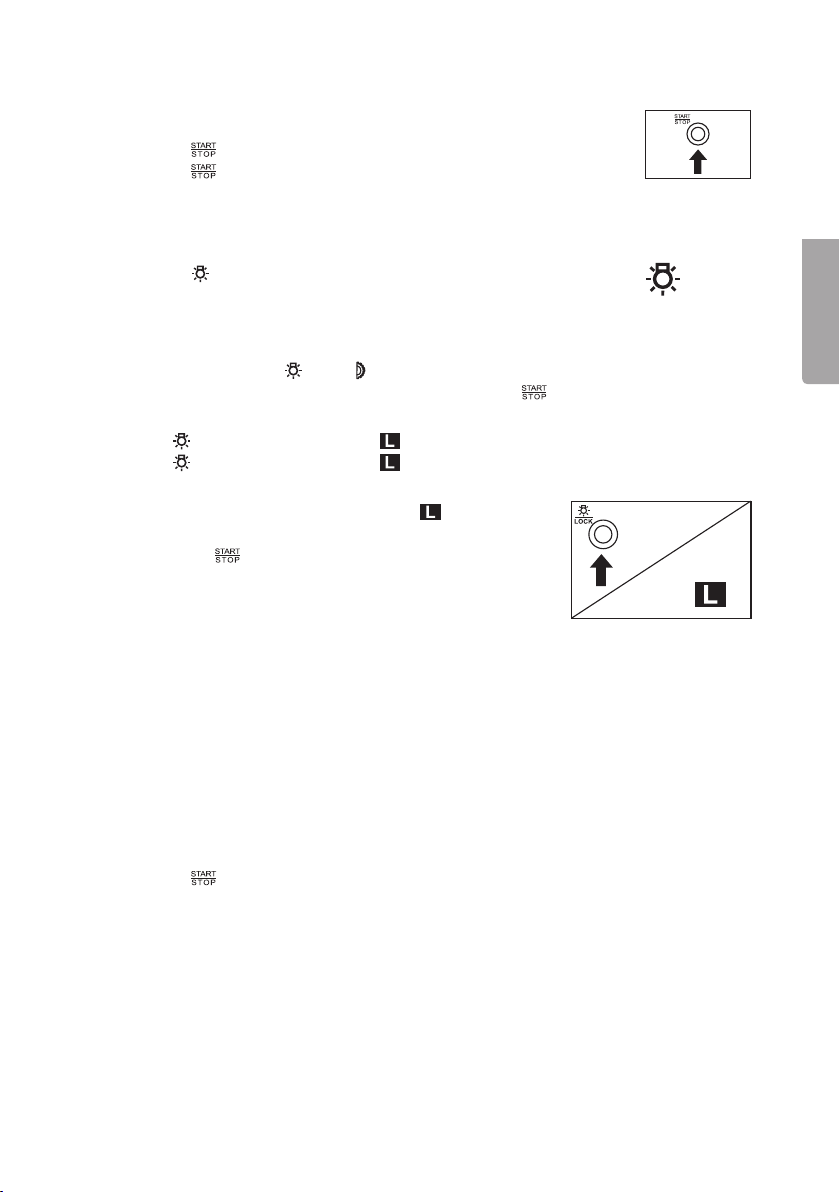
4.3 Starting and stopping thetimer
The[ ] button controls thetimer function.
1. Press [
2. Press [ ] again to stop thetimer.
Thetimer settings are saved and will continue if thetimer is started again.
] to start thetimer once it has been set.
4.4 Backlight
1. Press [ ] to switch thebacklight on.
2. Thelight will automatically go out after about 6 seconds.
4.5 Key lock
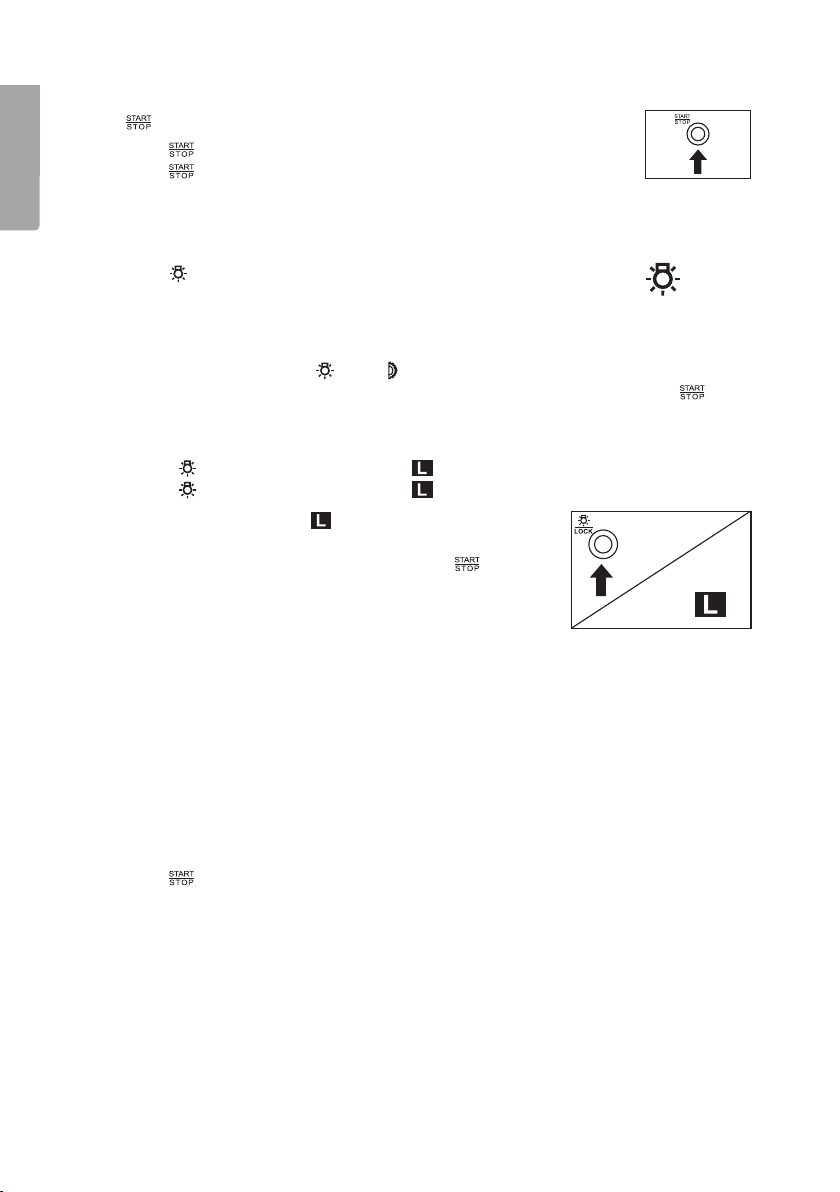
Locks all thebuttons except [ ] and [ ] upwards/downwards to prevent accidental
changes to settings. Theaccidental stopping of astarted function using the [
button is prevented.
Note: Themanual remote shutter release (3) is not affected by thekey lock.
1. Hold in [
2. Hold in [ ] for at least 3 seconds until disappears to unlock thebuttons again.
Note: Always check that the
trying to take apicture. If thesymbol is displayed, thekey
lock function must be deactivated. Then press [ ] to start
theset function.
] for at least 3 seconds until is displayed to lock thebuttons.
is NOT displayed before
]
4.6 Useful tips
Remember to set theshooting mode to single-frame shooting, if thecamera is set to
continuous shooting thecamera will not be controlled by theremote shutter release
but by thecamera settings.
When using theremote shutter release unattended:
• Focus your camera manually. In auto mode thecamera automatically focuses
before anexposure, in this case theremote shutter release will not work.
• Do not use thecamera timer at thesame time as theremote shutter release, as
theremote shutter release will not function correctly.
• Press [
• Theremote shutter release should be covered if used outdoors, it is not waterproof.
] to stop thetimer function before changing thememory card.
8
Page 9
5. Self-timer
Set theduration of thedelay (time) from when you have pressed [ ] until theshutter
is released.
5.1 Setting
Press [ ] repeatedly to advance to DELAY.
1. Press [ SET ] to enter theself-timer setting.
2. Thehour digits will flash.
3. Press [
setting:
4. Press [ ] to confirm your setting and go to
theminutes setting.
5. Theminutes digits will flash. Press [ ] upwards/
downwards to thedesired setting.
6. Press [ ] to confirm your setting and go to
theseconds setting.
7. Theseconds digits will flash. Press [ ] upwards/
downwards to thedesired setting:
8. Complete thesetting by pressing [ SET ] to confirm.
] upwards/downwards to thedesired
1
2
3
4
5.2 Sound
Press [ ] repeatedly to advance to . Press [ SET ].
• Press [
• Press [ SET ] to confirm.
] upwards/downwards until thedesired setting has been reached
or to activate or deactivate thespeaker during thecountdown.
5.3 Starting thecountdown
Press [ ] to start thecountdown to shutter release. Press thebutton again to
interupt thecountdown before shutter release.
Note: If thecamera is used in auto mode, theviewfinder should be covered to prevent
exposure error.
English
6. Long exposures
6.1 Setting
Set your camera to Bulb Mode (or its equivalent)
1. Press [
2. Set thetime in thesame way as you did in 4.1 Settings.
] repeatedly to advance to LONG.
9
Page 10
English
6.2 Starting along exposure
Press[ ] to start along exposure.
Press thebutton again to interupt thecountdown before theexposure is complete.
“RELEASE” flashes on thedisplay for as long as theshutter is open.
Note: If thecamera is not in bulb mode, continuous exposures will be made during
theentire set “long exposure” time (or until thememory card is full).
7. Interval timer
First set thetime interval between exposures (INTVL) and then set theexposure count (N).
7.1 Setting
Set thecamera to single shoot mode.
1. Press [
2. Set theinterval time in thesame way as you did in 4.1 Settings.
3. Press [ ] 1 time to advance to N (exposure count).
4. Press [ SET ] to enter thesettings mode.
5. Press [ ] upwards/downwards repeatedly to set
theexposure count.
6. Press [ SET ] to confirm theset exposure count.
Note: If theflash is used, theinterval time must be set to
alonger time than theflash recharge time.
7.2 Starting theinterval timer
Press [ ] to start theinterval timer.
Press thebutton again to interupt theinterval timer operation
before theexposure is complete.
“RELEASE” flashes on thedisplay for as long as theshutter is open.
Note: Theexposure count (N) can be set from 1 to 399, but it is
possible to select anunlimited number of exposures by setting
(N) to (- -) mode. In (- -) mode, theexposures will continue
until thememory card is full or thetimer function is interupted
manually.
] therequired number of times to select INTVL.
10
Page 11
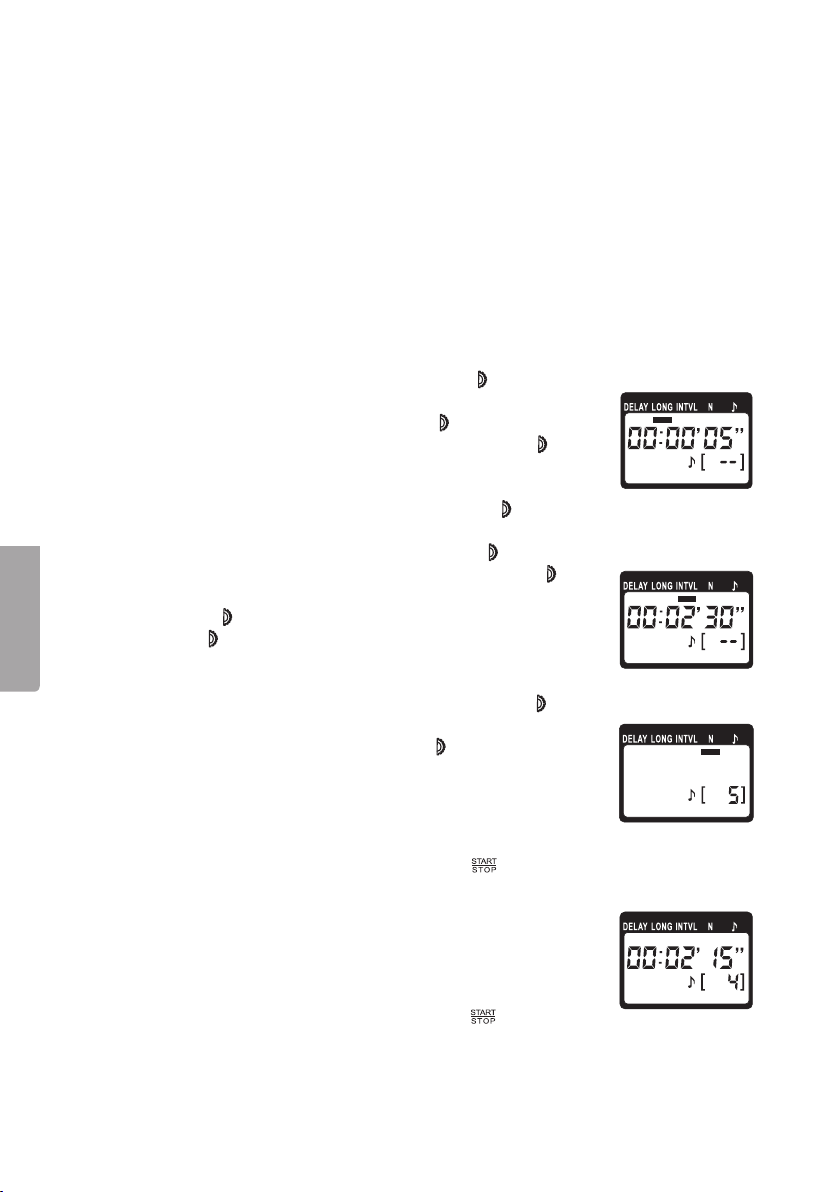
8. Example
8.1 Situation
• 5 exposures.
• Exposure time: 5 seconds.
• Interval between exposures: 2 minutes and 30 seconds.
8.2 Preparations
1. Place thecamera on astand or tripod.
2. Set thecamera to manual focus mode. Focus thecamera (refer to theuser manual
of thecamera).
8.3 Settings
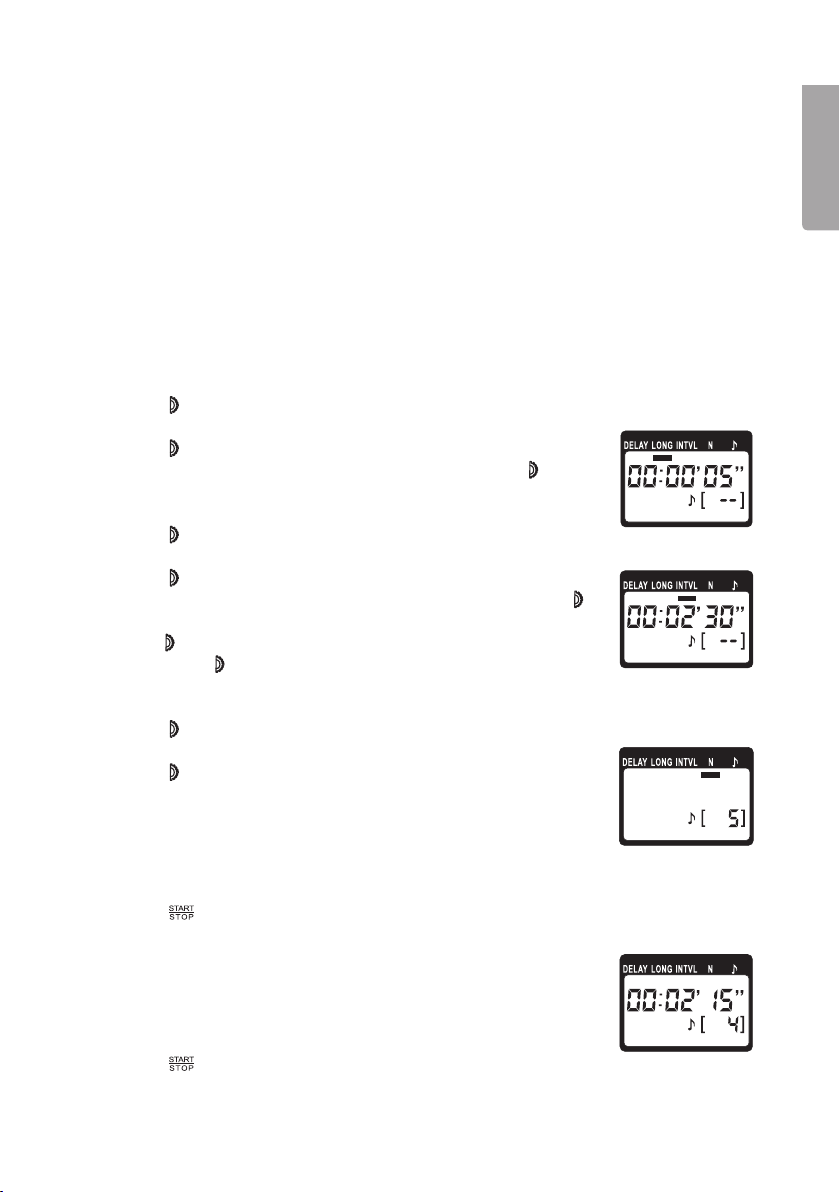
1. Press [ ] repeatedly to advance to LONG (long exposure).
2. Press [ SET ] to enter thesettings mode.
3. Press [ ] twice to advance past hours and minutes.
Theseconds will flash, set to 5 seconds by pressing [ ]
upwards 5 times.
4. Press [ SET ] to confirm theset exposure time.
5. Press [ ] 1 time to advance to INTVL (interval).
6. Press [ SET ] to enter thesettings mode.
7. Press [ ] once to advance past thehours to theminutes
(theminutes display flashes). Set to 2 minutes by pressing [ ]
upwards 2 times.
8. Press [ ] 1 time. Theseconds will start to flash, set to30 seconds
by pressing [ ] upwards 30 times (or hold it down to advance
quicker).
9. Press [ SET ] to confirm theset interval time between exposures.
10. Press [ ] 1 time to advance to N (exposure count).
11. Press [ SET ] to enter thesettings mode.
12. Press [ ] upwards 5 times to set theexposure count to 5.
13. Press [ SET ] to confirm theset exposure count. Thenote
symbol will appear on thedisplay to indicate that thespeaker
is activated.
English
8.4 Starting theset timer function
1. Press [ ] to start thetimer once it has been set.
2. Thecamera will take apicture immediately. “TIMER ACTIVE”
flashes on thedisplay whilst thetimer is counting down.
3. Thedisplay shows information about thestatus of thetimer
fumction. Thedisplay shows: 2 minutes and 15 seconds
remain until thenext exposure, 4 exposures remain and
thespeaker is activated.
4. Press [ ], start theset timer again or enter thesettings and
reset all thesettings to 0.
11
Page 12

English
9. Mode combinations
Pos. DELAY LONG INTVL N Mode Application
1 • Self-timer Specifies thetime for
2 • Interval timer, continues until
switched off (unlimited)
3 • Long exposures Astronomy
4 • Exposure count Time-lapse photography,
5 • • Time until theinterval
timer starts
6 • • After theself timer delay,
thelong exposure starts
7 • • After theself timer delay,
theset number of exposures
is taken at 1 second intervals
8 • • Long exposure interval
unlimited
9 • • Thenumber of set exposures
is taken at theset intervals
10 • • • After theself timer delay,
thelong exposure is taken
at unlimited intervals
11 • • • After theself timer delay,
theset number of exposures
is taken.
12 • • • Theset number of long
exposures is taken at
theset intervals
13 • • • • After theself timer delay,
theset number of long
exposures is taken at
theset intervals
14 • • Incompatible combination!
Theremote shutter release
will automatically revert to
mode 3.
15 • • • Incompatible combination!
Theremote shutter release
will automatically revert to
mode 6.
theshooting to start
Interval photography
(e.g. blossoming flowers)
e.g 1 second intervals
Interval photography
Interval photography,
astrophotography
Interval photography
(e.g. blossoming flowers)
Interval photography
(e.g. blossoming flowers)
12
Page 13
10. Manual remote shutter release operation
Theremote shutter release can be used to activate thecamera manually in thesame
way as aremote control. This function can be used regardless of theremote shutter
release settings. This function does not require battery power and can therefore be
used even when thebattery is flat.
English
1. Pressing therelease button halfway
in activates theautofocus and
sets theviewfinder and shutter
speed (in autofocus mode).
2. Pressing thebutton all theway in
takes apicture.
Long exposures
3. Press therelease button in completely
and then slide it forwards in thedirection
of thearrow to lock it.
4. To release thedepressed button (and
close theshutter), slide it back to its
original position.
11. Care and maintenance
Clean theproduct using asoft, moist cloth. Only use mild detergents; never use solvents
or strong, abrasive cleaning agents for cleaning as these can damage theproduct.
Note: Theremote shutter release is not waterproof.
12. Specifications
Model TC-C1 (Canon) Art. nr 38-6236
TC-N3 (Nikon) Art. nr 38-6237
Self timer 0 seconds to 99 hours, 59 minutes and 59 seconds
Long exposure 0 seconds to 99 hours, 59 minutes and 59 seconds
Interval timer 0 seconds to 99 hours, 59 minutes and 59 seconds
Exposure count 1 to 399 or unlimited
Cable length 80cm
Battery CR2032 (3 V)
Size 40×20×143 mm
Weight 85g (including battery)
13. Models supported
At time of writing, thefollowing models of camera are supported:
C1 Canon EOS 30, 33, 50E, 300, 300V, 3000, 50, 300D (Digital Rebel), 350D (Digital
Rebel XT), 400D (Digital Rebel XTi), 450D (Digital Rebel XSi), 500D, 1000D
N3 Nikon D90, D5000, D5100, D3100, D7000
13
Page 14

Time-lapse-fjärrutlösare
Art.nr 38-6236 Modell TC-C1 (Canon)
38-6237 TC-N3 (Nikon)
Läs igenom hela bruksanvisningen före användning och spara den sedan för framtida bruk.
Vi reserverar oss för ev. text- och bildfel samt ändringar av tekniska data. Vid tekniska
problem eller andra frågor, kontakta vår kundtjänst (se adressuppgifter på baksidan).
Innehållsförteckning
Svenska
1. Beskrivning .............................................................................. 15
1.1 Fjärrutlösare .............................................................................................................15
1.2 Display .....................................................................................................................16
2. Sätt i batteri ............................................................................. 16
2.1 Batterikontroll ..........................................................................................................16
3. Anslut fjärrutlösaren till kameran ............................................ 17
4. Inställningar ............................................................................. 17
4.1 Välj funktion .............................................................................................................17
4.2 Ställ in tid och antal exponeringar ..........................................................................18
4.3 Start/stopp ...............................................................................................................19
4.4 Bakgrundsbelysning ................................................................................................19
4.5 Hold-funktion ...........................................................................................................19
4.6 Användningstips ......................................................................................................19
5. Självutlösare ............................................................................ 20
5.1 Inställning .................................................................................................................20
5.2 Ljud ..........................................................................................................................20
5.3 Starta nedräkning ....................................................................................................20
6. Fotografering med lång exponeringstid ................................. 20
6.1 Inställning .................................................................................................................20
6.2 Starta lång exponering ............................................................................................21
7. Intervalltimer ............................................................................ 21
7.1 Inställning .................................................................................................................21
7.2 Starta intervalltimer .................................................................................................21
8. Användningsexempel .............................................................. 22
8.1 Förutsättning ...........................................................................................................22
8.2 Förberedelser ..........................................................................................................22
8.3 Inställningar .............................................................................................................22
8.4 Starta inställd timerfunktion ....................................................................................22
9. Kombinationer av flera funktioner .......................................... 23
10. Manuell fjärrutlösare .............................................................. 24
11. Skötsel och underhåll ............................................................ 24
12. Specifikationer ....................................................................... 24
13. Modellstöd ............................................................................. 24
14
Page 15

1. Beskrivning
1.1 Fjärrutlösare
6
5
4
3
2
1. Multifunktionsreglage, tryck upp/ner för
skrollning i meny - tryck in för att bekräfta
2. Batterifack
3. Manuell fjärrutlösare med spärr
4. [ ] Bakgrundsbelysning för display/lås
5. [ ] Starta eller stoppa vald timerfunktion
6. [ SET ] Öppna eller bekräfta inställning
7. Display
8. Kabel
9. Kontakt
10. Fäste för kamerans lock (över anslutningen
på kameran)
7
8
Svenska
1
9
10
2
15
Page 16
1.2 Display
Funktioner
Tryck in multifunktionsreglaget (1) flera gånger
för att välja funktion (se 4. Inställningar).
DELAY Självutlösare
LONG Timer för lång exponeringstid
INTVL Intervalltimer (time-lapse)
N Exponeringsräknare
a. 99:59′:59″ Visar tid till nästa exponering (slutare stängd, ”TIMER ACTIVE” blinkar)
Svenska
b. 99:59′:59″ (”RELEASE” blinkar) visar tid tills slutaren stängs (slutare öppen)
c. [ 399 ] Antal kvarvarande exponeringar
d. ”RELEASE” Blinkar när slutaren är öppen
e. ”SET” Blinkar i inställningsläge
f. Högtalare av (ljudet avstängt)
g. Batterisymbol (visas endast när batteriet är dåligt)
h. (locked) Visas när knapplåset är aktiverat
i. ”TIMER ACTIVE” Blinkar hela tiden när timer är startad
2. Sätt i batteri
Sätt i ett CR2032-batteri.
Obs! Ta bort fjärrutlösarens anslutningskabel
från kameran innan du sätter i batteriet.
1. Använd ett litet verktyg för att peta ut
2. Sätt i batteriet enligt polaritetsmärkningen
3. Stäng batterihållaren.
Högtalare av/på
batterihållaren som bilden visar. Torka av
batterikontakterna i batterihållaren innan
du sätter i batteriet för att ta bort ev. oxid
som ger dålig kontakt.
i batterifacket. Om du vänder batteriet fel
fungerar inte fjärrutlösaren.
a
b
i
c
d
efgh
2.1 Batterikontroll
• Batteriet kan hålla upp till 3 år.
• Fjärrutlösaren har ingen strömbrytare för
displayen. Visningen på displayen är aktiv
kontinuerligt, men det drar ytterst lite ström.
• När batteriet är bra visas inte batterisymbolen på displayen.
16
Page 17

När batterisymbolen blinkar på displayen ska batteriet ersättas
med ett nytt. Om du fortsätter utan att byta batteri kommer
fjärrutlösaren att sluta fungera utan förvarning.
• Om batteriet tas ur kommer fjärrutlösarens alla inställningar
att raderas.
• Batteriets kapacitet minskar tillfälligt vid låg temperatur och
återgår vid normal temperatur.
3. Anslut fjärrutlösaren till kameran
Svenska
1. Ta bort locket över kamerans anslutning
för fjärrkontrollen. Placera locket
i hållaren (10) på fjärrutlösaren.
3. Håll i kontakten och dra den rakt
utåt när du ska ta bort den.
2. Tryck på baksidan av kontakten när
4. Inställningar
4.1 Välj funktion
Tryck in [ ] upprepade gånger för att välja
önskad funktion:
DELAY (självutlösare) –> LONG (lång exponering)
–> INTVL (intervall-timer) –> N (antal exponeringar)
(högtalare på/av) –> DELAY…
–>
du ansluter fjärrutlösarens kabel till
kameran.
17
Page 18
4.2 Ställ in tid och antal exponeringar
Ställ in tid
Tryck in [ ] upprepade gånger för att stega till:
DELAY, LONG eller INTVL.
1. Inställningsläge öppnas. ” 00:00′00″ ”
2. Tryck på [ SET ] för att starta inställning,
3. Tryck [ ] uppåt/nedåt till önskad timme (eller
Svenska
4. Tryck in [ ] för att bekräfta inställning och gå
5. Tryck [ ] uppåt/nedåt till önskad minutangivelse.
6. Tryck in [ ] för att bekräfta inställning och gå till
7. Tryck [ ] uppåt/nedåt till önskad
8. Tryck på [ SET ] för att bekräfta inställningen av tid.
Inställningsområde för tid: från 1 sekund till 99 timmar,
59 minuter, 59 sekunder.
Ställ in antal exponeringar
1. Tryck på [ ] upprepade gånger för att stega till N för exponeringsantal.
2. Tryck på [ SET ], [ – – ] (antal) blinkar.
3. Vrid [ ] till önskat antal exponeringar (max 399).
4. Tryck på [ SET ] för att bekräfta.
(timmar : minuter : sekunder) visas.
timmar blinkar.
tryck in [ ] för att gå direkt till inställning för
minuter eller sekunder).
till inställning för minuter. Minuter blinkar.
inställning för sekunder. Sekunder blinkar.
sekundangivelse.
1
2
3
4
5
6
7
8
H M S
[ SET ]
Ställ in ljud (högtalare)
1. Tryck in [ ] upprepade gånger för att stega till .
2. Tryck på [ SET ], blinkar.
3. Tryck [ ] uppåt/nedåt till önskad inställning:
ON (på) eller OFF (avstängd).
18
Page 19
4.3 Start/stopp
Start/stopp av inställd timerfunktion.
1. Tryck på [
2. Tryck på [ ] igen för att stoppa inställd timerfunktion.
Inställningarna för timerfunktionen sparas och finns kvar vid omstart.
] för att starta inställd timerfunktion.
4.4 Bakgrundsbelysning
1. Tryck på [ ] för att aktivera bakgrundsbelysning.
2. Belysningen tänds och slocknar sedan efter ca 6 sekunder.
4.5 Hold-funktion
Låser alla knappar utom [ ] och [ ] uppåt/nedåt för att förhindra ofrivillig ändring av
inställningar. Ofrivilligt stopp av en startad funktion med [
Obs! Den manuella fjärrutlösaren (3) påverkas inte av hold-funktionen.
1. Håll in [
2. Håll in [ ] i minst 3 sekunder tills försvinner från displayen för att stänga av
hold-funktionen.
Obs! Kontrollera alltid före fotografering att
displayen. Om den visas måste hold-funktionen stängas av.
Tryck sedan på [ ] för att starta inställd funktion.
] i minst 3 sekunder tills visas på displayen för att låsa knapparna.
INTE visas på
] förhindras.
4.6 Användningstips
Kom ihåg att ställa in fotograferingsläge på enbildstagning, är kameran inställd på
kontinuerlig fotografering kommer inte kameran att styras av fjärrutlösaren utan av
kamerans inställning.
Gör så här vid oövervakad användning av fjärrutlösaren:
• Ställ in skärpan manuellt. I auto-läge gör kameran en autofokusering före exponering,
och då fungerar inte fjärrutlösaren.
• Använd inte kamerans egen timer samtidigt som fjärrutlösaren, då fungerar inte
fjärrutlösaren på rätt sätt.
• Tryck på [
• Täck över fjärrutlösaren om du är utomhus, fjärrutlösaren tål inte fukt.
] för att stoppa timerfunktion före byte av minneskort.
Svenska
19
Page 20
5. Självutlösare
Ställ in fördröjningen (tiden) från när du har tryckt på [ ] tills exponeringen sker.
5.1 Inställning
Tryck in [ ] upprepade gånger för att stega till DELAY.
1. Tryck på [ SET ] för att öppna inställning för
2. Inställningen för timmar blinkar.
3. Tryck [
Svenska
4. Tryck in [ ] för att bekräfta och öppna inställning
5. Inställningen för minuter blinkar. Tryck [ ] uppåt/
6. Tryck in [ ] för att bekräfta och öppna inställning
7. Inställningen för sekunder blinkar. Tryck [ ] uppåt/
8. Avsluta inställningen genom att trycka [ SET ] för
5.2 Ljud
Tryck in [ ] upprepade gånger och välj . Tryck på [ SET ].
• Tryck [
• Tryck på [ SET ] för att bekräfta.
självutlösare.
] uppåt/nedåt till önskad inställning för
timmar.
för minuter.
nedåt till önskad inställning.
1
för sekunder.
nedåt till önskad inställning.
2
3
4
att bekräfta.
] uppåt/nedåt] till önskad inställning eller för att aktivera eller stänga
av högtalaren om du vill höra ljud under nedräkningen eller inte.
5.3 Starta nedräkning
Tryck på [ ] för att starta nedräkning till exponering. Tryck en gång till om du vill
avbryta nedräkningen före exponering.
Obs! Om du använder kamerans autoläge bör du täcka över sökaren för att undvika
felexponering.
6. Fotografering med lång exponeringstid
6.1 Inställning
Ställ in kameran i bulb-läge (eller motsvarande).
1. Tryck in [
2. Ställ in tiden på samma sätt som i 4.1 Inställning.
] upprepade gånger för att stega till LONG.
20
Page 21

6.2 Starta lång exponering
Tryck på [ ] för att starta lång exponering.
Tryck en gång till om du vill avbryta nedräkningen innan exponeringen är klar.
”RELEASE” blinkar på displayen under tiden som slutaren är öppen.
Obs! Om inte kameran är i bulb-läge kommer den att ta bilder kontinuerligt hela den
inställda tiden (eller tills minneskortet är fullt).
7. Intervalltimer
Ställ först in tidsintervall mellan exponeringarna (INTVL) och sedan antal exponeringar (N).
7.1 Inställning
Ställ in kameran på enbildstagning.
1. Tryck in [
2. Ställ in intervalltiden på samma sätt som i 4.1 Inställning.
3. Tryck in [ ] 1 gång för att stega till N (antal exponeringar).
4. Tryck på [ SET ] för att öppna inställning.
5. Tryck [ ] uppåt/neråt upprepade gånger för att ställa in
antal exponeringar.
6. Tryck på [ SET ] för att bekräfta det inställda antalet exponeringar.
Obs! Om blixt används måste intervalltiden ställas så att
blixten hinner laddas upp mellan exponeringarna.
] upprepade gånger för att stega till INTVL.
7.2 Starta intervalltimer
Tryck på [ ] för att starta intervalltimer.
Tryck en gång till om du vill avbryta intervallfunktionen innan
exponeringen är klar.
”RELEASE” blinkar på displayen under tiden som slutaren är öppen.
Obs! Antal exponeringar (N) som går att ställa in är 1 till 399,
men det går att ställa in oändligt antal exponeringar genom att
välja läge (- -) i (N). I läge (- -) sker exponering i oändligt antal tills
minneskortet är fullt eller timer-funktionen avbryts manuellt.
Svenska
21
Page 22

8. Användningsexempel
8.1 Förutsättning
• 5 bilder.
• Exponeringstid 5 sekunder.
• Intervall mellan exponeringarna 2 minuter och 30 sekunder.
8.2 Förberedelser
1. Placera kameran på ett stativ.
2. Ställ in kameran för manuell fokusering. Ställ in skärpan (läs kamerans bruksanvisning).
Svenska
8.3 Inställningar
1. Tryck in [ ] upprepade gånger för att stega till LONG
2. Tryck på [ SET ] för att öppna inställning.
3. Tryck in [ ] två gånger för att stega förbi timmar och minuter.
4. Tryck på [ SET ] för att bekräfta den inställda exponeringstiden.
5. Tryck in [ ] 1 gång för att stega till INTVL (intervall).
6. Tryck på [ SET ] för att öppna inställning.
7. Tryck in [ ] en gång för att stega förbi timmar till minuter
8. Tryck in [ ] 1 gång. Sekundangivelsen blinkar, ställ in 30 sekunder
9. Tryck på [ SET ] för att bekräfta den inställda intervallen mellan
10. Tryck in [ ] 1 gång för att stega till N (antal exponeringar).
11. Tryck på [ SET ] för att öppna inställning.
12. Tryck [ ] uppåt 5 gånger för att ställa in 5 exponeringar.
13. Tryck på [ SET ] för att bekräfta det inställda antalet exponeringar.
8.4 Starta inställd timerfunktion
1. Tryck på [ ], starta timerfunktion.
2. Första exponeringen sker direkt. ”TIMER ACTIVE” blinkar under
3. Displayen visar information under tiden. På bilden visas:
4. Tryck på [
(lång exponeringstid).
Sekundangivelsen blinkar, ställ in 5 sekunder genom att trycka
[ ] uppåt 5 gånger.
(minutangivelsen blinkar). Ställ in 2 minuter genom att trycka
[ ] uppåt 2 gånger.
genom att trycka [ ] uppåt 30 gånger (håll in längre tid för att
starta automatisk uppräkning).
exponeringarna.
På bilden visas notsymbolen som tecken på att högtalare är
aktiverad.
tiden som timerfunktionen pågår.
2 minuter och 15 sekunder återstår till nästa exponering,
4 exponeringar återstår och högtalaren är aktiverad.
], starta den inställda timerfunktionen igen eller
öppna inställningar igen och återställ alla inställningar till 0.
22
Page 23

9. Kombinationer av flera funktioner
Pos. DELAY LONG INTVL N Funktion Användningsområde
1 • Självutlösare Ange tid till exponering
2 • Intervalltimer, fortsätter
tills man stänger av
(oändligt)
3 • Lång exponeringstid Astronomi
4 • Antal exponeringar Time-lapse-foto, t.ex.
5 • • Tid tills intervalltimer
startar
6 • • Tid tills lång exponering
startar
7 • • Tid till start av exponering
med 1 sekunds intervall
samt antal exponeringar
8 • • Lång exponering,
oändlig intervall
9 • • Intervalltimer och antal
exponeringar
10 • • • Tid tills lång exponering
startar och oändlig
intervall
11 • • • Tid till intervallfoto,
antal exponeringar
12 • • • Antal långa exponeringar
tas i inställd intervall
13 • • • • Efter inställd tid tas antal
långa exponeringar med
inställd intervall
14 • • Fel inställning!
Fjärrutlösaren
övergår automatiskt
till inställning 3.
15 • • • Fel inställning!
Fjärrutlösaren
övergår automatiskt
till inställning 6
Intervallfoto, t.ex.
växande blommor
1 sekunds intervall
Intervallfoto
Intervallfoto, astronomi
Intervallfoto, t.ex.
växande blommor
Intervallfoto, t.ex.
växande blommor
Svenska
23
Page 24

10. Manuell fjärrutlösare
Fjärrutlösaren kan användas för att aktivera kameran manuellt på samma sätt som en fjärrkontroll. Denna funktion kan användas oavsett fjärrutlösarens inställningar. Denna funktion
kräver inget batteri och kan därför användas även om fjärrutlösarens batteri är slut.
Svenska
1. Tryck ner knappen halvvägs för
att aktivera autofokus och ställa in
bländare och tid (i autoläge).
2. Tryck ner knappen helt för att
öppna slutaren.
Lång exponeringstid
3. Tryck ner knappen helt och tryck den
framåt i pilens riktning för att låsa knappen.
4. Frigör knappen (stäng slutaren) genom att
trycka knappen bakåt och släppa upp den.
11. Skötsel och underhåll
Torka av produkten med en lätt fuktad, mjuk trasa. Använd ett milt rengöringsmedel,
aldrig lösningsmedel eller starka, slipande rengöringsmedel, det kan skada produkten.
Obs! Fjärrutlösaren tål inte vatten eller fukt.
12. Specifikationer
Modell TC-C1 (Canon) Art. nr 38-6236
TC-N3 (Nikon) Art. nr 38-6237
Självutlösare 0 sek till 99 tim, 59 min, 59 sek
Långtidsexponering 0 sek till 99 tim, 59 min, 59 sek
Intervalltimer 0 sek till 99 tim, 59 min, 59 sek
Exponeringsräknare inställning 1 till 399 eller oändligt
Kabellängd 80 cm
Batteri CR2032 (3 V)
Mått 40×20×143 mm
Vikt 85 g (med batteri)
13. Modellstöd
Dessa kameramodeller stöds i skrivande stund:
C1 Canon EOS 30, 33, 50E, 300, 300V, 3000, 50, 300D (Digital Rebel), 350D (Digital
Rebel XT), 400D (Digital Rebel XTi), 450D (Digital Rebel XSi), 500D, 1000D
N3 Nikon D90, D5000, D5100, D3100, D7000
24
Page 25

Time-lapse-fjernutløser
Art.nr. 38-6236 Modell TC-C1 (Canon)
38-6237 TC-N3 (Nikon)
Les brukerveiledningen grundig før produktet tas i bruk og ta vare på den for framtidig
bruk. Vi reserverer oss mot ev. feil i tekst og bilde, samt forandringer av tekniske data.
Ved tekniske problemer eller spørsmål, ta kontakt med vårt kundesenter.
Innholdsfortegnelse
1. Beskrivelse ............................................................................. 26
1.1 Fjernutløser ..............................................................................................................26
1.2 Display .....................................................................................................................27
2. Sette i batteri ........................................................................... 27
2.1 Batterikontroll ..........................................................................................................27
3. Kobling mellom kamera og fjernutløser ................................. 28
4. Innstillinger .............................................................................. 28
4.1 Velg funksjon ...........................................................................................................28
4.2 Still inn tid og antall eksponeringer ........................................................................29
4.3 Start/stopp ...............................................................................................................30
4.4 Bakgrunnsbelysning ................................................................................................30
4.5 Hold-funksjon ..........................................................................................................30
4.6 Brukertips ................................................................................................................30
5. Selvutløser ............................................................................... 31
5.1 Installasjon ...............................................................................................................31
5.2 Lyd ............................................................................................................................31
5.3 Starte nedtellingen .................................................................................................31
6. Fotografering med lang eksponeringstid ............................... 31
6.1 Installasjon ..............................................................................................................31
6.2 Starte lang eksponering ..........................................................................................32
7. Intervalltimer ............................................................................ 32
7.1 Installasjon ..............................................................................................................32
7.2 Starte intervalltimer .................................................................................................32
8. Eksempel på bruk .................................................................... 33
8.1 Forutsetning .............................................................................................................33
8.2 Forberedelser ..........................................................................................................33
8.3 Innstillinger ..............................................................................................................33
8.4 Starte opp den innstilte timerfunksjonen ...............................................................33
9. Kombinasjon av flere funksjoner ............................................ 34
10. Manuell fjernutløser ............................................................... 35
11. Stell og vedlikehold ............................................................... 35
12. Spesifikasjoner ...................................................................... 35
13. Modellstøtte ........................................................................... 35
Norsk
25
Page 26

1. Beskrivelse
1.1 Fjernutløser
3
7
8
6
5
4
1
9
Norsk
2
1. Multifunksjonsbryter, trykk på opp/ned for å bevege
deg i menyen, og trykk inn for å bekrefte valg
2. Batteriholder
3. Manuell fjernutløser med sperre
4. [ ] Bakgrunnsbelysning for display/lås
5. [ ] Starte eller stoppe den valgte
timerfunksjonen
6. [ SET ] Åpne eller bekrefte innstilling
7. Display
8. Kabel
9. Kontakt
10. Feste til kameraets lokk (over uttaket på kameraet)
10
2
26
Page 27

1.2 Display
Funksjoner
Trykk inn multifunksjonsbryteren (1) flere
ganger for å velge funksjon (se 4. Innstillinger).
DELAY Selvutløser
LONG Timer (nedtelling) ved lang
eksponeringstid
INTVL Intervalltimer (time-lapse)
N Eksponeringstid
Høyttaler av/på
a. 99:59′59″ Viser tid til neste eksponering (lukker stengt, «TIMER ACTIVE» blinker)
b. 99:59′59″ («RELEASE» blinker) viser tiden til lukkeren stenges (lukker åpen)
c. [ 399 ] Antall gjenværende eksponeringer
d. «RELEASE» Blinker når lukkeren er åpen
e. «SET» Blinker i innstillingsmodus
f. Høyttaler av (lyden er stengt)
g. Batterisymbol (vises kun når batteriet begynner å bli svakt)
h. (locked) Vises når tastelåsen er aktivert
i. TIMER ACTIVE Blinker kontinuerlig når timer er aktiv/nedtellingen pågår
i
efgh
2. Sette i batteri
Batteriet skal være av typen CR2032.
Obs! Fjernutløseren skal kobles fra kameraet
før batteriet monteres.
1. Bruk et lite verktøy for å ta ut batteriholderen. Se fig. Tørk av batterikontaktene
i holderen før nytt batteri settes på plass.
Fjern også eventuell irr på kontaktene.
2. Sett batteriet i med polene sånn som
markeringen i batteriholderen viser.
Hvis batteriet settes i feil vil ikke fjernutløseren virke.
3. Lukk batteriholderen.
a
b
c
d
Norsk
2.1 Batterikontroll
• Et batteri kan vare i inntil 3 år.
• Fjernutløseren har ingen strømbryter
til displayet. Visningen på displayet er
kontinuerlig aktivt, men det trekker svært
lite strøm.
• Når batteriet er bra vil ikke batterisymbolet være oppe i displayet.
27
Page 28

Norsk
Når batterisymbolet blinker i displayet må batteriet skiftes.
Hvis batteriet ikke skiftes når det er begynt å bli dårlig vil fjernutløseren slutte å virke uten forvarsel.
• Alle innstillinger som er foretatt på fjernutløseren forsvinner
når batteriet tas ut.
• Kapasiteten til batteriet reduseres midlertidig ved lav temperatur,
men går tilbake til normal igjen ved normal temperatur.
3. Kobling mellom kamera og fjernutløser
1. Ta av lokket på uttaket til fjernutløser på
kameraet. Plasser lokket i holderen (10)
på fjernutløseren.
3. Når den skal fjernes igjen holder du
i kontakten og trekker den rett ut.
2. Trykk på baksiden av kontakten
4. Innstillinger
4.1 Velg funksjon
Trykk inn [ ] gjentatte ganger for å velge ønsket
funksjon:
DELAY (selvutløser) –> LONG (lang eksponering)
–> INTVL (intervall-timer) –> N (antall eksponeringer)
–> (høyttaler PÅ/AV) –> DELAY…
når du kobler fjernutløserens kabel
til kameraet.
28
Page 29

4.2 Still inn tid og antall eksponeringer
Stille inn tiden
Trykk inn [ ] gjentatte ganger for å gå til: DELAY,
LONG eller INTVL.
1. Åpne innstillingsmodus. « 00:00′00″ »
(timer : minutter : sekunder) vises.
2. Trykk på [ SET ] for å starte innstilling,
og timer blinker.
3. Trykk på [ ] opp/ned til ønsket time
(eller trykk inn [ ] for å gå direkte til
innstilling av minutter eller sekunder).
4. Trykk inn [ ] for å bekrefte innstillingen og
gå til innstilling av minutter. Minutter blinker.
5. Trykk inn [ ] opp/ned til ønsket minuttangivelse.
6. Trykk inn [ ] for å bekrefte innstillingen og gå til
innstilling av sekunder. Sekundene blinker.
7. Trykk inn [ ] opp/ned til ønsket sekundangivelse.
8. Trykk på [ SET ] for å bekrefte innstillingen av tid.
Innstillingsområde for tid er: fra 1 sekund til 99 timer,
59 minutter og 59 sekunder.
1
2
3
4
5
6
7
8
Still inn antall eksponeringer
1. Trykk inn [ ] gjentatte ganger for å gå til N for eksponeringsantall.
2. Trykk på [ SET ], og [ – – ] (antall) blinker.
3. Drei [ ] til ønsket antall eksponeringer (maks 399).
4. Trykk på [ SET ] for å bekrefte.
H M S
Norsk
[ SET ]
Still inn lyd (høyttaler)
1. Trykk inn [ ] gjentatte ganger for å gå til .
2. Trykk på [ SET ], og blinker.
3. Trykk inn [ ] opp/ned til ønsket innstilling:
ON (på) eller OFF (stengt).
29
Page 30

Norsk
4.3 Start/stopp
Start/stopp av innstilt timerfunksjon.
1. Trykk på [ ] for å starte innstilling av timerfunksjonen.
2. Trykk på [ ] for å stoppe innstilt timerfunksjonen.
Innstillingene for timerfunksjonen lagres og er lagret også ved omstart.
4.4 Bakgrunnsbelysning
1. Trykk på [ ] for å aktivere bakgrunnslyset.
2. Belysningen tennes, og slukkes automatisk etter ca. 6 sekunder.
4.5 Hold-funksjon
Låser alle knapper bortsett fra [ ] og [ ] opp/ned for å hindre at man ufrivillig endrer
innstillingene. Ufrivillig stopp av en startet funksjon med [ ] forhindres.
Obs! Den manuelle fjernutløseren (3) påvirkes ikke av hold-funksjonen.
1. Tastene låses ved at [
2. Hold-funksjonen låses ved at [ ] holdes inne i minst 3 sekunder til forsvinner
fra displayet.
Obs! Før fotografering bør man alltid kontrollere at
vises på displayet. Hvis dette vises må hold-funksjonen
deaktiveres. Trykk deretter på [ ] for å starte den innstilte
funksjonen.
] holdes inne i minst 3 sekunder til vises på displayet.
IKKE
4.6 Brukertips
Husk å stille inn ønsket fotograferingsmodus for fotograferingen. Hvis kameraet er
innstilt på kontinuerlig fotografering er det kameraet og ikke fjernutløseren som styrer
fotograferingen.
Slik gjør du når du skal bruke fjernløseren uten tilsyn:
• Still inn fokuseringen manuelt. I automodus foretar kameraet en automatisk
fokusering før eksponering, og da virker ikke fjernutløseren.
• Ikke bruk kameraets egen nedtellingsfunksjon/timer samtidig med fjernutløserens.
Da vil ikke fjernutløseren virke riktig.
• Trykk på [
• Fjernutløseren tåler ikke fuktighet og må tildekkes hvis du oppholder deg utendørs.
] for å stoppe nedtellingsfunksjonen før skifting av minnekort.
30
Page 31

5. Selvutløser
Still inn forsinkelsen (tiden) som det skal ta fra du har trykket på [ ] til eksponeringen skjer.
5.1 Installasjon
Trykk inn [ ] gjentatte ganger for å gå til DELAY.
1. Trykk på [ SET ] for å åpne innstillingsmodus
for selvutløser.
2. Innstillingen for timer blinker.
3. Trykk inn [
4. Trykk inn [ ] for å bekrefte og å åpne neste
innstilling (minutter).
5. Sifrene for minutter blinker. Trykk inn [ ] opp/ned
til ønsket innstilling.
6. Trykk inn [ ] for å bekrefte og å åpne neste
innstilling (sekunder).
7. Innstillingen for sekunder blinker. Trykk inn [ ]
opp/ned til ønsket innstilling.
8. Avslutt innstillingen ved å trykke på [ SET ] for
å bekrefte.
5.2 Lyd
Trykk inn [ ] gjentatte ganger og velg . Trykk på [ SET ].
• Trykk på [
høyttaleren hvis du ønsker/ikke ønsker å høre lyd under nedtellingen.
• Trykk på [ SET ] for å bekrefte.
] opp/ned til ønsket innstilling for timer.
1
2
3
4
] opp/ned til ønsket innstilling eller for å aktivere eller deaktivere
Norsk
5.3 Starte nedtellingen
Trykk på [ ] for å starte nedtellingen. Trykk en gang til hvis du ønsker å avbryte den.
Obs! Hvis du bruker kameraets automodus bør du dekke til søkeren for å unngå
feileksponering.
6. Fotografering med lang eksponeringstid
6.1 Installasjon
Still inn kameraet i bulb-modus (eller tilsvarende).
1. Trykk inn [
2. Still inn tiden på samme måte som i 4.1 Innstilling.
] gjentatte ganger for å gå til LONG.
31
Page 32

Norsk
6.2 Starte lang eksponering
Trykk på [ ] for å starte lang eksponering.
Trykk en gang til hvis du ønsker å avbryte nedtellingen før eksponeringen er utført.
«RELEASE» blinker i displayet mens lukkeren er åpen.
Obs! Hvis kameraet ikke er i bulb-modus vil det ta bilder kontinuerlig i tiden du har stilt
inn på (eller til minnekortet er fullt).
7. Intervalltimer
Still først inn tidsintervallet du ønsker mellom eksponeringene (INRVL) og deretter
antall eksponeringer du ønsker (N).
7.1 Installasjon
Still inn kameraet på enkel fotografering.
1. Trykk inn [
2. Still inn intervalltiden på samme måte som beskrevet
i 4.1 Innstilling.
3. Trykk inn [ ] en gang for å gå til N (antall eksponeringer).
4. Trykk på [ SET ] for å åpne innstillingsmodus.
5. Trykk [ ] opp/ned gjentatte ganger for å stille inn antall
eksponeringer.
6. Trykk på [ SET ] for å bekrefte antall eksponeringer.
Obs! Hvis man bruker blits samtidig må tiden stilles inn slik at
blitsen rekker å lades opp mellom eksponeringene.
] gjentatte ganger for å gå til INTVL.
7.2 Starte intervalltimer
Trykk på [ ] for å starte intervalltimeren.
Trykk en gang til hvis du ønsker å avbryte intervallfunksjonen før
eksponeringen er fullført.
«RELEASE» blinker i displayet mens lukkeren er åpen.
Obs! Antall eksponeringer (N) som kan stilles inn er 1 til 399,
men man kan stille inn på uendelig antall eksponeringer ved å
velge modus (- -) i (N). I modusen (- -) foregår eksponeringene
så lenge det er plass i minnekortet eller til timerfunksjonen
avbrytes manuelt.
32
Page 33

8. Eksempel på bruk
8.1 Forutsetning
• Det skal fotograferes 5 bilder.
• Eksponeringstiden skal være 5 sekunder.
• Intervallene mellom eksponeringene skal være 2 minutter og 30 sekunder.
8.2 Forberedelser
1. Plasser kameraet på et stativ.
2. Still inn kameraet på manuell fokusering. Still inn fokus (se i bruksanvisningen
til kameraet).
8.3 Innstillinger
1. Trykk inn [ ] gjentatte ganger for å gå til LONG
(lang eksponeringstid).
2. Trykk på [ SET ] for å åpne innstillingsmodus.
3. Trykk inn [ ] to ganger for å gå forbi timer og minutter.
Sekundangivelsen blinker. Still inn på 5 sekunder ved å trykke
på [ ] opp 5 ganger.
4. Trykk på [ SET ] for å bekrefte den innstilte eksponeringstiden.
5. Trykk inn [ ] en gang for å gå til INTVL (intervall).
6. Trykk på [ SET ] for å åpne innstillingsmodus.
7. Trykk inn [ ] en gang for å gå forbi timer til minutter (minuttangivelsen blinker). Still inn på 2 minutter ved å trykke på
[ ] 2 ganger opp.
8. Trykk inn [ ] en gang. Sekundangivelsen blinker. Still inn på
30 sekunder ved å trykke på [ ] 30 ganger opp (hold inne,
så starter den automatiske tellingen).
9. Trykk på [ SET ] for å bekrefte det innstilte intervallet mellom
eksponeringene.
10. Trykk inn [ ] en gang for å gå til N (antall eksponeringer).
11. Trykk på [ SET ] for å åpne innstillingsmodus.
12. Trykk [ ] opp 5 ganger for å stille inn på 5 eksponeringer.
13. Trykk på [ SET ] for å bekrefte antall eksponeringer. På bildet
vises not-symbolet for å angi at høyttaleren er aktivert.
Norsk
8.4 Starte opp den innstilte timerfunksjonen
1. Trykk på [ ], og timerfunksjonen starter.
2. Den første eksponeringen skjer direkte. «TIMER ACTIVE»
blinker mens som nedtellingen pågår.
3. Displayet viser informasjon i denne tiden. På fig. vises: 2 minutter
og 15 sekunder gjenstår til neste eksponering, 4 eksponeringer
gjenstår og høyttaler er aktivert.
4. Trykk på [ ]. Start den innstilte timerfunksjonen igjen eller
åpne innstillingene, og still alle innstillinger tilbake til 0.
33
Page 34

Norsk
9. Kombinasjon av flere funksjoner
Pos. DELAY LONG INTVL N Funksjon Bruksområde
1 • Selvutløser Oppgi tid til eksponering
2 • Intervalltimer, fortsetter til
man skrur den av
3 • Lang eksponeringstid Astronomi
4 • Antall eksponeringer Time-lapse-foto f.eks.
5 • • Tid til intervalltimer starter Intervallfotografering
6 • • Tid til lang eksponering
starter
7 • • Tid til start av eksponering
med ettsekunds intervall og
antall eksponeringer
8 • • Lang eksponering og
uendelig intervall
9 • • Intervalltimer og antall
eksponeringer
10 • • • Tid til lang eksponering star-
ter og intervall er uendelig
11 • • • Tid til intervallfotografering
og antall eksponeringer
12 • • • Antall lange eksponeringer i
innstilt intervallfotografering
og antall eksponeringer
13 • • • • Etter innstilt tid tas antall
lange eksponeringer med
innstilt intervall
14 • • Feil innstilling!
Fjernutløseren går automatisk
over til innstilling 3.
15 • • • Feil innstilling!
Fjernutløseren går automatisk
over til innstilling 6.
Intervallfotografering f.eks.
blomster som vokser
intervall på ett sek.
Intervallfoto astronomi
Intervallfotografering f.eks.
blomster som vokser
Intervallfotografering f.eks.
blomster som vokser
34
Page 35

10. Manuell fjernutløser
Fjernutløseren kan brukes til å aktivere kameraet manuelt, på samme måte som en
fjernkontroll. Denne funksjonen kan brukes uansett innstillinger på fjernutløseren.
Denne funksjonen krever ikke batteri og kan derfor brukes også selv med tomt batteri.
1. Trykk knappen halvveis ned for
å aktivere autofokus og still inn
blender og tid (i automodus).
2. Trykk knappen helt ned for å
åpne lukkeren.
Lang eksponeringstid
3. Trykk knappen helt ned og press den
fremover i pilens retning, for å låse
knappen.
4. Frigjør knappen ved å presse den
bakover, for så slippe den opp.
11. Stell og vedlikehold
Rengjør produktet med en myk, lett fuktet klut. Bruk et mildt rengjøringsmiddel ved behov.
Unngå å bruke løsemidler og slipende rengjøringsmidler. Det kan skade produktet.
Obs! Fjernutløseren tåler ikke å bli utsatt for fuktighet eller væsker.
12. Spesifikasjoner
Modell TC-C1 (Canon) Art. nr 38-6236
TC-N3 (Nikon) Art. nr 38-6237
Selvutløser 0 sekunder til 99 timer, 59 minutter og 59 sekunder
Langtidseksponering 0 sekunder til 99 timer, 59 minutter og 59 sekunder
Intervalltimer 0 sekunder til 99 timer, 59 minutter og 59 sekunder
Eksponeringsteller innstilling 1 til 399 (eller uendelig, se ovenfor)
Kabellengde 80 cm
Batteri CR2032 (3 V)
Mål 40×20×143 mm
Vekt 85 g (med batteri)
13. Modellstøtte
Støtter følgende kameramodeller:
C1 Canon EOS 30, 33, 50E, 300, 300V, 3000, 50, 300D (Digital Rebel),
350D (Digital Rebel XT), 400D (Digital Rebel XTi), 450D (Digital Rebel XSi),
500D, 1000D.
N3 Nikon D90, D5000, D5100, D3100, D7000
Norsk
35
Page 36

Suomi
Kaukolaukaisin
Tuotenro 38-6236 Malli TC-C1 (Canon)
38-6237 TC-N3 (Nikon)
Lue käyttöohje ennen tuotteen käyttöä ja säilytä se tulevaa tarvetta varten.
Pidätämme oikeuden teknisten tietojen muutoksiin. Emme vastaa mahdollisista tekstitai kuvavirheistä. Jos tuotteeseen tulee teknisiä ongelmia, ota yhteys myymälään tai
asiakaspalveluun (yhteystiedot käyttöohjeen lopussa).
Sisällysluettelo
1. Tuotteen kuvaus ...................................................................... 37
1.1 Kaukolaukaisin ........................................................................................................37
1.2 Näyttö .......................................................................................................................38
2. Pariston asettaminen .............................................................. 38
2.1 Pariston kesto ..........................................................................................................38
3. Kaukolaukaisimen liittäminen kameraan ................................ 39
4. Asetukset ................................................................................. 39
4.1 Toiminnon valitseminen ...........................................................................................39
4.2 Ajan ja valotusten määrän asettaminen .................................................................40
4.3 Käynnistys/pysäytys ...............................................................................................41
4.4 Taustavalo ................................................................................................................ 41
4.5 Näppäinlukitus .........................................................................................................41
4.6 Käyttövinkkejä .........................................................................................................41
5. Itselaukaisin ............................................................................. 42
5.1 Asetukset .................................................................................................................42
5.2 Ääni ..........................................................................................................................42
5.3 Lähtölaskennan aloittaminen ..................................................................................42
6. Valokuvaaminen pitkällä valotusajalla .................................... 42
6.1 Asetukset ................................................................................................................42
6.2 Pitkän valotusajan käynnistäminen ........................................................................43
7. Intervalliajastin ......................................................................... 43
7.1 Asetukset .................................................................................................................43
7.2 Intervalliajastimen käynnistäminen .........................................................................43
8. Käyttöesimerkkejä ................................................................... 44
8.1 Kuvausesimerkki .....................................................................................................44
8.2 Esivalmistelut ...........................................................................................................44
8.3 Asetukset .................................................................................................................44
8.4 Asetetun ajastintoiminnon käynnistäminen ...........................................................44
9. Useiden toimintojen yhdistäminen ......................................... 45
10. Manuaalinen kaukolaukaisin ................................................. 46
11. Puhdistaminen ....................................................................... 46
12. Tekniset tiedot ....................................................................... 46
13. Mallituki .................................................................................. 46
36
Page 37
1. Tuotteen kuvaus
1.1 Kaukolaukaisin
7
6
5
4
3
1
2
1. Monitoimisäädin, siirry valikossa painamalla
ylös/alas, vahvista painamalla
2. Paristolokero
3. Manuaalinen kaukolaukaisin lukituksella
4. [ ] Näytön/lukituksen taustavalo
5. [ ] Valitun ajastintoiminnon käynnistäminen
ja pysäyttäminen
6. [ SET ] Asetuksen avaaminen tai vahvistaminen
7. Näyttö
8. Johto
9. Liitin
10. Kameran kannen kiinnike (kameran liitännän päällä)
8
9
10
Suomi
2
37
Page 38

Suomi
1.2 Näyttö
Toiminnot
Valitse toiminto painamalla monitoimisäädintä (1)
useita kertoja (katso kohta 4. Asetukset).
DELAY Itselaukaisin
LONG Pitkän valotusajan ajastin
INTVL Intervalliajastin (time-lapse)
N Valotusajastin
Kaiuttimen sammuttaminen/käynnistäminen
a. 99:59′:59″ Näyttää ajan seuraavaan valotukseen (suljin sammutettu,
”TIMER ACTIVE” vilkkuu)
b. 99:59′:59″ (”RELEASE” vilkkuu) näyttää ajan, jolloin suljin sammuu (suljin auki)
c. [ 399 ] Jäljellä olevien valotusten määrä
d. ”RELEASE” Vilkkuu, kun suljin on auki
e. ”SET” Vilkkuu asetustilassa
f. Kaiutin sammutettu (ääni sammutettu)
g. Pariston symboli (näkyy vain, kun paristo on lähes tyhjä)
h. (locked) Näkyy, kun näppäinlukko on aktivoitu
i. ”TIMER ACTIVE” Vilkkuu, kun ajastin on käynnistetty
i
efgh
2. Pariston asettaminen
Aseta lokeroon CR2032-paristo.
Huom.! Irrota kaukolaukaisimen liitäntäkaapeli kamerasta ennen pariston asettamista.
1. Irrota paristopidike pienellä työkalulla
kuvan osoittamalla tavalla. Pyyhi paristopidikkeen liittimistä mahdolliset hapettumat, jotka heikentävät kontaktia.
2. Laita paristo lokeroon napaisuusmerkintöjen mukaisesti. Kaukolaukaisin ei toimi,
jos paristo asetetaan väärin päin.
3. Sulje paristolokero.
a
b
c
d
2.1 Pariston kesto
• Paristo kestää jopa kolme vuotta.
• Kaukolaukaisimen näytölle ei ole virtakytkintä.
Näyttö on jatkuvasti aktiivinen, mutta se
vie hyvin vähän virtaa.
• Kun paristo on lähes lopussa, paristosymboli ilmestyy näytölle.
38
Page 39
Kun paristosymboli vilkkuu, paristo pitää vaihtaa uuteen.
Jos paristoa ei vaihdeta, kaukolaukaisin lopettaa toiminnan
ilman erillistä varoitusta.
• Kaukolaukaisimen asetukset poistuvat, kun paristo vaihdetaan.
• Pariston kapasiteetti heikkenee alhaisessa lämpötilassa ja
palaa täyteen kapasiteettiin normaalissa lämpötilassa.
3. Kaukolaukaisimen liittäminen kameraan
1. Poista kameran kaukosäätimen liitännän
kansi. Laita kansi kaukolaukaisimen
pidikkeeseen (10).
3. Pidä kiinni kontaktista ja vedä sitä
suoraan ulospäin, kun irrotat sen.
2. Paina takaosan kontaktia,
4. Asetukset
4.1 Toiminnon valitseminen
Valitse toiminto painamalla [ ] useita kertoja:
DELAY (itselaukaisin) –> LONG (pitkä valotus)
–> INTVL (intervalliajastin) –> N (valotusten määrä)
(kaiutin päälle/pois päältä) –> DELAY…
–>
kun liität kaukolaukaisimen
johdon kameraan.
Suomi
39
Page 40

Suomi
4.2 Ajan ja valotusten määrän asettaminen
Ajan asettaminen.
Valitse DELAY, LONG tai INTVL painamalla [ ]
useita kertoja.
1. Asetustila avautuu.” 00:00′00″ ”
(tunnit : minuutit: sekunnit) näkyvät näytöllä.
2. Aloita asetusten teko painamalla [ SET ],
tunnit vilkkuvat.
3. Valitse tunnit painamalla [
minuuttien tai sekuntien asetuksiin painamalla [ ].
4. Vahvista asetus ja siirry minuuttien asetustilaan
painamalla [ ]. Minuutit vilkkuvat.
5. Aseta minuutit painamalla [ ].
6. Vahvista asetus ja siirry sekuntien asetustilaan
painamalla [ ]. Sekunnit vilkkuvat.
7. Aseta sekunnit painamalla [ ].
8. Vahvista aika-asetukset painamalla [ SET ].
Ajan asetusalue: 1 sekunnista 99 tuntiin, 59 minuuttiin
ja 59 sekuntiin.
] (tai siirry suoraan
1
2
3
4
5
6
7
8
H M S
[ SET ]
Valotusten määrän asettaminen
1. Valitse valotusluvuksi N painamalla useita kertoja [ ].
2. Paina [ SET ], [ – – ] (määrä) vilkkuu.
3. Valitse valotusten määrä (enintään 399) kiertämällä [ ].
4. Vahvista painamalla [ SET ].
Äänen asettaminen (kaiutin)
1. Siirry kohtaan painamalla useita kertoja [ ].
2. Paina [ SET ], vilkkuu.
3. Valitse asetus painamalla [ ]:
ON (päällä) tai OFF (sammutettu).
40
Page 41

4.3 Käynnistys/pysäytys
Asetetun ajastintoiminnon käynnistäminen/pysäyttäminen.
1. Käynnistä asetettu ajastintoiminto painamalla [
2. Pysäytä asetettu ajastintoiminto painamalla uudelleen [ ].
Ajastintoiminnon asetukset tallentuvat ja pysyvät muistissa myös,
kun laukaisin käynnistetään uudelleen.
].
4.4 Taustavalo
1. Aktivoi taustavalo painamalla [ ].
2. Taustavalo sammuu automaattisesti noin 6 sekunnin kuluttua.
4.5 Näppäinlukitus
Lukitsee kaikki muut painikkeet, paitsi painikkeet [ ] ja [ ], jolloin painikkeita ei voi
painaa vahingossa. Estää käynnistetyn toiminnon pysäyttämisen painikkeella [ ].
Huom.! Näppäinlukitus ei vaikuta manuaaliseen kaukolaukaisimeen (3).
1. Lukitse painikkeet painamalla [
kunnes näkyy näytöllä.
2. Poista näppäinlukitus painamalla [ ] vähintään kolmen sekunnin ajan,
kunnes katoaa näytöltä.
Huom.! Varmista aina ennen kuvaamista, että
näytöllä. Jos kuvake näkyy näytöllä, näppäinlukitus pitää
sammuttaa. Käynnistä asetettu toiminto painamalla [ ].
] vähintään kolmen sekunnin ajan,
ei näy
Suomi
4.6 Käyttövinkkejä
Muista asettaa valokuvaustila kertakuvaukseen. Jos kamerassa on valittu jatkuva kuvaus,
kamera ei ohjaudu kaukolaukaisimesta, vaan se ohjautuu kameran asetusten mukaisesti.
Toimi näin, jos kaukolaukaisinta käytetään ilman valvontaa:
• Tarkkuuden asettaminen manuaalisesti. Auto-tilassa kamera tekee automaat titarkennuksen ennen valotusta, eikä kaukolaukaisin toimi tällöin.
• Älä käytä kameran omaa ajastinta yhdessä kaukolaukaisimen kanssa, sillä se estää
kaukolaukaisimen oikean toiminnan.
• Pysäytä ajastintoiminto ennen muistikortin vaihtamista painamalla [
• Kaukolaukaisin ei ole kosteudenpitävä. Peitä se, jos kuvaat ulkona.
41
].
Page 42

Suomi
5. Itselaukaisin
Aseta painikkeen [ ] painamisen ja valotuksen välinen viive (aika).
5.1 Asetukset
Siirry kohtaan DELAY painamalla useita kertoja [ ].
1. Avaa itselaukaisimen asetustila painamalla [ SET ].
2. Tuntien asetus vilkkuu.
3. Valitse tunnit painamalla [
4. Vahvista ja siirry minuuttien asetukseen
painamalla [ ].
5. Minuuttien asetus vilkkuu. Valitse asetus
painamalla [ ].
6. Vahvista ja siirry sekuntian asetukseen
painamalla [ ].
7. Sekuntien asetus vilkkuu. Valitse asetus
painamalla [ ].
8. Vahvista asetukset painamalla [ SET ].
5.2 Ääni
Paina [ ] useita kertoja ja valitse . Paina [ SET ].
• Aktivoi tai sammuta kaiuttimesta kuuluva lähtölaskenta-ajastin
painamalla [ ].
• Vahvista painamalla [ SET ].
].
1
2
3
4
tai
5.3 Lähtölaskennan aloittaminen
Käynnistä valotuksen lähtölaskenta painamalla [ ]. Voit keskeyttää valotuksen
lähtölaskennan painamalla painiketta uudelleen.
Huom.! Jos käytät kameran automaattitilaa, peitä etsin väärän valotuksen estämiseksi.
6. Valokuvaaminen pitkällä valotusajalla
6.1 Asetukset
Aseta kamera bulb-tilaan (tai vastaavaan).
1. Siirry kohtaan LONG painamalla [
2. Aseta aika samalla tavalla kuin kohdassa 4.1 Asetukset.
] useita kertoja.
42
Page 43
6.2 Pitkän valotusajan käynnistäminen
Käynnistä pitkä valotusaika painamalla [ ].
Voit keskeyttää valotuksen lähtölaskennan painamalla painiketta uudelleen.
”RELEASE” vilkkuu näytöllä sulkimen ollessa auki.
Huom.! Jos kamera ei ole bulb-tilassa, se ottaa kuvia jatkuvasti koko asetuksen ajan
(tai kunnes muistikortti täyttyy).
7. Intervalliajastin
Aseta ensin valotusten välinen aikaintervalli (INTVL) ja sen jälkeen valotusten määrä (N).
7.1 Asetukset
Kameran asettaminen yhden kuvan kuvaustilaan
1. Siirry kohtaan INTVL painamalla useita kertoja [
2. Aseta intervalliaika samalla tavalla kuin kohdassa
4.1 Asetukset.
3. Siirry kohtaan N (valotusten määrä) painamalla kerran [ ].
4. Avaa asetustila painamalla [ SET ].
5. Valitse valotusten määrä painamalla useita kertoja [ ].
6. Vahvista valotusten määrä painamalla [ SET ].
Huom.! Jos käytät salamaa, intervalliaika tulee säätää niin,
että salama ehtii latautua valotusten välillä.
].
7.2 Intervalliajastimen käynnistäminen
Käynnistä intervalliajastin painamalla [ ].
Voit keskeyttää intervallitoiminnan painamalla painiketta
uudelleen.
”RELEASE” vilkkuu näytöllä sulkimen ollessa auki.
Huom.! Valittavien valotusten määrä (N) on 1–399, mutta
valitsemalla tilan (- -) kohdassa (N), voi valita rajattoman määrän
valotuksia. Tilassa (- -) ajastin ottaa rajattoman määrän kuvia,
kunnes muistikortti on täynnä, tai ajastintoiminto sammutetaan
manuaalisesti.
43
Suomi
Page 44
Suomi
8. Käyttöesimerkkejä
8.1 Kuvausesimerkki
• 5 kuvaa.
• Valotusaika 5 sekuntia.
• Valotusten välinen intervalliaika on 2 minuuttia ja 30 sekuntia.
8.2 Esivalmistelut
1. Laita kamera telineeseen.
2. Tarkenna kamera manuaalisesti. Säädä tarkkuus (lue kameran käyttöohjeesta).
8.3 Asetukset
1. Siirry kohtaan LONG (pitkä valotusaika) painamalla [ ] useita kertoja.
2. Avaa asetustila painamalla [ SET ].
3. Siirry tuntien ja minuuttien ohi painamalla [ ] kaksi kertaa.
Sekunnit vilkkuvat. Aseta ajaksi 5 sekuntia painamalla [ ]
ylöspäin 5 kertaa.
4. Vahvista valotusaika painamalla [ SET ].
5. Siirry kohtaan INTVL (intervalli) painamalla kerran [ ].
6. Avaa asetustila painamalla [ SET ].
7. Siirry tuntien ohi minuutteihin painamalla kerran [ ]
(minuutit vilkkuvat). Aseta ajaksi 2 minuuttia painamalla [ ]
ylöspäin 2 kertaa.
8. Paina kerran [ ]. Sekunnit vilkkuvat. Aseta ajaksi 30 sekuntia
painamalla [ ] ylöspäin 30 kertaa (voit myös pitää painiketta
pohjassa).
9. Vahvista valotusten väliset intervallit painamalla [ SET ].
10. Siirry kohtaan N (valotusten määrä) painamalla kerran [ ].
11. Avaa asetustila painamalla [ SET ].
12. Valitse valotusten määräksi 5 painamalla [ ] ylöspäin 5 kertaa.
13. Vahvista valotusten määrä painamalla [ SET ]. Kuvassa näkyy
nuottisymboli merkkinä kaiuttimen aktivoimisesta.
8.4 Asetetun ajastintoiminnon käynnistäminen
1. Käynnistä asetettu ajastintoiminto painamalla [ ].
2. Ensimmäinen valotus tapahtuu välittömästi. ”TIMER ACTIVE”
vilkkuu ajastintoiminnon aikana.
3. Tiedot näkyvät näytöllä tänä aikana. Kuvassa näkyy: Seuraava
valotus 2 minuutin ja 15 sekunnin kuluttua, 4 valotusta jäljellä,
ja kaiutin on aktivoitu.
4. Käynnistä asetettu ajastintoiminto uudelleen tai avaa asetustila
uudelleen ja palauta asetuksiksi 0 painamalla [
44
].
Page 45

9. Useiden toimintojen yhdistäminen
Pos. DELAY LONG INTVL N Toiminto Käyttöalueet
1 • Itselaukaisin Ilmoita valotusaika
2 • Intervalliajastin, jatkaa kunnes
se sammutetaan (rajattomasti)
3 • Pitkä valotusaika Astronomia
4 • Valotusten määrä Time-lapse-kuvaus
5 • • Aika, kunnes intervallikuvaus
käynnistyy
6 • • Aika, kunnes pitkä
valotus alkaa
7 • • Aika, kunnes yhden sekunnin
intervallivalotus alkaa sekä
valotusten määrä
8 • • Pitkä intervallivalotus, rajaton
9 • • Intervalliajastin ja valotusten
määrä
10 • • • Aika, kunnes pitkä valotus
alkaa sekä intervalli, rajaton
11 • • • Aika, kunnes intervallikuvaus
alkaa, valotusten määrä
12 • • • Pitkien valotusten määrä
asetetussa intervallissa
13 • • • • Asetetun ajan jälkeen otettavien
pitkien valotusten määrä
asetetulla intervallilla
14 • • Väärä asetus!
Kaukolaukaisin siirtyy auto-
maattisesti asetukseen 3
15 • • • Väärä asetus!
Kaukolaukaisin siirtyy auto-
maattisesti asetukseen 6
Intervallikuvaus, esim.
kasvavat kukat
esim. 1 sekunnin välein
Intervallikuvaus
Intervallikuvaus,
astronomia
Intervallikuvaus, esim.
kasvavat kukat
Intervallikuvaus, esim.
kasvavat kukat
Suomi
45
Page 46

10. Manuaalinen kaukolaukaisin
Kaukolaukaisimen avulla kameran voi aktivoida samalla tavalla kuin kaukosäätimellä. Tätä
toimintoa voidaan käyttää riippumatta kaukolaukaisimen asetuksista. Tämä toiminto ei
tarvitse paristoa, ja sitä voidaan myös käyttää, vaikka kaukolaukaisimen paristo on tyhjä.
Suomi
1. Aktivoi automaattitarkennus ja
aseta himmennin ja aika (automaattitilassa) painamalla painike
puoliväliin.
2. Avaa suljin painamalla painike
alas asti.
Pitkä valotusaika
3. Lukitse painike painamalla se alas asti
ja työntämällä sitä eteenpäin nuolen
suuntaan.
4. Vapauta painike (sulje suljin) painamalla
painiketta taaksepäin ja päästämällä
painike.
11. Puhdistaminen
Pyyhi laite kevyesti kostutetulla, pehmeällä liinalla. Käytä mietoa puhdistusainetta.
Älä käytä vahvoja, hankaavia puhdistusaineita tai liuotinaineita, sillä ne voivat
vahingoittaa laitetta. Huom.! Kaukolaukaisin ei kestä vettä ja kosteutta.
12. Tekniset tiedot
Malli TC-C1 (Canon) Tuotenro 38-6236
TC-N3 (Nikon) Tuotenro 38-6237
Itselaukaisin 0 sekuntia – 99 tuntia, 59 minuuttia, 59 sekuntia
Pitkäaikainen valotus 0 sekuntia – 99 tuntia, 59 minuuttia, 59 sekuntia
Intervalliajastin 0 sekuntia – 99 tuntia, 59 minuuttia, 59 sekuntia
Valotuslaskimen asetus 1–399 tai rajaton
Kaapelin pituus 80 cm
Paristo CR2032 (3 V)
Mitat 40×20×143 mm
Paino 85 g (paristo mukaan lukien)
13. Mallituki
Kaukolaukaisin on yhteensopiva seuraavien kameramallien kanssa:
C1 Canon EOS 30, 33, 50E, 300, 300V, 3000, 50, 300D (Digital Rebel), 350D (Digital
Rebel XT), 400D (Digital Rebel XTi), 450D (Digital Rebel XSi), 500D, 1000D
N3 Nikon D90, D5000, D5100, D3100, D7000
46
Page 47

Time-Lapse-Fernauslöser
Art.Nr. 38-6236 Modell TC-C1 (Für Canon)
38-6237 TC-N3 (Für Nikon)
Vor Inbetriebnahme diekomplette Bedienungsanleitung durchlesen und aufbewahren.
Irrtümer, Abweichungen und Änderungen behalten wir uns vor. Bei technischen Problemen
oder anderen Fragen freut sich unser Kundenservice über eine Kontaktaufnahme.
Inhaltsverzeichnis
1. Beschreibung ........................................................................... 48
1.1 Fernauslöser ............................................................................................................48
1.2 Display .....................................................................................................................49
2. DieBatterie einsetzen ............................................................. 49
2.1 Batteriestandanzeige ..............................................................................................49
3. Den Fernauslöser andieKamera anschließen ...................... 50
4. Einstellungen ........................................................................... 50
4.1 Funktion auswählen ................................................................................................50
4.2 Uhrzeit und Anzahl der Belichtungen einstellen ....................................................51
4.3 Start/Stopp ..............................................................................................................52
4.4 Hintergrundbeleuchtung .........................................................................................52
4.5 Hold-Funktion ..........................................................................................................52
4.6 Tipps zur Benutzung ...............................................................................................52
5. Selbstauslöser ......................................................................... 53
5.1 Einstellung ...............................................................................................................53
5.2 Ton ............................................................................................................................53
5.3 Den Countdown starten ..........................................................................................53
6. Fotografieren mit langer Belichtungsdauer ............................ 53
6.1 Einstellung ..............................................................................................................53
6.2 Lange Belichtung starten ........................................................................................54
7. Intervalltimer ............................................................................ 54
7.1 Einstellung ...............................................................................................................54
7.2 Den Intervalltimer starten ........................................................................................54
8. Praxisbeispiel .......................................................................... 55
8.1 Voraussetzung .........................................................................................................55
8.2 Vorbereitungen ........................................................................................................55
8.3 Einstellungen ...........................................................................................................55
8.4 Start der eingestellten Timerfunktion .....................................................................56
9. Kombination mehrerer Funktionen ......................................... 56
10. Manueller Fernauslöser ......................................................... 57
11. Pflege und Wartung ...............................................................58
12. Technische Daten .................................................................. 58
13. Modellunterstützung ............................................................. 58
Deutsch
47
Page 48
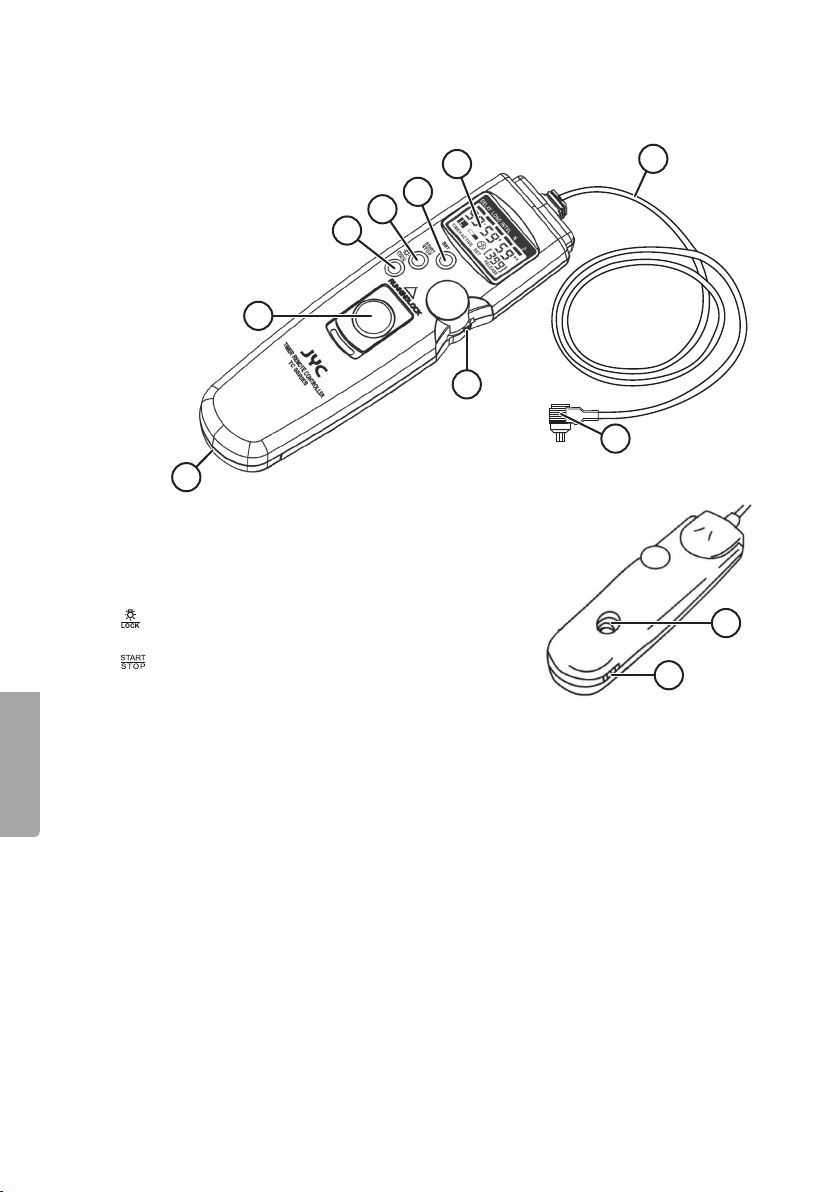
1. Beschreibung
1.1 Fernauslöser
1. Multifunktionsregler, zum Scrollen nach oben/
2. Batteriefach
3. Manueller Fernauslöser mit Arretierung
4. [ ]Hintergrundbeleuchtung für
5. [ ] Diegewählte Timerfunktion starten
6. [ SET ] Öffnen/Bestätigen der Einstellung
7. Display
8. Kabel
9. Stecker
Deutsch
10. Halterung für die Abdeckung über dem
5
4
3
2
unten drehen und zum Bestätigen mittig
herunterdrücken.
dasDisplay/Tastensperre
oder stoppen
Anschluss an der Kamera
7
8
6
1
9
10
2
48
Page 49

1.2 Display
Funktionen
Mehrmals auf den Multifunktionsregler (1)
drücken, um diegewünschte Funktion zu
wählen (siehe 4. Einstellungen).
DELAY Selbstauslöser
LONG Timer für lange Belichtungsdauer
INTVL Intervalltimer (Zeitraffer/Time Lapse)
N Belichtungszähler
Lautsprecher ein/aus
a. 99:59′:59″ Zeigt dieZeit bis zur nächsten Belichtung an (Verschluss geschlossen,
„TIMER ACTIVE“ blinkt)
b. 99:59′:59″ („RELEASE“ blinkt) zeigt dieZeit an, zu der der Verschluss geschlossen
wird (Verschluss offen)
c. [ 399 ] Anzahl verbleibender Belichtungen
d. „RELEASE“ Blinkt wenn der Verschluss offen ist
e. „SET“ Blinkt im Einstellungsmodus
f. Lautsprecher aus (Ton ausgeschaltet)
g. Batteriewarnsymbol (wird nur bei niedrigem Batteriestand angezeigt)
h.
(locked) Zeigt an, ob dieTastensperre aktiviert ist
i. „TIMER ACTIVE“ Blinkt konstant wenn der Timer gestartet wurde
i
efgh
a
b
c
d
2. DieBatterie einsetzen
Eine CR2032-Batterie einsetzen.
Hinweis: DasAnschlusskabel des Fernauslösers
von der Kamera entfernen bevor dieBatterie
eingesetzt wird.
1. Ein kleines Werkzeug benutzen um dieBatterie-
halterung herauszudrücken wie auf der Abbildung
zu sehen ist. Bevor dieBatterie eingesetzt
wird dieBatterie kontakte in der Halterung
abwischen um Verunreinigungen, dieden
Kontakt verschlechtern können, zu entfernen.
2. DieBatterie entsprechend der Markierung im Batteriefach einlegen. Wird
dieBatterie falsch herum eingesetzt, funktioniert der Fernauslöser nicht.
3. DieBatteriehalterung schließen.
Deutsch
2.1 Batteriestandanzeige
• DieBatterie kann bis zu 3 Jahre lang halten.
• Der Fernauslöser hat keinen Ein-/Ausschalter für
dasDisplay. DieDisplayanzeige läuft konstant, verbraucht
aber nur äußerst wenig Strom.
• Hat dieBatterie einen guten Ladestand wird dasBatteriewarn-
symbol nicht auf dem Display angezeigt.
49
Page 50

Wenn dasBatteriewarnsymbol blinkt, muss dieBatterie mit
einer neuen ersetzt werden. Wird dieBatterie trotz Betrieb
nicht ausgetauscht, kann der Fernauslöser ohne weitere
Vorwarnung aufhören zu funktionieren.
• Wird dieBatterie entnommen, werden alle Einstellungen am Fernauslöser gelöscht.
• DieKapazität der Batterie sinkt kurzzeitig bei niedrigen Temperaturen und steigt
wieder bei normalen Temperaturen.
3. Den Fernauslöser andieKamera anschließen
1. DieKameraabdeckung für den
Deutsch
3. Den Stecker festhalten und gerade heraus-
4. Einstellungen
4.1 Funktion auswählen
Zur Wahl der gewünschten Funktion mehrmals auf
[ ] drücken:
DELAY (Selbstauslöser) –> LONG (lange Belichtung)
–> INTVL (Intervalltimer) –> N (Anzahl Belichtungen)
–>
Anschluss des Fernauslösers abnehmen.
DieAbdeckung in dieHalterung (10) am
Fernauslöser stecken.
ziehen um ihn von der Kamera zu lösen.
(Lautsprecher EIN/AUS) –> DELAY…
2. Beim Anschluss des Fernauslöserkabels andieKamera auf
dieRückseite des Steckers
drücken.
50
Page 51

4.2 Uhrzeit und Anzahl der Belichtungen einstellen
Zeit einstellen
Mehrfach auf [
Einstellung zu gelangen: DELAY, LONG oder INTVL.
] drücken um zur gewünschten
1. Einstellungsmodus wird geöffnet.„ 00:00′00″ “
(Stunden : Minuten : Sekunden) wird angezeigt.
2. Auf [ SET ] drücken um dieEinstellung zu starten,
dieStunden blinken.
3. [ ] nach oben/unten drehen bis zur gewünschten
Stunde (oder [ ] gedrückt halten um direkt zur
Einstellung der Minuten oder Sekunden zu gehen).
4. Auf [ ] drücken um dieEinstellung zu bestätigen
und zu den Minuten weiterzugehen. DieMinuten
blinken.
5. [ ] nach oben/unten drehen bis zur
gewünschten Minutenanzeige.
6. Auf [ ] drücken um dieEinstellung zu bestätigen und zu den Sekunden weiterzugehen.
DieSekunden blinken.
7. [ ] nach oben/unten drehen bis zur
gewünschten Sekundenanzeige.
8. 8. Auf [ SET ] drücken um diegewählte
Einstellung zu bestätigen.
Einstellungsbereich der Zeit: von 1 Sekunde bis
99 Stunden, 59 Minuten und 59 Sekunden.
1
2
3
4
5
6
7
8
H M S
[ SET ]
Anzahl der Belichtungen einstellen
1. Mehrfach auf [ ] drücken um zu N (Einstellung der Belichtungsanzahl) zu gelangen.
2. Auf [ SET ] drücken, [ – – ] (Anzahl) blinkt.
3. [ ] bis zur gewünschten Anzahl Belichtungen drehen (max. 399).
4. Mit [ SET ] bestätigen.
Deutsch
Den Ton (Lautsprecher) einstellen
1. Mehrfach auf [ ] drücken um zu zu gelangen.
2. Auf [ SET ] drücken, blinkt.
3. [ ] nach oben/unten drehen bis zur gewünschten
Einstellung. ON (ein) oder OFF (aus).
51
Page 52

4.3 Start/Stopp
Start/Stopp der eingestellten Timerfunktion.
1. Auf [
2. Erneut auf [ ] drücken um dieeingestellte Timerfunktion
zu stoppen.
Einstellungen für dieTimerfunktion werden gespeichert und sind
auch nach einem Neustart noch vorhanden.
] drücken um dieeingestellte Timerfunktion zu starten.
4.4 Hintergrundbeleuchtung
1. Auf [ ] drücken um dieHintergrundbeleuchtung zu aktivieren.
2. DieBeleuchtung leuchtet auf und erlischt automatisch nach ca. 6 Sekunden.
4.5 Hold-Funktion
Sperrt alle Tasten außer [ ] und [ ] nach oben/unten um eine unabsichtliche
Änderung der Einstellungen zu verhindern. Mit [ ] wird ein unbeabsichtigtes
Stoppen einer gestarteten Funktion verhindert.
Hinweis: Der manuelle Fernauslöser (3) wird von der Hold-Funktion nicht beeinträchtigt.
] mindestens 3 Sekunden gedrückt halten bis auf dem Display angezeigt
1. [
wird um dieTasten zu sperren.
2. [ ] mindestens 3 Sekunden gedrückt halten bis vom Display verschwindet
um dieHold-Funktion auszuschalten.
Hinweis: Vor dem Fotografieren immer sicherstellen, dass
NICHT auf dem Display angezeigt wird. Wird dies angezeigt muss dieHold-Funktion ausgeschaltet werden. Dann
auf [ ] drücken um dieeingestellte Funktion zu starten.
4.6 Tipps zur Benutzung
Deutsch
Darauf achten, den Fotomodus auf Einzelbildaufnahme einzustellen. Ist dieKamera auf
Serienbildaufnahme eingestellt, wird sie nicht vom Fernauslöser gesteuert sondern von
den eigenen Einstellungen.
Bei unbeaufsichtigter Verwendung des Fernauslösers folgendermaßen vorgehen:
• DieSchärfe manuell einstellen. Im Auto-Modus benutzt dieKamera den Autofokus
• Den Kameratimer nicht gleichzeitig mit dem Fernauslöser benutzten, da dieser
• Auf [
• Den Fernauslöser bei Verwendung im Freien vor Feuchtigkeit schützen, z. B. durch
vor der Belichtung und dann funktioniert der Fernauslöser nicht.
sonst nicht ordnungsgemäß funktioniert.
] drücken um dieTimerfunktion vor dem Austausch der Speicherkarte
zu stoppen.
eine Abdeckung.
52
Page 53

5. Selbstauslöser
DieVerzögerungsdauer (Zeit) vom Drücken auf [ ] bis zur Belichtung einstellen.
5.1 Einstellung
Mehrfach auf [ ] drücken um zu DELAY zu gelangen:
1. Auf [ SET ] drücken um dieEinstellung für den
Selbstauslöser zu öffnen.
2. DieEinstellung für dieStunden blinkt.
] nach oben/unten drehen bis zur gewünschten
3. [
Einstellung der Stunden.
4. Auf [ ] drücken um zu bestätigen und
dieEinstellung der Minuten zu öffnen.
5. DieEinstellung für dieMinuten blinkt. [ ] nach oben/
unten bis zur gewünschten Einstellung drehen.
6. Auf [ ] drücken um zu bestätigen und
dieEinstellung der Sekunden zu öffnen.
7. DieEinstellung für dieSekunden blinkt. [ ] nach oben/
unten bis zur gewünschten Einstellung drehen.
8. Zum Beenden der Einstellung mit [ SET ] bestätigen.
5.2 Ton
Mehrfach auf [ ] drücken und auswählen. Auf [ SET ] drücken.
] nach oben/unten drehen bis zur gewünschten Einstellung oder um den
• [
Lautsprecher zu aktivieren oder auszuschalten, je nachdem ob für den Countdown
Ton gewünscht wird.
• Mit [ SET ] bestätigen.
1
2
3
4
5.3 Den Countdown starten
Auf [ ] drücken um den Countdown bis zur Belichtung zu starten. Erneut drücken
um den Countdown vor der Belichtung zu stoppen.
Hinweis: Wird der Automodus der Kamera benutzt, den Sucher abdecken um eine
fehlerhalte Belichtung zu verhindern.
6. Fotografieren mit langer Belichtungsdauer
6.1 Einstellung
DieKamera in den Bulb-Modus (Langzeitbelichtung) versetzen.
1. Mehrfach auf [
2. DieZeit auf dieselbe Weise wie in 4.1 Einstellung einstellen.
] drücken um zu LONG zu gelangen.
53
Deutsch
Page 54

6.2 Lange Belichtung starten
Auf [ ] drücken um dielange Belichtung zu starten.
Erneut drücken um den Countdown vor Beendigung der Belichtung zu stoppen.
„RELEASE“ blinkt auf dem Display während der Verschluss offen ist.
Hinweis: Ist dieKamera nicht im Bulb-Modus, nimmt sie während der eingestellten
Zeit kontinuierlich auf (oder bis dieSpeicherkarte voll ist).
7. Intervalltimer
Zuerst dasZeitintervall zwischen den Belichtungen einstellen (INTVL) und dann
dieAnzahl Belichtungen (N).
7.1 Einstellung
DieKamera auf Einzelbildaufnahme stellen.
1. Mehrfach auf [
2. DieIntervallzeit auf dieselbe Weise wie in 4.1 Einstellung
einstellen.
3. Einmal auf [ ] drücken um zu (N) zu gelangen (Anzahl
Belichtungen).
4. Auf [ SET ] drücken um dieEinstellung zu öffnen.
5. Mehrfach [ ] nach oben/unten drehen um dieAnzahl der
Belichtungen einzustellen.
6. Auf [ SET ] drücken um dieeingestellte Anzahl der
Belichtungen zu bestätigen.
Hinweis: Wird ein Blitz benutzt, muss dieIntervallzeit so
eingestellt werden, dass der Blitz zwischen den Belichtungen
wieder aufgeladen werden kann.
] drücken um zu INTVL zu gelangen.
7.2 Den Intervalltimer starten
Deutsch
Auf [ ] drücken um den Intervalltimer zu starten.
Erneut drücken um den Intervalltimer vor Beendigung der
Belichtung zu stoppen.
„RELEASE“ blinkt auf dem Display während der Verschluss
offen ist.
Hinweis: DieAnzahl der Belichtungen (N) kann von 1 bis
399 gewählt werden oder durch Auswählen von (– –) in
(N) als unendlich. Im Modus (– –) werden unendlich viele
Belichtungen durchgeführt, bis dieSpeicherkarte voll ist oder
der Timer dieTimer-Funktion manuell abbricht.
54
Page 55

8. Praxisbeispiel
8.1 Voraussetzung
• 5 Bilder.
• Belichtungsdauer 5 Sekunden.
• Intervall zwischen den Belichtungen 2 Minuten und 30 Sekunden.
8.2 Vorbereitungen
1. DieKamera auf ein Stativ setzen.
2. DieKamera auf manuellen Fokus einstellen. DieSchärfe einstellen
(siehe Bedienungsanleitung der Kamera).
8.3 Einstellungen
1. Mehrfach auf [ ] drücken um zu LONG (lange Belichtung)
zu gelangen.
2. Auf [ SET ] drücken um dieEinstellung zu öffnen.
3. Zweimal auf [ ] drücken um anden Stunden und Minuten
vorbeizugehen. DieSekundenanzeige blinkt. 5 Mal nach oben
auf [ ] drücken um 5 Sekunden einzustellen.
4. Auf [ SET ] drücken um dieeingestellte Belichtungsdauer
zu bestätigen.
5. Einmal auf [ ] drücken um zu INTVL (Intervall) zu gelangen.
6. Auf [ SET ] drücken um dieEinstellung zu öffnen.
7. Einmal auf [ ] drücken um anden Stunden vorbei zu den
Minuten zu gehen (dieMinutenanzeige blinkt). Um 2 Minuten
einzustellen, an [ ] 2-mal nach oben drehen.
8. Einmal [ ] drücken. DieSekundenanzeige blinkt. Um 30 Sekunden
einzustellen, [ ] 30-mal nach oben drehen (gedrückt halten
für schnellen Vorlauf).
9. Auf [ SET ] drücken um daseingestellte Intervall zwischen den
Belichtungen zu bestätigen.
10. Einmal auf [ ] drücken um zu (N) zu gelangen
(Anzahl Belichtungen).
11. Auf [ SET ] drücken um dieEinstellung zu öffnen.
12. Um 5 Belichtungen einzustellen, [ ] 5-mal nach oben drehen.
13. Auf [ SET ] drücken um dieeingestellte Anzahl der Belichtungen
zu bestätigen. Auf der Abb. wird dasNotensymbol angezeigt
als Zeichen dafür, dass der Lautsprecher aktiviert ist.
Deutsch
55
Page 56

8.4 Start der eingestellten Timerfunktion
1. Auf [ ] drücken um dieTimerfunktion zu starten.
2. Dieerste Belichtung wird sofort durchgeführt. „TIMER ACTIVE“
3. Auf dem Display wird währenddessen Information angezeigt.
4. Auf [ ] drücken, dieeingestellte Timerfunktion erneut starten
9. Kombination mehrerer Funktionen
Deutsch
blinkt während dieTimerfunktion eingeschaltet ist.
Auf dem Bild wird angezeigt: 2 Minuten und 15 Sekunden bis
zur nächsten Belichtung, 4 Belichtungen noch ausstehend und
der Lautsprecher ist aktiviert.
oder dieEinstellungen wieder öffnen und alle Einstellungen auf
0 setzen.
Pos. DELAY LONG INTVL N Funktion Einsatzbereich
1 • Selbstauslöser Zeit bis zur Belichtung
2 • Intervalltimer, fotografiert
bis er ausgeschaltet wird
(unendlich)
3 • Lange Belichtung Astronomie
4 • Anzahl Belichtungen Time-Lapse-Foto z. B.
5 • • Dauer bis zum Start des
Intervalltimers
6 • • Dauer bis zum Start der
Belichtung
7 • • Zeit bis zum Start der
Belichtung mit 1-Sekunden-
Intervall sowie Anzahl der
Belichtungen
8 • • Lange Belichtung bei
unendlichem Intervall
einstellen
Intervallfoto, z. B. von
wachsenden Blumen
1-Sekunden-Intervall
Intervallfoto
Intervallfoto Astronomie
56
Page 57

Pos. DELAY LONG INTVL N Funktion Einsatzbereich
9 • • Intervalltimer und Anzahl
Belichtungen
10 • • • Dauer bis zum Start der
langen Belichtung bei
unendlichem Intervall
11 • • • Dauer bis zum Intervallfoto,
Anzahl Belichtungen
12 • • • Anzahl lange Belichtungen
während dem eingestellten
Intervall
13 • • • • Nach der eingestellten Zeit
wird dieAnzahl Belichtungen
mit eingestelltem Intervall
durchgeführt
14 • • Falsche Einstellung! Der Fern-
auslöser geht automatisch
zu Einstellung 3 über
15 • • • Falsche Einstellung! Der Fern-
auslöser geht automatisch
zu Einstellung 6 über
Intervallfoto, z. B. von
wachsenden Blumen
Intervallfoto, z. B. von
wachsenden Blumen
10. Manueller Fernauslöser
Der Fernauslöser kann dazu benutzt werden, dieKamera auf dieselbe Weise wie mit
einer Fernbedienung manuell zu aktivieren. Diese Funktion kann unabhängig von den
Einstellungen des Fernauslösers verwendet werden. Diese Funktion erfordert keine Batterie
und kann daher auch benutzt werden, wenn dieBatterie des Fernauslösers verbraucht ist.
1. DieTaste halb herunterdrücken
um den Autofokus zu aktivieren
und dieBlende und Zeit einzustellen (im Automodus).
2. DieTaste komplett herunterdrücken
um den Verschluss zu öffnen.
Deutsch
Lange Belichtung
3. DieTaste komplett herunter- und nach
vorne in Pfeilrichtung drücken um
dieTaste zu sperren.
4. Um dieTastensperre zu lösen (den
Verschluss schließen), dieTaste nach
hinten drücken und loslassen.
57
Page 58

11. Pflege und Wartung
DasProdukt mit einem weichen, leicht befeuchteten Tuch reinigen. Ein mildes Reinigungsmittel verwenden, keine scharfen Chemikalien oder schleifende Reinigungsmittel.
Hinweis: Der Fernauslöser ist nicht wasser- oder feuchtigkeitsresistent.
12. Technische Daten
Modell TC-C1 (Canon) Art.Nr. 38-6236
TC-N3 (Nikon) Art.Nr. 38-6237
Selbstauslöser 0 Sek. bis 99 Std., 59 Min., 59 Sek.
Langzeitbelichtung 0 Sek. bis 99 Std., 59 Min., 59 Sek.
Intervalltimer 0 Sek. bis 99 Std., 59 Min., 59 Sek.
Einstellung des
Belichtungszählers 1 bis 399 oder unendlich
Kabellänge 80 cm
Batterie CR2032 (3 V)
Maße 40×20×143 mm
Gewicht 85 g (mit Batterie)
13. Modellunterstützung
Diese Kameramodelle werden zur aktuellen Zeit unterstützt:
C1 Canon EOS 30, 33, 50E, 300, 300V, 3000, 50, 300D (Digital Rebel), 350D (Digital
Rebel XT), 400D (Digital Rebel XTi), 450D (Digital Rebel XSi), 500D, 1000D
N3 Nikon D90, D5000, D5100, D3100, D7000
Deutsch
58
Page 59

59
Page 60

Sverige
Kundtjänst tel: 0247/445 00
fax: 0247/445 09
e-post: kundservice@clasohlson.se
Internet www.clasohlson.se
Post Clas Ohlson AB, 793 85 INSJÖN
Norge
Kundesenter tlf.: 23 21 40 00
faks: 23 21 40 80
e-post: kundesenter@clasohlson.no
Internett www.clasohlson.no
Post Clas Ohlson AS, Postboks 485 Sentrum, 0105 OSLO
Suomi
Asiakaspalvelu puh.: 020 111 2222
sähköposti: asiakaspalvelu@clasohlson.fi
Internet www.clasohlson.fi
Osoite Clas Ohlson Oy, Maistraatinportti 4 A, 00240 HELSINKI
Great Britain
Customer Service contact number: 0845 300 9799
e-mail: customerservice@clasohlson.co.uk
Internet www.clasohlson.com/uk
Postal 10 – 13 Market Place
Kingston Upon Thames
Surrey
KT1 1JZ
Deutschland
Kundenservice Unsere Homepage www.clasohlson.de besuchen und
auf Kundenservice klicken.
 Loading...