

Page 1
IR-Thermometer
IR-termometer
Infrapunalämpömittari
IR-Thermometer
Art.no. Model
36-2877 ST653
Ver. 20140219
EnglishSvenskaNorskSuomi
Deutsch
Page 2

Page 3

IR-Thermometer
Art.no 36-2877 Model ST653
Please read theentire instruction manual before use
and save it for future reference. We reserve theright
for any errors in text or images and for making any
necessary technical changes to this document. If you
should have any questions concerning technical
problems please contact our Customer Services.
Safety
• Always be careful when thelaser pointer
is activated.
• Do not point thebeam at your own, other
peoples or even animals’ eyes.
• Be careful while measuring reflective surfaces,
thebeam might reflect back towards your eyes.
• Never let thebeam point at flammable or explosive
gas or fluid.
• Never lower thethermometer into water or
other fluid.
• The product is not meant for medical purposes.
3
English
Page 4
Warnings
English
Warning! Do not open the casing! Certain
components within the product’s casing contain
dangerous currents. Contact with these may give
you an electric shock.
On thermometer
CLASS1
LASER PRODUCT
CLASS 1 LASER PRODUCT
Warning! Do not open the casing! Invisible laser
beam which can cause eye damage. Avoid exposure
to the laser beam. Do not look into the laser beam
even with optical instruments.
4
Page 5
Product Description
Suitable areas of use
• Control of handling and preparations of provisions
• Fire and safety inspection
• Hardening control
• Asphalt laying
• Temperature analysis during engine testing
• Soldering temperature control
• Measuring warehouse temperatures
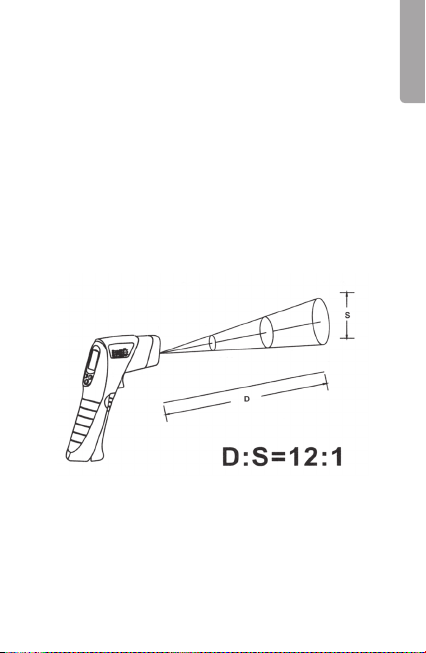
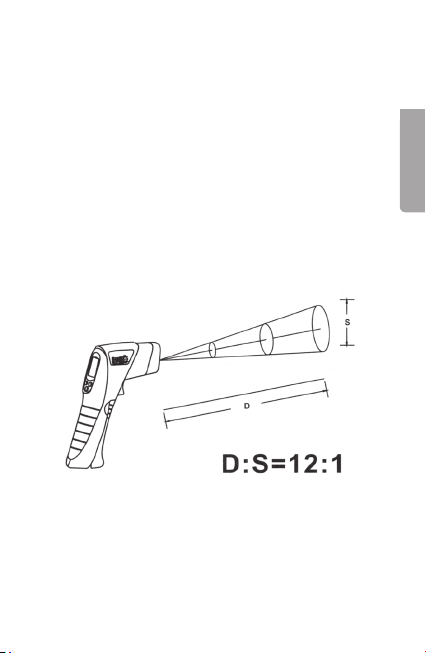
Measuring range
The thermometers measuring ratio is 12:1.
At ameasuring distance of 1.2 metres
themeasuring area has adiameter of 10 cm.
The laser point shows theapproximate centre
of themeasuring area.
5
English
Page 6
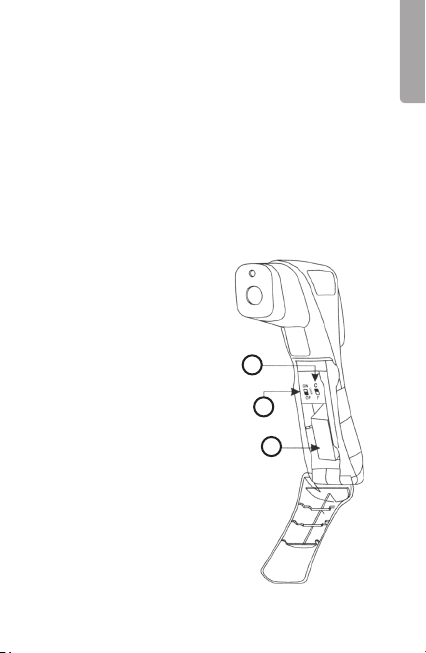
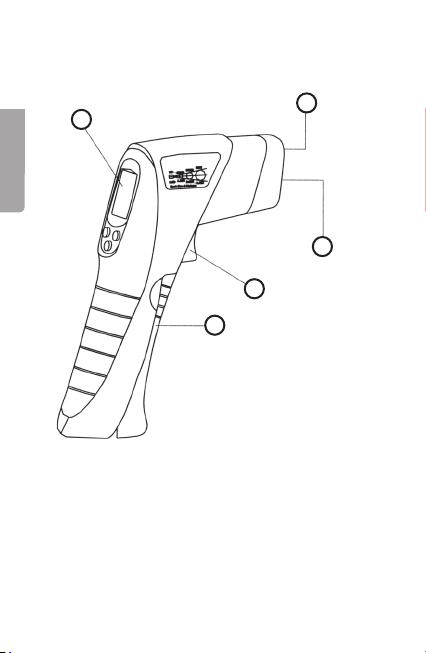
Buttons and Functions
English
1
5
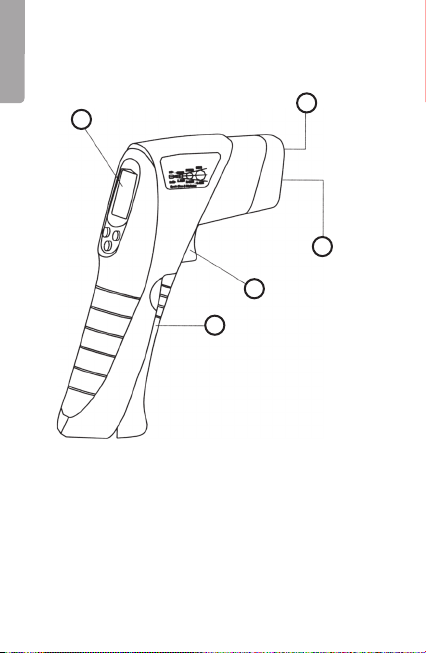
1. LCD-display
2. Laser pointer
3. IR sensor
4. Measuring button (trigger)
5. Battery cover
6
2
3
4
Page 7

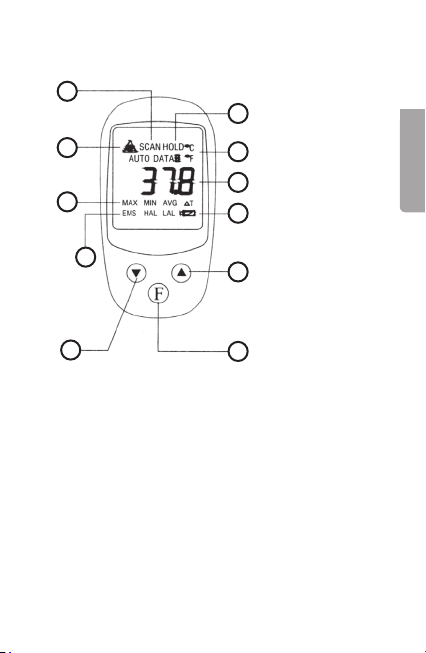
Display
6
English
16
7
8
9
10
6. Indicator for functions
7. Laser off/on
8. Max/Min/Avg indicator
9. Emission/alarm indicator
10. [ ▼ ] – Down
11. [ F ] – Functions
12. [ ▲] – Up
13. Battery warning
14. Temperature indicator
15. Celsius/Fahrenheit –indicator
16. Memory indicator
15
14
13
12
11
7
Page 8

Use
English
1. Press and hold themeasuring button (4) to
start themeasuring. The display will light
up if thebattery is good (change batteries if
thedisplay does not light up).
2. Hold theIT thermometer in its handle and point
it at thesurface to be measured. The laser point
indicates where on thesurface thetemperature
gets measured. “SCAN” will show in theupper
left corner of thedisplay during measuring.
3. Let go of themeasuring button to finish
themeasuring. The measured temperature and
theword “HOLD” is shown on thedisplay.
4. The IR thermometer is automatically shut off
6 seconds after themeasuring is finished.
8
Page 9
Advanced use
Show and change settings
1. Start theIR thermometer
by pressing the
measuring button (4).
2. Press thefunction
button (11) once or
several times to select
menu for settings.
The display indicates
selected menu.
3. Use [ ▲] and [ ▼ ] to
adjust selected setting.
4. Press thefunction
button (11) again to
confirm.
9
English
Page 10

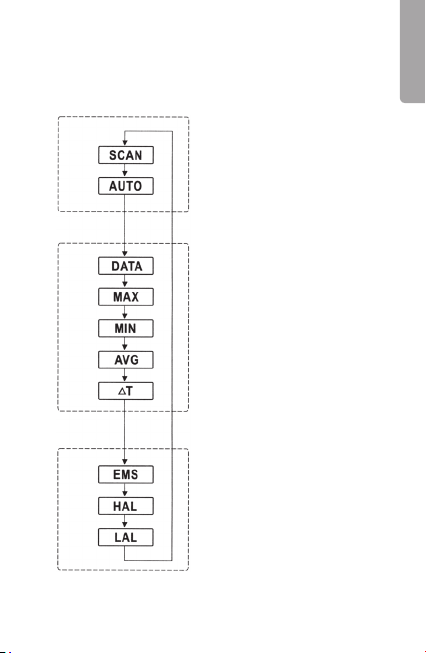
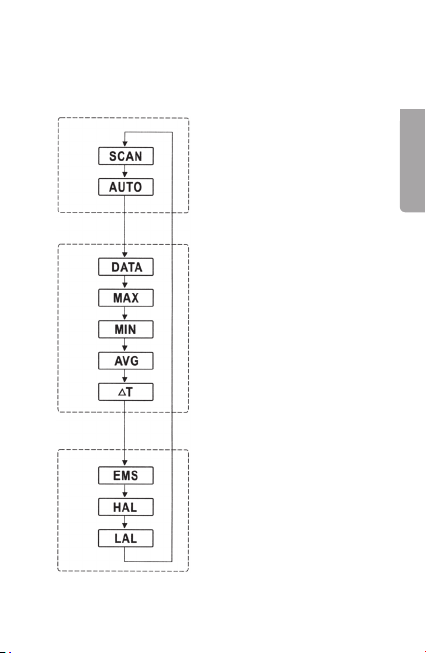
Explanation of themenus
English
DATA Activates thememory function. Select
memory position 1 to 10 with [ ▲] and
[ ▼ ] and then measure according to
theinstructions above.
MAX Displays thehighest measured temperature,
since thelast measurement.
MIN Displays thelowest measured temperature,
since thelast measurement.
AVG Displays theaverage temperature, since
thelast measurement.
∆T Displays thedifference in temperature,
since thelast measurement.
EMS Sets theemission (see chart).
HAL Alarm for thehighest approved temperature.
Sets alarm at aspecific temperature.
LAL Alarm for thelowest approved temperature.
Sets alarm at aspecific temperature.
10
Page 11
Automatic measuring
Measure thetemperature without holding
themeasuring button.
1. Press and hold themeasuring button (4).
2. Press repeatedly on thefunctions button (11)
until “AUTO” lights up on thedisplay.
3. Let go of themeasuring button. The measuring
continues after you let go of thebutton.
4. Press thefunctions button (11) again to finish
theautomatic measuring.
Change
temperature unit
Open thebattery cover and
find theswitch for Celsius
and Fahrenheit.
Set theswitch to C (Celsius)
or F (Fahrenheit).
17
18
English
17. Switch Celsius/
Fahrenheit
18. Laser point on/off
19. Battery
19
11
Page 12

Turn thelaser pointer on/off
English
The laser pointer can be turned on or switched off
with theswitch behind thebattery cover.
Set theswitch to ON (laser pointer is shown) or
OFF (laser pointer is off).
Emissivity
Most organic materials (ca 90 %) with apainted
or oxidised surface have anemission ratio of 0.95
(preset on theIR thermometer). Shiny materials
should be masked or painted black before
measuring. Give thetape or paint thetime to reach
thetemperature of themeasuring object. Measure
themasked or painted surface.
12
Page 13

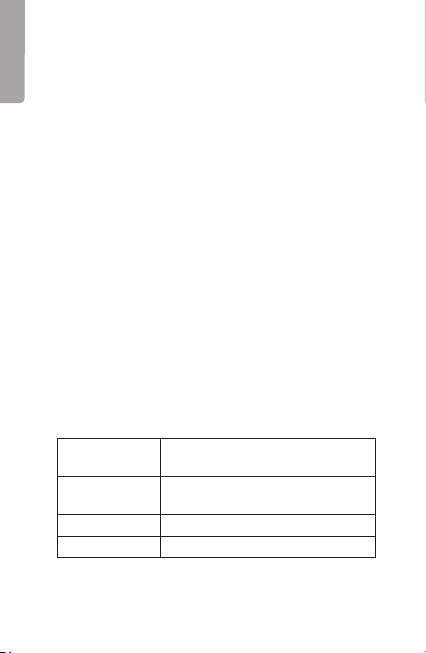
Material Thermal Emission Ratio
Asphalt 0.90–0.98
Concrete 0.94
Cement 0.96
Sand 0.90
Earth 0.92–0.96
Water 0.92–0.96
Ice 0.96–0.98
Snow 0.83
Glass 0.90–0.95
Ceramic 0.90–0.94
Marble 0.94
Mortar 0.89–0.91
Bricks 0.93–0.96
Fabric (black) 0.98
Skin 0.98
Leather 0.75–0.80
Coal (powder) 0.96
Varnish 0.80–0.95
Varnish (matt) 0.97
Rubber (black) 0.94
Plastic 0.85–0.95
Wood 0.90
Paper 0.70–0.94
Chrome oxide 0.81
Copper oxide 0.78
Iron oxide 0.78–0.82
Textile 0.90
13
English
Page 14

Helpful suggestions
English
Function
The IR thermometer reads thetemperature on
thesurface and measures thereflecting energy
collected in thesensor. The electric device converts
themeasured value to atemperature shown in
thedisplay. The laser beam is only used to direct
themeasuring centre.
Measuring range
Always make sure that thesurface to be measured
is larger than twice themeasuring area of
theinstrument at thecurrent measuring distance.
Distance and measuring range
The measuring area increases with increased
measuring distance (see chapter Measuring range).
Find thehottest surface
Search as usual, but move theIR thermometer
slowly back and forth over thewhole measuring
area and constantly read until you find thehighest
temperature.
14
Page 15
Note:
• Do not use thethermometer to measure shiny
or polished surfaces e.g. stainless steel (see
chapter Emissivity).
• The IR thermometer can not measure through
glass, it will then read thetemperature of
theglass.
• Steam, dust or smoke can give false readings.
Care and Maintenance
Change of battery
• When thebattery is bad thebattery warning
icon appears.
• Remove thebattery cover (5) and replace
thebattery of type 6LR61 (9 V).
Disposal
Follow local ordinances when disposing of this product.
If you are unsure about how to dispose of this product
contact your municipality.
15
English
Page 16
Specifications
English
Measuring ratio 12:1
Measurement Range -32 to +535 ºC
Accuracy ± 3 °C (from -32 to -20 °C)
± 2 °C (from -20 to 100 °C)
± 2 % (from 100 to 535 °C)
Spectral area 5–14 μm
Display resolution 0.1 °C
Reading time 500 ms
Shutting off Automatic after 6 seconds
Emission ratio 0.1–1.0
Battery type 1×6LR61 (9 V)
Size 170×133×45 mm
Weight 187 g
Environment
Operating
temperature 0 °C to +50 ºC
Humidity 10 to 90 %
Standards followed
EN61326 Electronic equipment for measuring,
IEC61000-4-2 Immunity against electrostatic
IEC61000-4-3 Immunity against radiation fields.
IEC61000-4-8 Immunity against magnetic fields.
steering and lab purposes.
discharge.
16
Page 17

IR-termometer
Art.nr 36-2877 Modell ST653
Läs igenom hela bruksanvisningen före användning
och spara den sedan för framtida bruk. Vi reserverar oss för ev. text- och bildfel samt ändringar
av tekniska data. Vid tekniska problem eller andra
frågor, kontakta vår kundtjänst (se adressuppgifter
på baksidan).
Säkerhet
• Var alltid försiktig när laserstrålen är aktiverad.
• Rikta inte laserstrålen mot dina eller andras
ögon, inte heller mot ögon på djur.
• Var försiktig vid mätning mot reflekterande ytor,
strålen kan speglas mot dina ögon.
• Låt aldrig strålen peka mot brandfarlig/explosiv
gas eller vätska.
• Sänk aldrig ner termometern i vatten eller annan
vätska.
• Produkten är inte avsedd för medicinska ändamål.
17
Svenska
Page 18
Lägg märke till dessa
säkerhetssymboler
Svenska
Varning! Öppna inte höljet! Farlig spänning finns
oskyddat på komponenter inuti produktens hölje,
kontakt med dessa kan leda till brand eller ge
elektriska stötar.
Vid termometer
CLASS1
LASER PRODUCT
KLASS 1 LASERAPPARAT
Varning! Öppna inte höljet! Osynlig laserstrålning
som kan orsaka ögonskador. Rikta inte blicken
in mot strålen och titta inte direkt på den genom
optiska instrument.
18
Page 19
Produktbeskrivning
Lämpliga användningsområden
• Kontroll vid lagring och beredning av livsmedel
• Inspektion för säkerhet och brand
• Härdningskontroll
• Asfaltsläggning
• Temperaturanalys vid motorprovning
• Kontroll vid lödning
• Mätning av lagertemperatur
Mätningsfält
Termometerns mätningsförhållande är 12:1.
Vid ett mätavstånd på 1,2 meter har mätytan en
diameter på 10 cm. Laserpunkten visar ungefärlig
mittpunkt på mätytan.
19
Svenska
Page 20
Knappar och funktioner
1
Svenska
1. LCD-display
2. Laserpekare
3. IR-sensor
4. Mätknapp (avtryckare)
5. Batterilucka
2
3
4
5
20
Page 21
Display
6
16
7
8
9
10
6. Funktionsindikator
7. Laser av/på
8. Max/Min/Avg –indikator
9. Emission/alarm –indikator
10. [ ▼ ] Ner
11. [ F ] Funktionsknapp
12. [ ▲] Upp
13. Batterivarning
14. Temperaturindikator
15. Celsius/Fahrenheit –indikator
16. Minnesindikator
15
14
13
12
11
21
Svenska
Page 22

Användning
1. Tryck och håll in mätknappen (4) för att starta
mätningen. Displayen tänds om batteriet är bra
(byt batteriet om inte displayen tänds).
2. Håll IR-termometern i handtaget och rikta den
mot den yta som ska mätas. Laserpunkten
Svenska
visar var på ytan temperaturen mäts och texten
”SCAN” visas i övre vänstra hörnet av displayen
när mätning pågår.
3. Släpp mätknappen för att avsluta mätningen.
Den uppmätta temperaturen och texten
”HOLD” visas i displayen.
4. IR-termometern stängs av automatiskt
6 sekunder efter att mätningen avslutats.
22
Page 23
Avancerad användning
Visa och ändra inställningar
1. Starta IR-termometern
med ett tryck på
mätknappen (4).
2. Tryck en eller
upprepade gånger
på funktionsknappen
(11) för att välja
inställningsmeny.
Displayen indikerar
vald meny.
3. Använd pilknapparna
[ ▲] och [ ▼ ] för att
justera vald inställning.
4. Tryck igen på funktionsknappen (11) för att
bekräfta.
23
Svenska
Page 24

Förklaring av menyerna
DATA Aktiverar minnesfunktionen. Välj minnesplats
1 till 10 med knapparna [ ▲] och [ ▼ ] och
gör sedan en mätning enligt instruktionen ovan.
MAX Visar den högsta uppmätta temperaturen
sedan den senaste mätningen.
MIN Visar den lägsta uppmätta temperaturen
Svenska
sedan den senaste mätningen.
AVG Visar medeltemperaturen sedan den
senaste mätningen.
∆T Visar temperaturskillnaden sedan den
senaste mätningen.
EMS Ställer in emissionsförmåga (se tabell).
HAL Alarm för högsta tillåtna temperatur.
Ställer in alarm vid en specifik temperatur.
LAL Alarm för lägsta tillåtna temperatur. Ställer in
alarm vid en specifik temperatur.
24
Page 25

Automatisk mätning
Mät temperaturen utan att hålla in mätknappen.
1. Tryck och håll in mätknappen (4).
2. Tryck upprepade gånger på funktionsknappen
(11) tills texten ”AUTO” tänds i displayen.
3. Släpp mätknappen. Mätningen fortsätter trots
att mätknappen släppts.
4. Tryck igen på funktionsknappen (11) för att
avsluta automatisk mätning.
Ändra
temperaturenhet
Öppna batteriluckan och
lokalisera omkopplaren för
Celsius och Fahrenheit.
Sätt omkopplaren i läge
C (Celsius) eller
F (Fahrenheit).
17. Omkopplare Celsius/
Fahrenheit
18. Laserpunkt på/av
19. Batteri
17
18
19
25
Svenska
Page 26

Slå av eller på laserpekaren
Laserpekaren kan slås på eller av med den omkopplare som finns lokaliserad bakom batteriluckan.
Sätt omkopplaren i läge ON (laserpekaren visas)
eller OFF (laserpekaren avstängd).
Svenska
Emissionsförmåga
De flesta organiska material (ca 90 %) med målad
eller oxiderad yta har en emissionsförmåga på 0,95
(förinställt på IR-termometern). Blanka föremål bör
maskas av eller svartmålas innan mätning. Ge tejp
eller färg tid att uppnå mätobjektets temperatur.
Mät mot den maskerade/målade ytan.
26
Page 27

Ämne Termisk emissionsförmåga
Asfalt 0,90–0,98
Betong 0,94
Cement 0,96
Sand 0,90
Jord 0,92–0,96
Vatten 0,92–0,96
Is 0,96–0,98
Snö 0,83
Glas 0,90–0,95
Keramik 0,90–0,94
Marmor 0,94
Murbruk 0,89–0,91
Tegel 0,93–0,96
Tyg (svart) 0,98
Hud 0,98
Läder 0,75–0,80
Kol (pulver) 0,96
Lack 0,80–0,95
Lack (matt) 0,97
Gummi (svart) 0,94
Plast 0,85–0,95
Trä 0,90
Papper 0,70–0,94
Kromoxid 0,81
Kopparoxid 0,78
Järnoxid 0,78–0,82
Textil 0,90
27
Svenska
Page 28

Tänk på detta
Funktion
IR-termometerar avläser temperaturen på ytan och
mäter den reflekterade energin som samlas i sensorn.
Elektroniken översätter mätvärdet till en temperatur
som visas i displayen. Laserstrålen används endast
Svenska
för att rikta in mätpunkten.
Mätfält
Se alltid till att ytan som ska mätas är större än
instrumentets mätyta vid aktuellt mätavstånd (ytan
som ska mätas bör helst vara dubbelt så stor som
instrumentets mätyta).
Avstånd och mätarea
Mätytan ökar med ökande mätavstånd (se avsnitt
Mätningsfält).
Hitta den hetaste ytan
Sök som vanligt, men för IR-termometern sakta
fram och tillbaka över hela mätområdet och avläs
hela tiden tills du hittar den högsta temperaturen.
28
Page 29

Obs!
• Använd inte termometern för att mäta på blanka
eller polerade ytor, t.ex. rostfritt stål (se avsnitt
Emissionsförmåga).
• IR-termometern kan inte mäta genom glas,
den mäter då glasets yttermeperatur.
• Ånga, damm eller rök kan ge felavläsning genom
att lura optiken.
Skötsel och underhåll
Byte av batteriet
• När batteriet börjar bli dåligt visas ikonen för
batterivarning .
• Vik ut den övre delen av batteriluckan (5) och
ersätt batteriet med ett nytt batteri av typen
6LR61 (9 V).
Avfallshantering
När du ska göra dig av med produkten ska detta
ske enligt lokala föreskrifter. Är du osäker på hur
du ska gå tillväga, kontakta din kommun.
29
Svenska
Page 30

Specifikationer
Mätningsförhållande 12:1
Mätområde -32 till 535 °C
Noggrannhet ± 3 °C (från -32 till -20 °C)
± 2 °C (från -20 till 100 °C)
± 2 % (från 100 till 535 °C)
Spektralområde 5–14 μm
Svenska
Displayens upplösning 0,1 °C
Avläsningstid 500 ms
Avstängning Automatiskt efter
ca 6 sekunder
Emissionsförmåga 0,1–1,0
Batterityp 1 st. 6LR61 (9 V)
Storlek 170×133×45 mm
Vikt 187 g
Miljö
Användnings temperatur 0 °C till 50 °C
Luftfuktighet 10 till 90 %
Standarder som följs
EN 61326 Elektrisk utrustning för mätning,
IEC 61000-4-2 Immunitet mot elektrostatisk
IEC 61000-4-3 Immunitet mot strålade fält.
IEC 61000-4-8 Immunitet mot magnetiska fält.
styrning och laboratorieändamål.
urladdning.
30
Page 31

IR-termometer
Art.nr. 36-2877 Modell ST653
Les nøye igjennom hele bruksanvisningen og ta
vare på den til senere bruk. Vi reserverer oss mot
ev. tekst- og bildefeil, samt forandringer av tekniske
data. Ved tekniske problemer eller andre spørsmål,
ta kontakt med vårt kundesenter (se opplysninger
på baksiden).
Sikkerhet
• Vær alltid forsiktig når laserstrålen er aktivert.
• Rett ikke laserstrålen mot dine eller andres
øyne, heller ikke mot øynene på dyr.
• Vær forsiktig ved måling mot reflekterende flater,
strålen kan reflekteres tilbake til dine øyne.
• La aldri strålen peke mot brannfarlig/eksplosiv
gass eller væske.
• Senk aldri termometret ned i vann eller annen
væske.
• Produktet er ikke beregnet for medisinske formål.
31
31
Norsk
Page 32

Legg merke til disse
sikkerhetssymbolene
Advarsel! Åpne ikke dekselet. Farlig spenning
ligger ubeskyttet på komponenter inne i produktets
deksel, kontakt med disse kan føre til brann eller gi
elektriske støt.
Norsk
Ved termometer
CLASS1
LASER PRODUCT
KLASSE 1 LASERAPPARAT
Advarsel! Åpne ikke dekselet. Usynlig laserstråling
som kan forårsake øyeskader. Rett ikke blikket mot
strålen, og se ikke rett på den gjennom optiske
instrumenter.
32
Page 33

Produktbeskrivelse
Passende bruksområder
• Kontroll ved lagring og tilberedning av mat
• Inspeksjon for sikkerhet og brann
• Herdningskontroll
• Asfaltlegging
• Temperaturanalyse ved motortesting
• Kontroll ved lodding
• Måling av lagertemperatur
Målefelt
Termometerets måleforhold er 12:1.
Ved en måleavstand på 1,2 meter har måleflaten en
diameter på 10 cm. Laserpunktet viser omtrentlig
midtpunkt på måleflaten.
33
Norsk
Page 34

Knapper og funksjoner
1
2
3
Norsk
1. LCD-display.
2. Laserpeker
3. IR-sensor
4. Måleknapp (avtrekker)
5. Batteriluke
4
5
34
Page 35

Display
6
16
7
8
9
10
6. Funksjonsindikator
7. Laser av/på
8. Maks/Min/Avg –indikator
9. Emission/alarm –indikator
10. [ ▼ ] Ner
11. [ F ] Funksjonsknapp
12. [ ▲] Opp
13. Batterivarsling
14. Temperaturindikator
15. Celsius-/Fahrenheit –indikator
16. Minneindikator
15
14
13
12
11
35
Norsk
Page 36

Bruk
1. Trykk og hold inne måleknappen (4) for å starte
målingen. Displayet tennes dersom batteriet er
bra (bytt batteriet hvis ikke displayet tennes).
2. Hold IR-termometeret i håndtaket og rett det
mot den flaten som skal måles. Laserpunktet
viser hvor på flaten temperaturen måles og
teksten «SCAN» vises øverst til venstre i
displayet når måling pågår.
3. Slipp måleknappen for å avslutte målingen.
Den målte temperaturen og teksten «HOLD»
Norsk
vises i displayet.
4. IR-termometeret skrus av automatisk
6 sekunder etter at målingen er avsluttet.
36
Page 37

Avansert bruk
Vise og endre innstillinger
1. Start IR-termometeret
med et trykk på
måleknappen (4).
2. Trykk en eller
gjentatte ganger på
funksjonsknappen
(11) for å velge
innstillingsmeny.
Displayet indikerer
valgt meny.
3. Bruk piltastene [ ▲] og
[ ▼ ] for å justere valgt
innstilling.
4. Trykk en gang til på
funksjonsknappen (11)
for å bekrefte.
37
Norsk
Page 38

Forklaring på menyer
DATA Aktiverer minnefunksjonen. Velg minneplass
1 til 10 med knappene [ ▲] og [ ▼ ] og
foreta deretter en måling som vist i
instruksjonen ovenfor.
MAX Viser den høyeste målte temperaturen
siden den forrige målingen.
MIN Viser den laveste målte temperaturen siden
den forrige målingen.
AVG Viser gjennomsnittstemperaturen siden den
forrige målingen.
∆T Viser temperaturforskjellen siden den
Norsk
forrige målingen.
EMS Stiller inn emisjonsevne (se tabell).
HAL Alarm for høyeste tillatte temperatur. Stiller
inn alarm ved en spesifikk temperatur.
LAL Alarm for laveste tillatte temperatur. Stiller
inn alarm ved en spesifikk temperatur.
38
Page 39

Automatisk måling
Mål temperaturen uten å holde inne måleknappen.
1. Trykk og hold inne måleknappen (4).
2. Trykk gjentatte ganger på funksjonsknappen (11)
til teksten «AUTO» tennes i displayet.
3. Slipp måleknappen. Målingen fortsetter til tross
for at måleknappen slippes.
4. Trykk en gang til på funksjonsknappen (11) for
å avslutte automatisk måling.
Forandre enheten
for temperaturvising
Åpne batteriluken og lokaliser
omkobleren for Celsius og
Fahrenheit.
Sett omkobleren på
C (Celsius) eller
F (Fahrenheit).
17. Omkobler Celsius/
Fahrenheit
18. Laserpunkt på/av
19. Batteri
17
18
19
39
Norsk
Page 40

Slå av eller på laserpekeren
Laserpekeren kan slås på eller av med den
omkobleren som finnes bak batteriluken.
Sett omkobleren på ON (laserpekeren vises)
eller OFF (laserpekeren er slått av).
Emisjonsevne
De fleste organiske materialer (ca. 90 %) med
malt eller oksidert flate har en emisjonsevne
på 0,95 (forhåndsinnstilt på IR-termometeret).
Blanke gjenstander bør maskeres eller svartmales
før måling. Gi teip eller farge tid til å oppnå
Norsk
måleobjektets temperatur. Mål mot den maskerte/
malte flaten.
40
Page 41

Emne Termisk emisjonsevne
Asfalt 0,90–0,98
Betong 0,94
Sement 0,96
Sand 0,90
Jord 0,92–0,96
Vann 0,92–0,96
Is 0,96–0,98
Snø 0,83
Glass 0,90–0,95
Keramikk 0,90–0,94
Marmor 0,94
Mørtel 0,89–0,91
Murstein 0,93–0,96
Tøy (svart) 0,98
Hud 0,98
Lær 0,75–0,80
Kull (pulver) 0,96
Lakk 0,80–0,95
Lakk (matt) 0,97
Gummi (svart) 0,94
Plast 0,85–0,95
Tre 0,90
Papir 0,70–0,94
Kromoksid 0,81
Kobberoksid 0,78
Jernoksid 0,78–0,82
Tekstil 0,90
41
Norsk
Page 42

Tenk på dette
Funksjon
IR-termometere leser av temperaturen på flaten
og måler den reflekterte energien som samles
i sensoren. Elektronikken oversetter måleverdien til
en temperatur som vises i displayet. Laserstrålen
brukes kun for å rette inn målepunktet.
Målefelt
Påse alltid at flaten som skal måles er større enn
instrumentets måleflate ved aktuell måleavstånd
(flaten som skal måles bør helst være dobbelt så
Norsk
stor som instrumentets måleflate).
Avstand og måleflate
Måleflaten øker med økende måleavstand
(se avsnitt Målefelt).
Finn den varmeste flaten
Søk som vanlig, men før IR-termometeret sakte
fram og tillbake over hele måleområdet og avles
hele tiden til du finner den høyeste temperaturen.
42
Page 43

Obs!
• Bruk ikke termometeret til å måle på blanke
eller polerte flater, f.eks. rustfritt stål (se avsnitt
Emisjonsevne).
• IR-termometeret kan ikke måle gjennom glass,
den måler da glassets yttertemperatur.
• Damp, støv eller røk kan gi feilavlesing ved at
det lurer optikken.
Vedlikehold
Bytte av batteri
• Når batteriet begynner å bli dårlig, vises ikonet
for batterivarsling .
• Brett ut den øvre delen av batteriluken (5) og
erstatt batteriet med ett nytt batteri av typen
6LR61 (9 V).
Avfallshåndtering
Når du skal kvitte deg med produktet, skal dette skje
i henhold til lokale forskrifter. Er du usikker på hvordan
du går fram, ta kontakt med lokale myndigheter.
43
Norsk
Page 44

Spesifikasjoner
Måleforhold 12:1
Måleområde -32 til 535 °C
Nøyaktighet ± 3 °C (fra -32 til -20 °C)
± 2 °C (fra -20 til 100 °C)
± 2 % (fra 100 til 535 °C)
Spektralområde 5–14 μm
Displayets
oppløsning 0,1 °C
Avlesningstid 500 ms
Skru av Automatisk etter ca. 6 sekunder
Emisjonsevne 0,1–1,0
Batteritype 1 stk. 6LR61 (9 V)
Norsk
Størrelse 170×133×45 mm
Vekt 187 g
Miljø
Brukstemperatur 0 °C til 50 °C
Luftfuktighet 10 til 90 %
Standarder som følges
EN 61326 Elektrisk utstyr for måling,
IEC 61000-4-2 Immunitet mot elektrostatisk
IEC 61000-4-3 Immunitet mot strålende felt.
IEC 61000-4-8 Immunitet mot magnetiske fet.
styring og laboratoriegjøremål.
utlading.
44
Page 45

Infrapunalämpömittari
Tuotenro 36-2877 Malli ST653
Lue käyttöohjeet ennen tuotteen käyttöönottoa
ja säilytä ne tulevaa tarvetta varten. Pidätämme
oikeuden teknisten tietojen muutoksiin. Emme
vastaa mahdollisista teksti- tai kuvavirheistä.
Jos tuotteeseen tulee teknisiä ongelmia, ota
yhteys myymälään tai asiakaspalveluun
(yhteystiedot käyttöohjeen lopussa).
Turvallisuus
• Noudata varovaisuutta aina kun lasersäde on
aktiivinen.
• Älä suuntaa sädettä silmiisi tai muiden (myöskään
eläinten) silmiin.
• Ole varovainen mitatessasi heijastavia pintoja.
Säde saattaa heijastua takaisin silmiisi.
• Älä kohdista sädettä palon-/räjähdyksenarkoihin
kaasuihin tai nesteisiin.
• Älä upota laitetta veteen tai muuhun nesteeseen.
• Laitetta ei ole tarkoitettu lääketieteelliseen
tarkoitukseen.
45
45
Suomi
Page 46

Huomioi seuraavat
turvallisuussymbolit
Varoitus! Älä avaa laitteen koteloa! Kotelon sisällä
on vaarallista jännitettä sisältäviä suojaamattomia
komponentteja, jotka voivat aiheuttaa sähköiskun.
Lämpömittarissa
CLASS1
LASER PRODUCT
Suomi
LUOKAN 1 LASERLAITE
Varoitus! Älä avaa laitteen koteloa! Näkymätön
lasersäde voi aiheuttaa silmävaurioita. Älä katso
säteeseen edes optisten instrumenttien läpi.
46
Page 47

Tuotekuvaus
Käyttötarkoituksia
• Elintarvikkeiden varastoinnin ja valmistuksen
valvonta
• Turvallisuus- ja palotarkastukset
• Karkaisun valvonta
• Asfaltointi
• Moottorin testauksen lämpötila-analyysit
• Juotosten tarkastus
• Varastolämpötilan mittaus
Mittausalue
Lämpömittarin mittaussuhde on 12:1.
1,2 metrin mittausetäisyydellä mitta-alue on halkaisijaltaan 10 cm. Laserpiste näyttää mittausalueen
keskimääräisen keskikohdan.
47
Suomi
Page 48

Painikkeet ja toiminnot
1
5
Suomi
1. LCD-näyttö
2. Laserosoitin
3. Infrapuna-anturi
4. Mittauspainike (laukaisin)
5. Paristolokero
48
2
3
4
Page 49

Näyttö
6
16
7
8
9
10
6. Toiminnon näyttö
7. Laser päälle/pois
8. Maksimi/Minimi/Avg -näyttö
9. Emissio-/hälytys-näyttö
10. [ ▼ ] Alas
11. [ F ] Toimintopainike
12. [ ▲] Ylös
13. Paristovaroitus
14. Lämpötilailmaisin
15. Celsius/Fahrenheit-näyttö
16. Muistitilan näyttö
49
15
14
13
12
11
Suomi
Page 50

Käyttö
1. Aloita mittaus painamalla mittauspainike (4)
pohjaan. Näyttö aktivoituu, jos paristossa on
varausta (vaihda paristo, jos näyttö ei aktivoidu).
2. Pidä infrapunamittaria kahvasta ja osoita
sillä mitattavaa kohdetta. Laserpiste osoittaa
mittauspisteen ja näytön vasemmassa
yläkulmassa lukee mittauksen aikana ”SCAN”.
3. Lopeta mittaus päästämällä mittauspainike.
Näytöllä näkyy mitattu lämpötila ja teksti
”HOLD”.
4. Laite sammuu automaattisesti 6 sekunnin
kuluttua mittauksesta.
Suomi
50
Page 51

Muut ominaisuudet
Näytä ominaisuudet/muokkaa
1. Aktivoi infrapunamittari
painamalla mittauspainiketta (4) kevyesti.
2. Valitse asetusvalikko
painamalla toimintopainiketta (11) kerran
tai useasti. Näytöllä
näkyy valittu valikko.
3. Muuta asetuksia
painikkeilla [ ▲] ja [ ▼ ].
4. Hyväksy painamalla
toimintopainiketta (11).
51
Suomi
Page 52

Valikkojen selitykset
DATA Aktivoi muistitoiminnon. Valitse muistipaikka
(1–10) painikkeilla [ ▲] ja [ ▼ ]. Suorita mittaus
kuten yllä.
MAX Näyttää korkeimman mitatun lämpötilan
viimeisen tarkistuksen jälkeen.
MIN Näyttää alhaisimman mitatun lämpötilan
viime tarkistuksen jälkeen.
AVG Näyttää keskilämpötilan viime tarkistuksen
jälkeen.
∆T Näyttää lämpötilaeron viime tarkistuksen
jälkeen.
EMS Emissiokyvyn säätö (katso taulukkoa).
HAL Korkeimman sallitun lämpötilan hälytys.
Aseta tietyn lämpötilan kohdalle hälytys.
LAL Alhaisimman sallitun lämpötilan hälytys.
Aseta tietyn lämpötilan kohdalle hälytys.
Suomi
52
Page 53

Automaattinen mittaus
Lämpötilan mittaus ilman mittauspainiketta.
1. Pidä mittauspainike (4) alas painettuna.
2. Paina toimintopainiketta (11) useasti, kunnes
näytöllä näkyy ”AUTO”.
3. Päästä mittauspainike. Mittaus jatkuu ilman
mittauspainiketta.
4. Lopeta automaattinen mittaus painamalla
toimintopainiketta (11).
Lämpötilan yksikön
vaihtaminen
Avaa paristolokero ja etsi
Celsius-/Fahrenheit valintakytkin.
Aseta kytkin asentoon
C (Celsius) tai
F (Fahrenheit).
17. Celsius-/Fahrenheitkytkin
18. Laserpiste päälle/pois
19. Paristo
17
18
19
53
Suomi
Page 54

Laserosoittimen päälle-/
poiskytkentä
Laserosoitin voidaan kytkeä päälle ja pois päältä
kytkimestä, joka sijaitsee paristolokeron sisäpuolella.
Aseta kytkin ON-asentoon, jolloin laserosoitin on
käytössä, tai OFF-asentoon, jolloin se on pois käytöstä.
Emissiokyky
Useimpien (n. 90 %) orgaanisten materiaalien
maalatun tai hapettuneen pinnan emissiokyky on
0,95 (infrapunamittarin esiasetus). Kiiltävät pinnat
tulisi teipata tai maalata mustiksi ennen mittausta.
Annan teipin tai maalin saavutta sama lämpötila,
kuin mitattavan kohteen ennen mittausta. Mittaa
teipatusta/maalatusta pinnasta.
Suomi
54
Page 55

Materiaali Terminen emissiokyky
Asvaltti 0,90–0,98
Betoni 0,94
Sementti 0,96
Hiekka 0,90
Maa 0,92–0,96
Vesi 0,92–0,96
Jää 0,96–0,98
Lumi 0,83
Lasi 0,90–0,95
Keramiikka 0,90–0,94
Marmori 0,94
Laasti 0,89–0,91
Tiili 0,93–0,96
Kangas (musta) 0,98
Iho 0,98
Nahka 0,75–0,80
Hiili (jauhe) 0,96
Lakka 0,80–0,95
Mattalakka 0,97
Kumi (musta) 0,94
Muovi 0,85–0,95
Puu 0,90
Paperi 0,70–0,94
Kromioksidi 0,81
Kuparioksidi 0,78
Rautaoksidi 0,78–0,82
Tekstiili 0,90
55
Suomi
Page 56

Ota huomioon
Toiminta
Infrapunamittari lukee pinnan lämpötilan ja mittaa
energian, joka heijastuu tunnistimeen. Mittausarvo
kääntyy lämpötilaksi, joka näkyy näytöllä. Lasersädettä käytetään ainoastaan suuntaamisen avuksi.
Mitta-alue
Varmista aina, että mitattava kohde on suurempi
kuin mittausalue todellisella mittausetäisyydellä
(mitattavan kohteen alan tulisi olla mielellään
kaksinkertainen mittausalueeseen nähden).
Etäisyys ja mitta-alue
Mittausalue laajenee etäisyyden myötä (katso
lukua Mittausalue).
Suomi
Etsi kuumin kohta
Etsi kuten normaalisti, mutta liikuta mittaria hitaasti
edestakaisin mitattavan alueen pinnalla ja lue
mittaustulosta koko ajan, kunnes löydät
kuumimman pisteen.
56
Page 57

Huom.!
• Älä käytä laitetta kiiltävien tai kiillotettujen
pintojen, kuten ruostumattoman teräksen
mittaamiseen (ks. Emissiokyky).
• Mittari ei mittaa lasin läpi, vaan mittaustulos on
lasin pintalämpötila.
• Höyry, pöly tai savu voivat ’huijata’ optiikkaa
siten, että mittaustulos vääristyy.
Huolto ja ylläpito
Pariston vaihto
• Pariston kuvake ilmestyy näytölle,
kun pariston varaustaso laskee liian alas.
• Avaa paristolokeron yläosa (5) ja vaihda
paristo uuteen 9 V:n 6LR61-paristoon.
Kierrätys
Kierrätä tuote asianmukaisesti, kun poistat sen
käytöstä. Tarkempia kierrätysohjeita saat kuntasi
jäteneuvonnasta.
57
Suomi
Page 58

Tekniset tiedot
Mittaussuhde 12:1
Mittausalue -32…535° C
Tarkkuus ± 3 °C (-32…-20 °C)
± 2 °C (-20…100 °C)
± 2 % (100…535 °C)
Spektrialue 5–14 μm
Näytön tarkkuus 0,1 °C
Mittausaika 500 ms
Sammutus Automaattinen n.
6 sekunnin kuluttua
Emissiokyky 0,1–1,0
Paristo 1 kpl 6LR61 (9 V)
Mitat 170×133×45 mm
Paino 187 g
Ympäristö
Käyttölämpötila 0 °C…50° C
Ilmankosteus 10…90 %
Suomi
Noudatetut standardit
EN 61326 Sähköiset mittaus-, ohjaus- ja
IEC 61000-4-2 Staattisen purkauksen sieto.
IEC 61000-4-3 Säteilevän radiotaajuisen
IEC 61000-4-8 Magneettikentän sieto.
laboratoriolaitteet.
kentän sieto.
58
Page 59

IR-Thermometer
Art.Nr. 36-2877 Modell ST653
Vor Inbetriebnahme diekomplette Bedienungsanleitung durchlesen und aufbewahren. Irrtümer,
Abweichungen und Änderungen behalten wir uns
vor. Bei technischen Problemen oder anderen
Fragen freut sich unser Kundenservice über eine
Kontaktaufnahme (Kontakt siehe Rückseite).
Sicherheitshinweise
• Bei aktivem Laserstrahl Vorsicht walten lassen.
• Den Laserstrahl nicht auf dieAugen richten,
was auch für Tiere gilt.
• Bei Messung anreflektierenden Flächen vorsichtig sein, denn derStrahl kann in dieAugen
zurückstrahlen.
• Den Strahl nie auf feuergefährliche/explosive
Gase oder Flüssigkeiten richten.
• Das Thermometer nicht in Wasser oder andere
Flüssig keiten tauchen.
• Das Produkt ist nicht für medizinische
Zwecke bestimmt.
59
Deutsch
Page 60

Diese Sicherheitskennzeichen
beachten
Warnung: Niemals versuchen, dasGehäuse zu öff-
nen. Im Inneren des Produktes befinden sich nicht
isolierte Komponenten mit gefährlicher Stromspannung. Kontakt mit diesen Komponenten kann zu
Bränden oder Stromschlägen führen.
Bei Thermometer
CLASS1
LASER PRODUCT
KLASSE 1 LASERGERÄT
Warnung: Niemals versuchen, dasGehäuse zu
öffnen. Unsichtbare Laserstrahlung, diezu Augen-
Deutsch
verletzungen führen kann. Niemals in den Laserstrahl blicken und niemals direkt auf dasoptische
Gerät blicken.
60
Page 61

Produktbeschreibung
Geeignete Anwendungsbereiche
• Kontrolle bei der Lagerung und Zubereitung
von Lebensmitteln
• Inspektion für Sicherheit und Brandschutz
• Härtungskontrolle
• Bei Asphaltarbeiten
• Temperaturkontrolle bei Motorentests
• Kontrolle beim Löten
• Messung von Lagertemperaturen
Messbereich
Das Verhältnis von Messabstand und Messfleckgröße des Thermometers beträgt 12:1. Bei einem
Abstand von 1,2 m beträgt derDurchmesser des
Bezugspunkt 10 cm. Der Laserpunkt zeigt ungefähr
dieMitte des Bezugspunktes.
61
Deutsch
Page 62

Tasten und Funktionen
1
1. LCD-Display
2. Laserpointer
3. IR-Sensor
Deutsch
4. Messknopf (Auslöser)
5. Batterieabdeckung
2
3
4
5
62
Page 63

Display
6
16
7
8
9
10
6. Funktionsanzeige
7. Laser ein/aus
8. Max/Min/Avg-Anzeige
9. Emissions-/Alarm-Anzeige
10. [ ▼ ] Abwärts
11. [ F ] Funktionstaste
12. [ ▲] Aufwärts
13. Batteriealarm
14. Temperaturanzeige
15. Celsius/Fahrenheit-Anzeige
16. Speicheranzeige
63
15
14
13
12
11
Deutsch
Page 64

Bedienung
1. Den Messknopf (4) drücken und zum Start
derMessung halten. Das Display erleuchtet,
wenn dieBatterie geladen ist (Die Batterie
austauschen, wenn dasDisplay nicht erleuchtet).
2. Das IR-Thermometer am Handgriff halten und
zu derFläche ausrichten, diegemessen werden
soll. Der Laserpunkt zeigt die Stelle an, an der
dieTemperatur gemessen wird.
Der Text „SCAN“ wird bei derMessung oben
in derlinken Displayecke angezeigt.
3. Zum Beenden derMessung Messknopf
loslassen. Die gemessene Temperatur und
derText „HOLD“ werden im Display angezeigt.
4. Das IR-Thermometer schaltet sich 6 Sekunden
nach Abschluss derMessung automatisch ab.
Deutsch
64
Page 65

Erweiterte Bedienung
Einstellungen anzeigen und ändern
1. Das IR-Thermometer
durch Betätigung
des Messknopfs (4)
einschalten.
2. Ein oder mehrere Male
auf dieFunktionstaste
(11) drücken, um
dasEinstellungsmenü
auszuwählen.
Das Display zeigt
dasgewählte Menü an.
3. Mit den Pfeiltasten
[ ▲] und [ ▼ ]
diegewünschte
Einstellung auswählen.
4. Zum Bestätigen
Funktionstaste (11)
drücken.
65
Deutsch
Page 66

Erklärung des Menüs
DATA Aktivierung des Speichers. Speicherplatz
1 bis 10 mit den Tasten [ ▲] und [ ▼ ]
auswählen und eine Messung wie o. a.
durchführen.
MAX Anzeige derzuletzt gemessenen
Höchsttemperatur.
MIN Anzeige derzuletzt gemessenen
Minimaltemperatur.
AVG Anzeige derzuletzt gemessenen
Durchschnittstemperatur.
DT Anzeige des zuletzt gemessenen
Temperaturunterschieds.
EMS Einstellung des Emissionsgrades
(siehe Tabelle).
HAL Alarm bei Höchsttemperatur. Einstellung
des Alarms bei definierter Temperatur.
LAL Alarm bei Minimaltemperatur. Einstellung
des Alarms bei definierter Temperatur.
Deutsch
66
Page 67

Automatische Messung
Messung derTemperatur ohne Betätigung des
Messknopfs.
1. Den Messknopf gedrückt halten (4).
2. Die Funktionstaste (11) mehrmals betätigen,
bis derText „AUTO“ im Display erscheint.
3. Den Messknopf loslassen (der Messvorgang
wird nicht unterbrochen).
4. Durch erneutes Betätigen derFunktionstaste (11)
wird dieautomatische Messung beendet.
Temperatureinheit
ändern
Das Batteriefach öffnen,
um anden Umschalter für
Celsius und Fahrenheit
zu gelangen.
Den Schalter in die Position
C (Celsius) oder
F (Fahrenheit) versetzen.
17. Umschalter Celsius/
Fahrenheit
18. Laserpunkt ein/aus
19. Batterie
17
18
19
67
Deutsch
Page 68

Laserpointer ein- oder ausschalten
Er lässt sich mit dem Umschalter hinter dem Batteriedeckel ein- und ausschalten.
Den Umschalter in Stellung ON (Laserpointer erscheint)
oder OFF (Laserpointer ausgeblendet) stellen.
Emissionsgrad
Die meisten organischen Materialien (ca. 90 %) mit
lackierten oder oxidierten Oberflächen haben einen
Emissionsgrad von 0,95 (voreingestellt im IR-Thermometer). Blanke Gegenstände müssen vor dem
Messen abgedeckt oder schwarz gestrichen werden.
Dem verwendeten Klebeband oder derFarbe Zeit
geben, dieTemperatur des Messobjektes anzunehmen.
Das Thermometer zum Messen auf dieabgedeckte/
gestrichene Fläche richten.
Deutsch
68
Page 69

Material Thermischer Emissionsgrad
Asphalt 0,90–0,98
Beton 0,94
Zement 0,96
Sand 0,90
Erde 0,92–0,96
Wasser 0,92–0,96
Eis 0,96–0,98
Schnee 0,83
Glas 0,90–0,95
Keramik 0,9–0,94
Marmor 0,94
Mörtel 0,89–0,91
Ziegel 0,93–0,96
Stoff (schwarz) 0,98
Fell 0,98
Leder 0,75–0,80
Kohle (pulverisiert) 0,96
Lack 0,80–0,95
Lack (matt) 0,97
Gummi (schwarz) 0,94
Kunststoff 0,85–0,95
Holz 0,90
Papier 0,70–0,94
Chromoxid 0,81
Kupferoxid 0,78
Eisenoxid 0,78–0,82
Textilien 0,90
69
Deutsch
Page 70

Bitte beachten
Funktionsweise
Das IR-Thermometer misst dieTemperatur ander
Oberfläche, indem derSensor diereflektierende
Energie auffängt. Die Elektronik „übersetzt“
dieMessung in einen Temperaturwert, derim
Display angezeigt wird. Der Laserstrahl dient nur
dazu, den Messpunkt zu finden.
Messbereich
Der Bezugspunkt am zu messenden Gegenstand
muss größer sein (mindestens doppelt so groß)
als derBezugspunkt des Gerätes beim aktuellen
Messabstand.
Abstand und Messbereich
Der Bezugspunkt vergrößert sich mit zunehmendem Abstand (siehe Abschnitt Messbereich).
Suche nach dem wärmsten Bereich
Das IR-Thermometer über den gesamten Messbereich vorsichtig hin- und herbewegen, und
dieTemperatur beobachten, bis ein Bereich dem
Deutsch
höchsten Temperatur erfasst ist.
70
Page 71

Achtung:
• Das Thermometer eignet sich nicht für blanke
oder polierte Oberflächen wie z. B. Edelstahl
(siehe Abschnitt Emissionsgrad).
• Wird dasIR-Thermometer auf Glas gerichtet,
wird lediglich dessen Oberflächentemperatur
ermittelt, da Glas nicht durchdrungen wird.
• Dampf, Staub oder Rauch auf derOptik kann
zu Fehlergebnissen führen.
Pflege und Wartung
Austausch derBatterie
• Bei niedrigem Batteriestand erscheint
dasBatteriewarnsymbol .
• Zum Austausch den oberen Teil derBatterieabdeckung (5) herausklappen und die Batterie
durch eine neue ersetzen (Typ 6LR61 mit 9 V).
Hinweise zur Entsorgung
Bitte dasProdukt entsprechend den lokalen
Bestimmungen entsorgen. WeitereInformationen
sind von derGemeinde oder den kommunalen
Entsorgungsbetrieben erhältlich.
71
Deutsch
Page 72

Technische Daten
Verhältnis von
Messabstand
und Messfleckgröße 12:1
Messbereich -32 bis 535 °C
Genauigkeit ± 3 °C (von -32 bis -20 °C)
± 2 °C (von -20 bis 100 °C)
± 2 % (von 100 bis 535 °C)
Spektralbereich 5–14 μm
Auflösung des Display
(Messschritte) 0,1 °C
Ablesezeit 500 ms
Abschaltung Automatisch nach
ca. 6 Sekunden
Emissionsgrad 0,1–1,0
Batterietyp 1 Stck. 6LR61 (9 V)
Größe 170×133×45 mm
Gewicht 187 g
Umwelt
Betriebstemperatur 0 °C bis 50 °C
Luftfeuchtigkeit 10 bis 90 %
Deutsch
72
Page 73

Eingehaltene Normen
EN 61326 Elektrische Mess-, Steuer-,
Regel- und Laborgeräte.
IEC 61000-4-2 Störfestigkeit gegen dieEnt-
ladung statischer Elektrizität.
IEC 61000-4-3 Störfestigkeit gegen hoch-
frequente elektromagnetische
Felder
IEC 61000-4-8 Störfestigkeit gegen Magnet-
felder mit energietechnischen
Frequenzen
73
Deutsch
Page 74

Page 75

Page 76

Sverige
Kundtjänst tel: 0247/445 00
fa x: 0247/445 09
e-post: kundservice@clasohlson.se
Internet www.clasohlson.se
Post Clas Ohlson AB, 793 85 INSJÖN
Norge
Kundesenter tlf.: 23 21 40 00
faks: 23 21 40 80
e-post: kundesenter@clasohlson.no
Internett www.clasohlson.no
Post Clas Ohlson AS
Postboks 485 Sentrum, 0105 OSLO
Suomi
Asiakaspalvelu puh.: 020 111 2222
sähköposti: asiakaspalvelu@clasohlson.fi
Internet www.clasohlson.fi
Osoite Clas Ohlson Oy
Maistraatinportti 4 A,
00240 HELSINKI
Great Britain
Customer Ser vice contact number: 0845 300 9799
e-mail: customerservice@clasohlson.co.uk
Internet www.clasohlson.com/uk
Postal 10 – 13 Market Place
Kingston Upon Thames
Surrey
K T1 1JZ
Deutschland
Kundenservice Unsere Homepage www.clasohlson.de
besuchen und auf Kundenservice klicken.
 Loading...