

Page 1
RETRACTABLE AIR HOSE REEL
MODEL NO: HVR15
PART NO: 3122011
INSTALLATION & USER GUIDE
ORIGINAL INSTRUCTIONS GC10/23
Page 2
INTRODUCTION
Thank you for purchasing this CLARKE product. This retractable air hose reel
incorporates a spring driven, automatic rewind with locking ratchet
mechanism. It can be installed in any location using the integral mounting
bracket and can be swivelled to cover a wide range of movement.
• Dimensions; L=460x W=400mm x D=130mm
• Weight 12.45kg
• Main Air Hose Size:-1/4” BSP connector /main hose x 15m long
• Reel Air Inlet (M): 1/4” BSP/1M long hose
• Maximum Rated Pressure: 16bar @ 23
Before attempting to use this product, please read this manual thoroughly and
follow the instructions carefully. In doing so you will ensure the safety of yourself
and that of others around you, and you can look forward to your purchase
giving you long and satisfactory service.
o
C or 11 bar @ 60oC
GENERAL SAFETY RULES
1. NEVER exceed the rated operating pressure for this product.
2. NEVER allow children to use the hose reel. Keep children clear of the work
area at all times.
3. NEVER allow the hose to retract freely. It should always be restrained to
prevent air tools from whipping back with resultant personal injury or
damage to property.
4. ALWAYS check for damage before using the hose. Any damage should be
properly repaired or the part replaced. Consult your local dealer.
5. ALWAYS ensure that a trailing hose does not constitute a trip hazard.
6. ALWAYS take appropriate safety precautions when using compressed air.
7. Wear safety glasses to protect against compressed air driven particles.
ENVIRONMENTAL RECYCLING POLICY
If disposing of airline products or any damaged components, do not
dispose of with general waste. This product contains valuable raw
materials. Metal products should be taken to your local civic
amenity site for recycling of metal products.
2
Parts & Service: 020 8988 7400 / E-mail: [email protected] or [email protected]
Page 3
INSTALLATION
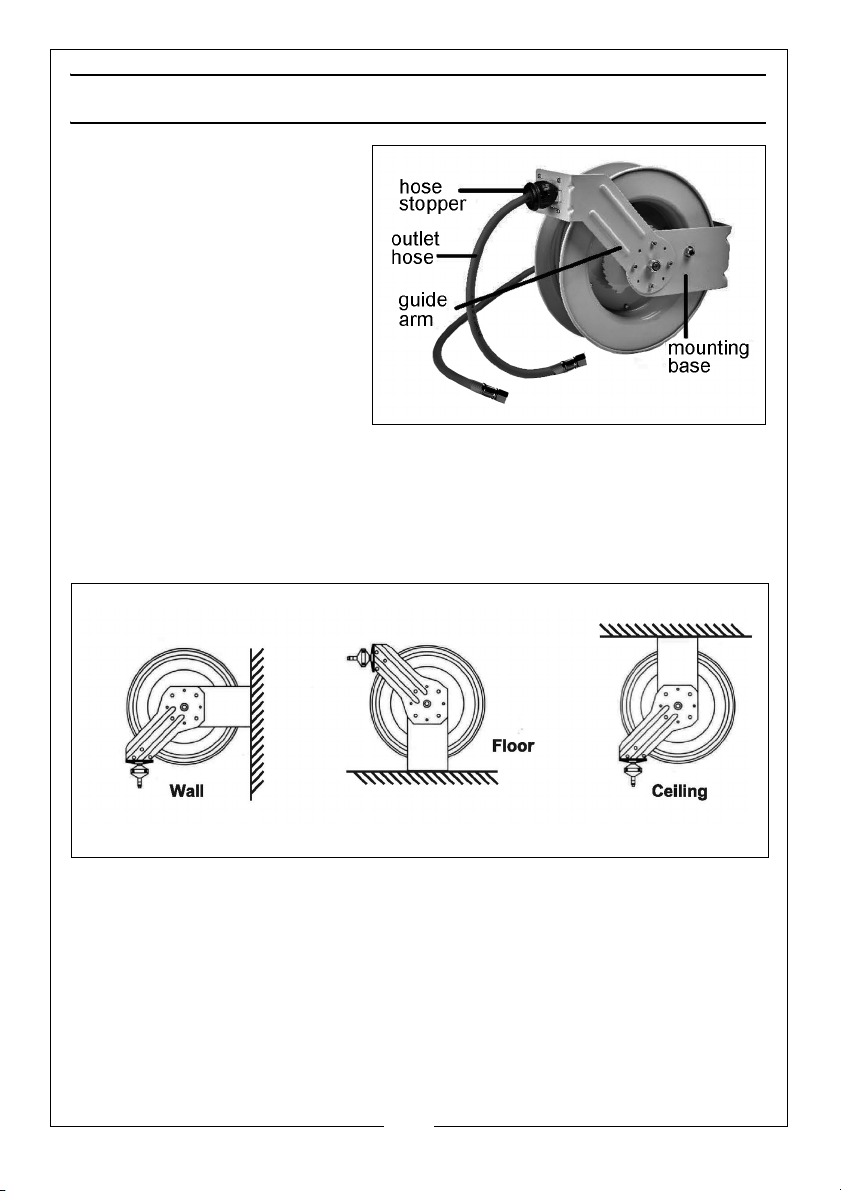
The hose reel may be mounted
to a wall, floor, or ceiling as
required. Ensure the mounting
hardware and the mounting
position is of sufficient strength
to support the hose and reel,
plus the force required to
extend the hose.
Choose a suitable mounting
position close enough to the air
compressor that the two items
can be connected together
using a shorter length of hose
and from where the air compressor can be conveniently adjusted.
Mount the reel using four holding down bolts with washers (supplied) and
secured through slots in the mounting bracket. Use washers on the mounting
bolts to help bear the weight of the reel.
TYPICAL MOUNTING POSITIONS
CONNECTING THE HOSE
After the reel is secured in position, attach the air hose coming from the
compressor. Wrap the threads of the male connector on the incoming hose
with PTFE tape or thread sealant and connect to the air inlet valve on the side
of the hose reel. Again using PTFE tape when connecting the hose to any air
powered tools being used.
Ensure air connections are properly sealed using PTFE tape or pipe sealant.
3
Parts & Service: 020 8988 7400 / E-mail: [email protected] or [email protected]
Page 4
ADJUSTING THE GUIDE ARM
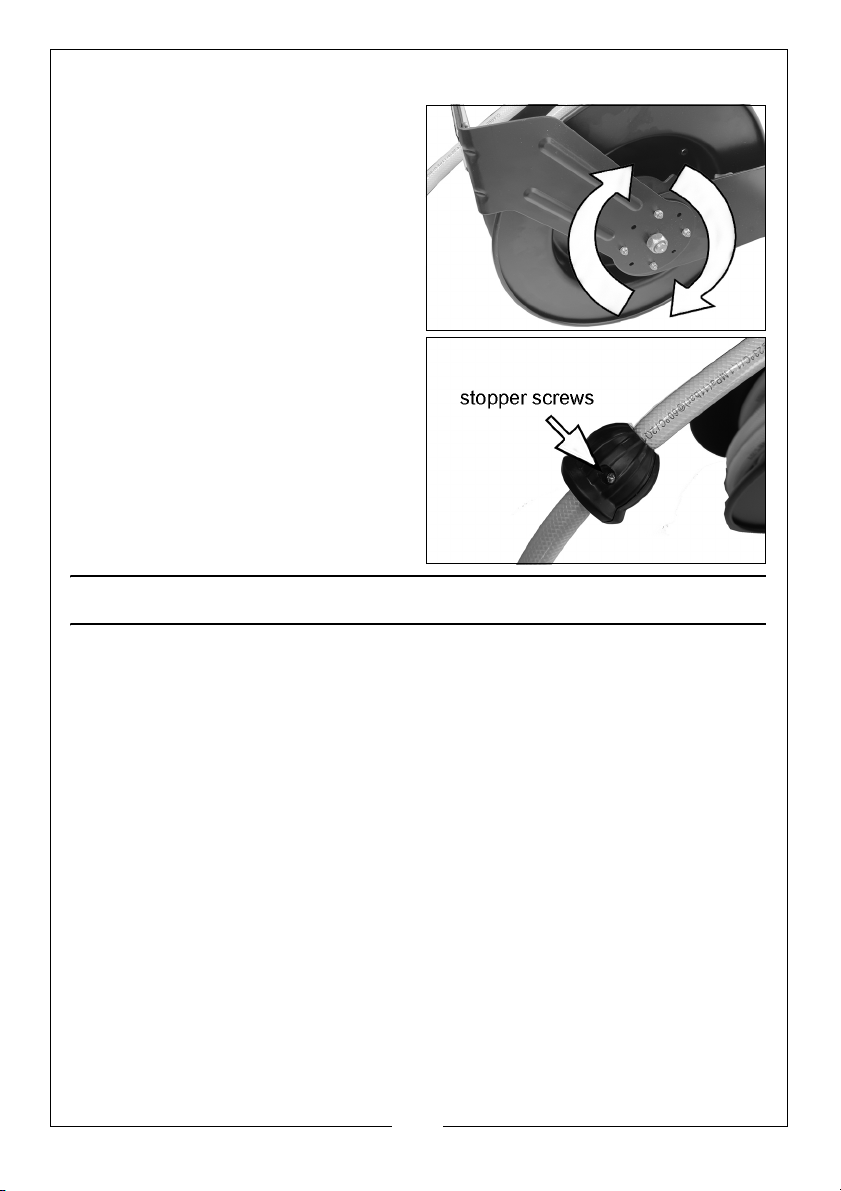
Pull out a metre of hose and allow
the reel to lock in position.
Remove the four bolts connecting
the guide arm to the support post.
Rotate the guide arm in 90o
increments to the desired position.
Replace the four bolts and tighten.
ADJUSTING THE HOSE STOPPER
The hose stopper determines the
length of hose that remains outside
the reel. To adjust, pull the hose out
past the desired position of the hose
stopper and latch the reel. Loosen
both stopper screws and move the
stopper to the required position.
Tighten the stopper screws.
OPERATION & USE
Check the hose reel for correct operation as follows:
Gently pull out the hose - a series of clicks will be heard every half revolution of
the drum.
When a click is heard, release the hose. It should be held by the latch.
Continue to pull out the hose, and after a series of clicks, at various lengths,
release it to check the operation of the latch.
To release the latch, give the hose a brief pull, and allow the hose to retract
under control until the stopper rests on the hose guide. DO NOT suddenly let
go of the hose. If the hose becomes twisted, pull out a long length of hose
before retracting so as to smooth out the hose.
When not in use, avoid leaving the hose reel exposed to very low
temperatures which will make the hose less flexible and difficult to retract.
Avoid contact with chemicals and solvents such as acetone, white spirit etc.
4
Parts & Service: 020 8988 7400 / E-mail: [email protected] or [email protected]
Page 5
MAINTENANCE
WARNING: BEFORE CARRYING OUT ANY MAINTENANCE OR REPAIRS, BE
SURE TO TURN OFF THE AIR SUPPLY TO THE HOSE REEL AND VENT ANY
PRESSURE IN THE AIR LINE.
Periodically, check the hose for wear and damage and for leakage using
soapy water. Any damage or leaks should be repaired before further use. If
the hose becomes very dirty, clean it with soapy water before retracting it into
the reel.
Where possible, store the reel and hose in a sheltered position out of direct
sunlight.
ADJUSTING THE RECOIL TENSION
1. Disconnect the incoming air supply.
2. Pull out about 2 feet of hose and latch the reel.
3. Remove the hose stopper.
4. While firmly holding onto the edge of the reel drum, unlatches the reel and
carefully allow the drum to slowly re-wind, drawing the hose end back
through the guide arm roller assembly and onto the reel. Latch the reel in
position.
• To increase tension: Unlatch the reel and turn clockwise (as viewed
from the air inlet side).
• To decrease tension: Unlatch the reel and rotate slowly
counterclockwise (as viewed from the air inlet side).
5. Once the desire spring tension is reached, latch the reel in position, feed
the hose end through the roller assembly in the guide arm and re-attach
the hose stopper.
6. Re-connect the air supply.
REPLACING THE HOSE
1. Secure and stabilise the hose reel. The hose can normally be replaced with
the reel still mounted.
2. Disconnect the incoming air supply.
3. Pull out the entire length of hose and lock the reel. Ensure it is securely
locked in place.
5
Parts & Service: 020 8988 7400 / E-mail: [email protected] or [email protected]
Page 6
4. Unscrew the hose clamps that secure the hose to the drum. Disconnect the
inlet end of the hose from the air inlet valve.
5. Pull the inlet end hose through the slot in the drum and guide rollers,
removing the old hose completely
6. Remove the spring hose guard, hose clamp and hose stopper from the old
hose. Fit these parts onto the new hose in identical positions.
7. Feed the inlet end of the hose through the guide rollers and slot into the
drum. Apply PTFE sealant tape or thread sealant to the hose connector
and connect to the inlet valve.
8. Attach the hose clamp to the drum. Rewind the hose onto the reel using
normal operation.
COMPONENT PARTS
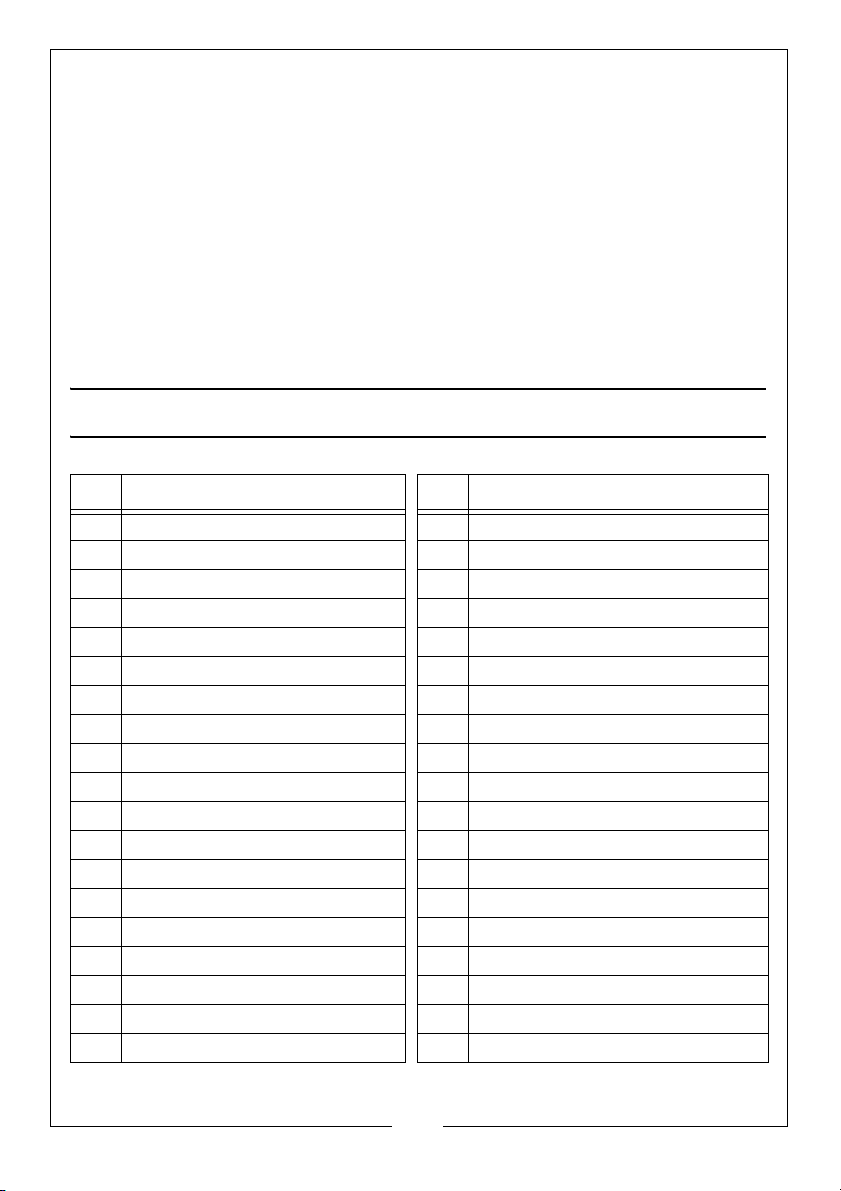
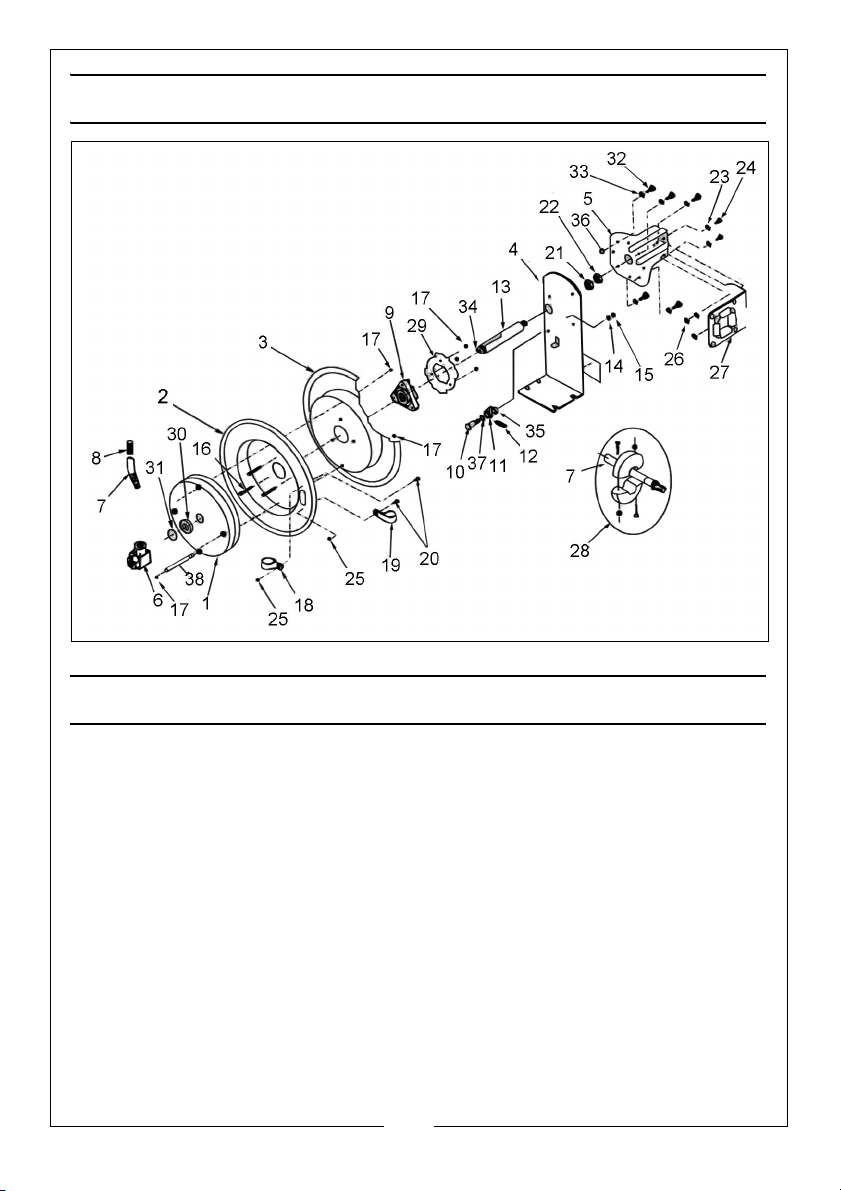
ID DESCRIPTION ID DESCRIPTION
1 Spring canister 20 Bolt
2 Drum (air inlet side) 21 Washer
3 Drum (mounting bracket side) 22 Bolt
4 Mounting bracket 23 Washer
5Guide arm 24Bolt
6 Air inlet valve assembly 25 Nut
7 Hose 26 Locknut
8 Spring hose guard 27 Roller guide bracket assembly
9 Hub bearing assembly 28 Hose stopper assembly
10 Bolt 29 Ratchet locking gear
11 Locking cam 30 Spacing washer
12 Spring 31 Retaining ring
13 Axle 32 Bolt
14 Lock washer 33 Lock washer
15 Nut 34 Setscrew
16 Bolt 35 Spacing washer
17 Nut 36 Nut
18 Clamp 37 Spacing washer
19 Clamp 38 Pin
6
Parts & Service: 020 8988 7400 / E-mail: [email protected] or [email protected]
Page 7
COMPONENT PARTS
GUARANTEE
This product is guaranteed against faulty manufacture for a period of 12
months from the date of purchase. Please keep your receipt which will be
required as proof of purchase.
This guarantee is invalid if the product is found to have been abused or
tampered with in any way, or not used for the purpose for which it was
intended.
Faulty goods should be returned to their place of purchase, no product can
be returned to us without prior permission.
This guarantee does not effect your statutory rights.
7
Parts & Service: 020 8988 7400 / E-mail: [email protected] or [email protected]
Page 8

 Loading...