

Page 1

ELECTRIC CHAINSAW
MODEL NO: CECS405D
PART NO: 3402078
OPERATION & MAINTENANCE
INSTRUCTIONS
ORIGINAL INSTRUCTIONS DL0124 Rev 1
Page 2
INTRODUCTION
Thank you for purchasing this Electric Chainsaw.
Please read this manual thoroughly, before attempting to operate, and
carefully follow all instructions given.
It is vitally important that ALL precautions are taken, as specified, which will not
only provide protection for yourself and that of others around you, but will also
ensure that the chainsaw will give you long and satisfactory service.
GUARANTEE
This CLARKE chainsaw is guaranteed against faulty manufacture for a period
of 12 months from the date of purchase. Please keep your receipt as proof of
purchase.
This guarantee is invalid if the chainsaw is found to have been abused or
tampered with in any way, or not used for the purpose for which it was
intended.
Faulty goods should be returned to their place of purchase, no chainsaw can
be returned to us without prior permission. This guarantee does not affect your
statutory rights.
ENVIRONMENTAL RECYCLING POLICY
Through purchase of this chainsaw, the customer is taking on the
obligation to deal with the WEEE in accordance with the WEEE
regulations in relation to the treatment, recycling & recovery and
environmentally sound disposal of the WEEE.
In effect, this means that this chainsaw must not be disposed of with general
household waste. It must be disposed of according to the laws governing
Waste Electrical and Electronic Equipment (WEEE) at a recognised disposal
facility.
2
Parts & Service: 020 8988 7400 / E-mail: [email protected] or [email protected]
Page 3

SAFETY PRECAUTIONS
WARNING: READ ALL INSTRUCTIONS. FAILURE TO FOLLOW ALL
INSTRUCTIONS LISTED BELOW MAY RESULT IN ELECTRIC SHOCK, FIRE AND/
OR SERIOUS INJURY. THE TERM “POWER TOOL” IN ALL WARNINGS LISTED
BELOW REFERS TO YOUR ELECTRIC CHAINSAW.
WORK AREA
1. Keep work area clean and well lit. Cluttered and dark areas invite
accidents.
2. DO NOT operate power tools in explosive atmospheres, such as in the
presence of flammable liquids, gases or dust. Power tools create sparks
which may ignite the dust or fumes.
3. Keep children and bystanders away while operating a power tool.
Distractions can cause you to lose control.
ELECTRICAL SAFETY
1. Avoid body contact with earthed or grounded surfaces such as pipes,
radiators, ranges or refrigerators. There is an increased risk of electric shock
if your body is earthed or grounded.
2. DO NOT expose power tools to rain or wet conditions. Water entering a
power tool will increase the risk of electric shock.
3. Use outdoor extension leads. If working outdoors, always use an approved
cable extension suitable for the power rating of this tool (see
specifications), the conductor size should also be at least the same size as
that on the machine, or larger. When using a cable reel, always unwind the
cable completely. We strongly recommend that this machine is
connected to the mains supply via a Residual Current Device (RCD).
PERSONAL SAFETY
1. Stay alert, watch what you are doing and use common sense when
operating a power tool. DO NOT use a power tool while you are tired or
under the influence of drugs, alcohol or medication. A moment of
inattention while operating power tools may result in personal injury.
2. Use safety equipment. Always wear eye protection. Safety equipment such
as dust mask, non-skid safety shoes, or hearing protection used for
appropriate conditions will reduce personal injuries.
3. Avoid accidental starting. Ensure the switch is in the off position before
connecting to the power supply.
3
Parts & Service: 020 8988 7400 / E-mail: [email protected] or [email protected]
Page 4

4. DO NOT overreach. Keep proper footing and balance at all times. This
enables better control of the power tool in unexpected situations.
5. Dress properly. DO NOT wear loose clothing or jewellery. Keep your hair,
clothing and gloves away from moving parts. Loose clothes, jewellery or
long hair can be caught in moving parts.
POWER TOOL USE AND CARE
1. DO NOT force the power tool. Use the correct power tool for your
application. The correct power tool will do the job better and safer at the
rate which it was designed.
2. DO NOT use the power tool if the switch does not turn it on and off. Any
power tool that cannot be controlled with the switch is dangerous and
must be repaired.
3. Disconnect the power before making any adjustments, changing
accessories, or storing power tools. Such preventive safety measures
reduce the risk of starting the power tool accidentally.
4. Store idle tools out of the reach of children and DO NOT allow persons
unfamiliar with the power tool or these instructions to operate the power
tool. Power tools are dangerous in the hands of untrained users.
5. Maintain power tools. Check for misalignment or binding of moving parts,
breakage of parts and any other condition that may affect the power tools
operation. If damaged, have the power tool repaired before use. Many
accidents are caused by poorly maintained power tools.
6. Keep cutting tools sharp and clean. Properly maintained cutting tools with
sharp cutting edges are less likely to bind and are easier to control.
7. Use the power tool and accessories in accordance with these instructions
and in the manner intended for the particular type of power tool, taking
into account the working conditions and the work to be performed. Use of
the power tool for operations different from intended could result in a
hazardous situation.
SERVICING
1. Have your power tool serviced by a qualified repair person using only
identical replacement parts. This will ensure that the safety of the power
tool is maintained. Contact CLARKE service department for more detail.
4
Parts & Service: 020 8988 7400 / E-mail: [email protected] or [email protected]
Page 5
CHAINSAW SAFETY WARNINGS
1. Keep all parts of the body away from the saw chain when the chainsaw is
operating. Before you start the chainsaw, make sure the saw chain is not
contacting anything. A moment of inattention while operating chainsaws
may cause entanglement of your clothing or body with the saw chain.
2. It is recommended that the first time user should have practical instruction
in the use of the chainsaw and recommended protective equipment from
an experienced operator. The initial practice should be cutting logs on a
saw horse or cradle.
3. Keep handles dry, clean, and free from oil and grease. Greasy, oily handles
are slippery causing loss of control.
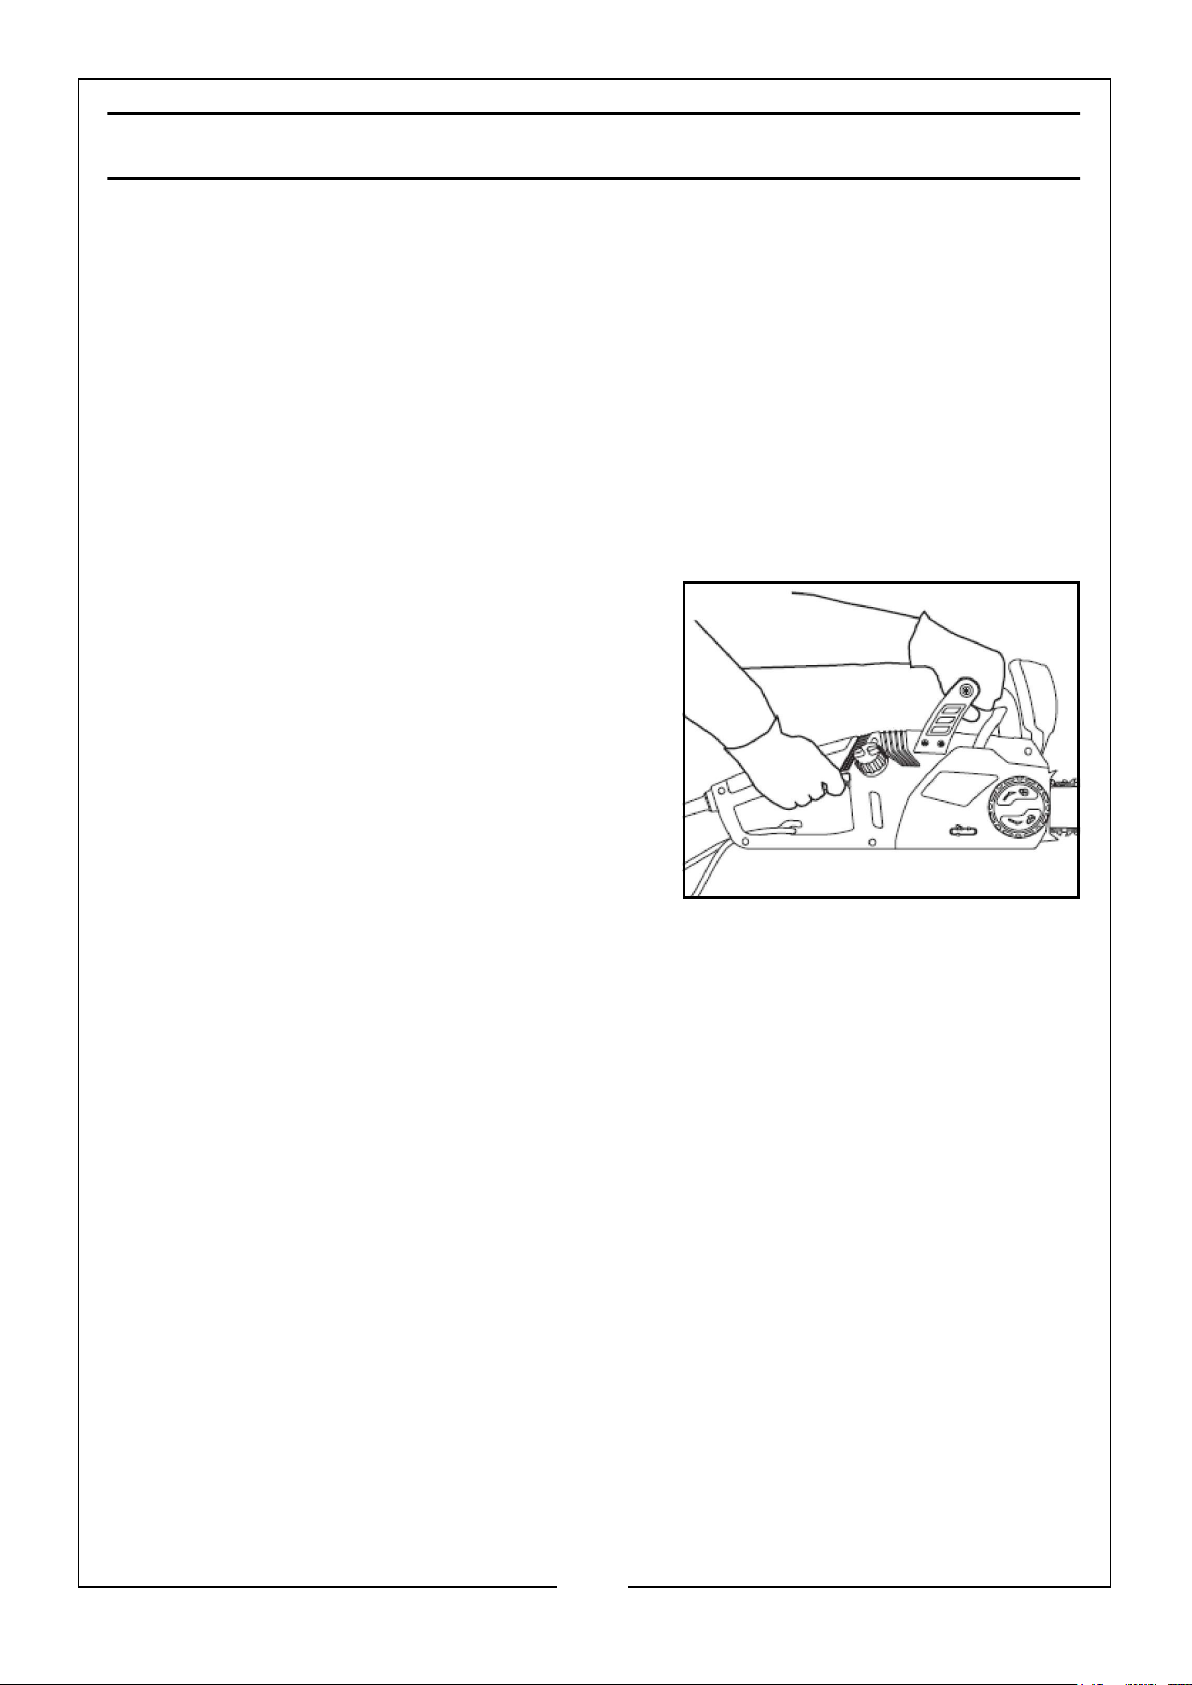
4. Always hold the chainsaw with your right
hand on the rear handle and your left
hand on the front handle, as shown.
Holding the chainsaw with a reversed
hand configuration increases the risk of
injury and should never be done.
5. Hold the chainsaw by insulated gripping
surfaces only, because the saw chain
may contact hidden wiring or its own
cable. Saw chains contacting a “live”
wire may make exposed metal parts of
the power tool “live” and could give the operator an electric shock.
6. Wear safety glasses and hearing protection. Further protective equipment
for head, hands, legs and feet must also be worn. Adequate protective
clothing will reduce personal injury by flying debris or accidental contact
with the saw chain.
7. DO NOT operate a chainsaw in a tree. Operation of a chainsaw while up in
a tree may result in personal injury.
8. Always keep proper footing and operate the chainsaw only when standing
on fixed, secure and level surface. Slippery or unstable surfaces such as
ladders may cause a loss of balance or control of the chainsaw.
9. When cutting a limb that is under tension be alert for spring back. When the
tension in the wood fibres is released the spring loaded limb may strike the
operator and/or throw the chainsaw out of control.
10. Use extreme caution when cutting brush and saplings. The material may
catch the saw chain and be whipped toward you or pull you off balance.
5
Parts & Service: 020 8988 7400 / E-mail: [email protected] or [email protected]
Page 6
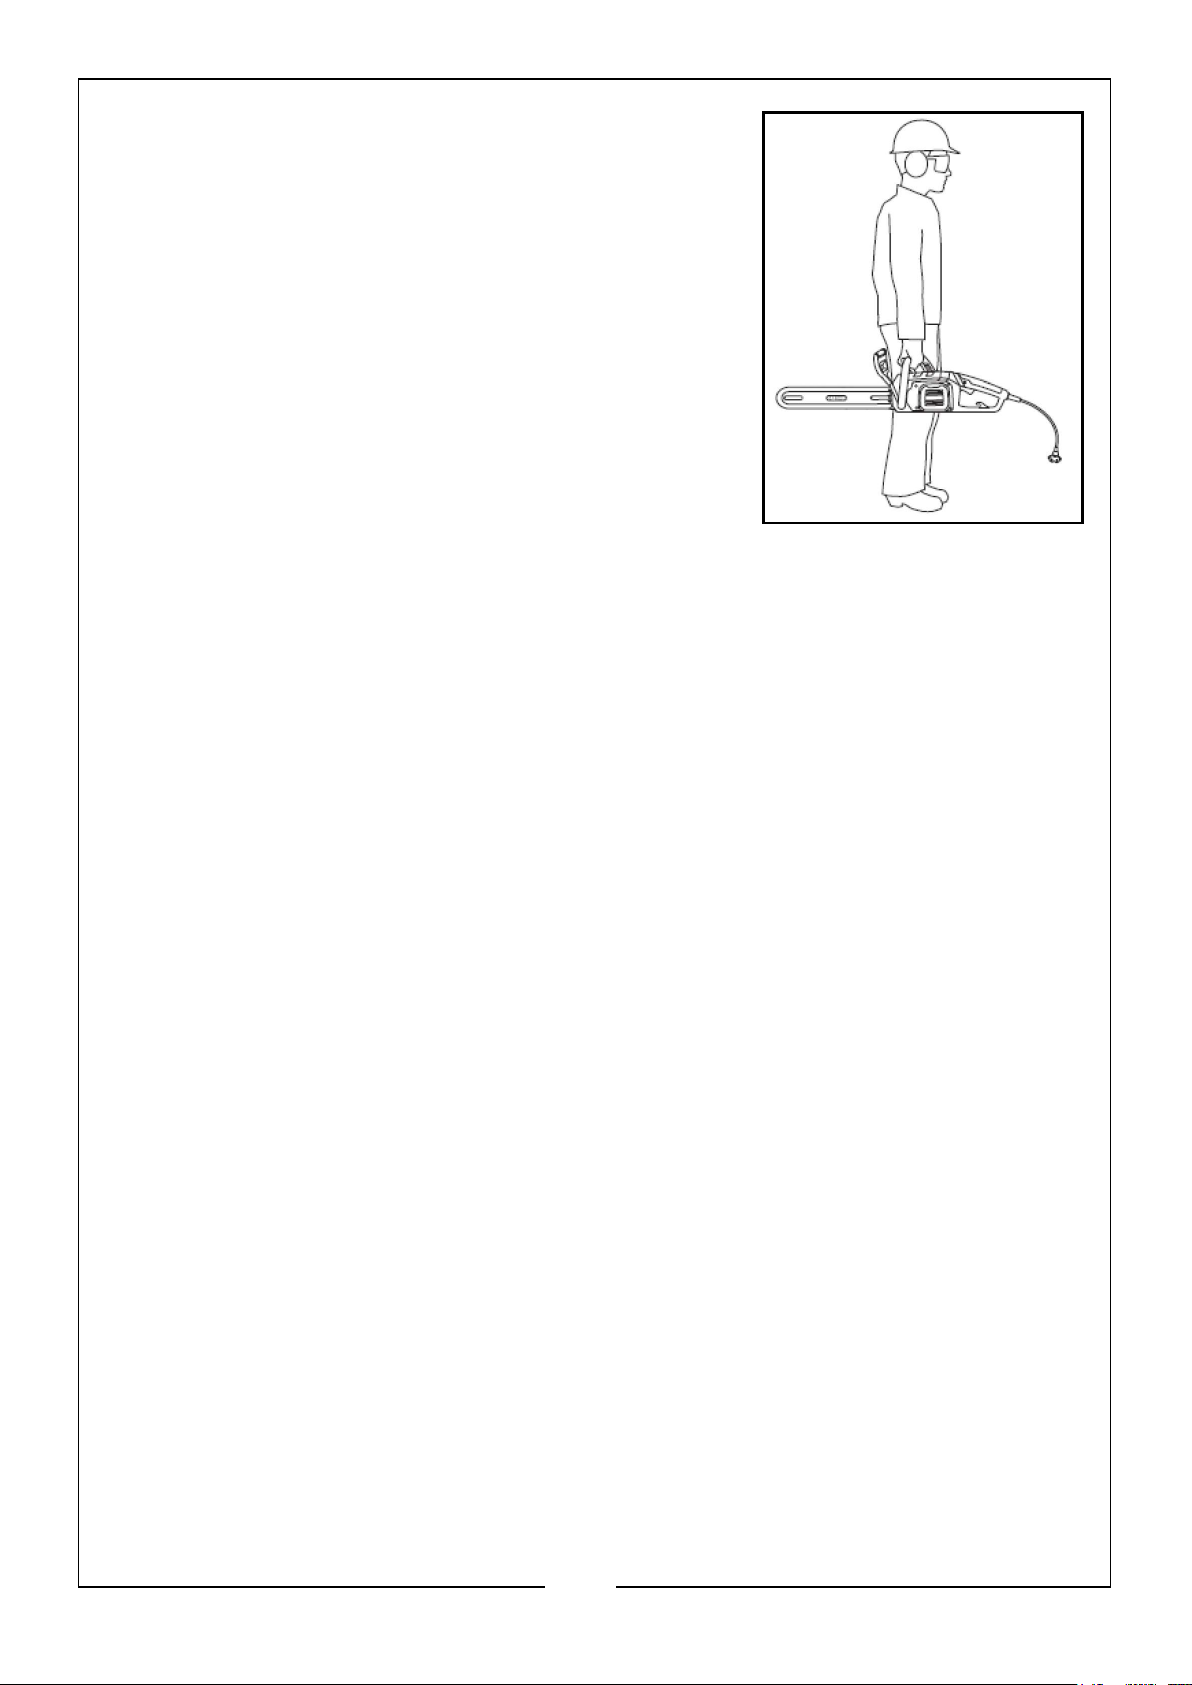
11. Carry the chainsaw by the front handle with the
chainsaw switched off and away from your
body. When transporting or storing the
chainsaw always fit the guide bar cover. Proper
handling of the chainsaw will reduce the
likelihood of accidental contact with the
moving saw chain.
12. Follow instructions for lubricating, chain
tensioning and changing accessories.
Improperly tensioned or lubricated chain may
either break or increase the chance for
kickback.
13. Cut wood only. DO NOT use the chainsaw for
purposes not intended. For example: DO NOT use the chainsaw for cutting
plastic, masonry or non-wood building materials. Use of the chainsaw for
operations different than intended could result in a hazardous situation.
14. Prolonged use of power tools has been reported to cause vascular,
muscular, and/or neurological disorders (such as vibration white finger or
Raynaud’s syndrome), particularly when operating the tool in cold
weather. If you experience numbness or loss of feeling in your extremities,
stop using the tool until symptoms fade. To reduce the incidence of
vibration induced trauma, follow these instructions:
• Wear gloves and keep hands and body warm.
• Maintain a firm grip on the chainsaw, but DO NOT use prolonged,
excessive pressure. Let the chainsaw do the work.
• Assure that the cutting system is maintained properly.
• Take frequent breaks.
15. Keep the power cord behind you, and know the position of the cord at all
times. Keeping the cord behind you and knowing the position of the cord
will help minimise tripping hazards and prevent severing the cord with the
chainsaw.
16. If the cord is cut or damaged, immediately stop using the chainsaw and
disconnect the cord from the mains. A damaged or cut cord increases the
risk of electrical shock.
6
Parts & Service: 020 8988 7400 / E-mail: [email protected] or [email protected]
Page 7
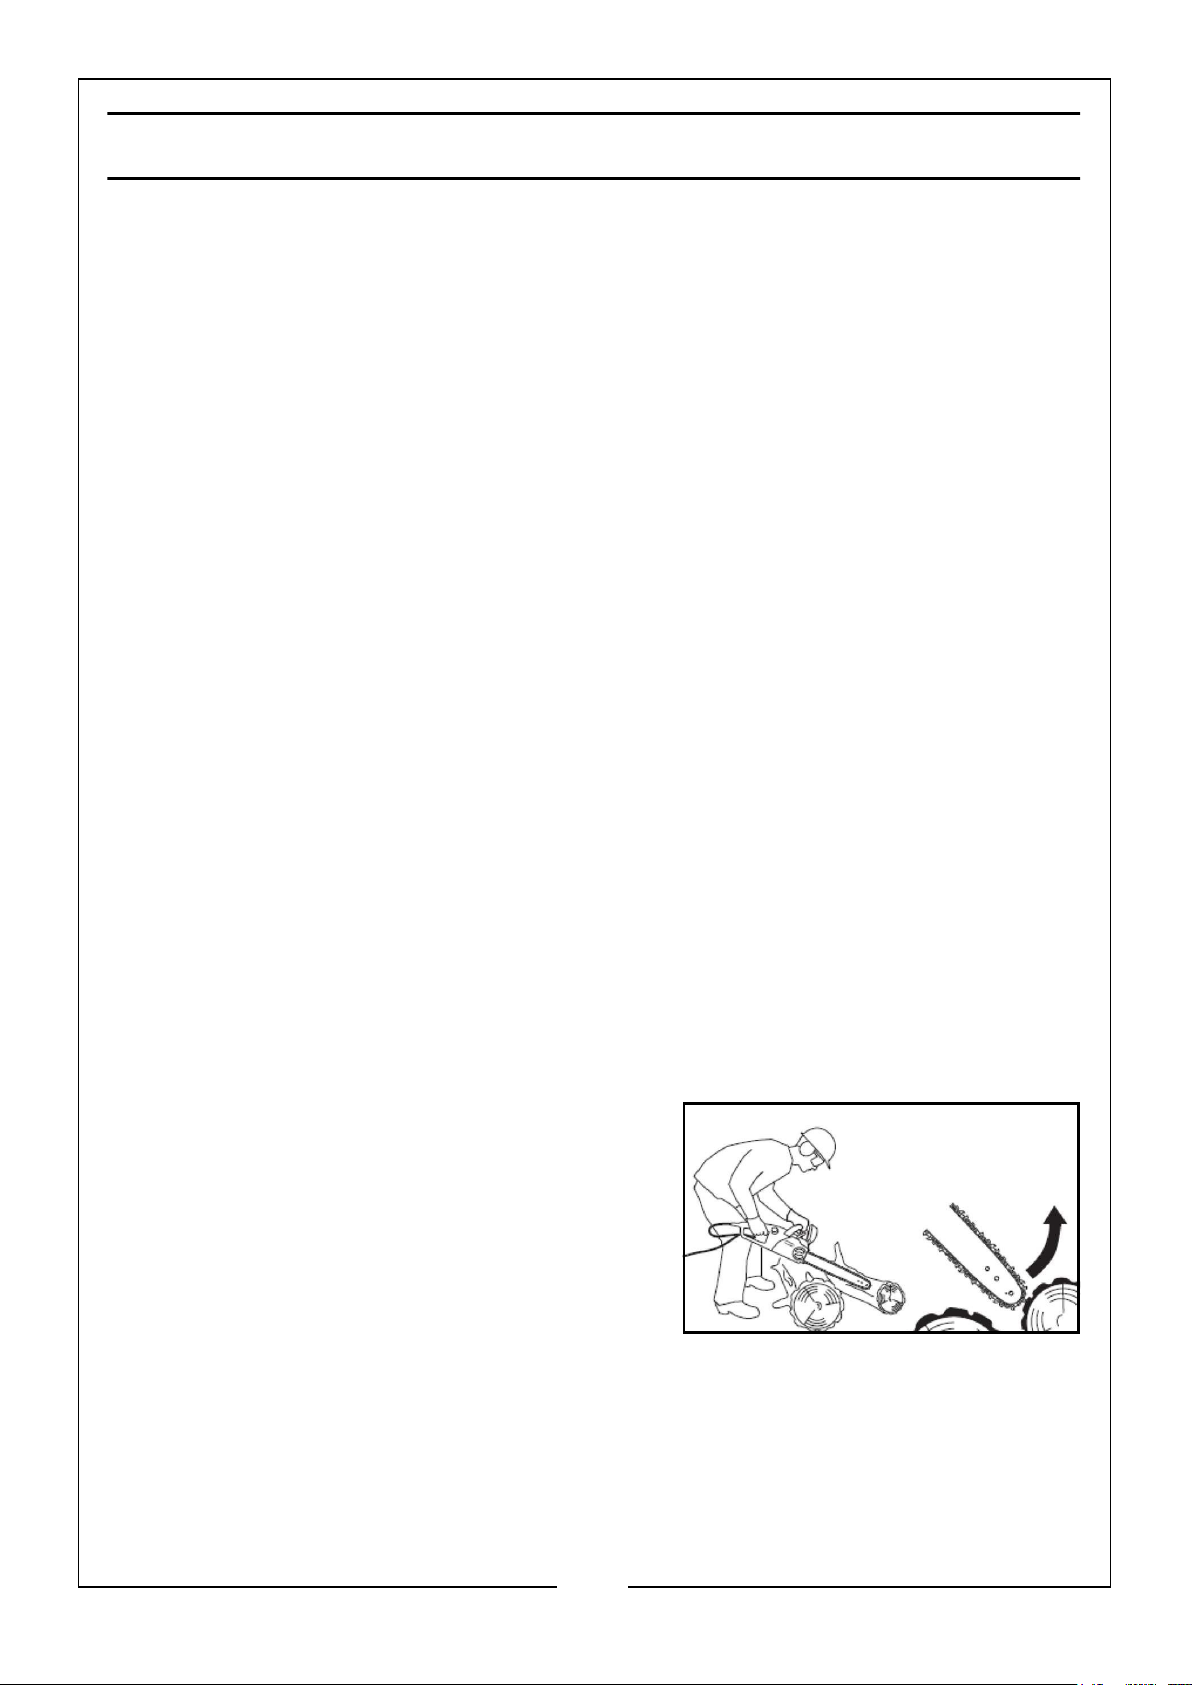
CAUSES AND PREVENTION OF KICKBACK
Kickback may occur when the nose or tip of the guide bar touches an object,
or when the wood closes in and pinches the saw chain in the cut.
Tip contact in some cases, may cause a sudden reverse reaction, kicking the
guide bar up and back towards the operator.
Pinching the saw chain along the top of the guide bar may push the guide
bar rapidly back towards the operator.
Either of these reactions may cause you to lose control of the saw which could
result in serious personal injury. DO NOT rely exclusively upon the safety devices
built into your saw. As a chainsaw user, you should take several steps to keep
your cutting jobs free from accident or injury.
Kickback is the result of tool misuse and/or incorrect operating procedures or
conditions and can be avoided by taking proper precautions as given below:
1. Maintain a firm grip, with thumbs and fingers encircling the chainsaw
handles, with both hands on the saw and position your body and arm to
allow you to resist kickback forces. Kickback forces can be controlled by
the operator if proper precautions are taken. DO NOT let go of the
chainsaw.
2. DO NOT overreach and DO NOT cut above shoulder height. This helps
prevent unintended tip contact and enables better control of the
chainsaw in unexpected situations.
3. Only use replacement bars and chains specified by the manufacturer.
Incorrect replacement bars and chains may cause chain breakage and/
or kickback.
KICKBACK SAFETY DEVICES ON THIS SAW
1. Chain Brake. This chainsaw comes
equipped with a chain brake, which
stops both the motor and the motion of
the chain when kickback occurs. The
chain brake can be activated by the
forward motion of the front hand-guard
as the saw rotates backward during
kickback; it can also be activated by the
inertial forces generated from a kickback event.
2. Chain. This chainsaw comes equipped with a saw chain that meets the
reduced kickback performance requirements of ISO 9518.
3. Bar. This saw comes equipped with a reduced kickback guide bar that has
a small radius nose. Smaller radius noses have less potential for kickback.
7
Parts & Service: 020 8988 7400 / E-mail: [email protected] or [email protected]
Page 8
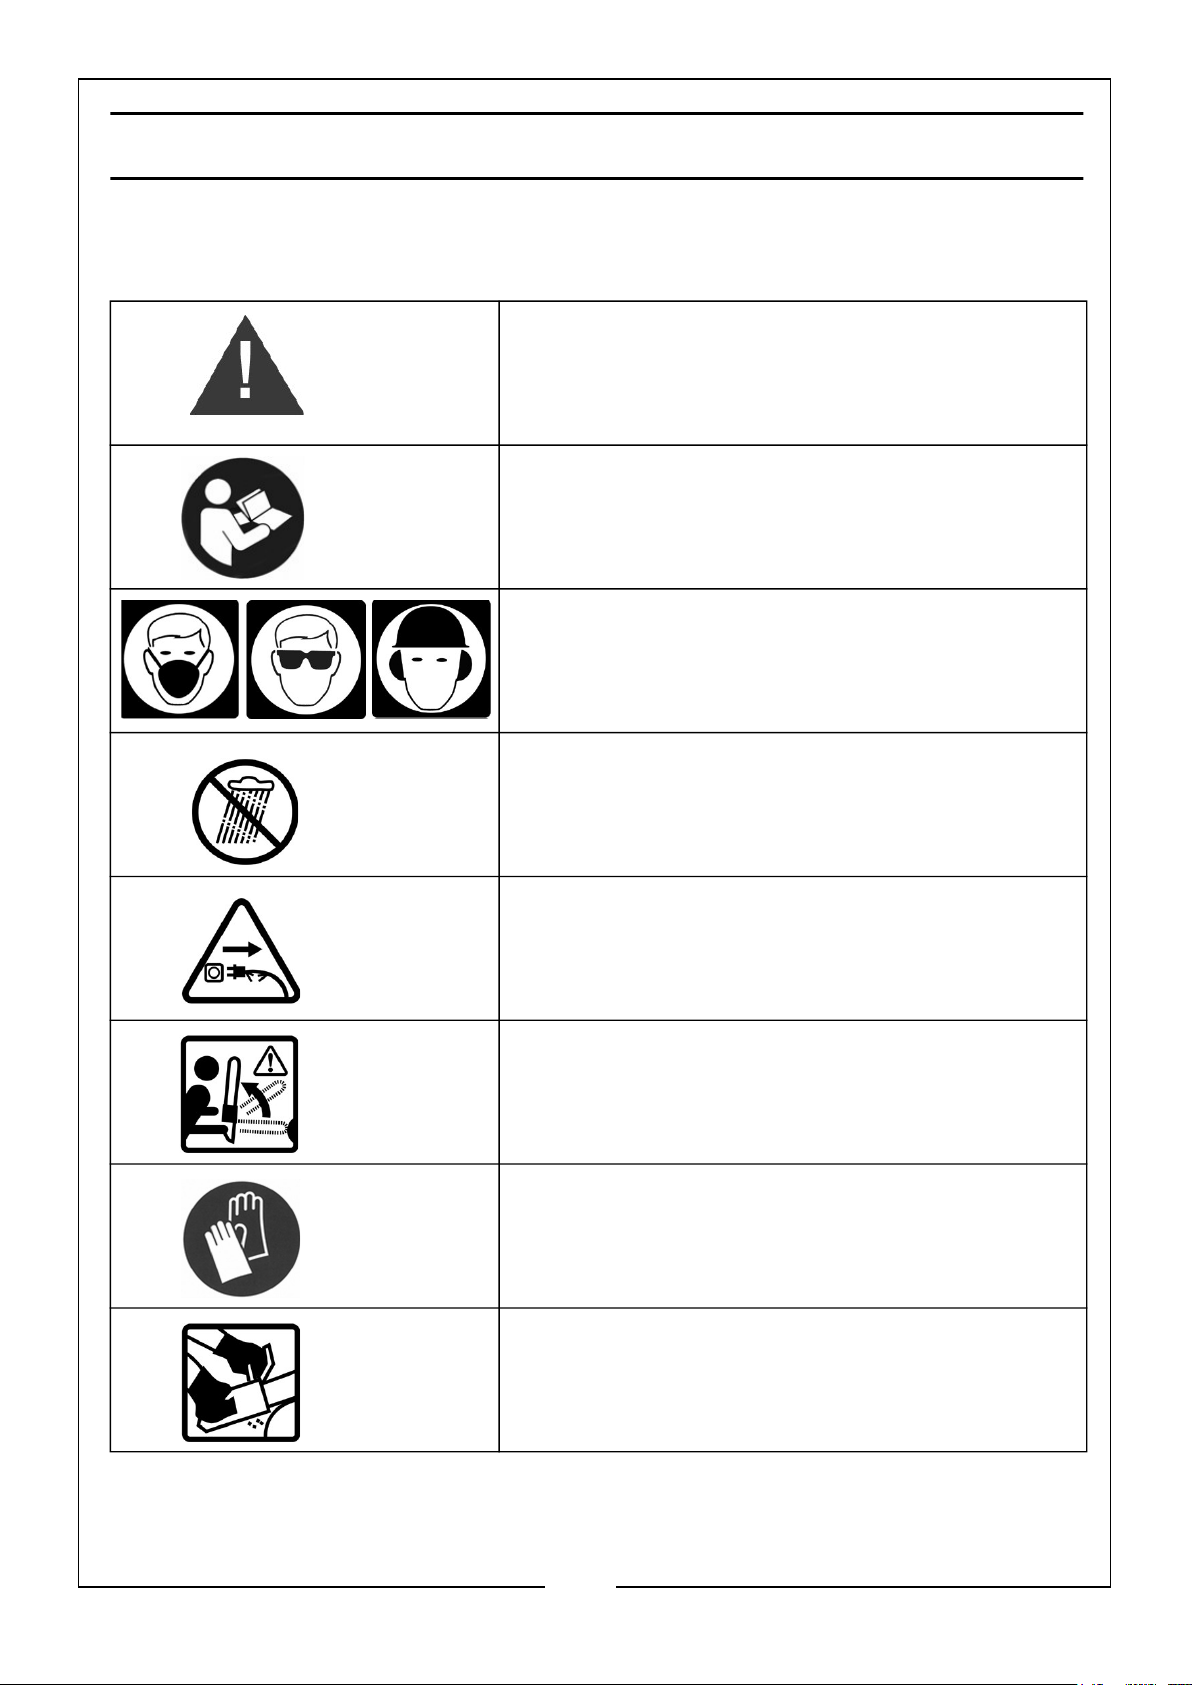
WARNING SYMBOLS
The following symbols are displayed on the chainsaw in order to remind you of
the safety precautions you should take during operation.
Warning! - When using this chainsaw, basic
safety precautions, including those in this user
guide, should be observed to reduce the risk of
fire, electric shock and personal injury.
Warning! - Read this user guide thoroughly
before use and keep in a safe place for future
reference.
Warning! - Wear safety goggles, ear protectors
and safety helmet when using this chainsaw.
Warning! - DO NOT expose this chainsaw to
rain, or use in damp or wet locations.
Warning! - Disconnect from the mains supply
immediately if the cable is damaged or cut.
Warning! - Never cut with the tip of the blade
as this may result in kickback and cause
personal injury.
Warning! - Always wear gloves approved for
chainsaw use.
Warning! - Always hold the chainsaw with both
hands during use.
8
Parts & Service: 020 8988 7400 / E-mail: [email protected] or [email protected]
Page 9
ELECTRICAL CONNECTIONS
WARNING: READ THESE ELECTRICAL SAFETY INSTRUCTIONS
THOROUGHLY BEFORE CONNECTING THE CHAINSAW TO THE MAINS
SUPPLY.
Before switching the chainsaw on, make sure that the voltage of your
electricity supply is the same as that indicated on the rating plate. This
chainsaw is designed to operate on 230V AC 50Hz. Connecting it to any other
power source may cause damage.
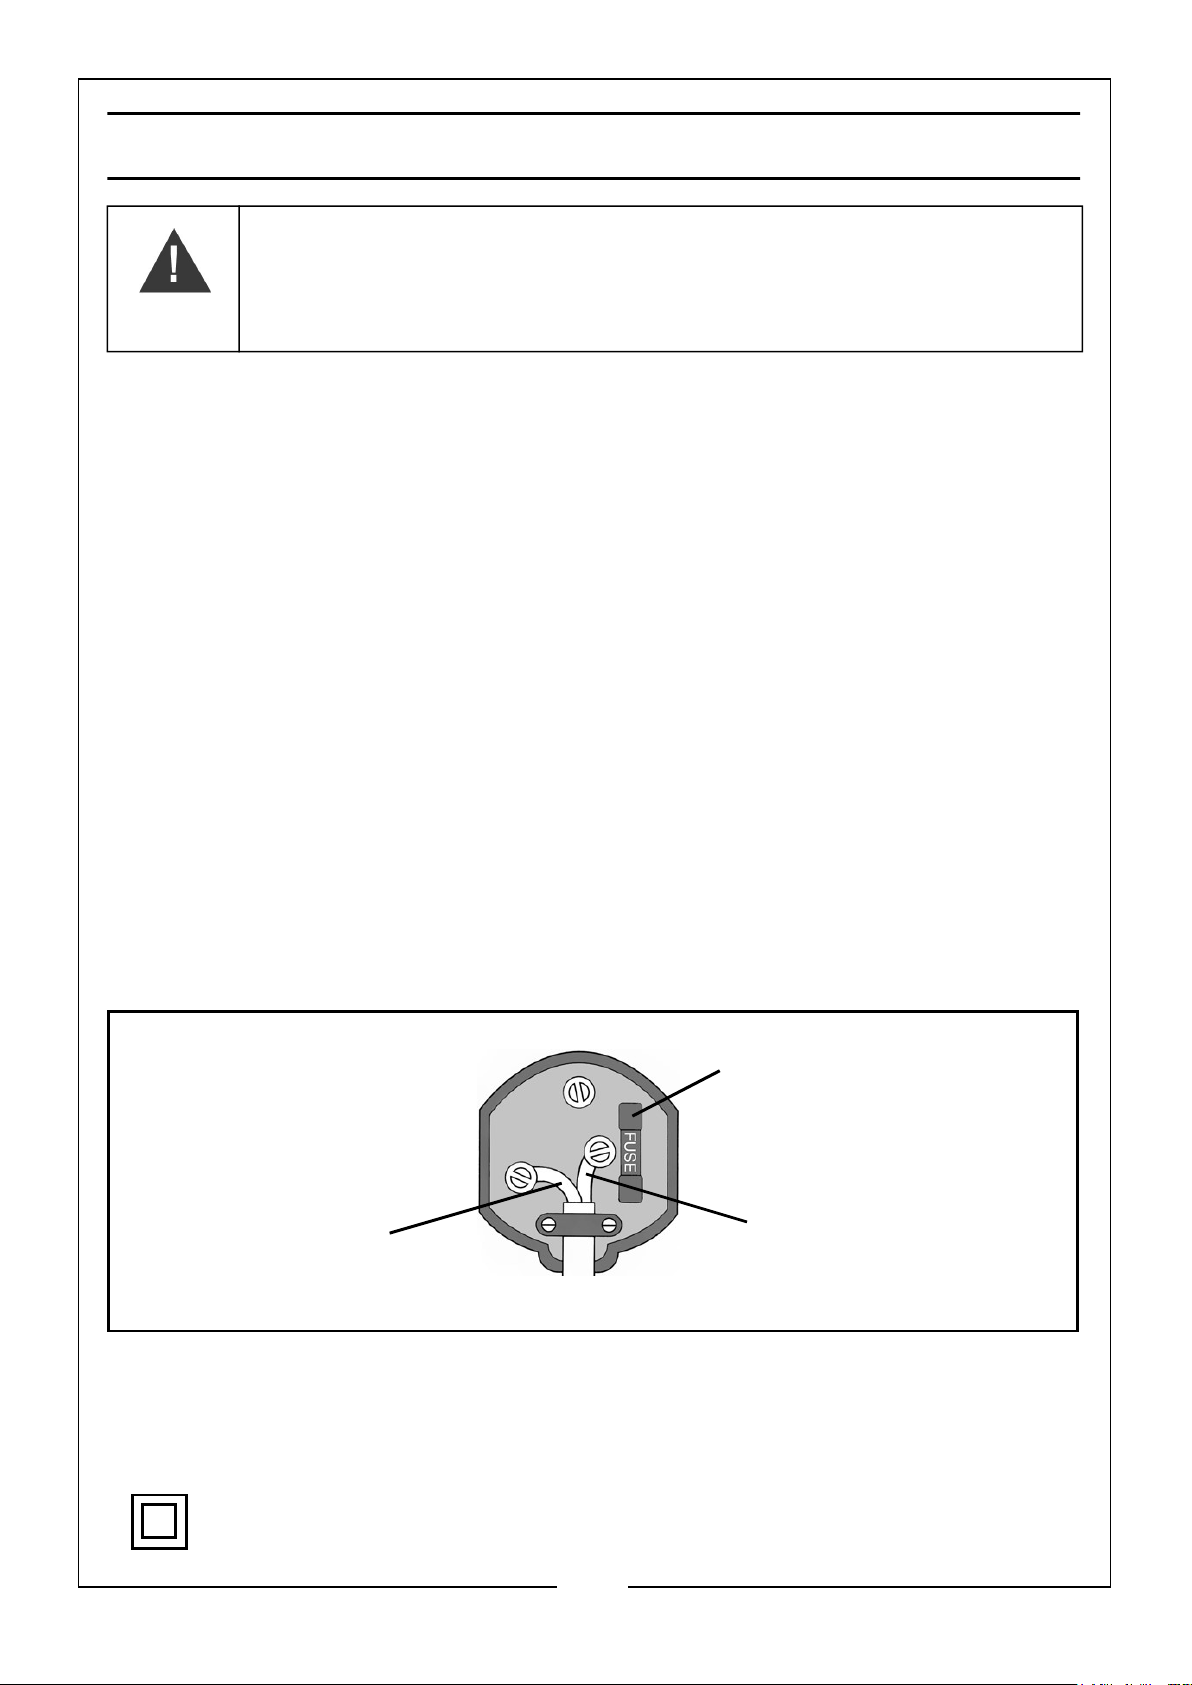
This chainsaw is fitted with a non-rewireable plug. If it is necessary to change
the fuse in the plug, the fuse cover must be refitted. If the fuse cover becomes
lost or damaged, the plug must not be used until a suitable replacement is
obtained.
If the plug has to be changed because it is not suitable for your socket, or due
to damage, it should be cut off and a replacement fitted, following the wiring
instructions shown below. The old plug must be disposed of safely, as insertion
into a mains socket could cause an electrical hazard.
If the colours of the wires in the power cable of this chainsaw do not
correspond with the markings on the terminals of your plug, proceed as
follows.
• The Blue wire must be connected to the terminal which is marked N
or coloured Black.
• The Brown wire must be connected to the terminal which is marked L
or coloured Red.
Plug must be BS1363/A approved.
Always fit a 13 Amp fuse.
Neutral
(Blue)
Ensure that the outer sheath of the cable is firmly held by the clamp
We strongly recommend that this machine is connected to the mains supply
via a Residual Current Device (RCD)
Live
(Brown)
If in any doubt, consult a qualified electrician. DO NOT attempt any repairs
yourself.
This symbol indicates that this is a Class II chainsaw, and does not
require an earth connection.
9
Parts & Service: 020 8988 7400 / E-mail: [email protected] or [email protected]
Page 10
Page 11

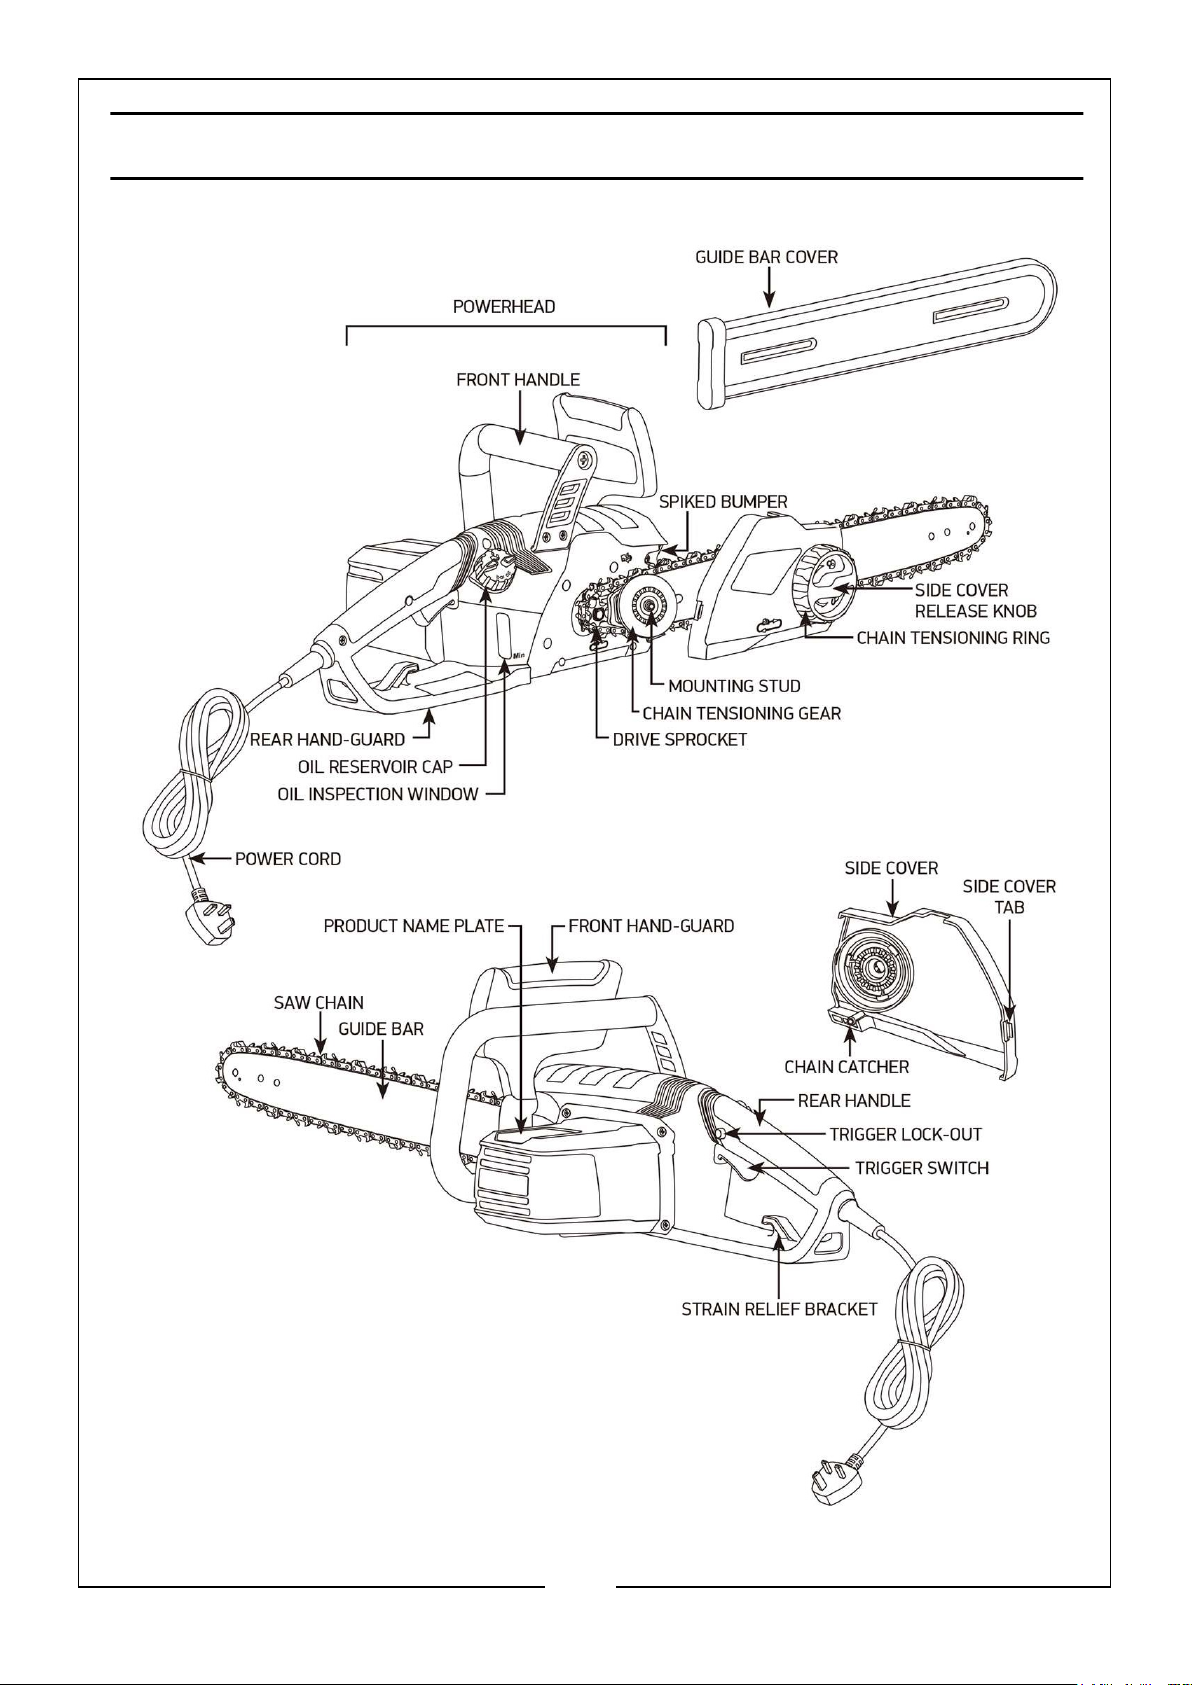
CHAINSAW NAMES & TERMS
• Alignment Flange: The protrusion on the bar pad that fits into the bar
slot.
• Automatic Oiler: The system that automatically lubricates the guide bar
and saw chain.
• Bar Pad: The mounting pad on the powerhead that helps ensure proper
alignment of the guide bar.
• Bar Slot: The cut out portion of the guide bar that fits on to the alignment
flange and mounting stud.
• Bystander Safety Zone: A 6m (20ft) circle around the operator that must
remain free from bystanders, children and pets.
• Chain Brake: A device for stopping or locking the saw chain, activated
manually or non-manually when kickback occurs.
• Chain Catcher: A device for retaining the saw chain if it breaks or derails.
• Chain Gauge: The thickness of the saw chain drive link, where it fits into
the bar groove, indicated by the part number stamped on the drive
links.
• Chain Pitch: The distance between any three consecutive rivets on the
saw chain divided by two, indicated by the part number stamped on
the drive links.
• Chainsaw Powerhead: A chainsaw without the saw chain or guide bar.
• Chain Tensioning Gear: A gear mounted on the guide bar that adjusts
saw chain tension when rotated.
• Chain Tensioning Ring: The ring around the side cover release knob, that
when turned, adjusts the saw chain tension.
• Drive Link: The fin shaped link of the saw chain that fits into the groove
on the guide bar.
• Drive Sprocket: The toothed part that drives the saw chain.
• Effective Cutting Length: The approximate distance from the the root of
the spiked bumper to the outside edge of the cutting link with the
tensioner set to the middle position.
• Felling Back Cut: The final cut in a tree felling operation made on the
opposite side of the tree from the notching undercut.
• Front Handle: The support handle located at or toward the front of the
chainsaw intended to be gripped by the left hand.
11
Parts & Service: 020 8988 7400 / E-mail: [email protected] or [email protected]
Page 12

• Front Handle Guard: A structural barrier between the front handle of a
chainsaw and the guide bar, which also serves as an activating
mechanism for the chain brake.
• Guide Bar: A railed structure that supports and guides the saw chain.
Sometimes simply called the ‘bar’.
• Guide Bar Cover: The plastic cover that protects the guide bar and saw
chain when the chainsaw is not in use.
• Kickback: The rapid backward and/or upward motion of the guide bar,
occurring when the saw chain near the top area of the nose of the
guide bar contacts any object (such as a log of branch), or when the
wood closes in and pinches the saw chain in the cut.
• Low Kickback Chain: A chain that complies with the low kickback
performance requirements of BS 11681.
• Motor Housing: The plastic cover of the chainsaw powerhead.
• Mounting Stud: The threaded protrusion on the alignment flange that
extends through the bar slot.
• Notching Undercut: A notch cut in a tree to direct the tree’s fall.
• Rear Handle: The support handle located at or toward the rear of the
saw intended to be gripped by the right hand.
• Rear Hand Guard: A structural barrier at the bottom right side of the rear
handle to protect the operator in case of rupture or derailing of the saw
chain.
• Reduced Kickback Guide Bar: A guide bar with a maximum nose radius
as specified in BS 11681 and which has been demonstrated to reduce
kickback significantly.
• Saw Chain: A loop of chain having cutting teeth, that cuts the wood,
that is driven by the powerhead and is supported by the guide bar.
Sometimes simply called the’chain’.
• Side Cover: The plastic cover on the powerhead that covers the drive
sprocket and chain tensioning gear which is removed and installed with
the side cover release knob.
• Side Cover Tab: The protrusion on the side cover that fits into a slot in the
powerhead. Use it to properly align the side cover during installation.
• Spiked Bumper: A device fitted to the front of the saw acting as a pivot
point when in contact with a tree or log to make cutting easier. Also
known as ‘bucking spikes’.
• Strain Relief Bracket: The hook on the rear handle to which the extension
cord is looped to protect the cord and prevent unplugging during
operation.
12
Parts & Service: 020 8988 7400 / E-mail: [email protected] or [email protected]
Page 13

• Trigger Lock Out: A movable stop that prevents the unintentional
operation of the trigger switch until manually actuated.
• Trigger Switch: A device that turns the chainsaw on and off.
• Wear Parts: Parts such as the saw chain and guide bar that can wear
during use and can be replaced by the user.
13
Parts & Service: 020 8988 7400 / E-mail: [email protected] or [email protected]
Page 14
PREPARING FOR USE
WARNING: FOR YOUR SAFETY AND THE SAFETY OF OTHERS MAKE SURE
THAT YOU HAVE READ AND UNDERSTOOD ALL THE SAFETY WARNINGS
BEFORE CONTINUING WITH THIS SECTION.
WARNING: ENSURE THAT THE CHAINSAW IS DISCONNECTED FROM THE
MAINS SUPPLY AND ALWAYS WEAR GLOVES DURING ALL CHECKS AND
ADJUSTMENTS IN THIS SECTION
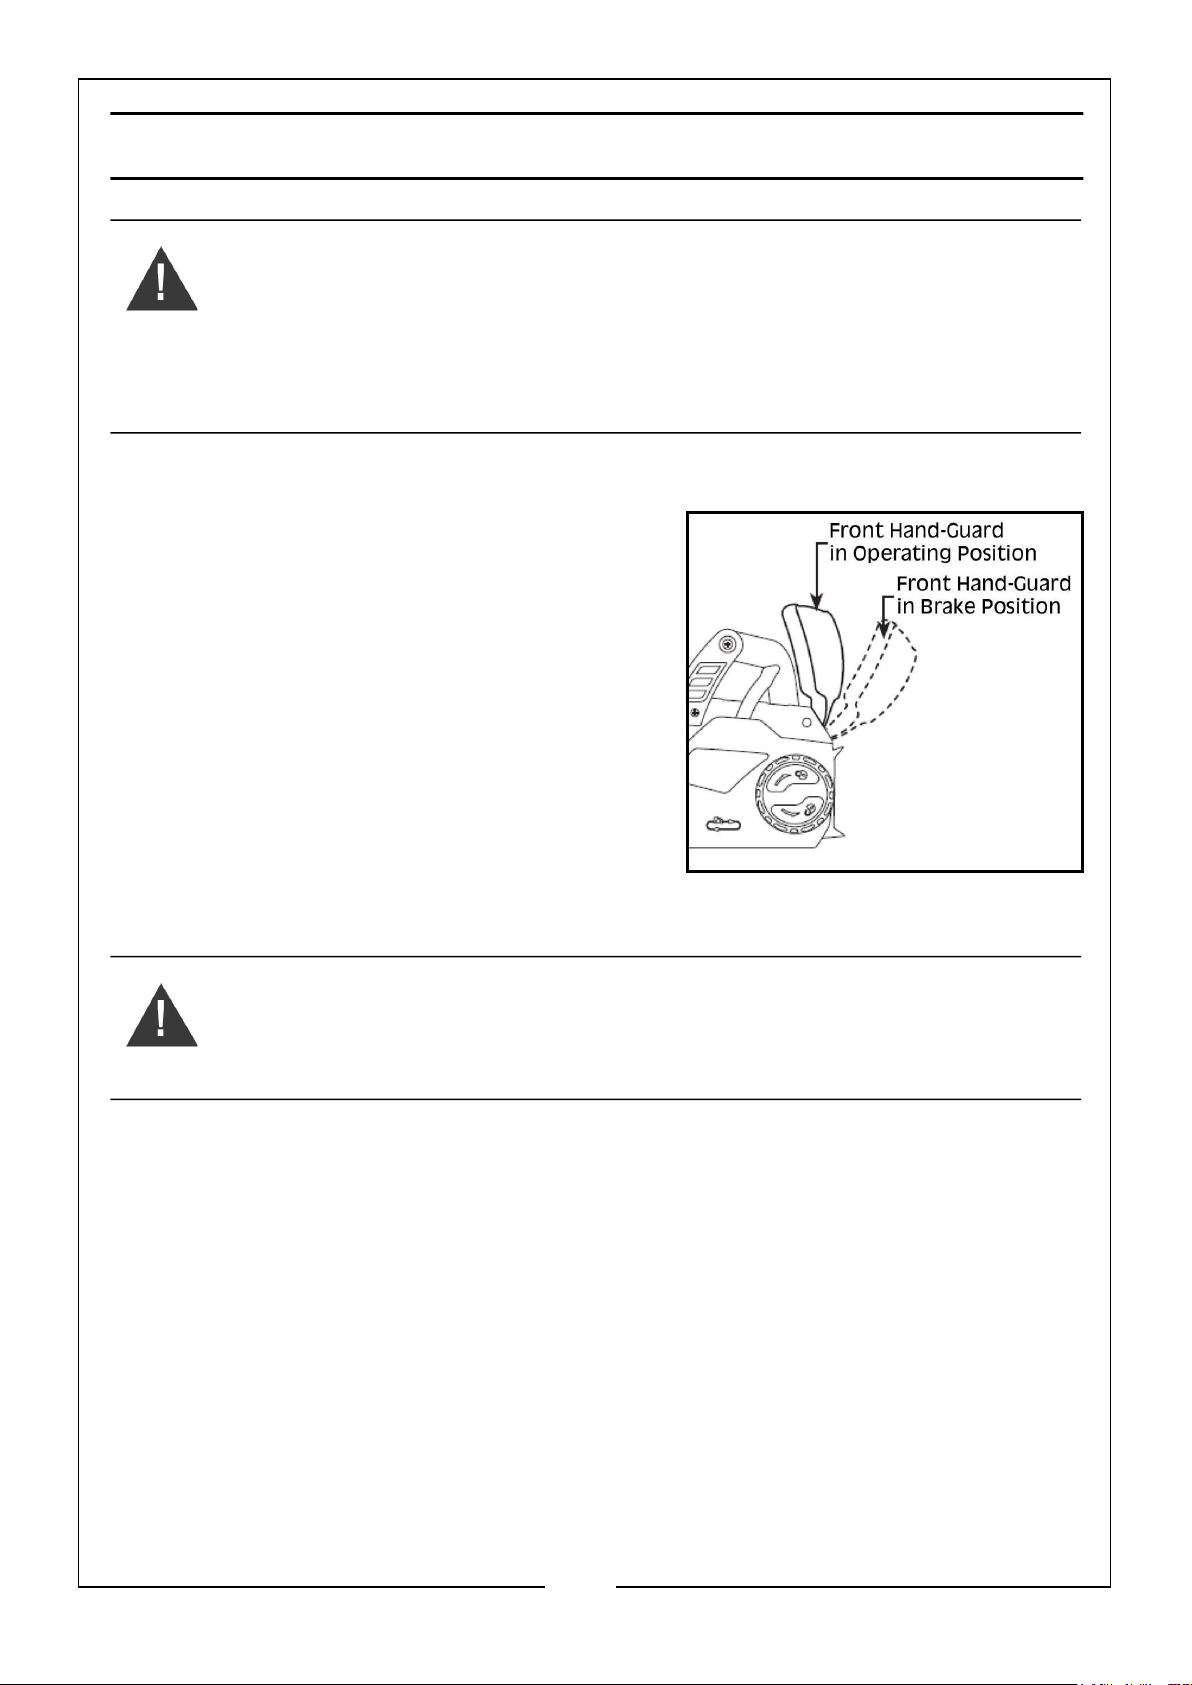
CHECKING THE FRONT HAND-GUARD POSITION
After unpacking the chainsaw, check the
position of the front hand-guard. The
chainsaw will not run with the chain brake
engaged. Pull the front hand-guard back
forwards the front handle before operation,
as shown.
FILLING THE BAR AND CHAIN OIL RESERVOIR
WARNING: BAR AND CHAIN OIL PREVENTS PREMATURE WEAR. NEVER
OPERATE THE CHAINSAW IF OIL IS NOT VISIBLE IN THE RESERVOIR
INSPECTION WINDOW. CHECK OIL LEVEL FREQUENTLY AND FILL AS
NEEDED
Bar and chain oil is required to properly lubricate the guide bar and saw
chain. The chainsaw is equipped with an automatic oiler that deposits oil on
the bar and chain when running, keeping them properly lubricated. Always
use chainsaw oil for best results, as it is specially designed to provide low fiction
and faster cuts. NEVER use oil or other lubricants that have not been
specifically designed for use on the bar and chain. This can lead to a clogged
oil system which may cause premature wear of the bar and chain.
14
Parts & Service: 020 8988 7400 / E-mail: [email protected] or [email protected]
Page 15
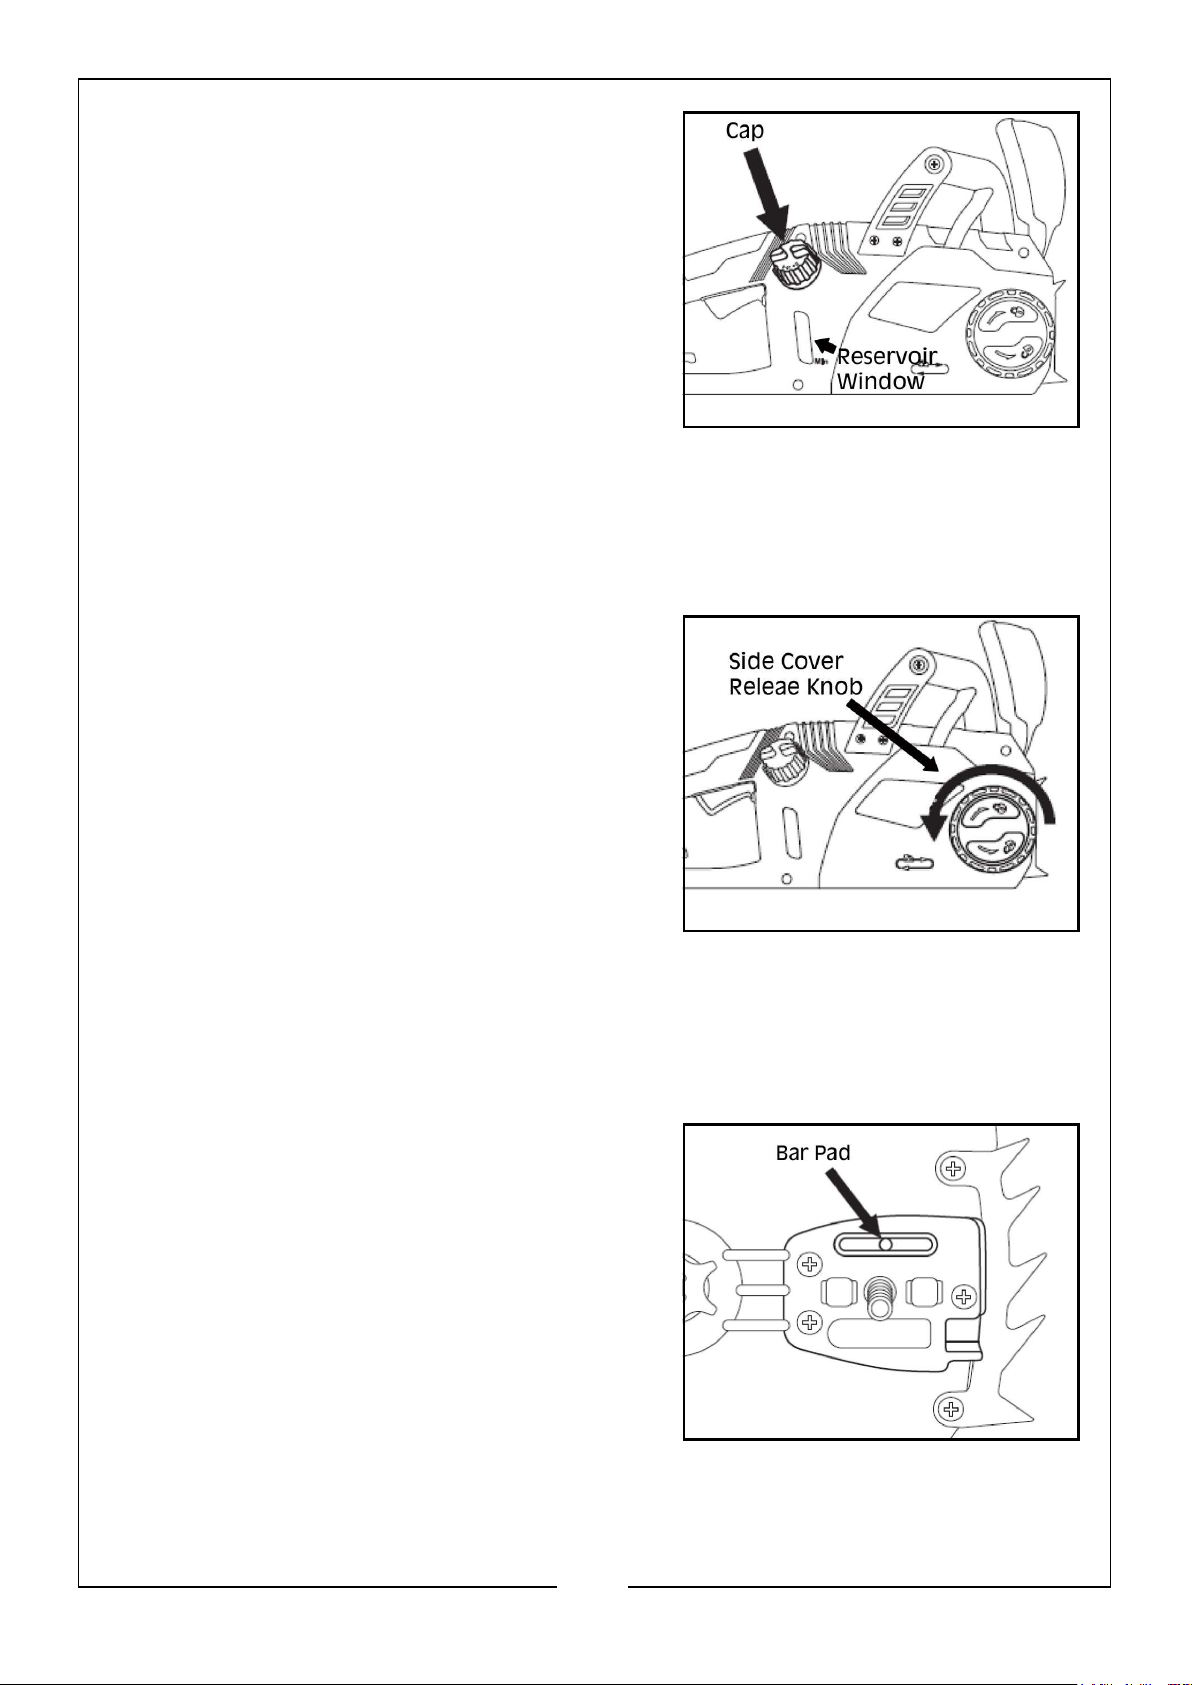
1. Place the chainsaw on a firm, flat surface
so that the oil cap is on top, as shown.
2. Clean any debris from the cap area.
3. Remove the cap.
4. Carefully pour the bar and chain oil into
the reservoir.
5. Replace the cap and make sure oil is
visible in the reservoir window.
PRIMING THE OILER
If this is the first time filling the bar and chain oil reservoir, or if the chainsaw has
been stored for a long period of time without use, prime the oiler, as follows:
1. Unplug the chainsaw.
2. Loosen the side cover release knob
slightly, but DO NOT remove the side
cover.
3. Loosen the chain tensioning ring that is
on the outside of the side cover release
knob (turn it anti-clockwise) as far as it will
go.
4. Loosen the side cover release knob and
remove the side cover.
5. Remove the guide bar and saw chain.
6. Install the side cover, then lightly tighten the side cover release knob.
7. Plug in the chainsaw.
8. Run the chainsaw for about two minutes.
9. Unplug the chainsaw, remove the side
cover and check for oil on the bar pad,
as shown.
10. If no oil is present on the bar pad,
replace the side cover and run for
another 30 seconds.
11. When oil begins to seep from the hole,
unplug the chainsaw and replace the
bar and chain as described in the next
section ‘Assembling the Guide Bar and
Saw Chain’.
15
Parts & Service: 020 8988 7400 / E-mail: [email protected] or [email protected]
Page 16
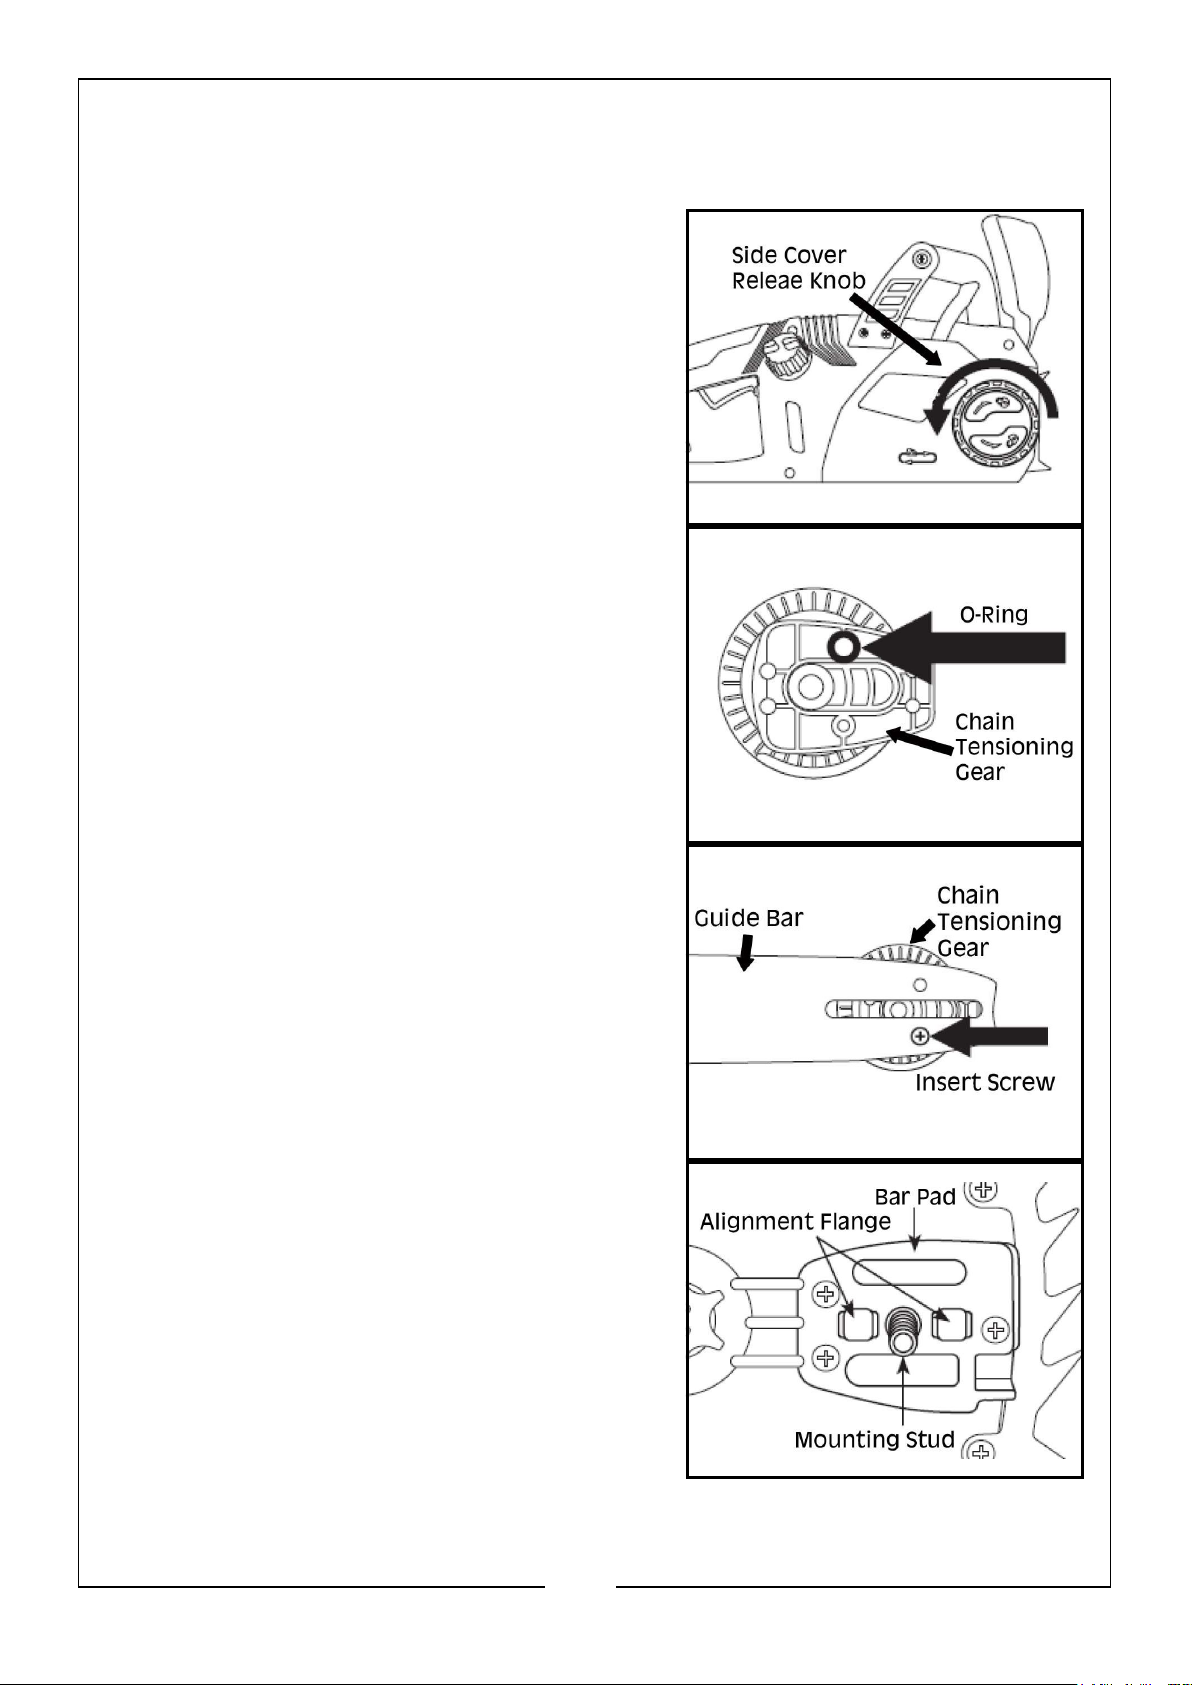
ASSEMBLING THE GUIDE BAR AND SAW CHAIN
1. Unplug the chainsaw.
2. Loosen the side cover release knob by
turning it counter clockwise, as shown,
then remove the side cover.
3. There is a rubber O-ring that is important
to the function of the saw, as shown. The
rubber O-ring must be in place around
the pin on the tensioner before the
tensioner is screwed onto the bar.
4. Insert the screw from the back side of the
chain tensioning gear and attach the
chain tensioning gear onto the guide
bar, as shown.
5. Place the chain tensioning gear on the
side of the guide bar facing you such
that the rectangular piece does not
protrude past the edges of the guide bar
and insert the screw.
6. Place the guide bar on the bar pad by
sliding the bar slot over the alignment
flange, as shown, with the mounting stud
inserted through the hole in the chain
tensioning gear.
16
Parts & Service: 020 8988 7400 / E-mail: [email protected] or [email protected]
Page 17
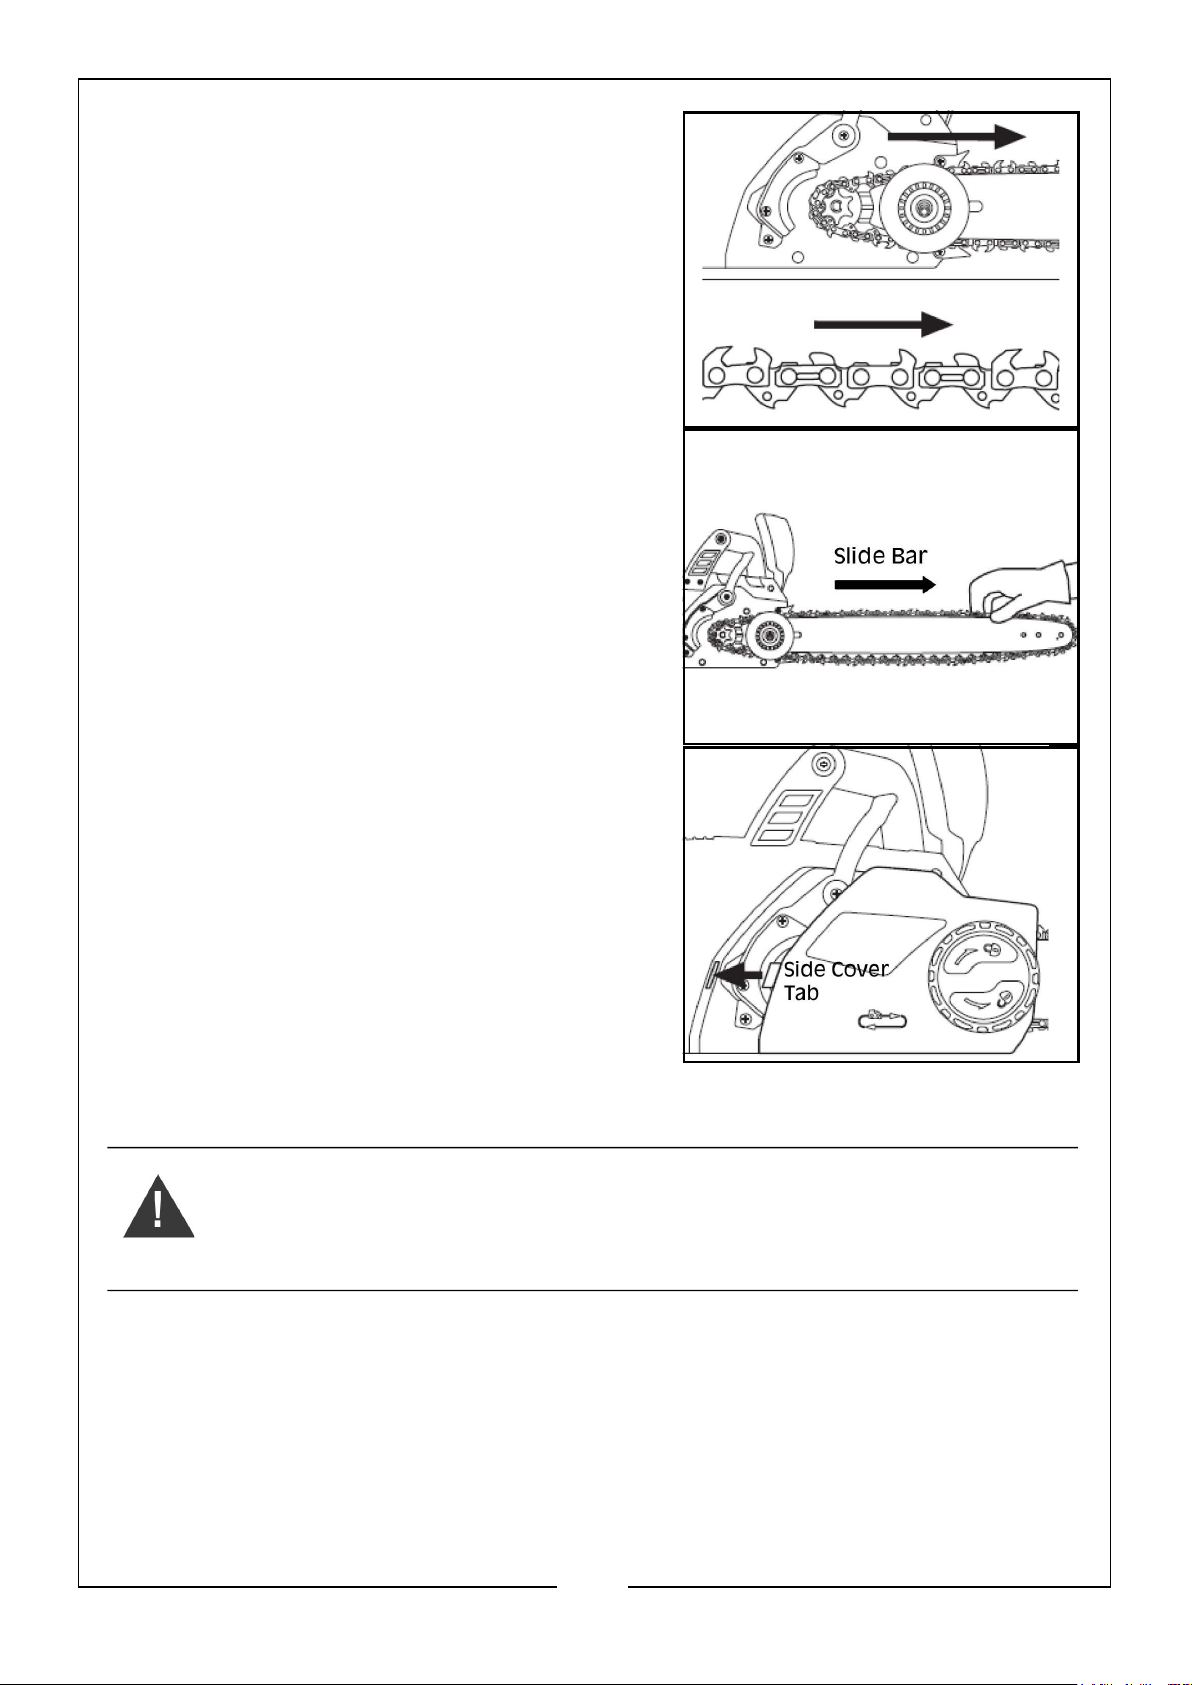
7. Loop the new saw chain onto the drive
sprocket so that the cutting edge of the
teeth along the top of the bar face
away from the powerhead, as shown.
8. Feed the chain into the groove of the
bar and slide the bar away from the
motor to remove slack from the chain, as
shown.
9. Install the side cover, making sure the
chain catcher and side cover tab are
seated in their proper locations, as
shown, then lightly tighten the side cover
release knob.
10. Tension the chain as described in the
following section ‘Tensioning the Saw
Chain’.
TENSIONING THE SAW CHAIN
WARNING: IF THE CHAIN IS STILL LOOSE WHEN THE SAW IS AT MAXIMUM
TENSION, REPLACE THE CHAIN.
CAUTION: ONLY TENSION THE SAW CHAIN WHEN THE CHAIN IS COOL. A HOT
CHAIN MAY CONTRACT AND DAMAGE THE GUIDE BAR OR CHAIN AS IT COOLS.
1. Unplug the chainsaw before tensioning.
2. Loosen the side cover release knob slightly, but DO NOT remove the side
cover.
17
Parts & Service: 020 8988 7400 / E-mail: [email protected] or [email protected]
Page 18
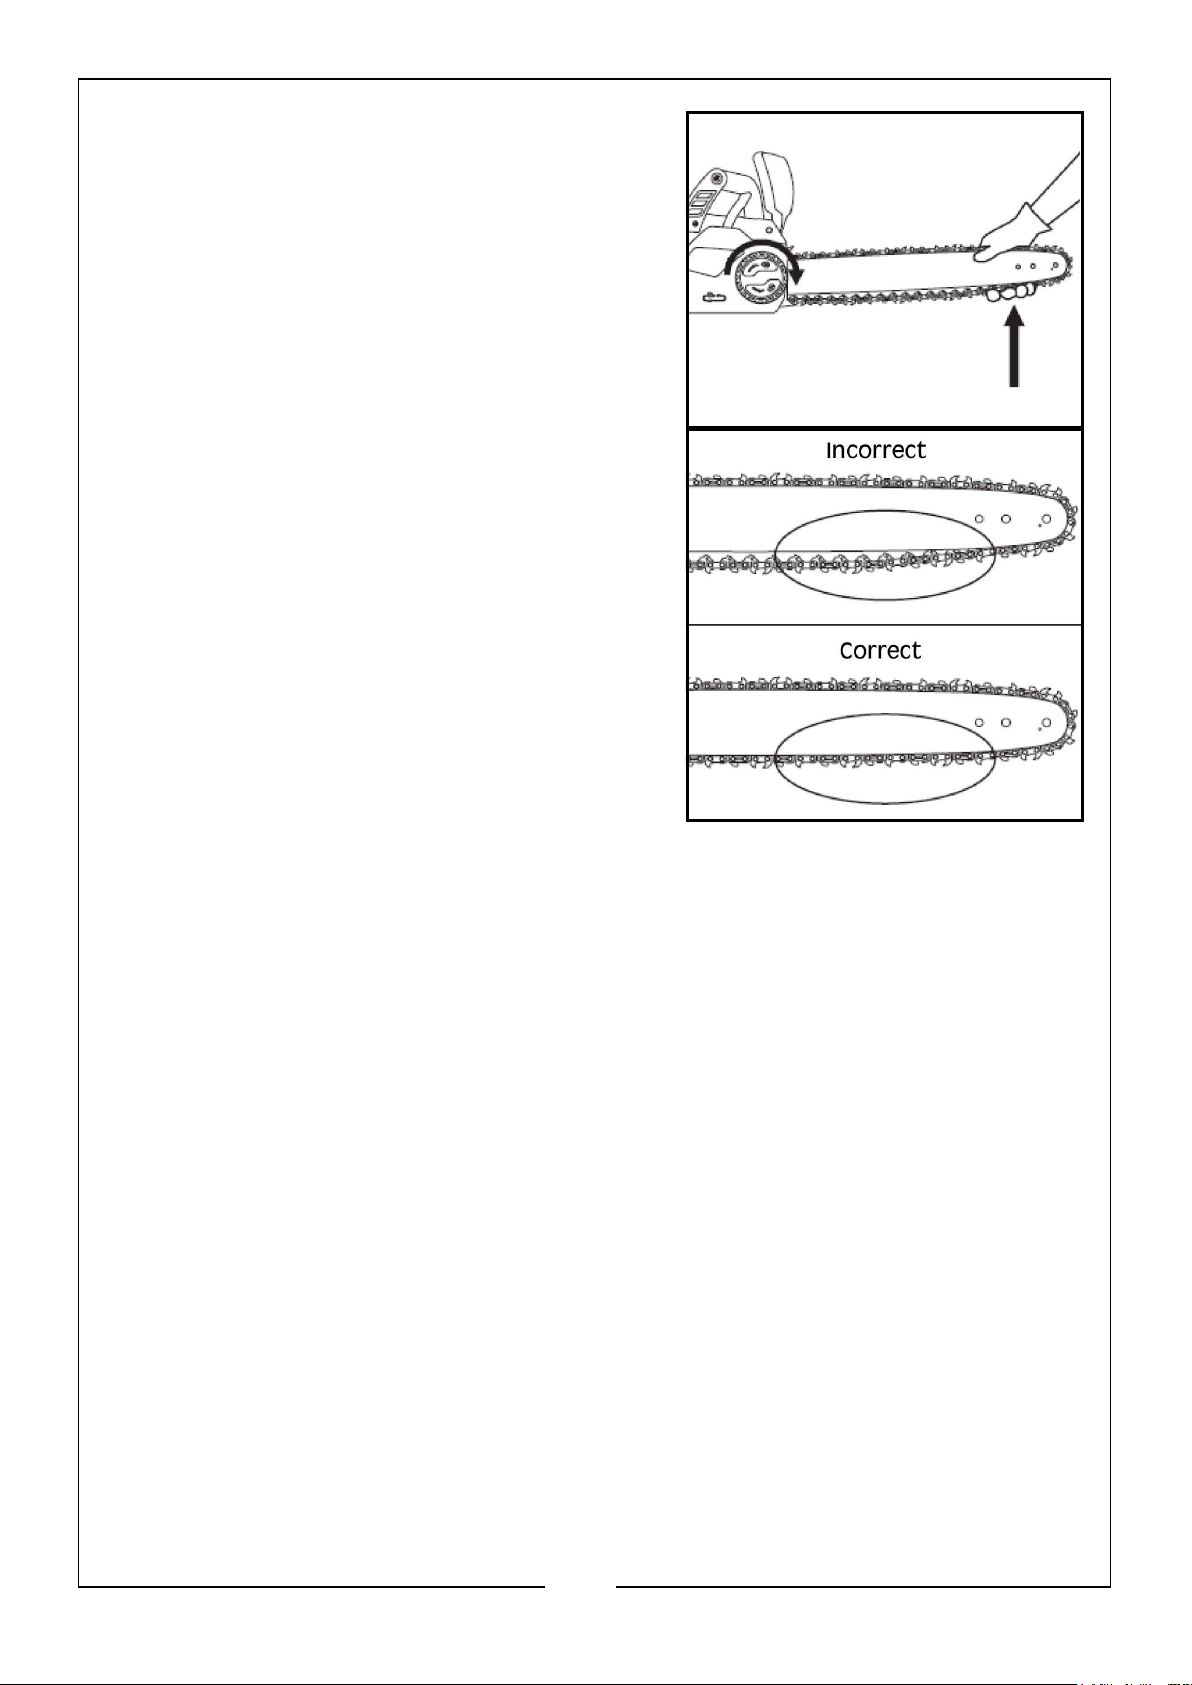
3. Hold up the nose of the guide bar, as
shown, and turn the chain tensioning ring
clockwise.
4. Tighten the chain tensioning ring until the
lowest cutters underneath the bar solidly
contact the bar, as shown.
5. Tighten the side cover release knob.
6. Lightly pull on the chain. The tension is
correct when the chain snaps back after
being pulled 3mm away from the guide
bar.
7. After a short period of use, allow the
chain to cool, unplug the chainsaw and
check the tension again. Watch tension
carefully for the first half hour of use and
periodically throughout the life of the chain, readjusting as required when
the chain and bar are cool to the touch. NEVER tension the chain when it is
hot.
NOTE: The chain will stretch as a result of normal use, however, insufficient oil,
aggressive use, or failure to perform recommended maintenance can
lead to premature stretching.
18
Parts & Service: 020 8988 7400 / E-mail: [email protected] or [email protected]
Page 19
USING THE CHAINSAW
WARNING: DO NOT START THE CHAINSAW UNTIL IT IS FULLY ASSEMBLED
AND ADJUSTED AND YOU HAVE READ ALL RELEVANT WARNINGS / SAFETY
INSTRUCTIONS.
For ‘first time’ users of this type of product, we recommend that introductory
training is undertaken from an experienced person before use.
PERSONAL PROTECTIVE EQUIPMENT
The following Personal Protective Equipment (PPE) available from you local
CLARKE dealer has been designed for use with chainsaws.
• A safety helmet with mesh visor.
• Ear defenders.
• Specialist chainsaw gloves.
• Trousers or chaps suitable for chainsaw use (they contain a clogging
material which stops the chain if cut).
• Safety boots with toe and shin protection.
• Close fitting hi-visibility jacket.
CAUTION: NO PPE WILL OFFER 100% PROTECTION AGAINST CHAINSAW
CUTS ESPECIALLY IF THE CHAINSAW IS USED IN A DANGEROUS MANNER.
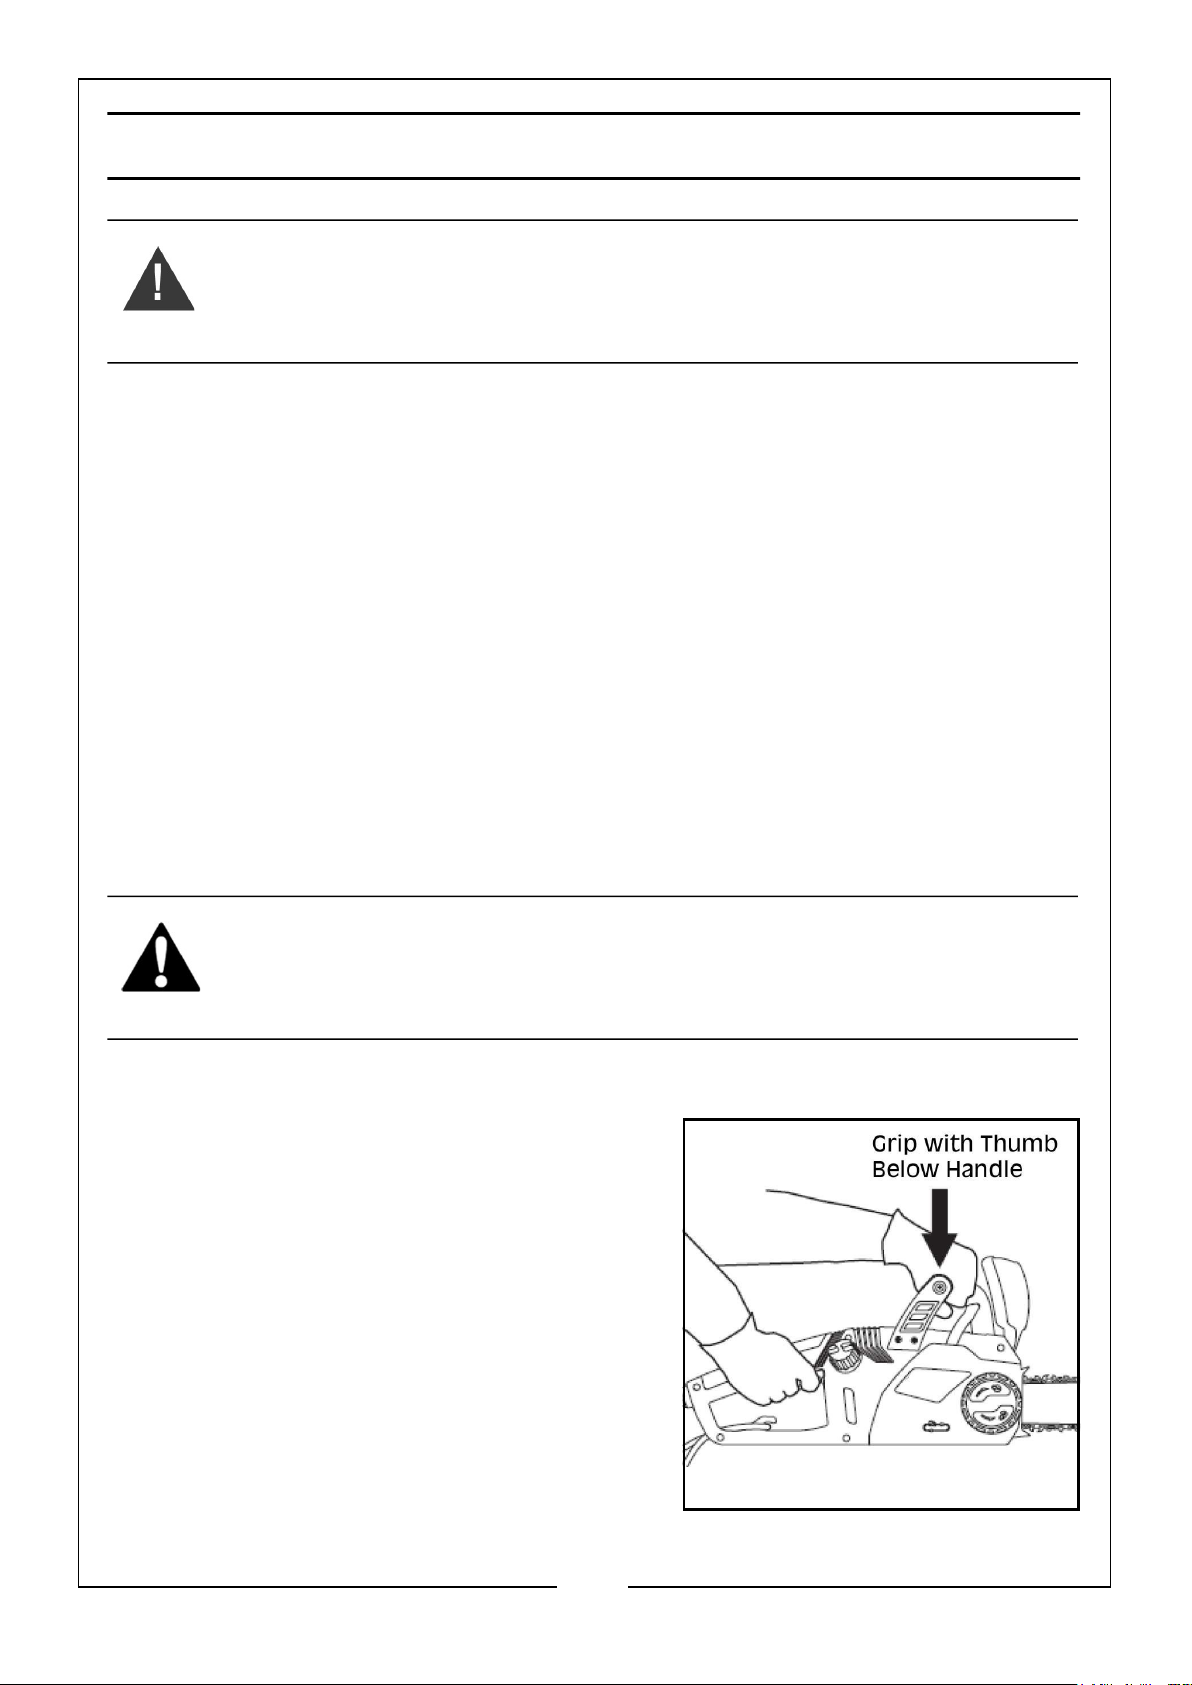
GRIP
Always grip the tool with both hands. Grasp
the front handle with the left hand and the
rear handle with the right, as shown. Wrap
the fingers over the top of the handle with
the thumb below the handle.
19
Parts & Service: 020 8988 7400 / E-mail: [email protected] or [email protected]
Page 20
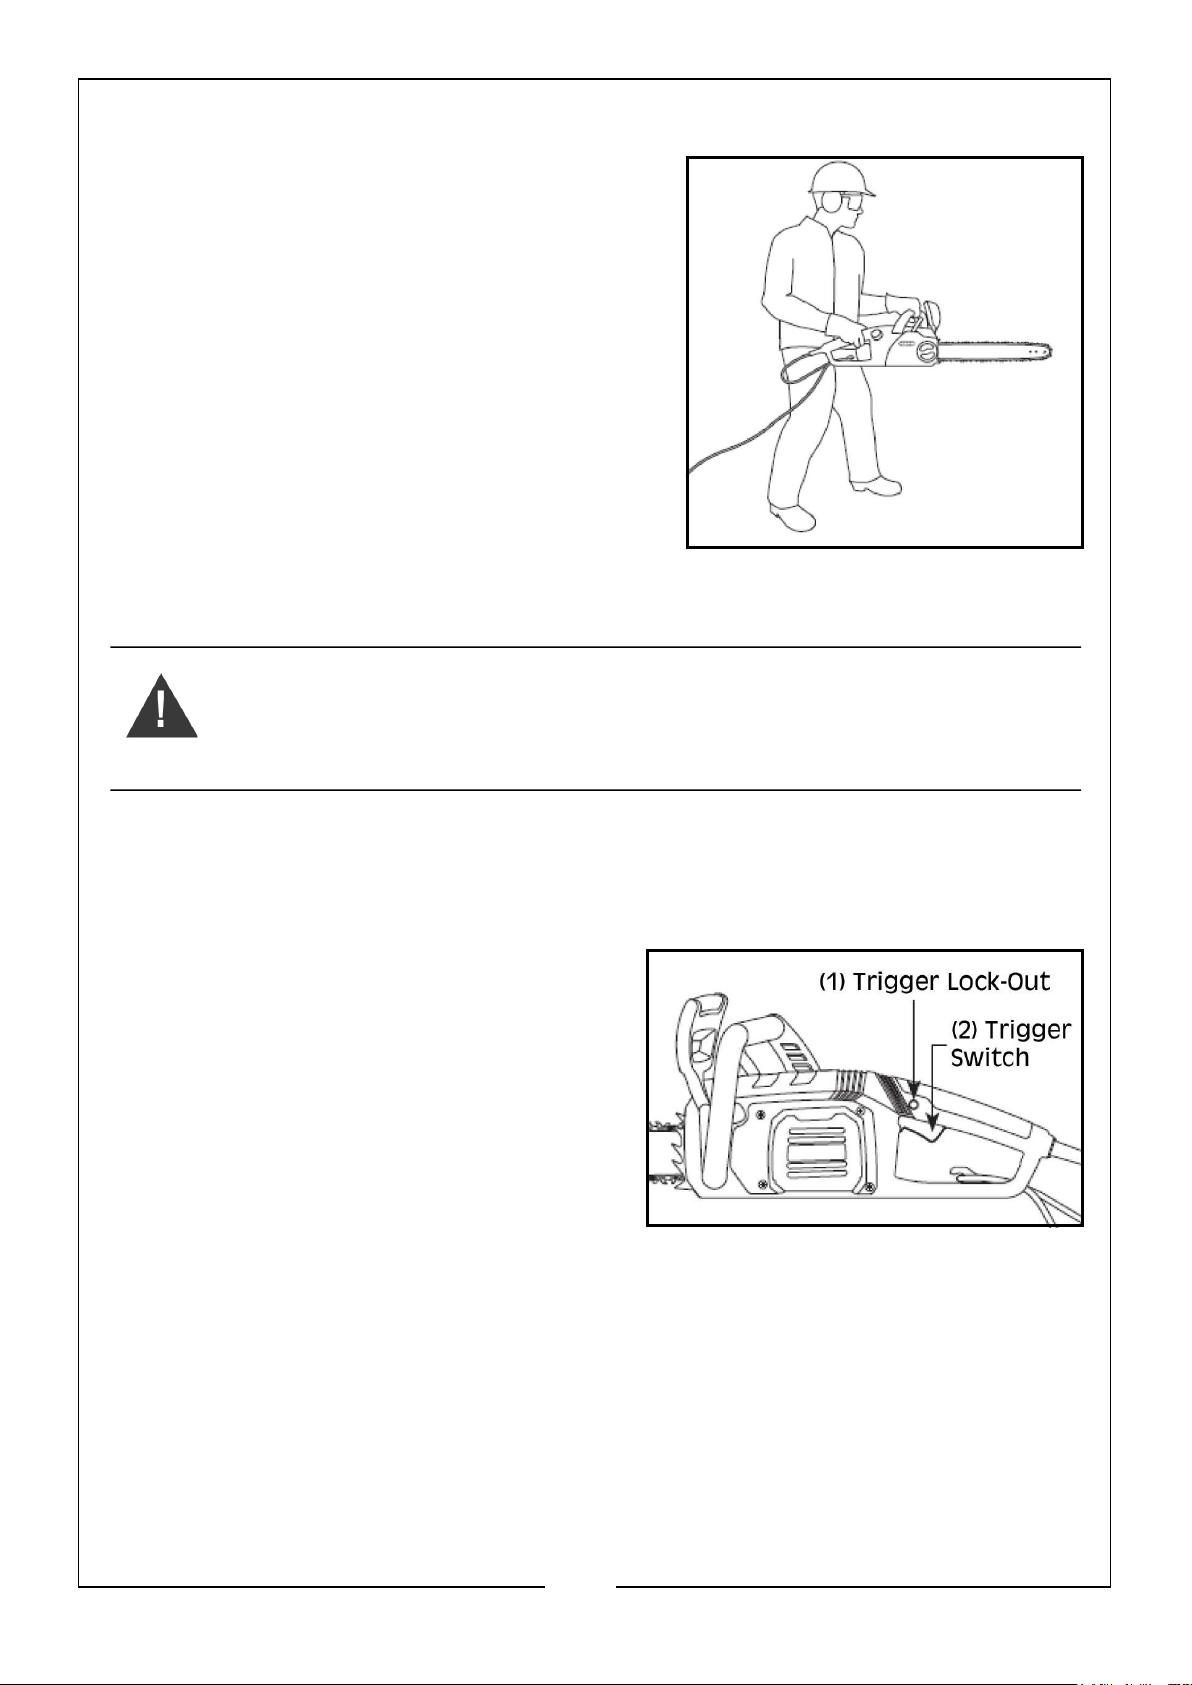
FOOTING
Stand with both feet on solid ground with
weight evenly spread between them, as
shown.
STARTING THE CHAINSAW
WARNING: TO REDUCE THE RISK OF INJURY, NEVER DEFEAT THE
INTERLOCK BY TAPING, WIRING OR TYING DOWN THE TRIGGER LOCKOUT.
1. Make sure the chain brake is not engaged.
2. Grasp the front and rear handles firmly.
3. Press and hold the trigger lockout with the thumb (1).
4. To start the saw, squeeze the trigger
switch (2), as shown.
5. There is no need to continue to press
the trigger lockout. It will remain
disengaged until the trigger is
released.
STOPPING THE CHAINSAW
Release the trigger switch to stop the chainsaw.
20
Parts & Service: 020 8988 7400 / E-mail: [email protected] or [email protected]
Page 21
TESTING THE CHAIN BRAKE
CAUTION: THE CHAIN BRAKE HAS BEEN DESIGNED TO REDUCE THE
POSSIBILITY OF INJURY IF KICKBACK OCCURS. HOWEVER, IT CANNOT BE
RELIED UPON TO PROTECT YOU AGAINST INJURY IF THE CHAINSAW IS
USED CARELESSLY. TAKE GREAT CARE WHEN CUTTING, AND ALWAYS TEST
THE CHAIN BRAKE BEFORE USING THE CHAINSAW.
To check brake operation:
1. Place the saw on a firm flat surface with no obstructions to the chain.
2. Start the saw briefly.
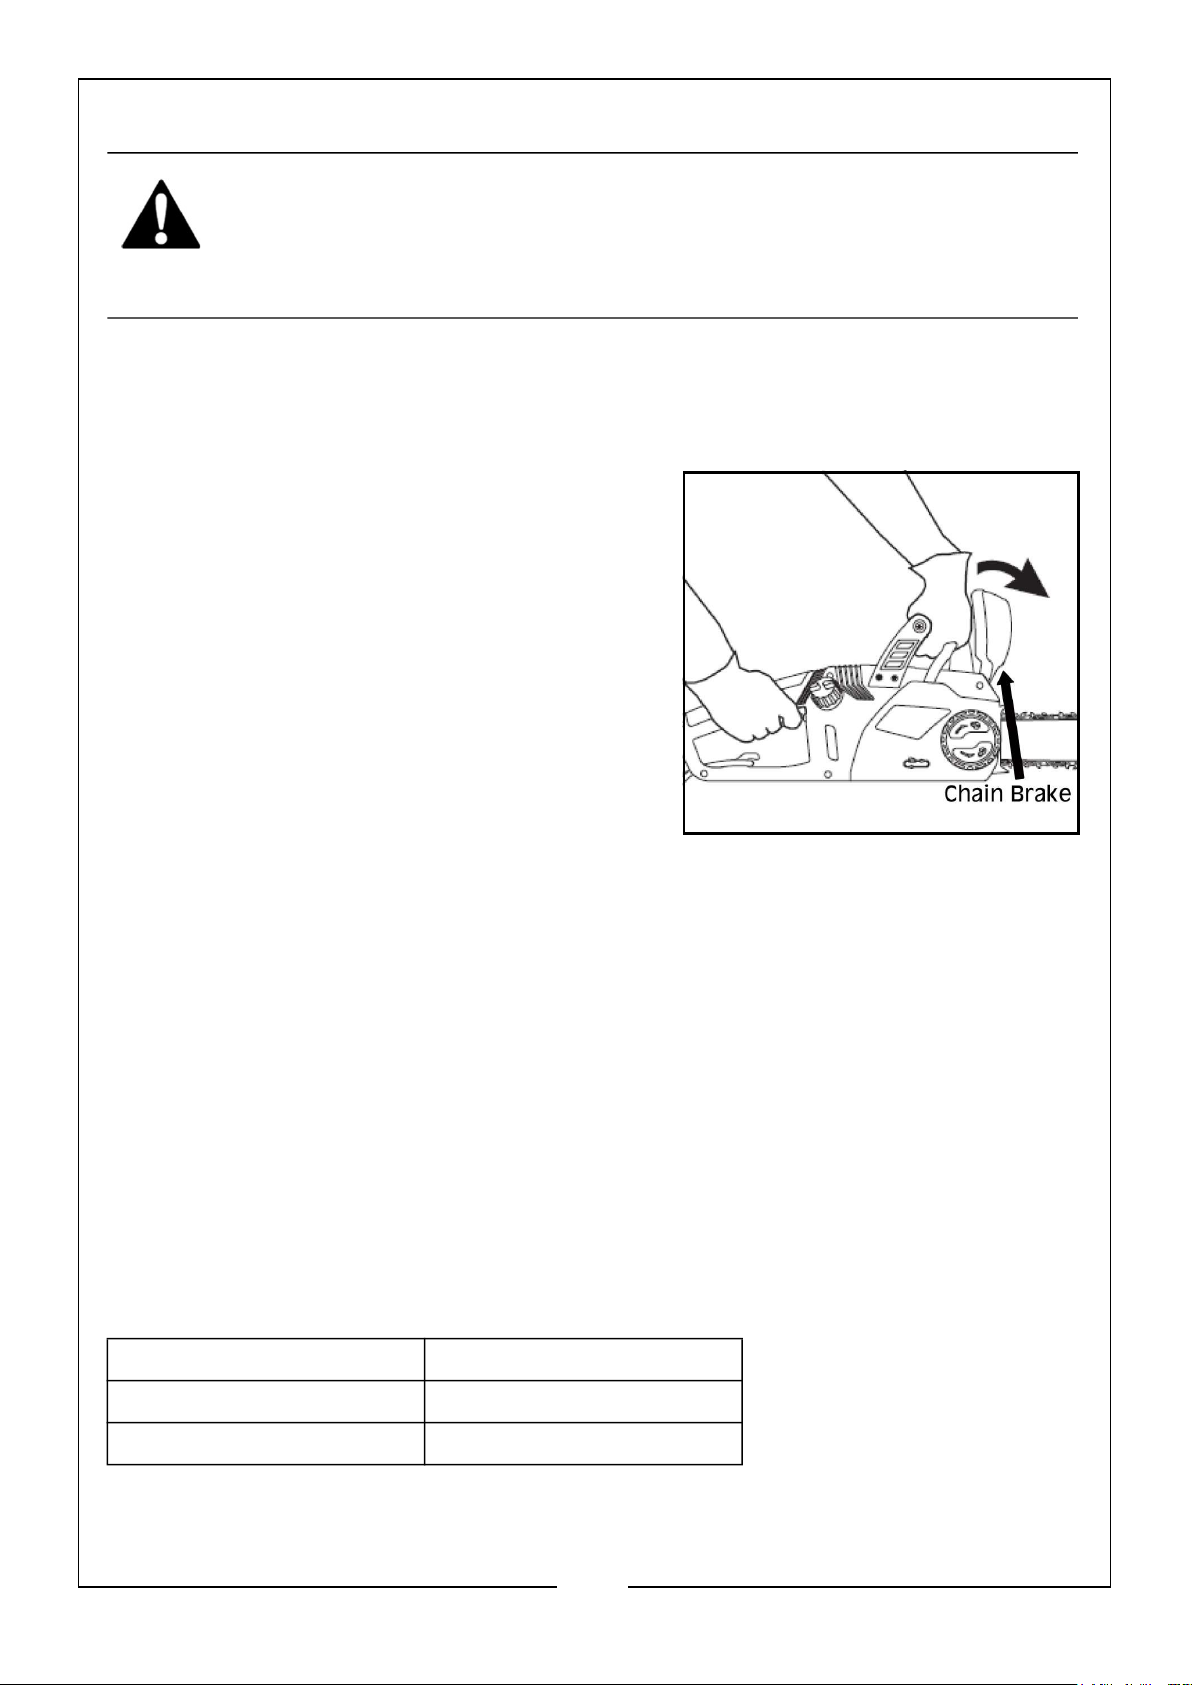
3. Keep the left hand on the front handle
and roll the left wrist to move the front
hand guard forward to manually
activate the chain brake, as shown.
4. Release the trigger switch.
NOTE: A properly functioning chain brake
stops the motor and saw chain
immediately. If the motor and saw
chain do not stop immediately, have
the chain brake checked at an
approved service location before
using the chainsaw.
5. Return the front hand guard to operating position.
POWER CORD USE AND CARE
SELECTING AN EXTENSION CORD
Select an extension cord that is:
1. Specifically labeled for outdoor use.
2. Of a wire size heavy enough to carry the current the full length of the cable
according to the table below.
Select the gauge of extension cord based on the desired length and the
electrical specifications found on the product label or in the specification
section of this manual.
Cord Length (M) Min. Diameter Wire Size
0 - 15 1.6277mm
16 - 30 2.0525mm
Make sure the insulation is free of cracks and that the plugs are undamaged.
21
Parts & Service: 020 8988 7400 / E-mail: [email protected] or [email protected]
Page 22
USING THE STRAIN RELIEF BRACKET
It is important to use the strain relief bracket for two reasons:
1. It saves wear on both the power cord and the extension cord and their
plugs.
2. It prevents the chainsaw from becoming unplugged from the extension
cord accidentally.
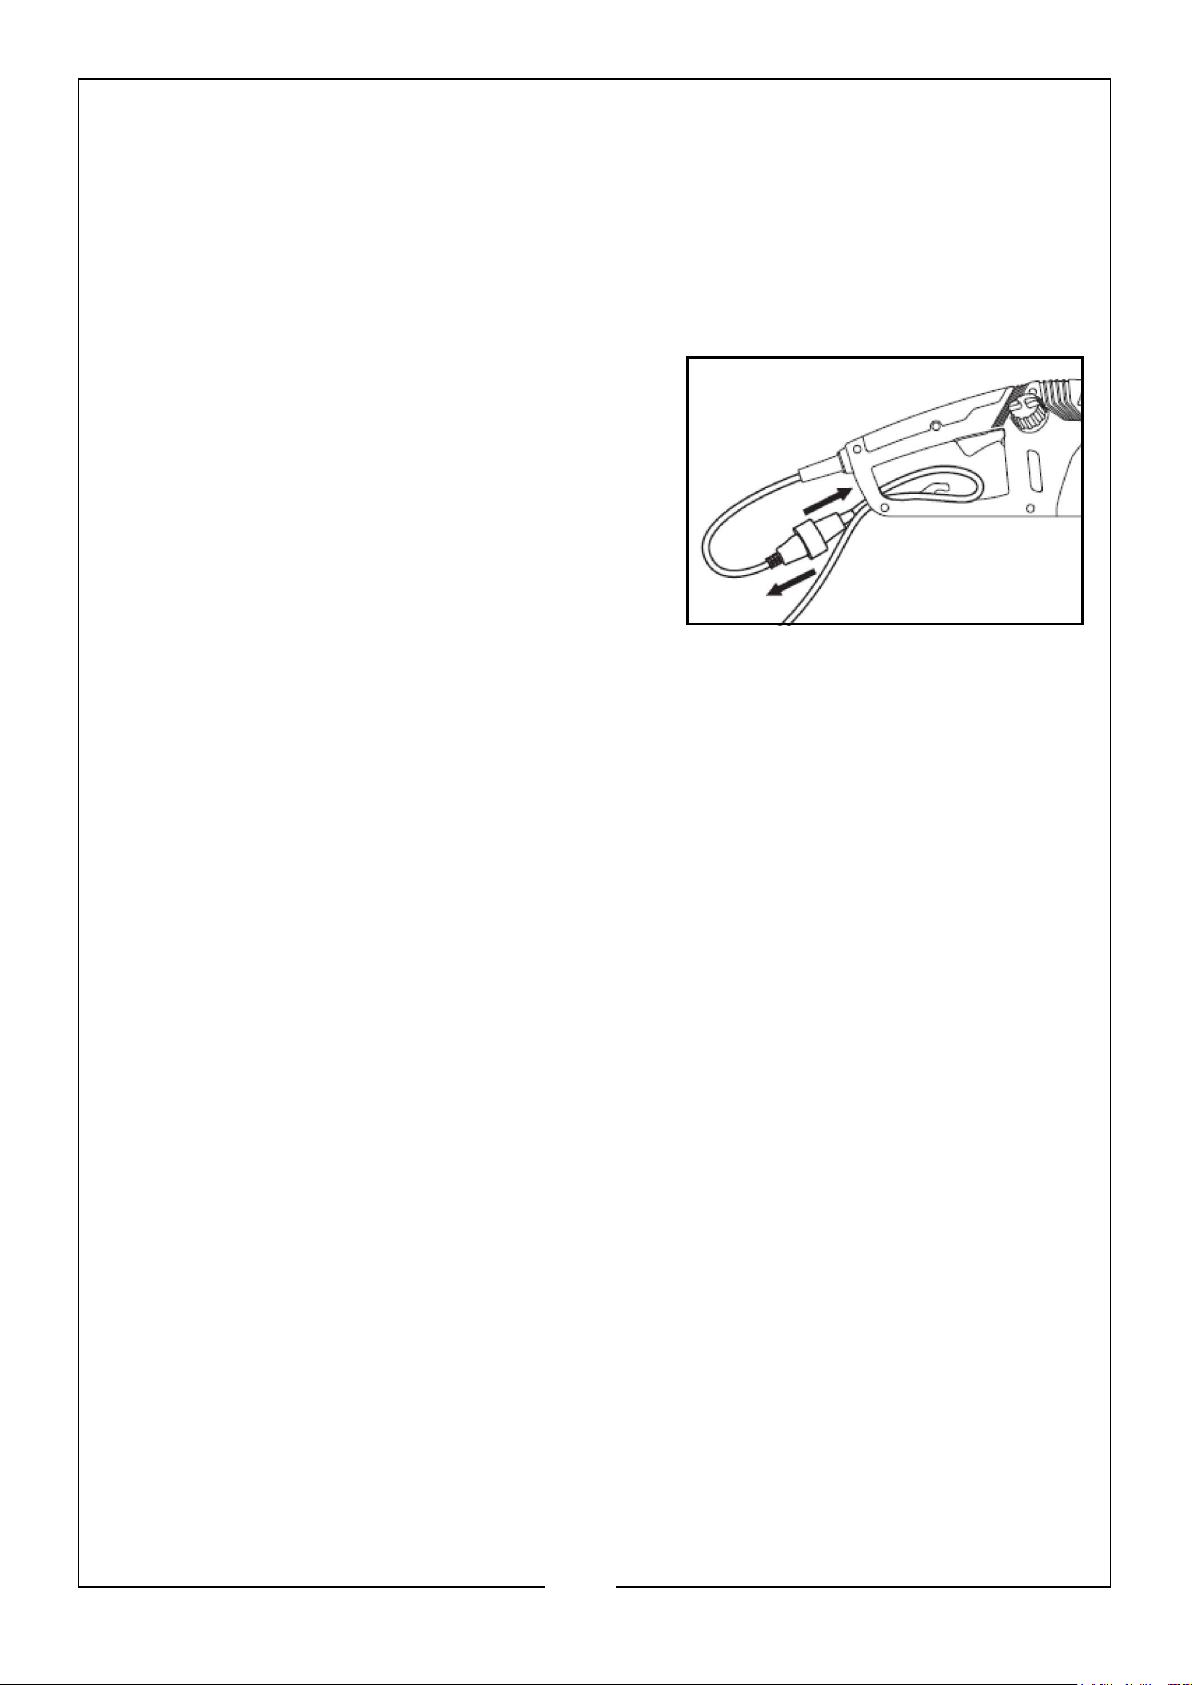
To use the strain relief bracket, bend the
extension cord into a U shape and put it
through the hole in the rear handle. Slide the
loop of cord over the hook and tug lightly
until snug, as shown.
22
Parts & Service: 020 8988 7400 / E-mail: [email protected] or [email protected]
Page 23
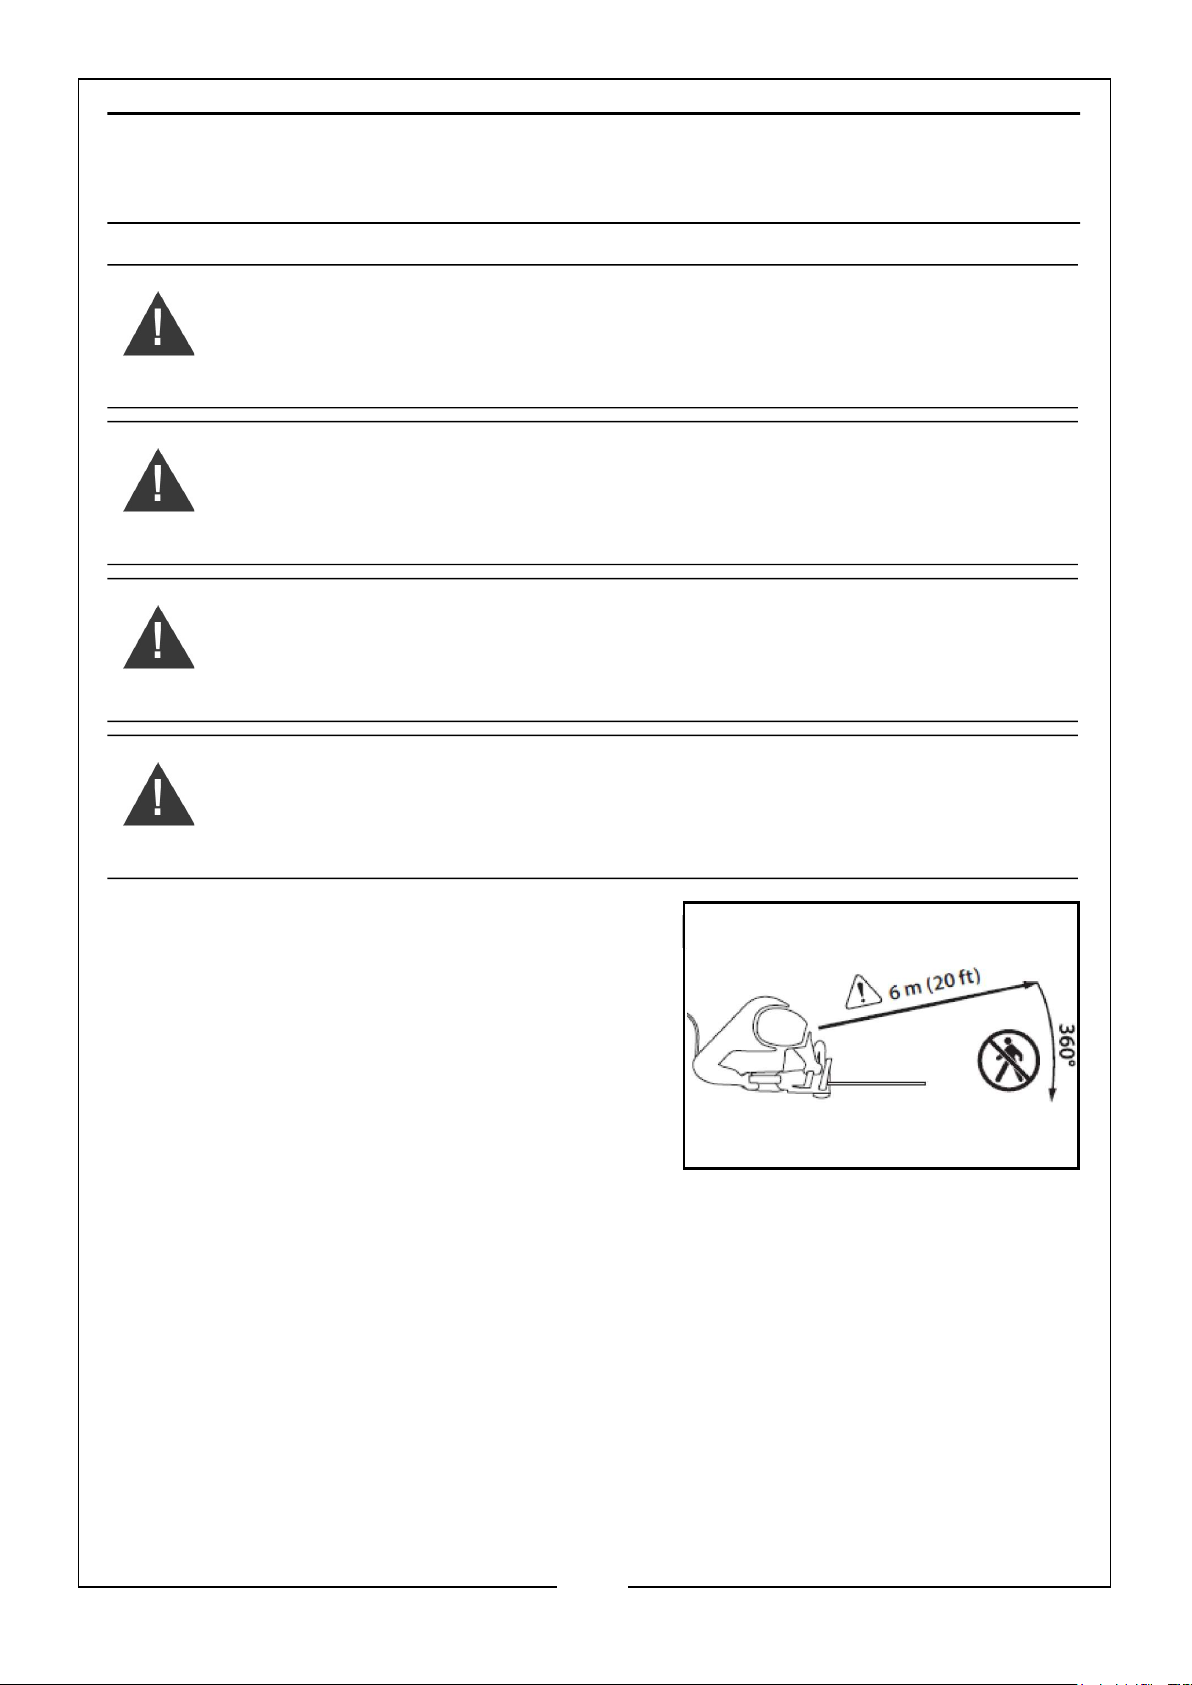
CUTTING, PRUNING, FELLING, LIMBING AND
BUCKING
WARNING: TO REDUCE THE RISK OF INJURY, WEAR PROPER BOOTS,
GLOVES, HEAD, EAR AND EYE PROTECTION.
WARNING: TO REDUCE THE RISK OF ELECTRIC SHOCK, MAKE SURE THE
CORD INSULATION IS INTACT AND THAT THE CORD IS IN A DRY LOCATION
WHERE THERE IS NO DANGER OF IT BEING CUT OR TRIPPED OVER.
WARNING: TO REDUCE THE RISK OF INJURY, ALWAYS BE SURE OF
FOOTING AND HOLD THE CHAINSAW FIRMLY WITH BOTH HANDS WHILE
THE MOTOR IS RUNNING.
WARNING: TO REDUCE THE RISK OF INJURY, PLAN AHEAD AND PLAN
MULTIPLE ESCAPE PATHS BEFORE BEGINNING WORK.
CAUTION: ESTABLISH A BYSTANDER SAFETY
ZONE OF 6M (20FT) PRIOR TO OPERATION OF
THIS EQUIPMENT. BYSTANDER SAFETY ZONE IS A
MINIMUM 6M (20FT) CIRCLE AROUND THE
OPERATOR THAT MUST REMAIN FREE FROM
BYSTANDERS, CHILDREN AND PETS. FELLING
OPERATIONS REQUIRE A LARGER SAFETY ZONE
ACCORDING TO THE SIZE OF THE TREE, SEE
‘FELLING A TREE’ SECTION.
IMPORTANT: Practice cutting logs on a sawhorse or cradle until you
become comfortable operating the saw.
To get the best performance and to operate the saw safely, follow these
instructions:
1. Observe all applicable national and local rules and regulations for cutting.
2. Take frequent breaks to reduce the risk of injury.
3. Before beginning to cut, make sure the saw chain is properly tensioned
and the chain is sharp.
23
Parts & Service: 020 8988 7400 / E-mail: [email protected] or [email protected]
Page 24
Saw chains are made to cut wood only. DO NOT use the chainsaw to cut any
other materials, and DO NOT allow the chain to come into contact with dirt,
stones, nails, staples or wire. These materials are extremely abrasive and will
wear away protective plating from the chain in a very short time.
Sharpen or replace the saw chain if any of these conditions occur:
1. The pressure required to make cuts increases noticeably.
2. Wood chips coming off of the chain are very fine or dust like.
DO NOT work with a dull chain as it will increase the effort required to cut,
cause jagged cuts, increase wear on the chainsaw and increase the risk of
kickback. NEVER force a dull chain to cut.
1. Assume the proper cutting grip and stance in front of the wood with the
saw turned off. Press the trigger switch. Let the chain reach full speed
before beginning the cut.
2. Begin cutting by lightly pressing the guide bar against the wood. Use only
light pressure and let the saw do the work.
3. Maintain a steady speed throughout the cut releasing pressure just before
the end of the cut.
4. Know the location of the cord at all times to avoid trip hazards and avoid
cutting the cord.
5. Know the location of the tip of the bar at all times and avoid contact with
other objects.
6. If the saw stops suddenly when cutting, remove the saw from the cut, then
resume cutting using lighter pressure on the work piece.
PRUNING
WARNING: FALLING LIMBS MAY BOUNCE OR SPRING BACK AFTER THEY
HIT THE GROUND SO IT IS ESSENTIAL TO KEEP THE GROUND CLEAR TO
PROVIDE MULTIPLE RETREAT PATHS. CLEAR THE WORK AREA AND WEAR
HEAD PROTECTION.
Pruning is removing dead or overgrown branches to maintain plant health.
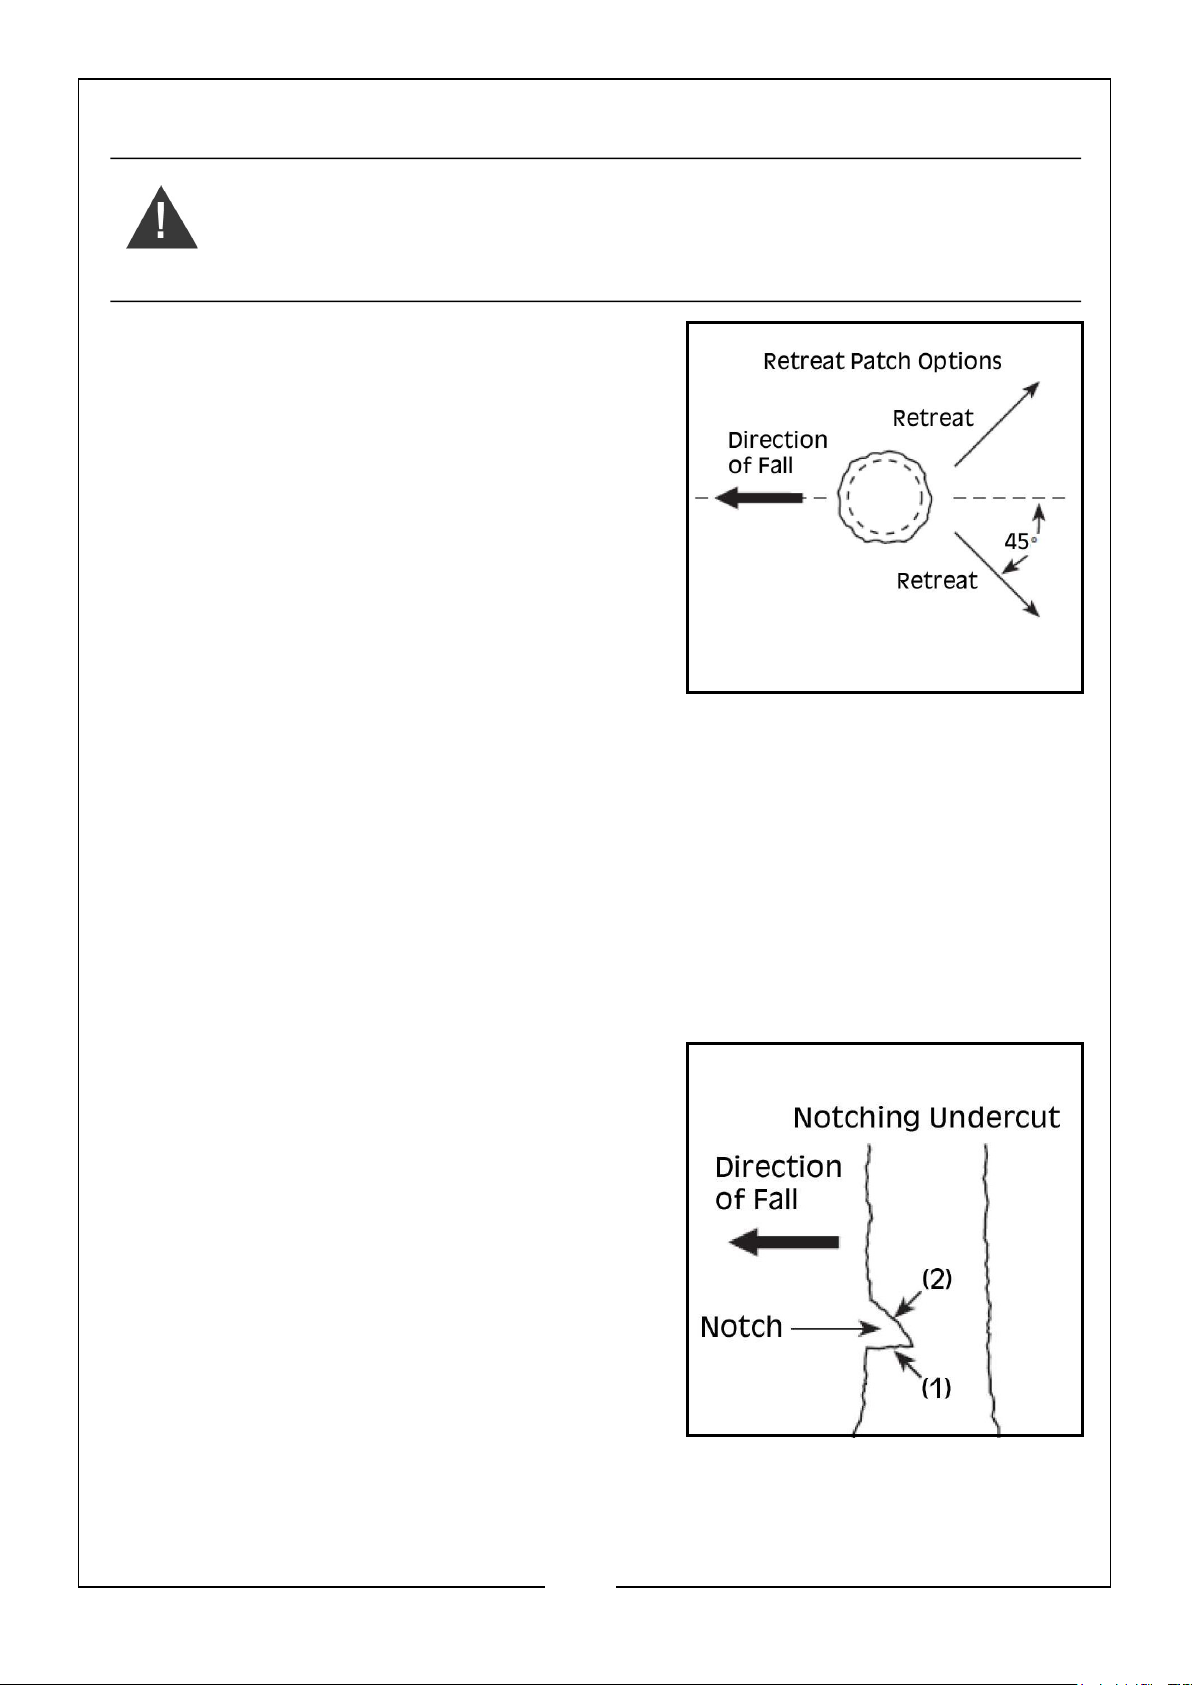
1. Plan retreat paths before beginning to cut, and make sure there are no
obstructions. Always know how to get out of the way of falling branches.
2. Make sure bystanders or helpers are a safe distance from falling branches.
Bystanders or helpers should not stand directly in front of or behind the
operator.
3. Maintain solid footing and hold the chainsaw firmly with both hands. DO
NOT overreach. NEVER climb a tree or ladder to reach high limbs.
4. Secure any branches that might be hazardous.
24
Parts & Service: 020 8988 7400 / E-mail: [email protected] or [email protected]
Page 25
5. Use proper auxiliary equipment.
6. Prune lower limbs before pruning higher ones.
7. Allow the saw chain to achieve full speed before cutting.
8. Apply light pressure to the branch.
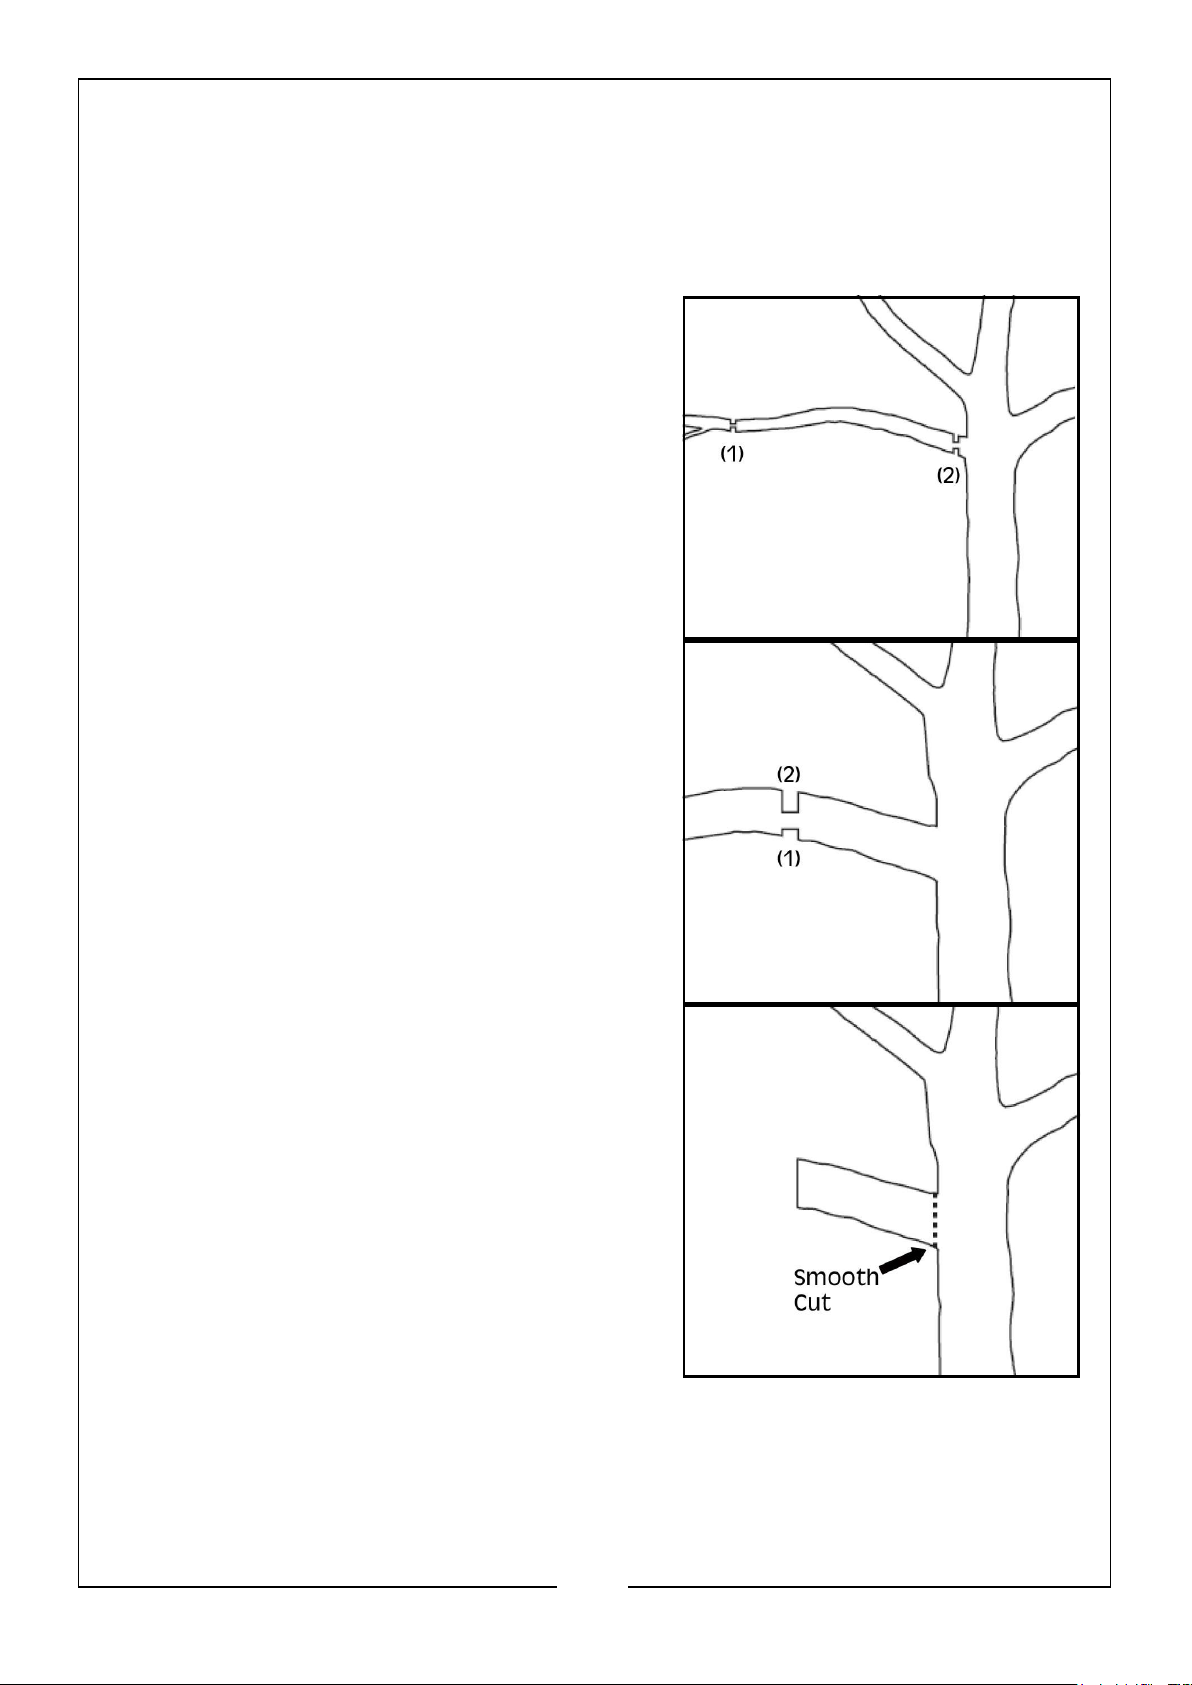
9. For long limbs, cut the end of the limb first
(1) to relieve pressure from the limb, then
prune closer to the trunk (2), as shown.
10. Thick limbs (greater than 10cm (4 inch) in
diameter) can splinter or pinch the chain
when making a single cut from the top.
To avoid pinching or splintering, first
make one shallow relief cut on the
bottom surface of the limb (1), then cut
the limb all the way through from the top
of the limb (2) to match the bottom cut,
as shown.
11. After most of the limb has been
removed, make one smooth cut near
the trunk, as shown.
25
Parts & Service: 020 8988 7400 / E-mail: [email protected] or [email protected]
Page 26
FELLING A TREE
WARNING: A TREE IS LIKELY TO ROLL OR SLIDE DOWNHILL AFTER IT IS
FELLED. PLAN AND CLEAR A RETREAT PATH BEFORE CUTS ARE STARTED.
THE RETREAT PATH SHOULD EXTEND BACK AND DIAGONALLY TO THE
REAR OF THE EXPECTED LINE OF FALL.
Felling is cutting down a tree. Before felling is
started, consider the natural lean of the
tree, the location of larger branches and the
wind direction to judge which way the tree
will fall and plan your retreat route.
1. Remove dirt, stones, loose bark, nails,
staples and wire from the tree where
felling cuts are to be made.
2. When bucking and felling operations are
being performed by two or more persons
at the same time, separate the felling
operation from the bucking operation by
a distance of at least twice the height of the tree being felled.
3. Trees should not be felled in a manner that would endanger any person,
strike any utility line or cause any property damage. If the tree contacts
any utility line, immediately leave the area and notify the utility company.
4. Use the metal spikes on the front of the saw to support the saw on the
wood. Set metal spiked bumper into the wood and use as a leverage point
to increase stability when cutting large diameter wood.
NOTCHING UNDERCUT
1. First, make a notch 1/3 the diameter of
the tree in the direction you want the
tree to fall. Make the lower horizontal
notching undercut first (1). This will help to
avoid pinching of either the saw chain or
the guide bar when the second cut (2) is
being made, as shown.
26
Parts & Service: 020 8988 7400 / E-mail: [email protected] or [email protected]
Page 27
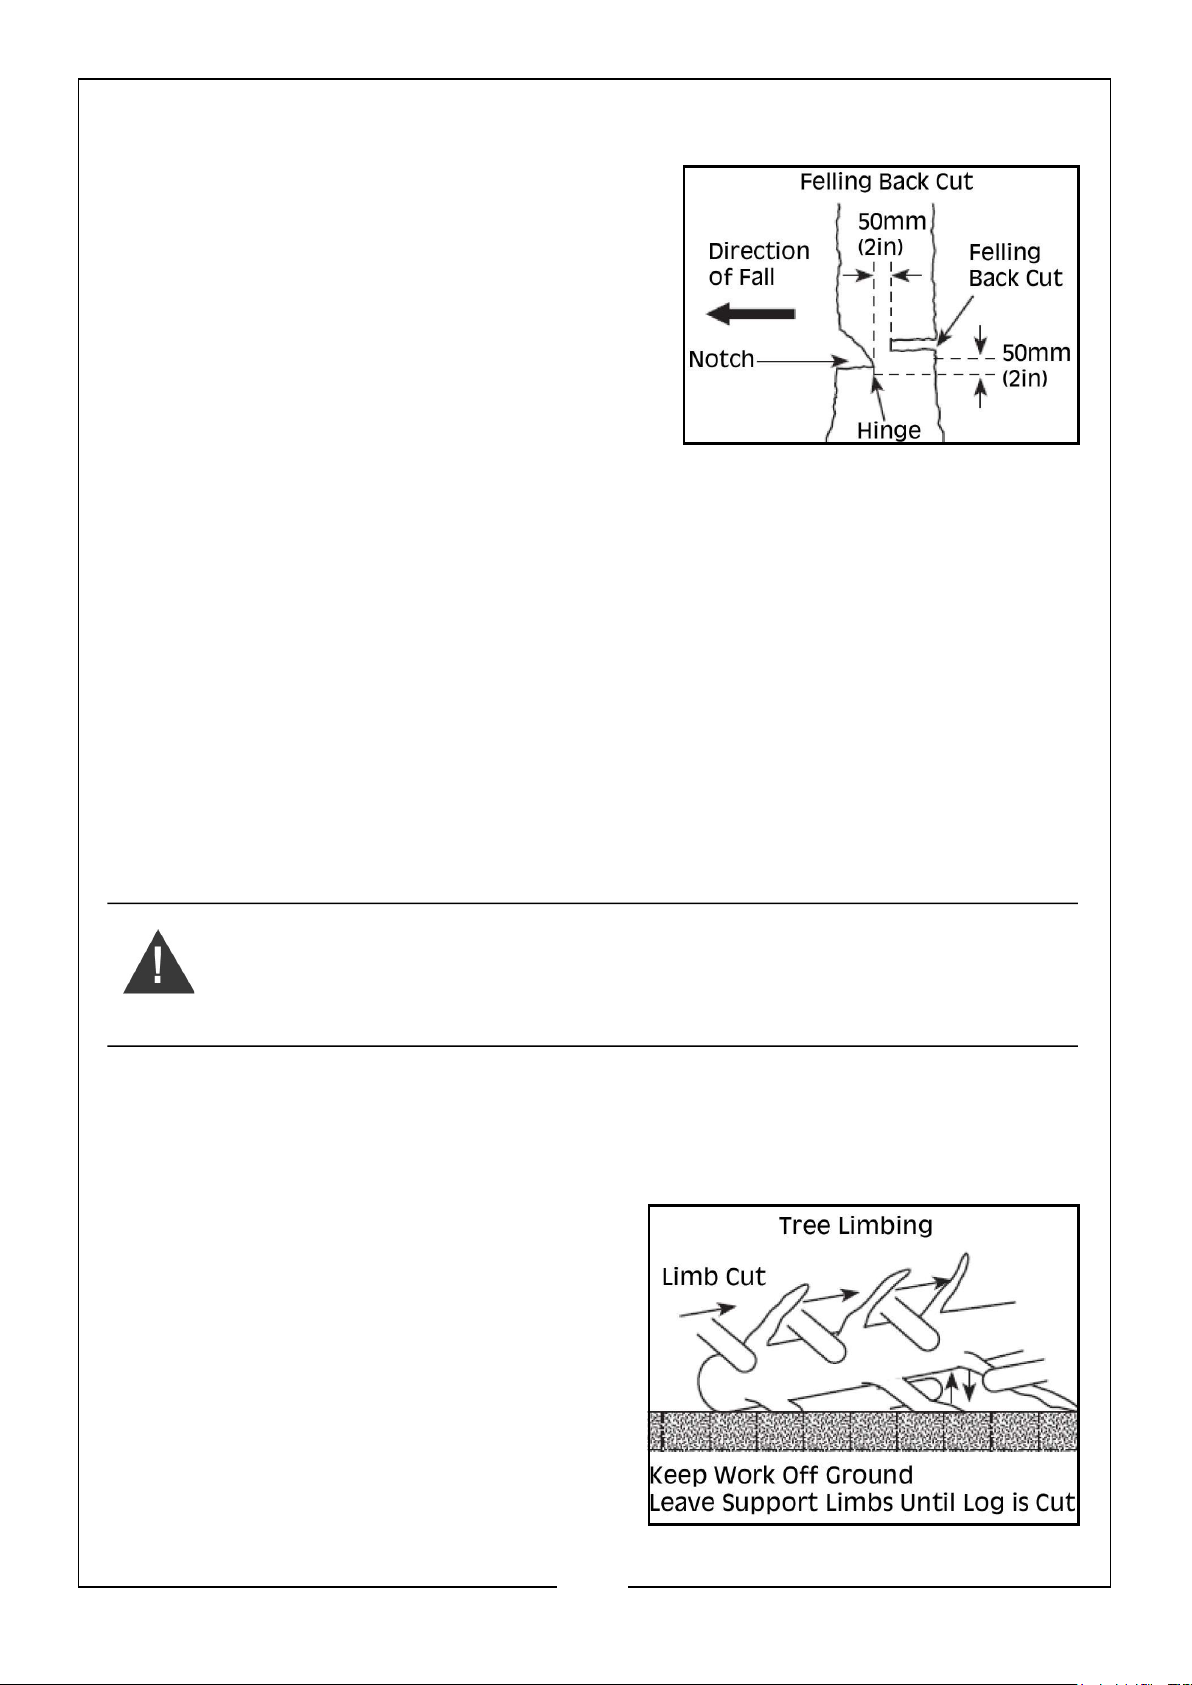
FELLING BACK CUT
1. Second, make the felling back cut at
least 50mm (2 inch) higher than the
horizontal notching undercut, as shown.
Keep the felling back cut parallel to the
horizontal notching undercut.
2. Make the felling back cut so enough
wood is left to act as a hinge. The hinge
wood keeps the tree from twisting and
falling in the wrong direction. DO NOT cut
through the hinge.
3. As the felling cut gets close to the hinge, the tree should begin to fall under
its own weight.
4. If there is any chance that the tree may not fall in the desired direction or it
may rock back and bind the saw chain, stop cutting before the felling
back cut is complete and use wedges of wood, plastic or aluminium to
open the cut and drop the tree along the desired line of fall.
5. When the tree begins to fall, remove the chainsaw from the cut, stop the
motor, put the chainsaw down, then use the retreat path planned.
6. Be alert for overhead limbs falling and watch footing.
LIMBING A TREE
WARNING: LIMBS UNDER TENSION CAN SPRING BACK AND CONTACT
THE OPERATOR OR THROW THE CHAINSAW OUT OF CONTROL RESULTING
IN PERSONAL INJURY. ALWAYS BE ALERT FOR WOOD UNDER TENSION
WHICH MAY STRIKE THE OPERATOR OR CHAINSAW WHEN CUT.
Limbing is removing the branches from a fallen tree.
1. When limbing, leave large lower limbs to support the log off the ground.
2. Remove the small limbs in one cut.
3. Branches under tension should be cut
from the bottom up to avoid binding
the chainsaw, as shown.
27
Parts & Service: 020 8988 7400 / E-mail: [email protected] or [email protected]
Page 28
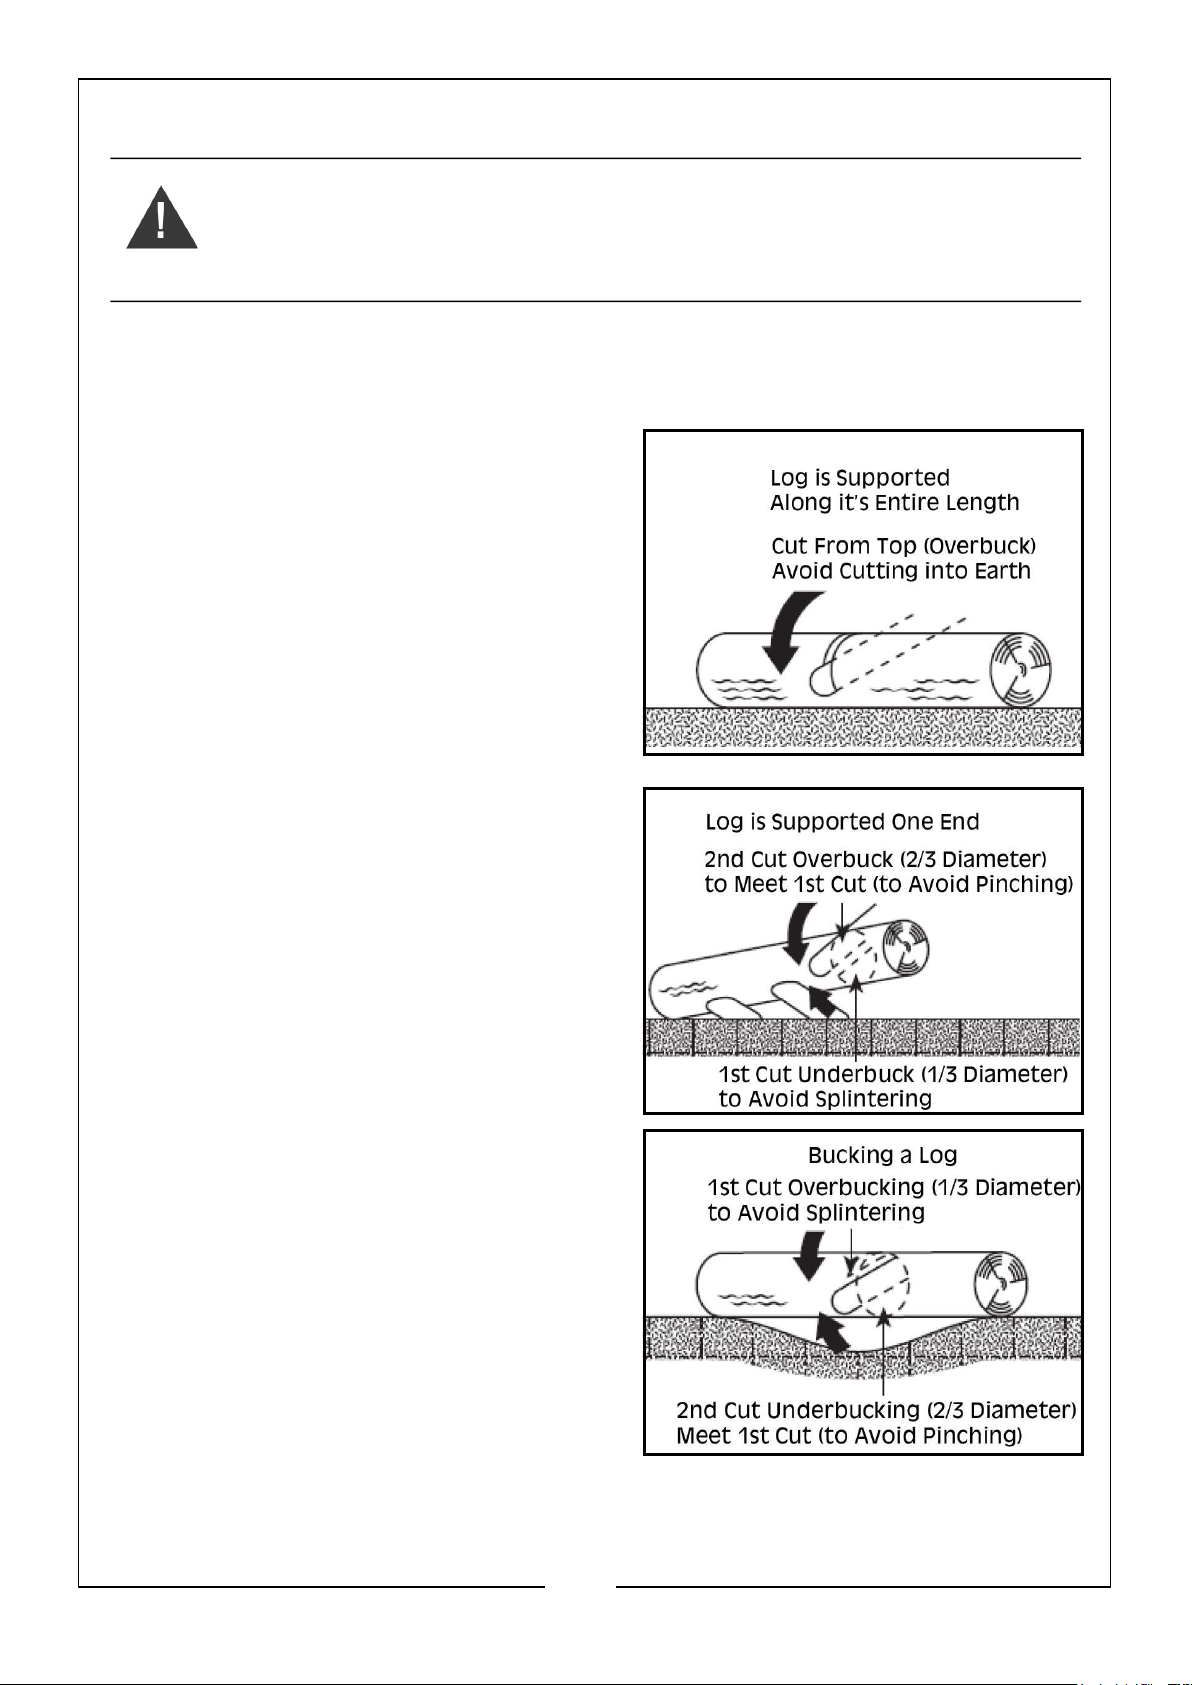
BUCKING A LOG
WARNING: BUCKING LOGS UNDER TENSION INCREASES THE CHANCE OF
KICKBACK. USE ONE OF THE METHODS BELOW TO SUPPORT THE LOG
WHEN BUCKING.
Bucking is cutting a log into lengths. It is important to make sure footing is firm
and weight is evenly distributed on both feet. When possible, the log should
be raised and supported by the use of limbs, logs or chocks.
1. When the log is supported along its
entire length, cut from the top
(overbuck), as shown.
2. When the log is supported on one
end, cut 1/3 the diameter from the
underside (underbuck), then make
the finished cut by overbucking to
meet the first cut, as shown.
3. When the log is supported on both
ends, cut 1/3 of that diameter from
the top overbuck, then make the
finished cut by underbucking the
lower 2/3 to meet the first cut, as
shown.
28
Parts & Service: 020 8988 7400 / E-mail: [email protected] or [email protected]
Page 29
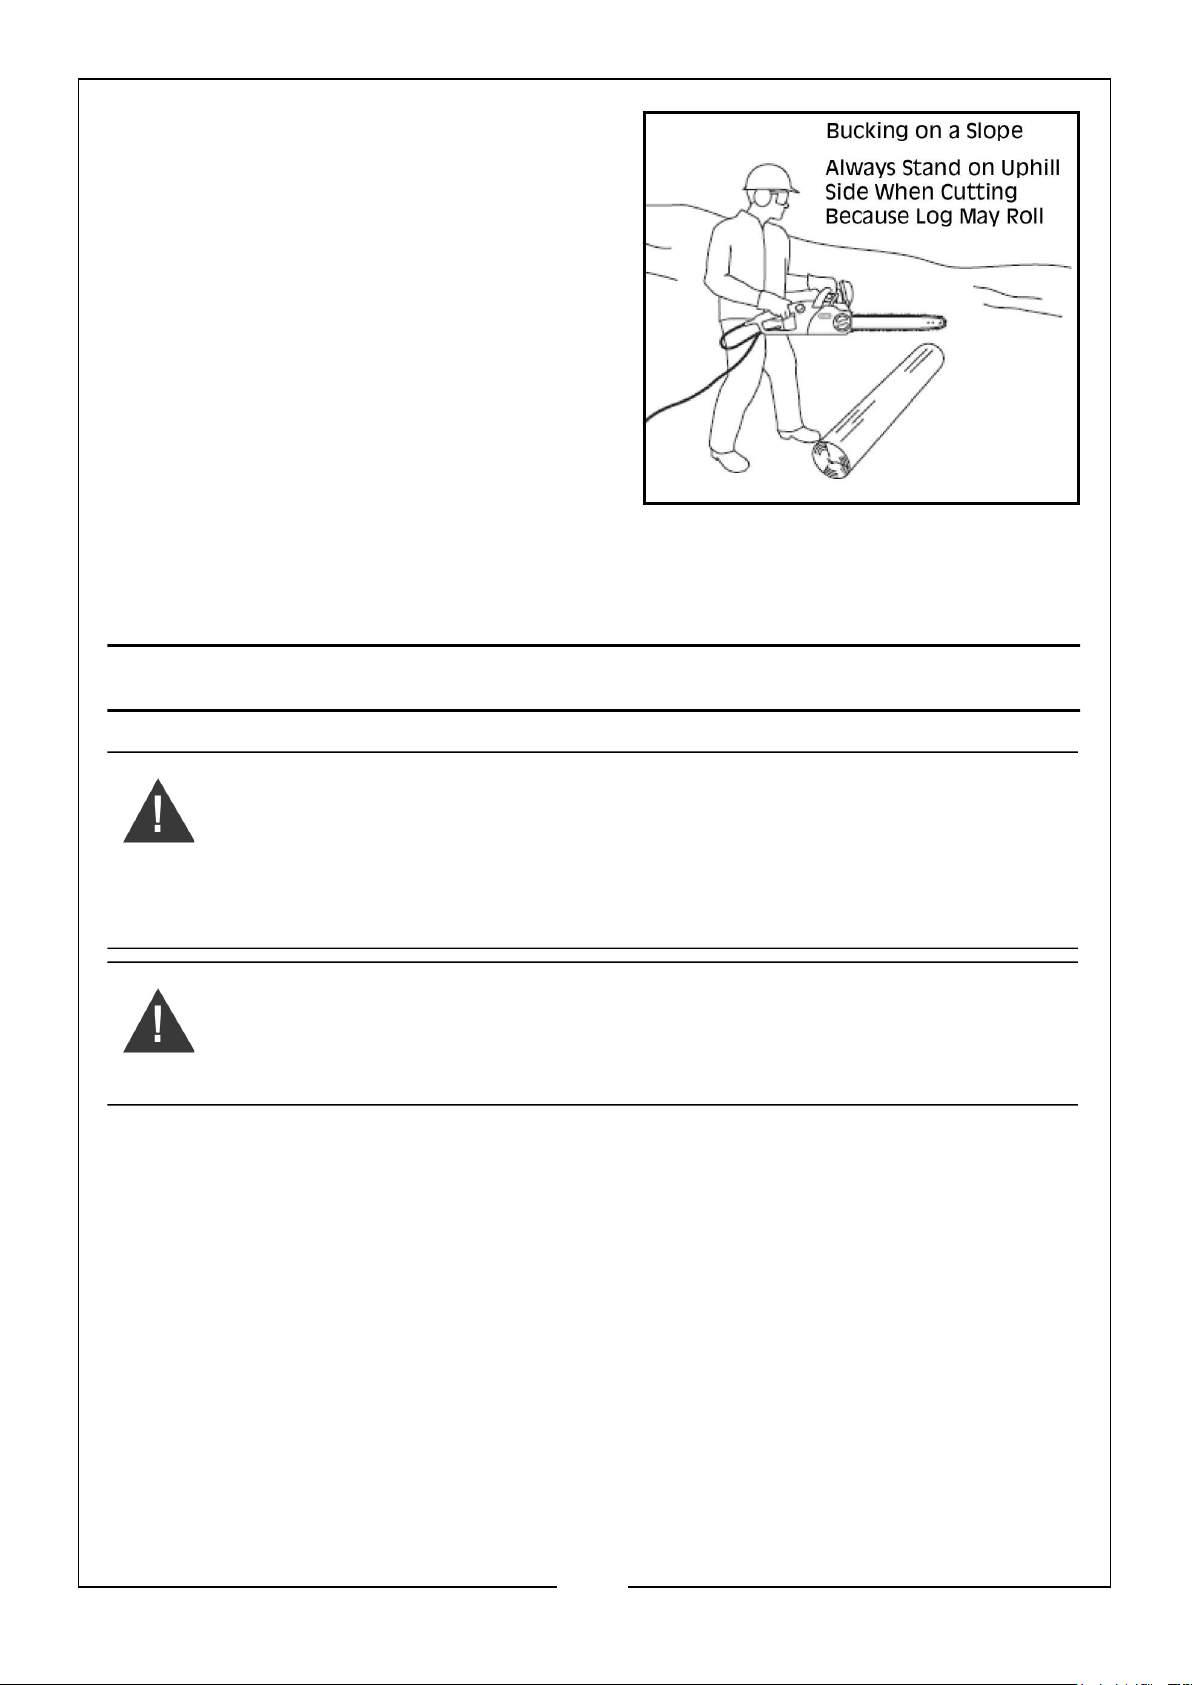
4. When bucking on a slope, always
stand on the uphill side of the log, as
shown.
5. To maintain complete control when
cutting through, release the cutting
pressure near the end of the cut
without relaxing the grip on the
chainsaw handles.
6. Don’t let the chain contact the
ground.
7. After completing the cut, wait for the
saw chain to stop before you move
the chainsaw.
8. Always stop the motor before moving from tree to tree.
MAINTENANCE AND CLEANING
WARNING: FAILURE TO IDENTIFY AND REPLACE DAMAGED OR WORN
PARTS CAN CAUSE SERIOUS PERSONAL INJURY. INSPECT THE CHAINSAW
REGULARLY. REGULAR INSPECTION IS THE FIRST STEP TO PROPER
MAINTENANCE. FOLLOW THE GUIDELINES BELOW TO MAXIMISE SAFETY
AND SATISFACTION. HAVE ANY DAMAGED OR EXCESSIVELY WORN
PARTS REPLACE IMMEDIATELY.
WARNING: ALWAYS SWITCH THE CHAINSAW OFF, DISCONNECT FROM
THE POWER SUPPLY AND LET THE CHAINSAW COOL DOWN BEFORE
PERFORMING INSPECTION, MAINTENANCE AND CLEANING WORK!
INSPECTION
Before each use and if the chainsaw has been dropped, inspect these parts:
• Cord: Ensure the plug is in good condition and not bent or corroded,
and that the insulation is intact. If the cord is damaged, DO NOT USE.
Contact CLARKE parts/service department.
• Handles: Front and rear handles should not have cracks or other
damage. They should be clean and dry.
• Front Hand Guard: The front hand guard should be free of damage and
able to move easily back and forth. When moved, the front hand guard
should activate the chain brake.
29
Parts & Service: 020 8988 7400 / E-mail: [email protected] or [email protected]
Page 30
• Guide Bar: The bar should be straight and free of chips, cracks or
excessive wear.
• Saw Chain: The chain should be properly tensioned and sharp and all
components free of cracks, chips, broken teeth or excessive wear. See
‘Tensioning the Saw Chain’ (pages 17-18) section.
• Side Cover: The side cover should be free of cracks or other damage. It
should fit tightly to the saw body with no warping. Make sure the chain
catcher is free of cracks.
• Chain Brake: Test the chain brake to make sure it is functioning properly.
See ‘Testing the chain brake’ section on page 21.
• Oil Level: Make sure the oil reservoir is full before use.
• Motor Housing: Check for cracks in the cover and debris in the air intake
vents.
Periodically inspect these parts:
• Drive Sprocket: Look for deep grooves, broken teeth or burrs.
• Chain Tensioning Gear: Inspect the gear for cracks, chips, loose screws,
warping or other damage.
• Bar Mounting Area Underneath Side Cover: Make sure the bar mounting
stud is not bent, stripped or cross threaded and that the bar pad and
alignment flange are free of debris and intact.
SHARPENING THE CHAIN
WARNING: SHARPENING THE CHAIN CAN PRODUCE LOW ENERGY
SPARKS. THE CHAIN SHOULD NOT BE SHARPENED IN THE PRESENCE OF
EXPOSED, EXTREMELY FLAMMABLE MATERIALS SUCH AS PETROL AND
ACETYLENE.
There are numerous types of chain sharpening devices on the market. The
following precautions should be adhered to.
1. A sharpener is designed specially for sharpening chainsaw chains. DO NOT
use it for any other purpose.
2. DO NOT sharpen damaged chainsaw chains.
3. DO NOT operate the sharpener without the relevant protective covers in
place.
4. ALWAYS adhere to the sharpeners user instructions and safety precautions.
30
Parts & Service: 020 8988 7400 / E-mail: [email protected] or [email protected]
Page 31

CLEANING
WARNING: WHEN CLEANING THE CHAINSAW POWERHEAD, DO NOT
IMMERSE IN WATER OR OTHER LIQUIDS.
1. Always wear gloves when cleaning the chainsaw.
2. Unplug the chainsaw.
3. Remove wood chips and other debris from the motor housing and the
vents.
4. Always clean out wood chips, saw dust and dirt from the bar groove when
replacing the chain.
5. Make sure the cord and plug are dry before connecting to an outlet.
TENSIONING THE SAW CHAIN
IMPORTANT: Only tension the saw chain when the chain is cool. A hot chain
may contract and damage the guide bar or chain as it cools.
If the chain does not touch the underside of the bar when the chainsaw is off
and cool, it should be tensioned.
Tension the chain as described in ‘Tensioning the Saw Chain’ section on
pages 17-18.
REPLACING A WORN SAW CHAIN
When the saw chain becomes cracked or has broken teeth, or is stretched to
the point that it cannot be kept at proper tension or simply cannot be
sharpened, it must be replaced.
1. Always wear gloves when handling the saw chain.
2. Unplug the chainsaw.
3. Loosen the side cover release knob slightly, but DO NOT remove the side
cover.
4. Loosen the chain tensioning ring (turn it anti-clockwise) as far as it will go.
5. Loosen the side cover release knob and remove the side cover.
6. Remove the saw chain.
31
Parts & Service: 020 8988 7400 / E-mail: [email protected] or [email protected]
Page 32
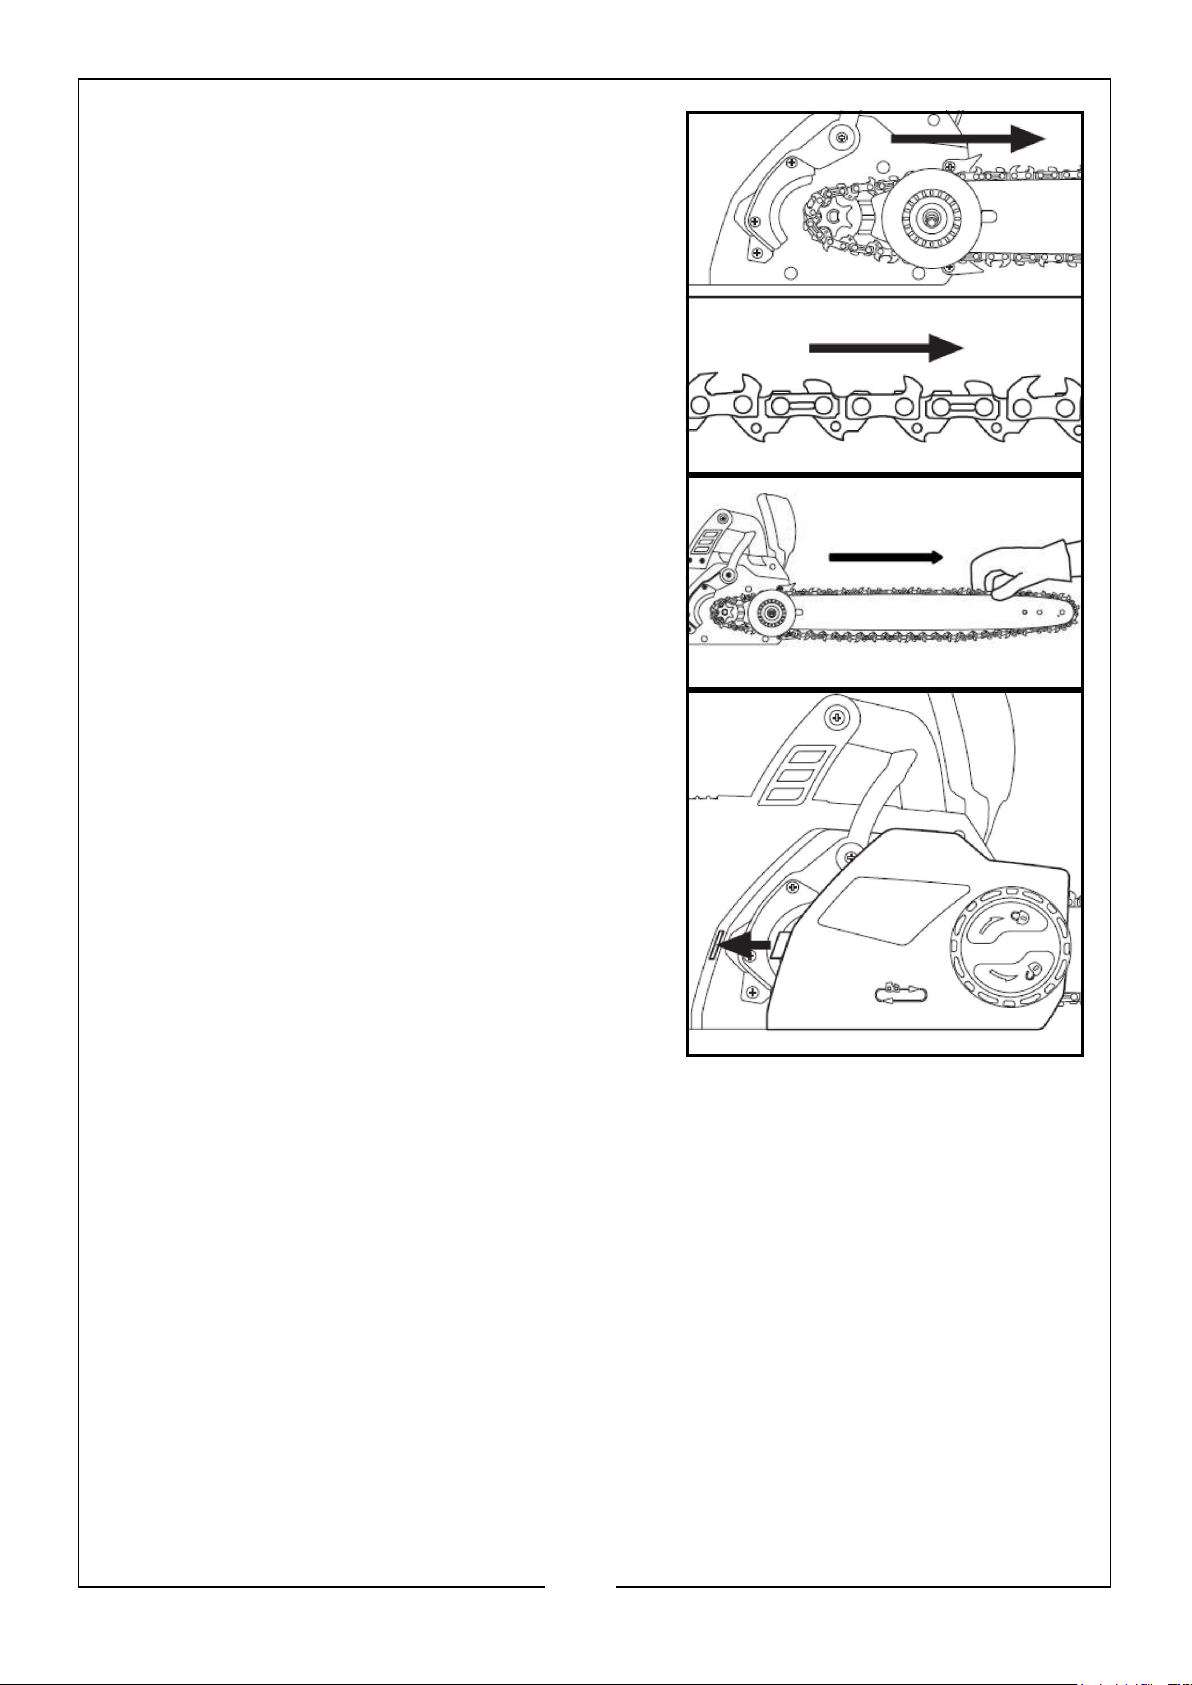
7. Loop the new saw chain onto the drive
sprocket so that the cutting edges of the
teeth along the top of the bar face
away from the powerhead, as shown.
8. Feed the chain into the groove of the
bar and slide the bar away from the
motor to remove slack from the chain, as
shown.
9. Install the slide cover, making sure the
chain catcher and side cover tab are
seated in their proper locations, as
shown, then lightly tighten the side cover
release knob.
10. Tension the chain as described in
‘Tensioning the Saw Chain’ section on
pages 17-18.
MAINTAINING THE GUIDE BAR
To even bar wear and maximise bar life, flip the bar occasionally.
1. Always wear gloves when handling the saw chain and bar.
2. Unplug the chainsaw.
3. Loosen the side cover release knob slightly, but DO NOT remove the side
cover.
4. Loosen the chain tensioning ring (turn it anti-clockwise) as far as it will go.
5. Loosen the side cover release knob and remove the side cover.
6. Remove the bar and chain and inspect for damage and wear.
32
Parts & Service: 020 8988 7400 / E-mail: [email protected] or [email protected]
Page 33
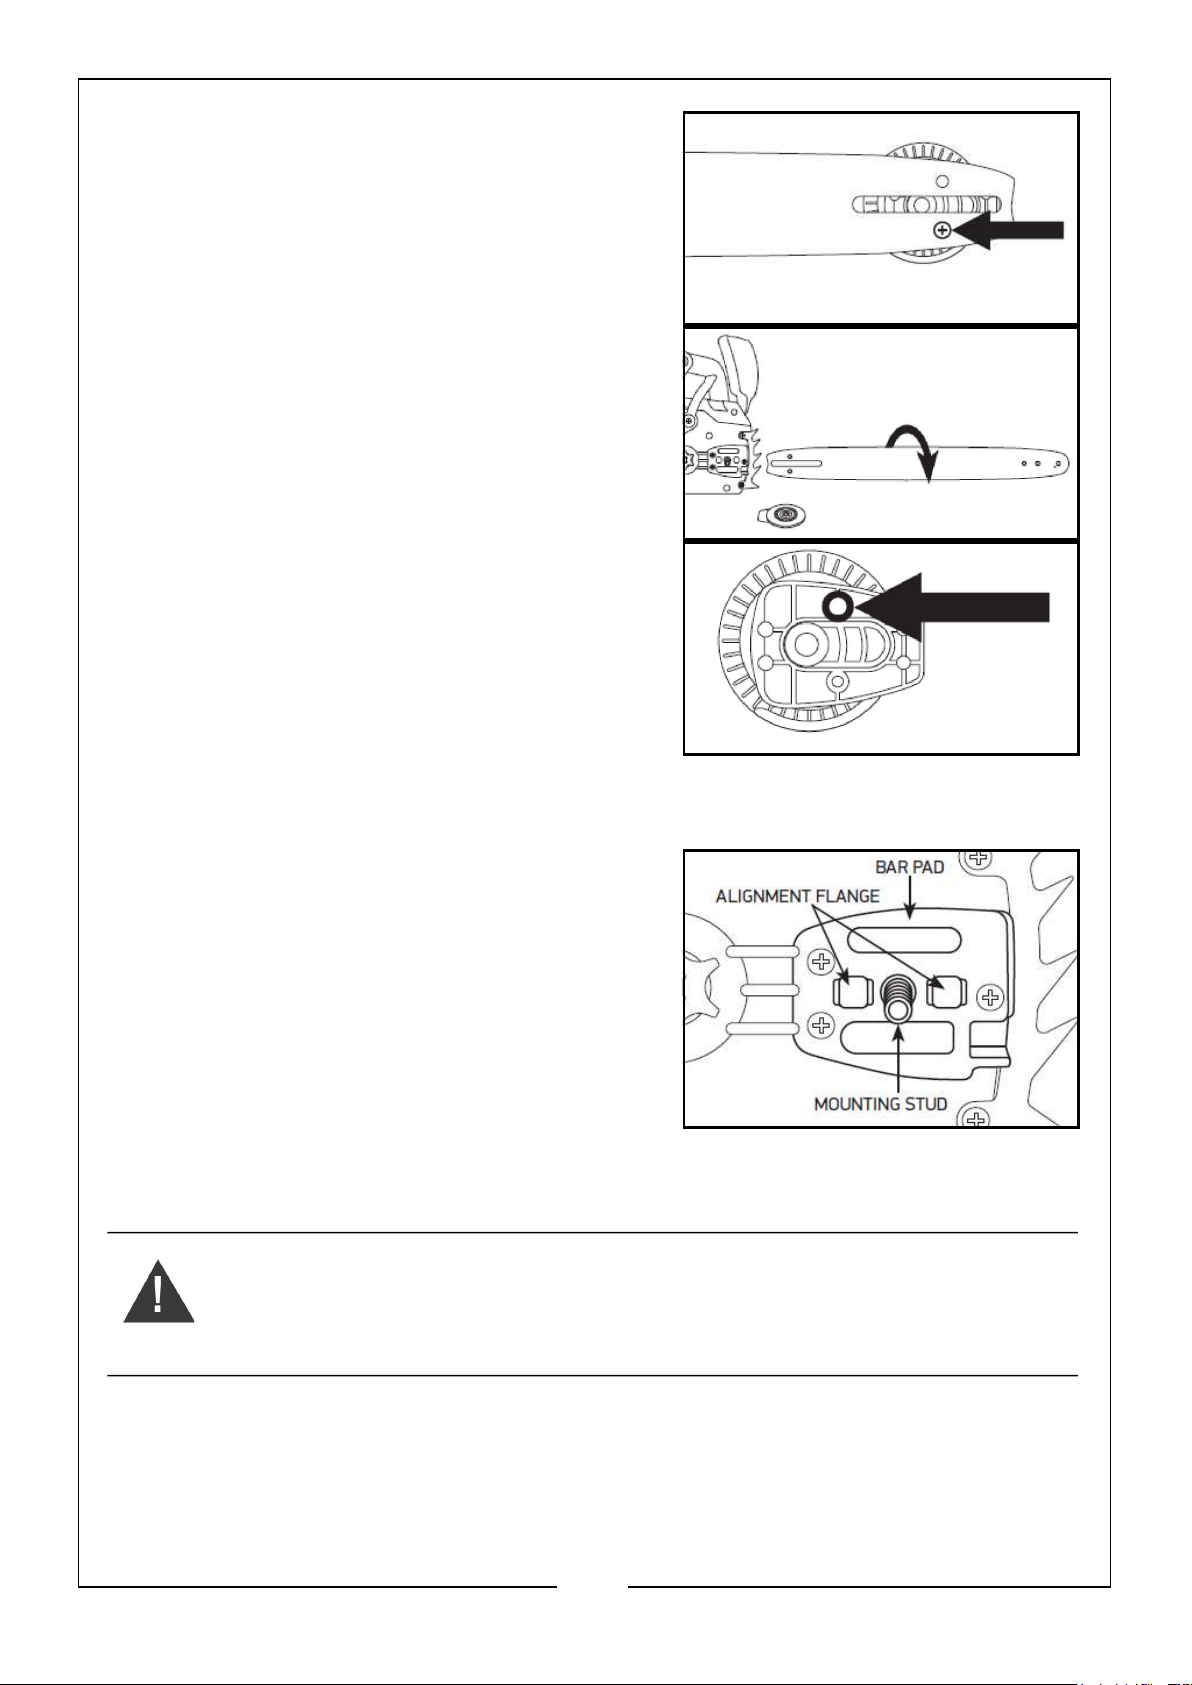
7. Remove the screw from the back side of
the chain tensioning gear and remove
the chain tensioning gear from the guide
bar, as shown.
8. Flip the bar, as shown.
9. there is a rubber washer that is important
to the function of the saw. the rubber
washer must be in place around the pin
on the tensioner before the tensioner is
screwed onto the bar, as shown.
10. Place the chain tensioning gear on the
side of the guide bar facing you such
that the rectangular piece does not protrude past the edges of the guide
bar and replace the screw.
11. Place the guide bar on the bar pad by
sliding the bar slot over the alignment
flange, as shown.
12. Replace the saw chain as described in
‘Replacing a Worn Saw Chain’ section
on pages 31-32.
13. Tension the chain as described in
‘Tensioning the Saw Chain’ section on
pages 17-18.
REPLACING A WORN GUIDE BAR
WARNING: THE EDGES OF A WORN GUIDE BAR, PARTICULARLY THE EDGES
OF THE GROOVE WHERE THE CHAIN TOUCHES THE BAR, CAN BE
EXTREMELY SHARP. ALWAYS USE APPROPRIATE HAND PROTECTION.
When the guide bar becomes cracked or has excessive wear around the
edges, particularly in the groove where the saw chain touches the bar, it must
be replaced. Also, if the nose sprocket at the end of the bar is worn, has teeth
missing or does not turn smoothly, the bar must be replaced.
1. Always wear gloves when handling the saw chain and bar.
33
Parts & Service: 020 8988 7400 / E-mail: [email protected] or [email protected]
Page 34

2. Unplug the chainsaw.
3. Loosen the side cover release knob slightly, but DO NOT remove the side
cover.
4. Loosen the chain tensioning ring (turn it anti-clockwise) as far as it will go.
5. Loosen the side cover release knob and remove the side cover.
6. Remove the bar and chain.
7. Remove the screw from the back side of the chain tensioning gear and
remove the chain tensioning gear from the guide bar as described in
‘Maintaining the Guide Bar’ section on pages 32-33.
8. Place the chain tensioning gear on the new guide bar and replace the
screw.
9. Replace the guide bar as described in ‘Maintaining the Guide Bar’ section
on pages 32-33.
10. Replace the saw chain as described in ‘Replacing a Worn Saw Chain’
section on pages 31-32.
11. Tension the chain as described in ‘Tensioning the Saw Chain’ section on
pages 17-18.
REPLACING A WORN CHAIN TENSIONING GEAR
1. Always wear gloves when handling the saw chain and bar.
2. Unplug the chainsaw.
3. Loosen the side cover release knob slightly, but DO NOT remove the side
cover.
4. Loosen the chain tensioning ring (turn it anti-clockwise) as far as it will go.
5. Loosen the side cover release knob and remove the side cover.
6. Remove the bar and chain.
7. Remove the screw from the back side of the chain tensioning gear and
remove the chain tensioning gear from the guide bar as described in
‘Maintaining the Guide Bar’ section on pages 32-33.
8. Place the new chain tensioning gear on the side of the guide bar facing
you, and replace the screw.
9. Place the guide bar on the bar pad by sliding the bar slot over the
alignment flange as described in ‘Maintaining the Guide Bar’ section on
pages 32-33.
10. Replace the saw chain as described in ‘Replacing a Worn Saw Chain’
section on pages 31-32.
34
Parts & Service: 020 8988 7400 / E-mail: [email protected] or [email protected]
Page 35
11. Tension the chain as described in ‘Tensioning the Saw Chain’ section on
pages 17-18.
REPLACING THE DRIVE SPROCKET
Replace the drive sprocket after every two saw chain replacements or when
the sprocket is damaged.
1. Always wear gloves when handling the saw chain and bar.
2. Unplug the chainsaw.
3. Loosen the side cover release knob slightly, but DO NOT remove the side
cover.
4. Loosen the chain tensioning ring (turn it anti-clockwise) as far as it will go.
5. Loosen the side cover release knob and remove the side cover.
6. Remove the bar and chain.
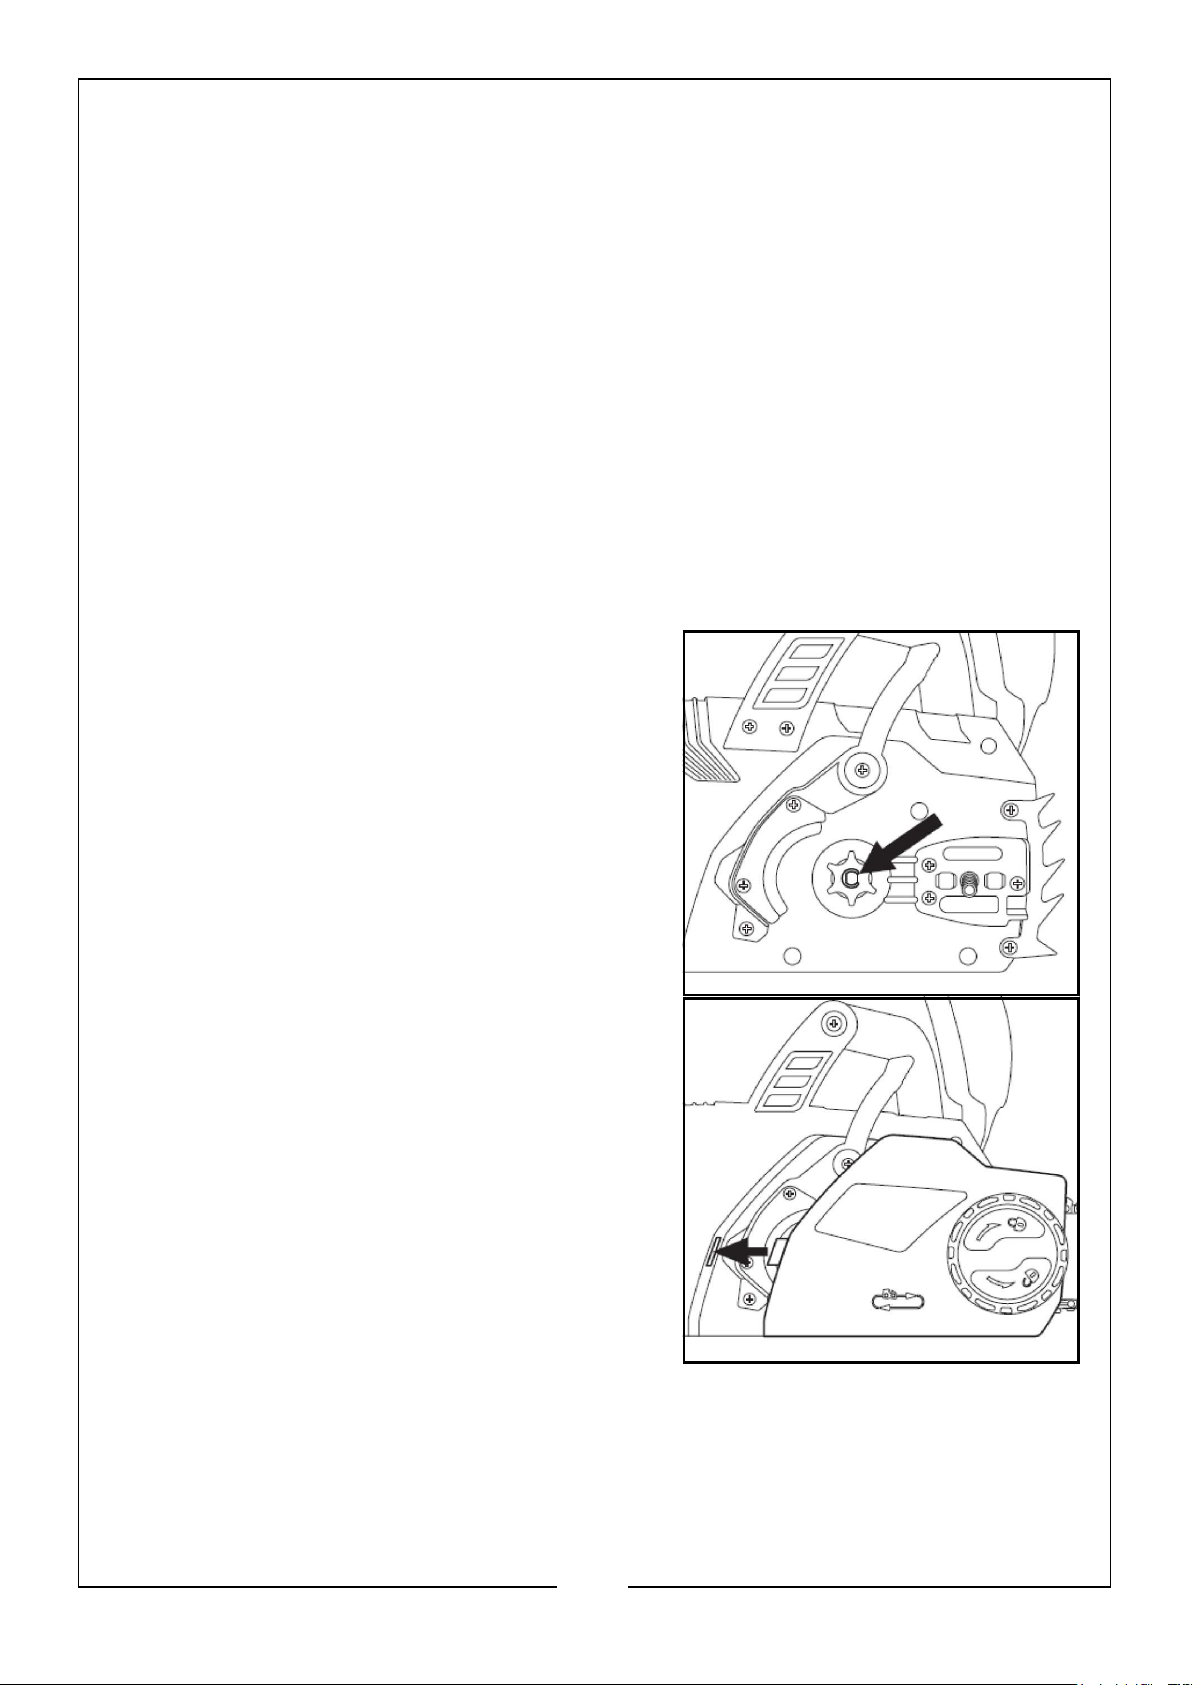
7. Use a small flat screwdriver to pry open
and remove the e-clip, then remove the
drive sprocket and spring, as shown.
8. Insert the new spring and drive sprocket,
and install the new e-clip, as shown.
9. Replace the saw chain as described in
‘Replacing a Worn Saw Chain’ section
on pages 31-32.
10. Tension the chain as described in
‘Tensioning the Saw Chain’ section on
pages 17-18.
35
Parts & Service: 020 8988 7400 / E-mail: [email protected] or [email protected]
Page 36

STORAGE & TRANSPORTATION
STORAGE
• Switch the chainsaw off and disconnect it from the power supply.
• Clean the chainsaw as described on page 31.
• Store the chainsaw and its accessories in a dry, frost-free, well-ventilated
place.
• Always store the chainsaw in a place that is inaccessible to children. The
ideal storage temperature is between 10°C and 30°C.
• We recommend using the original package for storage or covering the
chainsaw with a suitable cloth or enclosure to protect it against dust.
TRANSPORTATION
• Switch the chainsaw off and disconnect it from the power supply.
• Attach the blade cover.
• Always carry the chainsaw by its handles.
• Protect the chainsaw from any heavy impact or strong vibrations which
may occur during transportation in vehicles.
• Secure the chainsaw to prevent it from slipping or falling over.
36
Parts & Service: 020 8988 7400 / E-mail: [email protected] or [email protected]
Page 37
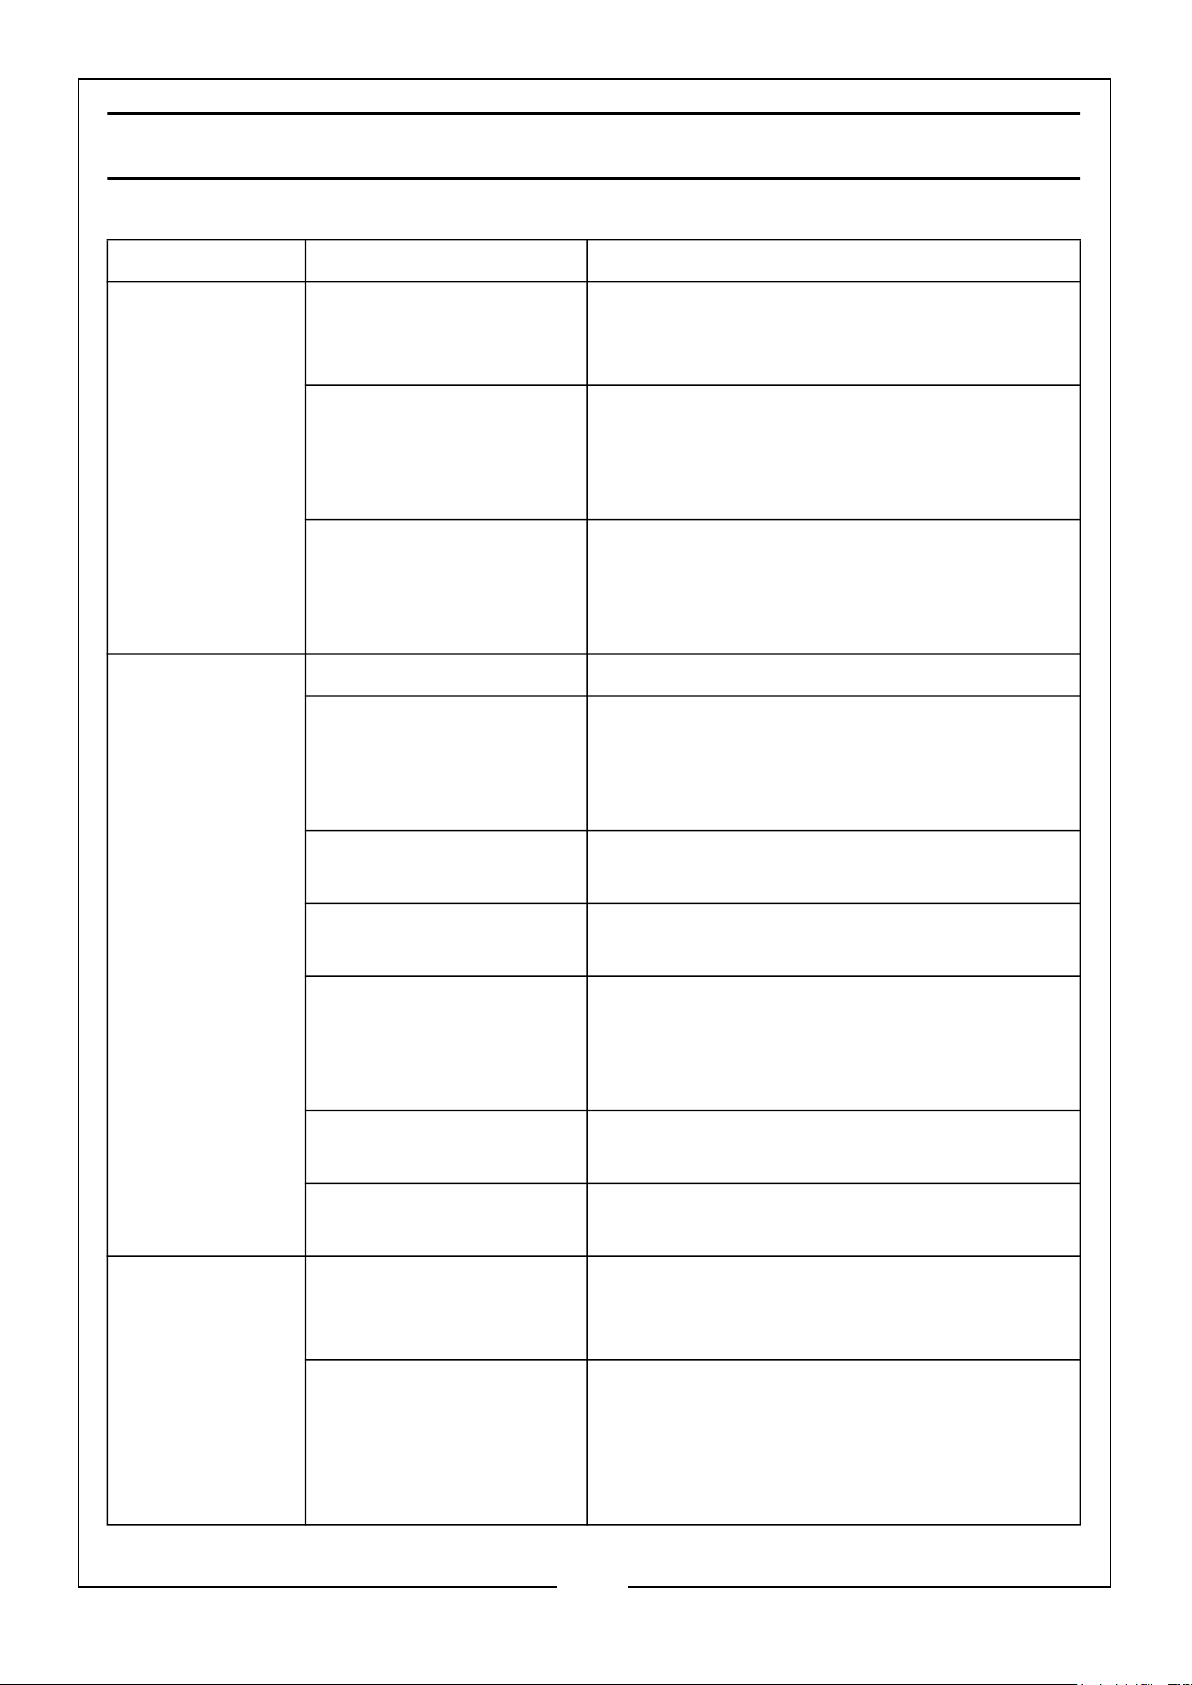
TROUBLESHOOTING
Problem Possible Cause Recommended Actions
Motor stops
while cutting
Motor does
not run or runs
intermittently
Chain pinched in cut Undercut limb to relieve pressure on
limb. See ‘Cutting’ section on page 2329
Cord is damaged or
severed
Chain brake is
engaged
Saw is not plugged in Plug in the saw
Cord is damaged or
severed
Outlet fuse is tripped Unplug extension cord, Reset the fuse
If extension cord is damaged, DO NOT
use and replace it. If chainsaw cord is
damaged, DO NOT use and contact
an approved service location
Set the front hand guard to the
operating position as described in
‘Checking the Front Hand Guard
Position’ on page 14
If extension cord is damaged, DO NOT
use and replace it. If chainsaw cord is
damaged, DO NOT use and contact
an approved service location
and plug the extension cord back in
Motor does
not stop when
chain brake is
engaged
Bad electrical outlet Plug extension cord into a different
outlet
Chain brake
engaged
Trigger lockout not
pressed
Debris is side cover Unplug the chainsaw, then remove
Debris preventing full
movement of front
hand guard
Possible chain brake
malfunction
Set the front hand guard to the
operating position as described in
‘Checking the Front Hand Guard
Position’ on page 14
Press the trigger lockout before
squeezing the trigger, see page 20
side cover and clean out debris
Clean debris from the external chain
brake mechanism
DO NOT USE. Warning, operating a
chainsaw without a functioning chain
brake could lead to serious personal
injury. Contact an approved service
location before using.
37
Parts & Service: 020 8988 7400 / E-mail: [email protected] or [email protected]
Page 38

Motor runs, but
saw chain
does not
rotate
Chain not engaging
drive sprocket
Reinstall the chain, making sure the
drive links on the chain are fully seated
on the drive sprocket. See ‘Replacing
a worn saw chain’ section on page 3132
Chainsaw
does not cut
properly
Guide bar nose
sprocket is not turning
Replace the guide bar. see ‘Replacing
a worn guide bar’ section on pages 3334
Insufficient chain
tension
Tension the chain. See ‘Tensioning the
saw chain’ section on page 17-18
Dull chain See ‘Sharpening with Chain’ section on
page 30
Chain installed
backwards
Install the chain with the teeth facing
the correct direction. See ‘Replacing a
worn saw chain’ section on page 31-32
Worn chain Replace the chain. See ‘See
‘Replacing a worn saw chain’ section
on page 31-32
Dry or excessively
stretched chain
Check the oil level. Refill oil reservoir if
necessary. See ‘Filling the bar and
chain oil reservoir’ section on page 1415
Chain
loosening or
coming off of
guide bar
Bar and chain
excessively hot
and/or
smoking
Chain not in bar
groove
Side cover not
installed correctly
Chain is under
lubricated
Reseat chain onto groove. See
‘Replacing a worn saw chain’ section
on page 31-32
Properly install side cover ensuring the
tab at rear of the side cover is tucked
into the saw body
Check the oil level. Refill oil reservoir if
necessary. See ‘Filling the bar and
chain oil reservoir’ section on page 1415
38
Parts & Service: 020 8988 7400 / E-mail: [email protected] or [email protected]
Page 39
Page 40

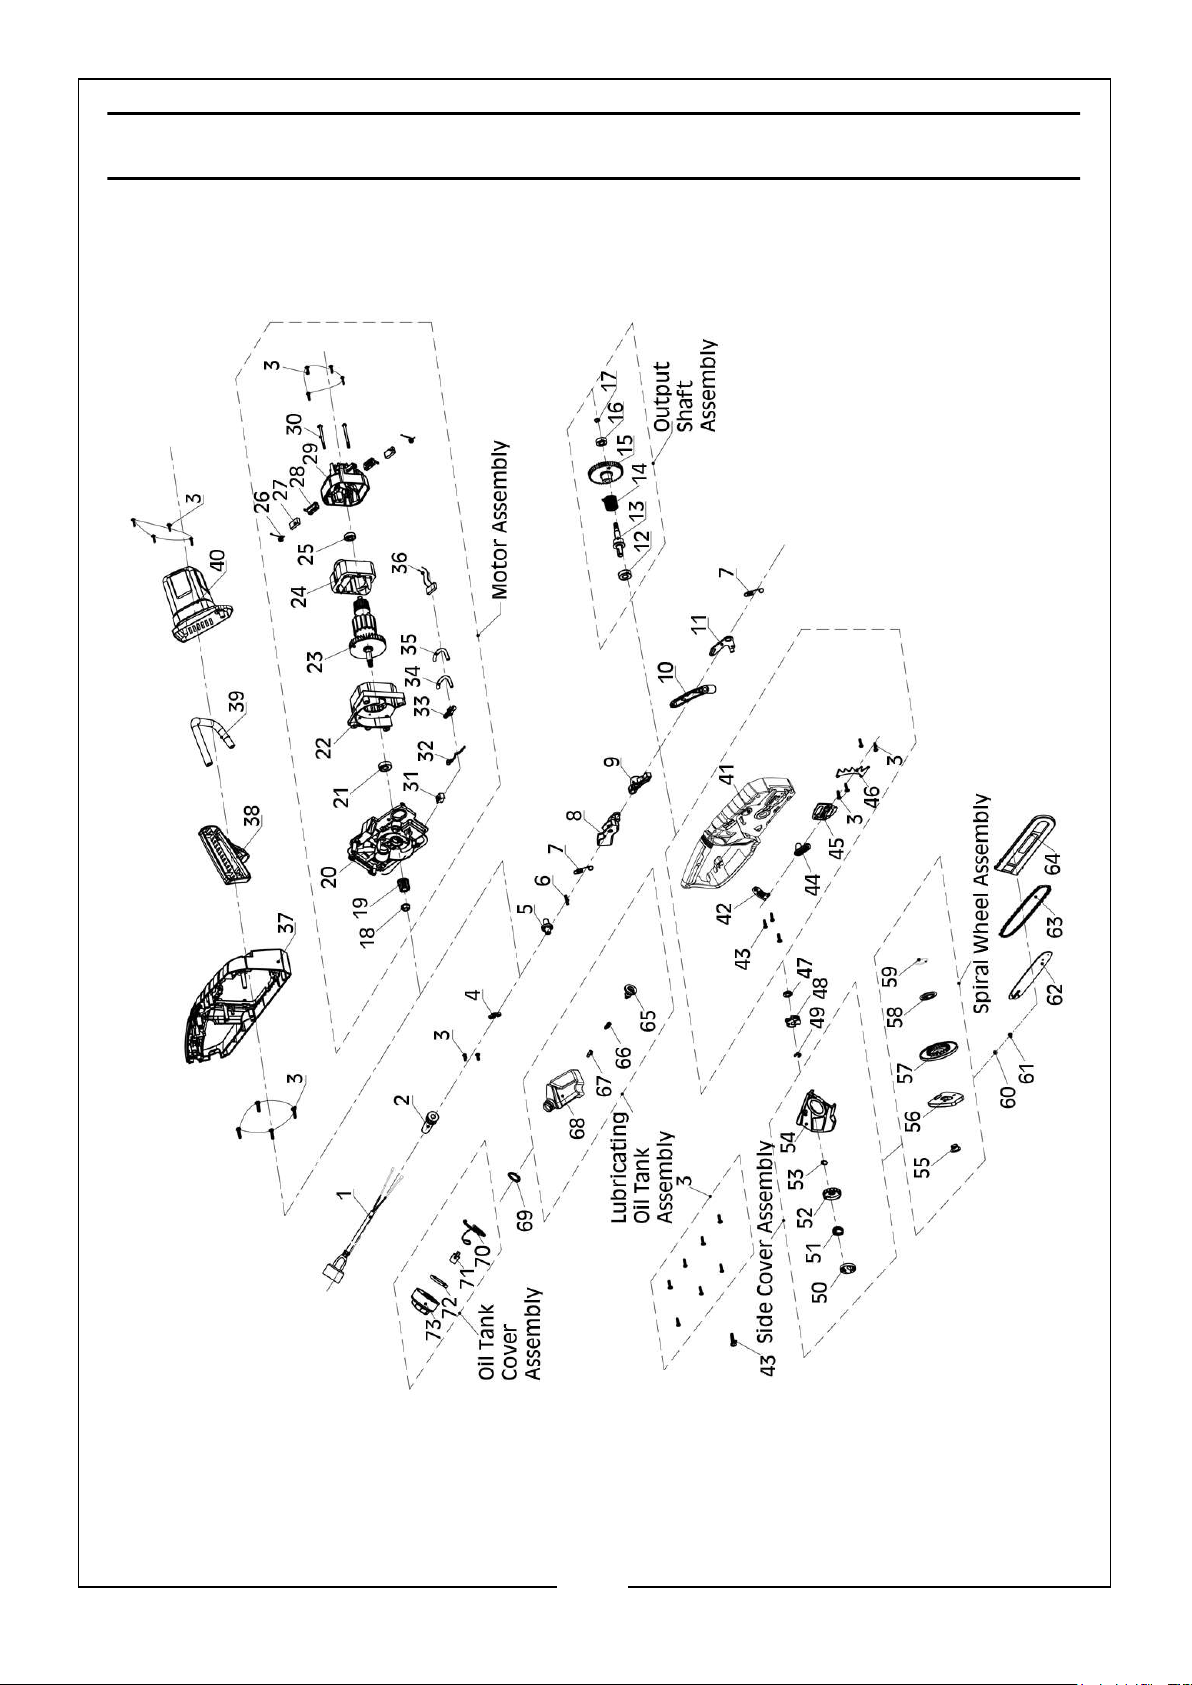
PARTS LIST
1 Power Cable Assembly 32 Brake Spring
2 Cable Sheath 33 Pump Unit
3 Screw ST4x16 34 Oil Pipe
4 Cable Clamp 35 Oil Pipe
5 Button 36 Left Housing
6 Button Spring 37 Preventer Plate
7 Retracting Spring 38 Front Handle
8 Button 39 Motor Rear Cover
9 Intermediate Connecting Rod 40 Right Housing
10 Link Switch 41 Front Handle Support Plate
11 Brake Block 42 Trigger
12 Deep Groove Ball Bearing 43 Screw ST5 x 25
13 Output Shaft 44 Seal Ring
14 Brake Torsion Spring 45 Thermal Insulation Gasket
15 Output Shaft Gear 46 Buffer Board
16 608Z Bearing 47 Axle Sleeve
17 Screw M8 48 Sprocket
18 Hexagon Nut M8 x 8 49 E Ring
19 Pinion 50 Compression Knob
20 Mounting Plate 51 Press Knob Spring
21 6000Z Bearing 52 Adjusting Knob
22 Wind Deflector 53 Circlip for Shaft
23 Rotor Assembly 54 Side Cover
24 Stator Assembly 55 Adapter Sleeve
25 608 Bearing 56 Knockout Plate
26 Torsional Spring 57 Circling Round
27 Carbon Brush 58 Pressing Plate
28 Brush Holder 59 Rand
29 Motor Back Support 60 Sealing Ring
30 Screw ST4 x 65 61 Screw 35
31 Microswitch 62 Bar
40
Parts & Service: 020 8988 7400 / E-mail: [email protected] or [email protected]
Page 41

63 Chain 69 Rubber Blanket
64 Blade Cover 70 Oil Tank Cover Anti-Loss Hook
65 Tank Outlet Sealing Ring 71 Valve
66 Conical Compression Spring 72 Sealing Ring for Oil Tank
67 Valve 73 Oil Tank Cap
68 Lubricating Oil Tank
The following accessories are available from you local CLARKE dealer:
CHAINSAW OIL
• 1 Litre Chainsaw Oil (Part Number: 3050865)
• 1 Litre Biodegradable Chainsaw Blade Oil (Part Number: 3050866)
OTHER CLARKE CHAINSAW & FORESTRY PRODUCTS
• ECSS2 Electric Chainsaw Sharpener (Part Number: 3402077)
• CCLH1 Chainsaw Log Horse (Part Number: 3402085)
• V6 Vertical Electric Log Buster (Part Number: 3402150)
• H4 4 Tonne Horizontal Electric Log Buster (Part Number: 3402152)
SPARE/REPLACEMENT PARTS
Contact the CLARKE parts department on 0208 988 7400 or
[email protected] for suitable replacement parts.
• Guide Bar
• Replacement Chain
• Drive Sprocket
• Chain Tensioning Gear
REPAIR
Except for the replacement parts mentioned above, this chainsaw does not
contain any parts that can be repaired by the consumer. Contact the CLARKE
parts/service department on 0208 988 7400, [email protected] or
[email protected] to have it checked and repaired.
41
Parts & Service: 020 8988 7400 / E-mail: [email protected] or [email protected]
Page 42

SPECIFICATIONS
Rated voltage 230V @ 50Hz
Motor power rating 2000W
Ampage 4A
RPM @ 230V 8200rpm
IP Rating IPX0
Insulation Class Class II
Oil Capacity 150ml
Oil Type Clarke Chainsaw Oil.
Dimensions (D x W x H) 245mm x 850mm x 280mm
Weight 6.4kg
Bar Length 405mm
Effective Cutting Length 370mm
Chain Type 3/8” Pitch, 1.27mm Thick,
56-57 Links
No Load Chain Speed 15m/s
Chain stopping time (Kickback & Handle
Release)
Noise & Vibration Data
Sound Pressure Level 103.09dB LwA
Sound Power Level 106.09dB LwA
Guaranteed Sound Power Level 110dB LwA
Uncertainty Factor 3dB
Vibration Level
Uncertainty Factor
< 0.13 seconds
Front Handle - 2.6m/s2
Rear Handle - 2.233m/s2
1.5m/s2
42
Parts & Service: 020 8988 7400 / E-mail: [email protected] or [email protected]
Page 43
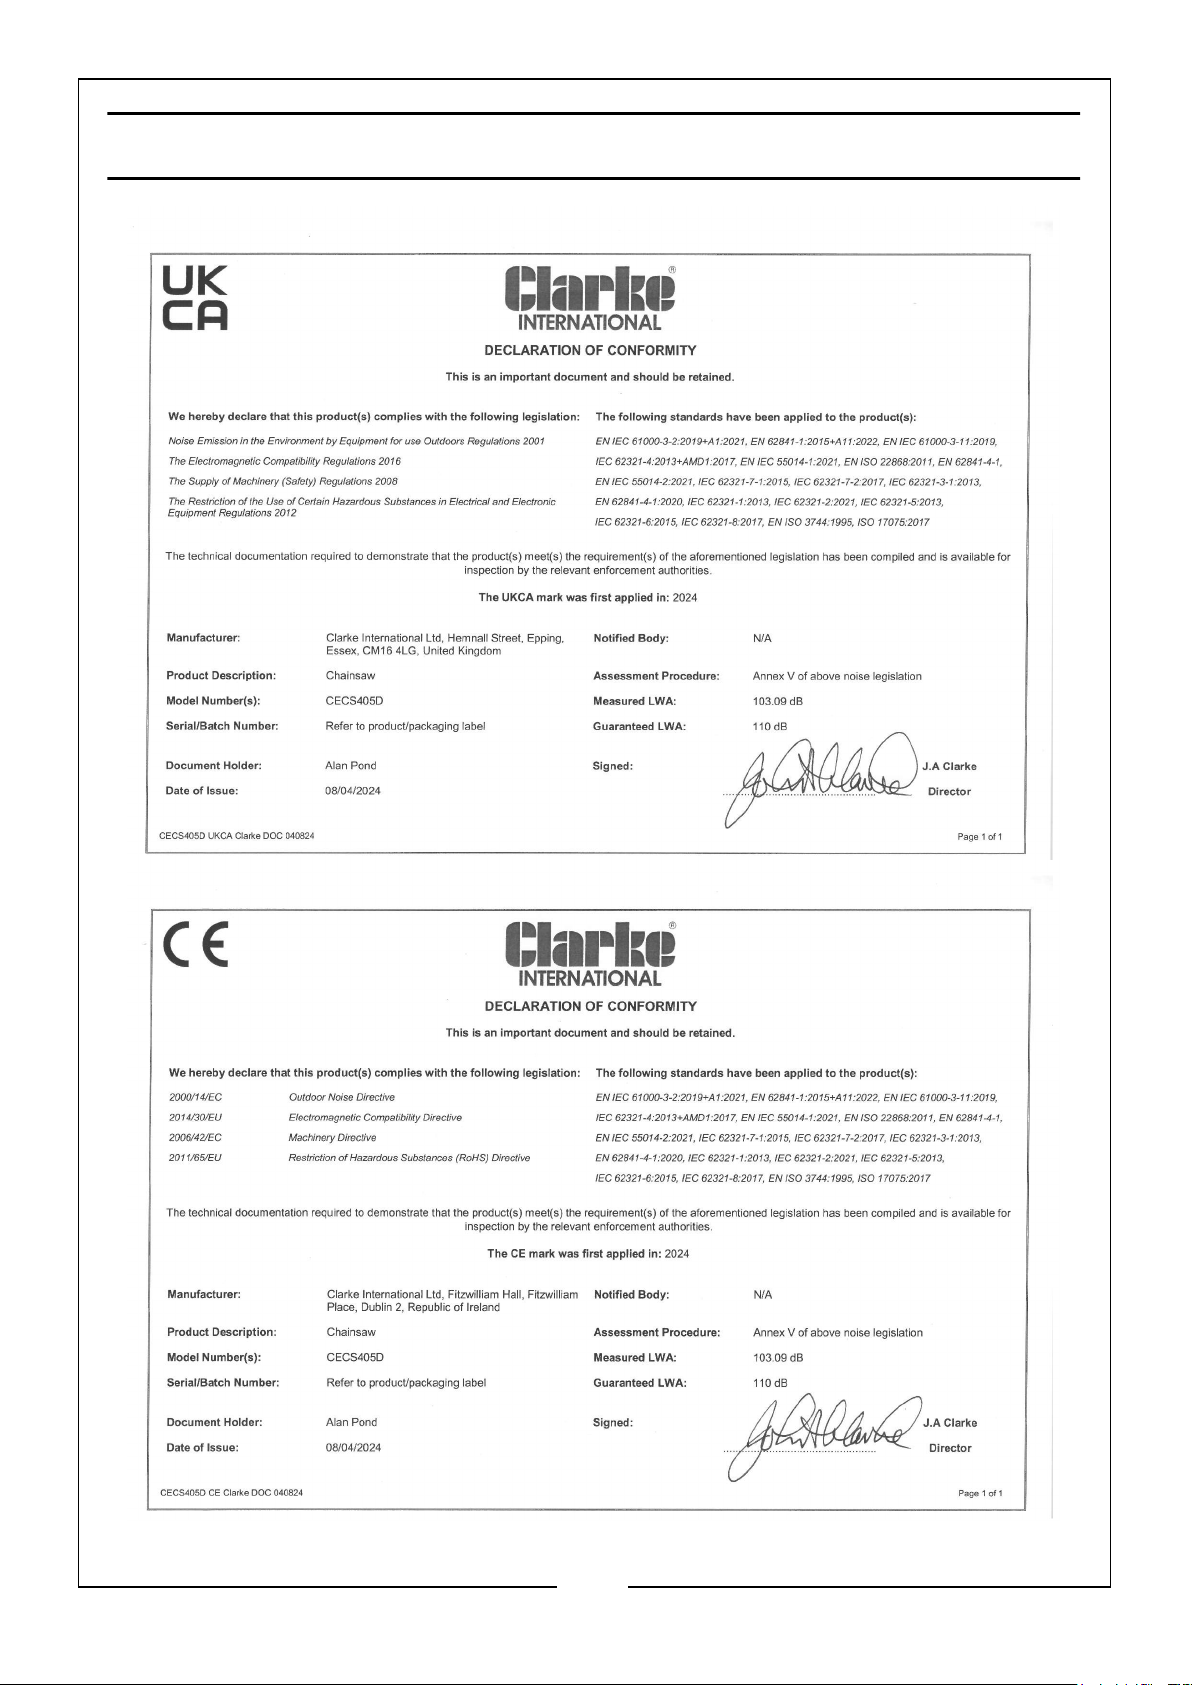
DECLARATION OF CONFORMITY
43
Parts & Service: 020 8988 7400 / E-mail: [email protected] or [email protected]
Page 44

 Loading...