

Page 1

ELECTRIC CHAINSAW
ELECTRIC CHAINSAW
MODEL No: CECS405
Part No: 3402070
OPERATING & MAINTENANCE
INSTRUCTIONS
1007
Page 2
2
Clarke International is a trading style of Clarke International Limited
This is an important document, and should be retained
DECLARATION OF CONFORMITY
We declare that this product complies to the following
standards/directives:
98/37/EC (ANNEX IV)
2000/14/EC
Product Description:
Model Number:
Serial (Batch) No:
CERTIFICATE No.
REPORT No.
NOTIFYING BODY:
DOCUMATION HELD
AT:
Engineering Manager
Date: 19 December, 2007
Signed
Hemnall Street, Epping, Essex CM16 4LG
TUV Product Services
Product Service GmnH,
Zertifizierstelle, Ridlerstrasse 65,
D-80339 Munich
Clarke International,
Shrubland Road, London E10 7RB
See Product Data Plate
ELECTRIC CHAINSAW
CECS405
BM 60010520 0001
15008124 001
31
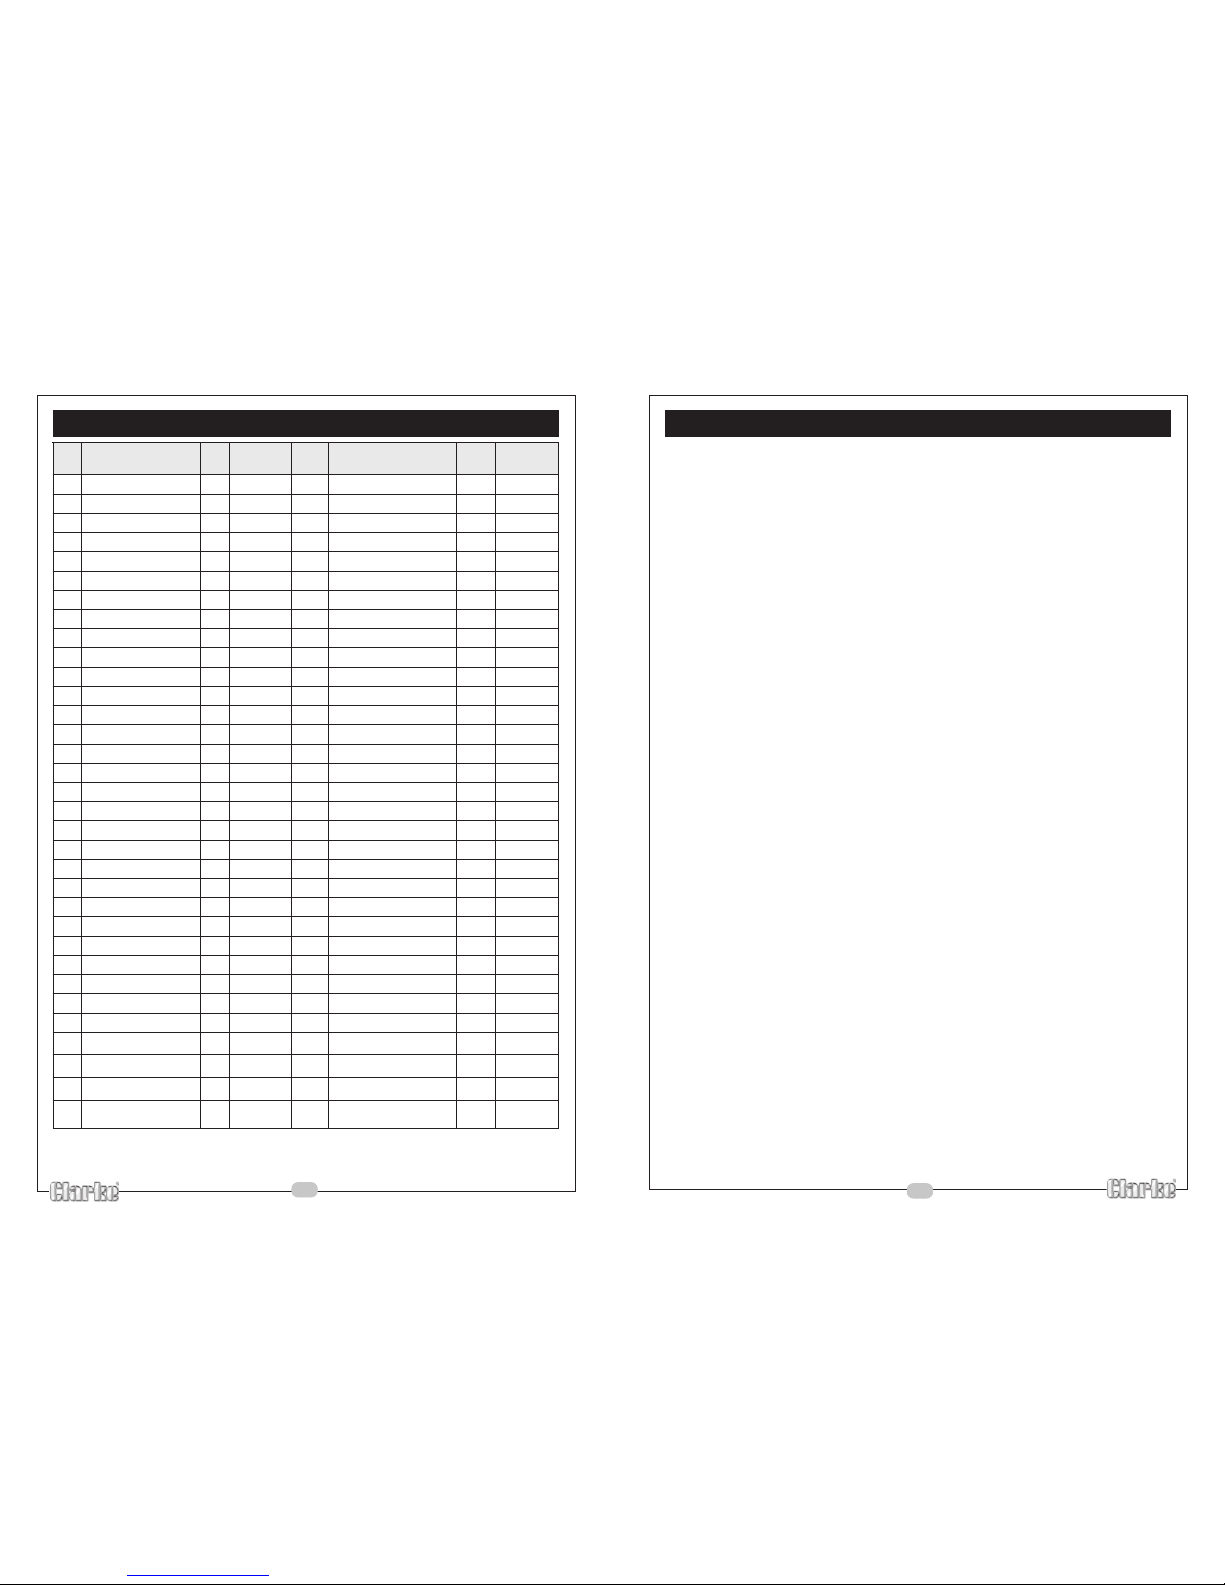
PARTS LIST
ON TRAP YTQ
TRAP
REBMUN
ON TRAP YTQ
TRAP
REBMUN
3-14gniraeBraeR246draoBdexiF146504SCECTH
24wercS124504SCECTH56wercS356504SCECTH
34rotatS134504SCECTH66hctiwSorciM166504SCEC
TH
44wercS144504SCECTH76rehsaW176504SCECTH
54doRgnitcennoChctiwS154504SCECTH86wercS186504SCECTH
64hctiwS164504SCECTH96wercS19
6504SCECTH
74leehWedilG174504SCECTH07dapekarB107504SCECTH
84nottuBhctiwS184504SCECTH17eriW117504SCECTH
94roticapaC194504S
CECTH27gniRrebbuRO227504SCECTH
05droCrewoP105504SCECTH37wercS337504SCECTH
15pirG115504SCECTH47rotpadAliO147504SCECTH
25evee
lSelbaC125504SCECTH57wercS157504SCECTH
35gnirpS135504SCECTH67mihS167504SCECTH
45pmalCelbaC145504SCECTH77draoBdrauG177504SCE
CTH
55pilCelbaC155504SCECTH87gnisuoHtfeL187504SCECTH
65wercS265504SCECTH97revoChsurBnobraC297504SCECTH
75ebuTteltuOliO175
504SCECTH08hsurBnobraC208504SCECTH
85rotpadA285504SCECTH18redloHhsurB218504SCECTH
95wercS295504SCECTH77draoBdrauG177504SC
ECTH
06ylbmessApmuPliO06504SCECTH87gnisuoHtfeL187504SCECTH
1-06pmuPliO197revoChsurBnobraC297504SCECTH
2-06revoCgulPli
O108hsurBnobraC208504SCECTH
3-06gniRO118redloHhsurB218504SCECTH
4-06dnatSnotsiP128muoloCrebbuR228504SCECTH
5-06leehWmroW138le
baLcepS138504SCECTH
6-06raeGleehWmroW148lebaLdnarB148504SCECTH
16gnirpS116504SCECTH58revoCrotoM158504SCECTH
26doRgnikarB12
6504SCECTH68wercS368504SCECTH
36doRgnitcennoC136504SCECTH
Page 3
3
CONTENTS
Declaration of Conformity ................................................... 2
Contents ............................................................................... 3
Guarantee ............................................................................ 4
Pack Contents ..................................................................... 4
Features ................................................................................ 4
Electrical Connections ......................................................... 5
Safety instructions ................................................................ 6
Kickback .............................................................................. 9
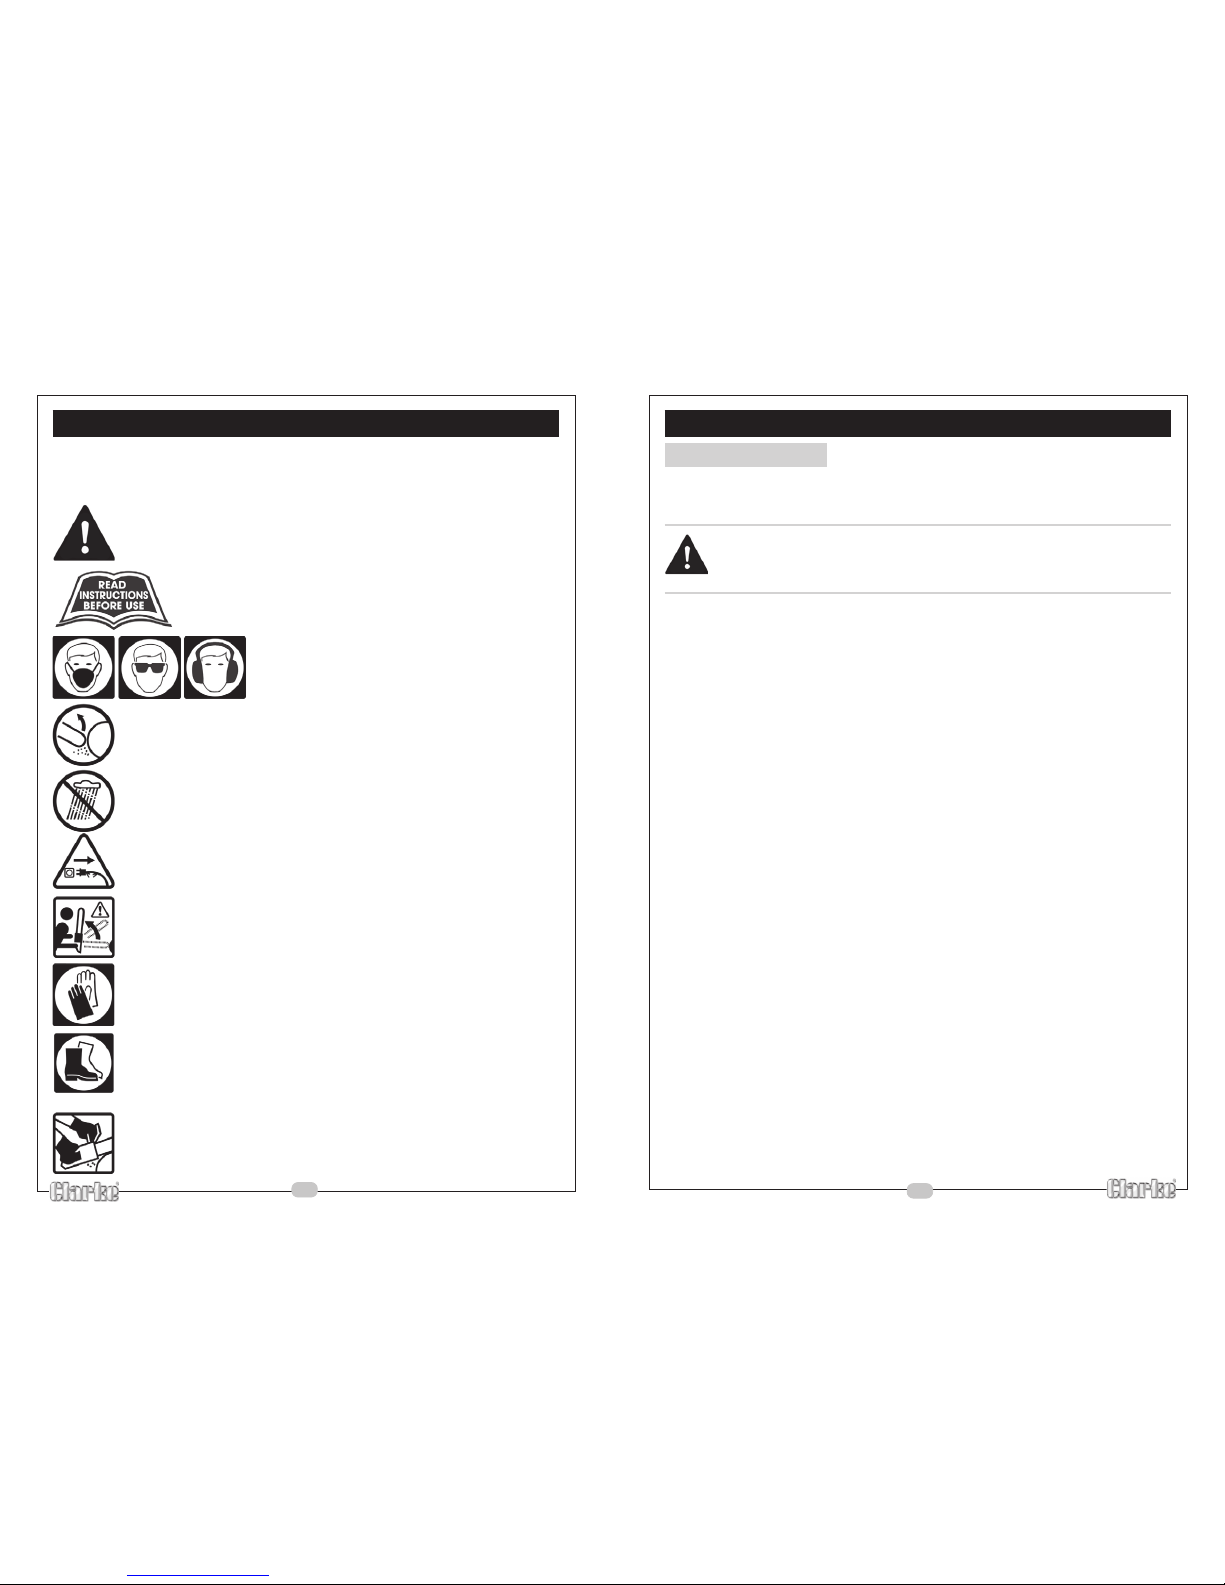
Warning symbols ................................................................. 10
Parts identification ............................................................... 11
Getting started ..................................................................... 12
1. Checking the chain saw ...................................................... 12
2. Filling the chain saw with oil .................................................. 12
3. Adjusting the chain tension .................................................. 13
4. Testing the chain brake ........................................................ 16
Using the chain saw ............................................................ 18
Cutting Instructions .............................................................. 19
1. Felling a tree .......................................................................... 19
2. Limbing ................................................................................... 2 2
3. Bucking .................................................................................. 23
New bar and chain ............................................................. 25
1. Removing the existing bar and chain ................................. 25
2. Fitting a new bar and chain ................................................. 26
Maintenance ....................................................................... 27
Storage ................................................................................. 28
Product Specifications ......................................................... 28
Exploded Parts Diagram ..................................................... 29
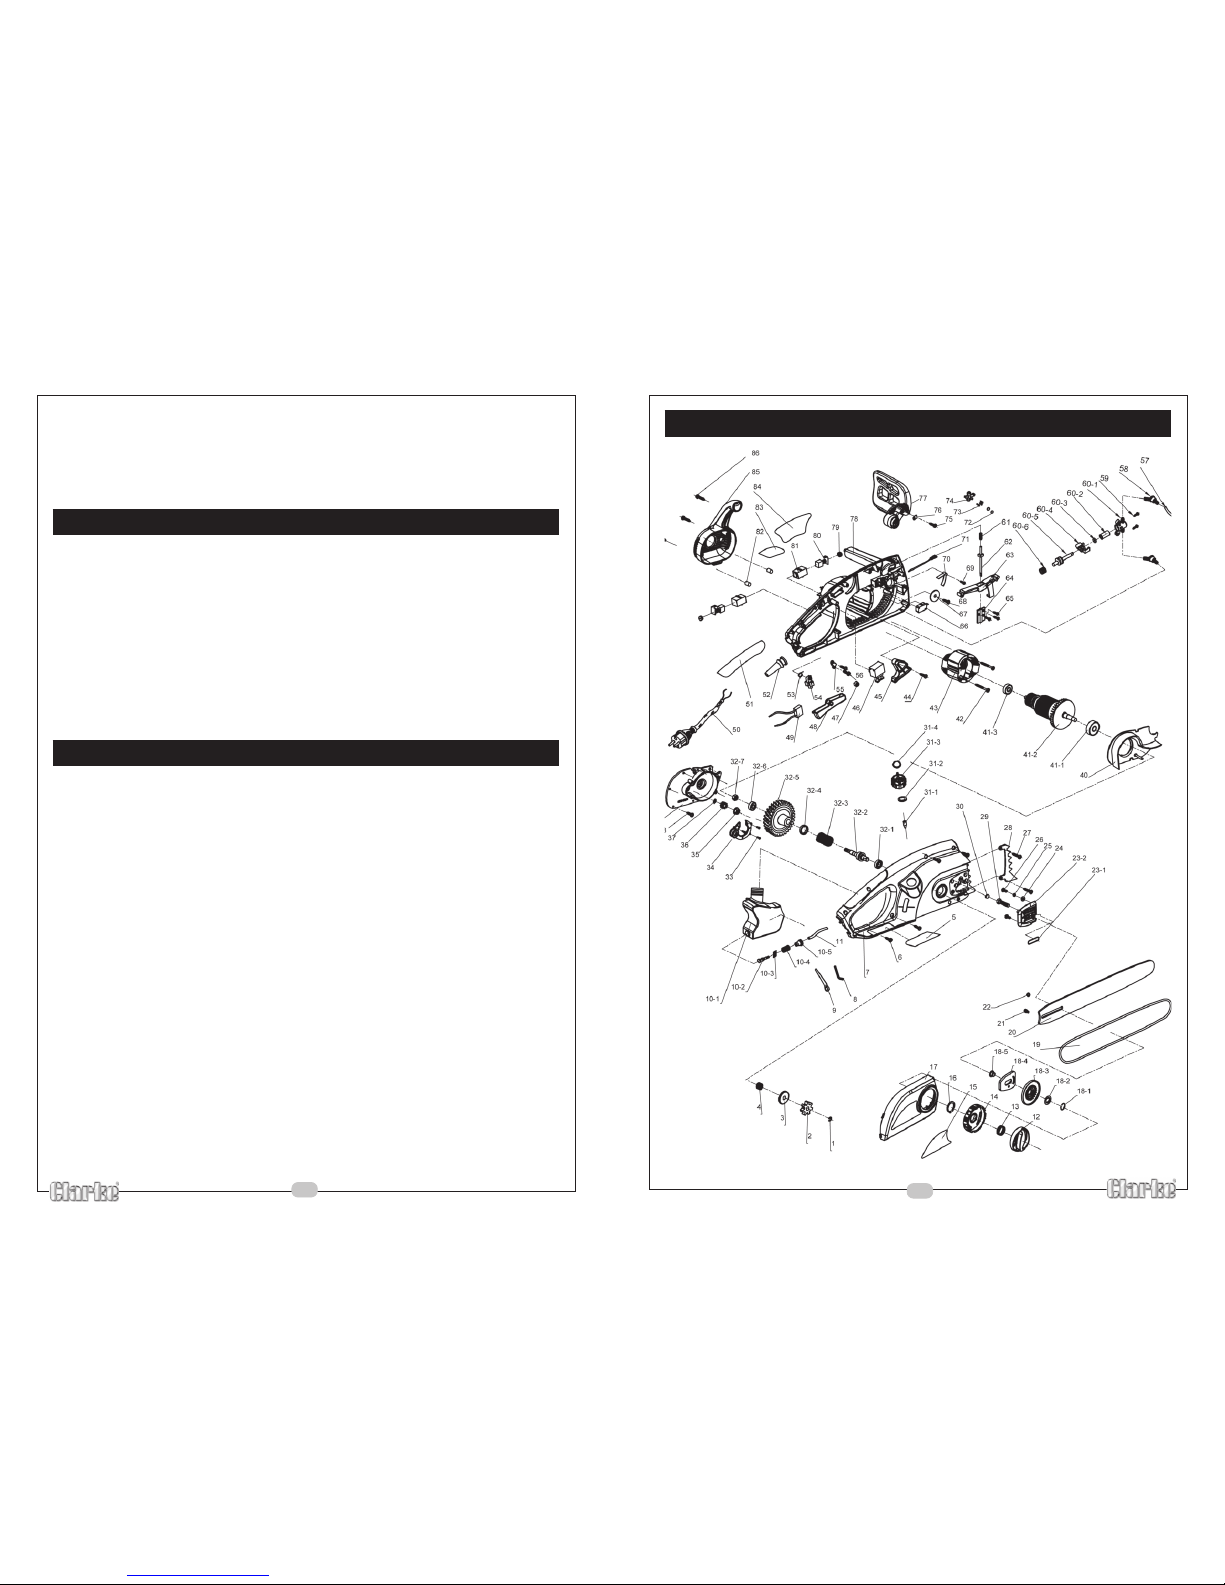
Parts List ................................................................................ 30
30
ON TRAP YTQ
TRAP
REBMUN
ON TRAP YTQ
TRAP
REBMUN
1gnirgniniaterepahsE110504SCECTH1-32gniRlaeS1
2tekcorpS120504SCECTH2-32gnisuohthgirfoetalptresnI1
3revoclaeS130504SCEC
TH42rehsaW742504SCECTH
4gnirpsnethgiT140504SCECTH52gnirpS752504SCECTH
5lebalgninraW150504SCECTH62wercS762504SCECTH
6wercS9605
04SCECTH72wercS272504SCECTH
7gnisuohthgiR170504SCECTH82draobreffuB182504SCECTH
8yekxeH180504SCECTH92wercS192504SCECTH
9hcne
rW190504SCECTH03gniRlaeS103504SCECTH
01ylbmessaknatliO01504SCECTH13ylbmessApaCliO13504SCECTH
1-01knatliO11-13evlaV1
2-01r
otpadatuoliO12-13gniRlaeSlanretnI1
3-01egnopS13-13paCliO1
4-01gnirpS14-13revoCpaCliO1
5-01rotpadadexiF123ylbmessatfahstupt
uO23504SCECTH
11ebutni-liO111504SCECTH1-23gniraeB1
21kcolrevocgnisuoH121504SCECTH2-23tfahstuptuO1
31gnirgniniatergnirp
S131504SCECTH3-23gnirpSgnikarB1
41laidgninoisnetedalB141504SCECTH4-23eveelStfahS1
51lebaLdnarB151504SCECTH5-23raeGtfahS1
61gnirgniniatergnirpS161504SCECTH6-23gniraeB1
71revocgnisuoH171504SCECTH7-23tuN1
81ylbmessagnivirD81504SCECTH33wercS13350
4SCECTH
1-81gnirpanS143revoctsuD143504SCECTH
2-81draoberusserP153tuNegnalF153504SCECTH
3-81leehwlaripS163raeGrotoM163504SC
ECTH
4-81draobhsuP173gnihsuBraeGrotoM173504SCECTH
5-81eveelstcennoC183wercS583504SCECTH
91"61,niahC191504SCECTH93draoBgni
troppuS193504SCECTH
02"61,rabniahC102504SCECTH04draoBdniW104504SCECTH
12wercS112504SCECTH14ylbmessArotoR14504SCECTH
22gn
iRlaeS122504SCECTH1-14gniraebtnorF1
32
foylbmessaetalptresnI
gnisuohthgir
32504SCECTH2-14rotoR1
PARTS LIST
Page 4
4
Thank you for purchasing this Electric Chain Saw.
Before attempting to use the chain saw, please read this manual thoroughly
and follow the instructions carefully. In doing so you will ensure the safety of
yourself and that of others around you, and you can look forward to the chain
saw giving you long and satisfactory service.
GUARANTEE
• This product is guaranteed against faulty manufacture for a period of 12
months from the date of purchase. Please keep your receipt which will
be required as proof of purchase.
• This guarantee is invalid if the product is found to have been abused or
tampered with in any way, or not used for the purpose for which it was
intended.
• Faulty goods should be returned to their place of purchase, no product
can be returned to us without prior permission.
• This guarantee does not effect your statutory rights.
PACK CONTENTS
• 1 x Chainsaw • 1 x Oregon Chain
• 1 x Chain Bar • 1 x Bottle of Chain Oil
• 1 x Instruction Manual
29
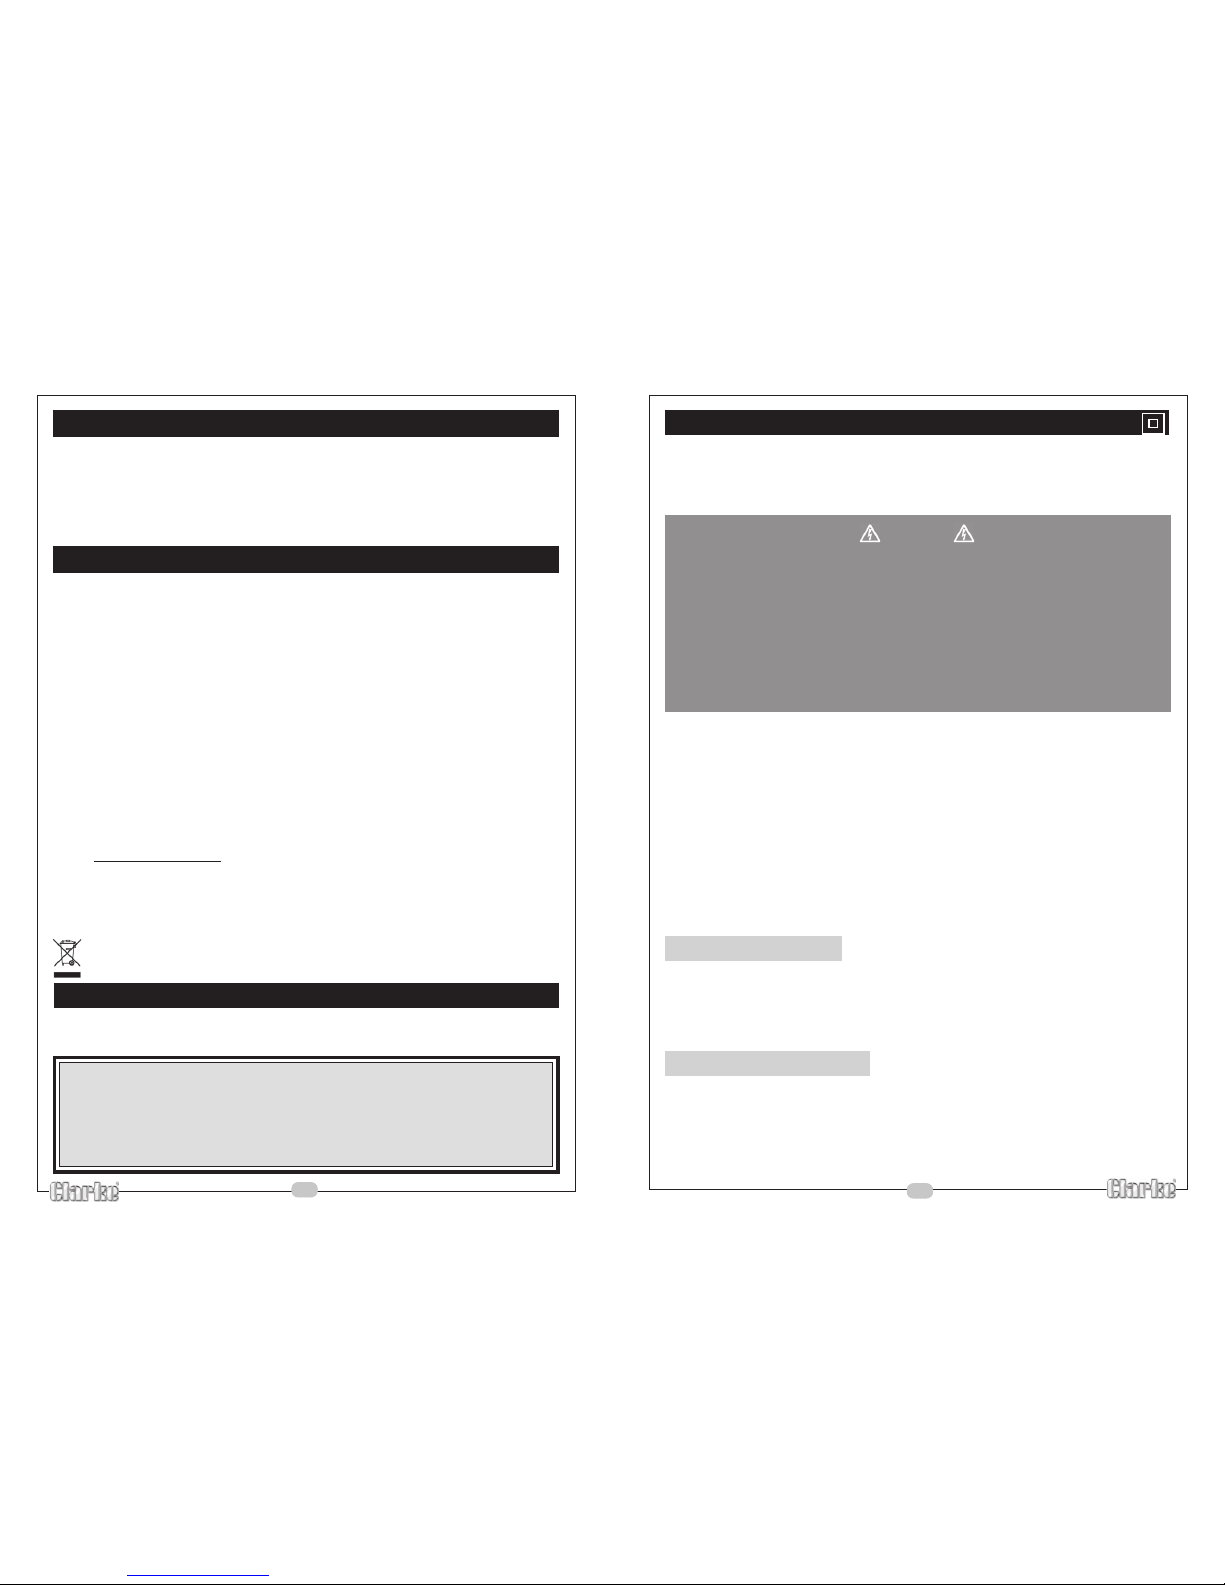
EXPLODED PARTS DIAGRAM
Page 5
5
ELECTRICAL CONNECTIONS
This product is provided with a standard 13 amp, 230 volt (50Hz), BS 1363 plug,
for connection to a standard, domestic electrical supply. Should the plug need
changing at any time, ensure that a plug of identical specification is used.
WARNING!
This appliance is double insulated, and the two wires in the mains lead should
be wired in accordance with the following colour code:
BLUE - NEUTRAL
BROWN - LIVE
•
Connect the BLUE coloured wire to the plug terminal marked with a
letter “N”
• Connect the BROWN coloured wire to the plug terminal marked with a
letter “L”
If this appliance is fitted with a plug which is moulded on to the electric cable
(i.e. non-rewireable) please note:
1. The plug must be thrown away if it is cut from the electric cable. There is
a danger of electric shock if it is subsequently inserted into a socket
outlet.
2. Never use the plug without the fuse cover fitted.
3. Should you wish to replace a detachable fuse carrier, ensure that the
correct replacement is used (as indicated by marking or colour code).
4. Replacement fuse covers can be obtained from your local Clarke
dealer or most electrical stockists.
FUSE RATING
The fuse in the plug must be replaced with one of the same rating (5 amps)
and this replacement must be ASTA approved to BS1362.
If in doubt, consult a qualified electrician. Do not attempt any electrical repairs
yourself.
CABLE EXTENSION
Always use an approved cable extension suitable for the power rating of this
tool (see specifications), the conductor size should also be at least the same
size as that on the machine, or larger. When using a cable reel, always unwind
the cable completely. If using tool outdoors, only use extension cables
intended for outdoor use.
28
STORAGE
• Always store the chainsaw with the guard in place.
• Make sure that the chainsaw is stored out of the reach of children.
• Never hang the chainsaw by the handle, always store the chainsaw on a
flat stable surface.
PARTS & SERVICE
For Spare Parts and Service, please contact your nearest dealer, or CLARKE
International, on one of the following numbers.
PARTS & SERVICE TEL: 020 8988 7400
or e-mail as follows:
PARTS: [email protected]
SERVICE: [email protected]
PRODUCT SPECIFICATION
Model number .......................................... CECS405
Rated voltage ...........................................230V AC - 50Hz
Motor power rating ..................................2000W
Chain speed ............................................. 13.5 m/s
Chain stopping time .................................0.15 seconds
Maximum cutting length .......................... 16” (405 mm)
Oil type .......................................................Chain oil (supplied).
Dimensions (L x W x H) .............................. 865 x 263 x 191 mm
Weight ........................................................ 6 kg
Vibration level (weighted) ....................... 4.89 m/s
2
Noise emission data
A-weighted sound pressure level ..........90 db (A)
Guaranteed sound power level ............. 104 dBLwa
When disposing of this product, ensure it is disposed of according to all local ordinances. It must
not be disposed of with general household waste.
Page 6
6
SAFETY INSTRUCTIONS
WARNING!
When using this chain saw, basic safety precautions, including the
following, should be followed to reduce the risk of fire, electric
shock and personal injury. Make sure that you have read all of these
instructions before using this chain saw. Keep this booklet in a safe
place for future reference. Persons not familiar with this booklet
should not use the tool.
FIRST TIME USER - It is recommended that the first time user should have practical
instruction in the use of the chain saw and the protective equipment, from
an experienced operator and that the initial practice should be cutting logs
on a saw horse or cradle.
KEEP WORK AREA CLEAN - Cluttered areas and benches invite injuries. Do not
start cutting until you have a clear work area, secure footing, and a
planned retreat path from the falling tree.
CONSIDER WORK AREA ENVIRONMENT - Avoid cutting small size brush and sapling,
as slender material may catch the saw chain and be whipped towards you
or pull you off balance. Do not operate a chain saw in a tree unless you are
specifically trained to do so. When cutting a limb that is under tension, be
alert for spring back, so that you will not be struck when the tension in the
wood fibres is released. Do not expose power tools to rain. Do not use the
chain saw in damp, or wet locations. Keep the work area well lit. Never use
the chain saw where there is a risk of fire, or explosion. Do not operate the
chainsaw alone - ensure someone is within calling distance
STORE IDLE TOOLS - When not in use, all tools should be stored in a dry, secure
place, out of reach of children. Always store the tool with the chain guard
fitted.
DO NOT FORCE THE TOOL - It will do the job better and safer at the rate for which
it was intended.
USE THE RIGHT TOOL - Do not force small tools or attachments to do the job of a
heavy duty tool. Do not use tools for purposes not intended. For example
do not use the chain saw to cut plastic, or masonry.
DRESS PROPERLY - Do not wear loose clothing, or jewellery that can be caught in
moving parts. Rubber gloves and non-skid footwear are recommended
when working outdoors. Wear protective hair covering to contain long hair.
USE SAFETY GEAR - Use safety glasses, safety footwear, snug fitting clothing,
protective gloves, and hearing and head protection when operating the
chain saw. We recommend the use of proprietary chainsaw protective
clothing.
27
MAINTENANCE
WARNING!
Make sure that the chain saw is disconnected from the mains supply
before continuing.
BAR MAINTENANCE
The following maintenance procedures must be performed to keep the chain bar
in good working order.
1) After 5 hours use, the bar should be turned, to ensure even wear on the
top and bottom of the bar. See pages 25 and 26 for instructions on how
to remove and refit a chain bar and chain.
2) The bar rails should be cleaned every time the bar is turned, or the chain
is removed. Using a suitable implement, clear any debris from the bar
rails. This will keep the oil passages open and provide correct lubrication
to the bar and chain.
OTHER MAINTENANCE PROCEDURES
1) After use, clean all excess sawdust, chippings and debris from the
chain saw, chain and chain bar using a soft brush.
2) Keep the air intake (end of motor housing) clean to prevent the motor
overheating.
3) Keep the main body of the chain saw clean using a soft cloth.
4) Check the chain tension regularly and adjust as often as necessary
to keep the chain snug on the bar. A new chain will require more
frequent adjustment.
5) Check the mains cable before each use. Do not use the chain saw if
the cable is damaged in any way.
6) Always check the chain brake before each use, following the
procedures on page 17 of this user guide.
7) Make sure that the automatic oiler system is working properly. Keep the
oil tank filled with chain oil during use.
Page 7
7
CARRYING THE CHAIN SAW - Carry the chain saw by the front handle with the
saw stopped and disconnected from the mains supply. Keep your finger off
the switch and make sure that the guide bar and saw chain are to the rear.
Always fit the chain guard when transporting the chain saw.
DO NOT ABUSE THE MAINS LEAD - Never carry the chain saw by the mains lead, or
pull it to disconnect it from the mains socket. Keep the mains lead away
from heat, oil and sharp edges.
DISCONNECT THE CHAIN SAW - Disconnect the chain saw from the mains supply
when not in use, before maintenance and when making any adjustments.
STAY ALERT - Watch what you are doing. Use common sense. Do not operate the
chain saw when you are tired.
CHECK DAMAGED PARTS - Before each use of the tool, any part that is damaged
should be carefully checked to determine that it will operate properly and
perform its intended function. Check for the alignment and free running of
moving parts, breakage of parts, and any other conditions that may affect
its operation. Any damaged part should be properly repaired or replaced
by an authorised service centre unless otherwise indicated in this instruction
booklet. Have defective switches replaced by authorised service
personnel. Do not use the tool if the switch does not function properly.
MAINTAIN TOOLS WITH CARE - Keep the chain sharp and clean for better and
safer performance. Follow instructions for lubricating and changing the
chain. Inspect the mains lead and any extension leads periodically and if
damaged have them repaired by an authorised service facility. Keep
handles dry, clean and free from grease.
WARNING - The use of any accessory, or attachment, other than those
recommended in this instruction book, may present a risk of personal injury.
HAVE YOUR TOOL REPAIRED BY A QUALIFIED PERSON - This electric tool is in
accordance with the relevant safety requirements. Repairs must only be
conducted by qualified persons using original parts.
KEEP CHILDREN AWAY - Never let any visitors or children touch the tools or the
extension lead. All visitors should be kept away from the work area.
USE BOTH HANDS - Grip the chain saw with both hands. Keep your hands and
fingers wrapped around the handles and do not release your hands until
the saw chain has stopped running.
USE WEDGES - The use of wedges will help to control tree felling and prevent the
chain saw binding in the cut.
USE CORRECT PART OF THE BLADE - Always use the underside of the chain bar saw
for cutting. Never attempt to use the top of the chain bar.
AVOID UNINTENTIONAL STARTING - Ensure that the chain saw is disconnected
from the mains supply when not in use. Never carry the chain saw by the
cable, or pull the cable to disconnect it from the mains socket. Always fit
the chain guard when carrying the saw.
SAFETY INSTRUCTIONS
26
2. FITTING A NEW BAR AND CHAIN
1) Fit the spiral wheel (removed from the old bar) to the new bar as shown
below.
2) Push the spiral wheel and bar into position as shown below.
3. Place the chain over the sprocket, ensuring that the chain is pointing in
the correct direction. The chain is marked with an arrow, showing the
direction in which the chain will travel.
3) Feed the chain around the bar , the saw chain will droop slightly along
the bottom edge.
4) Refit the housing cover, and secure using the housing cover lock.
5) Adjust the chain tension, using the instructions on page 14.
NEW BAR AND CHAIN
Spiral Wheel
Page 8
8
KEEP YOUR CHAIN SAW CLEAN AND SHARP - Never allow dirt or sawdust to build
up on the saw chain, chain bar or the cooling vents. Keep the saw chain
sharp and oiled. Make sure that the handles are clean and free from oil and
grease.
DO NOT - Do not use the chain saw if the switches do not operate correctly.
CHAIN BRAKE - Always check the chain brake for correct operation before using
the saw. Do not use the saw if there is malfunction of the chain brake. Refer
to qualified service personnel.
GUARD AGAINST ELECTRIC SHOCK - Avoid body contact with earthed surfaces.
(e.g pipes, radiators etc.)
DANGEROUS LOCATIONS - Do not use this chain saw in dangerous locations.
Never use this chain saw when standing in the branches of a tree, up a
ladder or on any other unstable surface. This chain saw should only be used
when standing on stable, level (never sloping) ground. Never use the
chainsaw over areas of water - for example, garden ponds.
WHAT
NOT TO CUT - Avoid cutting wood from old buildings - only commence
cutting when you are absolutely sure that the wood does not contain nails,
screws or other foreign objects. Never cut wood covered in mud or dirt as
this will dull the blade, increasing the risk of kickback. Avoid cutting wire
fences, prepared timber and saplings.
SWITCHING OFF - Always switch off before putting the chain saw down. The saw
chain will continue to run for a short time after it has been switched off.
Always disconnect from the mains supply when changing the work location,
cleaning the chain saw or making any adjustments.
SECURE THE WORK - Where possible the work should be secured using clamps.
Never use your foot to support the wood you are cutting.
CHAIN GUARD - Always fit the chain guard when carrying, storing or resting the
saw. The guard should always be fitted during cleaning, maintenance and
storage, unless otherwise instructed in this instruction booklet.
STORAGE - Always clean the chain saw and ensure it is completely dry prior to
storage. Lightly oil the chain and bar and remove any debris from the motor
cooling vents. Drain the oil reservoir and store in a dry secure place out of
the reach of children. Always fit the chain guard before storage.
SERVICING AND REPAIRS - Always have the chain saw serviced and repaired by
qualified personnel.
SAFETY INSTRUCTIONS
25
NEW BAR AND CHAIN
WARNING!
You must not attempt to sharpen your existing chain. This requires
specialist tools and should only be performed by a qualified
professional
Only fit recommended bar and chains. Replacement bar (part number:
HTCECS40520 ) and chains (part number: HTCECS40519 ) can be obtained from
your CLARKE dealer .
1. REMOVING THE EXISTING BAR AND CHAIN
WARNING!
Make sure that the chain saw is disconnected from the mains supply
before continuing.
1) Loosen the chain tension and then remove the housing cover by
rotating the housing cover lock anticlockwise.
2) Using a pair of gloves, remove the existing bar and chain by pulling it
towards you. Your local recycling centre can advise you on the best
method of disposal.
NOTE:
When you remove the bar, you will need to remove the spiral
wheel which is attached to it and place it onto the new bar.
See the following page.
4) Make sure that any debris is cleared from the mechanism and housing
using a soft brush. A clean paint brush is ideal.
Spiral Wheel
Page 9
9
SAFETY INSTRUCTIONS
KICKBACK
WARNING!
Kickback may occur when the tip of the chainsaw touches an
object, or when the wood closes in and pinches the chain. Tip
contact in some cases may cause a fast reverse action, kicking the
guide bar rapidly back towards the operator. Pinching the saw
chain along the top of the guide bar may push the guide bar rapidly
back towards the operator. Either of these reactions may cause you
to lose control of the saw which could result in serious injury to the
user.
The following precautions should be taken to avoid kickback.
1 Grip the chain saw firmly with both hands when the motor is running.
Keep a good firm grip on the saw with both hands, the right hand on the
rear handle and the left hand on the front handle.
2 Do not overreach. Keep proper footing and balance at all times.
3 Do not let the tip of the guide bar come into contact a log or branch, the
ground or any other obstruction.
4 Do not cut above shoulder height.
5 Use only replacement bars and chains available from your CLARKE dealer
6 Avoid cutting operations whereby the wood being cut can clog the saw
blade.
7 Check that there are no foreign objects (metal, cement or other hard
material) in the cutting path.
8 Do not attempt to cut with a loose or blunt chain.
9 Take care when you insert the chain saw into a previous cut. This could
cause kickback.
24
When it is not possible to use a sawhorse, follow the procedure below:
WARNING!
Make sure that the area is clear of debris, people and animals
before cutting.
1. When the trunk is supported along the entire length, cut from the top
taking care to avoid cutting into the ground.
2. When a fallen trunk is not evenly supported along its length, avoid cuts
where, due to the trunk bowing inwards, the trunk will pinch the bar and
chain.
3. Make notch cuts to prevent the trunk closing in on the bar and chain.
WARNING!
Always take care and be aware of how the trunk and cut off pieces
may fall/move when the cut is made.
CUTTING INSTRUCTIONS
Page 10
10
Warning! - When using this chain saw, basic safety precautions,
including those in this user guide, should be observed to reduce
the risk of fire, electric shock and personal injury.
Warning! - Wear a safety helmet, ear
protectors and safety goggles while using this
chain saw.
Warning! - Read this user guide thoroughly before use and
keep in a safe place for future reference.
Warning! - Never cut with the tip of the blade as this may result in
kickback and cause personal injury.
Warning! - Do not expose this chain saw to rain, or use in damp or
wet locations.
Warning! - Disconnect from the mains supply immediately if the
cable is damaged or cut.
Warning! - Never cut with the tip of the blade as this may result in
kickback and cause personal injury.
Warning! - Always wear gloves approved for chainsaw use.
Warning! - Always wear foot protection when using the chainsaw.
Warning! - Always hold the chain saw with both hands during use.
WARNING SYMBOLS
The following symbols are displayed on the chain saw in order to remind you of
the safety precautions you should take when operating the chain saw.
23
CUTTING INSTRUCTIONS
3. BUCKING
Bucking is the process of cutting a fallen trunk into lengths or logs. Whenever
possible, the best way of bucking a fallen trunk is using a sawhorse.
WARNING!
Take great care ensuring that the trunk is safely supported by the
sawhorse before bucking the trunk.
For personal safety and ease of cutting, the following should be followed at all
times:
1. Hold the saw firmly with both hands, keep the saw to the right hand side
of your body while cutting.
2. Keep the left arm as straight as possible.
3. Keep both feet firmly on the floor.
4. Do not put excessive pressure on the bar chain when cutting. Let the
saw to do the work.
5. If the saw stalls, lift the saw away from the workpiece and allow the saw
to build up to full speed.
6. When bucking large trunks, allow the gripping teeth at the back of the
bar chain to grip into the trunk and use a pivoting action, putting slight
downward pressure on the front handle and pulling up slightly on the rear
handle. Back off and reposition the gripping teeth lower down and
repeat pivoting action to progress the chain bar through the cut.
Page 11
11
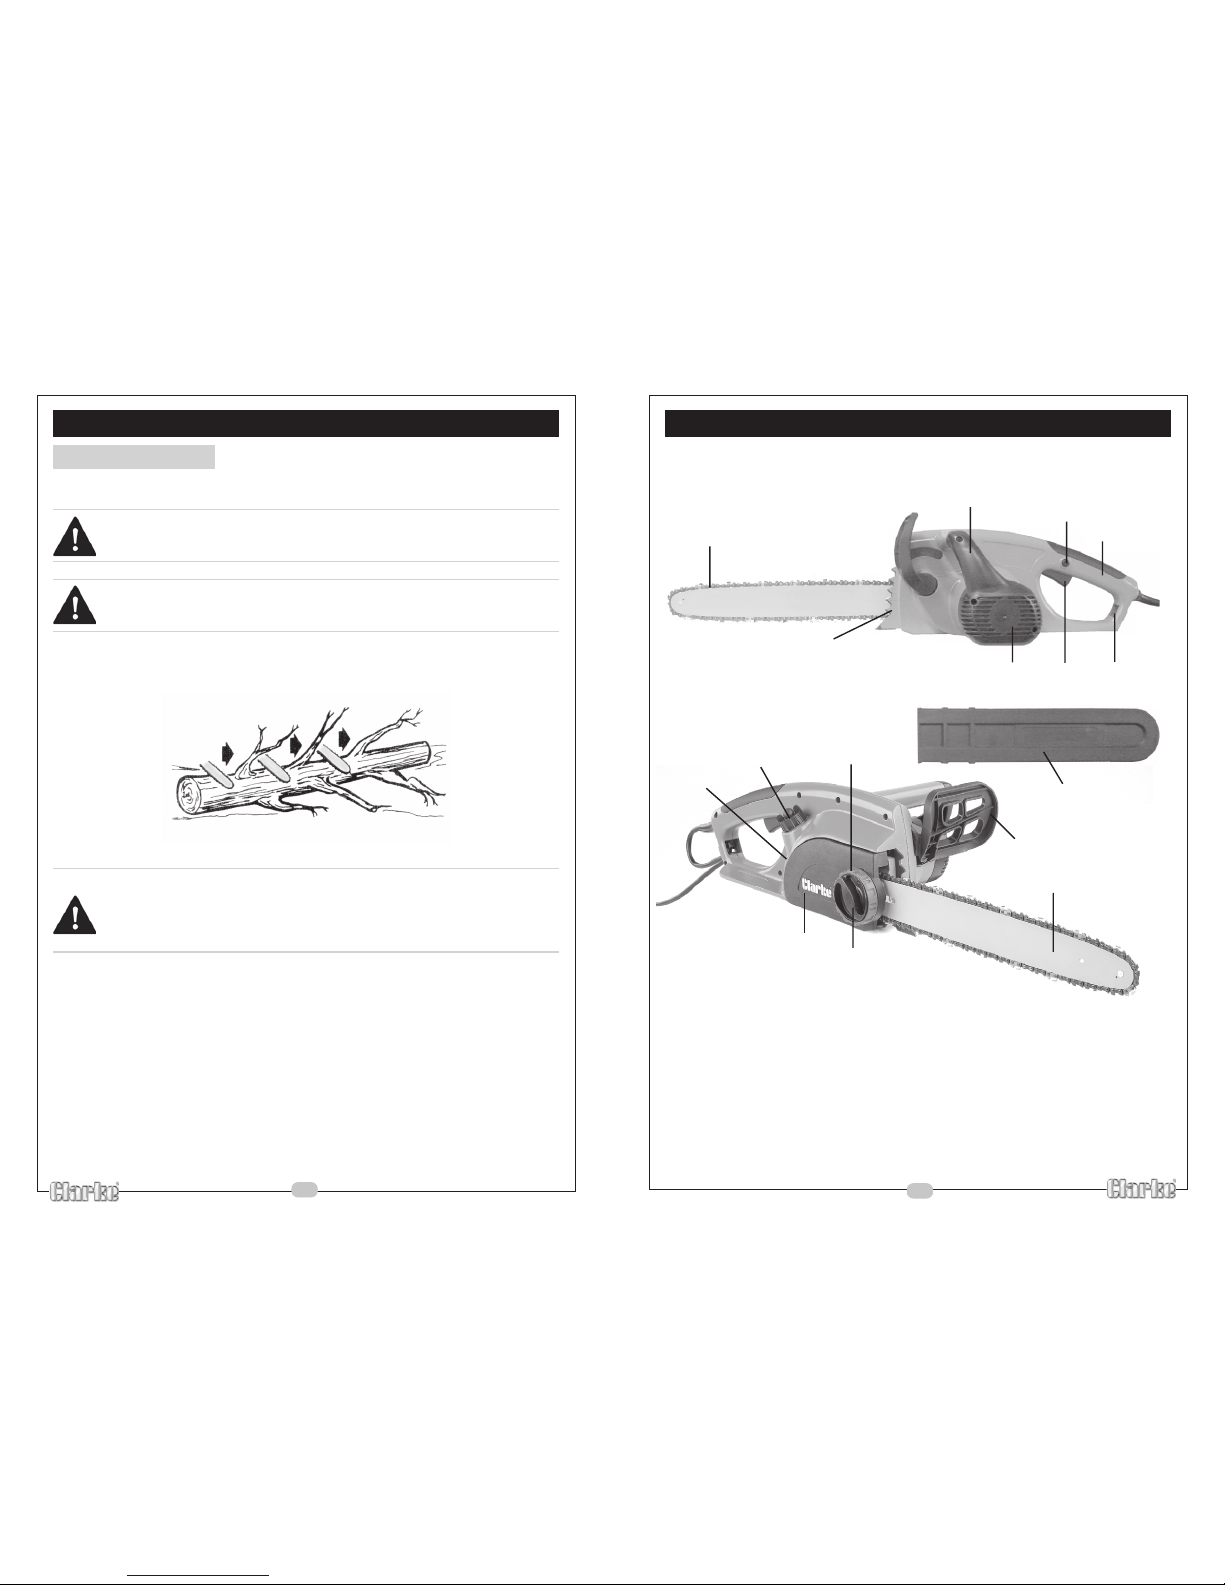
PARTS IDENTIFICATION
1 Chain
2 Chain Bar
3 Chain Brake Lever
4 Front Handle
5 Lock Button
6 Power On/Off Trigger Switch
7 Rear Handle
8 Cable Restraint
9 Oil Filler Cap
10 Oil Level Window
11 Chain Guard
12 Gripping Teeth
13 Air Intake
14 Blade Tensioning Dial
15 Housing Cover Lock
16 Housing Cover
1
2
3
4
5
6
7
8
9
10
11
12
13
14
15
16
22
CUTTING INSTRUCTIONS
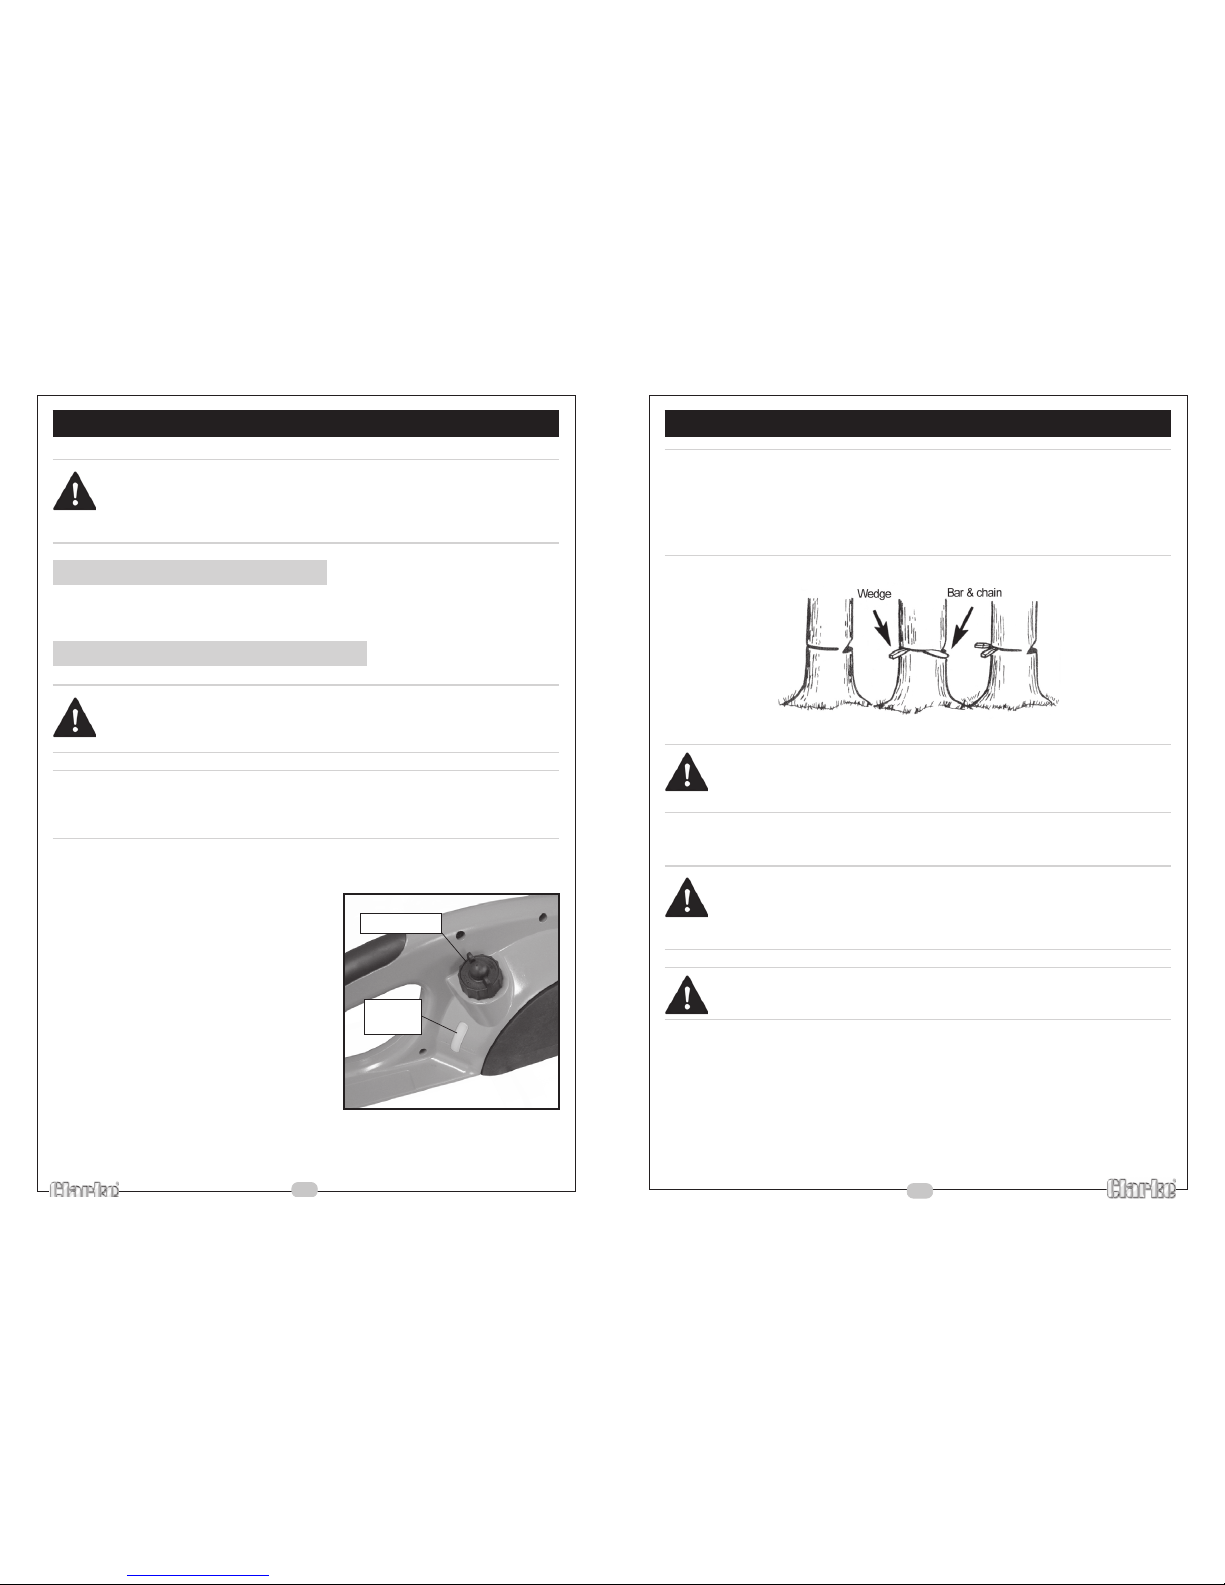
2. LIMBING
Limbing is the process of removing the branches from a fallen tree.
WARNING!
Do not stand on the tree trunk while limbing.
WARNING!
Make sure that the tree trunk is safely supported before limbing.
Limbing should be performed by working from one end of the trunk towards the
other. See diagram below.
WARNING!
Do not remove any branches that are supporting the trunk. The trunk
should be carefully rolled and supported before any supporting
branches are removed.
Page 12
12
GETTING STARTED
WARNING!
For your safety and the safety of others make sure that you have
read and understood all of the safety warnings on pages 4 to 10
before continuing with this section.
1. CHECKING THE CHAIN SAW
Remove the chain saw from the packaging, if there are any signs of damage,
please return your chain saw to the place of purchase.
2. FILLING THE CHAIN SAW WITH OIL
WARNING!
Ensure that the chainsaw is disconnected from the mains supply
during all checks and adjustments in this section.
CAUTION!
You must only use a chain oil with your chain saw. Using different oil
may cause damage to your chain saw and invalidate your warranty.
To fill the chain saw with oil, proceed as follows.
1 Place the chain saw on a stable, level
surface.
2 Remove the oil filler cap, by twisting in
an anticlockwise direction.
3 Using a funnel, fill the oil tank, with
chain saw oil (supplied). The oil tank
will hold 135cc of chain oil, enough to
lubricate the chain for 12-15 minutes
of sawing.
4 Wipe up any spills before continuing.
5 Refit the oil filler cap, by twisting in a
clockwise direction.
Oil filler cap
Oil level
window
21
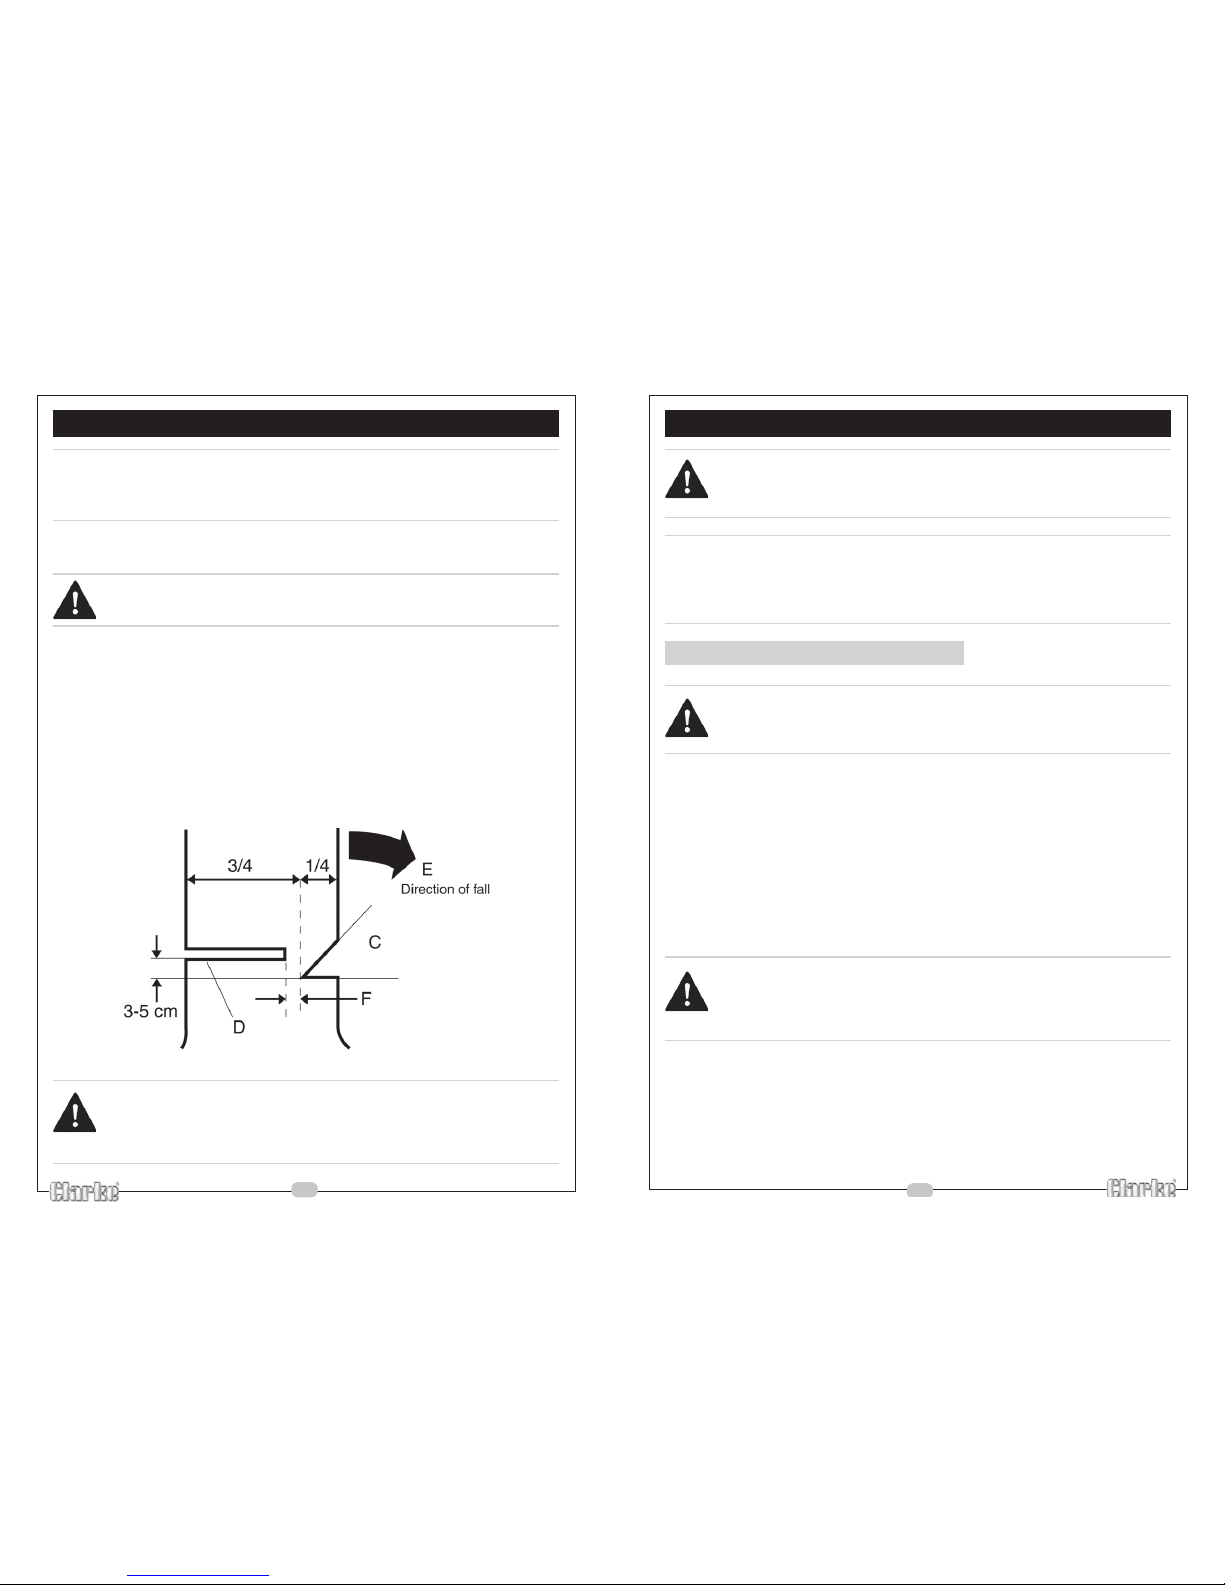
NOTE:
Before cutting completely through the trunk, use wooden or
plastic wedges, to prevent binding the bar or chain in the cut.
Wedges will also help the felling direction. See diagram
below.
WARNING!
Before making the final cut, always recheck the area is clear of
bystanders, animals or obstacles.
Once the wedges have been put into place, the felling cut can continue
through the remainder of the trunk.
WARNING!
As the final cut gets close to the hinge, the tree will begin to fall.
Carefully remove the chain saw from the cut, turn off and put the
chain saw down and leave the area along the planned retreat path.
WARNING!
Do not re-enter the area until the tree has fallen and the area is safe.
CUTTING INSTRUCTIONS
Page 13
13
CAUTION!
The oil tank level should be checked frequently to maintain lubrication
of the bar and chain.
NOTE:
Your chain saw is equipped with an automatic oiler system
and is the only necessary source of lubrication for the bar and
chain during operation.
3. ADJUSTING THE CHAIN TENSION
WARNING!
Ensure that the chainsaw is disconnected from the mains supply
during all checks and adjustments in this section.
Correct saw chain tension is extremely important and must always be checked
before starting the chain saw.
When using the chain saw for the first time (or after replacing the saw chain)
the tension should be checked regularly, as a new chain will stretch after four
or five cuts.
If the chain is too loose or too tight, the sprocket, bar and chain will wear more
rapidly. The tension should be sufficient to keep the chain snug on the bar, but
loose enough to allow the chain to be pulled around by hand. Taking the time
to adjust the chain tension correctly will result in improved cutting performance
and prolonged chain life. Refer to the adjustment procedure described on the
next page.
WARNING!
Always wear protective gloves when adjusting the chain tension
and NEVER check the chain tension when the chain saw is
connected to the mains supply.
GETTING STARTED
20
NOTE:
Before felling a tree, make sure that there are no local by-laws
that apply (e.g. restrictions)
Typically, felling consists of two main cutting operations, the notching cut (C)
and the felling cut (D).
WARNING!
Never walk in front of a tree that has a notch cut.
1. Start by making the diagnal part of the cut (C) on the side of the tree
facing the felling direction (E).
2. Do not cut the lower part of the notch cut (C) too deep into the trunk.
The notch depth should be about 1/4 of the diameter of the tree, deep
enough to create a hinge (F). The hinge is made to direct the fall of the
tree.
3. Make the felling cut (D) from the other side of the tree and 3-5 cm
above the edge of the notch. See diagram below.
WARNING!
Never saw completely through the trunk, without creating a notch.
If the trunk is cut without a notch, you will not be able to control the
felling direction.
CUTTING INSTRUCTIONS
Page 14
14
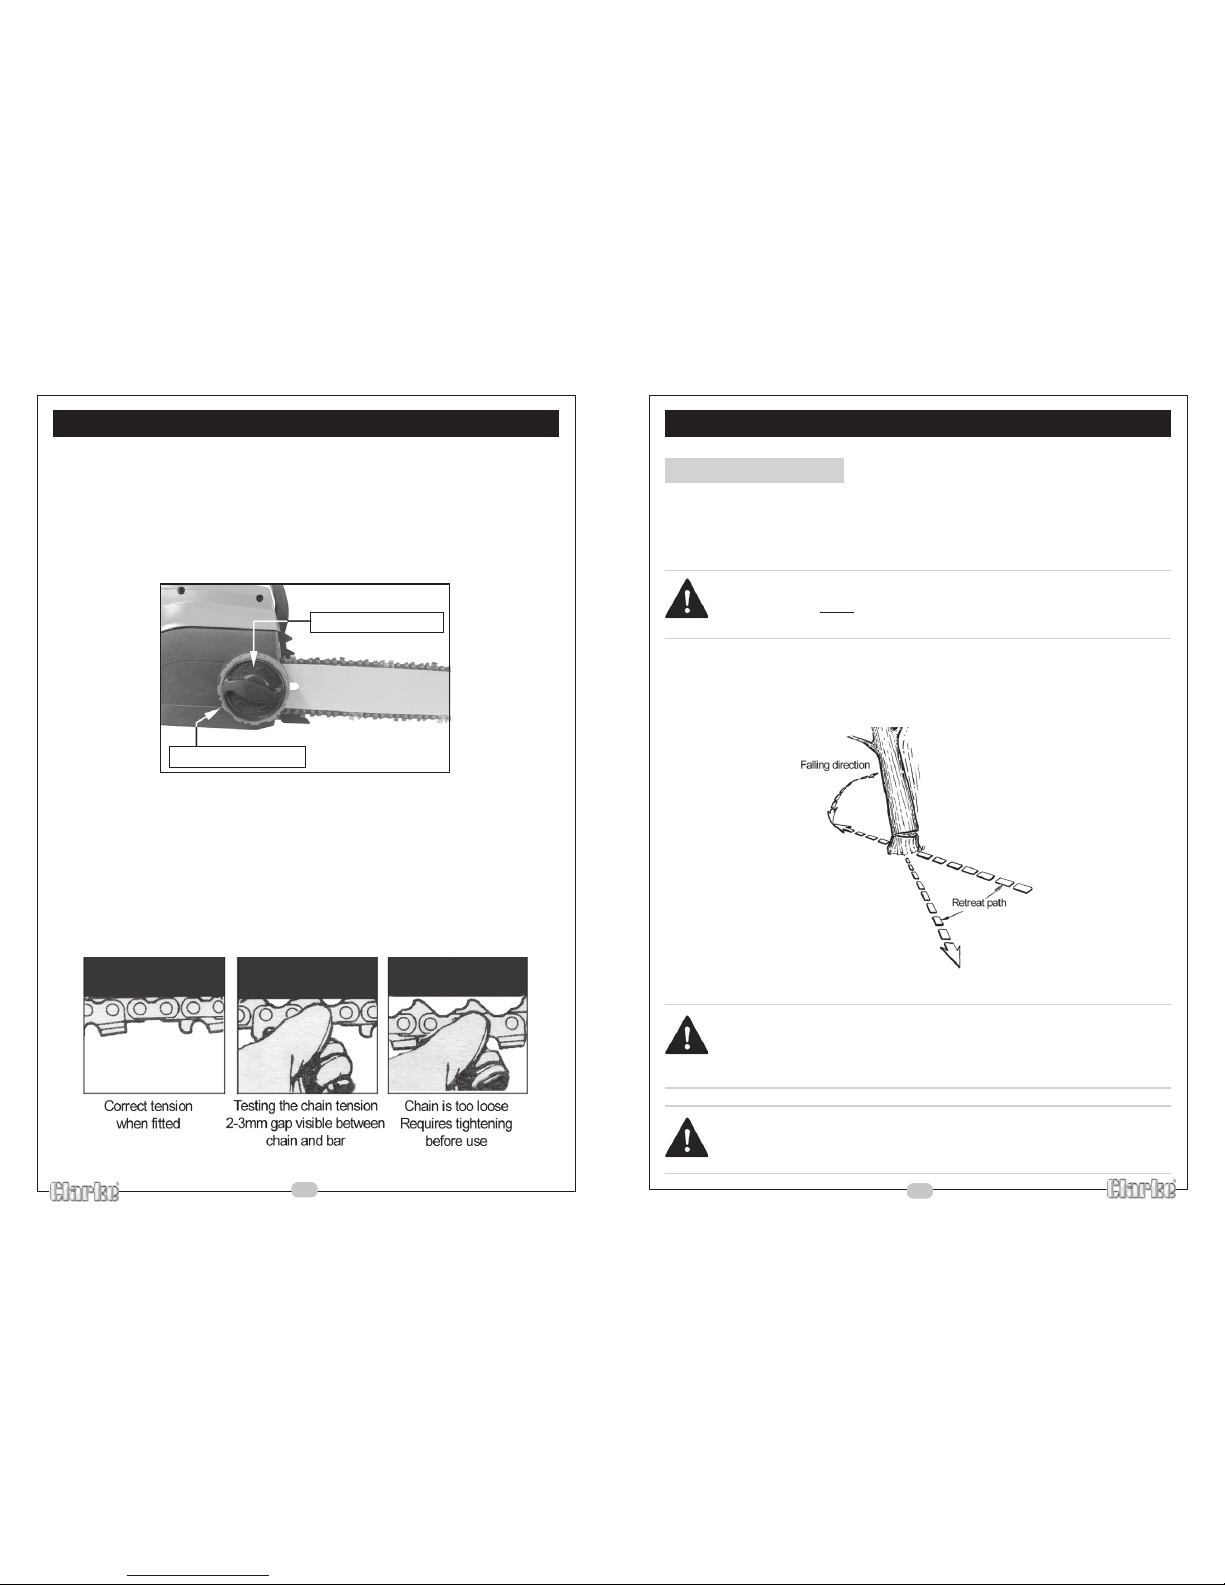
To adjust the chain tension, proceed as follows:
1 Ensure the chain brake handle is in the disengaged position (the chain
brake handle should be pulled back towards the handle).
2 Loosen the housing cover by slightly rotating the housing cover lock , (do
not remove). See diagram below.
3 Use the blade tensioning dial to adjust the tension of the chain.
Turn clockwise to decrease the chain tension and anticlockwise to
increase it.
4 Pull the chain gently downwards in the centre of the bar. The chain
is correctly adjusted when pulling only results in it moving 2-3 mm away
from the chain bar. See centre diagram below.
GETTING STARTED
Housing Cover Lock
Blade Tensioning Dial
19
CUTTING INSTRUCTIONS
1. FELLING A TREE
Felling is the term for cutting down a tree. Small trees with a diameter of 15-18
cm can usually be felled using a single cut. Larger trees require notch cuts, this
will determine the direction at which the tree will fall. Only attempt felling
operations that are within the capabilities of the saw.
WARNING!
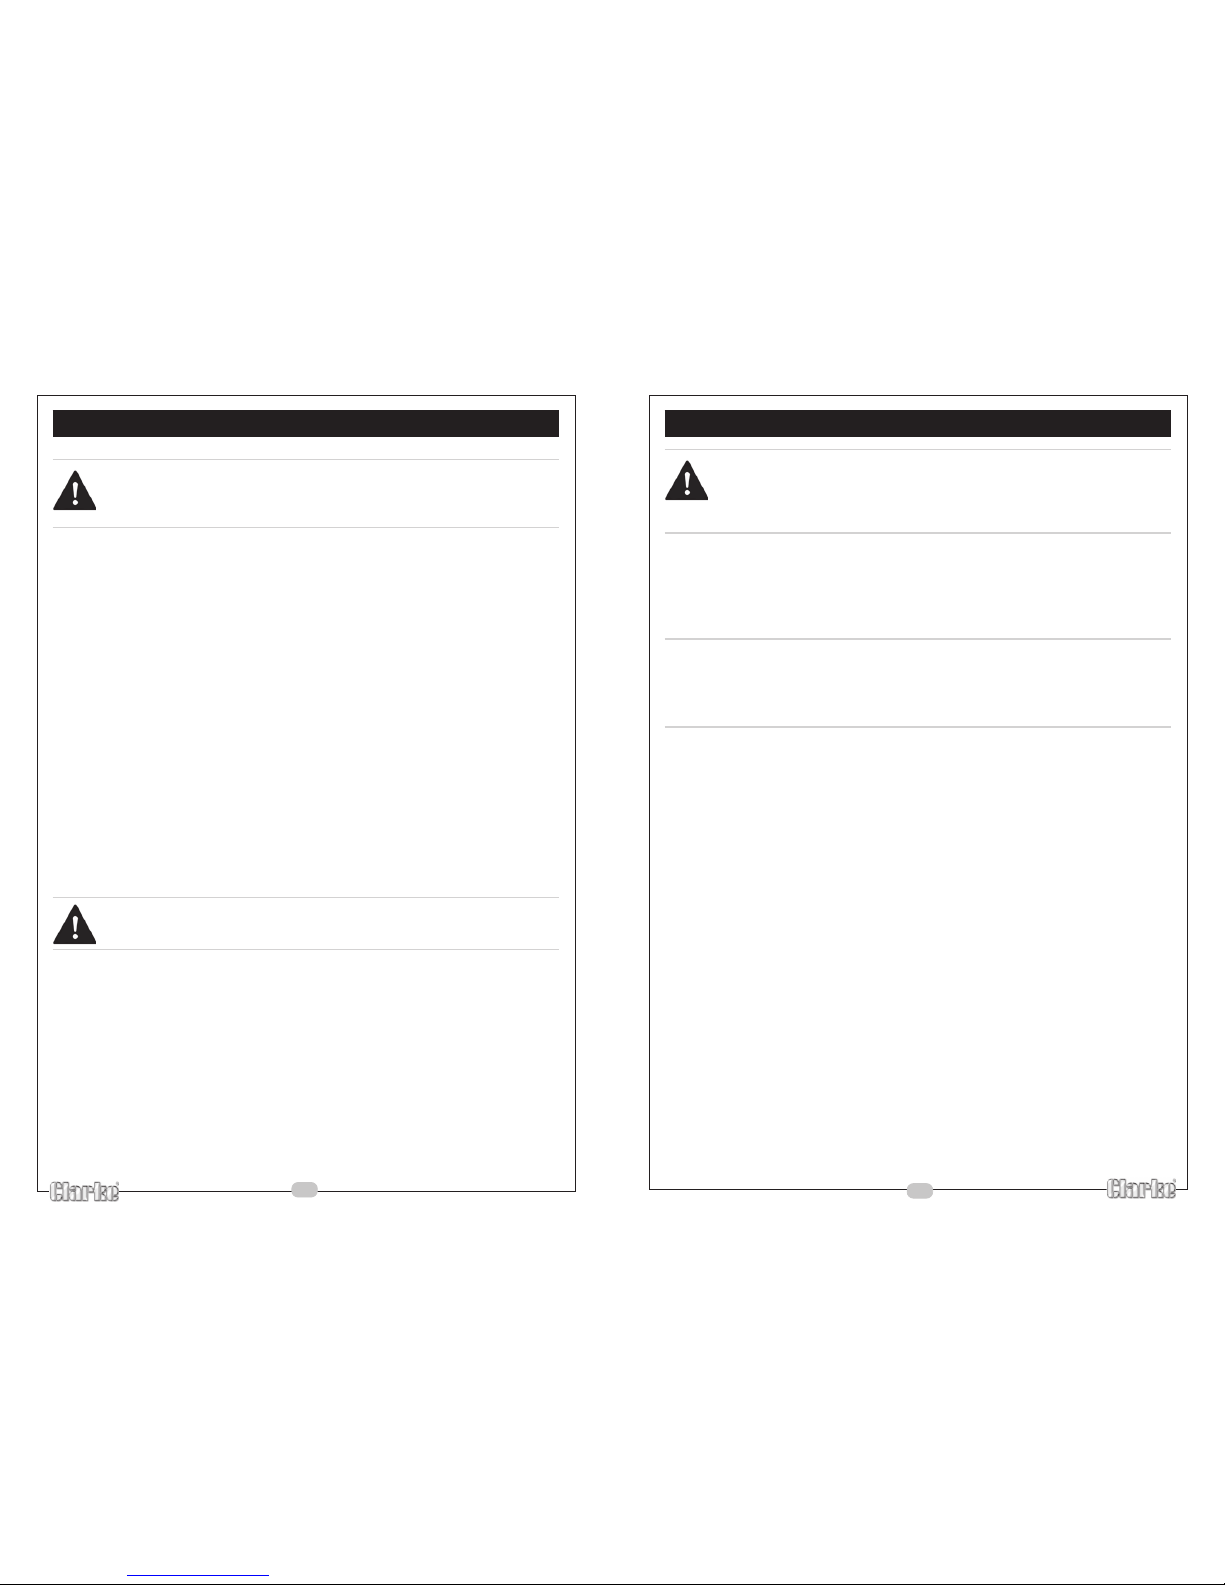
A retreat path must be planned and cleared before any cutting is
started. See diagram below.
The direction of fall is controlled by the notch cut. Before any cuts are made,
consider the location of larger branches and the natural lean of the tree to
determine the position of the notch cut.
WARNING!
Do not cut down a tree during high or changing winds or if there is a
danger to property. Do not cut down a tree if there is a risk of striking
phone or power wires.
WARNING!
Make sure the danger zone is identified & access is restricted for
onlookers.
Page 15
15
GETTING STARTED
WARNING!
For your safety and the safety of others make sure that you have
read and understood all of the safety warnings on pages 4 to 10
before continuing with this section.
5 When the chain tension is correct, whilst still supporting the tip of
the bar, re-tighten the housing cover lock securely.
6 Finally, pull the chain around the bar by hand - it should fit snugly
around the bar and move freely and smoothly.
NOTE:
If the chain binds or is difficult to rotate by hand, too much
tension has been applied. Repeat steps 2 to 6, turning the
blade tensioning dial clockwise slightly to reduce the tension.
18
USING THE CHAIN SAW
WARNING!
For your own safety make sure that you have read and understood
this user guide before continuing.
OPERATING THE CHAIN SAW
To operate the chain saw, proceed as follows:
1) Make sure that the oil tank has been filled with oil. See page 12.
2) Make sure that the chain tension has been checked. See page 13.
3) Make sure that the chain brake has been tested. See page 17. and in
the disengaged position (pulled back towards the motor).
4) Make sure that mains cable is correctly secured by the cable
restraint.
5) Remove the chain guard.
6) Hold the chain saw correctly. Hold the front handle with your left hand,
and the rear handle with your right hand.
7) Start the chain saw by pushing the safety lock off button and squeezing
the on/off trigger switch.
8) Release the trigger switch to stop the chainsaw.
WARNING!
Do not use the chain brake lever as a handle.
Page 16
16
GETTING STARTED
4. TESTING THE CHAIN BRAKE
WARNING!
For your safety and the safety of others make sure that you have
read and understood all of the safety warnings on pages 4 to 10
before continuing with this section.
Your chain saw is equipped with a chain brake that reduces the possibility of
injury due to kickback.
During kickback, the chain brake lever will strike your left forearm, engaging
the chain brake.
When the brake is activated,the chain will
stop in a fraction of a second.
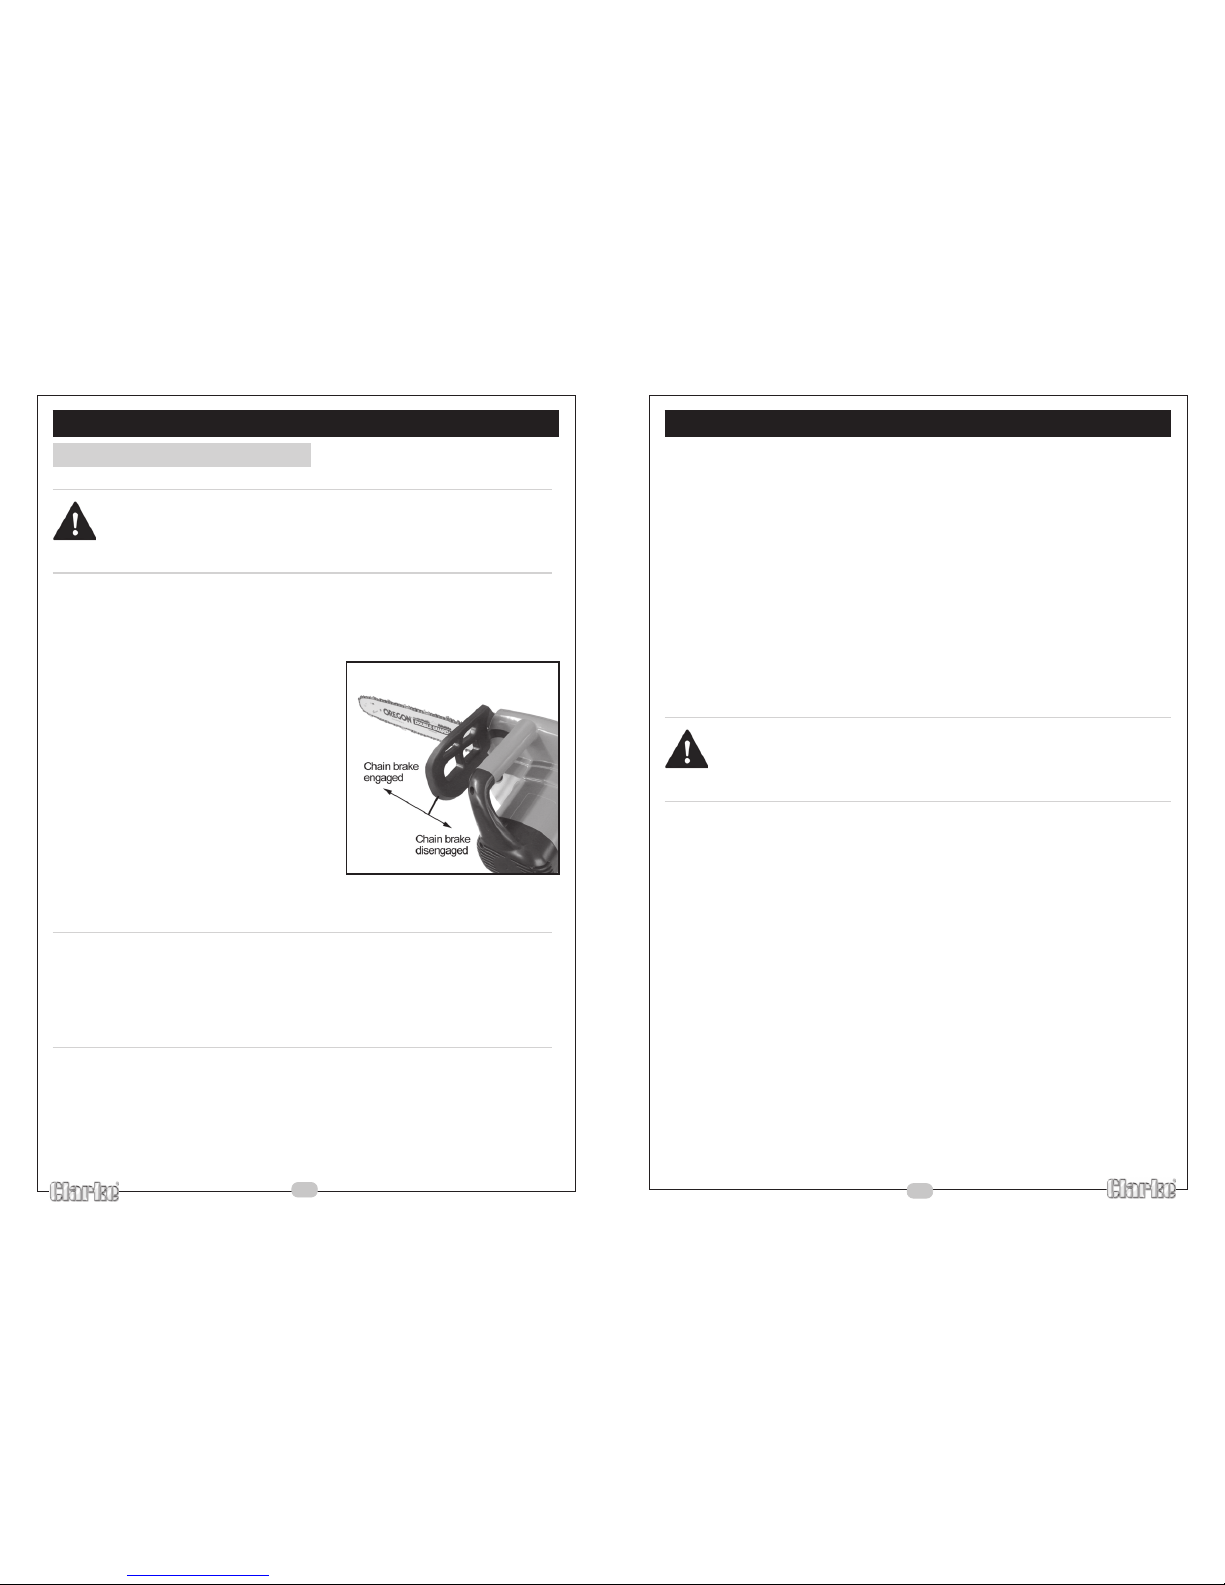
• The chain brake is disengaged (the
chain can move) when the brake
lever is pulled back towards you and
locked in place.
• The brake is engaged (chain is
stopped) when the brake lever is
locked in the forward position, away
from the front handle.
CAUTION!
The chain brake has been designed to reduce the possibility of injury
if kickback occurs. However, it can not be relied upon to protect
you against injury if the chain saw is used carelessly. Take great care
when cutting, and always test the brake before using the saw. See
page 17.
17
GETTING STARTED
Chain brake test procedure
1 Make sure that the chain brake is in the disengaged position.
2 Place the chain saw on a firm, flat, dry surface that is clear of any debris.
Do not let the saw come into contact with any objects.
3 Connect the chain saw to the mains supply.
4 Remove the chain guard.
5 Switch on the chain saw by depressing the safety lock button and
squeezing the on/off trigger switch.
6 While the chain saw is running, activate the chain brake by pushing the
chain brake lever forward.
7 The chain should stop abruptly (the motor will stop too).
WARNING!
If the chain fails to stop when the chain brake is engaged. DO NOT
USE the chain saw. You should return your chainsaw to you CLARKE
dealer for advice.
 Loading...