

Page 1

SERIAL No....................
0514
Page 2

2
Page 3

INTRODUCTION
Thank you for purchasing your CLARKE - CDP 151B, 13mm bench mounted Drill
Press.
Before attempting to operate the machine, please read this instruction manual
thoroughly, and follow all directions carefully. By doing so you will ensure the safety
of both yourself and others around you, and at the same time, you should look
forward to long and trouble free service from your Clarke Drill Press.
GUARANTEE
This product is guaranteed against faults in manufacture for 12 months from date
of purchase. Keep your receipt as proof of purchase. This guarantee is invalid if the
product has been found to have been abused or tampered with in any way, or not
used for the purpose for which it was intended. The reason for return must be
clearly stated. This guarantee does not affect your statutory rights.
TABLE OF CONTENTS PAGE
Safety Precautions........................................................................... 4
Additional Safety Rules for Drill Presses .......................................... 5
Electrical Connections and Wiring Diagram ................................ 6
Preparation for Use .......................................................................... 7
Description of Parts.......................................................................... 8
Assembly .......................................................................................... 9
Settings and Adjustments ............................................................. 11
Drill Speed Table ............................................................................ 12
Operation ....................................................................................... 13
Maintenance ................................................................................. 14
Cutting Speed Chart ..................................................................... 14
Trouble Shooting ............................................................................ 15
Parts Lists and Diagrams........................................................ 16 - 18
Specifications ................................................................................. 19
Optional Accessories .................................................................... 19
Spare Parts & Servicing ................................................................. 19
3
Page 4

GENERAL SAFETY PRECAUTIONS
WARNING
As with all machinery, there are certain hazards involved with their operation
and use. Exercising respect and caution will considerably lessen the risk of
personal injury. However, if normal safety precautions are overlooked, or
ignored, personal injury to the operator, or damage to property may result.
1. KNOW YOUR MACHINE. Read the manual carefully. Learn the machines applications
and limitations, as well as the specific potential hazards peculiar to it.
2. KEEP GUARDS IN PLACE and in working order.
3. EARTH ALL MACHINES. If the machine is equipped with three-pin plug, it should be
plugged into a three-pin electrical socket. Never remove the earth pin.
4. REMOVE ALL ADJUSTING KEYS AND WRENCHES. Before starting, form the habit of
checking to ensure that keys, wrenches and tools are removed from the machine.
5. KEEP WORK AREA CLEAN. Cluttered areas and benches invite accidents.
6. DON’T USE IN DANGEROUS ENVIRONMENT. Don’t use machinery in damp or wet
locations, or expose them to rain. Keep work area well lit.
7. MAKE WORKSHOP CHILDPROOF - with padlocks, master switches etc.
8. KEEP CHILDREN AND VISITORS AWAY. All children and visitors should be kept a safe
distance from work area
9. DON’T FORCE THE MACHINE. It will do the job better and safer, at the rate for which it
was designed.
10. USE THE RIGHT TOOL. Don’t force a tool or attachment to do a job for which it was not
designed.
11. WEAR PROPER APPAREL. Loose clothing, gloves, neckties, rings, bracelets, or other
jewellery may get caught in moving parts. Nonslip footwear is recommended. Long
hair should be contained.
12. USE SAFETY GLASSES. Everyday eyeglasses only have impact resistant lenses, they are
NOT safety glasses.
13. USE EAR DEFENDERS.
14. DON’T OVERREACH. Keep proper footing and balance at all times.
15. MAINTAIN TOOLS IN TOP CONDITION. Keep tools sharp and clean for best and safest
performance. Follow instructions for lubricating and changing accessories.
16. ALWAYS DISCONNECT THE MACHINE before servicing or changing accessories.
17. CHECK FOR DAMAGE. If part of the machine (eg. A cover or guard), is damaged, it
should be carefully inspected to ensure that it can perform its’ intended function
correctly. If in doubt, the part should be renewed. Damage to moving parts or major
components should be Inspected by a qualified technician before operating the
machine. Contact your local dealer for advice.
4
Page 5

19. DO NOT STAND ON THE MACHINE. Serious injury could occur if the machine is tipped
over. Do not store materials above or near the machine such that it is necessary to
stand on the machine to get to them.
20. NEVER operate a machine when under the influence of alcohol, drugs or
medication.
21. ALWAYS ENSURE THAT ADEQUATE LIGHTING is available. A minimum intensity of 300
lux should be provided. Ensure that lighting is placed so that you will not be working
in your own shadow.
ADDITIONAL SAFETY RULES FOR DRILL PRESSES
WARNING:
THIS MACHINE MUST NOT BE MODIFIED, OR USED FOR ANY PURPOSE OTHER
THAN THAT FOR WHICH IT IS DESIGNED.
1. IMPORTANT: You should not operate this machine unless you are thoroughly familiar
with drilling machines and drilling techniques. If there is any doubt whatsoever, you
should consult a qualified person.
2. Do not operate the machine until it is completely assembled, and you have read,
and understood. this entire manual
3. Ensure the proper electrical regulations are followed, and that the machine is
properly earthed.
4. Before switching the machine ON, ALWAYS:-
a. Ensure all chuck keys, spanners and wrenches are removed from the machine.
b. Examine the setup carefully, ensuring that the workpiece is perfectly secure.
c. Ensure your clothing is properly adjusted.
5. Make all adjustments with the power OFF.
6. Always use the correct drilling speeds for the drill size, and the type of material being
drilled (see page 14).
7. NEVER leave the drill unattended whilst it is running. Turn the machine OFF and do
not leave until it has come to a complete stop.
8. When you have finished with the machine, always remove and store the drill bits.
9. CAUTION: This Drill Press is designed for use with Drill Bits ONLY. The use of other cutting
tools or accessories could be hazardous.
10. ALWAYS use clamps, or a drill vice bolted to the table, to hold the work. It should
NEVER be held in bare hands.
ENVIRONMENTAL RECYCLING POLICY
Through purchase of this product, the customer is taking on the obligation to
deal with the WEEE in accordance with the WEEE regulations in relation to the
treatment, recycling & recovery and environmentally sound disposal of the
WEEE.
In effect, this means that this product must not be disposed of with general
household waste. It must be disposed of according to the laws governing Waste
Electrical and Electronic Equipment (WEEE) at a recognised disposal facility.
5
Page 6
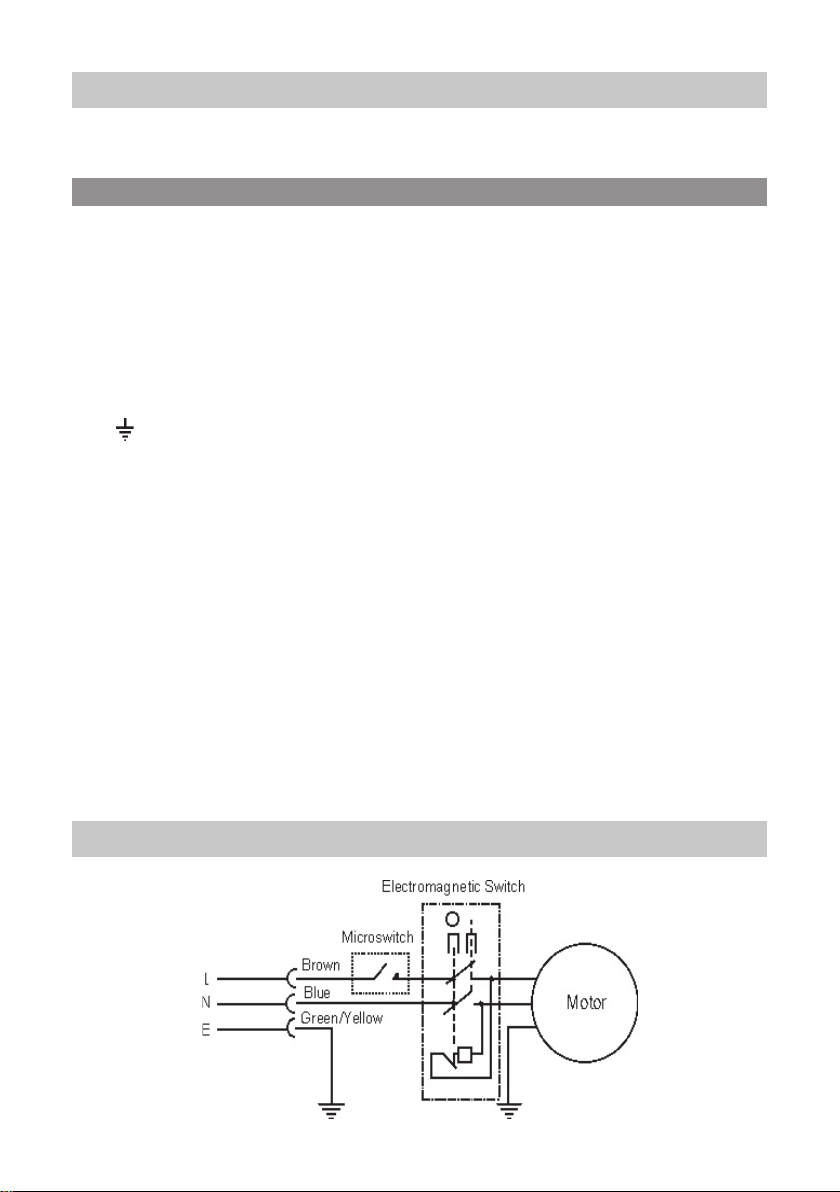
ELECTRICAL CONNECTIONS
Connect the mains lead to a standard, 230 Volt (50Hz) electrical supply through an
approved 13 amp BS 1363 plug, or a suitably fused isolator switch.
WARNING! THIS APPLIANCE MUST BE EARTHED
IMPORTANT: The wires in the mains lead are coloured in accordance with the following
code:
Green & Yellow - Earth
Blue - Neutral
Brown - Live
As the colours of the flexible lead of this appliance may not correspond with the coloured
markings identifying terminals in your plug proceed as follows:
Connect GREEN & YELLOW cord to terminal marked with a letter “E” or Earth symbol
“ ” or coloured GREEN or GREEN & YELLOW.
Connect BROWN cord to terminal marked with a letter “L” or coloured RED.
Connect BLUE cord to terminal marked with a letter “N” or coloured BLACK.
If this appliance is fitted with a plug which is moulded onto the electric cable (i.e. nonrewirable) please note:
1. The plug must be thrown away if it is cut from the electric cable. There is a danger of
electric shock if it is subsequently inserted into a socket outlet.
2. Never use the plug without the fuse cover fitted.
3. Should you wish to replace a detachable fuse carrier, ensure that the correct
replacement is used (as indicated by marking or colour code).
4. Replacement fuse covers can be obtained from your local dealer or most electrical
stockists.
5. The fuse in the plug must be replaced with one of the same rating (13 amps) and this
replacement must be ASTA approved to BS1363.
WIRING DIAGRAM
6
Page 7
PREPARATION
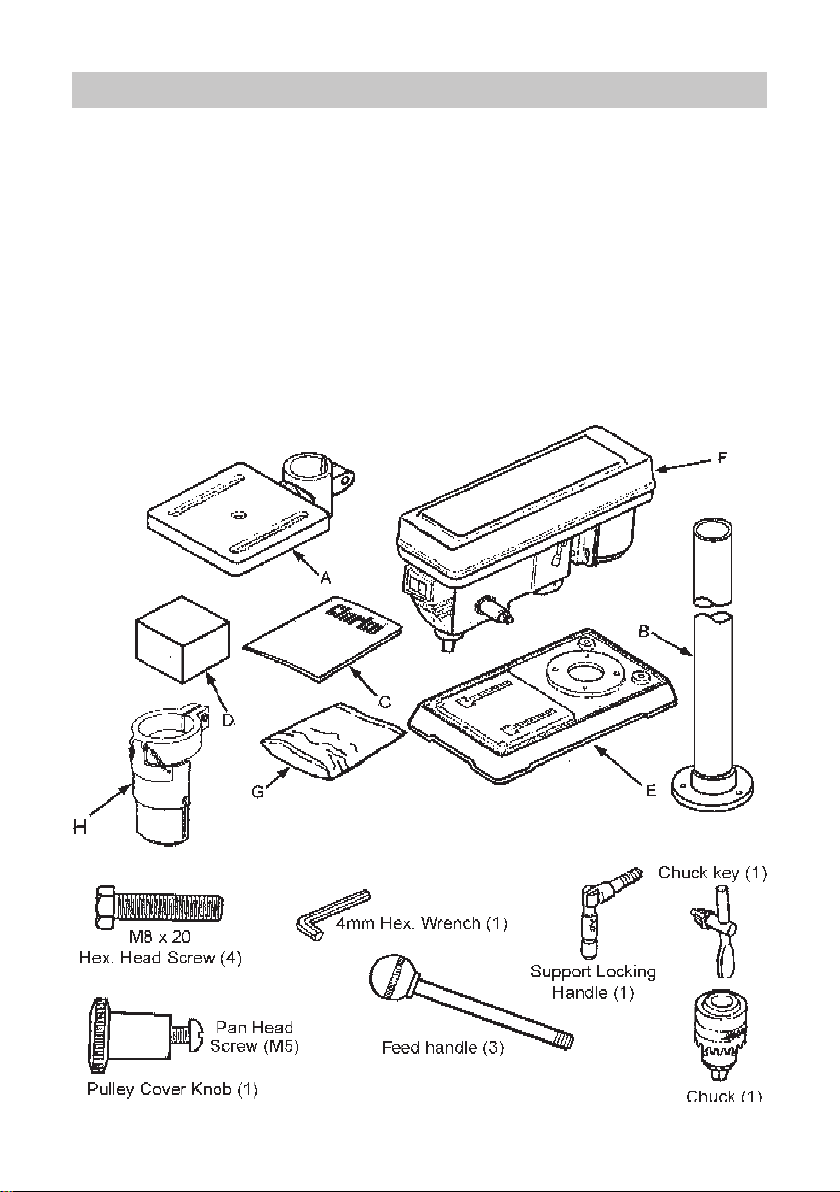
On receipt, carefully unpack the components, ensuring that no damage was suffered in
transit, and that all parts are accounted for.
The following loose items are to be found in the packing case.
A. Table Assy.
B. Column Assy.
C. This Manual
D. Box of loose parts
Check the parts against the above list and refer to the following diagrams.
Should there be any deficiencies or damage, you should contact your CLARKE dealer
immediately .
E. Base.
F. Head Assy.
G. 1 X Bag of loose parts.
H. Chuck Guard Assy.
Loose Items in Box and Bag
7
Page 8
Remove all traces of preservative from the components with paraffin or a good quality
solvent, and wipe all parts thoroughly with a clean dry cloth. Apply a coating of wax paste
or light oil, to the table, column and base, to prevent rust.
Take the necessary precautions when lifting components, considering their weight.
Assistance will be required.
Before use, the machine must be mounted, and securely bolted, to a strong, heavy
workbench, of sufficient height so that you do not need to bend your back to perform
normal operations.
Ensure the location is adequately lit, and that you will not be working in your own shadow.
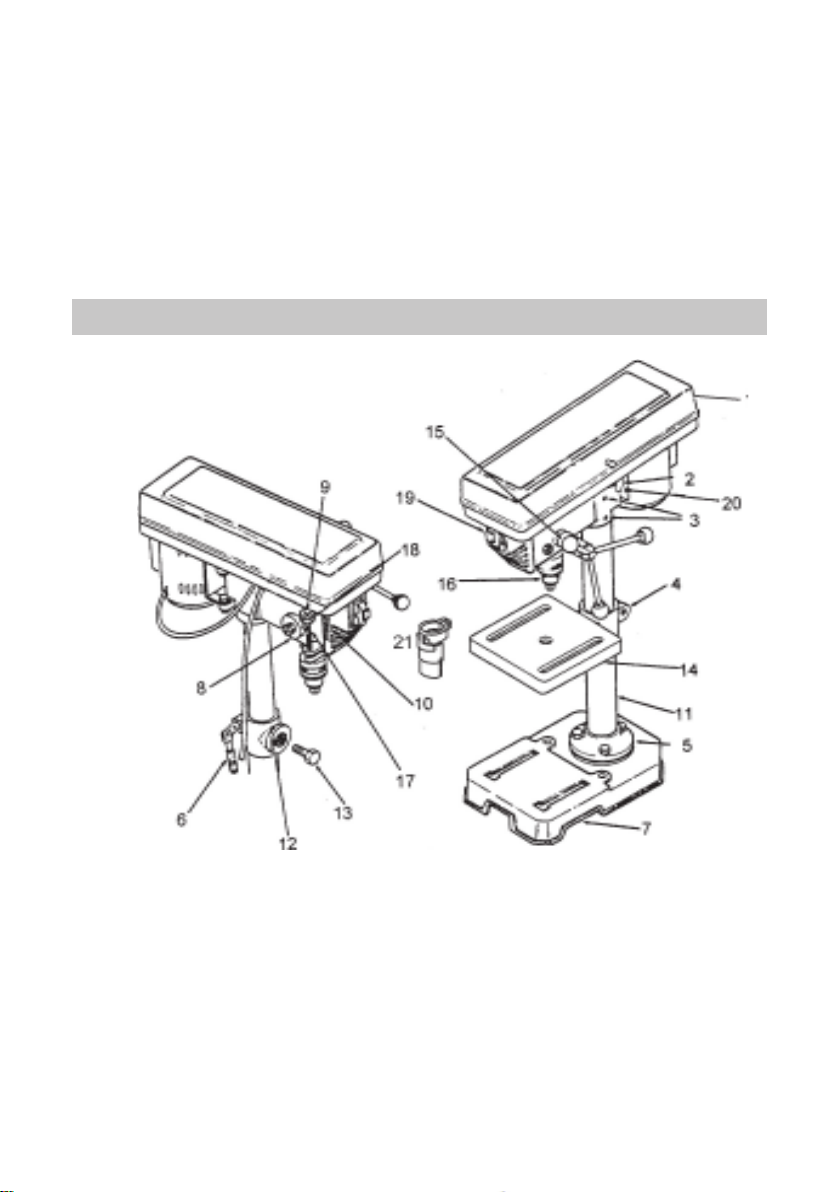
DESCRIPTION OF PARTS
1. Pulley Cover 11. Column
2. Belt Tension Locking Screw 12. Bevel Scale
3. Head Lock Set Screws 13. Table Lock Set Screw
4. Table Support 14. Table
5. Column Support 15. Feed Handles
6. Table Support Locking Handle 16. Chuck
7. Base 17. Feed Stop Rod
8. Quill Spring Assembly 18. Stop Nuts
9. Pointer 19. Switch
10. Depth Scale 20. Motor Stop
21. Chuck Guard
8
Page 9
ASSEMBLY
CAUTION!
IT IS ADVISED THAT ASSISTANCE BE USED WHEN ASSEMBLING THIS MACHINE.
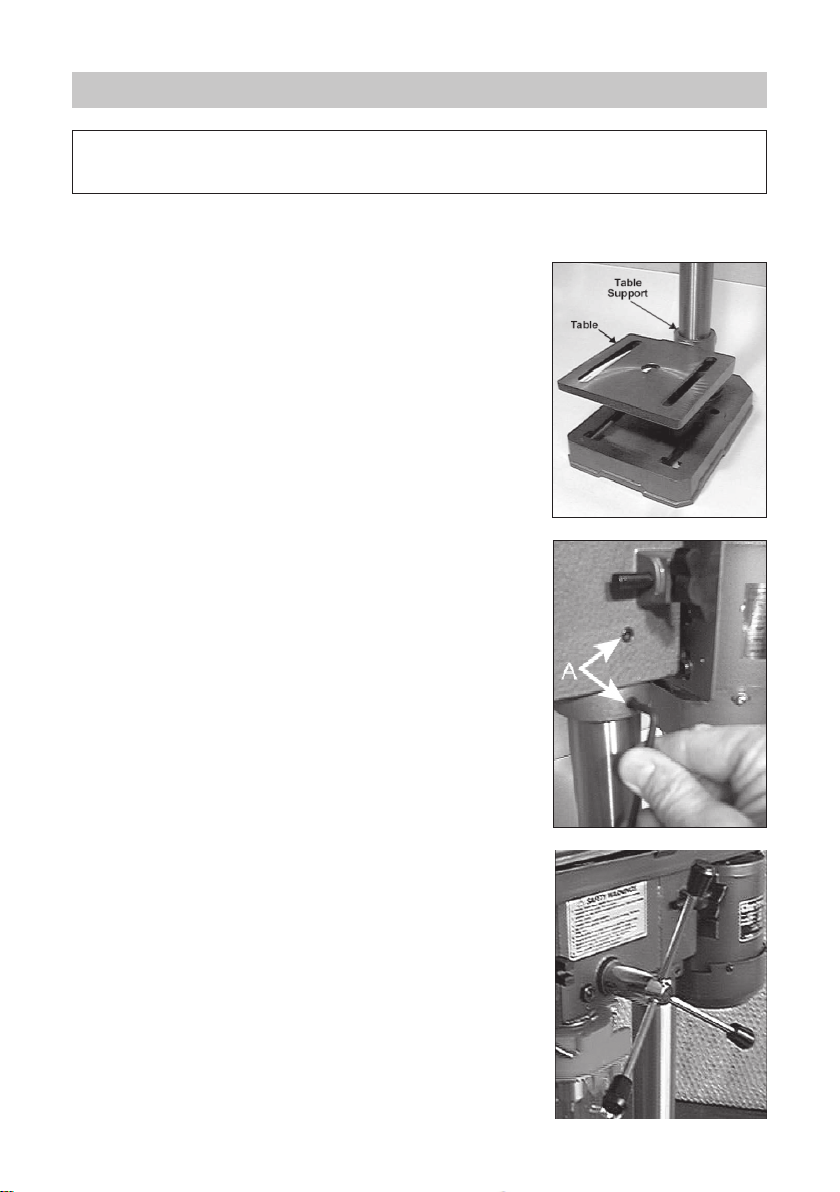
A. Column to the Base.
Bolt the column assembly to the base with the four M8 x
20mm hex. screws provided.
NOTE:
Ideally, the base with column attached, should be
firmly bolted to the workbench, prior to the assembly of
other components.
B. Table to Column.
1. Thread the Table Support Locking Handle into the
Table Support from the left hand side, and leave it
loose at this stage.
2. Slide the Table Support with Table, over the Column,
and lower it so that it rests against the column
support bracket (Fig. 1). Nip up the locking handle to
prevent the table from swinging freely during the
assembly process.
3. Check to ensure the column set screws, at the
column support, are tight
C. Head to Column.
NOTE: I
t may be necessary to unscrew the Head Lock Set
Screws (A fig.2), to ensure they do not protrude internally,
as this would prevent the head from sliding fully into
position.
1. With assistance, raise the Head, and locate it on top
of the Column, ensuring it slides home fully.
2. Align the head with the base, and tighten down the
Head Lock Set Screws using the wrench provided, to
secure the head.
Fig. 1
Fig. 2
3. Locate the three feed handles, and screw them
firmly into the hub of the feed shaft.
9
Fig. 3
Page 10
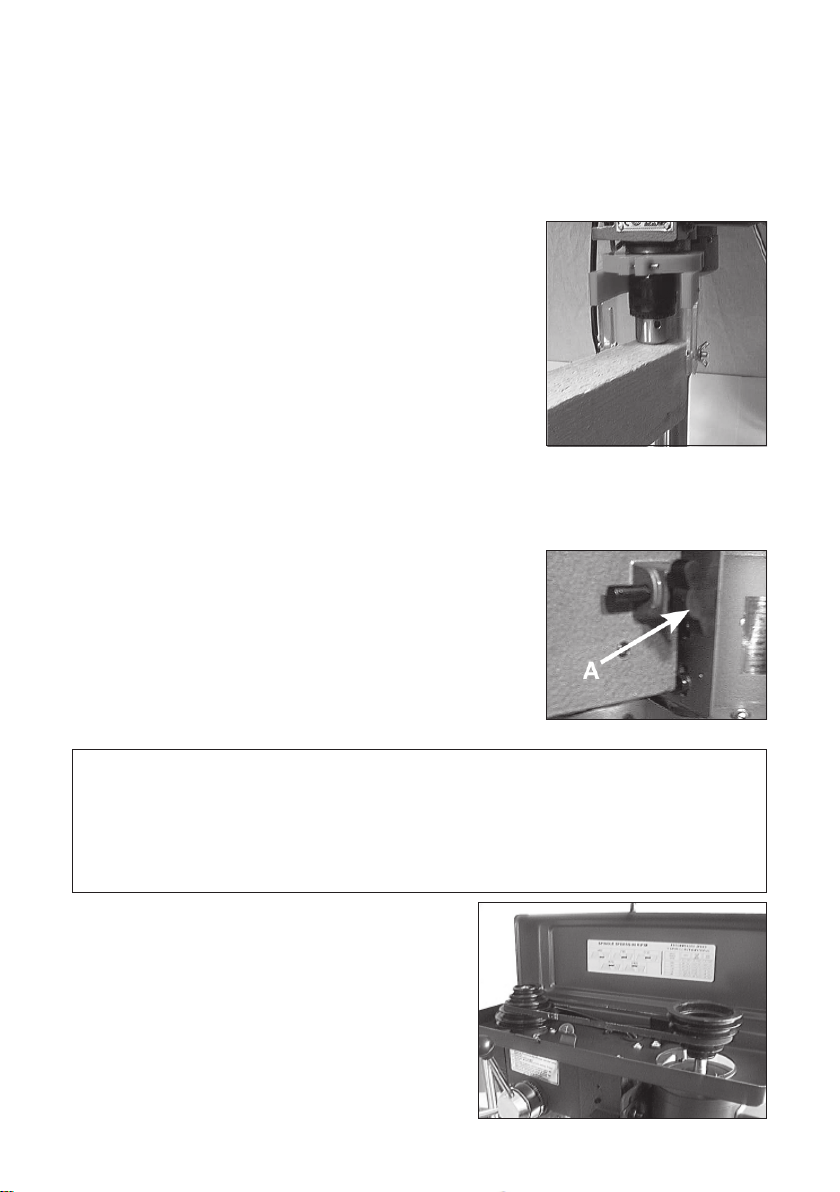
D. Chuck Guard Assembly
Slide the Chuck Guard over the Quill Shaft and nip up the pinch bolt, temporarily, with the
pinch bolt facing the front (see fig.4). Ensure the Quill Shaft/Spindle is at the top of its travel.
NOTE:
This operation should be carried out before the chuck is installed.
E. Installing the Chuck.
1. Slide the work table up the column to within 6" of the
spindle.
2. Open the jaws of the chuck to their maximum, using
the chuck key supplied.
3. Put a piece of scrap wood on to the table to protect
the chuck nose.
4. Ensuring all parts are thoroughly clean, dry, and burr
free, place the chuck over the end of the spindle, and
pull the spindle down using the feed handles, pressing
the chuck hard against the piece of scrap wood
until the chuck is forced home.
5. Slacken the chuck guard pinch bolt and turn the chuck guard so the the pinch bolt is
towards the rear and tighten the pinch bolt.
F. Belt Cover Knob.
Locate the knob, with pan head screw, and attach to the
cover, screwing on tightly.
Fig. 4
Fig. 5
G. Fitting the Drive Belt.
1. Undo the Belt Tension Locking Screw (A, Fig.5), and,
referring to the chart inside the belt cover (which is
duplicated on page 12), fit the belt in the position
corresponding to the spindle speed required.
CHECKING THE OPERATION OF THE MICROSWITCH
When closing the cover, check the operation of the Microswitch. It is important that it
operates immediately the cover is pulled open, in order to prevent the machine from
operating........NOT when the cover is opened sufficiently for fingers to be inserted.
If necessary, bend the actuating tab, which is attached to the cover, to ensure this.
IMPORTANT:
2. Lever the motor, on its bracket, away from
the head, so that tension is applied to the
belt.Tension is correct, when the belt
deflects by approx. ½” at its centre, when
using reasonable thumb pressure. Lock the
motor in this position using the Locking
Screw.
NOTE: I
f the belt should slip whilst drilling, adjust
the belt tension.
10
Fig.6
Page 11
SETTINGS and ADJUSTMENTS
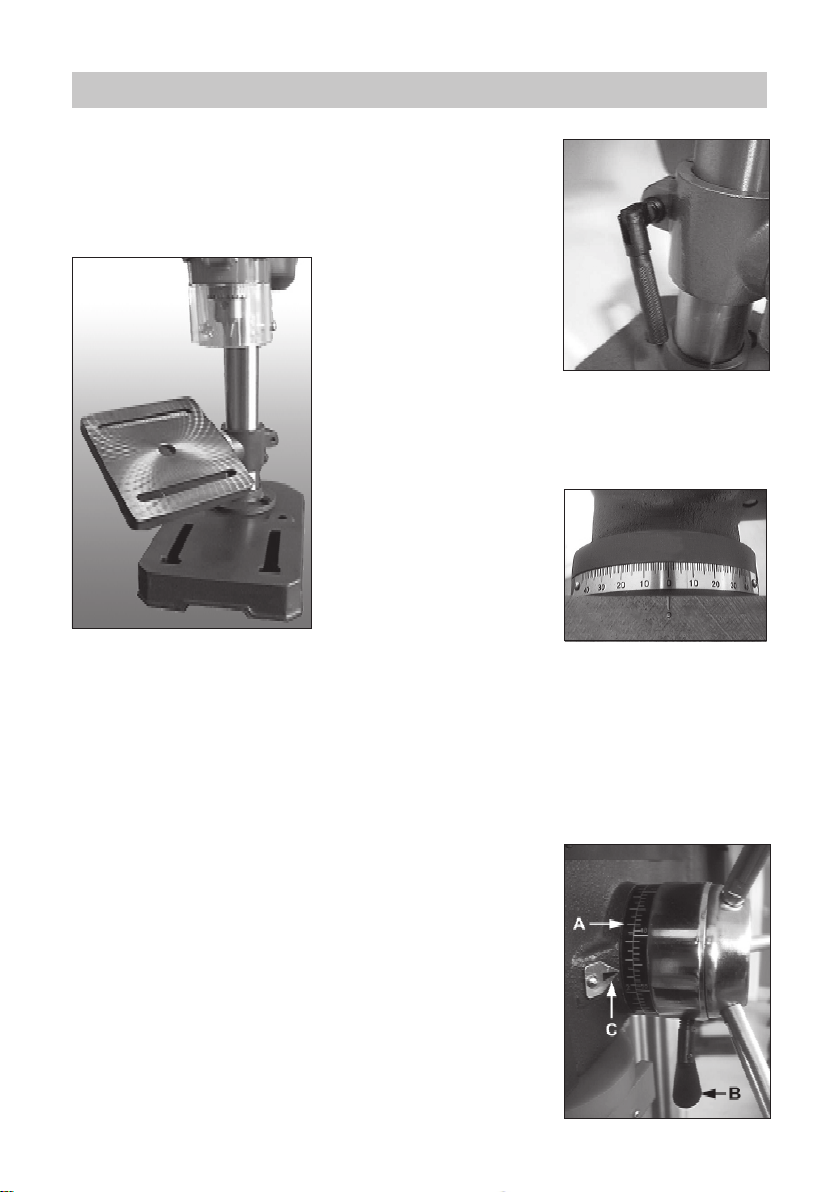
1. Table.
The table may be raised, lowered or swivelled about the
column, by slackening off the table support locking handle,
(Fig. 7), adjusting accordingly, and re-tightening the handle.
Fig. 8
It may also be tilted by loosening the screw, which
secures the table to its’ mount, beneath the table, tilting
to the required position, and re-tightening the screw.
A bevel scale is provided on
the table mounting,
measured in degrees, to
assist in setting the required
angle.
For all normal operations,
the table should be set to 0°.
Table shown tilted and swivelled
about the column
round bar in the chuck, place a square on the table and bring it up to the round bar. Adjust
the table tilt if necessary so that the table is correctly aligned.
To check to ensure the table
is entirely square to the drill,
insert a piece of straight
Fig. 7
Table Support
Locking Handle
Fig. 9
Table Tilt Scale
2. Spindle Depth
Located around the Spindle Feed Shaft is a Depth Stop Collar carrying a graduated scale
(A, Fig.10). The Collar is capable of turning about the shaft and may be locked in place by
Locking Screw B. The Graduations are Imperial (inches) and
Metric (mm).
To set a driling depth:
Lower the drill bit...WITH THE POWER OFF, so that it contacts
the work, and hold in that position with one hand whist
slackening the locking screw (B) and rotating the scale so
that the measurement for the depth of hole to be drilled is in
line with the pointer (C). Lock the collar in this position with
the locking screw (B).
The drill is now preset to drill holes to your pre-determined
depth. i.e. Providing your workpiece is level and flat, you
may drill a series of holes, each to the same depth, quickly
and accurately.
11
Fig. 10
Page 12
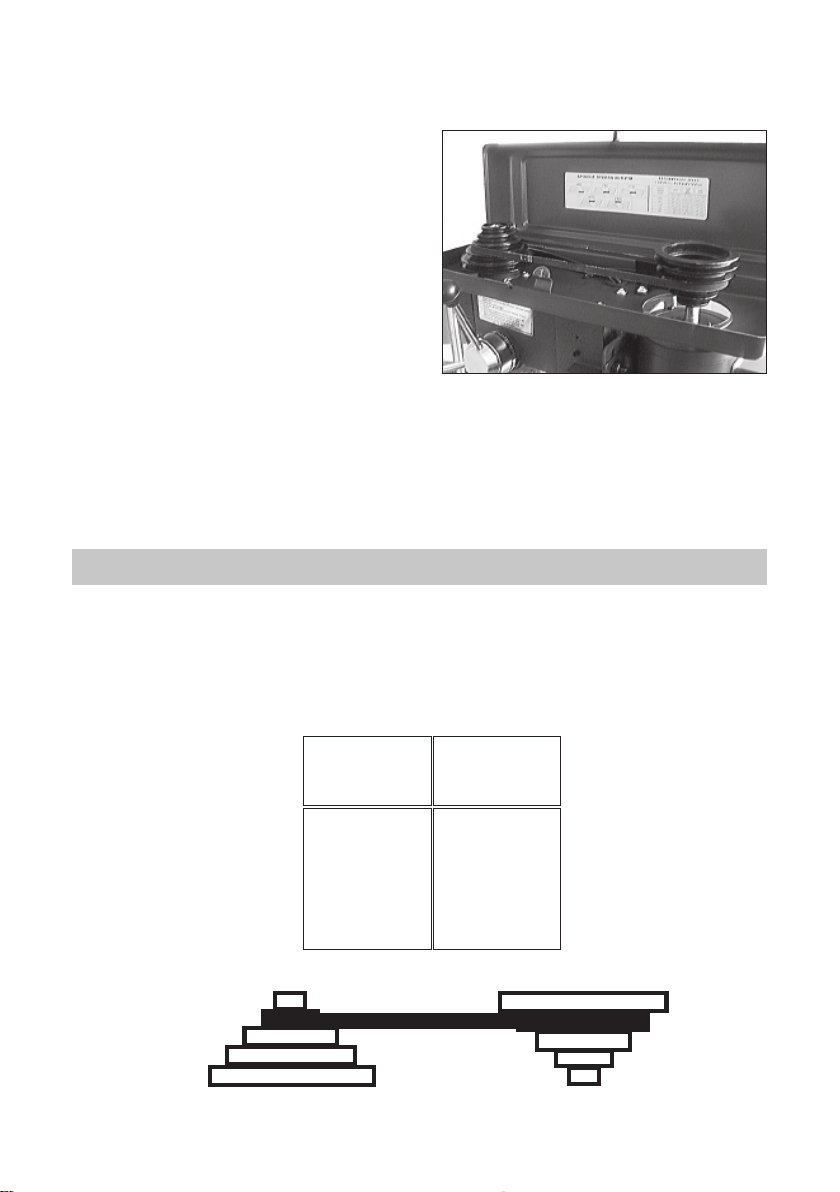
3. Changing Drill (Spindle) Speed.
Before changing the speeds, ensure the
machine is switched OFF and disconnected
from the mains supply.
1. Slacken off the Belt Tension Locking
Screw (see fig.5), to relieve any tension
on the drive belt.
2. Open the pulley cover.
3. Consult the chart inside the pulley
cover and position the belt on the
pulley’s according to the spindle
speed required.
4. When the belt has been correctly positioned, re-tension by levering the motor away
from the head, until the belt deflects by approx. ½” at its centre when using
reasonable thumb pressure. Lock the motor in this position with the Belt Tension Locking
Screw. Finally, recheck the operation of the Microswitch (see page 10)
Fig. 11
DRILL SPEED TABLE
The table below gives the belt arrangement for given drill speeds. The diagram shows the
belts fitted to step D of the Spindle Pulley and 4 of the Motor Pulley, giving a drill speed of
1,670 RPM.
A full chart is also provided on the inside of the pulley cover.
Spindle Belt
Speed Position
(RPM)
460 A1
730 B2
1130 C3
1670 D4
2480 E5
E
D
C
B
A
SPINDLE PULLEY MOTOR PULLEY
12
5
4
3
2
1
Page 13
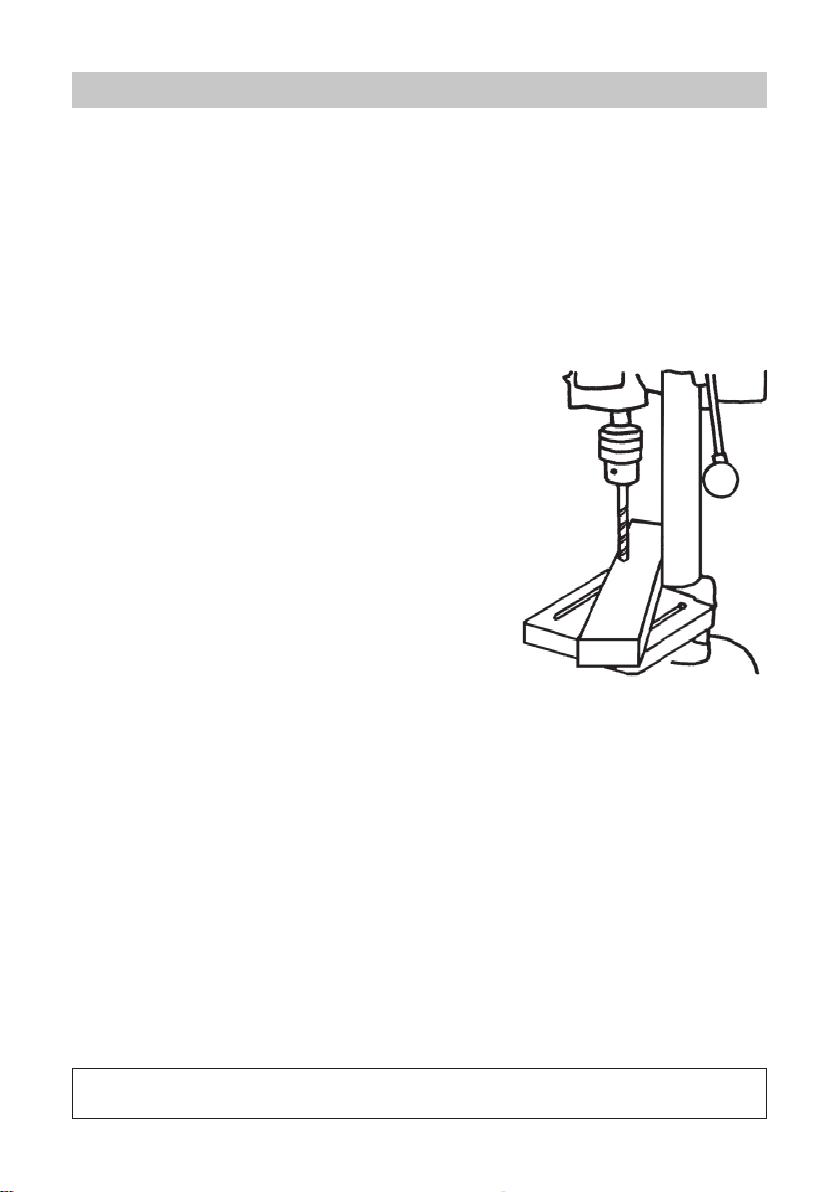
OPERATION.
1 . Insert the drill bit into the jaws of the chuck by approx 1", ensuring that the jaws do not
touch the flutes of the drill. Before tightening the chuck, ensure that the drill is centred
within the jaws.
2. Ensure the table height and position is set so that drill travel is sufficient for the job in
hand.
3. Ensure the work is securely clamped or held in a drill vice, bolted to the table. Never
hold it with bare hands. Severe personal injury may be caused if the workpiece is
whipped out of the operator’s hand and damage to the machine incurred if the work
strikes the column.
If the piece is of irregular shape and cannot be laid flat on the table, it should be
securely blocked and clamped.
Any tilting, twisting or shifting, results not only in a
rough hole but also increases drill breakage.
4. For small workpieces, that cannot be clamped to
the table, use a Drill Press Vice. The vice must be
clamped or bolted to the table.
5. When drilling completely through wood, always
position a piece of scrap wood between the
workpiece and the table to prevent splintering on
the underside of the workpiece as the drill breaks
through. The scrap piece of wood must make
contact with the left side of the column as shown in
Fig 12. In addition, set the depth of drill travel so
that the drill cannot possibly come into contact
with the table, or align the table so that the hole in
its’ centre is directly in line with the drill bit.
Fig. 12
6. When completely satisfied that the setup is sound, lower the Chuck Guard into
place, and switch the machine ON by pushing the GREEN ‘I’ button. To switch
OFF...push the RED ‘O’ button, see fig. 13.
Fig. 13
NOTE:
a. As a safety feature, the ON/OFF switch is a No Volt
Release type. Therefore, if the power is interrupted
whilst the machine is switched ON, it will not
automatically start when the power is restored.
b. A Micro switch is provided within the Pulley Cover,
which prevents the machine from operating unless
the Pulley Cover is firmly closed.
Drill Press Vices, Cross Vices and Clamps,
are available from your CLARKE dealer.
13
Page 14

MAINTENANCE
For maximum performance, it is essential that the Drill Press is properly maintained. Always
inspect before use. Any damage should be repaired, and faults rectified.
If the mains lead is worn or cut, or damaged in any way, it should be replaced immediately.
Please refer to the trouble shooting chart on page 13 . If you are unable to rectify any faults,
please contact your local dealer or Clarke International Service Division on 020 8556 4443
for assistance.
Monthly (When in constant use)
1. Check tightness of mounting bolts, and, head and column securing set screws.
2. Check belt for wear, and replace if frayed or damaged in any way.
3. Blow out any dust that may have accumulated in the motor fan.
4. Apply a thin coat of wax paste or light oil to the table and column, for lubrication, and
to help prevent corrosion.
Lubrication
All bearings are packed with grease at the factory and require no further lubrication.
After use
Remove all swarf from the machine and thoroughly clean all surfaces.
Components should be dry, with machined surfaces lightly oiled.
Always remove drill bits, and store in a safe place.
CUTTING SPEEDS
Factors which determine the best speed to use in any drill press operation are:
• Kind of material being worked • Size of hole • Quality of cut desired • Type of Drill
Generally, the smaller the drill, the greater the required RPM. In soft material, the speed
should be higher than for hard metals.
As a general guide, the drill speed for a given drill bit size, is according to the table below.
Speed Range
(RPM)
Wood
Alum, Zinc
& Brass
Iron &
Mild Steel
mm 9.5 12.5 - - -
mm 5.6 8.75 12 - -
mm 2.4 4 6.4 9.5 12.5
2480 1670 1130 730 460
in 3/8 1/2 - - -
in 7/32 11/32 15/32 - -
in 3/32 5/32 1/4 3/8 1/2
14
Page 15

TROUBLE SHOOTING
PROBLEM
Noisy operation
(under load)
Excessive
drill wobble
Motor won’t
start
Drill binds
in workpiece
Drill burns
or smokes
PROBABLE CAUSE REMEDY
A) Incorrect belt tension
B) Dry spindle
C) Loose pulley
D) Loose belt
E) Worn bearing
A) Loose chuck
B) Worn spindle, or bearing
C) Worn chuck
D) Bent drill
A) Power supply
B) Motor connection
C) NVR Switch connections
D) Faulty switch
E) Motor windings burned
F) Pulley Cover not closed.
G) Micro Switch inoperative.
A) Excessive feed pressure
B) Loose belt
C) Loose drill
D) Incorrect drill speed.
E) Drill angles incorrect for
type of material
F) Loose Spindle Pulley
A) Incorrect speed.
B) Chips are not discharging
C) Dull drill or incorrect
clearance for material.
D) Needs coolant
E) Excessive feed pressure
A) Adjust tension
B) Remove spindle/quill assembly
and lubricate
C) Tighten pulley
D) Adjust belt tension
E) Replace bearing
A) Tighten by pressing chuck down on
to a block of wood against table.
B) Replace spindle shaft or bearing
C) Replace chuck
D) Renew Drill
A) Check power cord/fuse
B) Check motor connections
C) Check switch connections
D) Replace switch
E) Replace motor
F) Close pulley cover.
G) Check operation of micro switch,
per instructions Page 10. If switch
operates correctly but motor fails
to start consult your Clarke dealer
A) Apply less pressure
B) Check belt tension
C) Tighten drill with key
D) Refer to Cutting Speed chart,and
adjust drill speed accordingly
E) Consult an appropriate manual
re. Drills and CuttingAngles, and
sharpen drill accordingly.
F) Tighten Pulley grub screw
A) Refer to Cutting Speed chart,
and adjust drill speed accordingly
B) Clean drill
C) Check sharpness & profile
D) Use coolant whilst drilling
E) Apply less pressure
Table difficult to
raise
A) Needs lubrication
B) Table lock tightened
A) Lubricate with light oil
B) Loosen clamp
15
Page 16
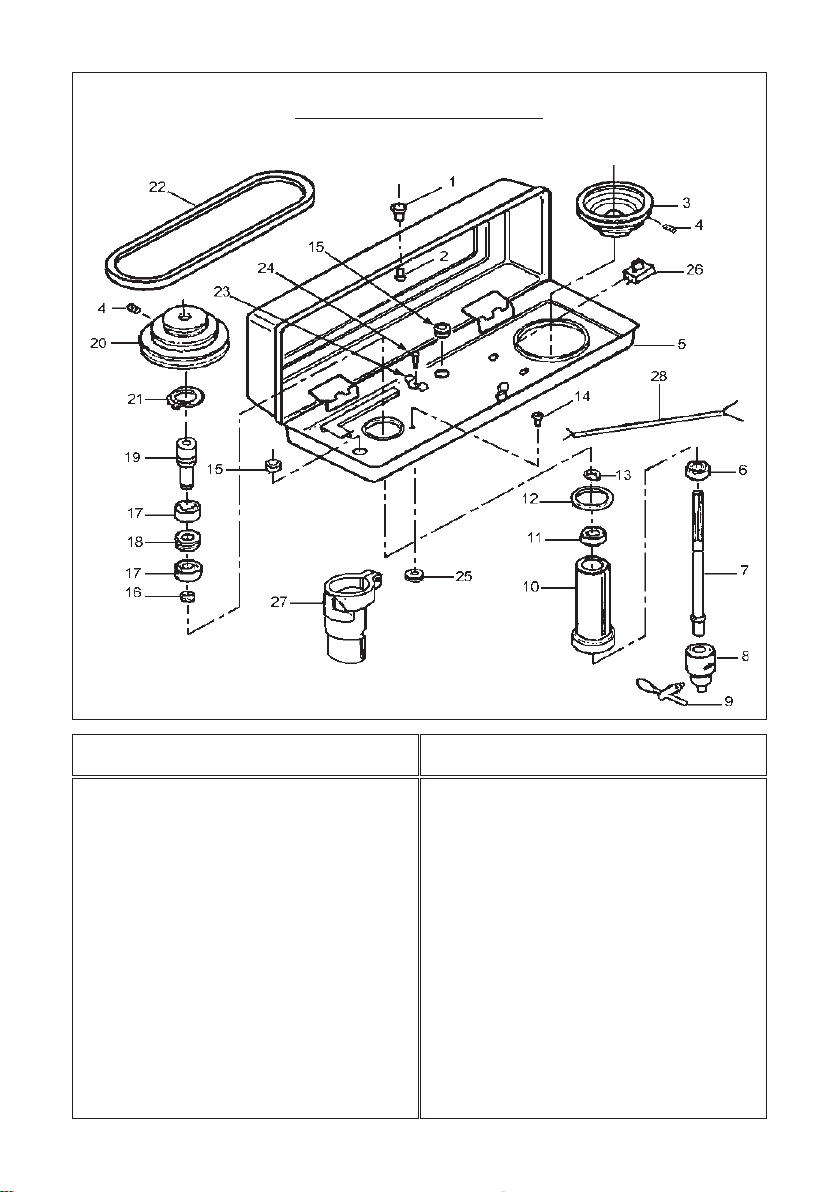
PULLEY ASSEMBLY
1 Knob DD16105008
2 Pan Head Screw M5 3040656
3 Motor Pulley DD13205005
4 Hex Skt Screw M6 3040487
5 Pulley Cover DD13205000
6 Bearing 80201 BRG80201
7 Spindle Shaft JT33 DD13203001A
8 Chuck JT33 DDJ2613
9 Chuck Key DD13303010
10 Quill Tube DD13203002A
11 Bearing 60201 BRG60201
12 Quill Gasket DD13303006
13 Circlip DDGB8941-88
14 Screw M6 3040650
Item Description Part No. Item Description Part No
15 Rubber Bushing DD20105012
16 Retaining Ring DDGB8941-86
17 Bearing 60203 BRG60203
18 Spacer DD13302023
19 Pulley Insert DD13202022
20 Spindle Pulley DD13205006
21 Retaining Ring DDGB8941-86
22 Vee Belt K30 DD13205007
23 Cable Clamp DD16102014
24 Pan Head Screw M5 3040410
25 Foam Washer DD13105009
26 Microswitch DDXN-5
27 Chuck Guard DD16108001
28 Mains lead DD13202029
16
Page 17
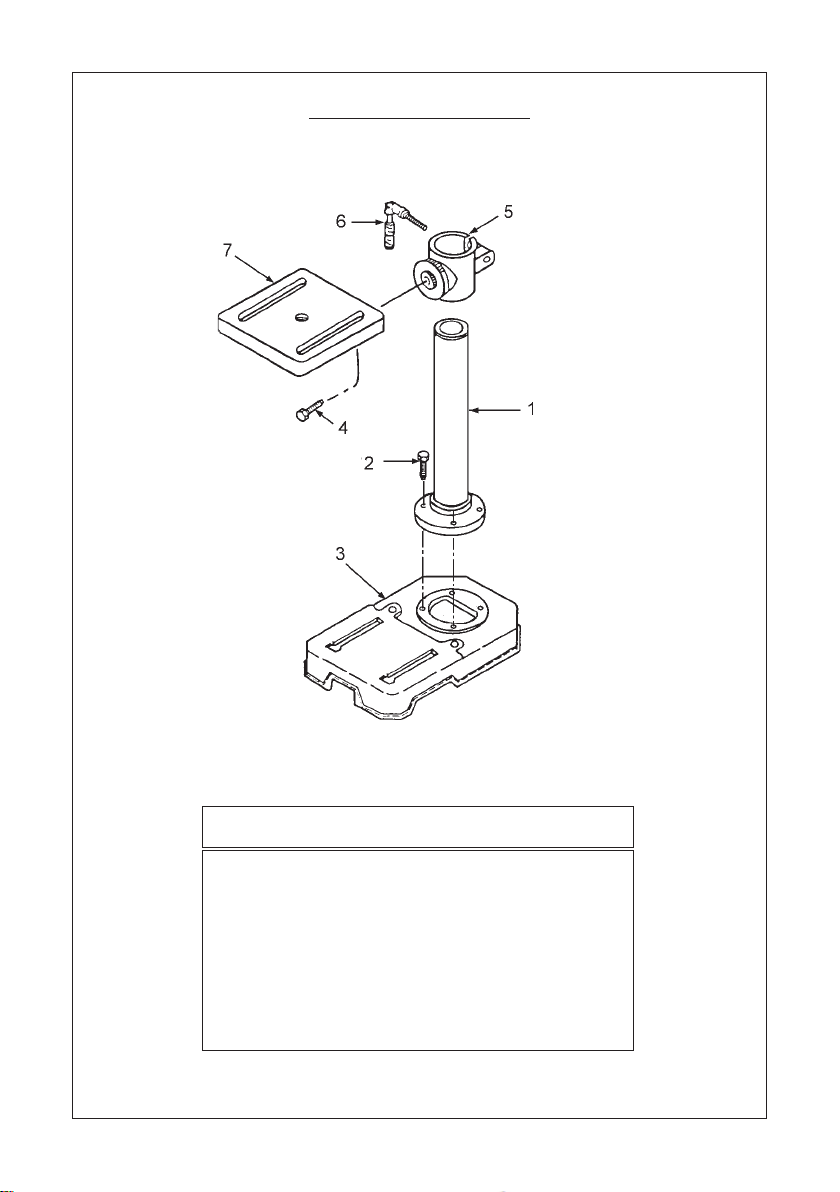
BASE ASSEMBLY
Item Description Part No
1 Column DD13201002
2 Hex. Head Screw M8 3040501
3 Base DD13201001
4 Table Tilt Locking Screw 3040510
5 Table Support w/Scale DD13201004A
6 Clamp Handle DD16101013
7 Table DD13201014
17
Page 18
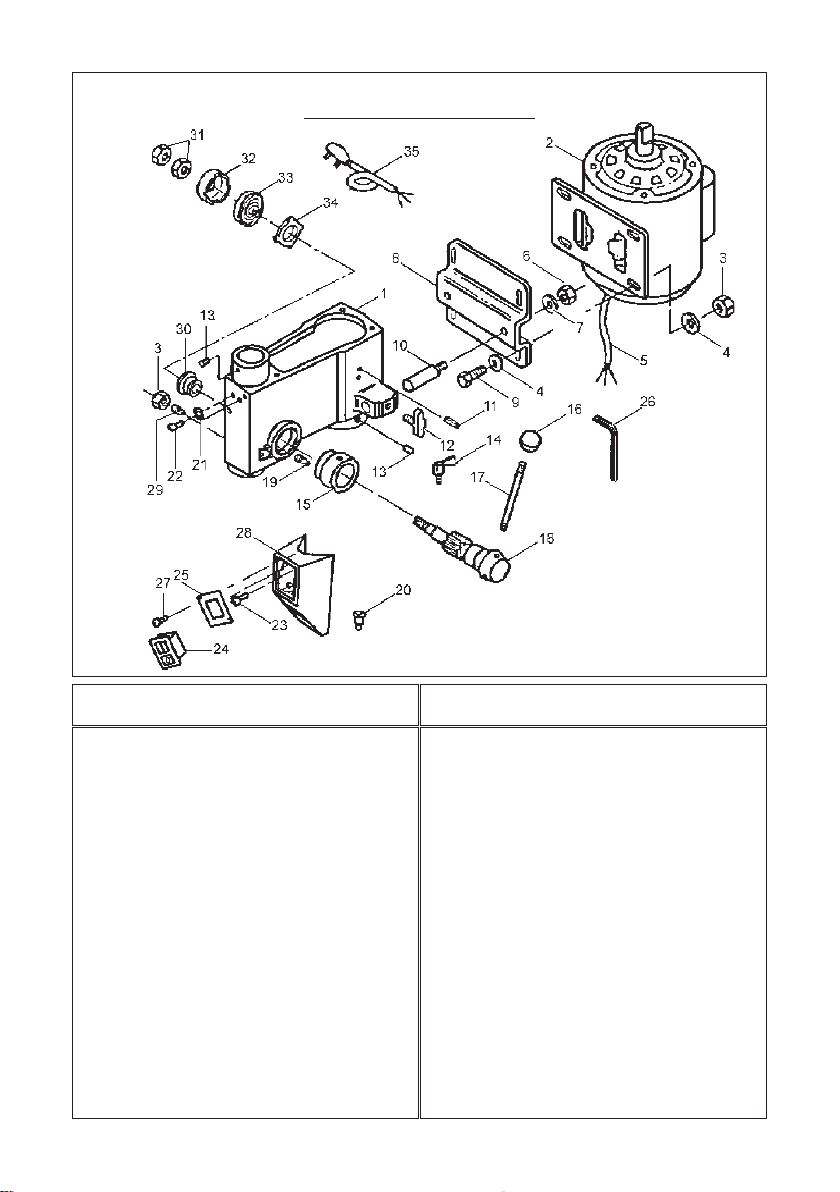
HEAD ASSEMBLY
1 Head w/Pointer and Trim DD13202001
2 Motor Assembly DDYYG71L4(W)
3 Hex. Nut M8 3040601
4 Washer DDGB972-85
5 Motor cable DD13202016
6 Hex. Nut M10 3040602
7 Lockwassher DDGB93-87
8 Motor Bracket DD13202007
9 Hex. Screw M8 7101107
10 Motor Brkt Support DD13202002
11 Roll Pin DDGB879-86
12 Belt Tension Lock. Screw DD13102005
13 Head Lock Set Screw M8 DDGB80-85
14 Depth Locking Screw DD16104012
15 Depth Stop Ring w/Scale DD13304003
16 Knob DD132040011
17 Feed Handle DD13202005
18 Feed Shaft DD13304000
Item Description Part No. Item Description Part No
19 Stop Pin DD13304010
20 Connector DD13302019
21 Lockwasher DDGB8621-87
22 Pan Head Screw M5x6 3040485
23 Pan Head Screw M5x12 3040656
24 NV Switch Assembly DDKJD6
25 Cover Switch Plate DD13202009A
26 Hex. Wrench DDGB5356-86
27 Self tapping Screw DDGB845-85
28 Switch Box DD13202008
29 Set Screw DD13202021
30 Spring Seat DD13204006
31 Hex Nut 3040603
32 Quill Spring Cap DD13104008
33 Quill Spring DD13104009
34 Spring retainer DD13104007
35 Power cable DD13302015L
18
Page 19

SPECIFICATIONS
Motor ........................................................................ 230VAC, 50Hz, 1 Phase
Power Rating ............................................. 300Watts
Current Rating ........................................... 1.3Amps
Speed ......................................................... 1400RPM
Fuse Rating ............................................................... 13Amps
No. of Speeds .......................................................... 5
Chuck Capacity ...................................................... 13mm
Spindle Taper ........................................................... JT33
Table Type ................................................................ Square - Dry
Table Dimensions ..................................................... 198 x 193mm
Table T- Slot Dimensions .......................................... 16x135mm
Max. Spindle Travel ................................................. 60mm
Max. Dist. Chuck to Table ....................................... 290mm
Column Dia. ............................................................. 59.5mm
Quill Collar Dia. ........................................................ 54mm
Dist. Column to Chuck Centre ............................... 126mm
Overall Dimensions .................................................. 720x295x480mm
Base Size ................................................................... 210x340mm
Belt Type ................................................................... K30 - 787
Weight .................................................................... 29kg
OPTIONAL ACCESSORIES
Drill Press Vices, from 3" to 6", Cross Vices (Cast Iron),
and Table Clamps
are available from your CLARKE dealer
SPARE PARTS & SERVICING
For Spare Parts and Service, please contact your nearest dealer,
or CLARKE International, on one of the following numbers.
PARTS & SERVICE TEL: 020 8988 7400
PARTS & SERVICE FAX: 020 8558 3622
or e-mail as follows:
PARTS: [email protected]
SERVICE: [email protected]
19
Page 20

 Loading...