

Page 1
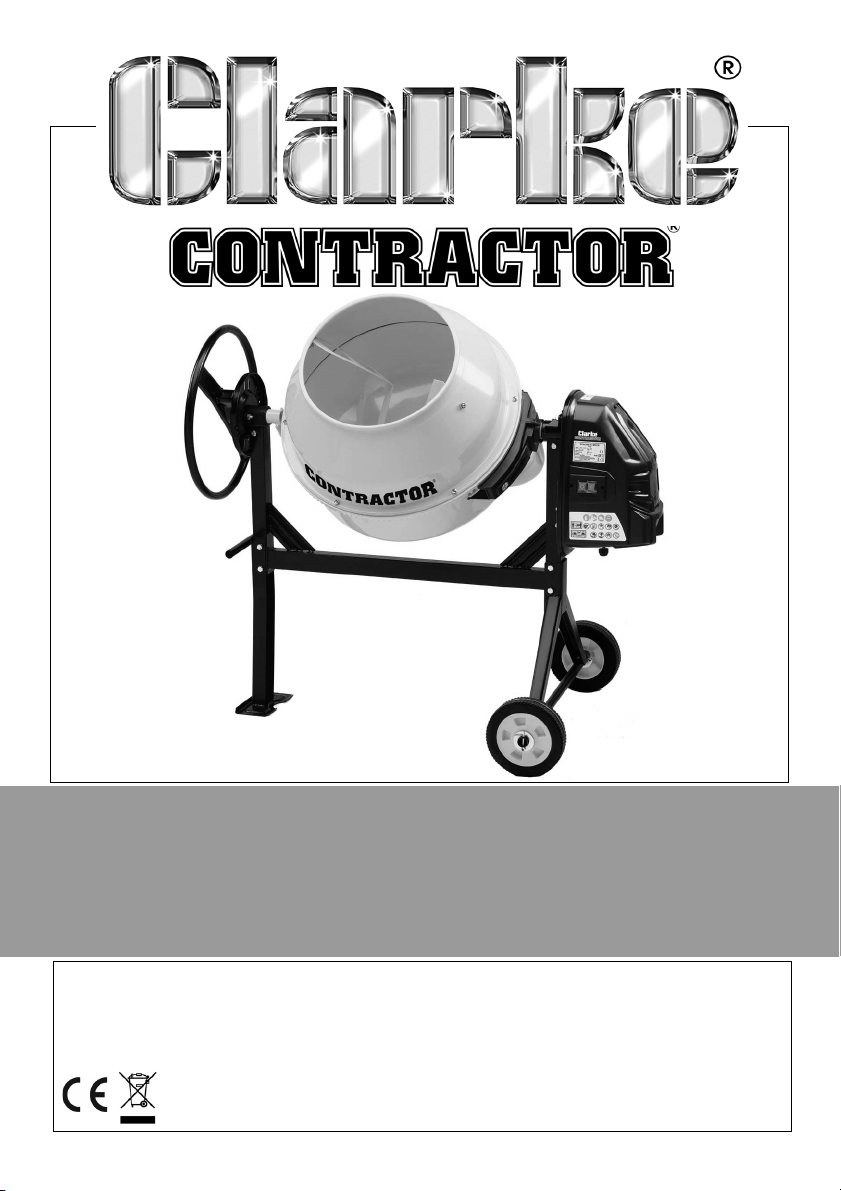
125L CEMENT MIXER
MODEL NO: CCM125D
PART NO: 3400841
OPERATION & MAINTENANCE
INSTRUCTIONS
ORIGINAL INSTRUCTIONS GC0522 - rev2
Page 2
INTRODUCTION
Thank you for purchasing this CLARKE Cement Mixer.
Before attempting to use this product, please read this manual thoroughly and
follow the instructions carefully. In doing so you will ensure the safety of yourself
and that of others around you, and you can look forward to your purchase
giving you long and satisfactory service.
SPECIFICATION
Max drum capacity 125 Litre
Max mixing capacity 79 Litre
Drum speed 26.6 rpm
Duty cycle classification S6 30%
Drum turning axis
Weight 45 kg
Dimensions: Length x Width x Height 1180 x 705 x 1070 mm
Power cable length 1.5 m
IP rating IP44D
Sound power guaranteed 91 dB LWA
360
o
GENERAL SAFETY PRECAUTIONS
1. ALWAYS keep the work area clean and well lit. Floors should always be kept
clear. Cluttered or dark areas invite accidents.
2. ALWAYS keep children and bystanders away while operating this machine.
Distractions can cause loss of control.
3. ALWAYS stay alert & do not use a machine while you are tired or under the
influence of medication or alcohol.
4. ALWAYS wear suitable protective clothing and eye protection including
industrial gloves, ear defenders & approved impact resistant safety glasses.
(Eye glasses are NOT safety glasses). Wear a dust mask if handling cement.
5. NEVER over-reach. Keep your proper footing and balance at all times to
enable better control of the machine in unexpected situations.
2
Parts & Service: 020 8988 7400 / E-mail: [email protected] or [email protected]
Page 3

6. NEVER stand on the machine. Injury could occur from a fall.
7. ALWAYS store machines out of reach of children.
8. ALWAYS read and become familiar with the entire operating manual.
9. NEVER allow persons unfamiliar with this manual to operate this machine.
10. ALWAYS maintain the machine with care and keep it clean for best / safest
performance.
11. NEVER use this machine if any part is damaged. Have it inspected and
repaired by a competent technician.
12. NEVER modify this machine in any way. Use it only for the purpose for which
it is designed.
13. ALWAYS ensure the electrical cable is fully protected and there is no
danger of damage from equipment or materials. Always Inspect the cable
before use and replace if any damage is apparent.
14. ALWAYS avoid inhaling cement dust while loading the mixer. Avoid contact
with cement or any mixing additives being used. Wear gloves/face mask if
necessary.
15. ALWAYS disconnect the machine from the power supply when not in use,
and before carrying out any maintenance.
16. NEVER leave the machine running unattended or leave the machine until it
comes to a complete stop.
17. ALWAYS keep your hands well clear of the rotating drum at all times. Never
put your hands inside the drum when the machine is switched on.
18. NEVER put any tools or other objects in or around the drum while it is
rotating.
19. NEVER wear jewellery or loose clothing that could be snagged by any part
of the rotating drum.
20. NEVER load the drum when the machine is switched off. Always switch on
and ensure the drum is rotating before loading.
21. NEVER operate this machine on a gradient. Always stand the mixer on firm,
level ground where it cannot tip over.
22. ALWAYS switch off and disconnect from the power supply before moving
the machine around the work site.
23. NEVER use the mixer if the power cable or other important parts of the
machine are damaged.
24. If an extension cable is used, the cable and plug must be of watertight
construction. Inadequate extension cables can be dangerous.
3
Parts & Service: 020 8988 7400 / E-mail: [email protected] or [email protected]
Page 4
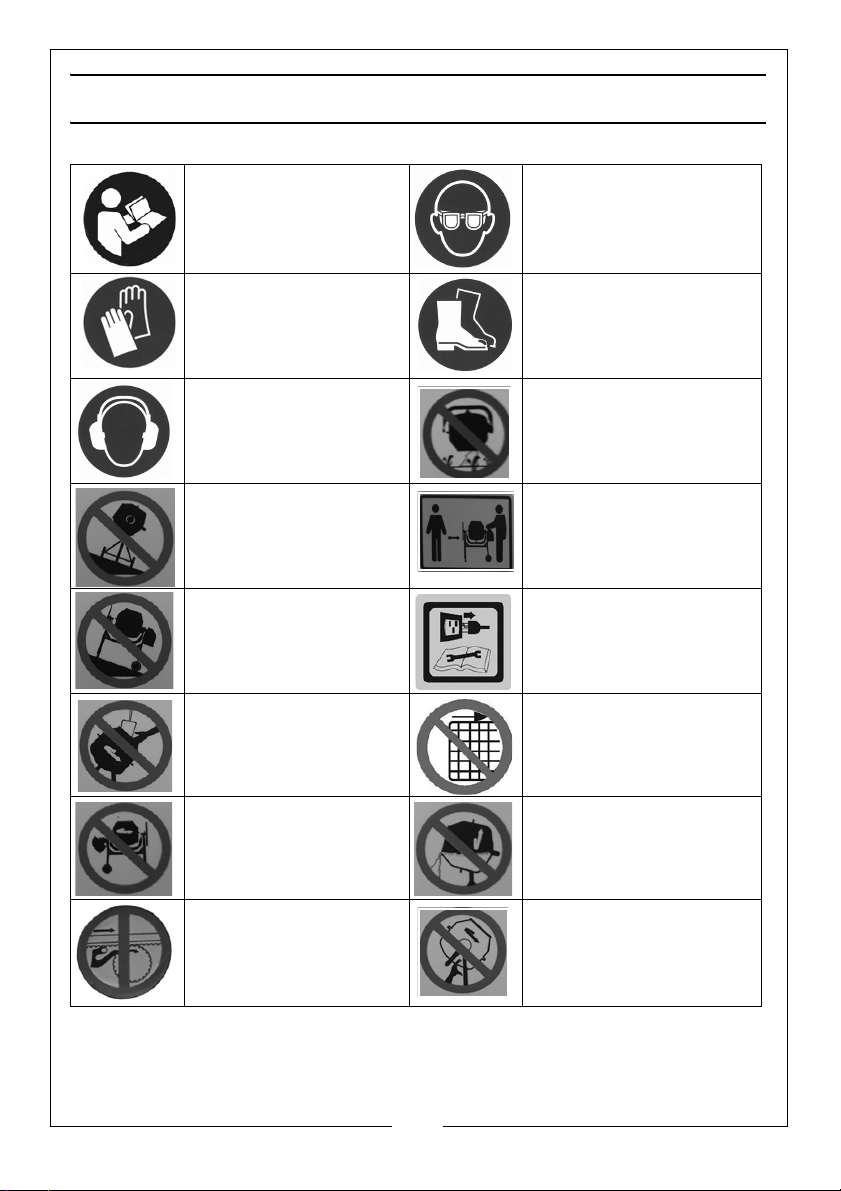
SAFETY SYMBOLS DISPLAYED ON THE MIXER
Read instruction
manual before use.
Wear prot ective
gloves.
Wear ear protection. Protect the
Do not use where the
mixer could tip over.
Do not operate on
sloping ground.
Do not insert anything
into the drum while
the mixer is running.
Wear eye protection.
Wear protective
footwear.
environment when
emptying.
Keep bystanders at a
safe distance.
Always disconnect the
power before starting
any maintenance or
cleaning.
Do not remove or
tamper with any
protection or safety
device.
Do not remove drive
guard with power
connected.
Pinch point hazard.
Do not insert fingers or
other objects.
4
Parts & Service: 020 8988 7400 / E-mail: [email protected] or [email protected]
Do not overload the
mixer.
Keep hands clear of the
machine when running.
Page 5
ELECTRICAL CONNECTIONS
WARNING: READ THESE ELECTRICAL SAFETY INSTRUCTIONS
THOROUGHLY BEFORE CONNECTING THE PRODUCT TO THE MAINS
SUPPLY.
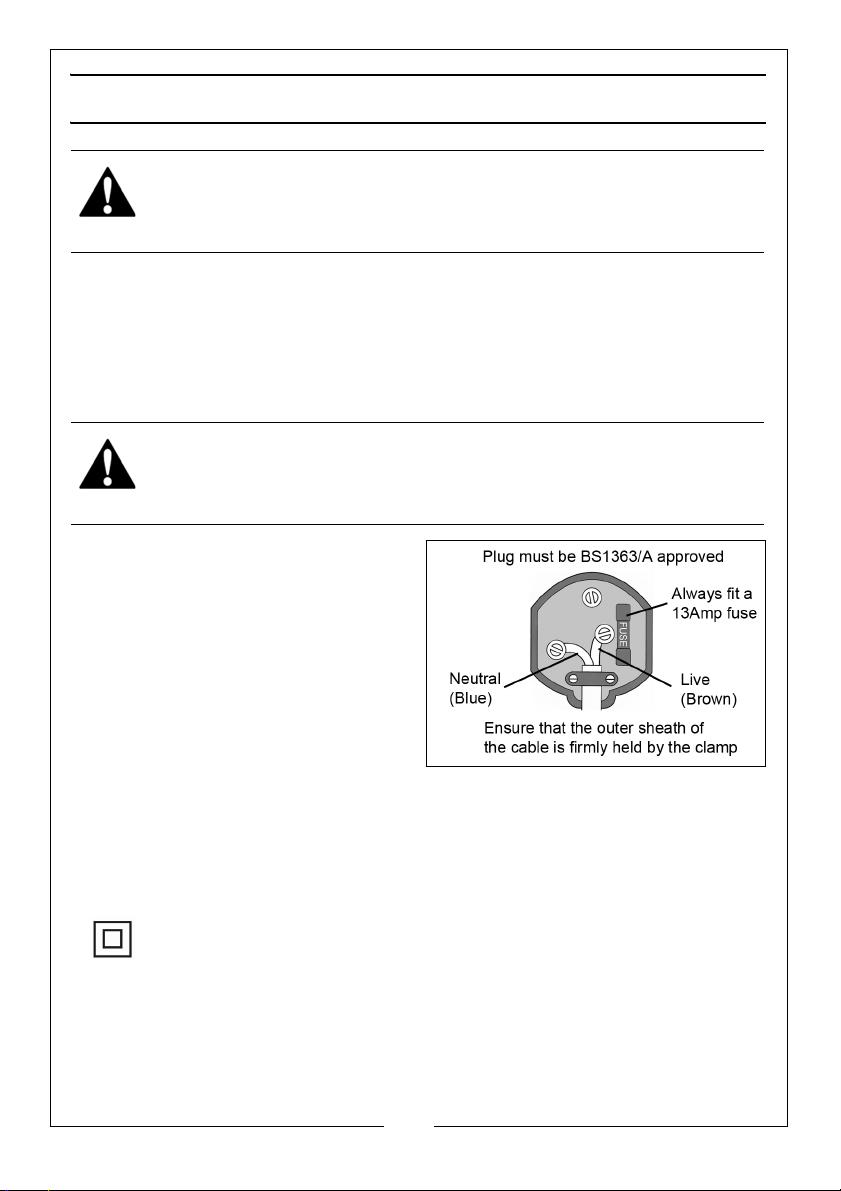
Connect the mains lead to a standard, 230 Volt (50Hz) electrical supply
through an approved 13 amp BS1363 plug, or a suitably fused isolator switch.
If the plug has to be changed because it is not suitable for your socket or
because of damage, it must be removed and a replacement fitted, following
the wiring instructions shown below. The old plug must be discarded safely as
insertion into a power socket could cause an electrical hazard.
WARNING: THE WIRES IN THE POWER CABLE OF THIS PRODUCT ARE
COLOURED IN ACCORDANCE WITH THE FOLLOWING CODE:
BLUE = NEUTRAL BROWN = LIVE
The wires in the mains lead should be
wired up in accordance with the
following colour code:
• Connect the BROWN coloured
wire to the plug terminal
marked a letter “L”.
• Connect the BLUE coloured wire
to the plug terminal marked a
letter “N”.
We strongly recommend that this machine is connected to the mains supply
via a Residual Current Device (RCD). If you are not sure, consult a qualified
electrician.
DO NOT try to carry out any repairs yourself.
This symbol indicates that this is a Class II product and does not
require an earth connection.
5
Parts & Service: 020 8988 7400 / E-mail: [email protected] or [email protected]
Page 6
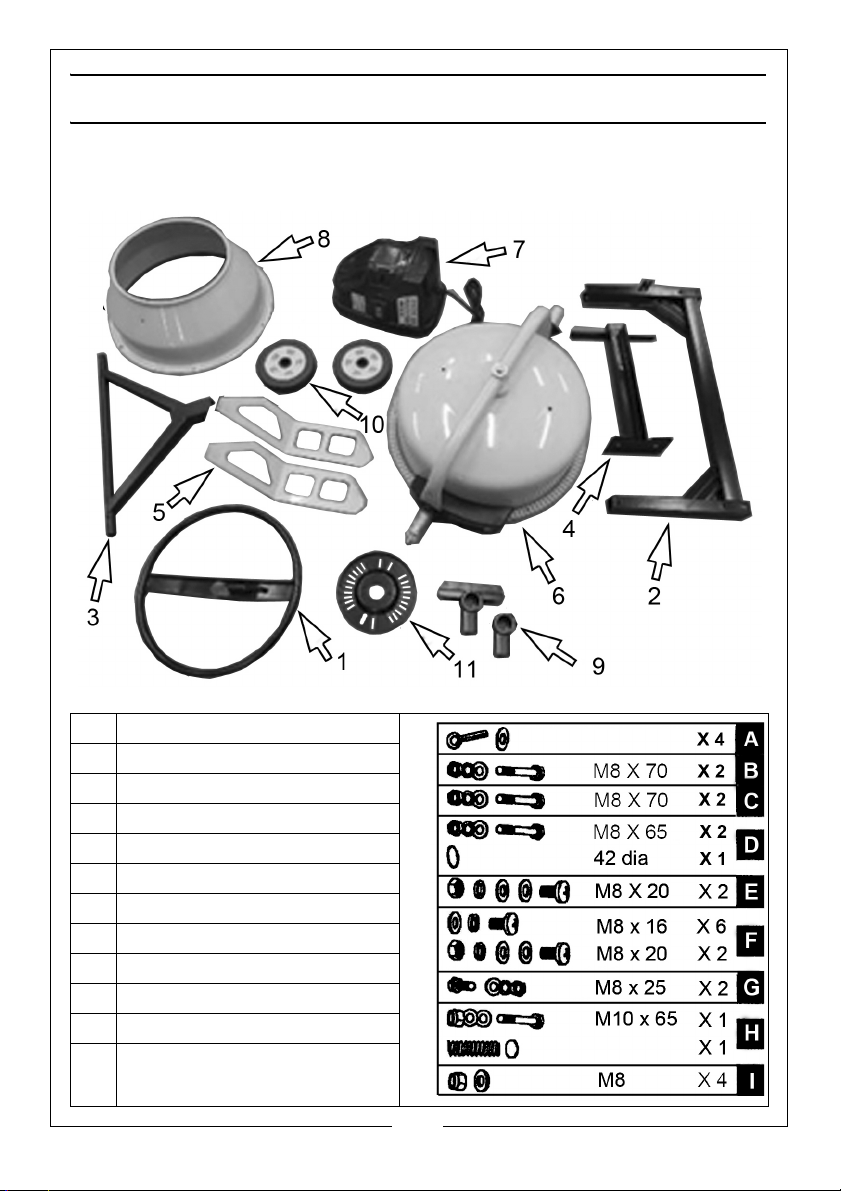
UNPACKING & PRE-ASSEMBLY CHECK
Remove all components from the packing and lay them out so that they can
be identified and checked for any damage in transit. Should any item be
damaged or missing, please contact your CLARKE dealer immediately.
1
1 x Tilt Handwheel
2
1 x Main Frame
3
1 x Axle Frame
4
1 x Support Stand
5
2 x Mixing Blades
6
1 x Lower Drum Assembly
7
1 x Motor/Drive Assembly
8
1 x Upper Drum
9
2 x Bearing housings
10
2 x Wheels
11
1 x Angle Adjusting Plate
12
1 x Fixings Kit Packs A to I with
contents as shown
6
Parts & Service: 020 8988 7400 / E-mail: [email protected] or [email protected]
Page 7
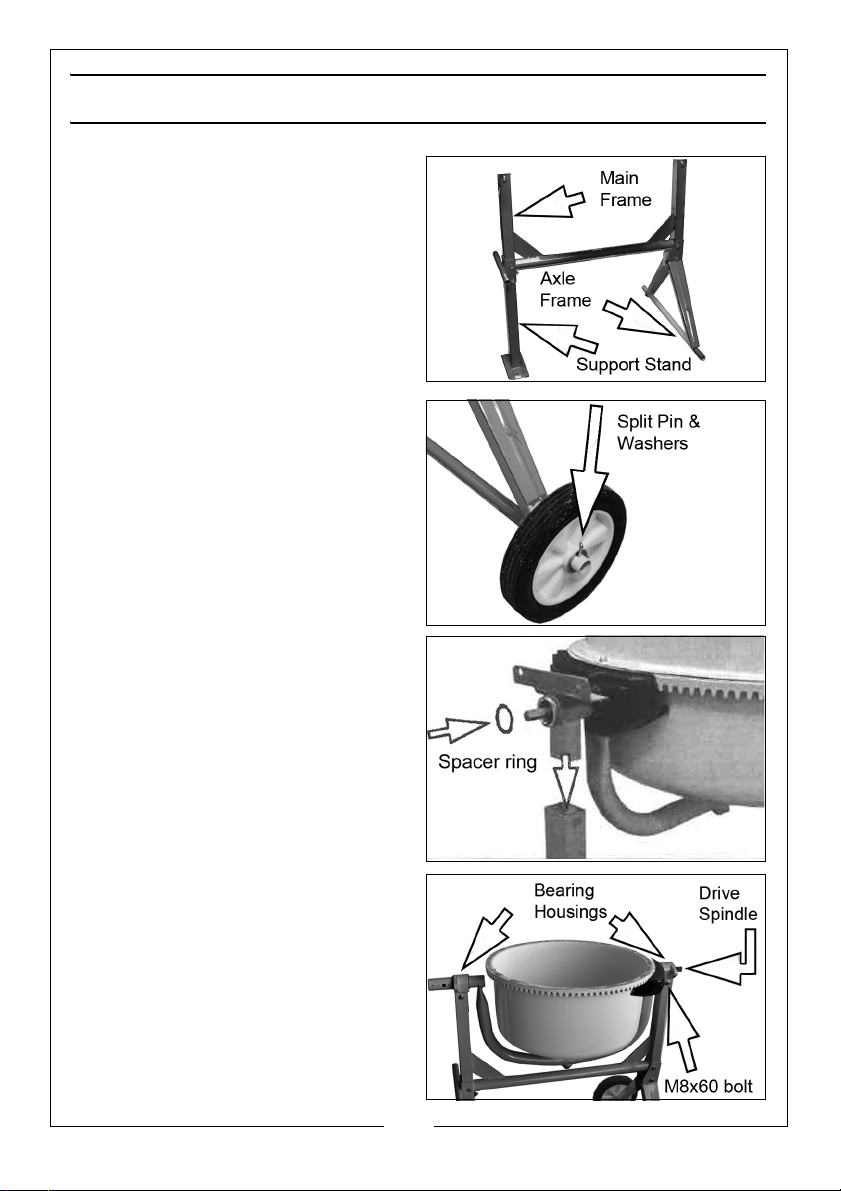
ASSEMBLY
1. Bolt the main frame to the axle
frame using M8 x 70mm bolts &
nuts supplied.
2. Bolt the support stand to the main
frame using M8 x 70mm bolts and
nuts. (Fixings packs B and C)
3. Slide the flat washers onto the
axles, followed by a wheel and a
second flat washer.
4. Insert the split pins in to the holes in
each axle. Bend the ends of the
split pins backward to secure
them. (Fixings pack A)
5. Slide the bearing blocks onto the
pivot shafts. Use the 42 dia ring at
the drive end and note which
way round the block should fit.
(Fixing pack D) With the help of
an assistant if required, lift the
lower drum assembly into position
on the main frame.
6. Secure the two bearing housings
to the main frame using M8 x
65mm bolts & nuts. (Fixing pack D)
• One includes the drive spindle
and spur gear to drive the
mixer. This assembly must be
fitted to the end of the mixer
where the drive assembly will
be fitted this will be the end of
the mixer with the wheels.
7
Parts & Service: 020 8988 7400 / E-mail: [email protected] or [email protected]
Page 8
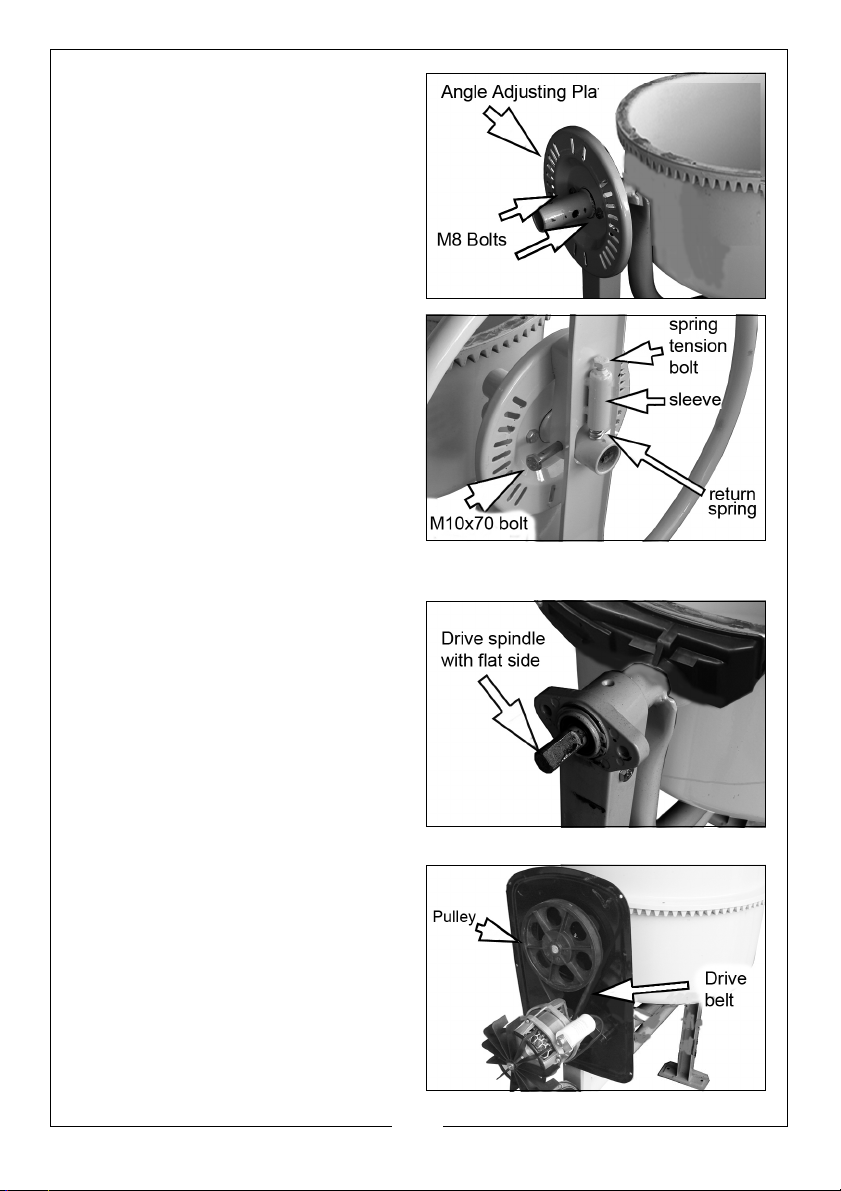
7. Fit the angle adjusting plate to the
bearing housing opposite the
drive spindle end. Slide it over the
cradle spindle and bolt it to the
bearing housing with two M8 x
25mm bolts. (Fixing pack G).
8. Insert the washer and return spring
into the sleeve on the tilt
handwheel and slide the
handwheel onto the cradle
spindle. Insert the M10 x 70
securing bolt through the wheel
and through the cradle spindle
before securing with two M10
nuts. (Fixing pack H)
9. Adjust the tensioning bolt shown
to set the spring tension to allow a
steady movement when engaging the wheel with the cradle.
10. Take the motor/drive assembly
and insert the drive spindle
through the drive pulley,
positioning the drive assembly
against the main frame.
NOTE: The drive spindle has a flat
side to correspond with the
flat provided in the drive
pulley. Rotate the lower
drum gently to turn the
spindle and align the flats.
11. Take the drive assembly with the
cover hanging loose from the
cable. Slide the large driven
pulley onto the drive shaft
complete with drive belt.
12. Bolt the drive assembly to the
main frame using four M8 x 25 mm
bolts/nuts/washers.(Fixing pack I).
• Bolting the drive to the frame
will tension the drive belt.
8
Parts & Service: 020 8988 7400 / E-mail: [email protected] or [email protected]
Page 9
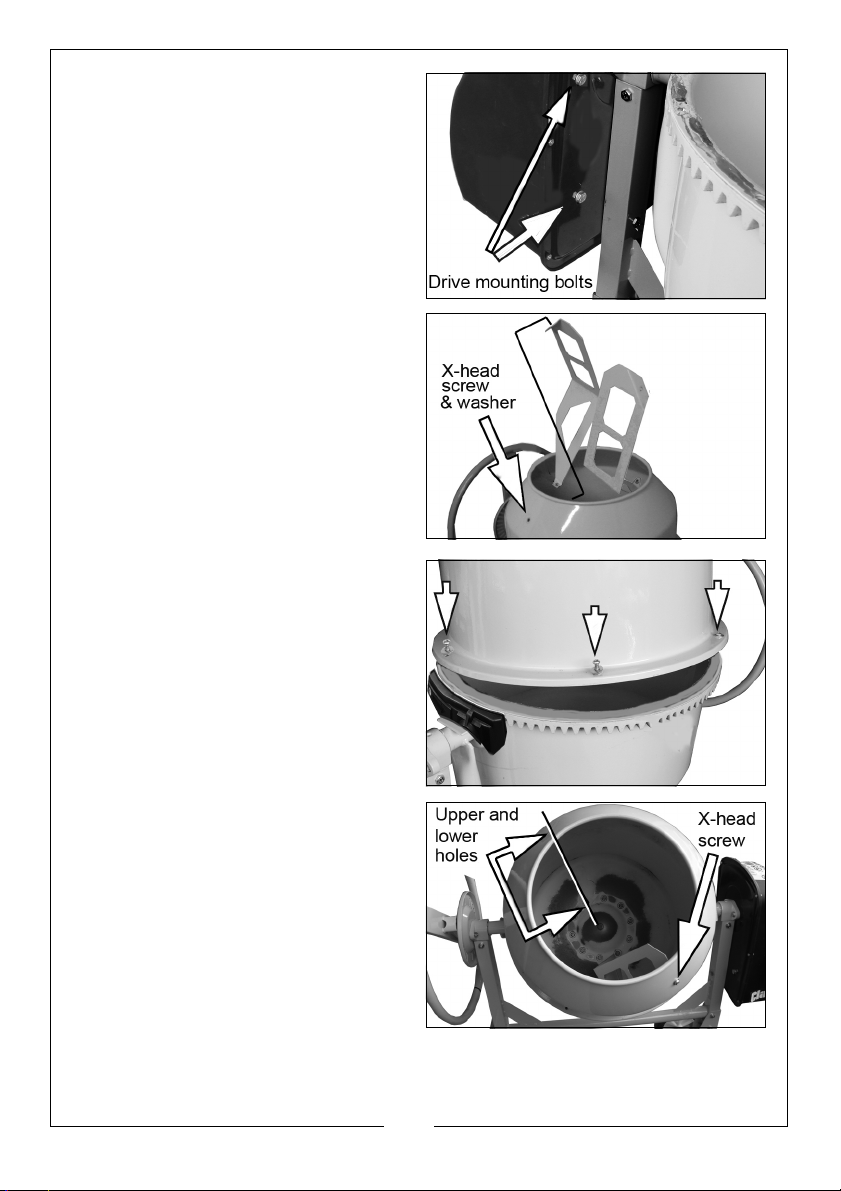
13. With the drive assembly in
position, re-fit the cover and
secure with the 6 self-tapping
screws.
14. Using the X-head screws, rubber
washers, flat washers and M8 nuts,
loosely fit the blades to the upper
drum, noting that the tapered
end will be at the bottom of the
drum. (Fixings pack F).
• Fit the X-head screws and
rubber washers on the outside
of the drum.
15. Rest the upper drum, (with
blades) on the lower drum. Rotate
the upper drum gently so that all 6
holes in the upper drum line up
with those in the lower drum.
• The lower tips of the blades line
up with their fixing holes in the
bottom of the lower drum. Note
also that the alignment arrows
on the drum should line up.
16. When all fixing holes line up,
secure the upper drum to the
lower drum using the 6 cross-head
screws and washers. (Fixing pack
F).
17. Secure the mixing blades to the
bottom of the mixing drum using
the M8 x 20 bolts and nuts.
18. Tighten all fixings and check that
all components are secure.
9
Parts & Service: 020 8988 7400 / E-mail: [email protected] or [email protected]
Page 10
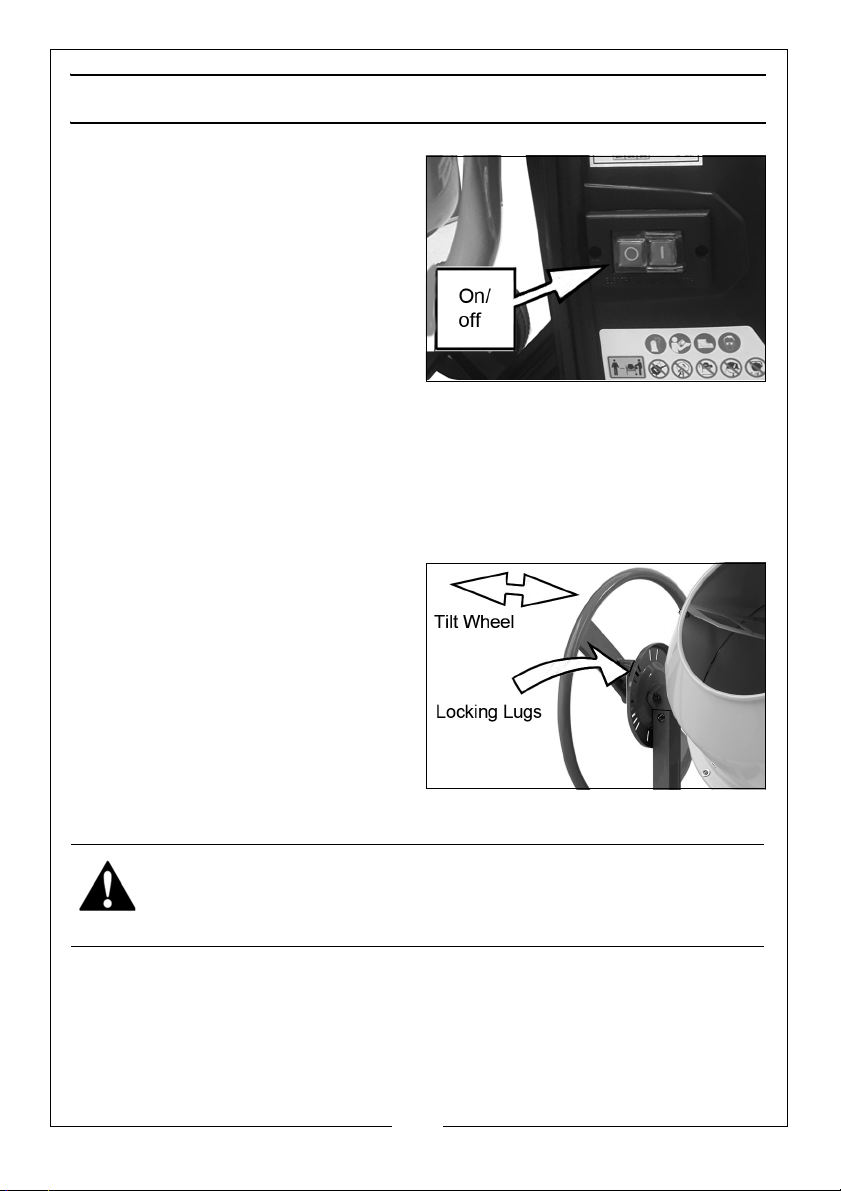
OPERATION
1. Switch the mixer on by pressing
the green (I) switch on the motor.
Stop by pressing the red (O)
switch.
2. Introduce water first, to prevent
the mixer from clogging.
3. Add cement as required.
4. Add aggregate to suit.
• Do not load the drum when the
machine is switched off. Always set the machine running before
filling.
• Avoid stopping and starting the mixer while there is a heavy weight
of material inside the drum as the extra strain could be harmful to
the motor.
• Keep the drum rotating while emptying the mixture.
5. When emptying, grip the tilt wheel
firmly and turn the wheel to
disengage the locking lugs.
6. Use the wheel to tip the mixer
drum forward.
• Only discharge the mixer when
a suitable receptacle for the
cement mix is in position.
• Do not operate this machine
on a steep gradient. Always
stand the mixer on firm, level ground where it cannot tip over.
WARNING: REMEMBER THAT THE CENTRE OF GRAVITY OF THE LOADED
MIXER MAY PRESENT A HAZARD WHEN OPERATING ON UNEVEN GROUND.
• Always keep water away from the motor and other electrical
components as far as possible.
It is essential that the mixer is kept clean. Dried cement inside the drum will be
very difficult to remove. For the mixer to perform at its best it must be
thoroughly cleaned after every use.
10
Parts & Service: 020 8988 7400 / E-mail: [email protected] or [email protected]
Page 11
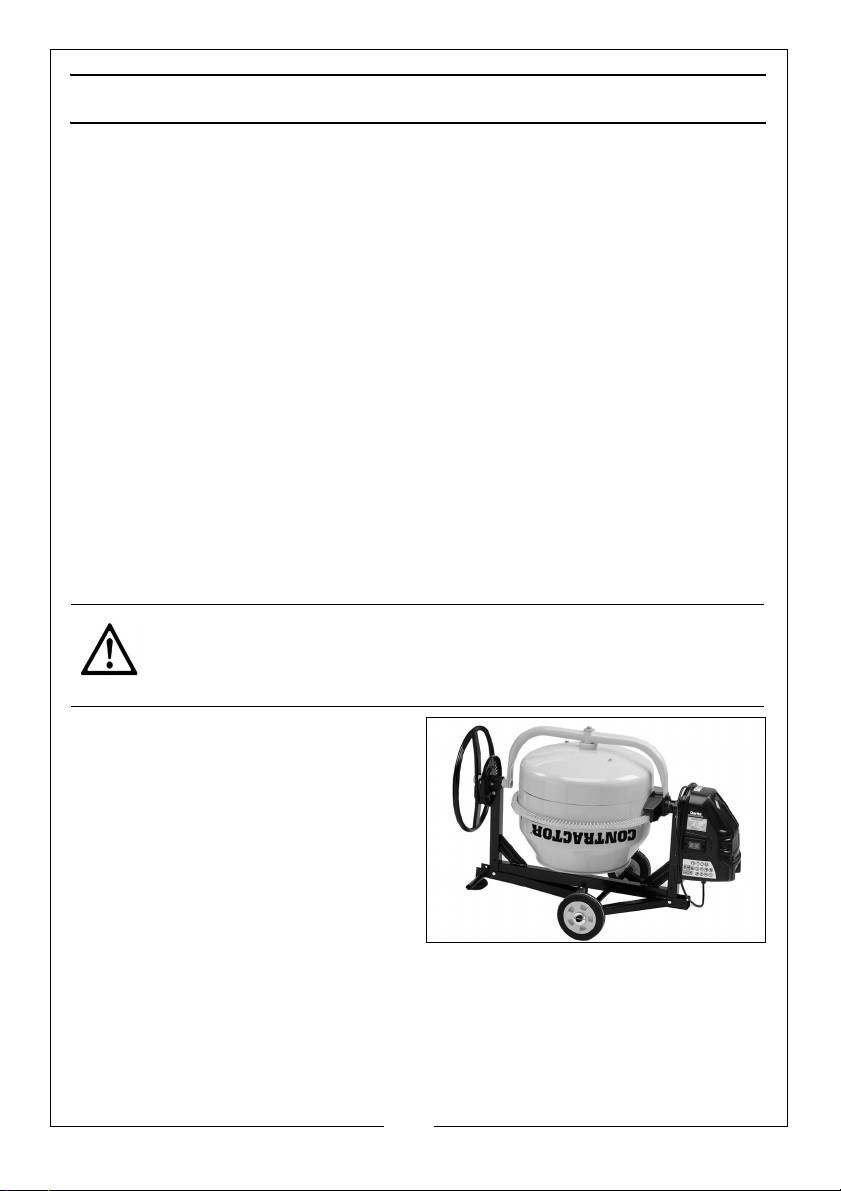
CARE AND MAINTENANCE
BEFORE STARTING WORK
Inspect the power cable and ensure it is free from damage and is not in
danger of being damaged by vehicles, equipment or other operations taking
place on the work site.
AFTER USE
At the end of the working shift it is essential that the machine is hosed down
thoroughly with clean water, being sure to remove all traces of the cement
mix especially from around the mixing blades. The drum may be scoured for a
couple of minutes running using course gravel and water which is then
discharged and the drum finally hosed clean.
Never allow cement residue to harden inside the drum and thereafter be
tempted to beat on the drum with hand tools to dislodge such accumulations
of dried cement.
The machine is constructed to IP44D ingress protection which enables the
drum and any other areas to be hosed down safety.
STORAGE
CAUTION: OWING TO THE WEIGHT AND BULK OF THE MIXER, TWO
PEOPLE WILL BE REQUIRED TO LOWER THE MIXER AND RE-FIT THE BOLTS.
The mixer can be better stored with
the axle frame and support stand
folded away.
Remove the top bolts only from the
axle frame and support stand and
lower the mixer to the floor with the
help of an assistant. Loosely re-fit the
bolts and nuts into their respective
holes for safe keeping.
Leave the mixer with the drum
inverted to exclude water or debris and always store the mixer in a dry place
out of reach of children.
PERIODICALLY
After extensive use, inspect the paintwork and remove any rust that may be
apparent before touching up where necessary with a rust resistant paint.
11
Parts & Service: 020 8988 7400 / E-mail: [email protected] or [email protected]
Page 12

MAINTENANCE FREE ITEMS
The bearings in the machine are sealed for life and require no maintenance.
The drive belt is under constant tension and therefore no adjustment is
required.
ENVIRONMENTAL RECYCLING POLICY
By purchasing this product, the customer is taking on the obligation to deal
with its safe disposal in accordance with the Waste Electrical and Electronic
Equipment (WEEE).
This means that this product must not be disposed of with general household
waste. It must be disposed of according to the laws governing Waste
Electrical and Electronic Equipment (WEEE) at a recognised disposal facility.
If disposing of this product or any damaged components, do not dispose of
with general waste. This product contains valuable raw materials. Metal
products should be taken to your local civic amenity site for recycling of metal
products.
GUARANTEE
This product is guaranteed against faulty manufacture for a period of 12
months from the date of purchase. Please keep your receipt which will be
required as proof of purchase.
This guarantee is invalid if the product is found to have been abused or
tampered with in any way, or not used for the purpose for which it was
intended. Faulty goods should be returned to their place of purchase, no
product can be returned to us without prior permission.
This guarantee does not effect your statutory rights.
12
Parts & Service: 020 8988 7400 / E-mail: [email protected] or [email protected]
Page 13
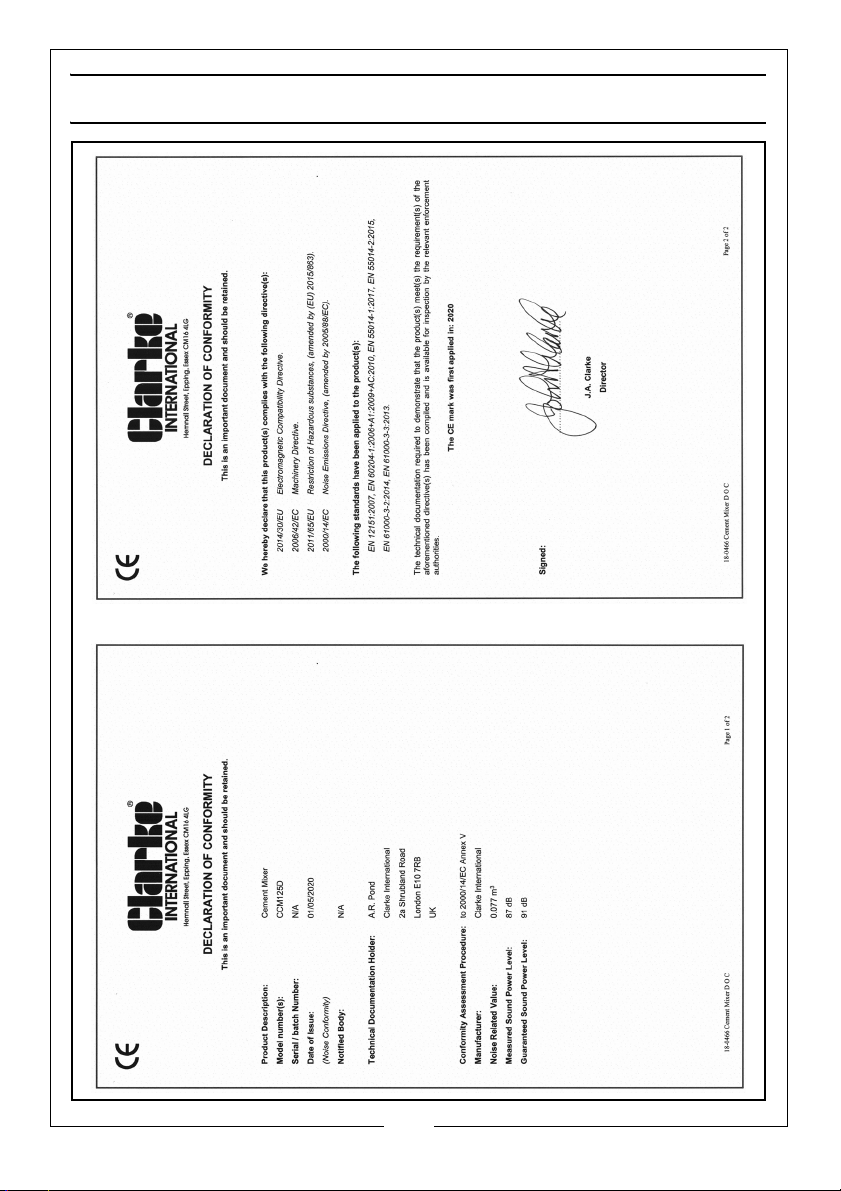
DECLARATION OF CONFORMITY
13
Parts & Service: 020 8988 7400 / E-mail: [email protected] or [email protected]
Page 14
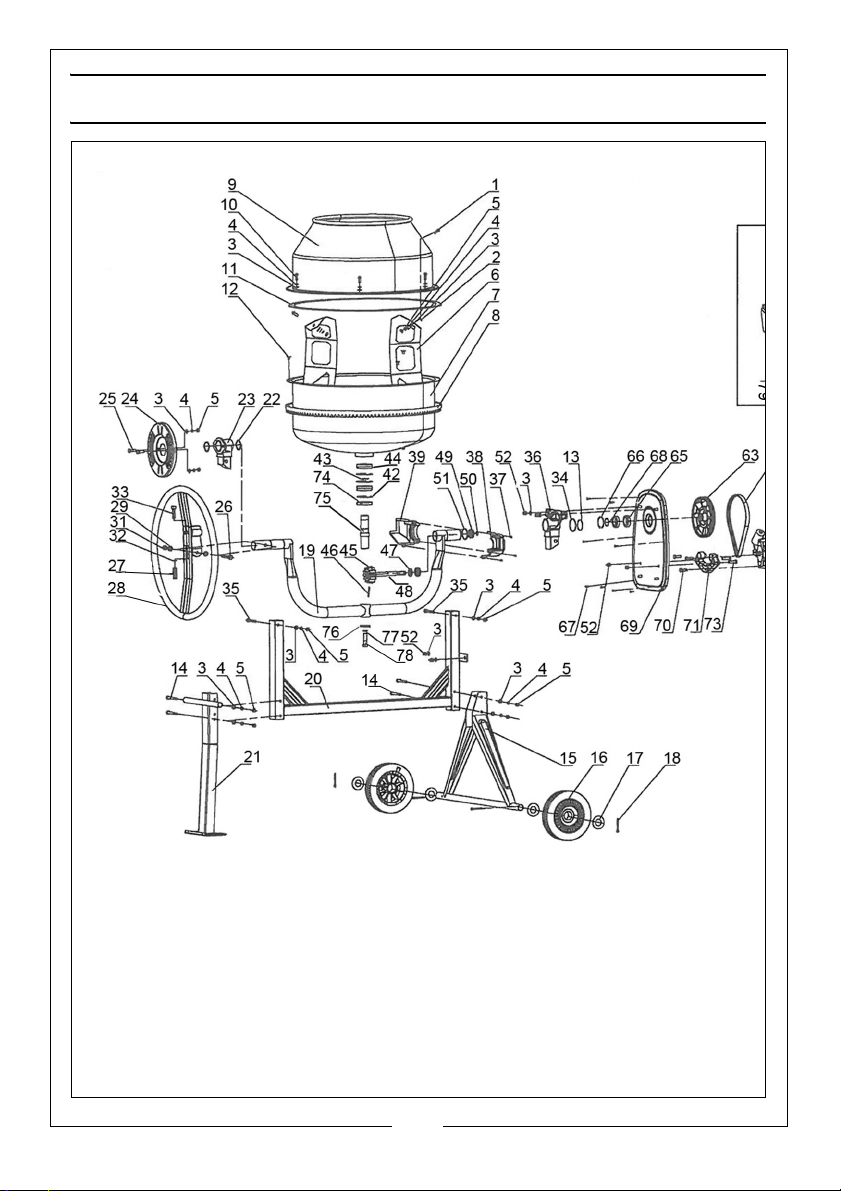
Page 15
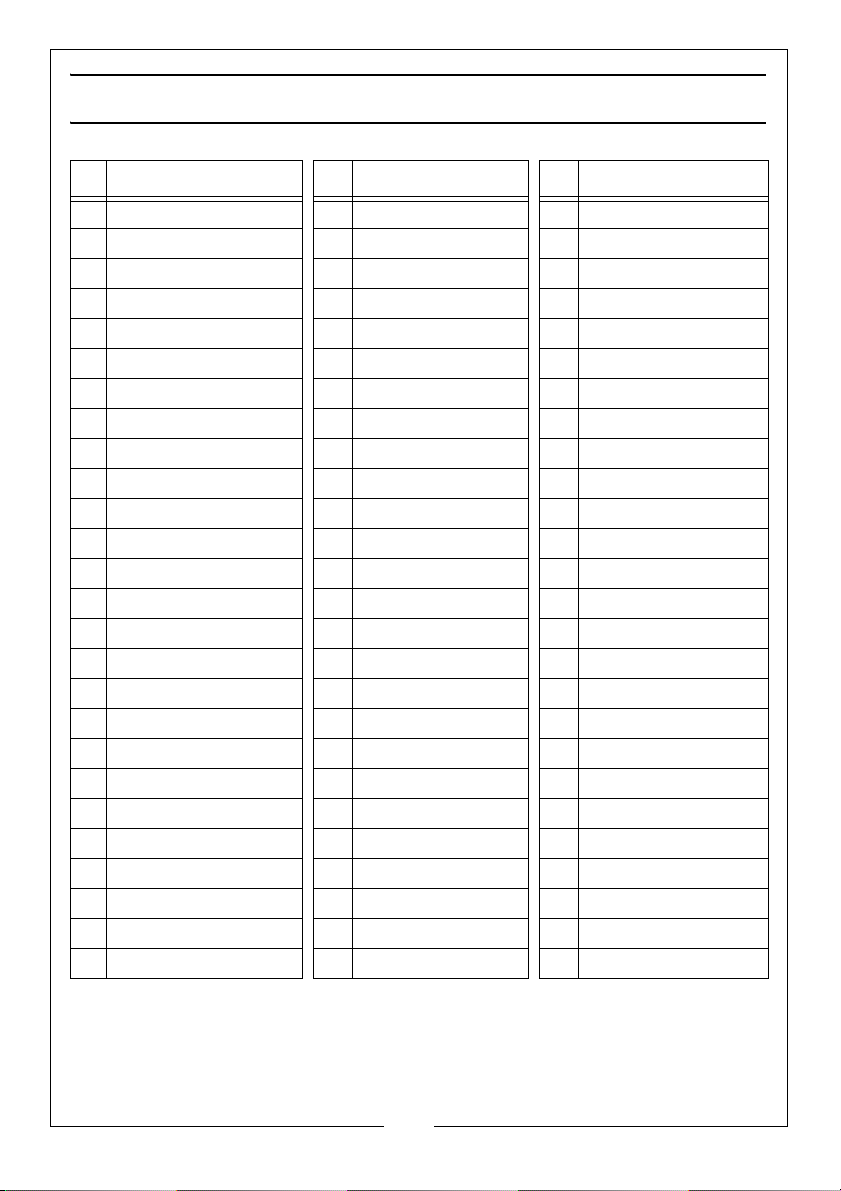
PARTS LIST
ID DESCRIPTION ID DESCRIPTION ID DESCRIPTION
1 X-head screw M8x20 27 Spring 53 Power cable
2 Waterproof washer 28 Tipping wheel 54 Strain relief nut
3 Flat washer 8 29 Flat washer 10 55 Strain relief rubber
4 Spring washer 8 30 n/a 56 Strain relief bolt
5 Nut M8 31 Nut M10 57 Strain relief nut
6 Mixing blade 32 Washer 8 58 Switch gasket
7 Lower drum 33 Bolt M10x30 59 Screw st3.5x16
8 Large gear 34 0-ring 60 Switch
9 Upper drum 35 Bolt M8x65 61 Motor cover
10 Bolt M8x16 36 Bearing block-right 62 Motor
11 Rubber gasket 37 Bolt 4.2x12 63 Idler pulley
12 Bolt M8x12 38 Gear guard 1 64 Belt
13 Circlip 42 39 Gear guard 2 65 Bearing 61906
14 Bolt M8x70 40 n/a 66 Snap washer
15 Axle bracket 41 n/a 67 Screw st4.2x16
16 Wheel 42 Circlip 62 68 Circlip 30
17 Flat washer 27 43 Circlip 30 69 End plate
18 Cotter pin 5x40 44 Bearing 6206 70 Bolt M8x25
19 Support arm 45 Drive pinion 71 Endplate (bracket)
20 Frame 46 Lock pin 6x45 72 n/a
21 Support leg 47 Sleeve 73 Bolt M8x30
22 Circlip 38 48 Drive shaft 74 Oil seal
23 Bearing block-left 49 Bearing 6202 75 Fixed shaft
24 Locking plate 50 Circlip 15 76 Washer
25 Bolt M8x25 51 Circlip 42 77 Spring washer 12
26 Bolt M8x65 52 Locknut M8 78 Bolt M12x25
15
Parts & Service: 020 8988 7400 / E-mail: [email protected] or [email protected]
Page 16

 Loading...