

Page 1
WARNING: Do not use the appliance without reading this manual
HLS160 3 Phase hot wash.fm Page 1 Wednesday, September 28, 2011 12:28 PM
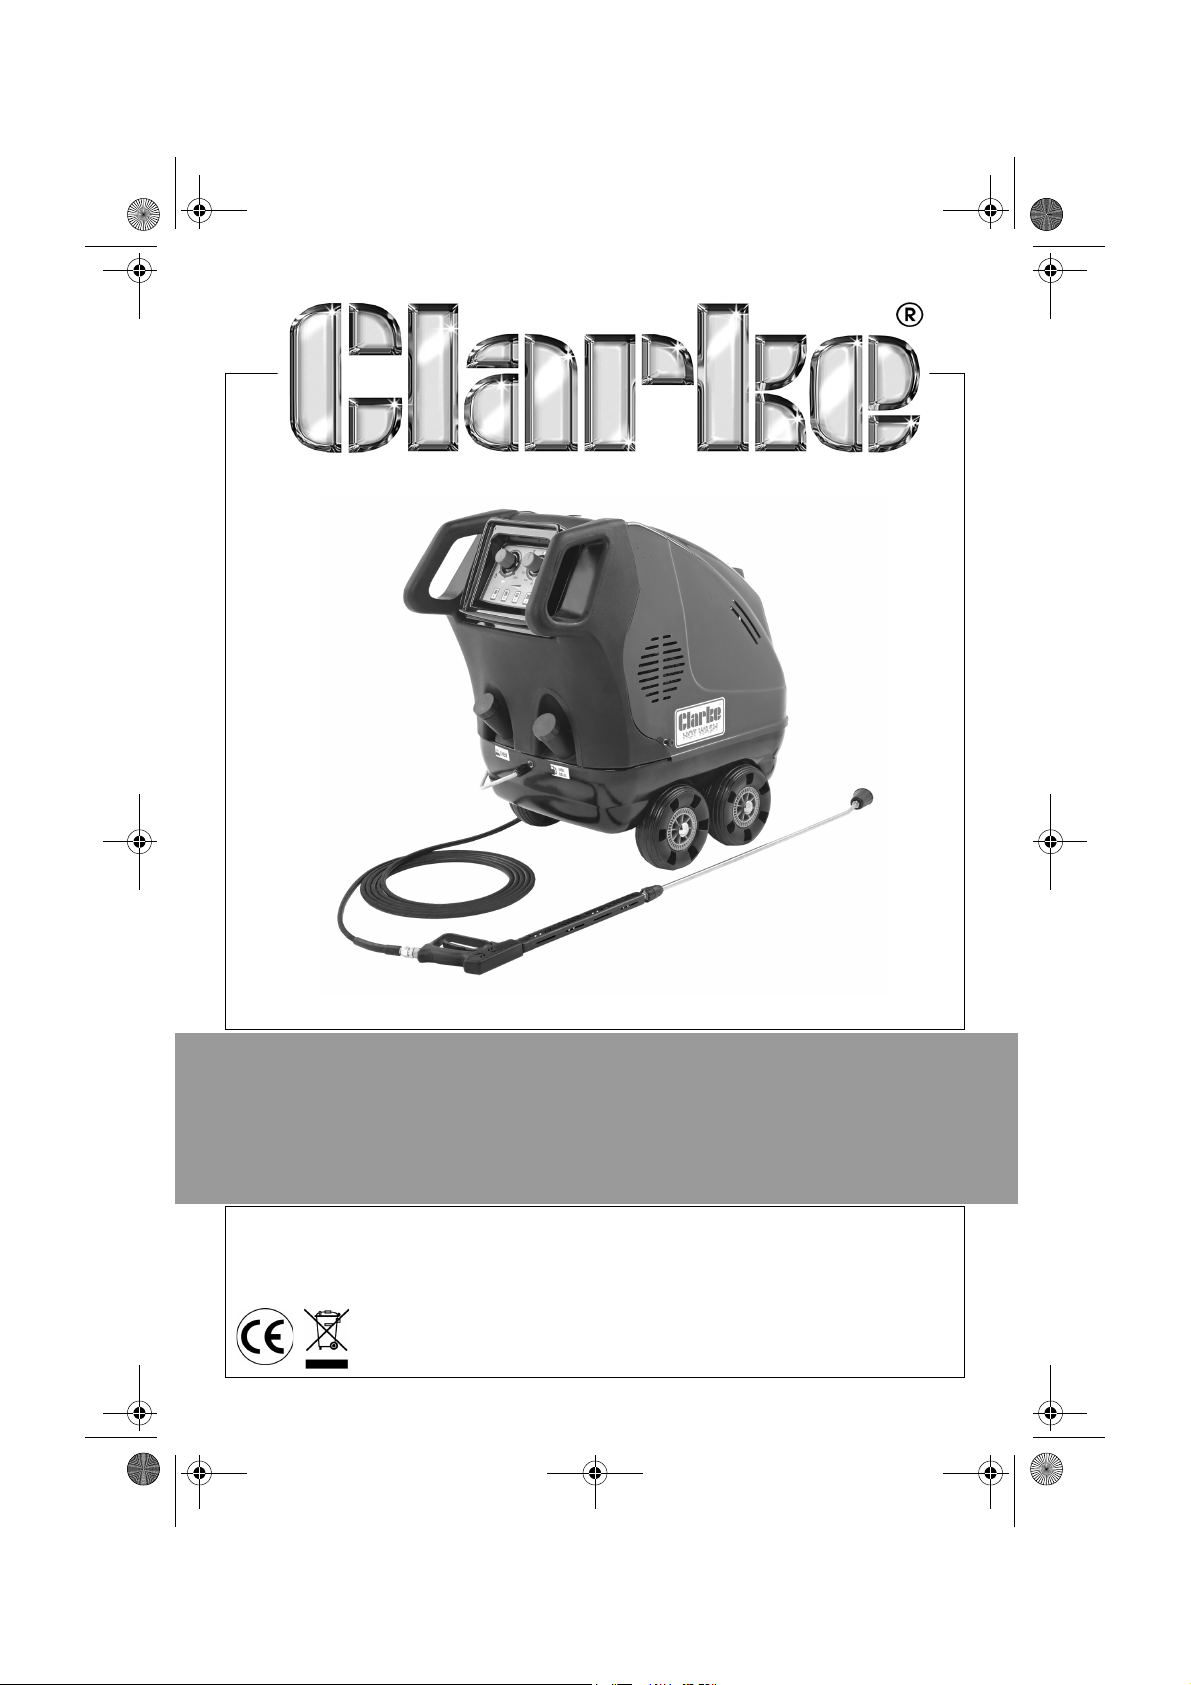
3 PHASE HOT WASHER
MODEL NO: HLS160
PART NO: 7320535
OPERATION & MAINTENANCE
INSTRUCTIONS
LS0911
Page 2
HLS160 3 Phase hot wash.fm Page 2 Wednesday, September 28, 2011 12:28 PM
INTRODUCTION
Thank you for purchasing this CLARKE 3 phase hot washer.
Before attempting to use this product, please read this manual thoroughly and
follow the instructions carefully. In doing so you will ensure the safety of yourself
and that of others around you, and you can look forward to your purchase
giving you long and satisfactory service.
GUARANTEE
This product is guaranteed against faulty manufacture for a period of 12
months from the date of purchase. Please keep your receipt which will be
required as proof of purchase.
This guarantee is invalid if the product is found to have been abused or
tampered with in any way, or not used for the purpose for which it was
intended.
Faulty goods should be returned to their place of purchase, no product can
be returned to us without prior permission.
This guarantee does not effect your statutory rights.
LIST OF CONTENTS
The following items should be supplied in the carton. If any parts are missing or
damaged, please see your Clarke dealer where you purchased the Pressure
Washer.
1 x Hot Water Power Jet Cleaner
1 x 10M Hose
1 x Spray Gun Assembly
1 x Lance Assembly
1 x Operating & Maintenance Manual
2
Parts & Service: 020 8988 7400 / E-mail: [email protected] or [email protected]
Page 3
HLS160 3 Phase hot wash.fm Page 3 Wednesday, September 28, 2011 12:28 PM
GENERAL SAFETY RULES
WARNING: WATER AT HIGH PRESSURE CAN BE DANGEROUS AND CAN
CAUSE DAMAGE IF THE OPERATOR IS CARELESS. NEVER ALLOW ANYONE
TO OPERATE THIS PRESSURE WASHER UNLESS THEY ARE FAMILIAR WITH THE
SAFETY PRECAUTIONS.
1. WARNING High pressure water jets can be dangerous if subject to misuse. The jet
must not be directed at animals or people.
2. NEVER allow children or untrained personnel to use this pressure washer.
3. NEVER operate the pressure washer with any of the covers removed.
4. NEVER attempt any electrical or mechanical repairs to this pressure washer. Always
refer to your Clarke dealer.
5. NEVER supply any liquid other than water to the water inlet.
6. NEVER use the detergent pickup facility to introduce flammable liquids/solvents, e.g.
paint thinners, petrol, oil as there is a risk of explosion.
7. ALWAYS release any residual pressure in the system by turning off the water supply
and operating the trigger, before disconnecting any hose or accessory.
8. ALWAYS keep the pressure washer itself dry and clear of water spray.
9. NEVER direct the spray jet at the pressure washer itself or any other electrical
equipment.
10. ALWAYS wear protective clothing and safety glasses. Loose particles and other
debris may be propelled at high speed by the water jet.
11. ALWAYS hold the spray gun firmly and expect the gun to ‘kick’ when starting.
12. ALWAYS disconnect from the water supply and ensure the system is completely
drained when not in use. Store in a cool dry location.
13. ONLY use chemical cleaning agents (detergents), that are approved for pressure
washers. CLARKE Traffic Film Remover or CLARKE Wash and WAX (available from your
dealer), are recommended.
14. ALWAYS Disconnect from the electrical power supply before carrying out user
maintenance.
15. ONLY use original spare parts from the man u f a c t urer o r approved by the
Clarke service department.
16. WARNI N G : High pressure hoses, fittings and couplings are important for the
safety of the appliance. Use only hoses, fittings and couplings
recommended by the manufacturer.
17. NEVER use the pressure washer if a power cord or important parts of
the p r essu r e was h e r are damaged, e.g. safety devices, high pressure hoses,
trigger gun.
Recycle unwanted materials instead of disposing of them as waste. All
tools, accessories and packaging should be sorted, taken to a recycling
centre and disposed of in a manner which is compatible with the
environment.
3
Parts & Service: 020 8988 7400 / E-mail: [email protected] or [email protected]
Page 4
HLS160 3 Phase hot wash.fm Page 4 Wednesday, September 28, 2011 12:28 PM
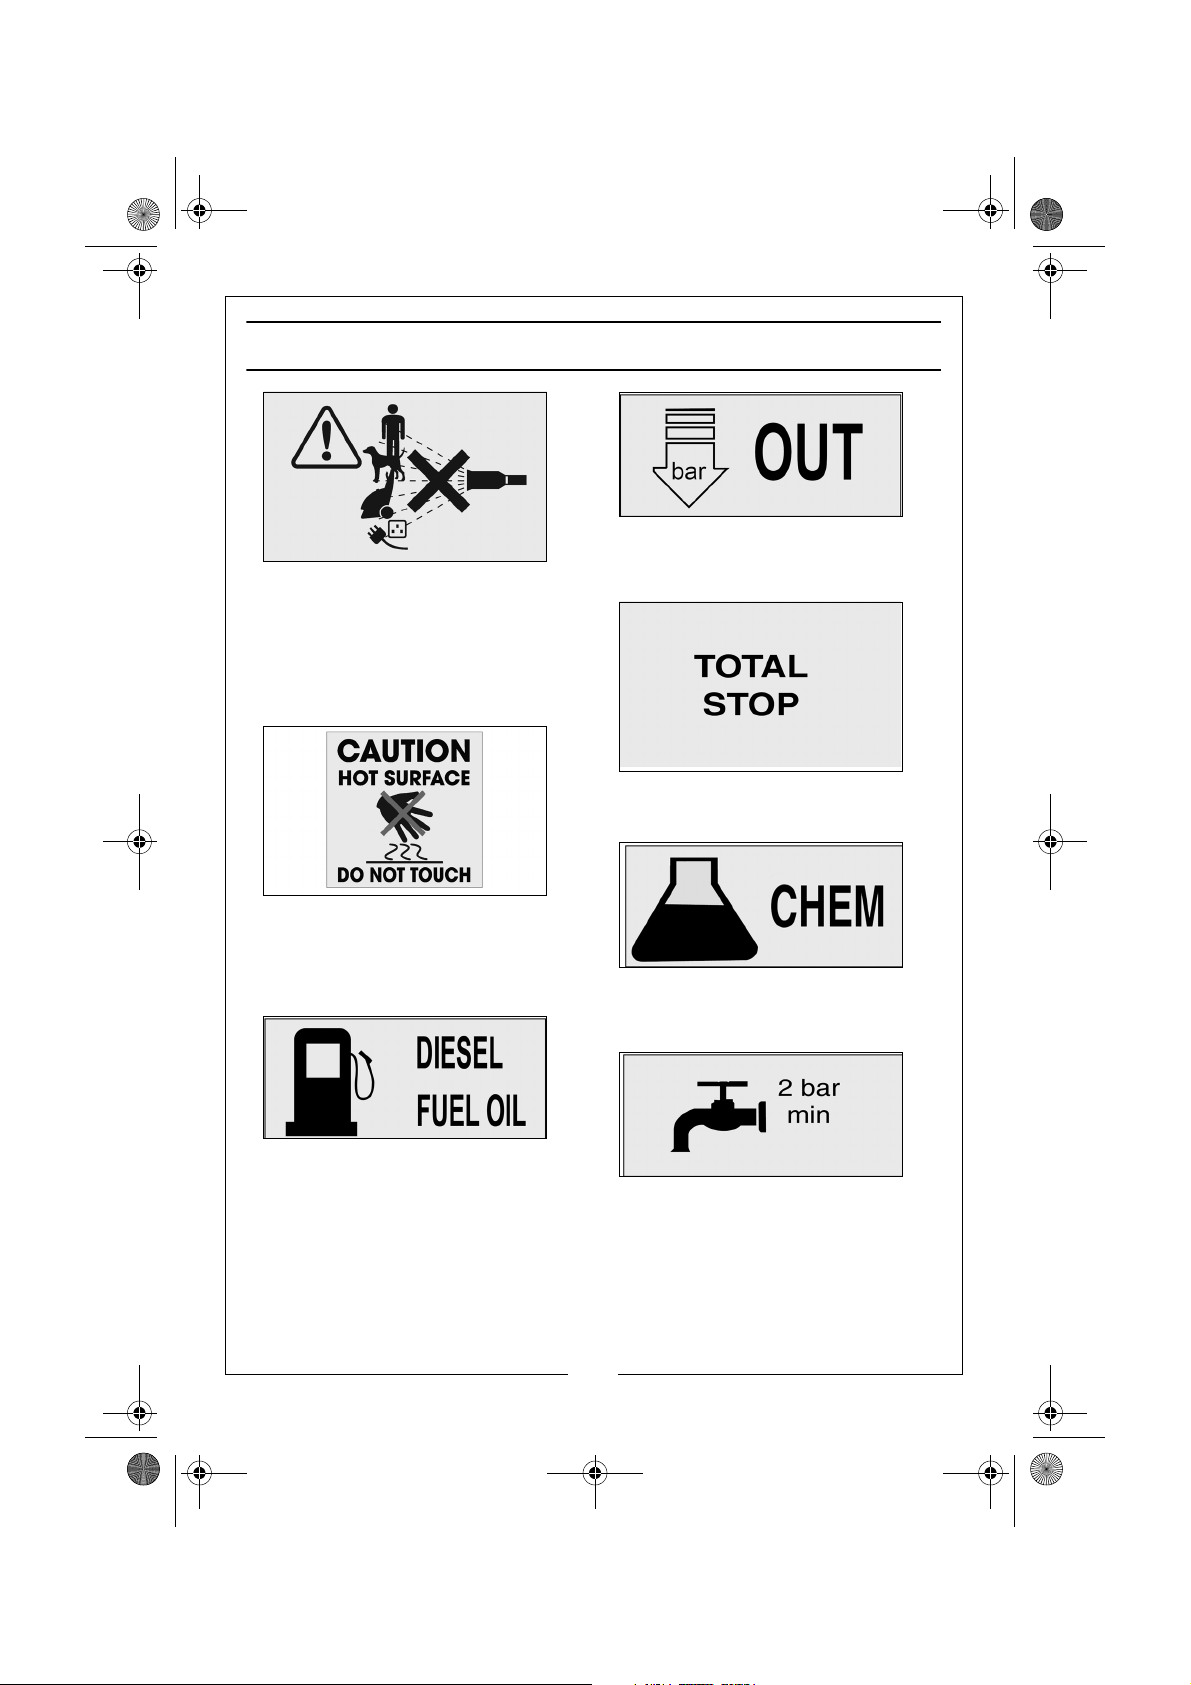
SAFETY SYMBOLS
High Pressure Water Outlet
WAR NI NG : Do not direct discharge
stream at persons or animals. Keep
clear of nozzle.
WAR NI NG : Never direct spray toward
any electrical device or electrical
outlet.
Total Stop System
WAR NI NG : Risk of hot surfaces. Avoid
contact with hot exhaust
components. Don't allow hoses to
contact the exhaust muffler during or
after use.
Detergent Tank
Fuel Tank
Water Input
4
Parts & Service: 020 8988 7400 / E-mail: [email protected] or [email protected]
Page 5
HLS160 3 Phase hot wash.fm Page 5 Wednesday, September 28, 2011 12:28 PM
ELECTRICAL CONNECTIONS
WARNING! READ THESE ELECTRICAL SAFETY INSTRUCTIONS
THOROUGHLY BEFORE CONNECTING THE PRODUCT TO THE
MAINS SUPPLY.
Connect the mains lead to a suitably fused 400V, 3 phase electrical supply via
a 16 Amp Industrial connector (to BSEN 60309-1/2)
The electric supply connection shall be made by a qualified electrician and
comply with IEC 60364-1.
We strongly recommend that this pressure washer is connected to the supply
via a suitable 3 phase 30 mA Residual Current Device.
FUSE RATING
The fuse rating for this pressure washer is 16 Amps.
EXTENSION CABLES
If an extension cable is used, always ensure it is fully unwound. When used
outdoors, ensure the extension cable is specifically designed for outdoor use.
If an extension cable is used, the plug and socket must be of watertight
construction.
WARNING: INADEQUATE EXTENSION CABLES CAN BE DANGEROUS.
ENSURE THE CABLE IS RATED FOR THE VOLTAGE AND AMPERAGE OF THE
PRESSURE WASHER.
5
Parts & Service: 020 8988 7400 / E-mail: [email protected] or [email protected]
Page 6
HLS160 3 Phase hot wash.fm Page 6 Wednesday, September 28, 2011 12:28 PM
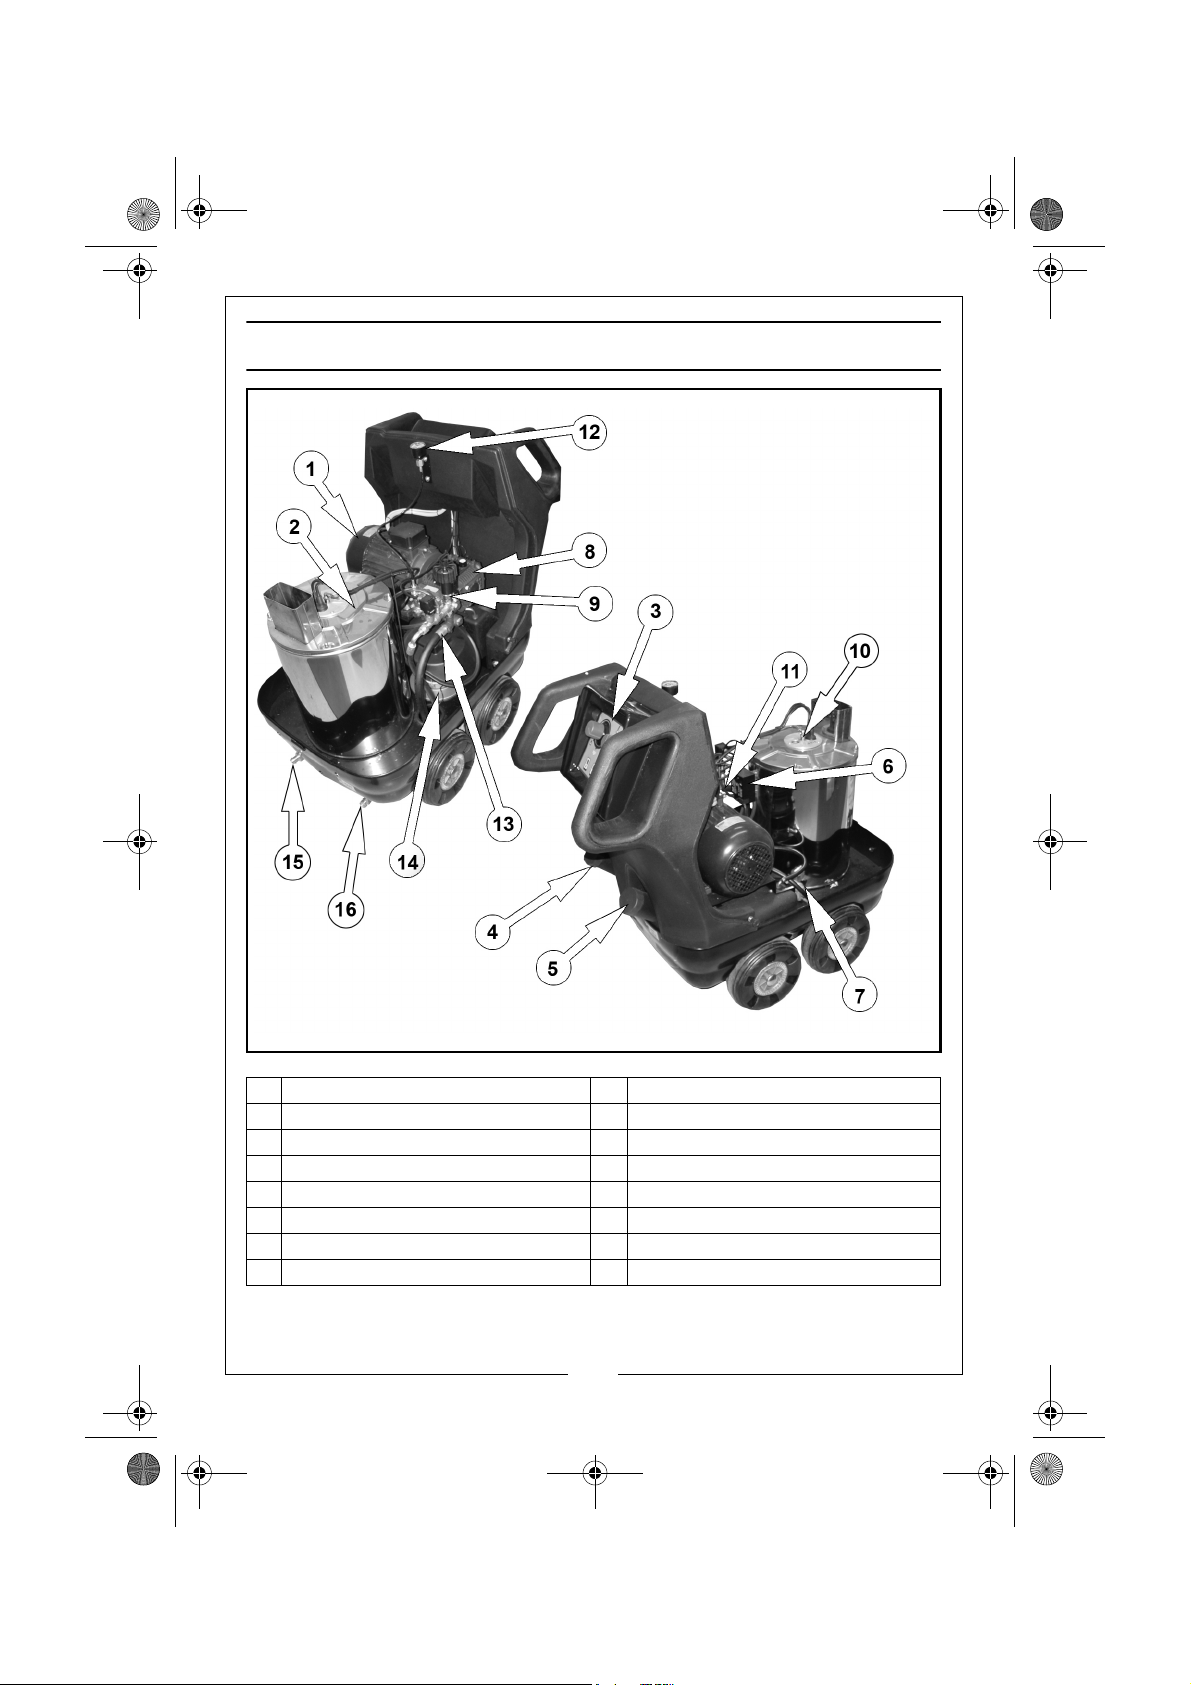
PARTS IDENTIFICATION
1 Electric Motor 9 Pressure Adjustment Valve
2 Boiler 10 Combustion Head
3 Control Panel 11 Pressure Switch
4 Detergent Tank Filler 12 Pressure Gauge
5 Fuel Tank Filler 13 Fuel Pump
6 Transformer 14 Burner Motor
7 Fuel Filter 15 Water Supply Inlet
8 High Pressure Pump 16 High Pressure Outlet
6
Parts & Service: 020 8988 7400 / E-mail: [email protected] or [email protected]
Page 7
HLS160 3 Phase hot wash.fm Page 7 Wednesday, September 28, 2011 12:28 PM
ASSEMBLY
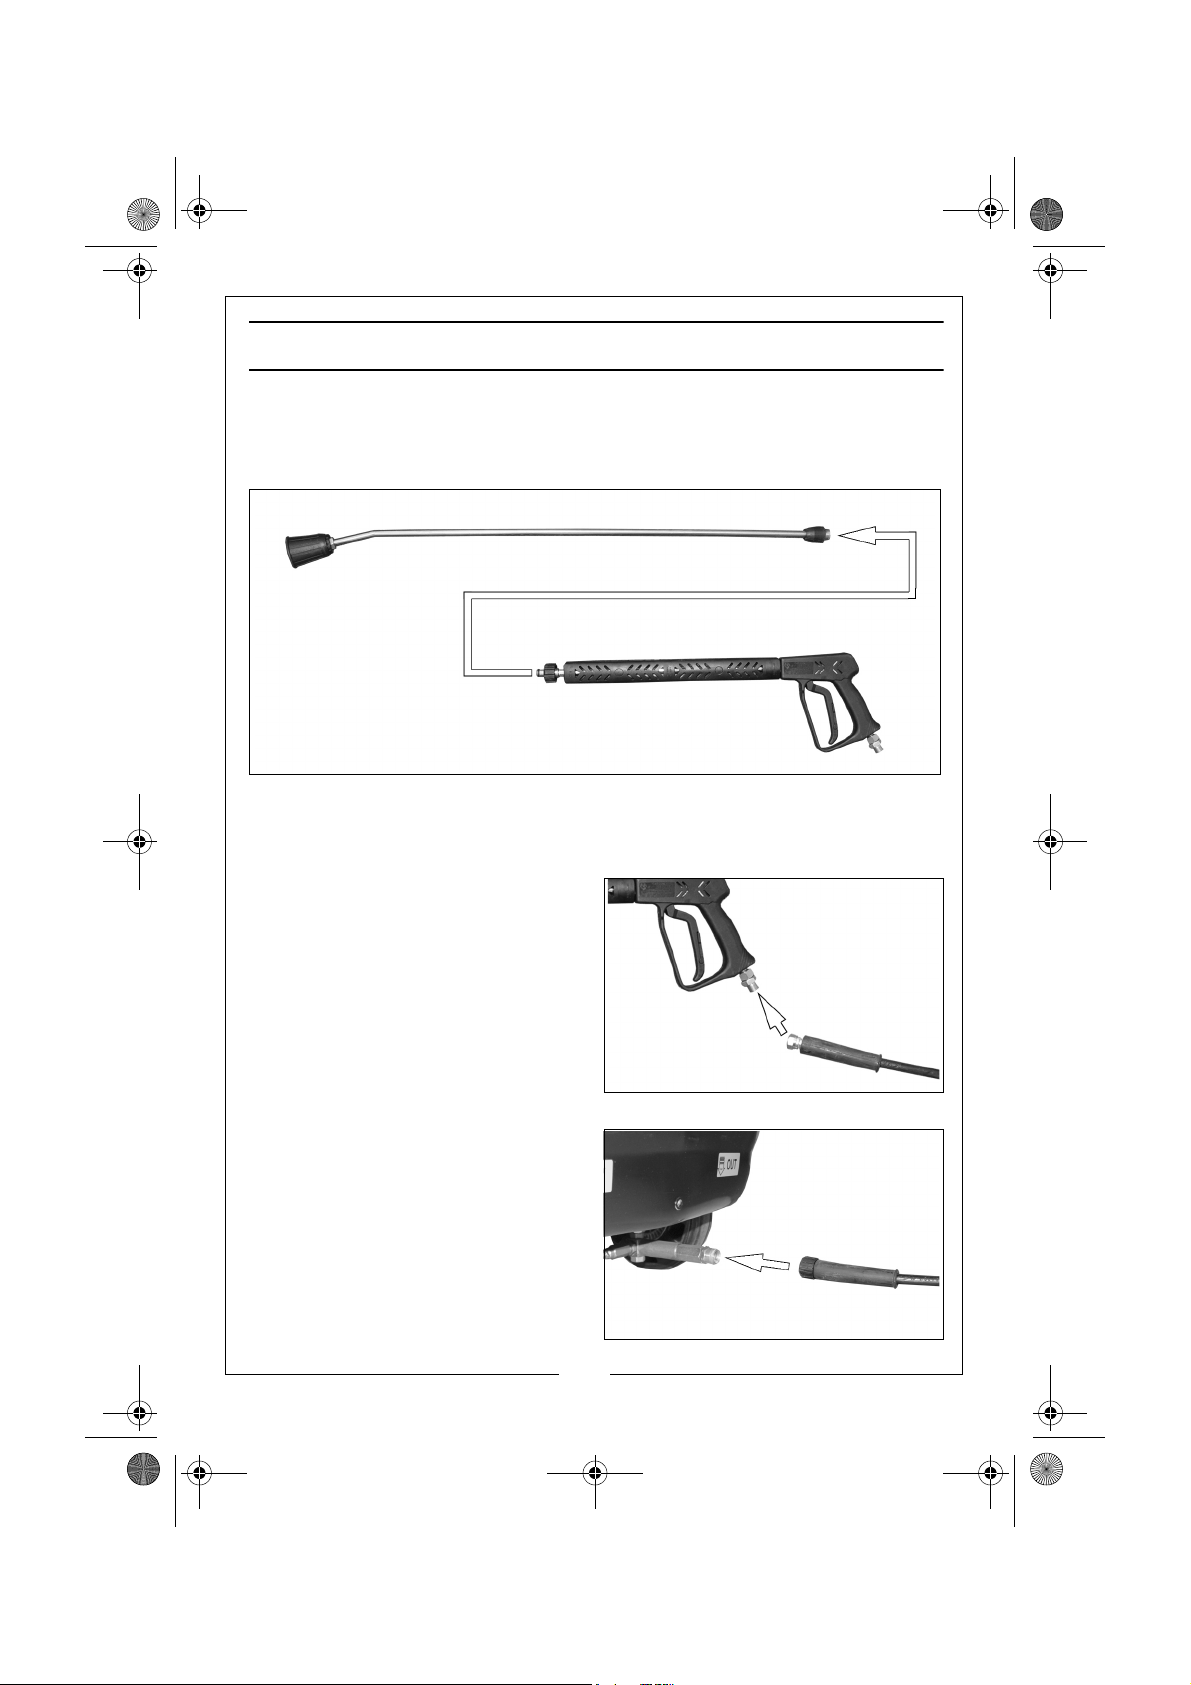
THE LANCE
1. Connect the spray lance to the gun assembly and tighten securely by
turning the locking ring.
CONNECTING THE HIGH PRESSURE HOSE
CONNECT THE HOSE TO THE GUN
1. Screw the high pressure hose onto
the gun assembly.
2. Use a spanner to tighten the
connector.
CONNECT THE HOSE TO THE WASHER
1. Screw the hose on to the pressure
washer outlet.
• Tighten the connector hand
tight only, Do not use a
spanner.
NOTE: Make sure the connection is
secure.
7
Parts & Service: 020 8988 7400 / E-mail: [email protected] or [email protected]
Page 8
HLS160 3 Phase hot wash.fm Page 8 Wednesday, September 28, 2011 12:28 PM
BEFORE USE
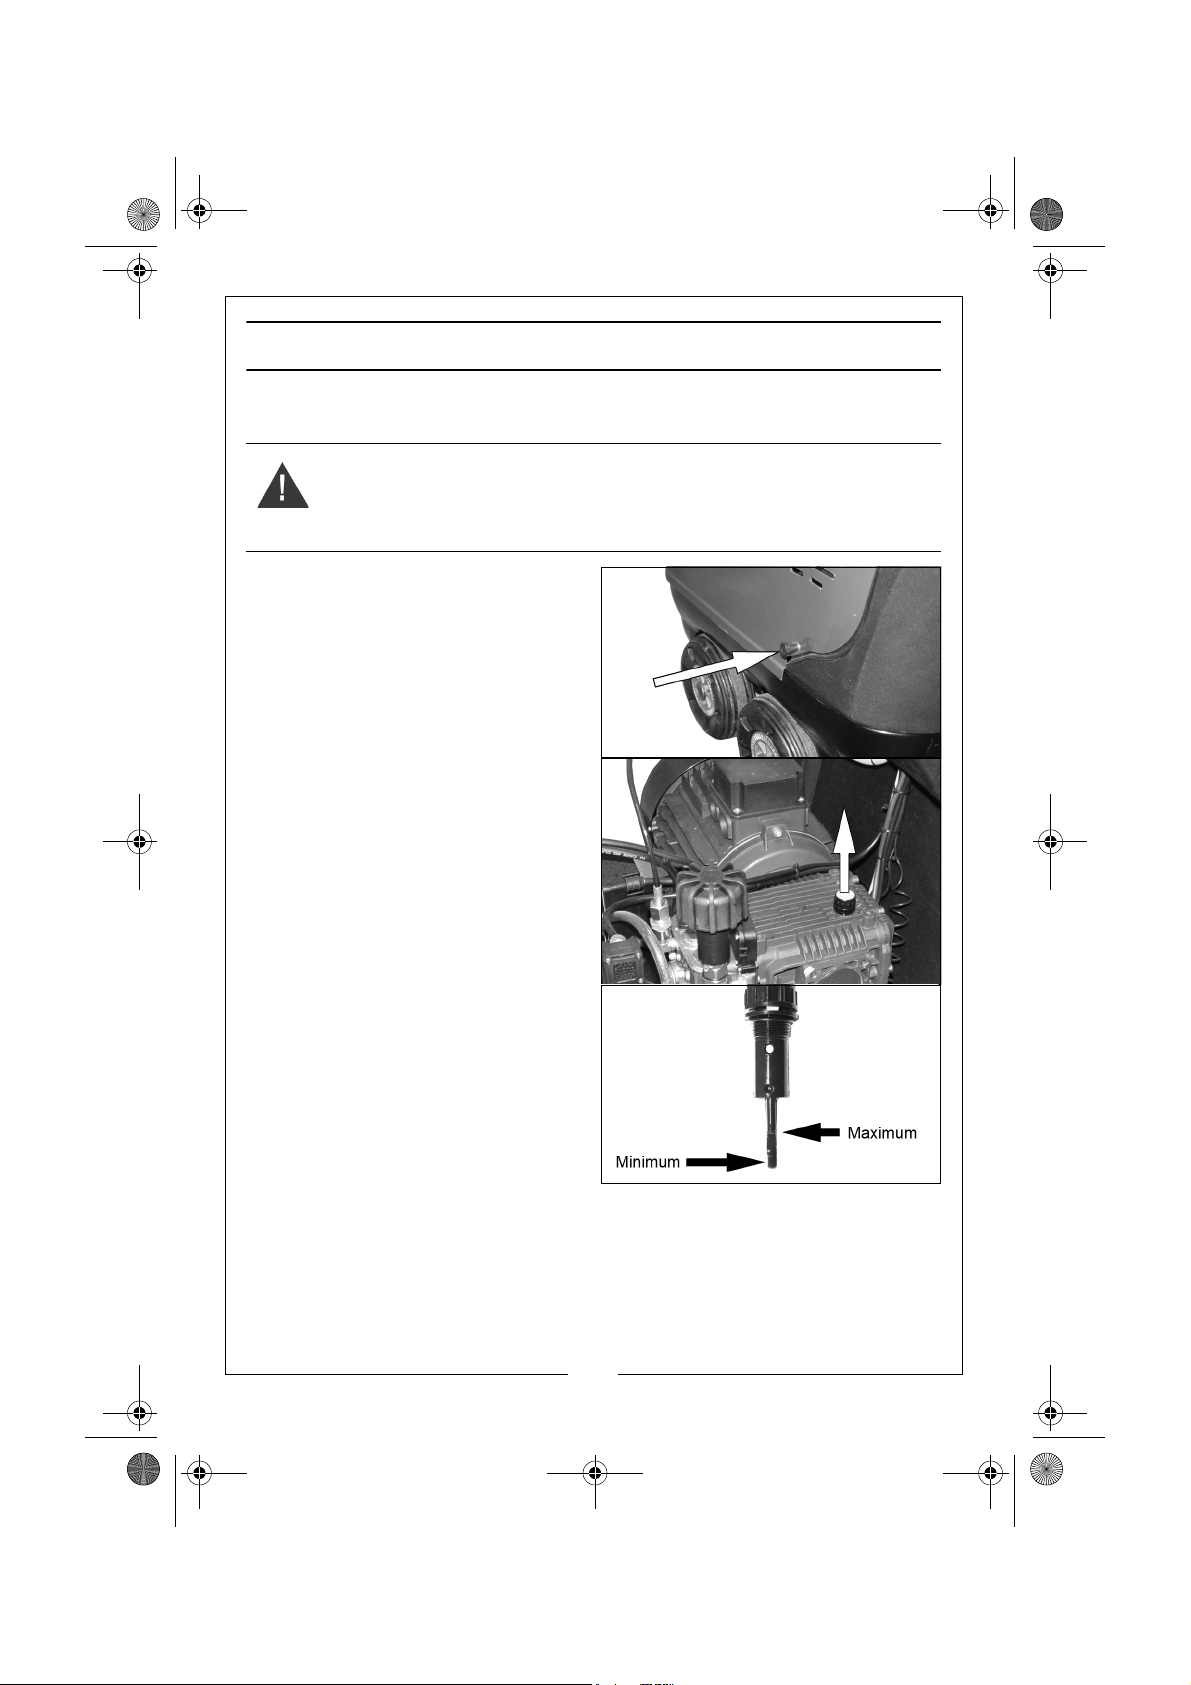
CHECK OIL
WARNING: TO CARRY OUT THIS CHECK, PLACE THE PRESSURE WASHER ON
LEVEL GROUND WITH THE PRESSURE WASHER SWITCHED OFF.
WARNING: TAKE CARE NOT TO TOUCH ANY HOT PARTS WHEN CHECKING
THE OIL LEVEL.
1. Remove the cover from the
pressure washer by removing the
securing screw from each side of
the cover then lifting the cover
off.
2. Turn the oil filler cap anticlockwise
and remove it from the pump,
wipe the integral dipstick with a
clean cloth.
3. Insert the oil filler cap back into
place and then remove it again.
4. If the oil reads low on the dipstick,
add oil to the oil reservoir (Max
0.463L).
• Do not overfill the oil reservoir.
• We recommend the use of
SAE30W oil.
• Do not mix grades of oil as this may effect the pressure washers
performance.
5. Replace the oil filler cap.
6. Replace the cover and tighten the securing screws
NOTE: Running the pump with insufficient oil will cause damage.
8
Parts & Service: 020 8988 7400 / E-mail: [email protected] or [email protected]
Page 9
HLS160 3 Phase hot wash.fm Page 9 Wednesday, September 28, 2011 12:28 PM
FUEL
• Refuel in a well-ventilated area, away from any sources of ignition.
• If the pressure washer has been running, allow it to cool before refueling.
• Do not leave fuel within the reach of children.
• Refuel carefully to avoid spilling fuel.
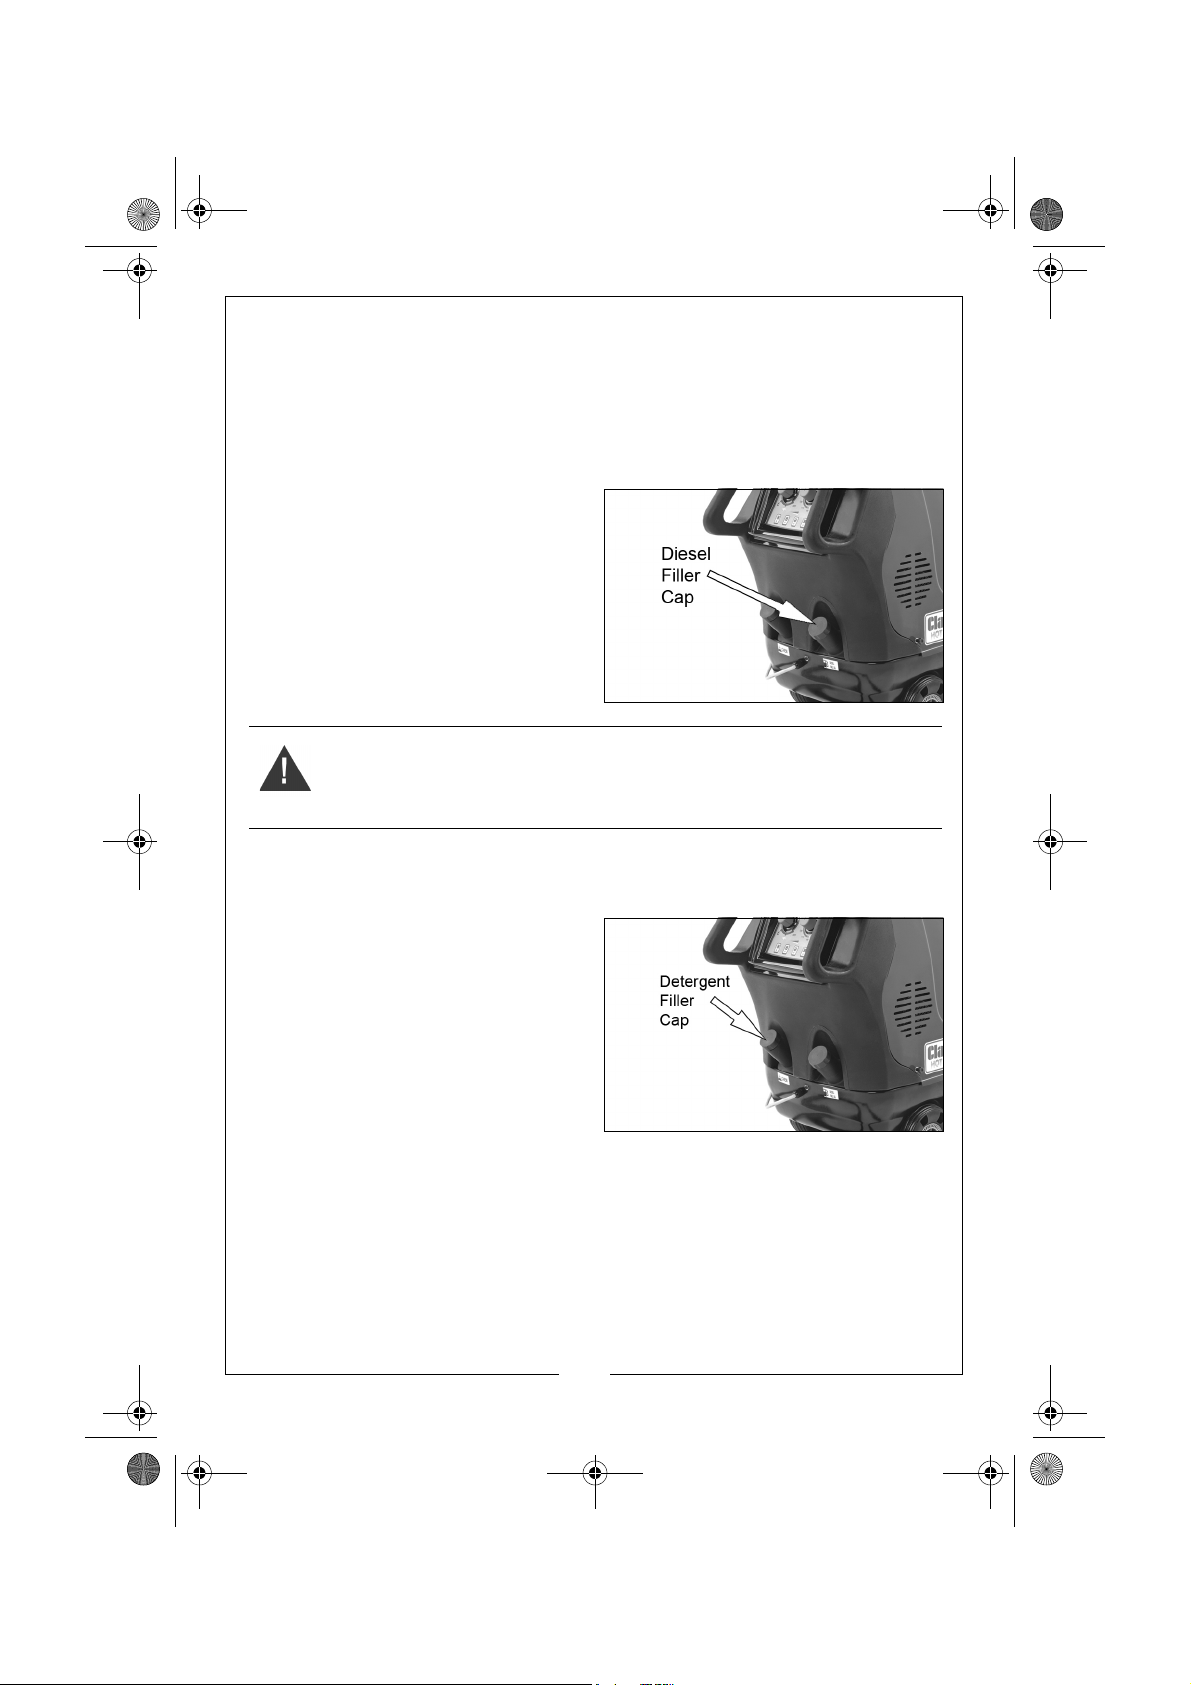
1. Remove the Diesel filler cap and
fill the tank with diesel fuel.
• Maximum 15L
2. Replace the Diesel filler cap
securely.
WARNING: INCORRECT FUELS MUST NOT BE USED AS THEY MAY PROVE
HAZARDOUS.
DETERGENT INJECTION FACILITY
If you intend to use the detergent injection facility
1. Unscrew the Detergent Filler Cap
located at the rear of the pressure
washer and fill with detergent.
• Only use detergents
recommended for use with
pressure washers, such as
CLARKE Traffic Film Remover
which is a powerful low
foaming agent for car
cleaning, patio cleaning etc.,
or CLARKE Wash & Wax, both available from your CLARKE dealer
9
Parts & Service: 020 8988 7400 / E-mail: [email protected] or [email protected]
Page 10
HLS160 3 Phase hot wash.fm Page 10 Wednesday, September 28, 2011 12:28 PM
CONNECTING THE WATER SUPPLY
The pressure washer must never be connected to the drinking water supply
without using a system separator (also known as a backflow preventer)
available from most hardware stores.
Always follow the regulations of your local water supplier.
CAUTION: WATER THAT HAS FLOWED THROUGH A SYSTEM SEPARATOR IS
CONSIDERED NON-DRINKABLE.
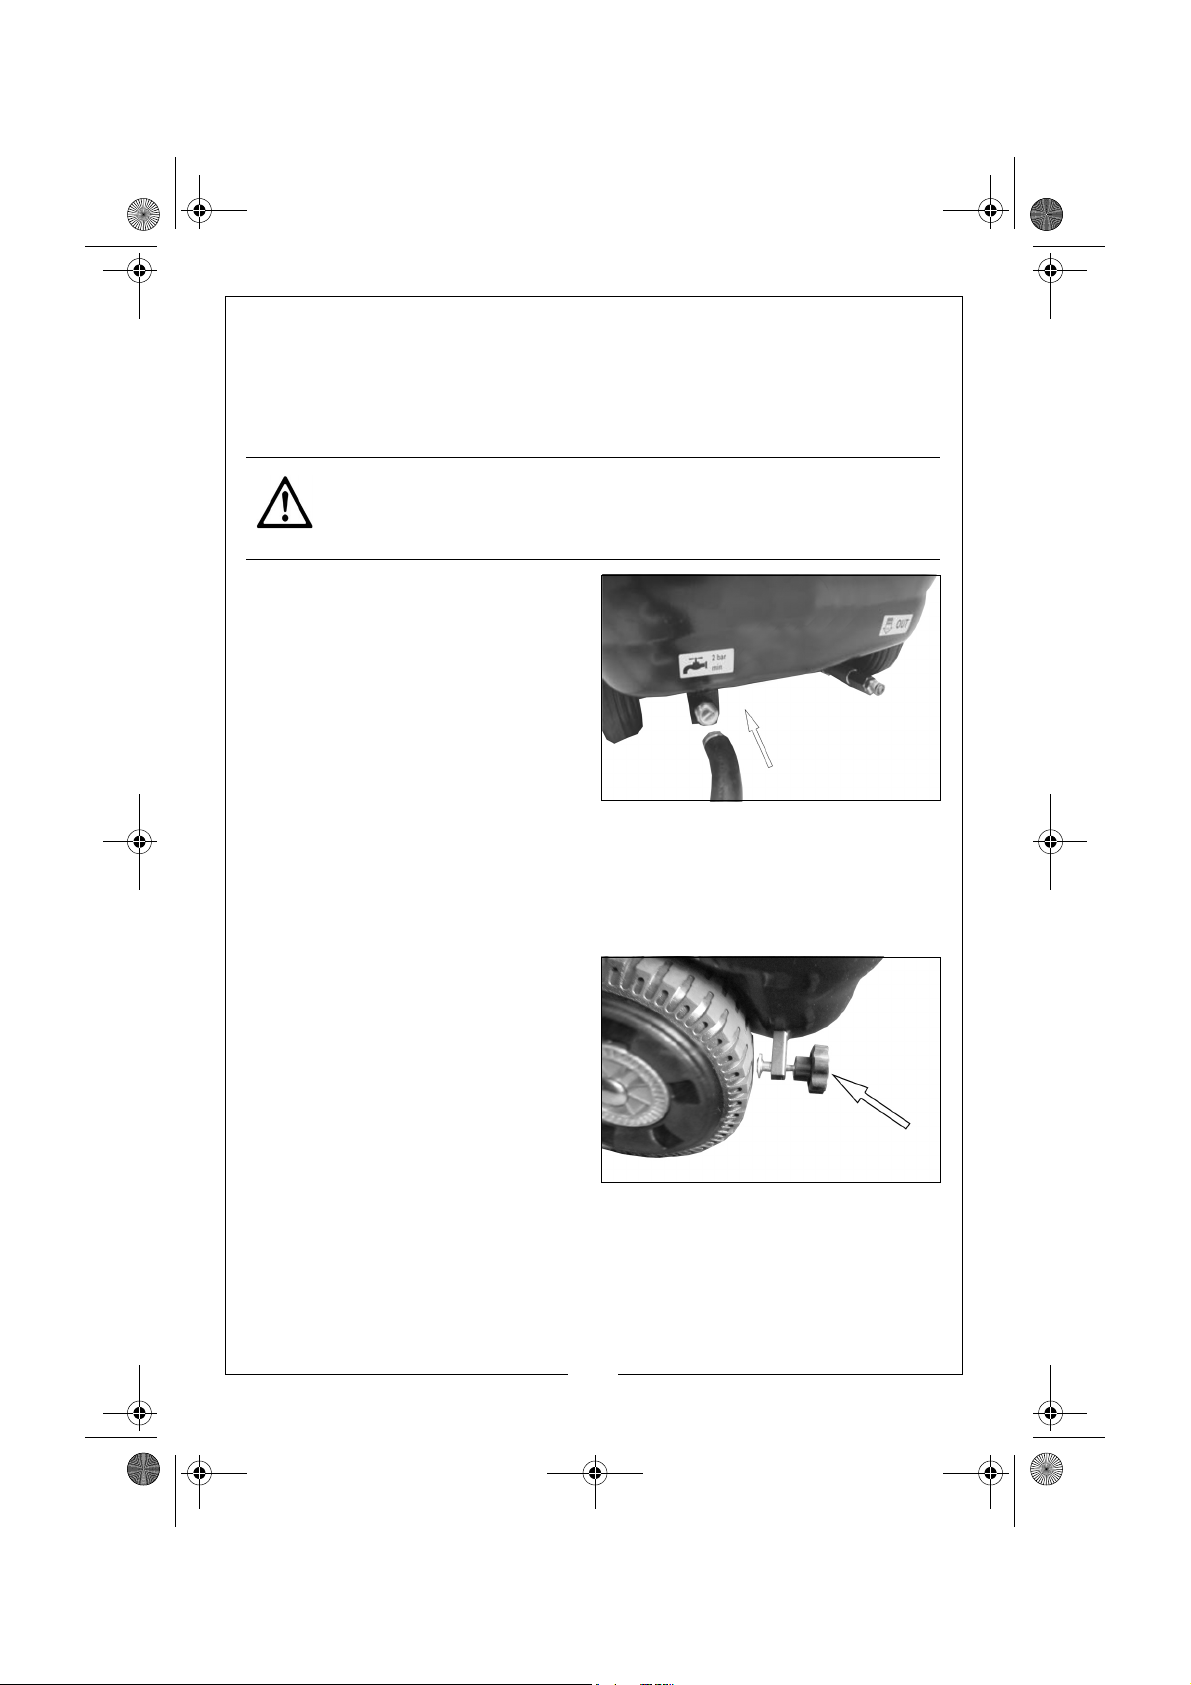
1. Connect the water supply hose to
the inlet fitting.
2. Connect the inlet fitting to the
Water inlet as shown.
• It is recommended to use a
reinforced hose having an
inner diameter of at least 10
mm.
• The water supply must be able
to deliver at least 15 l/min. and
have a max inlet temperature of 55 °C.
PARKING BRAKE
Before you operate you pressure washer you should make sure that the
parking brake is engaged.
To do this screw the brake shown in
the picture against the wheel to
engage the parking brake.
Screw the brake in the opposite
direction to release the parking
brake, and allow you to move the
pressure washer.
10
Parts & Service: 020 8988 7400 / E-mail: [email protected] or [email protected]
Page 11
HLS160 3 Phase hot wash.fm Page 11 Wednesday, September 28, 2011 12:28 PM
OPERATION
1. The pressure washer should always be located on a firm level surface
where it is not exposed to extreme weather conditions such as strong wind,
freezing or rain.
2. It is recommended that where possible a partition be erected between the
wash area and the pressure washer to prevent accidental spraying of the
pressure washer. Moisture entering the pressure washer may cause serious
damage.
3. Do not operate the pressure washer indoors, or in enclosed areas without
adequate ventilation, or in areas where flammable vapours (petrol,
solvents etc.) may be present.
4. If the pressure washer is to be used in an enclosed area the burner exhaust
MUST BE vented to the outside atmosphere. The use of a draft regulator is
recommended. All venting must be in accordance with applicable laws
and local ordinances for such installations.
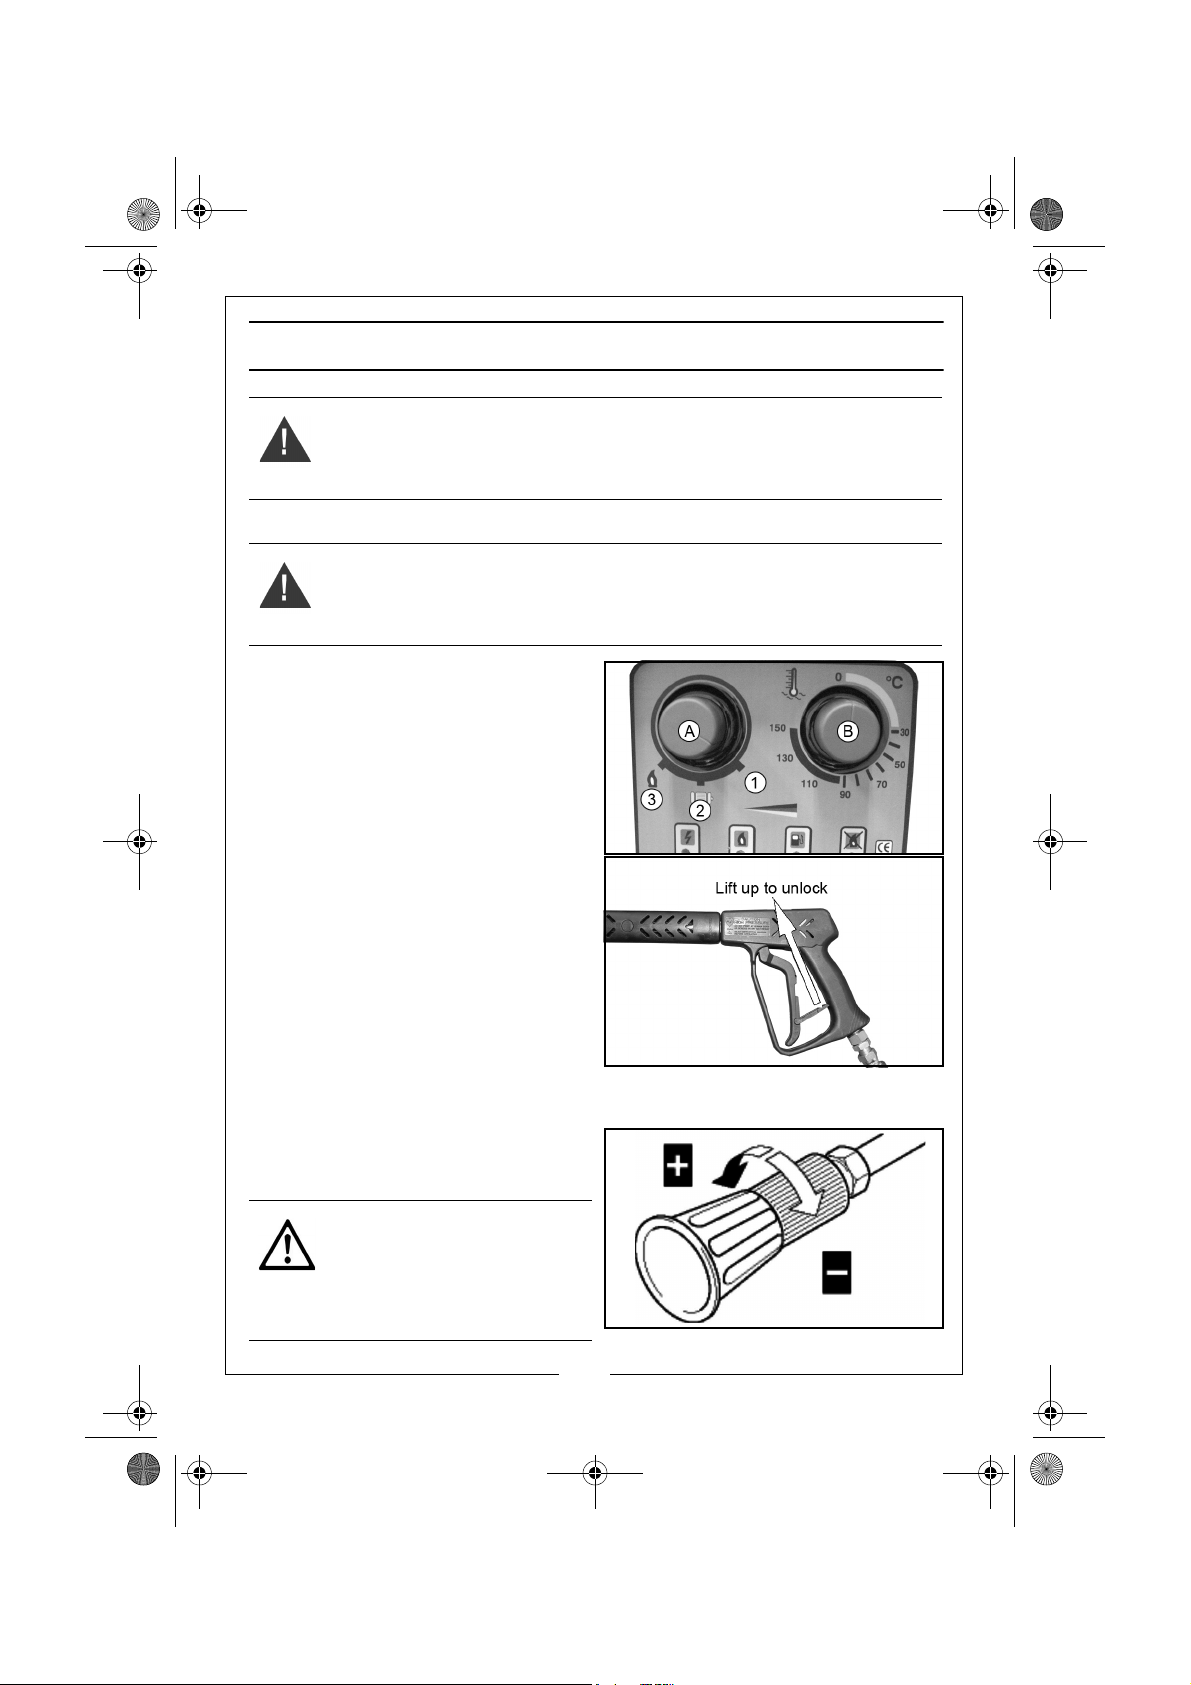
CONTROL PANEL
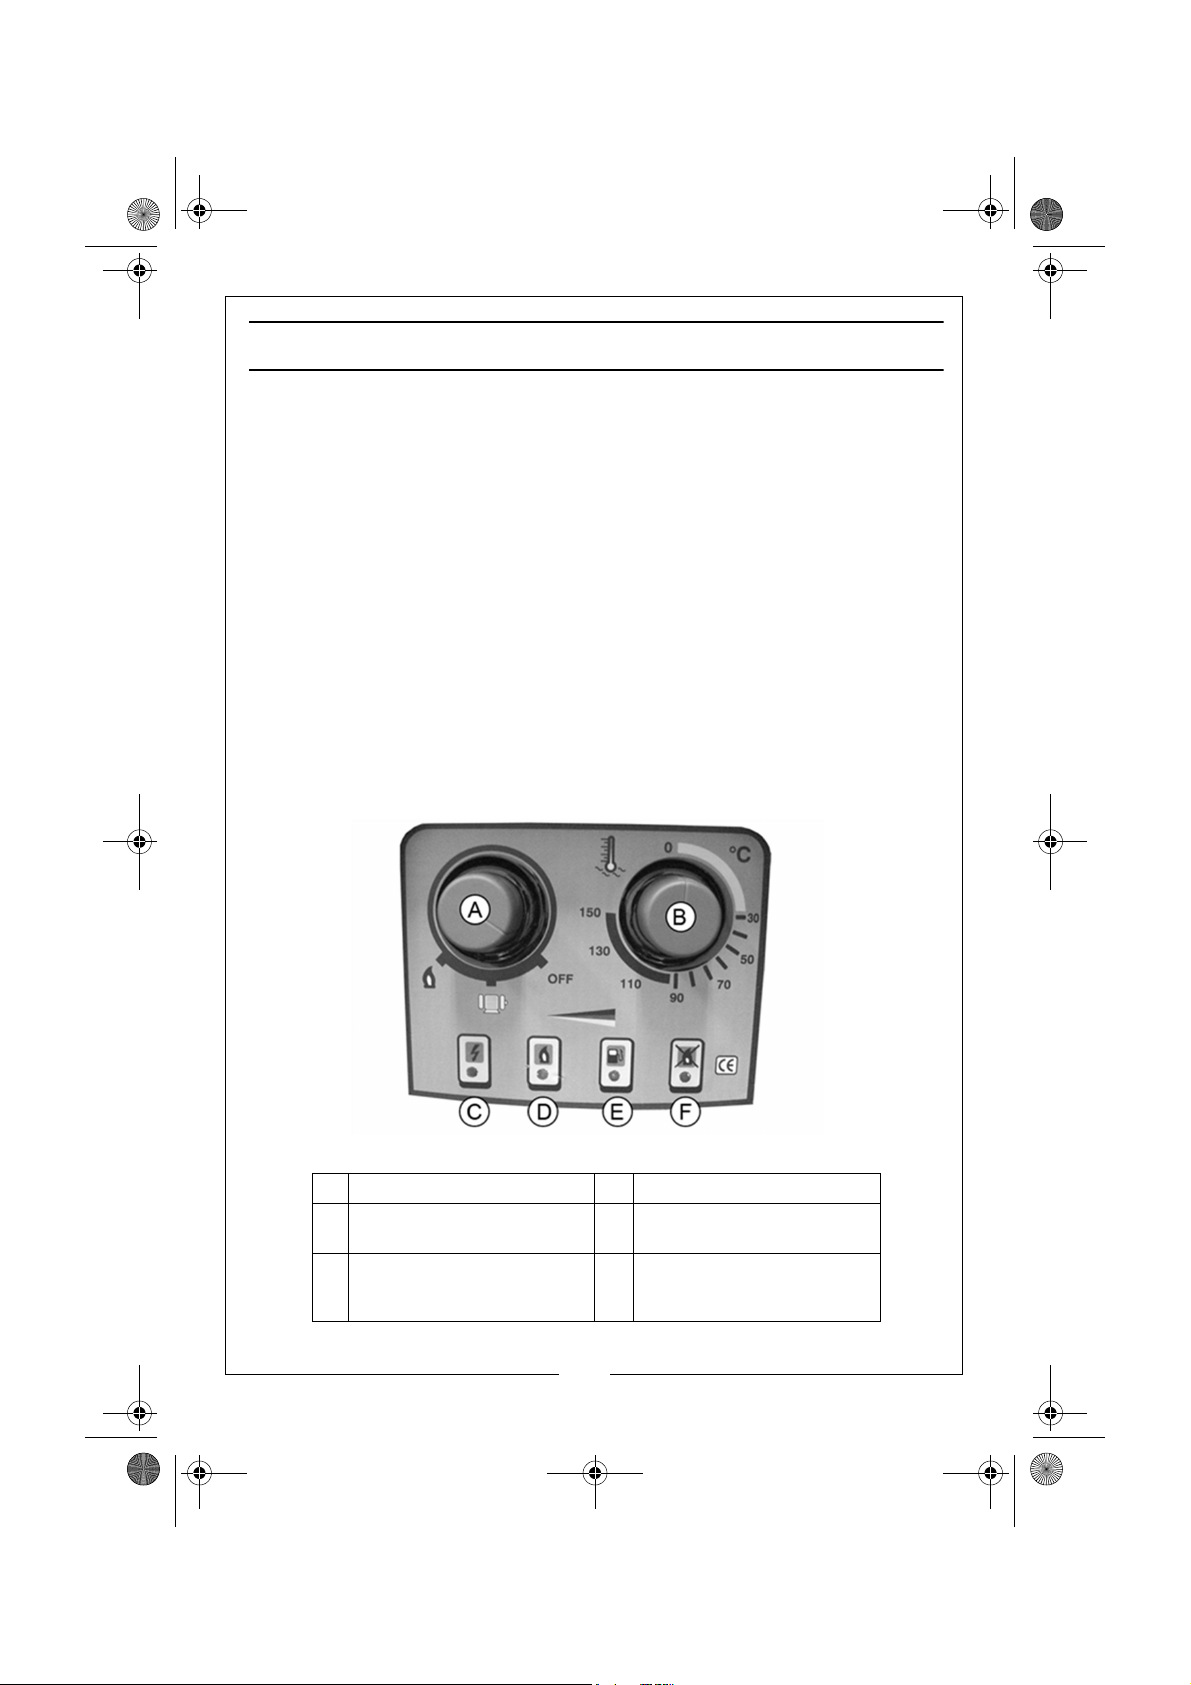
Operating Mode Selector D This is lit when the burner is on.
A
Temperature selector (from
B
0
°C to 150 °C.)
This is lit when connected to
C
an electrical power supply.
E This is lit when there is a lack of
fuel in the tank.
F This flashes when the flame
turns off inside the boiler.
11
Parts & Service: 020 8988 7400 / E-mail: [email protected] or [email protected]
Page 12
HLS160 3 Phase hot wash.fm Page 12 Wednesday, September 28, 2011 12:28 PM
COLD WASH OPERATION
1. Turn the water supply tap on, making sure that it is fully open.
WARNING: FAILURE TO TURN ON THE WATER FULLY COULD CAUSE
DAMAGE TO THE PRESSURE WASHER.
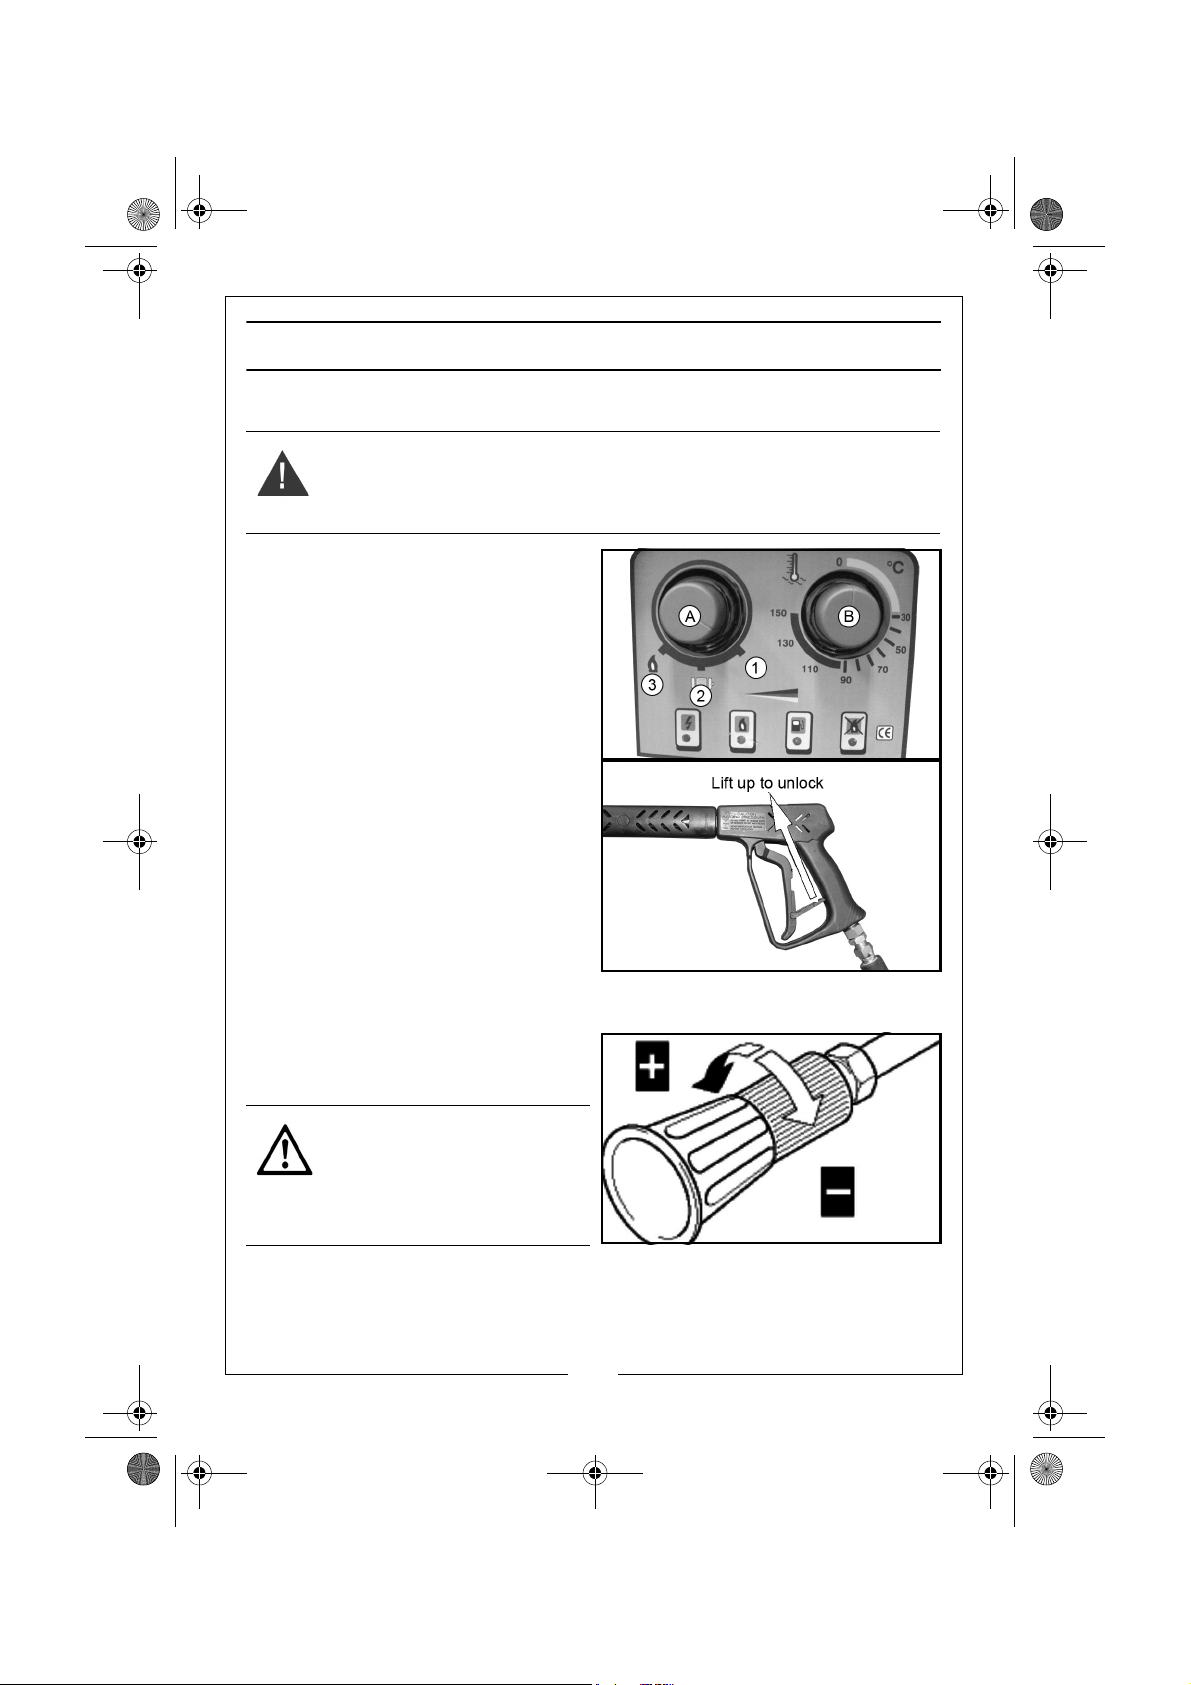
2. Set the mode selector (A) to
position 2 (pump setting)
3. Set the Temperature selector (B)
to “0” for cold washing.
• The pressure washer is now
ready for use.
4. Release the trigger lock.
5. Ensuring that you have a firm
footing and that you are also
holding the gun assembly and
spray lance firmly, pull the trigger
on the gun to start water flow.
• The lance and gun will kick
back when the trigger is first
pulled.
USING DETERGENT
The detergent is applied by twisting
the cap on the lance as shown and
then pulling the trigger on the gun.
CAUTION: IF YOUR EYES COME
INTO CONTACT WITH ANY
CLEANING FLUIDS, RINSE THEM
IMMEDIATELY WITH PLENTY OF
FRESH CLEAN WATER AND SEEK
MEDICAL ADVICE IF REQUIRED.
12
Parts & Service: 020 8988 7400 / E-mail: [email protected] or [email protected]
Page 13
HLS160 3 Phase hot wash.fm Page 13 Wednesday, September 28, 2011 12:28 PM
HOT WASH OPERATION
WARNING: THE BURNER EXHAUST MUST BE VENTED TO THE OUTSIDE
ATMOSPHERE. THE USE OF A DRAFT REGULATOR IS RECOMMENDED. ALL
VENTING MUST BE IN ACCORDANCE WITH APPLICABLE LAWS AND LOCAL
ORDINANCES FOR SUCH INSTALLATIONS.
1. Turn the water supply tap on, making sure that it is fully open.
WARNING: FAILURE TO TURN ON THE WATER FULLY COULD CAUSE
DAMAGE TO THE PRESSURE WASHER.
2. Set the mode selector (A) to
position 3 (hot wash setting)
3. Set the Temperature selector (B)
to the required temperature.
• The pressure washer is now
ready for use.
4. Release the trigger lock.
5. Ensuring that you have a firm
footing and that you are also
holding the gun assembly and
spray lance firmly, pull the trigger
on the gun to start water flow.
• The lance and gun will kick
back when the trigger is first
pulled.
USING DETERGENT
The detergent is applied by twisting
the cap on the lance as shown and
then pulling the trigger on the gun.
CAUTION: IF YOUR EYES COME
INTO CONTACT WITH ANY
CLEANING FLUIDS, RINSE THEM
IMMEDIATELY WITH PLENTY OF
FRESH CLEAN WATER AND SEEK
MEDICAL ADVICE IF REQUIRED.
13
Parts & Service: 020 8988 7400 / E-mail: [email protected] or [email protected]
Page 14
HLS160 3 Phase hot wash.fm Page 14 Wednesday, September 28, 2011 12:28 PM
ADJUSTING THE PRESSURE
WARNING: MAKE SURE THE OPERATING PRESSURE DOES NOT EXCEED THE
MAXIMUM PRESSURE INDICATED ON THE RATING PLATE
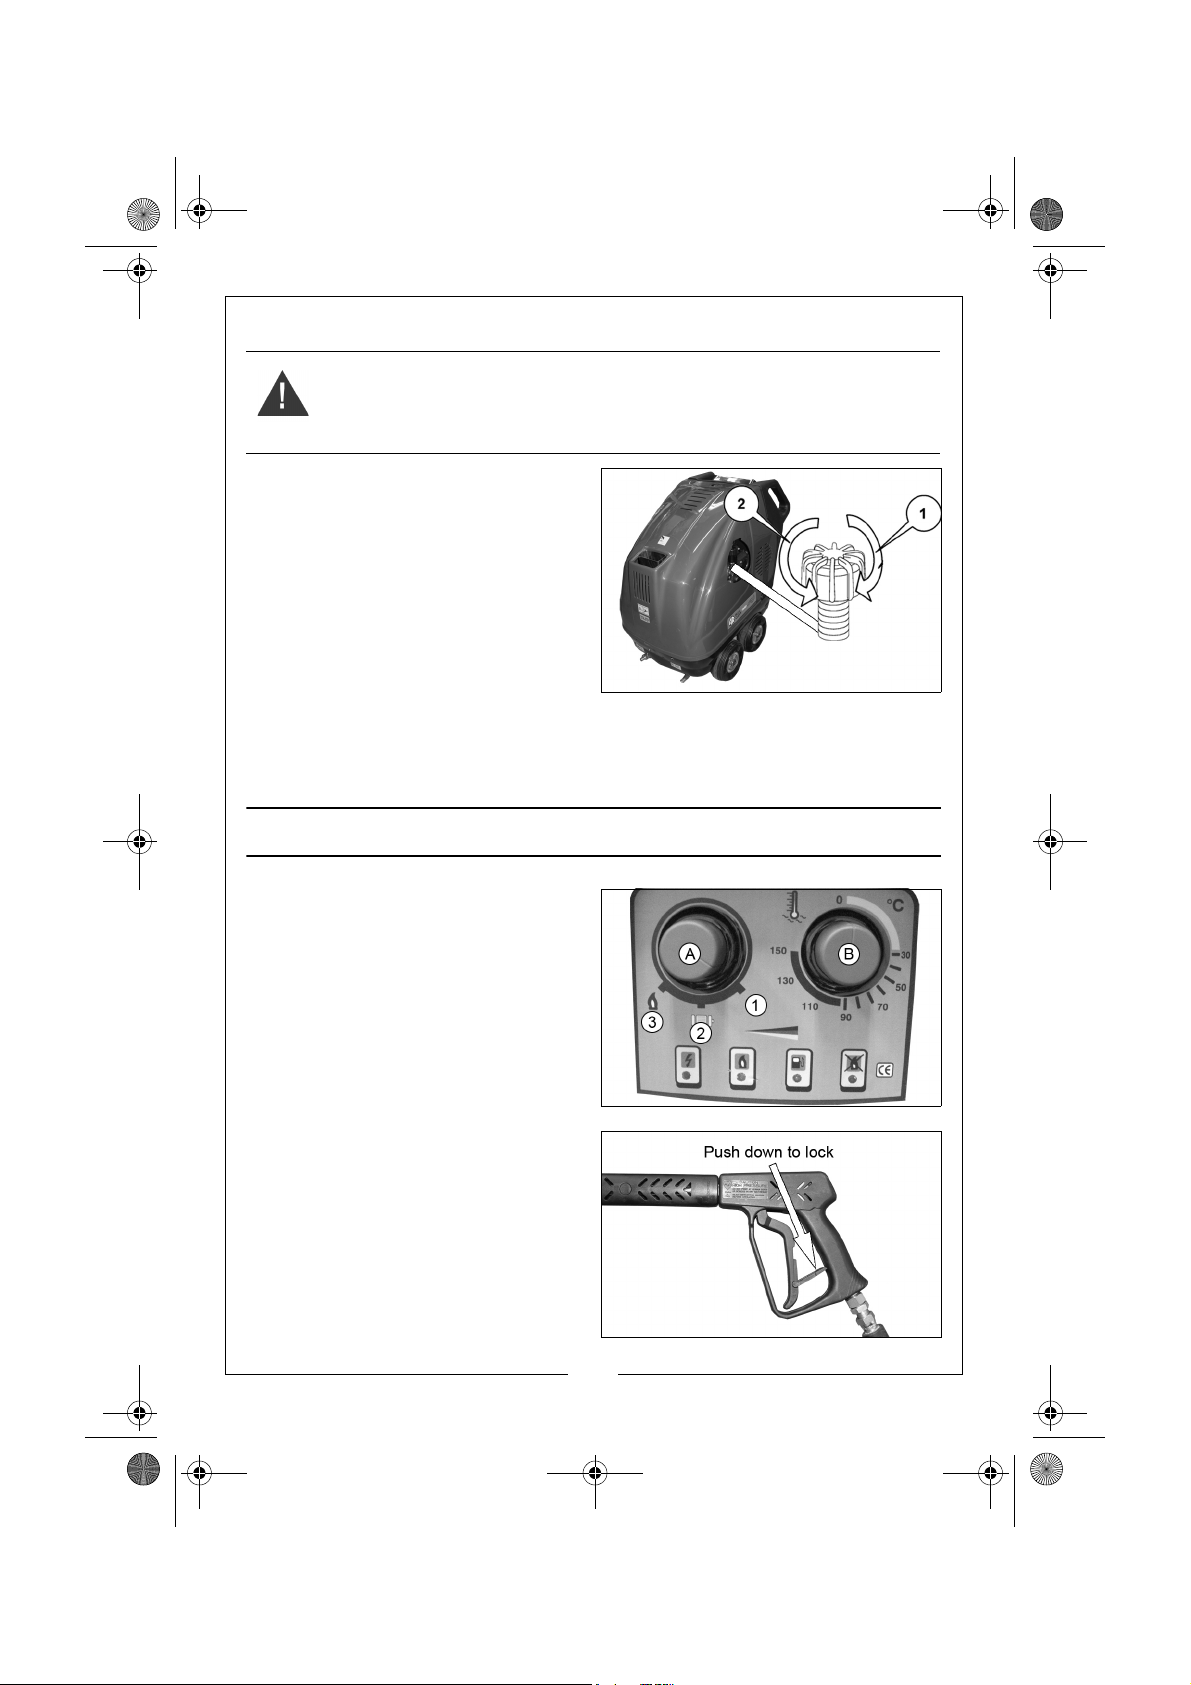
Reach into the access window and
turn the pressure adjustment valve.
• Turn clockwise (1) to increase
the pressure.
• Turn anti-clockwise (2) to
decrease the pressure.
TOTAL STOP SYSTEM
NOTE: The washer is fitted with a total stop system. When the trigger is
released the motor will stop. This system is designed to protect the
motor and is also an important safety feature.
AFTER USE
1. Set the mode selector (A) to
position 1 (OFF)
2. Turn water supply off at the tap.
• NEVER turn the water off with
the pressure washer running.
3. Release the pressure in the pump
and hose by squeezing the trigger
for a few seconds until no more
water comes out of the nozzle.
4. Move the trigger lock to the
locked position.
5. Store the pressure washer in a dry
safe place to prevent
unauthorised persons from using it.
14
Parts & Service: 020 8988 7400 / E-mail: [email protected] or [email protected]
Page 15
HLS160 3 Phase hot wash.fm Page 15 Wednesday, September 28, 2011 12:28 PM
MAINTENANCE AND SERVICING
• All repairs and maintenance operations must be carried out by
authorised personnel.
• All maintenance operations must be carried out keeping the pressure
washer on an even floor.
• The pressure washer must be disconnected from the power and water
supplies.
• Correct use and maintenance is necessary to guarantee the pressure
washer's reliability and best performance.
• The pressure washer needs constant checks that are to be carried out
according to the following time schedules:
DAILY (BEFORE EACH USE)
CHECK THE OIL LEVEL OF THE PUMP
See “Check oil” on page 8.
EVERY 2 WEEKS OR AFTER 50 HOURS WORKING
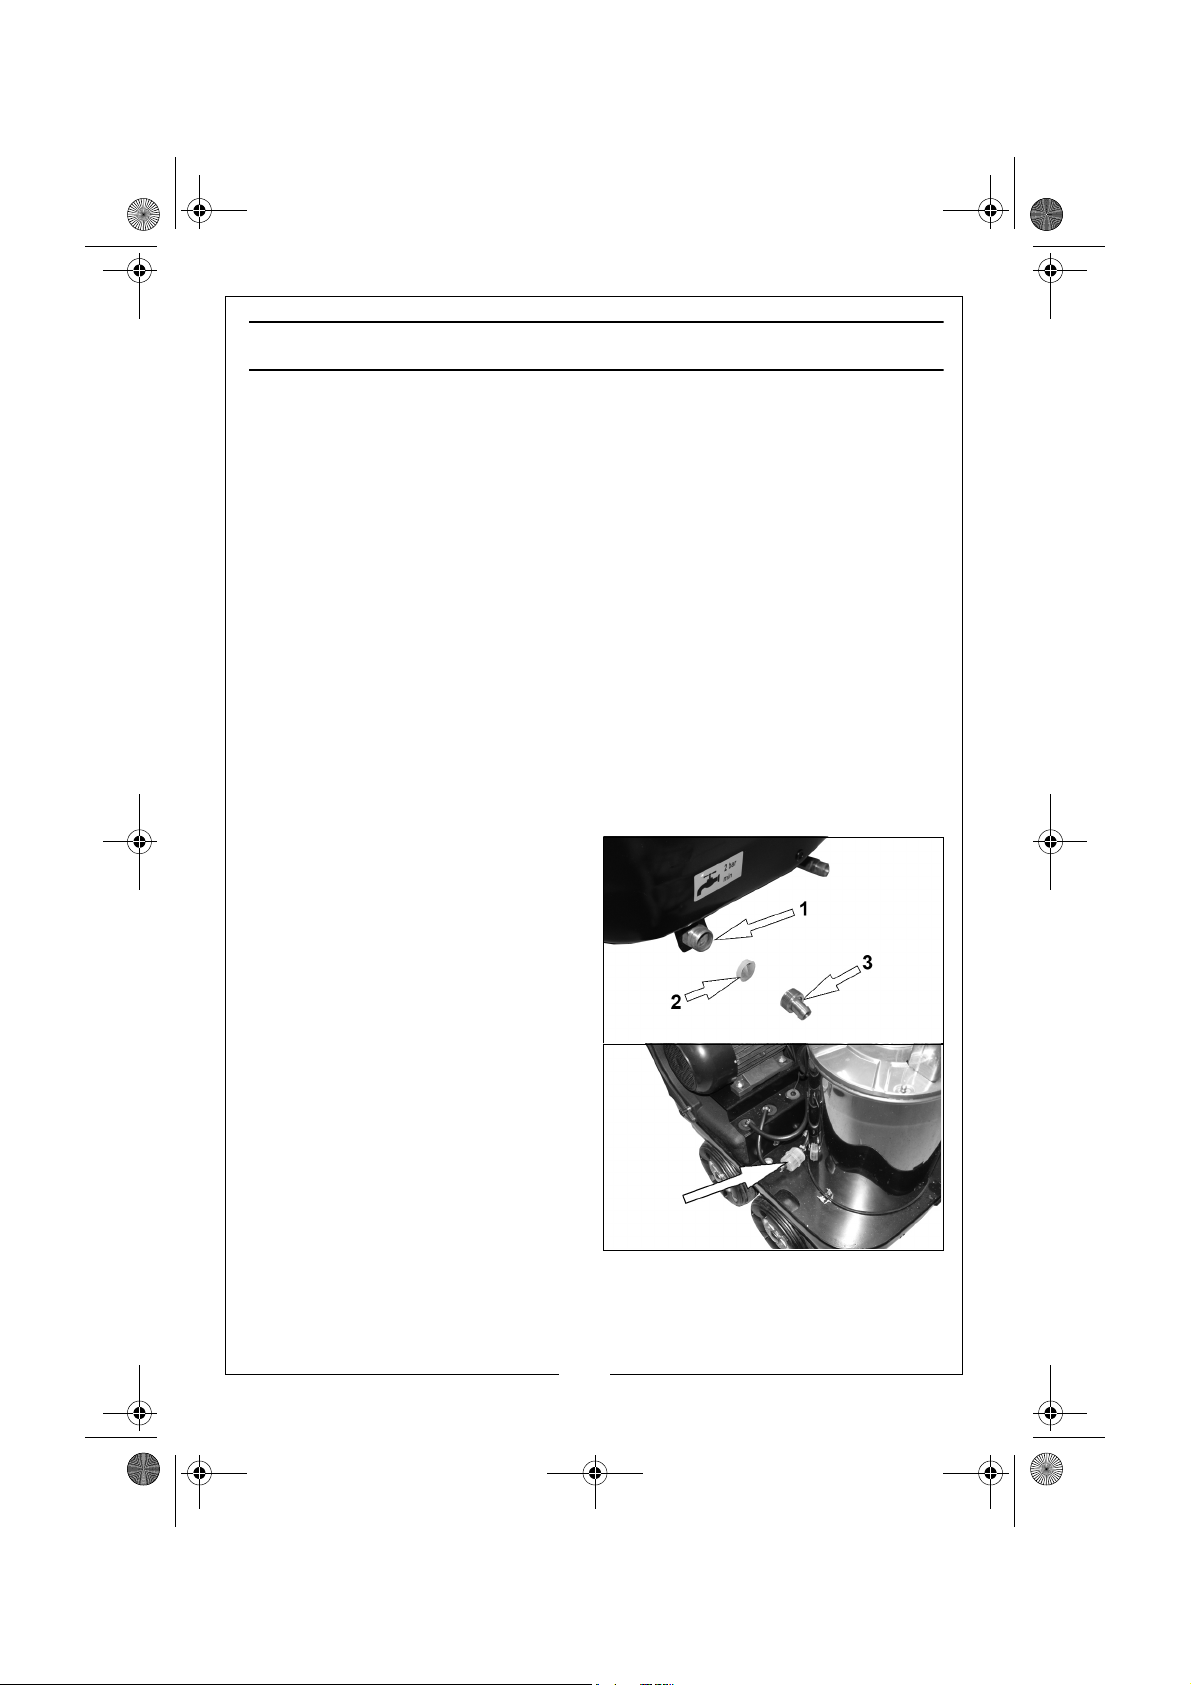
CLEAN THE WATER FILTER
1. Remove the inlet fitting (3)
2. Clean the water filter (2) located
in the water inlet (1).
REPLACING THE FUEL FILTER.
1. Remove the cover from the
pressure washer.
2. Check the filter.
• If dirty, replace it with a new
filter.
15
Parts & Service: 020 8988 7400 / E-mail: [email protected] or [email protected]
Page 16
HLS160 3 Phase hot wash.fm Page 16 Wednesday, September 28, 2011 12:28 PM
EVERY MONTH OR AFTER 100 HOURS OF WORK
CLEAN THE COMBUSTION HEAD AND CHECK THE ELECTRODES.
It is recommended that the burner and electrodes be serviced yearly, or
as needed depending upon the pressure washers' usage, Please contact the
CLARKE International Service Dept.
(This maintenance operation must be carried out by skilled personnel.)
EVERY MONTH 0R AFTER 200 HOURS OF WORK
CLEAN THE COMBUSTION PUMP FILTER.
(This maintenance operation must be carried out by skilled personnel.)
SOOT BUILD UP
Poor grades of fuel oil or inadequate combustion will cause heavy build
up of soot on the heating coil. This deposit will insulate the coil and
reduce its efficiency. It will also restrict air flow through the coil, further
aggravating the soot build up. Contact your CLARKE dealer or CLARKE
International Service Dept. on: 020 8988 7400 when de-sooting is required.
16
Parts & Service: 020 8988 7400 / E-mail: [email protected] or [email protected]
Page 17
HLS160 3 Phase hot wash.fm Page 17 Wednesday, September 28, 2011 12:28 PM
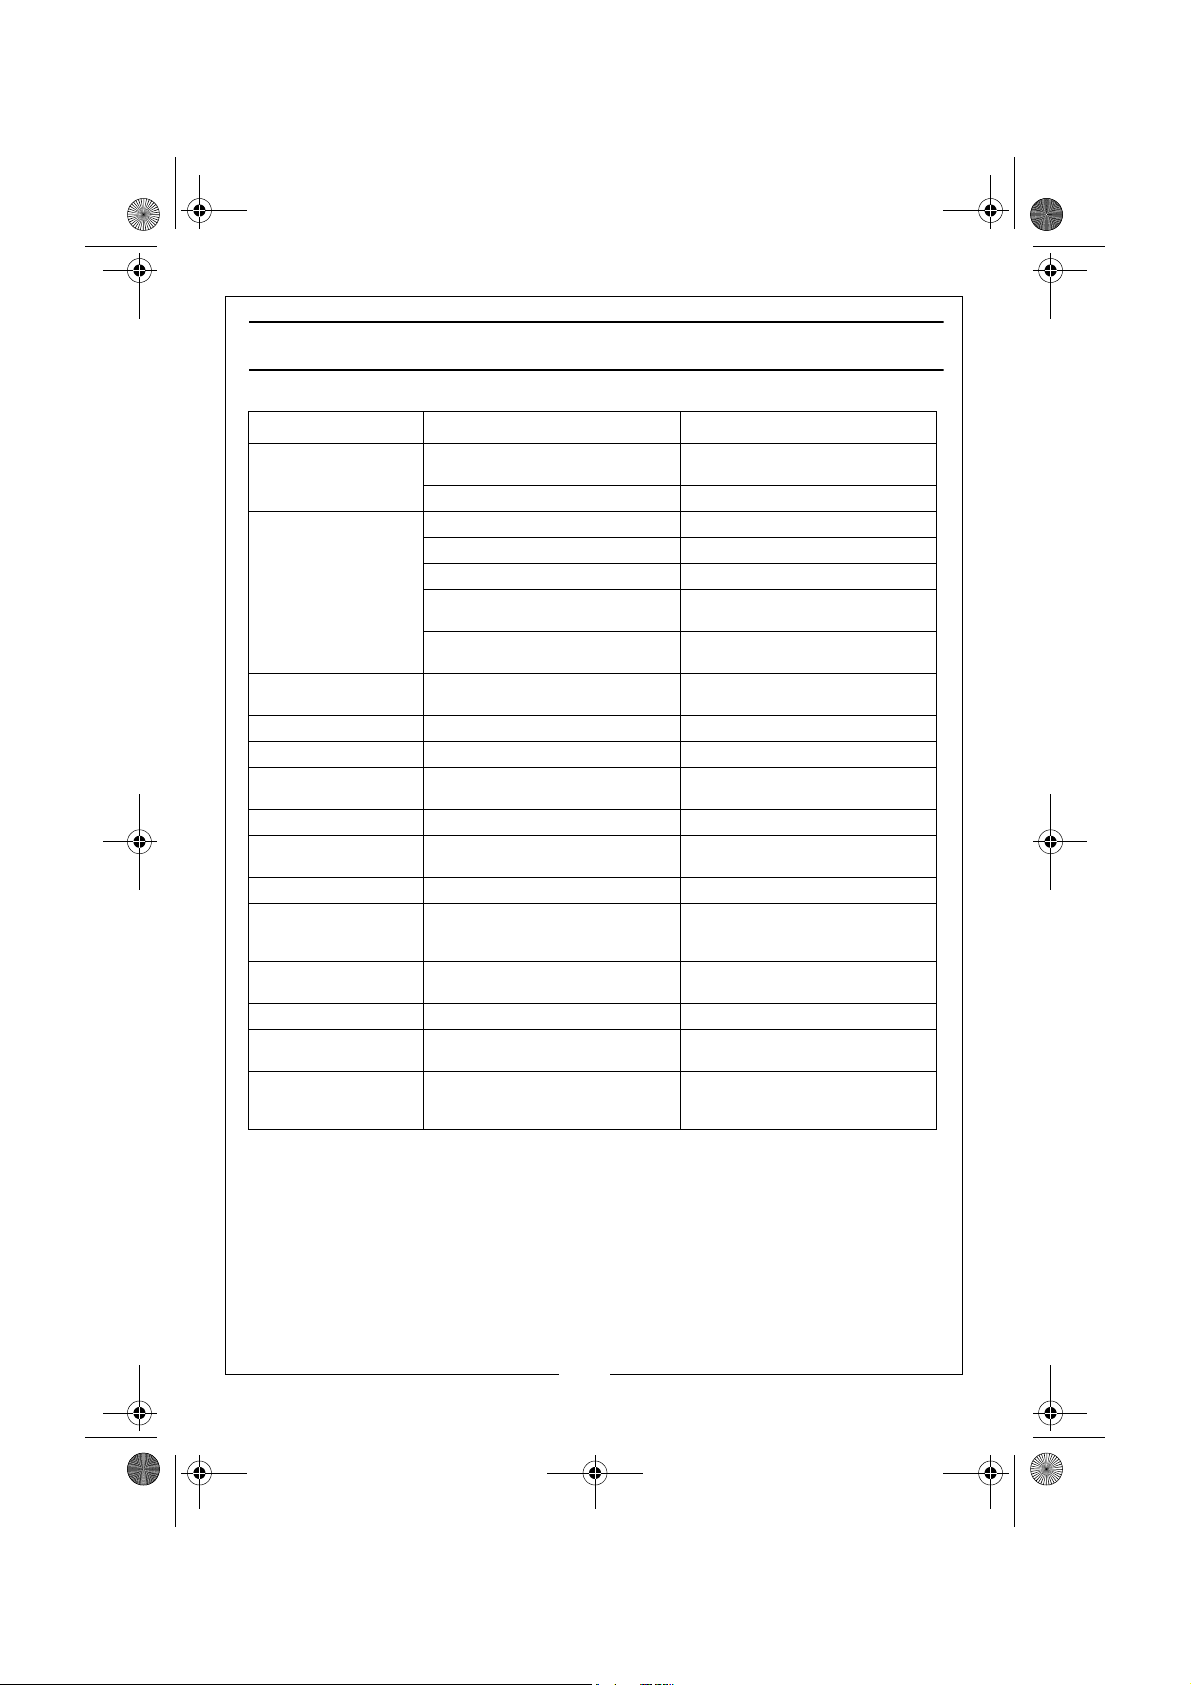
TROUBLESHOOTING
PROBLEM POSSIBLE CAUSE SOLUTION
Water does not come
out
Low pressure or irregular
pressure
The burner does not
turn on
Noisy pressure washer Air intake worn out / dirty/blocked
Water in the oil Worn out water/oil rings Contact Clarke Service Department
Oil leaking from the
head
Motor suddenly stops Thermal protection has activated
Dirty water filter blocked See “Clean the water filter” on
Clogged lance nozzle Clean
Insufficient water supply Check the Capacity
The pump takes in air Check
Worn out gaskets Contact Clarke Service Department
Exceeding the inlet water
temperature
Coil is covered in limescale Contact Clarke Service Department
Dirty burner nozzle Contact Clarke Service Department
Faulty thermostat Contact Clarke Service Department
Broken/blocked electrovalve Contact Clarke Service Department
Dirty fuel filter See “Replacing the fuel filter.” on
Insufficient electrodes spark Contact Clarke Service Department
Defective flowmeter and/or
pressure switch
Worn out motor pump joint Contact Clarke Service Department
Low Voltage Make sure the pressure washer is
valves
Worn out o-rings or the seal system Contact Clarke Service Department
due to overheating
page 15.
Make sure the water supply is below
55 degrees
for advice on descaling
page 15.
Contact Clarke Service Department
connected to a suitable power
supply
Contact Clarke Service Department
Switch off the pressure washer and
wait until the unit has cooled down
sufficiently.
17
Parts & Service: 020 8988 7400 / E-mail: [email protected] or [email protected]
Page 18
HLS160 3 Phase hot wash.fm Page 18 Wednesday, September 28, 2011 12:28 PM
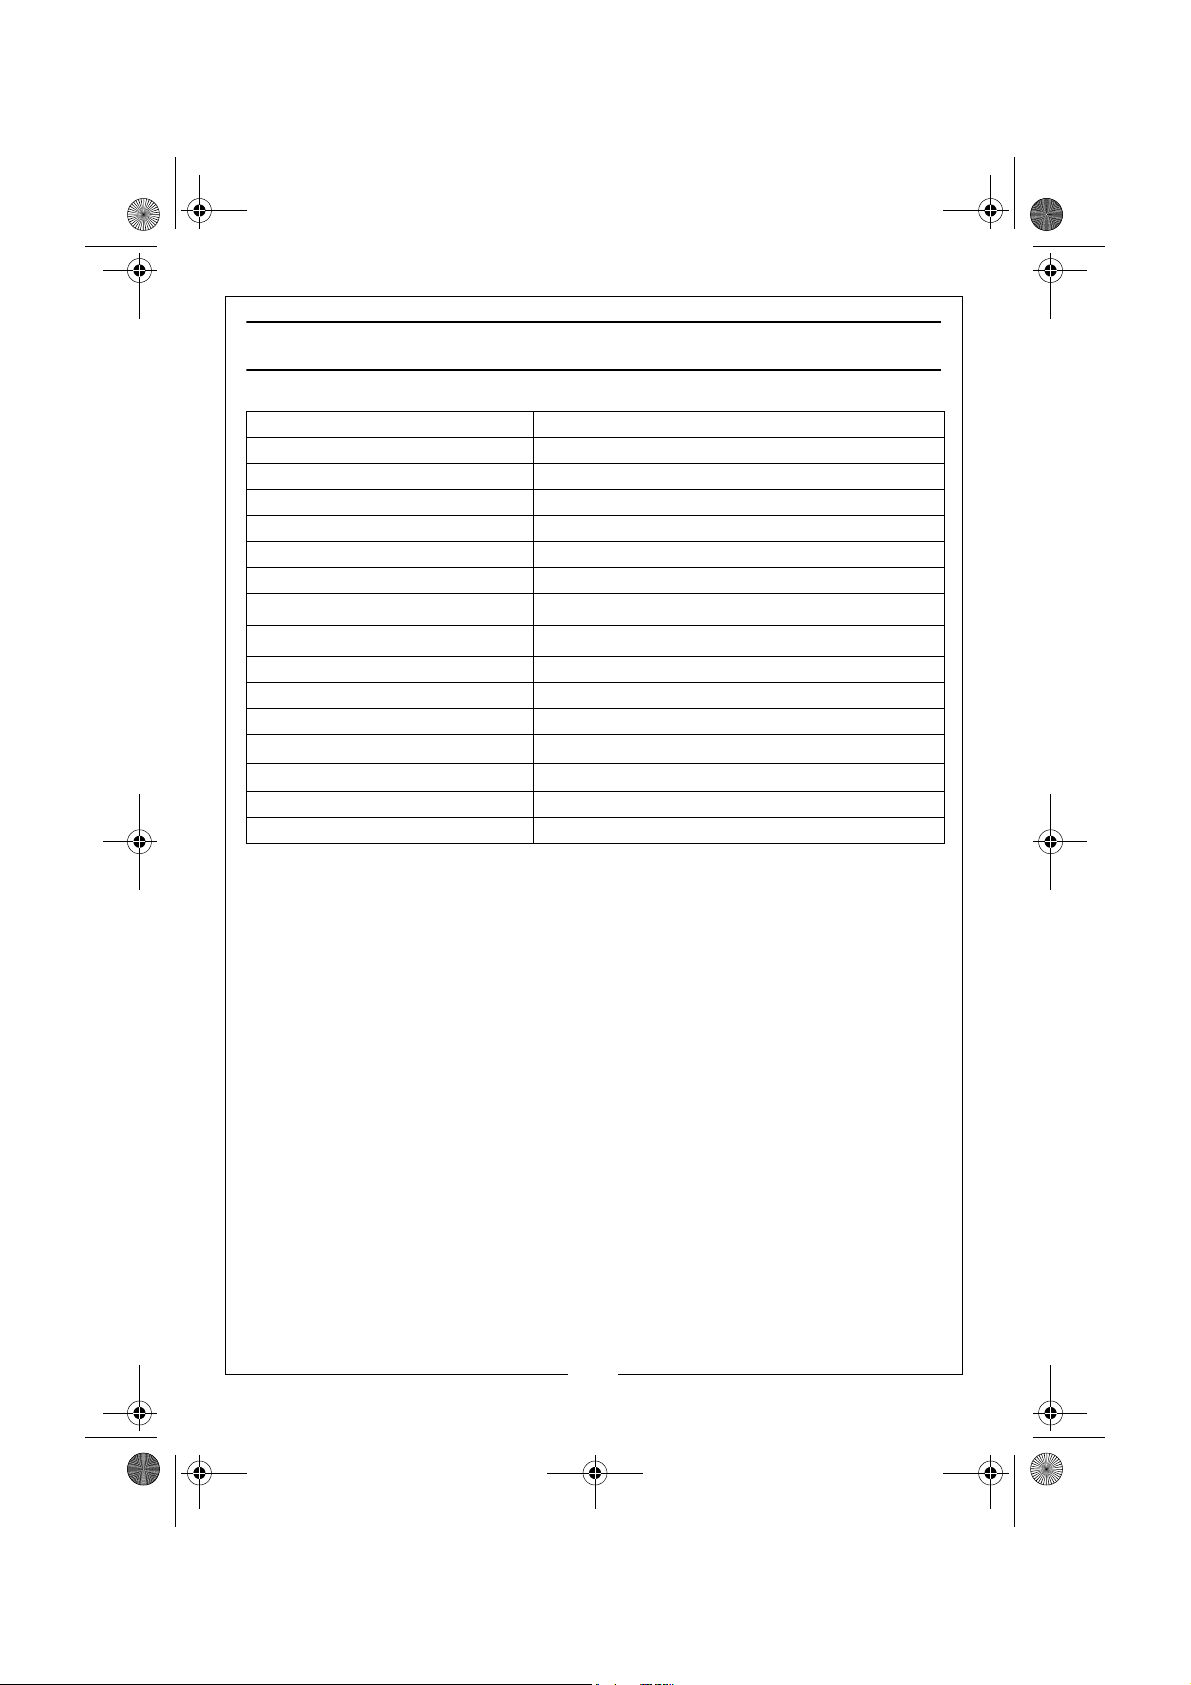
SPECIFICATIONS
Model Number HLS160
Part Number 7320535
Voltage 400 V / 50 Hz / 3 Phase
Power 5000 W
Working pressure 145 Bar / 2103 PSI
Maximum output pressure 150 Bar / 2175 PSI
Maximum output flow rate 900 L / hour
Maximum output temperature
Maximum input temperature
Oil capacity 0.463 L
Fuel tank capacity 15 L
Detergent tank capacity 5 L
Sound power level (L
Guaranteed sound power level (L
Dimensions (L x W x H) 980 x 590 x 920 mm
Weight 114 kg
)80.7 dB
WA
)89 dB
WA
150
55
o
C
o
C
18
Parts & Service: 020 8988 7400 / E-mail: [email protected] or [email protected]
Page 19
HLS160 3 Phase hot wash.fm Page 19 Wednesday, September 28, 2011 12:28 PM
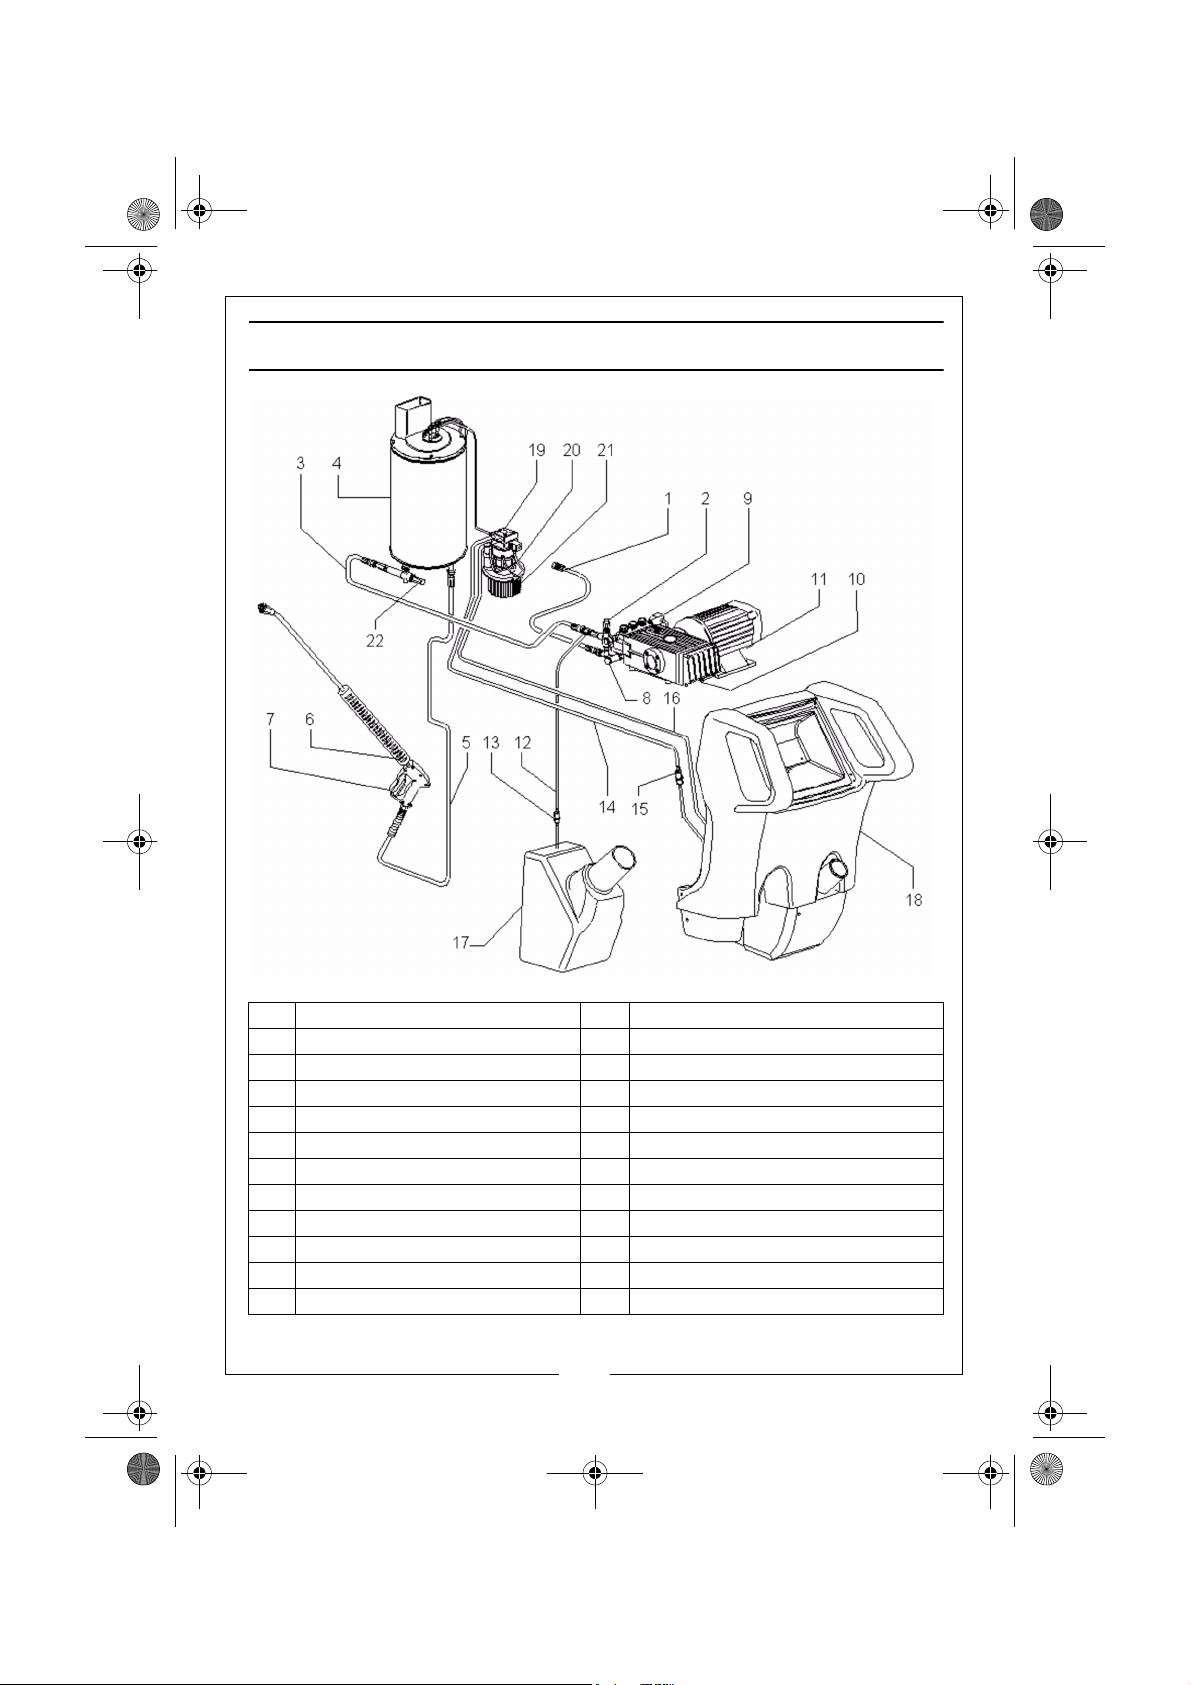
BASIC LAYOUT
POS DESCRIPTION POS DESCRIPTION
1 Water Inlet Pipe 12 Detergent Pipe
2 Adjustable Pressure Valve 13 Detergent Filter
3 Intake Pipe to Boiler 14 Fuel Intake Pipe
4 Boiler 15 Fuel Filter
5 High Pressure Hose 16 Fuel Outlet Pipe
6Lance 17Detergent Tank
7Gun 18Fuel Tank
8By-pass Valve 19Fuel Pump
9 Pressure Switch 20 Motor Fan
10 Pump 21 Fan
11 Electric Motor 22 Safety Valve.
19
Parts & Service: 020 8988 7400 / E-mail: [email protected] or [email protected]
Page 20
HLS160 3 Phase hot wash.fm Page 20 Wednesday, September 28, 2011 12:28 PM
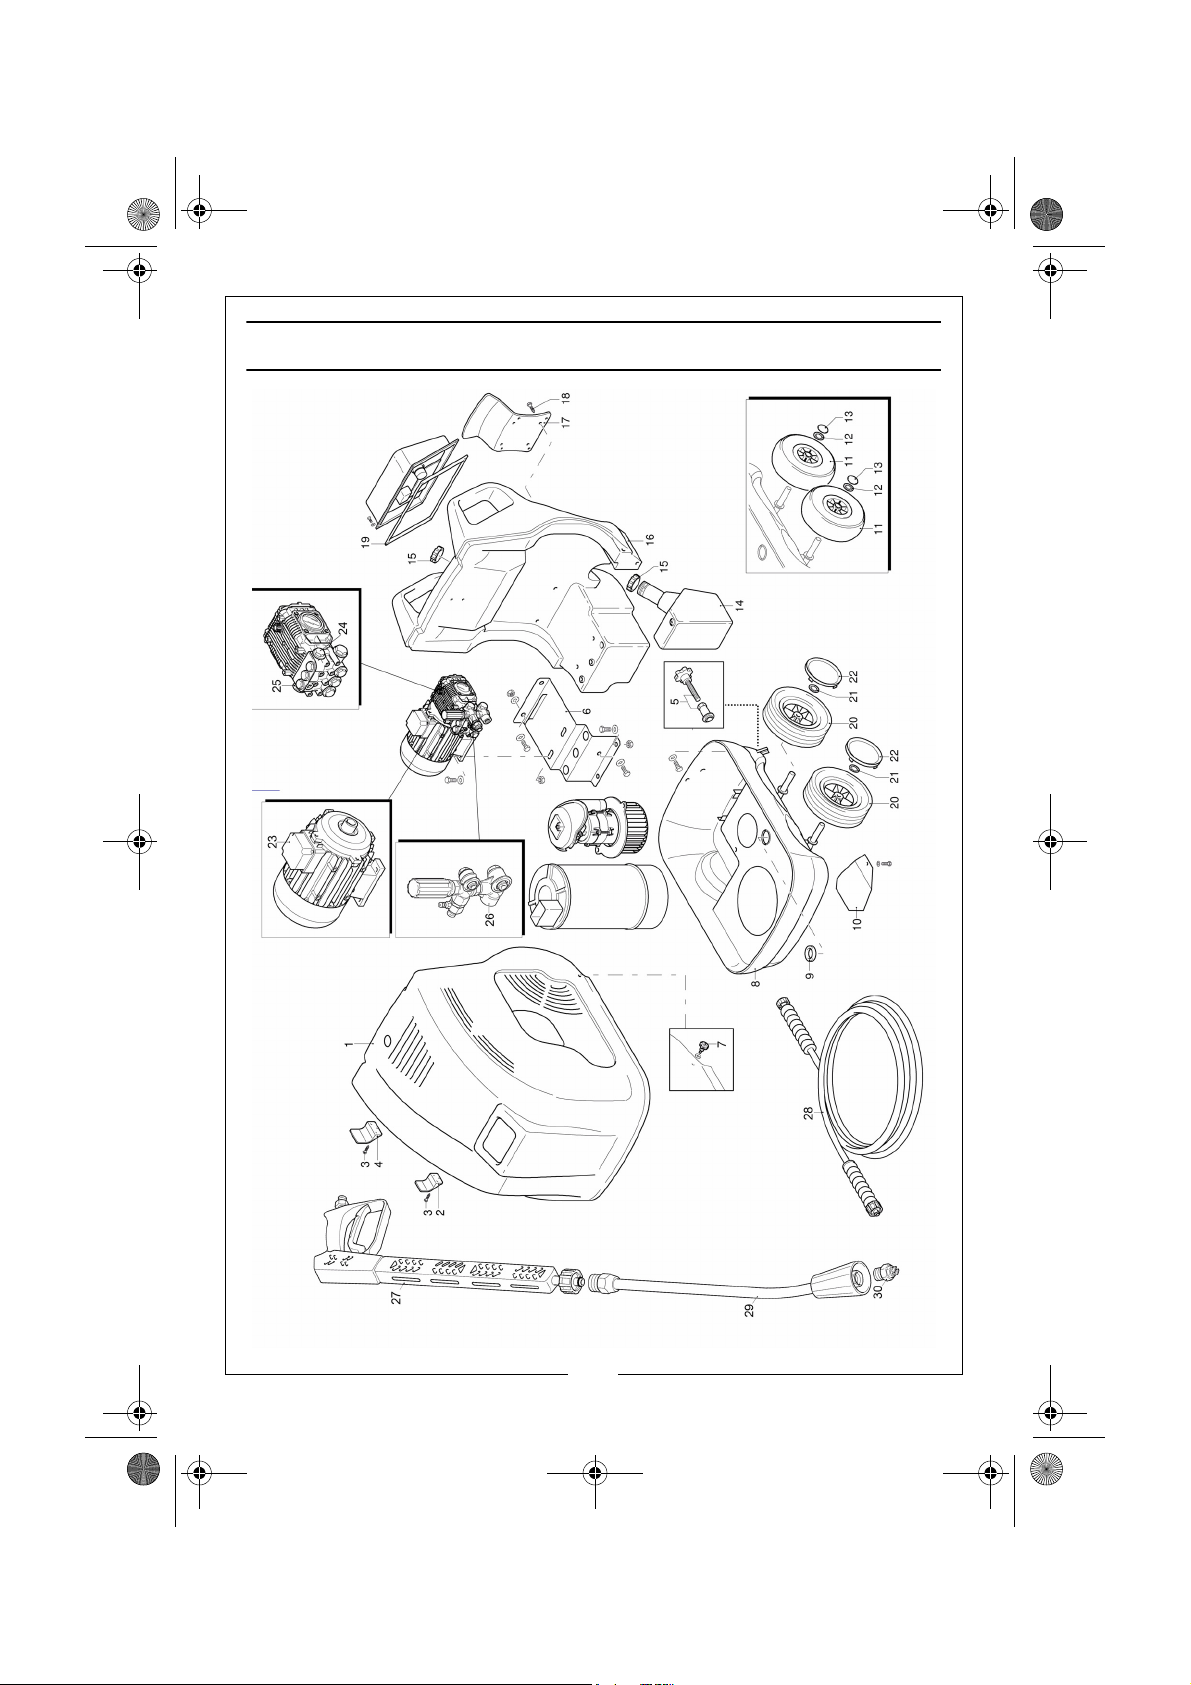
EXPLODED DIAGRAM
20
Parts & Service: 020 8988 7400 / E-mail: [email protected] or [email protected]
Page 21
HLS160 3 Phase hot wash.fm Page 21 Wednesday, September 28, 2011 12:28 PM
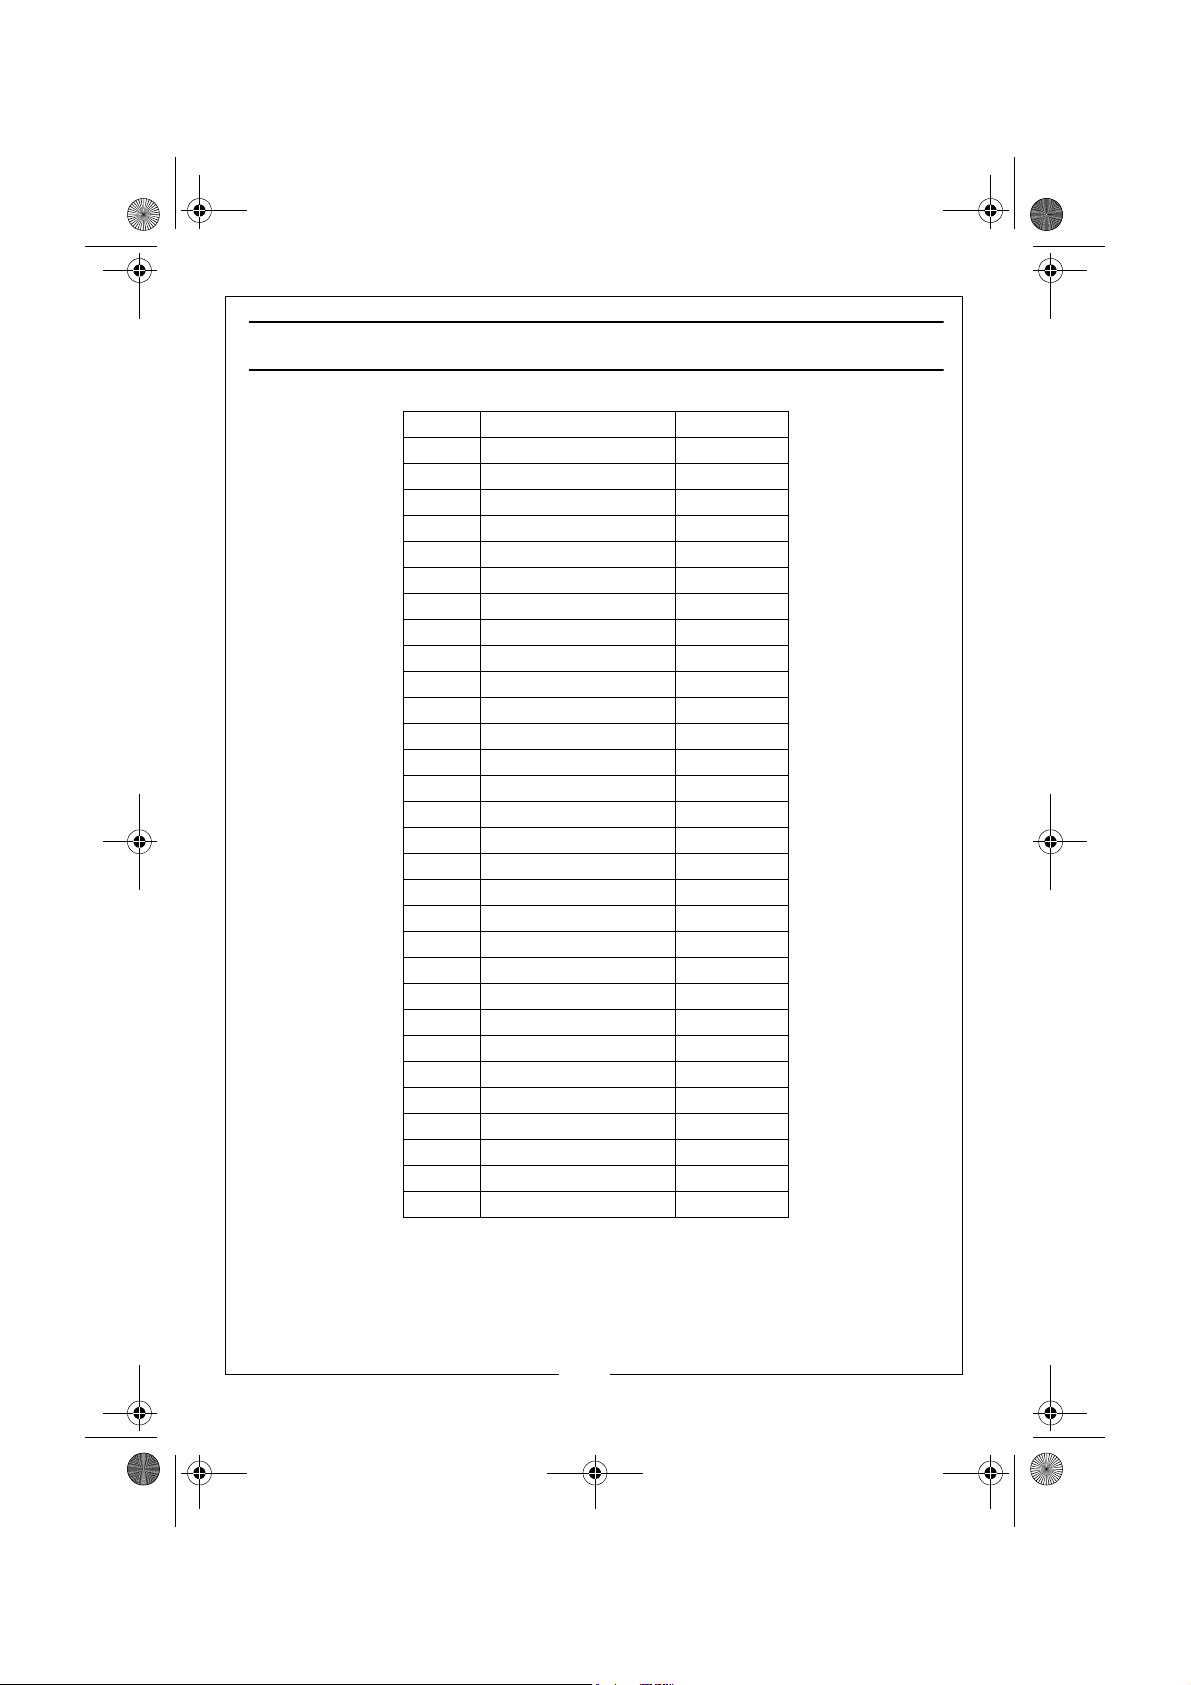
PARTS LIST
No Description Part number
1 Blue casing AR3160750
2 Accessories carrier AR3160100
3 Screw AR2100300
4 Accessories carrier AR3160110
5 Knob AR3163980
6 Support AR3160660
7 Knob AR3163990
8 Frame AR3160700
9 Gasket AR3161070
10 Guard AR3161900
11 Wheel AR3160780
12 Washer AR3163830
13 Guard AR3162020
14 Tank AR3161740
15 Plug AR3161920
16 Tank AR3161730
17 Accessories carrier AR3160090
18 Screw AR2360360
19 Gasket AR3161070
20 Wheel AR3160770
21 Washer AR3162010
22 Axle Cover AR3161940
23 Motor AR44285
24 Head assembly AR1789315
25 Pump assembly AR22954
26 Complete valve AR20082
27 Gun AR41089
28 High pressure hose AR3160160
29 Lance AR40826
30 Nozzle AR3083
21
Parts & Service: 020 8988 7400 / E-mail: [email protected] or [email protected]
Page 22
HLS160 3 Phase hot wash.fm Page 22 Wednesday, September 28, 2011 12:28 PM
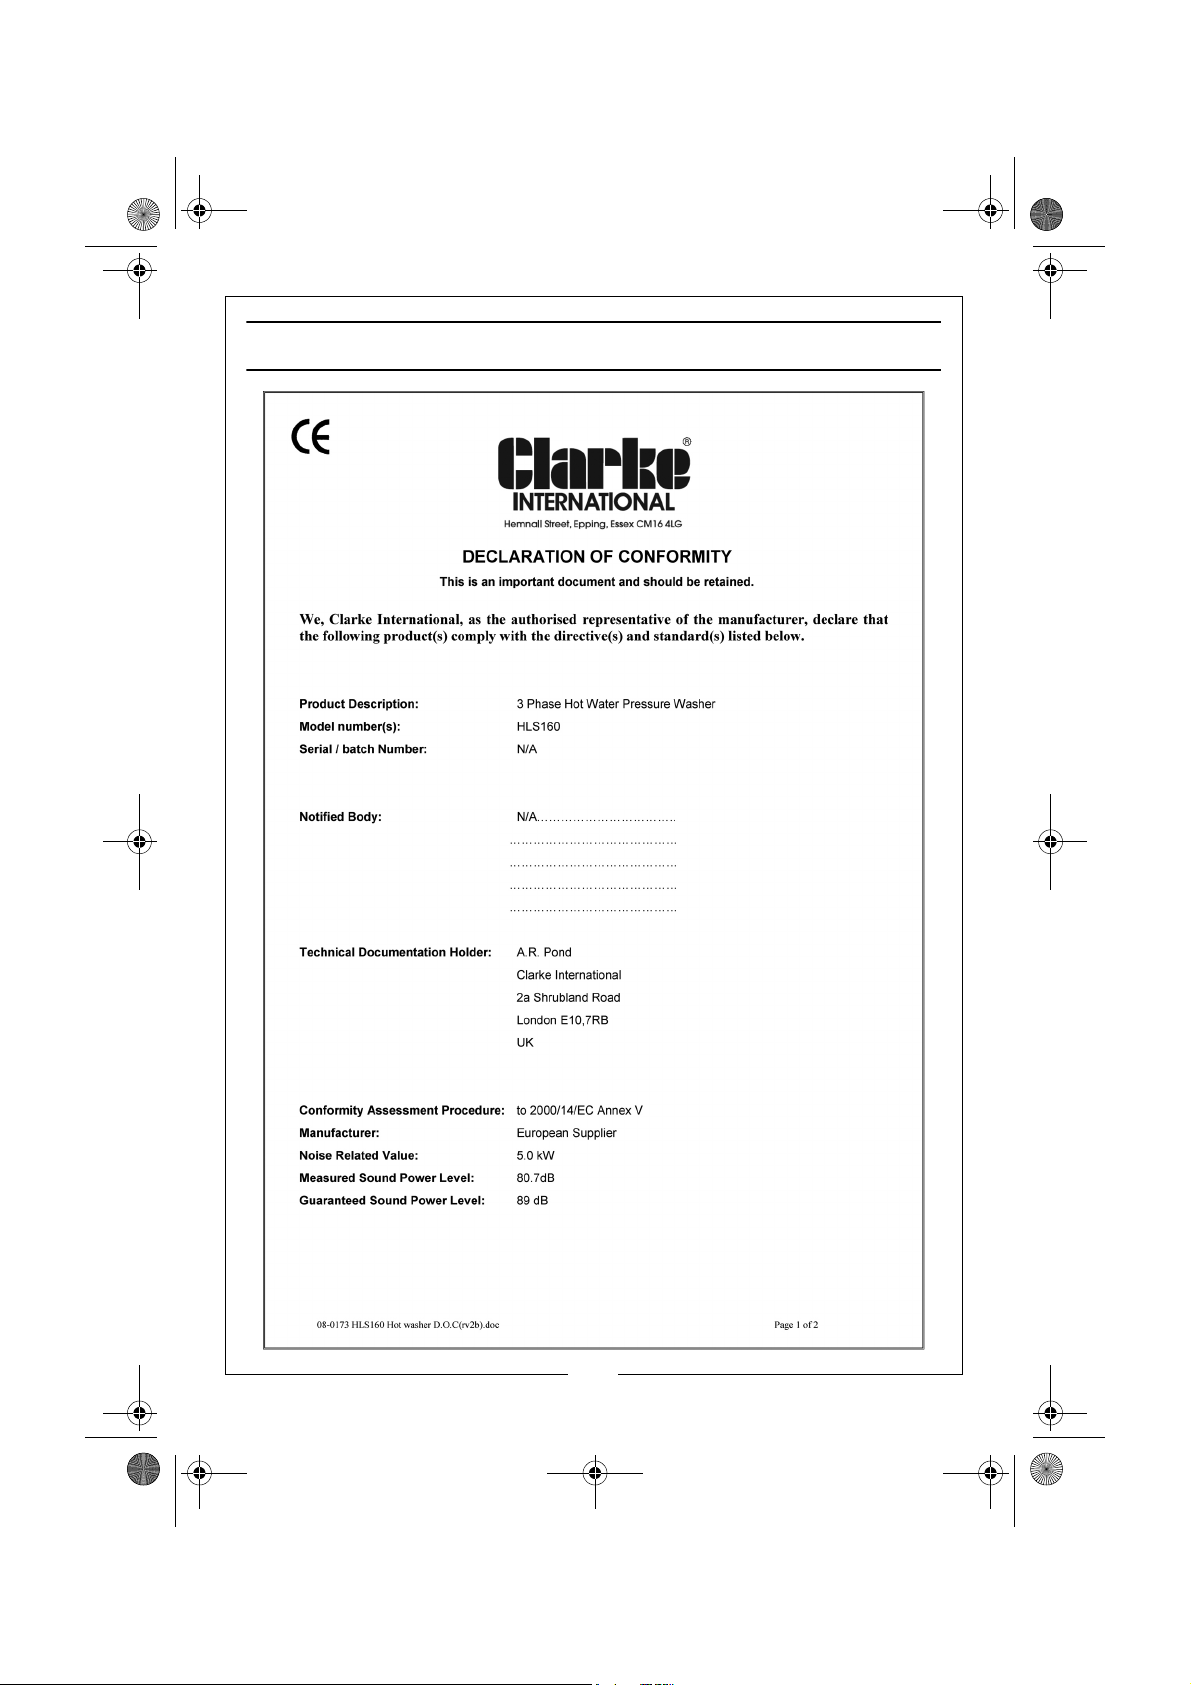
DECLARATION OF CONFORMITY
22
Parts & Service: 020 8988 7400 / E-mail: [email protected] or [email protected]
Page 23
HLS160 3 Phase hot wash.fm Page 23 Wednesday, September 28, 2011 12:28 PM
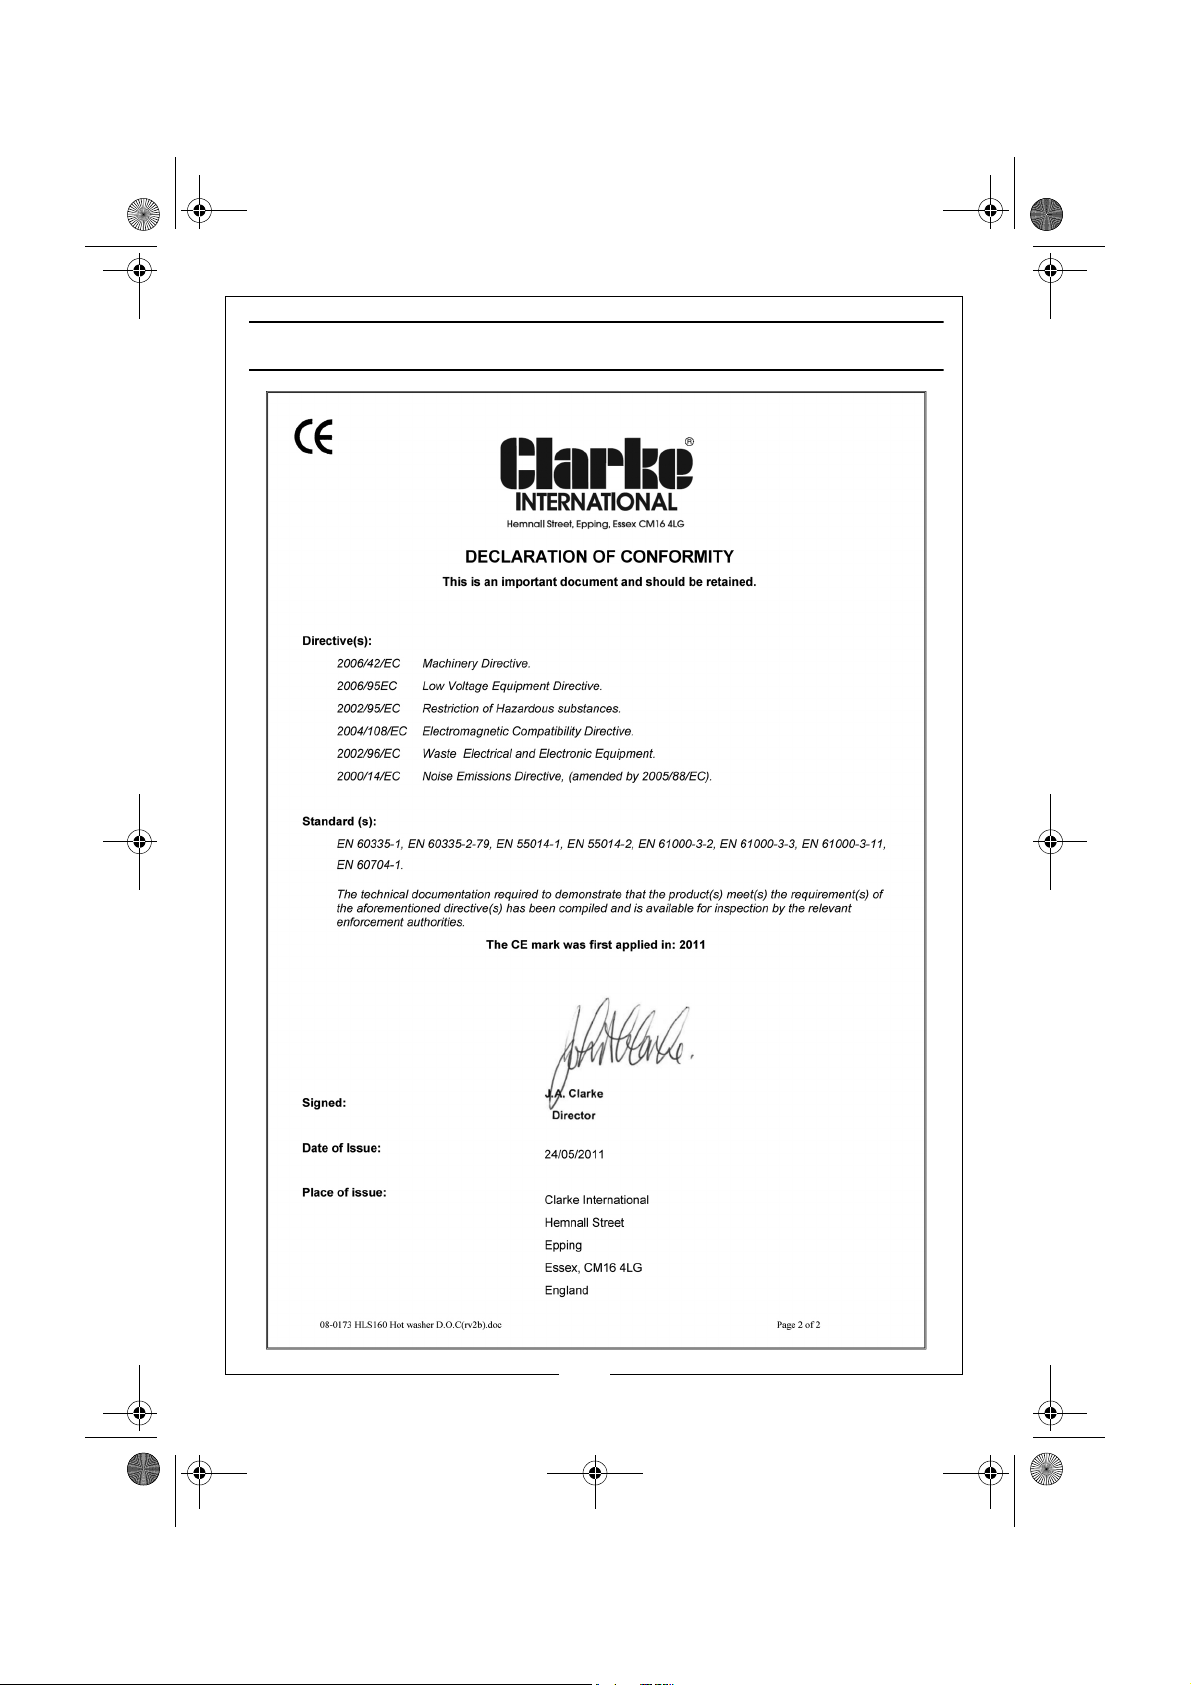
DECLARATION OF CONFORMITY
23
Parts & Service: 020 8988 7400 / E-mail: [email protected] or [email protected]
Page 24
HLS160 3 Phase hot wash.fm Page 24 Wednesday, September 28, 2011 12:28 PM
 Loading...