

Page 1
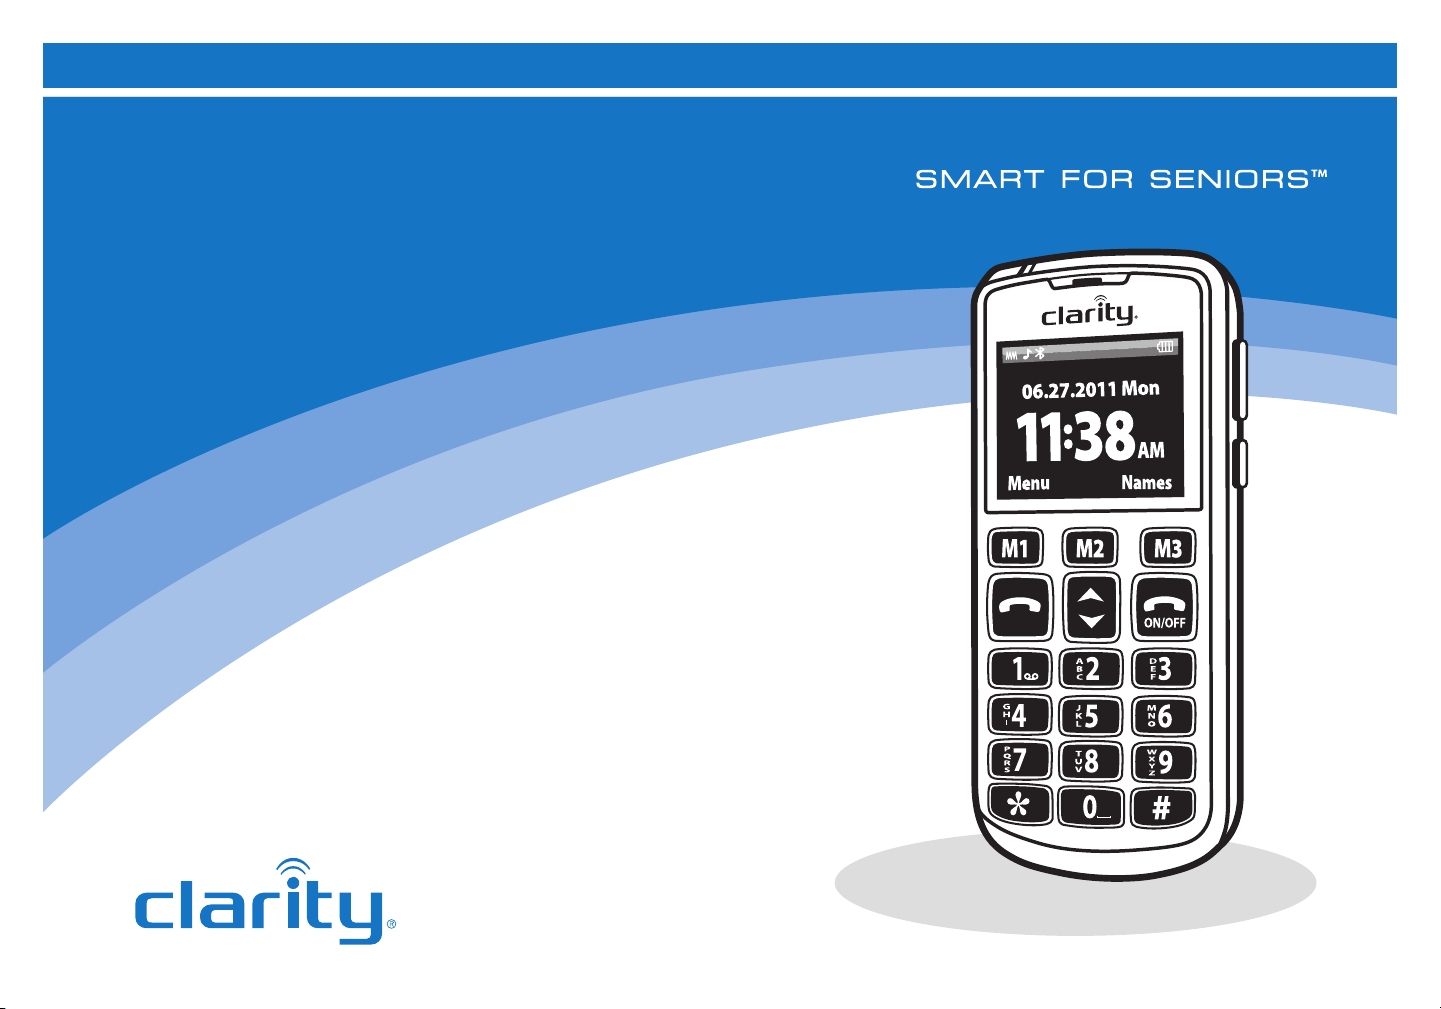
User Guide
TM
Clarity Pal
Amplied Mobile Phone
ClarityProducts.com
Page 2

Table of Contents Table of Contents
BASIC INFORMATION
Safety and Maintenance and Care ...................................................... 1-6
Warranty Information............................................................................ 7-8
FCC Regulations .................................................................................... 9-10
FEATURES OVERVIEW
Keys/Buttons/Features........................................................................11-12
LCD Status Icons ....................................................................................... 13
Technical Specications ........................................................................... 13
BATTERY
Installation/Removal ................................................................................. 14
Charging ....................................................................................................... 14
Use ................................................................................................................. 15
Security......................................................................................................... 15
NETWORK SETUP
SIM Card Information .............................................................................. 16
Inserting/Removal SIM Card .................................................................. 16
Locking SIM Card ...................................................................................... 16
Locking the phone ..................................................................................... 17
Connecting to Network..........................................................................17
Power On/OFF ........................................................................................... 17
PHONE MENU OVERVIEW
Overview .............................................................................................. 18 –23
OPERATIONS
Making a call ................................................................................................ 24
Dialing Status .............................................................................................. 24
Connecting Status ..................................................................................... 24
National calls ..............................................................................................25
International calls ......................................................................................25
Calling to an extension ............................................................................ 24
Calls from lists ............................................................................................ 25
Emergency calls .......................................................................................... 25
Conversations ............................................................................................25
Function operation ...................................................................................26
Call options ................................................................................................. 26
Use of TONE Key during conversations ............................................ 26
Auto DTMF ................................................................................................. 26
Auto Response ........................................................................................... 26
Function Menus
Rolling searching functions .....................................................................26
Personal shortcuts .................................................................................... 27
Exit ................................................................................................................. 27
Phonebook ...................................................................................................... 27
User Proles
General mode.............................................................................................28
Meeting mode ............................................................................................. 28
Outdoor mode ...........................................................................................28
Indoor mode ............................................................................................... 28
Headset mode ............................................................................................ 28
Bluetooth mode ......................................................................................... 28
Customizable features ...................................................................... 28-29
Messaging (SMS)
Writing a message ...............................................................................3 0 - 31
Inbox/Outbox ............................................................................................. 31
Templates.....................................................................................................31
Message Settings ........................................................................................31
SMS Settings ................................................................................................32
Page 3

Table of Contents Table of Contents
Messaging (MMS)
Writing a message ..................................................................................... 33
Inbox/Outbox ............................................................................................. 33
Draft Box ..................................................................................................... 33
Templates.....................................................................................................33
Voice Mail-Box ........................................................................................... 33
SETTINGS
Phone Settings ..................................................................................... 34-35
Network Settings ............................................................................... 36-37
Security Settings ................................................................................. 36-37
SIM Card Lock ............................................................................................36
Phone Lock .................................................................................................. 36
Keypad Lock................................................................................................ 36
Changing Password ................................................................................... 36
Changing PIN code ................................................................................... 36
ADDITIONAL FUNCTIONS
Restore factory settings ..........................................................................38
Bluetooth ..................................................................................................... 38
Organizer .........................................................................................................38
Calendar ....................................................................................................... 38
Stopwatch ....................................................................................................38
Calculator .................................................................................................... 39
Shortcuts .......................................................................................................... 39
Accessibility ....................................................................................................39
Language .......................................................................................................39
Help Settings/SOS .....................................................................................39
Recording .............................................................................................. 39- 40
Phone calls .......................................................................................................40
Call history .................................................................................................. 40
Call settings .................................................................................................40
Input methods
Input by English ................................................................................... 42- 43
Input by number ................................................................................. 44-45
TROUBLESHOOTING ............................................................................46
CONTACT INFORMATION ...............................................................47
Page 4

Safety and Maintenance Instructions Safety and Maintenance Instructions
Please read the following safety instructions before using your Clarity PalTM Dual Band Mobile Phone
and accessories. Please keep these instructions for your reference. When using this product, these
safety precautions and warnings should be followed to reduce the risk of re, electric shock, injury
to persons and damage to property. Additional warnings may be present on the product, packag-
ing, or in the user instructions.
WAR N IN G S
Emergency Call Feature
When the emergency button is pressed
the emergency numbers saved in the
phone’s address book will be called in
the order you have selected until a party
is reached. Up to ve emergency numbers may be saved in the address book.
The numbers and the order they will be
called must be entered into the phone
in order to ensure the desired numbers
are dialed when the emergency button is
pressed. After you have entered your ve
emergency numbers, you should test the
phone’s emergency call feature by pressing
the emergency button to ensure that you
have correctly entered the numbers into
the phone.
Since the phone service must be purchased
in advance through monthly pre-paid
credits, you must ensure that you have
made your pre-payment in order for the
phone service to remain activated. If you
do not make your monthly pre-payment or
if you do not make a full monthly payment,
you will lose your phone service, and the
phone and the emergency call feature will
not be available.
You must also ensure that the phone’s
battery is fully-charged at all times and that
the phone is in good working condition in
order for the emergency call feature
to work.
If the phone is outside of a cover-age area,
if network service is temporarily suspended by the network carrier, or if there
is network or phone interference, the
emergency call feature will not be available
during those times.
This phone is not equipped with a global
positioning service or other means to
determine the physical location of the
phone. Consequently, if an emergency
situation arises but you are unable to
provide your location to an emergency
contact person in your address book,
neither they nor an emergency response
service may be able to locate you.
The SIM card must be installed and activated before you will receive any phone
service. If the SIM card is damaged or
replaced, the emergency contact numbers you entered into the phone will be
lost. In that case you must re-enter your
ve emergency contact numbers into the
phone’s address book in order to restore
the emergency call feature.
After you have re-entered your ve
emergency numbers, you should test the
phone’s emergency call feature by pressing
the emergency button to ensure that you
have correctly entered the numbers into
the phone.
RADIO FREQUENCY
INTERFERENCE
Pacemakers
The Health Industry Manufacturers
Association recommends that a minimum
separation of (6) inches be maintained
between a handheld wireless phone and
a pacemaker to avoid potential interference with the pacemaker. Persons with
pacemakers:
• Should always keep the phone more than
(6) inches from their pacemaker when
the phone is turned on.
• Should not carry the phone in a
breast pocket.
• Should use the ear opposite the pace-
maker to minimize the potential for
interference.
If you have any reason to suspect that
interference is taking place, turn the
phone off immediately.
Hearing Aids
The phone may interfere with some hearing aids. If it does, consult the hearing aid
manufacturer or your physician for alternatives or remedies.
Other Medical Devices
If you use any other personal medical
device, consult the device manufacturer
or your physician to determine if it is
adequately shielded from external
(RF) energy.
COMPLIANCE WITH
MOBILE PHONE USE
RESTRICTIONS
Air Travel
Mobile phone use may be prohibited during
air travel.
Posted Signs
Obey posted signs or notices prohibiting mobile phone use in certain locations,
including but not limited to blasting areas,
health care facilities and aircraft.
Health Care Facilities
Turn the phone off in health care facilities
when any regulations posted in these areas
1 2
Page 5

Safety and Maintenance Instructions Safety and Maintenance Instructions
instruct you to do so. Hospitals and health
care facilities may use equipment that is
sensitive to external (RF) energy.
Driving Safely
Check and follow local laws and
regulations regarding use of a mobile phone
while driving.
If you decide to use a mobile phone while
driving a vehicle, give your full attention to
driving safely and keep the following driving
tips in mind:
*
• Be responsible behind the wheel. Don’t
Text and Drive!
• Get to know your wireless device and its
features such as speed dial and redial.
• Position your wireless device within
easy reach.
• Dial sensibly and assess the trafc; place
calls when you are not moving.
• Let the person you are speaking with
know you are driving; if necessary
suspend the call in heavy trafc or
hazardous weather conditions.
• Do not take notes or look up phone
numbers while driving.
• Use a hands-free device for convenience
and comfort.
• Do not engage in stressful or emotional
conversations that might divert your
attention from the road.
• Dial 911 or other local emergency num bers to report serious emergencies —
it’s free from your wireless phone.
• Use your wireless phone to help others
in emergencies.
• Call roadside assistance or a special
non-emergency wireless number
when necessary.
* Driving Tips used with permission from CTIAThe Wireless Association
®
For Vehicles Equipped with
an Air Bag
An air bag inates with great force. Do not
store the phone or any of its accessories in
the area over the air bag or in the air bag
deployment area.
CHARGER
WAR N IN G S
• Use only those Clarity products and
accessories designed for use with
this product.
• Do not disassemble the product or
AC adapter as this may expose you
to dangerous voltages or other risks.
Incorrect reassembly can cause electric
shock or re when the product is subse quently used.
• Use only the charger supplied by Clarity
to charge the product. Do not use the
chargers for any other purpose. Ensure
that the voltage rating corresponds to
the power supply you intend to use, for
example 100-240 V; 50/60 Hz; 0.2 A.
• Never store or use the product or
charge the battery where the tempera ture may fall below 0°C (32°F) or rise
above 40°C (104°F).
BATTERY
WAR N IN G S
To avoid the risk of explosion, re
or leakage of toxic chemicals, please
observe the following warnings:
• Do not dispose of the product or
battery in a re or heat above 40°C
(104°F).
• Do not open, deform or mutilate the
battery. There may be corrosive
materials which can cause damage to
eyes or skin and may be toxic
if swallowed.
Removable Battery
This phone contains a removable battery.
Change the battery only as directed in this
User Manual.
• Always store batteries where children
cannot reach them.
• Remove a spent battery promptly. When
replacing the battery, use only the bat tery provided by Clarity.
• Do not allow any battery or its holder
to contact metal objects such as keys
or coins.
MAINTENANCE AND CARE
This phone is not customer serviceable.
Do not attempt to repair or modify the
phone. Doing so may result in injury
or void your warranty.
Product Cleaning
Use only a slightly damp lint-free cloth to
clean the phone. Use of household cleaners, alcohol, or other chemicals may damage your mobile phone.
Handling the Phone
Do not drop, disassemble, open, crush,
bend, deform, puncture, shred, microwave,
incinerate, paint, or insert foreign objects
into the phone.
Discontinue use of your phone and contact
Clarity at 1-800-426-3738 if the product
overheats, has a damaged cord or plug or if
the product has been damaged.
Connecting Accessories
Do not force connectors into ports. In case
of experiencing unreasonable resistance
when attempting to insert a connector in a
port, check for compatibility, obstruction in
the port, or a disgured connector.
Do not insert anything into the phone
other than as directed in the user manual
because this may cause damage to the
internal components or cause injury
to you.
3 4
Page 6

Safety and Maintenance Instructions Safety and Maintenance Instructions
USE ENVIRONMENT
Avoiding Water
and Wet Locations
Do not use the phone in rain, or near
washbasins or other wet locations. Take
care not to spill any food or liquid on the
phone. In case the phone gets wet, un-plug
all cables, turn off the phone before cleaning, and allow it to dry thoroughly before
turning it on again. Do not attempt to dry
the phone with an external heat source,
such as a microwave oven or hair dryer.
Choking Hazard
Never allow children to play with the
phone or accessories — small parts may
be a choking hazard.
LISTENING LEVEL
WAR N IN G S
Exposure to high volume sound levels may
damage your hearing. Although there is
no single volume setting that is appropriate for everyone, you should always use
your mobile phone with the volume set
at moderate levels and avoid prolonged
exposure to high volume sound levels.
The louder the volume, the less time is
required before your hearing could be
affected. You may experience different
sound levels when using your headset or
headphones with different devices. The
device you use and its settings affect the
level of sound you hear. If you experience
hearing discomfort, you should stop listening to the device through your headset or
headphones. To protect your hearing, some
hearing experts suggest that you:
1. Set the volume control in a low posi
tion before putting the head set or head phones on your ears.
2. Limit the amount of time you use head
sets or headphones at high volume.
3. Avoid turning up the volume to block out
noisy surroundings.
4. Turn the volume down if the sound from
the headset or headphones prevents you
from hearing people speaking near you.
Visit www.plantronics.com/healthand
safety for more information on headsets
and hearing.
Exposure to Electromagnetic Energy in the Radio Frequency Band
When turned on, this device transmits and
receives electromagnetic radiation in the
radio frequency (RF) bandwidth through
its antenna. By international scientic
agreement, the unit of measurement of
(RF) energy is the “specic absorption
rate”, or SAR. In the United States, the
applicable SAR limit for the C900, set by
the FCC is 1.60 mW/g (thousandths of
watts per gram of mass), or 1.60 W/Kg
(watts per kilogram of mass). The maximum SAR exposure measured for the
C900 was 0.738 W/Kg when the phone
was turned on but not in use (body position), and 0.264 W/Kg when the phone
was in use (cheek position). In all cases,
the phone was passed by an independent
testing facility.
Disposal and Recycling
Check and follow local laws re-garding
disposal and recycling of your phone
and battery.
5 6
Page 7

Warranty Information Warranty Information
The following warranty and service
information applies only to products
purchased and used in the U.S. and
Canada. For warranty information in
other countries, please contact your
local retailer or distributor.
Limited Warranty
Clarity, a division of Plantronics, Inc.
(“Clarity”) warrants to the original consumer purchaser that, except for limitations and exclusions set forth below, this
product shall be free from defects in
materials and workmanship for a period
of one (1) year from the date of original
purchase (“Warranty Period”). The obligation of Clarity under this warranty shall be
at Clarity‘s option, without charge, of any
part or unit that proves to be defective in
material or workmanship during the Warranty Period.
Exclusions from Warranty
This warranty applies only to defects in
factory materials and factory workmanship. Any condition caused by accident,
abuse, misuse or improper operation,
vio-lation of instructions furnished by
Clarity, destruction or alteration,
improper electrical voltages or currents,
or repair or maintenance attempted by
anyone other than Clarity or an authorized
service center, is not a defect covered by
this warranty. Telephone companies manufacture different types of equipment and
Clarity does not warrant that its equipment is compatible with the equipment of
a particular phone company.
Implied Warranties
Under state law, you may be entitled to
the benet of certain implied warranties.
These implied warranties will continue
in force only during the warranty period.
Some states do allow limitations on how
long an implied warranty lasts, so the
above limitation may not apply to you.
Incidental
or Consequential Damages
Neither Clarity nor your retail dealer or
selling distributors has any responsibility
for any incidental or consequential damages including without limitation, commercial loss or prot, or for any incidental
expenses, loss of time, or inconvenience.
Some states do not allow exclusion or
limitation of incidental or consequential
damage, so the above limitation or exclusion may not apply to you.
Other Legal Rights
This warranty gives you specic legal rights
and you may also have other rights which
vary from state to state.
How to Obtain Warranty Service
To obtain warranty service, please prepay
shipment and return the unit to the appropriate facility listed to the right.
In the United States
Clarity Service Center
6131 Preservation Drive,
Chattanooga, TN 37416
Tel: (423) 622-7793 or
(800) 426-3738
Fax: (423) 622-7646 or
(800) 325-8871
In Canada
Plantronics Service Center
8112 Trans-Canada Hwy.
Ville St. Laurent. Que.
Canada H4S 1M5
Tel: (800) 540-8363
(514) 956-8363
Fax: (514) 956-1825
Please use the original container, or pack
the unit(s) in a sturdy carton with sufcient
packing material to prevent damage.
Include the following information:
1. A proof-of-purchase indicating model
number and date of purchase.
2. Bill-to address.
3. Ship-to address.
4. Number and description of units shipped.
5. Name and telephone number of person
to call, should contact be necessary.
6. Reason for return and description of
the problem.
Damage occurring during shipment is
deemed the responsibility of the carrier,
and claims should be made directly with
the carrier.
7 8
Page 8

FCC Regulations and Requirements FCC Regulations and Requirements
Part 15 of FCC Rules Information
This device complies with Part 15 of the
FCC Rules. Operation is subject to the
following two conditions: (1) This device
may not cause harmful interference, and
(2) this device must accept any interference
received, including interference that may
cause undesired operation.
Your equipment has been tested and found
to comply with the limits of a Class B
digital device, pursuant to Part 15 of FCC
rules. These limits are designed to provide
reasonable protection against harmful
interference in residential installation.
This equipment generates, uses and can
radiate radio frequency energy and, if not
installed and used in accordance with the
instructions, may cause harmful interference to radio communications. However,
there is no guarantee that interference will
not occur in a particular installation; if this
equipment does cause harmful interference
to radio or television reception, which can
be determined by turning the equipment
off and on, you are encouraged to try to
correct the interference by one of the following measures:
1. Where it can be done safely, reorient
the receiving televsion or radio antenna.
2. To the extent possible, relocate the
television, radio or other receiver with
respect to the telephone equipment.
(This increases the separation between the
telephone equipment and the receiver.)
3. Connect the telephone equipment into
an outlet on a circuit different from that
to which the television, radio, or other
receiver is connected.
4. Consult the dealer or an experienced
Radio/TV Technician for help.
CAUTION: Changes or modications to
this equipment not expressly approved by
the party responsible for compliance could
void the user’s authority to operate the
equipment.
Privacy of communications may not be
ensured when using this phone.
CAUTION: To maintain the compliance
with the FCC’s RF exposure guideline,
place the base unit at least 20cm from
nearby persons.
For body worn operation, this handset has
been tested and meets the FCC RF exposure guidelines when used with the (Plantronics) accessories supplied or designated
for this product. Use of other accessories
may not ensure compliance with FCC RF
exposure guidelines.
Industry Canada Technical
Specications
This product meets the applicable Industry
Canada technical specications.
Before installing this equipment, users
should ensure that it is permissible to be
connected to the facilities of the local telecommunications company. The equipment
must also be installed using an acceptable
method of connection. In some cases, the
company’s inside wiring associated with a
single line individual service may be extended by means of a certied connector
assembly (telephone extension cord). The
customer should be aware that compliance
with the above conditions may not prevent
degradation of service in some situations.
Repairs to certied equipment should be
made by an authorized Canadian maintenance facility designated by the supplier.
Any repairs or alterations made by the
user to this equipment, or equipment malfunctions, may give the telecommunications company cause to request the user
to disconnect the equipment.
Users should ensure for their own protection that the electrical ground connections
of the power utility, telephone lines and
internal metallic water pipe system, if present, are connected together. This precaution may be particularly important in
rural areas.
CAUTION: Users should not attempt to
make such connections themselves, but
should contact the appropriate electrical
inspection authority, or electrician, as
appropriate.
The Ringer Equivalence Number is an
indication of the maximum number of
terminals allowed to be connected to a
telephone interface. The termination on
an interface may consist of any combina-
tion of devices subject only to the requirement that the sum of the Ringer Equivalence Numbers of all the devices does not
exceed ve.
(The term “IC:” before the certication/
registration number only signies that the
Industry Canada technical specications
were met.)
This Class B digital apparatus complies with
Canadian ICES-003.
The party responsible for regulatory
compliance:
Clarity, A Division of Plantronics, Inc.
6131 Preservation Drive,
Chattanooga, TN 37416
Phone: 1-800-552-3368
9 10
Page 9
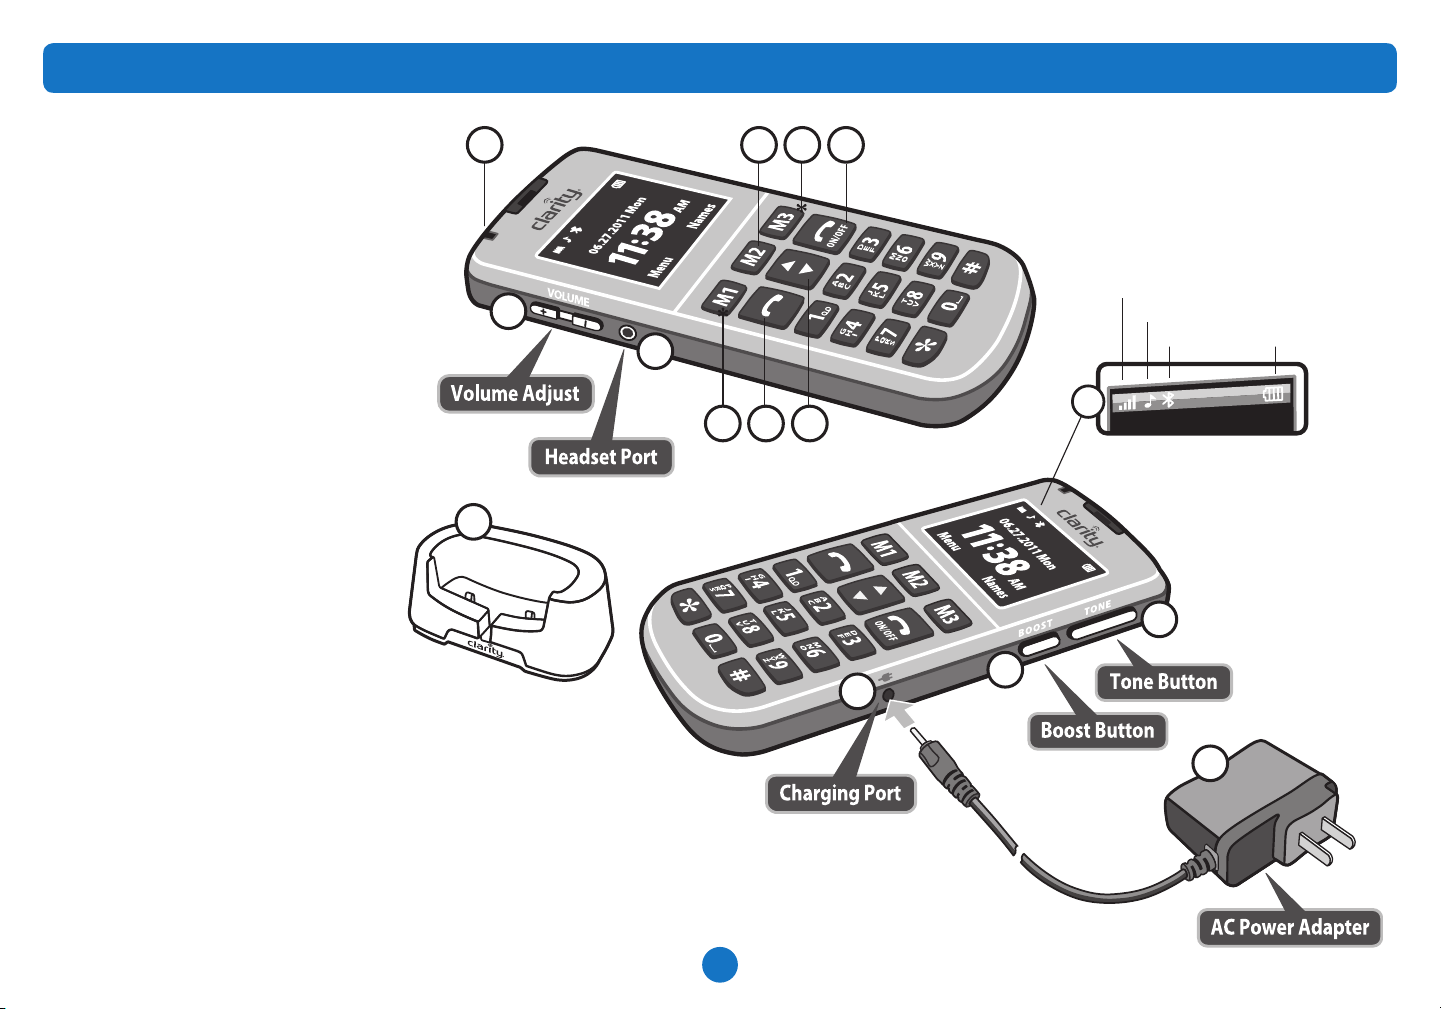
Features Overview
1 Message Alert Light
2
Volume Adjust Buttons (+/–)
3
Headset Port
4 M1*
( Press key to access and
select menu options.)
5 M2
6 M3*
( Also press key to access and
select menu options – short press.)
7
8
9
10
11
12
13
14
15
16
(Located on back of phone – see page 12)
17
(Located on back of phone – see page 12)
Important: Before using phone,
please read Safety Instructions.
Memory Key – Long-press/Memory
Memory Key
Memory Key – Long-press/Memory
Dial Key (Press to connect call)
ON/OFF Key (Press/Hold to Power ON/OFF)
Arrow Key (Menu Scroll)
TONE Button
BOOST Button (Amplify)
AC Adapter Power Port
Phone Status Icons (LCD Menu)
AC Power Adapter
Charging Base
Emergency Button
SIM Card
(Flashes)
1
2
3
15
Note: Phone battery may be charged
with or without the charging base.
To use the base, insert the “plug-tip” end
of the AC Power Adapter cord into the
back of the charging base, and insert
the phone making sure contacts engage
between the phone and base.
Without the base, plug in the AC Adapter
“plug-tip” end of power cord into the side
of phone as shown to the right.
5
4
7 9
86
12
Warning: Use the supplied AC
Adapter. Other adapters may damage
the phone and void the warranty.
Signal Strength
Ring Tone
Bluetooth Battery
13
10
11
14
11
Page 10

Features Overview LCD Status Icons/Technical Specications
Back Views
16
17
LCD Status Icons
Signal strength
No signal
GPRS connection
Unread message
Unread service message
Missed calls
Call transfer
Keypad lock
Keypad unlock
Alarm clock
Ring tone
Battery indication
Bluetooth connected
Unread MMS
Headset mode
Technical Specications
Function Specication
Model Pal
Size 5 x 2.5 x .5 in.
SIM type * Regular
Built-in Memory 506K
Frequency band * GSM 900
GSM 18 00
Dual Frequency
Phonebook
Capacity * 250pcs
(SIM capacity depends on SIM type.)
GPRS * Support
SMS/MMS Support
WAP Support
Bluetooth Support
Recorder WAV digital
record
(Can record ring tones.)
Backlights Support
Meoldies Support
Call transfer/call limit * Support
Call waiting/
conference call * Support
Alarm/calendar/
world time Support
Phonebook groups Support
STK * Support
Auto redial Support
Chinese/English input Support
12 13
* This function or service requires network
or SIM support.
Page 11

Battery installation and charging Battery use and security
Battery Installation and removal
Ste p 1: Remove the battery compartment
cover by sliding the cover towards the bottom end of the phone.
Step 2: Install the battery by pushing the
battery into the compartment while ensuring that the contacts on the battery and
battery compartment are correctly aligned
and engaged.
Step 3: Replace the battery compartment
cover by sliding the cover towards the
upper end of the phone. Make sure it snaps
securely into place.
Battery charging
Note: Phone Charging Options:
See page 11 for correct use of the AC
power adapter. The phone may be charged
by connecting the AC power cord (tip) directly
into the phones charging port on the side of
the phone (see page 11), or by using the
charging base with AC power adapter.
Begin the battery charging process by
inserting the “plug-tip” of the AC Power
cord into the charging port (11) of the
phone. Plug the AC Power Adapter into a
110V electrical outlet. Charging time is
approximately 2-3 hours. (See page 11)
The battery indication on the phone LCD
will begin to “blink.” If the phone is powered off, the LCD will display “charging.”
When charging is complete the battery
indicator will stop “blinking.”
Warning: The phone should be stored in
a well-ventilated environment where the
temperature is -40˚C — +55˚C. Use only the
factory supplied charger and battery.
The warranty will be void if the factory
supplied charger is not used.
Battery Use
Recharge the battery when the phone is
powered OFF automatically or when
there is a low battery indicator showing
on the LCD.
If the battery has not completely run out
of energy before charging, the mobile will
adjust and reduce the time of charging.
The idle and talk time of the phone specied by the factory is based on a perfect
working environment. In reality, the
working time of the battery will vary with
the network status, work environment and
usage requirements.
Battery Security
• Use only the factory supplied battery.
The use of non-original parts will void
the manufacturer’s warranty.
• The new battery can achieve the best
performance only after two or three
complete charging and use cycles.
• The battery may be charged for
hundred’s of times. However, over
time, the power will degrade and per formance will degrade. Install a new
battery when the idle and talk time
are apparently shortened.
Unplug and disconnect the AC Power
adapter when not in use. Do not connect
the battery to the AC Power adapter for
more than a week. Over-charging will
shorten the life of the battery.
• Do not store the battery with metal.
• Do not bend or open the battery.
• Do not place the battery in water or re.
14 15
Page 12

SIM Card Installation
Main menu
Back
Connecting to a Network
SIM card
Your network provider will supply you a
SIM card. The SIM card is key for accessing
the GSM network.
All information about the network and
your calling record will be saved to the
SIM card, along with the phonebook list
and messages. The SIM card can be transferred to other GSM mobile phones.
Avoid touching the metal areas of the card,
and keep away from metalic sources.
WARNING: Do not remove card
when the phone is powered ON, or
connected to an AC power source.
Install/Remove SIM card
Ste p 1: Power OFF the phone.
Step 2: Remove battery.
Step 3: Insert the SIM card as shown
below. Metal face down.
Step 4: Re-install battery. (See page 14
for battery installation instructions.)
Locking SIM card
To avoid illegal use, the phone is protected
by a PIN code.
Ste p 1: Power ON the phone.
Step 2: Select SIM card locking function.
Step 3: Input the appropriate PIN code.
Important: The network provider will
supply a standard PIN code. You should
choose to change this code to a personal
code of your choice.
Note: The default phone password
is [ 112 2 ].
You may also unlock the card by using the
PIN code.
The PIN code protection can also be
cleared, if errors occur in in the process.
However, be advised that after this unlocking process, the card is not protected,
and unauthorized use is possible.
Important: If the wrong code is inserted
continuously for three (3) times, the card
will be locked by the network. To correct
this error, a PUK code will have to be used.
Connecting to a network
After unlocking the SIM card, the phone
will search for the registered network, or
other available network. Once connected,
the name of the network provider will
show in the middle of the LCD. The phone
will be in an idle mode.
Important: If phone prompts the mes-
sage “Emergency call only” on the
LCD, it means the phone is out of service
area. However, you may still make emergency calls according to the signal strength.
Locking phone
To avoid illegal use, you should choose
the lock phone function, and create a
personal password.
Once choosing this function, you will be
required to enter this password each time
you input a PIN code.
Power ON/OFF
Long press the power key to turn ON
the phone.
If there is a prompt “insert the SIM
card,” then power OFF the phone and
check the SIM card.
Long press the power key to turn OFF
the phone.
Note: The phone is powered OFF when a
“ash” symbol will displays on the LCD.
Phone lock feature
Step 1
Use Arrow key to
select Settings.
Press M1 Memory
key to select OK.
OK Back
Step 2
Use Arrow key to
select Security
setup.
Press M1 Memory
key to select OK.
Step 3
Use Arrow key to
select Phone lock.
Press M1 Memory
key to select ON.
Step 4
Use keypad to
enter password.
OK Back
1
2
3
4
On Back
Input password
Phonebook
User profiles
Messages
Settings
Settings
Phone setup
Network setup
Security setup
Restore factory se
Security Setup
SIM lock
Phone lock
Auto keypad lock
Change password
Off
16 17
Page 13

Menu Overview
Main Menu
OK Back
The Clarity Pal main menu is organized to feature
the following options and funtions.
• Phonebook
• User Proles
• Messages
Note: Please see additional pages for instructions concerning each menu item listed below.
• Settings
• Bluetooth
• Organizer
• Shortcuts
• Accessibility
• Phone calls
Main Menu options
Phonebook
User profiles
Messages
Settings
Bluetooth
Organizer
Shortcuts
Accessibility
Phone calls
OK Back
Phonebook
Friends
Family
VIP
Business
Others
M1/M2/M3 Setting
Memory status
Save Path
Detail
Name list lter
User proles
User profiles
General
Meeting
Outdoor
Indoor
Headset
Bluetooth
Options Back
Phonebook
Quick search
Name search
Add new contact
Copy all
Delete
Caller groups
Phonebook
settings
Activate
–Or–
Customize
Customize
Tone setup
Volume
Alert type
Ring type
Extra tone
Answer mode
1 Incoming call
2 Alarm
3 Power on
4 Power off
5 Message
Tone setup
Volume
Alert type
Ring type
Extra tone
Answer mode
Check Balance
CLARITY DEMO
From SIM
From phone
Selected
1 Ringtone
2 Keyone
Warning
Error
Camp on
Connect
• Any key
To SIM
To Phone
From SIM
From Phone
• Select from
25 ring tones
• or add custo mized ring tones
• Select silent
or10 sounds
• Ring only
• Vib. only
• Vib. and ring
• Vib. then ring
• Single
• Repeat
• Ascending
18 19
Page 14

Menu Overview
Settings
Messages
Settings – Network SetupMessages
OK Back
1 Call voicemail
2 Edit
Settings
Wallpaper
Screen saver
Power on display
Power off display
Main menu style
Show date and time
Text messaging
Voicemail
1 Set time zone
2 Set time
3 Set format
4 Update time
with time zone
Phone setup
Network setup
Security setup
Restore factory
settings
OK Back
Write message
Inbox
Outbox
Templates
SMS settings
• Time and date
• Schedule
power on/off
• Language
• Display settings
• Dedicated key
• Flight mode
• LCD backlit
On Time
Prole settings
General settings
Memory status
Preferred storage
• Proles 1– 5
Delivery report
Reply path
SIM: 0.00%
Phone: 0.00
SIM: 0.00%
Phone: 0.00
12:00 AM
• English
• F r anç a is
• E s p a ˜n o l
1 Up
2 Down
• Normal mode
• Flight mode
• Query when
power on
1 LCD backlight
Time
1 New search
2 Select network
3 Selection mode
Settings
Phone setup
Network selection
Network setup
Security setup
Restore factory
settings
OK Back
Settings – Security Setup
Settings
Phone setup
Network setup
Security setup
Restore factory
settings
OK Back
SIM lock
Phone lock
Auto keypad lock
Change password
• PIN
• PIN 2
• Phone password
Settings – Restore Factory Settings
Settings
Phone setup
Network setup
Security setup
Restore factory
settings
OK Back
Input password to
restore settings
Network List
• T-mobile
• AT&T
• Automatic
• Manual
• ON
• OFF
• ON
• OFF
• None
• 5 sec
• 30 sec
• 1 min
20 21
Page 15

Menu Overview
Bluetooth
Main Menu
Phonebook
User profiles
Messages
Settings
Bluetooth
OK Back
Organizer
Main Menu
Phonebook
User profiles
Messages
Settings
Bluetooth
Organizer
OK Back
Shortcuts
Main Menu
Phonebook
User profiles
Messages
Settings
Bluetooth
Organizer
Shortcuts
OK Back
1 Bluetooth
2 Search
3 Paired device
Calendar
Tas k s
Alarm
Stopwatch
Calculator
1 Split
2 Lap
3 View records
Add new contact
Name search
Caller groups
Memory status
Save Path
Tone setup
Volume
Alarm
• OFF
• ON
Searches for
bluetooth device
Indicates
paired device
• Set a date
• Set a call
• Set Event
Option
to set 4
alarm times
Add
Edit
Delete
Delete all
Disable
Change order
Accessibility
Main Menu
Phonebook
User profiles
Messages
Settings
Bluetooth
Organizer
Shortcuts
Accessibility
OK Back
Phone Calls
Main Menu
Phonebook
User profiles
Messages
Settings
Bluetooth
Organizer
Shortcuts
Accessibility
Phone Calls
OK Back
Language
Help settings
Talking keypad
Missed calls
Dailed calls
Received calls
Delete call logs
Call timers
Text message counter
Call history
Call settings
• Off
• On
• English
• Français
• Español
1 SOS ON/OFF
2 SOS mode
Auto answer
3 Number setting
4 Sound recorder
5 Recorder
Selecting
Owner number
Call waiting
Call divert
Advanced settings
• ON
• OFF
• Keystroke
• Select from
Phonebook
1 New record
2 List
3 Settings
• Select a
recording
1 Default
2 Hide ID
3 Send ID
1 Block list
2 Auto redial
3 Speed dial
4 Call time display
5 Call time reminder
Make a new
recording
Recordings list
1 Storage
2 Audio quality
1 Activate
2 Deactivate
3 Query status
1 Divert all voice calls
2 Divert if unreachable
3 Divert if no answer
4 Divert if busy
5 Divert all data
6 Cancel all diverts
22 23
Page 16

Operations Operations
Making a call
The icon on the top left corner of the LCD
indicates the signal strength.
Signal strength
There are three methods to make
a call.
• Phonebook — Find the number to
dial, then press the dial key.
• Call history — Enter the list of missed
calls, received calls or dialed calls, then
choose the record, press the dial key.
• Manual — In idle mode, you can input
the number by numeric keys, then
press the dial key.
Dialing status
Enter the dialing status. The signal strength
and other icons will be displayed when
dialing. A “blicking” stick indicates the
location of the cursor.
Steps for inputting the number:
Ste p 1: Delete the character before
the cursor.
Step 2: Dial the number by using the
dial key.
Step 3: Press * key twice to input
“+”, which can be used to
make international calls. Press *
key three (3) times to input “P”,
which can be used for DTMF
functions.
Connecting status
After dialing the number, the LCD will display signal strength and battery indications.
If the number is not in the phonebook, the
number will be displayed — otherwise the
name will be displayed.
Calls outside local service area
The simpliest method to make a call is to
input the number by numeric keys, then
press the dial key. If you make an mistake,
touch the M3 key to clear the error.
• To make calls out of your local service
area, enter the area code, followed by
the phone number, and then press the
dial key.
• After dialing the number and press ing the dial key, a “calling” message will
display on the LCD.
• Short Press the Power Key to end or
abort the call.
Calls to extension numbers
Some xed phone numbers to not allow
direct access. If so, dial the switchboard
number, then the extension number.
Insert “P” between the switchboard number and extension to complete the call.
[Area code] + [swithboard number]
+ [P] + [extension number]
+ [dial key]
International calls
Press * key two (2) times to input “+”,
then the LCD will display “+” which
will allow you to make a call from any
country when the country prex number
is known.
Ste p 1: Input “+”.
Step 2: Input country code
Step 3: Input the complete phone number
Step 4: Press Dial key
Note: Country codes are unchangeable,
however, you must remove the “0” from
city codes.
[+] + [country code] + [complete
phone number] + [dial key]
Calls from a list
All calls you dial and receive will be saved
in the phone.
The numbers will be categorized by:
“Missed Calls”, Received Calls”, and
“Dialed Calls”.
Check all calls in the phone call log.
When the memory is full, old calls will be
automatically erased.
Note: You can save a new call to the
phonebook.
Emergency calls
If the phone is within the service network,
whether using the GSM network, you can
make emergency calls. If you have no roaming services in the area, LCD will display
“Emergency Calls Only”. As long as
you are in the network, you can make
Emergency Calls even without a SIM card.
Receiving calls
When there is an incoming call, the ring will
sound or the phone will vibrate.
Signal strength and battery indication will
display on the LCD while receiving. If the
contact number is saved in the phonebook,
the contact name will display — otherwise,
only the contact number.
Click “Answer” to answer the call, or
click “Refuse” to reject the call.
Receive a call by pressing the option, or by
pressing the “DIAL” (connect) key.
To reject the call, press the POWER ON/
OFF Key.
Note: If the headset is inserted, you can
receive the call with the headset. If auto
answer function is ON, and the headset is
inserted, the call will be auto-answered
after 2 seconds.
Conversation process
The conversation begins once connected.
LCD display: caller’s photo (if present),
number or name, call duration (if this function is open).
24 25
Page 17

Operations Operations
Phonebook list
Options
Function operation
During the conversation, enter the talking
options, press POWER ON/OFF key to
end the call; or use the numeric dial key.
If you make a new call, the current call
will remain.
• Short Press POWER ON/OFF key:
ends the converstion.
• Use the U P/DOW N navigation key,
or Volume UP/DOWN button on
left side of phone adjust the volume of
the earpiece.
• Press the M1 memory key to access
the menu and enter the call options.
Call options
You can enter call options during a converstaion — some functions can only be seen
during a conversation.
Note: Other functions, such as call trans-
fer, conference call, call holding, and call
waiting require network support. Refer to
your network provider for details.
Call options functions:
• Hold single call: Pause one of the
conversations during a multi-party call.
• End single call: End the current call.
• New call: After pausing of in-progress
calls, you can dial a new call.
• Phonebook: Enter the phonebook
menu.
• Message: Enter the message menu.
• Sound recorder: Record the
calling details.
• Mute/Resume: Open or close the
mute mode.
• DTMF: Send DTMF signal.
Tone button use during
conversations
Provides three (3) tone effects: Soprano,
Bass, and Alto.
During conversations, switch these effects
by pressing the TONE and BOOST
(25dB) buttons on the right side of
the phone.
The BOOST (25dB) button increases or
In all main or submenus, you can scroll
to the function needed by using UP/
DOWN/LEFT/RIGHT key (using UP/
DOWN key to turn pages), and then
press the (left )M1 memory key to enter
the function.
Personal shortcuts
Normally, the submenus and the
“options” have a shortcut number
by which you can enter the different functions. Input the shortcut number of the
submenu in the list, the relevant option
will be displayed.
recovers the volume.
Auto DTMF
Input a phone number with a “P”, and the
phone will enter the DTMF mode
automatically.
[letter P] + phone number = DTMF
mode
Auto response
After inserting a headset, and setting the
Phonebook
Quick search
Name search
Add new contact
Copy all
Delete
abc
Check Balance
CLARITY DEMO
auto answer function, the phone will auto
answer after two (2) seconds.
Back
BackOptions
FUNCTION MENUS
1
Rolling searching functions
In idle mode, press the M1 (left)
memory key to enter the menu.
During a conversation, press “options”
to enter.
Shortcut
numbers
2
3
4
OK
Call
View
Edit
Delete
BackBack
26 27
Exit
You can press the right Memory
Key (M3) to exit from a function. You
can press the OFF key to return to
idle mode.
Phonebook
There are two (2) memory types:
SIM card and phone. The number of SIM
card entries will depend on the type of
card. The phone capacity is 250 entries.
Press the M1 memory key to select
MENU, choose Phonebook, and press
the M1 memory key again (OK).
There are a number of options available
such as Quick search, Name search, Add
new contact, Copy all, Delete and Caller
Groups, and Phonebook settings.
You can choose the following functions
within the phonbook:
• Quick search
• Name search: you can search the
linked record by name.
• Add new contact: add new record to
the SIM card or phone.
• Copy all
• Delete: choose to delete single
records or all records on the SIM or
phone. Note: to delete all records,
you are required to enter the
phone’s password.
• Caller groups: there are ve (5)
groups. You are able to set the name,
ring-tone, picture, group members.
Page 18

Operations Operations
Main Menu
• Phonebook settings: set the phone-
book functions as follows: M1/M2/M3
Settings, Memory status, Save Path,
Detail, and Name list lter.
Selecting funtions under the
Phonebook option:
Step 1
Use Arrow
key to select
Phonebook.
Press M1
Memory key to
select OK.
Step 2
Use arrow key
to scroll/select
Caller groups.
Press M1 Memory
key to select OK.
Step 3
Select the type of
caller group.
Phonebook
User profiles
Messages
Settings
OK Back
Phonebook
Add new contact
Copy all
Delete
Caller groups
OK Back
Caller groups
1
Friends
2
Family
3
VIP
4
Business
5
Others
User proles
The phone includes six basic prole modes:
general, meeting, outdoor, indoor, headset,
and bluetooth.
In each prole mode you may choose to
select the basic settings (Activate) or
personal settings (Customize).
• General mode: Same setting options
as General mode.
• Meeting: Same setting options as
General mode.
• Outdoor: Same setting options as
General mode.
• Indoor: Same setting options as
General mode.
• Headset: Headset mode will be
activated when a headset is connected.
• Bluetooth: The phone will enter
into Bluetooth mode when the Blue tooth opens.
Note: On stanby screen, Long press “#”
to open/close mute mode.
Customizable features
There are (5) customizable options for
each prole mode.
Tone setup: set incoming call ring, alarm
clock ring, power on/off ring, message ring
and key tone.
Volume: 1– 7 volume levels for ring
and key tone.
Ring type: ring, vibration, ring/vibra-
tion, ring after vibration.
Extra tone: warning, error, network-
connecting, call-through.
Answer mode: any key answer, or
auto answer.
Step 1
Use Arrow key
to select
User proles.
Press M1
Memory key to
select OK.
Step 2
Use Arrow key
to select
General.
Press M1
Memory key to
select Options.
Step 3
Use Arrow key
to select
Customize.
Press M1
Memory key to
select OK.
Main menu
Phonebook
User profiles
Messages
Settings
OK Back
User profiles
G
General
Meeting
Outdoor
Indoor
Options Back
Profile options
1
Activate
2
Customize
OK Back
Step 4
Use Arrow key
to select
Tone setup.
Press M1
Memory key to
select OK.
Step 5
Use Arrow key
to select In-
coming call.
Press M1
Memory key to
select OK.
Step 6
Use Arrow key
to select a
Ring style of
your choice.
Press M1
Memory key to
select OK.
Customize
1
Tone setup
2
Volume
3
Alert type
4
Ring type
5
Extra tone
6
Answer mode
OK Back
Tone setup
1
Incoming call
2
Alarm
3
Power on
4
Power off
5
Message
OK Back
Incoming call
1
Ring 1
2
Ring 2
3
Ring 3
4
Ring 4
OK Back
OK Back
28 29
Page 19

Operations Operations
Writing and sending messages
Step 1
Use Arrow key
to scroll to
Messages.
Press M1
Memory key to
select OK.
Use Arrow key
to select Write
Message.
Press M1 Memory
key to select OK.
Step 2
Use keypad to
write message.
Press M1
Memory key to
select Options.
Use Arrow key to
select Done.
Press M1
Memory key to
select OK.
Step 3
Use Arrow key to
select Sen d only.
Press M1
Memory key to
select OK.
Messages
Write message
Inbox
Outbox
Templates
OK Back
Write message
ABC
Write sample message
here, then click Options
Options Back
Options
1
Done
2
Insert templates
3
Insert object
4
Text format
OK Back
Send options
1
Send only
2
Save and send
3
Save
4
Send to many
OK Back
Enter number
123
Search Back
Phonebook list
abc
John Sample
Joe Sample
Susan Sample
OK Back
Enter number
123
1234567890
OK Clear
Sending
Please wait
Cancel
Sending
OK
Sent
OK Cancel
Step 4
Enter the number
manually, or Press
M1 Memory key to
select Search.
Step 5
In phonebook list
type the contact’s
name in the search
eld and Press M1
Memory Key to
select OK.
Step 6
When contact’s
number appears in
screen, Press M1
Memory Key to
select OK.
Step 7
Message
sending
prompt appears
on screen.
Step 8
Conrmation
of message sent
prompt appears
on screen.
Write a SMS message
Press “#” key or the M1 Memory key
to switch the input methods: ENGLISH
(ABC)(abc); SPANISH/spanish; FRENCH/
french.
Six options to Write Message
function:
• Done
• Insert templates
• Insert object
• Text format
• Insert contact number
• Insert contact name
Note: After editing the message, you can
send, save and send, save, send to multiple
contacts, or send to a group.
Send: send it to the corresponding person.
Save and send: save the message to
outbox, and then send it out.
Save: save the message to the outbox.
Send to many: send the message to
more than one contact.
Send to group: send the message to all
members of a group.
After sending the message, the phone
will return to the SMS menu. If message
reporting has been set, you will receive
a successful delivery report. Refer to the
SMS setting, for instructions in setting the
message reporting function.
Note: Refer to “input methods”
for details.
Inbox
Check the messages received in the
inbox, and perform the following
functions: reply, delete and delete all, edit
and edit all, forward, copy, and copy all,
move, move all, and move to SIM or phone
memory, use the number (dial out or save),
use the connection and (connect to website
in SMS directly.
If the inbox has no message, a “empty”
prompt will appear.
Outbox
Check the messages saved in the outbox
already sent, or unsent and reply, delete,
edit, forward, copy to phone/SIM, move to
phone/SIM, delete all, copy all, move all, use
the number, and use USSD.
Templates
You can set some common templates for
convenience. Templates can be modied or
deleted. Or, you may choose to create a
new template.
Message setting
Basic settings before using the
message function:
Prole setting: Select an appropriate
prole name. Note: After entering a single
format, you can set the le name, SMS center
number, validity period and sending format.
General setting: set the message report
options: Delivery report and Reply
path (On/Off).
30 31
Page 20

Operations Operations
SMS settings
Phonebook
User profiles
Messages
Settings
OK Back
Messages
Text messages
Voicemail
OK Back
Messages
Inbox
Outbox
Templates
SMS settings
OK Back
SMS settings
1
Profile settings
2
General settings
3
Memory status
4
Preferred storage
OK Back
Profile settings
T-Mobile
Profile 2
Profile 3
Profile 4
Edit Back
Main Menu
T-Mobile
+13123149810
Edit Back
abc
T-Mobile
Options
1
Done
2
Input method
OK Back
1
Multitap ABC
2
Multitap abc
3
Numeric
4
Insert symbol
OK Back
Profile name
Profile name
Options
Input method
Clear
Memory status: set the storage options
for the phone and SIM card.
Preferred storage: choose SIM card
or phone.
Write a MMS message
Send to many: input the contact
information, which may include a single or
multiple phone numbers. (maximum 20).
Ste p 1: Press left M1 Memory key to
select “edit”. Add the number or
e-mail address.
Step 2: Choose “add number.”
Note: If the editing area is blank, press
“search” to view phonebook numbers,
then press “OK” to add.
You can edit or delete the phone number
of the contact if necessary. If you select
“delete all” — all numbers and e-mail
addresses for that contact are deleted.
Note: After writing a new MMS, you
may choose to send, save/send, save to
draft, or edit message settings by choosing
“sending options,” or simply exit.
Inbox
Display all MMS messages received. You
can check, reply, reply to all, forward,
delete, delete all, view details and use
the details.
Outbox
Display all MMS messages sent.
You can check MMS details, resend, edit,
dlete, delete all, view details and use
the details.
Draft box
All MMS messages written, but not sent.
You can check MMS details, send, edit,
delete, delete all, view details and use
the details.
Templates
Template formats saved.
Voice mail box
Voice mails received are saved in your
network. Dial the number of the mail box
to listen to voice mail.
Voice mail functions:
• Connect to voice mail: dial voice
mail number and listen to message.
• Edit: add or edit the name and number
of the mail box.
Settings
Options are set in the phone, including
screen adjustment, phone setting, call setting, network setting, security setting, and
restore factory defaults.
32 33
Page 21

Operations Operations
Schedule power on
Phone setup
Time and date
• Set time zone: Set home city
• Set Time and Date
• Set format: Time /Date MM/DD/
YYYY
• Update time with time zone: Select
Off/On
Schedule power ON/OFF: Four (4)
times available.
Language: English/Spanish/French
Display settings
• Wallpaper: Choose the wallpaper for
the idle mode (7 options).
• Screen saver: choose picture, and
the wait time.
• Power on display: Choose ash when
power ON (7 options).
• Power off display: choose ash when
power OFF (7 options).
• Main menu style: choose single page
or list.
• Show Date/time: choose whether
to display date and time in idle mode.
Dedicated key
• Set the functions of the “Navigation”
keys in idle mode (Select UP/DOWN).
Flight mode
• Normal mode, ight mode, and Query
when powering ON.
LCD Backlight ON Time
• Illumination level and time of
LCD backlight.
Phone Setup (Time and date — Schedule power on/off — Language)
Main Menu
Phonebook
User profiles
Messages
Settings
OK Back
Settings
Phone setup
Network setup
Security setup
Restore factory
OK Back
Phone setup
1
Time and date
2
Schedule power
3
Language
4
Display settings
OK Back
Time and date
1
Set time zone
2
Set time/date
3
Set format
4
Update time with
OK Back
Phone setup
1
Time and date
2
Schedule power
3
Language
4
Display settings
OK Back
Sched. power on/o
12:00 AM
12:00 AM
12:00 AM
12:00 AM
Edit Back
Edit power on/off
Status
Disable
Power on
00:00
OK Back
Phone setup
1
Time and date
2
3
Language
4
Display settings
OK Back
Language
English
Français
Español
OK Back
Set home city
GMT -6.00 Mexico Ci
GMT -5.00 Bogota
GMT -5.00 Montreal
GMT-5.00 New Yo
OK Back
34 35
Page 22

Operations Operations
Network setting
•
Network selection
– New search
– Select network (Automatic)
– Selection mode (Automatic/Manual
Security settings
•
SIM lock
Use PIN code (code is changeable) to
lock the SIM card. Security options for
the phone and SIM card can be set to
prevent unauthorized use.
PIN code can be toggled ON/OFF. If the
code is OFF, the phone will ask for it
upon powering-on.
Note: SIM lock must be enabled before
changing PIN. If you input the PIN code
in error more than three (3) times, the
SIM card will lock. A PUK code will be
required to unlock the card. The PIN
and PUK code may be provided to you
with the SIM card. If not, contact your
network provider.
The default code is [ 1234 ].
Change it to a personal code as soon
as possible.
•
Phone lock
You may choose to lock the phone
to avoid unauthorized use. However,
this requires an input of the personal
password each time the phone is
powered ON.
Note: The default phone password is
[ 1122 ]. Change it to a personal pass
word as soon as possible.
•
Auto Keypad lock
Set the waiting time for locking keypad.
After setting, the keypad will lock
automatically, if not used within the
appointed time. Press the right “M3”
memory key, then press the “#” key.
•
Change password
Change the password, including PIN,
PIN2 code, and mobile lock password.
•
Changing PIN code
Select “Settings. Select “security setup.”
Select “Change password.” Select “PIN.”
Enter old PIN number. Then create a
new PIN number. Enter the new PIN
number again to conrm.
Network and Security settings
Main menu
Phonebook
User profiles
Messages
Settings
OK Back
Settings
Phone setup
Network setup
Security setup
Restore factory
OK Back
Network setup
1
Network selection
OK Back
Network selection
1
New search
2
Select network
3
Selection mode
OK Back
OK Back
1
SIM lock
2
Phone lock
3
Auto keypad lock
4
Change password
On Back
Input PIN
Trials remain: 3
Settings
Phone setup
Network setup
Security setup
Restore factory se
Security Setup
Back
Security Setup
1
SIM lock
2
Phone lock
3
Auto keypad lock
4
Change password
On Back
Input Password
Back
Network list
T-Mobile
AT&T
OK Back
36 37
Page 23

Operations Operations
Restore factory settings
Input the password of the mobile lock.
The factory default may also be reset.
Note: The default phone password is
[ 1122 ]. Change it to a personal pass
word as soon as possible.
Bluetooth
The phone can be connected with
Bluetooth which is in range of 10m
(32 feet).
The wireless connection of Bluetooth
may be interfered with by obstacles, or
electronic equipment.
Bluetooth menu settings
• Bluetooth activation: ON/OFF
• Search
Activate Bluetooth, and the headset
before entering the menu, then begin
to search for the audio device. You will
be asked to input the password of the
device. After pairing, you may use Bluetooth for talking or MP3.
Note: the password is different for each
audio device. Refer to your audio device
manual for specic instructions.
• Paired device
The name of audio device will be
diplayed after pairing.
Organizer
• Calendar
You can check or edit the memo of the
appointed date.
Functions:
View: check or edit the memo of
the date. Refer to memo for details.
View all: all schedules are visible.
Add event: add new schedule.
Delete event: delete all/delete past or
certain time schedule.
Jump to date: skip to the appointed date
to check or edit the memo.
Go to weekly view: display calendar by
week or month.
• Ta s ks
Add important events, reminders, and
phone-calls, etc.
• Alarm
Set important reminder alerts.
• Stopwatch
There are two timing functions in
the menu:
Split and Lap timing.
Split timing: Maximum 20 split timing
for each record.
Lap timing: Maximum 20 lap timing for
each record.
View records: enter to check the timig
record. If there is no record,the LCD will
display a prompt “empty.”
• Calculator
Operations:
Input the rst number: when “0” is displayed
on LCD, input the rst number.
Input the counting symbol followed by the
second number:
Press [ M + / + ]
Press [ M - / - ]
Press [ MC/ * ]
Press [ = ] equal mark to show result.
Keep calculating: use the resul to continue
calculating.
Clear: press right “M3” key. The content
cleared is determined by inputting status.
If result is already determined, then “0” is
displayed on LCD. If numbers or symbols
are input, then only the current number or
symbol is cleared.
Exit: press “Back” to exit. If there is no soft
“Back” key on LCD, then press “Clear” to
exit one-by-one.
Shortcuts
There are nine (8) shortcut menus.
The following functions are available: Add,
Edit, Delete, Delete all, Disable, and
Change order.
The following standard menus may
be added as a shortcut menu:
Add new contact, Name search, Caller
groups, Memory status, Save Path, Tone
setup, Volume, and Alarm.
Accessibility
Options:
Access Language, Help Settings and Talking
keypad.
• Language
Select English, Français, or Español.
• Help Settings
– SOS: Select On or Off
– SOS mode Auto Answer:
Select On or Off
– Number setting:
Add phone numbers manually or from
the Phonebook contacts.
– Sound recorder:
Record your message.
– Recorder Selecting
If there are no entries, “Empty” will
display in the menu.
38 39
Page 24

Operations Operations
Record options:
1 – New Record
Make a new record. During record,
press the left “M1” key to pause or continue. Press the right “M3” key to stop.
Next, rename the le and press the left
“M1” key to save.
2 – List
In recording les list , if there is no entry,
the LCD will display “empty.”
Select: select current record as SOS
emergency alarm ring. Note: If there is
no record, it will play blank.
Play: play the chosen record.
Rename: rename the le.
Delete: delete the le.
Delete all: delete all les.
Send: send the record to MMS or
Bluetooth.
3 – Settings
Set the storage option in the phone.
Select Audio quality.
Note: If there is an incoming call during
record, the record will stop auto matically, and the recorded content will
be saved.
• Talking keypad
Select either OFF or ON.
Phone Calls
Select either “Call history” or
“Call settings”.
Call history menu:
– Missed Calls
– Dialed calls
– Received calls
– Delete call logs
– Call timers
– Text message counter
Call settings menu:
– Owner number
– Call waiting
– Call divert
– Advanced settings
The phone can store missed, dialed, and
received calls – maximum of 20 per group.
Call History Options:
Missed calls: check list of missed calls.
Dialed calls: check list of dialed calls.
Received calls: check list of
received calls.
Note: Choose one record to check
details, including date, time, number, call
time, and call duration.
Delete call logs: All call log lists may be
deleted as a group, or deleted individually.
Call timers: There are four submenus of
the “call timers” as follows: Last call, Dialed
calls, Received calls, and Reset all.
Text message counter:
Sent: total number of messages sent.
Received: total number of messages
received. Note: Clear the list by pressing
left “M1” key.
Call settings options:
Owner number: Options are, “Default”,
“Hide ID”, and “Send ID”.
Call waiting: Activate, Deactivate or
Query status.
Call divert options:
Divert all voice calls: call divert in
all conditions.
Divert if unreachble: call divert when number cannot be connected.
Divert if no answer: call divert when there is
no answer.
Divert if busy: call divert when line is busy.
Divert all data: call divert to a new number.
Cancel all diverts: cancel all call diverts.
Advanced settings:
Block list: set calls to not answer as
“black list.” (20 numbers maximum.)
Auto redial: set this function to auto-
matically redial an unconnected call.
Speed dial: set speed dial. In idle mode,
long press the relevant numeric key to
make the call.
Call time display: Enter IP number and
press OK to conrm settings, then cancel
or edit.
Call time reminder: options are OFF,
Single, and Periodic.
40 41
Page 25

Operations Operations
Input methods
Input by English
The following are denitions of the keypad
in English-input mode.
(Includes ABC and abc.)
Input by keypad
Operations of English input:
• Each key can be used to input
several characters.
• Quick click the key until the letter you
desire appears.
• Press (*) key to input English symbol.
• Press (#) key to switch
input methods.
• Press (0) key to input blank.
• Press Right (M1) key to clear
one character.
• Long-press Right (M3) key to clear
all characters.
Input by English
The following are denitions of the keypad in English-input mode.
(Includes ABC and abc.)
Corresponding
character or function
Number 0 key Number 0 or blank
Number 1 key Symbol
Number 2 key ABC, abc, number 2
Number 3 key DEF, def, number 3
Number 4 key GHI, ghi, number 4
Number 5 key JKL, jkl, number 5
Number 6 key MNO, mno, number 6
Number 7 key PQRS, pqrs, number 7
Number 8 key TUV, tuv, number 8
Number 9 key WXYZ, wxyz, number 9
* key Get symbol list
# key Switch input method
Up key Move cursor Up/Forward
Down key Move cursor Down/Forward
Left key Scroll to Left
Right key Scroll to Right
Right function key Return or clear
Power key Exit to idle mode
NoteKey name
42 43
Page 26

Operations Operations
Input by number
The denition of keypad under number
input mode.
Input by keypad
Operations of number input
method:
• Press 0-9 key to input the number.
• Press ( # )key to switch the input
method.
• Press Right (M3) key to clear one
character. Long-press Right (M3) key
to clear all characters.
Input by number
The denition of keypad under number input mode.
Corresponding
Key name
character or function
Number 1 key Number 0 or blank
Number 2 key Symbol
Number 3 key ABC, abc, number 2
Number 4 key DEF, def, number 3
Number 5 key GHI, ghi, number 4
Number 6 key JKL, jkl, number 5
Number 7 key MNO, mno, number 6
Number 8 key PQRS, pqrs, number 7
Number 9 key TUV, tuv, number 8
Number 0 key WXYZ, wxyz, number 9
# key Switch input method
Up key Move cursor Up/Forward
Down key Move cursor Down/Forward
Left key Scroll to Left
Right key Scroll to Right
Left function key Options
Right function key Return or clear
Power key Exit to idle mode
44 45
Page 27

Troubleshooting
Contact Information
Problem: SIM card error.
Reason: SIM damaged.
Reason: SIM card not setup correctly.
Reason: SIM card dirty.
Solutions:
• Contact the network provider.
• Check the SIM card settings, and clean
the card.
Problem: Weak, interrupted, or no signal.
Reason: Signal strength can be affected by
obstructions such as high buildings, or connements such as basements and subways.
Solution: Move to a more open area.
Problem: Phone will not Power ON.
Reason: Battery uncharged, used-up,
or defective.
Solutions:
• Charge battery.
• Replace battery.
Problem: Phone will not connect a call.
Reason: Barring function is activated.
Solution: Cancel barring dialing function.
Problem: No connection to network.
Reason: SIM is invalid or defective.
Reason: Out of GSM service area.
Reason: Weak, interrupted, or no signal.
Solutions:
• Contact the network provider.
• Move the phone into the GSM
service area.
• Try connecting again in a better
signal environment.
Problem: Phone will not charge.
Reason: Voltage is unsuitable.
Reason: Non-standard charger.
Reason: Not connected.
Solutions:
• Use the recommended voltage.
• Use the factory supplied charger.
• Check connections at AC power
outlet, and at the phone.
Clarity, a Division of Plantronics, Inc.
6131 Preservation Drive, Chattanooga, TN 37416
Telephone: 800-426-3738 Fax: 800-325-8871
E-mail: claritycs@plantronics.com
Website: ClarityProducts.com
©2012 Clarity, a Division of Plantronics, Inc. All Rights Reserved.
Clarity, Clarity Pal and Smart for Senior s are trademarks or registered trademarks of Plantronics, Inc.
46 47
 Loading...