

Page 1

QY-8200/QY-8250 SERIES MODEL
Navigation system manual
Page 2

Names of Various Parts
Basic method of use
Basic Operations
Basic Settings
���������������������������������������������������������
Source Media Mode
Bluetooth Operation
Navigation
����������������������������������������������������������
����������������������������������������������������
�����������������������������������������������������
�������������������������������������������������������
�����������������������������������������������������
�����������������������������������������������������
Navigation System Settings
Outline of Destination
Entering Procedures
Entering the Destination
Route Guidance
About Information
����������������������������������������������������
����������������������������������������������������
��������������������������������������������������
�������������������������������������������������������
������������������������������������������������������
Table of contents
������������������������������������������������
11
13
14
18
22
22
24
28
31
5
6
English
7
8
1
Page 3
Warning
English
●When driving, the driver shall not operate….
The driver must park the vehicle in a safe place before
operating the system.
●When driving, the driver must not read the navigation
map…
Please refer to the voice prompts and follow the actual
traffic laws in driving.
●When driving, the driver must not watch the display
of this unit….
Or the conditions at front of the vehicle may be neglected
that may result in traffic accidents.
●Please follow the actual traffic laws to drive when
using the navigation system as route guide or voice
prompt…
If you drive only as per the route guided by the navigation
system, you may violate the actual traffic laws that may
result in traffic accidents.
●Do not use the equipment for a long time when the
engine is off…
Or it will cause loss of electricity to the vehicle battery.
●Do not dismantle or modify this unit…
Or it may trigger accident, fire or electric shock.
●Do not use the unit under such failure conditions as
no display or no voice play…
Or it may trigger accident, fire or electric shock. Contact
NISSAN dealers.
Safety Precautions
●Stop using it immediately when there is any foreign
object, water spill, smoke or bad smell and contact
designated NISSAN dealers…
Continuous use may trigger accident, fire or electric
shock.
Caution
●The volume during driving shall be adjusted so that
the sound outside the vehicle can be heard.
Or it may cause accidents.
●Pay full attention to operating this unit while driving
so that safe driving is not affected…
Or it may affect driving and cause accidents.
●Do not use this unit for any purpose other than in
the vehicle…
Or it may result in injuries or accidents.
●Never continue to use the unit in accidents…
Cut off the unit power supply if smoke, abnormal noise
or smell is found.
●If the temperature inside the vehicle is high, use the
unit after the temperature is lowered …
Or it may result in failure.
●Do not exert force on the screen
Or it may result in failure.
●Please follow the actual road traffic lights to drive
when using the navigation
Map contents may not be completely accurate due to
traffic development. Please keep in touch with the NISSAN Car dealers for timely update of map data.
2
Page 4
Warning
●Changes or modifications to this unit not expressly approved by the party responsible for compliance could
void the user’s authority to operate the equipment.
NOTE:
GThis equipment has been tested and found to comply with
the limits for a Class B digital device, pursuant to Part 15
of the FCC Rules. These limits are designed to provide
reasonable protection against harmful interference in a
residential installation. This equipment generates, uses and
can radiate radio frequency energy and, if not installed and
used in accordance with the instructions, may cause harmful
interference to radio communications.
However, there is no guarantee that interference will not
occur in a particular installation. If this equipment does
cause harmful interference to radio or television reception, which can be determined by turning the equipment
off and on, the user is encouraged to try to correct the
interference by one or more of the following measures:
zReorient or relocate the receiving antenna.
zIncrease the separation between the equipment and receiver.
zConnect the equipment into an out et on a ciruit differ-
ent from that to which the receiver is connected.
zConsult the dealer or an experienced radio/TV technician for help.
This device complies with Part 15 of the FCC Rules. Operation is subject to the following two conditions : (1) this
device may not cause harmful interference, and
(2) this device must accept any interference received, in-
cluding interference that may cause undesired operation.
Shielded cables must be used with this unit to ensure
compliance with the Class B FCC limits.
English
Radio
●The phenomenon of occasionally not receive radio
station broadcast, noises or crosstalk during driving
may be caused by road conditions, weather or environmental reasons.
USB
Not all USB memory devices are compatible with this unit
due to different USB memory device models.
Bluetooth
●Not all mobile phones are compatible with this unit due
to different mobile phone models and functions.
Disc
●In cold or rainy days, water droplets may form inside
the equipment as mist may condense on the window
glass.
●This (condensation) will result in distortion or failure in
playing. Please wait for a moment and use the equipment after ventilation or dehumidification.
●In order to protect the internal structure of the player,
the player will stop playing automatically for protection
3
Page 5

English
when something abnormal occurs during the playing.
If the machine can’t operate normally even if you operate as per the displayed instructions, the machine may
have malfunctions and you should contact NISSAN
dealers
.
●Distortion may occur if the vehicle is driven on the road
of harsh conditions or is vibrated violently.
●MP3/WMA music files stored in CD-ROW/CD-R/CDRW may be played.
●Because of the characteristics, scratches, stains on the
CD/SACD/CD-ROM/CD-R/CD-RW disc or long-time
use inside the vehicle, the disc may not be played due
to the worsening disc performance. The disc mentioned
above can’t be played if it has been finally treated or
written in UDF format.
●Music CD should be officially identified.
●This unit does not support 8-cm disc.
●Do not use any disc with transparent or translucent
data reading side as it can’t be inserted, taken out or
played normally.
●Please do not use any disc that is not from the legitimate manufacturer.
Disc Storage
■
●Do not expose the disc to direct sunlight and make
sure to put it inside the box, or the disc will deform and
can’t be used.
●No paper slip should be adhered to the playing side or
identification side of the disc or it will cause failure.
●Do not use any disc with crack or deformation, or it will
cause failure.
●Do not touch the playing side of the disc (which is the
smooth side with rainbow colours) when holding the
disc, or fingerprints will be left on the disc surface that
may cause skipping.
●Playing a stained disc may result in disc scratch or
skipping. Use disc cleaning agent available on the market to remove the stains on the disc by wiping softly
from the inside to the outside.
Use of New Disc
■
●When a new disc is used, there might be some burrs
at the inner edge and outer of the disc that shall be
removed with a ball pen or other means.Or the bur will
adhere to the playing side of the disc that may cause
skipping.
Special- Shaped Disc
■
●Do not use any leased disc with glass film, lease label
or other adhesive. If such disc is played in the player, it
will be hard to get it out and may result in failure.
Disc of Special Shape
■
●No disc in the shape of heart or octagon may be played
or the machine will be damaged. Do not use such kind
of discs.
4
Page 6
Disc Decoration
[ ]
[OPEN/TILT]
■
●Do not use any decoration to improve tone quality or
protect disc (such as disc case or protective case) as
the change in the thickness or dimension of the disc
may result in failure.
●Do not use any decoration to improve tone quality or
shockproof performance (such as disc ring case or
functional protective case), or the decoration may fall
inside the machine that the disc can’t be played or
taken out and result in failure.
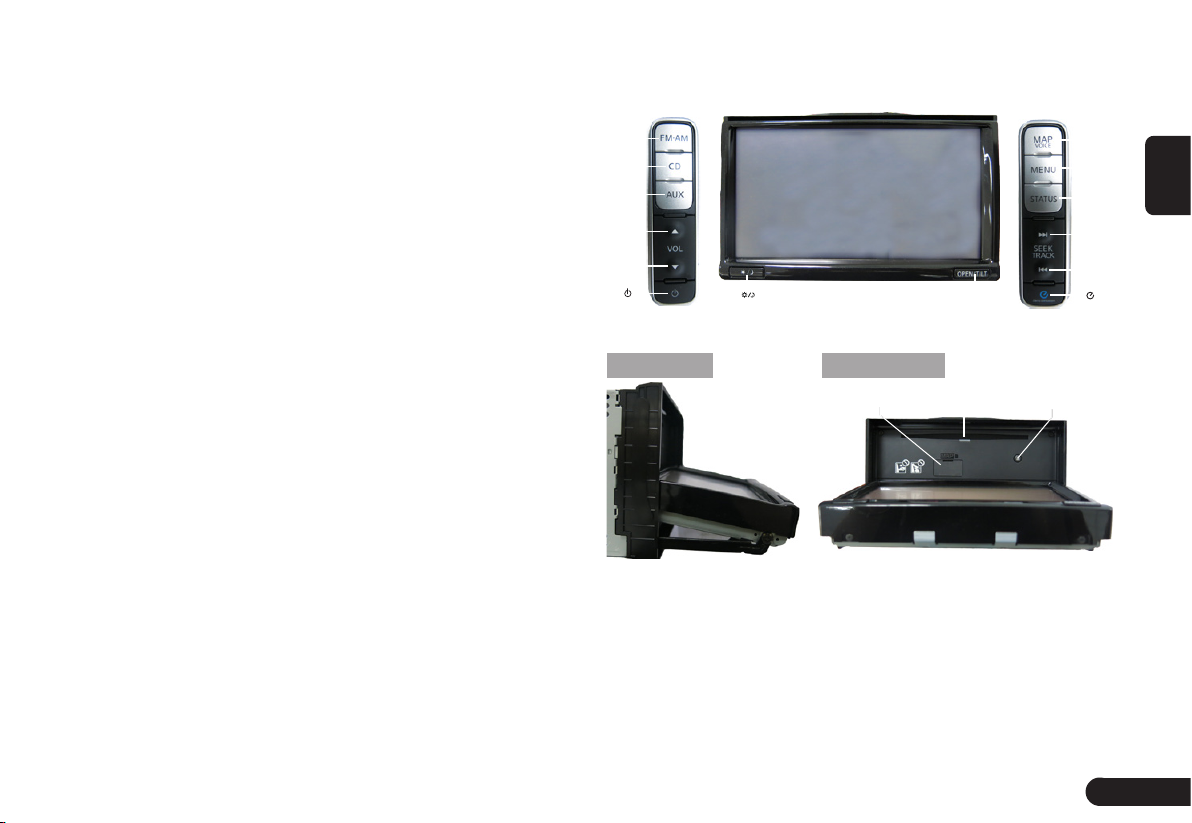
Names of Various Parts
Operational Panel
[FM・AM]
[CD]
[AUX]
[w]
[z]
[ ]
[MAP]
[MENU]
[STATUS]
[v]
[x]
[ ]
English
LCD
●There will be brightened or darkened visual phenomenon if you watch the LCD from the sides.
●The screen will become illegible under direct sunlight
or external light on the display.
●If the machine is turned on when the temperature is
below zero, LCD will appear to be darker than usual
until the temperature inside the machine rises.
Press [OPEN/TILT] button to slide down the panel.
Left side
Front side
[SD Card Slot]
[Disc Slot]
Names of Buttons
1
[FM・AM] button: enter the FM・AM mode.
2
[CD] button: enter the CD mode.
3
[AUX] button: enter the AUX mode.
4
[w] button: Increase the volume.
[Q]
5
Page 7
English
5
[z] button: Decrease the volume.
6
button/Volume Knob: short press to turn off/on audio
device.
7
[MAP] button: Press to enter the map screen.
8
[MENU] button:Press to enter Menu Screen to select au-
dio function or navigation function.
9
[STATUS] button: View current status.
[D]Next Track button: In CD/USB/iPod/Bluetooth Au-
0
dio Device mode, short press it to select the next track
to play, and long press it to Fast Forward; in AM/FM
mode, short press to search radio station frequency up
manually.
[A]Previous Track button: In CD/USB/iPod/ Bluetooth
!
Audio Device mode, short press it to select the previous
track to play, and long press it to Fast Reverse; in AM/
FM mode, short press to search radio station frequency
down manually.
[ ] button: Enter the vehicle information menu and view
@
the information.
[ ]Day/night button: Press to switch between day or
#
night mode.
[ OPEN/TILT ] button: Press to slide down the panel.
$
SD card slot: Map SD card.
%
Disc slot: CD disc can be inserted for playing.
[Q]Eject button: Short press it to eject the disc inside
&
the unit.
Caution
●It is prohibited to pull out the map SD card or the
system will not work.
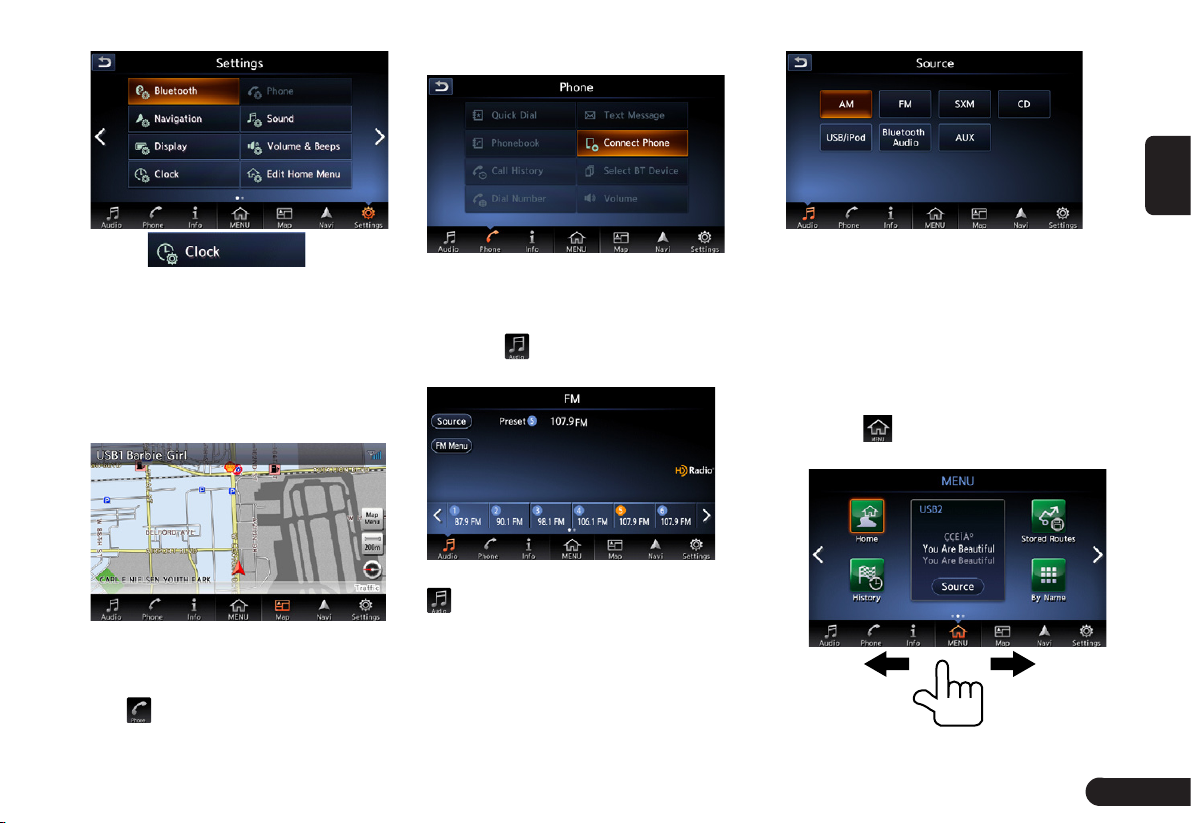
Basic method of use
Switching the language
When the unit turns on, the default language is set to
English. Switch to your language to use the unit.
1
Press [MENU] button on the panel.
2
Touch to enter Settings Screen.
3
Touch or slide the screen.
4
Touch .
5
Select the language and unit you use.
Setting the time
1
Press [MENU] button on the panel.
2
Touch to enter Settings Screen.
6
Page 8
3
Touch .
4
Set the clock you need.
Mode Switch
Switch to navigation mode
■
Press [MAP] button on the panel to
switch to navigation mode for map
display.
Switch to Bluetooth mobile
■
phone mode
Touch switch to Bluetooth
mobile phone mode.
Switch to source mode
■
Press [AUDIO] button on the panel
or touch to switch to source mode
such as Radio mode.
Press [AUDIO] button or touch
in Source mode to switch
to source selection screen.
Basic Operations
Main menu operations
On main menu screen you can enter
corresponding work mode by touch
the icons on the screen.
1
Press [MENU] on the panel or
touch to enter main menu
screen.
English
7
Page 9
zChange page by dragging left or
right or touch and .
English
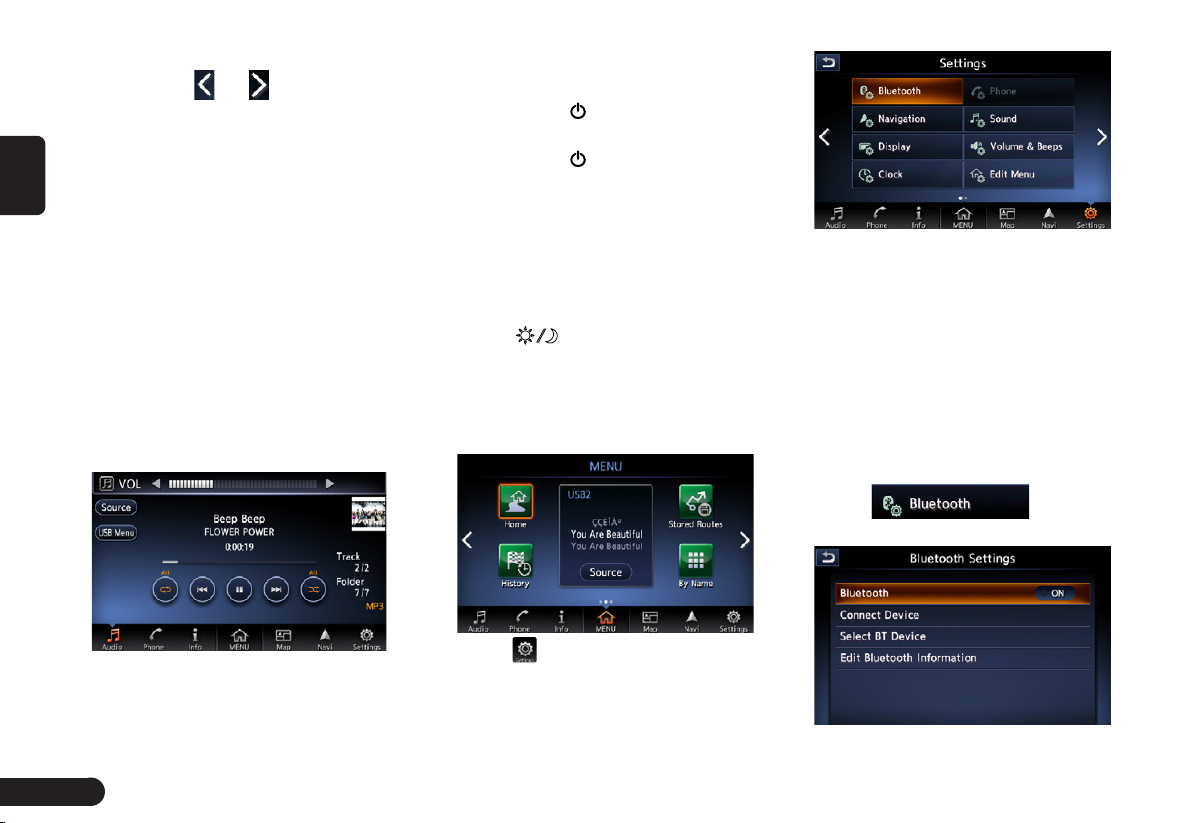
Adjust Volume
1
Press the [w] or [z] button on
the panel to adjust the volume.
zSource mode: Adjust the volume of source.
zBluetooth Mobile Phone mode: Adjust the
incoming call ringtone volume when receiving a call, adjust the outgoing call ringtone
volume when making a call, or adjust the
call volume when speaking on the phone.
zMap navigation: Adjust Voice Guidance
volume when voice guidance interrupt.
zParking guidance: Adjust parking guid-
ance volume in parking guidance.
For example, press the volume button in Source USB mode to adjust
the volume as shown below.
ON, you can turn off the
Audio device.
1
Short press
[ ]
button to turn off
Audio.
2
Short press
[ ]
button again to
resume playing.
Day/Night Display Mode
Switch
This can switch the screen display
mode.
1
Press [ ] button on the panel to
to switch between day and night.
Basic Settings
1
Press [MENU] button on the panel.
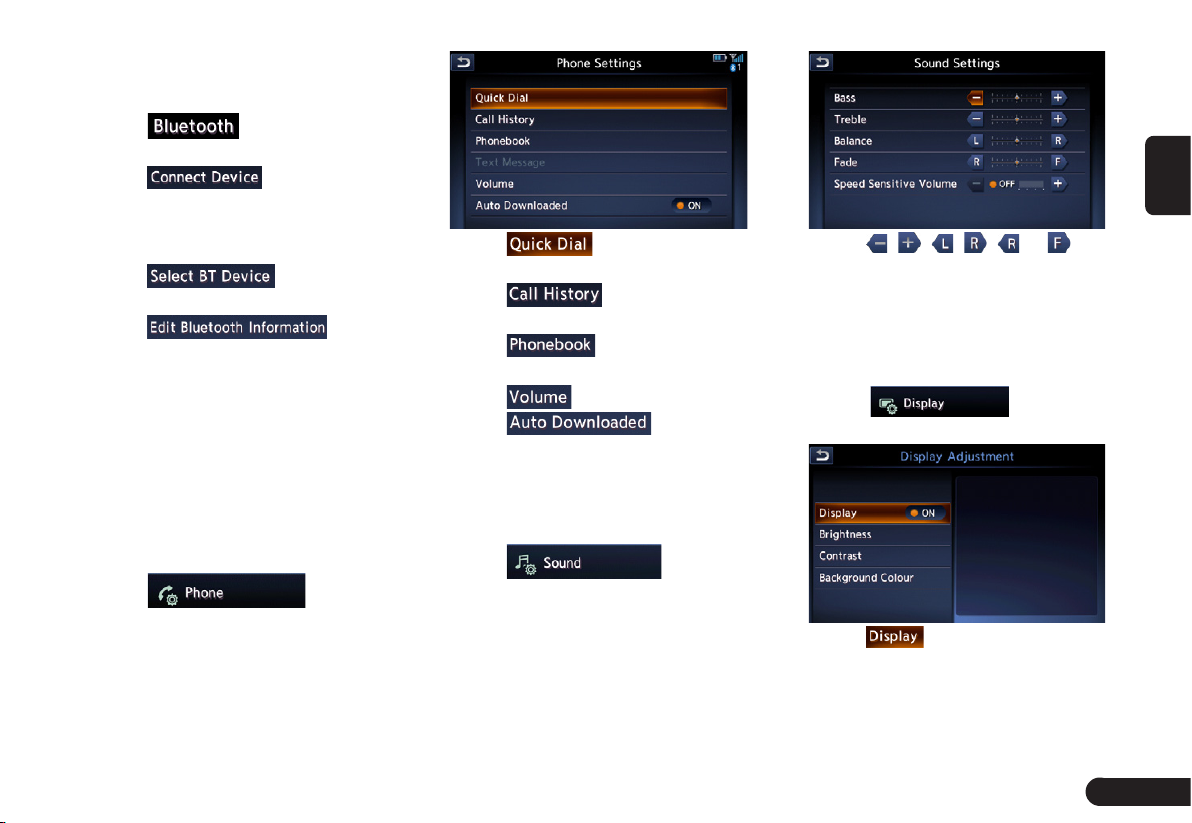
Bluetooth Settings
Pair Bluetooth Mobile Phone or Bluetooth Audio Device / check the list of
paired equipment/Set Bluetooth
system of this unit.
NOTE:
*Pairing method of some mobile phones or
audio devices may differ or fail for Bluetooth
pairing due to different types of mobile
phones and audio devices.
1
Touch to enter
Bluetooth setting screen.
Audio On/Off
When the radio or media player is
8
2
Touch to enter Settings Screen.
Page 10
zWhen there is no Bluetooth pairing equip-
ment record, the items “Connect with Blue-
tooth” and “Select Device” will be invalid.
2
Touch to turn Bluetooth
On or Off.
3
Touch to Select the
mobile phone or audio device to
connect. You can operate as per
the information prompted.
4
Touch to view and
select BT Device.
5
Touch to edit
Bluetooth information.
Phone settings
You can confirm and view various
information concerning about the
Bluetooth phone.
Note:
Before setting phone you need to
pair the mobile phone with this unit.
1
Touch to enter
Phone setting screen.
2
Touch to edit and delete
Quick Dial number.
3
Touch to view Call His-
tory records.
4
Touch to download
Phonebook.
5
Touch to set Volume.
6
Touch to turn the
Auto Downloaded on or off.
Audio Settings
To set various sound effects.
1
Touch to enter
Audio setting screen.
2
Touch , , , , or to
adjust the tone quality.
Display Adjustment
Adjust the display effect of the
screen.
1
Touch to enter
Display Adjustment screen.
2
Touch , the screen display
can be switched off to enter power
save mode.
zAfter the screen display is OFF, the buttons
on the panel are still operational. Press
English
9
Page 11

English
[ ] button on the panel will resume
the previous source play screen or map
navigation screen. Or you can press any
button for the corresponding operation.
3
Touch to enter brightness
adjustment screen.
ground color adjustment screen.
Next page
zTouch or to adjust the
brightness of display.
4
Touch to enter contrast
adjustment screen.
zTouch or to adjust
the contrast of display.
5
Touch to enter back-
10
zTouch or to change
the background color.
Volume and Beeps
Adjust the Audio volume/Guidance
volume/ Ringtone/ Incoming Call/
outgoing Call/NissanConnect Svcs,
turn On or Off the button beeps and
guidance voice.
1
Touch to enter
Volume & Beeps screen.
2
Touch
or
to adjust the vol-
ume.
3
Touch to turn on or off
button beeps.
4
Touch to turn on or off
guidance voice .
Edit menu
1
Touch to enter
Edit menu screen.
2
Touch to delete the quick menu.
Page 12

3
Touch to add the quick menu.
4
Touch the quick menu to rearrange
it.
5
Touch to save the settings.
Source Media Mode
1
Press [AUDIO] button on the panel
or touch to enter source
screen.
FM/AM mode
1
Touch / to enter FM/AM
screen.
1
2
3
Back to source screen.
1
View station list, RDS Info and
2
turn on or off HD radio mode.
Preset channel list(Station list). Up
3
to 12 channels can be saved.
SXM mode
Before to enter this mode you need
to check the antenna.
1
Touch to enter SiriusXM
screen.
1 2 345
0
9
8
7
6
Channel category.
1
Channel name.
2
Artist name.
3
Song title.
4
Save the favourite channel by
5
artist or song alert.
Preset channel list(Station list).
6
Up to 18 channels can be
saved.
Switch the play mode between
7
replay and live.
SiriusXm signal intensity.
8
View track list by kinds of
9
categories etc.
Back to source screen.
0
CD mode
After disc is loaded, the play mode is
automatically engaged.
1
2
3 4 5 6 7
Back to source screen.
1
English
11
Page 13

2
3
4
English
5
6
7
USB mode
1
1
2
1
2
3
4
5
View track list and select to play it.
Turn on or off repeat play.
Short touch: switch to Previous
Track; Long touch: Fast Backward.
Touch to Play/Pause
Short touch: switch to next Track;
Long touch: Fast Forward.
Turn on or off shuffle play.
Touch to enter USB audio
screen when you connect a USB.
3 4 5 6 7
Back to source screen.
Select the folder and track, turn on
or off the display of album artwork.
Turn on or off repeat play.
Short touch: switch to Previous
Track; Long touch: Fast Backward.
Touch to Play/Pause
Short touch: switch to next Track;
6
Long touch: Fast Forward.
Turn on or off shuffle play.
7
iPod mode
1
Touch to enter iPod audio
screen when you connect an iPod.
1
2
3 4 5 6 7
Back to source screen.
1
Select the track from playlist, art-
2
ists, albums, songs, podcasts,
genres, composers and audiobooks; Turn on or off the Display
of Album Artwork.
Turn on or off repeat play.
3
Short touch: switch to Previous
4
Track; Long touch: Fast Backward.
Touch to Play/Pause
5
Short touch: switch to next Track;
6
Long touch: Fast Forward.
Turn on or off shuffle play.
7
Bluetooth Audio mode
Before playing Bluetooth Audio you
need to pair the audio device with
this unit.
1
Touch / to enter Bluetooth
Audio screen.
1
2
3 4 5 6 7
Back to source screen.
1
View track list and select a track
2
to play it; enter the bluetooth
settings screen.
Turn on or off repeat play.
3
Short touch: switch to Previous
4
Track; Long touch: Fast Backward.
Touch to Play/Pause
5
Short touch: switch to next Track;
6
Long touch: Fast Forward.
Turn on or off shuffle play.
7
12
Page 14

AUX mode
Insert the external sound device into
AUX slot via the audio cable.
1
Touch to enter AUX mode.
2
Choose “Low”, “Middle”or “High”
input sense of auxiliary device.
Bluetooth Operation
Pair Bluetooth Device
1
Touch to select the
mobile phone or audio device to
pair.
2
If you want to select the mobile
phone 秋to pair, touch .
3
If you want to select the audio
device秋to pair, touch , and
you have to edit the PIN (minimum
4 digits and maximum 16 digits) to
pair the audio device.
4
After entering the PIN, touch
and operate as per the information
prompted.
5
After successful pairing, it will
automatically return to Bluetooth
Setting screen.
Bluetooth Telephone
1
Touch to enter Phone screen.
English
13
Page 15

English
2
Touch to edit and
delete Quick Dial number.
3
Touch to view Phone-
book.
4
Touch to view Call
History records.
5
Touch to dial phone
number by keypad.
6
Touch to pair a phone
with this unit.
7
Touch to select
paired phone.
8
Touch to set Volume.
Navigation
Menu Types and Operation
Map menu (Menu on current
■
location map)
Touch on the map screen to
display the Map menu at the left side
of the screen. You can store the current location to the Address Book or
change the map appearance.
1
2
3
4
5
[BACK] key:Return to the map
1
screen.
[Save Location] key:Save the cur-
2
rent location in the AddressBook.
[Nearby POIs] key:Displays the
3
Category screen of the POIs
nearby the current location.
[Map View] key:Change the types
4
of the screen and map appearance.
[Map Icons] key: Turn on or off the
5
map icons.
Location menu (Menu on
■
scrolled map)
After scrolling the map by touching
the Map screen, touch on the
screen to display the Location menu
at the left side of the screen. You
can set the location under the cursor at the centre of the screen as the
destination or store it to the Address
Book.
1
2
3
4
5
[BACK] key:Returns to the scrolled
1
Map screen before touching the
key.
[New Destination] key:Sets the
2
location under the cursor as the
destination. When a destination
is already set, the old destination
is cancelled as soon as the new
destination is set.
[Add to Route] key:When another
3
location is already set as the destination, you can set the location
under the cursor as a waypoint.
14
Page 16

Touching this key displays the Edit
Route screen. Specify the desired
order of passing to set the location as a waypoint.
[Nearby POIs]] key:Displays the
4
Category screen of the POIs
nearby the location under the
cursor.
[Save Location] key:Save the
5
location under the cursor in the
Address Book.
Map Screen Features
Types of the map
■
There are two types of map: the 2D
map and the 3D map. Such as the
method of scrolling the map, some
operation are different depending on
the map types.
●2D Map
The 2D map is a map screen represented to the plane just like the map
of atlases. It is suitable for searching
a destination and confirming the road
or route.
●3D Map
The 3D map is a map screen using
a viewing position above the vehicle
while looking in the direction of the
car heading. It is suitable for understanding the image of the direction,
because the perspective of the travelling direction can be adjusted as
required.
Indicators on the map
■
Indicators displayed on the Map
screen are different according to the
conditions at that time.This section
explains the main indicators displayed on the Map.
Indicators on the map of the current
location
Audio mark: Indicates the current
1
source mode.
Vehicle mark:Indicates the current
2
location and direction of your
vehicle.
[ ]Map Menu key:Displays the
3
Map menu.
[ ]Map scale key: Touch this
4
key to decreases/increases the
map scale.
[ ]Map bearing mark:Indicates
5
the map orientation. You can
switch the map orientation
between Heading Up, North Up
and 3D map by touching this icon.
Indicators on the scrolled map
Indicators are displayed after scrolling the map. During scrolling, only
1
2
3
4
5
English
15
Page 17

the scroll cursor is
displayed on the map.
English
[
1
] (Slow Scroll)key: Displayed
only on the 2D map. Turn on the
Slow scroll mode. Scroll cursor:
Displayed when scrolling the map.
Displays the name of the street
2
under the cursor.
Indicators displayed during the route
guidance mode
After a destination is set and travelling is started, the guidance route
and various guidance information are
displayed on the map.
1
2
Small Turn Arrow display:Displays
1
3
the turning direction and distance
to the next guidance point.
Guidance point:Indicates the
2
guidance point
Distance to the waypoint/
3
destination:The distance from the
current location to the next waypoint or destination are displayed.
Manipulating the Map Screen
Scrolling the map
■
Touching the Map screen displays
a cursor at the centre of the screen,
and you can scroll the map. For the
2D map, touch the map to move the
map to the touched position, and
keep touching the map to scroll the
map towards the touched direction.
For the 3D map, touch the upper part
of the map to scroll the map toward
the touched direction, and touch the
left or right part to rotate the map
1
while touching.
2
Slow scroll mode operation
■
Touch while scrolling the 2D map
3
to display the following screen:
Keep touching the desired arrow key
( , , , , , , , .) moves
the map slowly towards the corre-
sponding direction. To quit the slow
scroll mode, touch .
Zooming IN/OUT the map
■
1
Touch to display the zoom in/
out key.
16
Page 18

zTouch the corresponding key
to change the map view.
3
Touch to display the
View Settings screen.
English
2
Touch or to change the
map scale.
Changing the map appearance
■
The Map screen can be adjusted
regarding orientation or appearance
of the map.
1
Touch on the Map screen of
the current vehicle location.
2
Touch to enter Map View
screen.
z [Intersection]:During the route guid-
ance mode, displays the Intersection
Close-up display which displays the
turning direction of the next guidance
junction at the left of the screen.
z[Turn List]:During the route guidance
mode, displays the list of the name, distance, and turning direction of the guidance junctions at the left of the screen.
z[Full Map]:Changes to display
one map using full screen.
Screen examples
• 2D Map
• 3D Map
2D/2D Map
2D/3D Map
17
Page 19

English
4
Touch to enter Map
Settings screen.
●[Map Orientation] key: Changes
the orientation of the map between
Heading Up and North Up.
zThis control is available
when [2D] is selected.
●[Long Range] key: Changes the
map view to view a wider area in
the direction that the vehicle is
travelling. When this feature is activated, the vehicle mark is located
slightly lower than the centre of the
screen.
zThis control is available when [2D]
is selected and the Map Orientation is set to Heading-Up.
●[Map Colour] key:Selects the
colours(Map Colour 1/2/3/4) of the
map.
●[Map Text Size] key: Change
the map text size(Large,
Medium,Small).
●[Birdview Angle] key: Changes the
angle of the 3D map. Touch to
raise the angle, and to lower
the angle.
zThis control is available
when [3D] is selected.
●[North Up when Zoomed Out]
key: Turn on or off north up when
zoomed.
●[Names Displayed on Map] key:
Change the names of place, facilitiy and road displayed on map.
●[Left Split Map Settings] key:
Change settings of Map Orientation, Long Range and Map Scale
of left split map.
●[Show all Freeway Exits on Route]
key: Turn on to show all freeway
exits on route.
●[Auto. Show Turn List on Freeway]
key: Turn on to show turn list on
freeway.
Navigation System
Settings
1
Press [MENU]/[MAP] button on the
panel to display the fuction bar.
2
Touch , to enter
Navigation Settings Screen.
18
Page 20

Registering/Editing the
Address Book
From the Address Book, you can
register the home address, addresses of facilities and places, routes,
and Avoid Areas. You can also edit
the data registered.
The registered places or routes can
be set as the destination or as the
current route.
Home Location
■
Register your home address. You can
edit the registered home address.
To register the Home Location
The Home Location can be registered when the
key is displayed.
1
Touch .
2
Search for the location of
your home by a similar way
as for entering destinations.
3
Touch to register it.
To edit the Home Location
1
Touch to enter edit Home
Location screen .
2
Touch the desired Item to edit it.
3
Touch to adjust the
location by moving the cursor on
the Map screen.
4
Touch to delete the regis-
tered Home location.
5
Touch to register it.
Stored Locations
■
Registers locations in the Address
Book. You can register up to 200 locations, and can also edit the registered locations.
To register Location
1
Touch .
2
Touch .
3
Search for the location you wish
to register by a similar way as for
entering destinations.
4
Touch to register it.
5
Touch to sort the loca-
tions by number,name, icon and
group.
To edit a Stored Location
1
Touch .
2
Touch the name of the Stored Lo-
cation you wish to edit.
3
Refer to “To edit the Home Loca-
tion” on Page 秋17秋to edit it.
English
19
Page 21

Stored Routes
■
Registers the current route. You can
register up to 5 routes, and can also
edit the registered routes.
English
To register the current route
1
Touch .
2
Touch .
3
Then touch from the
displayed confirmation screen.
To edit the Stored Route
1
Touch .
2
Touch the name of the Stored
Route you wish to edit.
3
Touch the desired item, then edit it.
●[Rename] key: Changes the name
of the Stored Route.
●[Replace] key: Replaces the Stored
Route with the current route.
●[Delete] key: Deletes the Stored
Route.
4
Touch to register it.
Avoid Area
■
You can register areas you do not
want to pass or areas that often get
congested as an Avoid Area. When
you register the Avoid Areas, you can
set the system to calculate routes
avoiding the registered areas. Up to
10 Avoid Areas can be registered.
You can edit the registered Avoid
Areas.
To register an Avoid Area
1
Touch .
2
Touch .
3
Search the area to avoid by a simi-
lar way as for entering a destination.
4
Touch to register it.
To edit an Avoid Area
1
Touch .
2
Touch the name of the Avoid Area
you wish to edit.
3
Touch the desired item to edit, and
edit it by similar way as for registering Avoid Areas.
●[Rename] key:You can change the
name of the Avoid Area. Enter the
name, then touch .
●[Move Location] key:You can adjust the location of the Avoid Area.
●[Resize Area] key:You can change
the size of the Avoid Area([Large],
[*], [Medium], [*], or [Small]), then
touch .
●[FWY] key:You can set whether to
avoid freeway passing the Avoid
Area.
●[Delete] key:Deletes the current
Avoid Area.
4
Touch to register it.
Deleting the Stored Items
■
You can delete various data stored in
the navigation system.
1
Touch .
2
Touch the item key to delete.
●[Delete Home Location] key: Deletes your home location.
●[Delete Address Book] key:
z[Delete All]:Deletes all the stored locations.
z[Delete 1 Entry]:Deletes only the location
that you specify on the Delete One screen.
●[Delete Stored Routes] key:
z[Delete All]:Deletes all the stored routes.
z[Delete 1 Entry]:Deletes only the route that
you specify on the Delete One screen.
●[Delete Avoid Areas] key:
z[Delete All]:Deletes all the
stored avoid areas.
z[Delete 1 Entry]:Deletes only the avoid area
that you specify on the Delete One screen.
●[Delete Previous Destination] key:
20
Page 22

z[Delete All Previous Destinations]:Deletes
all the registered previous destinations.
z[Delete Previous Destination]:Deletes only
the previous destination that you specify on
the Delete Previous Destination screen.
z[Delete Previous Starting Point]:
Deletes the starting point.
3
From the displayed confirmation
screen, touch .
Tansfer Address Book
■
You can Tansfer Address Book from
SD card.
1
Touch .
●[Export Data] key:Export data to
SD card.
●[Import Data] key:Import data from
SD card.
Navigation Settings
Map View
■
Please refer to “Changing the map
appearance” on Page 秋17秋 .
Map Icons
■
Switches ON or OFF Landmark icon
display for each type.
1
Touch .
2
Touch the desired item key you
wish to change the setting.
3
The types of icons that can be set
are the following 6 types.
● [Restaurant] key
● [Petrol Station] key
● [Hotel] key
● [ATM] key
●[Rest Area] key
Guidance Settings
■
You can change settings concerning
the guidance guidance.
1
Touch to enter
Guidance Settings screen.
2
Touch the desired menu item to
set.
●[Guidance Volume] key:Adjusts the
volume of the voice guidance.
●[Guidance Voice] key: Sets whether to activate the voice guidance.
●[Traffic Announcement] key: Sets
whether to read out the traffic
information.
●[Intersection Guidance Settings]
key: The Intersection Guidance
Settings screen is displayed. You
can set the intersection guidance
for Level1, Level2,Level3 and
Level4.
●[Estimated Time] key:Changes the
setting of arrival time indication
displayed on the Map screen.
z[Destination]:Sets to display the ar-
rival time to the destination.
z[Waypoint]:Sets to display the arrival time
to the next waypoint or destination.
Route Settings
■
You can change settings concerning
the route guidance.
1
Touch to enter route
Settings screen.
2
Touch the desired item key.
●[Basic Route Type] key:You can
change the conditions of route
calculation.
z[Fastest Route]:Calculates the route of
which the required time is shortest.
z[Minimise Motorways]:Calculates
the route of which motorways are
not used as much as possible.
z[Shortest Route]:Calculates the route
of which the distance is shortest.
●[other Routing Choices] key:You
can specify other route calculation
English
21
Page 23

methods.
z[Minimise Toll Roads]: Mini-
mises the use of toll roads.
z[Use Time Restricted Roads]:Uses
English
roads with restricted usage time.
z[Use Real Time Traffic Information] :Con-
siders the traffic information for routing.
z[Use Avoid Area Settings]:Takes a de-
tour to avoid the registered Avoid Area.
z[Use Ferries]:Uses car ferries for routing.
z[Use Learned Routes]:Considers
the Learned Routes for routing.
z[Use HOV Lanes]:Uses HOV
lanes for routing.
z[Auto Reroute]:When leaving the suggested
route during the route guidance mode, a
new route is automatically recalculated.
Traffic Information Settings
■
You can set the various functions
concerning the traffic information.
1
Touch to enter the
Traffic Information Settings screen.
2
Touch the desired key on the
screen to set it.
●[Use Traffic Information] key: Considers the information.
●[Show Incidents on Map] key:
Switches on or off the traffic information display on the map.
●[Show Traffic Flow on Map] key:
Switches on or off the traffic flow
display on the map.
●[Traffic Announcement] key:
Switches on or off the traffic announcement standby mode.
Others
■
1
Touch to enter the Others
settings screen.
●[Map Scrolling Information] key:
When you scroll the Map screen
and move the cursor on an icon,
the information on the location can
be displayed. You can set this function whether to activate or not.
z[Address Book Icons] key
z[TMC Traffic Icons] key
z[Destination/Waypoint Icons] key
z[Latitude/Longitude Info.] key
●[Customize nearby POIs] key:You
can customise the five categories
of the Customize nearby POI feature.
●[Keyboard Type] key: To change
the keyboard type(QWERTY type
and ABC type).
●[Tracking Dots Displayed on Map]
key: To change the setting of the
tracking dots displayed on map.
●[Adjust Current Location] key:You
can correct the vehicle position on
the Map screen by Scroll the map.
Resetting All Navigation Settings
■
to Defaults
You can reset all the Navigation settings to return to the factory settings.
Note:
GThough all the settings are reset, the
stored data such as the Address Book,
Stored Routes, and Avoid Area are not
erased.
1
Touch
.
2
Then touch from the
displayed confirmation screen.
Outline of Destination
Entering Procedures
To start route guidance, operate the
navigation system with the following
procedure:
●Select the method of searching
destination from the Destination
menu screen, then search for
the desired destination.
Select a suitable searching method
according to the place to search.
22
Page 24

●Confirm the position of the
place found with the Set Location menu screen, then start the
route guidance.
You can store the place found to
the Address Book, or can confirm
the information according to the
place, as well as set it as destination. You can also display other
suggested routes, or confirm information of the route.
Setting destination by
entering the address
This section explains the basic operation procedure to set the destination
in detail, using the example to specify
the destination by entering the address from the Destination menu.
Read this explanation thoroughly
because this procedure is similar to
other destination entering methods.
For other destination entering methods, please refer to “Entering the
Destination” on page 秋24秋.
1
Press [MENU]/[MAP]/[AUDIO]
button on the panel to display the
fuction bar.
2
Touch to enter Destination
screen when no route exist.
zYou need to touch to enter
Destination screen when a route had exist.
3
Touch to enter
Street Address screen.
Note:
G You can omit the state/province name
entry and directly enter a road name.
Proceed to step 9.
4
Touch to enter the
state/province name you wish to
go to by touching the characters
on the screen.
●[Change Area] key: To change the
courty area.
●[Current state] key: Use current
state.
●[Space] key: Input a space.
English
23
Page 25

English
●[List] key:Displays the city name
list corresponding to the entered
character(s).
●[ABC] key:Displays the alphabetic
input keyboard.
●[ÀÈß] key:Displays the accent
characters input keyboard.
●[12#] key:Displays the number
input keyboard.
Note:
GDuring the character entry, the system
shows the city name list automatically
when all the matching cities can be
displayed on one page.
5
Touch to enter the city name
you wish to go to by touching
characters on the screen. Then,
the system returns to the Street
Address screen. Enter the street
name by the same way.
6
Touch to enter the street
name you wish to go.
7
Touch to enter the house
number input screen. Then enter
the house number by touching
numbers on the screen, touch .
Note:
GYou can omit the house number entry.
Proceed to step 9.
8
Confirm the entries, then touch
.
●[Start] key:Sets the location shown
by the “ ”on the map as the
destination, and starts the route
guidance.
●[Route Details] key: The Calculate
Route menu is displayed. You can
change the route search conditions
or check the route information.
●[Move Location] key:The Map
screen is displayed. You can adjust
the location of the destination.
●[Add to Route] key:When the destination is already set, the specified
location is set as the waypoint.
●[Save Location] key:Save the
specified location into the Address
Book.
●[Details] key:Displays information
about the specified place if it is
included in the map data.
9
Touch , the route guidance
will be started. The place found is
shown with “ ” on the map.
Entering the Destination
Searching Your Destination
from the Destination Menu
You can search for a destination from
the Destination menu by using various methods. Use a suitable searching method according to the place
you wish to go to.
Destination menu screen
24
Page 26

For the operation procedure hereafter, see the explanation of each section.
By Street Address
■
For the operation procedure, refer to
“Setting destination by entering the
address” on page 秋21秋.
By charging spot
■
1
Touch .
2
Touch your desired category.
3
Confirm the location of the destina-
tion, then touch .
By Points of Interest (POI)
■
Select the category of the place, narrow down the data by specifying the
area or entering the name, and then
select the place you wish to go to.
By touching , you can also
search a place by simply entering the
name.
1
Touch .
2
Touch your desired category. For
example . When a additional
category list is displayed, touch a
category again to select one.
3
Set the narrow down conditions for
the places.
●[By Name] key: Input the facility
name to narrow down the target
place.
●[Select a City] key: Input the city
name to narrow down the target
place.
●[Near Current Location] key:
Shows a list of facilities around the
current location.
●[Near Destination] key: When the
destination is set, shows the list of
facilities around the destination.
An example of specifying By Name is
explained below.
4
Touch . Enter the facility
name, and then touch .
●[By Distance] key:Sorts the list by
nearby order.
●[New Category] key:Displays the
Category screen so you select a
new category.
5
Touch the place you wish to go
from the displayed place list.
6
Confirm the location of the destina-
tion, then touch .
By Address Book
■
Specifies a place registered in the
navigation system as the destination.
Note:
English
25
Page 27

• To use this function, register places
beforehand.
1
Touch .
2
English
Touch the stored location you wish
to go from the displayed Address
Book list.
3
Confirm the location of the destina-
tion, then touch .
By Intersection
■
An intersection of any two streets can
be set as the destination.
1
Touch .
2
Enter the 1st street and the 2nd
street, then touch
3
Touch .
By Nearby Points of Interest
■
1
Touch .
2
Touch your desired category.
An example of specifying RESTAURANT is explained below.
3
Touch the place you wish to go
from the displayed place list.
4
Confirm the location of the destina-
tion, then touch .
Going Home
■
When your home address is registered, you can start route guidance to
your home by a simple operation.
Note:
GWhen your home address is not
registered, a message is displayed
when touching the [Home] key.
Register it by touching the [Yes] key.
When the list of searching methods
appears, register your home address
by the desired method.
1
Touch .
2
Touch .
The route to your home is automati-
cally calculated and the route guidance is started.
By Previous Destination
■
The destinations previously used are
registered in the previous destination
list (up to 100 locations). You can enter a destination by selecting it from
this list. When the previous destination list exceeds 100 items, the oldest
entries are automatically deleted.
1
Touch .
2
Touch the place you wish to go
from the displayed history list.
3
Touch .
By Phone number
■
If the telephone number of the facility
is available, use this to find the facility
by entering the number.
Note:
GTelephone numbers that were stored
for stored destinations can also be
used.
GIf the area code of the specified
telephone number does not exist in the
map data, the system will not search
26
Page 28

for the location.
GOnly the locations included in the
database in the map data can be
searched by the phone number.
GResidential phone numbers cannot be
used to search for a location.
1
Touch . Enter the
phone number including the area
code, and then touch .
2
Touch the place you wish to go
from the displayed place list.
3
Touch .
By City Center
■
The center of a city can be set as the
destination.
1
Touch to enter
the character input screen.
2
Enter the name of the city, then
touch . The city center list
displayed.
3
Touch the place you wish to go
from the displayed place list.
4
Touch .
By Stored Routes
■
Selects a route previously registered,
then set it as the new route.
Note:
• To use this function, one or more
registered routes are required.
1
Touch .
2
Touch the route you wish to go
from the displayed stored route list.
3
Touch .
By Freeway Entrance/Exit
■
The entrance or exit of a freeway can
be set as the destination.
1
Touch to enter
the character input screen. .
2
Enter the name of the freeway,
then touch . Freeway list displayed.
3
Touch the place you wish to go
from the displayed freewaylist.
4
Touch .
Searching Your Destination from
■
the Map Screen
You can search for a place by scrolling the map, and set it as the destination.
1
Scroll the map by touching the
Map screen, and move the cursor
to the place you wish to go to.
Touch .
2
Confirm the location of the destina-
tion, then touch .
●[More Routes] key: You can
change to other suggested routes
with a different priority condition.
●[Route Info] key: Shows the
information of the suggested route
selected on the screen.
●[Add Waypoint] key: Adds
waypoints to the suggested route
displayed on the map. Up to five
waypoints can be specified.
3
Touch .
Note:
GWhen you search a place far from the
current location, change the map scale
to search more quickly.
English
27
Page 29

Route Guidance
After you have entered the destination and started the route guidance,
English
you will be guided along the route by
screen display and by voice.
Route Guidance Screen
Features
As well as the Map screen, various
guidance screens are displayed during the route guidance mode according to the situation.
Pressing the [MAP] button to switch
the screen between the following
guidance screens and the full map
screen.
OFF.
Note:
GBefore the Junction Map is displayed,
a voice guidance will be heard at
approx. 600 m or 0.4 miles (2 km or
1.3 miles for a motorway) from the
next guidance point. You can change
this setting by setting the Junction
Guidance Settings.
two displays and the Turn List on
Route is displayed on the left display
if Turn List is activated. The Turn List
contains the guidance points next to
the vehicle position, and will change
while travelling.
When you get near to the next guidance point, the left display is automatically changed to the Junction
Map.
You can set to display the Turn List
screen always in the route guidance
mode.
Junction Map
■
When you get near to approx. 300 m
or 300 yd (1 km or 1 mile for a motorway) from the next guidance point,
the screen will be divided into two
displays and the Junction Map will be
displayed on the left display.
You can set to display the Junction
Map screen always in the route guidance mode. The default setting is
28
1 2
Remaining distance indication:
1
Indicates the remaining distance
to the next guidance point with the
bar gauge.
Guidance route: Indicates the
2
direction to travel.
Guidance point:Indicates the next
3
guidance point.
Turn list on Route
■
The screen is always divided into
3
1
Turn List:The list of the guidance
1
points and turning directions are
displayed from the items near to
the vehicle position, and it will
change while travelling.
Scrolling key:Scrolls the Turn List
2
2
Page 30

on Route screen.
About the Voice Guidance
After starting the route guidance,
not only guidance by screen but also
guidance by voice, such as the turning direction or the distance to the
guidance point, will be given when
you get near to the guidance point.
You can set whether to use the voice
guidance or not, and set the volume
to be changed according to the vehicle speed.
Changing/Editing the Route
Settings
From the Route menu, editing the
current route, confirming the route
information, setting the conditions
of the route calculation, etc. can be
performed.
1
Press [MENU] button on the panel.
2
Touch to enter Route menu
screen when a route had exist.
Delete the route guidance
■
Delete the route guidance/Terminates
the route guidance during the route
guidance mode.
1
Touch . A confir-
mation message is displayed.
2
Touch , the route guid-
ance will be terminated, and the
destination and route will be deleted.
Confirming the route information
■
Confirm various information of the
current route.
1
Touch to enter
Route Info. screen.
●[Turn List] key: Display the list of
route information. The guidance
points from the current location to
the destination are displayed with
the list format.
●[Simulation] key: Simulate the
route guidance with moving the
vehicle mark automatically on the
Map screen.
●[Store Route] key: Store the specified route. A maximum of 5 routes
can be stored, and they can be
easily retrieved.
●[Map Scroll] key: Displays the Map
screen where the specified route
can be confirmed.
2
Touch the desired item to view the
information.
English
Editing the route
■
You can edit the current route.
29
Page 31

English
1
Touch to enter
the Edit Route screen.
2
[Add Destination] key: Touch this
key when you want to set a new
destination. The original destination will be set as a waypoint in the
route.
●[Add Waypoint] key: Up to 5 waypoints can be set. The specified
waypoints are displayed by marks
with the ordinal number for visiting.
●[(Current destination/waypoint
name)] key: You can touch the
name of the current destination or
waypoints you wish to edit.
●[(Route calculation criteria)] key:
You can change the conditions of
route calculation.
z[ECO Route]
z[Fastest Route]
z[Minimize Freeway]
z[Shortest Route]
3
Change settings by touching the
desired setting item.
4
Touch , The route is recal-
culated with specified conditions.
Route settings
■
You can change settings concerning
the route guidance. About the details,
please refer to “Guidance Settings”
on page 秋21秋and “Route Calculation
Criteria” on page 秋21秋.
Recalculating the route
■
After changing the conditions of
the route calculation or when the
status of the route is changed, you
can recalculate the route if you
want.
1
Touch , the route
is automatically recalculated, and
the Calculate Route screen is
displayed.
2
Touch , the route guidance
will be restarted.
Setting a diverted route using
■
traffic information
The route with traffic information
considered is automatically calculated, and the route guidance will be
restarted.
1
Touch . The
diverted route is displayed with
TMC traffic information taken into
account. When no diverted route is
found, a message is displayed.
2
Confirm the diverted route, then
touch .
Setting the diverting distance
■
Search for a diverted route where the
section from the current location up
to the specified distance is avoided.
1
Touch to enter
the Detour screen.
2
Touch the distance you want to
avoid.
The route where the section of selected distance is avoided is automatically calculated, and the route
guidance will be restarted.
30
Page 32

About Information
You can view kinds of information.
1
Press [MENU] button on the panel.
2
Touch to enter Info screen.
●[NissanConnect Apps] key: You
can browse the NissanConnect
Apps.
●[SXM Weather] key: You can
browse the weather information.
●[SXM Traffic] key: You can browse
the traffic information.
●[SXM Sports] key: You can browse
the sports information.
●[SXM Stocks] key: You can add or
delete the stocks.
●[SXM Movie Listings] key: You can
browse the nearby theaters and
current movies.
●[Vehicle] key: You can browse the
energy information of the vehicle.
●[Charging Station Info] key: You
can browse the Charging Station
information of the vehicle.
●[Where am I?] key: You can browse
the information on current location.
●[SXM Weather Alerts] key: You can
browse the weather alerts lists and
set the alerts.
●[Navigation Version] key: You can
browse the Navigation Version of
this unit.
●[GPS Position] key: You can
browse the information on the current GPS data.
3
Touch the desired item to view the
information, and about some itmes
you can operate as per the information prompted.
English
31
Page 33

 Loading...