

Page 1

Thank you for purchasing Mitsubishi Multi Entertainment System (MMES).
Please read this owner’s manual thoroughly before operating MMES.
•
After reading this manual, be sure to keep it handy for future reference.
•
Contents
Audio ................................................................................................................................................... 3
Playable Discs .......................................................................................................................................................................................4
DVD Video Features ..............................................................................................................................................................................4
1. PRECAUTIONS ....................................................................................................................................................................................6
Operation Panel/Generalities ................................................................................................................................................................6
Cleaning ................................................................................................................................................................................................7
About the Registered Marks, etc. ..........................................................................................................................................................7
2. CONTROLS ..........................................................................................................................................................................................8
Functions of Buttons ..............................................................................................................................................................................8
Outline of Button and Touchkey Operation ............................................................................................................................................9
3. BASIC OPERATIONS .........................................................................................................................................................................13
Turning the Power On/Off ....................................................................................................................................................................13
Opening the Operation Panel and Adjusting the Angle .......................................................................................................................13
Switching the Operation Mode ............................................................................................................................................................14
Turning the Audio Off ...........................................................................................................................................................................14
Switching between day and night modes ............................................................................................................................................14
Turning the Monitor Display Off ...........................................................................................................................................................14
Displaying the Clock Screen ................................................................................................................................................................14
Adjusting the Volume ...........................................................................................................................................................................15
Setting/Ejecting a Disc ........................................................................................................................................................................15
Inserting/Removing an SD Memory Card ...........................................................................................................................................16
Connecting/Disconnecting a USB Media Device .................................................................................................................................17
Selecting a Media Source ...................................................................................................................................................................18
Steering Remote Control Operations ..................................................................................................................................................19
1
Page 2

Contents
4. SOURCE OPERATIONS .....................................................................................................................................................................20
Radio Operations ................................................................................................................................................................................20
Audio CD Operations ...........................................................................................................................................................................23
MP3/WMA/AAC Operations ................................................................................................................................................................24
DVD Video Operations.........................................................................................................................................................................26
5. SOURCE OPERATIONS (ACCESSORIES) .......................................................................................................................................32
SD Memory Card Operations ..............................................................................................................................................................32
USB Memory Operations ....................................................................................................................................................................33
®
iPod
Operations .................................................................................................................................................................................34
Bluetooth Audio Operations .................................................................................................................................................................36
Telephone Operations .........................................................................................................................................................................37
6. SYSTEM SETTINGS ...........................................................................................................................................................................40
Audio Settings .....................................................................................................................................................................................40
Display Adjustment ..............................................................................................................................................................................41
Volume and Beeps Settings ................................................................................................................................................................42
Selecting a Language ..........................................................................................................................................................................42
Bluetooth Settings ...............................................................................................................................................................................42
Setting the Clock .................................................................................................................................................................................43
Other Settings .....................................................................................................................................................................................43
7. TROUBLESHOOTING ........................................................................................................................................................................44
2
Page 3

Audio
3
Page 4
Playable Discs
This DVD player can play the following discs:
Playable discs
DVD video discs Audio CDs CD TEXT
In addition, the DVD player can play
CD-R/RW, DVD-R/RW, and DVD+R/RW discs
on which the following media files have been
recorded:
Playable media files
MP3/WMA/AAC
For detailed information, see the sections
entitled “MP3/WMA/AAC Operations”
(page 24).
About CD Extra discs
A CD Extra disc is a disc in which a total of
two sessions have been recorded. The first
session is Audio session and the second
session is Data session.
Your personally-created CDs with more than
second data sessions recorded cannot be
played on this DVD player.
Note:
When you play a CD Extra disc, only the first
•
session will be recognized.
About playing a CD-R/RW disc
This player can play CD-R/RW discs
previously recorded in Audio CD format or
format with MP3/WMA/AAC files.
About playing a DVD-R/RW or
DVD+R/RW disc
This player can play DVD-R/RW and DVD+R/
RW discs previously recorded in DVD video
format or format with MP3/WMA/AAC files.
Discs that cannot be played back
This player cannot play DVD Audio,
DVD-RAM, Video CDs, Photo CDs, etc.
Note:
It may not be possible to play back discs
•
recorded on some CD/DVD drive units. (Cause:
disc characteristics, cracks, dust/dirt, dust/dirt
on player’s lens, etc.)
If a CD-R/RW, DVD-R/RW, or DVD+R/RW disc
•
that has not been finalized is played, it will take
a long time to start playing. Also, it may not
be possible to play depending on its recording
conditions.
•
You cannot play Super Audio CDs. Playback
of the CD player is not supported even if it is a
hybrid disc.
Note on region numbers of DVD
video discs
The DVD video system assigns a region
number to DVD players and DVD discs by
sales area.
The DVD video region number playable in this
system is marked on the disc jacket as shown
below.
ALL
2
DVD Video Features
This unit provides the following functions in
addition to the high image quality and sound
quality of DVD video.
Note:
The functions described in this section differ
•
depending on the DVD video disc. Refer to the
instructions provided with the DVD video.
Some disc functions may operate differently
•
from described in this manual.
4
Page 5
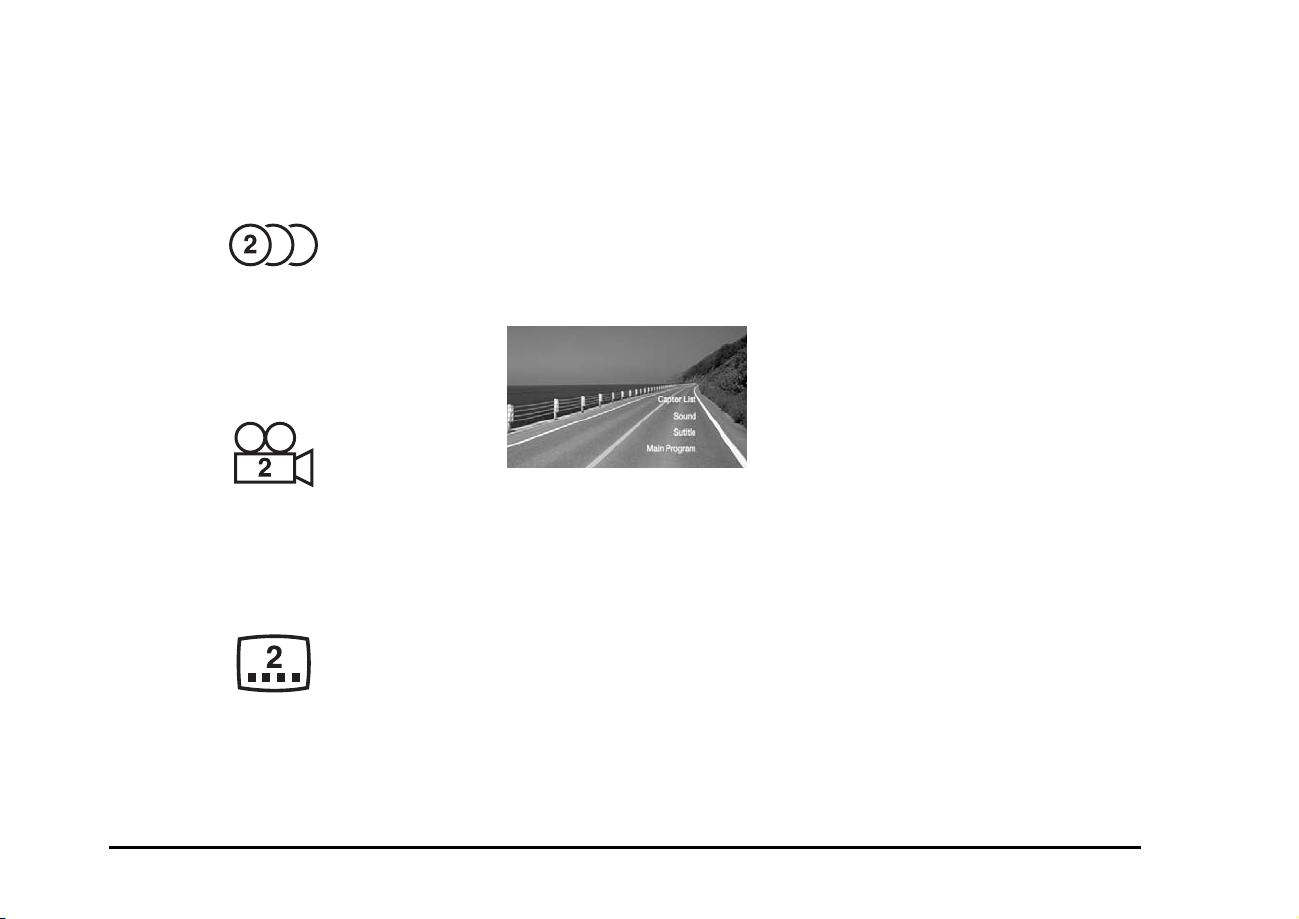
Multi-sound function
DVD video can store up to 8 languages
for one film; select the language of your
preference.
•
The languages stored on the disc are
indicated by the icon shown below.
Multi-story function
When a DVD video contains more than one
story for a film, you can select the story you
wish to enjoy. The operation procedures vary
with the disc; observe the instructions for
selecting a story provided during playback.
DVD menu
DVD Menus can be called up during DVD
video playback to perform menu setting.
Multi-angle function
A DVD video that is filmed from multiple
angles allows you to select the angle of
choice.
•
The number of recorded angles is indicated
by the icon shown below.
Subpicture (subtitles) function
A DVD video can record subtitles for up to 32
languages and you can select the language of
the subtitles you wish to see.
•
The number of recorded subtitle languages
is indicated by the icon shown below.
Example showing DVD menu•
5
Page 6
1. PRECAUTIONS
WARNING
For your safety, the driver should not
watch the DVD video/movie data or
operate the controls while driving.
Please note that watching and operating
the DVD video/movie data while driving
are prohibited by law in some countries.
Also, while driving, keep the volume to
a level at which external sounds can be
heard.
When the inside of the car is very cold and
1.
the player is used soon after switching on
the heater, moisture may form on the disc
(DVD/CD) or the optical parts of the player
and proper playback may not be possible.
If moisture forms on the disc (DVD/CD),
wipe it off with a soft cloth. If moisture
forms on the optical parts of the player,
do not use the player for about one hour.
The condensation will disappear naturally
allowing normal operation.
2.
Driving on extremely bumpy roads which
cause severe vibration may cause the
sound to skip.
3.
This unit uses a precision mechanism.
Even in the event that trouble arises, never
open the case, disassemble the unit, or
lubricate the rotating parts.
The on-screen display in some operations
4.
is not available in Thai.
Thai on-screen display is available:
Navigation screens, Hands Free
Phonebook/Call Log/SNS
Thai on-screen display is not available:
Audio operation screens, Titles of CD/USB/
iPod modes, Bluetooth application screens.
Subpicture (subtitles) in Thai of DVD can
be displayed if available.
INFORMATION FOR USERS:
CHANGES OR MODIFICATIONS TO
THIS PRODUCT NOT APPROVED BY
THE MANUFACTURER WILL VOID THE
WARRANTY.
Operation Panel/
Generalities
For a longer service life, be sure to read the
following cautions.
The operation panel will operate properly in
•
a temperature range of 0 to 60°C.
Do not allow any liquids on the set from
•
drinks, umbrellas, etc. Doing so may
damage the internal circuitry.
Do not disassemble or modify the set in any
•
way. Doing so may result in damage.
Do not draw the operation panel out and use
•
it as a tray. Also, subjecting the operation
panel to shocks may result in breakage,
deformation, or other damage.
Do not let cigarettes burn the display. Doing
•
so may damage or deform the cabinet.
If a problem should occur, have the set
•
inspected at your store of purchase.
Do not insert objects or poke in the space
•
between the operation panel and the main
unit when the panel is tilted.
Do not place anything on the display when
•
the panel is tilted.
In extremely cold weather, the display
•
movement may slow down and the display
may darken, but this is not a malfunction.
The display will work normally when the
temperature increases.
Small black and shiny spots inside the
•
operation panel are normal for LCD
products.
The operation panel may stop temporarily
•
when it opens or closes, when the engine
stops or when it is cold.
The touchkeys on the display operate when
•
slightly touched. Do not press the touchkey
screen with much force.
6
Page 7

•
Do not push the case surrounding the
touchkey panel with much force. This may
cause malfunctioning of the touchkeys.
Cleaning
•
Cleaning the cabinet
Use a soft and dry cloth and gently wipe off
the dirt. For tough dirt, apply some neutral
detergent diluted in water to a soft cloth,
wipe off the dirt gently, then wipe again with
a dry cloth.
Do not use benzene, thinner, car cleaner,
etc., as these substances may damage the
cabinet or cause the paint to peel. Also,
leaving rubber or plastic products in contact
with the cabinet for long periods of time may
cause stains.
CAUTION
Do not use benzene, thinner, car cleaner,
polishing spray, etc., as these substances
may cause a fire.
Cleaning the operation panel
•
The operation panel tends to collect dust, so
wipe it off occasionally with a soft cloth. The
surface is easily scratched, so do not rub it
with hard objects.
About the Registered
Marks, etc.
This product incorporates copy protection
•
technology that is protected by U.S. and
other intellectual property rights. The use
of Rovi Corporation’s copy protection
technology in the product must be
authorized by Rovi Corporation. Reverse
engineering or disassembly is prohibited.
Use of this product by the customer is
restricted to play program materials to which
the Rovi copyright protection process has
been applied.
Manufactured under license from Dolby
•
Laboratories.
“Dolby” and the double-D symbol are
trademarks of Dolby Laboratories.
The Bluetooth word mark and logos are
•
owned by the Bluetooth SIG, Inc. and any
use of such marks by Clarion Co., Ltd. is
under license. Other trademarks and trade
names are those of their respective owners.
“Made for iPod,” and “Made for iPhone”
•
mean that an electronic accessory has been
designed to connect specifically to iPod, or
iPhone, respectively, and has been certified
by the developer to meet Apple performance
standards.
Apple is not responsible for the operation of
this device or its compliance with safety and
regulatory standards.
Please note that the use of this accessory
with iPod or iPhone may affect wireless
performance.
iPhone and iPod are trademarks of Apple
Inc., registered in the U.S. and other
countries.
BBE MP (Minimized Polynomial Non-Linear
•
Saturation) Process improves digitally
compressed sound, such as MP3, by
restoring and enhancing the harmonics lost
through compression. BBE MP works by
regenerating harmonics from the source
material, effectively recovering warmth,
details and nuance.
Manufactured under license from BBE
•
Sound, Inc.
Licensed by BBE Sound, Inc. under one or
•
more of the following US patents: 5510752,
5736897. BBE and BBE symbol are
registered trademarks of BBE Sound, Inc.
Unit operation Temperature 0°C-+60°C
7
Page 8

This device complies with Part 15 of the FCC Rules and with RSS-210 of Industry Canada. Operation is subject to
the following two conditions: (1) This device may not cause harmful interference, and (2) this device must accept any
interference received, including interference that may cause undesired operation.
Le présent appareil est conforme aux CNR d'Industrie Canada applicables aux appareils radio exempts de licence.
L'exploitation est autorisée aux deux conditions suivantes : (1) l'appareil ne doit pas produire de brouillage, et
(2) l'utilisateur de l'appareil doit accepter tout brouillage radioélectrique subi, même si le brouillage est susceptible
d'en compromettre le fonctionnement.
NOTE: The manufacturer is not responsible for any radio or TV interference caused by unauthorized modifications
to this equipment. Such modifications could void the user's authority to operate the equipment.
NOTE: This equipment has been tested and found to comply with the limits for a Class B digital device, pursuant to part
15 of the FCC Rules. These limits are designed to provide reasonable protection against harmful interference in
a residential installation. This equipment generates uses and can radiate radio frequency energy and, if not installed and
used in accordance with the instructions, may cause harmful interference to radio communications.
However, there is no guarantee that interference will not occur in a particular installation. If this equipment does cause
harmful interference to radio or television reception, which can be determined by turning the equipment off and on,
the user is encouraged to try to correct the interference by one or more of the following measures:
- Reorient or relocate the receiving antenna.
- Increase the separation between the equipment and receiver.
-Connect the equipment into an outlet on a circuit different from that to which the receiver is connected.
-Consult the dealer or an experienced radio/TV technician for help
Page 9

2. CONTROLS
Operation Panel
l
[AV] button
[{], [}] (Volume) buttons
Microphone
[POWER] button
With the operation panel open
l
[∧], [∨](Tune/Track) buttons
[OPEN/nTILT] button
SD memory card slot
[MAP] button
[DEST] button
[MENU] button
Functions of Buttons
Note:
•
Be sure to read this section while referring to
the front diagram.
[{], [}] (Volume) buttons
Use these buttons to increase/decrease the
•
volume.
[AV] button
Press this button to display/hide the Source
•
screen to switch the source mode.
[POWER] button
•
Use this button to turn on/off the audio
features of this unit.
[∧], [∨] (Tune/Track) buttons
•
In Tuner mode, press these buttons to seek
up/down by 1 step. Press and hold these
buttons to seek a station automatically.
•
In Audio CD, MP3/WMA/AAC, USB, iPod,
and Bluetooth Audio modes, use these
buttons to select a track to be played.
•
In Audio CD, MP3/WMA/AAC, USB, iPod,
and Bluetooth Audio modes, pressing and
holding a button during playback performs
the fast-forward/fast-backward operation.
[MAP] button
•
Press this button to display the Map screen
of the current location in any mode.
•
When the destination is set, keep pressing
this button for more than 1.5 seconds to
check the current guidance message.
[MENU] button
•
Press this button to display the Main Menu
screen in any mode.
[DEST] button
Press this button to display the Destination
•
Menu screen in any mode.
Keep pressing this button for more than
•
1.5 seconds to display the Go Home screen
in any mode.
[OPEN/nTILT] button
Use this button to open/close the operation
•
panel.
SD memory card slot
Insert an SD memory card with music files
•
into the unit to play them.
Microphone
The built-in microphone is for a Bluetooth
•
telephone.
Note:
•
Do not put a pointed object into the hole of the
microphone. This may damage the microphone.
8
Page 10
Outline of Button and
Touchkey Operation
Turning the power on
Note:
•
Start the engine before using this unit.
•
Be careful about using this unit for a long time
without running the engine. If you drain the car’s
battery too far, you may not be able to start the
engine and this can reduce the service life of
the battery.
System check
The format utilized on this unit is provided
with a system check function. When the
system check function is performed under
the following conditions, the power is
automatically turned off. Once turn off the
engine switch, then restart the engine again.
When power is first turned on after initial
•
installation.
When an external device is connected or
•
disconnected.
Note:
*1 These images indicate the buttons to press or keys to touch.
Engine ON
position
*1
You can change the media sources.
9
Page 11

Tuner mode operation
Switches the radio band.
(Source screen)
Select desired station after
•
selecting radio band.
Preset ch.
Manual tuning
10
Page 12
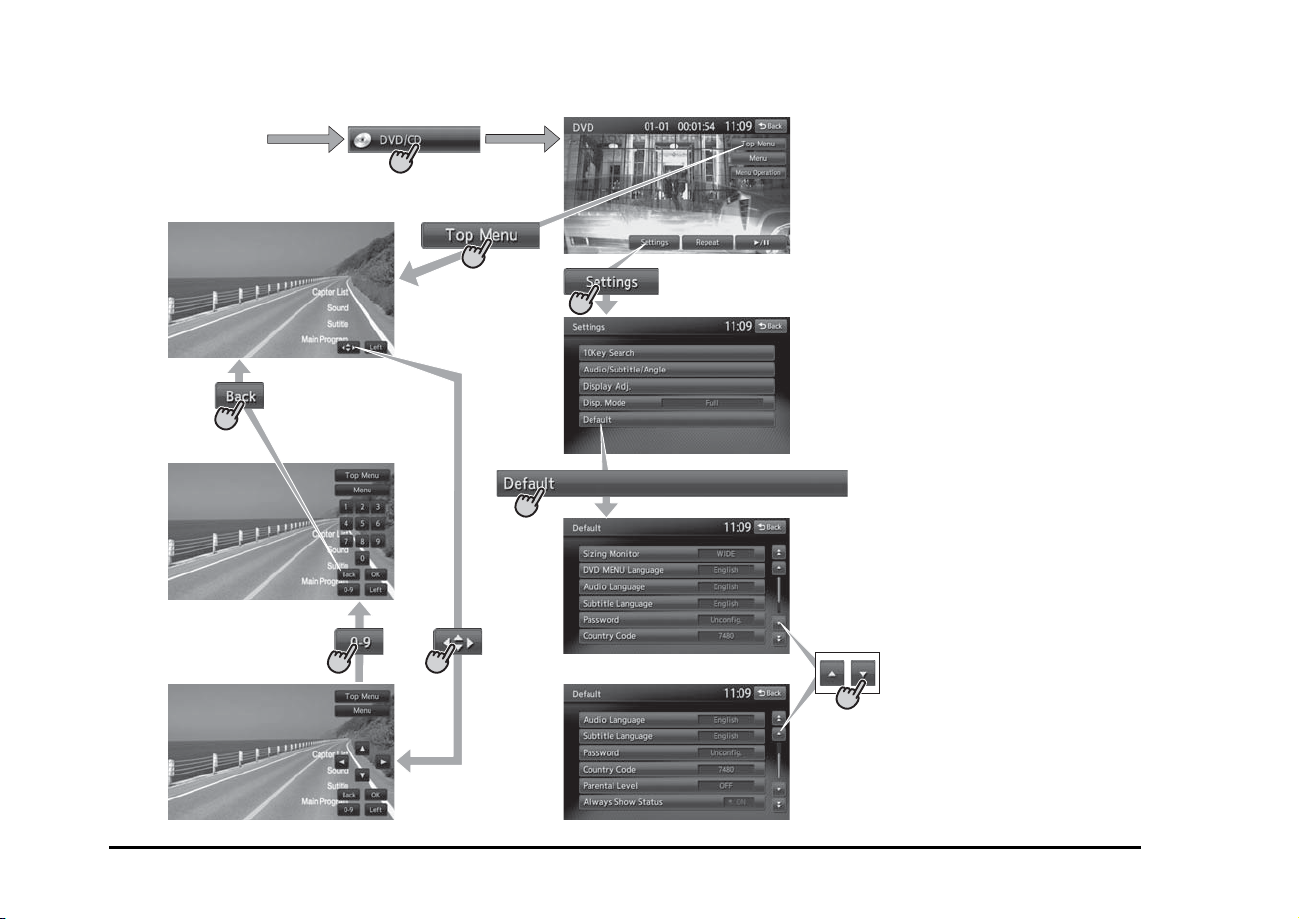
DVD Video mode operation
(Source screen)
(DVD top menu)
(DVD Video mode screen)
(Settings screen)
(Default screen)
11
Page 13
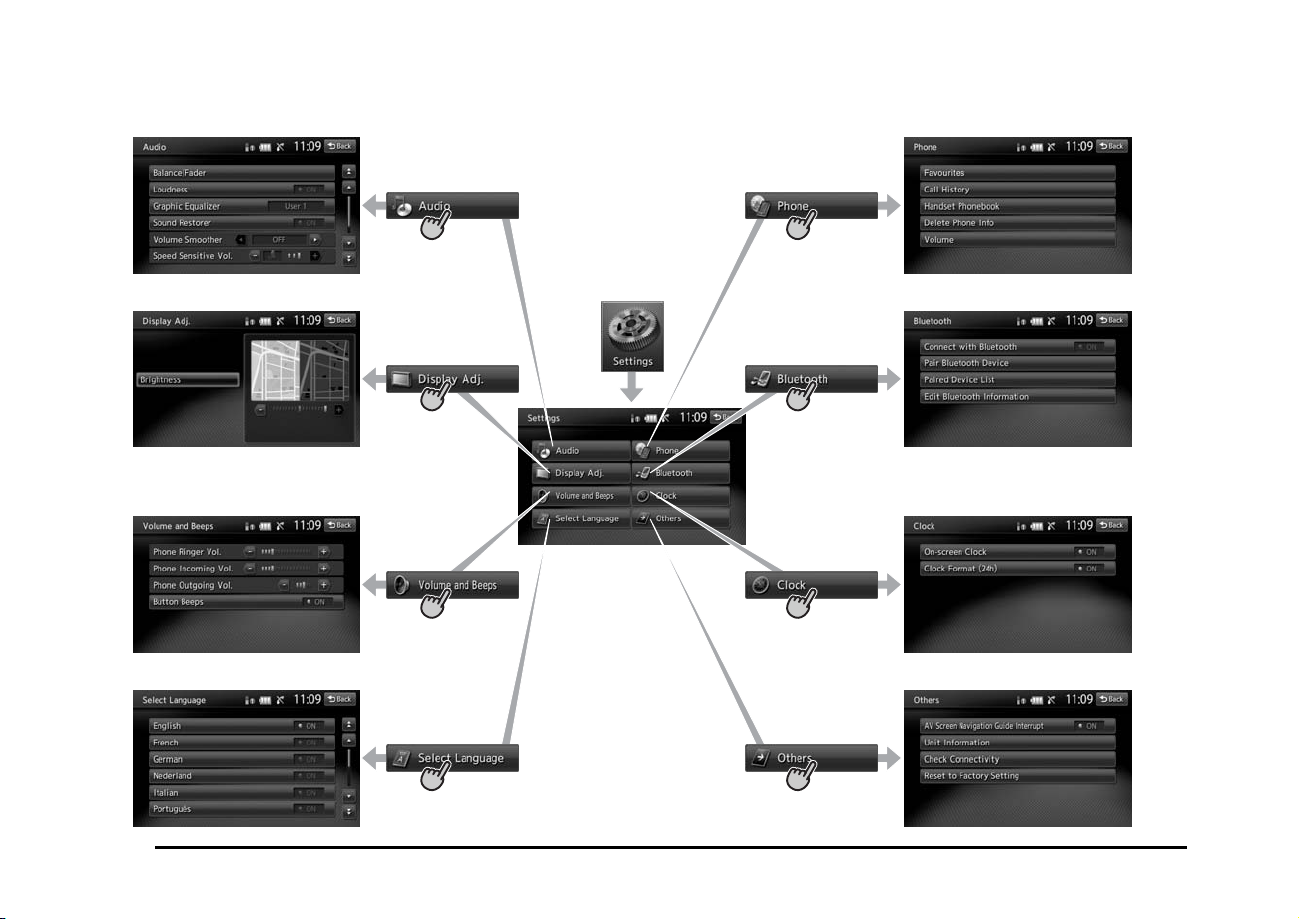
Adjusting the General settings
(Audio screen)
(Phone screen)
(Display Adj. screen)
(Volume and Beeps screen)
(Select Language screen)
12
(Main menu screen)
(Bluetooth screen)
(Clock screen)
(Others screen)
Page 14
3. BASIC
OPERATIONS
Note:
Be sure to read this chapter while referring to
•
“2. Controls” (page 8).
Turning the Power On/Off
Note:
Start the engine before using this unit.
•
Be careful about using this unit for a long time
•
without running the engine. If you drain the car’s
battery too far, you may not be able to start the
engine and this can reduce the service life of
the battery.
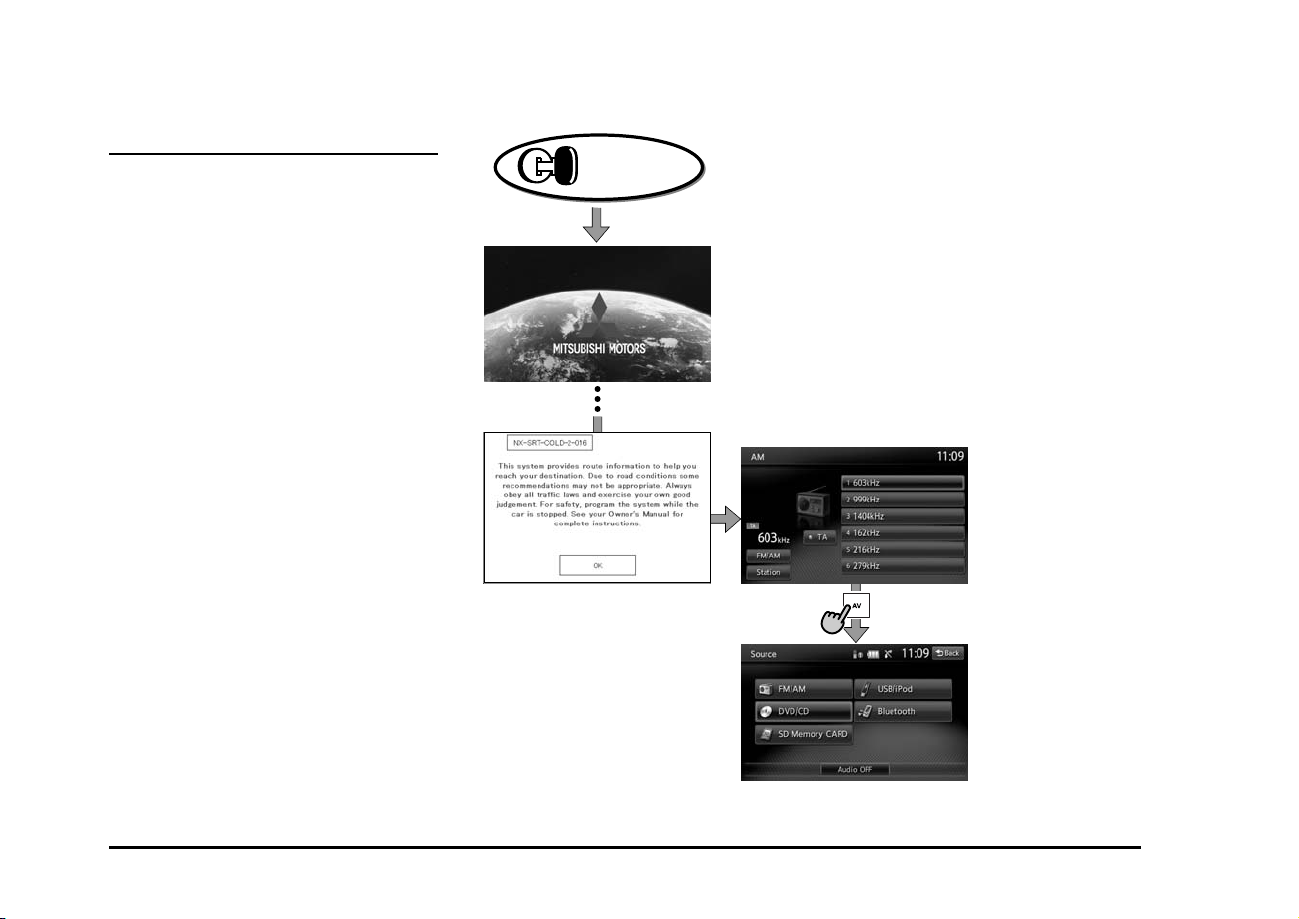
Turning the power on
q
Start the engine. The power is
1.
automatically turned on and the startup
screen is displayed.
Engine ON
position
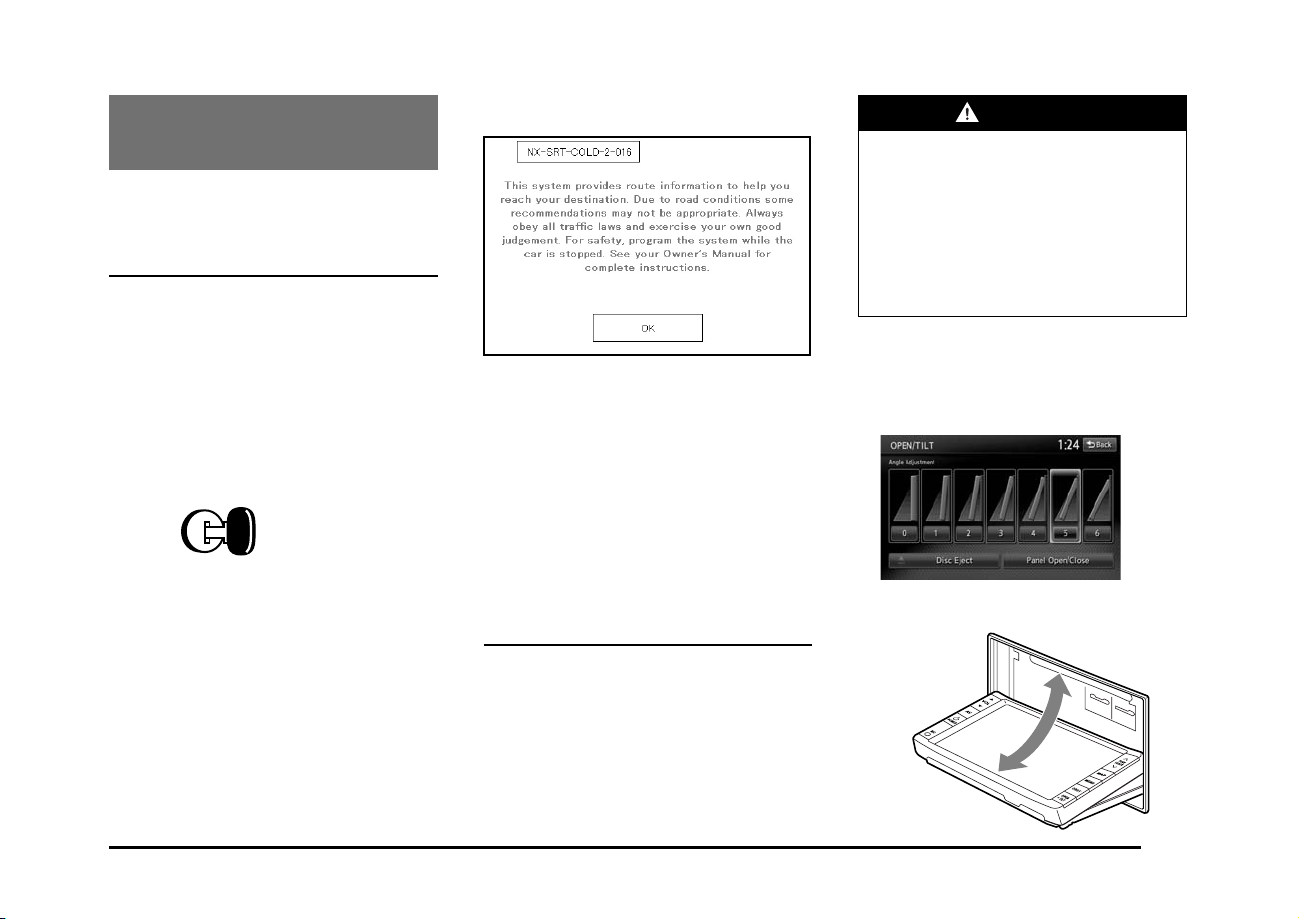
When the following caution screen is
displayed
Touch the [OK] key. The system resumes from
its status when the power was turned off.
The navigation system does not operate until
the [OK] key is touched.
The Audio features are available even if the
•
[OK] key is not touched.
Turning the power off
q
Turn the ignition switch to the OFF position.
1.
WARNING
To prevent the battery from going
•
dead, operate this unit with the engine
running if possible.
When the operation panel is operating,
•
be careful not to get your hand or
finger caught between the panel and
main unit or the instrument panel of
the car.
Do not move the operation panel by
•
hand.
Opening/closing the operation
panel
Press the [OPEN/nTILT] button to display
1.
the OPEN/TILT screen:
Note:
•
The power is turned on even when the ignition
switch is set to the ACC ON position.
Opening the Operation
Panel and Adjusting the
Angle
The operation panel can be opened/closed to
insert/eject a disc or memory card. The angle
of the operation panel can be adjusted to suit
the mounting angle of the unit or light coming
into the car.
2.
Touch the [Panel Open/Close] key.
The operation panel opens.
13
Page 15
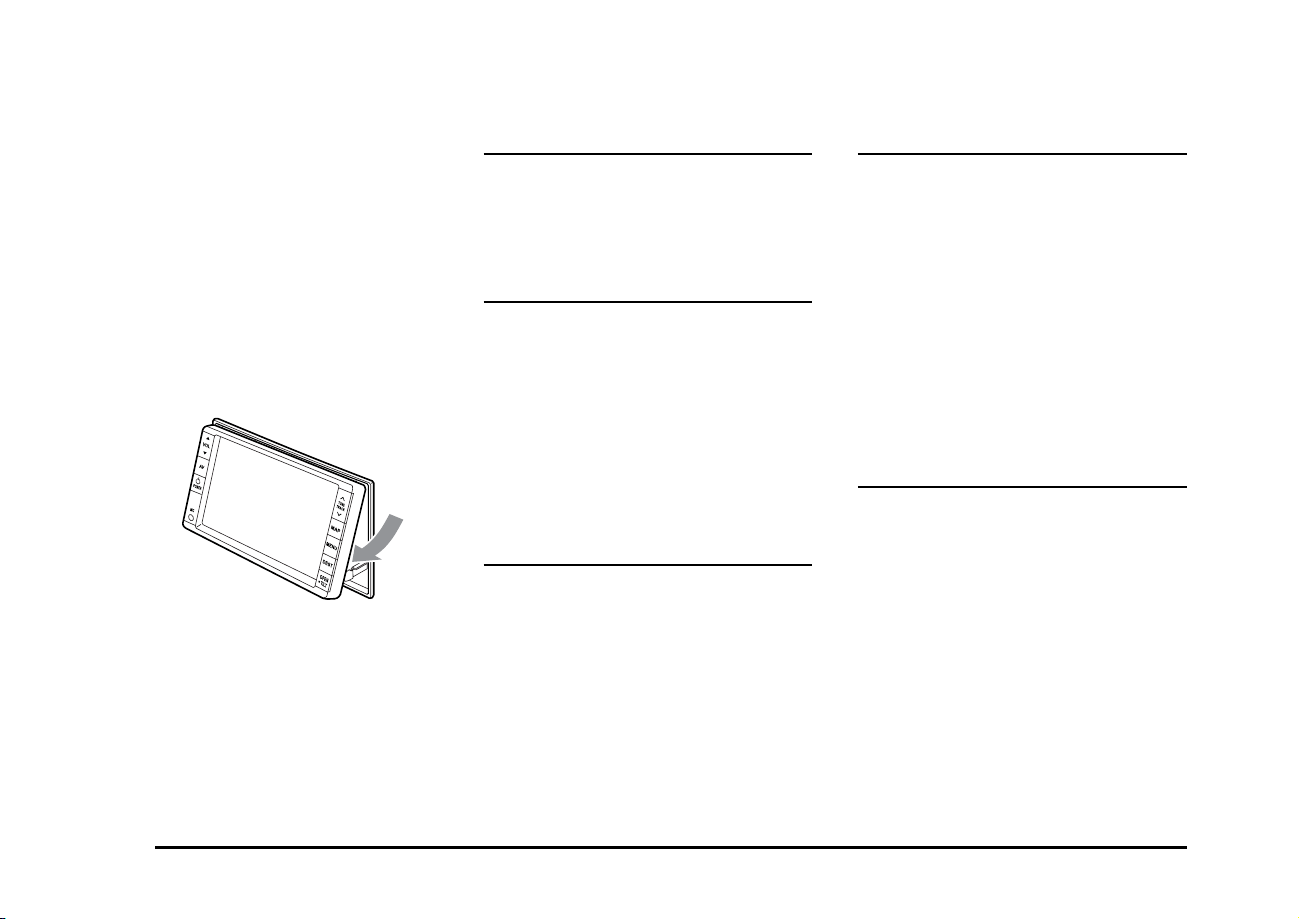
Touch the [Panel Open/Close] key when
3.
the operation panel is open.
The operation panel closes.
Adjusting the angle of the
operation panel
The angle of the operation panel can be
adjusted in the range of 0° to 30°.
Press the [OPEN/nTILT] button to display
1.
the OPEN/TILT screen.
Select the angle from [0] to [6] in Angle
2.
Adjustment.
The selected angle is stored in memory.
Once you select the angle of the operation
panel, the operation panel returns to the
selected angle even after it is opened/
closed.
Touch the [Back] key to return to the
3.
previous screen.
Returning the operation panel to
the original angle
Press the [OPEN/nTILT] button to display
1.
the OPEN/TILT screen.
2.
Touch the [0] key in Angle Adjustment.
The operation panel moves and stops at
0°.
Switching the Operation
Mode
To switch to the Source menu screen from
the Navigation screen, press the [AV] button
twice. To switch to the Navigation screen from
the Source menu screen, press the [MAP]
button.
Turning the Audio Off
You can turn off all of the Audio features.
Press the [AV] button (once or twice) until
1.
the Source menu screen is displayed.
Touch the [Audio OFF] key.
2.
Turning the Audio features on
Press the [AV] button (once or twice) until
1.
the Source menu screen is displayed.
Touch one of the source keys.
2.
Switching between day
and night modes
You can switch the screen brightness setting
between day and night modes.
1.
Press the [MENU] button and touch the
[Day/Night] key.
The display dims or brightens.
Turning the Monitor
Display Off
You can turn off the monitor display, and
change it to a black screen.
Press the [MENU] button and touch the
1.
[Display] key to display the Display screen.
Touch the [Screen Display OFF] key.
2.
The monitor display turns off.
Turning the monitor display on
Touch the monitor display.
1.
You can also turn on the monitor display
•
by pressing the [AV], [MAP], [MENU],
[DEST], or [OPEN/nTILT] button, or any
button on the steering remote control.
Displaying the Clock
Screen
You can change the screen to display only the
digital clock on a dark background.
1.
Press the [MENU] button and touch the
[Display] key to display the Display screen.
2.
Touch the [Clock Screen Display] key.
The Clock screen is displayed.
To return to the current mode screen,
touch the monitor screen or press the [AV]
button.
Note:
•
The Clock screen cannot be displayed while in
Tel mode.
14
Page 16

Adjusting the Volume
1.
Press the [{], [}] (Volume) buttons to
adjust the volume.
[{] button: Increases the volume.
[}] button: Decreases the volume.
•
The volume level has a range of 0 (min.)
to 31 (max.).
CAUTION
About CD Extra discs
A CD Extra disc is a disc in which a total of
two sessions have been recorded. The first
session is an Audio session and the second
session is a Data session.
Your personally-created CDs with more than
a second data session recorded cannot be
played on this unit.
Note:
•
When you play a CD Extra disc, only the first
session is recognised.
Notes on handling discs
q
Handling
New discs may have some roughness
•
around the edges. If such discs are used,
the player may not work or the sound may
skip. Use a ball-point pen or the like to
remove any roughness from the edge of the
disc.
Ball-point pen
While driving, keep the volume at a level at
which external sounds can be heard.
Setting/Ejecting a Disc
Playable discs
q
This unit can play the following discs.
Playable discs
Audio CDs
About CD TEXT discs
This unit is compatible with CD TEXT, and
supports the display of the DISC TITLE,
TRACK TITLE, and TRACK ARTIST of the CD
TEXT.
CD TEXT
About playing a CD-R/RW disc
This unit can play CD-R/RW discs previously
recorded in Audio CD format or format with
MP3/WMA files.
Discs that cannot be played back
This player cannot Video, DVD Audio, DVDRAM, Video CDs, Photo CDs, etc.
Note:
It may not be possible to play back discs
•
recorded on some CD/DVD drives. (Cause: disc
characteristics, cracks, dust/dirt, dust/dirt on
player’s lens, etc.)
•
If a CD-R/RW disc that has not been finalised is
played, it takes a long time to start playing. Also,
it may not be possible to play depending on its
recording conditions. Be sure to record the disc
in a relevant format and finalise it.
•
Do not use a dual disc because it may not be
ejected.
•
You cannot play Super Audio CDs. Playback is
not supported even if it is a hybrid disc.
About MP3/WMA/AAC playback
This unit can play back CD-R/RW discs on
which MP3/WMA/AAC music data have been
stored. É “MP3/WMA/AAC Operations” (page
24).
Roughness
Never stick labels on the surface of the disc or
mark the surface with a pencil or pen.
Never play a disc with any cellophane tape
•
or other glue on it or with labels that are
peeling off. If you try to play such a disc, you
may not be able to get it back out of the unit
or it may damage the unit.
Do not use discs that have large
•
scratches or a unique shape, or discs
that are misshapen, cracked, etc. Use
of such discs may cause malfunction or
damage.
To remove a disc from its storage case,
•
press down on the centre of the case
and lift the disc out, holding it carefully by
the edges.
Do not use commercially available disc
•
protection sheets or discs equipped with
stabilizers, etc. These may damage the
disc or cause breakdown of the internal
mechanism.
15
Page 17

Storage
Do not expose discs to direct sunlight or any
•
heat source.
Do not expose discs to excess humidity or
•
dust.
Do not expose discs to direct heat from
•
heaters.
Cleaning
To remove finger marks and dust, use a soft
•
cloth and wipe in a straight line from the
centre of the disc to the circumference.
Do not use any solvents, such as
•
commercially available cleaners, anti-static
spray, or thinner to clean discs.
After using special disc cleaner, let the disc
•
completely dry off before playing it.
On Discs
Exercise sufficient precaution when loading
•
a disc.
Never turn off the power and remove the
•
unit from the car with a disc loaded.
Do not use lens cleaning discs. These may
•
damage the lens of this unit.
When there seems to be something wrong
•
with reading discs, please consult the
nearest authorized Mitsubishi Motors dealer.
Setting a disc
q
Press the [OPEN/nTILT] button to display
1.
the OPEN/TILT screen.
Touch the [Panel Open/Close] key.
2.
The operation panel opens.
Insert a disc into the centre of the insertion
3.
slot with the label side facing up.
The disc is automatically drawn into the
disc slot.
16
After setting a disc
The system automatically switches to the
relevant source mode according to the disc,
and starts playing back the disc.
When a DVD video disc is set:
The system is switched to the DVD Video
mode. See “DVD video Operations”
(page 26).
When an Audio CD is set:
The system is switched to the Audio CD
mode. See “Audio CD Operations” (page 23).
When a CD/DVD with MP3/WMA/AAC files
is set:
The system is switched to the MP3/WMA/AAC
mode.
See “MP3/WMA/AAC Operations” (page 24).
Note:
•
Never insert foreign objects into the disc slot.
•
If the disc cannot be inserted, another disc
might already be in the disc slot. Eject a disc in
the disc slot before inserting a new disc.
•
8 cm (single play) discs cannot be used.
CAUTION
For your safety, the driver should not
insert or eject a disc while driving.
Ejecting a disc
q
Press the [OPEN/nTILT] button to display
1.
the OPEN/TILT screen.
Touch the [Disc Eject] key to eject the disc.
2.
The operation panel opens and the disc is
ejected.
If a disc is left in the ejected position for
•
20 seconds, the disc is automatically
reloaded (Auto reload).
Remove the disc carefully.
3.
4.
Touch the [Panel Open/Close] key to close
the operation panel.
Note:
If you force a disc into the insertion slot before
•
auto reloading, this can damage the disc.
Inserting/Removing an SD
Memory Card
Playable discs
q
This unit has one USB (Universal Serial Bus)
connector which is compatible with USB 1.1
and USB 2.0.
q
Playable SD memory cards
This system can control the following SD
memory cards.
Cards with a FAT16 or FAT32 file system
•
Cards with a size of up to 32GB
•
This system does not operate or may
•
operate improperly with some SD memory
cards.
About the SD memory card
This system can play audio files (MP3/WMA/
AAC) stored in an SD memory card. You can
use your SD memory card as an audio device
by simply copying desired audio files into it.
Files protected with any DRM cannot be
•
played.
For the other limitations, see “SD Memory
•
Card Operations” (page 32).
Page 18

Inserting an SD memory
q
card
CAUTION
For your safety, the driver should not
•
insert or remove an SD memory card.
Do not start the vehicle’s engine while
•
the SD memory card is inserted, since
it may result in loss or damage to data
on the SD memory card. Insert the SD
memory card to this unit after starting
the engine.
About MP3/WMA/AAC playback
This unit can play back SD memory cards on
which MP3/WMA/AAC music data have been
stored. É “MP3/WMA/AAC Operations” (page
24).
Inserting an SD memory
q
card
Press the [OPEN/nTILT] button to display
1.
the OPEN/TILT screen.
Touch the [Panel Open/Close] key.
2.
The operation panel opens.
Insert an SD memory card into the SD
3.
memory card slot with the label side facing
up and the connectors facing forward. You
will hear a “click” when the SD memory
card is fully inserted.
After inserting an SD memory card
The system automatically switches to SD
Memory CARD mode, and starts playing back
the files on the card.
Note:
•
Never insert foreign objects into the SD memory
card slot.
•
If the SD memory card cannot be inserted,
another SD memory card might already be in
the SD memory card slot. Eject the SD memory
card SD memory card slot before inserting a
new SD memory card.
CAUTION
For your safety, the driver should not
insert or remove an SD memory card while
driving.
Removing an SD memory
q
card
Press the [OPEN/nTILT] button to display
1.
the OPEN/TILT screen.
Lightly press the SD memory card inward
2.
with your finger until it stops, and then pull
back your finger. The SD memory card
comes out.
Remove the SD memory card carefully.
3.
Touch the [Panel Open/Close] key to close
4.
the operation panel.
Connecting/Disconnecting
a USB Media Device
This unit has one USB (Universal Serial Bus)
connector which is compatible with USB 1.1
and USB 2.0.
Playable USB media devices
q
This system can control the following USB
media devices connected to the USB
connector.
Apple iPod
•
USB memory
•
About an Apple iPod
To enjoy videos stored in the iPod with
the video displayed on this unit, a special
connection cable (sold separately) is required.
For details, consult your Mitsubishi Motors
dealer.
Note:
•
An iPhone can also be connected to this
system. References to “iPod” appearing in this
manual also apply to the use of an iPhone.
•
This system does not operate or may operate
improperly with unsupported versions.
•
For detailed information on the playable iPod
models, consult your Mitsubishi Motors dealer.
•
For the other limitations, see “iPod Operations”
(page 34).
About the USB memory
This system can play audio files (MP3/
WMA/AAC) stored in a USB memory which
is recognized as “USB Mass Storage Class
device”. You can use your USB memory as an
audio device by simply copying desired audio
files into it.
Note:
•
This system does not operate or may operate
improperly with some USB memory devices.
•
Files protected with any DRM cannot be played.
•
For the other limitations, see “USB Memory
Operations” (page 33).
17
Page 19

Connecting a USB media
q
device
CAUTION
For your safety, the driver should not
•
connect or disconnect a USB media
device.
Do not start the vehicle’s engine while
•
the USB media device is connected,
since it may result in loss or damage to
data on the USB media device. Connect
the USB media device to this unit after
starting the engine.
Turn on the power of your USB media
1.
device, if required.
Confirm the orientation of the connectors,
2.
and connect the USB media device to the
USB connector of this unit.
It may take a long time to recognize the
•
connected device.
After connecting a USB device
The system switches to the relevant source
media mode depending on the USB device
connected, and playback starts.
When an iPod is connected:
The system switches to iPod mode. See “iPod
Operations” (page 34).
When a USB memory is connected:
The system switches to USB Memory mode.
See “USB Memory Operations” (page 33).
Note:
•
Never insert unrelated objects into the USB
connector.
•
Always insert the USB media device fully into
the connector. Incomplete connections may
cause the device not to be recognized.
Disconnecting a USB media
q
device
Confirm that data is not being transferred
1.
to or from the USB media device.
For how to confirm this, refer to the
operation manual of your USB media
device.
Remove the USB media device from the
2.
USB connector.
CAUTION
Be sure to disconnect the USB media
device while the vehicle’s engine is
running. Otherwise, loss of or damage to
data on the USB media device may occur.
Do not stop the engine when the USB
media device is connected.
Note:
•
When turning on the ACC power with no USB
media device connected, “No USB memory.”
may be displayed on the screen if USB mode is
selected.
Selecting a Media Source
You can change the media source to be
played from the Source menu screen.
Press the [AV] button to display the Source
1.
screen.
Touch the corresponding key for the
2.
desired Source.
The system switches to the corresponding
source mode.
When [Audio OFF] is not enabled,
pressing the [AV] button from the Source
menu screen displays the current mode
screen.
Note:
•
You can also change the source mode by using
the steering remote controller. For details, see
“Steering Remote Control Operations” (page
19)
Available media sources
Key name Corresponding
FM/AM Tuner mode P. 20
DVD/CD*1CDDA mode P. 23
SD Memory
CARD
USB/iPod*
Bluetooth Bluetooth Audio
*1 The source mode differs depending on the
data format of the disc set in the CD player.
When no disc is set in the CD player, “No
disc.” is displayed.
source mode
MP3/WMA/AAC
mode
DVD Video mode P. 26
SD memory card
mode
2
USB Memory
mode
iPod mode P. 34
mode
Refer to
P. 24
P. 32
P. 33
P. 36
18
Page 20

*2 The source mode differs depending on
the device connected. When no device
is connected, “No USB memory.” is
displayed.
Selecting the Telephone mode
Touching the [Phone] key after pressing the
[MENU] button calls the Telephone mode.
Even in the Telephone mode, the previous
Source mode is kept operating. É “Telephone
Operations” (page 37)
Steering Remote Control
Operations
You can use the Steering Remote Control to
perform various audio operations.
These operations can be used only when your
vehicle is equipped with a Steering Remote
Control.
Note:
•
While driving, be sure that audio control
operations do not interfere with your driving.
•
The buttons on the Steering Remote Control
are effective only when the Audio features are
turned on. On the unit, press the [AV] button
(once or twice) until the Source menu screen
is displayed and select a source before you
operate the Steering Remote Control.
Function of controls
The operations differ depending on the type of
Steering Remote Control that you use.
[+], [–] buttons
•
Press these buttons to increase/decrease
the volume. [MODE/SOURCE] button.
•
Press this button to switch between the
source mode. Switching is performed in the
following order:
FM1 (Tuner mode) É FM2 (Tuner mode)
É AM (Tuner mode) É SD Memory CARD
mode* É Bluetooth Audio mode* É DVD/
CD mode* É USB/iPod mode* É FM1
(Tuner mode) …
* When a corresponding media is not
inserted or connected, the unit will skip the
SD Memory CARD mode, Bluetooth Audio
mode, DVD/CD mode, and USB/iPod
mode.
[TRACK/CH UP], [TRACK/CH DOWN] buttons
These buttons have the same function as
•
the [∧] and [∨] (TUNE TRACK) buttons on
the unit. For details, see “” (page 8).
In Tuner mode, press these buttons to
•
change to the next/previous preset station.
Continue pressing these buttons to
automatically seek a station.
In Audio CD, MP3/WMA/AAC (CD), SD
•
Memory CARD, USB, iPod, SD Memory
CARD, and Bluetooth Audio modes, press
these buttons to select a track to be played.
In MP3/WMA/AAC (CD) and USB modes,
•
continue pressing these buttons to select
the next/previous folder.
In Bluetooth Audio mode, continue pressing
•
these buttons to select the next/previous
group.
For other Steering Remote Controls:
l
The buttons for a Mitsubishi Steering Remote
Control and other Steering Remote Controls
may be different. Refer to the following chart
for button equivalents:
Mitsubishi Other
[+] [VOL +]
[–] [VOL –]
[MODE/SOURCE] [MODE]
[{]
[}]
[CH +]
[CH –]
19
Page 21

4. SOURCE
OPERATIONS
Radio Operations
This unit supports FM and AM radio reception.
This unit also has a built-in “Radio Data
System” (RDS) decoder system that supports
broadcast stations transmitting RDS data.
RDS functions are only available for the FM
band.
Note:
When you store a station without broadcasting
•
RDS data to the preset memory, store the
station after receiving it for more than
10 seconds. If you store such a station within
10 seconds, it will be stored as an RDS station,
and the RDS tracking function will activate
when you tune in.
Selecting the Tuner mode
q
Press the [AV] button to display the Source
1.
menu screen.
Touch the [FM/AM] key to select Tuner
2.
mode.
The Tuner mode screen is displayed.
You can also select Tuner mode and the
•
radio band by using the steering remote
control. É “Steering Remote Control
Operations” (page 19)
Tuner mode screen
q
Information pane Preset keys
When station names are received from RDS
•
stations, they are displayed on the Preset
keys in place of the frequency indications.
When station names and PTY (Program
•
Type) of the currently tuned station are
received, they are displayed on the
information pane.
“Stereo” appears when a stereo broadcast
•
is detected.
Radio operations
q
Listening to the radio
Touch the [FM/AM] key to select the radio
1.
band.
Each time you touch this key, the radio
reception band changes in the following
order:
FM1 É FM2 É AM É FM1…
•
The current radio reception band is
•
indicated at the top of the display.
Touch the desired Preset key on the Preset
2.
key pane to tune in the preset station.
Manual tuning
There are 3 manual tuning methods: step
tuning, seek tuning, and fast tuning.
When you are in step tuning mode, the
frequency changes one step at a time. In seek
tuning and fast tuning modes, you can quickly
tune the desired frequency.
Select the desired band by touching the
1.
[FM/AM] key.
Tune into a station.
2.
Step tuning:
Press the [∧] or [∨] (TUNE/TRACK) button
to manually tune in a station.
Seek tuning:
Press and hold the [∧] or [∨] (TUNE/
TRACK) button and release it within
1.5 seconds to tune in a station.
Fast tuning:
Press and hold the [∧] or [∨] (TUNE/
TRACK) button for more than 1.5 seconds
to step up or down continuously. When the
button is released, a station will be tuned
by seek tuning.
Recalling a preset station
There are total of 18 preset positions
(6 for FM1, 6 for FM2, and 6 for AM) to store
individual radio stations in memory.
Touch the [FM/AM] key to select the
1.
desired band.
Touch the desired Preset key on the Preset
2.
key pane to recall the preset station.
20
Page 22

Manual memory
Touch the [Band] key to select the desired
1.
band.
Select the desired station with the manual
2.
tuning or preset tuning.
Touch and hold one of the Preset key for
3.
more than 1.5 seconds to store the current
station into the preset memory.
Displaying the Station List
You can display a list of stations that are
currently receivable.
Touch the [FM/AM] key to select the
1.
desired band.
Touch the [Station] key to display the
2.
Station List screen.
You can tune in a station by touching the
desired Station key.
You can update the station list by
•
touching the [Update Radio Station
List] key. The currently receivable
stations are listed in alphabetical order.
The system also updates the list of FM
stations automatically.
Note:
•
The system does not update the list of AM
stations automatically. Touch the [Update Radio
Station List] key to update the station list.
Displaying radio text
Note:
•
This function is only available when using Radio
Data System functions.
When the station receiving broadcasts text
data, you can display the data on the screen.
1.
Touch the [Info] key on the Tuner mode
screen.
The received radio text is displayed on the
screen.
TA (Traffic Announcement)
q
function
Note:
•
This function is only available when using Radio
Data System functions.
When a traffic announcement broadcast
starts during TA standby mode, the traffic
announcement broadcast is received as top
priority regardless of the function mode, so
you can listen to it.
Setting TA standby mode
1.
Touch the [TA] key.
The key becomes lighted and “TA” is
displayed in the information pane.
Canceling a TA broadcast
Touch the [Cancel] key while receiving a TA
broadcast. Broadcast reception is canceled,
and the system goes into TA standby mode.
Canceling TA standby mode
1.
When the [TA] key is highlighted, touch the
[TA] key.
The key lighting turns off and [TA]
disappears from the information pane.
AF (Alternate Frequency)
q
function
Note:
•
This function is only available when using Radio
Data System functions.
The AF function switches to different
frequencies of the same broadcast in order to
maintain optimum reception.
Setting the AF function
1.
Touch the [Settings] key to display the
Settings screen.
2.
Touch the [AF (Alternative Frequency)]
key.
The AF function is turned on and [AF] is
displayed in the information pane.
If the reception of the current broadcast
deteriorates considerably, this unit searches
for the same broadcast on another frequency.
REG (Regional Frequency)
q
function
Note:
•
This function is only available when using Radio
Data System functions.
When set to ON and the AF function activates,
the REG function allows the unit to receive a
station with the same programme identification
code as the one that was previously received.
When set to OFF and the AF function
activates, the system receives stations with
other programme identification codes, such as
regional variants of a programme.
- The default setting is ON.
Setting the REG function
Touch the [Settings] key to display the
1.
Settings screen.
Touch the [REG (Regional)] key.
2.
The REG function is turned on and [REG]
is displayed in the information pane.
Note:
•
This function can only be set when the AF
function is set to ON.
21
Page 23

PTY (Program Type) function
q
Note:
•
This function is only available when using Radio
Data System functions.
This function enables you to listen to a
broadcast of the specified programme type
when the broadcast starts, even if the system
operates in a mode other than Tuner mode.
Some countries do not yet have PTY
broadcasts.
In TA standby mode, a TA broadcast has
priority over a PTY broadcast.
The default setting is OFF.
Setting the PTY function
1.
Touch the [Settings] key to display the
Settings screen.
2.
Touch the [PTY (Program Type)] key.
3.
Touch the [PTY Select] key to display the
PTY Select screen.
4.
Touch your desired PTY item key to select
the programme type.
The 29 types of PTY listed below can be
selected.
PTY item
News
Current Affairs
Information
Sport
Education
Drama
Culture
Science
Varied Speech
Pop Music
Rock Music
Easy Listening
Light Classics
Serious Classics
Other Music
Weather
Finance
Children’s Progs
Social Affairs
Religion
Phone In
Travel & Touring
Leisure & Hobby
Jazz Music
Country Music
National Music
Oldies Music
Folk Music
Documentary
PTY item
The programme type is set.
Canceling a PTY interrupt broadcast
1.
Touch the [Cancel] key while receiving the
PTY interrupt broadcast.
The PTY interrupt is cancelled, and the
system returns to PTY standby mode.
Emergency broadcast
If an emergency broadcast is received, all
function mode operations are stopped, “Alarm”
appears on the screen and the emergency
broadcast can be heard.
Canceling an emergency broadcast
1.
Touch the [Cancel] key while receiving the
emergency broadcast.
The emergency broadcast reception is
cancelled.
Volume setting for TA,
q
emergency broadcast, and
PTY
Note:
•
This function is only available when using Radio
Data System functions.
The volume of interrupts for the TA function,
emergency broadcasts, and the PTY function
can be set.
Touch the [Settings] key to display the
1.
Settings screen.
Touch the [–] or [+] key on the [TA Volume]
2.
pane to set the volume to the desired level.
Level: 0 to 31
•
You can also adjust the volume of a
•
TA interrupt by pressing the [–] and [+]
(Volume) buttons during the TA interrupt.
22
Page 24

Audio CD Operations
This system is a CD TEXT compatible
model, and supports the display of DISC
TITLE, TRACK TITLE, and TRACK ARTIST
information from CD TEXT.
Note:
•
This unit supports CD TEXT in English, French,
and German. Some characters may not be
reproduced properly on the display.
Selecting Audio CD mode
q
Insert an audio CD into the unit.
1.
The system will automatically read the disc
data, change to Audio CD mode, and start
playback after a short time. É “Setting/
Ejecting a Disc” (page 15)
WARNING
Some CDs may be recorded at a higher
volume level than desired. Increase
the volume gradually from the minimal
setting when starting playback.
l
When an audio CD is already inserted
1.
Press the [AV] button to display the Source
menu screen.
2.
Touch the [DVD/CD] key to select Audio
CD mode.
The system changes to Audio CD mode,
and starts playback from the previous
position.
•
You can also select Audio CD mode
(CD mode) by using the steering remote
control. É “Steering Remote Control
Operations” (page 19)
Audio CD mode screen
q
q
Audio CD operations
Selecting a track to play
Display the desired Track key on the Track
1.
list pane by touching the [{], [}], [
{
[
] key, then touch the Track key to play
{
back the track.
Playback of the specified track starts.
}
}
Changing tracks
Press the [∧] or [∨] (TUNE/TRACK) button
1.
during playback.
Tracks are skipped each time you press the
button, and playback starts.
Pressing the [∧] button starts playback
•
from the beginning of the next track.
Pressing the [∨] button starts playback
•
from the beginning of the current track.
Pressing the [∨] button twice within about
•
1.5 seconds starts playback from the
beginning of the previous track.
] or
Fast forward and fast backward
Press and hold the [∧] or [∨] (TUNE/
1.
TRACK) button during playback.
The playback speed becomes 5-times
faster at first and then 30-times faster
3 seconds later.
Release the button to resume playback at
normal speed.
Other various play functions
Touch the [Mode] key.
1.
The Mode screen is displayed.
Touch a key for the function you want to
2.
use.
[Repeat All] key:
Plays back all the tracks repeatedly.
[Repeat All] is displayed on the information
pane.
[Repeat Folder] key:
Plays back the current folder repeatedly.
[Repeat Folder] is displayed on the
information pane.
[Repeat Track] key:
Plays back the current track repeatedly.
[Repeat Track] is displayed on the
information pane.
[Shuffle All] key:
Plays back tracks recorded in the disc in
random order.
[Shuffle All] is displayed on the
information pane.
23
Page 25

[Shuffle Folder] key:
Plays back tracks in a single folder on a
disc in random order.
[Shuffle Folder] is displayed on the
information pane.
Note:
The play mode cannot be cancelled. Normally, it
•
should be set to [Repeat All].
MP3/WMA/AAC
Operations
This system can play MP3/WMA/AAC data
recorded on a disc.
About the MP3/WMA/AAC
q
files
What is MP3/WMA/AAC?
MP3, WMA, and AAC are audio compression
methods which have become standard
formats.
MP3 is an audio compression method
and classified into audio layer 3 of MPEG
standards.
WMA (Windows Media Audio) is an audio
compression method developed by Microsoft
Corporation.
AAC (Advanced Audio Coding) is a newer
audio compression method developed for
used with video compression standards
MPEG-2 and MPEG-4, and has been adopted
as the standard audio format of the iPod and
iTunes by Apple Inc.
These features compress the original audio
data to about 10 percent of its initial size with
a high sound quality. This means that about
10 music CDs can be recorded on a CD-R/
RW disc to allow a long listening time without
24
having to change CDs.
Displaying MP3/WMA/AAC Tag
titles
Tag information such as title, artist and album
title can be displayed for an MP3/WMA/AAC
file containing Tag information.
This system supports ID3 Tag ver. 1.x/2.x
•
and WMA Tag.
This system supports the tag titles up to
•
30 bytes for ID3 Tag ver. 1.x, and up to 60
bytes for ID3 Tag ver. 2.x and WMA tag.
Precautions on MP3/WMA/AAC
data
Files with other than MP3/WMA/AAC data
•
cannot be played. In addition, some files
may not be played because of the encoding
format. When a file cannot be played, the
next file is played instead.
Some noise may occur depending on the
•
type of encoder software used to encode
the data.
Files encoded in VBR (variable bit rate)
•
format may not be played. In the case of
data recorded in VBR format, the displayed
play time may be slightly different from the
actual play time.
Tag information entered with 2-byte
•
characters may not be displayed properly.
Files with DRM cannot be played.
•
Add a file extension “.MP3” or “.mp3” to an
•
MP3 file, “.WMA” or “.wma” to a WMA file,
and “.M4A” or “.m4a” to an AAC file using
single byte characters. If you add other file
extension or forget to add the file extension,
the file cannot be played.
Playable MP3 specifications
•
Item Specification
Format MPEG1 AUDIO LAYER3
Sampling
frequency
(kHz)
Bit rate
(kbps)
•
Playable WMA specifications
Item Specification
Format Windows Media Audio
Sampling
frequency
(kHz)
Bit rate
(kbps)
MPEG2 AUDIO LAYER3
MPEG2.5 AUDIO LAYER3*
32/44.1/48 (MPEG1)
16/22.05/24 (MPEG2)
32/44.1/48 (MPEG1)
16/22.05/24 (MPEG2)
8/11.025/12 (MPEG2.5)
32/40/48/56/64/80/96/112/12
8/160/192/224/256/320/VBR
(MPEG1)
8/16/24/32/40/48/56/64/80/96/
112/128/144/160 (MPEG2)
8/16/24/32/40/48/56/64/80/96/
112/128/144/160 (MPEG2.5)
Ver. 7, 8, 9*
8/11.025/16/22.05/32/
44.1/48
5*3/6*3/8*3/12 (for 8 kHz)
8*3/10*3 (for 11.025 kHz)
10*3/12*3/16/20 (for 16 kHz)
16*3/20/22/32 (for 22.05 kHz)
32/36/40/44/48/64 (for 32 kHz)
32/48/64/80/96/128/160/192
(for 44.1 kHz)
128/160/192 (for 48 kHz)
2
1
Page 26

Playable AAC specifications
•
Item Specification
Format Advanced Audio Coding
Sampling
frequency
(kHz)
Bit rate
(kbps)
*1 VBR playback is supported.
*2 WMA9 Pro, WMA9 Voice, and WMA9
Lossless are not playable.
*3 Only for monaural data.
High-Efficiency Advanced
Audio Coding
11.025/16/22.05/24/32/44.1/48
8/16/20 (for 11.025 kHz)
24/28 (for 16 kHz)
16/32 (for 22.05 kHz)
20/40 (for 24 kHz)
24/28/32/48/56 (for 32 kHz)
40/48*1/56/64*1/80*1/96*1/112/
128*1/160*1/192*1/224/256*1/
320 (44.1 kHz)
56/64*1/80*1/96*1/112/128*1/
160*1/192*1/224/256*1/320
(48 kHz)
Precautions when preparing a
disc
Logical format (File system)
l
Specify the following formats as the file
system.
Otherwise, normal playback may not be
possible.
ISO9660 Level 1
•
ISO9660 Level 2
•
Joliet
•
Romeo
•
l
Folder structure
•
The folder hierarchy must be within 8
hierarchical levels. Otherwise, playback is
not possible.
•
You can store MP3, WMA, and AAC files
together in a folder.
l
Number of files or folders
•
The maximum allowable number of folders
is 255 (including the root directory).
•
The maximum allowable number of folders
and files in a disc is 510.
•
The maximum allowable number of files in a
folder is 255.
l
Folder representation in the Folder list
•
Only folders containing MP3/WMA/AAC files
(1 to 4 in the illustration) are displayed on
the list.
Folders containing no MP3/WMA/AAC file
are not displayed.
•
Folder hierarchy is ignored, and unified into
1 level.
•
Folders are arranged in the order of folder
creation.
1
2
3
1
4
2
4
3
Selecting MP3/WMA/WMA
q
mode
Insert a disc with MP3/WMA/AAC data into
1.
the unit.
The system will automatically read the disc
data, change to MP3/WMA/AAC mode,
and start playback after a short time.
É “Setting/Ejecting a Disc” (page 15)
WARNING
Some tracks may be recorded at a
•
higher volume level than desired.
Increase the volume gradually from
the minimal setting when starting
playback.
When a disc is already set
l
Press the [AV] button to display the Source
1.
menu screen.
Touch the [DVD/CD] key to select MP3/
2.
WMA/AAC mode.
The system changes to MP3/WMA mode,
and starts playback from the previous
position.
You can also select MP3/WMA/AAC
•
(CD) mode by using the steering remote
control.É “Steering Remote Control
Operations” (page 19)
25
Page 27

MP3/WMA/AAC mode screen
q
Information pane Folder name
File type Folder list pane
q
MP3/WMA/AAC operations
Selecting a track to play
Touch the desired Folder key on the Folder
1.
list pane to display the Track list screen.
You can scroll the Folder list by touching
•
the [{], [}], [
Touch the Track key to play back the track.
2.
Playback of the specified track starts.
You can scroll the Track list by touching
•
the [{], [}], [
Touch the [Back] key.
3.
}
}
}
}
] or [
] or [
{
{
{
{
] key.
] key.
Changing tracks
Press the [∧] or [∨] (TUNE/TRACK) button
1.
during playback.
Tracks are skipped each time you press the
button, and playback starts.
Pressing the [∧] button starts playback
•
from the beginning of the next track.
Pressing the [∨] button starts playback
•
from the beginning of the current track.
•
Pressing the [∨] button twice within about
1.5 seconds starts playback from the
beginning of the previous track.
These functions are performed in the
•
current folder only.
Fast forward and fast backward
Keep pressing the [∧] or [∨] (TUNE/
1.
TRACK) button during playback.
The playback speed becomes 30-times
faster.
Release the button to resume playback at
normal speed.
Skipping the current folder
Touch a Folder key during playback.
1.
The tracks of the current folder are skipped
and playback starts from the first track of
the selected folder.
DVD Video Operations
Selecting the DVD Video
q
mode
Insert a DVD video disc into the unit.
1.
The system will automatically read the disc
data, change to DVD mode (DVD Video
mode), and start playback after a short
time.
See also “Setting/Ejecting a Disc” (page
15).
WARNING
Some videos may be recorded at a
•
higher volume level than desired.
Increase the volume gradually from
the minimal setting when starting
playback.
For your safety, the driver should
•
not watch the video or operate the
controls while driving. Please note that
watching the video and operating the
controls while driving are prohibited
by law in some countries.
When a DVD video disc is already set
Press the [AV] button to display the Source
1.
screen.
Touch the [DVD/CD] key to select DVD
2.
Video mode.
The system changes to DVD mode (DVD
Video mode), and starts playback from the
previous position.
DVD menu operations
q
Showing the DVD menu
Touch the screen to display the DVD Video
1.
mode screen.
26
Page 28

Touch the [Top Menu] or [Title Menu] key
2.
during playback.
The DVD menu appears.
The displayed contents for each key
•
differ depending on the DVD software.
An example shown below is the DVD
•
menu display:
Operating the DVD menu
You can operate the menu items by displaying
the cursor and keypad panels.
When the DVD Top Menu displayed, touch
1.
the [ ] (Cursor) key.
The arrow keys are displayed on the
screen.
Touch the arrow keys to move the cursor
•
in the corresponding direction. Touch the
[OK] key to specify the selected menu
item.
To display the keypad, touch the [0-9]
•
key.
The keypad is displayed on the screen.
Touch the number keys to select the
corresponding number on the screen
(if numbers are displayed).
Note:
•
To return to the arrow key panel to the keypad
panel, touch the [Back] key.
Switching the cursor/keypad panel
position
If the menu items are being obscured by
some of the keys, you can move the cursor
and keypad panels to the opposite side of the
screen.
[Left]
[Right]
Stopping playback
In the DVD Video mode screen, touch and
1.
hold the [p] key for more than 1 second
during playback.
Playback is stopped.
To resume playback, touch the [p] key.
2.
Playback resumes from the scene where
playback was stopped.
Pausing playback
Showing the DVD Video mode screen,
1.
touch the [p] key during playback.
Playback pauses.
To resume playback, touch the [p] key
2.
again.
Playback resumes.
Slow playback
In the DVD Video mode screen, touch
1.
the [p] key during playback to pause
playback.
Press and hold the [∧ (TUNE TRACK)]
2.
button.
While holding the button, slow playback
continues at 1/4 speed.
Releasing the button resumes the normal
playback.
Slow playback cannot be performed in
•
reverse. In addition, audio cannot be
reproduced during slow playback.
Fast forward and fast backward
In the DVD Video mode screen, press and
1.
hold the [∧ (TUNE TRACK)] or
[∨ (TUNE TRACK)] button during playback.
[∧ (TUNE TRACK)] button: Fast forward
[∨ (TUNE TRACK)] button: Fast backward
The playback speed becomes 4-times
faster at first and then 16-times faster
3 seconds later.
Releasing the button resumes normal
speed playback.
No audio is reproduced during fast
•
forward and fast backward operation.
The fast forward and fast backward
•
speed may differ depending on the disc.
27
Page 29

Skipping chapters (searching)
“Chapter” means a small segment to divide
the “Title” (film) which is recorded on the disc.
Showing the DVD Video mode screen,
1.
press the [∧ (TUNE TRACK)] or [∨ (TUNE
TRACK)] button during playback.
Chapters are skipped as many as the
times touching the key, and playback starts.
Current
location
Chapter Chapter Chapter
down up
Touching the [∧ (TUNE TRACK)] key
•
starts playback from the beginning of the
next chapter.
Touching the [∨ (TUNE TRACK)] key
•
starts playback from the beginning of the
current chapter.
When touching this key again within
about 3 seconds, playback starts from
the beginning of the previous chapter.
∧∨
Repeat playback
This operation plays back the current title or
chapter repeatedly.
In the DVD Video mode screen, touch the
1.
[Settings] key.
Touch the [Repeat] key of the Repeat item,
2.
then touch the [Back] key.
The “T.RPT” or “Repeat Chapter” will be
displayed.
Touch the [Back] key to return to the
3.
previous screen.
Perform the same operation to turn off the
4.
28
repeat playback.
Changing the DVD System
q
Settings
Note:
•
If a Setup operation is performed during DVD
video playback, playback will restart from
beginning.
Displaying the DVD Setup screen
Touch the screen to display the DVD Video
1.
mode screen.
Touch the [Settings] key to display the
2.
Settings screen.
3.
Configure the desired setting items.
See the following sections for details.
Perform the operations in the following
sections by continuing from this point.
4.
Touch the [Back] key.
Searching with a chapter/title
number
You can locate the beginning of a scene using
the chapter numbers or title numbers recorded
on the disc.
“Chapter” means a small segment to divide
the “Title” (film) which is recorded on the disc.
3-1. Touch the [10 Key Search] key to display
the 10 Key Search screen.
The Key Pad screen appears.
3-2. Specify the title number by touching the
corresponding number keys, or specify
a chapter within the current title by
touching [Chapter], and then touching
the corresponding number keys.
3-3. Touch the [OK] key to go to the specified
title/chapter.
If you make a mistake, touch the [Delete]
key to delete an input number.
Playback starts from the specified scene once
you exit the menu.
Setting the DVD audio/subtitle/
angle
You can specify the audio track, subtitle, or
angle of the DVD if multiple audio tracks,
subtitles, or angles are available.
3-1. Touch the [Audio/Subtitle/Angle] key to
display the Audio/Subtitle/Angle screen.
3-2. To set the audio track, touch the [Audio]
key.
To set the subtitles, touch the [Subtitle]
key.
To set the angle, touch the [Angle] key.
Adjusting the Brightness/Colour/
Black Level
You can adjust display settings.
Note:
•
The unit has its own display adjustment setting
independent of the DVD display adjustment
settings. See “” (page 41).
3-1. Touch the [Display Adj.] key to display
the Display Adj. screen.
Page 30

3-2. Touch the key for the item you want to
adjust.
•
To adjust the brightness, touch the
[Brightness] key.
•
To adjust the colour, touch the [Colour]
key.
•
To adjust the black level, touch the
[Black Level] key.
3-3. To increase the setting, touch the [+] key.
To decrease the setting, touch the [–]
key.
Selecting the screen size
You can change the display mode to suit to
the video you are watching.
•
The factory default setting is [Full].
3-1. Touch the [Disp. Mode] key to display
the Disp. Mode screen.
3-2. Touch the [Normal], [Full], or [Cinema]
key to select a display mode.
[Normal]:
The image is expanded so that the top
and bottom edges of the image fit to the
screen, and the aspect ratio of the image
becomes 4:3. The aspect ratio of the
image may be changed.
[Full]:
The image is expanded so that the
rectangle of the image fits to the screen
(16:9). The aspect ratio of the image may
be changed.
[Cinema]:
The image is expanded so that the top
and bottom edges of the image fit to the
screen.
This mode is suitable for letterbox-format
images.
Subtitles of non-letterboxed images may
be cut off in this mode.
Setting up the screen size
Set up the screen size to match the rear
monitor connected to this unit (if you are using
an optional rear monitor).
The factory default setting is [WIDE].
•
3-1. Touch the [Default] key to display the
Default screen.
3-2. Touch the [Sizing Monitor] key to
display the Sizing Monitor screen.
3-3. Touch the [WIDE], [Pan Scan], or [Letter
Box] key of the TV Display item to
change the screen size to “Wide”, “Pan
Scan” or “Letter Box”.
Switching DVD menu languages
On a DVD in which two or more menu
languages have been included, you can
designate which language to preferentially
display.
Note:
•
This function does not work if the specified
menu language is not included on the DVD.
3-1. Touch the [Default] key to display the
Default screen.
3-2. Touch the [DVD MENU Language] key
to display the DVD MENU Language
screen.
3-3. Select your preferred menu language.
See the following table.
Language
English
French
German
Nederland
Italian
Português
Spanish
Swedish
Chinese
Japanese
Korean
Switching DVD audio languages
On a DVD in which two or more audio tracks
or audio languages have been recorded, you
can designate which language to preferentially
play.
Note:
•
This function does not work if the specified
menu language is not included on the DVD.
3-1. Touch the [Default] key to display the
Default screen.
3-2. Touch the [Audio Language] key to
display the Audio Language screen.
29
Page 31

3-3. Select your preferred audio language.
See the following table.
Language
English
French
German
Nederland
Italian
Português
Spanish
Swedish
Chinese
Japanese
Korean
Switching subtitles
On a DVD in which two or more subtitle
languages have been included, you can
designate which language to preferentially
display.
3-1. Touch the [Default] key to display the
Default screen.
3-2. Touch the [Subtitle Language] key to
display the Subtitle Language screen.
3-3. Select your preferred subtitle language.
See the following table.
Language
English
French
German
Nederland
Italian
Português
Spanish
Swedish
Chinese
Japanese
Korean
OFF (This disables subtitles when
possible.)
Setting the password for the
parental level
The factory default setting is “0000”.
3-1. Touch the [Default] key to display the
Default screen.
If the password has not been set,
[Unconfig.] is displayed in the Password
panel.
3-2. Touch the [Password] key to display the
Enter Password screen.
Enter the current 4-digit password using
the number keys, and touch the [OK] key.
3-3. Enter a new 4-digit password using the
number keys, and touch the [OK] key.
The new password is set. [Configured]
is displayed in the Password panel.
Note:
When a disc with view restrictions is inserted,
•
you will be prompted to input a password.
The disc will not be viewable until the correct
password is entered.
Setting the country code
Set the country code for the parental level.
The factory default setting is [7166] ([UNITED
KINGDOM]).
3-1. Touch the [Default] key to display the
Default screen.
3-2. Touch the [Country Code] key to display
the Country Code screen.
30
Page 32

3-3. Enter the country code for the parental
level country. See the following table.
Country Input code
ALBANIA 6576
ANDORRA 6568
AUSTRIA 6584
BAHRAIN 6672
BELGIUM 6669
BOSNIA AND
HERZEGOWINA
BULGARIA 6671
CROATIA (local name:
Hrvatska)
CYPRUS 6789
CZECH REPUBLIC 6790
DENMARK 6875
EGYPT 6971
FINLAND 7073
FRANCE 7082
(FRANCE,
METROPOLITAN
GERMANY 6869
GREECE 7182
HUNGARY 7285
ICELAND 7383
IRAN (ISLAMIC
REPUBLIC OF)
6665
7282
7088
7382
Country Input code
IRAQ 7381
IRELAND 7369
ISRAEL 7376
ITALY 7384
JAPAN 7480
JORDAN 7479
KUWAIT 7587
LEBANON 7666
LESOTHO 7683
LIECHTENSTEIN 7673
LUXEMBOURG 7685
MACEDONIA, THE
FORMER YUGOSLAV
REPUBLIC OF
MALTA 7784
MONACO 7767
NETHERLANDS 7876
NETHERLANDS
ANTILLES
NORWAY 7879
OMAN 7977
POLAND 8076
PORTUGAL 8084
QATAR 8165
ROMANIA 8279
7775
6578
Country Input code
SAN MARINO 8377
SAUDI ARABIA 8365
SLOVAKIA (Slovak
Republic)
SLOVENIA 8373
SOUTH AFRICA 9065
SPAIN 6983
SWAZILAND 8390
SWEDEN 8369
SWITZERLAND 6772
SYRIAN ARAB
REPUBLIC
TURKEY 8482
UNITED ARAB
EMIRATES
UNITED KINGDOM 7166
Vatican City State 8665
YEMEN 8969
YUGOSLAVIA 8985
FAROE ISLANDS 7079
GIBRALTAR 7173
GREENLAND 7176
SVALBARD AND JAN
MAYEN ISLANDS
8375
8389
6569
8374
31
Page 33

Setting up the parental level
You can change the parental lock level (audio/
video restriction level).
This function allows cutting scenes that are
unfavorable for children or replacing them
automatically with other scenes prepared in
advance.
The factory default setting is [OFF].
3-1. Touch the [Default] key to display the
Default screen.
3-2. Touch the [Parental Level] key to display
the Default screen.
3-3. Enter the 4-digit password using the
number keys, and touch the [OK] key.
3-4. Touch the key for the level at which you
want to set the Parental Level setting.
[OFF] disables the Parental Level setting.
[Level 8] is the least restrictive. [Level 1]
is the most restrictive.
Displaying/hiding the playback
status
3-1. Touch the [Default] key to display the
Default screen.
3-2. Touch the [Always Show Status] key to
display the Default screen.
The playback status is displayed on the
screen.
32
Chapter number
Title number Playback time
5. SOURCE
OPERATIONS
(ACCESSORIES)
SD Memory Card
Operations
This system can play audio files stored in
an SD memory card. You can use your SD
memory card as an audio device by simply
copying desired audio files into it.
Notes on using SD memory
q
cards
General notes
When no data is present, the message
•
“Check SD Memory Card” will be displayed.
Notes on MP3/WMA/AAC files
This system can play MP3/WMA/AAC files
•
stored in an SD memory card.
The limitations of MP3/WMA/AAC files are
•
the same as those in MP3/WMA/AAC CD
mode. See “Precautions on MP3/WMA/AAC
data” (page 24).
Notes on folder structure
The folder hierarchy must be within 8 levels.
•
Otherwise, playback will be impossible.
The maximum allowable number of folders
•
is 512 (including the root directory and
folders with no MP3/WMA/AAC file).
The maximum allowable number of folders
•
and files in an SD card is 8000.
Page 34

The maximum allowable number of files in a
•
folder is 255.
You can store MP3, WMA, and AAC files
•
together in a folder.
Notes on tag titles
Tag information such as track title, artist
name, and album title can be displayed for an
MP3/WMA/AAC file containing tag information.
Folder representation in the folder
list
The limitations on folder representation are
the same as those in MP3/WMA/AAC CD
mode. See “Folder representation in the
Folder list” (page 25).
Selecting the SD Memory
q
CARD mode
Insert an SD memory card into the unit.
1.
The system will automatically read the card
data, change to SD Memory CARD mode,
and start playback after a short time. É
“Inserting an SD Memory Card” (page 17)
WARNING
Some tracks may be recorded at a
•
higher volume level than desired.
Increase the volume gradually from
the minimal setting after playback has
started.
l
When an SD memory card is already
connected
1.
Press the [AV] button to display the Source
menu screen.
Touch the [SD Memory CARD] key to
2.
select SD Memory CARD mode.
The system changes to SD Memory
CARD mode, and starts playback from the
previous position.
You can also select SD Memory CARD
•
mode by using the steering remote
control. É “Steering Remote Control
Operations” (page 19)
SD Memory CARD mode
q
screen
Information pane Folder name
File type Folder list pane
q
SD Memory CARD mode
operations
Operations in SD Memory CARD mode are
the same as those in the MP3/WMA/AAC
(CD) mode. See “MP3/WMA/AAC operations”
(page 24).
USB Memory Operations
This system can play audio files (MP3/WMA/
AAC) stored in an USB memory. You can use
your USB memory as an audio device by
simply copying desired audio files into it.
To connect your USB memory to this unit, use
the optional USB cable.
Note:
•
This system will not operate or may operate
improperly with some USB memory devices.
•
Files protected with any DRM cannot be played.
Notes on using USB
q
memories
General notes
When no data is present, the message “No
•
audio file” will be displayed.
Notes on MP3/WMA/AAC files
This system can play MP3/WMA/AAC files
•
stored in a USB memory.
The limitations of MP3/WMA/AAC files are
•
the same as those in MP3/WMA/AAC mode
(CD) mode.. See “Precautions on MP3/
WMA/AAC data” (page 24).
Notes on folder structure
The folder hierarchy must be within 8 levels.
•
Otherwise, playback will be impossible.
•
The maximum allowable number of folders
•
is 512 (including the root directory and
folders with no MP3/WMA/AAC file).
The maximum allowable number of folders
•
and files in a USB memory is 8000.
The maximum allowable number of files in a
•
folder is 255.
You can store MP3 files and AAC files
•
together in a folder.
Notes on tag titles
Tag information such as track title, artist
name, and album title can be displayed for an
MP3/WMA/AAC file containing tag information.
33
Page 35

Folder representation in the folder
list
The limitations on folder representation are
the same as those in MP3/WMA/AAC (CD)
mode. See “Folder representation in the
Folder list” (page 25).
Selecting the USB mode
q
Connect your USB memory to the USB
1.
connector.
The system changes to USB mode, and
starts playback after a short time.
WARNING
Some tracks may be recorded at a
•
higher volume level than desired.
Increase the volume gradually from
the minimal setting after playback has
started.
l
When a USB memory is already
connected
1.
Press the [AV] button to display the Source
menu screen.
2.
Touch the [USB/iPod] key to select USB
mode.
The system changes to USB mode, and
starts playback from the previous position.
•
You can also select USB mode by using
the steering remote control. É “Steering
Remote Control Operations” (page 19)
USB mode screen
q
Information pane Folder name
File type Folder list pane
q
USB mode operations
Operations in USB mode are the same as
those in the MP3/WMA/AAC (CD) mode. See
“MP3/WMA/AAC operations” (page 24).
iPod® Operations
This unit can be used to control a connected
Apple iPod.
To connect your iPod to this unit, use a USB
cable (sold separately).
Note:
•
iPhones can also be connected to this system
and “iPod” appearing in this manual should be
referred to as “iPod/iPhone”.
•
This unit will not operate or may operate
improperly with unsupported versions.
•
For detailed information on the playable iPod
models, consult your Mitsubishi Motors dealer.
•
You cannot enjoy video movies on this unit.
When a video track is played back, only the
audio data will be output.
•
Some functions may not operate properly
depending to the software version of the iPod.
Use an iPod updated with the latest software
downloaded from Apple’s website.
•
When you connect an iPod which has large
number of tracks, it may take a long time to
establish a connection with the iPod or to
control the iPod features.
•
Before connecting an iPod, be sure to store
audio tracks using iTunes®. If an iPod has no
audio track, an error occurs when the iPod is
connected.
•
If no sound is output from an iPod, disconnect it
from the unit once, then connect it again.
Notes on using an Apple
q
iPod
After the iPod has been connected to this
•
unit, a logo screen sent from this unit is
displayed on the screen of the iPod.
This unit can display Podcast titles*1, Artist
•
names, Album titles, Song titles, Genre
names, Playlist titles, and Composer names
registered on an iPod. When no data is
present, “----------” will be displayed.
*1 Whether these functions are available or
not depends on the iPod version.
The iPod is used with the equalizer function
•
turned off.
Do not connect an iPod to this unit with a
•
headset connected to the iPod.
Selecting iPod mode
q
Connect your iPod to the USB connector.
1.
The system changes to iPod mode, and
the iPod mode screen is displayed.
34
Page 36

iPod mode screen
[Mode] key[Menu] key
Press the [AV] button to display the Source
1.
screen.
Touch the [USB/iPod] key to select iPod
2.
mode.
The system changes to USB mode (iPod
mode), and starts playback from the
previous position.
Controlling the iPod
q
Operation keys
Track keys (on the Track list pane)
Use to select the track you wish to play
•
back. You can scroll the list by touching the
[{], [}], [
[Menu] key
Touch this key to display the Playlists,
•
Artists, Albums, Songs, Podcasts, Genres,
and Composers categories. You can select
tracks to be played by specifying the
categories.
[Mode] key
Use to display the Mode screen. You can
•
specify various play modes and whether to
display the album artwork from this screen.
}
}
] or [
{
{
] key.
Skipping a track (searching)
Press the [∧] or [∨] (TUNE/TRACK) button
1.
during playback.
Tracks are skipped as many times as the
button is pressed, and playback starts.
Press the [∧] button to start playback
•
from the beginning of the next track.
Press the [∨] button to start playback
•
from the beginning of the current track.
When this button is pressed again within
about 1.5 seconds, playback starts from
the beginning of the previous track.
Fast forward and fast backward
Press and hold the [∧] or [∨] (TUNE/
1.
TRACK) button during playback.
The playback location moves forward/
backward quickly.
Releasing the button resumes playback at
normal speed.
Specifying various play
q
functions
Touch the [Mode] key.
1.
Touch a key of the function you want to
2.
play.
[Shuffle] key:
Performs shuffle play.
[Off]
•
Cancels shuffle play. “OFF” is displayed
on the information pane.
[Songs]
•
Plays back all the tracks currently
selected in a random order. “Songs” is
displayed on the information pane.
[Albums]
•
Plays back the albums in random order
when more than one album is selected.
Tracks in an album are played back
in order. “Albums” is displayed on the
information pane.
[Repeat] key:
Performs repeat play.
•
[One]
Plays back the current or selected track
repeatedly. “One” is displayed on the
information pane.
•
[All]
Plays back all the tracks currently
selected repeatedly. “All” is displayed on
the information pane.
3.
Touch the [Back] key to return to the
previous screen.
Note:
•
Repeat play cannot be cancelled. Normally, it
should be set to the Repeat All play.
Displaying the Album
q
Artwork on the iPod mode
screen
The default setting is ON.
•
Touch the [Mode] key.
1.
Touch the [Show Album Artwork] key to
2.
turn this feature on/off.
Touch the [Back] key to return to the
3.
previous screen.
Selecting tracks to be played
q
You can select the tracks to be played by
using the following category keys:
[Playlists] key:
Lists all the Playlists stored in the iPod.
[Artists] key:
Lists all the Artists stored in the iPod or under
the specified Genre.
35
Page 37

[Albums] key:
Lists all the Albums stored in the iPod or
under the specified Artist or Composer.
[Songs] key:
Lists all the Tracks stored in the iPod.
[Podcasts] key:
You can narrow the Tracks to be listed by
specifying the Podcast name.
[Genres] key:
Lists the available Genres to narrow the
Artists to be listed.
[Composers] key:
Lists all the Composers stored in the iPod.
Selecting tracks to be played from
the Menu screen
Touch the [Menu] key to display the Menu
1.
screen.
Touch the desired Category key to display
2.
the corresponding list screen.
Touch the desired item key listed on the
3.
screen to select it.
You can scroll the list by touching the
•
[{], [}], [
When the track list of the specified
•
Album, Playlist, or Podcast is displayed,
selecting a track starts playback of the
listed tracks from the selected track.
When the track list of the Songs is
•
}
}
] or [
{
{
] key.
displayed, selecting a track starts
playback of all the tracks stored in the
iPod from the selected track.
When another list screen is displayed,
•
repeat this operation until you select the
tracks to be played back.
Touching the [Menu] key returns to the
•
previous list screen.
Touching the [Now Playing] key returns
•
to the iPod mode screen.
Touch the [Back] key to return to the
4.
previous screen.
Bluetooth Audio
Operations
Some Bluetooth mobile phones have audio
features, and some portable audio players
support Bluetooth features. These devices are
referred to as “Bluetooth audio players” in this
manual.
This system can play audio data stored in a
Bluetooth audio player.
Note:
•
This system supports the profiles A2DP and
AVRCP. However, this system will not operate
or may operate improperly with some Bluetooth
audio players according to their performance or
specification.
•
A connection with a Bluetooth audio player
is disconnected forcibly when you start
transferring phonebook data from a Bluetooth
telephone. When transferring the phonebook
data is finished, it will be reconnected
automatically.
•
A Bluetooth audio player will not reconnected
automatically when turning the power on.
Reconnect it manually from the Paired Device
List. (page 42).
•
The sound of Bluetooth audio players may be
interrupted because of surrounding radio wave
conditions.
Selecting the Bluetooth
q
mode
Press the [AV] button to display the Source
1.
menu screen.
Touch the [Bluetooth] key to select the
2.
Bluetooth Audio mode.
The system changes to Bluetooth Audio
mode, and starts searching for Bluetooth
audio players.
If a connection with a Bluetooth audio
player is established, the system will start
playback after a while.
You can also select the Bluetooth Audio
•
mode by using the steering remote
control. É “Steering Remote Control
Operations” (page 19)
Bluetooth Audio mode
q
screen
Note:
•
Some Bluetooth audio players may not support
sending audio information; Album Name, Song
Title, Artist Name, etc. These names/titles are
not displayed for such players.
•
The [Mode] key is displayed only when a
Bluetooth audio player that supports the audio
control feature is connected.
•
When you have enabled the RDS features TA
(Traffic Announcement) and PTY (Program
36
Page 38

Type), the [TA] and [PTY] keys for these
functions may appear on the screen. Touch the
keys to display the corresponding screens.
For details, see “RDS” (page 21).
Registering your Bluetooth
q
audio player (Pairing)
You can register up to 5 Bluetooth audio
players.
Registering operation is performed from
the Bluetooth menu screen under the
Settings menu. For the operation details, see
“Bluetooth Settings” (page 42).
To register your Bluetooth audio player,
perform the following operation:
Confirm the Bluetooth Information, and set
1.
the PIN (Pass key) if required.
Pair your Bluetooth audio player.
2.
Select your Bluetooth audio player from the
3.
Paired Device List.
Controlling the Bluetooth
q
audio player
Note:
•
Depending on the specification of your
Bluetooth audio player, all functions may not
operate or may operate improperly. In these
cases, perform operations directly from your
Bluetooth audio player.
•
Occasionally, depending on the environment,
playback sounds may be fragmented, or switch
noises may be generated.
Playing back music
After the connection with a Bluetooth audio
player is established, the play mode is
automatically engaged.
•
When playback is not started, touch the
[p] key, or start playback directly from
your Bluetooth audio player.
Pausing playback
Touch the [p] key during playback.
1.
Playback pauses.
To resume playback, touch the [p] or
2.
[p] key.
Playback resumes.
Skipping a track (searching)
Press the [∧] or [∨] (TUNE/TRACK) button
1.
during playback.
Tracks are skipped as many times as the
button is pressed, and playback starts.
Note:
•
Depending on the Bluetooth audio player,
pressing the [
play the previous track.
∨
] button twice may be required to
Fast forward and fast backward
Press and hold the [∧] or [∨] (TUNE/
1.
TRACK) button during playback.
The system enters the fast backward or
fast forward playback mode while the
button is pressed.
Releasing the button resumes playback at
normal speed.
Specifying various play
q
functions
Note:
•
These functions may not be available with
some Bluetooth audio players; the [Mode] key
is displayed only when a Bluetooth audio player
that supports these functions is connected.
Touch the [Mode] key.
1.
Touch a touch key of the function you want
2.
to play.
[Shuffle] key:
Performs shuffle play.
•
[OFF]
Cancels the shuffle play.
•
[All]
Plays back all the specified tracks in a
random order. “Shuffle All” is displayed
on the screen.
•
[GROUP]
Plays back the Groups in no particular
order when more than one Group is
specified. Tracks in a Group are played
back in the recorded order. “Shuffle
Group” is displayed on the screen.
[Repeat] key:
Sets the repeat mode.
•
[One]
Plays back the current track repeatedly.
“Repeat One” is displayed on the screen.
•
[All]
Plays back all the specified tracks
repeatedly. “Repeat All” is displayed on
the screen.
•
[Group]
Plays back all the tracks in the current
Group repeatedly. “Repeat Group” is
displayed on the screen.
3.
Touch the [BACK] key to return to the
previous screen.
Note:
•
Depending on the Bluetooth audio player, the
repeat play may not be cancellable.
Telephone Operations
When the connection with your Bluetooth
mobile phone is established, the following
functions are available on this unit:
•
Listening to your telephone calls on the
vehicle speakers.
37
Page 39

Making a call using the keypad screen,
•
using the phonebook data downloaded from
your mobile phone, using the Call History
(incoming/outgoing call records), or using
the Handset Memory (speed dial).
Note:
•
This system supports the profiles HFP, OPP,
A2DP, AVRCP, and PBAP. However, this system
will not operate or may operate improperly with
some Bluetooth mobile phones according to
their performance or specification.
•
Depending on your mobile phone, you may
need to perform the Object Push transfer
operation on the mobile phone.
•
Some mobile phones may not be able to
transfer phonebook data.
•
Phonebook data transmission may take a long
time. Operations for making outgoing calls are
disabled during data transmission.
Selecting the Telephone
q
mode
Press the [MENU] button to display the
1.
Main menu screen.
Touch the [Phone] key to select telephone
2.
mode.
The telephone screen is displayed.
Telephone screen
q
Note:
•
The keys to make a call are disabled when no
connection with a mobile phone is established.
Telephone settings
q
Confirming Bluetooth Information
and setting the PIN (Pass key)
You can confirm information concerning the
Bluetooth interface feature, and can set the
PIN (Pass key).
These operations are performed from the
Bluetooth menu screen under the Settings
menu. É “Bluetooth Settings” (page 42)
Registering your mobile phone
(Pairing)
You can register up to 5 mobile phones.
Turn on the power of the mobile phone you
1.
wish to register.
Touch the [Pair Phone] key to display the
2.
Pair Phone screen.
Perform the following operations on your
3.
mobile phone:
Perform the Bluetooth device search
•
operation.
Specify the device named “MY-CAR”
•
to register this system to your mobile
phone.
When the PIN (Pass key) input prompt is
4.
displayed on your mobile phone, enter the
same code as the PIN (Pass key) set to
this unit.
If a selection function prompt is displayed
on your mobile phone, select the
“Handsfree” function.
When the pairing operation completes,
the registered mobile phone is set as the
current telephone, and the display returns
to the Telephone screen.
l
To delete the telephone registration
1.
Touch the [Paired Phones] key.
2.
Touch the desired device key you wish to
delete.
3.
Touch the [Delete] key.
4.
Touch the [Yes ] key.
The registration is deleted.
Selecting the mobile phone
1.
Touch the [Paired Phones] key to display
the Paired Phones screen.
2.
Touch the desired device key you wish to
use.
3.
Touch the [Connect] key.
4.
Touch the [Back] key to return to the
previous screen.
Telephone operations
q
Making a call using the keypad
Touch the [Dial Number] key to display the
1.
keypad screen.
Enter the telephone number by using the
2.
keypad displayed on the screen.
Touch the [Call] key to call the entered
3.
number.
The following Phone screen is displayed
•
during the phone call.
38
Page 40

Touch the [Private] key to talk using the
•
mobile phone, cancelling the hands-free
function. To return to hands-free mode,
connect your mobile phone again from
the Phone screen.
Touch the [Mute] key to mute the
•
microphone. To resume using the
microphone, touch the [Cancel Mute]
key.
When the call is finished, touch the [Hang
4.
up] key to hang up.
Note:
•
Depending on the mobile phone, the connection
with this system may be disconnected when
entering Handset mode.
•
The Map screen can be displayed during a call
by pressing the [MAP] button. To return to the
Phone screen, press the [MENU] button and
touch the [Phone] key.
Using the Handset Phonebook
The system can download phonebook data
registered in the selected mobile phone. You
can use it to make a call from this unit.
Note:
•
Some mobile phones may not be able to
transfer phonebook data.
•
Only phonebook items with at least one
telephone number registered in the downloaded
phonebook data are displayed on the
phonebook screen.
•
Some mobile phones may take a long time to
download phonebook data.
•
While transferring phonebook data, the
connection with the Bluetooth audio player will
be terminated temporarily. When transferring
phonebook data is finished, it automatically
reconnects.
•
When phonebook data downloading is
terminated by touching the [Cancel] key,
phonebook items already transferred will be
registered normally.
If the same phonebook item as an item
•
already registered is downloaded, the item
will be registered again. When you wish to
update phonebook items, delete the registered
phonebook items before downloading
phonebook data.
Touch the [Handset Phonebook] key to
1.
display the Phonebook screen.
To download phonebook data from your
2.
mobile phone, touch the [Download] key.
When the confirmation message is
displayed:
Touch the [Yes ] key, and then perform
•
the Object Push operation from your
mobile phone to start transferring
phonebook data.
If the Object Push operation from your
•
mobile phone is not required, touch the
[No] key on the confirmation screen to
start transferring phonebook data.
When data downloading is completed,
the system will return to the Phonebook
screen.
Touch the desired name key you wish to
3.
dial.
Touch the [{], [}], [
•
scroll the list.
When you touch the alphabet key at the
•
}
}
] or [
{
] key to
{
left of the screen, the list scrolls to the
first item which starts with the specified
character.
Touch the number key, and then touch the
4.
[Call] key to call the specified number.
The Phone screen is displayed, and calling
starts.
When the call is finished, touch the
•
[Hang up] key to hang up.
Using the Vehicle Phonebook
You can register phone numbers into the
Vehicle Phonebook records, selecting from
phonebook data, the Outgoing/Incoming Calls
records, and directly entered phone numbers.
Up to 5 phone numbers can be registered.
•
Adding a Vehicle Phonebook entry
l
Touch the [Vehicle Phonebook] key to
1.
display the Vehicle Phonebook screen.
Touch the [Add New] key.
2.
Touch the [Copy from Call history], [Copy
3.
from Handset Phonebook], or [Enter
Number by Keypad] key to select the
method to specify the number, and then
perform the same operation as you would
perform when making a call.
Touch the [OK] key on the confirmation
4.
screen to register the specified number
into the Favourite Call records.
You can edit/delete registered numbers
•
from the settings menu.
Making a call using the Vehicle
l
Phonebook
Touch the [Vehicle Phonebook] key to
1.
display the Vehicle Phonebook screen.
Touch the desired number key you wish to
2.
dial.
Touch the [Call] key to call the specified
3.
number.
The Phone screen is displayed, and calling
starts.
When the call is finished, touch the
•
[Hang up] key to hang up.
39
Page 41

Using the Call History
The system automatically records outgoing/
incoming call history data. You can confirm
calls and use the records to make a call from
this unit.
Up to 5 outgoing calls and 5 incoming calls
•
can be recorded for each registered mobile
phone.
Note:
•
When using multiple registered mobile phones,
the outgoing/incoming call records of one
mobile phone do not display records made on
other mobile phones.
Touch the [Call History] key.
1.
Touch the [Outgoing] or [Incoming] key
2.
according to the type of record list you
wish to display.
The corresponding record list screen is
displayed.
Touch the [BACK] key to return to the
•
previous screen.
Touch the desired Record key you wish to
3.
dial.
Touch the [Call] key to call the specified
4.
number.
The Phone screen is displayed, and calling
starts.
You can adjust the volume of the calls. É
•
“Volume and Beeps Settings” (page 42)
When the call is finished, touch the
•
[Hang up] key to hang up.
Answering a call
When a call is received, the Phone screen is
displayed.
Touch the [Answer] key to answer the call.
1.
Touching the [Reject] key disconnects
•
the call.
When the call is finished, touch the
2.
[Hang up] key to hang up.
Note:
The Audio feature is terminated temporarily
•
during a call, and the system resumes the last
status of the Audio feature when the call is
finished.
•
The Map screen can be displayed during a call
by pressing the [MAP] button. To return to the
Phone screen, press the [MENU] button and
touch the [Phone] key.
6. SYSTEM
SETTINGS
You can set various settings of this system
from the Settings menu.
Settings screen
Settings - Others screen
Press the [MENU] button.
1.
The Main menu screen is displayed.
Touch the [Settings] key.
2.
The Settings screen is displayed.
Touching the [Others] key displays the
Settings - Others screen.
Audio Settings
When you touch the [Audio] key from the
Settings menu, you can adjust various sound
effect settings.
40
Page 42

Adjusting the balance/fader
q
Touch the [Balance/Fader] key.
1.
Touch the [Volume Balance Control] key
2.
or the [Vocal Image Control] key.
[Volume Balance Control] key:
Adjusts the volume balance for the left, right,
front, and rear speakers.
[Vocal Image Control] key:
Adjusts the volume balance of the vocals for
the left, right, front, and rear speakers.
3.
Touch the [Front] or [Rear] key to adjust
the fader level.
•
The default setting is 0.
•
Adjustment range: front 5 to rear 5.
[Front] key:
Emphasises the sound from the front
speakers.
[Rear] key:
Emphasises the sound from the rear
speakers.
4.
Touch the [Left] or [Right] key to adjust the
balance level.
•
The default setting is 0.
•
Adjustment range: left 5 to right 5.
[Left] key:
Emphasises the sound from the left
speakers.
[Right] key:
Emphasises the sound from the right
speakers.
Note:
•
To reset to the factory settings, touch the [Reset
to Factory Setting] key.
Loudness function
q
The loudness function increases the level of
the high and low frequencies in accordance
with the volume setting.
Touch the [Loudness] key to turn ON/OFF
1.
the Loudness function.
Adjusting the Graphic
q
Equalizer
You can adjust sound tone using the Graphic
Equalizer function.
Selecting from the Standard
Preset settings
Touch the [Graphic Equalizer] key.
1.
Select a Standard Preset setting
2.
by touching the [Bass.B], [High.B],
[Acoustic], [Impact], [Smooth], or [Flat]
key.
Register the Customized Preset
settings
Touch the [Graphic Equalizer] key.
1.
Touch the desired User key to select the
2.
Customized Presets to register, then touch
the [Adjust] key.
Touch the [{] or [}] key under the
3.
frequency you wish to adjust the level.
Frequency: 60Hz, 250Hz, 820Hz,
•
1.6kHz, 5kHz, 16kHz
Level: –6 to +6
•
Note:
•
To reset to the factory settings, touch the [Flat]
key.
Sound Restorer function
q
The Sound Restorer function restores
high tone range to audio that has been
compressed, bringing it closer to its original,
pre-compressed quality.
1.
Touch the [Sound Restorer] key to turn
ON/OFF the Sound Restorer function.
Volume Smoother function
q
The Volume Smoother function automatically
adjusts the audio level to compensate for
differences in volume levels between multiple
audio playback sources, volume levels
between a TV show and commercials, or
volume levels between different scenes in a
movie.
Touch the [Left] or [Right] key to adjust the
1.
Volume Smoother level.
The default setting is [OFF].
•
Adjustment range: [LOW] to [HIGH].
•
Speed Sensitive Vol. function
q
The Speed Sensitive Vol. function
automatically increases the volume as your
vehicle’s speed increases, and decreases the
volume as your vehicle’s speed decreases.
Touch the [+] or [–] key to adjust the Speed
1.
Sensitive Vol. level.
The default setting is [OFF].
•
Adjustment range: 1 (low) to 3 (high)
•
bars.
Virtual Bass function
q
The Virtual Bass function adds harmonic
elements to bass ranges, strengthening them
and enabling richer bass playback.
Touch the [Left] or [Right] key to adjust the
1.
Virtual Bass level.
The default setting is [OFF].
•
Adjustment range: [LOW] to [HIGH].
•
Display Adjustment
When you touch the [Display Adj.] key
from the Settings menu, you can adjust the
brightness level of the monitor display.
41
Page 43

Note:
•
The brightness level adjustment operates upon
the current Screen Colour mode.
Touch the [+] or [–] key to adjust the
1.
brightness level.
[+] key:
Makes the image brighter.
[–] key:
Makes the image dimmer.
Volume and Beeps
Settings
You can change the volume settings and other
beep settings.
1.
Touch the [Volume and Beeps] key.
The Volume and Beeps menu is displayed.
2.
Touch the desired menu item to set.
[Phone Ringer Vol.]:
Adjusts the volume of the telephone ringer.
[Phone Incoming Vol.]:
Adjusts the volume of the incoming calls.
[Phone Outgoing Vol.]:
Adjusts the volume of the outgoing calls.
[Button Beeps] key:
Sets whether to activate the sound of
button operations.
Touch the [Button Beeps] key to turn
3.
ON/OFF the Button Beeps function.
Selecting a Language
You can change the language used by the
system.
1.
Touch the [Select Language] key.
2.
Touch the key of the desired language.
You can select the language from the
following language keys.
42
[English] key
[Français] key
[Deutsch] key
[Nederlands] key
[Italiano] key
[Português] key
[Español] key
[Svenska] key
[Dansk] key
[Norsk (Some part is English)] key
[Polski (Some part is English)] key
Note:
•
For the languages other than English, distances
are displayed using the metric system.
Bluetooth Settings
When you touch the [Bluetooth] key from the
Settings menu, you can set various functions
related to the Bluetooth feature.
Activating Bluetooth feature
q
Touch the [Connect with Bluetooth] key
1.
to turn ON/OFF the Bluetooth feature.
Pairing the Bluetooth device
q
Turn on the power of the mobile phone or
1.
Bluetooth audio player you wish to register.
Touch the [Pair Bluetooth Device] key.
2.
Touch the [Mobile Phone] key to register a
3.
mobile phone, or the [Audio Device] key to
register a Bluetooth audio player.
Perform the following operations on your
4.
mobile phone or Bluetooth audio player:
Perform the search operation for
•
Bluetooth devices.
Specify the device named “NX-BT” to
•
register your device.
When the PIN (Pass key) input prompt
5.
appears on your device, enter the same
PIN (Pass key) set to this unit.
If you are prompted to select functions,
select the functions you wish to use.
When the pairing operation completes,
the registered device is set as the current
telephone or audio device.
Paired Device List
q
operations
Touch the [Paired Device List] key to
1.
display the Paired Device List screen.
Touch the [Bluetooth Phone] or
2.
[Bluetooth Audio] key to display the list
for devices of that type.
Touch the key for the device you wish to
3.
use.
Touch the [Connect] key to pair with a
4.
phone, or the [Select] key to pair with an
audio device.
To delete the registration of the specified
•
device, touch the [Delete] key.
Confirming/Editing the
q
Bluetooth Information
Touch the [Edit Bluetooth Information]
1.
key to display the Edit Bluetooth
Information screen.
To change the PIN (Pass key), touch the
2.
[PIN] key, enter your desired PIN (Pass
key), and then touch the [OK] key.
To change the device name of this unit,
3.
touch the [Device Name] key, enter the
desired device name, and then touch the
[OK] key.
To save changes, touch the [OK] key.
4.
To return to the previous screen without
saving changes, touch the [Back] key.
Page 44

Setting the Clock
You can set various settings related to the
clock.
1.
Touch the [Clock] key.
The Clock screen is displayed.
2.
Touch the desired menu item to set.
[On-screen Clock] key:
Set whether to display the clock on the
screen.
[Clock Format (24h)] key:
Set to [ON] to change the clock to 24-hour
format. Turn off to change the clock to
12-hour format.
Other Settings
When you touch the [Others] key from the
Settings menu, you can check system details
and adjust various system settings.
Interruption feature
q
You can choose to automatically display
information on upcoming route directions in
the audio mode screen.
Touch the [AV Screen Navigation Guide
1.
Interrupt] key to turn ON/OFF the AV
Screen Navigation Guide Interrupt function.
Unit Information
q
You can view details about this unit, and
update this unit’s software.
Touch the [Unit Information] key.
1.
The Unit Information screen is displayed.
You can view software version
•
information by touching the [Version
Info] key.
You can view the unit code and serial
•
number for this unit by touching the
[Product Info] key.
Update this unit’s software
Insert an SD card with a newer version of
1.
the system software into the unit.
Touch the [Unit Information] key.
2.
Touch the [Version Info] key.
3.
Touch the [Software Update] key.
4.
The software update begins.
Checking Connectivity
q
You can view details for various connections
to this unit.
Touch the [Check Connectivity] key.
1.
The Check Connectivity screen is
displayed.
[OK] is displayed in the panel for each item
2.
that is correctly connected.
You can also touch the [GPS] key for
detailed GPS connection information.
Resetting to Factory
q
Settings
You can reset all the settings to return to the
factory settings.
Note:
•
When the system is reset to the factory settings,
all stored data will be erased except for the
updated system software and map data.
Touch the [Reset to Factory Setting] key.
1.
From the displayed confirmation screen,
2.
touch the [Yes ] key.
43
Page 45

7. TROUBLESHOOTING
If you have a problem with this system, check the following items to resolve it. Consult your Mitsubishi Motors dealer for additional information.
General
Problem Cause Measure
Power does not turn on.
(No sound is produced.)
The display is dark. The Dimmer control is too low. Adjust the Dimmer properly.
There are red, green and
blue points in the display.
Fuse is blown. Replace with a fuse of the same amperage. If the fuse blows again, consult
your store of purchase.
Incorrect wiring. Consult the nearest Mitsubishi Motors dealer.
The operating condition is not good. The temperature inside the vehicle may be 0°C or lower. Set to an appropriate
temperature (25°C or so) and check it again.
The headlight of the vehicle is lit. The display is made dark at night to prevent the glare (when the headlight is
the vehicle is lit in the daytime, the display gets dark).
This is not a failure, but a phenomenon peculiar to a liquid crystal display
(The liquid crystal display is produced according to technology with very high
precision. Note that, though there are effective pixels of 99.99% or more, pixel
missing or normally lit pixels account for 0.01%).
44
Page 46

DVD Player
Problem Cause Measure
Disc cannot be loaded. Another disc is already loaded. Eject the disc before loading the new one.
There is a foreign matter already in
place.
Sound skips or is noisy. Disc is dirty. Clean the disc with a soft cloth.
Disc is heavily scratched or warped. Replace with a disc with no scratches.
MP3/WMA/AAC files are not encoded
properly.
Sound is bad directly after
power is turned on.
Disc cannot be played with
the display “Please change
the parental level to play
this disc.” shown.
Disc cannot be played. File system is not correct. Use ISO9660 level 1/2, Romeo, Joliet, or Apple ISO file system for CD-R/RW,
The color of the display is
light or a shade of color is not
good.
Water droplets may form on the
internal lens when the car is parked
in a humid place.
The view is limited. Release the view limitation or change the parental level.
The color is not adjusted adequately. Check that the Brightness, Colour, and Black level are adjusted properly.
Eject the foreign matter forcibly.
Use MP3/WMA/AAC files encoded properly.
Let dry for about 1 hour with the power on.
See the subsection “Setting up the parental level” (page 32).
or UDF for DVD±R/RW.
45
Page 47

USB Devices
Problem Cause Measure
USB device cannot be
inserted.
USB device is not
recognized.
No sound heard with the
display “No audio file.”
shown.
Sound skips or is noisy. MP3/WMA/AAC files are not encoded
If an error display other than the ones described above appears, turn off and on the ACC power to restart the system. If the problem persists, consult
your store of purchase.
The USB device has been inserted
with wrong direction.
The USB connector is broken. Replace with a new USB device.
The USB device is damaged. Disconnect the USB device and reconnect. If the device is still not recognized,
Connectors are loose.
No MP3/WMA/AAC file is stored in
the USB device.
properly.
Reversing the connection direction of the USB device, try it again.
try replacing with a different USB device.
Store these files properly in the USB device.
Use MP3/WMA/AAC files encoded properly.
46
 Loading...