

Page 1

Owner’s manual & Installation manual
Mode d’emploi et manuel d’installation
Manual de instrucciones y de instalación
NX 500
NZ 500
2-DIN DVD MULTIMEDIA STATION
WITH BUILT-IN NAVIGATION
& 6.5” TOUCH PANEL CONTROL
DVD MULTIMEDIA STATION
WITH BUILT-IN NAVIGATION
& 7” TOUCH PANEL CONTROL
STATION MULTIMÉDIA DVD 2-DIN
AVEC NAVIGATION INTÉGRÉE
ET ÉCRAN TACTILE DE 6,5 POUCES
STATION MULTIMÉDIA DVD
AVEC NAVIGATION INTÉGRÉE
ET ÉCRAN TACTILE DE 7 POUCES
ESTACIÓN DVD MULTIMEDIA DOBLE DIN
CON SISTEMA DE NAVEGACIÓN
INCORPORADO Y PANTALLA TÁCTIL DE 6,5”
ESTACIÓN DVD MULTIMEDIA
CON SISTEMA DE NAVEGACIÓN
INCORPORADO Y PANTALLA TÁCTIL DE 7”
Page 2

English
Dear Customer:
Owner’s Manual
Congratulations on your purchase of a Clarion mobile electronic product. We are
confident that you’ll enjoy your Clarion experience.
There are many benefits to registering your product. We invite you to visit our
website at www.clarion.com to register your Clarion product.
We have made product registration simple with our easy to use website.
The registration form is short and easy to complete. Once you’re registered, we can
keep you informed of important product information.
Register at www.clarion.com - it’s easy to keep your Clarion product up to date.
CLARION PRODUCT REGISTRATION INFORMATION
For USA and Canada only
www.clarion.com
2 NX500/NZ500
Page 3

Contents
1. FEATURES .........................................................................................................................4
Expanding Systems ...........................................................................................................4
2. PRECAUTIONS ................................................................................................................. 5
3. CONTROLS ....................................................................................................................... 7
Operational Panel ...............................................................................................................7
Functions of Buttons ..........................................................................................................8
Remote Control .................................................................................................................. 9
Functions of Remote Control Buttons................................................................................10
4. CAUTIONS ON HANDLING .............................................................................................. 12
Operation panel ..................................................................................................................12
Navigation System .............................................................................................................12
USB Port ............................................................................................................................13
Cleaning .............................................................................................................................13
Handling Discs ...................................................................................................................14
5. DVD VIDEO SYSTEM ........................................................................................................ 15
DVD Video Features ...........................................................................................................15
Discs ................................................................................................................................16
About the registered marks etc. .........................................................................................17
6. OPERATIONS ....................................................................................................................18
Basic Operations ................................................................................................................18
Radio Operations ...............................................................................................................22
DVD Video Player Operations ............................................................................................23
Sirius Satellite Radio Operations ........................................................................................ 30
Navigation System Operations...........................................................................................32
Introduction to Navigation Software .............................................................................32
Main Menu Screen Operations ...................................................................................... 32
Route to Home Address ............................................................................................. 33
Select the Destination ................................................................................................ 33
• Address or Intersection Mode ................................................................................ 33
• Point of Interest Mode ............................................................................................ 34
• Coordinates Mode ..................................................................................................35
• Edit Favorites Mode ...............................................................................................35
• History Mode ..........................................................................................................36
System Preferencies Setup ........................................................................................36
Office Address Setup .................................................................................................37
Trip Computer Readings and Resets .........................................................................38
7. ACCESSORIES ................................................................................................................. 39
iPod/iPhone Operations ..................................................................................................... 39
USB Operations .................................................................................................................41
Bluetooth Audio Player Operations ....................................................................................42
HD Radio Operations .........................................................................................................47
AUX In/AV In Operations .................................................................................................... 49
Camera In Operations ........................................................................................................49
Setup Operations ...............................................................................................................50
8. TROUBLESHOOTING ....................................................................................................... 52
9. ERROR DISPLAYS ............................................................................................................53
10. SPECIFICATIONS..............................................................................................................54
INSTALLATION/ WIRE CONNECTION GUIDE ..................................................................... 55
English
English
Owner’s Manual
NX500/NZ500 3
Page 4
English
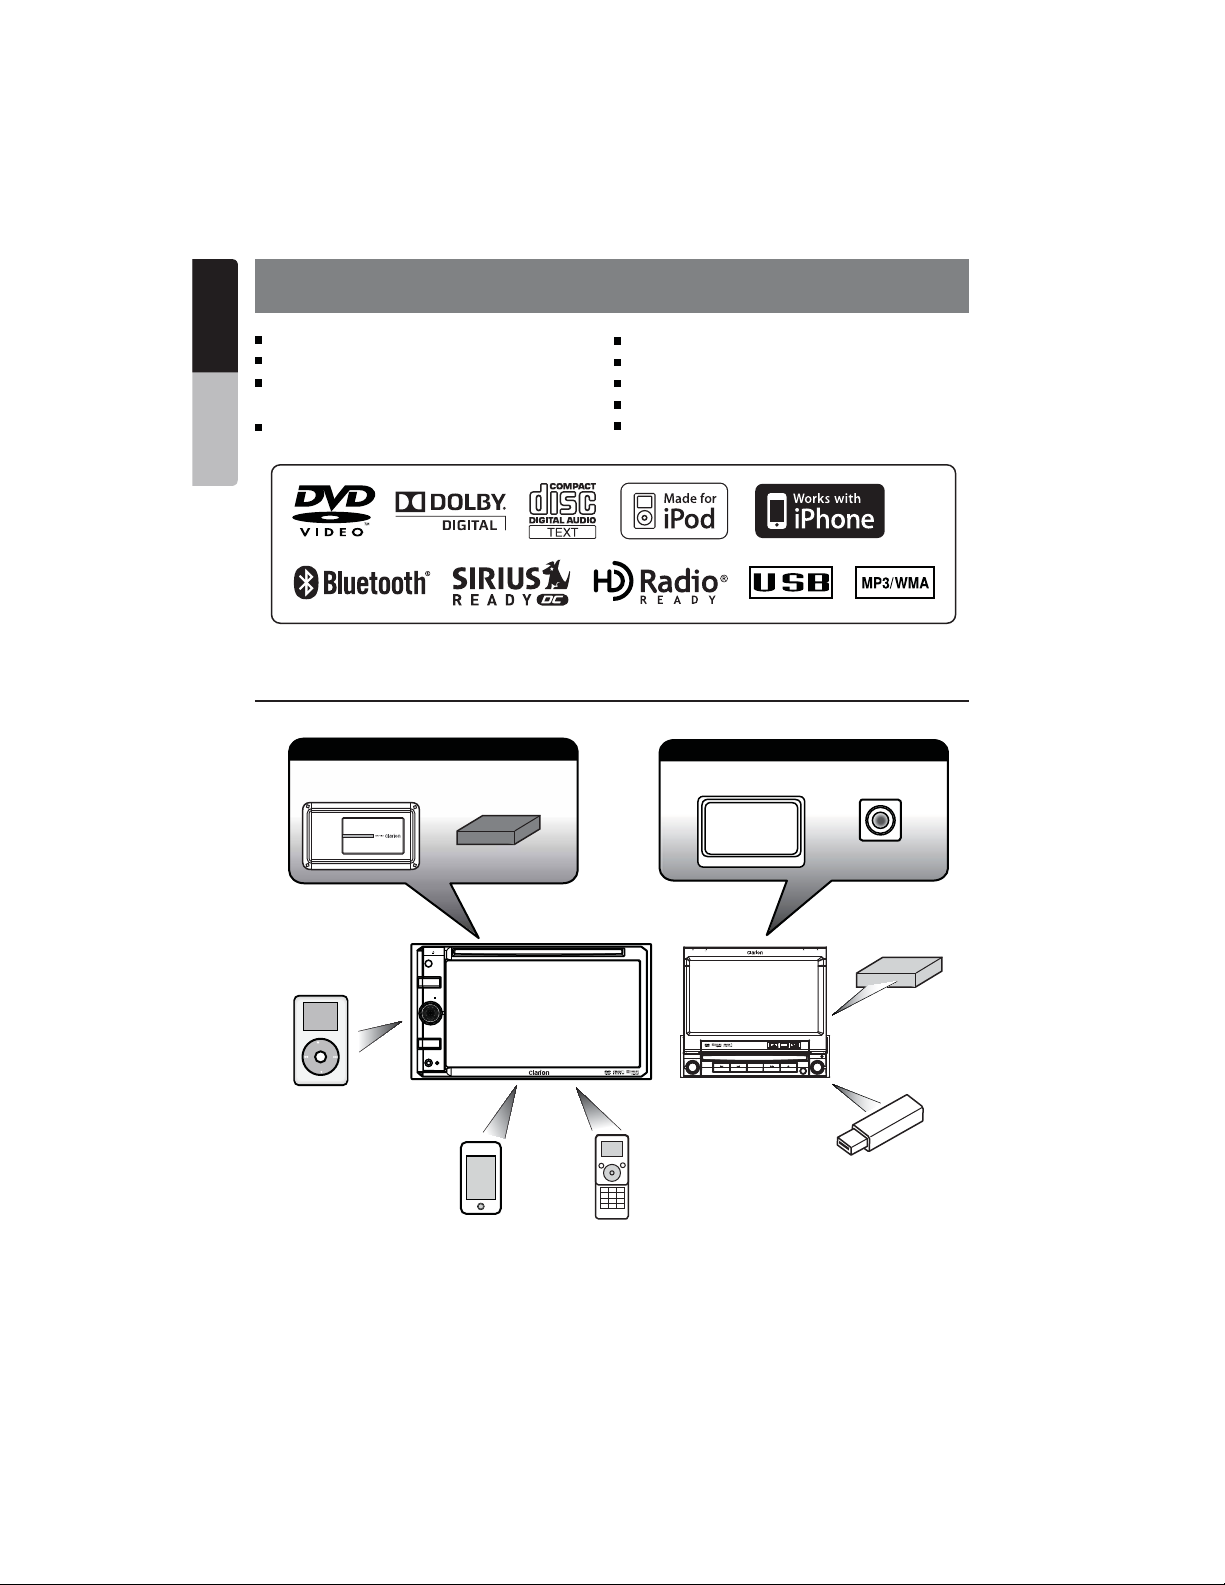
1. FEATURES
Double Din 6.5” Touch Panel Control
Motorized 7” Touch Panel Control
Owner’s Manual
DVD Video/CD-DA/MP3/WMA
Playback Capability
Built-In Navigation
Expanding Systems
Expanding audio features
External
Power Amplifier
iPod
Tuner Module
NAVI/AV
MUTE PWR
VOL
SOURCE
NX500
HD Radio™
OEM Steering Wheel Remote Ready
Compatible with Sirius Satellite Radio
Built-In Bluetooth
Compatible with iPod
®
®
/
iPhone
™
via USB
HD Radio™ Ready
Expanding visual features
Rear monitor
CLOSE BND
push MUTE
PWR
VOL
NZ409
SOURCE
PS/AS NAVI/AV
INFO
SCAN
Back up camera
Satellite Radio
Direct Connect
push ENT
SEL
Sirius
iPhone
BT Phone
USB
Memory
NOTE:
The unit can receive analog, HD Radio (optional) and satellite radio (optional) broadcasts.
The items listed outside the frames are the commercial products generally sold.
4 NX500/NZ500
Page 5

2. PRECAUTIONS
English
WARNING
• For your safety, the driver should not watch any video sources and/or operate the controls while driving.
Please note that watching and operating any video sources while driving are prohibited by law in some
countries. Also, while driving, keep the volume to a level at which external sounds can be heard.
• When using the navigation system, follow the precautions listed below. After reading this manual,
be sure to keep it in a handy place (such as the glove box of your car).
• This navigation system should not be used to replace your own judgment. No itinerary suggested
by this navigation system should ever override any highway regulations, your own judgment, or a
knowledge of safe driving practices. Do not follow the navigation system’s suggested itinerary if it
would cause you to perform a dangerous or illegal act, place you in a dangerous situation, or take
you into an area you consider unsafe.
• The advice provided by the navigation system is to be regarded as a suggestion only. There
may be times when the navigation system displays the vehicle’s location incorrectly, fails to
suggest the shortest route, or fails to direct you to your desired destination. In such instances, rely
on your own driving judgment, taking into account the driving conditions at the time.
• Do not use the navigation system to locate emergency services. The database does not contain a
complete listing of emergency services such as police stations, fire halls, hospitals and walk-in
clinics. Please show discretion and ask for directions in such instances.
• As the driver, you alone are responsible for your driving safety.
• In order to avoid a traffic accident, do not operate the system while driving.
• In order to avoid a traffic accident, operate the system only when the vehicle is stopped at a safe
place and the parking brake is on.
• In order to avoid a traffic accident or traffic offense, remember that actual road conditions and
traffic regulations take precedence over the information contained on the navigation system.
• The software may contain inaccurate or incomplete information due to the passage of time,
changing circumstances, and the sources of information used. Please respect current traffic
conditions and regulations at all times while driving.
• Where actual road conditions and highway regulations differ from the information contained on
the navigation system, abide by the highway regulations.
• Keep the amount of time spent viewing the screen while driving to a strict minimum.
• The navigation system does not provide, nor represent in any way information on: traffic and
highway regulations; technical aspects of the vehicle including weight, height, width, load and
speed limits; road conditions including grade, percentage of incline and surface conditions;
obstacles such as the height and width of bridges and tunnels; and other current driving or road
conditions. Always rely on your own judgment when driving a car, taking into account current
driving conditions.
• Do not disassemble or modify this unit. It may cause an accident, fire, or electric shock.
• Do not use this unit when a trouble exists, such as no screen content appears or no sound is
audible. It may cause an accident, fire, or electric shock. For that case, consult your authorized
dealer or a nearest Clarion service center.
• In case of a problem, such as foreign materials have entered in the unit, the unit gets wet, or
smoke or strange smells come out of the unit, etc., stop using this unit immediately, and consult
your authorized dealer or a nearest Clarion service center.
Using it in that condition may cause an accident, fire, or electric shock.
• Use a fuse with the same specification only when replacing the fuse.
Using a fuse with a different specification may causes a fire.
• For the installation of this unit or a change in the installation, ask your authorized dealer or a
nearest Clarion service center for safety. Professional skills and experiences are required to do so.
English
Owner’s Manual
NX500/NZ500 5
Page 6
English
1.When the inside of the car is very cold and
the player is used soon after switching on the
heater, moisture may form on the disc (DVD/
Owner’s Manual
CD) or the optical parts of the player and
proper playback may not be possible. If
moisture forms on the disc (DVD/CD), wipe it
off with a soft cloth. If moisture forms on the
optical parts of the player, do not use the
player for about one hour. The condensation
will disappear naturally allowing normal
operation.
2.Driving on extremely bumpy roads which
cause severe vibration may cause the sound
to skip.
3.This unit uses a precision mechanism. Even
in the event that trouble arises, never open
the case, disassemble the unit, or lubricate
the rotating parts.
4.This equipment has been tested and found to
comply with the limits for a Class B digital
device, pursuant to Part 15 of the FCC Rules.
These limits are designed to provide
reasonable protection against harmful
interference in a residential installation. This
equipment generates, uses, and can radiate
radio frequency energy and, if not installed
and used in accordance with the instructions,
may cause harmful interference to radio
communications. However, there is no
guarantee that interference will not occur in a
particular installation. If this equipment does
cause harmful interference to radio or
television reception, which can be determined
by turning the equipment off and on, the user
is encouraged to consult the dealer or an
experienced radio/TV technician for help.
INFORMATION FOR USERS:
CHANGES OR MODIFICATIONS TO
THIS PRODUCT NOT APPROVED
BY THE MANUFACTURER WILL VOID
THE WARRANTY AND WILL VIOLATE
FCC APPROVAL
6 NX500/NZ500
Page 7
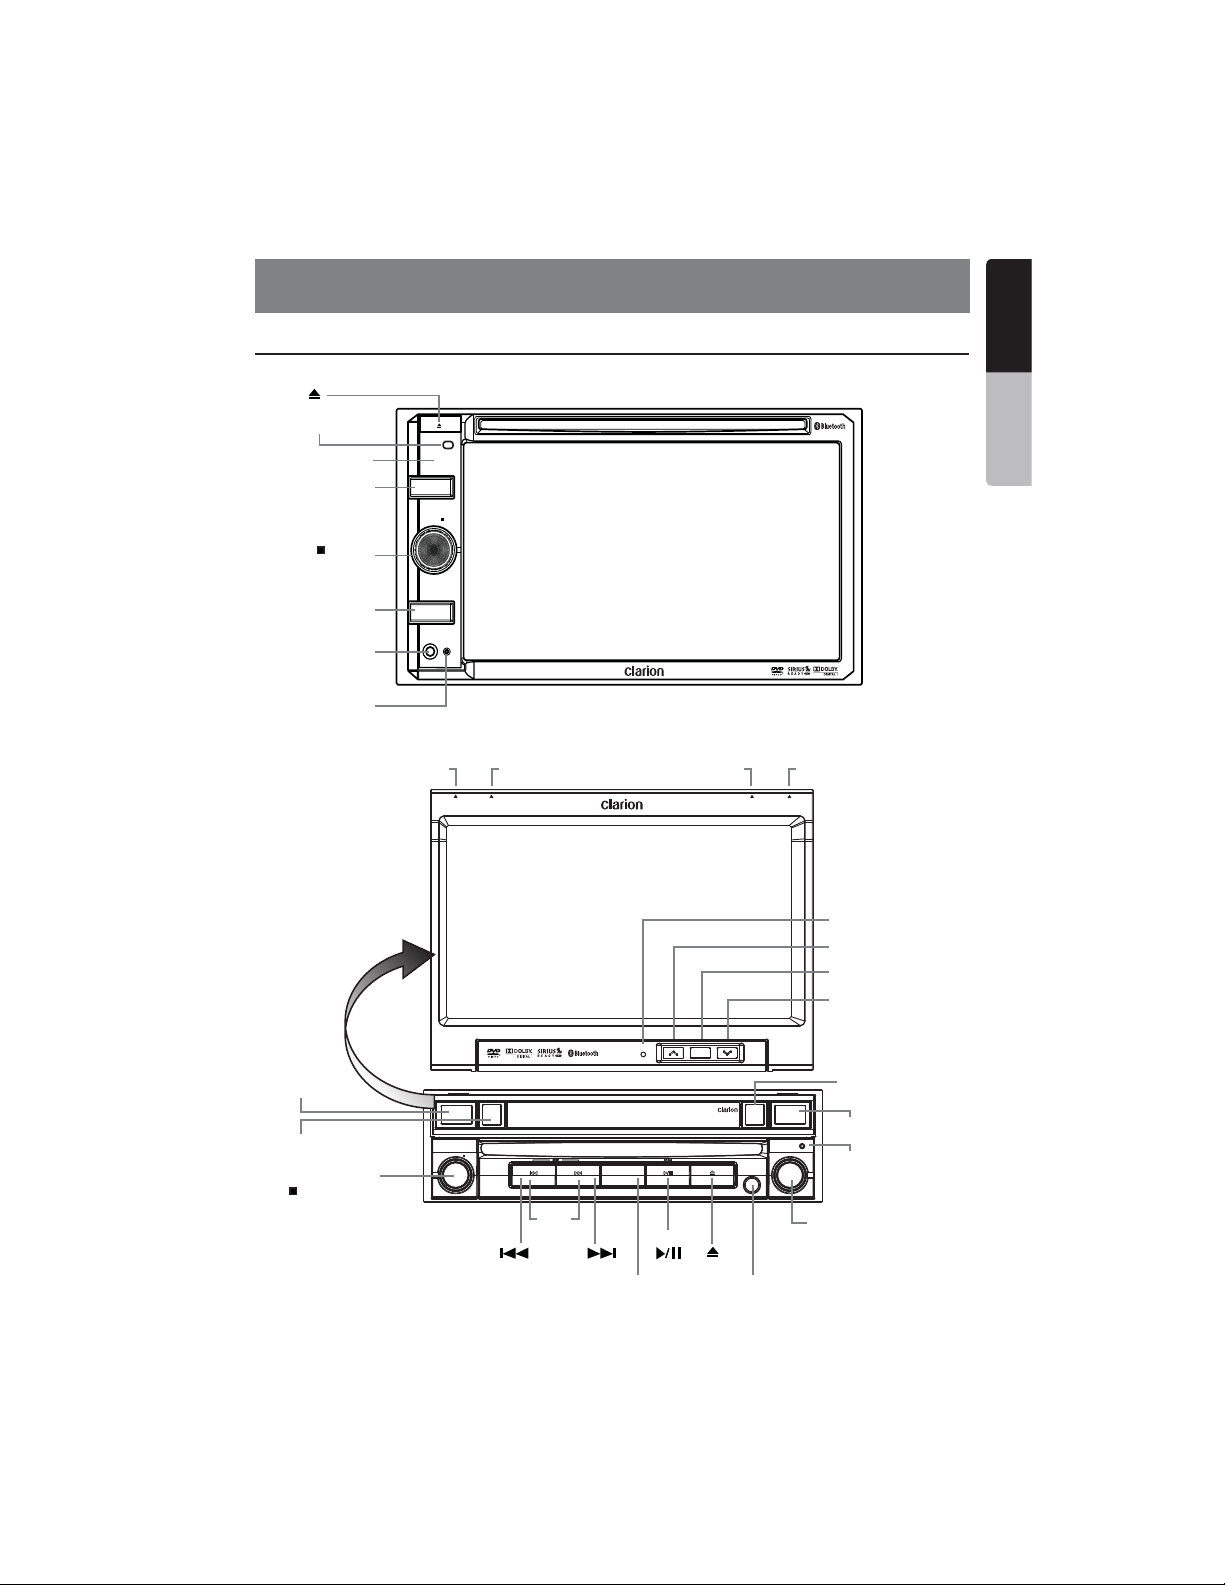
3. CONTROLS
English
Operational Panel
[ ]
MIC
SENSOR
[NAVI/AV]
[MUTE]
[ PWR]
[VOL]
[SOURCE]
AUX IN
RESET
NAVI/AV
MUTE PWR
VOL
SOURCE
[CLOSE] [BND] [PS/AS] [NAVI/AV]
CLOSE BND
English
Owner’s Manual
NX500
PS/AS NAVI/AV
MIC
[TILT UP]
[INFO]
[TILT DOWN]
[OPEN]
[BND]
[push MUTE]
[ PWR]
[VOL]
OPEN BND
VOL
push MUTE
PWR
NZ500
[ ] [ ]
SEEK
MIC
SOURCE
[SOURCE]
SCAN
[ ]
INFO
[ ]
PS
AS
AUX IN
DISP
push ENT
PS
AS
DISPLAY
SEL
RESET
[push ENT]
[SEL]
NX500/NZ500 7
Page 8

Functions of Buttons
English
Note: Be sure to read this chapter while
referring to front diagram “CONTROLS”
[MUTE] [ PWR] [VOL] Knob
• Press this knob to turn on the power. Keep
Owner’s Manual
pressing this knob more than 1 second to turn
off the power.
• Press this knob to attenuate the sound of the
receiver, press again to restore sound.
• Rotate the knob to increase or decrease the
volume.
[NAVI/AV] Button
• Press this button to enter navigation video.
• Press this button more than 2 seconds to
return to the previous mode.
[SOURCE] Button
• Press this button to scroll through the
available sources such as AM/FM Tuner,
Sirius, DVD, NAVI, USB, Camera modes, etc.
[ ] [ ] Search/Seek Button
• Press to search next or previous station or
channel in Tuner, Sirius radio modes.
• Press to search next or previous track or
chapter in CD, MP3/WMA, iPod and DVD
video modes.
• Press and hold to fast forward or fast
backward by ×2 ,4,8,16 step in CD, MP3/
WMA and DVD video mode.
• Press and hold to fast forward or fast
backward in iPod music.
• Press and hold to enter manual seek status in
Tuner and Sirius radio mode, then press
briefly to seek station by step.
[ ] Play /Pause Button / Scan Button
Press to play, pause or scan audio or video.
• Press shortly to scan.
• Press and hold one time:
Audio or video file will be paused. If then
press briefly, file will be resumed to play.
[ ] Eject
• Press to eject disc from unit when panel
is opened.
[OPEN] [CLOSE] Button
Use this button to open/close operation panel.
[PS/AS] Button
• Press this button to start the preset scan
mode.
• Press and hold this button to start the auto
preset scan and setting mode.
[ ] [ ] Button
Press the buttons to adjust the operational
panel angle.
[INFO] Button
Press to turn On and Off to display list in
Tuner, Sirius radio, DVD/CD modes.
[push ENT] [SEL] Button
• Rotate the button to move to next folder in
iPod mode.
• Press to confirm and play current media file
in CD, MP3/WMA, DVD and iPod mode.
[DISPLAY] Button
• Press this button to display band in Radio,
Sattelite, CD/DVD, iPod mode.
• Press one more time to dispaly current time
from any mode.
RESET Button
• Press this button to reset the unit.
SENSOR
• Receiver for the remote control unit (operating
range: 30 degree in all directions).
MIC
• Internal microphone for use during Bluetooth
phone calls. Sensitivity can be adjusted from
the Settings menu.
[BAND] Button
• Use this button to enter AM/FM tuner mode
from any source.
• Once in AM/FM tuner mode, you can press it
to change bands between FM1, FM2, FM3,
AM bands.
8 NX500/NZ500
Page 9
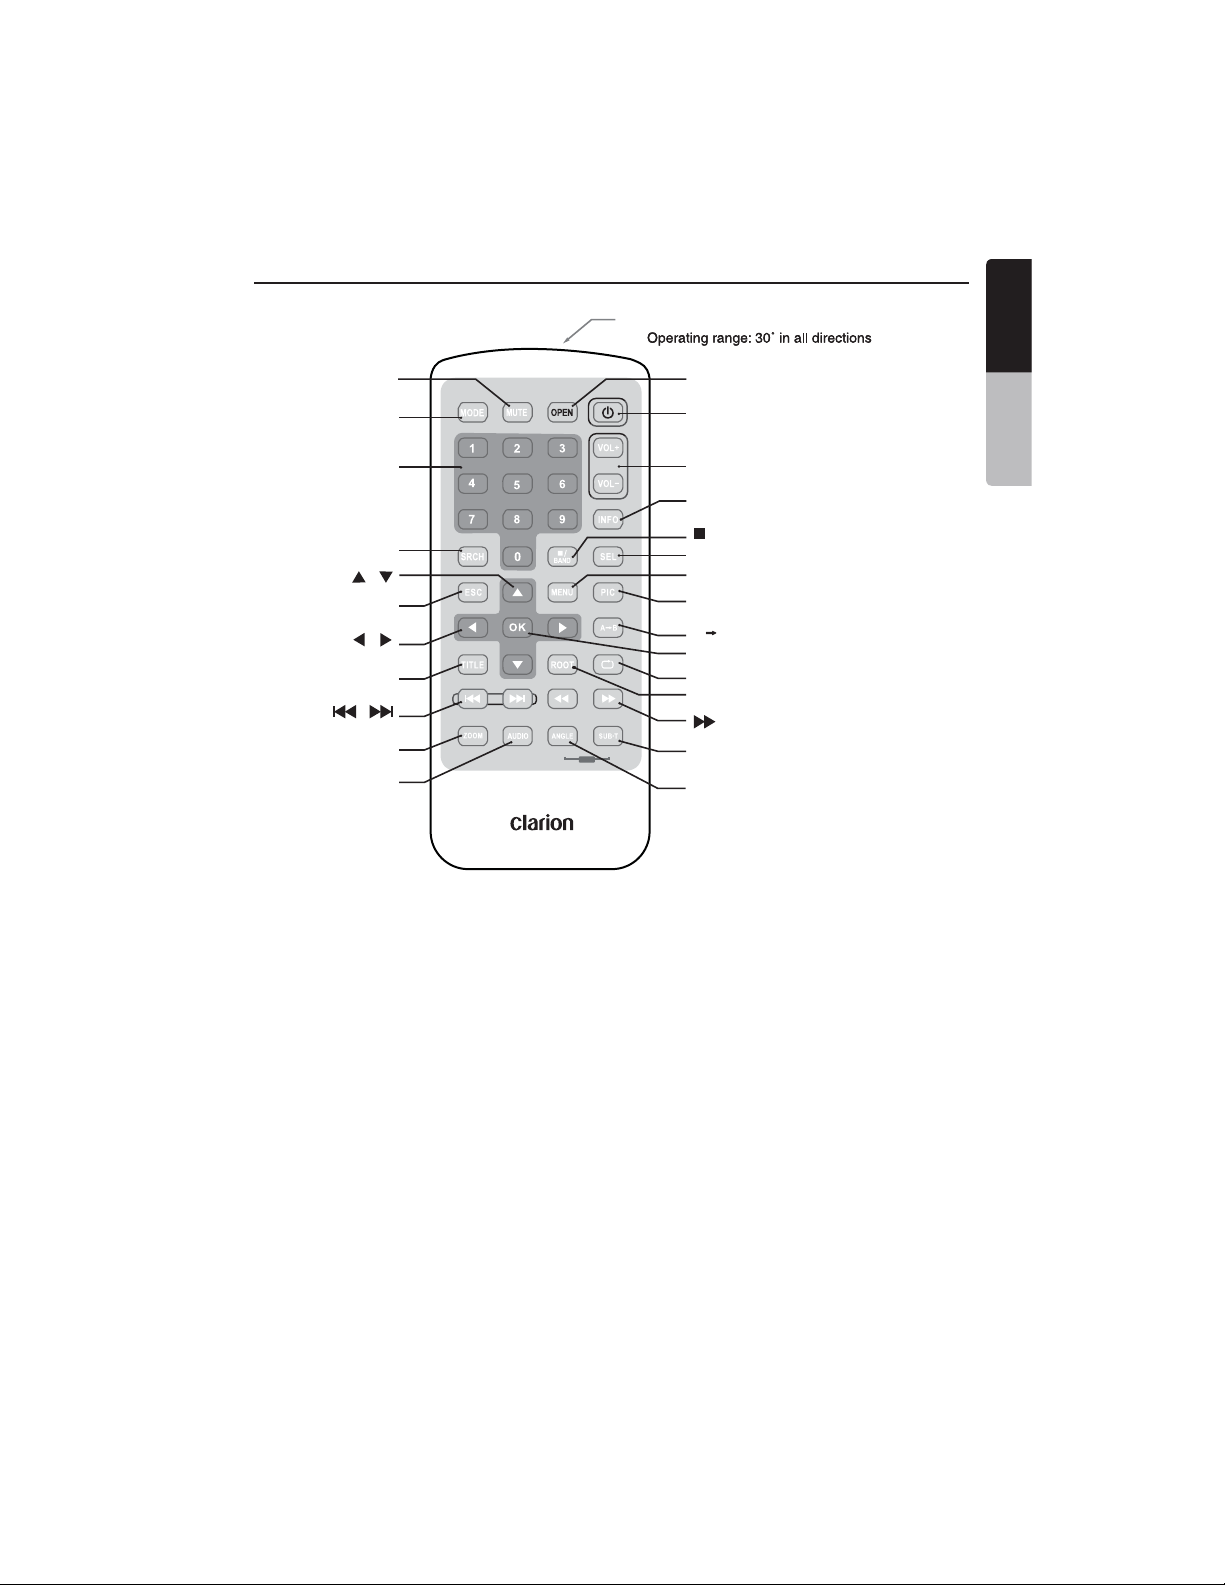
Remote Control
[
]
MUTE
Signal transmitter
Signal transmitter
[
OPEN
English
English
]
Owner’s Manual
[
]
MODE
[
]
0 - 9
[
]
SRCH
[][]
[
]
ESC
[][]
[
]
TITLE
[]
[]
[
]
ZOOM
[
]
AUDIO
Replacing the batteries
1. Press the retention tab and pull
out the battery tray and remove
the old battery.
2. Insert the new CR2025 battery
and slide the battery tray back
in the remote control the same
direction that you removed it.
Please ensure the tray is inserted in
the correct direction.
AUDIO VIDEO
iPod
[
POWER
[
VOLUME
[
INFO
[
[
SEL
[
MENU
[
PIC
[]
A B
[
OK
[]
REPEAT
[]
ROOT
]
/ BAND
]
]
]
]
]
]
]
[]
[SUB TITLE/VIDEO iPod MODE*]
[
ANGLE/AUDIO iPod MODE*]
* Only when capable iPod/iPhone
is connected
Note:
Using batteries improperly can cause
them to explode. Take note of the
following points:
• When replacing batteries, replace
both batteries with new ones.
• Do not short-circuit, disassemble or
heat batteries.
• Do not dispose of batteries into fire or
flames.
• Dispose of discharged batteries
properly.
NX500/NZ500 9
Page 10

Functions of Remote Control Buttons
English
You can use the remote control unit to control the NX500 and NZ500.
Note:
•
The wireless remote control operation may not be optimal in direct sunlight.
Owner’s Manual
Shared modes
[MODE] Button
• Press this button to scroll through the various
available sources such as the AM/FM tuner,
DVD player, iPod, Sirius Radio, or AUX IN.
[VOLUME] Button
Increase and decrease volume.
[MUTE] Button
Turns mute on and off.
[POWER] Button
Press this button to turn the unit on or off.
[OPEN] Button
Press this button to OPEN or CLOSE the
motorized screen. Please ensure there are
no obstructions before starting the operation.
[MENU] Button
Press this button to enter the MAIN MENU.
From the main menu, you can select your
desired source or change your settings.
[PIC] Button
Press this button to change your monitor
settings such as Brightness, Color, and
Contrast.
[SEL] Button
Press this button to change your audio
settings such as Tone, Fader, and Balance.
[ESC] Button
Press this button to exit selection and
adjustment menus.
TUNER/Satellite Radio mode
[BAND] button
Switches reception band.
[0 - 9] Buttons
• Use in the Key Pad screen to set the radio
frequency or Satellite Radio channels.
• Use to select the preset number in the Preset
List screen.
[SEARCH] Button
Press to show/hide the Key Pad screen.
[OK] button
Press to fix the entered data in the Key Pad
screen.
[ ], [ ] Buttons
Press to seek the next available higher or
lower station in TUNER mode. In Sirius Radio
mode, you will scroll through the categories.
[ ], [ ] Buttons
Press to manually select the next higher or
lower station in TUNER and Satellite Radio
modes.
[ ], [ ] Buttons
Press to scroll through the saved presets in
the TUNER mode. Press [OK] to tune to the
highlighted preset.
[INFO] Button
Press to switch in and out of the LIST mode
while in the TUNER/ Sirius Radio mode.
DVD PLAYER mode
• Press to turn on and off the playtime display
in the DVD video.
• Press to switch in and out of the LIST mode
while playing CD audio.
[SEARCH] Button
Press to open the direct search menu while in
the DVD video mode.
[OK] Button
Press to select, play or pause video and
audio media.
[ /BAND] Button
• Press to stop video and audio media play
back.
[0 - 9] Buttons
• Press to enter DVD video chapters/titles in the
Key Pad screen.
• Press to set the track/folder number of the
CD, or MP3/WMA in the Key Pad screen.
[DISC SEL] Button
• Press to show/hide the Track List screen in
the CD mode.
• Press to show/hide the Folder List screen in
the MP3/WMA mode.
[TITLE] Button
Press to go to the title menu on the DVD.
[ROOT] Button
Press to go to the root menu on the DVD.
[ ], [ ], [ ], [ ] Buttons
• Press to select button items on the menu
screen of a DVD video.
• Press [ ], [ ] to scroll through the page
screens in the CD and MP3/WMA modes.
10 NX500/NZ500
Page 11

Functions of Remote Control Buttons
[ ], [ ] Buttons
• Press to select the next higher or lower
chapter number in DVD video mode.
• Press to select the next higher or lower track
in CD.
[ ], [ ]Buttons
Press to perform fast-forward and fastbackward. Press again to advance to higher
speed reversing or forwarding such as 2x,
4x, 8x and 16x. Press once more to resume
normal speed playback.
[RPT] Button
• Press to perform chapter repeat in the DVD
video mode, and track repeat in CD and MP3/
WMA modes.
• Press again to perform title repeat in DVD
video mode or folder repeat in MP3/WMA
mode. In CD mode, this will activate the
repeat all mode.
• Press again to perform all repeat in MP3/WMA
playback mode.
[A B] Button
• Press to set initial starting point of repeat.
The screen will show ‘REP A-’.
• Press again to set repeat ending point.
The screen will show ‘REP A-B’
• Press again to turn off A-B repeating. The
screen will show ‘REP AB Off’
[ZOOM] Button
Press to turn on and zoom in while in DVD
Video mode. You can zoom in up to 3x.
[AUDIO] Button
Press to switch the AUDIO function in the DVD
video mode.
[SUB-T] Button
Press to display subtitles in the DVD video
mode.
[ANGLE] Button
Press to switch the ANGLE function in the DVD
video mode when the Angle mark is displayed.
[OK ] Button
Press to play or pause the selected media.
[ ], [ ] Buttons
Press to scroll the list screens.
[ ], [ ] Buttons
Press to select the next higher or lower track
numbers.
[ ], [ ] Buttons
Press to perform fast-forward or fast-backward
searching. Press again to change the speed
to 2x, 4x, 8x or 16x.
English
English
Owner’s Manual
NX500/NZ500 11
Page 12

English
4. CAUTIONS ON HANDLING
Operation Panel
Owner’s Manual
For a longer service life, be sure to read the following cautions.
• The operation panel will operate properly in a
temperature range of 0˚ to 60˚ C.
• Do not allow any liquids on the set from
drinks, umbrellas etc. Doing so may damage
the internal circuitry.
• Do not disassemble or modify the set in any
way. Doing so may result in damage.
• Subjecting the operation panel to shocks may
result in breakage, deformation or other
damage.
• If a problem should occur, have the set
inspected at your store of purchase.
• Do not insert objects or poke in the space
between the operation panel and the main
unit when the panel is tilted.
• The remote control unit may not work if the
remote control sensor is exposed to direct
sunlight.
• In extremely cold weather, the display
movement may slow down and the display
may darken, but this is not a malfunction. The
display will work normally when the
temperature increases.
• Small black and shiny spots inside the liquid
crystal panel are normal for LCD products.
Navigation System
• To prevent discharge of the car battery, use
this system with the engine of the vehicle
running as much as possible.
• The housing of this unit may become hot
because this unit has a high-speed CPU. Be
careful to handle the unit during navigating or
immediately after turning the power off.
• Turn off the power of the vehicle when
connecting or disconnecting wires. Doing this
while the power of the vehicle is turned on,
may cause a trouble or malfunction.
Note:
•
When using this unit first time after
purchasing, or not used for long periods
of time, it might take about 5 to 15 minutes
until the current location is determined
using GPS. Moreover, even when using
it often, it may take about 2 to 3 minutes until
the current location is determined according
to the GPS measuring situation.
•
When the route (path) cannot be calculated,
move desired destination to a nearby main
road and perform calculation again. It may
be impossible to find a route in case the
car location is too close to the desired
destination.
•
For vehicles equipped with an intelligent key,
do not bring the intelligent key close to the
unit of the navigation system. The navigation
system may not operate correctly.
•
If an electrical equipment that generates
a strong electrical noise is used near this
unit, the screen may be disturbed and noise
may be generated. In this case, keep away
such an electrical equipment or refrain from
using it.
• Data saved to the flash memory may get lost
in case of a breakdown, malfunction, or other
trouble of this unit.
• Operation of the navigation system may be
limited to protect the unit if the temperature is
extremely high or low. In such a case, please
wait until temperature becomes normal again.
12 NX500/NZ500
Page 13

USB Port
• The USB memory stick may stick out when
inserted, so it may cause danger during
driving. In such cases, you can use a
commercial USB extension cable, etc., but
use it safely under your own judgment.
• The USB memory sticks must be recognized
as “USB mass storage class” to work
properly. Some models may not operate
correctly.
When the memorized data is lost or
damaged by any chance, Clarion shall not
be liable for any damage.
When using an USB memory stick, we
recommend that you backup your data stored
on it before by using a personal computer
etc.
• Data files may be broken when using USB
memory sticks in the following situation:
When disconnecting the USB memory stick
or turning the power off during writing or
reading data.
When affected by static electricity or electric
noise.
Connect/disconnect the USB memory stick
when it is not accessed.
• Some USB memory sticks cannot be inserted
to the main unit because of their shape. In
such cases, use a commercial USB extension
cable to connect them.
• Connecting with the computer is not covered.
• Music files (MP3, WMA, etc.) stored in the
USB memory stick cannot be played back.
WARNING
English
English
Owner’s Manual
Cleaning
• Cleaning the cabinet
Use a soft, dry cloth and gently wipe off the dirt.
For tough dirt, apply some neutral detergent
diluted in water to a soft cloth, wipe off the dirt
gently, then wipe again with a dry cloth.
Do not use benzene, thinner, car cleaner, etc.,
as these substances may damage the cabinet
or cause the paint to peel. Also, leaving rubber
or plastic products in contact with the cabinet
for long periods of time may cause stains.
• Cleaning the liquid crystal panel
The liquid crystal panel tends to collect dust, so
wipe it off occasionally with a soft cloth. The
surface is easily scratched, so do not rub it with
hard objects.
Alkaline (CR) button batteries contain
Perchlorate.
Dispose of discharged batteries properly.
NX500/NZ500 13
Page 14
Handling Discs
English
Handling
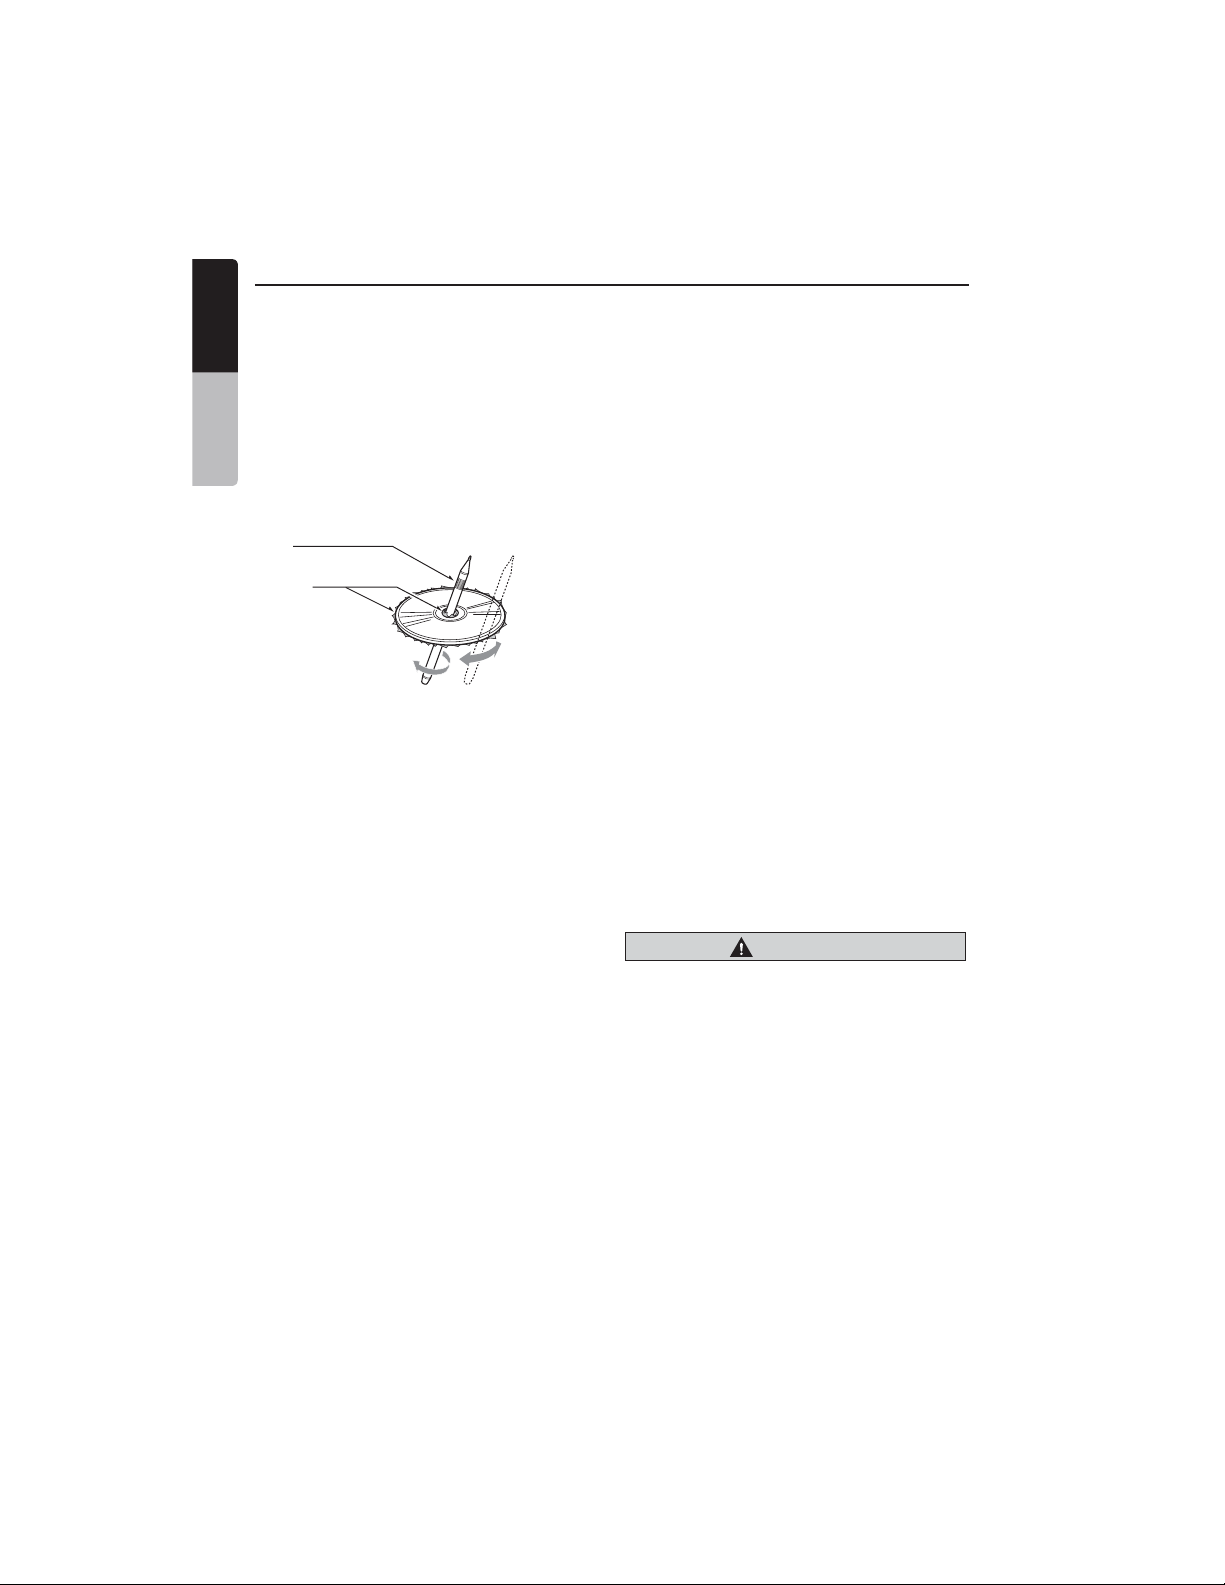
• New discs may have some roughness
Owner’s Manual
around the edges. If such discs are used,
the player may not work or the sound
may skip. Use a ball-point pen or the like
to remove any roughness from the edge
of the disc.
Ball-point pen
Roughness
• Never stick labels on the surface of the
disc or mark the surface with a pencil or
pen.
• Never play a disc with any cellophane
tape or other glue on it or with peeling off
marks. If you try to play such a disc, you
may not be able to get it back out of the
DVD player or it may damage the DVD
player.
• Do not use discs that have large
scratches, are misshapen, cracked, etc.
Use of such discs may cause
misoperation or damage.
• To remove a disc from its storage case,
press down on the center of the case
and lift the disc out, holding it carefully
by the edges.
• Do not use commercially available disc
protection sheets or discs equipped with
stabilizers, etc. These may damage the
disc or cause breakdown of the internal
mechanism.
Storage
• Do not expose discs to direct sunlight or
any heat source.
• Do not expose discs to excess humidity
or dust.
• Do not expose discs to direct heat from
heaters.
Cleaning
• To remove fingermarks and dust, use a
soft cloth and wipe in a straight line from
the center of the disc to the
circumference.
• Do not use any solvents, such as
commercially available cleaners,
anti-static spray, or thinner to clean
discs.
• After using special disc cleaner, let the
disc dry off well before playing it.
On Discs
• Exercise a good precaution when loading
a disc. The operation panel will close
automatically when leaving it open for a
while.
• Never turn off the power and remove the
unit from the car with a disc loaded.
CAUTION
For your safety, the driver should
not insert or eject a disc, opening
the operation panel while driving.
14 NX500/NZ500
Page 15
5. DVD VIDEO SYSTEM
English
DVD video is a high-quality digital video source that provides crisp and clear images.
One 12 cm disc contains either one film or four hours of music.
DVD Video Features
This unit provides the following functions
in addition to the high image quality and
sound quality of DVD video.
Note:
•
The functions described in this section,
for example, the recorded language,
subtitles, angles, etc. differ depending on
the DVD video disc.
Refer to the instructions provided with
the DVD video.
•
Some disc functions may operate
differently from described in this manual.
Multi-sound function
DVD video can store up to 8 languages for
one film; select the language of your
preference.
• The languages stored on the disc are
indicated by the icon shown below.
Multi-angle function
A DVD video that is filmed from multiple
angles allows you to select the angle of
choice.
• The number of recorded angles are
indicated by the icon shown below.
Subpicture (subtitles) function
A DVD video can record subtitles for up
to 32 languages and you can select the
language of the subtitles you wish to see.
The number of recorded subtitle
languages are indicated by the icon shown
below.
Multi-story function
When a DVD video contains more than
one story for a film, you can select the
story you wish to enjoy. The operation
procedures vary with the disc; observe the
instructions for selecting a story provided
during playback.
Menu screens
Menus can be called up during DVD
video playback to perform menu setting.
• Example showing menu display
English
Owner’s Manual
NX500/NZ500 15
Page 16
Discs
English
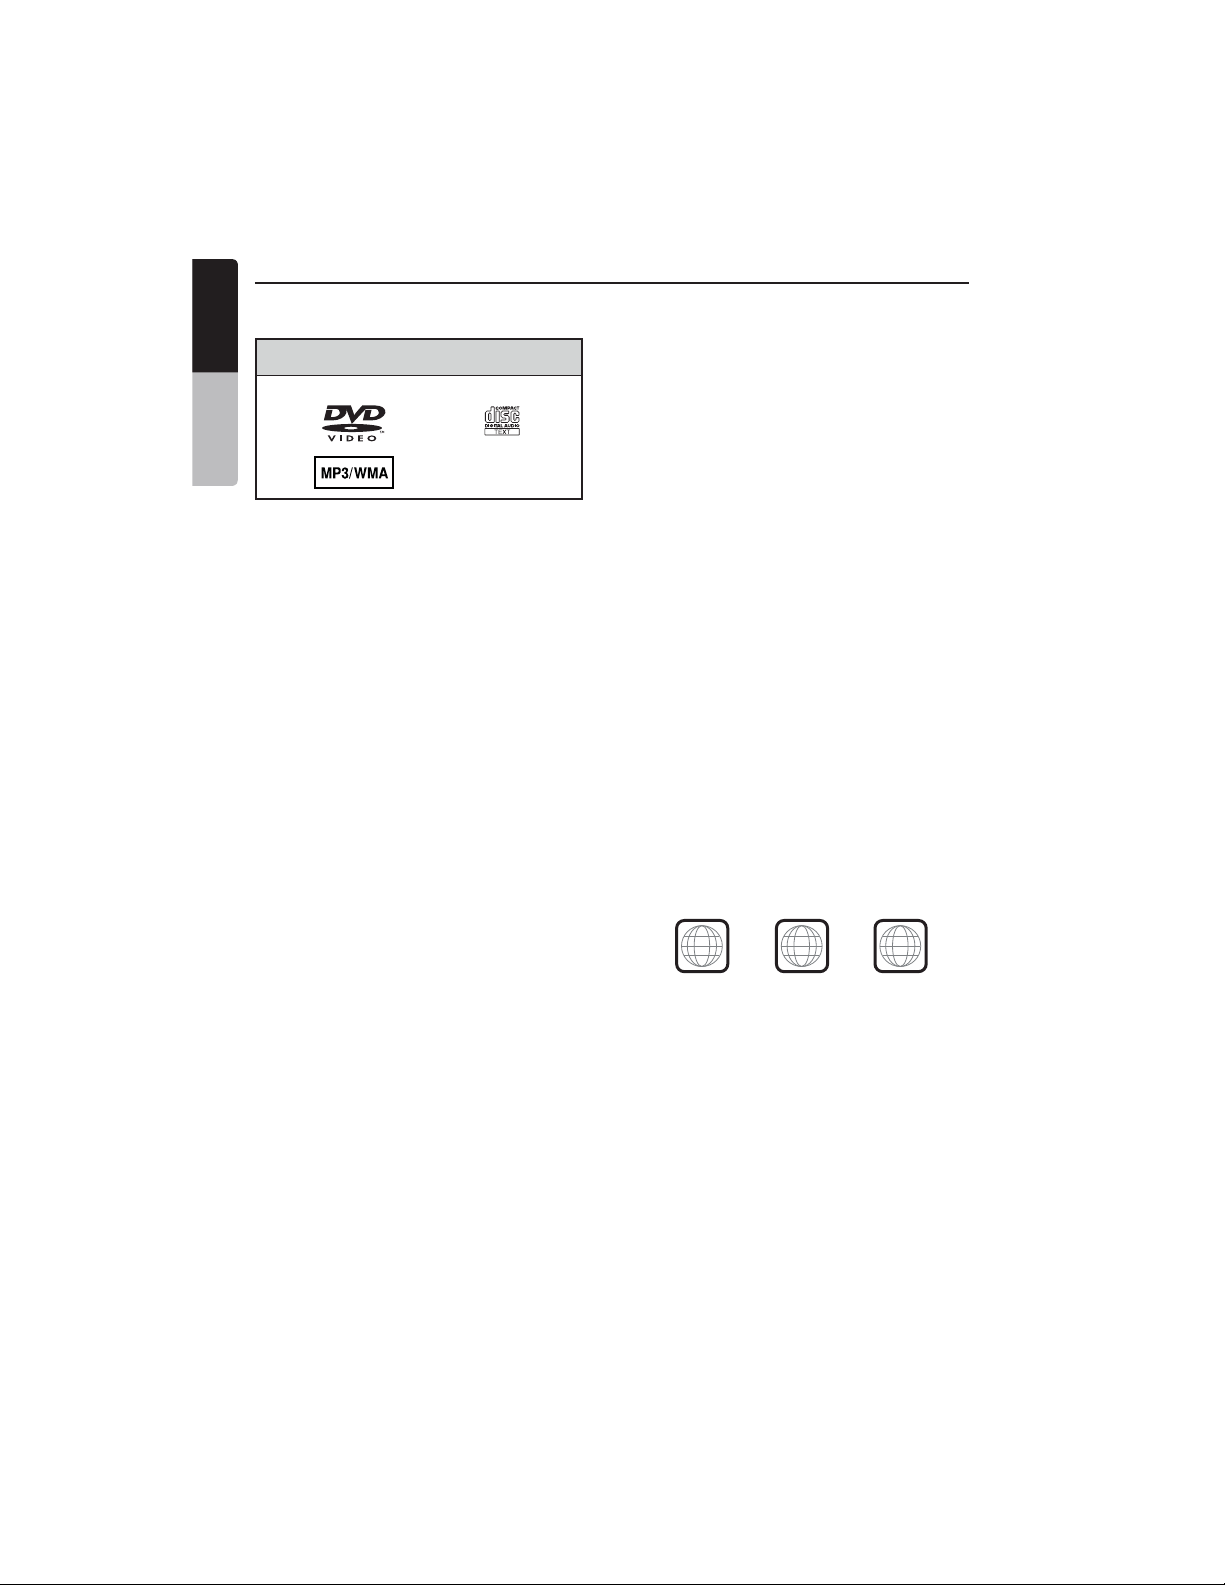
Playable discs
This DVD video player can play the following discs.
Owner’s Manual
DVD video discs
About CD Extra discs
A CD Extra disc is a disc in which a total of two
sessions have been recorded. The first session
is Audio session and the second session is Data
session.
Your personally-created CDs with more than second
data sessions recorded cannot be played on this
DVD video player.
Note:
•
When you play a CD Extra disc, only the first
session will be recognized.
About playing a CD-R/CD-RW disc
(MP3, WMA)
This player can play CD-R/CD-RW discs previously
recorded in music CD format (MP3, WMA) or video
CD format.
About playing a DVD-R/RW or DVD+R/RW
disc
This player cannot play DVD-R/RW and DVD~R/ RW
discs previously recorded in video CD format.
However, MP3/WMA files recorded on DVD-R/ RW
and DVD+R/RW discs can be played.
Playable discs
Audio CDs
Discs that cannot be played back
T
his DVD video player cannot play back DVD-Audio,
DVD-RAM, Photo CDs, etc.
Note:
•
It may also not be possible to play back CDs
recorded on a CD-R unit and CD-RW unit.
(Cause: disc characteristics, cracks, dust/dirt,
dust/dirt on player’s lens, etc.)
•
If a CD-R or CD-RW disc that has not been
finalized is played, it will take a long time to
start playing. Also, it may not be possible
to play depending on its recording conditions.
•
You cannot play SuperAudio CDs. Playback of
the CD player is not supported even if it is a
hybrid disc.
About MP3/WMA playback
This unit can play back CD-R/CD-RW, DVD-R/ RW
and DVD~R/RW discs on which MP3/WMA music
data have been recorded.
For a detailed information, see the section
entitled “Listening to MP3/WMA”.
Note on region numbers
The DVD video system assigns a region number to
DVD video players and DVD discs by sales area. DVD
video players sold in the United States can play back
DVD discs with the region number
“ALL”, “1” or any combination of numbers that also
incorporate a “1”.
The DVD video region number is marked on the disc
jacket as shown below.
1
ALL
1
4
6
16 NX500/NZ500
Page 17

About the registered marks, etc.
•
This product incorporates copyright protection
technology that is protected by U.S. patents
and other intellectual property rights. Use of this
copyright protection technology must be
authorized by Macrovision, and is intended for
home and other limited viewing uses only
unless otherwise authorized by Macrovision.
Reverse engineering or disassembly is prohibited.
•
Manufactured under license from Dolby
Laboratories. “Dolby”, “Pro Logic” and the
double-D symbol are trademarks of Dolby
Laboratories.
•
“Made for iPod” means that an electronic
accessory has been designed to connect
specifically to iPod and has been certified by the
developer to meet Apple performance standards.
“Works with iPhone” means that an electronic
accessory has been designed to connect
specifically to iPhone and has been certified by the
developer to meet Apple performance standards.
Apple is not responsible for the operation of this
device or its compliance with safety and regulatory
standards.
iPod and iTunes® are trademarks of Apple Inc.,
registered in the U.S. and other countries.
iPhone is a trademark of Apple Inc.
•
Ready logos are proprietary trademarks of iBiquity
Digital Corporation.
•
by the Bluetooth® SIG, Inc. and any use of such
marks by Clarion Co.,Ltd. is under license. Other
trademarks and trade names are those of their
respective owners.
•
related marks and logos are trademarks of SIRIUS
XM Radio Inc. and its subsidiaries. All other marks,
channel names and logos are the property of their
respective owners.
English
English
Owner’s Manual
HD Radio™ and the HD Radio and HD Radio
The Bluetooth® word mark and logos are owned
2009 SIRIUS XM Radio Inc., SIRIUS, XM and all
NX500/NZ500 17
Page 18
English
6. OPERATIONS
Basic Operations
Note:
Owner’s Manual
•
Be sure to read this chapter referring to the
chapter “3. CONTROLS”
CAUTION
When the unit is turned on, starting and
stopping the engine with its volume raised to
the maximum level may harm your hearings.
Be careful about adjusting the volume.
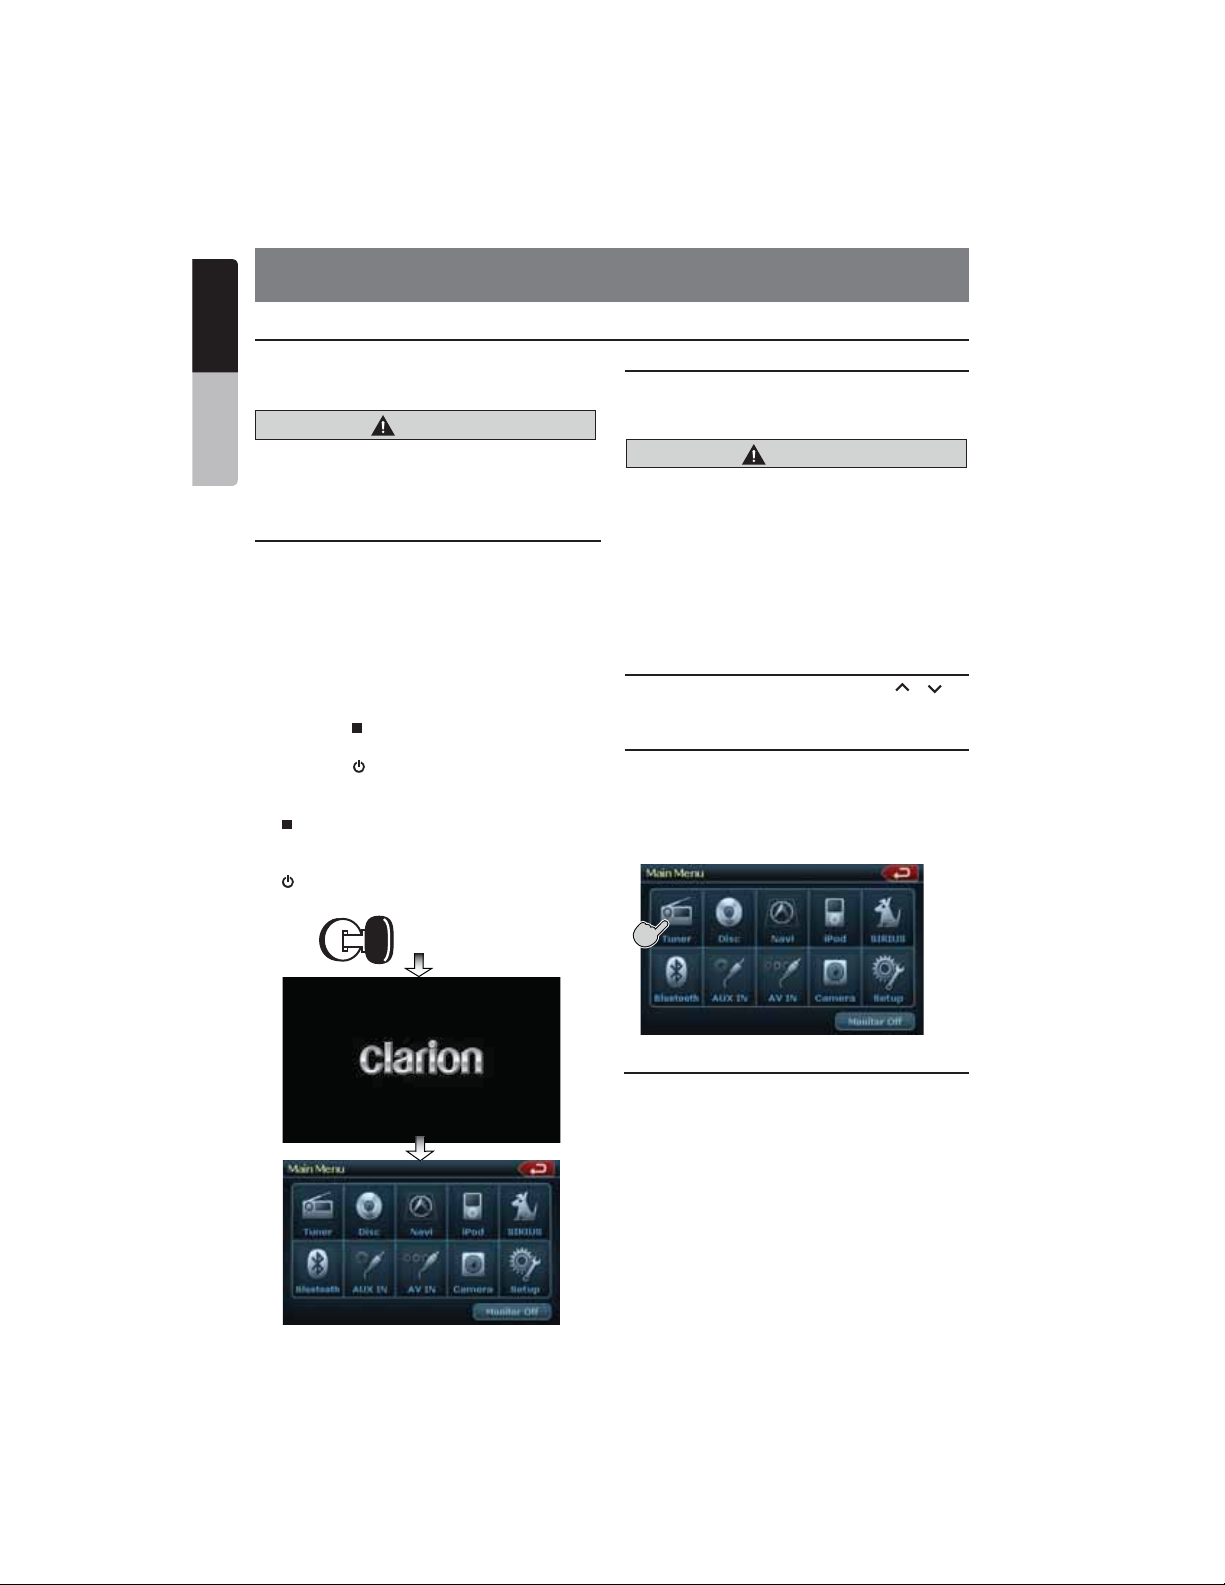
Turning ON and OFF the Power
Note:
•
Start the engine before using this unit.
•
Be careful about using this unit for a long
time without running the engine. If you drain
the car’s battery too far, you may not be able
to start the engine and this can reduce the
service life of the battery.
1. Start the engine. The power button / knob
illumination on the unit will light up.
2. Press the [ PWR] button on the tuner to
turn ON the power.
3. Press the [ ] power button on the remote
control to turn ON the power.
4. To turn OFF the power, press and hold the
[ PWR] power button on the tuner for more
than 2 seconds.
5. To turn OFF the power, press and hold the
[ ] power button on the remote control for
more than 2 seconds.
Engine ON
position
Opening and Closing Operational Panel
Press [OPEN] button on the unit (NZ500).
The operational panel will be open.
Press the same button again to close the panel.
CAUTION
• Do not move the operation panel forcibly or
do not apply strong force to the operation
panel.
• When the operation panel is operating, be
careful not to get your hand or finger caught
between the operation panel and main unit
or its mechanical parts.
• The driver should not operate the operation
panel while driving.
Adjusting the Angle of the Operational Panel
Adjust the desired angle by pressing [ ] [ ]
tilt buttons on the unit (NZ500).
Selecting a Mode
1. Touch the screen button on the Main Menu to
enter the desired mode: Tuner, Disc, NAVI,
USB, Sirius, AUX IN, AV IN, etc., iPod/iPhone.
*External equipment not connected to this
unit is not displayed.
18 NX500/NZ500
Turning Monitor ON or OFF
1. Touch the screen button Monitor OFF on the
Main Menu to turn Off the screen.
2. Touch the screen again to turn monitor
screen On.
Page 19
Basic Operations
Adjusting the volume
Turn the volume knob to adjust the volume.
Clockwise : Increases the volume.
Counter- clockwise : Decreases the volume.
• The volume level indicated in the display is
in a range from 0 (min.) to 40 (max.).
CAUTION
While driving, keep the volume level at which
external sounds can be heard.
Mute
Press the [MUTE] [PWR] button to turn mute
On and Off.
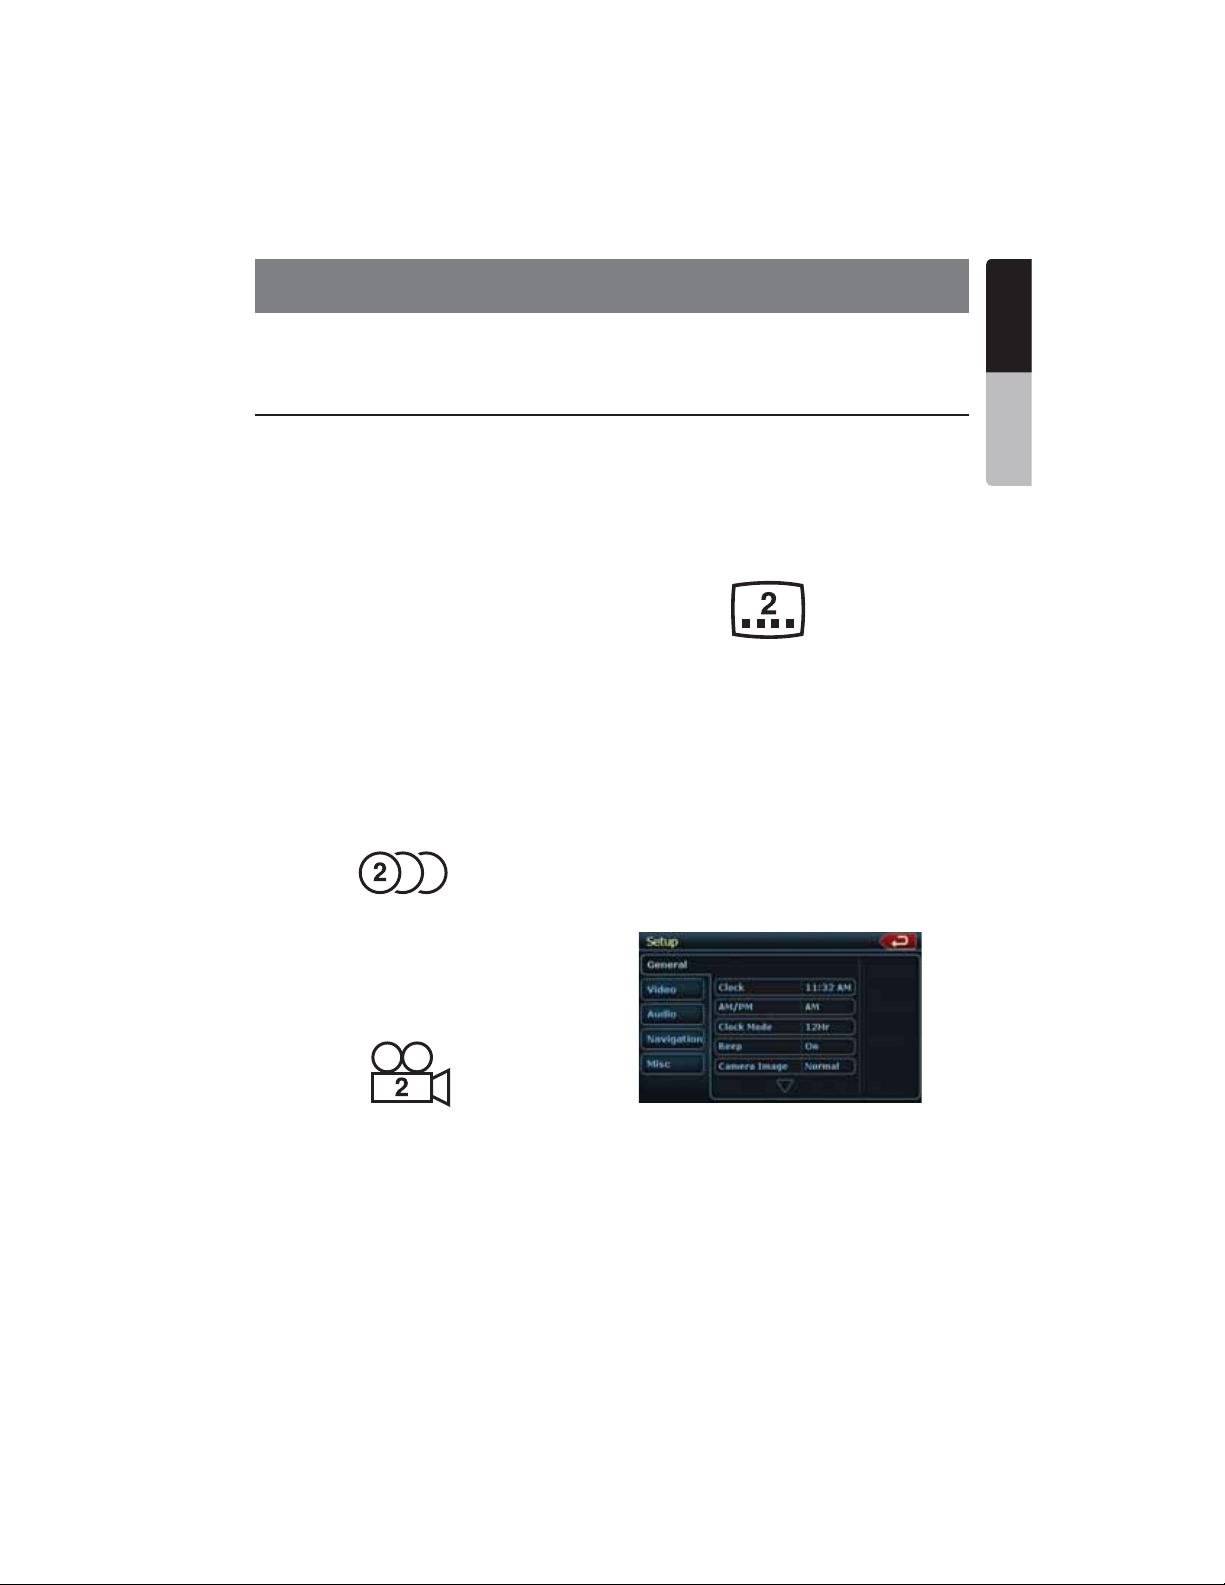
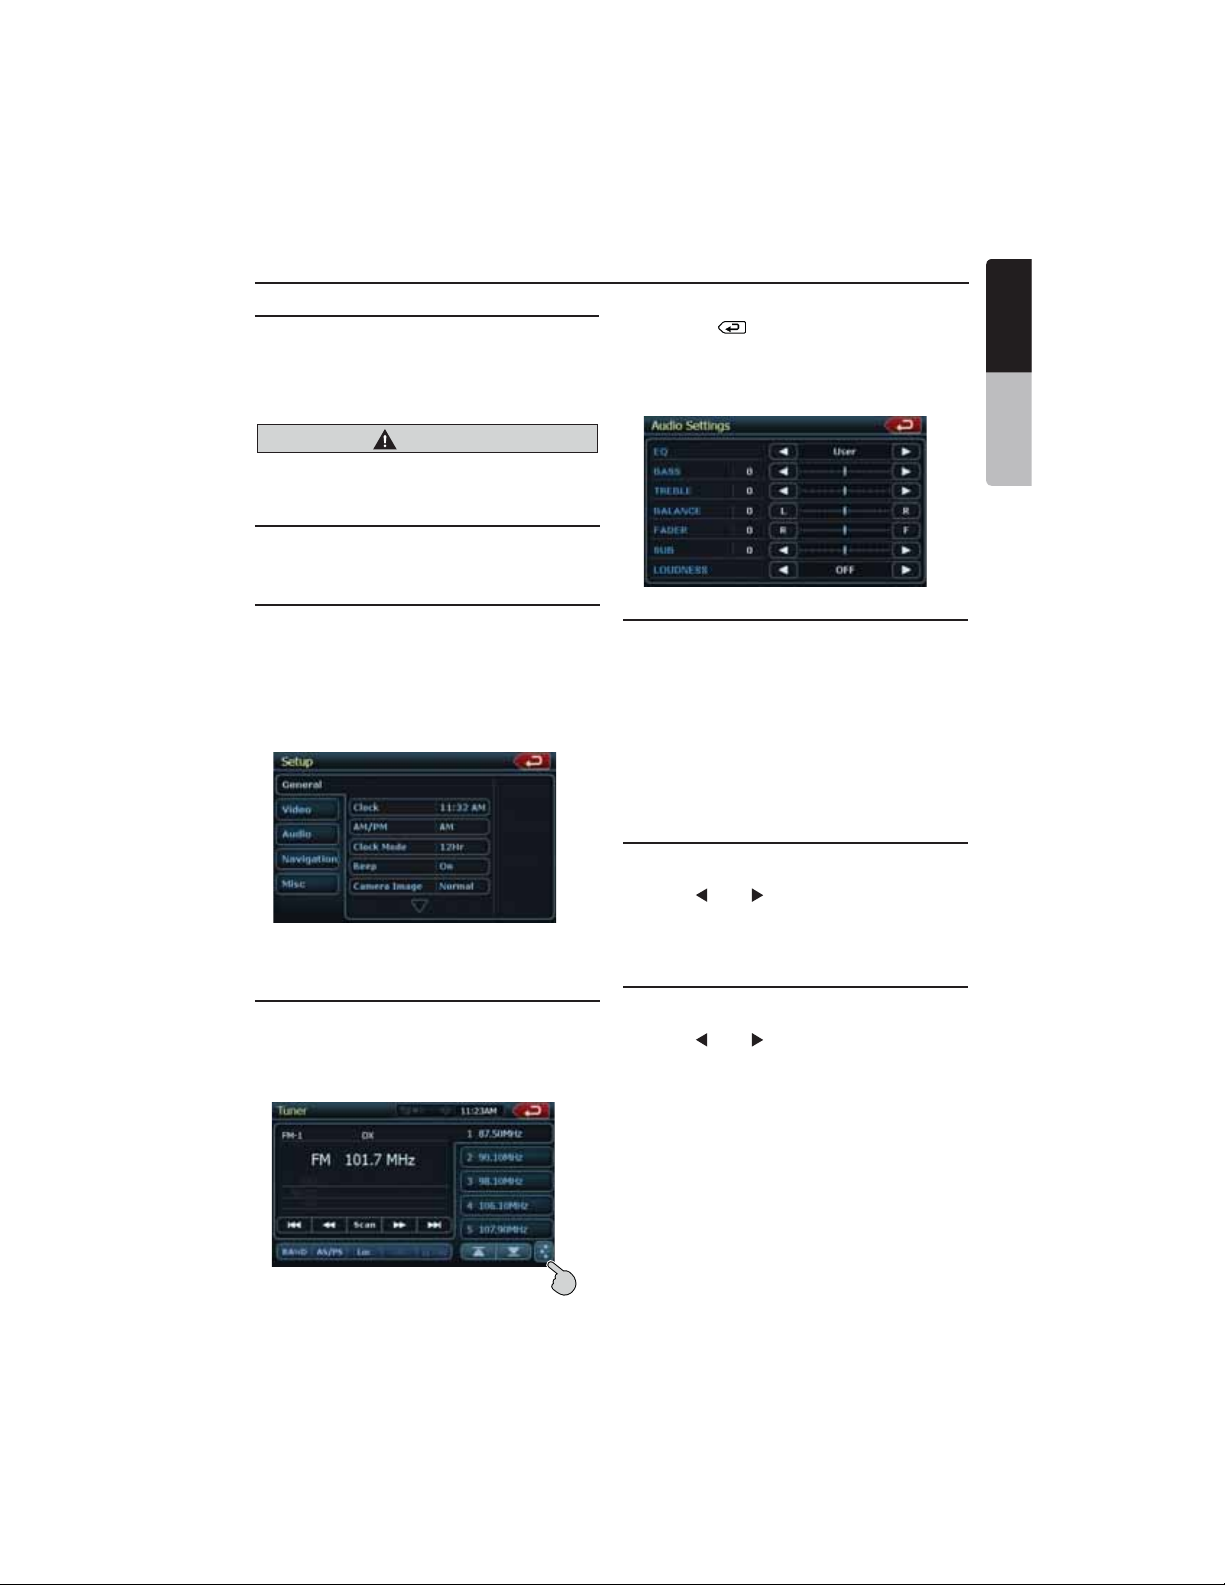
Adjusting the Settings
1. Press [Setup] to enter setting menu mode.
2. Press the desired mode button.
Modes come in the following order:
• General, including Clock settings, Beep,
Camera Image, Radio Field, Tel Mute, Tel
SP, Aux In Input SW, Version.
• Video, Audio, Navigation, Misc.
3. Perform the adjustment for the desired item.
See the following sections fo details.
Adjusting the Audio
1. Press the [EQ] button on the screen or
the [SEL] button on the remote control.
2. Touch the item key to adjust.
3. Perform the adjustment.
4.Touch the [ ] key to return to the previous
screen.
* In the following sections, only the details
regarding adjustments are described,
procedures to select items are skipped.
Adjusting the Balance/Fader
1. Touch the BALANCE or FADER in the
Audio Settings.
2. Touch the [F] or [R] key to adjust to the
fader level.
• The factory default setting is “0”.
(Adjustment range: front 9 to rear -9)
3. Touch the [L] or [R] key to adjust to the
balance level.
• The factory default setting is “0”.
(Adjustment range: left -9 to right 9)
Adjusting the Bass
The bass gain and bass frequency can
be adjusted as follows.
1. Touch [ ] or [ ] key to set the
desirable level.
2. To set the bass center frequency, enter
the Audio adjustment in the SETUP menu.
Adjusting the Treble
The treble gain and treble frequency can
be adjusted as follows.
1. Touch [ ] or [ ] key to set the desirable
level.
2. To set the treble center frequency, enter
the Audio adjustment in the SETUP menu.
English
English
Owner’s Manual
See the following sections for detail.
NX500/NZ500 19
Page 20
Basic Operations
English
Adjusting the clock
Press the [Setup] button. The Setup menu will
be displayed. Touch “Clock” in General sub
menu.
Owner’s Manual
2. Set up the time by touching the digital
numbers on the screen.
3. Touch the [Clock Mode] to change time
settings to 12Hr or 24Hr. Select 12Hr, than
you can choose AM or PM mode.
Adjusting the Radio region
1. Touch the [Radio Field] button in the Setup
menu.
2. A region selection menu will appear. Scroll
down using the arrow at the bottom of the
menu. Scroll up using the arrow at the
bottom of the menu. Select the area’s radio
region that you are in. If the region selected is
incorrect, radio reception will be poor.
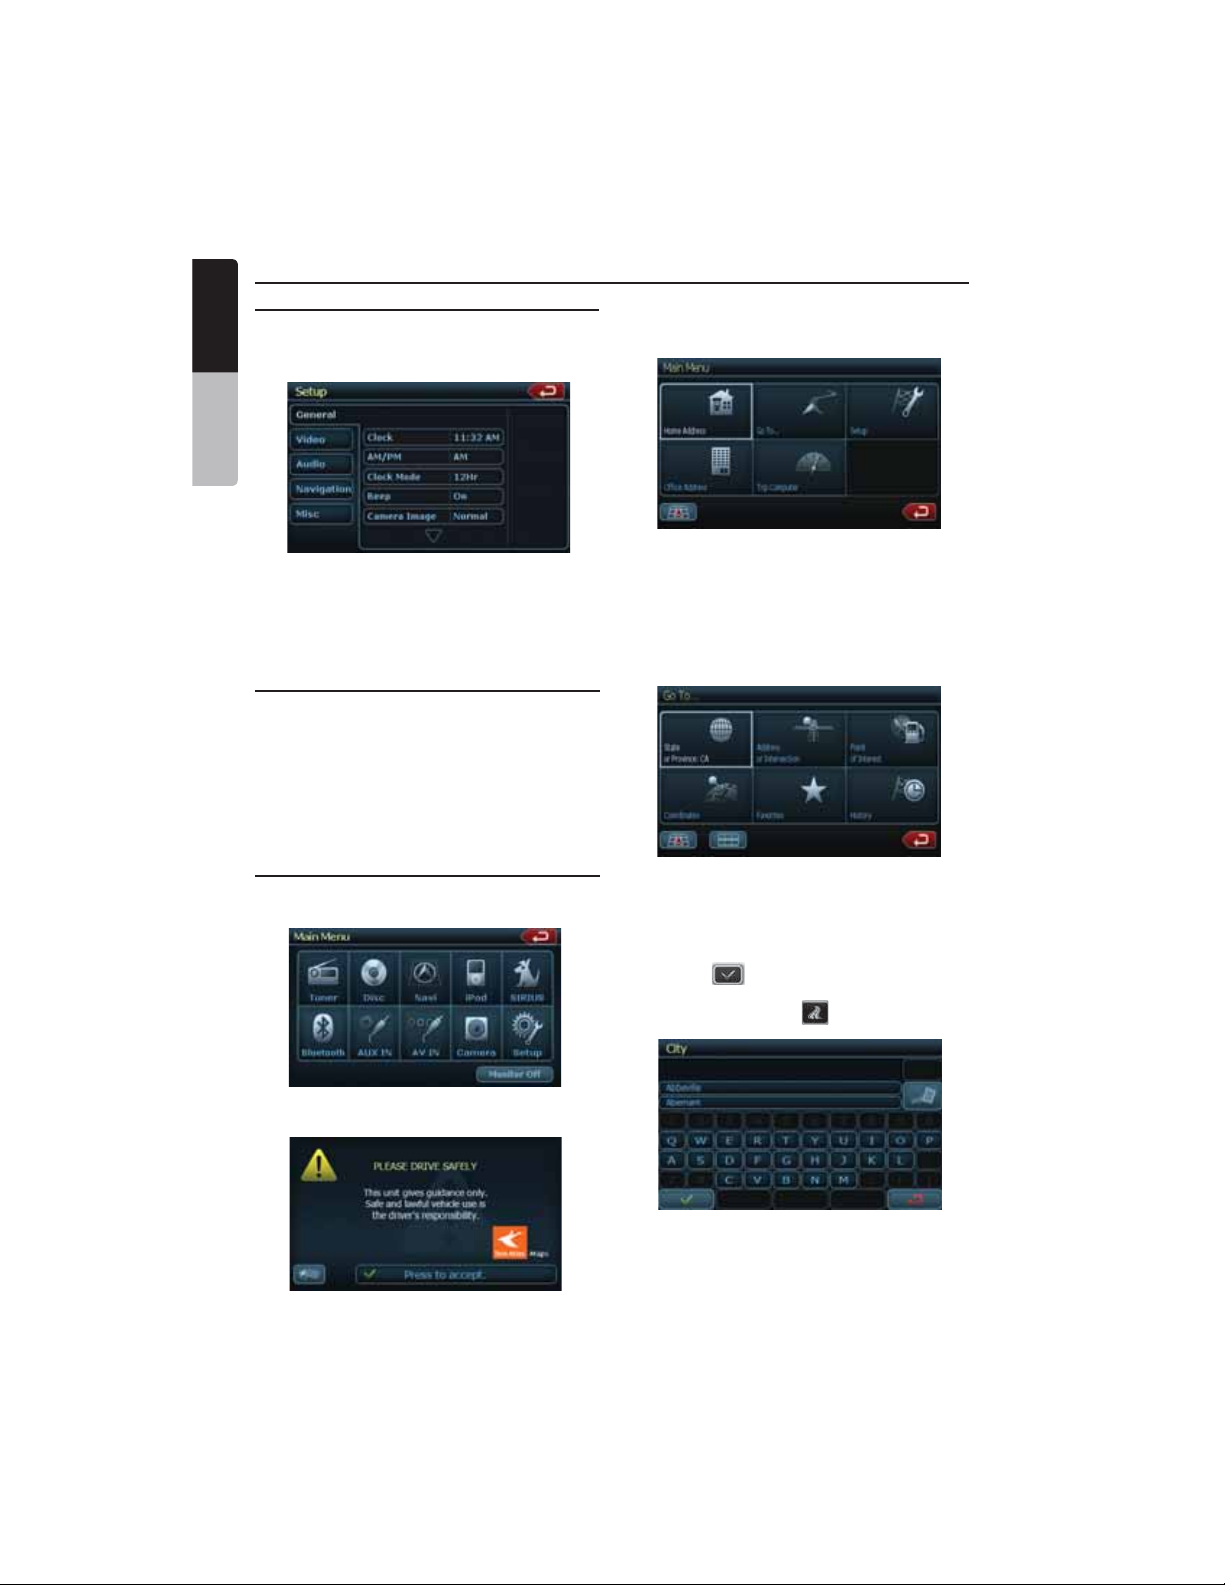
Displaying the Navigation Map
1. Touch the [Navi] button on the Main Menu
screen.
2. Press the highlighted check mark (Accept).
The Main Menu will be displayed. Select your
destination.
3. Select one of the options dispalyed on the
screen.
• Go To...
• Point of Interest
• State or Province: CA (The software
remembers the last State/Province)
• History (The adresses you navigate before)
4. The navigation system will calculate a route
to the selected destination by using the
criteria set in Setup Mode.
5. Touch the State or Province button.
The “City” keyboard screen will be displayed.
Press the check button to choose the
city from the list, or spell the City name on
keyboard. Than press Enter button.
The warning screen will be displayed.
20 NX500/NZ500
Page 21
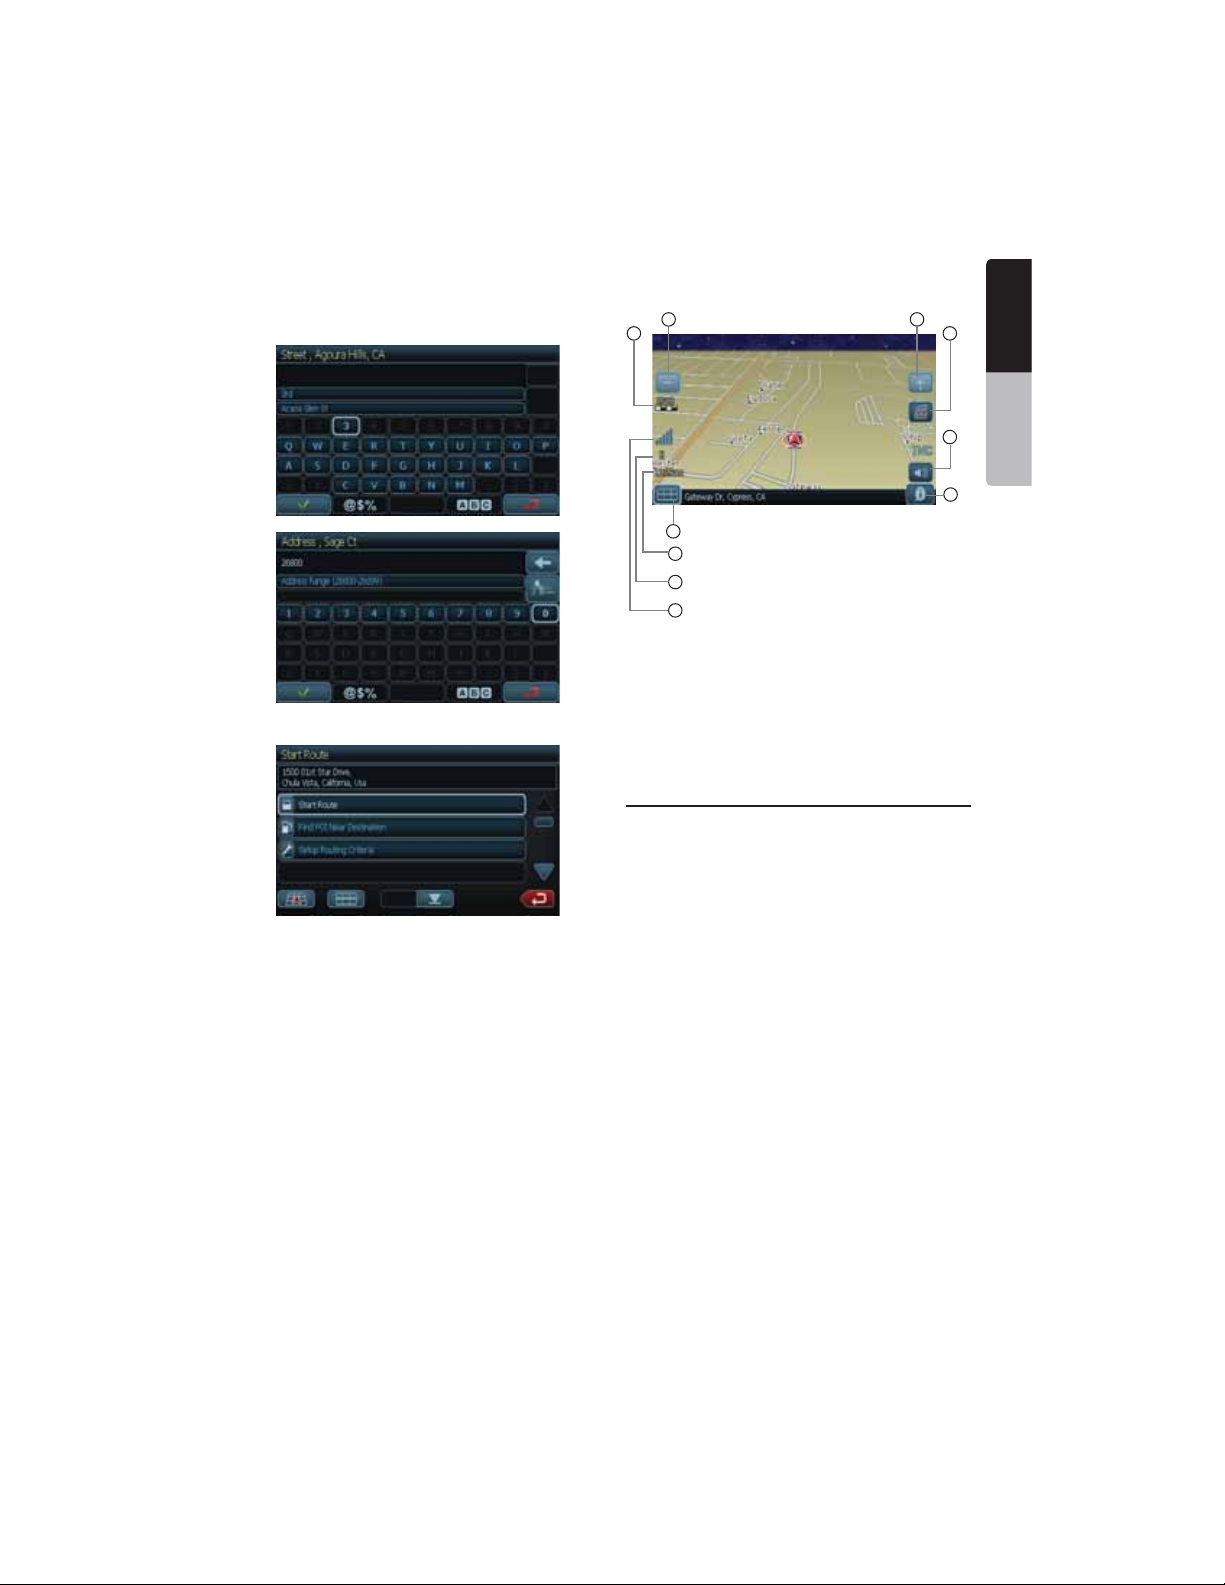
6. Enter the required information on the screens
displayed in the order shown below.
In order to proceed to the next sreen,
press the “Check” button.
7. Press the highlighted “Start Route” button.
8. Route map will be displayed. The navigation
to your destination will start.
1
2
6
5
4
3
1 - Zoom Out
2 - Map Scale
3 - GPS Status
4 - Compass Position
5 - Current Time
6 - Back to Menu
7 - Local Information
8 - Mute
9 - Change View
10 - Zoom In
10
9
8
7
9. To set up navigation menu, see “Navigation
set up “ in “Setup Operations” chapter.
Reset to Factory Defaults
1. Press Setup to enter setting menu mode.
2. Press the Misc button.
3. Press Restore Defaults button.
Select [YES] to restore your unit to factory
default settings. This function will erase all
memory from the unit and you must reset all
personalized items such as tuner presets.
NOTE: You will be asked once to confirm that
you would like to reset the unit. The unit will
power down and restart with factory defaults.
English
English
Owner’s Manual
NX500/NZ500 21
Page 22
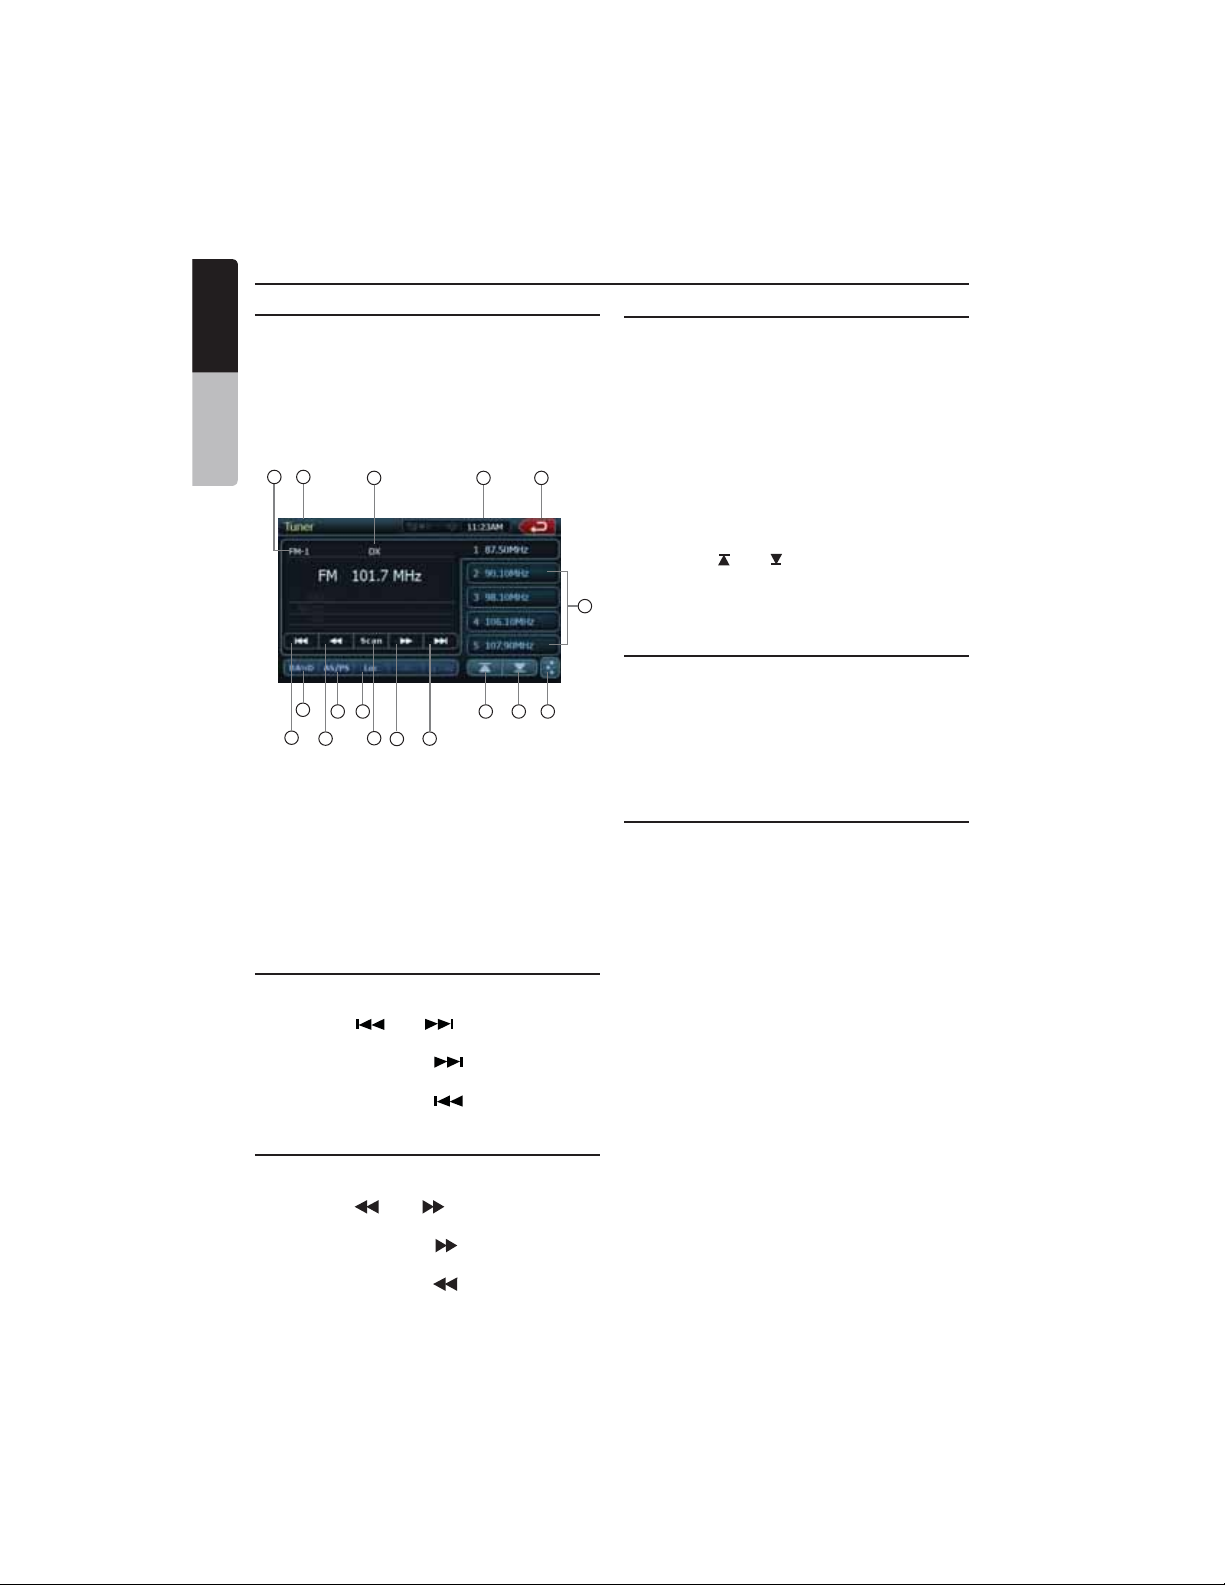
Radio Operations
English
Listening to the Radio
1. Touch the Tuner button on the Main menu
display. The tuner mode screen is displayed.
2. Press the [BAND] button or touch the [Band]
Owner’s Manual
key on remote control to select the radio
band. Each time the button is pressed, the
radio reception band changes in the following
order: FM1, FM2, FM3, AM, FM1...
4 1
12
7
1 - Tuner display
2 - Clock display
3 - Main Menu button
4 - Band display
5 - Loc/DX display
6 - Preset list
7 - Seek down
8 - Tune down
9 - Scan button
10 - Tune Up
5
13
14 15 16 17
9
8
11
10
11 - Seek Up
12 - Band button
13 - AS/PS button
14 - Loc/DX Button
15 - Previous page
button
16 - Next page button
17 - EQ button
Seek Tuning
1. Press the [BAND] button to select the radio
band (FM or AM).
2. Touch the [ ] or [ ] key to
automatically seek a station.
• When touching the [ ] key, the station is
sought in the direction of higher frequencies.
• When touching the [ ] key, the station is
sought in the direction of lower frequencies.
Manual Tuning
1. Press the [BAND] button to select the radio
band (FM or AM).
2. Touch the [ ] or [ ] key to
automatically seek a station.
• When touching the [ ] key, the station is
sought in the direction of higher frequencies.
• When touching the [ ] key, the station is
sought in the direction of lower frequencies.
22 NX500/NZ500
Recalling a preset station
There are 2 ways to recall the preset station.
• Using the remote control:
1. Press the [BAND] button to select the
desire band (FM or AM) on the remote
control.
2. Press the preset number (1 to 6) on
numeric pad.
32
• Using the tuner unit:
1. Press the [BAND] button to select the
desire band (FM or AM) on the tuner.
2. Press the preset station (1 to 5) on tuner
display.
3. Press [ ] or [ ] to select next station up
or down the preset list.
4. Press [AS] button to auto search and store
6
the stations.
Manual memory
1. Touch the desired Band key to select the
band you wish to store.
2. Tune in the station you wish to store using the
seek tuning, manual tuning, or preset tuning.
3. Touch and hold the desired Preset key you
wish to store the current station for more than
2 seconds.
Auto Store
The Auto Store is a function for storing up to 12
stations that are automatically tuned in
sequentially. If 12 receivable stations cannot be
received, a previously stored station remains
unoverwritten at the memory position.
1. Touch the [Band] key to select the desired
band. (FM or AM)
2. Touch and hold the [AS] key to start
the Auto Store function.
A beep sounds and the stations with good
reception are stored automatically to the
preset channels.
Page 23
Radio Operations
Preset Scan
The Preset Scan receives the stations stored in
the preset memory in order. This function is
useful when searching for the desired station in
memory.
1. Touch the [Band] key to select the desired
band. (FM or AM)
2. Touch the [PS] key to start the Preset Scan.
The unit starts scanning each station for 10
seconds sequentially.
3. When the desired station is tuned in, touch
the [PS] key again to continue receiving that
station.
DVD Video Player Operations
LOC/DX Setting
The DX / LOC setting changes the tuner
sensitivity in order to seperate closely spaced
stations. This feature is useful in areas that
have many radio stations in close proximity.
1. Touch the [DX] key to switch to LOCAL
tuner sensitivity.
2. Touch the [LOC] key to switch to DX tuner
sensitivity.
English
English
Owner’s Manual
Change DVD System Settings
Note:
If the set up operation is performed in
the middle of DVD video play, the disc
will restart from the beginning.
Selecting DVD Set Up Menu
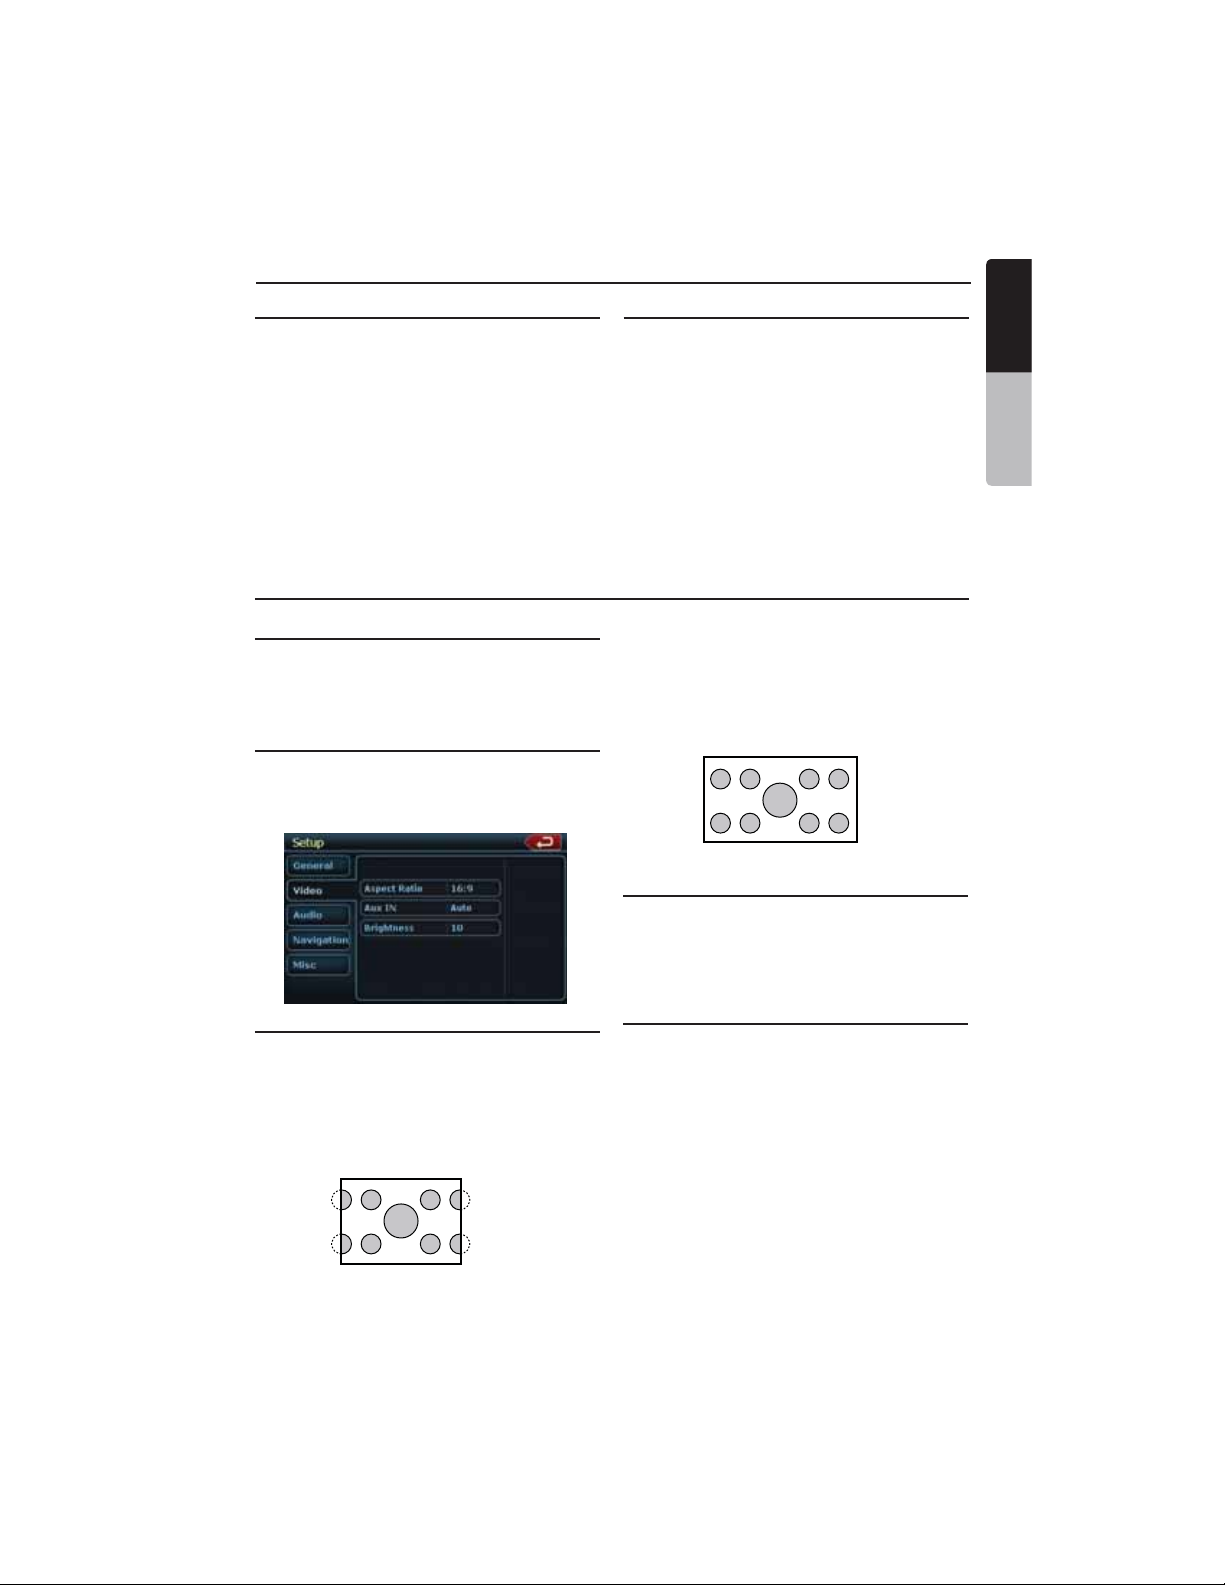
1. Press the [SETUP] button on the Main Menu
to access the Video set up menu.
2. Press the [Video]. The video menu is
displayed.
Setting up the Screen Size
Press the [Aspect Ratio] button on the display
in to change the sceen size 4:3 or 16:9.
The factory default setting is “ 16:9 ”.
• When watching a wide type through a
conventional type of the rear view monitor
(4:3), the leftmost and rightmost areas of the
screen are cut off.
part of image fully on the screen. In some
cases, image is displayed while being panned
(scrolled).
• When watching a wide type through a wide
type of the rear view monitor (16:9),
the leftmost and rightmost areas of the
screen are not cut off.
Setting up the Video System Format
Press the Aux IN button on the display to set up
the video system format : Auto, PAL or NTSC.
The default setting is Auto.
Touch the required system format on the
screen.
Setting up the Video Brightness
Press the brightness button. Touch the desired
video brightness displayed, on scale from 0 to
20.
This function allows displaying the important
NX500/NZ500 23
Page 24
DVD Video Player Operations
English
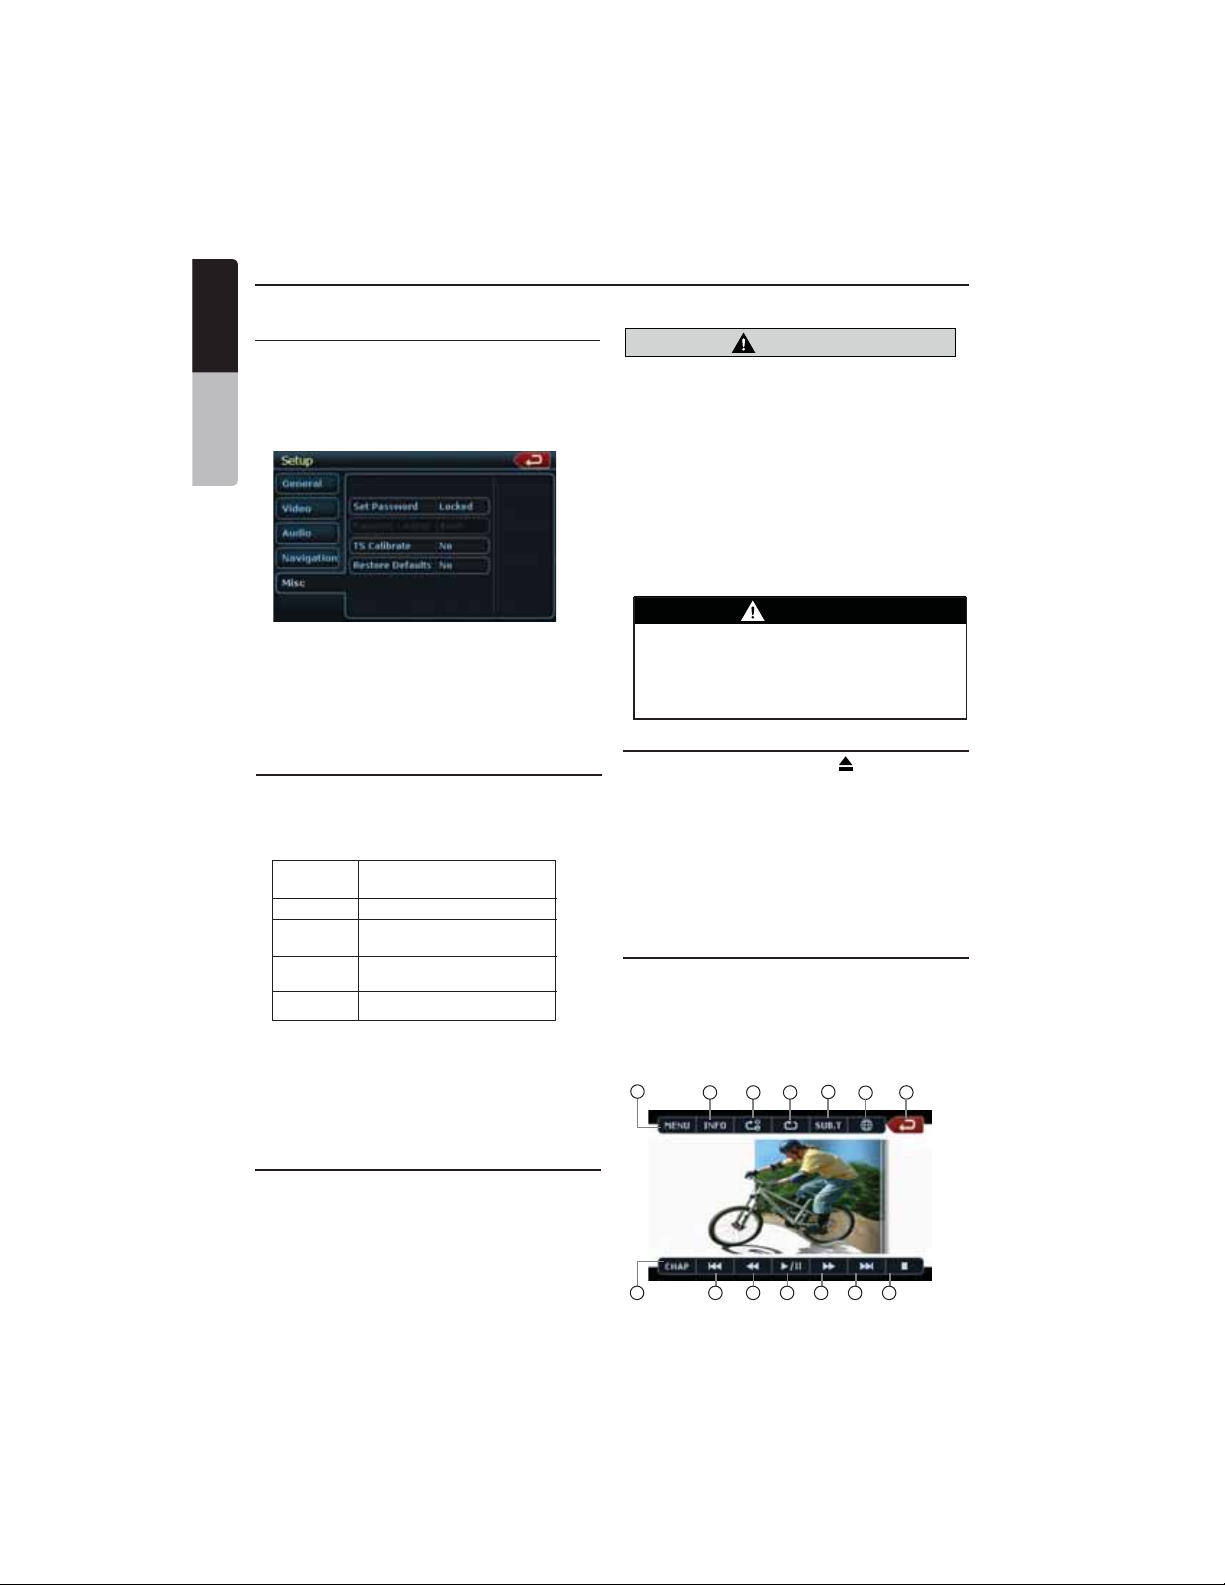
Setting up the password for parental level
control
The factory default setting is “0000”.
Owner’s Manual
1. In Main Menu press Setup button. Press
Misc button on the dispaly. Touch the
Set Password ---- and a numerical key pad
will appear.
Input a new password. The password is set.
Note: When a disc with view restrictions is
inserted, you will be prompted to input
a password. The disc will not be
viewable until the correctpassword is
entered.
Set rating for parental level control
1. Select MISC screen while in
SETUP mode. Press Kid Saf button.
Press the desired rating for level control.
Use this table to set the parental level.
NC-17 NO ONE 17 AND
UNDER ADMITTED
R RESTRICTED
PG13 PARENTS STRONGLY
CAUTIONED
PG PARENTAL GUIDANCE
SUGGESTED
G GENERAL AUDIENCES
• The contents that the parental level restricts
vary with the country code.
Note: The rating can be selected only under
the password unlocked status, and the
limits can be set only under the password
locked status.
Watching/Listening to a disc
Note:
Refer to the diagram in “CONTROLS”
chapter.
1. To load a disc:
Press the [OPEN] button to flip down
the front panel. (NZ500 only)
Insert the disc into the center of the insertion
slot the label side facing up.
CAUTION
For your safety, the driver should not insert
or eject a disc, or operate the controls
while driving.
Note:
•
Never insert foreign objects into the disc
insertion slot.
•
If the disc is not inserted easily, there maybe
another disc in the mechanism or the unit may
require service.
•
8cm (single play) discs cannot be used.
2. Disc starts playing automatically.
WARNING
Some videos may be recorded at higher
than desired volume levels. Increase the
volume gradually from the minimal
setting after the video has started.
Ejecting a disc
1. To eject a disc press eject [ ] button.
The play mode than switches to the Tuner
mode.
*If the disc is left in the ejected position for
15 seconds, the disc is automatically
reloaded. In this case, the play mode will
remain set to the Tuner mode.
Note: If you force a disc into before auto
reloading, it will damage a disc.
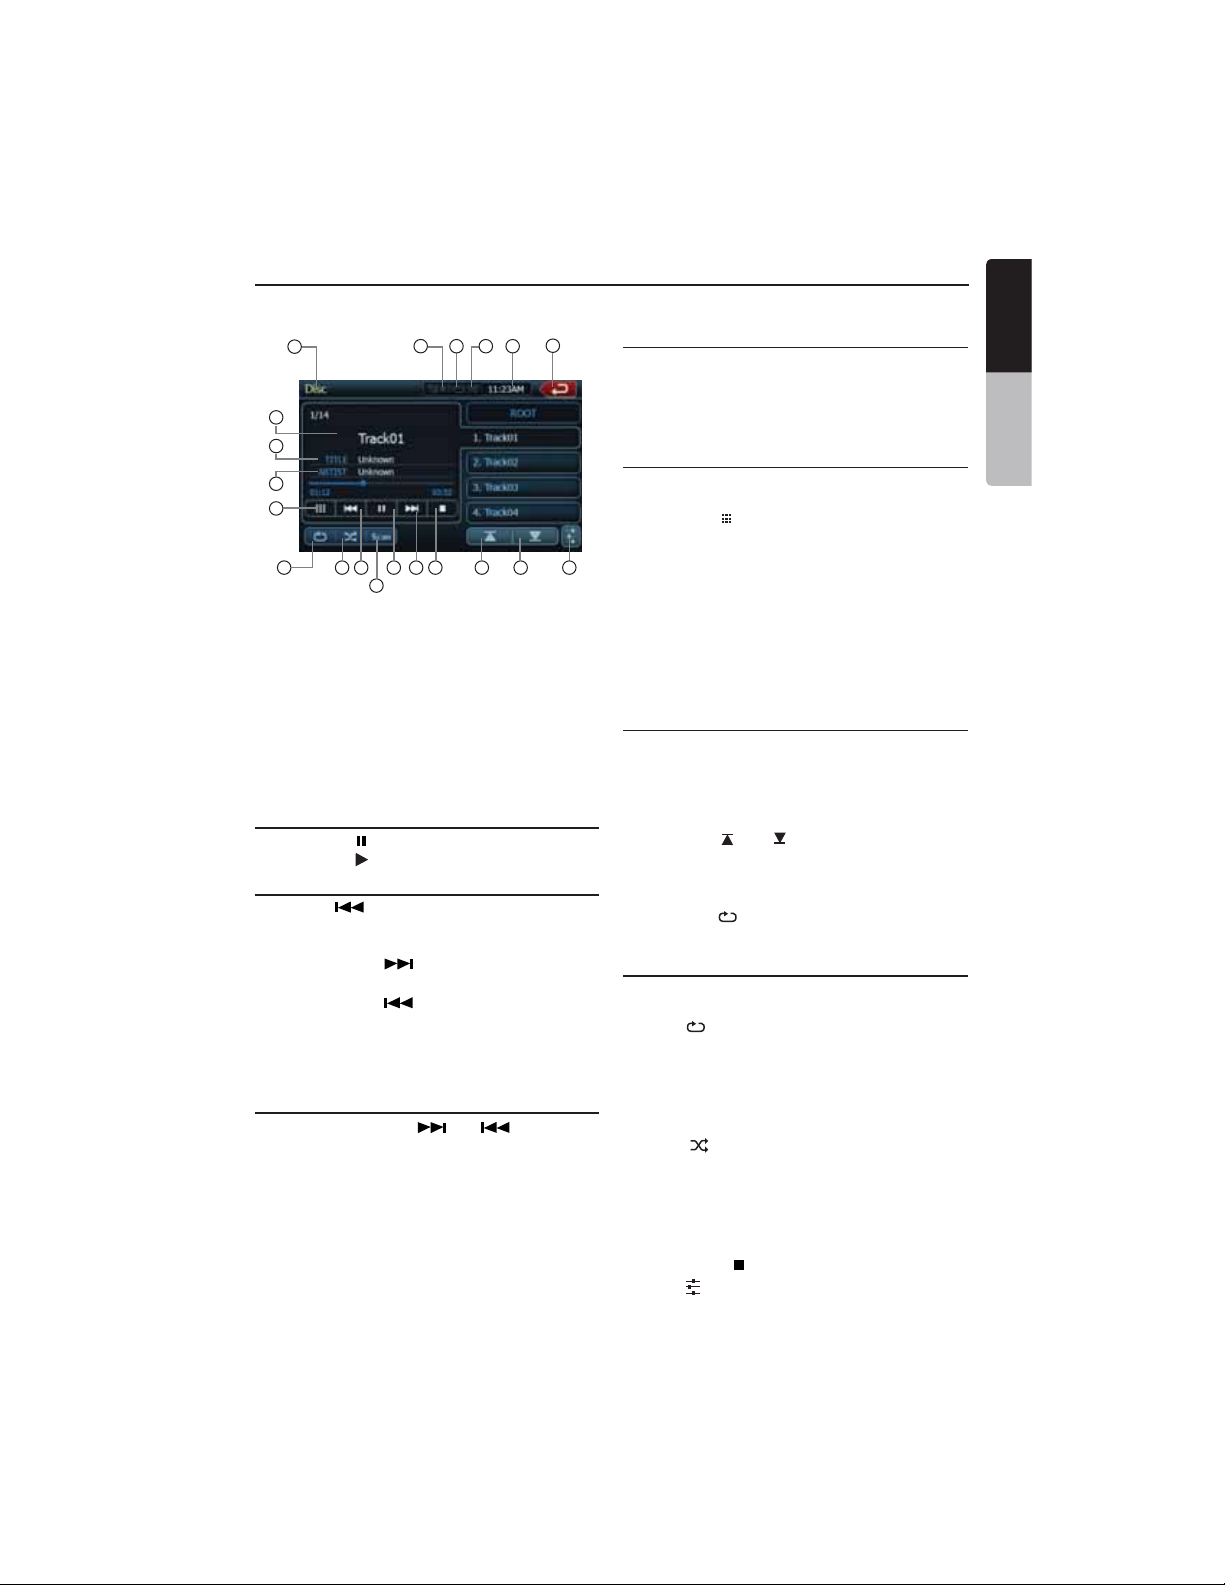
Showing DVD Player mode screen
After disc is loaded, the play mode is
automatically engaged.
Touch the screen of the playing disc to display
DVD Video menu. The display will return to the
playback screen, if you do not touch the screen
for 5 seconds.
1
8 9
3 42
10 11 12 13 14
5
7
6
24 NX500/NZ500
Page 25
DVD Video Player Operations
1 - MENU Button
2 - INFO Button
3 - A-B Repeat Button
4 - Repeat Button
5 - Subtitle Button
6 - Channel Button
7 - Main Menu Button
Operate the DVD Player menu
You can select the button items displayed in the
DVD menu by directly touching it.
If the button items are hard to select correctly,
you can also operate them by using the remote
control directional buttons.
Stop Playback
1. Touch the [ ] key. Playback is stopped.
2. To resume playback, press the [ ] button.
Playback resumes from the scene where
playback is stopped.
Play/Pause Playback
1. Touch the [ ] key to pause during
playback.
2. Touch the [ ] key again to resume
playback.
Skip (Search) a Chapter
1. Press the [ ] or [ ] button during
playback.
Chapters are skipped down or up from current locations, as many times as the button is
pressed, and playback starts.
Fast Forward Fast Backward
1. Press the [ ] or [ ] button to start your
fast backward or fast forward during
playback.
The playback speed starts at 2x, then will
increase to 4x,8x, and 16x with each
additional press.
*No audio is reproduced during fast forward
and fast backward operation.
*The fast forward and fast backward speed
may differ depending on the disc.
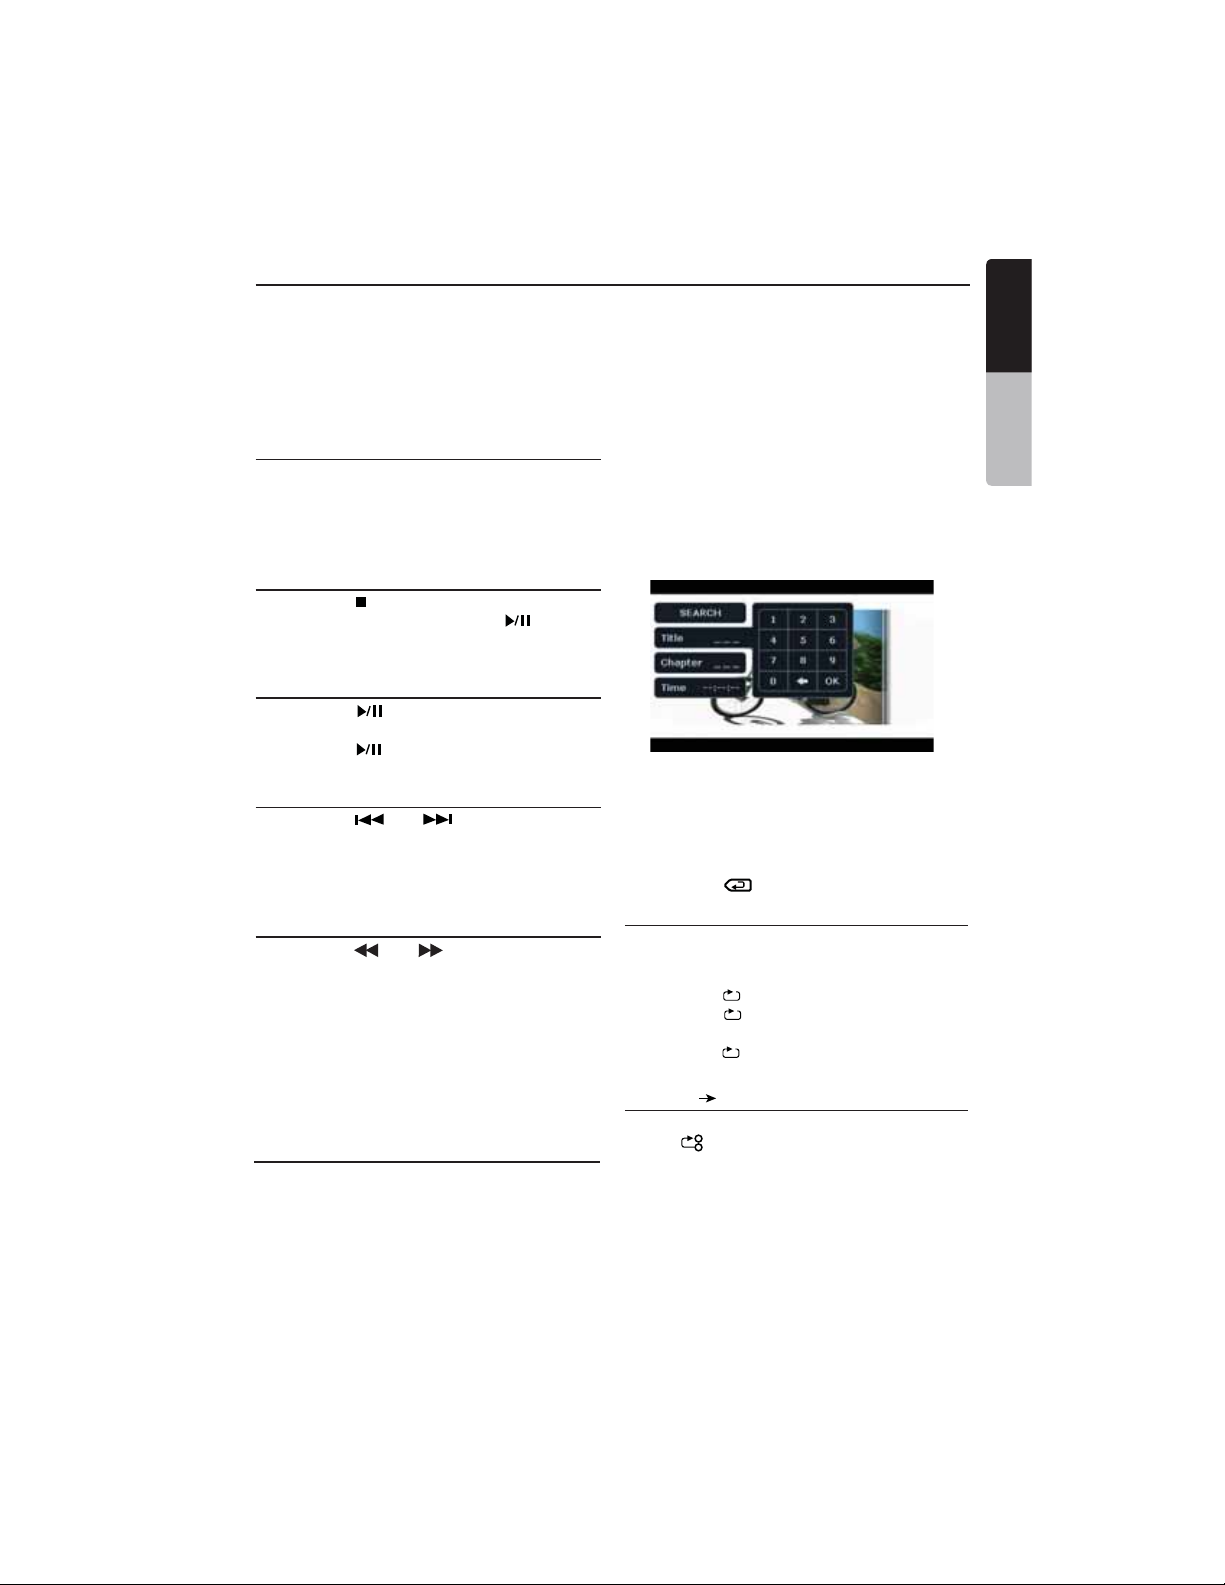
Search with a Chapter/Title Number
You can locate the beginning of a scene using
the chapter numbers or title numbers recorded
on the DVD Video disc.
1. Showing the DVD PLAYER mode screen,
touch the [CHAP] key.
The Key Pad screen appears with the chapter
number input mode. Touching the [Title] key
8 - Chap Button
9 - Previous Track Button
10 - Fast Backward Button
11 - Play/Pause Button
12 - Fast Forward Button
13 - Next Track Button
14 - Stop Button
turns the Key Pad to the title number input
mode. Touching the [Time] key turns the Key
Pad to the time number input mode.
• Title
A large segment to divide the data area of
the disc.
• Chapter
A small segment to divide the data area of
the disc.
• Time
A specific time on the disc.
2. Input the number of the title/chapter/time that
you want to play back with the [0] to [9] key.
3. Touch the [OK] key.
Playback starts from the scene of the input
title number, time or chapter number.
*If the input title/chapter/time number does
not exist or searching with a title/chapter
number is not allowed, the screen image will
not change.
4. Touch the [ ] Back key.
Repeat Playback
This operation plays back chapters recorded on
the DVD-Video repeatedly.
1. Showing the DVD Player mode screen,
touch the [ ] Repeat key.
2. Touch the [ ] key once for Chapter
Repeat, again for Title Repeat.
3. Press the [ ] button again to turn off
the repeat playback.
Repeat A B
Select the desired passage to play back.
Touch [ ] repeat A to B button.
B
A
Selected passage starts play again.
Touch this button again to stop replay.
English
English
Owner’s Manual
NX500/NZ500 25
Page 26
DVD Video Player Operations
English
Using the Title Menu
On DVD discs containing two or more titles, you
can select from the title menu for playback.
1. Showing the DVD PLAYER mode screen,
Owner’s Manual
touch the [CHAP] key during playback.
The title menu screen appears.
*Depending on the disc, the title menu cannot
be called.
2. Select the button items displayed in the title
menu screen by the same way of the DVD
menu operation.
*Depending on the disc, items cannot be
selected with the ten-key buttons.
Switching among the languages
On discs in which two or more audios or audio
languages have been recorded, you can switch
among the audio languages during playback.
1. Touch the [ ] audio key during playback.
• Each time you touch the key, you can
switch among audio languages.
• It may take time to switch among audios.
* Depending on the disc, up to 8 audios may
be recorded. For details, see the mark of
the disc: ( Indicates that 8 audios
have been recorded).
* When the power is turned on and when the
disc is changed to a new one, the language
set as the factory default is selected. If that
language has not been recorded, the
language specified on the disc.
* Depending on the disc, switching may be
completely impossible or impossible on
some scenes.
2. The DVD PLAYER mode screen will hide in
5 seconds after your selection is made.
8
Switching Subtitles
On DVD discs in which two or more subtitle
languages have been recorded, you can switch
among the subtitle languages during playback.
1. Touch the [Sub T.] key during playback.
Each time you touch the key, you can switch
among subtitles.
• It may take time to switch among subtitles.
* Depending on the disc, up to 32 kinds of
subtitles may be recorded. For details, see
the mark of the disc: ( Indicates that 8
kinds of 8 subtitles have been recorded).
* Depending on the disc, switching may be
completely impossible or impossible on
some scenes.
8
2. The DVD Player mode screen will hide in
5 seconds after your selection is made.
3. To turn off subtitles, repeat touching [Sub T.]
key until subtitles are turned off.
Switching angles
On DVD discs in which video images have been
recorded in two or more angles, you can switch
among the angles during playback.
1. Touch the [Angle] button on the remote
control during playback. Each time you
touch the key, you can switch among angles.
* It may take time to switch among angles.
* Depending on the disc, up to 9 angles may
be recorded. For details, see the mark of
the disc: ( Indicates multi-angle).
* Depending on the disc, angles may switch
smoothly or switch with a momentary still
image.
* Depending on the disc, switching may be
completely impossible or impossible on
some scenes.
* Depending on the disc, scenes recorded in
two or more angles may be played back.
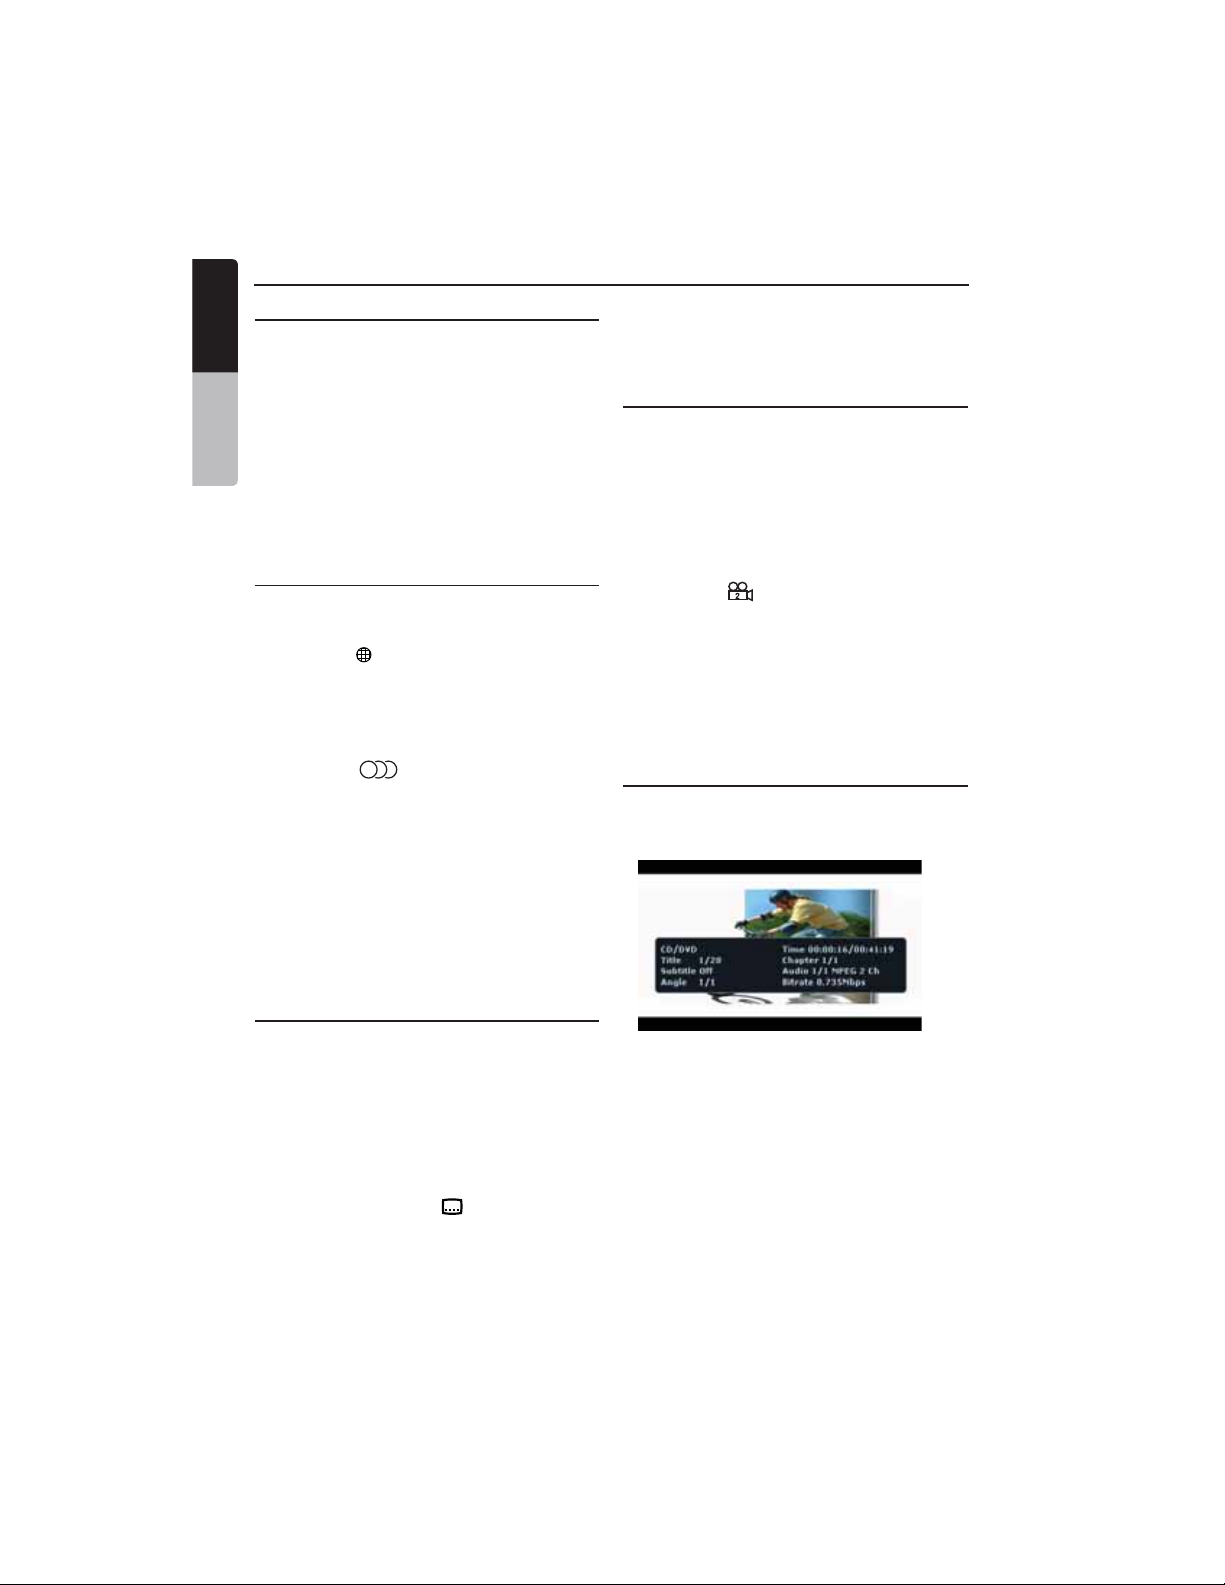
Displaying the playback status
Touch the [INFO] key on the DVD Player
mode screen, or remote control.
Playback status is displayed on the screen.
26 NX500/NZ500
Page 27
DVD Video Player Operations
LISTENING TO a CD
16
17
18
19
6
8 9
7
1 - Mute Display
2 - Repeat Display
3 - Shuffle Display
4 - Clock Display
5 - Main Menu Button
6 - Keyboard Button
7 - Repeat Button
8 - Shuffle Button
9 - Previous Track Button
10 - Play/Pause Button
11 - Next Track Button
Pausing Playback
10 11 12 13 14
20
1
3 42
12 - Stop Button
13 - Previous Page Button
14 - Next Page Button
15 - EQ Button
16 - Source Display
17 - Song Title
18 - Artist Information
19 - Album Information
20 - Scan Button
1. Touch the [ ] button to pause playback.
2. Touch the [ ] button to resume playback.
Skipping a Track (searching)
Touch the [ ] button during playback.
Tracks are skipped, as many as the times the
button is pressed, and playback starts.
• Pressing the [ ] button starts playback
from the beginning of the next track.
• Pressing the [ ] button starts playback
from the beginning of the current track.
When this button is pressed again within
about 2 seconds, playback starts from the
beginning of the previous track.
Fast Forward and Fast Backward
1. Press and hold the [ ] or [ ] button
during playback.
Press again to advance to higherspeed
reversing or forwarding such as 2x,4x, 8x
and 16x. Press once more to resume
normal speed playback.
5
15
Scanning the Tracks
1. Touch the [Scan] button during playback.
Touch again to advance to higher speed
reversing or forwarding such as 2x,4x, 8x
and 16x. Press once more to resume
normal speed playback.
Searching with the Track Number
This operation allows searching using the track
numbers recorded on the CDs.
1. Touch the [ ] keyboard button on a display.
The numerical keypad will appear on the
screen.
2. Input the track number that you want to play
back with [0] to [9] key.
Playback starts from the track of the input
track number.
• If the input track number does not exist or
searching with a track number is not
allowed, the screen image will not change.
Selecting a track on the Track List Screen
This function allows you to select tracks from a
displayed list.
1. Touch the trak title on the display list.
The selected track will start playing.
2. When the desired track is not displayed,
touch the [ ] or [ ] key to scroll the track
list.
3. Touch the desired track title key.
The corresponding track is started playback.
4. Press the [ ] key to return to the previous
screen.
Other various play functions
Touch the touch key of the function you want
to play.
Repeat [ ]: Press once to start a single track
repeat. Press again to activate a repeat all.
To turn repeat off, press same button again.
• Repeat symbols are displayed in the info
window in the upper right area of the
screen.
Shuffle [ ]: Touch this button to shuffle the
tracks during playback.
Touch this button again to turn off the feature.
• A shuffle symbol is displayed in the info
window in the upper right area of the
screen.
Stop Playing [ ]: Stop play all the tracks.
Set up [ ] Audio: Touch this button to enter
EQ settings menu.
NX500/NZ500 27
English
English
Owner’s Manual
Page 28

DVD Video Player Operations
English
LISTENING TO MP3/WMA
This unit is an ID3 Tag compatible model.
This unit supports the ID3 TAGs of the Version
2.4, 2.3, 1.1 and 1.0.
Owner’s Manual
In displaying, this unit gives priority to the
Version 2.3 and 2.4 TAGs.
After USB device inserted into USB slot, or
disc is loaded, the play mode is automaticlly
engaged.
What is MP3/WMA?
MP3 is an audio compression method and
classified into audio layer 3 of MPEG standards.
WMA is an audio compression method
developed by Microsoft Corporation.
These audio compression methods have
penetrated into PC users and become a
standard format.
These features compress the original audio data
to about 10 percent of its initial size with a high
sound quality. This means that about 10 music
CDs can be recorded on a CD-R disc or CD-RW
disc to allow a long listening time without
having to change CDs.
Note:
•
Some CDs recorded on CD-R/RW mode may
not be usable.
Displaying MP3/WMA TAG titles
Tag information such as title, artist and album
title can be displayed for MP3/WMA file
containing Tag information.
Precautions when creating MP3 disc
•
File extensions
1. Always add a file extension “.MP3” or “.mp3”
to an MP3 file, and “.WMA” or “.wma” to a
WMA file by using single byte letters. If you
add a file extension other than specified or
forget to add these file extension, the file
cannot be played. In addition, if you use
upper case and lower case letters (capital
and small letters) mixedly for file extensions,
normal play may not be possible.
2. Files other than MP3/WMA data cannot be
played.
Playing files with a format not supported will
be skipped, and the scan, random and
repeat playback mode may be canceled.
•
File and Disc Not Supported
Files and discs with following extensions are
not supported: *.AAC, *.DLF, *.M3U, *.PLS,
MP3 PRO files, files with DRM, open session
discs.
Logical format (File system)
•
1. When writing an MP3/WMA file on a disc,
please select “ISO9660 level 1 or level 2
(without including expansion format)” as
the writing software format. Normal playback
may not be possible if the disc is recorded
on another format.
2. The folder name and file name can be
displayed as the title during MP3/WMA play
but the title must be within 31 single byte
alphabetical letters and numerals for the
folder name and file name (including an
extension). Entering more letters or numerals
than specified may cause an incorrect
display.
Entering File and Folder Names
•
Names using the code list characters are the
only file names and folder names that can be
entered and displayed. Using any other
character will cause the file and folder names
to be displayed incorrectly.
•
Electronic Shock Protection
10 seconds for CD-DA (CDA)
45 seconds for MP3 recorded at 44.1 kHz,
128kbps
90 seconds for WMA recorded at 44.1 kHz,
128kbps
•
Folder structure
1. A disc with a folder having more than 8
hierarchical levels will conflict with the
ISO9660 and playback will be impossible.
•
Number of files or folders
1. The maximum allowable number of folders is
200 (including root directory); the maximum
allowable number of files is 1500 (max. 1500
per folder). This represents the maximum
number of tracks that can be played back.
2. Tracks are played in the order that they were
recorded onto a disc. (Tracks might not
always be played in the order displayed on
the PC).
• Some noise may occur depending on the
type of encoder software used while
recording.
• In case of a track recorded at VBR (variable
bit rate), the display for the play time of the
track may be slightly different from the
actual play time. Also, the recommended
value of VBR ranges from 32 kbps to
320 kbps.
• After disc selection, the play mode is
automatically engaged.
28 NX500/NZ500
Page 29
DVD Video Player Operations
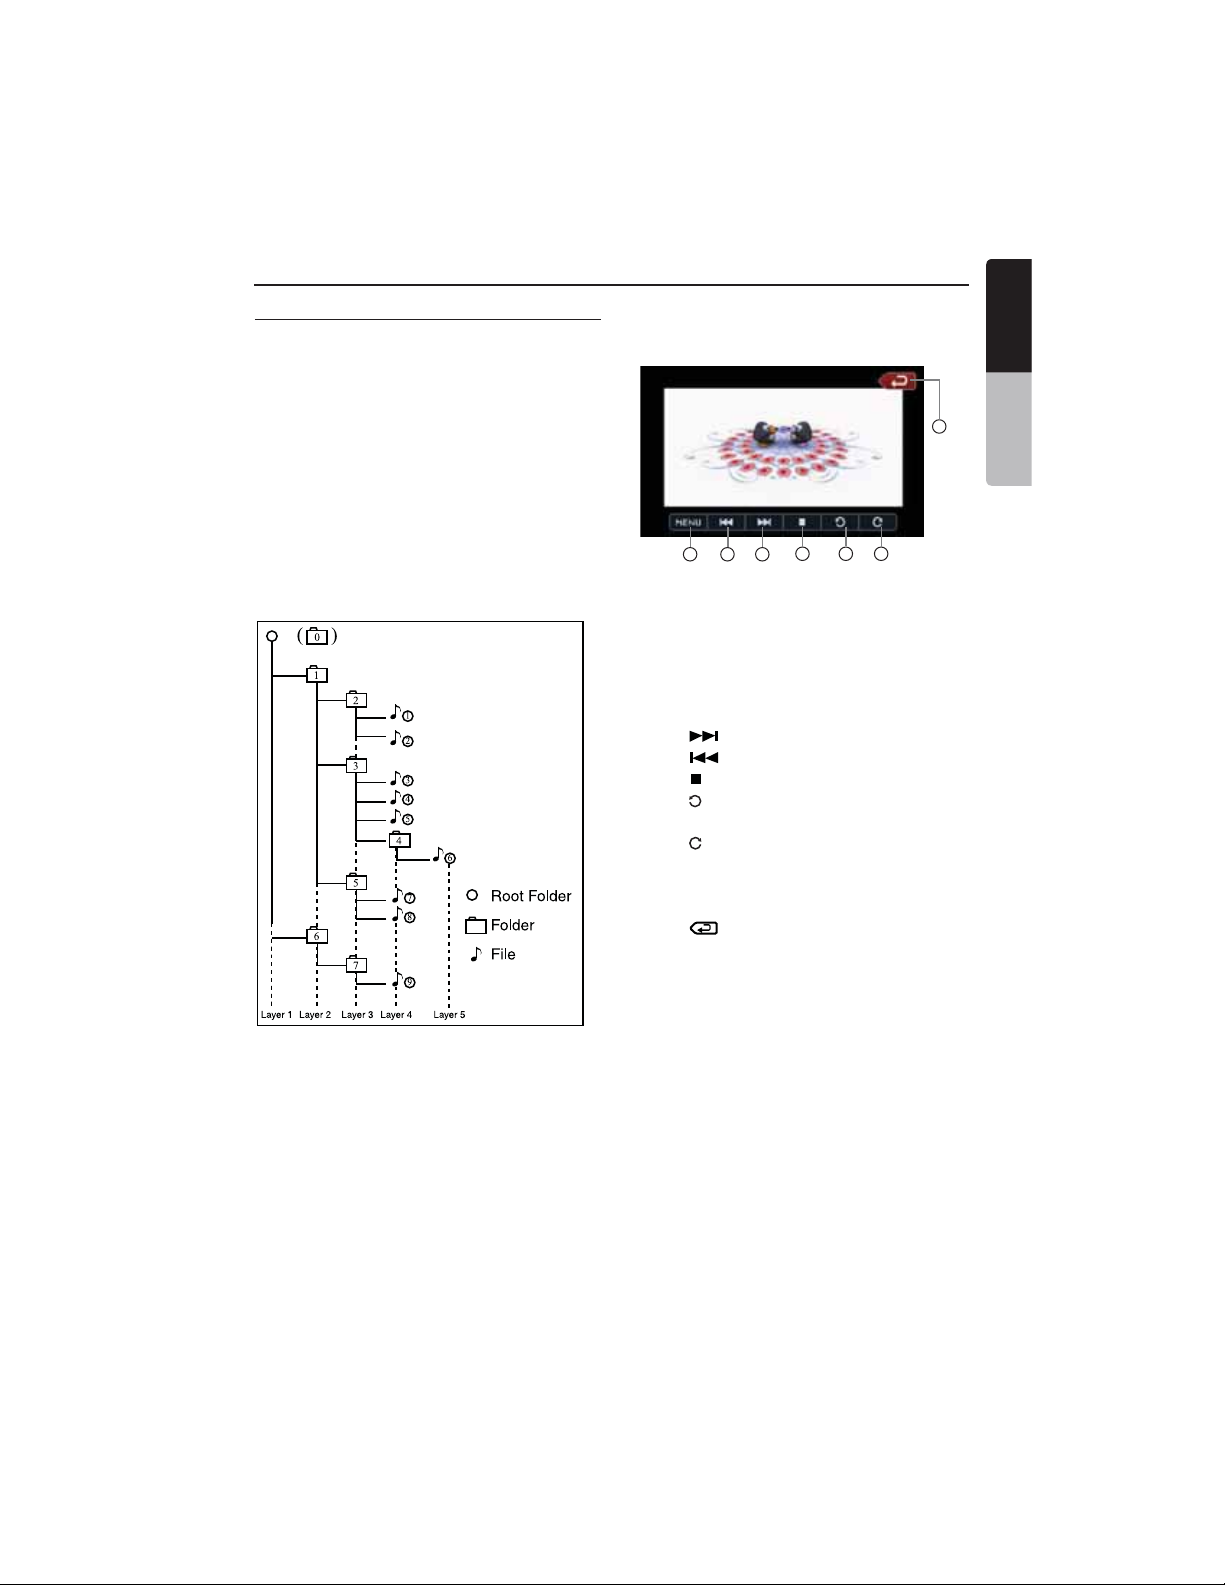
Playing MP3 folders
When selected for play, files and folders
(Folder Search, File Search or Folder Select)
are accessed in the order in which they were
written to the media. As a result, the order in
which they are expected to be played may not
match the order in which they are actually
played.
You may be able to set the order in which
MP3/WMA files are to be played by assigning
file names beginning with play sequence
numbers such as “01” to “99”.
For example, a medium with the following
folder/ file hierarchy is subject to Folder
Search, File Search or Folder Select.
See the diagram below.
Playback Picture Menu
The picture on the display comes with the
different functions to operate.
1
5
3 42
1 -
Main Menu Button
2
-
Menu Button
3
-
Previous Picture Button
4
-
Next Picture Button
5
-
Stop Button
6
-
Rotate Picture counterclockwise
7
-
Rotate Picture clockwise
6 7
• Touch [ ] button to play next picture.
• Touch [ ] button to play previous picture.
• Touch [ ] button to stop playing.
• Touch [ ] button to rotate picture 90
counterclockwise.
• Touch [ ] button to rotate picture 90
clockwise.
0
0
• Touch [MENU] button to return to disc root
Menu.
• Touch [ ] button to return to the Main
menu.
English
English
Owner’s Manual
The player will only recognize three folder
levels and does not display folders containing
other folders. In the example above, the unit
will display folders 2, 3, 4, 5, and 7, but not
1 and 6 since they only contain folders and
not playable material.
NX500/NZ500 29
Page 30
Sirius Satellite Radio Operations
English
This function is available when a Sirius Satellite
Radio Receiver is connected through the
dedicated connection. This unit requires the
following receiver:
Owner’s Manual
SIRIUS Satellite Radio Receiver: SC-C1
Note:
SIRIUS satellite radio is a subscription service.
Please contact Sirius Radio to begin or alter
your subscription:
•
Internet: www.sirius.com
Telephone: 888-539-SIRIUS (747487)
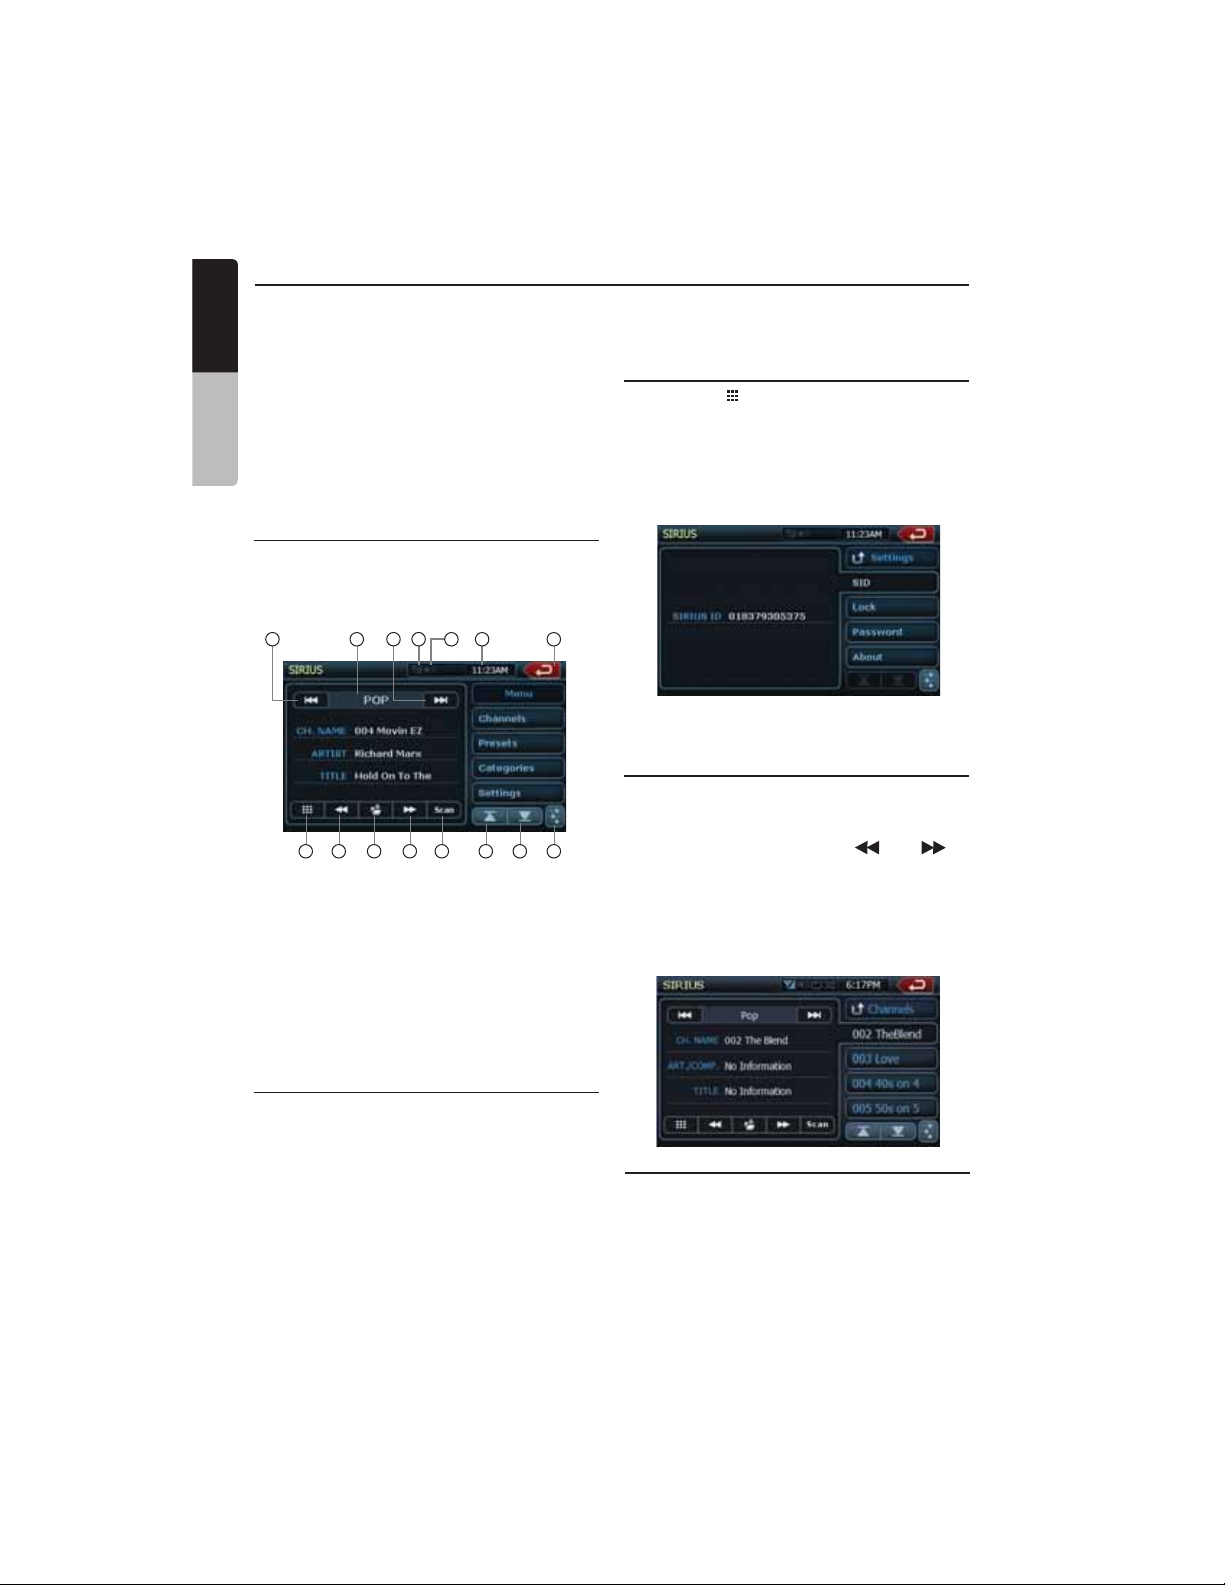
Selecting a Satellite Radio mode
Press the [SIRIUS] button on Main Menu
display. The system changes to the Sirius
Satellite Radio mode. The Sirius mode screen is
displayed.
14 13 12 10 91115
1 3
2
1 - Keyboard Button
2 - Previous Channel
Button
3 - Store Button
4 - Next Channel Button
5 - Scan Button
6 - Previous Page
Button
7 - Next Page Button
8 - EQ Button
9 - Main Menu Button
10 - Clock Display
4 5 6 7 8
11 - Mute Display
12 - Satellite Signal
13 - Next Category Button
14 - Category Name
15 - Previous Category
Button
16 - Source Display
17 - Song Title
18 - Artist Information
19 - Album Information
20 - Scan Button
Information Displayed During Reception
The following information is displayed when the
satellite radio cannot be received normally.
• When the receiver is turned on the first time or
after a reset: “UPDATING” followed by a
percentage of completion.
• When a channel is being tuned in (no signal is
yet received): “ACQUIRING SIGNAL”
• A channel without a broadcast has been
selected: “INVALID CHANNEL”
• A channel not covered by your contract:
“CALL 888-539-SIRIUS”
Call (888) 539-747487 to activate your radio.
30 NX500/NZ500
• When a channel is out of air time: “OFF AIR”
• When the antenna is disconnected or has
been damaged: “ANTENNA ERROR”
Confirming Your Radio ID
1. Touch the [ ] keyboard button on the
SIRIUS Menu display to display the keypad.
Enter “0” and press “OK”.
Your SIRIUS ID (12-digit number) will be
displayed.
2. Touch the [Settings] button on the SIRIUS
Menu display to enter Settings menu.
2. Press [SID] button. Your SIRIUS ID (12-digit
number) will be displayed.
Channel Selection
1. Touch the [Channels] button on the
SIRIUS Menu display to enter channel list
preview mode.
2. Select the channel with the [ ] or [ ].
Only channels that can be received are
selected.
Channels that are locked and channels not
covered by the contract will be skipped.
The receiver seeks the next available channel
below or above the current channel.
Channel Selection with the channel number
1. Touch the direct access button on the
SIRIUS Menu display to enter direct channel
selection.
2. Enter the channel number of your desired
station by touching the [0] to [9] keys.
If you enter a wrong number, you can cancel
it by touching the [BACK] key.
Page 31

Sirius Satellite Radio Operations
3. Touch the [OK] key.
The radio channel you entered will be tuned.
Recalling a preset station
A total of 20 satellite radio stations can be
stored in the receiver’s memory. You can access
the presets by pressing the Presets button.
This allows you to store your favorite satellite
radio stations in the memory for later recall.
1. Touch the [Preset...] button to enter the
preset list to select or save your presets.
2. Touch [ ] or [ ] button to view previous or
next page.
* There are 5 pages of preset memory space
available for your use. You can scroll the
pages using the scroll bar buttons to the right
of the screen.
3. Touch the [Preset...] key to return to the
previous screen.
Auto Preset Store
1. Touch and hold for more than 2 seconds the
corresponding preset key to save the
selected channel.
2. Touch the [ ] button to save the current
channel.
Deleting a Preset
1. Touch [Preset...] button and enter the preset
menu.
2. Touch the preset button you would like to
delete.
3. Touch the [DEL] button to delete it.
Note:
When the category selection mode is entered,
the category of the last received channel is
displayed first.
Parental Controls Lock Channels
1. Touch [Settings] button to enter setting list.
2. Touch [Lock] button to enter lock list.
3. Touch [ ] key to view next page in the lock
list.
4. Touch the channel item, and it will be locked
or unlocked altenately.
Setting the password
1. Touch [Settings] button to enter setting list.
2. Touch [Password] button to enter password
mode.
3. Touch [ ] to set password.
4. Touch [ ] button to remove password.
5. Touch [Settings] button to return to Sirius
menu.
English
English
Owner’s Manual
Receiving Stations by Category
Satellite Radio allows you to select broadcast
channel category (contents).
1. Touch [Categories] button to enter category
mode.
2. Touch [ ] or [ ] button to view all valid
category.
3. Touch the desired category item key to select
the category.
4. Select the desired channel by touching it
momentarily on the screen.
Note:
If you set passwords, you must input the correct code to enter
lock list. When you try to locked channel by keypad, it will dispaly
password’s keypad. Only entering correct code can tune to the
channel, or it will be back to the last channel, if a password is wrong.
NX500/NZ500 31
Page 32

Navigation System Operations
English
Introduction to Navigation Software
Navigation software provides turn-by-turn
visual and voice assistance to direct you to
selected destination. The software quickly
Owner’s Manual
calculates step-by-step directions to any
destination available on the included
navigation map. The navigation software uses
Global Positioning System (GPS) satellites, and
a digital roadway map database to calculate
and display travel directions. The system’s GPS
antenna receives signals from a constellation
of 24 satellites orbiting the earth and uses the
strongest of signals, to determine your position
to within meters.
Vehicle Position
The navigation software’s computer considers
vehicle speed and heading changes, together
with longitude and latitude information, to
accurately determine vehicle heading and
position on a digital map. Signals from GPS
satellites are used to determine the vehicle
location. Three (good) or four (best) satellites
must be received to accurately determine
location. The GPS reception status is indicated
by the GPS symbol on the map.
Map and Information Database
The map database used by navigation software
was created using high-resolution aerial and
land based data collection. Car navigation maps
are frequently updated. While the database was
judged to be as accurate as possible at the
time of its release, a map database can never
be 100% accurate. Road information that is
maintained in the map databases, such as turn
restrictions or road names may change over
time.
Main Menu Screen Operations
1. After the navigation system is activated
by touching “NAVI” button on the Main Menu
screen, the warning screen is displayed.
Press the button to accept it.
2. The ”Main Menu” navigation screen is
displayed.
3. Main menu screen has different options:
Home Address - Route to home address.
Go To... - Select a destination for navigation.
Setup - Set preferences for routing and
navigation display.
Office Address - Route to office address.
Trip Computer - Display speed, trip,
odometer reading, clock reading.
4. To operate the navigation system use display
function buttons as described below.
Zoom in the map to show a smaller
area
Zoom out the map to show a larger
area
Return to Map mode
Display map in 2D view
Return to the previous screen
Display menu, jump to main menu
Display map in 3D view
Select current panned position,
after panning map.
Information about current location
on the map, mode items
Select (check) currently highlighted
item
Display spell mode
Page up, page down in
displayed list
Step up or step down on menu list
Voice instractions are activated
Reset button
Cancel button
Delete button (Move cell content to
Trash can)
32 NX500/NZ500
Page 33

Route to home address
1. Touch the Home Address button on the
screen. If the home address is not set
previously, the following screen will be
displayed.
2. Press the check key to display home address
set up screen.
3. Select one of the option on the screen to set
the address. Once the address is set, it will
be saved in the software memory.
4. If the home address was saved previously,
the screen with address will pop up, after
you touched the Home Address button.
Start your route
Select the destination
To select the destination press Go To... button
on Main Menu screen. The Go To... screen is
displayed.
To start your navigation use one of these
modes:
Address or Intersection
Point of Interest
Favorites
History
Adress or Intersection Mode
1. Press Address or Intersection, if you know
the street address. The spelling keyboard
will be dispayed.
English
English
Owner’s Manual
2. Touch the first letter of desired city on the
keyboard. The city name will appear on the
screen.
3. Touch the select key. The list of the
cities, which name starts with same letter, will
be displayed. Press the desired city name.
NX500/NZ500 33
Page 34

English
4. Touch street key to dispay street
name.
The street screen is displayed.
Owner’s Manual
5. Choose desired street by typing on the
keyboard. The list of streets under this
letter will be displayed. Press up or down
button to go thru the list. Select your street.
NOTE: The system remembers the last State/
Province selected, so this step is not
necessary every time.
2. Point of Interest may be searched by
Category, City or Name.
• Use Category mode, if you are lookig for a
certain service or business, like nearest gas
station.
Press button to return to the street
mode screen.
6. Touch the postal code button to
dispay postal code.
Press the select key to dispaly the list
of the postal code. Select the desired code
and press return key.
Point of Interest Mode
1. Use Point of Interest option when you
are going to a public place or are looking
for some type of facility such as a gasoline
station. After selecting the Point of Interest
option, you must select the State/Province
where the destination is located.
34 NX500/NZ500
• City mode - select the city by spelling it’s
name.
• Name mode - select the name by typing it.
Page 35

Coordinates Mode
You can route to a destination by directly
inputting latitude and longitude values.
Favorites Mode
You can select your route to a destination by
choosing one of preset favorite places in
the Favorites mode.
1. Address Book is a convenient place to store
frequently visited destinations.
3. My POI will allow to create and save
your personal points of interest.
4. Trip Book will allow to navigate multiple
destination trip.
Edit Favorites
1. Press this button to edit Address Book, Trail
Book, Trip Book, My POI. The following
screen will pop up.
English
English
Owner’s Manual
2. Trail Book will allow to create your own
navigation routes.
2. Select the mode, you want to edit.
The editing screen will be displayed.
Address Book editing screen:
NX500/NZ500 35
Page 36

Trail Book editing screen:
English
Owner’s Manual
Trip Book editing screen:
My POI editing screen:
System Preferencies Setup
Press this button to set up your preferences for
routing and navigation. The following screen will
pop up. Select the mode you want to be set.
1. Press Setup Routing Criteria to set up your
driving preferences. Check the preferable
items on pop up screen.
2. Press Display Options to set up your
screen display preferences. All the options
are listed on 3 screens. Check the preferable
items on pop up screen list.
History Mode
Previous destinations entered into your
navigation software are automatically saved into
the memory. This is helpful when you want to
return to a recent destination, such as a hotel
where you may be staying. The Previous Origin
of the last calculated route is also stored for
easy return to your start point.
36 NX500/NZ500
Page 37

3. Press User Preferences to set up your
personal preferences. All the options
are listed on 2 screens. Check the preferable
items on pop up screen list.
4. Press Location Reset to set up your
location preferences. Select the item, you
would like to reset from pop up screen
options.
• Select the Volume mode. The popup screen
will allow to mute or turn on the system
sound.
• Select the GPS Diagnostics mode.
The information about current GPS condition
will be displayed on poup screen.
• Select the System Information mode.
The information about your navigation
system will be displayed on pop up screen.
English
English
Owner’s Manual
5. Press System button. The following screen
will pop up.
Office Adress Guidance and Setup
Press this button and the Start Route screen
will pop up.
NX500/NZ500 37
Page 38

If the office address is not saved:
English
• Press the Favorites on the Go To screen.
• On pop up screen press Edit Favorites
button. The following screen will pop up.
Owner’s Manual
Touch the arrow keys down or up the list
or page to display more listed items.
• Press the Office Address button.
The Set Office Address screen will be
displayed. Fill the information in highlighted
items.
Trip Computer Readings and Resets
Press this button to display speed, trip,
odometer reading, clock reading.
1. Touch the button to display the trip
informaton items.
The following screen will pop up.
2. Select the item from dispayed list by
touching it.
3. Reset the displayed item by pressing the
reset key. The following screen will
pop up.
4. Touch the check button to accept,
or cancell button to return back to Trip
Computer screen.
38 NX500/NZ500
Page 39

7. ACCESSORIES
English
iPod/iPhone Operations
iPod/iPhones can be connected by using the connector cable supplied with the iPod/iPhone, but in
this case, you can enjoy its audio sound only. To enjoy video movies stored in the iPod/iPhone with
video displaying them on this unit, it is required to use the special connector cable separately sold.
Note:
•
This system will not operate or may operate improperly with unsupported versions.
•
For detailed information on the playable iPod/iPhone models, see our home page:
www.clarion.com
Notes on using Apple iPod/iPhone
•
Do not connect an iPod/iPhone to this unit
with a headphone connected to the iPod/
iPhone.
•
After the iPod/iPhone has been connected
to this unit, the iPod’s buttons are
disabled for operation in the Music mode.
In the Video mode, do not operate the iPod’s
buttons.
•
When in the iPod mode, a special iPod/iPhone
control screen is displayed different from the
main screens for other modes.
•
When in the iPod mode, the screen image
input from the AUX terminal is output to
the rear monitor.
•
When no data is present, the title display will
remain blank.
•
The iPod/iPhone is used with the equalizer
function turned OFF.
•
Set the iPod/iPhone’s language setting to
English before connecting your iPod/iPhone.
Some characters of the other languages may
not be displayed correctly in this system.
• Precautions on battery consumption:
If the iPod/iPhone is connected to this unit
when the iPod/iPhone’s internal battery has
run down, this function may not operate
correctly. You must connect the iPod/iPhone
after charging the battery if it has run down.
Selecting the iPod mode
1. Connect your iPod/iPhone to the USB
connector. The system will automatically
detect the connected device and change
to the iPod mode. The iPod icon is displayed
on the Main Menu screen.
The playback starts after a while, from where
the iPod/iPhone has been paused.
• When a iPod/iPhone is already connected
Touch the [iPod] key on the Main Menu
screen. The system changes to the iPod
mode, and starts playback from the previous
position.
Controlling the iPod/iPhone
Operation keys
• iPod audio mode screen
12
11
17
18
19
20
1 3
1 - Repeat Button
2 - Shuffle Button
3 - Previous Track Button
4 - Scan Button
5 - Play/Pause Button
6 - iPod Video Button
7 - Next Track Button
8 - Stop Button
9 - Previous Page Button
10 - Next Page Button
11 - EQ Button
4 7 8 109
5
2
6
16
14 1315
12 - Main Menu Button
13 - Clock Display
14 - Shuffle Display
15 - Repeat Display
16 - Mute Display
17 - Song Title
18 - Artist Information
19 - Album Information
20 - Keyboard Button
[ ] Video key
• Switches to the screen of which the video
output from the iPod/iPhone is displayed.
Note:
•
Note that not all iPod/iPhone devices are
compatible to output video to this unit.
English
Owner’s Manual
NX500/NZ500 39
Page 40

iPod/iPhone Operations
English
[ ] Shuffle key
• Use to switch the shuffle mode on or off.
When enabled, this function performs
playback of tracks in random order,
Owner’s Manual
regardless of the order in which they are
recorded.
[ ] Play/Pause key
• Use to control playback and pause.
1. Touch the key during playback. Playback
pauses.
2. To resume playback touch the key again.
[ ] EQ button
• Use to enter Audio Settings menu to set.
[ ] Keyboard button
• Use to input number to select the track.
[ ] Repeat button
• Use to repeat the selected track.
Skipping a track (searching)
1. Press the [ ] or [ ] button during
playback. Tracks are skipped, as many times
as the button is pressed, and playback starts.
• Pressing the [ ] button starts playback
from the beginning of the next track.
• Pressing the [ ] button starts playback
from the beginning of the current track.
When this button is pressed again within
about 2 seconds, playback starts from the
beginning of the previous track.
Fast forward and fast backward playback
Press and hold the [ ] or [ ] buttons
on the menu display for fast forward or fast
reverse. The first press will advance the music
at 2x speed. Following presses will increase the
speed to 4x, 8x, and 16x.
Release the button to resume normal playback.
Selecting a list item from a list screen
1. Touch the display list icon in the iPod
selection screen.
2. Touch a desired list item on the screen to
display the corresponding list of tracks.
• Use the [ ] and [ ] keys to scroll the list.
3. Touch the desired track name on the list to
play back.
• Use the [ ] and [ ] keys to scroll the list.
Viewing video data in the iPod/iPhone (only
for the iPod/iPhone with video features)
When you connect an iPod/iPhone with video
features by using the optional connector cable
for iPod/iPhone with video, you can enjoy the
video data and slide show data stored in the
iPod/iPhone showing them on the display of this
unit (and the rear monitor if connected).
Note:
•
Do not connect the iPod/iPhone to this unit
when a Video Playlists item is selected on the
iPod/iPhone.
1. Touch the [ ] video key on the iPod audio
menu screen. The iPod play video screen is
displayed.
1
2. Select the type of video, you would like to be
played, by touching it on the right side of the
menu. The video playback will start.
Note:
Video playback is not available on all iPod/
iPhone devices. Please contact your Clarion
dealer for details. An optional connection cable
or accessory may be required for this feature.
3. To stop the video play, touch the screen.
iPod play video menu will be displayed.
4. Touch the [ ] audio button (1) to return to
the iPod audio menu.
Note:
•
“AUDIO ONLY” is displayed when the
automobile is moving.
•
Image data may not be played back according
to the status of the iPod/iPhone.
•
The volume setting of video data is relatively
lower than audio data. Be sure to lower the
volume setting before switching to the other
mode.
•
Do not select the categories with no track
registered from the iPod menu screen.
The iPod/iPhone may be frozen. If the iPod
/iPhone is frozen, reset the iPod/iPhone
by following the procedure described in the
instruction manual of the iPod/iPhone.
•
Audio may be played back slightly out of
synchronization with video images.
40 NX500/NZ500
Page 41

USB Operations
This system can play audio files (MP3/WMA) stored in an USB memory which is recognized as
“USB Mass Storage Class device”. You can use your USB memory as an audio device by simply
copying desired audio files into it.
Note:
•
This system will not operate or may operate improperly with some USB memory.
•
Files protected with any DRM can not be played.
Notes on using USB memories
•
General notes
• When no data is present, the message
“NO FILE” will be displayed.
• The USB memory is used with the equalizer
function turned OFF.
•
Notes on the MP3/WMA files
• This system can play the MP3/WMA
files stored in the USB memory.
• This system cannot play DivX files stored in
the USB memory.
• Set the Sampling Frequency to:
For MP3 files:
• MPEG1 Layer3: 32, 44.1, or 48 kHz
• MPEG2 Layer3: 16, 22.05, or 24 kHz
• MPEG2.5 Layer3: 8, 11.025, or 12 kHz
For WMA files: 32, 44.1, or 48 kHz
• Set the Bit Rate to:
For MP3 files:
• MPEG1 Layer3: 32 to 320 kbps (VBR)
• MPEG2 Layer3: 16 to 160 kbps (VBR)
• MPEG2.5 Layer3: 16 to 160 kbps (VBR)
For WMA files: 32,48, 64, 80, 96, 128, 160,
or 192 kbps
• Add the following file extension using single
byte characters:
For MP3 files: “.MP3” or “.mp3”
For WMA files: “.WMA” or “.wma”
•
Notes on the folder structure
• The folder hierarchy must be within 8
hierarchical levels. Otherwise, playback will
be impossible.
• The maximum allowable number of folders
is 200 (including root directory and folders
with no MP3/WMA file).
• The maximum allowable number of files in a
folder is 1500.
• The maximum files allowable in all folders
is 1500.
• You can store the MP3 files, WMA files
together in a folder.
•
Notes on the Tag titles
The limitations on the Tag titles are same as
those in the MP3/WMA modes.
• Folder representation in the folder list
The limitations on the folder representation
are same as those in the MP3/WMA
modes.
Selecting the USB Memory mode
Connect your USB memory to the USB
connector. The system will automatically
detect the connected device, and change to
the USB mode (USB Memory mode), and
start playback after a while. If you reconnect
the same device that you disconnected last,
the system will play back where it left off.
•
When an USB memory is already connected
Touch the [USB] key to select the USB in a
Main Menu mode.
The system changes to the USB mode and
starts playback from the previous position.
Playing back files in the USB memory
The operations in the USB Memory mode are
same as those in the MP3/WMA modes.
See “Listening to a CD” for details.
Note:
When performing the fast forward or fast
backward function, the playback speed will
become 10-time faster. For the VBR files, it
may differ depending on the file.
English
English
Owner’s Manual
NX500/NZ500 41
Page 42

Bluetooth Audio Player Operations
English
Some Bluetooth cellular phones have the audio features, and some portable audio player support
the Bluetooth feature. These devices will be called as “Bluetooth audio players” in this manual.
This system can play audio data stored in a Bluetooth audio player.
Note:
Owner’s Manual
•
This system will not operate or may operate improperly with some Bluetooth audio players.
•
For detailed information on the playable Bluetooth audio players, see our home page:
www.clarion.com
Selecting the Bluetooth mode
1. Press the [ ] button to display the Main
Menu screen.
2. Touch the [Bluetooth] key to select the
Bluetooth mode.
The system changes to the Bluetooth mode.
If the connection with a Bluetooth audio
player has been already established, you may
select the Music function.
• When the connection with a Bluetooth audio
player has been established, the icon is
displayed at the top of the screen.
2. When you finish confirming the Bluetooth
information, touch the [BT Menu] key to
return to the previous screen.
If you want to change the Pass Key setting of
this unit, perform the following steps.
• The factory default setting is “1234”.
3. Touch the text box of the Pass Key item to
display the Ten-Key Pad screen.
4. Enter your desired 4-digit PIN number, then
touch the [OK] key.
Registering your Bluetooth audio player
(Pairing)
You can register up to 5 Bluetooth audio
players.
1. Turn on the power of the Bluetooth audio
player you wish to register.
2. Touch the [Device] key to display the Device
Select screen.
Bluetooth audio player settings
Confirming Bluetooth Information and setting Pass Key
You can confirm the various information
concerning the Bluetooth Interface features.
1. Touch the [Settings] key to display the
information on the screen.
42 NX500/NZ500
3. Touch the [Add] key to display the Add the
Device screen.
4. Touch your desired Device key to select the
key for the Bluetooth audio player to be
registered.
5. If entering the Pass Key code is prompted on
your Bluetooth audio player, enter the Pass
Key code set to this unit.
• You can change the Pass key setting of
this unit from the BT Info screen.
Page 43

When the pairing operation completes, the
registered Bluetooth audio player is set as
the current device, and the display returns
to the Bluetooth mode screen.
Note:
•
You cannot register the same Bluetooth
audio player which is already registered
doubly.
If you wish to change the Device key
registered, once delete the corresponding
Bluetooth audio player from the previous
Device key, and then register it again to your
desired Device key.
• To delete the Bluetooth audio player
registration
1. Touch the [Device] key.
2. Touch the desired Device key you wish to
delete.
A confirmation screen is displayed.
3. Touch the [Delete] key to display the Delete
the Device screen.
Selecting the Bluetooth audio player
To change the current Bluetooth audio player to
the other device which is already registered,
perform the following operation.
1. Touch the [Device] key to display the Device
Select screen.
2. Touch the currently connected device, then
press the [Cut] key to disconnect the active
device.
3. Touch the desired Device key you wish to
use. Press the [Connect] key to select
it as your active device. The corresponding
Bluetooth audio player is set as the current
device.
• If the power of the Bluetooth audio player
is not turned on, turn it on.
• The Bluetooth audio player may prompt to
acknowledge the Bluetooth connection or
to enter the Pass Key code of this unit.
Perform these operations according to the
message displayed.
4. Touch the [BT Menu] key to return to the
previous screen.
Playing back a music
After the connection with a Bluetooth audio
player is established, the play mode is
automatically engaged.
• When playback is not started, touch the
[ ] key.
Pausing playback
1. Touch the [ ] key during playback.
Playback pauses.
2. To resume playback, touch the [ ] key.
Playback resumes.
Skipping a track (searching)
1. Press the [ ] or [ ] button during
playback.
Tracks are skipped, as many as the times
the button is pressed, and playback starts.
Fast forward and fast backward
1. Press and hold the [ ] or [ ] button
during playback.
The system enters the fast backward or fast
forward playback mode during pressing the
button. Releasing the button resumes the
normal speed playback.
Bluetooth Telephone Operations
When the connection with your Bluetooth
cellular phone is established, the following
functions are available on this unit:
• Listening to your telephone calls on the car
speakers.
• Answering to an incoming call.
• Making a call using the Ten-Key pad screen.
• Making a call using the Phone Book data in
the selected cellular phone.
• Making a call using the History data of the
dialed/received calls.
Note:
•
Some cellular phones may not be able to
transfer the Phone Book data.
•
The Phone Book data transmission may take
a long time. The operations of sending calls
are disabled during the data transmission.
English
English
Owner’s Manual
Controlling the Bluetooth audio player
Note:
•
Occasionally, depending on the environment,
playback sounds may be fragmented, or
switch noises may be generated.
NX500/NZ500 43
Page 44

• You can talk with other party by using
English
the internal microphone. When it is hard
to hear for the other party in accordance
with the communication condition or the
used telephone, use the optional microphone
(RCB-199), and set the Microphone
Owner’s Manual
Select setting to “External”. The sound will
be improved, but noises may still be heard
depending on the communication condition.
Selecting the BT Phone mode
1. Press the [ ] button to display the Menu
screen.
2. Touch the [Bluetooth] key to select the
Bluetooth mode.
3. Touch the [Telephone] key to select the BT
Phone mode.
The Telephone screen is displayed.
• When the connection with a Bluetooth
telephone has been established, the
icon and signal level indicator are displayed
at the top of the screen.
Telephone settings
Setting the telephone features
1. Touch the [Setting] key to display the
Telephone Settings screen.
2. Perform setting for the desired item.
See the following sections for detail.
3. Touch the [Back] key to return to the
previous screen.
• Setting Automatic Connection
The system automatically reconnects the
cellular phone after the connection is lost or the
system is restarted.
• The factory default setting is “OFF”.
Touch the [ON] or [OFF] key of the Automatic
Connection item to set the function ON or
OFF.
• Selecting Microphone
You can select the microphone to be used.
• The factory default setting is “Internal”.
Touch the [External] or [Internal] key of the
Microphone Select item to set the function.
Note:
•
When “Internal” is selected, and a call
comes in during the operation panel open,
the operation panel is automatically closed
because the microphone is on the operation
panel.
•
When “Internal” is selected, the
[OPEN /CLOSE] button is disabled
during a call.
• Setting Microphone Gain
You can adjust the input level of the
microphone in 5 levels.
• The factory default setting is “3”.
Note:
•
The input level of the microphone can be
affected by its surroundings. Adjust the level
when the person on the other end of
the telephone has a reception problem.
1. Touch the level indicator button of the
Microphone Gain item to adjust the input
level.
• Confirming Bluetooth Information and
setting Pin Code
You can confirm the various information
concerning the Bluetooth Interface features.
1. Touch the [Settings] key of the BT Info item
to display the information on the screen.
2. When you finish confirming the Bluetooth
information, touch the [BT Menu] key to
return to the previous screen.
If you want to change the Pin Code setting
of this unit, perform the following steps.
3. Touch the text box of the Pin Code item to
display the Ten-Key Pad screen.
• The factory default setting is “1234”.
4. Enter your desired 4-digit PIN number, then
touch the [OK] key.
44 NX500/NZ500
Page 45

Registering your cellular phone (Pairing)
You can register up to 4 cellular phones.
1. Turn on the power of the cellular phone you
wish to register.
2. Touch the [Device] key to display the
Device Select screen.
3. Touch the [Add] key to display the Add the
Cellular screen.
4. Touch your desired Cellular key to select the
key for the cellular phone to be registered.
• You cannot select the Cellular key of which
another cellular phone is already registered.
Select a blank Cellular key.
5. If entering the Pass Key code is prompted on
your cellular phone, enter the Pass Key code
set to this unit.
• You can change the Pass key setting of this
unit by the BT Info screen under the
Telephone Settings screen.
When the pairing operation completes, the
registered cellular phone is set as the current
telephone, and the display returns to the
Telephone screen.
Note:
•
You cannot register the same cellular phone
which is already registered doubly. If you
wish to change the Cellular key registered,
once delete the corresponding cellular phone
from the current Cellular key, and then
register it again to your desired Cellular key.
• To delete the cellular phone registration
1. Touch the [Device] key.
2. Touch the desired Device key you wish to
delete. A confirmation screen is displayed.
3. Touch the [Delete] key to display the
Delete the Cellular screen.
Selecting the cellular phone
To change the current cellular phone to the
other device which is already registered,
perform the following operation.
1. Touch the [Device] key to display the
Device Select screen.
2. Touch the currently connected device, then
press the [Cut] key to disconnect the active
device.
3. Touch the desired Device key you wish to
use. Press the [Connect] key to select
it as your active device. The corresponding
cellular phone is set as the current telephone.
• If the power of the cellular phone is not
turned on, turn it on.
• The cellular phone may prompt to
acknowledge the Bluetooth connection or
to enter the Pass Key code of this unit.
Perform these operations according to the
message displayed.
4. Touch the [Back] key to return to the
previous screen.
Obtaining the Phone Book data
Sending the Phone Book data from the cellular
phone enables you to make a call using the
Phone Book function from this unit.
1. Perform the Object Push transfer operation
of the Phone Book data on the current
cellular phone.
For details of the operation, see the
operation manual of the cellular phone.
Note:
•
Some cellular phones may not be able to
transfer the Phone Book data.
•
Some cellular phones cannot transfer
the Phone Book data when the hands-free
mode is set or it is also registered in the
Bluetooth mode. In those cases, disable
these functions from the cellular phone
before performing the Object Push transfer.
•
Some cellular phones may transfer Phone
Book data automatically.
English
English
Owner’s Manual
NX500/NZ500 45
Page 46

Telephone operations
English
Note:
• For your safety, this system disables the
calling functions when the car is moving. Be
sure to stop the car and apply the parking
brake before making a call.
Owner’s Manual
Making a call using the Ten-Key pad
1. Touch the [Telephone] key to display the
Ten-Key pad screen.
2. Enter the telephone number by using the
Ten-Key pad displayed on the screen.
3. Touch the [ ] (Send) key to call the entered
number.
• The following Telephone Interrupt screen is
displayed during phone call.
• Touch the [ ] (Private) key to talk using
the cellular phone canceling the hands-free
function. To return to the hands-free mode,
touch the [ ] (Private) key.
4. When the call is finished, touch the [ ]
(End) key to hang up. The display will return
to the previous mode screen selected before
entering the BT Phone mode.
Note:
•
Depending on the cellular phone, the
Telephone Interrupt screen may be closed
and the connection with this system may
be disconnected when entering the Private
mode.
Making a call using the Phone Book
You can use the Phone Book data obtained
from the cellular phone to make a call from this
unit.
Note:
•
Before using this function, the Phone Book
data must be sent from the cellular phone
•
Only the Phone Book items with at least one
telephone number registered in the captured
Phone Book data are displayed on the Phone
Book screen.
1. Touch the [Contacts] key to display the
Phone Book screen.
2. Touch the desired Name key you wish to dial.
• Touch the [ ] or [ ] key to scroll the list.
• When you touch the alphabet key at the
right of the screen, the list scrolls to the item
which starts with the specified character.
3. Touch the desired Number key you wish to
dial.
4. Touch the [Call] key to call the specified
number. The Telephone Interrupt screen is
displayed, and calling starts.
• When the call is finished, touch the [ ]
(End) key to hang up.
Making a call using the History
The system will memorize the Dialed/Received
calls record data in the memory. You can
confirm it and use it to make a call from this
unit.
1. Touch the [Call Log] key.
The History List screen is displayed.
• The items are sorted by Dialed, Missed and
Received calls.
• Touch the [ ] or [ ] key to scroll the list.
• Touch the [BT Menu] key to return to the
previous screen.
2. Touch the desired History item key you wish
to dial.
3. Touch the [Call] key to call the specified
number. The Telephone Interrupt screen is
displayed, and calling starts.
• When the call is finished, touch the [ ]
(End) key to hang up.
Answering to an incoming call
When a call comes in, the following Telephone
Interrupt screen appears.
You can answer to the incoming call on this
system by the following operation.
1. Touch the [ ] (Send) key to answer to the
call.
• When the call is finished, touch the [ ]
(End) key to hang up.
46 NX500/NZ500
Page 47

HD Radio Operations
This function is available when an HD Radio tuner is connected.
This unit can control the following HD Radio tuner:
• HD Radio Module (THD400)
Note:
•
Be sure to disconnect power before connecting/disconnecting the HD Radio tuner.
•
Not all areas offer HD Radio broadcasts
•
HD Radio stations may not always broadcast subchannels
•
Volume levels of HD Radio stations may vary. Increase the volume gradually from the minimal
setting after the channel is selected. Be sure to lower the volume setting before switching to
another mode or channel.
Additional information about HD Radio can be found at www.hdradio.com
Listening to HD Radio
1. Touch the Tuner button on the Main menu
display. The tuner mode screen is displayed.
2. Press the [BAND] button or touch the [Band]
key on remote control to select the radio
band. Each time the button is pressed, the
radio reception band changes in the following
order: FM1, FM2, FM3, AM, FM1...
3
11
20
19
18171615
1 - Stereo indicator
2 - Signal strength
3 - Station name
4 - HD Radio status
5 - Clock
6 - Main Menu key
7 - Preset list
8 - EQ mode key
9 - Next preset page
10 - Previous preset page
11 - Frequency display
2
14
1
13
5 6
4
12
10
9 8
12 - Seek up
13 - iTunes TAG key
14 - Manual tune up
15 - Auto store/Preset
scan key
16 - Channel scan
17 - HD Radio
subchannel key
18 - Manual tune down
19 - Band key
20 - Seek down
Seek Tuning
1. Press the [BAND] button to select the radio
band (FM or AM).
2. Touch the [ ] or [ ] key to
automatically seek a station.
• When touching the [ ] key, the station is
sought in the direction of higher frequencies.
• When touching the [ ] key, the station is
sought in the direction of lower frequencies.
Manual Tuning
1. Press the [BAND] button to select the radio
band (FM or AM).
2. Touch the [ ] or [ ] key to
automatically seek a station.
• When touching the [ ] key, the station is
7
sought in the direction of higher frequencies.
• When touching the [ ] key, the station is
sought in the direction of lower frequencies.
3. To quick tune, touch and hold the [ ] or
[ ] key to tune into a station.
Recalling a preset station
There are 2 ways to recall the preset station.
• Preset scan function:
1. Press the [BAND] button to select the
desire band (FM or AM) on the remote
control.
2. Press the [AS/PS] key momentarily. The
unit will begin to scan the saved presets.
3. When the desired preset is found, press
the [AS/PS] key momentarily.
English
English
Owner’s Manual
NX500/NZ500 47
Page 48

HD Radio Operations
English
• Manual recall:
1. Press the [BAND] button to select the
desire band (FM or AM) on the tuner.
2. Press the preset station (1 to 15) on tuner
Owner’s Manual
display. Press [ ] or [ ] to select
next station up or down the preset list.
3. Touch the desired Band key to select the
band you wish to store.
4. Tune in the station you wish to store using
the seek tuning, manual tuning, or preset
tuning.
5. Touch and hold the desired Preset key you
wish to store the current station for more
than 2 seconds.
Manual memory
1. Touch the desired Band key to select the
band you wish to store.
2. Tune in the station you wish to store using
the seek tuning, manual tuning, or preset
tuning.
3. Touch and hold the desired Preset key you
wish to store the current station for more than
2 seconds.
Auto Store
The Auto Store is a function for storing up to 15
stations that are automatically tuned in
sequentially. If 15 receivable stations cannot be
received, a previously stored station remains
unoverwritten at the memory position.
1. Touch the [Band] key to select the desired
band. (FM or AM)
2. Touch and hold the [AS/PS] key to start the
Auto Store function. A beep sounds and
the stations with good reception are stored
automatically to the preset channels.
Preset Scan
The Preset Scan receives the stations stored in
the preset memory in order. This function is
useful when searching for the desired station in
memory.
1. Touch the [Band] key to select the desired
band. (FM or AM)
2. Touch the [PS] key to start the Preset Scan.
The unit starts scanning each station for 10
seconds sequentially.
3. When the desired station is tuned in, touch
the [PS] key again to continue receiving that
station.
HD Radio Subchannel Function
1. Touch the [HD] key to switch between
the available subchannels. Each time the
key is touched, the subchannel reception
changes in the following order: HD1, HD2,
HD3, HD4, HD1…
2. You can save your desired subchannel by
touching and holding the desired Preset key
you wish to store the current subchannel for
more than 2 seconds.
Note: Not all stations have HD Radio
subchannel broadcasts.
iTunes Tagging Function
1. Touch the [TAG] key to store the current
music information to memory.
2. You may store up to 64 tags in the memory
when an iPod/iPhone is not connected.
3. When an iPod/iPhone is connected to
the unit, the unit will automatically transfer
the tags to the iPod/iPhone.
Note: Not all broadcasted material can be
tagged. The iTunes Tagging function is
only available for Apple iPod and iPhone
devices.
48 NX500/NZ500
Page 49

AUX In / AV In Operations
External peripheral devices, including a game
console, camcorder, navigation unit, iPod/
iPhone, etc. can be connected to the AUX IN or
AV IN connector on the back of this unit using
the A/V media cables.
WARNING
For your safety, the driver should not
watch the VTR, etc. or operate the controls
while driving. Please note that watching
and operating the VTR, etc. while driving
are prohibited by law in some countries.
NOTE:
For your safety, the unit has a safety function,
which turns off the picture when car is moving,
so only the audio can be heard. The picture can
be only watched, when the car is stopped and
parking brake is applied.
Camera In Operations
Switching to AUX IN / AV IN mode
Press [AUX IN] or [AV IN] button on Main Menu
to select desired mode (when unit is reading).
The LCD will display the external video.
The screen will dispaly “No Video” menu, if
there is no video signal.
You cannot directly control external devices
connected to the AUX IN or AV IN input.
English
English
Owner’s Manual
Switching to Camera mode
Press [Camera] button on Main Menu
to select desired mode (when unit is reading).
The LCD will display the external video.
The screen will dispaly “No Video” menu, if
there is no video signal. Press [ ] back
button to return to the Main Menu.
When the video signal is displayed, press right
top corner to return to the Main Menu.
NX500/NZ500 49
Page 50

Setup Operations
English
Press [Setup] button on the Main Menu screen.
The Setup menu screen will be displayed.
General Setup Menu
Owner’s Manual
Video Setup Menu
This menu includes: TV Shape; Aux IN;
Brightness.
Clock: Touch the button to set the clock.
Select Clock Mode 12 Hr.
AM/PM: Touch the button to change
AM or PM, when 12Hr mode is
selected.
Beep: The function of it is to choose the
Beep voice on or off.
Camera Image: The Function of it is to choose
the mode of camera image normal or
mirror.
Radio Field: The function of it is to choose the
radio mode in the country you are. It’s
contain USA, Europe, S. America,
Other.
Tel Mute: The function of it is to set the
Bluetooth ready on or off .
Tel SP: The function of it is to set the speaker
of the Bluetooth ready front left or
front right.
Aux In Input SW: The function of it is to choose
the auxin input switch, including Low,
Mid, High.
Version: Display the software version
information.
TV Shape: The function of it is to choose the
screen area shape - 4:3 or 16:9.
Aux IN: The function of it is to choose Aux In
format. It contains AUTO, PAL, NTSC.
Brightness: Set brightness value from 0 to 20.
Audio Setup Menu
This menu includes: Bass Freq; Treble Freq; Sub
Filter; Bass Q-Factor.
Bass Freq: Choose the desired bass frequency.
60Hz, 80Hz, 100Hz, 200Hz
Treble Freq: Choose the desired treble
frequency 10KHz/12.5KHz/1 5KHz/
17.5KHz.
Sub Filter: Choose the desired Sub Filter
frequency: 80Hz/120Hz/160Hz.
Bass Q-Factor: Choose the Bass
Q-Factor:1.0/1.25/1.5/2.0.
Navigation Setup Menu
This menu includes: GPS Time, Time Zone, DST
50 NX500/NZ500
Page 51

Setup Operations
GPS Time: Use this function of it is to
synchronize the GPS time or not.
It contains two choices: Ignore and
Sync.
Time Zone: Choose the desired Time Zone:
NTF/Atlantic/Eastern/Central/
Mountain/Pacific/Alaska.
DST: Use this function to set Daylight
Saving Time on or off.
Misc Set Up
This menu include: TS Calibrate; Set Password;
Parental control.
TS Calibrate: The function of it is to select the
TS Calibrate YES or NO.
Set password: The function of it is to set the
password of the child lock.
Parental control: The function of it is to set
the rating of the age. It contains
Kid Saf/G/PG/PG- 13/PG-R/R/
NC- 17/Adult.
Software Update: Choose the function to
update the software.
NAV Update: Choose the function to
update the NAV software.
Restore Defaults: The function is to select to
load factory default or not.
Phone Menu
If you receive a phone call and the Bluetooth
is On, the screen will display Phone Interrupt
Menu.
1. Press the right top corner to go back to Main
Menu.
2. Touch [Setup] button to set Tel Mute and
Tel SP.
EQ Set Up
1
3
4
5
6
7
8
9
No. Button Name Function
1 Title Name Display title
2 Main Menu
3 EQ Set EQ mode
4 BASS Set bass value
5 TREBLE Set treble value
6 BALANCE Set balance
7 FADER Set fader
8 SUB Set Sub Woofer
9 LOUDNESS Set loudness
Button
name
Close the
Audio Settings
menu
position
position
level
on or off
Monitor OFF Menu
Press [Monitor OFF] button to temporarily turn
off the dispaly. Touch the screen to turn the
display on.
2
English
English
Owner’s Manual
NX500/NZ500 51
Page 52

English
8. TROUBLESHOOTING
GENERAL
Owner’s Manual
Problem Cause Measure
Power does not turn on.
(No sound is produced.)
Nothing happens when
buttons are pressed.
Display is not accurate.
The remote control unit does
not work.
Fuse is blown. Replace with a fuse of the
Incorrect wiring. Consult your store of
The microprocessor has
malfunctioned due to
noise, etc.
Direct rays of the sun fall on
the light-receptive part of the
remote control unit.
The batteries of the remote
control unit are dead or there
is no battery in the remote
control unit.
same amperage. If the fuse
blows again, consult your
store of purchase.
purchase.
Turn off the power and open
the operation panel. Press the
reset button with a thin rod.
Note:
When the Reset button is
pressed, turn off the ACC
power.
* When the Reset button is
pressed, frequencies of radio
stations, titles, etc. stored in
memory are cleared.”
When direct rays of the sun fall
on the light-receptive part of
the remote control unit, it may
not work.
Check the batteries of the
remote control unit.
DVD PLAYER
Problem Cause Measure
Disc cannot be loaded. Another disc is already loaded. Eject the disc before loading
There is a foreign matter
already in place.
Sound skips or is noisy. Compact disc is dirty. Clean the compact disc with a
Compact disc is heavily
scratched or warped.
Sound is bad directly after
power is turned on.
The image is not displayed. The parking brake is not
Disc cannot play with the
display “PARENTAL
VIOLATION” shown.
52 NX500/NZ500
Water droplets may form on
the internal lens when the car
is parked in a humid place.
engaged.
Feature exceeds set parental
level.
the new one.
Eject the foreign matter
forcibly.
soft cloth.
Replace with a compact disc
with no scratches.
Let dry for about 1 hour with
the power on.
Check that the parking brake
is engaged.
Release the view limitation or
change the parental level.
See the subsection “Setting up
the parental level”
Page 53

USB DEVICE
Problem Cause Measure
USB device cannot be
inserted.
USB device is not recognized. The USB device is damaged. Disconnect the USB device
No sound heard with the
display “NO FILE” shown.
Sound skips or is noisy. MP3/WMA files are not
The iPod/iPhone’s video
image is disturbed.
The USB device has been
inserted with wrong direction.
The USB connector is broken. Replace with a new USB
Connectors are loose.
No MP3/WMA file is stored in
the USB device.
encoded properly.
The TV Signal setting of
the iPod/iPhone is not set
correctly.
Reversing the connection
direction of the USB device,
try it again.
device.
and reconnect. If the device
is still not recognized, try
replacing with a different USB
device.
Store these files properly in the
USB device.
Use MP3/WMA files encoded
properly.
Set the TV Signal setting
(NTSC/PAL) of the iPod/iPhone
correctly.
9. ERROR DISPLAY
If an error occurs, one of the following displays is displayed.
Take the measures described below to solve the problem.
English
English
Owner’s Manual
DVD PLAYER
Display Cause Measure
BAD DISC
BAD DISC
BAD DISC
PARENTAL VIOLATION
WRONG REGION
If an error display other than the ones described above appears, press the Reset button.
If the problem persists, turn off the power and consult your store of purchase.
* When the Reset button is pressed, frequencies of radio stations, titles, etc. stored in
memory are cleared.
A disc is caught inside the CD
deck and is not ejected.
A disc cannot be played due
to scratches, etc.
A disc is loaded upside- down
inside the DVD deck and does
not play.
Parental level error Set the correct Parental level.
Region code error Eject the disc, and replace
This is a failure of DVD deck’s
mechanism and consult your
store of purchase.
Replace with a non-scratched,
non-warped disc.
Eject the disc then reload it
properly.
correct region code disc.
NX500/NZ500 53
Page 54

English
10. SPECIFICATIONS
FM Tuner
Frequency Range: 87.9 MHz to 107.9 MHz
Owner’s Manual
Usable Sensitivity: 8 dBμV
50dB Quieting Sensitivity: 14 dBμV
Alternate Channel Selectivity: 70 dB
Stereo Separation: 25 dB (1 kHz)
Frequency Response: 30 Hz to 15kHz
AM Tuner
Frequency Range: 530 kHz to 1710 kHz
Usable Sensitivity: 28 dBμV
DVD Player System
Digital Versatile Disc System with CDDA
capable
Usable discs:
DVD video disc, Compact disc
Frequency Response: 20 Hz to 20 kHz
Sound/Noise Ratio: 95 dbA (1W Ref)
Dynamic Range: 95 dB (1 kHz)
Distortion: 0.05%
Video system: NTSC
Navigation
Memory: NAND Flash Memory
Upgrade Platform: USB
TTS (Text to Speech): Street Announcements
Find Menu: Address, POI, History, Coordinates,
Favorites, Plan on map
POI: 12 million
Road Selection: Unpaved, Permit needed,
Motor ways, Toll, Ferries,
Border crossing, Carpool lanes
Audio/Video Input
Audio input voltage: 300 μVrμs (low)
Audio input voltage: 600 μVrμs (med)
Audio input voltage: 950 μVrμs (high)
Video input voltage: 1.0Vp-p @75
Audio/Video output
Audio output impedance: 10k
Video output voltage: 1.0Vp-p @75
LCD Monitor
NX500 Screen Size: 6.5” wide type
Pixels: 280,800
Resolution: 1200 x 234 (RGB)
NZ500 Screen Size: 7” wide type
Pixels: 336,960
Resolution: 1440x234 (RGB)4 (RGB)
General
Power source voltage:
14.4 V DC (10.8 to 15.6 V allowable)
Ground: Negative
Current consumption:
4.0 A @1 W (57.6W @1W)
Auto Antenna Rated Current: 500 mA less
NX500 dimensions:
7” (178mm) width, 3-15/16” (100mm) height,
7” (179mm) depth
NX500 weight: 3.5 kg
NZ500 dimensions:
7” (178mm) width, 2” (50 mm) height,
7.5” (191.5mm) depth
NZ500 weight: 3.5 kg
Remote Control dimensions:
2-1/8” (54mm) width, 9/16” (14mm) height
4-13/16” (122 mm) depth
Remote Control weight:
50 grams (including battery)
Note:
•
Specifications comply with JEITA
Standards
•
Specifications and design are subject
to change without notice for further
improvement.
Power Output:
18W RMS x 4 Channels at 4
and 1% THD+N
Signal to Noise Ratio:
85 dBA (reference: 1W into 4
.
)
54 NX500/NZ500
Page 55

INSTALLATION /WIRE
English
CONNECTION GUIDE
CONTENTS
1. Before Starting .................................................................... 55
2. Package Contents .............................................................. 55
3. General Cautions ................................................................ 55
4. Cautions On Installation .....................................................56
5. Installing The Main Unit ...................................................... 57
6. Cautions On Wiring ............................................................59
7. Wire Connections ............................................................... 60
1. Before Starting
1. This set is exclusively for use in cars with a
negative ground 12V power supply.
2. Read these instructions carefully.
3. Be sure to disconnect the battery“ ”terminal
before starting. This is to prevent short circuits
during installation. (Figure 1)
2. Package Contents
Main unit .................................... 1
GPS antenna ............................. 1
Wiring harness ........................... 1
AV cable .................................... 1
USB extension cable ................. 1
Remote control unit ................... 1
Battery (CR2025) ....................... 1
(Installed in remote control)
2DIN trim ring ........................... 1
2DIN trim ring 200mm wide ...... 1
Back Strap ................................. 1
Flush mount bolts ..................... 4
Cap bolts ................................... 4
Rear radio stud and stopper .... 1
Cleaning cloth ........................... 1
Warranty Card ........................... 1
Owner’s manual and
Installation manual .................... 1
English
Owner’s Manual
3. General Cautions
1. Do not open the case. There are no
user- serviceable parts inside. If you
drop anything into the unit during
installation, consult your dealer or an
authorized Clarion service center.
2. Use a soft, dry cloth to clean the case.
Never use a rough cloth, thinner,
benzine, or alcohol etc. For tough dirt,
apply a little cold or warm water to a
soft cloth and wipe off the dirt gently.
NX500/NZ500 55
Page 56

4. Cautions on Installation
English
1. Prepare all articles necessary for
installing the source unit before starting.
2. This model features an operation panel
Owner’s Manual
that slides forward.
On some types of cars, the operation
panel may make contact with the
dashboard or gearshift lever, in which
cause it cannot be installed. Before
installing, check that the unit will not
hamper operation of the gearshift lever
or obstruct your view before selecting
the installation location. (Figure 2)
Dashboard
NZ500
4. If you have to do any work on the car
body, such as drilling holes, consult
your car dealer before hand.
5. Use the enclosed screws for
installation. Using other screws can
cause damage. (Figure 4)
Chassis Chassis
Damage
Max. 8 mm (M5 screw)
Figure 4
Gearshift lever
(Check that it does
not touch the LCD)
Gearshift lever
Figure 2
3. Install the unit within 30° of the
horizontal plane. (Figure 3)
NX500
NZ500
Figure 3
56 NX500/NZ500
Page 57

5. Installing the Main Unit
English
This unit is designed for fixed installation in the
dashboard.
1. When installing the main unit in NISSAN
vehicles, use the parts attached to the unit
and follow the instructions in Figure 6.
When installing the main unit in TOYOTA
vehicles, use the parts attached to the
Mounting Screw Holes (Side View of the Main Unit)
For NISSAN vehicle For TOYOTA vehicle
Figure 5
Installing the Main Unit in NISSAN Vehicle
vehicle and follow the instructions in
Figure 7.
2. Wire as shown in Section 7.
3. Reassemble and secure the unit in the
dashboard and set the face panel and center
panel.
English
Owner’s Manual
Main Unit
Finisher (
*1)
Mounting bracket
(1 pair for the left and right sides)
Figure 6
Note:
*
1: Position the face panel with its wide edge at the
bottom. Fit the edge into the groove of the main unit.
6- Spacer (thickness: 1mm)
6-Spacer (thickness: 1 mm)
6- Flat head screws
6-Flat head screw
(M5x8)
(M5 8)
(Attached to the main unit)
(attached to the main unit)
NX500/NZ500 57
Page 58

Installing the Main Unit in TOYOTA Vehicle
English
Install by using parts attached to the vehicle. (Screws marked are attached to the
vehicle.)
Owner’s Manual
Main Unit
8- Hexagonal screws
8-Hexagonal screw
(M5x8)
(M5 8)
Mounting bracket
Center Panel
(
* 2 )
* 3
Figure 7
Figure 7
Mounting bracket
(1 pair for the left
(1 pair for the left
and right sides)
and right sides)
*2 Some panel openings are too small for the
unit depending on the vehicle type and
model. In such a case, trim the upper and
lower sides of the panel frame by about
0.5 to 1.5 mm so the unit can be inserted
smoothly.
*3 If a hook on the installation bracket
interferes with the unit, bend and flatten it
with a nipper or similar tool.
Typical Mounting Brackets
3elpmaxE1elpmaxE Example 2
Affix the screws to the marks.
Vehicles other than NISSAN and TOYOTA
In some cases the center panel may require modification. (Trimming, filing, etc.)
• Removing the Main Unit
When the main unit is to be removed, disassemble it in the reverse of the order in
“INSTALLING THE MAIN UNIT”.
58 NX500/NZ500
Page 59

6. Cautions on Wiring
1. Be sure to turn the power off before wiring.
2. Be particularly careful where you route the wires.
Keep them well away from the engine, and
exhaust pipe, etc. Heat may damage the wires.
3. If the fuse should blow, check to see if the
wiring is correct.
If a fuse is blown, replace it with a new one of
the same amperage rating as the original (15A FUSE).
4. To replace the fuse, remove the old fuse on the back
of the unit and insert the new one. (Figure 8)
NOTE:
There are various types of fuse holder. Do not let the battery
side touch other metal parts.
caution
CAUTION
After the connection, fix the cord by a clamp
or insulation tape for protection.
Fuse (15A FUSE)
Fuse holder
Figure 8
Figure 8
English
English
Owner’s Manual
NX500/NZ500 59
Page 60

7. Wire Connections
English
Note:
•
Before installing, be sure to disconnect the negative cable of the car battery.
•
In the optional devices, the RCA cables and the Connector cables are separately-sold
Owner’s Manual
items.
NX500
Black
GPS
Antenna
External
Microphone
Connection
Radio Antenna
Refer to
page 61
Red
Black
Gray
Black
Black
Black
Gray
Black
Purple
Steering Wheel
Remote Control Terminal
Yellow
Red
Line Out
R
Front
White
Line Out
L
Front
Red
Line Out
R
Rear
White
Line Out
Rear
Red
White
Yellow
Yellow
L
Subwoofer 1
Subwoofer 2
Audio/L
Audio/R
Video In
Video Out
White
Red
Video Out
Sirius
HD Radio
Monitor
Connector
Cable
HD Radio™ Tuner Module
4-Channel Amplifier
iPod/iPhone
iPod
Connector Cable
Camera
SIRIUS CONNECTVEHICLETUNER
60 NX500/NZ500
Page 61

NZ500
English
GPS
Antenna
Black
External
Microphone
Connection
Refer to
page 61
Radio Antenna Jack
Black
Red
Purple
Black
Gray
Yellow
White
Red
Red
White
Red
White
Red
White
Video
Audio/L
Audio/R
Line Out
Subwoofer
Line Out
Rear R
Line Out
Rear L
Line Out
Front R
Line Out
Front L
HD Radio
Sirius
HD Radio™ Tuner Module
SIRIUS CONNECTVEHICLE
Connector
Cable
iPod
iPod/iPhone
Yellow
White
Red
Connector Cable
4-Channel Amplifier
English
Owner’s Manual
TUNER
Black
Gray
Yellow
Video Out
Yellow
Video Out
Camera
Steering Wheel
Remote Control Terminal
Monitor
NX500/NZ500 61
Page 62

English
Owner’s Manual
Blue/White
Orange/White
Blue
Brown
Yellow
Purple
Purple/Black
Red
Gray
Gray/Black
White
White/Black
Green
Green/Black
Grass-green
Purple/White
Black
Rear right +
Rear right -
Front right +
Front right -
Front left +
Front left -
Rear left +
Rear left -
Amplifier turn-on cord
Illumination
Auto antenna
Phone interrupt (*1)
+12V main power
Ground
+12V accessory
Parking brake cord
Reverse gear cord
Note:
*1: Connecting the PHONE INTERRUPT terminal
The phone interrupt will mute the audio if the lead receives a negative or ground signal.
See next page for how to connect the parking brake cord.
62 NX500/NZ500
Page 63

Connecting the parking brake cord
Connect the cord to parking brake lamp ground in the meter panel.
Note:
•
Connecting the parking brake cord to lamp ground allows you to watch iPod/iPhone
video/DVD video/AV input when the parking brake is engaged.
•
When the parking brake cord is not connected, the monitor will not show any video
sources.
•
If
“AUDIO ONLY”
release the parking brake while confirming safety, and then engage the parking brake
again.
Electro-tap
(not included)
appears on the screen just after turning on the ACC power of the car,
How to attach the electro-tap (not included)
English
English
Owner’s Manual
Connecting the accessories
• Connecting to the external amplifier
The external amplifiers can be connected to the 6 channel RCA output connections.
Ensure that the connectors are not grounded or shorted to prevent damage to the unit.
• Connecting to iPod/iPhone device
The iPod/iPhone device can be connected to dedicated iPod/iPhone connection on the
main unit. For detailed information, refer to the instruction sheet or manual for the
iPod/iPhone cable.
Note:
•
This unit may not support all functions of all iPod/iPhone devices.
•
The iPod/ iPhone connection will charge your iPod/iPhone unless the iPod/iPhone
battery is completely depleted. If the specified cord of the cellular phone is connected
to the phone interrupt cord of the main unit, the audio mute is activated when cellular
phone in use.
• Connecting to Sirius Satellite Radio Receiver
When Sirius Satellite Radio Receiver is to be connected, use the dedicated connector.
For detailed information,refer to the instruction manual of the Sirius Satellite Radio
Receiver.
NX500/NZ500 63
Page 64

Français
d’emploi
Mode
DONNÉES D’ENREGISTREMENT DU PRODUIT CLARION
États-Unis et Canada seulement
www.clarion.com
À l’intention du client :
Nous vous félicitons d’avoir acheté un produit électronique mobile Clarion. Nous sommes
persuadés que vous en apprécierez l’expérience.
Il existe de nombreux avantages à l’enregistrement de votre produit. Aussi, nous vous
invitons à visiter notre site Internet à l’adresse www.clarion.com afin de l’enregistrer.
Nous avons d’ailleurs simplifié cet enregistrement grâce à la convivialité du site Internet
en question.
Le formulaire d’enregistrement est rapide et facile à remplir. Une fois l’enregistrement
terminé, nous pourrons vous communiquer des renseignements importants sur le produit.
Il suffit d’enregistrer votre produit Clarion à l’adresse www.clarion.com pour en assurer
la mise à jour constante.
64 NX500/NZ500
Page 65

Table des matières
1. CARACTÉRISTIQUES ....................................................................................................... 66
Évolutivité des systèmes .................................................................................................... 66
2. PRÉCAUTIONS ................................................................................................................. 67
3. COMMANDES ................................................................................................................... 69
Panneau de commande .....................................................................................................69
Fonction des boutons ........................................................................................................70
Télécommande ...................................................................................................................71
Fonctions des boutons de la télécommande .....................................................................72
4. MESURES DE PRÉCAUTION ........................................................................................... 74
Panneau de commande .....................................................................................................74
Système de navigation ....................................................................................................... 74
Port USB ............................................................................................................................ 75
Nettoyage ...........................................................................................................................75
Manipulation des disques ..................................................................................................76
5. SYSTÈME DE DVD VIDÉO................................................................................................ 77
Caractéristiques des DVD vidéo ........................................................................................77
Disques .............................................................................................................................. 78
À propos des marques de commerce ................................................................................ 78
6. COMMANDES ................................................................................................................... 79
Fonctionnement de base ...................................................................................................79
Fonctionnement de la radio ...............................................................................................83
Commandes du lecteur DVD vidéo ....................................................................................84
Commandes radio satellite Sirius.......................................................................................91
Commandes du système de navigation ............................................................................. 93
Présentation du logiciel de navigation .......................................................................... 93
Commandes de l’écran du menu principal ...................................................................93
Route vers le domicile ................................................................................................94
Sélection d’une destination ........................................................................................94
• Mode d’adresse ou d’intersection .......................................................................... 94
• Mode de points d’intérêt ........................................................................................95
• Mode de coordonnées ...........................................................................................96
• Mode de modification des favoris .......................................................................... 96
• Mode d’historique ..................................................................................................97
Configuration des préférences ...................................................................................97
Configuration de l’adresse au travail ..........................................................................98
Lectures des données de voyage et réinitialisation ................................................... 99
7. ACCESSOIRES ................................................................................................................. 100
Commandes iPod/iPhone ..................................................................................................100
Commandes USB .............................................................................................................. 102
Commandes du lecteur audio Bluetooth ...........................................................................103
Commandes Radio HD ......................................................................................................107
Commandes AUX In/AV In .................................................................................................110
Commandes de l’entrée caméra ........................................................................................ 110
Commandes de configuration ............................................................................................111
8. DÉPANNAGE .....................................................................................................................113
9. ÉCRAN D’AFFICHAGE DES ERREURS ...........................................................................114
10. CARACTÉRISTIQUES TECHNIQUES .............................................................................. 115
MANUEL D’INSTALLATION ET DE CÂBLAGE ..................................................................... 116
Français
d’emploi
Mode
NX500/NZ500 65
Page 66

1. CARACTÉRISTIQUES
Écran tactile 6,5 pouces Double DIN
Écran tactile 7 pouces motorisé
Fonction de lecture DVD vidéo,
CD audio, MP 3 et WMA
Navigation intégrée
Français
d’emploi
Mode
Évolutivité des systèmes
Fonctions audio évolutives
Amplificateurs de
puissance externes
iPod
NAVI/AV
MUTE PWR
VOL
SOURCE
Syntoniseur
HD Radio™
NX500
Prêt pour Commandes au Volant d’Origine
Compatible avec la radio satellite Sirius
Bluetooth
Compatible avec iPod
®
intégré
®
/
iPhone
™
par USB
Prêt pour la radio HD Radio™
Fonctions vidéo évolutives
Écran arrière
CLOSE BND
push MUTE
PWR
VOL
NZ409
SCAN
SOURCE
PS/AS NAVI/AV
INFO
push ENT
Caméra de recul
Radio satellite
Sirius
Direct Connect
SEL
iPhone
BT Phone
Mémoire
USB
REMARQUE :
Cet appareil peut capter des diffusions analogiques, de radio HD (facultatif) et la radio satellite (facultatif).
Les articles figurant hors des cadres sont les produits commerciaux qui se vendent habituellement.
66 NX500/NZ500
Page 67

2. PRÉCAUTIONS
AVERTISSEMENT
• Aux fins de sécurité, le conducteur ne doit jamais regarder un appareil vidéo ou en utiliser les commandes pendant
qu’il conduit son véhicule. Veuillez remarquer que, dans certains pays, il est interdit de regarder un appareil vidéo
ou d’en utiliser les commandes en cours de conduite. Lorsque vous conduisez, prenez soin de régler le volume de
l’appareil de manière à ce que vous puissiez entendre les sons extérieurs.
• Veuillez respecter les précautions suivantes lors de l’utilisation du système de navigation. Après avoir lu
ce manuel, rangez-le dans un endroit facilement accessible (comme la boîte à gants de votre véhicule).
• Ce système de navigation ne doit pas se substituer à votre propre jugement. Aucun itinéraire suggéré
par ce système de navigation ne devrait supplanter une quelconque réglementation routière, votre
jugement, ni votre bonne conduite. Ne pas suivre l’itinéraire suggéré du système de navigation s’il vous
force à effectuer des manœuvres interdites ou dangereuses, s’il vous met en danger ou vous fait passer
par une zone que vous considérez peu sûre.
• Les conseils offerts par le système de navigation doivent être considérés uniquement à titre de
suggestions. Il est possible que le système de navigation situe incorrectement l’emplacement du
véhicule, n’indique pas l’itinéraire le plus court, ni ne vous amène à la destination de votre choix.
Dans de tels cas, fiez-vous à votre jugement en tenant compte des conditions de la route.
• N’utilisez pas le système de navigation pour localiser les services d’urgence. La base de données
ne contient pas une liste exhaustive des services d’urgence tels que postes de polices, casernes,
hôpitaux et cliniques de consultation sans rendez-vous. Dans de tels cas, soyez prudent et demandez
des indications.
• À titre de conducteur, vous êtes le seul responsable de votre sécurité.
• Afin d’éviter un accident de la route, ne faites pas fonctionner ce système pendant que vous conduisez.
• Afin d’éviter un accident de la route, ne faites fonctionner le système que lorsque le véhicule se trouve
dans un endroit sûr et que le frein de stationnement est engagé.
• Afin d’éviter un accident de la route ou des infractions au code de la route, n’oubliez que les conditions
de route et le code de la route sont prioritaires par rapport aux informations contenues dans le système
de navigation.
• Il est possible que le logiciel contienne des informations erronées ou incomplètes en raison du laps de
temps écoulé, de changement de circonstances et des sources d’information utilisées. Veuillez
respecter les conditions de route et réglementations actuelles, à tout instant, quand vous conduisez.
• Si les conditions de route ou le code de la route en vigueur diffèrent des informations du système de
navigation, respectez le code de la route.
• Réduisez au minimum le temps passé à regarder l’écran pendant la conduite.
• Le système de navigation ne contient ni ne reflète les informations concernant : la circulation et le code
de la route, les aspects techniques du véhicule incluant le poids, la hauteur, la largeur, la charge et les
limites de vitesse ; les conditions routières incluant la déclivité ou le degré d’inclinaison des routes et
l’état de la surface ; les obstacles comme la hauteur et la largeur des ponts et des tunnels ; et les autres
conditions actuelles de la circulation et des conditions routières. Il faut toujours vous fier à votre propre
jugement lors de la conduite d’un véhicule et tenir compte des conditions routières actuelles.
• Ne pas démonter ni modifier cet appareil. Ceci peut causer un accident, un incendie ou une
décharge électrique.
• Cessez toute utilisation de l’appareil en cas de problème, par exemple aucun affichage ou aucun son
audible. Ceci peut causer un accident, un incendie ou une décharge électrique. Dans ce cas, consultez
votre détaillant ou communiquez avec le centre d’entretien Clarion agréé le plus proche.
• En cas de problème, par exemple si un corps étranger est présent dans l’appareil, l’appareil est
mouillé, ou si l’appareil émet de la fumée ou une senteur étrange, etc. cessez d’utiliser le système
immédiatement et consultez votre détaillant ou communiquez avec le centre d’entretien Clarion agréé
le plus proche.
L’utilisation de l’appareil dans de pareilles conditions peut causer un accident, un incendie ou une
décharge électrique.
• Lors du remplacement du fusible, n’utilisez qu’un fusible comportant les mêmes caractéristiques.
L’utilisation d’un fusible différent peut causer un incendie.
• Pour obtenir des conseils d’installation ou de modification d’installation, consultez votre représentant
agréé ou communiquez avec le centre Clarion agréé le plus proche pour des raisons de sécurité.
Ces opérations requièrent une expérience et un savoir-faire professionnels.
NX500/NZ500 67
Français
d’emploi
Mode
Page 68

1. Si la température ambiante de l’habitacle est
très froide et que vous utilisez le lecteur peu de
temps après la mise en fonction du chauffage,
il peut se former de l’humidité sur le disque
(DVD/CD) ou sur les pièces optiques du lecteur
ce qui risque d’en rendre la lecture impossible.
S’il y a de l’humidité sur le disque (CD/DVD),
essuyez-le à l’aide d’un chiffon doux. S’il y a
de l’humidité sur les composants optiques de
l’appareil, attendez environ une heure avant
Français
d’utiliser le lecteur. La condensation se dissipera
d’elle-même, rétablissant du même coup le
fonctionnement normal de ce dernier.
2. La conduite sur des routes extrêmement
d’emploi
cahoteuses donne lieu à de fortes vibrations qui
Mode
risquent de provoquer des sauts de lecture.
3. Cet appareil étant muni d’un mécanisme de
précision, n’ouvrez jamais son boîtier, ne
démontez jamais l’appareil et ne lubrifiez jamais
ses pièces, même en cas de défectuosité.
4. Cet équipement a été testé et il est considéré
conforme aux exigences en matière de limitations
qui s’appliquent aux appareils numériques de
classe B, aux termes du paragraphe 15 de la
réglementation FCC. Ces conditions restrictives
sont conçues pour fournir une protection
raisonnable contre les interférences nuisibles
dans le cadre d’une installation résidentielle. Le
présent équipement génère, utilise et peut émettre
des radiofréquences susceptibles, faute d’une
installation adéquate et d’une utilisation conforme
aux instructions, de causer un brouillage nuisible
aux communications radioélectriques. Il n’existe
toutefois aucune garantie que ce brouillage ne
se produira pas dans une installation donnée.
S’il s’avère que le présent équipement cause un
brouillage nuisible à la réception radiophonique
et télévisuelle, dont il est possible de déterminer
l’effet sur simple mise en fonction et hors fonction
de l’appareil, on invite l’utilisateur à consulter le
détaillant ou un technicien en radio ou en télévision
aux fins d’assistance.
RENSEIGNEMENTS À L’INTENTION
DES UTILISATEURS :
LES MODIFICATIONS DU PRODUIT
QUI NE FONT PAS L’OBJET D’UNE
APPROBATION PAR LE FABRICANT ET
QUI CONSTITUENT UNE INFRACTION
AUX NORMES D’HOMOLOGATION DE
LA FCC ONT POUR CONSÉQUENCE
D’ANNULER LA GARANTIE.
68 NX500/NZ500
Page 69

3. COMMANDES
Panneau de commande
[ ]
MIC
CAPTEUR
[NAVI/AV]
[MUTE] Sourdine
[ PWR]
[VOL]
[SOURCE]
ENTRÉE AUX
RÉINITIALISATION
[CLOSE] Fermer [BND] Bande
NAVI/AV
MUTE PWR
VOL
SOURCE
NX500
CLOSE BND
[PS/ENT]
Préréglages/enter
PS/AS NAVI/AV
[NAVI/AV]
Français
d’emploi
Mode
[OPEN] Ouvrir
[BND] Bande
Sourdine
[push MUTE]
[
PWR]
[VOL]
OPEN BND
VOL
push MUTE
PWR
NZ500
(recherche)
[ ] [ ]
SEEK
MIC
SOURCE
(balayage)
[SOURCE]
SCAN
[ ]
INFO
PS
AS
ENTRÉE AUX
MIC
[TILT UP] Inclinaison
vers le haut
[INFO]
[TILT DOWN]
Inclinaison vers
le bas
[PS] (préréglages)
[AS] Mémorisation
automatique
DISP
push ENT
DISPLAY (Affichage)
SEL
RÉINITIALISATION
[PS/ENT] Appuyez/enter
[SEL] (sélectionner)
NX500/NZ500 69
Page 70

Fonction des boutons
Remarque : Bien lire ce chapitre en vous reportant
au schéma de face du chapitre « COMMANDES ».
Bouton [MUTE] [
PWR] [VOL]
• Appuyez sur ce bouton pour mettre l’appareil
en fonction. Appuyez sur ce bouton pendant
plus d’une seconde pour mettre l’appareil
hors fonctions.
• Appuyez sur ce bouton pour atténuer le son du
récepteur et appuyez de nouveau pour rétablir
le son.
• Tournez le bouton pour augmenter ou diminuer
Français
le volume.
Bouton [NAVI/AV]
• Appuyez sur ce bouton pour accéder à la
navigation vidéo.
• Appuyez sur ce bouton pendant plus de
2 secondes pour retourner au mode précédent.
d’emploi
Bouton [SOURCE]
Mode
• Appuyez sur ce bouton pour faire défiler les
différentes sources disponibles comme le
syntoniseur AM/FM, Sirius, DVD, NAVI, USB,
modes caméra, etc.
Boutons de recherche [
] [
• Appuyez pour chercher la prochaine station ou
la précédente ou le prochain canal en mode
syntoniseur ou de radio Sirius.
• Appuyez pour chercher la prochaine piste ou la
précédente ou le prochain chapitre en mode CD,
MP3/WMA, iPod et DVD.
• Maintenez enfoncé pour lancer l’avance ou le
recul rapide ×2, 4, 8, 16 étapes en mode CD,
MP3/WMA et DVD vidéo.
• Maintenez enfoncé pour lancer l’avance ou le
recul rapide en mode iPod.
• Maintenez enfoncé pour entrer en recherche
manuelle dans le mode syntoniseur et Sirius,
puis appuyez brièvement pour chercher une
station par étape.
[
] Bouton Lecture/Pause/Balayage
Appuyez pour lancer ou interrompre la lecture audio
ou vidéo ou pour faire un balayage.
• Appuyez brièvement pour effectuer le balayage.
• Maintenez enfoncé une fois :
Le fichier audio ou vidéo sera mis en pause.
Puis appuyez brièvement pour reprendre la
lecture du fichier.
[
] Éjection
• Appuyez pour éjecter le disque de l’appareil
lorsque le panneau est ouvert.
Bouton [OPEN] [CLOSE] (ouvrir/fermer)
Utiliser ce bouton pour ouvrir ou fermer le panneau
de commande.
Bouton bande [BAND]
• Utilisez ce bouton pour accéder au mode
syntonisation AM/FM depuis n’importe quelle
source.
• Une fois en mode syntonisation AM/FM, vous
pouvez appuyer sur ce bouton pour sélectionner
les bandes FM1, FM2, FM3 ou AM.
Bouton [PS/AS] Préréglages/mémorisation
automatique
• Appuyez sur ce bouton pour lancer le mode
balayage des présélections.
• Appuyez sur ce bouton et maintenez-le enfoncé
pour lancer le mode configuration et balayage
automatique des présélections.
Boutons [
] [ ]
Appuyez sur ces boutons pour régler l’angle du
panneau de commande.
Bouton [INFO]
Appuyez sur ce bouton pour mettre en fonction
ou hors fonction l’affichage de liste en mode
syntoniseur, Sirius, DVD/CD.
Bouton [push ENT] [SEL]
]
• Tournez le bouton pour passer au dossier suivant
en mode iPod.
• Appuyez pour confirmer et lire le fichier
multimédia actuel en mode CD, MP3/WMA,
DVD et iPod.
Bouton d’affichage [DISPLAY]
• Appuyez sur ce bouton pour afficher la bande
en mode radio, satellite, CD/DVD, iPod.
• Appuyez une autre fois pour afficher l’heure
actuelle à partir de n’importe quel mode.
Bouton de réinitialisation [RESET]
• Appuyez sur ce bouton pour réinitialiser l’appareil.
CAPTEUR
• Récepteur du signal de la télécommande
(portée : 30° dans toutes les directions).
MIC
• Microphone interne pour utilisation durant les
appels en mode Bluetooth. La sensibilité peut
être réglée depuis le menu Setting (Paramètres).
70 NX500/NZ500
Page 71

Télécommande
[
]
MUTE
Transmetteur de signal
Angle de fonctionnement : 30° dans
toutes les directions
[
]
OPEN
[
]
MODE
[
]
0 - 9
[
]
SRCH
[][]
[
]
ESC
[][]
[
]
TITLE
[]
[]
[
]
ZOOM
[
]
AUDIO
Remplacement des piles
1. Appuyez sur la patte de retenue, sortez le
compartiment des piles et enlevez la pile usée.
2. Insérez la pile CR2025 neuve et remettez le
compartiment des piles dans la télécommande
dans le même sens que vous l’avez enlevé.
Veuillez prendre soin d’insérer le compartiment
dans le bon sens.
AUDIO VIDEO
iPod
[
POWER
[
VOLUME
[
INFO
[
[
SEL
[
MENU
[
PIC
[]
[
OK
[]
REPEAT
[]
ROOT
/ BAND
A B
]
]
]
]
]
]
]
]
[]
[SUB TITLE/VIDEO iPod MODE*]
[
ANGLE/AUDIO iPod MODE*]
* Seulement en cas de possibilité
de raccordement iPod/iPhone.
Remarque :
L’utilisation inadéquate des piles peut
provoquer leur explosion. Faites attention
aux points suivants :
• Lors du remplacement des vieilles piles,
insérez deux piles neuves.
• Ne court-circuitez pas, ne désassemblez pas
ni ne chauffez les piles.
• Ne jetez pas les piles dans le feu.
• Se débarrasser des piles mortes de manière
appropriée.
Français
d’emploi
Mode
NX500/NZ500 71
Page 72

Fonctions des boutons de la télécommande
Vous pouvez utiliser la télécommande aux fins de pilotage des appareils NX500 et NZ500.
Remarque :
•
Il se peut que la télécommande sans fil fonctionne moins bien sous la lumière directe du soleil.
Modes partagés
Bouton [MODE]
• Appuyez sur ce bouton pour faire défiler les
différentes sources disponibles comme le
syntoniseur AM/FM, lecteur DVD, iPod, radio
Sirius, ou AUX IN.
Boutons [VOLUME]
Boutons servant à monter ou à baisser le volume.
Français
Bouton sourdine [MUTE]
Bouton de mise en fonction et hors fonction de
la sourdine.
Bouton [POWER]
Appuyez sur ce bouton pour mettre l’appareil en
fonction ou hors fonction.
d’emploi
Bouton ouvrir [OPEN]
Mode
Appuyez sur ce bouton pour OUVRIR ou FERMER
l’écran motorisé. Veuillez vérifier qu’il n’y a pas
d’obstacles avant de le mettre en marche.
Bouton [MENU]
Appuyez sur ce bouton pour accéder au MENU
PRINCIPAL. Depuis le menu principal, vous pouvez
sélectionner la source voulue ou modifier vos
paramètres de réglage.
Bouton d’image [PIC]
Appuyez sur ce bouton pour modifier les paramètres
vidéo de luminosité, de couleur et de contraste de
votre écran.
Bouton sélection [SEL]
Appuyez sur ce bouton pour modifier les paramètres
audio de tonalité, d’équilibrage avant-arrière et
de balance.
Bouton échappement [ESC]
Appuyez sur ce bouton pour quitter les menus
de sélection et de réglage.
Mode SYNTONISATION ou radio satellite
Bouton de bande [BAND]
Bouton servant à syntoniser la bande de réception.
Boutons [0 - 9]
• Utilisez l’écran de pavé numérique pour régler la
fréquence radio ou les canaux de radio satellite.
• Utilisez-les pour choisir le numéro de présélection
intégré à l’écran liste des présélections.
Bouton de recherche [SEARCH]
Appuyez sur ce bouton pour afficher ou masquer
le pavé numérique.
Bouton [OK]
Appuyez sur ce bouton pour confirmer les
données faisant l’objet d’une saisie au moyen
du pavé numérique.
], [
Boutons [
Appuyez sur ces boutons pour rechercher
]
la station précédente ou suivante en mode
SYNTONISATION. En mode radio Sirius,
vous faites défiler les catégories.
Boutons [
Appuyez sur ces boutons pour sélectionner
manuellement la station précédente ou suivante en
mode SYNTONISATION ou en mode radio satellite.
Boutons [
Appuyez sur ces boutons pour faire défiler
les présélections mises en mémoire en mode
SYNTONISATION. Appuyez sur le bouton [OK]
pour syntoniser la présélection mise en évidence.
Bouton [INFO]
Appuyez sur ce bouton pour accéder à la LISTE
ou la quitter, alors qu’on se trouve en mode
SYNTONISATION ou radio satellite Sirius.
Mode LECTEUR DVD
• Appuyez sur ce bouton pour mettre en fonction
ou hors fonction l’écran d’affichage de la durée
de lecture en mode DVD vidéo.
• Appuyez sur ce bouton pour accéder à la LISTE
ou la quitter, alors qu’on fait jouer un CD audio.
Bouton de recherche [SEARCH]
Appuyez sur ce bouton pour ouvrir le menu de
recherche directe en mode DVD vidéo.
Bouton [OK]
Appuyez sur ce bouton pour assurer la sélection,
la lecture et la pause du support audio ou vidéo.
Bouton bande [
• Appuyez sur ce bouton pour interrompre la
lecture du support audio ou vidéo.
Boutons [0 - 9]
• Appuyez sur ces boutons pour saisir les titres
ou les chapitres DVD vidéo au moyen du pavé
numérique.
• Appuyez sur ces boutons pour choisir le numéro
de dossier ou de plage du disque CD et du
disque MP3/WMA au moyen du pavé numérique.
Bouton de sélection de disque [DISC SEL]
• Appuyez sur ce bouton pour afficher ou masquer
la liste des plages en mode CD.
• Appuyez sur ce bouton pour afficher ou masquer
la liste des dossiers en mode MP3/WMA.
Bouton titre [TITLE]
Appuyez sur ce bouton pour accéder au menu des
titres du disque DVD.
Bouton racine [ROOT]
Appuyez sur ce bouton pour accéder au menu
racine du disque DVD.
Boutons [
• Appuyez sur ces boutons pour sélectionner les
articles à l’écran d’affichage menu du disque
DVD vidéo.
• Appuyez sur les boutons [
défiler les pages en mode CD ou MP3/WMA.
], [
], [
], [
]
/BAND]
], [
]
], [
]
], [
] pour faire
72 NX500/NZ500
Page 73

Fonctions des boutons de la télécommande
Boutons [ ], [ ]
• Appuyez sur ces boutons pour sélectionner le
numéro de chapitre précédent ou suivant en
mode DVD vidéo.
• Appuyez sur ces boutons pour sélectionner les
numéros de plage précédents ou suivants en
mode CD.
], [
Boutons [
]
Appuyez sur ces boutons pour actionner la
commande d’avance ou de recul rapide. Appuyez
de nouveau sur l’un ou l’autre bouton pour
augmenter la vitesse de défilement de 2x, 4x,
8x et 16x. Appuyez encore une fois pour rétablir
la vitesse normale de lecture.
Bouton répétition [RPT]
• Appuyez sur ce bouton pour assurer la répétition
d’un chapitre en mode DVD vidéo ou d’une plage
en mode CD ou MP3 et WMA.
• Appuyez de nouveau sur ce bouton pour assurer
la répétition d’un titre en mode DVD vidéo ou
d’un dossier en mode MP3/WMA. En mode
CD, cette opération permet d’actionner le mode
Repeat all (répétition intégrale).
• Appuyez de nouveau sur ce bouton pour
assurer la répétition intégrale en mode de
lecture MP3/WMA.
Bouton [A
B]
• Appuyez sur ce bouton pour régler le point
initial de la répétition. L’écran affiche alors la
mention REP A.
• Appuyez de nouveau sur ce bouton pour régler
le point final de la répétition. L’écran affiche alors
la mention REP A-B.
• Appuyez de nouveau sur ce bouton pour
interrompre la répétition A-B. L’écran affichera
alors la mention REP AB Off.
Bouton [ZOOM]
Appuyez sur ce bouton pour mettre le zoom avant
en fonction en mode DVD vidéo. Il est possible
d’agrandir l’image jusqu’à 3x.
Bouton [AUDIO]
Appuyez sur ce bouton pour actionner la fonction
AUDIO en mode DVD vidéo.
Bouton sous-titres [SUB-T]
Appuyez sur ce bouton pour afficher les sous-titres
en mode DVD vidéo.
Bouton [ANGLE]
Appuyez sur ce bouton pour actionner la fonction
ANGLE en mode DVD vidéo lorsque le repère
d’angle de prise de vue s’affiche à l’écran.
Bouton [OK]
Appuyez sur ce bouton pour assurer la lecture ou
la pause du support sélectionné.
Boutons [
], [
]
Appuyez sur ces boutons pour faire défiler les listes.
], [
Boutons [
]
Appuyez sur ces boutons pour sélectionner les
numéros de plage précédents ou suivants.
Boutons [
], [
]
Appuyez sur ces boutons pour actionner la
commande d’avance ou de recul rapide. Appuyez
de nouveau sur ces boutons pour augmenter la
vitesse de défilement de 2x, 4x, 8x ou 16x.
Français
d’emploi
Mode
NX500/NZ500 73
Page 74

4. MESURES DE PRÉCAUTION
Panneau de commande
Pour une plus longue durée de vie, veuillez lire les mesures de précaution suivantes.
• Le panneau de commande fonctionnera
adéquatement à des températures comprises
entre 0 et 60˚C.
• Aucun liquide (boisson, parapluie, etc.) ne doit
atteindre l’appareil, car il pourrait endommager
les circuits internes.
Français
• Ne démontez et ne modifiez pas l’appareil
de quelque façon que ce soit. Cela risque de
l’endommager.
• Soumettre le panneau de commande à des chocs
peut causer des ruptures, des déformations ou
d’emploi
d’autres dommages.
• En cas d’anomalie, faites vérifier l’appareil par le
Mode
magasin où vous l’avez acheté.
Système de navigation
• Pour éviter de décharger la batterie du véhicule,
utilisez de préférence ce système pendant que le
moteur tourne.
• Le boîtier de cet appareil peut devenir chaud
car il contient une unité centrale à haute vitesse.
Manipulez avec soins l’appareil lors de la
navigation ou immédiatement après l’avoir éteint.
• Coupez le moteur du véhicule avant de brancher
ou de débrancher les fils. Vous risquez sinon de
provoquer un dysfonctionnement.
Remarque :
•
Lorsque vous utilisez cet appareil la première
fois ou que vous ne vous en êtes pas servi
depuis un certain temps, le GPS peut prendre
entre 5 et 15 minutes pour déterminer la
position actuelle. De plus, même en cas
d’utilisation fréquente, le GPS peut parfois
prendre entre 2 et 3 minutes pour déterminer
la position actuelle, selon les conditions
de mesure.
•
Lorsque l’itinéraire (route) ne peut pas être
calculé, déplacez le point de destination sur
• N’insérer pas d’objet ou de pointe dans l’espace
compris entre le panneau de commande et le
corps principal lorsque le panneau est incliné.
• La télécommande peut ne pas fonctionner si le
capteur de télécommande est exposé aux rayons
directs du soleil.
• Par grand froid, le mouvement de l’écran peut
ralentir et l’affichage devenir plus foncé, mais
il ne s’agit pas là d’un dysfonctionnement.
L’affichage se remet à fonctionner normalement
lorsque température augmente.
• Les petits points noirs et brillants dans le
panneau à cristaux liquides sont normaux dans
les produits ACL.
une route principale à proximité et relancez le
calcul. Un itinéraire peut être difficile à trouver
si la position du véhicule est trop proche du
point de destination défini.
•
Pour tout véhicule muni d’une clé intelligente,
n’approchez pas cette clé de l’unité du système
de navigation. Cela peut interférer avec le
fonctionnement du système de navigation.
•
L’utilisation d’un appareil électrique générant un
bruit électrique fort près de cet appareil risque
de perturber l’image et de provoquer des
parasites. Dans ce cas, éloignez l’appareil en
question ou évitez de l’utiliser simultanément.
• Les données enregistrées sur le disque dur
risquent d’être perdues en cas de panne, de
dysfonctionnement ou de tout autre problème
de cet appareil.
• Le fonctionnement du système de navigation
peut être limité afin de protéger l’appareil si la
température devient extrêmement élevée ou
basse. Dans ce cas, attendez que le système
revienne à sa température normale.
74 NX500/NZ500
Page 75

Port USB
• Une fois insérée, la clé USB peut dépasser de
son logement et présenter un risque lors de
la conduite. Dans ce cas, vous pouvez utiliser
un câble de rallonge USB en vente dans le
commerce, en adoptant les mesures de sécurité
appropriées.
• Les clés USB doivent être reconnues comme des
« périphériques de stockage de masse USB »
pour fonctionner correctement. Certains modèles
peuvent ne pas fonctionner correctement.
Si les données mémorisées venaient à être
perdues ou endommagées, Clarion ne saurait
être tenu responsable.
Lorsque vous utilisez une clé USB, sauvegardez
d’abord les données qu’elle contient sur un
ordinateur, etc.
• Les fichiers de données peuvent être endommagés
lorsque vous utilisez une clé USB dans les
conditions suivantes :
Lors de la déconnexion de la clé USB ou la mise
hors tension de l’appareil pendant l’écriture ou la
lecture de données.
Lorsque l’électricité statique ou un bruit électrique
se produisent.
Connectez/déconnectez la clé USB lorsqu’elle
est inactive.
• Certaines clés USB ne peuvent pas être insérées
dans l’unité principale en raison de leur forme.
Dans ce cas, utilisez un câble de rallonge vendu
dans le commerce pour effectuer la connexion.
• La connexion à l’ordinateur n’est pas couverte.
• Les fichiers de musique (MP3, WMA, etc.)
stockés dans la clé USB ne peuvent pas être lus.
Les piles bouton alcalines (CR) contiennent
Débarrassez-vous des piles mortes de
Nettoyage
• Nettoyage du boîtier
Utilisez un chiffon sec et doux pour essuyer doucement la poussière.
Pour la saleté plus tenace, humectez un chiffon doux avec du
détergent neutre dilué dans l’eau, essuyez doucement la saleté,
puis essuyez de nouveau avec un chiffon sec.
Ne pas utiliser de benzène, de diluant, de nettoyant à automobile,
ni d’autres nettoyants.
Ces produits peuvent endommager le boîtier ou faire peler la peinture.
De plus, laisser des produits en caoutchouc ou en plastique en contact
avec le boîtier pendant de longues périodes peut provoquer l’apparition
de taches.
• Nettoyage de l’écran à cristaux liquides
L’écran à cristaux liquides attire la poussière ; essuyez-le régulièrement
avec un chiffon doux. La surface se raye facilement ; ne la frottez pas
avec des objets durs.
AVERTISSEMENT
du perchlorate.
manière appropriée.
Français
d’emploi
Mode
NX500/NZ500 75
Page 76

Manipulation des disques
Manipulation
• Le rebord des disques neufs peut être
irrégulier. Lorsque de tels disques sont
utilisés, le lecteur peut ne pas fonctionner
ou le son peut sauter. Utilisez un stylo
à bille ou l’équivalent pour ôter les
irrégularités du rebord du disque.
Français
Stylo à bille
Irrégularité
d’emploi
Mode
• Ne collez jamais d’étiquette ou n’écrivez
jamais avec un stylo ou un crayon sur la
surface du disque.
• Ne lisez jamais un disque qui présente du
papier adhésif ou de la colle, ou dont la
surface pèle. Si vous tentez d’utiliser un
disque en cet état, il est possible que vous
ne puissiez pas les faire ressortir du lecteur
DVD ou que vous causiez des dommages
au lecteur DVD.
• N’utilisez pas de disques présentant de
grandes rayures, déformés, fendus, etc.
Leur utilisation peut provoquer un
dysfonctionnement ou des dommages.
• Pour retirer un disque de son boîtier de
rangement,appuyez sur le centre du boîtier
etsoulevez le disque en le tenant par les
rebords.
• N’utilisez pas de feuilles de protection de
disque disponibles dans le commerce ni
de disques munis de stabilisateurs, etc.
Ils peuvent endommager le disque ou le
mécanisme interne.
Rangement
• N’exposez pas les disques aux rayons
directs du soleil ou à une source de chaleur.
• N’exposez pas les disques à une humidité
ou à de la poussière excessive.
• N’exposez pas les disques à la chaleur
directe des radiateurs.
Nettoyage
• Pour retirer les traces de doigts et la
poussière, utilisez un chiffon doux et frottez
en ligne droite du centre du disque à la
circonférence.
• N’utilisez pas de solvants, comme les
nettoyants commerciaux, de produits
antistatiques ou de diluant pour nettoyer
les disques.
• Après utilisation d’un nettoyant spécial
pour disque, laissez le disque bien sécher
avant de l’utiliser.
À propos des disques
• Chargez les disques avec précaution.
Le panneau de commande se ferme
automatiquement lorsqu’il est laissé
ouvert uncertain temps.
• Ne coupez jamais le courant et ne
retirez pas l’appareil de la voiture avec
un disque chargé.
ATTENTION
Pour votre sécurité, le conducteur
ne devrait pas insérer ou éjecter
un disque en ouvrant le panneau de
commande pendant qu’il conduit.
76 NX500/NZ500
Page 77

5. SYSTÈME DE DVD VIDÉO
Les DVD vidéo constituent une source vidéo numérique de haute qualité fournissant des
images nettes et précises. Un disque de 12 cm contient un film ou quatre heures de musique.
Caractéristiques des DVD vidéo
En plus de fournir les images et le son de
haute qualité des DVD vidéo, cet appareil
dispose des fonctions suivantes.
Remarque :
•
Les fonctions décrites dans ce chapitre,
langue enregistrée, sous-titre, angles, etc.
par exemple, diffèrent en fonction desDVD
vidéo. Reportez-vous aux directives
fournies avec le DVD vidéo.
•
Certaines fonctions des disques peuvent
être différentes de celles qui sont décrites
dans ce manuel.
Fonction multison
Le DVD vidéo peut mémoriser jusqu’à
8 langues pour un film ; choisissez la
langue que vous préférerez.
• Les langues enregistrées sur le disque sont
indiquées par l’icône ci-dessous.
Fonction multi-angle
Un film sur DVD vidéo est filmé de différents
angles et vous permet de choisir l’angle de
votre choix.
• Le nombre d’angles enregistrés est
indiqué par l’icône ci-dessous.
Fonction sous-image (sous-titres)
Des sous-titres, correspondant à un maximum
de 32 langues, peuvent être enregistrés sur un
DVD vidéo, et vous pouvez choisir la langue des
sous-titres que vous désirez voir. Le nombre de
langues de sous-titres enregistrées est indiqué
par l’icône ci-dessous.
Fonction multihistoire
Lorsqu’un DVD vidéo contient plus d’une
histoire pour un film, vous pouvez choisir
l’histoire que vous désirez voir. Les procédures
de fonctionnement varient d’un disque à
l’autre ; suivez les directives de sélection
d’une histoire fournies pendant la lecture.
Écrans de menus
Des menus peuvent apparaître pendant la
lecture du DVD vidéo afin que vous puissiez
effectuer des réglages.
• Exemple de l’affichage d’un menu
Français
d’emploi
Mode
NX500/NZ500 77
Page 78

Disques
Disques lisibles
Ce lecteur DVD vidéo peut lire les disques suivants :
Disques lisibles
Disques DVD vidéo CD audio
Français
À propos des disques CD Extra
Un disque CD Extra est un disque sur lequel deux
sessions au total ont été gravées. La première session
est une session audio et la deuxième, une session
de données.
Les CD que vous avez créés avec plus d’une deuxième
d’emploi
session de données ne peuvent pas être lus sur ce
Mode
lecteur DVD vidéo.
Remarque :
•
Lorsque vous lisez un disque CD Extra, seule la
première session est reconnue.
À propos de la lecture des disques CD-R/
CD-RW (MP3, WMA)
Ce lecteur peut lire les disques CD-R/CD-RW gravés en
format de CD de musique (MP3, WMA) ou de CD vidéo.
À propos de la lecture des disques DVD-R/
RW ou DVD+R/RW
Ce lecteur ne peut pas lire les disques DVD-R/RW et
DVD+R/ RW gravés en format de CD vidéo.
Cependant, les fichiers MP3/WMA gravés sur des
disques DVD-R/ RW et DVD+R/RW peuvent être lus.
Disques ne pouvant pas être lus
C
e lecteur DVD vidéo ne peut pas lire les disques
DVD-audio, DVD-RAM, CD photo, etc.
Remarque :
•
Il peut aussi être impossible de lire des CD gravés avec
un graveur de CD-R ou de CD réinscriptibles (CD-RW).
(Cause : caractéristiques des disques, fissures,
poussière/saleté, sur les lentilles du lecteur, etc.)
•
Lorsqu’ un disque CD-R ou CD-RW qui n’a pas été
finalisé est inséré dans le lecteur, la lecture commence
au bout d’un temps plus long. De plus, la lecture peut
être impossible selon les conditions de gravure.
•
Vous ne pouvez pas lire de CD Super Audio. La lecture
de ce CD n’est pas prise en charge, même s’il s’agit
d’un disque hybride.
À propos de la lecture de fichiers MP3/WMA
Ce lecteur peut lire les disques CD-R/CD-RW,
DVD-R/RW et DVD+R/RW sur lesquels des fichiers
de musique MP3/WMA ont été gravés.
Pour plus de renseignements, reportez-vous à la section
« Écoute d’un fichier MP3/WMA ».
Note sur les codes de région
Le système de DVD vidéo affecte un code de région aux
lecteurs de DVD vidéo et aux disques DVD par région de
vente. Les lecteurs de DVD vidéo vendus aux États-Unis
peuvent lire les disques DVD ayant le code de région
« ALL », « 1 » ou toute autre combinaison de chiffres
contenant un « 1 ».
Le code de région des DVD vidéo est inscrit sur la
pochette du disque, comme le montre l’illustration.
1
ALL
1
4
6
À propos des marques de commerce déposées
•
Ce produit contient une technologie de protection des
droits d’auteurs protégée par un brevet des États-Unis
et d’autres droits de propriété intellectuelle. L’utilisation
de cette technologie de protection des droits d’auteurs
doit être autorisée par Macrovision ; elle est destinée
uniquement aux visionnements domestiques limités à
moins d’une autorisation de Macrovision. L’ingénierie
inverse ou le démontage est interdit.
•
Fabriqué sous licence de Dolby Laboratories.
« Dolby », « Pro Logic » et le symbole des deux D sont
des marques de commerce de Dolby Laboratories.
•
L’indication « Made for iPod » signifie qu’un accessoire
électronique donné a été conçu pour être connecté
à un iPod et que son fabricant certifie qu’il respecte
les normes de perfomances d’Apple. L’indication
« Works with iPhone » signifie qu’un accessoire
électronique donné a été conçu pour être connecté à
un iPhonet que son fabricant certifie qu’il respecte les
normes de perfomances d’Apple.
78 NX500/NZ500
L’entreprise Apple n’est pas responsable du
fonctionnement de ce périphérique et du respect,
par celui-ci, des normes et réglementations relatives
à la sécurité.
iPod et iTunes® sont des marques de commerce
de Apple Inc., déposées aux États-Unis et dans
d’autres pays.
iPhone est une marque de commerce de Apple Inc.
•
Les logos HD Radio™ et HD Radio et HD Radio Ready
sont des marques de commerce appartenant à iBiquity
Digital Corporation.
•
2009 Sirius XM Radio Inc., SIRIUS, XM et toutes
marques et appellations reliées sont enregistré à
SIRIUS XM Radio Inc., et ses affiliations.
Toutes autres marques, nom de canal et logos
appartiennent à leurs propriétaires respectifs.
Page 79

6. PRINCIPES DE FONCTIONNEMENT
Fonctionnement de base
Remarque :
•
Bien lire ce chapitre en vous référant au chapitre
« 3. COMMANDES »
ATTENTION
Lorsque l’appareil est sous tension, le
démarrage et l’arrêt du moteur peuvent
produire un son très fort si son volume est réglé
au maximum. Réglez le volume avec soin.
Mise sous et hors tension
Remarque :
•
Faire démarrer le moteur avant d’utiliser
l’appareil.
•
Évitez d’utiliser cet appareil pendant de longues
périodes sans que le moteur tourne. Si vous
déchargez trop la batterie, vous pourriez ne pas
pouvoir faire démarrer le moteur ; de plus, cela
réduit la durée de vie de la batterie.
1. Démarrer le moteur. L’éclairage de l’interrupteur
et des boutons est activé.
2. Appuyez sur le bouton [
l’appareil en fonction.
3. Appuyer sur le bouton [
télécommandepour mettre l’appareil
sous tension.
4. Pour mettre l’appareil hors tension, maintenez
enfoncé le bouton [
pendant plus de 2 secondes.
5. Pour mettre l’appareil hors tension, maintenez
enfoncé le bouton [
pendant plus de 2 secondes.
PWR] pour mettre
TITLE] de la
PWR] du syntoniseur
] de la télécommande
Moteur en marche
Ouverture et fermeture du panneau de commande
Appuyez sur le bouton [OPEN] de l’appareil (NZ500).
Le panneau de commande s’ouvrira.
Appuyez sur le même bouton pour fermer le panneau.
ATTENTION
• Ne bougez pas le panneau de commande en
insistant et ne le forcez pas.
• Lorsque le panneau de commande fonctionne,
faites attention à ne pas vous coincer les doigts ou
la main entre le panneau et l’unité principale ou
ses pièces mécaniques.
• Le conducteur ne devrait pas actionner le panneau
de commande lorsqu’il conduit.
Réglage de l’angle du panneau de commande
Réglez l’angle voulu en appuyant sur les boutons
d’inclinaison [
Sélection d’un mode
1. Appuyez sur le bouton du menu principal pour
entrer dans le mode désiré : syntoniseur,
disque, NAVI, USB, Sirius, AUX IN, AV IN, etc.,
iPod/iPhone.
*L’équipement externe non raccordé à cet
appareil n’est pas affiché.
] [ ] de l’appareil (NZ500).
Français
d’emploi
Mode
Mettre le moniteur en fonction ou hors fonction
1. Appuyez sur le bouton de fermeture d’écran
sur l’écran principal pour mettre le moniteur
hors tension.
2. Appuyez de nouveau sur le bouton à l’écran
pour remettre l’écran en fonction.
NX500/NZ500 79
Page 80

Fonctionnement de base
Réglage du volume
Tournez le bouton de volume pour régler le volume.
Dans le sens des aiguilles d’une montre :
Augmentation du volume.
Dans le sens inverse des aiguilles d’une montre :
Diminution du volume.
• Le volume indiqué sur l’écran couvre
une plage allant de 0 (min.) à 40 (max.).
ATTENTION
Lorsque vous conduisez, prenez soin de régler
le volume de l’appareil de manière à ce que
Français
vous puissiez entendre les sons extérieurs.
Sourdine
Appuyez sur le bouton [MUTE] [PWR] pour activer
et désactiver la sourdine.
Configuration des paramètres
d’emploi
Mode
1. Appuyez sur le bouton Setup pour accéder au
menu de configuration des modes.
2. Appuyez sur le bouton du mode désiré.
Les modes apparaissent dans l’ordre suivant :
• Général, incluant les paramètres horloge,
bip, image caméra, champs de radio,
sourdine téléphone, haut-parleur téléphone,
commutateur d’entrée AUX IN, version.
• Vidéo, audio, navigation, divers
3. Effectuez le réglage désiré. Pour plus de détails,
reportez-vous aux sections suivantes.
Réglage du son
1. Appuyez sur le bouton [EQ] sur l’écran ou sur le
bouton [SEL] de la télécommande.
2. Appuyez sur la touche de l’élément pour le régler.
3. Effectuer le réglage.
4. Appuyez sur [
] pour revenir à l’écran
précédent.
* Les sections suivantes présentent seulement les
détails concernant les réglages ; les procédures
de sélection des éléments sont sautées.
Réglage de la balance et de l’équilibre avant/arrière
1. Appuyez sur BALANCE ou FADER dans le menu
de réglage Audio.
2. Appuyez sur [F] (avant) ou [R] (arrière) pour
régler l’équilibre avant/arrière.
• Le réglage par défaut de l’usine est 0.
(Plage de réglage : avant 9 à arrière -9)
3. Appuyez sur [L] (gauche) ou [R] (droite) pour
régler la balance gauche/droite.
• Le réglage par défaut de l’usine est 0.
(Plage de réglage : gauche -9 à droite 9)
Réglage des basses
Le gain et la fréquence des basses se règlent de la
façon suivante :
1. Appuyez sur les boutons[
le niveau désiré.
] ou [
] pour régler
2. Pour régler la fréquence centrale des
basses, ouvrez le réglage Audio du menu de
configuration.
Réglage des aigus
Le gain et la fréquence des aigus se règlent de
la façon suivante :
1. Appuyez sur [
] ou [
] pour régler le
niveau désiré.
2. Pour régler la fréquence centrale des aigus,
ouvrez le réglage Audio du menu
de configuration.
Pour plus de détails, reportez-vous aux
sections suivantes.
80 NX500/NZ500
Page 81

Fonctionnement de base
Réglage de l’horloge
Appuyez sur le bouton [Setup]. Le menu de
configuration s’affichera. Appuyez sur Clock
(Horloge) dans le sous-menu General.
2. Appuyez sur la coche en surbrillance (Accept).
Le menu principal s’affichera. Sélectionnez
votre destination.
Français
2. Réglez l’heure en appuyant sur les chiffres
à l’écran.
3. Appuyez sur [Clock Mode] pour modifier le
format d’affichage de l’heure de 12 à 24 heures.
Sélectionnez 12Hr, puis sélectionnez le mode
AM ou PM.
Réglage de la région de la radio
1. Appuyez sur le bouton [Radio Field] dans le
menu deconfiguration.
2. Un menu de sélection de région apparaît. Faire
défiler le menu vers le bas à l’aide de la flèche
située au bas du menu. Faire défiler le menu
vers le haut en utilisant la flèche en bas du
menu. Sélectionnez la région radio où vous vous
trouvez. Si la région sélectionnée est incorrecte,
la qualité de la réception radio sera médiocre.
Affichage de la carte de navigation
1. Appuyez sur le bouton [Navi] sur l’écran du
menu principal.
L’écran d’avertissement s’affichera.
3. Sélectionnez l’une des options affichées
à l’écran.
• Go To... (Aller à...)
• Point of Interest (Point d’intérêt)
• State or Province (État ou province) :
CA (Le système mémorise le dernier État ou
la dernière province)
• History (Historique) (Les adresses inscrites
antérieurement)
4. Le système de navigation calculera un itinéraire
vers la destination sélectionnée en utilisant les
critères inscrits dans le Mode de configuration.
5. Appuyez sur le bouton State or Province
(État ou Province).
Le clavier « Ville » s’affichera. Appuyez sur le
bouton de la coche
la liste ou tapez le nom de la ville sur le clavier.
Ensuite appuyez sur le bouton Entrée
pour choisir la ville dans
.
d’emploi
Mode
NX500/NZ500 81
Page 82

6. Entrez les informations requises sur l’écran dans
l’ordre illustré ci-dessous. Pour passer à l’écran
suivant, appuyez sur le bouton de la coche.
8. La carte routière s’affichera. La navigation vers
votre destination s’amorcera.
1
2
10
9
8
Français
d’emploi
Mode
7. Appuyez sur le bouton « Start Route (Point
de départ) ».
7
6
5
4
3
1 - Zoom arrière
2 - Échelle de carte
3 - Statut du GPS
4 - Position de la
boussole
5 - Heure actuelle
6 - Retour au menu
7 - Informations locales
8 - Sourdine
9 - Changement de vue
10 - Zoom avant
9. Pour configurer le menu de navigation, consultez
« Configuration de la navigation » dans le
chapitre « Commandes de configuration ».
Restauration des réglages par défaut de l’usine
1. Appuyez sur le bouton [Setup] pour accéder
au menu de configuration des modes.
2. Appuyez sur le bouton Misc (divers).
3. Appuyez sur le bouton Restore Defaults
(restaurer les paramètres par défaut).
Sélectionnez [YES] pour rétablir les réglages
par défaut de l’usine de votre appareil.
Cette fonction efface la mémoire de l’appareil
et vous devez réinitialiser tous les éléments
personnalisés, comme les préréglages du
syntoniseur.
REMARQUE : Une fenêtre vous demandera de
confirmer que vous voulez réinitialiser l’appareil.
L’appareil se met hors tension, puis sous tension
avec les réglages par défaut de l’usine.
82 NX500/NZ500
Page 83

Fonctionnement de la radio
Écoute de la radio
1. Appuyez sur le bouton Tuner sur l’écran du menu
principal. L’écran du mode syntoniseur apparaît.
2. Appuyez sur le bouton [BAND] ou appuyez sur
[Band] sur la télécommande pour sélectionner
la bande radio. À chaque pression sur le bouton,
la bande de réception de la radio change dans
l’ordre suivant : FM1, FM2, FM3, AM, FM1...
4 1
12
7
1 - Écran du syntoniseur
2 - Écran de l’horloge
3 - Bouton du menu
principal
4 - Affichage de la bande
5 - Affichage Loc/DX
6 - Liste de présélections
7 - Recherche vers le bas
8 - Syntonisation vers
le bas
9 - Bouton de balayage
Syntonisation de recherche
1. Appuyez sur le bouton [BAND] pour sélectionner
la bande (FM ou AM).
2. Appuyez sur [
automatiquement une station.
• Lorsqu’on appuie sur la touche [
recherche de station s’effectue vers les
fréquences supérieures.
• Lorsqu’on appuie sur la touche [
la recherche de station s’effectue vers les
fréquences inférieures.
Syntonisation manuelle
1. Appuyez sur le bouton [BAND] pour
sélectionner la bande (FM ou AM).
2. Appuyez sur [
automatiquement une station.
• Lorsqu’on appuie sur la touche [
recherche de station s’effectue vers les
fréquences supérieures.
• Lorsqu’on appuie sur la touche [
la recherche de station s’effectue vers les
fréquences inférieures.
5
13
14 15 16 17
9
8
10
] ou [
] ou [
11
10 - Syntonisation vers
le haut
11 - Recherche vers
le haut
12 - Bouton bande
13 - Bouton [AS/PS]
14 - Bouton LoC/DX
15 - Bouton de page
précédente
16 - Bouton de page
suivante
17 - Bouton EQ
] pour chercher
] pour chercher
32
], la
],
], la
],
6
Rappel d’une station présélectionnée
Deux façons permettent de rappeler une station
présélectionnée.
• Utilisation de la télécommande :
1. Appuyez sur le bouton [BAND] pour
sélectionner la bande désirée (FM ou AM)
sur la télécommande.
2. Appuyez sur le numéro de préréglage (1 à 6)
sur le pavé numérique.
• Utilisation du syntoniseur :
1. Appuyez sur le bouton [BAND] pour
sélectionner la bande désirée (FM ou AM)
sur le syntoniseur.
2. Appuyez sur le numéro de préréglage (1 à 5)
sur le syntoniseur.
3. Appuyez sur [
station suivante ou précédente dans la liste
] ou [
] pour sélectionner la
de présélections.
4. Appuyez sur le bouton [AS] pour faire une
recherche automatique et mémoriser
les stations.
Mémoire manuelle
1. Touchez la touche tactile pour sélectionner la
bande que vous désirez mémoriser.
2. Syntonisez la station que vous désirez
mémoriser avec la recherche de syntonisation,
la syntonisation manuelle ou la syntonisation
présélectionnée.
3. Touchez et maintenez le doigt sur la touche
tactile de présélection pendant plus de
2 secondes pour mémoriser la station actuelle.
Mémorisation auto
La mémorisation automatique (AS) est une
fonction permettant de mémoriser jusqu’à
12 stations syntonisées séquentiellement de
façon automatique. Si 12 stations recevables
ne sont pas reçues, une station précédemment
mémorisée reste mémorisée à la positon de
mémorisation.
1. Appuyez sur [Band] pour sélectionner la bande
désirée. (FM ou AM)
2. Touchez et maintenez le doigt sur la touche
[AS] pour amorcer la fonction de mémorisation
automatique.
Un bip retentit et les stations dont la réception
est bonne sont automatiquement mémorisées
aux canaux présélectionnés.
NX500/NZ500 83
Français
d’emploi
Mode
Page 84

Fonctionnement de la radio
Balayage des stations présélectionnées
Le balayage des stations présélectionnées permet
de recevoir les stations mémorisées en ordre dans
la mémoire de présélection. Cette fonction sert à à
rechercher la station désirée dans la mémoire.
1. Appuyez sur [Band] pour sélectionner la bande
désirée. (FM ou AM)
2. Appuyez sur [PS] pour lancer le balayage des
stations présélectionnées. L’appareil commence
le balayage séquentiel de chaque station sur
laquelle il s’arrête 10 secondes.
Français
3. Lorsque la station désirée est syntonisée,
appuyez sur [PS] une nouvelle fois pour
continuer à recevoir cette station.
Commandes du lecteur DVD vidéo
d’emploi
Modification des réglages du système de DVD
Mode
Remarque :
Si l’opération est effectuée pendant la lecture
d’un DVD, le disque recommencera à jouer
depuis le début.
Sélection du menu de configuration DVD
1. Appuyez sur le bouton [SETUP] sur l’écran
du menu principal pour accéder au menu de
configuration vidéo.
2. Appuyez sur [Video]. Le menu vidéo apparaîtra.
Réglages LOC/DX
Le réglage DX / LOC permet de modifier la
sensibilité du syntoniseur afin de séparer des
stations peu espacées. Cette fonction est utile
dans les régions où de nombreuses stations de
radio sont proches les unes des autres.
1. Appuyez sur [DX] pour passer à la sensibilité
LOCALE du syntoniseur.
2. Appuyez sur [LOC] pour passer à la sensibilité
DX du syntoniseur.
Cette fonction permet d’afficher sur tout l’écran
une partie importante de l’image. Dans certains
cas, l’image est affichée pendant un
panoramique (défilement).
• Lors du visionnement d’un écran large sur un
écran large du moniteur arrière (16:9) les parties
les plus à gauche et à droite de l’écran ne sont
pas coupées.
Configuration de la taille de l’écran
Appuyez sur le bouton [Aspect Ratio] sur l’écran
afin de modifier la taille de l’écran 4:3 ou 16:9.
Le réglage par défaut de l’usine est 16:9.
• Lors du visionnement d’un écran large sur sur
un écran classique du moniteur arrière (4:3),
les parties les plus à gauche et à droite de
l’écransont coupées.
84 NX500/NZ500
Configuration du système de format vidéo
Appuyez sur le bouton Aux IN sur l’écran pour
configurer le système de format vidéo : Auto, PAL
ou NTSC.
Le paramètre par défaut est Auto.
Appuyez sur le système de format à l’écran.
Configuration de la luminosité
Appuyez sur le bouton de luminosité. Appuyez sur
la luminosité affichée sur une échelle de 0 à 20.
Page 85

Commandes du lecteur DVD vidéo
Établissement du mot de passe du niveau de
contrôle parental
Le réglage par défaut de l’usine est « 0000 ».
1. Dans le Menu principal appuyez sur le bouton
Configuration. Appuyez sur le bouton Misc.
(Divers) sur l’écran. Appuyez sur Set Password
(Réglage du mot de passe) ---- et le pavé
numérique apparaîtra.
Entrez un nouveau mot de passe. Le mot de
passe est réglé.
Remarque : Lorsqu’un disque avec des
restrictions de visionnement est
inséré, une fenêtre vous demande
d’entrer un mot de passe. Le
disque ne peut pas être visionné
tant que le mot de passe correct
n’est pas entré.
Réglage du niveau de contrôle parental
1. Sélectionnez l’écran MISC (DIVERS) en mode
SETUP (CONFIGURATION). Appuyez sur le
bouton Kid Saf (adéquat pour les enfants).
Appuyez sur le niveau de contrôle parental
désiré. Utilisez ce tableau pour établir le
niveau parental.
NC-17 (18 ANS ET PLUS)
R (17 ANS ET PLUS)
PG13 SOUS SURVEILLANCE
ÉTROITE DES PARENTS
PG PRÉSENCE DES
PARENTSSUGGÉRÉE
G AUDIENCES GÉNÉRALES
• Le contenu que le niveau parental limite varie
avec le code des pays.
Remarque : La cote peut être sélectionnée
seulement en statut de mot de passe déverrouillé,
et les limites peuvent être réglées en statut de mot
de passe verrouillé.
Visionnement/écoute d’un disque
Remarque :
Veuillez consulter le diagramme dans
le chapitre « COMMANDES ».
1. Pour charger un disque :
Appuyez sur le bouton [OPEN] pour incliner
le panneau avant. (NZ500 seulement)
Insérez un disque au centre de la fente
d’insertion, l’étiquette sur le dessus.
ATTENTION
Pour votre sécurité, le conducteur ne devrait
pas insérer ou éjecter un disque ou actionner
le panneau de commande lorsqu’il conduit.
Remarque :
•
N’insérez jamais de corps étranger dans la fente
d’insertion de disque.
•
Si le disque ne s’insère pas facilement, il peut
y avoir un autre disque dans le mécanisme ;
l’appareil peut aussi avoir besoin d’une
réparation.
•
Les disques de 8 cm (un seul morceau) ne
peuvent pas être utilisés.
2. Le disque est lu automatiquement.
AVERTISSEMENT
Certaines vidéos sont gravées à des niveaux
sonores supérieurs aux niveaux désirés.
Augmentez progressivement le volume à
partir du minimum une fois la lecture du
disque vidéo commencée.
Éjection d’un disque
1. Pour éjecter un disque appuyez sur le bouton
d’éjection [
au mode syntonisation.
* Si un disque est laissé plus de 15 secondes
en position éjectée, il sera automatiquement
rechargé. Dans ce cas, le mode demeurera en
mode syntonisation.
Remarque : Vous pouvez endommager un
disque si vous le forcez dans la
fente avant son rechargement
automatique.
Écran du mode lecteur DVD
Après la sélection du disque, le mode lecture entre
automatiquement en fonction.
Appuyez sur l’écran du disque chargé pour afficher
le menu du DVD vidéo. Si vous ne touchez pas
l’écran pendant 5 secondes, l’affichage revient à
l’écran de lecture.
1
8 9
]. Le mode de lecture passe alors
3 42
10 11 12 13 14
5
7
6
Français
d’emploi
Mode
NX500/NZ500 85
Page 86

Commandes du lecteur DVD vidéo
1 - Bouton MENU
2 - Bouton INFO
3 - Bouton répétition A-B
4 - Bouton répétition
5 - Bouton sous-titrage
6 - Bouton de canal
7 - Bouton du menu principal
8 - Bouton Chapitre
9 - Bouton piste précédente
10 - Bouton de recul rapide
11 - Bouton Lecture/Pause
12 - Bouton d’avance rapide
13 - Bouton piste suivante
14 - Bouton Arrêt
Fonctionnement du menu du lecteur DVD
Vous pouvez sélectionner les éléments de boutons
affichés dans le menu du DVD en les touchant
directement.
Français
Si les éléments de boutons sont difficiles à
sélectionner correctement, vous pouvez aussi les
sélectionner au moyen des boutons de direction de
la télécommande.
Arrêt de la lecture
d’emploi
1. Appuyez sur [
Mode
2. Pour reprendre la lecture, appuyez sur le
bouton [
]. La lecture s’arrête.
]. La lecture reprend à partir de
la scène durant laquelle elle a été arrêtée.
Bouton Lecture/Pause
1. Appuyez sur [
2. Appuyez une autre fois sur [
] pour pauser la lecture.
la lecture.
Saut (recherche) d’un chapitre
1. Appuyez sur [
] ou [
] pendant la lecture.
Autant de chapitres sont sautés vers l’avant ou
l’arrière que vous appuyez de fois sur le bouton.
La lecture reprend après.
Avance et recul rapide
1. Appuyez sur les boutons[
] ou [
lancer la marche arrière rapide ou l’avance
rapide pendant la lecture.
La lecture commence à 2 fois la vitesse, puis
accélère à 4, 8 et 16 fois la vitesse à chaque
nouvelle pression.
* Aucun son n’est reproduit pendant l’avance et
la marche arrière rapides.
*La vitesse de l’avance et de la marche arrière
rapides peut varier selon le disque.
Recherche à l’aide d’un numéro de chapitre/titre
Vous pouvez localiser le début d’une scène au
moyen d’un numéro de chapitre et de titre gravé
sur le disque DVD vidéo.
1. Sur l’écran du mode lecteur DVD, appuyez sur
[CHAP].
Le pavé numérique apparaît avec le mode d’entrée
du numéro de chapitre. Appuyer sur [Title] fait
passer le pavé numérique en mode d’entrée de
numéro de titre. Appuyer sur [Time] fait passer le
pavé numérique en mode d’entrée de temps.
] pour reprendre
] pour
• Title (Titre)
Grand segment de la zone de données
du disque.
• Chapter (Chapitre)
Petit segment de la zone de données
du disque.
• Time (Temps)
Temps particulier sur le disque.
2. Entrez le numéro du titre/chapitre/temps que
vous désirez lire au moyen des touches tactiles
[0] à [9].
3. Appuyez sur [OK].
La lecture commence à partir de la scène
correspondant au numéro du titre, du temps ou
du chapitre entré.
* Si le numéro du titre/chapitre/temps entré
n’existe pas ou que la recherche au moyen d’un
numéro de plage s’avère impossible, l’image à
l’écran ne change pas.
4. Appuyez sur [
].
Lecture répétitive
Cette opération permet de lire de façon répétitive
des chapitres gravés sur le DVD vidéo.
1. Sur l’écran du mode lecteur DVD, appuyez
sur [
] (répétition).
2. Appuyez une fois sur le bouton [
] (répétition)
pour répéter un chapitre.
3. Appuyez une autre fois sur le bouton [
] pour
arrêter la lecture répétitive.
Répétition A B
Sélectionnez le passage à répéter.
Appuyez sur le bouton de répétition A-B [
La lecture du passage sélectionné s’amorcera.
B
].
A
Appuyez une autre fois sur le bouton pour arrêter
la répétition.
86 NX500/NZ500
Page 87

Commandes du lecteur DVD vidéo
Utilisation du menu de titres
Sur les DVD contenant plusieurs titres, vous
pouvez faire un choix de lecture à partir du
menu de titres.
1. Sur l’écran du mode lecteur DVD, appuyez sur
[CHAP] pendant la lecture. L’écran du menu de
titres apparaît.
* Selon le disque, le menu de titres peut ne pas
apparaître.
2. Sélectionnez les éléments de bouton affichés
dans l’écran de menu de titres de la même façon
que pour le fonctionnement du menu du DVD.
* Selon le disque, les éléments peuvent ne pas
être sélectionnés à l’aide des dix boutons tactiles.
Commutation des langues
Sur les disques dont les pistes ont fait l’objet d’un
enregistrement en deux ou plusieurs langues, vous
pouvez passer d’un sous-titre langue à l’autre en
cours de lecture.
1. Appuyez sur [
• Chaque fois que vous appuyez sur cette
] en cours de lecture.
touche, vous pouvez changer de langue.
• Il se peut que le changement de langue prenne
un certain temps.
* Un disque peut comporter jusqu’à huit pistes
sonores différentes. Pour plus de
renseignements, reportez-vous à la mention
sur le disque. (
l’enregistrement comporte huit pistes sonores).
Ce nombre indique que
8
* Lorsqu’on met l’appareil en fonction et qu’on
remplace l’ancien disque par un nouveau, la
langue par défaut faisant l’objet de la sélection
est celle dont la configuration s’est effectuée
en usine. Si cette langue n’est pas enregistrée,
c’est précisé sur le disque.
* Sur quelques disques, le choix de l’angle
de prise de vue peut s’avérer totalement
impossible, sauf en partie au cours du
déroulement de certaines scènes.
2. L’écran de mode LECTEUR DVD fait l’objet d’un
masquage 5 secondes après votre sélection.
Changement des sous-titres
Sur les disques DVD dont les pistes ont fait l’objet
d’un enregistrement en deux ou plusieurs langues
sous-titrées, vous pouvez passer d’un sous-titre à
l’autre en cours de lecture.
1. Appuyez sur [Sub T.] en cours de lecture.
Chaque fois que vous appuyez sur cette touche,
vous pouvez changer de sous-titre.
• Il se peut que le changement de sous-titre
prenne un certain temps.
* Un disque peut comporter jusqu’à trente-deux
types différents de sous-titres. Pour plus de
renseignements, reportez-vous à la mention
sur le disque. (
l’enregistrement comporte huit types de
Ce nombre indique que
8
sous-titres.)
* Sur quelques disques, le choix de l’angle
de prise de vue peut s’avérer totalement
impossible, sauf en partie au cours du
déroulement de certaines scènes.
2. L’écran de mode lecteur DVD fait l’objet d’un
masquage 5 secondes après votre sélection.
3. Pour désactiver les sous-titres, appuyez sur
[Sub T.] (Sous-titrage) jusqu’à ce que l’écran
affiche « subtitle off ».
Modification des angles de prise de vue
Sur les disques DVD dont les images vidéo ont fait
l’objet d’un enregistrement sous deux ou plusieurs
angles de prise de vue, vous pouvez passer d’un
angle à l’autre en cours de lecture.
1. Appuyer sur le bouton [Angle] de la
télécommande pendant la lecture. Chaque
fois que vous appuyez sur cette touche, vous
pouvez modifier l’angle de prise de vue.
* Il se peut que la modification de l’angle de
prise de vue prenne un certain temps.
* Un disque peut comporter jusqu’à 9 angles
de vue enregistrés. Pour plus de
renseignements, reportez-vous à la mention
sur le disque. (
prise de vue multiangulaire.)
Ce nombre indique une
* Sur quelques disques, le passage d’un angle
de prise de vue à un autre peut s’effectuer en
douceur ou faire un court arrêt sur image.
* Sur quelques disques, le choix de l’angle de
prise de vue peut s’avérer totalement
impossible, sauf en partie au cours du
déroulement de certaines scènes.
* Sur quelques disques, les scènes enregistrées
sous deux ou plusieurs angles de prise de vue
peuvent faire l’objet d’une lecture.
Affichage de l’état de la lecture
Appuyez sur [INFO] sur l’écran de mode lecteur
DVD ou sur la télécommande.
L’état de la lecture s’affiche à l’écran.
NX500/NZ500 87
Français
d’emploi
Mode
Page 88

Commandes du lecteur DVD vidéo
ÉCOUTE D’UN CD
16
17
18
19
Français
6
7
1 - Affichage sourdine
d’emploi
2 - Affichage répétition
Mode
3 - Affichage lecture
aléatoire
4 - Écran de l’horloge
5 - Bouton du menu
principal
6 - Bouton de clavier
7 - Bouton répétition
8 - Bouton de lecture
aléatoire
9 - Bouton piste précédente
8 9
1
10 11 12 13 14
20
Pause de lecture
1. Appuyer sur la touche [ ] pour arrêter la lecture.
2. Appuyer sur la touche [ ] pour recommencer la
lecture.
Saut de lecture (recherche)
Appuyez sur le bouton [
Il se produit alors autant de sauts de lecture que
vous appuyez de fois sur le bouton, après quoi la
lecture commence.
• Appuyez sur le bouton [
la lecture depuis le début de la plage suivante.
• Appuyez sur le bouton [
la lecture depuis le début de la plage actuelle.
Si on appuie de nouveau sur ce bouton dans
les deux secondes environ, la lecture commence
depuis le début de la plage précédente.
Avance et recul rapide
1. Maintenez enfoncés les boutons [
ou [
] pendant la lecture.
Appuyez de nouveau pour augmenter la vitesse
de défilement avant ou arrière de 2x, 4x, 8x
et 16x. Appuyez encore une fois pour rétablir
la vitesse normale de lecture.
88 NX500/NZ500
3 42
10 - Bouton Lecture/Pause
11 - Bouton piste suivante
12 - Bouton Arrêt
13 - Bouton de page
précédente
14 - Bouton de page suivante
15 - Bouton EQ
16 - Affichage de la source
17 - Titre de la chanson
18 - Information sur l’artiste
19 - Informations sur l’album
20 - Bouton de balayage
] pendant la lecture.
] pour commencer
] pour commencer
5
Balayage des pistes
1. Appuyez sur [Scan] pendant la lecture.
Appuyez de nouveau sur l’un ou l’autre bouton
pour augmenter la vitesse de de défilement
avant ou arrière de 2x, 4x, 8x et 16x. Appuyez
encore une fois pour rétablir la vitesse normale
de lecture.
Recherche au moyen d’un numéro de plage
Cette opération lance la recherche au moyen
des numéros de plage faisant l’objet d’un
enregistrement sur les CD.
1. Appuyez sur le bouton [
Le clavier numérique apparaîtra à l’écran.
2. Saisissez le numéro de la plage dont vous
15
souhaitez faire la lecture au moyen des nombres
] du clavier à l’écran.
[0] à [9] du pavé numérique.
La lecture commence depuis le numéro de la plage
ayant fait l’objet de la saisie.
• Si le numéro de la plage ayant fait l’objet de la
saisie n’existe pas ou que la recherche au moyen
d’un numéro de plage s’avère impossible, l’image
ne change pas sur l’écran.
Sélection d’une plage sur la liste des plages
Cette fonction permet de sélectionner les plages
dans une liste qui s’affiche à l’écran.
1. Appuyez sur le nom de la plage souhaitée dans
la liste. La lecture de la plage sélectionnée
s’amorcera.
2. Lorsque la plage souhaitée ne s’affiche pas
à l’écran, appuyez sur [
défiler la liste des plages.
] ou [ ] pour faire
3. Appuyez sur la touche du titre de la plage
souhaitée. La lecture de la plage correspondante
commence.
4. Appuyez sur [
précédent.
] pour revenir à l’écran
Diverses fonctions de lecture
Appuyez sur la touche tactile de la fonction que
vous souhaitez commander.
Répétition [
commande pour lancer la répétition d’une
] : Appuyez une fois sur cette
seule plage. Appuyez de nouveau pour lancer
la répétition intégrale. Pour arrêter la répétition,
appuyez sur le même bouton.
• Les symboles de répétition s’affichent dans
la fenêtre INFO située dans le coin supérieur
droit de l’écran.
Lecture aléatoire [
pendant la lecture pour faire la lecture aléatoire
]
des plages.
Appuyez une autre fois sur le même bouton pour
] : Appuyez sur ce bouton
arrêter la fonction.
• Un symbole de lecture aléatoire s’affiche dans
la fenêtre INFO située dans le coin supérieur
droit de l’écran.
Arrêt de la lecture [
les plages.
Réglages audio [
pour accéder au menu audio.
] : Arrête la lecture de toutes
] : Appuyez sur ce bouton
Page 89

Commandes du lecteur DVD vidéo
Écoute d’un disque MP3/WMA
Cet ensemble constitue un modèle compatible
avec les étiquettes ID3.
Il assure la prise en charge des étiquettes ID3
versions 2.4, 2.3, 1.1 et 1.0.
Lors de l’affichage, il accorde la priorité aux
étiquettes versions 2.3 et 2.4.
Après l’insertion d’un appareil USB dans le
logement USB ou si un disque est chargé, le mode
de lecture entre automatiquement en fonction.
En quoi consiste la technologie MP3/WMA ?
La technologie MP3 est un mode de compression
audio faisant l’objet d’un classement au sein des
normes MPEG à architecture à trois couches audio.
La technologie WMA est un mode de compression
audio élaboré par la société Microsoft.
Ces modes de compression audio ont conquis
les utilisateurs d’ordinateurs personnels et sont
devenus des formats normalisés.
Ils assurent la compression des données audio
originales en les réduisant à 10 pour cent environ
de leur taille initiale sans perte de qualité sonore.
Ce qui signifie qu’on peut enregistrer à peu près
dix CD audio sur un disque CD-R ou CD-RW
afin de prolonger la durée d’écoute sans devoir
changer constamment de disque.
Remarque :
•
Certains CD enregistrés en mode CD-R/RW
peuvent toutefois s’avérer inutilisables.
Affichage des titres MP3/WMA
Les données d’étiquetage comme le titre, l’artiste
et le titre de l’album peuvent s’afficher sur un fichier
MP3/WMA contenant les données en question.
Précautions à prendre lors de la création d’un
disque MP3
•
Extension des fichiers
1. Ajoutez toujours l’extension .MP3 ou .mp3 à
un fichier MP3 et l’extension .WMA ou .wma
à un fichier WMA en utilisant des lettres à un
octet. Si vous ajoutez une extension autre que
celle prescrite ou si vous oubliez de l’adjoindre
au fichier, la lecture de ce dernier deviendra
impossible. Si vous mélangez les lettres
haut de casse ou bas de casse (majuscules
ou minuscules) aux fins d’identification de
l’extension des fichiers, la lecture de ces
derniers peut devenir impossible.
2. Les fichiers au format de données autres que
MP3/WMA ne sont pas lus.
Les fichiers comportant un format non pris en
charge donnent lieu à des sauts de lecture ou
à la neutralisation possible des fonctions de
balayage, de lecture aléatoire et de répétition.
•
Fichiers et disques qui ne sont pas pris en charge
Les fichiers et les disques avec les extensions
suivantes ne sont pas pris en charge : *.AAC,
*.DLF, *.M3U, *.PLS, MP3 PRO, les fichiers DRM
(gestion numérique des droits), les disques dont
la session n’est pas fermée.
Format logique (Système de fichiers)
•
1. Au moment de graver un fichier MP3/WMA
sur un disque, veuillez sélectionner « ISO9660
niveau 1 ou niveau 2 (sans inclure le format
d’expansion) » comme format du logiciel
de gravure. La lecture normale peut s’avérer
impossible si le disque fait l’objet d’un
enregistrement sous un autre format.
2. Le nom du dossier et du fichier peut être
affiché en tant que titre pendant la lecture du
disque MP3/WMA, mais ce titre doit comporter
au plus 31 caractères alphanumériques à
un octet aux fins d’identification du nom du
dossier et du fichier (y compris l’extension).
La saisie d’un nombre supérieur de caractères
alphanumériques au nombre prescrit risque de
provoquer un affichage erroné.
•
Entrée des noms de fichiers et de dossiers
Les noms utilisant les caractères de la liste
de code sont les seuls noms de fichiers et de
dossiers qui pourront être entrés et affichés.
L’utilisation de tout autre caractère causera un
affichage incorrect des noms de fichiers et
de dossiers.
•
Protection contre les décharges électriques
10 secondes pour les CD audio (CDA)
45 secondes pour les MP3 enregistrés
à 44,1 kHz, 128 kbps
90 secondes pour les WMA enregistrés
à 44,1 kHz, 128 kbps
•
Structure du dossier
1. Un disque comportant un dossier à plus de
8 niveaux hiérarchiques entre en conflit avec
la norme ISO 9660, ce qui en rend la lecture
impossible.
•
Nombre de fichiers et de dossiers
1. Le nombre maximum admissible de dossiers
est de 200 (y compris le répertoire racine), alors
que le nombre maximum admissible de fichiers
s’élève à 1500 (c’est-à-dire 1500 au plus par
dossier). Ce qui représente le nombre maximum
de plages pouvant faire l’objet d’une lecture.
2. Les plages se lisent dans l’ordre de
l’enregistrement sur le disque. (Les pistes ne
seront peut-être pas toujours lues dans l’ordre
affiché sur l’ordinateur).
• Un certain bruit peut se produire, selon le
type de logiciel de codage utilisé lors de
l’enregistrement.
• Dans le cas d’une plage enregistrée à débit
binaire variable (VBR), la durée de lecture de
la plage s’affichant à l’écran peut différer
légèrement de la durée de lecture réelle.
Aussi, la valeur recommandée du débit binaire
variable (VBR) s’échelonne-t-elle de 32 kbps
à 320 kbps.
• Après la sélection du disque, le mode lecture
entre automatiquement en fonction.
Français
d’emploi
Mode
NX500/NZ500 89
Page 90

Commandes du lecteur DVD vidéo
Lecture de dossiers MP3
Les fichiers et les dossiers sélectionnés pour la
lecture (Recherche dossier, recherche fichier ou
sélection dossier) sont accessibles selon l’ordre où
ils ont été gravés sur le support. Par conséquent,
l’ordre dans lequel ils devraient jouer, peut ne
pas correspondre à l’ordre dans lequel ils sont
effectivement lus.
Vous pourriez être capable de régler l’ordre
dans lequel les fichiers MP3/WMA seront lus en
attribuant des noms de fichiers commençant
Français
par un chiffre de lecture en séquence comme
« 01 » à « 99 ».
Par exemple, un support multimédia ayant la
hiérarchie de dossier et de fichiers suivante est
soumis à la recherche dossier, recherche fichier
ou sélection dossier.
d’emploi
Consultez le diagramme ci-dessous.
Mode
Dossier racine
Dossier
Fichier
Menu de lecture d’images
Les images à l’écran varient selon les différentes
fonctions de commandes.
1
5
6 7
] pour lire
3 42
1 -
Bouton du menu principal
2
-
Bouton Menu
3
-
Bouton image précédente
4
-
Bouton image suivante
5
-
Bouton Arrêt
6
-
Pivoter l’image dans le sens antihoraire
7
-
Pivoter l’image dans le sens horaire
• Appuyez sur le bouton [
l’image suivante.
• Appuyez sur le bouton [
] pour lire
l’image précédente.
• Appuyez sur le bouton [
] pour arrêter la
lecture d’image.
• Appuyez sur le bouton [
] pour faire pivoter
l’image de 90 0 dans le sens antihoraire.
• Appuyez sur le bouton [
] pour faire pivoter
l’image de 90 0 dans le sens des aiguilles
d’une montre.
• Appuyez sur le bouton [MENU] pour retourner
au menu racine du disque.
• Appuyez sur le bouton [
] pour retourner au
menu principal.
Couche 1 Couche 1 Couche 1 Couche 1 Couche 1
Le lecteur ne reconnaîtra que trois niveaux de
dossiers et n’affichera pas les dossiers contenant
d’autres dossiers. Dans l’exemple ci-dessus,
l’appareil affichera les Dans l’exemple ci-dessus,
l’appareil affi chera les dossiers 2, 3, 4, 5, et 7,
mais pas le 1 ni le 6 puisqu’ils ne contiennent pas
de dossiers.
90 NX500/NZ500
Page 91

Commandes radio satellite Sirius
Cette fonction est accessible lorsqu’un récepteur
radio satellite Sirius fait l’objet d’un raccordement
au moyen du connecteur exclusif. Cet appareil
nécessite le récepteur suivant :
Le récepteur radio satellite SIRIUS modèle SC-C1
Remarque :
La radio satellite SIRIUS comporte un service de
souscription. Veuillez communiquer avec Radio
Sirius pour lancer ou modifier votre souscription :
•
Internet : www.sirius.com
Téléphone : 888 539-SIRIUS (747487)
Sélection du mode radio satellite
Appuyez sur le bouton [SIRIUS] sur l’écran du menu
principal. L’ensemble passe alors en mode radio
satellite Sirius. L’écran du mode Sirius apparaît.
14 13 12 10 91115
1 3
2
1 - Bouton de clavier
2 - Bouton de canal
précédent
3 - Bouton mémorisation
4 - Bouton de canal suivant
5 - Bouton de balayage
6 - Bouton de page
précédente
7 - Bouton de page suivante
8 - Bouton EQ
9 - Bouton du menu principal
10 - Écran de l’horloge
4 5 6 7 8
11 - Affichage sourdine
12 - Signal satellite
13 - Bouton catégorie
suivante
14 - Nom de catégorie
15 - Bouton de catégorie
précédente
16 - Affichage de la source
17 - Titre de la chanson
18 - Information sur l’artiste
19 - Informations sur l’album
20 - Bouton de balayage
Renseignements affichés en cours de réception
Les renseignements suivants s’affichent lorsque la
radio satellite ne fonctionne pas en mode normal
de réception.
• Lorsque le récepteur fait l’objet d’une mise en
fonction la première fois ou après une remise
à zéro : UPDATING (MISE À JOUR) suivi d’un
pourcentage de réussite.
• Lors de la syntonisation d’un canal (alors qu’aucun
signal ne fait encore l’objet d’une réception) :
ACQUIRING SIGNAL (TRANSMISSION DU
SIGNAL EN COURS)
• Sélection d’un canal sans signal de radiodiffusion :
INVALID CHANNEL (CANAL ERRONÉ)
• Canal non accessible en vertu de votre contrat :
CALL (COMPOSEZ) 888 539-SIRIUS
Composez le numéro 888 539-747487 pour
mettre votre radio en activité.
• Canal hors plage horaire de diffusion : OFF AIR
(HORS DES ONDES)
• Antenne débranchée ou endommagée :
ANTENNA ERROR (ERREUR ANTENNE)
Confirmation de votre code de radio
1. Appuyez sur le bouton [ ] sur l’écran de menu
SIRIUS pour afficher le pavé numérique.
Entrez « 0 » et appuyez sur « OK ».
Votre code radio (nombre à 12 chiffres) s’affiche
alors à l’écran.
2. Appuyez sur le bouton [Settings] sur l’écran
du menu SIRIUS pour accéder au menu de
configuration.
2. Appuyez sur le bouton [SID]. Votre code SIRIUS
(nombre à 12 chiffres) s’affiche alors à l’écran.
Sélection des canaux
1. Appuyez sur le bouton [Channels] sur l’écran
du menu SIRIUS pour accéder mode d’aperçu
de la liste de canaux.
2. Sélectionnez le canal avec les boutons [
ou [
]. Seuls les canaux sujets à réception
font l’objet d’une sélection :
]
Les canaux verrouillés et non accessibles par
contrat font l’objet d’un saut de syntonisation.
Le récepteur se met aussitôt à la recherche du
canal précédent ou suivant auquel vous
avez accès.
Sélection d’un canal par numéro
1. Appuyez sur le bouton d’accès direct de l’écran
de menu SIRIUS pour sélectionner directement
le canal.
2. Saisissez le numéro du canal de la station
désirée en appuyant sur les touches numériques
de [0] à [9]. Si vous faites une erreur de saisie
du numéro, vous pouvez la corriger en appuyant
sur [BACK].
NX500/NZ500 91
Français
d’emploi
Mode
Page 92

Commandes radio satellite Sirius
3. Appuyez sur [OK].
Le canal radio fait alors l’objet d’une syntonisation.
Sélection d’un canal par numéro
Le récepteur peut mémoriser jusqu’à vingt stations
radio satellite. Pour accéder aux présélections,
il suffit d’appuyer sur le bouton Présélections.
Cette opération permet de stocker vos stations
radio satellite préférées dans la mémoire du
récepteur aux fins de rappel ultérieur.
1. Appuyez sur [Preset...] pour accéder à la liste
permettant de choisir ou de sauvegarder vos
Français
présélections.
2. Appuyez sur [
] ou [
] pour voir la page
précédente ou suivante.
* Il existe cinq pages d’espace mémoire de
présélection à votre disposition. Vous pouvez
d’emploi
faire défiler les pages au moyen de la barre de
défilement située à la droite de l’écran.
Mode
3. Appuyez sur [Preset...] pour revenir à l’écran
précédent.
Stockage automatique des présélections
1. Appuyez sur la touche de présélection
correspondante et maintenez-la enfoncée
pendant plus de deux secondes pour
sauvegarder le canal de votre choix
2. Appuyez sur [
] pour mémoriser le canal actuel.
Effacement d’une présélection
1. Appuyez sur le bouton [Preset...] pour accéder
au menude présélections.
2. Appuyez sur le bouton de la présélection que
vous désirez supprimer.
3. Appuyez sur le bouton [DEL] pour la supprimer.
Remarque :
Au moment d’accéder au mode sélection de la
catégorie, la catégorie du dernier canal faisant l’objet
d’une réception s’affiche en premier lieu à l’écran.
Verrouillage de canaux (contrôle parental)
1. Appuyez sur [Settings] pour accéder à la liste
de réglages.
2. Appuyez sur [Lock] pour accéder à la liste de
verrouillage.
3. Appuyez sur [
la liste de verrouillage.
] pour voir la page suivante de
4. Appuyez sur l’élément de canal pour le verrouiller
ou le déverrouiller.
Établissement du mot de passe
1. Appuyez sur [Settings] pour accéder à la liste
de réglages.
2. Appuyez sur [Password] pour accéder au mode
de mot de passe.
3. Appuyez sur [
4. Appuyez sur [
5. Appuyez sur [Settings] pour retourner au menu
] pour inscrire le mot de passe.
] pour supprimer le mot de passe.
SIRIUS.
Réception de stations par catégorie
La radio satellite permet de sélectionner une
catégorie de canaux de diffusion (contenu).
1. Appuyez sur [Categories] pour accéder au
mode decatégorie.
2. Appuyez sur [
] ou [
] pour voir toutes les
catégories valides.
3. Appuyez sur la touche Élément de catégorie
souhaitée pour sélectionner la catégorie.
4. Il suffit d’appuyer momentanément sur l’écran
pour sélectionner le canal de votre choix.
92 NX500/NZ500
Remarque :
Si vous inscrivez des mots de passe, vous devez inscrire le bon
code pour accéder à la liste de verrouillage. Lorsque vous tentez de
verrouiller un canal avec le pavé numérique, l’écran de mot de passe
s’affichera. Seule la saisie d’un code correct activera la syntonisation
du canal, si le mot de passe est incorrect le dernier canal s’affichera.
Page 93

Commandes du système de navigation
Présentation du logiciel de navigation
Le logiciel de navigation offre un guidage visuel
et vocal détaillé pour vous aider à vous rendre à
votre destination. Le logiciel calcule rapidement les
directions pas à pas à n’importe quelle destination
figurant dans la carte de navigation fournie.
Le logiciel de navigation utilise les satellites d’un
système de positionnement mondial (GPS), et une
base de données cartographiques numérique pour
calculer et afficher les directions routières. L’antenne
du système GPS reçoit des signaux provenant d’une
constellation de 24 satellites en orbite autour de
la terre et elle utilise les signaux les plus forts pour
déterminer votre position à quelques mètres près.
Position du véhicule
Le logiciel de navigation tient compte de la vitesse
de déplacement du véhicule et des changements de
direction, ainsi que des renseignements au sujet de
la latitude et de la longitude pour établir précisément
la direction et la position sur la carte numérique. Les
signaux provenant des satellites GPS sont utilisés
pour déterminer la position du véhicule. Les signaux
de trois (bon) ou quatre (meilleur) satellites doivent
être reçus pour établir précisément la position du
véhicule. La qualité des signaux est indiquée par le
symbole GPS sur la carte.
Base de données cartographiques et de
renseignements
La base de données cartographiques utilisée par
le logiciel de navigation a été créée en collectant
des données aériennes et de terrain haute
résolution. Les cartes de navigation automobile
sont fréquemment mises à jour. Bien que la
base de données ait été jugée aussi précise que
possible au moment de son lancement, une base
de données cartographiques ne peut jamais être
à 100 % précise. Les renseignements routiers
qui sont maintenus dans la base de données
cartographiques, tels que les restrictions relatives
aux virages ou le nom des rues peuvent changer
au fil du temps.
Commandes de l’écran du menu principal
1. Activez le système de navigation en appuyant
sur le bouton « NAVI » sur l’écran du menu
principal ; un écran d’avertissement s’affichera.
Appuyez sur le bouton pour accepter.
2. L’écran du menu principal de navigation apparaît.
3. L’écran du menu principal vous offre différentes
options :
Home Address (Domicile) - Route vers le
domicile.
Go To... (Destination...) - Sélectionnez une
destination pour la navigation.
Setup (Configuration) - Configurez les
préférences pour les itinéraires et l’affichage
de navigation.
Office Address (Travail) - Route vers le travail.
Trip Computer (Données de voyage) -
Affichage de la vitesse, lecture de l’odomètre
du trajet et du temps.
4. Utilisez les boutons de fonctions, décrits
ci-dessous, pour faire fonctionner le système
de navigation.
Zoom avant pour afficher une plus
petite zone
Zoom arrière pour afficher une plus
grande zone
Retour au mode de carte routière
Affichage de la carte en 2D
Retour à l’écran précédent
Affichage du menu, retour au
menu principal
Affichage de la carte en 3D
Sélection d’une position actuelle
en mode panoramique
Renseignements sur la position actuelle
sur la carte, mode d’éléments
Sélectionnez (cochez) l’élément
actuellement en surbrillance
Affichage du mode d’épellation
Page précédente, page suivante
dans la liste à l’écran.
Étape précédente ou étape suivante
dans la liste de menu
Français
d’emploi
Mode
Instructions vocales activées
Bouton de réinitialisation
Bouton d’annulation
Bouton de suppression (Déplacer le
contenu de la cellule dans la poubelle)
NX500/NZ500 93
Page 94

Route vers le domicile
1. Appuyez sur le bouton Home Address (Domicile)
sur l’écran. Si l’adresse du domicile n’a jamais été
inscrite, l’écran suivants’affichera.
Français
2. Appuyez sur la coche pour afficher l’écran de
configuration de l’adresse du domicile.
d’emploi
Mode
3. Sélectionnez l’une des options à l’écran
pour configurer l’adresse. Une fois l’adresse
configurée, elle sera mémorisée par le logiciel.
4. Si l’adresse est déjà mémorisée, l’écran
apparaîtra avec l’adresse affichée, une fois
que vous aurez appuyé sur le bouton Home
Address (Domicile).
Point de départ
Sélection d’une destination
Pour sélectionner une destination appuyez sur le
bouton Go To... (destination) sur l’écran du menu
principal. L’écran Go To... (destination) s’affiche.
Utilisez l’un des trois modes suivants pour
commencer votre navigation :
Address or Intersection (Adresse ou
intersection)
Point of Interest (Point d’intérêt)
Favorites (Favoris)
History (Historique)
Mode d’adresse ou d’intersection
1. Si vous connaissez l’adresse, appuyez
sur Address or Intersection (Adresse ou
intersection). Le clavier apparaîtra.
94 NX500/NZ500
2. Appuyez sur la première lettre de la ville sur le
clavier. Le nom de la ville apparaîtra àl’écran.
3. Appuyez sur la touche de
La liste de toutes les villes commençant par
cette lettre s’affichera. Appuyez sur le nom de
la ville désirée.
sélection.
Page 95

4. Appuyez sur la touche «
afficher le nom de la rue.
L’écran des rues s’affichera.
(Rue) » pour
REMARQUE : Le système mémorise le dernier
état ou la dernière province utilisé,
cette étape n’est donc pas
obligatoire à chaque fois.
2. La recherche par Point of Interest (Point
d’intérêt) peut être effectuée par catégories,
par ville ou par nom.
5. Sélectionnez la rue en inscrivant le nom sur le
clavier. La liste des rues commençant par ces
lettres s’affichera. Appuyez sur les boutons
Haut ou Bas pour parcourir la liste.
Sélectionnez la rue.
Appuyez sur le bouton
à l’écran du mode Rue.
6. Appuyez sur le bouton
pour retourner
de code postal
pour afficher le code postal.
Appuyez sur la touche de sélection pour afficher
la liste de codes postaux. Sélectionnez le code
désiré et appuyez sur la touche Retour.
• Utilisez le mode Category (Catégorie), si
vous cherchez un service ou un commerce,
comme la station d’essence la plus proche.
• Mode City (Ville) - sélectionnez la ville en
épelant son nom.
• Mode Name (Nom) - sélectionnez le nom en
le tapant.
Français
d’emploi
Mode
Mode par point d’intérêt
1. Utilisez l’option Point of Interest (Points
d’intérêt) lorsque vous vous rendez dans
un endroit public ou que vous cherchez un
emplacement tel qu’une station service. Après
avoir sélectionné l’option Point of Interest
(Points d’intérêt) vous devez sélectionner l’état
ou la province où se situe votre destination.
NX500/NZ500 95
Page 96

Mode de coordonnées
Vous pouvez naviguer vers une destination en
entrant directement la longitude et la latitude.
Français
Mode de favoris
Vous pouvez sélectionner votre itinéraire vers
une destination en choisissant l’un des favoris
présélectionnés dans le mode Favorites (Favoris).
d’emploi
Mode
1. Le Address Book (Carnet d’adresses) est un
endroit pratique pour mémoriser les destinations
fréquemment visitées.
3. My POI (Mes POI) vous permettra de créer et
de sauvegarder vos points d’intérêt personnels.
4. Le Trip Book (Carnet de voyages) vous
permettra de naviguer vers plusieurs
destinations pendant un voyage.
Modification des favoris
1. Appuyez sur ce bouton pour modifier les
Address Book (Carnet d’adresses),
Trail Book (Carnet d’itinéraires), Trip Book
(Carnet de voyages), My POI (Mes POI).
L’écran suivant apparaîtra.
2. Le Trail Book (Carnet d’itinéraires) vous
permettra de créer vos propres itinéraires
de navigation.
96 NX500/NZ500
2. Sélectionnez le mode à modifier.
L’écran de modification s’affichera.
Écran de modification du Address Book
(Carnet d’adresses) :
Page 97

Écran de modification du carnet
d’itinéraires :
Écran de modification du carnet de voyages :
Écran de modification de mes
Points d’intérêt :
Configuration des préférences
Appuyez sur ce bouton pour configurer vos
préférences de type d’itinéraire et de navigation.
L’écran suivant apparaîtra. Sélectionnez le mode
à utiliser.
1. Appuyez sur Setup Routing Criteria (Sélection
des critères d’itinéraire) pour configurer vos
préférences de conduite. Cochez les éléments
favoris à l’écran.
2. Appuyez sur Display Options (Options
d’affichage) pour configurer vos préférences
d’affichage. Toutes les options sont énumérées
sur 3 écrans. Cochez les éléments favoris sur la
liste à l’écran.
Français
d’emploi
Mode
Mode d’historique
Les destinations précédemment entrées dans
votre logiciel de navigation sont automatiquement
inscrites dans la mémoire. Ceci est pratique pour
retourner à une destination récente, comme un
hôtel où vous avez séjourné. L’origine précédente
du dernier itinéraire calculé est aussi mémorisée
pour retourner facilement à votre point de départ.
NX500/NZ500 97
Page 98

3. Appuyez sur User Preferences (Préférences
de l’utilisateur) pour configurer vos préférences
personnelles. Toutes les options sont énumérées
sur 2 écrans. Cochez les éléments favoris sur la
liste à l’écran.
• Sélectionnez le mode Volume. L’écran vous
permettra d’activer ou de désactiver le son
du système.
Français
d’emploi
Mode
4. Appuyez sur Location Reset (Réinitialisation
d’emplacement) pour configurer vos
préférences en matière d’emplacement.
Sélectionnez l’élément que vous désirez
réinitialiser à partir des options du menu.
5.
Appuyez sur le bouton System (Système).
L’écran suivant apparaîtra.
• Sélectionnez le mode Diagnostic GPS.
Les renseignements concernant l’état GPS
s’afficheront sur l’écran.
• Sélectionnez le mode Renseignements sur
le système. Les renseignements concernant
votre système de navigation s’afficheront
à l’écran.
Configuration et guidage vers l’adresse
au travail
Appuyez sur ce bouton et l’écran Start Route
(Point de départ) apparaîtra.
98 NX500/NZ500
Page 99

Si l’adresse au travail n’est pas sauvegardée :
• Appuyez sur Favorites à l’écran Go To.
• Sur l’écran appuyez sur le bouton Edit Favorites.
L’écran suivant apparaîtra.
Appuyez sur les flèches pour monter ou descendre
dans la liste ou pour changer de page et afficher
d’autres éléments.
• Appuyez sur le bouton Office Address (ravail).
L’écran Set Office Address (Réglage de
l’adresse au travail) apparaîtra. Inscrivez
les renseignements dans les éléments en
surbrillance.
Lectures des données de voyage
et réinitialisation
Appuyez sur ce bouton pour afficher la vitesse,
la lecture de l’odomètre et du temps.
1. Appuyez sur le bouton
les éléments d’information du voyage.
L’écran suivant apparaîtra.
pour afficher
2. Appuyez sur l’élément de la liste pour le
sélectionner.
3. Réinitialisez l’élément affiché en appuyant
sur la
L’écran suivant apparaîtra.
4. Appuyez sur le bouton
sur le bouton
à l’écran de données de voyage.
touche de réinitialisation.
pour accepter ou
pour annuler et retourner
Français
d’emploi
Mode
NX500/NZ500 99
Page 100

7. ACCESSOIRES
Commandes iPod/iPhone
Les appareils iPod/iPhone peuvent être branchés avec le câble de branchement fourni avec l’iPod/
iPhone, mais dans ce cas, vous ne pourrez entendre que le son. Pour visionner les films stockés dans
l’iPod/iPhone avec l’image sur cet appareil, vous devez utiliser le câble de branchement spécial vendu
séparément.
Remarque :
•
Ce système ne fonctionne pas ou risque de mal fonctionner s’il utilise des versions qui ne sont pas
prises en charge.
•
Pour des informations supplémentaires sur les modèles d’iPod/iPhone compatibles, consultez notre
Français
page d’accueil : www.clarion.com
Remarques sur l’utilisation de l’iPod/iPhone
de Apple
•
Ne branchez pas un iPod/iPhone à cet
appareil lorsque les écouteurs sont branchés
d’emploi
à l’iPod/iPhone.
•
Après le raccordement de l’iPod/iPhone à cet
Mode
appareil, les boutons de commandes de l’iPod/
iPhone sont désactivés pour le mode musique.
En mode vidéo, ne pas utiliser les boutons de
l’iPod/iPhone.
•
En mode iPod, un écran spécial de commande
iPod/iPhone s’affiche à l’écran, qui diffère des
écrans principaux des autres modes.
•
En mode iPod, l’image entrée par la connexion
AUX est diffusée sur l’écran arrière.
•
En l’absence de données, l’affichage du titre
reste vierge.
•
Le baladeur iPod s’utilise lorsque la commande
de correction est hors fonction (OFF).
•
Réglez la langue de l’iPod/iPhone à l’anglais
avant de brancher votre iPod/iPhone. Certains
caractères des autres langues peuvent s’afficher
incorrectement dans ce système.
• Précautions concernant la consommation
de la pile :
Si l’iPod/iPhone est raccordé à cette unité
lorsque la pile interne de l’iPod/iPhone est
déchargée, il est possible que cette fonction
ne marche pas correctement. Si la pile est
déchargée, assurez-vous de la recharger avant
de brancher l’iPod/iPhone à cet appareil.
Sélection du mode iPod
1. Branchez votre iPod/iPhone par le connecteur
USB. Le système détectera automatiquement le
périphérique et passeraau mode iPod. L’icône
iPod s’affichera à l’écran du menu principal.
La lecture commencera où l’iPod/iPhone a été mis
en pause.
• Lorsqu’un iPod/iPhone est déjà branché
Appuyez sur [USB] sur l’écran du menui Pod.
Le système passera au mode iPod (USB) et
commencera la lecture à partir de la position
précédente.
Commande de l’iPod/iPhone
Boutons de commande
• Écran du mode audio iPod
16
17
18
19
20
1 3
1 - Bouton répétition
2 - Bouton de lecture aléatoire
3 - Bouton piste précédente
4 - Bouton de balayage
5 - Bouton Lecture/Pause
6 - Bouton vidéo iPod
7 - Bouton piste suivante
8 - Bouton Arrêt
9 - Bouton de page
précédente
10 - Bouton de page suivante
Touche vidéo [
4 7 8 109
5
6
]
2
11 - Bouton EQ
12 - Bouton du menu principal
13 - Écran de l’horloge
14 - Affichage lecture aléatoire
15 - Affichage répétition
16 - Affichage sourdine
17 - Titre de la chanson
18 - Information sur l’artiste
19 - Informations sur l’album
20 - Bouton de clavier
• Permet de passer à l’écran de la sortie vidéo
de l’iPod/iPhone.
Remarque :
•
Remarquez que tous les dispositifs iPod/iPhone
ne sont pas compatibles avec la sortie vidéo
reliée à cet appareil.
14 1315
12
11
100 NX500/NZ500
 Loading...