

Page 1

Owner’s manual & Installation manual
Mode d’emploi et manuel d’installation
Benutzerhandbuch & Installationshandbuch
Manuale dell’utente e manuale di installazione
Gebruikershandleiding en installatiehandleiding
Manual de instrucciones y de instalación
Ägar- & installationshandbok
Manual do utilizador e manual de instalação
Betjeningsvejledning og installationsvejledning
NX509E
2-DIN MEMORY NAVIGATION & DVD MULTIMEDIA STATION
WITH 7-inch TOUCH PANEL CONTROL
SYSTEME DE NAVIGATION & STATION MULTIMEDIA DVD
2 DIN AVEC COMMANDE PAR ECRAN TACTILE 7 pouces
2-DIN-SPEICHERNAVIGATION UND DVD-MULTIMEDIASTATION MIT 7-Zoll-TOUCHSCREEN-STEUERUNG
2-DIN MEMORIA DI NAVIGAZIONE E STAZIONE
MULTIMEDIALE DVD DOTATA DI PANNELLO DI
CONTROLLO A SFIORAMENTO DA 7 POLLICI
2-DIN NAVIGATIESYSTEEM MET GEHEUGEN & DVDMULTIMEDIASTATION MET 7-inch TOUCH PANEL-BEDIENING
SISTEMA DE NAVEGACIÓN Y EQUIPO DVD MULTIMEDIA
2-DIN CON PANEL DE CONTROL TÁCTIL DE 7 pulgadas
2-DIN MINNESNAVIGERING OCH DVD MULTIMEDIASTATION MED 7-tums PEKSKÄRM
SISTEMA DE NAVEGAÇÃO E ESTAÇÃO MULTIMÉDIA DE DVD
2-DIN COM CONTROLO DE PAINEL DIGITAL DE 7 polegadas
2-DIN HUKOMMELSESNAVIGATION OG DVD
MULTIMEDIESTATION MED 7" BERØRINGSPANEL
Page 2
CAUTIONS:
This appliance contains a laser system and is
classified as a “CLASS 1 LASER PRODUCT”.
To use this model properly, read this Owner’s
Manual carefully and keep this manual for
your future reference. In case of any trouble
with this player, please contact your nearest
“AUTHORIZED service station”. To prevent
direct exposure to the laser beam, do not try
to open the enclosure.
!CAUTION
USE OF CONTROLS OR ADJUSTMENTS OR
PERFORMANCE OF PROCEDURES OTHER
THAN THOSE SPECIFIED IN THE OWNER’S
MANUAL MAY RESULT IN HAZARDOUS
RADIATION EXPOSURE.
ADVARSEL.
Denne mærking er anbragt udvendigt på
apparatet og indikerer, at apparatet arbejder
med laserstråler af klasse 1, hvilket betyder,
at der anvendes laserstråler af svageste
klasse, og at man ikke på apparatets yderside
kan blive udsat for utilladelig kraftig stråling.
APPARATET BØR KUN ÅBNES AF FAGFOLK
MED SÆRLIGT KENDSKAB TIL APPARATER
MED LASERSTRÅLER!
Indvendigt i apparatet er anbragt den her
gengivne advarselsmækning, som advarer
imod at foretage sådanne indgreb i apparatet,
at man kan komme til at udsaætte sig for
laserstråling.
OBS!
Apparaten innehåller laserkomponenten som
avger laserstrålning överstigande gränsen
för laserklass 1.
VAROITUS
Suojakoteloa si saa avata. Laite sisältää
laserdiodin, joka lähettää näkymätöntä
silmille vaarallista lasersäteilyä.
Page 3

Thank you for purchasing the Clarion NX509E.
• Please read this owner’s manual thoroughly before operating this equipment.
• After reading this manual, be sure to keep it in a handy place (e.g., glove compartment).
• Check the contents of the enclosed warranty card and keep it carefully with this manual.
• The provided disc (CD-ROM manual) cannot be played back on this unit.
English
Contents
1. FEATURES .................................................................................................................... 2
Expanding Systems........................................................................................................ 2
Playable Discs................................................................................................................ 3
DVD Video Features ...................................................................................................... 3
2. PRECAUTIONS ............................................................................................................. 4
Operation Panel/Generalities ......................................................................................... 5
Cleaning ......................................................................................................................... 5
About the Registered Marks, etc. ................................................................................... 6
3. CONTROLS ................................................................................................................... 6
Functions of Buttons....................................................................................................... 6
Outline of Button and Touchkey Operation .................................................................... 8
Remote Control Unit..................................................................................................... 13
4. BASIC OPERATIONS.................................................................................................. 14
Turning On and Off the Power ..................................................................................... 14
Adjusting the Volume ................................................................................................... 15
Opening the Operation Panel and Adjusting the Angle................................................ 15
Turning the Audio OFF................................................................................................. 16
Turning the Monitor OFF .............................................................................................. 17
Displaying the Clock Screen......................................................................................... 17
Setting/Ejecting a Disc ................................................................................................. 17
Connecting/Disconnecting an USB Media Device........................................................ 18
Selecting a Media Source ............................................................................................ 20
2-Zone Function ........................................................................................................... 21
5. SOURCE OPERATIONS ............................................................................................. 22
Radio Operations ......................................................................................................... 22
DVD Video Operations ................................................................................................. 26
Audio CD Operations ................................................................................................... 33
MP3/WMA/AAC Operations ......................................................................................... 34
DivX Operations ........................................................................................................... 37
6. SOURCE OPERATIONS (ACCESSORIES)................................................................ 40
iPod Operations............................................................................................................ 40
USB Memory Operations.............................................................................................. 44
Navigation System Operations..................................................................................... 45
AUX Operations ........................................................................................................... 46
7. SYSTEM SETTINGS.................................................................................................... 47
Audio Settings .............................................................................................................. 47
General Settings........................................................................................................... 50
Adjusting the Monitor.................................................................................................... 53
8. TROUBLESHOOTING................................................................................................. 54
9. ERROR DISPLAYS...................................................................................................... 56
10. SPECIFICATIONS ....................................................................................................... 58
INSTALLATION AND WIRE CONNECTION MANUAL ................................................... 59
Owner’s manual
NX509E
1
Page 4
English
1. FEATURES
Owner’s manual
■ USB Direct connection for iPod
■ All-in-one AV & Navigation unit with Touch Panel control
■ Built-in RDS-TMC tuner for traffic information
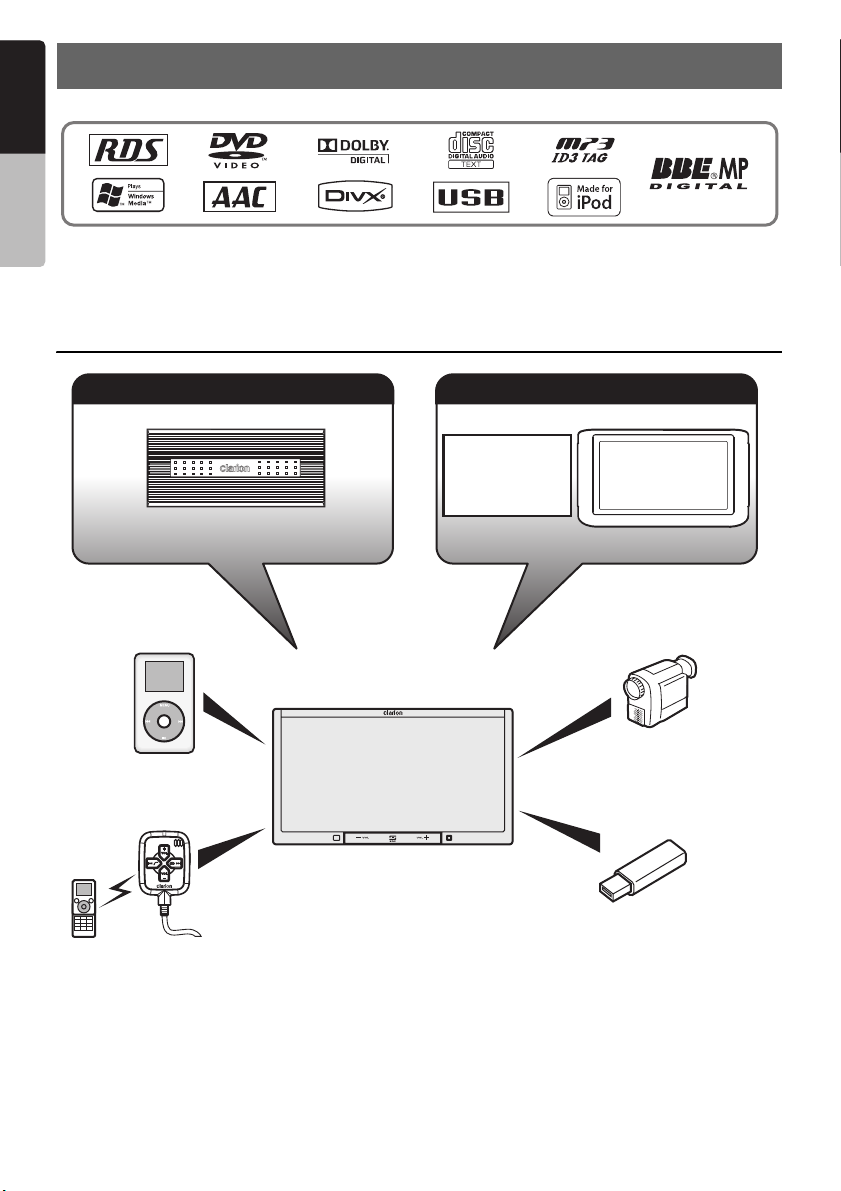
Expanding Systems
Expanding audio features
4-Channel Amplifier
iPod
BLT373
Bluetooth
Note:
The items listed outside of the frames are the
commercial products generally sold.
®
cellular phone
Expanding visual features
Rear Vision
Camera
(CC2011E/
CAA185)
NX509E
Rear Monitor
VTR etc.
USB Memory
2
NX509E
Page 5
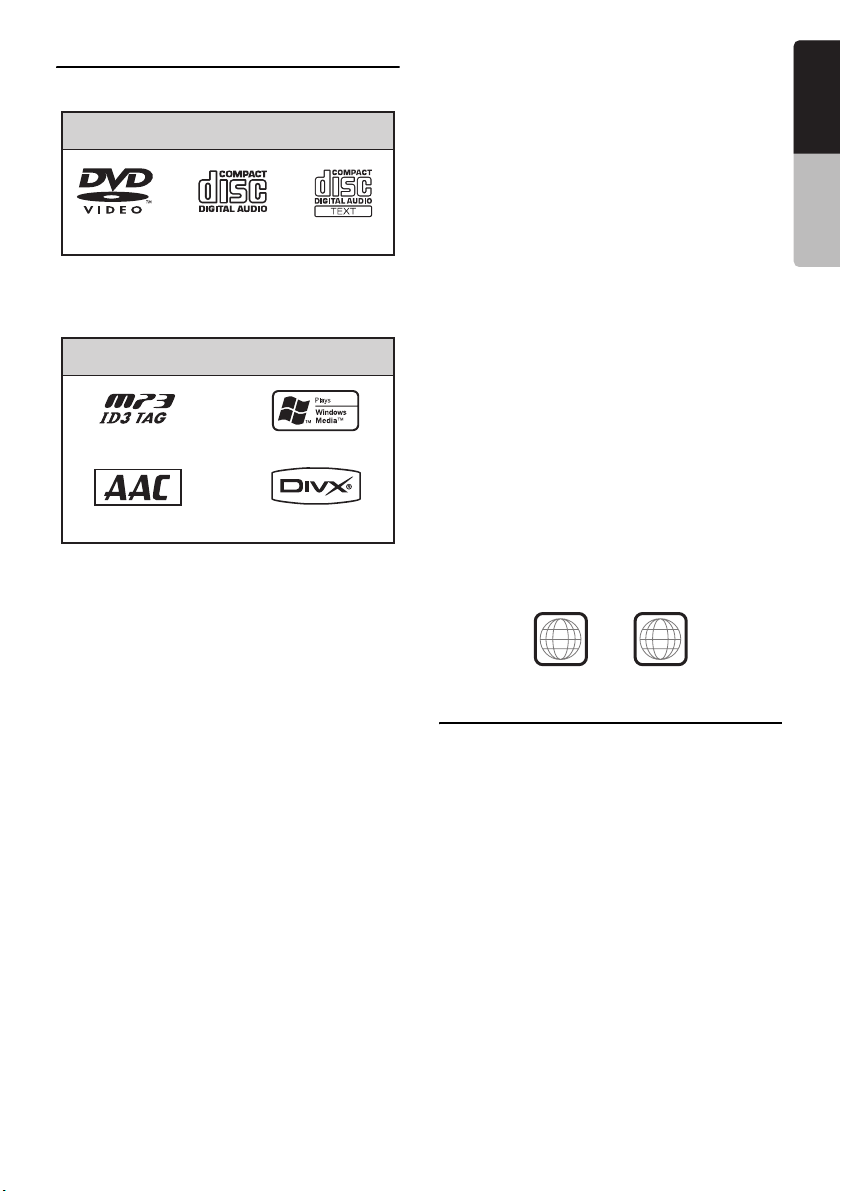
Playable Discs
This DVD player can play the following discs:
Playable discs
DVD video discs
In addition, the DVD player can play CD-R/RW,
DVD-R/RW, and DVD+R/RW discs on which the
following media files have been recorded:
MP3 ID3 TAG
AAC
For detailed information, see the sections entitled
“MP3/WMA/AAC Operations” (page 34) and
“DivX Operations” (page 37).
Audio CDs CD TEXT
Playable media files
WMA
DivX
About playing a DVD-R/RW or
DVD+R/RW disc
This player can play DVD-R/RW and DVD+R/RW
discs previously recorded in DVD video format or
format with MP3/WMA/AAC/DivX files.
Discs that cannot be played back
This player cannot play DVD Audio, DVD-RAM,
Video CDs, Photo CDs, etc.
Note:
• It may not be possible to play back discs recorded
on some CD/DVD drive units. (Cause: disc
characteristics, cracks, dust/dirt, dust/dirt on
player’s lens, etc.)
• If a CD-R/RW, DVD-R/RW, or DVD+R/RW disc
that has not been finalized is played, it will take a
long time to start playing. Also, it may not be
possible to play depending on its recording
conditions.
• You cannot play Super Audio CDs. Playback of the
CD player is not supported even if it is a hybrid
disc.
Note on region numbers of DVD
video discs
The DVD video system assigns a region number
to DVD players and DVD discs by sales area.
The DVD video region number playable in this
system is marked on the disc jacket as shown
below.
English
Owner’s manual
About CD Extra discs
A CD Extra disc is a disc in which a total of two
sessions have been recorded. The first session is
Audio session and the second session is Data
session.
Your personally-created CDs with more than
second data sessions recorded cannot be played
on this DVD player.
Note:
• When you play a CD Extra disc, only the first
session will be recognized.
About playing a CD-R/RW disc
This player can play CD-R/RW discs previously
recorded in Audio CD format or format with MP3/
WMA/AAC/DivX files.
ALL
2
DVD Video Features
This unit provides the following functions in
addition to the high image quality and sound
quality of DVD video.
Note:
• The functions described in this section differ
depending on the DVD video disc. Refer to the
instructions provided with the DVD video.
• Some disc functions may operate differently from
described in this manual.
NX509E
3
Page 6

Multi-sound function
English
DVD video can store up to 8 languages for one
film; select the language of your preference.
• The languages stored on the disc are indicated
by the icon shown below.
Owner’s manual
Multi-angle function
A DVD video that is filmed from multiple angles
allows you to select the angle of choice.
• The number of recorded angles is indicated by
the icon shown below.
Subpicture (subtitles) function
A DVD video can record subtitles for up to 32
languages and you can select the language of
the subtitles you wish to see.
• The number of recorded subtitle languages is
indicated by the icon shown below.
Multi-story function
When a DVD video contains more than one story
for a film, you can select the story you wish to
enjoy. The operation procedures vary with the
disc; observe the instructions for selecting a story
provided during playback.
DVD menu
DVD Menus can be called up during DVD video
playback to perform menu setting.
2. PRECAUTIONS
WARNING
For your safety, the driver should not watch
the DVD video/movie data or operate the
controls while driving. Please note that
watching and operating the DVD video/
movie data while driving are prohibited by
law in some countries. Also, while driving,
keep the volume to a level at which external
sounds can be heard.
1. When the inside of the car is very cold and the
player is used soon after switching on the
heater, moisture may form on the disc (DVD/
CD) or the optical parts of the player and
proper playback may not be possible. If
moisture forms on the disc (DVD/CD), wipe it
off with a soft cloth. If moisture forms on the
optical parts of the player, do not use the
player for about one hour. The condensation
will disappear naturally allowing normal
operation.
2. Driving on extremely bumpy roads which
cause severe vibration may cause the sound
to skip.
3. This unit uses a precision mechanism. Even
in the event that trouble arises, never open
the case, disassemble the unit, or lubricate
the rotating parts.
INFORMATION FOR USERS:
CHANGES OR MODIFICATIONS TO THIS
PRODUCT NOT APPROVED BY THE
MANUFACTURER WILL VOID THE
WARRANTY.
• Example showing DVD menu
4
NX509E
Page 7

Operation Panel/
Generalities
For a longer service life, be sure to read the
following cautions.
• Be sure to house the operation panel inside the
main unit when parking the car outdoors for a
long period of time. The operation panel will
operate properly in a temperature range of 0 to
60°C.
• Do not allow any liquids on the set from drinks,
umbrellas, etc. Doing so may damage the
internal circuitry.
• Do not disassemble or modify the set in any
way. Doing so may result in damage.
• Do not draw the operation panel out and use it
as a tray. Also, subjecting the operation panel
to shocks may result in breakage, deformation,
or other damage.
• Do not let cigarettes burn the display. Doing so
may damage or deform the cabinet.
• If a problem should occur, have the set
inspected at your store of purchase.
• Do not insert objects or poke in the space
between the operation panel and the main unit
when the panel is tilted.
• Do not place anything on the display when the
panel is tilted.
• The remote control unit may not work if the
remote control sensor is exposed to direct
sunlight.
• In extremely cold weather, the display
movement may slow down and the display may
darken, but this is not a malfunction. The
display will work normally when the
temperature increases.
• Small black and shiny spots inside the
operation panel are normal for LCD products.
• The operation panel may stop temporarily
when it opens or closes, when the engine stops
or when it is cold.
• The touchkeys on the display operate when
slightly touched. Do not press the touchkey
screen with much force.
• Do not push the case surrounding the touchkey
panel with much force. This may cause
malfunctioning of the touchkeys.
Cleaning
• Cleaning the cabinet
Use a soft and dry cloth and gently wipe off the
dirt. For tough dirt, apply some neutral
detergent diluted in water to a soft cloth, wipe
off the dirt gently, then wipe again with a dry
cloth.
Do not use benzene, thinner, car cleaner, etc.,
as these substances may damage the cabinet
or cause the paint to peel. Also, leaving rubber
or plastic products in contact with the cabinet
for long periods of time may cause stains.
• Cleaning the operation panel
The operation panel tends to collect dust, so
wipe it off occasionally with a soft cloth. The
surface is easily scratched, so do not rub it with
hard objects.
English
Owner’s manual
NX509E
5
Page 8
About the Registered
English
Marks, etc.
3. CONTROLS
• This product incorporates copyright protection
technology that is protected by U.S. patents
and other intellectual property rights. Use of
Owner’s manual
this copyright protection technology must be
authorized by Macrovision, and is intended for
home and other limited viewing uses only
unless otherwise authorized by Macrovision.
Reverse engineering or disassembly is
prohibited.
• Manufactured under license from Dolby
Laboratories.
“Dolby” and the double-D symbol are
trademarks of Dolby Laboratories.
• Windows Media™, and the Windows
trademarks, or registered trademarks of
Microsoft Corporation in the United States and/
or other countries.
• “DivX”, “DivX Certified”, and associated logos
are trademarks of DivX, Inc., and are used
under license.
• “Made for iPod” means that an electronic
accessory has been designed to connect
specifically to iPod and has been certified by
the developer to meet Apple performance
standards.
Apple is not responsible for the operation of
this device or its compliance with safety and
regulatory standards.
iPod is a trademark of Apple Inc., registered in
the U.S. and other countries.
• BBE MP (Minimized Polynomial Non-Linear
Saturation) Process improves digitally
compressed sound, such as MP3, by restoring
and enhancing the harmonics lost through
compression. BBE MP works by regenerating
harmonics from the source material, effectively
recovering warmth, details and nuance.
• Manufactured under license from BBE Sound,
Inc.
• Licensed by BBE Sound, Inc. under one or
more of the following US patents: 5510752,
5736897. BBE and BBE symbol are registered
trademarks of BBE Sound, Inc.
®
logo are
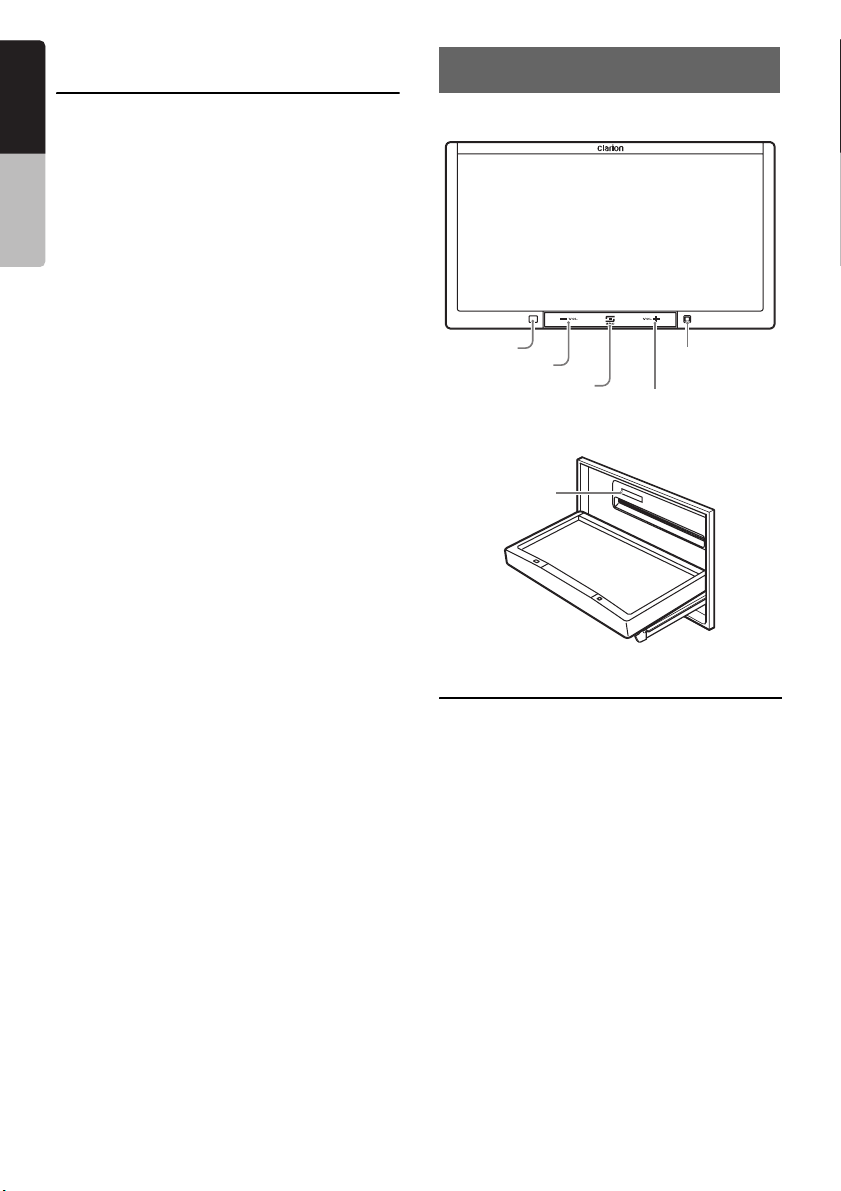
● Operation Panel
NX509E
Sensor
[VOL –]
[SRC]
● With the operation panel open
SD memory
card slot
Blink LED/
Reset button
[VOL +]
Functions of Buttons
Note:
• Be sure to read this section while referring to the
front diagram.
Sensor
• Receiver for the remote control unit (operating
range: 30° in all directions).
[VOL –], [VOL +] buttons
• Use these buttons to increase/decrease the
volume.
6
NX509E
Page 9

[SRC] button
• Press this button to display/hide the Source
screen to switch the source mode.
• When the RDS interrupts are arisen, keep
pressing this button more than 1 second to
cancel these interrupts.
Blink LED
• When the Blink LED function is set to “On” from
the System tab menu on the General screen,
blinks when the ACC power is turned off.
SD memory card slot
• SD memory card function is available in the
Navi mode. For more information about the SD
memory card function, see your User manual
(for the Navi mode).
Note:
• When you insert the SD memory card stored music
files, they cannot be read in this unit.
English
Owner’s manual
NX509E
7
Page 10
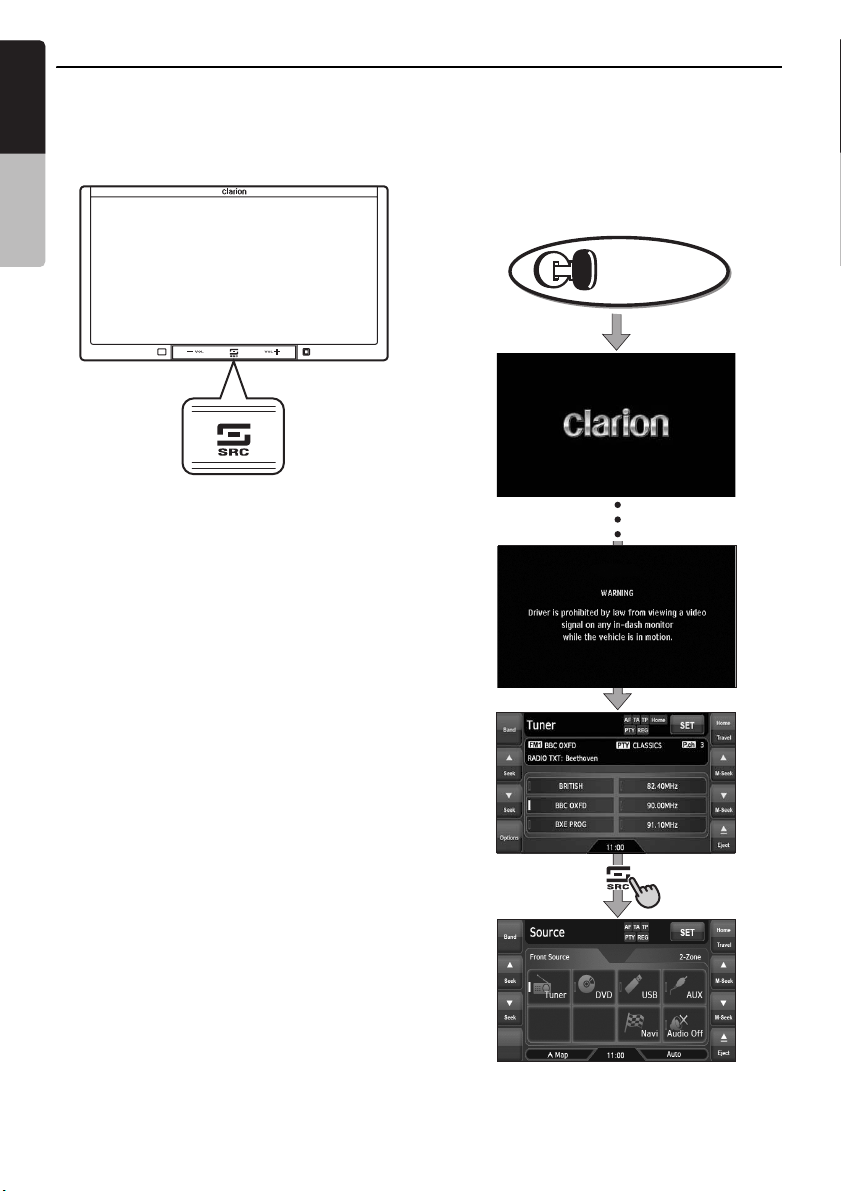
Outline of Button and Touchkey Operation
English
Turning the power on
Owner’s manual
NX509E
System check
The CeNET format utilized on this unit is provided
with a system check function. When the system
check function is performed under the following
conditions, the power is automatically turned off.
Once turn off the engine switch, then restart the
engine again.
• When power is first turned on after initial
installation.
• When an external device is connected or
disconnected.
• When Reset button is pressed.
* In addition to the above conditions, the system
check function can be performed from the System
tab menu on the General screen.
Note:
*1 These images indicate the buttons to press or
keys to touch.
Engine ON
position
*1
You can change the media sources.
8
NX509E
Page 11
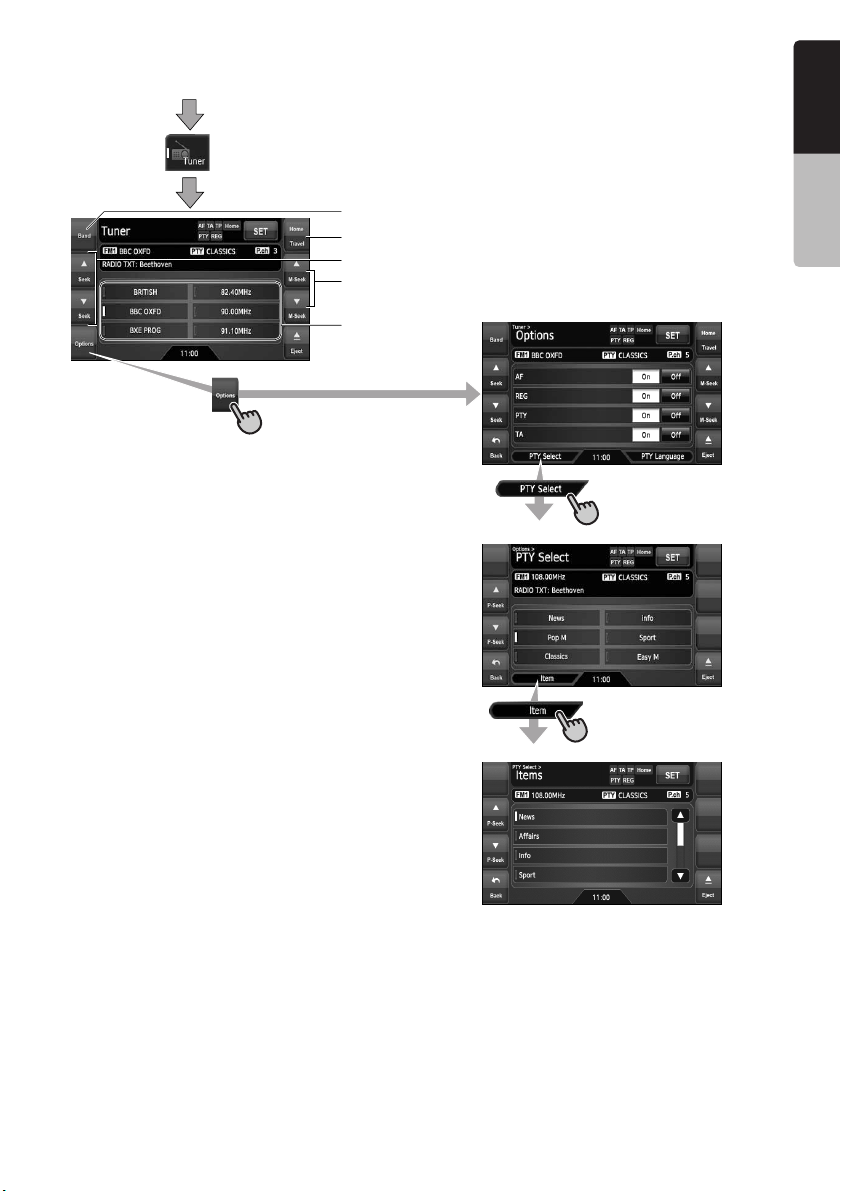
Tuner mode operation
(Source screen)
• Select desired station after
selecting radio band.
English
Owner’s manual
Switches the radio band.
Selects Home/Travel modes.
Seek tuning
Manual tuning
(Options screen)
Preset ch.
(PTY Select screen)
(Items screen)
NX509E
9
Page 12

DVD Video mode operation
English
(Source screen)
Owner’s manual
(DVD Video mode screen) *2
* Screen during DVD Video mode
when automobile moving.
(DVD top menu) *2
(Options screen)
(Setup screen)
Note:
*2 If you do not touch the screen for about 7 seconds, all the keys on the screen will disappear. Touch
the screen surface to redisplay them.
10
NX509E
Page 13
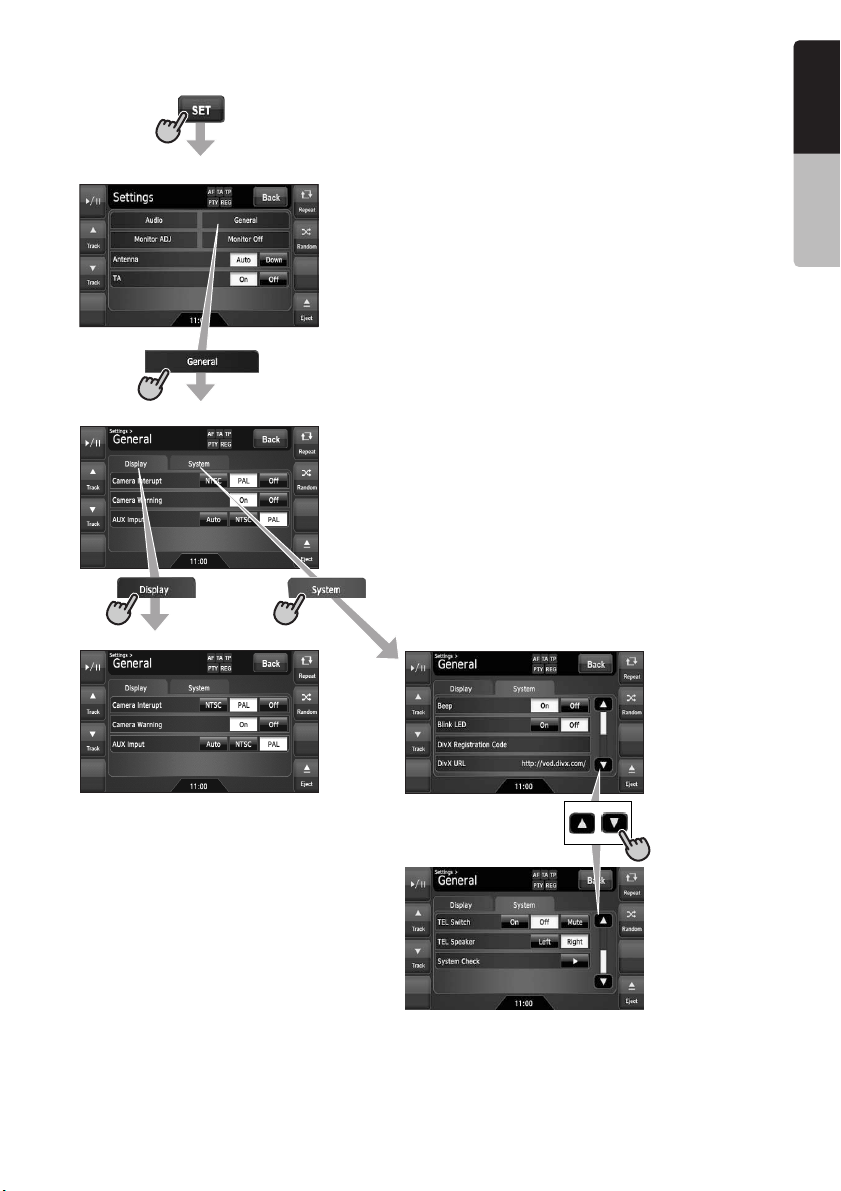
Adjusting the General settings
(Source or Mode screen)
English
(Settings screen)
(General screen)
Owner’s manual
(System tab screen)(Display tab screen)
NX509E
11
Page 14
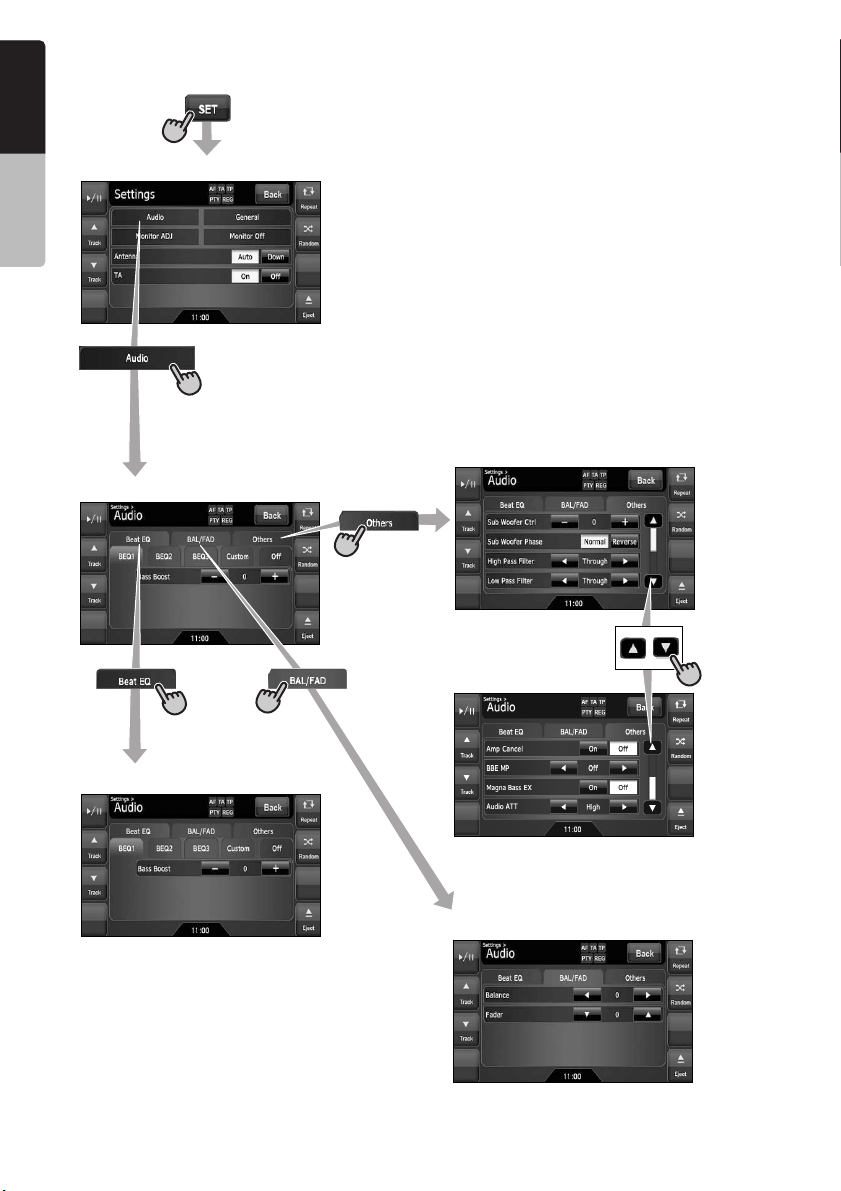
Adjusting the Audio settings
English
(Source or Mode screen)
Owner’s manual
(Settings screen)
(Audio screen)
(Others tab screen)
(Beat EQ tab screen)
12
NX509E
(BAL/FAD tab screen)
Page 15
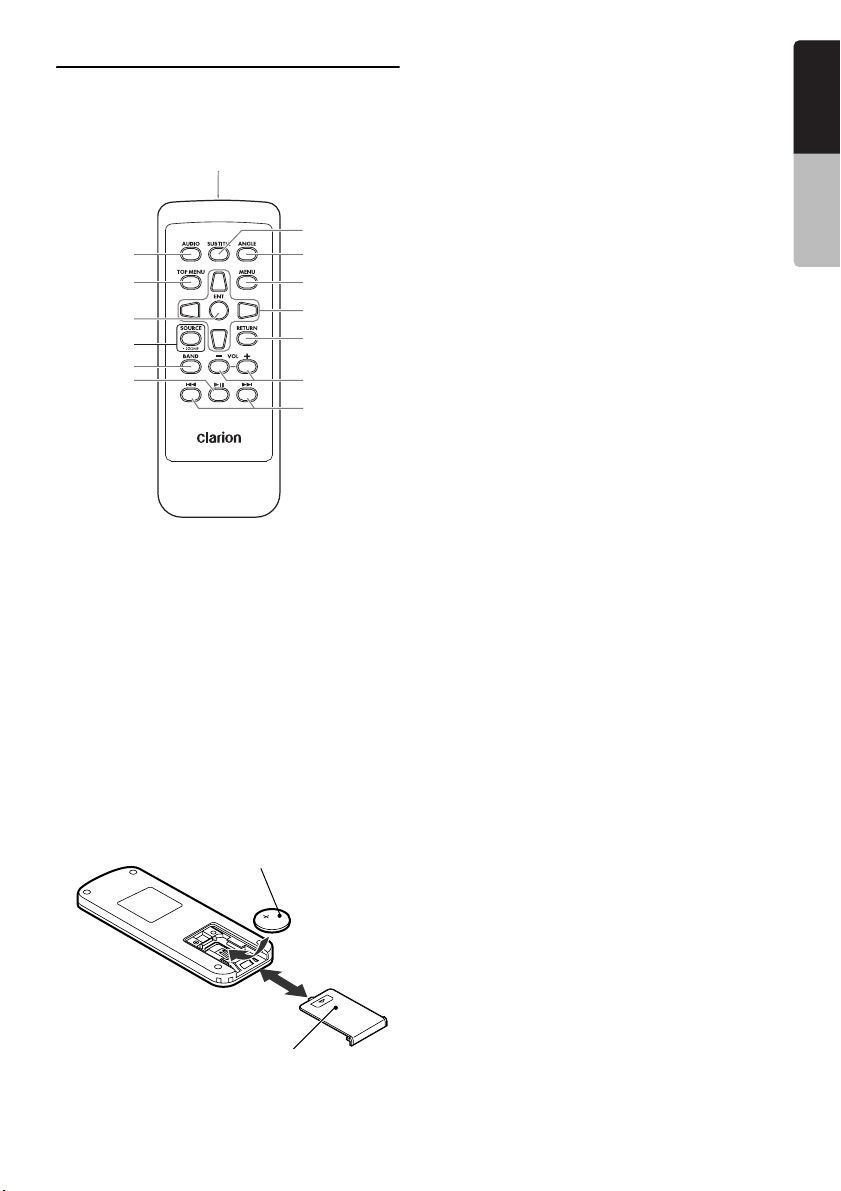
Remote Control Unit
]
❏ Names of buttons
Signal transmitter
Operating range: 30° in all directions
[SUBTITLE]
[AUDIO]
[TOP MENU]
[ENT]
[SOURCE]
[BAND]
[6]
❏ Inserting the Battery
1. Slide the rear cover in the direction of the
arrow, and remove it.
2. Insert the CR2025 battery bundled with the
remote control unit in the directions shown in
the figure, then close the rear cover.
Note:
Using battery improperly can cause it to explode.
Take note of the following points:
• Do not short-circuit, disassemble or heat battery.
• Do not dispose of battery into fire or flames.
• Dispose of spent battery properly.
[ANGLE]
[MENU]
[E], [e], [T], [t
[RETURN]
[–], [+]
[R], [F]
❏ Functions of Remote Control
Unit Buttons
You can use the remote control unit to control the
NX509E. When the 2-Zone function is ON, the
controls work upon the Sub zone only.
Note:
• The steering wheel remote control operations work
upon the Main zone even when the 2-Zone
function is ON.
[AUDIO] button
• Press to set the Audio language. (in DVD Video
and DivX modes)
[SUBTITLE] button
• Press to display subtitles. (in DVD Video and
DivX modes)
[ANGLE] button
• Press to switch among the angles when DVD
video discs recorded in multiple angles are
played back.
[TOP MENU] button
• Press to display the DVD top menu stored on
the DVD video disc. Some discs are not
displayed the DVD top menu. (in DVD Video
mode)
[MENU] button
• Press to display the DVD menu stored on the
DVD video disc. (in DVD Video mode)
[ENT] button
• Press to fix the selected menu item on the DVD
menu. (in DVD Video mode)
[E], [e], [T], [t] buttons
• Press to select desired menu item displayed on
the DVD menu. (in DVD Video mode)
English
Owner’s manual
Rear side
CR2025 battery
Rear cover
NX509E
13
Page 16
[SOURCE] button
English
• Press to switch the source modes such as
Tuner mode, DVD mode, etc. (in any mode)
* Only DVD, USB, and AUX modes are selectable
when 2-Zone ON.
• Keep pressing more than 1 second to turn the
Owner’s manual
2-Zone function ON/OFF. (in any mode)
[RETURN] button
• Press to return to the previous screen while the
DVD menu is being displayed. However, it may
occur that this button operation dose not work
on some discs. (in DVD Video mode)
[BAND] button
• Switches reception bands. (in Tuner mode;
disabled when 2-Zone ON)
• Keep pressing more than 1 second to switch
the Home/Travel modes. (in Tuner mode;
disabled when 2-Zone ON)
• Press to select the next higher folder. (in MP3/
WMA/AAC/DivX and USB memory modes)
[VOL –], [VOL +] buttons
• Decreases or increases the volume. (in any
mode; disabled when 2-Zone ON)
[6] button
• Press to play or pause video and audio media.
(in DVD and USB modes; disabled in USB
mode when 2-Zone ON)
• Keep pressing more than 1 second to stop
video playback. (in DVD Video mode)
[R], [F] buttons
• Press to select the next lower or higher preset
station. (in Tuner mode; disabled when 2-Zone
ON)
• Press to select the next lower or higher chapter
number. (in DVD Video mode)
• Press to select the next lower or higher track.
(in CDDA, MP3/WMA/AAC/DivX, and USB
modes)
• Keep pressing to perform fast backward or fast
forward playback. (in DVD and USB modes)
4. BASIC
OPERATIONS
Note:
• Be sure to read this chapter referring to the chapter
“3. CONTROLS” (page 6).
Turning On and Off the
Power
CAUTION
CAUTION
When the unit is turned on, starting and
stopping the engine with its volume raised to
the maximum level may harm your hearings.
Be careful about adjusting the volume.
Note:
• Start the engine before using this unit.
• Be careful about using this unit for a long time
without running the engine. If you drain the car’s
battery too far, you may not be able to start the
engine and this can reduce the service life of the
battery.
1. Start the engine. The power is supplied to this
unit.
Engine ON
position
The unit automatically memorizes its last
operation mode and will automatically switch
to display that mode.
2. To turn off the power, turn off the engine
switch.
● About the CT (Clock Time) display
• The displayed clock data is based on the CT
(clock time) data in the Navigation system.
• When the CT data cannot be received, “--:--”
appears in the display.
14
NX509E
Page 17
Adjusting the Volume
1. Press the [VOL –]/[VOL +] buttons to adjust
the volume.
[VOL –]: Decreases the volume.
[VOL +]: Increases the volume.
• The volume level indicated in the display is
in a range from 0 (min.) to 33 (max.).
CAUTION
CAUTION
While driving, keep the volume level at which
external sounds can be heard.
Opening the Operation
Panel and Adjusting the
Angle
The operation panel can be opened/closed to
insert/eject a disc. The angle of the operation
panel can be adjusted depending on the
mounting angle of the unit or light coming into the
car.
WARNING
• To prevent the battery from going dead,
operate this unit with the engine running
if possible.
• When the operation panel is operating, be
careful not to get your hand or finger
caught between the panel and main unit
or the instrument panel of the car.
• Do not move the operation panel by hand.
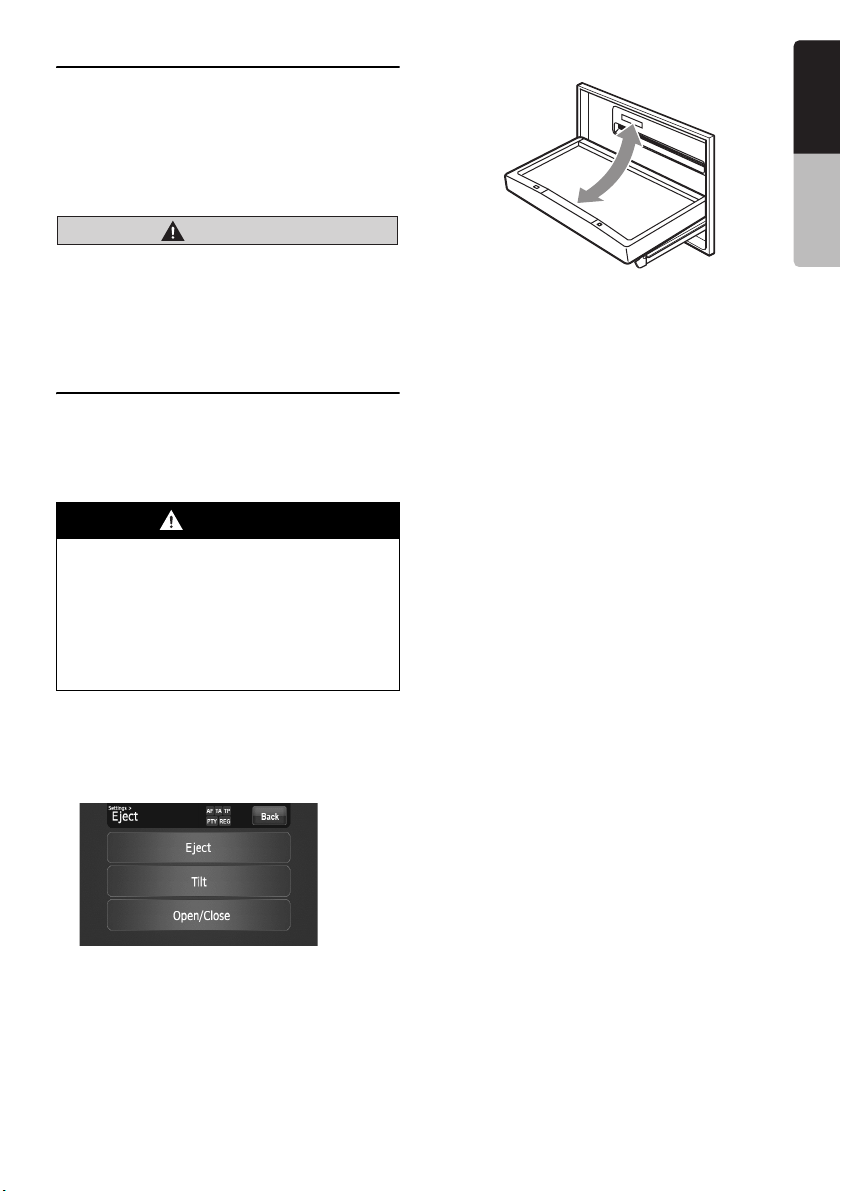
2. Touch the [Open/Close] key.
The operation panel will be opened.
3. Touch the [Open/Close] key when the
operation panel is open.
The operation panel will be closed.
• The operation panel will close automatically
when leaving it open for a while.
4. Touch the [Back] key to return to the previous
screen.
English
Owner’s manual
Opening/closeing the operation
panel
1. Touch the [o (Eject)] key to display the
following Eject screen:
NX509E
15
Page 18

Adjusting the angle of the operation
English
panel
The angle of the operation panel can be adjusted
in the range of 0° to 30°
1. Touch the [o (Eject)] key to display the Eject
screen.
Owner’s manual
2. Repeat touching the [Tilt] key to adjust the
angle of the operation panel. Every touching
the [Tilt] key tilts the operation panel forward
or backward.
The adjusted angle is stored in memory.
Once you adjust the angle of the operation
panel, the operation panel will return to the
adjusted angle even after it is opened/closed.
3. When the adjustment is finished, touch the
[Back] key to return to the previous screen.
Returning the operation panel to the
original angle
1. Touch and hold the [Tilt] key.
The operation panel will move and stop at 30°.
2. Touch and hold the [Tilt] key again.
The operation panel will move and stop at 0°.
Turning the Audio OFF
You can turn off all of the AV features.
1. Press the [SRC] button to display the Source
screen.
2. Touch the [Audio Off] key.
The AV features are turned off.
Turning the AV features on
1. Press the [SRC] button to display the Source
screen.
2. Touch the desired Source key.
The AV features are turned on, and the
system enters into the specified mode.
16
NX509E
Page 19

Turning the Monitor OFF
You can turn off the monitor screen, and change
it to a black screen.
1. Touch the [SET] key to display the Settings
screen.
2. Touch the [Monitor Off] key.
The monitor screen is turned off.
Turning the monitor on
1. Touch the monitor screen.
The monitor screen is turned on, and resumes
the last screen.
• You can also turn on the monitor by
pressing the [SRC] button.
Displaying the Clock
Screen
You can change the screen to display only the
digital clock on a black screen.
1. Touch the clock display on most screens.
The Clock screen is displayed.
2. To return to the current mode screen, touch
the monitor screen.
• Pressing the [SRC] button displays the
Source screen.
Setting/Ejecting a Disc
❏ Notes on handling discs
Handling
• New discs may have some roughness around
the edges. If such discs are used, the player
may not work or the sound may skip. Use a
ball-point pen or the like to remove any
roughness from the edge of the disc.
Ball-point pen
Roughness
• Never stick labels on the surface of the disc or
mark the surface with a pencil or pen.
• Never play a disc with any cellophane tape or
other glue on it or with peeling off marks. If you
try to play such a disc, you may not be able to
get it back out of the DVD player or it may
damage the DVD player.
• Do not use discs that have large scratches, are
misshapen, cracked, etc. Use of such discs
may cause misoperation or damage.
• To remove a disc from its storage case, press
down on the center of the case and lift the disc
out, holding it carefully by the edges.
• Do not use commercially available disc
protection sheets or discs equipped with
stabilizers, etc. These may damage the disc or
cause breakdown of the internal mechanism.
Storage
• Do not expose discs to direct sunlight or any
heat source.
• Do not expose discs to excess humidity or
dust.
• Do not expose discs to direct heat from
heaters.
Cleaning
• To remove fingermarks and dust, use a soft
cloth and wipe in a straight line from the center
of the disc to the circumference.
• Do not use any solvents, such as commercially
available cleaners, anti-static spray, or thinner
to clean discs.
• After using special disc cleaner, let the disc dry
off well before playing it.
On Discs
• Exercise a good precaution when loading a
disc with the panel open.
• Never turn off the power and remove the unit
from the car with a disc loaded.
• Do not use lens cleaning discs. These may
damage the lens of this unit.
• When there seems to be something wrong with
reading discs, please consult your dealer or an
authorized Clarion service center.
English
Owner’s manual
NX509E
17
Page 20

❏ Setting a disc
English
1. Touch the [o (Eject)] key to display the Eject
screen.
2. Touch the [Open/Close] key.
The operation panel will be opened.
3. Insert a disc into the center of the insertion
Owner’s manual
slot with the label side facing up.
The disc will automatically be drawn into the
DVD player.
After setting a disc
The system will automatically be switched to the
relevant source media mode according to the
disc, and start playing back the disc.
When a DVD video disc is set:
The system is switched to the DVD Video mode.
See “DVD Video Operations” (page 26).
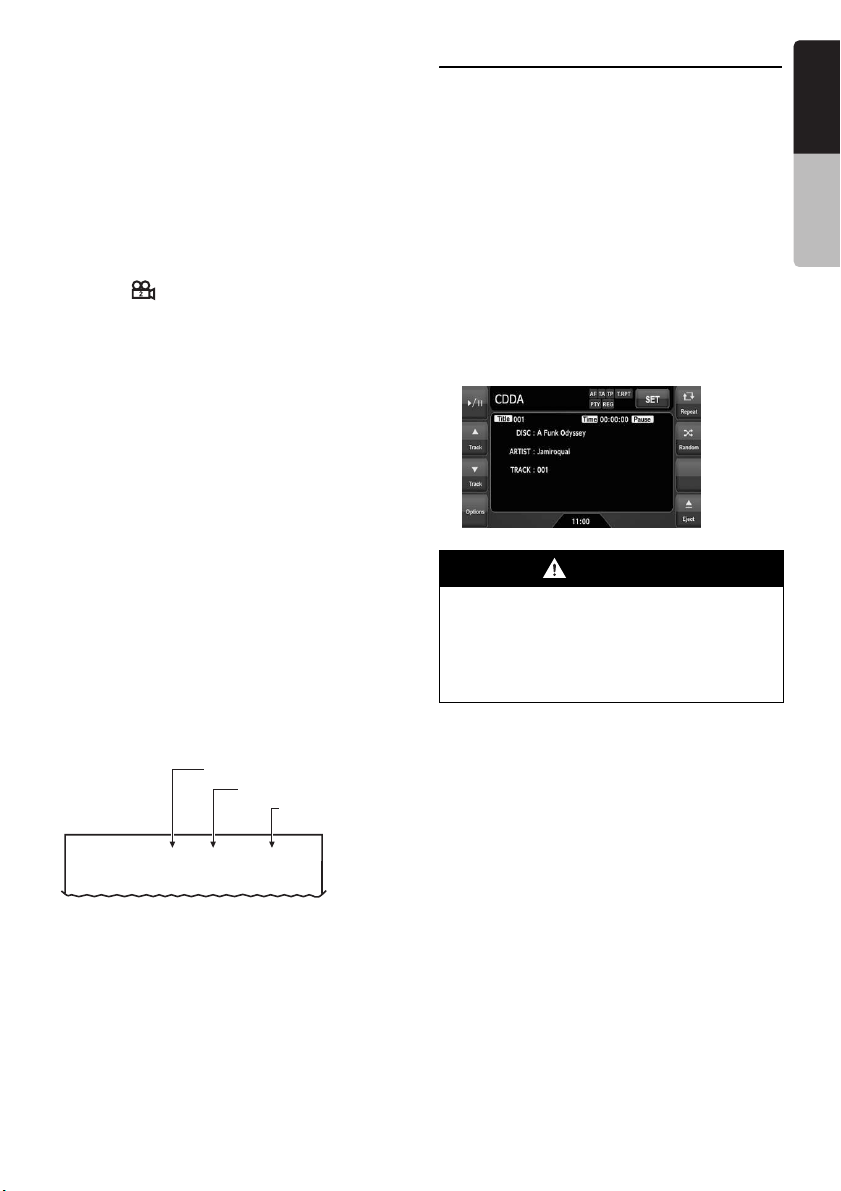
When an Audio CD is set:
The system is switched to the CDDA mode. See
“Audio CD Operations” (page 33).
When a CD/DVD with MP3/WMA/AAC/DivX
files is set:
The system is switched to the MP3/WMA/AAC
mode or DivX mode according to the Playform
setting. See “MP3/WMA/AAC Operations”
(page 34) or “DivX Operations” (page 37).
Note:
• Never insert foreign objects into the disc insertion
slot.
• If the disc is not inserted easily, there may be
another disc in the mechanism or the unit may
require service.
• 8 cm (single play) discs cannot be used.
CAUTION
For your safety, the driver should not insert
or eject a disc while driving.
❏ Ejecting a disc
1. Touch the [o (Eject)] key to display the Eject
screen.
2. Touch the [Eject] key to eject the disc.
The operation panel will be opened and the
disc will be ejected.
• If a disc is left in the ejected position for 15
seconds, the disc is automatically reloaded
(Auto reload).
3. Remove the disc carefully.
4. Touch the [Open/Close] key to close the
operation panel.
• The operation panel will close automatically
when leaving it open for a while.
5. Touch the [Back] key.
Note:
• If you force a disc into the insertion slot before auto
reloading, this can damage the disc.
Connecting/Disconnecting
an USB Media Device
This unit has one USB (Universal Serial Bus)
connector which is compatible with USB 1.1 and
USB 2.0.
❏ Playable USB media devices
This system can control the following USB media
devices connected to the USB connector.
• Apple iPod
• USB memory
About the Apple iPod
iPods can be connected by using the connector
cable supplied with the iPod you use, but in this
case, you can enjoy its audio sound only. To
enjoy video movies stored in the iPod with video
displaying them on this unit, it is required to use
the special connector cable separately sold.
Note:
• This system will not operate or may operate
improperly with unsupported versions.
• For detailed information on the playable iPod
models, see our home page: www.clarion.com
• For the other limitations, see “iPod Operations”
(page 40).
About the USB memory
This system can play audio files (MP3/WMA/
AAC) stored in an USB memory which is
recognized as “USB Mass Storage Class
device”. You can use your USB memory as an
audio device by simply copying desired audio
files into it.
Note:
• This system will not operate or may operate
improperly with some USB memory.
• Files protected with any DRM can not be played.
• For the other limitations, see “USB Memory
Operations” (page 44).
18
NX509E
Page 21

❏ Connecting an USB media
device
CAUTION
• For your safety, the driver should not
connect or disconnect an USB media
device.
• Do not start the vehicle’s engine while the
USB media device is connected, since it
may result in loss or damage to data on the
USB media device. Connect the USB media
device to this unit after starting the engine.
1. Turn on the power of your USB media device,
if required.
2. Confirming the orientation of the connectors,
connect the USB media device to the USB
connector of this unit.
• It may take a long time to recognize the
connected device.
After connecting an USB device
The system will automatically be switched to the
relevant source media mode according to the
USB device connected, and start playback.
When an iPod is connected:
The system is switched to the iPod mode. See
“iPod Operations” (page 40).
When an USB memory is connected:
The system is switched to the USB Memory
mode. See “USB Memory Operations” (page 44).
Note:
• Never insert foreign objects into the USB
connector.
• Always insert the USB media device fully into the
connector. Incomplete connections may cause the
device not to be recognized.
❏ Disconnecting an USB media
device
1. Confirm that data transfer is not performed on
the USB media device.
For the method to confirm it, see the operation
manual of your USB media device.
2. Remove the USB media device from the USB
connector.
CAUTION
Be sure to disconnect the USB media device
while the vehicle’s engine is running.
Otherwise, it may result in loss or damage to
data on the USB media device. Do not stop
the engine when the USB media device is
connected.
Note:
• When turning on the ACC power with no USB
media device connected, “No Media” may be
displayed on the screen if the USB mode is
selected.
English
Owner’s manual
NX509E
19
Page 22
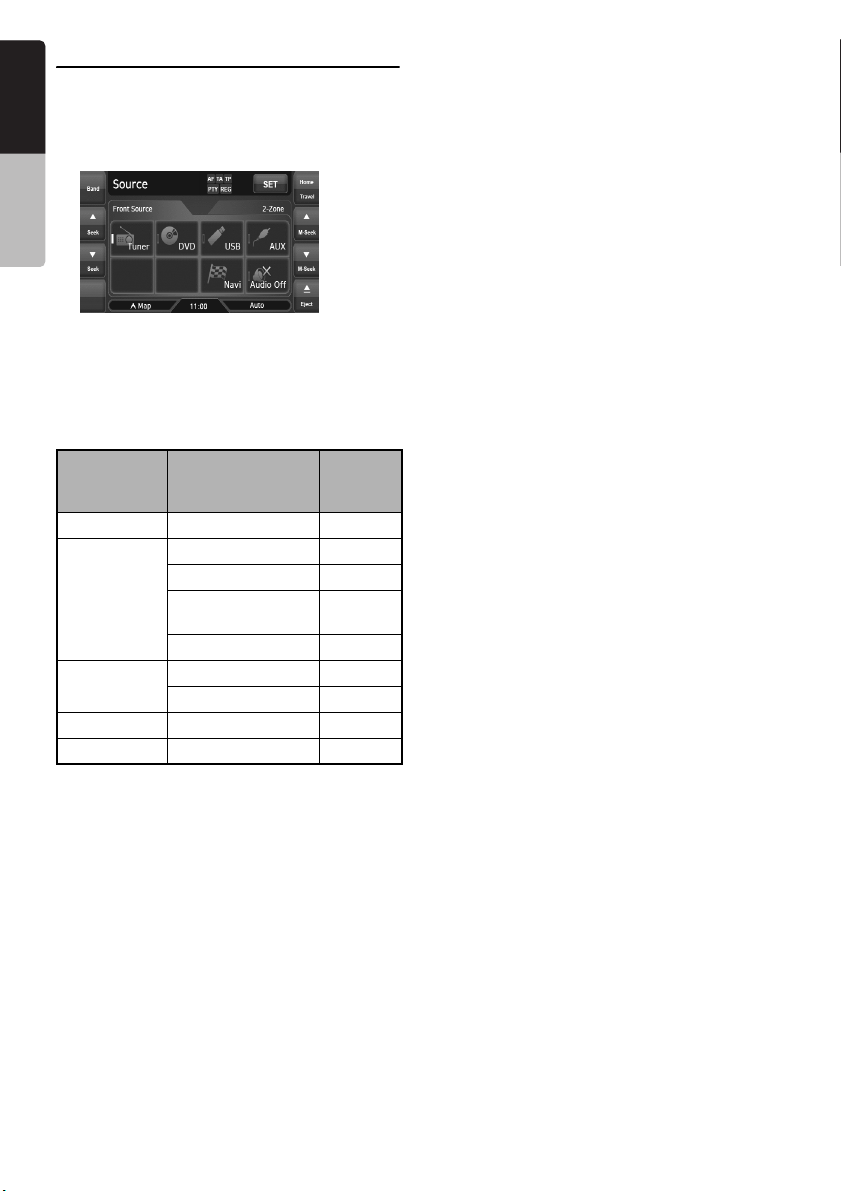
Selecting a Media Source
English
Changing the source mode
1. Press the [SRC] button to display the Source
screen.
Owner’s manual
2. Touch the desired Source key you wish to
change to.
The system is switched to the corresponding
source media mode.
Available media sources
Source
mode
Tuner mode Tuner mode page 22
DVD mode*
USB mode*
AUX mode AUX mode page 46
Navi mode Navi mode page 45
*1:The source media mode to be selected differs
depending on the data format of the disc set
in the DVD player. When no disc is set, “No
Disc” will be displayed.
*2:The source media mode to be selected differs
depending on the type of the USB media
device connected. When no USB media
device is connected, “No Media” will be
displayed.
Note:
• When the USB mode is selected, video images
input from the AUX1 terminal will be output to the
rear monitor. This is normal.
Corresponding
source media
mode
1
DVD Video mode page 26
CDDA mode page 33
MP3/WMA/AAC
mode
DivX mode page 37
2
iPod mode page 40
USB Memory mode page 44
Refer to
page 34
20
NX509E
Page 23

2-Zone Function
About the 2-Zone function
The 2-Zone function is a function that assigns
separate source output to the Main zone (this
unit) and Sub zone (the optional rear monitor) by
simultaneously playing two sources in this
system. Therefore, the rear passengers are
allowed to enjoy a different video source from the
source played on the operation panel of this unit.
• The source sounds of the Main zone are output
from the speakers of the vehicle side, and
those of the Sub zone are from the optional
headphone systems.
• Controlling a source assigned to the Sub zone
can be made by using the optional remote
control unit. To control it from this unit, once
assign the same source to the Main zone, then
control it.
• When a media without video images is played
on the Sub zone, a black screen is output to the
rear monitor.
Note:
• When an interrupt of the navigation system arises
during the 2-Zone function is turned on, the sound
of the Main zone is muted, but the sound of the
Sub zone is output normally.
• When it arises during the 2-Zone function is turned
off, the audio signals to the 4ch speakers are
attenuated, and the voice from the navigation
system is output from the front two speakers.
• You cannot operate the 2-Zone function during the
interrupt of the navigation system.
• When the same source is assigned for Main and
Sub zones, operations in a zone are also applied
for another zone.
Assignable source mode for Main/
Sub zones
● For Main zone
All the source modes can be assigned for the
Front zone.
● For Sub zone
The following source modes can be assigned:
• DVD mode
•USB mode
• AUX1 mode
Note:
• The AUX2 mode cannot be assigned for the Sub
zone.
Setting the 2-Zone function
• The factory default setting is OFF.
1. Press the [SRC] button to display the Source
screen.
2. Touch the [2-Zone] tab to display the 2-Zone
tab screen.
The source keys for the Sub zone are
displayed.
3. Touch the desired source key you wish to
assign to the Sub zone.
The 2-Zone function is turned on with the
selected source mode assigned to the Sub
zone.
4. Touch the [Back] key to return to the previous
screen.
Note:
• Use the remote control unit to control the source
assigned to the Sub zone. To control it from this
unit, once select the same source mode as
assigned to the Sub zone for the Main zone, and
then control it.
English
Owner’s manual
Turning off the 2-Zone function
1. Press the [SRC] button to display the Source
screen.
2. Touch the [2-Zone] tab to display the 2-Zone
tab screen.
3. Touch and hold the [2-Zone Off] key for more
than 1 second.
NX509E
21
Page 24

English
5. SOURCE
OPERATIONS
Owner’s manual
Radio Operations
Listening to the radio
1. Press the [SRC] button, and touch the [Tuner]
key.
The Tuner mode screen is displayed, and the
system resumes the last status of the Tuner
mode.
2. Touch the [Home Travel] key to select the
Home or Travel mode.
The Home/Travel modes are provided to
manage the preset stations separately in your
home location and in a location during a trip.
3. Touch the [Band] key to select the radio band.
Each time the key is touched, the radio
reception band changes in the following
order:
• In Home mode: FM Home 1 ➜ FM Home 2
➜ AM Home (MW/LW) ➜ FM Home 1...
• In Travel mode: FM Travel ➜ AM Travel
(MW/LW) ➜ FM Travel...
4. Touch the desired Preset key to tune in the
corresponding preset station.
Seek tuning
There are 2 types of seek tuning: DX SEEK and
LOCAL SEEK.
The DX SEEK can tune in to receivable
broadcast stations, and the LOCAL SEEK can
tune in to only broadcast stations with a good
reception condition.
1. Touch the [Band] key to select the desired
band (FM or AM (MW, LW)).
2. Tune in to a station.
•If “TA” is displayed on the screen, TP
stations are automatically sought.
● DX SEEK
Touch the [{ (Seek)] or [} (Seek)] key to
automatically seek a station.
When the [{ (Seek)] key is touched, the station
is sought in the direction of higher frequencies; if
the [} (Seek)] key is touched, the station is
sought in the direction of lower frequencies.
• When the DX Seek tuning starts, “DX-S”
appears on the screen.
● LOCAL SEEK
If you keep touching the [{ (Seek)] or [} (Seek)]
key more than 1 second, the Local Seek tuning is
carried out.
The broadcast stations with good reception
sensitivity are automatically selected.
• When the Local Seek tuning starts, “LO-S”
appears on the screen.
Manual tuning
There are 2 ways available: Quick tuning and
step tuning.
When it is in the step tuning mode, the frequency
changes one step at a time. In quick tuning mode,
you can quickly tune the desired frequency.
1. Touch the [Band] key to select the desired
band (FM or AM (MW/LW)).
2. Tune into a station.
Quick tuning:
Touch and hold the [{ (M-Seek)] or [} (MSeek)] key to tune in a station.
Step tuning:
Touch the [{ (M-Seek)] or [} (M-Seek)] key
to manually tune in a station.
22
NX509E
Page 25

Recalling a preset station
There are total of 30 preset positions (6-FM
Home 1, 6-FM Home 2, 6-AM Home, 6-FM
Travel, and 6-AM Travel) to store individual radio
stations in memory.
1. Touch the [Home Travel] key to select the
Home or Travel mode.
2. Touch the [Band] key to select the band.
3. Touch the corresponding Preset key to recall
the stored station.
• Touching and holding the desired Preset
key for more than 2 seconds will store the
current station to the preset memory.
Manual memory
1. Touch the [Home Travel] key to select the
Home or Travel mode.
2. Touch the [Band] key to select the band you
wish to store.
3. Tune in the station you wish to store using the
seek tuning, manual tuning, or preset tuning.
4. Touch and hold the desired Preset key you
wish to store the current station for more than
2 seconds.
❏ About the RDS (Radio Data
System)
This unit has a built in RDS decoder system that
supports broadcast stations transmitting RDS
data. This system can display the name of the
broadcast station being received (PS), and can
automatically switch to the broadcast station with
the best reception as you move long distances
(AF switching). Also, if a traffic announcement or
program type information is broadcast from an
RDS station, no matter what mode you are in, this
broadcast is received. Additionally, if EON
information is received, this information enables
automatic renewal of other preset stations on the
same network and interruption of traffic
announcement and/or chosen program type from
other stations (TP). This function is not available
in some areas.
“AF” : Alternative Frequency
“PS” : Program Service Name
“PTY” : Program Type
“EON”: Enhanced Other Network
“TP” : Traffic Program
• The RDS interrupt does not function during AM
(MW/LW) radio reception.
English
Owner’s manual
Auto Store
The Auto Store is a function for storing up to 6
stations that are automatically tuned in
sequentially. If 6 receivable stations cannot be
received, a previously stored station remains
unoverwritten at the memory position.
• The Auto Store function works only in the
Travel mode.
1. Touch the [Home Travel] key to select the
Travel mode.
2. Touch the [Band] key to select the band.
3. Touch the [Auto Store] key to start scanning
stations.
A beep sounds and the stations with good
reception are stored automatically to the
preset channels.
•“AS” appears during scanning stations. To
stop the scanning, touch the [Auto Store]
key again.
Scrolling radio text
When the current station broadcasts text data, it
is displayed on the Tuner mode screen. When
the text is longer than the text area, you can
confirm the entire text by scrolling it.
1. Touch the text area.
The text will scroll once.
❏ AF (Alternative Frequency)
function
The AF function switches to a different frequency
on the same network in order to maintain
optimum reception.
Switching ON/OFF the AF function
1. Touch the [Options] key.
2. Touch the [On] or [Off] key of the AF item to
turn the function on or off.
• When the AF function is ON, “AF” will be
displayed at the top of the screen.
• If the reception of the current broadcast
station deteriorates durably, “AF” indication
will blink, and this unit searches for the
same program on another frequency.
NX509E
23
Page 26

❏ REG (Regional Program)
English
function
When the REG function is ON, the optimum
regional station can be received. When this
function is OFF, if the regional station area is
switched as you drive, a regional station for that
Owner’s manual
region is received.
Note:
• This function is disabled when a national station
such as BBC R2 is being received.
• The REG function ON/OFF setting is enabled only
when the AF function is ON.
Switching ON/OFF the REG function
1. Touch the [Options] key.
2. Touch the [On] or [Off] key of the REG item to
turn the function on or off.
Manually tuning a regional station in
the same network
Note:
• This function can be used when a regional
broadcast of the same network is received.
• This function is enabled only when the AF function
is ON and the REG function is OFF.
1. Touch the [Band] key to select the band.
2. Touch your desired Preset key to call out a
regional station.
3. Each time you touch the same Preset key, this
unit switches from a local station to the other
on the same network.
❏ TA (Traffic Announcement)
function
When a traffic announcement broadcast starts
during the TA standby mode, the traffic
announcement broadcast is received as top
priority regardless of the function mode, so you
can listen to it. The Traffic Program (TP)
automatic tuning is also available.
Setting TA standby mode
1. Touch the [Options] key.
2. Touch the [On] key of the TA item to set the
TA standby mode.
“TA” will be displayed at the top of the screen,
and the system will automatically search for a
TP station (TP SEEK). When an RDS
broadcast station with traffic announcement
program is received, “TP” will be displayed at
the top of the screen.
• You can also set the function from the
Settings screen (see page 52).
Note:
• If no TP station is received, this system continues
the search operation. Performing the above
procedure again makes the “TA” go off, and stops
TP station searching.
● Canceling a Traffic Announcement
broadcast
1. Touch the [Back] key while a Traffic
Announcement broadcast is being received.
The Traffic Announcement broadcast
reception is canceled, and the system goes
into the TA standby mode.
• You can also cancel the Traffic
Announcement broadcast by keeping
pressing the [SRC] button for more than 1
second.
● Canceling TA standby mode
1. When “TA” is displayed on the screen, touch
the [Options] key.
2. Touch the [Off] key of the TA item.
“TA” on the screen goes off, and the TA
standby mode is canceled.
❏ PTY (Program Type) function
This function enables you to listen to a broadcast
of the specified program type when the broadcast
starts, even if the system operates in a mode
other than the Tuner mode.
• Some countries do not yet have PTY
broadcast.
• In the TA standby mode, a TP station has
priority over a PTY broadcast station.
24
NX509E
Page 27

Selecting PTY
1. Touch the [Options] key.
2. Touch the [On] key of the PTY item to enter
the PTY standby mode.
3. Touch the [PTY Select] key to display the
PTY Select screen.
• If no operation is made within 7 seconds,
the system will return to the Options screen.
4. Touch your desired PTY Preset key to select
the program type.
• The following table shows the factory
default settings stored for the Preset keys:
Preset
number
1NewsNews
2 Info Information
3 Pop M Pop music
4 Sport Sport
5 Classics Classics
6 Easy M Easy listening
5. Touch the [Back] key to return to the previous
screen.
● Canceling PTY standby mode
1. Touch the [Options] key.
2. Touch the [Off] key of the PTY item.
“PTY” goes off, and the PTY standby mode is
canceled.
● Canceling PTY interrupt broadcast
1. Touch the [Back] key during receiving the
PTY interrupt broadcast. The PTY interrupt is
canceled, and the system returns to PTY
standby mode.
• You can also cancel the PTY interrupt
broadcast by keeping pressing the [SRC]
button for more than 1 second.
● Changing the PTY language
1. Touch the [Options] key.
2. Touch the [PTY Language] key to display the
PTY Language screen.
3. Touch the desired Language key you wish to
set.
4. Touch the [Back] key to return to the previous
screen.
ENGLISH Contents
PTY item
music
PTY seek
1. Touch the [Options] key.
2. Touch the [PTY Select] key to display the
PTY Select screen.
3. Touch your desired PTY Preset key to select
the program type.
• If no operation is made within 7 seconds,
the system will return to the Options screen.
• You can also select a program type from the
Items screen.
4. Touch a Seek key.
If you touch the [{ (P-seek)] key, the system
seeks a PTY broadcast moving up the
frequencies.
If you touch the [} (P-seek)] key, it seeks
moving down the frequencies.
• If no station with the selected PTY
broadcast can be received, the unit returns
to the previous mode.
PTY preset memory
1. Touch the [Options] key.
2. Touch the [PTY Select] key.
3. Touch the [Item] key to display the Items
screen.
• If no operation is made within 7 seconds,
the system will return to the Options screen.
4. Touch the desired PTY Item key to select the
program type you wish to store.
• You can scroll the list by touching [{] or [}]
key.
5. Touch the [Back] key to display the PTY
Select screen.
6. Touch and hold the desired PTY Preset key
you wish to store the currently selected
program type for more than 2 seconds.
• The 29 types of PTY listed below can be
selected.
PTY item
ENGLISH Contents
News News
Affairs Current Affairs
Info Information
Sport Sport
Educate Education
Drama Drama
Culture Culture
Science Science
Varied Varied
English
Owner’s manual
NX509E
25
Page 28

Pop M Pop Music
English
Rock M Rock Music
Easy M Easy Listening Music
Light M Light Classical Music
Owner’s manual
Classics Serious Classical
Other M Other Music
Weather Weather
Finance Finance
Children Children’s Programs
Social Social Affairs
Religion Religion
Phone in Phone In
Travel Travel
Leisure Leisure
Jazz Jazz Music
Country Country Music
Nation M National Music
Oldies Oldies Music
Folk M Folk Music
Document Documentary
Music
Emergency broadcast
If an emergency broadcast is received, all the
function mode operations are stopped. “Alarm”
appears on the screen and the emergency
broadcast can be heard.
● Canceling an emergency broadcast
1. Touch the [Back] key during receiving the
emergency broadcast. The emergency
broadcast is canceled, and the system returns
to the PTY standby mode.
• You can also cancel the emergency
broadcast by keeping pressing the [SRC]
button for more than 1 second.
❏ Volume setting of TA,
emergency broadcast (Alarm)
and PTY
The volume for TA, Alarm and PTY interrupts can
be set during TA, Alarm or PTY interrupt.
• The factory default setting is “15”.
1. Use the [VOL +] and [VOL –] buttons to set
the volume to the desired level (00 to 33)
during a TA, Alarm or PTY interrupt.
• When the TA, Alarm, or PTY interrupt ends,
the volume returns to the level before the
interrupt.
DVD Video Operations
❏ Selecting the DVD Video mode
1. Set a DVD video disc to the DVD player.
The system will automatically read the disc
data, change to the DVD mode (DVD Video
mode), and start playback after a while.
See also “Setting/Ejecting a Disc” (page 17).
WARNING
• Some videos may be recorded at a higher
volume level than desired. Increase the
volume gradually from the minimal
setting after the video has started.
• For your safety, the driver should not
watch the video or operate the controls
while driving. Please note that watching
and operating the video while driving are
prohibited by law in some countries.
Note:
• For your safety, this system has a safety function
which turns off the picture when the car is moving,
so only the audio can be heard. The picture can
only be watched when the car is stopped and the
parking brake is applied.
• If “Audio Only” appears on the screen just after
turning on the ACC power of the car, release the
parking brake while confirming safety, and then
engage the parking brake again.
● When a DVD video disc is already set
1. Press the [SRC] button to display the Source
screen.
2. Touch the [DVD] key to select the DVD Video
mode.
The system changes to the DVD mode (DVD
Video mode), and starts playback from the
previous position.
26
NX509E
Page 29

❏ Changing the DVD System
Settings
Note:
• If the Setup operation is performed in the middle of
DVD video play, the disc will restart from
beginning.
Displaying the DVD Setup screen
1. Touch the screen to display the DVD Video
mode screen.
2. Touch the [Options] key to display the
Options menu.
3. Touch the [Setup] key to display the Setup
screen.
• Touch the [}] key to display the next page.
• Touch the [{] key to return to the previous
page.
● When watching through a wide type of the
rear monitor (16:9)
Wide:
● When watching through a conventional
type of the rear monitor (4:3)
Pan Scan:
The leftmost and rightmost areas of the screen
are cut off.
This function allows displaying the important
part of image fully on the screen. In some
cases, image is displayed while being panned
(scrolled).
Letter Box:
A black zone is created in the top and bottom
areas of the screen.
English
Owner’s manual
4. Perform setting for the desired setting items.
See the following sections for detail.
• In the following sections, only the details of
settings are described, the procedures to
select items are skipped.
5. Touch the [Back] key.
Setting up the screen size
Set up the screen size according to the optional
rear monitor which is connected to this unit.
• The factory default setting is “Wide”.
4-1. Touch the [Wide], [PS], or [LB] key of the TV
Display item to change the screen size to
“Wide”, “Pan Scan” or “Letter Box”.
This method displays Cinema Scope and Vista
Vision images without cutting them off by
creating a black zone on the top and bottom
gaps.
Setting up the angle mark display
You can set up so that the angle mark appears on
scenes where the angles can be switched.
• The factory default setting is “Off”.
4-1. Touch the [On] or [Off] key of the Angle item
to turn the Angle function ON or OFF.
NX509E
27
Page 30

Setting up the disc menu language
English
• The factory default setting is “English”.
4-1. Touch the []] key of the Menu Language
item.
4-2. Touch the desired Language key you wish
Owner’s manual
to set.
4-3. Touch the [Back] key.
Setting up the audio language
• The factory default setting is “English”.
4-1. Touch the []] key of the Audio Language
item.
4-2. Touch the desired Language key you wish
to set.
4-3. Touch the [Back] key.
Setting up the subtitle language
• The factory default setting is “English”.
4-1. Touch the []] key of the Subtitle Language
item.
4-2. Touch the desired Language key you wish
to set.
• To turn off the subtitle, select the [Off] key.
4-3. Touch the [Back] key.
Setting up the password for setting
up of the parental level
• The factory default setting is “0000”.
4-1. Touch the []] key of the Password item.
4-2. Touch the ten-key (0 to 9) to input a 4-digit
password.
• Input the old password, and touch the
[ENT] key.
Input “4356” to reset password.
• Input a new password, and touch the
[ENT] key.
• Input the same new password again, and
touch the [ENT] key.
Note:
• When a disc with view restrictions is inserted, you
will be prompted to input a password. The disc will
not be viewable until the correct password is
entered.
Setting up the country code
Set up the country number for setting up of the
parental level.
• The factory default setting is “7166” (U.K.).
4-1. Touch the []] key of the Country Code item.
4-2. Touch the ten-key (0 to 9) to input a 4-digit
country code (see the following table).
4-3. Touch the [ENT] key.
Country code list:
Country Input code
ALBANIA 6576
ANDORRA 6568
AUSTRIA 6584
BAHRAIN 6672
BELGIUM 6669
BOSNIA AND
HERZEGOWINA
BULGARIA 6671
CROATIA (local name:
Hrvatska)
CYPRUS 6789
CZECH REPUBLIC 6790
DENMARK 6875
EGYPT 6971
FINLAND 7073
FRANCE 7082
(FRANCE,METROPOLITAN) 7088
GERMANY 6869
GREECE 7182
HUNGARY 7285
ICELAND 7383
IRAN (ISLAMIC REPUBLIC
OF)
IRAQ 7381
IRELAND 7369
ISRAEL 7376
ITALY 7384
6665
7282
7382
28
NX509E
Page 31

JAPAN 7480
JORDAN 7479
KUWAIT 7587
LEBANON 7666
LESOTHO 7683
LIECHTENSTEIN 7673
LUXEMBOURG 7685
MACEDONIA, THE FORMER
YUGOSLAV REPUBLIC OF
MALTA 7784
MONACO 7767
NETHERLANDS 7876
(NETHERLANDS ANTILLES) 6578
NORWAY 7879
OMAN 7977
POLAND 8076
PORTUGAL 8084
QATAR 8165
ROMANIA 8279
SAN MARINO 8377
SAUDI ARABIA 8365
SLOVAKIA (Slovak Republic) 8375
SLOVENIA 8373
SOUTH AFRICA 9065
SPAIN 6983
SWAZILAND 8390
SWEDEN 8369
SWITZERLAND 6772
SYRIAN ARAB REPUBLIC 8389
TURKEY 8482
UNITED ARAB EMIRATES 6569
UNITED KINGDOM 7166
Vatican City State 8665
YEMEN 8969
YUGOSLAVIA 8985
FAROE ISLANDS 7079
GIBRALTAR 7173
GREENLAND 7176
SVALBARD AND JAN
MAYEN ISLANDS
7775
8374
Setting up the parental level
You can change the level of parental lock
(audiovisual restriction).
This function allows cutting scenes that are
unfavorable for children or replacing them
automatically with other scenes prepared in
advance. For example, by replacing scenes of
radical violence or portrayals of sex with safe
scenes, you can make a trouble-free story as if it
were so from the beginning.
• The factory default setting is “8”.
4-1. Touch the [–] or [+] key of the Parental Level
item.
The Password input screen is displayed.
4-2. Touch the ten-key (0 to 9) to input a 4-digit
password, and touch the [ENT] key.
• The factory default setting of the
password is “0000”.
4-3. Touch the [–] or [+] key to select level “1” to
“8”, or “Off”.
The relationship between DVD video
category codes and parental level are
shown in the following table. Use this table
when setting the parental level.
LEVEL7 NC-17
(NO ONE 17 AND UNDER
ADMITTED)
LEVEL6 R
(RESTRICTED)
LEVEL4 PG-13
(PARENTS STRONGLY
CAUTIONED)
LEVEL3 PG
(PARENTAL GUIDANCE
SUGGESTED)
LEVEL1 G
(GENERAL AUDIENCES)
• The contents that the parental level restricts
vary with the country code.
English
Owner’s manual
NX509E
29
Page 32

❏ Operating a DVD video
English
Watching a DVD Video
After disc loading, the play mode is automatically
engaged.
• When playback is not started, touch the [p]
Owner’s manual
key.
• Operations may differ depending on the story
of the disc.
● About the volume adjustment when playing
DVD Video discs
This system has the independent volume data for
playing DVD Video discs. The volume setting
during DVD playback does not affect the volume
of the other modes, and the volume setting in the
other modes does not affect the DVD playback.
● When the DVD menu is displayed
For general DVD Video discs, the DVD menu
may appear.
After the DVD menu is displayed, select an item
in the operations described as follows.
Showing the DVD Video mode
screen
The DVD Video mode screen is used to control
the playback mode from the screen.
1. Touch the screen.
The DVD Video mode screen is displayed.
If you do not touch the screen for 7 seconds,
the display will return to the playback screen.
[Normal]:
The image is expanded so that the top and
bottom edges of the image fit to the screen,
and that the aspect ratio of the image
becomes 4:3. The aspect ratio of the image
may be changed.
[Wide]:
The image is expanded so that the left and
right edges of the image fit to the screen. The
top and bottom areas of the image may be cut
off.
3. Touch the [Hide] key to return to the playback
screen.
DVD menu operations
● Showing the DVD menu
1. Showing the DVD Video mode screen, touch
the [Top Menu] or [Title Menu] key during
playback.
The DVD menu appears.
• The displayed contents for each key differ
depending on the DVD software.
• An example shown below is the DVD menu
display:
Selecting the screen size
You can change the screen size to suit to the
playback film.
• The factory default setting is “Full Wide”.
1. Touch the screen to display the DVD Video
mode screen.
2. Repeat touching the [S-Size] key until your
desired screen size is selected.
•
This key shows the current screen size setting.
[Full Wide]:
The image is expanded so that the rectangle
of the image fits to the screen (16:9). The
aspect ratio of the image may be changed.
[Cinema]:
The image is expanded so that the top and
bottom edges of the image fit to the screen.
Suitable for letterbox-format images. Subtitles
of non-letterboxed images may be cut off in
this mode.
30
NX509E
● Operating the DVD menu
You can operate the menu items by displaying
the Key Pad panel.
1. Showing the DVD Video mode screen, touch
the [Cursor] or [10key] key.
The Cursor-Key Pad panel or the NumericKey Pad panel is displayed on the screen.
• Touching the [Num] key or [Cur] key
changes to the each other panel.
2. Select the desired menu item using either the
Cursor-Key or the Nummeric-Key according
to the menu contents.
3. Touch the [ENT] key to specify the selected
menu item.
4. Touch the [Back] key to hide the Key Pad
panel.
Page 33

● Switching Key Pad position
When the menu items become difficult to view by
the Key Pad buttons, you can move the Key Pad
panel to the other side of the screen.
Key Pad
Key Pad
Stopping playback
1. Showing the DVD Video mode screen, touch
and hold the [p] key for more than 1
second during playback.
Playback is stopped.
2. To resume playback, touch the [p] key.
Playback resumes from the scene where
playback is stopped.
Pausing playback
1. Showing the DVD Video mode screen, touch
the [p] key during playback.
Playback pauses.
2. To resume playback, touch the [p] key
again.
Playback resumes.
Slow playback
1. Showing the DVD Video mode screen, touch
the [p] key during playback to pause
playback.
2. Touch and hold the [{ (Chapter)] key.
While touching the key, slow playback
continues at 1/3 speed.
Releasing the key resumes the normal
playback.
• Slow playback cannot be performed in the
backward direction. In addition, audio
cannot be reproduced during slow
playback.
Fast forward and fast backward
1. Showing the DVD Video mode screen, touch
and hold the [{ (Chapter)] or [} (Chapter)]
key during playback.
[{ (Chapter)] key: Fast forward
[} (Chapter)] key: Fast backward
The playback speed becomes 4-time faster at
first and then 16-time faster 3 seconds later.
Releasing the key resumes the normal speed
playback.
• No audio is reproduced during fast forward
and fast backward operation.
• The fast forward and fast backward speed
may differ depending on the disc.
Skipping chapters (searching)
“Chapter” means a small segment to divide the
“Title” (film) which is recorded on the disc.
1. Showing the DVD Video mode screen, touch
the [{ (Chapter)] or [} (Chapter)] key during
playback.
Chapters are skipped as many as the times
touching the key, and playback starts.
Current
location
Chapter ChapterChapter
down
• Touching the [{ (Chapter)] key starts
playback from the beginning of the next
chapter.
up
English
Owner’s manual
NX509E
31
Page 34

• Touching the [} (Chapter)] key starts
English
Owner’s manual
playback from the beginning of the current
chapter.
When touching this key again within about 4
seconds, playback starts from the
beginning of the previous chapter.
Searching with a chapter/title
number
You can locate the beginning of a scene using
the chapter numbers or title numbers recorded
on the DVD video disc.
• “Chapter” means a small segment to divide the
“Title” (film) which is recorded on the disc.
1. Showing the DVD Video mode screen, touch
the [Options] key.
2. Touch the [Direct] key.
The Key Pad screen appears.
• You can specify the title number by touching
the [Title] key.
3. Input the chapter number that you want to
play back using the [0] to [9] key.
4. Touch the [ENT] key.
Playback starts from the scene of the input
chapter number of the selected title.
• If the input chapter number does not exist or
searching with a chapter number is not
allowed, the screen image will not change.
Repeat playback
This operation plays back the current title or
chapter repeatedly.
1. Showing the DVD Video mode screen, touch
the [Options] key.
2. Touch the [Title] or [Chapter] key of the
Repeat item, then touch the [Back] key.
The “T.RPT” or “C.RPT” will be displayed.
3. Touch the [Back] key to return to the previous
screen.
4. Perform the same operation to turn off the
repeat playback.
2. Touch the [Audio] key during playback.
Each time you touch the key, you can switch
among audio languages.
• Depending on the disc, up to 8 audios may
be recorded. For details, see the mark of the
8
disc ( : Indicates that 8 audios have
been recorded).
• Depending on the disc, switching may be
completely impossible or impossible on
some scenes.
• It may take time to switch among audios.
• When the power is turned on and the disc is
changed to a new one, the language set as
the factory default is selected. If that
language has not been recorded, the
language is specified on the disc.
3. Touch the [Back] key to return to the previous
screen.
Switching subtitles
On DVD discs in which two or more subtitle
languages have been recorded, you can switch
among the subtitle languages during playback.
1. Showing the DVD Video mode screen, touch
the [Options] key.
2. Touch the [Subtitle] key during playback.
The Subtitle Language screen appears.
3. Touch the Language key you wish to display.
• Depending on the disc, up to 32 kinds of
subtitles may be recorded. For details, see
the mark of the disc ( : Indicates that 8
kinds of subtitles have been recorded).
• To turn off subtitles, select “OFF”.
• Depending on the disc, switching may be
completely impossible or impossible on
some scenes.
• It may take time to switch among subtitles.
4. Touch the [Back] key to return to the previous
screen.
8
Switching among languages
On discs in which two or more audios or audio
languages have been recorded, you can switch
among the audio languages during playback.
1. Showing the DVD Video mode screen, touch
the [Options] key.
32
NX509E
Page 35
Switching angles
On DVD discs in which video images have been
recorded in two or more angles, you can switch
among the angles during playback.
• When the Angle function is set to “On”, the
angle mark will appear on scenes where the
angles can be switched (see page 27).
1. Showing the DVD Video mode screen, touch
the [Angle] key during playback.
Each time you touch the key, you can switch
among angles.
• Depending on the disc, up to 9 angles may
be recorded. For details, see the mark of the
disc ( : Indicates multi-angle).
• Depending on the disc, angles may switch
smoothly or switch with a momentary still
image.
• Depending on the disc, switching may be
completely impossible or impossible on
some scenes.
• It may take time to switch among angles.
• Depending on the disc, scenes recorded in
two or more angles may be played back.
• When the power is turned on and the disc is
changed to a new one, the language set at
the time of factory shipment is selected. If
that language has not been recorded, the
language is specified on the disc.
Displaying/hiding the playback
status
1. Showing the DVD Video mode screen, touch
the [Options] key.
2. Touch the [On] or [Off] key of the P.Time item
during playback.
3. Touch the [Back] key to return to the previous
screen.
Playback status is displayed on the screen.
Title number
Chapter number
Playback time
91:00:00 100C 10T
Audio CD Operations
This system is a CD TEXT compatible model,
and supports the display of the DISC TITLE,
TRACK TITLE, and TRACK ARTIST (or DISC
ARTIST) of the CD TEXT.
Note:
• This unit supports only CD TEXT in English. Also,
some character data may not be reproduced
properly on the display.
❏ Selecting the CDDA mode
1. Set an audio CD to the DVD player.
The system will automatically read the disc
data, change to the DVD mode (CDDA
mode), and start playback after a while.
See also “Setting/Ejecting a Disc” (page 17).
WARNING
• Some CDs may be recorded at a higher
volume level than desired. Increase the
volume gradually from the minimal
setting after playback has started.
• For your safety, the driver should not
operate the controls while driving.
● When an audio CD is already set
1. Press the [SRC] button to display the Source
screen.
2. Touch the [DVD] key to select the CDDA
mode.
The system changes to the DVD mode
(CDDA mode), and starts playback from the
previous position.
English
Owner’s manual
NX509E
33
Page 36

❏ Operating an audio CD
English
Listening to an audio CD
After disc loading, the play mode is automatically
engaged.
• When playback is not started, touch the [p]
Owner’s manual
key.
Pausing playback
1. Touch the [p] key during playback.
Playback pauses.
2. To resume playback, touch the [p] key.
Playback resumes.
Skipping a track (searching)
1. Touch the [{ (Track)] or [} (Track)] key
during playback.
Tracks are skipped, as many as the times the
key is touched, and playback starts.
• Touching the [{ (Track)] key starts
playback from the beginning of the next
track.
• Touching the [} (Track)] key starts
playback from the beginning of the current
track.
When this key is touched again within about
2 seconds, playback starts from the
beginning of the previous track.
Fast forward and fast backward
1. Touch and hold the [{ (Track)] or [} (Track)]
key during playback.
The playback speed becomes 4-time faster
first and then 16-time faster 3 seconds later.
Releasing the key resumes the normal speed
playback.
Other various play functions
1. Touch the [Options] key.
2. Touch the [Track] key of the function you
want to play.
Track repeat playback:
Touch the [Track] key of the Repeat item.
• This operation plays back the current track
repeatedly.
•“T.RPT” is displayed on the screen.
• You can also specify this function by
touching the [Repeat] key on the CDDA
mode screen.
Track random playback:
Touch the [Track] key of the Random item.
• This operation plays back all tracks on the
disc in no particular order.
•“T.RDM” is displayed on the screen.
• You can also specify this function by
touching the [Random] key on the CDDA
mode screen.
3. To cancel the play, touch the [Track] key of
the function to cancel.
4. Touch the [Back] key to return to the previous
screen.
Scrolling track titles
When a title or name displayed on the screen is
longer than the text area, you can confirm the
entire text by scrolling it.
1. Displaying the text you wish to scroll, touch
the text area.
The text will scroll once.
MP3/WMA/AAC Operations
This system can playback MP3/WMA/AAC files
recorded on a disc.
❏ About the MP3/WMA/AAC files
What is MP3/WMA/AAC?
MP3, WMA, and AAC are the audio file formats
which have penetrated into PC users and
become a standard format.
MP3 is an audio compression method and
classified into audio layer 3 of MPEG standards.
WMA (Windows Media Audio) is an audio
compression method developed by Microsoft
Corporation.
AAC (Advanced Audio Coding) is a newer audio
compression method developed for used with
video compression standards MPEG-2 and
MPEG-4, and has been adopted as the standard
audio format of the iPod and iTunes by Apple Inc.
These features compress the original audio data
to about 10 percent of its initial size with a high
sound quality. This means that about 10 audio
CDs can be recorded on a CD-R/RW disc to
allow a long listening time without having to
change CDs.
34
NX509E
Page 37

Displaying MP3/WMA/AAC Tag titles
Tag information (track title, artist name, and
album title) can be displayed for an MP3/WMA/
AAC file containing the Tag information.
This system supports the ID3 TAG version 1.x/
2.x and WMA-TAG.
Note:
• Tag information entered with 2-byte characters
may not be displayed properly on the display.
• The ID3 version 2.x tag format is not completely
supported. This system can display information up
to 60 bytes, and ignores the rest.
• Album titles of WMA-TAG may not be displayed
properly.
Precautions on the MP3/WMA/AAC
files
● General precautions
• Files other than MP3/WMA/AAC format cannot
be played. In addition, some files may not be
played because of the encoding settings.
When a file cannot be played, the next file is
played instead.
• Some noise may occur depending on the type
of encoder software used to encode the data.
• You can apply the VBR (Variable Bit Rate)
format when encoding. In this case, the
displayed play time may be slightly different
from the actual play time.
• Files that the DRM (Digital Rights
Management) function is set cannot be played.
● For MP3 files
• Set the Sampling Frequency to:
• MPEG1 Layer3: 32, 44.1, or 48 kHz
• MPEG2 Layer3: 16, 22.05, or 24 kHz
• MPEG2.5 Layer3: 8, 11.025, or 12 kHz
• Set the Bit Rate to:
• MPEG1 Layer3: 32 to 320 kbps (VBR)
• MPEG2 Layer3: 8 to 160 kbps (VBR)
• MPEG2.5 Layer3: 8 to 160 kbps (VBR)
• Add a file extension “.MP3” or “.mp3” using
single byte characters.
● For WMA files
• Set the Sampling Frequency to within ranges
from 22.05 to 44.1 kHz.
• Set the Bit Rate to 48, 64, 80, 96, 128, 160, or
192 kbps.
• Add a file extension “.WMA” or “.wma” using
single byte characters.
● For AAC files
• This system supports only the MPEG4 Audio
files encoded by the iTunes.
• Set the Sampling Frequency to 44.1 or 48 kHz.
• Set the Bit Rate to within ranges from 16 to 320
kbps (VBR).
• Add a file extension “.M4A” or “.m4a” using
single byte characters.
Precautions when preparing a disc
Note:
• For details of the DivX file mentioned below, see
“DivX Operations” (page 37).
● Logical format (File system)
The following writing formats are available when
writing MP3/WMA/AAC/DivX files on a disc:
• For CD-R/RW: ISO9660 level 1/level 2,
Romeo, Joliet, or Apple ISO (without including
expansion format)
• For DVD±R/RW: UDF (Universal Disk Format)
● Folder structure
• The folder hierarchy must be within 8
hierarchical levels. Otherwise, playback will be
impossible.
• You can store the MP3 files, WMA files, and
AAC files together in a disc or folder.
• You can also store the MP3/WMA/AAC files
and DivX files together in a disc or folder. In
such a case, you can select whether the disc is
regarded as an MP3/WMA/AAC disc or as a
DivX disc. See “Setting the Playform of discs
recorded with DivX files” (page 37).
● Number of files or folders
• The maximum allowable number of folders is
255 (including root directory).
• The maximum allowable number of files in a
folder is 255.
English
Owner’s manual
NX509E
35
Page 38

● Folder representation in the folder list
English
• Only folders containing MP3/WMA/AAC files or
DivX files (1 to 4 in illustration) are displayed
on the list. Folders containing no MP3/WMA/
AAC/DivX file are not displayed.
• Folder hierarchy (1 to 4 in illustration) is
Owner’s manual
ignored, and unified into one level.
• Folders are arranged in the order of the folder
creation.
1
2
3
1
4
2
4
3
❏ Selecting the MP3/WMA/AAC
mode
1. Set a disc which the MP3/WMA/AAC files are
recorded to the DVD player.
The system will automatically read the disc
data, change to the DVD mode (MP3/WMA/
AAC mode), and start playback after a while.
See also “Setting/Ejecting a Disc” (page 17).
WARNING
• Audio files may be recorded at a higher
volume level than desired. Increase the
volume gradually from the minimal
setting after playback has started.
• For your safety, the driver should not
operate the controls while driving.
Note:
• Note that the system enters to the DivX mode
when setting a disc with DivX files if the Playform
function has been set to “Video” (see page 37).
● When a disc is already set
1. Press the [SRC] button to display the Source
screen.
2. Touch the [DVD] key to select the MP3/WMA/
AAC mode.
The system changes to the DVD mode (MP3/
WMA/AAC mode), and starts playback from
the previous position.
❏ Operating MP3/WMA/AAC
playback
Note:
• The same operations listed below are also used in
the USB Memory mode.
Listening to MP3/WMA/AAC files
After disc loading, the play mode is automatically
engaged.
• When playback is not started, touch the [p]
key.
Pausing playback
1. Touch the [p] key during playback.
Playback pauses.
2. To resume playback, touch the [p] key.
Playback resumes.
Skipping a track (searching)
1. Touch the [{ (Track)] or [} (Track)] key
during playback.
Tracks are skipped, as many as the times the
key is touched, and playback starts.
• Touching the [{ (Track)] key starts
playback from the beginning of the next
track.
• Touching the [} (Track)] key starts
playback from the beginning of the current
track.
When this key is touched again within about
2 seconds, playback starts from the
beginning of the previous track.
• These functions perform in the current
folder only.
Fast forward and fast backward
1. Touch and hold the [{ (Track)] or [} (Track)]
key during playback.
The playback speed becomes 4-time faster
first and then 16-time faster 3 seconds later.
Releasing the key resumes the normal speed
playback.
36
NX509E
Page 39

Skipping the current folder
1. Touch the [{ (Folder)] or [} (Folder)] key
during playback.
The tracks of the current folder are skipped
and playback starts from the first track of the
next or previous folder.
Selecting a folder/track from the list
screen
1. Touch the [List] key.
The Folder List screen is displayed.
2. When the desired folder is not displayed,
touch the [{] or [}] key to scroll the list.
3. Touch the desired Folder key.
The Track List screen appears.
4. Touch the [{] or [}] key to scroll the list, and
touch the desired Track key.
The corresponding track is started playback.
5. Touch the [Back] key.
Other various play functions
1. Touch the [Options] key.
2. Touch a touch key of the function you want to
play.
Folder repeat playback:
Touch the [Folder] key of the Repeat item.
• This operation plays back tracks in the
current folder repeatedly.
•“F.RPT” is displayed on the screen.
Track repeat playback:
Touch the [Track] key of the Repeat item.
• This operation plays back the current track
repeatedly.
•“T.RPT” is displayed on the screen.
Folder random playback:
Touch the [Folder] key of the Random item.
• This operation plays the tracks in the
current folder in a random order.
•“F.RDM” is displayed on the screen.
Track random playback:
Touch the [Track] key of the Random item.
• This operation plays back tracks recorded
in the disc in no particular order.
•“T.RDM” is displayed on the screen.
3. To cancel the play, touch the same touch key
of the function to cancel.
4. Touch the [Back] key to return to the previous
screen.
Scrolling track titles
When a title or name displayed on the screen is
longer than the text area, you can confirm the
entire text by scrolling it.
1.
Displaying the text you wish to scroll, touch the
text area.
The text will scroll once.
Setting the Playform of discs
recorded with DivX files
MP3/WMA/AAC files can be stored together with
DivX files in a disc or folder. You can select
whether such discs are regarded as MP3/WMA/
AAC discs or as DivX discs.
1. Touch the [Options] key.
2. Touch the [Audio] or [Video] key of the
Playform item to specify the setting.
[Audio]:
Discs are regarded as MP3/WMA/AAC discs.
[Video]:
Discs are regarded as DivX discs.
3. Touch the [Back] key if required.
Note:
• This setting is disabled when a Mixed Mode
CD, which contains both data track and audio
tracks, is set in the DVD player.
DivX Operations
This system can playback DivX movie files
recorded on a disc.
• Official DivX
• Plays all versions of DivX
DivX
media files.
❏ About the DivX file
What is DivX?
DivX is a popular media technology created by
DivX, Inc. DivX media files contain highly
compressed video with high visual quality that
maintains a relatively small file size. DivX files
can also include advanced media features like
menus, subtitles, and alternate audio tracks.
Many DivX media files are available for download
online, and you can create your own using your
personal content and easy-to-use tools from
DivX.com.
®
Certified product
®
6) with standard playback of DivX®
®
video (including
English
Owner’s manual
NX509E
37
Page 40

Precautions on the DivX file
English
• This system can play DivX version 4.x, 5.x, and
6.x files. DivX Ultra is not supported.
• Files other than DivX format (such as the Xvid
files) cannot be played. In addition, some files
may not be played because of the encoding
Owner’s manual
format. When a file cannot be played, the next
file is played instead.
• DivX VOD (Video-on Demand files) that have
authorization data can also be played. These
files must be authorized on your PC
beforehand using the DivX Registration Code
displayed on the System tab screen under the
General screen (see page 51).
• Set the Frame Size to 640 x 480 or 320 x 240
pixels.
• Set the Frame Rate to 30 or 15 fps.
• Add a file extension “.AVI”, “.avi”, “.DIVX”, or
“.divx” using single byte characters.
Precautions when preparing a disc
Note:
• The limitations on preparing a disc are same as
those in the MP3/WMA/AAC modes. See
“Precautions when preparing a disc” (page 35).
❏ Selecting the DivX mode
1. Set a disc which the DivX files are recorded to
the DVD player.
The system will automatically read the disc
data, change to the DVD mode (DivX mode),
and start playback after a while.
See also “Setting/Ejecting a Disc” (page 17).
WARNING
• Some movie files may be recorded at a
higher volume level than desired.
Increase the volume gradually from the
minimal setting after the movie has
started.
• For your safety, the driver should not
watch the movie or operate the controls
while driving. Please note that watching
and operating the movie while driving are
prohibited by law in some countries.
Note:
• For your safety, this system has a safety function
which turns off the picture when the car is moving,
so only the audio can be heard. The picture can
only be watched when the car is stopped and the
parking brake is applied.
• If “Audio Only” appears on the screen just after
turning on the ACC power of the car, release the
parking brake while confirming safety, and then
engage the parking brake again.
•
You can store
files together in a disc or folder. In such a case, you
can select whether the disc is regarded as a
or as an
Playform of discs recorded with audio files” (page 40).
● When a disc is already set
1. Press the [SRC] button to display the Source
screen.
2. Touch the [DVD] key to select the DivX mode.
The system changes to the DVD mode (DivX
mode), and starts playback from the previous
position.
DivX
files and the
MP3/WMA/AAC
MP3/WMA/AAC
DivX
disc. See “Setting the
disc
38
❏ Operating DivX playback
Note:
• The most operations in the DivX mode are same
as those in the MP3/WMA/AAC modes. See also
“Operating MP3/WMA/AAC playback” (page 36).
• The random plays cannot be specified in the DivX
mode.
NX509E
Page 41

Watching DivX movies
After disc loading, the play mode is automatically
engaged.
• When playback is not started, touch the [p]
key.
● To play a file with Authorization data
When a file with Authorization data is played, a
message is displayed on the screen. Confirm the
message displayed, and touch the [Done] or
[Yes] key to play the movie.
Showing the DivX mode screen
The DivX mode screen is used to control the
playback mode from the screen.
1. Touch the screen.
The DivX mode screen is displayed.
If you do not touch the screen for 7 seconds,
the display will return to the playback screen.
• You can hide the DivX mode screen by
touching the [Hide] key.
Searching with a folder/track
number
You can specify a file to play using the folder
number or track number.
1. Showing the DivX mode screen, touch the
[Options] key.
2. Touch the [Direct] key.
The Key Pad screen appears with the folder
number input mode.
3. Input the folder/track number that you want to
play back using the [0] to [9] key.
• Touching the [Track] key turns the Key Pad
to the track number input mode.
4. Touch the [ENT] key.
The system starts playback of the file
specified with the input folder/track numbers.
• If the input folder/track number does not
exist or searching with a folder/track
number is not allowed, the screen image will
not change.
English
Owner’s manual
Selecting the screen size
You can change the screen size to suit to the
playback film.
• The factory default setting is “Full Wide”.
1. Touch the screen to display the DivX mode
screen.
2. Repeat touching the [Full Wide/Cinema/
Normal/Wide] key until your desired screen
size is selected.
•
This key shows the current screen size setting.
[Full Wide]:
The image is expanded so that the rectangle
of the image fits to the screen (16:9). The
aspect ratio of the image may be changed.
[Cinema]:
The image is expanded so that the top and
bottom edges of the image fit to the screen.
Suitable for letterbox-format images. Subtitles
of non-letterboxed images may be cut off in
this mode.
[Normal]:
The image is expanded so that the top and
bottom edges of the image fit to the screen,
and that the aspect ratio of the image
becomes 4:3. The aspect ratio of the image
may be changed.
[Wide]:
The image is expanded so that the left and
right edges of the image fit to the screen. The
top and bottom areas of the image may be cut
off.
3. Touch the [Hide] key to return to the playback
screen.
Switching Audios
You can switch the audio data if the current DivX
file has two or more audio data.
1. Showing the DivX mode screen, touch the
[Options] key.
2. Touch the [Audio] key during playback or
pause.
Each time you touch the key, you can switch
among the audio data.
• The number of audios recorded and their
audio formats may differ depending on the
DivX file.
• Depending on the DivX file, switching may
be impossible.
• It may take time to switch the audio data.
3. Touch the [Back] key.
NX509E
39
Page 42

Switching Subtitles
English
You can switch the subtitle language if the
current DivX file has one or more subtitles.
1. Showing the DivX mode screen, touch the
[Options] key.
2. Touch the [Subtitle] key during playback or
Owner’s manual
pause.
Each time you touch the key, you can switch
among the subtitle language.
• The number of subtitles recorded may differ
depending on the DivX file.
• Depending on the DivX file, switching may
be impossible.
• It may take time to switch the subtitle
language.
3. Touch the [Back] key.
Setting the Playform of discs
recorded with audio files
DivX files can be stored together with MP3/WMA/
AAC files in a disc or folder. You can select
whether such discs are regarded as DivX discs or
as MP3/WMA/AAC discs.
1. Showing the DivX mode screen, touch the
[Options] key.
2. Touch the [Audio] or [Video] key of the
Playform item to specify the setting.
[Audio]:
Discs are regarded as MP3/WMA/AAC discs.
[Video]:
Discs are regarded as DivX discs.
3. Touch the [Back] key if required.
Note:
• This setting is disabled when a Mixed Mode CD,
which contains both data track and audio tracks, is
set in the DVD player.
6.
SOURCE OPERATIONS
(ACCESSORIES)
iPod Operations
iPods can be connected by using the connector
cable supplied with the iPod, but in this case, you
can enjoy its audio sound only. To enjoy video
movies stored in the iPod with video displaying
them on this unit, it is required to use the special
connector cable (CCA-723) separately sold.
Note:
• This system will not operate or may operate
improperly with unsupported versions.
• For detailed information on the playable iPod
models, see our home page: www.clarion.com
❏ Notes on using Apple iPod
• Do not connect an iPod to this unit with a
headphone connected to the iPod.
• When in the iPod mode, the screen image input
from the AUX1 terminal is output to the rear
monitor.
• When no data is present, the title display will
remain blank.
• The iPod is used with the equalizer function
turned OFF.
• Set the iPod’s language setting to English
before connecting your iPod. Some characters
of the other languages may not be displayed
correctly in this system.
● Precautions on battery consumption:
If the iPod is connected to this unit when the
iPod’s internal battery has run down, this function
may not operate correctly. You must connect the
iPod after charging the battery if it has run down.
40
❏ Selecting the iPod mode
1. Connect your iPod to the USB connector.
The system will automatically detect the
connected device, and change to the USB
mode (iPod mode), and start playback after a
while.
See also “Connecting/Disconnecting an USB
Media Device” (page 18).
● When an iPod is already connected
1. Press the [SRC] button to display the Source
screen.
2. Touch the [USB] key to select the iPod mode.
The system changes to the USB mode (iPod
mode), and starts playback from the previous
position.
NX509E
Page 43

❏ Controlling the iPod
Operation keys
● iPod mode screen
Play mode icons
[Options] key
[Music/Videos] key
List keys
Pausing playback
1. Touch the [p] key during playback.
Playback pauses.
2. To resume playback, touch the [p] key
again.
Playback resumes.
Skipping a track (searching)
1. Touch the [{ (Track)] or [} (Track)] key
during playback.
Tracks are skipped, as many as the times the
key is touched, and playback starts.
• Touching the [{ (Track)] key starts
playback from the beginning of the next
track.
• Touching the [} (Track)] key starts
playback from the beginning of the current
track. When this key is kept touching,
playback starts from the beginning of the
previous track.
English
Owner’s manual
[Music/Videos] key:
Switches the operation mode to the Video mode
or Music mode.
• Enabled in the Simple Control mode.
List keys:
Displays the corresponding list screen to select
track to be played.
[Videos], [Playlists], and [Music] are available.
[Hide] key:
Hides the iPod mode screen to display the
playback picture.
• Displayed only in the Video mode.
[Options] key:
Displays the Options screen. You can specify
play modes and other settings from this screen.
Play mode icons:
Displays status of Repeat, Shuffle play.
: 1-track Repeat
: All Repeat
: Song Shuffle
: Album Shuffle
Fast forward and fast backward
1. Touch and hold the [{ (Track)] or [} (Track)]
key during playback.
The playback speed becomes faster.
Releasing the key resumes the normal speed
playback.
Scrolling track titles
When a title or name displayed on the screen is
longer than the text area, you can confirm the
entire text by scrolling it.
1. Displaying the text you wish to scroll, touch
the text area.
The text will scroll once.
Controlling from the iPod
Setting this function to “On” enables to use the
iPod buttons to control the iPod.
1. Touch the [Options] key.
2. Touch the [On] or [Off] key of the Simple
Control item to specify the setting.
[On]:
Enables the iPod buttons. Only the above
operations can be performed from this
system.
[Off]:
Disables the iPod buttons. All controls are
performed from this system.
3. Touch the [Back] key to return to the previous
screen.
NX509E
41
Page 44

Other various play functions
English
1. Touch the [Options] key.
2. Touch a touch key of the function you want to
play.
1-track repeat:
Touch the [One] key of the Repeat item.
Owner’s manual
• This operation plays back the current or
selected track repeatedly.
All repeat:
Touch the [All] key of the Repeat item.
• This operation plays back all the tracks
currently selected repeatedly.
Song shuffle:
Touch the [Song] key of the Shuffle item.
• This operation plays back all the tracks
currently selected in a random order.
Album shuffle:
Touch the [Album] key of the Shuffle item.
• When more than one album is selected, this
operation plays back the albums in no
particular order. Tracks in an album are
played back in the recorded order.
3. To cancel the shuffle play, touch the [Off] key
of the function to cancel.
• The repeat play cannot be canceled.
Normally, it should be set to the All repeat
play.
4. Touch the [Back] key to return to the previous
screen.
Note:
• “All repeat” will be selected automatically when
you connect the iPod which is turned off the repeat
function.
❏ Selecting tracks to be played
You can specify the tracks to be played by
touching the following list keys:
● [Videos] key
The following category keys are displayed. You
can narrow the listed items by selecting these
categories.
• The category keys displayed may differ
depending on the connected iPod.
[Playlists]:
The list of all the Video Playlists stored in the iPod
is displayed.
[Movies]:
The list of all the Movies stored in the iPod is
displayed.
[Music Videos]:
You can narrow the Albums to be listed by
specifying the Artist name.
[Rental]:
The list of all the Rental Movies stored in the
iPod, which are downloaded with iTunes Movie
Rentals, is displayed.
[TV Shows]:
You can narrow the Seasons to be listed by
specifying the Program title.
[Video Podcasts]:
You can narrow the Tracks to be listed by
specifying the Video Podcast name.
● [Playlists] key
The list of all the Playlists and Video Playlists
stored in the iPod is displayed.
● [Music] key
The following category keys are displayed. You
can narrow the listed items by selecting these
categories.
• The category keys displayed may differ
depending on the connected iPod.
[Playlists]:
The list of all the Playlists stored in the iPod is
displayed.
[Artists]:
You can narrow the Albums to be listed by
specifying the Artist name.
[Albums]:
The list of all the Albums stored in the iPod is
displayed.
[Songs]:
The list of all the Tracks stored in the iPod is
displayed.
[Genres]:
You can narrow the Artists to be listed by
specifying the Genre name.
[Composers]:
You can narrow the Albums to be listed by
specifying the Composer name.
42
NX509E
Page 45

Selecting tracks to be played from a
list screen
1. Touch the desired Category key from the iPod
mode screen to display the corresponding list
screen.
2. Touch the desired item key on the screen to
specify it.
• Touch the [{] or [}] key to scroll the list.
You can also use the ABC Search function
to scroll the list (see below).
• When a track list of an Album, Playlist, or
Video Playlist is displayed, specifying a
track starts playback of the specified album/
playlist from the specified track.
• When the track list of the Songs is
displayed, specifying a track starts playback
of all the tracks stored in the iPod from the
specified track.
• When the other list screen is displayed,
repeat this operation until you select the
tracks to be played back.
• When video tracks are specified in the
Music mode, only the audio data will be
played back.
3. Touch the [Back] key to return to the previous
screen.
● Using the ABC Search function
1. Touch the [ABC Search] key when the list
screen you wish to scroll is displayed.
2. Repeat touching the [A ]], [[ Z], or [0-9] key
to specify the initial character of the list item
you wish to display.
3. Touch the [Search] key.
The list will scroll to display the first item
started from the specified character (or a
following character).
❏ Viewing video data in the iPod
(only for the iPod with video)
When you connect an iPod with video by using
the optional connector cable, you can enjoy the
video data stored in the iPod showing them on
the operation panel of this unit (and the rear
monitor if connected).
WARNING
• Some videos may be recorded at a higher
volume level than desired. Increase the
volume gradually from the minimal
setting after the video has started.
• For your safety, the driver should not
watch the video or operate the controls
while driving. Please note that watching
and operating the video while driving are
prohibited by law in some countries.
1. Play back your desired video tracks.
The system will automatically enter into the
Video mode and the playback starts. The
specified video image is also displayed on the
rear monitor if connected.
• When in the Simple Control mode, touch the
[Music/Videos] key to switch to the Video
mode. To return to the Music mode, touch
the [Music/Videos] key again.
2. Touch the [Hide] key to hide the iPod mode
screen.
The video image will be displayed on this unit.
3. To display the iPod mode screen, touch the
screen.
Note:
• “Audio Only” is displayed when the automobile is
moving.
• Video data may not be played back according to
the status of the iPod.
• The volume setting of video data is relatively lower
than audio data. Be sure to lower the volume
setting before switching to the other mode.
• Do not select the categories with no track
registered from a list screen. The iPod may be
frozen. If the iPod is frozen, reset the iPod by
following the procedure described in the instruction
manual of the iPod.
English
Owner’s manual
NX509E
43
Page 46

Selecting the Output Signal
English
This setting is used to select the audio signal of
video tracks.
1. Touch the [Options] key.
2. Touch the [Digital] or [Analog] key of the
Output Signal item to specify the setting.
Owner’s manual
[Digital]:
The digital audio data via the USB will be
output. Normally select this setting.
[Analog]:
The analog audio data via the AUX1 will be
output. Select this setting if your iPod cannot
output digital signals.
3. Touch the [Back] key to return to the previous
screen.
Note:
• Make sure to reconnect the iPod after changing
this setting. The key ([Digital] or [Analog])
indicator and output setting will be changed after
reconnecting your iPod.
USB Memory Operations
This system can play audio files (MP3/WMA/
AAC) stored in an USB memory which is
recognized as “USB Mass Storage Class
device”. You can use your USB memory as an
audio device by simply copying desired audio
files into it.
Note:
• This system will not operate or may operate
improperly with some USB memory.
• Files protected with any DRM can not be played.
• Set the Bit Rate to:
For MP3 files:
• MPEG1 Layer3: 32 to 320 kbps (VBR)
• MPEG2 Layer3: 16 to 160 kbps (VBR)
• MPEG2.5 Layer3: 16 to 160 kbps (VBR)
For WMA files: 32, 48, 64, 80, 96, 128, 160, or
192 kbps
For AAC files: 16 to 320 kbps (VBR)
• Add the following file extension using single
byte characters:
For MP3 files: “.MP3” or “.mp3”
For WMA files: “.WMA” or “.wma”
For AAC files: “.M4A” or “.m4a”
● Notes on the folder structure
• The folder hierarchy must be within 8
hierarchical levels. Otherwise, playback will be
impossible.
• The maximum allowable number of folders is
512 (including root directory and folders with no
MP3/WMA/AAC file).
• The maximum allowable number of files in a
folder is 255.
• You can store the MP3 files, WMA files, and
AAC files together in a folder.
● Notes on the Tag titles
The limitations on the Tag titles are same as
those in the
“Displaying MP3/WMA/AAC Tag titles” (page 35).
● Folder representation in the folder list
The limitations on the folder representation are
same as those in the MP3/WMA/AAC modes.
See “Folder representation in the folder list”
(page 36).
MP3/WMA/AAC
modes. See
❏ Notes on using USB memories
● General notes
• When no data is present, the message “No
File” will be displayed.
• The USB memory is used with the equalizer
function turned OFF.
● Notes on the MP3/WMA/AAC files
• This system can play the MP3/WMA/AAC files
stored in the USB memory.
• This system cannot play DivX files stored in the
USB memory.
• For AAC files, this system supports only the
MPEG4 Audio files encoded by the iTunes.
• Set the Sampling Frequency to:
For MP3 files:
• MPEG1 Layer3: 32, 44.1, or 48 kHz
• MPEG2 Layer3: 16, 22.05, or 24 kHz
• MPEG2.5 Layer3: 8, 11.025, or 12 kHz
For WMA files: 32, 44.1, or 48 kHz
For AAC files: 44.1 or 48 kHz
44
NX509E
Page 47
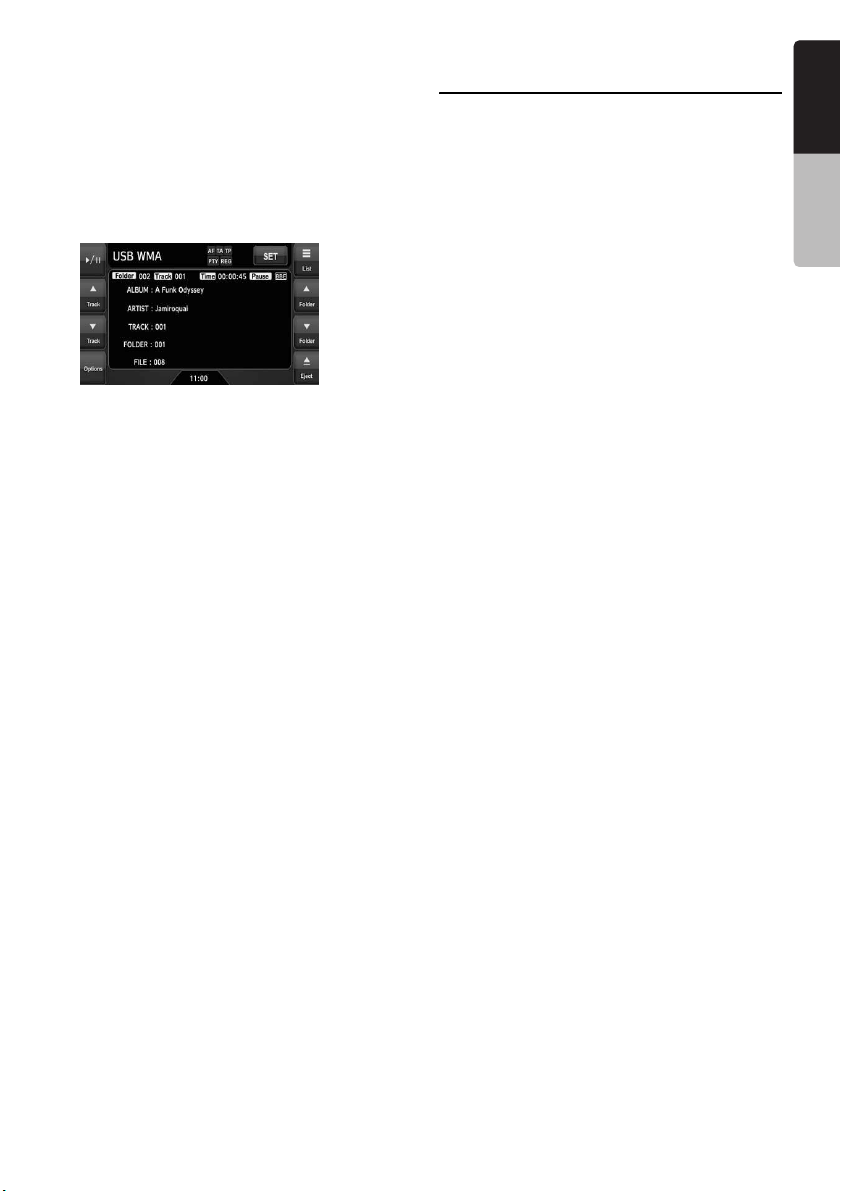
❏ Selecting the USB Memory
mode
1. Connect your USB memory to the USB
connector.
The system will automatically detect the
connected device, and change to the USB
mode (USB Memory mode), and start
playback after a while.
See also “Connecting/Disconnecting an USB
Media Device” (page 18).
● When an USB memory is already connected
1. Press the [SRC] button to display the Source
screen.
2. Touch the [USB] key to select the USB
Memory mode.
The system changes to the USB mode (USB
Memory mode), and starts playback from the
previous position.
❏ Playing back files in the USB
memory
The operations in the USB Memory mode are
same as those in the MP3/WMA/AAC modes.
See “Operating MP3/WMA/AAC playback”
(page 36) for details.
Note:
• When performing the fast forward or fast backward
function, the playback speed will become 10-time
faster. For the VBR files, it may differ depending on
the file.
Navigation System
Operations
Notes on the Navi functions
• Hereafter in this section, the Navigation system
will be called as “Navi”.
• The following functions are available:
• Showing the Navi display (The [Navi] key
selection available on the Source screen)
• Showing the current location screen (The
[Map] key selection available on the Source
screen).
• Navi guidance voice interruption
• When a voice interrupt of the Navi arises during
2-Zone ON, the sound of the Main zone is
muted, and the sound of the Sub zone is output
normally. When it arises during 2-Zone OFF,
the audio signals to the 4ch speakers are
attenuated, and the voice from the navigation
system is output from the front two speakers.
Note:
• The [Map] key may be disabled depending on the
navigation system conditions.
Navi operations
Changes between the Navi display and the
Audio/Visual (hereinafter, referred as “AV”)
display.
● When in the AV mode
• Touch the [Navi] or [Map] key on the Source
screen to switch to the Navi mode.
• When the image interruption from the Navi
arises, the screen will be changed to the Navi
display. When the interruption is finished, the
screen will return to the previous AV display.
Note:
• Depending on the distance to the next guidance
point and the vehicle’s speed, the image
interruption may continue until the next route
guidance finishes.
● When in the Navi mode
• Touch the [AV] key on the Source screen to
switch to the AV mode.
Note:
• For more information on the Navi mode, see the
User Manual.
English
Owner’s manual
NX509E
45
Page 48

AUX Operations
English
This function is available when a VTR, etc. is
connected to the AUX1 or AUX2 terminal.
Owner’s manual
• For your safety, the driver should not
watch the video or operate the controls
while driving. Please note that watching
and operating the video while driving are
prohibited by law in some countries.
Note:
• For your safety, this system has a safety function
which turns off the picture when the car is moving,
so only the audio can be heard. The picture can
only be watched when the car is stopped and the
parking brake is applied.
• When an iPod with video is connected to the AUX1
terminal using the special connector cable (CCA-
723) separately sold, the video/audio input from
the iPod will be output to the monitor screen and
rear monitor even in the AUX1 mode. However,
you must select the iPod mode to control the iPod.
WARNING
Selecting the AUX mode
1. Press the [SRC] button, and touch the [AUX]
key. The system will enter into the AUX mode.
Showing the AUX mode screen
The AUX mode screen is used to adjust settings
concerning the AUX mode.
1. Touch the screen.
The AUX mode screen is displayed.
If you do not touch the screen for 7 seconds,
the display will return to the video screen.
Switching to another AUX mode
1. Showing the AUX mode screen, touch the
[AUX] key.
The system will enter into another AUX mode.
Changing the audio input level
The input audio level of the AUX terminals can be
changed.
• The factory default setting is “High”.
1. Touch the screen to display the AUX mode
screen, then repeat touching the [Sense] key
to select the level.
High: 10 dB
Mid: 4 dB
Low: 0 dB
Selecting the screen size
You can change the screen size to suit to the
video image.
• The factory default setting is “Full Wide”.
1. Touch the screen to display the AUX mode
screen.
2. Repeat touching the [S-Size] key until your
desired screen size is selected.
• This key shows the current screen size
setting.
[Full Wide]:
The image is expanded so that the rectangle
of the image fits to the screen (16:9). The
aspect ratio of the image may be changed.
[Cinema]:
The image is expanded so that the top and
bottom edges of the image fit to the screen.
[Normal]:
The image is expanded so that the top and
bottom edges of the image fit to the screen,
and that the aspect ratio of the image
becomes 4:3. The aspect ratio of the image
may be changed.
[Wide]:
The image is expanded so that the left and
right edges of the image fit to the screen. The
top and bottom areas of the image may be cut
off.
3. Touch the [Hide] key to return to the video
screen.
46
NX509E
Page 49

7.
SYSTEM SETTINGS
Audio Settings
❏ Displaying the Audio screen
You can customize the various audio settings of
this unit from the Audio screen.
1. Touch the [SET] key.
The Settings screen appears.
2. Touch the [Audio] key.
The Audio screen appears.
3. Touch the desired Tab key, and perform the
adjustment.
See the following sections for details.
• In the following sections, only the details
regarding adjustments are described,
procedures to select items are skipped.
4. When the adjustment completes, touch the
[Back] key to return to the previous screen.
❏ Setting the Beat EQ
This system provides 4 types of sound tone
adjustment functions. You can select desired
function and adjust the effect level.
• The factory default setting is “Off”.
3-1. Touch the [Beat EQ] key to display the Beat
EQ tab screen.
3-2. Touch the [BEQ1], [BEQ2], [BEQ3],
[Custom], or [Off] key to select the function
you wish to apply.
[BEQ1]:
The bass sound area is emphasized.
[BEQ2]:
The mid sound area is reduced, and the
bass and treble sound area are
emphasized.
[BEQ3]:
The mid sound area is lowered, and the
bass and treble sound area are extremely
emphasized.
[Custom]:
You can adjust the sound tone of bass, mid,
and treble areas individually. For details,
see the following section.
[Off]:
No sound effect is applied.
3-3. When you select an item other than
“Custom” and “Off” in step 3-2, adjust the
effect level by touching the [–] or [+] key.
Setting range: –3 to +3
• The factory default setting is “0”.
Notes:
• The volume will change each time the Beat EQ
function is switched.
• Sufficient effects may not be obtained with some
speaker systems. In such cases, adjust the
volume.
English
Owner’s manual
Adjusting the custom tone
3-1. Touch the [Beat EQ] key to display the Beat
EQ tab screen.
3-2. Touch the [Custom] key.
3-3. Perform the following settings to adjust the
sound tone.
NX509E
47
Page 50

● Adjusting the Bass
English
3-4. Touch the [Bass] key.
3-5. Touch the [–] or [+] key of the desired item
to adjust the effect level.
Gain: –7 to +7
Owner’s manual
• The factory default setting is “0”.
Frequency: 50Hz, 100Hz, 200Hz
• The factory default setting is “100Hz”.
Q: 0.7, 1, 1.4, 2
• The factory default setting is “1”.
● Adjusting the Mid
3-4. Touch the [Mid] key.
3-5. Touch the [–] or [+] key of the desired item
to adjust the effect level.
Gain: –7 to +7
• The factory default setting is “0”.
Frequency: 500Hz, 1kHz, 2kHz
• The factory default setting is “1kHz”.
Q: 0.7, 1, 1.4, 2
• The factory default setting is “1”.
● Adjusting the Treble
3-4. Touch the [Treble] key.
3-5. Touch the [–] or [+] key of the desired item
to adjust the effect level.
Gain: –7 to +7
• The factory default setting is “0”.
Frequency: 5kHz, 10kHz, 15kHz
• The factory default setting is “10kHz”.
Q: 0.7, 1, 1.4, 2
• The factory default setting is “1”.
❏ Adjusting the Balance/Fader
3-1. Touch the [BAL/FAD] key to display the
BAL/FAD tab screen.
3-2. Touch the [[] or []] key of the Balance item
to adjust the balance level.
[[]:
Emphasizes the sound from the left
speakers.
[]]:
Emphasizes the sound from the right
speakers.
Adjustment range: left 12 to right 12
• The factory default setting is “0”.
3-3. Touch the [{] or [}] key of the Fader item
to adjust the fader level.
[{]:
Emphasizes the sound from the front
speakers.
[}]:
Emphasizes the sound from the rear
speakers.
Adjustment range: front 12 to rear 12
• The factory default setting is “0”.
❏ Setting the Sub Woofer
Control
You can adjust the volume output to the Sub
Woofer.
• The factory default setting is “0”.
3-1. Touch the [Others] key to display the Others
tab screen.
3-2. Touch the [–] or [+] key of the Sub Woofer
Ctrl item to adjust the output level.
Setting range: –6 to +6
❏ Setting the Sub Woofer Phase
You can reverse the phase of the Sub Woofer
output signal.
• The factory default setting is “Normal”.
3-1. Touch the [Others] key to display the Others
tab screen.
3-2. Touch the [Reverse] or [Normal] key of the
Sub Woofer Phase item to select the phase
setting.
❏ Adjusting the High Pass Filter
You can adjust the cut-off frequency of the High
Pass Filter for the front/rear speaker output.
• The factory default setting is “Through”.
3-1. Touch the [Others] key to display the Others
tab screen.
3-2. Touch the [[] or []] key of the High Pass
Filter item to adjust the setting.
Settings: Through, 60Hz, 90Hz, 120Hz
48
NX509E
Page 51

❏ Adjusting the Low Pass Filter
You can adjust the cut-off frequency of the Low
Pass Filter for the subwoofer output.
• The factory default setting is “Through”.
3-1. Touch the [Others] key to display the Others
tab screen.
3-2. Touch the [[] or []] key of the Low Pass
Filter item to adjust the setting.
Settings: Through, 120Hz, 90Hz, 60Hz
❏ Setting the Amp Cancel
When an external amplifier is used, using this
function reduces power noises of the audio lines.
• The factory default setting is “Off”.
3-1. Touch the [Others] key to display the Others
tab screen.
3-2. Touch the [}] key to display the next
screen.
3-3. Touch the [On] or [Off] key of the Amp
Cancel item to turn the Amp Cancel function
on or off.
❏ Setting the BBE MP
This function works only for the sound in the USB
mode, corrects the distorted waveform of the
high-pass area when decoding the digital sound.
• The factory default setting is “Off”.
3-1. Touch the [Others] key to display the Others
tab screen.
3-2. Touch the [}] key to display the next
screen.
3-3. Touch the [[] or []] key of the BBE MP item
to set the correction level.
Settings: Off, Low, Mid, High
❏ Turning on/off the Magna Bass
EXtend
The Magna Bass Extend does not adjust the low
sound area like the normal sound adjustment
function, but emphasizes the deep bass sound
area to provide you with a dynamic sound.
• The factory default setting is “Off”
3-1. Touch the [Others] key to display the Others
tab screen.
3-2. Touch the [}] key to display the next
screen.
3-3. Touch the [On] or [Off] key of the Magna
Bass EX item to turn the Magna Bass
Extend function on or off.
❏ Setting the Audio
ATTenuation
The audio output can be attenuated when a voice
interrupt of the navigation system arises.
• The factory default setting is “High”.
3-1. Touch the [Others] key to display the Others
tab screen.
3-2. Touch the [}] key to display the next
screen.
3-3. Touch the [[] or []] key of the Audio ATT
item to set the volume level when a voice
interrupt arises.
Settings: Mute, Low, Mid, High
English
Owner’s manual
NX509E
49
Page 52

General Settings
English
❏ Displaying the General screen
You can customize the various settings of this
unit from the General screen.
Owner’s manual
1. Touch the [SET] key.
The Settings screen appears.
2. Touch the [General] key.
The General screen appears.
3. Touch the desired Tab key, and perform the
adjustment.
See the following sections for details.
• In the following sections, only the details
regarding adjustments are described,
procedures to select items are skipped.
4. When the adjustment completes, touch the
[Back] key to return to the previous screen.
❏ Setting Camera Interrupt
When the optional Rear Vision Camera is
connected to this unit, the rear view image is
displayed on the screen when the gear lever is
put in the reverse gear position.
• The factory default setting is “Off”.
3-1. Touch the [Display] key to display the
Display tab screen.
3-2. Touch the [NTSC], [PAL], or [Off] key of the
Camera Interrupt item to set to “NTSC”,
“PAL”, or “Off”.
[NTSC]:
Turn on the function with the NTSC video
system.
[PAL]:
Turn on the function with the PAL video
system.
[Off]:
Turn off the function.
❏ Setting Camera Warning
The following warning message is displayed
during use of the Rear Vision Camera: “Make
sure of safety around your vehicle”.
• The factory default setting is “On”.
Note:
• This setting is disabled when the Camera Interrupt
feature is set to Off.
3-1. Touch the [Display] key to display the
Display tab screen.
3-2. Touch the [On] or [Off] key of the Camera
Warning item to turn the Camera Warning
function on or off.
❏ Setting the AUX input (NTSC/
PAL)
• The factory default setting is “PAL”.
Note:
• This setting is applied only to the AUX video input.
• If nonstandard video signals are input, the video
image may be disturbed.
• When you set to “Auto”, the video image may be
disturbed temporarily depending on the input video
signal.
3-1. Touch the [Display] key to display the
Display tab screen.
3-2. Touch the [Auto], [NTSC], or [PAL] key of
the AUX input item to set the VTR system.
❏ Setting the Beep
The sound heard when you make operations is
called “beep”. The system can be set so that it
does not produce this beep sound.
• The factory default setting is “On”.
3-1. Touch the [System] key to display the
System tab screen.
3-2. Touch the [On] or [Off] key of the Beep item
to turn the Beep function on or off.
50
NX509E
Page 53

❏ Setting the Blink LED
You can set the unit to blink the Blink LED
indication when the ACC power is turned off.
• The factory default setting is “Off”.
3-1. Touch the [System] key to display the
System tab screen.
3-2. Touch the [On] or [Off] key of the Blink LED
item to turn the Blink LED function on or off.
❏ Confirming the DivX
Registration Code and DivX
URL
When you download a DivX VOD (Video-onDemand) file from a web site, entering the
registration code of your playback system may
be required to authorize the file. You can confirm
the registration code of your system and the URL
information by the following operation.
3-1. Touch the [System] key to display the
System tab screen.
3-2. Confirm the displayed information of the
DivX Registration Code and DivX URL
items.
Note:
• The DivX registration code is not displayed when a
disc is set in the DVD player.
❏ Setting the TEL Switch
When a telephone is connected to this unit using
the optional adapter box, you can listen to your
telephone calls on your car speakers.
• The factory default setting is “Off”.
3-1. Touch the [System] key to display the
System tab screen.
3-2. Touch the [}] key to display the next
screen.
3-3. Touch the [On], [Off], or [Mute] key of the
TEL Switch item to set this function.
On:
The telephone calls are output from the car
speaker.
Off:
The telephone interrupts are ignored.
Mute:
The sound from this unit is muted during
telephone calls.
❏ Setting the TEL Speaker
You can select the speaker which the telephone
calls are output.
• The factory default setting is “Right”.
3-1. Touch the [System] key to display the
System tab screen.
3-2. Touch the [}] key to display the next
screen.
3-3. Touch the [Left] or [Right] key of the TEL
Speaker item to select the speaker.
Left:
The telephone calls are output from the front
left speaker.
Right:
The telephone calls are output from the front
right speaker.
❏ Performing the System Check
You can perform the system check by the
following operation.
3-1. Touch the [System] key to display the
System tab screen.
3-2. Touch the [}] key to display the next
screen.
3-3. Touch the []] key of the System Check item.
The System Check screen is displayed.
3-4. Touch the [Start system check] key to
perform the system check manually.
The system will be restarted after
performing the system check.
❏ Resetting the navigation
system
You can reset the navigation system.
3-1. Touch the [System] key to display the
System tab screen.
3-2. Touch the [}] key to display the next
screen.
3-3. Touch the []] key of the System Check item.
3-4. Touch the [Reset NAVI module.] key to
reset the navigation system.
English
Owner’s manual
NX509E
51
Page 54

❏ Setting the anti-theft function
English
(CATS)
“CATS” is the acronym of “Clarion Anti-Theft
System”. When you set a PIN code (called as
“Personal Code”), a theft is prevented by
disabling the operation of the unit at the theft.
Owner’s manual
In addition, set the Blink LED function to improve
the effect of the CATS function (see page 51).
Setting your Personal Code
3-1. Touch the [System] key to display the
System tab screen.
3-2. Touch the [}] key to display the next
screen.
3-3. Touch and hold the blank area just below
the []] key of the System Check item for
more than 2 seconds.
The Personal Code screen appears.
• When a Personal Code is already set, the
Erase Code screen will appear. Retry this
operation after erasing the old Personal
Code.
3-4. Enter your desired 4-digit Personal Code by
touching the [0] to [9] keys, then touch the
[ENT] key.
• Touch the [BS] key when you make a
mistake in entering.
3-5. Enter the same Personal Code again for
confirmation, then touch and hold the [ENT]
key for more than 2 seconds.
The entered Personal Code will be set, and
it will return to the previous screen.
Note:
• Write down your Personal Code in case you forget
it.
Erasing the Personal Code
3-1. Touch the [System] key to display the
System tab screen.
3-2. Touch the [}] key to display the next
screen.
3-3. Touch and hold the blank area below the []]
key of the System Check item for more than
2 seconds.
The Erase Code screen appears.
3-4. Enter the Personal Code currently set by
touching the [0] to [9] keys, then touch and
hold the [ENT] key for more than 2 seconds.
The message “Personal Code has been
erased” appears, and it will return to the
previous screen.
When the ENTER PERSONAL CODE
screen appears
The Personal Code screen will be displayed
when turning the ACC power on after performing
the following operations:
• The car battery was replaced.
• The backup power was cut off.
• The Reset button was pressed.
Note:
• If you forgot your Personal Code, please consult
your dealer or an authorized Clarion service
center.
1. Enter your Personal Code currently set.
2. When the correct Personal Code is entered,
the unit will restart from the initial startup
screen.
Note:
• When you enter a wrong Personal Code, the
message “Code Incorrect” is displayed and the
Personal Code entry is prohibited for a while. This
prohibited time is changed according to the
number of times of wrong code entry as follows:
• 1 to 6 times: 15 seconds
• 7 times or more: 15 minutes
❏ Setting the Auto Antenna
When an auto antenna which is extended
automatically is used, you can set so that it is
automatically extended/collapsed according to
the power setting of this unit.
1. Touch the [SET] key to display the Settings
screen.
2. Touch and hold the [Auto] or [Down] key of
the Antenna item for more than 1 second to
set this function.
Auto:
The auto antenna function is turned on.
Down:
The antenna is collapsed.
❏ Setting the TA function
Note:
• This function can also be set from the Tuner mode
(see page 24).
1. Touch the [SET] key.
2. Touch the [On] or [Off] key of the TA function.
52
NX509E
Page 55

Adjusting the Monitor
You can customize the various monitor settings
by the following operations.
❏ Setting the Screen mode
The system has two screen modes: the Day
mode and Night mode. Each mode has the own
dimmer setting. You can select these modes
temporarily by performing the following
operation.
• The factory default setting is “Auto”.
1. Press the [SRC] button to display the Source
screen.
2. Touch the [Day], [Night], or [Auto] key to set
the Screen mode.
[Day]:
Set the dimmer level temporarily to the Day
mode (brighter).
[Night]:
Set the dimmer level temporarily to the Night
mode (dimmer).
[Auto]:
The dimmer level is changed according to the
status of the car light:
When the car light is off: Day mode
When the car light is on: Night mode
Note:
• When the Night Mode setting of the navigation
system is set to “Automatic”, this setting also
works upon the Color mode of the navigation
system.
❏ Adjusting the Dimmer, Bright,
Color, Contrast, and Hue level
Note:
• The Bright, Color, Contrast, and Hue settings can
be adjusted only when a video image is displayed
on the screen, and the car is stopped with applying
the parking brake.
• The Hue setting can be adjusted when the NTSC
mode is selected.
• The navigation screen has own dimmer setting
separately from the AV screen. The dimmer
adjustment in a mode does not affect each other
screen.
• The Rear Vision Camera image cannot be
adjusted directly. Perform the adjustments when
displaying a video image of the other source.
1. Touch the [SET] key to display the Settings
screen.
2. Touch the [Monitor ADJ] key to display the
Monitor screen.
3. Touch the [Dimmer], [Bright], [Color],
[Contrast], or [Hue] key you wish to adjust,
then touch the [–] or [+] key to adjust the level.
[Dimmer]:
Adjusts the panel brightness when the car
lights are ON or OFF.
[+]: Press to make image brighter.
[–]: Press to make image dimmer.
[Bright]:
Adjusts the brightness of the display.
[+]: Press to make image brighter.
[–]: Press to make image dimmer.
[Color]:
Adjusts the color saturation.
[+]: Press to increase color depth.
[–]: Press to decrease color depth.
[Contrast]:
Adjusts the contrast of the display.
[+]: Press to make contrast higher.
[–]: Press to make contrast lower.
[Hue]:
Adjust the tone of color (red or green is
emphasized).
[+]: Press to increase green.
[–]: Press to increase red.
4. When the adjustment completes, touch the
[Back] key to return to the previous screen.
English
Owner’s manual
NX509E
53
Page 56

English
8. TROUBLESHOOTING
If you have a problem with this system, check the following items to resolve it. See also our homepage
(www.clarion.com) for additional information.
Owner’s manual
General
Problem Cause Measure
Power does not turn
on. (No sound is
produced.)
Nothing happens
when buttons are
pressed.
Display is not
accurate.
The remote control
unit does not work.
The display is dark. The Dimmer control is too
There are red, green
and blue points in
the display.
Fuse is blown. Replace with a fuse of the same amperage. If the
Incorrect wiring. Consult your store of purchase.
The microprocessor has
malfunctioned due to
noise, etc.
Direct rays of the sun fall on
the light-receptive part of
the remote control unit.
The battery of the remote
control unit is dead or there
is no battery in the remote
control unit.
low.
The operating condition is
not good.
The headlight of the vehicle
is lit.
fuse blows again, consult your store of purchase.
Turn off the power. Press the Reset button with a
thin rod.
Note:
When the Reset button is pressed, turn off the ACC
power.
Reset button
• The frequencies of radio stations, setting data,
etc. stored in memory are not cleared even
when the Reset button is pressed.
When direct rays of the sun fall on the lightreceptive part of the remote control unit, it may not
work.
Check the battery of the remote control unit.
Adjust the Dimmer properly.
The temperature inside the vehicle may be 0°C or
lower. Set to an appropriate temperature (25°C or
so) and check it again.
The display is made dark at night to prevent the
glare (when the headlight is the vehicle is lit in the
daytime, the display gets dark).
This is not a failure, but a phenomenon peculiar to
a liquid crystal display (The liquid crystal display is
produced according to technology with very high
precision. Note that, though there are effective
pixels of 99.99% or more, pixel missing or
normally lit pixels account for 0.01%).
54
NX509E
Page 57

DVD Player
Problem Cause Measure
Disc cannot be
loaded.
Sound skips or is
noisy.
Sound is bad directly
after power is turned
on.
The image is not
displayed.
Disc cannot be
played with the
display “Parental
Violation” shown.
Disc cannot be
played.
The color of the
display is light or a
shade of color is not
good.
Another disc is already
loaded.
There is a foreign matter
already in place.
Disc is dirty. Clean the disc with a soft cloth.
Disc is heavily scratched or
warped.
MP3/WMA/AAC files are
not encoded properly.
Water droplets may form
on the internal lens when
the car is parked in a humid
place.
The parking brake is not
engaged.
The view is limited. Release the view limitation or change the parental
File system is not correct. Use ISO9660 level 1/2, Romeo, Joliet, or Apple
The color is not adjusted
adequately.
Eject the disc before loading the new one.
Eject the foreign matter forcibly.
Replace with a disc with no scratches.
Use MP3/WMA/AAC files encoded properly.
Let dry for about 1 hour with the power on.
Check that the parking brake is engaged.
level.
See the subsection “Setting up the parental level”
(page 29).
ISO file system for CD-R/RW, or UDF for DVD±R/
RW.
Check that the Bright, Color, Contrast, and Hue
are adjusted properly.
English
Owner’s manual
NX509E
55
Page 58

USB Devices
English
Problem Cause Measure
USB device cannot
be inserted.
Owner’s manual
USB device is not
recognized.
No sound heard with
the display “No File”
shown.
Sound skips or is
noisy.
The iPod’s video
image is disturbed.
The USB device has been
inserted with wrong
direction.
The USB connector is
broken.
The USB device is
damaged.
Connectors are loose.
No MP3/WMA/AAC file is
stored in the USB device.
MP3/WMA/AAC files are
not encoded properly.
The TV Signal setting of
the iPod is not set correctly.
Reversing the connection direction of the USB
device, try it again.
Replace with a new USB device.
Disconnect the USB device and reconnect. If the
device is still not recognized, try replacing with a
different USB device.
Store these files properly in the USB device.
Use MP3/WMA/AAC files encoded properly.
Set the TV Signal setting (NTSC/PAL) of the iPod
correctly.
9. ERROR DISPLAYS
If an error occurs, one of the following displays is displayed.
Take the measures described below to solve the problem.
DVD Player
Display Cause Measure
Error 2 A disc is caught inside the
DVD player and is not
ejected.
Error 3 A disc cannot be played
due to scratches, etc.
Error 6 A disc is loaded upside-
down inside the DVD
player and does not play.
No MP3/WMA/AAC/DivX
file is recorded on the disc.
Parental Violation Parental level error Set the correct Parental level.
Wrong Region Region code error Eject the disc, and replace correct region code
DRM WMA files protected by
DRM are played.
Not Support Files not supported by this
unit are played.
This is a failure of DVD player’s mechanism.
Consult your store of purchase.
Replace with a non-scratched, non-warped disc.
Eject the disc then reload it properly.
Write these files properly onto a disc.
disc.
Perform the operation such as skipping a file.
(Repeat and random playback mode may be
canceled.)
56
NX509E
Page 59

USB Devices
Display Cause Measure
Error 2 The connected USB device
Error 3
(USB memory)
Error 3 (iPod) The selected category has
Error 5 (iPod) The connected iPod is not
Bus Error Over-current or data error
Device Error The device is connected
DRM WMA files protected by
Not Support Files not supported by this
If an error display other than the ones described above appears, press the Reset button. If the problem
persists, turn off the power and consult your store of purchase.
• The frequencies of radio stations, setting data, etc. stored in memory are not cleared even when the
Reset button is pressed.
is not supported.
An error occurred when
controlling the USB device.
no track data.
The iPod is frozen. Disconnect the iPod, reset it, and reconnect it
recognized.
is detected.
via the USB Hub.
DRM are played.
unit are played.
If the USB device is frozen, disconnect it, reset it,
and reconnect it again.
Connect a proper USB device.
Disconnect the USB device, and reconnect it
again.
Touch the [{ (Track)] key. If the error is not
cleared, disconnect the iPod, and reconnect it
again.
again.
Disconnect the iPod, and reconnect it again. If the
iPod is still not recognized, try replacing with a
different iPod.
If the iPod is frozen, disconnect it, reset it, and
reconnect it again.
Turn off the ignition switch, disconnect the device,
restart the engine and reconnect it again. If the
device is still not recognized, try replacing with a
different device.
Disconnect the device, and reconnect directly to
the USB connector of this unit without using the
USB Hub.
Perform the operation such as skipping a file.
(Repeat and random playback mode may be
canceled.)
English
Owner’s manual
NX509E
57
Page 60
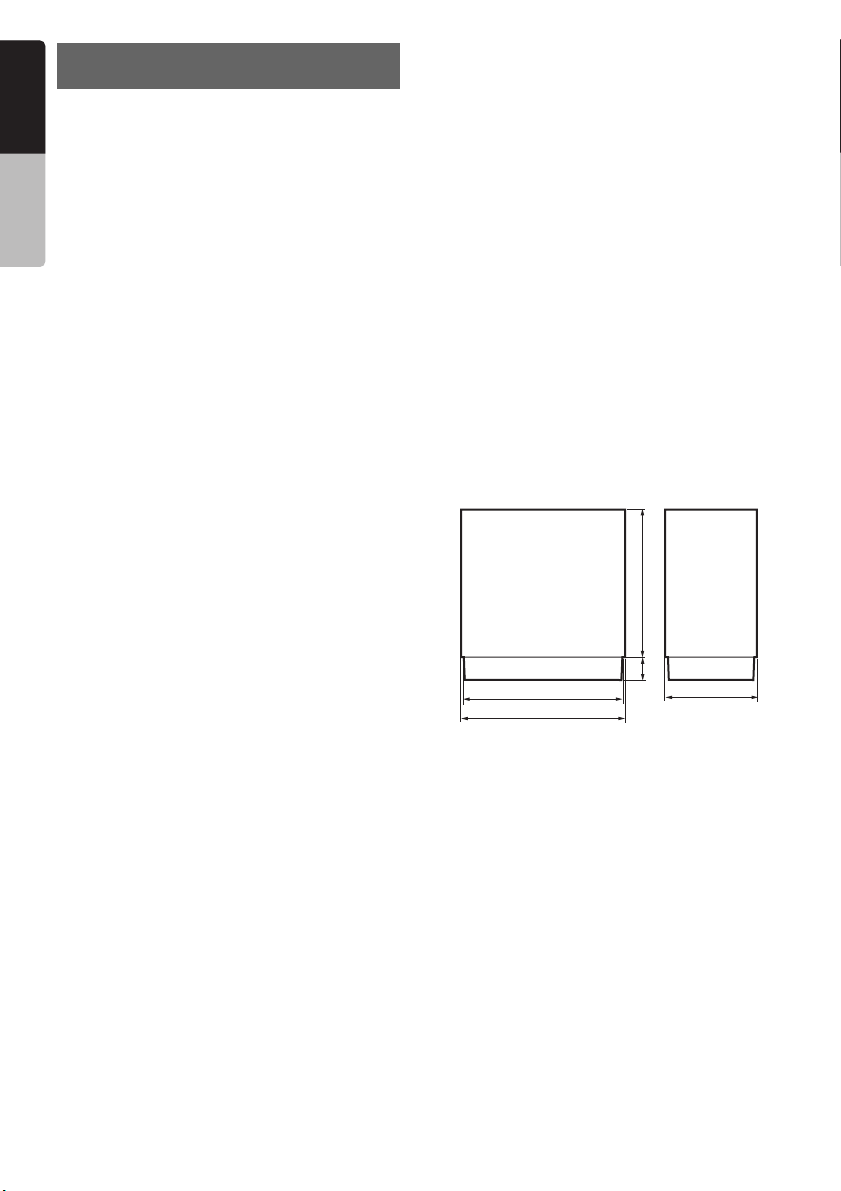
English
10.SPECIFICATIONS
FM Tuner
Frequency Range: 87.50 MHz to 108.00 MHz
Owner’s manual
Usable Sensitivity: 9 dBf
50dB Quieting Sensitivity: 15 dBf
Alternate Channel Selectivity: 70 dB
Stereo Separation (1 kHz): 38 dB
Frequency Response (±3 dB): 30 Hz to 15 kHz
AM Tuner
Frequency Range:
MW: 531 kHz to 1602 kHz
LW: 153 kHz to 279 kHz
Usable Sensitivity:
MW: 29 dBµV
LW: 35 dBµV
DVD Player
System:
Digital Versatile Disc System with CDDA
capable
Usable discs:
DVD video disc, Compact disc
Frequency Response:
20 Hz to 20 kHz (CD) (±1 dB)
Signal to Noise Ratio: 100 dB (1 kHz)
Dynamic Range: 100 dB (1 kHz)
Distortion: 0.006%
Video Output
Video output:
1.0 ±0.2 Vp-p (output impedance 75 Ω)
LCD Monitor
Screen Size: 7-inch wide type
152 mm Width × 85 mm Height
Display method:
Transmission type TN liquid crystal display
Drive method: TFT (thin-film transistor)
active matrix driving
Pixels: 336,960 (1440 × 234)
General
Power source voltage:
14.4 V DC (10.8 to 15.6 V allowable)
Ground: Negative
Current consumption: 3.5 A (1 W)
Auto Antenna Rated Current: 500 mA less
Dimensions of the Main Unit:
178 mm Width × 100 mm Height × 160 mm
Depth
Weight of the Main Unit: 2.6 kg
Dimensions of the Remote Control Unit:
43.4 mm Width × 12.5 mm Height × 112.7 mm
Depth
Weight of the Remote Control Unit:
60 g (including battery)
USB
Specification: USB 2.0 Full Speed
File system: FAT12/16/32, non-VFAT-compliant
Playable audio format:
MP3 (.mp3): MPEG 1/2 Audio Layer-3
WMA (.wma): Ver. 7/8/9.1/9.2
AAC (.m4a): AAC format encoded by iTunes
and iTunes+ only
Maximum number of folders: 512
Maximum number of files: 255 (for a folder)
Maximum folder hierarchy: 8 levels (including Root)
Maximum power supply: 500 mA
Audio Amplifier
Maximum power output:
200 W (50 W × 4)
Output Power:
4 × 26 W (DIN 45324, +B = 14.4 V)
Speaker impedance: 4 Ω (4 to 8 Ω allowable)
Input
Audio input sensitivity:
High: 0.65 V (at 2 V output)
Mid: 1.3 V (at 2 V output)
Low: 2.0 V (at 2 V output)
(input impedance 10 kΩ or greater)
Video input:
1.0 ±0.2 Vp-p (input impedance 75 Ω)
58
NX509E
160mm
21.8mm
171 mm
178 mm
Note:
• Specifications comply with JEITA Standards.
• Specifications and design are subject to change
without notice for further improvement.
100 mm
Page 61
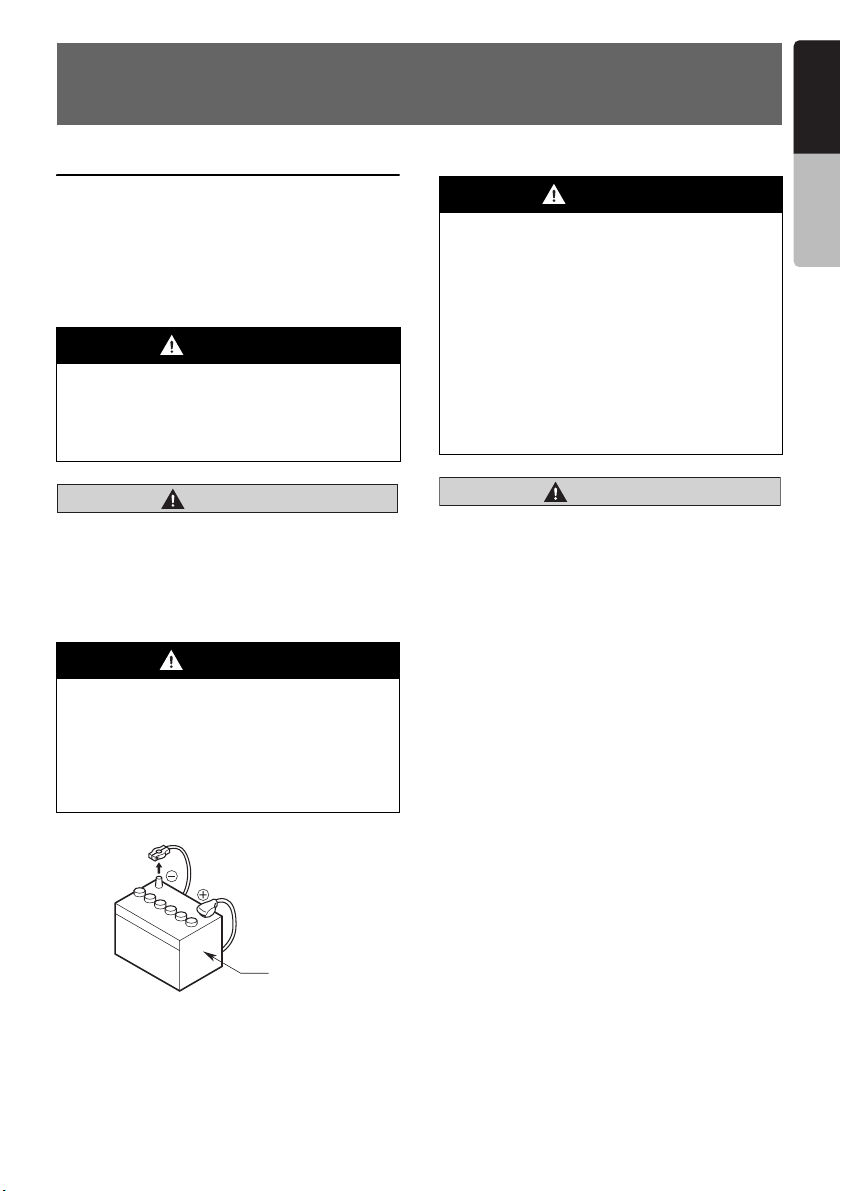
INSTALLATION AND WIRE CONNECTION
MANUAL
English
1. SAFETY PRECAUTIONS
Symbol Identification
This manual uses symbols and icons to indicate
safety precautions and concerns during the
installation procedure. Be sure to carefully read
and understand each precaution prior to
beginning the installation.
WARNING
This symbol is intended to alert the user to
the presence of important operating
instructions. Failure to heed the
instructions may result in severe injury or
death.
CAUTION
CAUTION
This symbol is intended to alert the user to
the presence of important operating
instructions. Failure to heed the instructions
can result in injury or material damage.
Before Use
WARNING
• Confirm the battery voltage of the vehicle
to be installed. This unit is designed only
for vehicles with DC 12V power supply.
• Disconnect the negative terminal of the
battery before connecting wires,
otherwise an electric shock, injury by
short circuit may occur.
Installation Precautions
WARNING
• When installing the unit to a vehicle with
an airbag system, never install it in a
place where it may affect the operation of
the airbag.
• Do not install this unit in the following
locations:
A location interfering with the driver’s
visual range or operation.
A location where the gear shift or brake
pedal are hindered.
A location where passengers are at risk.
An unstable location, or where the
system may fall.
CAUTION
CAUTION
• Do not install the system in the locations
described below. This may cause a fire,
accident or electrical shock:
A location exposed to rain or dust.
An unstable location, or where the system
may fall.
• Do not install this unit in a place exposed to
direct sunlight, heat or a place where the
vent holes or heat radiation holes are
covered.
• When you install the antenna, mount it in a
place where the elements of the antenna do
not protrude beyond the edge of the front,
back, left and right of the vehicle.
If it comes in contact with pedestrians, it
may cause an accident.
• Ensure a minimum distance around the
apparatus for sufficient ventilation.
• Do not place naked flame sources, such as
lighted candles on the apparatus.
• Use the apparatus only in moderate
climates (not in tropical climates).
INSTALLATION
MANUAL
Car battery
NX509E
59
Page 62

Installation Notes
English
WARNING
• Please note the position of pipes, tanks
and electrical wirings before installing
the unit into the vehicle; failure in
INSTALLATION
MANUAL
avoiding these may cause a fire or
malfunction.
CAUTION
CAUTION
• Use only the supplied parts.
If unspecified parts are used, they may
cause damage.
• Any holes made in the body of the vehicle
should be sealed with a silicon adhesive.
If exhaust fumes or water penetrates into
the vehicle, this may cause an accident.
• Fasten the bolts securely when installing
the unit. If the bolts are loose an accident or
malfunction could occur.
Connection Notes
WARNING
• Loom all cables according to the
instruction manual, so as not to hinder
operation.
• Wire the connecting cords/cables away
from high temperature areas. If the
coatings of the cables melt, it could
cause an accident/fire by a short circuit.
Take care when wiring in the engine
compartment.
• When wiring the connecting cables in a
vehicle with an airbag system, never feed
the cables through a place where it may
affect the operation of the airbag.
An airbag not operating correctly in an
emergency may cause increased injury.
CAUTION
CAUTION
• Verify wires with a digital multi-meter prior
to making any connections. Many new
vehicles use multiplexed and/or low voltage
circuits that can be damaged if a test light
or logic probe is used.
• Connect cables appropriately. If a wrong
connection is made, this may cause a fire or
accident.
• When passing cables through the body of
the vehicle, use non-conductive grommets.
If the coatings of the cables are worn out by
rubbing, this may cause an accident, fire or
a short circuit.
• After wiring cables, fix them with insulation
tape.
• Be sure to switch off the vehicle when
connecting or disconnecting cords to/from
the unit, otherwise an electric shock, injury
or accident may occur.
2. PACKAGE CONTENTS
1 Main unit
2 Owner’s Manual (this book)
3 Navigation System Operation Manuals
(book & CD-ROM)
4 Power supply cord
5 RCA pin cord
6 Bag for accessories
Flat head screw (M5 × 8 mm)...................... 8
Hexagonal bolt (M5 × 8 mm) ....................... 8
Electro tap ................................................... 1
Rubber cap (for RCA pin cord) .................. 14
Lead holder.................................................. 3
Double-sided tape
for fastening GPS antenna .......................... 1
7 Remote control unit
8 Battery
9 Finisher
0 Warranty card
! GPS antenna
Note:
• The provided disc (CD-ROM manual) cannot be
played back on this unit.
60
NX509E
Page 63

3. GENERAL CAUTIONS
• Do not open the case. There are no userserviceable parts inside. If you drop anything
into the unit during installation, consult your
dealer or an authorized Clarion service center.
4. CAUTIONS ON
INSTALLATION
• Prepare all articles necessary for installing the
main unit before starting.
• This model features an operation panel that
slides forward.
On some types of cars, the operation panel
may make contact with the dashboard or
gearshift lever, in which cause it cannot be
installed. Before installing, check that the unit
will not hamper operation of the gearshift lever
or obstruct your view before selecting the
installation location. (Figure 2)
Dashboard
Gearshift lever (check
that it does not touch
the LCD.)
• Install the unit within 30° of the horizontal
plane. (Figure 3)
Figure 2
• Use the included screws for installation. Using
other screws can cause damage. (Figure 4)
Chassis
Chassis
Max. 3 mm (M4 screw)/
Max. 8 mm (M5 screw)
• This unit has a fan motor in the right side of the
main unit so as not to raise the temperature in
the main unit. When the fan motor vent is
covered with cords or mounting bracket, it may
cause a malfunction. Be sure not to cover it
when wiring cords. (Figure 5)
Fan motor vent
Chassis
Damage
Figure 4
Figure 5
English
INSTALLATION
MANUAL
Max. 30°
Figure 3
• If you have to do any modification on the car
body, such as drilling holes, consult your car
dealer beforehand.
NX509E
61
Page 64
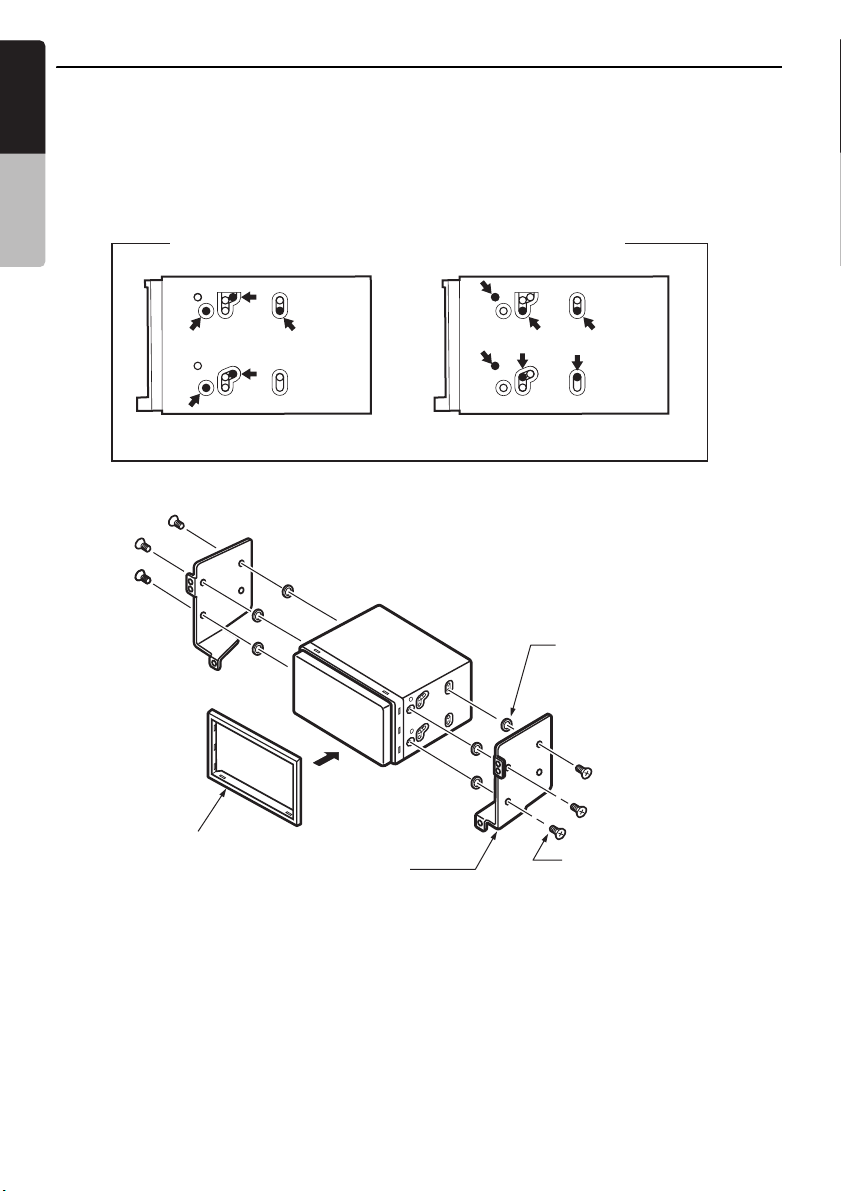
5. INSTALLING THE MAIN UNIT
English
This unit is designed for fixed installation in the
dashboard.
• When installing the main unit in NISSAN
vehicles, use the parts attached to the unit and
follow the instructions in Figure 6.
INSTALLATION
When installing the main unit in TOYOTA
MANUAL
vehicles, use the parts attached to the vehicle
and follow the instructions in Figure 7.
Mounting Screw Holes (Side View of the Main Unit)
For NISSAN vehicle For TOYOTA vehicle
Installing the Main Unit in a NISSAN Vehicle
• Wire as shown in Section 9 (see page 66).
• Reassemble and secure the unit in the
dashboard and set the face panel and center
panel.
Main Unit
Finisher (*1)
Mounting bracket
(1 pair for the left and right sides)
Figure 6
Note:
*1 Position the face panel with its wide edge at the bottom. Fit the edge into the groove of the main unit.
62
NX509E
6-Spacer (thickness: 1 mm)
6-Flat head screw
(M5 × 8)
(attached to the main unit)
Page 65

Installing the Main Unit in a TOYOTA Vehicle
Install by using parts attached to the vehicle. (Screws marked ★ are attached to the vehicle.)
Main Unit
8-Hexagonal screw
(M5 × 8)
English
INSTALLATION
MANUAL
Center Panel *2
Note:
*2 Some panel openings are too small for the unit
depending on the vehicle type and model. In
such a case, trim the upper and lower sides of the
panel frame by about 0.5 to 1.5 mm so the unit
can be inserted smoothly.
*3
Figure 7
*3 If a hook on the installation bracket interferes
with the unit, bend and flatten it with a nipper or
similar tool.
Mounting bracket
(1 pair for the left and right
sides)
Typical Mounting Brackets
Example 1 Example 2 Example 3
Affix the screws to the ● marks.
Vehicles other than NISSAN and TOYOTA
In some cases the center panel may require modification. (Trimming, filing, etc.)
NX509E
63
Page 66
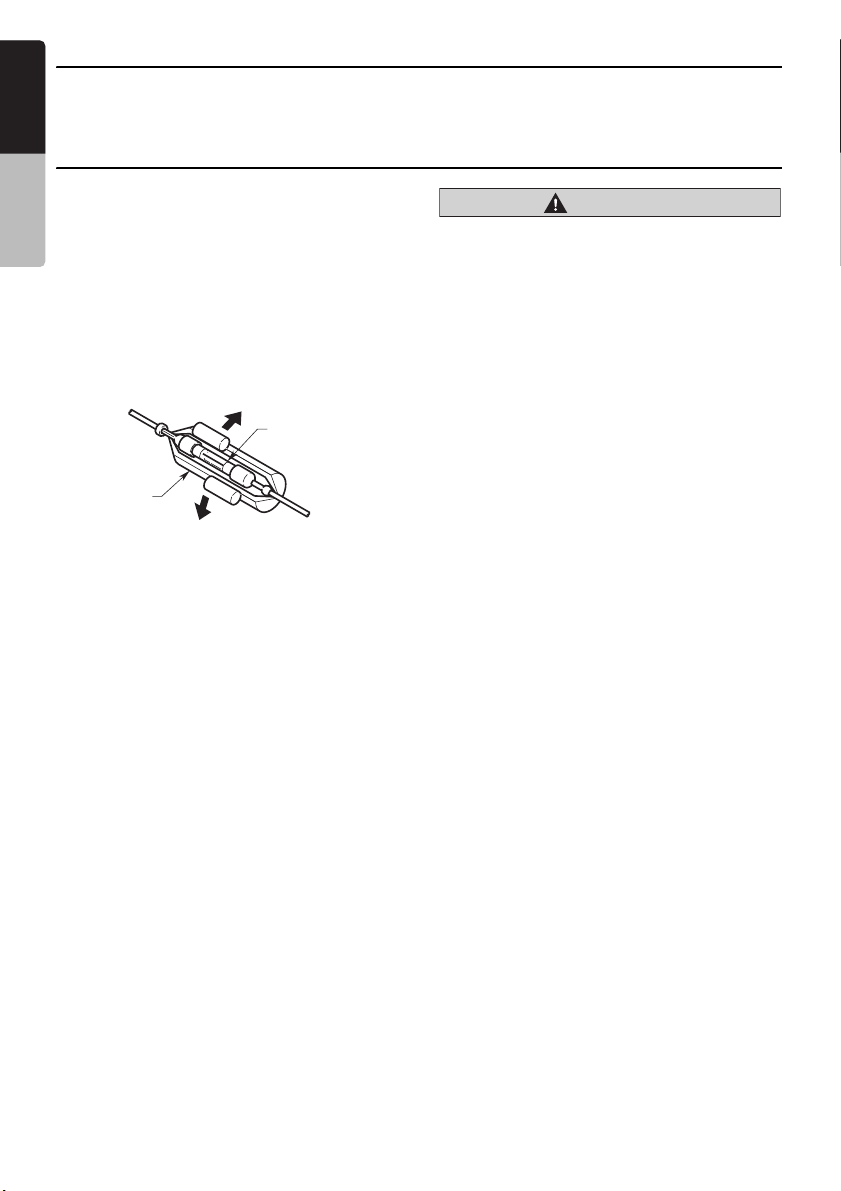
6. REMOVING THE MAIN UNIT
English
When the main unit is to be removed, disassemble it in the reverse of the order in “INSTALLTING THE
MAIN UNIT” (see page 62).
7. CAUTIONS ON WIRING
INSTALLATION
MANUAL
• Be sure to turn the power off before wiring.
Be particularly careful where you route the
wires.
• Keep them well away from the engine, and
exhaust pipe, etc. Heat may damage the wires.
• If the fuse should blow, check to see if the
wiring is correct.
If a fuse is blown, replace it with a new one of
the same specification as the original.
• To replace the fuse, remove the old fuse of the
power supply cord and insert the new one.
(Figure 8)
Fuse (15A FUSE)
Fuse holder
Figure 8
Note:
• There are various types of fuse holder. Do not let
the battery side touch other metal parts.
caution
CAUTION
After the connection, fix the cord by a clamp
or insulation tape for protection.
64
NX509E
Page 67

8. Installing the GPS Anttenna
WARNING
• Do not install the GPS antenna in a place where it may interfere with the operation of the
airbag or hinder the driver’s visual range.
• Do not use the navigation system with the GPS antenna cord cut off. The power cables in the
cord may be short-circuited.
Note:
• The supplied GPS antenna is for installing inside the vehicle. Do not install it outside the vehicle.
• Install the GPS antenna more than 50 cm away from the main unit, other audio devices such as CD player,
and a radar detector. If it is installed near these devices, GPS reception may be impaired.
• To improve the GPS signal reception, install the GPS antenna horizontally on a flat plane.
• Do not wax or paint the cover of the GPS antenna. This may reduce the performance of the GPS antenna.
• Install the GPS antenna at least 10 cm away from the windshield.
• Wipe off the dirt of the mounting surface before installing the GPS antenna.
• Stick the double-sided tape to the bottom face of the GPS antenna.
Double-sided
tape
Bottom face of the GPS antenna
• Mount the GPS antenna.
Stick it surely on a flat plane of the passenger-side dashboard where GPS signal interruption is
minimized.
• Wire the GPS antenna cord.
Fasten the cord using the cord holders.
English
INSTALLATION
MANUAL
(Shows an example in case of the left-hand traffic.)
GPS antenna
Cord holder
NX509E
65
Page 68

9. WIRE CONNECTION
English
MANUAL
Radio antenna jack
iPod
Aux2 audio input terminal
INSTALLATION
• Use the AUX1 audio input when you
connect your iPod.
• Connect the optional adaptor (BLT373)
when you use your Bluetooth cellular
phone.
USB terminal
Connector cable
(included in your
iPod)
or
iPod with video
GPS antenna
jack
Connector cable
(CCA-723)
Steering wheel
remote control
terminal
Connect to the AUX1 audio/
video input terminal.
Refer to the following page.
4-Channel Amplifier
Rear Monitor
Wireless Headphone
Gray
Black
Purple
Gray
Green
Black
Red
White
Red
White
Red
White
Yellow
Red
White
Yellow
Right
Left
Right
Left
Front audio
output terminal
Rear audio
output terminal
Subwoofer output
terminal (MONO 2ch)
Video output terminal
Right
Left
(2-Zone audio
output terminal)
Rear Vision Camera terminal
66
Black
Black
Red
NX509E
Yellow
Yellow
Red
White
AUX1 video input terminal
AUX2 video input terminal
Right
Left
AUX1 audio input
terminal
VTR etc.
Connect to the AUX2 audio
input terminal.
Page 69
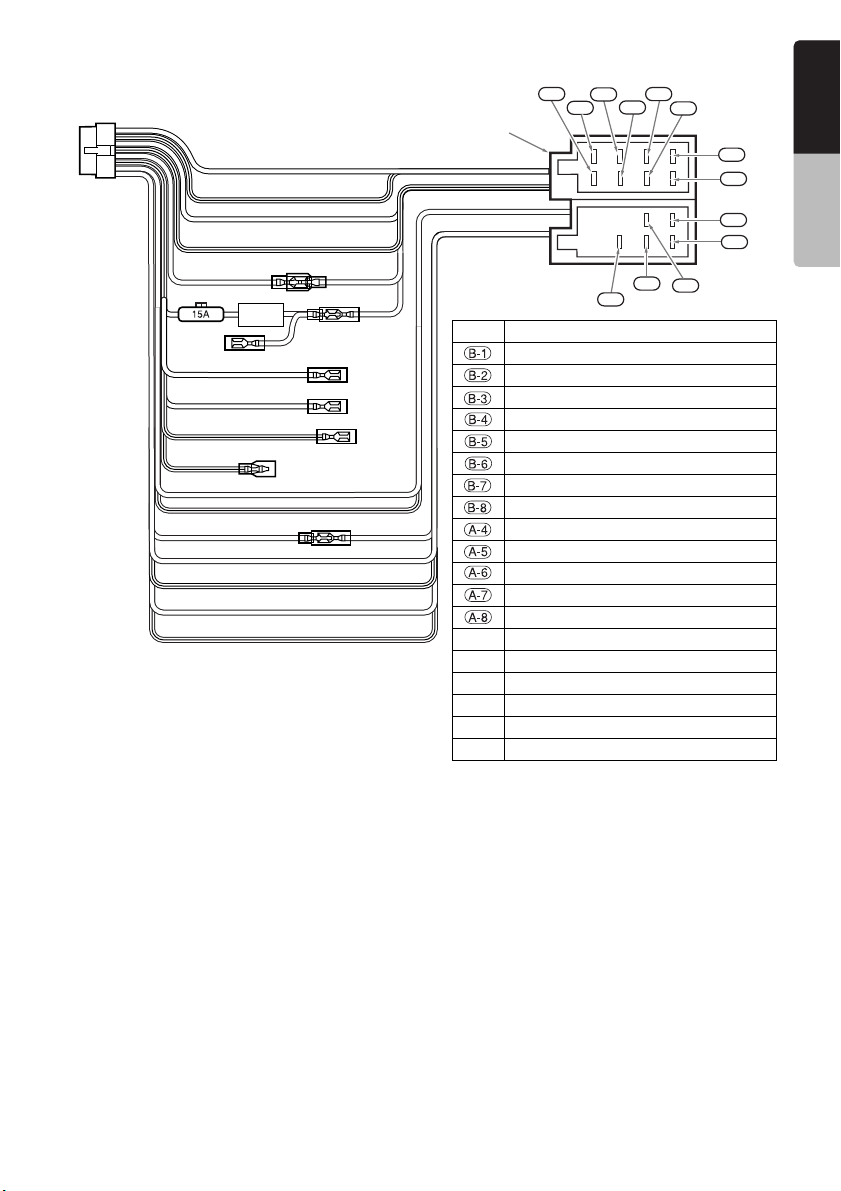
English
2
6
3
4
∗1
∗1
5
B-2
B-1
B-3
B-4
B-5
B-6
1
B-7
B-8
A-7
A-8
A-6
A-4
No. Description
REAR RIGHT+
REAR RIGHTFRONT RIGHT+
∗2
FRONT RIGHTFRONT LEFT+
FRONT LEFTREAR LEFT+
REAR LEFT-
+12 V MAIN POWER (*1)
Auto antenna
ILLUMINATION
+12 V ACCESSORY (*1)
GROUND
1 ISO CONNECTOR
2 Spare terminal (Yellow)
3 PHONE MUTE (Brown)
4 Parking brake (Grass-green)
5 Remote terminal (Blue/White) (*2)
6 Reverse gear terminal (Purple/White)
A-5
INSTALLATION
MANUAL
Note:
*1 In certain vehicles - Volkswagen/Opel/Vauxhall - it is necessary to exchange the accessory <<Red>> and
the main power <<Yellow>> connection, to avoid overload and loss of memory.
*2 When the unit is installed in a 1998 or later Volkswagen model, make sure to interrupt the <<Remote>>
output. Disconnect the <<blue/white>> wire and insulate the front ends of this cord. A breakdown may occur
if the cord is not disconnected, or front ends are not insulated.
See next page for how to connect the parking brake cord.
NX509E
67
Page 70

● Connecting the parking brake cord
English
Connect the cord to parking brake lamp ground in the meter panel.
Note:
• Connecting the parking brake cord to lamp ground allows you to watch video images when the parking brake
is engaged.
• When the parking brake cord is not connected, the monitor will not display video images.
• If “Audio Only” appears on the screen just after turning on the ACC power of the car, release the parking
INSTALLATION
brake while confirming safety, and then engage the parking brake again.
MANUAL
Parking brake lamp
+ cord to battery
Parking brake
Electro-tap
Parking brake
signal cord
Parking brake cord
(Grass-green)
● How to attach the electro-tap
1. Place the Parking brake cord at the stopper,
and fold it back in the direction of the arrow.
2. Pass the Parking brake signal cord through,
and fold it back in the direction of the arrow.
Parking brake
signal cord
Stopper
Parking brake
signal cord
Parking brake cord
(Grass-green)
Connecting the Accessories
● Connection to the Rear Vision Camera for vehicle
The Rear Vision Camera for vehicle can be connected to Rear Vision Camera video input terminal of
the RCA pin cord. For detailed information, refer to the instruction sheet or manual for the Rear Vision
Camera.
Note:
• Be sure to connect the reverse gear cord to the vehicle’s relevant terminal.
• Connect the Rear Vision Camera to the RCA pin cord; if not, the screen turns black while the gearshift lever
is in the reverse gear position.
• The power supply box CAA185 (sold separately) is required for connection of the main unit and the Rear
Vision Camera.
● Bluetooth Cellular Phone
Use the Telephone Adapter BLT373, and connect it to the AUX2 audio input terminal and the PHONE
MUTE code. For detailed information, refer to the instruction manual of the BLT373.
68
NX509E
Page 71

English:
Declaration of conformity
We Clarion declares that this model
NX509E is following the provision of
Directive 1999/5/EC with the essential
requirements and the other relevant
regulations.
Français:
Déclaration de conformité
Nous, Clarion, déclarons que ce modèle
NX509E est conforme aux exigences
essentielles et aux autres dispositions
pertinentes de la directive 1999/5/CE.
Deutsch:
Konformitätserklärung
Wir, Clarion, erklären, dass diese Modell
NX509E den Bestimmungen der
Richtlinie 1999/5/EG im Hinblick auf die
grundlegenden Anforderungen und
andere relevante Bestimmungen
entspricht.
Italiano:
Dichiarazione di conformità
Clarion dichiara che il presente modello
NX509E è conforme ai requisiti
essenziali e alle altre disposizioni
pertinenti stabiliti dalla direttiva
1999/5/CE.
Authorized Representative
Clarion Europa GmbH
Hessenring 19-21, 64546 Mörfelden-Walldorf, Germany
telephone: +49-6105-977-0 facsimile: +49-6105-977-399
Nederlands:
Conformiteitsverklaring
Clarion verklaart dat het model NX509E
in overeenstemming is met de
essentiële eisen en andere relevante
voorschriften van de bepalingen van
Richtlijn 1999/5/EC.
Español:
Declaración de conformidad
Clarion declara que este modelo
NX509E cumple con los requisitos
esenciales y otras disposiciones
aplicables descritos en la Directiva
1999/5/CE.
Svenska:
Intyg om överensstämmelse
Härmed intygar Clarion att denna modell
NX509E uppfyller kraven i direktiv
1999/5/EG gällande väsentliga
egenskaper och övriga relevanta
bestämmelser.
Português:
Declaração de conformidade
A Clarion declara que este modelo
NX509E está de acordo com as
provisões da Directiva 1999/5/CE
relativamente aos requisitos essenciais
e outros regulamentos aplicáveis.
Dansk:
Erklæring om overholdelse
Clarion erklærer herved, at denne model
NX509E overholder de væsentlige krav
og øvrige relevante krav i Direktiv
1999/5/EF.
2009/5
Clarion Co., Ltd.
All Rights Reserved. Copyright © 2009: Clarion Co., Ltd.
Printed in China / Imprimé en Chine / Gedruckt in China
Stampato in Cina / Gedrukt in China / Impreso en China
Tryckt i Kina / Impresso na China / Trykt i Ungarn
QY-5011E
280-8740-00
 Loading...