

Page 1

Owner’s manual
NX404
DVD MULTIMEDIA STATION WITH BUILT-IN NAVIGATION &
6.2’’ TOUCH PANEL CONTROL
Page 2
CLARION PRODUCT REGISTRATION INFORMATION
For USA and Canada only
www.clarion.com
Dear Customer:
Congratulations on your purchase of a Clarion mobile electronic product. We are
confident that you’ll enjoy your Clarion experience.
There are many benefits to registering your product. We invite you to visit our website
at www.clarion.com to register your Clarion product.
We have made product registration simple with our easy to use website.
The registration form is short and easy to complete. Once you’re registered, we can
keep you informed of important product information.
Register at www.clarion.com - it’s easy to keep your Clarion product up to date.
INFORMATIONS DE L’ENREGISTREMENT DE PRODUITS CLARION
Pour les Étas Unis et le Canada seulement
Cher client:
Nous vous remercions d’avoir acheté ce produit électronique mobile Clarion. Nous
sommes confiants que vous apprécierez votre expérience Clarion.
Il y a beaucoup d’avantage à enregistrer votre produits. Nous vous invitons à visiter
notre site Web www.clarion.com pour enregistrer votre produit Clarion.
Nous avons facilité la tache d’enregistrement de produit simple et facile grâce à notre
site Web.Le formulaire d’enregistrement est court et facile à compléter. Lorsque vous
êtes enregistrer, nous pouvons vous tenir informé des informations important de
produits. Enregistrer à www.clarion.com - c’est facile de mettre à jour votre produit
Clarion.
INFORMACIÓN DEL REGISTRO DE PRODUCT O DE CLARION
Querido Cliente:
Felicitaciones por su compra de producto electrónico móvil de Clarion. Estamos
seguros que usted gozará de su experiencia con el producto de Clarion.
Hay muchas ventajas al registrar su producto. Le invitamos a que visite nuestro sitio
en internet www.clarion.com para registrar su producto de Clarion.
Hemos hecho el registro de producto fácil en nuestro sitio. La forma de registro es
corta y fácil de completar. Una vez que lo registre, podremos proporcionarle la información de su producto.
Registrese en www.clarion.com - es fácil mantener su producto de Clarion actualizado.
www.clarion.com
Para USA y Canada nomas
www.clarion.com
English
English
Owner’s Manual
Under Industry Canada regulations, this radio transmitter may only operate using an
antenna of a type and maximum (or lesser) gain approved for the transmitter by Industry
Canada. To reduce potential radio interference to other users, the antenna type and its
gain should be so chosen that the equivalent isotropically radiated power (e.i.r.p.) is not
more than that necessary for successful communication.
Conformément à la réglementation d’Industrie Canada, le présent émetteur radio peut
fonctionner avec une antenne d’un type et d’un gain maximal (ou inférieur) approuvé pour
l’émetteur par Industrie Canada. Dans le but de réduire les risques de brouillage radioélectrique
à l’intention des autres utilisateurs, il faut choisir le type d’antenne et son gain de sorte
que la puissance isotrope rayonnée équivalente (p.i.r.e.) ne dépasse pas l’intensité nécessaire à l’établissement d’une communication satisfaisante.
NX404
1
Page 3

English
Contents
Thank you for purchasing this Clarion product.
•
Please fully read this owner’s manual before operating this equipment.
•Check the contents of the enclosed warranty card and store it in a safe place with this manual.
Owner’s Manual
1. FEATURES ...........................................................................................................4
Expanding Systems ..............................................................................................4
2. PRECAUTIONS ....................................................................................................5
3. CAUTIONS ON HANDLING.................................................................................8
Operation Panel ....................................................................................................8
USB Port ...............................................................................................................8
Cleaning ................................................................................................................8
Handling Discs ......................................................................................................9
4.OPERATIONAL PANEL ......................................................................................11
Functions of Buttons ...........................................................................................11
5. REMOTE CONTROL..........................................................................................12
Remote Control Function ....................................................................................13
6. MAIN MENU.......................................................................................................15
7. DVD VIDEO PLAYER OPERATIONS ...............................................................16
Discs ...................................................................................................................16
Change DVD System Settings ............................................................................17
Watching to a disc ..............................................................................................17
Operate the DVD Player menu ............................................................................18
Operate the Video files Player menu...................................................................20
Switching Subtitles .............................................................................................20
Video files list ......................................................................................................20
Play DivX Video-On-Demand file ........................................................................20
Playable disc video files ......................................................................................21
8. CD PLAYER OPERATIONS ...............................................................................22
Listening to a disc/Ejecting a disc ......................................................................22
Showing CD Player mode screen .......................................................................22
Operate the CD Player menu ..............................................................................22
Listening to compressed audio ..........................................................................23
Tag display function ............................................................................................23
9. USB AUDIO OPERATIONS ...............................................................................25
Notes on using USB memories ...........................................................................25
Select USB Audio mode .....................................................................................25
Playing Audio files in USB memory ....................................................................26
10. USB VIDEO OPERATIONS ..............................................................................27
Notes on using USB memories ...........................................................................27
Select USB Video mode .....................................................................................27
Playing video files in USB memory .....................................................................27
Playable Video file ...............................................................................................27
11. iPod OPERATIONS..........................................................................................29
Notes on using Apple iPod/iPhone .....................................................................29
iPod Audio ID3 Info .............................................................................................29
iPod audio playlist mode screen .........................................................................30
iPod Video Menu Operations ..............................................................................31
iPod Video ID3 mode screen ..............................................................................31
iPod Video List mode screen ..............................................................................32
iPod Video Simple Control Mode Screen ...........................................................32
iPod Video play mode screen .............................................................................32
iPod Audio Bluetooth mode ................................................................................33
12. Pandora® OPERATIONS .................................................................................34
NX404
2
Page 4

Selecting the Pandora mode ..............................................................................34
Pandora Bluetooth mode ....................................................................................35
13. Bluetooth® AUDIO PLAYER OPERATIONS ..................................................36
Selecting the Bluetooth Audio mode ..................................................................36
Bluetooth audio player settings ..........................................................................36
Registering your Bluetooth audio player (Pairing)...............................................36
Selecting the Bluetooth audio player ..................................................................37
Controlling the Bluetooth audio player ...............................................................37
14. Bluetooth®
Select the BT Phone mode .................................................................................38
Bluetooth Telephone settings .............................................................................38
Registering your cellular phone (Pairing) ............................................................39
Select the cellular phone ....................................................................................39
Obtaining the Phone Book data .........................................................................39
Telephone operations .........................................................................................39
15. TUNER OPERATIONS .....................................................................................41
16. HDMI MODE ....................................................................................................42
Wire connection of HDMI mode .........................................................................42
Select HDMI source ...........................................................................................43
HDMI Mode .........................................................................................................43
17. AUX .................................................................................................................44
18. CAMERA INPUT OPERATIONS .....................................................................44
19. REAR SOURCE OPERATIONS .......................................................................45
DVD Video in Rear ..............................................................................................45
DVD Video Rear Source Control Info mode. ......................................................45
DVD Video Rear Source Control Direct mode. ..................................................45
iPod Video in Rear ..............................................................................................46
iPod Video Rear Source Control Play Mode .......................................................46
iPod Video Rear Source ID3 Mode .....................................................................46
20. SETTING OPERATIONS ..................................................................................47
General Setup Menu ...........................................................................................47
Video Setup Menu ..............................................................................................47
Audio Setup Menu ..............................................................................................48
Navigation Setup Menu ......................................................................................48
Others Setup Menu .............................................................................................48
Set the Anti-Theft code .......................................................................................49
21. TROUBLESHOOTING .....................................................................................50
GENERAL ............................................................................................................50
DVD PLAYER ......................................................................................................50
USB DEVICE .......................................................................................................51
Bluetooth ............................................................................................................51
TFT screen ..........................................................................................................52
22. ERROR DISPLAY.............................................................................................53
DVD PLAYER ......................................................................................................53
23. SPECIFICATIONS ............................................................................................54
24. WIRE CONNECTION GUIDE ...........................................................................56
TELEPHONE OPERATIONS ..........................................................38
English
English
Owner’s Manual
NX404
3
Page 5
English
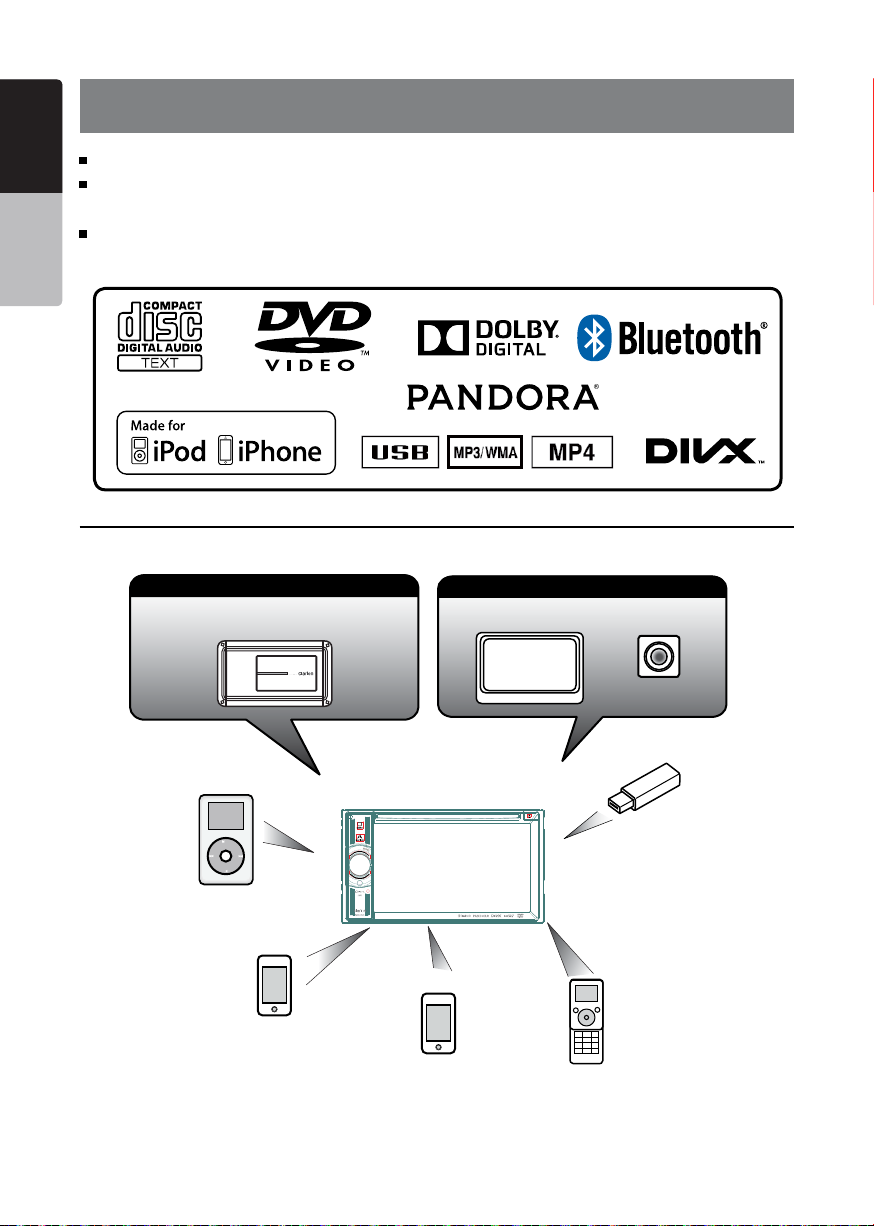
1. FEATURES
FLAC(Free Lossless Audio Codec) Compatible with ID3-TAG Display
Built-in Bluetooth® Handsfree (HFP) and Audio Streaming (A2DP &
Owner’s Manual
AVRCP)
Front-Panel Auxiliary Input and 6ch RCA Output with Subwoofer Control
Expanding Systems
Expanding audio features
External Power
Amplier
®
iPod
(Connect via CCA-750)
®
iPhone
iPhone®/ Smartphone via HDMI
(Connect via CCA-750)
(Connect via CCA-770,CCA-771)
Expanding visual features
Rear monitor
Rear Vision Camera
USB
Memory
Bluetooth
Telephone
NOTE:
•
The items listed outside of the frames are the commercial products generally sold.
•
CCA-750,CCA-770,CCA-771:Sold separately.
NX404
4
Page 6

2. PRECAUTIONS
English
WARNING
• For your safety, the driver should not watch any video sources and/or operate the controls while driving.
Please note that watching and operating any video sources while driving are prohibited by law in some
countries. Also, while driving, keep the volume to a level at which external sounds can be heard.
• Do not disassemble or modify this unit. It may cause an accident, re, or electric shock.
• Do not use this unit when a trouble exists, such as no screen content appears or no sound is
audible. It may cause an accident, fire, or electric shock. For that case, consult your authorized
dealer or a nearest Clarion service center.
• In case of a problem, such as any material has been entered in the unit, the unit gets wet, or
smoke or strange smells come out of the unit, etc., stop using this unit immediately, and consult
your authorized dealer or a nearest Clarion service center.
Using it in that condition may cause an accident, fire, or electric shock.
• Use a fuse with the same specication only when replacing the fuse.
Using a fuse with a different specification may causes a fire.
• For the installation of this unit or a change in the installation, ask your authorized dealer or a
nearest Clarion service center for safety. Professional skills and experiences are required to do
so.
• This navigation system should not be used to replace your own judgment. No itinerary suggested
by this navigation system should ever override any highway regulations, your own judgment, or a
knowledge of safe driving practices. Do not follow the navigation system’s suggested itinerary if it
would cause you to perform a dangerous or illegal act, place you in a dangerous situation, or take
you into an area you consider unsafe.
• The advice provided by the navigation system is to be regarded as a suggestion only. There may
be times when the navigation system displays the vehicle’s location incorrectly, fails to suggest
the shortest route, or fails to direct you to your desired destination. In such instances, rely on your
own driving judgment, taking into account the driving conditions at the time.
• Do not use the navigation system to locate emergency services. The database does not contain
a complete listing of emergency services such as police stations, fire halls, hospitals and walk-in
clinics. Please show discretion and ask for directions in such instances.
• As the driver, you alone are responsible for your driving safety.
• In order to avoid a trafc accident, do not operate the system while driving.
• In order to avoid a trafc accident, operate the system only when the vehicle is stopped at a safe
place and the parking brake is on.
• In order to avoid a trafc accident or trafc offense, remember that actual road conditions and
traffic regulations take precedence over the information contained on the navigation system.
• The software may contain inaccurate or incomplete information due to the passage of time,
changing circumstances, and the sources of information used. Please respect current traffic
conditions and regulations at all times while driving.
• Where actual road conditions and highway regulations differ from the information contained on
the navigation system, abide by the highway regulations.
• Keep the amount of time spent viewing the screen while driving to a strict minimum.
• The navigation system does not provide, nor represent in any way information on: trafc and
highway regulations; technical aspects of the vehicle including weight, height, width, load and
English
Owner’s Manual
NX404
5
Page 7

speed limits; road conditions including grade, percentage of incline and surface conditions;
English
obstacles such as the height and width of bridges and tunnels; and other current driving or road
conditions. Always rely on your own judgment when driving a car, taking into account current
driving conditions.
• This equipment has been tested and found to comply with the limits for a Class B digital device,
pursuant to Part 15 of the FCC Rules.
Owner’s Manual
These limits are designed to provide reasonable protection against harmful interference in a
residential installation.This equipment generates, uses, and can radiate radio frequency energy
and, if not installed and used in accordance with the instructions, may cause harmful interference
to radio communications.However, there is no guarantee that interference will not occur in a
particular installation. If this equipment does cause harmful interfrence to radio reception, which
can be determined by turning the equipment off and on, the user is encourage to consult the
dealer or an experienced radio technician for help.
NX404
6
Page 8
1.When the inside of the car is very cold and
the player is used soon after switching on the
heater, moisture may form on the disc (DVD/
CD) or the optical parts of the player and
proper playback may not be possible. If
moisture forms on the disc (DVD/CD), wipe it
o with a soft cloth. If moisture forms on the
optical parts of the player, do not use the
player for about one hour. The condensation
will disappear naturally allowing normal
operation.
2.Driving on extremely bumpy roads which
cause severe vibration may cause the sound
to skip.
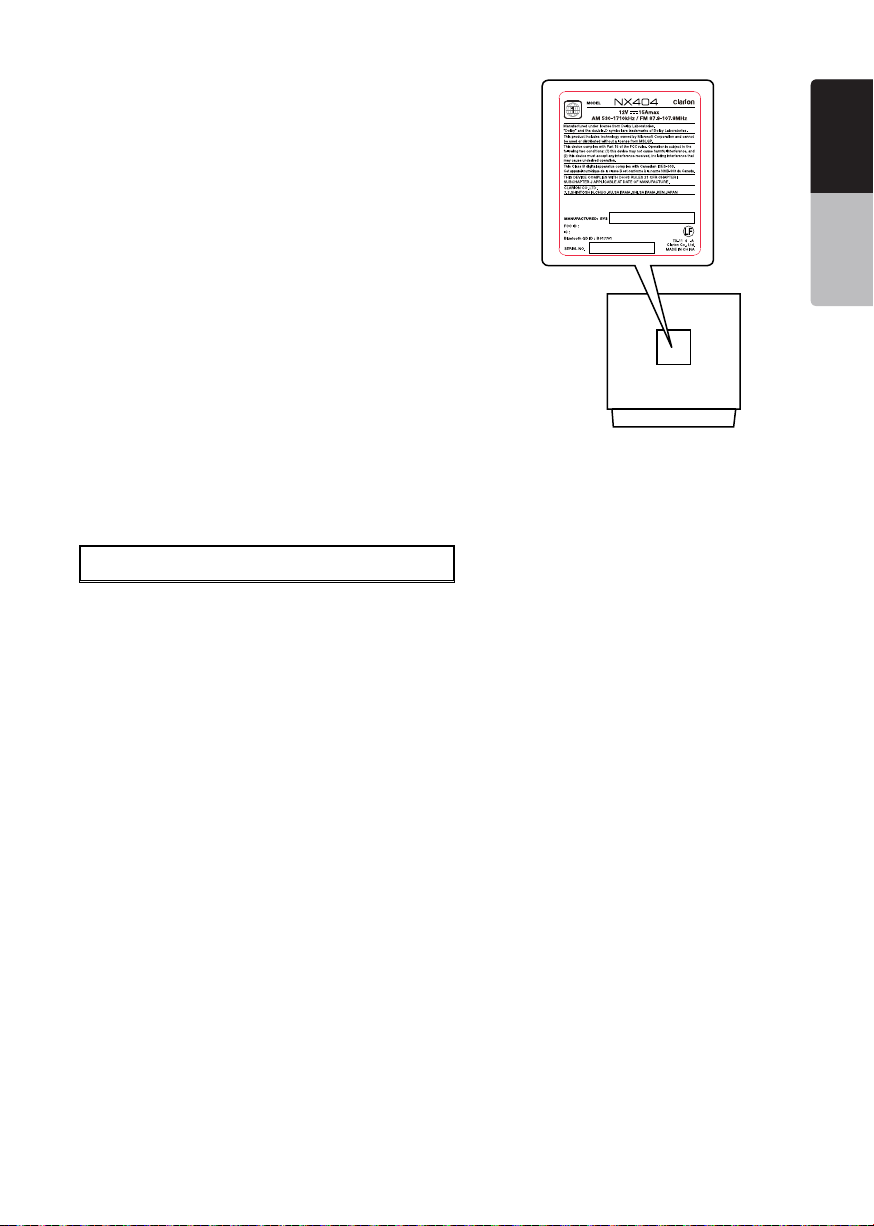
V8VCNE8 239DCL
8614A-C NE8239 DCL
English
English
Owner’s Manual
B
5
3.This unit uses a precision mechanism. Even
in the event that trouble arises, never open
the case, disassemble the unit, or lubricate
the rotating parts.
INFORMATION FOR USERS:
Changes or modications to this product
unapproved by the manufacturer will void the
warranty and will violate FCC approval.
NX404
NX404
7
Page 9

English
3. CAUTIONS ON HANDLING
Operation Panel
For a longer service life, be sure to read the following cautions.
Owner’s Manual
• The operation panel will operate properly in a
temperature range of 0˚ to 60˚ C.
• Do not allow any liquids on the set from
drinks, umbrellas etc. Doing so may damage
the internal circuitry.
• Do not disassemble or modify the set in any
way. Doing so may result in damage.
• Subjecting the operation panel to shocks
may result in breakage, deformation or other
damage.
• Do not let cigarettes burn the display.
• If a problem should occur, have the set
inspected at your store of purchase.
• The remote control unit may not work if the
remote control sensor is exposed to direct
sunlight.
• In extremely cold weather, the display
movement may slow down and the display
may darken, but this is not a malfunction.
The display will work normally when the
temperature increases.
• Small black and shiny spots inside the liquid
crystal panel are normal for LCD products.
USB Port
• The USB memory sticks must be recognized
as “USB mass storage class” to work
properly. Some models may not operate
correctly.
When the memorized data is lost or
damaged by any chance, Clarion shall not
be liable for any damage.
When using an USB memory stick, we
recommend that you backup your data stored
on it before by using a personal computer etc.
Cleaning
• Cleaningthecabinet
Use a soft, dry cloth and gently wipe off
the dirt. For tough dirt, apply some neutral
detergent diluted in water to a soft cloth, wipe
off the dirt gently, then wipe again with a dry
cloth.
Do not use benzene, thinner, car cleaner, etc.,
as these substances may damage the cabinet
or cause the paint to peel. Also, leaving rubber
or plastic products in contact with the cabinet
• Data les may be broken when using USB
memory sticks in the following situation:
When disconnecting the USB memory stick or
turning the power off during writing or reading
data. When affected by static electricity or
electric noise. Connect/disconnect the USB
memory stick when it is not accessed.
• Connecting with the computer is not covered.
for long periods of time may cause stains.
• Cleaningtheliquidcrystalpanel
The liquid crystal panel tends to collect dust,
so wipe it off occasionally with a soft cloth.
The surface is easily scratched, so do not rub
it with hard objects.
NX404
8
Page 10
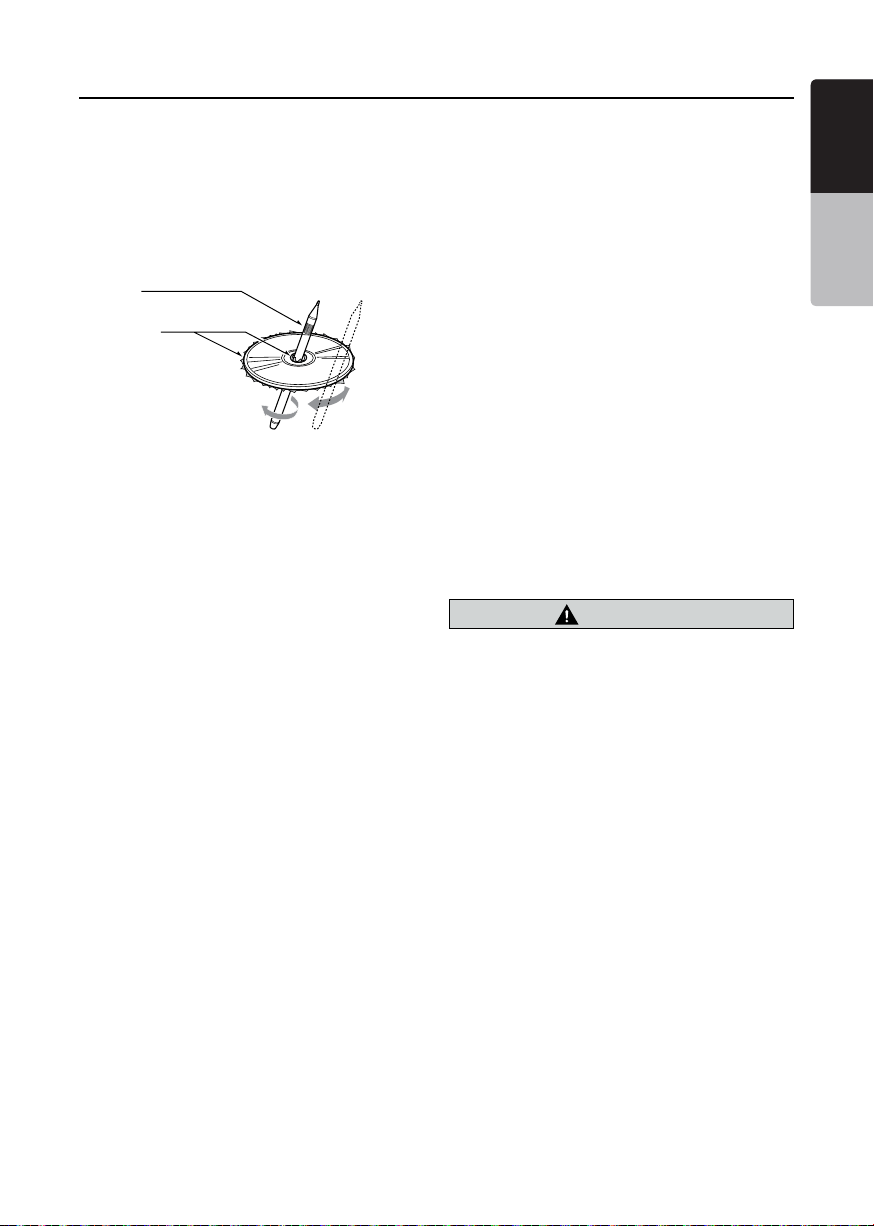
Handling Discs
Handling
• New discs may have some roughness
around the edges. If such discs are used,
the player may not work or the sound
may skip. Use a ball-point pen or the like
to remove any roughness from the edge
of the disc.
Ball-point pen
Roughness
Never stick labels on the surface of the
disc or mark the surface with a pencil or
pen.
• Never play a disc with any cellophane
tape or other glue on it or with peeling off
marks. If you try to play such a disc, you
may not be able to get it back out of the
DVD player or it may damage the DVD
player.
• Do not use discs that have large
scratches, are misshapen, cracked,
etc. Use of such discs may cause
missoperation or damage.
• To remove a disc from its storage case,
press down on the center of the case
and lift the disc out, holding it carefully
by the edges.
• Do not use commercially available disc
protection sheets or discs equipped with
stabilizers, etc. These may damage the
disc or cause breakdown of the internal
mechanism.
Storage
• Do not expose discs to direct sunlight or
any heat source.
• Do not expose discs to excess humidity
or dust.
• Do not expose discs to direct heat from
heaters.
Cleaning
• To remove ngermarks and dust, use
a soft cloth and wipe in a straight
line from the center of the disc to the
circumference.
• Do not use any solvents, such as
commercially available cleaners, antistatic spray, or thinner to clean discs.
• After using special disc cleaner, let the
disc dry off well before playing it.
On Discs
• Never turn off the power and remove the
unit from the car with a disc loaded.
CAUTION
For your safety, the driver should not
insert or eject a disc, opening the
operation panel while driving.
English
English
Owner’s Manual
NX404
9
Page 11

English
About the registered marks, etc.
This product incorporates copyright protection
•
technology that is protected by U.S. patents
and other intellectual property rights. Use of this
copyright protection technology must be authorized
Owner’s Manual
by Rovi Corporation, and is intended for home and
other limited viewing uses only unless otherwise
authorized by Rovi Corporation.
Reverse engineering or disassembly is prohibited.
Manufactured under license from Dolby
•
Laboratories. “Dolby” and the double-D symbol are
trademarks of Dolby Laboratories.
"Made for iPod," and "Made for iPhone" mean
•
that an electronic accessory has been designed to
connect specifically to iPod, or iPhone, respectively,
and has been certified by the developer to meet
Apple performance standards. Apple is not
responsible for the operation of this device or its
compliance with safety and regulatory standards.
Please note that the use of this accessory with iPod
or iPhone may affect wireless performance.
iPhone, iPod, iPod nano and iPod touch are
trademarks of Apple Inc., registered in the U.S. and
other countries.
Lightning is a trademark of Apple Inc.
The Bluetooth® word mark and logos are registered
•
trademarks owned by the Bluetooth® SIG, Inc. And
any use of such marks by Clarion Co.,Ltd. is under
license. Other trademarks and trade names are
those of their respective owners.
Pandora. the Pandora logo. and the Pandora trade
•
dress are trademarks or registered trademarks of
Pandora Media. Inc. used with permission.
®
DivX
, DivX Certified® and associated logos
•
are trademarks of Rovi Corporation or its
subsidiaries and are used under license.
DivX Certified® to play DivX® video, including
premium content. Covered by one or more
of the following U.S. patents: 7,295,673;
7,460,668; 7,515,710; 7,519,274
ABOUT DivX VIDEO: DivX® is a digital video
format created by DivX, LLC, a subsidiary of
Rovi Corporation.
This is an official DivX Certified® device that
has passed rigorous testing to verify that it
plays DivX video. Visit divx.com for more
information and software tools to convert your
files into DivX videos.
ABOUT DivX VIDEO-ON-DEMAND: This DivX
Certified® device must be registered in order
to play purchased DivX Video-on-Demand
(VOD) movies. To obtain your registration
code, locate the DivX VOD section in your
device setup menu. Go to vod.divx.com for
more information on how to complete your
registration.
NX404
10
Page 12
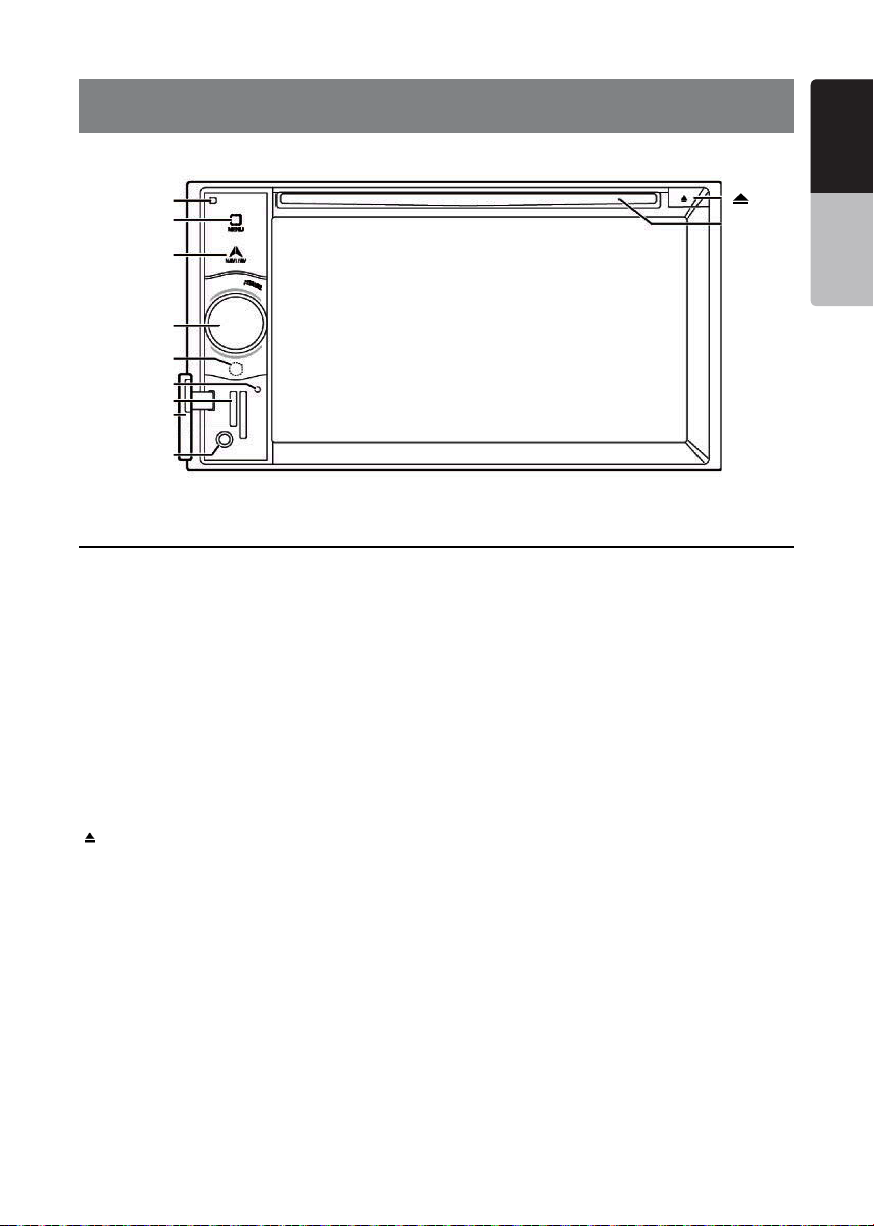
4.OPERATIONAL PANEL
English
English
[Microphone]
[MENU]
[NAVI/AV]
[POWER/VOL]
[IR]
[RESET]
[microSD slot]
[Cover]
[AUX IN]
Only navigation map card is available and don’t remove it when unit is power on
Functions of Buttons
[POWER/VOL] Knob
• Press this knob to turn on the power.
• When the power is already on, it moves to the
Navigation mode. If Navigation mode is displayed, it
moves to the Navigation menu.
• Keep pressing this knob more than 2 second to turn
off the power.
• Turn this knob to left or right to decrease or increase
the volume of the system.
[NAVI/AV] Button
• Press this button to display NAVI, press again to
return current source.
• Press and hold this button for 2 seconds to display
the Dimmer setting menu.
[
] Eject
• Press to eject disc from the unit.
[MENU] Button
• Press this button to display main menu; press again
to return current source.
• Press and hold this button for 2 seconds to turn off
the monitor. Press any place of the screen to turn on
the monitor again.
[RESET] Button
• Press this button to hardware reset the unit.
Note: When the [RESET] button is pressed, frequencies
of radio stations, titles, etc. stored in memory are
cleared.
[microSD slot ]
Note: The microSD card is only for navigation. Please
don’t insert microSD card for other purpose. After
insertion of microSD card for MAP, don’t remove it;
otherwise, the navigation function will be disabled.
[AUX IN]
AUX 1 Connector.
[Microphone]
This is used for Bluetooth phone.
[IR] SENSOR
•Receiver for the remote control unit (operating range:
30 degree in all directions).
[
]
[Disc slot]
Owner’s Manual
NX404
11
Page 13
English
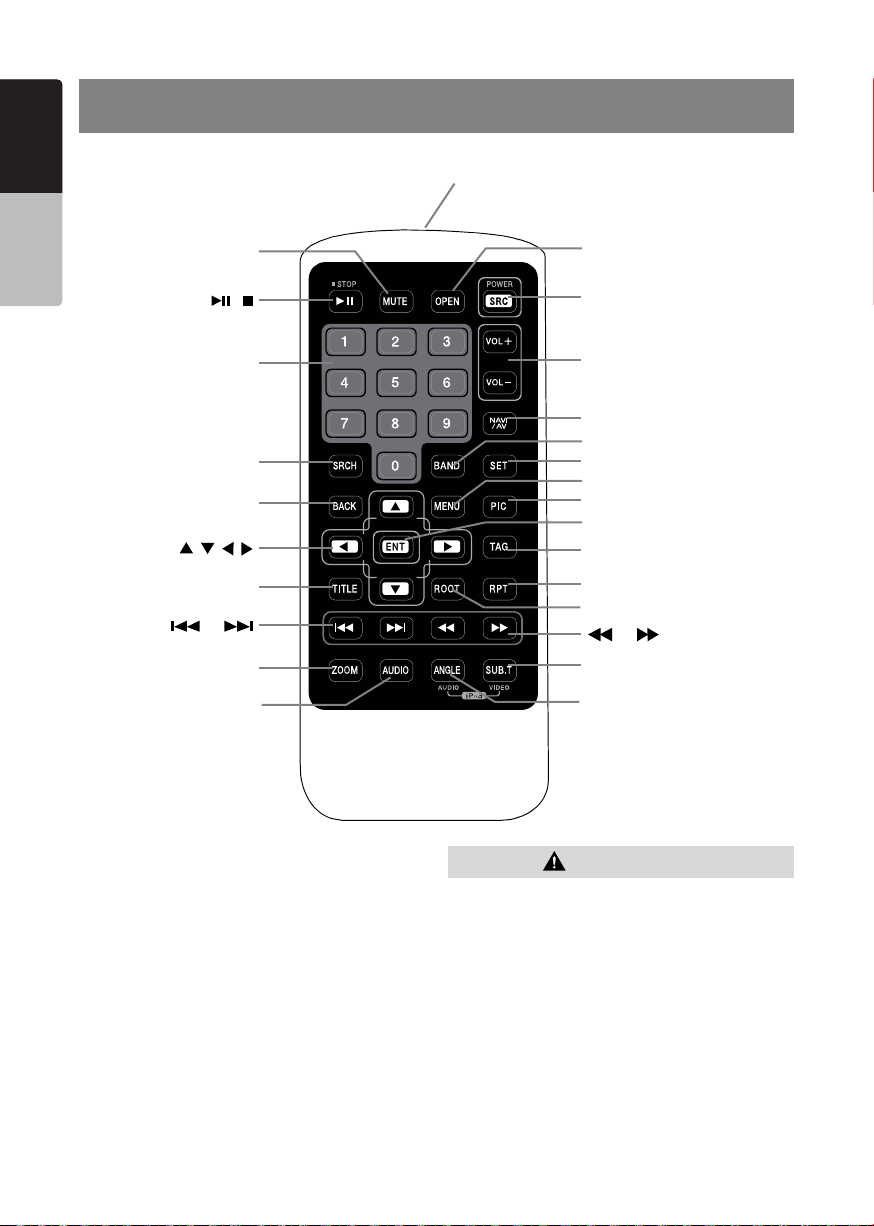
5. REMOTE CONTROL
Owner’s Manual
RCX005 Remote Control Included
[MUTE]
[ / ]
[ 0-9 ]
[SRCH]
[BACK]
[ , , , ]
[TITLE]
[ ], [ ]
[ZOOM]
[AUDIO]
Signal transmitter
Operating range : 30°in all directions
[OPEN]
[POWER / SRC]
[VOLUME]
[NAV/ AV]
[BAND]
[SET]
[MENU]
[PIC]
[ENT]
[TAG]
[RPT]
[ROOT]
[ ], [ ]
[SUB.T]
[ANGLE]
Replacing the batteries
1.Press the retention tab and pull out the
battery tray and remove the old battery.
2. Insert the new CR2025 battery and slide
the battery tray back in the remote control
the same direction that you removed it.
Please ensure the tray is inserted in the
correct direction.
NX404
12
CAUTION
• Keep the battery out of the reach of children.
Should the battery be swallowed, consult a doctor
immediately.
• Batteries (battery pack or batteries installed)
must not be exposed to excessive heat such as
sunshine, re or the like.
Page 14

CAUTION
• Use one CR2025 (3V) lithium battery.
• Remove the battery if the remote control is not
used for a month or longer.
• There is a danger of explosion if battery in
incorrectly replaced. Replaced only with the same
or equivalent type.
• Do not handle the battery with metallic tools.
• Do not store the battery with metallic objects.
• If the battery leaks, wipe the remote control
completely clean and install a new battery.
• When disposing of used batteries, comply with
governmental regulations or environmental public
institutions’ rules that apply in your country/area.
Important
• Do not store the remote control in high
temperatures or direct sunlight.
• The remote control may not function properly in
direct sunlight.
• Do not let the remote control fail onto the oor,
where it may become jammed under the brake or
accelerator pedal.
Remote Control Functions
You can use the remote control unit to control the NX404.
Note:
• The wireless remote control operation may not be optimal in direct sunlight.
English
English
Owner’s Manual
[ / ] Button
• Press this button to play or pause video and audio
media.
• Press this button more than 1 second to stop video
and audio media.
[MUTE] Button
• Mute or Unmute the speaker.
• The symbol
indicates that speaker is muted.
[POWER/SRC] Button
• Press this button to move the focus to next available
source item on main menu.
• Press this button to power on when the unit is power
off.
• Press this button more than 1 second to power off
when the unit is power on.
[0 - 9] Buttons
• Use in the Key Pad screen to select the radio.
• Use to select the track in the track list screen.
• Press to enter DVD video chapters/titles in the Key
Pad screen.
[VOLUME] Buttons
• Increase and decrease volume.
[NAVI/AV] Button
• Press this button to switch between current source
and current position on navigation map.
[SRCH] Button
• Press this button to open chapter or title search
window while playing DVD.
on upper right area of the screen
[BAND] Button
• Switch to next band alternately.
[SET] Button
• Press this button to open the Audio setting menu in
any mode.
[BACK] Button
• Press this button to quit main menu if current screen
is main menu.
], [ ], [ ], [ ] Buttons
[
• Press this button for cursor movement in main menu
or Setting mode.
• From the main menu, you can select your desired
source or change your settings.
[MENU] Button
• Press this button to enter the MAIN MENU or return
current resource.
[PIC] Button
• Press and hold this button to change your monitor
Dimmer.
[ENT] Button
• Press to x the entered data in the Key Pad screen
or enter the item the cursor is on.
[TAG] Button
•No function.
[TITLE] Button
• Press to go to the title menu on the DVD.
[ROOT] Button
• Press to go to the root menu on the DVD.
[RPT] Button
NX404
13
Page 15

• Press to perform chapter repeat / title repeat / repeat
English
off while playing DVD mode.
• Press to perform Repeat Track/Repeat All while
playing CD.
• Press to perform Repeat Track /Repeat Folder/
Repeat All while playing MP3/WMA, or video les on
Owner’s Manual
disc.
• Press to perform Repeat Track /Repeat Folder/
Repeat All while playing MP3/WMA, or video les in
USB memory.
], [ ] Buttons
[
• Press to seek the next available lower or higher
station in Tuner mode.
• Press to select the next lower or higher chapter
number in DVD video mode.
• Press to select the next lower or higher track in CD,
USB Video, USB Audio mode.
• Press for movement of background source in
Navigation mode.
], [ ]Buttons
[
• Press to manually select the next lower or higher
station in Tuner modes.
• Press to perform fast-backward or fast-forward
searching. Press again to change the speed to 2x,
4x, 8x or 16x.
• Press for movement of background source in
Navigation mode.
[ZOOM] Button
• Press to turn on and zoom in while playing DVD. You
can zoom in up to 3x. (No all DVD disc supports this
function)
.
[AUDIO] Button
• Press to switch the AUDIO channel of the disc while
playing DVD.
[SUB-T] Button
• Press to switch next available subtitle while playing
DVD.
• Press to display Video menu in iPod mode.
[ANGLE] Button
• Press to switch the different ANGLE while playing
DVD. (No all DVD disc supports this function)
• Press to display Audio menu in iPod mode.
[OPEN] Button
• Press to eject disc from the unit.
NX404
14
Page 16
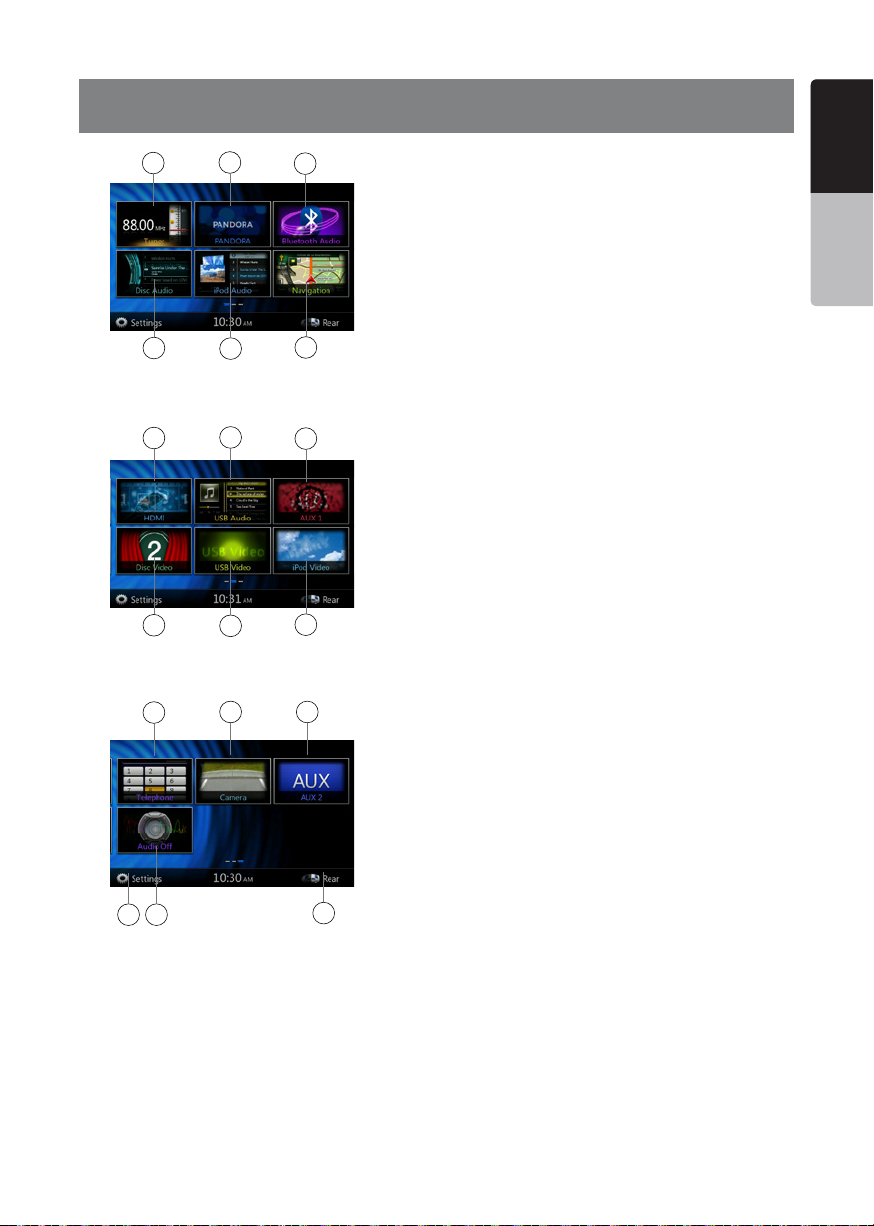
6. MAIN MENU
English
1
2
3
1 - Tuner---Touch the button to display the Tuner mode.
2 - Pandora---Touch the button to display the Pandora
mode.
3 - Bluetooth Audio--- Touch the button to display the
English
Owner’s Manual
Bluetooth Audio mode.
4 - Disc Audio---Touch the button to display the Disc
Audio mode.
5 - iPod Audio---Touch the button to display the iPod
Audio mode.
6 - Navigation---Touch the button to display the
4
5
6
Navigation mode.
7 - HDMI---Touch the button to display the HDMI
mode.
8 - USB Audio---Touch the button to display the USB
Audio mode.
7
8
9
9 - AUX1 ---Touch the button to display the AUX1
mode.
10 - Disc Video---Touch the button to display the Disc
Video mode.
11 - USB Video---Touch the button to display the USB
Video mode.
12 - iPod Video---Touch the button to display the iPod
Video mode.
13 - Telephone--- Touch the button to display the
Telephone mode.
10
11
12
14 - Camera---Touch the button to display the Camera
mode.
15 - AUX2 ---Touch the button to display the AUX2
mode.
16 - Setting button---Touch the button to display the
13
14 15
Setting menu.
17 - Audio off---Touch the button to make audio source
voice off.
18 - Rear---Touch the button to display the Rear mode.
Scrolling the menu
Flicking to right or left it will switch to next or previous
page of main menu.
Moving the menu position
16
17
18
1. Touch any quadrate icon on main menu more than 2
seconds, the icon will float on main menu.
2. Scrolling the floating icon to any position you want.
NX404
15
Page 17
English
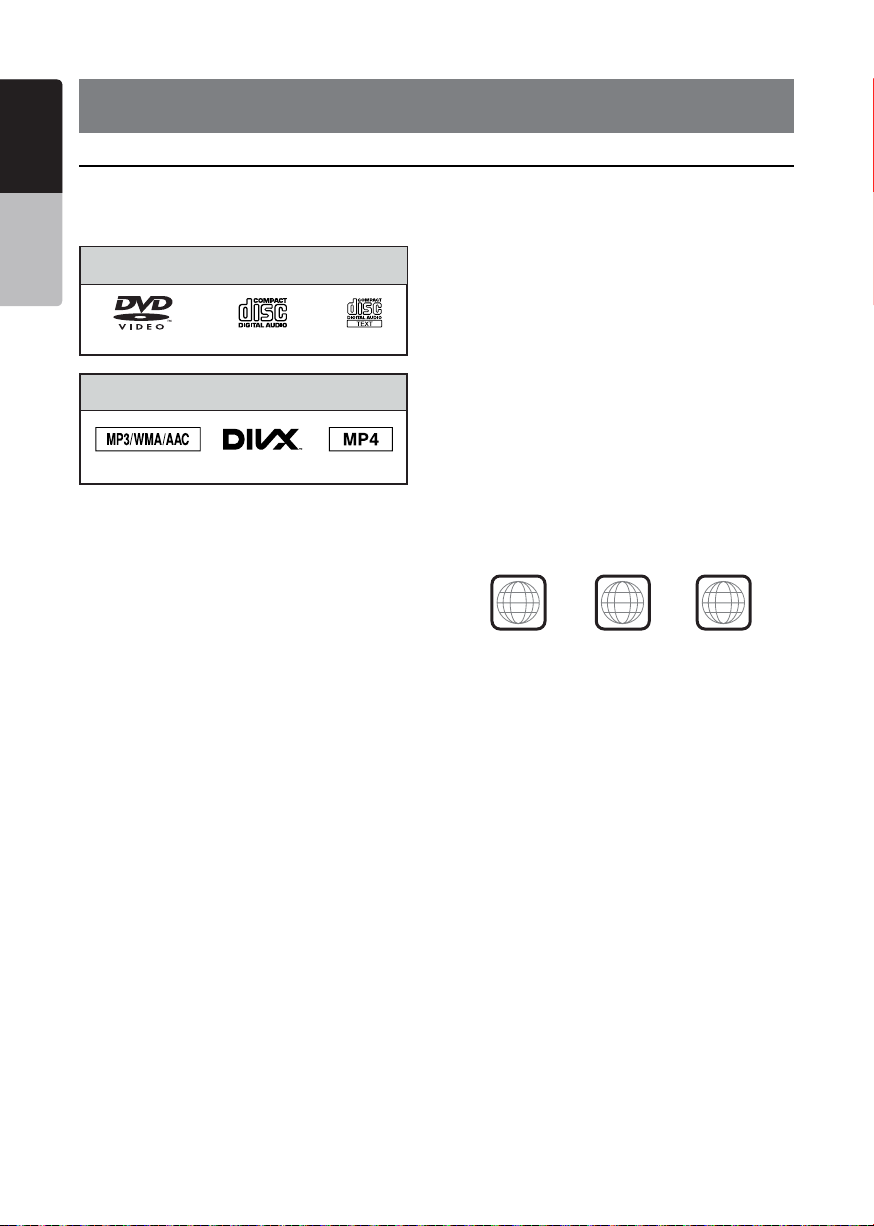
7. DVD VIDEO PLAYER OPERATIONS
Discs
•
Playable discs
Owner’s Manual
This DVD video player can play the following
discs.
Playable discs
Playablemediales
MP3/WMA/AAC
About CD Extra disc
A CD Extra disc is a disc in which a total of two
sessions have been recorded. The rst session
is Audio session and the second session is Data
session.
Your personally-created CDs with more than
second data sessions recorded cannot be played
on this DVD video player.
Note:
•
When you play a CD Extra disc, only the first
session will be recognized.
About playing a CD-R/CD-RW disc (MP3,
WMA)
This player can play CD-R/CD-RW discs
previously recorded in music CD format (MP3,
WMA).
About playing a DVD-R/RW or DVD+R/RW
disc
MP3/WMA les recorded on DVD-R/ RW and
DVD+R/RW discs can be played.
Discs that cannot be played back
This DVD video player cannot play back DVDAudio, DVD-RAM, Photo CDs, etc.
Note:
•
I
t may also not be possible to play back CDs
recorded on a CD-R unit and CD-RW unit.
(Cause: disc characteristics, cracks, dust/dirt,
dust/dirt on player’s lens, etc.)
•
If a CD-R or CD-RW disc that has not been
finalized is played, it will take a long time to
start playing. Also, it may not be possible to
play depending on its recording conditions.
NX404
16
DivX
CD TEXTDVD video discs Audio CD
MP4
You cannot play SuperAudio CD.
The CD player is not supported even if it is a
hybrid disc.
About MP3/WMA playback
This unit can play back CD-R/CD-RW, DVD-R/
RW and DVD+R/RW discs on which MP3/WMA
music data have been recorded.
For a detailed information, see the section
entitled “Listening to compressed audio”.
Note on region numbers
The DVD video system assigns a region number
to DVD video players and DVD discs by sales
area. DVD video players sold in Asia can play
back DVD discs with the region number “ALL”,
“1” or any combination of numbers that also
incorporate a “1”.
The DVD video region number is marked on the
disc jacket as shown below.
ALL
1
1
3
4
Page 18

Change DVD System Settings
Note:
If the setup operation is performed in the middle of DVD
video play, the disc will restart from the beginning.
Selecting DVD Setup Menu
1. Touch the [Settings] button on the Main Menu to
access the Video setup menu.
2. Touch [Video] button. The video menu is displayed.
Setting up the Screen Size
Touch the [DVD Wide Screen Mode] button to turn on
or turn off the DVD wide screen mode.
The factory default setting is “off”
Note: Not all DVD disc support this function.
Setting up the password for parental level
control
The factory default pass code is “0000”.
1.In Main Menu Touch [Settings] button. Touch
[Others] button on the display. Touch the [Set
Password] ---- and a numerical key pad will appear.
Set rating for parental level control
1.Select Others screen while in Setting mode. Touch
[Parental Control] button. Touch the desired rating for
level control. Use this table to set the parental level.
Kid Safe Kid Safe
G General Audiences
PG Parental Guidance Suggested
PG-13 Parents Strongly Cautioned
PG-R Parental Guidance Restricted
R Restricted
NC-17 No One 17 And Under Admitted
Adult Only Adult
• The contents that the parental level restricts vary
with the country code.
Note: The rating can be selected only under the
password unlocked status, and the limits can be set only
under the password locked status.
Watching to a Disc
1. To load a disc:
Insert the disc into the center of the insertion slot the
label side facing up.
CAUTION
For your safety, the driver should not
insert or eject a disc, opening the
operation panel while driving.
Note:
• Never insert foreign objects into the disc insertion slot.
• If the disc is not inserted easily, there may be another
disc in the mechanism or the unit may require service.
• 8cm (single play) discs cannot be used.
2. Disc starts playing automatically.
WARNING
Some videos may be recorded at higher
than desired volume levels. Increase the
volume gradually from the minimal setting
after the video has started.
English
English
Owner’s Manual
Input a new password and come again. The password
is set.
Note:
When a disc with view restrictions is inserted, you will
be prompted to input this password. The disc will not be
viewable until the correct password is entered.
Ejecting a disc
1. To eject a disc press eject [ ] button. The play
mode then switches to the Tuner mode.
If the disc is left in the ejected position for 10
seconds, the disc is automatically reloaded. In this
case, the play mode will remain in the Tuner mode.
Note: If you force a disc into before auto reloading, it
may damage a disc. Change DVD System Settings
NX404
17
Page 19

Showing DVD Player mode screen
English
After disc is loaded, the play mode is automatically
engaged.
Touch any place of the screen to display DVD Video
menu touch the screen again to return the playback
screen. The display will return to the playback screen,
if you do not touch the screen for 10 seconds.
Owner’s Manual
1 2 3 5
13
14 15 16 17 18
1 - Option button
2 - Show Cursor keys button
3 - Previous Chapter /Fast Backward button
4 - Play/Pause button
5 - Next Chapter /Fast Forward button
6 - Elapsed playing time
7 - Seek bar
8 - Total time
9 - Menu List button
10 - System time
11 - Bluetooth status indicator
12 - DVD playback information
13 - Shortcut button
14 - Repeat Switching button
15 - Audio Channel switching button
16 - Subtitle switching button
17 - Information button
18 - Direct chapter or title searching button
6
7 8 94
Operate the DVD Player Menu
You can select the button items displayed in the DVD
menu by directly touching it.
Play/Pause Playback
1. Touch [
2. Touch [
101112
Skip (Search) a Chapter
1. Touch [ ] or [ ] button during playback.
Chapters are skipped down or up from current
locations, as many times as the button is touched, and
playback starts.
Skip use seek bar
Touch the triangle [ ] on seek bar and drag it to any
position where you want to start playback.
Fast Forward/Fast Backward
1. Touch [ ] or [ ] button and hold 2 seconds to
start fast backward or fast forward during playback.
The playback speed starts at 2x, then will increase
to 4x, 8x, and 16x. Release the button will continue
playing with normal speed.
Note:
• No audio is reproduced during fast forward and fast
backward operation.
• The fast forward and fast backward speed may differ
depending on the disc.
Search function
You can locate the beginning of a scene using the
chapter numbers or title numbers recorded on the
DVD Video disc.
1. Showing the DVD Video menu, touch [
The Key Pad screen appears with the chapter/Title
number input mode.
Touching [
chapter number input mode.
Touching [
number input mode.
• Title
A large segment to divide the data area of the disc.
• Chapter
A small segment to divide the data area of the disc.
2. Input the number of the title/chapter that you want
to play with the [0] to [9] key.
3. Touch the [
Settings
] button to pause during playback.
] button again to resume playback.
] button turns the Key Pad to the
] button turns the Key Pad to the title
] button. Change DVD System
] button.
NX404
18
Page 20
Playback starts from the scene of the input title
number or chapter number.
NOTE:
*If the input title/chapter number does not exist or
searching with a title/chapter number is not allowed,
the screen image will not change.
4. Touch [
] button to close the key pad.
Repeat Playback
This operation plays back chapters recorded on the
DVD-Video repeatedly.
1. Showing the DVD Video menu, touch [
2. Touch [
for Repeat Title.
3. Touch [
playback.
] button once for Repeat Chapter, again
] button again to turn off the repeat
] button.
Using the Title Menu
On DVD discs containing two or more titles, you can
select from the title menu for playback.
1. Showing the DVD Video menu, touch [ ] button
during playback.
* Depending on the disc, the title menu may not be
called.
2. Touch the title menu screen. And touch the Show
Cursor keys.
3. Select the items in the title menu screen by
directional buttons.
* Depending on the disc, items may not be selected
with the directional buttons.
4. Touch [
5. Touch [
] button to x on the selected item.
] button.
Switching Audio
On discs in which two or more audios or audio
languages have been recorded, you can switch among
the audio languages during playback.
1. Showing the DVD Video menu, touch [
during playback.
• Each time you touch the button, you can switch
among audio languages.
• It may take time to switch among audios.
Depending on the disc, up to 8 kinds of audios may
be recorded. For details, see the mark of the disc:
(
Indicates that 8 audios have been recorded).
When the power is turned on and when the disc
is changed to a new one, the language set as the
factory default is selected. If that language has not
] button
been recorded on disc the language is specied on
the disc.
Depending on the disc, switching may be
completely impossible or impossible on some
scenes.
Switching Subtitles
On DVD discs in with two or more subtitle languages
have been recorded, you can switch among the
subtitle languages during playback.
1. Showing the DVD Video menu, touch [
to select a subtitle during playback. Each time you
touch the button, you can switch among subtitles.
• It may take time to switch among subtitles.
Depending on the disc, up to 32 kinds of subtitles
may be recorded. For details, see the mark of the
disc: (
Indicates that 8 kinds of subtitles have
been recorded).
Depending on the disc, switching may be
completely impossible or impossible on some
scenes.
2. To turn off subtitles, repeat touching [
until subtitles are turned off.
Displaying the playback status
Touch [ ] button on DVD Player mode screen,
Playback status is displayed on screen.
Play MP4/DivX video files
This system can play video les (AVI/MP4, etc.) stored
on disc.
Note:
DivX Certified
content.
®
to play DivX® video, including premium
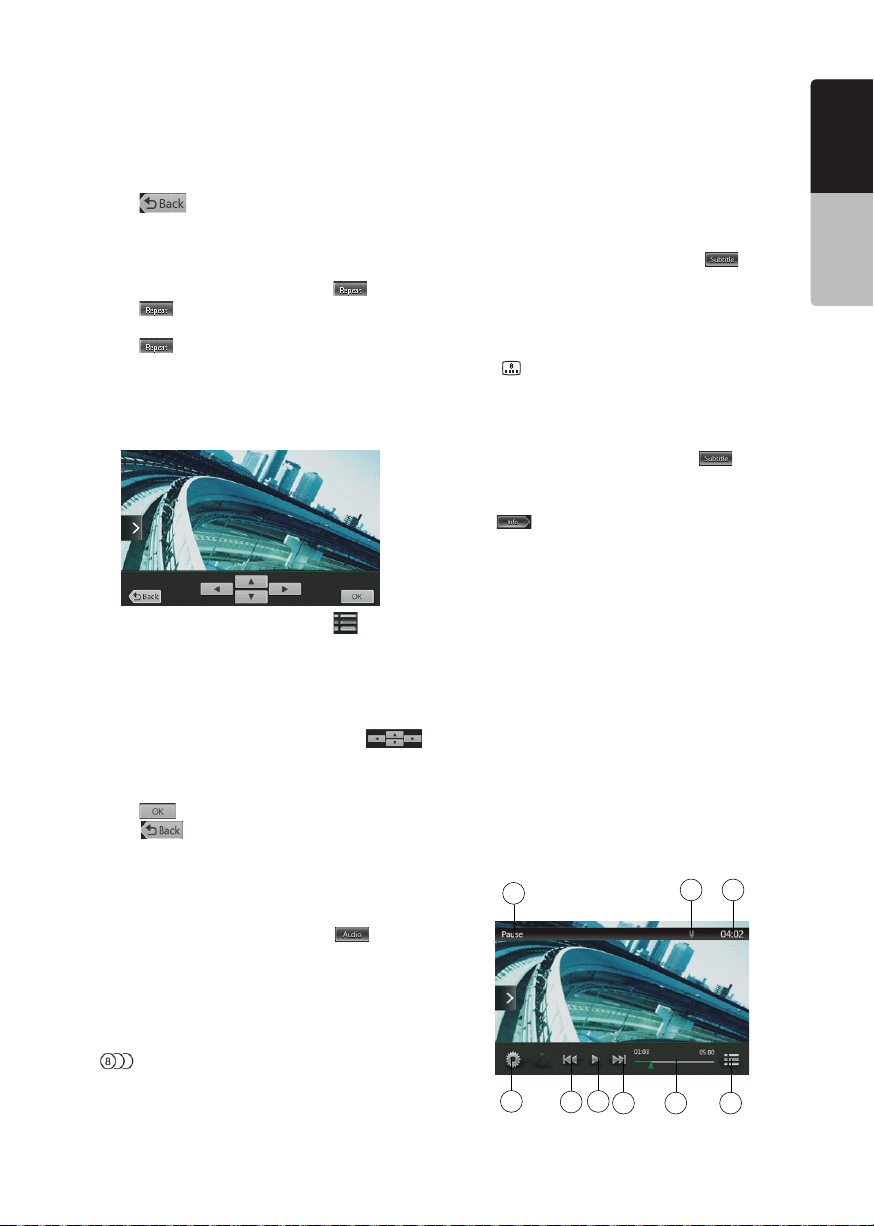
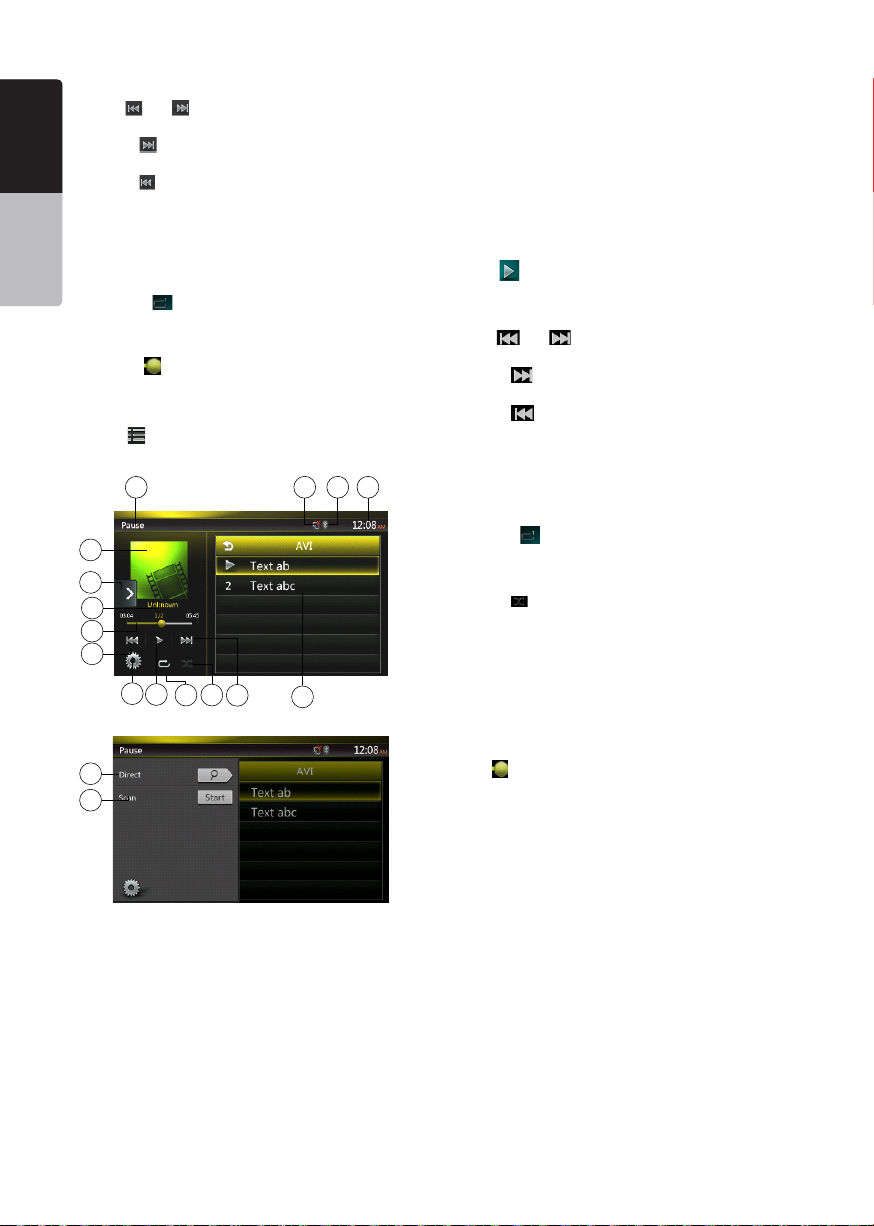
Showing video files Player mode screen
1. After disc with video les is loaded, touch [Disc
Video] button on MAIN MENU to show video les
player mode screen.
2. Touch the screen of the playing video le to display
Video les player menu touch the screen again to
return the playback screen. The display will return to
the playback screen, if you do not touch the screen
for 10 seconds.
9
1
3
2
4 5 6
English
English
Owner’s Manual
] button
] button
78
NX404
19
Page 21
English
Owner’s Manual
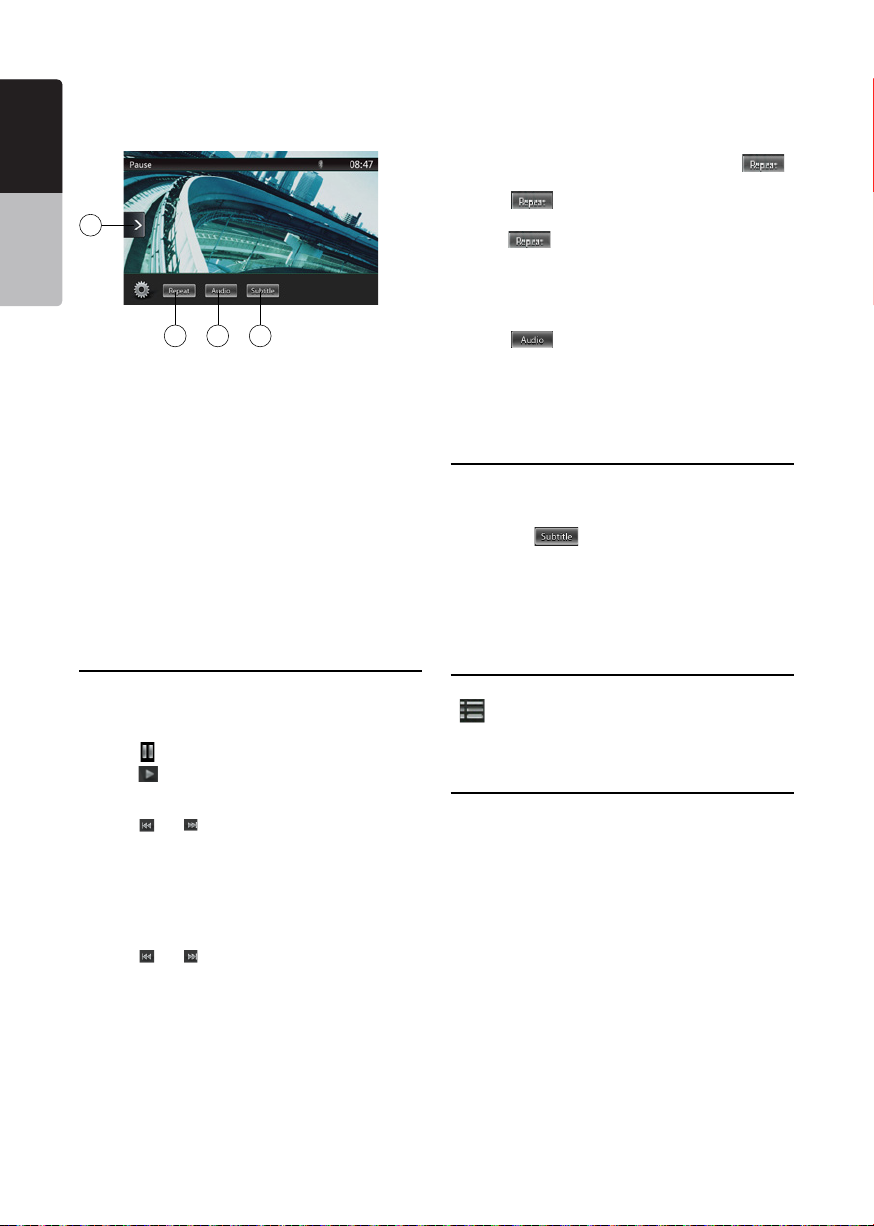
10
11 12 13
1 - Option button
2 - Previous Track /Fast Backward button
3 - Play/Pause button
4 - Next Track/Fast Forward button
5 - Elapsed playing time /Seek bar
6 - List Mode button
7 - System time
8 - Bluetooth status indicator
9 - Playback information
10 - Shortcut button
11 - Repeat button
12 - Audio button
13 - Subtitle button
Operating Video Files Player Menu
You can select the button items displayed in the Video
les player menu by directly touching it.
Play/Pause Playback
1. Touch [ ] button to pause during playback.
2. Touch [
Switch to Previous/Next File
1. Touch [ ] or [ ] button during playback to play
previous /next le
Skip using seek bar
Touch the triangle on seek bar and drag it to any
position where you want to start playback.
Fast Forward /Fast Backward
1. Touch [ ] or [ ] button and hold 2 seconds to
start fast backward or fast forward during playback.
The playback speed starts at 2x, then will increase
to 4x, 8x, and 16x. Release the button will continue
playback with normal speed.
Note:
*No audio is reproduced during fast forward and fast
backward operation.
*The fast forward and fast backward speed may differ
depending on the disc.
20
] button again to resume playback.
NX404
Repeat Playback
This operation plays back video les recorded on the
disc repeatedly.
The repeat set as the factory default is Repeat all.
1. Showing the video les player menu, touch [
button.
2. Touch [
for Repeat Folder.
3.Touch [
] button once for Repeat Track, again
] button again for Repeat All.
Switching Audio
Some video les will have two or more audio channels;
you can switch among the audio channels during
playback.
1. Touch [
• Each time you touch the button, you can switch
among audio languages.
• It may take time to switch among audios.
Depending on the disc, switching may be impossible.
] button during playback.
Switching Subtitles
Some video les will have two or more subtitles have
been recorded; you can switch among these subtitles
during playback.
1. Touch the [
playback.
• Each time you touch the button, you can switch
among subtitles.
• It may take time to switch among subtitles.
Depending on the disc, switching may be impossible.
] button to select a subtitle during
Video Files List
Showing the Video les player menu; touch the
[
] button to display video les list screen.
Video les list operations is almost same as Disc Audio
player mode. Please refer to CD Player Operations.
Play DivX Video-On-Demand Files
You must complete a one-time registration process
in order to play a purchased DivX movie on your DivX
device.
Registration is not needed to play free DivX movies
you create or download.
Getting DivX Registration Code and
Registering Your Device
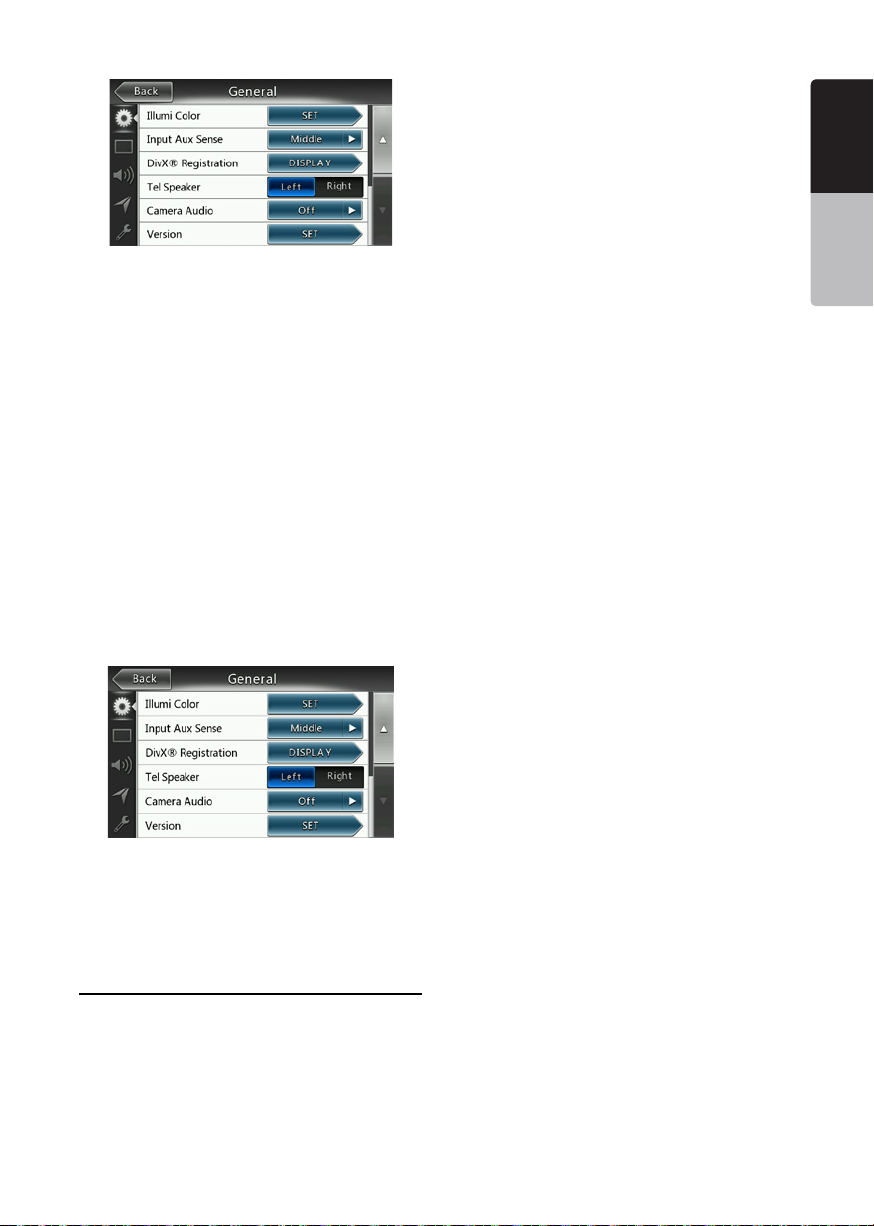
1. Touch the [Settings] button on the Main Menu to
access [General] setup menu.
2. Touch [General] setup button, and touch [DISPLAY]
button on the right side of “DivX
You will nd “10 digit DivX registration code on the
screen.
®
Registration”.
]
Page 22
3. Enter this code in DivX Player to create a
“Registration video” disc on your PC. Once this
“Registration video” disc has played on this device,
registration is done, and you can enjoy some
purchased DivX movies on your device.
For detail please visit “http://www.divx.com/vod”
4. Touch [OK] to close the pop-up window.
Note:
After you register your device, this setting menu is
changed to “DivX
®
Deregistration”
Deregister your device
Even after you have nished registration, you
can deregister your device if you will not watch
purchased movies on this device anymore.
1. Touch the [Settings] button on the Main Menu to
access [General] setup menu.
2. Touch [General] setup button, and touch [SET]
button on the right side of “DivX
You will be asked if you want to deregister this
device, then touch [YES] in the pop-up screen.
®
Deregistration”.
*.mp4 les:
• format: MPEG4 Visual Simple @L1
• Picture size: 720 x 480
• Audio format: AAC
• Audio sampling frequency: 32/44.1/48 KHz
*.mpg les
• format: MPEG2
• Picture size: 720 x 480
• Audio format: MP3
• Audio sampling frequency: 32/44.1/48 KHz
*.divx les
• format: Divx 3.11/4/5/6
• Picture size: 720 x 480
• Audio format: MP3
• Audio sampling frequency: 32/44.1/48 KHz
English
English
Owner’s Manual
3. Note 10 digit “Deregistration code” in the pop-up
screen. Keep this code until you deregister this
device on your PC.
4. Deregister this device by using the “Deregistration
code” on your PC.
For detail please visit “http://www/divx.com/vod”
Playable Video Disc Formats
This system can play video les stored on disc.
*.avi les
• format: Divx 4/5/6
• Picture size: 720 x 480
• Audio format: MP3
• Audio sampling frequency: 32/44.1/48 KHz
NX404
21
Page 23
English
8. CD PLAYER OPERATIONS
Listening to a Disc/Ejecting a Disc
Please refer to Disc Video Player Operations -watching
to a disc and Ejecting a disc.
Owner’s Manual
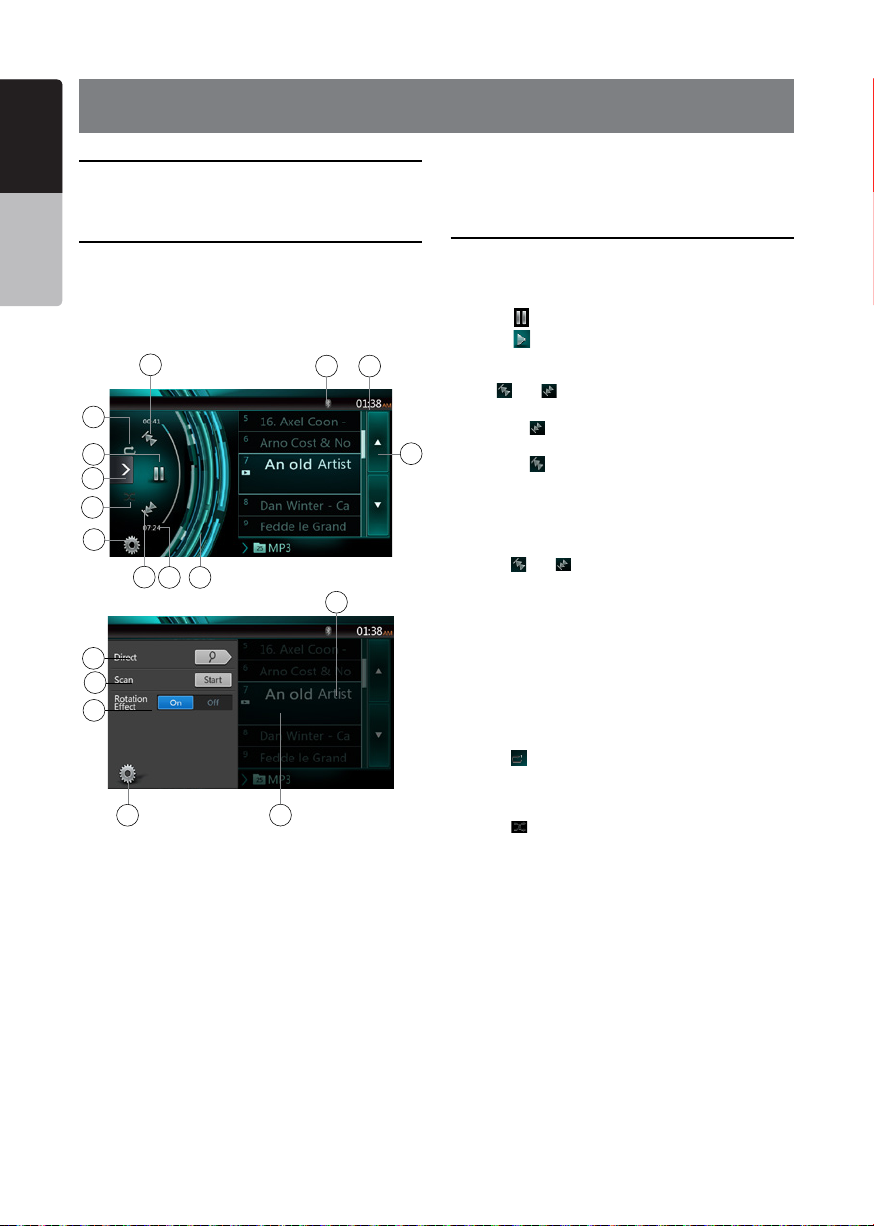
Showing CD Player Mode Screen
1. After disc is loaded, the play mode is automatically
engaged.
2. If disc have been loaded you can touch [Disc Audio]
button on main menu to display CD player mode
screen.
8
7
10
9
12
1
211
3
13
14
15
18
1 - Option button
2 - Elapsed playing time indicator
3 - Rotation effect
4 - Page Turning button
5 - System time
6 - Bluetooth status indicator
7 - Repeat button
8 - Previous Track /Fast Backward button
9 - Shortcut button.
10 - Play/Pause button
11 - Next Track/Fast Forward button
12 - Shufe button
13 - Direct Searching button
14 - Scan Start/Stop button
15 - Rotation Effect On/Off button
6
17
5
16
16 - Song Title
17 - Artist/album Information
18 - Close option menu Button
Operate the CD Player Menu
You can select the button items displayed in the CD
player menu by directly touching it in list.
Play/Pause Playback
1. Touch [ ] button to pause during playback.
2. Touch [
Switch to Previous/Next file or track
Touch [ ] or [ ] button during playback to play
previous /next le.
• Touching [
beginning of the next track.
4
• Touching [
beginning of the current track. When this button is
touched again within 5 seconds, playback starts
from the beginning of previous track.
Fast Forward /Fast Backward
1. Touch [ ] or [ ] button and hold more than
2 seconds to start fast backward or fast forward
during playback. The playback speed starts at 2x,
then will increase to 4x, 8x, and 16x. Release the
button will continue playback with normal speed.
Note:
* The fast forward and fast backward speed may differ
depending on the disc.
Repeat Playback
* The repeat set as the factory default is Repeat All.
Touch [
Repeat All and Repeat Track.
Shuffle Playback
1. Touch [ ] button to shufe the tracks during
playback.
2. Touch this button again to turn off the feature.
Selecting a track on the Track List Screen
This function allows you to select tracks from a
displayed list.
1. Touch the track title on the display list. The selected
track will start playing.
2. When the desired track is not displayed, touch and
ick the track list up or down.
3. Touch the desired track title button. The
corresponding track is started playback.
] button again to resume playback.
] button starts playback from the
] button starts playback from the
] button switch between Repeat Folder
NX404
22
Page 24
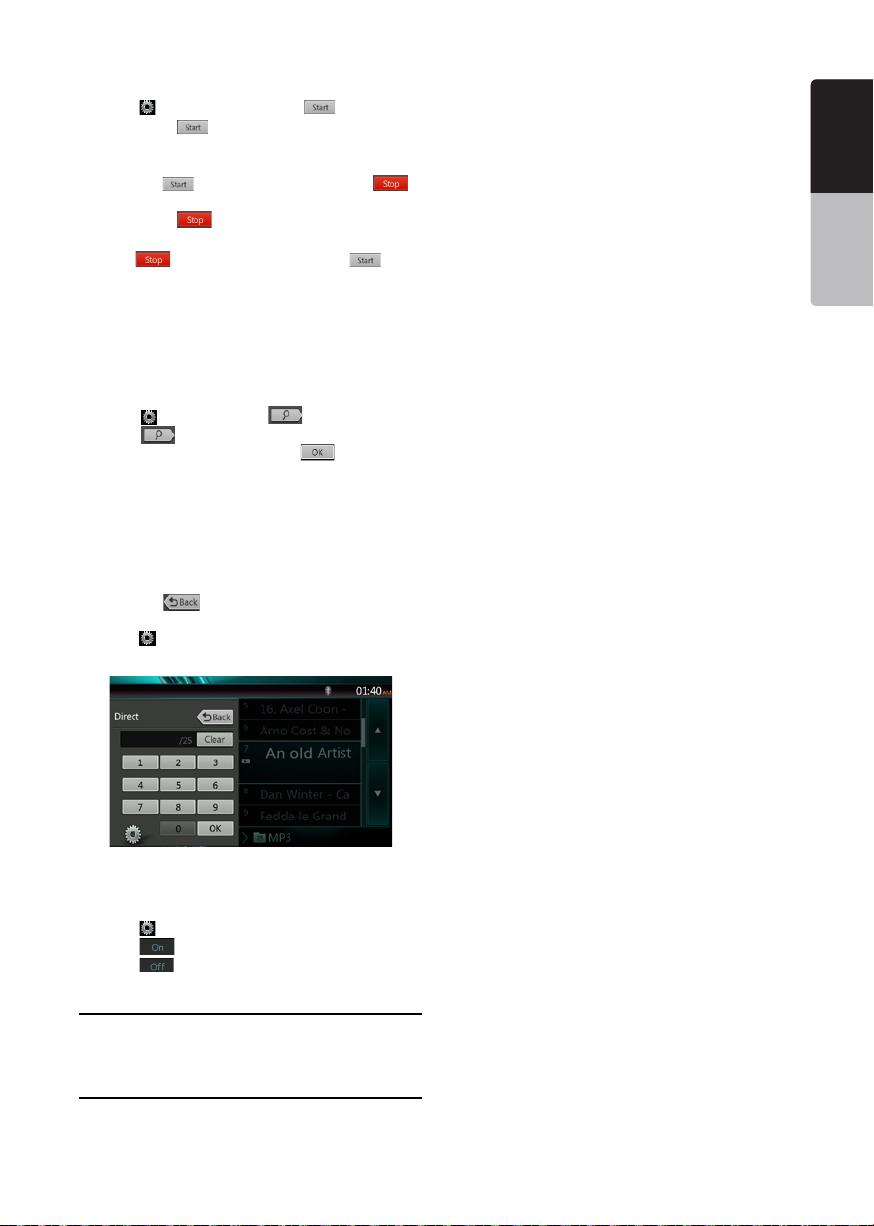
Scanning the Tracks
1. Touch [ ] button to show [Scan ] button.
2. Touch [Scan
• It will play from next track, and each track will
display for 10 seconds.
• The [Scan
button.
3. Touch [Scan
• It will continue playback from current track.
• [Scan
button.
* The function will scan all tracks orderly in current
folder once. After Scan stopped playback will
continue.
] button during playback.
] button will switch to [Scan ]
] button.
] button will switch to [Scan ]
Searching with the Track Number
This operation allows searching using the track
numbers recorded on the CDs.
1. Touch [
2. Touch [
appear on the screen and touch [
3. Input the track number that you want to play back
with [0] to [9] key and touch [OK] button.
Playback starts from the track of the input track
number.
• If the input track number does not exist or searching
with track number is not allowed, the screen image
will not change.
• Touch the [
keypad.
• Touch [
display playback screen.
] button to show [ ] button.
] button .The numerical keypad will
] button.
] button will close the numerical
] button will close the option window and
Rotation Effect On/Off
This operation allows turn on/turn off rotation effect.
The factory default is On.
1. Touch [
2. Touch [
3. Touch [
] button to show [Rotation effect] button
] button will turn on the Rotation effect.
] button will turn off the Rotation effect.
Listening to Compressed Audio
This system can play audio les stored on disc.
MP3/ WMA/ AAC
Tag Display Function
This unit is an ID3 Tag compatible model.
This unit supports the ID3 TAGs of the Version 2.4, 2.3,
1.1 and 1.0.
In displaying, this unit gives priority to the Version 2.3
and 2.4 TAGs.
Note:
• Some CDs recorded on CD-R/RW mode may not be
usable.
Displaying MP3/WMA/AAC TAG titles
Tag information can be displayed for compressed
audio le containing Tag information.
MP3: title, artist, album
WMA: artist
AAC: can not display tag information.
Precautions when creating MP3 disc
• File extensions
1. Always add a le extension “.MP3” or “.mp3” to
an MP3 le, and “.WMA” or “.wma” to a WMA and
“.m4a” to a AAC le by using single byte letters.
If you add a le extension other than specied or
forget to add these le extension, the le cannot be
played. In addition, if you use upper case and lower
case letters (capital and small letters) mixed for le
extensions, normal play may not be possible.
2. Files other than MP3/WMA/AAC data cannot be
played.
Playing les with a format not supported will be
skipped, and the scan, random and repeat playback
mode may be canceled.
• File and Disc Not Supported
Files and discs with following extensions are not
supported: *.AAC, *.DLF, *.M3U, *.PLS, *.MP3 PRO
les, les with DRM, open session discs.
• Logical format (File system)
1. When writing an MP3/WMA/AAC le on a disc,
please select “ISO9660 level 1 or level 2 (without
including expansion format)” as the writing software
format. Normal playback may not be possible if the
disc is recorded on another format.
2. The folder name and le name can be displayed as
the title during MP3/WMA/AAC play .
• Entering File and Folder Names
Names using the code list characters are the only
le names and folder names that can be entered and
displayed. Using any other character will cause the le
and folder names to be displayed incorrectly.
• Folder structure
1. A disc with a folder having more than 8 hierarchical
levels will conict with the ISO9660 and playback
will be impossible.
• Number of les or folders
1. The maximum allowable number of folders is 200
(including root directory); the maximum allowable
number of les is 1500 (max. 200 per folder). This
represents the maximum number of tracks that can
be played back.
English
English
Owner’s Manual
NX404
23
Page 25
2. Tracks are played in the order that they were
English
recorded onto a disc. (Tracks might not always be
played in the order displayed on the PC).
• Some noise may occur depending on the type of
encoder software used while recording.
• In case of a track recorded at VBR (variable bit rate),
the display for the play time of the track may be
Owner’s Manual
slightly different from the actual play time. Also, the
recommended value of VBR ranges from 32 kbps to
320 kbps.
• After disc selection, the play mode is automatically
engaged.
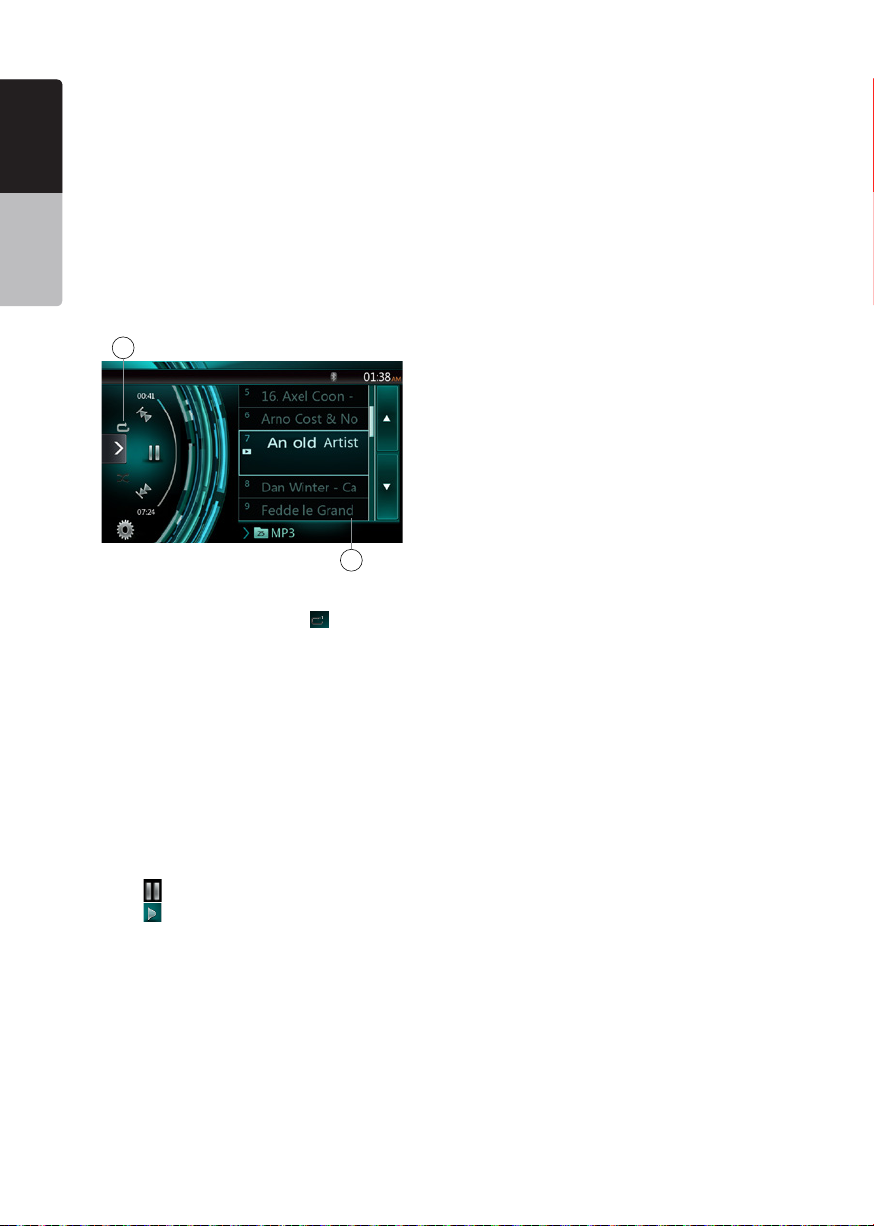
Playback MP3/WMA/AAC menu
1
2
1. Repeat Playback
While playing MP3/WMA/AAC touch
switch between Repeat Folder, Repeat All and Repeat
Track, Repeat Folder and Repeat All.
2.Current Folder
• Showing title of current folder.
• The number on the folder symbol is the number of
les and folders number in current folder.
• Touch the title of current folder, play list will show
les and folders in upper folder.
*Other operations about playing MP3/WMA/AAC are
almost same as CD Player mode.
Stop Playback
1. Touch [
2. Touch [
Playback resumes from start of the folder which
playing track is in.
•Other operations about playing MP3/WMA/AAC are
almost same as CD Player mode.
24
] button to stop playback.
] button again to resume playback.
NX404
button can
Page 26
9. USB AUDIO OPERATIONS
This system can play audio les (MP3/WMA/AAC/
FLAC) stored in an USB memory which is recognized
as “USB Mass Storage Class device”. You can use
your USB memory as an audio device by simply
copying desired audio les into it.
Note:
• This system will not operate or may operate improperly
with some USB memory.
• Files protected with any DRM cannot be played.
Notes on Using USB Memories
General notes
• When no support les, the le list display nothing.
Notes on the Audio les
• This system can play the MP3/WMA/AAC/FLAC les
stored in the USB memory.
MP3 les:
• format: MPEG1/2 Audio layer3
• bit rate: 8k ~ 320kbps
• sampling frequency: 8/12/16/24/32/44.1/48KHz
• le extension: . mp3
WMA les:
• format: Windows media Audio standard L3
prole
• bit rate: 32 ~ 192KHz
• sampling frequency: 32/44.1/48 KHz
• le extension: .wma
AAC les
• format: Advanced Audio Coding LC-AAC,HE-
AAC
• sampling frequency: 32/44.1/48 KHz
• le extension: . m4a
FLAC les
• format: Free Lossless Audio Codec
• quantization bit rate: 16 or 24 bits
• sampling frequency: 44.1~192 KHz
• le extension: . ac
Notes on the folder structure
• The folder hierarchy must be within 8 hierarchical
levels. Otherwise, playback may be impossible.
• The maximum allowable number of folders is 65535
(including root directory and folders with no MP3
les, WMA AAC/FLAC le).
• The maximum allowable number of les in a folder
is 65535.
• You can store the MP3 les, WMA AAC/FLAC
together in a folder.
• The system may become slow if the les or folders
exceed the limitation above.
Notes on the Tag titles
The limitations on the Tag titles are same as those in
CD Player mode.
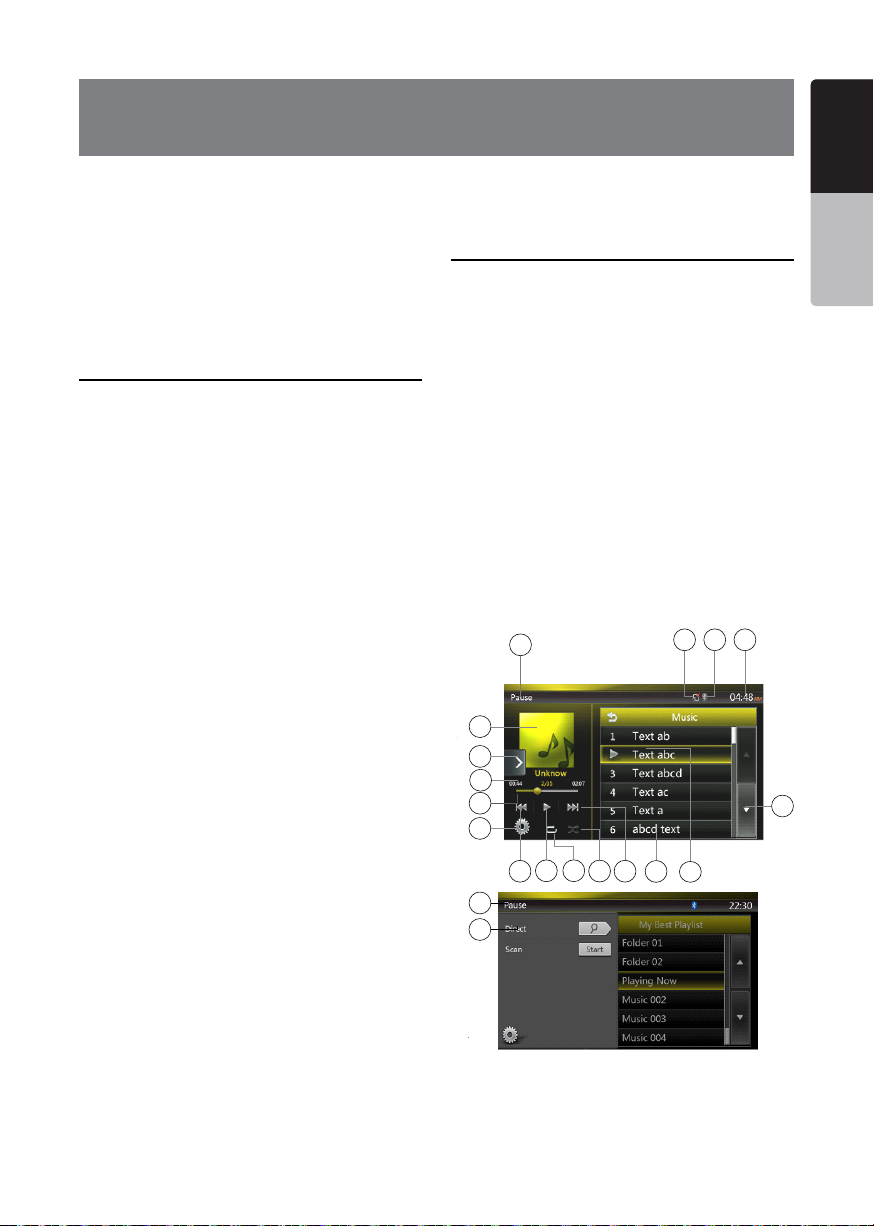
Select USB Audio Mode
Connect your USB memory with MP3 les, WMA AAC/
FLAC les to the USB connector. The system will
automatically detect the connected device, and the
[USB Audio] button on main menu will be enabled.
• When an USB memory is already connected
Touch [USB Audio] button to select the USB Audio
mode.
The system changes to the USB Audio mode and
starts playback from the previous position or from the
beginning.
Note:
This system has two USB connectors and can connect
two USB.
You can select the desired USB by touching the list of
USB root menu.
This system indicate the USB as “My USB1”, “My USB2”
on the list.
13
14
15
16
17
1
3
2
18
19
1. Option button
2. Play/Pause button
3. Previous Track /Fast Backward button
4. Next Track/Fast Forward button
English
English
Owner’s Manual
101112
9
5
4
6
7
8
NX404
25
Page 27

5. Repeat button
English
6. Shufe button
7. MP3 les, WMA les in list
8. Folders in list
9. Page turning button
10. System time
11. Bluetooth status indicator
Owner’s Manual
12. Mute status indicator
13. Playback status information
14. Album Art
15. Shortcut button
16. Current ID3 info area
17. Elapsed playing time indicator/Seek bar
18. Direct button
19. Scan button
Playing Audio Files in USB Memory
Play/Pause Playback
1. Touch [ ] button to pause during playback.
2. Touch [
Switch to Previous/next file
Touch [ ] or [ ] button during playback to play
previous /next le.
• Touch [
beginning of the next track.
• Touch [
beginning of the current track; when this button is
touched again within about 5 seconds, playback
starts from the beginning of previous track.
Fast Forward /Fast Backward
Touch [ ] or [ ] button and hold more than
2 seconds to start fast backward or fast forward
during playback. The playback speed starts at 2x,
then will increase to 4x, 8x, and 16x .Release the
button will continue playback with normal speed.
Note:
*The fast forward and fast backward speed may differ
depending on the audio files.
Repeat Playback
* The repeat set as the factory default is Repeat All.
Touch the [
Repeat Folder, Repeat All.
Shuffle Playback
1. Touch [ ] button to shufe the tracks in playing
folder during playback.
2. Touch this button again to turn off the feature.
Album Art work
If current audio le contains album art image in ID3,
the picture will be displayed in this area.
ID3 Information Area
This area display ID3 information of playing le: song
title, artist information, album information, number
of current le/total number in current folder, elapsed
playing time/total time of current le.
Skip Using Seek Bar
Touch on seek bar and drag it to any position where
you want to start playback.
] button again to resume playback.
] button to start playback from the
] button to start playback from the
] button once for Repeat Track, again for
Select a Folder on Display List
Touch the folder title on the display list, the display list
will display les and folders in selected folder.
Selecting a Track on the Display List
This function allows you to select tracks from a
displayed list.
1. Touch the track title on the display list. The selected
track will start playing.
2. When the desired track is not displayed, touch and
ick the track list up or down.
3. Touch the desired track title button. The
corresponding track is started playback.
Scanning the Tracks
1. Touch [ ] button to show [Scan ] button.
2. Touch [Scan
• It will play from next track, and each track will
display for 10 seconds.
• The [Scan
button.
3. Touch [Scan
• It will continue playback from current track.
• [Scan
button.
* The function will scan all tracks orderly in current
folder once .After Scan stopped, playback will
continue.
] button during playback.
] button will switch to [Scan ]
] button.
] button will switch to [Scan ]
Searching With the Track Number
This operation allows searching to use the track
numbers in playing folder.
1. Touch [
2. Touch [
appear on the screen.
3. Input the track number that you want to play back
with [0] to [9] key and touch [OK] button.
Playback starts from the track of the input track
number.
• If the input track number does not exist or searching
with a track number is not allowed, the screen image
will not change.
• Touch [
• Touch [
display playback screen.
] button to show [ ] button.
] button .The numerical keypad will
] button will close the numerical keypad.
] button will close the option window and
NX404
26
Page 28
10. USB VIDEO OPERATIONS
This system can play USB video les (MP4, 3GP etc.)
stored in an USB memory which is recognized as
“USB Mass Storage Class device”. You can use your
USB memory as an video device by simply copying
desired video les into it.
Note:
• This system will not operate or may operate improperly
with some USB memory.
• Files protected with any DRM cannot be played.
Notes on Using USB Memories
General notes
When no support les, the le list display nothing.
Notes on the folder structure
The limitations on the folder structure are same as
those in USB Audio Player mode.
Notes on the Tag titles
The limitations on the Tag titles are same as those in
CD Player mode.
Select USB Video Mode
Connect your USB memory with video les to the USB
connector. The system will automatically detect the
connected device, and the [USB Video] button on
main menu will be enabled.
• When an USB memory is already connected
Touch [USB Video] button on main menu to select the
USB Video mode.
The system changes to the USB Video mode and
starts playback from the previous position or from the
beginning.
Note: This system has two USB connectors and can
connect two USB.
You can select the desired USB by touching the list of
USB root menu.
This system indicate the USB as “My USB1”, “My USB2”
on the list.
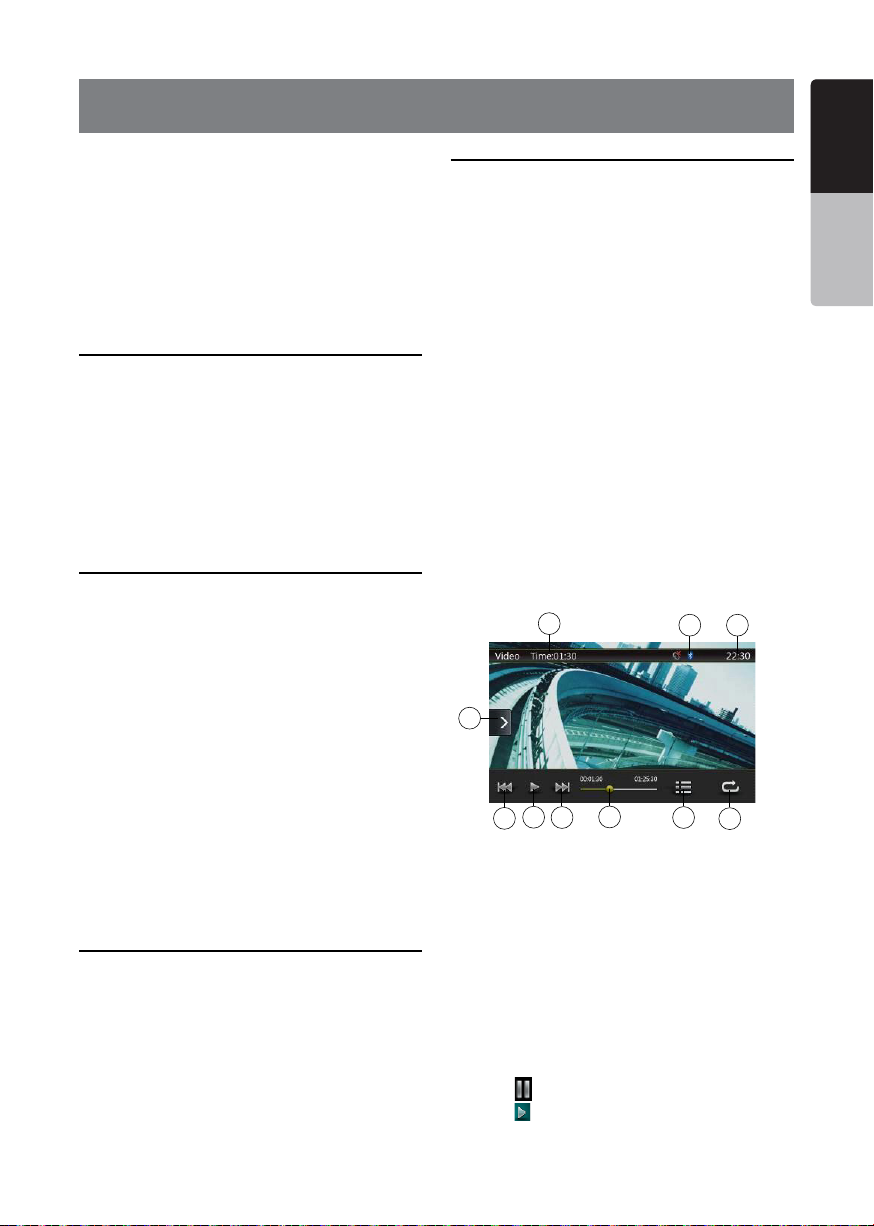
Playing Video Files in USB Memory
If the video is playing, touch the screen of the playing
video to display Operation buttons.
* The display will return to the playback screen, if you
do not touch the screen for 10 seconds.
Playable Video Format
*.mp4 les
• format: MPEG4 Visual
MPEG4 AVC (H.264)
• Picture size: 1280 X 720 (MPEG4 Visual)
1920 x 1080 (MPEG4 AVC)
• Audio format: AAC
• Audio sampling frequency: 32/44.1/48 KHz
*.m4v les
• format: MPEG4 Visual
MPEG4 AVC (H.264)
• Picture size: 720 x 480
• Audio format: AAC
• Audio sampling frequency: 32/44.1/48 KHz
*.mpg les
• format: MPEG2
• Picture size: 720 x 480
• Audio format: MP3
• Audio sampling frequency: 32/44.1/48 KHz
*.3gp les
• format: MPEG4 Visual
H.263
• Audio format: AAC, AMR
• Audio sampling frequency: 8/16/32/44.1/48 KHz
9
10
2
1
1 - Previous Track /Fast Backward button
2 - Play/Pause button
3 - Next Track/Fast Forward button
4 - Elapsed playing time indicator/Seek bar
5 - Menu List
6 - Repeat button
7 - System time
8 - Bluetooth status indicator
9 - Playback information
10 - Shortcut button
Play/Pause Playback
1. Touch [ ] button to Pause playback.
2. Touch [
] button to resume playback.
English
English
Owner’s Manual
8 7
3
4
5
6
NX404
27
Page 29
Switch to Previous/next file
English
Touch [ ] or [ ] button during playback to play
previous /next le.
• Touch [
beginning of the next track.
• Touch [
Owner’s Manual
beginning of the current track; when this button is
touched again within about 5 seconds, playback
starts from the beginning of previous track.
] button to starts playback from the
] button to starts playback from the
Repeat Playback
* The repeat set as the factory default is Repeat All.
Touch the [
for Repeat Folder, again for Repeat All.
] button once for Repeat Track, again
Skip Using Seek Bar
Touch the on seek bar and drag it to any position
where you want to start playback.
Switching USB Video Menu
Touch [ ] button playback will be paused, and the
screen will switch to USB Video List.
11
12
13
14
15
3
2
1
5
6
4
16
17
1 - Option button
2 - Play/Pause button
3 - Previous Track /Fast Backward button
4 - Next Track/Fast Forward button
5 - Repeat button
6 - Shufe button
7 - Video les in list
8 - System time
9 - Bluetooth status indicator
10 - Mute status indicator
11 - Playback status information
7
12 - Album Art
13 - Shortcut button
14 - Current le information area
15 - Elapsed playing time indicator/Seek bar
16 - Direct button
17 - Scan button
Play/Pause Playback
*On USB Video menu screen, playback status is
pause.
Touch [
will go to video screen automatically.
] button to resume playback. The screen
Switch to Previous/next file
Touch [ ] or [ ] button during playback to play
previous /next le.
• Touch [
beginning of the next track.
• Touch [
beginning of the current track; when this button is
touched again within about 5 seconds, playback
starts from the beginning of previous track.
8910
Repeat Playback
* The repeat set as the factory default is Repeat All.
Touch the [
Repeat Folder, again for Repeat All.
] button to starts playback from the
] button to starts playback from the
] button once for Repeat Track, again for
Shuffle Playback
1. Touch [ ] button to shufe the tracks in playing
folder during playback.
2. Touch this button again to turn off the feature.
Current File Information Area
This area displays information of current video le: le
name, number of current le/total number in current
folder, Elapsed playing time/total time of current le.
Skip Using Seek Bar
Touch on seek bar and drag it to any position
where you want to start playback.
Select a Folder on Display List
This operation is same as this in USB Audio mode.
Selecting a Track on the Display List
This operation is same as this in USB Audio mode.
Scanning the Tracks
This operation is same as this in USB Audio mode.
Searching with the Track Number
This operation is same as this in USB Audio mode.
NX404
28
Page 30
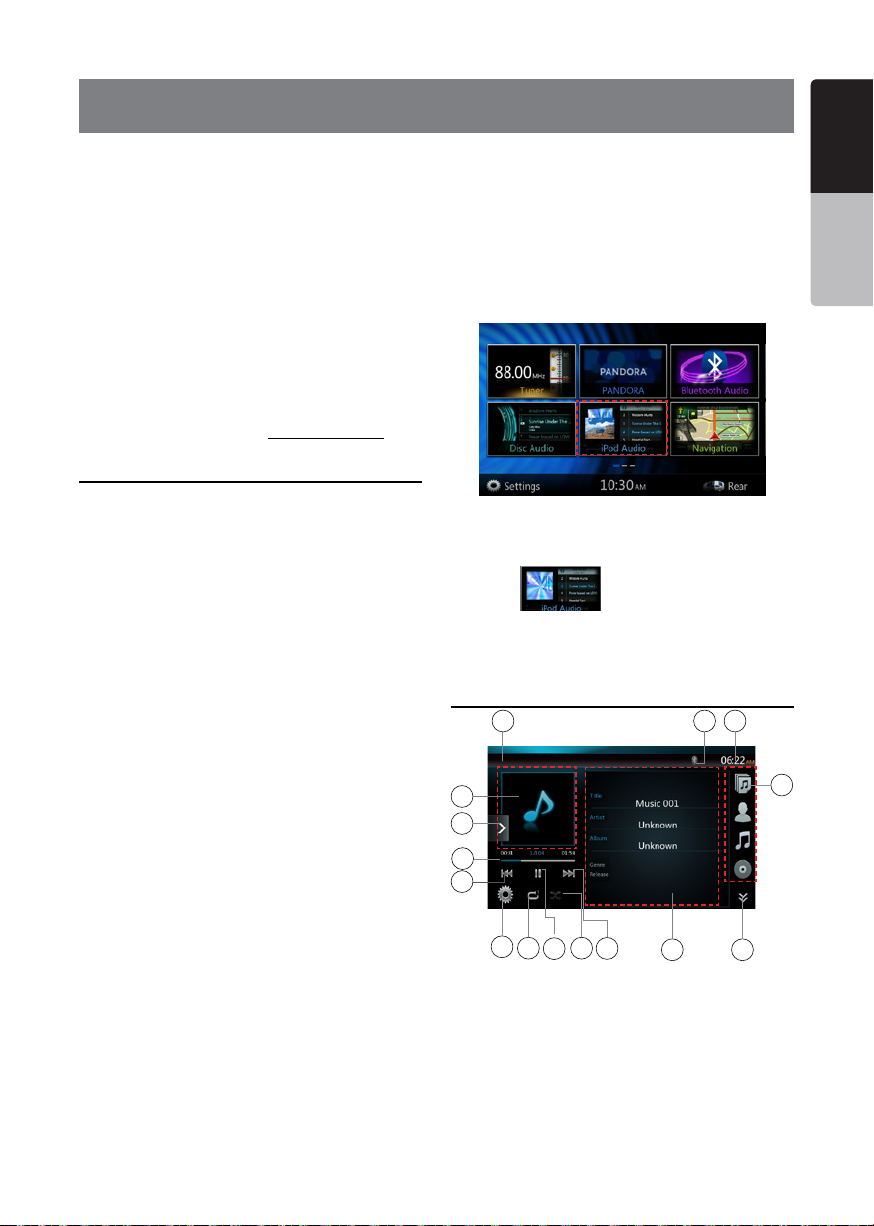
11. iPod OPERATIONS
English
iPod/iPhone can be connected by using the
connector cable supplied with the iPod/iPhone, but in
this case, you can enjoy its audio sound only. To enjoy
video movies stored in the iPod/iPhone with video
displaying them on this unit, it is required to use the
special connector cable (CCA-750) separately sold.
However the new products such as iPhone 5, iPhone
5s and iPhone 5c, iPod touch
iPod nano
cable (no video signal output),so these new products
cannot display video in video mode.
Note:
• This system will not operate or may operate improperly
• For detailed information on the playable iPod/iPhone
®
(7th generation) only can connect 10-pin
with unsupported versions.
models, see our home page: www.clarion.com
®
(5th generation) and
Notes on using iPod/iPhone
• Do not connect an iPod/iPhone to this unit with a
headphone connected to the iPod/ iPhone.
• After the iPod/iPhone has been connected to this
unit, the buttons of iPod are disabled for operation
in the Music mode. In the Video mode, do not
operate the buttons of iPod.
• When in the iPod mode, the screen image input
from the AUX terminal, is output to the rear monitor.
• When no data is present, the title display will remain
blank.
• Set the language setting of iPod/iPhone to English
before connecting your iPod/iPhone. Some
characters of the other languages may not be
displayed correctly in this system.
• Precautions on battery consumption:
If the iPod/iPhone is connected to this unit when the
internal battery of iPod/iPhone has run down, this
function may not operate correctly. You must connect
the iPod/iPhone after charging the battery if it has run
down.
iPod Audio Menu Operations
Connect your iPod/iPhone to the USB connector.
The system will automatically detect the connected
device and the iPod Audio button will be enabled for
operation on the Main Menu screen.
Note:
1.This system has two USB connectors, please
connect to the USB with the label of “iPod/iPhone”.By
connecting another USB cable, iPod/iPhone can’t play
back the music.
2.When iOS device is connected via both USB and
Bluetooth at the same time and select iPod mode, iOS
device is controlled by USB connecton.
3. When the iPod mode and operate the audio player
or internet radio other than iPod, there is a case that
iPod doesn’t playback correctly. Please don’t operate
the audio payer or internet radio other than Pandora
when the Pandora mode.
4. During iOS device is connected by Bluetooth, and
select the iPod mode, the volume level is controlled by
only iOS device.
5. During iOS device is connected by Bluetooth, Album
jacket image is not displayed.
The playback starts after a while, from where the iPod/
iPhone has been paused.
• When iPod/iPhone is already connected
Touch the [
screen. The system changes to the iPod mode, and
starts playback from the previous position.
] button on the Main Menu
iPod Audio ID3 Information
12
13
14
15
4
21
5
3
6
1 - Option button
2 - Repeat button
3 - Shufe button
4 - Previous Track /Fast Backward button
5 - Play/Pause button
6 - Next Track/Fast Forward button
7 - ID3 Information
1011
9
7
8
English
Owner’s Manual
NX404
29
Page 31

English
8 - Next Page[ ] / Previous Page[ ] button
9 - Category list
10 - System time
11 - Bluetooth status indicator
12 - Playback status indicator
Owner’s Manual
13 - Art work
14 - Shortcut button
15 - Progress bar
Play/Pause Playback
1. Touch [ ] button to pause during playback.
2. Touch [
] button again to resume playback.
Switch to Previous/next file
• Touch [ ] or [ ] button during playback to play
previous /next le.
• Touch [
Touch of the next track.
• Touch [
] button to starts playback from the
] button to starts playback from the
beginning of the current track; when this button is
touched again within about 5 seconds, playback
starts from the beginning of previous track.
Fast Forward /Fast Backward
Touch [ ] or [ ] button and hold more than 2
seconds to start fast backward or fast forward during
playback.
Note:
*The fast forward and fast backward speed may differ
depending on the audio files.
Repeat Playback
* depend on iPod.
1. Touch the [
for Repeat All, again for Repeat Off.
] button once for Repeat Track, again
Shuffle Playback
1. Touch [ ] button to shufe the tracks in playing
folder during playback.
2. Touch this button again to turn off the feature.
Album Art work
If current audio le contains album art image in ID3,
the picture will be displayed in this area.
ID3 Information Area
This area display ID3 information of playing le:
song title, artist information, album information
(Genre, playlist and release time).
Category List
Select different category songs to play. The
category is same as the iPod/iPhone.
iPod Audio Playlist Mode Screen
1
1 - Switch to information button
2 - Playing list
3 - Page turning button
4 - Back to father folder
5 - Close the list mode
6 - Search with the rst alphabet in current list
2
4
6
iPod Audio List Mode Screen
• In the ID3 information mode screen, touch the ID3
info area to switch the playing list, and in the playing
list mode screen, touch the button [
the father folder. If the list is in root, touch it to
close the list.
• Touch the button[
the list is in root, touch it to close the list.
• Touch the button [
the ID3 information mode.
] to back to the father folder. If
] to close the List and back to
3
5
] to back to
NX404
30
Page 32

Simple Control Mode
1
2
1 - Simple Control button
2 - Video Mode button
• If the Simple Control is set to [
the screen will become Simple Control Mode. It can
also display the video of iPod/iPhone regardless it
is iPod Audio or iPod Video mode. But only
“Previous Track”、“Play/Pause” and “Next Track”
can be operated.
• Touch [
]the video will play from iPod.
] in option menu,
Note: In Simple Control Mode, the best way is to control
the iPod just on iPod.
Selecting a list item from a list screen
(1). Touch the list screen and ick up or down to scroll
the list.
(2). Touch a desired list item on the screen to display
the corresponding list of tracks.
(3). Touch the desired track name on the list to play it.
iPod Video Menu Operations
Connect your iPod/iPhone to the USB connector.
The system will automatically detect the connected
device and the iPod Video button will be enabled for
operation on the Main Menu screen.
• When an iPod/iPhone is already connected
Touch the [
screen. The system changes to the iPod Video mode,
and starts playback from the previous position.
Touch MENU button on Operational Panel to return to
the Main Menu.
• Viewing video data in the iPod/iPhone (only for the
iPod/iPhone with video features)
When you connect an iPod/iPhone with video features
by using the optional connector cable for iPod/iPhone
with video, you can enjoy the video data and slide
show data stored in the iPod/iPhone and show them
on the display of this unit (and the rear monitor if
connected).
] button on the Main Menu
English
English
Owner’s Manual
Skipping a Track (Simple Control Mode)
Touch the [ ] or [ ] button during playback. Tracks
are skipped, as many times as the button is touched,
and playback starts.
• Touch the [
beginning of the next track.
• Touch the [
beginning of the current track.
When this button is touched again within about 5
seconds, playback starts from the beginning of the
previous track.
] button to starts playback from the
] button to starts playback from the
iPod Video ID3 Mode Screen
11
12
13
14
3
21
4
5
6
NX404
910
7
8
31
Page 33

English
1 - Option button
2 - Repeat button
3 - Previous Track button
4 - Play/Pause button
5 - Next Track button
Owner’s Manual
6 - Playing File title
7 - Category list
8 - Next Page[
9 - System time
10 - Bluetooth Status indicator
11 - Playback Status indicator
12 - Art work
13 - Shortcut button
14 - Progress bar
Note:
This icon shows only when 2-Zone on. This icon is in
some screen pictures and none in other some pictures.
It is better to be same setting in a manual. (Also, Navi
icon shows owned by setting. (There is no Navi icon
screen in this manual))
] / Previous Page[ ] button
Play/Pause Playback
1. Touch [ ] button to pause during playback.
2. Touch [
] button again to resume playback.
Switch to Previous/Next file
• Touch [ ] or [ ] button during playback to play
previous /next le.
• Touch [
beginning of the next track.
• Touch [
beginning of the current track.
] button to starts playback from the
] button to starts playback from the
Repeat Playback
* The repeat set as the factory default is depend on
iPod/iPhone.
1. Touch the [
for Repeat All, again for Repeat Off.
Album Art work
If current video le contains album art image in ID3,
the picture will be displayed in this area.
] button once for Repeat One, again
ID3 Information Area
The area is display the title of the playing le.
Category List
Select different category movies to play. The
category is same as the iPod/iPhone.
This operation is same as this in iPod Audio mode.
iPod Video Simple Control Mode Screen
This operation is same as this in iPod Audio mode.
iPod Video Play Mode Screen
9
8
7
iPod Video List Mode Screen
NX404
32
2
3
1
1 - Previous Track /Fast Backward button
2 - Play/Pause button
3 - Next Track/Fast Forward button
4 - Progress bar
4 5
6
Page 34

5 - Menu List button
6 - Repeat button
7 - System time
8 - Bluetooth status indicator
9 - Playback information
Play/Pause Playback
1. Touch [ ] button to pause during playback.
2. Touch [
] button again to resume playback.
Switch to Previous/Next Track
• Touch [ ] or [ ] button during playback to play
previous /next track.
• Touch [
beginning of the next track.
• Touch [
] button to starts playback from the
] button to starts playback from the
beginning of the current track; when this button is
touched again within about 5 seconds, playback
starts from the beginning of previous track.
beginning of the current track.
Fast Forward /Fast Backward
Touch [ ] or [ ] button and hold more than 2
seconds to start fast backward or fast forward during
playback. Release the button will continue playback
with normal speed.
Note:
*The fast forward and fast backward speed may differ
depending on the video files.
Repeat Playback
* The repeat set as the factory default is Repeat Off.
Touch the [
for Repeat All, again for Repeat Off.
Note:
The operation in iPod video mode is as same as iPod
Audio mode. Please refer to the iPod Audio Mode
operation.
Note:
Video playback is not available on all iPod/ iPhone
devices. Please contact your Clarion dealer for details.
An optional connection cable or accessory may be
required for this feature.
Note:
• “AUDIO ONLY” is displayed when the automobile is
moving.
• Image data may not be played back according to the
status of the iPod/iPhone
• The volume setting of video data is relatively lower than
audio data. Be sure to lower the volume setting before
switching to the other mode.
• Do not select the categories with no track registered
from the iPod menu screen. The iPod/iPhone may be
frozen. If the iPod/iPhone is frozen, reset the iPod/
iPhone by following the procedure described in the
] button once for Repeat One, again
instruction manual of the iPod/iPhone.
• Audio may be played back slightly out of
synchronization with video images.
iPod Audio Bluetooth Mode
When your iPod/iPhone have connected via bluetooth
to this unit, you can also enter iPod Audio mode. The
operation is same as the normal iPod Audio mode.
NX404
English
English
Owner’s Manual
33
Page 35

English
12. Pandora® OPERATIONS
If you have any issues with the Pandora application on your
mobile phone, please direct them to
pandora-support@pandora.com.
Selecting the Pandora Mode
Owner’s Manual
1. Turn on Pandora function of your iPod.
2. Connect your iPod/iPhone/Android to the unit.
3. When iPod/iPhone/Android is already connected,
touch the
[Pandora] icon on the Main Menu screen.
• Pandora mode now playing screen / Pandora mode
information screen
1
2
4 5 76
3
1 - Art Work
2 - Progress bar
3 - Settings button
4 - Thumbs down
Touch this button Thumbs-down current track and
play next track.
5 - Play/Pause button
Use to control playback and pause.
(1). Touch the button during playback. Playback
pauses.
(2). To resume playback touch the button again.
6 - Next track button
7 - Thumbs up
8 - System time
9 - List button
Touch this button to show List Screen
10 - Current station name
11 - Current title.
Touch icon to store current title to track favorites list.
12 - Current artist.
Touch icon to store current artist to artist favorites list.
13 - Current album name.
•Skipping a track (Pandora mode)
Touch [ ] button during playback, tracks are
skipped and starts playback from the beginning of the
next track.
Note:
• Some track are not able to be skipped.
• If skip limit has been reached(Skip 6 tracks in
1H), this function will not available.
•Track rating
Touch [
] or [ ] button to Thumbs down or Thumbs
up current track, and the button will light.
Note:
•Touch [
] button will skip to next track (skip limit has
not been reached).
•Some track is not able to be rated (i.e. audio ads
and shared station content). The thumbs buttons will
8
disable.
9
10
•Bookmarking
Touch [
11
track favorites list.
12
Note:
13
•Some track are not able to be bookmarked (i.e. audio
] button to store current title or artist to
ads). In this case the bookmark buttons will disable.
• Pandora Mode Station List
1
1 - [ ]button
Touch this button to display Information Screen.
2 - [
]button
Touch this button to sort the list by rst letter, touch
again to sort the list by date.
3 - Station list, touch to select station play.
When the desired station is not displayed, touch and
ick the station list up or down.
• Pandora Mode Setting screen
1
2
3
2
3
NX404
34
Page 36

1 - Add a new Station
2 - Select a device
•This “Select Device” key is use when connect
iPhone by the USB and connect the Android by
Bluetooth. The default setting, the USB connection
has priority
3 - Close the setting screen
Pandora Bluetooth Mode
When your mobile phone have connected to the unit
via bluetooth.You can also enter the Pandora mode.
The operation is same as the normal Pandora mode.
1
1 - BT mode
When connected via bluetooth. This icon will change
from USB to BT
Note:
1. Pandora internet radio may not be available in all
areas due to government restrictions.
English
English
Owner’s Manual
2. When the Pandora mode start, this system chooses
the previously connected device (Android or iOS).
When it is connected Android(BT), iPhone(BT or USB)
together, and “Do not show again” is not checked,
display the popup of choose device.
3. When connect the mobile phone by Bluetooth or
USB when the Pandora mode, there is a case the
change device button works correctly. We recommend
that after finished the Pandora mode, then connect
other mobile phone.
4. When the Pandora mode and operate the audio
player or internet radio other than Pandora, there is a
case that Pandora doesn’t playback correctly. Please
don’t operate the audio payer or internet radio other
than Pandora when the Pandora mode.
5. During Pandora playback in the Pandora mode
with the Bluetooth connection, the volume level is
controlled only by the mobile phone side. (Both iOS
devise and Android)
NX404
35
Page 37

English
13. Bluetooth® AUDIO PLAYER OPERATIONS
Some Bluetooth cellular phones have audio features,
and some portable audio players support the
Bluetooth feature. These devices will be called as
Owner’s Manual
“Bluetooth audio players” in this manual. This system
can play audio data stored in a Bluetooth audio player.
Note:
• This system will not operate or may operate improperly
with some Bluetooth audio players.
• For detailed information on the playable Bluetooth
audio players, see our home page: www.clarion.com
Selecting the Bluetooth Audio Mode
1. Touch the [Bluetooth Audio] button to select the
Bluetooth Audio mode.
The system changes to the Bluetooth mode. If the
connection with a Bluetooth audio player has been
already established, you may select the Music
function.
2. Press MENU button on Operational Panel to return
to the Main Menu.
• When the connection with blue icon a Bluetooth
audio player has been established, the [
displayed at the top of the screen.
] icon is
If you want to change the Pin Code setting of this unit,
perform the following steps.
• The factory default setting is “1234”.
3. Touch the text box of the Pin Code item to display
the Ten-Key Pad screen.
4. Enter your desired 4-digit PIN number, and then
touch the [
] button.
Registering your Bluetooth Audio
Player (Pairing)
You can register up to 5 Bluetooth audio players.
Your mobile phone Bluetooth version is under 2.0.
Please input PIN code “0000”.
1. Turn on the power of the Bluetooth audio player you
wish to register.
2. Touch the Device button [
Select screen.
3. Touch the [ ] button to display the Inquiring Device
screen.
] to display the Device
Bluetooth Audio Player Settings
You can conrm various information concerning about
the Bluetooth Interface features.
1. Touch the [
the screen.
2. When you nish conrming the Bluetooth
information, touch the [
previous screen.
36
] button to display the information on
] button to return to the
NX404
Page 38

4. Touch your desired device button and touch [
And select a type of this device.
When the pairing operation completes, the registered
Bluetooth audio player is set as the current device,
after selecting the favorite icon, the display return to
the device list screen. Touch [
will return to the Bluetooth audio mode screen.
• To delete the Bluetooth audio player registration
1. Touch the [
A conrmation screen is displayed.
2. Touch the [
] button to register for the Bluetooth audio
player. Then select an image of this device.
] button, the display
] button to delete the device.
] button to conrm delete.
Controlling the Bluetooth Audio Player
Note:
• Occasionally, depending on the environment, playback
sounds may be fragmented, or switch noises may be
generated.
Playing Music
After the connection with a Bluetooth audio player is
established, the play mode is automatically engaged.
• When playback is not started for some devices,
touch the [
Pausing Playback
1. Touch the [ ] button during playback.
Playback Pauses.
2. To resume playback, touch the [ ] button.
Playback resumes.
Skipping a Track (searching)
3. Touch the [ ] or [ ] button during playback.
Stopping Playback
4. Touch the [ ] button during playback.
Tracks are stopped, touch the [
playback the rst Track.
Show Track List
5. Touch the [ ] button to show the current track
list.
Touch the [
you can playback any tracks by touch the items in
the list.
] button manually.
] button to
] button to show all of the lists. And
English
English
Owner’s Manual
Selecting the Bluetooth Audio Player
To change the current Bluetooth audio player to the
other device which is already registered, perform the
following operation.
1. Touch the device button to [
Select screen.
2. Touch the currently connected device button, then
touch the [
device.
3. Touch the desired Device button you wish to use.
Touch [
device. The corresponding cellular phone is set as
current telephone.
4. Touch the [
screen.
] button to disconnect the active
] button to select it as your active
] button to return to the previous
] display the Device
NX404
37
Page 39

English
14. Bluetooth®
TELEPHONE OPERATIONS
When the connection with your Bluetooth cellular
phone is established, the following functions are
available on this unit:
Owner’s Manual
• Listening to your telephone calls on the car
speakers.
• Answering to an incoming call.
• Making a call using the Ten-Key pad screen.
• Making a call using the Phone Book data in the
selected cellular phone.
• Making a call using the History data of the dialed/
received calls.
Note:
• Some cellular phones may not be able to transfer the
Phone Book data to head unit.
• The Phone Book data transmission may take a long
time. The operations of sending calls are disabled
during the data transmission.
Select the BT Phone Mode
1. Touch the [Bluetooth Telephone] button to select the
Bluetooth Telephone mode.
The Telephone screen is displayed.
2. Press MENU button on Operational Panel to return
to the Main Menu.
• When no Bluetooth Telephone connected, the icon
[
] is displayed at the top of the screen.
• When the connection with a Bluetooth Telephone
has been established, the icon [
indicator are displayed at the top of the screen.
] and signal level
1. Touch the [
the screen.
2. Perform setting for the desired item. See the
following sections for detail.
3. When you nish conrming the Bluetooth
information, touch the [
previous screen.
Setting Automatic Connection
The system automatically reconnects the cellular
phone after the connection is lost or the system is
restarted.
• The factory default setting is “ON”. Touch the
[
] or [ ] button of the Automatic Connection
item to set the function ON or OFF.
Setting Automatic Answer
If a call comes in, answer automatically after
5 seconds.
• The factory default setting is “OFF”. Touch the
] or [ ] button of the Automatic Answer item
[
to set the function ON or OFF.
Setting Microphone Gain
You can adjust the input level of the microphone in
16 levels.
• Touch the level indicator button of the Microphone
Gain item to adjust the input level.
Note:
• The input level of the microphone can be affected by
its surroundings. Adjust the level if the person on the
other end of the telephone has a reception problem.
] button to display the information on
] button to return to the
Bluetooth Telephone Settings
You can conrm various information concerning about
the Bluetooth Interface features.
NX404
38
Page 40

Registering Your Cellular Phone
(Pairing)
You can register up to 3 cellular phones. The
registering method is as same as “Registering your
Bluetooth audio player”.
Your mobile phone Bluetooth version is under 2.0.
Please input PIN code “0000”.
1. Turn on the power of the cellular phone you wish to
register.
2. Touch the Device button [
Device Select screen.
3. Touch the [ ] button to display the Inquiring
Device screen.
] to display the
When the pairing operation completes, the
registered cellular phone is set as the current
telephone, and the display returns to the
Telephone screen.
• To delete the cellular phone registration
1. Touch the [
A conrmation screen is displayed.
2. Touch the [
] button to delete the device.
] button to conrm delete.
Select the Cellular Phone
To change the current cellular phone to the other
device which is already registered, perform the
following operation.
1. Touch the [
screen.
2. Touch the currently connected device, then touch
[
3. Touch the desired Device button you wish to use.
Touch [
device. The corresponding cellular phone is set as
the current telephone.
• If the power of the cellular phone is not turned on,
turn it on.
• The cellular phone may prompt to acknowledge the
Bluetooth connection or to enter the Pass Key code
of this unit. Perform these operations according to
the message displayed.
4. Touch the [
screen.
] button to display the Device Select
] button to disconnect the active device.
] button to select it as your active
] button to return to the previous
English
English
Owner’s Manual
4. Touch your desired Cellular button to select the
button for the cellular phone to be registered, and
touch[
cellular phone.
• You cannot select the Cellular button of which
another cellular phone is already registered.
Select a blank Cellular button.
5. If entering the Pass Key code is prompted on your
cellular phone, enter the Pass Key code set in this
unit.
• You can change the Pass key setting of this
unit from the Bluetooth Info screen under the
Telephone Settings screen.
] button to register for the Bluetooth
Obtaining the Phone Book Data
Sending the Phone Book data from the cellular phone
enables you to make a call using the Phone Book
function from this unit.
Telephone Operations
Making a call using the Ten-Key pad
1. Touch the [ ] button to display the Ten-Key pad
screen.
2. Enter the telephone number by using the Ten-Key
pad displayed on the screen.
NX404
39
Page 41

English
Owner’s Manual
3. Touch the [ ] (Send) button to call the entered
number.
• The following Telephone Interrupt screen is
displayed during phone call.
• Touch the [ ] button to talk by using the cellular
phone and canceling the hands-free function
(Private Mode). To return to the hands-free mode,
touch the [
• Touch the [
Now you can hear the other side, but the other side
cannot hear your side.
• Touch the [
now you can answer to the other incoming call.
Touch again to talk with previous call
If during a call with a third-party call, you can keep
the current call to answer a third party or hang up
the current call to answer a third party. You can also
ignore the third-party calls.
] button again.
] button to mute the microphone.
] button to hold the current phone call,
Making a Call Using the Phone Book
You can use the Phone Book data obtained from the
cellular phone to make a call from this unit.
Note:
• Before using this function, the Phone Book data must
be sent from the cellular phone.
• Only the Phone Book items with at least one telephone
number registered in the captured Phone Book data
are displayed on the Phone Book screen.
1. Touch the [
screen.
2. Touch the desired name button you wish to dial.
• Flick the list up and down to scroll the list.
3. Touch the [
number. The Telephone Interrupt screen is
displayed, and calling starts.
• When the call is nished, touch the [
to hang up.
] button to display the Phone Book
] button to call the specied
] button
Making a Call Using the History
The system will memorize the Dialed/Received calls
record data in the memory. You can conrm it and use
it to make a call from this unit.
1. Touch the [
displayed.
• The items are sorted by Dialed, Missed and
Received calls.
• Flick the list up and down to scroll the list.
2. Touch the desired History item key you wish to dial.
3. Touch the [
number. The Telephone Interrupt screen is
displayed, and calling starts.
• When the call is nished, touch the [
to hang up.
] button. The History List screen is
] button to call the specied
] button
Answering to an incoming call
When a call comes in, the following Telephone
Interrupt screen appears.
4. When the call is nished, touch [ ] button to
hang up.
Note:
• Depending on some special cellular phone, the
Telephone Interrupt screen may be closed and the
connection with this system may be disconnected
when entering the Private mode.
NX404
40
You can answer to the incoming call on this system by
the following operation.
1. Touch the [
2. When the call is nished, touch the [
to hang up.
] button to answer the call.
] button
Page 42

15. TUNER OPERATIONS
English
Listening to the Tuner
1. Touch the Tuner button on the main menu display.
The tuner mode screen is displayed.
2. Touch the [FM1/FM2/FM3/AM] button to select the
radio band. Each time the button is touched, the
radio reception band changes in the following order:
FM1->FM2->FM3->AM -> FM1...
11
12
113
1. Preset Scan button
2. Seek down button
3. Seek up button
4. Step down button
5. Step up button
6. Frequencies display
7. System time
8. Bluetooth status indicator
9. Preset channel list
10. DX/Local indicator
11. Band button
12. Shortcut button
13. Option button
2
3
7
8910
Seek Tuning
1. Touch the [FM1/2/3/AM] button to select the radio
band (FM or AM).
2. Touch the [
• When touch the [
in the direction of higher frequency.
• When touch the [
in the direction of lower frequency.
] or [ ] button
] button, the station is searched
] button, the station is searched
Step Tuning
1. Touch the [FM1/2/3/AM] button to select the radio
band (FM or AM).
2. Touch the [
tune up or down by one step.
] or [ ] button in frequency menu to
Recalling a preset station
1. Touch the [FM1/2/3/AM] button to select the desire
band (FM or AM) on the tuner.
2. Press the preset station (1 to 6) on Preset list.
Manual memory
1. Touch the desired band button to select the band
you wish to store.
2. Tune to a station you want to store using the seek
tuning, step tuning, or preset tuning.
3. Touch and hold the desired Preset button you want
to store for about 2 seconds.
Auto Store
The Auto Store is a function for storing up to 6 stations
that are automatically searched in sequentially. If the
5
number of receivable stations cannot reach to 6, the
previous stored station remains.
1. Touch the [FM1/2/3/AM] button to select the
6
desired band. (FM or AM)
2. Touch the [
button to start the Auto Store.
4
A beep sounds and the stations with good reception
are stored automatically to the preset list.
Notes:
1. After auto store, the previous stored stations will be
overwritten.
2. The unit has 4 bands, but FM3 and AM can store by
Auto Store function.
] button, and then touch the [ ]
Preset Scan
The Preset Scan receives the stations stored in the
preset memory in order. This function is useful when
searching for the desired station in memory.
1. Touch the [FM1/2/3/AM] button to select the desired
band. (FM or AM)
2. Touch the [
The unit starts scanning each station for 10 seconds
sequentially. But the station stored is not a valid
station; the scanning time is only 2 seconds.
3. When the desired station is tuned in, touch the
[
] button again to stay in that station.
] button to start the Preset Scan.
DX/Local Setting
The DX / Local setting changes the tuner sensitivity in
order to separate closely spaced stations. This feature
is useful in areas that have many radio stations in
close proximity.
NX404
English
Owner’s Manual
41
Page 43

English
iPhone 4 and iPhone 4S
NX404
Apple Genuine Lightning
TM
NX404
16. HDMI MODE
Wire
Owner’s Manual
Wire
Connection
Wire
Wire
iPhone 4, iPhone 4S, iPhone 5, iPhone 5s and iPhone 5c
supplied with the and HDMI cable (sold in the
market) or CCA-770 and digital Av adapter.
Note:
The following is part of the wiring example.
Depending on the device, there is a case to connect to the device directly with the CCA-771.
Depending on the adapter or device, there is a case that the audio noise and video noise is generated.
(1) Connection with the iPhone 4 and iPhone 4S
of
HDMI
of
HDMI
of
of
HDMI
HDMI
iPhone 4, iPhone 4S, iPhone 5, iPhone 5s and iPhone 5c
Mode
can be connected by using the connector cable
HDMI cable sold in the market or ★CCA-770
NX404
(2) Connection with the iPhone 5, iPhone 5s and iPhone 5c
(3) Connection with the Android Phone
NX404
(4) Connecon with the equipment with HDMI output
Apple Genuine 30pin cable
HDMI cable sold in the market or
cable
Micro USB cable sold in the market
HDMI cable sold in the
★
market or
CCA-770
HDMI cable sold in the
market
Apple Genuine
30pin-Digital AV adapter
★
CCA-770
Apple Genuine
Lightning-Digital AV adapter
MHL adaptor sold
in the market
Electronic devices with HDMI output
iPhone 5, iPhone 5s and iPhone 5c
42
NX404
Page 44

Select HDMI source
Touch the HDMI menu button, then appear the screen
of the connected device.
This HDMI mode is only indicate the
screen of the iPhone, Android. Can‘t
operate by the touch screen of NX404
English
English
Owner’s Manual
Note:
Depending on the application and model of the
mobile phone, there is the case that black frame
appears around the screen.
NX404
43
Page 45

English
17. AUX
External peripheral devices, including a game console, camcorder, navigation unit, iPod/iPhone, etc. can be
connected to the AUX connector on the front or back of this unit using the A/V media cables.
Owner’s Manual
Switching to AUX IN
Touch [AUX1] /[AUX2] button on Main Menu to select desired mode (when unit is reading). If the external device
connected to AUX input have audio signal, the unit will broadcast audio of external device. Press Menu button on
Operational Panel to return to the Main Menu.
You cannot directly control external devices connected to AUX input.
18. CAMERA INPUT OPERATIONS
Switching to Camera mode
Touch [Camera] button on Main Menu.
The LCD will display the external camera video. The screen will display “No Video Signal” message, if a valid
camera is not connect to this head unit.
Press MENU button on Operational Panel to return to the Main Menu.
Setting Camera audio
Select “ON” button in the Camera Audio setting of the General setting.
The audio from camera will heard when back gear is on. The volume control is available but not indicated on the
screen due to the safety.
Select “MUTE” button, then mute the audio of the current mode when back gear is on.
Note:
If the reverse cable is connected correctly to the car, the unit goes to camera mode automatically when the car is in
reverses.
As an additional safety feature, the audio from camera with built-in microphones can be heard through
the NX404.
NX404
44
Page 46

19. REAR SOURCE OPERATIONS
English
If a monitor is installed in the rear zone and connected
to the rear zone AV output, passengers in the back
seat can watch the DVD/iPod Video/AUX1/ AUX2
video separately from front source.
12
1. Touch the button to access the front source.
2. Touch the button to close the rear source.
Multi-Zone Operation
Independent sources can be played simultaneously
on the unit. For example, a FM/AM console can be
playback on the front screen while DVD video is
available to rear passengers. But now can’t select
DVD video in front.
Access Rear-Zone
1. Touch the Rear button on Main Menu to access the
Rear Source.
2. Select a source to play.
Exit Rear-Zone
Touch the 2-Zone off button to close the Rear
Source.
Note:
1. If the source is selected as the front, the source in
rear can’t be selected.
2. If the source is selected as the rear, the source in
front can’t be selected.
3. Touch the Front button to access the main menu but
not close the Rear Source.
1 -Option button
2 -Show Cursor keys
3 -Previous Chapter /Fast Backward button
4 -Play/Pause button
5 -Next Chapter /Fast Forward button
6 -Elapsed playing time
7 -Menu List button
8 -Front/Rear button
If the screen displays Rear Source, touch Front/Rear
button to switch to Front Source.
If the screen displays Front Source, touch Front/Rear
button to switch to Rear Source.
DVD Video Rear Source Control Info
Mode.
Touch BACK button to return.
DVD Video Rear Source Control Direct
Mode.
English
Owner’s Manual
DVD Video in Rear
1 2 3 4 5 6 7
8
NOTE: More detail please refer to DVD Video Front
source.
NX404
45
Page 47

English
Owner’s Manual
AUX1
AUX2
iPod Video Rear Source ID3 Mode
iPod Video in Rear
iPod Video Rear Source Control Play
Mode
7
1 2 3 4 5 6
1 - Previous Track /Fast Backward button
2 - Play/Pause button
3 - Next Track/Fast Forward button
4 - Progress bar
5 - Menu List button:
Press the Menu button to display the iPod Video
Rear Source mode screen.
6 - Repeat button:
Same as iPod function of front source
7 - Front/Rear button
If the screen displays Rear Source, touch to switch to
Front Source.
If the screen displays Front Source, touch to switch to
Rear Source.
NOTE:
If the source is selected as the front, the source in rear
can’t be selected.
If the source is selected as the rear, the source in front
can’t be selected.
Touch the Front button to access the front main menu
but the rear source will keep running.
NX404
46
Page 48

20. SETTING OPERATIONS
English
Touch [ ] button on the Main menu screen.
The Setting menu screen will be displayed.
General Setup Menu
System Language: Set the Language for system
screen.
Illumination Color: Set the illumination color on the
panel.
Select menu to be able to select from Shortcut
menu and drag it to left side area.
Time: Set system clock.
24-Hour Format: Set the time display mode.
Beep: Turn on or turn off the beep conrmation sound.
Bluetooth: Set the Bluetooth On or Off.
Wallpaper: Choose the desired wallpaper.
Input Aux Sense: AUX input switch, including Low,
Middle, High.
®
DivX
Registration: Display the information about
®
registration.
DivX
Tel Speaker: There are two options, Left and Right.
For example, if current setting is Right, when BT
phone is coming in, only right speaker can hear the
phone.
Pandora:There are two options, On and Off.
Camera Audio: There are three options, Off, On and
Mute.
Version: Display the software version information.
Note:
• Time and 24-Hour Format can be adjusted when set
the system time not to be synchronized with GPS local
time.
English
Owner’s Manual
Video Setup Menu
NX404
47
Page 49

This menu includes: DVD Wide Screen Mode;
English
Dimmer. Dimmer Mode
DVD Wide Screen Mode: Set the DVD wide screen
mode On or Off.
Dimmer: Set Dimmer value from 0 to 20.
Dimmer Mode: There are three options, Day, Night
and Auto.
Owner’s Manual
Audio Setup Menu
This menu includes: Balance, Fader, Beat EQ, Sub
Woofer Ctrl, Sub Woofer Phase, High Pass Filter Low
Pass Filter, Line Out and Magna Bass EX.
Balance: Choose the desired volume for left and right
speaker.
Fader: Choose the desired volume for front and rear
speaker.
Beat EQ: Choose the desired mode: Bass Boost,
Impact, Excite, Custom and OFF.
Subwoofer Ctrl: Choose the desired subwoofer gain
from 0 to 14.
Subwoofer Phase: Choose the Subwoofer Phase
normal or reverse.
High Pass Filter: Choose the frequency about the
high pass lter or enable. The frequencies include
60Hz, 90Hz and 120Hz.
Low Pass Filter: Choose the frequency about the low
pass lter or enable. The frequencies include 60Hz,
90Hz and 120Hz.
Magna Bass EX: Choose the loudness On or Off.
Note:
Optional cable (sold separately) is necessary when you
use Audio line out.
Navigation Setup Menu
This menu includes: GPS Time, Navi Interrupt, Voice
Guidance.
GPS Time: Set the system time to be synchronized
with GPS local time or not.
Navi Interrupt: There are three choices: On/Popup/
Off. “On”: The navigation screen will cover to AV
screen when reaching some key point. “Popup”: When
small turn info window will pop up in the top of the
AV screen to indicate the key point. “Off”: Turn off this
function.
Voice Guidance: There are three choose: On/Mute/
Off.
On: Interrupt function of voice guidance is on. While
interrupting no attenuate function of AV sound.
Mute: Interrupt function of voice guidance is on. While
interrupting attenuate function sound is on.
Off: Disable the navigation voice guidance.
Others Setup Menu
This menu include: Set Password; Parental Control;
Audio Language; Subtitle Language; Screen
Calibration and Factory Default.
Set Password: Set the password for DVD parental
control.
Parental Control: Set the rating of the age. It contains
Kid Safe/G/PG/PG- 13/PG-R/R/NC- 17/Adult.
NX404
48
Page 50

Audio Language: Set the Language for DVD Audio.
Subtitle Language: Set the Language for DVD subtitle.
Blinking LED: Set blinking LED On or Off.
Screen Calibrate: The function of it is to select the TS
Calibrate YES or NO.
Factory Default: The function is to select to load
factory default or not.
Set the Anti-Theft code
1. If your unit is unlocked, hold the [ ] button
more than 2 seconds, then the Anti-Theft setting
mode will display. Users can change anti-theft
code.
Touch [YES] button, the numerical keypad is
displayed. Enter the new password twice, then antitheft code is set and your unit is secured.
When the Anti-theft is “On”, you need enter correct
Anti-theft code to turn the unit on. If you enter
wrong code three times, the unit is locked, and must
be unlocked by the professionals.
English
English
Owner’s Manual
2. If your unit is secured, hold the [
than 2 seconds, then the Anti-Theft setting mode
will display. The numerical keypad is displayed,
enter the right code to unlock.
Note:
If the anti-theft code is lost or forgotten, a charge will
be incurred at the owner’s expense by a Clarion service
station to unlock the NX404.
] button more
NX404
49
Page 51

English
21. TROUBLESHOOTING
GENERAL
Problem Cause Measure
Owner’s Manual
Power does not turn on. (No
sound is produced.)
Nothing happens when buttons
are pressed.
Display is not accurate.
The remote control unit does
not work.
Fuse is blown. Replace with a fuse of the
Incorrect wiring. Consult your installation center.
The microprocessor has
malfunctioned due to noise,
etc.
Direct rays of the sun fall on
the light-receptive part of the
remote control unit.
The battery of the remote
control unit is dead or there is
no battery in the remote control
unit.
same amperage. If the fuse
blows again, consult your store
of purchase.
Press the reset button with a
thin rod.
Note:
When the Reset button is
pressed, turn o the ACC
power.
* When the Reset button is
pressed, frequencies of radio
stations, titles, etc. stored in
memory are cleared.
When direct rays of the sun fall
on the light-receptive part of
the remote control unit, it may
not work.
Check the battery of the remote
control unit.
DVD PLAYER
Problem Cause Measure
Disc cannot be loaded. A disc is already loaded. Eject the disc before loading
There is foreign matter already
in the disc slot.
Sound skips or is noisy. Disc is dirty. Clean the disc with a soft cloth.
Disc is heavily scratched or
warped.
Sound is bad directly after
power is turned on.
Video images are not
displayed.
Disc cannot play with
the display “PARENTAL
VIOLATION” shown.
NX404
50
Condensation may form on the
internal lens when the car is
parked in a humid place.
The parking brake is not
engaged.
Feature exceeds set parental
level.
the new one.
Remove the foreign matter, or
consult a service station.
Replace with a disc in good
condition.
Let dry for about 1 hour with the
power on.
Check that the parking brake is
engaged.
Release the view limitation or
change the parental level.
See the subsection “Setting up
the parental level”
Page 52

USB DEVICE
Problem Cause Measure
USB device cannot be inserted. The USB device has been
USB device is not recognized. The USB device is damaged. Disconnect the USB device
No sound heard with the
display “NO FILE” shown.
Sound skips or is noisy. MP3/WMA les are not
The video image of iPod/
iPhone is disturbed.
inserted with wrong direction.
The USB connector is broken. Replace with a new USB
Connectors are loose.
No MP3/WMA le is stored in
the USB device.
encoded properly.
The TV Signal setting of the
iPod/iPhone is not set correctly.
Reversing the connection
direction of the USB device, try
it again.
device.
and reconnect. If the device
is still not recognized, try
replacing with a dierent USB
device.
Store these les properly in the
USB device.
Use MP3/WMA les encoded
properly.
Set the TV Signal setting
(NTSC/PAL) of the iPod/iPhone
correctly.
Bluetooth
Problem Cause Measure
Cannot pair the Bluetooth
enable device with the car
audio system.
The audio quality is poor after
connection with a Bluetooth
enabled device.
The device does not support
the proles required for the
system.
The Bluetooth function of the
device is not enabled.
The Bluetooth reception is
poor.
Use another device to connect.
Refer to the user manual of the
device for how to enable the
function.
Move the device closer to the
car audio system or remove
any obstacle between the
device and the system.
English
English
Owner’s Manual
NX404
51
Page 53

TFT screen
English
Problem Cause Measure
The image is not displayed. The parking brake is not
Owner’s Manual
The display is dark. The Dimmer control is too low. Adjust the Dimmer properly.
There are red, green, and blue
points in display.
engaged.
The operating condition is not
good.
The headlight of the vehicle
is lit
-------------------- This is not a failure, but a
Check that the parking brake is
engaged.
The temperature inside the
vehicle may be 0°C or lower. Set
to an appropriate temperature
(25°C or so) and check it again.
The display is made dark
at night to prevent the glare
(When the headlight of the
vehicle is lit in the daytime, the
display gets dark).
phenomenon peculiar to a
liquid crystal panel (The liquid
crystal panel is produced
according to technology with
very high precision. Note that,
though there are eective
pixels of 99.99% or more, pixel
missing or normally lit pixels
account for 0.01%).
NX404
52
Page 54

22. ERROR DISPLAY
English
If an error occurs, one of the following displays is displayed.
Take the measures described below to solve the problem.
DVD PLAYER
Display Cause Measure
BAD DISC A disc is caught inside the DVD
deck and is not ejected.
BAD DISC A disc cannot be played due to
scratches, etc.
BAD DISC A disc is loaded upside- down
inside the DVD deck and does
not play.
PARENTAL VIOLATION Parental level error Set the correct Parental level.
Disc Region incorrect Region code error Eject the disc, and replace
This is a failure of DVD deck’s
mechanism and consult your
store of purchase.
Replace with a non-scratched,
non-warped disc.
Eject the disc then reload it
properly.
correct region code disc.
English
Owner’s Manual
NX404
53
Page 55

English
23. SPECIFICATIONS
FM Tuner
Frequency Range: 87.9 MHz to 107.9 MHz
Owner’s Manual
Usable Sensitivity: 8 dBµV
Stereo Separation:
Frequency Response: 30 Hz to 14 kHz
25 dB (1 kHz)
AM Tuner
Frequency Range: 530 kHz to 1,710 kHz
Usable Sensitivity: 30 dBµV
DVD Player System
Digital Versatile Disc System with CDDA capable
Usable discs:
DVD video disc, Compact disc
Frequency Response: 20 Hz to 20 kHz
Signal/Noise Ratio: 93 dbA (1 W Ref)
Distortion: 0.05%
Video system: NTSC/PAL
Audio/Video Input
Audio input voltage: ≤ 2 V
Video input voltage: 1.0 V
Audio input sensitivity (at 2 V output)
High: 325 mV
Mid: 650 mV
Low: 1.3 V
rms
rms
rms
rms
@75
p-p
A2DP (Advanced Audio Distribution Prole)
AVRCP1.2,1.3,1.4 (AV Remote Control Prole)
PBAP (Phone Book Access Prole)
SPP (Serial Port Prole)
Power Class: 2
USB
Specication: USB 1.1/2.0 (FS)
Playable Audio format:
MP3,WMA,AAC,FLAC
Playable Video format:
AVI,MP4,MPG/MPEG,3gp
General
Power source voltage:
14.4 VDC (10.8 to 15.6 V allowable)
Ground: Negative
Current consumption: 4.0 A @1 W
Auto Antenna Rated Current: 500 mA less
Note:
• Specications and design are subject
to change without notice for further
improvement.
Audio/Video output
Video output voltage: 1.0 V
Screen Size: 6.2” wide type
Pixels: 1,152,000
Resolution: 800 x 480 x 3 (RGB)
p-p
@75
Bluetooth
Specication: Bluetooth Ver 2.1+EDR
Prole: HFP1.5(Hands Free Prole)
HSP1.0 (Headset Prole)
NX404
54
Power Output:
18W RMS x 4 Channels at 4Ω
and ≤1% THD+N
Signal to Noise Ratio:
82 dBA(reference 1 W into 4Ω)
Page 56

English
7’’ 4’’
172mm
165mm
6.8’’
6.4’’
NX404 dimensions:
NX404 weight: 2.3 kg
mm001mm871
English
Owner’s Manual
NX404
55
Page 57

English
NX404
CAMERA
VIDEO OUT
REAR RCH
REAR LCH
AUX2 VIDEO IN
AUX2 AUDIO IN LCH
MIC
Red
Red
White
White
Yellow
Yellow
Yellow
CCA-750(sold separately)
4-Channel Amplifier
Red
Front
Right
Rear
Right
Front
Left
Rear
Left
Gray
Black
Gray
Black
Red RedWhite White White
SWI
SUBWOOFER1
SUBWOOFER2
AUX2 AUDIO IN RCH
HDMI CABLE
For Rear zone
24. WIRE CONNECTION GUIDE
Note:
• Before installing, be sure to disconnect the negative cable of the car battery.
Owner’s Manual
• In the optional devices, the RCA cables and the Connector cables are separately-sold
items.
•
When connect the HDMI cable, be sure to x with the HDMI cable holder and Machine screw(M2 x
4).
56
NX404
Refer to
page 57
HDMI cable holder
Page 58

Blue White/
Orange White/
Blue
Brown
Grass-green
Purple Whit/
Purple
Purple Bla/
Red
Gray
Gray Bla/
White
White Bla/
Green
Green Blac/
Ye llow
Blac
ck
ck
ck
e
k
Rear right +
Rearright -
Frontright +
Frontright -
Front left
Front left
Rear left+
k
Rear left-
Amplifiertu
Illumination
Auto antenna
Phone interr
Parkingbrake cord
Reverse gear cord
Connect directly
+12V
to battery
Ground
+12V accessory
+
-
non cord-
r
upt
English
English
Owner’s Manual
Note:
*1: Connecting the PHONE INTERRUPT terminal
The phone interrupt will mute the audio if the lead receives a negative or ground signal.
NX404
57
Page 59

Clarion Co., Ltd.
All Rights Reserved. Copyright © 2014: Clarion Co., Ltd.
Page 60

US English
Owner’s manual
NX404
Page 61

Thank you for choos ing the Clarion NX404 as your navigator. Start using Clarion NX404 right
away. This document is the detailed description of the navigation software. You can easily discover
Clarion Mobile Map while you are usi ng it; howe ver, we s till recom mend that you r ead this m anual
to fully understand the features and functions.
Easy navigation map updates
It is easy to keep the navigation s ystem up to date. Simpl y download new m ap data from Clarion’s
portal site, store them on a microSD card and i nsert it into the Clarion NX404 via the front card
slot.
Latest Map Guarantee
When you start using the p roduct, you have 30 da ys to download the latest a vailable map free of
charge.
2 NX404 English
Page 62

Table of contents
1 Warnings and Safety information ........................................................................................... 6
2 Getting started ........................................................................................................................... 7
2.1 Navigation menu ................................................................................................................................. 8
2.2 Buttons and other controls on the screen ........................................................................................... 9
2.2.1 Using keyboards........................................................................................................................................ 10
2.2.2 Beyond single screen tap........................................................................................................................... 11
2.3 Map screen ....................................................................................................................................... 12
2.3.1 Na vigating on the map .............................................................................................................................. 12
2.3.2 Position marker s........................................................................................................................................ 14
2.3.2.1 Vehimarker and Lock-on-Road ........................................................................................................................... 14
2.3.2.2 Selected map location (Cursor) and selected map object ................................................................................... 14
2.3.3 Objects on the map .................................................................................................................................... 15
2.3.3.1 Streets and roads ................................................................................................................................................ 15
2.3.3.2 Turn preview and Next street .............................................................................................................................. 15
2.3.3.3 Lane information and Signposts ......................................................................................................................... 16
2.3.3.4 Junction view ...................................................................................................................................................... 17
2.3.3.5 Freeway exit ser vices .......................................................................................................................................... 17
2.3.3.6 3D object types ................................................................................................................................................... 18
2.3.3.7 Elements of the active route ................................................................................................................................ 18
2.3.4 Manipulating the map ............................................................................................................................... 19
2.3.5 Quick menu ............................................................................................................................................... 20
2.3.6 Checking the details of the current position (Where Am I?)..................................................................... 23
3 On-road navigation ................................................................................................................. 25
3.1 Selecting the destination of a route .................................................................................................. 25
3.1.1 Combined Search ...................................................................................................................................... 25
3.1.1.1 Combined Search - Navigating to a recent destination (History) ....................................................................... 28
3.1.1.2 Combined Search - Navigating to a Favorite destination ................................................................................... 29
3.1.1.3 Combined Search - Navigating to an address ..................................................................................................... 30
3.1.1.4 Combined Search - Navigating to an intersection .............................................................................................. 31
3.1.1.5 Combined Search - Navigating to a Place of Interest ......................................................................................... 32
3.1.1.6 Combined Search - Navigating to a Place of Interest by its category ................................................................. 33
3.1.2 Entering an address or a part of the address .............................................................................................. 34
3.1.2.1 Entering an address (United States) ................................................................................................................... 35
3.1.2.2 Entering an address (Canada) ............................................................................................................................ 37
3.1.2.3 Entering an address starting with the street name (in the United States only) ................................................... 39
3.1.2.5 Entering the midpoint of a street as the destination ............................................................................................ 42
3.1.2.6 Selecting an intersection as the destination ........................................................................................................ 43
NX404 English 3
Page 63

3.1.2.7 Selecting a city/town center as the destination ................................................................................................... 45
3.1.2.8 Entering an address with a ZIP code .................................................................................................................. 46
3.1.2.9 Tips on entering addresses quickly ..................................................................................................................... 48
3.1.3 Selecting the destination from the Places of Interest ................................................................................ 49
3.1.3.1 Quick search for a Place of Interest ................................................................................................................... 49
3.1.3.2 Searching for a Place of Interest using preset categories ................................................................................... 51
3.1.3.3 Searching for a Place of Interest by category ..................................................................................................... 53
3.1.3.4 Searching for a Place of Interest by name .......................................................................................................... 56
3.1.3.5 Searching for a Place of Interest by its phone number ....................................................................................... 59
3.1.3.6 Selecting nearby assistance from 'Where Am I?' ................................................................................................ 60
3.1.4 Selecting a map location as the destination ............................................................................................... 62
3.1.5 Selecting the destination from your Favorites ........................................................................................... 62
3.1.6 Selecting your Home location ................................................................................................................... 64
3.1.7 Selecting a recent destination from the History ........................................................................................ 65
3.1.8 Entering the coordinate of the destination ................................................................................................ 66
3.1.9 Building a route from the list o f de stinations (Create Route) ................................................................... 67
3.2 Viewing the entire route on the map ................................................................................................. 68
3.3 Checking route parameters and accessing route related functions .................................................. 69
3.4 Modifying the route .......................................................................................................................... 70
3.4.1 Selecting a new de s t ination when already having a route: New Route, Waypoint or Final Destination .. 70
3.4.2 Setting a new starting position for the route ............................................................................................. 70
3.4.3 Editing the list of destinations (Edit Route) .............................................................................................. 72
3.4.4 Paus ing the active route ............................................................................................................................ 73
3.4.5 Canceling the active route ......................................................................................................................... 73
3.4.6 Checking route alternatives when planning the rout e ............................................................................... 73
3.4.7 Checking route alternatives for an existi ng route ...................................................................................... 74
3.4.8 Changing the road types used in route planning ....................................................................................... 76
3.5 Saving a location as a Favorite destination ..................................................................................... 77
3.5.1 Editing the details of a Favorite destination .............................................................................................. 77
3.6 Saving a map location as an alert point ........................................................................................... 78
3.7 Editing an alert point ........................................................................................................................ 79
3.8 Watching the simulation of the route ................................................................................................ 80
4 Off-road navigation ................................................................................................................. 82
4.1 Selecting the destination of the route ............................................................................................... 82
4.2 Navigating in off-road mode............................................................................................................. 82
5 Reference Guide ...................................................................................................................... 83
5.1 Concepts ........................................................................................................................................... 83
5.1.1 Smart Zoom .............................................................................................................................................. 83
4 NX404 English
Page 64

5.1.2 Daytime and night color themes ............................................................................................................... 83
5.1.3 Tunnel view .............................................................................................................................................. 84
5.1.4 Route calculation and recalculation .......................................................................................................... 84
5.1.5 Green routing ............................................................................................................................................ 85
5.1.6 Road safety cameras and other proximity alert points .............................................................................. 86
5.1.7 Speed limit warning .................................................................................................................................. 87
5.2 'More' menu ...................................................................................................................................... 88
5.3 Settings menu .................................................................................................................................... 89
5.3.1 Sound and Warnings ................................................................................................................................. 91
5.3.2 Customize Quick menu ............................................................................................................................. 93
5.3.3 Route settings ............................................................................................................................................ 93
5.3.4 User profiles .............................................................................................................................................. 96
5.3.5 Map settings .............................................................................................................................................. 97
5.3.6 Visual guidance settings............................................................................................................................ 98
5.3.7 Display settings ....................................................................................................................................... 100
5.3.8 Regional settings ..................................................................................................................................... 100
5.3.9 Trip monitor settings ............................................................................................................................... 100
5.3.10 Log collection settings .......................................................................................................................... 101
6 Glossary .................................................................................................................................. 102
7 End User License Agreement ............................................................................................... 104
8 Copyright note ....................................................................................................................... 110
NX404 English 5
Page 65

1 Warnings and Safety infor mation
The navigation system helps you find your way to your destin ation with the b uilt-in GPS r eceiver. Clari on
Mobile Map does not transmit your GPS position; others cannot track you.
If you accept it when first us ing the application, Clario n Mobile Map collects usage inf ormation and GPS
logs that may be us ed for improving the appl ication and the qualit y and coverage of maps. T he data is
processed anonymous ly; no one will be ab le to track any person al information. If you change your m ind
later, you can enable or disable the log collection in Settings (page 101).
It is important that you l ook at the displ ay on ly when it is saf e to do so. I f you are the driver of the vehicle ,
we recommend that you oper ate Clarion Mobile Map b efore you start your journey. Plan th e route before
your departure and stop if you need to change the route.
You must obey the traffic signs and follow the road geometry. If you deviate from the recommended
route, Clarion Mobile Map changes the instructions accordingly.
Never place Clarion NX404 where it obstructs the dr iver's view, where it is in the deployment zone of an
airbag or where it might cause injuries in an accident.
For more information, consult the End User License Agreement (page 104).
6 NX404 English
Page 66

2 Getting started
Clarion Mobile Map is optimized for in-c ar use. You can use it easil y by tapping the screen buttons and
the map with your fingertips.
When using the navigation software for the firs t time, an initial setup process star ts automatically. Do as
follows:
1. Select the written language of the application interface. Later you can change it in Regional
settings (page 100).
2. Read the End User License Agreement. Tap
3. You are now asked whether you allow the software to collect usage information and GPS logs that
may be used for improving the application and the quality and coverage of maps. Tap
to allow the anonymous statistics or disable this function. Later you can turn
them on or off individually in Log collection settings (page 101).
4. The Configuration wizard starts. Tap
5. Select the language and speaker used for voice guidance messages. Later you can change it in
Sound and Warnings settings (page 100).
to continue.
to continue.
NX404 English 7
Page 67

6. If needed, modify the time format and unit settings. Later you can change them in Regional
settings (page 100).
7. If needed, modify the default route planning options. Later you can change them in Route settings
(page 93).
8. The initial setup is now complete. The Configuration wizard can be restarted later from the Settings
menu (page 89).
After the initial setup, the Navigation menu appears and you can start using Clarion Mobile Map.
2.1 Navigation menu
You can reach all parts of Clarion Mobile Map from the Navigation menu.
You have the following options:
• Tap
interest, a location on the map or one of your Favorite destinations. You can also look up your
recent destinations from the Smart History or enter a coordinate.
to select your destination by entering an address or selecting a place of
• Tap
You can also perform route-related actions such as editing or canceling your route, setting a start
point for the route, picking route alternatives, avoiding parts of the route, simulating navigation or
adding the destination to your Favorites.
8 NX404 English
to display the route parameters and the route in its full length on the map.
Page 68
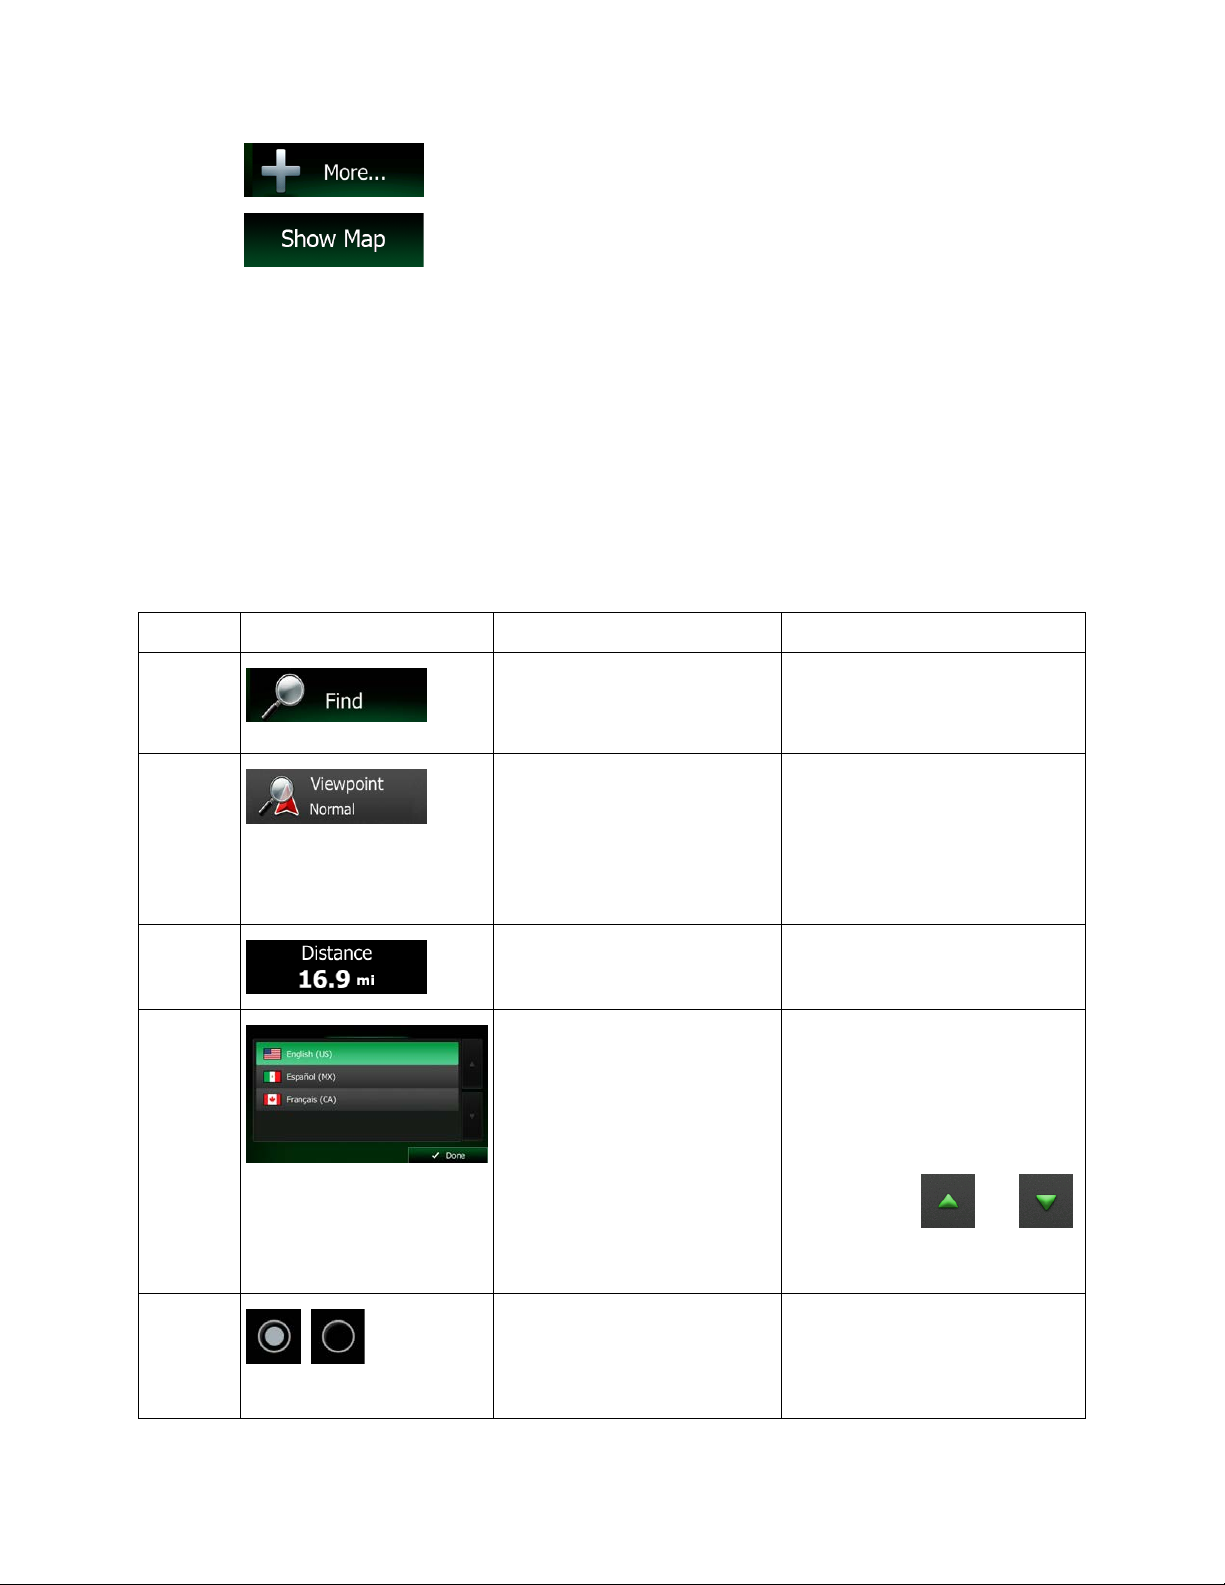
• Tap to simulate demo routes or to run some additional applications.
Type
Example
Description
How to use it
Icon
Some icons also function as a
• Tap
that shows your current position, the recommended route and the surrounding map area. Tap the
button to enlarge the map to the full screen.
to start navigating on the map. The button itself is a miniature live map
2.2 Buttons and other controls on the screen
When you are using Clarion Mobile Map, you usually tap buttons on the touch screen.
You only need to co nfirm selections or changes if the app lication needs to res tart, it needs to per form a
major reconfigurati on, or you are about to lose some of your d ata or settings. Other wise, Clarion Mobil e
Map saves your selections and applies the new settings without confirmation as soon as you use the
controls.
Button
Button
with value
Tap it to initiate a function, to
open a new screen, or to set a
parameter.
Some buttons display the
current value of a field or
setting. Tap the button to
change the value. After the
change, the new value is
shown on the button.
Tap it once.
Tap it once.
List
Radio
button
Shows status information.
When you need to select from
several options, they appear in
a list.
When there are only a few
choices, radio buttons may be
used instead of lists. Only one
value can be selected.
button. Tap them once.
Grab the list anywhere and slide
your finger up or down.
Depending on the speed of the
sliding, the list will scroll fast or
slow, only a bit or till the end.
Alternatively, move between
pages with the and
buttons and tap the value that
you want.
Tap one of the buttons to select
a new value.
NX404 English 9
Page 69

Switch
Each key is a touch screen
Task
Instruction
Switching to another keyboard
button and select the new keyboard
Correcting your entry on the
Entering a space, for example
street names
Entering upper and lower case
When there are only two
choices, a checkmark shows
whether the feature is enabled.
Tap it to turn the switch on or off.
Slider
Virtual
keyboard
When a feature can be set to
different values in a range,
Clarion Mobile Map shows an
indicator on a gauge that
displays and sets the value.
Alphabetic and alphanumeric
keyboards to enter text and
numbers.
• Drag the handle to move
the slider to its new
position.
• Tap the slider where you
want the handle to
appear; the thumb jumps
there.
button.
2.2.1 Using keyboards
You only need to enter lett ers or num bers when you c annot avo id it. You can t ype with your fingert ips on
the full-screen keyboards and you can switch between various keyboard layouts, for exam ple English,
Greek or numerical.
layout, for example from an
English keyboard to a Greek
keyboard
keyboard
between a first name and a
family name or in multi-word
letters
10 NX404 English
Tap the
layout from the list.
Tap to remove the unneeded character(s).
Tap and hold the button to delete se veral c haracter s or the ent ire input
string.
Tap the button at the botto m center of the screen.
When entering a text, the first character appears in upper case while
the rest of the text is in lower case. Tap to enter an upper case
letter or tap twice to turn on Caps Lock. Tap again and lower case
letters return.
Page 70

Entering numbers and symbols
Tap to switch to a keyboard offering numeric and symbol
Finalizing the keyboard entry
result)
Finalizing the keyboard entry
Finalizing the keyboard entry
Canceling the keyboard entry
Tap .
Action
Details
Tapping and
characters.
(accepting the suggested search
(opening the list of search
results)
(saving your input)
(returning to the previous screen)
Tap .
Tap .
Tap .
2.2.2 Beyond single screen tap
You usually need to tap the screen only once. However, some useful features can be accessed with
combined touch screen tapping. Those are the following:
holding the screen
Tap and keep pressing the following buttons to reach extra functions:
• Tap and hold on list and menu screens: the Map screen
appears.
• Tap and hold any of the , , , , , and
buttons on the Map screen: you can rotate, tilt or scale the map continuously.
• Tap and hold on keyboard screens: you can delete several characters
quickly.
• Tap and hold or in long lists: you can scroll pages continuously.
NX404 English 11
Page 71

Gestures
(drag&drop)
You need to drag and drop the screen only in cases like:
• Moving the handle on a slider.
• Scrolling the list: grab the list anywhere and slide your finger up or down.
Depending on the speed of the sliding, the list will scroll fast or slow, only a bit
or till the end.
• Moving the map in map browsing mode: grab the map, and move it in the
desired direction.
2.3 Map screen
2.3.1 Navigating on the map
The Map screen is the most frequently used screen of Clarion Mobile Map.
A small live map is displayed on the Navigation menu, as a part of the
To enlarge this small map and open the Map screen, tap
This map shows the curre nt position (the Vehimark er, a blue arrow by default), the recommended route
(an orange line), and the surrounding map area.
When there is no GPS position, the Vehimarker is transparent. It shows your last known position.
You see colored dots circ ling around a satellite symbol in the top lef t corner. The more green dots you
see, the closer you are to get the valid GPS position.
.
button.
12 NX404 English
Page 72

Field
Description
Shows your current speed given by the GPS receiver.
Shows the speed limit of the current road if the map contains it.
When GPS position is available, the Vehimarker is displayed in full color, now showing your current
position.
There are screen buttons and data fields on the screen to help you navigate. During navigation, the
screen shows route information.
The
functions in Settings.
By default, only one data field is displayed in the bot tom right corner. T ap this field to s ee all route data
fields. Tap any of the data fields to suppress others and display only the selected one.
The data fields are different when you are navi gating an active route and w hen you have no specified
destination (the orange line is not displayed).
Default data fields when cruising without a destination (tap and hold any of the fields to change its value):
button gives quick access to frequently used functions. You can change the available
Shows the current tim e corrected with time zone offset. The ac curate time comes
from the GPS satellites, an d the time zone information comes from the map or it can
be set manually in Regional settings.
(The current time is always displayed in the top left corner of menu screens.)
NX404 English 13
Page 73

Default data fields when navigating a route (tap and hold any of the fields to change its value):
Field
Description
Shows the distance you need to travel on the route before reaching your final
Shows the time needed to reach the final destination of the route based on
Shows the estimated arrival time at the final destination of the route based on
destination.
information available for the remaining segments of the route.
The calculation cannot take into account traffic jams and other possible delays.
information available for the remaining segments of the route.
The calculation cannot take into account traffic jams and other possible delays.
2.3.2 Position markers
2.3.2.1 Vehimarker and Lock-on-Road
When your GPS position is available, Clarion Mobile Map marks your current position with the
Vehimarker. By default, this marker is a blue arrow, but you can change this icon in Settings.
When on-road navigation is selected, the Vehimarker may not show your exact GPS position and
heading. If roads are near, it is aligned to the nearest road to suppress GPS position errors, and the
direction of the icon is aligned to the direction of the road.
If you select off-road navigatio n: The Vehimarker is at your exact GPS position. T he direction of the icon
shows your current heading.
2.3.2.2 Selected map location (Cursor) and selected map object
You can mark a map location in the following ways:
• Tap the map when navigating,
• Tap the map when you are asked to confirm the destination at the end of a search, or
• Tap the map in Find on Map (page 62)
When a map locatio n is selected, the Cursor app ears at the selected point on the map. The Cursor is
displayed with a radiating red dot (
The location of the Cursor can be used as the des tination of the route, a new aler t point, you can searc h
for Places around it, or you can save this location as one of your Favorite destinations.
You can also select som e of the objects on the m ap. If you tap the m ap at the icon of a Place of Inter est
or an alert point, the object will be s elected ( you see a r ed circling b order aroun d the objec t), and you can
get information about this object or use it as a route point.
14 NX404 English
) to make it visible at all zoom levels.
Page 74

2.3.3 Objects on the map
Icon
Description
Turn left.
Turn right.
Turn back.
Bear right.
Turn sharp left.
2.3.3.1 Streets and roads
Clarion Mobile Map shows the streets in a way that is similar to how the pap er road maps show them.
Their width and colors correspond to their importance: you can easily tell a freeway from a small street.
2.3.3.2 Turn preview and Next street
When navigating a ro ute, the to p sect ion of the Map s cr een shows i nform ation a bout the n ext rout e e vent
(maneuver) and the next street or the next city/town.
There is a field in th e top left corner that displa ys the nex t maneuver. Both the type of the event (turn,
traffic circle, exiting freeway, etc.) and its distance from the current position are displayed.
A smaller icon shows the type of the s econd next maneuver if it is near the firs t one. Otherwise , only the
next maneuver is displayed.
Most of these icons are ver y intuit ive. T he following table lists som e of the f requentl y shown ro ute event s.
The same symbols are used in both fields:
NX404 English 15
Page 75

Keep left.
Continue straight in the intersection.
Go left on the traffic circle, 3rd exit (next maneuver).
Enter traffic circle (second nex t maneuver).
Enter freeway.
Exit freeway.
Board ferry.
Leave ferry.
Approaching a waypoint.
Approaching the destination.
2.3.3.3 Lane information and Signposts
When navigating on multilane roads, it is important to take the appropriate lane in order to follow the
recommended route. If lane information is available in the map data, Clarion Mobile Ma p displays the
lanes and their direc tions using sm all arrows at t he bottom of the map. Highlight ed arrows repr esent the
lanes and direction you need to take.
Where additional infor mation is ava ilable, signposts substitute ar rows. Signp osts are displa yed at the top
of the map. The color and style of the s ig npos ts ar e s i milar to the real ones you c an s ee ab ov e r oa d or by
the roadside. They show the available destinations and the number of the road the lane leads to.
All signposts look s imilar when cr uising ( when t here is no recom m ended route). When navigating a route,
only the signpost that points to the lane(s) to be taken is displayed in vivid colors; all others are darker.
If you want to hide the curr entl y displayed si gnposts, t ap any of them and the nor mal Map s creen returns
until new signpost information is received.
16 NX404 English
Page 76

2.3.3.4 Junction view
If you are approaching a freeway exit or a complex i ntersection and the neede d information exists, the
map is replaced with a 3D vie w of the junction. The lanes you need to take ar e displayed with arr ows. At
the top of the screen road signs show you additional information.
If you want to hide the currently displayed junction, tap the picture and the Map screen returns.
2.3.3.5 Freeway exit services
You may need a gas station or a restaurant during your j ourney. This feature displa ys a new button on
the map when you are driving on freeways.
Tap this button to open a panel with the details of the next few exits or service stations.
Tap any of them to display the ex it area on the map. You can now easil y add this exit as a waypoint to
your route if needed.
If you want to dis play other types of Places for the exits, you ca n change the icons in Vis ual Guidance
settings (page 98).
NX404 English 17
Page 77
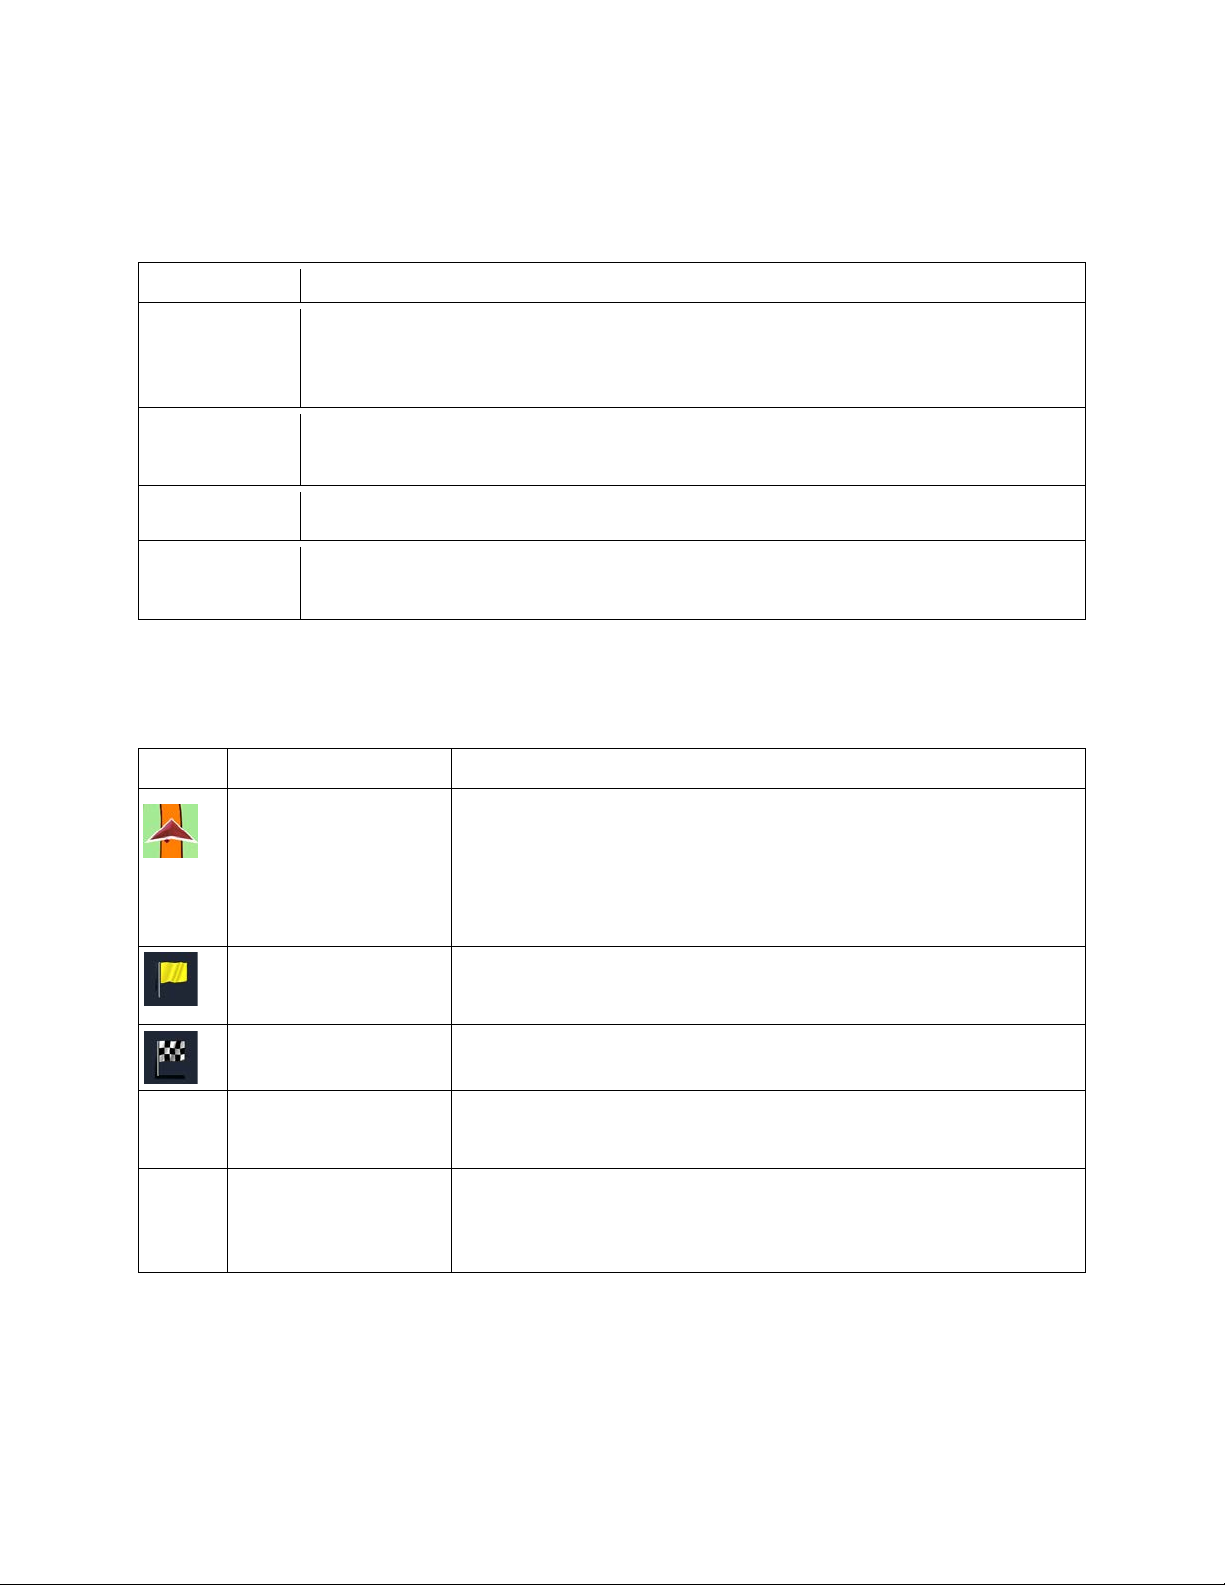
2.3.3.6 3D object types
Type
Description
3D terrain
3D terrain map data shows changes in terrain, elevations or depressions in the land
illustrated by color and shading on the 2D map.
Elevated roads
3D buildings
3D block representation of full city building data containing actual building size and
Symbol
Name
Description
Current GPS position
position. If there is no valid GPS position, Clarion Mobile Map uses
Waypoint (intermediate
An intermediate destination of the route before reaching the final
Route color
on the map, both in da ytime
Streets and roads that
You can choose whether you want to use or avoid certain road types
is different from the route color.
Clarion Mobile Map supports the following 3D object types:
when you view the map in 2D, and use it to plot the route map in 3D when you
navigate. Hills and mountains are shown in the background of the 3D map, and
Complex intersections and vertically isolated roads (such as overpasses or bridges) are
displayed in 3D.
3D landmarks Landmarks are 3D artistic or block representations of prominent or well-known objects.
position on the map.
2.3.3.7 Elements of the active route
Clarion Mobile Map shows the route in the following way:
Your current position displayed on the map. If roads are near, it is
and Start point
destination)
Destination (end point) The final destination of the route.
are excluded from the
navigation
aligned to the nearest road.
Normally if GPS positi on is available, the route st arts from the current
the last known position as the start point.
destination.
The route always stands o ut with its color
and in night color mode.
(page 93). However, when Clar ion Mobile Map cannot avoid such
roads, the route will include them and it will show them in a color that
18 NX404 English
Page 78

2.3.4 Manipulating the map
Action
Button(s)
Description
Moving the
drag&drop
No buttons
n: tap and hold the m ap, and
Zooming in
quality vector maps that let you
ed
t names and other text with the
down, and you only see the streets
Map scaling has a limit in 3D map view mode. If you zoom out
the view in large steps, or tap and
Tilting up and
Rotating left
iew in large steps , or tap and
2D or 3D view
Compass in
up view, and then tap again to rotate the map in the
Compass in
o switch
up view, and then tap again to rotate the map in the
Tap the map anywher e to browse it dur ing navigation. T he map stops following the current positio n (the
Vehimarker, a blue arrow by default, is n ot locked in a fix position on the scr een any more) and co ntrol
buttons appear to help you modify the map view.
map with
and out
down
and right
,
,
,
You can move the map in an y directio
move your finger towards the direction you want to move the map.
Changes how much of the map is displayed on the screen.
Clarion Mobile Map uses high-
examine the map at various zoom levels, always with optimiz
content. It always displays stree
same font size, never upsideand objects that you need.
further, the map switches to 2D view mode.
Tap the button once to modify
hold the button to modify it continuously and smoothly.
Changes the vertical view angle of the map in 3D mode.
Tap the button once to modify the view in large steps , or tap and
hold the button to modify it continuously and smoothly.
Changes the horizontal view angle of the map.
Tap the button once to modify the v
hold the button to modify it continuously and smoothly.
Tap this button to s witch between the 3D perspec tive and 2D top-
,
2D map view
mode
3D map view
mode
,
,
down map view modes.
The direction of the compass shows North. Tap the button to switch
to Northprevious direction.
The direction of the compass shows North. Tap the button t
to Northprevious direction.
NX404 English 19
Page 79

Location
information
ation about the
Return to
Additional
of additional features like saving the
destination, or searching for Places around
Select
Button
Description
Shortcut for
This button opens the Co mbined Search function that allows you
and recent destinat ions by
Destination (page 25)
This function lets you sear ch for a Place by its name. The search
rent
Destination / Find Places /
Tap this button to open a new screen with inform
selected map point, the Cursor.
normal
navigation
options
destination
Tap this button to m ove the map back to follow the current GPS
position. Automatic map rotation is also re-enabled.
The map manipulation buttons disappear and navigation continues.
Tap this button to open a list
Cursor as a Favorite
the Cursor.
Tap this button to select t h e Curs or as a new destination. The route
is automatically calculated.
2.3.5 Quick menu
The Quick menu is a s election of controls and f unctions that are frequen tly needed during navigat ion. It
can be opened directly from the Map screen by tapping
.
The menu will close after a few seconds of inactivity or if you tap
Most of these functions are shortcuts. They are accessible from the menu system.
There are more f unctions availabl e than the num ber of butt ons in the m enu. In Settings , you can choose
the function of each button (page 93). The following options are available:
to search addresses, Plac es, Favorite
name in one unified environment.
is carried out either along your route or around your cur
location if there is no route calculated.
.
Quick Search (page 49)
20 NX404 English
Page 80

This button opens the list of your Favorite destinations.
Find / Favorite (page 62)
he History list. You can select one of your
Find / History (page 65)
My Route / Edit Route
More / Settings / Route
More / Settings / Map
This button opens a special screen with information about the
arby emergency or
Tap the Current Street field
route and stops n avigation. The button is
My Route / Cancel Route
n/a
the
My Route / Overview (page
More / Settings / Visual
My Route / Avoidances
More / Trip Monitor (page
This button opens t
previous destinations.
This button opens the route editing function.
This button opens the route related settings.
This button opens the map related settings.
current position and a button to search for ne
roadside assistance. For details, see the next chapter.
This button cancels the
replaced with the next one if waypoints are given.
This button skips the next waypoint from the route.
This button opens a 2D map scaled and positioned to show
entire route.
Settings (page 93)
Settings (page 97)
on the Map screen
(page 73)
68)
This button opens the Visual Guidance settings screen.
This button lets you bypass parts of the recommended route.
This button opens the Tr ip Monitor screen where you can manage
your previously saved trip logs and track logs.
Guidance (page 98)
88)
NX404 English 21
Page 81

This button opens the list of maneuvers (the itinerary).
Tap the top of the Map
My Route / More / Save
With this function you can replace the active route with a
My Route / More / Load
Find / Find Places (page
My Route / More / Simulate
This button opens the GPS Information screen with satellite
Tap the top of the Map
More / Settings / Route
screen during navigation.
With this function you can save the active route for later use.
previously saved route.
With this function you can search for Places of Interest in various
different ways.
This button opens th e Map screen an d starts sim ulating the act ive
route.
position and signal strength information.
This button offers your Home location as a destination.
Route
Route
49)
Navigation (page 80)
screen when there is no
GPS reception
This button opens the parameters of the selected Vehicle profile.
22 NX404 English
(page 93)
Page 82

2.3.6 Checking the details of the current position (Where Am I?)
This screen contains information about the current position (or about the last known position if GPS
reception is not available) and a button to search for useful Places nearby.
You can access this screen from the map in one of the following ways:
• If the current street is displayed below the Vehimarker (the current position on the map), tap it to
open the Where Am I? screen.
• Open the Quick menu and tap the
Information on this screen:
•
•
•
•
• In the middle of the screen you can see whether the position is current, or the time left since it was
, : Latitude and Longitude (coordinate of the current position in WGS84 format).
: Altitude (elevation information coming from the GPS receiver - often inaccurate).
: House number on the left.
: House number on the right.
last updated.
button.
• Address details (when available) of the current position are displayed at the bottom.
You can also perform some actions on this screen:
Tap
to save the current position as a Favorite destination.
NX404 English 23
Page 83

You can also search f or assistance near your current posit ion. Tap
screen for the Quick search:
The following services can be searched around the current position or the last known position:
•
•
•
•
Tap any of the buttons, select a Place from the list, and navigate to it.
: Car repair and roadside assistance services
: Police stations
: Medical and emergency services
: Gas stations
to open a ne w
24 NX404 English
Page 84

3 On-road navigation
When first started, Clari on Mobile Map c alculates routes us ing the road net work of the high qualit y vector
maps provided with the product.
You can set up your route in different ways:
• If you need a route for immediate navigation, you can select the destination and start navigating to
it right away (normal navigation).
• You can also plan a route independently of your current GPS position or even without GPS
reception. To achieve this you need to set a new starting point in My Route / Edit Route by tapping
the flag icon at the current position. This will also turn off the GPS receiver so that the route is not
recalculated when a new position is recei ved.
You can plan routes with multiple destinations. Select the first destination. Then select a second
destination and add it to your rout e to create a multi-point r oute. You can add as m any destinations to
your route as you like.
You can also use Clarion Mobile Map for off-road navigation. For details, see page 82.
3.1 Selecting the destination of a route
Clarion Mobile Map offers you several ways of choosing your destination:
• Enter a full address or a part of an address, for example a street name without a house number or
the names of two intersecting streets (page 34).
• Enter an address with ZIP code (page Error! Bookmark not defined.). This way you do not need
to select the name of the city/town and the search for street names might be faster as well.
• Use a built-in Place of Interest as your destination (page 49).
• Select a location on the map with the Find on Map feature (page 62).
• Use a previously saved Favorite destination (page 62).
• Select a location from the History of previously used destinations (page 65).
• Enter the coordinate of the destination (page 66).
3.1.1 Combined Search
There are several ways to select the destination of the route. You can find buttons in the Destination
menu that initiate a sep arate search for addresses, P laces, Favorite or recent destinatio ns. The fastest
way to search for any of these is to use the Combined Search. In this section you can find the full
description of how this feature works. The below process shows how to carry out the search and the
following subsections will help you find specific kinds of results.
1. In the Navigation menu, tap
2. Tap
and the Combined Search screen appears.
.
NX404 English 25
Page 85

3. First you see hints on the screen showing how you can use the function. These hints are only
displayed the first time you use this screen.
4. Tap anywhere and the hints disappear. Once you get through this screen to the search results, the
hint will not appear again when you open this windo w later but you can see them again if you tap
the information button on the right side of the input field.
5. You can see the input field at the top of the screen. Right below that you see the search area, the
city/town around which the search is carried out. The default search area is the area where you are
located. For a local search, skip the next step.
6. (optional) To search in a different area, do as follows:
1. Tap
how you can specify the new search center.
2. Tap anywhere and the hint disappears. If you successfully select a new search area, the
hint will not appear again when you open this windo w later but you can see it aga i n if you
tap the information button on the right side of the input field.
3. Start entering the center of the new search area using the screen keyboard. You only need
to enter a few letters to get a result. If the new search area is in a different country or state,
you can narrow the search results if you enter one space and then a few letters of the
country or state of the search area.
4. The most likely result appears below the input field as you enter new letters. Tap to select
this as your new search area. If you cannot see your preferred area after a few letters, tap
. A new screen opens with a new input field. A hint bubble explains
and select one from the list.
26 NX404 English
Page 86

7. With the proper search area displayed, you can start entering the name, address or category of the
destination you are looking for. The number shown in the
many results match the entered text. The background search is carried out while you enter letters
so this number may keep on increasing if you wait a few seconds. Keep on entering new letters
while this number is high.
8. Once the number of results is acceptable after a few seconds of searching, you can tap
to switch to the result screen.
9. The result screen also opens with hints. Tap anywhere to suppress them. Once you select a
destination, they will not appear again.
button shows how
10. You see all results in the list, regardless of their type. Addresses, Places, Place categories,
Favorite and recent destinations are mixed within one list.
11. You have the following options:
• Tap the result you want to use as your destination. Scroll the list if neces sary.
• To narrow the search for only one type of result (for example for Places only) you can tap
the related button at the top of the screen. See the next sections for details.
12. Once the destination is selected, a full screen map appears with the selected point in the middle. If
necessary, tap the map somewhere else to modify the destination. The Cursor (
the new location. Tap
select a different destination.
to confirm the destination, or tap to
) appears at
NX404 English 27
Page 87

13. After a short summary of the route parameters, the map appears showing the entire route. The
If you know that you will use this destination frequently, before tapping
confirm the destination, put it
location. The map with the destination returns automatically. Now you can start your journey.
route is automatically calculated. Tap
and start your journey.
Tip!
, give a name for the new Favorite, and tap to save the
to modify route parameters, or tap
to
on the list of your Favorites first: tap then
3.1.1.1 Combined Search - Navigating to a recent destination (History)
To find one of your r ecent destinations in Com bined Search, carry out the search as described ear lier.
For the input text you can us e eith er a part of the na m e or a part of the addr ess of the recent dest inati on.
When you get to the result screen, do as follows:
1. Tap
2. The list is now filtered. What you see is the list of recent destinations with a matching name or
address.
3. Scroll down the list if necessary and then select one of the destinations from the list.
4. Once the destination is selected, a full screen map appears with the selected point in the middle. If
necessary, tap the map somewhere else to modify the destination. The Cursor (
the new location. Tap
select a different destination.
at the top of the screen.
) appears at
to confirm the destination, or tap to
28 NX404 English
Page 88

The alternative way to search for a recent destination is to tap the
menu or in the Destination menu. The rest of the procedure is similar to the above.
5. After a short summary of the route parameters, the map appears showing the entire route. The
route is automatically calculated. Tap
and start your journey.
Note!
to modify route parameters, or tap
button in the Quick
3.1.1.2 Combined Search - Navigating to a Favorite destination
To find one of your Favorite destinations in Combined Search, c arry out the sear ch as described ear lier.
When you get to the result screen, do as follows:
1. Tap
2. The list is now filtered. What you see is the list of your Favorite destinations with a matching name.
3. Scroll down the list if necessary and then select one of the destinations from the list.
4. Once the destination is selected, a full screen map appears with the selected point in the middle. If
necessary, tap the map somewhere else to modify the destination. The Cursor (
the new location. Tap
select a different destination.
at the top of the screen.
) appears at
to confirm the destination, or tap to
NX404 English 29
Page 89

The alternative way to search for a
menu or in the Destination menu. The rest of the procedure is similar to the above.
5. After a short summary of the route parameters, the map appears showing the entire route. The
route is automatically calculated. Tap
and start your journey.
Note!
Favorite destination is to tap the button in the Quick
to modify route parameters, or tap
3.1.1.3 Combined Search - Navigating to an address
To find an address in Com bined Search, carr y out the search as described ear lier. Use the name of the
street alone or combined with the h ouse num ber as your input text. W hen you get to the res ult screen, do
as follows:
1. Tap
2. The list is now filtered. What you see is the list of matching addresses.
3. Scroll down the list if necessary and then select one of the addresses from the list.
4. Once the destination is selected, a full screen map appears with the selected point in the middle. If
necessary, tap the map somewhere else to modify the destination. The Cursor (
the new location. Tap
select a different destination.
at the top of the screen.
) appears at
to confirm the destination, or tap to
30 NX404 English
Page 90

The alternative way to search for an address is to tap the
Unlike the Combined Search, this alternative search method is a structured one where you can
define the parts of the address separat
5. After a short summary of the route parameters, the map appears showing the entire route. The
route is automatically calculated. Tap
and start your journey.
Note!
ely.
to modify route parameters, or tap
button in the Destination menu.
3.1.1.4 Combined Search - Navigating to an intersection
To find an intersection in C ombined Sear ch, carr y out the search as describe d earlier but use the '&' sign
to separate the two inters ecting streets. You do not need to us e spaces before and after the separator
character. For exam ple you can use any of the following input t exts to find the intersections of Coll ins
Street and Douglas Avenue (the more precise the input string the fewer false results are expected):
• Collins St & Douglas Ave
• Collins & Douglas
• Coll St & Dou Av
• Col&Doug
• C&D
• Collins St& (this one will give you all the intersections of Collins Street so that you can select the
appropriate one from the result list)
When you get to the result screen, do as follows:
1. Tap
2. The list is now filtered. What you see is the list of matching intersections.
3. Scroll down the list if necessary and then select one intersection from the list.
4. Once the destination is selected, a full screen map appears with the selected point in the middle. If
necessary, tap the map somewhere else to modify the destination. The Cursor (
at the top of the screen.
) appears at
NX404 English 31
Page 91

the new location. Tap to confirm the destination, or tap to
The alternative way
menu. Unlike the Combined Search, this alternative search method is a structured one where
you can define the parts of the address separately.
select a different destination.
5. After a short summary of the route parameters, the map appears showing the entire route. The
route is automatically calculated. Tap
and start your journey.
Note!
to search for an address is to tap the button in the Destination
to modify route parameters, or tap
3.1.1.5 Combined Search - Navigating to a Place of Interest
To find a Place of Interest in Combined Search, carry out the s earch as described earlier. Search for a
part of its name. When you get to the result screen, do as follows:
1. Tap
2. The list is now filtered. What you see is the list of matching Places ordered by their distance from
your current location.
3. Scroll down the list if necessary and then select one of the Places from the list.
4. Once the destination is selected, a full screen map appears with the selected point in the middle. If
necessary, tap the map somewhere else to modify the destination. The Cursor (
the new location. Tap
select a different destination.
32 NX404 English
at the top of the screen.
to confirm the destination, or tap to
) appears at
Page 92
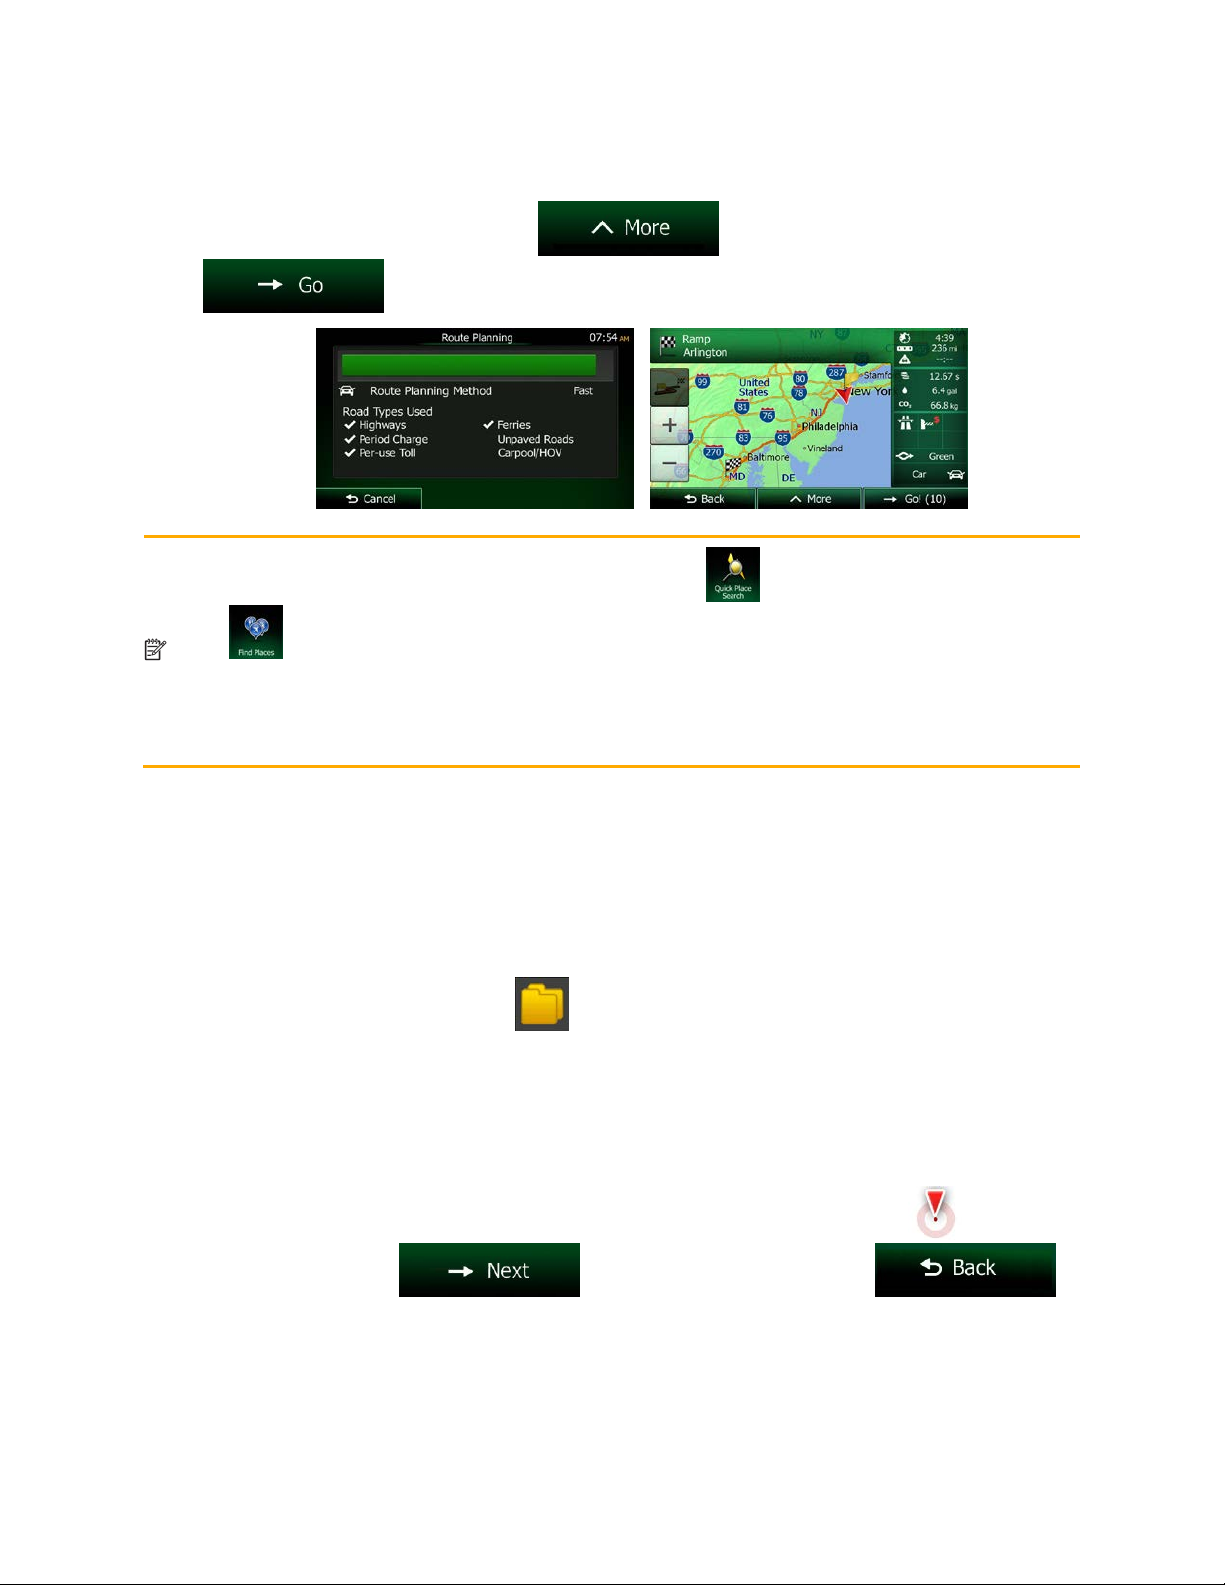
The alternative way to search for a Place is to tap the
Search. The first one is also a name search but i
out around your current location but along the route. The Place search in the Destination menu
is a complex Place search with several options including category search or search around the
destination of t
5. After a short summary of the route parameters, the map appears showing the entire route. The
route is automatically calculated. Tap
and start your journey.
Note!
button in the Destination menu. These alternatives are different from the Combined
he current route.
to modify route parameters, or tap
button in the Quick menu or the
f there is a route planned, it will not be carried
3.1.1.6 Combined Search - Navigating to a Place of Interest by its category
To find a Place of Interest in Combined Search by giving its category only, carry out the search as
described earlier. Search for a part of the category name. When you get to the result screen, do as
follows:
1. The list is ordered with Place categories at the beginning but if you want, you can filter the list to
contain Place categories only. Tap
2. Scroll the list and select one of the categories. You get the list of Places in that category ordered
by their distance from your current position. If the selected category contains subcategories, you
will see all Places in that category mixed into one list.
3. Scroll down the list if necessary and then select one of the Places from the list.
4. Once the destination is selected, a full screen map appears with the selected point in the middle. If
necessary, tap the map somewhere else to modify the destination. The Cursor (
the new location. Tap
select a different destination.
at the top of the screen to filter the list.
) appears at
to confirm the destination, or tap to
NX404 English 33
Page 93

5. After a short summary of the route parameters, the map appears showing the entire route. The
The alternative way to search for a Place category is to tap the
menu and then tap
search for a Place category here, you will go through the whole Place category tree. When you
select a category, the list of its subcategories opens.
route is automatically calculated. Tap
and start your journey.
Note!
. This alternative is different from the Combined Search. When you
3.1.2 Entering an address or a part of the address
to modify route parameters, or tap
button in the Destination
If you know at least a part of the address, it is the quickest way to select the destination of the route.
Using the same screen, you can find an address by entering:
• the exact address, including house number
• the center of a city/town
• an intersection
• the midpoint of a street
• any of the above, starting the search with the ZIP code (page Error! Bookmark not defined.)
34 NX404 English
Page 94

3.1.2.1 Entering an address (United States)
To enter an address as the destination, do as follows:
1. If you are on the Map screen, tap
2. In the Navigation menu, tap the following buttons:
3. By default, Clarion Mobile Map proposes the country and state where you are. If needed, tap
, enter the first few letters of the destination country or state on the keyboard,
and select one from the list. If you select a country without a state, you can search for a city/town in
all its states.
4. Select a new city/town:
a. Tap
. The city/town of your current location is offered by default. For a
to return to the Navigation menu.
, .
local search, tap
city/town name.
b. Start entering the name of the city/town on the keyboard.
c. Find the city/town you need:
• The most likely city/town name is always shown in the input field. To accept it, tap
.
• If the desired name does not show up, the names that match the string appear in a
list after entering a couple of characters (to open the list of results before it appears
automatically, tap
to accept it, otherwise continue with entering the destination
). Select the city/town from the list.
NX404 English 35
Page 95

5. Enter the street name:
a. Tap
b. Start entering the street name on the keyboard.
c. Find the street you need:
• The most likely street name is always shown in the input field. To accept it, tap
.
• If the desired name does not show up, the names that match the string appear in a
list after entering a couple of characters (to open the list of results before it appears
automatically, tap
6. Enter the house number:
a. Tap
.
). Select the street from the list.
.
b. Enter the house number on the keyboard. (To enter letters, tap
c. Tap
cannot be found, the midpoint of the street is selected as the destination.)
7. A full screen map appears with the selected point in the middle. If necessary, tap the map
somewhere else to modify the destination. The Cursor (
to confirm the destination, or tap to select a different
destination.
to finish entering the address. (If the entered house number
) appears at the new location. Tap
).
36 NX404 English
Page 96

8. After a short summary of the route parameters, the map appears showing the entire route. The
route is automatically calculated. Tap
and start your journey.
3.1.2.2 Entering an address (Canada)
To enter an address as the destination, do as follows:
1. If you are on the Map screen, tap
2. In the Navigation menu, tap the following buttons:
to modify route parameters, or tap
to return to the Navigation menu.
, .
3. By default, Clarion Mobile Map proposes the country, state and city/town where you are. If needed,
tap
keyboard, and select one from the list. If you select a country without a state, you can search for a
city/town in all its states.
4. If needed, select a new city/town:
a. Tap
b. Start entering the name of the city/town on the keyboard.
c. Find the city/town you need:
• The most likely city/town name is always shown in the input field. To accept it, tap
, enter the first few letters of the destination country or state on the
.
.
NX404 English 37
Page 97

• If the desired name does not show up, the names that match the string appear in a
list after entering a couple of characters (to open the list of results before it appears
automatically, tap
5. Enter the street name:
a. Tap
b. Start entering the street name on the keyboard.
c. Find the street you need:
• The most likely street name is always shown in the input field. To accept it, tap
.
• If the desired name does not show up, the names that match the string appear in a
list after entering a couple of characters (to open the list of results before it appears
automatically, tap
). Select the city/town from the list.
.
). Select the street from the list.
6. Enter the house number:
a. Tap
b. Enter the house number on the keyboard. (To enter letters, tap
38 NX404 English
.
).
Page 98

c. Tap
cannot be found, the midpoint of the street is selected as the destination.)
7. A full screen map appears with the selected point in the middle. If necessary, tap the map
somewhere else to modify the destination. The Cursor (
to confirm the destination, or tap to select a different
destination.
8. After a short summary of the route parameters, the map appears showing the entire route. The
route is automatically calculated. Tap
and start your journey.
to finish entering the address. (If the entered house number
) appears at the new location. Tap
to modify route parameters, or tap
3.1.2.3 Entering an address starting with the street name (in the United States only)
You can leave the c ity/town name empty and start the s earch with the street name. This w ay you can
search in all streets of a state. Do as follows:
1. If you are on the Map screen, tap
2. In the Navigation menu, tap the following buttons:
to return to the Navigation menu.
, .
NX404 English 39
Page 99

3. By default, Clarion Mobile Map proposes the country and state where you are. If needed, tap the
button with the name of the country, enter the first few letters of the destination country or state on
the keyboard, and select a countr y and state from the list. If you select the country without a state,
this function cannot work.
4. Enter the street name:
a. Tap
b. Start entering the street name on the keyboard.
c. Find the street you need:
• The most likely street name is always shown in the input field. To accept it, tap
.
• If the desired name does not show up, the names that match the string appear in a
list after entering a couple of characters (to open the list of results before it appears
automatically, tap
.
). Select the street from the list.
40 NX404 English
Page 100

5. Enter the house number:
a. Tap
b. Enter the house number on the keyboard. (To enter letters, tap
c. Tap
cannot be found, the midpoint of the street is selected as the destination.)
6. A full screen map appears with the selected point in the middle. If necessary, tap the map
somewhere else to modify the destination. The Cursor (
to confirm the destination, or tap to select a different
destination.
7. After a short summary of the route parameters, the map appears showing the entire route. The
.
).
to finish entering the address. (If the entered house number
) appears at the new location. Tap
route is automatically calculated. Tap
and start your journey.
to modify route parameters, or tap
NX404 English 41
 Loading...