

Page 1

Owner’s manual
DXZ946MP
AM/FM CD/MP3/WMA PLAYER
BUILT-IN DSP/EQ WITH TOUCHPANEL
•
•
Page 2

Thank you for purchasing this Clarion product.
English
∗ Please read this owner’s manual in its entirety before operating this unit.
∗ After reading this manual, be sure to keep it in a handy place (e.g., glove compartment).
∗ This manual includes the operating procedures of the CD changer and TV tuner connected via the
CeNET cable. The CD changer and TV tuner have their own manuals, but no explanations for
operating them are described.
Contents
1. FEATURES...................................................................................................................................... 2
2. PRECAUTIONS .............................................................................................................................. 3
Sloping Console .............................................................................................................................. 4
Handling Compact Discs ................................................................................................................. 4
3. CONTROLS .................................................................................................................................... 5
4. NOMENCLATURE .......................................................................................................................... 6
Names of the Buttons and their Functions ...................................................................................... 6
Major Button Operations when External Equipment is Connected to this Unit ................................ 7
Display Items ................................................................................................................................... 8
Display Operations .......................................................................................................................... 8
5. DCP ................................................................................................................................................. 9
6. REMOTE CONTROL .................................................................................................................... 10
Inserting the Batteries .................................................................................................................... 10
Functions of Remote Control Unit Buttons ..................................................................................... 11
7. OPERATIONS ............................................................................................................................... 12
Basic Operations ........................................................................................................................... 12
AC-Processor III Operations .......................................................................................................... 17
Radio Operations ........................................................................................................................... 23
CD / MP3 / WMA Operations ......................................................................................................... 26
Different Pieces of Music Heard by Plural Listeners (2-ZONE function) ....................................... 31
Operations Common to Each Mode .............................................................................................. 32
8. OPERATIONS OF ACCESSORIES .............................................................................................. 45
CD Changer Operations ................................................................................................................ 45
TV Operations ............................................................................................................................... 48
5.1ch Surround Decoder Operations ............................................................................................. 51
9. IN CASE OF DIFFICULTY ............................................................................................................ 56
10. ERROR DISPLAYS ....................................................................................................................... 58
11. SPECIFICATIONS ......................................................................................................................... 59
1. FEATURES
• Optiomedia Display:
16-Gradation 320 x 64 Full-dot LCD with Touch Panel Control
• AC PROCESSOR III:
Time Alignment/”VIRTUAL SPACE ENHANCER”/”Dolby Pro Logic II”/3 BAND P.EQ
• ADF (Anti Distortion Filter)
• Codematic
• 24-Bit Digital to Analog Converter for Audiophile
• 4V / 6ch Gold Plated RCA Output and 2ch RCA AUX Input with 3 Level Adjustments
• 5.1ch Surround Decoder Control
2 DXZ946MP
Page 3
2.PRECAUTIONS
English
1. When the inside of the car is very cold and
the player is used soon after switching on the
heater, moisture may form on the disc or the
optical parts of the player and proper
playback may not be possible. If moisture
forms on the disc, wipe it off with a soft cloth.
If moisture forms on the optical parts of the
player, do not use the player for about 1 hour.
The condensation will disappear naturally
allowing normal operation.
WARNING
For your safety, do not watch or operate the touch panel while driving.
CAUTION
USE OF CONTROLS, ADJUSTMENTS, OR
PERFORMANCE OF PROCEDURES OTHER
THAN THOSE SPECIFIED HEREIN, MAY
RESULT IN HAZARDOUS RADIATION
EXPOSURE.
THE COMPACT DISC PLAYER AND MINI DISC
PLAYER SHOULD NOT BE ADJUSTED OR
REPAIRED BY ANYONE EXCEPT PROPERLY
QUALIFIED SERVICE PERSONNEL.
CHANGES OR MODIFICATIONS NOT
EXPRESSLY APPROVED BY THE
MANUFACTURER FOR COMPLIANCE COULD
VOID THE USER’S AUTHORITY TO OPERATE
THE EQUIPMENT.
2. Driving on extremely bumpy roads may
cause severe vibration and cause the sound
to skip.
3. This unit uses a precision mechanism. Even
in the event that trouble arises, never open
the case, disassemble the unit, or lubricate
the rotating parts.
INFORMATION FOR USERS:.
CHANGES OR MODIFICATIONS TO THIS
PRODUCT NOT APPROVED BY THE
MANUFACTURER WILL VOID THE
WARRANTY.
DXZ946MP 3
Page 4
Sloping Console
English
This unit uses a SLOPING CONSOLE to make
large screen displays possible.
When you use the SLOPING CONSOLE, be
sure to close it.
CAUTION
BE CAREFUL NOT TO GET YOUR FINGERS
CAUGHT WHEN OPENING AND CLOSING
THE SLOPING CONSOLE.
1. For safety’s sake, always close the SLOPING
CONSOLE before leaving this unit unused for
a prolonged period or switching OFF the
ignition key.
If you switch OFF the ignition key with the
SLOPING CONSOLE tilted, the SLOPING
CONSOLE does not close.
Handling Compact Discs
2. Before the SLOPING CONSOLE closes,
there may be a braking sound from the safety
mechanism. This is normal.
3. If you move the SLOPING CONSOLE by
hand, this may start play. To correct this play,
with the power for the unit ON, press the [
button to close the SLOPING CONSOLE.
4. After a disc is ejected, the SLOPING
CONSOLE automatically returns to the tilted
or closed state. If there is any obstruction
when the SLOPING CONSOLE tries to close,
the safety mechanism is triggered and the
SLOPING CONSOLE returns to the open
state. If this happens, remove the
obstruction, then press the [
5. To avoid scratching the compact disc, keep
the 12 or 8 cm CD level when loading or
removing it.
QQ
Q] button.
QQ
QQ
Q]
QQ
Use only compact discs bearing the or
mark.
Do not play heart-shaped, octagonal, or other
specially shaped compact discs.
Some CDs recorded in the CD-R/CD-RW mode
may not be usable.
Handling
• Compared to ordinary music CDs, CD-R and
CD-RW discs are both easily affected by high
temperature and humidity and some CD-R and
CD-RW discs may not be playable. Therefore,
do not leave them for a long time in the car.
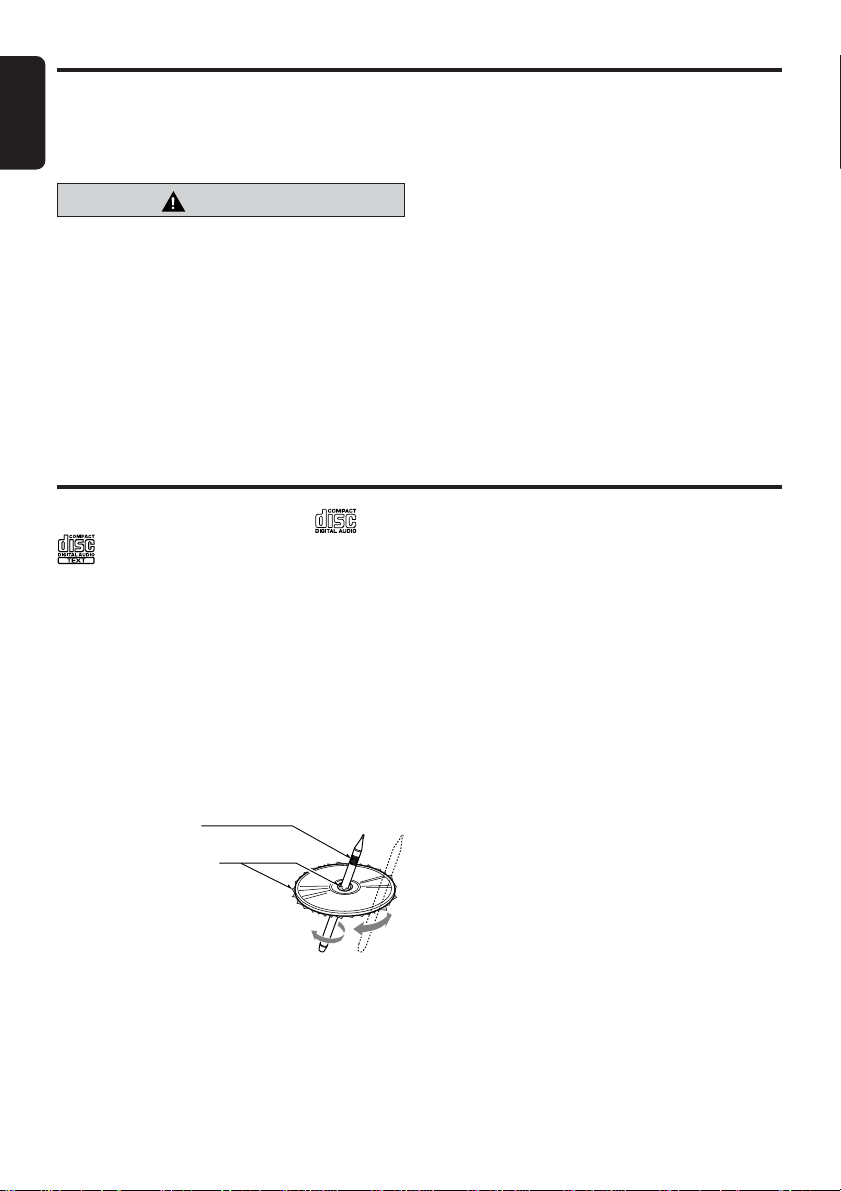
• New discs may
have some
roughness
around the
edges. If such discs
are used, the player
may not work or the sound
may skip. Use a ball-point pen
or the like to remove any
roughness from the edge of the disc.
• Never stick labels on the surface of the
compact disc or mark the surface with a pencil
or pen.
• Never play a compact disc with any cellophane
tape or other glue on it or with peeling off
marks. If you try to play such a compact disc,
you may not be able to remove it from the CD
player or it may damage the CD player.
Ball-point pen
Roughness
• Do not use compact discs that have large
scratches, are misshapen, cracked, etc. Use of
such discs may cause misoperation or
damage.
•To remove a compact disc from its storage
case, press down on the center of the case
and lift the disc out, holding it carefully by the
edges.
• Do not use commercially available CD
protection sheets or discs equipped with
stabilizers, etc. These may damage the disc or
break the internal mechanism.
Storage
• Do not expose compact discs to direct sunlight
or any heat source.
• Do not expose compact discs to excess
humidity or dust.
• Do not expose compact discs to direct heat
from heaters.
Cleaning
•To remove fingermarks and dust, use a soft
cloth and wipe in a straight line from the center
of the compact disc to the circumference.
• Do not use any solvents, such as commercially
available cleaners, anti-static spray, or thinner
to clean compact discs.
• After using special compact disc cleaner, let
the compact disc dry off well before playing it.
4 DXZ946MP
Page 5
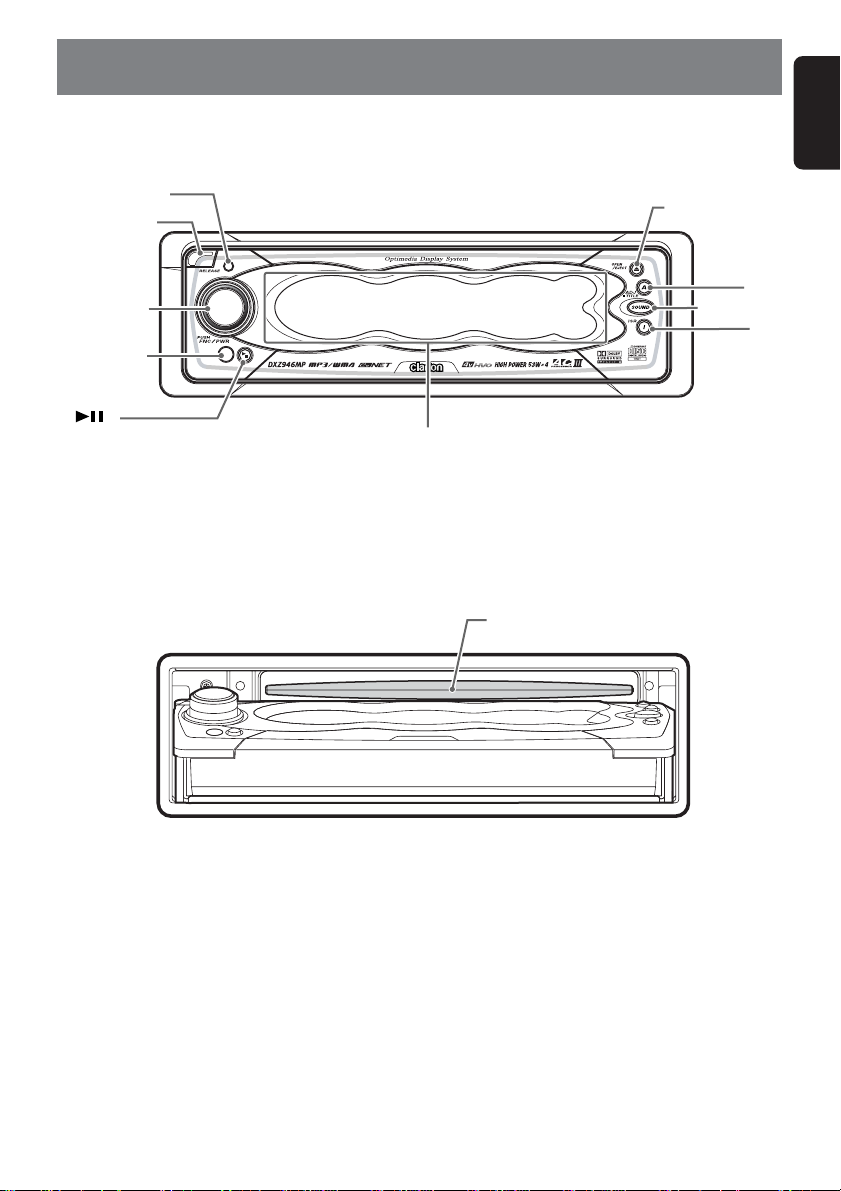
3. CONTROLS
Source unit
English
Photo Sensor
[
RELEASE
[
ROTARY
IR-Receiver
[ ]
]
]
Display
With the SLOPING CONSOLE opened
[
CD SLOT
[Q]
[
A]
[SOUND
]
]
[I]
DXZ946MP 5
Page 6
English
4. NOMENCLATURE
Names of the Buttons and their Functions
[RELEASE] button
• Remove the DCP.
Photo Sensor
• This sensor detects the brightness inside your
car. When the auto-dimmer function is set to
“AUTO”, the brightness of the display is
dimmed according to the brightness detected
by this sensor.
[ROTARY] knob
• Press the knob to turn the power ON. Each
press of this knob switches the mode.
• Press and hold the knob for 1 second or longer
to turn the power OFF.
• This knob can also be turned to adjust the
volume, or to adjust the various settings in the
adjust mode.
[Q] button
• Opens/closes the control panel.
If a disc is already loaded, it will be ejected
when the control panel is opened.
Note:
If the disc is not ejected, hold down the [Q] button
for 1 second or longer.
[A] button
• Use this button to set or adjust the various
settings in the adjust mode.
• Use this button to enter station names in the
radio mode or disc titles in the CD mode.
[SOUND] button
• Use this button for setting or adjusting various
settings such as audio space.
• Holding this button down for 1 second or
longer also toggles the 2-ZONE function ON
and OFF.
[I] button
• Immediately calls up a favorite radio station
regardless of the current mode. (This is the
ISR function.) You can store radio stations to
the [I] button by holding this button down for 2
seconds or longer in the radio mode (when the
2-ZONE function is “OFF”).
Switches the operation of the 2-ZONE function.
Holding this button down for 1 second or
longer switches the 2-ZONE type (when the 2ZONE function is “ON”).
[ ] button
• Pauses and unpauses a track (in the CD
mode).
Display
• Displays the various information that indicates
the operating state of this unit such as tuning/
play state and indicators.
•Touch the display with your finger, and touch
to enable operation. (cf. page 8)
6 DXZ946MP
Page 7

Major Button Operations when External Equipment is Connected to this Unit
English
● When the CD/DVD changer is
connected
∗ For details, see the section “CD changer
operations” (cf. page 45). For the DVD
changer, refer to the Owner’s Manual
provided with the DVD changer.
[ ] button
• Play or pause a CD or DVD.
[A] button
• Used for entering disc titles in the CD changer
mode.
● When the TV is connected
∗ For details, see the section “TV
operations” (cf. page 48).
[ ] button
• Switch the TV picture mode or VTR (external)
picture mode.
[A] button
• Used for entering the name of the TV station.
DXZ946MP 7
Page 8
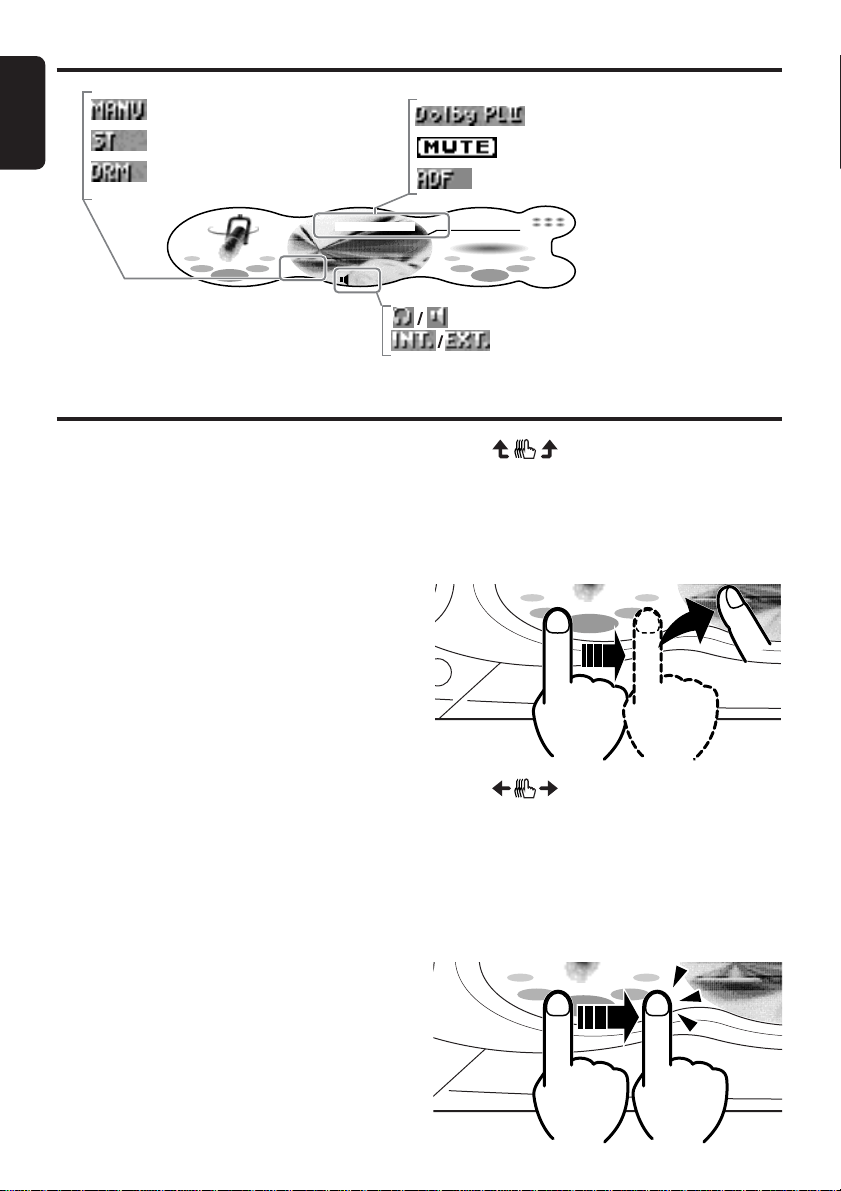
Display Items
English
: Manual indication
: Stereo indication
: DRM (Digital Rights
Manegement) indication
ADF Dolby PL II
98.10MHz
MANU
INT.
Display Operations
A touch panel display is used as the display on
this unit. You can operate this display just by
touching it with your fingertip. There are four
main display operations as follows:
Touch
Touch the display with your fingertip and take it
away within 1 second. This is the most basic
operation when operating the display.
Touch and hold
Touch the display with your fingertip and hold it
on the display for 1 or 2 seconds or longer. Do
not move your finger while you are touching the
display.
Touching and holding the display for 1 second or
longer displays lists, for example, and calls up
other handy functions.
Touching and holding the display for 2 seconds
or longer is used for storing preset memory or
other information.
: Dolby PLII indication
: Mute indication
: ADF (Anti Distortion Filter)
indication
USER
FM1
42
MODE
B
3
BAND
: 2-ZONE indication
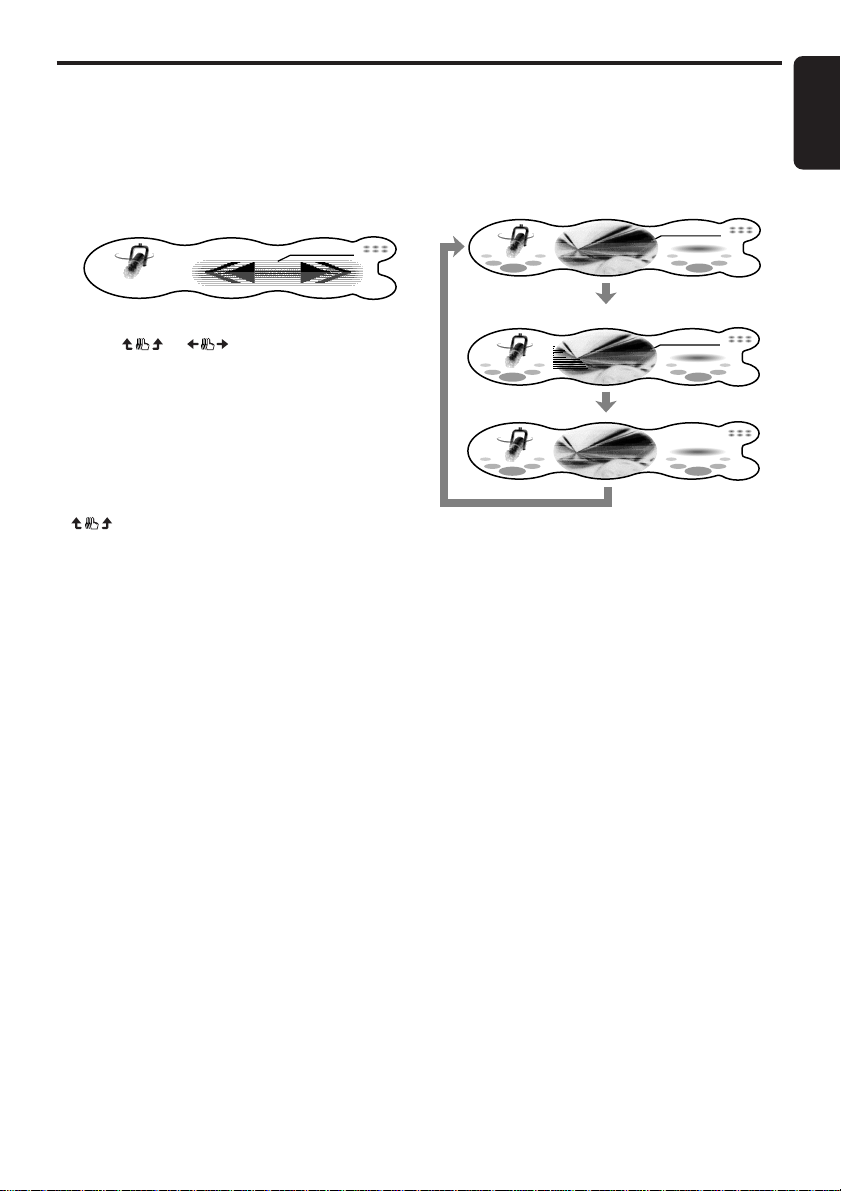
Touch
Touch the display with your fingertip, and move
your finger to the left ( ➔ ) or right ( ➜ ) with your
fingertip still touching the display, and take your
fingertip away within 1 second. This operation is
used for selecting preset memory (1 to 6) or
tracks.
98.10MHz
Touch
Touch the display with your fingertip, and move
your finger to the left ( ➔ ) or right ( ➜ ) with your
fingertip still touching the display, and keep your
fingertip on the display. The current operation
continues for the time your fingertip is held on
the display. This operation is used, for example,
for manual tuning or fast-forwarding/fastbackwarding tracks.
8 DXZ946MP
98.10MHz
Page 9
5. DCP
English
The control panel can be detached to prevent
theft. When detaching the control panel, store it
in the DCP (DETACHABLE CONTROL PANEL)
case to prevent scratches.
We recommend taking the DCP with you when
leaving the car.
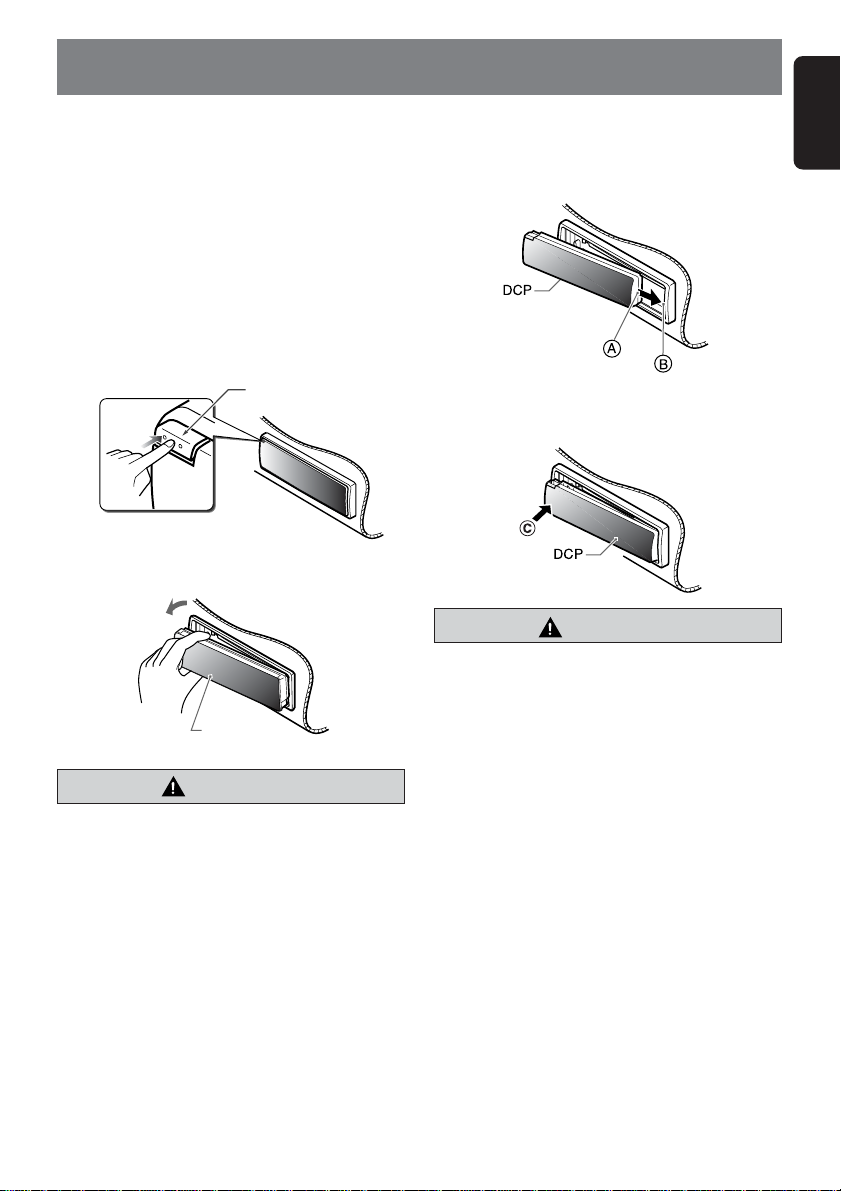
Removing the DCP
1. With the SLOPING CONSOLE closed, turn
off the power.
2. Press the [RELEASE] button deeply to open
the DCP.
3. Pull the DCP toward you and remove it.
[RELEASE] button
DCP
CAUTION
• Always close the SLOPING CONSOLE
before removing the DCP.
• If you remove the DCP with the SLOPING
CONSOLE open, the sloping console
closes immediately. Be careful not to get
your fingers caught.
Attaching the DCP
1. Insert the DCP so that the A section on the
right side of the DCP catches on the hook B
on the unit.
2. Press the left side C of the DCP carefully to
fit it in place.
CAUTION
• The DCP can easily be damaged by shocks.
After removing it, be careful not to drop it
or subject it to strong shocks.
• If the [RELEASE] button is pressed and the
DCP is not locked into place, it may fall out
from vibration of the car. This can break the
DCP, so after removing it, either install it on
the unit or put it in its DCP case.
• The connector connecting the unit and the
DCP is an extremely important part. Be
careful not to damage it by pressing on it
with fingernails, screwdrivers, etc.
Note:
• If the DCP is dirty, wipe off the dirt with a soft, dry
cloth only.
DXZ946MP 9
Page 10
English
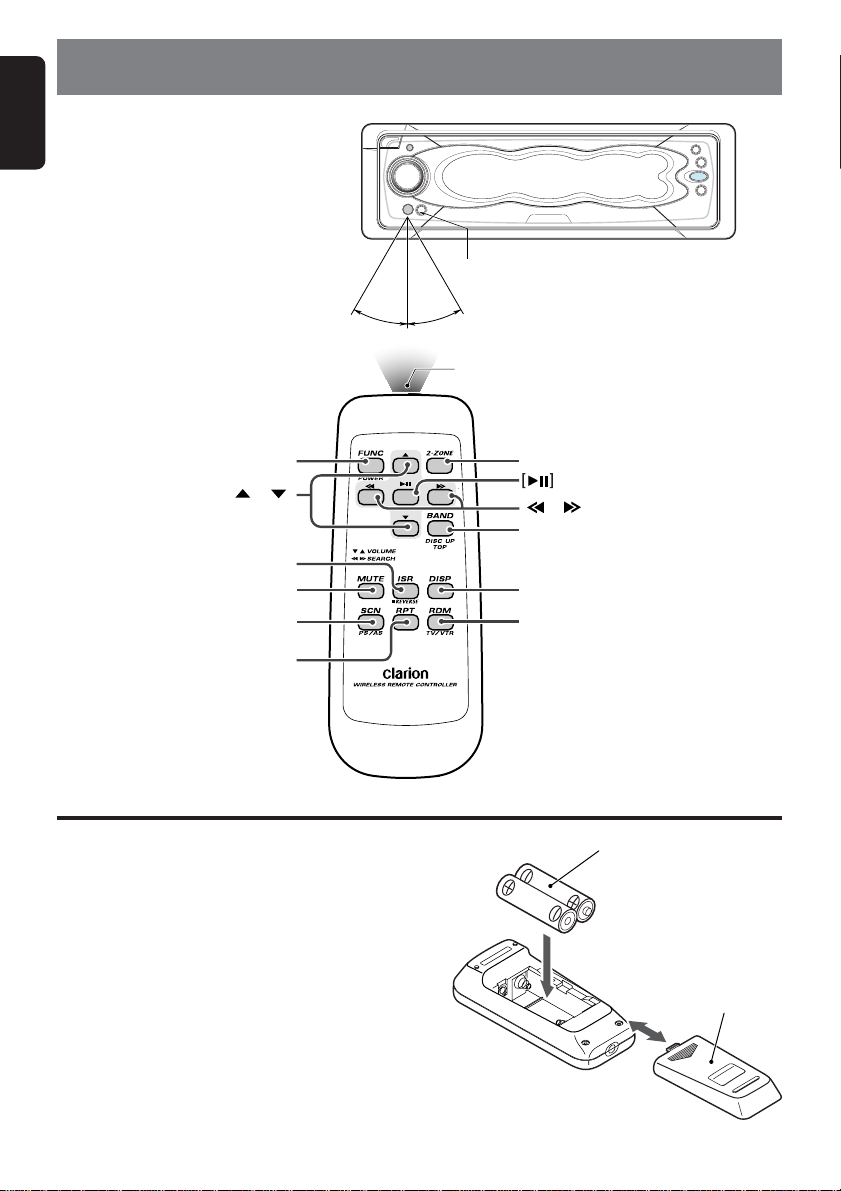
6. REMOTE CONTROL
Remote control unit
[
]
FUNC
[
],[ ]
[
]
ISR
[
]
MUTE
[
]
SCN
Receiver for remote control unit
Operationg range : 30° in all directions
Signal transmitter
[
[
[
[
[
2-ZONE
],[ ]
BAND
]
DISP
]
RDM
]
]
[
]
RPT
Inserting the Batteries
1. Turn the remote control unit over, then slide
the rear cover in the direction of the arrow.
2. Insert the AA (SUM-3, R-6/1.5V) batteries
that came with the remote control unit facing
in the directions shown in the figure, then
close the rear cover.
Notes:
Using batteries improperly can cause them to
explode. Take note of the following points:
• When replacing batteries, replace both batteries
with new ones.
• Do not short-circuit, disassemble or heat batteries.
• Do not dispose of batteries into fire or flames.
• Dispose of spent batteries properly.
10 DXZ946MP
AA (SUM-3, R-6/1.5V)
Batteries
Rear cover
Rear side
Page 11
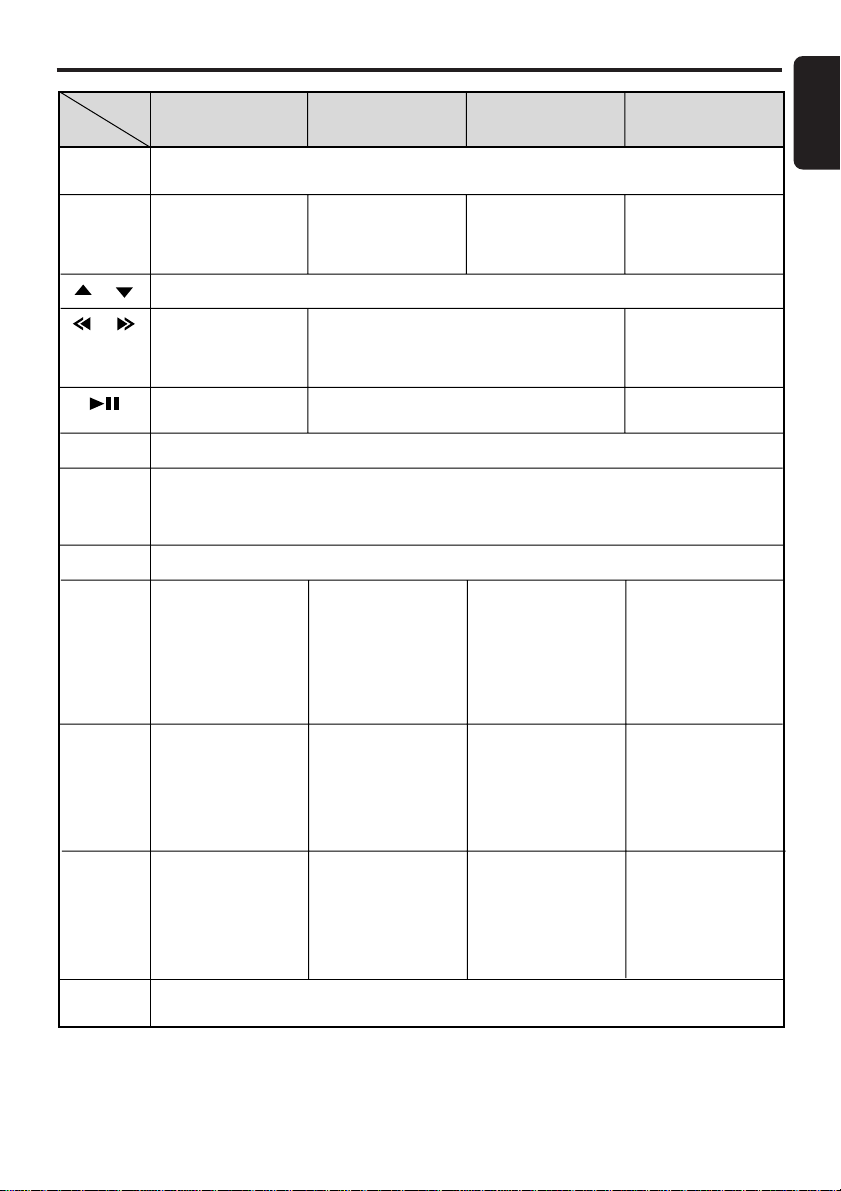
Functions of Remote Control Unit Buttons
English
Mode
Button
[FUNC]
[BAND]
[ ] , [ ]
[ ] , [ ]
[ ]
[MUTE]
[ISR]
[DISP]
[SCN]
Radio CD/MP3
Switches among radio, CD/MP3, CD changer, DVD changer, TV and AUX.
Switches reception
band.
Increases and decreases volume (in all modes).
Moves preset
channels up and
down.
No function.
Tu r ns mute on and off.
Recalls ISR radio station in memory.
Press and hold for 2 seconds or longer: Stores current station into ISR memory (radio mode only).
Press and hold the button for 1 second or longer to switch the main and sub zone sound
source.(only while 2-ZONE mode on)
Switches among main display, clock display.
Preset scan.
When pressed and
held for 2 seconds
: Aut o store.
longer
Plays the first track.
Top play.
Moves tracks up and down.
When pressed and held for 1 second
:
longer
Fast-forward/fast-backward.
Switches between playback and pause.
Scan play.
Press and hold the
button for 1 second
or
or longer to perform
folder scan play while
in the MP3/WMA
disc.
CD changer/
DVD changer
Moves the next disc
in increasing order.
or
Scan play.
When pressed and
held for 1 second
: Disc scan
longer
play.
or
TV
Switches reception
band.
Moves preset
channels up and
down.
No function.
Preset scan.
When pressed and
held for 2 seconds
: Aut o store.
longer
or
[RPT]
[RDM]
[2-ZONE]
∗ Some of the corresponding buttons on the main unit and remote control unit have different functions.
No function.
No function.
Press and hold for 1 second or longer to turn on or off the 2-ZONE mode.
Press to switch the control zone between main zone or sub zone while 2-ZONE mode on.
Repeat play.
Press and hold the
button for 1 second
or longer to perform
folder Repeat play
while in the MP3/
WMA disc.
Random play.
Press and hold the
button for 1 second
or longer to perform
folder Random play
while in the MP3/
WMA disc.
Repeat play.
When pressed and
held for 1 second
: Disc repeat
longer
play.
Random play.
When pressed and
held for 1 second
: Disc random
longer
play.
No function.
or
Switches between TV
and VTR.
or
DXZ946MP 11
Page 12

English
7. OPERATIONS
Basic Operations
CAUTION
Be sure to lower the volume before
switching the unit off or the ignition key. The
unit remembers its last volume setting. If
you switch the power OFF with the volume
up, when you switch the power back ON, the
sudden loud volume may hurt your hearing
and damage the unit.
Turning ON/OFF the power
Turning on
Note:
• Be careful when using this unit for a long time
without running the engine. If you drain the car’s
battery too far, you may not be able to start the
engine and this can reduce the service life of the
battery.
1. Press the [ROTARY] knob.
The mode that was previously active is
displayed.
System check
The first time that this unit is turned on after wire
connections are completed, this unit checks
which equipment is connected. (This is called
the “system check.”) When the power is turned
ON, and “System Check” is displayed, follow
the procedure below to perform the system
check.
1. When “System Check” appears on the
display, press the [ROTARY] knob.
The system check starts.
When the system check is complete,
“Completed” appears on the display.
2. Press the [ROTARY] knob again.
The main display for the radio mode
appears.
CODEMATIC function
When “CODEMATIC” is set to “ON”, and the
power is turned ON with the DCP attached, the
Touch Code display appears. Touch the display
in the order that was set in the adjust mode.
For details on the CODEMATIC function, see
“Using the security function” (cf. page 44).
Turning off
1. Hold down the [ROTARY] knob for 1 second
or longer.
∗ If the power is turned OFF with the clock
displayed, the clock will stay displayed
even after the power is turned OFF.
Selecting a mode
1. Press the [ROTARY] knob to change the
operation mode.
2. Each time you press the [ROTARY] knob,
the operation mode changes in the following
order:
Radio mode ➜ CD/MP3 mode ➜ CD
changer mode ➜ DVD changer mode ➜
TV mode ➜ AUX mode ➜ Radio mode...
∗ External equipment not connected with
CeNET is not displayed.
Adjusting the volume
1. Turning the [ROTARY] knob clockwise
increases the volume; turning it
counterclockwise decreases the volume.
∗ The volume level is from 0 (minimum) to
33 (maximum).
12 DXZ946MP
Page 13
Basic Operations
English
Switching the operation mode
There are 2 basic operation modes: standard
operation and simple operation.
1. In the main display screen, touch and hold
the left of the display for 1 second or longer.
The operation mode is switched.
SIMPLE MODE
98.10MHz
In the simple operation, the operations of
touching or in the radio mode or
CD mode main display screen are not required,
and this unit can be used by performing simple
operation.
Note, however, that the following operations are
not available in the simple operation.
• Preset tuning, folder selection, disc selection,
and other operations that involve touching
on the right of the display
• Display switching operations (cf. page 13)
•Title display switching operations (cf. page 14)
• Operations for displaying title entry screens.
In screens (e.g. list display, adjust mode, etc.)
other than the main display, there is no
difference between the standard operation
and the simple operation.
MODE
B
BAND
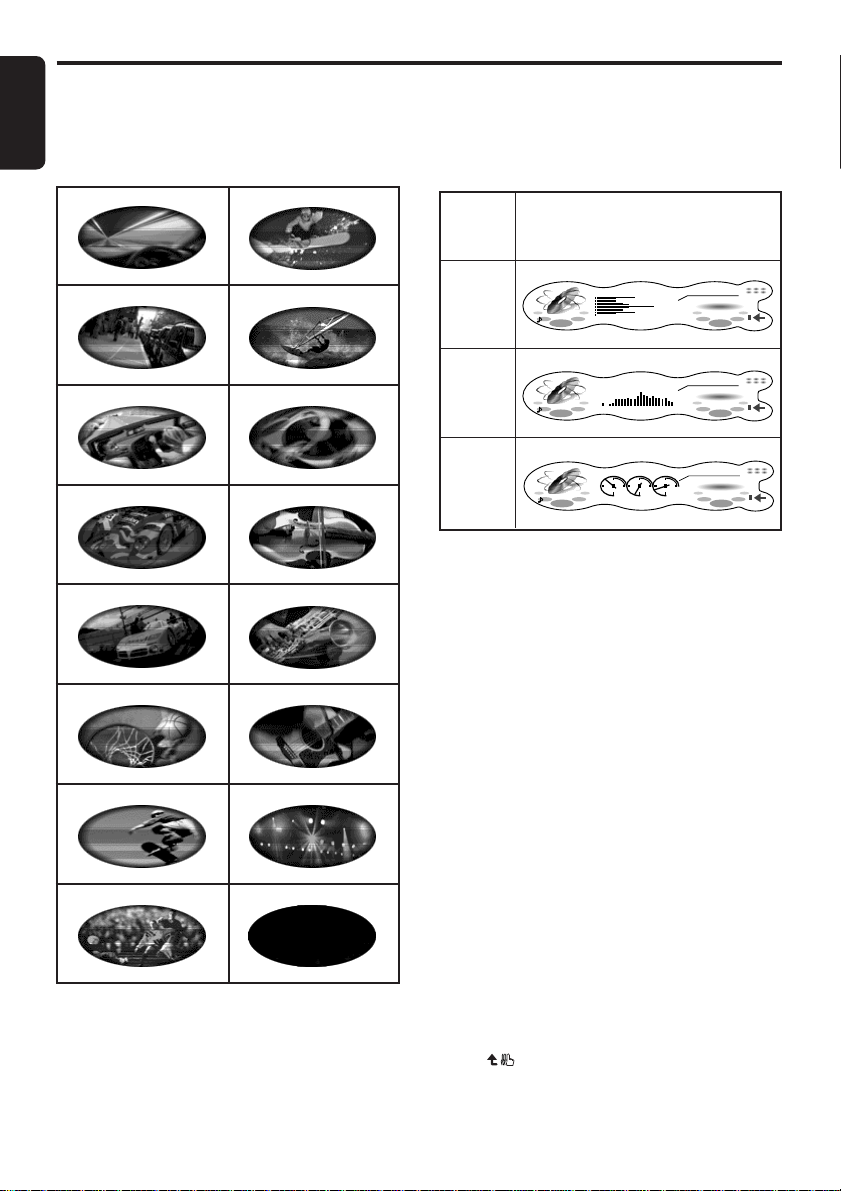
Switching the display
1. Touch the center of the display.
Each time you touch the display, it changes
as follows:
Title display
USER
MODE
FM1
42
98.10MHz
Spectrum Analyzer display
S/A SCAN
98.10MHz
Time display
10 05 am
98.10MHz
10 05 am
Screen saver
When the screen saver function is set to “ON”,
and you do not operate this unit for about 30
seconds, the screen saver will be displayed. For
details, see page 36.
3
FM1
42
3
FM1
42
3
B
BAND
MODE
B
BAND
MODE
B
BAND
Descriptions given in this manual are mainly for
the standard operation. For descriptions for
operations in the simple operation, refer to the
descriptions for the screen displays in the radio
mode or the CD mode.
DXZ946MP 13
Page 14
Basic Operations
English
Wallpaper
Touching and holding the center of the display
for 1 second or longer switches to the wallpaper
display.
1
2
3
4
5
6
7
8
9
0
!
@
#
$
%
¥
Spectrum analyzer display
Touching and holding the right of the display for
1 second or longer during the spectrum
analyzer (S/A) display switches the spectrum
analyzer display.
S/A
SCAN
S/A 1
S/A 2
S/A 3
S/A 1, S/A 2, and S/A 3 are
displayed for 10 seconds or longer
each.
S/A 1
MODE
WMA
WMA
01/01:48
WMA
WMA
01/01:56
WMA
WMA
02/00:04
FLDR No.
003
S/A 2
FLDR No.
003
S/A 3
FLDR No.
003
TOP
MODE
TOP
MODE
TOP
Switching the title display
You can display disc titles and other information
that is stored to discs when playing back CDs in
the CD or CD changer modes.
1. Touch and hold the right of the display for 1
second or longer in the title display.
Each time you touch and hold the display
switches the display as follows:
CD-TEXT disc
User title (disc) ➜ CD-text title (disc) ➜
Artist name ➜ CD-text title (track) ➜ User
title (disc)...
MP3/WMA disc
Folder ➜ File ➜ Album TAG ➜ Artist TAG
➜ Title TAG ➜ Folder...
Notes:
• MP3 supports ID3 Tags V2.3 / 2.2 / 1.1 / 1.0.
•Tag displays give priority to V2.3 / 2.2.
• In the case of album Tags for WMA, the
information written into the extension header is
displayed.
• Only ASCII characters can be displayed in Tags.
■ To scroll a title
Touch on the title display while the title is
displayed.
The title scrolls to the left.
14 DXZ946MP
Page 15
■ To stop scrolling
Touch on the title display.
Setting the ADF
• ADF is the abbreviation of Anti Distortion
Filter.
The adopted “Liveliness Enhancement Filter”
and “Sound Tone Compensation” functions
allow well-modulated realistic playback without
affecting the characteristics of the original sound
tone.
This unit are provided with 4 types of sound
tone effects stored in memory. Select the one
you prefer.
ADF-1 : Suitable for genuine speakers
ADF-2 : Suitable for separate speakers
ADF-3 : Suitable for co-axial speakers
USER : This setting can be adjusted by the
OFF : No sound effect
• The factory default setting for “OFF”.
Notes:
• As the volume changes when ADF is switched,
• On some speaker systems, sufficient effect
• When ADF is set to “USER”, “1”, “2” or “3”, the
1. Press the [SOUND] button.
2. Touch ADF.
3. Touch on the right of the display to
user to his or her individual preference.
switch ADF with the volume and “SW VOLUME”
(sub-woofer) and “CTR VOLUME” (center
speaker) turned down as far as possible.
sometimes cannot be obtained. If this happens,
adjust the ADF parameter or the volume.
VSE function and BASS/TREB function under
EQ-SELECT are disabled.
OFF
POSITION
2 - ZONE
OFF
OFF
P. EQ
SOUND MENU
ADF
OFF
OFF
Dolby PL
A - MODE
RTN
II
select the ADF mode.
RTN
ADF MODE
OFF
When ADF is set to “OFF”, the ADF setting
is not reflected on the music source. This
ends the ADF setting. Press the [SOUND]
button to return to the original mode.
∗ Select one of USER, 1, 2, 3, or OFF.
Basic Operations
4. To change the details of the ADF setting,
press the [A] button.
5. Touch on the adjustment item display
to select the desired item.
Each touch of switches the
adjustment item display as follows:
●Adjustment item (when USER is
selected in step 3)
BASS ➜ TREBLE ➜ COMP ➜ BASS...
●Adjustment item (when 1 to 3 is
selected in step 3)
LEVEL ➜ COMP ➜ LEVEL...
6. Touch on the right of the display to
adjust the item.
∗ “BASS” and “TREBLE” can be adjusted
within the range 1 to 13.
∗ “LEVEL” can be adjusted within the range
-3 to +3.
∗ Select either “ON” or “OFF” for “COMP”.
7. Press the [SOUND] button to return to the
original mode.
Adjusting the Sub-woofer and
Center Speaker
•“SW VOLUME” (sub-woofer) can be adjusted
only when “SUB-WOOFER” is set to “ON”.
•“CTR VOLUME” (center speaker) can be
adjusted only when the Dolby Pro Logic II
mode is set to either “MUSIC” or “MATRIX”,
“SP-SETTING” is set to “CTR+SW” and
“CENTER-SP” is set to “ON”.
• The factory default setting for SW VOLUME is
“0” and for CTR VOLUME is “0”.
1. Press the [SOUND] button.
2. Touch A-MODE.
OFF
POSITION
2 - ZONE
OFF
OFF
P. EQ
SOUND MENU
ADF
OFF
3. Touch on the adjustment item display
to select “SW VOLUME” or “CTR VOLUME”.
AUDIO MODE
SW VOLUME
OFF
Dolby PL
A - MODE
0
RTN
II
RTN
English
DXZ946MP 15
Page 16

Basic Operations
English
4. Touch on the right of the display and
adjust the item as desired.
∗ This item can be adjusted within the range
-5 to +5.
5. Press the [SOUND] button to return to the
original mode.
Adjusting balance/fader
BALANCE:
Adjusts the volume balance between the left
and right speakers.
FADER:
Adjust the volume balance between the front
and rear speakers.
• The factory default setting for BALANCE is “0”
and for FADER is “0”.
Note:
• Balance/fader cannot be adjusted when “PRO” is
selected at AC-PRO III (cf. page 39) and the
position function is set to “ON”. Adjust balance/
fader by the “Selecting the position menu” (cf.
page 17).
1. Press the [SOUND] button.
2. Touch A-MODE.
OFF
POSITION
2 - ZONE
OFF
OFF
P. EQ
SOUND MENU
ADF
OFF
OFF
Dolby PL
A - MODE
Adjusting bass/treble
The bass/treble mode can be adjusted only
when the Dolby Pro Logic II mode is set to
“OFF” (cf. page 17) and “EQ SELECT” is set to
“BAS/TREB” (cf. page 39).
• The factory default setting is “0”.
1. Press the [SOUND] button.
2. Touch A-MODE.
OFF
POSITION
2 - ZONE
OFF
P. EQ
SOUND MENU
ADF
OFF
3. Touch on the adjustment item display
to select “BASS” or “TREBLE”.
AUDIO MODE
BASS
4. Touch on the right of the display and
adjust the item as desired.
∗ This item can be adjusted within the range
-6 to +6.
5. Repeat steps 3 and 4 to adjust the desired
RTN
II
item.
6. Press the [SOUND] button to return to the
original mode.
OFF
Dolby PL
A - MODE
0
RTN
II
RTN
3. Touch on the adjustment item display
to select “BALANCE” or “FADER”.
AUDIO MODE
BALANCE
RTN
0
4. Touch on the right of the display
adjust the item as desired.
∗ “BALANCE” can be adjusted within the
range L13 (left side emphasized) and R13
(right side emphasized).
∗ “FADER” can be adjusted within the range
R12 (rear side emphasized) and F12 (front
side emphasized).
5. Press the [SOUND] button to return to the
original mode.
16 DXZ946MP
Page 17
AC-Processor III Operations
Dolby Pro Logic II
Dolby Pro Logic II is a matrix decoding
technology in which updated digital matrix
technology is applied and Dolby Pro Logic is
further improved. Dolby Pro Logic II realizes
excellent 5.1 channel reproduction of Dolby
surround source as well as stereo sound
sources such as CDs, thereby causing a
surround channel to be full-ranged (20 Hz to 20
kHz) and become stereo. Therefore, you can
enjoy any stereo sources with dynamic sound of
5.1 channel. The Music Mode or Matrix Mode
can be selected according to a source to be
reproduced.
This product is manufactured under license from
Dolby Laboratories. “Dolby”, “Pro Logic” and
the double-D symbol are trademarks of Dolby
Laboratories.
Selecting the PL II menu
(Dolby PL II)
Select the MUSIC mode or the MATRIX mode
matched the source you are to play as the
Dolby Pro Logic II mode.
• The factory default setting is “OFF”.
■ MUSIC (music mode)
• This mode is suited for stereo sound sources
such as CDs.
• Another adjustment mode that enables more
detailed adjustment is also available as the
sound field spreads differently depending on
the state of the recorded music source. (See
page 42)
■ MATRIX (matrix mode)
• This mode is suited for sound sources such
as AM/FM radio.
■ OFF
• The Dolby Pro Logic II mode is not used, and
the AC-PROIII mode is used. For details on
the AC-PROIII mode, see “Selecting each
mode” (cf. page 39).
1. Press the [SOUND] button.
2. Touch Dolby PLII.
OFF
POSITION
2 - ZONE
OFF
OFF
P. EQ
SOUND MENU
ADF
OFF
OFF
Dolby PL
A - MODE
RTN
II
3. Touch on the right of the display to
select the Dolby Pro Logic II mode.
RTN
Dolby PL II
OFF
The mode display is switched as follows:
MUSIC (music mode) ➜ MATRIX (matrix
mode) ➜ OFF (PL II off) ➜ MUSIC (music
mode)...
* For details on the volume adjustment of
the center speaker/sub-woofer, see page
40.
4. Touch RTN.
Selecting the position menu
With POSITION, you can select from 5 types it
takes for the sound to arrive from the speaker to
your seat position.
Also, the time alignment function allows pinpoint setting of speakers so that the same audio
effect can be obtained from each speaker up to
all listeners.
In the “Selecting each mode” procedure (cf.
page 39), set AC-PROIII to “PRO”.
• The factory default setting for POSITION is
“OFF” and for the position basic menu is
“FRONT”.
■ Position menu
This function is pre-stored with 5 position
menus. Select the desired menu to suit your
preference.
1. Press the [SOUND] button.
2. Touch POSITION.
OFF
POSITION
2 - ZONE
OFF
OFF
P. EQ
SOUND MENU
ADF
OFF
OFF
Dolby PL
A - MODE
RTN
II
English
DXZ946MP 17
Page 18
AC-Processor III Operations
English
3. Touch on the ON/OFF display.
The position effect is toggled ON/OFF.
POSITION MODE
OFF
FRONT
When the position effect is set to “OFF”, the
position setting is not reflected on the music
source. This ends the position setting. Press
the [SOUND] button to return to the original
mode.
4. Touch B/U to select “BASIC”.
POSITION MODE
ON
FRONT
Each touch of B/U toggles between “BASIC”
and “USER”.
5. Touch on the position basic menu No.
to select the position basic menu.
Position basic menu
No. Display Name Seat Position
1 FRONT-L Front left seat
2 FRONT-R Front right seat
3 FRONT Front seats
4 REAR Rear seats
5 FULL SEAT All seats
BASIC
3
BASIC
3
1. Press the [SOUND] button.
2. Touch POSITION.
RTN
BU
B/U
3. Touch on the ON/OFF display.
The position effect is toggled ON/OFF.
4. Touch B/U to select “BASIC” or “USER”.
5. Touch on the right of the display to
select the menu that is used as the menu for
adjustment.
6. Press the [A] button.
7. Touch on the left of the display to
select “T-ALIGN” or “SP GAIN”.
8. Touch on the center of the display to
RTN
BU
B/U
select each adjustment item.
Each touch of switches the
adjustment items as follows:
Adjustment items
FRONT L SP (front left speaker)
FRONT R SP (front right speaker)
REAR L SP (rear left speaker)
REAR R SP (rear right speaker)
(when “SP-SETTING” is set to
“CTR+SW”)
SUB-WOOFER (sub-woofer)*
1
6. Press the [SOUND] button to return to the
original mode.
Adjusting/storing positions
(user memory)
With user memory, pin-point setting of speakers
is enabled so that the same audio effect can be
obtained from each speaker up to all listeners
based upon the position basic menu. Up to 5
adjustment setups can be stored to user
memory.
T-ALIGN (time alignment):
The distance from the listener up to each
speaker can be entered in 2.3 cm steps, and the
time that the sound reaches the listener from
each speaker can be adjusted.
SP GAIN (speaker gain):
Adjusts the speaker output level. Adjust so that
the volumes that are output from each speaker
are all the same.
18 DXZ946MP
(when “SP-SETTING” is set to
“SW L + SW R ”)
SUB-W L (sub-woofer Lch)*
SUB-W R (sub-woofer Rch)*
*1This is displayed only when “SUB-
WOOFER” under “SOUND” in the adjust
mode is set to “ON”.
*2This is displayed only when “SUB-
WOOFER” under “SOUND” in the adjust
mode is set to “ON”, and “T-ALIGN” is
selected at step 7.
1
2
9. Touch on the right of the display and
adjust the item as desired.
T-ALIGN
POSITION EDIT
FRONT L SP 085 . 1cm
RTN
∗ “T-ALIGN” can be adjusted within the
range 0 cm to 501.4 cm in 2.3 cm steps.
∗ “SP GAIN” can be adjusted within the
range -20dB to 0dB.
Page 19

10. Repeat steps 7 to 9 to adjust the desired
item.
11. When you have finished adjusting each item,
touch RTN.
The display returns to the original screen,
and “” is displayed at the BASIC or USER
display.
Operation so far completes position
adjustment. To continue to store the
adjustment values to the position user menu,
perform the following.
12. Touch and hold RTN for 1 second or longer.
The position menu list is displayed.
13. Touch and hold the user memory you want
to store the adjustment values to for 2
seconds or longer.
You will hear a long beep, and the values
you adjusted up to step 10 are stored to the
position user menu.
If you hear a short beep, the adjustment
values up to step 10 are discarded. Adjust
these values again as required.
14. Touch RTN.
15. Press the [SOUND] button to return to the
original mode.
∗ To select a stored user memory, touch B/U
to display “USER” and touch of on
the user memory No.
Selecting the VSE menu
VSE (Virtual Space Enhancer) allows you to
compensate the sound pressure balance inside
your car so that the same sound effect can be
obtained whichever seat you are sitting in as
proved in compensation simulations.
In the “Selecting each mode” procedure (cf.
page 39), set AC-PROIII to “STD”.
• The factory default setting for VSE is “OFF”
and for the VSE basic menu is “FLAT”.
■ VSE basic menu
Six basic menus are pre-stored to this function.
Select the basic menu to suit your preference.
1. Press the [SOUND] button.
2. Touch VSE.
OFF
VSE
2 - ZONE
OFF
OFF
P. EQ
SOUND MENU
ADF
OFF
OFF
Dolby PL
A - MODE
RTN
II
AC-Processor III Operations
3. Touch on the ON/OFF display.
The VSE effect is toggled ON/OFF.
OFF
VSE MODE
FLAT
26
BASIC
1
RTN
BU
B/U
When VSE is set to “OFF”, the VSE setting
is not reflected on the music source. This
completes the VSE setting. Press the
[SOUND] button to return to the original
mode.
4. Touch B/U to select “BASIC”.
ON
VSE MODE
FLAT
26
BASIC
1
RTN
BU
B/U
Each touch of B/U toggles between “BASIC”
and “USER”.
5. Touch on the VSE basic menu No. to
select the desired VSE basic menu.
VSE basic menus
No.
Function Name
1 FLAT
Description
Sound source flat
equalizing
2 BASS BOOST Bass tones enhanced
3 HIGH BOOST
4 IMPACT
5 ACOUSTICAL
6 SMOOTH
Mid and treble
enhanced
Low and treble
enhanced
Mid tones (human
voice) enhanced
Produces smoothsounding tones.
6. Press the [SOUND] button to return to the
original mode.
Adjusting/storing VSE (user
memory)
User memory settings allow you to compensate
the sound pressure distribution to suit your
preference based upon the VSE basic menu.
Up to six user adjustments can be stored.
DIFFUSE:
Adjusts the deviation in diffused sound
pressure.
CAR WIDTH:
Adjusts the deviation in sound pressure along
the width of the car.
English
DXZ946MP 19
Page 20

AC-Processor III Operations
English
CAR LENGTH:
Adjusts the deviation in sound pressure along
the length of the car.
1. Press the [SOUND] button.
2. Touch VSE.
3. Touch on the ON/OFF display.
The VSE effect is toggled ON/OFF.
4. Touch B/U to select “BASIC” or “USER”.
5. Touch on the right of the display to
select the menu that is used as the menu for
adjustment.
6. Press the [A] button.
7. Touch on the adjustment item display
to select “DIFFUSE”, “CAR WIDTH” or “CAR
LENGTH”.
VSE EDIT
DIFFUSE
8. Touch on the right of the display and
adjust the item as desired.
∗ This item can be adjusted within the range
1 to 10.
9. Repeat steps 7 and 8 to adjust the desired
item.
10. When you have finished adjusting each item,
touch RTN.
The display returns to the original screen,
and “” is displayed at the BASIC or USER
display.
Operation so far completes VSE adjustment.
To continue to store the adjustment values to
the VSE user menu, perform the following.
11.Touch and hold RTN for 1 second or longer.
The VSE user menu list is displayed.
12. Touch and hold the user memory you want
to store the adjustment values to for 2
seconds or longer.
You will hear a long beep, and the values
you adjusted up to step 9 are stored to the
VSE user menu.
If you hear a short beep, the adjustment
values up to step 9 are discarded. Adjust
these values again as required.
13. Touch RTN.
14. Press the [SOUND] button to return to the
original mode.
∗ To select a stored user memory, touch B/U
to display “USER” and touch on the
user memory No.
20 DXZ946MP
Selecting the P.EQ menu
P.EQ (Parametric Equalizer) allows you to
compensate the entire frequency level range in
detail by smooth curve using frequency
compensation matched to the type of your car.
In the “Selecting each mode” procedure (cf.
page 39), set EQ SELECT to “P.EQ”.
• The factory default setting for P.EQ is “OFF”
and for the P.EQ basic menu is “SEDAN-1”.
■ P.EQ basic menu
6 types of P.EQ basic menu are pre-stored to
this function matched to the type of your car and
the speaker mounting position. Select the basic
menu to suit you car.
1. Press the [SOUND] button.
2. Touch P.EQ.
RTN
5
OFF
POSITION
2 - ZONE
OFF
3. Touch on the ON/OFF display.
The P.EQ effect is toggled ON/OFF.
OFF
When the P.EQ effect is set to “OFF”, the
P.EQ setting is not reflected on the music
source. This ends the P.EQ setting. Press
the [SOUND] button to return to the original
mode.
4. Touch B/U to select “BASIC”.
ON
Each touch of B/U toggles between “BASIC”
and “USER”.
5. Touch on the P.EQ basic menu No. to
select the P.EQ basic menu.
OFF
P. EQ
SOUND MENU
ADF
OFF
P.EQ MODE
SEDAN-1
P.EQ MODE
SEDAN-1
OFF
Dolby PL
A - MODE
BASIC
26
1
BASIC
26
1
RTN
II
RTN
BU
B/U
RTN
BU
B/U
Page 21

P.EQ basic menu
No. Display name
1 SEDAN-1 Front: Front door
2 SEDAN-2 Front: Front door
3WAGON-1 Front: Front door
4WAGON-2 Front: Front door
5 MINI VAN-1 Front: Front door
6 MINI VAN-2 Front: Front door
6. Press the [SOUND] button to return to the
original mode.
Speaker Mounting
position
Rear: Rear parcel
Rear: Rear door
Rear: Luggage (side)
Rear: Rear door
Rear: Luggage (side)
Rear: Rear door
Adjusting/storing P.EQ (user
memory)
With user memory, you can compensate the
frequency characteristics to suit your car based
upon the P.EQ basic menu. Up to 6 adjustment
setups can be stored to user memory. For
details, see “P.EQ adjustment”.
1. Press the [SOUND] button.
2. Touch P.EQ.
3. Touch on the ON/OFF display.
The P.EQ effect is toggled ON/OFF.
4. Touch B/U to select “BASIC” or “USER”.
5. Touch on the right of the display to
select the menu that is used as the menu for
adjustment.
6. Press the [A] button.
7. Touch on the left of the display to
select “FRONT” or “REAR”.
P.EQ EDIT
FRONT
8. Touch on the center of the display to
select each adjustment item.
Each touch of switches the
adjustment item as follows:
Adjustment items
BAND ➜ FREQ ➜ Q ➜ GAIN ➜ BAND...
BAND
RTN
1
AC-Processor III Operations
9. Touch on the right of the display and
adjust the item as desired.
∗ “BAND” can be adjusted within the range
1 to 3.
∗ “FREQ” can be adjusted within the range
20Hz to 20kHz.
∗ Select one of 1, 3, 5, 7, or 20 as “Q”.
∗ “GAIN” can be adjusted within the range
-12dB to +12dB.
10. Repeat steps 7 to 9 to adjust the desired
item.
11. When you have finished adjusting each item,
touch RTN.
The display returns to the original screen,
and “” is displayed at the BASIC or USER
display.
Operation so far completes P.EQ
adjustment. To continue to store the
adjustment values to the P.EQ user menu,
perform the following.
12. Touch and hold RTN for 1 second or longer.
The P.EQ menu list is displayed.
13. Touch and hold the user memory you want
to store the adjustment values to for 2
seconds or longer.
You will hear a long beep, and the values
you adjusted up to step 10 are stored to the
P.EQ menu.
If you hear a short beep, the adjustment
values up to step 10 are discarded. Adjust
these values again as required.
14. Touch RTN.
15. Press the [SOUND] button to return to the
original mode.
∗ To select a stored user memory, touch B/U
to display “USER” and touch on the
user memory No.
■ P.EQ adjustment
The settings that can be adjusted in the P.EQ
menu are as follows. The center frequency, gain
and Q curve can be stored to channel/band
combinations.
For example, center frequency “250Hz”, gain “
-8dB” and Q curve “3” can be stored to band 1
on the front.
FRONT/REAR (channel selection)
Selects the channel (front or rear) to adjust.
BAND (band selection)
Selects the frequency band (1 to 3) to adjust.
Set the center frequency (FREQUENCY), gain
(GAIN) and Q curve (Q) for each frequency
band.
English
DXZ946MP 21
Page 22

AC-Processor III Operations
English
FREQUENCY (center frequency selection)
Selects the frequency to be used as the center
of the frequency band to be compensated from
the range 20Hz to 20kHz.
(1/3 octave steps, 31 points)
GAIN (gain adjustment)
Adjusts the gain (output level) within the range
-12dB to +12dB.
(1dB steps, 25 points)
Q (Q curve selection)
Sets one of 1, 3, 5, 7, or 20 as the sharpness of
the Q curve.
● Compensation
There is no need to compensate frequency
characteristics if they are flat (no peaks or
valleys) when you have measured the
frequency characteristics with a measuring
device. However, sometimes the frequency
characteristics rise or fall in some places. If this
happens, the frequency characteristics must be
compensated. Create a frequency curve having
characteristics that are opposite to the center
frequency of parts where the characteristics rise
and fall to cancel out these peaks and values,
and make the frequency characteristics as flat
as possible.
Making the frequency characteristics as flat as
possible is called “compensation.”
On this unit, frequency characteristics can be
compensated by P.EQ (Parametric Equalizer).
● Compensation of frequency
characteristics
The figure below shows the relationship
between the center frequency, gain and Q
curve.
f
Q curve (Q)
Q =
3dB
Frequency
curve
F
f
Frequency
(Hz)
Level
(dB)
Gain
(G)
Center Frequency (F)
● Q curve
The Q curve becomes sharper when the
numerical value is increased, and smoother
when the numerical value is decreased.
Flat frequency characteristics can be made by
selecting a Q curve opposite to that of the curve
to be compensated.
Q curve : (Q)
Q curve : 20 Q curve : 1
F: Center frequency, G: Gain (output level), Q: Q curve
No.
(car type)
1 Front 250 Hz -8 dB 3 2 kHz -4 dB 1 5 kHz -4 dB 1
(SEDAN-1) Rear 250 Hz -10 dB 3 1.25 kHz 0 dB 5 8 kHz 0 dB 5
2 Front 250 Hz -10 dB 7 800 Hz -4 dB 3 8 kHz -5 dB 1
(SEDAN-2) Rear 80 Hz 3 dB 7 125 Hz -12 dB 5 1.25 kHz 0 dB 5
3 Front 250 Hz -8 dB 3 1 kHz -8 dB 3 10 kHz -6 dB 1
(WAGON-1) Rear 250 Hz -8 dB 3 800 Hz -8 dB 1 8 kHz 0 dB 5
4 Front 250 Hz -8 dB 7 400 Hz -10 dB 7 1.25 kHz -8 dB 7
(WAGON-2) Rear 125 Hz -8 dB 3 500 Hz -5 dB 5 1.6 kHz 0 dB 3
5 Front 125 Hz -4 dB 5 1.25 kHz -4 dB 3 2 kHz 3 dB 7
(MINI VAN-1) Rear 250 Hz -6 dB 1 630 Hz -4 dB 3 8 kHz 0 dB 5
6 Front 250 Hz -4 dB 3 1.25 Hz -8 dB 3 80 Hz 3 dB 3
(MINI VAN-2) Rear 250 Hz -8 dB 3 500 Hz -5 dB 5 8 kHz 0 dB 5
Channel
FGQF GQFGQ
Parametric Equalizer Parameters
Band 1 Band 2 Band 3
22 DXZ946MP
Page 23

Radio Operations
Screen displays in the radio
mode
■ Main display
This is displayed by pressing the [ROTARY]
knob and selecting the radio mode.
USER
MODE
FM1
42
98.10MHz
MANU
Manual
indicator
Reception band
Title display
Frequency
display
Touching the left of the display for 1 second or
longer switches the simple operation display.
SIMPLE MODE
98.10MHz
Title display
Frequency display
Frequency display
The frequency currently being received is
displayed.
Touching or the in the standard
operation display allows you to perform seek
tuning or manual tuning.
Title display
Displays the name of the broadcast channel
currently being received. Touching this name
switches the display.
Reception band display
AM: AM band name
FM1: FM band name
Preset No. display
Touching in the standard operation
display selects a preset memory.
3
Preset No.
display
B
BAND
MODE
B
BAND
MODE
Touching this displays sub-functions. Touching
and holding this for 1 second or longer displays
the preset memory list.
P-SCAN:
This is displayed during a preset scan.
Touching this ends the preset scan.
A-STORE:
This is displayed during an auto store.
Touching this ends auto store.
BAND
Touching this switches the reception band.
Touching and holding this for 1 second or longer
switches between the manual tuning mode and
the seek tuning mode.
a d (only in the simple operation display)
Touching these enables seek tuning or step
tuning (in the manual tuning mode).
Touching and holding these enables quick
tuning (in the manual tuning mode).
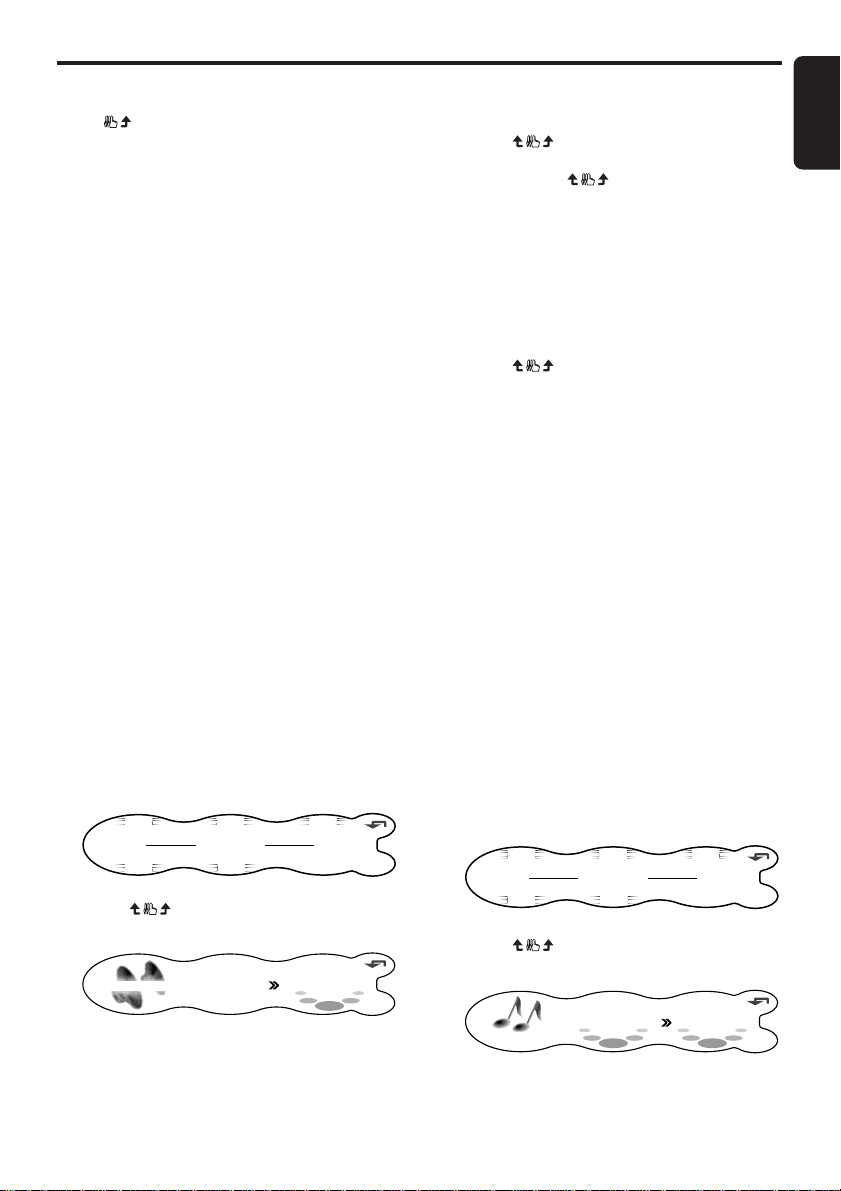
■ Preset memory list display
This is displayed when MODE is touched and
held for 1 second or longer in the main display.
001
87. 5MHz
107.9MHz
004
002
87.9MHz
TITLE LIST
108.0MHz
005
003
98. 1MHz
87. 5MHz
006
RTN
Preset No.
Station name (or frequency)
: Tuning in progress
RTN: Touch this to return to the main display.
Listening to the radio
1. Press the [ROTARY] knob to select the radio
mode.
Each press of the [ROTARY] knob switches
the mode as follows:
Radio ➜ CD/MP3 ➜ (CD Changer) ➜
(DVD Changer) ➜ (TV) ➜ AUX ➜
Radio...
∗ The mode of equipment that is not
connected is not displayed.
2. Touch BAND to switch the reception band.
Each touch of BAND switches the reception
band as follows:
FM1 ➜ FM2 ➜ FM3 ➜ AM ➜ FM1...
English
DXZ946MP 23
Page 24

Radio Operations
English
Tuning
There are 3 types of tuning mode available,
seek tuning, manual tuning and preset tuning.
Seek tuning
Seek tuning is a function for automatically
tuning stations with good reception.
1. Touch and hold BAND for 1 second or longer
while MANU is displayed.
Automatic tuning is possible when MANU
disappears.
2. Touch on the frequency display.
SEEK UP/SEEK DOWN is displayed, and
tuning starts.
Tuning automatically stops at stations with
good reception.
■ To cancel tuning
1. Touch on the frequency display again.
Manual tuning
There are 2 ways available: quick tuning and
step tuning.
In the step tuning mode, the frequency changes
1 step at a time. In the quick tuning mode, you
can quickly tune the desired frequency.
1. Touch and hold BAND for 1 second or longer
while MANU is not displayed.
Manual tuning is possible when MANU is
displayed.
2. Operate the frequency display to tune to a
frequency on which there is a broadcast.
● Step tuning
Touch on the frequency display.
● Quick tuning
Touch on the frequency display. Tuning
stops when you take your finger away from the
panel.
Recalling a preset station
Recalling a preset station is a function for tuning
pre-stored stations.
1. Touch and hold MODE for 1 second or
longer.
The preset memory list is displayed.
2. Touch the station you want to listen to.
∗ In the normal mode, preset No. can also
be tuned by touching in the main
display.
■ To cancel tuning
1. Touch RTN.
Preset memory
A total of 24 preset positions (6-FM1, 6-FM2, 6FM3, 6-AM) exists to store individual radio
stations in memory.
1. Touch BAND to switch the reception band.
2. Operate the frequency display to store the
station to.
3. Touch and hold MODE for 1 second or
longer.
The preset memory list is displayed.
4. Touch and hold the preset No. to store the
station to for 2 seconds or longer.
You will hear a long beep, and the station is
stored in memory.
Auto store
Auto store is a function for storing up to 6
stations that are automatically tuned in
sequentially.
1. Touch MODE.
2. Touch and hold A-STORE for 2 seconds or
longer.
The MODE display changes to “A-STORE”
and the preset No. in the auto-store
operation appears on the preset No. display.
∗ Stations with good reception are
automatically searched, and are stored to
preset memory (No.1 to No.6) in order
from the station having the lowest
frequency.
24 DXZ946MP
Page 25

Notes:
• When auto store is performed, stations stored to
memory so far are cleared.
• When there are fewer than 6 stations with good
reception, low frequencies are automatically
returned to, and auto store is performed again. If
there are fewer than 6 stations even after auto
store is performed twice, stations stored so far
remain in memory.
Preset scan
Preset scan is a function for receiving stations in
the order that they are currently stored to preset
No. so that broadcasts can be checked.
1. Touch MODE.
2. Touch P-SCAN.
The MODE display changes to “P-SCAN”
and the preset No. in the preset scan
operation is displayed in the preset No.
display.
* The currently stored stations are received
in order for 7 seconds or longer each.
Stations with poor reception are skipped,
and the next station is received.
When preset scan is performed in an FM
broadcast, FM stations are received as
follows:
FM1 (1 ➜ 6) ➜ FM2 (1 ➜ 6) ➜ FM3 (1 ➜
6) ➜ FM1 (1 ➜ 6)...
When preset scan is performed in an AM
broadcast, AM stations are received as
follows:
AM (1 ➜ 6) ➜ AM (1 ➜ 6) and so forth.
■ To cancel preset scan
1. Touch P-SCAN.
The P-SCAN display changes to “MODE”,
and the stations that were being received
when P-SCAN was touched are received
next.
Radio Operations
Instant station recall (ISR)
Instant station recall is a special radio preset
that instantly accesses a favorite radio station at
a touch of a button. The ISR function even
operates with the unit in other modes.
• The ISR function cannot be used when the 2ZONE function is in use.
• The factory default setting is “FM87.9MHz”.
1. Press the [I] button.
“ISR” appears on the display.
■ To return to the previous mode
Either press the [I] button again, or press the
[ROTARY] knob.
■ To store the station to “ISR”
In the radio mode, tune the station to store, and
touch and hold the [I] button for 2 seconds or
longer.
You will hear a long beep, and the station
currently being received is stored to ISR.
English
DXZ946MP 25
Page 26

CD / MP3 / WMA Operations
English
Screen displays in the CD
mode
■ Main display
This is displayed by pressing the [ROTARY]
knob to select the CD mode.
FOLDER
WMA
WMA
04/02 :11
05
DRM
indicator
Track/playing time
display
Touching the left of the display for 1 second or
longer switches the simple operation display.
T04/02 :11
Track/playing time display
Track/playing time display
01/02: 00:
The track No. being played and the playing time
are displayed.
If or is touched in the standard
operation display, you can select the track to
play, or fast-forward or fast-backward tracks.
Title display
The display is switched when this display is
touched.
Folder display (in the case of MP3/WMA)
Touching in the standard operation display
selects folders.
MODE:
Touching this displays sub-functions. Touching
and holding this in the case of MP3/WMA for 1
second or longer displays the folder list.
FLDR No.
003
Folder display
Title display
SIMPLE MODE
Title display
MODE
TOP
MODE
TOP
Note:
• This function is enabled only when a disc is
playing.
-SCAN/ -SCAN: This is displayed during scan
play. Touching this ends scan play.
-RPT/ -RPT: This is displayed during repeat
play. Touching this ends repeat play.
-RDM/ -RDM: This is displayed during random
play. Touching this ends random play.
TOP:
Touching this starts play from the track at the
top of the disc or folder being played.
a d (only in the simple operation display)
Touching these buttons selects the track to play.
Touching and holding these buttons fastforwards or fast-backwards tracks.
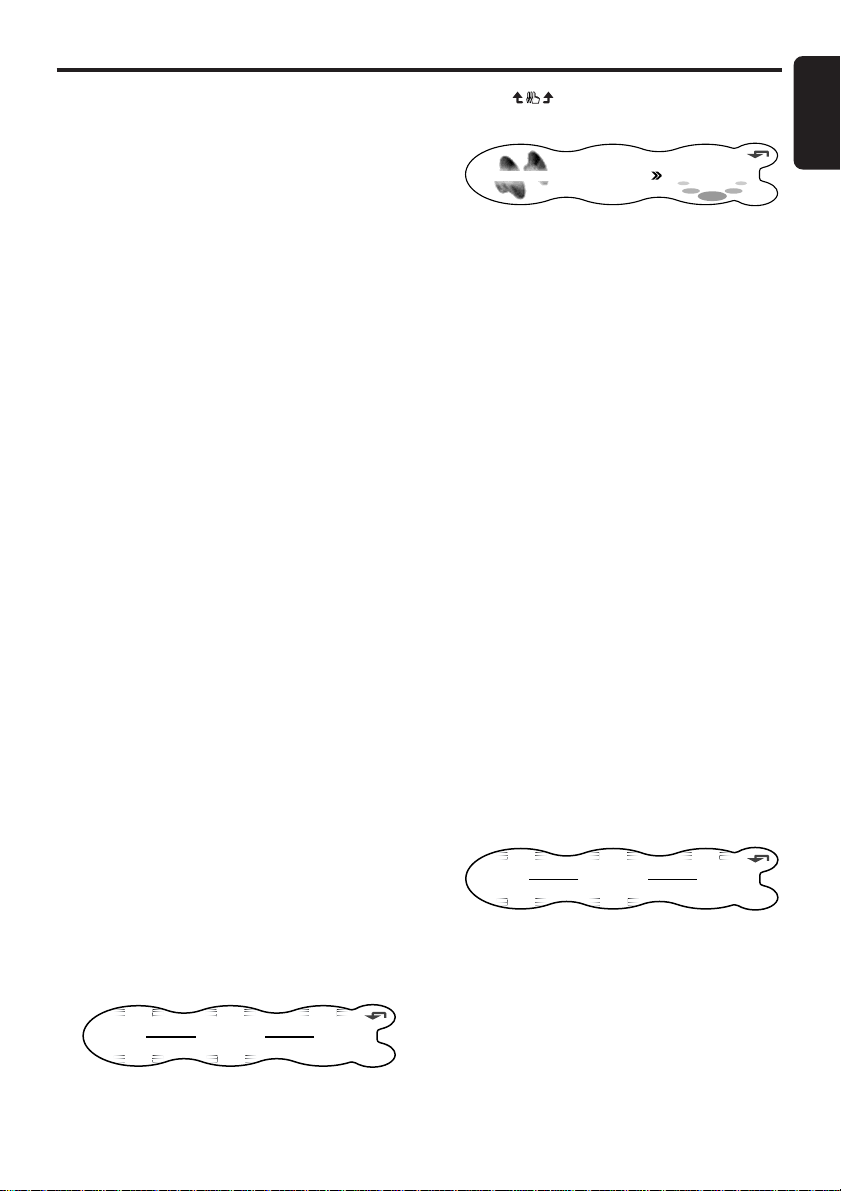
■ Folder list display (in the case of
MP3/WMA)
This is displayed by touching and holding
MODE for 1 second or longer in the main
display.
001
ROOT
0610
004
Folder No.
When this is displayed in gray, the folder cannot
be selected.
: Selection in progress
Touching a folder name returns the screen to
the main display, and play starts from the first
track in the folder you touched.
➔
PREV-RTN:
Touching this displays the previous folder list.
Touching and holding this for 1 second or longer
returns the screen to the main display.
➜ NEXT:
Touching this displays the next folder list.
Folder name
TITLE LIST
1115
005
Folder No.
0105JAZZ
1600
003002
006
PREV
-RTN
NEXT
26 DXZ946MP
Page 27

CD / MP3 / WMA Operations
English
What is MP3?
MP3 is an audio compression method and is
classified as audio layer 3 of the MPEG
standard.
This audio compression method has gained
ground into PC users and Become a standard
format.
This MP3 features original audio data
compression to about 10 percent of its initial
size while keeping high sound quality intact.
This means that about 10 music CDs can be
recorded on a CD-R disc or CD-RW disc to
allow a long listening time without having to
change CDs.
What is WMA?
WMA is the abbreviation of Windows Media
Audio, an audio file format developed by
Microsoft Corporation.
Notes:
• If you play a file with DRM (Digital Rights
Management) for WMA remaining ON, no audio is
output. (The WMA indicator blinks)
• Windows Media™, and the Windows® logo are
trademarks, or stored trademarks of Microsoft
Corporation in the United States and/or other
countries.
● To disable DRM (Digital Rights
Management):
• When using Windows Media Player 8, click on
TOOLS ➜ OPTIONS ➜ COPY MUSIC tab,
then under COPY SETTINGS, unclick the
check box for PROTECT CONTENT. Then,
reconstruct files.
• When using Windows Media Player 9, click on
TOOLS ➜ OPTIONS ➜ MUSIC record tab,
then under COPY SETTINGS, unclick the
check box for PROTECT CONTENT. Then,
reconstruct files.
Personally constructed WMA files are used at
your own responsibility.
Precautions when creating an
MP3/WMA disc
● Usable sampling rates and bit rates:
1. MP3:
Sampling rate: 11.025 kHz to 48 kHz
Bit rate: 8 kbps to 320 kbps / VBR
2. WMA:
Bit rate 48 kbps to 192 kbps
● File extensions
1. Always add a file extension “.MP3” or
“.WMA” to an MP3 or WMA file by using
single byte letters. If you add a file extension
other than specified or forget to add the file
extension, the file cannot be played.
2. Files without MP3/WMA data will not play.
The indication “--: --” appears in the playing
time display if you attempt to play files
without MP3/WMA data.
● Logical format (File system)
1. When writing an MP3/WMA file on a CD-R
disc or CD-RW disc, please select “ISO9660
level 1, 2 or JOLIET or Romeo” as the
writing software format. Normal play may not
be possible if the disc is recorded on another
format.
2. The folder name and file name can be
displayed as the title in the case of MP3/
WMA play but the title must be within 128
single byte alphabetical letters and numerals
(including an extension).
3. Do not give a name to a file inside a folder
having the same name.
● Folder structure
1. A disc with a folder having more than 8
hierarchical levels is not allowed.
● Number of files or folders
1. Up to 255 files can be recognized per folder.
Up to 500 files can be played.
2. Tracks are played in the order that they were
recorded onto a disc. (Tracks might not
always be played in the order displayed on
the PC.)
3. Some noise may occur depending on the
type of encoder software used while
recording.
DXZ946MP 27
Page 28

CD / MP3 / WMA Operations
English
Multi-session selection
This function allows you to select either CD-DA
or MP3/WMA files in the case of discs (e.g. CDEXTRA) containing a mixture of CD-DA (music
CD) and MP3/WMA files.
1. Touch MODE.
2. Touch M-SESS.
Each touch of M-SESS toggles the M-SESS
display between “CD” (play CD-DA) or
“MP3/WMA” (play MP3/WMA).
∗ If M-SESS is not displayed, touch NEXT.
3. Touch RTN.
The multi-session selection setting is
reflected the next time you load a CD.
Note:
• When playing a CCCD (Copy Control CD), set the
setting to CD type. When this is set to MP3/WMA
type, the cannot be playing normally in some
cases.
Disc-In-Play function
As long as the ignition key is turned to the ON
or ACC position, the control panel opens by
pressing the [Q] button even if this unit is not
turned on. This function also allows you to turn
the unit on and start playing the disc
automatically.
CAUTION
Be careful not to catch your hand or fingers
while closing the SLOPING CONSOLE.
Notes:
• If the SLOPING CONSOLE does not open fully,
gently open with your hand.
• After loading a CD, always close the SLOPING
CONSOLE.
• Do not try to put your hand or fingers in the
CD SLOT. Also never insert
foreign objects into the slot.
• Do not load discs where adhesive comes out
from cellophane tape or a rental CD label, or
discs with marks where cellophane tape or
rental CD labels were removed. It may be
impossible to eject these discs from the unit
and they may cause the unit to break down.
Loading a CD
1. Press the [Q] button.
The control panel opens.
2. Load the disc into the CD SLOT.
When the disc is loaded, the control panel
automatically closes after several seconds,
and play starts.
Notes:
• Never insert foreign objects into the CD SLOT.
• If the CD is not loaded easily, there may be
another CD in the mechanism or the unit may
require service.
• Discs not bearing the or mark and
CD-ROMs cannot be played by this unit.
• Some CDs recorded in the CD-R/CD-RW mode
may not be usable.
Loading 8 cm compact discs
No adapter is required to play an 8 cm CD.
Load the 8 cm CD into the center of the CD
SLOT.
Ejecting a CD
You can eject a disc by pressing the [Q] button
even if the engine key or ACC is at the OFF
position automatically.
CAUTION
When the disc is ejected, press the [Q]
button to close the control panel. If the
control panel is left open, You will hear a
double beep, and the control panel
automatically closes.
1. Press the [Q] button.
The control panel opens, and the disc is
ejected. The mode automatically switches to
the radio mode.
∗ Be sure to remove ejected discs from this
unit. If you leave the disc in the disc tray, it
is pulled back into the unit after 15
seconds or longer, and the control panel
closes. (auto reload function)
∗ Single CDs are not auto-loaded. Be sure
to remove single CDs after ejecting them.
CAUTION
If you use excessive force to load a disc
after it has been ejected, the surface of the
disc may become scratched. Remove the
disc before loading it again.
28 DXZ946MP
Page 29

CD / MP3 / WMA Operations
English
Listening to a disc already
loaded in the unit
1. Press the [ROTARY] knob to select the CD
mode.
∗ Play automatically starts when the mode
changes to the CD mode.
Pausing play
1. Press the [ ] button.
■ To resume play
1. Press the [ ] button again.
Selecting a track
When a CD-R/CD-RW recorded with an MP3
file or a WMA file is loaded, you can select only
tracks recorded to the same folder by touching
on the track display.
1. To listen to the next track, touch on the
track display.
2. To listen to the previous track, touch
twice on the track display.
Touching plays the next track. If you
touch more times, the track advances
ahead to the track for the number of times
you touched and that track is played.
Touching plays the previous track. If you
touch more times, the track moves back
to the track for the number of times you
touched and that track is played.
∗ If you touch twice on the track display
while the start of the track is being played,
the track 2 tracks back is sometimes
played.
■ To select a folder
To select a different folder, either touch
on the folder display, or perform the following.
1. Touch and hold MODE for 1 second or
longer.
The folder list is displayed. Touching PREV
or NEXT displays the previous or next part
of the folder list.
2. Touch the folder name.
■ To play the play list
Play lists (M3U file) also can be played.
Note, however, that of M3U files currently saved
down to five layers (including the root) in the file
hierarchy, only the top 5 files having new file
timestamps can be played.
Notes:
• Up to 255 files can be played in a single play list.
• Only MP3 or WMA files currently saved to folders
down to five layers (including the root) in the file
hierarchy can be played.
Perform the following to play the play list.
1. Touch MODE.
2. Touch NEXT.
3. Touch PLY LIST.
Reading of the play list starts. When reading
of the play list ends, the play list having the
newest timestamp starts automatically. The
operation of selecting the play list or tracks
in the play list is the same as that of
selecting a folder or tracks in a folder.
∗ PLY LIST is not displayed when a correct
play list (M3U file) is not saved on the CDR/CD-RW loaded on the unit.
■ Stopping play of play list
1. Touch MODE.
2. Touch NEXT.
3. Touch PLY LIST.
Fast-forward/Fast-backward
1. To fast-forward, touch on the track
display.
2. To fast-forward, touch on the track
display.
Top function
The top function resets the CD player to the first
track of the disc.
1. Touch TOP.
Play starts from the first track (track No.1).
In case of MP3/WMA, the first track of a
folder being played will be returned.
DXZ946MP 29
Page 30

CD / MP3 / WMA Operations
English
Scan play
This function allows you to locate and play the
first 10 seconds of all the tracks recorded on a
disc.
1. Touch MODE.
2. Touch -SCAN.
The MODE display changes to “ -SCAN”
and scan play starts.
∗ Scan play starts from the next track after
the track currently being played.
■ To cancel scan play
1. Touch -SCAN.
The -SCAN display changes to “MODE”,
and the track that was playing when you
touched -SCAN is played.
Folder scan play
This function allows you to locate and play the
first 10 seconds of the first track of all the
folders on an MP3/WMA disc.
1. Touch MODE.
2. Touch -SCAN.
The MODE display changes to “ -SCAN”
and folder scan play starts.
* Folder scan play starts from the folder
following the folder that is playing.
■ To cancel folder scan play
1. Touch -SCAN.
The -SCAN display changes to “MODE”,
and the track that was playing when you
touched -SCAN is played.
Repeat play
This function allows you to play the current track
repeatedly.
1. Touch MODE.
2. Touch -REPEAT.
The MODE display changes to “ -RPT” and
repeat play is started.
■ To cancel repeat play
1. Touch -RPT.
The -RPT display changes to “MODE”, and
regular play starts from the track that was
playing when you touched -RPT.
Folder repeat play
This function allows you to repeatedly play the
folder currently being played. This function is
available only when a CD-R/CD-RW recorded
with MP3 files or WMA files is loaded.
1. Touch MODE.
2. Touch -REPEAT.
The MODE display changes to “ -RPT” and
folder repeat play is started.
■ To cancel folder repeat play
1. Touch -RPT.
The -RPT display changes to “MODE”,
and regular play starts from the track that
was playing when you touched -RPT.
Random play
This function allows you to play all tracks
recorded on a disc in a random order.
-RANDOM
Plays all tracks on the disc at random.
When the disc contains 2 or more folders, all of
the tracks in the folder are played at random,
followed by all of the tracks in the next folder.
This is repeated for all folders.
-RANDOM
Plays tracks on the disc at random.
This function is available only when a CD-R/CDRW recorded with MP3 files or WMA files is
loaded.
1. Touch MODE.
2. Touch -RANDOM or -RANDOM.
The MODE display changes to “ -RDM” or
“ -RDM”, and random play starts.
■ To cancel random play
1. Touch -RDM or -RDM.
The -RDM display or -RDM display
changes to “MODE”, and regular play starts
from the track that was playing when you
touched these buttons.
30 DXZ946MP
Page 31

Different Pieces of Music Heard by Plural Listeners
RTN
Internal External
ON
CONTROL
RTN
External Internal
ON
CONTROL
(2-ZONE function)
English
The 2-ZONE function outputs separate sounds
from the MAIN zone and SUB zone by
simultaneously operating 2 sources in the 1
center unit, thereby allowing 2 or more listeners
to enjoy separate music sources.
This unit can control its internal sources (radio,
CD, MP3, etc.) to play them back, and further,
can simultaneously play back sources from
external equipment connected via CeNET (for
instance, CD changers etc.).
The sources of the MAIN zone are played back
from the speakers inside your car, and those of
the SUB zone are from the headphone systems
(WH104/WH204).
Type-1
Type-2
OFF
MAIN SUB
The upper figure is for when a sound source is
being played by the unit’s internal mode (radio,
CD, AUX) on the speakers.
The lower figure is for when a sound source is
being played by the unit’s external mode (CD
changer, DVD changer, TV, AUX) on the
speakers.
• The factory default setting is “OFF”.
Notes:
• The ISR function is not available while the 2ZONE function is in use.
• The new volume adjustment made by turning the
[ROTARY] knob on this unit is reflected only on
the speakers.
The AUX-SENS setting is reflected on both the
speakers and the headphones.
■ Screen display when the 2-ZONE
function is in use
“INT.” (internal mode) or “EXT.” (external mode)
is displayed in the center of the display to
indicate whether you can hear play in the
internal mode or external mode in the current 2ZONE function operation mode.
1. Press the [SOUND] button.
2. Touch 2-ZONE.
OFF
POSITION
2 - ZONE
OFF
OFF
P. EQ
SOUND MENU
ADF
OFF
OFF
Dolby PL
A - MODE
RTN
II
3. Touch and hold the ON/OFF center of the
display for 1 second or longer.
CONTROL
Internal External
ON
RTN
When 2-ZONE is set to ON, the current 2-
RTN
ZONE type is displayed.
The 2-ZONE function is not available when
2-ZONE is set to OFF. Press the [SOUND]
button to return to the original mode.
4. Touch on the ON/OFF display to
select the 2-ZONE type.
2-ZONE type
Type 1
Type 2
Speaker
Internal External
(internal mode) (external mode)
External Internal
(external mode) (internal mode)
Headphones
5. Touch the speaker display or the headphone
display to select the 2-ZONE function
operation mode.
If you touch the speaker display, you can
operate audio on the speakers.
If you touch the headphone display, you can
operate audio on the headphones.
6. Press the [SOUND] button to return to the
original mode.
■ To switch the 2-ZONE function ON/
OFF
1. Press and hold the [SOUND] button on the
unit for 1 second or longer.
DXZ946MP 31
Page 32

Different Pieces of Music Heard by
English
Plural Listeners (2-ZONE function)
■ To switch the 2-ZONE type
Press and hold the [I] button on the unit for 1
second or longer while the 2-ZONE function is
in use.
■ To switch the 2-ZONE function
operation mode
Press the [I] button on the unit while the 2ZONE function is in use.
Selecting the mode when the
2-ZONE function is in use
When you load a CD while the 2-ZONE function
is in use, the functions of the internal mode on
this unit change to CD, and play starts
automatically.
1. Press the [I] button on the unit to switch the
2-ZONE function operation mode.
The display for the equipment (speaker or
headphone) that can be currently operated
is switched.
2. Press and hold the [I] button for 1 second or
longer to select the 2-ZONE type.
The “INT.” or “EXT.” display is toggled.
3. Press the [ROTARY] knob.
Each press of the [ROTARY] knob while
“INT.” is displayed switches the mode as
follows:
Redio ➜ CD ➜ AUX ➜ Radio...
Each press of the [ROTARY] knob while
“EXT.” is displayed switches the mode as
follows:
AUX ➜ (CD changer) ➜ (DVD changer) ➜
(TV *1) ➜ AUX...
∗ The mode of equipment that is not
connected is not displayed.
*1When the TV mode is selected, the mode
automatically changes to the VTR mode,
and cannot be changed.
Operations Common to Each Mode
Screen display in the title
entry mode
■ Main display
This is displayed when the title entry mode is
selected. (cf. page 14)
TITLE INPUT
JAZZ
Text type
display
Title display
Text type display
A: Capital alphabet letters
a: Small alphabet letters
0-9: Numbers
!?: Symbols
Å: Umlaut
Title display
The currently entered title is displayed. Touch
to determine the entry position. Touching
and holding the button for 2 seconds or longer
causes all title text to disappear.
Entered text display
Touch to select the entered text.
RTN
Touching this cancels entry of titles, and returns
the display to the original screen. Touching and
holding this for 1 second or longer displays the
text list matched to current text type.
MEMO
Touching and holding this for 2 seconds or
longer stores the title that was input, and returns
the display to the original screen.
■ Text list display
This is displayed by touching and holding RTN
for 1 second or longer in the main display.
RTN
Z
M
MEMO
Entered text
display
32 DXZ946MP
-A-
-M-
-E-
FONT LIST
-Q-
-I-
-U-
RTN
NEXT
Page 33

Type of text
The text that is displayed changes according to
the text type display.
When text type display is “A”: A E I M Q U X
(space)
When text type display is “a”: a e i m q u x
When text type is “0-9”, “!?” or “Å”: All
characters are displayed.
RTN
Touching this returns the display to the main
display.
NEXT
Touching this displays the next text list.
Entering titles
You can give radio and TV stations a title up to
10 characters long, and to CDs. These titles can
be displayed when broadcasts are received or
when playing CDs.
The number of titles that can be entered is as
follows:
Mode Number of titles
CD mode 50 titles
TV mode 20 titles
Radio mode 30 titles
CD changer mode Number of titles
DCZ625 connected 100 titles
CDC655Tz connected 100 titles
CDC1255z connected 50 titles
1. Either receive the radio or TV station, or play
a CD for which you want to enter the title.
2. Touch the center of the display to set to the
user title display.
When the display changes to the user title
display, “USER” is displayed above the
preset No. display.
3. Press and hold the [A] button for 1 second
or longer.
The mode changes to the title entry mode.
4. Touch on the title display to determine
the entry position.
The position of the blinking text moves to the
left or the right.
Operations Common to Each Mode
CAUTION
Pressing the reset button clears all user
memories such as titles stored on this unit.
5. Touch on the text type display to
select the type of text.
Each touch of switches the type of
text as follows:
Capital alphabet letters
(space) A B C D E F G H I J K L M N O P Q
R S T U V W X Y Z
Small alphabet letters
a b c d e f g h i j k l m n o p q r s t u v w x y z
Numbers
0 1 2 3 4 5 6 7 8 9
Symbols, Umlaut
Å Ä Ë É E Ê Ï Æ Ø å ä ë é e ê ï ö ü æ ø
6. Either touch on the right of the
display, or turn the [ROTARY] knob to
determine the entered characters.
7. Repeat steps 4 to 6 to enter the title.
Pressing and holding the title display for 2
seconds or longer causes all currently
entered title characters to disappear.
8. Touch and hold MEMO for 2 seconds or
longer.
You will hear a long beep, and the title is
stored in memory.
■ To switch the title display to the clock
or other display
Touch the center of the display.
■ When a new title is stored beyond the
maximum number of titles
In the case of a radio or TV station
Titles not stored to preset channels and ISR
(radio stations only) are automatically cleared,
and the new title is stored in memory.
In the case of a CD
Titles of CDs that have been played the least
are cleared, and the new title is stored in
memory.
English
TITLE INPUT
JAZZ
∗ Up to ten characters can be input.
RTN
Z
M
MEMO
DXZ946MP 33
Page 34

Operations Common to Each Mode
English
Clearing titles
1. Either receive the radio or TV station, or play
a CD whose title you want to clear.
2. Touch the center of the display to set to the
user title display.
When the display changes to the user title
display, “USER” is displayed above the
preset No. display.
3. Press and hold the [A] button for 1 second
or longer.
The mode changes to the title entry mode.
4. Touch and hold the title display for 2
seconds or longer.
All characters in the title disappear.
5. Touch and hold MEMO for 2 seconds or
longer.
You will hear a long beep, and the title is
cleared.
Triggered audio mute for
cellular telephones
This unit requires special wiring to mute the
audio signal automatically when a cellular
telephone rings in the car.
∗ This function is not compatible with all cellular
telephones Contact your local authorized
Clarion dealer for information on proper
installation and compatibility.
Changing settings
Selecting setting items
1. Press the [A] button.
The mode changes to the adjust mode.
ADJUST MODE
DISPLAY
2. Touch on the setting item display to
select the item to set.
∗ Touching on the left of the display
switches main items 1 item at a time.
Touching on the left of the display
switches sub-items continuously.
∗ Touching on the center of the
display switches the sub-items 1 item at a
time. Touching switches sub-items
continuously.
3. When “EDIT” is displayed at the right of the
display, touch EDIT to switch to the
adjustment details display.
4. Either touch on the right of the
display, or turn the [ROTARY] knob to set
the details.
■ To return to the original mode
1. Press the [A] button again.
CLOCK EDIT
34 DXZ946MP
Page 35

Operations Common to Each Mode
● Setting items
Main Item Sub-item
DISPLAY CLOCK
• Clock setting (cf. page 36)
SCREEN SVR
• Screen saver setting (cf. page 36)
MSG INPUT
• Message information input (cf. page 37)
MESSAGE
• Message display setting at power ON/OFF (cf. page 37)
S/A SENS
• Setting the Spectrum analyzer sensitivity (cf. page 38)
SCROLL
• Adjusting the scroll speed (cf. page 38)
APPERNCE DIMMER IN
• Auto-dimmer setting (cf. page 38)
DMR LEVEL
• Setting the dimmer level (cf. page 38)
CONTRAST
• Adjusting the display contrast (cf. page 39)
BLINK LED
• Making the LED blink when DCP is removed (cf. page 39)
BEEP
• Setting beep (cf. page 39)
SOUND AC-PRO III
• Selecting the VSE mode (STD/PRO) (cf. page 39)
EQ SELECT
• Selecting the equalizer mode (cf. page 39)
SP-SETTING
• Setting the speaker configuration (cf. page 40)
CENTER-SP / SUB-WOOFER
• Setting sub-woofer speaker ON/OFF (cf. page 40)
HPF / SUB-W LPF
• Adjusting the speaker filter frequency (cf. page 41)
AMP CANCEL
• Setting internal amplifier use ON/OFF (cf. page 41)
SP GAIN
• Adjusting the speaker output level (cf. page 41)
PL II DELAY SRD-SP
• Adjusting the rear speaker delay time (cf. page 42)
PL II CONT PANORAMA / DIMENSION / CTR WIDTH
• Setting the music mode in detail (cf. page 42)
TUNER TV ARER
• Setting the TV area (cf. page 51)
TV DIVER
• Setting TV diversity (cf. page 51)
SETTING AUX SENS
• Setting the portable audio (AUX) input level (cf. page 43)
SYSTEM CHECK
• Performing a system check (cf. page 43)
CODEMATIC
• Setting security (cf. page 44)
English
DXZ946MP 35
Page 36

Operations Common to Each Mode
English
Setting the clock (CLOCK)
When the power is turned OFF with the clock
displayed, the clock remains displayed even if
this unit is turned off as long as the car engine is
running (ACC is ON).
The clock is displayed in 12-hour format.
1. Press the [A] button.
2. Touch on the setting item display to
select “CLOCK” under “DISPLAY”.
ADJUST MODE
DISPLAY
3. Touch EDIT.
The time (“e.g. “PM 2: 20”) currently set on
this unit is displayed, and the mode changes
to the time setting mode.
CLOCK
∗ If you operate another button while you
are setting the time, the time is not
adjusted.
4. Touch on the center of the display to
set hours.
5. Either touch on the right of the
display, or turn the [ROTARY] knob to set
minutes.
6. Touch SET.
∗ You will hear a long beep, and the time is
set.
Notes:
• The clock cannot be adjusted when the power is
OFF.
• When the battery has been removed for
maintenance or for repair, set the time again.
7. Press the [A] button to return to the original
mode.
CLOCK EDIT
ADJUST MODE
10am 05
RTN
S
SET
Setting the screen saver
(SCREEN SVR)
This function allows you display a screen saver
when you have not operated this unit for about
30 seconds.
• The factory default setting is “ON”.
1. Press the [A] button to set to the adjust
mode.
2. Touch on the setting item display to
select “SCREEN SVR” under “DISPLAY”.
ADJUST MODE
DISPLAY
3. Either touch on the right of the
display, or turn the [ROTARY] knob to select
“ON” or “OFF”.
4. Press the [A] button to return to the original
mode.
■ To switch the screen saver display
Touch PREV or NEXT while the screen saver is
displayed.
Each touch of these buttons switches the
screen saver display.
● Screen savers
Screen saver pattern 1
Screen saver pattern 2
Screen saver pattern 3
SCREEN SVR ON
36 DXZ946MP
Spectrum analyzer pattern 1
Page 37

Spectrum analyzer pattern 2
Spectrum analyzer pattern 3
Spectrum analyzer pattern 4
Message information
MESSAGE
Welcome to Optimedia
Welcome to Optimedia
PREV
NEXT
SS SCAN
The above 8 indications are displayed for
about 10 seconds each.
Entering messages to display
in message information
(MSG INPUT)
1 type of screen saver is available. For details
on how to switch the screen saver display, see
“Setting the screen saver” (cf. page 36).
• Up to 30 characters can be entered.
• The factory default setting is “Welcome to
Optimedia”.
1. Press the [A] button to set to the adjust
mode.
2. Touch on the setting item display to
select “MSG INPUT” under “DISPLAY”.
ADJUST MODE
DISPLAY
3. Touch EDIT.
The mode changes to the message entry
mode.
MSG INPUT ED IT
Operations Common to Each Mode
4. Touch on the center of the display to
determine the entry position.
∗ To clear the message, touch and hold the
center of the display for 2 seconds or
longer.
If you perform the operation at step 8 with
the message cleared, the message returns
to its factory default setting.
5. Touch on the left of the display to
select the type of text.
Each touch of switches the type of
text. For details, see page 32.
6. Either touch on the right of the
display, or turn the [ROTARY] knob to
determine the entered characters.
7. Repeat steps 4 to 6 to enter the message.
8. Touch and hold MEMO for 2 seconds or
longer.
You will hear a long beep, and the message
is stored in memory.
9. Press the [A] button to return to the original
mode.
Displaying messages
(MESSAGE)
This function allows you to display messages on
the display when the power is turned ON/OFF.
“Hello” is displayed when the power is turned
ON, and “See you” is displayed when power is
turned OFF.
• The factory default setting is “ON”.
1. Press the [A] button to set to the adjust
mode.
2. Touch on the setting item display to
select “MESSAGE” under “DISPLAY”.
ADJUST MODE
DISPLAY
3. Either touch on the right of the
display, or turn the [ROTARY] knob to select
“ON” or “OFF”.
4. Press the [A] button to return to the original
mode.
MESSAGE ON
English
DXZ946MP 37
Page 38

Operations Common to Each Mode
English
Setting the sensitivity of the
spectrum analyzer
(S/A SENS)
This function allows you to adjust the sensitivity
(amount of deflection) of the spectrum analyzer.
For details on displaying the spectrum analyzer,
see “Switching the display” (cf. page 13) or
“Setting the screen saver” (cf. page 36).
• The factory default setting is “MID”.
1. Press the [A] button to set to the adjust
mode.
2. Touch on the setting item display to
select “S/A SENS” under “DISPLAY”.
ADJUST MODE
DISPLAY
3. Either touch on the right of the
display, or turn the [ROTARY] knob to adjust
the sensitivity.
∗ Select either LOW (small deflection
amount), MID or HIGH (large deflection
amount).
4. Press the [A] button to return to the original
mode.
S/A SENS MID
4. Press the [A] button to return to the original
mode.
Setting the auto-dimmer
(DIMMER IN)
This function allows you to dim the lighting of
the display matched to the illumination or the
brightness inside your car.
Select either “AUTO” (interlocked to the
brightness inside your car) or “ILLUMI”
(interlocked to the illumination inside your car)
as the auto-dimmer setting.
• When the auto-dimmer function is set to
“AUTO”, the brightness of the display is
dimmed according to the brightness detected
by this sensor.
• Set the dimmer setting at DMR LEVEL.
• The factory default setting is “AUTO”.
1. Press the [A] button to set to the adjust
mode.
2. Touch on the setting item display to
select “DIMMER IN” under “APPERNCE”.
ADJUST MODE
APPERNCE
DIMMER IN AUTO
Adjusting the display scroll
speed (SCROLL)
This feature allows you to slow down the scroll
speed when the scroll speed is too fast, making
it difficult to view the screen.
• The factory default setting is “SPEED 2”.
1. Press the [A] button to set to the adjust
mode.
2. Touch on the setting item display to
select “SCROLL” under “DISPLAY”.
ADJUST MODE
DISPLAY
3. Either touch on the right of the
display, or turn the [ROTARY] knob to adjust
the sensitivity.
* This setting item can be adjusted within
the range SPEED 1 to SPEED 7.
Adjust this setting item while viewing how
the appearance of the display changes.
SCROLL SPEED2
38 DXZ946MP
3. Either touch on the right of the
display, or turn the [ROTARY] knob to select
“AUTO” or “ILLUMI”.
4. Press the [A] button to return to the original
mode.
Setting the dimmer level
(DMR LEVEL)
This function allows you to set how much the
displayed is to be dimmed.
• The factory default setting is “3”.
1. Press the [A] button to set to the adjust
mode.
2. Touch on the setting item display to
select “DMR LEVEL” under “APPERNCE”.
ADJUST MODE
APPERNCE
3. Either touch on the right of the
display, or turn the [ROTARY] knob to set
the dimmer level.
DMR LEVEL 3
Page 39

∗ Select one of OFF (dimming OFF, bright),
1 (slightly dimmed) to 5 (dark).
4. Press the [A] button to return to the original
mode.
Adjusting the contrast of the
display (CONTRAST)
You can adjust the contrast of the display to
match the mounting angle of the unit.
• The factory default setting is “6”.
1. Press the [A] button to set to the adjust
mode.
2. Touch on the setting item display to
select “CONTRAST” under “APPERNCE”.
ADJUST MODE
APPERNCE
3. Either touch on the right of the
display, or turn the [ROTARY] knob to adjust
the contrast.
* This setting item can be adjusted within
the range 1 to 11.
Adjust this setting item while viewing how
the appearance of the display changes.
4. Press the [A] button to return to the original
mode.
CONTRAST 6
Making the LED blink when
DCP is removed (BLINK LED)
You can make the LED on this unit blink when
the DCP is removed.
• The factory default setting is “OFF”.
1. Press the [A] button to set to the adjust
mode.
2. Touch on the setting item display to
select “BLINK LED” under “APPERNCE”.
ADJUST MODE
APPERNCE
3. Either touch on the right of the
display, or turn the [ROTARY] knob to select
“ON” or “OFF”.
4. Press the [A] button to return to the original
mode.
LEDBLINK OFF
Operations Common to Each Mode
Setting the beep for when
buttons are operated (BEEP)
The short or long high-pitched tone you hear
when a button is operated is called a “BEEP”.
• The factory default setting is “ON”.
1. Press the [A] button to set to the adjust
mode.
2. Touch on the setting item display to
select “BEEP” under “APPERNCE”.
ADJUST MODE
APPERNCE
3. Either touch on the right of the
display, or turn the [ROTARY] knob to select
“ON” or “OFF”.
4. Press the [A] button to return to the original
mode.
BEEP ON
Selecting each mode
This item cannot be selected when the Dolby
Pro Logic II is set to “MUSIC” or “MATRIX” (cf.
page 17).
• The factory default setting is “PRO” for AC-
PROIII and “P.EQ” for EQ SELECT.
■ AC-PROIII
When “STD” (standard mode) is selected, the
sound quality and field can be adjusted by VSE
(Virtual Space Enhancer) so that the same
audio effect can be obtained whichever seat you
are sitting in.
When “PRO” (PRO mode) is selected, the
sound quality and field can be adjusted in detail
for each seating position.
■ EQ SELECT
When “P.EQ” (equalizer mode) is selected, the
entire frequency level range can be
compensated by a detailed smooth curve.
When “BAS/TREB” (bass/treble mode) is
selected, the frequency level can be
compensated by dividing it into 2 major levels,
bass (low tones) and treble (high tones).
1. Press the [A] button to set to the adjust
mode.
English
DXZ946MP 39
Page 40

Operations Common to Each Mode
English
2. Touch on the setting item display to
select “AC-PROIII” under “SOUND” and “EQ
SELECT” under “SOUND”.
ADJUST MODE
SOUND
AC-PRO III PRO
Speaker configuration
CTR+SW Front/rear speakers (4ch)
5.1ch Center speaker (1ch)
configuration Sub-woofer (1ch)
SWL +SW
R
Front/rear speakers (4ch)
4ch+sub-woofer Sub-woofer (2ch)
configuration
3. Either touch on the right of the
display, or turn the [ROTARY] knob to select
the mode.
Mode selection
AC-PRO III STD
• Standard mode (VSE menu)
PRO
• PRO mode (position menu)
EQ SELECT P.EQ
• Equalizer mode (P.EQ menu)
BAS/TREB
• Bass/treble mode
4. Press the [A] button to return to the original
mode.
Setting the speaker
configuration (SP-SETTING)
Set to match the speaker configuration of your
car to fully bring out the audio characteristics of
this unit.
• The factory default setting is “SWL + SWR”.
1. Press the [A] button to set to the adjust
mode.
2. Touch on the setting item display to
select “SP-SETTING” under “SOUND”.
SOUND
ADJUST MODE
SP-SETTING
SWL+SW
R
Notes:
• Sound is not output from the center speaker
unless the following settings are made when
“CTR+SW” is set.
(1) Referring to “Selecting the PLII menu” (cf.
page 17), set the Dolby Pro Logic II mode to
“MUSIC” or “MATRIX”.
(2) Referring to “Setting speakers ON/OFF” (cf.
page 40), set the center speaker to “ON”.
• Sound is not output from the sub-woofer Lch
when “SWL+SWR” is set and the Dolby Pro
Logic II mode is set to “MUSIC” or “MATRIX”.
4. Press the [A] button to return to the original
mode.
Setting speakers ON/OFF
(CENTER-SP/SUB-WOOFER)
Set the center speaker (CENTER-SP) and subwoofer (SUB-WOOFER) ON/OFF.
Be sure to set this setting to “OFF” when there
is no center speaker or sub-woofer.
• The center speaker (CENTER-SP) can be set
when the Dolby Pro Logic II mode is set to
“MUSIC” or “MATRIX”, and “SP-SETTING” is
set to “CTR-SW”.
• The factory default setting is “ON”.
1. Press the [A] button to set to the adjust
mode.
2. Touch on the setting item display to
select “CENTER-SP” under “SOUND” and
“SUB-WOOFER” under “SOUND”.
3. Either touch on the right of the
display, or turn the [ROTARY] knob to set
the speaker configuration.
40 DXZ946MP
ADJUST MODE
SOUND
CENTER - SP
ON
3. Either touch on the right of the
display, or turn the [ROTARY] knob to select
“ON” or “OFF”.
4. Press the [A] button to return to the original
mode.
Page 41

Adjusting the filter
frequencies of speakers
(HPF/SUB-W LPF)
This function allows you to adjust the filter
frequency matched to the speakers you are
using.
• The filters (HPF/SUB-W LPF) that you can
use differ according to the Dolby Pro Logic II
mode setting.
Dolby Pro Logic II
mode setting HPF SUB-W LPF*
MUSIC / MATRIX
OFF Adjustable Adjustable
*1Adjustment is possible only when
“SUB-WOOFER” is set to “ON”.
• The factory default setting is “THROUGH”.
■ Filter adjustment
● HPF (high-pass filter adjustment)
This filter cuts bass sound from the front and
rear speakers.
THROUGH ➜ 50Hz ➜ 80Hz ➜ 120Hz
Set the filter matched to the speaker when
small-diameter speakers are used.
THROUGH
Set this when using speakers that can
generate bass.
● SUB-W LPF (sub-woofer low-pass filter
adjustment)
This filter cuts treble sound from the sub-woofer.
THROUGH ➜ 50Hz ➜ 80Hz ➜ 120Hz
Set the filter frequency to match the sub-woofer.
THROUGH
Set this when a low-pass filter built-in
powered sub-woofer is used.
1. Press the [A] button to set to the adjust
mode.
2. Touch on the setting item display to
select “HPF” under “SOUND” and “SUB-W
LPF” under “SOUND”.
SOUND
3. Either touch on the right of the
display, or turn the [ROTARY] knob to set
the frequency.
* Select one of THROUGH, 50Hz, 80Hz,
and 120Hz.
Filter
Not adjustable Adjustable
ADJUST MODE
HPF
THROUGH
Operations Common to Each Mode
4. Press the [A] button to return to the original
mode.
Setting internal amplifier use
ON/OFF (AMP CANCEL)
Set internal amplifier use ON/OFF matched to
whether or not an external amplifier is used.
Set AMP CANCEL to “ON” (internal amplifier
use OFF) when an external amplifier is
connected and the internal amplifier is not used.
1
• The factory default setting is “OFF” (internal
amplifier used).
1. Press the [A] button to set to the adjust
mode.
2. Touch on the setting item display to
select “AMP CANCEL” under “SOUND”.
ADJUST MODE
SOUND
3. Either touch on the right of the
display, or turn the [ROTARY] knob to select
“ON” or “OFF”.
4. Press the [A] button to return to the original
mode.
AMP CANCEL
Adjusting the output level of
the speakers (SP GAIN)
Use the test tone function built into this unit to
adjust so that the volume that is output from all
speakers is the same.
• This item can be set only when the Dolby Pro
Logic II mode is set to “MUSIC” or “MATRIX”.
• The factory default setting is “0dB”.
1. Press the [A] button to set to the adjust
mode.
2. Touch on the setting item display to
select “SP GAIN” under “SOUND”.
ADJUST MODE
SOUND
3. Touch EDIT.
The mode changes to the SP GAIN
adjustment mode.
SP GAIN
English
OFF
EDIT
DXZ946MP 41
Page 42

Operations Common to Each Mode
English
4. Touch on the adjustment item display
to select the desired item.
Each touch of switches the
adjustment item as follows:
Adjustment items
FRONT L GAIN
(front left speaker)
CTR GAIN
(center speaker) *
3. Either touch on the right of the
display, or turn the [ROTARY] knob to adjust
the delay time.
∗ “SRD-SP” can be adjusted within the
range 0 ms to 15 ms.
1
4. Press the [A] button to return to the original
mode.
SUB-W GAIN
(sub-woofer)
SRD L GAIN
(rear left speaker)
2
*
FRONT R GAIN
(front right speaker)
SRD
R
GAIN
(rear right speaker)
*1“CTR GAIN” is displayed only when “SP-
SETTING” is set to “CTR+SW” and
“CENTER-SP” is set to “ON”.
*2“SUB-W GAIN” is displayed only when
“SUB-WOOFER” is set to “ON”.
5. Either touch on the right of the
display, or turn the [ROTARY] knob to adjust
the output level.
The output level can be adjusted within the
range -10 dB to +10 dB
6. Repeat steps 4 and 5 to adjust each item.
7. Press the [A] button to return to the original
mode.
Adjusting the delay time of
the rear speaker
(PL II DELAY)
The timing that sound arrives at the listening
position differs according to the mounting
position of the rear speakers and the size of
your car. If you adjust the delay time of the rear
speakers, you can adjust so that sound from the
rear speakers can be heard at the same timing
as output from the front speakers.
• This item can be set only when the Dolby Pro
Logic II mode is set to “MUSIC” or “MATRIX”.
• The factory default setting is “0ms”.
1. Press the [A] button to set to the adjust
mode.
2. Touch on the setting item display to
select “SRD-SP” under “PL II DELAY”.
ADJUST MODE
PLII DELAY
SRD-SP
0ms
Setting the music mode in
detail (PL II CONT)
This function allows you to set the music mode
in more detail when the Dolby Pro Logic II mode
is set to “MUSIC”.
• This item can be set only when the Dolby Pro
Logic II mode is set to “MUSIC”.
• The factory default setting for PANORAMA is
“NO”, for DIMENSION is “3” and for CTR
WIDTH is “3”.
Adjustment items
PANORAMA (panorama control setting)
This widens the soundfield image at the front up
to the rear speakers. Set this item to “YES” if
you feel that there is no surround effect.
DIMENSION (dimension setting)
Shifts the soundfield image to the front or the
rear. When the soundfield image inclines to
either the front or the rear, this inclination can be
compensated.
Adjustment value 3 is the center position.
Adjustment values 2 to 0 shift the soundfield
image to the rear, while adjustment values 4 to
6 shift the soundfield image to the front.
CTR WIDTH (center width setting)*
Adjusts the fixed position of the center channel
between the center speaker and L/R front
speakers.
When the center sound is divided equally to the
left and right, the entire soundfield image
increases to produce a naturally expanding
feeling.
Adjustment value 0 plays back all center sounds
on the center speaker.
Adjustment value 7 divides the center sound
equally between the L/R front speakers.
*1“CTR WIDTH” is displayed only when “SP-
SETTING” is set to “CTR+SW” and
“CENTER-SP” is set to “ON”.
1. Press the [A] button to set to the adjust
mode.
1
42 DXZ946MP
Page 43

2. Touch on the setting item display to
select the desired adjustment item under
“PL II CONT”.
The adjustment items are “PANORAMA”,
“DIMENSION” and “CTR WIDTH”.
ADJUST MODE
PLII CONT
PANORAMA
NO
Operations Common to Each Mode
Performing a system check
This function allows you to perform a system
check from the adjust mode when required.
1. Press the [A] button to set to the adjust
mode.
2. Touch on the setting item display to
select “SYSTEM CHECK” under
“SETTING”.
English
3. Either touch on the right of the
display, or turn the [ROTARY] knob and
adjust the item as desired.
∗ Select “YES” or “NO” for “PANORAMA”.
∗ “DIMENSION” can be adjusted within the
range 0 to 6.
∗ “CTR WIDTH” can be adjusted within the
range 0 to 7.
4. Press the [A] button to return to the original
mode.
AUX function
This system has an external RCA input so you
can listen to sounds and music from external
devices connected to this unit.
Setting the input level
(AUX SENS) of portable audio
(AUX mode)
This function allows you to set the input level of
optional external devices connected to this unit.
• The factory default setting is “MID”.
1. Press the [A] button to set to the adjust
mode.
2. Touch on the setting item display to
select “AUX SENS” under “SETTING”.
ADJUST MODE
SETTING
3. Touch and hold START for 1 second or
longer.
“System Check” appears on the display.
4. Press the [ROTARY] knob.
The system check starts.
When the system check is complete,
“Completed” appears on the display.
5. Press the [ROTARY] knob again.
The main display for the radio mode
appears.
SYSTEM CHECK
START
ADJUST MODE
SETTING
3. Either touch on the right of the
display, or turn the [ROTARY] knob to set
the input level.
∗ Select one of LOW, MID or HIGH.
4. Press the [A] button to return to the original
mode.
AUX SENS MID
DXZ946MP 43
Page 44

Operations Common to Each Mode
English
Using the security function
(CODEMATIC)
This function prevents persons who do not know
the touch sequence from easily operating this
unit. The Touch Code display appears when
DCP is attached and the power is turned ON
with “CODEMATIC” set to “ON”.
If you touch the display in this screen in the
preset order, “SUCCESSFUL” is displayed and
the power is turned OFF.
When the power is next turned ON, the Touch
Code display does not appear, and the main
display in the radio mode or CD mode is
displayed.
1. Press the [A] button to set to the adjust
mode.
2. Touch on the setting item display to
select “CODEMATIC” under “SETTING”.
ADJUST MODE
SETTING
2 types of items are displayed for
“CODEMATIC”, items for which “ON” or
“OFF” is displayed at the right of the screen,
and items for which “INPUT” is displayed at
the right of the screen. Here, select the item
for which “ON” or “OFF” is displayed at the
right of the display.
3. Either touch on the right of the
display, or turn the [ROTARY] knob to select
“ON” or “OFF”.
4. Touch on the setting item display to
select “CODEMATIC” under “SETTING”.
Here, select the item for which “INPUT” is
displayed at the right of the display.
5. Touch INPUT.
The Touch Code display appears.
CODEMATIC ON
6. Enter the touch code.
∗ Touch one of 5 locations (left, center, right,
top right, or bottom right) of the display.
Each touch of the display lights one of the
Touch Code indicators.
∗ For example, touch (1) center, (2) top
right, (3) left, and (4) bottom right, in that
order. You can also repeatedly touch the
same location.
When you touch 4 times, and 4 indicators
light, you will hear a long beep, and the
original mode is returned to.
■ To cancel CODEMATIC
If you have forgotten the touch order, either
touch 1 bottom right, 2 left, 3 top right and
then 4 right in that order, or press [SCN] on the
remote control unit.
3
1
42
44 DXZ946MP
Page 45

8. OPERATIONS OF ACCESSORIES
CD Changer Operations
English
CD changer
When an optional CD changer is connected
through the CeNET cable, this unit can control
CD changer operations. This unit can be
connected to a total of 2 CeNET-wired CD
changers.
DVD changer
When an optional DVD changer is connected
through the CeNET cable, this unit can control
DVD changer operations. To view a DVD, an
optional monitor is required.
Operation and display of the DVD changer on
this unit is a simplified version, and does not
support all DVD changer functions. For
operating the DVD changer, use the remote
control unit that is provided with the DVD
changer. For details, refer to the User’s Manual
provided with the DVD changer.
■ When 2 CD changers are connected
Press the [ROTARY] knob to select the changer
connected to this unit. (Each press of the
[ROTARY] knob switches the changer.)
• If the CD changer does not contain a
magazine, “NO MAG” is displayed, and if the
magazine does not contain a CD, “NO DISC”
is displayed.
• For details on the title display, see “Switching
the title display” (cf. page 14).
Screen displays in the
changer mode
■ Main display (CD changer mode)
This is displayed by pressing the [ROTARY]
knob to select the CD changer mode.
DISC
MODE
T04/01 :18
05
Track/playing time display
DISC No.
03
Disc No. display
Title display
DISC
Touching the left of the display for 1 second or
longer switches the simple operation display.
SIMPLE MODE
T04/01 :18
MODE
DISC
Title display
Track/playing time display
Track/playing time display
T01/02: 00: The No. of the track currently being
played and the playing time are displayed.
Touching or in the standard
operation display allows you to select the track
to play, or fast-forward/back-forward tracks.
Title display
Touching this switches the display.
Disc No. display
If you touch in the standard operation
display, you can select a disc.
MODE
Touching this displays sub-functions. Touching
and holding this for 1 second or longer displays
the disc list.
T-SCAN/D-SCAN
This is displayed during scan play. Touching
T-SCAN/D-SCAN ends scan play.
T-RPT/D-RPT
This is displayed during repeat play. Touching
T-RPT/D-RPT ends repeat play.
T-RDM/D-RDM
This is displayed during random play.
Touching T-RDM/D-RDM ends random play.
DISC
Touching this starts play of the next disc.
a d (only in the simple operation display)
Touching these selects the track to play.
Touching and holding these fast-forwards/fastbackwards tracks.
DXZ946MP 45
Page 46

CD Changer Operations
English
■ Disc list display (CD changer mode)
This is displayed by touching and holding
MODE for 1 second or longer in the main
display.
Disc name
001
NO TITLE
TITLE
**
004
: Selection in progress
Touching a disc name returns the screen to the
main display, and play starts from the first track
in the disc you touched.
➔
PREV-RTN:
Touching this displays the previous title list.
Touching and holding this for 1 second or longer
returns the screen to the main display.
➜ NEXT:
Touching this displays the next title list.
TITLE LIST
TITLE
Disc No.
005
**
003002
NO TITLEJAZZ
TITLE
006
**
PREV
-RTN
NEXT
CAUTION
CD-ROM discs cannot be played from every
CD changer. This depends on the model.
Note:
• Some CDs recorded in the CD-R/CD-RW mode
may not be usable.
Selecting the changer mode
1. Press the [ROTARY] knob to select the
changer mode.
∗ The mode of equipment that is not
connected is not displayed.
Play starts automatically when the mode
changes to the changer mode.
Pausing play
1. Press the [ ] button.
■ To resume play
1. Press the [ ] button again.
Selecting a CD
1. Touch on the disc No. display to
select a disc.
Play starts.
∗ If magazine does not contain the disc you
selected, the No. for that disc is not
displayed.
∗ Touching DISC starts play of the next
disc.
■ To select a disc from the disc list
display
1. Touch and hold MODE for 1 second or
longer.
The disc list is displayed. If you touch NEXT,
the next part of the disc list is displayed.
2. Touch the disc name.
∗ If magazine does not contain the disc you
selected, “NO DISC” is displayed for that
disc No.
∗ If you selected the same disc as that
currently being played, play returns to and
starts from the first track on that disc. (top
function)
Selecting a track
1. To listen to the next track, touch on the
track display.
2. To listen to the previous track, touch
twice on the track display.
Touching plays the next track. If you
touch more times, the track advances
ahead to the track for the number of times
you touched and that track is played.
Touching plays the previous track. If you
touch more times, the track moves back
to the track for the number of times you
touched and that track is played.
* If you touch twice on the track display
while the start of the track is being played,
the track 2 tracks back is sometimes
played.
Fast-forward/Fast-backward
1. To fast-forward, touch on the track
display.
2. To fast-forward, touch on the track
display.
46 DXZ946MP
Page 47

CD Changer Operations
English
Top function
The top function starts play from the first track
on the disc currently being played.
1. Touch and hold MODE for 1 second or
longer.
The disc list is displayed. If you touch NEXT,
the next part of the disc list is displayed.
2. Touch the disc name.
∗ If magazine does not contain the disc you
selected, “NO DISC” is displayed for that
disc No.
∗ If you selected the same disc as that
currently being played, play returns to and
starts from the first track on that disc.
Scan play
Scan play locates and plays the first 10 seconds
of each track on a disc automatically. This
function continues on the disc until it is
canceled.
The scan play function is useful when you want
to select a desired track.
1. Touch MODE.
2. Touch T-SCAN.
The MODE display changes to “T-SCAN”
and scan play starts.
∗ Scan play starts from the next track after
the track currently being played.
■ To cancel scan play
1. Touch T-SCAN.
The T-SCAN display changes to “MODE”,
and the track that was playing when you
touched T-SCAN is played.
Disc scan play
Disc scan play locates and plays the first 10
seconds of the first track on each disc in the
currently selected CD changer. This function
continues automatically until it is canceled.
Disc scan play is useful when you want to select
a desired CD.
1. Touch MODE.
2. Touch D-SCAN.
The MODE display changes to “D-SCAN”
and disc scan play starts.
* Disc scan play starts from the next disc
after the disc currently being played.
■ To cancel disc scan play
1. Touch D-SCAN.
The D-SCAN display changes to “MODE”,
and the track that was playing when you
touched D-SCAN is played.
Repeat play
Repeat play continuously plays the current
track. This function continues automatically until
it is canceled.
1. Touch MODE.
2. Touch T-REPEAT.
The MODE display changes to “T-RPT” and
repeat play is started.
■ To cancel repeat play
1. Touch T-RPT.
The T-RPT display changes to “MODE”, and
regular play starts from the track that was
playing when you touched T-RPT.
Disc repeat play
After all the tracks on the current disc have
been played, disc repeat play automatically
replays the current disc over from the first track.
This function continues automatically until it is
canceled.
1. Touch MODE.
2. Touch D-REPEAT.
The MODE display changes to “D-RPT” and
disc repeat play is started.
■ To cancel disc repeat play
1. Touch D-RPT.
The D-RPT display changes to “MODE”, and
regular play starts from the track that was
playing when you touched D-RPT.
DXZ946MP 47
Page 48

CD Changer Operations
English
TV Operations
Random play
Random play selects and plays individual tracks
on the disc in no particular order. This function
continues automatically until it is canceled.
1. Touch MODE.
2. Touch T-RANDOM.
The MODE display changes to “T-RDM” and
random play starts.
■ To cancel random play
1. Touch T-RDM.
The T-RDM display changes to “MODE”,
and regular play starts from the track that
was playing when you touched T-RDM.
Disc random play
The disc random play selects and plays
individual tracks or discs automatically in no
particular order. This function continues
automatically until it is canceled.
1. Touch MODE.
2. Touch D-RANDOM.
The MODE display changes to “D-RDM” and
random play starts.
■ To cancel disc random play
1. Touch D-RDM.
The D-RDM display changes to “MODE”,
and regular play starts from the track that
was playing when you touched D-RDM.
TV tuner function
When an optional TV tuner is connected through
the CeNET cable, this unit controls all TV tuner
functions. To watch TV, you need a TV tuner
and a monitor.
Screen displays in the TV
mode
■ Main display
This is displayed by pressing the [ROTARY]
knob to select the TV mode.
STATION
5ch
MANU
indicators
Reception
band display
Title display
Channel display
Touching the left of the display for 1 second or
longer switches the simple operation display.
SIMPLE MODE
5ch
Title display
Preset No. display
MODE
TV 1
B
3
BAND
Preset No.
display
MODE
B
BAND
48 DXZ946MP
Channel display
1ch: The channel currently being received is
displayed.
Touching or in the standard
operation display allows you to perform seek
tuning or manual tuning.
Title display
3ch : The name of the station currently being
received is displayed.
VTR : In video mode
Touching these switches the display.
Reception band display
TV1 : Band name
Preset No. display
Touching in the standard operation
display selects a preset memory.
Page 49

MODE
Touching this displays sub-functions. Touching
and holding this for 1 second or longer displays
the preset memory list.
P-SCAN: This is displayed during a preset
scan. Touching this ends the preset scan.
A-STORE: This is displayed during an autostore. Touching this ends the auto-store.
BAND
Touching this switches the reception band.
Touching and holding this for 1 second or longer
toggles between the manual tuning mode and
the seek tuning mode.
a d (only in the simple operation display)
Touching these buttons enables seek tuning or
step tuning (in the manual tuning mode).
Touch and holding these buttons enables quick
tuning (in manual tuning mode).
■ Preset memory list display
This is displayed by touching and holding
MODE for 1 second or longer in the main
display.
Station name
001
3ch
32ch
004
:
Tuning in progress
RTN :
Touching this returns the display to the main
display.
TITLE LIST
80ch
005
Preset No.
003002
12ch5ch
105ch
006
RTN
Selecting the TV mode
1. Press the [ROTARY] knob to select the TV
mode.
Each press of the [ROTARY] knob switches
the mode as follows:
∗ The mode of equipment that is not
connected is not displayed.
TV Operations
Switching the reception band
1. Touch BAND to switch the reception band.
Each touch of BAND switches the reception
band.
TV1 ➜ TV2 ➜ TV1...
Seek tuning
Seek tuning is a function for automatically
tuning stations with good reception.
1. Touch and hold BAND for 1 second or longer
while MANU is displayed.
Automatic tuning is possible when MANU
disappears.
2. Touch on the channel display.
SEEK UP/SEEK DOWN is displayed, and
tuning starts. Tuning automatically stops at
stations with good reception.
■ To cancel tuning
1. Touch on the channel display again.
Manual tuning
There are 2 ways available: quick tuning and
step tuning.
When you are in the step tuning mode, the
frequency changes 1 step at a time. In the quick
tuning mode, you can quickly tune the desired
frequency.
1. Touch and hold BAND for 1 second or longer
while MANU is not displayed.
Manual tuning is possible when MANU is
displayed.
2. Operate the channel display to tune to a
channel on which there is a broadcast.
There are 2 manual tuning methods: step
tuning and quick tuning.
∗ Step tuning is a function for switching the
channel 1 step at a time.
Touch on the frequency display.
∗ Quick tuning is a function for switching the
channel continuously.
Touch at the channel display.
Tuning stops when you take your finger
away from the panel.
English
DXZ946MP 49
Page 50

TV Operations
English
Recalling a preset station
This function allows the user to select a preset
station.
1. Touch and hold MODE for 1 second or
longer.
The preset memory list is displayed.
2. Touch the station you want to listen to.
* The station can also be tuned by touching
at a preset No.
■ To cancel tuning
1. Touch RTN.
* Stations with good reception are
automatically searched, and are stored to
preset memory (No.1 to No.6) in order
from the station having the lowest
frequency.
Notes:
• When auto store is performed, stations stored to
memory so far are cleared.
• When there are fewer than 6 stations with good
reception, low frequencies are automatically
returned to, and auto store is performed again. If
there are fewer than 6 stations even after auto
store is performed twice, stations stored so far
remain in memory.
Preset memory
A total of 12 TV stations can be stored (6-TV1
and 6-TV2). This allows you to select your
favorite TV stations and store them in memory
for later recall.
1. Touch BAND to switch the reception band.
2. Operate the channel display to select the
station to store to.
3. Touch and hold MODE for 1 second or
longer.
The preset memory list is displayed.
4. Touch and hold the preset No. to store for 2
seconds or longer.
You will hear a long beep, and the station is
stored in memory.
If you hear a short beep, the station is not
stored to memory. Repeat the procedure
from step 1.
Auto store
Auto store selects 6 TV stations automatically
and stores each one into preset memory.
If there are not 6 stations with good reception,
stations previously stored in memory remain
and only the strong stations are stored into
memory.
1. Touch MODE.
2. Touch and hold A-STORE for 2 seconds or
longer.
The MODE display changes to “A-STORE”
and the preset No. in the auto-store
operation appears on the preset No. display.
Preset scan
Preset scan is a function for receiving stations in
the order that they are currently stored to preset
Nos. so that broadcasts can be checked.
1. Touch MODE.
2. Touch P-SCAN.
The MODE display changes to “P-SCAN”
and the preset No. in the preset scan
operation is displayed in the preset No.
display.
∗ The currently stored stations are received
in order for 7 seconds or longer each.
Stations with poor reception are skipped,
and the next station is received.
TV stations are received as follows:
TV1 (1 ➜ 6) ➜ TV2 (1 ➜ 6) ➜ and so
forth.
■ To cancel the preset scan
1. Touch P-SCAN.
The P-SCAN display changes to “MODE”,
and the stations that were being received
when P-SCAN was touched are received
next.
Watching a video
The TV tuner has a VTR input terminal to which
1 external device can be connected. Connect a
12 V video cassette player (VCP) or video
cassette recorder (VCR) to the TV tuner input
terminal.
1. Press the [ ] button.
VTR is displayed, and the mode is switched
to the VTR mode.
∗ The TV screen enters the video input
mode, and videos can be viewed.
50 DXZ946MP
Page 51

TV Operations
■ To return to the TV mode
1. Press the [ ] button again.
Setting the TV area
(TV AREA)
When you select the TV area (TV reception
area), the TV tuner area setting changes.
1. Press the [A] button to set the adjust mode.
2. Touch on the setting item display to
select “TV AREA” under “TUNER”.
ADJUST MODE
TUNER
3. Either touch on the right of the
display, or turn the [ROTARY] knob to select
the area.
4. Press the [A] button to return to the previous
mode.
The above operations are required when a TV
tuner other than TTX7501z is connected.
TV AREA
******
Setting the TV diver
(TV DIVER)
You can change the reception setting for the TV
antenna connected to the TV tuner.
• Set this item to “OFF” when a TV diversity
antenna is not in use.
• The factory default setting is “ON”.
1. Press the [A] button to set to the adjust
mode.
2. Touch on the setting item display, and
select “TV DIVER” under “TUNER”.
ADJUST MODE
TUNER
3. Either touch on the right of the
display, or turn the [ROTARY] knob to select
“ON” or “OFF”.
4. Press the [A] button to return to the original
mode.
TV DIVER
ON
5.1ch Surround Decoder Operations
When an optional CeNET wiring-compatible
5.1ch surround decoder is connected, the 5.1ch
surround decoder can be controlled on this unit.
The following functions change when a 5.1ch
surround decoder is connected:
•Two modes “MOVIE” and “VIRTUAL” are
added to the Dolby Pro Logic II mode.
• The VSE/POSITION mode is changed to the
DSF (Digital Sound Field) mode.
• In the P.EQ (Parametric Equalizer) mode, the
settings of each speaker can be adjusted in
even more detail.
• Settings relating to music in setting items (cf.
page 34) are changed.
Selecting PL II (Dolby PL II)
Select one of the available four modes matched
to the source you are to play as the Dolby Pro
Logic II mode.
• The factory default setting is “OFF”.
■ MUSIC (Music mode)
See “Selecting the PLII menu (Dolby PLII)”
(cf. page 17).
■ MATRIX (Matrix mode)
See “Selecting the PLII menu (Dolby PLII)”
(cf. page 17).
■ MOVIE (Movie mode)
Suitable for DVD video movies.
■ VIRTUAL (Virtual mode)
Suitable for movies and other audio sources.
■ OFF
The Dolby Pro Logic II mode is not used.
1. Press the [SOUND] button.
2. Touch Dolby PLII.
OFF
DSF
A - MODE
OFF
P. EQ
SOUND MENU
OFF
Dolby PL
RTN
II
English
DXZ946MP 51
Page 52

5.1ch Surround Decoder Operations
English
3. Touch on the right of the display to
select the Dolby Pro Logic II mode.
4. Touch on the DSF menu No. to select
the desired DSF menu.
RTN
Dolby PL II
OFF
The mode display is switched as follows:
MUSIC (music mode) ➜ MATRIX (matrix
mode) ➜ MOVIE (movie mode) ➜
VIRTUAL (virtual mode) ➜ OFF (PL II off)
➜ MUSIC (music mode)...
* For details on the volume adjustment of
the center speaker/sub-woofer, see page
40.
4. Touch RTN.
Selecting the DSF menu
DSF (Digital Sound Field) makes it possible
through sound simulation to enjoy the acoustic
experience you would have in a concert hall or
live performance hall.
• The factory default setting for DSF is “OFF”
and for the DSF menu is “HALL”.
• When the DSF menu is selected, the volume
sometimes decreases.
1. Press the [SOUND] button.
2. Touch DSF.
OFF
DSF
A - MODE
3. Touch on the ON/OFF display.
The DSF effect is toggled ON/OFF.
OFF
When DSF is set to “OFF”, the DSF setting
is not reflected on the music source. This
completes the DSF setting. Press the
[SOUND] button to return to the original
mode.
OFF
P. EQ
SOUND MENU
DSF MODE
HALL
OFF
Dolby PL
BASIC
1
RTN
II
RTN
ON
DSF MODE
CHURCH
BASIC
1
RTN
DSF menus
HALL ➜ CHURCH ➜ STADIUM ➜ LIVE ➜
JAZZCLUB ➜ THEATER ➜ HALL...
Function
No.
Name
Discription
1 HALL Large concert hall
2 CHURCH Church with a vaulted
ceiling
3STADIUM Large stadium without
roof or walls
4 LIVE Live performance hall,
larger than a jazz club
5 JAZZCLUB Jazz club with a low
ceiling
6 THEATER Movie or drama theater
5. Press the [SOUND] button to return to the
original mode.
Selecting the Parametric
Equalizer menu
Parametric Equalizer (P.EQ) allows you to
compensate the entire frequency level range in
detail by smooth curve using frequency
compensation matched to the type of your car.
• The factory default setting provides the
following settings for all speakers.
FREQ = 1kHz, Q =1, GAIN = 0dB
1. Press the [SOUND] button.
2. Touch P.EQ.
OFF
DSF
A - MODE
3. Touch on the ON/OFF display.
The P.EQ effect is toggled ON/OFF.
OFF
OFF
P. EQ
SOUND MENU
P.EQ MODE
SIGNAL
OFF
Dolby PL
P-NOIS
RTN
II
RTN
52 DXZ946MP
Page 53

When the P.EQ effect is set to “OFF”, the
P.EQ setting is not reflected on the music
source. This ends the P.EQ setting. Press
the [SOUND] button to return to the original
mode.
4. Touch on the P.EQ menu No. to select
the P.EQ menu.
ON
P.EQ MODE
SP - SEL
FRONT
RTN
5.1ch Surround Decoder Operations
■ P. EQ adjustment
The settings that can be adjusted in the P.EQ
menu are as follows. The center frequency, gain
and Q curve can be stored to channel/band
combinations.
For example, center frequency “250Hz”, gain “
-8dB” and Q curve “3” can be stored to band 1
on the front.
For details on the P.EQ function, see “P. EQ
adjustment” (cf. page 21).
English
P.EQ menus
SIGNAL ➜ SP-SEL ➜ BAND ➜ FREQ ➜ Q
➜ GAIN ➜ SIGNAL...
5. Touch on the right on the display and
adjust the item as desired.
SIGNAL (selects the adjustment signal):
Selects “P-NOIS” or “MUSIC”
• P-NOIS: set when pink noise is to be
used
• MUSIC: set to use music signals
SP-SEL (selects the speakers whose P.EQ
value is to be adjusted):
Select one of “FRONT”, “CENTER” or
“SURROUND”.
• FRONT: front speaker
• CENTER: center speaker
• SURROUND: surround speaker
BAND (selects the frequency band):
Select one of band 1 to 3
FREQ (selects the center frequency):
The adjustment range is from 20 Hz to
20 kHz.
Q (sets the Q curve):
Sets one of 1, 3, 5, 7, or 20 as the
sharpness of the Q curve.
GAIN (adjusts the output level):
Adjusts the gain (output level) within the
range -12dB to +12dB. (1dB steps, 25
points)
6. Repeat steps 4 and 5 to adjust the desired
item.
7. Press the [SOUND] button to return to the
original mode.
Changing settings
When a 5.1ch surround decoder is connected,
settings relating to music in the adjust mode are
changed.
Selecting setting items
The following describes the items whose
settings are changed.
For details of other items that are not changed,
see “Changing settings” (cf. page 34) at
“Operations Common to Each Mode”.
1. Press the [A] button.
The mode changes to the adjust mode.
ADJUST MODE
SOUND
CENTER - SP
2. Touch on the setting item display to
select the item to set.
∗ Touching on the left of the display
switches main items 1 item at a time.
Touching on the left of the display
switches sub-items continuously.
∗ Touching on the center of the
display switches the sub-items 1 item at a
time. Touching switches sub-items
continuously.
3. When “THROUGH” is displayed at the right
of the display, touch THROUGH to switch to
the adjustment details display.
4. Either touch on the right of the
display, or turn the [ROTARY] knob to set
the details.
■ To return to the original mode
1. Press the [A] button again.
ON
DXZ946MP 53
Page 54

5.1ch Surround Decoder Operations
English
● Setting items
Main Item Sub-item
SOUND CENTER-SP / SRD-SP / SUB-WOOFER
DELAY CENTER-SP / SRD-SP
DOLBY D D-RANGE
PL II CONT PANORAMA / DIMENSION / CTR WIDTH
• Setting the speaker ON/OFF (cf. page 54)
FRONT HPF / CENTER HPF / SRD HPF / SUB-W LPF
• Adjusting the speaker filter frequency (cf. Page 54)
SP GAIN
• Adjusting the speaker output level (cf. page 41)
• Adjusting the speaker delay time (cf. page 55)
• Adjusting the dynamic range (cf. page 55)
• Setting the music mode in detail (cf. page 42)
Setting speakers ON/OFF
(CENTER-SP/SRD-SP/SUBWOOFER)
Set the center speaker (CENTER-SP), surround
speaker (SRD-SP) and sub-woofer (SUBWOOFER) ON/OFF.
Be sure to set this setting to “OFF” when there
is no center speaker, surround speaker or subwoofer.
• The factory default setting is “ON”.
1. Press the [A] button to set to the adjust
mode.
2. Touch on the setting item display to
select “CENTER-SP” under “SOUND”,
“SRD-SP” under “SOUND”, and “SUB-
WOOFER” under “SOUND”.
ADJUST MODE
SOUND
3. Either touch on the right of the
display, or turn the [ROTARY] knob to select
“ON” or “OFF”.
∗ In the case of “SUB-WOOFER”, select
one of “ON+”, “ON-” or “OFF”.
Normally, select “ON+”. However, when
“ON-” is set, an effect in the low range can
be strongly felt.
4. Press the [A] button to return to the original
mode.
CENTER - SP
ON
Adjusting the filter
frequencies of speakers
(FRONT HPF/CENTER HPF/
SRD HPF/SUB-W LPF)
This function allows you to adjust the filter
frequency matched to the speakers you are
using.
•A speaker that was turned off in the section
“Setting speakers on or off (CENTER-SP/
SRD-SP/SUB-WOOFER)” is not displayed.
• The factory default setting for “FRONT HPF”
or “SRD HPF” is “THROUGH” (no filter), and
for “CENTER HPF” or “SUB-W LPF” is
“120Hz”.
■ Filter adjustment
FRONT HPF/CENTER HPF/SRD HPF
(high-pass filter adjustment)
This filter cuts bass sound from the front center
and surround speakers.
THROUGH ➜ 50Hz ➜ 80Hz ➜ 120Hz
Set the filter matched to the speaker when
small-diameter speakers are used.
THROUGH
Set this when using speakers that can
generate bass. THROUGH cannot be set at
CENTER HPF.
SUB-W LPF (sub-woofer low-pass filter
adjustment)
This filter cuts treble sound from the sub-woofer.
50Hz ➜ 80Hz ➜ 120Hz
Set the filter frequency to match the sub-woofer.
1. Press the [A] button to set to the adjust
mode.
54 DXZ946MP
Page 55

2. Touch on the setting item display to
select “FRONT HPF” under “SOUND”,
“CENTER HPF” under “SOUND”, “SRD
HPF” under “SOUND”, and “SUB-W LPF”
under “SOUND”.
ADJUST MODE
SOUND
FRONT HPF
THROUGH
3. Either touch on the right of the
display, or turn the [ROTARY] knob to set
the frequency.
∗ Select one of THROUGH*
1
, 50Hz, 80Hz,
and 120Hz.
*1THROUGH is displayed only when
“FRONT HPF” or “SRD HPF” is
selected.
4. Press the [A] button to return to the original
mode.
Adjusting the delay time of
the speaker
(CENTER-SP/SRD-SP)
The timing when the sound of each speaker
reaches the listening position depends on your
speaker installation and the size of your car.
Adjust the delay time of each speaker so that
the sound of all speakers reaches the listening
position at the same time as the sound from the
front speakers.
• The factory default setting is “0 ms”.
1. Press the [A] button to set to the adjust
mode.
2. Touch on the setting item display to
select “CENTER-SP” under “DELAY” and
“SRD-SP” under “DELAY”.
5.1ch Surround Decoder Operations
Adjusting the Dolby Digital
functions (D-RANGE)
This function compresses the dynamic range of
Dolby Digital to maintain low level sounds such
as actor conversation and suppress loud sound
volumes.
These functions are only available on Dolby
Digital DVD discs.
• The factory default setting is “MAX”.
1. Press the [A] button to set to the adjust
mode.
2. Touch on the setting item display to
select “DOLBY D” under “D-RANGE”.
ADJUST MODE
Dolby D
D - RANGE
3. Touch on the right of the display to
adjust the dynamic range and adjust the
desired item.
MAX: maximum dynamic range mode of the
original source
STD: recommended mode for standard
listening
MIN: the most compressed dynamic range
mode that renders even low sounds easy to
hear.
4. Press the [A] button to return to the original
mode.
MAX
English
ADJUST MODE
DELAY
CENTER - SP
0ms
3. Touch on the right of the display to
adjust the delay time.
∗ “CENTER-SP” can be adjusted within the
range 0 ms to 5 ms.
∗ “SRD-SP” can be adjusted within the
range 0 ms to 15 ms.
4. Press the [A] button to return to the original
mode.
DXZ946MP 55
Page 56

English
9. IN CASE OF DIFFICULTY
Problem
Power does not
turn on.
(No sound is
produced.)
No sound output
when operating
the unit with
amplifiers or
power antenna
attached.
General
Nothing happens
when buttons are
pressed.
Display is not
accurate.
No sound heard.
Sound skips or is
noisy.
CD/MP3/WMA
Sound is cut or
skipped.
Noise is
generated or
noise is mixed
with sound.
Cause
Fuse is blown.
Incorrect wiring.
Power antenna lead is
shorted to ground or
excessive current is required
for remote-on the amplifiers
or power antenna.
The microprocessor has
malfunctioned due to noise,
etc.
DCP or main unit connectors
are dirty.
There is a disc other than a
compact disc or foreign
matter already in place.
MP3/WMA files are absent in
a disc.
Files are not recognized as
an MP3/WMA file.
File system is not correct.
Disc is dirty.
Disc is heavily scratched or
warped.
MP3/WMA files are not
encoded properly.
Measure
Replace with a fuse of the same amperage. If the
fuse blows again, consult your store of purchase.
Consult your store of purchase.
1. Turn the unit off.
2. Remove all wires attached to the power antenna
lead. Check each wire for a possible short to
ground using an ohm meter.
3. Turn the unit back on.
4. Reconnect each amplifier remote wire to the
power antenna lead one by one. If the amplifiers
turn off before all wires are attached, use an
external relay to provide remote-on voltage
(excessive current required).
Turn off the power, then
press the [RELEASE]
button and remove the DCP.
Press the reset button with
a thin rod.
Wipe the dirt off with a soft cloth moistened with
cleaning alcohol.
With the slooping console open, press and hold the
[Q] button for 3 seconds or longer.
The foreign matter is forcibly ejected.
Write MP3/WMA files onto the disc properly.
Use MP3/WMA files encoded properly.
Use ISO9660 level 1, 2 or JOLIET or Romeo file
system.
Clean the disc with a soft cloth.
Replace with a disc with no scratches.
Use MP3/WMA files encoded properly.
Reset button
56 DXZ946MP
Page 57

English
Problem
Sound is bad
directly after
power is turned
on.
Wrong filename
Play list play is
CD/MP3/WMA
not performed.
Cause Measure
Water droplets may form on
the internal lens when the
car is parked in a humid
place.
File system is not correct.
File name or extension is not
correct.
Let dry for about 1 hour with the power on.
Use ISO9660 level 1, 2 or JOLIET or Romeo file
system.
Use alphanumeric/ASCII characters for MP3/WMA
file name.
Use “.M3U” for the file extension of a play list.
DXZ946MP 57
Page 58

English
10. ERROR DISPLAYS
If an error occurs, one of the following displays is displayed.
Take the measures described below to eliminate the problem.
Error Display Measure
ERROR 2
ERROR 3
ERROR 6
CD/MP3/WMA
AMP GUARD
General
ERROR 2
ERROR 3
CD changer
ERROR 6
ERROR 2
ERROR 3
ERROR 6
DVD changer
ERROR P
A DISC is caught inside the CD deck and is
not ejected.
A DISC cannot be played due to scratches,
etc.
A DISC is loaded upside-down inside the
CD deck and does not play.
The speaker protection circuit is operating.
During this operation, if any volume
operation is performed, the display shows
“AMP GUARD”.
“AMP GUARD” sometimes functions when
special test signals are used.
A DISC inside the CD changer is not
loaded.
A DISC inside the CD changer cannot be
played due to scratches, etc.
A DISC inside the CD changer cannot be
played because it is loaded upside-down.
A DISC inside the DVD changer cannot be
played.
A DISC cannot be played due to scratches,
etc.
A DISC inside the DVD changer cannot be
played because it is loaded upside-down.
Parental level error
Cause
This is a failure of CD deck’s mechanism and
consult your store of purchase.
Replace with a non-scratched,
non-warped-disc.
Eject the disc then reload it properly.
1. Turn down sound volume. Function can
also be restored by turning the power off
and on again.
(Speaker volume is reduced automatically
when the speaker protection circuit operates).
2. If the sound is muted again, consult our
service department.
This is a failure of CD changer’s mechanism
and consult your store of purchase.
Replace with a non-scratched, non-warped
disc.
Eject the disc then reload it properly.
This is a failure of DVD mechanism and consult your store of purchase.
Retry or replace with a non-scratched, nonwarped-disc.
Eject the disc then reload it properly
Set the correct Parental level.
ERROR R
Region code error
Eject the disc and replace correct region
code disc.
If an error display other than the ones described above appears, press the reset button. If the problem
persists, turn off the power and consult your store of purchase.
58 DXZ946MP
Page 59

11. SPECIFICATIONS
English
FM Tuner
Frequency Range:
87.0 MHz to 108.0 MHz
Usable Sensitivity:
9 dBf
50dB Quieting Sensitivity:
15 dBf
Alternate Channel Selectivity:
70 dB
Stereo Separation (1 kHz):
35 dB
Frequency Response (±3 dB):
30 Hz to 15 kHz
AM Tuner
Frequency Range:
531 kHz to 1629 kHz
Usable Sensitivity:
25 µV
CD Player
System:
Compact disc digital audio system
Usable Discs:
Compact disc
Frequency Response (±1 dB):
5 Hz to 20 kHz
Signal to Noise Ratio (1 kHz):
100 dB
Dynamic Range (1 kHz):
96 dB
Harmonic Distortion:
0.01%
Audio
Maximum Power Output:
212 W (53 W × 4 ch)
Continuous Average Power Output:
18 W × 4, into 4 Ω, 20 Hz to 20 kHz, 1%THD
Bass Control Action (50 Hz):
±12 dB
Treble Control Action (12.5 kHz):
±12 dB
Line Output Level (CD 1 kHz):
4 V/F 2ch + 4V/R 2ch
4 V/SUB WOOFER 2ch
0.5 V/2-ZONE 2ch
General
Power Supply Voltage:
14.4 V DC (10.8 to 15.6 V allowable), negative
ground
Current Consumption:
Less than 15 A, 3A
Speaker Impedance:
4 Ω (4 Ω to 8 Ω allowable)
Weight / Source unit:
1.7 kg (3.74 lb.)
Weight / Remote control unit:
80 g (2.82 oz.) (including battery)
Dimensions / Source unit:
178 (Width) × 50 (Height) × 155 (Depth) mm
[7" (Width) × 2" (Height) × 6-1/8" (Depth)]
Dimensions / Remote control unit:
44 (Width) × 110 (Height) × 27 (Depth) mm
[1-3/4" (Width) × 4-5/16" (Height) × 1-1/8"
(Depth)]
Note:
• Specifications and design are subject to change without notice for further improvement.
DXZ946MP 59
 Loading...