

Page 1
Owner's
Mode
Manual de instrucciones
manual
d'emploi
DUZ3855AT
CD/USBIMP3IWMAlAAC RECEIVER WITH CeNET CONTROL
AUTORADIO CD/USB/MP3IWMAlAAC
RECEPTOR CD/USB/MP3IWMAlAAC CON CONTROL CeNET
I AVEC COMMANDE CeNET
Page 2
This equipment has been tested and found to comply with the limits for a Class B digital device, pursuant to
Part 15 of the FCC Rules.
in
These limits are designed to provide reasonable protection against harmful interference
a residential
installation.
This equipment generates, uses, and can radiate radio frequency energy and, if not installed and used
in
accordance with the instructions, maycause harmful interference to radio communications. However, there is
no guarantee that interference will not occur in a particular installation.
If
this equipment does cause harmful interference to radio or television reception, which can be determined by
turning the equipment off and on, the user
is
encouraged to consult the dealer oranexperienced radiofTV
technician for help.
juge
Cet appareil a ete teste et
15
Section
des Reglements FCC.
conforme aux limites des apparelis numenquesdeClasseB.aux termesdela
Ces limites ant pour but d'assurer une protection raisonnable contre les interferences parasites dans une
installation residentielle.
Cet appareil engendre, utilise et peut emettre une energie radioelectrique et, s'iI n'est pas instal
et utilise
en
Ie
stricte conformite avec ces instructions.ilpeut provoquer des interferences parasites sur les liaisons
radiophoniques. Ceci
garantit par pour autant qu'une installation particuliereneprovoquera
aucunG
ne
interference.
Si
I'appareil engendre des interferences sur la reception des andes radioaude
en
verifie
un
mettant I'appareil hoI's tension puis sous tension, I'utilisateur est invite aconsulter son revendeur
technicien exprimenleenradio/television pour lui demanderconsell.
television,cequi peut etre
au
Este equipo ha sido probado y se ha comprobado que cumple con los Ifmites
B,
segun10indicado en la Parte 15 de las Normas de FCC.
deundispositivo digital de
c1ase
Estos Iimites se han establecido para ofrecer una protecci6n razonable contra interferencias perjudiciales en
instalaciones residenciales.
Este equipo genera, emplea, y puede radiar energfa de radiofrecuencia
acuerdo con las instrucciones, puede causar interferencias perjudiciales
embargo, no se garantiza que las interferencias no ocurran en una instalaci6n
Si este
equipo
determinarse
consulte al
causa
interferencias perjudiciales en la recepcionderadio 0detelevision, 10 cual
conectandoydesconectando
abastecedor0que
MODEL
I
AM 530-1710kHz/FM 87.9-107.9MHz
THIS
DEVICE COMPLIES WITH PART 15OFTHE
OPERATION IS SUBJECTTO THE FOLLOWING
{ll
THIS DEVICE MAY NOTCAUSE HARMFUL INTERFERENCE, AND
(2) THIS DEVICE MUST ACCEPT
INCLUDING INTERFERENCE THAT MAY CAUSE UNDESIRED
OPERATION.
THIS PRODUCTION COMPLIES WITH OHHS RULES21CFR
SUBCHAPTERJAPPLICABLE
CLARIONCO..
lTD
7-2. SHINTOSHIN,CHUD-KU,SAITAMA·SHI,SAIT
This product includes technology
Microsoft Corporation
without a license from
MANUFACTURED:
SERIAL
No
PE~c:::=J
pida
ayuda
12V 8 GROUND
/>NY
INTERFERENCE RECEIVED,
AT DATEOFMANUFACTURE.
owned
and
cannot beusedordistributed
MSLGP.
by
la alimentacion del equipo, se
a un tecnico en radio/television experimentado.
I
Clarion
FCC RULES.
lWO
CONDITIONS:
AMA
3JO·0081.JAPAN
216L:::::::J
Clarion
Co.,
lid.
MADE IN c=::J
y,
si no se instala y emplea de
en
las radiocomunicaciones. Sin
en
particular.
aconseja
al usuario
o
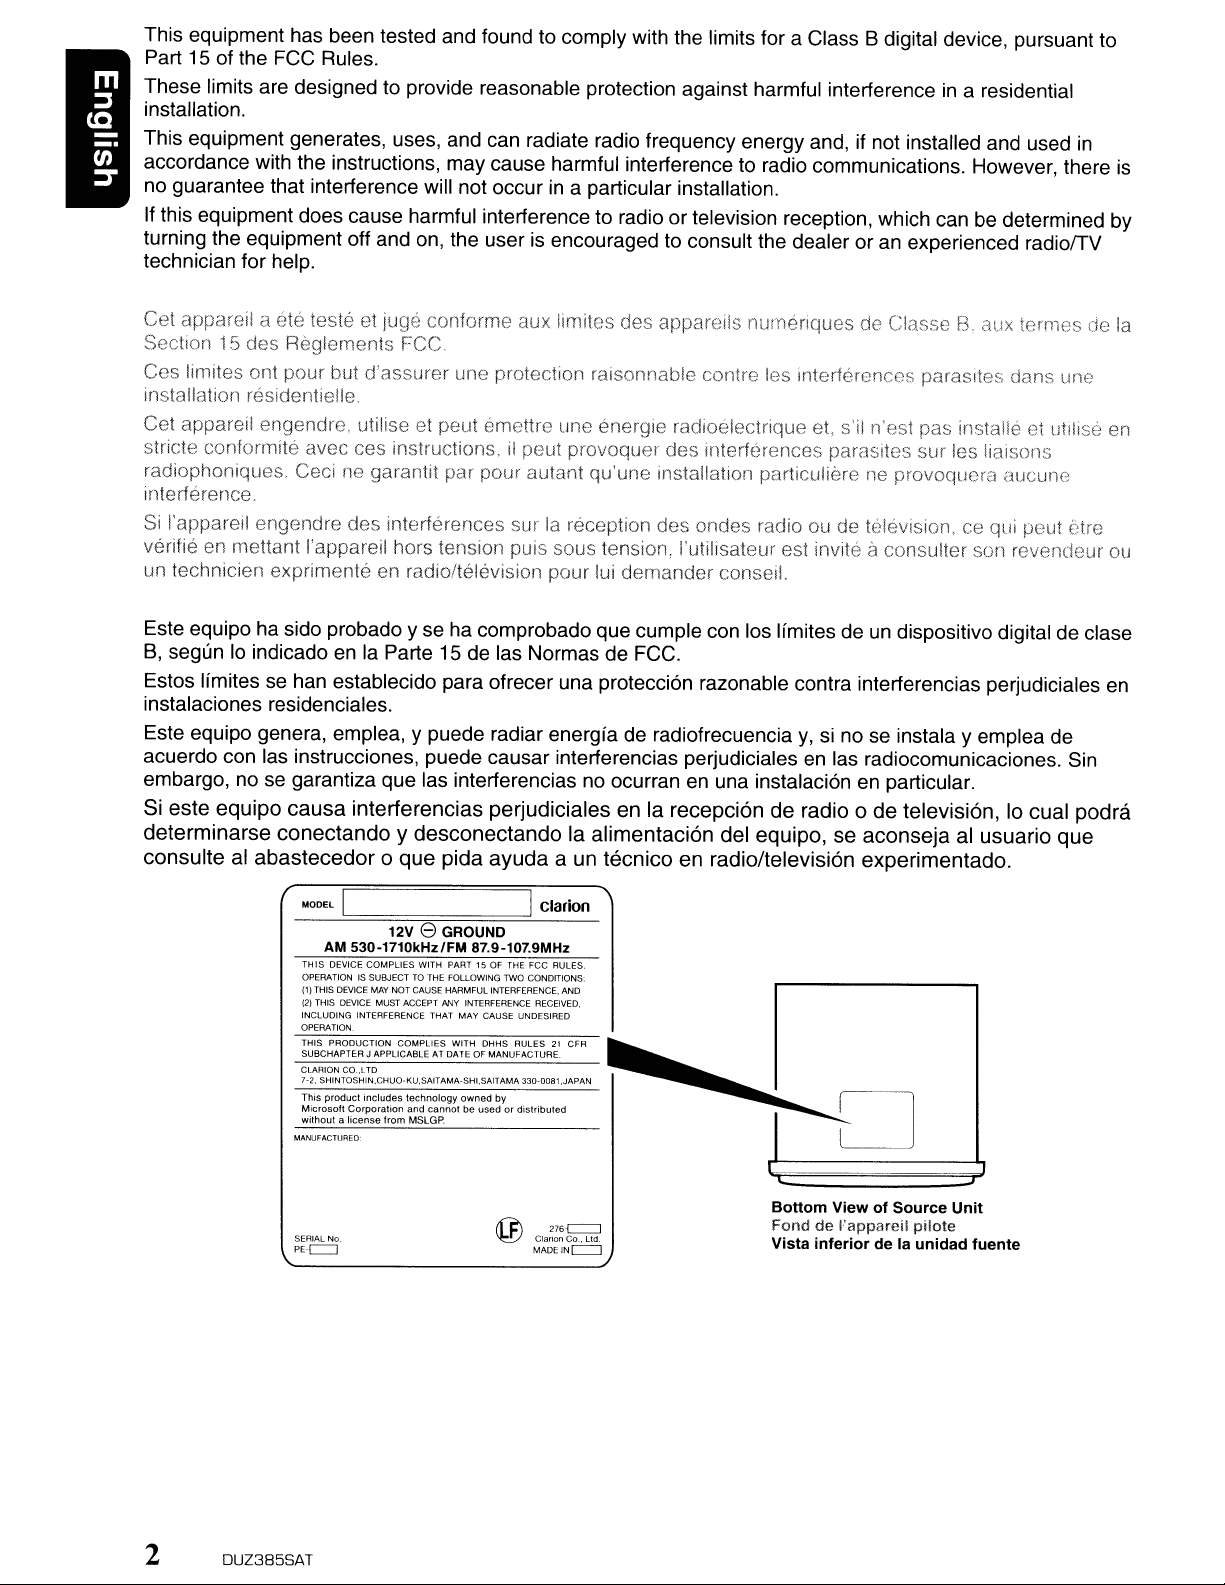
Bollom
FonddeI'appareil
Vista
ViewofSource
inferiordela
Unit
pilote
unidad
podra
que
fuente
2
DUZ385SAT
Page 3
CLARION
PRODUCT
For
REGISTRATION INFORMATION
USA
and
Canada
only
www.clarion.com
Dear Customer:
Congratulations
that you'll enjoy your Clarion experience.
There are many benefits to registering your product. We invite you to visit our website at
on
your purchase of a Clarion mobile electronic products.
We
are confident
www.clarion.com to register your Clarion product.
We have made product registration simple with our easy to use website. The registration form
is short and easy to complete. Once you're registered. we can keep you informed of important
product information.
Register at
www.clarion.com - it's easy to keep your Clarion product up to date.
Thank you for purchasing this
* Please read this owner's manual
* After reading this manual, be sure to keep it
Clarion product.
in
its entirety before operating this equipment.
in
a handy place (e.g., glove compartment).
* Check the contents of the enclosed warranty card and keep it carefully with this manual.
Contents
1. FEATURES 4
2.
PRECAUTIONS 4
Handling Compact Discs 5
3. CONTROLS 6
Names of the Buttons and Their Functions 6
Display Items 8
Display Screen 8
4.
REMOTE CONTROL 9
Functions of Remote Control Unit Buttons 9
Inserting the Battery
5.
OPERATIONS 12
Basic Operations
Radio Operations 15
XM
Satellite Radio Operations 17
CD/MP3IWMAlAAC Operations 19
Operations Common to Each Mode 23
6.
ACCESSORIES 27
USB/MTP Operations 27
iPod Operations 29
SIRIUS Satellite Radio Operations :
CD Changer Operations 33
DVD Changer Operations 34
TV Operations 34
7.
TROUBLESHOOTING 36
8.
ERROR DISPLAYS 38
9.
SPECIFICATIONS 39
10. OTHERS
11
12
31
40·
DUZ385SAT 3
Page 4
1.
FEATURES
.
IAACI
lusnl
~
'~A~I:'.-I
REA
• USB Audio for
• USB Digital Media Streaming Capability
• XM Mini Tuner Direct Ready
* "iPod"
"iPod"
*
XM
is
for legal or rightholder-authorized copying only. Don't steal music.
is
a trademarkofApple Inc., registeredinthe U.S.
and the
XM
iPod@
logos
are
trademarks of
XM
2. PRECAUTIONS
1.
When the inside of the car is very cold and
the player is used soon after switching on the
heater moisture may form on the disc or the
optical parts of the player and proper
playback may not be possible.
forms on the disc, wipe it off with a soft cloth.
If
moisture forms on the optical parts of the
player, do not use the player for about one
hour. The condensation will disappear
naturally allowing normal operation.
2.
Driving on extremely bumpy roads which
cause severe vibration may cause the sound
to skip.
3.
This unit uses a precision mechanism. Even
in
the event that trouble arises, never open
the case, disassemble the unit, or lubricate
the rotating parts.
If
moisture
O2JlTNET
D Y
Satellite Radio
IR,.::J
ID3TAG
101
Madefor
~iPod
and
other countries.
Inc.
A CAUTION
USE OF CONTROLS, ADJUSTMENTS, OR
PERFORMANCE OF PROCEDURES OTHER
THAN THOSE SPECIFIED HEREIN, MAY
RESULT IN HAZARDOUS RADIATION
EXPOSURE.
THE COMPACT DISC PLAYER SHOULD NOT
BE ADJUSTED OR REPAIRED BY ANYONE
EXCEPT PROPERLY QUALIFIED SERVICE
PERSONNEL.
CHANGES OR MODIFICATIONS NOT
EXPRESSLY APPROVED BY THE
MANUFACTURER FOR COMPLIANCE
COULD VOID THE USER'S AUTHORITY TO
OPERATE THE EQUIPMENT.
INFORMATION
CHANGES OR MODIFICATIONS TO THIS
PRODUCT
MANUFACTURER WILL VOID THE
WARRANTY AND WILL VIOLATE FCC
APPROVAL.
FOR USERS:
NOT
APPROVED
BYTHE
4 DUZ385SAT
Page 5
Handling Compact Discs
Use only compact discs bearing the
rillo~@
~
Do not play heart-shaped, octagonal, or other
specially shaped compact discs.
Some CDs recorded
may not be usable.
mark.
in
CD-R/CD-RW mode
mJD~@
DIGITAL
AUDIO
or
Handling
• Compared to ordinary music CDs, CD-R and
CD-RW discs are both easily affected by high
temperature and humidity and some of CD-R
be
and CD-RW discs may not
Therefore, do not leave them for a longtime
in
the car.
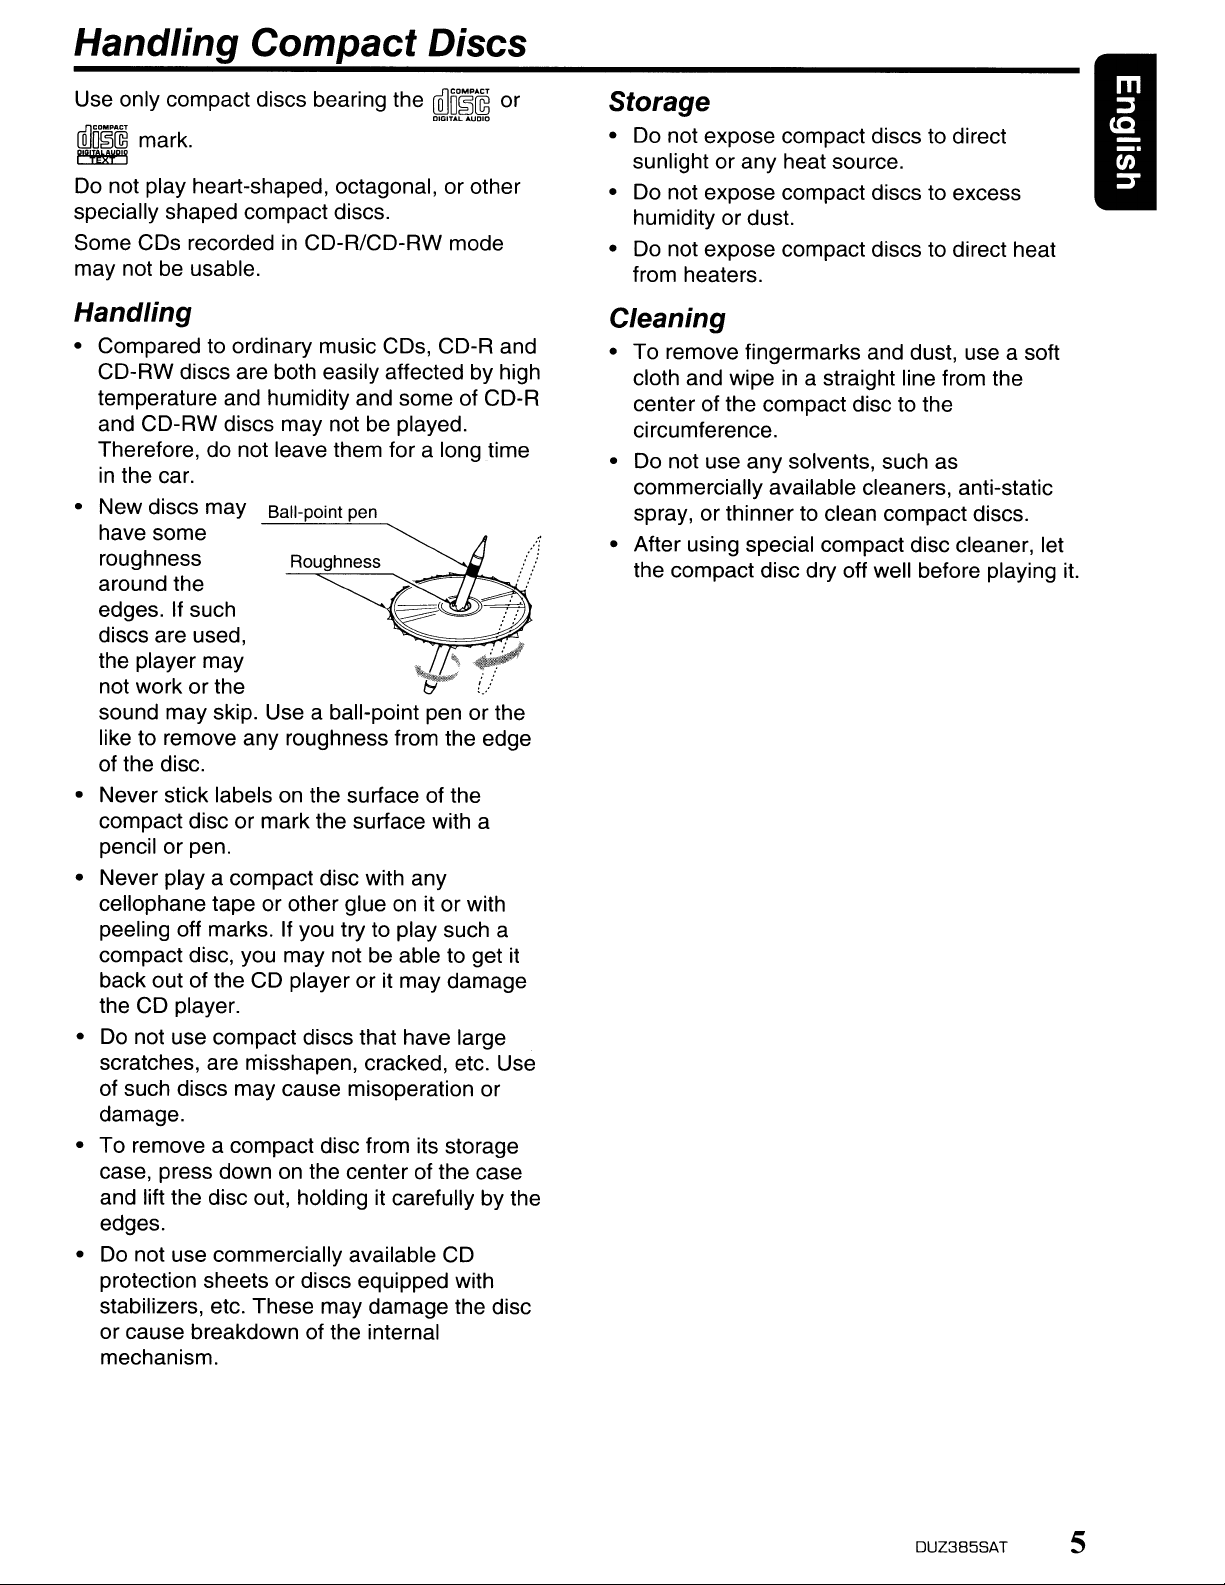
• New discs may
have some
roughness
around the
If
edges.
discs are used, .
the player may
not work or the
sound may skip. Use a ball-point pen orthe
like to remove any roughness from the edge
of the disc.
• Never stick labels on the surface of the
compact disc or mark the surface with a
pencil or pen.
• Never
cellophane tape or other glue
peeling off marks. If you try to play such a
compact disc, you may not be able to get it
back out of the CD player or it may damage
the CD player.
Do
•
scratches, are misshapen, cracked, etc. Use
of such discs may cause misoperation or
damage.
• To remove a compact disc from its storage
case, press down
and lift the disc out, holding it carefully by the
edges.
• Do not use commercially available CD
protection sheets or discs equipped with
stabilizers, etc. These may damage the disc
or cause breakdown of the internal
mechanism.
such
playa
not use compact discs that have large
Ball-point pen
compact disc with any
on
the center of the case
played.
~
t3
on
it or with
?
L.:
Storage
• Do not expose compact discs to direct
sunlight or any heat source.
• Do not expose compact discs to excess
humidity or dust.
• Do not expose compact discs to direct heat
from heaters.
Cleaning
• To remove fingermarks and dust, use a soft
in
cloth and wipe
center of the compact disc to the
circumference.
• Do not use any solvents, such as
commercially available cleaners, anti-static
spray, or thinner to clean compact discs.
• After using special compact disc cleaner, let
the compact disc dry off well before playing it.
a straight line from the
DUZ385SAT
5
Page 6
· ,
3. CONTROl.S
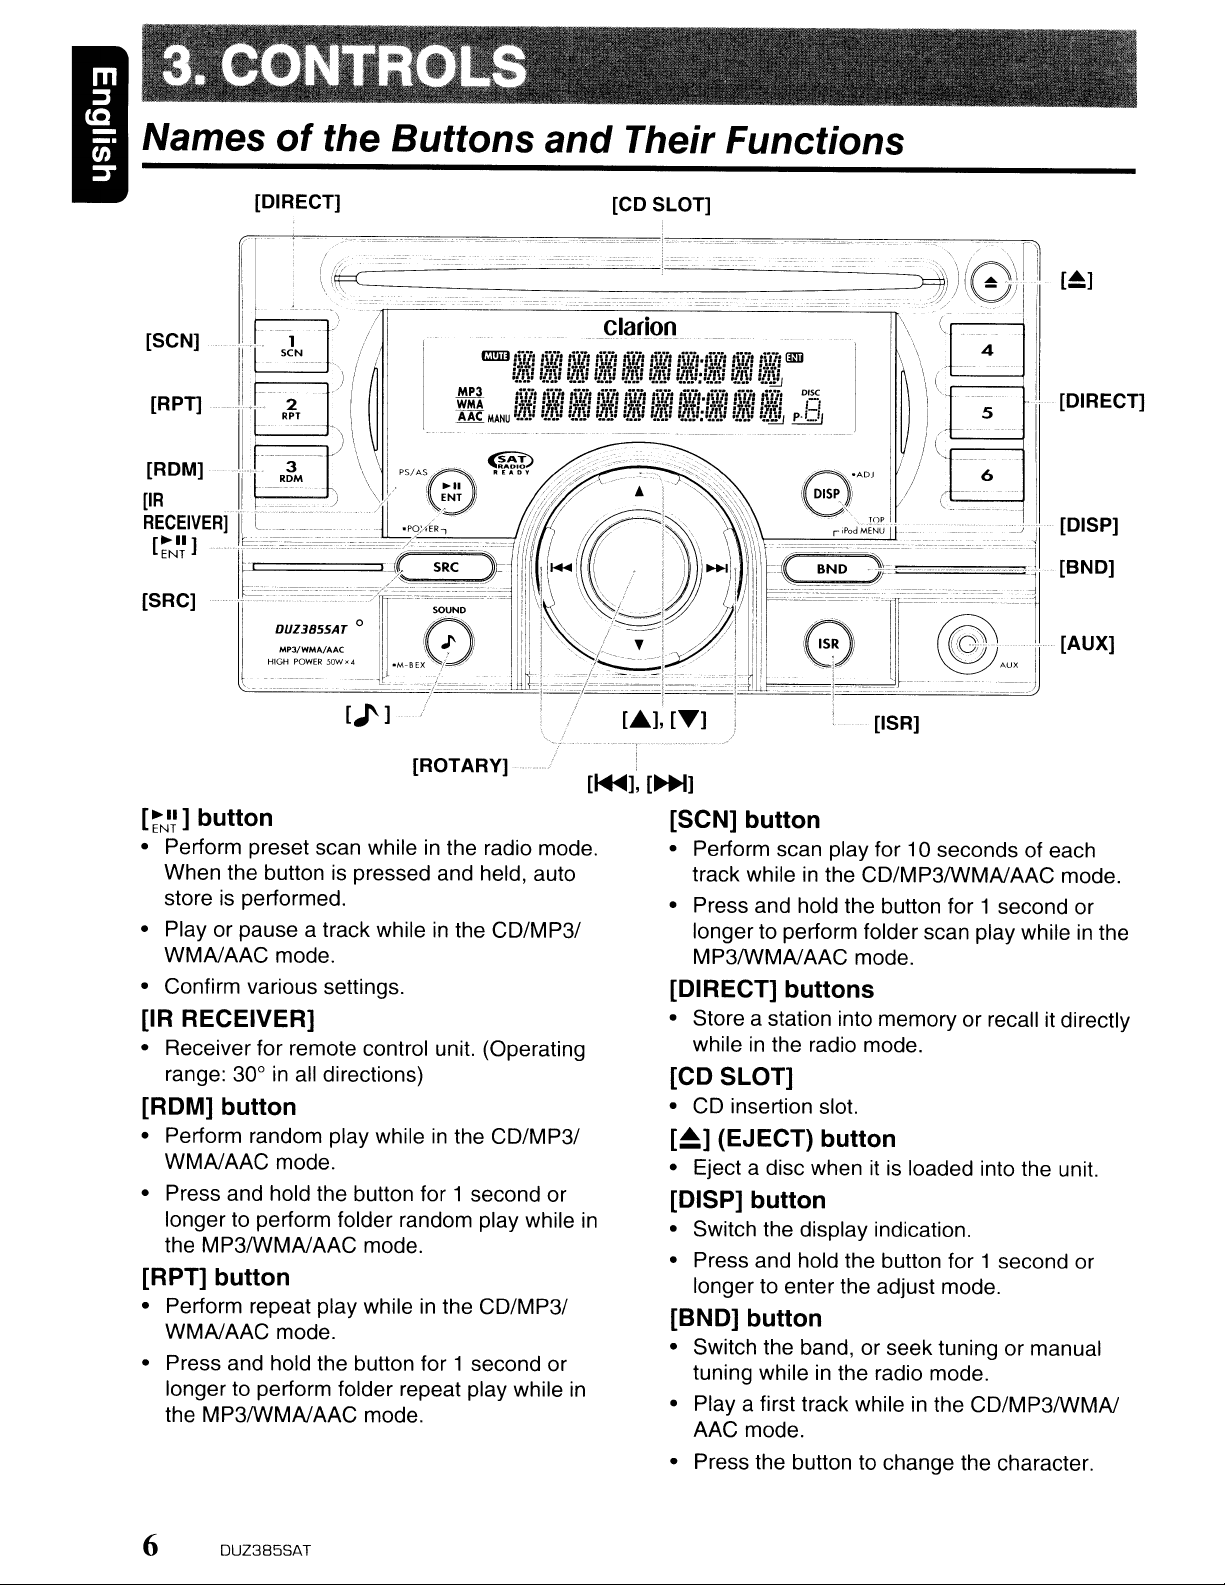
Names
of
the Buttons
[DIRECT]
and
'-
Their Functions
[CD SLOT]
[ROTARY]-
~II]
button
[
ENT
• Perform preset scan whileinthe radio mode.
When the button is pressed and held, auto
store is performed.
in
• Play or pause a track while
WMAJAAC mode.
• Confirm various settings.
the CD/MP31
[IR RECEIVER]
• Receiver for remote control unit. (Operating
range: 30°
in
all directions)
[ROM] button
• Perform random play whileinthe CO/MP31
WMAJAAC mode.
• Press and hold the button for 1 second or
longer to perform folder random play while
the MP3IWMAJAAC mode.
[RPn
• Perform repeat play whileinthe CO/MP31
• Press and hold the button for 1 second or
button
WMAJAAC mode.
longer to perform folder repeat play while
the MP3IWMAJAAC mode.
in
[1+1I],
in
[~]
[SCN] button
• Perform scan play for 10 seconds of each
in
track while
• Press and hold the button for 1 second or
longer to perform folder scan play while
MP3IWMAJAAC mode.
the CD/MP3IWMAJAAC mode.
[DIRECT] buttons
• Store a station into memory or recall it directly
while
in
the radio mode.
[CD SLOT]
• CD insertion slot.
[~]
(EJECT) button
• Eject a disc when itisloaded into the unit.
[DISP] button
• Switch the display indication.
• Press and hold the button for 1 second or
longer to enter the adjust mode.
[BND] button
• Switch the band, or seek tuning or manual
in
tuning while
Playa
•
AAC mode.
• Press the button to change the character.
first track whileinthe CO/MP3IWMAJ
the radio mode.
in
the
6
DUZ385SAT
Page 7
Names of the Buttons
and
Their Functions
[AUX] input jack
• The input jack for connecting an external
device.
[ISR] button
• Recall ISR radio stationinmemory.
• Press and hold the button for 2 seconds or
longer: Store current station into ISR memory
(radio mode only).
LA.]
(UP),
• Select the folder whileinthe MP3IWMAJAAC
mode.
• Use the buttons to perform various settings.
[
....
<lllI],
• Select a station whileinthe radio mode or
select a track while
mode.
This button is used to make various settings.
• Press and hold the button for 1 second or
longer to enter the fast-forward
backward mode.
[..-]
[~~]
(ON) buttons
buttons
in
the CD/MP3IWMAJAAC
or
fast-
[ROTARY] knob
• Adjust the volume by turning the knob
clockwise or counterclockwise.
[J']
button
• Use the button to switch to the sound adjust
mode.
• Press and hold the button for 1 second or
to
longer
EXTEND mode.
turn on or off the MAGNA BASS
[SRC] button
• Press the button to turn on the power.
• Press and hold the button for 1 second or
longer to turn off the power.
• Switch the operation mode among the radio
mode, etc.
DUZ385SAT
7
Page 8
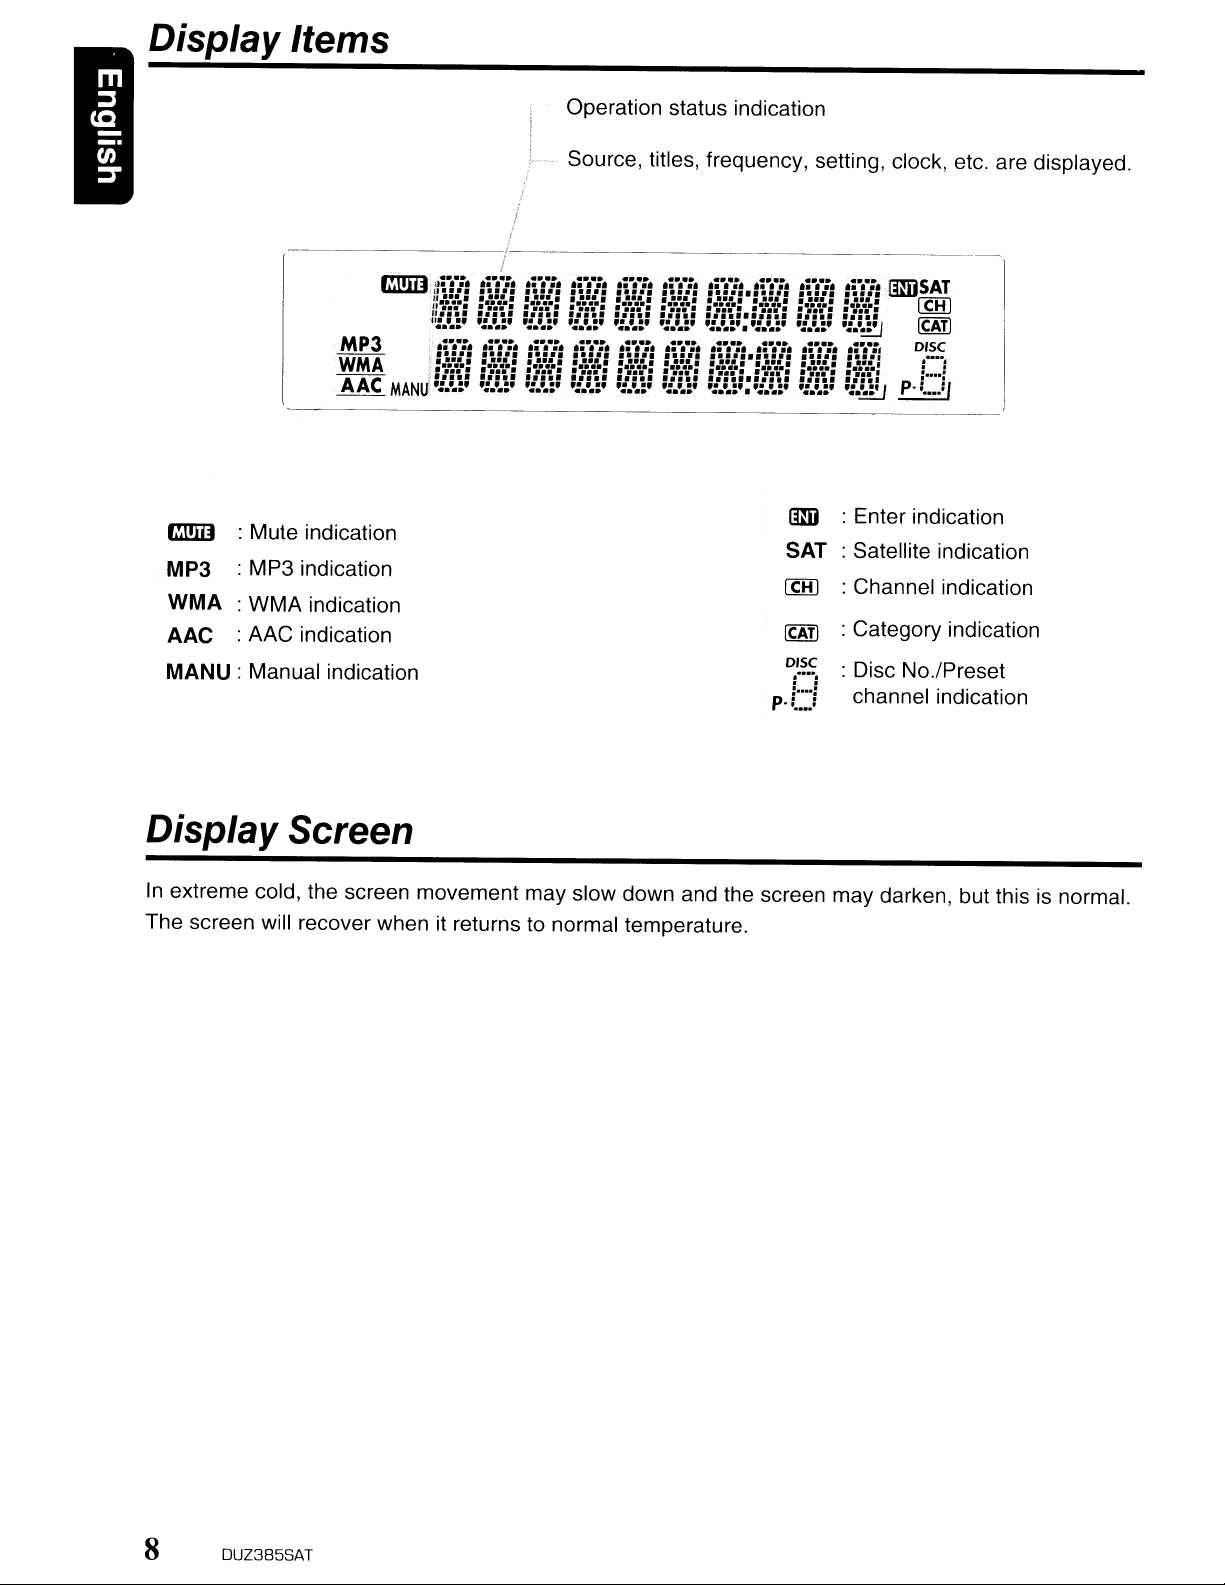
Display Items
----------------,----------------_._-----------
Operation status indication
Source, titles, frequency, setting, clock, etc. are displayed.
I
!
Enter indication
Satellite indication
Channel indication
Category indication
Disc No.lPreset
=-
...:
channel indication
rm:n
MP3
WMA
AAC
MANU:
Mule indication
MP3 indication
WMA indication
AAC indication
Manual indication
tmi
SAT
ICHI
ICATI
DISC
:---:
p.: :
Display Screen
In
extreme cold, the screen movement may slow down and the screen may darken, but this is normal.
The screen will recover when it returns to normal temperature.
8
DUZ385SAT
Page 9
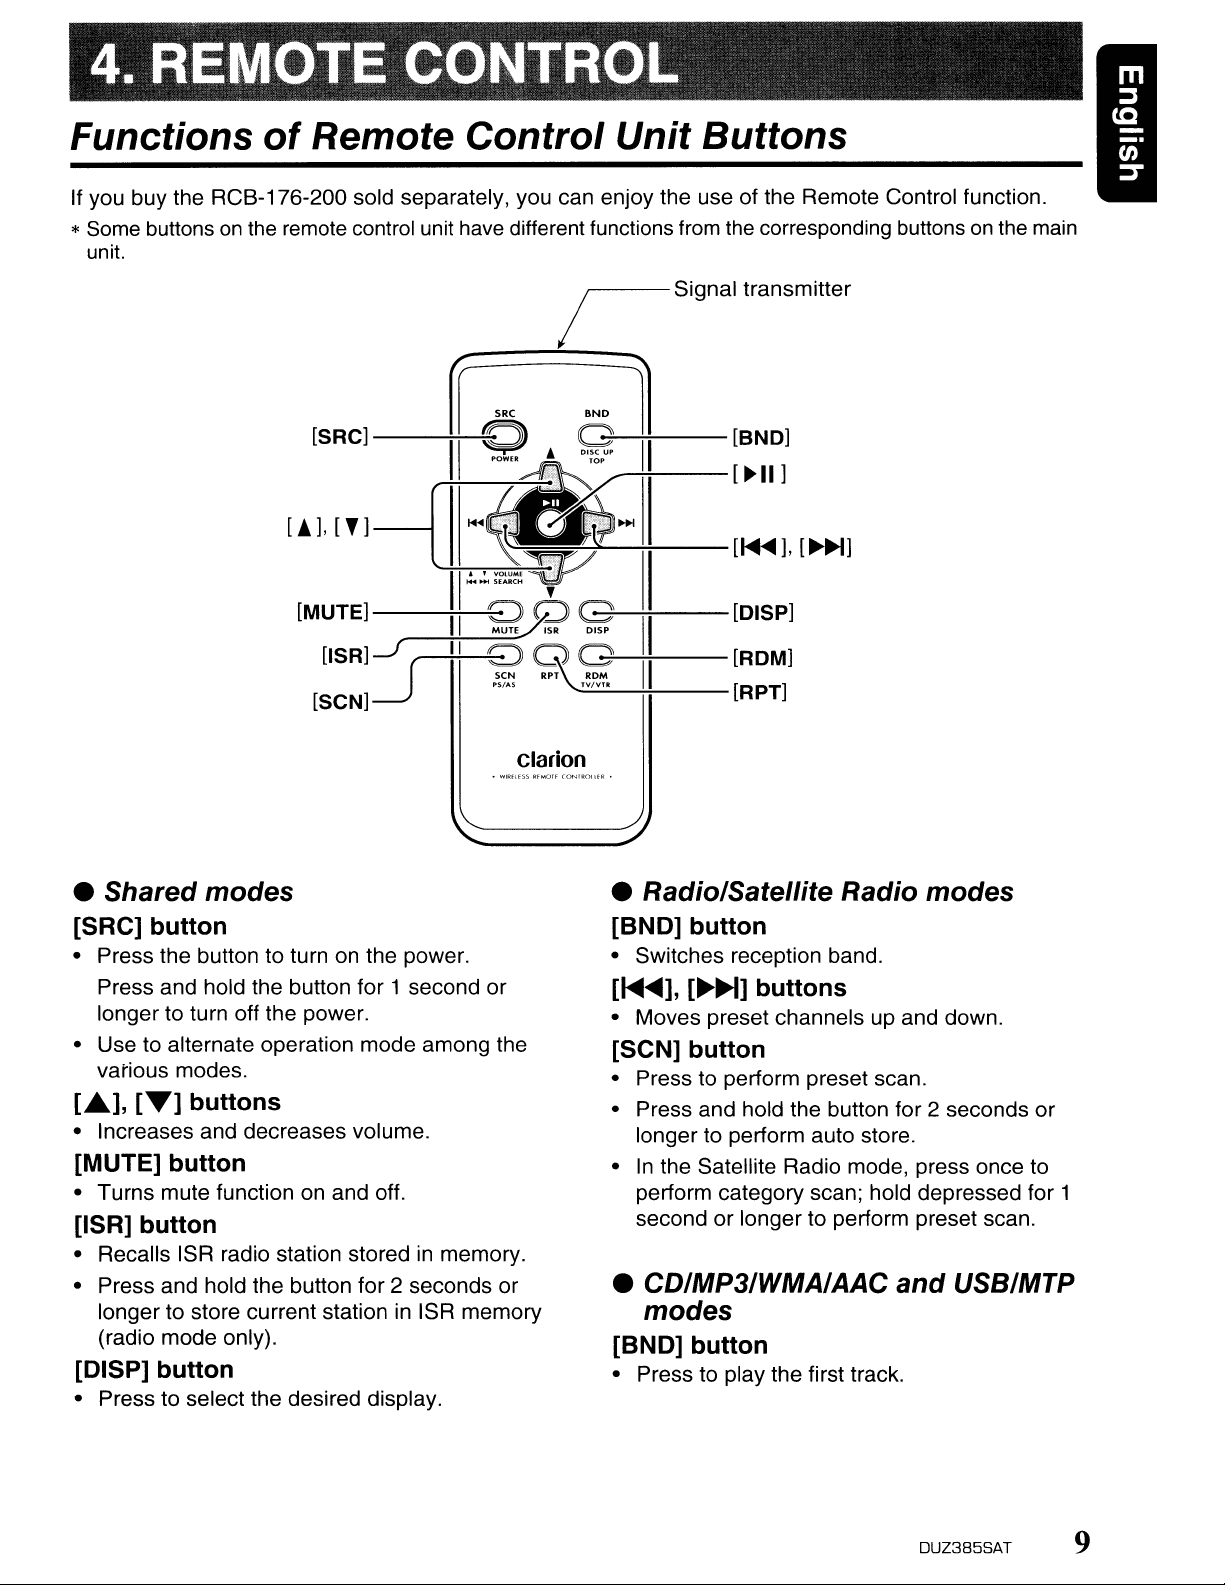
Functions
If you buy the RCB-176-200 sold separately, you can enjoy the use of the Remote Control function.
*
Some
buttonsonthe
unit.
of
Remote
remote control unit
[SRC]--++---,
[!],
[']---1
Control
have
different functions
Unit
Buttons
from
the
corresponding buttonsonthe
main
[MUTE]
[ISR]-f
----H--
(
9 g
PSI":; T
[SCN]~
• Shared
[SRC]
• Press the button to turnonthe power.
Press and hold the button for 1 second or
longer to turn off the power.
• Use to alternate operation mode among the
various modes.
[.],r..]
• Increases and decreases volume.
[MUTE]
• Turns mute functiononand off.
[ISR]
• Recalls ISR radio station storedinmemory.
• Press and hold the button for 2 seconds or
[DISP]
• Press to select the desired display.
button
longer to store current station
(radio mode only).
modes
button
buttons
button
button
in
ISR memory
\.
Clarion
--+;....---
~"---+;!---
TV/VTR
• Radio/Satellite Radio
[BND]
• Switches reception band.
[~~],
• Moves preset channels up and down.
[SCN]
• Press to perform preset scan.
• Press and hold the button for 2 seconds or
longer to perform auto store.
•
In
the Satellite Radio mode, press once to
perform category scan; hold depressed for 1
second or longer to perform preset scan.
• CD/MP3/WMA/AAC
[DISP]
[ROM]
[R
button
[~~]
button
PT]
buttons
modes
and
USB/MTP
modes
[BND]
• Press to play the first track.
button
DUZ385SAT
9
Page 10
Functions
of
Remote Control Unit Buttons
[~],
• Press to move the tracks up and down.
• Press and hold the button for 1 second or
[~II]
• Switches between playback and pause.
[~~]
longer to perform fast-forward/fast-backward
(Except DRM file).
buttons
button
[SCN] button
• Press to perform scan play.
in
• When
modes, press and hold the button for 1
second or longer to perform folder scan play.
[RPn
• Press to perform repeat play.
• When
modes, press and hold the button for 1
second or longer to perform folder repeat
play.
MP3IWMNAAC
button
in
MP3IWMNAAC and USB/MTP
and USB/MTP
[ROM] button
• Press to perform random play.
• When in
modes, press and hold the button for 1
second or longer to perform folder random
play.
MP3IWMNAAC
and USB/MTP
• iPod mode
[~
...],
[~~]
• Press to move the tracks up and down.
• Press and hold the button for 1 second or
longer to perform fast-forward/fast-backward.
[~II]
• Switches between playback and pause.
button
[RPT] button
• Press to perform repeat play.
[ROM] button
• Press to perform random play.
• Press and hold the button for 1 second or
longer to perform all random play.
•
TV
mode
[BNO] button
• Switches reception band.
[~],
• Moves preset channels up and down.
[~~]
[SCN] button
• Press to perform preset scan.
• Press and hold the button for 2 seconds or
longer to perform auto store.
buttons
buttons
•
CD
changerlDVD changer modes
[BNO] button
• Press to switch to next disc in ascending
order.
[~],
• Press to move the tracks up and down.
• Press and hold the button for 1 second or
[~
• Switches between playback and pause.
[~]
longer to perform fast-forward/fast-backward.
buttons
II] button
[SCN] button
• Press to perform scan play.
• Press and hold the button for 1 second or
longer to perform disc scan play.
[RPn
• Press to perform repeat play.
• Press and hold the button for 1 second or
button
longer to perform disc repeat play.
[ROM] button
• Press to perform random play.
• Press and hold the button for 1second or
longer to perform disc random play.
[ROM] button
• Press to alternate between TV and VTR.
10 DUZ385SAT
Page 11
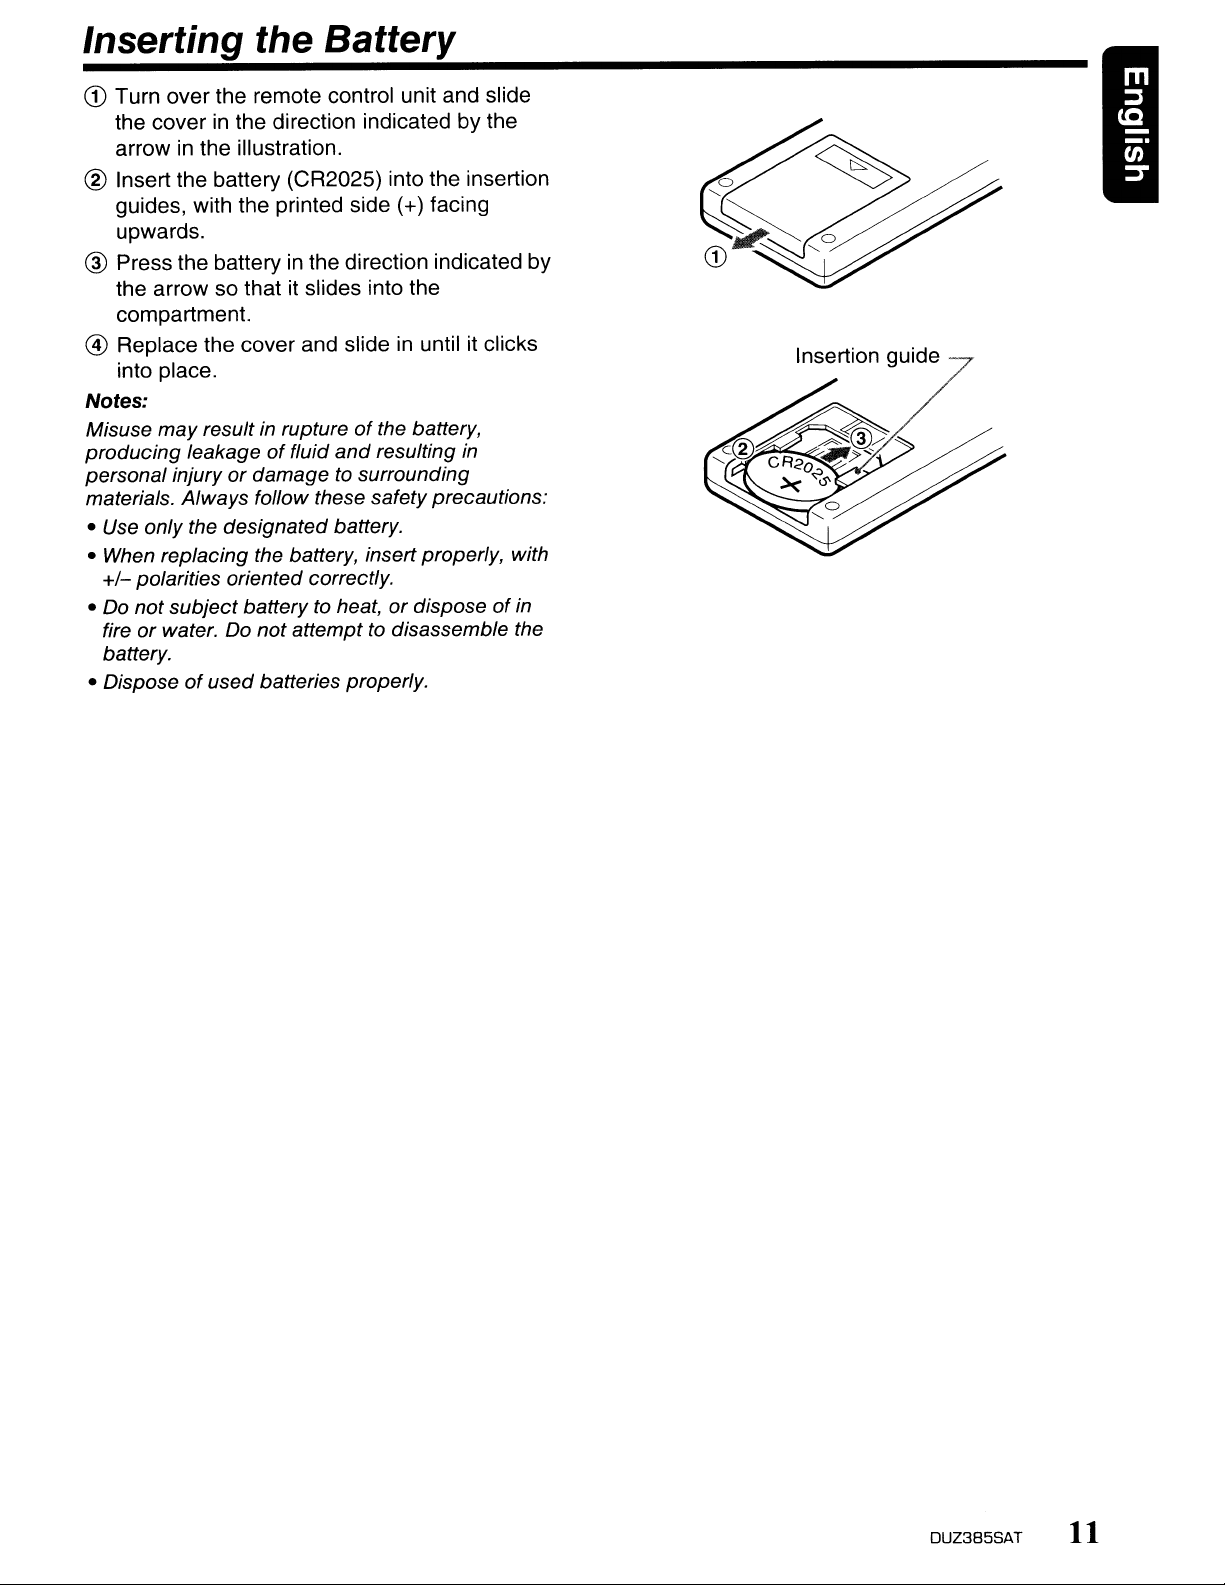
Inserting the Battery
G)
Turn
over the remote control unit and slide
cover
the
arrow in the illustration.
® Insert the battery (CR2025) into the insertion
guides, with the printed side (+) facing
upwards.
® Press the battery in the direction indicated by
the arrow so that it slides into the
compartment.
@ Replace the cover and slide in until it clicks
into place.
Notes:
Misuse may result in ruptureofthe battery,
producing
personal injuryordamage to surrounding
materials. Always follow these safety precautions:
• Use only the designated battery.
• When replacing the battery, insert properly, with
+/-
polarities oriented correctly.
not
• Do
fire
or
battery.
• Dispose
in the direction indicatedbythe
leakageoffluid
subject battery to heat,ordisposeofin
water. Do not attempt to disassemble the
of
used
batteries properly.
and
resulting
in
Insertion guide
DUZ385SAT
11
Page 12
Note:
• Be sure
to
read this chapterreferringtothe front diagramsofchapter "3. CONTROLS" on
Basic Operations
page
6.
A CAUTION
Be sure to lower the
switching off
key.
The
setting. If you switch the power off with the
volume
on, the sudden loud
hearing and
the
unit remembers its last
up,
when
damage
Turning on/off the power
Note:
• Be careful
without running the engine.
battery too
engine
battery.
1.
Press the [SRC] button.
The
2.
up.
operation
to display
3.
Press and hold the [SRC] button for 1
second
unit.
Note:
• System check
The
connections are completed, it must be
what equipment is connected. When the
is
turned
the display, then the unitreturnstothe
display mode.
unit. Then press the {SRCj button again, the unit
turn
about
far,
and
this can reduce the service lifeofthe
illumination and display on the unit light
The
unit automatically
mode
that
or
longer
first time this unitis turned on after the wire
on,
the "SYSTEM CHECK" appears
The
to
the radio mode.
volume
unit
powerorthe ignition
you switch the
volume
the unit.
using this unit for a long time
you
may
and
will automatically switch
mode.
to turn off the
system
before
volume
power
may
hurt your
If you drain the car's
not be abletostart the
remembers
power
checked
clock
check
starts within the
back
its last
for the
power
Selecting a mode
1.
Press the [SRC] buttontochange
operation mode.
2. Each
time
you press the [SRC] button, the
operation
order:
Radio
WMAJAAC-+USB/MTP/iPod-+(CD
changer)-+(DVD
-+
Radio ...
mode
changes
-+
XM-+(Satellite radio)
changer)-+(TV)-+AUX
in the following
the
-+
CD/MP31
* External equipment not connected with
is
CeNET
not displayed.
* iPod/MTP can connect to this unit via USB
cable.
Adjusting the volume
1. Turning
increases the volume; turning it
counterclockwise
the
[ROTARY]
knob
decreases
clockwise
the volume.
*The volume level is from 0 (minimum) to 33
(maximum).
Switching the display
Press the [DISP] button to select the desired
display.
* Once selected, the preferred display becomes the
display default. When a function adjustment such
as volume is made, the screen will momentarily
switch to that function's display, then revert back
in
to the preferred display several seconds after the
adjustment.
* If the button operation is performed with the
screen saverfunction on, the operation display
is
corresponding to the button operation
for about 30 seconds and the display returns to
the screen saver display.
For details, refer to the subsection
screen saver functiononor
"Operations CommontoEach Mode".
off"
shown
"Turning the
in
section
12
OUZ385SA
T
Page 13
Basic
Operations
Sound Adjustment
You can adjust a sound effect or tone quality to
your
preference.
To
change
1.
Press the
sound adjustment selection display.
*The factory default sound setting
EHCR".
2. Then press the
select the sound adjustment mode.
Each time you press the
button,
changes
"Z-EHCR"
*
In
the case of display blinking "ENT", you
can press the
setting value.
3. Press the
selected audio mode.
4. After completing settings, press the
button to return to the previous mode.
•
Setting
This unit is provided with 4 types of sound tone
effects stored in memory.
Select the one you prefer.
* The factory default setting
2-1. Select "Z-EHC
3-1. Each time you press
the tone effect
order:
"Z+FLA
"IMPACT"H"B-BOOST"
Z+FLAT
CUSTOM
EXCITE : bass and treble emphasized
IMPACT
B-BOOST
OFF
sound
[..I']
the
sound adjustment mode
as following order:
H
"BALANCE"
L.A.]or[T]
the
Z-Enhancer
T"
<-->
"CUSTOM"
: user
: user custom
mid
: bass and treble emphasized
: bass emphasized
: no sound effect
setting
button to switch to the
[~~]or[~~]
[:-~~
1button to adjust the
button to adjust the
is
R".
the
changesinthe following
Z+FLAT
emphasized
button to
[~~]or[~~]
<->
"FADER"
Plus
"OFF".
[A.]or[T]
H "EXCITE"
<-->
"OFF"
is
"Z-
[.I']
button,
~--,
When
3-2. Press and hold the
When
3-2. Press the
When
3-2. Press the
3-3. Press the
3-4. Press the
•
This adjustment can be performed only when
the
3-2. Press the
3-3. Press the
3-4. Press the
3-5. Press the
"Z+FLAT"is
1 secondorlonger, bass/treble
characteristics
the
"CUSTOM"
"CUSTOM"isset:
TREBLE"
"EXCITE/IMPACT/B-BOOST"
setting in the range of
set:
[~II]
ENT
become
mode.
[:-~~]
button to
adjust mode.
[:-~~
] button.
LA.]or[T]
flat and switch to
button to adjust the
-3
*The factory default setting
[:-NI~
] button to return to the
previous mode.
Adjusting
Z-Enhancer
following order.
BASS
TREBLE
The
setting.
BASS
BASS
BASS
TREB
TREB
the
bass/treble
Plus is set to "CUSTOM".
[:-NI~]
button.
[~~]or[~~]
G H
BASS
G H
factory default setting is
[:-~~
[A.]or[T]
G:
The
(Adjustment range: +7 to
F:
The
"60".
(Adjustment range: 60/80/100/
200)
Q:
The
(Adjustment range: 1/1.25/1.5/2)
G:
The
(Adjustment range:
F :
The
F H
BASS
TREBLE
1button.
button to select the
factory default setting is "0".
factory default setting is
factory default setting is "1".
factory default setting is "0".
factory default setting is
button for
enter
the
"BASSI
is
set:
to +3.
is
"0".
button to select as
Q <--,
F
"BASS
+7to-7)
G".
-7)
"10K".
(Adjustment range: 10K/12.5K/
15K/17.5K)
3-6. Press the
previous mode.
[:-NI~
1button to return to the
DUZ385SAT 13
Page 14
Basic Operations
• Adjusting the balance
2-1. Select "BALANCE".
3-1. Press the
balance of the right and left speakers.
*
The
(center). (Adjustment range: RIGHT12
LEFT12 (right12to
[~]or[~]
factory default settingis"CENTER"
button to adjust the
left
12))
• Adjusting the fader
2-1. Select "FADER".
3-1. Press the
balance of the rear and front speakers.
*The factory default setting
(center). (Adjustment
REAR12 (front12to
Note:
• During SOUND adjustment mode,
is
performed for more than 10 seconds, this
mode can be cancelled
mode.
[~]or[~]
rear
and
button to adjust the
is
range:
12))
returntoprevious
"CENTER"
FRONT12
if
no
operation
Setting the MAGNA BASS EXTEND
The MAGNA BASS EXTEND does not adjust
the low frequencies like the normal sound
adjustment function, but emphasizes the deep
bass frequencies to provide you with a dynamic
to
to
sound.
*The factory default setting
1.
Press and hold the
or longer to turn on the MAGNA BASS
EXTEND effect. "M-B
display for 2 seconds.
2.
Press and hold the
or longer to turn off the MAGNA BASS
EXTEND effect. "M-B
the display for 2 seconds.
is
"OFF" (off).
[..I'
]button for 1 second
EX
ON" appears in the
[..I'
]button for 1 second
EX
OFF" appears
in
14 OUZ385SAT
Page 15
Radio Operations
Listening
1.
Press the [SRC] button and select the radio
mode. The frequency appears in the display.
2.
Press the [BND] button and select the radio
band. Each time the button
radio reception band changes in the
following order:
FM1-.FM2-.FM3-.AM-.FM1
3.
Press the
desired station.
Tuning
There are 3 types of tuning mode available,
seek tuning, manual tuning and preset tuning.
Seek
1.
Press the [BND] button and select the
desired band (FM or AM).
*
If
"MANU"islitinthe
the [BND] button for 1second or longer.
"MANU"
tuning
2.
Press the
automatically seek a station.
When the
is sought
frequencies; if the
the station is sought
frequencies.
to
[~]or[~]
tuning
in
is
now available.
[~]or[~]
[~]
in
the
radio
is
pressed, the
button to tuneinthe
display, press
the display goes off
button to
button is pressed, the station
the direction of higher
[~]
button is pressed,
in
the direction of lower
and
...
and
seek
hold
•
Quick
Press and hold the[~....
second or longer to tune
• Step
Press the[~....
in
a station.
tuning
tuning
] or
] or
[~~]
button for 1
in
a station.
[~]
button to manually tune
Recalling a preset station
A total of 24 preset positions (6-FM1, 6-FM2, 6FM3, 6-AM) exists to store individual radio
stations in memory. Press the corresponding
[DIRECT] button or the
recall the stored radio frequency automatically.
1.
Press the [BND] button and select the
desired band (FM or AM).
2.
Press the corresponding [DIRECT] button or
the
[.]
/
[T]
station.
Note:
• Press
Manual
1.
2.
and
holdoneofthe [DIRECT] buttons for 2
seconds orlongertostore that station into preset
memory.
memory
Select the desired station with seek tuning or
manual tuning.
Press and hold one of the [DIRECT] buttons
for 2 seconds or longerto store the current
station into preset memory.
[.]
/
[T]
button to
button to recall the stored
Manual
There are 2 ways available: Quick tuning and
step tuning.
When you are in the step tuning mode, the
frequency changes one step at a time.
quick tuning mode, you can quickly tune the
desired frequency.
1.
Press the [BND] button and select the
desired band (FM or AM).
*
2.
Tune into a station.
tuning
In
the
If
"MANU"isnot litinthe display, press
hold the [BND] button for 1second or longer.
"MANU"
is
now
is
litinthe display and manual tuning
available.
and
Auto
Auto store is a function for storing up to 6
stations that are automatically tuned
sequentially. If 6 receivable stations cannot be
received, a previously stored station remains
unoverwritten at the memory position.
1.
2.
store
in
Press the [BND] button and select the
desired band (FM or AM).
Press and hold the
or longer. The stations with good reception
are stored automatically to the preset
channels.
* If auto store
stations
was
are
chosen for storing stations.
[~NI~]
button for 2 seconds
is
performedinthe
storedinFM3
FM
evenifFM
bands,
1or
FM2
the
DUZ385SAT
15
Page 16

Radio Operations
Preset scan
Preset scan receives the stations stored
preset memoryinorder. This function is useful
when searching for a desired station
1.
Press the
2.
When a desired stationistuned in, press the
[~Nln
[~Nln
button.
button again to continue receiving that
station.
Note:
• Be careful not
for
2 seconds
function
stations.
is
engaged
to
press
and
hold the
or
longer, otherwise the auto store
and
the unitstarts storing
in
in
memory.
[~rJ~
Jbutton
Instant station recall (ISR)
Instant station recallisa special radio preset
that instantly accesses a favorite radio station at
a touch of a button. The ISR function even
operates with the unit
elSR
1.
memory
Select the station that you wish to store
ISR memory.
2.
Press and hold the
seconds or longer.
• Recalling a station with ISR
In
any mode, press the [ISR] button to turn
the radio function and tune the selected radio
station. "ISR" appears
[ISR] button again to return to the previous
mode.
in
other modes.
[ISR]
button for 2
in
the display. Press the
in
on
16
DUZ385SAT
Page 17

XM
Satellite Radio Operations
This unit can control the satellite radio receiver
(XM Mini-Tuner).
Note:
• When the functionisdiffer depending to the
connected receiver, they are distinguished
the following notations:
"XM":
Selecting a Satellite
1.
for an
XM
Satellite Radio
Radio
Press the [SRC] button.
The system changes to the specified
Satellite Radio mode.
mode
by
Selectingaband
1.
Press the [BND] button to select a band.
This changes the reception band as follows:
XM1-+XM2-+XM3-+XM1
•
Information
The following information is displayed when the
satellite radio cannot be received normally.
• When the antenna is not be
"CHECK
• When the mini tuner is not be
"CHECK
• When no signal is received: "NO
• When a channel is being tuned in (no signal is
yet received):
• A channel without a broadcast has been
selected: "OFF AIR"
• An unviable channel has been selected:
"CH
UNAVL"
• A channel not covered by your contract:
"UNAUTH"
Confirming
1.
Press the
channelO.
The
2.
XM ID No. appears in the display.
Displaying
1.
Press the [DISP] button to select the desired
channel label.
Channel -+ Category -+
Channel.
displayed
ANTENNA"
XM TUNER"
"LOADING"
your
[~]or[~~]
XM
channel
..
during
labels
...
reception
connected:
connected:
SIGNAL"
ID
button to switch to
Name
(Title) -+
Channel
T his function allows you to input the channel
No. directly.
1.
Press and hold the [DISP] button for 1
second
selection display.
2.
Press the [....~]or
"CHANNEL".
3.
Press the
4.
Press the
channel No.
5.
Press and hold the
or longer to select the channel.
Setting
This function allows you to tuning a channel
directly or indirectly .
*The factory default setting
1.
Press and hold the "DISP" button for 1
second or longerto switch to the adjustment
selection display.
2. Press the
"DIRECT'.
3.
Press the
or "OFF".
• ON:
Press the
channel after tuning operations. Otherwise,
the operation will switch to the other
channel automatically after 2 seconds.
• OFF:
Press the
channel after tuning operations. Otherwise,
the operation will return to the pre.'ious
channel after 5 seconds.
Channel
1.
Channels are selected with the
[~~]
For details, see the following operation
descriptions.
Note:
The
operations are
selection.
input
or
channel
dffecUy
longer to switch to the adjustment
[~~]
[~NI~]
button.
[.]
or
[T]
[~J~]
tuning
[~]or[~]
[.]
or
[T]
[~II]
button to switchtoanother
ENT
[~II]
button to switch to another
ENT
selection
button.
audio output is muted
not
accepted
button to select
button to input the
button for 1 second
is
"OFF".
button to select
button to select "ON"
[~]
or
and
other button
during channel
DUZ385SAT
17
Page 18

XM
Satellite Radio Operations
Tuning mode
There are two channel selection modes: quick
tuning mode and step tuning mode.
Quick tuning
1.
Press and hold the
[~]or[~~]
button for 1
second or longer.
2.
Press the
[~NI~]
button to switchtoanother
channel.
Step tuning
1.
Press the
2.
Press the
[~]or[~]
[~NI~]
buttontoswitchtoanother
button.
channel.
Recalling a preset station
A total of 18 satellite radio stations can
stored.
6-XM1, 6-XM2 and 6-XM3
This allows you to store your favorite satellite
radio stations
1.
Press the [BND] button to select the desired
in
memory for later recall.
band.
2.
Press the
L&]
/['Y] button or [DIRECT]
button to select the desired preset station.
be
Preset memory
1.
Press the [BND] button to select the desired
band.
2.
Select the desired channel with quick tuning
or step tuning.
3.
Press and hold the [DIRECT] button for 2
seconds or longer to store the current
channel into preset memory.
Receiving stations selected by
category
Satellite Radio allows you to select broadcast
channel category (contents).
1.
Press and hold the [BND] button for 1
second or longer to select the category
selection mode.
*
If
press
and
hold
the
2.
Press the
longer
selection
once
mode.
[.]
again,
or
['Y] button to change the
category item and press the
switch to another categoty.
button for 1second
returntothe
channel
[~~~
] button to
or
3.
Press the
station and press the
[~]or[~~]
button to tuneina
[~~~]
button to switch to
another channel.
Notes:
•
When
the category selection modeisentered,
of
the category
displayed first.
The
category selection modeiscanceled when
•
no channel with the selected category can be
found.
•
If
no operationisperformed whithin 15 seconds,
the category selection mode
resumes
• Press and hold the
seconds or longer
preset channel memory.
•
If
you press the
buttoninthe category mode, can recall the
preset channel station.
the lastreceived channel
to
the channel mode.
{DIRECT} button for 2
to
store the currentstation into
{.}
/ {'Y} button
is
canceled, and
or
is
{DIRECT}
Scan function
There are two scan modes: the category scan
mode and the preset scan mode.
During scanning channels are displayed
abbreviated form, the display mode cannot be
switched.
Preset scan (PRESET SCN)
A preset scan scans the channels (up to 18
channels) stored
in
the preset memory about
every 10 seconds.
1.
Press and hold the
[~~~]
button for 1 second
or longer to select the preset scan mode.
And start the preset scanning.
Category scan (CAT SCN)
In
a category scan, broadcast channelsinthe
same category
as
the current channel are
selected about every 10 seconds.
1.
Press and hold the [BND] button for 1
second or longerto select the category
mode.
2.
Press and hold the
[~~~]
button for 1 second
or longer to select the category scan mode.
And start the category scanning.
Note:
Category scanningisnot available when
categoryisdefined for the current channel.
in
no
18
DUZ385SA
T
Page 19

CDIMP31WMAIAAC Operations
MP31WMAIAAC What
• AAC is an acronym for "Advanced Audio
WhatisMP3?
MP3isan audio compression method and
classified into audio layer 3 of MPEG standards.
This audio compression method has penetrated
PC
into
This MP3 features the original audio data
compression to about 10 percent of its initial
size with a high sound quality. This means that
about
disc or CD-RW disc to allow along listening time
without having to change CDs.
users and become a standard format.
10
music CDs can be recordedona CD-R
WhatisWMA?
WMA is the abbreviation of Windows Media
Audio, an audio file format developed by
Microsoft Corporation.
Notes:
• If you
• Windows Media
playa
Management) for WMA remaining
is
output (The WMA indicator blinks).
trademarks,
Microsoft Corporation in the United States and/or
other countries.
• To disable DRM (Digital Rights
Management)
1.
When using Windows Media Player 9/10/11,
click
RECORD tab, then under Recording
settings, unclick the Check box for RECORD
PROTECTED MUSIC. Then, reconstruct
files.
Personally constructed WMA files are used
at your own responsibility.
file with
or
on
TOOL~OPTIONS~MUSIC
DRM
(Digital Rights
TM,
and
the Windows® logo are
registered trademarks
ON,
no audio
of
Coding" and refers to the audio compression
method used with video compression
standards MPEG-2 and MPEG-4.
• AAC files composed with the following
conditions can be played:
- AAC files encoded with iTunes.
- iTunes Ver. 7.0 or earlier.
- File extension ".m4a" (".M4A")
• Tracks purchased at an iTunes Music store,
and copyright-protected files cannot be
played.
• When playing AAC files that include image
data, additional time may be required before
playback begins.
• Files may not play properly, depending on the
iTunes version under which
encoded.
Precautions when creating MP31
WMAIAAC file
• Usable sampling rates and bit rates
1.
MP3: Sampling rate 8 kHz-48 kHz,
Bit rate 8 kbps-320 kbps / VBR
2.
WMA: Bit rate 8 kbps-320 kbps
3.
AAC: Sampling rate 8 kHz-48 kHz,
Bit rate 8 kbps-320 kbps / VBR
• File extensions
1.
Always add a file extension ".MP3", ".WMA"
or ".M4A" to MP3, WMA or AAC file by using
single byte letters. If you add a file extension
other than specified or forget to add the file
extension, the file cannot be played.
2.
Files without MP3IWMAlAAC data will not
play. The files will be played soundlessly if
you attempt to play files without MP3IWMAI
AAC data.
*
*
is
AAC?
an
AAC file is
When
display
When
no
VBR
files
are
played,
may
differ the play location.
MP3IWMAlAAC files
sound partiscaused between tunes.
the
are
play time
played, a little
DUZ385SAT 19
Page 20

CDIMP31WMAIAAC Operations
•
Logical
1.
When writing MP3IWMAJAAC file on a CD-R
disc or CD-RW disc, please select
level1,2 or JOLIET or Romeo" or APPLE
ISO as the writing software format. Normal
play may not be possible if the disc
recorded on another format.
2.
The folder name and file name can be
displayed as the title during MP3IWMAJAAC
play but the title must be within
byte alphabetical letters and numerals
(including an extension).
3.
Do not affix a name to a file inside a folder
having the same name.
•
Folder
1.
A disc with a folder having more than 8
hierarchical levels will be impossible.
•
Numberoffilesorfolders
1.
Up to 255 files canberecognized per folder.
Up to 510 files can
2.
Tracks are playedinthe order that they were
recorded onto a disc. (Tracks might not
always be played
the PC.)
3.
Some noise may occur depending on the
type of encoder software used while
recording.
Set the type
(multi-session
When a single disc holds both normal CD type
tracks and MP3IWMAJAAC type tracks, use this
command
* Default setting
• When only one type of track (either music CD
or MP3/WMAJAAC)
selecting either type will allow playback of the
disc.
• When playing CCCD (copy-control CDs), set
to CD type.
format
structure
of
(File
system)
be
played.
in
the order displayed on
file
to
be
played
"1509660
64 single
function)
to
select which type of track to play.
is
"MULTI-SESS
is
recordedona disc,
CD".
is
1.
Press and hold the [BND] button for 1
second or longer.
Each time the button
way, the playback type alternates between
CD type and MP3IWMAJAAC type.
• "MULTI-SESS
When playing music CD only.
• "MULTI-SESS MP3"
When playing music MP3IWMAJAAC only.
2.
When settingiscompleted, remove the disc
and reinsert it.
Disc-In-Play
As long as the ignition key is turned to the ON or
ACC position, this function allows you to turn the
power to the unit and start playing the disc
automatically when the disc is inserted even if
the power
function
is
not turned on.
CD"
is
held pressedinthis
A CAUTION
• Do
• Do
not
trytoput
the
disc
insertion
foreign
out
label,
cellophane
removed. It
these
cause
Backup
Just pressing the
even if the power
1.
Press the
out from the ejected position. "EJECT"
appears
Notes:
elf
a CD (12 cm)
15
(Auto reload).
e
If
you force a CD into before auto reloading, this
can damage the
objects
not
insert
from
cellophane
or
discs
discs
the
unittobreak
Eject
[~]
in
the display.
seconds, the
your
handorfingers
slot.
Also
never
into
the
slot.
discs
tapeorrental CD
maybeimpossibletoextract
from
with
where
marks
the
adhesive
tapeora rental CD
where
labels
unit
and
they
down.
function
[~]
button, ejects the disc
to
the unit was not turned on.
button to eject the CD. Take it
is
leftinthe ejected position for
CDisautomatically reloaded
CD.
in
insert
comes
were
may
20
DUZ385SA
T
Page 21

CDIMP31WMAIAAC Operations
to a
Listening
the
unit
Press the [SRC] button to select the CD/MP31
WMAJAAC mode.
When the unit enters the CD/MP3IWMAJAAC
mode, play starts automatically.
If there is no disc loaded, the indication "NO
DISC" appears
The mode changes each time the [SRC] button
is pressed. (Modes are not displayed for
equipment that is not connected.)
Radio~XM~(Satellite
WMAlAAC~USB/MTP/iPod~(CD
~
(DVD
Loading
changer)~(TV)~AUX~Radio
a CD
disc
in
the title display.
1. Insert a CD into the center of the CD SLOT
with the labeled side facing up. "LOADING"
in
appears
slot, and the play starts.
Notes:
• Never insert foreign objects into the CD SLOT.
• If the CD is notinserted easily, there may
another CDinthe mechanismorthe unitmay
require service.
• Discs not bearing the
CD-ROMs cannot be played
• Some CDs recordedinCD-RICD-RWmode
notbeusable.
Pausing
1.
Press the
"PAUSE" appears
2.
To resume CD play, press the
again.
the display, the CD enters intothe
play
[~~~]
already
radio)
loaded
~
CD/MP31
rQjCOM
...,
~~~orr~~
by
t IS unit.
button to pause play.
in
the display.
[~~n
in
changer)
...
be
mark
and
may
button
Displaying CD titles
This unit can display title data for CD-textlMP31
WMAJAAC disc and user titles input with this
unit.
1.
Each time you press the [DISP] button to
change the title display.
• CD-TEXT
User~Track~Disc (Artist)~User
•
MP3IWMAlAAC
Track~Folder~Title (Album)~Artist
Track
Notes:
•
• If MP31WMAIAAC disc is not input
• For MP3, supports 103 Tags
• Tag displays give prioritytoV2.3 12.2.
• In the caseofalbum Tags for WMA, the
• Only ASCII characters can be displayedinTags.
...
If
the CD playingisnot a CD-text CDorno user
title has been input, "NO TITLE" appearsinthe
display.
TITLE" appears in the display.
information written into the extension headeris
displayed.
Selecting a
•
Track-up
1.
Press the
beginning of the next track.
2.
Each time you press the
track advances ahead to the beginning of the
next track.
Track-down
•
1.
Press the[~....
beginning of the current track.
2.
Press the[~....
the beginning of the previous track.
disc
disc
TAG,
V2.3
12.2 I 1.1 I
track
[~]
button to move ahead to the
[~]
button, the
] button to move back to the
] button twice to move backto
...
~
"NO
1.0.
Fast-forwardlfast-backward
•
Fast-forward
1.
Press and hold the
or longer.
•
Fast-backward
1.
Press and hold the
or longer.
* For
MP3IWMAJAAC
until the start
addition, the playing time may have a margin
error.
of
[~]
button for 1 second
[~]
button for 1 second
discs, it takes some time
searching
and
between tracks.
DUZ385SAT
In
of
21
Page 22

CDIMP31WMAIAAC Operations
Folder Select
This function allows you to select a folder
containing MP3IWMAJAAC files and start
playing from the first track
1.
Press the
Press the
Press the
folder.
2.
To select a track, press the [....~]or
button.
[T]
or
[A]
buttontomove the nextfolder.
[T]
button to move the previous
[A]
in
the folder.
button.
[~~]
Top function
The top function resets the CD playerto the first
track of the disc. Press the [BND] button to play
the first track (track
*
In
caseofMP3IWMAJAAC,
folder being played will
No.1)onthe disc.
the first trackofa
be
returned.
Other various play functions
• Scan play
This function allows you to locate and play the
first 10 seconds of all the tracks recorded on a
disc.
1.
Press the [SCN] button to perform scan play.
in
"SCAN" appears
seconds.
*
Scan
play starts
track currently being played.
the display for 2
from
the
next track after
the
• Folder scan play
This function allows you to locate and play the
first 10 seconds of the first track of all the folders
onanMP3IWMAJAAC disc.
1.
Press and hold the [SCN] button for 1
second or longer to perform folder scan play.
"ALL
SCAN" appearsinthe display for 2
seconds.
*Folder
after
scan
play starts
the
folder currently being played.
from
the
next folder
• Repeat play
This function allows you to play the current track
repeatedly.
1.
Press the [RPT] button to perform repeat
play.
"REPEAT'
seconds.
appearsinthe display for 2
• Folder repeat play
This function allows you to
being played
repeatedly.
1.
Press and hold the [RPT] button for 1second
or longer to perform folder repeat play.
"ALL
seconds.
in
the MP3IWMAJAAC folder
RPT" appears in the display for 2
playa
track currently
• Random play
This function allows you to play all tracks
recorded
1.
Press the [ROM] button to perform random
play.
"RANDOM" appears
seconds.
on
a discina random order.
in
the display for 2
• Folder random play
This function allows you to play all the tracks of
all the folders recorded
disc
in
a random order.
1.
Press and hold the [ROM] button for 1
second or longer to perform folder random
play.
"ALL
ROM" appearsinthe display for 2
seconds.
.To
cancel play
1.
Press the operating button previously
selected.
*
The
various play
various playoff
seconds.
mode
on
an
MP3IWMAJAAC
modeiscanceled
appearsinthe
and
the
display for 2
22 DUZ385SAT
Page 23

Operations Common to Each Mode
•
Displaying
To
change
1.
Press and hold the [DISP] button for 1
second or longer to switch to the
adjustment selection display.
2.
Press the
the "item name".
"CLOCK"
~
"CODE"
<--+
"MESSAGE INPUT"
"DIMMER"~"BLINKLED"~"TEL-SP" H
"TEL-SW"
3.
Press the
"desired
*
In
the caseofdisplay blinking "ENT",
can
setting value.
*After completing settings. press
button
•
Setting
2-1. Select "CLOCK".
3-1. Press the
3-2. Press the
hour or the minute.
3-3. Press the
correct time.
*
The
3-4. Press the
memory.
Note:
•
You
cannot set the
with only the ignition on.Ifyou drainorremove
the car's battery
reset. While setting the clock,
operation is selected, the
canceled.
•
Setting
You can adjust the display contrast to match the
angle of installation of the unit.
*
The
factory default settingis"10".
(Adjustment level: 1to16)
2-1. Select
3-1. Press the
contrast.
adjustment
[~]or[~]
<--+
"CONTRAST'~"SETTINGS"
<--+
"XM SRC"~"SCRN SVR"
<--+
"SYSTEM CHECK"
[.]
or
[~]
setting
value".
setting
button to select
<--+
"SCROLL"
button to select the
you
press
the
[:-~~]
buttontoadjust the
the
[DISP]
to
returntothe previous
the
clock
[:-NI~]
button.
[~]or[~]
[.]
or
[~]
button to selectthe
button to set the
mode.
clockisdisplayedin12-hour format.
[:-NI~]
button to store the time into
clock
the
or
take
contrast
when it is
out
this unit, the
clock
displayed
if
anotherbutton
set
mode
clock
"CONTRASr'.
[.]
or
[~]
button to adjust the
<--+
is
is
or
The number of indicator of this unit decreases,
you can see the state of current settings at any
operation mode.
2-1. Select "SETTINGS".
3-1. Press the
state of current settings.
*
When
the
For example:
f---TT--
a
_:,f::
in I-rOn,
. v
, ,
.)L
Setting
"CATS" is the acronym of
System".
When you set a PIN code (called as "Personal
Code"), a theft is prevented by disabling the
operation ofthe unit at the theft.
Setting
2-1. Select "CODE".
3-1. Press the
The set personal code screen appears.
4-1. Press the [DIRECT] buttons
your desired 4-digit Personal Code.
5-1. Press and hold the
seconds or longer.
The entered Personal Code will be set, and
it will return to the previous screen.
Note:
• Write
forget
down
it.
Erasing the Personal Code
2-1. Select "CODE".
3-1. Press the
The ERASE PERSONAL CODE screen
appears.
4-1. Enter the Personal Code currently.
5-1. Press and hold the
seconds or longer.
Enter a Personal Code mode is cancelled.
the
settings
[.]
or
[~]
button to display the
the settingisselected, after 1second
current state
willbedisplayed.
after 1 second,
--f-
_UJb
I U .
the
anti-theft
your
[:-NI~]
your Personal Code in case you
[:-~n
I
_)
G.
II
__
P..I
function
"Clarion
Personal Code
button.
[1
[:-NI~
] button for 2
button.
[:-~~]
button for 2
(CATS)
Anti-Theft
]-[6] to enter
DUZ385SAT 23
Page 24

Operations Common
When the
ENTER
to
Each Mode
PERSONAL CODE
screen appears
The ENTER
displayed when turning the ACC
performing the following operations:
• The car battery
• The backup power
• The [RESET] button was pressed.
Note:
• Ifyou have lost your Personal Code, please
contact Clarion customerservice.
1. Enter your Personal Code currently set.
2.
When
the unit will restart from the initial startup
screen.
Notes:
When
•
message "LOCK - - -
Personal Code entryis prohibited for
This
prohibited time is changed accordingtothe
number
• 1to6 times: 15 seconds
• 7 times
Saving
This function allows the XM source name to be
saved in the display, whether the mini tuner is
connected
*The factory default setting
1. Press and hold the [DISP] button for 1
second or longerto switch to the adjustment
selection display.
2. Press the
SRC".
3. Press the
or "OFF".
•
Only when the mini tuner is connected to
this unit, the XM source
the display when you switch the operation
mode.
•
Even if the mini tuner is connected to this
unit
in
operation mode.
PERSONAL
was
the correct Personal Code is entered,
you enter a wrong Personal Code, the
CODE
replaced.
was
cut off.
-"isdisplayed
screen will be
power
on after
and
a while.
of
timesofwrong code entry as follows:
or
more: 15 minutes
XM
source name
to
the unit or not.
is
"ON".
[~]or[~]
LA]or[T]
OFF:
ON:
or
not, the XM source
the display when you switch the
button to select "XM
button to select "ON"
name
will
appear
name
will appear
the
•
Turning
or
off
This unit is provided with the screen saver
function which allows you to show various kinds
of patterns and characters in the operation
status indication area of the display in a random
order. You can turn on
button operation is performed with the screen
saver function on, the operation display
corresponding to the button operation is shown
for about 30 seconds and the display returns to
the screen saver display.
the screen saver
or
off this function. If the
function
on
*The factory default setting is "ON".
2-1. Select "SCRN SVR".
3-1. Press the
setting.
Each time you pressthe
the setting changes in the following order:
"MESSAGE"<~"ON" <-> "OFF"
LA]or[T]
• Entering message
Message upto30 characters long can be stored
in
memory
saver setting.
and displayed as a type of screen
*The factory default setting
CLARION".
2-1. Select
3-1. Press the
3-2. Press and hold the [BND] button for 1
second
3-3. Press the
cursor.
3-4. Press the [BND] button to select a
character type. Each time you press the
[BND]
in the following order:
Capital letters
Capital letters...
3-5. Press the
in
desired character.
3-6. Repeat step 3-3 to 3-5 to enter up to 30
characters for message.
3-7. Press and hold the
seconds or longer to store the message in
memory.
*
"MESSAGE
[~NI~
] button.
or
longer to clear the old message.
[~
.....]or
button, the character type changes
-+
[A]
or
Pres.s
and hold the [BND] button for 1
second or longer
message. Then press and hold the
button for 2 seconds or longer to store the
message and the message return to default
setting.
button to select the
LA]or[T]
button,
information
is
"WELCOME
INPUT".
[~~]
buttontomove the
Numbers-+Symbols
[T]
button to select the
[~J~]
button for 2
to
cancel the input
TO
[~NI~]
-+
24
DUZ385SAT
Page 25

Operations Common
to
Each Mode
• Setting
Set how to scrollinCD-TEXT, MP3IWMAJAAC
title.
*
The
2-1. Select "SCROLL".
3-1. Press the
or "OFF".
• ON:
To scroll automatically.
• OFF:
To scroll just 1 time.
*When
• Setting
You can set the dimmer control "ON" or "OFF".
*
The
2-1. Select "DIMMER".
3-1. Press the
or "OFF".
•
Anti-theft
The red Anti-theft indicator is a function for
preventing theft. When the ACC is off, this
indicator blinks.
*
The
2-1. Select "BLINKLED".
3-1. Press the
or "OFF".
• Setting
cellular
*
The
*To output the telephone calls, set
phone
When the AUX input jack is used to connect an
AUX BLUETOOTH
separately):
2-1. Select "TEL-SP".
3-1. Press the
"RIGHT" or "LEFT".
the
method
factory default settingis"ON".
CA.]or[T]
you
wanttosee
mode,
title
for 3 seconds
factory default settingis"ON".
the
press
or
dimmer
[A.]
or
for
title
button to select "ON"
the title again,inthe
and
hold
the
[DISP] button
longertoscroll the title.
control
[T]
button to select "ON"
indicator
factory default settingis"OFF".
CA.]
or
[T]
button to select
the
car
speaker
output
phone
factory default settingis"RIGHT'.
the
interruptto"ON".
BB
(BLT370) (sold
[A.]or[T]
button to select
scroll
for
cellular
"ON"
the
• Cellular
If you connect this unit and your cellular phone
with a separately sold cable, you can listen to
your telephone calls
*
The
factory default settingis"OFF'.
2-1. Select "TEL-SW".
3-1
.. Press the
setting. Each time you press the
[T]
following order:
"OFF"
• OFF:
This unit continues normal operation even
when the cellular phone is used.
• ON:
You can listen to your telephone calls from
the speakers connected to this unit.
*
• MUTE:
The sound from this unit is muted during
telephone calls.
Note:
•
If
connecting a hands-free kit, please ensure the
setting is ON to receive the telephone audio
through the system.
•
Performingasystem
This function allows you to perform a system
check from the adjust mode when required.
2-1. Select "SYSTEM CHECK".
3-1. Press and hold the
second or longer.
"SYSTEM CHECK" appears
then the unit returns to the previous
operation mode.
phone
button, the setting changesinthe
+4
"ON"
When
speakers,
turning
listeningtoyour callsonyour car
the
interrupt
on
CA.]
or
+--+
you
can
[ROTARY]
setting
your car speakers.
[T]
button to select the
"MUTE"
adjust the volume
knob.
check
[:-NI~
] button for 1
in
LA] or
by
the display,
• RIGHT:
be
Telephone calls can
right speaker connected to this unit.
• LEFT:
Telephone calls can be heard
left speaker connected to this unit.
heard on the front
on
the front
DUZ385SAT 25
Page 26

Operations Common to Each Mode
Entering titles
Titles up to 10 characters long can be stored
memory and displayed for CD, CD changer,
Radio stations and TV stations. The number of
titles that can be entered for each mode are as
follows.
Mode
CD
mode
TV
mode
Radio
mode
CD changer
mode
DCZ625 connected
1.
Press the [SRC] button to select the mode
you want to enter a title (Radio, CD, CD
changer or TV).
2.
Select and
tune
in
playa
CDinthe CD changer or
to a TV station or Radio for which you
want to enter the title.
3.
Press and hold the [DISP] button for 1
second or longer.
4. Press the
[~]or[~]
"TITLE INPUT".
5. Press the
[:-J~]
button.
The display switches to the title input display.
6. Press the
[~]or[~~]
cursor.
7.
Press the [BND] button to select a character
type. Each time you press the [BND] button,
the character type changes
order:
Capital letters
~
Numbers~Symbols
Capital letters...
8.
Press the LA.] or
[T]
desired character.
9.
Repeat steps 6 to 8 to enter up to 10
characters for the title.
10.Press and hold the
or longer to store the title into memory.
Numberoftitles
50
titles
20 titles
30 titles
Numberoftitles
100 titles
button to select
button to move the
in
the following
button to select the
[:-J~]
button for 2 seconds
~
Clearing titles
in
1.
Select and
tune
playa
in
to a TV station or Radio for which you
CDinthe CD changer or
want to clear the title.
2.
Press and hold the [DISP] button for 1
second or longer.
3.
Press the
[1<1IIIII
....] or
[~~]
button to select
"TITLE INPUT'.
4. Press the
[:-NI~]
button.
The display switches to the title input display.
5.
Press and hold the [BND] button for 1
second or longer.
All characters
6. Press and holdthe
in
the title disappear.
[:-NI~]
button for 2 seconds
or longer to store the setting.
AUX
function
This system has an external input jack on the
front panel so you can listen to sounds and
music from external devices connected to this
unit.
• Selecting AUXINsensitivity
Make the following settings to select the
sensitivity when sounds from external devices
connected to this unit are difficult to hear even
after adjusting the volume.
*The factory default setting
1.
Press and hold the [DISP] button for 1
second or longer.
2.
Press the
"AUX SENS".
3. Press the
"HIGH", "MID" or "LOW".
Note:
When
sensitivity
[~]or[~~]
[.]
or
the AUX modeisselected, setting AUX IN
is
available.
is
"MID".
button to select
[T]
button to select
26 DUZ385SAT
Page 27

6. ACCESSORIES
USBIMTP
USB memorylMTP device
Note:
•
The
following operations are the sameasfor CD
mode:
*Pause
*Track
*Fast-forwardlfast-backward
*Top
*Scan
*Repeat
*Random
*Folder
See "CDIMP3IWMAIAAC
22) for details.
About
• USB is an acronym for Universal Serial Bus,
and refers to an external bus standard
supporting data transfer rates of 12 Mbps.
• This unit is compatible with USB 1.1/2.0 with
maximum datatransfer rates of 12 Mbps.
• USB memory devices that can be played by
connecting to the unit's USB cable are limited
to those recognized as "USB mass storage
class devices"; operation is not guaranteed
with all USB memory devices.
• Consult the manufacturer of your USB
• Audio files playable on this unit are limited to
• To prevent the accidental loss of data, always
• This unit does not support connections to a
• When a USB memory device is composed of
selection
function
play
play
play
selection
USB
* Devices compatible with
Class"
the host device, without need for special
drivers or application software.
memory device for information regarding
whether it is supported by "USB Mass
Storage Class" standards.
MP3IWMAlAAC files. For details, see the
section
back up important data on your computer.
computer.
through a USB hub device are also not
supported.
two
be detected.
canbeused
"MP3/WMAlAAC" (page 19).
or
more drives, only one ofthe drives will
Operations
operation
(Except DRM file)
Operations"
memory
"USB
Mass Storage
merelybyconnecting
In
addition, connections made
(page 19-
to
• USB memory devices with security functions
cannot be played.
in
• The order
differ depending on the USB memory device
connected (the actual playback order may not
be the same as that indicated
computer's display).
• If you operate folder up/down continuously,
the play time display keeps as "00:00", and
the sound is not emitted.
About
This unit supports USB Digital Media Streaming.
USB Digital Media Streaming is a function used
to play music files transmitted using Media
Transfer Protocol (MTP). This function also
supports the playback of WMDRM 10 files.
During USB Digital Media Streaming, the unit
displays the "MTP" mode indicator.
Use of USB Digital Media Streaming requires
the purchase of a supported portable audio
player. For information regarding supported
portable audio players, consult your nearest
Clarion dealer,
USB
which tracks are recorded may
on
your
Digital
or
visit Clarion's website.
Media Streaming
A CAUTION
•
Insert
device
accessed. Connectingordisconnecting
the
result in
-
- When
• Do
unattended in an automobile. Exposure
direct
cause
the
• Do
MTP deviceisconnected,
resultinlossordamagetodataonthe
MTP device.
the
turned
and remove a USB memory/MTP
only
when
device at
the
If
the
USB memory/MTP
removedorpowerisdisconnected
during
electricityorelectric noise.
not
not
writingtothe
the
leave a USB memory/MTP device
sunlightorhigh
deformationorother
USB memory/MTP device.
turn
on
USB cable
on.
the
deviceisnot
the
following
lossofdata:
deviceissubjectedtostatic
vehicle
Connect
after
vehicle
times
device
device.
temperatures
malfunction
ignition
sinceitmay
the
MTP device
ignition
being
may
is
when
may
the
to
is
to
of
DUZ385SAT 27
Page 28

USBIMTP Operations
Connecting
a
USB
memorylMTP
device
1.
Connect the USB memory/MTP device to the
USB cable.
Playback will begin from the first file
recorded on the device.
*
If
the device
[SRCj button
device.
*
Always insert the device fully into the
connector. Incomplete connections may
cause the device not
*
Depending
some amount
tracks are read into the unit.
*
The order
differ depending
actual playback order may not
that indicated
To
listen
is
not recognized, press the
to
switch the source
to
be
recognized.
on
the number of tracks recorded,
of
time may
in
which tracks are recorded may
on
the device connected (the
on
your computer's display).
to
tracks
on
be
required until
be
a
connected
to
the same
USB memorylMTP device
1.
Press the [SRC] button to switch the source.
When USB memory/MTP device is selected,
playback (except DRM file) will begin from
the location at which playback was
previously stopped.
*
When a USB memory/MTP device
connected the USB/MTP mode will
displayed.
*
When a
disconnected and then reconnected, playback
will begin from the beginning of the USB
memory/MTP device.
*
When the "MTP" mode
files
USB
memory/MTP device
on
the MTP device can not
is
selected, the AAC
be
is
be
is
played.
the
all
as
To
stop
1.
Press the [SRC] button and switch the
function to a source other than the USB
memory.
Do
not
when
may
USB memory/MTP device.
Always
your
2. Remove the USB memory/MTP device from
the USB cable.
play
A
remove
the
USB/MTP
result
computer.
in
backup
CAUTION
the
USB memory/MTP
mode
loss
or
damage
and save
is
selected,
to
data
important
device
since
on
data
the
on
it
28
DUZ385SAT
Page 29

iPod Operations
This section describes operations when
connected to an Apple iPod via the
Notes:
• See the iPod Owner's Manual for details
regarding operation conditions.
The
unit will
•
improperly with unsupported versions.
a list
• For
model, please contact your clarion dealer
www.clarion.com.
not
operate,ormay operate
of
compatible Apple iPod unit with this
USB
cable.
or
Connecting an iPod
When an iPod is connected to the
"Shuffle" set on the iPod will become as follows:
• "Shuffle (Albums)"
• "Shuffle (Songs)"
The
iPod has
the "iPod menu mode" for selecting tracks.
Switch between these modes by pressing the
[BND]
Notes:
•
button.
WhenaniPodisconnectedtothe USB cable,
please use the attached connecting cable with
the iPod unit.
two
play"
play"
modes, the "Play mode" and
All random play
USB
cable,
Random play
Select iPod mode
1.
Press the [SRC] button.
Playback will begin from the last file that was
played on the iPod.
Note:
The
following operationsinPlay mode operate
•
as
in
the same
*Track
*Fast-forwardlfast-backward:
*Pause:
*Top
See "CDIMP3IWMAJAAC
22) for details.
selection:
function:
CD mode:
[~Nln
[BND]
[~],
[~~]
[~],
Operations"
[~]
(page 19-
Other various play functions
(in Play mode)
Notes:
in
• These functions are not supported when
iPod menu mode.
The
Random function seton the iPodremains the
•
same after attachment/detachment
The
Repeatfunction on the iPod will be
•
when you connect/disconnect the iPodtothe
unit.
of
• Repeat play
Play back one track repeatedly.
1. Press the [RPT] button.
• Random play
Play all albums within a selected category, in
random order. (Corresponds to "Shuffle
(Albums)"
1. Press the [ROM] button.
•
All
Play all tracks within a selected category,
random order. (Corresponds to "Shuffle
(Songs)"
1.
Press and hold the [ROM] button for 1
second or longer.
.To
1. Press the same play button once again.
Notes:
When
•
play
playback
selected category.
• When playing the last track within
category
then
different track.
• Through the defaultsetting
Repeat", the indication
displayed.
command
on iPod.)
random play
command
on iPod.)
cancel play
the repeat play modeiscanceled, after
all tracks within a selected category,
will begin from the first track in the
a selected
in
Random mode, ifACCisswitchedoff
on again, playback will begin from a
ofaniPodis"ALL
on the mode status
the
the iPod.
changed
in
is
not
DUZ385SAT
29
Page 30

iPod
Operations
Selecting category from the
iPod
menu
1.
Press and hold the [BND] button for 1
second or longerto select the iPod menu
mode.
The iPod menu categories will be displayed.
Notes:
• Repeat and Random mode operations are not
supported when
•
In
the iPod menu mode, if you press the
{~~]/{~~]
the playback may not be performed.
2.
Press the
between categories.
The iPod menu categories alternate
following order:
"PLA
YLlSTS"
"ALBUMS"
"COMPOSERS"
Note:
The
iPod menu mode can be canceled
performing one
• Press the {BND] button.
•
When
the categoryselectscreen
press the
3.
Press the
4.
When the track name display is showing,
{~]
press the
Playback will begin from the first track
selected category, and the iPod menu mode
will be canceled.
*
Subfolders may
the category.
In
this case, use the
switch between subfolders, then
button to select the desired subfolder.
*
When the track name display
pressing
currently playing folder name display.
5.
Use the
[A]
track within a category.
in
the iPod menu mode.
button
[A]
or
or
H
H
"SONGS"
the
{A]lt"']
rT]
button to switch
"ARTISTS"
<-+
H
"GENRES"
...
of
the following operations:
and
is
[T]
button.
[~~]
button to select the category.
[~~]
button.
be
displayed, depending
[A]
is
the
[~]
button will return
and
[T]
buttons to select a
button fast,
in
by
displayed,
in
buttons to
use
the
showing,
to
the
the
H
the
on
[~]
Selecting category
using
preset
memory
1.
Press and hold the [BND] button for 1
second or longer to select the iPod menu
mode.
The category can be set as follows
[DIRECT] (1-6) buttons.
[1]
:
PLAYLISTS
[2] : ARTISTS
[3]:
ALBUMS
[4]:
SONGS
[5]:
GENRES
[6]
: COMPOSERS
2.
Press the desired [DIRECT] (1-6) button to
select the category.
*
Subfolders may
be
displayed, depending
the category.
In
this case,
use
the
[A]
and
[T]
switch between subfolders, then
button to select the desired subfolder.
3.
When the track name display is showing,
press the
[~~]
button.
Playback will begin from the first track
selected category, and the iPod menu mode
will be canceled.
*
Use
the
[A]
and
[T]
buttons to select a track
within acategory.
About
title display
This unit supports the display of title information
transmitted from a connected iPod.
• Character code information is UTF-8;
displayable characters include English
alphanumerics, some symbols, and some
umlaut characters.
• Unsupported characters will be replaced by
asterisks
(*).
in
buttons to
use
the
the
on
[~~]
in
the
30
DUZ385SAT
Page 31

SIRIUS Satellite Radio Operations
This function is available when Sirius Radio
Receiver is connected through the CeNET
cable.
This unit can control the following satellite radio
receivers:
• SIRIUS Satellite Radio Receiver: SIRCL3
• SIRIUS Satellite Translator Adapter:
CLA-SC1 (which needs Sirius universalTuner
sold separately.)
Note:
• When the function is differdepending to the
connected receiver, they are distinguished
the following notations:
"SIRIUS": for
Selecting
1.
Press the [SRC] button.
The system changes to the specified
Satellite Radio mode.
a SIRIUS Satellite Radio
a Satellite
Radio
mode
by
Selectingaband
1.
Press the [BND] button to select a band.
This changes the reception band as follows:
SR1~SR2~SR3~SR1
•
Information
The following information is displayed when the
satellite radio cannot be received normally.
• When the receiver is turned on the first time
or after a reset: "UPDATING"
• When a channel
yet received):
SIRIUS: "ACQUIRING"
• A channel without a broadcast has been
selected:
SIRIUS: "INVALID CH"
• A channel not covered by your contract:
SIRIUS:
(alternated)
displayed
"CALL
is
being tuned in (no signal is
888" +-> "539-SIRI"
during
...
reception
Confirming
1.
Press and hold the [DISP] button for 1
second or longer to display the ADJUST
item.
2.
Press the
DISP".
3.
Press the
the upper 6 digits.
4.
Press the [....] or
between the display for the upper 6 digits
and lower 6 digits.
5.
To return to the previous mode, press the
[DISP] button.
Displaying
1.
Press the [DISP] button to select the desired
channel label.
Channel~Category~Title (Artist)~Radio
text
~
Channel
1.
Channels are selected with the
[~~]
button.
* For details, see
descriptions.
Note:
The
audio output is muted
•
operations are not
selection.
Tuning
There are two channel selection modes: quick
tuning mode and step tuning mode.
•
1.
•
1.
Quick
Step
tuning
Press and hold the
second or longer.
tuning
Press the
your
[~]or[~~]
[~rJ~]
button, the displaywill display
['Y]
channel
Channel.
..
selection
the
accepted
mode
[~]or[~]
SIRIUS ID
button to select "SID
button to switch
labels
[~]
following operation
and
other button
during channel
[~]or[~]
button.
button for 1
or
DUZ385SA
T
31
Page 32

SIRIUS Satellite Radio Operations
Recalling
a preset station
A total of 18 satellite radio stations can be
stored.
6-SR1, 6-SR2 and 6-SR3
This allows you to store your favorite satellite
radio stations
1.
Press the [BND] button to select the desired
in
memory for later recall.
band.
2.
Press the LA.] /
[T]
button or [DIRECT]
button to select the desired preset station.
Preset
1.
memory
Press the [BND] button to select the desired
band.
2.
Select the desired channel with quick tuning
or step tuning.
3.
Press and hold the [DIRECT] button for 2
seconds or longer to store the current
channel into preset memory.
Receiving stations selected
by
category
Satellite Radio allows youtoselect broadcast
channel category (contents).
1.
Press and hold the [BND] button for 1
second or longer to select the category
selection mode.
*If press once again, return to the channel
selection mode.
2.
Press the r.A.] or
category item.
3.
Press the
[1<IllI
station.
Notes:
When
•
•
•
the categoryselection modeisentered,
the category
displayed first.
The
category selection modeiscanceled when
no channel with the selected category can be
found.
If
no operationisperformed whithin 7 seconds,
the categoryselection mode
resumes
of
to
the channel mode.
[T]
button to change the
....
] or
[~~]
buttontotuneina
the last received channel
is
canceled, and
is
Presetting a
category
A category can be preset by registering specific
categories
desired category can be recalled
in
[DIRECT] buttons 1 to6.Then the
by
pressing
the corresponding [DIRECT] button.
1.
Press and hold the [BND] button for 1
second or longer to enter the category mode.
2.
Press the
[.]
or
[T]
button to select a
category.
3.
Press and hold one of the [DIRECT] buttons
for 2 seconds or longer to store the current
category into preset memory.
Notes:
•
When
the name
changed
show
may
stored name.
• A channel stored
discontinued at the option
channel.
•
If
no operationisperformed for more than 1
second, category seek tuning can automatically
tune in
Scan
a receivable broadcastchannel category.
function
of
a channel stored
by
a broadcasting channel, the display
in
memory is
a channel name that differs from the
in
memory may be
of
the broadcasting
There are two scan modes: the category scan
mode and the preset scan mode.
During scanning channels are displayed
in
abbreviated form, the display mode cannot be
switched.
• Preset
scan
(PRESET SCN)
A preset scan scans the channels (up to 18
channels) stored
every
10
seconds.
Press and hold the
in
the preset memory about
[~NI~]
button for 1 second or
longer to select the preset scan mode. And start
the preset scanning.
Category
•
In
a category scan, broadcast channelsinthe
scan
(CAT SCN)
same category as the current channel are
selected about every
Press the
[~NI~]
10
seconds.
button to select the category
scan mode. And start the category scanning.
Note:
is
• Category scanning
category
is
defined for the current channel.
not available when no
32
DUZ385SAT
Page 33

CD Changer Operations
Note:
•
The
following operations are the same as for CD
mode:
*Pause
*Track
*Fast·forwardlfast·backward
*Scan
*Repeat
*Random
See "CDIMP3IWMAIAAC
22) for details.
CD
When an optional CD changer is connected
through the CeNET cable, this unit controls all
CD changer functions. This unit can control a
total of 2 changers.
Press the
changer mode to start play. If 2 CD changers
are connected, press the
the
*
If
magazine into the
appears
(checks) the magazine.
*
If
magazine
reinsert the magazine back into the
Note:
• Some CDs recorded in CD-RICD-RW mode
notbeusable.
selection
play
play
play
Operations"
changer
[SRC] button and select the CD
CD
changer for play.
"NO MAG" appearsinthe display, insert the
in
"NO DISC" appearsinthe display, eject the
functions
[SRC] button to select
CD
changer. "D-CHECK"
the display while the player loads
and
insert discs into each slot. Then,
(page 19-
CD
changer.
may
A CAUTION
CD-ROM
CD
Displaying CD titles
This unit can display title data for CD-text CDs
and user titles input with this unit.
*Title data for CD-text CDs
this unit only when
1.
Press the [DISP] button to change the title
display.
Notes:
•
If
the CD playing is nota CD-text CDorno user
title has been input, "NO TITLE" appears in the
display.
•
If
a CD-text CD
title, "NO TITLE" appears in the display.
discs
changer,
cannot
it's
depended
is
be
played
on
canbedisplayed with
itisconnectedtoDCZ625.
notinputits disc title
the
from
model.
or
every
a track
Procedure
Set "SCROLL" to "ON" or "OFF".
(The factory default setting is "ON". Refer to the
subsection
in section
Mode".)
•
When
The title is automatically kept scrolling.
• When
To scroll just 1 time.
When you want to see the title again,
mode, press and hold the
seconds or longer to scroll the title.
to
scrollatitle
"Setting
"Operations
setto"ON"
setto"OFF"
the
method
CommontoEach
[D1SP]
for
title
in
the title
button for 3
scroll"
Selecting a CD
1.
Press the
desired disc.
*
IfaCDisnot loadedina slotofmagazine,
pressing the [
Other
•
Disc
Disc scan play locates and plays the first 10
seconds of the first track on each disc
currently selected CD changer. This function
continues automatically until it is cancelled.
* Disc scan play
desired
1.
Press and hold the [SCN] button for 1
second or longer.
the display and disc scan play starts.
•
Disc
After all the tracks on the current disc have been
played, disc repeat play automatically replays
the current disc over from the first track. This
function continues automatically until it is
cancelled.
1.
Press and hold the [RPT] button for 1 second
or longer.
and disc repeat play starts.
•
Disc
The disc random play selects and plays
individual tracks or discs automatically
particular order. This function continues
automatically until it is cancelled.
1.
Press and hold the [ROM] button for 1
second or longer.
display and disc random play starts.
.To
cancel
1.
Press the operating button previously
selected.
[.]
various
scan
repeat
random
play
is
CD.
"ALL
play
or [....] button to select the
...
] or [....] button
play
useful when
functions
"ALL
SCAN" appears
can
you
want to select a
not work.
in
play
RPT" appears
in
the display
play
in
"ALL
ROM" appears in the
the
in
no
DUZ385SAT 33
Page 34

DVD Changer Operations
By connecting an optional DVD changer that
supports CeNET wiring, this unit can be used to
control the DVD changer. To view DVDs,
optional monitorisrequired.
• The DVD control and display functions
supported by this unit are limited; the unit
does not support all the functions possible on
a DVD changer.
For fullest functionality, use the remote
control unit provided with your DVD changer
to control its operations. For details, consult
the Owner's Manual provided with your DVD
changer.
TV
Operations
Note:
The
following operations are performed the same
•
as for radio mode:
*Channel
*Storing
*Calling
*Auto
*Preset scan
See "Radio
selection
channelsinmemory
channels
store
Operations"
from
memory
(page 15-16) for details.
an
TV tuner functions
Whenanoptional TV tuner is connected through
the CeNET cable, this unit controls all TV tuner
functions. To watch TV requires a TV tuner and
monitor.
Note:
The
following operations are the same as for CO
•
and
CO Changer modes:
*Pause
*Track
*Fast-forwardlfast-backward
*Scan
*Repeat
*Random
See "CDIMP3IWMAIAAC
22) and "CD
details.
1.
2.
3.
4.
5.
6.
selection
play
play
play
Operations"
Changer
Press and hold the [DISP] button for 1
second or longer to switch to the adjustment
selection display.
Press the
VTR".
Press and hold the
or longer to set to "VTR".
To return to the TV broadcast, press and
hold the [DISP] button for 1 second or longer
to switch to the adjustment selection display.
Press the
VTR".
Press and hold the
or longer to set to "TV".
[1<IlII~]
[~]or[~]
Operations"
or
[~~]
[~~n
[~NI~]
button to select "TV!
button for 1 second
button to select "TV!
button for 1 second
(page 19-
(page 33) for
Watching a
1.
Press the [SRC] button and select the TV
mode.
2.
Press the [BND] button to select the desired
TV
band
is pressed, the input selection toggles
between
3.
Press the
desired TV station.
TV
(TV1
or TV2). Each time the button
TV1
and TV2.
[~]or[~]
button to tuneinthe
Watching a video
The TV tuner has a VTR input terminal to which
1 external device can be connected. Connect a
12 V video cassette player (VCP) or video
cassette recorder (VCR) to the TV tuner input
terminal.
*
The
factory default settingis"TV".
34
DUZ385SAT
Page 35

TV
Operations
Setting the
You can change the reception setting for the TV
antenna connected to the TV tuner.
*
The
factory default settingis"ON".
1.
Press and hold the [DISP] button for 1
second
selection display.
2. Press the [
DIVER".
3.
Press the
"OFF".
• ON:
Sets the diver setting to ON.
• OFF:
Sets the diver setting to OFF.
4.
Press the [DISP] button to return to the
previous mode.
TV
diver
or
longer to switch to the adjustment
........
] or
[~~]
button to select "TV
[~]
or [....] button to setto "ON" or
DUZ385SAT
35
Page 36

7. TROUBLESHOOTING
Problem
Power does not Fuse is blown.
turn on.
(No sound is
produced.)
No sound output
when operating
the unit with excessive current
amplifiers or
power antenna or powerantenna.
attached.
e
CD
c
Nothing happens The microprocessor has Turn off the power, then press
CD
when buttons are
pressed.
"
Display is not
accurate.
Incorrect wiring.
Power antenna lead
shorted to ground or
for remote-on the amplifiers
malfunctioned due to noise, the reset button for about 2
etc. seconds with a thin rod.
DCP or main unit connectors Wipe the dirt off with a soft cloth moistened with
are dirty. cleaning alcohol.
Cause
is
is
required
Replace with afuse of the same amperage. Ifthe fuse
blows again, consult your store of purchase.
Consult your store of purchase.
1.
Turn the unit off.
2.
Remove all wires attached to the power antenna
lead. Check each wire for a possible short to
ground using
3.
Turn the unit back on.
4.
Reconnect each amplifier remote wire to the power
antenna lead one by one. If the amplifiers turn off
before all wires are attached, use an external relay
to provide remote-on voltage (excessive
required).
an
ohm meter.
Measure
MP3/
HIG
~
cu
!AAC
FR
rrent
\ Reset
button
~"'4
1.
No sound heard The speakerprotection circuit
is operating. restored by turning the power off and on again.
No sound heard MP3IWMAlAAC files are Write MP3IWMAlAAC files onto the disc properly.
in
absent
Files are not recognized as
an
File system
Sound skips or is Compact discisdirty. Clean the compact disc with a soft cloth.
(,)
noisy.
«
~
:&:
Sound is cut or MP3IWMAlAAC files are not Use MP3IWMAlAAC files encoded properly.
skipped. encoded properly.
~
D.
Noise is
generated or
~
(,)
noise is mixed
with sound.
Sound is bad Waterdroplets may form on Let dry for about 1 hour with the power on.
directly after the internal lens when the car
power is turned is parked
on.
Wrong filename File system
Compact disc is heavily Replace with a compact disc with no scratches.
scratched or warped.
a disc.
MP3IWMAlAAC file.
is
not correct. Use 1509660 level 1,2or JOLIET or Romeo or
in
a humid place.
is
not correct. Use 1509660 level 1,2or JOLIET or Romeo or
Turn down sound volume. Function can also
(Speaker volumeisreduced automatically when
the speaker protection circuit operates).
2.
If the sound is muted again, consult our service
department.
Use MP3IWMAlAAC files encoded properly.
APPLE ISO file system.
APPLE ISO file system.
be
36 OUZ385SAT
Page 37

'~?i!_>_
~~~i;~~~d
m~
i~f_
:.
Sound is The MP3IWMAlAAC files are Use only properly encoded MP3IWMAlAAC files,
'i~j,
interrupted or has
:i:
~:
noise.
The device isn't
;1;-
recognized.
,,:l-
}i,
i,I"
Can't insert the The devices has been Try reversing the connection direction of the device
><
"''';:
device. inserted improperly. (usually the brand name surface should be facing
~eard
The device contains no
WMAlAAC files.
The files are not proper
WMAlAAC format.
Connectors are loose.
improperly encoded,
The device
Connectors are loose.
According to the state of Disconnect the device and reconnect.
operation on the device, the
communication fault is
caused.
is
~-!i~;!ti;!!-;(,
damaged. Disconnect the device and reconnect. If the device
''jL
;'."c;
y.-:,
The connector is broken. Replace with a new device.
:ii.:;'
MP31
MP31
''Y.i'Wf
,,,:;i,'""c"',,,;,
k::·,!TY!H;,·
Record MP3IWMAlAAC files properly to the device.
Use only properly encoded MP3IWMAlAAC files.
Disconnect the device and reconnect securely,
still not recognized, try replacing with a different
device.
left).
:'.,
,.
.'i
.:!;-":;,,,'';
)5':;;":;;':'"
,:
is
DUZ385SAT 37
Page 38

If an error occurs,
Take
the
measures
oneofthe following displays is displayed.
described
below
to eliminate the problem.
Error Display
ERROR 2 A CD is caught inside the CD
0
c:a:
~
ERROR 3
::E
~
D.
ERROR 6
~
0
ERROR 2
..
CD
ERROR 3
0)
c
ta
s:.
u
c
ERROR 6 A CD inside the CD changer
0
ERROR 2
ERROR 3 A DISC cannot be played due
..
CD
0)
c
ta
ERROR 6 A DISC inside the DVD
s:.
u
Q
>
0
deck and is not ejected.
A CD cannot be played due
to scratches, etc.
A CD is loaded upside-down
inside the CD deck and does
not play.
A CD inside the
is not loaded. consult your store of purchase.
A CD inside the
cannot be played due to
scratches, etc.
cannot be played because it
is loaded upside-down.
A DISC inside the DVD This is a failure of DVD mechanism and consult your
changer cannotbeplayed. store of purchase.
to scratches, etc. disc.
changer cannot be played
because it is loaded upside-
down.
Cause
CD
CD
Measure
This is a failure of CD deck's mechanism and consult
your store of purchase.
Replace with a non-scratched, non-warped-disc.
Eject the disc then reload it properly.
changer This is a failure of CD changer's mechanism and
changer Replace with a non-scratched, non-warped disc.
Eject the disc then reload it properly.
Retry or replace with a non-scratched, non-warped-
Eject the disc then reload it properly.
ERROR P Parental level error Set the correct Parental level.
ERROR R Region code error Eject the disc and replace correct region code disc.
ERROR 2 The files are not proper
WMAlAAC format.
ERROR 3
(USB/MTP mode) improperly encoded.
ERROR 3 The iPod contains no audio Insert an iPod containing audio files.
'8
(iPod mode)
D.
if
ERROR 5 The connected devices are Disconnect the device and reconnect.
....
~
tIJ
BUS-PWR Overcurrent detection. Disconnect the devices and reconnect. If the devices
~
HUB The connected devices are Disconnect the devices and reconnect.
If an error display
persists, turn off the
The MP3IWMAlAAC files are Use only properly encoded MP3IWMAlAAC files.
files.
not recognized.
not recognized.
other
than
the
ones
described
power
and
consult
MP31
above
your
storeofpurchase.
Use only properly encoded MP3IWMAlAAC files.
are still not recognized, try replacing with a different
devices.
If
are still not recognized, try replacing with a different
devices.
appears, press the reset button. If the
the devices
problem
38 DUZ385SAT
Page 39

9. SPECIFICATIONS
FM Tuner
Frequency Range: 87.9 MHz to 107.9 MHz
11
Usable Sensitivity:
50dB Quieting Sensitivity: 17
Alternate Channel Selectivity: 60 dB
Stereo Separation
Frequency Response (±3 dB): 30 Hz to 15 kHz
AM
Tuner
Frequency Range: 530 kHz to
Usable Sensitivity: 28
CD
Player
System: Compact disc digital audio system
Usable Discs: Compact disc
Frequency Response
Dynamic Range
Harmonic Distortion: 0.03%
dB~V
(1
kHz): 30 dB
dB~V
(±1
(1
kHz): 80 dB
dB~V
1710kHz
dB): 20 Hz to 20 kHz
General
Power Supply Voltage:
14.4 V DC (10.8 to 15.6 V allowable), negative
ground
Current Consumption: Less than 15 A
Speaker Impedance: 4
Auto Antenna Rated Current: 500 mA or less
Weight / Source unit: 3.46 lb. (1.56 kg)
Dimensions / Source unit:
7" (Width) X
[178 (W) X 100 (H) X 155 (D) mm]
Power Output:
20 W
RMS
and 1 % THD+N
Signal to Noise Ratio:
90 dBA (reference: 1 W into 4 Q )
2"
x 4 Channels at 4 Q
n(4n to 8 n allowable)
(Height) X 6-1/8" (Depth)
Audio
Maximum Power Output: 200 W (50 W X 4 ch)
-14
-14
dB
dB
Bass Control Action (100 Hz): +14 dB,
Treble Control Action (10 kHz): +14 dB,
Line Output Level (CD 1 kHz): 2 V
Note:
• Specifications
and
design are subject to change without notice for further improvement.
DUZ385SAT 39
Page 40

10.0-rHER.
WMDRM 10 for devices
• This product is protected by certain intellectual property rights of Microsoft. Use or distribution of
such technology outside of this product is prohibited without a license from Microsoft.
• Content owners use Windows Media digital rights management technology (WMDRM) to protect
their intellectual property, including copyrights. This device uses WMDRM software to access
WMDRM-protected content. If the WMDRM software fails to protect the content, content owners may
ask Microsoft to revoke the software's ability to use WMDRM to play or copy protected content.
Revocation does not affect unprotected content. When you download licenses for protected content,
you agree that Microsoft may include a revocation list with the licenses. Content owners may require
you to upgrade WMDRM to access their content. If you decline an upgrade, you will not be able to
access content that requires the upgrade.
40 DUZ385SAT
Page 41

Clarion Co., Ltd.
2007/12
All
Rights Reserved. Copyright © 2007: Clarion Co., Ltd.
Printed
in
China / Impnme
Gn
Clllne / Impreso en China
PE-3051B
280-8581-00
Page 42

PrintedinChina/lmprime
en
Chine_lm.;.,pr_eso_e_n_ch_in_a
..:2:.:o~07.:..:./.:..11:...._
---:2::;84-::...:..1.;.,1:.:9:..;4..:-0:.,:0:....
...,
InstaliationlWire
II
~_.lIi"l
_
~....,J...
...
ko..
"'-""
10:.
..
Manuel
Gui'a de instalaci6n/conexi6n
.........
-1.
1.
This set is exclusively for use in cars with a
negative ground, 12 V power supply.
2.
Read these instructions carefully.
3.
Be sure to disconnect the battery
before starting. Thisisto prevent short circuits
during installation. (Figure
BEFORE STARTING I PREPARATIFS I ANTES DE COMENZAR
"8"
1)
Connection
d'installation
1.
Cet appareil est exclusivement destine aetre
utilise dans les voitures avec une alimentation
12 V amasse negative.
2.
terminal
Lire ces instructions attentivement.
3.
S'assurer de debrancher la borne
batterie avant de commencer. Cela evitera les
court-circuits pendant I'installation. (Figure
et de
Guide
connexion
de
cables
"8"
de la
1
..
Esta unidad ha sido disenada para utilizarse
exclusivamente en automoviles con fuente de
alimentacion de 12
2.
Lea cuidadosamente estas instrucciones.
3.
Antes de comenzar, cerciorese de desconec-
1)
tar el terminal
evitar cortocircuitos durante la instalacion.
(Figura 1)
V,
Ynegativo
"8"
de la bateria. Esto es para
amasa.
Car
battery
Batteriedevoiture
Bateria
del
autom6vil
Figure 1 / Figure 1 / Figura 1
.........
-2.
1.
Prepare all articles necessary for installing the source unit before
starting.
2.
Install the unit within 30° of the horizontal plane. (Figure
3.Ifyou have to do any work on the car body, suchasdrilling holes,
consult your car dealer beforehand.
4.
cause damage. (Figure
CAUTIONS
Use the enclosed screws for installation. Using other screws can
Max.
3)
30·/30·
ON
INSTALLATION'
max./Max.
30·
Figure2/Figure 2 /
2)
Figura
PRECAUTIONSAUSUJET
1.
Avant de commencer, preparer toutes les pieces necessaires pour
installer I'appareil pilote.
2.
Installer I'appareil avec
rizontal. (Figure
3.
S'il est necessaire d'effectuer certains travaux sur la carrosserie
commepercer des trous, consulter d'abord votre concessionnaire
automobile.
4.
Utiliser les vis fournies pour I'installation. L'utilisation d'autres vis
peut causer des dommages. (Figure
2
un
2)
angle inf€!rieur a30° par rapport aI'ho-
DE
L'INSTALLATION'
3)
Chassis/Chassis/Chasis
,
,
,
,
,
,
,
,
,
,
,------
Max.8mm
/ 8mmmax./Max.8mm
Figure
PRECAUCIONES
1.
Antes de comenzar, prepare todos los elementos necesarios para
instalar la unidad fuente.
2.
Instale la unidad conunangulo de 30° sobreelplano horizontal.
(Figura 2)
3.Sitiene que realizar cualquier trabajo en la carroceria, como
taladrado de orificios, etc., consultealproveedor desuautomovil.
4.
Use los tornillos incluidos para la instalacion.EIuso de otros
tomillos puede causar danos. (Figura 3)
Chassis/Chassis/Chasis
3/
Figure 3 / Figura 3
,------
,
,
,
,
.
,
,
,
1 -
PARA
LA
Damage/Dommage/Dano
INSTALACION
.........
-3.
This unitisdesigned for fixed installationinthe dashboard.
1.
When installing the source unit in NISSAN vehicles, use the parts attached to the unit and follow the instructions in Figure
When installing the source unit in TOYOTA vehicles (Figure 5), use
the parts attached to the vehicle and follow the instructions in Figure
5.
2.
Wire as shown in Section
3.
panel and center panel.
INSTALLING
Reassemble and secure the unitinthe dashboard and set the face
THE
4.
SOURCE
Mounting Screw Holes
Side Viewofthe Source Unit
UNIT
4.
r r
'INSTALLATION
Cet appareil est
1.Sivous installez I'appareil pilote dansunvehicule NISSAN, utilisez les
pieces attachees aI'appareil
Si
vous installez I'appareil dansunvehicule TOYOTA (Figure 5),
utilisez les pieces attacheesauvehicule et suivez les instructions de la
figure
2.
Raccordez comme indique dansIeparagraphe
3.
Montezetfixez I'appareil dansIetableau de bordetposezIepanneau
avant etIepanneau central.
con<;u
5.
Orifices de montage
Vue laterale de I'appareil pilote
DE
L'APPAREIL
pour etre installe dansIetableau de
et
suivez les instructions de la figure
4.
PILOTE
bordo
'INSTALACION
Esta unidad ha sido disenada para instalarse fijada al tablero de
instrumentos.
4.
1.
Cuando instale la unidad fuente enunautomovil NISSAN, utilice las
piezas suministradas con la unidad, y siga las instrucciones de la
Figura
4.
Cuando instale la unidad fuente en un automovil TOYOTA (Figura 5),
utilice las piezas fijadas al automovil y siga las instrucciones de la
Figura
5.
2.
Conecte los cables comosemuestraenla Seccion
3.
Ensamble y asegure la unidadaltablero de instrumentos, y coloque
panel frontal yelpanel central.
Orificios
para
los
tornil/os
Vista lateraldela unidad fuente
DE
de montaje
LA UNIDAD
FUENTE
4.
el
......
Screw
Orifices
Orificios
holes
for
NISSAN
pourunvehicule
para
tomillos
vehicle
NISSAN
paraunautom6vil
NISSAN
Screw
Orifices
Orificios
holes
for
TOYOTA
pourunvehicule
para
tomillos
vehicle
TOYOTA
paraunautom6vil
TOYOTA
Page 43

•
Installing
the
Source
6-Double-sided tape
6-Bande
6-Cinta
adhesiva
Unitina NISSAN Vehicle
adouble face adhesive ...J
par
ambas
caras
Finisher (Note 1)
Finisseur (Remargue 1)
Placadeadorno
(Nota 1)
.Installation
vehicule NISSAN
" ';@
de
Note
,~
"'@~h
,
~t
/'ffR
,~~
I'appareil
2/
Remarque2/Nota
pilote
dans
2
~~~~~~~~ises
6-Separador
~
I 6-Flat
l'~,
p~
.~@
~
/r
~t
~
V
'~
;-
I 6-Tornillos
~
...
~
j~
un
• Instalacion
vii
NISSAN
head
screw
de
(M5 x 8)
source
cabeza
fuente)
(attachedtothe
6-Vis atete plate (M5 x 8)
(sur
I'appareil pilote)
(fijados alaunidad
Mounting
Supportdemontage(1paire, pour les faces gauche et droite)
Soportedemontaje(1par para los lados izquierdo y derecho)
bracket(1pair for the left and right sides)
delaunidad
unit)
plana
(M5 x 8)
fuenteenun
automo-
Note 1:
Position the face panel with its wide edge
into the groove
Note
2:
Peel
off
source unit.
• Installing the Source
Installbyusing parts attached to
attachedtothe vehicle.)
of
the source unit.
the exfoliation sheet from the tape
Unitina TOYOTA Vehicle
the
at
the bottom. Fitthe edge
and
attach the spacertothe
vehicle. (Screws marked *
Figure41Figure41Figura
Remarque
Posez
Inserez
Remarque2:
Enlevez /a feuille de protection de /a bandeetcollez I'entretoise
I'appareil pilote.
.Installation
are
1:
Ie
panneau avant avecIebordIeplus large dirige versIebas.
Ie
bord danslarainuredeI'appareil pilole.
de
I'appareil
pilote
vehicule TOYOTA
IInstalier avec les pieces fixeesauvehicule.
sont fixeesauvehicule.)
(Les
4
dans
vis
indiquees par *
Nota
1:
Coloque
borde enlaunidad fuente.
Nota
sur
Despegueelpapel
unidad fuente.
un
• Instalaciondela
el
2:
vii
TOYOTA
Instalaci6n delaunidad utilizando las piezas fijadasalautom6vil. (Los
tomillos marcados
panel
frontal consuborde ancho en la parte inferior. Fije
de exfoliaci6n delacinta y fijeelseparador a la
unidad
con
*estan fijados
fuente enunautomo-
al
autom6vil.)
el
Center
Panel (Note 3)
Panneau central (Remargue 3)
Panel central (Nota 3)
Note
3:
Some panelopenings are too small for the unitdepending on the vehicle type and model. In such
the panel framebyabout 1/64" to 3164" (0.5to1.5 mm) so the unit can
be inserted smoothly.
Note
4:
If
a hook on the installation bracket interferes with the unit, bend
flatten it with a nipperorsimilartool.
a case, trim the upper
and
__
-J
lower sides
and
Typical
Mounting
Note
4 /
Remargue
Figure51Figure51Figura
Remarque3:
SelonIemodeleetIe
petites
of
pour
inferieur du panneau d'environ 1/64" a3/64" (0,5 a 1,5 mm)
I'appareil puisse etre insere sans probleme.
Remarque4:
Siuncrochet
comp/etement avec une pince ou un outi/ similaire.
Brackets
type de vehicule, les ouvertures sont parfois trop
I'appareil. Dans ce cas, ajustez les cotes
du support d'installa!ion gene rappareil, rabattez-Ie
I Exemples de fixation de I'etrier I Soprtes para montaje tfpico
Affix the
Inserez les vis
Fije los tomillos a las
'--
4 /
Nota
4
~.~
5
superieur
pour
screwstothe.
dans
Mounting bracket
(1
pair for the left and right sides)
Supportdemontage
(1
paire, pour les faces gauche et droite)
Soportedemontaje
(1
par para los lados izquierdo y derecho)
Nota
3:
Algunas aberturas del
et
dependiendo del tipo y modelo de autom6vil. En tal caso, recorte las
que
partes superior
a fin de poder insertar fscilmente la unidad.
mm)
Nota
4:
Si un gancho del soporte de montaje interfiere en
aplsnelo con unos alicates u otra herramienta similar.
marks.
les orifices indiques par
marcas
•.
panel
son demasiado pequeiias para /a unidad
e inferior del marco delpanel de 1/64" a 3164" (0,5 a 1,5
la
•.
unidad, d6blelo y
• Vehicles
In
some
cases the center panel
filing, etc.)
• Removing
When
the
of
soure unitistoberemoved, disassemble itinthe reverse
the
orderin"INSTALLING
other
the
than
NISSAN and TOYOTA
may
require modification. (Trimming,
Source
Unit
THE
SOURCE UNIT".
Example 1:
Exemple 1:
Ejemplo 1:
Example
Exemple
Ejemplo
• Vehicules
2:
2:
2:
d'une
Example
Exemple
Ejemplo
3:
3:
3:
autre marque que NISSAN
TOYOTA
Dans
certains cas,Iepanneau central devra subir quelques modifica-
tions. (Ajustement, limage, etc.)
• RetraitdeI'appareil
5i vous devez enlever I'appareil pilote, demontez-Ie
I'inverse de "INSTALLATIONDEL'APPAREIL PILOTE".
pilote
en
procedant a
et
•
Automoviles
En
algunos casos, el panel frontal puede requerir modificaci6n.
(Recorte, Iimado, etc.)
• Desmontajedela
Cuando desee desmontar la unidad fuente, hagaloensentido inverso
al
de "INSTALACI6NDELA
quenosean NISSANniTOYOTA
unidad
fuente
UNlOAD FUENTE".
Page 44

amID"
BIll
-4.
No.
CD
®
@
@
®
®
(j)
WIRE CONNECTIONS I CONNECTIQUE I CONEXION
Description
REAR
RIGHT
REAR
FRONT
FRONT
OEM
JACK
CNP (connect toXMmini
USB
Antena
~~::~~:
~~~
Black (Red)
LEFT
Black (White)
RIGHT
Grey
Grey
(Red)
(White)
WHEEL
REMOTE
tuner
direct)
USB
memory/MTP/iPod
LEFT
STEERING
(Black)
cable (connect to
~
0
i::i
E~~e~E6~~~~
EntradadeCeNET
_-
i
Front Right
Avant droit
Delantero derecho
Front Left
Avant gauche
Delantero izquierdo
Rear Right
Arriere droit
Trasero derecho
Rear Left
Arriere gauche
Trasero Izquierdo
Derecho
Gauche
Izquierdo
Right
Droit
Left
EBGrayIEBGrisIEBGris
8Gray/BIack
EBWhiteIEBBlancIEBBlanco
8White/BIack
EBPurpleIEBPourpreIEBPurpura
8Purpie/BIack
EBGreenIEBVertIEBVerde
8GreeniBIack
4-Speaker system
Systeme
Sistema con 4altavoces
2-Speaker system
Systeme
Sistema con 2altavoces
............
EBGrayIEBGrisIEBGris
II
",-
8Gray/BIack I
............
EBWhite
II
",-
8White/BIackI 8 Blanc/noir I 8Blanco/negro
EBPurpleIEBPourpreIEBPurpura
8Purpie/BIack I 8Pourpre/noir I 8Purpuralnegro
EBGreen
X
tused.
No
sulate each wire.
In
Inutilise.
Isoler chaque fil.
No se utilize.
Aisle
todos
los conductores.
8GreeniBIack
CONTROL
INPUT
device)
~
0
~~®~5
~Jj=~_~t::~:::::;::
t
Remote
control
Telecommande
Control
remota
I
8Grislnoir
I 8Blanc/noir I 8Blanco/negro
I 8Pourprelnoir18Purpuralnegro
I 8Vert/noir18Verde/negro
a4 haut-parleurs
+
or
o
+
a2 haut parleurs
8Gris/noir
I (f)Blanc I
I EBvert I
leVert/noir
I 8Grislnegro
I 8Grislnegro
EBBlanco
EBVerde
I 8Verde/negro
No.IDescription
CD
(2)
@
~)
(§)
@ I CNP (brancher
(f) I Cable
~
=:
: (
Black wire (Ground lead)
Fil
Conductor negro (Conductor
;
:\
OrangelWhite wire (Illumination lead)
Fil
(
Conductor anaranjado/blanco (conductor
,)
)
Blue wire (Auto antenna lead)
, \
Fil
Conductor azul (conductor paralaantena motorizada)
DE
ARRIERE
.
ARRIERE
AVANT
AVANT
PRISE
OEM
: MTP/iPod)
I
Yellow
Fit
Conductor amarillo (Conductorde proteccion
Yellow
Fil
Conductor
Red
Fil
Conductor rojo (Conductor
BluelWhite wire (Amplifier turn-on lead)
Fil
Conductor azullblanco (Conductor
noir (fildeterre)
orange/blanc
bleu
DROIT
Noir (Rouge)
GAUCHE
DROIT
GAUCHE
D·ENTREEDETELECOMMANDE
(Noir)
USB(abrancher
Nolr(BiarlCi
Gris
(Rouae)
Gris
(Blanc)
directement
sur
au mini
dispositildememoire
®
=..-.J
16-Pin ConnectorExtension Lead
(attached to
Fil prolongateur-connecteur 16 broches
(attache sur I'appareil pilote)
Cable prolongador
(fijado a
Brown
Fil
marron
Conductor
wire (Memory back-up lead)
jaune
jaune
Fuse
Fusible
Fusible (3A)
wire (Power lead)
rouge (fil d'alimentation)
bleu/blanc
(IiideI'antenne elect
the
source unit)
de
la
unidad fuente)
wire
(Phone
(fil
de
marr6n
Connect to cellular phone mute lead.
Brancher
Conectelo
(Iiidesoutien memoire)
Fuse
(15A)
Fusible (15A)
Fusible
(15
wire
(Bus
(fildebus
amarillo
(3A)
(3A)
(fildemise sous tension telecommandabledeI"amplificateur)
Connect
Brancher
de
I'ampliticateur.
Conactelo
alimentacion del amplilicador.
Connect
Brancher II
Conectelo a una parte metalica del chasis del vehiculo.
(Iii
d·eclairage)
Connect
Le connecter ala
de
la voiture.
Conectelo alterminal de alimentacion del automovil para
iluminacion.
Connect ittothe car power suppty terminal for the antenna.
Le
connecterIIla
de
la
Conectelo alterminal de alimentacion delaantena.
16 contactos
mute
lead)*
sourclnedetelephonel*
(Conductordesilenciamientodetelefono)*
au
Iii de sourdinedutelephone mobile.
al
conductor de silenciamiento deltelefono modular.
A)
power
lead)*
d'alimentationl*
(conductordealimentaci6ndebus)*
de
alimentacion)
de
conexiondela
to
remote turn-on lead01amplifier.
au
fildemise sous tension telecommandable
al
conductor de conexion automatica de
de
puesta amasa)
to
vehicle chassis ground.
la
terreduchassisduvehicule.
ittothe car power supply terminal lor illumination.
borne
rique)
voitu
borne d'alimentationdeI'antenne electrique
re.
CABLES
---
SUR
VOLANT
tuner
XM)
USBI
To
'RCA
delamemoria)
Connect directly to battery.
Brancher directement II
Conactelo directamente a
Connect directlyto battery.
Brancher directement II
Conactelo directamente a la bateria.
AccessorvEB12 V
AccessoireEB12 V
AccesorioE£)12
de
iluminacion)
d'alimentationdeI'eclairage
V
alimentacion
external amplifier
CAUTION:
Versunamplificateur
ATTENTION:
Aunampliflcador externo
PRECAUCI6N:
la
batterie.
la
bateria.
la
baUerie_
det
amplificador)
la
Num,
CD
®
@
@
®
®
(j)
Pleaae
make
sure
when
chassis,
ground
happen.
externe
Lorsque
vous
correctement
risquez
d'endommager
Cuando
adecuadamente amasaenel cha
fuente podria danarse seriamente.
Note:
Some unitsdo
(Refer to
Remarque:
Certains appareils n'onlpas de conducleurs de connexiol1aude prises.
(Voir*.)
Nota:
Algunas unidadesno tienen cables de conexi6nniconectores.
(Refierase a
connecting external poweramplifier, that
the
amplifier.Ifthisisnot
raccordezunamplidepuissance
"amplificateur
conaeleunamplilicadordepotencia externo, cercioresedeponerlo
*.)
*.)
_rJ2_L~9.sJ.l:JI~_E.r!~~~
(~)
(~)
(4:)
(~)
@:i
r'D!
@j
(~;
(!Q!
rft
Gl,
\J3)1
(141
(15)
@:
@;
iJl;
@'
t?9:
CD
®
@
@
®
®
0
®
®
@
@
@
@
@
@
@J
@
@
@
®
Descripci6n
TRASERO
TRASERO
DELANTERO
DELANTERO
TOMADEENTRADADECONTROL
EL
CNP
Cable
MTP/iPod)
gravement
not
CD
®
@
@
®
®
0
®
®
@
@
@
@
@
@
@J
@
@
@
®
!
i
i
j
!
DERECHO
IZQUIERDA
VOLANTE
(conecteJo directamente al
USB
(conectelo al dispositivodememoria
done,
ala
masse
surIechassis
I'appareil
sis
de su autom6vil.Sino10
have connecting leadsorjacks.
Main
unit
CeNET
extension
V-adapter (sold separately)
CD
changer
DVD
chanaer
RCA
extension
Power
amplifier (2-or4-Channel)
Front
speakers
Rear
speakers
Monitor
Satellite radio receiver
TV
tuner
module
5.1 ch
surround
5.1 ch
surround
Optical
connector
Center
speaker
Subwoofer
External
unit
Aux
BluetoothBB(BLT370)
Stereo
mini-plug
Cable
rallonCle
Adaptateur
ChangeurdeCD
ChangeurdeDVD
Cable de rallonCle RCA (vendu separement)
Amplificateurdepuissance
Haut-parleurs avant
Haut-Darleurs arriEne
Negro (Rojo)
DERECHO
IZQUIERDA
OEM
Y (vendu separement)
Negro (Blanco)
Gris
Gris (Blanco)
(Nearo)
severe
damagetothe
externe,
faites
delavoiture.
pilote.
cable
cable
(sold separately)
decoder
decoder
cable
(with amplilier)
(with amplifier)
cable
(sold
____
CeNET
(Roio)
sintonizador
you
bien
hiclese, la unidad
control unit
seoaratelvl
._.
________.__.__________
(2-
I Moniteur
Recepteur radio
I
Module
Decodeur
Unitedeconfrelededecodeur
i
voies
I
Cabledeconnexion
Haut·parleur
Caissondearaves
Unite externe
Aux BluetoothBB(BLT370)
Cable
stereo amini-fiche (vendu
I
I
separement)
I
Unidad principal
Cable
Drolonaador
Adaptador
Cambiadordediscos
CambiadordeDVD
Cabledeextensi6n
Amplilicadordepotencia
Altavoces delanteros
Altavoces traseros
Monitor
Receptorderadio
M6dulo
Decodificadordesonido
Surroundde5.1
Unidaddecontrol del
sonido
envolvente
Cable
con
Altavoz
Altavozdesubgraves
Unidad
BluetoothBBauxiliar (BLT370)
Cabledeminiclavija
separado)
sat~~~~
tuner TV
surround
central
en Y (vendido aparte)
sintonizadordetelevisi6n
conector
central (con amplificador)
externa
__________
5.1
voies
oDtiaue
(avec
amplificateur)
(avec amDlilicateur)
CeNET
compactos
RCA
(2 6 4 canales)
via
satelite
envolvente
canales
decodificador
Surroundde5.1 canales
optico
(con amplificador)
eslereo
(vendido
REMOTO
properly, to
source
unit
attentionamettre
Sinon,
vous
ou
4-canauxl
surround5_1
de
por
PARA
mini XM)
USBI
the
car
may
Page 45

.......
-5.
•1.Be sure to turn the power off when wiring.
2.
3.
Note:
4.
5.
CAUTIONS
Be particularly careful where you route the wires. Keep them well away from the
engine, exhaust pipe, etc. Heat may damage the wires.
If the fuse should blow, check that the wiringiscorrect.
If it is, replace the fuse with a new one with the same amperage rating asthe
original one. (Figure
There are various typesoffuse holder. Do
metalparts.
Connect the CeNETextension cable fully and securely until it locks. When the
CeNET extension cabie is pulled, hold the slide cap part and pull it towards you.
7)
(Figure
* When the CeNET extension cable
cable CCA-520 (2.5m) or CCA-521 (0.6m), or V-adapter CCA-519 (each of
themIssold separately).
* Use the CeNETextension cable made by Clarion.
When the main power supplyfuseinthe caris15A or less, purchase an
automotive cable thatcan withstand 15 A and supply this unit with power
directly from the battery to ensure that the unit will operate normally.
Note that afuse must be installed at a distance no longer than30em
cable battery terminal to prevent accidents.
6)
ON
WIRINGIPRECAUTIONSAUSUJET
not
let the baNery side touch
is
extended or branches, use extension
.,,'
~
Fuse
Porte-fusible
Portafusibles
other
from the
Fuse
Fusible
Fusible
case
DES
CONNEXIONSIPRECAUCIONES
•
1.
S'assurer de mettre rappareil hors circuit avant defaIreIecablage.
2.
Faire particulierement attention lors deI'acheminement des fils.
Les eloigner du moteur, des tuyaux d'echappement, etc. La chaleur risque
d'endommager ces fils.
3.SiIe
fusible saute, verifiersiIe cablage est correct.
SiIefusible est grille.Ieremplacer par un fusible neut de meme amperage que
Ie
fusible d·origine. (Figure
Remarque:
11
y a different type de porte·lusible. La borne du cote batterie ne doitpas
foucher d'autres pieces metalliques.
4.
ConnecterIeciible d'extension CeNETcompletement et solidement jusqu'a
qU'il
soit verrouille. Pour tirerIecable d'extension CeNET, tenir la partie
coulissanteducapuchon et tirer vers vous.
" Pour etendreouderiverIecable d'extension CeNET, utiliserIecable
d'extension CCA·520 (2.5 m[8piedsllouCCA·521
I'adaptateur YCCA·519 (ces cables sont vendus separement)
-,
Utiliser les cables d'extension CeNET fabriques par Clarion.
5.SiIe
fusible d'alimentation principaledela voiture est de15Aou moins.
achetezuncable automobile qui peut supporter15Aetalimenter cet apparelI
directement apartir de la batterie et assurer
normalement.
Notez qu'un fusible doit eire installe a une distance de mains 30emde borne
de la batterie pour eviter tout accident.
6)
(figure
7)
(O,6m[2piedsJ). ou
que
I'appareil fonctionnera
Slide
cap
Capuchon
Tapa
coulissant
deslizante
•1.Antes de hacer las conexiones, asegurese dedesconectar laalimentaci6n de
la unidad.
2.
Sea especialmente cuidadoso al dirigir y lijartos cables. mantengalos alejados
del motor, tubo de escape, etc.EIcalor puededaliar los cables.
3.
Sl el fusiblesequema, revise las conexiones.
5i
amperaje que el original. (Figura 6)
Nota:
Existen varios tfpos de portafusibles. No permitaqueelterminal
baterfa toque otras partesmetalicas.
ce
4.
Conecte el cable prolongador CeNET completa y seguramente hastaque
chasquee. Para desconectar el cable, sujete la parte dela tapa deslizable y lire
hacia usted. (Figura
* Para prolongar 0 ramificar el cable prolongador CeNET, utilice un cable
* Utilice un cabte prolongador CeNET fabricado porClarion.
5.
Cuando el fusible de alimentaci6n principal del autom6vil sea de 15 A 0 menos,
adquiera un cable para autom6vil que pueda resistir15A y alimente esta
unidad directamente desde la bateria paracerciorarse de que pueda funcionar
normalmente.
Tengaencuenta que para evitar accidentes, deberainstalar un fusibleenal
cable que va a terminales de la bateria a una distancia no superior a 30
~/
,~
-
~
~
PARALACONEXIONDECABLES
esta quemado, reemplace el fusible por otro nuevo con el mismo valor de
del
lado de la
7)
prolongador CCA-520 (2,5 m) 0 CCA-521 (0,6 m), 0 un adaptador en Y"CCA·
519 (vendidos aparte).
em.
CeNET
~
Entree
EntradadeCeNET
~
CeNET
Cable
Cable
input
CeNET
cable
CeNET
CeNET
.......
-6.
• Exampleofthe
• Exemple de systeme
• Ejemplodesistema
SYSTEM EXAMPLE I EXEMPLE
system
using
utilisantunamplificateur
utilizandounamplificador
an external
Figure6/Figure6/Figura 6
amplifier
(Audio
exterieur. (audio-visuel)
externo
Visual)
(audiovisual)
DE
SYSTEME I EJEMPLO DESISTEMA
Figure 7 / Figure
• ExampleofAUX
• Exemple de
•
Ejemplodeconexi6ndeAUX
7/
BluetoothBBconnection
connexion
~
I
I
I
I
Figura 7
AUX
Bluetooth
Bluetooth
®
I
BB
BB
6,..0
orloulo
®
~~------' ~-B----·'
I " '
,
Amp',
I
I
:
I " '
Amp'
'I
II
::5:
~-~-_::_-J-_:
.......
-7.
1.Donot open the case. There are no user serviceable parts inside.
2.
GENERAL CAUTIONS I PRECAUTIONS GENERALES I PRECAUCIONES GENERALES
you
drop anything into the unit during installation, consult your dealer
oranauthorized CLARION service center.
Use a soft, dry cloth to clean the case. Never use hard cloth, thinner,
benzen, alcohol, etc. For tough dirt, apply a little cold or warm water
to a soft cloth and wipe off the dirt gentry.
This system hasanexternal input jack on the front panel,
so you can listen to your telephone calls or music from
external devices on your car speaker.
Commece systeme possedeune prise d'entree externe sur
Ie
panneau avant, vous pouvez ecouter vos appels
telephoniquesoudelamusique provenant de composants
externes par les haut-parleurs de votre voiture.
Este sistema tiene una toma de entrada exterior enelpanel
frontal para poder escuchar las lIamadas telef6nicas 0 la
'
,
Note:
Use a CeNET extension cable that is less than 20 minlength. (including the V-adapter CCA-519.)
Remarque:
Utiliser
un
cable d'extension CeNET inlerieur a20 m
Nota:
Utiliceuncable prolongador CeNET de menos de 20 m de longitud (incluyendoeladaptadorenV CCA-519).
*This source unit can control a total of 2 changers except 2 DVD changers exist
" L'appareil pilote est capable de commander 2 changeursautotalenplus des 2 changeurs de
dansIesysteme.
*Esta unidad fuente puede controlar
sistema.
1.Nepas ouvrirIecoffret.IIn'y a pasdepieces reparables par
II
I'utilisateur aI'interieur de I'appareil.
I'appareil pendant I'installation, consulter votre revendeurouun
service apres-vente agree CLARION.
2.
Utiliserunchiffon doux et sec pour nettoyerIecollret,nejamais
utiliserunchiffon rigide,undiluant,dubenzene, de I'alcool, etc. Pour
enlever la salete tenace, appliquerunpeu d'eau lroideoutiede sur
un
chiffon doux et essuyer doucement la salete.
Siunobjet est tombe dans
musica de los dispositivos externos por los altavoces del
autom6vil.
de
long
(en
comptant aussi I'adaptateur Y CCA·519).
in
the system.
en
total 2 cambiadores excepto los 2 cambiadores de discos DVD del
1.Noabra la caja.Enel interior no hay piezas que pueda reparar
usuario.Sidentro de la unidad entra algo durante la instalaci6n,
consulte asuproveedor 0 auncentro de servicio autorizado por
CLARION.
2.
Para limpiar la caja, utiliceunpano suave y seco. no use nunca
pano duro, diluidor de pintura, benceno, alcohol, etc. Para la
suciedad resistente, aplique un poco de agua fria 0 caliente a
pano suave y frote suave mente la parte sucia.
DVD
qui existent
el
un
un
IMPORTANT:
Improperinstallation
nothave the appropriate experience, consult
Cutting chassis wire leads voids the warranty.
may
cause damage to
your
unitorcar.Ifyou
a qualified installer.
do
IMPORTANT:
Une installation incorrecte
wfihicule.SiI'on ne possede pas les connaissances requises,
consulter un installateur qualifie. Couper
garantie.
peut
endommagerI'appareil ou
Ie
fil du chassis annule
IMPORTANTE:
Ie
la
La instalaci6n inapropiada puede causar
autom6vil.Siustednoposee la experiencia apropiada, consulte a un
instaladorcualificado. EI corte de los conductores
(carrocerfa) anulara la garantfa.
daiiosensu
de
unidad 0
puesta
su
amasa
Clarion Co., Ltd.
Page 46

.;11&
Clarion"
Amoins d'une contre-indication, les produits Clarion achetes chez un revendeur Clarion autorise sont garantis contre
tous les defauts de materiaux et de mise en oeuvre pour une periode d'un (1) an
Les produits Clarion notes ci-dessous (**) sont garantis contre tous les defauts de materiaux et
une periode de deux (2) ans
ET
lorsque I'installation du produit est eftectuee parIerevendeur.
** DRZ9255
Tous les cables, fils et autres accessoires Clarion achetes chez un revendeur autorise Clarion sont garantis contre
tous les defauts
TOUS
LES
SOUMIS AUX RESTRICTIONS DE
Les conditions de cette garantie limitee et I'etendue
((
Clarion»)
1.
UNE PREUVEDELA
DANS LE CAS D'UN PRODUIT
PREUVE
AUTORISE SONT REQUISES. TOUTE L'INFORMATION
AUTORISES DE CLARION PEUT ETRE OBTENUE
2. Cette garantie Iimitee sera annulee
non autorise par un centre de services sous garantie Clarion.
3. Cette garantie limitee ne s'applique pas
dont
autrement qu'en suivant les instructions fournies par Clarion.
4. Cette garantie limitee ne couvre pas I'interference electrostatique produite ou non
Ie reglage de la tete de lecture ou des elements laser,
du
lecteur
5.Laseule responsabilite
remplacement du produit,
6. Le produit doit etre envoye
etre entierement assure et tous les frais
Clarion
7.
LES
INCLUANT
CLARION, NE
L1MITES PRESCRITES PARLALOI.
L'ELIMINATION
S'
APPLIQUE
8.
AUCUNE
DECRITE
POURRA
INDIRECTS
PUISQUE
OU
DE LIMITERLARESPONSABILITE
OU
EXCLUSIONS
9. CETTE
VOUS
DXZ775USB DXZ675USB
de
materiaux et de mise en oeuvre pour une periode de90jours.
PRODUITS
d'apres cette garantie limitee sont les suivantes :
DELADATE D'ACHAT ET UNE PREUVE QUE L'INSTALLATION A ETE EFFECTUEE
Ie numerodeserie a ete modifi8, obstrue ou efface, ou qui ont ete raccordes, installes, ajustes ou repares
pour
n'assumera
PRODUITS
TOUS
AU PRODUIT
GARANTIE
CI-DESSUSETCE, EN
EN
AUCUN
ENCOURUS
CERTAINS ETATS
GARANTIE
POUVEZ
CLARION
DATE D'ACHAT EST REQUISE POUR TOUTE REPARATION SOUS GARANTIEDECE
reparation.
de
aucune responsabilite en
CLARION'ACHETES
LES
ACHATS EFFECTUES SUR
SONT
PAS COUVERTS
DES
GARANTIES
IMPLICITE
CAS
PEUVENT
L1MITEE VOUS OCTROIE
POSSEDER DES DROITS
PourIeCanadaetles
Etats-Unis
seulement
acompter
de
la date d'achat originelle.
de
mise en oeuvre pour
acompter de la date d'achat originelle, lorsqu'achetes chez un revendeur Clarion autorise
DXZ575USB
ACHETES CHEZ UN REVENDEUR NON AUTORISE PAR
GARANTIE
L1STE
CI-DESSUS, BENEFICIANTDELA
pour
Clarion, d'apres cette garantie limitee, est restreinte ala reparation du produit ou au
SUPPLEMENTAIRES DECRITES CI-DESSOUS.
tout
dommage
aux
produits negliges, accidentes ou ayant subi un usage incorrect, ou
ala discretion absolue
aClarion
SERA
ETRE
PAR
dans
son emballage original ou
de
transport doivent etre prepayes.
CHEZ UN REVENDEUR AUTRE QU'UN REVENDEUR CLARION AUTORISE,
LES
GARANTIES
DANSLECAS
SOUS
DE QUINZE (15)
NE
ACCORD
TENUE
L'USAGE
NE
PERMETTENT
NE
PASS'APPLIQUER
CES
POURRA
RESPONSABLE
DU
EN
SUPPLEMENTAIRES
cas
AVEC
PRODUIT
CASDEDOMMAGES
DFZ675MC
de
la responsabilitedeClarion CorporationofAmerica
DPX11500 DPX1800 DPX2250
CLARION
GA~A,NTIE
L1MIT~E
DE
PARUNREVENDEUR
APROPOS DES CENTRES DE SERVICES SO
EN
COMMUNIQUANT AUX ADRESSES
encouru lors d'une reparation effectuee
ni
les couts de manutention pourIeretrait ou la reinstallation
de
Clarion.
dans
un emballage equivalent. Le colis doit
de perte oudedommages
INTERNET
OU
CONDITIONS,LAPERIODE DE
JOURS
S'ETENDRE
LES
OU
PAS DE LIMITERLADUREE
A VOUS.
DES
DROITS
CHEZ
L1MITEES DE
LES
LOIS
APPLICABLES
A PARTIR DELADATED'ACHAT
AU-DELA
L1MITES
PRESCRITES
DES
PERTES
L'IMPOSSIBILITE
DIRECTS
LEGAUX
SELON
encourus lors du transport.
UN REVENDEUR NON AUTORISE PAR
CLARION
DELAPERIODEDEGARANTIE
OU
PRECIS.
VOTRE LIEU DE RESIDENCE.
parIevehicule, ni Ie nettoyage ou
GARANTIE
DOMMAGES
D'UTILISERLEPRODUIT.
DES
OU
L1STEES
ET CE, EN ACCORD AVEC
NE
PERMETTENT
PAR
LA
LOI.
GARANTIES
INDIRECTS,
SONT
PRODUIT.
DEUX (2) ANS, UNE
US
GARANTIE
CI-DESSOUS.
pardupersonnel
PAS
L1MITEE QUI
ORIGINELLE.
CLARION
DIRECTS
IMPLICITES,
CES
NE
OU
LIMITATIONS
LES
GARANTIE LIMITEE DE CLARION 2007
10. Les lois de I'Etat de la Californie contr61ent totalement cette garantie limitee, son interpretation et sa mise en execution.
11. Si vous eprouvez des problemes
avec Clarion ou visitez notre site Web aI'adresse ci-dessous afin d'obtenir une liste
autorises Clarion
aux adresses ci-dessous, afin d'obtenir
de
votre region. N'hesitez pas a
Aux
Etats-Unis:
Clarion Corporation of America
Attn:Customer
6200 Gateway Drive
Cypress,
1-800-GO-CLARION
www.c!arion.com
CA.
de
performance du produit pendant la periode garantie, veuillez
une
Service Manager
90630
des
centresdeservice
communiquer
resolutiondetout probleme relie aux produits Clarion.
avec les Centres de service Clarion,
Au
Canada:
Clarion Canada
Centre de services sous garantie
2239 Winston Park
Oakville, Ontario
(905) 829-4600
www.c1arioncanada.com
Inc.
L6H
Drive
5R1
communiquer
Page 47

281-0632-02 2006/9
"
clarion
Except as noted, Clarion products purchased from an authorized Clarion dealerare warranted against all defects
materials and workmanship for a periodofone (1) year from the date of original purchase.
The following Clarion products noted below ** are warranted against all defectsinmaterials and workmanship for a two
(2) year period from the date oforiginal purchase when purchased from
** DRZ9255 DXZ775USB DXZ675USB DXZ575USB DFZ675MC DPX11500 DPX1800 DPX2250
All Clarion cables, wires and other accessories if purchased from an authorized Clarion dealer are warranted against
all defectsinmaterials and workmanship for ninety (90) days from the dateoforiginal purchase.
ALL
PURCHASES
TO
FURTHER
The conditions of this Limited Warranty and the extent of responsibility of Clarion Corporation of America ("Clarion")
under this Limited Warranty are as follows:
1. PROOF OF DATE
WARRANTY SERVICE OFTHIS PRODUCT.INTHE CASE OFTHE TWO (2) YEAR LIMITED WARRANTY FOR THE
CLARION PRODUCTS NOTED ABOVE, PROOF OF DATE OF PURCHASE AND PROOF OF INSTALLATIONBYAN
AUTHORIZED CLARION DEALER IS REQUIRED. INFORMATION
SERVICE CENTERS MAYBEOBTAINEDBYCONTACTING CLARIONATTHE ADDRESS LISTED BELOW.
2. This Limited Warranty will become void if service performed by anyone other than an approved Clarion Warranty
Service Center results in damage to the products.
OF
CLARION
WARRANTY
OF
PURCHASE FROM AN AUTHORIZED CLARION DEALER
CLARION 2007 LIMITED WARRANTY
For
USA
and
PRODUCTS
RESTRICTIONS
Canada
FROM
AS
DESCRIBED
only
AND
NON-AUTHORIZED
BELOW.
ABOUT
installed by an authorized Clarion dealer.
CLARION
CLARION AUTHORIZED WARRANTY
DEALERS
WILL
ARE
BE
REQUIRED FOR
in
SUBJECT
3. This Limited Warranty does not apply to any product which has been subject to misuse, neglect or accident,
or
which has had the serial number altered, defacedorremoved,orwhich has been connected, installed,
adjustedorrepaired, otherthan in accordance with the instructions furnished by Clarion.
4. This Limited Warranty does not cover
cleaningoradjustments,orlabor costs for the removalorreinstallation of the unit for repair.
5. The sole responsibility of Clarion under this Limited Warranty shall be limited to the repair of the products or
replacement of the prOduct, at the sole discretion of Clarion.
6. Product must be shipped in its original carton or equivalent carton, fUlly insured, with shipping charges prepaid.
Clarion will not assume any responsibility for any lossordamage incurredinshipping.
7.
CLARION
INCLUDING
CLARION
ALLOWED
ELIMINATION OF WARRANTIES UNDER THESE CIRCUMSTANCES, THE
PERIOD
8.
ALL
GREATER DURATION
SHALL
OF THE USE OR
ON HOW LONG
CONSEQUENTIAL
PRODUCTS
ANY
DEALER,
BY
APPLICABLE
SHALL
IMPLIED WARRANTIES EXCEPT TO THE EXTENT PROHIBITEDBYAPPLICABLE
CLARION
AN
PURCHASED
AND
ALL
PURCHASES VIA THE INTERNET FROM A NON INTERNET AUTHORIZED
SHALL
BE
DEEMED TOBEFIFTEEN (15) DAYS FROM THE DATE OF
BE
LIABLE
INABILITY
IMPLIED WARRANTY
DAMAGES, THE
NOTBECOVERED
LAW. IN THE EVENT
THAN
THE WARRANTY PERIOD SET FORTH ABOVE. UNDER NO CIRCUMSTANCES
TO USE THE PRODUCT. BECAUSE SOME STATES DO NOT
9. THIS LIMITED WARRANTY GIVES YOU SPECIFIC
WHICH VARY FROM STATE TO STATE.
10. The laws of the State of California shall govern and control this limited warranty, its interpretation and enforcement.
11. Should you have any difficulties with the performance of this product during the warranty period, please call Clarion
or
visit
our
web site for a listing of Authorized Warranty Service Centers in your area.
Clarion Customer Service at the address listed below for any service help you may need with Clarion products.
FOR
car
staticorother electrical interferences, tape headorlaser pick-up
FROM A SOURCE OTHER
BY
ANY
CLARION
AND
TO THE EXTENT
ANY
LOSS OR DAMAGE, DIRECT OR CONSEQUENTIAL, ARISING OUT
LASTS
ABOVE
OR EXCLUSIONS OR LIMITATIONS OF INCIDENTAL OR
LIMITATIONS OR EXCLUSIONS MAY NOT APPLY TO YOU.
LEGAL
RIGHTS, AND YOU MAY
THAN
LIMITED
AN AUTHORIZED
WARRANTY
APPLICABLE
APPLICABLE
ORIGINAL
ALSO
You
may also contact the
CLARION
TO THE EXTENT
LAW
PROHIBITS
LIMITED WARRANTY
PURCHASE.
LAW
SHALL
ALLOW
HAVE OTHER RIGHTS
DEALER,
HAVE NO
LIMITATIONS
In
USA:
Clarion CorporationofAmerica
Attn:Customer Service Manager
6200 Gateway Drive
Cypress,
1-800-GO-CLARION
www.clarion.com
CA.
90630
In
Canada:
Clarion Canada
Warranty Service Center
2239 Winston Park Drive
Oakville, Ontario
(905) 829-4600
www.clarioncanada.com
Inc.
L6H
5R1
 Loading...