

Page 1
Owner’s manual
Mode d’emploi
Manual de instrucciones
DSC920S
SIRIUS SATELLITE RADIO
RECEIVER CONTROLLER
CONTRÔLEUR DE RÉCEPTEUR
RADIO SATELLITE SIRIUS
CONTROLADOR DEL
SINTONIZADOR SIRIUS DE
RECEPCIÓN RADIO VÍA
SATÉLITE
Page 2
Thank you for purchasing this Clarion DSC920S.
English
∗Please read this owner’s manual in its entirety before operating this equipment.
∗After reading this manual, be sure to keep it in a handy place (e.g., glove compartment).
∗Check the contents of the enclosed warranty card and keep it carefully with this manual.
Contents
1. PRECAUTIONS............................................................................................................................... 2
2. SUMMARY OF THE DSC920S ....................................................................................................... 2
3. CONTROLS..................................................................................................................................... 3
Names of the Buttons and their Functions ...................................................................................... 3
Display Items ................................................................................................................................... 4
4. OPERATIONS ................................................................................................................................. 5
5. INSTALLATION............................................................................................................................... 8
1.PRECAUTIONS
1. The DSC920S can easily be damaged by
moisture, high temperatures or high humidity.
Keep the inside of the car clean and well
ventilated.
2. Never subject the DSC920S to strong shocks
or open its case. Doing so may result in damage.
3. Use a soft, dry cloth to wipe dirt off the
DSC920S. Never use a hard cloth or thinner,
alcohol, etc. For tough dirt, apply some cold
or lukewarm water to a soft cloth and wipe off
the dirt gently.
CHANGES OR MODIFICATIONS NOT EXPRESSLY APPROVED BY THE MANUFACTURER FOR COMPLIANCE COULD VOID THE
USER’S AUTHORITY TO OPERATE THE
EQUIPMENT.
INFORMATION FOR USERS:.
CHANGES OR MODIFICATIONS TO THIS
PRODUCT NOT APPROVED BY THE MANUFA CTURER WILL V OID THE WARRANTY.
CAUTION
2.SUMMARY OF THE DSC920S
The DSC920S has been designed to activate
the Clarion Sirius Satellite Radio Receiver in the
Stand alone mode.
Moreover, even if the unit was connected with
the main unit compatible with the CeNET connection (Sirius-ready unit built-in), the SIRIUS
Satellite Receiver can be controlled from the
DSC920S or the main unit.
■
To receive Sirius Satellite Radio
The Sirius Satellite Radio Receiver that is connected with the DSC920S holds a “SIRIUS ID”
for user identification. All you have to do to obtain a subscriber contract and enable reception
of Sirius Satellite Radio is to call the Sirius Service Center (888-539-SIRI) and inform us of
your Sirius ID and a few other details.
For your “SIRIUS ID”, refer to the subsection
“Verifying your SIRIUS ID” in the section “OP-
ERATIONS”.
2 DSC920S
Page 3
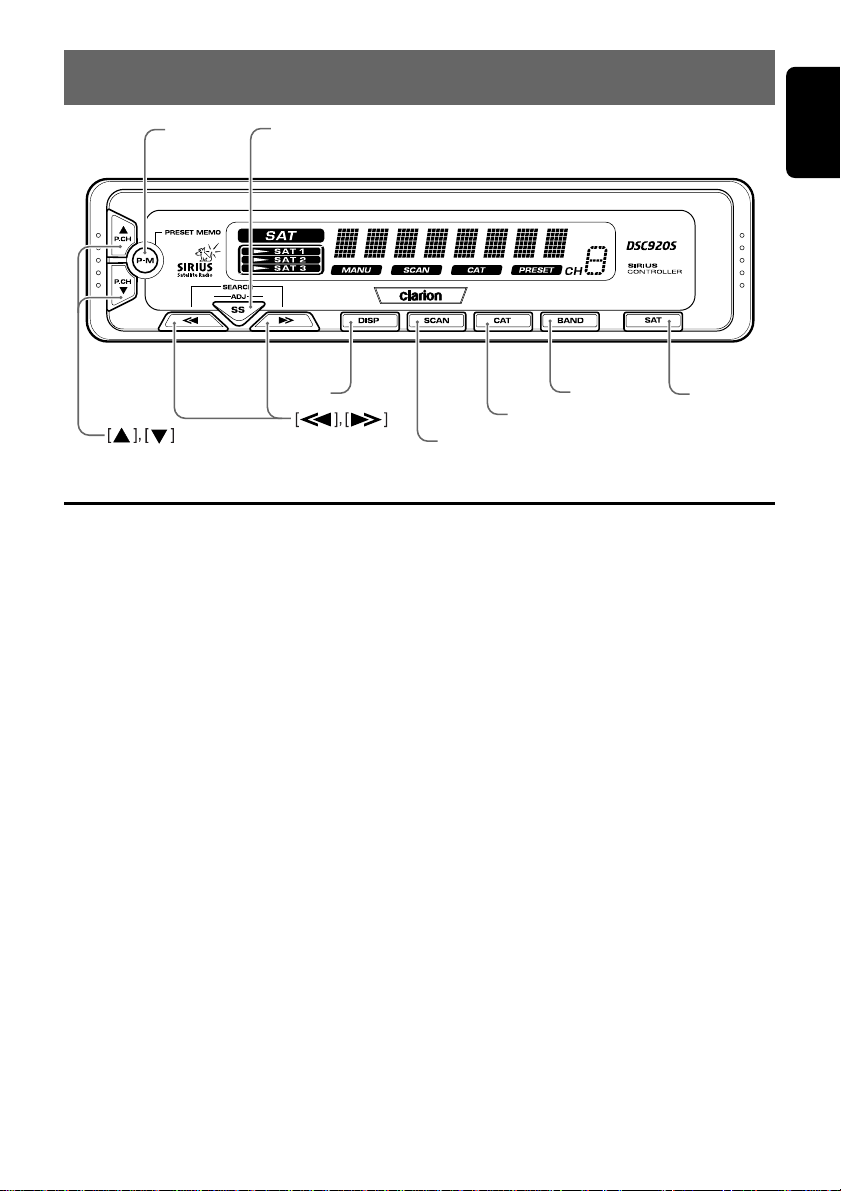
3.CONTROLS
[
]
P-M
Names of the Buttons and their Functions
[SS]
[
DISP
CAT
[
BAND
]
]
[
[
]
SCAN
English
]
[
SAT
]
[SAT] button
• Used to turn the power on or off.
[BAND] button
• Used to switch the reception band.
• Used to switch the Tuning mode (seek/
manual) when pressed and held for 1 second
or longer.
[CAT] button
• Used to turn the Category selection mode on
or off.
[SCAN] button
• Used to perform the category scan.
• Used to perform the preset scan when the
button is pressed and held for 1 second or
longer.
[DISP] button
• Used to switch the Text mode.
• The text display in the operation status indica-
tion scrolls when the button is pressed and
held for 1 second or longer.
[a], [d] button
• Used to move the channel up or down.
• Used to search up or down the channel in the
Category selection mode.
• Used to switch the adjustment item in the Ad-
just mode.
• Used to move the channel faster when kept
pressed.
[w], [z] button
• Used to move the preset channel up or down.
• Used to move the category up or down in the
Category selection mode.
• Used to switch the item adjustment or the item
in the Adjust mode. (Contrast adjustment,
SIRIUS ID display switching)
[P-M] button
• Used to enter the Preset memory mode.
• Received channels are stored in the preset
channels when the button is pressed and held
for 2 seconds or longer.
[SS] button
• Used to switch the screen saver.
OFF ➜ SS1 ➜ SS2 ➜ OFF……
• Used to enter the Adjust mode when pressed
and held for 1 second or longer. When
pressed, the Adjust mode is terminated.
DSC920S 3
Page 4

Display Items
English
Preset channel indication (1 to 6)
SAT(satellite) indication
BAND
indication
MANU (manual) indication
SAT (satellite) indication:
• Lights in the SIRIUS mode, goes off in some
other mode or when the power is turned off.
Operation status indication:
• Station names, etc. are displayed.
• Display examples
CH 051 : channel No.
P SCAN : preset scan
CONTRAST : displayed when the contrast
adjustment is selected in the
Adjust mode.
ESN>> : displayed when the SIRIUS ID
is confirmed.
CAT SEL : displayed when the Category
selection mode is selected.
LINKING : displayed when a channel is
being tuned in (no signal is yet
received).
NOSIGNUP : displayed when a channel not
covered by your contract is selected.
UPDATING : displayed when the receiver is
turned on or after a reset.
INVLD CH : a channel without a broadcast
has been selected.
Operation status
indication
PRESET indication
CAT(category) indication
SCAN indication
MANU (manual) indication:
• Lights when tuning is performed in the Manual
mode.
SCAN indication:
• Lights when category scan is performed or
when preset scan is performed.
CAT (category) indication:
• Lights when the unit enters the Category selection mode or when category scan is performed.
PRESET indication:
• Lights when the unit enters the Preset
memory mode.
BAND indication:
• Lights when the band (“SAT1”, “SA T2” or
“SAT3”) is being received in the SAT mode.
4 DSC920S
Page 5

4.OPERATIONS
English
Turning the power on/off
1. Press the [SAT] button to turn the power on/
off.
When the power is turned on, “SAT” is dis-
played in the Operation status indication and
then the display is changed to the channel
being received.
Verifying your Sirius ID
1. Press and hold the [SS] button for 1 second
or longer to enter the Adjust mode.
2. Press the [a] or [d] to select the “ESN
>>”.
∗ When the unit enters the SIRIUS ID display
mode, “ESN>>” is displayed and then the dis-
play is changed to the high-order 6 digits of
the SIRIUS ID (“012345
status indication.
3. Press the [z] button to change the low-or-
der 6 digits of the SIRIUS ID (“678901 w”).
∗ To display the high-order 6 digits of the
SIRIUS ID again, press the [w] button.
4. Press the [a] or [d] button to return the
previous mode.
zz
z”) in the Operation
zz
Selecting a band
1. Press the [BAND] button to select a band.
BAND indication (“SAT1”, “SAT2” or “SAT3”)
is light in the display.
Tuning mode
There are two channel selection modes: seek
mode and manual mode.
● Manual tuning
Any channel including channels without broadcasts and channels not covered by the contract
can be selected during manual tuning.
1. Press and hold the [BAND] (BND) button for
1 second or longer.
∗ This changes the seek mode to manual mode
and the “MANU” indicator on the display lights.
When this operation is performed in manual
mode, the seek mode is engaged and the
“MANU” indicator on the display goes off.
Notes:
• The receiver automatically reverts to the seek
mode when the [
7 seconds in the manual mode.
2. Press the [a] or [d] button. The receiver
moves to channels above or below the current channel one by one.
a
] or [d] button is not used for
3. Press and hold the [a] or [d] for 1 second
or longer.
The receiver moves to seek channels below
or above the current channel and the channel found when either button is released is
received.
● Seek tuning
Only channels that can be received are selected
while channels without broadcasts and channels
not covered by the contract are automatically
skipped.
1. Press the [a] or [d] button.
The receiver seeks the next available chan-
nel below or above the current channel.
2. Press and hold the [a] or [d] button.
The receiver moves to seek channels below
or above the current channel. If the channel
found when either button is released is available that channel is received. Otherwise,
seeking continues until an available channel
is found.
Preset memory
3 bands are available for preset memory and 6
channels for each band, a total of 18 channels
can be stored in memory.
The indication concerning the preset memory is
displayed both in the BAND indication for the
band being received (“SAT1”, “SAT2”, or
“SAT3”) and in the Preset channel indication for
the preset number.
● Recalling a preset station
1. Press the [w] or [z] button to recall a preset station. Each time the button is pressed,
preset stations are recalled in a sequential
order.
∗ When the [P-M] button is pressed and the Pre-
set memory mode is engaged, preset stations
cannot be recalled.
∗ When the button is pressed, the sound is
muted and reception channel data are displayed in the Operation status indication in the
following order.
Channel number (for example “CH 051”) ➜
abbreviated 8-digit channel name ➜ returned
to the original display mode
DSC920S 5
Page 6

Operations
English
● Manual memory
1. Select a channel to be memorized.
2. Press the [P-M] button to enter the Preset
memory mode.
∗ The reception channel number (“CH 051”) in
the Operation status indication blinks and the
PRESET indication light.
3. Press the [w] or [z] button to select a preset number to be memorized.
∗ The selected preset number is displayed in
the Preset channel indication.
4. Press and hold the [P-M] button for 2 seconds or longer to store the channel being received in memory.
∗ If the [P-M] button is released within less than
2 seconds, preset memory is cancelled and
the Preset memory mode is terminated.
Scan function
There are two scan modes: a category scan
mode and a preset scan mode.
During scanning channels are displayed in abbreviated form and the display mode cannot be
switched.
● Category scanning
In a category scan, broadcast channels in the
same category as the current channel are selected about every 10 seconds.
1. Press the [SCAN] button to start a category
scan.
2. Press the [SCAN] button to cancel a category scan.
Note:
• Category scanning is not available when no cat-
egory is defined for the current channel.
● Preset scan
A preset scan scans the channels (up to 18
channels) stored in the preset memory about
every 10 seconds.
1. Press and hold the [SCAN] button for 1 second or longer to start a preset scan.
2. Press the [SCAN] button to cancel a preset
scan.
Receiving stations selected by
category
1. Press the [CAT] button to enter the category
selection mode. CAT indication is light in the
display.
2. Press the [w] or [z] button to select a category.
3. Press the [a] or [d] button to tune in a station.
Notes:
• When the category selection mode is entered, the
category of the last received channel is displayed
first.
• The category selection mode is canceled when
no channel with the selected category can be
found.
• Press the [
ter a channel has been set to continue seeking
channels up or down. The category selection
mode is canceled and normal reception is resumed if no operation is performed for 7 seconds.
a
] or [d] button within 7 seconds af-
Switching the text display
1. Press the [DISP] button. Each time the
[DISP] button is pressed, the item changes in
the following order:
channel number ➜ channel name (long) ➜
title ➜ artist ➜ category ➜ R-TEXT
∗ When the [DISP] button is pressed while the
Screen saver mode is engaged, the displayed
text cannot be switched. If this happens, release the Screen saver mode and scroll the
displayed text again.
∗ If the reception channel is changed, the dis-
play changes in the order of channel number
➜ channel name (short) and then the original
display mode is resumed.
∗ When there is no text information, the indica-
tion “
--------
” will appear on the display.
About the scrolling of the displayed text
Scrolling is performed once when the title being
selected is changed or when the [DISP] button
is pressed and held for 1 second or longer.
∗ Scrolling is not performed when a channel number,
abbreviated channel name or category is displayed.
6 DSC920S
Page 7

Switching the screen saver
1. Press the [SS] button to switch the screen
saver. Each time the button is pressed, the
screen saver is switched in the order of OFF
➜ SS1 ➜ SS2 ➜ OFF.
∗ If the screen saver is turned on and the button
operation is performed, the screen saver
mode is released.
After information corresponding to the button
operation is displayed for 30 seconds, the
screen saver displayed is returned.
When “OFF” is selected, the display is not lit.
(only with backlight)
∗ If some other mode than SIRIUS mode is se-
lected with the system wire bound using
CeNET, the set screen saver works.
Adjusting the display contrast
You can adjust the display contrast to match the
angle of installation of the unit.
∗ The factory default setting is “4”. (Adjustment lev el :
1 to 7)
1. Press and hold the [SS] button for 1 second
or longer to enter the Adjust mode.
2. Press the [w] or [z] to adjust the contrast.
3. Press the [SS] button to return to the previous mode.
Operations
English
DSC920S 7
Page 8

English
5.INSTALLATION
Before Installation
1. This set is exclusively for use in cars with a
negative ground, 12 V power supply.
2. Read these instructions carefully.
3. Be sure to disconnect the battery “–” terminal
before starting. This is to prevent short circuits during installation. (Figure 1)
Car battery
Fig 1
Accessories
1 Owner’s manual .......................................... 1
2 Warranty card.............................................. 1
3 Power suply cord......................................... 1
4 Connection cord.......................................... 1
5 Parts bag.......................................................
• Cord holder ................................................ 2
• Velcro tape (large A) .................................. 2
• Velcro tape (small B) .................................. 2
Power supply cord connection
Connect the connection cable securely.
Connect the L-shaped side of the connection
cable to the terminal of the Sirius Satellite Radio
(DSH920S).
Note:
For other connections, refer to the Owner’s manual
provided with the Sirius Satellite Radio (DSH920S).
4
3
8 DSC920S
Page 9

Installation of the Control unit
■
Installing location
Place the Control unit on the passenger’s seat
or stick the Velcro tape (large A) to the center
console.
∗ Before sticking the Velcro tape, clean the sticking
surface.
∗ Choose a location where the driving of a car is not
hindered and the reception of the signals from the
remote control unit is ensured as well (Figure 2).
Fig 2
Dashboard
Velcro tape
(large A)
English
■
How to install the Control unit
When installing the Control unit, use the Velcro
tape (small B) to secure it (Figure 3).
∗ Before sticking the Velcro tape, clean the sticking
surface.
∗ To secure the cord, use the cord holder by sticking
it to the center console, etc. (Figure 4).
Notes:
Do not leave the Control unit at a location (dashboard, etc.) where the temperature goes high. Otherwise, the unit may be deformed or damaged.
UP
160
2
55
117
3 9
2 – ø3.5
How to install the Control unit (in case of
using screws)
∗ Screws are not enclosed with unit.
∗ Be sure to check the screw length. (M3 x 6mm
MAX)
Fig 4
Velcro tape
(small B)
Fig 3
Control unit
Cord holder
DSC920S 9
Page 10

English
10 DSC920S
 Loading...