

Page 1

CX609E
2-DIN Bluetooth® CD/USB/MP3/WMA/AAC RECEIVER
2DIN Bluetooth® CD/USB/MP3/WMA/AAC ПРИЕМНИК
Page 2
CAUTIONS:
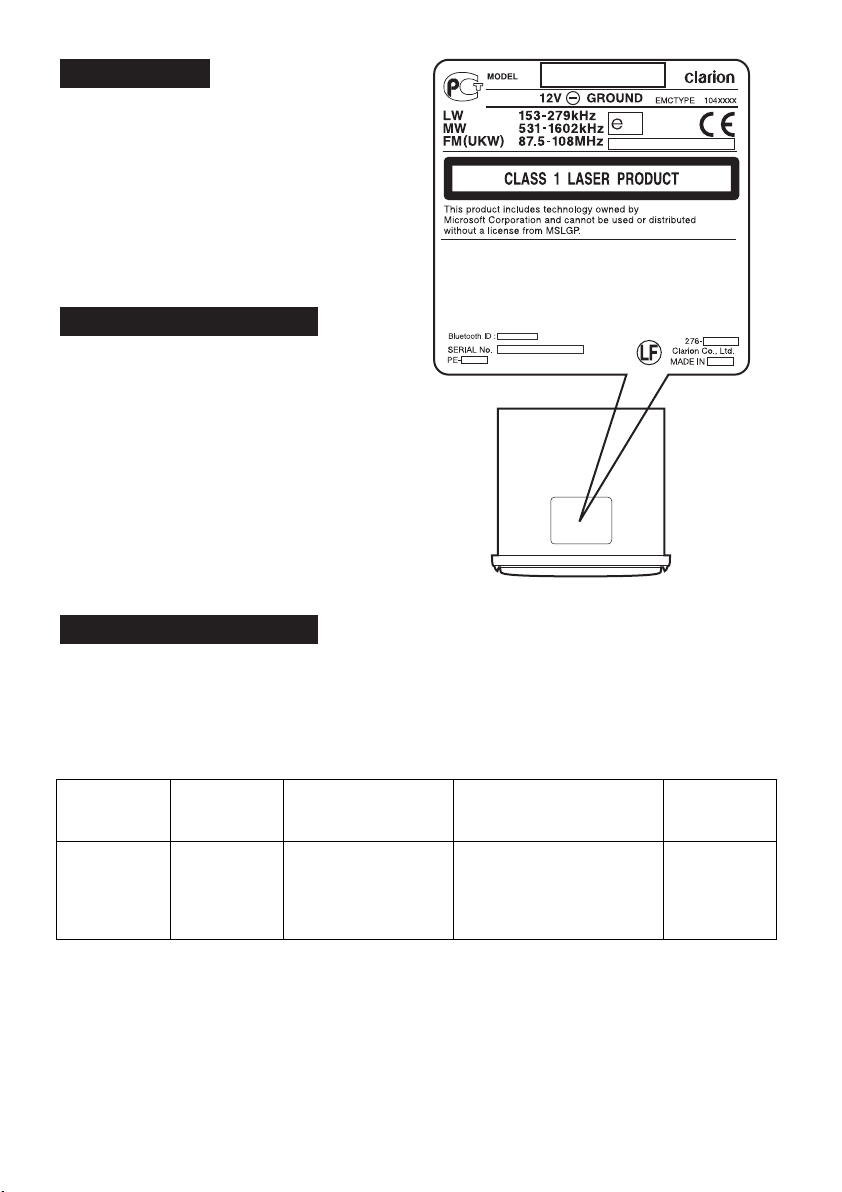
This appliance contains a laser system and
is classified as a “CLASS 1 LASER
PRODUCT”. To use this model properly,
read this Owner’s Manual carefully and keep
this manual for your future reference. In
case of any trouble with this player, please
contact your nearest “AUTHORIZED service
station”. To prevent direct exposure to the
laser beam, do not try to open the
enclosure.
ПРЕДУПРЕЖДЕНИЯ:
Данное устройство содержит лазерную
систему и классифицировано как
«ЛАЗЕРНОЕ ИЗДЕЛИЕ КЛАССА 1». Для
правильного использования данной
модели внимательно прочтите данное
Руководство по эксплуатации и
сохраните данное руководство для
информации в будущем. В случае любой
неисправности в данном проигрывателе,
пожалуйста, обратитесь на
«АВТОРИЗИРОВАННУЮ сервисную
станцию». Во избежание прямого
воздействия лазерного луча не
пытайтесь вскрывать корпус.
ВНИМАНИЕ!
ЕСЛИ ВЫ ПРИОБРЕЛИ АППАРАТУРУ НАДЛЕЖАЩЕГО
КАЧЕСТВА, ТО, ПО РОССИЙСКИМ ЗАКОНАМ, ОНА НЕ
ПОДЛЕЖИТ ВОЗВРАТУ ИЛИ ОБМЕНУ НА АНАЛОГИЧНЫЙ
ТОВАР ДРУГИХ РАЗМЕРА, ФОРМЫ И Т.Д.
26
Регистрациионный номер
декларации
РОСС JP.
AЯ46.Д30871
1.2009г.
от 27.0
2 CX609E
Информация о Российской сертификации
Орган
сертификации
“POCTECT-
МОСКВА”
Нормативные
документы
ГОСТ 51515-99
ГОСТ 28279-89
ГОСТ 22505-97
ГОСТ 5651-89
Наименование
сертифицированной
продукции
Автомобильные радио-,
телеприёмники с
проигрывателями компакткассет, компакт/мини-дисков
и MP-3 плеерами
Срок действия
5 лет
Page 3
Thank you for purchasing this Clarion product.
∗ Please read this owner’s manual in its entirety before operating this equipment.
∗ Check the contents of the enclosed warranty card and keep it carefully with this manual.
Contents
1. FEATURES ...................................................................................................................................... 4
2. PRECAUTIONS ............................................................................................................................... 4
3. CONTROLS ..................................................................................................................................... 5
Names of the Buttons and Their Main Functions ............................................................................. 5
4. REMOTE CONTROL ....................................................................................................................... 6
Functions of Remote Control Unit Buttons ....................................................................................... 6
Inserting the Battery ......................................................................................................................... 7
5. OPERATIONS.................................................................................................................................. 8
Basic Operations .............................................................................................................................. 8
Radio Operations ........................................................................................................................... 11
Radio Data System Operations...................................................................................................... 12
CD/MP3/WMA/AAC Operations ..................................................................................................... 15
Bluetooth Operations...................................................................................................................... 18
Operations Common to Each Mode ............................................................................................... 22
6. ACCESSORIES ............................................................................................................................. 25
USB/MTP Operations..................................................................................................................... 25
iPod Operations.............................................................................................................................. 27
7. TROUBLESHOOTING................................................................................................................... 30
8. ERROR DISPLAYS ....................................................................................................................... 31
9. SPECIFICATIONS ......................................................................................................................... 32
10. OTHERS ........................................................................................................................................ 32
English
3 CX609E
Page 4

English
1. FEATURES
• Built in Bluetooth® handsfree (HFP) and audio streaming (A2DP & AVRCP)
• BBE MP for compressed audio improvement
• 728-Variable colour display & illuminated key
2. PRECAUTIONS
This unit is applicable for on-road 4 wheel
vehicle purpose only. Use for tractor, fork truck,
bulldozer, off road vehicle, 2 or 3 wheel motor
bicycle, marine boat or other special purpose
vehicle is not appropriate.
INFORMATION FOR USERS:
CHANGES OR MODIFICATIONS TO THIS
PRODUCT NOT APPROVED BY THE
MANUFACTURER WILL VOID THE
WARRANTY.
Handling Compact Discs
• Compared to ordinary music CDs, CD-R and
CD-RW discs are both easily affected by high
temperature and humidity and some of CD-R
and CD-RW discs may not be played.
Therefore, do not leave them for a long time
in the car.
• Never stick labels on the surface of the
compact disc or mark the surface with a
pencil or pen.
Display Screen
In extreme cold, the screen movement may slow
down and the screen may darken, but this is
normal.
The screen will recover when it returns to
normal temperature.
4 CX609E
Page 5
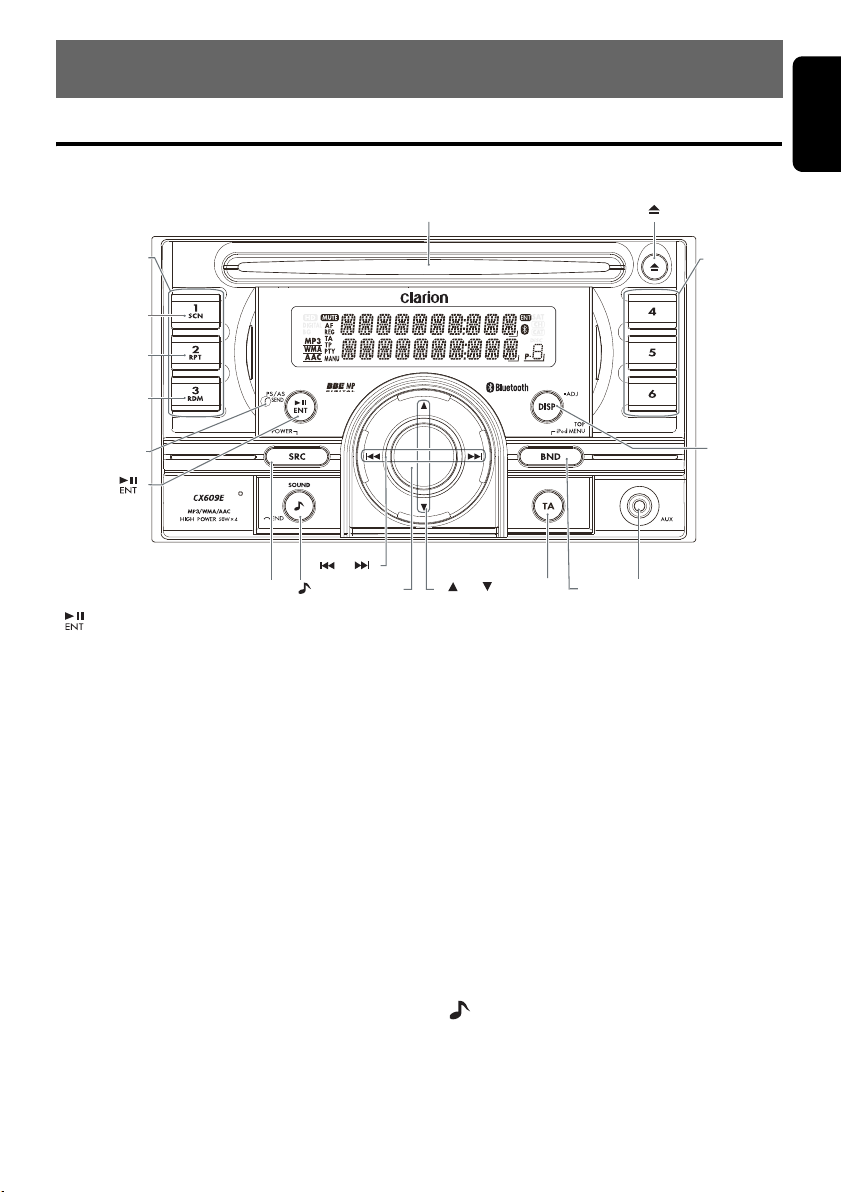
3. CONTROLS
Names of the Buttons and Their Main Functions
Source unit
English
[DIRECT]
[SCN]
[RPT]
[RDM]
[IR
RECEIVER]
[]
[ ], [ ]
[SRC]
[]
[ROTARY]
[ ] button
• Perform preset scan while in radio mode.
• Play or pause a track while in CD/MP3/WMA/
AAC/USB/iPod mode.
[IR RECEIVER] button
• Receiver for remote control unit.(Operating
range: 30° in all directions)
[RDM] button
• Perform random play while in the CD/MP3/
WMA/AAC/USB/iPod mode.
[RPT] button
• Perform repeat play while in CD/MP3/WMA/
AAC/USB/iPod mode.
[SCN] button
• Perform scan play while in CD/MP3/WMA/
AAC/USB mode.
[DIRECT] buttons
• Store radio stations in memory or recall it
directly while in radio mode.
[CD SLOT]
• Insert CDs here.
[Q] (EJECT) button
• Press to eject disc.
[BND]
[]
[AUX]
[CD SLOT]
[], []
[TA]
[DISP] button
• Switch display mode.
[AUX] input jack
• Input jack for connecting external device.
[BND] button
• Change bands, or select seek tuning or
manual uning while in the radio mode.
[TA] button
• Press to set the TA (Traffic Announcement)
standby mode.
[w], [z] buttons
• Select folders while in MP3/WMA/AAC/USB
mode.
[ROTARY] knob
• Roatate to adjust the volume.
[x], [v] buttons
• Commence fast-forward or fast-reverse
mode.
[ ] (SOUND) button
• Press to switch to the sound adjust mode.
[SRC] button
• Turn the power on or off.
[DIRECT]
[DISP]
5 CX609E
Page 6
English
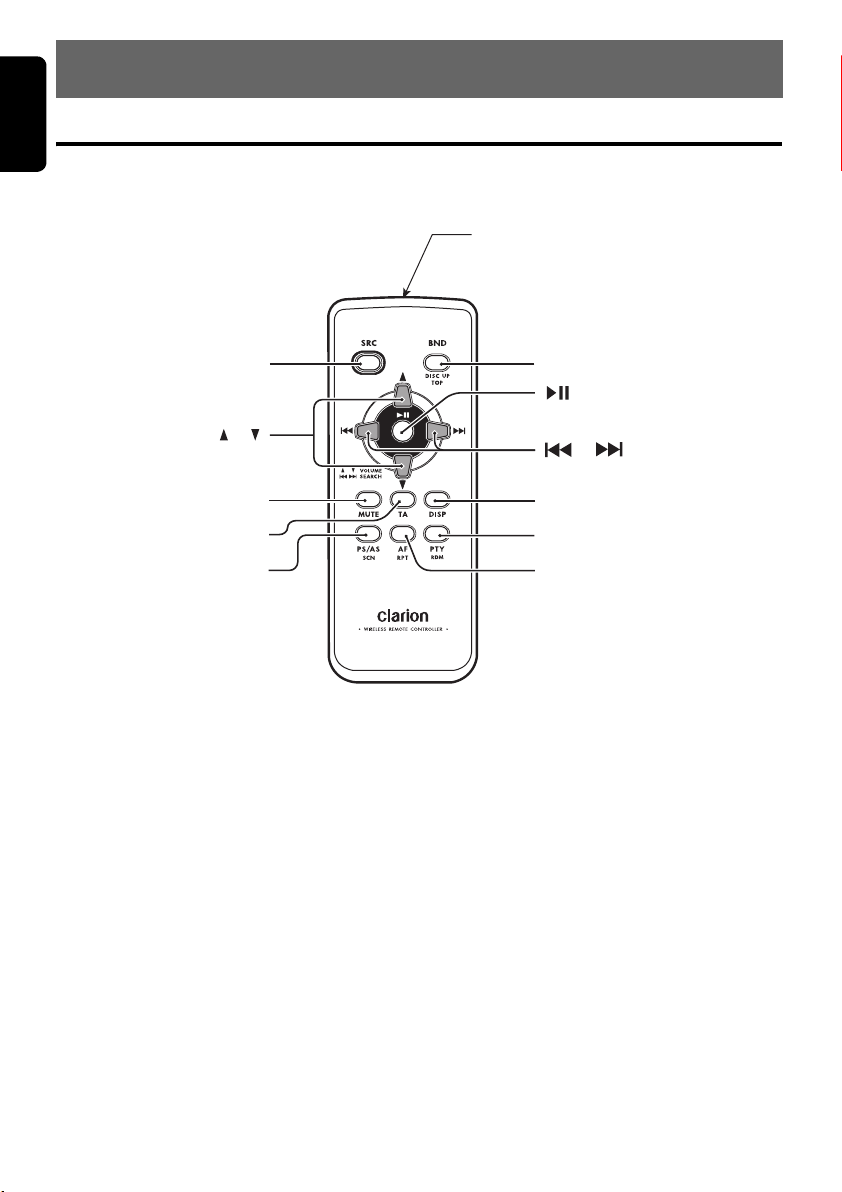
4. REMOTE CONTROL
Functions of Remote Control Unit Buttons
If you buy the RCB-176-301 sold separately, you can enjoy the use of the Remote control functions.
∗ Some buttons on the remote control unit have different functions from the corresponding buttons on the main
unit.
Signal transmitter
[
SRC
]
[
]
BND
[]
[ ], [ ]
[
]
MUTE
[TA]
[
]
PS/AS
● Shared modes
[SRC] button
• Use to alternate operation mode among the
various modes.
• Press to cancel a traffic announcement
broadcast, an emergency broadcast, and a
PTY broadcast during a TA, ALARM or PTY
interrupt.
, [z] buttons
[w]
• Increases and decreases volume.
[MUTE] button
• Turns mute function on and off.
[TA] button
• TA on and off.
• Press to cancel a traffic announcement
broadcast during a TA interrupt.
[ ], [ ]
[
]
DISP
[
]
PTY
[AF]
[PTY] button
• Press to cancel a PTY broadcast during a
PTY interrupt.
[DISP] button
• Press to alternate among main display, title
display and CT (clock time) display.
● Radio (Radio Data System) mode
[BND] button
• Switches reception band.
[x], [v] buttons
• Moves preset channels up and down.
[PS/AS] button
• Press to perform preset scan.
• Press and hold the button (2 sec.) for auto
store.
6 CX609E
Page 7
Functions of Remote Control Unit Buttons
[AF] button
• AF function on and off.
• Press and hold (1 sec.) for REG function on
and off.
[PTY] button
• PTY mode on and off.
● CD/MP3/WMA/AAC and USB/MTP
modes
[BND] button
• Press to play the first track.
[x], [v] buttons
• Press to move the tracks up and down.
• Press and hold (1 sec.) for fast-forward/fastreverse.
[] button
• Switches between playback and pause.
[PS/AS] button
• Press to perform scan play.
• When in MP3/WMA/AAC and USB/MTP
modes, press and hold (1 sec.) for folder scan
play.
English
[AF] button
• Press to perform repeat play.
• When in MP3/WMA/AAC and USB/MTP
modes, press and hold (1 sec.) for folder
repeat play.
[PTY] button
• Press to perform random play.
• When in MP3/WMA/AAC and USB/MTP
modes, press and hold (1 sec.) for folder
random play.
● iPod mode
[x], [v] buttons
• Press to move the tracks up and down.
• Press and hold (1 sec.) for fast-forward/fastreverse.
[ ] button
• Switches between playback and pause.
[AF] button
• Press to perform repeat play.
[PTY] button
• Press to perform random play.
• Press and hold (1 sec.) for all random play.
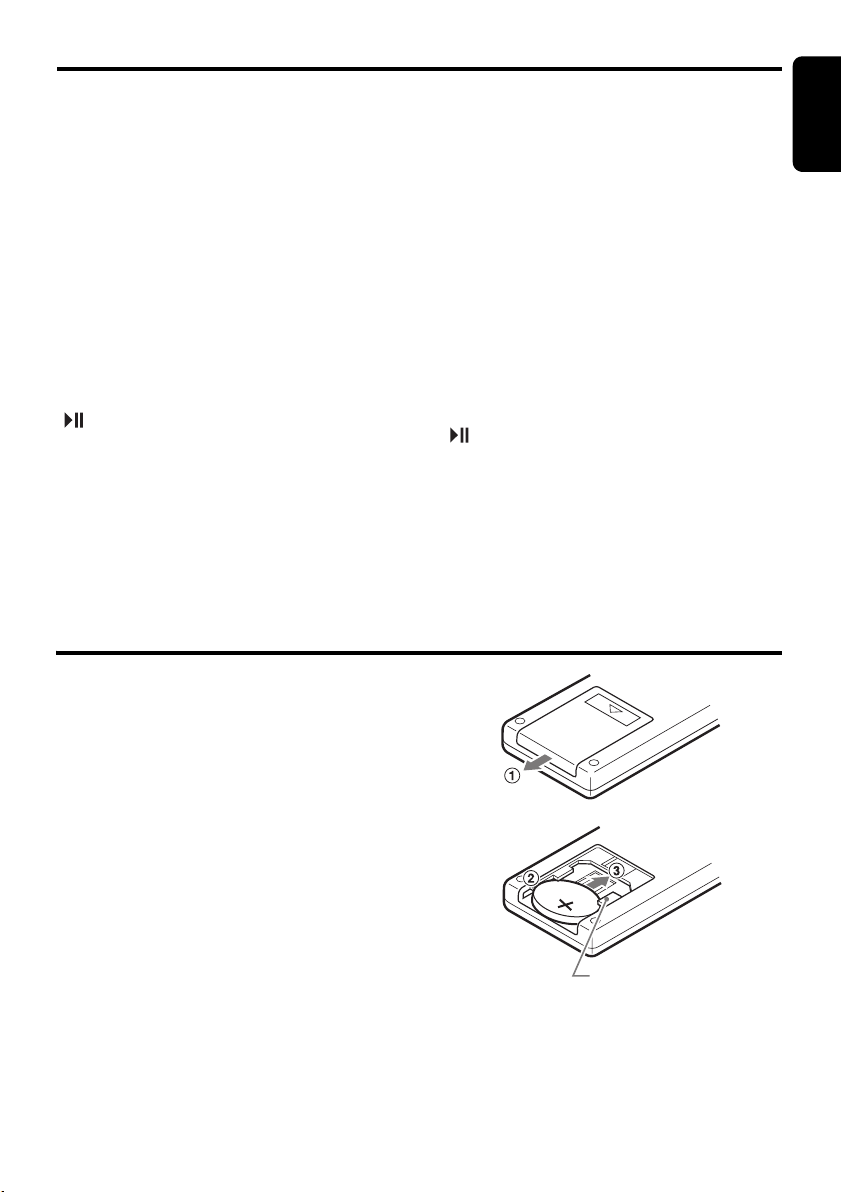
Inserting the Battery
1 Turn over the remote control unit and slide
the cover in the direction indicated by the
arrow in the illustration.
2 Insert the battery (CR2025) into the insertion
guides, with the printed side (+) facing
upwards.
3 Press the battery in the direction indicated by
the arrow so that it slides into the
compartment.
4 Replace the cover and slide in until it clicks
into place.
Notes:
Misuse may result in rupture of the battery,
producing leakage of fluid and resulting in
personal injury or damage to surrounding
materials. Always follow these safety precautions:
• Use only the designated battery.
• When replacing the battery, insert properly, with
+/– polarities oriented correctly.
• Do not subject battery to heat, or dispose of in
fire or water. Do not attempt to disassemble the
battery.
• Dispose of used batteries properly.
R
2
C
0
2
5
Insertion guide
7 CX609E
Page 8
English
5. OPERATIONS
Note:
• Be sure to read this chapter referring to the front diagrams of chapter “3. CONTROLS” on page 5.
Basic Operations
CAUTION
Be sure to lower the volume before
switching off the unit power or the ignition
key. The unit remembers its last volume
setting.
Turning on/off the power
Note:
1. Press the [SRC] button to turn on the power.
2. Press and hold the [SRC] button (1 sec.) for
to turn off the power.
Selecting a mode
1. Press the [SRC] button to change the
operation mode.
Radio ➜ CD/MP3/WMA/AAC ➜ USB/MTP/
iPod ➜ BLUETOOTH ➜ AUX ➜ Radio...
∗ iPod/MTP can connect to this unit via USB
cable.
Adjusting the volume
1. Turning the [ROTARY] knob clockwise
increases the volume; turning it
counterclockwise decreases the volume.
∗ The volume level is from 0 (minimum) to 33
(maximum).
Switching the display
Press the [DISP] button to select the desired
display.
Sound Adjustment
You can adjust a sound effect or tone quality to
your preference.
To change sound setting
1. Press the [ ] button to switch to the
sound adjustment selection display.
∗ The factory default sound setting is
“BEAT EQ”.
2. Then press the [x] or [v] button to
select the sound adjustment mode.
Each time you press the [x] or [v]
button, the sound adjustment mode
changes as following order:
BEAT EQ” ↔ “M-B EX” ↔ “BALANCE” ↔
“
FADER” ↔ “LPF” ↔ “S-W VOL” ↔ “HPF”
“
∗ In the case of display blinking “ENT”, you
can press the
setting value.
3. Press the [w] or [z] button to adjust the
selected audio mode.
4. After completing settings, press the [ ]
button to return to the previous mode.
● Setting the BEAT EQ
This unit is provided with 4 types of sound tone
effects stored in memory.
Select the one you prefer.
∗ The factory default setting is “OFF”.
2-1. Select “BEAT EQ”.
3-1. Each time you press the [w] or [z] button,
the tone effect changes in the following
order:
“CUSTOM” ↔ “EXCITE” ↔ “IMPACT” ↔
“B-BOOST” ↔ “OFF”
CUSTOM : user custom
EXCITE : bass and treble emphasized
IMPACT : bass and treble emphasized
B-BOOST : bass emphasized
OFF : no sound effect
[] button to adjust the
mid emphasized
8 CX609E
Page 9

Basic Operations
When “CUSTOM” is set:
3-1. Press the [ ] button.
3-2. Press the [x] or [v] button to select the
“BASS”/“MID”/“TREBLE” mode to adjust.
3-3. If you want to set the flat, press the [ ]
button to return to the “CUSTOM” mode,
then press and hold the [ ] button
(1 sec.), bass/mid/treble characteristics
become flat.
When “EXCITE/IMPACT/B-BOOST” is set:
3-2. Press the [ ] button.
3-3. Press the [w] or [z] button to adjust the
setting in the range of
∗ The factory default setting is “0”.
3-4. Press the [ ] button to return to the
previous mode.
● Adjusting the BASS/MID/TREBLE
This adjustment can be performed only when
the BEAT EQ is set to “CUSTOM”.
Note:
• While connected with the external aplifers,
please do not set the “BASS”/“MID”/“TREBLE”
in the maximum level. Otherwise the speakers
may be damaged.
3-2. Press the [ ] button.
3-3. Press the [x] or [v] button to select as
following order.
“BASS<G>” ↔ “BASS<F>” ↔ “BASS<Q>”
“MID<G>” ↔ “MID<F>” ↔ “MID<Q>”
“TREBLE<G>” ↔ “TREBLE<F>” ↔
“TREBLE<Q>”
∗ The factory default setting is “BASS<G>”.
3-4. Press the [w] or [z] button to select the
setting.
BASS<G>:The factory default setting is “0”.
(Adjustment range: +7 to –7)
BASS<F>:
BASS<Q>:The factory default setting is “1”.
MID<G> : The factory default setting is “0”.
MID<F> :
MID<Q> :
TREBLE<G>:The factory default setting is “0”.
The factory default setting is “50”
(Adjustment range: 50/100/200)
(Adjustment range: 0.7/1/1.4/2)
(Adjustment range: +7 to
The factory default setting is “
(Adjustment range: 500/1K/2K)
The factory default setting is
(Adjustment range: 0.7/1/1.4/2)
(Adjustment range: +7 to –7)
–3 to +3.
–7)
500
“1”
.
TREBLE<F>:
TREBLE<Q>:The factory default setting is “1”.
3-5. Press the [ ] button to return to the
previous mode.
The factory default setting is
“
10K
”.
(Adjustment range: 5K/10K/15K)
(Adjustment range: 0.7/1/1.4/2)
● Setting the MAGNA BASS EXTEND
The MAGNA BASS EXTEND does not adjust
the low frequencies like the normal sound
adjustment function, but emphasizes the deep
bass frequencies to provide you with a dynamic
sound.
∗ The factory default setting is “OFF” (off).
2-1. Select “M-B EX”.
3-1. Press [w] or [z] button to select
“OFF”.
● Adjusting the balance
2-1. Select “BALANCE”.
3-1. Press the [w] or [z] button to adjust the
balance of the right and left speakers.
∗ The factory default setting is “CENTER”
(center). (Adjustment range: RIGHT12 to
LEFT12 (right 12 to left 12))
● Adjusting the fader
2-1. Select “FADER”.
3-1. Press the [w] or [z] button to adjust the
balance of the rear and front speakers.
∗ The factory default setting is “CENTER”
(center). (Adjustment range: FRONT12 to
REAR12 (front 12 to rear 12))
● Adjusting the subwoofer
You can set the low pass filter of subwoofer.
This adjustment can be performed only when
the “REAR/S-W” is set to “S-WOOFER”
(page 24).
.
2-1. Select “LPF”.
3-1. Press the [w] or [z] button to select as
following order.
“THROUGH” ↔ “60” ↔ “90” ↔ “120”
∗ The factory default setting is “THROUGH”.
● Adjusting the subwoofer output
”.
volume
You can adjust the volume output from the unit’s
subwoofer output terminal.
This adjustment can be performed only when
the “REAR/S-W” is set to “S-WOOFER”
(page 24).
English
“ON” or
9 CX609E
Page 10

Basic Operations
English
2-1. Select “S-W VOL”.
3-1. Press the [w] or [z] button to increases
or decreases the subwoofer volume.
∗ The factory default setting is “0”.
(Adjustment range: +6 to –6)
● Adjusting the HPF
2-1. Select “HPF”.
3-1. Press the [w] or [z] button to select as
following order.
“THROUGH” ↔ “60” ↔ “90” ↔ “120”
∗ The factory default setting is “THROUGH”.
● Setting the BBE MP (Sound
Enhancement and Restoration for
compressed audio files)
BBE MP (Minimized Polynomial Non-Linear
Saturation) Process improves digitally
compressed sound, such as MP3, by restoring
and enhancing the harmonics lost through
compression. BBE MP works by regenerating
harmonics from the source material, effectively
recovering warmth, detail and nuance.
∗ This fuction is effective for the audio files in the
CD/MP3/WMA/AAC or USB/iPod mode, but it is
ineffective for the video in the USB/iPod mode.
1. Press the [ ] button to switch to the sound
adjustment selection display.
2. Press the [x] or [v] button to select
“BBE MP”.
3. Press the [w] or [z] button to select “ON”
or “OFF”.
∗ The factory default setting is “OFF”.
4. When you select “ON”, press the [ ]
button, then press the [w] or [z] button to
select as following order.
LOW↔MID↔HIGH
Notes:
• Manufactured under license from BBE Sound,
Inc.
• Licensed by BBE Sound, Inc. under one or more
of the following US patents: 5510752, 5736897.
BBE and BBE symbol are registered trademarks
of BBE Sound, Inc.
• During SOUND adjustment mode, if no operation
is performed for more than 10 seconds, this
mode can be cancelled and return to previous
mode.
CT (Clock Time) function
The CT function receives CT data sent from an
“Radio Data System” station and displays the
time.
∗ If a CT data is not being received, “CT– –:– –”
appears in the display.
Note:
• CT data is not transmitted in some countries and
by some broadcast stations. Also, in some areas,
the CT may not display accurately.
10 CX609E
Page 11

Radio Operations
Listening to the radio
1. Press the [SRC] button and select the radio
mode. The frequency or PS and PTY
appears in the display.
∗ PS: Programme service name
∗ PTY: Programme type
2. Press the [BND] button and select the radio
band. Each time the button is pressed, the
radio reception band changes in the
following order:
FM1 ➜ FM2 ➜ FM3 ➜ AM (MW/LW) ➜
FM1...
Tuning
3 types of tuning mode available, seek tuning,
manual tuning and preset tuning.
Seek tuning
2 types of seek tuning: DX SEEK and LOCAL
SEEK.
DX SEEK can automatically tune in to
receivable broadcast stations; LOCAL SEEK
can tune in to only broadcast stations with a
good reception sensitivity.
∗ If “MANU” is lit in the display, press and hold the
[BND] button for 1 second or longer. “MANU” in
the display goes off and seek tuning is now
available.
∗ If “TA” is lit in the display, TP stations are
automatically sought.
● DX SEEK
Press the [x] or [v] button to automatically
seek a station.
When the [v] button is pressed, the station is
sought in the direction of higher frequencies; if
the [x] button is pressed, the station is sought
in the direction of lower frequencies.
● LOCAL SEEK
If the [x] or [v] button is pressed and held
in position for 1 second or longer, local seek
tuning will be enabled. Broadcast stations with
good reception sensitivity are selected.
Manual tuning
2 ways available: Quick tuning and step tuning.
● Quick tuning
Press and hold the [x] or [v] button (1 sec.)
to tune a station.
English
● Step tuning
Press the [x] or [v] button to manually tune
a station.
∗ If no operation is performed for more than 7
seconds, manual tuning is cancelled and the
display returns to the previous mode.
Recalling a preset station
A total of 24 preset positions (6-FM1, 6-FM2,
6-FM3, 6-AM) exists to store individual radio
stations in memory. Press the corresponding
[DIRECT] button or the [w] or [z] button to
recall the stored radio frequency automatically.
Manual memory
1. Select the desired station with seek tuning or
manual tuning.
2. Press and hold one of the [DIRECT] buttons
(2 sec.) to store the current station into
preset memory.
Auto store
Auto store is a function for storing up to 6
stations that are automatically tuned in
sequentially. If 6 receivable stations cannot be
received, a previously stored station remains
unoverwritten at the memory position.
1. Press the [BND] button and select the
desired band (FM or AM (MW/LW)).
2. Press and hold the [ ] button (2 sec.) . The
stations with good reception are stored
automatically to the preset channels.
∗ If auto store is performed in the FM bands, the
stations are stored in FM3 even if FM1 or FM2
was chosen for storing stations.
Preset scan
Preset scan receives the stations stored in
preset memory in order. This function is useful
when searching for a desired station in memory.
1. Press the [ ] button.
2. When a desired station is tuned in, press the
[ ] button again to continue receiving that
station.
Note:
• Be careful not to press and hold the [ ] button
(2 sec.), otherwise the auto store function is
engaged and the unit starts storing stations.
11 CX609E
Page 12

Radio Data System Operations
English
RDS (Radio Data System)
This unit has a built-in RDS decoder system
that supports broadcast stations transmitting
“RDS” data.
When using the RDS function, always set the
radio to FM mode.
AF function
The AF function switches to a different
frequency on the same network in order to
maintain optimum reception.
∗ The factory default setting is “ON”.
1. Press and hold the [DISP] button (1 sec.) to
switch to the RDS adjustment selection
display.
2. Press the [x] or [v] button to select
“AF”.
3. Press the [w] or [z] button to select
or “OFF”.
•ON:
“AF” in the display lights and AF function
turns on.
•OFF:
“AF” in the display goes off and AF function
turns off.
4. Press the [DISP] button to return to the
previous mode.
∗ If the reception of the current broadcast
station deteriorates, “PI SEARCH” appears in
the display and the radio searches for the
same programme on another frequency.
“ON”
REG (Regional programme)
function
When the REG function is ON, the optimum
regional station can be received. When this
function is OFF, if the regional station area
switches as you drive, a regional station for that
region is received.
∗ The factory default setting is “OFF”.
Notes:
• This function is disabled when a national station
such as BBC R2 is being received.
• The REG function ON/OFF setting is valid when
the AF function is ON.
1. Press and hold the [DISP] button (1 sec.) to
switch to the RDS adjustment selection
display.
2. Press the [x] or [v] button to select
“REG”.
3. Press the [w] or [z] button to select
“OFF”.
•ON:
“REG” in the display lights and REG function
turns on.
•OFF:
“REG” in the display goes off and REG
function turns off.
4. Press the [DISP] button to return to the
previous mode.
“ON” or
Manually tuning a regional station
in the same network
1. This function is valid when the AF function is
ON and the REG function is OFF.
Note:
• This function can be used when a regional
broadcast of the same network is received.
2. Press any one of the [DIRECT] buttons to
call out the regional station.
3. If the reception condition of the called out
station is bad, press the [DIRECT] button of
the same number. The unit receives a local
station on the same network.
TA (Traffic Announcement)
In the TA standby mode, when a traffic
announcement broadcast starts, the traffic
announcement broadcast is received as top
priority regardless of the function mode so you
can listen to it. Traffic programme (TP)
automatic tuning is also possible.
∗ This function can only be used when “TP” is lit in
the display. When “TP” is lit, this means that the
“Radio Data System” broadcast station being
received has traffic announcement programmes.
● Setting the TA standby mode
If you press the [TA] button when only
in the display,
and the unit is set into the TA standby mode
until a traffic announcement is broadcast. When
a traffic announcement broadcast starts, “TRA
INFO” appears in the display. If you press the
[TA] button while a traffic announcement
broadcast is being received, the traffic
announcement broadcast reception is cancelled
and the unit goes into the TA standby mode.
● Cancelling the TA standby mode
“TP” and “TA” lit in the display, press the [TA]
As
button. The “TA” in the display goes off and the
TA standby mode is cancelled.
“TP” and “TA” light in the display
“TP” is lit
12 CX609E
Page 13

Radio Data System Operations
∗ If “TP” is not lit, pressing the [TA] button searches
for a TP station.
● Searching for a TP station
“TP” is not lit, if you press the [TA] button,
When
“TA” in the display lights and the unit
automatically receives a TP station.
Auto store function for TP stations
You can automatically store up to 6 TP stations
into preset memory. If the number of TP can be
received less than 6, broadcast stations already
stored in memory and left without being
overwritten.
As “TA” lit in the display, press and hold the
[ ] button (2 sec.). The TP stations with the
good reception sensitivity are stored into preset
memory.
∗ Even if you select FM1 or FM2, a TP station is
stored into memory for FM3.
PTY (Programme Type)
This function enables you to listen to a
broadcast of the selected programme type even
if the unit is on a function mode other than radio.
∗ Some countries do not yet have PTY broadcast.
∗ In the TA standby mode, a TP station has priority
over a PTY broadcast station.
∗ The factory default setting is “OFF”.
1. Press and hold the [DISP] button (1 sec.) to
switch to the RDS adjustment selection
display.
2. Press the [x] or [v] button to select
“PTY”.
3. Press the [w] or [z] button to select “ON”
or “OFF”.
•ON:
“PTY” in the display lights and PTY standby
mode is turned on. When the selected PTY
broadcast starts, the PTY item name
appears in the display.
•OFF:
“PTY” in the display goes off and PTY
standby mode is cancelled.
4. Press the [DISP] button to return to the
previous mode.
● Cancelling a PTY interrupt broadcast
Press the [TA] button during the PTY interrupt
broadcast, the PTY interrupt is cancelled and
the unit returns to PTY standby mode.
English
Selecting PTY
1. Press and hold the [DISP] button (1 sec.) to
switch to the RDS adjustment selection
display.
2. Press the [x] or [v] button to select
“PTY SELECT”.
3. Press the [ ] button.
4. Press any one of the [DIRECT] buttons.
Alternatively, press the [w] or [z] button to
select the desired PTY.
5. Press the [DISP] button to return to the
previous mode.
∗ Below are the factory default settings stored
for the [DIRECT] buttons.
∗ The PTY select mode is cancelled
automatically 7 seconds after a PTY is
selected.
PTY seek
1. Press and hold the [DISP] button (1 sec.) to
switch to the RDS adjustment selection
display.
2. Press the [x] or [v] button to select
“PTY SELECT”.
3. Press the [ ] button.
4. Press the [v] button to search for a PTY
broadcast in the direction of higher
frequencies; press the [x] button to search
in the direction of lower frequencies.
∗ If no station with the selected PTY broadcast
can be received, the unit returns to the PTY
select mode.
PTY preset memory
1. Press and hold the [DISP] button (1 sec.) to
switch to the RDS adjustment selection
display.
2. Press the [x] or [v] button to select
“PTY SELECT”.
3. Press the [ ] button.
4. Press the [w] or [z] button to select the
desired PTY.
The 29 types of PTY below can be selected.
5. If you press and hold any one of the
[DIRECT] buttons (2 sec.), the selected PTY
is stored into that preset channel memory.
13 CX609E
Page 14

Radio Data System Operations
English
Emergency broadcast
If an emergency broadcast is received, all the
function mode operations are stopped.
“ALARM” appears in the display and the
emergency broadcast can be heard.
● Cancelling an emergency broadcast
If you press the [TA] button, emergency
broadcast reception is cancelled.
Switching the PTY display language
You can select one of 4 languages (English,
German, Swedish or French) for the PTY
displayed in the display.
∗ The factory default setting is “ENGLISH”.
1. Press and hold the [DISP] button (1 sec.) to
switch to the adjustment selection display.
2. Press the [x] or [v] button to select
“LANGUAGE”.
3. Press the [w] or [z] button to select the
desired language.
4. Press the [DISP] button to return to the
previous mode.
Volume setting of TA, emergency
broadcast (Alarm) and PTY
The volume for TA, Alarm and PTY interrupts
can be set during TA, Alarm or PTY interrupt.
∗ The factory default setting is “15”.
During a TA, Alarm or PTY interrupt, turn the
[ROTARY] knob to set the volume to the desired
level (0 to 33).
∗ When the TA, Alarm or PTY interrupt ends, the
volume returns to the level it had before the
interrupt.
14 CX609E
Page 15

CD/MP3/WMA/AAC Operations
This unit can play back MP3/WMA/
AAC files
Notes:
• If you play a file with DRM (Digital Rights
Management) for WMA remaining ON, no audio
is output (The WMA indicator blinks).
• Windows Media™, and the Windows® logo are
trademarks, or registered trademarks of
Microsoft Corporation in the United States and/or
other countries.
● To disable DRM (Digital Rights
Management)
1. When using Windows Media Player 9/10/11,
click on TOOL ➜ OPTIONS ➜ MUSIC
RECORD tab, then under Recording
settings, unclick the Check box for RECORD
PROTECTED MUSIC. Then, reconstruct
files.
Personally constructed WMA files are used
at your own responsibility.
Precautions when creating MP3/
WMA/AAC file
● Usable sampling rates and bit rates
1. MP3: Sampling rate 8 kHz-48 kHz,
Bit rate 8 kbps-320 kbps / VBR
2. WMA: Bit rate 8 kbps-320 kbps
3. AAC: Sampling rate 8 kHz-48 kHz,
Bit rate 8 kbps-320 kbps / VBR
● File extensions
1. Always add a file extension “.MP3”, “.WMA”
or “.M4A” to MP3, WMA or AAC file by using
single byte letters. If you add a file extension
other than specified or forget to add the file
extension, the file cannot be played.
2. Files without MP3/WMA/AAC data will not
play. The files will be played soundlessly if
you attempt to play files without MP3/WMA/
AAC data.
∗ When VBR files are played, the play time
display may differ the play location.
∗ When MP3/WMA/AAC files are played, a little
no sound part is caused between tunes.
English
● Logical format (File system)
1. When writing MP3/WMA/AAC file on a CD-R
disc or CD-RW disc, please select “ISO9660
level 1, 2 or JOLIET or Romeo” or APPLE
ISO as the writing software format. Normal
play may not be possible if the disc is
recorded on another format.
2. The folder name and file name can be
displayed as the title during MP3/WMA/AAC
play but the title must be within 64 single
byte alphabetical letters and numerals
(including an extension).
3. Do not affix a name to a file inside a folder
having the same name.
● Folder structure
1. A disc with a folder having more than 8
hierarchical levels will be impossible.
● Number of files or folders
1. Up to 255 files can be recognized per folder.
Up to 510 files can be played.
2. Tracks are played in the order that they were
recorded onto a disc. (Tracks might not
always be played in the order displayed on
the PC.)
3. Some noise may occur depending on the
type of encoder software used while
recording.
Set the type of file to be played
(multi-session function)
When a single disc holds both normal CD type
tracks and MP3/WMA/AAC type tracks, use this
command to select which type of track to play.
∗ Default setting is “MULTI-SESS CD”.
• When only one type of track (either music CD or
MP3/WMA/AAC) is recorded on a disc, selecting
either type will allow playback of the disc.
• When playing CCCD (copy-control CDs), set
to CD type.
1. Press and hold the [BND] button for
1 second or longer.
Each time the button is held pressed in this
way, the playback type alternates between
CD type and MP3/WMA/AAC type.
• “MULTI-SESS CD”
When playing music CD only.
• “MULTI-SESS MP3”
When playing music MP3/WMA/AAC only.
2. When setting is completed, remove the disc
and reinsert it.
15 CX609E
Page 16

CD/MP3/WMA/AAC Operations
English
Backup Eject function
Just pressing the [Q] button, ejects the disc
even if the power to the unit was not turned on.
1. Press the [ EJECT] button. Remove the disc
after it is ejected.
Notes:
• If you force a CD into before auto reloading, this
can damage the CD.
• If a CD (12 cm) is left in the ejected position for
15 seconds, the CD is automatically reloaded
(Auto reload).
Listening to a disc already loaded in
the unit
Press the [SRC] button to select the CD/MP3/
WMA/AAC mode.
When the unit enters the CD/MP3/WMA/AAC
mode, play starts automatically.
If there is no disc loaded, the indication “NO
DISC” appears in the title display.
Loading a CD
1. Insert a CD into the center of the CD SLOT
with the labeled side facing up. The CD plays
automatically after loading.
Notes:
• Never insert foreign objects into the CD SLOT.
• If the CD is not inserted easily, there may be
another CD in the mechanism or the unit may
require service.
• Discs not bearing the or mark and
CD-ROMs cannot be played by this unit.
• Some CDs recorded in CD-R/CD-RW mode may
not be usable.
Pausing play
1. Press the [ ] button to pause play.
“PAUSE” appears in the display.
2. To resume CD play, press the [ ] button
again.
Displaying CD titles
This unit can display title data for CD-text/MP3/
WMA/AAC disc and user titles input with this
unit.
1. Each time you press the [DISP] button to
change the title display.
● CD-TEXT disc
User ➜ Track ➜ Disc/Artist ➜ User ...
● MP3/WMA/AAC disc
Track ➜ Folder ➜ Title/Album ➜ Artist ➜
Track ...
Notes:
• If the CD playing is not a CD-text CD or no user
title has been input, “NO TITLE” appears in the
display.
• If MP3/WMA/AAC disc is not input TAG, “NO
TITLE” appears in the display.
• For MP3, supports ID3 Tags V2.3/2.2/1.1/1.0.
• Tag displays give priority to V2.3/2.2.
• In the case of album Tags for WMA, the
information written into the extension header is
displayed.
• Only ASCII characters can be displayed in Tags.
Selecting a track
● Track-up
1. Press the [v] button to move ahead to the
beginning of the next track.
2. Each time you press the [v] button, the
track advances ahead to the beginning of the
next track.
● Track-down
1. Press the [x] button to move back to the
beginning of the current track.
2. Press the [x] button twice to move back to
the beginning of the previous track.
Fast-forward/Fast-reverse
● Fast-forward
1. Press and hold the [v] button (1 sec.).
● Fast-reverse
1. Press and hold the [x] button (1 sec.).
∗ For MP3/WMA/AAC discs, it takes some time
until the start of searching and between
tracks. In addition, the playing time may have
a margin of error.
16 CX609E
Page 17

CD/MP3/WMA/AAC Operations
Folder Select
This function allows you to select a folder
containing MP3/WMA/AAC files and start
playing from the first track in the folder.
1. Press the [z] or [w] button.
Press the [w] button to move the next folder.
Press the [z] button to move the previous
folder.
2. To select a track, press the [x] or [v]
button.
Top function
The top function resets the CD player to the first
track of the disc. Press the [BND] button to play
the first track (track No. 1) on the disc.
∗ In case of MP3/WMA/AAC, the first track of a
folder being played will be returned.
Other various play functions
● Scan play
This function allows you to locate and play the
first 10 seconds of all the tracks recorded on a
disc.
1. Press the [SCN] button to perform scan play.
● Folder scan play
This function allows you to locate and play the
first 10 seconds of the first track of all the folders
on an MP3/WMA/AAC disc.
1. Press and hold the [SCN] button (1 sec.) for
folder scan play.
● Repeat play
This function allows you to play the current track
repeatedly.
1. Press the [RPT] button to perform repeat
play.
● Folder repeat play
This function allows you to play a track currently
being played in the MP3/WMA/AAC folder
repeatedly.
1. Press and hold the [RPT] button (1 sec.) for
folder repeat play.
● Random play
This function allows you to play all tracks
recorded on a disc in a random order.
1. Press the [RDM] button to perform random
play.
English
● Folder random play
This function allows you to play all the tracks of
all the folders recorded on an MP3/WMA/AAC
disc in a random order.
1. Press and hold the [RDM] button (1 sec.) for
folder random play.
● To cancel play
1. Press the operating button previously
selected.
∗ The various play mode is canceled and the
various play off mode appears in the display
for 2 seconds.
17 CX609E
Page 18

Bluetooth Operations
English
The Bluetooth allows you to utilize your car’s
built-in audio system for wireless mobile phone
or music handsfree communication.
Some Bluetooth mobile phones have the audio
features, and some portable audio players
support Bluetooth feature.
This system can play audio data stored in a
Bluetooth audio device.
The car stereo with Bluetooth installed will be
able to retrieve phonebook contacts, received
call, dialed call, missed call, incoming calls,
outgoing call, redial call and listen to music.
Notes:
• Do not leave the microphone of Bluetooth
handsfree in the places with wind passing such
as air outlet of the air conditioner, etc. This may
cause a malfunction. In addition, if leave it in the
places subjected to direct sun, high temperature
can cause distortion, discoloration which may
result in a malfunction.
• This system will not operate or may operate
improperly with some Bluetooth audio players.
• For detailed information on the playable
Bluetooth audio players, see our home page:
www.clarion.com
• When a audio device is paired, the following
operations are the same as for CD mode:
∗ Pause
∗ Track selection
∗ Fast-forward
∗ Fast-reverse
• The titles and the play time can not appear in the
display.
See “CD/MP3/WMA/AAC Operations” (page
15-17
) for details.
Basic Operations
Select Bluetooth
1. Press the [SRC] button to switch the source.
2. You can press and hold the [ ] button to
disconnect the currently connected device.
Switch the display
Press the [DISP] button to select the display in
the following order:
“BT TEL” ↔ “BT AUDIO”
∗ The connected device name will appear in the
display.
Making a call
There are 4 ways to make outgoing call.
● Direct Number Call
Outgoing call can be made by entering
telephone numbers directly via the car stereo.
Telephone number uses 0, 1, 2, 3, 4, 5, 6, 7, 8,
9, *, #, and +.
1. Press the [BND] button to select “DIAL
NUMBER”.
2. Press the [ ] button.
3. Press the [w] or [z] button to select the
numbers.
4. Press the [x] or [v] button to input or
delete the number.
5. Press and hold the [ ] button (1 sec.) to
call the mobile phone No.
∗ Press the [ ] button to end the call.
● Call from Phonebook
User can search the contact name in the
phonebook and make call.
Alternatively, user can call from mobile phone.
1. Press the [BND] button to select “PHONE
BOOK”.
2. Press the [v] button to enter the contact
name mode (In this case, use the [w], [z]
button to select the desired contact name).
3. When the contact name is displayed, press
the [v] or [x] button to select the contact
name’s phone number.
4. Press the [ ] button to call the mobile
phone No.
∗ Press the [ ] button to end the call.
● Answering a call
1. You can answer an incoming call by pressing
any button.
∗ Press the [ ] button to reject an incoming
call.
● Received/Dialled/Missed Call History
You can search any Received/Dialled/Missed
Call History.
1. Press the [BND] button to select “HISTORY”.
2. Press the [v] button to enter the contact
name mode (In this case, use the [w], [z]
button to select the desired contact name).
3. When the contact name is displayed, press
the [x] or [v] button to select the contact
name’s phone number.
4. Press the [ ] button to call the mobile
phone No.
18 CX609E
Page 19
Bluetooth Operations
● Redial a call
You can call a redial phone No.
1. Press the [BND] button to select “REDIAL”.
2. Press and hold the [ ] button (1 sec.) to
call the redial phone No.
∗ Press the [ ] button to end the call.
To change Bluetooth adjustment
setting
1. Press and hold the [DISP] button (1 sec.)
to switch to the Bluetooth adjustment
selection display.
2. Press the [x] or [v] button to select
the “item name”.
“PAIRING” ↔ “SELECT” ↔ “DELETE” ↔
“DISCONNECT” ↔ “ADD PHONE BOOK”
↔ “DEL NO. PHONE BOOK” ↔
“HISTORY DELETE ALL” ↔ “PHONE
BOOK TYPE” ↔ “MIC GAIN” ↔ “RING
VOL” ↔ “TONE SEL” ↔ “NOISE” ↔
“AUTO ANS” ↔ “AUTO CON” ↔ “PASS
KEY” ↔ “ADDRESS” ↔ “BT NAME” ↔
“BT FW”
3. Press the [w] or [z] button to select the
“desired setting value”.
∗ In the case of display blinking “ENT”, you
can press the [] button to adjust the
setting value.
∗ After completing settings, press the [DISP]
button to return to the previous mode.
● PAIRING
This option is used to perform Bluetooth pairing
with the mobile phone and audio.
Up to a maximum of 5 mobile phones and a
audio device can be paired.
2-1. Select “PAIRING”.
3-1. Press the [ ] button.
3-2. Press the [w] or [z] button to select
“TELPHONE” or “AUDIO”. then press the
[ ] button.
For a no paired device after reset or at the
first time when you select
please press the
select the phone book type.
(For details, see the chaperter “
BOOK TYPE
[w
” (page 20))
“TELEPHONE”
] or [z] button to
PHONE
English
3-3. After select the “TELEPHONE”, press the
[w] or [z] button to select “MEMORY 1”
to “MEMORY 5”, then press and hold the
[ ] button (1 sec.) to memory.
4-1. Press the [w] or [z] button to select
“SEARCH” or “WAIT”.
5-1. Press and hold the [ ] button (1 sec.).
∗ When the “SEARCHING” appears in the
display, you can press the [ ] button to
stop search, then the list search appear.
“SEARCH” mode: User can search the
Bluetooth mobile phone or audio device.
“WAIT” mode: User can search this uint via
the mobile phone or audio device.
6-1. After the search, press the [w] or [z]
button to select the desired Bluetooth
mobile phone.
7-1. Press and hold the [ ] button (1 sec.) to
pair.
● SELECT
This is a setting for user to select one of the
paired mobile phones or audio.
2-1. Select “SELECT”.
3-1. Press the [ ] button, then the paired
mobile phones appears in the display.
4-1. Press the [w] or [z] button to choose one
of the 5 mobile phones.
5-1. Press and hold the [ ] button (1 sec.) to
connect.
Connected device will be able to use all the
functionalities provided.
● DELETE
This is a setting for user to delete one of the
paired device from the list.
2-1. Select “DELETE”.
3-1. Press the [ ] button, then the paired
mobile phones appears in the display.
4-1. Press the [w] or [z] button to choose one
of the 5 mobile phones and a audio device.
5-1. Press and hold the [ ] button to delete
the paired device.
Notes:
,
• Deleted paired device will not automatically
rearrange in the paired device list.
• After deleting the device, the phone book and
the call history records will be deleted too.
19 CX609E
Page 20
Bluetooth Operations
English
● DISCONNECT
This option is used to disconnect the currently
connected device.
2-1. Select “DISCONNECT”.
3-1. Press and hold the [ ] button (1 sec.) to
disconnect.
∗ Press and hold the [ ] button (2 sec.) to
disconnect.
● ADD PHONE BOOK
This option is used to add one of the phone No.
2-1. Select “ADD PHONE BOOK”.
3-1. Press the [ ] button (1 sec.), then the
“RECEIVING” appears in the display.
∗ At the same time the phone No. from the
paired phone book list is sent out, then there
is a prompt on the mobile phone if it is
successful.
∗ Some mobile phones cannot transfer the
phone book to this unit because of the less
word and the language type. In this time,
please edit your phone book in other
language, and transfer it once again.
● DEL NO. PHONE BOOK
This option is used to delete one of or all phone
No. of the added phone book.
2-1. Select “DEL NO. PHONE BOOK”.
3-1. Press the [ ] button.
4-1. Press the [w] or [z] button to select
“1 DEL” or “ALL DEL”.
5-1. When you select “1 DEL”, press the [ ]
button, then press the [w] or [z] button to
select one of the desired phone No.
6-1. Press the [ ] button, then the
“DELETE?” appears in the display.
7-1. Press the [ ] button (1 sec.) to delete.
Note:
• If you want to transfer or handl this unit, please
perform “DELETE”, “ADD PHONE BOOK” and
“DEL NO. PHONE BOOK” function to delete all
of your personal information.
● HISTORY DELETE ALL
This option is used to delete all of the call
records.
2-1. Select “HISTORY DELETE ALL”.
3-1. Press the [ ] button, then the
“CONFIRM?” appears in the display.
4-1. Press the [ ] button (1 sec.) , then the
“DELETING” appears in the display, detele
all of the call records successfully.
● PHONE BOOK TYPE
The unit provide 3 types of phone book which
are stored in memory.
2-1. Select “PHONE BOOK TYPE”.
3-1. Press the [ ] button.
3-2. Press the [w] or [z] button to select
“1” , “2” or “3”, then press the [ ] button to
store in memory.
Notes:
• If you change the phone book type, all of the
paired mobile phones’s book data will be
deleted.
• The piece number of the phone book’s record
can be stored in the different memory of the
phone book type are as follow:
PHONE
MEMORY 1MEMORY 2MEMORY 3MEMORY 4 MEMORY
TYPE
250
1
piece
2
piece
3
piece
250
piece 0 piece 0 piece 0 piece
200
100
100
100
piece
100
piece
100
piece
piece
50
piece
100
piece
5
50
piece
100
piece
● MIC GAIN
MIC gain can be set by each paired mobile
phone device. Each registered device has
unique MIC gain setting.
2-1. Select “MIC GAIN”.
3-1. Press the [w] or [z] button to change the
MIC gain setting.
∗ The factory default setting is “3”.
(Adjustment range:1 to 5)
● RING VOL
This option is used to change the ringing volume
by each paired mobile phone device.
2-1. Select “RING VOL”.
3-1. Press the [w] or [z] button to change the
ringing volume.
∗ The factory default setting is “5”.
(Adjustment range:1 to 10)
● TONE SEL
The system can ring if the mobile phone cannot
ring when the Bluetooth connection has been
established.
2-1. Press “TONE SEL”.
3-1. Press the [w] or [z] button to select
“INTERNAL” or “AUTO”
∗ The unit setting is “AUTO”.
“INTERNAL”: Adjust tone in the car
bluetooth system.
20 CX609E
Page 21

Bluetooth Operations
“AUTO”: Automatic adjustment is enabled
in the paired mobile phone.
● NOISE
This option is used to set noise volume in the
car bluetooth system.
2-1. Press “NOISE”.
3-1. Press the [w] or [z] button to select
“LOW” or “HIGH”.
∗ The factory default setting is “LOW”.
● AUTO ANS
This is a setting to determine whether any
incoming call will be automatically or manually
answered.
∗ The factory default setting is “OFF”.
2-1. Select “AUTO ANS”.
3-1. Press the [w] or [z] button to select “ON”
or “OFF”.
ON: Any incoming call is automatically
answered in 5 seconds.
OFF: User needs to manually answer the
call.
● AUTO CON
This function allows the Bluetooth to be
connected automatically with previously
connected device. Connection can be
established at any source mode.
∗ The factory default setting is “OFF”.
2-1. Select “AUTO CON”.
3-1. Press the [w] or [z] button to select “ON”
or “OFF”.
ON: Automatic connection is enabled.
OFF: Automatic connection is disabled.
● PASS KEY
This PASS KEY is used during pairing mode. A
maximum of 10 digits can be changed through
the car stereo.
∗ The factory default PASS KEY is “1234”.
2-1. Select “PASS KEY”.
3-1. Press the [ ] button.
4-1. Press the [x] or [v] button to remove
the cursor.
5-1. Press the [w] or [z] button to select the
desired digits.
6-1. Press and hold the [ ] button (2 sec.) to
store in memory.
∗ If press the [BND] button, the pass key
returns to the factory default setting.
English
● ADDRESS
This will hold the unique Bluetooth address. The
address is 12 figures.
2-1. Select “ADDRESS”.
The Bluetooth address 6 figures appears in
the display.
3-1. Press the [w] or [z] button to display.
● Bluetooth Name
This will display the name of the Bluetooth.
2-1. Select “BT NAME”.
The Bluetooth name appears in the display.
● Bluetooth Firmware version
This will display the firmware version of the
Bluetooth.
2-1. Select “BT FW”.
The Bluetooth firmware version appears in
the display.
21 CX609E
Page 22

Operations Common to Each Mode
English
To change adjustment setting
1. Press and hold the [DISP] button (1 sec.)
to switch to the adjustment selection
display.
2. Press the [x] or [v] button to select
the “item name”.
“CONTRAST” ↔ “SETTINGS” ↔
“COLOR” ↔ “CODE” ↔ “SCRN SVR” ↔
“MESSAGE INPUT” ↔ “SCROLL” ↔
“DIMMER” ↔ “BLINKLED” ↔
“A-CANCEL” ↔ “INT-SW” ↔ “REAR/
S-W” ↔ “SYSTEM CHECK”
3. Press the [w] or [z] button to select the
“desired setting value”.
∗ In the case of display blinking “ENT”, you
can press the [ ] button to adjust the
setting value.
∗ After completing settings, press the [DISP]
button to return to the previous mode.
● Setting the contrast
You can adjust the display contrast to match the
angle of installation of the unit.
∗ The factory default setting is “10”.
(Adjustment level: 1 to 16)
2-1. Select “CONTRAST”.
3-1. Press the [w] or [z] button to adjust the
contrast.
● Displaying the settings
The number of indicator of this unit decreases,
you can see the state of current settings at any
operation mode.
2-1. Select “SETTINGS”.
3-1. Press the [w] or [z] button to display the
state of current settings.
∗ When the setting is selected, after 1 second
the current state will be displayed.
For example: after 1 second:
● Setting the button illumination
2-1. Select “COLOR”.
3-1. Press the [w] or [z] button to select the
color type.
• Setting COLOR SCAN mode
As selecting “COLOR SCAN”, the color
automatically changes.
∗ The factory default setting is “COLOR SCAN”.
∗ After 3 seconds the color changes to the other.
•
Setting USER mode
The factory default setting is “RED 8” (red),
“GREEN 8” (green), “BLUE 8” (blue).
As selecting “USER COLOR 1, 2, 3”, press the
[ ] button to enter the setting.
1. Press the [x] or [v] to select “RED”,
“GREEN” or “BLUE”.
2. Press the [w] or [z] button to select from 0
to 8.
3. Press and hold the [ ] button for 2 seconds
or longer to store the color in memory and
cancel the setting mode.
● Setting the anti-theft function
(CATS)
“CATS” is the acronym of “Clarion Anti-Theft
System”. When you set a PIN code (called as
“Personal Code”), a theft is prevented by
disabling the operation of the unit at the theft.
• Setting your Personal Code
2-1. Select “CODE”.
3-1. Press the [ ] button.
The set personal code screen appears.
4-1. Press the [DIRECT] buttons [1]-[6] to enter
your desired 4-digit Personal Code.
5-1. Press and hold the [ ] button (2 sec.)
The entered Personal Code will be set, and
it will return to the previous screen.
Note:
• Write down your Personal Code in case you
forget it.
•
Erasing the Personal Code
2-1. Select “CODE”.
3-1. Press the [ ] button.
The ERASE PERSONAL CODE screen
appears.
4-1. Enter the Personal Code currently.
5-1. Press and hold the [ ] button (2 sec.) or
longer.
Enter a Personal Code mode is cancelled.
• When the ENTER PERSONAL
CODE screen appears
The ENTER PERSONAL CODE screen will be
displayed when turning the ACC power on after
performing the following operations:
• The car battery was replaced.
• The backup power was cut off.
• The [RESET] button was pressed.
22 CX609E
Page 23

Operations Common to Each Mode
Note:
• If you have lost your Personal Code, please
contact Clarion customer service.
1. Enter your Personal Code currently set.
2. When the correct Personal Code is entered,
the unit will restart from the initial startup
screen.
Notes:
• When you enter a wrong Personal Code, the
message “LOCK - - - -” is displayed and the
Personal Code entry is prohibited for a while.
This prohibited time is changed according to the
number of times of wrong code entry as follows:
• 1 to 6 times: 15 seconds
• 7 times or more: 15 minutes
● Turning the screen saver function on
or off
This unit is provided with the screen saver
function which allows you to show various kinds
of patterns and characters in the operation
status indication area of the display in a random
order. You can turn on or off this function. If the
button operation is performed with the screen
saver function on, the operation display
corresponding to the button operation is shown
for about 30 seconds and the display returns to
the screen saver display.
∗ The factory default setting is “ON”.
2-1. Select “SCRN SVR”.
3-1. Press the [w] or [z] button to select the
setting.
Each time you press the [w] or [z] button,
the setting changes in the following order:
“MESSAGE” ↔ “ON” ↔ “OFF”
● Entering message information
Message up to 30 characters long can be stored
in memory and displayed as a type of screen
saver setting.
∗ The factory default setting is “WELCOME TO
CLARION”.
2-1. Select “MESSAGE INPUT”.
3-1. Press the [ ] button.
3-2. Press and hold the [BND] button (1 sec.) to
clear the old message.
3-3. Press the [x] or [v] button to move the
cursor.
3-4. Press the [BND] button to select a
character type. Each time you press the
[BND] button, the character type changes
in the following order:
Capital letters ➜ Numbers ➜ Symbols ➜
Umlaut ➜ Capital letters…
English
3-5. Press the [w] or [z] button to select the
desired character.
3-6. Repeat step 3-3 to 3-5 to enter up to 30
characters for message.
3-7. Press and hold the [ ] button (2 sec.) to
store the message in memory.
∗ Press and hold the [BND] button (1 sec.) to
cancel the input message. Then press and
hold the [ ] button (2 sec.) to store the
message and the message return to default
setting.
● Setting the method for title scroll
Set how to scroll in CD-TEXT, MP3/WMA/AAC
title.
∗ The factory default setting is “ON”.
2-1. Select “SCROLL”.
3-1. Press the [w] or [z] button to select “ON”
or “OFF”.
•ON:
To scroll automatically.
• OFF:
To scroll just 1 time.
∗ When you want to see the title again, in the
title mode, press and hold the [DISP] button
(3 sec.) to scroll the title.
● Setting the dimmer control
You can set the dimmer control “ON” or “OFF”.
∗ The factory default setting is “ON”.
2-1. Select “DIMMER”.
3-1. Press the [w] or [z] button to select “ON”
or “OFF”.
● Anti-theft indicator
The red Anti-theft indicator is a function for
prevent theft. When the ACC or POWER is off,
this indicator blinks.
∗ The factory default setting is “OFF”.
2-1. Select “BLINKLED”.
3-1. Press the [w] or [z] button to select “ON”
or “OFF”.
● Setting the external amplifier
∗ The factory default setting is “OFF”.
2-1. Select “A-CANCEL”.
3-1. Press the [w] or [z] button to select “ON”
or “OFF”.
•ON:
Use with connected AMP.
• OFF:
Use with inside AMP.
23 CX609E
Page 24

Operations Common to Each Mode
English
● Cellular phone interrupt setting
If you connect this unit and your cellular phone
with a separately sold cable, you can listen to
your telephone calls on your car speakers.
∗ The factory default setting is “OFF”.
2-1. Select “INT-SW”.
3-1. Press the [w] or [z] button to select the
setting. Each time you press the [w] or
[z] button, the setting changes in the
following order:
“OFF” ↔ “ON” ↔ “MUTE”
•OFF:
This unit continues normal operation even
when the cellular phone is used.
•ON:
You can listen to your telephone calls from
the speakers connected to this unit.
∗ When listening to your calls on your car
speakers, you can adjust the volume by
turning the [ROTARY] knob.
•MUTE:
The sound from this unit is muted during
telephone calls.
Note:
• If connecting a hands-free kit, please ensure the
setting is ON to receive the telephone audio
through the system. (the sound output from the
AUX.)
● Selecting Rear or Subwoofer
The factory default setting is “REAR”.
2-1. Select “REAR/S-W”.
3-1. Press the [w] or [z] button to select
“REAR” or “S-WOOFER”.
● Performing a system check
This function allows you to perform a system
check from the adjust mode when required.
2-1. Select “SYSTEM CHECK”.
3-1. Press and hold the [ ] button (1 sec.).
“SYSTEM CHECK” appears in the display,
then the unit returns to the previous
operation mode.
Entering titles
Titles up to 10 characters long can be stored in
memory and displayed for CD. There 50 titles
that can be entered.
1. Press the [SRC] button to select the mode
you want to enter a title (CD).
2. Select and play a CD for which you want to
enter the title.
3. Press and hold the [DISP] button (1 sec.).
4. Press the [x] or [v] button to select
“TITLE INPUT”.
5. Press the [ ] button.
The display switches to the title input display.
6. Press the [x] or [v] button to move the
cursor.
7. Press the [BND] button to select a character
type. Each time you press the [BND] button,
the character type changes in the following
order:
Capital letters ➜ Numbers ➜ Symbols ➜
Umlaut ➜ Capital letters…
8. Press the [w] or [z] button to select the
desired character.
9. Repeat steps 6 to 8 to enter up to 10
characters for the title.
10.Press and hold the [ ] button (2 sec.) to
store the title into memory.
Clearing titles
1. Select and play a CD in the CD changer for
which you want to clear the title.
2. Press and hold the [DISP] button (1 sec.).
3. Press the [x] or [v] button to select
“TITLE INPUT”.
4. Press the [ ] button.
The display switches to the title input display.
5. Press and hold the [BND] button (1 sec.).
All characters in the title disappear.
6. Press and hold the [ ] button for (2 sec.) to
store the setting.
AUX function
This system has an external input jack on the
front panel so you can listen to sounds and
music from external devices connected to this
unit.
● Selecting AUX IN sensitivity
Make the following settings to select the
sensitivity when sounds from external devices
connected to this unit are difficult to hear even
after adjusting the volume.
∗ The factory default setting is “MID”.
1. Press and hold the [DISP] button (1 sec.).
2. Select “AUX SENS”.
3. Press the [w] or [z] button to select
“HIGH”, “MID” or “LOW”.
Note:
• When AUX mode is selected, AUX IN sensitivity
can be set.
24 CX609E
Page 25

6. ACCESSORIES
USB/MTP Operations
English
USB memory/MTP device operation
Note:
• The following operations are the same as for CD
mode:
∗ Pause
∗ Track selection
∗ Fast-forward/reverse (Except DRM file)
∗ Top function
∗ List search function
∗ Scan play
∗ Repeat play
∗ Random play
∗ Folder selection
See “CD/MP3/WMA/AAC Operations” (page 15-
17) for details.
About USB memory
• USB is an acronym for Universal Serial Bus,
and refers to an external bus standard
supporting data transfer rates of 12 Mbps.
• This unit is compatible with USB 1.1/2.0 with
maximum data transfer rates of 12 Mbps.
• USB memory devices that can be played by
connecting to the unit’s USB cable are limited
to those recognized as “USB mass storage
class devices”; operation is not guaranteed
with all USB memory devices.
∗ Devices compatible with “USB Mass Storage
Class” can be used merely by connecting to
the host device, without need for special
drivers or application software.
• Consult the manufacturer of your USB
memory device for information regarding
whether it is supported by “USB Mass
Storage Class” standards.
• Audio files playable on this unit are limited to
MP3/WMA/AAC files. For details, see the
section “MP3/WMA/AAC” (page 15).
• The Podcast files of iTunes Store that stored
in the USB memory device can not be played.
Besides, the data that edit through some softs
such as the Tag edit soft may not be played.
• To prevent the accidental loss of data, always
back up important data on your computer.
• This unit does not support connections to a
computer. In addition, connections made
through a USB hub device are also not
supported.
• When a USB memory device is composed of
two or more drives, only one of the drives will
be detected.
• USB memory devices with security functions
cannot be played.
• The order in which tracks are recorded may
differ depending on the USB memory device
connected (the actual playback order may not
be the same as that indicated on your
computer’s display).
• If you continuously operate folder up/down,
the play time keeps as “00:00”, and the sound
is not emitted.
About USB Digital Media Streaming
This unit supports USB Digital Media Streaming.
USB Digital Media Streaming is a function used
to play music files transmitted using Media
Transfer Protocol (MTP). This function also
supports the playback of WMDRM 10 files.
During USB Digital Media Streaming, the unit
displays the “MTP” mode indicator.
Use of USB Digital Media Streaming requires
the purchase of a supported portable audio
player. For information regarding supported
portable audio players, consult your nearest
Clarion dealer, or visit Clarion’s website.
CAUTION
• Insert and remove a USB memory/MTP
device only when the device is not being
accessed. Connecting or disconnecting
the device at the following times may
result in the loss of data:
- If the USB memory/MTP device is
removed or power is disconnected
during writing to the device.
- When the device is subjected to static
electricity or electric noise.
• Do not leave a USB memory/MTP device
unattended in an automobile. Exposure to
direct sunlight or high temperatures may
cause deformation or other malfunction of
the USB memory/MTP device.
25 CX609E
Page 26

USB/MTP Operations
English
• Do not turn on vehicle ignition when the
MTP device is connected, since it may
result in loss or damage to data on the
MTP device. Connect the MTP device to
the USB cable after vehicle ignition is
turned on.
Connecting a USB memory/MTP
device
1. Connect the USB memory/MTP device to the
USB cable.
Playback will begin from the first file
recorded on the device.
∗ If the device is not recognized, press the
[SRC] button to switch the source to the
device.
∗ Always insert the device fully into the
connector. Incomplete connections may
cause the device not to be recognized.
∗ Depending on the number of tracks recorded,
some amount of time may be required until all
tracks are read into the unit.
∗ The order in which tracks are recorded may
differ depending on the device connected (the
actual playback order may not be the same as
that indicated on your computer’s display).
To listen to tracks on a connected
USB memory/MTP device
1. Press the [SRC] button to switch the source.
When USB memory/MTP device is selected,
playback (except DRM files) will begin from
the location at which playback was
previously stopped.
∗ When a USB memory/MTP device is
connected the USB/MTP mode will be
displayed.
∗ When a USB memory/MTP device is
disconnected and then reconnected, playback
will begin from the beginning of the USB
memory/MTP device.
∗ When “MTP” mode is selected, AAC files on
the MTP device cannot be played.
To stop play
1. Press the [SRC] button and switch the
function to a source other than the USB
memory/MTP.
CAUTION
Do not remove the USB memory/MTP device
when the USB/MTP mode is selected, since it
may result in loss or damage to data on the
USB memory/MTP device.
Always backup and save important data on
your computer.
2. Remove the USB memory/MTP device from
the USB cable.
26 CX609E
Page 27

iPod Operations
This section describes operations when
connected to an Apple iPod via the USB cable.
Notes:
• See the iPod Owner’s Manual for details
regarding operation conditions.
• The unit will not operate, or may operate
improperly with unsupported versions.
• For a list of compatible Apple iPod unit with the
this model, please contact your Clarion dealer or
www.clarion.com.
• “Made for iPod” means that an electronic
accessory has been designed to connect
specifically to iPod and has been certified by the
developer to meet Apple performance
standards.
Apple is not responsible for the operation of this
device or its compliance with safety and
regulatory standards.
iPod and iTunes are trademarks of Apple Inc.,
registered in the U.S. and other countries.
Connecting an iPod
When an iPod is connected to the USB slot,
“Shuffle” set on the iPod will become as follows:
• “Shuffle (Albums)” play ➜ Random play
• “Shuffle (Songs)” play ➜ All random play
The iPod has two modes, the “Play mode” and
the “iPod menu mode” for selecting tracks.
Switch between these modes by pressing the
[BND] button for 1 second or longer.
Note:
• To connect iPod, please use the USB cable
attached in iPod.
Select iPod mode
1. Press the [SRC] button.
Playback will begin from the last file that was
played on the iPod.
Notes:
• The following operations in Play mode operate
the same as in CD mode:
∗ Track selection: [x], [v]
∗ Fast-forward/fast-backward: [x], [v]
∗ Pause: []
See “CD/MP3/WMA/AAC Operations” (page 15-
17) for details.
• After a Podcast file has completed playback, the
pause display, or the track-end position PlayTime display will appear. At that time, select a
music file once again.
Setting iPod simple mode
Use this function if you wish to operate through
your iPod connected to this unit via the USB cable.
∗ The factory default setting is “OFF”.
1. Press and hold the [DISP] button (1 sec.).
2. Press
[x] or [v] to select “S-CTRL”.
3. Press the [ ] button.
4. Press the [w] or [z] button to select “ON”
or “OFF”.
• ON:
Operations can be made through your iPod.
• OFF:
Operations cannot be made through your
iPod.
5. Press and hold the [ ] button (1 sec.) to
store the setting and return to the previous
mode.
Notes:
• When performing iPod operations using simple
control mode, make the operations slowly. If
repetitive operations are performed too quickly,
unforseen errors may occur.
• When performing iPod operations using simple
control mode, please do not operate the iPod
and the unit at the same time, otherwise there
may be unexpeted event happened.
• Some iPod models do not support this function.
Consult your nearest Clarion dealer or website to
confirm which models do not support this
function.
Other various play functions
(in Play mode)
Notes:
• These functions are not supported when in the
iPod menu mode.
• The Random function set on the iPod remains the
same after attachment/detachment of the iPod.
• The Repeat function on the iPod will be changed
when you connect/disconnect the iPod to the
unit.
● Repeat play
Play back one track repeatedly.
1. Press the [RPT] button.
● Random play
Play all albums within a selected category, in
random order. (Corresponds to “Shuffle
(Albums)” command on iPod.)
1. Press the [RDM] button.
English
27 CX609E
Page 28

iPod Operations
English
● All random play
Play all tracks within a selected category, in
random order. (Corresponds to “Shuffle
(Songs)” command on iPod.)
1. Press and hold the [RDM] button (1 sec.).
● To cancel play
1. Press the same play button once again.
Notes:
• When the repeat play mode is canceled, after
play all tracks within a selected category,
playback will begin from the first track in the
selected category.
• When playing the last track within a selected
category in Random mode, if ACC is switched off
then on again, playback will begin from a
different track.
• Though the default setting of an iPod is “All
Repeat”, the indication on the mode status is not
displayed.
• When performing operations using simple control
mode, do not set the repeat off on the iPod.
Selecting category from the iPod
menu
1. Press and hold the [BND] button to select the
iPod menu mode.
The iPod menu categories will be displayed.
Notes:
• Repeat and Random mode operations are not
supported when in the iPod menu mode.
• In iPod menu mode, if you press the [x]/[v]
or
[w]/[z] button fast, playback may not be
performed.
2. Press the [w] or [z] button to switch
between categories.
The iPod menu categories alternate in the
following order:
“PLAYLISTS” ↔ “ARTISTS” ↔
“ALBUMS” ↔ “SONGS” ↔ “GENRES” ↔
“COMPOSERS”...
Note:
The iPod menu mode can be canceled by
performing one of the following operations:
• Press the [BND] button.
• When the category select screen is displayed,
press the [v] button.
3. Press the [v] button to select the category.
4. When the track name display is showing,
press the [v] button.
Playback will begin from the first track in the
selected category, and the iPod menu mode
will be canceled.
∗ Subfolders may be displayed, depending on
the category.
In this case, use the [w] and [z] buttons to
switch between subfolders, then use the [v]
button to select the desired subfolder.
∗ When the track name display is showing,
pressing the [x] button will return to the
currently playing folder name display.
5. Use the [w] and [z] buttons to select a
track within a category.
iPod menu alphabet search
This function searches the subfolders for
desired alphabetical letters.
1. Press the [BND] button to select the iPod
menu mode.
2. Press the [w] or [z] button to switch
between categories.
[v]
3. Press the
∗ Subfolders may be displayed, depending on
the category.
In this case, you can use the [w] or [z] button
to switch between subfolders and use the [
button to enter the next subfolder layer.
4. Press and hold the [DISP] button (1 sec.).
5. Press the [w] or [z] button to select the
desired letter to search.
6. Press the [DISP] button to perform search.
• During search, press the [DISP] button to
cancel search.
button.
v
Selecting category using preset
memory
1. Press and hold the [BND] button (1 sec.) to
select the iPod menu mode.
The category can be set as follows in the
[DIRECT] (1-6) buttons.
[1] : PLAYLISTS
[2] : ARTISTS
[3] : ALBUMS
[4] : SONGS
[5] : GENRES
[6] : COMPOSERS
2. Press the desired [DIRECT] (1-6) button to
select the category.
∗ Subfolders may be displayed, depending on
the category.
In this case, use the [w] or [z] buttons to
switch between subfolders, then use the [v]
button to select the desired subfolder.
3. When the track name display is showing,
press the [v] button.
]
28 CX609E
Page 29

iPod Operations
Playback will begin from the first track in the
selected category, and the iPod menu mode
will be canceled.
∗ Use the [w] or [z] buttons to select a track
within a category.
iPod menu list back
In the iPod menu operation mode:
∗ If press the [BND] button, it will return to the
previous subfolder list mode.
∗ If press and hold the
return to the category list mode.
[BND] button (1 sec.), it will
About title display
This unit supports the display of title
information transmitted from a connected iPod.
• Character code information is UTF-8;
displayable characters include English
alphanumerics, some symbols, and some
umlaut characters.
• Unsupported characters will be replaced
by asterisks (*).
English
29 CX609E
Page 30

English
7. TROUBLESHOOTING
Problem Cause Measure
Power does not
turn on.
(No sound is
produced.)
No sound output
when operating
the unit with
amplifiers or
power antenna
attached.
Nothing happens
when buttons are
General
pressed.
Display is not
accurate.
No sound heard The speaker protection circuit
No sound heard MP3/WMA/AAC files are
Sound skips or is
noisy.
Sound is cut or
skipped.
Noise is
generated or
noise is mixed
CD/MP3/WMA/AAC
with sound.
Sound is bad
directly after
power is turned
on.
Wrong filename File system is not correct. Use ISO9660 level 1, 2 or JOLIET or Romeo or
Fuse is blown. Replace with a fuse of the same amperage. If the fuse
Incorrect wiring. Consult your store of purchase.
Power antenna lead is
shorted to ground or
excessive current is required
for remote-on the amplifiers
or power antenna.
The microprocessor has
malfunctioned due to noise,
etc.
DCP or main unit connectors
are dirty.
is operating.
absent in a disc.
Files are not recognized as
an MP3/WMA/AAC file.
File system is not correct. Use ISO9660 level 1, 2 or JOLIET or Romeo or
Compact disc is dirty. Clean the compact disc with a soft cloth.
Compact disc is heavily
scratched or warped.
MP3/WMA/AAC files are not
encoded properly.
Water droplets may form on
the internal lens when the car
is parked in a humid place.
blows again, consult your store of purchase.
1. Turn the unit off.
2. Remove all wires attached to the power antenna
lead. Check each wire for a possible short to
ground using an ohm meter.
3. Turn the unit back on.
4. Reconnect each amplifier remote wire to the power
antenna lead one by one. If the amplifiers turn off
before all wires are attached, use an external relay
to provide remote-on voltage (excessive current
required).
Press the reset button for
about 2 seconds with a thin
rod.
If the RESET button is
pressed when a disc is
loaded, Please eject the disc
and load it once again before
attempting to play it.
Wipe the dirt off with a soft cloth moistened with
cleaning alcohol.
1. Turn down sound volume. Function can also be
restored by turning the power off and on again.
(Speaker volume is reduced automatically when
the speaker protection circuit operates).
2. If the sound is muted again, consult our service
department.
Write MP3/WMA/AAC files onto the disc properly.
Use MP3/WMA/AAC files encoded properly.
APPLE ISO file system.
Replace with a compact disc with no scratches.
Use MP3/WMA/AAC files encoded properly.
Let dry for about 1 hour with the power on.
APPLE ISO file system.
Reset
button
30 CX609E
Page 31

Problem Cause Measure
No sound heard The device contains no MP3/
Sound is
interrupted or has
noise.
The device isn’t
USB/MTP/iPod
recognized.
Can’t insert the
device.
WMA/AAC files.
The files are not proper MP3/
WMA/AAC format.
Connectors are loose. Disconnect the device and reconnect securely.
Some USB portable music
players may consume current
that exceeds the USB rating.
In this case, the unit’s
overcurrent protection circuit
operates to stop the music
playback.
The MP3/WMA/AAC files are
improperly encoded.
The device is damaged. Disconnect the device and reconnect. If the device is
Connectors are loose.
According to the state of
operation on the device, the
communication fault is
caused.
The device has been inserted
improperly.
The connector is broken. Replace with a new device.
Record MP3/WMA/AAC files properly to the device.
Use only properly encoded MP3/WMA/AAC files.
Check operation of portable music player.
Use only properly encoded MP3/WMA/AAC files.
still not recognized, try replacing with a different
device.
Disconnect the device and reconnect.
Try reversing the connection direction of the device
(usually the brand name surface should be facing
left).
8. ERROR DISPLAYS
English
If an error occurs, one of the following displays is displayed.
Take the measures described below to eliminate the problem.
Error Display Cause Measure
ERROR 2 A CD is caught inside the CD
ERROR 3 A CD cannot be played due
ERROR 6 A CD is loaded upside-down
CD/MP3/WMA/AAC
ERROR 2 The files are not proper MP3/
ERROR 3
(USB/MTP mode)
CUR ERR Overcurrent detection. Disconnect the devices and reconnect. If the devices
USB/MTP/iPod
HUB ERR Do not support the HUB
deck and is not ejected.
to scratches, etc.
inside the CD deck and does
not play.
WMA/AAC format.
The MP3/WMA/AAC files are
improperly encoded.
devices.
This is a failure of CD deck’s mechanism and consult
your store of purchase.
Replace with a non-scratched, non-warped-disc.
Eject the disc then reload it properly.
Use only properly encoded MP3/WMA/AAC files.
Use only properly encoded MP3/WMA/AAC files.
are still not recognized, try replacing with a different
devices.
Do not use the HUB devices.
If an error display other than the ones described above appears, press the reset button. If the problem
persists, turn off the power and consult your store of purchase.
31 CX609E
Page 32

English
9. SPECIFICATIONS
Radio section
Tuning System: PLL synthesizer tuner
Receiving Frequencies:
FM : 87.5 to 108 MHz (0.05 MHz steps)
MW : 531 to 1602 kHz (9 kHz steps)
LW : 153 to 279 kHz (3 kHz steps)
CD player section
System: Compact disc digital audio system
Frequency Response: 20 Hz to 20 kHz (± 1 dB)
Signal to Noise Ratio: 100 dB (1 kHz)
Dynamic Range: 80 dB (1 kHz)
Distortion: 0.03%
General
Output Power: 25 W ✕ 4 (DIN 45324, +B=14.4V)
Power Supply Voltage:
14.4 V DC (10.8 to 15.6 V allowable),
negative ground
Power Consumption: Less than 15 A
Speaker Impedance: 4 Ω (4 to 8 Ω allowable)
Weight:
Main unit: 1.59 kg
Dimensions:
Main unit:
178 (W) ✕ 100 (H) ✕ 155 (D) mm
Bluetooth
Specification: Bluetooth Ver. 2.0
Profile:
HFP (Hands-Free Profile)
OPP (Object Push Profile) Phone Book
A2DP (Advanced Audio Distribution Profile)
AVRCP (Audio/Video Remote Control Profile)
Send/Receive Sensitivity: Class 2
Note:
• Specifications and design are subject to change without notice for further improvement.
10.OTHERS
WMDRM 10 for devices
• This product is protected by certain
intellectual property rights of Microsoft. Use or
distribution of such technology outside of this
product is prohibited without a license from
Microsoft.
• Content owners use Windows Media digital
rights management technology (WMDRM) to
protect their intellectual property, including
copyrights. This device uses WMDRM
software to access WMDRM-protected
content. If the WMDRM software fails to
protect the content, content owners may ask
Microsoft to revoke the software’s ability to
use WMDRM to play or copy protected
content. Revocation does not affect
32 CX609E
unprotected content. When you download
licenses for protected content, you agree that
Microsoft may include a revocation list with
the licenses. Content owners may require you
to upgrade WMDRM to access their content.
If you decline an upgrade, you will not be able
to access content that requires the upgrade.
Page 33

Благодарим Вас за покупку данного изделия Clarion.
∗ Пожалуйста, прочитайте полностью данное руководство пользователя перед работой с данным
оборудованием.
∗ Ознакомьтесь с содержанием прилагаемого гарантийного талона и аккуратно сохраните его вместе с
данным руководством.
Содержание
1. ХАРАКТЕРИСТИКИ ..................................................................................................................... 34
2. МЕРЫ ПРЕДОСТОРОЖНОСТИ ................................................................................................. 34
3. ОРГАНЫ УПРАВЛЕНИЯ ............................................................................................................. 35
Названия клавиш и их основные функции ................................................................................. 35
4. ПУЛЬТ ДИСТАНЦИОННОГО УПРАВЛЕНИЯ ............................................................................ 36
Функции кнопок пульта дистанционного управления ................................................................ 36
Установка батареи ....................................................................................................................... 37
5. ОПЕРАЦИИ................................................................................................................................... 38
Основные операции ..................................................................................................................... 38
Операции в режиме радиоприемника......................................................................................... 41
Использование системы радиоданных (Radio Data System) .................................................... 42
Операции в режимах CD/MP3/WMA/AAC ................................................................................... 44
Использование Bluetooth ............................................................................................................. 47
Операции, общие для каждого режима ...................................................................................... 52
6. ВСПОМОГАТЕЛЬНОЕ ОБОРУДОВАНИЕ................................................................................. 55
Операции в режиме USB/MTP..................................................................................................... 55
Операции в
7. ПОИСК И УСТРАНЕНИЕ НЕИСПРАВНОСТЕЙ......................................................................... 60
8. ОТОБРАЖЕНИЕ ОШИБОК НА ДИСПЛЕЕ ................................................................................ 62
9. ТЕХНИЧЕСКИЕ ХАРАКТЕРИСТИКИ.......................................................................................... 63
10. ПРОЧЕЕ ........................................................................................................................................ 63
режиме iPod.............................................................................................................. 57
Pyccкий
33 CX609E
Page 34

1. ХАРАКТЕРИСТИКИ
• Встроенные профили Bluetooth® (HFP) и потокового аудио (A2DP и AVRCP)
• Улучшение качества сжатого аудио по технологии BBE MP
•728-Подсветка дисплея и клавиш в нескольких цветах
Pyccкий
2. МЕРЫ ПРЕДОСТОРОЖНОСТИ
Данный аппарат применяется только для 4колесных легковых автомобилей. Он не подходит
для использования на тракторах,
автопогрузчиках с вильчатым захватом,
бульдозерах, внедорожных транспортных
средствах, 2 или 3-колесных мотоциклах,
морских судах или на других транспортных
средствах
ИНФОРМАЦИЯ ДЛЯ
ПОЛЬЗОВАТЕЛЕЙ:
ИЗМЕНЕНИЯ ИЛИ МОДИФИКАЦИИ
ДАННОГО ИЗДЕЛИЯ БЕЗ ОДОБРЕНИЯ
ИЗГОТОВИТЕЛЯ ДЕЛАЮТ
НЕДЕЙСТВИТЕЛЬНОЙ ГАРАНТИЮ НА
ДАННОЕ ИЗДЕЛИЕ.
специального назначения.
Обращение с компакт-дисками
• По сравнению с обычными музыкальными
дисками CD, диски CD-R и CD-RW легко
подвергаются влиянию высокой температуры
и влажности, в результате чего некоторые из
них могут не воспроизводиться. Поэтому не
оставляйте их на долгое время в автомобиле.
• Не используйте самоклеющиеся ярлыки или
обозначения ручкой или карандашом на
поверхности компакт-дисков.
Экран дисплея
При слишком низкой температуре
быстродействие и яркость экрана могут
снизиться, и экран может темнеть, но это
является нормальным явлением.
Свойства экрана восстановятся при нормальной
температуре.
34 CX609E
Page 35

3. ОРГАНЫ УПРАВЛЕНИЯ
Названия клавиш и их основные функции
Основной блок
[DIRECT]
[SCN]
[RPT]
[RDM]
[IR
RECEIVER]
[]
[ ], [ ]
[SRC]
Кнопка []
• Сканирование диапазона и регистрация
сигнала радиостанций в рамках
фиксированной настройки в режиме радио.
• Воспроизведение или пауза при
воспроизведении дорожки в режиме CD/MP3/
WMA/AAC/USB/iPod.
Кнопка [IR RECEIVER]
• Приемник сигнала пульта дистанционного
управления. (Рабочий диапазон: 30° в любом
направлении)
Кнопка [RDM]
• Воспроизведение дорожек в произвольном
порядке в режиме CD/MP3/WMA/AAC/USB/
iPod.
Кнопка [RPT]
• Воспроизведение дорожек с повторением в
режиме CD/MP3/WMA/AAC/USB.
Кнопка [SCN]
• Ознакомительное воспроизведение дорожек в
режиме CD/MP3/WMA/AAC/USB/iPod.
Кнопки [DIRECT]
• Занесение зарегистрированных радиостанций
в память или непосредственный выбор
радиостанции, занесенной в память, в режиме
радио.
[CD SLOT]
• Щель для загрузки компакт-дисков.
[]
[ROTARY]
[BND]
[]
[AUX]
[CD SLOT]
[], []
[TA]
Кнопка [Q] (EJECT)
• Нажмите, чтобы извлечь диск.
Кнопка [DISP]
• Переключение режимов дисплея.
Входной разъем [AUX]
• Входной разъем для подключения внешних
устройств.
Кнопка [BND]
• Смена диапазонов, или выбор поисковой или
ручной настройки в режиме радио.
Кнопка [TA]
• Нажмите, чтобы задать режим ожидания для
функции TA (Передача информации о
дорожной обстановке).
Кнопки [w], [z]
• Выбор папок в режиме MP3/WMA/AAC/USB.
Ручка [ROTARY]
• Вращайте, чтобы отрегулировать уровень
громкости.
Кнопки [x], [v]
• Активация функции быстрого перехода вперед
или назад.
Кнопка [ ] (SOUND)
• Нажмите, чтобы перейти в режим настройки
звучания.
Кнопка [SRC]
• Включение и выключение питания.
Pyccкий
[DIRECT]
[DISP]
35 CX609E
Page 36

4. ПУЛЬТ ДИСТАНЦИОННОГО УПРАВЛЕНИЯ
Функции кнопок пульта дистанционного управления
При наличии пульта ДУ RCB-176-301 (продается отдельно) управление функциями может
Pyccкий
осуществляться в дистанционном режиме.
∗ Функции некоторых кнопок пульта дистанционного управления не совпадают с функциями соответствующих
кнопок на основном блоке.
Передатчик сигнала
[
SRC
]
[
]
BND
[]
[ ], [ ]
[
]
MUTE
[TA]
[
]
PS/AS
● Общие режимы
Клавиша [SRC]
• Используется для переключения режимов
работы и выбора требуемого режима.
• Нажмите, чтобы отменить прием срочной
дорожной информации, экстренных
сообщений, а также прием кода типа
программы во время приема сигналов TA,
ALARM или PTY.
Клавиши [w], [z]
• Используются для увеличения и уменьшения
громкости.
Клавиша [MUTE]
• Включение и отмена беззвучного режима
работы.
Клавиша [TA]
• Включение и отключение оповещений о
загруженности и состоянии дорог.
[ ], [ ]
[
]
DISP
[
]
PTY
[AF]
• Нажмите, чтобы отменить прием срочной
дорожной информации во время приема
сигнала TA.
Клавиша [PTY]
• Нажмите, чтобы отменить прием кода типа
программы во время приема сигнала PTY.
Клавиша [DISP]
• Нажмите, чтобы переключиться между
основным дисплеем, дисплеем заголовков и
дисплеем CT (текущего времени и даты).
● Режим радио (Radio Data
System)
Клавиша [BND]
• Используется для переключения шкалы
приемника.
Клавиши [x], [v]
• Используются для перемещения между
предустановленными каналами вверх и вниз.
36 CX609E
Page 37

Клавиша [PS/AS]
• Нажмите, чтобы выполнить сканирование в
заданном диапазоне частот.
• Нажмите и удерживайте эту клавишу (2 с),
чтобы выполнить автоматическое сохранение.
Клавиша [AF]
• Включение и отключение списка
альтернативных частот.
• Нажмите и удерживайте (1 с), чтобы включить
или отключить функцию REG.
Клавиша [PTY]
• Включение и отключение режима приема кода
типа программы.
● Режимы CD/MP3/WMA/AAC и
USB/MTP
Клавиша [BND]
• Нажмите, чтобы воспроизвести первую дорожку.
Клавиши [x], [v]
• Нажмите, чтобы выбрать предыдущую или
следующую дорожку.
• Нажмите и удерживайте (1 с), чтобы выполнить
быструю прокрутку вперед или назад.
Клавиша []
• Используется для начала и приостановки
воспроизведения.
Клавиша [PS/AS]
• Нажмите, чтобы выполнить ознакомительное
воспроизведение.
• В режимах MP3/WMA/AAC и USB/MTP
нажмите и удерживайте (1 с), чтобы выполнить
ознакомительное воспроизведение папки.
Клавиша [AF]
• Нажмите, чтобы повторить воспроизведение.
• В режимах MP3/WMA/AAC и USB/MTP
нажмите и удерживайте (1 с), чтобы повторить
воспроизведение папки.
Клавиша [PTY]
• Нажмите, чтобы выполнить воспроизведение в
случайном порядке.
• В режимах MP3/WMA/AAC и USB/MTP
нажмите и удерживайте (1 с), чтобы
выполнить воспроизведение папки в
случайном порядке.
● Режим iPod
Клавиши [x], [v]
• Нажмите, чтобы выбрать предыдущую или
следующую дорожку.
• Нажмите и удерживайте (1 с), чтобы выполнить
быструю прокрутку вперед или назад.
Клавиша []
• Используется для начала и приостановки
воспроизведения.
Клавиша [AF]
• Нажмите, чтобы повторить воспроизведение.
Клавиша [PTY]
• Нажмите, чтобы выполнить воспроизведение в
случайном порядке.
• Нажмите и удерживайте (1 с), чтобы
выполнить воспроизведение всех дорожек в
случайном порядке.
Pyccкий
Установка батареи
1 Переверните пульт дистанционного
управления и сдвиньте крышку в
направлении, указанном стрелкой на рисунке.
2 Установите батарею (CR2025) в
направляющие стороной с отметкой (+) вверх.
3 Надавите на батарею в направлении,
указанном стрелкой, чтобы установить ее в
отсек.
4 Установите крышку, задвинув ее до щелчка.
Примечания:
При неправильной установке батарея может
треснуть, что приведет к утечке жидкости и
травмам или повреждению материалов,
расположенных рядом. Соблюдайте следующие
правила техники безопасности.
• Используйте только указанную батарею.
• При замене батареи новую устанавливайте
правильно с соблюдением (+/–) полярности.
• Не подвергайте нагревайте батарею и не
подвергайте ее воздействию огня и воды. Не
разбирайте батарею.
• Использованную батарею утилизируйте в
соответствии с местными нормами.
R
2
C
0
2
5
Направляющая
37 CX609E
Page 38

5. ОПЕРАЦИИ
Примечание:
• Читая данную главу, обращайтесь к диаграммам в
“3. ОРГАНЫ УПРАВЛЕНИЯ” (стр.35).
Pyccкий
Основные операции
ПРЕДУПРЕЖДЕНИЕ
Обязательно понижайте уровень
громкости перед отключением питания
аппарата или ключа зажигания. Аппарат
запоминает последнюю настройку уровня
громкости.
Включение/выключение питания
1. Нажмите клавишу [SRC], чтобы включить
питание.
2. Нажмите и удерживайте (1 с) клавишу [SRC],
чтобы выключить питание.
Выбор режимов
1. Нажмите клавишу [SRC] для изменения
рабочего режима.
Radio ➜ CD/MP3/WMA/AAC ➜ USB/MTP/
iPod ➜ BLUETOOTH ➜ AUX ➜ Radio...
iPod/MTP можно подсоединить к данному
аппарату с помощью кабеля USB.
Регулировка уровня громкости
1. Поворачивайте ручку [ROTARY] по часовой
стрелке для повышения и против часовой
стрелки для понижения уровня громкости.
∗ Диапазон уровня громкости составляет от 0
(минимальное значение) до 33 (максимальное
значение).
Переключение индикации на
дисплее
Нажмите клавишу [DISP] для выбора желаемого
режима индикации.
Регулировка звука
По желанию можно отрегулировать звуковые
эффекты и тональность.
Для изменения настроек звука
1. Нажмите клавишу [] для переключения
в режим индикации регулировки звука.
∗ Заводская настройка по умолчанию: “BEAT
EQ”.
2. Нажмите [x] или [v] для выбора
режима регулировки звука.
Каждый раз при нажатии [x] или [v]
режим регулировки звука изменяется
следующим образом:
“BEAT EQ” ↔ “M-B EX” ↔
“BALANCE” ↔ “FADER” ↔ “LPF” ↔
“S-W VOL” ↔ “HPF”
∗ Когда на дисплее мигает “ENT”, нажмите
клавишу [] для установки значения
настройки.
3. Нажмите клавишу [w] или [z], чтобы
настроить выбранный режим аудио.
4. После завершения настроек нажмите
клавишу [] для возврата к предыдущему
режиму.
● Настройка эквалайзера BEAT EQ
Данный аппарат имеет в памяти 4 типа эффектов
тональности звука.
Выберите желаемый эффект.
∗ Заводская настройка по умолчанию: “OFF”.
2-1. Выберите “BEAT EQ”.
3-1. При нажатии клавиши [w] или [z]
звуковой эффект изменяются следующим
образом:
“CUSTOM” ↔ “EXCITE” ↔ “IMPACT” ↔
“B-BOOST” ↔ “OFF”
CUSTOM : настройки пользователя
EXCITE : подчеркивание нижних и
верхних частот, выделение
средних частот
IMPACT : подчеркивание нижних и
верхних частот
B-BOOST : подчеркивание нижних частот
OFF : звуковой эффект отсутствует
При выборе режима “CUSTOM”:
3-1. Нажмите клавишу [].
3-2. Нажмите клавишу [x] или [v], чтобы
выбрать режим “BASS”/“MID”/“TREBLE”
и настроить его.
38 CX609E
Page 39

3-3. Чтобы установить одинаковый уровень всех
настроек, нажмите клавишу [], чтобы
вернуться в режим “CUSTOM”, затем
нажмите и удерживайте клавишу [] (1 с),
после чего для характеристик нч/сч/вч будут
установлены одинаковые значения.
При установке режима “B-BOOST/IMPACT/
EXCITE”:
3-2. Нажмите клавишу [].
3-3. Нажмите клавишу [w] или [z], чтобы
установить требуемое значение (Диапазон
настройки: от
∗ Заводская настройка по умолчанию: “0”.
–3 до +3).
3-4. Нажмите клавишу [] для возврата к
предыдущему режиму.
● Настройка уровня BASS/MID/
TREBLE
Эту настройку можно выполнить, только если
для эквалайзера BEAT EQ выбран режим
“CUSTOM”.
Примечание:
• Если подключены внешние усилители, не
устанавливайте максимальные уровни для
параметров “BASS”/“MID”/“TREBLE”. В
противном случае можно повредить динамики.
3-2. Нажмите клавишу [].
3-3. Нажмите клавишу [x] или [v], чтобы
выбрать требуемое значение в следующем
порядке.
“BASS<G>” ↔ “BASS<F>” ↔ “BASS<Q>”
“MID<G>” ↔ “MID<F>” ↔ “MID<Q>”
“TREBLE<G>” ↔ “TREBLE<F>” ↔
“TREBLE<Q>”
∗ Заводское значение по умолчанию:
“BASS<G>”.
3-4. Нажмите клавишу [w] или [z], чтобы
выбрать требуемое значение.
BASS<G>:заводское значение по
BASS<F>:заводское значение по
BASS<Q>:заводское значение по
MID<G>:заводское значение по
MID<F>
умолчанию:
“
0
”.
(Диапазон настроек: от +7 до –7)
умолчанию:
“
50
”
.
(Диапазон настроек: 50/100/200)
умолчанию:
“
1
”
.
(Диапазон настроек: 0,7/1/1,4/2)
умолчанию:
“
0
”.
(Диапазон настроек: от +7 до –7)
:
заводское значение по
умолчанию:
“500”
.
(Диапазон настроек: 500/1K/2K)
MID<Q>:заводское значение по
умолчанию:
“
1
”
.
(Диапазон настроек: 0,7/1/1,4/2)
TREBLE<G>:заводское значение по
умолчанию:
“
0
”
.
(Диапазон настроек: от +7 до –7)
TREBLE<F>:заводское значение по
умолчанию:
“10K”
.
(Диапазон настроек: 5K/10K/15K)
TREBLE<Q>:заводское значение по
умолчанию:
“
1
”
.
(Диапазон настроек: 0,7/1/1,4/2)
3-5. Нажмите клавишу [ ], чтобы вернуться в
предыдущий режим.
● Настройка MAGNA BASS EXTEND
Функция MAGNA BASS EXTEND не регулирует
низкие частоты как обычные настройки регулировки
звука, а выделяет диапазон насыщенных низких
частот динамическим звучанием.
∗ Заводская настройка по умолчанию: “OFF”.
2-1. Выберите “M-B EX”.
3-1. Нажмите клавишу [w] или [z], чтобы
выбрать “ON” или “OFF”.
● Регулировка баланса звука
2-1. Выберите “BALANCE”.
3-1. Нажмите клавишу [w] или [z], чтобы
настроить баланс между правыми и левыми
динамиками.
∗
Заводская настройка по умолчанию:
“
CENTER
до LEFT12 (правый громкоговоритель - 12,
левыйгромкоговоритель -12))
”. (Диапазон настройки: от RIGHT12
● Регулировка микшера
2-1. Выберите “FADER”.
3-1. Нажмите клавишу [w] или [z], чтобы
настроить баланс между передними и
задними динамиками.
∗
Заводская настройка по умолчанию:
“
CENTER
до REAR12 (фронтальный громкоговоритель 12
– тыловой громкоговоритель 12))
”. (Диапазон настройки: от FRONT12
● Настройка сабвуфера
Можно настроить фильтр нижних частот
сабвуфера.
Эту настройку можно выполнить только в том
случае, если параметру “REAR/S-W” присвоено
значение “S-WOOFER” (стр.54).
2-1. Выберите “LPF”.
3-1. Нажмите клавишу [w] или [z], чтобы
выбрать требуемое значение в следующем
порядке.
“THROUGH” ↔ “60” ↔ “90” ↔ “120”
∗ Заводское значение по умолчанию:
“THROUGH”.
Pyccкий
39 CX609E
Page 40

● Настройка выходной громкости
сабвуфера
Отрегулируйте уровень громкости сигнала с
выходного громкости сабвуфера.
Эту настройку можно выполнить только в том
случае, если параметру “REAR/S-W” присвоено
значение “S-WOOFER” (стр.54).
Pyccкий
2-1. Выберите “S-W VOL”.
3-1. Нажмите клавишу [w] или [z], чтобы
увеличить или уменьшить громкость
сабвуфера.
∗ Заводская настройка по умолчанию: “0”.
(Диапазон настройки: от +6 до –6)
● Настройка HPF
2-1. Выберите “HPF”.
3-1. Нажмите клавишу [w] или [z], чтобы
выбрать требуемое значение в следующем
порядке.
“THROUGH” ↔ “60” ↔ “90” ↔ “120”
∗ Заводское значение по умолчанию:
“THROUGH”.
● Настройка BBE MP (улучшение и
восстановление звука сжатых
аудиофайлов)
При обработке по технологии BBE MP
(Minimized Polynomial Non-Linear Saturation)
улучшается звук, сжатый цифровым способом,
например MP3, путем восстановления и
улучшения гармоник, утраченных при сжатии.
Технология BBE MP регенерирует гармоники из
исходного материала, эффективно
восстанавливая теплоту, тонкости и оттенки.
∗ Эта функция оказывает эффект на аудиофайлы в
режиме CD/MP3/WMA/AAC или USB/iPod, но не
имеет влияния на видео в режиме USB/iPod.
1. Нажмите клавишу [ ], чтобы перейти к
дисплею выбора настроек звука.
2. Нажмите клавишу [x] или [v], чтобы
выбрать “BBE MP”.
3. Нажмите клавишу [w] или [z], чтобы
выбрать “ON” или “OFF”.
∗ Заводское значение по умолчанию: “OFF”.
4. При выборе значения “ON” нажмите клавишу
[], а затем клавишу [w] или [z], чтобы
выбрать требуемое значение в следующем
порядке.
“LOW” ↔ “MID” ↔ “HIGH”
Примечания:
• Изготовлено по лицензии компании BBE Sound, Inc.
• Лицензия выдана компанией BBE Sound, Inc. на
основании одного или нескольких следующих
патентов США: 5510752, 5736897. BBE и символ
BBE являются зарегистрированными товарными
знаками компании BBE Sound, Inc.
• Если во время режима регулировки звука не
выполняется никакого действия в течение 10
секунд, данный режим отменяется и аппарат
возвращается в предыдущий режим.
Функция CT (автоматическая
коррекция хода встроенных часов
по сигналам точного времени)
Функция CT принимает данные CT, передаваемые
станцией RDS, и отображает время на дисплее.
∗ Когда нет приема данных CT, на дисплее
отображается индикация “CT– –:– –”.
Примечание:
• Данные CT не передаются в некоторых странах и
некоторыми станциями радиовещания. Кроме
того, в некоторых областях CT может не
отображаться точно.
40 CX609E
Page 41

Операции в режиме
радиоприемника
Прослушивание программ
радиовещания
1. Нажмите клавишу [SRC] и выберите режим
радиоприемника.
∗ PS: Название программы радиовещания
∗ PTY: Тип программы
2. Нажмите клавишу [
приема. Каждый раз при нажатии клавиши
диапазон изменяется следующим образом:
FM1 ➜ FM2 ➜ FM3 ➜ AM (MW/LW) ➜
FM1...
Настройка
Имеется 3 режима настройки: настройка поиском,
ручная настройка и настройка по предустановкам.
Настройка поиском
Имеется 2 режима настройки поиском: DX SEEK
и LOCAL SEEK.
DX SEEK может выполнять автоматическую
настройку на принимаемые станции
радиовещания. LOCAL SEEK может выполнять
настройку только на станции радиовещания с
хорошим сигналом приема.
∗ Если на экране дисплея отобразится “MANU”,
нажмите [BND] (1 с).
Индикация “MANU” на дисплее исчезнет, и будет
доступна настройка поиском.
∗
Если на экране дисплея загорится “TA”, выполняется
автоматический поиск радиостанций TP.
● DX SEEK
Нажмите [x] или [v] для выполнения
автоматического поиска радиостанций.
При нажатии клавиши [v] поиск станций
выполняется в направлении повышения частот;
при нажатии клавиши [x] поиск станций
выполняется в направлении понижения частот.
● LOCAL SEEK
При нажатии и удержании в нажатом положении
(1 с) [x] или [v] включается настройка
поиском местных станций. Выбираются
радиостанции с хорошим сигналом приема.
Ручная настройка
Имеется 2 режима: быстрая настройка и
пошаговая настройка.
● Быстрая настройка
Нажмите и удерживайте (1 с) [x] или [v],
чтобы выполнить настройку на станцию.
BND
] и выберите диапазон
● Пошаговая настройка
Нажмите [x] или [v] для выполнения
ручной настройки на радиостанцию.
∗ Если никакого действия не выполняется в течение
7 секунд, режим ручной настройки отменяется, и
индикация на экране дисплея возвращается в
предыдущий режим.
Вызов из памяти
предустановленной радиостанции
Всего имеется 24 позиции предустановок (6-FM1,
6-FM2, 6-FM3, 6-AM) для сохранения настроек
радио в памяти. Нажмите соответствующую
клавишу [DIRECT] или клавишу [w]/[z],
чтобы автоматически вызвать сохраненную
частоту.
Ручное сохранение в памяти
1. С помощью настройки поиском или ручной
настройки выберите желаемую радиостанцию.
2. Нажмите и удерживайте (2 с) одну из клавиш
[DIRECT], чтобы сохранить текущую
радиостанцию в памяти предустановок.
Автоматическое сохранение в
памяти
Функция автоматического сохранения сохраняет
до 6-ти последовательных автоматически
настроенных радиостанций. Если невозможно
обнаружить 6 принимаемых станций, в ее памяти
остаются ранее сохраненные радиостанции.
1. Нажмите клавишу [BND] и выберите
желаемый диапазон (FM/AM (MW/LW)).
2. Нажмите и удерживайте клавишу [] (2 с).
Радиостанции с хорошим сигналом приема
автоматически сохраняются на каналах
предустановок.
∗ Если автоматическое сохранение выполняется
в диапазоне частот FM, радиостанции
сохраняются в FM3, даже если для сохранения
радиостанций были выбраны FM1 или FM2.
Сканирование предустановок
Функция сканирования предустановок
последовательно выполняет прием
радиостанций, сохраненных в памяти
предустановок. Данная функция удобна для
поиска радиостанций, сохраненных в памяти.
1. Нажмите клавишу [].
2. Когда выполняется прием желаемой
радиостанции, нажмите клавишу [] еще
раз, чтобы продолжить прием эту станцию.
Примечание:
• Не нажимайте и не удерживайте (2 с) клавишу
[], в противном случае сработает функция
автоматического сохранения и аппарат начнет
сохранять радиостанции в памяти.
41 CX609E
Pyccкий
Page 42

Использование системы
радиоданных (Radio Data
System)
RDS (Radio Data System –
Pyccкий
система радиоданных)
Данный аппарат имеет встроенный декодер RDS,
поддерживающий станции радиовещания,
передающие данные RDS.
При использовании функции RDS, всегда
устанавливайте режим радиоприема в диапазоне
FM.
Функция AF
Функция AF позволяет выполнять переключение
на другие частоты в одной и той же сети для
обеспечения оптимального приёма.
∗ Заводская настройка по умолчанию: “ON”.
1. Нажмите и удерживайте (1 с) клавишу
[DISP], чтобы переключить дисплей в режим
выбора настройки RDS.
2. Нажмите [x] или [v], чтобы выбрать
“AF”.
3. Нажмите клавишу [w] или [z], чтобы
выбрать
“ON” или “OFF”.
•ON:
На дисплее отобразится “AF”, и функция AF
включится.
•OFF:
Индикация “AF” на дисплее отключится, и
функция AF отключится.
4. Нажмите клавишу [DISP] для возврата к
предыдущему режиму.
∗ Если приём текущей радиостанции ухудшается, на
дисплее появляется индикация “PI SEARCH” и
радиоприемник начинает поиск этой же
программы на другой частоте.
Функция REG (Regional
programme – Региональная
программа)
Когда функция REG включена (ON), может
приниматься региональная радиостанция с
оптимальным приемом. Когда данная функция
выключена (OFF), если зона региональных
станций изменяется во время вождения,
принимается региональная станция для нового
региона.
∗ Заводская настройка по умолчанию: “OFF”.
Примечания:
• Данная функция отключается во время приема
общенациональных станций, таких как BBC R2.
• Настройка функции REG ON/OFF является
действительной, когда функция AF включена (ON).
1. Нажмите и удерживайте (1 с) клавишу
[DISP], чтобы переключить дисплей в режим
выбора настройки RDS.
2. Нажмите [x] или [v], чтобы выбрать
“REG”.
3. Нажмите клавишу [w] или [z], чтобы
выбрать
“ON” или “OFF”.
•ON:
На дисплее отобразится “REG” и функция
REG включится.
•OFF:
Индикация “REG” на дисплее отключится, и
функция REG отключится.
4. Нажмите клавишу [DISP] для возврата к
предыдущему режиму.
Ручная настройка региональных
станций в одной и той же сети
1. Данная функция действительна, когда
включена (ON) функция AF и выключена
(OFF) функция REG.
Примечание:
• Данная функция может использоваться при
приеме вещании региональных программ в той же
сети.
2. Нажмите одну из клавиш [DIRECT], чтобы
вызвать из памяти региональную станцию.
3. Если условия приёма вызванной из памяти
станции плохие, нажмите ту же клавишу
[DIRECT]. Аппарат примет местную
радиостанцию в той же сети.
TA (Traffic Announcement –
Дорожные сообщения)
В режиме ожидания дорожных сообщений (TA),
когда начинается передача дорожных
сообщений, дорожные сообщений принимаются
с главным приоритетом, несмотря на текущий
функциональный режим, чтобы Вы могли их
прослушать. Также предусмотрена
автоматическая настройка на дорожные
программы (TP).
∗ Данная функция может использоваться, только
когда на дисплее отображается индикация “TP”.
Когда отображается индикация “TP”, это означает,
что принимаемая станция, передающая данные
RDS, транслирует программы дорожных
сообщений.
42 CX609E
Page 43

● Настройка режима ожидания TA
Если Вы нажмете клавишу [TA], когда на дисплее
отображается только
отобразится
установлен в режим ожидания TA до тех пор,
пока не начнется трансляция дорожных
сообщений. Когда начнется трансляция дорожных
сообщений, на дисплее отобразится индикация
“
TRA INFO
время приема трансляции дорожных сообщений,
приём дорожных сообщений будет отменен и
аппарат перейдет в режим ожидания TA.
● Отмена режима ожидания ТА
Как только на дисплее отобразится
нажмите клавишу [TA]. На дисплее погаснет
индикация “TA” и режим ожидания ТА будет
отменен.
∗ Если не отображается “TP”, нажатие клавиши [TA]
запустит поиск радиостанции TP.
● Поиск радиостанции ТР
Когда не отображается
клавишу [TA], на дисплее отобразится “TA” и
аппарат автоматически будет принимать вещание
радиостанции TP.
“
”. Если Вы нажмёте клавишу [TA] во
“
TP
TP
” и “TA” и аппарат будет
”, на дисплее
“TP”, если Вы нажмете
“TP” и “TA”,
Функция автоматического
сохранения для радиостанций ТР
Вы можете автоматически сохранить до 6-ти
радиостанций ТР в памяти предустановок. Если
принимается меньше 6 радиостанций ТР, то в
памяти остаются уже сохраненные станции без
перезаписи.
Когда на дисплее отображается “TA”, нажмите и
удерживайте (2 с) клавишу [ ]. Станции TP с
хорошим сигналом приёма сохраняются в памяти
предустановок.
∗ Даже если Вы выберите FM1 или FM2, станция ТР
сохраняется в памяти для FM3.
3. Нажмите клавишу [w] или [z], чтобы
выбрать “ON” или “OFF”.
•ON:
На дисплее отобразится “PTY”, и режим
ожидания PTY включится. Когда начинается
трансляция PTY, на дисплее появляется имя
элемента PTY.
•OFF:
Индикация
режим ожидания PTY будет отменен.
4. Нажмите клавишу [DISP] для возврата к
предыдущему режиму.
● Отмена вещания в режиме прерывания
трансляции передач PTY
Нажмите клавишу [TA] во время вещания в
режиме прерывания трансляции передач PTY,
функция прерывания трансляции передач PTY
будет отменена и аппарат вернется в режим
ожидания PTY.
на дисплее “PTY” отключится, и
Выбор функции PTY
1. Нажмите и удерживайте (1 с) клавишу
[DISP], чтобы переключить дисплей в режим
выбора настройки RDS.
2. Нажмите [x] или [v], чтобы выбрать
“PTY SELECT”.
3. Нажмите клавишу [].
4. Нажмите какую-либо из клавиш [DIRECT].
Либо нажмите клавишу [w] или [z], чтобы
выбрать требуемый код типа программы
(PTY).
5. Нажмите клавишу [DISP] для возврата к
предыдущему
∗ Для клавиш [DIRECT] сохраняется 6 типов
PTY.
∗ Режим выбора PTY отменяется автоматически
через 7 секунд после выбора PTY.
режиму.
Pyccкий
PTY (Programme Type – Тип
программы)
Данная функция позволяет прослушивать
трансляцию выбранного типа программы, даже
когда аппарат работает в функциональном
режиме, кроме радиоприемника.
∗ В некоторых странах еще не ведется вещание PTY.
∗ В режиме ожидания TA, радиостанции ТР имеет
приоритет над радиостанциями вещания PTY.
∗ Заводская настройка по умолчанию: “OFF”.
1. Нажмите и удерживайте (1 с) клавишу
[DISP], чтобы переключить дисплей в режим
выбора настройки RDS.
2. Нажмите [x] или [v], чтобы выбрать
“PTY”.
Поиск PTY
1. Нажмите и удерживайте (1 с) клавишу
[DISP], чтобы переключить дисплей в режим
выбора настройки RDS.
2. Нажмите [x] или [v], чтобы выбрать
“PTY SELECT”.
3. Нажмите клавишу [].
4. Нажмите клавишу [v] для поиска
программы PTY в направлении повышения
частот; нажмите клавишу [x] для поиска
программы PTY в направлении понижения
частот.
∗ Если радиостанция с трансляцией выбранного
типа программы PTY не обнаружена, аппарат
возвращается к режиму выбора PTY.
43 CX609E
Page 44

Память предустановок PTY
1. Нажмите и удерживайте (1 с) клавишу [
чтобы переключить дисплей в режим выбора
настройки RDS.
2. Нажмите [x] или [v], чтобы выбрать
“PTY SELECT”.
Pyccкий
3. Нажмите клавишу [].
4. Нажмите клавишу [w] или [z], чтобы
выбрать требуемый код типа программы (PTY).
Можно выбрать 29 типов PTY.
5. Если Вы нажмете и удержите (2 с) какую-либо
из клавиш [
сохраняется в памяти канала предустановки.
DIRECT
], выбранный тип PTY
Трансляция экстренных сообщений
Если принимается трансляция экстренных
сообщений, останавливаются все операции
функциональных режимов.
На экране появляется индикация “ALARM” и
начинается воспроизведение трансляции
экстренных сообщений.
●
Отмена трансляции экстренных сообщений
Если Вы нажмёте клавишу [TA], прием трансляции
экстренных сообщений будет отменен.
Переключение языка дисплея
для PTY
Вы можете выбрать один из 4 языков
(английский, немецкий, шведский или
французский) для отображения PTY на дисплее.
∗ Заводская настройка по умолчанию: “ENGLISH”.
1. Нажмите и удерживайте (1 с) клавишу [
чтобы переключить дисплей в режим выбора
настройки.
2. Нажмите [x] или [v], чтобы выбрать
“LANGUAGE”.
3. Нажмите клавишу [w] или [z], чтобы
выбрать язык.
4. Нажмите клавишу [DISP] для возврата к
предыдущему режиму.
Настройка уровня громкости для
TA, трансляции экстренных
сообщений (Alarm – Тревога) и PTY
Уровень громкости функции прерывания
трансляции передач TA, Alarm и PTY может быть
установлен во время прерывания трансляции
передач TA, Alarm или PTY.
∗ Заводская настройка по умолчанию: “15”.
Во время прерывания трансляции передач TA, Alarm
или PTY поверните ручку [
установить желаемый уровень громкости (от 0 до 33).
∗ Когда завершается прерывание трансляции
передач TA, Alarm или PTY, уровень громкости
возвращается на прежний уровень.
ROTARY
], чтобы
DISP
DISP
] ,
] ,
Операции в режимах CD/
MP3/WMA/AAC
Данный аппарат поддерживает
воспроизведение файлов MP3/
WMA/AAC.
Примечания:
• При попытке воспроизведения файла WMA с
действительной функцией DRM (Digital Rights
Management – Управление правами на цифровые
данные), аудиосигналы выводиться не будут
(индикатор WMA будет мигать).
• Логотипы Windows Media™ и Windows ® являются
товарными знаками или зарегистрированными
товарными знаками корпорации Microsoft
Corporation в США и/или в других странах.
● Для деактивирования DRM (Управления
правами на цифровые данные)
1. В Windows Media Player 9/10/11 сделайте
щелчок на TOOL (СЕРВИС)
(ПАРАМЕТРЫ)
(КОПИРОВАНИЕ МУЗЫКИ С КОМПАКТ-
ДИСКА). В поле Настройка копирования с
компакт-диска щелкните мышью, чтобы снять
метку из окошка RECORD PROTECTED MUSIC
(МУЗЫКА С ЗАЩИТОЙ ОТ КОПИРОВАНИЯ).
Затем снова создайте файлы.
Используйте созданные Вами файлы WMA
под свою личную ответственность.
➜
закладка MUSIC RECORD
Меры предосторожности при
создании файлов MP3/WMA/AAC
● Применимые частоты дискретизации и
скорости потока данных
1. MP3: Частота дискретизации: 8 кГц - 48 кГц,
Скорость потока данных: 8 кбит/с - 320 кбит/с /
переменный поток данных (VBR)
2. WMA: Скорость потока данных: 48 кбит/с -
192 кбит/с
3. AAC: Частота дискретизации: 8 кГц - 48 кГц,
Битрейт: 8 кбит/с - 320 кбит/с / переменный
поток данных (VBR)
● Расширения файлов
1. Всегда добавляйте расширение файла “.MP3”,
“.WMA” или “.M4A” к файлам, используя
однобайтовые символы. Если будет
добавлено другое расширение файла или оно
будет отсутствовать, файл не сможет
воспроизводиться.
➜
OPTIONS
44 CX609E
Page 45

2. Файлы, не содержащие данных MP3/WMA/
AAC, воспроизводиться не будут. При
воспроизведении файлов, не содержащих
данные MP3/WMA/AAC, звук не будет
слышен.
∗ При воспроизведении файлов с переменным
битрейтом VBR дисплей времени
воспроизведения может изменить
расположение воспроизведения.
∗ При воспроизведении файлов MP3/WMA/AAC
между дорожками создается кратковременна
пауза.
● Логический формат (Файловая система)
1. При выполнении записи файлов MP3/WMA/
AAC на диск CD-R или CD-RW выберите в
качестве формата в программном
обеспечении “ISO9660 level 1, 2 или JOLIET
либо Romeo”. Стандартное воспроизведение
может оказаться невозможным, если диск
записан в другом формате.
2. Во время воспроизведения MP3/WMA/AAC в
качестве названия может отображаться имя
папки и имя файла. В то же время названия
должны содержать не более 64 однобайтовых
букв алфавита и цифр (включая расширение).
3. Не добавляйте имя к файлу внутри папки с
таким же именем.
● Структура папок
1. Если папка на диске содержит более
8 иерархических уровней, такой диск не
удастся воспроизвести.
● Количество файлов и папок
1. Может распознаваться до 256 файлов в одной
папке
. Может воспроизводиться до 510
файлов.
2. Дорожки воспроизводятся в той
последовательности, в которой они были
записаны на диск. (Дорожки не всегда могут
воспроизводиться в последовательности,
отображенной на ПК.)
3. В зависимости от типа программного
обеспечения для кодирования, используемого
для записи, может возникать некоторый шум.
Выбор типа файла, который
требуется воспроизвести
(функция нескольких сеансов)
Если на одном диске содержатся дорожки в
обычном формате CD и дорожки в формате MP3/
WMA/AAC, с помощью этой команды можно
выбрать тип дорожек, который будет
воспроизводиться.
∗ Значение по умолчанию: “MULTI-SESS CD”.
• Если на диске записаны дорожки только
одного типа (музыкальный компакт-диск или
MP3/WMA/AAC), диск будет воспроизведен
при выборе любого типа.
• При воспроизведении диска CCCD (copycontrol CD) выберите тип CD.
1. Нажмите и удерживайте клавишу [BND]
(1 с).
Каждое нажатие и удерживание кнопки таким
образом переключает режим воспроизведения
с CD на MP3/WMA/AAC и обратно.
• “MULTI-SESS CD”
Воспроизведение только музыкального
компакт-диска.
• “MULTI-SESS MP3”
Воспроизведение только дорожек в формате
MP3/WMA/AAC.
2. Завершив настройку, извлеките диск и снова
вставьте его.
Резервная функция извлечения
дисков
При нажатии клавиши [Q] диск будет извлечен
даже при выключенном питании устройства.
1. Нажмите клавишу [EJECT]. Выньте диск
после его извлечения.
Примечания:
• Применение силы к диску перед его
автоматической повторной загрузкой может
повредить диск.
• Если Вы оставите компакт-диск (12 см) в
выгруженном состоянии в течение 15 секунд, он
будет автоматически повторно загружен
(автоматическая повторная загрузка).
Прослушивание диска, уже
загруженного в аппарат
Нажмите клавишу [SRC] для выбора режима CD/
MP3/WMA/AAC.
Когда аппарат перейдет в этот режим,
воспроизведение начнется автоматически.
Когда диск не загружен, на экране дисплея
отображается “NO DISC”.
Загрузка компакт-диска
1. Вставьте компакт-диск в центр паза CD SLOT
стороной с этикеткой вверх. Компакт-диск
будет воспроизводиться автоматически после
загрузки.
Pyccкий
45 CX609E
Page 46

Примечания:
• Никогда не вставляйте посторонние предметы в
паз CD SLOT.
• Если компакт-диск не загружается легко,
возможно, в аппарат уже загружен другой
компакт-диск или необходимо техническое
обслуживание аппарата.
Pyccкий
• Диски без знака или и диски CD-
ROM не поддерживаются.
• Некоторые диски CD-R/CD-RW могут быть
непригодны.
Постановка воспроизведения на
паузу
1. Нажмите клавишу [ ], чтобы поставить
воспроизведение на паузу.
На дисплее отобразится “PAUSE”.
2. Для возобновления воспроизведения компакт-
диска снова нажмите клавишу [].
Отображение названий на
компакт-диске
Это устройство отображает данные в рамках
заголовков для следующих типов дисков: CDтекст/MP3/WMA/AAC, а также данные
пользовательских заголовков, введенных в
память устройства.
1. Каждый раз при нажатии клавиши [DISP]
отображение названий на дисплее будет
изменяться.
● Диски с текстовой информацией CD-
TEXT
Пользователь ➜ Дорожка ➜ Диск/Исполнитель ➜
Пользователь ...
● Диски MP3/WMA/AAC
Дорожка ➜ Папка ➜ Название/Альбом ➜
Исполнитель ➜ Дорожка ...
Примечания:
• Если воспроизводимый диск CD не является
диском CD с текстовой информацией, на дисплее
отображается “NO TITLE”.
• Если на диске MP3/WMA/AAC отсутствует
введенная теговая информация, на дисплее
отображается “NO TITLE”.
• Данный аппарат поддерживает тэговую
информацию формата MP3 ID3 Tag V2.3 / 2.2 / 1.1 /
1.0.
• Приоритет отображения тегов отдается V2.3/
2.2.
• Для тегов альбома WMA отображается
информация, записанная в заголовок расширений.
• В тегах можно отобразить только символы
ASCII.
Выбор дорожки
● Выбор следующей дорожки
1. Нажмите клавишу [v], чтобы перейти к
началу следующей дорожки.
2. Каждый раз при нажатии клавиши [v]
выполняется переход к началу следующей
дорожки.
● Выбор предыдущей дорожки
1. Нажмите клавишу [x], чтобы вернуться к
началу текущей дорожки.
2. Дважды нажмите клавишу [x], чтобы
вернуться к началу предыдущей дорожки.
Быстрая прокрутка вперёд/
быстрая прокрутка назад
● Быстрая прокрутка вперёд
1. Нажмите и удерживайте (1 с) клавишу [v].
● Быстрая прокрутка назад
1. Нажмите и удерживайте (1 с) клавишу [x].
∗ Для дисков MP3/WMA/AAC до начала
перемещения между дорожками потребуется
некоторое время. Кроме того возможны некоторые
погрешности в отображении времени
воспроизведения.
Выбор папки
Выберите папку, содержащую файлы MP3/WMA/
AAC, и воспроизведение начнется с первой
дорожки в этой папке.
1. Нажмите клавишу [z] или [w].
Нажмите клавишу [w], чтобы перейти к
следующей папке. Нажмите клавишу [z],
чтобы перейти к предыдущей папке.
2. Чтобы выбрать дорожку, нажмите [x] или
[v].
Функция первой дорожки
С помощью функции первой дорожки
проигрыватель компакт-дисков вернется к
первой дорожке на диске. Нажмите клавишу
[BND], чтобы воспроизвести первую дорожку
(дорожку No. 1) на диске.
∗ При прослушивании файлов в формате MP3/WMA/
AAC будет возобновлено воспроизведение первой
дорожки в папке.
46 CX609E
Page 47

Другие режимы
воспроизведения
● Сканирующее воспроизведение
Данная функция обнаруживает и воспроизводит
первые 10 секунд всех дорожек, записанных на
диск.
1. Нажмите клавишу [SCN], чтобы поставить
сканирующее воспроизведение на паузу.
● Сканирующее воспроизведение
папок
Данная функция обнаруживает и воспроизводит
первые 10 секунд первых дорожек во всех папках
на диске MP3/WMA/AAC.
1. Нажмите и удерживайте (1 с) клавишу [SCN],
чтобы начать сканирующее воспроизведение
папок.
● Повторное воспроизведение
Данная функция воспроизводит текущую
дорожку повторно.
1. Нажмите клавишу [RPT], чтобы начать
повторное воспроизведение.
● Повторное воспроизведение папки
Повторно воспроизводит все дорожки в текущей
папке на диске MP3/WMA/AAC.
1. Нажмите и удерживайте (1 с) клавишу [RPT],
чтобы начать повторное воспроизведение
папки.
● Произвольное воспроизведение
дорожек
Данная функция воспроизводит все дорожки,
записанные на диск, в произвольной
последовательности.
1. Нажмите клавишу [RDM], чтобы начать
произвольное воспроизведение.
● Произвольное воспроизведение
папок
Данная функция воспроизводит все дорожки во
всех папках, записанные на диске MP3/WMA/
AAC, в произвольной последовательности.
1. Нажмите и удерживайте (1 с) клавишу [RDM],
чтобы начать произвольное воспроизведение
папки.
● Для отмены режимов
воспроизведения
1. Нажмите выбранную ранее клавишу.
∗ Режим воспроизведения будет отменен, и на
дисплее на 2 секунды появится сообщение об
отключении режима.
Использование Bluetooth
C помощью технологии Bluetooth можно
использовать встроенную аудиосистему
автомобиля для прослушивания музыки с
мобильного телефона или переносного
аудиоплеера без использования проводов.
Некоторые мобильные телефоны оснащены
функцией проигрывателя, а некоторые переносные
аудиоплееры поддерживают технологию Bluetooth.
На этой системе можно воспроизвести
аудиоданные, сохраненные в аудиоустройстве с
поддержкой Bluetooth.
С помощью автомобильной стереосистемы с
поддержкой Bluetooth можно переносить контакты
из телефонной книги, информацию о полученных,
набранных, пропущенных, входящих и исходящих
вызовах, перезванивать абоненту и слушать музыку.
Примечания:
• Не оставляйте микрофон Bluetooth-гарнитуры в
местах с воздушным потоком, например у
выходного отверстия кондиционера воздуха и т.п.
Это может привести к неисправности. Кроме
того, длительное воздействие прямых солнечных
лучей или высокой температуры может привести
к деформации и обесцвечиванию и стать причиной
неисправной работы.
• С некоторыми Bluetooth-аудиоплеерами эта
система
может не работать или работать
неправильно.
• Для получения дополнительной информации о
совместимых Bluetooth-аудиоплеерах посетите
нашу домашнюю страницу по адресу:
www.clarion.com
• В режиме сопряжения с аудиоустройством
следующие действия выполняются так же, как и в
режиме воспроизведения компакт-диска:
∗ Приостановка
∗ Выбор дорожки
∗ Быстрая прокрутка вперед
∗ Быстрая прокрутка назад
• Заголовки и время воспроизведения могут не
отображаться на дисплее.
Для получения дополнительной информации см.
раздел “Операции в режимах CD/MP3/WMA/
AAC” (стр.44-47).
Основные действия
Выбор функции Bluetooth
1. Нажмите клавишу [SRC] для смены
источника.
2. Чтобы отключить текущее подключенное
устройство, нажмите и удерживайте клавишу
[].
Pyccкий
47 CX609E
Page 48

Смена дисплея
Нажмите клавишу [DISP], чтобы выбрать
дисплей в следующем порядке:
“BT TEL” ↔ “BT AUDIO”
∗ Имя подключенного устройства отобразится на
дисплее.
Pyccкий
Совершение вызова
Доступно 4 способа выполнить исходящий
вызов.
● Прямой набор номера
Исходящий вызов можно выполнить, введя
номер телефона непосредственно со
стереосистемы автомобиля.
В номерах телефона используются цифры 0, 1, 2,
3, 4, 5, 6, 7, 8, 9 и символы *, # и +.
1. Нажмите клавишу [BND], чтобы выбрать
“DIAL NUMBER”.
2. Нажмите клавишу [].
3. Нажимайте клавишу [w] или [z], чтобы
выбрать цифры.
4. Нажмите клавишу [x] или [v], чтобы
ввести или удалить цифру.
5. Нажмите
чтобы вызвать номер мобильного телефона.
∗ Чтобы завершить вызов, нажмите клавишу
● Вызов из телефонной книги
Пользователь может найти имя контакта в
телефонной книге и выполнить вызов.
Кроме того, можно выполнить вызов с
мобильного телефона.
1. Нажмите клавишу [BND], чтобы выбрать
“PHONE BOOK”.
2. Нажмите клавишу [v], чтобы перейти в
режим имени контакта (в этом случае для
выбора требуемого имени контакта
используйте клавиши [w] и [z]).
3. При отображении
нажмите клавишу [v] или [x], чтобы
выбрать номер телефона контакта.
4. Нажмите клавишу [ ], чтобы выполнить
вызов по номеру мобильного телефона.
∗ Чтобы завершить вызов, нажмите клавишу
● Ответ на звонок
1. Ответить на звонок можно, нажав любую
клавишу.
∗ Чтобы отклонить входящий вызов, нажмите
и удерживайте клавишу [] (1 с),
[].
требуемого имени контакта
[].
клавишу [].
● Журнал полученных/набранных/
пропущенных вызовов
В журнале можно найти любой полученный/
набранный/пропущенный вызов.
1. Нажмите клавишу [BND], чтобы выбрать
“HISTORY”.
2. Нажмите клавишу [v], чтобы перейти в
режим имени контакта (в этом случае для
выбора требуемого имени контакта
используйте клавиши [w] и [z]).
3. При отображении требуемого имени контакта
нажмите клавишу [x] или [v], чтобы
номер телефона контакта.
выбрать
4. Нажмите клавишу [], чтобы выполнить
вызов по номеру мобильного телефона.
● Повторный набор
Можно повторно набрать номер телефона.
1. Нажмите клавишу [BND], чтобы выбрать
“REDIAL”.
2. Нажмите и удерживайте клавишу [] (1 с),
чтобы повторно набрать номер телефона.
∗ Чтобы завершить вызов, нажмите клавишу
[].
Изменение заданных настроек
Bluetooth
1. Нажмите и удерживайте клавишу [DISP]
(1 с), чтобы перейти к дисплею выбора
настроек Bluetooth.
2. Нажмите клавишу [x] или [v], чтобы
выбрать “название элемента”.
“PAIRING” ↔ “SELECT” ↔ “DELETE” ↔
“DISCONNECT” ↔ “ADD PHONE BOOK”
↔ “DEL NO. PHONE BOOK” ↔
“HISTORY DELETE ALL” ↔ “PHONE
BOOK TYPE” ↔ “MIC GAIN” ↔ “RING
VOL” ↔ “TONE SEL” ↔ “NOISE” ↔
“AUTO ANS”
KEY” ↔ “ADDRESS” ↔ “BT NAME” ↔
“BT FW”
3. Нажмите клавишу [w] или [z], чтобы
выбрать “требуемое значение настройки”.
∗ Если на дисплее мигает индикация “ENT”,
можно нажать клавишу [ ], чтобы
установить значение настройки.
∗ Выполнив настройку, нажмите клавишу
[DISP], чтобы вернуться в предыдущий
режим.
↔ “AUTO CON” ↔ “PASS
48 CX609E
Page 49

● СОПРЯЖЕНИЕ
Этот параметр используется для выполнения
сопряжения модуля Bluetooth с мобильным
телефоном или аудиоустройством.
Можно выполнить сопряжение с 5 мобильными
телефонами или аудиоустройствами.
2-1. Выберите “PAIRING”.
3-1. Нажмите клавишу [].
3-2. Нажмите клавишу [w] или [z], чтобы
выбрать “TELEPHONE” или “AUDIO”, а
затем нажмите клавишу [].
При подключении несопряженного
устройства после сброса или при выборе
значения “
w
[
телефонной книги.
(Для получения дополнительной
информации см. главу “
ТЕЛЕФОННОЙ КНИГИ
3-3. Выбрав “TELEPHONE”, нажмите клавишу
[w] или [z], чтобы выбрать значение от
“MEMORY 1” до “MEMORY 5”, затем
нажмите и удерживайте клавишу [] (1 с),
чтобы сохранить выбор в памяти.
4-1. Нажмите клавишу [w] или [z], чтобы
выбрать “PI SEARCH” или “WAIT”.
5-1. Нажмите и удерживайте клавишу [] (1 с).
∗ После отображения на дисплее индикации
Режим “PI SEARCH”: пользователь может
выполнить поиск мобильного телефона или
аудиоустройства с поддержкой Bluetooth.
Режим “WAIT”: пользователь может
выполнить поиск данного устройства с
помощью мобильного телефона или
аудиоустройства.
6-1. Выполнив поиск, нажмите клавишу [w]
или [z], чтобы выбрать требуемый
мобильный телефон с поддержкой Bluetooth.
7-1. Нажмите и удерживайте клавишу [] (1 с),
чтобы выполнить сопряжение.
TELEPHONE
] или [z], чтобы выбрать тип
“SEARCHING” можно нажать клавишу
[], чтобы остановить поиск, и отобразится
список его результатов.
” нажмите клавишу
ТИП
” (стр.50))
● ВЫБОР
С помощью этой настройки пользователь может
выбрать один мобильный телефон или одно
аудиоустройство из числа сопряженных со
стереосистемой.
2-1. Выберите “SELECT”.
3-1. Нажмите клавишу [ ], и на дисплее
отобразятся сопряженные мобильные
телефоны.
4-1. Нажмите клавишу [w] или [z], чтобы
выбрать один из 5 мобильных телефонов.
5-1. Нажмите и удерживайте клавишу [] (1 с),
чтобы выполнить подключение.
подключения устройства можно
После
будет использовать все доступные
возможности.
● УДАЛЕНИЕ
С помощью этой настройки пользователь может
удалить одно из сопряженных устройств из
списка.
2-1. Выберите “DELETE”.
3-1. Нажмите клавишу [ ], и на дисплее
отобразятся сопряженные мобильные
телефоны.
4-1. Нажмите клавишу [w] или [z], чтобы
выбрать мобильный телефон или
аудиоустройство из 5 доступных.
5-1. Нажмите и удерживайте клавишу [ ],
чтобы удалить сопряженное устройство.
Примечания:
• После удаления сопряженного устройства
автоматическая перегруппировка списка
сопряженных устройств не выполняется.
• При удалении устройства также будут удалены
телефонная книга и журнал вызовов.
● ОТКЛЮЧЕНИЕ
Этот параметр используется для отключения
текущего подключенного устройства.
2-1. Выберите “DISCONNECT”.
3-1. Нажмите и удерживайте клавишу [] (1 с),
чтобы выполнить отключение.
∗ Нажмите и удерживайте клавишу [] (2 с),
чтобы выполнить отключение.
● ДОБАВЛЕНИЕ ТЕЛЕФОННОЙ
КНИГИ
Этот параметр используется для добавления
телефонного номера.
2-1. Выберите “ADD PHONE BOOK”.
3-1. Нажмите клавишу [] (1 с), и на дисплее
отобразится индикация “RECEIVING”.
∗ В это время из списка сопряженной
телефонной книги будет отправлен номер
телефона, и в случае успешной передачи на
дисплее мобильного телефона отобразится
сообщение.
∗ С некоторых мобильных телефонов не
удастся передать телефонную книгу на это
устройство в связи с превышением
допустимой длины слов или отсутствием
поддержки данного языка. В этом случае
отредактируйте телефонную книгу, изменив
язык, и повторите попытку.
Pyccкий
49 CX609E
Page 50

● УДАЛЕНИЕ НОМЕРА ИЗ
ТЕЛЕФОННОЙ КНИГИ
Этот параметр используется для удаления номера
телефона из добавленной телефонной книги.
2-1. Выберите “DEL NO. PHONE BOOK”.
3-1. Нажмите клавишу [].
Pyccкий
4-1. Нажмите клавишу [w] или [z], чтобы
выбрать “1 DEL” или “ALL DEL”.
5-1. При выборе значения “1 DEL” нажмите
клавишу [], а затем клавишу [w] или
[z], чтобы выбрать один требуемый номер
телефона.
6-1. Нажмите клавишу [ ], и на дисплее
отобразится индикация “DELETE?”.
7-1. Нажмите клавишу [] (1 с), чтобы
выполнить удаление.
Примечание:
• При передаче этого устройства в пользование
другому лицу выполните операции “DELETE”,
“ADD PHONE BOOK” и “DEL NO. PHONE
BOOK”, чтобы удалить всю персональную
информацию.
● УДАЛЕНИЕ ВСЕХ ЗАПИСЕЙ
ЖУРНАЛА
Этот параметр используется для удаления всех
записей о вызовах.
2-1. Выберите “HISTORY DELETE ALL”.
3-1. Нажмите клавишу [ ], и на дисплее
отобразится индикация “CONFIRM?”.
4-1. Нажмите клавишу [] (1 с), на дисплее
отобразится индикация “DELETING”, и все
записи о вызовах будут успешно удалены.
● ТИП ТЕЛЕФОННОЙ КНИГИ
В памяти этого устройства можно хранить
телефонные книги трех типов.
2-1. Выберите “PHONE BOOK TYPE”.
3-1. Нажмите клавишу [].
3-2. Нажмите клавишу [w] или [z], чтобы
выбрать “1”, “2” или “3”, а затем нажмите
клавишу [], чтобы выполнить
сохранение в память.
Примечания:
• При изменении типа телефонной книги все данные
телефонной книги сопряженного телефона будут
удалены.
• Отдельный номер из телефонной книги можно
сохранить в другой памяти или телефонной книге
другого типа следующим образом:
ТЕЛЕФОН
ПАМЯТЬ 1ПАМЯТЬ 2ПАМЯТЬ 3ПАМЯТЬ 4ПАМЯТЬ
ТИП
250
1
номеров
2
номеров
3
номеров
250
номеров0 номеров0 номеров 0 номеров
200
100
100
100
номеров
100
номеров
100
номеров
номеров
50
номеров
100
номеров
5
50
номеров
100
номеров
● УВЕЛИЧЕНИЕ ГРОМКОСТИ
МИКРОФОНА
Громкость микрофона можно настроить для
каждого сопряженного мобильного телефона.
Для каждого зарегистрированного устройства
выполняются индивидуальные настройки
громкости микрофона.
2-1. Выберите “MIC GAIN”.
3-1. Нажмите клавишу [w] или [z], чтобы
изменить настройку громкости микрофона.
∗ Заводское значение по умолчанию: “3”.
(Диапазон настроек: от 1 до 5)
● ГРОМКОСТЬ ЗВОНКА
Этот параметр используется для изменения
громкости звонка для каждого сопряженного
мобильного телефона.
2-1. Выберите “RING VOL”.
3-1. Нажмите клавишу [w] или [z], чтобы
изменить громкость звонка.
∗ Заводское значение по умолчанию: “5”.
(Диапазон настроек: от 1 до 10)
● ВЫБОР СИГНАЛА
Если во время установленного соединения
Bluetooth мобильный телефон не может звонить,
звонок может раздаваться через динамики
системы.
2-1. Выберите “TONE SEL”.
3-1. Нажмите клавишу [w] или [z], чтобы
выбрать “INTERNAL” или “AUTO”.
∗
Значение устройства по умолчанию: “
AUTO
”.
“INTERNAL”: настройка сигнала через
автомобильную Bluetooth-систему.
“AUTO”: включена автоматическая
настройка через сопряженный мобильный
телефон.
● ШУМ
Этот параметр используется для настройки
громкости шума в автомобильной Bluetoothсистеме.
2-1. Выберите “NOISE”.
3-1. Нажмите клавишу [w] или [z], чтобы
выбрать “LOW” или “HIGH”.
∗ Заводское значение по умолчанию: “LOW”.
50 CX609E
Page 51

● АВТООТВЕТ
С помощью этой настройки можно выбрать
автоматический ответ на каждый входящий
вызов или ответ вручную.
∗ Заводское значение по умолчанию: “OFF”.
2-1. Выберите “AUTO ANS”.
3-1. Нажмите клавишу [w] или [z], чтобы
выбрать “ON” или “OFF”.
ON: автоматический ответ на любой
входящий вызов через 5 секунд.
OFF: пользователь отвечает на вызовы
вручную.
● АВТОПОДКЛЮЧЕНИЕ
С помощью этой функции модуль Bluetooth
может автоматически подключаться к
устройству, которое было подключено ранее.
Подключение можно установить в режиме
любого источника.
∗ Заводское значение по умолчанию: “OFF”.
2-1. Выберите “AUTO CON”.
3-1. Нажмите клавишу [w] или [z], чтобы
выбрать “ON” или “OFF”.
ON: автоматическое подключение
включено.
OFF: автоматическое подключение
выключено.
● КЛЮЧ ДОСТУПА
Этот КЛЮЧ ДОСТУПА используется в режиме
сопряжения. С помощью этой автомобильной
стереосистемы можно ввести до 10 цифр.
∗ Заводской КЛЮЧ ДОСТУПА по умолчанию:
“1234”.
2-1. Выберите “PASS KEY”.
3-1. Нажмите клавишу [].
4-1. Нажмите клавишу [x] или [v], чтобы
переместить курсор.
5-1. Нажмите клавишу [w] или [z], чтобы
выбрать требуемые цифры.
6-1. Нажмите и удерживайте клавишу [] (2 с),
чтобы выполнить сохранение в память.
∗ При нажатии клавиши [BND] будет
установлен заводской ключ доступа по
умолчанию.
● АДРЕС
Используется для сохранения индивидуального
адреса Bluetooth-устройства. Адрес представляет
собой 12 цифр.
2-1. Выберите “ADDRESS”.
На дисплее отобразится 6 цифр адреса
Bluetooth-устройства.
3-1. Нажмите клавишу [w] или [z], чтобы
отобразить адрес.
● Имя Bluetooth-устройства
Отобразится имя Bluetooth-устройства.
2-1. Выберите “BT NAME”.
На дисплее отобразится имя Bluetoothустройства.
● Версия микропрограммного
обеспечения Bluetooth-устройства
Отобразится версия микропрограммного
обеспечения Bluetooth-устройства.
2-1. Выберите “BT FW”.
На дисплее отобразится версия
микропрограммного обеспечения Bluetoothустройства.
Pyccкий
51 CX609E
Page 52

Операции, общие для
каждого режима
Изменение заданных настроек
Pyccкий
1. Нажмите и удерживайте (1 с) клавишу
[DISP] , чтобы переключить дисплей в
режим настройки.
2. Нажимайте [x] или [v], чтобы выбрать
“название элемента”, как это указано
ниже:
“CONTRAST” ↔ “SETTINGS” ↔
“COLOR” ↔ “CODE” ↔ “SCRN SVR” ↔
“MESSAGE INPUT” ↔ “SCROLL” ↔
“DIMMER” ↔ “BLINKLED” ↔
“A-CANCEL” ↔ “INT-SW” ↔
“
REAR/S-W” ↔ “SYSTEM CHECK”
3. Нажмите клавишу [w] или [z], чтобы
выбрать требуемое значение.
∗ Когда на дисплее мигает “ENT”, нажмите
клавишу [] для установки значения
настройки.
4. После завершения настроек нажмите
клавишу [DISP] для возвращения к
предыдущему режиму.
● Настройка контрастности
Можно настроить контрастность дисплея в
соответствии с углом установки устройства.
∗ Заводское значение по умолчанию: “10”.
(Уровень настроек: от 1 до 16)
2-1. Выберите “CONTRAST”.
3-1. Нажмите клавишу [w] или [z], чтобы
настроить контрастность.
● Отображение настроек
Вы можете просмотреть состояние текущих
настроек в любом режиме работы.
2-1. Выберите “SETTINGS”.
3-1. Нажмите клавишу [w] или [z], чтобы
отобразить текущие настройки.
∗ Когда настройка выбрана, текущее состояние
появится на дисплее через 1 секунду.
Например через 1 секунду
● Настройка подсветки кнопок
2-1. Выберите “COLOR”.
3-1. Нажмите кнопку [w] или [z], чтобы
выбрать режим цветной подсветки.
• Выбор режима COLOR SCAN
Если выбран режим “COLOR SCAN”, цвет
подсветки изменяется автоматически.
∗ Используемым по умолчанию задано значение
“COLOR SCAN”.
∗ Цвет подсветки изменяется с 3-секундным
интервалом.
• Выбор режима USER
По умолчанию заданы следующие значения:
“RED 8” (красный цвет), “GREEN 8” (зеленый
цвет), “BLUE 8” (синий цвет).
Выбрав параметр “USER COLOR 1, 2, 3”,
нажмите кнопку [ ], чтобы задать
соответствующее значение.
1. Нажмите кнопку [x] или [v], чтобы
выбрать “RED”, “GREEN” или “BLUE”.
2. Нажмите кнопку [w] или [z], чтобы
выбрать значение от 0 до 8.
3. Нажмите и удержите кнопку [] в
положении в течение 2 или более секунд,
чтобы занести выбранный цвет в память и
отменить режим настройки.
нажатом
● Настройка функции
автоматического сторожа
(CATS)
“CATS” расшифровывается как “Clarion AntiTheft System” (“Система защиты от краж
Clarion”). Чтобы предупредить кражу устройства
путем блокировки его функций в случае кражи,
необходимо задать личный идентификационный
код (называемый “Личный код”) .
• Назначение личного кода
2-1. Выберите “CODE”.
3-1. Нажмите кнопку [].
Отобразится экран назначения личного
кода.
4-1. Нажимая кнопки [DIRECT] [1]-[6], введите
желаемый 4-значный личный код.
5-1. Нажмите и удержите кнопку [] в
нажатом положении (в течение 2 с.)
Введенный личный код будет задан,
устройство выполнит возврат к
предыдущему экрану.
Примечание:
• Запишите личный код, чтобы не забыть.
52 CX609E
Page 53

• Аннулирование заданного
личного кода
2-1. Выберите “CODE”.
3-1. Нажмите кнопку [].
Отобразится экран ERASE PERSONAL
CODE.
4-1. Введите текущий личный код.
5-1. Нажмите и удержите кнопку [] в
нажатом положении (в течение 2 с. или
дольше).
Режим ввода личного кода деактивирован.
• Отображение экрана с
предложением ввести личный
код - “ENTER PERSONAL CODE”
Экран с предложением ввести личный код
“ENTER PERSONAL CODE” отображается в
результате включения питания устройства от
источника питания (ACC - аккумуляторная
батарея) в следующих случаях:
• После замены аккумуляторной батареи.
• После отключения резервного источника
питания.
• После нажатия на кнопку [RESET].
Примечание:
• Если личный код утерян, обратитесь в сервисную
службу Clarion.
1. Введите текущий личный код.
2. Если личный код введен правильно,
устройство начнет работу с отображения
начального экрана.
Примечания:
• В случае ввода неверного личного кода,
отображается надпись “LOCK - - - -” ;
повторный ввод личного кода будет временно
заблокирован. Продолжительность периода
блокировки повторного ввода личного кода
определяется количеством вводов неверного кода:
•1 - 6 попыток: 15 секунд
•7 и более попыток: 15 минут
● Включение и выключение функции
энергосбережения для экрана
Данный аппарат оснащен функцией
энергосбережения для экрана, которая позволяет
отображать различные шаблоны и произвольные
символы в зоне индикации рабочего состояния
дисплея. Данную функцию можно включать и
выключать. При нажатии клавиши, пока функция
энергосбережения для экрана включена,
соответствующий рабочий дисплей отображается
в течение 30 секунд, а затем дисплей возвращается
в режим энергосбережения для
∗ Заводская настройка по умолчанию: “ON”.
экрана дисплея.
2-1. Выберите “SCRN SVR”.
3-1. Нажмите клавишу [w] или [z], чтобы
выбрать требуемое значение.
При каждом нажатии клавиши [w] или [z]
настройки изменяются в следующем
порядке:
“MESSAGE” ↔ “ON” ↔ “OFF”
● Ввод информации о сообщении
Сообщения длиной до 30 символов можно
сохранить в памяти и отобразить в виде типа
настроек заставки.
∗ Заводское значение по умолчанию: “WELCOME
TO CLARION”.
2-1. Выберите “MESSAGE INPUT”.
3-1. Нажмите клавишу [].
3-2. Нажмите и удерживайте клавишу [BND]
(1 с), чтобы удалить прежнее сообщение.
3-3. Нажмите клавишу [x] или [v], чтобы
переместить курсор.
3-4. Нажмите клавишу [BND], чтобы выбрать
режим типа символов. При каждом нажатии
клавиши [BND] тип символов изменяется в
следующем порядке:
Заглавные буквы ➜ Цифры ➜ Символы ➜
Умляут ➜ Заглавные буквы…
3-5. Нажмите клавишу [w] или [z], чтобы
выбрать требуемый символ.
3-6. Повторите шаги с 3-3 по 3-5, чтобы ввести
сообщение длиной до 30 символов.
3-7. Нажмите и удерживайте клавишу [] (2 с),
чтобы сохранить сообщение в памяти.
∗ Нажмите и удерживайте клавишу [BND]
(1 с), чтобы отменить ввод сообщения. Затем
нажмите и удерживайте клавишу [] (2 с),
чтобы сохранить сообщение, и для
сообщения буду установлены настройки по
умолчанию.
● Настройка метода прокрутки
наименований
Установите настройку прокрутки названий для
CD-TEXT, MP3/WMA/AAC.
∗ Заводская настройка по умолчанию: “ON”.
2-1. Выберите “SCROLL”.
3-1. Нажмите клавишу [w] или [z], чтобы
выбрать “ON” или “OFF”.
• ON: автоматическая прокрутка.
• OFF: только однократная прокрутка.
∗ Чтобы снова просмотреть заголовок, в
режиме заголовка нажмите и удерживайте
клавишу [DISP] (3 с), чтобы пролистать
заголовок.
Pyccкий
53 CX609E
Page 54

● Установка затемнения дисплея
Для затемнения дисплея можно установить “ON”
или “OFF”.
∗ Заводская настройка по умолчанию: “ON”.
2-1. Выберите “DIMMER”.
3-1. Нажмите клавишу [w] или [z], чтобы
Pyccкий
выбрать “ON” или “OFF”.
● Противоугонный индикатор
Красный противоугонный индикатор
используется для предотвращения краж. Этот
индикатор мигает, когда ключ находится в
положении ACC или питание отключено.
∗ Заводское значение по умолчанию: “OFF”.
2-1. Выберите “BLINKLED”.
3-1. Нажмите клавишу [w] или [z], чтобы
выбрать “ON” или “OFF”.
● Настройка внешнего усилителя
∗ Заводское значение по умолчанию: “OFF”.
2-1. Выберите “A-CANCEL”.
3-1. Нажмите клавишу [w] или [z], чтобы
выбрать “ON” или “OFF”.
• ON: используется с подключенным
усилителем (AMP).
• OFF: используется со встроенным
усилителем (AMP).
● Настройка режима прерывания
мобильного телефона
Если Вы подсоедините данный аппарат и Ваш
мобильный телефон через опционный кабель, Вы
сможете прослушивать Ваши телефонные звонки
через громкоговорители автомобиля.
∗ Заводская настройка по умолчанию: “OFF”.
2-1. Выберите “INT-SW”.
3-1. Нажмите клавишу [w] или [z], чтобы
выбрать требуемое значение. При нажатии
клавиши [w] или [z] значения
изменяются следующим образом:
“OFF” ↔ “ON” ↔ “MUTE”
• OFF: аппарат продолжает стандартный
режим работы, даже если используется
мобильный телефон.
• ON: телефонные звонки можно услышать
через громкоговорители, подсоединенные
к данному аппарату.
∗ При прослушивании звонков через
громкоговорители Вашего автомобиля,
поверните ручку [ROTARY], чтобы
отрегулировать уровень громкости.
• MUTE: во время телефонных звонков звук
от данного аппарата приглушается.
Примечание:
• При подсоединении комплекта громкой связи
убедитесь, что настройка установлена на“ON”
для приема аудиосигналов через данную систему.
(Звук выводится через AUX.)
● Выбор задних громкоговорителей
или сабвуфера
По умолчанию задано значение “REAR”
(“Задние громкоговорители”).
2-1. Выберите “REAR/S-W”.
3-1. Нажатием кнопки [w] или [z] выберите
“REAR” или “S-WOOFER”.
● Выполнение проверки системы
Эта функция при необходимости позволяет
выполнять проверку системы в режиме
настройки.
2-1. Выберите “SYSTEM CHECK”.
3-1. Нажмите и удерживайте клавишу [] (1 с).
На дисплее отобразится индикация
“SYSTEM CHECK”, затем устройство
вернется к предыдущему рабочему режиму.
Ввод заголовков
Заголовки длиной до 10 символов можно
сохранить в памяти и отобразить для компактдиска. Можно ввести до 50 заголовков.
1. Нажмите клавишу [SRC], чтобы выбрать
требуемый режим для ввода заголовка
(компакт-диск).
2. Выберите и начните воспроизведение
компакт-диска, для которого требуется ввести
заголовок.
3. Нажмите и удерживайте клавишу [DISP]
(1 с).
4. Нажмите клавишу
выбрать “TITLE INPUT”.
5. Нажмите клавишу [].
На дисплее отобразится область для ввода
заголовков.
6. Нажмите клавишу [x] или [v], чтобы
переместить курсор.
7. Нажмите клавишу [BND], чтобы выбрать
режим типа символов. При каждом нажатии
клавиши [BND] тип символов изменяется в
следующем порядке:
Заглавные буквы ➜ Цифры ➜ Символы ➜
Умляут ➜ Заглавные буквы…
8. Нажмите клавишу [w] или [z], чтобы
выбрать требуемый символ.
9. Повторите шаги с 6 по 8, чтобы ввести
заголовок длиной до 10 символов.
[x] или [v], чтобы
54 CX609E
Page 55

10. Нажмите и удерживайте клавишу [] (2 с),
чтобы сохранить заголовок в памяти.
6. ВСПОМОГАТЕЛЬНОЕ
Удаление заголовков
1. Выберите и начните на CD-чейнджере
воспроизведение компакт-диска, для которого
требуется удалить заголовок.
2. Нажмите и удерживайте клавишу [DISP]
(1 с).
3. Нажмите клавишу [x] или [v], чтобы
выбрать “TITLE INPUT”.
4. Нажмите клавишу [].
На дисплее отобразится область для ввода
заголовков.
5. Нажмите и удерживайте клавишу [BND] (1 с).
Все символы заголовка будут удалены.
Нажмите и удерживайте клавишу [] (2 с)
6.
для сохранения.
Функция AUX
На передней панели имеется входной разъем для
внешних устройств (AUX), обеспечивающий
воспроизведение звука и музыки с внешних
устройств.
● Выбор чувствительности для AUX
IN
Выполните следующие настройки для
регулировки чувствительности, когда звуки от
внешних устройств плохо слышны на данном
аппарате даже после регулировки уровня
громкости.
∗ Заводская настройка по умолчанию: “MID”.
1. Нажмите и удерживайте (1 с) клавишу
[DISP].
2. Выберите “AUX SENS”.
3. Нажмите клавишу [w] или [z], чтобы
выбрать “HIGH”, “MID” или “LOW”.
Примечание:
• Когда выбран режим AUX, может быть
установлена чувствительность AUX IN.
ОБОРУДОВАНИЕ
Операции в режиме USB/
MTP
Операции с запоминающими
устройствами USB/MTP
Примечание:
• Следующие операции аналогичны операциям в
режиме CD:
∗ Пауза
∗ Выбор дорожки
∗ Быстрая прокрутка вперёд/быстрая
прокрутка назад (кроме файла,
защищенного по технологии DRM)
∗ Функция первой дорожки
∗ Функция поиска по списку
∗ Сканирующее воспроизведение
∗ Повторное воспроизведение
∗ Произвольное воспроизведение
∗ Выбор папки
За подробной информацией обращайтесь к
“Операции в режимах CD/MP3/WMA/AAC”
(стр.44-47).
О памяти USB
•USB – это сокращение от Universal Serial Bus
(Универсальная последовательной шина), что
означает стандарт внешней шины,
поддерживающий передачу данных со
скоростью 12 Мбит/с.
• Данный аппарат совместим с USB 1.1/2.0 c
максимальной скоростью передачи данных
12 Мбит/с.
• Устройства памяти USB, которые могут
воспроизводиться через кабель USB на данном
аппарате, ограничиваются устройствами,
распознаваемыми как “запоминающие
устройства USB большой емкости”; работа не
гарантируется со всеми запоминающими
устройствами USB.
∗ Устройства, совместимые с “запоминающими
устройствами USB большой емкости ”, могут
использоваться при подключении к главному
устройству без специальных драйверов или
программного обеспечения.
• Обращайтесь к изготовителю используемого
накопительного устройства USB для
получения информации о соответствии этого
устройства стандартам “накопительного
устройства USB большой емкости”.
Pyccкий
55 CX609E
Page 56

• Аудиофайлы, воспроизводимые на данном
аппарате, ограничиваются файлами MP3/
WMA/AAC. За подробной информацией
обращайтесь к “MP3/WMA/AAC” (стр.44).
• Возможно, не удастся воспроизвести файлы
подкаста магазина iTunes Store, которые
хранятся в памяти USB-устройства. Кроме
Pyccкий
того, возможно, не удастся воспроизвести
данные, отредактированные с помощью
определенных программ, например, программ
для редактирования тегов.
• Во избежание случайной потери данных,
всегда
выполняйте резервное копирование
важных данных на Вашем компьютере.
• Подключение к компьютеру через
концентраторы USB не поддерживается.
• Когда накопительное устройство USB состоит
из двух или более приводов, будет обнаружен
только один привод.
• Накопительные устройства USB с функциями
безопасности не поддерживаются.
• Последовательность, в которой записываются
дорожки, зависит от накопительного
устройства USB (последовательность
фактического воспроизведения
отличаться от той, которая отображается на
дисплее Вашего компьютера).
• При постоянной прокрутке папки вверх/вниз
отображается индикация времени “00:00”, а
звук отсутствует.
может
О функции потоковой передачи
данных мультимедиа USB
Это устройство поддерживает функцию
потоковой передачи данных мультимедиа USB.
Функция потоковой передачи данных
мультимедиа USB используется для
воспроизведения музыкальных файлов,
передаваемых по протоколу MTP. Эта функция
также поддерживает воспроизведение файлов
WMDRM 10.
Во время потоковой передачи данных
мультимедиа USB на устройстве отображается
индикатор режима “MTP”.
Для использования функции потоковой передачи
данных мультимедиа USB необходимо
приобрести поддерживаемый переносной
аудиопроигрыватель
информации о поддерживаемых переносных
аудиопроигрывателях обратитесь к ближайшему
дилеру Clarion или посетите веб-сайт компании
Clarion.
. Для получения
ПРЕДУПРЕЖДЕНИЕ
• Подключайте и удаляйте
накопительное устройство USB/MTP,
только когда это устройство не
находиться в режиме доступа.
Подсоединение/отсоединение данного
устройства в следующих ситуациях
может привести к потере данных:
• Если накопительное устройство USB/
MTP снимается или питание
отключается во время записи на
данное устройство.
• Если устройство подвергается
электростатическому воздействию
или помехам от электрического
оборудования
• Не оставляйте накопительное
устройство USB/MTP без присмотра в
автомобиле. Воздействие прямых
солнечных лучей или высоких
температур может вызвать
деформацию или другую
неисправность накопительного
устройства USB/MTP.
• Не включайте зажигание автомобиля,
когда подключено устройство MTP, так
как это может привести к потере или
повреждению данных на устройстве
MTP. Устройство MTP следует
подключать к кабелю USB после
включения
Подсоединение накопительного
устройства USB/MTP
1. Подсоедините накопительное устройство USB
к кабелю USB/MTP.
Воспроизведение начнется с первого файла,
записанного на устройство.
∗ Если устройство не распознано, нажмите
клавишу [SRC], чтобы выбрать это устройство
в качестве источника.
∗ Всегда полностью вставляйте устройство в
разъем. Неплотные соединения могут привести
к тому, что устройство не будет
распознаваться.
∗ В зависимости от количества записанных
дорожек, считывание всех дорожек в данный
аппарат может занять некоторое время.
∗ Порядок записи
подключенного устройства (фактический
порядок воспроизведения может отличаться от
отображаемого на экране компьютера).
.
зажигания автомобиля.
дорожек может зависеть от
56 CX609E
Page 57

Для прослушивания дорожек на
подключенном накопительном
устройстве USB/MTP
1. Нажмите клавишу [SRC] для переключения
источников. Когда выбрано накопительное
устройство USB/MTP, воспроизведение
(кроме файлов, защищенных по технологии
DRM) начнется с места, на котором
воспроизведение было остановлено в
прошлый раз.
∗ При подключении USB-накопителя/устройства
MTP на дисплее отобразится режим USB/MTP.
∗ Если USB-накопитель/устройство MTP
отключено и затем снова подключено,
воспроизведение начнется с начала USBнакопителя/устройства MTP.
∗ В режиме “MTP” файлы AAC на устройстве
MTP не удастся воспроизвести.
Для остановки воспроизведения
1. Нажмите клавишу [SRC] и переключите
аппарат на источник, кроме накопительного
устройства USB/MTP.
ПРЕДУПРЕЖДЕНИЕ
Не отсоединяйте накопительное
устройство USB/MTP, пока выбран режим
USB/MTP, так как это может привести к
потере или повреждению данных на
накопительном устройстве USB/MTP.
Всегда выполняйте резервное
копирование и сохранение важных
данных на Вашем компьютере.
2. Отсоедините накопительное устройство USB/
MTP от кабеля USB.
Операции в режиме iPod
В данном разделе описаны операции при
подсоединении Apple iPod через кабель USB.
Примечания:
• Смотрите Руководство пользователя iPod для
получения подробной информации относительно
операций.
• Данный аппарат не будет работать или может
не работать правильно с не поддерживающимися
версиями.
• Для получения перечня моделей Apple iPod,
совместимых с данным аппаратом, пожалуйста,
обращайтесь к Вашему дилеру Clarion или на вебсайт: www.clarion.com.
• Сделано для iPod означет, что этот электронный
аксессуар был специально разработан для
подключения к iPod и был сертифицирован в
соответствии с требованиями компании Apple.
Компания Apple не несет ответственности за
работу этого устройства и его соответствие
стандартам безопастности.
iPod и iTunes являются торговыми марками
компании Apple Inc., зарегистрированными в США
и других странах.
Подсоединение iPod
Когда к кабелю USB подсоединен iPod, режим
“Shuffle” на iPod будет следующим:
• Воспроизведение выборки (альбомов) “Shuffle
(Albums)” ➜ Произвольное воспроизведение
• Воспроизведение выборки (песен) “Shuffle
(Songs)” ➜ Произвольное воспроизведение
всех дорожек
В iPod есть два режима: режим воспроизведения
“Play mode” и режим меню “iPod menu mode” для
выбора дорожек. Переключайте между данными
режимами нажатием клавиши [BND].
Примечание:
• Для подсоединения iPod, пожалуйста, используйте
кабель USB, прилагаемый в комплекте поставки
iPod.
Pyccкий
57 CX609E
Page 58

Выберите режим iPod
1. Нажмите клавишу [SRC].
Воспроизведение начнется с последнего
файла, который был воспроизведён на iPod.
Примечания:
• Следующие операции в режиме воспроизведения
Pyccкий
(Play) аналогичны операциям в режиме компактдисков (CD):
∗ Для выбора дорожек: [x], [v]
∗ Быстрая прокрутка вперёд/быстрая
прокрутка назад: [x], [v]
∗ Пауза: []
За подробной информацией обращайтесь к
“Операции в режимах CD/MP3/WMA/AAC”
(стр.44-47).
• После завершения воспроизведения файла подкаст
на экране дисплея
или время воспроизведения позиции окончания
дорожки. В это время снова выберите
музыкальный файл.
отобразится индикация паузы
Установка простого режима
iPod
Используйте эту функцию, если Вы хотите
выполнять операции через iPod, подключенный к
данному аппарату через кабель USB.
∗ Заводская настройка по умолчанию: “OFF”.
1. Нажмите и удерживайте (1 с) клавишу
[DISP].
2. Нажмите [x] или [v], чтобы выбрать
“S-CTRL”.
3. Нажмите клавишу [].
4. Нажмите клавишу [w] или [z], чтобы
выбрать “ON” или “OFF”.
• ON: Операции можно выполнять через iPod.
• OFF: Операции не могут выполняться
через iPod.
5. Нажмите и удерживайте (1 с) клавишу [] ,
чтобы сохранить настройку и вернуться
предыдущему режиму.
Примечания:
• При выполнении операций с iPod с использованием
простого режима управления выполняйте
операции медленно. Если последовательные
операции выполняются слишком быстро, могут
произойти непредвиденные ошибки.
• При работе с iPod в простом режиме управления
не рекомендуется одновременное использование
iPod и устройства, так как это может привести
к непредсказумым результатам.
• Некоторые модели iPod не поддерживают эту
функцию. Обратитесь к ближайшему дилеру
Clarion или на веб-сайт, чтобы проверить, какие
модели не поддерживают эту функцию.
Другие функции
воспроизведения
(в режиме воспроизведения)
Примечания:
• Данные функции не поддерживаются в режиме
меню iPod.
• Функция произвольного воспроизведения,
установленная на iPod, сохраняется после
подсоединения/отсоединения iPod.
• Функция повторного воспроизведения iPod будет
изменена при подсоединении/отсоединении iPod к
данному аппарату.
● Повторное воспроизведение
Повторное воспроизведение одной дорожки.
1. Нажмите клавишу [RPT].
● Произвольное воспроизведение
Воспроизведение всех альбомов в выбранной
категории в произвольной последовательности.
(Соответствует команде воспроизведения
альбомов “Shuffle (Albums)” на iPod.)
1. Нажмите клавишу [RDM].
● Произвольное воспроизведение
всех дорожек
Воспроизведение всех дорожек в выбранной
категории в произвольной последовательности.
(Соответствует команде воспроизведения
выборки (песен) “Shuffle (Songs)” на iPod.)
1. Нажмите и удерживайте (1 с) клавишу [RDM].
● Для отмены воспроизведения
1. Нажмите ту же клавишу еще раз.
Примечания:
• При отмене режима повторного воспроизведения,
после того как все дорожки в выбранной
категории будут воспроизведены, воспроизведение
начнется с первой дорожки в выбранной
категории.
• При выключении ACC во время воспроизведения
последней дорожки в выбранной категории в
к
режиме произвольного воспроизведения,
воспроизведение начнется с другой дорожки,
когда ACC включится.
• Хотя настройка по умолчанию
“All Repeat”, на дисплее состояния режима эта
индикация не отображается.
• При выполнении операций с использованием
простого режима управления не выключайте на
iPod режим повторного воспроизведения.
на iPod задана на
Выбор категории из меню iPod
1. Нажмите клавишу [BND], чтобы выбрать
режим меню iPod.
На дисплее будут отображены категории
меню iPod.
58 CX609E
Page 59

Примечания:
• Операции в режиме повторного и произвольного
воспроизведения не поддерживаются в режиме
меню iPod.
• В режиме меню iPod, возможно, не удастся
выполнить воспроизведение при кратковременном
нажатии клавиши [x]/[v] или [w]/[z].
2. Нажмите клавишу [w] или [z], чтобы
сменить категорию.
Категории меню iPod переключаются
следующим образом:
“PLAYLISTS” ↔ “ARTISTS” ↔
“ALBUMS” ↔ “SONGS” ↔ “GENRES” ↔
“COMPOSERS”...
Примечание:
Режим меню iPod можно отменить, выполнив одну
из следующих операций:
• Нажмите клавишу [BND].
• Когда на дисплее отображается экран выбора
категории, нажмите клавишу [v].
3. Нажмите клавишу [v] для выбора
категории.
4. Когда на дисплее отображается название
дорожки, нажмите клавишу [v].
Воспроизведение начнется с первой дрожки в
выбранной категории, и режим меню iPod
будет отменен.
∗ В зависимости от категории, на дисплее могут
отображаться папки нижележащего уровня.
В этом случае с помощью клавиш [w] и [z]
можно сменить вложенную папку, а затем
нажать клавишу [v], чтобы выбрать
требуемую вложенную папку.
∗ Когда на дисплее отображается название
дорожки, нажмите клавишу [x], чтобы
вернуться к индикации названия папки
текущего воспроизведения.
5. Для выбора дорожки в категории нажимайте
клавишу [w] или [z].
Алфавитный поиск в меню iPod
Данная функция выполняет поиск желаемых
алфавитных символов среди папок
нижележащего уровня.
1. Нажмите клавишу [BND], чтобы выбрать
режим меню iPod.
2. Нажмите клавишу [w] или [z], чтобы
сменить категорию.
3. Нажмите клавишу [v].
∗ В зависимости от категории, на дисплее могут
отображаться папки нижележащего уровня.
В этом случае с помощью клавиш [w] и [z]
можно сменить вложенную папку, а затем
нажать клавишу [v], чтобы перейти на
следующий уровень вложенных папок.
4. Нажмите и удерживайте (1 с) клавишу
[DISP].
5. Нажмите клавишу [w] или [z], чтобы
выбрать требуемую букву для поиска.
6. Нажмите клавишу [DISP], чтобы выполнить
поиск.
∗ Во время поиска нажмите клавишу [DISP],
чтобы отменить поиск.
Выбор категории с помощью
памяти предустановок
1. Нажмите клавишу [BND], чтобы выбрать
режим меню iPod.
Категории можно задать для клавиш
[DIRECT] (1-6) следующим образом.
[1] : PLAYLISTS
[2] : ARTISTS
[3] : ALBUMS
[4] : SONGS
[5] : GENRES
[6] : COMPOSERS
2. Нажмите желаемую клавишу [DIRECT] (1-6)
для выбора категории:
∗ В зависимости от категории, на дисплее могут
отображаться папки нижележащего уровня.
В этом случае с помощью клавиш [w] и [z]
можно сменить вложенную папку, а затем
нажать клавишу [v], чтобы выбрать
требуемую вложенную папку.
3. Когда на дисплее отображается название
дорожки, нажмите клавишу [v].
Воспроизведение начнется с первой дрожки в
выбранной категории, и режим меню iPod
будет отменен.
∗ Для выбора дорожки в категории нажимайте
клавишу [w] или [z].
Обратный переход в меню iPod
В режиме работы с меню iPod:
∗ При нажатии клавиши [BND] будет выполнен
возврат к предыдущему списку вложенных папок.
∗ При нажатии клавиши
возврат к списку категорий.
[BND] (1 с) будет выполнен
О дисплее названий
Данный аппарат поддерживает индикацию
информации о названии, полученной с
подключенного iPod.
• Информация закодирована в формате UTF-8;
отображаемые символы включают английские
буквенно-цифровые знаки, некоторые
символы, а также некоторые буквы с умляут.
• Неподдерживаемые знаки будут заменены
звёздочкой (*).
Pyccкий
59 CX609E
Page 60

7. ПОИСК И УСТРАНЕНИЕ НЕИСПРАВНОСТЕЙ
Проблема Причина Способ устранения
Pyccкий
Не включается
питание.
(Нет звука)
Нет звука при
использовании
аппарата в
соединении с
усилителями или
телескопической
антенной.
Ничего не
происходит при
Общее
нажатии клавиш.
Дисплей
отображает
неточную
информацию.
Нет звука Сработала система защиты
Перегорел предохранитель. Замените предохранитель предохранителем того же
Неправильная проводка. Обратитесь к Вашему дилеру.
Короткое замыкание провода
телескопической антенны,
или требуется избыточный
ток для дистанционного
включения усилителя или
телескопической антенны.
Ошибки в работе
микропроцессора из-за
шумовых помех и т.п.
Загрязнены разъемы СПУ
(съемной панели управления)
или основного блока.
громкоговорителей.
номинала. Если предохранитель снова перегорит,
обратитесь к Вашему дилеру.
1. Отключите аппарат.
2. Отсоедините все провода, подключенные к проводу
телескопической антенны. Проверьте каждый
провод на возможное короткое замыкание с
использованием измерителя сопротивления.
3. Снова включите аппарат.
4. Повторно подсоедините, один за другим, каждый из
проводов дистанционного включения усилителей к
проводу телескопической антенны. Если усилители
выключены перед тем
используйте внешнее реле для обеспечения
напряжением для дистанционного включения
(требуется избыточный ток).
С помощью тонкого стержня
нажмите и удерживайте (2 с)
кнопку сброса.
Если кнопка сброса
загруженном диске,
пожалуйста, извлеките диск и
загрузите его снова, прежде
чем выполнять его
воспроизведение.
Удалите загрязнение мягкой тканью, смоченной в
спиртовом растворе для очистки.
1. Выключите регулятор уровня громкости. Функцию
также можно восстановить, отключив и повторно
включив питание. (Уровень громкости
громкоговорителей понижается автоматически,
когда срабатывает система защиты
громкоговорителей.)
2. Если звук все еще заглушен, обратитесь к Вашему
дилеру.
как прикреплены все провода,
нажата при
60 CX609E
Page 61

Проблема Причина Способ устранения
Нет звука На диске отсутствуют файлы
Звук пропадает
или с шумовыми
помехами.
Звук прерывается
или пропадает.
Образуются
шумовые помехи
или шумовые
CD/MP3/WMA/AAC
помехи на фоне
звука.
Плохой звук сразу
же после
включения
питания.
Неправильное имя
файла.
Нет звука Устройство содержит файлы
Звук пропадает
или с шумовыми
USB/MTP/iPod
помехами.
Устройство не
распознается.
Невозможно
подсоединить
устройство к
кабелю USB.
MP3/WMA/AAC.
Файлы не распознаются в
качестве файлов MP3/WMA/
AAC.
Неверная файловая система. Используйте файловую систему ISO9660 Level 1, 2
Компакт-диск испачкан. Очистите компакт-диск мягкой тканью.
Компакт-диск сильно
поцарапан/деформирован.
Файлы MP3/WMA/AAC
неправильно закодированы.
Конденсация может
образоваться на внутренних
линзах, когда автомобиль
припаркован на стоянке с
повышенной влажностью.
Неверная файловая система. Используйте файловую систему ISO9660 Level 1, 2
MP3/WMA/AAC.
Файлы неправильно записаны
в формате MP3/WMA/AAC.
Соединения выполнены
непрочно.
Некоторые портативные
проигрыватели USB могут
потреблять ток,
превышающий номинальное
значение USB. В этом случае
срабатывает цепь защиты
аппарата от перегрузки,
останавливая
воспроизведение музыки.
Файлы MP3/WMA/AAC
неправильно закодированы.
Устройство повреждено. Отсоедините и снова подсоедините устройство. Если
Соединения выполнены
непрочно.
В зависимости от рабочего
состояния устройства,
устройство может не
распознаваться.
Устройство неправильно
подсоединено.
Повреждён соединитель. Замените новым устройством.
Правильно запишите на диск файлы MP3/WMA/AAC.
Используйте правильно закодированные файлы MP3/
WMA/AAC.
либо JOLIET или Romeo.
Возьмите компакт-диск без царапин.
Используйте правильно закодированные файлы MP3/
WMA/AAC.
Дайте высохнуть приблизительно в течение 1 часа
включенным питанием.
либо JOLIET или Romeo.
Правильно запишите файлы в формате MP3/WMA/
AAC на устройство.
Используйте правильно закодированные файлы MP3/
WMA/AAC.
Отсоедините и снова надежно подсоедините
устройство.
Проверьте работу портативного музыкального
проигрывателя.
Используйте правильно закодированные файлы MP3/
WMA/AAC.
устройство не распознается, попытайтесь заменить его
другим устройством.
Отсоедините и снова подсоедините устройство.
Подсоедините устройство в обратном направлении.
Pyccкий
с
61 CX609E
Page 62

8. ОТОБРАЖЕНИЕ ОШИБОК НА ДИСПЛЕЕ
При возникновении ошибки на дисплее отображается одно из следующих сообщений.
Примите меры указанные ниже для устранения проблемы.
Pyccкий
Индикация
ошибки
ERROR 2 Компакт-диск застрял внутри деки для
ERROR 3 Компакт-диск не воспроизводится из-за
ERROR 6 Компакт-диск загружен обратной
CD/MP3/WMA/AAC
ERROR 2
ERROR 3
(режим USB/
MTP)
CUR ERR Обнаружена перегрузка по току. Отключите устройства и подключите заново.
USB/MTP/iPod
HUB ERR Концентраторы не поддерживаются. Не используйте концентраторы.
компакт-дисков и не извлекается.
царапин, и т.п.
стороной в деку для компакт-дисков и не
воспроизводится.
Файлы не являются требуемыми файлами в
формате MP3/WMA/AAC.
Файлы MP3/WMA/AAC закодированы
неправильно.
Если отобразится индикация ошибки, отличная от описанных выше, нажмите кнопку сброса. Если
проблема сохранится, отключите питание и обратитесь к Вашему дилеру.
Причина Способ устранения
Поломка механизма деки для компакт-дисков.
Обратитесь к Вашему дилеру.
Замените диском без царапин и деформаций.
Извлеките диск и правильно снова загрузите
его.
Используйте только правильно
закодированные файлы в формате MP3/WMA/
AAC.
Используйте только правильно
закодированные файлы в формате MP3/WMA/
AAC.
Если устройства не распознаются, попробуйте
подключить другие устройства.
62 CX609E
Page 63

9. ТЕХНИЧЕСКИЕ ХАРАКТЕРИСТИКИ
Секция радиоприёмника
Система настройки: тюнер синтезатора частот PLL
Диапазон принимаемых частот:
FM : от 87,5 до 108 МГц
(с интервалом 0,05 МГц)
MW : от 531 до 1602 кГц (с интервалом 9 кГц)
LW : от 153 до 279 кГц (с интервалом 3 кГц)
Секция проигрывателя
компакт-дисков
Система: цифровая аудиосистема для компакт-
дисков
Амплитудно-частотная характеристика:
от 5 Гц до 20 кГц (± 1 дБ)
Отношение сигнал/шум: 100 дБ (1 кГц)
Динамический диапазон: 80 дБ (1 кГц)
Искажение: 0,03%
Общее
Выходная мощность:
25 Вт
✕
4 (DIN 45324, +В = 14,4 В)
Напряжение источника питания: 14,4 В
постоянного тока (допускается от 10,8 до 15,6 В),
отрицательное заземление
Потребляемая мощность: не более 15 А
Полное сопротивление громкоговорителей: 4 Ω
(допускается от 4 до 8 Ω)
Вес:
Основной блок: 1,59 кг
Пульт дистанционного управления: 40 г
(включая батарею)
Размеры:
Основной блок:
178 (Ш) ✕ 100 (В) ✕ 155 (Г) мм
Bluetooth
Технические характеристики: Версия Bluetooth: 2.0
Профиль:
HFP (Hands-Free Profile)
OPP (Object Push Profile) Телефонная книга
A2DP (Advanced Audio Distribution Profile)
AVRCP (Audio/Video Remote Control Profile)
Чувствительность отправки/приема: класс 2
Примечание:
• Технические характеристики и дизайн могут изменяться без предварительного уведомления в целях
дальнейшего усовершенствования продукции.
Pyccкий
10. ПРОЧЕЕ
Технология WMDRM 10 для устройств
• Это изделие защищено рядом прав на интеллектуальную собственность компании Microsoft.
Использование или распространение этой технологии без лицензии компании Microsoft запрещено.
• Владельцы контента используют технологию Windows Media Digital Rights Management Technology
(WMDRM) для защиты своей интеллектуальной собственности, в том числе авторских прав. В этом
устройстве установлено программное обеспечение WMDRM для доступа к контенту, защищенному с
помощью технологии WMDRM. Если с помощью
защитить контент, владельцы контента могут обратиться в компанию Microsoft и отозвать право на
использование в программном обеспечении технологии WMDRM для воспроизведения или
копирования защищенного контента.
Отзыв не отразится на незащищенном контенте. Загружая лицензии для защищенного контента,
пользователь соглашается с правом компании Microsoft на приложение списка отозванного контента к
лицензиям.
своему контенту. В случае отказа от обновления пользователи не смогут получить доступ к контенту,
для которого требуется выполнить обновление.
Владельцы контента могут потребовать обновления технологии WMDRM для доступа к
программного обеспечения WMDRM не удается
63 CX609E
Page 64

2010/2
Clarion Co., Ltd.
All Rights Reserved. Copyright © 2009: Clarion Co., Ltd.
Printed in China / Отпечатано в Китае
PE-3154E
280-8763-01
 Loading...