

Page 1

QUICK START GUIDE (ENGLISH)
CMS5
MARINE BLACK BOX SOURCE UNIT WITH J1939
Page 2
CLARION PRODUCT REGISTRATION INFORMATION
Dear Customer:
Congratulations on your purchase of a Clarion Marine Electronic Product. We are Confident
that you will enjoy your Clarion experience.
There are many benefits to registering your product. We invite you to visit our website at
www.clarion.com to register your Clarion product.
We have made product registration simple with our easy to use website.
The registration form is short and easy to complete. Once you are registered,
We can keep you informed of important product information.
Register at www.clarion.com - It is easy to keep your Clarion product up to date.
Under Industry Canada regulations, this radio transmitter may only operate
using an antenna of a type and maximum (or lesser) gain approved for the
transmitter by Industry Canada. To reduce potential Radio interference
to other users, the antenna type and its gain should be chosen that the
equivalent Isotropically radiated power (E.I.R.P.) is not more than that
necessary for successful communication.
For USA and Canada only
www.clarion.com
Contents
This manual was created to guide you through the basic functions of this system
Features .................................................................................................................................................................2
Precautions.............................................................................................................................................................2
Cautions On Handling ............................................................................................................................................2
Display Controller Buttons ......................................................................................................................................3
Turning System ON and OFF .................................................................................................................................4
Understanding the GUI (Graphical User Interface) ................................................................................................5
Sources
Radio (FM/AM/Weather Band) ................................................................................................................7
iPod .........................................................................................................................................................8
USB Audio ...............................................................................................................................................9
SXM ......................................................................................................................................................10
Pandora .................................................................................................................................................11
Phone ....................................................................................................................................................11
Settings .................................................................................................................................................12
CMS5 Information Screen 12
Clock ......................................................................................................................................12
Date .......................................................................................................................................13
Bluetooth ................................................................................................................................13
Bluetooth Audio......................................................................................................................15
Audio Settings (Button).........................................................................................................................................17
Display Settings (Button) ......................................................................................................................................18
Favorites (Button) .................................................................................................................................................18
NOTE:
- For details on functions and operation of this product, refer to the “Owner’s Manual”.
- The screens shown in the examples may differ from actual screens. Actual screens may be changed without notice
for performance and function improvements.
1 CMS5
2-Zone ....................................................................................................................................16
FEATURES
- SiriusXM-Ready™ (SiriusXM Connect Tuner and Subscription sold separately) Bluetooth (HFP, A2DP,
- Pandora
- USB iPod® / iPhone® Audio and Video Compatible (CCA750 Required for iPod Video)
- 2-Zone (Independent Zone Source Control)
- SVC (Source Volume Control), Independent Volume Control for each source
- Two Audio/Video RCA Inputs
- Video Output
- Dedicated Rear Camera RCA Input
- Global FM Tuner with RDS
- Favorites
- Weather Band Radio
- Water Resistant Chassis and Display Controller
- 2.1A USB Port
- OEM Steering Wheel Interface Ready
- Clarion Wired Remote Ready (MW1/MW2/MW4)
- 50W x 4 Built-In MOSFET Amplifier
aptX, AVRCP1.4, PBAP, SSP, SPP)
PRECAUTIONS
* For your safety, while boating, keep the volume to a level at which external sounds can be heard.
1.
This unit has precision parts inside. Even in the event that trouble arises, never open the case,
disassemble the unit, or lubricate any parts.
2.
This equipment has been tested and found to comply with the limits for a Class B digital device,
pursuant to Part 15 of the FCC Rules.
These limits are designed to provide reasonable protection against harmful interference in a
residential installation. This equipment generates, used, and can radiate radio frequency energy
and, if not installed and used in accordance with the instructions, may cause harmful interference to
radio communications. However, there is no guarantee that interference will not occur in a particular
installation. If this equipment does cause harmful interference to radio or television reception, which
can be determined by turning the equipment off and on, the user is encouraged to consult the
dealer or an experienced radio/TV technician for help.
INFORMATION FOR USERS:
CHANGES OR MODIFICATIONS TO
THIS PRODUCT NOT APPROVED BY
THE MANUFACTURER WILL VOID THE
WARRANTY AND MAY VIOLATE FCC
REGULATIONS.
WARNING
CAUTIONS ON HANDLING
- Protect product from water. Do not submerge or expose the product directly to water, as this can cause
electrical shorts, fire or other damages.
- Protect from high temperature. Exposure to direct sunlight for an extended period of time can produce very
high temperature in your vessel. Cool down the interior before use.
Note: If devices such as MW4 or MW1 are disconnected when a function is running, please make sure
the entire unit(s) is restarted after connecting the remote devices for proper function of the system.
CMS5 2
Page 3

DISPLAY CONTROLLER BUTTONS
Previous Song
Seek Back
Volume Knob
Functions:
Rotate Volume Knob = Adjust Volume Level (Play Screens).
Press in & Release Volume Knob = Mute/Unmute (Play Screens).
Rotate Volume Knob = Scroll Through Options (Menus).
Press in & Release Volume Knob = Select/Enter (Menu Options).
Play/Pause
Next Song
Seek Forward
Back
Previous Screen
Source
Main Menu
Power
ON / OFF
Display Options
Audio Settings
Menu Options
Favorites
Volume
Option Scroll
Enter Selection
Mute/Unmute
TURNING SYSTEM ON AND OFF
When the unit is turned ON, and the volume has been increased to the maximum level:
May cause damage to your hearing.
Please be aware and cautious of the volume level at all times.
Note:
- Start the engine before using this unit.
- Be careful about using this unit without the engine running. If used for long periods of time without the engine
running to charge the batteries, you may not be able to start the engine and this can Reduce the life and
performance of the batteries. A Warning will appear when voltage is 10V or below.
- The audio will stop until voltage increases to 10.4v or above, then the audio will resume. This will
help from draining too much current from the battery until the voltage increases.
ON
1. Start the engine. (Accessory Battery Switch ON)
The CMS5 will automatically Power ON
2.
3. The Blue LED trim around the Volume Knob will light up and the CMS5 Display Controller
- Clarion Splash Screen (10 Seconds)
- Viewing Video Disclaimer (5 Seconds)
4. Press and Release the Power Button to turn ON or OFF the unit
If the CMS5 does not Power ON when the vessel is started, Press and Release the Power Button [ ]
*
CAUTION
Options Arrow
This double sided arrow will only appear when additional options are available.
3 CMS5
OFF
Press and Hold the Power Button for 3-seconds[ ]
1.
2. The Blue LED trim around the Volume Knob will turn OFF
- System in Powering Down Screen (5 Seconds)
- Clarion Splash Screen (10 Seconds)
CMS5 4
Page 4
UNDERSTANDING THE GRAPHICAL USER INTERFACE (GUI)
This section helps define and explain the operation and functions of the
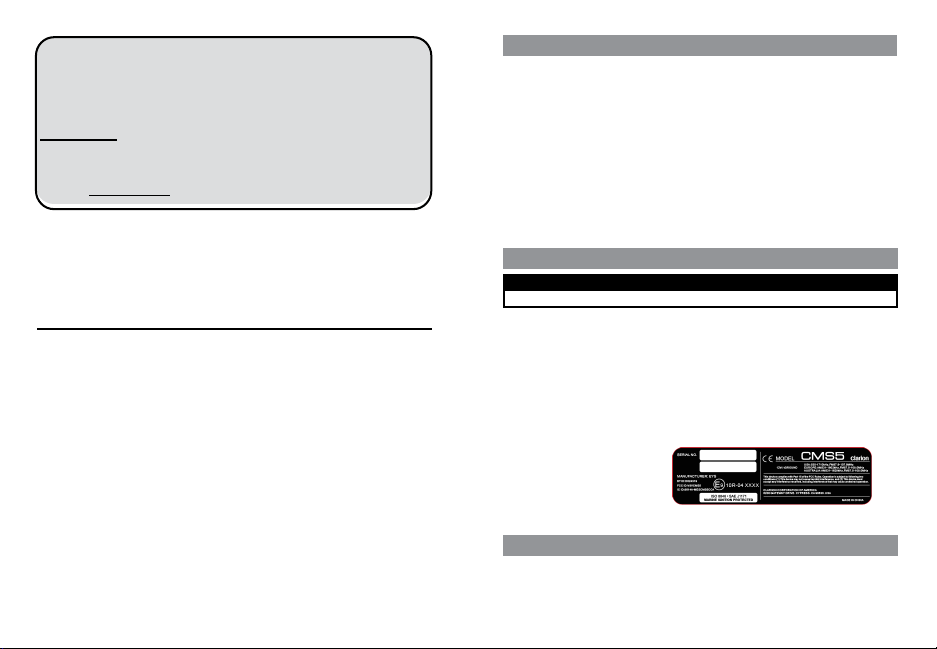
Main Menu Screen
This carousel of Sources provides a simple and easy way to view Sources and can be accessed anytime by
pressing the Source Button [SRC]
Status Bar
The Status bar will be displayed on either the Top or Bottom of the screen. The Status Bar will disappear
when viewing a video to allow for optimal view area.
The Status Bar provides several icon indicators that will appear when a source or feature requires it.
- Time (Please refer to the Clock Settings to Set the Time)
- Voltage Indication (This displays the voltage based on the Yellow +12v constant wire)
- Bluetooth Logo (When a compatible Bluetooth Device is Paired and Connected)
- Signal Strength Meter (SiriusXM, Phone)
- LO/DX Indicator (Local and Distance for Radio Tuner)
- Favorite Indicator (Star and number will appear if you tune to a station or channel that is a preset and
which Channel number is saved)
-Mute indicator (when Volume is muted)
Graphical User Interface.
Status Bar
Main Menu Screen /
Source Icon Carousel
UNDERSTANDING THE GRAPHICAL USER INTERFACE (GUI)
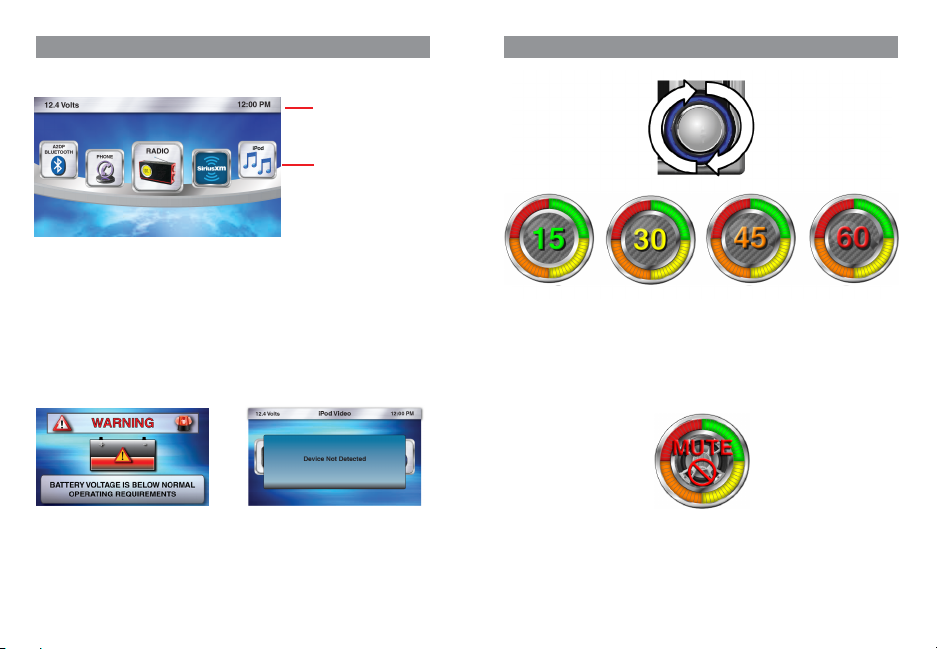
Volume
This type of Volume indication provides a simple and easy way to adjust the volume level. Each detent
“Click” of the Volume Knob represents one bar for volume indication.
- 1 through 15 (Green)
- 16 through 30 (Yellow)
- 31 through 45 (Orange)
- 46 through 60 (Red)
When in a source play screen and the volume knob is rotated, this will adjust the volume level. After the
volume has been adjusted, the volume indicator will stay displayed for 2 seconds, then it will disappear.
Low Battery Voltage Warning
This screen will appear when the Battery Voltage
drops to or below 10v.
The audio will stop until voltage increases to 10.4v or
above, then the audio will resume. This will help
from draining too much current from the battery until
the voltage increases.
5 CMS5
No Device Detected Screen
This screen will appear if you are trying to use a
source that requires a plug in device or accessory.
Note: No Device Detected screen is not displayed in
the case of Pandora Source & SiriusXM.
- iPod = iPod or iPhone
- Bluetooth = iPod, iPhone or Smartphone
- Camera = Back up Camera
- USB = USB Flash Drive
Mute
- When you are in a source play screen and would like to Mute the volume, simply press in& release
the volume knob.
- A volume mute indicator will appear on the status bar letting to know that the volume is on Mute and
will stay displayed until it is unmuted.
- When the volume is muted and if the user simply press in and releases the volume knob,
the unit will be unmuted.
** Be Cautious and Aware of the Volume Level when you Mute and Un-Mute the Volume **
CMS5 6
Page 5

RADIO (FM / AM / WEATHER BAND)
iPod
FM Band
Digital channel indication
The dial moves according to channel tuning through the Seven NOAA channels.
Each Radio Play Screen offers a unique look and visual experience.
Radio Channels are changed by pressing the Seek Buttons.
Scrolling Radio Text (FM Station Name and or Song Title/Artist name) and PTY (Song
Genre) is displayed for the FM Radio Stations that transmit this information.
Radio Operation
[ SEEK] Seek Back Button
Press and release button to tune down in frequency step by step
-
- Press and Hold for Three Seconds to scan back to the previous strongest station frequency
[SEEK ] Seek Forward Button
Press and release button to tune up in the frequency step by step
-
- Press and Hold for Three Seconds to scan to the next strongest station frequency
[MENU] Menu Button
- Press to select FM, AM, Weather Band, Local (LO) or Distance (DX) and region select.
- Use the volume knob to scroll through options
- Press in & release the volume knob to select option in the middle of the carousel
- AM (Amplitude Modulation)
- FM (Frequency Modulation)
- Weather Band (NOAA - National Oceanic and Atmospheric Administration)
- Local (LO)
- Distance (DX)
- Region Settings
-Press the Region Select option to select the Region that needs to be changed.
- Now a pop up window will appear providing 4 options
- Other Countries
- USA
- Europe
- Australia
*Default=USA
- Use the volume knob to toggle between region options
- Press in & release the volume knob to select your choice
- Press the BACK button to return to the previous Screen
[ ] Back Button
- Press to go back to previous Menu or Settings Screen
- Press to backwards in multiple Menu Screens
- Press to return to current source play screen from Menu or Settings Screen
Weather Band
Radio Play Screens
7 CMS5
AM Band
Analog channel tuning
Button Operation for iPod
[ SEEK] Seek Back Button
- Press and release button to go back to previous song. (If Seek Back button is pressed before 2-seconds are
elapsed in current track, the previous track will be played. If Seek Back Button is pressed after 2-seconds are
elapsed in a current track, the same track will be restarted).
- Press and Hold for Three Seconds to scan through the songs, release and song will continue playing
-If currently playing track is the First track in the category and repeat feature is disabled; then Seek Back button press results in
pop-up message "List Empty. Select other track" since there are no more tracks in the current category for playing.
[SEEK ] Seek Forward Button
- Press and release button to advance to next song.
- Press and Hold for Three Seconds to scan through song, then release and song will continue playing.
- If currently playing track is last track in the category and repeat feature is disabled; then Seek Forward button press results in
pop-up message "List Empty. Select other track" since there are no more tracks in the current category for playing.
[ ] Play / Pause Button
- Press to PAUSE current song
- When track is PAUSED, press again to continue
playing current song (iPod, Bluetooth Audio, USB, and
Pandora
[ ] Back Button
-Press to go back to previous Menu or Settings Screen Press to backwards in multiple Menu Screens
- Press to return to current source play screen from Menu
Screen or Settings Screen
-Press to return to active source from Source screen view.
[MENU] Menu Button
[MENU] Menu Button
Press to access additional options.
- Playlists (Search by “ABC” or “123”)
- Songs (Search by “ABC” or “123”)
- Artists (Search by “ABC” or “123”)
- Genre (Search by “ABC” or “123”)
- Composers (Search by “ABC” or “123”) - Podcasts
(Search by “ABC” or “123”) - Repeat (Song, Playlist,
All, Off)
- Shuffle (ON or OFF)
In Video ( Switches from iPod Audio to iPod Video) and for
Search In Video like:
(Search by "ABC" or "123")
- Artists ( Search by "ABC" or "123")
- Tracks ( Search by "ABC" or "123")
CMS5 8
Page 6

USB AUDIO
Button Operation for USB
[ SEEK] Seek Back Button
- Press and release button to go back to previous song
- Press and Hold for Three Seconds to scan back through song, release and song will continue playing
[SEEK ] Seek Forward Button
- Press and release button to advance to next song
- Press and Hold for Three Seconds to scan through song, release and song will continue playing
[ ] Play / Pause Button
- Press to PAUSE current song
- When track is PAUSED, press again to continue playing current song.
[ ] Back Button
- Press to go back to previous Menu or Settings Screen
- Press to backwards in multiple Menu Screens
- Press to return to current source play screen from Menu Screen or Settings Screen
[MENU] Menu Button
Press to access additional options
- Repeat (Song, All, Off)
- Shuffle (ON or OFF)
- Songs (Access Songs)
- Scan (Option for intro Music SCAN)
9 CMS5
SiriusXM®
Button Operation for SiriusXM®
[ SEEK] Seek Back Button
-
Press and release button to tune to the previous channel
[SEEK ] Seek Forward Button
- Press and release button to tune to the next channel
[MENU] Menu Button
- Press to select Direct channel, Parental Controls, Channels, Category and Tag
- Use the volume knob to scroll through options
- Press in & release the volume knob to select option in the middle of the carousel
- Direct (Tune directly to channel by entering channel number)
- Parental Controls (Lock Mature Content Channels, Manage Password)
- Channels (Search by stations)
- Categories (Seach by music type)
- Tag (Tag track to iPod/iPhone to purchase from iTunes when device is connected to iTunes)
- Settings
[ ] Back Button
- Press to go back to previous Menu or Settings Screen
- Press to backwards in multiple Menu Screens
- Press to return to current source play screen from Menu Screen or Settings Screen
Note: To perform User Factory Reset, refer to System Reset Section on Page 39 of the Owners Manual.
CMS5 10
Page 7

PANDORA
Button Operation for Pandora
[ SEEK] Seek Back Button
- No Function
[SEEK ] Seek Forward Button
- Press and release button to advance to next track
[ ] Play / Pause Button
- Press to PAUSE track
- When track is PAUSED, press again to continue
playing the track
[ ] Back Button
- Press to go back to previous Menu or Settings Screen
- Press to go backwards in multiple Menu Screens
- Press to return to current source play screen from Menu
or Settings Screen
[MENU] MENU Button
Press to access additional options:
- Stations (Music Stations from your Pandora Account)
- Bookmark (YES or CANCEL)
- Thumbs up
- Thumbs Down
PHONE
Phone Menu options
-Speaker (Select Left Front or Right Front Speaker (Default) for Hands-Free Calling Audio)
-Contacts (View list of Contact from Paired and connected Phone)
-Dial Pad (to Manually Enter in a Phone number to Call)
-Call History (View your Missed Calls, Incoming Calls, Outgoing Calls)
-Paired Devices (View Paired/Connected Phone Information, Switch Paired Device, Delete Device)
Phone functionalities includes:
-Receiving Incoming calls
-Making outgoing calls from Dialpad, Contact list and Call history
-Pair a device, Switch to and delete the device
-Speaker selection
-Supports call waiting, conference call, swap call
-Also suppots call transfer from Hands free to private or vice versa
11 CMS5
SETTINGS
Settings
1. Press the Source Button (SRC)
2. Use the volume knob to scroll through the sources
3. When the Settings Icon is in the middle of the carousel,
Press in & release the volume knob to select Settings
4. Once in Settings, the following features will be accessible:
- CMS5 Information
- Clock
- Date
- Bluetooth
5. Press in & release the volume knob to select the Settings Option you would like to enter
CMS5 Information
This section contains information for the following
CMS5 Features and Functions:
- Hardware Information
- Operating System Information (OS)
- Software Version Information
- Bluetooth Software Version Information
- Application Firmware Information
- System Reset option for factory default reset
Clock
1. Press the Source Button (SRC)
2. Use the volume knob to scroll through the sources
3.
When the Settings Icon is in the middle of the carousel,
Press in & release the volume knob to select Settings
4. Once in Settings, rotate the volume knob to Clock
5. Press in & release the volume knob to enter the Clock Settings
- Hour
- Minutes
- AM/PM
- 12 / 24 Hour Mode
** The halo will always default to Hour adjustment first, then minutes, AM/PM, and 12/24
6.
With the halo around Hour, rotate the volume knob to adjust to the correct Hour
7. Press in & release the volume knob to set the Hour
8. The halo will automatically shift to Minutes
9. With the halo around the Minutes, rotate the volume knob to adjust to the correct Minutes
10. Press in & release the volume knob to set the Minutes
11. The halo will automatically shift to AM/PM
12. With the halo around the AM/PM, rotate the volume knob to change from AM to PM
13. Press in & release the volume knob to set AM or PM
14. The halo will automatically shift to 12/24
15. With the halo around the 12/24, rotate the volume knob to change from 12 to 24 Hour Mode
16. Press in & release the volume knob to set 12 or 24 Hour Mode
17. After the Clock has been set, you will return to the Settings Menu
12.4 Volts
CMS5 12
Page 8

SETTINGS
Date
1. Press the Source Button (SRC)
2. Use the volume knob to scroll through the sources
3. When the Settings Icon is in the middle of the carousel, Press in & release the volume knob to select Settings
4. Once in Settings, rotate the volume knob to Date
5.
Press in & release the volume knob to enter the Date Settings
- Day/ Month/ Date/ Year (Default= 2014)
** The halo will always default to Year adjustment first, then Month, Date and Day automatically appears
6. With the halo around Year, rotate the volume knob to adjust to the correct Year
Press in & release the volume knob to set the Year
7.
The halo will automatically shift to Month
8.
9.
With the halo around the month, rotate the volume knob to adjust to the correct month
10. Press in & release the volume knob to set the Month
The halo will automatically shift to Date
11.
With the halo around the Date, rotate the volume knob to adjust to the Date
12.
13.
Press in & release the volume knob to set the Date
After the Date has been set, you will return to the Settings Menu
14.
BLUETOOTH PHONE OPERATION
Bluetooth
1. Press the Source Button (SRC)
2. Use the volume knob to scroll through the sources
3. When the Settings Icon is in the middle of the carousel, Press in & release the volume knob to select Settings
4. Once in Settings, rotate the volume knob to Bluetooth
5. Press in & release the volume knob to enter Bluetooth Settings
- Bluetooth Hands-Free ON or OFF (Turns the Bluetooth Hands-Free Feature ON or OFF)
- Pairing (Pair, Connect, Transfer Bluetooth Connection, and Delete Paired Device)
- Microphone Gain (Adjust the Optional external Bluetooth Microphone sensitivity)
BLUETOOTH PHONE OPERATION
Bluetooth (Hands-Free ON or OFF)
1. Press the Source Button (SRC)
2. Use the volume knob to scroll through the sources
3. When the Settings Icon is in the middle of the carousel, Press in & release the volume knob to select Settings
4. Once in Settings, rotate the volume knob to Bluetooth
5. Press in & release the volume knob to enter Bluetooth Settings
6. With the halo around Bluetooth Hands-Free ON / OFF Icon
7. Press in & release the volume knob to select Bluetooth Hands-Free ON / OFF
8. Now a pop-up window will appear providing Two options:
- ON = Turn ON the Bluetooth Hands-Free Profile (Allows for Hands-Free Calling)
- OFF = Turns OFF the Bluetooth Hands-Free Profile (Disables the ability for Hands-Free Calling)
Default = ON
*
9. Use the volume knob to toggle between ON and OFF
10. Press in & release the volume knob to select your choice
11. After your choice has been made, you will be taken back to the Bluetooth Settings Menu
Bluetooth (Pairing)
The CMS5 Bluetooth Pairing sequence is based on the Bluetooth SSP (Simple Secure Pairing
Profile) and will Not require input of a PIN Code to Pair Bluetooth Devices
1. Press the Source Button (SRC)
2. Use the volume knob to scroll through the sources
3. When the Settings Icon is in the middle of the carousel, Press in & release the volume knob to select Settings
4. Once in Settings, rotate the volume knob to Bluetooth
5. Press in & release the volume knob to enter Bluetooth Settings
6. Rotate the volume knob and move the halo until it is around the Pairing Icon
7. With the halo around Pairing Icon press in & release the volume knob to select Bluetooth Device Pairing
8.
You will now see the Bluetooth Pairing Screen that displays Five Icons that will populate with the
“Paired Devices" names
*
If No Devices have been Paired, you will see Five “+ADD” Icons
9.
Use the volume knob to toggle through the Icons to select the position to save the Paired Device
Information
13 CMS5
CMS5 14
Page 9

BLUETOOTH PHONE OPERATION
10.
Press in & release the volume knob to select a “Paired Devices”
11.
The CMS5 is now in Bluetooth Pairing Mode
12.
Confirm that your Bluetooth Device is “ON” and the Bluetooth on the device is “ON”
13.
When the CMS5 has found a Bluetooth Device, you will see a pop-up window appear asking you to
Confirm the PIN Information from the CMS5 to the Device
*
Confirm that the PIN Number on the screen of the CMS5 is the same as the PIN Number that is
being displayed on the screen of the Bluetooth Device
14.
If both PIN Numbers are the same, press in & release the volume knob to select “PAIR”
15.
Once the CMS5 and the Bluetooth Device are Paired, you will now be taken to the Bluetooth
16 Paired/Connected Device Menu Screen
BLUETOOTH AUDIO
[ SEEK] Seek Back Button
- Press and release button to go back to previous song
- Press and Hold for Three Seconds to scan back through song, release and song will continue playing
[SEEK ] Seek Forward Button
- Press and release button to advance to next song
- Press and Hold for Three Seconds to scan through song, release and song will continue playing
[ ] Play / Pause Button
- Press to PAUSE current song
- When track is PAUSED, press again to continue playing current song
(iPod, Bluetooth Audio, USB, and Pandora)
[ ] Back Button
- Press to go back to previous Menu or Settings Screen
- Press to backwards in multiple Menu Screens
- Press to return to current source play screen from Menu or Settings Screen
[MENU] Menu Button
Press to access additional options
-Repeat (Song, All, Off)
- Shuffle (ON or OFF)
- Paired Devices
BLUETOOTH AUDIO
Bluetooth Audio
1. Press the Source Button (SRC)
2. Use the volume knob to scroll through the sources
3. When the Bluetooth Audio Icon is in the middle of the carousel
4. Press in & release the volume knob to select Bluetooth Audio
5. You will now be taken to the Bluetooth Audio Play Screen
15 CMS5
2-ZONE
Using 2-Zone option, user can listen to separate audio sources in either front or Rear Speaker.
1. Press the Source Button (SRC)
2. Use the volume knob to scroll through the sources
3. When the 2-Zone Icon is in the middle of the carousel, Press in & release the volume knob to select 2-Zone
4. Once in 2-Zone, rotate the volume knob until the halo is around 2-Zone
5. Press in & release the volume knob to turn the 2-Zone Feature ON or OFF
6. Rotate the volume knob and move the halo until it is around 2-Zone ON or 2-Zone OFF
7. If you select ON, then the 2-Zone Feature will be enabled
8. If you select OFF, then the 2-Zone Feature will be disabled
9. With 2-Zone ON, you will return to the 2-Zone Menu to select Front and Rear Sources
10. With 2-Zone OFF, you will return to the Main Source Menu
Note: Once a source has been selected for each Zone, you can go to the source for
Zone 1 or Zone 2 for operation and functionality on 2-Zone ON/OFF, the current playing
source will be deselected.
CMS5 16
Page 10

AUDIO SETTINGS (BUTTON)
Audio Settings
1.
Press the Audio Button
2. Use the volume knob to scroll through the Audio Settings Carousel
3. Press in & release the volume knob to select the Audio Settings you would like to adjust
- Balance/Fader (Adjust the sound position from Left to Right and Front to Rear)
- Equalizer (Adjust the frequency from -10 to 10 and the level for 5-bands)
- Source Volume Control (SVC) (Adjust the volume level for each source from 0 to 10)
- Subwoofer (Adjust the Volume from -10 to +10, Frequency from 70Hz to 140 Hz Through )
Phase adjustments Normal and Reverse
- 2-Zone (Adjust the volume from -10 to +10 for Zone 1, Zone 2)
Note: 2-Zone selection icon will be deactivated when 2-Zone feature is active
Press in & release volume knob to advance options
Rotate volume knob to scroll through options
17 CMS5
Balance/Fader
Equalizer
Source Volume
Control
Subwoofer
2-Zone
DISPLAY SETTINGS (BUTTON)
Display
1. Press the Display Button
2. Use the volume knob to move the halo to the Display Option you would like to adjust
3. Press in & release the volume knob to select the Display Option
- Clock (Large Clock Display after 25 seconds of no action)
- Status Bar (View the Status Bar on Top or Bottom of Screen)
- Mode (Change from Day Mode to Night Mode)
- Brightness (Adjust the screen Brightness)
FAVORITES (BUTTON)
Favorites
Rather than having to repeatedly scroll though various channels, the unit provides easier
access to preset stations and contacts
1. Press the Favorites Button
2. Use the volume knob to scroll through your saved Favorites
3. Press in & release the volume knob to access your saved Favorite
4. It will then change to the source for the Favorite and tune to the saved station
Save or Replace Station or Channel to Favorites
1. Tune to Radio Sation, SiriusXM Channel or Pandora station you would like to save
2. Press the Favorites Button
3. Use the volume knob to scroll through Favorites, until you find the Favorite number position you would
like to save the station or channel to
4. Press in & release the volume knob to save station or channel Favorite numbered position
5. After you are finished saving your Favorite, you will return back to the source you are currently using
18 Favorite spots are reserved for SXM channels
6.
32 Favorite spots are reserved for the combination Pandora, Radio (FM/AM/WB), SXM and
7.
Phone Contacts
Same Station/ Channels cannot be stored more than once in Favorite list
8.
Delete Favorites
1. Press the Favorites Button
Use the volume knob to scroll through Favorites, until you find the Favorite number position you would
2.
like to delete
Press in & release the volume knob for three seconds
3.
A pop-up window will appear asking you to confirm you want to delete the saved Favorite
4.
Use the volume knob to select "YES" or "CANCEL" and press in & release the volume knob to select
5.
After your selection has been made, you will return to the source you are using
6.
CMS5 18
Page 11

Clarion Corporation of America
All Rights Reserved. Copyright © 2015: Clarion Corporation of America
Printed in China / Imprime` au Chine / Impreso en China
2015/06
CMS5
 Loading...