

Page 1
Owner’s manual / Mode d’emploi
Bedienungsanleitung / Istruzioni per l’uso
Gebruiksaanwijzing / Manual de instrucciones
Bruksanvisning / Manual de instruções
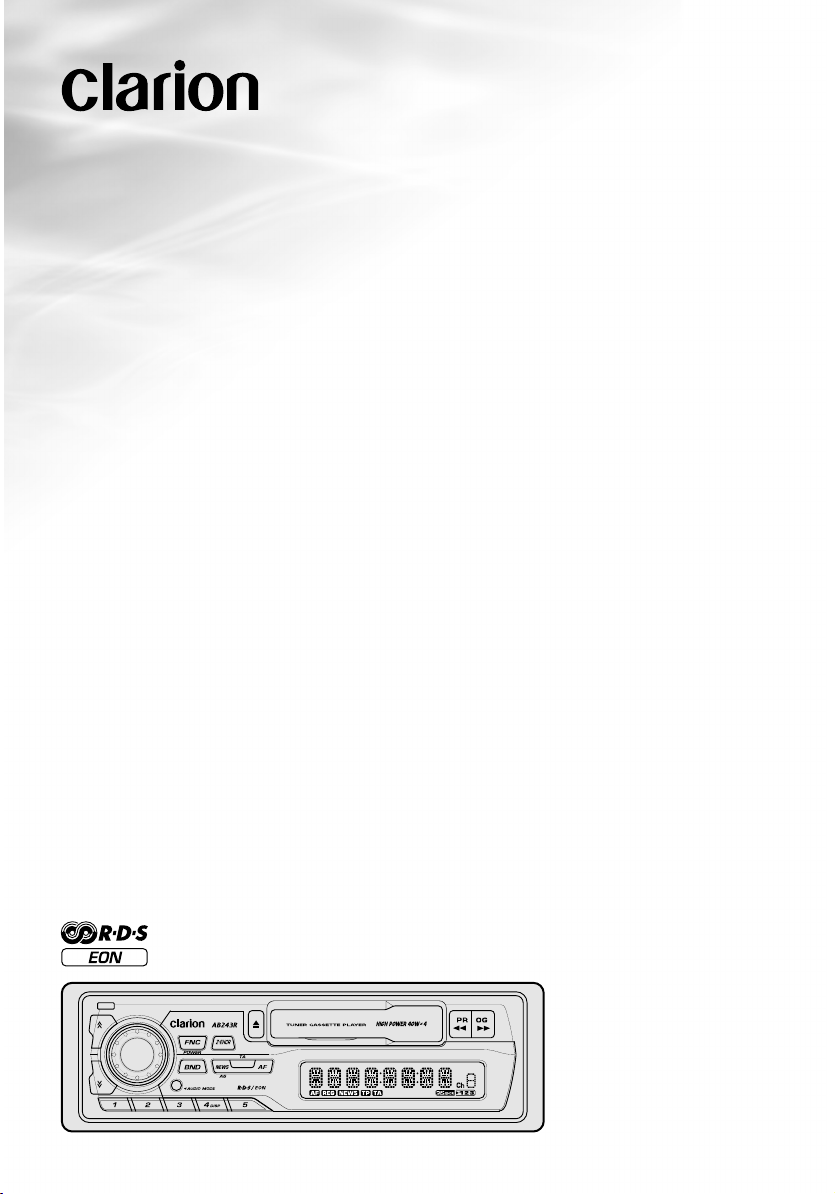
AB243R
AB243RG
RDS-EON/FM/MW/LW RADIO CASSETTE COMBINATION
COMBINÉ RADIO-CASSETTE RDS-EON/FM/PO/GO
RDS-EON/UKW/MW/LW-RADIO-KASSETTENKOMBINATION
SINTOLETTORE A CASSETTA/RADIORDS-EON/FM/OM/OL
RDS-EON/FM/MG/LG RADIO CASSETTESPELER
COMBINATIE
COMBINACIÓN DE RADIOCASETE DERDS-EON/FM/MW/LW
RDS-EON/FM/MV/LV-RADIO OCH KASSETTSPELARE
COMBINAÇÃO DE RÁDIO RDS-EON/FM/MW/LW E LEITOR
DE CASSETES
•
•
•
•
•
•
•
Page 2

Contents
1. CASSETTE PRECAUTIONS AND CARE...................................................................................2
2. CONTROLS .................................................................................................................................3
3. D.C.P. (Detachable Control Panel) ............................................................................................4
4. BUTTON TERMINOLOGY...........................................................................................................5
Display Items................................................................................................................................5
5. OPERATION ................................................................................................................................6
Basic Operations..........................................................................................................................6
Radio Operations .........................................................................................................................7
RDS (Radio Data System) Operations ........................................................................................8
Tape Operations.........................................................................................................................10
6. TROUBLESHOOTING...............................................................................................................11
7. SPECIFICATIONS......................................................................................................................11
1.
CASSETTE PRECAUTIONS AND CARE
English
1. Tape slack can lead to operating difficulties.
Remove tape slack before inserting a cassette, particularly when using C-90 or prerecorded cassettes.
2. Use C-30 to C-90 cassettes. Avoid using
C-120 or longer cassettes (The very thin
tape may stretch or break).
3. Clean the head periodically by playing a wet
type cleaning cassette in the player. Avoid
touching the head with magnetic or hard
objects.
Be sure to unfold and read the next page. / Veuillez déplier et vous référer à la page suivante.
Bitte ausfalten und die nächste Seite lesen. / Si raccomanda di dischiudere e leggere la pagina successiva.
Vouw de volgende pagina uit en lees door. / Cerciórese de desplegar y de leer la página siguiente.
Vik ut och läs igenom nästa sida också. / Não deixe de abrir e ler a próxima página.
4. Do not oil the cassette mechanism.
5. Always remove the cassette from the mechanism when not in use. Exposure to direct
sunlight, extreme temperatures or high
humidity may damage cassettes.
6. Always ensure that cassette tapes are in
good condition prior to use.
AB243R/AB243RG
2
Page 3
@%#$
2537468
1
09!
¥
Cassette Insertion Slot / Fente d’insertion de la cassette
Cassettenschacht / Vano di inserimento cassetta
Cassette-insteekgleuf / Ranura de inserción del casete
Kassettfack / Abertura de inserção de cassete
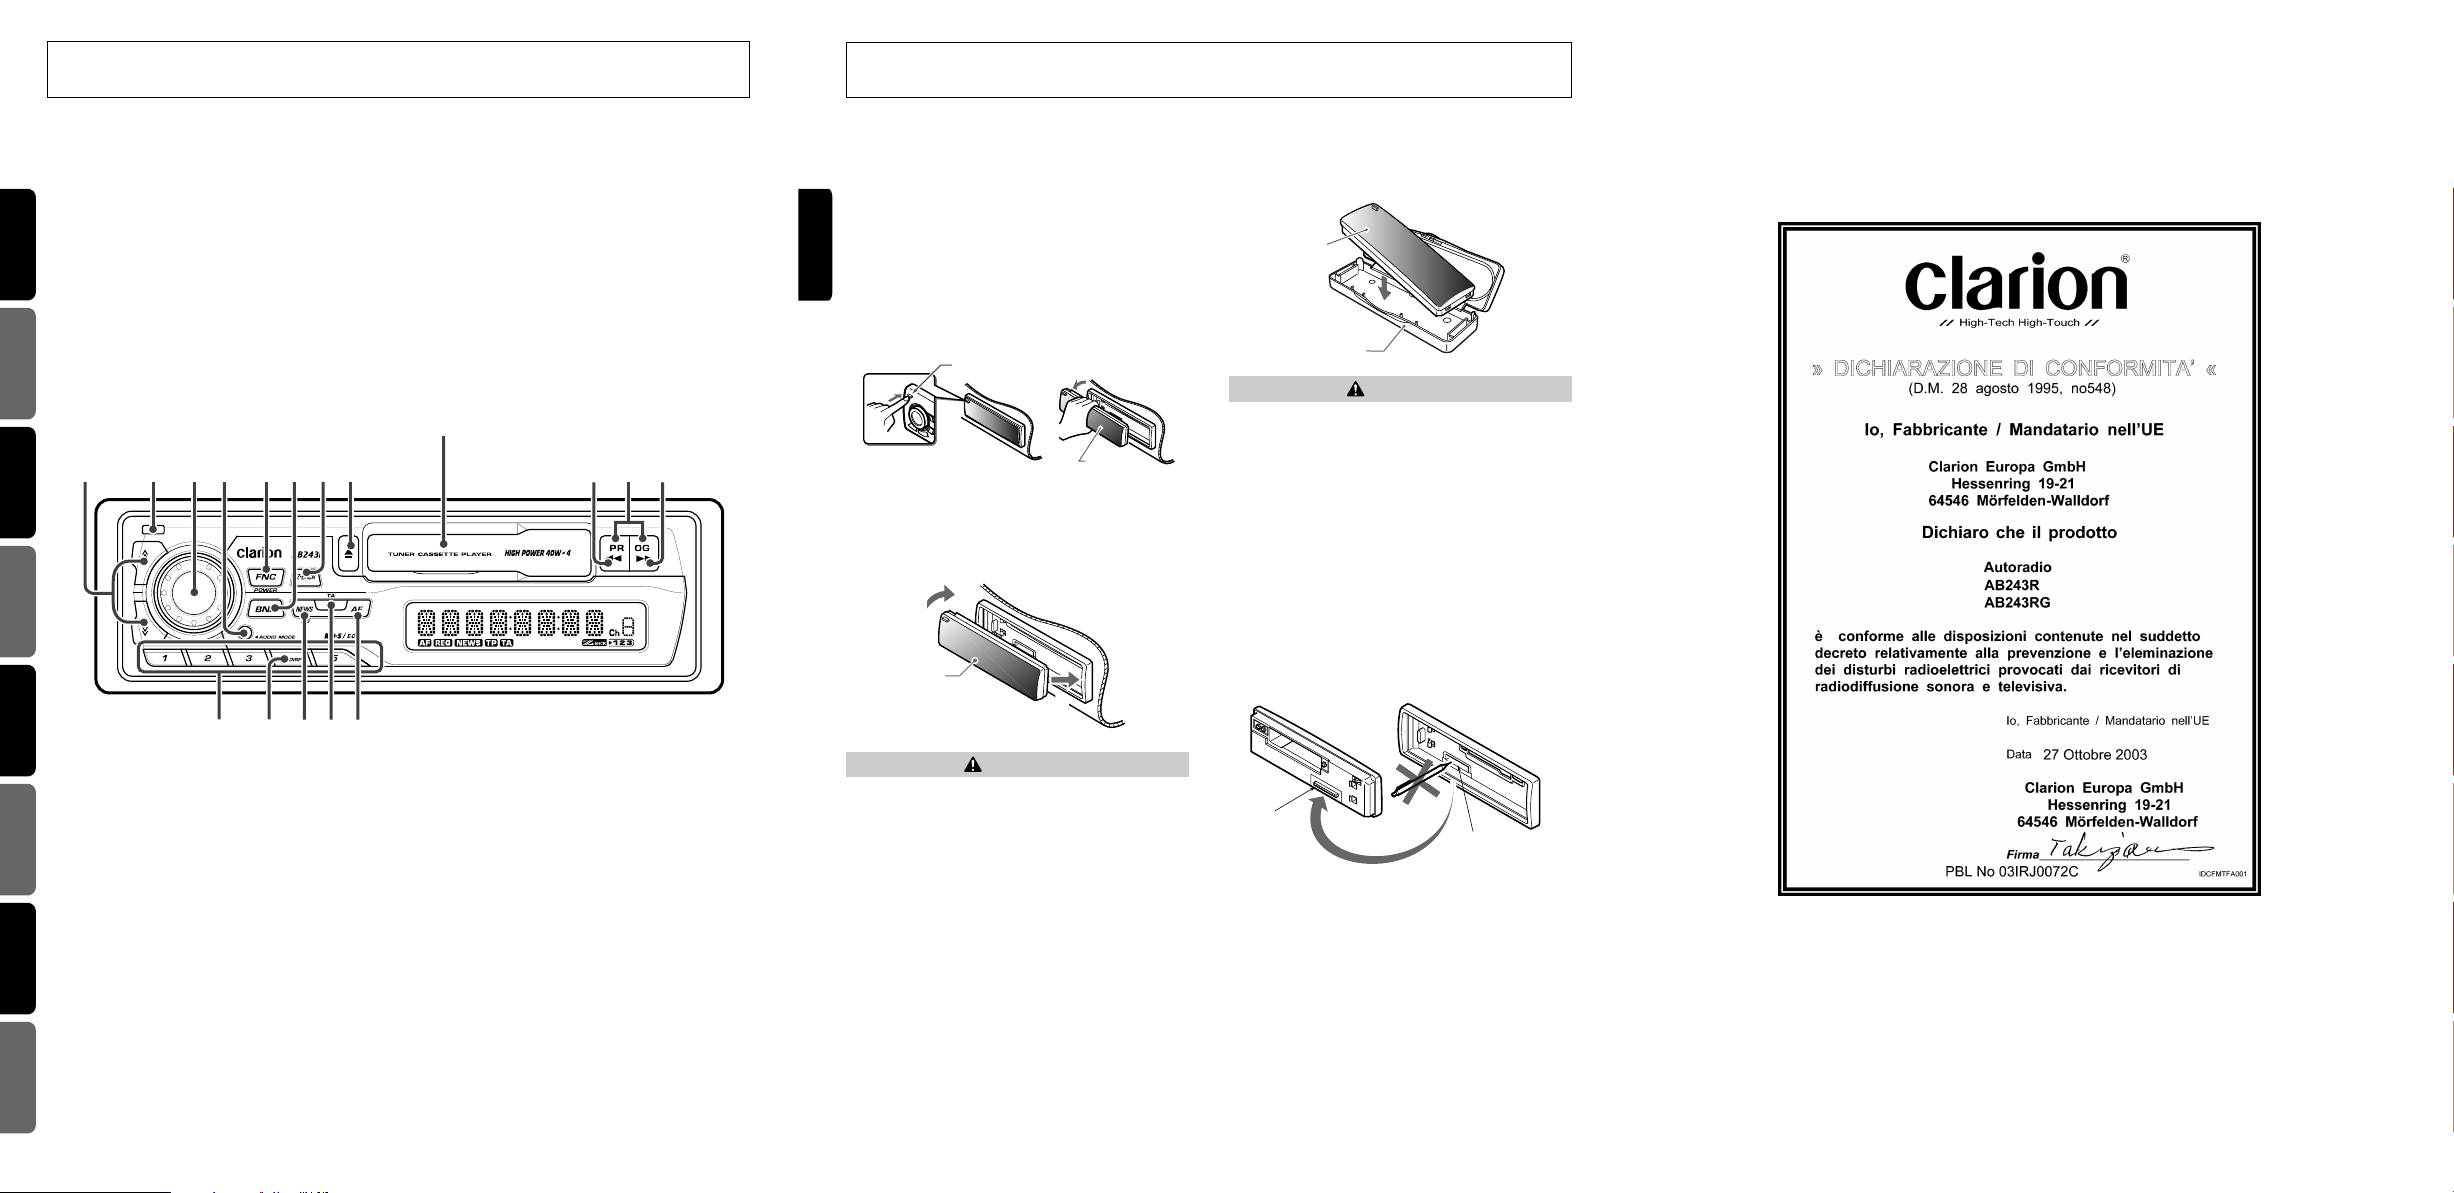
CONTROLS / COMMANDES / BEDIENUNGSELEMENTE / COMANDI
DCP Rear Panel Main Unit Front
Main unit connector
DCP
connector
DCP
DCP case
DCP
2.
1.
DCP
DCP Release button 2
2.
BEDIENINGSORGANEN / CONTROLES / REGLAGE / CONTROLOS
3. D.C.P. (Detachable Control Panel)
Note: Be sure to unfold this page and refer to the front diagrams as you read each chapter.
Remarque: Veuillez déplier cette page et vous référer aux schémas quand vous lisez chaque chapitre.
Hinweis: Bitte diese Seite ausfalten und beim Lesen der einzelnen Kapitel die Zeichnungen auf der ersten Seite beachten.
Nota: Assicurarsi di aprire questa pagina e fare riferimento a questi diagrammi quando si legge ciascun capitolo.
Opmerking:
English Français Deutsch Italiano
Nota: Cuando lea los capítulos, despliegue esta página y consulte los diagramas.
Observera: Vik ut denna sida för att kunna överblicka illustrationerna som hör till varje kapitel.
Nota: Lembre-se de abrir esta página e consultar os diagramas frontais durante a leitura de cada capítulo.
Vouw deze pagina uit en zie tevens de afbeeldingen van het voorpaneel tijdens het doorlezen van de volgende hoofdstukken.
MAIN UNIT / APPAREIL PRINCIPAL / HAUPTGERÄT / APPARECCHIO PRINCIPALE
HOOFDAPPARAAT / UNIDAD PRINCIPAL / BILSTEREO / APARELHO PRINCIPAL
Nederlands
The control panel can be detached to prevent
theft. When detaching the control panel, store it
in the included DCP case to prevent scratches.
We recommend taking the detachable control
panel with you when leaving the car.
English
Removing the DCP
1. Turn the power off.
2. Press the DCP release button 2.
The DCP is unlocked.
*
3. Remove the DCP.
Attaching the DCP
Insert the DCP into the right side of the main unit
and press the left side to lock it.
Storing the DCP in the DCP Case
Hold the DCP, in the orientation as shown in the
figure below, and put it into the supplied DCP case
(Ensure the DCP is in the correct orientation.)
CAUTION
The DCP can easily be damaged by shocks.
•
After removing it, place it in a protective
case and be careful not to drop it or subject
it to strong shocks.
When the release button is pressed and the
•
DCP is unlocked, the car’s vibrations may
cause it to fall. To prevent damage to the
DCP, always store it in a protective case
after detaching it.
The rear connector that connects the main
•
unit and the DCP is an extremely important
part. Be careful not to damage it by pressing
on it with fingernails, pens, screwdrivers, etc.
Español Svenska
Português
3
AB243R/AB243RG AB243R/AB243RG
CAUTION
DO NOT insert the DCP from the left side.
Doing so may damage it.
4
Note:
If the DCP is dirty, wipe off the dirt with a soft, dry cloth only.
•
85
AB243R/AB243RG
Page 4

AB243R/AB243RG
1 Up/Down ( and ) Buttons
2 Release Button
3 Rotary knob
4 A-M (Audio Mode) Button
5 POWER Button
FNC (Function) Button
6 BAND Button
7 Z-Ehcr (Z-enhancer)
8 Eject (Q) Button
9 Rewind Button (a)
0 PROG (Programme Selector) Button
! Fast Forward Button (d)
@ AF (Alternate Frequency) Button
# TA (Traffic Announcement) Button
$ NEWS Button
AS (Auto Store) Button
% DISP (Display Selector) Button
¥ Preset Buttons
5
English
4. BUTTON TERMINOLOGY
Note: Be sure to read this chapter by referring to the front diagrams in chapter 2. CONTROLS on page 3 (unfold).
Display Items
: Alternative frequency indication
: Regional indication
: Information indication
: Traffic announcement indication
: Traffic programme indication
Z-Enhancer Plus indication
Preset channel indication (1 to 5)
Page 5

AB243R/AB243RG
When this unit is turned on, starting and stopping the engine of a car with its volume raised
to the maximum level may harm your hearing.
Be careful about adjusting the volume.
Turning on the power and adjusting
the volume
1) Press the POWER button 5.
*
To turn the power on and off, press the POWER
button.
2) Tur ning the Rotary knob 3 clockwise
increases the volume; turning it counterclockwise decreases the volume.
*
The volume level is from 0 (minimum) to 33 (maximum).
Setting the Z-enhancer
This unit comes with 3 types of sound tone
effects stored in memory. Select the one you
prefer.
*
The factory default setting is “OFF”.
Each time you press Z-EHCR button
7, the tone
effect changes in the following order:
“Z-EHCR 1” ➜ “Z-EHCR 2” ➜ “Z-EHCR 3” ➜
“OFF” ➜ “Z-EHCR 1”...
• Z-EHCR 1 : bass emphasized
• Z-EHCR 2 : treble emphasized
• Z-EHCR 3 : bass and treble emphasized
• OFF : no sound effect
Adjusting the tone
Press A-M button 4 and select the item to
adjust. Each time you press A-M button 4, the
item changes in the following order:
“BASS 0” ➜ “TREB 0” ➜ “BAL 0” ➜ “FAD 0”
➜ Function mode...
Adjusting the bass
1. Press A-M button 4 and select “BASS”.
2. Tu rning the Rotary knob 3 clockwise
emphasizes the bass; turning it counterclockwise attenuates the bass.
*
The factory default setting is “0”. (Adjustment
range: –6 to +6)
3. When the adjustment is complete, press A-M
button 4 several times until the function
mode is reached.
Adjusting the treble
1. Press A-M button 4 and select “TREB”.
2. Tu rning the Rotary knob 3 clockwise
emphasizes the treble; turning it counterclockwise attenuates the treble.
*
The factory default setting is “0”. (Adjustment
range: –6 to +6)
3. When the adjustment is complete, press A-M
button 4 several times until the function
mode is reached.
Adjusting the balance
1. Press A-M button 4 and select “BAL”.
2. Tu rning the Rotary knob 3 clockwise
emphasizes the sound from the right speaker; turning it counterclockwise emphasizes
the sound from the left speaker.
*
The factory default setting is “0”. (Adjustment
range: L9 to R9)
3. When the adjustment is complete, press A-M
button 4 several times until the function
mode is reached.
Adjusting the fader
1. Press A-M button 4 and select “FAD ”.
2. Tu rning the Rotary knob 3 clockwise
emphasizes the sound from the front speakers; turning it counterclockwise emphasizes
the sound from the rear speakers.
*
The factory default setting is “0”. (Adjustment
range: F9 to R9)
3. When the adjustment is complete, press A-M
button 4 several times until the function
mode is reached.
6
English
5. OPERATION
Basic Operations
Note: Be sure to read this chapter by referring to the front diagrams
in chapter 2. CONTROLS on page 3 (unfold).
CAUTION
Page 6

Switching display
While pressing the BAND button 6, press the
DISP button % to select the desired display.
The display switches in the following order:
Main ➜ Clock (CT) ➜ Main ...
7
English
AB243R/AB243RG
Basic Operations
*
If the display is changed by other button operation
when the clock (CT) is displayed, the clock display
returns automatically after the operation.
*
The example shows the display in radio mode.
Radio Operations
Listening to the radio
1) To tune in a station, first use the BAND but-
ton 6 to select FM (FM1, FM2, FM3, FM4)
or AM (MW/LW).
The band switches as follows each time the
BAND button 6 is pressed:
FM1 ➜ FM2 ➜ FM3 ➜ FM4 ➜ AM ➜ FM1
(The FM1, FM2, FM3 and FM4 bands are
provided so that a maximum of 20 FM stations can be preset, but the reception frequency range is the same for all four.)
2) Press the up or down button 1. Tuning auto-
matically stops at a broadcasting frequency.
(Seek tuning)
Seek tuning
There are two types of seek tuning: DX seek, in
which receivable stations are tuned in order, and
Local seek, in which only stations with good
reception are tuned in.
DX seek
1)
Press the BAND button 6to select the band.
2) Press the up or down button 1. “DX”
appears in the display, and tuning automatically stops at a broadcasting frequency.
Local seek
1)
Press the BAND button 6to select the band.
2) Press the up or down button 1 for 1second
or longer. “LO” appears in the display, and
tuning automatically stops at a broadcasting
frequency.
Manual tuning
1)
Press the BAND button 6to select the band.
2) Press the BAND button 6 for 2 seconds or
longer.
3) “MAN” appears in the display, and manual
tuning is possible.
4) Use the
up or down
buttons 1 to tune in sta-
tions.
*
The mode automatically switches back to the
seek tuning mode after 7 seconds.
Page 7

8
English
AB243R/AB243RG
Radio Operations RDS (Radio Data System)
Operations
Tuning in preset stations
1) Press the BAND button 6 to select the band.
2) Use the Preset buttons ¥ to select the
desired station.
Preset memory
A total of 25 stations (5 each for the FM1, FM2,
FM3, FM4 and AM (MW/LW) bands) can be
stored in the preset memory.
Note:
•
When a station is stored in the preset memory, the
station previously stored at that position is cleared.
Presetting stations manually
1) Press the BAND button 6 to select the band
for the station to be preset.
2) Use the
up or down
buttons 1 to tune in the
station to be preset.
3) Press the Preset buttons ¥ at which you
want to store the station for 2 seconds or
longer.
Auto store
1) Press the BAND button 6 to select the band
for the stations to be preset.
2) Press the AS button $ for 2 seconds or
longer. Stations with strong signals are automatically stored in the preset memory.
*
If there are fewer than 5 storable stations, the previously stored stations remain at the direct buttons for which no new stations were stored.
About RDS
*
The PS (Programme Service) name is displayed
when an RDS station is tuned in.
*
“ALARM” appears if an emergency broadcast is
received while an RDS station is tuned in.
The emergency broadcast is automatically presented
at the preset volume level.
*
The “AF” indicator on the display starts flashing if the
RDS station’s signal becomes weak, and stops flashing if the signal becomes stronger.
Switching to the RDS mode
Press the AF button @ to turn the RDS mode on
and off.
*
The “AF” indicator lights (or flashes) when the RDS
mode is turned on.
Note:
•
The AF mode can only be turned on and off in the
RDS mode.
Regional Programme (REG) mode
With this mode, it is possible to automatically follow AF stations.
REG on: Only a certain broadcast is received.
REG off: When you enter a different area while
receiving a regional broadcast in the
original area, a regional broadcast in
the new area is tuned in.
Press the AF button @ for 2 seconds or longer
to turn the REG function on and off.
When on, the “REG” indicator lights in the display.
*
The REG mode can only be turned on and off in the
RDS mode.
Affiliated program search
Use this function to follow RDS stations (regional stations only).
1) Press one of the Preset buttons ¥ to tune in
a preset regional station.
2) Press the AF button @ for 2 seconds or
longer to turn off the REG function.
3) Press the same Preset buttons ¥ again to
start searching and tune in another regional
station.
*
This operation may not work in some areas.
Page 8

9
English
AB243R/AB243RG
RDS EON (Enhanced Other Networks)
information
When an RDS station’s EON data is received, EON
is automatically activated. In the traffic announcement standby mode (when the TA mode is on), the
traffic announcement is tuned in, even if it is on a
station other than the one currently tuned in.
*
Some countries and radio stations do not broadcast
EON data.
NEWS function
With this function, broadcasts of a specific programme type can be tuned in.
Selecting NEWS
1) When you press the NEWS button $, “NEWS”
lights and NEWS appears in the display. The
unit enters the NEWS standby mode.
2) When you press the NEWS button $ again,
cancelling NEWS standby mode.
*
The factory setting is “off”
TA (Traffic Announcement) function
With this function, when a traffic announcement
starts, it is tuned in with priority.
Press the TA button #. The “TA ” indicator lights
and a traffic announcement broadcast station is
searched for.
To cancel, press the TA button # again. Note,
however, that if the TA button # is pressed while
a traffic announcement is being received, the
traffic announcement is canceled and the traffic
announcement standby mode is set.
*
If a traffic announcement broadcast station is found,
the traffic announcement standby mode is set.
*
When a traffic announcement starts, “TRA INFO” is
displayed, after which the PS (Programme Service)
name or frequency appears.
*
During traffic announcements, the loudness function
is turned off and the radio is automatically set to the
preset volume.
*
When the TA button is pressed while tuned to a station
that does not broadcast traffic announcements, a traffic
announcement broadcast station is searched for.
Auto store while “TA” is lit or flashing
If the AS button $ is pressed for more than 2
seconds or longer while the “TA” indicator is lit
or flashing, only traffic announcement broadcast
stations are automatically stored.
RDS (Radio Data System) Operations
Setting the volume for traffic
announcements and emergency
broadcasts
1) Press the TA button # for 2 seconds or
longer.
2) Use the Up/Down buttons 1 to adjust the
volume.
*
This volume settings can only be adjusted in the
FM radio mode.
Page 9

10
English
AB243R/AB243RG
Loading tapes
Insert the cassette tape horizontally so that the
side where the tape can be seen is on the right.
Ejecting cassette tapes
When you press Eject button 8, the cassette
tape is ejected.
Using Fast Forward/Rewind
1) During top side playback (playback direction
is toward the right):
d :Press Fast forward button ! until it
locks.
a :Press Rewind button 9 until it locks.
2) During bottom side playback (playback direction is toward the left):
a :Press Rewind button 9 until it locks.
d :Press Fast forward button ! until it
locks.
3) Release
Press the opposite button – either 9 or !.
Changing the Programme
(Running Direction)
Press the PROG button 0 both the Fast forward
button ! and Rewind button 9 together at the
same time. Playback is switched automatically
to the other side of tape.
Tape Operations
Page 10

11
English
AB243R/AB243RG
If a display other than one of the displays above appears and the problem persists, turn the power off and contact
your store of purchase.
Problem Cause Measure
Power does not turn on
(or no sound is produced).
Fuse is blown.
Replace with a fuse of the same amperage as the old fuse.
Connections are improper.
Read the connection instructions once
more and connect carefully.
Sound quality is poor.
Playback head is dirty.
Use a cleaning tape, etc. to clean
head.
6. TROUBLESHOOTING
Radio Section
Tuning System……PLL synthesizer tuner
Receiving Frequencies……
FM : 87.5 to 108 MHz (0.05 MHz steps)
MW : 531 to 1,602 kHz (9 kHz steps)
LW : 153 to 279 kHz (3 kHz steps)
Tape Deck Section
Cassette Type……Compact Audio Cassette
Playback System
…… Auto reversing 4-track, 2-channel
stereo cassette tape playback (monaural playback also possible)
Frequency Response
…… 30 Hz to 15 kHz (±3 dB)
Wow & Flutter (WRMS)……0.1%
S/N Ratio……120 µs (normal) 53 dB
Tape Types……Normal
General
Output Power (DIN45324, +B=14.4V)
…… 4 × 22 W
Power Supply Voltage
…… DC 14 V (10.8 to 15.6 V allowable),
negative ground
Power Consumption……Less than 10 A
Speaker Impedance……4 Ω (4 to 8 Ω allowable)
Auto Antenna Rated Current
…… 0.5 A or less
Weight……1.3 kg
Dimensions
…… 178 mm Width × 50 mm Height × 155
mm Depth
Notes:
•
Short-circuiting the power antenna terminal or using a
power antenna with a current exceeding the rated
current can damage internal circuits. Always use with
the rated current.
•
Specifications and design are subject to change without notice for further improvement.
50 mm
58 mm
178 mm
188 mm
155 mm
7. SPECIFICATIONS
 Loading...