

Page 1

4 Monitor, climate, audio, phone and voice-
activated control systems
Safety note....................................................... 4-2
Control panel button functions ......................... 4-2
How to use multi function button................ 4-4
Start-up screen (model with Navigation
system) ....................................................... 4-5
Vehicle information and setting........................ 4-5
How to use “STATUS” button ...................... 4-5
How to use “INFO” button .......................... 4-5
Warning display .......................................... 4-9
How to use “SETTING” button................... 4-10
“AUDIO” settings...................................... 4-12
Rear view monitor .......................................... 4-17
How to read the displayed lines................ 4-18
Adjusting the screen ................................. 4-18
Operating tips........................................... 4-18
Ventilators...................................................... 4-19
Automatic climate control............................... 4-21
Automatic operation.................................. 4-22
Manual operation...................................... 4-23
Ambient temperature ................................ 4-24
Rear control button (if so equipped) ......... 4-25
Operating tips........................................... 4-25
In-cabin microfilter ................................... 4-25
Servicing climate control ........................... 4-25
Audio system ................................................. 4-26
Audio operation precautions ..................... 4-26
Radio ........................................................ 4-26
FM-AM-SATELLITE radio with compact disc
(CD) changer ............................................. 4-34
CD care and cleaning ................................ 4-38
Steering wheel switch for audio control .... 4-38
Audio rear control switch (if so
equipped) ................................................. 4-39
INFINITI mobile entertainment system
(MES) (if so equipped) .............................. 4-40
Antenna .................................................... 4-49
Car phone or CB radio.................................... 4-49
Hands-free phone system............................... 4-50
Pairing procedure...................................... 4-52
Phonebook registration ............................. 4-53
Making a call ............................................ 4-54
Receiving a call......................................... 4-55
During a call ............................................. 4-56
Phone setting............................................ 4-56
Voice-Activated Control System (VACS)........... 4-57
Using the system ...................................... 4-57
System features ........................................ 4-58
List of voice commands............................. 4-59
墌 04.10.8/Y50-D 墍
Page 2

Troubleshooting guide .............................. 4-63
墌 04.10.8/Y50-D 墍
Page 3
SAFETY NOTE CONTROL PANEL BUTTON FUNCTIONS
13
ページ未定
KI3(ディスプレイ)P4-2〜P4-19
WARNING
쐌 Positioning of the heating or air condi-
tioning controls and display controls
should not be done while driving, in order that full attention may be given to
driving operation.
쐌 Do not disassemble or modify this sys-
tem. If you do, it may result in accidents, fire, or electric shock.
쐌 Do not use this system if you notice
any abnormality, such as a frozen
screen or lack of sound. Continued use
of the system may result in accident,
fire or electric shock.
쐌 In case you notice any foreign object in
the system hardware, spill liquid on it,
or notice smoke or smell coming from
it, stop using the system immediately
and contact your nearest INFINITI
dealer. Ignoring such conditions may
lead to accidents, fire, or electric
shock.
6
7
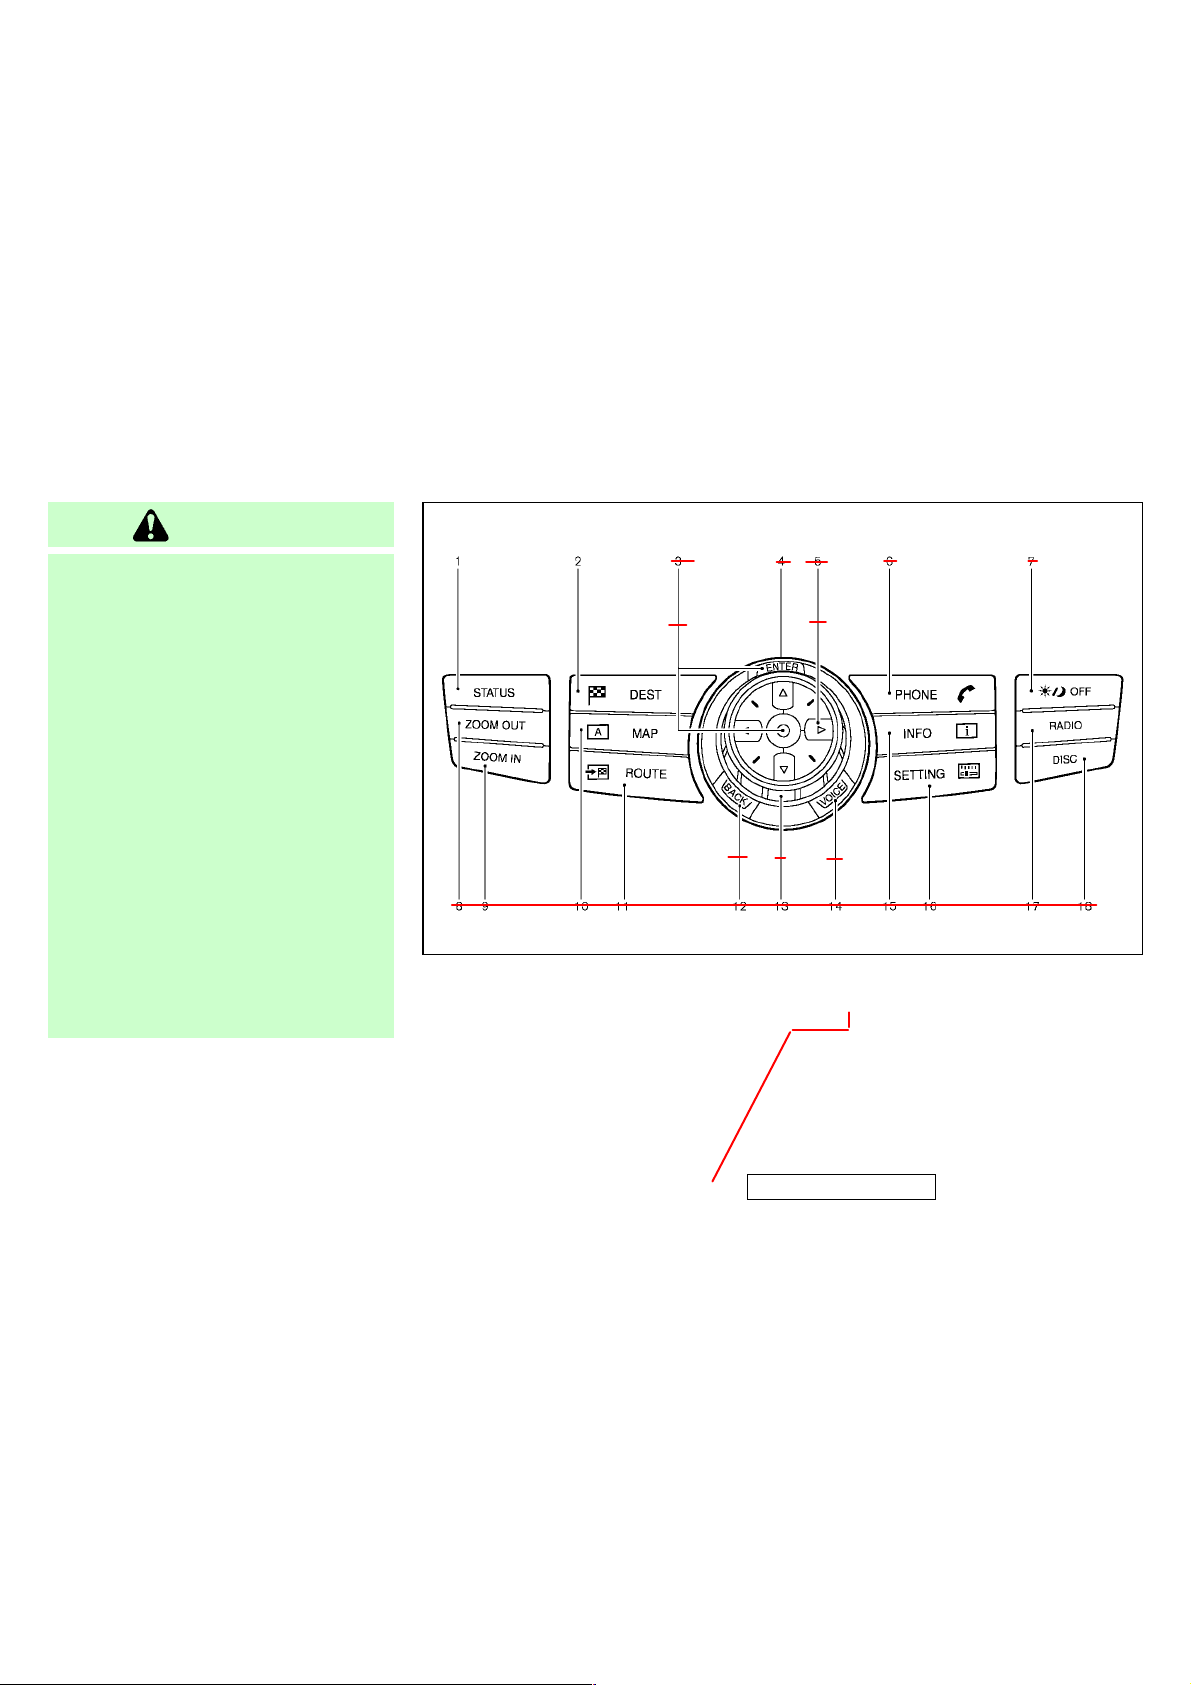
1. “STATUS” status display button (P.x-x)
2, 6, 7, 8, 9. For navigation system con-
3. Multi function switch (P.x-x)
4-2 Monitor, climate, audio, phone and voice-activated control systems
8
trol buttons (Refer to the
separate Navigation Owner’s Manual.)
3
With Navigation system
4. “PHONE” hands-free phone system
button (P.x-x)
5. “ ” brightness control and display
ON/OFF button (P.x-x)
10. “INFO” vehicle information button
(P.x-x)
4
10911
5
12
SAA1095
墌 04.10.8/Y50-D 墍
Icon will be added.
Page 4
11. “SETTING” button (P.x-x)
ページ未定
KI3(ディスプレイ)P4-2〜P4-19
12. “RADIO” AM/FM/CAT band selector
button (P.x-x)
13. “DISC” CD/DVD (if so equipped) se-
lector button (P.x-x)
SR
3
4
5
6
7
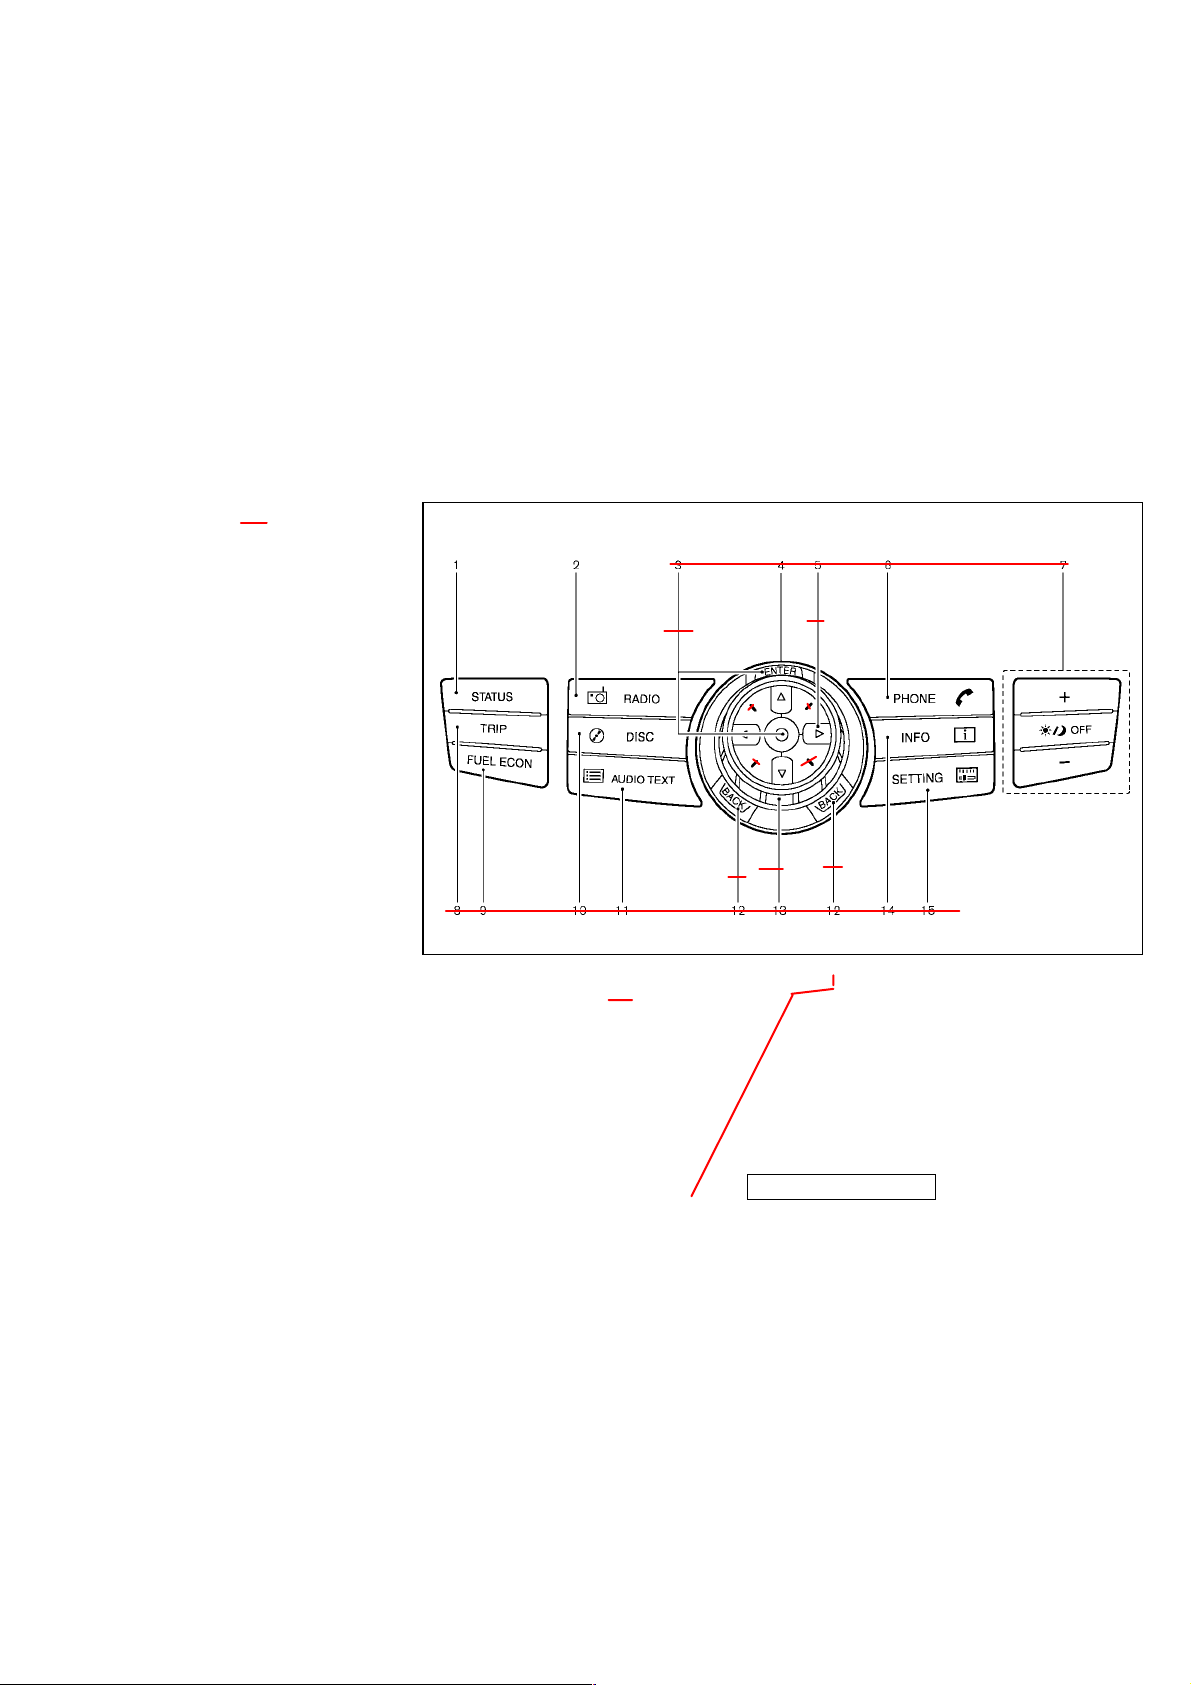
1. “STATUS” status display button (P.x-x)
2. “RADIO” AM/FM/CAT band selector
button (P.x-x)
3. Multi function switch (P.x-x)
4. “PHONE” hands-free phone system
button (P.x-x)
89
Without Navigation system
SR
Monitor, climate, audio, phone and voice-activated control systems 4-3
Icon will be added.
10 11
5. “ ” brightness control and display
ON/OFF button (P.x-x)
6. “TRIP” drive computer button (P.x-x)
7. “FUEL ECON” button (P.x-x)
8. “DISC” CD/DVD (if so equipped) selector button (P.x-x)
墌 04.10.8/Y50-D 墍
SAA1096
Page 5
9. “AUDIO TEXT” display button (P.x-x)
KI3(ディスプレイ)P4-2〜P4-19
10. “INFO” vehicle information button
(P.x-x)
11. “SETTING” button (P.x-x)
When you use this system, make sure the
engine is running.
If you use the system with the engine
not running (ignition ON or ACC) for a
long time, it will use up all the battery
power, and the engine will not start.
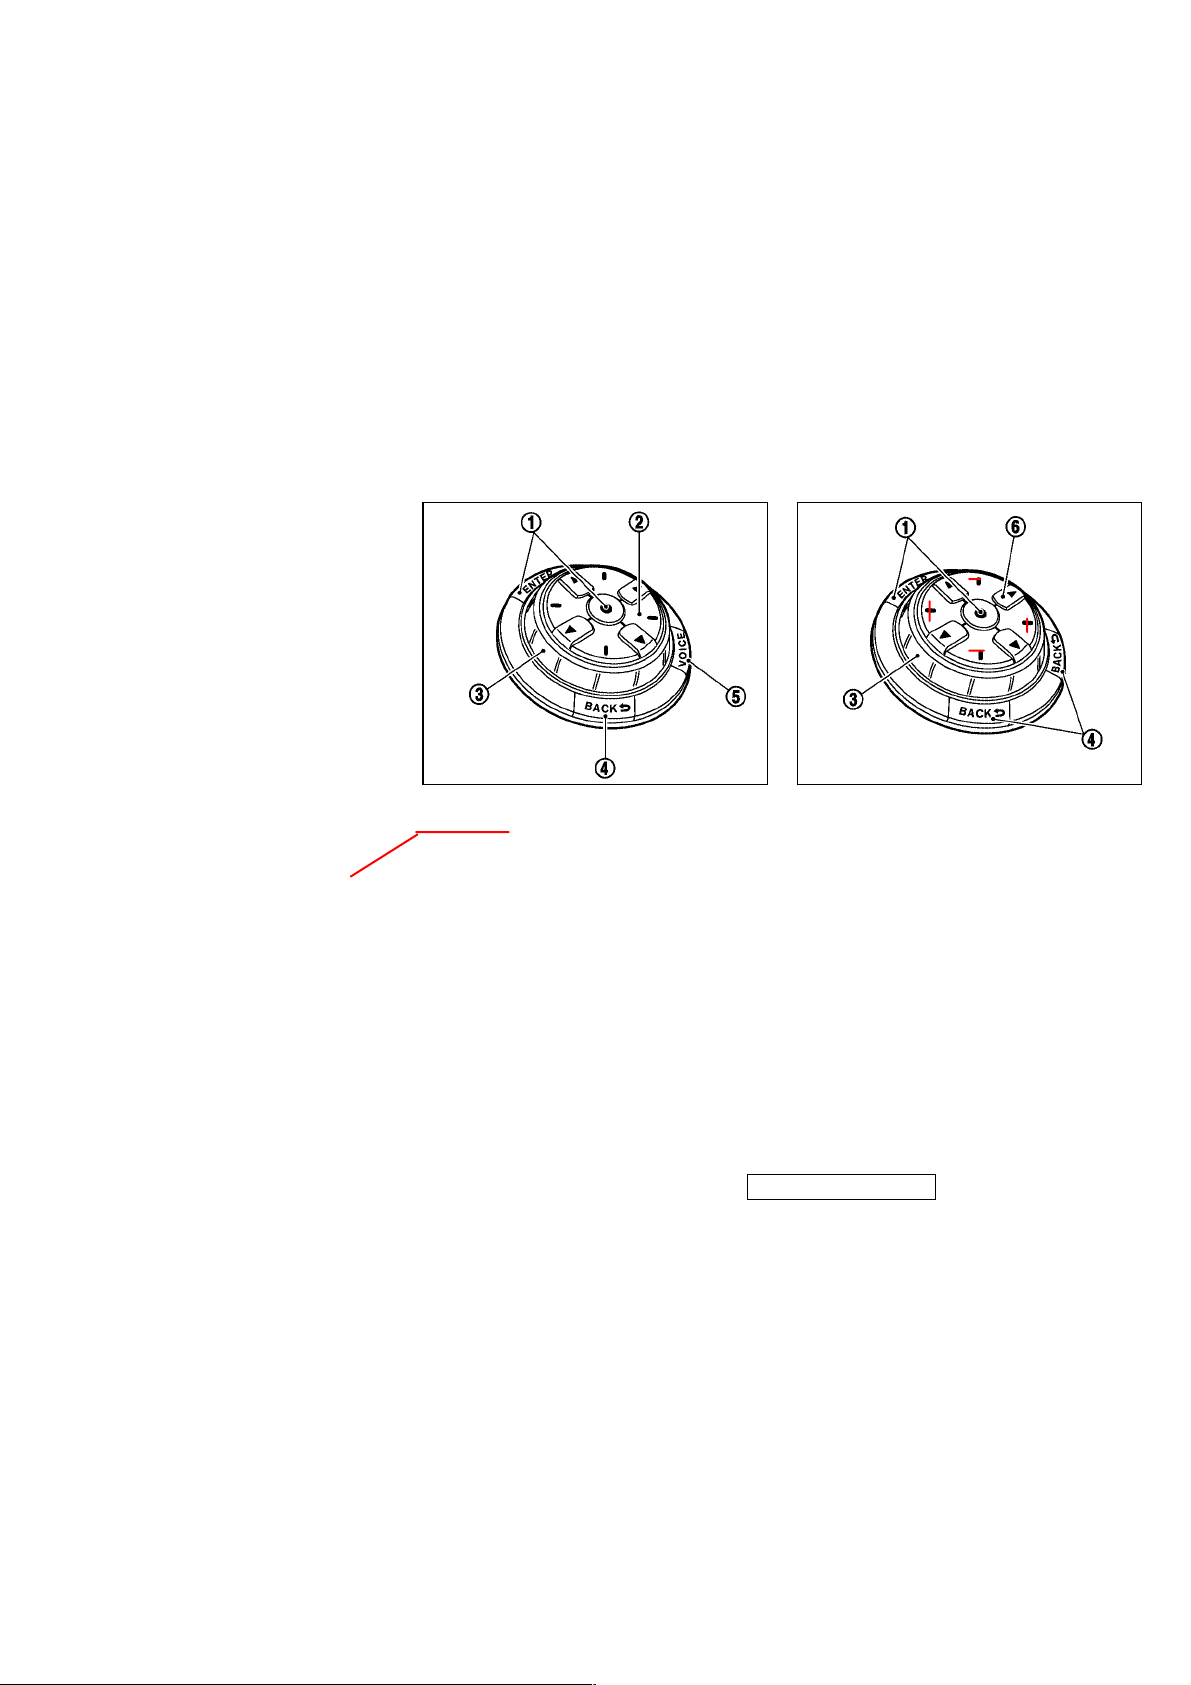
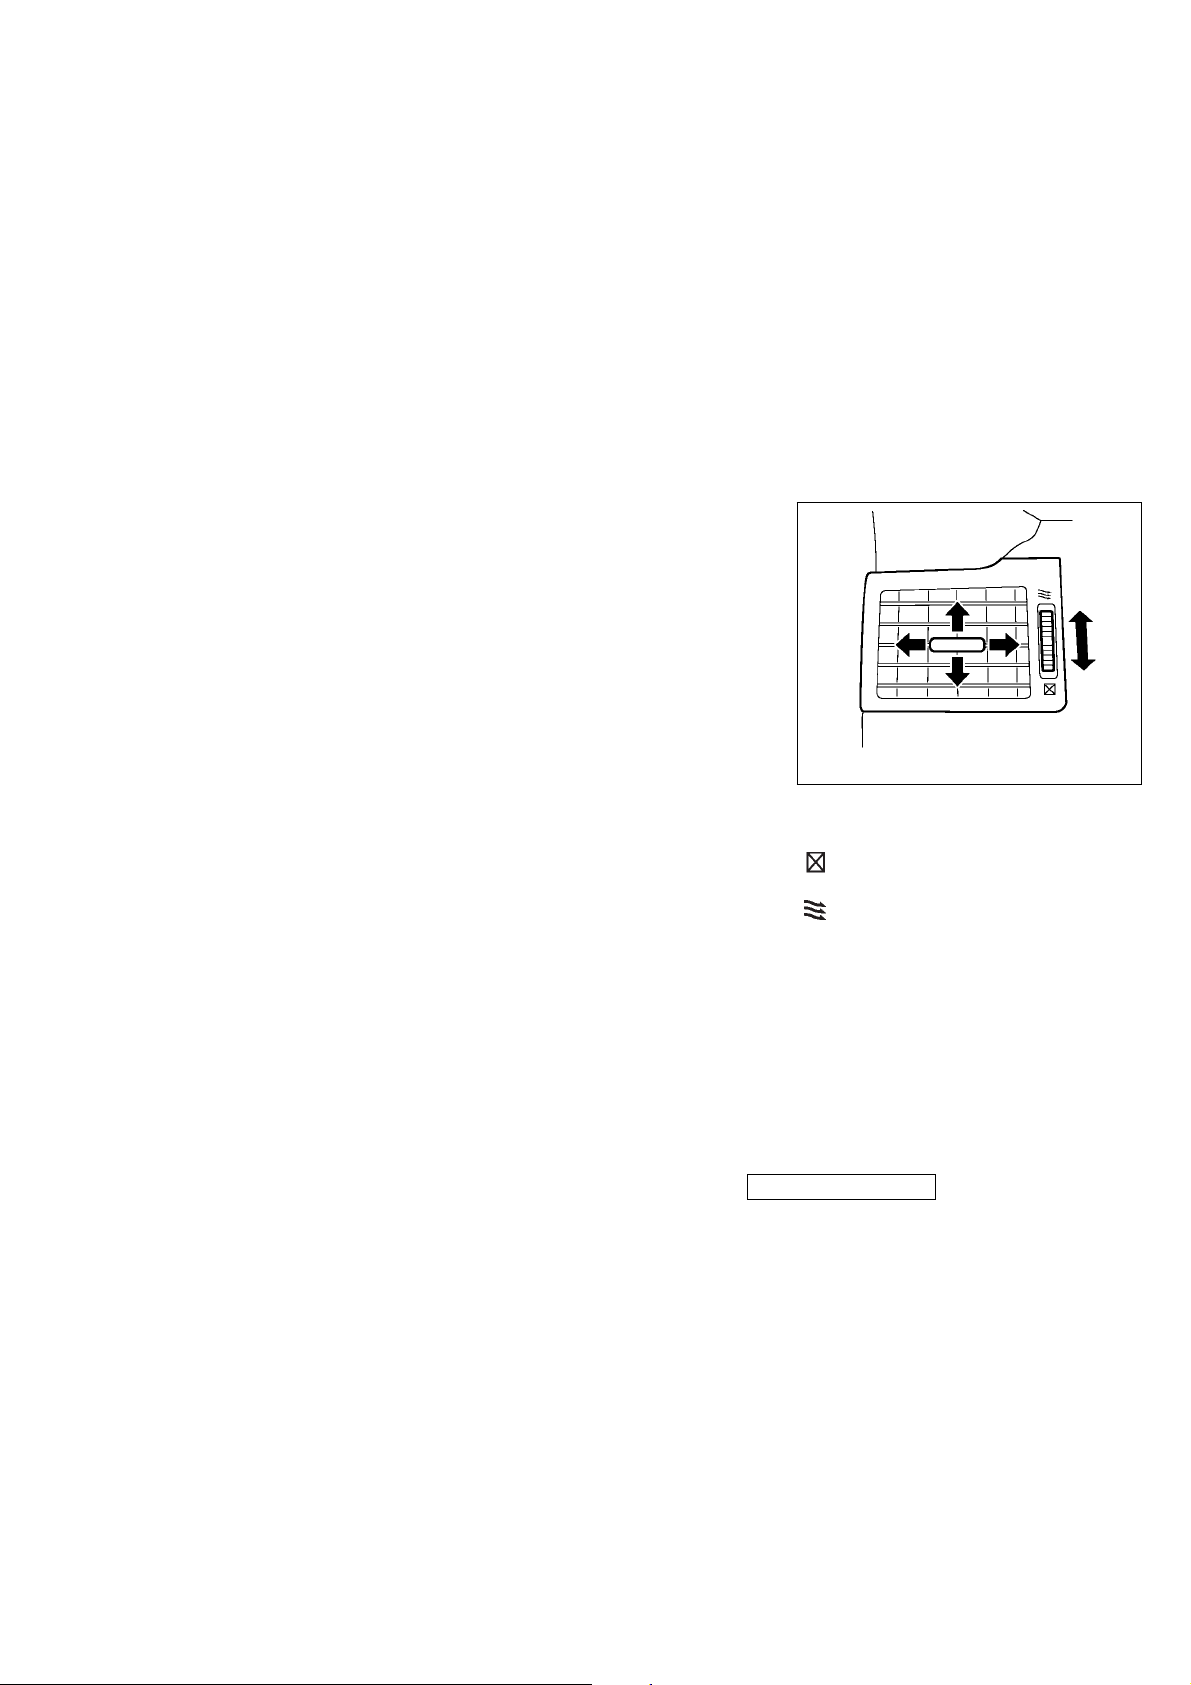
HOW TO USE MULTI FUNCTION
With Navigation system
BUTTON
Choose an item on the display using the
SWITCH
eight-directional switch
directional switch
system) or center dial
“ENTER” button
If you push the “BACK” button
the setup is completed, the setup will be
canceled and/or the display will return to
the previous screen.
After the setup is completed, push the
6
쎻
1
for operation.
쎻
4-4 Monitor, climate, audio, phone and voice-activated control systems
SAA1097
2
(or four-
쎻
without Navigation
3
and push the
쎻
4
before
쎻
“BACK” button
Without Navigation system
ous screen.
For the “VOICE” button
refer to the separate Navigation Owner’s
Manual.
4
and return to the previ-
쎻
쎻
墌 04.10.8/Y50-D 墍
5
functions,
SAA1098
Page 6
[T3] HOW TO USE "BRIGHTNESS CONTROL" BUTTON
KI3(ディスプレイ)P4-2〜P4-19
Push the "-----" button to switch the display brightness to the daytime mode or the nighttime mode.
Push the "-----" button more than 2 seconds to turn the display off. Push the button again more than 2 seconds to turn
the display on.
Display brightness can be adjusted more precisely using the "+/-" button. (Model with Navigation system)
[T3] HOW TO USE "TRIP" / "FUEL ECON" BUTTON
Push the "TRIP" or "FUEL ECON" button to check trip computer information or fuel economy information. (Model with
Navigation system)
For more details, see "How to use INFO button" later in this section.
VEHICLE INFORMATION AND SETTING
HOW TO USE “STATUS” BUTTON
To display the status of the audio, climate
control system, fuel consumption and
navigation system, push the “STATUS”
button. The following information will appear when the “STATUS” button is
pushed.
Audio , Audio and Climate control
system , Audio and fuel consumption ,
Audio and Navigation system (if so
equipped) , Audio
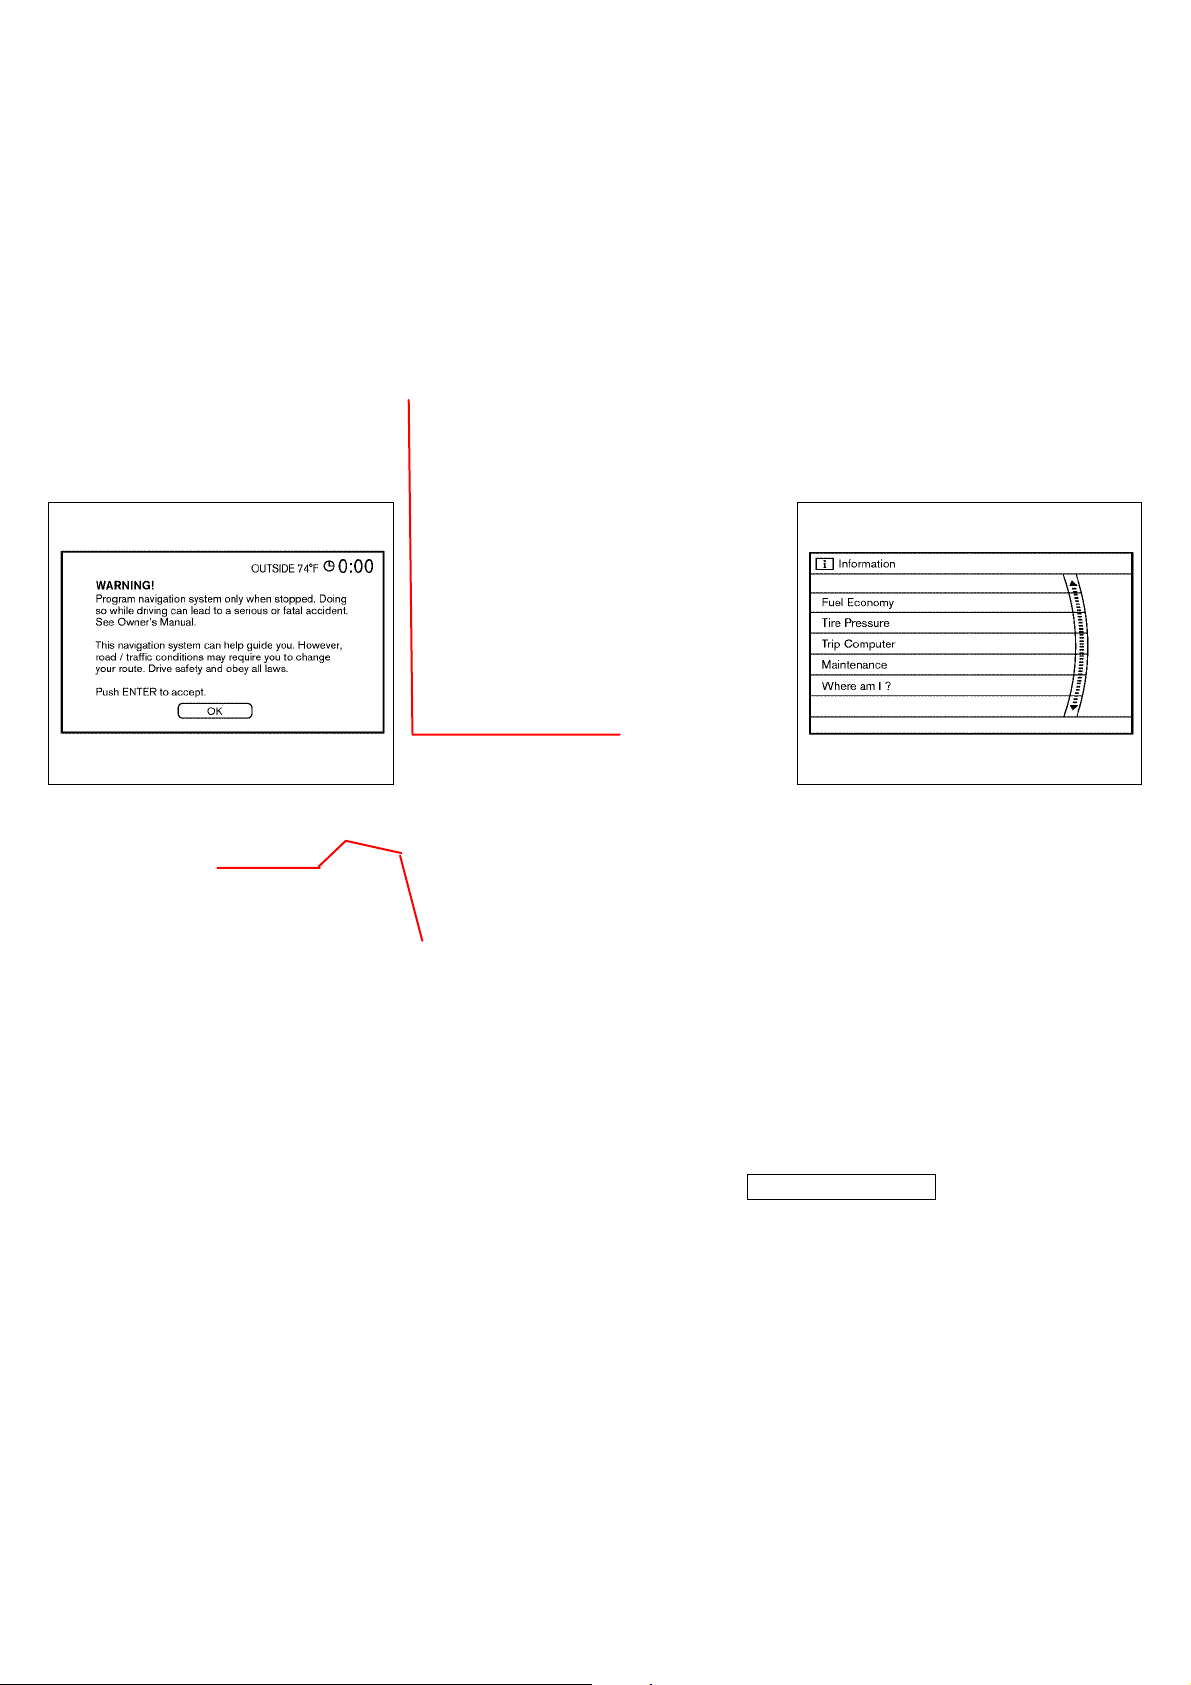
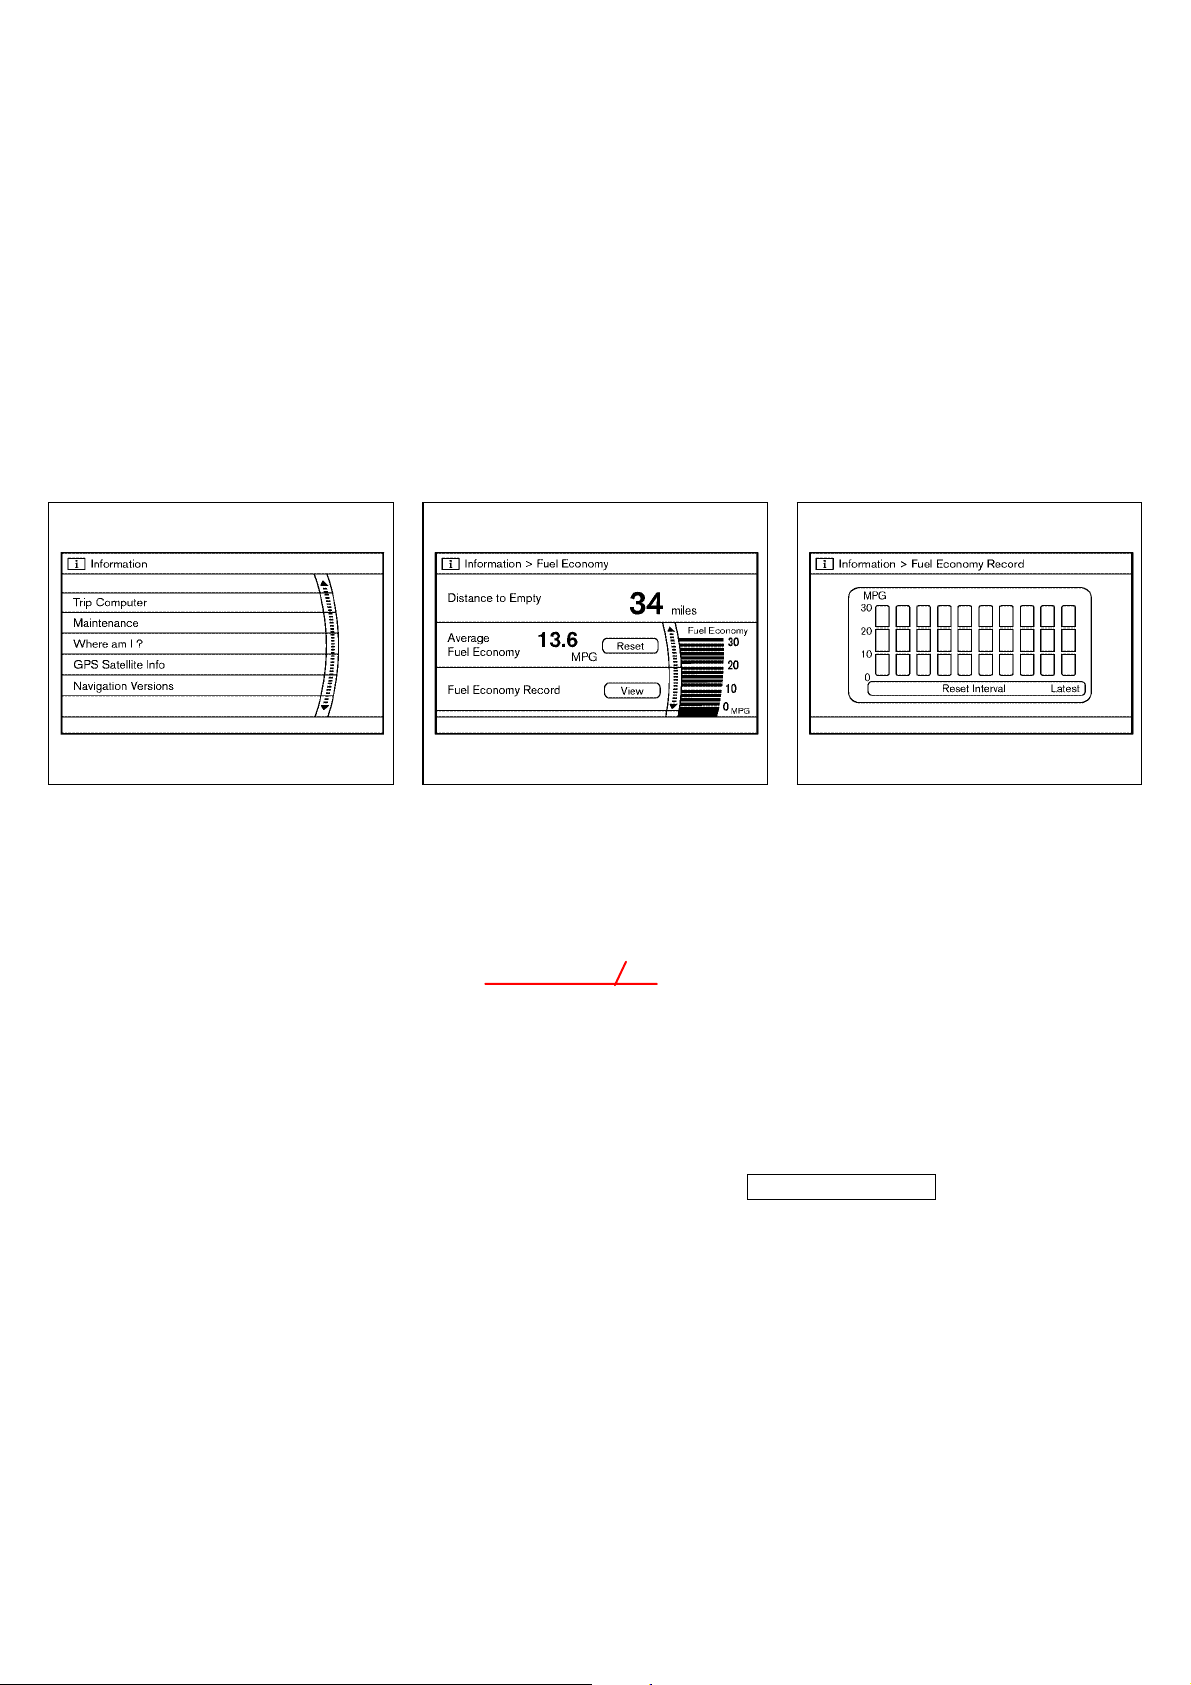
HOW TO USE “INFO” BUTTON
SAA1072 SAA1073
START-UP SCREEN (model with
Navigation system)
When you turn the ignition key to ACC,
the SYSTEM START-UP warning is displayed on the screen. When you read and
agree with the warning, push the “ENTER”
button.
If you do not push the “ENTER” button,
this system will not proceed to the next
step display.
To proceed to the NAVI system, refer to
the separate Navigation system Owner’s
Manual.
The display screen shows vehicle information for your convenience.
The information shown on the screen
should be a guide to determine the condition of the vehicle.
push-button ignition
switch
Monitor, climate, audio, phone and voice-activated control systems 4-5
Vehicle information display
1. Push the “INFO” button on the control
panel.
The screens as illustrated will appear.
2. Choose an item using the multi func-
tion switch and push the “ENTER” button.
3. After viewing or adjusting the informa-
tion on the following screens, push
the “BACK” button to return to the VEHICLE INFORMATION menu.
For the items “Where am I?”, “GPS Satellite Info” and “Navigation Versions”, refer
墌 04.10.8/Y50-D 墍
Page 7
SAA1074 SAA1075 SAA1076
KI3(ディスプレイ)P4-2〜P4-19
to the separate Navigation Owner’s
Manual.
“FUEL ECONOMY” information
Average fuel economy and distance to
empty will be displayed for reference.
To reset the Average Fuel Economy, use
the multi function switch to highlight the
“Reset” key and push the “ENTER”
button.
If the “Fuel Economy Record” key is highlighted with the multi function switch and
the “ENTER” button is pushed, the average fuel consumption history will be
displayed in graph form along with the
average for the previous Reset-to-Reset
4-6 Monitor, climate, audio, phone and voice-activated control systems
period.
View
墌 04.10.8/Y50-D 墍
Page 8
SAA1077 SAA1078
KI3(ディスプレイ)P4-2〜P4-19
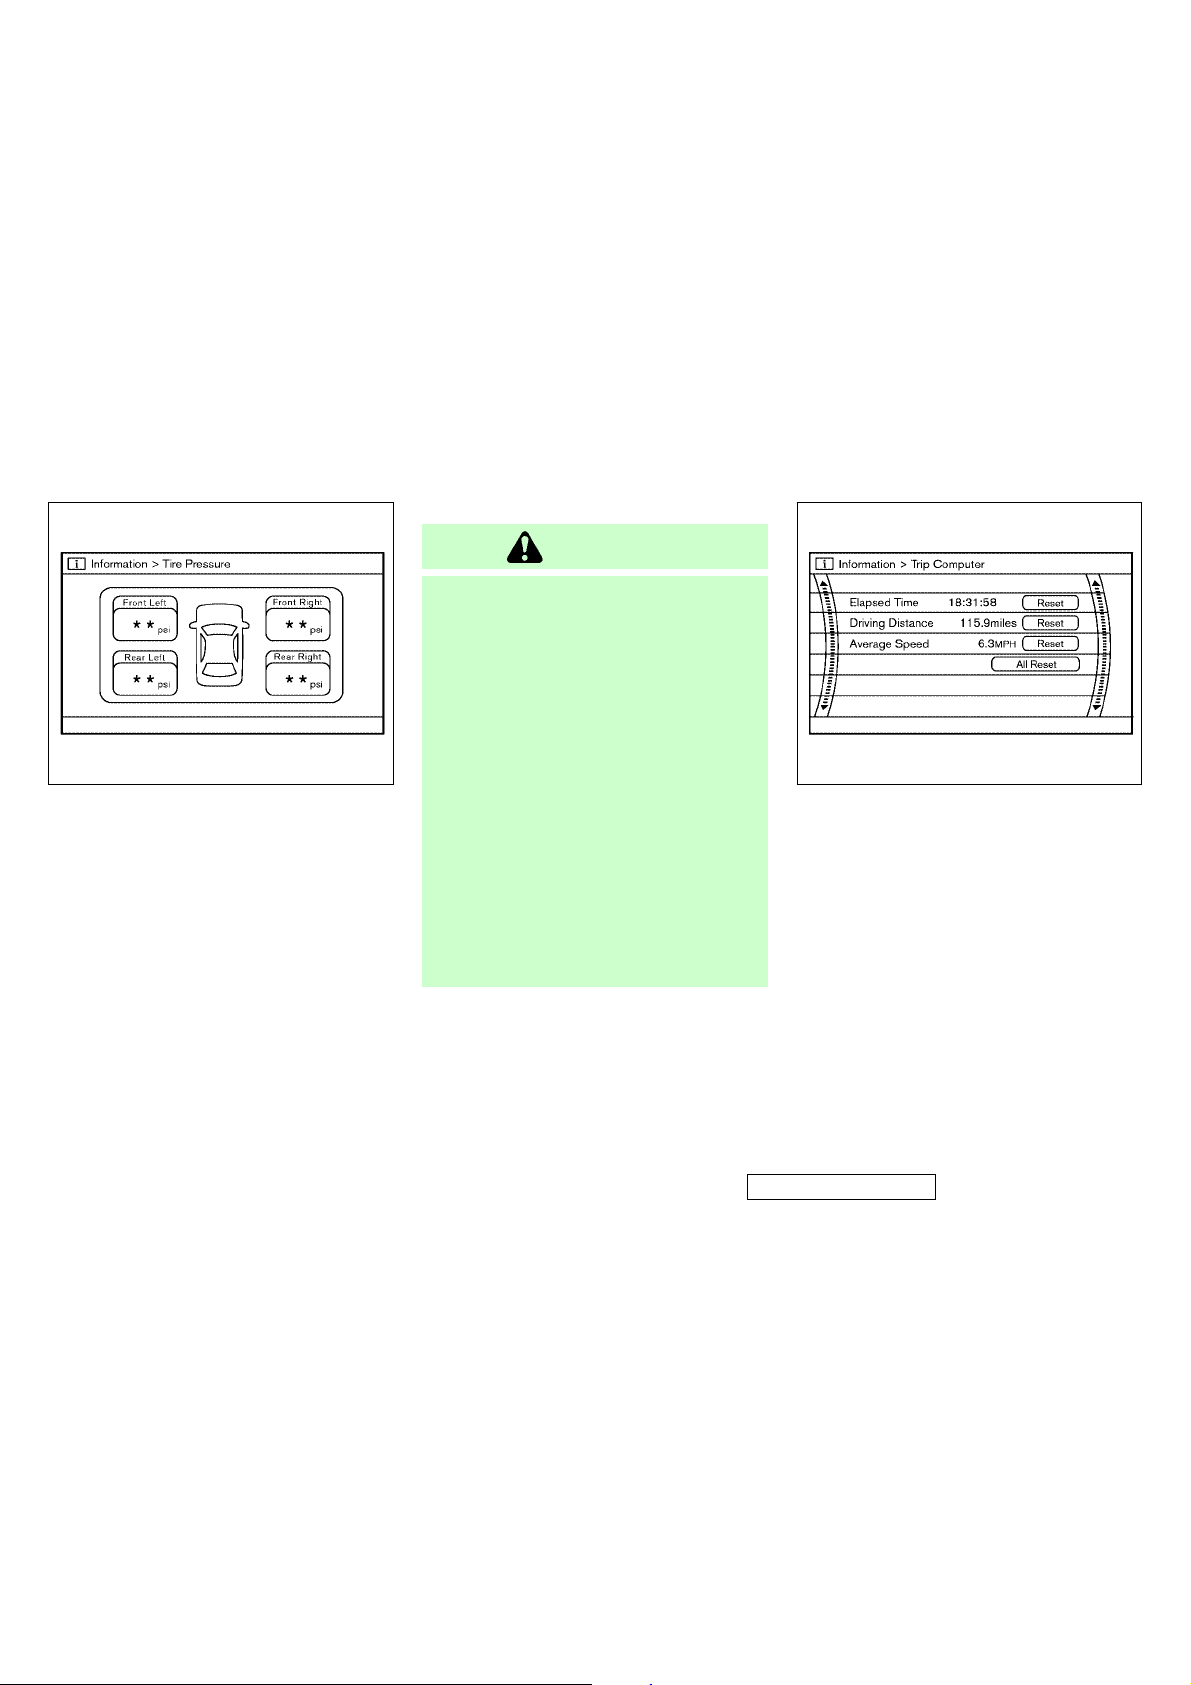
“TIRE PRESSURE” information
Pressure indication in ** psi on the
screen indicates that the pressure is
being measured. After a few driving trips,
the pressures for all 4 tires will be displayed.
In case of low tire pressure, the low tire
pressure warning light will come on
and/or a FLAT TIRE warning is displayed
on the screen:
FLAT TIRE — low tire air pressure
Tire pressure rises and falls depend on
heat by vehicle’s traveling condition and
ambient temperature.
WARNING
쐌 When the low tire pressure warning
light is on and/or a WARNING is displayed on the screen, check all tire
pressures.
Please refer to the “6. In case of emergency” section for repairing.
쐌 If the system is malfunctioning, a
WARNING for tire pressure will be indicated on the display.
To confirm the details, push the “ENTER” button.
쐌 When a spare tire is mounted or a
wheel is replaced, the pressure will not
be indicated and the low tire pressure
warning system will not function. Contact your INFINITI dealer as soon as
possible for tire replacement and/or
system resetting.
Monitor, climate, audio, phone and voice-activated control systems 4-7
“TRIP COMPUTER” information
Elapsed Time, Driving Distance and Average Speed will be displayed.
To reset, use the multi function switch to
highlight the “Reset” key and push the
“ENTER” button immediately before
driving the vehicle.
墌 04.10.8/Y50-D 墍
Page 9
SAA1079 SAA1080
KI3(ディスプレイ)P4-2〜P4-19
4. To return the display to MAINTENANCE
INFO., push the “BACK” button.
Maintenance information display cannot
be operated when the vehicle is moving.
Stop the vehicle in a safe place to see the
information.
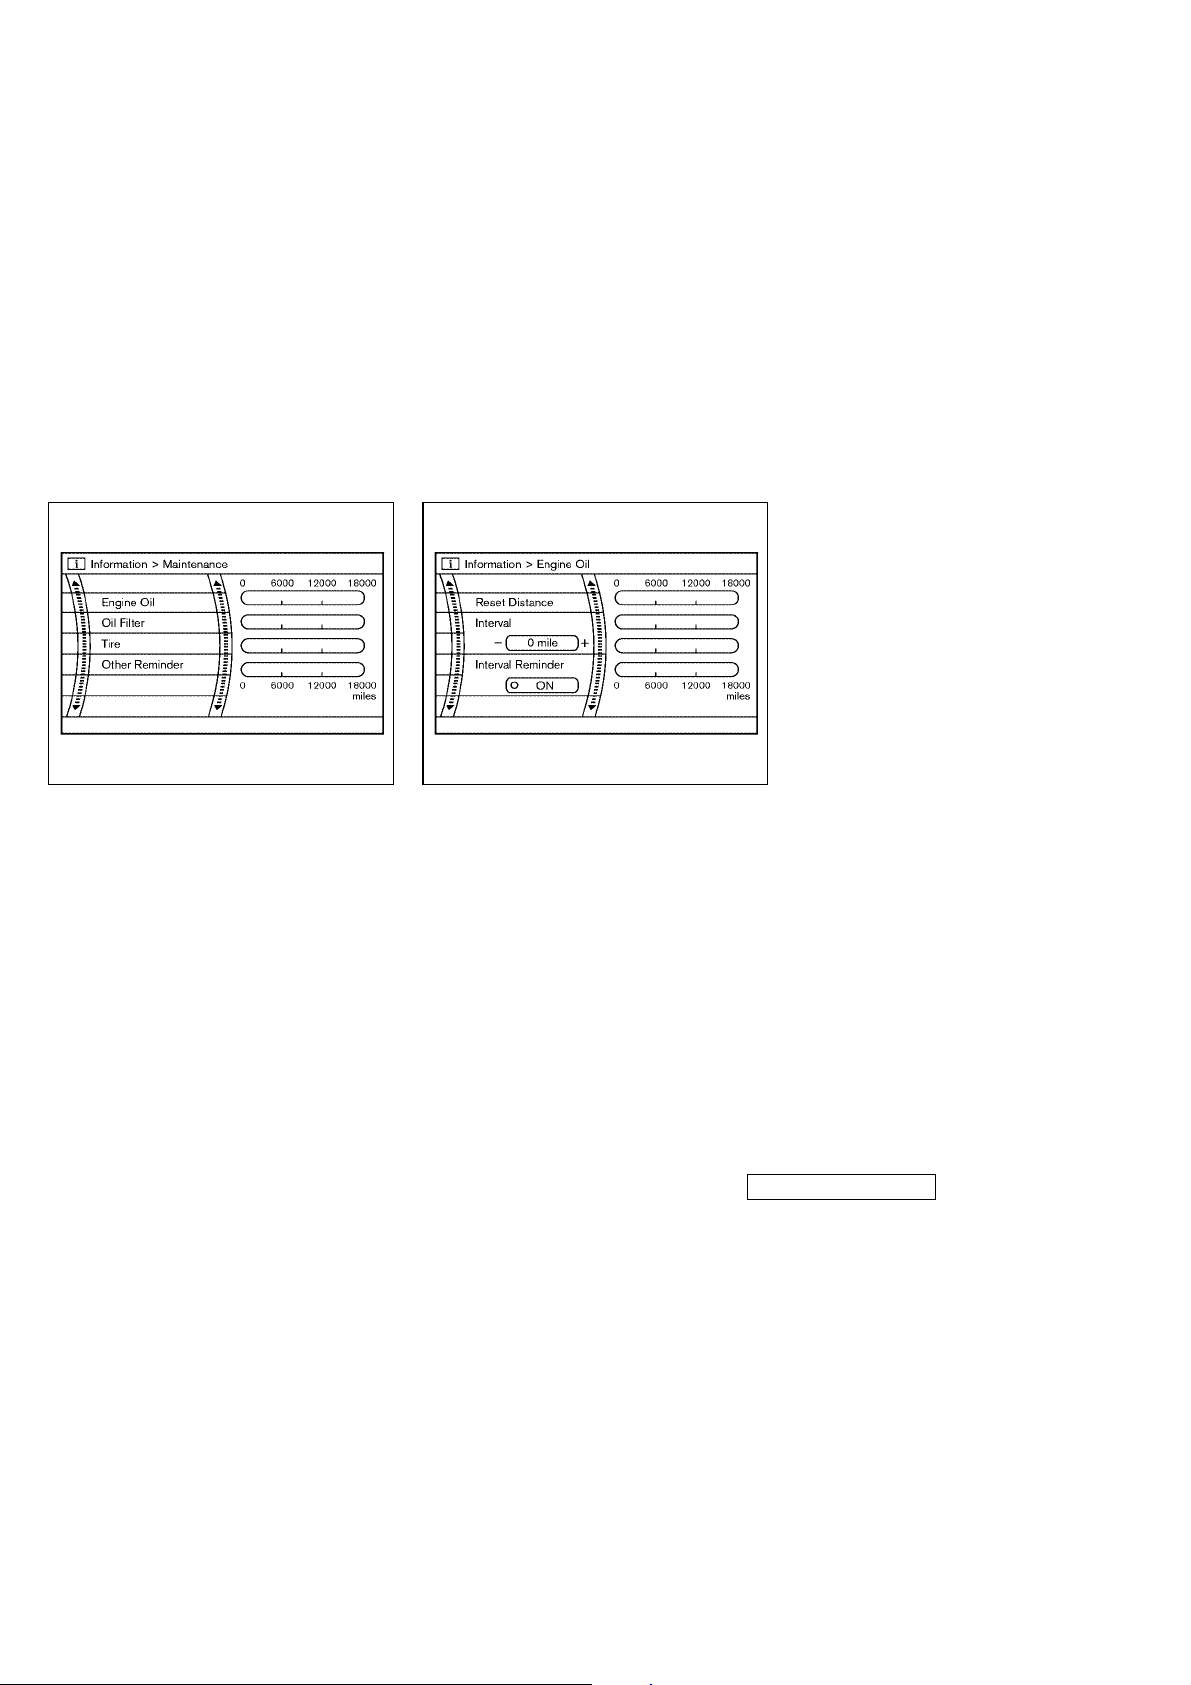
“MAINTENANCE” information
To set the maintenance interval for the
Engine Oil, Oil Filter, Tire Rotation or
Other Reminder, choose an item using the
multi function switch and push the “EN-
TER” button.
You can also set to display a message to
remind you that the maintenance needs
to be performed.
The following example shows how to set
the engine oil change interval. Use the
same steps to set the other maintenance
information.
1. Reset the driving distance to the new
maintenance schedule.
2. Set the interval (mileage) of the maintenance schedule. To determine the
recommended maintenance interval,
refer to your “INFINITI Service and
Maintenance Guide”.
3. To display the MAINTENANCE INFORMATION automatically when the set
trip distance is reached, highlight the
“Interval Reminder” key with the
multi function switch and push the
“ENTER” button.
4-8 Monitor, climate, audio, phone and voice-activated control systems
墌 04.10.8/Y50-D 墍
Page 10
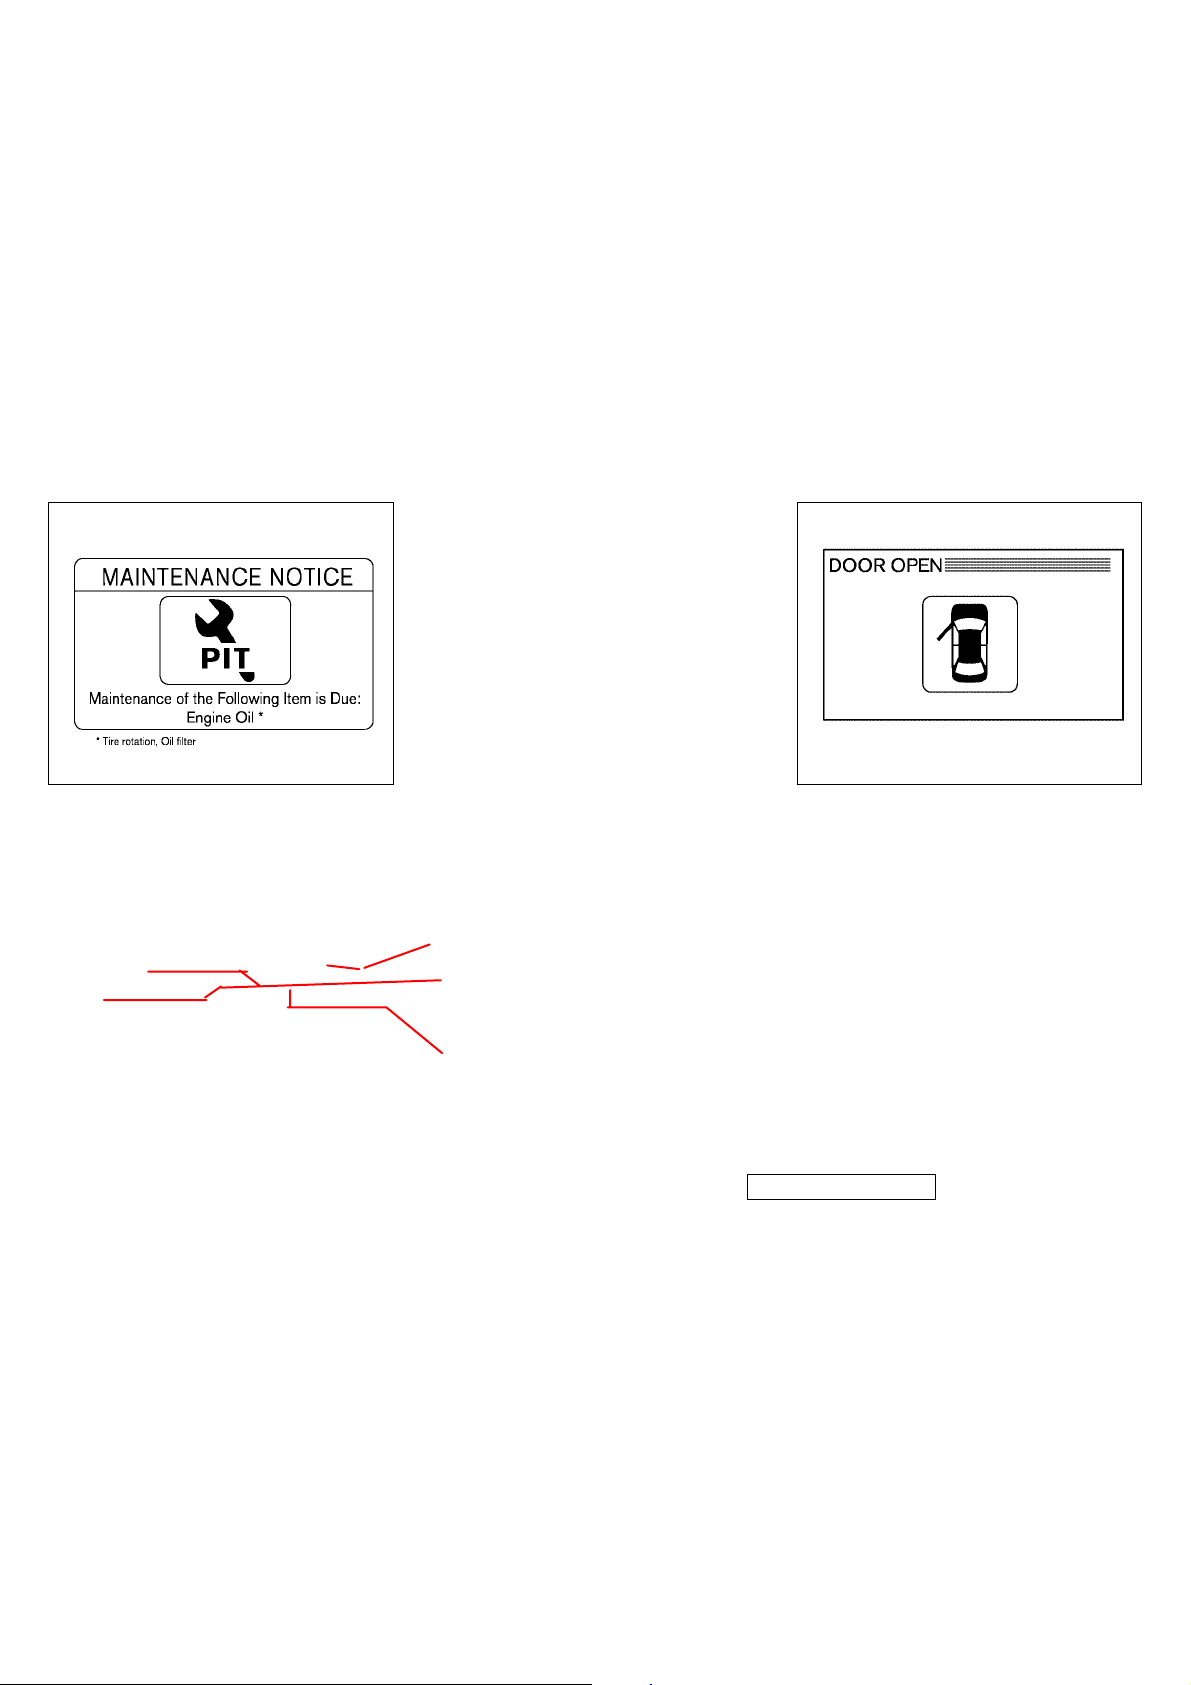
The “MAINTENANCE NOTICE” screen dis-
KI3(ディスプレイ)P4-2〜P4-19
plays each time the key is turned ON until
one of the following conditions are met:
쐌 “RESET Distance” is selected.
쐌 “Interval Reminder” is set OFF.
쐌 the maintenance interval is set again.
SAA0858 SAA0863
MAINTENANCE NOTICE:
The “MAINTENANCE NOTICE” screen (“ENGINE OIL”, “Tire Rotation”, “Oil Filter” or
“Other Reminder”) will be automatically
displayed as shown when both of the following conditions are met:
쐌 the vehicle is driven the set distance
and the ignition key is turned OFF.
쐌 the ignition key is turned ON the next
time the vehicle will be driven.
To return to the previous display after the
“MAINTENANCE NOTICE” screen is displayed, push the BACK button.
to LOCK
push-button ignition
switch
to
Monitor, climate, audio, phone and voice-activated control systems 4-9
WARNING DISPLAY
This display will appear when the door is
not securely closed while driving over 3
MPH (5 km/h).
This display will disappear when the vehicle speed slows down under 3 MPH (5
km/h) even if the door is not securely
closed yet.
Make sure to stop the vehicle and close
the door securely.
墌 04.10.8/Y50-D 墍
Page 11
SAA1081 SAA1082 SAA1083
KI3(ディスプレイ)P4-2〜P4-19
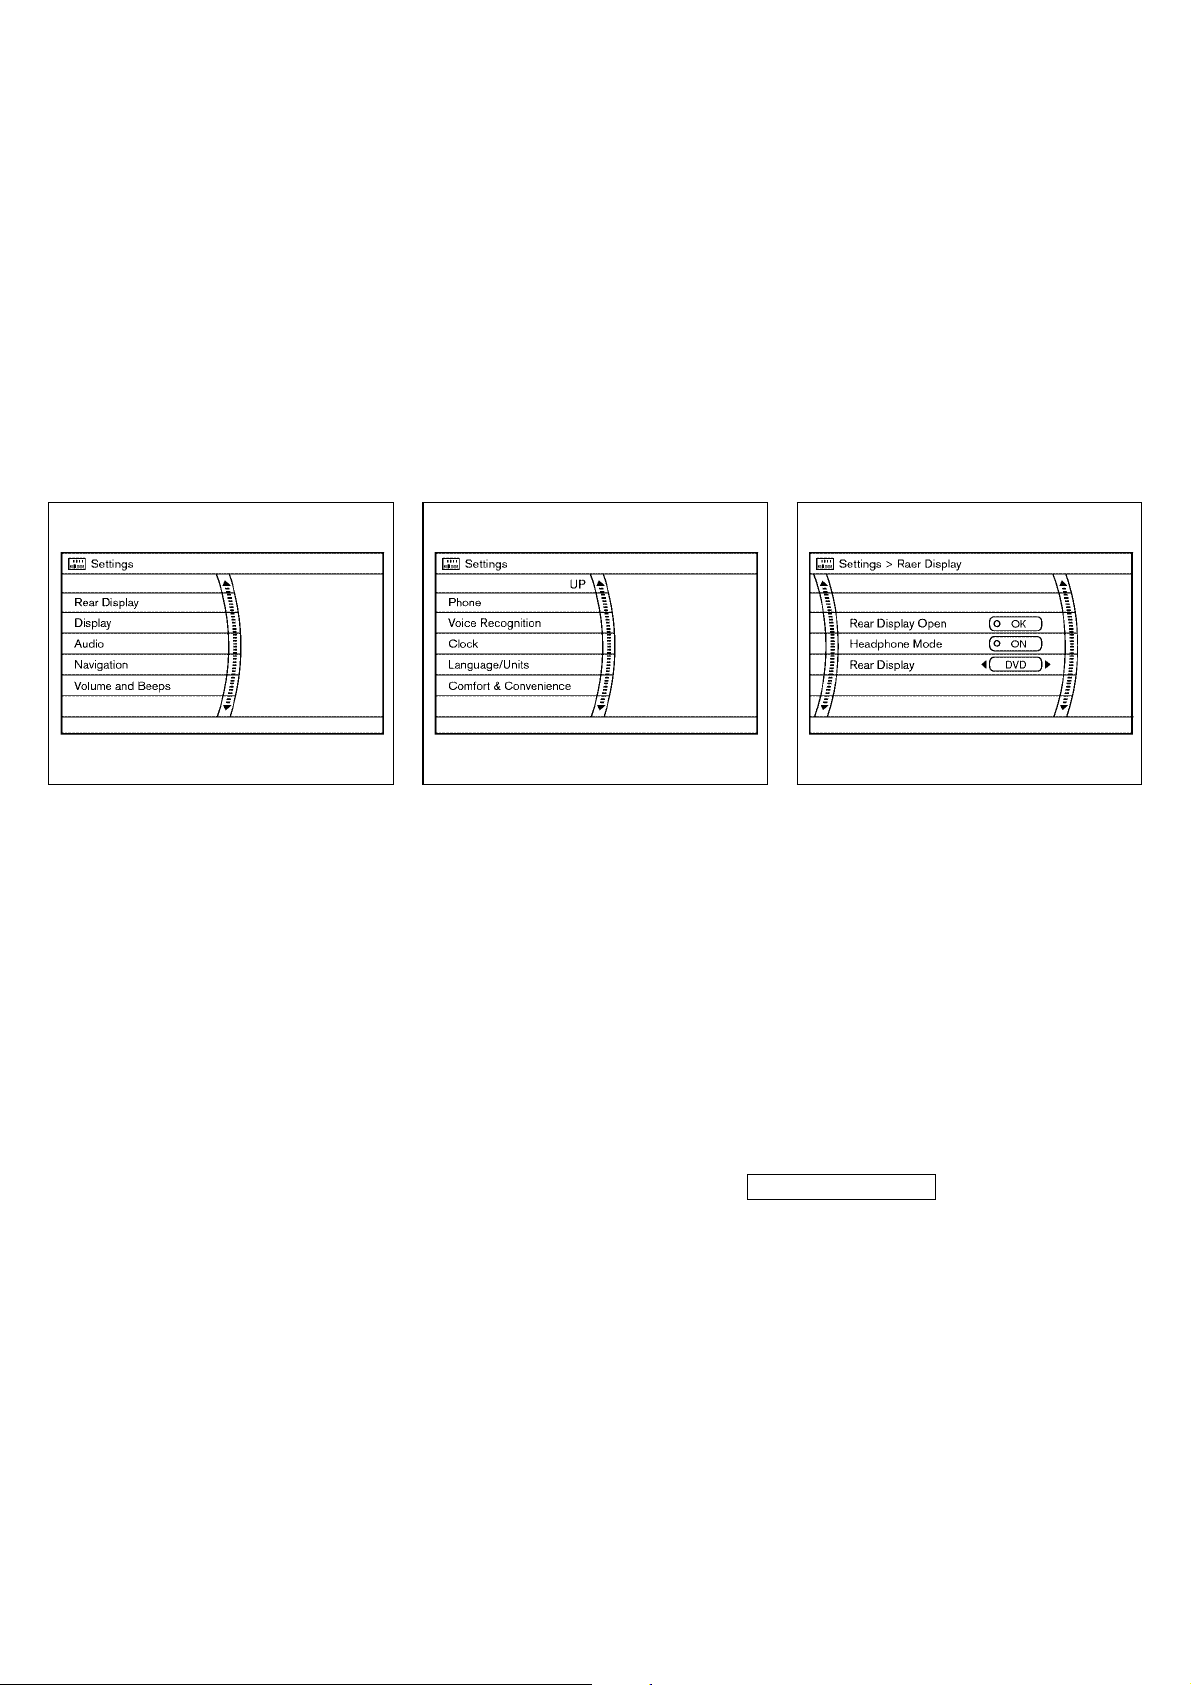
HOW TO USE “SETTING” BUTTON
The display as illustrated will appear
when the “SETTING” button is pushed.
For “Navigation” settings, refer to the
separate Navigation Owner’s Manual.
4-10 Monitor, climate, audio, phone and voice-activated control systems
“REAR DISPLAY” settings (if so
equipped)
The following display will appear when
pushing the “SETTING” button, selecting
the “Rear Display” key and pushing the
“ENTER” button.
Rear display open:
When this item is turned to ON, the rear
display opens. When the push-button ignition switch is turned to the ACC or ON
position, the rear display is flipped down
automatically. When the push-button ignition switch is turned to the LOCK position,
墌 04.10.8/Y50-D 墍
Page 12
the rear display is closed automatically if
KI3(ディスプレイ)P4-2〜P4-19
ON is selected.
Headphone mode:
To allow the use of the wireless headphones originally equipped with the vehicle, turn this item to the ON position.
For more details, see “Headphones” later
in this section.
Rear display:
The following screens are able to be selected for the rear display.
DVD
,
+
AUX
,
+
Map
SAA1084
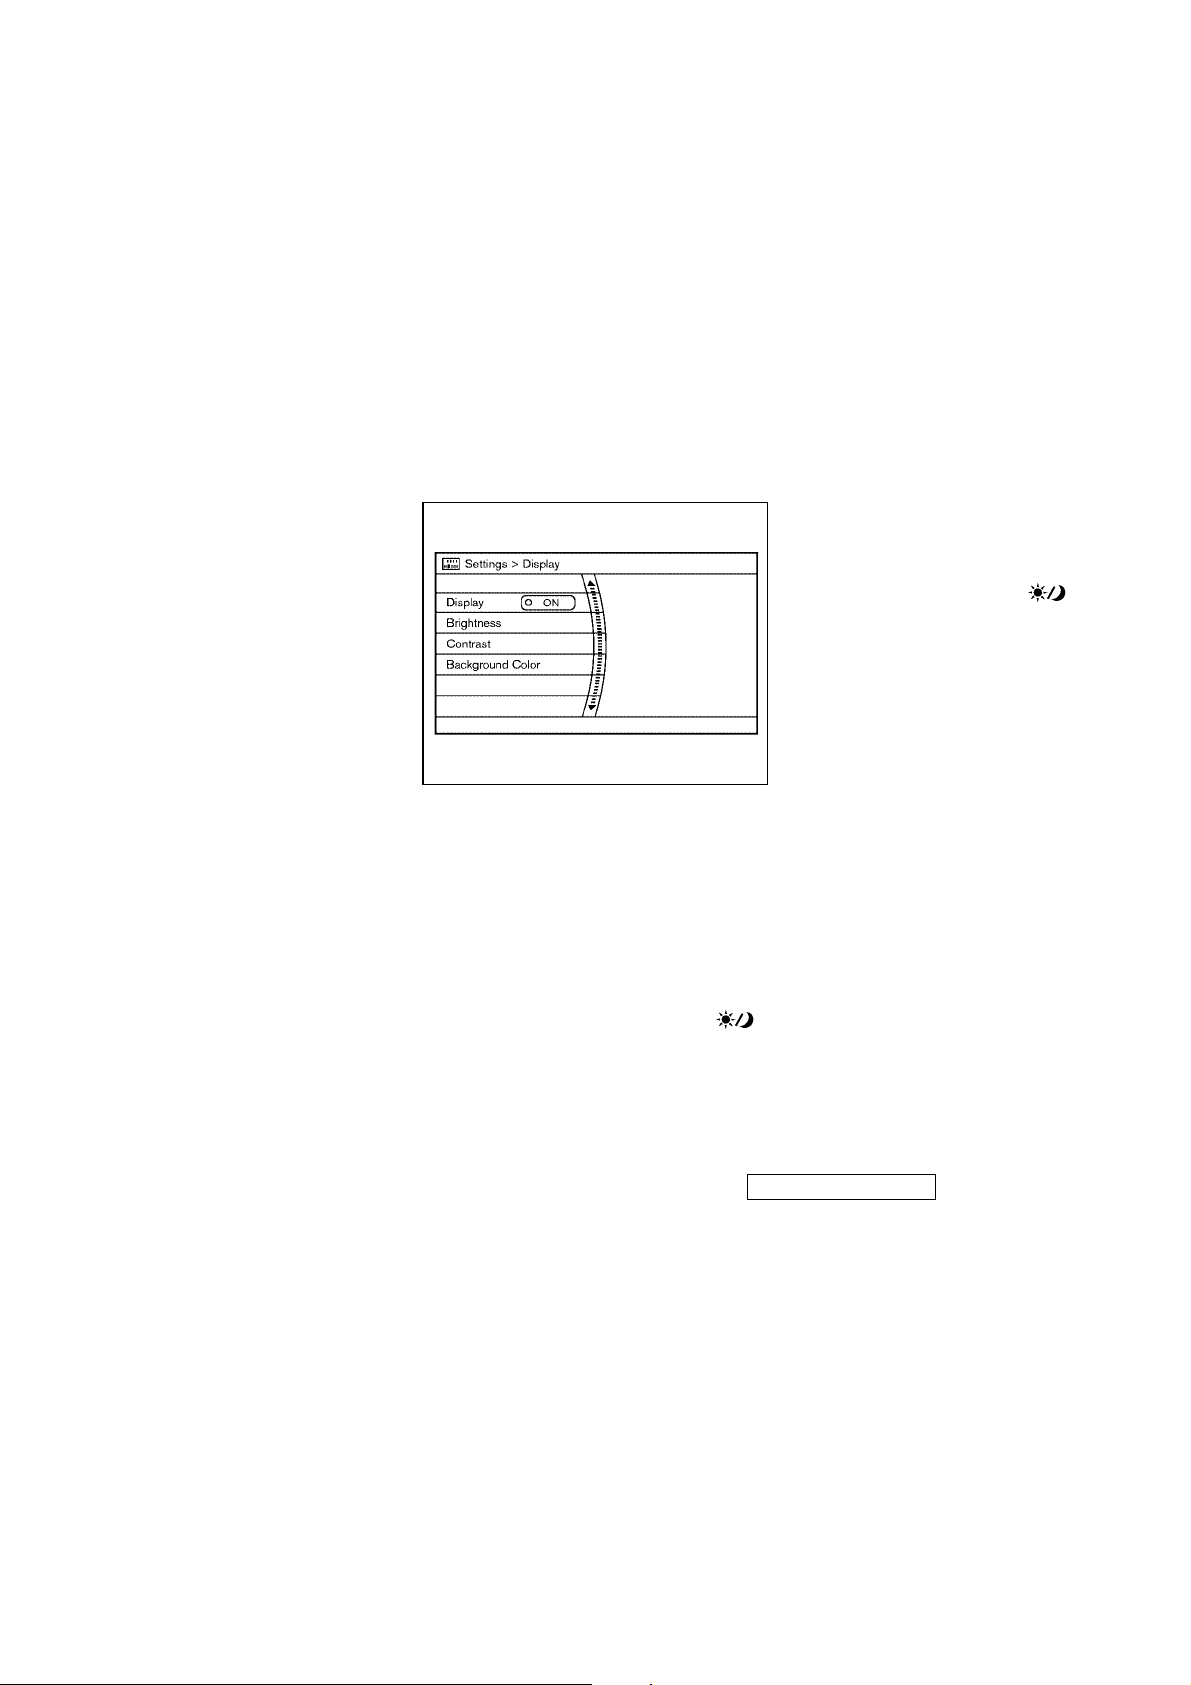
“DISPLAY” settings
The following display will appear when
pushing the “SETTING” button, selecting
“Display” key and pushing the “ENTER”
button.
Display:
To turn off the screen, push the “ENTER”
button and turn the “Display ON” indicator off, then push the “BACK” button.
The other method is to push the “
button for more than 2 seconds.
When any mode button is pushed with
the screen off, the screen turns on for fur-
Monitor, climate, audio, phone and voice-activated control systems 4-11
ther operation. The screen will turn off automatically 5 seconds after the operation
is finished.
To turn on the screen, set this item to the
ON position, or push the “
for more than 2 seconds.
Brightness/Contrast/Background color:
To adjust the brightness, contrast and
background color of the screen, select the
appropriate “Brightness”, “Contrast”or
“Background Color” key and push the
“ENTER” button. Then you can adjust the
brightness to “Darker” or “Brighter”, and
the contrast to “Lower” or “Higher” using
the multi function switch. Switch the
background color to “Dark” or “Bright” by
pushing the “ENTER” button.
”
” button
墌 04.10.8/Y50-D 墍
Page 13
SAA1085 SAA1086 SAA1087
KI3(ディスプレイ)P4-2〜P4-19
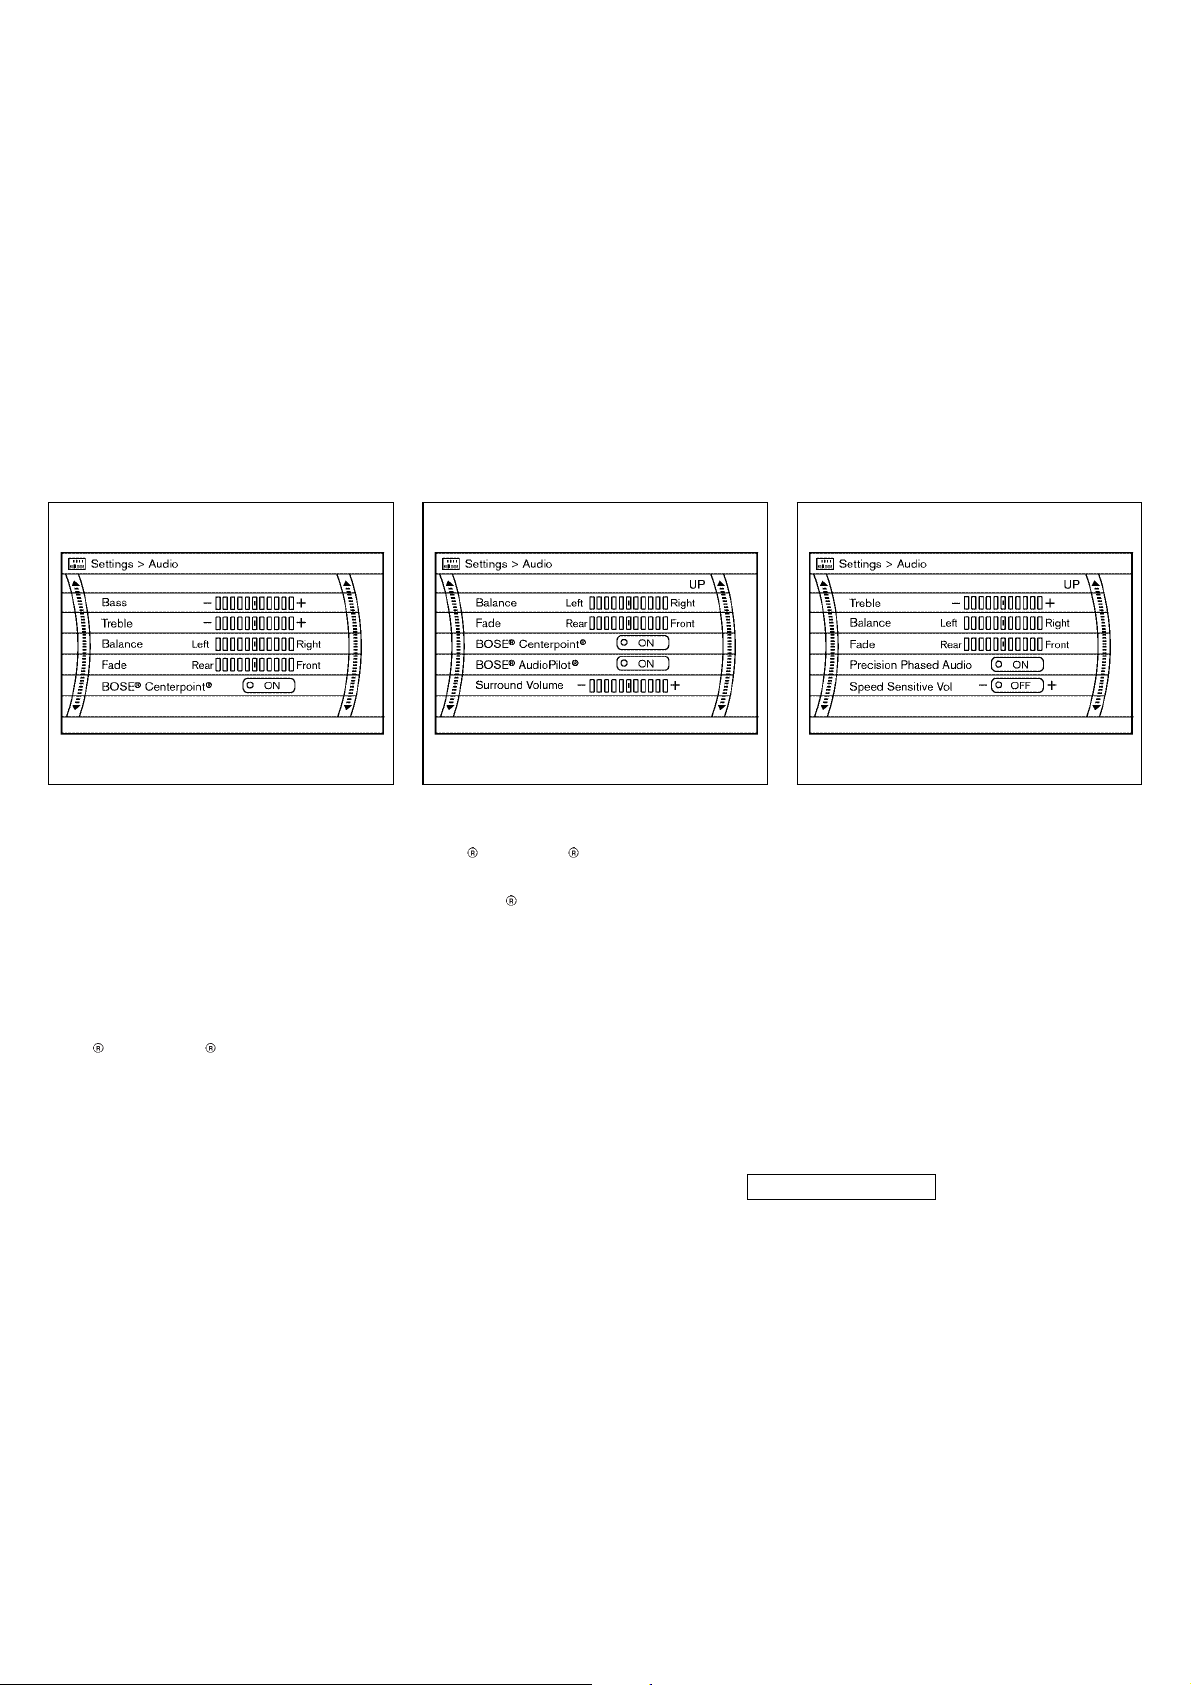
“AUDIO” SETTINGS
The following display will appear when
pushing the “SETTING” button, selecting
the “AUDIO” key and pushing the “EN-
TER” button.
Bass/Treble/Balance/Fade:
To adjust the speaker tone quality and
sound balance, select the “Bass”,
“Treble”, “Balance”or“Fade” key and ad-
just it with the multi function switch.
BOSE
When this item is turned to ON, an ex-
Centerpoint (if so equipped):
citing surround sound is generated from a
traditional stereo recording.
BOSE
When this item is turned to ON,
Audiopilot
ger compartment with a microphone and
compensates for any unpleasant noise.
Surround Volume (if so equipped):
To adjust the surround sound volume, select “Surround Volume” and adjust it with
the multi function switch.
Audiopilot (if so equipped):
monitors noise in the passen-
4-12 Monitor, climate, audio, phone and voice-activated control systems
Precision Phased Audio (if so equipped):
When this item is turned to ON, super
high pitch sound and super low pitch
sound are emphasized and midrange
sound is played naturally.
Speed Sensitive Vol (if so equipped):
Sound volume is increased according to
the vehicle speed. Choose the effect level
from OFF (0) to 5.
“Navigation” settings (if so
equipped)
For the details of “Navigation” settings,
墌 04.10.8/Y50-D 墍
Page 14
refer to the separate Navigation Owner’s
KI3(ディスプレイ)P4-2〜P4-19
Manual.
SAA1088 SAA1089
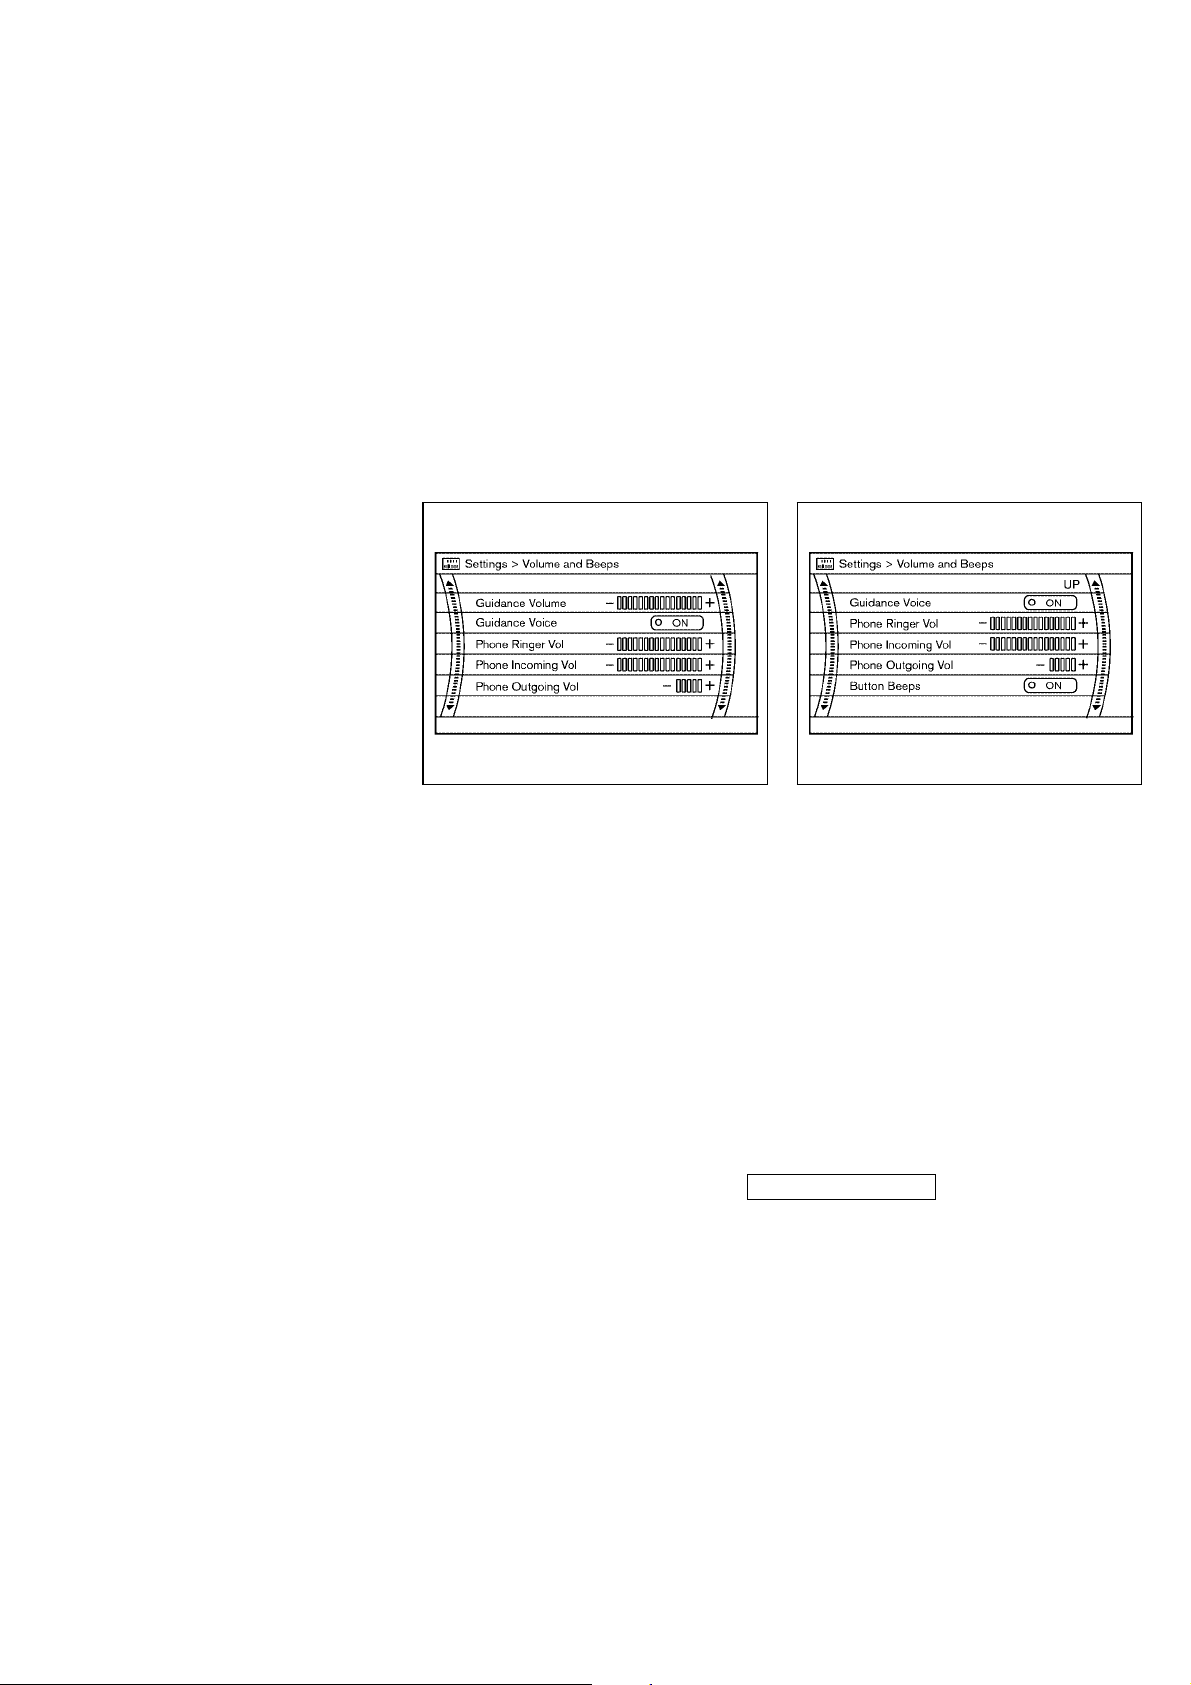
“Volume and Beeps” settings
The following display will appear when
pushing the “SETTING” button, selecting
the “Volume and Beeps” key and pushing
the “ENTER” button.
Guidance Volume:
To adjust the guidance voice volume
louder or softer, select the “Guidance Volume” and adjust it with the multi function
switch.
Guidance Voice:
When this item is turned to ON, you will
Monitor, climate, audio, phone and voice-activated control systems 4-13
hear voice guidance in the navigation (if
so equipped) operation or in other operations.
Phone Ringer Vol/Phone Incoming Vol/
Phone Outgoing Vol:
For the details of these Items, refer to
“Hands-free phone system” later in this
section.
Button Beeps:
When this item is turned to ON, you will
hear a beep sound when you click a
button.
墌 04.10.8/Y50-D 墍
Page 15

“Phone” settings
KI3(ディスプレイ)P4-2〜P4-19
For the details of “Phone” settings, refer
to “Hands-free phone system” later in
this section.
SAA1090 SAA1091
“Voice Recognition” settings
The following display will appear when
pushing the “SETTING” button, selecting
the “Voice recognition” key and pushing
the “ENTER” button.
Minimize Voice Feedback:
When this item is turned to ON, vocal
feedback is reduced if the voice recognition system is activated.
4-14 Monitor, climate, audio, phone and voice-activated control systems
“Clock” settings (if so equipped)
The following display will appear when
pushing the “SETTING” button, selecting
the “Clock” key and pushing the “ENTER”
button.
On-screen Clock:
When this item is turned to ON, a clock is
always displayed on the right corner of
the screen.
Clock Format:
Choose either the 12-hour clock display
or the 24-hour clock display.
upper
墌 04.10.8/Y50-D 墍
Page 16
Offset Adjust:
KI3(ディスプレイ)P4-2〜P4-19
Adjust the time by increasing or decreasing per minute.
Daylight Saving Time:
Turn this item to ON for daylight saving
time application.
Time Zone:
Choose the time zone from the following
쐌 Pacific
쐌 Mountain
쐌 Central
쐌 Eastern
쐌 Atlantic
쐌 Newfoundland
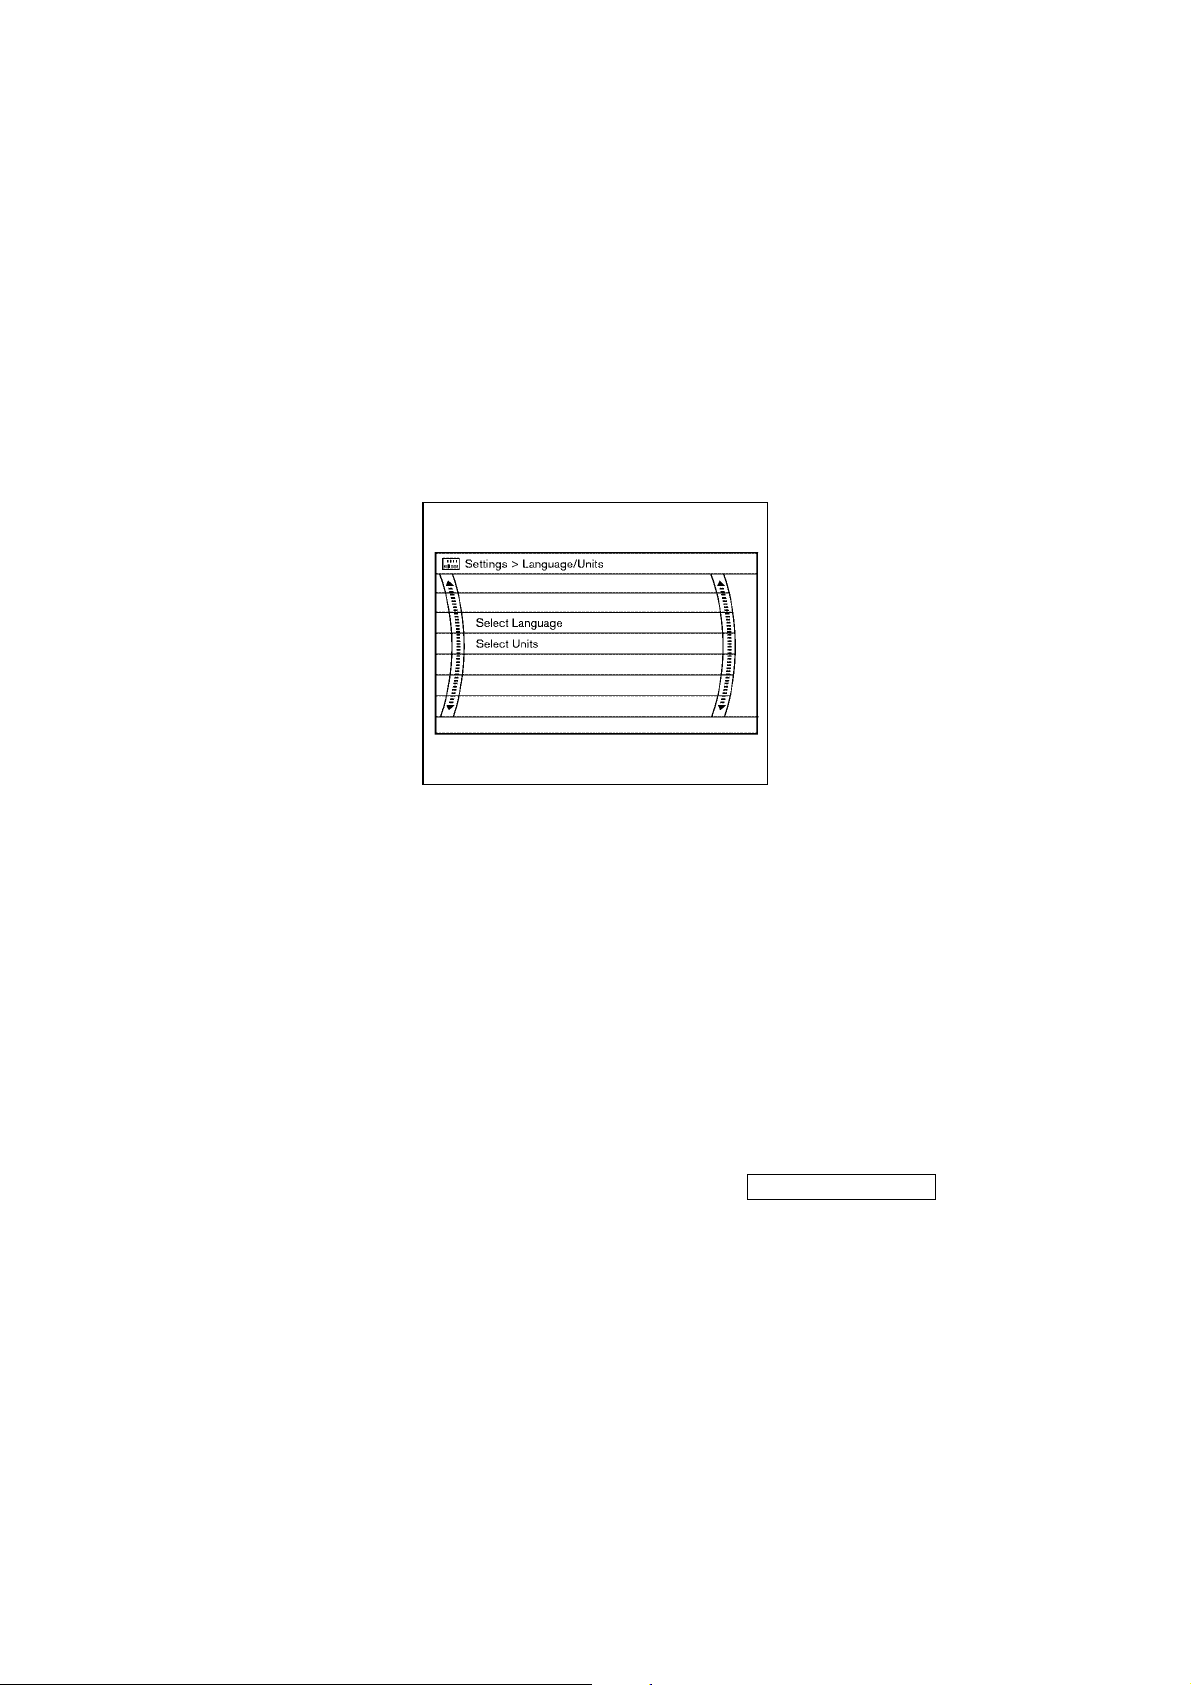
Select Units:
Choose the “Select Units” key and push
the “ENTER” button. From the following
display, select “US” (Mile, °F, MPG) or
“Metric” (km, °C, L/100 km) for your favorite display appearance.
SAA1092
“Language/Units” settings
The following display will appear when
pushing the “SETTING” button, selecting
the “Language/units” key and pushing
the “ENTER” button.
Select Language:
Choose the “Select Language” key and
push the “ENTER” button. From the following display, select “English” or
“Francais” for your favorite display appearance.
Monitor, climate, audio, phone and voice-activated control systems 4-15
墌 04.10.8/Y50-D 墍
Page 17
SAA1093 SAA1094
KI3(ディスプレイ)P4-2〜P4-19
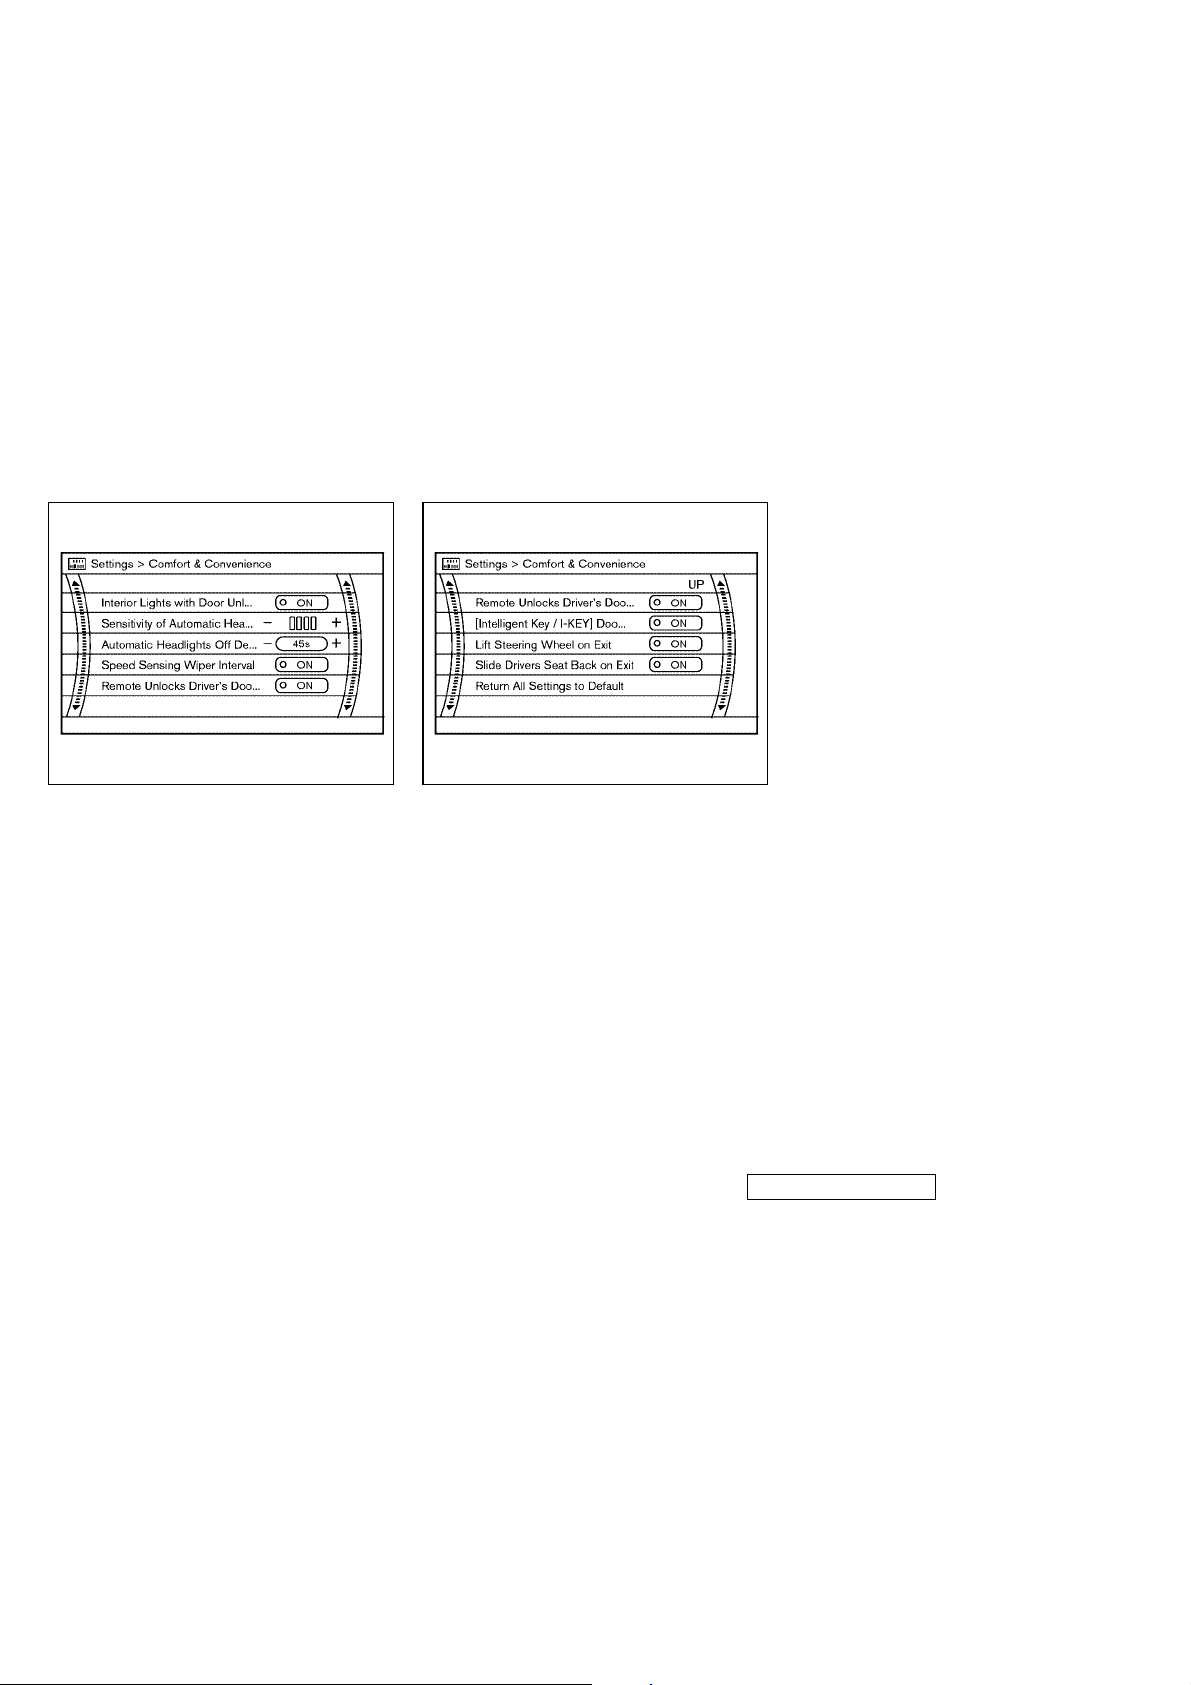
“Comfort and Convenience”
settings
The following display will appear when
pushing the “SETTING” button, selecting
the “Comfort and Convenience” key and
pushing the “ENTER” button. This key
does not appear on the display until the
push-button ignition switch is turned to
the ON position.
Interior Lights with Door Unlocked:
When this item is turned to ON, the interior lights will illuminate if any door is unlocked with the interior light control
switch in the “DOOR” position.
Sensitivity of Automatic Headlights:
Adjust the sensitivity of the automatic
headlights higher (right) or lower (left).
Automatic Headlights Off Delay:
Adjust the duration of the automatic
headlight off timer from 0 to 180 seconds.
Speed Sensing Wiper Interval:
When this item is turned to ON, the wiper
interval is adjusted automatically according to the vehicle speed.
4-16 Monitor, climate, audio, phone and voice-activated control systems
Remote Unlocks Driver’s Door:
When this item is turned to ON, only the
driver’s door is unlocked first after the
door unlock operation. All the doors can
be unlocked if the door unlock operation
is performed again within 5 seconds.
When this item is turned to OFF, all the
doors will be unlocked after the door unlock operation is performed once.
[Intelligent Key/I-KEY] Door Lock/
Unlock:
When this item is turned to ON, door
lock/unlock function by pushing the door
handle request switch will be activated.
Lift Steering Wheel on Exit:
When this item is turned to ON, the steering wheel moves upward for easy exit if
the push-button ignition switch is in the
LOCK position and the driver’s door is
opened. After getting into the vehicle and
turning the push-button ignition switch to
the ACC position, the steering wheel
moves to the previous position.
Slide Driver’s Seat Back on Exit:
When this item is turned to ON, the driver’s seat moves backward for easy exit if
the push-button ignition switch is in the
墌 04.10.8/Y50-D 墍
Page 18
REAR VIEW MONITOR
KI3(ディスプレイ)P4-2〜P4-19
LOCK position and the driver’s door is
opened. After getting into the vehicle and
turning the push-button ignition switch to
the ACC position, the driver’s seat moves
to the previous position.
Return All Settings to Default:
Select this item, push the “ENTER” button
and choose “YES” if you want to return all
settings to default.
When the selector lever is shifted into the
R (Reverse) position, the monitor display
shows view to the rear of the vehicle.
The system is designed as an aid to the
driver in detecting large stationary objects
to help avoid damaging the vehicle. The
system will not detect small objects
below the bumper and may not detect objects close to the bumper or on the
ground.
WARNING
쐌 The rear view camera is a convenience
but it is not a substitute for proper
backing up. Always turn and check that
it is safe to do so before backing up.
Always back up slowly.
쐌 Objects viewed in the rear view monitor
differ from actual distance because a
wide-angle lens is used. Objects in the
rear view monitor will appear visually
opposite than when viewed in the rear
view and outside mirrors.
쐌 Make sure that the trunk is securely
closed when backing up.
쐌 Do not put anything on the rear view
camera. The rear view camera is installed above the license plate.
쐌 When washing the vehicle with high-
pressure water, be sure not to spray it
around the camera. Otherwise, water
may enter the camera unit causing
water condensation on the lens, a malfunction, fire or an electric shock.
쐌 Do not strike the camera. It is a preci-
sion instrument. Otherwise, it may malfunction or cause damage resulting in a
fire or an electric shock.
CAUTION
There is a plastic cover over the camera. Do
not scratch the cover when cleaning dirt or
snow from the cover.
Monitor, climate, audio, phone and voice-activated control systems 4-17
墌 04.10.8/Y50-D 墍
Page 19
HOW TO ADJUST
KI3(ディスプレイ)P4-2〜P4-19
Prospective course line (if so
equipped)
When the steering wheel is turned with
the selector lever in the R (Reverse) position, the prospective course line
played on the monitor.
CAUTION
쐌 The prospective course line is highly af-
fected by the vehicle position, road
condition and road grade. Always check
SAA1099
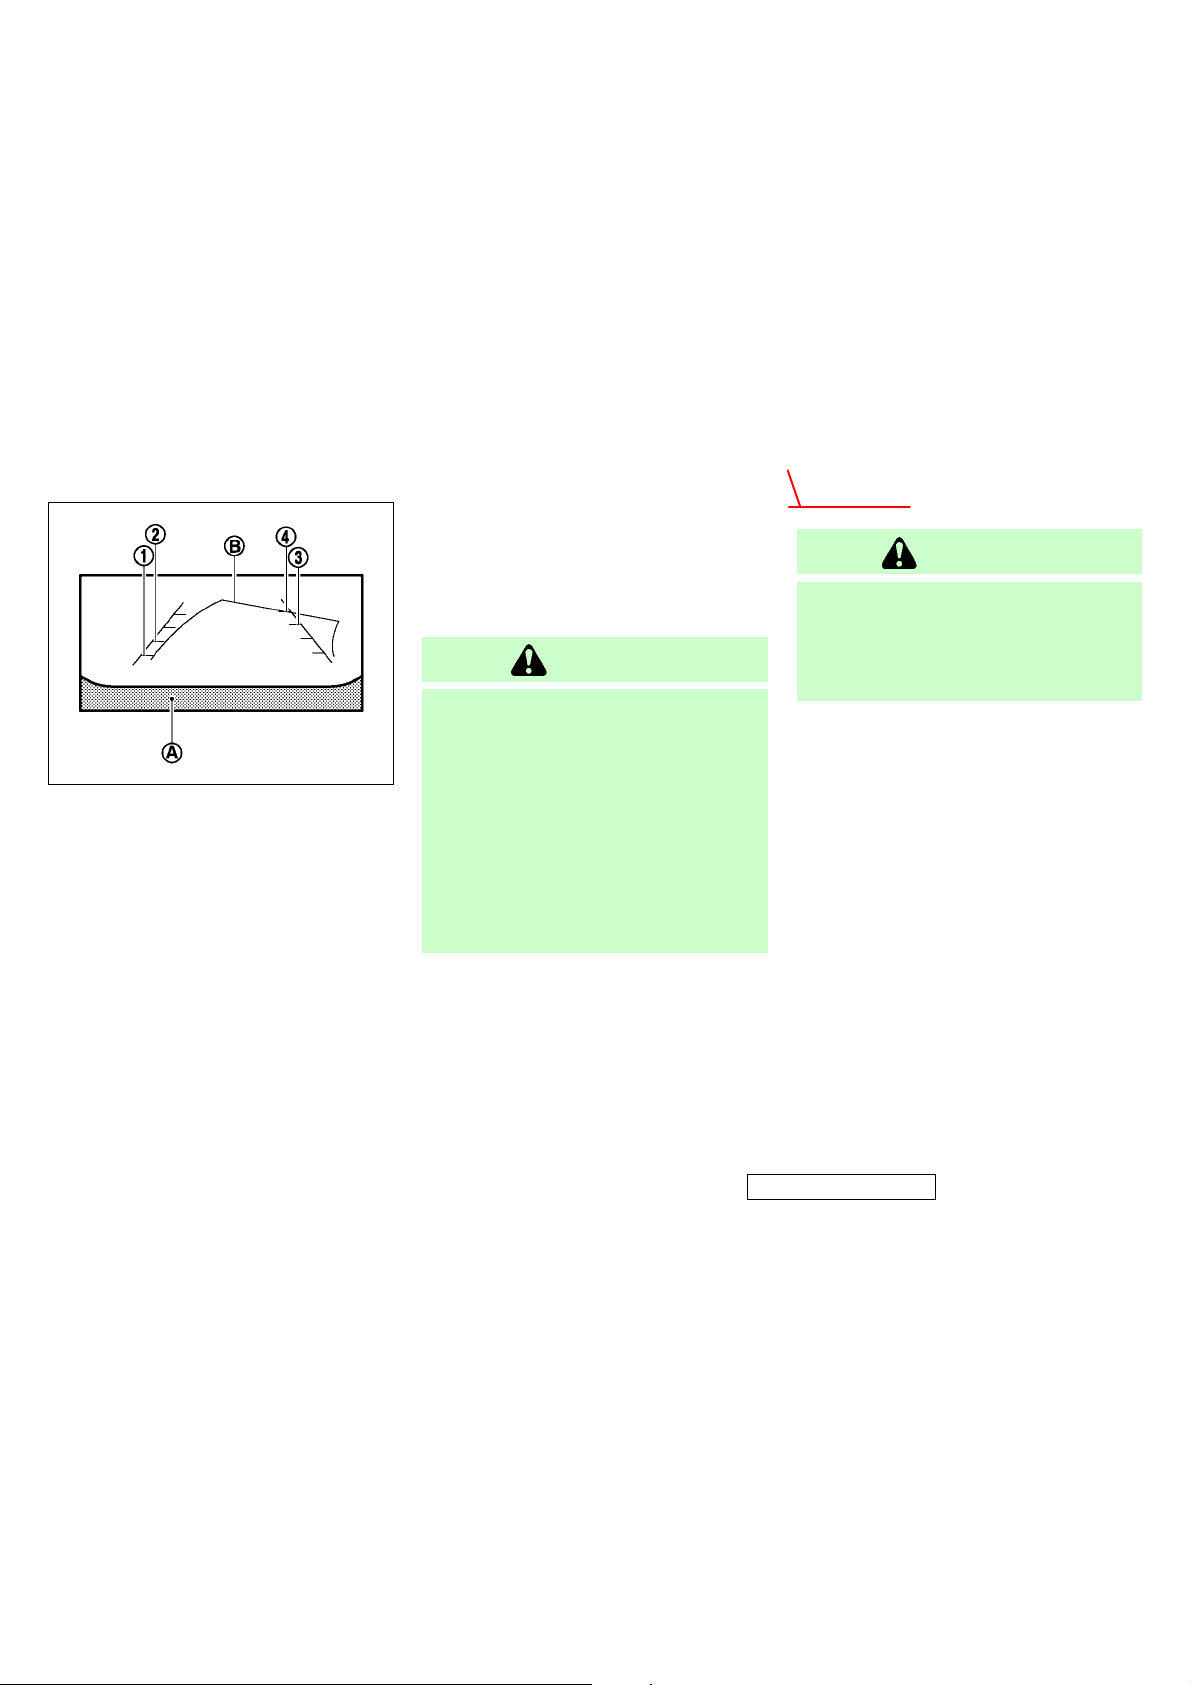
HOW TO READ THE DISPLAYED
LINES
Lines which indicate the vehicle clearance
and distances to objects with reference to
the bumper line
monitor.
They are indicated as reference distances
to objects. Displayed lines indicate distances 1.5 feet (red)
2
, 7 feet (green)
쎻
4
[0.5 m (red), 1 m (yellow), 2 m (green)
쎻
and 3 m (green)] from the lower part of
the bumper line
A
쎻
are displayed on the
1
, 3 feet (yellow)
쎻
3
and 10 feet (green)
쎻
A
쎻
.
4-18 Monitor, climate, audio, phone and voice-activated control systems
around the vehicle while backing up.
쐌 If the tires are replaced with different
sized tires, the prospective course line
may be displayed incorrectly.
쐌 On a snow-covered or slippery road,
there may be a difference between the
prospective course line and the actual
course line.
The vehicle clearance and prospective
course lines are wider than the actual
clearance.
쎻
B
is dis-
ADJUSTING THE SCREEN
WARNING
Do not adjust the Brightness, Contrast, Tint
and Color of the rear view monitor while
the vehicle is moving. Make sure the parking brake is firmly applied and the engine
is not running.
To adjust the Display ON/OFF, Brightness,
Tint, Color and Contrast of the rear view
monitor, push the “SETTING” button with
the rear view monitor on, select the item
key and adjust the level using the multi
function switch.
OPERATING TIPS
쐌 When the selector lever is shifted to R,
the monitor screen automatically
changes to the rear view monitor
mode. However, the radio can be
heard.
쐌 It may take some time until the rear
view monitor is displayed after the selector lever has been shifted to R from
another position or to another position from R. Objects may be distorted
墌 04.10.8/Y50-D 墍
Page 20
VENTILATORS
KI3(ディスプレイ)P4-2〜P4-19
KC5(エアコン)次頁有り
momentarily until the rear view
monitor screen is displayed completely.
쐌 When the temperature is extremely
high or low, the screen may not clearly
display objects. This is not a malfunction.
쐌 When strong light directly enters the
camera, objects may not be displayed
clearly.
쐌 Vertical lines may be seen in objects
on the screen. This is due to strong reflected light from the bumper. This is
not a malfunction.
쐌 The screen may flicker under fluores-
cent light. This is not a malfunction.
쐌 The colors of objects on the rear view
monitor may differ somewhat from
those of the actual object.
쐌 When the contrast of objects is low at
night, pushing the “ENTER” button
may not change the brightness.
쐌 Objects on the monitor may not be
clear in a dark place or at night.
쐌 If dirt, rain or snow attaches to the
camera, the rear view monitor may not
clearly display objects. Clean the camera.
쐌 Do not use alcohol, benzine or thinner
to clean the camera. This will cause
discoloration. To clean the camera,
wipe with a cloth dampened with diluted mild cleaning agent and then
wipe with a dry cloth.
쐌 Do not damage the camera as the
monitor screen may be adversely affected.
쐌 Do not use body wax on the camera
window. Wipe off any wax with a clean
cloth dampened with mild detergent
diluted with water.
Monitor, climate, audio, phone and voice-activated control systems 4-19
Front
SAA1100
Open or close, and adjust the air flow direction of ventilators.
: This symbol indicates that the
vents are closed.
: This symbol indicates that the
vents are open.
墌 04.10.8/Y50-D 墍
Page 21

Rear
KC5(エアコン)次頁有り
SAA1101
4-20 Monitor, climate, audio, phone and voice-activated control systems
墌 04.10.8/Y50-D 墍
Page 22

AUTOMATIC CLIMATE CONTROL
ページ未定
KC5(エアコン)次頁有り
1. “MODE” manual air flow control
button (driver side) (P.x-x)
2. “TEMP” temperature control button
(P.x-x)
To be revised
SSI0095
3. “AUTO” automatic climate control ON
button (P.x-x)
4. “
5. “ ” automatic upper vent
” front defroster button (P.x-x)
system ON/OFF button (P.x-x)
Monitor, climate, audio, phone and voice-activated control systems 4-21
6. “A/C” air conditioner ON/OFF button
(P.x-x)
7. “
8. “TEMP” temperature control button
9. “MODE” manual air flow button (avail-
10. “OFF” button for climate control
11. “
12. “
13. “DUAL” independent control ON/OFF
14. “
+” fan speed increase button
(P.x-x)
(available for passenger side when the
DUAL mode is on) (P.x-x)
able for passenger side when the
DUAL mode is on) (P.x-x)
system
” rear window defroster button
(P.x-x)
” outside air circulation /
“
” air recirculation selector
button (P.x-x)
button for passenger side temperature and manual air flow mode (P.x-x)
−” fan speed decrease button
(P.x-x)
墌 04.10.8/Y50-D 墍
Page 23

will appear. See “How to use STATUS but-
KC5(エアコン)次頁有り
WARNING
쐌 The air conditioner cooling function op-
erates only when the engine is running.
쐌 Do not leave children or adults who
would normally require the support of
others alone in your vehicle. Pets
should not be left alone either. On hot,
sunny days, temperatures in a closed
vehicle could quickly become high
enough to cause severe or possibly
fatal injuries to people or animals.
쐌 Do not use the recirculation mode for
long periods as it may cause the interior air to become stale and the windows to fog up.
쐌 Positioning of the heater and/or air
conditioner controls should not be done
while driving, so full attention may be
given to vehicle operation.
Start the engine and operate the automatic climate control system.
When the “STATUS” button is pushed, the
automatic climate control status screen
ton” earlier in this section.
4-22 Monitor, climate, audio, phone and voice-activated control systems
SAA1102
You can individually set driver and front
passenger side temperature and air flow
using each temperature control button
and manual air flow control button.
AUTOMATIC OPERATION
Cooling and/or dehumidified
heating (AUTO)
This mode may be used all year round.
The system works automatically to
maintain a constant temperature. Air flow
distribution and fan speed are also
controlled automatically.
墌 04.10.8/Y50-D 墍
Page 24

1. Push the “AUTO” button on. (The indi-
KC5(エアコン)次頁有り
cator on the button will illuminate and
AUTO will be displayed.)
2. Push the temperature control button
to set the desired temperature.
Adjust the temperature to about 75°F
(24°C) for normal operation.
쐌 The temperature of the passenger
compartment will be maintained automatically. Air flow distribution and fan
speed are also controlled automatically.
3. You can individually set driver and
front passenger side temperature
using each temperature control
button. When the “DUAL” button is
pushed or the passenger side temperature control button is turned, the
DUAL indicator will come on. To turn
off the passenger side temperature
control, push the “DUAL” button.
4. To turn off the climate control system,
push the “OFF” button.
Heating (A/C OFF)
The air conditioner does not activate.
When you need to heat only, use this
mode.
1. Push the “A/C” button. (The A/C indicator will turn off.)
2. Push the temperature control button
to set the desired temperature.
쐌 The temperature of the passenger
compartment will be maintained automatically. Air flow distribution and fan
speed are also controlled automatically.
쐌 Do not set the temperature lower than
the outside air temperature. Otherwise
the system may not work properly.
쐌 Not recommended if windows fog up.
Dehumidified defrosting or
defogging
1. Push the “ ” front defroster
button. (The indicator light on the button will come on.)
2. Push the temperature control button
to set the desired temperature.
쐌 To quickly remove ice from the outside
of the windows, push the fan speed
increase button “
the maximum position.
쐌 As soon as possible after the wind-
shield is clean, push the AUTO button
Monitor, climate, audio, phone and voice-activated control systems 4-23
+” and set it to
to return to the auto mode.
쐌 When the “
button is pushed, the air conditioner
will automatically be turned on at outside temperatures above 23°F (−5°C)
to defog the windshield, and the air
recirculate mode will automatically be
turned off.
Outside air is drawn into the passenger compartment to improve the
defogging performance.
” front defroster
MANUAL OPERATION
Fan speed control
Push the fan speed increase “ +” or
decrease “
trol the fan speed.
Push the “AUTO” button to return to automatic control of the fan speed.
−” buttons to manually con-
Air recirculation
Push the intake air control button “
” to recirculate interior air inside the
vehicle. The indicator light on the “
side will come on.
The air recirculation mode cannot be
activated when the air conditioner is in the
front defrosting mode “
”.
”
墌 04.10.8/Y50-D 墍
Page 25

TUNE
KC5(エアコン)次頁有り
TRUCK
Outside air circulation
Push the intake air control button “
” to draw outside air into the passenger compartment. The indicator light
on the “
” side will come on.
Automatic intake air control
In the AUTO mode, the intake air will be
controlled automatically. To manually control the intake air, push the intake air
control button “
the automatic control mode, push the intake air control button “
about 2 seconds. The indicator lights
(both air recirculation and outside air circulation sides) will flash twice, and then
the intake air will be controlled automatically.
”. To return to
” for
Air flow control
Pushing the “MODE” manual air flow control button selects the air outlet to:
: Air flows from center and side
ventilators.
: Air flows from center and side
ventilators and foot outlets.
: Air flows mainly from foot outlets.
: Air flows from defroster and foot
outlets.
Automatic upper vent system
When the “ ” automatic upper vent
button is pushed, the air flow against the
driver’s or passenger’s upper body becomes gentle. The indicator light on the
button will come on.
In this mode, air from the center ventilators flows both straight and upward in order not to send air to a specific body part.
To turn the system off
Push the OFF button.
AMBIENT TEMPERATURE
The ambient temperature will be displayed.
The ambient temperature sensor is located in front of the radiator. The sensor
may be affected by road or engine heat,
wind direction and other driving conditions. The display may differ from the actual ambient temperature or the temperature displayed on various signs or billboards.
SAA1103
1. Auto button
2. Fan speed control button
3. Temperature control button
4-24 Monitor, climate, audio, phone and voice-activated control systems
墌 04.10.8/Y50-D 墍
Page 26

SWITCH FOR CLIMATE CONTROL
KC5(エアコン)次頁有り
REAR CONTROL BUTTON (if so
equipped)
The rear seat passengers can adjust the
climate control system using the following
climate control button items in the rear
seat.
“AUTO” button: automatic climate control
mode on
“
” button: Fan speed control up
(Max fan speed , return to Low fan
speed)
“
” button: Temperature control
up/down
OPERATING TIPS
When the engine coolant temperature and
outside air temperature are low, the air
flow from the foot outlets may not operate
for a maximum of 150 seconds. This is
not a malfunction. After the coolant temperature warms up, air flow from the foot
outlets will operate normally.
SAA0642A
The sensor
helps maintain a constant temperature.
Do not put anything on or around this
sensor.
A
쎻
on the instrument panel
IN-CABIN MICROFILTER
The climate control system is equipped
with an in-cabin microfilter which collects
dirt, pollen, dust, etc. and it is also
equipped with a deodorant filter to reduce
odor. To make sure the air conditioner
heats, defogs, and ventilates efficiently,
replace the filter in accordance with the
maintenance schedule in the INFINITI
Service and Maintenance Guide. To re-
Monitor, climate, audio, phone and voice-activated control systems 4-25
place the filter, contact your INFINITI
dealer.
The filter should be replaced if air flow is
extremely decreased or when windows
fog up easily during operating heater or
air conditioning system.
SERVICING CLIMATE CONTROL
The climate control system in your
INFINITI is charged with a refrigerant designed with the environment in mind. This
refrigerant will not harm the earth’s
ozone layer. However, special charging
equipment and lubricant are required
when servicing your INFINITI air conditioner. Using improper refrigerants or lubricants will cause severe damage to your
climate control system. See “Capacities
and recommended fuel/lubricants” in the
“9. Technical and consumer information”
for climate control system refrigerant and
lubricant recommendations.
Your INFINITI dealer will be able to service your environmentally friendly climate
control system.
墌 04.10.8/Y50-D 墍
Page 27

AUDIO SYSTEM
KI3(オーディオ)P4-26〜P4-50
KC5(エアコン)
WARNING
The system contains refrigerant under high
pressure. To avoid personal injury, any air
conditioner service should be done only by
an experienced technician with the proper
equipment.
Radio
Turn the push-button ignition switch to
the ACC or ON position and push the “RA-
DIO” button to turn on the radio. If you
listen to the radio with the engine not
running, the push-button ignition switch
should be turned to the ACC position.
Radio reception is affected by station signal strength, distance from radio transmitter, buildings, bridges, mountains and
other external influences. Intermittent
changes in reception quality normally are
caused by these external influences.
Using a cellular phone in or near the vehicle may influence radio reception
quality.
Radio reception:
Your INFINITI radio system is equipped
with state-of-the-art electronic circuits to
enhance radio reception. These circuits
are designed to extend reception range,
and to enhance the quality of that reception.
However there are some general characteristics of both FM and AM radio signals
that can affect radio reception quality in a
4-26 Monitor, climate, audio, phone and voice-activated control systems
AUDIO OPERATION PRECAUTIONS
moving vehicle, even when the finest
equipment is used. These characteristics
are completely normal in a given reception area, and do not indicate any malfunction in your INFINITI radio system.
Reception conditions will constantly
change because of vehicle movement.
Buildings, terrain, signal distance and interference from other vehicles can work
against ideal reception. Described below
are some of the factors that can affect
your radio reception.
墌 04.10.8/Y50-D 墍
Page 28

SAA0306
KI3(オーディオ)P4-26〜P4-50
FM radio reception:
Range: FM range is normally limited to 25
to 30 miles (40 to 48 km), with monaural
(single channel) FM having slightly more
range than stereo FM. External influences
may sometimes interfere with FM station
reception even if the FM station is within
25 miles (40 km). The strength of the FM
signal is directly related to the distance
between the transmitter and receiver. FM
signals follow a line-of-sight path, exhibiting many of the same characteristics as
light. For example they will reflect off objects.
Fade and drift: As your vehicle moves
away from a station transmitter, the signals will tend to fade and/or drift.
Static and flutter: During signal interference from buildings, large hills or due to
antenna position, usually in conjunction
with increased distance from the station
transmitter, static or flutter can be heard.
This can be reduced by adjusting the
treble control counterclockwise to reduce
treble response.
Multipath reception: Because of the reflective characteristics of FM signals, direct and reflected signals reach the receiver at the same time. The signals may
cancel each other, resulting in momentary
flutter or loss of sound.
AM radio reception:
AM signals, because of their low frequency, can bend around objects and
skip along the ground. In addition, the
signals can be bounced off the ionosphere and bent back to earth. Because
of these characteristics. AM signals are
also subject to interference as they travel
from transmitter to receiver.
Fading: Occurs while the vehicle is
passing through freeway underpasses or
Monitor, climate, audio, phone and voice-activated control systems 4-27
in areas with many tall buildings. It can
also occur for several seconds during
ionospheric turbulence even in areas
where no obstacles exist.
Static: Caused by thunderstorms, electrical power lines, electric signs and even
traffic lights.
Satellite radio reception:
When the satellite radio (if so equipped)
is first installed or the battery has been
replaced, the satellite radio may not work
properly. This is not a malfunction. Wait
more than 10 minutes with satellite radio
ON for satellite radio to receive all of the
necessary data.
No satellite radio reception is available
and “NO SAT” is displayed when the SAT
band option is selected unless optional
satellite receiver and antenna are installed (retrofit unavailable without factory satellite radio pre-wiring), and an
XM
or SIRIUSTMsatellite radio service
subscription is active.
Satellite radio performance may be affected if cargo carried on the roof blocks
the satellite radio signal.
If possible, do not put cargo over the satellite antenna.
CAT
SR
墌 04.10.8/Y50-D 墍
Page 29

쐌 The player may skip while driving on
KI3(オーディオ)P4-26〜P4-50
rough roads.
쐌 The CD player sometimes cannot func-
tion when the passenger compartment
temperature is extremely high. Decrease the temperature before use.
쐌 Only use high quality 4.7 inches (12
cm) round discs that have the “COMPACT disc DIGITAL AUDIO” logo on
the disc or packaging.
쐌 Do not expose the CD to direct sun-
light.
쐌 CDs that are of poor quality, dirty,
scratched, covered with fingerprints,
or that have pin holes may not work
properly.
쐌 The following CDs may not work prop-
erly:
SAA0480
Compact Disc (CD) player
쐌 During cold weather or rainy days, the
player may malfunction due to the humidity. If this occurs, remove the CD
and dehumidify or ventilate the player
completely.
- Copy control compact discs (CCCD)
- Recordable compact discs (CD-R)
- Rewritable compact discs (CD-RW)
쐌 Do not use the following CDs as they
may cause the CD player to malfunction.
- 8 cm (3.1 in) discs with an adapter
4-28 Monitor, climate, audio, phone and voice-activated control systems
- CDs that are not round
- CDs with a paper label
- CDs that are warped, scratched, or
have abnormal edges
쐌 CDs with MP3 or WMA format cannot
be written by this audio system.
쐌 If the CD cannot be played, one of the
following messages will be displayed.
CHECK DISC:
- Confirm that the CD is inserted correctly (the label side is facing up,
etc.).
- Confirm that the CD is not bent or
warped and it is free of scratches.
PUSH EJECT:
This is an error due to the temperature inside the player is too high. Remove the CD by pushing the EJECT
button, and after a short time reinsert
the CD. The CD can be played when
the temperature of the player returns
to normal.
UNPLAYABLE:
The file is unplayable in this audio
system (only MP3 CD).
墌 04.10.8/Y50-D 墍
Page 30
Compact Disc with MP3 or WMA
KI3(オーディオ)P4-26〜P4-50
Terms:
쐌 MP3 — MP3 is short for Moving Pic-
tures Experts Group Audio Layer 3.
MP3 is the most well known compressed digital audio file format. This
format allows for near “CD quality”
sound, but at a fraction of the size of
normal audio files. MP3 conversion of
an audio track from CD-ROM can reduce the file size by approximately
10:1 ratio with virtually no perceptible
loss in quality. MP3 compression removes the redundant and irrelevant
parts of a sound signal that the
human ear doesn’t hear.
쐌 WMA — Windows Media Audio (WMA)
is a compressed audio format created
by Microsoft as an alternative to MP3.
The WMA codec offers greater file
compression than the MP3 codec, enabling storage of more digital audio
tracks in the same amount of space
when compared to MP3s at the same
level of quality.
쐌 Bit rate — Bit rate denotes the number
of bits per second used by a digital
music files. The size and quality of a
compressed digital audio file is deter-
mined by the bit rate used when encoding the file.
쐌 Sampling frequency — The rate at
which the samples of a signal are converted from analog to digital (A/D conversion) per second.
쐌 Multisession — Multisession is one of
the methods for writing data to media.
Writing data once to the media is
called a single session, and writing
more than once is called a multisession.
쐌 ID3 Tag — The ID3 tag is the part of
the encoded MP3 or WMA file that
contains information about the digital
music file such as song title, artist, album title, encording bit rate, track
time duration, etc. ID3 tag information
is displayed on the Album/Artist/Track
title line on the display.
* Windows
registered trademarks and trademarks
in the United States of America and
other countries of Microsoft Corporation of the USA.
and Windows Media are
Monitor, climate, audio, phone and voice-activated control systems 4-29
SAA1025
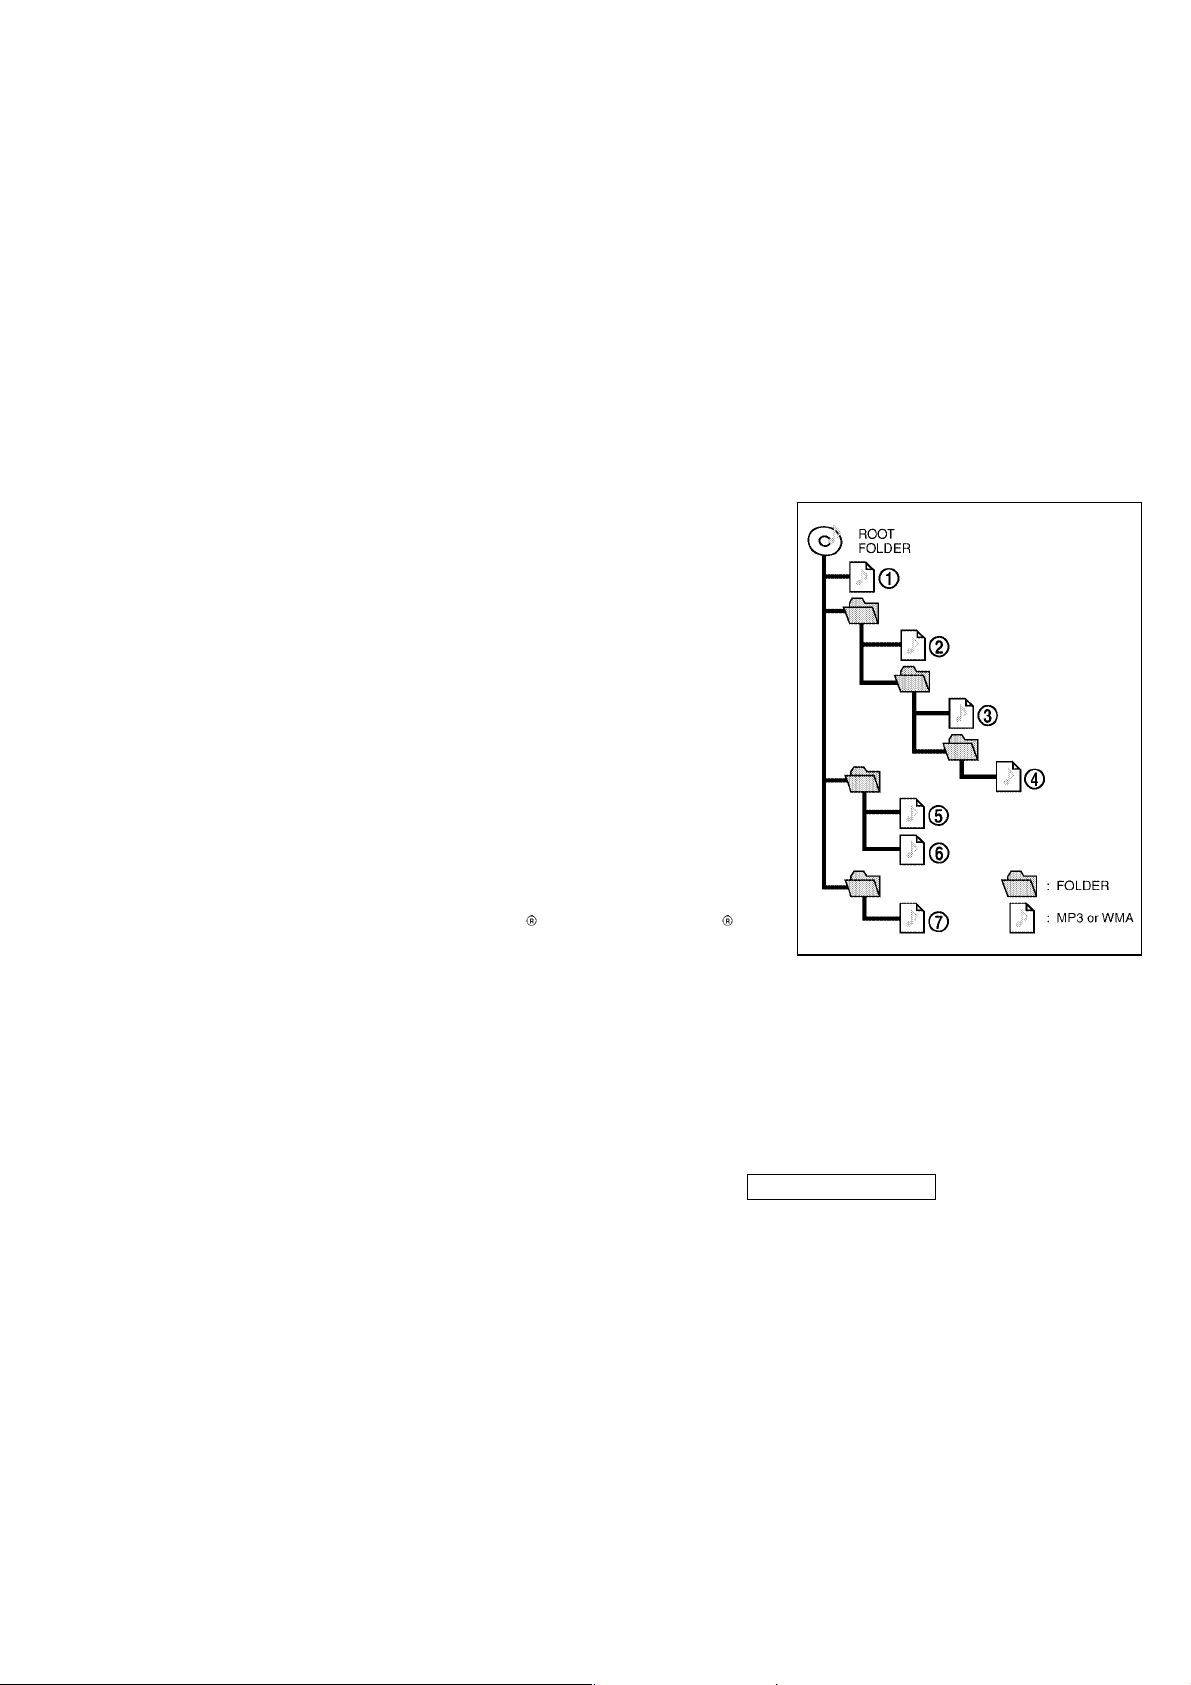
Playback order:
Playback order of the CD with MP3 or
WMA is as illustrated above.
쐌 The folder names of folders not con-
墌 04.10.8/Y50-D 墍
Page 31

taining MP3/WMA files are not shown in the display.
KI3(オーディオ)P4-26〜P4-50
쐌 If there is a file in the top level of the disc, “ROOT” is displayed.
쐌 The playback order is the order in which the files were written by the writing soft-
ware, so the files might not play in the desired order.
4-30 Monitor, climate, audio, phone and voice-activated control systems
墌 04.10.8/Y50-D 墍
Page 32

Specification chart:
KI3(オーディオ)P4-26〜P4-50
Supported media CD, CD-R, CD-RW
Supported file systems
Version MPEG1, MPEG2, MPEG2.5
MP3
Supported versions*
WMA
Tag information ID3 tag VER1.0, VER1.1, VER2.2, VER2.3 (MP3 only)
Folder levels
Text character number limitation 128 characters
Displayable character codes
Sampling frequency 8 kHz - 48 kHz
Bit rate 8 kbps - 320 kbps, VBR
Version WMA7, WMA8, WMA9
Sampling frequency 32 kHz - 48 kHz
Bit rate 48 kbps - 192 kbps, VBR
ISO9660 LEVEL1, ISO9660 LEVEL2, Romeo, Joliet
* ISO9660 Level 3 (packet writing) is not supported.
Folder levels: 8, Folders: 255 (including route
folder), Files: 512
01: ASCII, 02: ISO-8859-1, 03: UNICODE (UTF-16
BOM Big Endian), 04: UNICODE (UTF-16 Non-BOM
Big Endian), 05: (UTF-8), 06: UNICODE (Non-UTF-16
BOM Little Endian)
* Files created with a combination of 48 kHz sampling frequency and 64 kbps bit rate
cannot be played.
Monitor, climate, audio, phone and voice-activated control systems 4-31
墌 04.10.8/Y50-D 墍
Page 33

Troubleshooting guide:
KI3(オーディオ)P4-26〜P4-50
Symptom Cause and Countermeasure
Check if the disc was inserted correctly.
Check if the disc is scratched or dirty.
Check if there is condensation inside the player, and if there is, wait until the condensation is gone (about 1 hour) before using the player.
Cannot play
Poor sound quality Check if the disc is scratched or dirty.
It takes a relatively long time before the music starts playing.
Music cuts off or skips
Skipping with high bit rate files Skipping may occur with large quantities of data, such as for high bit rate data.
Move immediately to the next
song when playing.
The songs do not play back in the
desired order.
If there is a temperature increase error, the CD player will play correctly after it returns to the normal temperature.
If there is a mixture of music CD files (CD-DA data) and MP3/WMA files on a CD, only the music CD files (CD-DA data) will be
played.
Files with extensions other than “.MP3”, “.WMA”, “.mp3” or “.wma” cannot be played. In addition, the character codes and
number of characters for folder names and file names should be in compliance with the specifications.
If there are many folder or file levels on the MP3/WMA disc, or if it is a multisession disc, some time may be required before
the music starts playing.
The writing software and hardware combination might not match, or the writing speed, writing depth, writing width, etc., might
not match the specifications. Try using the slowest writing speed.
When a non-MP3/WMA file has been given an extension of “.MP3”, “.WMA”, “.mp3” or “.wma”, or when play is prohibited by
copyright protection, there will be approximately 5 seconds of no sound and then the player will skip to the next song.
The playback order is the order in which the files were written by the writing software, so the files might not play in the desired order.
4-32 Monitor, climate, audio, phone and voice-activated control systems
墌 04.10.8/Y50-D 墍
Page 34

SSI0096
10. CD EJECT button (P.x-x)
ページ未定
KI3(オーディオ)P4-26〜P4-50
7. Radio CAT (category) / CD RPT (repeat)
play button (P.x-x)
8. REW (rewind) button for SEEK/TRACK
(P.x-x)
9. FF (fast forward) button for
SEEK/TRACK (P.x-x)
1. ON⋅OFF/VOLUME button (P.x-x)
2. Radio station and CD selector button
(P.x-x)
3. Clock (P.x-x)
4. Radio tuning / MP3 folder selector /
AUDIO control knob (P.x-x)
5. CD LOAD button (P.x-x)
6. Radio PRESET A-B-C selector button
(P.x-x)
Monitor, climate, audio, phone and voice-activated control systems 4-33
墌 04.10.8/Y50-D 墍
Page 35

CAT
KI3(オーディオ)P4-26〜P4-50
SR
FM-AM-SATELLITE RADIO WITH
COMPACT DISC (CD) CHANGER
No satellite radio reception is available
and “NO SAT” is displayed when the SAT
button is pressed to select satellite radio
station unless optional satellite receiver
and antenna are installed (retrofit unavailable without factory satellite radio prewiring), and an XM
radio service subscription is active.
or SIRIUSTMsatellite
Audio main operation
Head unit:
The radio has an FM diversity reception
system, which employs two antennas
printed on the rear window. This system
automatically switches to the antenna
which is receiving less interference.
The auto loudness circuit enhances the
low frequency range automatically in both
radio reception and tape and CD playback.
ON⋅OFF/Volume control:
Turn the push-button ignition switch to
the ACC or ON position, and then push
the ON⋅OFF/VOLUME control knob while
the system is off to call up the mode (radio, tape or CD) which was playing imme-
diately before the system was turned off.
While the system is on, pushing the
ON⋅OFF/VOLUME control knob turns the
system off.
Turn the ON⋅OFF/VOLUME control knob to
adjust the volume.
This vehicle has some sound effect functions as follows (if so equipped):
쐌 BOSE
쐌 BOSE
쐌 Precision Phased Audio
쐌 Speed sensitive Volume
For more details, see “Vehicle information
and settings” earlier in this section.
Adjusting tone quality and speaker
balance:
To adjust Bass, Treble, Balance and
Fader, refer to “How to use SETTING
button” earlier in this section.
Centerpoint
Audiopilot
FM-AM-SR radio operation
RADIO (FM/AM/SR) band select:
Pushing the RADIO band select button
will change the band as follows:
FM , AM , SR
4-34 Monitor, climate, audio, phone and voice-activated control systems
CAT
When the RADIO band select button is
pushed while the ignition switch is in the
ACC or ON position, the radio will come
on at the station last played.
The last station/channel played will also
come on when the ON⋅OFF/VOL control
knob is pushed to ON.
No satellite radio reception is available
and “NO SAT” is displayed when the SAT
button is pressed to select satellite radio
station unless optional satellite receiver
and antenna are installed (retrofit unavailable without factory satellite radio prewiring), and an XM
radio service subscription is active.
If another audio source is playing when
the RADIO band select button is turned to
ON, the other audio source will automatically be turned off and the last radio station played will come on.
When the stereo broadcast signal is
weak, the radio will automatically change
from stereo to monaural reception.
or SIRIUSTMsatellite
SR
墌 04.10.8/Y50-D 墍
Page 36

TUNE (Tuning):
KI3(オーディオ)P4-26〜P4-50
WARNING
The radio should not be tuned while driving
so full attention may be given to vehicle
operation.
Turn the TUNE/FOLDER knob for manual
tuning.
SEEK tuning:
쐌 For AM and FM radio
Push the SEEK button
tune from high to low or low to high frequencies and to stop at the next broadcasting station.
쐌 For satellite radio
Push the SEEK button
seek channels of the next or previous category.
PRESET select:
Push the PRESET select button to go to
the next PRESET. After choosing from the
PRESET A, B or C, you can select the desired channel using the multi function
switch or the buttons
or to
or to
to .
to Station memory
Six stations/channels can be set for
PRESET A, B and C.
1. Choose preset channel A, B or C using
the preset select button.
2. Tune to the desired station using the
SEEK, SCAN or TUNE button.
3. Select the desired station/channel
and keep pushing any of the desired
station preset buttons (
until a beep sound is heard. (The radio
mutes when the select button is
pushed.)
4. The channel indicator will then come
on and the sound will resume. Memorizing is now complete.
5. Other buttons can be set in the same
manner.
If the battery cable is disconnected, or if
the fuse blows, the radio memory will be
erased. In that case, reset the desired
stations.
“SAT” satellite radio button (if the unit
is so equipped):
No satellite radio reception is available
operations:
to )
Monitor, climate, audio, phone and voice-activated control systems 4-35
and “NO SAT” will be displayed when the
SAT button is pushed unless the optional
satellite receiver and antenna were purchased and installed and an XM
SIRIUS
tion is active. Satellite radio option can
only be installed in vehicles that were factory pre-wired for satellite radio.
The XM name and related logos are registered trademarks of XM Satellite Radio
inc. SIRIUS and related marks are trademarks of Sirius Satellite Radio Inc. All
rights are reserved.
When the
than 1.5 seconds during FM mode, the
PTY name of the current tuned station is
displayed (Type A only). During this time
if the PTY data code is zero, or the data is
unreadable; the display will show NONE.
When the RPT/CAT button is pressed for
more than 1.5 seconds during the satellite radio mode, the category name of the
current channel is displayed.
1. CAT selection mode
TM
satellite radio service subscrip-
CATEGORY (CAT):
button is pressed for more
CAT name selection can be done by
turning the TUNE/FOLDER knob in the
CAT selection mode.
or
[T5] Audio Text:
When the "Audio Text" key is selected with the
multi function switch on the display and
then the ENTER button is pushed while
the satellite radio is being played, some text information
will be displayed on the screen.
墌 04.10.8/Y50-D 墍
Page 37

Initial CAT names are stored in the station
KI3(オーディオ)P4-26〜P4-50
preset buttons
can be changed by pressing the station
preset buttons for more than 1.5 seconds
when the desired CAT name is in the display.
to ; but these
2. CAT SEEK tuning mode
After selecting a CAT name, push the
SEEK button
seconds. Tuning to the CAT station will
start. If you do not push the SEEK
button within the 10 second period,
the PTY mode will be canceled.
or within 10
Compact disc (CD) changer
operation
Turn the push-button ignition switch to
the ACC or ON position, push the LOAD
button and insert the compact disc into
the slot with the label side facing up. The
compact disc will be guided automatically
into the slot and start playing.
After loading the disc, the number of
tracks on the disc and the play time will
appear on the display.
If the radio is already operating, it will
automatically turn off and the compact
disc will play.
CAUTION
Do not force the compact disc into the slot.
This could damage the player.
If the system has been turned off while
the compact disc was playing, pushing
the ON⋅OFF/VOL control knob will start
the compact disc.
CD LOAD:
To insert a CD in the CD changer, push
the LOAD button for less than 1.5 seconds. Select the loading slot by pushing
the CD insert select button (
), then insert the CD.
To insert 6 CDs to the CD changer in succession, push the LOAD button for more
than 1.5 seconds.
The inserted slot numbers will illuminate
on the display.
DISC PLAY:
When the DISC (CD play) button is
pushed with the system off and the compact disc loaded, the system will turn on
and the compact disc will start to play.
When the DISC button is pushed with the
compact disc loaded with the radio
playing, the radio will automatically be
turned off and the compact disc will start
to play.
to
4-36 Monitor, climate, audio, phone and voice-activated control systems
墌 04.10.8/Y50-D 墍
Page 38

below will be displayed
KI3(オーディオ)P4-26〜P4-50
on the screen.
"Audio Text" key
Audio Text Audio Text:
When the audio text is selected with the
multi function switch on the display and
then the ENTER button is pushed while
the CD is being played, the music information displayed can be changed in the
following order.
CD:
쐌 Disk title
쐌 Track title
CD with MP3 or WMA:
쐌 Folder title
쐌 File title
쐌 Track title
쐌 Artist
When the
ward) button is pushed for more than 1.5
seconds while the compact disc is being
played, the compact disc will play while
fast forwarding or rewinding. When the
button is released, the compact disc will
Disc
FF (Fast Forward), REW
(Rewind)/APS (Automatic
Program Search) FF, APS
REW:
(rewind) or (fast for-
return to normal play speed.
When the
for less than 1.5 seconds while the compact disc is being played, the tracks in
the CD will be changed.
CD PLAY select buttons:
To change CD, push the CD play select
buttons (1 to 6).
REPEAT (RPT):
When the RPT button is pushed while the
compact disc is played, the play pattern
can be changed as follows:
(CD)
(CD with MP3 or WMA)
CD EJECT:
When the CD EJECT button is pushed with
the compact disc loaded, the compact
disc will be ejected.
To eject the discs selected by the CD se-
or button is pushed
Monitor, climate, audio, phone and voice-activated control systems 4-37
lect button, push the EJECT button for less
than 1.5 seconds.
To eject all the discs, push the EJECT button for more than 1.5 seconds.
When this button is pushed while the
compact disc is being played, the compact disc will come out and the system
will turn off.
If the compact disc comes out and is not
removed, it will be pulled back into the
slot to protect it. (except 3.1 in (8 cm) diameter compact discs)
墌 04.10.8/Y50-D 墍
Page 39

쐌 A new disc may be rough on the inner
2
KI3(オーディオ)P4-26〜P4-50
and outer edges. Remove the rough
edges by rubbing the inner and outer
edges with the side of a pen or pencil
as illustrated.
SAA0451 SAA1107
CD CARE AND CLEANING
쐌 Handle a CD by its edges. Never touch
the surface of the disc. Do not bend
the disc.
쐌 Always place the discs in the storage
case when they are not being used.
쐌 To clean a disc, wipe the surface from
the center to the outer edge using a
clean, soft cloth. Do not wipe the disc
using a circular motion.
Do not use a conventional record
cleaner or alcohol intended for industrial use.
STEERING-WHEEL-MOUN
TED CONTROLS
4-38 Monitor, climate, audio, phone and voice-activated control systems
1. Channel/Track/Disc/Folder up and
down switch
2. ENTER switch
3. BACK
4. Volume control switch
5. Source select switch
STEERING WHEEL SWITCH FOR
AUDIO CONTROL
“SOURCE” select switch
Push the source select switch to change
the mode in the sequence of radio PRESET
A, PRESET B, PRESET C and CD changer.
墌 04.10.8/Y50-D 墍
Page 40

TUNE
KI3(オーディオ)P4-26〜P4-50
TRACK
FOR AUDIO
This source switch will not change to the
DVD player.
Volume control switch
Push the upper (+) or lower (−) side
switch to increase or decrease the
volume.
Channel/Track/Disc/Folder up and
down switch
Push the switch upward or downward to
select a channel, track, CD or folder when
they are listed on the display.
ENTER switch
After selecting a channel, track, CD or
folder using the up and down switch,
push the ENTER switch to complete the
selection.
BACK switch
Push this switch to go back to the previous screen or cancel the selection if it is
not completed.
1. Volume control switch
2. Tune/Track switch
3. ON/OFF switch
4. Source select switch
5. Display
SAA1108
AUDIO REAR CONTROL SWITCH (if
so equipped)
The audio system can be operated using
the rear control switch.
“ON⋅OFF” switch
With the ignition key turned to the ACC or
ON position, push the “ON⋅OFF” switch to
turn the audio system ON or OFF.
push-button ignition
switch
Source select switch
Push the “SRC” select switch to change
the mode in the sequence of radio PRESET
A, PRESET B, PRESET C and CD changer.
When the CD changer is loaded, the mode
changes to CD changer.
Tune/Track switch
Manual tuning (radio):
Push the tune/track switch “
or “
onds to change the radio frequency.
Seek tuning (radio):
Push the tune/track switch “
“
seek the next or previous radio station.
” (front) for less than 1.5 sec-
” for more than 1.5 seconds to
” (rear)
”or
Monitor, climate, audio, phone and voice-activated control systems 4-39
墌 04.10.8/Y50-D 墍
Page 41

APS (Automatic Program Search) FF, APS
あっていますでしょうか?
ご確認ください。
KI3(オーディオ)P4-26〜P4-50
REW (CD changer):
Push the tune/track switch “
” for less 1.5 seconds to return to
“
the beginning of the present program or
skip to the next program. Push several
times to skip back or skip through programs.
FF, REW (CD changer):
Push the tune/track switch “
” for more than 1.5 seconds to
“
change the playing disc up or down.
”or
”or
Volume control switch
Push the “ ” (front) side or “ ”
(rear) side of the switch to adjust the volume.
” Front side: Volume increases
“
“
” Rear side: Volume decreases
INFINITI MOBILE ENTERTAINMENT
SYSTEM (MES) (if so equipped)
This vehicle is equipped with the mobile
entertainment system, which enables you
to play a Digital Video Disc (DVD), providing the images and sounds both in the
front and rear display screens.
The driver must not attempt to operate the
DVD entertainment system while driving so
full attention may be given to vehicle operation.
쐌 Do not attempt to use the system in ex-
tremely high or low temperature condition [below −4°F (−20°C) or above
158°F (70°C)].
쐌 To avoid draining the vehicle battery,
do not operate the system for more
than 15 minutes without starting the
engine.
The front display is designed not to show
the images while driving, as the driver’s
attention must be given to vehicle operation for safety. Sounds are available. To
show the images in the front display, stop
the vehicle in a safe location and apply
the parking brake.
WARNING
CAUTION
4-40 Monitor, climate, audio, phone and voice-activated control systems
SAA1109
Digital video disc (DVD) system
components
DVD player:
The DVD slot is located inside of the center console. Insert a DVD into the slot
with the label side facing the front passenger’s seat side. The DVD will be
guided automatically into the slot.
墌 04.10.8/Y50-D 墍
Page 42

CAUTION
KI3(オーディオ)P4-26〜P4-50
Do not force a DVD into the slot. This could
cause damage the player.
When ejecting the DVD, push the EJECT
button
Displays :
쎻
1
.
CAUTION
쐌 The glass screen on the liquid crystal
display may break if hit with a hard or
sharp object. If the glass breaks, do
not touch the liquid crystalline material, which contains a small amount of
mercury. In case of contact with skin,
wash immediately with soap and water.
쐌 Use soft, damp cloth when cleaning the
Mobile Entertainment System components. Do not use solvents or cleaning
solutions.
쐌 Be sure to stow the rear display when it
is not used.
Front display
SAA1111
Use the remote controller to operate the
rear display.
1. Push the REAR DISPLAY OPEN/CLOSE
button on the remote controller to
open or close the display.
2. Adjust the display angle by pushing
the DISPLAY TILT button
.
Monitor, climate, audio, phone and voice-activated control systems 4-41
Rear display
SAA0719A
CAUTION
Do not touch the display when it is opening
or closing.
or
墌 04.10.8/Y50-D 墍
Page 43

SAA0720 SAA0721
KI3(オーディオ)P4-26〜P4-50
Headphones:
Headphones are a wireless type and no
cables are necessary. You can use them
in almost all the ranges in the rear seat.
(It is not possible to use the headphones
in the front seat.)
Power ON/OFF:
Push the POWER button to turn the headphones on or off.
Volume control:
Turn the volume control knob to adjust
the volume.
The headphones will automatically be
turned off in 30 seconds if there is no
sound during that period. To prevent the
battery from being discharged, keep the
power supply turned off when not in use.
4-42 Monitor, climate, audio, phone and voice-activated control systems
SAA1110
Remote controller:
The remote controller has the following
controls:
1. REAR DISPLAY OPEN/CLOSE button
墌 04.10.8/Y50-D 墍
Page 44

Joystick
KI3(オーディオ)P4-26〜P4-50
2. Multi function switch
3. ENTER button
4. DVD button
6. VOLUME CONTROL button (
7. Headphones button
8. RADIO button
9. DISPLAY TILT button
10. BACK button
11. Aux button
12. ASPECT button
13. SOUND button
14. Keypad
15. CD button
)
AUX
5. DISP button
or
Remote control and headphones
battery replacement
Replace the battery as follows:
1. Open the lid.
2. Replace both batteries with new ones.
쐌 Size AA (remote control)
쐌 Size AAA (headphones)
SAA0978 SAA0723
Make sure that the 䊝 and 䊞 ends on the
batteries match the markings inside the
compartment.
3. Close the lid securely.
If the battery is removed for any reason
other than replacement, perform step 3
above.
쐌 If you will not be using the remote
control for long periods of time, remove the batteries.
쐌 Replacement of the batteries is
needed when the remote control only
functions at extremely close distances
Monitor, climate, audio, phone and voice-activated control systems 4-43
墌 04.10.8/Y50-D 墍
Page 45

to the MES or not at all.
j
KI3(オーディオ)P4-26〜P4-50
쐌 Be careful not to touch the battery
terminal.
쐌 An improperly disposed battery can
harm the environment. Always confirm
local regulations for battery disposal.
쐌 When changing batteries, do not let
dust or oil get on the remote control
and headphones.
FCC Notice:
Changes or modifications not expressly
approved by the manufacturer compliance
could void the user’s authority to operate
the equipment. This device complies with
Part 15 of the FCC Rules and RSS-210 of
Industry Canada. Operation is subject to
the following two conditions: (1) This device may not cause harmful interference,
and (2) this device must accept any interference received, including interference
that may cause undesired operation of
the device.
Before operating the DVD
entertainment system
Precautions:
Start the engine when using the DVD entertainment system.
CAUTION
쐌 Only operate the DVD while the vehicle
engine is running. Operating the DVD
for extended periods of time with the
engine OFF can discharge the vehicle
battery.
쐌 Do not allow the system to get wet. Ex-
cessive moisture such as spilled liquids
may cause the system to malfunction.
쐌 The driver must not attempt to wear the
headphones while the vehicle is in motion so that full attention may be given
to vehicle operation.
쐌 While playing video CD media, this DVD
player does not guarantee complete
functionality of all video CD formats.
4-44 Monitor, climate, audio, phone and voice-activated control systems
Disc selection:
Use DVDs with a region code “2” or “ALL”
for your DVD entertainment system. (The
region code is displayed as a small
symbol printed on the top of the DVD.)
This vehicle-installed DVD player cannot
play DVDs with a region code other than
“2” or “ALL”.
Display settings:
To adjust the display mode, push the
“DISP” (Display) button on the remote
controller.
To adjust the display brightness, tint,
color and contrast, select each key using
the multi function switch and tilt the multi
function switch to right or left.
Push the BACK button to apply the settings and return to the previous display.
rear
Playing a digital video disc (DVD)
Push the “DISC” button on the instrument
panel and turn the display to the DVD
mode.
When a DVD is loaded, it will be replayed
automatically. To operate the DVD player,
push the “DISC” button on the instrument
panel or the “DVD” button on the remote
controller while a DVD is being played.
oystick
墌 04.10.8/Y50-D 墍
Page 46

After the setup is finished, push the
the keypad of
KI3(オーディオ)P4-26〜P4-50
“BACK” button and return to the DVD play
back screen.
To operate the DVD player,
select each key displayed on the
operation screen using the multi
function switch.
on when the DISC button
located on the instrument
panel is pushed while a DVD
is being played and turn
once more
Select each “Display” key by using the
multi function switch and push the ENTER
button located on the instrument panel to
perform the operation.
The operation screen will turn off after a
period of time. To turn it on again, push
the DISC button located on the instrument panel.
Select the “
ENTER button to pause the DVD. To resume playing the DVD, use the “PLAY”
key.
Operation screen
PAUSE:
” key and push the
SAA1112
Monitor, climate, audio, phone and voice-activated control systems 4-45
To pause the DVD, it is also possible to
push the “
troller.
Select the “
ENTER button to start playing the DVD, for
example, after pausing the DVD.
To start playing the DVD, it is also possible to push the “
mote controller.
Select the “
ENTER button to stop playing the DVD.
To stop playing the DVD, it is also possible to push the “
mote controller.
Select the “
ENTER button to skip the chapter(s) of the
disc forward. The chapters will advance
the number of times the ENTER button is
pushed.
To skip the chapter(s) forward, it is also
possible to push the “
remote controller.
A
쎻
” button on the remote con-
PLAY:
” key and push the
A
쎻
” button on the re-
STOP:
” key and push the
D
쎻
” button on the re-
SKIP (FORWARD):
” key and push the
B
쎻
” button on the
墌 04.10.8/Y50-D 墍
Page 47

the keypad of
不明なセッティング項目が
あります。ご指示ください。
KI3(オーディオ)P4-26〜P4-50
SKIP (REWIND):
Select the “
ENTER button to skip the chapter(s) of the
disc backward. The chapters will go back
the number of times the ENTER button is
pushed.
To skip the chapter(s) backward, it is also
possible to push the “
remote controller.
Setting/AUX:
Select the “Setting/AUX” key and push
the ENTER button to adjust the following
settings:
쐌 AUX
쐌 Menu*
쐌 Top Menu*
쐌 Audio*
Select the “Audio” key and push the
ENTER button. Choose the language
using the multi function switch and
push the ENTER button again.
쐌 Subtitle*
Select the “Subtitle” key and push the
ENTER button. Choose the language
using the multi function switch and
” key and push the
E
쎻
” button on the
push the ENTER button again.
To turn off the subtitle, push and hold
the ENTER button until a beep sounds.
쐌 Surround Information*
Select the “Surround Information” key
and push the ENTER button. The surround information screen will appear.
Push the “BACK” button to return to
the previous screen.
쐌 Display Mode
Select the “Display Mode” key and
push the ENTER button. Choose from
the “Full”, “Wide”, “Normal” or “Cinema” mode using the multi function
switch and push the ENTER button
again.
쐌 Angle*
If the DVD contains different angles
(such as moving images), the current
image angle can be switched to another one.
Select the “Angle” key and push the
ENTER button. When the “+” side or
“−” side is selected, the angle will
change.
쐌 Angle Mark
4-46 Monitor, climate, audio, phone and voice-activated control systems
쐌 10 Key Search*
The scene with the specified number
will be displayed by entering the number and then pushing the ENTER
button.
쐌 Title Search*
The scene with the specified title will
be displayed when the “+” side or “−”
side is selected.
쐌 Menu Skip
쐌 DVD Language
쐌 DRC
쐌 DOWN MIX
*: These items can be set from the rear
display. Push the “DVD” button on the
remote controller while a DVD is being
played.
墌 04.10.8/Y50-D 墍
Page 48

SAA1110
KI3(オーディオ)P4-26〜P4-50
1. REAR DISPLAY OPEN/CLOSE button
2. Multi function switch
3. ENTER button
4. DVD button
6. VOLUME CONTROL button (
)
7. Headphones button
8. RADIO button
9. DISPLAY TILT button
10. BACK button
11. Aux button
12. ASPECT button
13. SOUND button
14. Key pad
15. CD button
or
Settings by remote controller
Use the remote controller to adjust the
following items.
DVD/AUX/RADIO/CD MODE:
To select the DVD, AUX (Auxiliary input
jacks), radio or CD mode, push the desired button.
VOLUME:
To control the volume level, push the
“VOL” button
or .
Monitor, climate, audio, phone and voice-activated control systems 4-47
DISPLAY SIZE:
To change the display size, push the “ASPECT” button. Each time the button is
pushed, the display size will change to
“Cinema”, “Wide”, “Full” or “Normal”.
HEADPHONES MODE:
When the HEADPHONES MODE is selected, the DVD sound can be heard
through the headphones.
Push the “
button is pushed the mode will switch to
ON or OFF.
To control the volume of sound from the
headphones, use the VOLUME CONTROL
knob attached to the headphones.
Sound:
To change the language, push the
“SOUND” button. Each time the button is
pushed, the language will change to each
language stored in the DVD.
” button. Each time the
Care and maintenance
Use a lightly dampened, lint free cloth to
clean the surfaces of your Mobile Entertainment System. (DVD player face,
screen, remote controller, etc.)
墌 04.10.8/Y50-D 墍
Page 49

CAUTION
KI3(オーディオ)P4-26〜P4-50
쐌 Do not use any solvents or cleaning so-
lutions when cleaning the video
system.
쐌 Do not use excessive force on the
monitor screen.
쐌 Avoid touching or scratching the
monitor screen as it may become dirty
or damaged.
쐌 Do not attempt to operate the system
in extreme temperature conditions [below −4°F (−20°C) and above 158°F
(70°C)].
쐌 Do not attempt to operate the system
in extreme humidity conditions (less
than 10% or more than 75%).
SAA0451
How to handle the DVD
CAUTION
쐌 Handle a DVD by its edges. Never touch
the surface of the disc.
쐌 To clean a disc, wipe the surface from
the center to the outer edge using a
clean, soft cloth. Do not wipe the disc
using a circular motion.
쐌 Do not use a conventional record
cleaner, benzine, thinner or alcohol intended for industrial use.
쐌 A new disc may be rough on its inner
and outer edges. Remove the rough
edges using the side of a pen or pencil
as illustrated.
쐌 Never attempt to use a DVD that has
been cracked, deformed, or repaired
using adhesive. Doing so may cause
damage to the equipment.
쐌 Handle the DVD carefully to avoid con-
tamination or flaws. Otherwise, signals may not be read properly.
쐌 Do not write, draw or attach anything
on any side of the DVD.
쐌 Do not store the DVD in locations with
direct sunlight or in high temperatures
or humidity.
쐌 Always place discs in the storage case
when they are not being used.
쐌 Do not put on any sticker or write any-
thing on either surface of the DVD.
4-48 Monitor, climate, audio, phone and voice-activated control systems
墌 04.10.8/Y50-D 墍
Page 50

T3
KI3(オーディオ)P4-26〜P4-50
CAR PHONE OR CB RADIO
SIC2773
Auxiliary input jacks
The auxiliary input jacks are located on
the rear side of the center console. Compatible devices such as video games,
camcorders and portable video players
can be connected to the auxiliary jacks.
The auxiliary jacks are color coded for
identification purposes.
쐌 Yellow - video input
쐌 White - left channel audio input
쐌 Red - right channel audio input
Before connecting a device to a jack,
power off the portable device and turn off
the DVD player.
ANTENNA
Window antenna
The antenna pattern is printed inside the
rear window.
CAUTION
쐌 Do not place metalized film near the
rear window glass or attach any metal
parts to it. This may cause poor reception or noise.
쐌 When cleaning the inside of the rear
window, be careful not to scratch or
damage the rear window antenna.
Lightly wipe along the antenna with a
dampened soft cloth.
Move to the location
(A) on the page 4-50.
Monitor, climate, audio, phone and voice-activated control systems 4-49
When installing a car phone or a CB radio
in your INFINITI, be sure to observe the
following cautions, otherwise the new
equipment may adversely affect the electronic control modules and electronic control system harness.
WARNING
쐌 A cellular telephone should not be used
while driving so full attention may be
given to vehicle operation. Some jurisdictions prohibit the use of cellular
telephones while driving.
쐌 If you must make a call while your ve-
hicle is in motion, the hands-free cellular phone operational mode (if so
equipped) is highly recommended. Exercise extreme caution at all times so
full attention may be given to vehicle
operation.
쐌 If a conversation in a moving vehicle
requires you to take notes, pull off the
road to a safe location and stop your
vehicle before doing so.
墌 04.10.8/Y50-D 墍
Page 51

HANDS-FREE PHONE SYSTEM
KI3(ハンズフリーフォン)P4-50〜P4-57
KI3(オーディオ)P4-26〜P4-50
(A):
This section will be replaced with the
warnings from P. 4-49
CAUTION
쐌 Keep the antenna as far away as pos-
sible from the electronic control modules.
쐌 Keep the antenna wire more than 8 in
(20 cm) away from the electronic control system harness. Do not route the
antenna wire next to any harness.
쐌 Adjust the antenna standing-wave ratio
as recommended by the manufacturer.
쐌 Connect the ground wire from the CB
radio chassis to the body.
쐌 For details, consult an INFINITI dealer.
WARNING
쐌 Use a phone after stopping your vehicle
in a safe location. If you have to use a
phone while driving, always confirm the
safety around the vehicle and finish a
call as soon as possible.
쐌 Do not leave your cellular phone in your
vehicle when you get out of the vehicle.
It is your responsibility to prevent a
malfunction, deformity and theft of your
cellular phone if it is left in the vehicle.
CAUTION
쐌 Set up the wireless connection between
a cellular phone and the in-vehicle
phone module before using the handsfree phone system.
쐌 To avoid draining the vehicle battery,
use a phone after starting the engine.
쐌 Some Bluetooth
phones may not be recognized by the
TM
enabled cellular
in-vehicle phone module. Contact an
INFINITI dealer for a recommended
phone list.
쐌 You will not be able to use a hands-free
phone under the following conditions:
- Your vehicle is outside of the telephone service area.
- Your vehicle is in an area where it is
difficult to receive radio waves; such
as in a tunnel, in an underground
parking garage, behind a tall
building or in a mountainous area.
- Your cellular phone is locked so that
it cannot to be dialed.
쐌 When the radio wave condition is too
bad or ambient sound is too loud, it
may be difficult to hear the other person’s voice during a call.
쐌 Immediately after the push-button igni-
tion switch is turned to the ON position
or the DVD-ROM for the navigation system is inserted into the player (if so
equipped), it may be impossible to re-
4-50 Monitor, climate, audio, phone and voice-activated control systems
墌 04.10.8/Y50-D 墍
Page 52

ceive a call for a short period of time.
KI3(ハンズフリーフォン)P4-50〜P4-57
쐌 Do not place the cellular phone in an
area surrounded by metal or far away
from the in-vehicle phone module to
prevent tone quality degradation and
wireless connection disruption.
쐌 While a cellular phone is connected
through the Bluetooth
TM
wireless connection, the battery power of the cellular phone may discharge quicker than
usual.
쐌 If the hands-free phone system seems
to be malfunctioning, contact an
INFINITI dealer.
쐌 Refer to the cellular phone Owner’s
Manual regarding the telephone
charges, cellular phone antenna and
body, etc.
Your INFINITI is equipped with the
Bluetooth
you are an owner of a Bluetooth
TM
Hands-Free Phone system. If
TM
enabled cellular phone, you can set up the
wireless connection between your cellular
phone and the in-vehicle phone module.
Monitor, climate, audio, phone and voice-activated control systems 4-51
SAA1120
TM
Thanks to Bluetooth
wireless technology, you can make or receive a telephone call with your cellular phone in
your pocket.
Once your cellular phone is paired to the
in-vehicle phone module, no phone con-
墌 04.10.8/Y50-D 墍
Page 53

necting procedure is required anymore.
KI3(ハンズフリーフォン)P4-50〜P4-57
Your phone is automatically connected
with the in-vehicle phone module when
the push-button ignition switch is turned
to the ON position with the registered cellular phone turned on and carried in the
vehicle.
You can register up to 5 different
Bluetooth
TM
cellular phones in the invehicle phone module. However, you can
talk on only one cellular phone at a time.
The voice recognition system supports the
cellular phone voice commands, so dialing a phone number using your voice is
possible. For more details, see “Voiceactivated control system” later in this section.
PAIRING PROCEDURE
1. Push the “SETTING” button, and select the “PHONE” key on the display
using the multi function switch. Then
push the ENTER button.
2. Select the “Bluetooth Setup” key, and
push the “ENTER” button.
3. Select the “Pair Phone” key, and push
the “ENTER” button.
4. When a PIN code appears on the
screen, operate the Bluetooth
lular phone to enter the PIN code. The
pairing procedure of the cellular
4-52 Monitor, climate, audio, phone and voice-activated control systems
SAA1114 SAA1115
phone varies according to each cellular phone manufacturer. See the cellular phone Owner’s Manual for the
details.
5. When the pairing is completed, the
screen will return to the Bluetooth
setup display.
TM
cel-
TM
墌 04.10.8/Y50-D 墍
Page 54

SAA1116 SAA1117 SAA1118
KI3(ハンズフリーフォン)P4-50〜P4-57
PHONEBOOK REGISTRATION
Up to 40 phone numbers can be stored in
the phonebook.
1. Push the “SETTING” button, and select the “PHONE” key on the display
using the multi function switch. Then
push the ENTER button.
2. Select the “Phonebook” key, and push
the “ENTER” button.
3. Select the “None (Add New)” key from
the name list of the phonebook, and
push the “ENTER” button.
Monitor, climate, audio, phone and voice-activated control systems 4-53
4. Select the “Bluetooth” key, and push
the “ENTER” button.
5. Operate the cellular phone to send a
person’s name and phone number
from the memory of the cellular
phone. The memory sending procedure from the cellular phone varies according to each cellular phone manufacturer. See the cellular phone Owner’s Manual for more details.
6. If you want to add a voice tag, select
“YES” on the “Add a voice tag?”
screen. For example, if the partner’s
name is David, speak “David” while
墌 04.10.8/Y50-D 墍
Page 55

Dial Keypad:
KI3(ハンズフリーフォン)P4-50〜P4-57
Input the name and phone number manually.
Outgoing Calls:
Store the name and phone number from
the outgoing call list.
Incoming Calls:
Store the name and phone number from
the incoming call list.
To delete an item, Select the “Delete
SAA1119 SAA1121
item” key and push the “ENTER” button.
the “Store voice tag” screen is on the
display. The “David” voice tag is
stored in the phonebook. Voice tag is
a useful function for easy dialing supported by the voice recognition
system. See “Voice-activated control
system” later in this section.
7. When the phonebook registration is
completed, the screen will return to
the name list of the phonebook.
There are different methods to input a
phone number. Select one of the following options in step 4 above.
steering-wheel-mounted
controls
4-54 Monitor, climate, audio, phone and voice-activated control systems
MAKING A CALL
To make a call, follow the procedures below.
1. Push the “PHONE” button on the instrument panel or the “
on the steering control switch for more
than 1 second. The “PHONE” screen
will appear on the display.
2. Select the “Phonebook” key on the
“PHONE” menu, and push the “ENTER”
button.
3. Select the registered person’s name
from the list, and push the “ENTER”
墌 04.10.8/Y50-D 墍
” button
Page 56

steering-wheel-mounted
Hang
KI3(ハンズフリーフォン)P4-50〜P4-57
controls
button. Dialing will start.
4. After the call is over, perform one of
the following to finish the call.
a.Select the “Hung up” key and push
the “ENTER” button.
b.Push the “
steering control switch.
c. Push the “PHONE” button on the in-
strument panel.
There are different methods to make a
call. Select one of the following options
instead of “Phonebook” in the step 2
above.
Dial Keypad:
Input the phone number manually.
Call Logs - Outgoing Calls:
Select the name and phone number from
the outgoing call logs.
Call Logs - Incoming Calls:
Select the name and phone number from
the incoming call logs.
Redial:
Dial the previously dialed number again.
” button on the
Hang
SAA1122
RECEIVING A CALL
When you hear a phone ring, the display
will change to the ON HOLD mode. To receive a call, follow the three procedures
listed below.
a. Select the “Answer” key on the dis-
play and push the “ENTER” button.
b. Push the “PHONE” button on the in-
strument panel.
c. Push the “
steering control switch.
There are some options available for
” button on the
Monitor, climate, audio, phone and voice-activated control systems 4-55
when receiving a call. Select one of the
following displayed on the screen.
Answer:
Accept an incoming call to talk.
Hung up:
Reject an incoming call.
Handset:
Transfer the call to the cellular phone.
To finish the call, follow the three procedures listed below.
a. Select the “Hung up” key on the dis-
play and push the “ENTER” button.
b. Push the “PHONE” button on the in-
strument panel.
c. Push the “
steering control switch.
Hang
” button on the
steering-wheel-mounted
controls
墌 04.10.8/Y50-D 墍
Page 57

Dial:
KI3(ハンズフリーフォン)P4-50〜P4-57
Input specific numbers related to the
partner.
To adjust the partner’s voice to be louder
or quieter, push the volume control
switch located on the steering control or
turn the volume control knob on the instrument panel while talking on the
phone. This adjustment is also available
in the SETTING mode.
PHONE SETTING
SAA1123
DURING A CALL
There are some options available during a
call. Select one of the following displayed
on the screen if necessary.
Hang
Hung up:
Finish the call.
Handset:
Transfer the call to the cellular phone.
Mute:
Mute your voice to the person.
To set up the hands-free phone system to
your preferred settings, push the “SETTING” button on the instrument panel and
select the “PHONE” key on the display,
and then push the “ENTER” button.
Phonebook:
See “Phonebook registration” in this section.
Delete Call Logs:
Delete all the outgoing or incoming call
logs from the list
Phone Ringer Vol:
Adjust the ring volume to be louder (+) or
quieter (−).
4-56 Monitor, climate, audio, phone and voice-activated control systems
steering-wheel-mounted
controls
Phone Incoming Vol:
Adjust the phone incoming volume to be
louder (+) or quieter (−).
Phone Outgoing Vol:
Adjust the phone outgoing volume to be
louder (+) or quieter (−).
Automatic Hold:
If this item is turned on, an incoming call
will be placed on hold automatically after
several rings.
Use Vehicle Ringtone:
If this item is turned on, a specific ringtone that is different from the cellular
phone’s will sound when receiving a call.
Bluetooth Setup:
See the following information for each
item.
쐌 Bluetooth Handsfree
If this item is turned off, the connection between the cellular phone and
the in-vehicle phone module will be
canceled.
墌 04.10.8/Y50-D 墍
Page 58

쐌 Paired Phone List
KI3(音声認識)P4-57〜P4-63
KI3(ハンズフリーフォン)P4-50〜P4-57
Up to 5 registered cellular phones are
shown on the list.
쐌 Pair Phone
See “Pairing Procedure” in this section.
쐌 Remove Paired Phone
Delete a registered cellular phone
from the paired list.
쐌 Bluetooth Info
Check information about the device
name, device address and device PIN.
VOICE-ACTIVATED CONTROL SYSTEM
(VACS)
The Voice-Activated Control System
(VACS) allows hands-free operation of the
systems equipped on this vehicle, such
as the display, audio, climate control,
phone and optional navigation systems.
To operate the VACS, push and release
the Push-To-Talk (PTT) switch
cated on the steering wheel. Then speak
the command for the system you wish to
activate. The command given is picked up
by the microphone, and it is performed
when it is properly recognized. At this
time the VACS will provide a voice and it
is message (in the center display) feedback to inform you of the command results.
lo-
USING THE SYSTEM
Initialization
When the ignition switch is turned to the
ON position, the VACS is initialized, which
takes a few seconds. When completed,
the system is ready to accept voice commands. If the PTT switch is pushed before
the initialization completes, the display
will show the message: “Phonetic data
downloaded. Please wait.”
push-button
Monitor, climate, audio, phone and voice-activated control systems 4-57
SAA1113
Giving voice commands
1. Turn the ignition switch to the ON position.
2. Push and release the PTT switch located on the steering wheel.
3. The system voice says, “Please say a
command after a tone.”
4. After the tone sounds, speak a command. (Refer to “List of voice commands” later in this section for the
commands available.)
5. Voice and message feedback will be
announces
push-button
墌 04.10.8/Y50-D 墍
Page 59

T
system announces
KI3(音声認識)P4-57〜P4-63
he system will announce
provided when the command is accepted.
쐌 If the command is not recognized, the
voice says, “Please say again.” Repeat
the command in a clear voice.
쐌 If you want to cancel the command,
push the PTT switch or the BACK
” switch twice. The message
“
“VOICE CANCELED” will be heard.
쐌 If you want to adjust the volume of
the voice feedback, push the volume
control switches (+ or −) on the steering wheel while being provided with
the feedback.
Operating tips
To get the best performance out of the
VACS, observe the following:
쐌 Keep the vehicle interior as quiet as
possible. Close the windows to cut off
the surrounding noises (travel noise
and vibration, etc.), which may prevent the system from receiving the
voice commands correctly.
쐌 Wait until a tone sounds before
speaking a command. Otherwise, the
command will not be received properly.
쐌 Start speaking a command within 5
seconds after the tone sounds.
쐌 Speak in a natural voice without paus-
ing between words.
SYSTEM FEATURES
The VACS can activate the following systems:
쐌 Vehicle information display
쐌 Audio (radio, CD and DVD — if so
equipped)
쐌 Automatic climate control
쐌 Hands-free phone
쐌 Navigation (for navigation system
equipped model)
For the detailed operations, refer to each
description in this Owner’s Manual. For
the navigation system, see a separate
Navigation System Owner’s Manual.
How to say numbers
The VACS requires a certain way to speak
numbers in voice commands. Refer to the
following examples.
(General rule: Either “zero” or “oh” can
be used for “0”).
4-58 Monitor, climate, audio, phone and voice-activated control systems
Radio frequencies:
Speak radio frequencies according to the
following examples:
쐌 “Select nine thirty AM” or “Select nine
thirty” (930 kHz).
쐌 “Select one thousand” (1000 kHz).
쐌 “Select ten forty” (1040 kHz).
쐌 “Select seventeen ten” (1710 kHz).
쐌 “Select nine seven point nine FM” or
“Select ninety seven point nine” (97.9
MHz).
쐌 “Tune one hundred point five” (100.5
MHz).
쐌 “Tune one oh one point one FM”
(101.1 MHz).
Temperatures (climate control):
Speak temperatures according to the following examples:
쐌 “Temperature seventy four” (74°F).
쐌 “Temperature twenty one point five”
or “Temperature twenty one and a
half” (21.5°C).
쐌 “Temperature nineteen point zero”,
“Temperature nineteen point oh” or
墌 04.10.8/Y50-D 墍
Page 60

“Temperature nineteen” (19.0°C).
KI3(音声認識)P4-57〜P4-63
Phone numbers:
Speak phone numbers according to the
following examples:
쐌 1010 - “ten ten”
쐌 0900 - “oh nine hundred” or “zero
nine hundred”
쐌 1-800-662-6200
- “Dial one eight oh oh six six two six
two oh oh”,
- “Dial one eight hundred six six two
six two oh oh”, or
- “Dial one eight zero zero six six two
oh oh”.
Personal vocabulary (voicetags)
The VACS provides the function called
“voicetags,” which can be associated with
the phone and the navigation system (if
so equipped). Using your own voice, 40
speed dials can be registered in the
“Phonebook” (phone) and 10 locations
can be registered in the “Address Book”
(navigation system).
See “Hands-free phone” earlier in this
section and/or the separate Navigation
system
System Owner’s Manual (if so equipped)
for the method of “voicetag” registration.
LIST OF VOICE COMMANDS
Depending on the commands, some different phrases are available. Optional
words are shown in brackets [ ]. A few
words, identified with a slash /, indicate
the alternate words that you can select
when speaking the command. Data items
that you need to enter, such as phone
numbers, are indicated in italics with
brackets < >.
How to say commands
Example 1: “[CLIMATE/CLIMATE CONTROL] TEMPERATURE DOWN/COOLER”
stands for the following commands.
1. TEMPERATURE DOWN
2. TEMPERATURE COOLER
3. CLIMATE TEMPERATURE DOWN
4. CLIMATE TEMPERATURE COOLER
5. CLIMATE CONTROL TEMPERATURE
DOWN
6. CLIMATE CONTROL TEMPERATURE
COOLER
Example 2: “[PHONE] DIAL/CALL <phone
Monitor, climate, audio, phone and voice-activated control systems 4-59
number digits>” stands for the following
commands.
1. DIAL <1 to 16 phone number digits>
2. CALL <1 to 16 phone number digits>
3. PHONE DIAL <1 to 16 phone number
digits>
4. PHONE CALL <1 to 16 phone number
digits>
General commands
Dialogue:
쐌 “YES/NO”
Confirms the command when asked,
“Please say YES or NO”.
쐌 “CANCEL”
Cancels the command when asked,
“Please say YES, NO or CANCEL”.
쐌 “CORRECT/CORRECTION”
Confirms the last group of the numbers after entering the phone number
using the phone enter command.
쐌 “STORE”
Stores the phone number after entering it.
墌 04.10.8/Y50-D 墍
Page 61

Browsing:
KI3(音声認識)P4-57〜P4-63
쐌 “NEXT/PREVIOUS PAGE/GROUP”
Goes to the next/previous page/group
in the list displayed.
Help commands
쐌 “VOICE HELP”, “[SHOW] [VOICE] COM-
MAND LIST” or “[SHOW] VOICE COMMANDS”
Gives spoken information about the
VACS and displays the list of help
commands.
쐌 “AUDIO HELP”
Gives spoken information about the
general audio system voice commands
and displays the list of them.
쐌 “CD/MP3 [CHANGER/DJ] HELP”
Gives spoken information about the
CD changer voice commands and displays the list of them.
쐌 “DVD HELP”
Gives spoken information about the
DVD player voice commands and displays the list of them (if so equipped).
쐌 “RADIO HELP”
Gives spoken information about the
radio voice commands and displays
the list of them.
쐌 “CLIMATE [CONTROL] HELP”
Gives spoken information about the
climate control voice commands and
displays the list of them.
쐌 “INFO/INFORMATION HELP”
Gives spoken information about the
vehicle information voice commands
and displays the list of them.
쐌 “PHONE/TELEPHONE HELP”
Gives spoken information about the
phone voice commands and displays
the list of them.
쐌 “NAVIGATION HELP”
Gives spoken information about the
navigation system voice commands
and displays the list of them (if so
equipped).
Audio system commands
CD changer:
General: Say numbers where the following words are placed.
4-60 Monitor, climate, audio, phone and voice-activated control systems
<disc number> 1to6
<track number> 1 to 512
<folder number> 1to255
쐌 “CD/MP3 [ON/PLAY/PLAYER]”
Starts to play the CD changer.
쐌 “[CD/MP3] [PLAY/SELECT] DISC <disc
number>”
Switches to the specified disc.
쐌 “[CD/MP3] [PLAY/SELECT] DISC <disc
number> TRACK <track number>”
Switches to the specified track on the
specified disc.
쐌 “[CD/MP3] [PLAY/SELECT] FOLDER
<folder number>”
Selects the specified MP3 folder and
plays the first file.
쐌 “CD/MP3 [PLAY/SELECT] TRACK <track
number>”
Switches to the specified track.
DVD player (if so equipped):
General: Say numbers where the following words are placed.
<title number> 1to99
墌 04.10.8/Y50-D 墍
Page 62

<group number> 1to9
KI3(音声認識)P4-57〜P4-63
<chapter number> 1to999
<track number> 1to99
쐌 “DVD [ON/PLAY/PLAYER]”
Turns the DVD player on, selecting the
track last played.
쐌 “DVD STOP”
Stops playing the DVD (DVD system
stays on).
쐌 “[DVD] [PLAY/SELECT] TITLE <title num-
ber>”
Switches to the specified DVD title.
쐌 “[DVD] [PLAY/SELECT] GROUP <group
number>”
Switches to the specified DVD group.
쐌 “[DVD] [PLAY/SELECT] TITLE <title num-
ber> CHAPTER <chapter number>”
Switches to the specified DVD title on
the specified chapter.
쐌 “[DVD] [PLAY/SELECT] GROUP <group
number> TRACK <track number>”
Switches to the specified DVD group
on the specified track.
쐌 “DVD [PLAY/SELECT] TRACK <track
number>”
Switches to the specified DVD track.
쐌 “[DVD] [PLAY/SELECT] CHAPTER <chap-
ter number>”
Switches to the specified DVD chapter.
Radio commands
쐌 “RADIO PLAY”
Turns the radio on, selecting the station and band last played.
쐌 “[RADIO] [TUNE [TO]] AM/FM”
Turns to the band given in the command, selecting the station last
played.
쐌 “[RADIO] [TUNE [TO]] SAT/SATELLITE”
Turns to the SAT radio, selecting the
station last played.
쐌 “[RADIO] [TUNE [TO]] [SATELLITE/SAT]
CHANNEL <channel number (1 to 255)>
[SAT]”
Tunes to the specified SAT radio channel.
쐌 “[RADIO] [TUNE [TO]] PRESET <preset
Monitor, climate, audio, phone and voice-activated control systems 4-61
bank (A to C)> <preset number (1 to
6)>”
Switches directly to the specified
preset station in the specified preset
bank.
쐌 “[RADIO] [TUNE [TO]] <frequency> [AM/
FM]”
Tunes to the specified frequency.
Climate control commands
General: Speak temperature where the
word <degree> is located (60 to 90 for
Fahrenheit, 18 to 32 for Centigrade) in the
following examples.
쐌 “CLIMATE/CLIMATE CONTROL AUTO/
AUTOMATIC”
Turns the climate control system on
and operates it in AUTO mode
쐌 “[CLIMATE/CLIMATE CONTROL] [SET/
SELECT] [DRIVER] TEMPERATURE [TO]
<degree>”
Sets the climate control temperature
to the value given in the command.
(When the dual mode is selected, only
the driver’s side temperature will be
changed.)
墌 04.10.8/Y50-D 墍
Page 63

쐌 “[CLIMATE/CLIMATE CONTROL] [SET/
KI3(音声認識)P4-57〜P4-63
SELECT] PASSENGER TEMPERATURE
[TO] <degree>”
Sets the passenger’s side temperature
to the value given in the command.
쐌 “[CLIMATE/CLIMATE CONTROL] TEM-
PERATURE UP/WARMER”
Changes temperature increment by 2
degrees. (When the dual mode is selected, only the driver’s side temperature will be changed.)
쐌 “[CLIMATE/CLIMATE CONTROL] TEM-
PERATURE DOWN/COOLER”
Changes temperature decrements by 2
degrees. (When the dual mode is selected, only the driver’s side temperature will be changed.)
Vehicle information commands
General: The display will be switched to
the screen given in the command.
쐌 “FUEL ECONOMY”
쐌 “MAINTENANCE”
쐌 “TIRE PRESSURE”
쐌 “TRIP COMPUTER”
Phone commands
쐌 “[PHONE] DIAL/CALL <phone number
digits>”
Dials the phone number given in the
command.
쐌 “[PHONE] DIAL/CALL <voicetag>”
Dials the phone number registered in
the specified “voicetag”.
쐌 “[PHONE] DIAL/CALL MEMORY <memory
location number>”
Dials the speed dial stored in the
specified memory location number (1
to 40).
쐌 “PHONE [PLAY] DIRECTORY”
Dials the phone number in the phone
directly.
쐌 “PHONE ENTER <phone number digits>”
Enters the phone number given in the
command.
쐌 “PHONE DISPLAY/SCREEN/MENU”
Displays the phone screen (the same
response as pushing and holding the
PTT switch).
registered in the phonebook
4-62 Monitor, climate, audio, phone and voice-activated control systems
쐌 “[PHONE] REDIAL”
Redials the phone number last dialed.
쐌 “[PHONE] INCOMING CALLS”
Shows the incoming call history (1 to
5).
쐌 “[PHONE] OUTGOING CALLS”
Shows the outgoing call history (1 to
5).
쐌 “PHONEBOOK”
Shows the first page of the “Phonebook” list.
Navigation system commands (if
so equipped)
See the separate Navigation System Owner’s Manual for the voice commands available and operations.
墌 04.10.8/Y50-D 墍
Page 64

TROUBLESHOOTING GUIDE
KI3(音声認識)P4-57〜P4-63
The system should respond correctly to all voice commands without difficulty. If problems are encountered, follow the solutions
given in this guide for the appropriate error.
Where the solutions are listed by number, try each solution in turn, starting with number one, until the problem is resolved.
Symptom/error message Solution
Displays “COMMAND NOT RECOGNIZED” or the system fails to
interpret the command correctly.
Displays “NO SPEECH DETECTED”.
Displays “VOICETAG NOT
UNIQUE”.
The system consistently selects
the wrong voicetag.
1. Ensure that the command format is valid, see Command list in this section.
2. Ensure that the command is given after the tone while “LISTENING” is displayed.
3. Speak clearly without pausing between words and at a level appropriate to the ambient noise level.
4. Ensure that the ambient noise level is not excessive, for example, windows open or defrost on.
NOTE:
If it is too noisy to use the phone, it is likely that voice commands will not be recognized.
5. If optional words of the command have been omitted, then the command should be tried with these in place.
6. If a number of commands have been given in rapid succession resulting in the message “COMMAND NOT RECOGNIZED” to be
displayed, then allow the system to recover (approximately one minute) before trying the command again.
7. If the system consistently fails to recognize commands, the voice training procedure should be carried out to improve the recognition response for the speaker.
1. Ensure that the command is given after the tone while “LISTENING” is displayed.
2. Ensure that the command is given within a maximum of five seconds from the end of the tone.
NOTE:
Be sure you know what to say before pushing the Voice button.
1. This response will be received when storing a voicetag if the voicetag being given has already been stored. This can be confirmed by giving the Radio Directory of Phone Directory command.
2. If this response is received and the voicetag has not been used already, then it is too similar to an existing voicetag or voice
grammar and an alternative should be used.
1. Ensure that the voicetag requested matches what was originally stored. This can be confirmed by giving the Radio Directory or
Phone Directory command.
2. Delete one of the voicetag being confused and replace it with a different voicetag.
Monitor, climate, audio, phone and voice-activated control systems 4-63
墌 04.10.8/Y50-D 墍
 Loading...