

Page 1
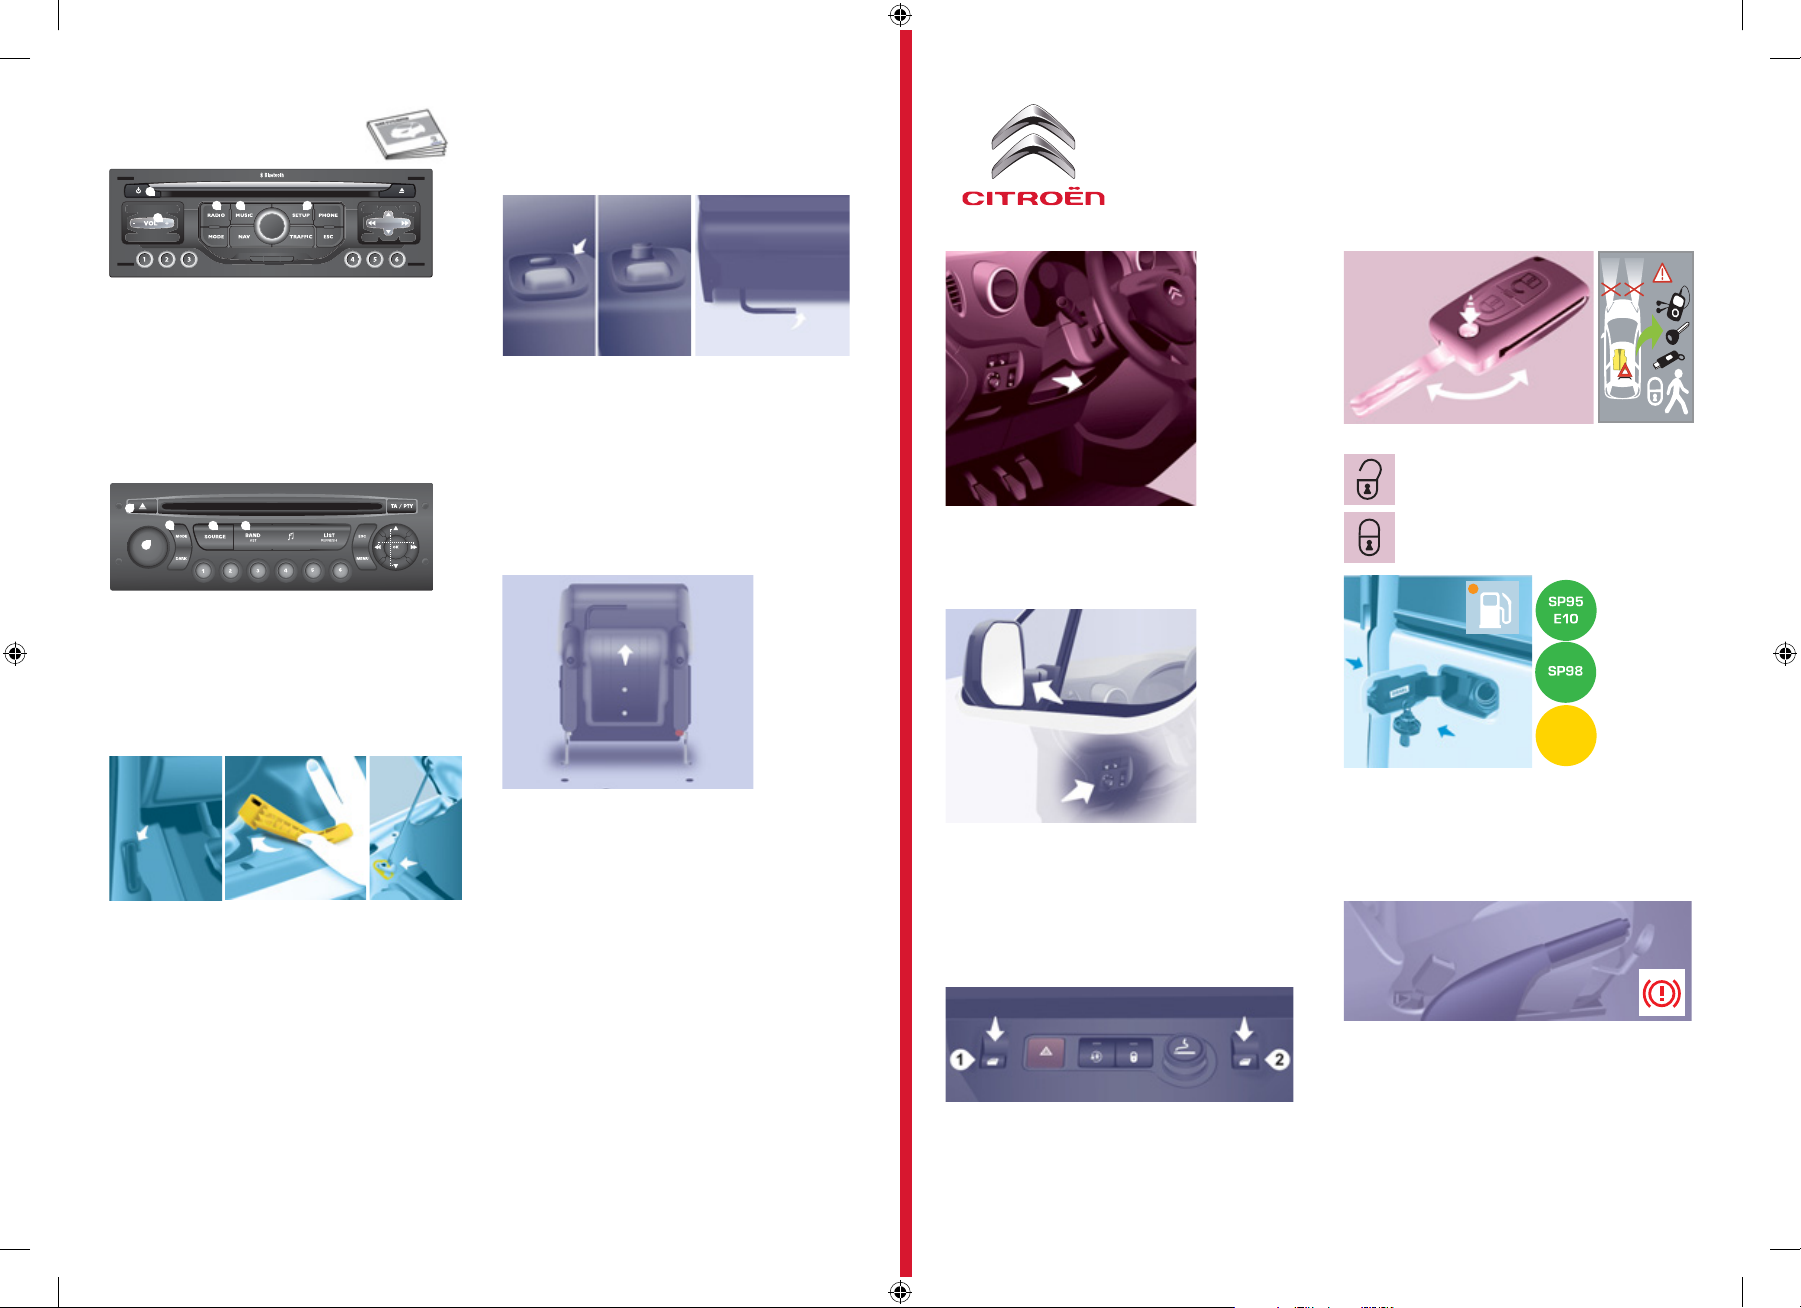
AUDIO EQUIPMENT AND
TELEMATICS
1
1. Engine not running
- Short press: on/off.
- Long press: CD pause, mute for the radio.
Engine running
- Short press: CD pause, mute for the radio.
- Long press: reinitialisation of the system.
2. Volume adjustment (each source is independent, including also navigation
messages and alerts) .
3. Access to the "Radio" Menu. Display the list of stations.
4 . Access to the "Music" Menu. Display the tracks.
5. Access to the "SETUP" menu.
Long press: access to the GPS coverage and the demonstration mode.
2
1
1 . On/Off and volume adjustment.
2. CD eject.
3 . Selection of the display on the screen from the following modes:
Audio (AUDIO), Trip Computer (TRIP) and Telephone (TEL) functions.
4. Selection of source:
radio, audio CD/MP3 CD, USB, Jack connection, Streaming.
5. Selection of FM1, FM2, FMast and AM wavebands.
3 4
2
3
4 5
5
REAR BENCH SEAT
Fully folded position
Example of operations for the 1/3 section. They are identical for
the 2/3 section.
- Place the head restraints in the low position.
- If necessary, move the front seats forward.
- Press the grey control located on the upper part of the seat
back.
- Fold the seat back onto the seat cushion.
- Raise the grey control bar, located at the rear of the seat
cushion.
- Tilt the entire seat forward.
STEERING WHEEL ADJUSTMENT
When the vehicle is stationary, unlock the steering wheel by pulling
the lever.
Adjust the height and depth of the steering wheel, then lock by pushing the lever fully.
READY TO SET OFF
CITROËN BERLINGO VP
REMOTE CONTROL
Central unlocking
Central locking
OPENING THE BONNET
DIESEL
FILLING WITH FUEL
Putting back in place
On the inside
Pull the lever under the fascia panel towards you. The bonnet is
unlocked.
On the outside
Raise the bonnet slightly by reaching in a at hand, palm down, to
make access to the lever easier.
With this hand, push the lever to the left. Raise the bonnet.
Tilt the entire seat rearwards until it locks.
Raise the seat back.
The seat is locked correctly when the control (at the top of the seat
back) is no longer visible.
Removing the bench seat
- If necessary, move the front seats forward.
- Place the bench seat (1/3 section and/or 2/3 section) in the
fully folded position.
- Tilt the entire seat rearwards by approximately 45°.
- Lift the bench seat vertically to the limit of the anchorages.
- Straighten bench seat by tilting it forwards then lift it.
ELECTRIC EXTERIOR MIRRORS
- Move the control to the right or to the left to select the
corresponding mirror.
- Move the control in all four directions to adjust.
- Return the control to the central position.
Bonnet strut
Secure the strut in its location, identied by a sticker on the left-hand
panel side of the vehicle, to hold the bonnet open.
Before closing the bonnet, put the strut back in its clip without using
excessive force.
Fiche_loueur_berlingo_vp_an_01-21 1Fiche_loueur_berlingo_vp_an_01-21 1 02/07/2010 15:00:5302/07/2010 15:00:53
ELECTRIC WINDOWS
1. Driver's electric window control
2. Passenger electric window control
There are two operating modes:
FL - BERLINGO VP - ED 01-2010 - AN
- Open the fuel ller ap.
- Insert the key, then turn it a quarter turn.
- Remove the cap and hook it onto the clip located on the inside
of the ap.
HANDBRAKE
Applying
Pull the handbrake to immobilise your vehicle.
Check that the handbrake is applied rmly before leaving the ve-
hicle.
Releasing
Pull the handle and press the button to lower the handbrake.
Page 2
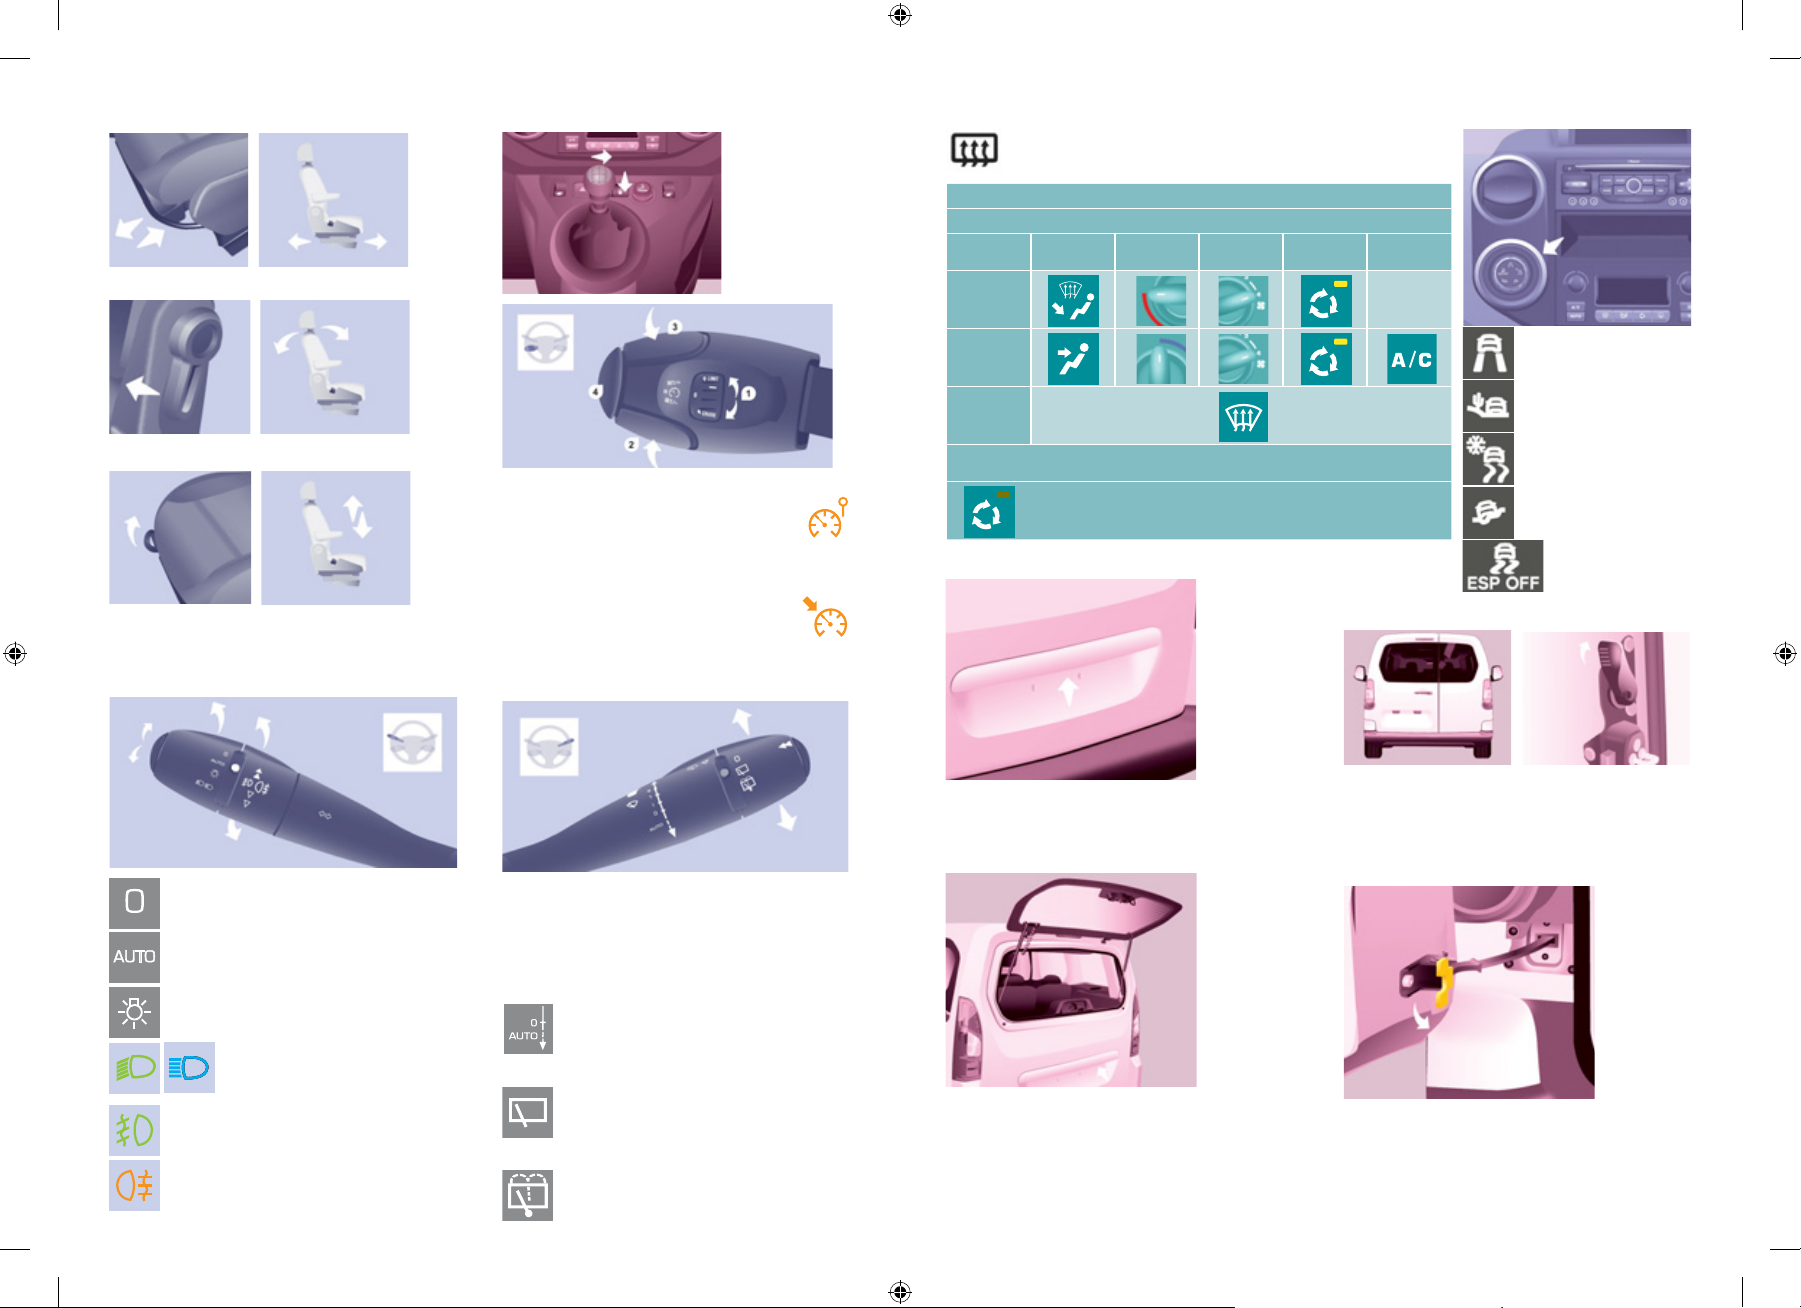
FRONT SEATS
1 - Forwards/backwards adjustment
GEARBOX
To engage reverse gear,
wait until the vehicle is
stationary then push the
gear lever to the right
then down.
REAR SCREEN DEMIST - DEFROST
VENTILATION
Recommended settings for the Manual Air Conditioning
I f
I require...
Heating
A i r
distribution
Temperature
Air ow
A i r
recirculation
"GRIP CONTROL"
A C
-
2 - Seat back angle adjustment
3 - Driver's seat height adjustment
LIGHTING CONTROL
Lights off
Automatic lights
Side lights
Dipped beam (green)
Main beam (blue)
Front fog lamps (green, 1st rotation of the ring forwards).
Rear fog lamps (amber, 2nd rotation of the ring forwards).
SPEED LIMITER "LIMIT"
1 . Selecting/Switching off speed limiter mode.
2. Decrease the programmed value.
3. Increase the programmed value.
4. Speed limiter on/off.
CRUISE CONTROL "CRUISE"
1 . Selecting/Switching off cruise control mode.
2. Decrease the programmed value.
3. Increase the programmed value.
4. Cruise control Off/Resume.
WINDSCREEN WIPER STALK
2 Fast wipe (heavy rain).
1 Normal wipe (moderate rain).
l Intermittent wipe.
0 Off.
È Single wipe
(press downwards).
Do not cover the rain sensor, located in the centre of the
windscreen, behind the mirror.
Rear windscreen wiper
Turn the ring to the rst notch.
Rear windscreen wash
Turn the ring past the rst notch: the windscreen wash
then the windscreen wiper operate for a xed time.
Cooling
De-icing
Demisting
With Automatic Air Conditioning, operation in AUTO mode is recommended irrespective of the requirement.
Remember to switch the system off when the ambient air suits your requirements.
TAILGATE
From outside
Locking/unlocking is by means of the remote control.
Tailgate screen
Opening
After unlocking the vehicle using the remote control or the key, press
the control and raise the rear screen to open it.
Closing
Close the rear screen by pressing the centre of the glass until it is fully closed.
ESP (normal mode).
Sand .
Snow.
All terrain.
ESP OFF.
HINGED REAR DOORS
Pull the lever to open the right-hand door.
To close, start with the right-hand door then close the left-hand
door.
With the roof rear ap, the rear bumper has been strengthened to
serve as a footrest on accessing the vehicle.
Opening to approximately 180°
A check strap system permits extension of the opening from approximately 90° to approximately 180°.
Pull the yellow control when the door is open.
The check strap will re-attach automatically on closing.
Fiche_loueur_berlingo_vp_an_01-22 2Fiche_loueur_berlingo_vp_an_01-22 2 02/07/2010 15:01:0702/07/2010 15:01:07
Page 3

REAR SEATS (7 SEAT VERSION)
Row 3 seat adjustments
REAR SEATS (5 SEAT VERSION)
Handling the Row 3 seat
Removing the seat
- Lower the head restraint.
- Place the seat in the fully folded position.
- Tilt the entire seat forwards.
- On each side, take hold of the uprights of the folded seat,
tilting it forward slightly, and lift it.
Repositioning the seat
The label on the seat indicates the position in which it must be
installed.
- Place the hooks of the front feet between the two bars.
- Ensure that no object or foot is obstructing the rear anchoring
recesses and that the seat belt is positioned correctly and
available.
- Fold back the seat to x its rear anchoring feet.
- Operate the control to raise the seat back to its initial position.
- Raise the head restraint.
Placing the seat back in the table position
- Lower the head restraint fully.
- Operate the control to fold the seat back onto the seat cushion.
Returning the seat back to the sitting position
- Release the seat back by pulling the control, then return it to its
original position.
Ensure that the entire seat is anchored securely.
Placing the seat in the fully folded position
- Place the seat in the table position.
- Raise the bar tted with a red strap, located behind the seat, to
release feet of the seat from their anchorage on the oor.
- Tilt the entire seat forwards.
Returning the seat to its original position
- Push the red control.
- Fold back the entire seat.
Placing the seat in the fully folded position
- Pull the control to place the seat back in the table position.
- Raise the bar located behind the seat to release the rear
anchoring points.
- Tilt the entire seat forwards, until it locks.
Returning the seat to its original position
- Push the red control.
- Fold back the seat to x the rear anchoring
points.
- Raise the seat back by pulling the control.
Check that the entire seat is anchored securely.
Before folding it back, ensure that the feet of the passenger in row 3 are not obstructing the row 2 seat anchoring
points.
Adjusting the angle of the seat back
- Operate the control and adjust the angle of the seat back.
Removing the seat
- If necessary, move the front seats forward and lower the head
restraint.
- Place the seat in the fully folded position.
- Press the red lever to release the front feet.
- Tilt the entire seat rearwards by approximately 45° without
releasing the lever.
- Release the lever.
- Lift the seat vertically to the limit of the anchorages.
- Straighten the seat by tilting it forwards then lift it.
Putting the seat back in place
- Tilt the seat forward by 45°.
- Place the hooks between the two bars.
- Fold back the seat to x the rear anchoring
points.
- Pull the control to return the seat back to its
initial position.
- Raise the head restraint.
CITROËN BERLINGO VP
Fiche_loueur_berlingo_vp_an_01-23 3Fiche_loueur_berlingo_vp_an_01-23 3 02/07/2010 15:01:2702/07/2010 15:01:27
 Loading...