

Exterior features
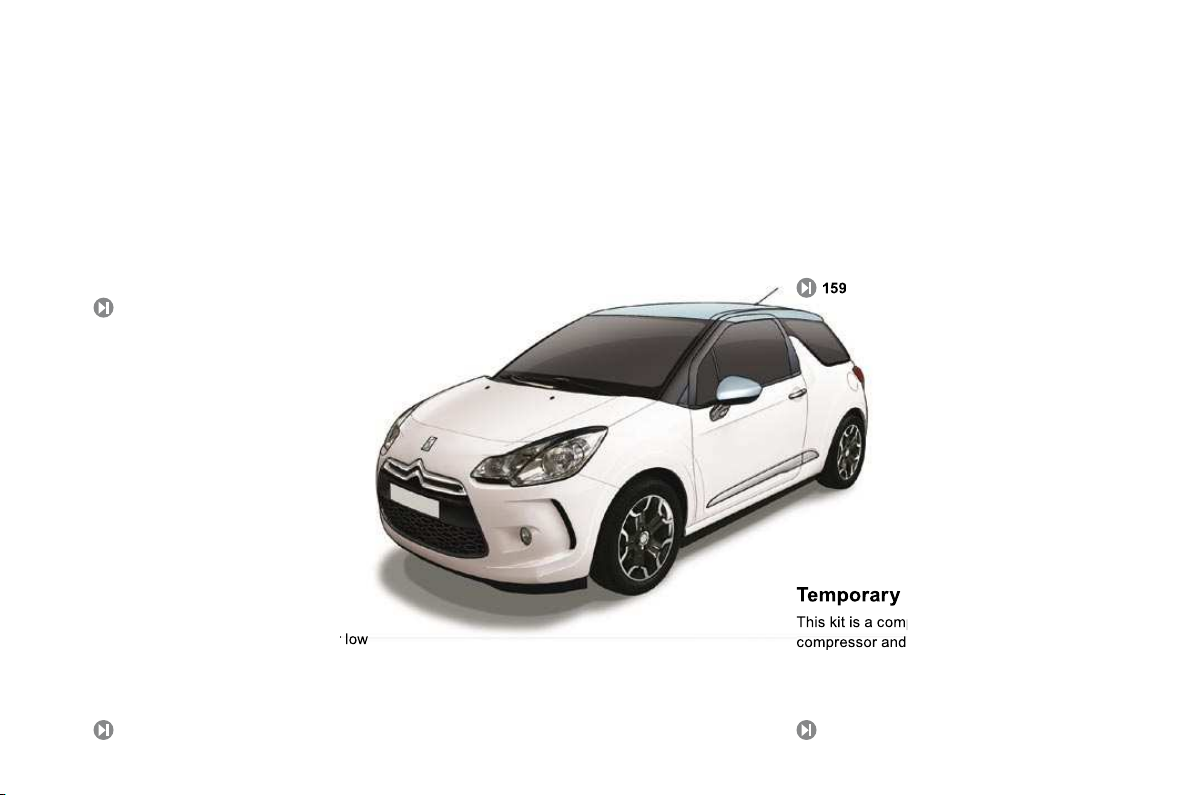
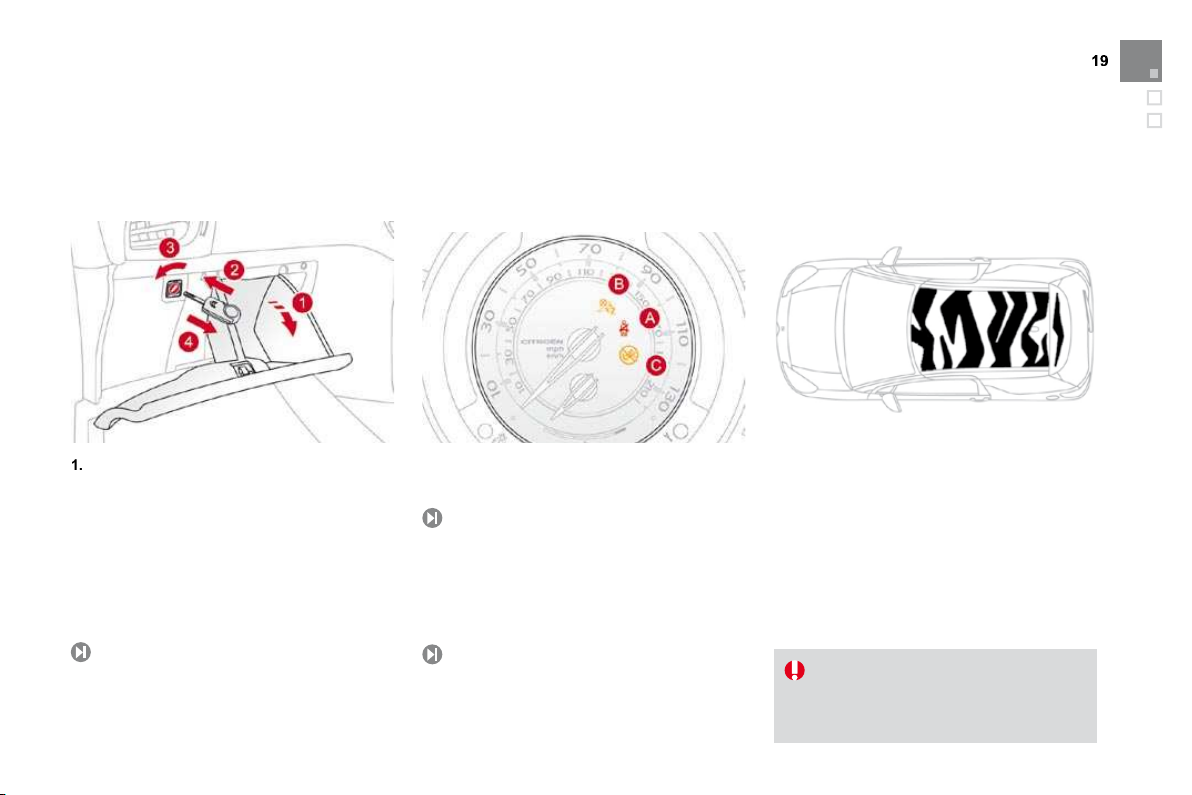
Personalisation kits
These expresive stickers form part of a range
of kits, very different one from another, which
allow you to create a unique and attractive
exterior for your vehicle.
Guide-me-home lighting
After switching off the ignition, under low
lighting conditions the headlamps remain on for
a few seconds to help you leave the vehicle.
Rear parking sensors
This system provides a warning when reversing
by detecting obstacles located behind the
vehicle.
19
103
compressor and integral sealant product,
to allow the temporary repair of a tyre.
176
Familiarisation
80
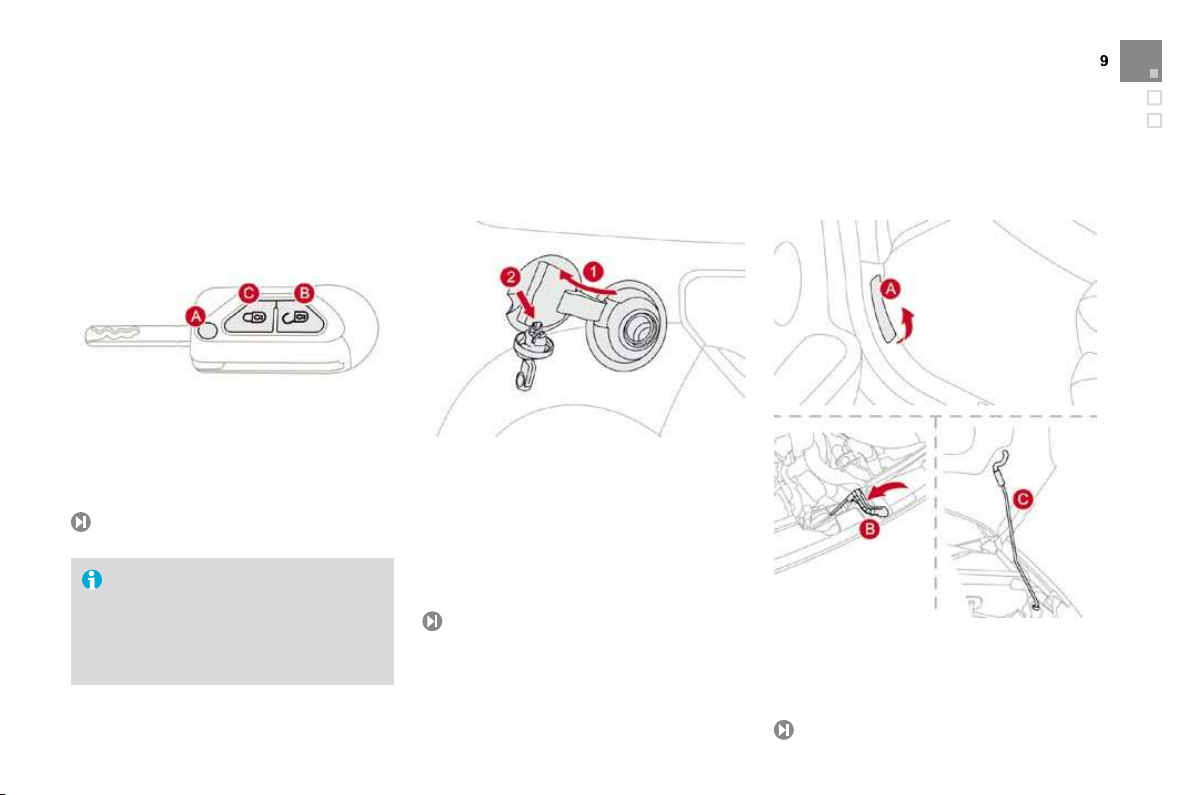
Open
A.
Unfolding/Folding the key.
Unlocking the vehicle.
Remote control key
Other functions...
C.
Normal locking of the vehicle
or
Deadlocking the vehicle.
Vehicle location.
Opening the fuel filler flap.
Opening and hooking the fuel filler cap.
Fuel tank
96
165
Tank capacity:
- approximately 50 litres (petrol),
- approximately 48 litres (Diesel).
A.
Interior release lever.
B.
Exterior safety catch.
C.
Bonnet stay.
Bonnet
Interior features
Interior mood lighting
This subdued passenger compar tment
lighting improves visibilty inside the vehicle in
low lighting conditions. It comprises several
lamps, located in the footwells and in the lower
dashboard storage compartment.
Gear change indicator
Associated with the manual gearbox, this
system suggests when to change up to obtain
optimum fuel consumption.
Scented air freshener
The scented air freshener diffuses the
selected fragrance throughout the passenger
compartment from its location in the ventilation
system.
Digital air conditioning
After setting the desired level of comfor t, the
system then automatically controls this level
according to the exterior climatic conditions.
111
150
69
66
249
Audio and communication
systems
These systems benefit from the latest
technology: MP3 compatible Audio system,
Bluetooth system and USB Box, MyWay with
221
Audio system
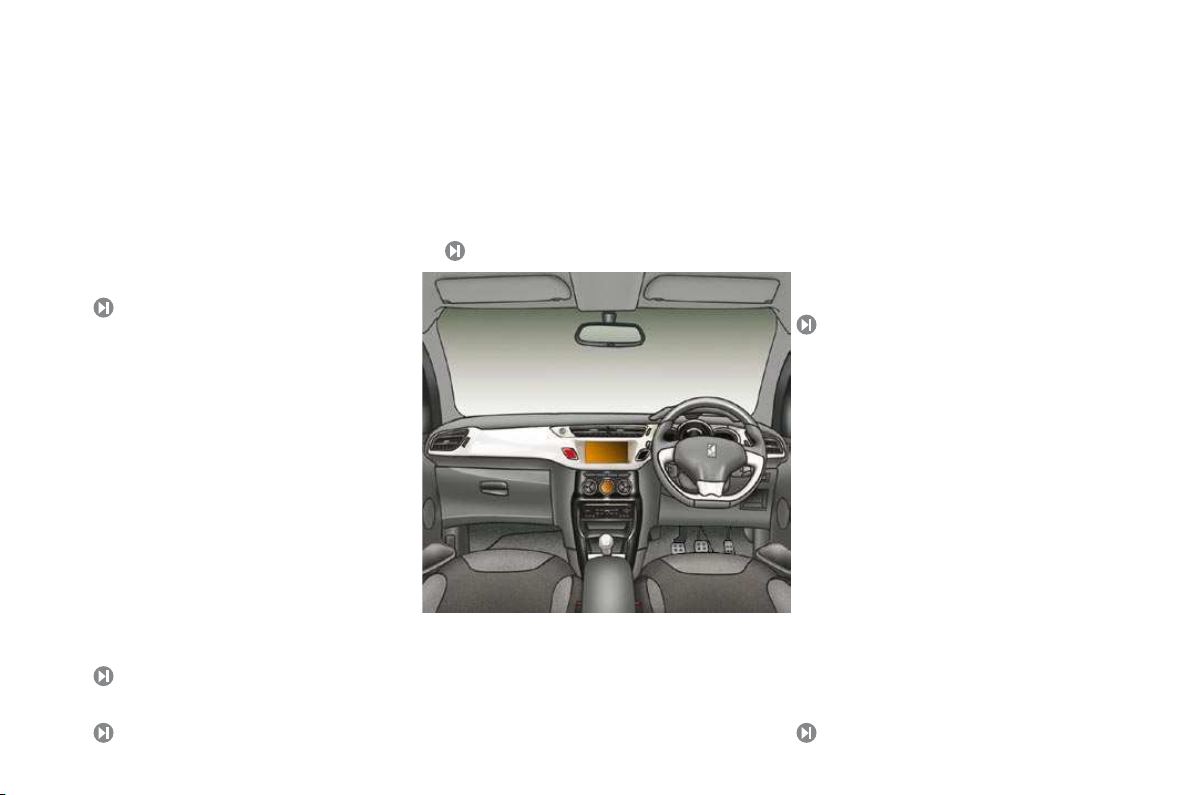
Familiarisation
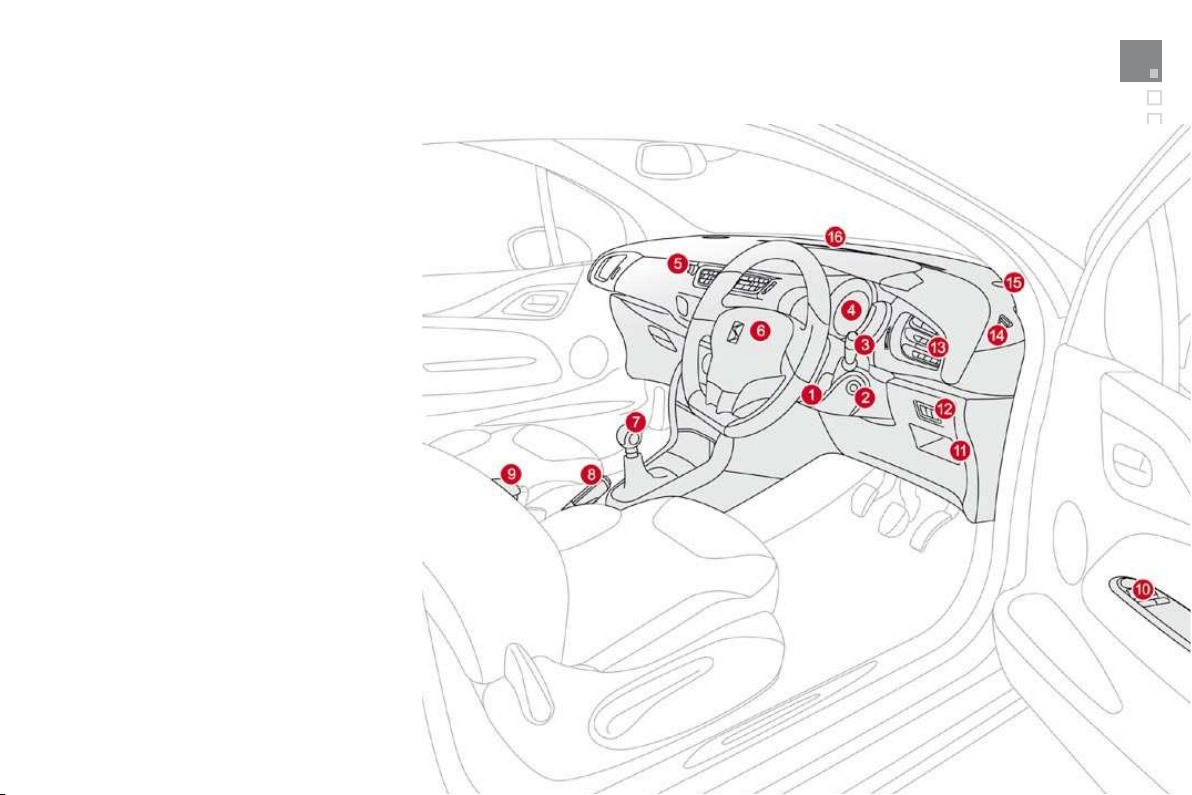
Instruments and controls
Audio equipment steering wheel controls.
Steering lock and ignition.
Wipers/wash-wipe/trip computer stalk.
Instrument panel.
Scented air freshener.
Driver’s airbag.
Horn.
Gear lever.
Parking brake.
Central armrest with storage.
Door mirror controls.
Electric window controls.
Oddments storage
Alarm button
Electronic stability programme button
Side adjustable air vent.
Front door window demisting/defrosting
vent.
Speaker (tweeter).
Windscreen demisting/defrosting vent.

Instruments and controls
Steering wheel adjustment.
Headlamp height adjustment.
Cruise control/speed limiter controls.
Lighting and direction indicator stalk
Central locking button.
Multifunction screen.
Hazard warning lamp switch.
Central adjustable air vents.
Sunshine sensor
Hi-Fi audio system central speaker.
Passenger’s airbag.
Glove box/Passenger airbag deactivation/
Bonnet release lever.
12 V accessory socket
USB port/auxiliary socket.
Upper and lower storage.
MyWay or Audio system.
Heating/air conditioning controls.
Familiarisation
Sitting comfortably
Seat back angle adjustment.
Front seats
Forwards-backwards adjustment.
Height adjustment.

Sitting comfortably
Head restraint height adjustment.
Other adjustments
Access to rear seats.
Unlock the adjustment mechanism.
Adjust for height and reach.
Lock the adjustment mechanism.
Steering wheel adjustment
For reasons of safety, these operations
vehicle stationary.
Familiarisation
Sitting comfortably
Door mirrors
Adjustment
A.
Selecting the door mirror.
Adjusting the position of the door mirror.
De-selecting the door mirror.
Folding/Unfolding.
Rear view mirror
Manual day/night type
Rear view mirror orientation.
Automatic day/night type
Automatic detection of day/night mode.
Rear view mirror orientation.
A.
Fitting the belt.
Fastening.
Check that the belt is correctly fastened by
Front seat belts
137
Seeing clearly
Lighting
Ring A
Ring B
Wipers
Control stalk A: windscreen
wipers
Fast wipe.
Normal wipe.
Intermittent wipe.
Park.
AUTO
Automatic wiping or single wipe.
Wash-wipe: pull the stalk towards you.
106
Switching on "AUTO" mode
Push the stalk downwards and release it.
Switching off "AUTO" mode
Push the stalk upwards and return it to
Ring B: rear wiper
108
107
Lighting off.
Automatic illumination of headlamps.
Sidelamps.
Dipped/main beam headlamps.
Front and rear foglamps.
Park.
Intermittent wipe.
Wash-wipe.
Familiarisation
Ventilation
Advice on interior settings
Air distribution
Air flow
Air recirculation
/
use of the fully automatic mode by pressing the
button is preferable.
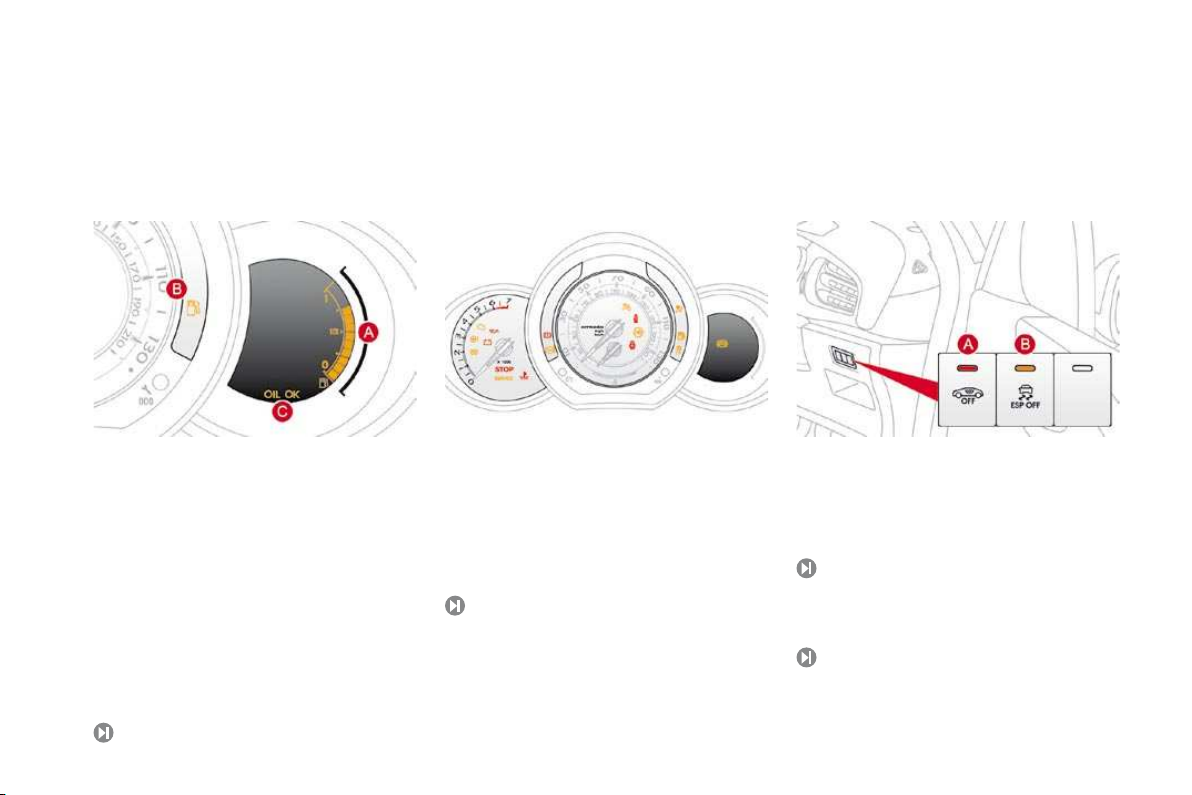
Monitoring
On switching on, the dial needles go to the
With the ignition on, the fuel gauge bars for
the fuel remaining should light up.
With the engine running, the associated
With the ignition on, the oil level indicator
for a few
If the levels are not correct, top up the level
which is low.
Instrument panel
With the ignition on, the orange and red
warning lamps come on.
With the engine running, these warning
If a warning lamp remains on, refer to the page
Warning lamps
Lighting of the indicator lamp indicates the state
Deactivation of interior volumtric protection.
Switch panel
Deactivation of the ESP/ASR system.
Familiarisation
Passenger safety
Open the glove box.
Insert the key.
Select position:
(activation), with front passenger or
(deactivation), with "rear facing"
4.
Remove the key keeping the switch in the
Front passenger’s airbag
A.
Front seat belts not fastened or unfastened
warning lamp.:
Front seat belts and
142
These styling stickers are treated to give good
Available also as accessories, we recommend
that you have them fitted by a CITROËN dealer.
Using expressive stickers
When using a high pressure jet wash,
Front passenger’s airbag deactivation
Front passenger’s airbag activation
137
Personalise your vehicle
Driving safely
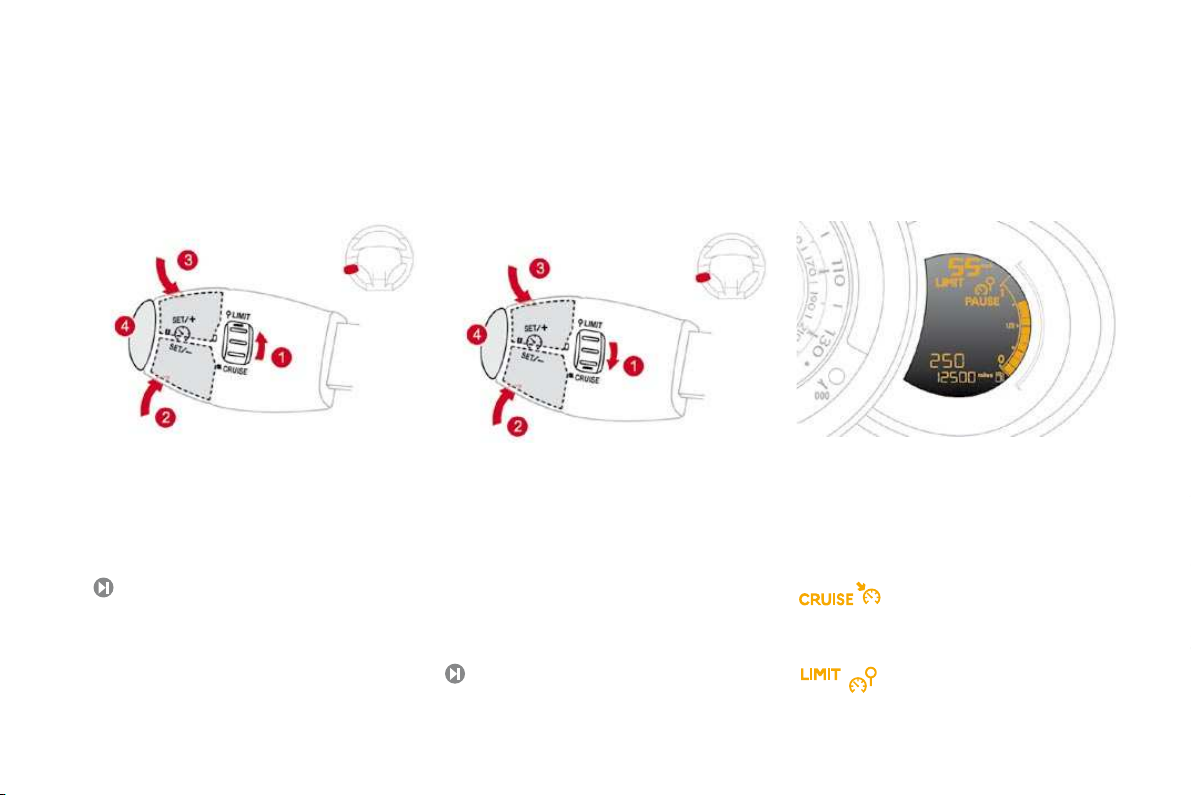
Selecting/Switching off speed limiter mode.
Decrease the programmed value.
Increase the programmed value.
Speed limiter on/off.
The values must be set with the engine running.
Speed limiter "LIMIT"
155
Selecting/Switching off cruise control mode.
Decrease the programmed value.
Increase the programmed value.
Cruise control Off/Resume.
In order to be programmed or activated, the
vehicle speed must be higher than 25 mph
Cruise control "CRUISE"
157
The cruise control or speed limiter mode
Display in the instrument panel
Cruise control
Speed limiter
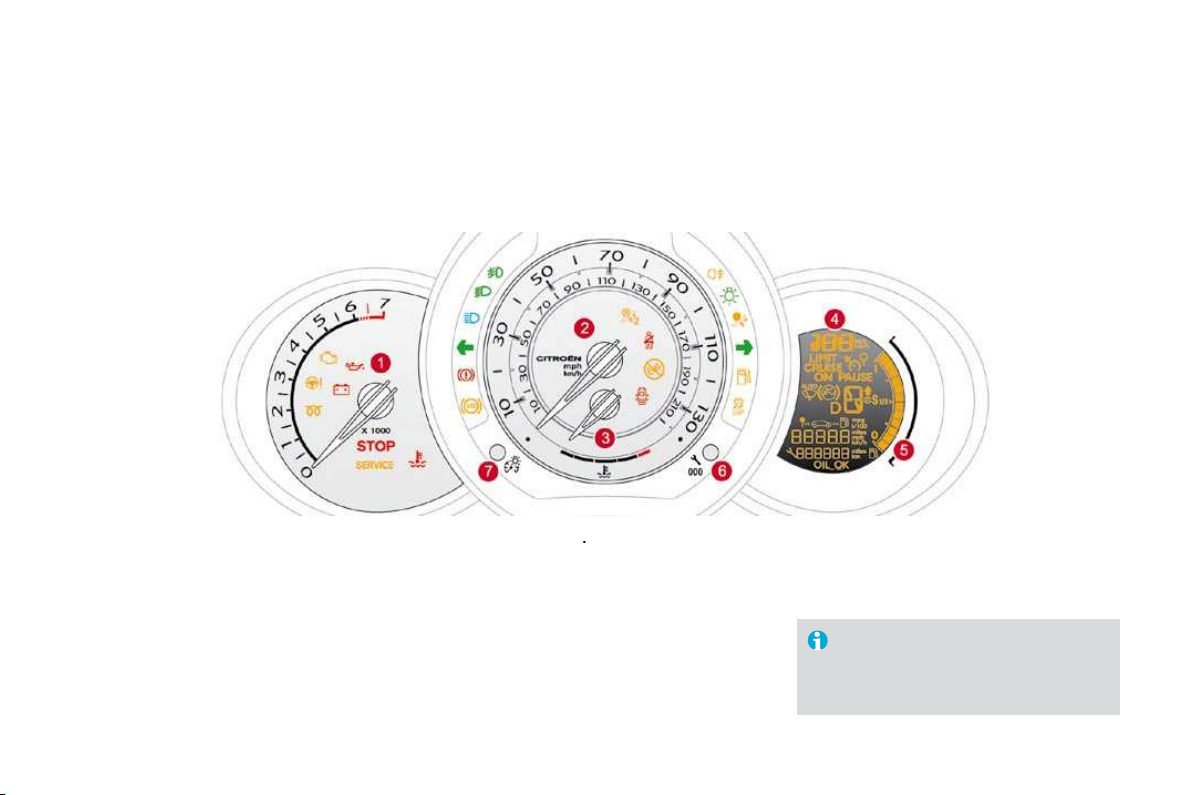
Petrol - Diesel instrument panels, manual or automatic gearbox
Provided with permanent back-lighting, the instrument panel groups together the vehicle's dials and indicator and warning lamps.
Indicates the speed of rotation of the
Vehicle speed.
Indicates the current speed of the moving
vehicle (mph or km/h).
Indicates the temperature of the engine
Dials
Adjusts the level of the instrument and
4.
Indicates the quantity of fuel remaining in
the tank.
Alternates display between range and trip
Servicing information.
Resets the selected function to zero (trip
For more information, refer to the
function and its associated display.
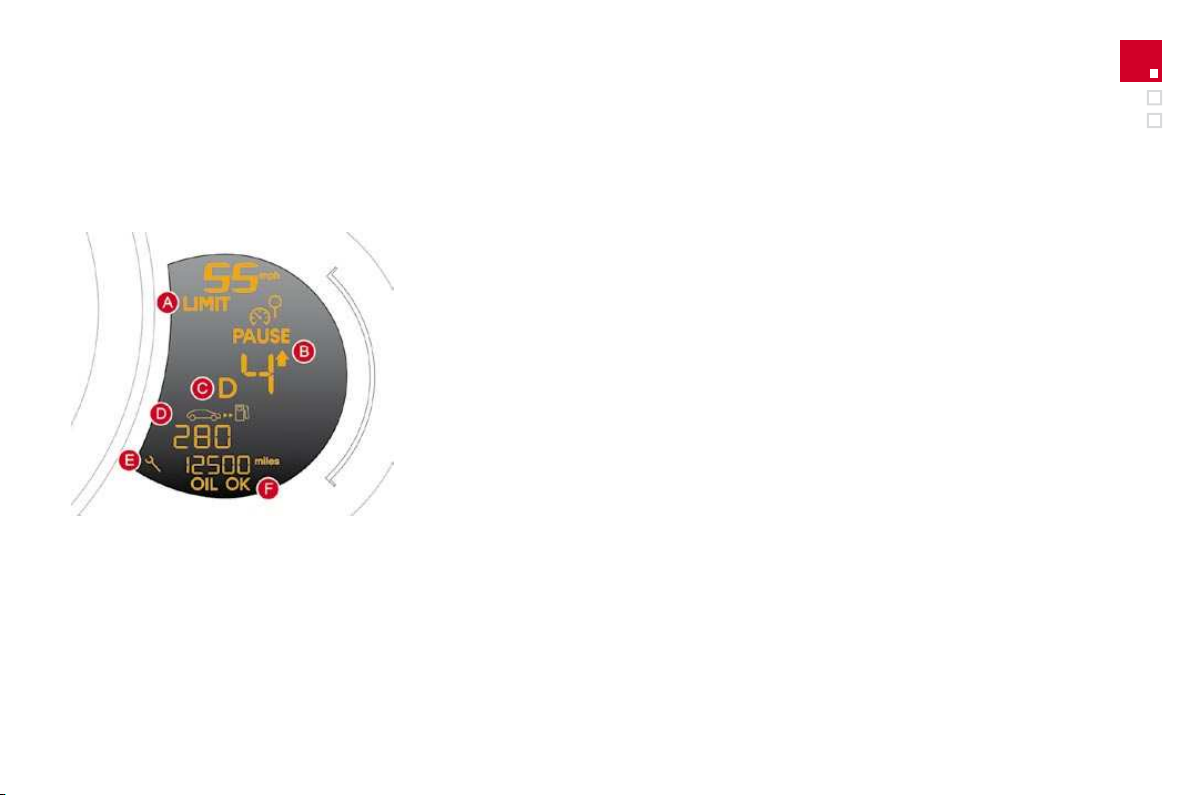
Instruments and controls
Screen
(miles or km), then
These two functions are displayed
Appears a few seconds after switching on
the ignition, then disappears.
A.
(mph or km/h) or
Automatic gearbox information.
(miles or km) or

Visual indicators informing the driver
that a system is in operation (operation
When the ignition is switched on
Certain warning lamps come on for a few seconds
when the vehicle's ignition is switched on.
When the engine is started, these same warning
If they remain on, before moving off, refer to the
Associated warnings
The switching on of cer tain warning lamps may
The warning lamps may come on
Certain warning lamps may come
The passenger airbag system operation
Instruments and controls
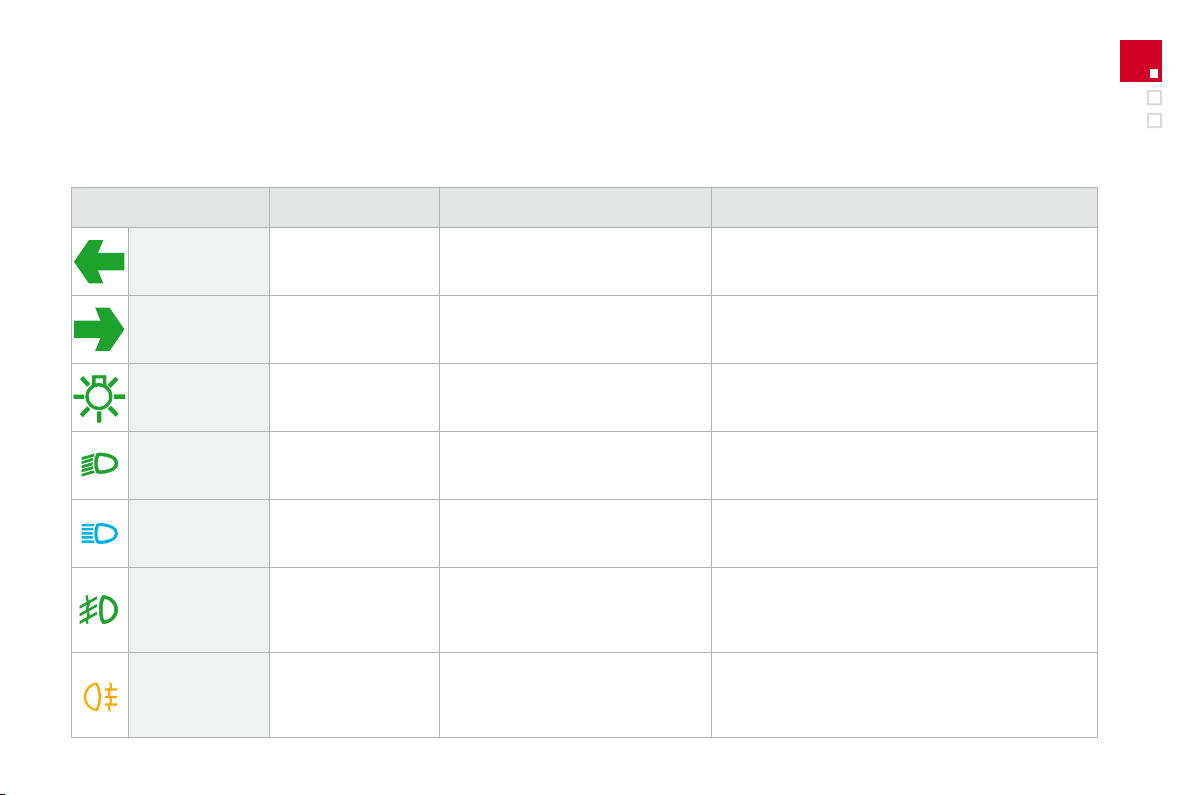
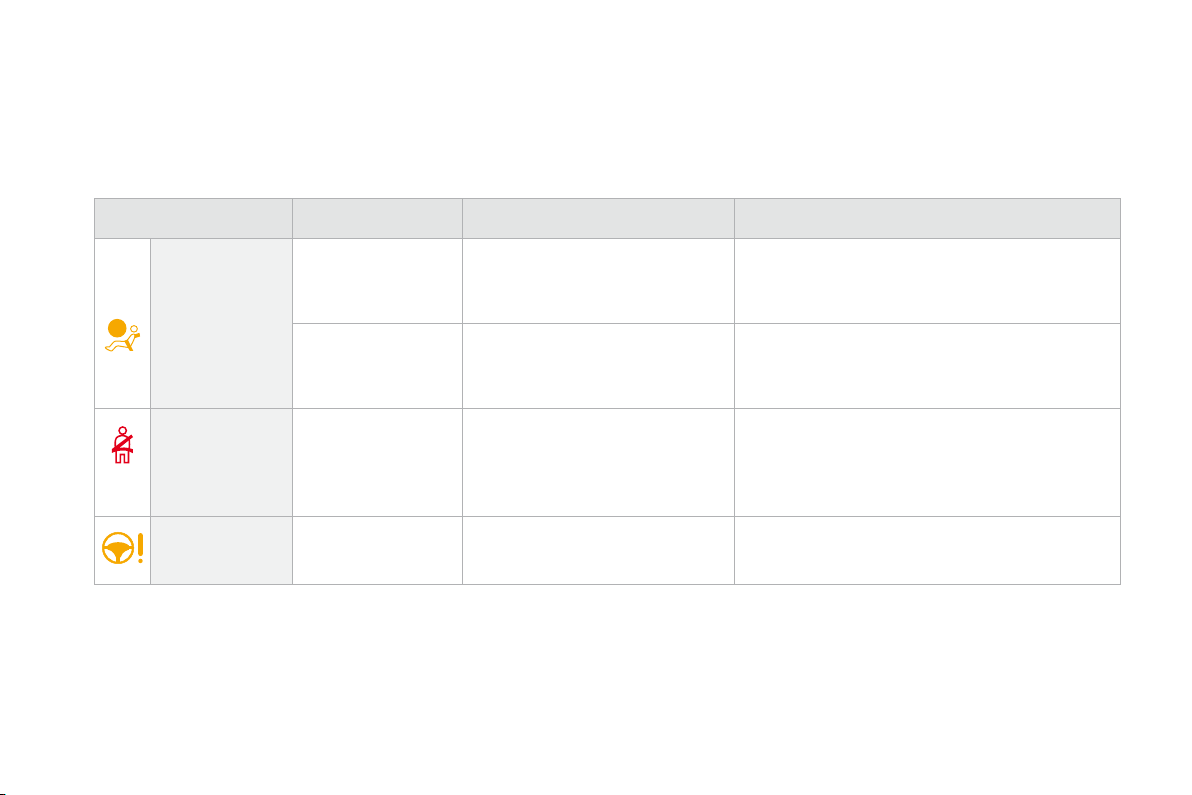
Operation indicator lamps
If one of the following indicator lamps comes on, this confirms that the corresponding system has come into operation.
Warning lamp
Action/Observations
flashing with buzzer.
The lighting stalk is pushed down.
flashing with buzzer.
The lighting stalk is pushed up.
fixed.
The lighting stalk is in the "Sidelamps"
Turn the control to the desired position.
fixed.
The lighting stalk is in the "Dipped
Turn the control to the desired position.
fixed.
The lighting stalk is pulled towards
you.
Pull the stalk to return to dipped beam headlamps.
fixed.
The front foglamps are switched on.
Turn the ring on the stalk rearwards twice to switch off
the front foglamps.
fixed.
The rear foglamps are switched on.
Turn the ring on the stalk rearwards to switch off the
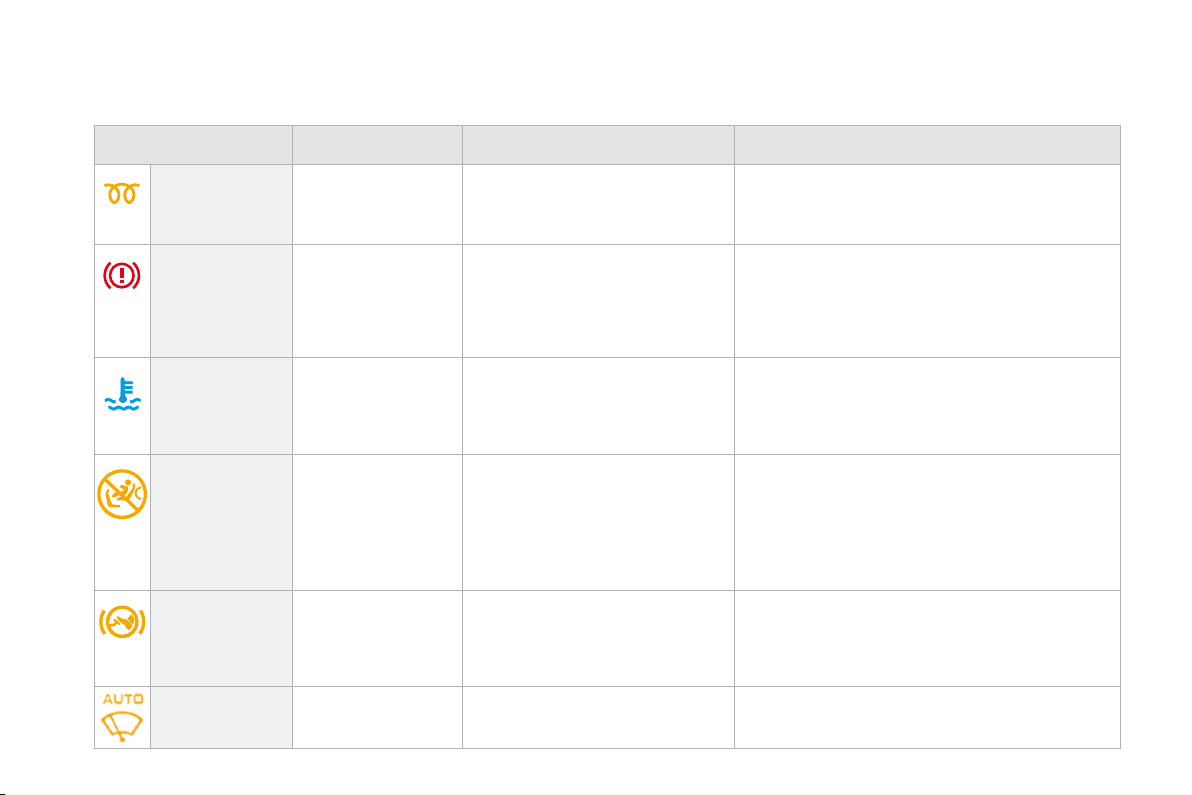
Warning lamp
Action/Observations
fixed.
The ignition switch is at the
position (ignition on).
Wait until the warning lamp has switched off before starting.
The duration for which the warning lamp is on is determined
fixed.
The parking brake is applied or not
Release the parking brake to switch off the warning
Observe the safety recommendations.
For further information on the parking brake, refer to
the "Driving" section.
temperature
fixed blue.
On starting the engine, it indicates
that the engine is cold.
After a few minutes driving, it swiches off to indicate
that the engine temperature is normal.
In order to protect your engine, avoid driving too hard
fixed.
With an automatic gearbox, you have
forgotten to press the brake pedal to
postion.
With the engine running, before releasing the parking
the
position.
Automatic wiping
fixed.
The wiper control is pushed
Automatic front wiping is activated.
fixed.
The control switch, located in the glove
" position.
In this case, do not install a rear-facing
Turn the control switch to the "
" position to
The passenger's airbag system is automatically put
" position).
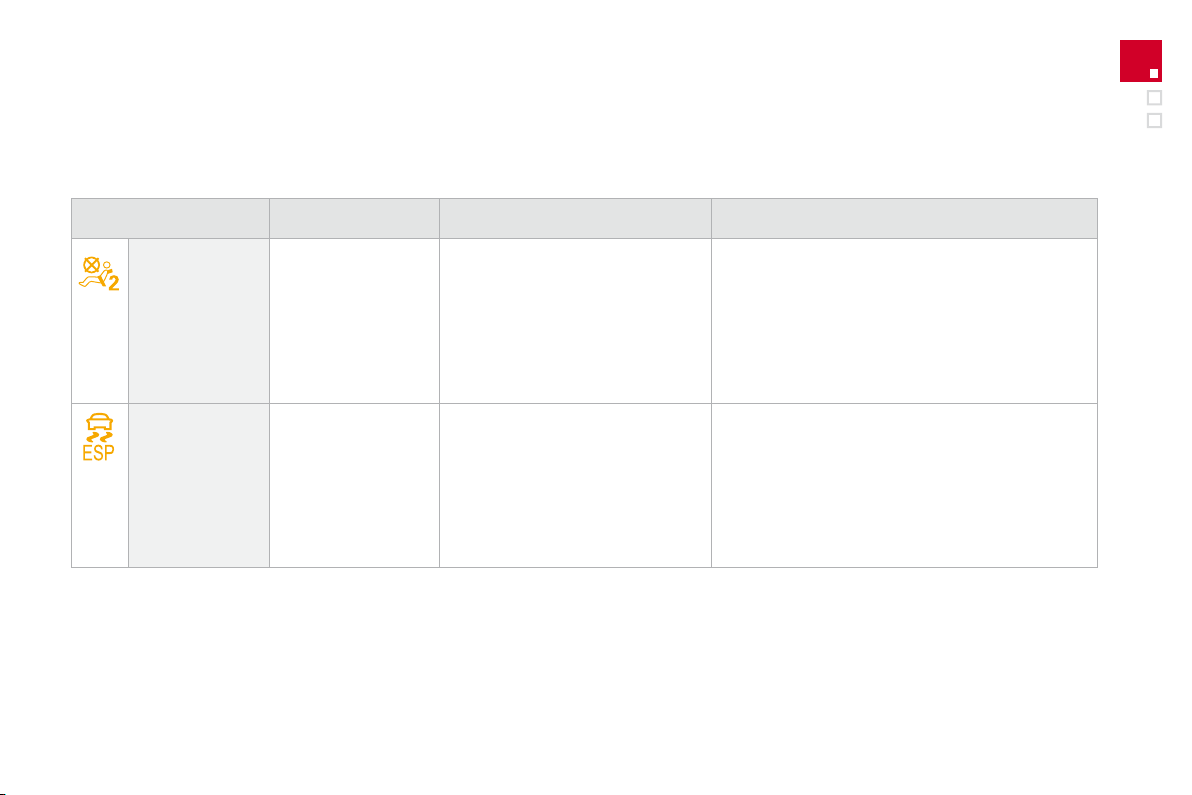
Instruments and controls
If one of the following indicator lamps comes on, this confirms that the corresponding system has been switched off intentionally.
Warning lamp
Action/Observations
fixed.
The control, located in the glove box,
position.
The passenger's front airbag is
facing" child seat.
Set the control to the
position to activate the
The passenger's airbag system is put into service
position).
fixed.
The button, located at the bottom
The ESP/ASR is deactivated.
ESP: electronic stability programme.
ASR: anti-skid regulation.
Press the button again to manually reactivate the
From approximately 30 mph (50 km/h),
the system is reactivated automatically
The ESP/ASR system is activated automatically
when the vehicle is star ted.
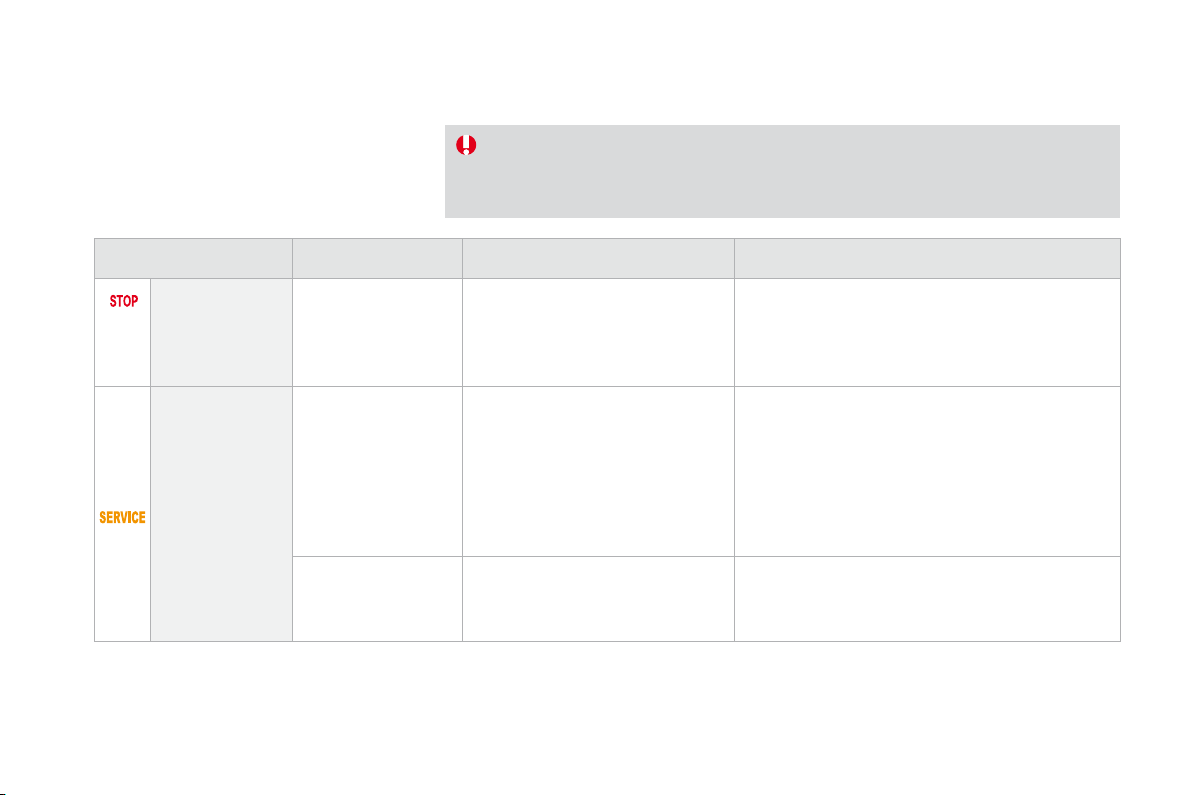
Warning lamps
When the engine is running or the vehicle is
following warning lamps indicates a fault which
Any fault resulting in the switching on of a warning lamp must be investigated further by
If you encounter any problems, do not hesitate to contact a CITROËN dealer.
Warning lamp
Action/Observations
fixed, associated with
It is associated with the braking
temperature.
Stop as soon as it is safe to do so.
Park, switch off the ignition and call a CITROËN
temporarily.
A minor fault has occurred for which
there is no specific warning lamp.
Identify the fault by reading the message shown on the
- the engine oil level,
- the screenwash level,
- the remote control battery,
- saturation of the particle emission filter (Diesel).
For any other faults, contact a CITROËN dealer.
fixed.
A major fault has occurred for which
there is no specific warning lamp.
Identify the fault by reading the message shown on the
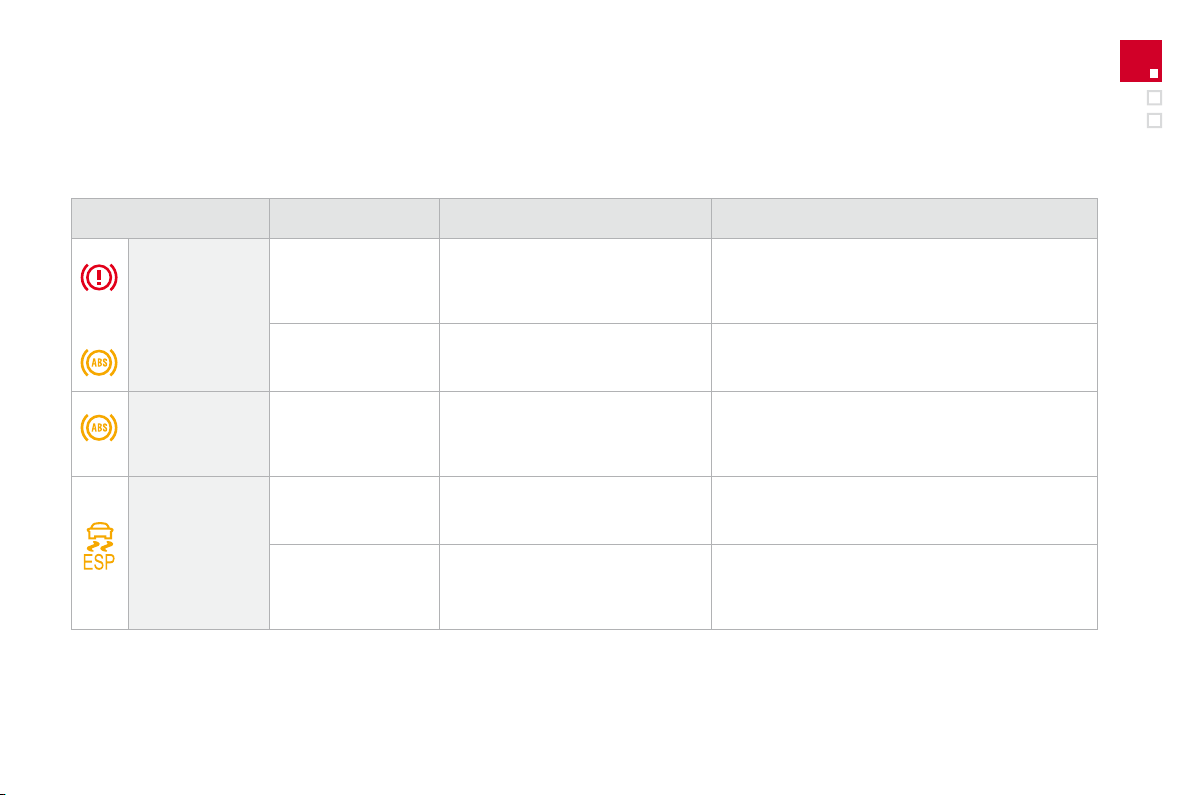
Instruments and controls
fixed.
The braking system fluid level has
Top up with brake fluid recommended by CITROËN.
If the problem persists, have the system checked by a
+
fixed, associated with
the ABS warning lamp.
The electronic brake force distribution
Have it checked by a CITROËN dealer.
Warning lamp
Action/Observations
Anti-lock Braking
fixed.
The anti-lock braking system has a
fault.
The vehicle retains conventional braking.
Drive carefully at reduced speed and contact a
flashing.
The ESP/ASR regulation is active.
The system optimises traction and improves the
fixed.
Unless it has been deactivated with
the indicator lamp on the button on,
the ESP/ASR system is faulty.
Have it checked by a CITROËN dealer.
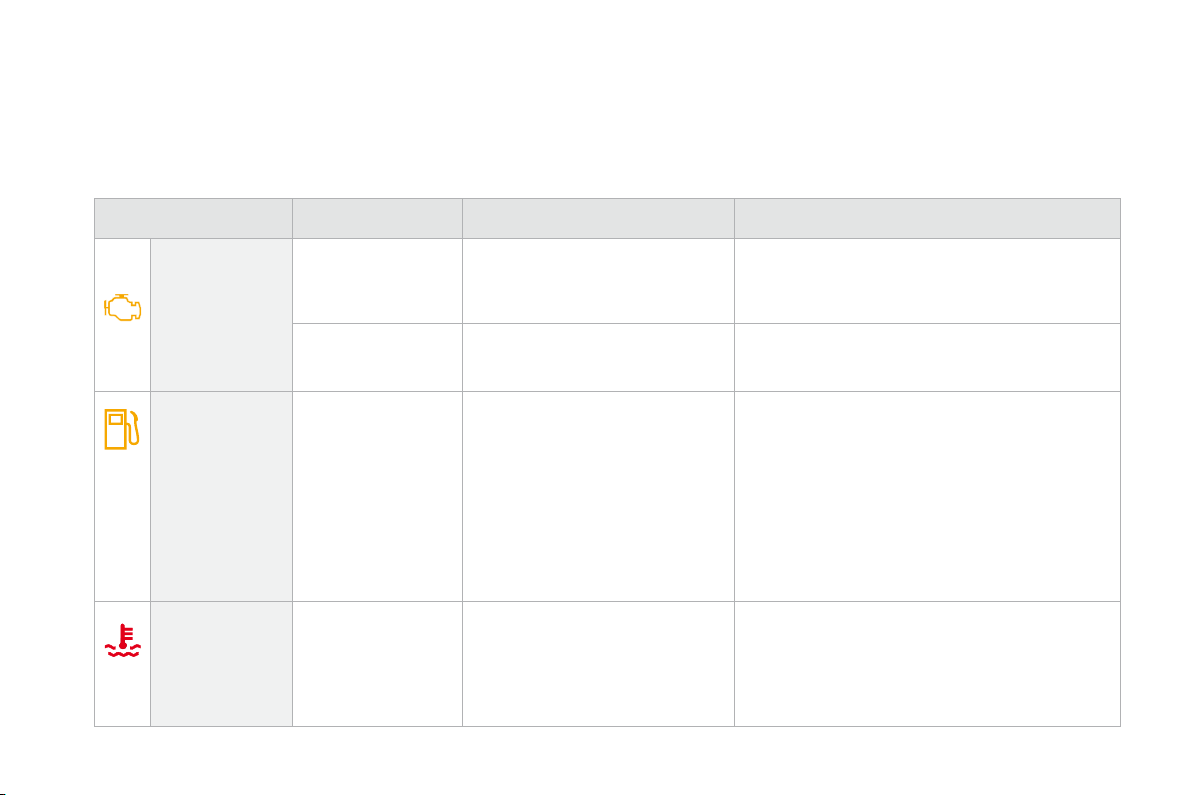
Warning lamp
Action/Observations
fixed.
The emission control system has a
fault.
This lamp should switch off when the engine is started.
If it does not switch off, contact a CITROËN dealer
flashing.
The engine management system has
Risk of destruction of the catalytic convertor.
Have it checked by a CITROËN dealer.
fixed.
When it first comes on there remains
fuel
the tank.
You must refuel as soon as possible to avoid running
Fuel tank capacity: approximately 50 litres (petrol) or
48 litres (Diesel).
Never continue to drive until you run out of fuel as
this could damage the emission control and injection
temperature
fixed red.
The temperature of the cooling system
Stop as soon as it is safe to do so.
Wait until the engine has cooled down before topping
If the problem persists, contact a CITROËN dealer.
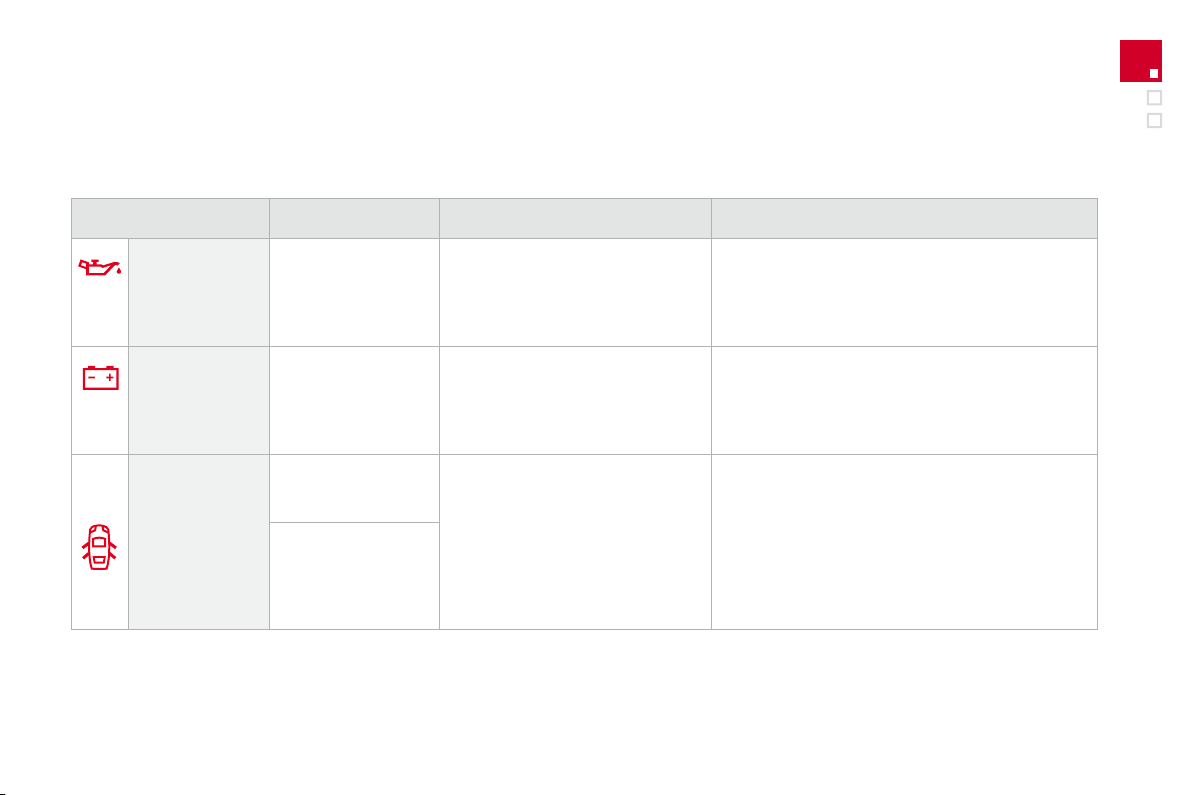
Instruments and controls
Warning lamp
Action/Observations
fixed.
There is a fault with the engine
Stop as soon it is safe to do so.
Park, switch off the ignition and contact a CITROËN
fixed.
The battery charging circuit has a fault
This lamp should switch off when the engine is started.
If it does not switch off, contact a CITROËN dealer.
fixed if the speed is
A door or the boot is still open.
Close the door or boot.
fixed and accompanied
Airbags
temporarily.
This lamp comes on for a few seconds
when you turn on the ignition, then
This lamp should switch off when the engine is started.
If it does not switch off, contact a CITROËN dealer.
fixed.
One of the airbag or seat belt
Have it checked by a CITROËN dealer.
Warning lamp
Action/Observations
fastened/
fixed then flashing
The driver and/or the front passenger
their seat belt.
Pull the strap then inser t the tongue in the buckle.
fixed.
The power steering has a fault.
Drive carefully at reducd speed.
Have it checked by a CITROËN dealer.
Instruments and controls
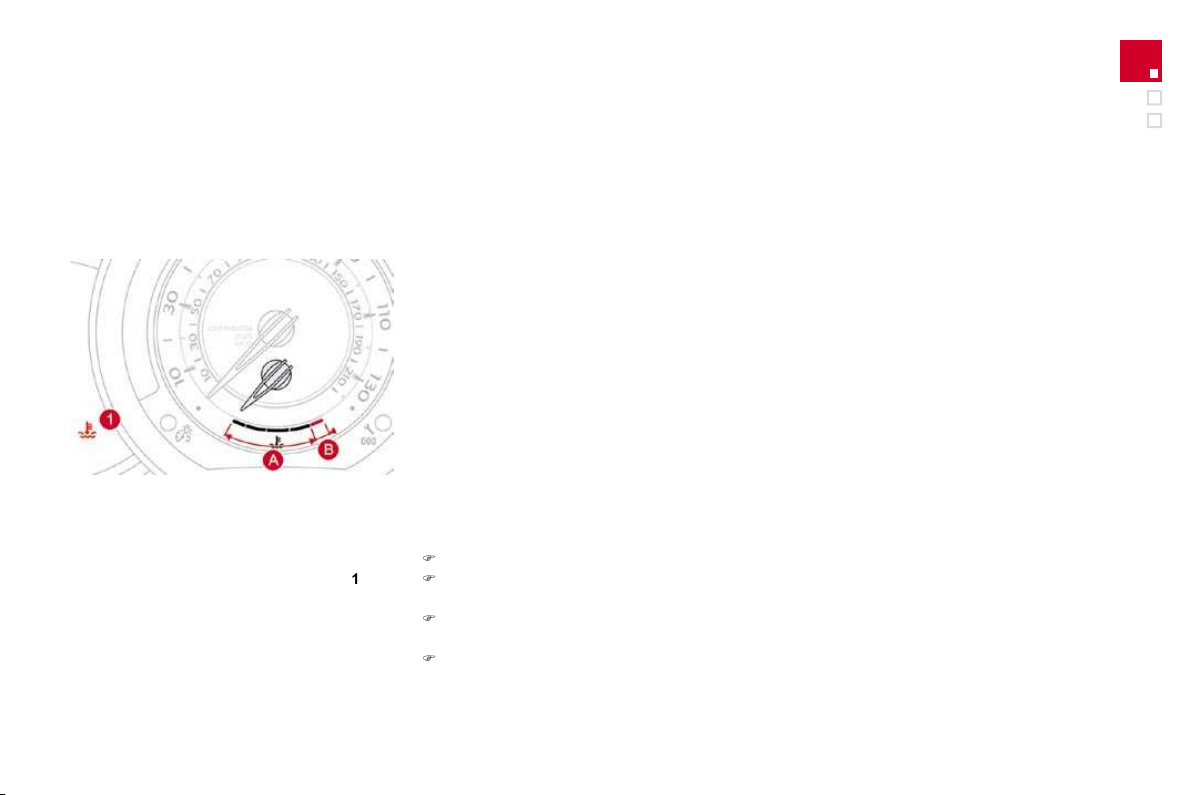
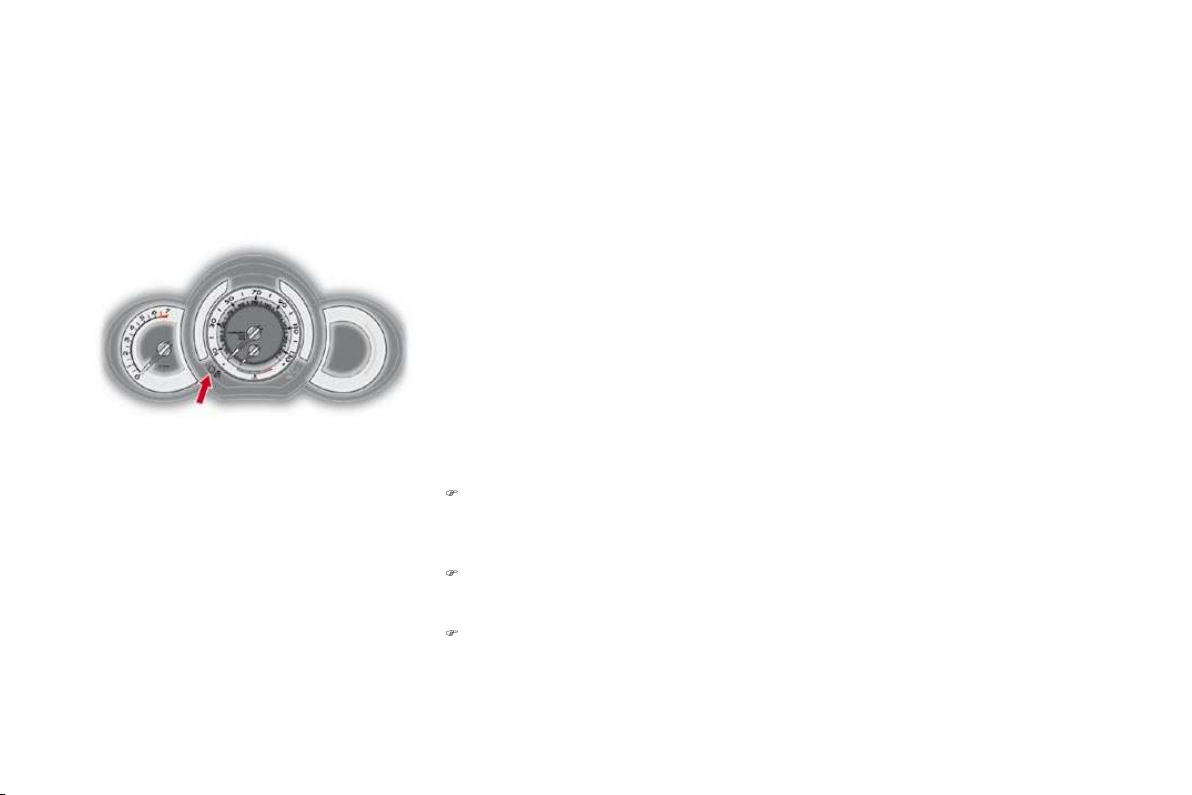
With the engine running, when the needle is:
- in zone
A
, the temperature is correct,
- in zone
, the temperature is too high;
the central
warning lamp and the
You
stop as soon as it is safe to do so.
Wait a few minutes before switching off the
Consult a CITROËN dealer.
After driving for a few minutes, the temperature
To top up the level:
wait for the engine to cool down,
unscrew the cap by two turns to allow the
when the pressure has dropped, remove
the cap,
top up the level to the "MA X" mark.
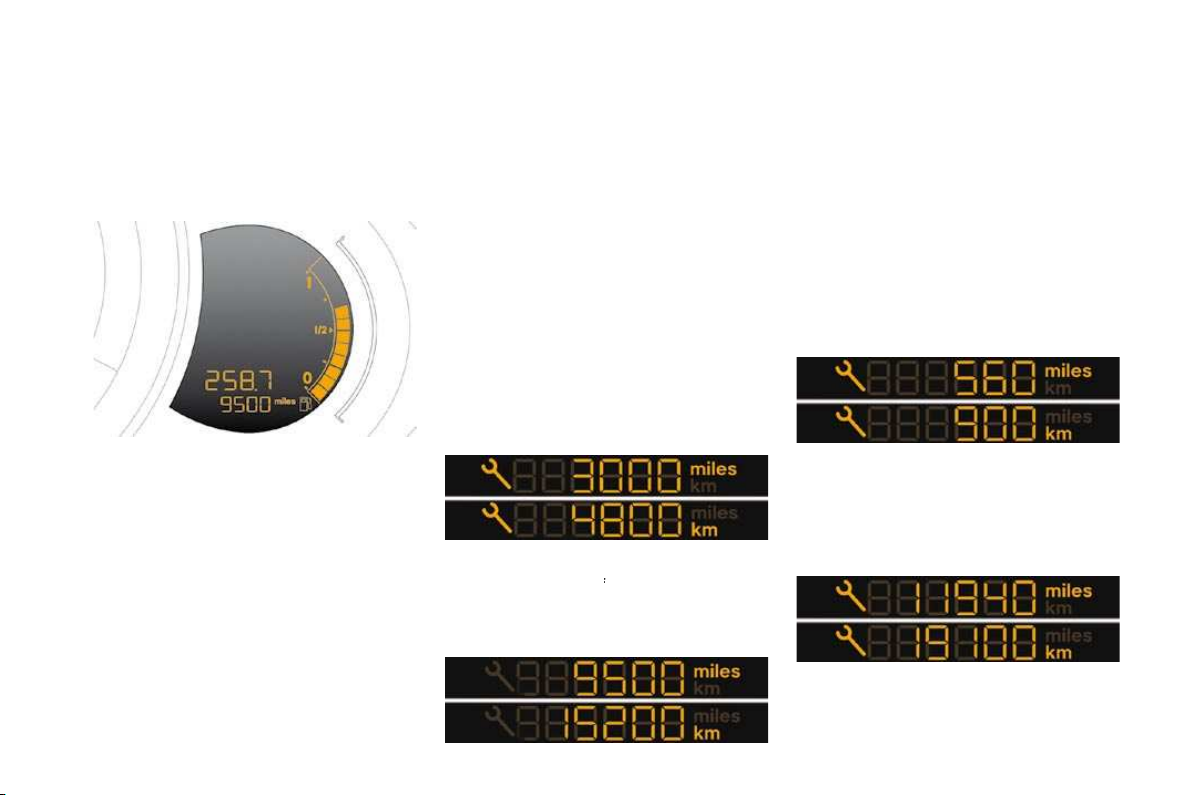
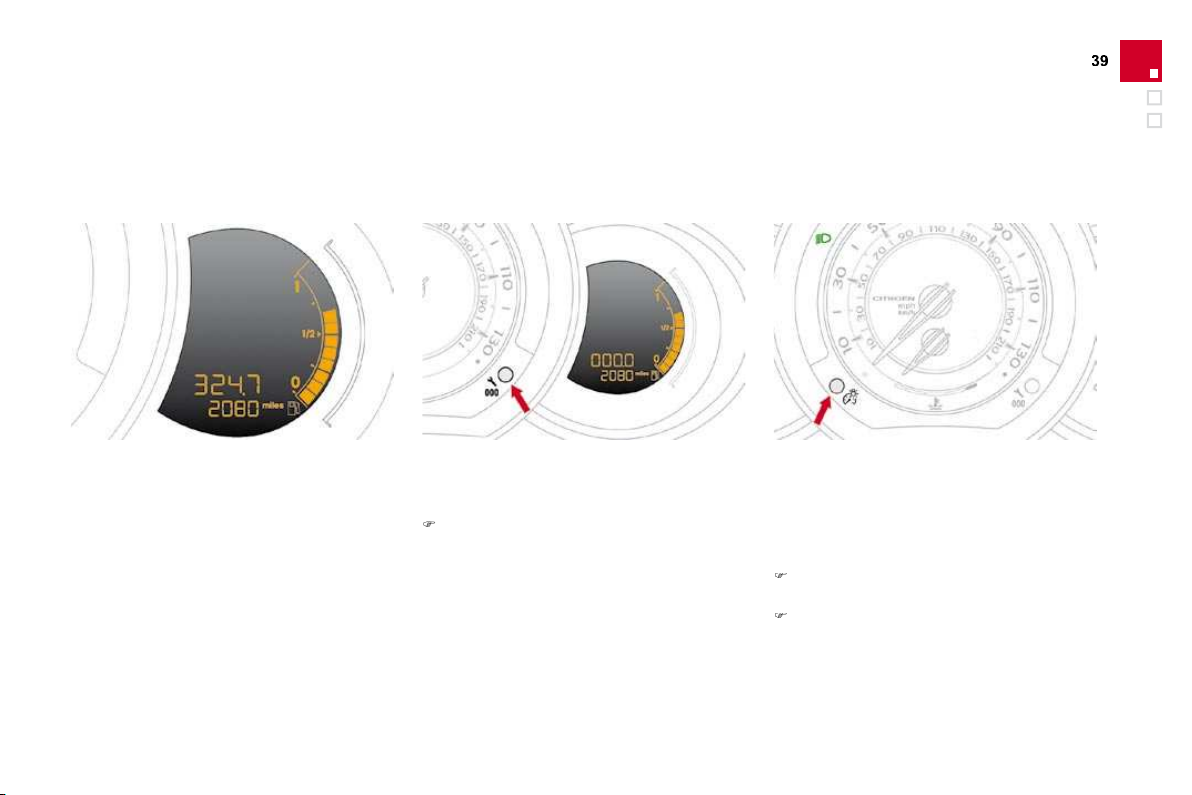
System which informs the driver when the
The point at which the service is due is
- the distance travelled,
- the time elapsed since the last service.
For 5 seconds after the ignition is switched on,
the spanner symbolising the service operations
4 800 km remain before the next
For 5 seconds after the ignition is switched on,
the display indicates:
Less than 600 miles (1 000 km)
400 miles (900 km) remain before
the next service is due.
For 5 seconds after the ignition is switched on,
the display indicates:
5 seconds after the ignition is switched on,
the distance recorder resumes its normal
to
5 seconds after the ignition is switched on,
the
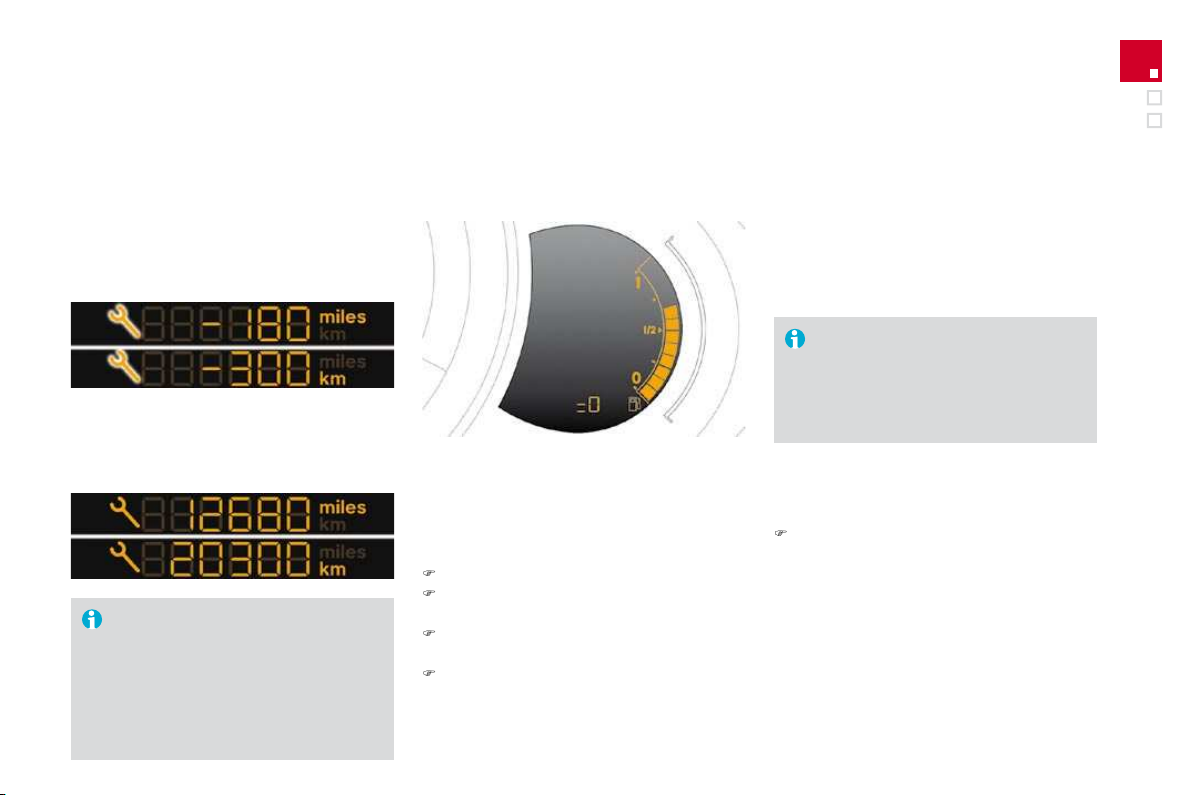
Instruments and controls
5 seconds after the ignition is switched on,
the distance recorder resumes its normal
The distance remaining may be
weighted by the time factor, depending
Therefore, the spanner may also come
After each service, the service indicator must
The procedure for resetting to zero is as
follows:
switch off the ignition,
press and hold the trip distance recorder
switch on the ignition; the distance recorder
when the display indicates
, release
the button; the spanner disappears.
Following this operation, if you wish to
Retrieving the service information
You can access the service information at any
time.
Press the trip distance recorder zero reset
The service information is displayed for a
few seconds, then disappears.
Service overdue
For 5 seconds after the ignition is switched
the spanner flashes
to indicate that
the service must be carried out as soon as
the service is overdue by 300 km.
For 5 seconds after the ignition is switched on,
the display indicates:
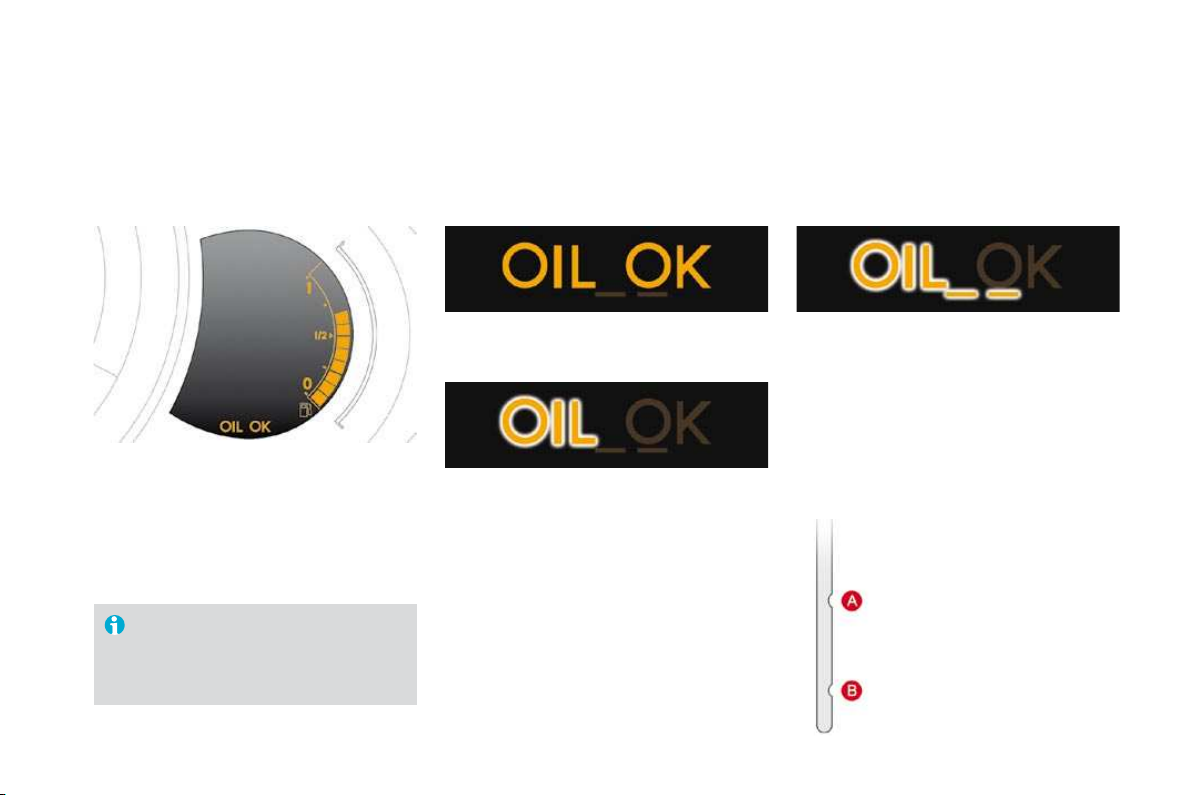
System which informs the driver whether the
This information is indicated for a few seconds
when the ignition is switched on, after the
The level read will only be correct if
the vehicle is on level ground and the
Oil level correct
Lack of oil
This is indicated by the flashing of
, linked
with the service warning lamp, accompanied
If the lack of oil is confirmed by a check using
the dipstick, it is essential that the level is
topped up to prevent damage to the engine.
Oil level indicator fault
This is indicated by the flashing of
There are 2 marks on the
= max; never exceed this
-
= min; top up the level via
the oil filler cap, using the
Dipstick
Refer to the "Checks" section to locate the
Instruments and controls
System which measures the total distance
travelled by the vehicle during its life.
The total and trip distances are displayed for
thirty seconds when the ignition is switched off,
when the driver's door is opened and when the
vehicle is locked or unlocked.
Total distance recorder
System which measures a distance travelled
With the ignition on, press the button until
Trip distance recorder
System for manual adjustment of the brightness
Activation
When the lighting is on:
press the button to change the brightness
when the level of brightness required is
Deactivation
When the lighting is off, or in day mode on
vehicles fitted with LED lamps, pressing the
Black panel
System allowing certain displays to be switched
The instrument panel remains lit with only the
vehicle speed and cruise control or speed
If there is an alert or a change in a function
Activation
With the lighting on, press the left hand
times to progressively reduce the
Press the button again to reduce the
the interior mood lighting.
Press the button again to activate the black

Instruments and controls
Trip computer
System which provides current information concerning the trip travelled (range, fuel consumption...).
Monochrome screen A
Data displays
Press the button, located at the end of the
wiper stalk
, to display the various items of
trip computer data in succession.
Zero reset
Press the control for more than
two seconds to reset to zero the distance
travelled, the average fuel consumption
- range,
- current fuel consumption,
- distance travelled,
- average fuel consumption,
- average speed.
The next press then returns you to the

Trip computer
System which provides current information concerning the route travelled (range, consumption…).
Monochrome screen C
Data displays
Press the button, located at the end of
the
wiper stalk
, to display the various trip
Trip zero reset
When the route required is displayed, press
the control for more than two seconds.
Trips
and
are independent but their use
Trip
permits, for example, daily calculations,
monthly calculations.
- the current information tab
with:
the range,
the current fuel
the distance remaining to
- the trip
tab with:
the distance travelled,
the average fuel
the average speed, for the
first route.
- the trip
tab with:
the distance travelled,
the average fuel
the average speed, for the
Pressing the button again returns you to
the normal display.

Instruments and controls
A few definitions…
Range
(miles or km)
This indicates the distance
which can still be travelled with the fuel
fuel consumption over the last few miles
Current fuel consumption
(mpg or l/100 km or km/l)
This is the average fuel consumption
Average fuel
(mpg or l/100 km or km/l)
This is the average fuel consumption since the
Distance travelled
(miles or km)
This indicates the distance travelled
Average speed
(mph or km/h)
This is the average speed
Distance remaining
(miles or km)
This is the distance remaining to be travelled
to the final destination. It can be entered by
the user.
If the distance is not entered, dashes are
This value may var y following a change
If dashes are displayed continuously
while driving in place of the digits,
This function is only displayed from
When the range falls below 20 miles (30 km),

Monochrome screen A
This displays the following information:
- time,
- date,
- ambient temperature (this flashes if there is
- status of the doors and boot,
- audio sources (radio, CD...),
- trip computer (refer to the "Instruments and
Warning messages (e.g.: "Emission control
"ESC"
button.
Displays on the screen
From the control panel of your Audio system,
you can:
press the
button to gain access to
the
menu
,
press the "
" or "
" buttons to scroll
through the items on the screen,
press the
button to change
the permanent application (date, audio
press the "
" or "
" buttons to change a
press the
button to confirm,
press the
button to abandon the
Controls
Press the
button to gain access
to the
menu
, then press the "
" or
" buttons to scroll through the various
- radio-CD,
- vehicle configuration,
- options,
- display settings,
- languages,
- units.
Press the
button to select the menu
Main menu

Multifunction screens
Radio-CD
With the Audio system switched on, once the
with use of the radio (RDS, REG), or the CD
For further details concerning the "Radio-CD"
the "Audio and Telematics" section.
Vehicle confi guration
Once the " Vehicle Configuration" menu has
the following equipment:
- wiper linked with reverse gear (refer to the
- "guide-me-home" lighting (refer to the
- parking sensors (refer to the "Driving"
Options
Once the "Options" menu has been selected,
you can start diagnostics of the status of the

Languages
Once the "Languages" menu has been selected,
you can change the language used by the display
Units
Once the "Units" menu has been selected,
you can change the units of the following
- temperature (°C or °F),
- fuel consumption (l/100 km, mpg or km/l).
Once the fuel consumption units have
For safety reasons, configuration by the
Display settings
Once the "Display settings" menu has been
- year,
- month,
- day,
- hour,
- minutes,
- 12 or 24 hour mode.
Once you have selected a setting, press
the "
" or "
" buttons to change its value.
Press the "
" or "
" buttons to switch
Press the
button to save the change
the
button to cancel.

Multifunction screens
Monochrome screen C
This displays the following information:
- time,
- date,
- ambient temperature (this flashes if there is
- status of doors and boot,
- audio sources (radio, CD, USB port, jack
- trip computer (refer to the "Instruments and
Warning messages (E.g. "Emisions control
Automatic headlamps active") may appear
temporarily. These can be cleared by pressing
the
button.
Displays on the screen
From your Audio system control panel, you can:
press the
button to gain access to
the
menu
,
press the "
" or "
" buttons to scroll
through the items on the screen,
press the
button to change the
press the "
" or "
" buttons to change a
press the
button to confirm,
or
press the
button to abandon the
Controls
Press the
button to gain access to
the
menu
:
- audio functions,
- the trip computer,
- personalisation-configuration,
- telephone (hands-free kit).
Press the "
" or "
" buttons to select the
the
button.
Main menu

With the Audio system switched on, once this
For further details on the "Audio functions"
the "Audio and Telematics" section.
"Audio functions"
"Trip computer" menu
Once this menu has been selected, you can
vehicle (warnings log, status of functions, etc.).
Alert log
This summarises the active warning messages,
Status of functions
This summarises the status (active or inactive)
Enter distance to destination
This allows you to enter an approximate
Press the
button to gain access to
the general menu.
Press the arrows, then the
button to
menu.
In the
menu, select one

Multifunction screens
"Personalisation-
Once this menu has been selected, you can
- define the vehicle parameters,
- display configuration,
- choice of language.
Defi ne the vehicle parameters
Once this menu has been selected, you can
- wiper linked to reverse gear (refer to the
- "guide-me-home" lighting
- parking sensors (refer to the "Driving"
Example: setting of the duration of the "guide-
Press the "
" or "
" buttons, then the
button to select the menu required.
Press the "
" or "
" buttons, then the
button to select the "Guide-me-home
Press the "
" or "
" buttons to set the
value required (15, 30 or 60 seconds), then
button to confirm.
Press the "
" or "
" buttons, then the
button to select the
box and
button to

Display confi guration
Once this menu has been selected, you can
- brightness-video setting,
- date and time setting,
- selection of units.
Once the fuel consumption units have
For safety reasons, configuration by the
Choice of language
Once this menu has been selected, you can
* According to country of destination.
With Audio system on, once this menu is
telephone directories (list of calls, services...)
For more details on the "Telephone" function,
telematics" section.
"Telephone" Menu

Multifunction screens
16/9 colour screen (MyWay)
It displays the following information
- time,
- date,
- altitude,
- ambient temperature (the value displayed
flashes if there is a risk of ice),
- check of the doors,
- warning and vehicle function status
- audio functions,
- satellite navigation system information.
Displays on the screen
MyWay To select one of the applications, at the
press the dedicated
,
,
,
,
or
button for access to the
turn the dial to change the selection,
press the dial to confirm the selection,
press the
button to abandon the
Controls
For further information on these applications,
to the specific user guide given to you with the

"SETUP" menu
Press the
button to gain access
to the
menu. This allows you to
- "System language",
- "Date and time",
- "Display",
- "Vehicle",
- "Units",
- "System".
System language
This menu allows you to select the language
Date and time
This menu allows you to set the date and time,
the format of the date and the format of the time
to the specific user guide given to you with the
Display
This menu allows you to set the brightness of
the screen, the screen colour scheme and the
* According to country.
Vehicle
This menu allows you to activate or deactivate
- wiper linked with reverse gear (refer to the
- guide-me-home lighting and duration (refer
to the "Visibility" section),
- parking sensors (refer to the "Driving"
Units
This menu allows you to select the units:
temperature (°C or °F) and fuel consumption
System
This menu allows you to restore the factory
For safety reasons, configuration of the

Ventilation
Air intake
The air circulating in the passenger compartment
via the grille located at the base of the windscreen
Air treatment
The incoming air follows various routes
- direct arrival in the passenger compartment
- passage through a heating circuit (heating),
- passage through a cooling circuit (air
The temperature control enables you to obtain
the level of comfort required by mixing the air of
the various circuits.
The air distribution control enables you to
The air flow control enables you to increase or
Control panel
The controls of this system are grouped
together on control panel
A
on the centre
- the level of comfort required,
- air flow,
- air distribution,
- demisting-defrosting,
- manual or digital air conditioning controls.
Air distribution
Windscreen demisting-defrosting vents.
Front side window demisting-defrosting
vents.
Side adjustable air vents.
4.
Central adjustable air vents.
Air outlets to the front footwells.
Air outlets to the rear footwells.

Comfort
Recommendations for ventilation and air conditioning
If after an extended stop in sunshine,
the interior temperature is very
The air conditioning system does not
In order for these systems to be fully effective, follow the operation and maintenance
To obtain an even air distribution, take care not to obstruct the exterior air intake grilles
Do not cover the sunshine sensor, located on the dashboard; this is used for regulation
Operate the air conditioning system for at least 5 to 10 minutes, once or twice a month
to keep it in perfect working order.
Ensure that the passenger compartment filter is in good condition and have the filter
We recommend the use of a combined passenger compartment filter. Thanks to its
To guarantee correct operation of the air conditioning system, you are also advised to
If the system does not produce cold air, deactivate it and contact a CITROËN dealer.
When towing the maximum load on a steep gradient in high temperatures, switching off the
The condensation created by the air

Heating/Ventilation
Manual control panel
Electric control panel

1. Temperature adjustment
Turn the dial from blue
the temperature to your
2. Air fl ow adjustment
Turn the dial from position
to position
to obtain a
If you place the air flow control
(deactivation of the
3. Air distribution adjustment
Windscreen and side windows.
Windscreen, side windows and
footwells.
Footwells.
Central and side vents.
The air distribution can be
4. Air intake/Air recirculation
The intake of exterior air avoids the formation of
The recirculation of interior air insulates the
Return to exterior air intake as soon as possible
to prevent deterioration of the air quality and
the formation of mist.
Press the button to recirculate
the interior air. The indicator
Press the button again to
to confirm this.

Comfort
5. Air conditioning On/Off
The air conditioning is designed to
with the windows closed.
Press the button to recirculate
the interior air. This is
Press the button again to allow fresh air
It enables you to:
- lower the temperature, in summer,
- increase the effectiveness of the demisting
Switching on
Press the
button, the associated
when the air flow adjustment control 2
Switching off
Press the
button again, the

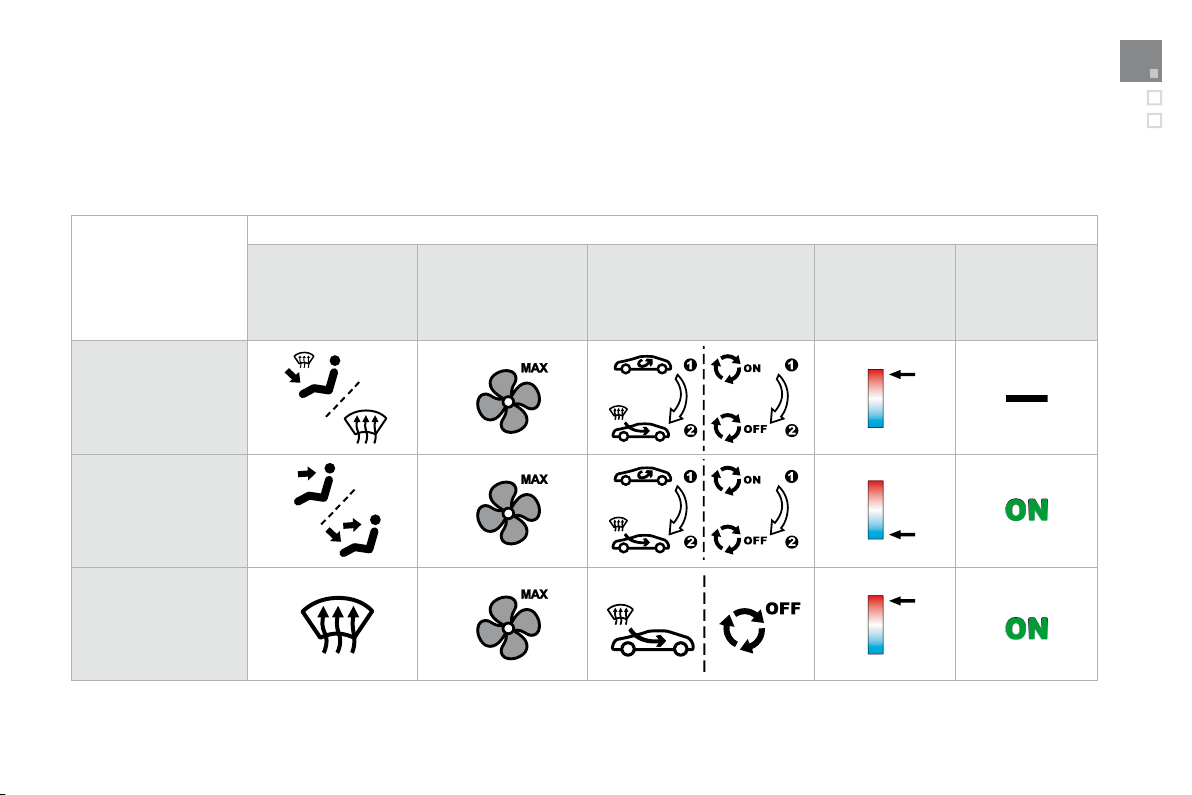
Front demist - defrost
With the heating/ventilation
Put the temperature and air flow controls to
the dedicated marked position.
Put the air intake control to the "Exterior air
(manual control to the right or electric
Put the air distribution control to the
These markings on the control panel indicate the control positions for rapid demisting or
With the manual air
Put the temperature and air flow controls to
the dedicated marked position.
Put the air intake control to the "Exterior air
(manual control to the right or electric
Put the air distribution control to the
Switch on the air conditioning by pressing
the
button; the associated green
warning lamp comes on.

Comfort
Rear screen demist - defrost
The control button is located on the heating or air conditioning system control panel.
Switching on
The rear screen demisting/defrosting can only
Press this button to demist/defrost the rear
the button comes on.
Switching off
The demisting/defrosting switches off
It is possible to stop the demisting/
the button switches off.
Switch off the demisting/defrosting
If the engine is switched off before the

Comfort
Manual air conditioning
Manual control panel
Electric control panel

1. Temperature adjustment
Turn the dial from blue
the temperature to your
2. Air fl ow adjustment
Turn the dial from position
to position
to obtain a
If you place the air flow control
(deactivation of the
3. Air distribution adjustment
Windscreen and side windows.
Windscreen, side windows and
footwells.
Footwells.
Central and side vents.
The air distribution can be
4. Air intake/Air recirculation
The intake of exterior air avoids the formation of
The recirculation of interior air insulates the
Return to exterior air intake as soon as possible
to prevent deterioration of the air quality and
the formation of mist.
Press the button to recirculate
the interior air. The indicator
Press the button again to
to confirm this.

Comfort
5. Air conditioning On/Off
The air conditioning is designed to
with the windows closed.
Press the button to recirculate
the interior air. This is
Press the button again to allow fresh air
It enables you to:
- lower the temperature, in summer,
- increase the effectiveness of the demisting
Switching on
Press the
button, the associated
when the air flow adjustment control 2
Switching off
Press the
button again, the

Front demist - defrost
With the heating/ventilation
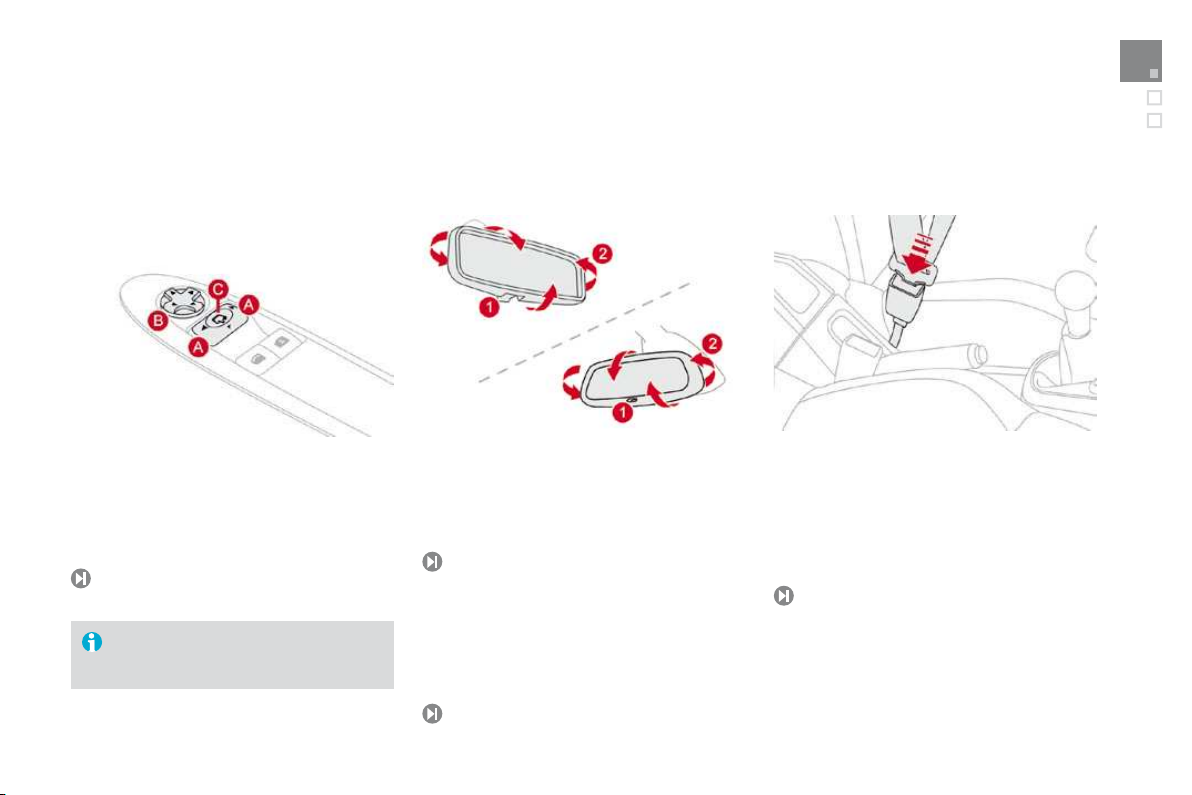
Put the temperature and air flow controls to
the dedicated marked position.
Put the air intake control to the "Exterior air
(manual control to the right or electric
Put the air distribution control to the
These markings on the control panel indicate the control positions for rapid demisting or
With the manual air
Put the temperature and air flow controls to
the dedicated marked position.
Put the air intake control to the "Exterior air
(manual control to the right or electric
Put the air distribution control to the
Switch on the air conditioning by pressing
the
button; the associated green
warning lamp comes on.

Comfort
Rear screen demist - defrost
The control button is located on the heating or air conditioning system control panel.
Switching on
The rear screen demisting/defrosting can only
Press this button to demist/defrost the rear
the button comes on.
Switching off
The demisting/defrosting switches off
It is possible to stop the demisting/
the button switches off.
Switch off the demisting/defrosting
If the engine is switched off before the

Front demist - defrost
With the heating/ventilation
Put the temperature and air flow controls to
the dedicated marked position.
Put the air intake control to the "Exterior air
(manual control to the right or electric
Put the air distribution control to the
These markings on the control panel indicate the control positions for rapid demisting or
With the manual air
Put the temperature and air flow controls to
the dedicated marked position.
Put the air intake control to the "Exterior air
(manual control to the right or electric
Put the air distribution control to the
Switch on the air conditioning by pressing
the
button; the associated green
warning lamp comes on.

Comfort
Rear screen demist - defrost
The control button is located on the heating or air conditioning system control panel.
Switching on
The rear screen demisting/defrosting can only
Press this button to demist/defrost the rear
the button comes on.
Switching off
The demisting/defrosting switches off
It is possible to stop the demisting/
the button switches off.
Switch off the demisting/defrosting
If the engine is switched off before the

Digital air conditioning
The air conditioning can only operate when the engine is running.
Automatic operation
1. Automatic "comfort"
Press the
button. The
symbol is displayed.
We recommend that you use
this mode. It provides optimised
functions: passenger compartment
temperature, air flow, air distribution and air
that you have chosen.
For your comfort, when the engine is
To prevent too great a distribution of
flow will only reach its optimum level
2. Temperature adjustment
The value indicated on the display corresponds
to a level of comfort and not to a temperature in
On entering the vehicle, if the interior
to reach the required level of comfort.
Press the
and
buttons to
the value
enables optimum
3. Automatic "visibility"
The automatic comfort programme
windscreen and side windows
In this case, select the automatic visibility
indicator lamp comes on.
The system automatically controls the air
To exit this programme, press button
again
, the indicator lamp on the button is
is displayed.

Comfort
It is possible to adjust one or more functions
The
symbol switches off.
To return to automatic mode, press the
Manual override
4. Air conditioning on/off
For maximum cooling or heating of the
Press the blue button
until
until
is displayed.
Press this button to switch off the air
Stopping the air conditioning may cause
Automatic operation of the air conditioning is
is displayed.
5. Air intake/Air recirculation
Press this button for recirculation of
the interior air. The air recirculation
is displayed.
Air recirculation enables the
Press this button again or press the
is
Avoid prolonged recirculation of interior
Switching to manual mode may not be

Pressing this button several times in
- the windscreen and the side windows
- the windscreen, side windows and air
vents,
- the windscreen, the side windows, the air
vents and the footwells,
- the windscreen, the side windows and the
footwells,
- the footwells,
- the air vents and the footwells,
- the air vents.
Avoid driving for long periods with the
Press the
button to
7. Air fl ow adjustment
The air flow symbol, the fan, fills progressively
Press the
button to
Switching the system off
Press the air flow
button
until the fan symbol
This action switches off all of the functions of
the air conditioning system.
Thermal comfort is no longer controlled.
A slight flow of air resulting from the movement
Pressing the air flow
button
or on
reactivates the system with the values

Comfort
Scented air freshener
System permitting the diffusion of a fragrance in the passenger compartment in accordance with your requirements, by means of the adjustment dial
This dial is located on the dashboard.
It allows you to adjust the intensity of diffusion
Turn the dial to the right to permit diffusion
Turn the dial to the left to stop diffusion of
the fragrance.
Adjustment dial
This cartridge can be removed easily. The
first time it is used, replace the plug with a real
You can change it at any time and store it in the
You can obtain different fragrance cartridges
from CITROËN dealers.
Leave the central vents open.
The intensity of diffusion of the
fragrance may depend on the
ventilation or air conditioning settings.
Fragrance cartridge
Do not discard the original cartridge
fragrance cartridge is in use.
In order to preserve the service life
the left when you no longer wish to
As a safety precaution, do not carry
Do not dismantle the cartridges.
Do not attempt to refill the fragrance
Avoid all contact with the skin and eyes.
Keep out of reach of children and

Removing the cartridge
Press the dial and turn it a quarter of a turn
Remove the cartridge.
Refit its sealing case.
Fitting the cartridge
Remove the cartridge from the sealing
Install the cartridge (flower at top left).
Press the dial and turn it a quarter of a turn

Comfort
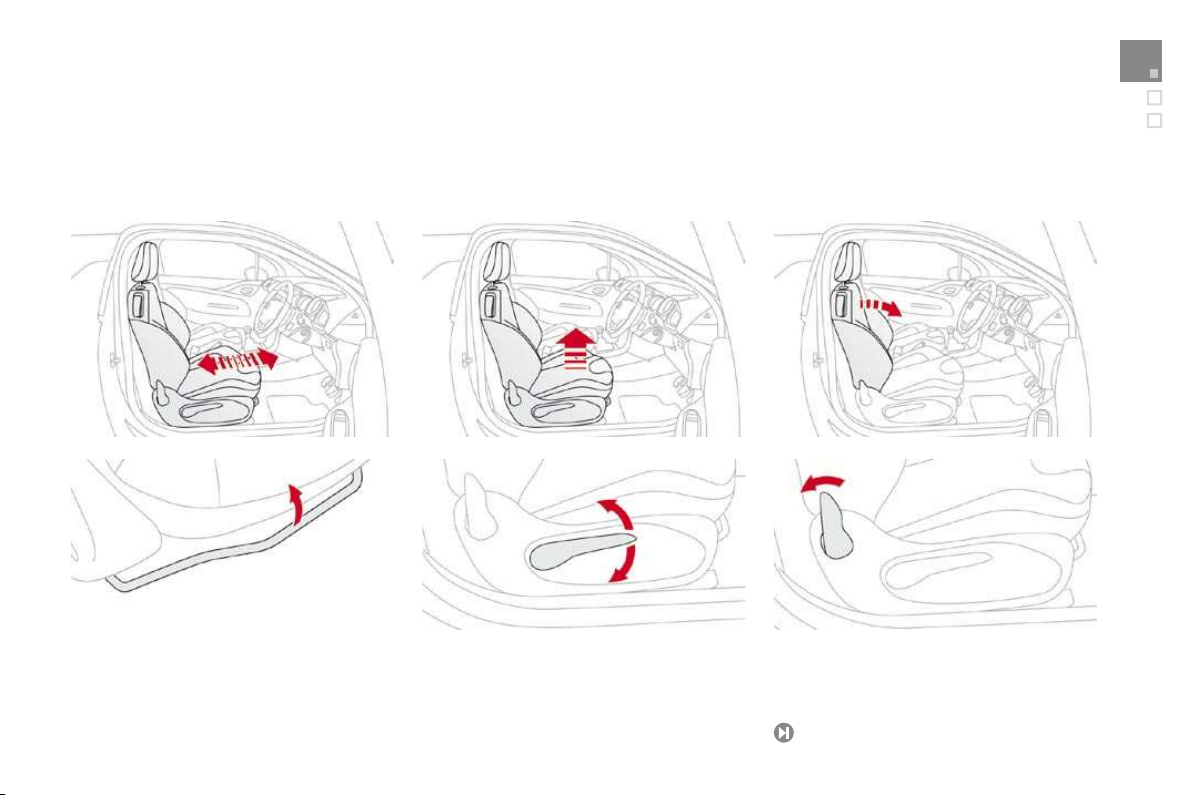
Front seats
Seat consisting of a seat cushion, a seat back and a head restraint which can all be adjusted to adapt your position for ease of driving and comfort.
Manual adjustments
Forwards-backwards adjustment
Raise the control and slide the seat
forwards or backwards.
Driver's or passenger's seat
Pull the control upwards to raise or push
Seat back angle adjustment
Push the control rear wards.

Additional adjustments
Head restraint height adjustment
To raise the head restraint, pull it upwards.
To remove the head restraint, press the
A
and pull the head restraint upwards.
To put the head restraint back in place,
To lower the head restraint, press the lug
The head restraint is fitted with a frame
with notches which prevents it from
Never drive with the head restraints

Comfort
Access to the rear seats
Pull the control upwards to fold the seat
When put back in place, the seat returns to
No person or object should prevent the
Check that the seat belt has reeled in
the rear seats for passengers.
Grab handle
This easy to use handle, located at the top of
the side trim:
- provides a means of support for the outer
- provides a hand hold to ease access to the
- facilitates exit from the rear seats.

Rear seats
Move the corresponding front seat forward
Check that the seat belt is positioned
Place the head restraints in the low
Folding the backrest
Pull control
forwards to release the seat
Fold the seat back
on to the cushion.
When repositioning the rear seat backrest:
Straighten the seat back
and secure it.
Check that the red indicator, located next to
the control
, is no longer visible.
Repositioning the seat backrest
When repositioning the seat backrest,
take care not to trap the seat belts.

Comfort
These have one position for use (up) and a
They can also be removed.
release the backrest using control
,
tilt the backrest
slightly forwards,
pull the head restraint upwards to the stop,
then, press the lug
A
.
Rear head restraints
Never drive with the head restraints
Steering wheel adjustment
When stationary
, pull the control lever to
When stationary
Adjust the height and reach to suit your
Push the control lever to lock the steering
wheel.
As a safety precaution, these
while the vehicle is stationary.

Mirrors
Each fitted with an adjustable mirror glass
for overtaking or parking. They can also be
folded for parking in confined spaces.
Demisting - Defrosting
If your vehicle is fitted with heated mirrors, the
Adjustment
Move control
to the right or to the left to
Move control
in all four directions to
Return control
A
to the central position.
Door mirrors
The objects observed are, in reality,
Take this into account in order to
Folding
From outside: lock the vehicle using the
From inside: with the ignition on, pull
rearwards.
Unfolding
From outside: unlock the vehicle using the
From inside: with the ignition on, pull
A
rearwards.
If the mirrors are folded using control
A
,
they will not unfold when the vehicle is
A
.
The folding and unfolding of the door
Never fold or unfold the electric folding

Comfort
Rear view mirror
Adjustable mirror providing a central rearward view.
Equipped with an anti-dazzle system, useful in poor light.
Manual day/night model
Adjustment
Adjust the mirror so that the glass is
Day/night position
Pull the lever to change to the "night" anti-
Push the lever to change to the normal
By means of a sensor, which measures the
Automatic day/night model
In order to guarantee optimum visibility
As a safety precaution, the mirrors
It has an anti-dazzle system which darkens the
the sun...

Remote control key
System which permits central unlocking or locking of the vehicle using the lock or from a distance. It is also used to locate and start the vehicle, as well
Unlocking the vehicle
Unfolding the key
First press button
A
to unfold the key.
Unlocking using the remote
Unlocking using the key
Press the open padlock to unlock
the vehicle.
Turn the key to the right in the driver’s door
Unlocking is confirmed by rapid flashing
two seconds.
According to version, the door mirrors unfold at
the same time.

Access
Locking using the remote control
Locking using the key
Turn the key to the left in the driver’s door
Locking is confirmed by fixed lighting of
the direction indicators for approximately
two seconds.
According to version, the door mirrors fold at
the same time.
Press the closed padlock to lock
the vehicle.
If one of the doors or the boot is still
When the vehicle is locked, if it is
The folding and unfolding of the door

Press the closed padlock to lock
the vehicle completely.
Press the closed padlock again
within five seconds to deadlock
the vehicle.
Deadlocking using the key
Turn the key to the left in the driver’s door
Turn the key to the left again within
five seconds to deadlock the vehicle.
Deadlocking is confirmed by fixed lighting
two seconds.
According to version, the door mirrors fold at
the same time.
Deadlocking renders the exterior and
It also deactivates the manual central
Therefore, never leave anyone inside
the vehicle when it is deadlocked.

Access
This is indicated by lighting of the courtesy
for a few seconds.
Press the closed padlock to
Anti-theft protection
Electronic engine immobiliser
The key contains an electronic chip which has
This electronic engine immobiliser locks the
In the event of a malfunction,
you are informed by
In this case, your vehicle does not start; contact
Folding the key
First press button
to fold the key.

which are harmful to the environment.
Take them to an approved collection
Visit a CITROËN dealer with the vehicle's V5 registration document and your personal
The CITROËN dealer will be able to retrieve the key code and the transponder code
Remote control
The high frequency remote control is a sensitive system; do not operate it while it is in your
Do not repeatedly press the buttons of your remote control out of range and out of sight of
your vehicle. You run the risk of stopping it from working and the remote control would have
to be reinitialised.
The remote control does not operate when the key is in the ignition, even when the ignition
Locking the vehicle
Driving with the doors locked may make access to the passenger compartment by the
As a safety precaution (with children on board), remove the key from the ignition when you
Anti-theft protection
Do not make any modifications to the electronic engine immobiliser system; this could
When purchasing a second-hand vehicle
Have the key codes memorised by a CITROËN dealer, to ensure that the keys in your

- Position 1:
- Position 2:
- Position 3:
Starting the vehicle
Insert the key in the ignition switch.
The system recognises the starting code.
Turn the key fully towards the fascia to
.
When the engine starts, release the key.
Immobilise the vehicle.
Turn the key fully towards you to position
Remove the key from the ignition switch.
Switching the vehicle off
Do not attach any heavy objects to
the key as this could weigh down on it
when in the ignition switch and cause
Key reminder
If the key is left in the ignition switch, an

Access
Following disconnection of the vehicle battery,
you can no longer unlock, lock or locate your
vehicle.
First of all, use the key in the lock to unlock
Then, reinitialise the remote control.
If the problem persists, contact a CITROËN
Reinitialisation
Switch off the ignition.
Turn the key to position
Press the closed padlock immediately for a
few seconds.
Switch off the ignition and remove the key
from the ignition switch.
The remote control is fully operational again.
Changing the battery
Battery ref.: CR1620/3 volts.
This replacement battery is available from
Maintain pressure on lug
A
and remove the
Unclip the casing by inserting a coin at the
Slide the flat battery out of its location.
Slide the new battery into its location
Clip the casing in place, then the chrome
finisher.
Reinitialise the remote control.
If the battery is flat, you
this warning lamp in the
Unfold the key.
Release the chrome finisher by pressing on

which are harmful to the environment.
Take them to an approved collection
Visit a CITROËN dealer with the vehicle's V5 registration document and your personal
The CITROËN dealer will be able to retrieve the key code and the transponder code
Remote control
The high frequency remote control is a sensitive system; do not operate it while it is in your
Do not repeatedly press the buttons of your remote control out of range and out of sight of
your vehicle. You run the risk of stopping it from working and the remote control would have
to be reinitialised.
The remote control does not operate when the key is in the ignition, even when the ignition
Locking the vehicle
Driving with the doors locked may make access to the passenger compartment by the
As a safety precaution (with children on board), remove the key from the ignition when you
Anti-theft protection
Do not make any modifications to the electronic engine immobiliser system; this could
When purchasing a second-hand vehicle
Have the key codes memorised by a CITROËN dealer, to ensure that the keys in your

Access
Alarm
System which protects and provides a deterrent against the theft of your vehicle. It provides two types of protection, exterior and interior, as well as a
Exterior perimeter protection
The system detects opening of the vehicle.
The alarm is triggered if anyone tries to enter
the vehicle by forcing a door, the boot or the
Interior volumetric protection
The system detects any variation in the volume
The alarm is triggered if anyone breaks a
window or moves inside the vehicle.
If you wish to leave a pet in the vehicle or a
window partially open, deactivate the interior
volumetric protection.
Self-protection function
The system detects the putting out of service of
The alarm is triggered if anyone tries to put
the wires of the siren, the central control or the
Do not make any modifications to
the alarm system, this could cause

To be effective, this deactivation must
Locking the vehicle with full
Activation
Switch off the ignition and get out of the
vehicle.
Lock or deadlock the vehicle using the
The alarm is activated; the indicator lamp on
A
flashes once per second.
The exterior perimeter protection is activated,
The interior volumetric protection is activated,
45 seconds after the locking button on the
Deactivation
Unlock the vehicle using the unlocking
The alarm is deactivated; the indicator lamp on
A
switches off.
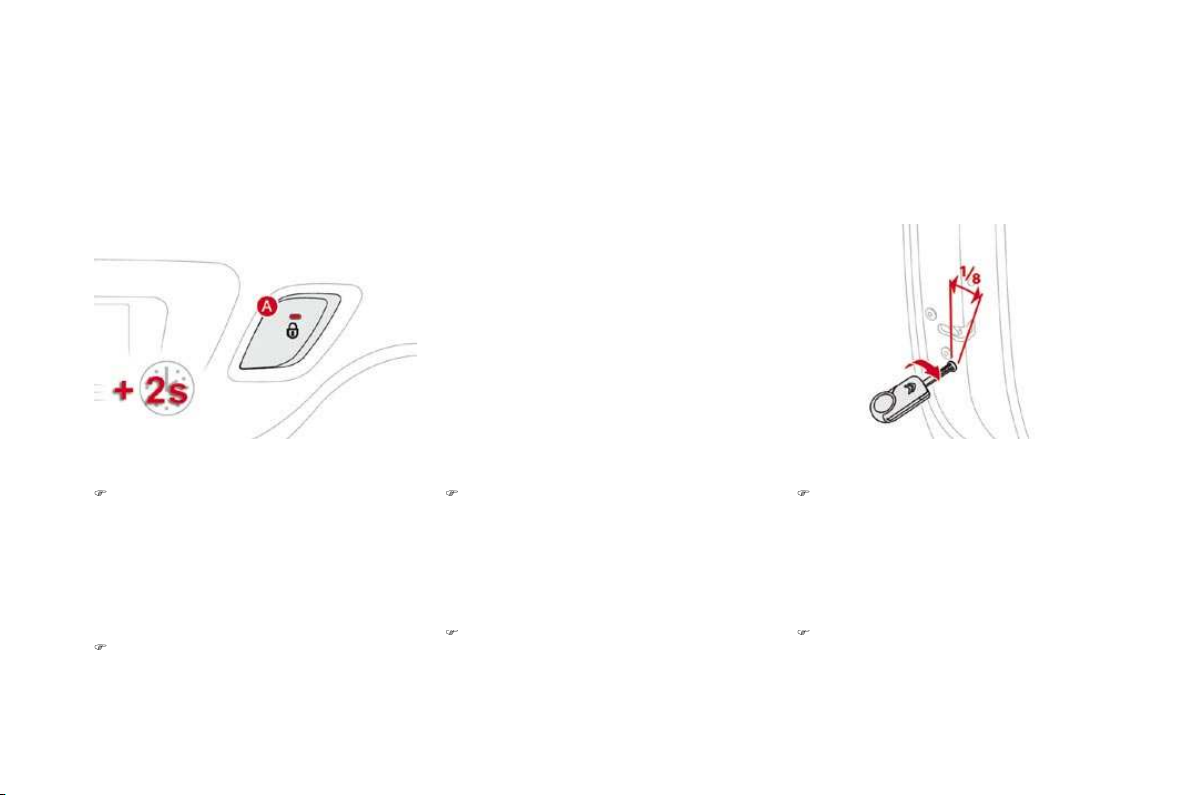
Locking the vehicle with exterior
Deactivation of the interior
volumetric protection
Switch off the ignition.
Within ten seconds, press button
until
the indicator lamp is lit continuously.
Get out of the vehicle.
Lock or deadlock the vehicle without delay
The exterior perimeter protection alone remains
A
flashes once per second.
Reactivation of the interior
volumetric protection
Unlock the vehicle using the unlocking
Relock the vehicle using the remote control.
The alarm is activated again with both types
flashes once per second.
If an opening - door or boot - is not
will be activated after 45 seconds at
the same time as the interior volumetric

Access
Triggering of the alarm
This is indicated by sounding of the siren
After it has been triggered, both types of
If the alarm is triggered ten times in
If the indicator lamp on button
A
flashes
was triggered during your absence.
When the ignition is switched on, this
flashing stops immediately.
To avoid triggering the alarm when
washing your vehicle, lock it using the
Failure of the remote control
Unlock the vehicle using the key in the
Open the door; the alarm is triggered.
Switch on the ignition; the alarm stops.
Locking the vehicle without
Lock or deadlock the vehicle using the key
Malfunction
When the ignition is switched on, lighting of
the indicator lamp on button
for ten seconds
Have it checked by a CITROËN dealer.
* According to country.
Automatic activation *
2 minutes after the last door or the boot is
To avoid triggering the alarm on entering
the vehicle, first press the unlocking button

Window controls
System which opens or closes a window manually or automatically. It is fitted with anti-pinch protection on the driver's side.
The electric window switches
45 seconds after the ignition is
the window stops. Any new operation
Press or pull the switch. The
window stops as soon as the
Passenger's electric window
There are two methods of operation:
Driver's electric window
-
Press or pull the switch without passing
the point of resistance. The window
-
Press or pull the switch fully. The window
Pressing or pulling the switch again

Access
In the event of unwanted opening of the
window on closing (for example in the
press the switch until it opens
then pull it immediately until it
continue to hold the switch for
window has closed.
Safety anti-pinch
On the driver's side, the one-touch front electric
window has a safety anti-pinch function.
When the window rises and meets an obstacle,
Reinitialisation
Always remove the key from the ignition
when leaving the vehicle, even for a
In the event of contact during operation
When the driver operates the
The driver should ensure that the
Be aware of children when operating
the windows.
In the event of a malfunction you have to
windows:
release the switch and pull it again until the
window closes completely,
hold the switch for approximately
press the switch to lower the window

Doors
Opening
From outside
After unlocking the vehicle using the
From inside
Pull the door lever to open the door; this
Closing
When a door is not closed correctly:
when the engine is running
, this
warning lamp comes on, accompanied
when the vehicle is moving
(speed higher
than 6 mph (10 km/h)), this warning lamp
Version with
The interior door controls do
Access
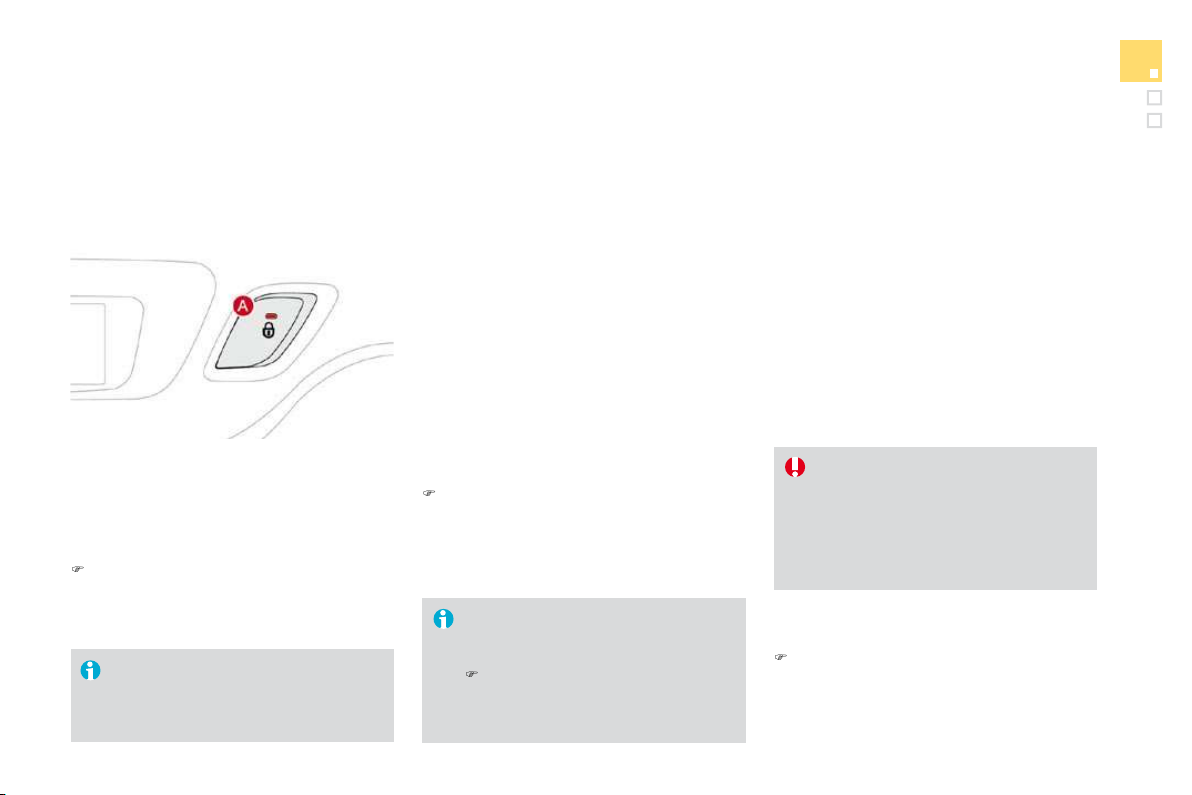
System which provides full manual locking or
Locking
Press button
A
to lock the vehicle.
The red indicator lamp on the button comes on.
Unlocking
Press button
again to unlock the vehicle.
The red indicator lamp on the button switches off.
If one of the doors is open, central
If the vehicle is locked from the outside,
the red indicator lamp flashes and
A
is inactive.
In this case, use the remote control
Automatic centralised
System which provides full automatic locking
You can activate or deactivate this function.
Locking
When the speed exceeds 6 mph (10 km/h), the
Unlocking
Above 6 mph (10 km/h), press button
A
to
If one of the doors is open, the
If the boot is open, the automatic
Activation
Press button
for more than two seconds.
A confirmation message appears on the
Deactivation
Press button
again for more than
two seconds.
A confirmation message appears on the
System which locks or unlocks the doors
the central locking.
Locking the driver's door
Insert the key in the lock, then turn it to the
Unlocking the driver's door
Insert the key in the lock, then turn it to the
Locking the passenger door
Insert the key in the lock, located on the
.
Unlocking the passenger door
Pull the interior door opening control.

Access
Boot
Opening
After unlocking the vehicle using the
Closing
Lower the tailgate using the interior grab
If the tailgate is not closed correctly:
-
when the engine is running
, this
warning lamp comes on, accompanied
-
when the vehicle is moving
(speed above
System for mechanical unlocking of the boot
Unlocking
Fold back the rear benchseat to gain
Insert a small screwdriver into hole
of the

Fuel tank
Low fuel level
Filling
A label affixed to the inside of the flap reminds
you of the type of fuel to be used depending on
your engine.
Additions of fuel must be of at least 5 litres,
The key cannot be removed from the
Opening the filler cap may create a
vacuum is entirely normal, resulting
from the sealing of the fuel system.
To fill the tank in complete safety:
the engine
switched off,
open the fuel filler flap,
insert the key in the cap, then turn it to the
remove the cap and hook it onto the clip
fill the tank,
; this could cause
When you have filled the tank:
put the cap back in place,
turn the key to the right, then remove it
from the cap,
close the flap.
When the fuel tank minimum level
first comes on there remains
of fuel in the tank.
You must refuel as soon as possible to avoid
If you run out of fuel (Diesel), refer also to the

Access
The petrol engines are perfectly compatible
with E10 type petrol biofuels (containing 10 %
E85 type fuels (containing up to 85 % ethanol)
for the use of this type of fuel (BioFlex
vehicles). The quality of the ethanol must
For Brazil only, special vehicles are marketed
to run on fuels containing up to 100 % ethanol
The Diesel engines are perfectly compatible
with biofuels which conform to current and
future European standards (Diesel fuel which
The B30 biofuel can be used in certain Diesel
The use of any other type of (bio)fuel

Lighting controls
System for selection and control of the various front and rear lamps providing the vehicle's lighting.
The various front and rear lamps of the vehicle
- sidelamps, to be seen,
- dipped beam headlamps to see without
- main beam headlamps to see clearly when
the road is clear.
Main lighting
Other lamps are installed to fulfil the
visibility:
- a rear foglamp to be seen from afar,
- front foglamps for improved vision.
- LED lamps to be seen during the daytime.
Additional lighting
Various automatic lighting control modes
- guide-me-home lighting,
- automatic illumination of headlamps.
Programming
In some climatic conditions (e.g. low
temperature or humidity), the presence

Visibility
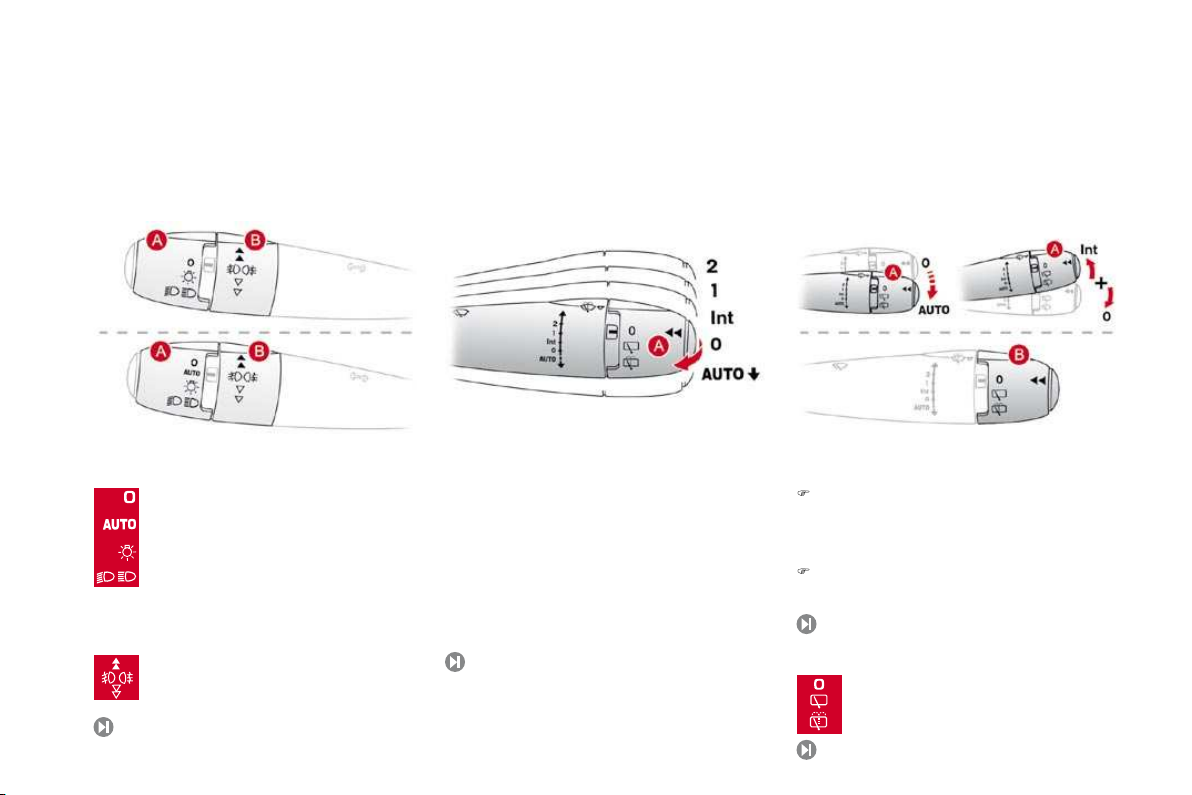
Model without AUTO lighting
Model with AUTO lighting
Manual controls
The lighting commands are issued directly by
the driver by means of the ring
A
and the stalk
.
Automatic illumination of headlamps.
Stalk for switching the headlamp beam:
In the lamps off and sidelamps modes, the
temporarily ("headlamp flash") by maintaining a
A.
Main lighting mode selection ring: turn it
to position the symbol required facing the
Lamps off.
Sidelamps only.
Dipped headlamps or main beam
Displays
Lighting of the corresponding indicator lamp on
the instrument panel confirms the switching on
The instrument panel has permanent back-
therefore not linked to the exterior lighting.

Foglamp selection ring.
The foglamps operate with the dipped and main
Rotate and release the ring
forwards a first time to switch on the front
foglamps.
forwards a second time to switch on the
rearwards a first time to switch off the rear
foglamp
rearwards a second time to switch of the
front fog lamps.
Model with front foglamps and
Lighting on buzzer
When the ignition is switched off, all
If the lighting is switched on manually
they have forgotten to switch off the
vehicle's lighting, with the ignition off.
In good or rainy weather, by both day
Do not forget to switch off the front
foglamps and the rear foglamp when
they are no longer necessary.
Front and rear foglamps
When the lighting is switched off automatically
foglamps and sidelamps will remain on.
Turn the ring rearwards to switch off the
foglamps, the sidelamps will then switch off.

Visibility
Temporarily keeping the dipped beam
when the light is poor.
Switching on
With the ignition off, "flash" the headlamps
A further "headlamp flash" switches the
function off.
Switching off
The manual guide-me-home lighting switches

As soon as the brightness returns to a
Automatic illumination
Activation
A
to the
position. The
Deactivation
Turn ring
A
to a position other than
. Deactivation is accompanied by a
Coupling with the automatic
Association with the automatic illumination of
with the following additional options:
- selection of the lighting duration to
the monochrome screen A, for which the
- automatic activation of "guide-me-home"
Operating fault
In the event of a fault with the
Consult a CITROËN dealer.
In fog or snow, the brightness
Do not cover the brightness sensor,

Visibility
LED lamps
Daytime external lighting using specific front lamps providing a signature of the vehicle. Comprising
two sets of six diodes, they are located in the vertical scoops below each headlamp.
On starting the vehicle, in daylight the LED
or
.
If the dipped beam headlamps are switched
For countries where exterior lighting by day
Driver only or driver + front passenger.
.
Intermediate setting
5 people.
. 5 people + load in the boot.
Driver only + maximum authorised load in
the boot.
Higher settings may limit the spread of light
from the headlamps.
The initial setting is position
.
Programming
In countries where it is a legal
- this function is activated by default
- in daylight, the sidelamps and
- If the dipped beam headlamps
Headlamp
adjustment

System for selection and control of the various
front and rear wiping modes for the elimination
The vehicle's front and rear wipers are
Wiper controls
Programming
Model with intermittent wiping
Various automatic wiper control modes are also
- automatic rain sensitive windscreen wipers,
- rear wiping on engaging reverse gear.
Model with AUTO wiping
The wiper commands are issued directly by the
A
and the ring
.
Manual controls
Windscreen wipers
wiping speed selection stalk:
single wipe (press downwards),
automatic, then single wipe (see
following page).
fast (heavy rain),
normal (moderate rain),
intermittent (proportional to the
park,

Visibility
rear wiper selection ring:
If a significant accumulation of snow or
park,
intermittent wipe,
wash-wipe (set duration).
Reverse gear
When reverse gear is engaged, the rear wiper
will come into operation if the windscreen
wipers are operating.
Programming
The function is activated or deactivated via the
This function is activated by default.
Windscreen wash
Pull the wiper stalk towards you. The
windscreen wash, then the windscreen wipers,

windscreen wipers
The windscreen wipers operate automatically,
without any action on the part of the driver, if
the rainfall.
Activation
This is controlled manually by the driver by
to the
position.
It is accompanied by the lighting of
this indicator lamp in the instrument
Switching off
This is controlled manually by the driver
upwards, returning it to
It is accompanied by the indicator
The automatic wiping must be
for more than one minute, by pushing
A
downwards.

Visibility
Operating fault
If an automatic wiping malfunction occurs, the
wipers will operate in intermittent mode.
Have it checked by a CITROËN dealer.
To retain the effectiveness of the "flat-
- handle them with care,
- clean them regularly using soapy
water,
- not use them to hold a sheet of
- replace them at the first signs of
wear.
Do not cover the rain sensor, linked
with the brightness sensor and located
the rear view mirror.
Switch off the automatic wiping when
In winter, it is advisable to wait until the
windscreen is completely clear of ice
This position allows the wiper blades to be lifted
for winter parking, cleaning or replacement
without damaging the bonnet.
In the minute following switching of f of the
the wipers vertically.
To park the wipers after this has been done,
Vertical windscreen wiper
 Loading...