

Page 1

CITROËN C5
Owner’s handbook
Page 2

CAFEINE - TOTAL LUBRIFIANTS, Le Diamant B, 16 rue de la République, 92922 PARIS LA DEFENSE - 552 006 454 RCS Nanterre - www.lubrifiants.total.com
Citroën and Total
A partnership of expertise
A partnership for the environment
*Ofcial C02 emissions reduction of 4g per km (approx. 6g per mile). Corresponds to a reduction
in C02 emissions of 1 tonne throughout the life of the vehicle, on a private diesel vehicle with an
average life expectancy estimated at 250 000 km (approx. 160 000 miles). Source: TOTAL. **Or
30L, average quantity of fuel required to ll a tank at a petrol station. Result obtained using TOTAL
ACTIVA/QUARTZ INEO ECS oil instead of a traditional 15W-40 oil, on a CITROËN C4 1.6HDi,
whose average fuel consumption is 58.9 mpg (4.8L/100km), travelling 18 000km (approx. 12 000
miles) per year. Source: TOTAL.
.
A partnership of success
For 39 years, the research teams of
Citroën and Total have combined their
know-how to offer you the best engine/
lubricant combination available.
Cutting edge technology for your benet.
With Total, you can be sure to have chosen the benchmark
oil that best guarantees your Citroën’s performance and lifeexpectancy.
Total oils support Citroën’s advances in fuel
economy, and C02 and harmful emission reductions.
The development of new generation oils specially
adapted for Particle Filters, like TOTAL ACTIVA/
QUARTZ INEO ECS can reduce C02 emissions
by a tonne* and save a tank of fuel each year**.
Competitive successes in the national rallies of the World
Rally Championship bear testament to the performance and
efciency of the Citroën – Total partnership.
prefers
Page 3

This handbook is compiled on the basis of all the equipment (whether standard or optional) that is
available, and of the technical specifications that were known at the time of going to print.
The level of equipment on your vehicle depends on the model,
the options chosen and the country where the vehicle is marketed.
Some of the equipment mentioned in this handbook may only become available at a later date.
Descriptions and illustrations are given without obligation.
AUTOMOBILES CITROËN reserves the right to modify its models and their
equipment without necessarily being bound to update the present handbook.
The trained, professional staff of the CITROËN network are at
your disposal to answer any questions you may have.
We wish you safe and enjoyable motoring in your new CITROËN.
This handbook is an integral part of the vehicle.
Keep it where it can be easily consulted.
Do not forget to pass it on to the new owner,
should you sell your vehicle.
Page 4

X7-GB-3008
Edition 03-2008
Page 5

1
We thank you and congratulate you for choosing to drive a new CITROËN. Please read this
handbook carefully before taking to the road. It contains essential information about driving
your vehicle and operating its equipment, as well as other important advice to be rigorously
followed. The types of equipment your vehicle possesses will be dependent on its version,
on the options you have chosen as well as on the country where it was marketed. The
handbook also contains all you need to know about the servicing and routine maintenance
of your vehicle, thus assuring both your safety and the reliability of your new CITROËN, a
thorough knowledge of which will enable you to enjoy driving to the full.
Depending on the version of your vehicle and the options it possesses, as well as on its date of marketing,
some of the functions or types of equipment described in this handbook may not be present on the
vehicle.
Page 6

2
C O N T E N T S
DRIVING
II
Remote control .............................. 22-23
Keys .................................................... 24
Anti-intrusion alarm .......................25-26
Steering lock -
Ignition - Starter ............................... 27
Starting ............................................... 28
Instrument panel ....................29➟33-41
Warning lamps ..............................29➟33
Diesel particulate lter system ........... 33
Instrument panel ......................... 34➟41
Trip computer ................................34-35
Navigation .......................................... 35
Checks / Oil level ................................ 36
Maintenance indicator ................... 37-38
Main Menu .......................................... 39
Vehicle parameters ............................ 40
Fixed centred controls
steering wheel .............................42-43
Signalling .....................................
44➟46
Bend lighting ...................................... 47
Xenon dual function directional
headlamps - Angled lighting ............ 48
Wipers ...........................................49-50
Windows ..............................................51
Steering column adjustment -
Seat belt height adjustment ...................52
Front seats ..................................53➟55
Memorisation of
driver's adjustments ......................... 56
Rear view mirrors .......................... 57-58
Multifunction display ....................59➟62
Manual gearbox ................................. 63
Automatic gearbox ......................64➟67
Cruise control ................................68-69
Speed limiter ................................. 70-71
Tyre deation detection ................. 72-73
Brakes .................................................74
Electric parking brake .................
75➟81
Hill start assist .................................... 82
Manual parking brake......................... 83
Electronic stability programme ..........
84
“Hydractive III+” suspension .........85-86
Lane Departure Warning System ......
87
Parking assistance ........................88-89
Parking space sensor ...................90-91
22-91
I
IN BRIEF
4-21
Exterior .................................................
4
Opening .............................................5-6
Interior .................................................. 7
Dashboard ..................................... 8➟10
Getting started ...............................11-12
Visibility .............................................. 13
Ventilation ........................................... 14
Monitoring ..................................... 15-16
Passenger safety ................................17
Driving ......................................... 18➟21
Page 7

3
C O N T E N T S
COMFORT
III
92-125
RADIO
IV
126-143
MAINTENANCE
V
144-160
PRACTICAL ADVICE
VI
161-179
TECHNICAL SPECIFICATIONS
VII
180-188
ALPHABETICAL INDEX ............... 189
USER PRECAUTIONS .............
I-XXIV
Access ........................................... 92-94
Automatic air conditioning ......... 95➟102
General........................................ 95➟96
Monozone .................................... 97➟99
Dual-zone ................................ 100➟102
Programmable heating .............. 103-105
Rear seats ................................. 106-107
Airbags ............................................. 108
Child safety ...................................... 109
Child restraints ......................... 110➟113
Interior lighting ..........................114➟116
Interior comfort ......................... 117➟119
Boot (saloon) .................................... 120
Boot (Tourer) .....................................121
Luggage cover blind (Tourer) ........... 122
Cargo net (Tourer) ............................ 123
Sunroof (saloon) ............................... 124
Panoramic roof (Tourer) ................... 125
Audio/telematics system .................. 126
RDS audio compact disc system ..... 127
Button controls ................................. 128
Controls at the steering wheel ......... 129
General functions -
Audio adjustments ......................... 130
Radio source ..............................131-132
RDS system .............................. 133-134
CD/CD MP3 source .................. 135-136
CD changer source ...........................137
Bluetooth® ................................138➟140
HiFi system ........................................141
Frequently-asked questions .......142-143
Fuel ................................................... 161
Changing bulbs ........................162➟171
Safety recommendations ..................172
Puncture kit .......................................173
Changing a wheel ....................174➟176
Towing – Lifting ................................ 177
Very cold protection ..........................178
Snow guard .......................................179
Bonnet release ................................. 144
Petrol engines ..........................145➟146
Diesel engines ..........................147➟148
Levels ........................................ 149-150
Diesel injection equipment .........151-152
Capacities ........................................ 153
12V battery ................................ 154-155
Fuses ....................................... 156➟160
General...................................... 180-181
Fuel consumption ...................... 182-183
Dimensions (saloon) .................. 184-185
Dimensions (Tourer) .................. 186-187
Vehicle identication ........................ 188
Page 8

I
4
IN BRIEF
E X T E R I O R
The Xenon dual-function directional
headlamps
This function automatically provides you
with extra visibility on bends. This lighting is
linked with the angular lighting which maximises the area lit at intersections and when
parking.
48
Lane Departure Warning
System
This driving assistance device
warns you when you unwittingly
cross a lane marking.
87
Parking assistance
(visual + sound)
This function warns you, whilst
manoeuvring, by detecting
obstacles located in front of and
behind the vehicle.
Tyre deation detection
This function monitors the pressure of each tyre and warns you
of tyres that are punctured or
deated.
88 72
Glass panoramic roof (Tourer)
This provides you with improved brightness in the
passenger compartment.
Glass sun roof (saloon)
This also provides you with improved ventilation in the
passenger compartment.
124-125
Page 9

I5I
5
F
B
A
D
C
E
E
IN BRIEF
A. Key release / storage.
B. Locking of the vehicle.
C. Unlocking of the vehicle.
D. Guide-me-home lighting.
To open the fuel ap, press on the
top left part of it, then pull from the
edge.
Locking ller cap
Turn the key a quarter turn to lock
and unlock the ller cap.
When refuelling, place the cap on
hook F.
Remote control key Opening the boot Fuel tank
22
161
Tank capacity:
approximately 71 litres
93
O P E N I N G
Press upwards on the lever E.
The boot automatically locks when
the vehicle is moving at a speed
of over 10 km/h (6 mph), even if
automatic central locking is deactivated. It is unlocked when a door is
opened or when the central locking
button is pressed (speed lower than
10 km/h (6mph)).
Page 10

I
6
A
B
IN BRIEF
Access to the spare wheel
To access the spare wheel:
1.
Lift up the boot oor using the
strap (saloon) or the retractable
hook (Tourer).
2.
Fold back the boot carpet
(saloon).
3.
Attach the hook to the upper
section of the boot.
4.
To remove the spare wheel,
detach the strap then push the
wheel forwards, before lifting it
out.
Spare wheel
Note: The tools are to be found
in a protective holder inside the
spare wheel.
173144
O P E N I N G
Bonnet release
This operation should only be
performed while the vehicle is
stationary.
Open the door.
To unlock, pull release lever A.
Lift up lever
B, then raise the bon-
net.
174
Puncture kit
The puncture repair kit is a complete system including a compressor and a setting product.
Saloon
Tourer
Page 11

I7I
7
IN BRIEF
INTERIOR
Electric parking brake
The electric parking brake combines automatic engagement when
the engine is switched off, and automatic release when the vehicle is
set in motion (automatic function activated by default).
Note: Manual locking/unlocking is possible.
Parking space sensor
The “Parking Space Sensor” func-
tion assists you in nding a parking
space.
126 75
Dual-zone automatic air
conditioning
This function enables you to adjust the comfort levels of the driver and the front passenger independently. It is also automatically
regulated depending on the external climatic
conditions.
100
Audio and communication
systems
This equipment benets from the latest technology: MP3 compatible RD4
radio, Bluetooth® hands-free kit,
NaviDrive (See NaviDrive instructions).
90
Page 12

I
8
8
9
17
10
1
2
11
5
18
4
7
3
6
16
12
14
15
13
19
20
IN BRIEF
1 Electric windows / rear view mirrors / Child
safety controls
2
Memorisation of driver’s seat, rear view mirrors
and air conditioning settings
3
Controls at the steering wheel:
Speed limiter
Cruise control
4 Horn
5
Audio/telematic controls under steering wheel
6
Driver's airbag
7
Navigation controls
8
Driver's air vent
9
Instrument panel
10
Driver's air vent
11
Lighting control
12 Windscreen wiper / Screen wash controls
13
Ignition switch
14
Controls:
Locking/unlocking of doors and boot
Lane Departure Warning System
15 Steering column adjustment
16
Knees airbag
17
Oddments tray
18
Checks / Anti-intrusion alarm / Parking space
sensor controls
19
Lighting / Direction indicators / Foglamp / Voice
recognition controls
20
Manual headlamp height adjustment
-
-
-
-
D A S H B O A R D
Page 13

I9I
9
23
33
38
39
37
36
35
21
24
30
28
22
25
29
31
32
34
41
40
26
27
IN BRIEF
D A S H B O A R D
21 Sunlight sensor
22 Soft diffusion air conditioning adjustment knob
23 Passenger's airbag
24 Side window demister
26
Bonnet release
25
Passenger's air vents
27
Hazard lamps button
28
Key switch:
Passenger’s airbag activation/deactivation
29
Glovebox:
Vehicle document storage
Audio-video sockets
Fusebox access ap
30 ESP
/ Parking assistance controls
31 Automatic gearbox SPORT/SNOW mode
controls
32 Electric parking brake
33 Armrest with cup-holder
34 Suspension controls:
Ground clearance adjustment
Sport mode
35
Ashtray with lighter
36
Gear lever
37 Storage
38
Radio mono CD or NaviDrive
39
Air conditioning controls
40 Storage
41
Multifunction display
-
-
-
-
-
-
Page 14

I
10
IN BRIEF
D A S H B O A R D
Audio
Instrument panel menu
Multifunction
display menu
Telephone
Cruise control
and Speed limiter
42
The “SET +, PAUSE, VOL+, MUTE”
buttons are located so that you can
use them without needing to take
your eyes off the road.
Activation of voice
recognition or reminder of
navigation guidance
MODE: selection of the type
of information displayed on
multifunction screen.
Page 15

I11I
11
A
F
G
H
I
C
B
D
J
JEK
IN BRIEF
F. Seat height and slide adjust-
ments.
G. Adjustment of the backrest
angle.
H. Adjustment of top of backrest.
I. Adjustment of 2 axis lumbar
support.
J. Massage function.
K. Heated seat control.
A.
Adjustment of the backrest
angle.
B.
Adjustment of the seat height
and angle.
C.
Heated seat control.
D.
Longitudinal adjustment of seat.
E.
Adjustment of the backrest lumbar support.
53 54
G E T T I N G S TA R T E D
56
Memorisation
The Memorisation function allows
you to programme the driver’s
seat, rear view mirrors and air
conditioning settings.
The correct positioning of the belt
strap is through the middle of the
shoulder. See “Seat belts”.
To adjust the seat belt for height,
compress the control and slide it
in the desired direction.
Seat belt height adjustmentFront seats
Electrical adjustmentsManual adjustments
Page 16

I
12
A
4
3
2
b
a
c
1
IN BRIEF
G E T T I N G S TA R T E D
Automatic electrochrome
rear view mirror
58 52
This automatically and progressively adapts to day-time or nighttime use.
Operation
Switch on the ignition and press
button 4.
Warning lamp 3 on: automatic
mode.
Warning lamp 3 off: automatic
mode stopped. The mirror
remains in its lightest denition.
•
•
With the vehicle at rest, unlock
the steering wheel by pushing control A forwards.
Adjust the height and the reach
of the steering wheel, then lock
the position by pulling the lever
upwards.
Steering column adjustment
57
Electric exterior rear view
mirrors
1. Selection of rear view
mirror:
a - Left hand side.
b - Right hand side.
c - Foldback / Deployment.
2. Directional control for
mirror selected
Page 17

I13I
13
A
B
C
IN BRIEF
Front wipers
V I S I B I L I T Y
50
45- 46
Control positions
2.
Rapid wipe.
1.
Normal wipe.
I
. Intermittent wipe.
0.
Off.
One press downwards:
AUTO
: Automatic wipe acti-
vated.
Single wipe.
Screen wash
Pull the screen wipe control stalk
towards you.
•
•
Note: If the ignition has been
switched off for around 1 minute,
it is necessary to re-activate
automatic wiping.
Lighting
Ring A
Sidelamps.
Dipped beams/main
beams.
Lamps off.
Pull the control stalk towards you
to change between dipped beam
and main beam.
Front foglamps and
rear foglamps on.
Front foglamps on.
Ring B
Automatic lighting of headlamps.
Rear wipers (Tourer)
Rotate control C to the desired
position.
Off
Intermittent wipe
Screen wash
49
Page 18

I
14
IN BRIEF
Automatic air conditioning
Adjustment of air distribution
on driver's side
Passenger's side
automatic operation
Adjustment
of temperature on
driver's side
Adjustment of air
distribution on
passenger's side
Rear and external rear view
mirrors demisting - deicing
Air recirculation -
Entry of air from outside
Front demisting -
deicing
Driver's side automatic
operation
Note: It is recommended to use automatic mode by pressing on the “AUTO” button.
V E N T I L AT I O N
Adjustment of
temperature on
passenger's side
Activation/deactivation
of air conditioning
Adjusting the air ow
97
Page 19

I15I
15
1111E
D
F
A
J
C
I
B
H
G
IN BRIEF
Instrument panel
The hazard lamps can
also be used with the ignition switched off.
M O N I TORING
A. Fuel gauge and low fuel warning lamp.
B.
Cruise control/speed limiter information.
C.
Coolant temperature.
D. Speed indicator.
E.
Instrument panel.
F.
Mileage recorder.
G.
Trip mileage recorder reset button.
H.
Rev counter.
I. Engine oil temperature.
J.
Display of automatic gearbox information.
Note:
When the ignition is switched on, the orange
and red warning lamps light up.
When the engine is running, these warning
lamps should go out.
If any warning lamps remain lit, refer to the
relevant page.
•
•
•
Hazard warning lamps
29
44
Page 20

I
16
A
IN BRIEF
M O N I TORING
Tyre deation detection
This function allows you to display
the log of alerts.
Press on button A. The following
messages appear consecutively
on the instrument panel screen:
Tyre pressure check.
Maintenance indicator reminder.
Display of message alerts.
Oil level check.
•
•
•
•
Log of alerts
The tyre deation detection system
is a driving aid which informs you
of the condition of your tyres.
It does not replace either vigilance
or responsibility on the part of the
driver.
72
36
Economy mode
When the engine is stopped, some
functions (audio system, screen
wipe, electric windows, sunroof,
electric seats, telephone, video,
interior lighting etc.) are only electrically supplied for a maximum
period of 30 minutes, to avoid discharging the battery.
Once this period is over, a message is displayed on the instrument panel screen and the active
functions are placed on standby.
These functions will be automatcially reactivated when the vehicle
is restarted.
27
Page 21

I17I
17
J
I
A
B F G
H
C
D E
IN BRIEF
Front passenger's airbag
deactivation
Child safety
In order to be able to use a rearfacing child seat in the front passenger's seat position, it is imperative to deactivate the passenger's
airbag.
For that:
With the ignition switched off,
insert the key into the switch I.
Turn the key to the “OFF” position, the passenger's airbag is
deactivated.
The front passenger's airbag deactivation warning lamp G lights up
when the ignition is switched on.
•
•
This deactivates the controls in the
rear of the vehicle, both for the rear
windows and for opening the rear
doors from the inside. The electric
child safety device is activated by
pressing on button J.
The activation of the function is
indicated by a message on the
instrument panel screen and the
light on button J.
51108
PA S S E N G E R S A F E T Y
32
The seat belt fastened/unfastened
status for each seat category is
indicated by the lighting or ashing of the warning lamps linked to
each position:
A.
Non-fastened / unfastened
front and/or rear seat belts
warning lamp.
B.
Front left-hand seat belt warning lamp.
C.
Front right-hand seat belt
warning lamp.
D.
Rear right-hand seat belt
warning lamp.
E.
Central rear seat belt warning
lamp.
F.
Rear left-hand seat belt warning lamp.
G.
Front passenger's airbag
deactivation warning lamp.
H.
Front passenger's airbag activation warning lamp.
Seat belts and front
passenger's airbag
Page 22

I
18
B
A
IN BRIEF
D R I V I N G
Electric parking brake
75
Never leave a child alone
inside the vehicle with
the ignition on, as they
could release the parking
brake.
Hill start assist
Manual operation
The MANUAL application/release
of the parking brake is possible
permanently by pulling/pushing
control B.
Before leaving the
vehicle, check that
warning lamp A (!)
(red) on the instru-
ment panel is permanently lit and
that warning lamp P (red) on control B is lit.
With the engine running,
if you leave the vehicle,
manually apply the parking brake.
Do not leave the vehicle
while it is being held in the
temporary immobilisation
hill start assist phase.
To aid starting on a gradient, your
vehicle is equipped with a system
which keeps it immobilised for a
short time (about 2 seconds), the
approximate time it takes to move
your foot from the brake pedal to
the accelerator pedal.
This function is only active when:
The vehicle is completely stationary, with your foot on the
brake pedal.
In particular conditions on a
slope.
With the driver's door closed.
•
•
•
82
Before leaving the
vehicle, check that
warning lamp A (!)
(red) on the instru-
ment panel is permanently lit and
that warning lamp P (red) on control B is lit.
Automatic operation
The electronic parking brake
releases automatically and progressively when you press the
accelerator. With the vehicle stationary, the parking brake is automatically applied when the engine
is switched off.
Page 23

I19I
19
IN BRIEF
D R I V I N G
This system allows you to maintain a constant vehicle speed programmed by the driver.
Cruise control
Speed limiter
This system allows you to choose
a maximum speed that you do not
wish to exceed.
68
70
Note: The chosen speed must be
higher than 30 km/h (20 mph).
Cruise control is active on the
higher gears of the gearbox. The
chosen speed must be higher
than 40 km/h (25 mph).
Instrument panel display
The speed limiter or cruise control
mode is displayed on the instrument panel when selected.
Cruise control
Speed limiter
Selection of “LIMIT
”: Activation of speed limiter
mode.
“SET +”: Increase of the
maximum speed.
“SET -”: Reduction of the
maximum speed.
Suspension or resumption
of mode.
Deactivation.
The chosen speed is mem-
orised.
Selection of “CRUISE
”:
Activation of cruise control
mode.
“SET”: Memorisation
of the speed (system
paused).
“SET +”: Increase of the
memorised speed (system
ON).
“SET -”: Reduction of the
memorised speed (system
ON).
Suspension or resumption of
mode.
Deactivation.
Page 24

I
20
B
A
IN BRIEF
D R I V I N G
Move the stalk briey upwards or
downwards, without going beyond
the resistance point; the direction
indicators will ash 3 times.
Positions
P: Parking.
R:
Reverse gear.
N:
Neutral.
D:
Automatic mode.
M: Sequential mode.
The automatic gearbox offers you:
Operation in auto-active mode,
with automatic adaptation to your
style of driving as well as to the
road prole (Position D).
Operation in sequential mode,
with manual gear changing (Position M).
Operation in automatic SPORT
mode (Position D) and press
button A.
Operation in automatic SNOW
mode (Position D) and press
button B.
-
-
-
-
For safety:
The gear lever can
only be disengaged
from position P if
you are pressing the
brake pedal.
When a door is opened, an
audible signal sounds if the
gear selector is not in position P.
Before leaving the vehicle,
make absolutely certain that
position P is selected.
Direction indicators “Motorway” function
Automatic gearbox
64
44
Page 25

I21I
21
A
B
C
IN BRIEF
You can activate/deactivate the
parking assistance by pressing
button B. When the parking assistance is inactive, the warning lamp
on button B is lit up.
Parking assistance (visual
and sound)
Lane Departure Warning
System
This device is designed for use on
motorways and dual carriageways,
and operates only at speeds above
80 km/h (50 mph).
A press on button C activates the
function, the warning lamp on the
button lights up.
Parking space sensor
You can select the “Parking Space
Sensor” by pressing button A,
which ashes when next to the
space to be measured, with a speed
lower than 20 km/h (12 mph) and
at a distance of less than 1.5 m
from the space.
The xed lighting of the warning
lamp indicates that this function is
selected.
878890
Note: The system does not
alert you if one of your direction indicators is operating and
for approx. 20 seconds after the
direction indicator has stopped.
D R I V I N G
Page 26

22
II
A CB
D
E
R E M O T E C O N T R O L
Note:
The simultaneous use of other
high frequency equipment
(mobile telephones, domestic
alarms, etc.) may momentarily hinder the operation of the
remote control.
If there is a permanent fault, the
remote control has to be reinitialised. See “Changing remote
control batteries”.
•
•
Central unlocking
A press on button A unlocks your
vehicle.
This is conrmed by rapid ashing
of the direction indicators and lighting of the interior lamp (provided
this function is active). This also
deploys the exterior rear view mirrors.
Central locking / Closing
of windows and sunroof /
Deadlocking
A short press on button C
locks your vehicle.
A long press on button C locks
your vehicle and closes the windows and the sun roof.
2 successive presses on button C will deadlock the vehicle.
It is then impossible to open the
doors, either from the inside or
from the outside.
•
•
•
If closing the windows and sun roof using the remote control,
the user must make sure that no person is preventing the
windows and/or sun roof from closing properly.
It is dangerous to operate the deadlocking when a person is
inside the vehicle as unlocking is impossible from the inside
without the remote control.
Guide-me-home lighting
A press on button B activates the guide-me-home
lighting (lighting of the
sidelamps, dipped beams,
registration plate lights for
around 1 minute).
A second press prior to the end of
this timing cancels the guide-mehome lighting.
This operation is conrmed by the
direction indicators illuminating for
approx. 2 seconds and by the interior lamp switching off. This also
folds the exterior rear view mirrors.
If any of the doors, or the boot, is
open or not properly closed, the
central locking does not operate.
With the vehicle stationary and the
engine switched off, locking is sig-
nalled by the ashing of the interior
locking control warning lamp.
Page 27

23
II
R E M O T E C O N T R O L
Folding and ejecting the key
Button D is for folding and ejecting the key from its housing in the
remote control.
If you do not press on button D,
you could damage the key mechanism.
Except when reinitialising, the remote control cannot function while the key is in the ignition, even
when switched off.
Warning: by inadvertently actioning the remote control, when for example it is in your pocket, you
can unlock the vehicle without your realising it.
However, if none of the doors is opened within thirty seconds following an unlocking, the doors will
automatically relock.
Warning: there is a risk of damage if the replacement battery is not the correct one.
Only use batteries that are identical or equivalent to those approved by CITROËN.
Locating of the vehicle
To locate the vehicle in a carpark,
press button C. Locating of the
vehicle is conrmed by:
The ashing of the direction
indicators for a few seconds.
The interior lighting coming on.
The vehicle remains locked.
•
•
Electric boot opening
Pressing button E opens
the boot.
Re-initialisation of the
remote control
After a change of battery, it is necessary to re-initialise the remote
control. To do that, switch on the
ignition and immediately press button C of your remote control until
you achieve the desired result.
This may take some ten seconds.
Note: Make a careful note of the
numbers for the keys and for the
remote control on the ASSISTANCE
card. Keep this in a safe place.
Do not throw away used batteries. Return them to a CITROËN
dealer or take them to an author-
ised recycling facility (camera
shops, etc).
Changing the remote
control battery
Unclip the cover to gain access to
the battery.
Battery: CR 0523 de 3 V.
Page 28

24
II
K E Y S
Never attempt to modify the electronic immobiliser’s electrical circuit, as this could render your
vehicle undriveable.
It is dangerous to operate the deadlocking when a person is inside the vehicle as unlocking is
impossible from the inside without the remote control.
The key number is on the label attached to the key.
Should the key be lost or modied (addition, cancellation or replacement), you must contact a CITROËN
dealer, with all of the vehicle keys in your possession as well as your proof of identity.
Central locking using the
key
Briey turn the key in the door lock.
The vehicle is locked.
Deadlocking: Central
locking using the key
A second immediate action with
the key deadlocks the vehicle. It is
then impossible to open the doors
from the interior or exterior.
Note:
With the vehicle stationary and
the engine switched off, lock-
ing is signalled by the ashing
of the interior locking control
warning lamp.
If any of the doors, or the boot,
is open or not properly closed,
the central locking does not
operate.
•
•
Electronic immobiliser key
The key operates all the vehicle’s
locks as well as the ignition.
The key can be used to deactivate
the front passenger’s airbag. See
“Airbags”.
Electronic immobiliser
The ELECTRONIC IMMOBILISER
DEVICE locks the engine supply
system.
The system activates automatically as the key is removed from
the ignition.
All the vehicle’s keys contain an
electronic immobiliser device.
After you switch on the ignition, a
dialogue starts between the key
and the electronic immobiliser
device.
If the key is not recognised, you
cannot start the vehicle
If this occurs, leave your vehicle immobilised and contact a
CITROËN dealer.
Page 29

25
II
B
A
A N T I - I N T R U S I O N A L A R M
The anti-intrusion alarm provides:
Exterior perimeter protection by
means of detectors on the vehicle
access points (doors, boot, bonnet).
Electrical supply protection.
Interior volumetric protection
by means of ultrasonic sensors
(detecting movement inside the
passenger compartment). This
can be deactivated using the control A.
Anti-lifting protection by means of
sensors.
•
•
•
•
The installation also has a siren,
and a warning lamp on the control A which is visible from outside
the vehicle, indicating the three
possible statuses of the alarm.
Alarm not active (disarmed),
warning lamp off.
Alarm active (armed), the warn-
ing lamp ashes slowly.
Alarm triggered (signalling an
intrusion), the warning lamp
ashes rapidly if the alarm is
deactivated by a press on the
control B. It stops as soon as
you switch on the ignition.
Note: If there is a malfunction,
the warning lamp remains permanently on.
•
•
•
Deactivation of the alarm
usng the remote control
The alarm is disarmed when you
unlock the vehicle (with a press on
button B on the remote control).
Deactivation of the alarm
with the key
Unlock the doors with the key. The
siren triggers. Enter the vehicle,
insert the key in the ignition and
turn it to the drive position to stop
the siren. Otherwise the siren will
continue for approximately 30 seconds.
Page 30

26
II
B
A
C
A N T I - I N T R U S I O N A L A R M
Operating the alarm
First make sure all the doors are
closed.
The alarm is armed by pressing
button C on the remote control.
With the alarm armed, the protections are active after 5 seconds
(perimeter) and 45 seconds (volumetric).
When the alarm is armed (on
standby), any intrusion will trigger
the siren for 30 seconds, accompanied by the direction indicators
lighting up.
The alarm then goes back on
standby. The triggering remains
memorised. The warning lamp on
button A ashes quickly when the
alarm is deactivated by pressing
the unlocking button B. This ashing stops when you switch on the
ignition.
Deactivating the volumetric
detection
You can operate the alarm with
perimeter protection only, by deactivating the volumetric protection (if
for example you wish to leave an
animal in the vehicle).
Deactivation of the
volumetric detection
Switch off the ignition.
Within 10 seconds, press button A
until the warning lamp remains on
permanently.
Exit the vehicle.
Lock or deadlock the vehicle with
the remote control locking button.
The light on button A ashes once
a second.
Note: It is recommended to deactivate the volumetric detection when
washing the vehicle in order to prevent the random triggering of the
alarm.
Automatic activation
(depending on country)
The alarm is armed automatically,
2 minutes after the last door, or the
boot, has been closed.
In order to prevent the alarm from
triggering when you open one of
the doors or the boot, it is essential to press the unlocking button B
again on the remote control.
The siren is also triggered if there
is a cutting of the electrical supply. To stop it, restore the electrical
supply then press on the unlocking
button B.
Note:
If you want to lock your vehicle
without arming the alarm, just
lock with the key only.
If you lock your vehicle and a
door, or the boot, is still open,
the central locking does not
operate but the alarm will arm
itself after approx. 45 seconds.
Note: The siren is automatically
deactivated (for example for disconnecting the battery) as soon as
the vehicle is unlocked using the
remote control.
•
•
Page 31
27
II
S T E E R I N G L O C K - I G N I T I O N - S TA R T E R
NEVER REMOVE THE IGNITION KEY BEFORE THE ENGINE
HAS COME TO A COMPLETE STOP.
IT IS ESSENTIAL ALWAYS TO DRIVE WITH THE ENGINE
RUNNING, SO AS TO RETAIN STEERING AND BRAKING
ASSISTANCE (risk of the steering lock engaging and loss of safety
features).
When stationary, having removed the key, carefully turn the steering
wheel if you wish to lock the steering.
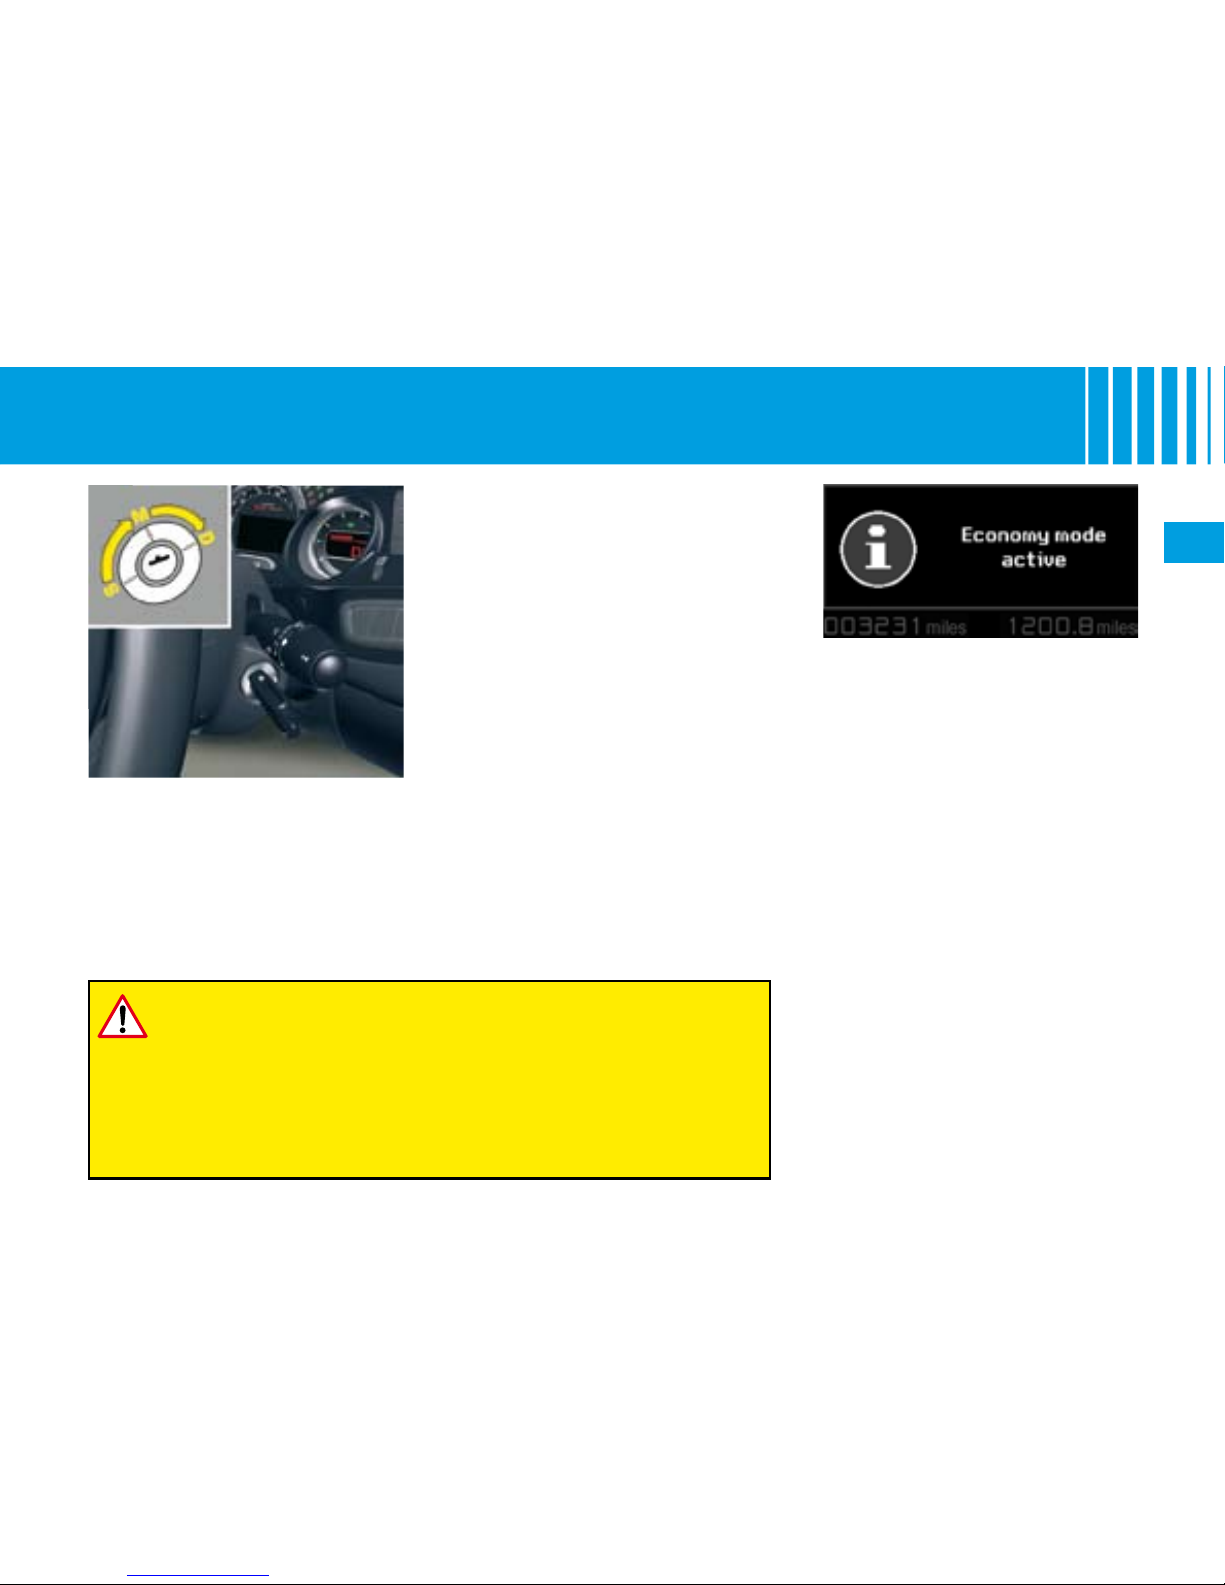
S: Steering lock
To unlock the steering, gently move
the steering wheel while turning the
key, without exerting undue force.
When you remove the key, turn
your steering wheel to lock the
steering. The key can only be
removed when in position S.
Economy mode
When the engine is stopped, some
functions (audio system, screen
wipe, electric windows, sunroof,
electric seats, telephone, video,
interior lighting etc.) are only
electrically supplied for a maximum
period of 30 minutes, to avoid
discharging the battery.
Once this period is over, a message
is displayed on the instrument panel
screen and the active functions are
placed on standby.
The electrical components relating
to comfort and also the headlamps
(not sidelamps or hazard warning
lamps) cut out automatically. To
reactivate them, it is necessary to
start the engine.
M: Drive position
The steering is unlocked (by turning the key in position M, if necessary move the steering wheel).
D: Starting
Release the key as soon as the
engine starts. Never turn it while
the engine is running.
Page 32
28
II
DO NOT RUN THE ENGINE IN A CLOSED SPACE OR IN ONE
THAT IS INSUFFICIENTLY VENTILATED.
Manual gearbox
Ensure that the gear lever is
in the neutral position.
Do not touch the accelerator.
For Diesel engines: Turn the
key to the drive position. Wait
for the preheater warning
lamp to go off, if this has
come on.
Turn the key to action the
starter (not for more than ten
seconds), until the engine
starts.
Note: In ambient temperatures
lower than 0°C, depress the clutch
while actioning the starter to facilitate starting. Then release the
clutch pedal slowly.
•
•
•
•
Automatic gearbox
Check that you are in position P.
Do not touch the accelerator.
For Diesel engines: Turn the
key to the drive position. Wait
for the preheater warning
lamp to go off, if this has
come on.
Turn the key to action the
starter (not for more than ten
seconds), until the engine
starts.
Note: Starting is possible in position N.
•
•
•
Advice
Diesel vehicles equipped
with a Turbo
Never stop the engine without hav-
ing rst allowed it to run at idle for
a few seconds, thus allowing the
turbo to return to normal speed.
Do not press the accelerator pedal
as the ignition is being switched
off. This could severely damage
the turbo unit.
S TA R T I N G
Note: If the engine does not start at the rst attempt, switch off the ignition.
Wait 10 seconds, then action the starter again as described above.
Page 33
29
II
1111G
C
F
A DB E
I N S T R U M E N T PA N E L
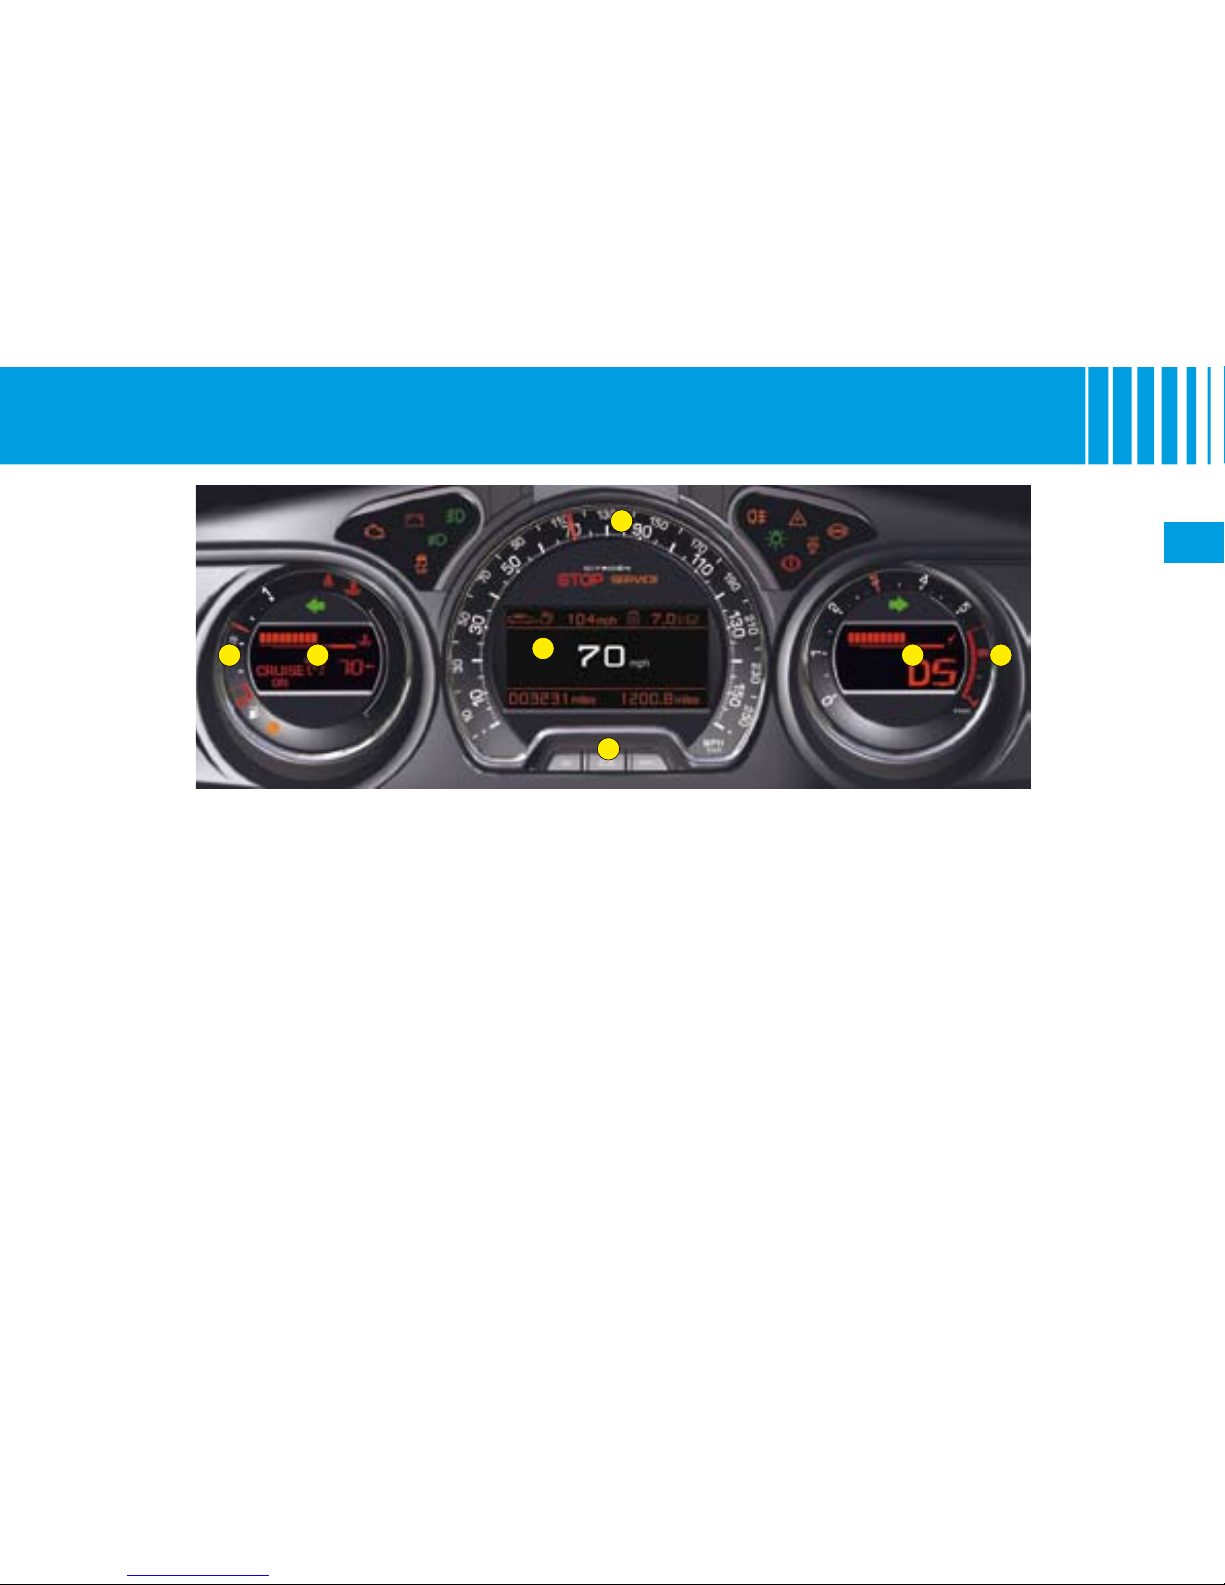
A Fuel gauge
B
Indicator:
Coolant temperature
Cruise control/Speed limiter information
C Speed indicator
D
Rev counter
E
Indicator:
Engine oil temperature
Gear selector position and gear engaged (Auto-
matic gearbox)
F
Controls:
Lighting rheostat
Resetting to zero of trip mileage computer and
maintenance indicator
•
•
•
•
•
•
G Instrument panel screen indicating:
Depending on the page selected with the left-hand
control knob on the steering wheel:
Digital speed
Trip computer
Navigation (guidance) information
Display of message alerts
Engine oil level check
Maintenance indicator
Permanently:
Trip mileage recorder
Total mileage recorder
•
-
-
-
-
-
-
•
-
-
Page 34
30
II
I N S T R U M E N T PA N E L
WA RN IN G LA MP S
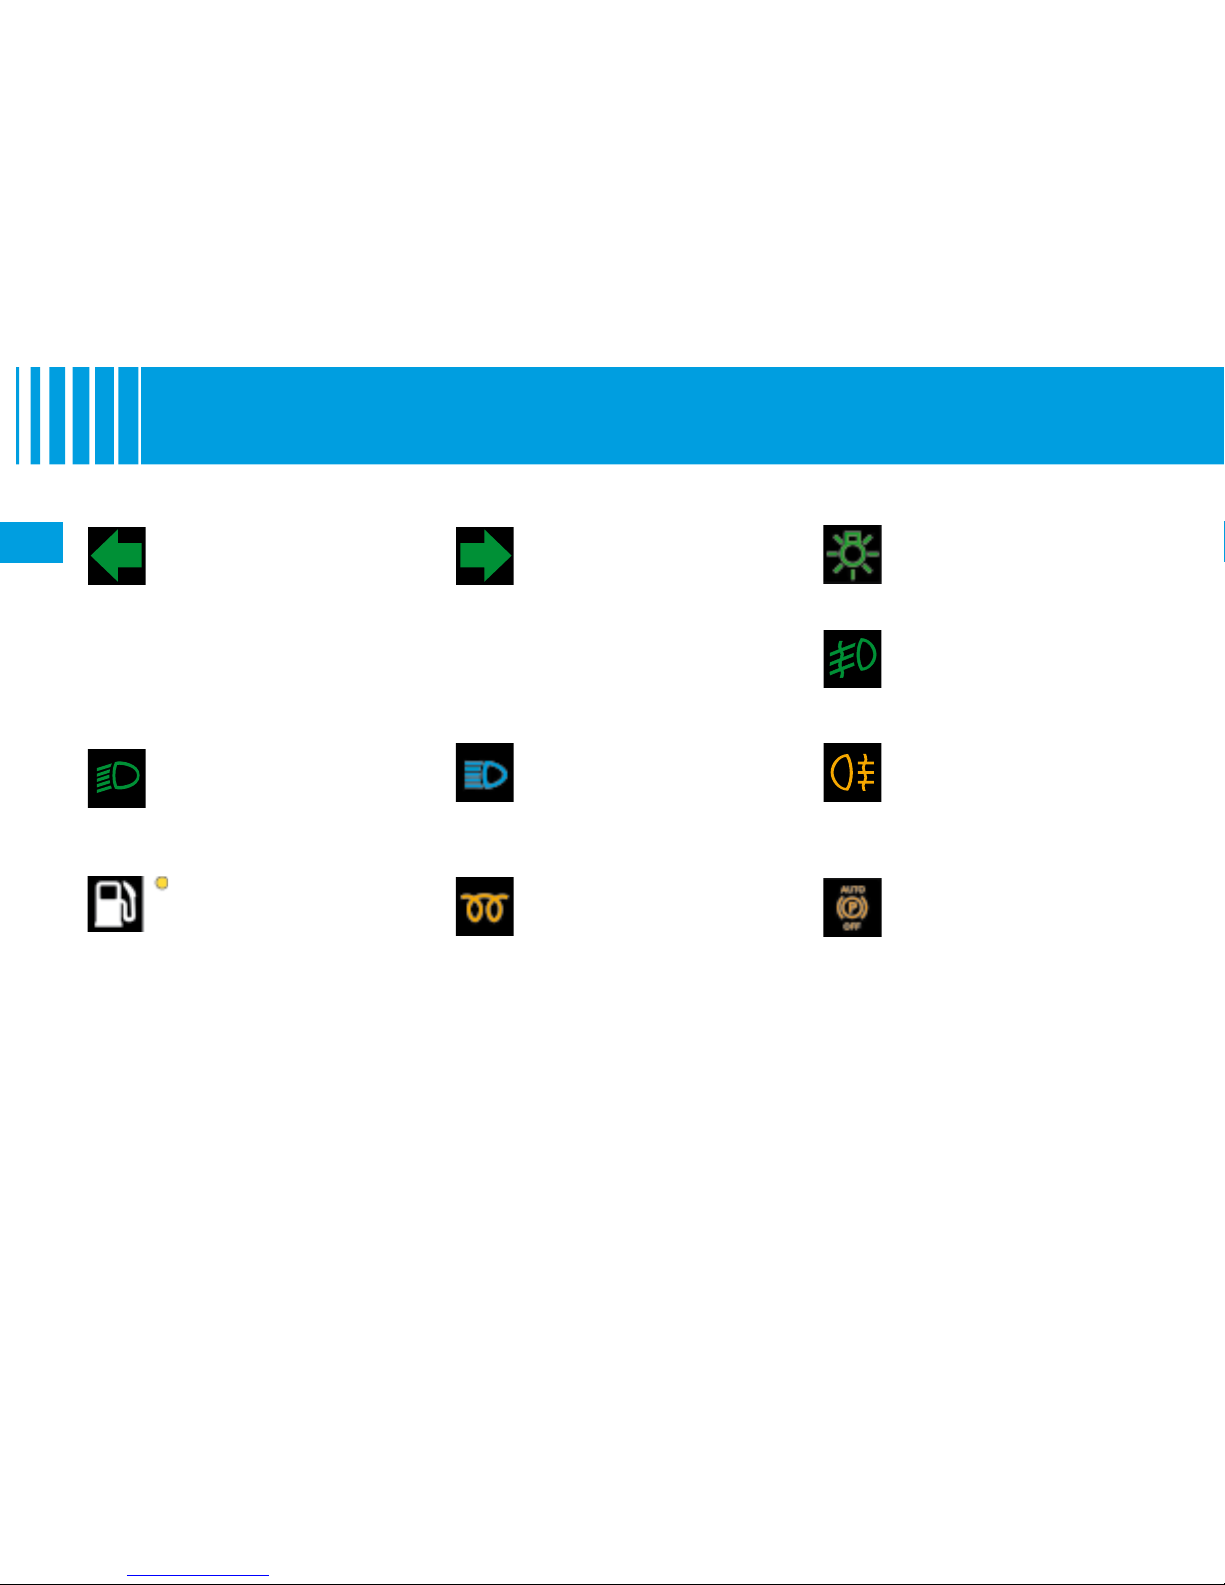
Left hand direction
indicator
See “Signalling”.
Right hand direction
indicator
See “Signalling”.
Sidelamps
See “Signalling”.
Front foglamps
See “Signalling”.
Dipped beams
See “Signalling”.
Foglamps (rear)
See “Signalling”.
Main beams
See “Signalling”.
All the direction indicators ash simultaneously when the hazard
warning lamps are switched on.
Indicator and headlamp warning lamps
Fuel low
In some driving conditions and depending on
the engine, the range
may be less than 50 kilometres
(approx. 30 miles).
See “Fuel”.
Diesel engine
preheater
See method for starting
the engine.
See “Starting”.
Electronic parking
brake - deactivation
of automatic
functions
This warning lamp comes on if the
“automatic locking” (upon switching off the ignition) and the “automatic unlocking” functions are
deactivated or faulty.
Page 35
31
II
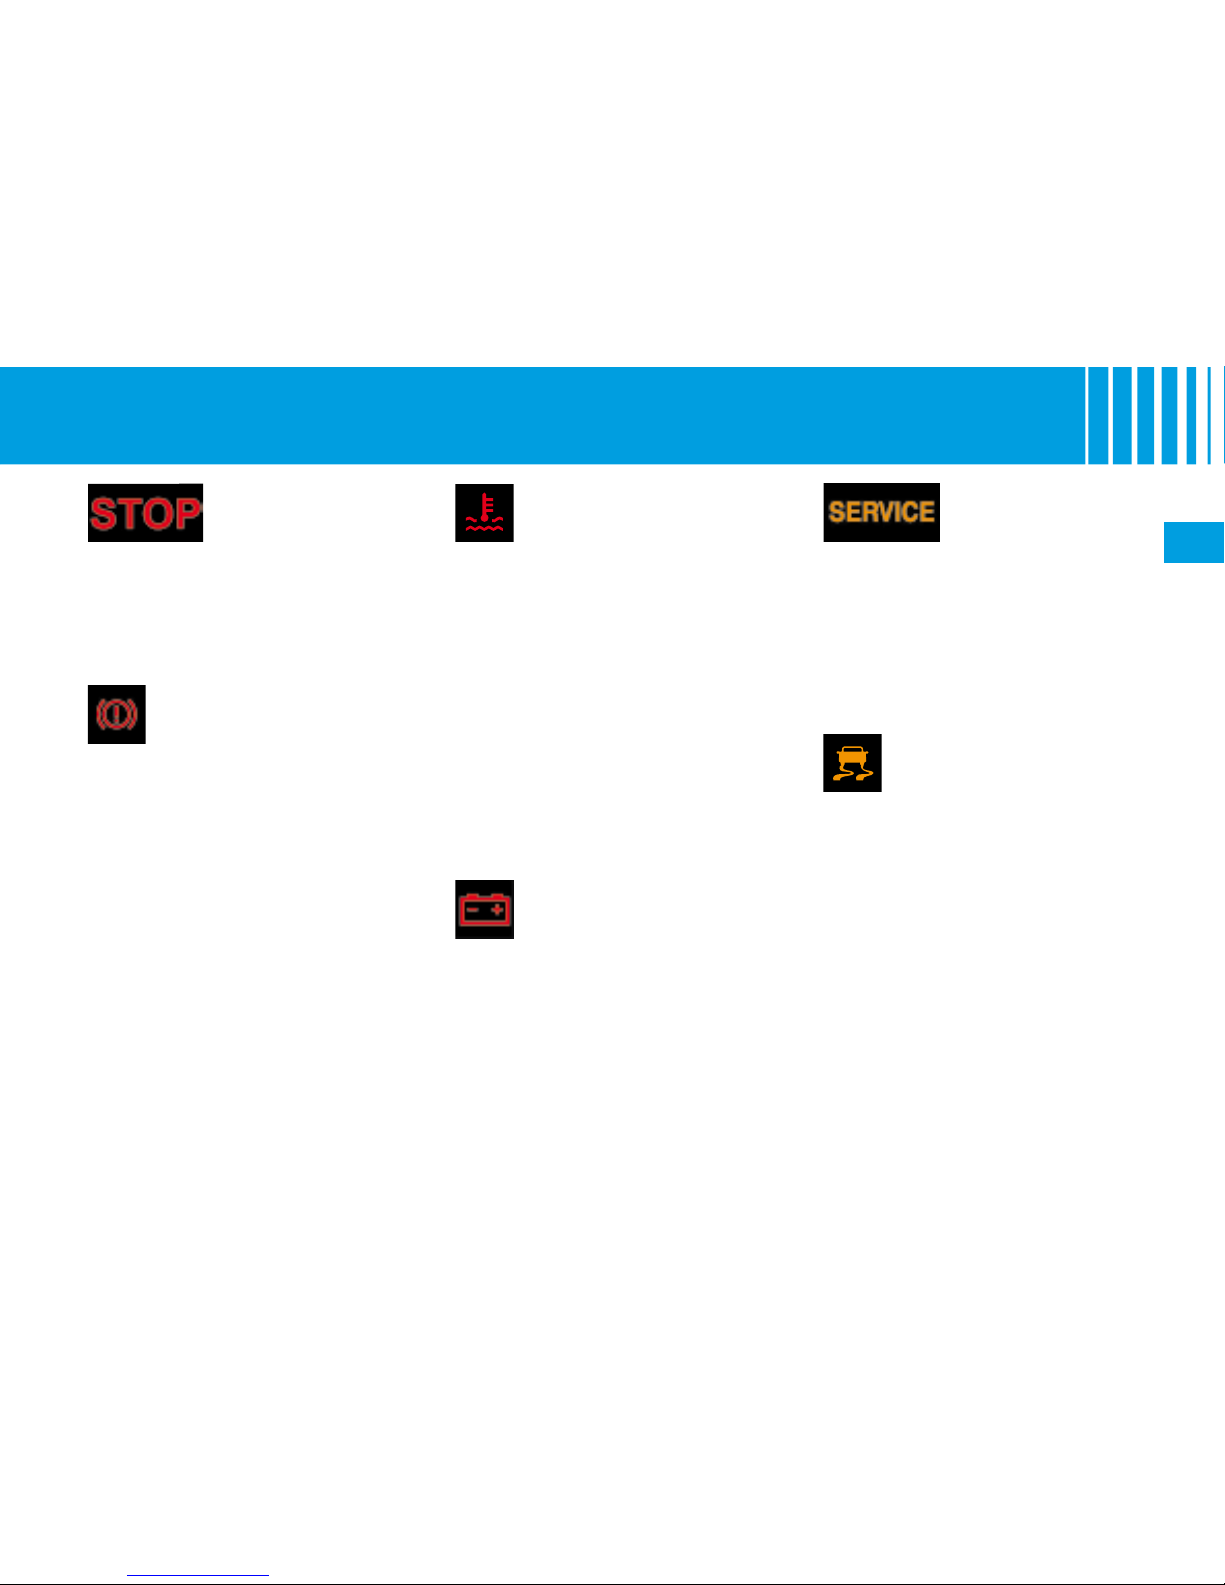
STOP warning
lamp
When the warning
lamp comes on,
you must stop the vehicle and
switch off the engine. Contact a
CITROËN dealer.
Parking brake
The permanent lighting of
this warning lamp conrms
that the parking brake is
applied.
If this warning lamp ashes, it indi-
cates a fault with its application
or release. Consult a CITROËN
dealer as soon as possible.
See “Brakes”.
With the engine running, and
when displayed at the same time
as the STOP warning lamp, it indi-
cates that the brake uid level is
too low.
If this warning lamp comes on,
stop immediately and contact
a CITROËN dealer.
See “Brakes”.
Battery charge
This warning lamp comes
on temporarily when the
engine is switched on. If it
remains on permanently,
contact a CITROËN dealer.
In the event of a battery failure,
the application of the electronic
parking brake when the engine
is switched off is not guaranteed.
You must therefore apply the
parking brake before switching
off the engine.
I N S T R U M E N T PA N E L
WA RN IN G LA MP S
SERVICE
This warning lamp
remains on perma-
nently, as long as
the fault displayed on the instrument panel screen is present (for
serious faults).
Consult a CITROËN dealer as
soon as possible.
This warning lamp remains on
only for a short time for faults that
are minor.
Contact a CITROËN dealer.
ESP/ASR
Operating
If either of the ESP or ASR
systems is active, the warning
lamp ashes.
For a malfunction
With the engine running, the lighting of this warning lamp along
with a message on the instrument
panel screen, the lighting of the
SERVICE warning lamp and a
sound signal, indicates a system
fault.
Contact a CITROËN dealer.
Deactivation
The lighting of this warning lamp
and the light on the ESP deactivation button conrms that the system is deactivated.
See “Dynamic stability control”
(ESP).
Coolant temperature
It comes on for a few seconds each time you switch
on the ignition.
If this warning lamp comes on,
engine running, it tells you that
the coolant temperature is rising
abnormally.
This warning lamp is linked with
the STOP warning lamp.
It is essential to stop the vehicle.
Check the coolant level.
If the level is too low, contact
a CITROËN dealer.
Page 36
32
II
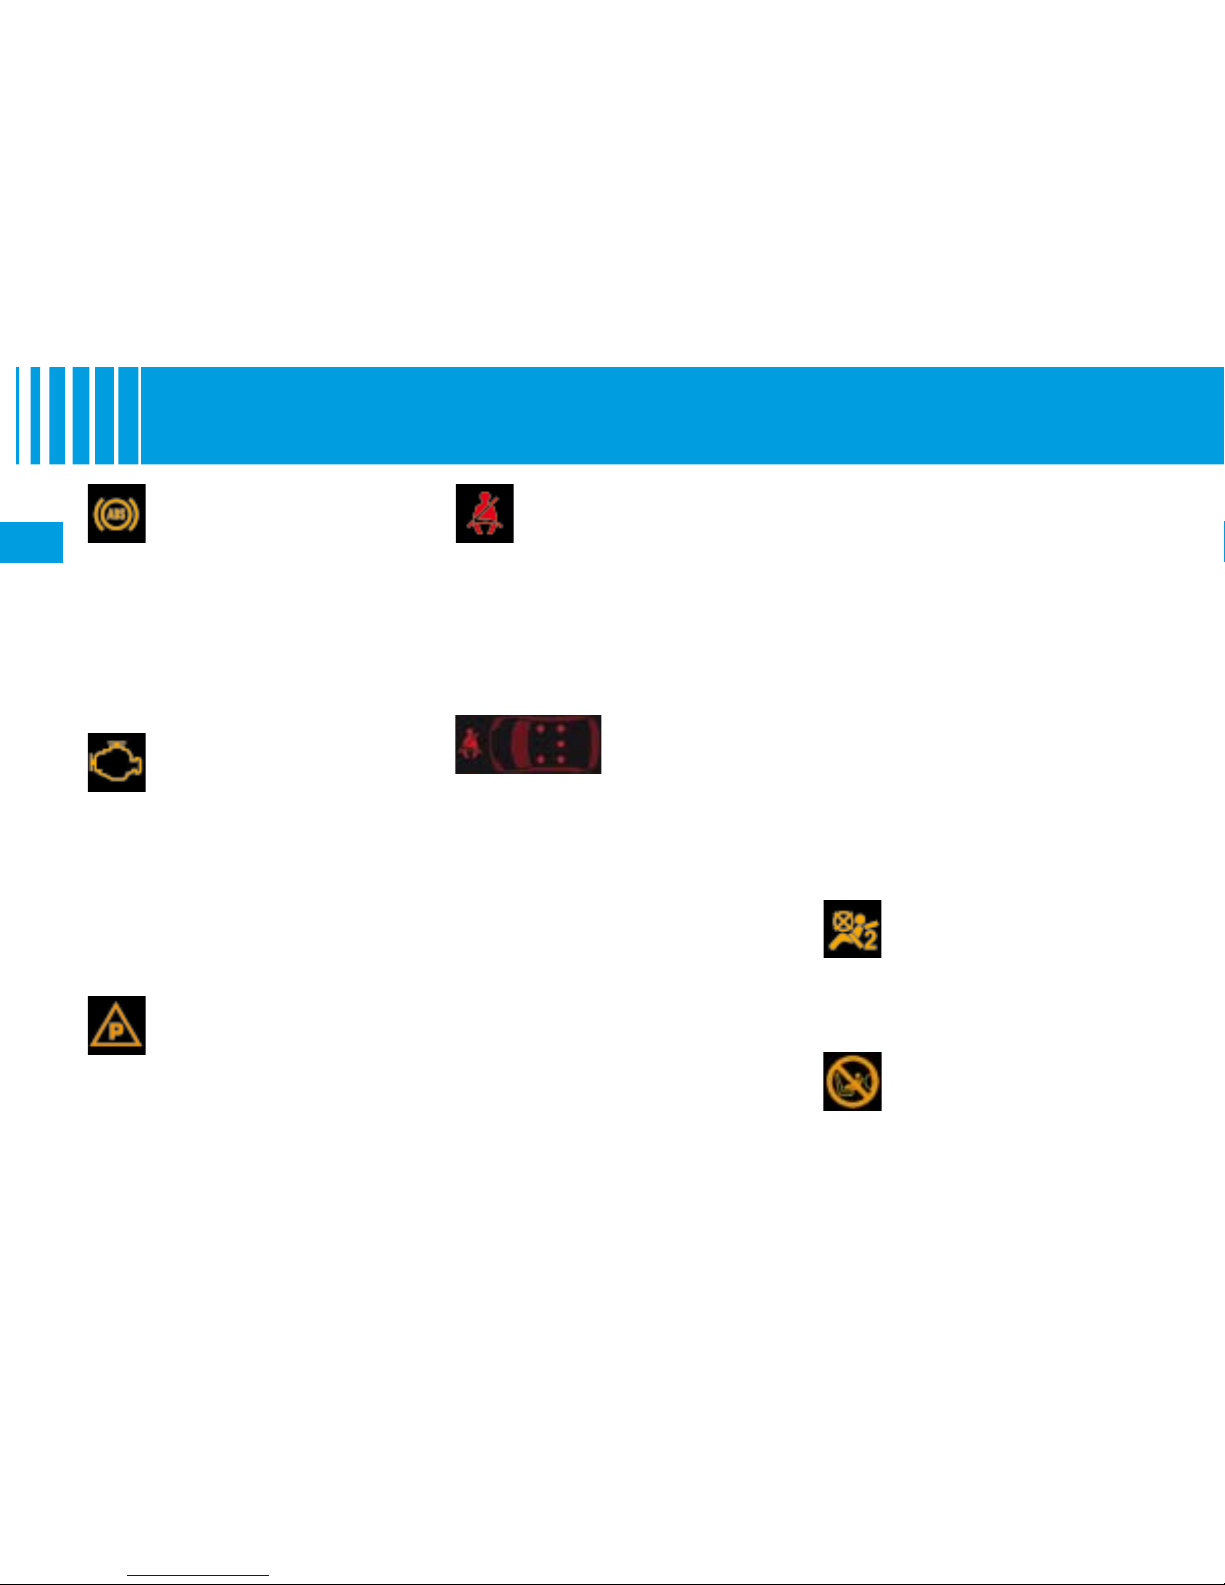
Front passenger's
airbag deactivation
warning lamp
See “Airbags”.
I N S T R U M E N T PA N E L
WA RN IN G LA MP S
Front passenger's
airbag activation
warning lamp
See “Airbags”.
Seat belt not
fastened
This warning
lamp is located
on the roof console, in front of the
front interior lamp. It informs you
of the driver and passenger seat
belts which are not fastened.
The lit up locations represent the
seat positions which are not fastened.
Driver's seat belt not fastened:
The warning lamp lights up
from 0 to 20 km/h (12 mph).
Over 20 km/h (12 mph):
the warning lamp ashes,
a beep is repeated for about
2 minutes with 3 progressive
loudness levels.
•
•
-
-
Front and rear passengers seat
belt not fastened:
When the ignition is switched
on, the locations corresponding
to the seat positions which are
not fastened remain lit up permanently for 30 seconds.
Seat belts unfastened whilst driving:
The location corresponding to
the seat position unfastened
lights up from 0 to 20 km/h
(12 mph).
Over 20 km/h (12 mph):
the warning lamp corresponding to the seat position unfas-
tened ashes,
a beep is repeated for about
2 minutes with 3 progressive
loudness levels. The beeping
stops when the seat belt is
re-fastened or when a door is
opened when the vehicle has
stopped.
•
•
•
-
-
Seat belt not fastened
(instrument panel)
This warning lamp lights
up on the instrument panel
to remind the driver and all passengers that they must fasten their
seat belt. It is linked to the seat
belt information given by the roof
console (see below).
ABS
The ABS warning lamp
lights up when you switch
on the ignition: it should go
out after a few seconds. If it does
not go out, there could be a system malfunction.
See “Brakes”.
Electronic parking
brake fault
This warning lamp comes
on if there is a fault with
the electronic parking brake.
Contact a CITROËN dealer.
Depollution system
If the warning lamp ashes
or comes on whilst driving,
it indicates a problem with
the operation of the depollution system.
Consult a CITROËN dealer as
soon as possible.
Page 37
33
II
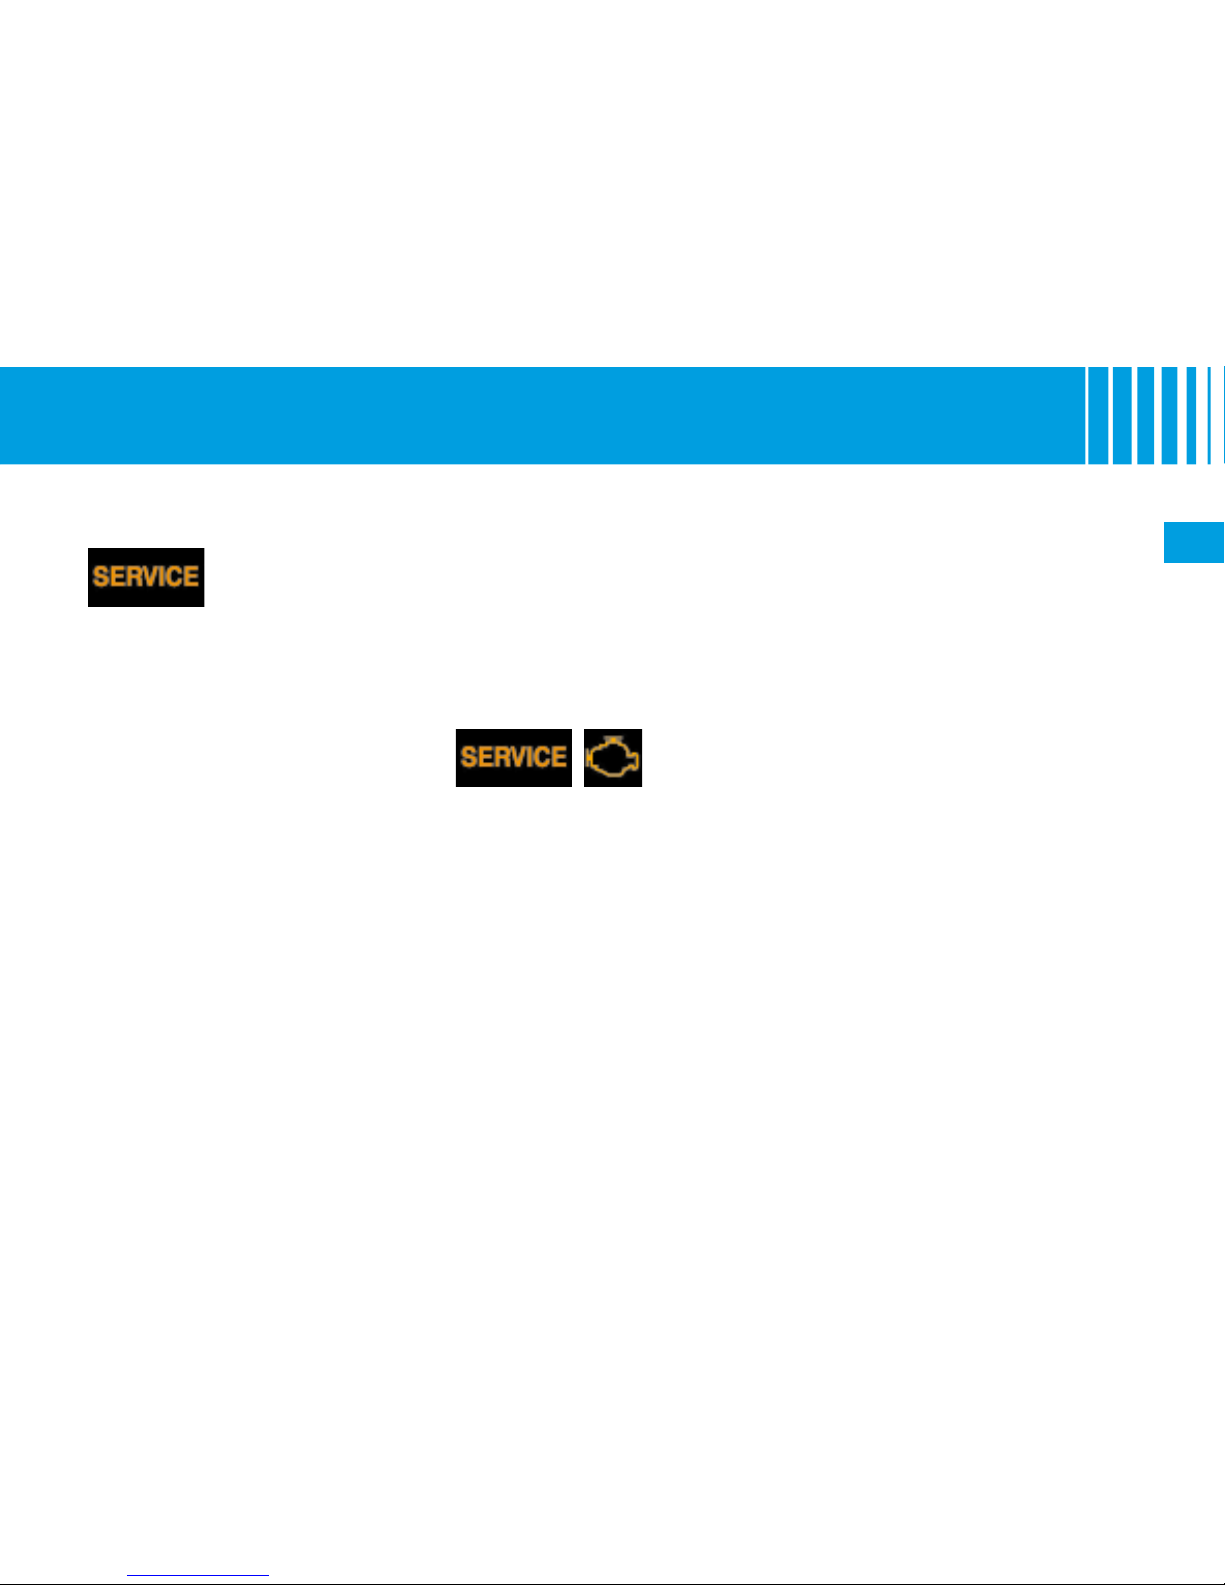
The simultaneous lighting of the
SERVICE warning lamp and the
display of the message “Particle
lter (FAP) additive level too low”
on the instrument panel screen
indicates that the additive needs to
be topped up.
Contact a CITROËN dealer as
soon as possible.
I N S T R U M E N T PA N E L
PA R TI CL E FI LT E R
In addition to the catalytic converter, this lter contributes actively to the preserving of air quality, by collecting the
polluting particles that have not been burnt off. Black exhaust fumes are thus eliminated.
Clogging of the
particle lter
Clogging is caused by the particle
lter starting to be saturated (owing
to exceptionally long periods spent
driving in urban conditions : low
speeds, trafc jams, etc.).
In order to regenerate the lter you
are advised to drive as soon as pos-
sible, when trafc conditions allow,
at a speed of 60 km/h (approx.
37 mph) or more for at least 5 minutes. If the problem persists, contact a CITROËN dealer.
Note: If the vehicle has been running for long periods at very low
speeds or at idle, vapour emissions may be seen coming from
the exhaust under acceleration.
These have no consequences for
the running of the vehicle or for the
environment.
DIESEL
additive
level
The simultaneous lighting of the
SERVICE warning lamp and the
display of the message “Risk of
saturation of particle lter (FAP)”
on the instrument panel screen
indicates an increased risk of saturation.
Contact a CITROËN dealer as
soon as possible.
Page 38
34
II
B
C
A
Range
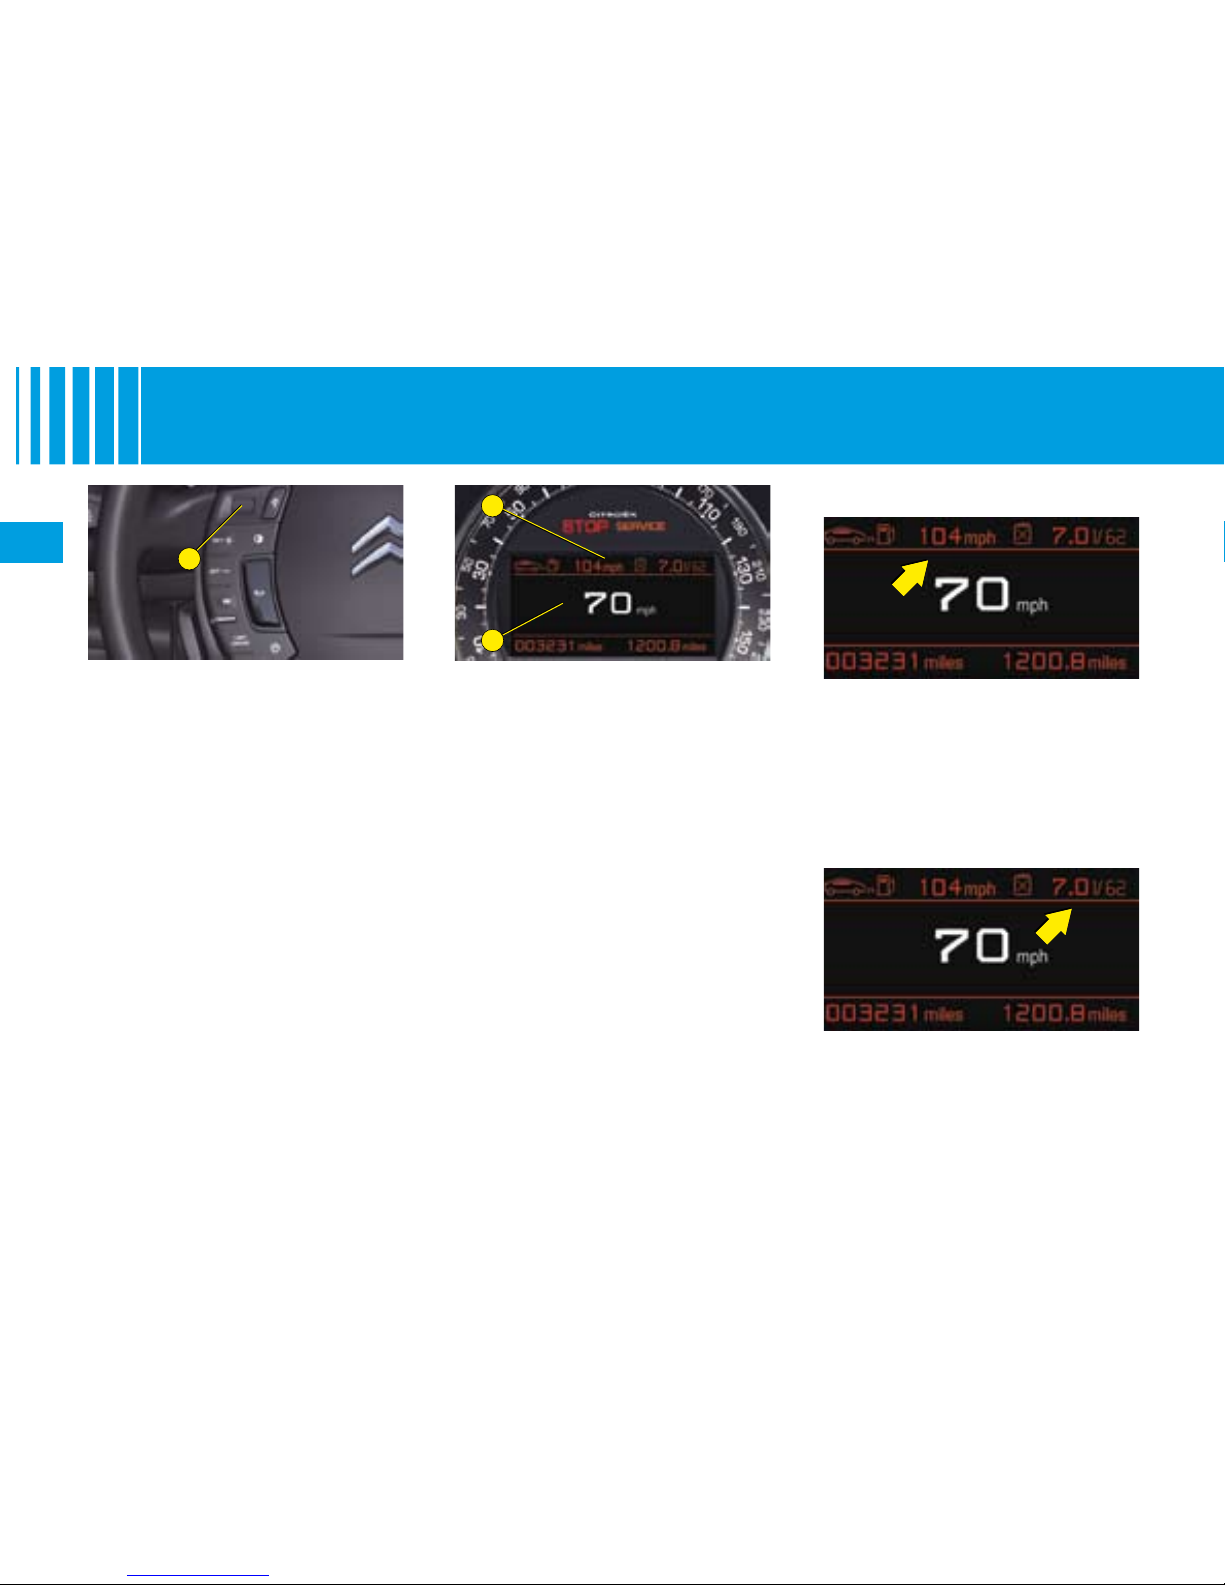
This is the distance that can still
be travelled on the amount of fuel
remaining in the tank.
When the range is lower than
30 km (19 miles), only four dashes
are displayed.
Instantaneous consumption
This is the result from the consumption recorded within the last
2 seconds. This function is only
available when travelling at over
30 km/h.
Instantaneous information
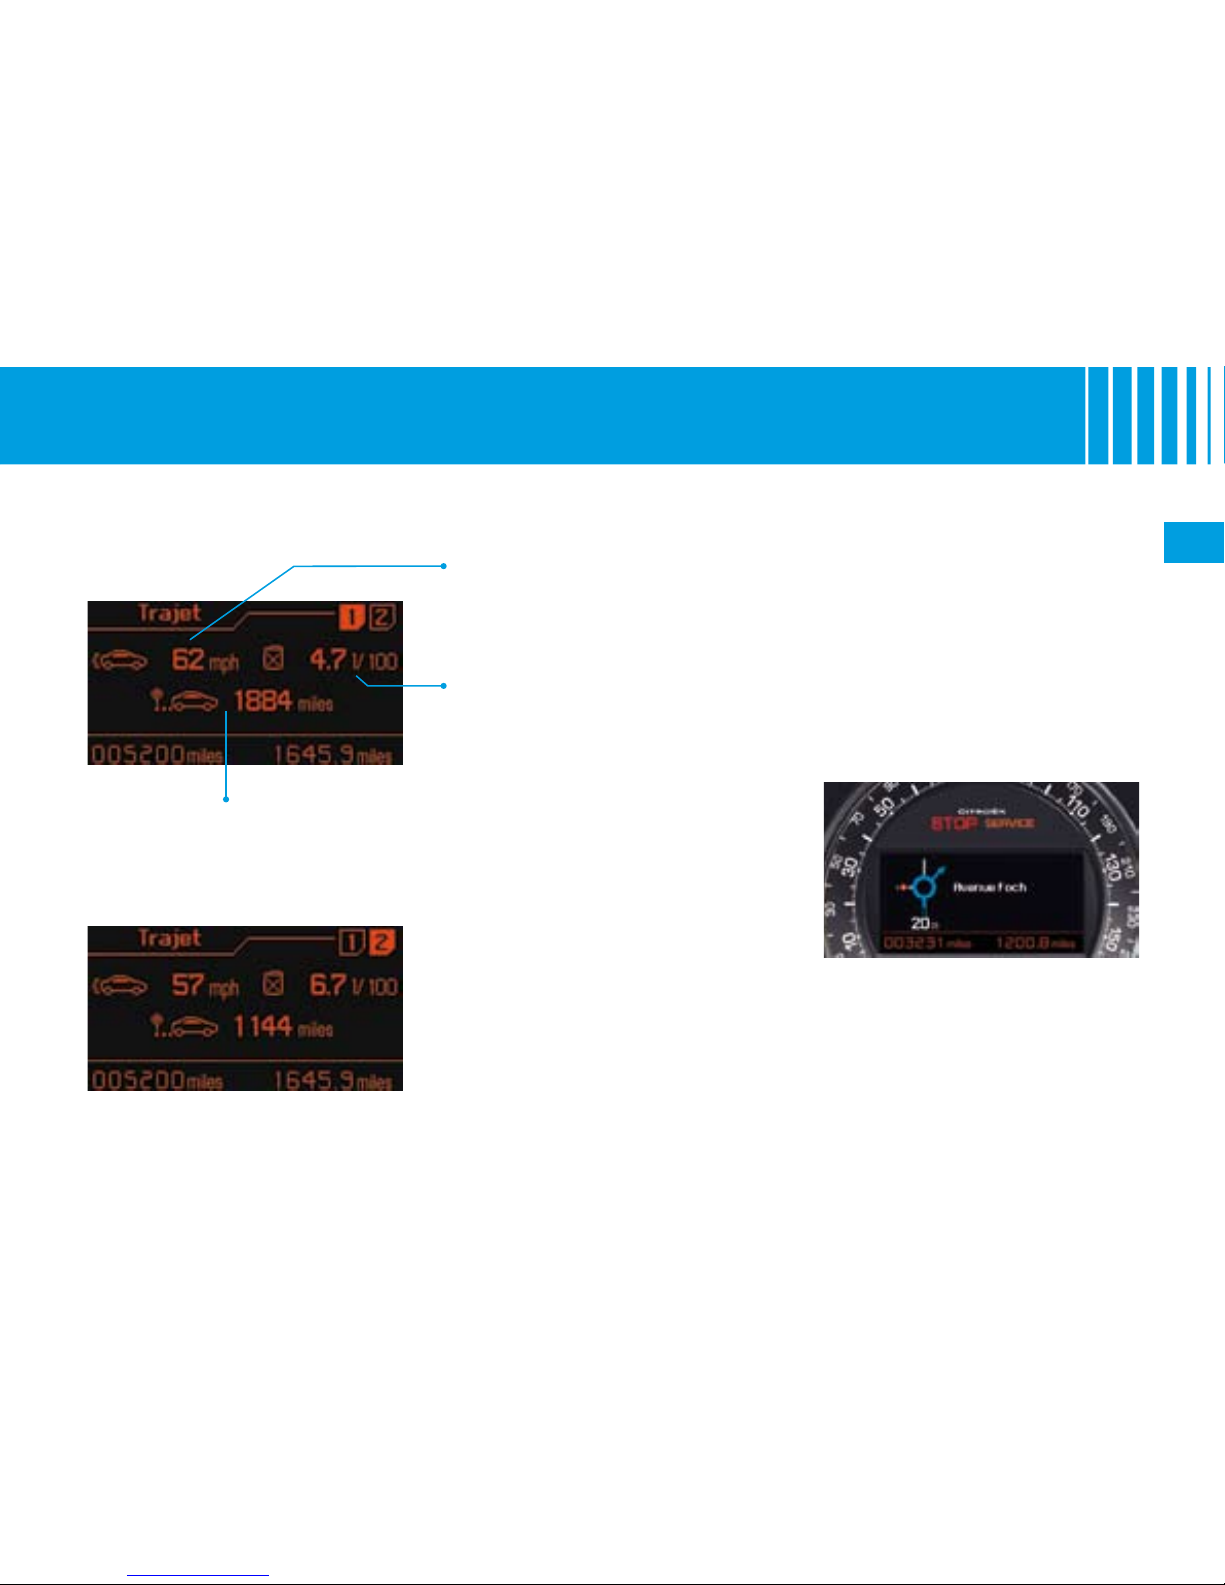
OPERATION
The trip computer is displayed on
the instrument panel screen. It
gives you access to:
2 types of instantaneous
information:
Range.
Instantaneous consumption.
This information can be displayed in zone B of the instrument panel screen when you
switch the ignition on, immediately after the display of oil level
and/or maintenance information.
The different information to be
displayed is selected by rotating the control knob A.
•
-
-
I N S T R U M E N T PA N E L
T R I P C O M P U T E R
3 types of information for
two journeys 1 and 2:
Average speed.
Average consumption.
The distance travelled.
This information is displayed in
zone C of the instrument panel
by rotating the control knob A.
•
-
-
-
Page 39
35
II
I N S T R U M E N T PA N E L
T R I P C O M P U T E R / N AV IG AT IO N
Distance travelled
This is the distance that has been
travelled since the last reset to zero
of the journey selected.
Journeys
Journeys 1 and 2 are independent
of each other but identical in use.
They allow you, for example, to
assign journey 1 for daily calculations and journey 2 for monthly calculations.
Reset a journey to zero
When the required journey is displayed, make a long press on the
left-hand control knob A on the
steering wheel.
A second rotation of control knob
A
allows you to display the information
for journey 2.
Average speed
This is calculated (since the last
reset to zero of the trip computer)
by dividing the distance travelled
by the time taken (with the engine
running).
Average consumption
This is the relationship between
the fuel consumed and the distance travelled since the last reset
to zero of the selected journey.
Information for two journeys 1 and 2
A rst rotation of control knob A on the steering wheel allows you to display
the information for journey 1.
Return to the main
instrument panel screen
display
Successive rotations of the control
knob A on the steering wheel allow
you to return to the main instrument panel screen display (vehicle
speed), via the navigation information screen, then the screen
displaying only the total mileage
and the trip mileage (bottom of
screen).
Display of navigation
information on instrument
panel screen
You can display navigation information on the instrument panel
screen by rotating the left-hand
knob A on the steering wheel.
Page 40
36
II
A
I N S T R U M E N T PA N E L
C H E CK S / OI L L EV EL
Engine oil level indicator
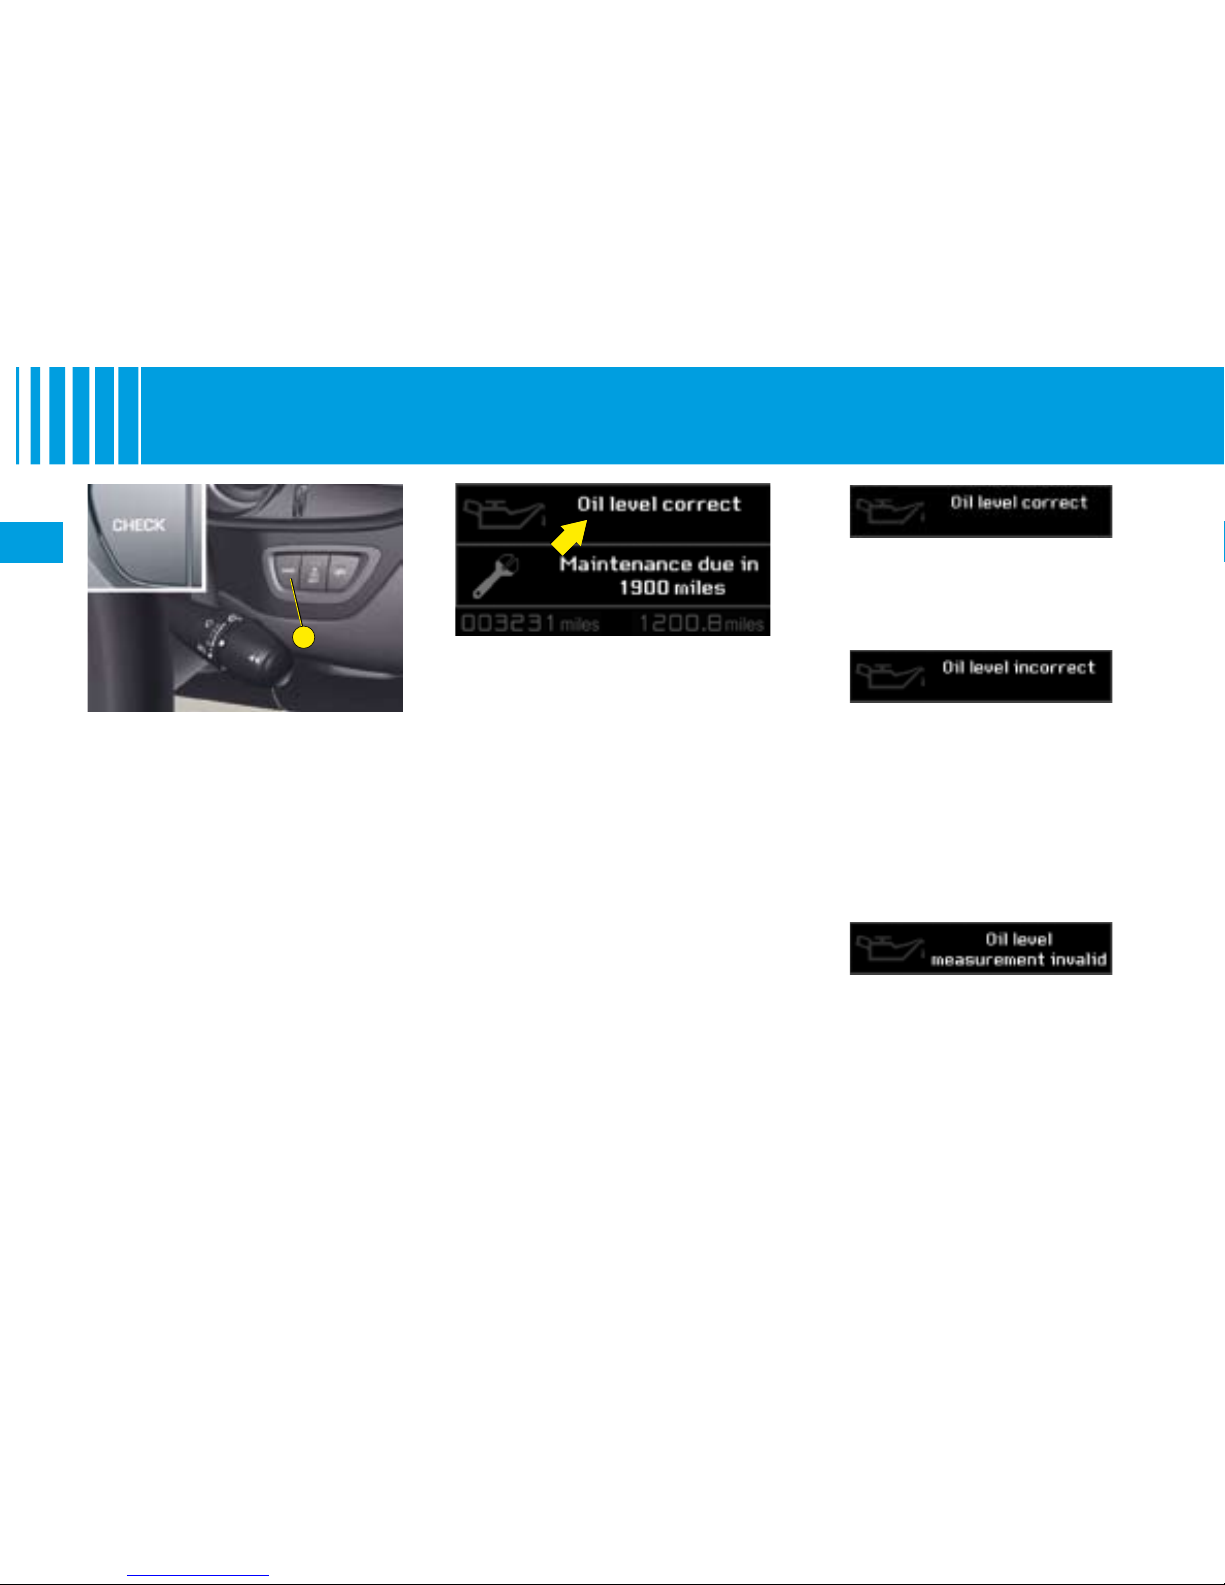
When you switch the ignition on,
the engine oil check is displayed
for a few seconds on the instrument panel screen.
Note: to ensure that this measurement is accurate, check the oil
level on horizontal ground after the
engine has been switched off for
at least 15 minutes. An incorrect
engine oil level can seriously damage your engine.
“Oil level incorrect” indicates that
the oil level is too low.
Check using the manual dipstick.
See “Levels”.
If, after topping up, the message
re-appears, contact a CITROËN
dealer.
“Oil level measurement invalid”
indicates a malfunctioning of the
indicator.
Contact a CITROËN dealer.
“Oil level correct” indicates normal operating.
Log of alerts
This function allows you to display
the log of alerts.
Press on button A. The following
messages appear consecutively
on the instrument panel screen:
Tyre pressure check.
Maintenance indicator
reminder.
Display of message alerts.
Oil level check.
•
•
•
•
Page 41
37
II
Maintenance indicator
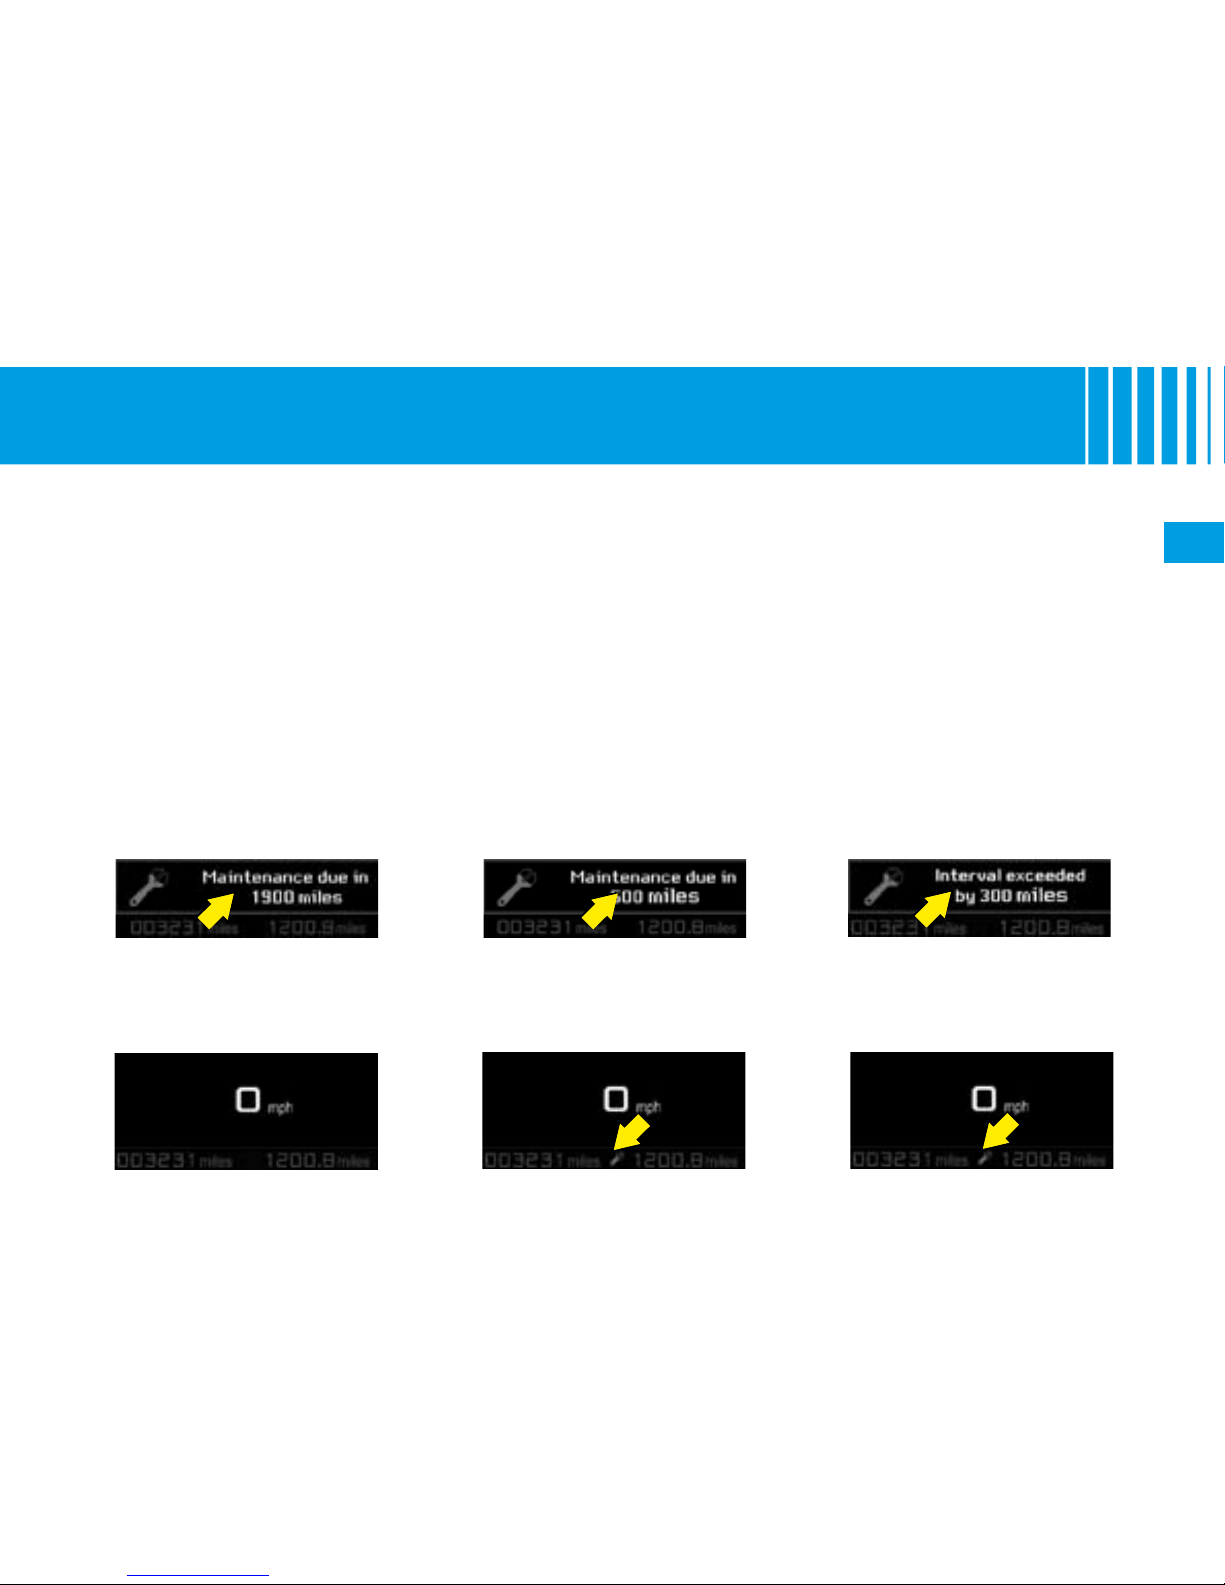
It informs you when the next routine service is due in accordance with the vehicle servicing schedule in the Maintenance Guide. This information is dependent on two parameters: the mileage covered, and the time elapsed since
the last visit
Functioning if the distance to
the next service is less than
3000 km (approx. 1900 miles)
When switching on the ignition,
a message is displayed on the
instrument panel screen for a
few seconds. It indicates to you the
remaining distance before the next
service.
Example: there remain up to the
next service: 1900 miles.
A few seconds after the ignition is
switched on, the message disappears.
Functioning if the distance to
the next service is less than
1000 km (approx. 600 miles)
When switching on the ignition,
a message is displayed on the
instrument panel screen for a few
seconds. It indicates to you the
remaining distance before the next
service.
Example: there remain up to the
next service: 500 miles.
A few seconds after the ignition is
switched on, the message disappears, then the maintenance symbol (spanner) remains lit.
Operation if the service
interval has been passed
When switching on the ignition,
a message is displayed on the
instrument panel screen for a
few seconds. It indicates to you
that the service interval has been
exceeded.
The routine service on your vehicle
needs to be carried out as soon as
possible.
A few seconds after the ignition is
switched on, the message disappears, then the maintenance symbol (spanner) remains lit.
I N S T R U M E N T PA N E L
M A I NT EN AN CE I ND IC AT OR
Page 42
38
II
A
Resetting to zero of the maintenance indicator
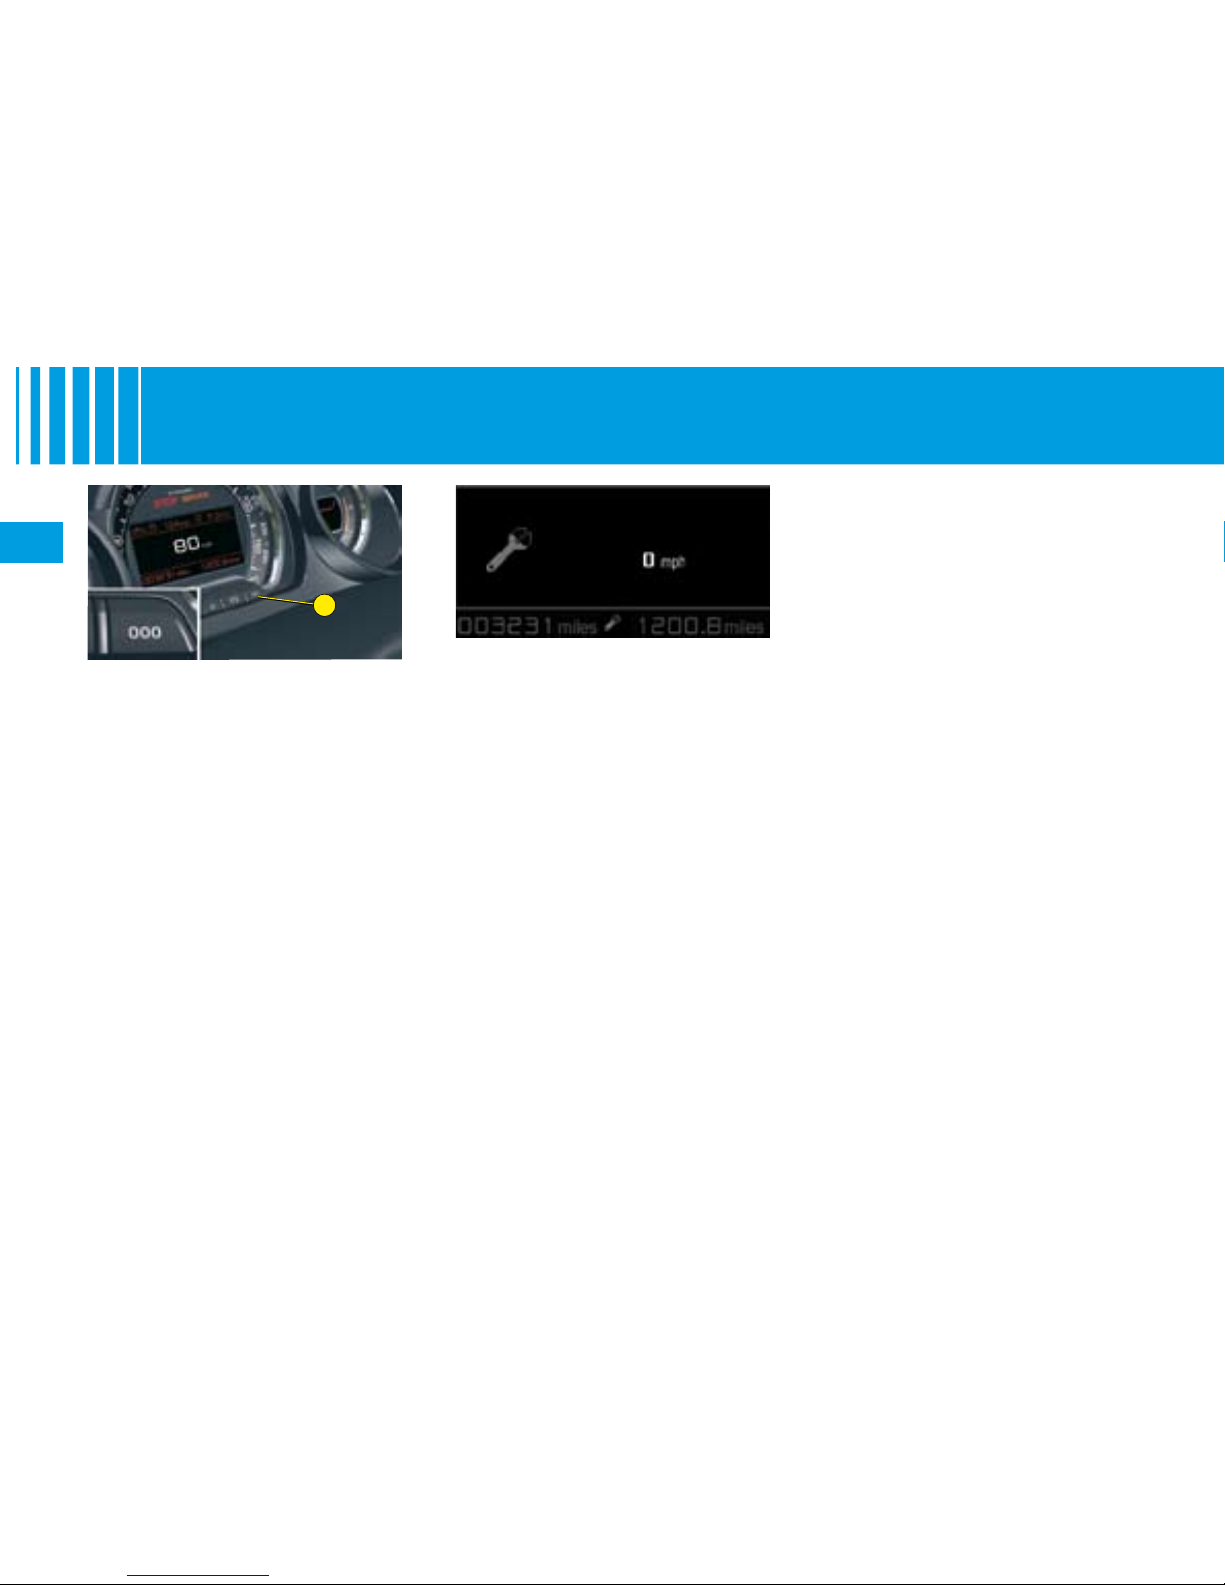
If you are carrying out the service yourself, the procedure for resetting to
zero is as follows:
Swicth off the ignition, then move the key to position
S, anti-theft.
Press on button
A and keep it pressed.
Switch on the ignition. The instrument panel screen counts down from
10 to 0 and displays the maintenance symbol.
Hold down button
A until the zero appears and the maintenance symbol
disappears.
Switch off the ignition.
•
•
•
•
•
I N S T R U M E N T PA N E L
M A I NT EN AN CE I ND IC AT OR
Page 43
39
II
B
A
I N S T R U M E N T PA N E L
M A I N ME NU
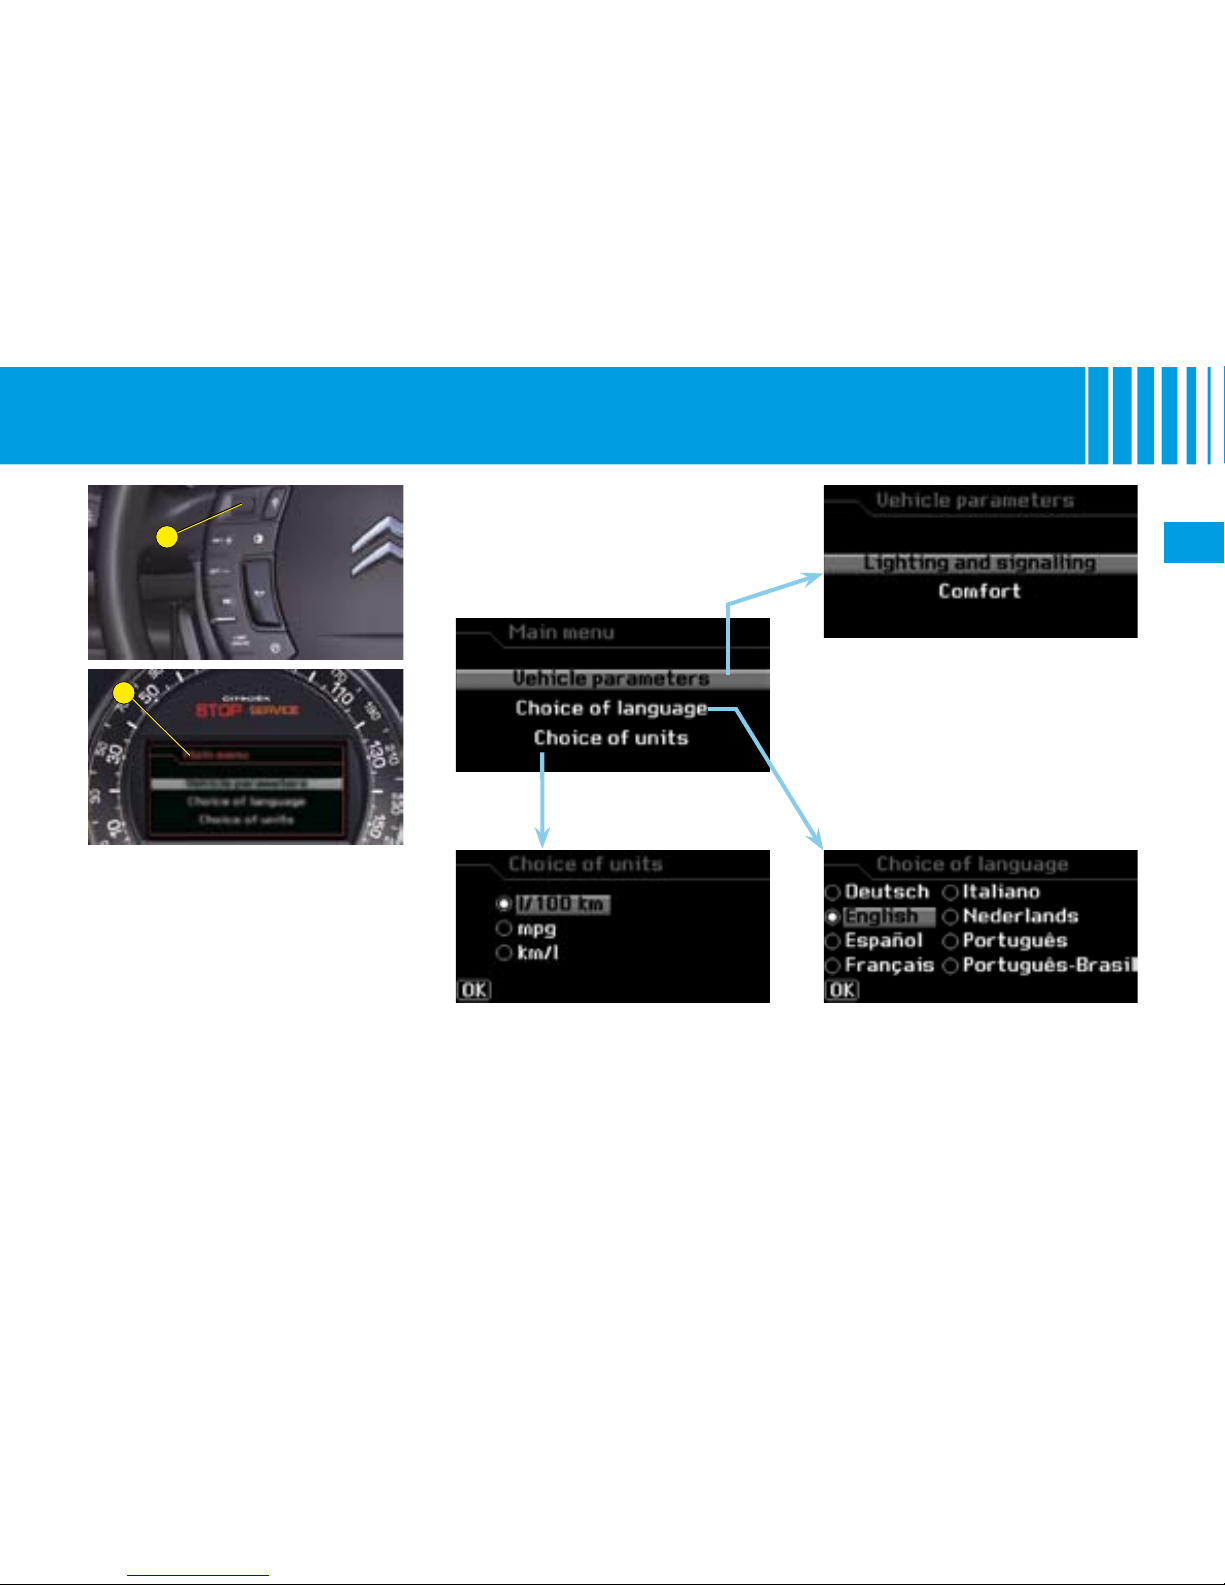
“Vehicle parameters” menu
This allows you to access the
parameters relating to:
The vehicle lighting.
The comfort levels in the vehi-
cle.
See “Instrument panel - Vehicle
parameters”.
•
•
“Choice of units” menu
This allows you to choose metric or
imperial units.
The main menu allows you to programme certain vehicle and instrument panel functions:
The instrument panel
B is located
in the centre of the dashboard.
With the vehicle stationary, you
can access the main menu of the
instrument panel by quickly pressing on the left-hand rotating control A on the steering wheel.
Note: The message “Action
impossible whilst driving” is dis-
played on the instrument panel
if you try to open the main menu
whilst driving.
“Choice of language” menu
This allows you to choose the
display and voice recognition language.
Page 44
40
II
I N S T R U M E N T PA N E L
V E H IC LE PA R A M ET E R S
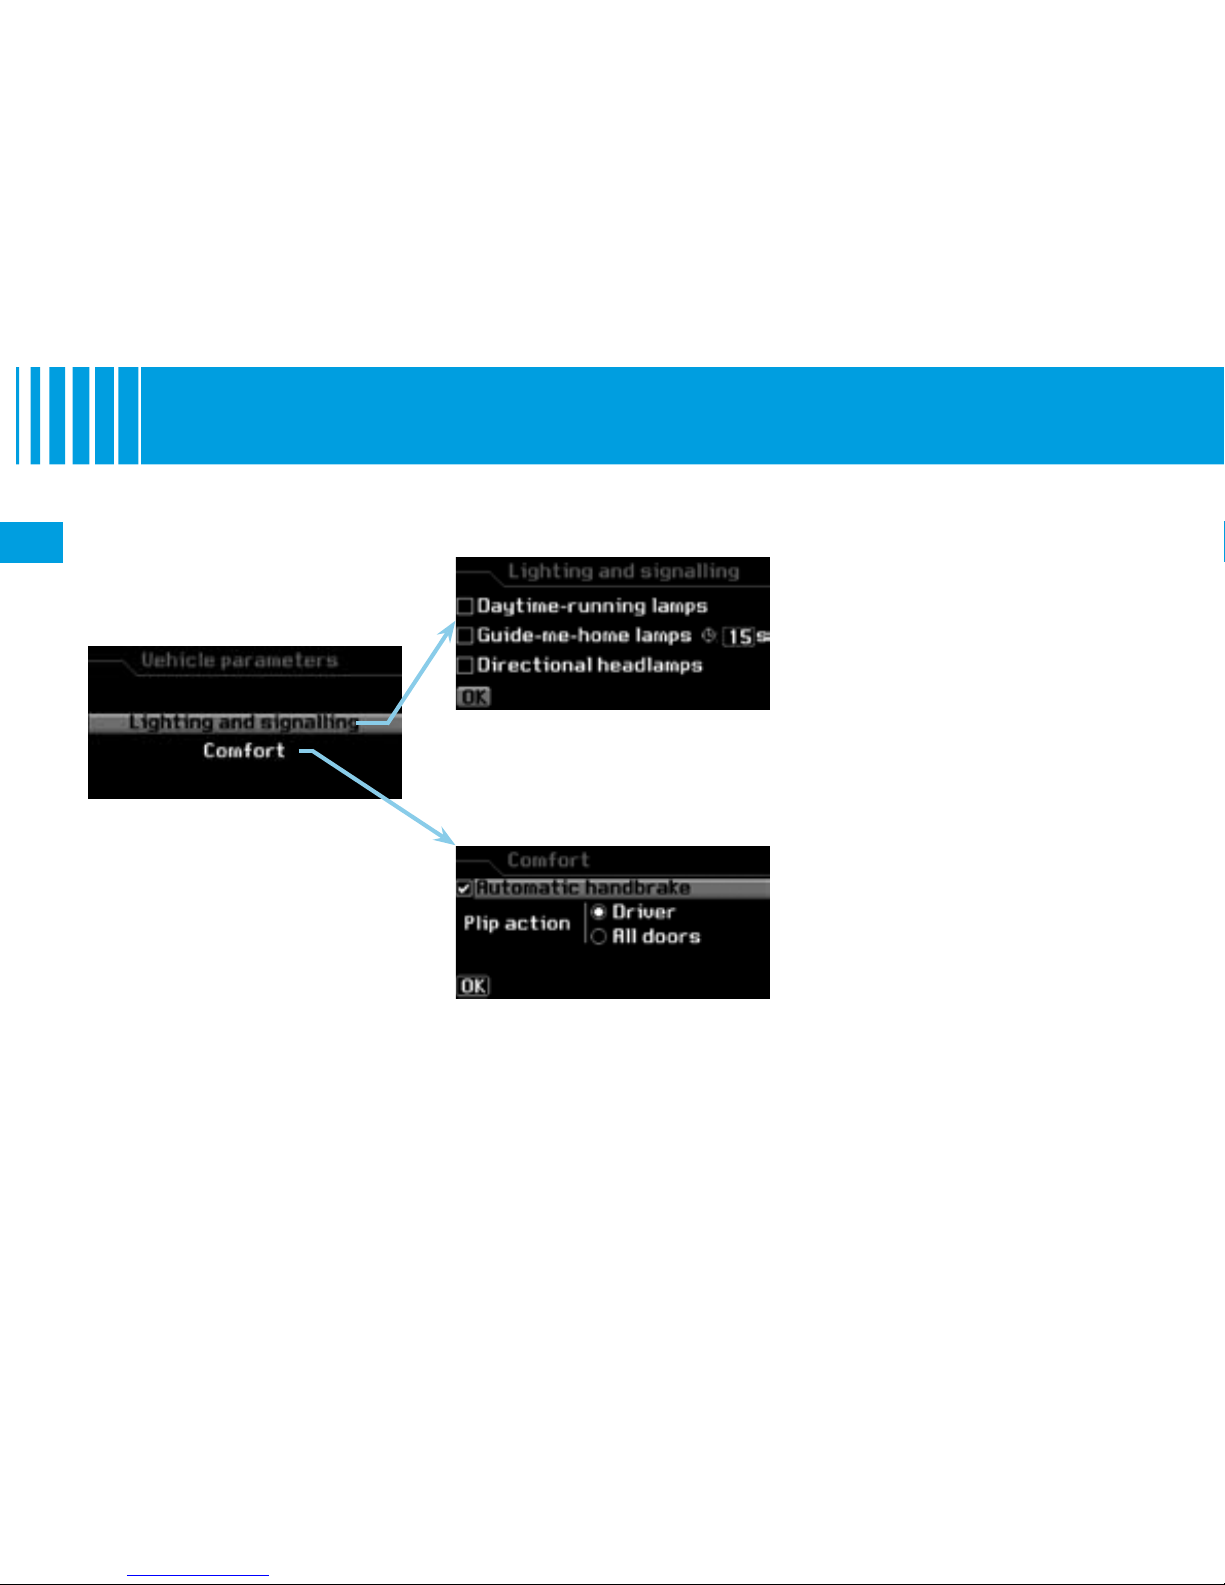
“Vehicle parameters” menu
This menu can be accessed from
the instrument panel “Main menu”.
It allows you to set the lighting and
comfort settings for your vehicle.
“Lighting” menu
Once you have selected this menu,
you can:
Activate/deactivate the lighting
of the daytime-running lamps*.
Activate/deactivate the guideme-home lighting and adjust its
duration.
Activate/deactivate the dualfunction Xenon directional
headlamps.
•
•
•
“Comfort” menu
Once you have selected this menu,
you can:
Activate/deactivate the driver's
welcome lighting function.
Select the unlocking of all the
doors or just the driver's door.
Activate/deactivate the automatic engaging of the electric
parking brake.
•
•
•
* Depending on country.
Page 45
41
II
A
2
1 2
1
I N S T R U M E N T PA N E L
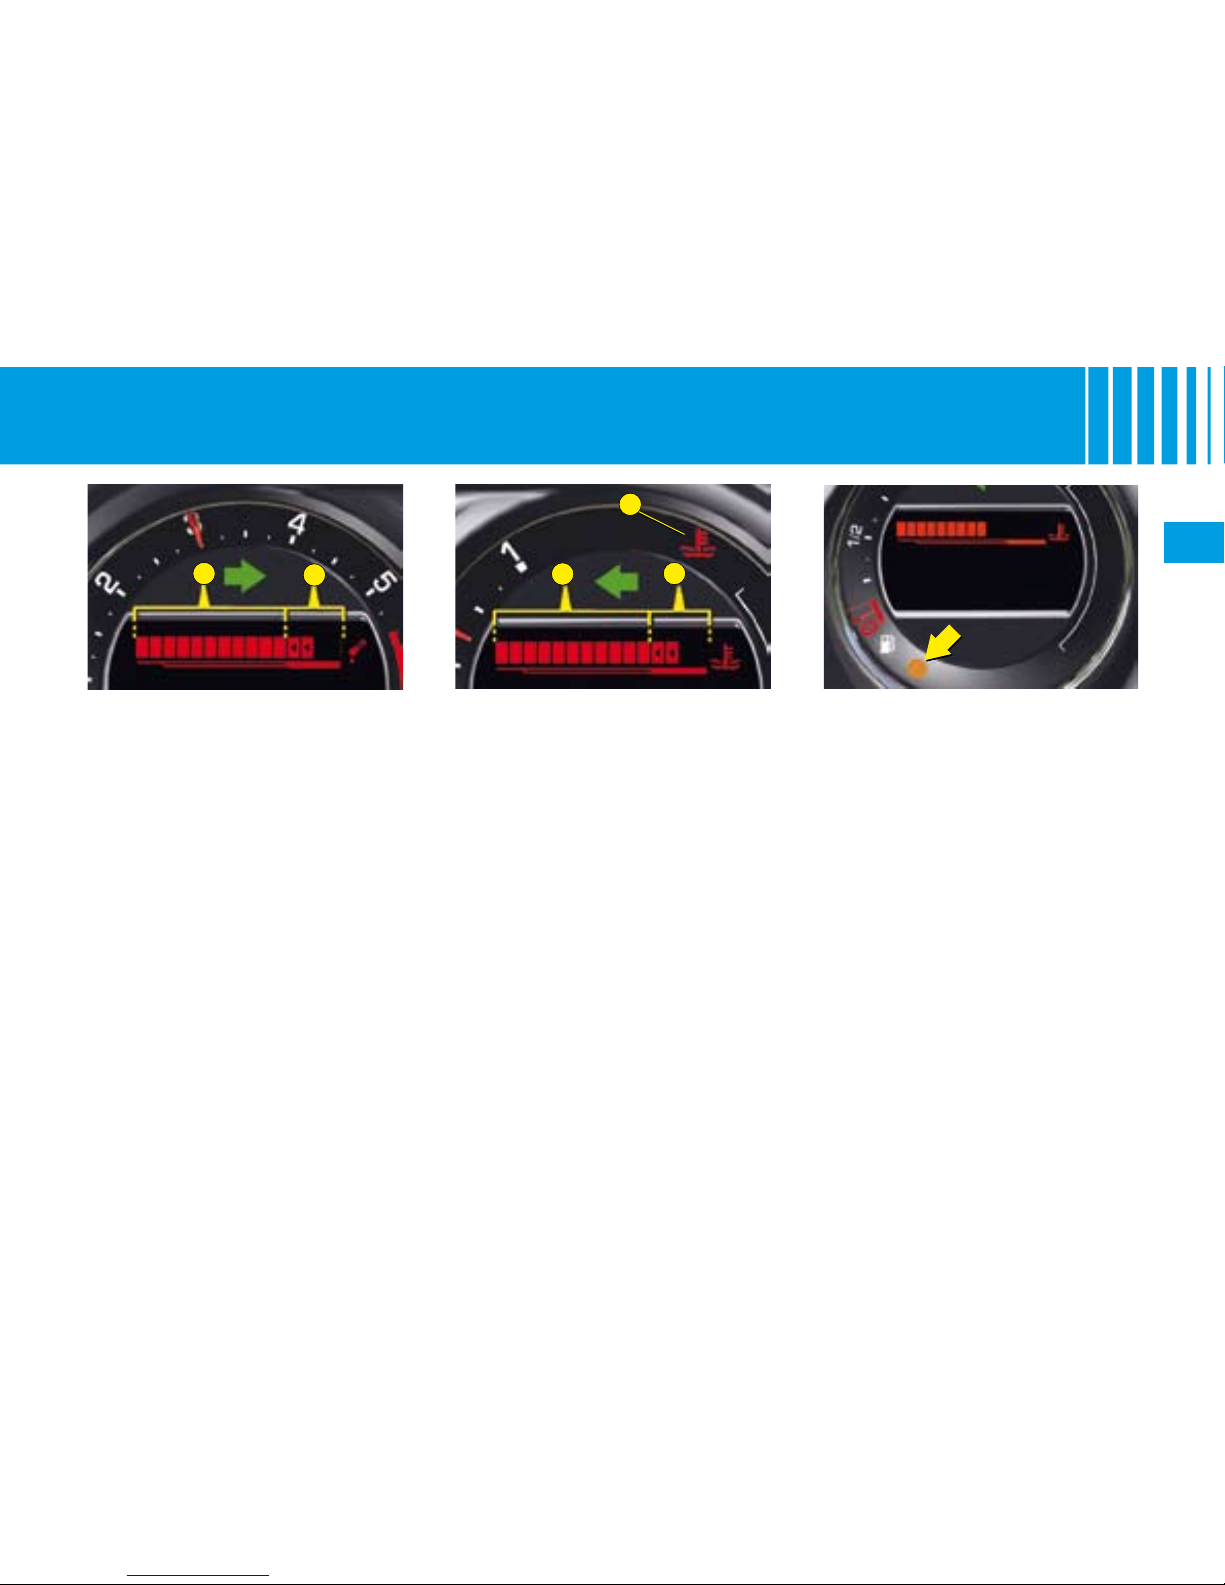
Engine oil temperature
gauge
Under normal operating conditions, the bars should be within
section 1.
In severe operating conditions, the
bars may extend into section 2.
In this event, slow down, and if necessary, stop the engine and check
the levels (see chapter - Maintenance - “Levels”).
Fuel gauge
On horizontal ground, the lighting
of the fuel low warning lamp warns
you that you are using the reserve
tank.
A message alert is displayed on
the instrument panel.
Coolant temperature
indicator
Under normal operating conditions, the bars should be within
section 1.
In severe operating conditions, the
bars may extend into section 2, the
engine coolant temperature warning lamp A and the STOP warning
lamp will light up, stop immedi-
ately. Switch off the ignition. The
cooling fan may continue to
operate for a certain time. Allow
the engine to cool down while taking the precautions indicated in
chapter - Maintenace - “Levels”.
Contact a CITROËN dealer.
If the SERVICE warning lamp lights
up, check the levels (see chapter Maintenance - “Levels”).
Page 46
42
II
1
2
10
9
3
4
5
6
7
8
11
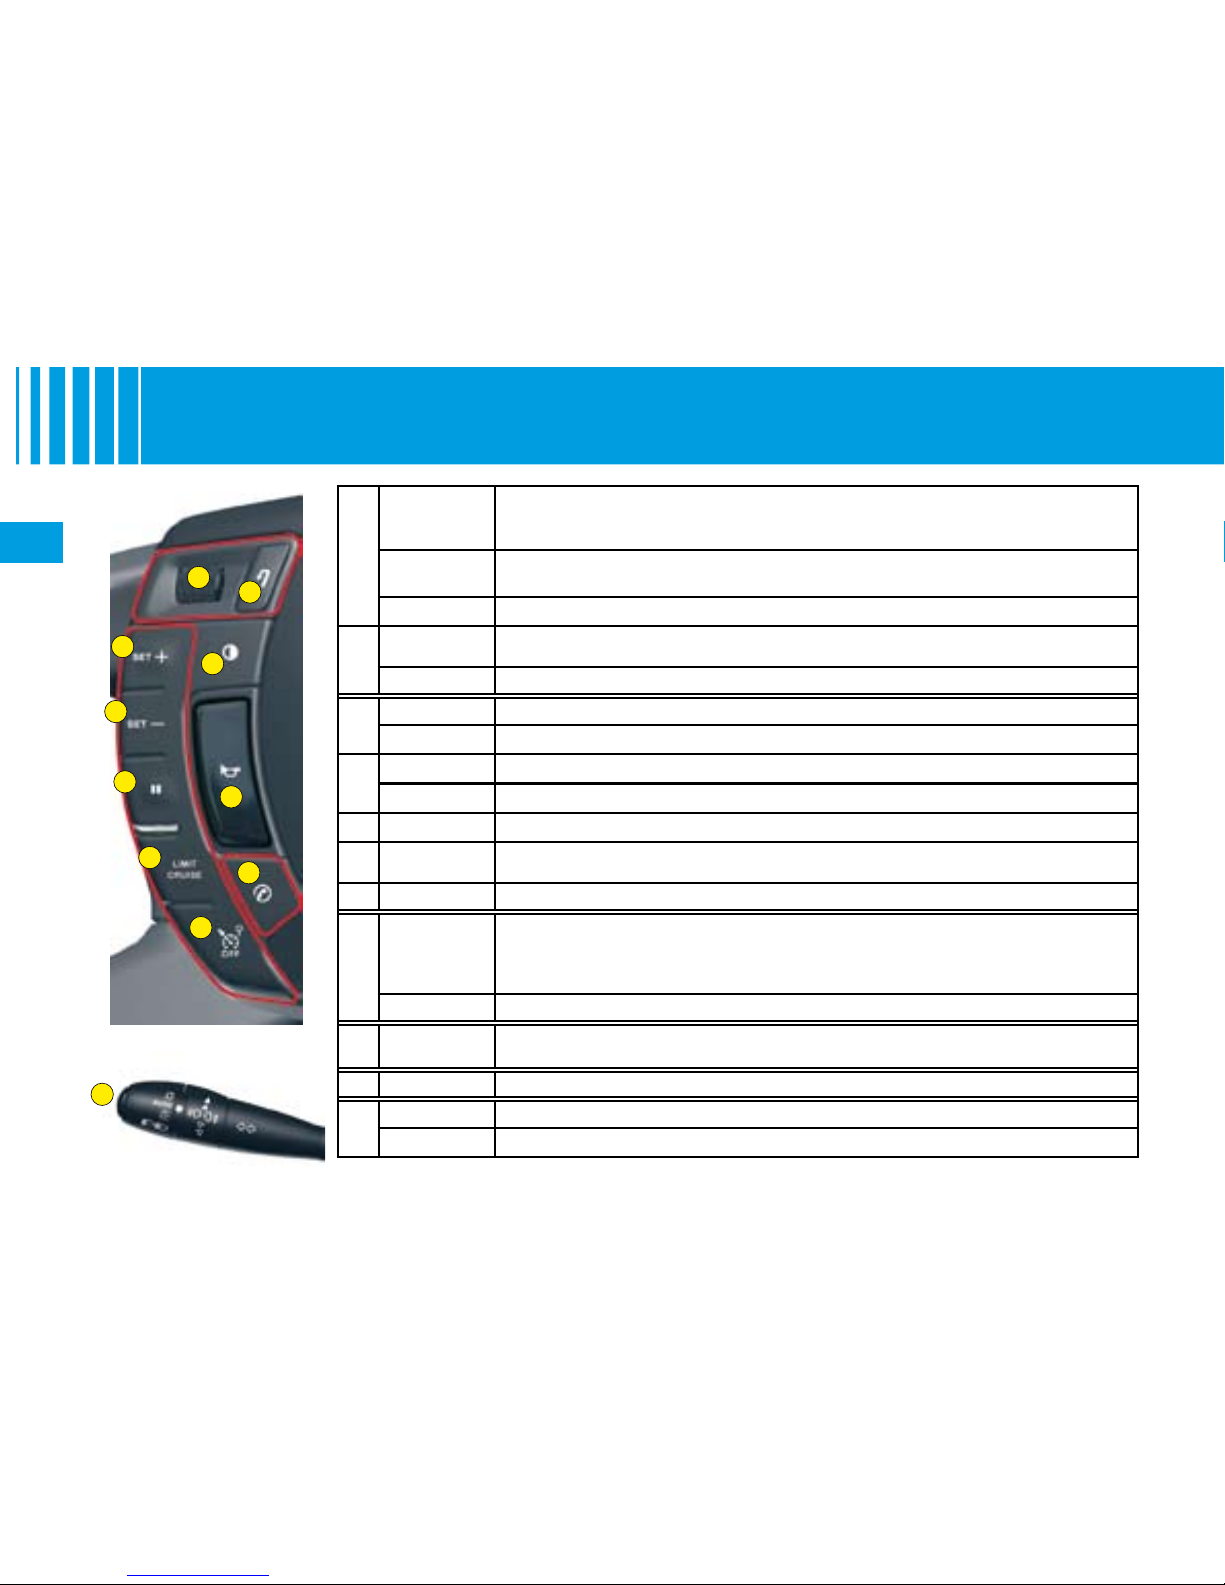
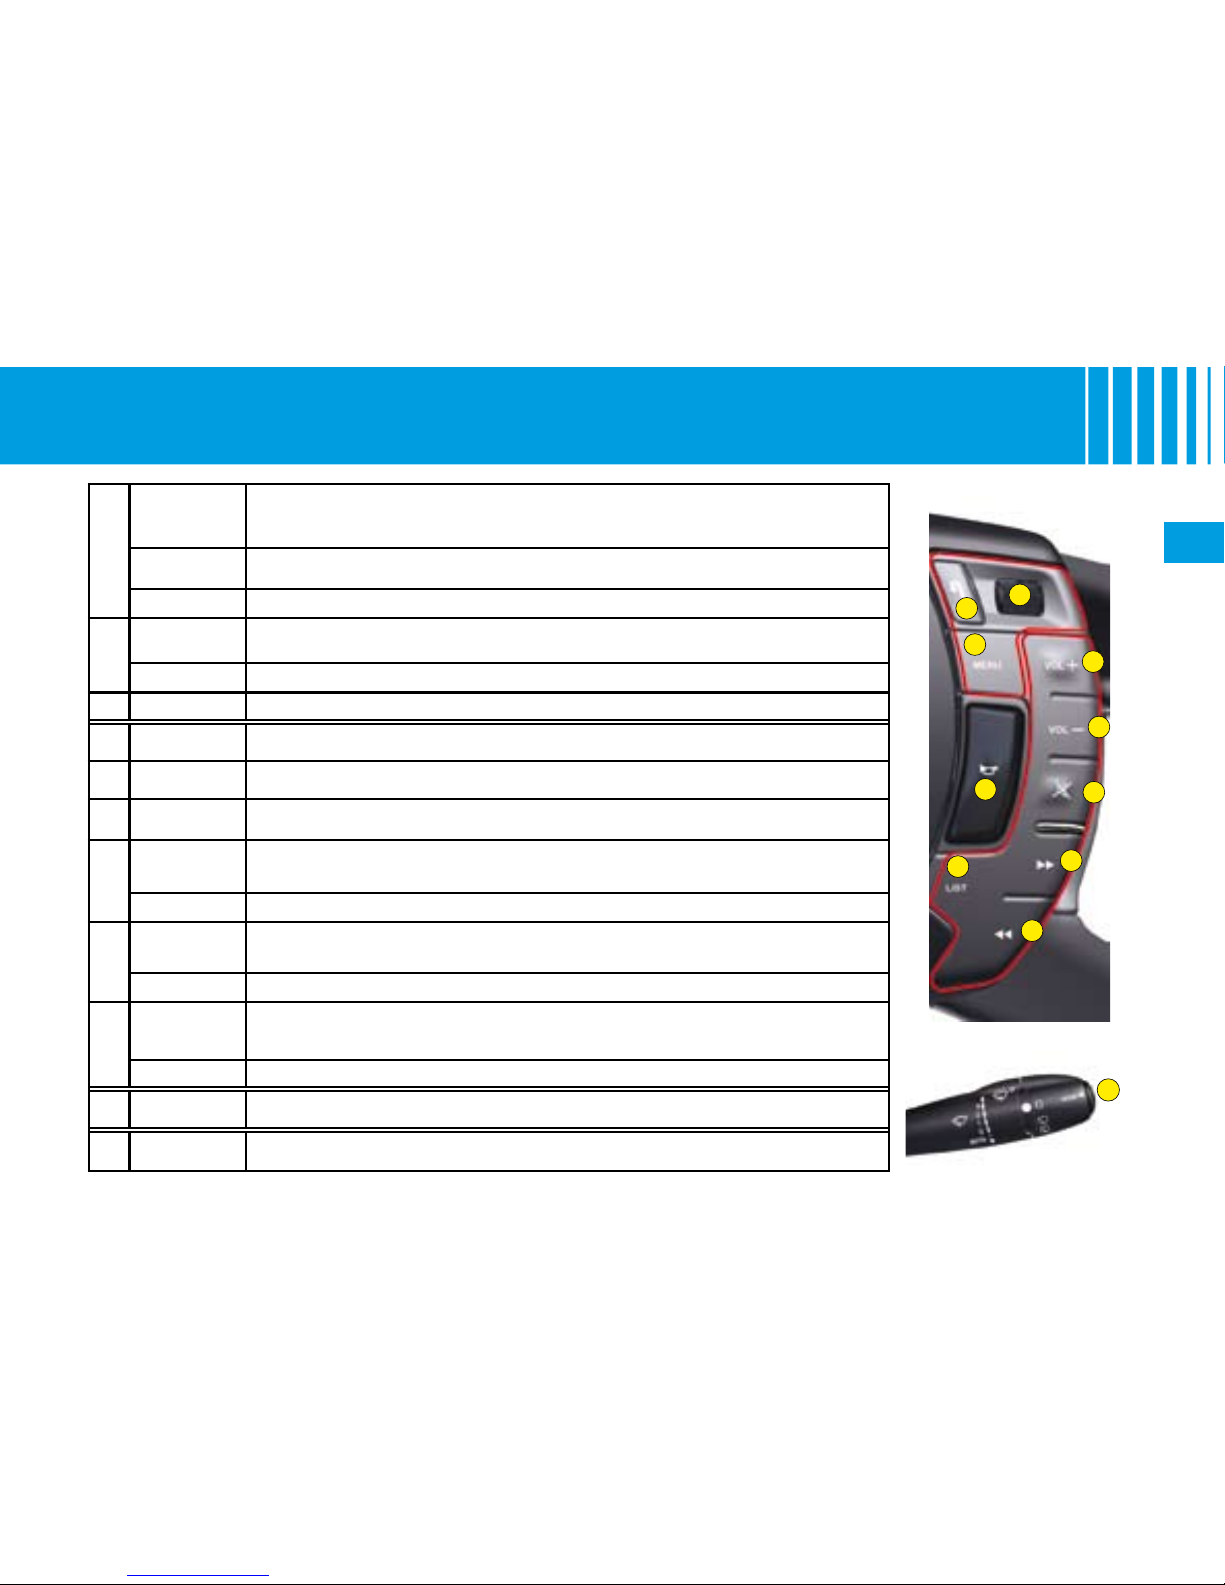
FI XED CEN TRED CO NTROLS STEERIN G
WH EEL
1
Rotate
- Scroll through the different information screens on instrument panel
- Move through the different instrument panel menus
- Increase/reduction of values
Short press
- Open the instrument panel menu (only when vehicle stationary)
- Select and validate information
Long press Reset the trip computer (if the trip computer page is displayed)
2
Short press
- Cancel the current operation
- Return to the previous instrument panel display
Long press Return to the original instrument panel display
3
Short press Increase speed in steps of 1 km/h/memorisation of speed
Press and hold Increase speed in steps of 5 km/h
4
Short press Reduce speed in steps of 1 km/h/memorisation of speed
Press and hold Reduce speed in steps of 5 km/h
5 Short press Suspend or restart cruise control/speed limiter (depending on mode selected)
6 Short press
Select cruise control or speed limiter (the cycle on this button always starts with the speed limiter
selector)
7 Short press Deactivation
8
Short press
- Pick up an incoming call
- Hang up during a call
- Open the contextual telephone menu
- Validate in the telephone list or menu
Long press Refuse an incoming call
9
Short press /
Long press
Horn
10 Short press Activation/deactivation of Black Panel mode (night driving)
11
Short press
Activation of voice recognition
Long press Reminder of navigation guidance
Page 47
43
II
11
12
13
19
20
14
15
16
17
18
21
FI XED CEN TRED CO NTROLS STEERIN G
WH EEL
11
Rotate
- Radio source: Scroll through pre-set stations
- CD/CD MP3/CD changer/jukebox source: Scroll through CDs and directories
- In the multifunction display menus: Move around and increase/decrease
Short press
- In the multifunction display menus: Validation
- Open the shortcut menus (depending on the multifunction display page)
Long press Open the multifunction display main menu
12
Short press
Cancel the current operation and return to the previous multifunction display screen
Note: For an incoming call: Refuse the call
Long press Return to the original multifunction display
13 Short press Access the multifunction display main menu
14
Short press /
Press and hold
Increase volume
15
Short press /
Press and hold
Decrease volume
16 Short press
- First press: mute
- Second press: cancel mute
17
Short press
- Radio source: Automatic search of higher frequencies
- CD/CD MP3/CD changer/jukebox source: Search of the next track
Press and hold - CD/CD MP3/CD changer/jukebox source: Fast forward with accelerated sound
18
Short press
- Radio source: Automatic search of lower frequencies
- CD/CD MP3/CD changer/jukebox source: Search of previous track
Press and hold - CD/CD MP3/CD changer/jukebox source: Rapid reverse with accelerated sound
19
Short press
- Radio source: Display of the list of radio stations available
- CD/MP3 CD and CD changer source: Display of the list of CD tracks and directories
- Jukebox source: Display of the list of albums
Long press Updating of the list of radio stations
20
Short press /
Long press
Horn
21 Short press MODE : selection of the type of information displayed on the multifunction screen
Page 48
44
II
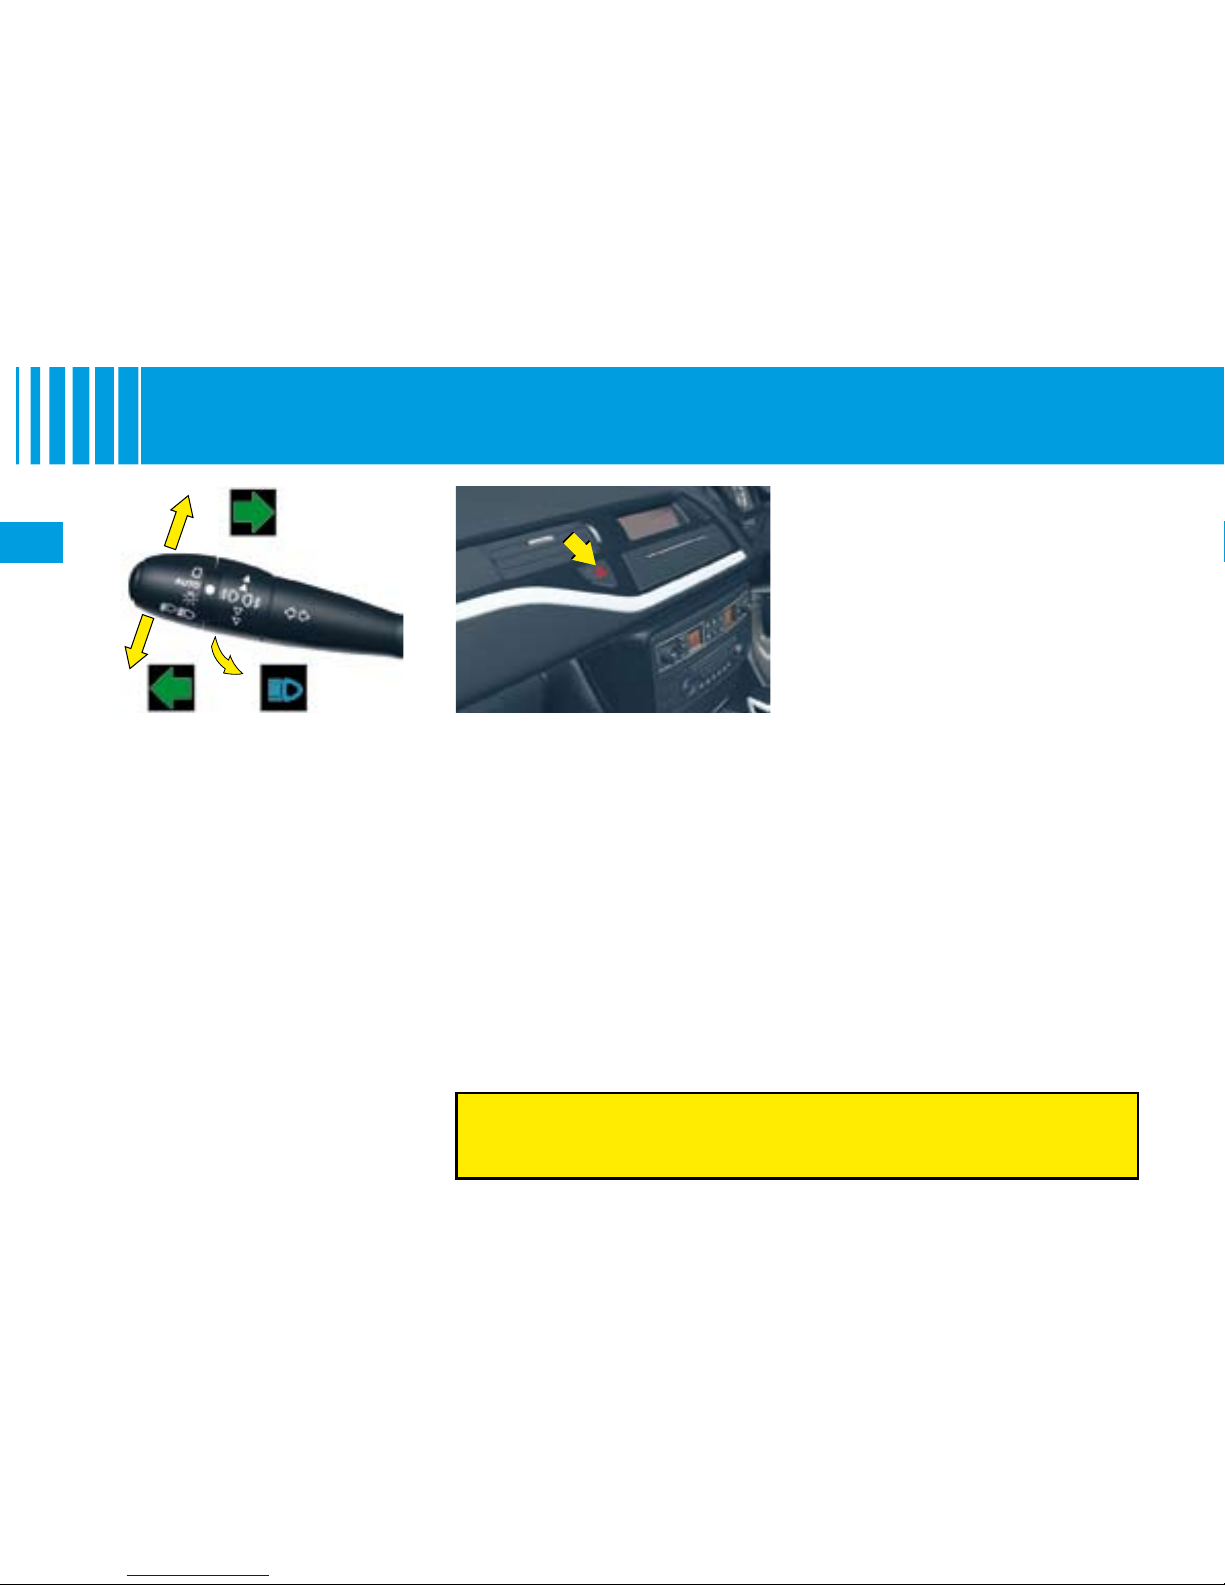
S I G N A L L I N G
Direction indicators
Left, downwards.
Right, upwards.
For a change of direction, move
the control stalk beyond the tight
spot. The indicator is automatically
cancelled when the steering wheel
returns to its normal position.
Hazard warning lamps
This operates all the direction indicators simultaneously.
Only use them to indicate danger, for an emergency stop or for
driving in abnormal conditions.
The hazard lamps can also be
used with the ignition switched off.
The direction indicators cannot operate if the hazard warning lamps
are on.
Emergency operation of
hazard warning lamps
A sudden deceleration of the vehicle causes the hazard lamps to
come on automatically.
They will cease to operate automatically, or manually if you press
the hazard lamps button on the
dashboard.
“Motorway” function
Move the stalk briey upwards or
downwards, without going beyond
the resistance point; the direction
indicators will ash 3 times.
Page 49
45
II
A
3
2
4
1
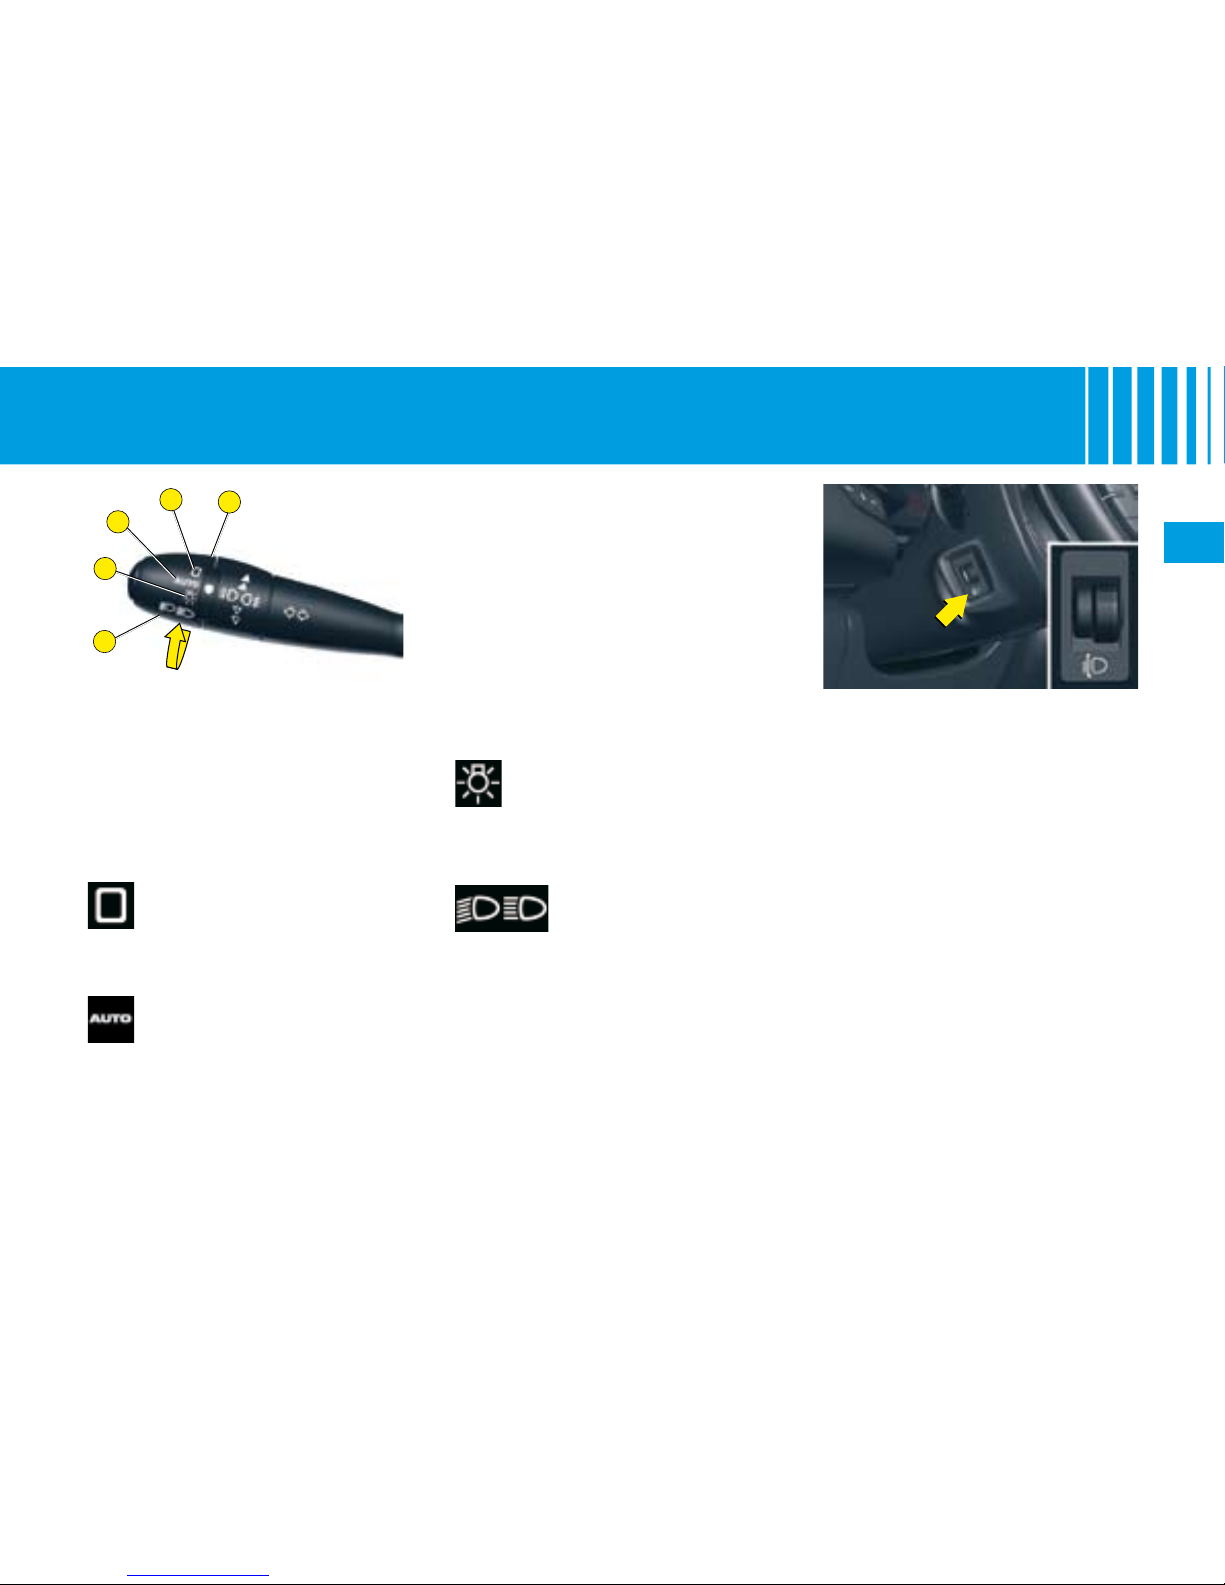
LIGHTING CONTROL STALK
1 : Off.
2 : Automatic lighting.
3 : Sidelamps.
4 : Dipped beams / Main beams.
All vehicle lamps off
Rotate the ring A forwards.
They go out once the brightness
has reached a satisfactory level
or about 5 minutes after the windscreen wipers have stopped.
To activate this function, turn the
ring A to position 2.
Take care not to cover the brightness sensor, which is visible
from outside the windscreen,
behind the interior rear view mirror.
Automatic lighting of
headlamps
The sidelamps and the dipped
beams come on automatically
when the light is insufcient or if
the windscreen wipers are in continuous operation.
Rotate the ring
A forwards.
Sidelamps on
Dipped beams/
main beams on
Pull the control stalk towards you
to change between dipped beam
and main beam.
Rotate the ring
A forwards.
S I G N A L L I N G
Manual headlamp height
adjustment
You are advised to adjust the aim
of the headlamps in accordance
with vehicle load.
0. 1 or 2 people in the front seats.
-. 3 people.
1. 5 people.
-.
Intermediate setting.
2. 5 people + maximum permitted
load.
-.
Intermediate setting.
3.
Driver + maximum permitted
load.
Visible alert / headlamp
ash
Pull the control towards you.
The headlamp ash can be made
even with the ignition switched off.
Page 50
46
II
A
B
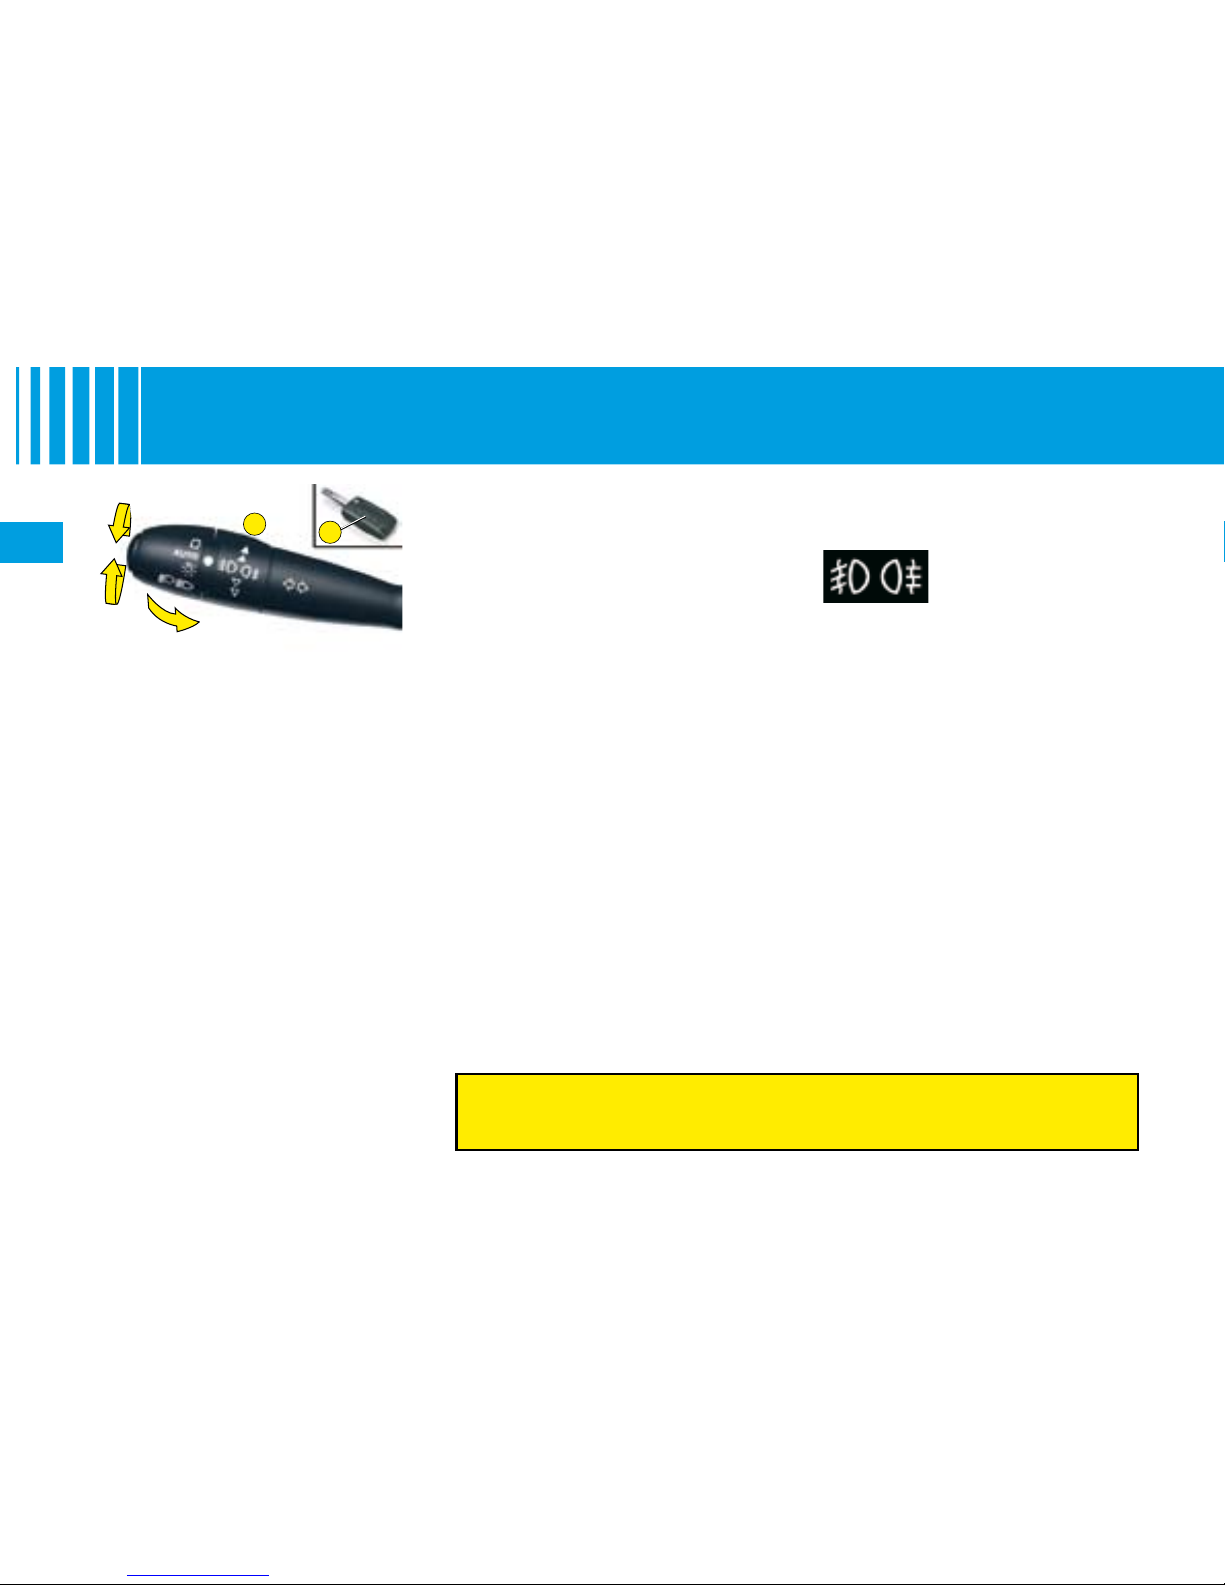
For vehicles tted with rear
foglamps:
1st turn forwards: lighting of rear
foglamps.
1st turn rearwards: extinction of
rear foglamps.
For vehicles tted with front
and rear foglamps:
1st turn forwards: lighting of front
foglamps.
2nd turn forwards: lighting of rear
foglamps.
1st turn rearwards: extinction of
rear foglamps.
2nd turn rearwards: extinction of
front foglamps.
Note: the foglamps should be used
only in fog or in other conditions of
poor visibility.
-
-
-
-
-
-
FRONT AND REAR
FOGLAMPS (RING B)
These operate in
conjunction with the
sidelamps, the dipped
beams or the main
beams.
S I G N A L L I N G
GUIDE-ME-HOME LIGHTING
With the ignition off, this function
temporarily switches on your headlamps to give you exterior lighting
when leaving your vehicle.
This function is activated:
Manually by pulling the lighting
stalk towards you, ignition off.
Automatically in the following
conditions:
automatic headlamp lighting
is activated,
guide-me-home lighting is
activated.
brightness conditions are low.
using button
A on the remote
control.
You can modify the length of time
guide-me-home lighting stays on
for (around 60, 30 or 15 seconds)
using the “Main Menu” of the instrument panel screen.
See “Instrument panel screen”.
•
•
-
-
-
-
To do so, select “Vehicle parameters / Lighting”, then adjust the time
for guide-me-home lighting.
Sound signal for headlamps
left on
This operates when the driver's door
is opened, ignition off, to indicate that
the vehicle lamps are still on.
It stops when you close the door,
switch off the lamps or switch on the
ignition.
This signal does not operate if the
automatic lighting of headlamps
or the guide-me-home lighting are
active.
Daytime-running lamps
They light up automatically and permanently, when the engine is running, if:
The function is activated* in the
“Main Menu” of the instrument
panel screen. See “Instrument
panel screen”.
The lighting control is at position 0 or AUTO.
All the headlamps are off.
Note : you can deactivate* this
function using the “Main Menu” of
the instrument panel screen. See
“Instrument panel screen”.
•
•
•
In foggy conditions, if the ambient light is not such that
the headlamps come on automatically, it is up to the driver
to switch on dipped beams, and/or foglamps, manually.
* Depending on country.
Page 51
47
II
B E N D L I G H T I N G
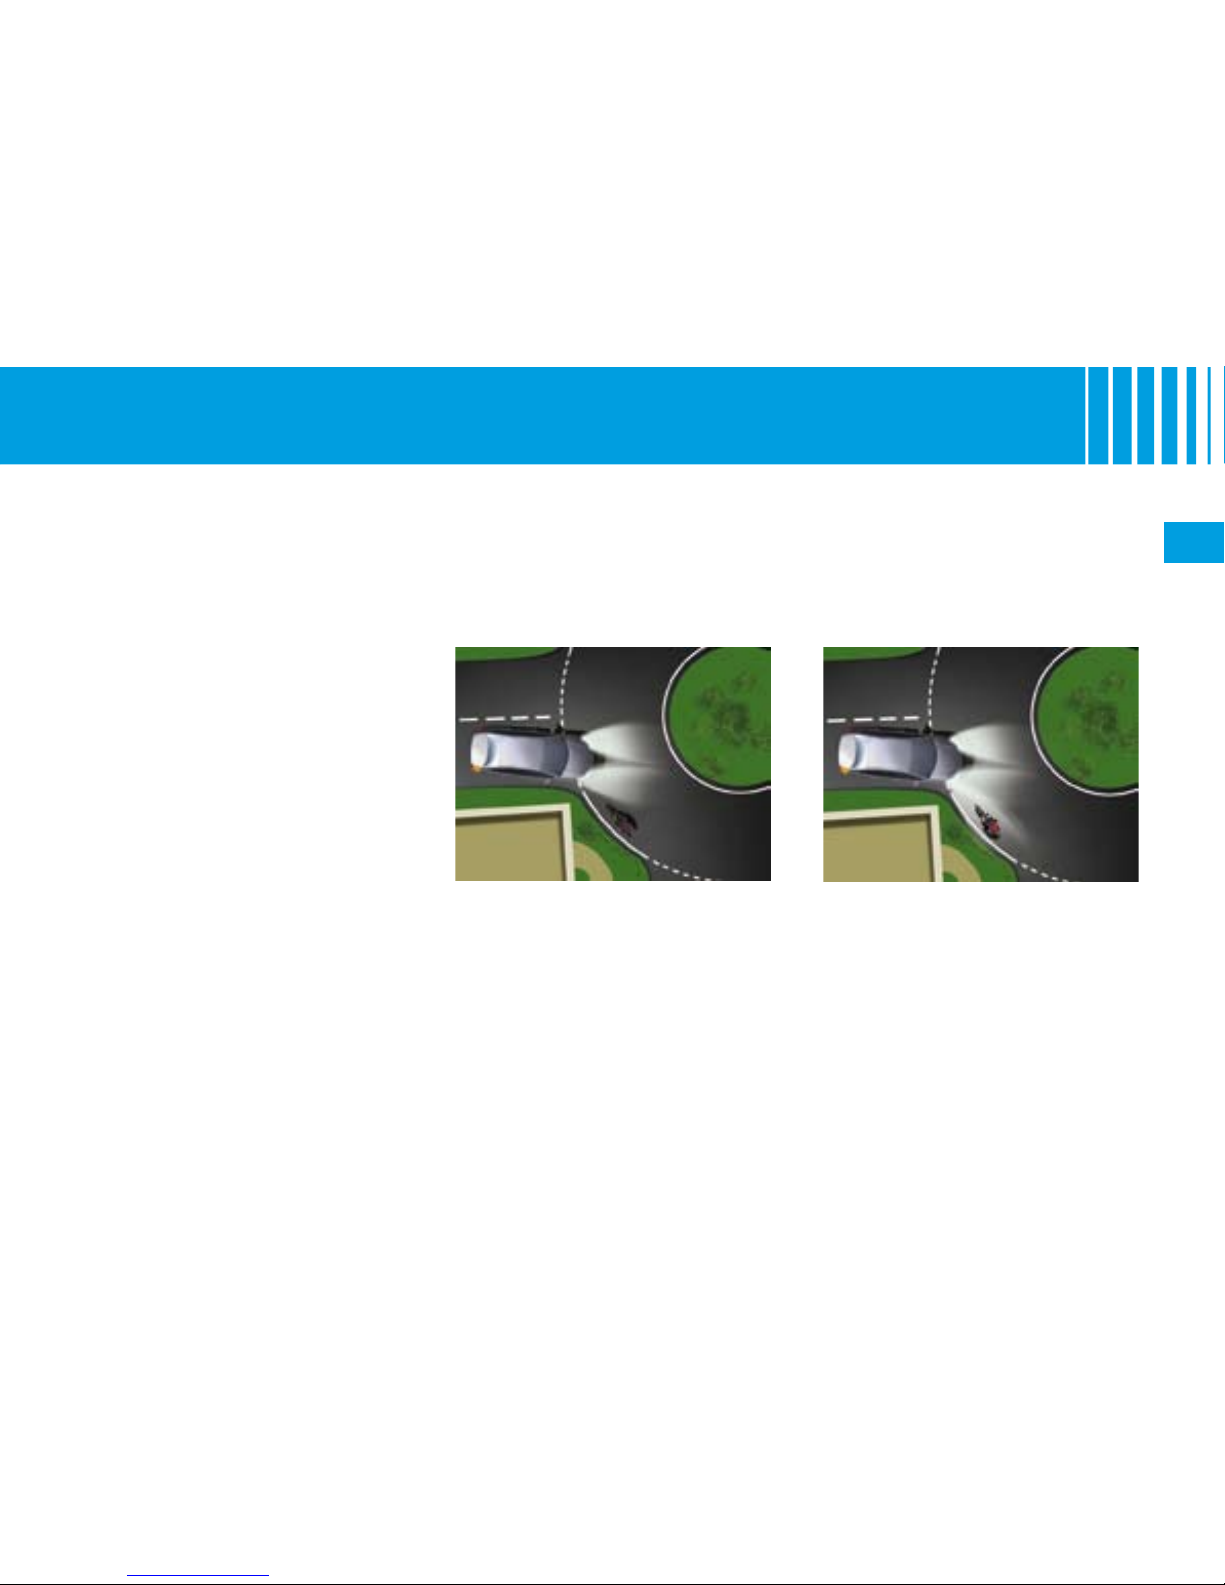
Without bend lighting With bend lighting
With dipped or main beams, this function provides additional lighting for the inside of a bend.
This lighting is most useful when travelling at low and medium speed (urban driving, winding road, intersections...).
Operation
This lighting is activated past a certain angle of rotation of the steering wheel. It is deactivated with
the vehicle stationary or at very
low speed, or with reverse gear
engaged.
Page 52
48
II
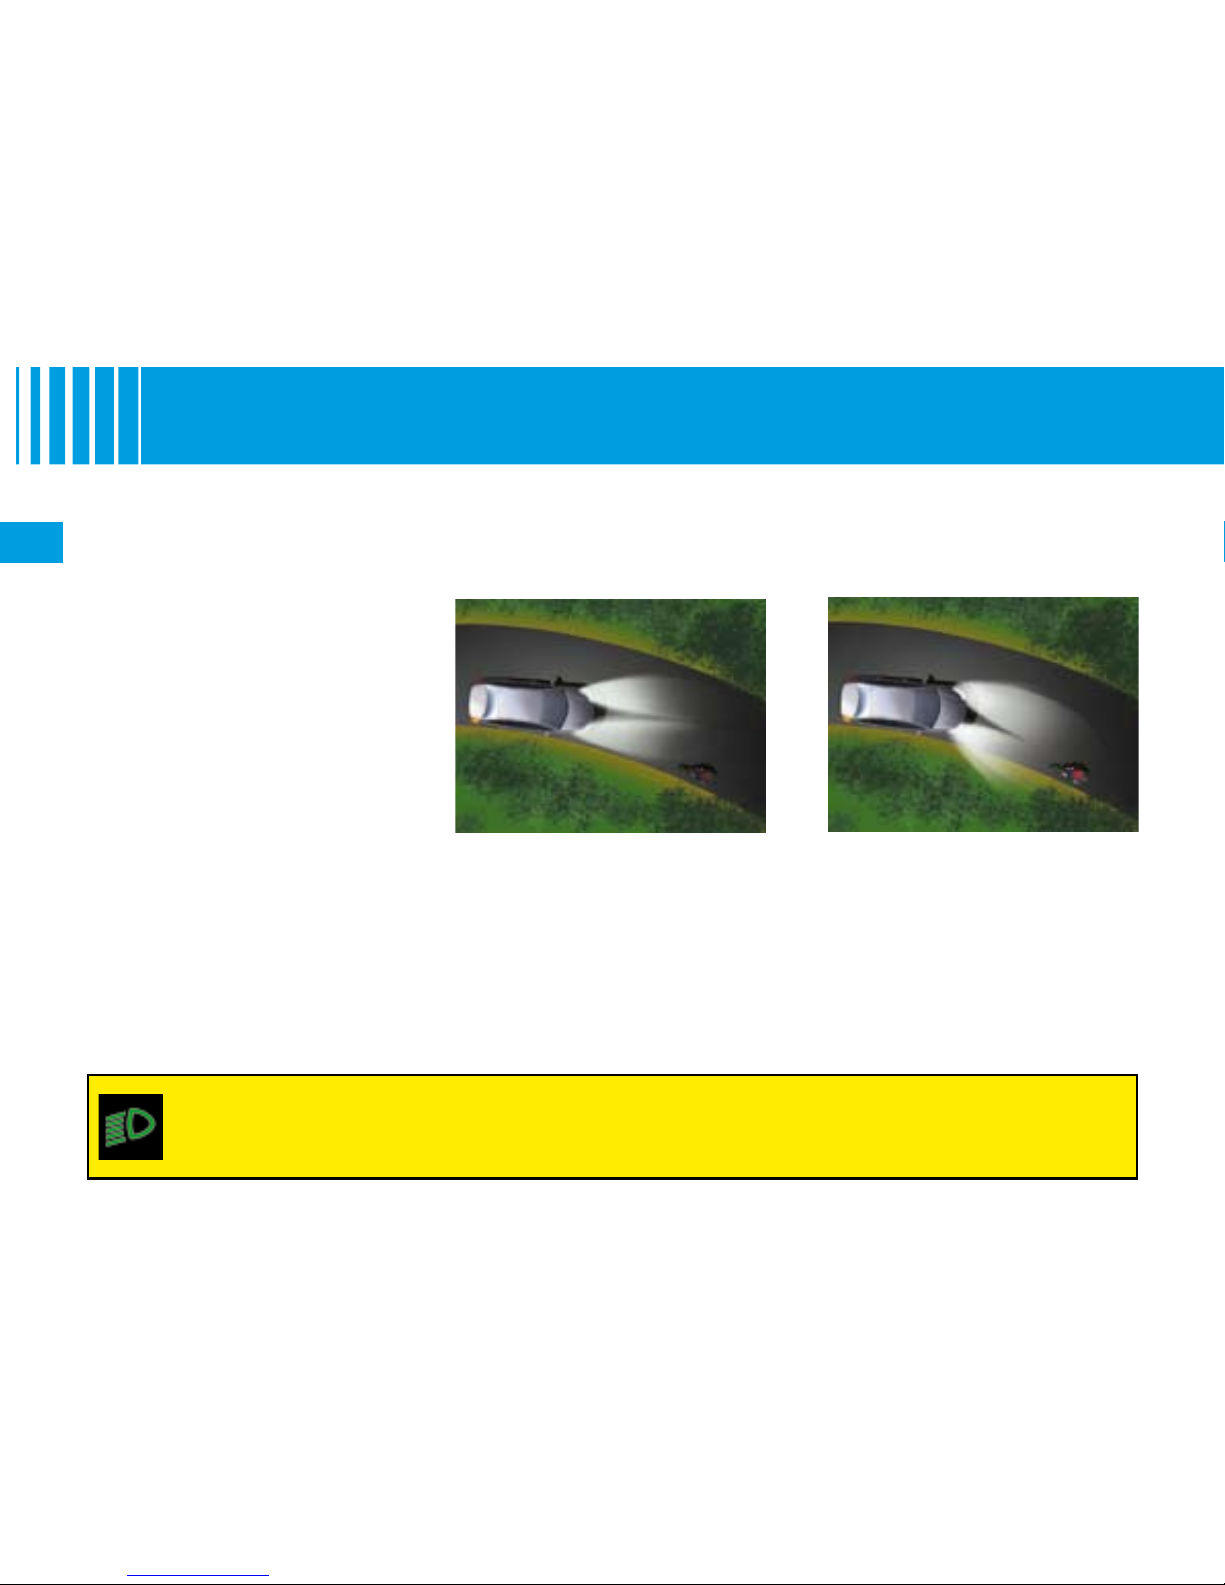
With dipped beams or main beams, the Directional headlamps function turns the headlamps in the direction the
road ahead is taking. Your vision on bends is considerably enhanced.
This function is activated once your vehicle speed reaches 10 km/h (6 mph) and stops when your speed decreases
to 5 km/h (3 mph).
Note: An automatic correction of the beam height enables you not to dazzle other drivers.
XENON DUA L FUNCTION D IRECTIONA L
HEADLAMPS -
ANGLED LI GH TI NG
Function activatedFunction deactivated
Activation/Deactivation
Activated by default, this function
can be activated/deactivated in
the “Main Menu” of the instrument
panel screen. To do so, select
“Vehicle parameters / Lighting /
Directional headlamps”.
The activated/deactivated status
is retained when you switch off
the engine.
Note: This function is not active
when the vehicle is stationary,
moving at very low speed, or in
reverse gear.
If there is a malfunction, the “Dipped beams” warning lamp ashes, accompanied by a message
on the instrument panel. Contact a CITROËN dealer.
This device is linked with the Angular lighting which lights up the inside of a bend when the vehicle speed is lower
than 40 km/h (25 mph). This maximises the lighting at intersections and when parking, for example.
The angular lighting is deployed:
When the direction indicators are activated,
and/or
from a certain angle of rotation of the steering wheel.
Note: The angular lighting is deactivated when the directional headlamps are deactivated.
•
•
Page 53
49
II
W I P E R S
FRONT WIPERS
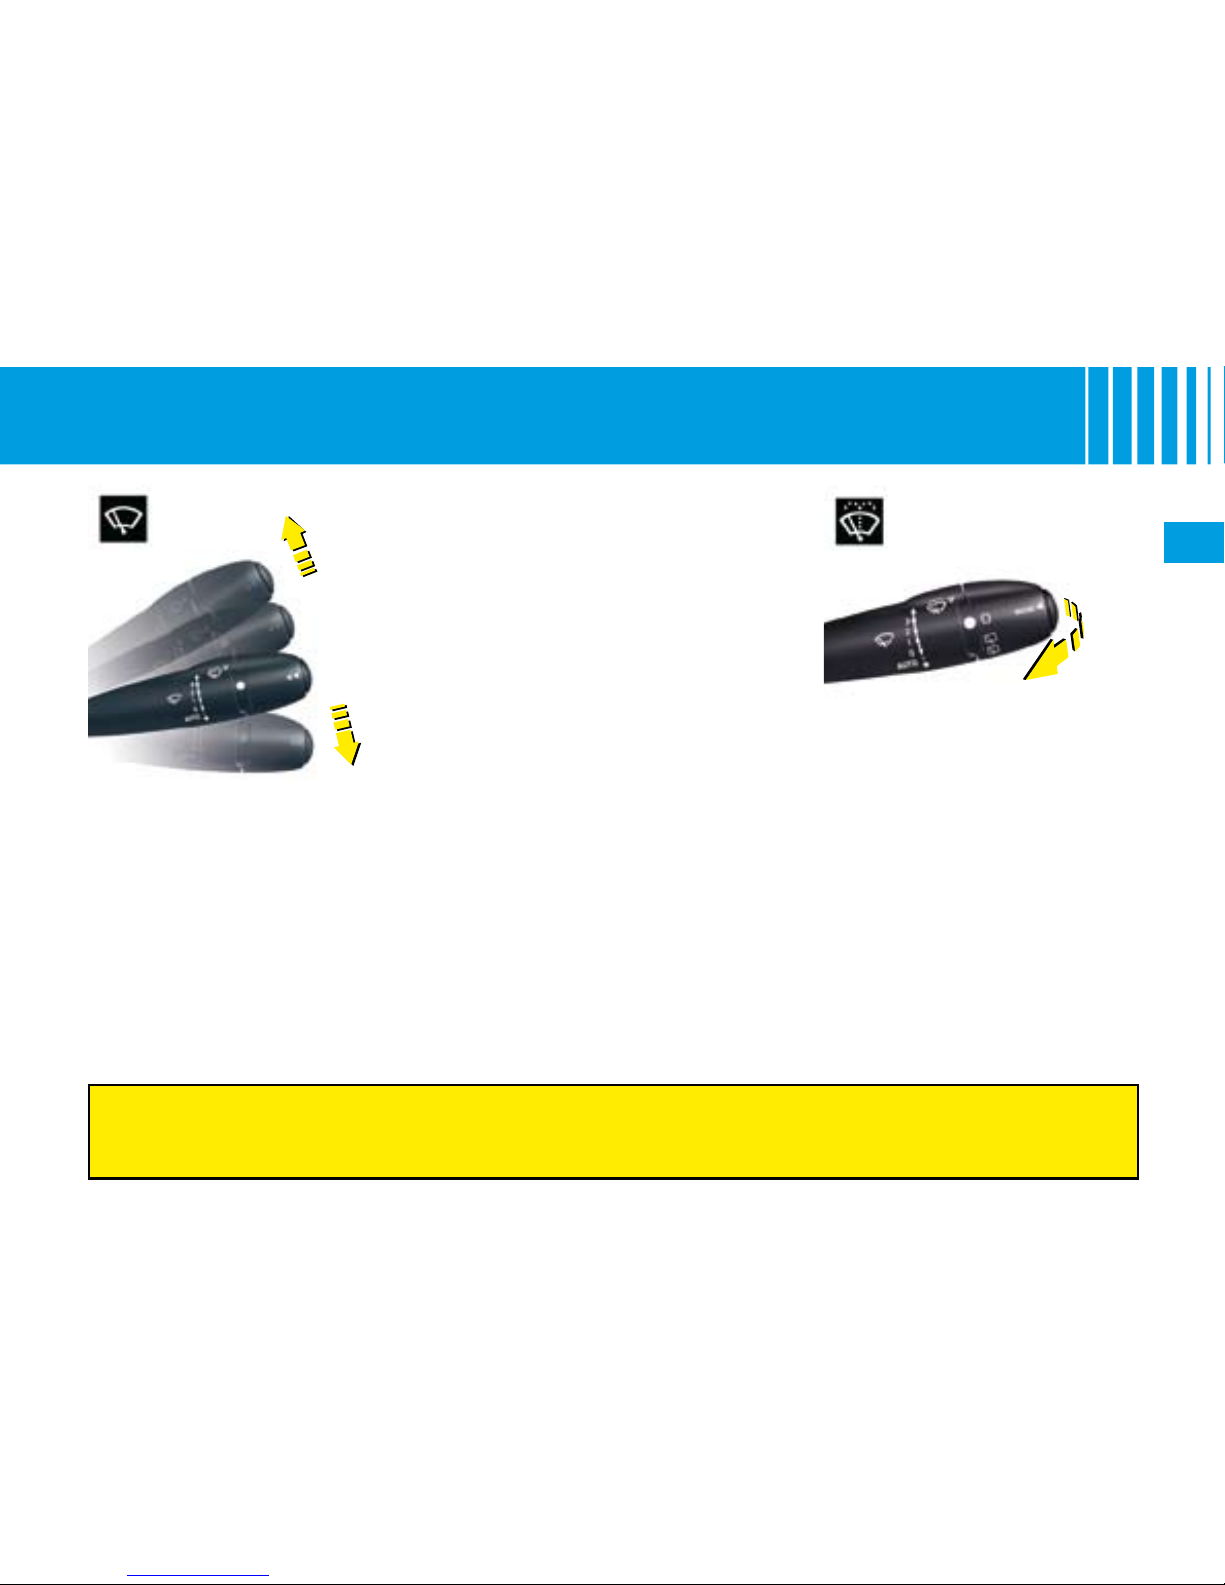
Control positions
2: Rapid wipe.
1: Normal wipe.
I
: Intermittent wipe.
0: Off.
One press downwards:
AUTO:
Automatic wipe acti-
vated.
Single wipe.
•
•
Position I: The speed of the wipers will adjust itself to the speed of
your vehicle.
Positions 1 and 2: When the vehicle is stationary, the speed of the
wipers will reduce automatically.
For safety, the wiper system is
deactivated when the ignition is
switched off.
Automatic wipe: To activate auto-
matic wipe, place the control stalk
on position 0, then press it downwards. The activation of this mode
is conrmed by one wipe and a
message on the instrument panel
screen. The wipe speed will adjust
according to the intensity of the
rain.
Note:
Pulling the stalk downwards will
produce a single wipe, without
deactivating automatic wiping.
Automatic wiping is not retained
once the engine is switched
off.
Deactivation of automatic
wipe:
Go to position I, then return to
position 0.
Or stop the engine.
•
•
•
•
Do not cover the rain detector which is located behind the interior
rear view mirror and visible from outside the windscreen.
Using an automatic car wash: switch the ignition off to avoid the wiping system activating.
Screen wash
Pull the screen wipe control stalk
towards you.
The screen wash is accompanied
by a timed wipe sequence. If the
dipped beams are on, it is also
accompanied by a timed headlamp
wash.
Page 54
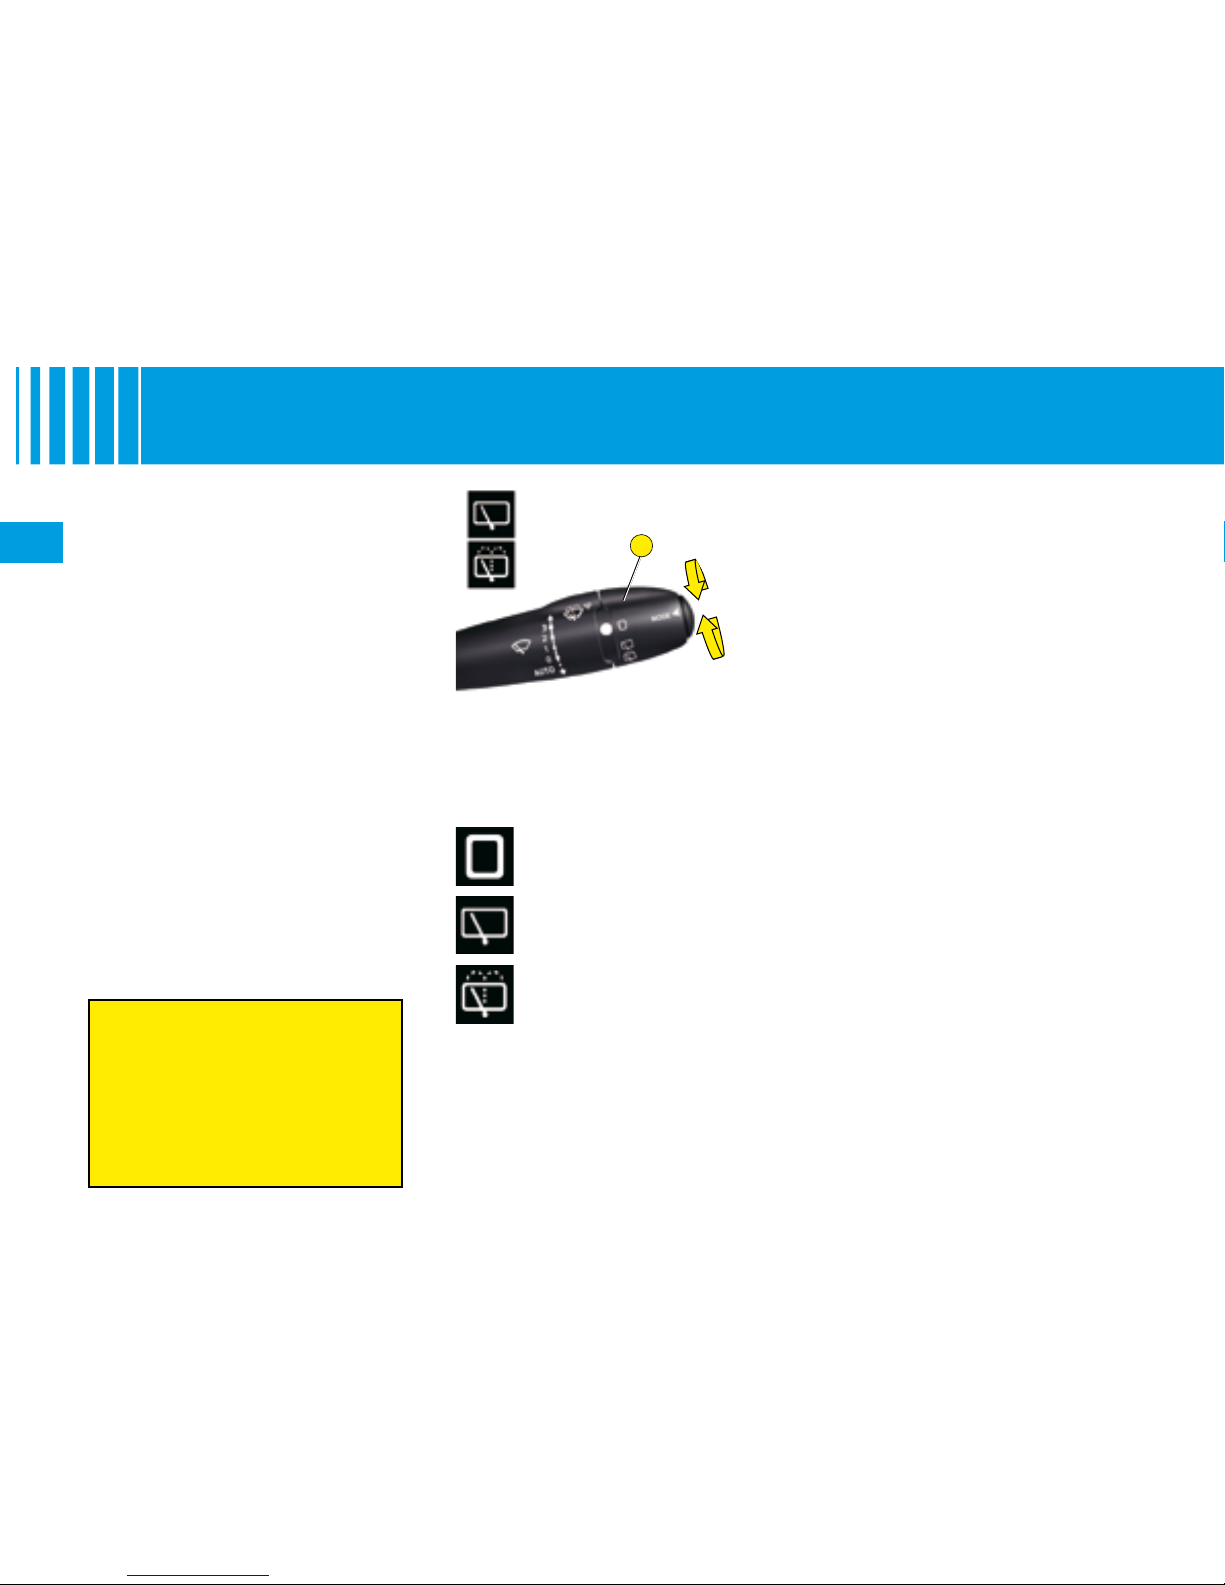
50
II
A
W I P E R S
Check that the wipers can operate freely in freezing temperatures.
Remove any accumulation of
snow at the base of the windscreen.
Changing the wiper blades
If changing the wiper blades, they
must be stopped in the maintenance position. For this, switch
off the ignition and then within one
minute move the wiper control
stalk. The wipers stand up vertically.
After replacement, switch on the
ignition and move the wiper
control stalk so that the wipers
resume their normal position.
Remark: The maintenance posi-
tion can also be used in snowy
conditions to avoid a build up of
snow.
REAR WIPERS AND WASH
(TOURER)
Rotate control A to the desired
position.
Off
Intermittent wipe
The screen wash is accompanied
by a timed rear wipe sequence.
Screen wash
Page 55
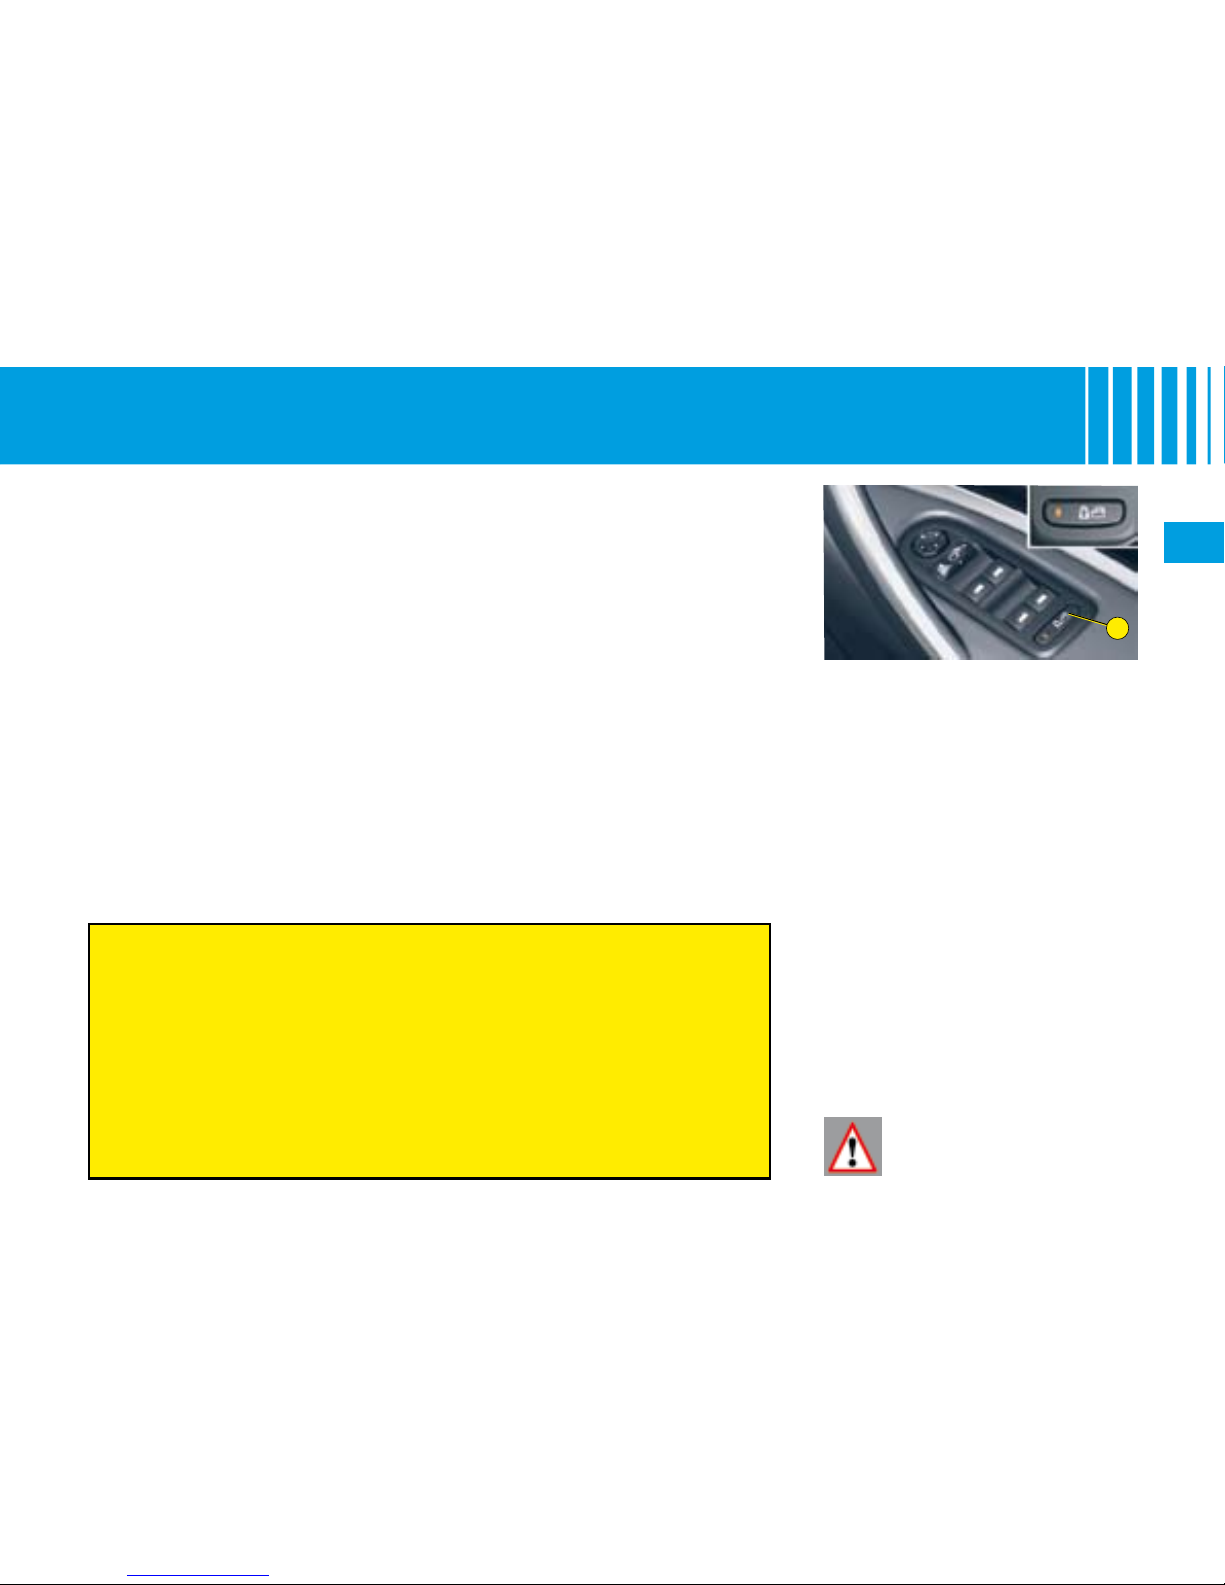
51
II
A
Anti-pinch
An anti-pinch device stops the
window from rising. If it meets an
obstacle, it goes back down.
If there is a malfunction, sequential operation is deactivated. When
you raise the window again, press
the control each time the window
stops until you reach the desired
position. You must then re-initialise the function for each electric
window:
Lower the window fully using
the control, then close. It will
rise only a few centimetres.
Press repeatedly on the control
until the window is fully closed.
Keep the control pressed down
for at least 1 second having
closed the window.
•
•
During this operation,
the anti-pinch protection
does not work.
Electric operation
The driver uses the controls located
on the door to operate the vehicle’s
electric windows.
Note: The windows can also be
operated for a short period after
the ignition has been switched
off (including after the front doors
have been opened).
Sequential operation
An action on the control to the rst
notch causes a window movement
which stops as soon as the control
is released.
An action on the control to the
second notch causes the window
to close or open completely, a further press on the control stops the
movement.
ALWAYS PAY ATTENTION TO WHERE CHILDREN ARE WHEN
OPENING OR CLOSING THE WINDOWS
Always remove the ignition key when leaving the vehicle, even if for
a short time.
If the driver is operating the electric window controls for passengers, he or she should ensure that no passenger is obstructing the
window from closing.
The driver must ensure that the electric windows are used properly
by passengers.
Should there be any risk of a person becoming trapped by a window
closing, you should immediately reverse the window movement. To
do this, press on the control concerned.
W I N D O W S
Child safety
This deactivates the controls in the
rear of the vehicle, both for the rear
windows and for opening the rear
doors from the inside.
This is activated by a press on button A located on the window control panel. The warning lamp on
button A lights up.
A message on the instrument panel
informs you of the activation/deactivation of child safety.
You can still open the doors from
outside and operate the rear electric windows from the front of the
vehicle.
Page 56
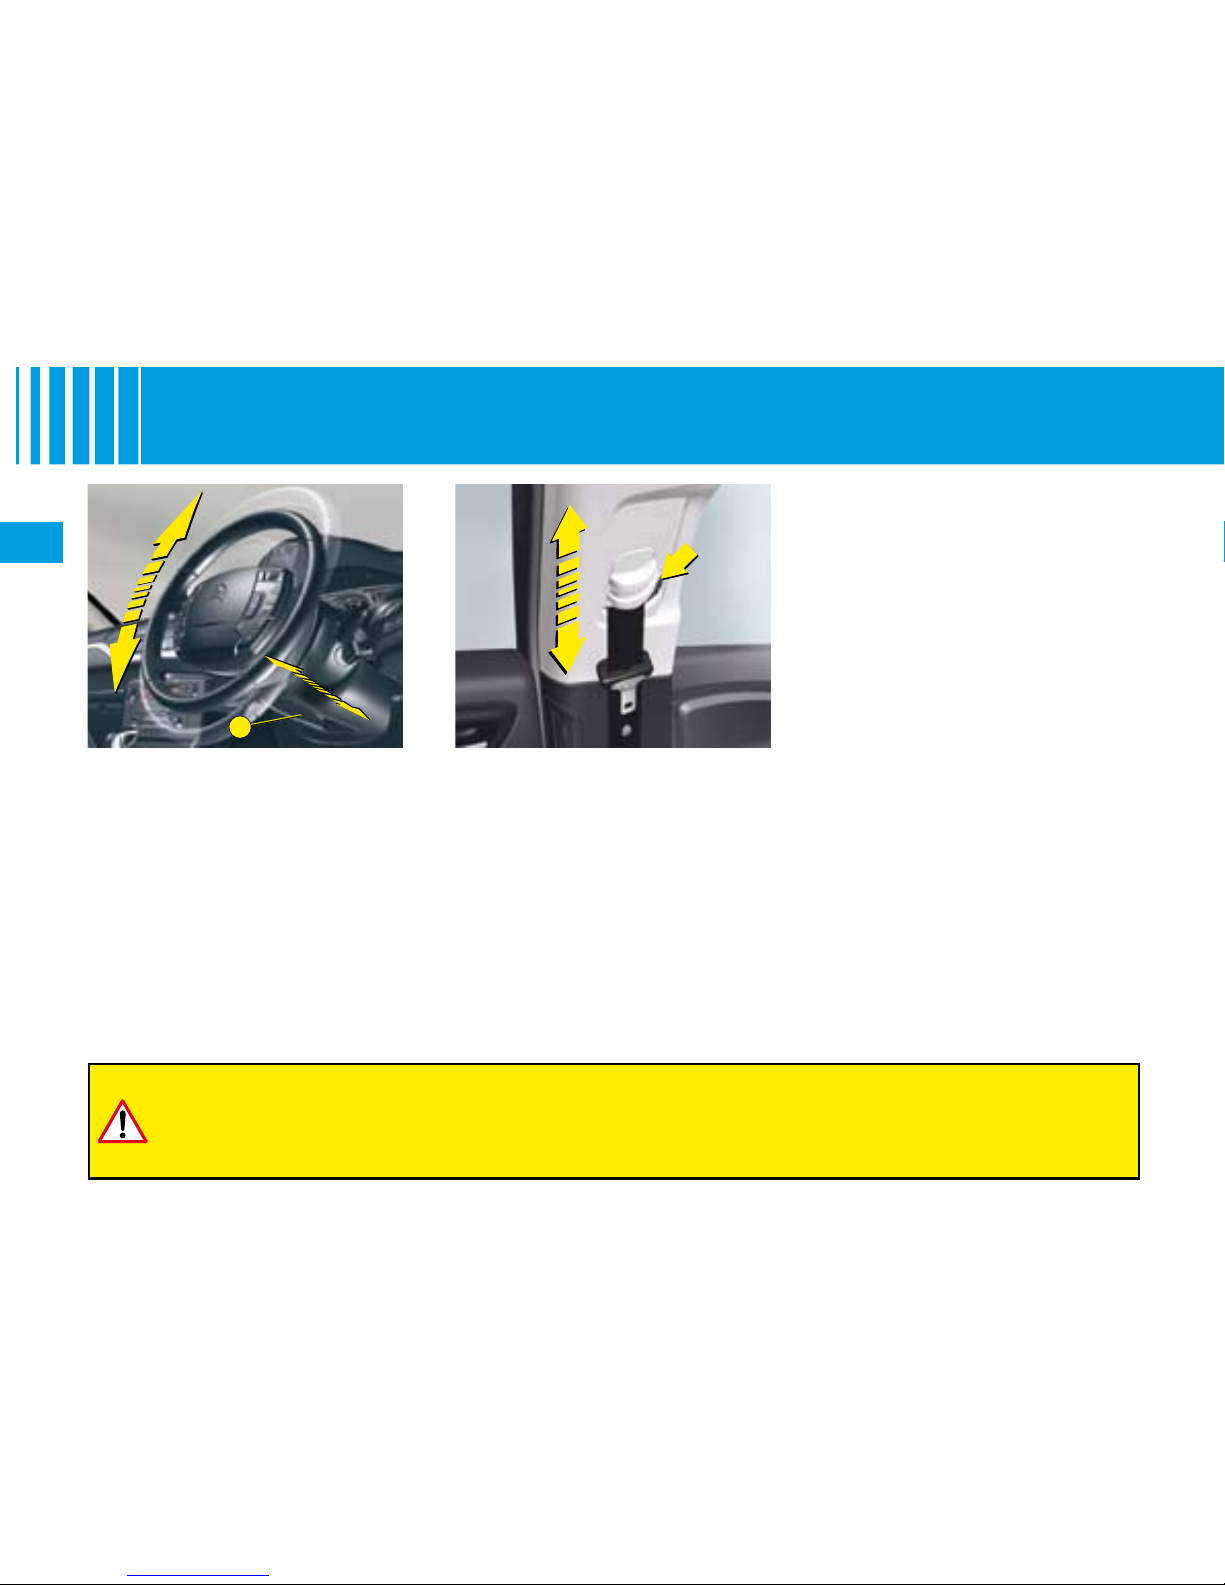
52
II
A
S TEERI N G C OLUM N AD J U S T MENT –
S EAT B E LT H E I G H T ADJU S T M E NT
Adjustment of height and
reach of steering wheel
With the vehicle at rest, unlock
the steering wheel by pushing control A forwards.
Adjust the height and the reach
of the steering wheel, then lock
the position by pulling the lever
upwards.
As a matter of safety, the adjustments in your driving position must be made only while the vehicle
is stationary.
First adjust your seat to the most suitable position, then adjust the position of the steering wheel.
See “Driving position”.
Seat belt height adjustment
The correct positioning of the belt
strap is through the middle of the
shoulder. See “Seat belts”.
To adjust the seat belt for height,
compress the control and slide it
in the desired direction.
Page 57
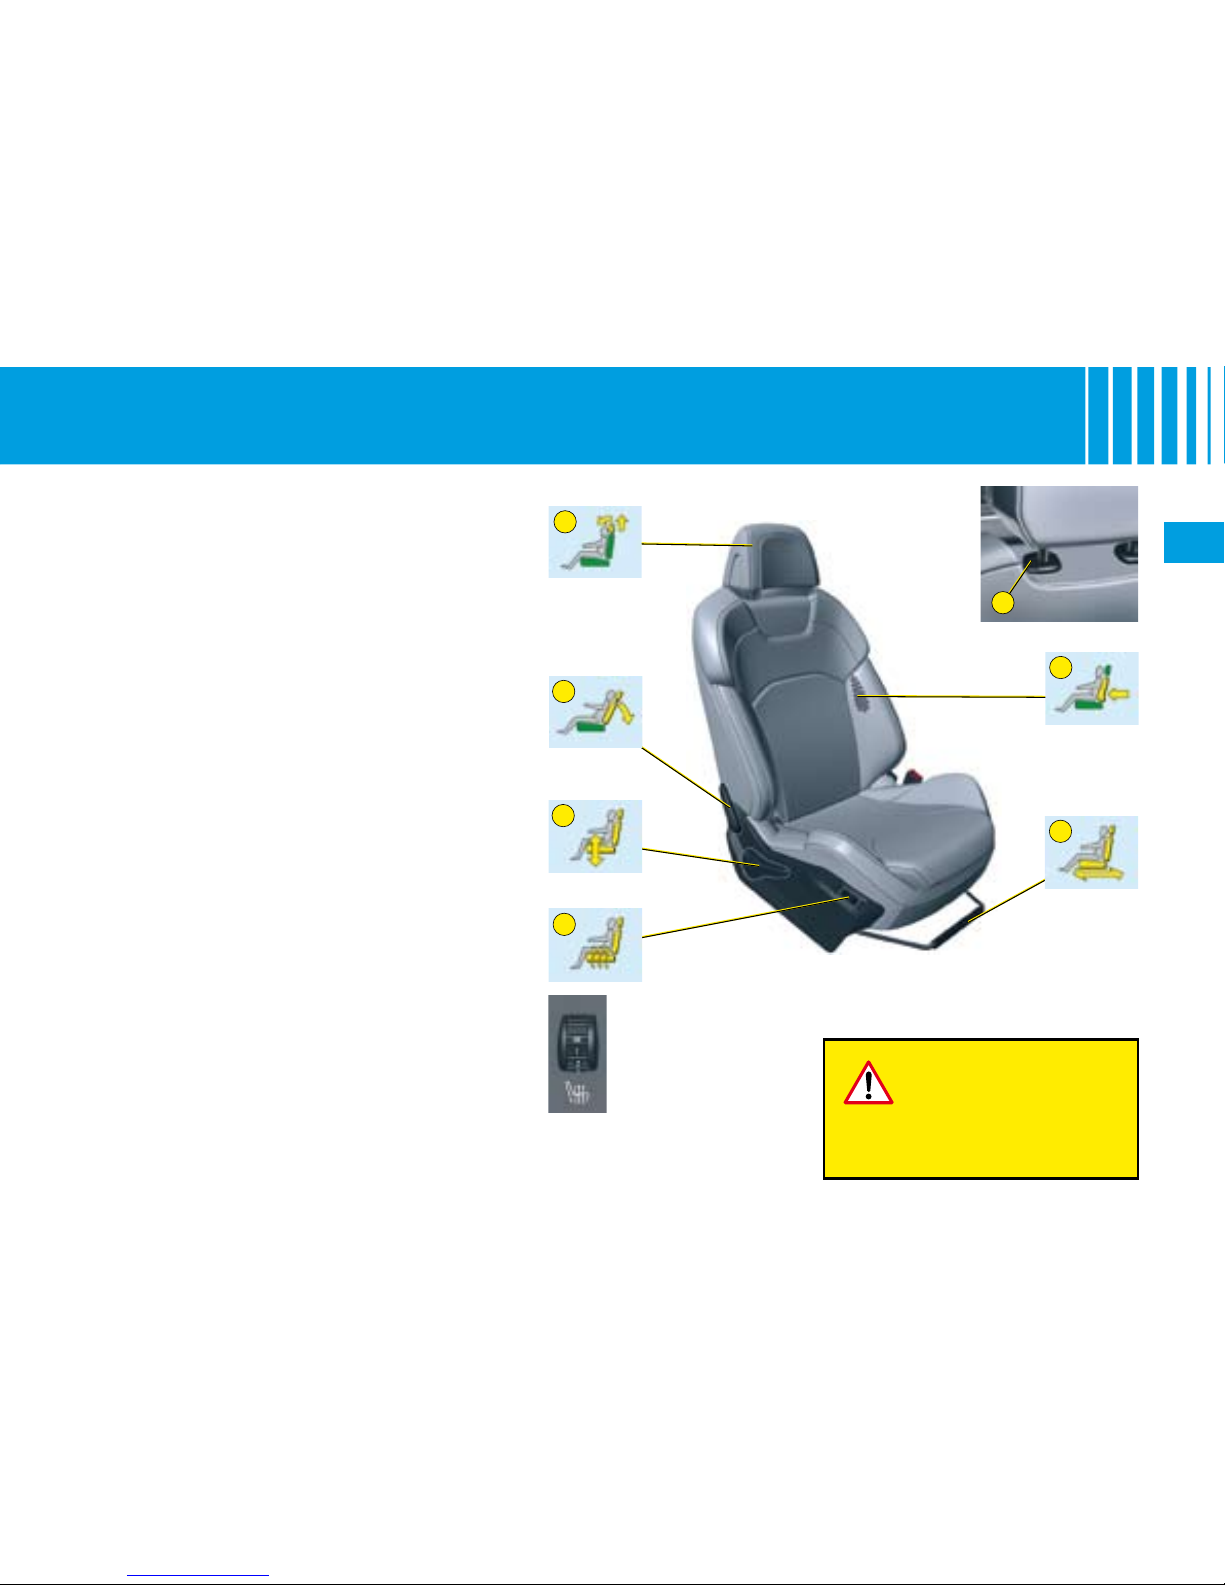
53
II
A
5
4
3
2
1
6
F R O N T SEAT S
M A N UA L AD JU ST ME NT S
1. Adjustments to the height and
angle of the head restraint
To raise it, pull upwards.
To lower it, press on the control A to unlock
it, and simultaneously on the head restraint
itself. The adjustment is correct when the
top edge of the head restraint is at the same
height as the top of the head. It is also tiltadjustable.
To raise it, press control A to unlock it, then
pull it upwards.
2. Adjustment of the backrest angle
Use the control to adjust the backrest
angle.
It is possible to recline the backrest angle to
45° by pushing it until it locks.
3. Adjustment of the seat height and
angle
Raise or lower the control the number of
times required to obtain the desired position.
4. Longitudinal adjustment of seat
Lift the control bar and adjust to the desired
position.
5. Adjustment of lumbar support
Turn the control and adjust to the desired
position.
6. Heated seat controls
Note: The heated seats only operate when
the engine is running.
0: Off.
1: Gentle.
2: Medium.
3: Strong.
For your safety, do not
drive with th e head
restraints removed ;
th e s e mus t b e i n
place and correctly
adjusted.
Page 58
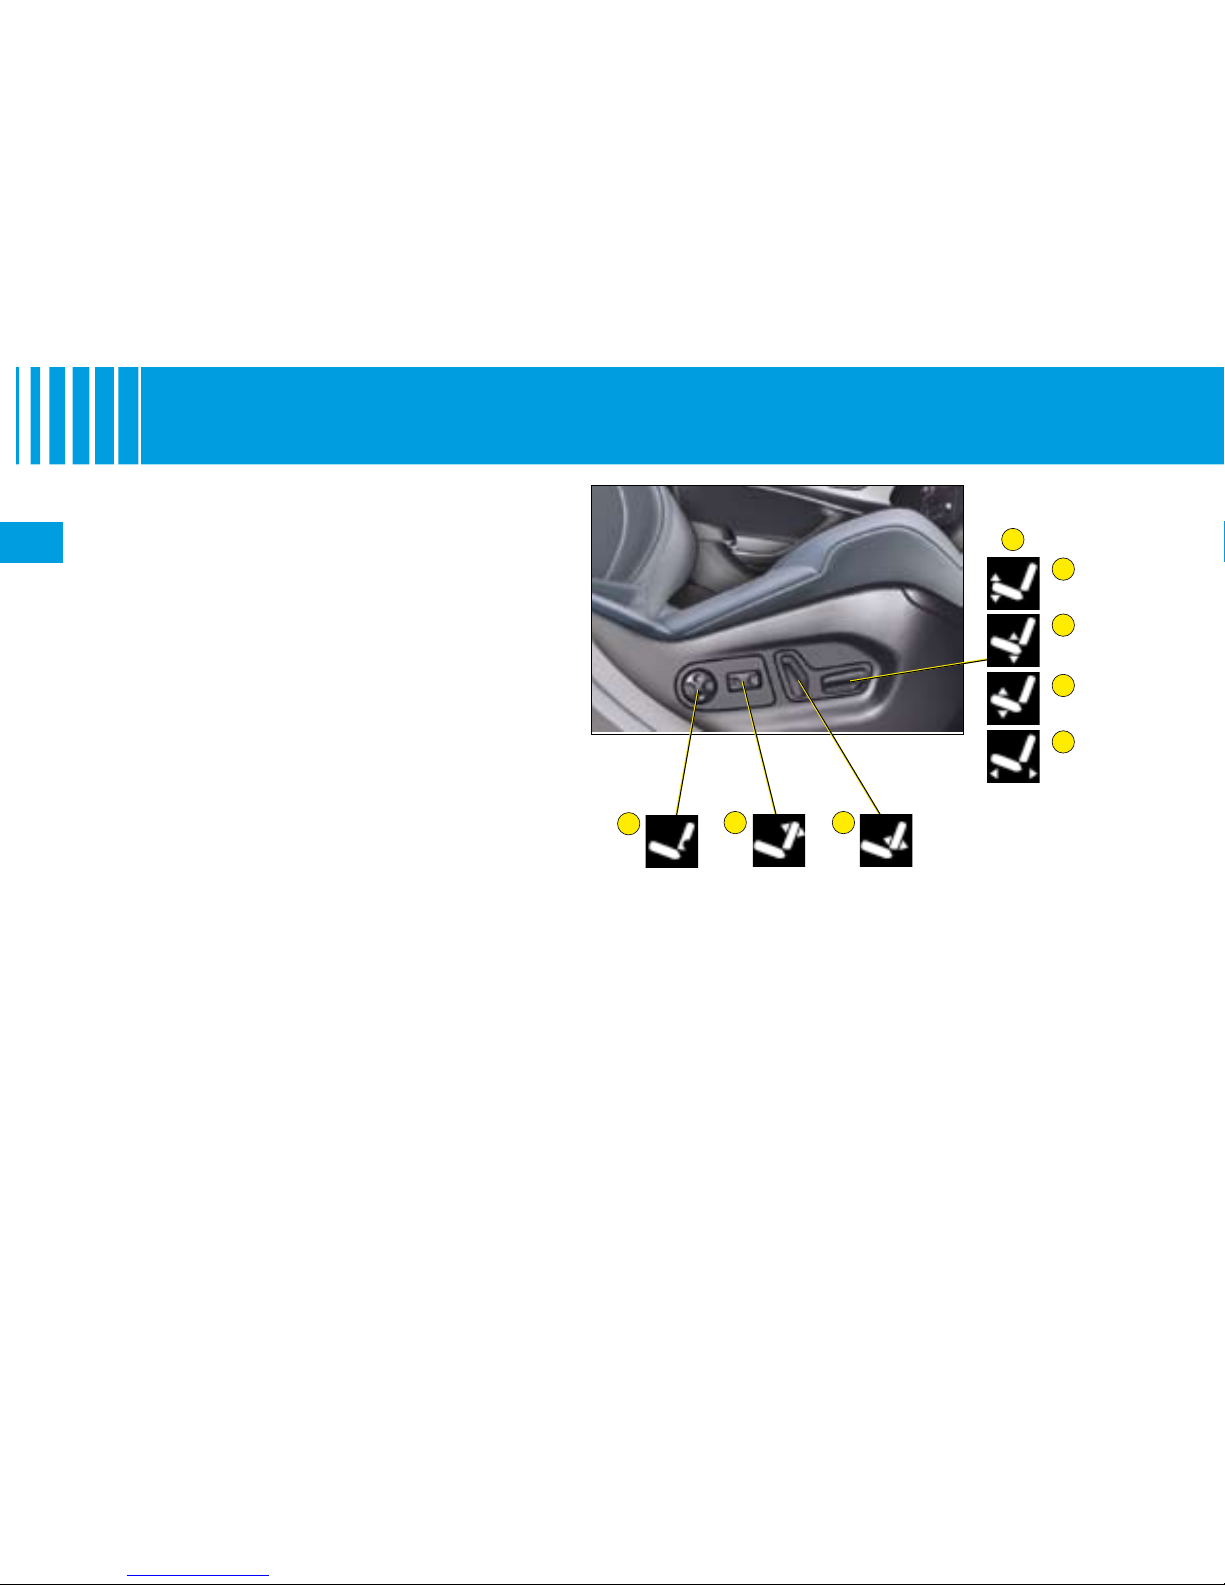
54
II
2
1
3
4
a
b
c
d
F R O N T SEAT S
E L E CT RI CA L AD JU ST ME NT S
To adjust the electrical seats,
switch on the ignition or start the
engine if the vehicle has gone into
economy mode.
2. Adjustment of the
backrest angle
Move the control forwards or
backwards to adjust the backrest angle.
3. Adjustment of the angle
of the top of the backrest
Move the control forwards or
backwards to adjust the angle
of the top of the backrest.
4. Adjustment of lumbar
support
This function allows you to independently adjust the height and
level of lumbar support.
Move the control:
Forwards or backwards to
increase or reduce the lumbar
support.
Upwards or downwards to
raise or lower the lumbar support zone.
•
•
1. Adjustment of the seat
height and angle, and
longitudinal adjustment
a Raise or lower the front of
the control in order to raise or
lower the front of the seat.
b
Raise or lower the rear of the
control in order to raise or
lower the rear of the seat.
c Simultaneously raise or lower
the front and rear of the control in order to raise or lower
the entire seat.
d Slide the control forwards or
backwards to move the seat
forwards or backwards.
Note: Seat adjustments are also
possible for a short period after
opening one of the front doors or
switching off the ignition.
Page 59
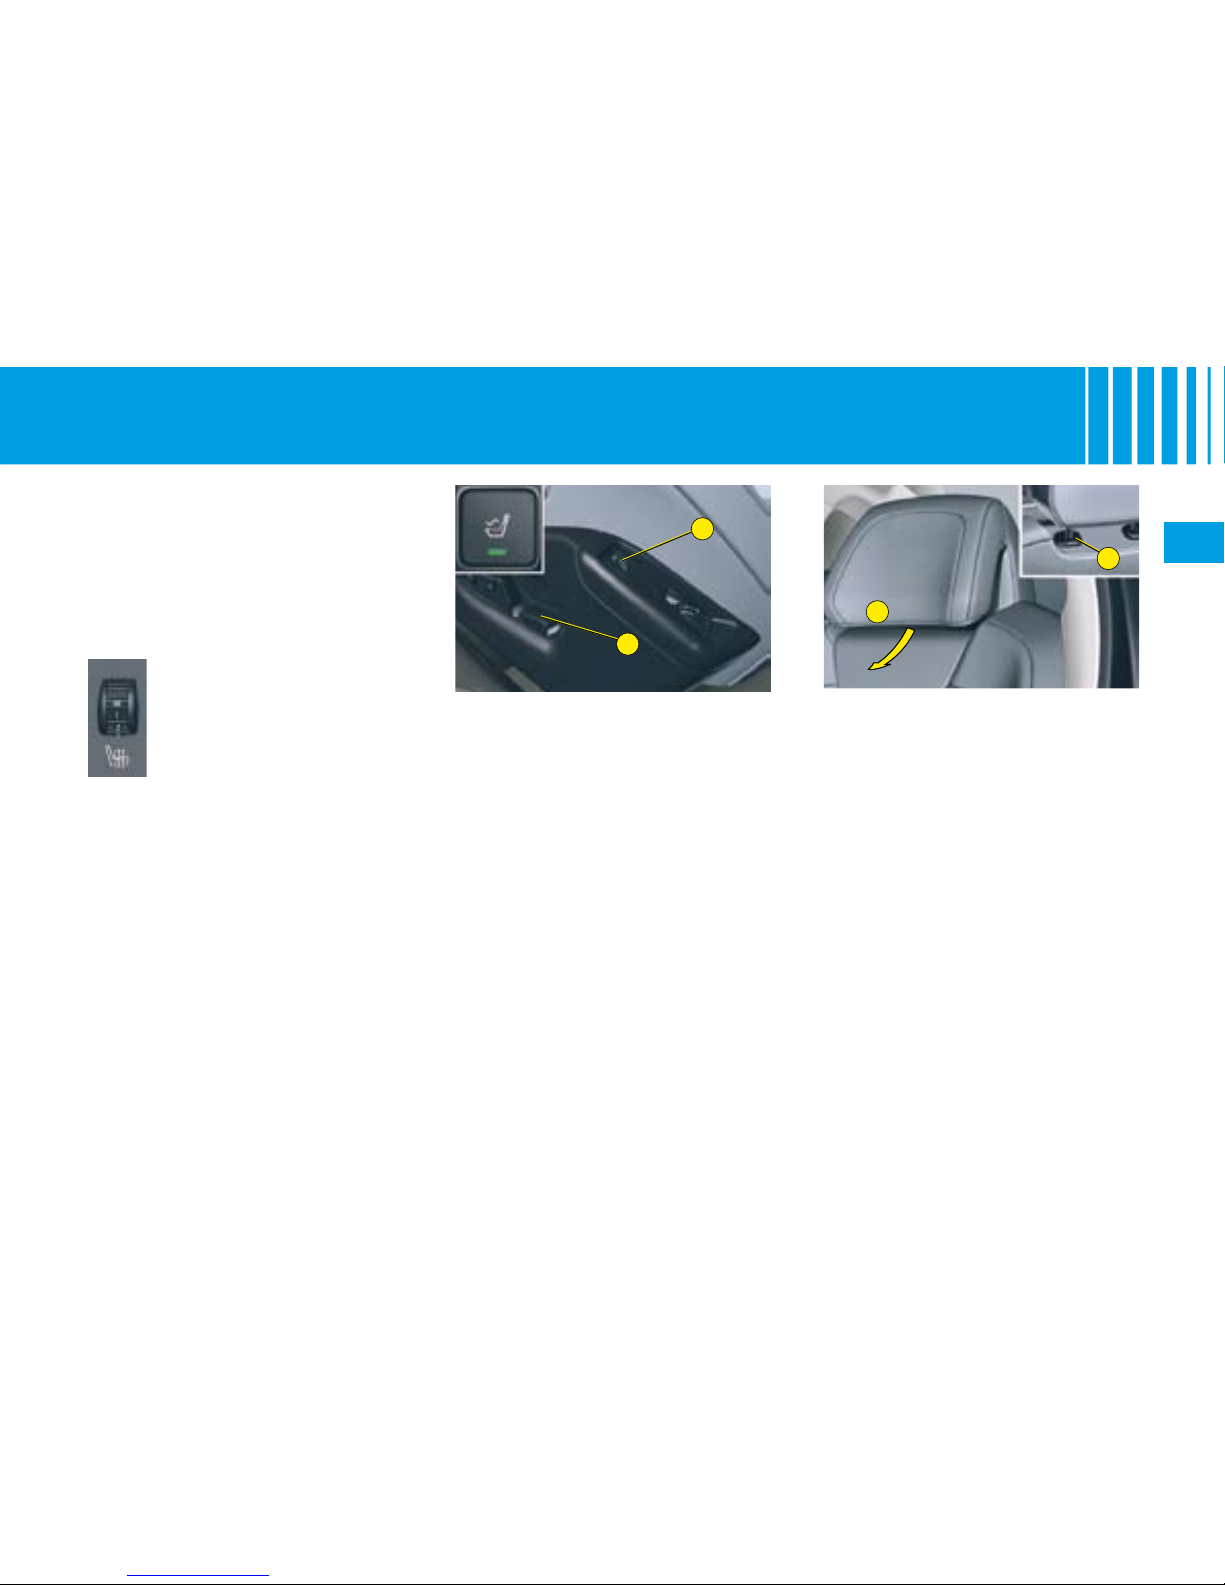
55
II
C
B
D
A
F R O N T SEAT S
E L E CT RI CA L AD JU ST ME NT S
The Welcome function
When the driver's door is opened
and the ignition is off, the seat
moves to ease accessing or leaving the vehicle.
Take care not to hinder the forwards or backwards movement of
the seat.
You may activate or deactivate this
function using the “Main Menu” on
the instrument panel screen. To do
so, select “Vehicle parameters /
Comfort / Driver welcome”.
Head restraint height and
angle adjustments on
electric seats
To adjust the angle of the head
restraint, push back or pull forward
section C of the head restraint until
you reach the desired position.
To raise it, pull upwards.
To lower it, press on the control D
to unlock it, and simultaneously on
the head restraint itself.
To raise it, press control D to unlock
it, then pull it upwards.
0: Off.
1: Gentle.
2: Medium.
3: Strong.
Controls for the heated
seats
The front seats can be heated individually. With the engine running,
use control A, located beside the
seats to choose between three
heating levels:
Massage function
This function provides the driver
with a back massage.
To activate the massage, with the
engine runnuing, press on button B. The warning lamp comes on
and the massage function is activated for a period of 1 hour. During
this time, massage is performed
in cycles of 6 minutes (4 minutes
of massage followed by 2 minutes
break). In total, the system will perform 10 cycles.
After 1 hour, the function is deactivated. The warning lamp goes out.
You can deactivate the massage
function at any time by pressing on
button B.
Page 60
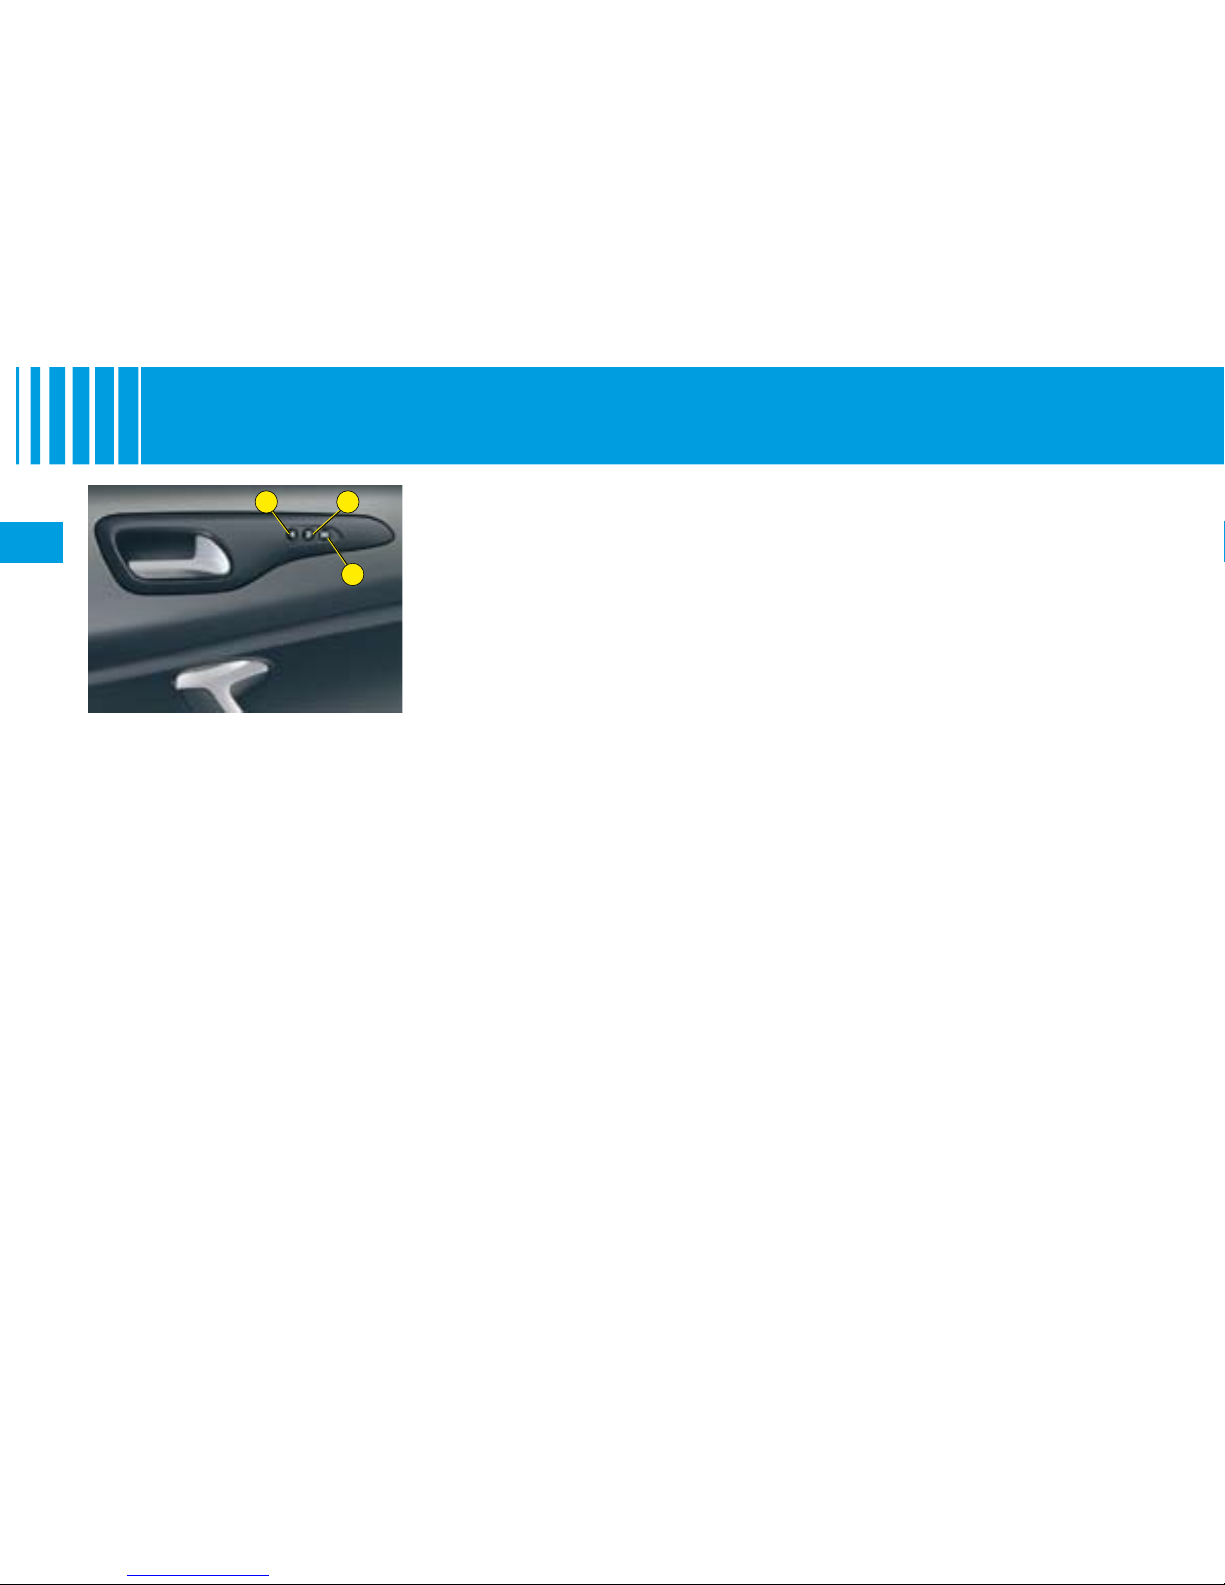
56
II
21
M
M E M O R I S AT I O N O F D R I V E R ' S
A D J U S T M E N T S
Memorisation of driving
positions
a. Place the igntion key in “Drive”
position (second position).
b
Adjust your seat, the exterior
rear view mirrors and the air
conditioning.
c
Press successively on button
M then on button 1 (rst driving
position) or 2 (second driving
position).
The memorisation is conrmed by
a sound signal.
Note: The memorisation of a
new driving position cancels and
replaces the previous one.
The memorisation function allows
you to make the following dashboard adjustments:
Driver's seat.
Exterior rear view mirrors.
Air conditioning (temperature
and air ow).
You have the possibility to memorise two driving positions using
buttons 1 and 2.
•
•
•
Recall of a memorised
driving position
Vehicle stationary (ignition
on or engine running)
Press briey on button 1 or 2 to
recall the corresponding memorised position.
The completion of the adjustments
is conrmed by a sound signal.
Vehicle in motion
Keep button 1 or 2 pressed down
to recall the corresponding memorised position.
Page 61
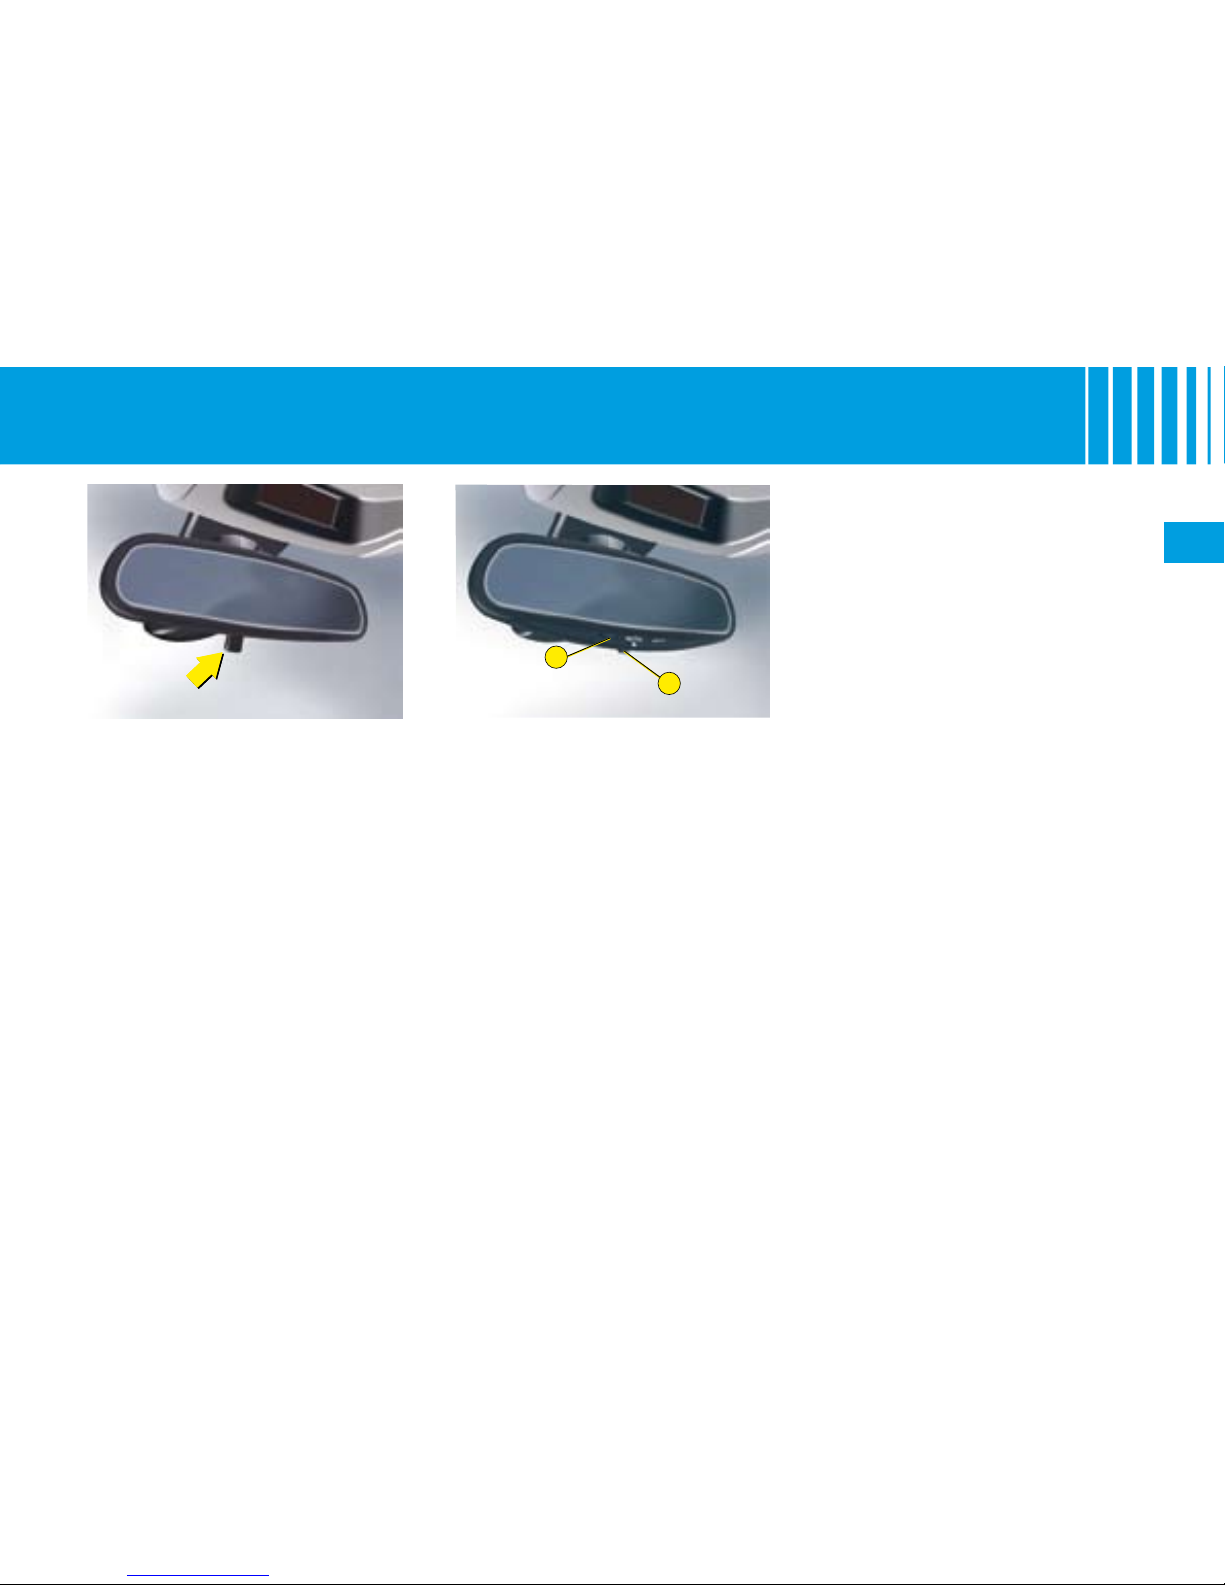
57
II
1
2
R E A R V I E W M I R R O R S
Operation
Press on button 1.
Warning lamp 2 on: automatic
mode.
Warning lamp 2 off: automatic
mode stopped. The mirror
remains in its lightest denition.
Note: In order to ensure optimal
visibility when manoeuvring, the
interior and exterior rear view mirrors lighten when reverse gear is
engaged.
•
•
Automatic electrochrome
interior and exterior rear
view mirrors
These provide an automatic and
progressive change between day
use and night use.
To prevent dazzle, the mirrors automatically become darker as a function of the intensity of light coming from the rear. They become
lighter as soon as the brightness
diminishes, thus ensuring optimal
vision.
Interior rear view mirror
The lever on the lower edge enables you to place the rear view mirror in either of two positions.
Day position: the lever is not visible.
Night position (anti-dazzle):
the
lever is visible.
Page 62
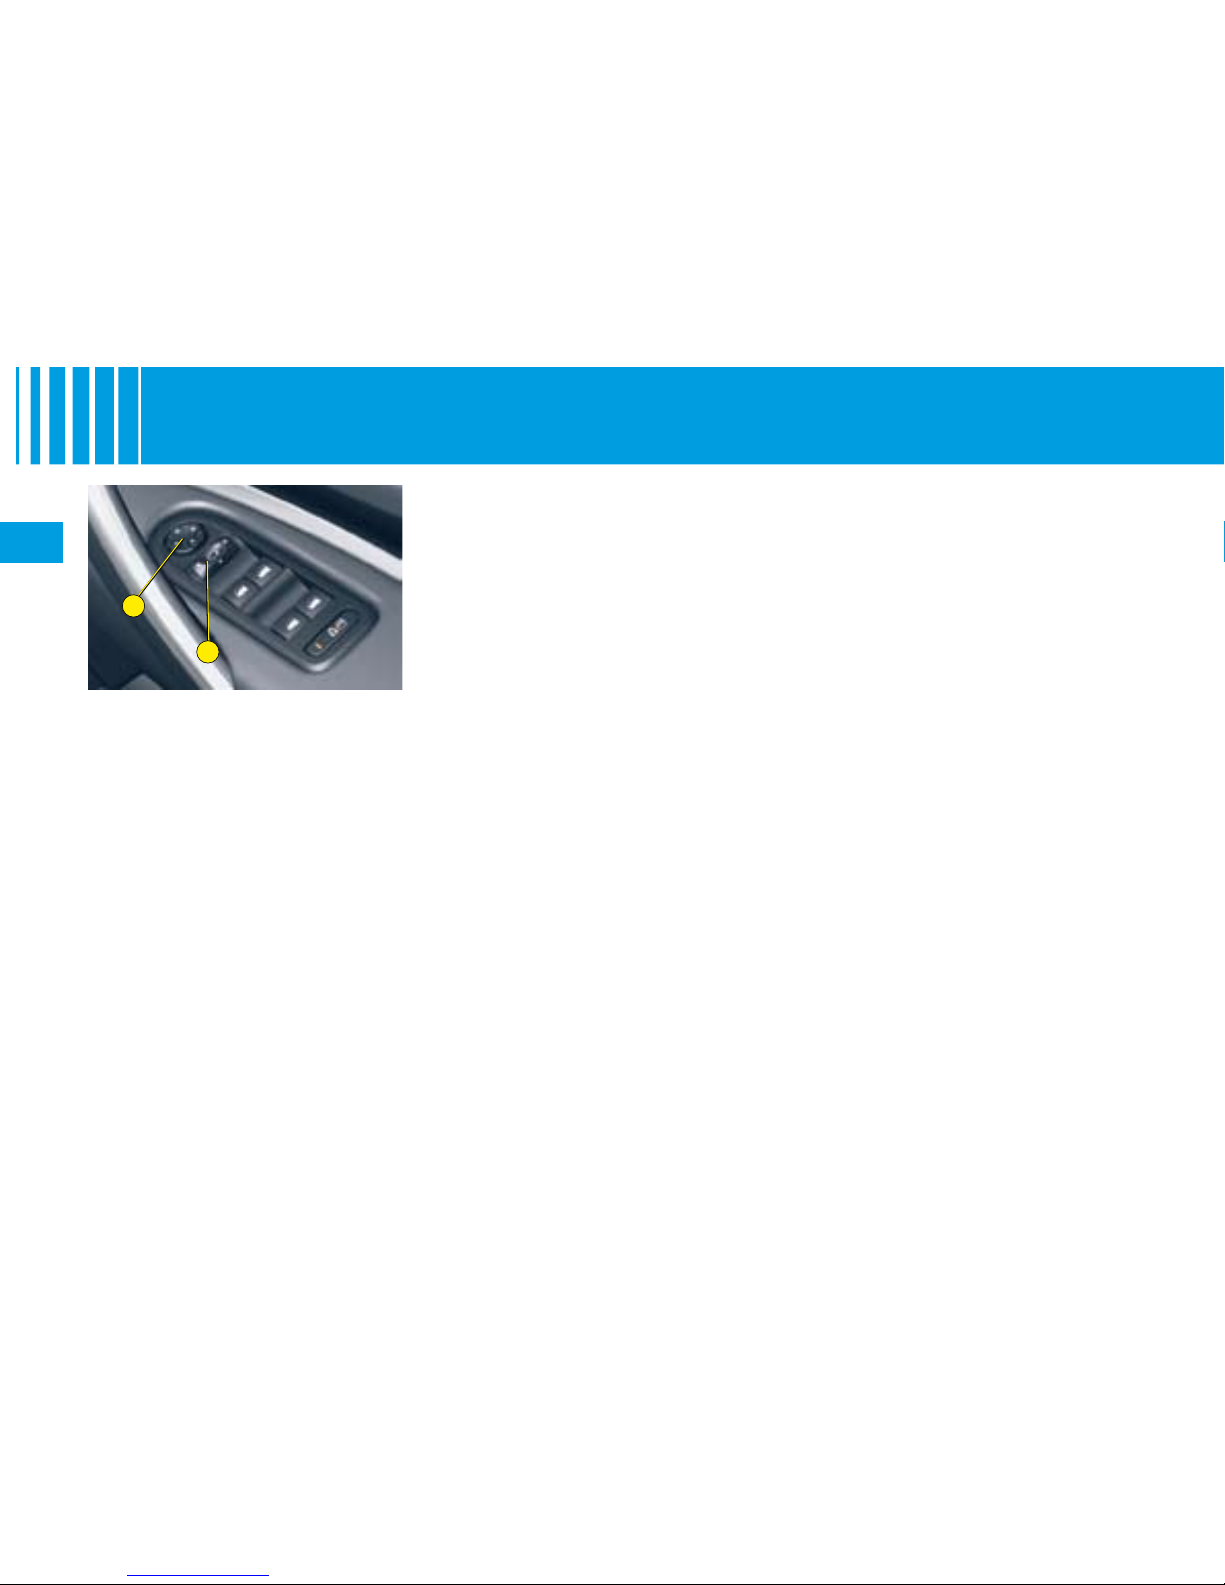
58
II
1
2
R E A R V I E W M I R R O R S
Fold-back of door mirrors
When the vehicle is parked, the
door mirrors can be folded back
either manually or electrically.
Electric fold-back
From the central position, one
press towards the rear on control 1
folds the rear view mirrors back.
To return them to the initial position,
press again on control 1 towards
the rear.
Automatic fold-back on
locking
Automatic fold-back operates when
you lock the doors.
The opposite movement will take
place on unlocking, unless foldback has been requested using
control 1 before switching off the
ignition.
Note: Automatic fold-back of the
rear view mirrors can be deactivated. Contact a CITROËN
dealer.
In reverse gear: adjustment
of the indexed positions for
the passenger’s and driver’s
rear view mirrors
With the engine running:
1. Select the (driver's or passen
-
ger's) rear view mirror using
control 1.
2. Engage reverse gear, the mirror
glass automatically positions
itself to improve your vision of
the pavement.
3.
Adjust the mirror to your preference using control 2.
These adjustments are automatically memorised.
The rear view mirrors resume their
original position:
20 seconds after reverse gear
is disengaged.
Once the vehicle reaches a
speed of over 10 km/h (6 mph).
Deactivation of the driver's
and passenger's indexed
rear view mirrors function
To deactivate the function, move
control 1 to the central position.
Note: this action cancels the
indexing of the rear view mirrors if
in progress.
•
•
Electric door mirrors
adjustment
This can operate when the ignition
is switched on.
The driver selects the rear view
mirror by moving control 1, to the
left or to the right, then adjusts the
mirror in the four directions by acting on control 2.
Demisting-deicing of the rear view
mirrors is linked with that for the
rear screen.
The adjustments you have made to
the rear view mirrors are included
in the memorisation of driving positions. See “Memorisation of driver's adjustments”.
Page 63
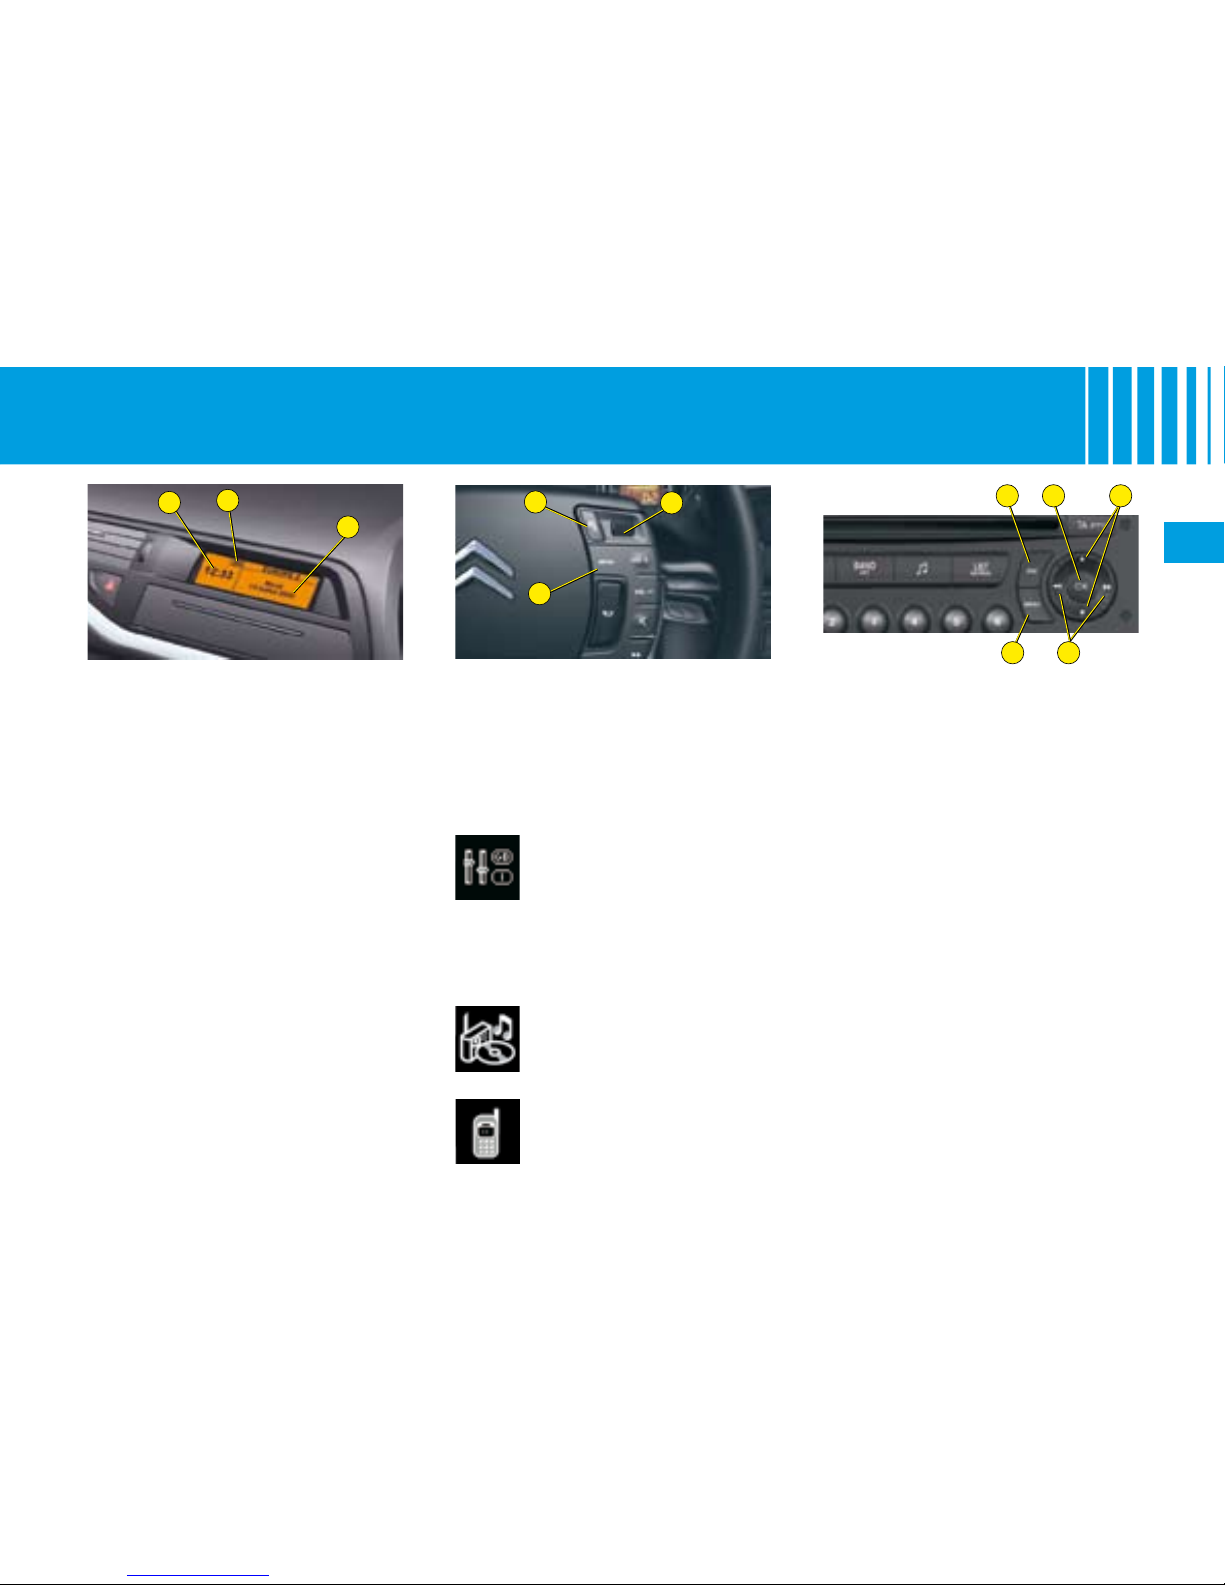
59
II
B
C
A
B D
C
A C
2
3
1
DISPLAY CONFIGURATION
To adjust the display
brightness and contrast:
1 Press on A.
2 Using
C, select the “Brightness -
video adjustments” menu. Conrm by pressing on C on the
steering wheel or on D on the
radio panel.
3
Select the display conguration with a press on C. Conrm
by pressing on C on the steering wheel or on D on the radio
panel.
4 Select the brightness adjust-
ment. Conrm by pressing on C
on the steering wheel or on D
on the radio panel.
5 Using
C, select normal or alter-
native display mode, then validate by pressing on C on the
steering wheel or on D on the
radio panel. To adjust the brightness, select “+” or “-” and con-
rm the adjustment by pressing
on C.
6 Validate “
OK” on the screen.
Radio - CD
(See “Radio” chapter).
Display conguration,
allowing you to adjust:
The display brightness
and contrast.
The time and date.
The units used for the
outside temperature
display.
•
•
•
MAIN MENU
Press on control A to the right of
the steering wheel to display the
multifunction display “Main Menu”.
This menu gives you access to the
following functions:
Bluetooth® hands-free
kit
(See “Radio” chapter).
The driver is recommended not to
concern himself with the display
controls while driving.
1.
Time.
2.
Outside temperature.
3.
Date - Display zone.
When the outside temperature
is between +3 °C and –3 °C, the
temperature display ashes (risk
of ice).
Controls
A. Access to the multifunction dis-
play main menu.
B.
Cancellation of the operation or
return to the previous display.
C. Scrolling through the multifunc
-
tion display menus.
Validation using steering wheel
controls.
D.
Validation using radio panel.
Note: The outside temperature
displayed may be higher than the
actual temperature if the vehicle is
stationary in bright sunlight.
M U LT I F U N C T I O N D I S P L AY
Page 64
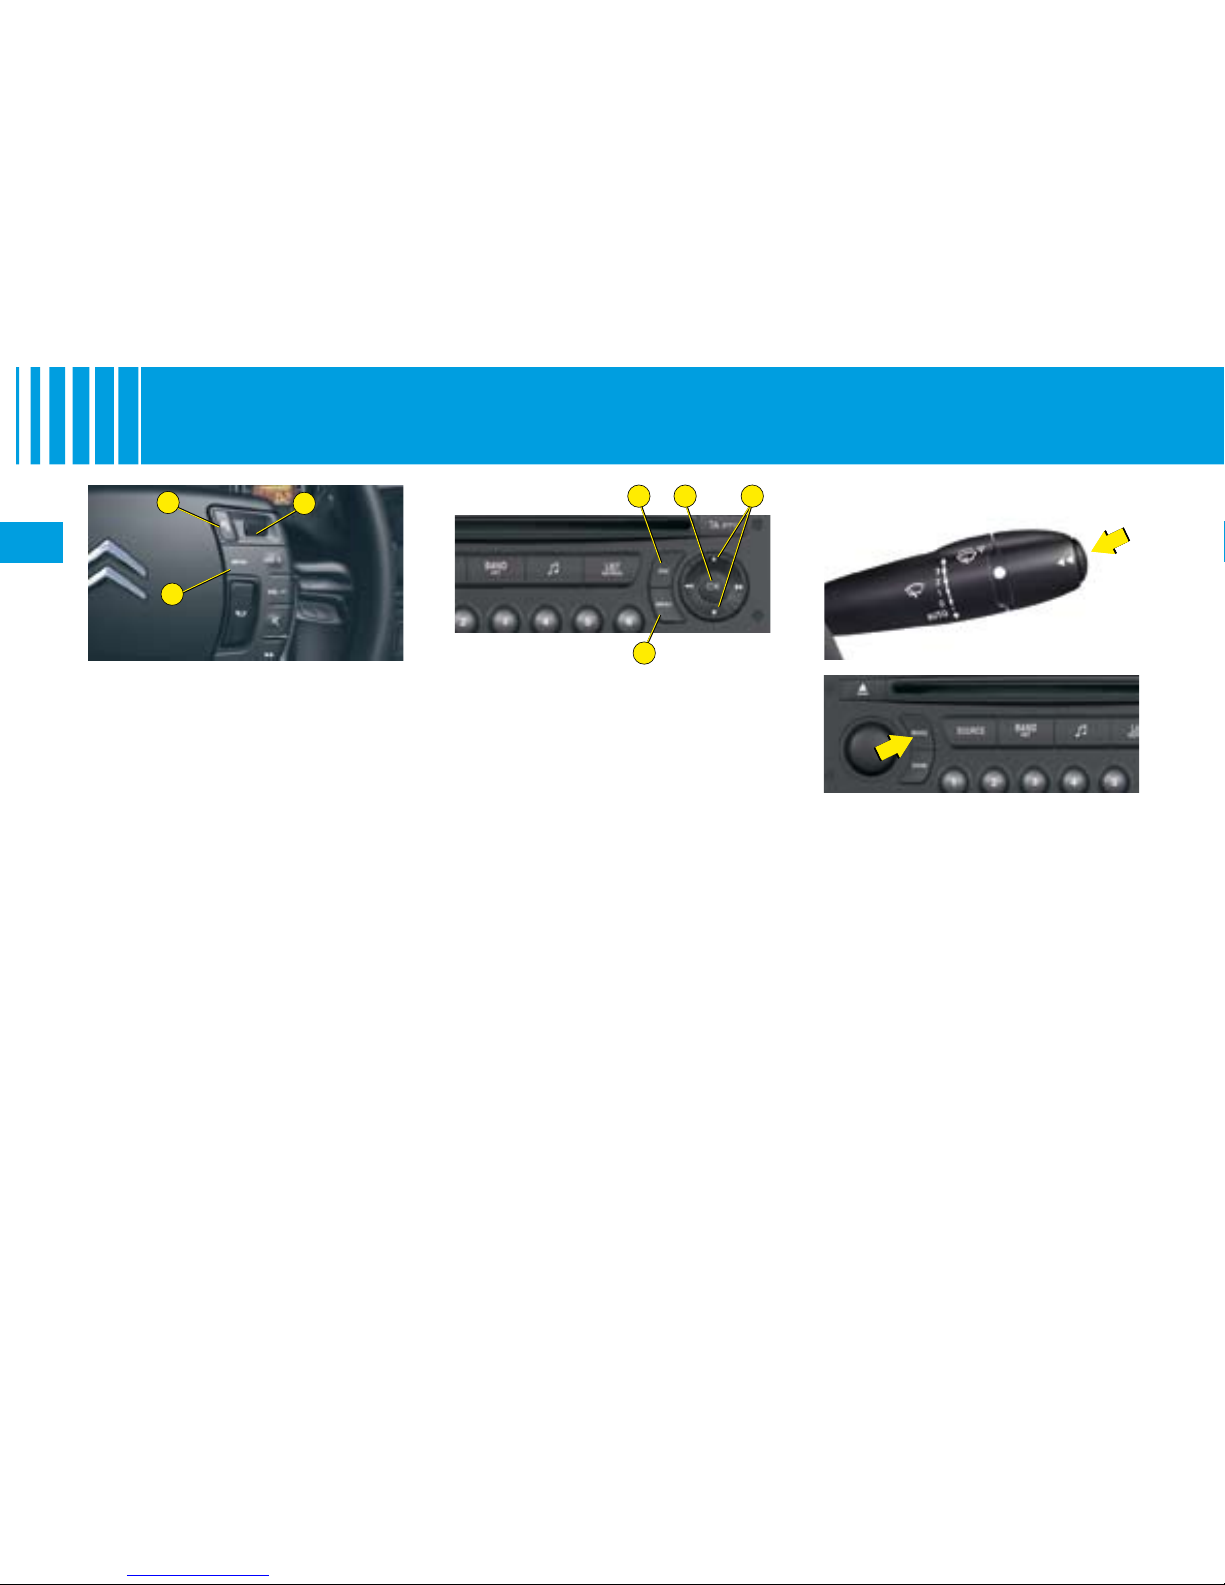
60
II
B
C
A
B D C
A
To choose the units for
the outside temperature
display:
1 Press on A.
2 Using
C, select the “Choice of
temperature unit” menu. Conrm by pressing on C on the
steering wheel or on D on the
radio panel.
3 Select the unit using
C. Conrm
by pressing on C on the steering wheel or on D on the radio
panel.
4 Validate “OK” on the screen.
To adjust the date and the
time:
1 Press on A.
2 Using
C, select the “Date and
time adjustment” menu. Conrm by pressing on C on the
steering wheel or on D on the
radio panel.
3
Select the display conguration with a press on C. Conrm
by pressing on C on the steering wheel or on D on the radio
panel.
4 Using B, adjust the date and
time, then conrm by pressing
on C on the steering wheel or
on D on the radio panel.
5 Press
C to select the values
you wish to modify. Conrm
by pressing on C on the steering wheel or on D on the radio
panel.
6 Validate “
OK” on the screen.
Selection of the type of
information displayed
(MODE)
Consecutive presses on the end
of the wiper control stalk or the
MODE button on the radio allow
you to select the type of information presented on the multifunction
display (date or radio/CD/CD MP3/
CD changer).
M U LT I F U N C T I O N D I S P L AY
Page 65
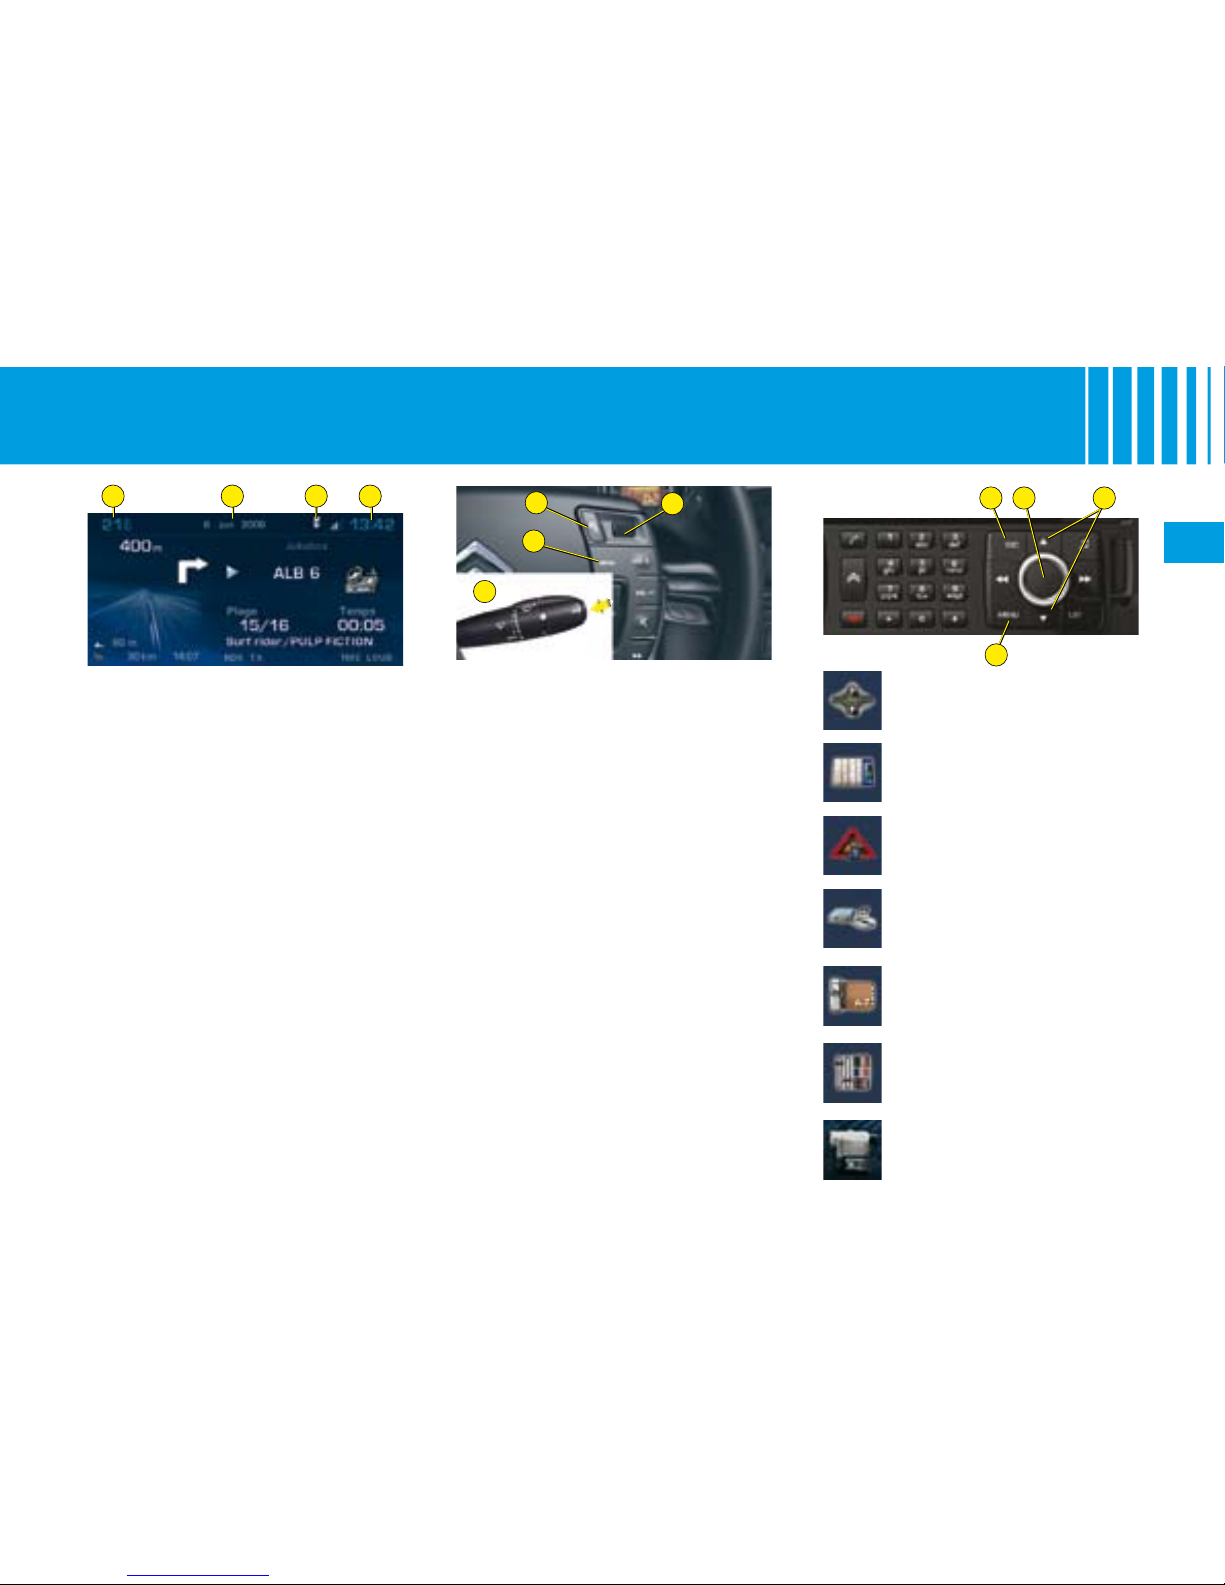
61
II
B D C
A
B
C
A
E
1 2 3 4
M U LT I F U N C T I O N D I S P L AY
T E L EM AT IC S
Controls
A. Access to the telematics multi-
function display menu.
B.
Cancellation of the operation or
return to the previous display.
C. Scrolling through the menus of
the telematics multifunction display. Validation using steering
wheel controls.
D.
Validation using radio panel.
E. Selection of the type of informa
tion presented on the telematics multifunction display (date,
radio/CD/CD MP3/CD changer/
jukebox, navigation information,
telephone).
Trafc information
See NaviDrive instructions.
Navigation/guidance
See NaviDrive instructions.
Audio
See NaviDrive instructions.
Main Menu
Press on button A to display the
telematics multifunction display
“Main Menu”. This menu gives you
access to the following functions:
Telephone and
telematic services
See NaviDrive instructions.
Map
See NaviDrive instructions.
1
Outside temperature.
2
Date.
3
Telephone.
4 Time.
When the outside temperature
is between +3 °C and –3 °C, the
temperature display ashes (risk
of ice).
Note: The outside temperature
displayed may be higher than the
actual temperature if the vehicle is
stationary in bright sunlight.
The driver is advised not to use the
controls described opposite whilst
driving.
Conguration,
allows you to adjust various
settings (date, time...).
Video Menu,
allows you to adjust various video settings.
Page 66
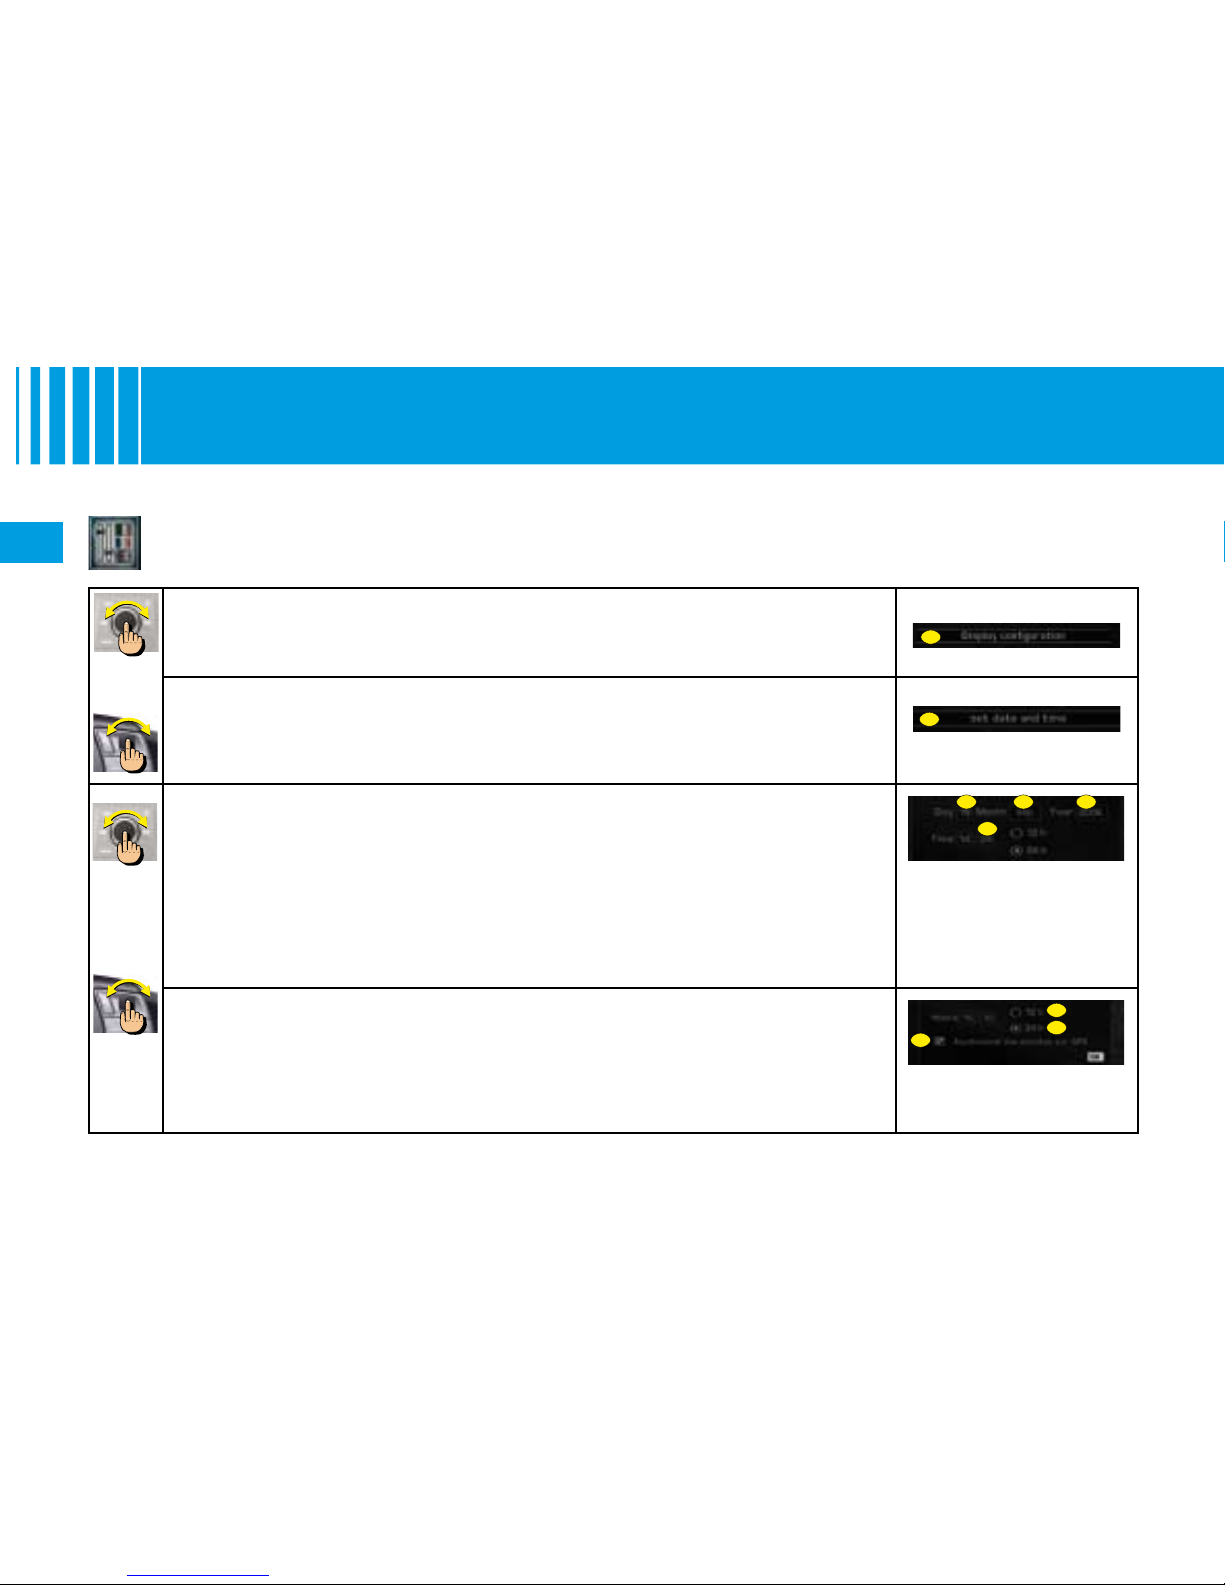
62
II
A
B
F
C D E
G
I
H
M U LT I F U N C T I O N D I S P L AY
T E L EM AT IC S
Other functions of the conguration menu: See NaviDrive instructions.
In the conguration menu:
Rotate the control to select the menu
A.
Press on the control to validate.
•
•
Rotate the control to select the menu B.
Press on the control to validate.
•
•
Rotate the control to select a eld:
C for the day
D for the month
E for the year
F for the time.
Press on the control to validate.
Rotate the control or use the alphanumeric keypad to select the digits that
make up the date and the time.
Press on the control to validate each eld.
-
-
-
-
•
•
•
Rotate the control to select:
G for 12 hour mode.
H for 24 hour mode.
I for an automatic adjustment of minutes thanks to GPS.
Press on the control to validate.
-
-
-
•
To adjust the date and the time:
Press on the MENU button.
Rotate the control to select the Conguration icon.
Press on the control to validate.
•
•
•
or
or
Page 67
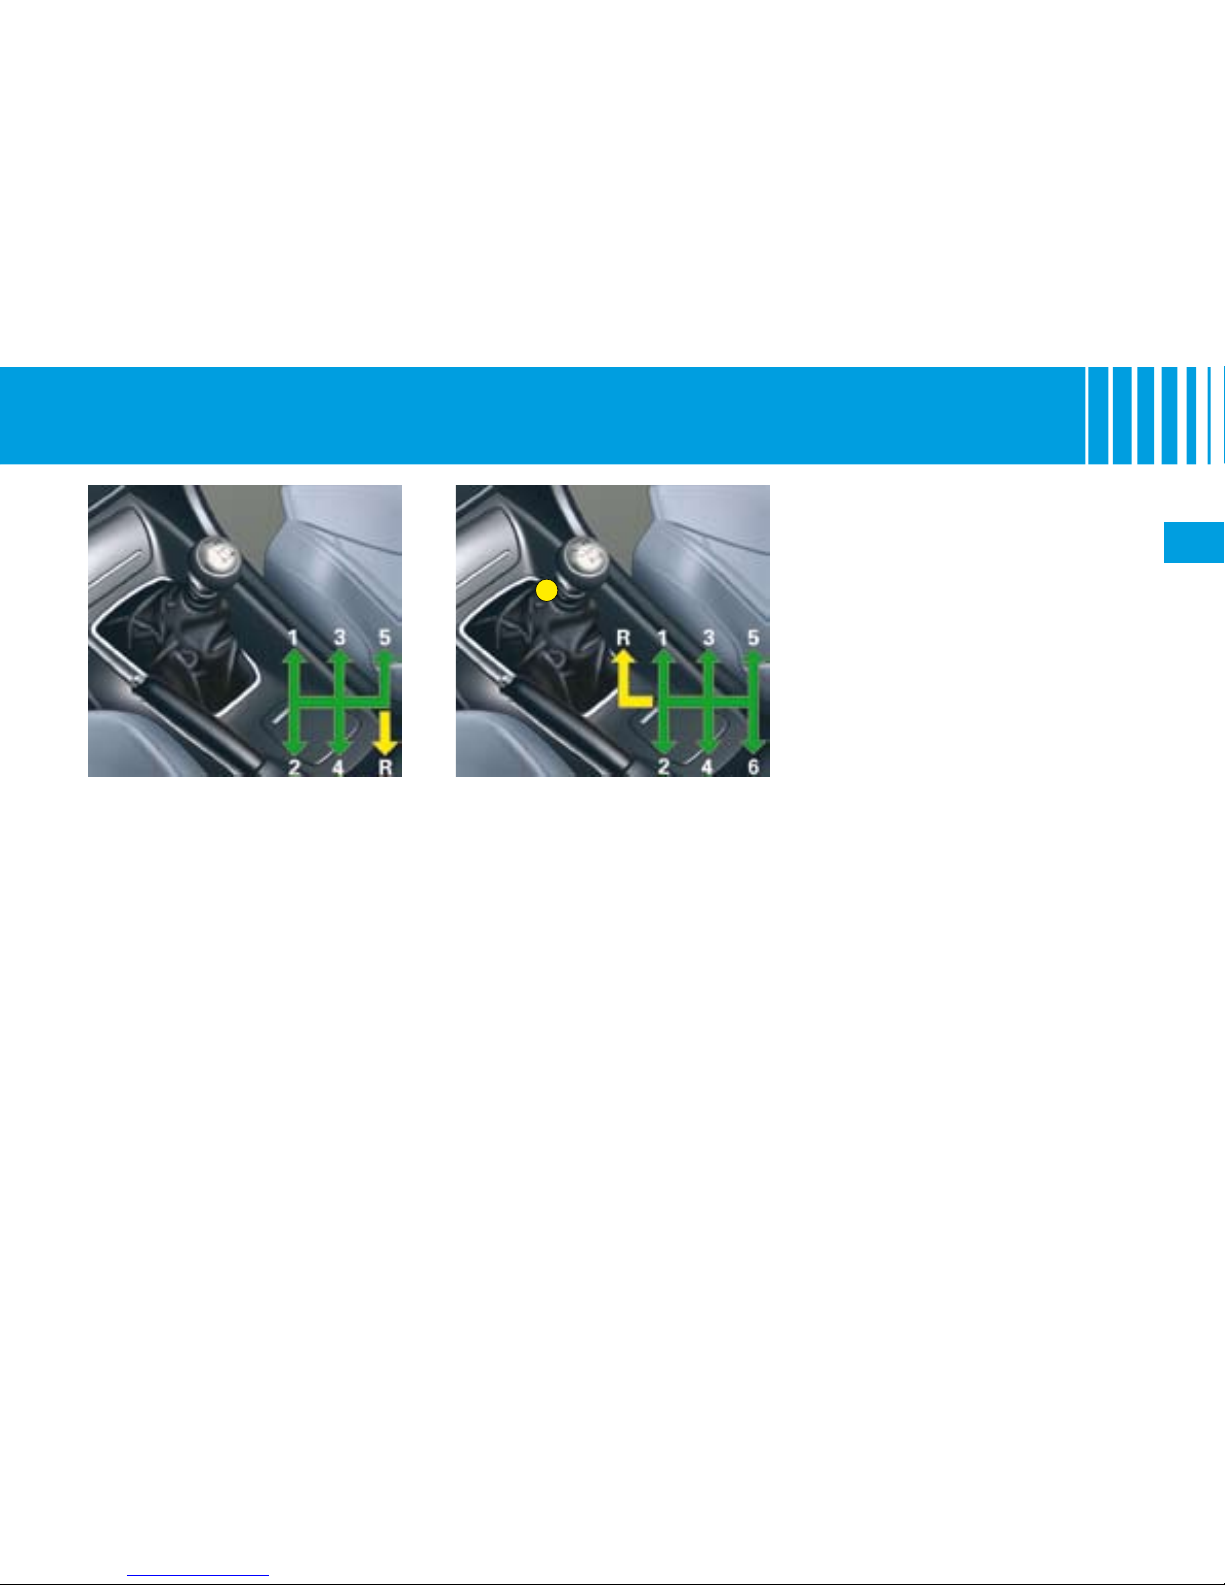
63
II
A
M A N U A L GEARBOX
5 speed gearbox
Reverse gear
Do not select reverse gear until the
vehicle is completely stationary.
Depress the clutch pedal and wait a
few moments before gently engaging reverse gear.
6 speed gearbox
Reverse gear
Lift the collar A to engage reverse
gear.
Do not select reverse gear until the
vehicle is completely stationary.
Depress the clutch pedal and wait a
few moments before gently engaging reverse gear.
Page 68
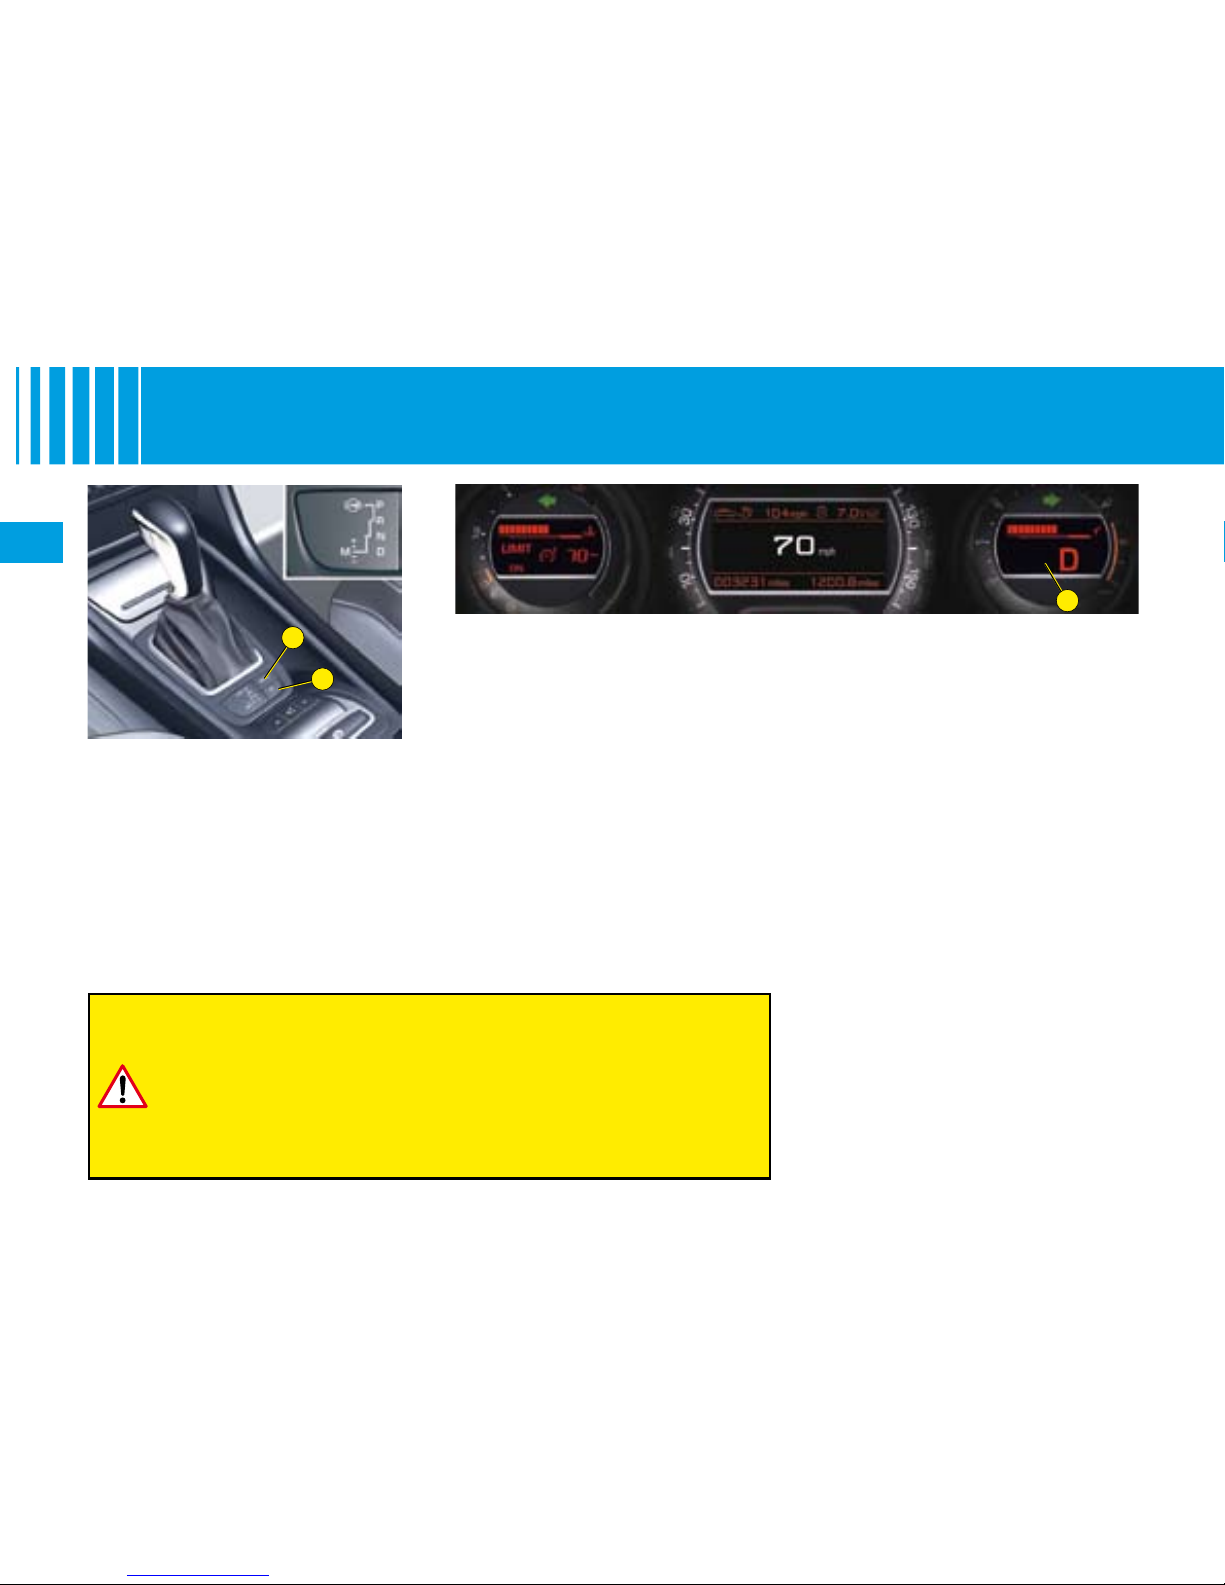
64
II
B
A
C
A U TOMAT I C G E A R B O X
For safety:
The gear lever can only be disengaged from position P if
you are pressing the brake pedal.
When the driver's door is opened, a beep sounds if the
gear lever is not in position P.
Before leaving the vehicle, make absolutely certain that
position P is selected.
•
•
•
Position of the gear selector
The driving mode and the position
of the gear lever are displayed in
dial C of the instrument panel.
4 and 6 speed automatic
gearbox
Parking (Position P).
Reverse gear
(Position R).
Neutral
(Position N).
•
•
•
The automatic gearbox offers
you:
Operation in auto-active
mode, with automatic adap-
tation to your style of driving
as well as to the road prole
(Position D).
Operation in sequential
mode, with manual gear
changing (Position M).
Operation in automatic
SPORT mode (Position D)
and press button A.
Operation in automatic
SNOW mode (Position D)
and press button B.
•
-
-
-
-
Page 69
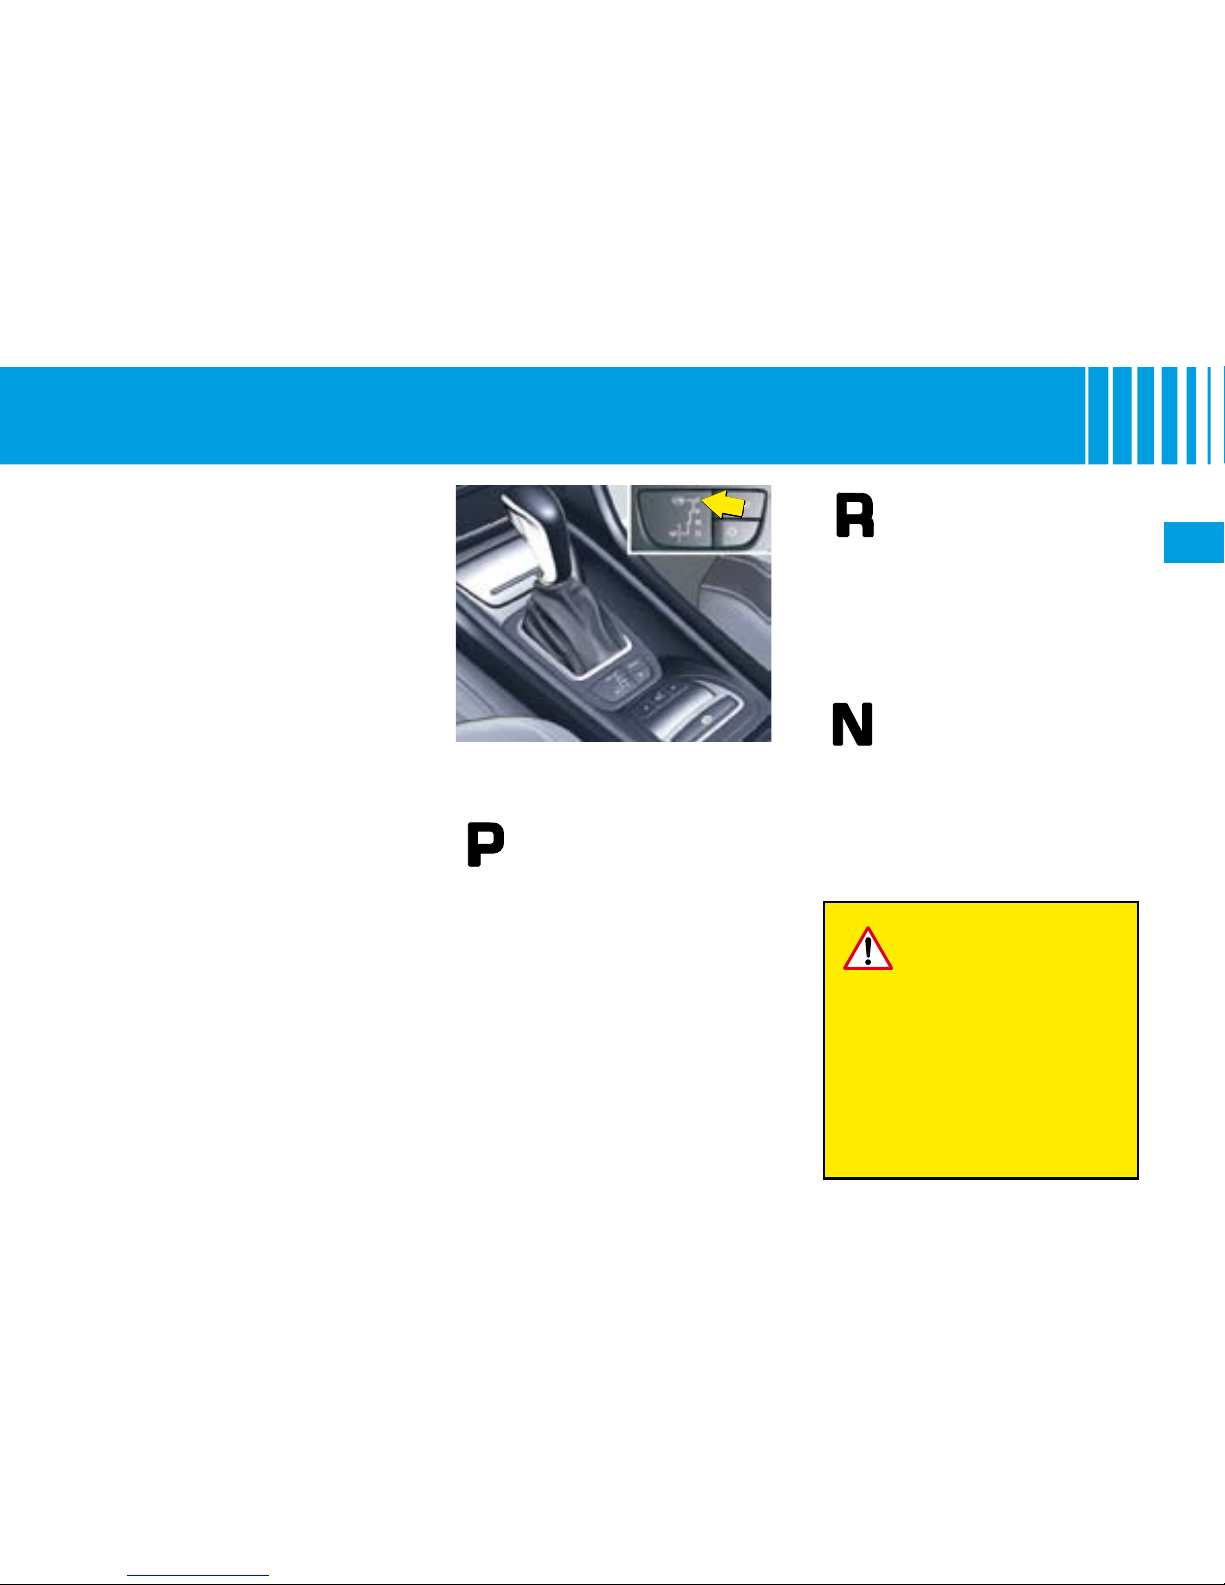
65
II
A U TOMAT I C G E A R B O X
The engine can only be started
when the lever is at position P
or N.
A safety device ensures that starting is impossible in the other positions.
Once the engine has been started,
with the gear lever at P, press on
the brake pedal then place the
lever at:
D for automatic mode.
R for reverse gear.
M to change to manual mode.
The change from position D (driving in automatic mode) to position M (driving in sequential mode)
or vice versa can be made at any
time.
The gear selected is displayed on
the instrument panel.
•
•
•
Using the automatic
gearbox
Do not select position N if the vehicle
is moving (except in
absolute necessity).
Never select positions P
or R if the vehicle is not
completely stationary.
If while the vehicle is moving you inadvertently select
position N, leave the engine
to idle before engaging position D or M.
•
•
Parking
To avoid any movement of
the vehicle when parked,
place the gear lever to P.
Do not engage until the vehicle is
completely stationary. In this position, the driving wheels are locked.
Check that the selector is in the
correct position. Securely apply
the parking brake.
Reverse gear
Do not engage until the
vehicle is stationary, foot
on brake. To avoid gearbox snatching, do not accelerate
immediately after the selection.
Note: Juddering may be felt when
changing from position P to R on a
steep gradient.
Neutral
Do not select position N
if the vehicle is moving,
unless absolutely nec-
essary (vehicle being
towed).
Page 70
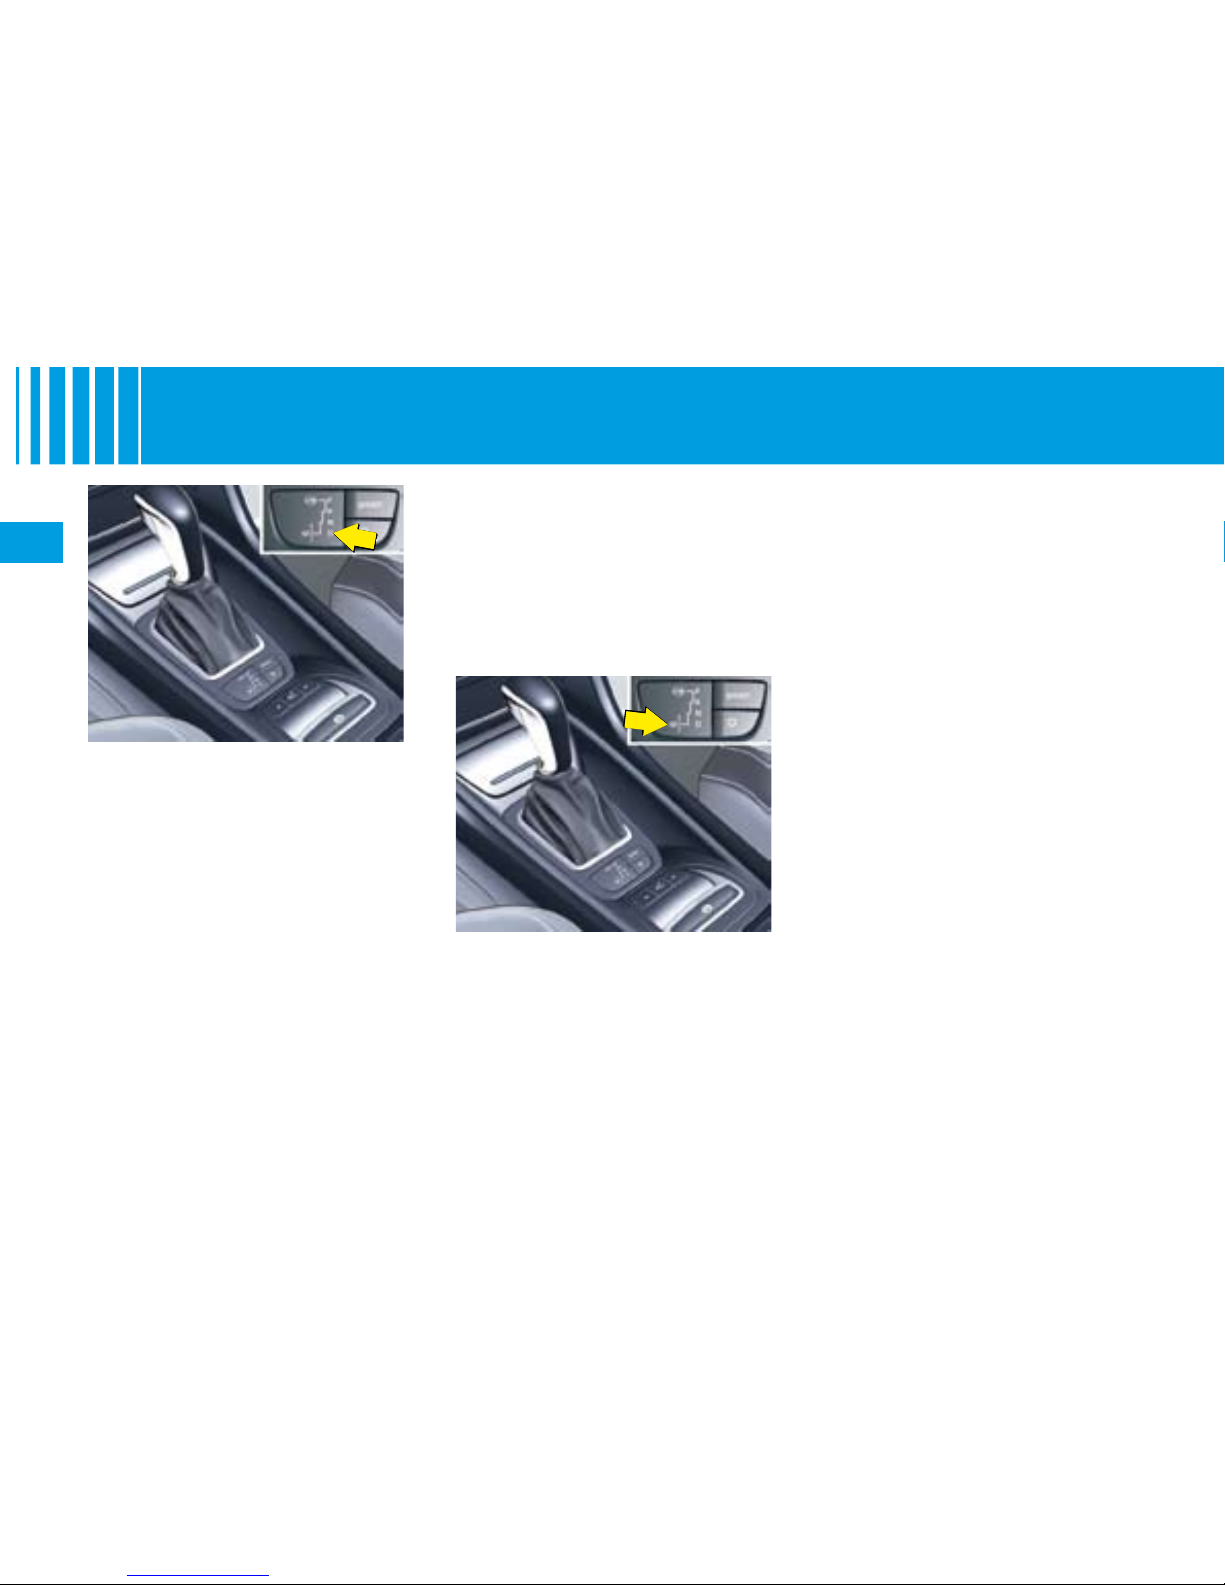
66
II
A U TOMAT I C G E A R B O X
Automatic forward drive
(lever at position D)
The gearbox always selects the
gear best adapted to the following
parameters:
Style of driving.
Road prole.
Vehicle load.
In this way the gearbox operates
without the need for your intervention.
For certain manoeuvres (e.g. overtaking), it is possible to obtain
maximum acceleration by pressing hard all the way down on the
accelerator pedal, which may trigger automatic changedown to a
lower gear.
•
•
•
Sequential forward drive
(lever at position M)
Position M allows you to change
gear manually:
Push the lever towards “+” to
change up a gear.
Pull the lever towards “-” to
change down a gear.
•
•
Remarks:
During braking, the gearbox
may kick down automatically
in order to offer an effective
engine brake.
If you suddenly lift your foot off
the accelerator, the gearbox will
guard your safety by not changing up again.
•
•
Note:
Passage from one gear to
another is only possible when
vehicle speed and engine
speed permit.
The “SPORT” and “SNOW”
modes are not available in
sequential operation.
If the engine speed is too high,
the gearbox automatically
selects a higher gear.
If the engine speed is too low,
the gearbox automatically
selects a lower gear.
•
•
•
•
Page 71
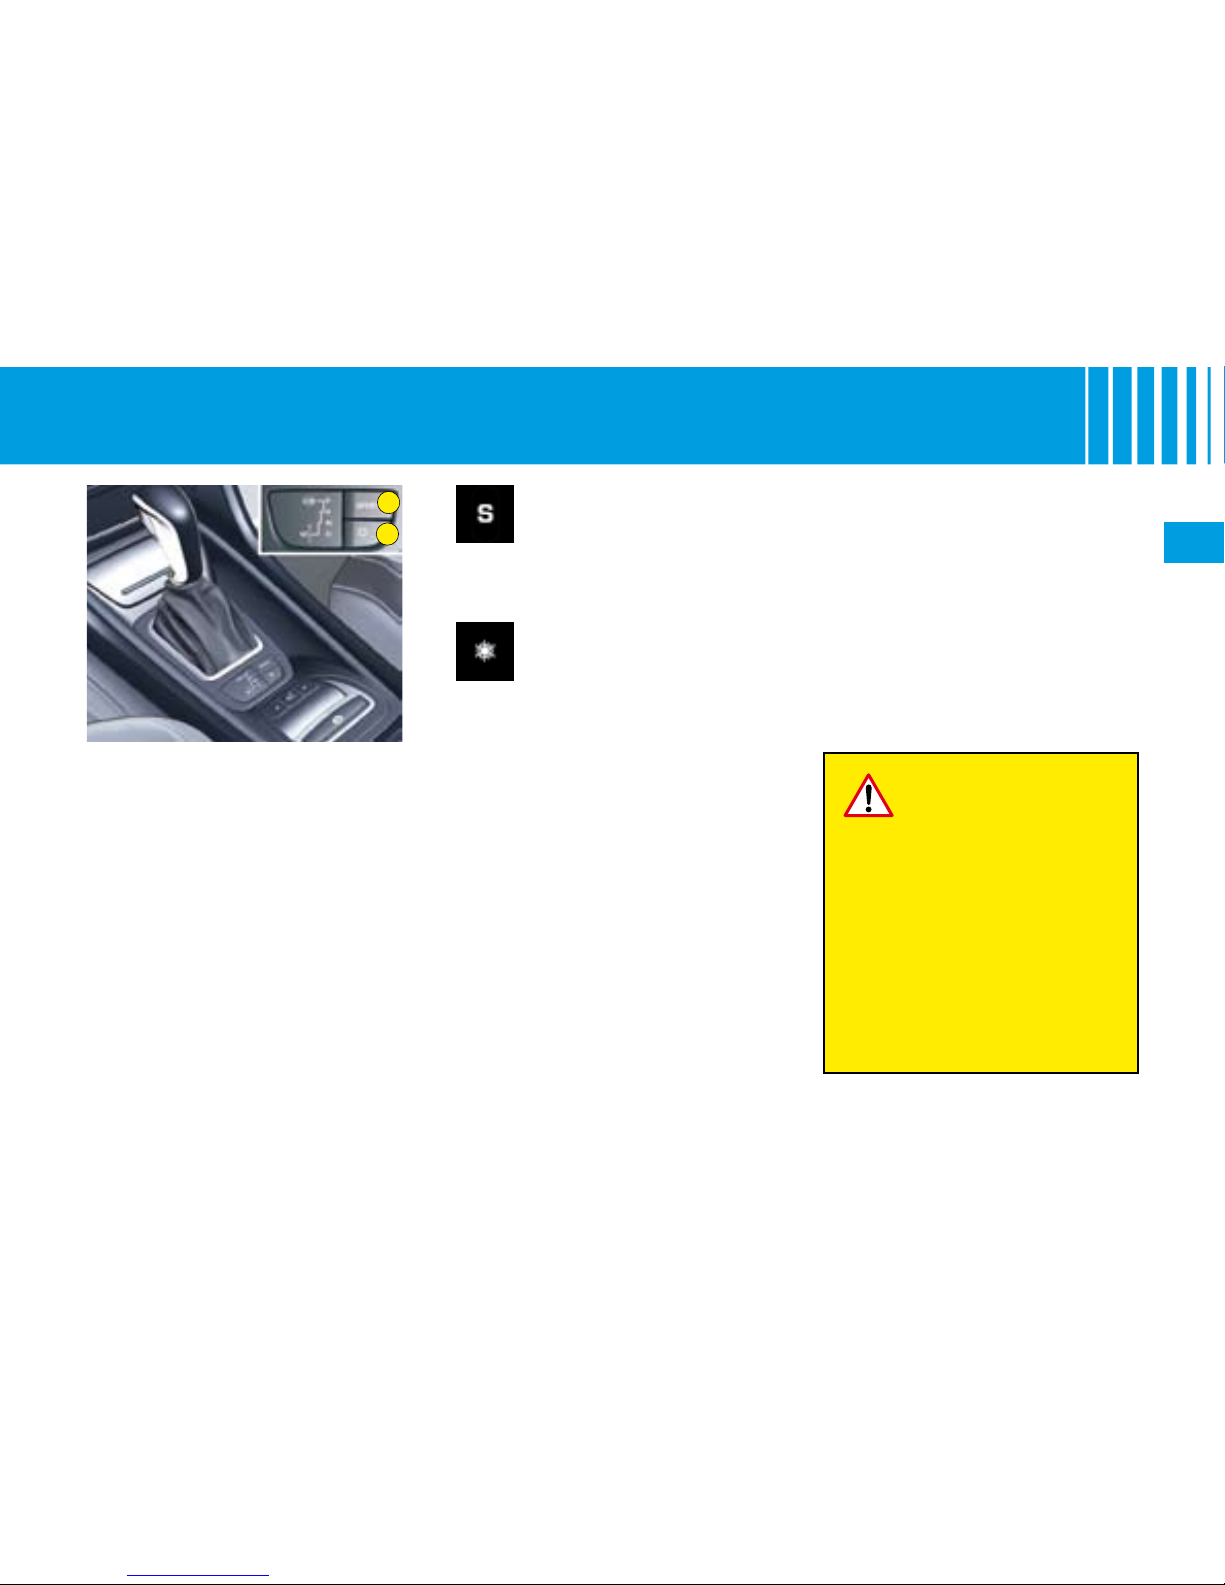
67
II
A
B
A U TOMAT I C G E A R B O X
Operation in SPORT or
SNOW automatic mode
Lever at D:
Press on button A to select the
SPORT driving mode.
Press on button B to select the
SNOW driving mode.
Pressing again on button A or B
returns you to NORMAL driving
mode.
NORMAL
mode is selected by
default when the engine is started.
This driving mode is suitable for
normal driving conditions.
No warning lamp will light up in the
instrument panel.
SNOW
mode facilitates
starting and smooth driving
when road adherence conditions are poor.
The instrument panel display lights
up.
SPORT
mode is for more
responsive driving, to provide maximum performance and acceleration.
The instrument panel display lights
up.
Remark:
The driving mode
selected before you switched off
the engine will be retained the next
time you start up.
If there is an operat
ing fault, the gearbox
is stuck in a gear, do
not exceed 100 km/h
(approx. 60 mph).
Juddering may be felt when
selecting R for reverse gear
or when returning to position D.
Consult a CITROËN dealer as
soon as possible.
Do not stop your engine if
the gear selector lever is in
position D or R.
Page 72
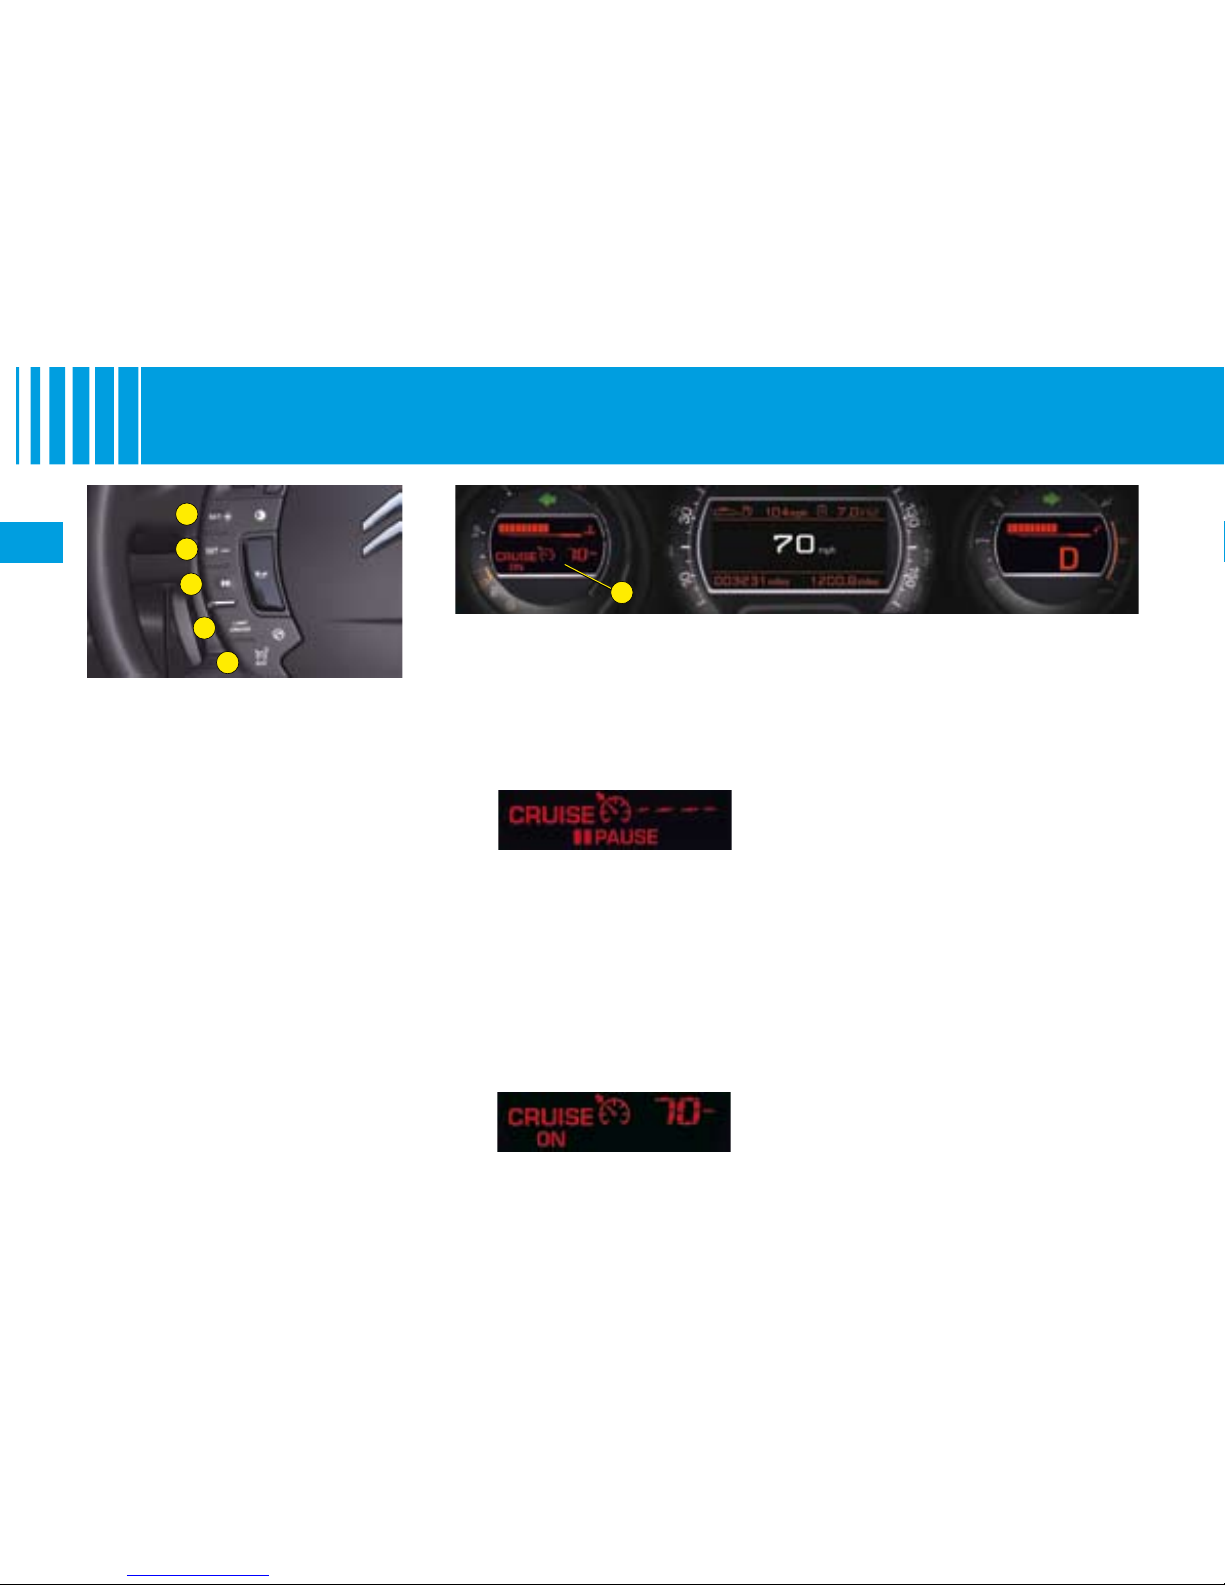
68
II
A
3
5
4
2
1
This driving assistance function
allows you to drive at the speed of
your choice without the need to
action the accelerator. It is active
over speeds of around 40 km/h
(25 mph).
Remark: For the function to be
active, the gearbox must be in at
least:
4th gear for manual gearboxes.
2nd gear for automatic gear
-
boxes.
The cruise control controls are
located on the left-hand side of the
steering wheel and cruise control
information is displayed in zone A
of the instrument panel.
•
•
C R U I S E C O N T R O L
When the function is selected, no
cruising speed has yet been
memorised.
Once the desired speed has been
reached using the accelerator,
press button 1 or button 2. The
cruising speed is then memorised
and cruise control is activated.
The cruising speed is displayed
in zone A of the instrument panel,
and “ON” is displayed.
You can then release the accelera
tor pedal. The vehicle will automatically keep to the speed chosen.
Note: The vehicle speed may vary
slightly from that memorised.
If during cruise control the system
cannot keep to the cruise speed
(e.g. on a steep descent), then the
speed ashes. If necessary, brake
to curb your speed.
Adjustment of the
memorised speed while
cruise control is in
operation
You can adjust the memorised
speed, displayed in zone A, by
pressing:
Button
1 to increase the speed.
Button
2 to reduce the speed.
Remark: Successive presses will
modify the cruise speed in steps of
1 mph and a continuous press in
steps of 5 mph.
•
•
To select the function
Press button 4 to select cruise control mode “CRUISE”.
The selection is conrmed by the
display of the function in zone A of
the instrument panel.
Page 73
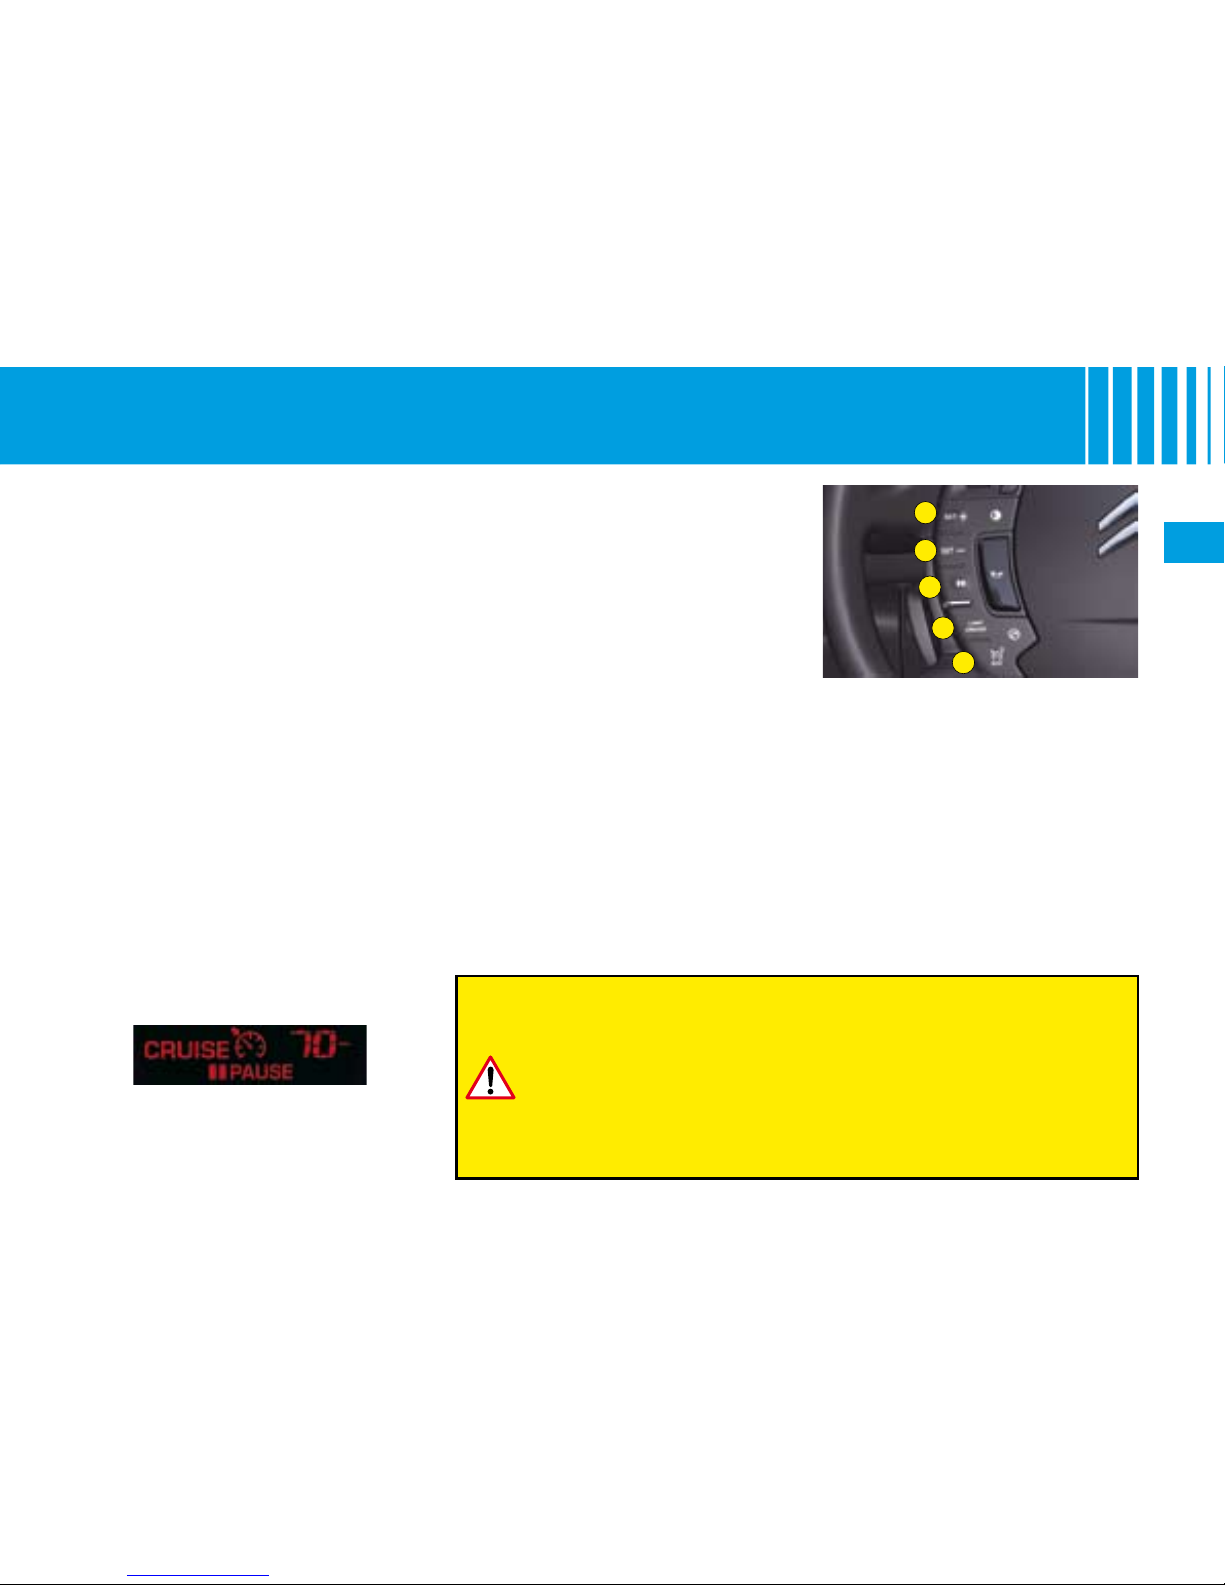
69
II
3
5
4
2
1
C R U I S E C O N T R O L
To cancel the function
Press on button 5.
Select the cruise control func
-
tion.
Or stop the engine.
The speed that was chosen is no
longer memorised.
If there is a malfunction, a message is displayed accompanied by
a sound signal and lighting of the
SERVICE warning lamp.
Contact a CITROËN dealer.
•
•
•
Cruise control must only be used where the trafc conditions
permit driving at a constant speed.
Do not use it on congested roads or when the weather or the
road conditions are poor.
The driver still has to remain attentive and in complete control
of his vehicle.
You are recommended to keep your feet within range of the
pedals.
These actions do not cancel the
cruising speed which remains displayed on the instrument panel.
Reactivation of cruise
control
By recalling the memorised
speed:
After deactivation, press button 3. Your vehicle automatically returns to the memorised
cruising speed. The memorised
speed and “ON” are displayed
in zone A.
If the memorised cruising speed is
higher than the current speed, the
vehicle will accelerate strongly to
reach the current speed.
By selecting the current
speed:
Press button
1 or 2 once
the desired speed has been
reached.
The new speed and “ON” will
appear in zone
A.
•
•
Temporary override of the
cruise speed
While cruise control is in operation,
it is always possible to go above the
cruise speed simply by pressing
the accelerator pedal (for example
to overtake another vehicle).
The speed displayed in zone A
ashes.
You only have to release the accelerator pedal to return to the cruising speed.
Suspension or resumption
of cruise control with a
memorised speed
Either by pressing the brake
pedal or the clutch pedal.
Or by pressing button
3.
Or by the ESP or ASR systems
being active.
Note: for vehicles with a manual
gearbox, cruise control is deactivated if the gear lever is in neutral.
•
•
•
“PAUSE” will be displayed in
zone A of the instrument panel.
Page 74
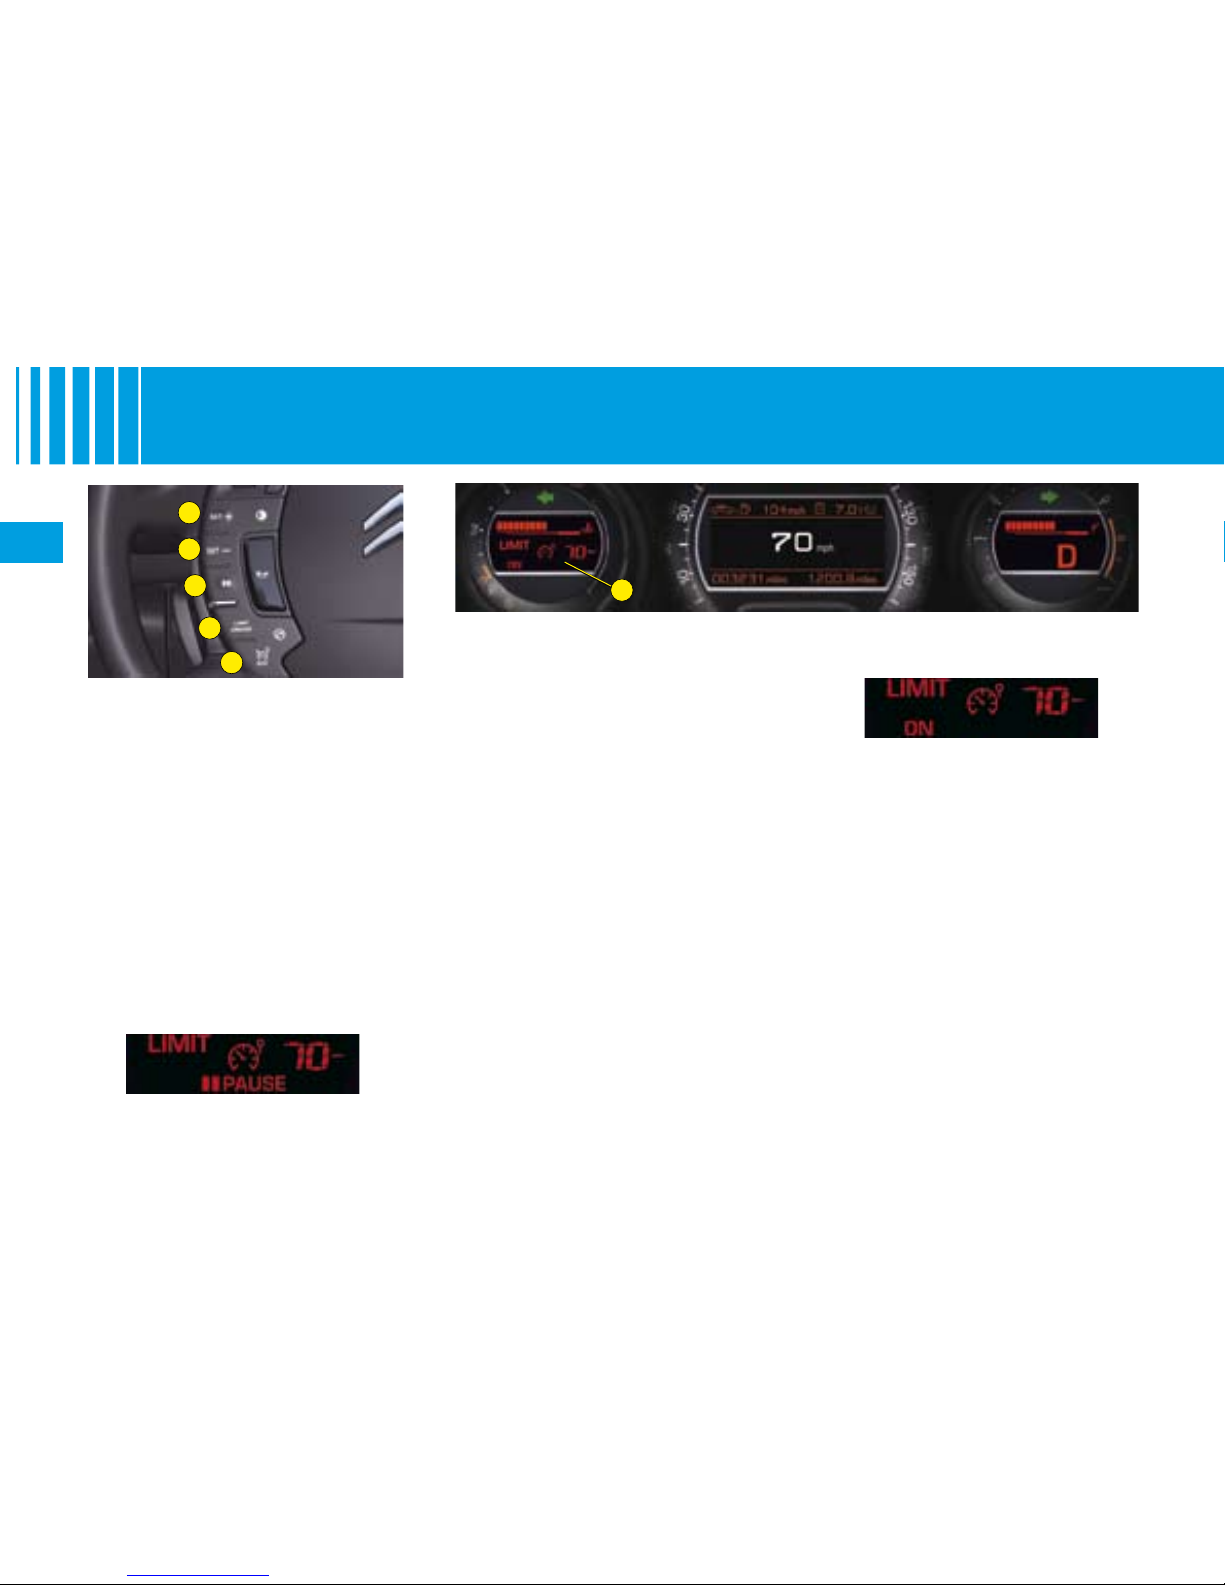
70
II
3
5
4
2
1
A
S P E E D L I M I T E R
This driving aid allows you to
choose a maximum speed that you
do not wish to exceed. This has to
be over 30 km/h (19 mph).
The speed limiter controls are
located on the steering wheel.
Note: The speed limiter information is displayed in zone A of the
instrument panel.
To select the function
Press on button 4 to select speed
limiter mode “LIMIT”.
The selection is conrmed by the
display of the function in zone A of
the instrument panel.
To adjust the maximum
speed
With the engine running, you can
adjust the memorised maximum
speed, displayed in zone A, by
pressing on:
Button
1 to increase the memo-
rised maximum speed.
Button
2 to decrease the mem-
orised maximum speed.
Remark: Successive presses will
modify the cruise speed in steps of
1 mph and a continuous press in
steps of 5 mph.
•
•
Activation of the function
When the function is selected,
the last memorised speed and
the information “PAUSE” are displayed.
When the desired maximum speed
is displayed, press on button 3
to activate the speed limiter. The
information “ON” disappears from
zone A.
Page 75
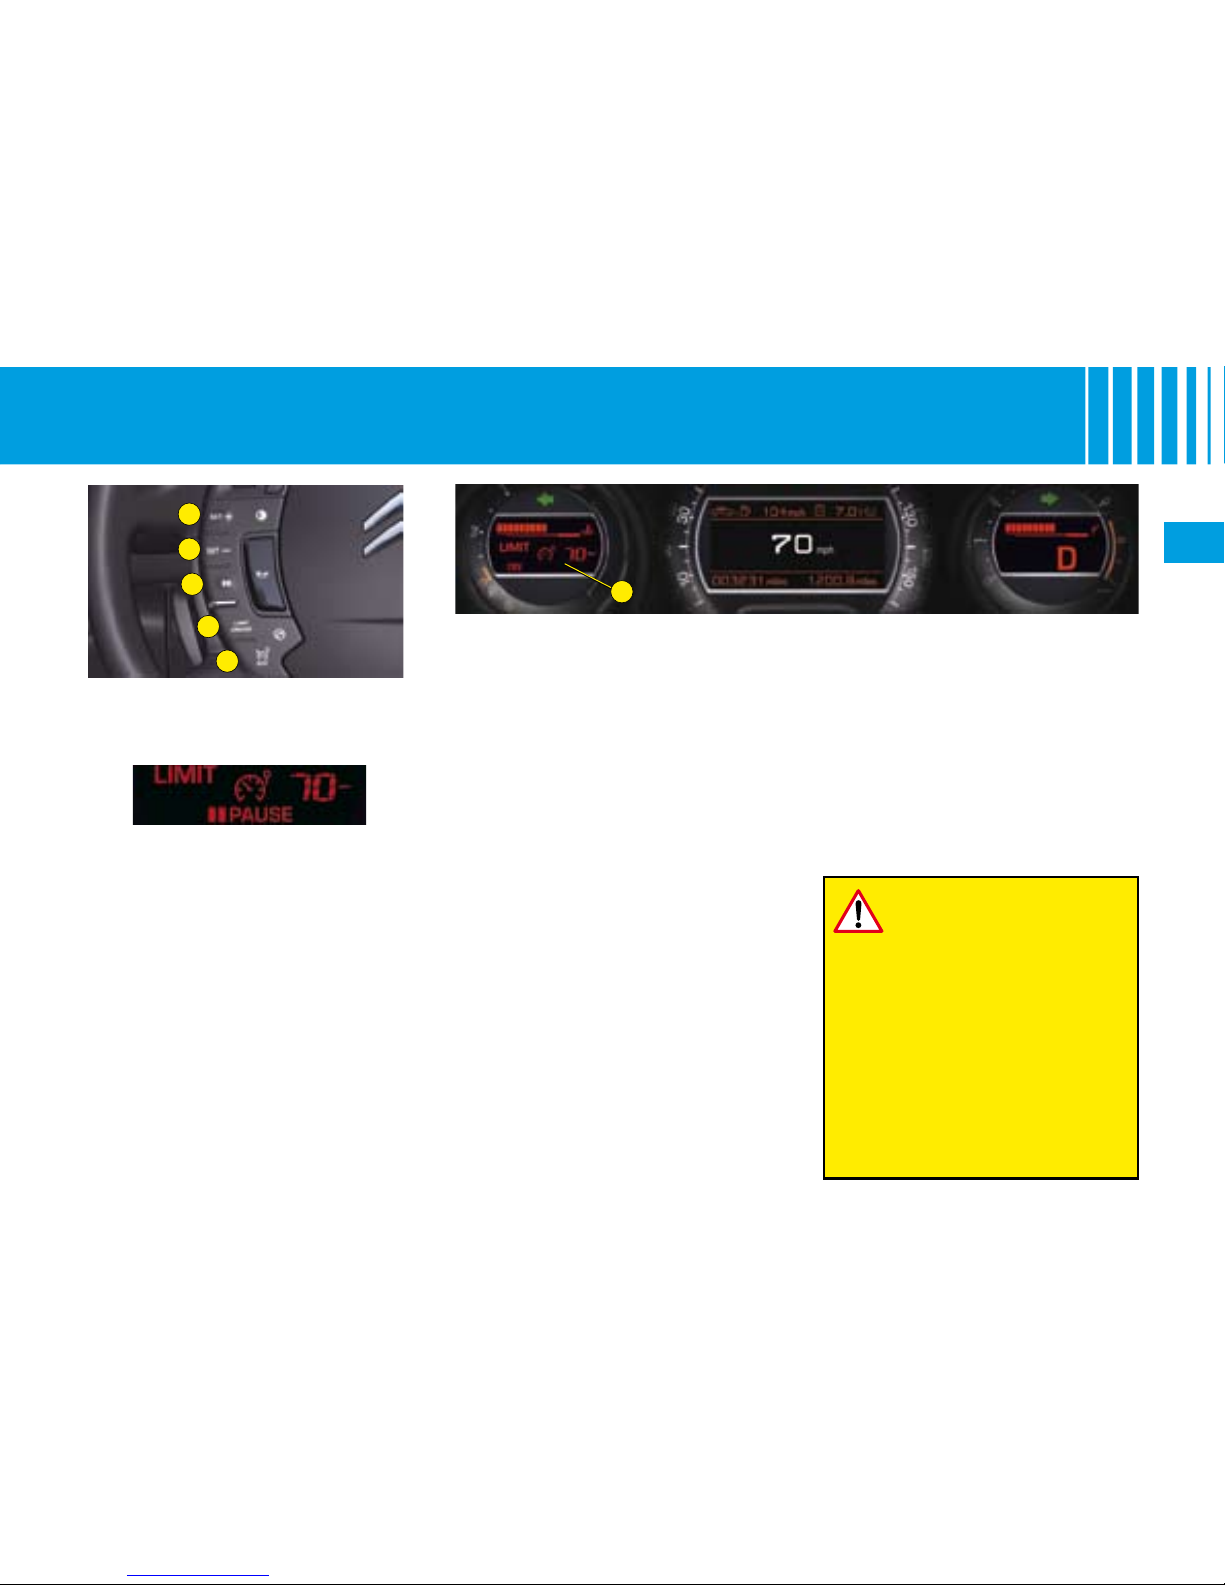
71
II
3
5
4
2
1
A
S P E E D L I M I T E R
Suspension or resumption
of maximum speed
Press on button 3.
Temporary override of the
maximum speed
The accelerator pedal has an endof-travel switch. In order to exceed
the memorised maximum speed at
any time, you can press the pedal
all the way down. While the speed
is being exceeded, the speed displayed in zone A will ash. You
have only to release the accelerator pedal to return below the maximum speed, to restore the function.
Remark: the speed will also ash
if the speed limiter is not able to
prevent the vehicle from exceeding
the programmed speed (e.g. on a
steep descent or under excessive
acceleration).
To reactivate the speed limiter,
release the accelerator to slow to a
speed lower than the programmed
speed.
To cancel the function
Press on button 5.
Select the speed limiter func
-
tion.
Or stop the engine.
The speed that was chosen is no
longer memorised.
If there is a malfunction, a message is displayed accompanied by
a sound signal and lighting of the
SERVICE warning lamp.
Contact a CITROËN dealer.
•
•
•
Use of a oor mat
other than that recommended by CITROËN
may affect the normal
operation of the accelerator pedal and hamper the
operation of the speed limiter.
Floor mats approved by
CITROËN are tted with a 3rd
xing located in the pedal
area to avoid any risk of interference with the pedals.
This action causes the information
“PAUSE” to appear in zone A of
the instrument panel.
This action does not cancel the
memorised maximum speed which
remains displayed in zone A of the
instrument panel.
Remark: In the event of a steep
descent or under excessive acceleration, the speed limiter (which
does not act on the brakes) may
not be able to prevent the vehicle
from exceeding the programmed
speed.
The speed limiter can in no way
replace respect for speed limits or
vigilance and responsibility on the
part of the driver.
Page 76
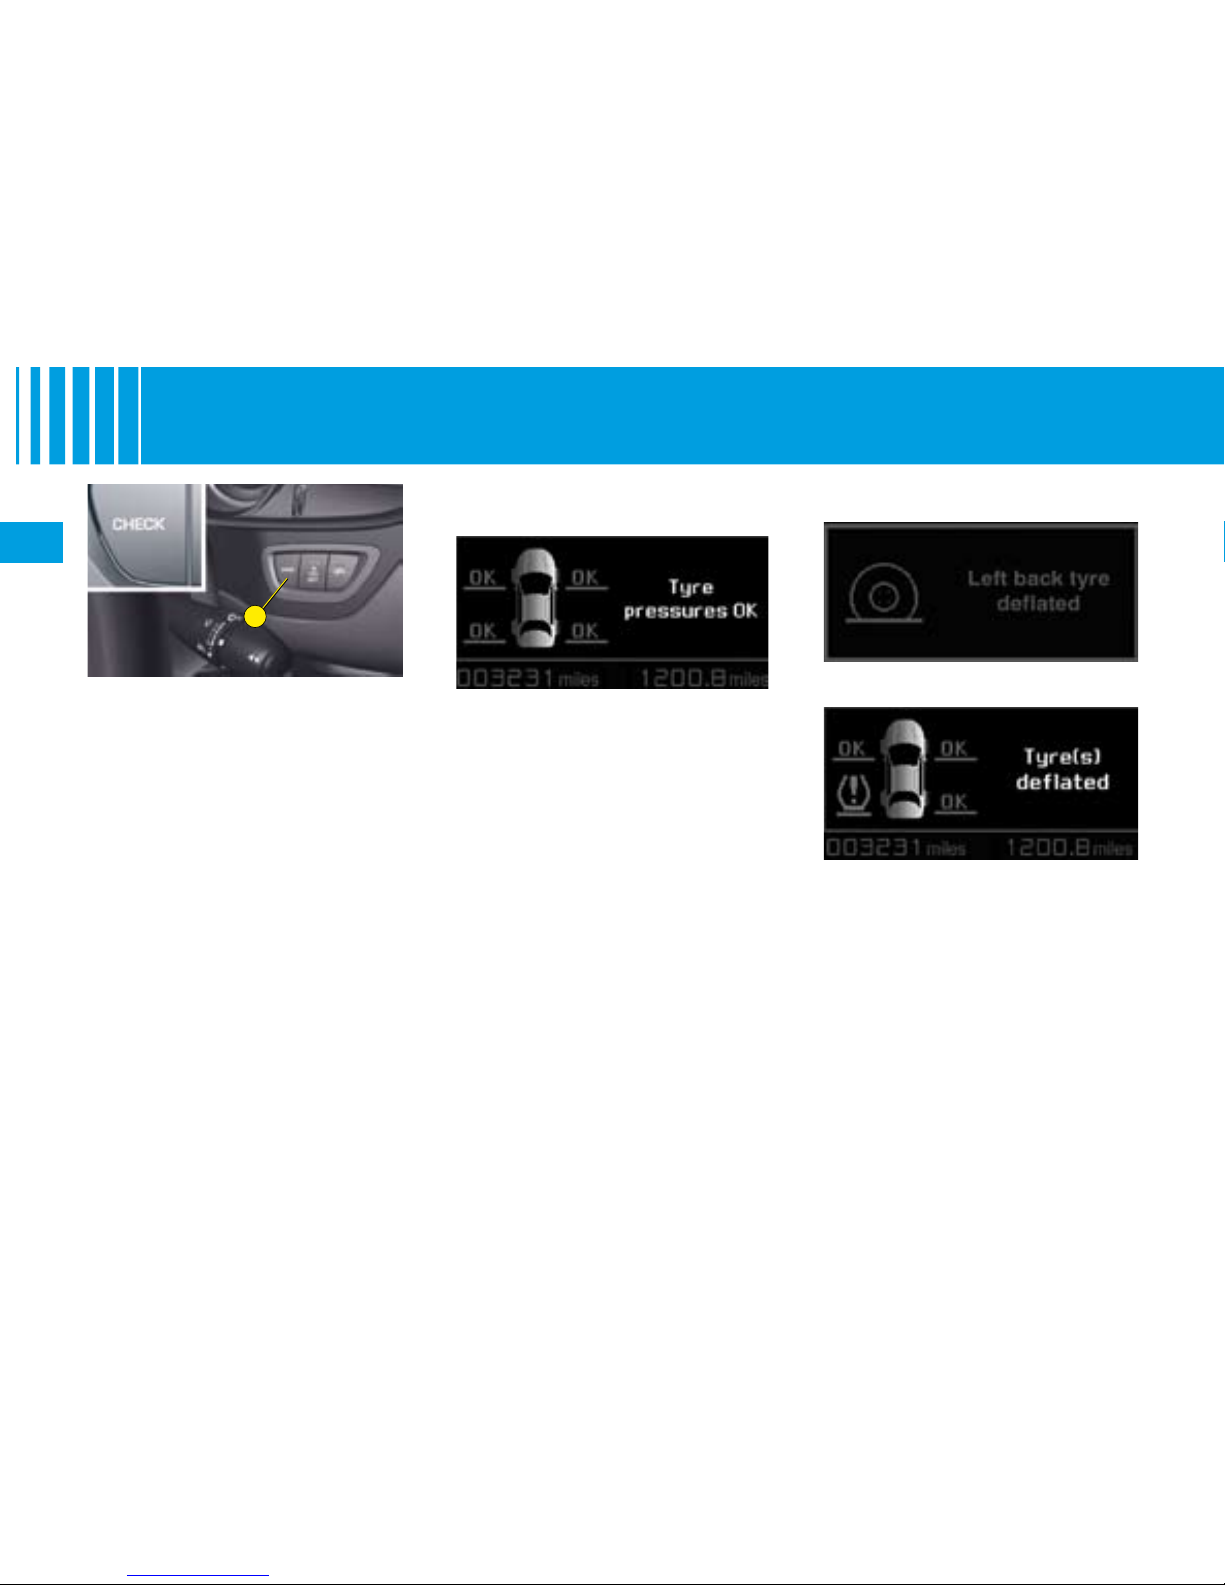
72
II
A
Deation detection
This function warns you of tyres
that are deated or punctured.
Automatic detection
Sensors monitor the tyre pressures while driving. In the event of
an anomaly, a message will appear
on the instrument panel screen.
Driver request detection
You can check the tyre pressures
at any given moment. To do so,
press on button A (CHECK) ; the
information will be displayed on the
instrument panel screen.
Display of tyres in good
condition
Automatic detection:
A message indicates to you which
tyre is deated.
Driver request detection:
The vehicle outline indicates the
deated tyre(s).
The message is accompanied by
the SERVICE warning lamp lighting up and a beep.
Check the tyre pressures as soon
as possible.
T Y R E D E F L AT I O N D E T E C T I O N
Tyre deation alert
The system indicates to you that
the tyres are correctly inated.
This information is only available
on the request of the driver.
Press on Check
Press on Check
Automatic detection
Page 77
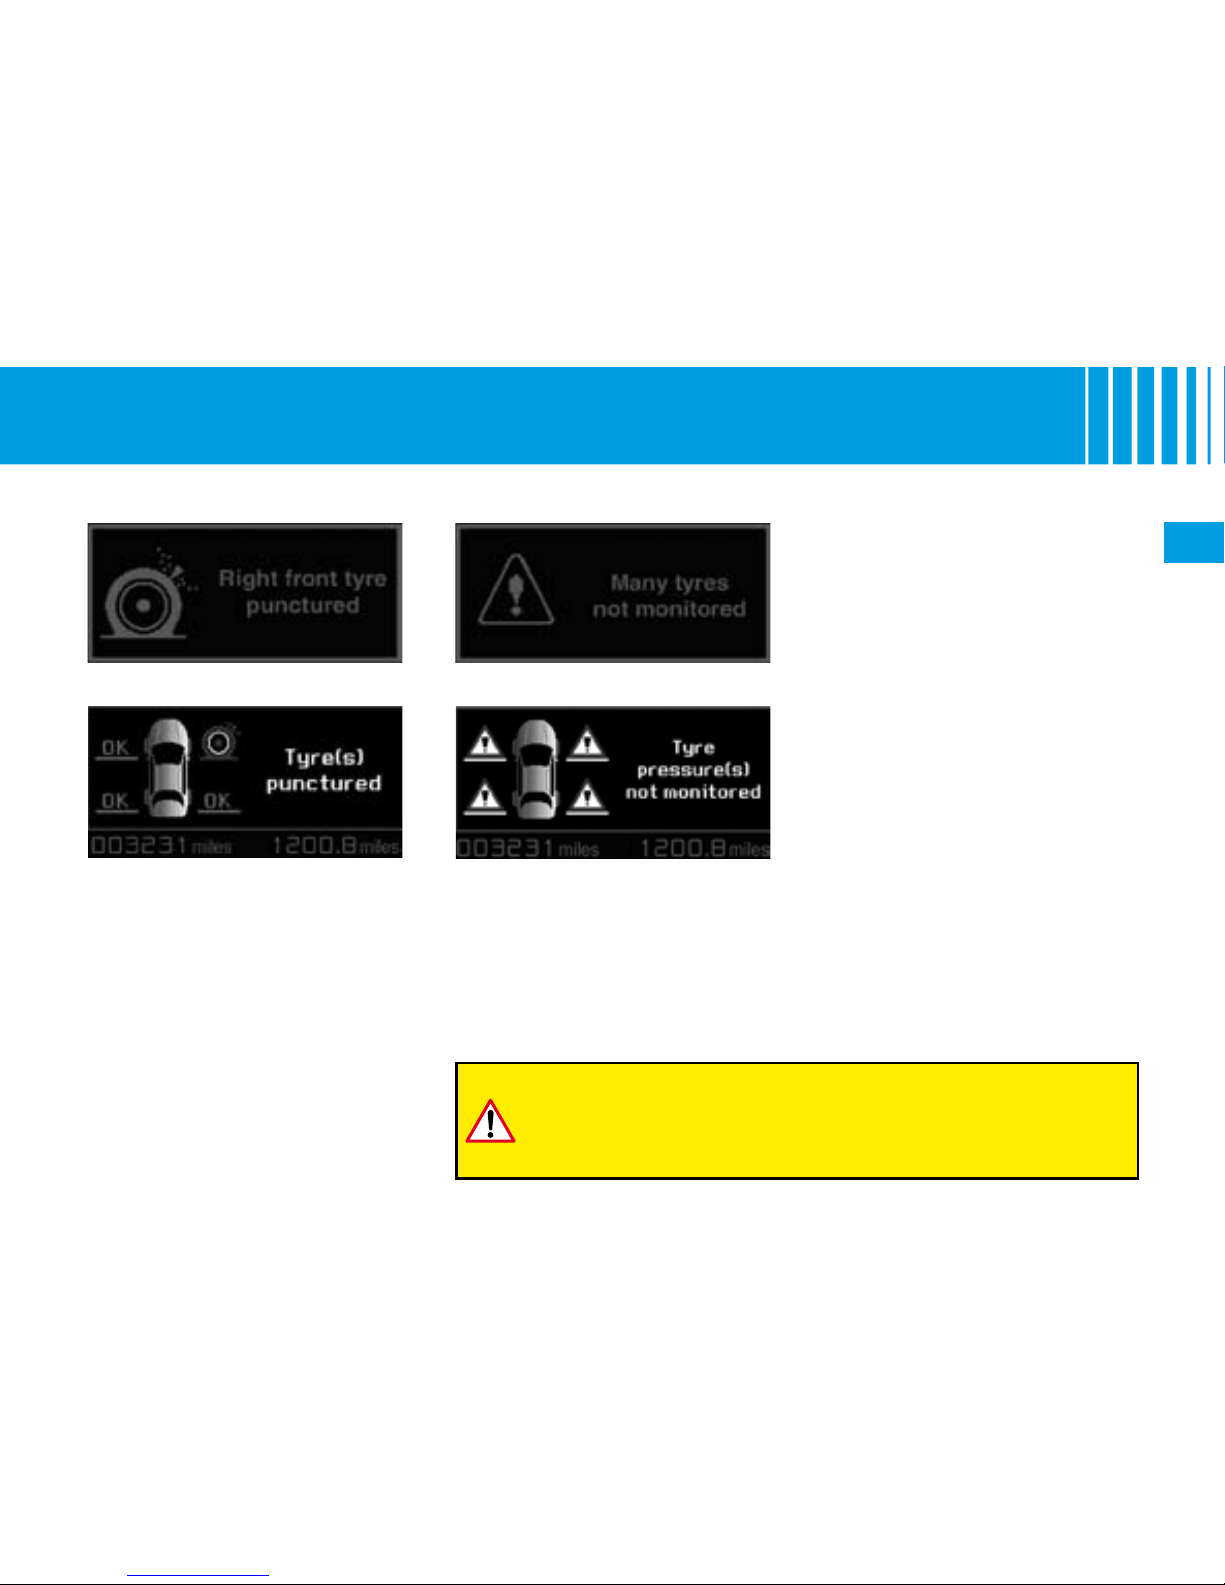
73
II
T Y R E D E F L AT I O N D E T E C T I O N
Wheel not detected
The deation detection system is
a driving aid, but which does not
absolve the driver from the need to
be vigilant and responsible.
This system does not dispense with
the requirement to check the tyres
on a regular basis (see “Vehicle
identication”), to make sure that
the vehicle is behaving correctly
and to avoid premature tyre wear
arising from driving too fast etc.
Do not forget to check the pressure in the spare wheel.
Any repair or replacement of a tyre on a wheel that is equipped
with a sensor must be carried out by a CITROËN dealer.
The system may suffer from temporary interference caused
by radio transmissions on neighbouring frequencies.
Automatic detection:
A message indicates to you which
tyre is punctured.
Driver request detection:
The vehicle outline indicates the
punctured tyre(s).
The message is accompanied by
the STOP warning lamp lighting up
and a beep.
Puncture
Automatic detection:
A message indicates to you which
wheel is not detected.
Driver request detection:
The vehicle outline indicates
the wheel(s) which is/are not
detected.
Press on Check
Automatic detection
Press on Check
Automatic detection
Note:
If you have tted a wheel/wheels
not equipped with tyre dea-
tion detection (e.g. snow tyres),
contact a CITROËN dealer.
The message is accompanied
by the SERVICE warning lamp
lighting up and a beep.
Contact a CITROËN dealer
to have the faulty sensor(s)
replaced.
•
•
•
Page 78
74
II
B R A K E S
G E N ER AL
ABS system
The ABS system enhances your
safety by preventing the wheels
from locking in the event of sudden braking or in conditions of
poor road adherence. It enables
you to retain control of the steering.
The functioning capability of all
the electrical components essential to the ABS is monitored electronically before and during your
journey. The ABS warning lamp
lights up when you switch on the
ignition: it should go out after a few
seconds.
If the monitoring warning lamp
does not go out, that means
that the ABS has disconnected
because there is a fault. Also, the
fact that the monitoring warning
lamp comes on during the journey shows that the ABS system is
inactive. In both cases, the normal
braking system remains efcient,
exactly as on a vehicle without
ABS. However, in order for the
security associated with the correct functioning of the ABS to be
restored, the vehicle should be
examined as soon as possible by
a CITROËN dealer.
On roads with poor adherence
(chippings, snow, ice etc.), it is
always imperative to drive with
prudence.
If the parking brake is released
,
the lighting of this warning lamp
along with the STOP warning
lamp indicates an insufcient level
of brake uid or a malfunction of
the braking distribution.
It is essential to stop the vehicle.
Consult a CITROËN dealer as
soon as possible.
System of emergency
braking assistance
The emergency braking assistance
system allows you, in an emergency, to achieve the optimum
braking pressure more quickly,
thereby reducing the stopping distance. It is triggered by the speed
of your action on the brake pedal,
which reduces its resistance. To
prolong this action of the emergency braking assistance system,
simply keep your foot on the brake
pedal.
Page 79
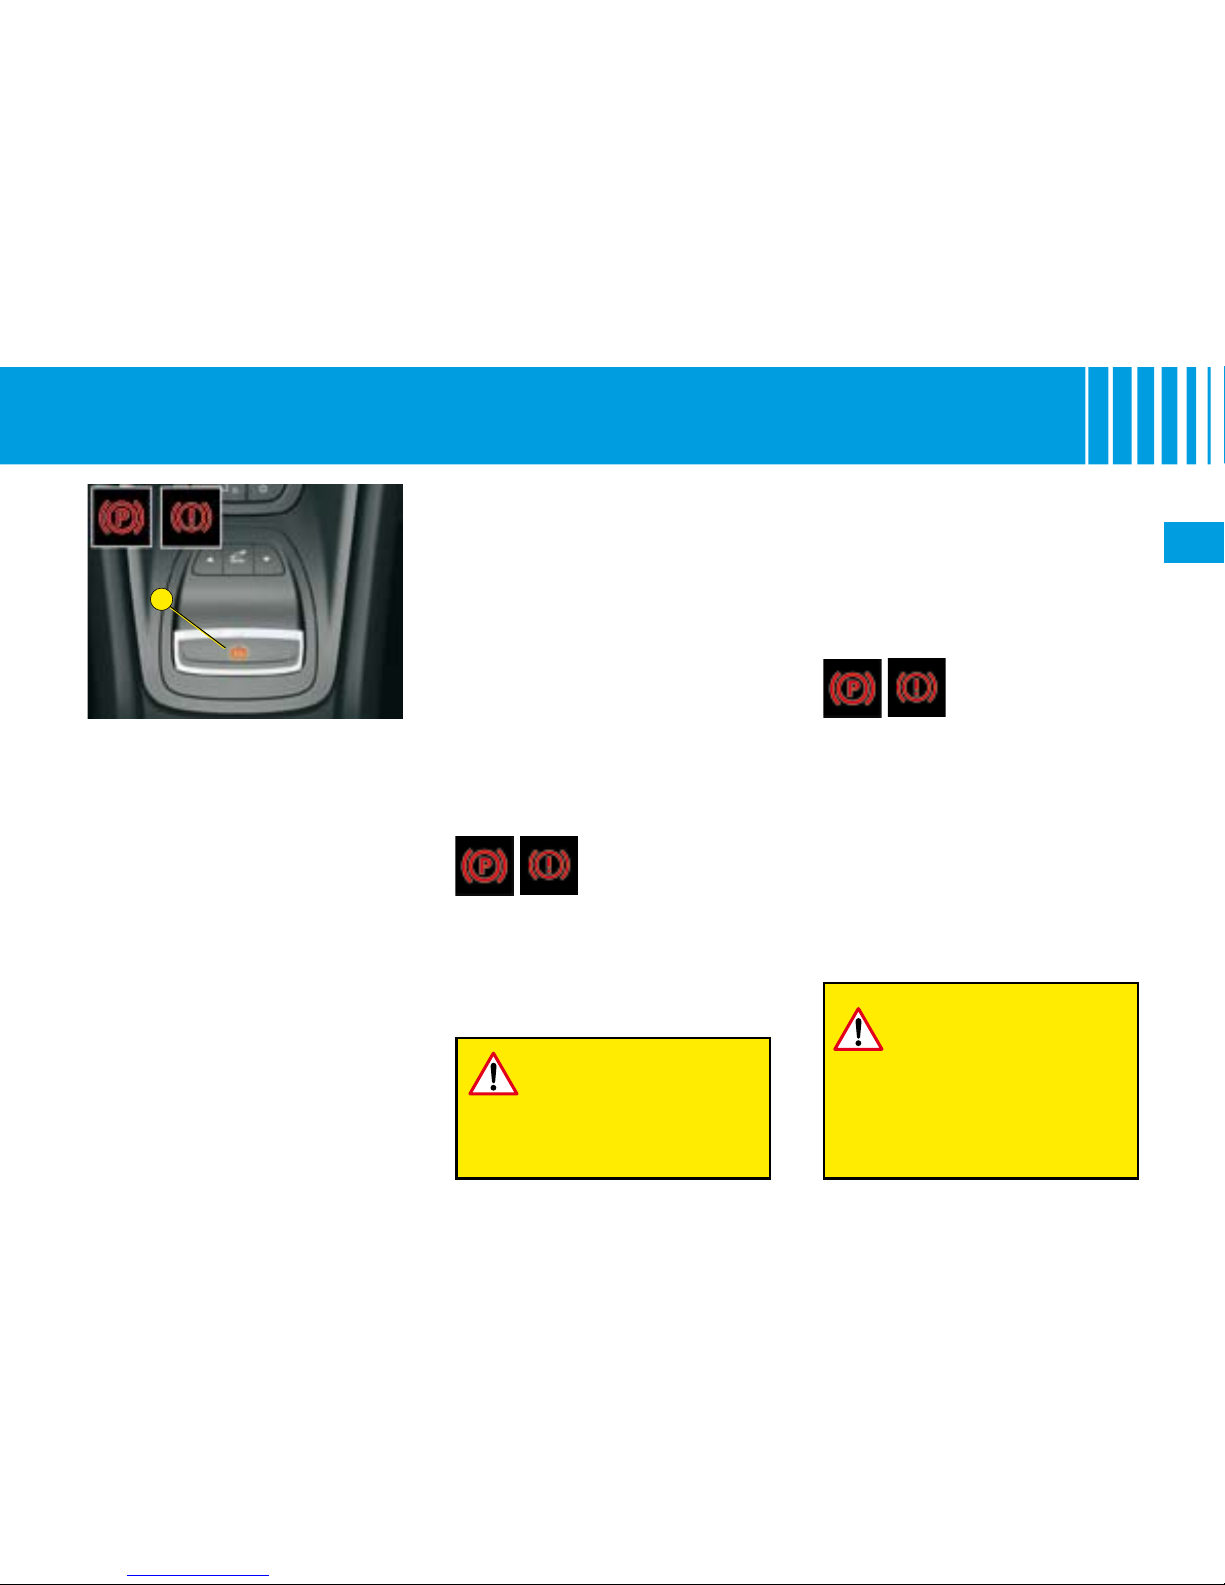
75
II
A
The electronic parking brake combines 2 operational modes:
AUTOMATIC:
Automatic application when the
engine is stopped and automatic
release on use of the accelerator
(automatic operation by default).
MANUAL:
The MANUAL application/release
of the parking brake is possible
permanently by pulling/pushing
control A.
•
•
To start the vehicle
The parking brake releases automatically and progressively
when you press the accelerator:
With a manual gearbox (rst
gear or reverse gear engaged),
press down fully on the clutch
pedal then press on the accelerator pedal and move off.
With an automatic gearbox,
accelerate with the selector in
position D, M or R.
•
•
AUTOMATIC OPERATION
Full release of the
parking brake is
conrmed by:
The extinction of the warning
lamp on control A and of the
instrument panel warning lamp.
The display of the message
“Parking brake released” on the
instrument panel screen.
•
•
The application of
the parking brake is
conrmed by:
The lighting of the warning lamp
on control A and of the warning
lamp on the instrument panel.
The display of the message
“Parking brake applied” on the
instrument panel screen.
Note: an operation sound will con-
rm to you the application/release
of your electronic parking brake.
•
•
To immobilise the vehicle
Immobilisation, engine off
With the vehicle stationary, the
parking brake is automatically
applied when the engine is
switched off.
Before leaving the vehicle, check that the parking brake warning lamp
on the instrument panel
is permanently lit.
Never leave a child alone inside
the vehicle with the ignition
on, as they could release the
parking brake.
When stationary, with
the engine running, do
not press the accelerator pedal unnecessarily
(especially when starting the engine, including when
in neutral), as you may release
the parking brake.
E LECTR I C PA RKING B R A KE
Page 80
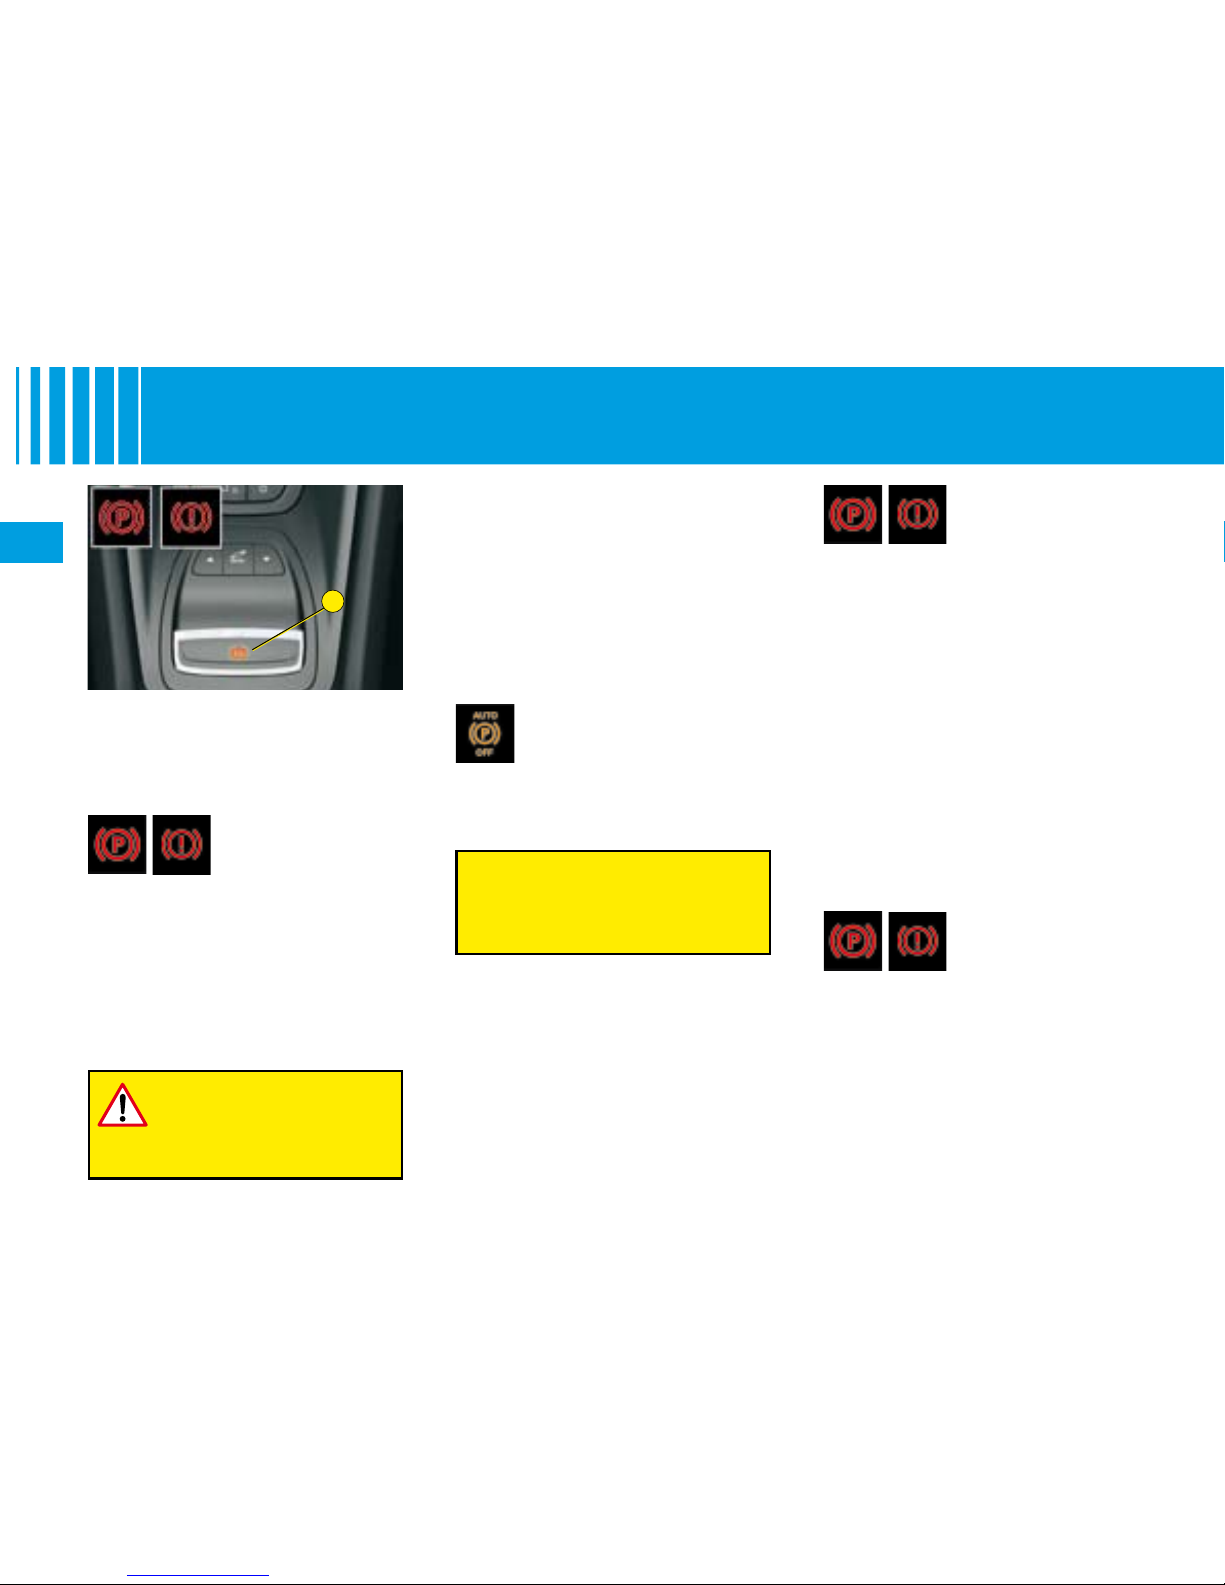
76
II
A
E LECTR I C PA RKING B R A KE
ACTIVATION / DEACTIVATION OF
THE AUTOMATIC FUNCTIONS
The automatic application when
the engine is switched off and the
automatic release when you press
the accelerator can be deactivated. Activation / deactivation is
performed using the “Main Menu”
of the instrument panel screen.
To do so, select “Vehicle parameters / Comfort / Automatic parking
brake”.
The deactivation of these
functions is conrmed by
the lighting of this warning lamp on the instrument
panel.
With the automatic functions deactivated, the application and release
of the parking brake are done manually.
MANUAL OPERATION
Manual application / release of the
parking brake is always possible.
To start the vehicle
With the ignition on or the engine
running, to release the parking
brake, press on the brake or accelerator pedal, push then release
control A.
The application of
the parking brake is
conrmed by:
The lighting of the warning lamp
on control A and of the warning
lamp on the instrument panel.
The display of the message
“Parking brake applied” on the
instrument panel screen.
When the driver’s door is opened,
a beep is heard and a message
displayed if the parking brake has
not been applied.
•
•
Immobilisation, engine running
With the engine running and the
vehicle stationary, in order to
immobilise the vehicle you need to
manually apply the parking brake
by pulling on control A.
Before leaving the vehicle, check that the parking brake warning lamp
on the instrument panel
is permanently lit.
The deactivation of the automatic
functions is recommended in
particularly cold conditions (ice)
and during towing (breakdown,
caravan, etc).
Full release of the
parking brake is
conrmed by:
The extinction of the warning
lamp on control A and of the
instrument panel warning lamp.
The display of the message
“Parking brake released” on the
instrument panel screen.
Remark: If you push control A
without pressing the brake pedal,
the parking brake will not be
released and the message “Foot
on brake necessary” will be displayed on the instrument panel
screen.
•
•
The application of
the parking brake
is conrmed by:
The lighting of the warning lamp
on control A and of the warning
lamp on the instrument panel.
The display of the message
“Parking brake applied” on the
instrument panel screen.
When the driver’s door is opened
with the engine running, a beep is
heard and a message displayed
if the parking brake has not been
applied.
•
•
To immobilise the vehicle
With the vehicle stationary, to
apply the parking brake whether
the engine is running or off, pull on
control A.
Page 81
77
II
E LECTR I C PA RKING B R A KE
S P E CI AL FE AT U R E S
MAXIMUM APPLICATION
If necessary, you can utilise maximum application of the parking
brake. It is obtained by means of
a long pull on control A, until you
see the message “Maximum parking brake application” and a beep
is heard.
Maximum application is indispensable:
In the case of a vehicle towing a
caravan or a trailer, if the automatic functions are activated
but you are applying the parking brake manually.
When the gradient you are
parked on is variable in its effect
(e.g. on a ferry, in a lorry, during
towing).
Note:
In the case of towing, a loaded
vehicle or parking on a gradient,
turn the front wheels towards
the pavement and engage a
gear when you park.
After maximum application, the
release time will be longer.
•
•
•
•
In order to guarantee its
correct operation and
therefore your safety, the
number of consecutive
applications/releases of
your parking brake is limited to
eight times.
In case of misues, you are
alerted by the message “Parking brake faulty” and the warn-
ing lamp ! which ashes (see
chapter “Operating anomalies”).
PARTICULAR SITUATIONS
In certain situations (starting the
engine, etc), the parking brake can
automatically alter its force. This is
normal operation.
To advance your vehicle a few centimetres without starting the engine,
but with the ignition on, press on
the brake pedal and release the
parking brake by pushing then
releasing control A.
The full release of the parking
brake is conrmed by the extinction of the warning lamp on control A, and of the warning lamp on
the instrument panel, and by the
display of the message “Parking
brake released” on the instrument
panel screen.
If the parking brake malfunctions
while applied or if the battery
runs at, an emergency release
is always possible (see paragraph
“Emergency unlocking”).
Page 82
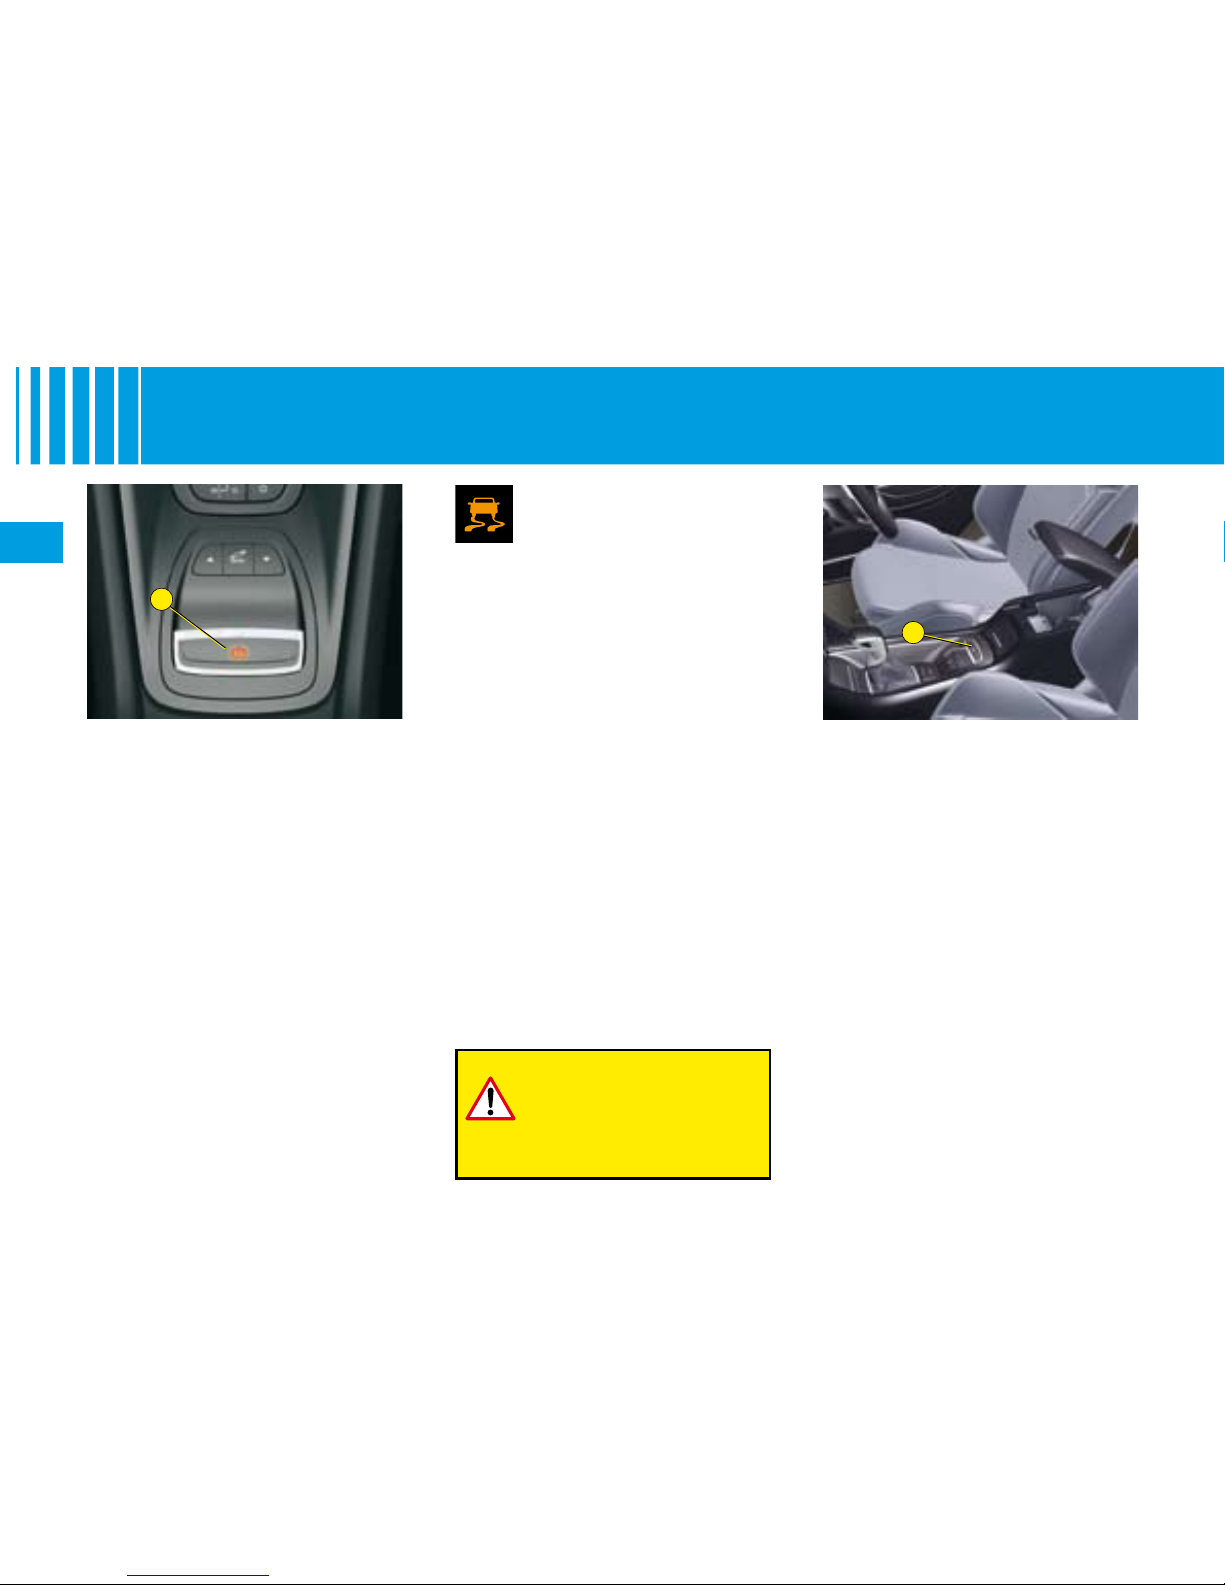
78
II
A
A
E LECTR I C PA RKING B R A KE
Dynamic emergency braking
In the event of a failure of the vehicle’s main braking system or in an
exceptional situation (e.g. driver
taken ill, under instruction, etc) a
continuous pull on control A will
stop the vehicle.
The electronic stability programme
(ESP) provides stability during
dynamic emergency braking.
If the dynamic emergency braking
malfunctions, one of the following
messages will be displayed on the
instrument panel screen:
“Parking brake faulty”.
“Parking brake control faulty”.
•
•
If a failure of the ESP system is signalled by the lighting of this warning lamp,
then braking stability is not
guaranteed. In this event,
stability must be assured by the
driver by repeating alternate “pullrelease” actions on control A.
The dynamic emergency
braking must only be
used in exceptional circumstances.
Unlocking in emergency
In the event of the electric parking
brake malfunctioning or the bat-
tery running at, an emergency
manual device can be used to
unlock it.
1
Immobilise the vehicle, with the
engine running, by engaging
rst gear (manual gearbox) or
position P (automatic gearbox),
then switch off the ignition and
remove the key.
Note: If it is impossible to immobilise the vehicle, do not action the
unlocking control and urgently contact a CITROËN dealer.
Page 83
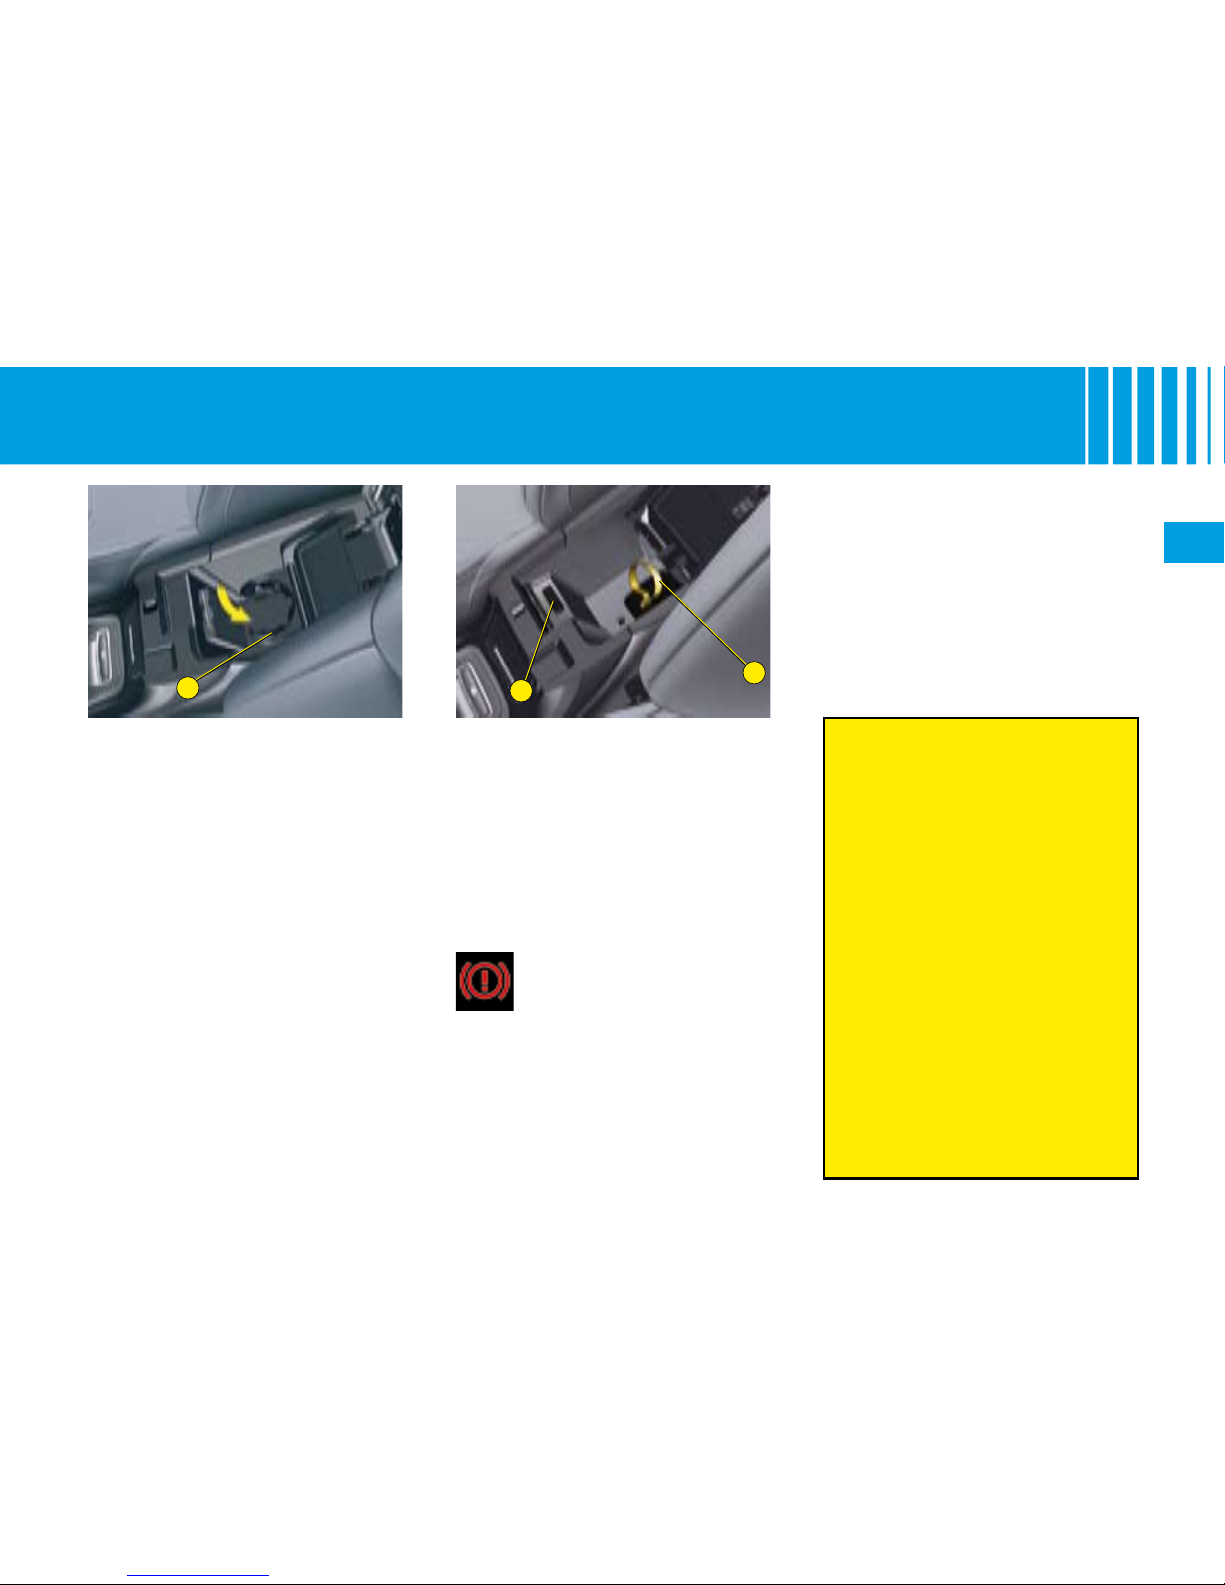
79
II
C
D
B
E LECTR I C PA RKING B R A KE
9. Make sure that you position the
strap back in its location C. If
not, the application of the parking brake will not be possible.
Contact a CITROËN dealer.
10.
Ret the rubber mat at the base
of the armrest.
11.
Remove and store the block.
This strap cannot apply the parking brake.
To re-engage the electric parking brake (once the malfunc-
tion or the at battery has been
resolved), make a long pull on the
control lever A until the parking
brake warning lamp (!) ashes on
the instrument panel then make a
second long pull until this warning
lamp remains lit permanently.
The time for applying the brake
subsequent to the emergency
unlocking will be longer.
While the parking brake has
not been re-engaged (flashing then permanent lighting of
warning lamp (!) on the instrument panel), you must keep the
ignition switched off to avoid
damaging it.
2.
Fetch the vehicle block located
in the boot.
3.
Immobilise the vehicle by placing the block in front of or behind
one of the rear wheels.
4.
Open the lower compartment
of the central armrest by pulling
upwards.
5. Ensure that the cup-holder
B is
folded back.
6.
Remove the rubber mat covering the base of the armrest.
7.
Disengage the strap from its
location C.
8.
Pull the strap to unlock the
brake. A loud click conrms that
the brake is unlocked.
Note: It is necessary to
check that the parking
brake warning lamp lights
up on the instrument panel
when the parking brake is
applied.
Remark: Diagnostic socket in
the armrest strengthener. Ensure
that you do not allow any dusty or
damp elements near the diagnostic socket D which is essential for
the maintenance of your vehicle.
Page 84
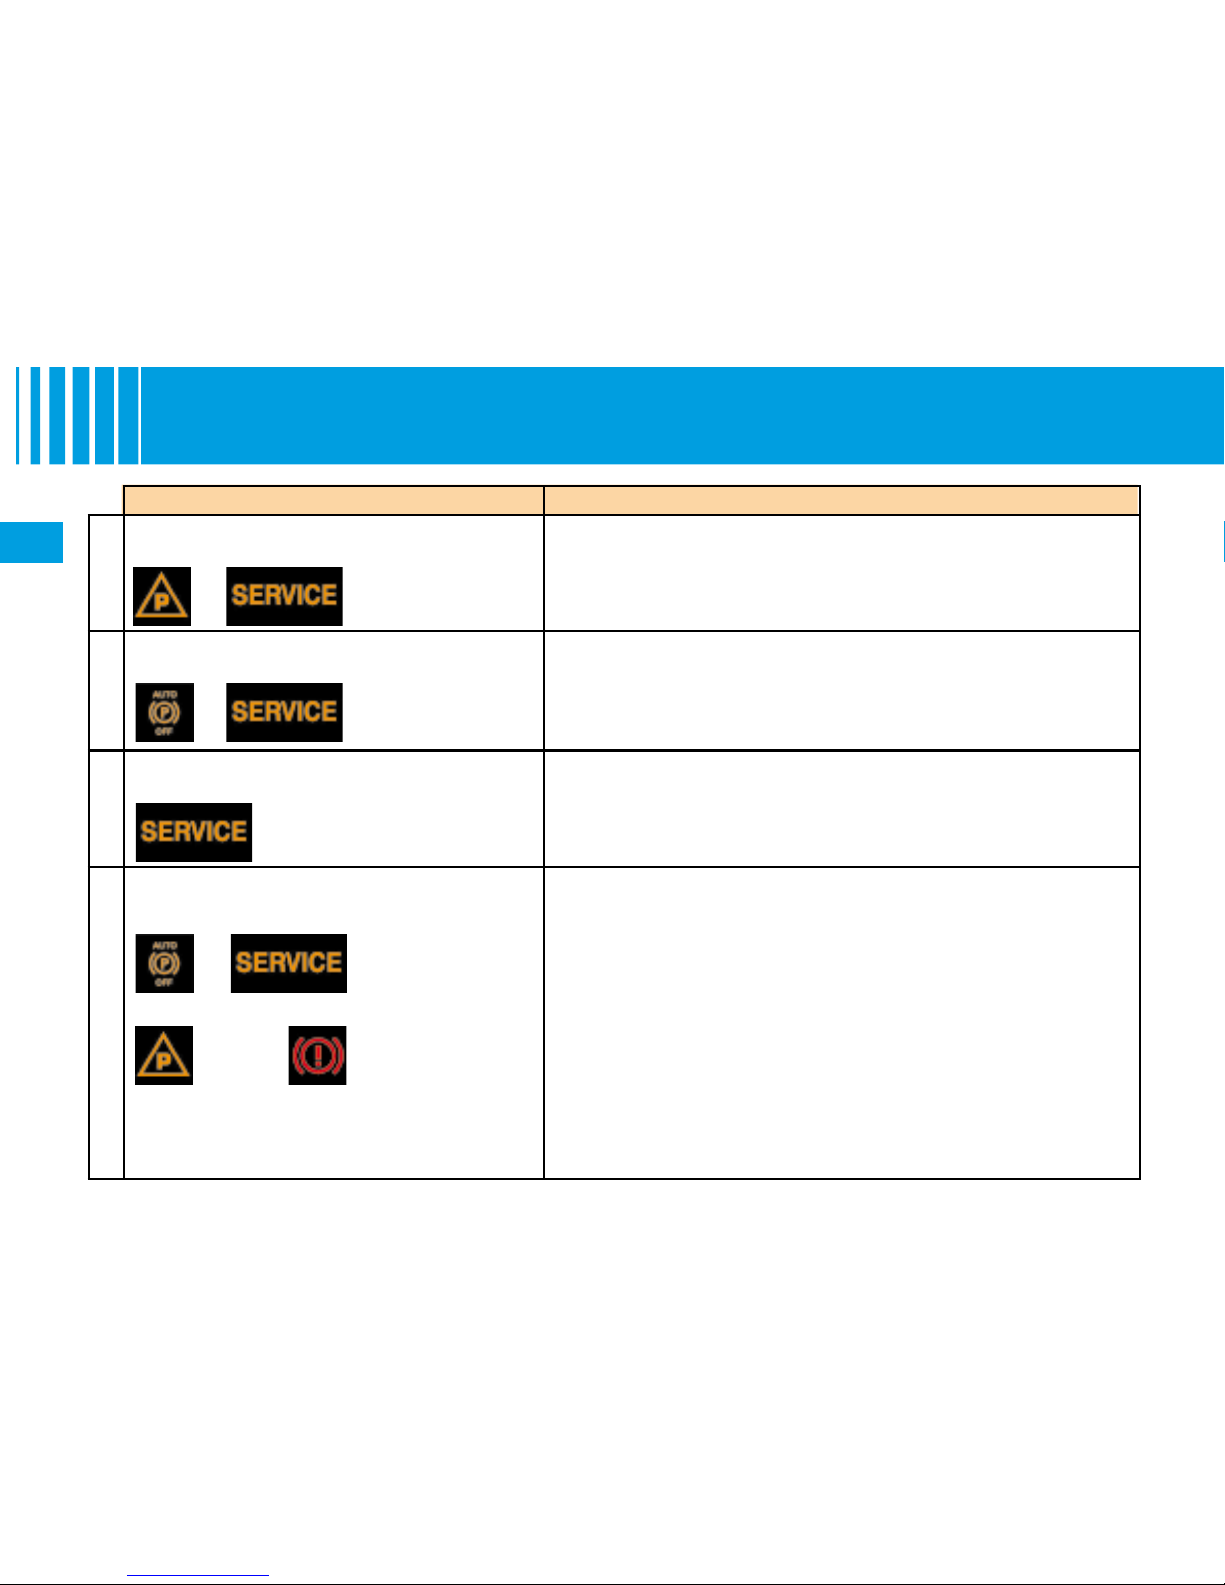
80
II
E LECTR I C PA RKING B R A KE
O P E RAT I N G A NO MA LI ES
SITUATION CONSEQUENCES
1 Electronic parking brake fault and display
of message “Parking brake faulty” and the
following warning lamps:
If the electronic parking brake fault warning lamp and the service warning lamp light up, position the vehicle in a safe location
(on at ground, with a gear engaged).
2 Display of the messages “Parking brake
faulty” and “Anti-rollback system faulty”,
and the following warning lamps:
The automatic functions are deactivated.
The hill start assist is unavailable.
The electronic parking brake is only available manually.
•
•
•
3 Display of the messages “Parking brake
faulty” and “Anti-rollback system faulty”,
and the following warning lamps:
The manual release of the electronic parking brake is unavailable.
The hill start assist is unavailable.
The automatic functions and manual application are still avail-
able.
•
•
•
4 Display of the messages “Parking brake
faulty” and “Anti-rollback system faulty”,
and the following warning lamps:
The automatic functions are deactivated.
The hill start assist is unavailable.
To apply the electronic parking brake:
1. Immobilise the vehicle and switch off the ignition.
2. Pull the control lever for at least 5 seconds or until maximum
application.
3. Switch on the ignition and check that the electronic parking
brake warning lamps are on.
Note:
Application may take longer than in normal operation.
If warning lamp (!) ashes or if the warning lamps do not come
on when the ignition is switched on, this method does not work.
Contact a CITROËN dealer.
To release the electronic parking brake:
1. Switch on the ignition.
2. Push the control lever and hold it for over 3 seconds.
•
•
•
•
and/or Flashing
Page 85
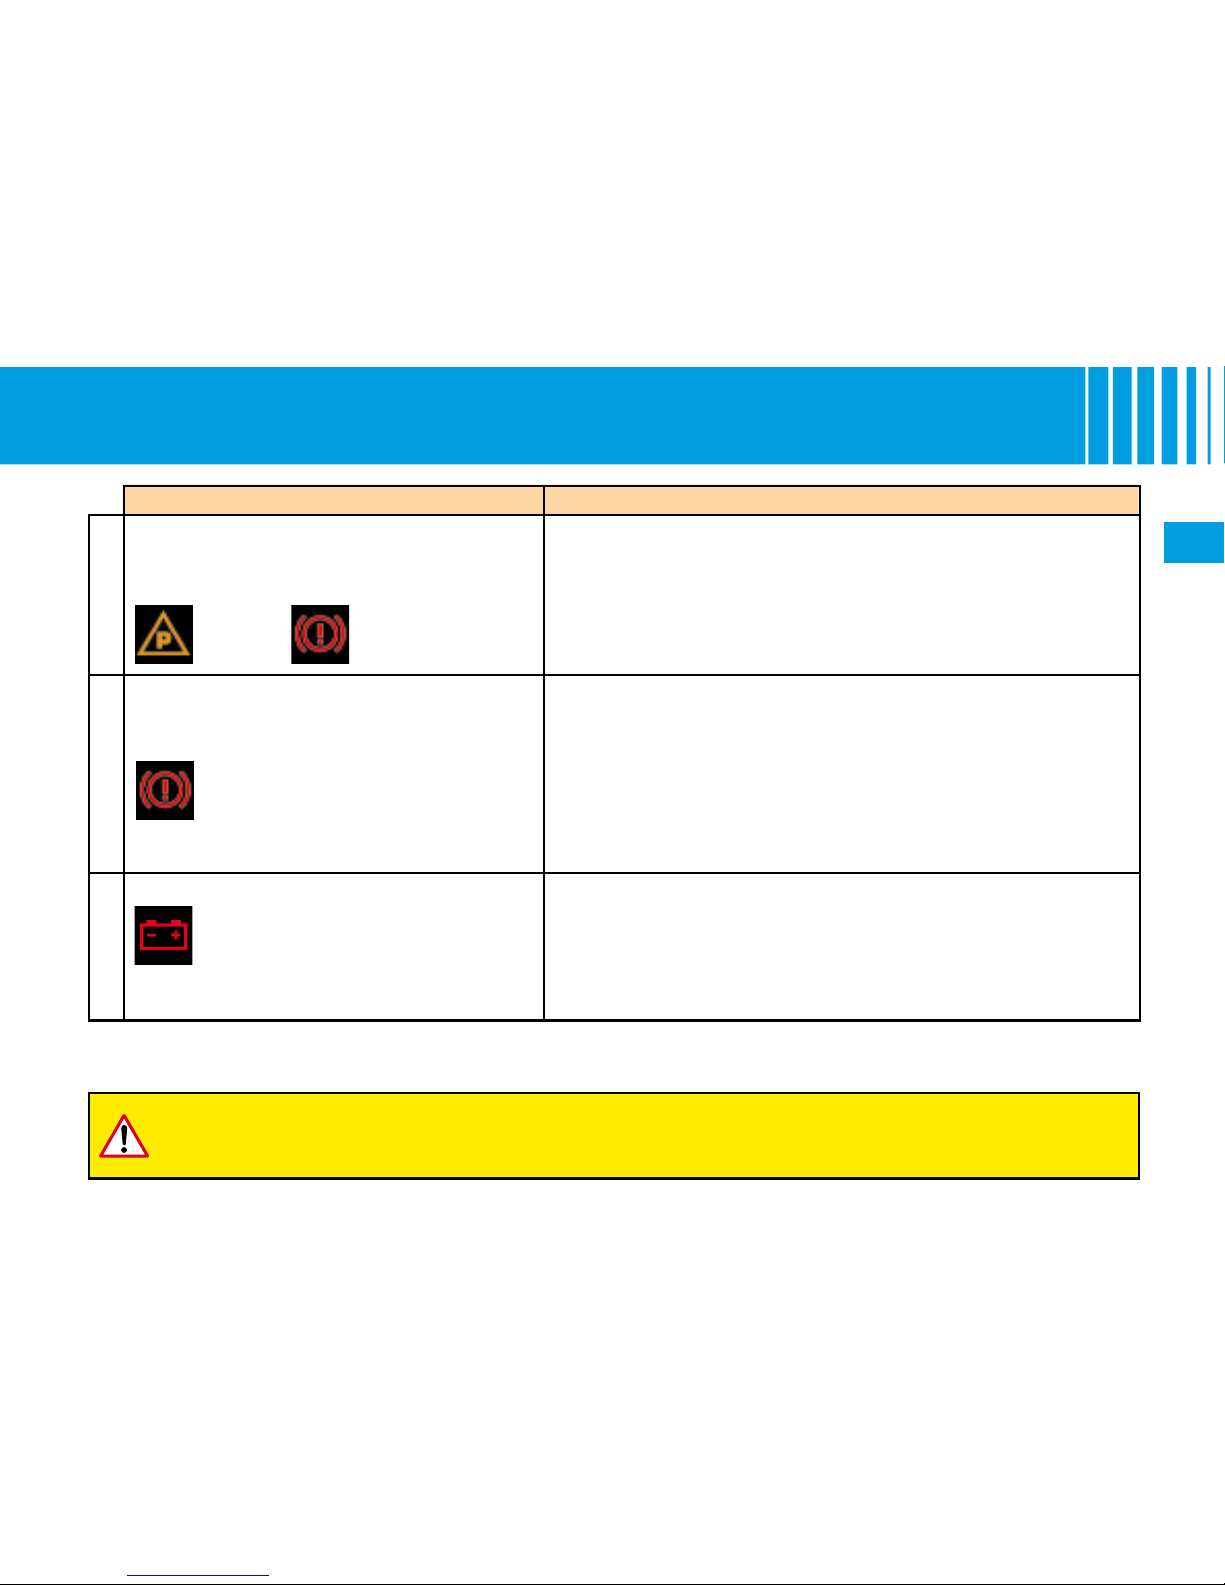
81
II
If any of these instances arises, contact a CITROËN dealer as soon as possible.
E LECTR I C PA RKING B R A KE
O P E RAT I N G A NO MA LI ES
SITUATION CONSEQUENCES
5 Display of message “Parking brake control
faulty - automatic mode activated” and
the following warning lamps:
Only the functions for automatic application on switching off
the engine and automatic release on acceleration are available.
MANUAL application/release of the electronic parking brake
and dynamic emergency braking are unavailable.
•
•
and/
or
Flashing
6 Display of message “Parking brake faulty”
and the following warning lamp:
The application of your parking brake is not guaranteed.
Your parking brake is momentarily unavailable.
If any of these instances arises:
Wait for about 3 minutes.
Wait for about 3 minutes.
After 3 minutes, if the warning lamp is still ashing, try
to reinitialise your parking brake, either by pushing and
releasing the control lever A whilst pressing the brake pedal,
or by making a long pull on the control lever A.
•
•
•
•
•
Flashing
7 Battery fault The lighting of the battery warning lamp means that you
must stop the vehicle as soon as it is safe to do so. Stop and
immobilise your vehicle.
The application of the electronic parking brake is not
guaranteed after the engine is switched off. You must therefore
apply the parking brake before switching off the engine.
•
•
Page 86
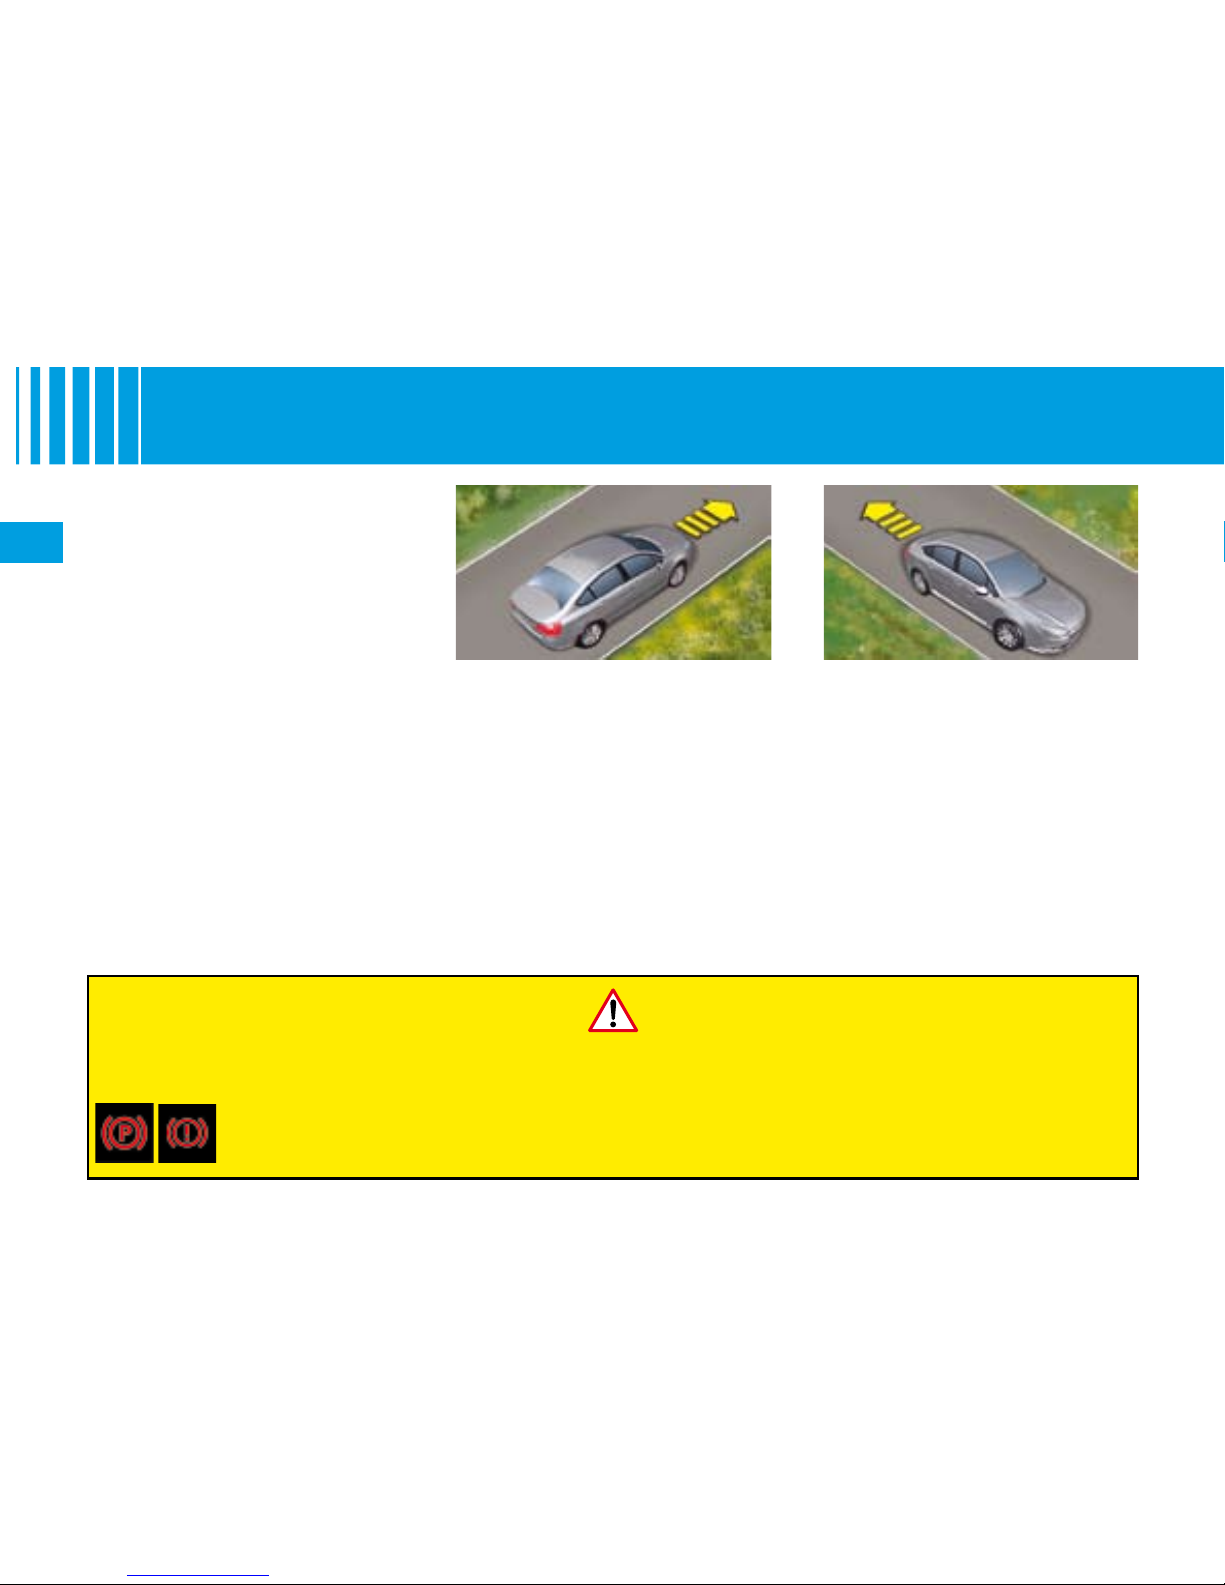
82
II
H I L L STA R T A S S I S T
To aid starting on a gradient, your
vehicle is equipped with a system
which keeps it immobilised for a
short time (about 2 seconds), the
approximate time it takes to move
your foot from the brake pedal to
the accelerator pedal.
This function is only active when:
The vehicle is completely stationary, with your foot on the
brake pedal.
In particular conditions on a
slope.
With the driver's door closed.
Note: The hill start assist function
cannot be deactivated.
The display of the message “Hill
start assist fault” indicates a malfunction of the hill start assist function.
•
•
•
On an ascending slope, with the
vehicle stationary, the vehicle
is held for a brief moment when
you release the brake pedal:
If you are in rst gear or neutral
with a manual gearbox.
If you are in
D or M gear with an
automatic gearbox.
•
•
On an descending slope, with the
vehicle stationary and reverse
gear engaged, the vehicle is
held for a brief moment when
you release the brake pedal.
If you need to exit the vehicle with the engine running, manually apply the parking brake and
ensure that the warning lamp P (on the intrument panel) and the warning lamp P (on control A)
are permanently on.
User Precautions:
Do not leave the vehicle while it is being held in the temporary immobilisation hill start assist phase.
Page 87
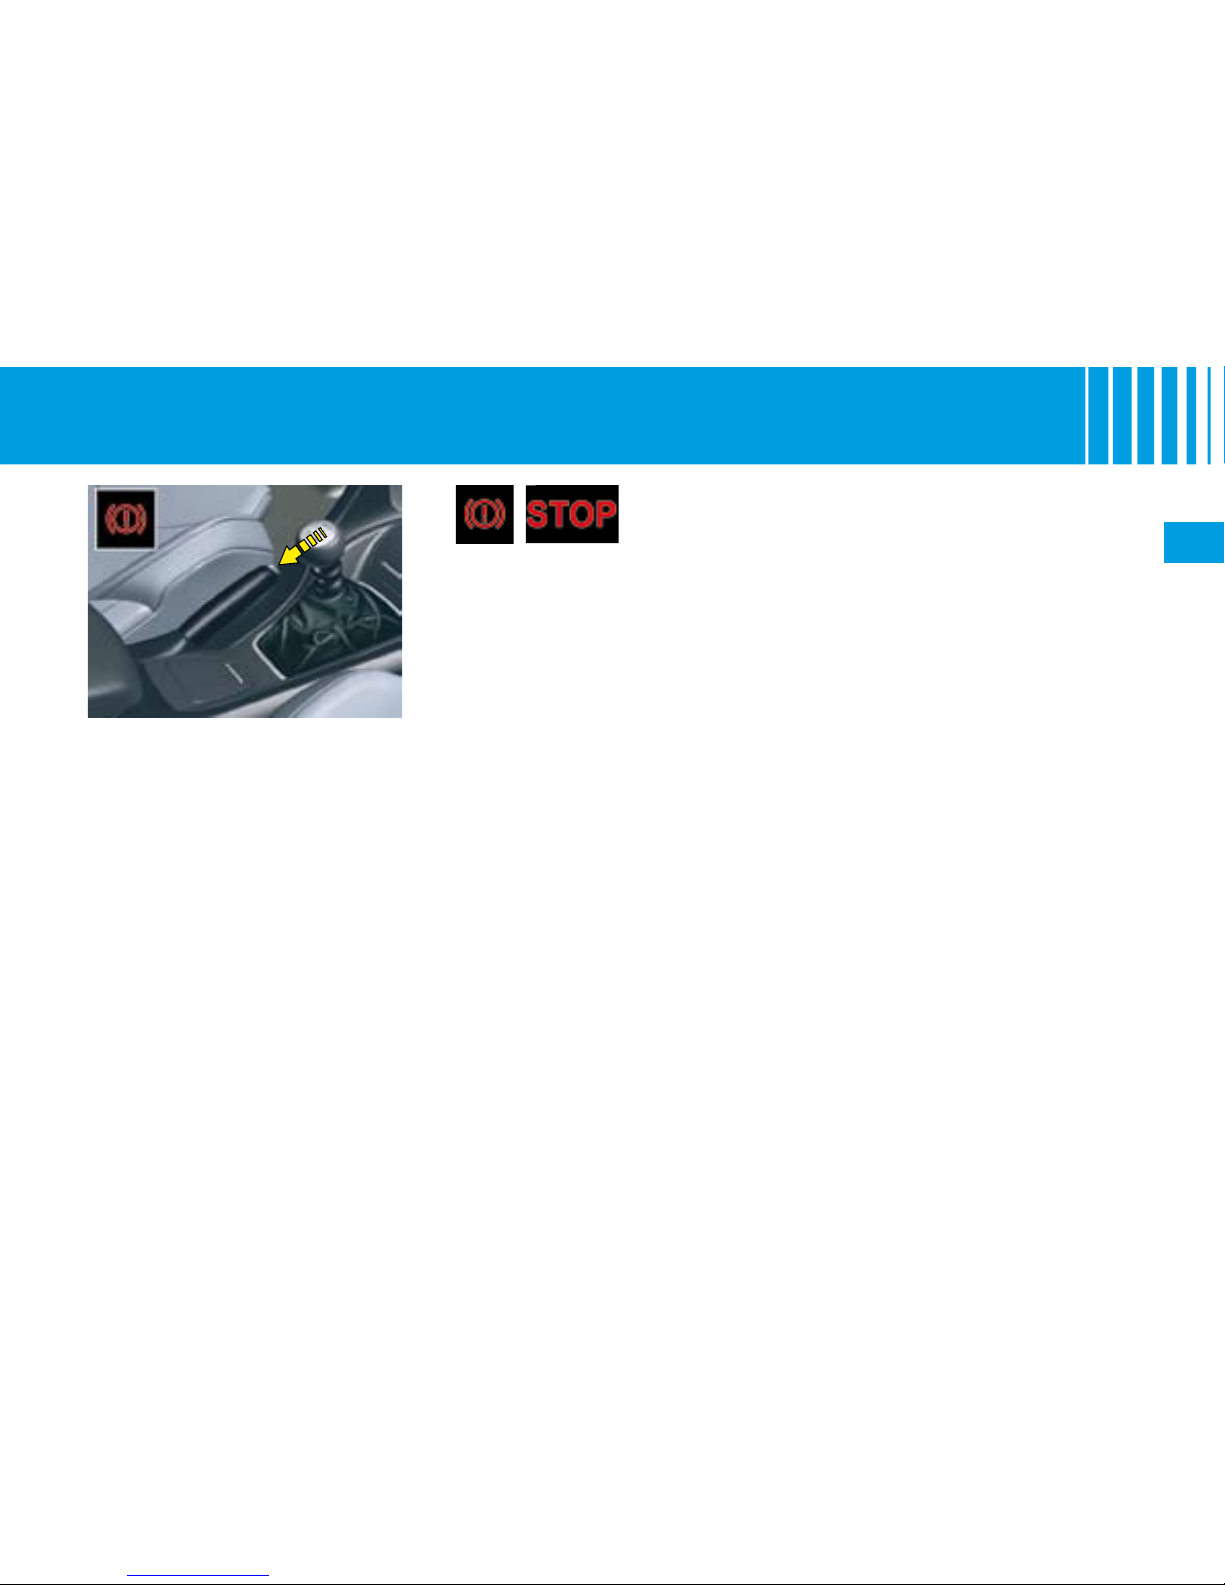
83
II
M A N U A L PA R K I N G B R A K E
Parking brake
The parking brake is engaged,
with the vehicle stationary, by pulling on the lever with a force appropriate to the slope.
To facilitate the action on the lever,
you are recommended to press
the brake pedal at the same time.
In all circumstances, as a pre-
cautionary measure, engage rst
gear.
On steep gradients, turn the steer-
ing towards the pavement.
To release the parking brake,
press on the end of the lever whilst
pulling it then lower it fully.
The warning lamp comes on if the
parking brake is engaged or not
fully released.
If the parking brake is released
,
the lighting of this warning lamp
along with the STOP warning
lamp indicates an insufcient level
of brake uid or a malfunction of
the braking distribution.
It is essential to stop the vehicle.
Consult a CITROËN dealer as
soon as possible.
Page 88
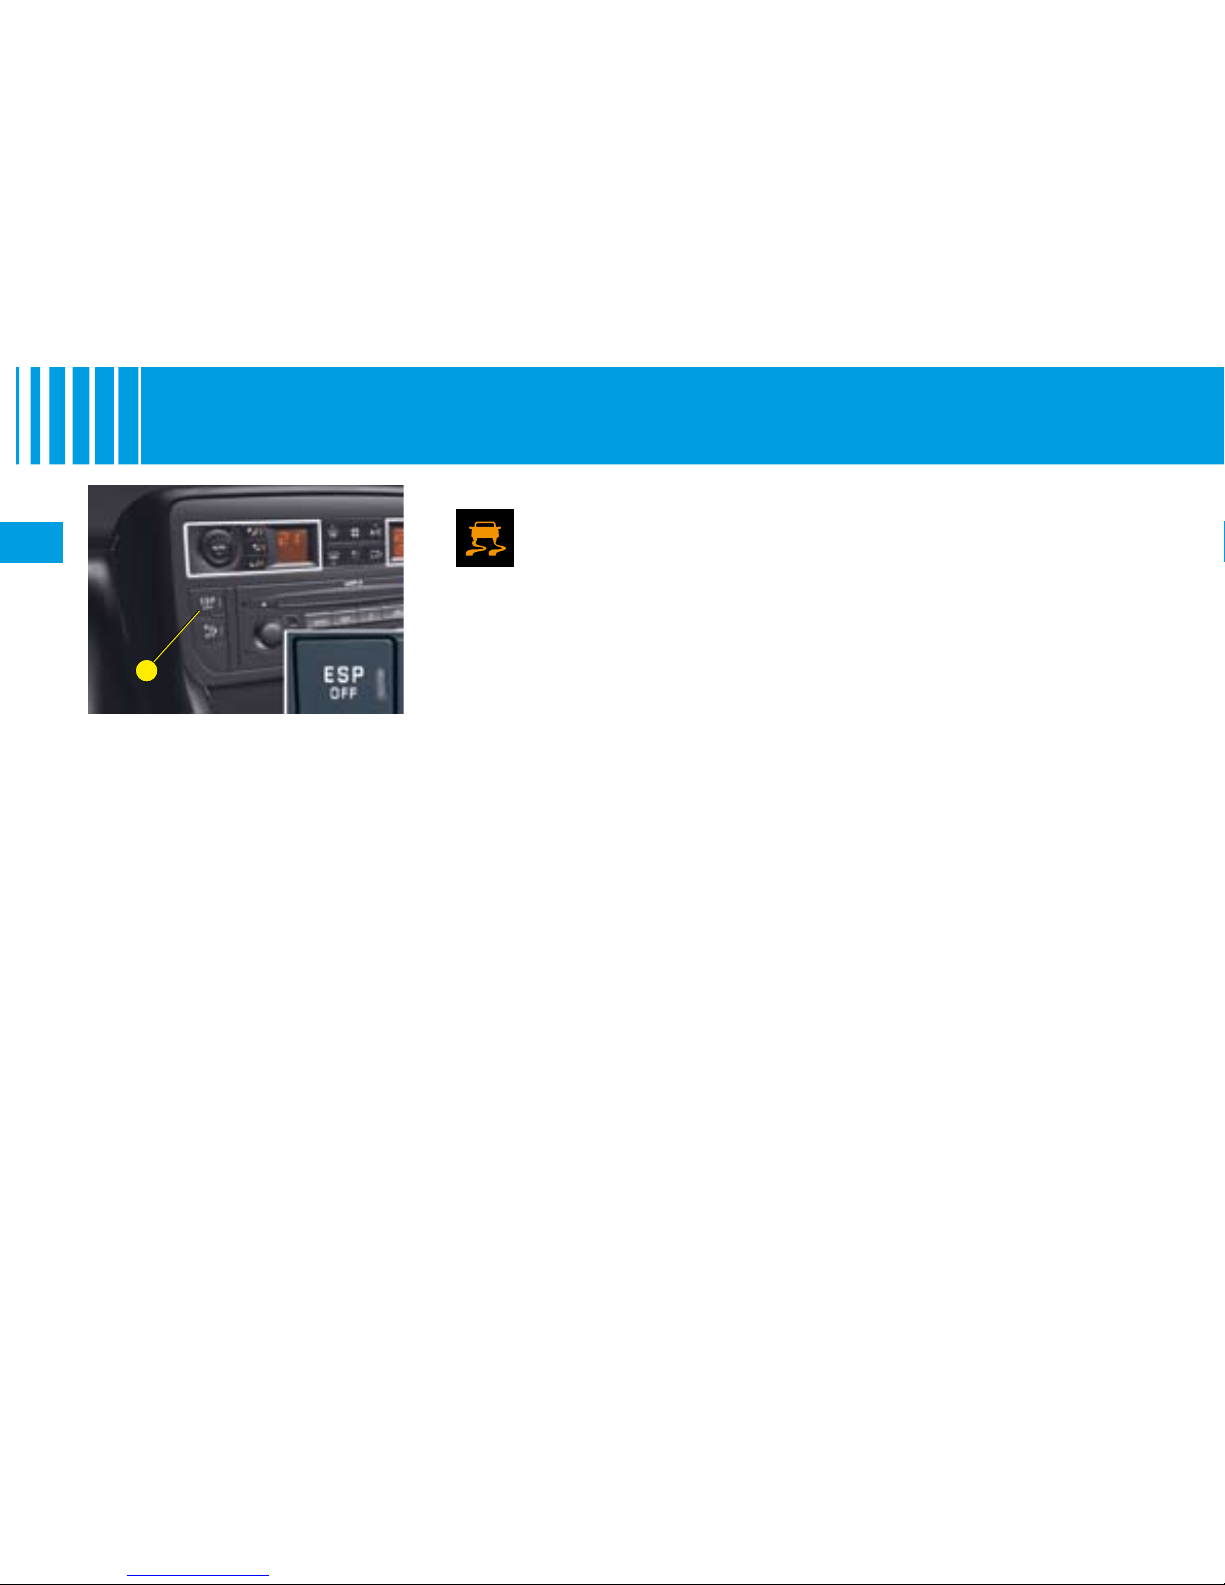
84
II
A
E L E C T R O N I C S TA B I L I T Y P R O G R A M M E
Electronic Stability
Programme (ESP) and
Traction Control (ASR)
These systems are closely associated with ABS and additional to it.
In the event of a loss of control of
the vehicle by the driver, the ESP
system acts automatically on one
or more wheels and also on the
engine to bring the vehicle back on
trajectory. The ASR system optimises traction and prevents wheel
spin by acting on the brakes of the
driving wheels as well as on the
engine. It also improves steering
stability during acceleration.
Operation
If either of the ESP or
ASR systems is active, the
warning lamp ashes.
Deactivation
In exceptional conditions (vehicle
stuck in snow, soft ground, etc.)
it may prove useful to deactivate
the ESP/ASR systems to allow
the wheels to spin and thus regain
traction.
Press on control A, the warning
lamp and the light on control A
light up. The ESP/ASR systems
are no longer active.
The ESP/ASR systems will acti-
vate again:
Automatically
after the igni-
tion has been switched off.
Automatically
when you drive
at above approx. 50 km/h
(approx. 30 mph).
Manually
with another press
on button A.
•
•
•
Operational anomaly
If there is a system fault, the warning lamp lights up, accompanied
by a message on the instrument
panel screen, the lighting of the
SERVICE warning lamp and a
beep.
Contact a CITROËN dealer to have
the system checked.
The ESP system offers increased
driving safety but is not in place to
encourage the driver to take additional risks or to drive at excessive
speeds.
The functioning of this system is
subject to compliance with the
manufacturer’s recommendations
on wheels (tyres and rims), brake
parts and electronic components,
as well as with the assembly and
repair procedures approved by
CITROËN.
After any collision, contact a
CITROËN dealer.
Page 89
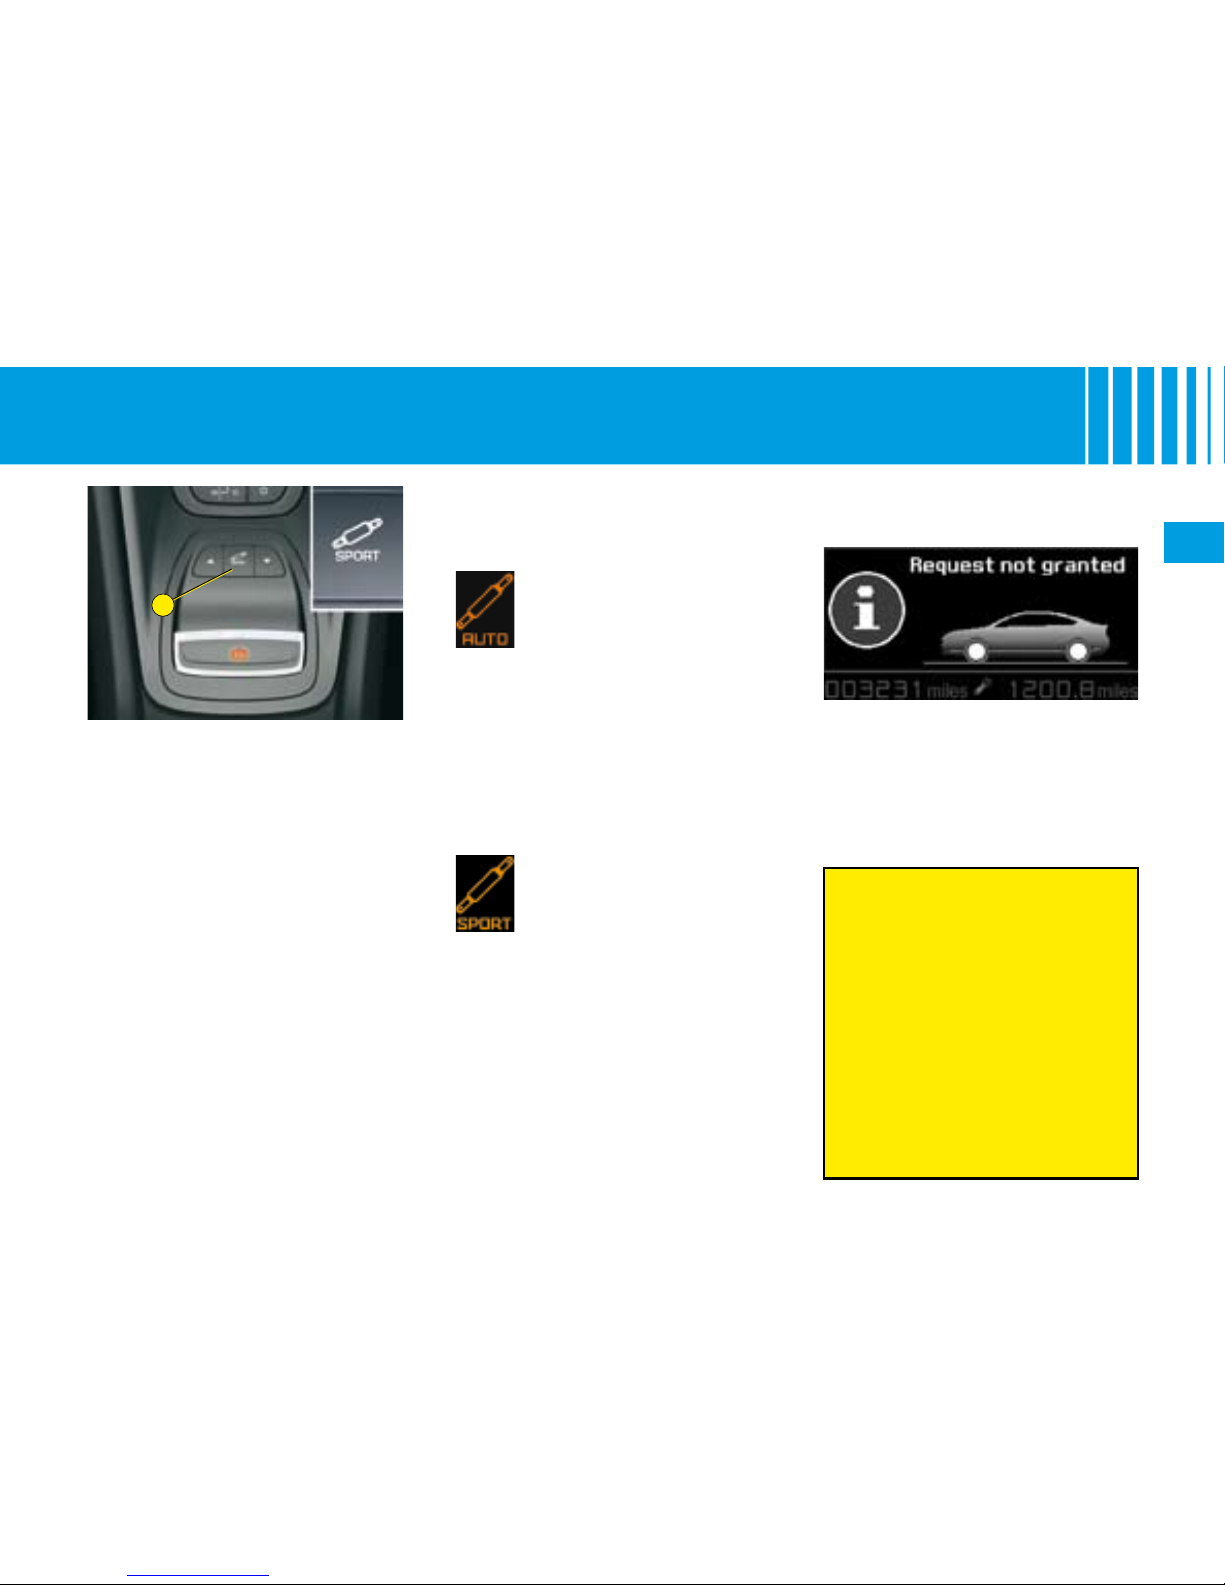
85
II
A
“ H Y D R A C T I V E I I I + ” S U S P E N S I O N
Normal mode, for maximum
comfort
“Hydractive III +” suspension automatically adjusts to road surface
conditions and driving style.
It allows you to alternate between
soft and rm suspension settings,
maximising comfort at the same
time as permanently guaranteeing
the highest level of safety. It also
automatically corrects road holding, according to the vehicle load
and driving conditions.
Also, the “Hydractive III +” suspension gives you the possibility of
choosing between two modes of
suspension.
A change of suspension mode can
be made either when the vehicle
is moving or when stationary, by
pressing on button A.
Signalling
Sport mode, more suited for
a sporty style of driving
Note: Sport mode is retained when
you switch off the engine.
Note: If the speed authorised for a
particular position is exceeded, the
vehicle reverts automatically to the
normal road position.
Note: Automatic variation of
ground clearance
If your speed exceeds
110 km/h (approx. 70 mph),
on a good road surface,
ground clearance is lowered.
The vehicle returns to its
normal position if the road
surface deteriorates or if your
speed is lower than 90 km/h
(approx. 55 mph)
At low or medium speed, if the
road surface is poor, ground
clearance is increased. The
vehicle returns to its normal
position as soon as conditions
allow.
•
•
Signalling of a requested
position not authorised
The instrument panel screen
temporarily displays a message
indicating that this position is not
authorised.
The vehicle remains in the authorised position and the instrument
panel screen indicates this position
to you.
A message is displayed on
the instrument panel.
A message is displayed on
the instrument panel and
the warning lamp on button A comes on.
Page 90
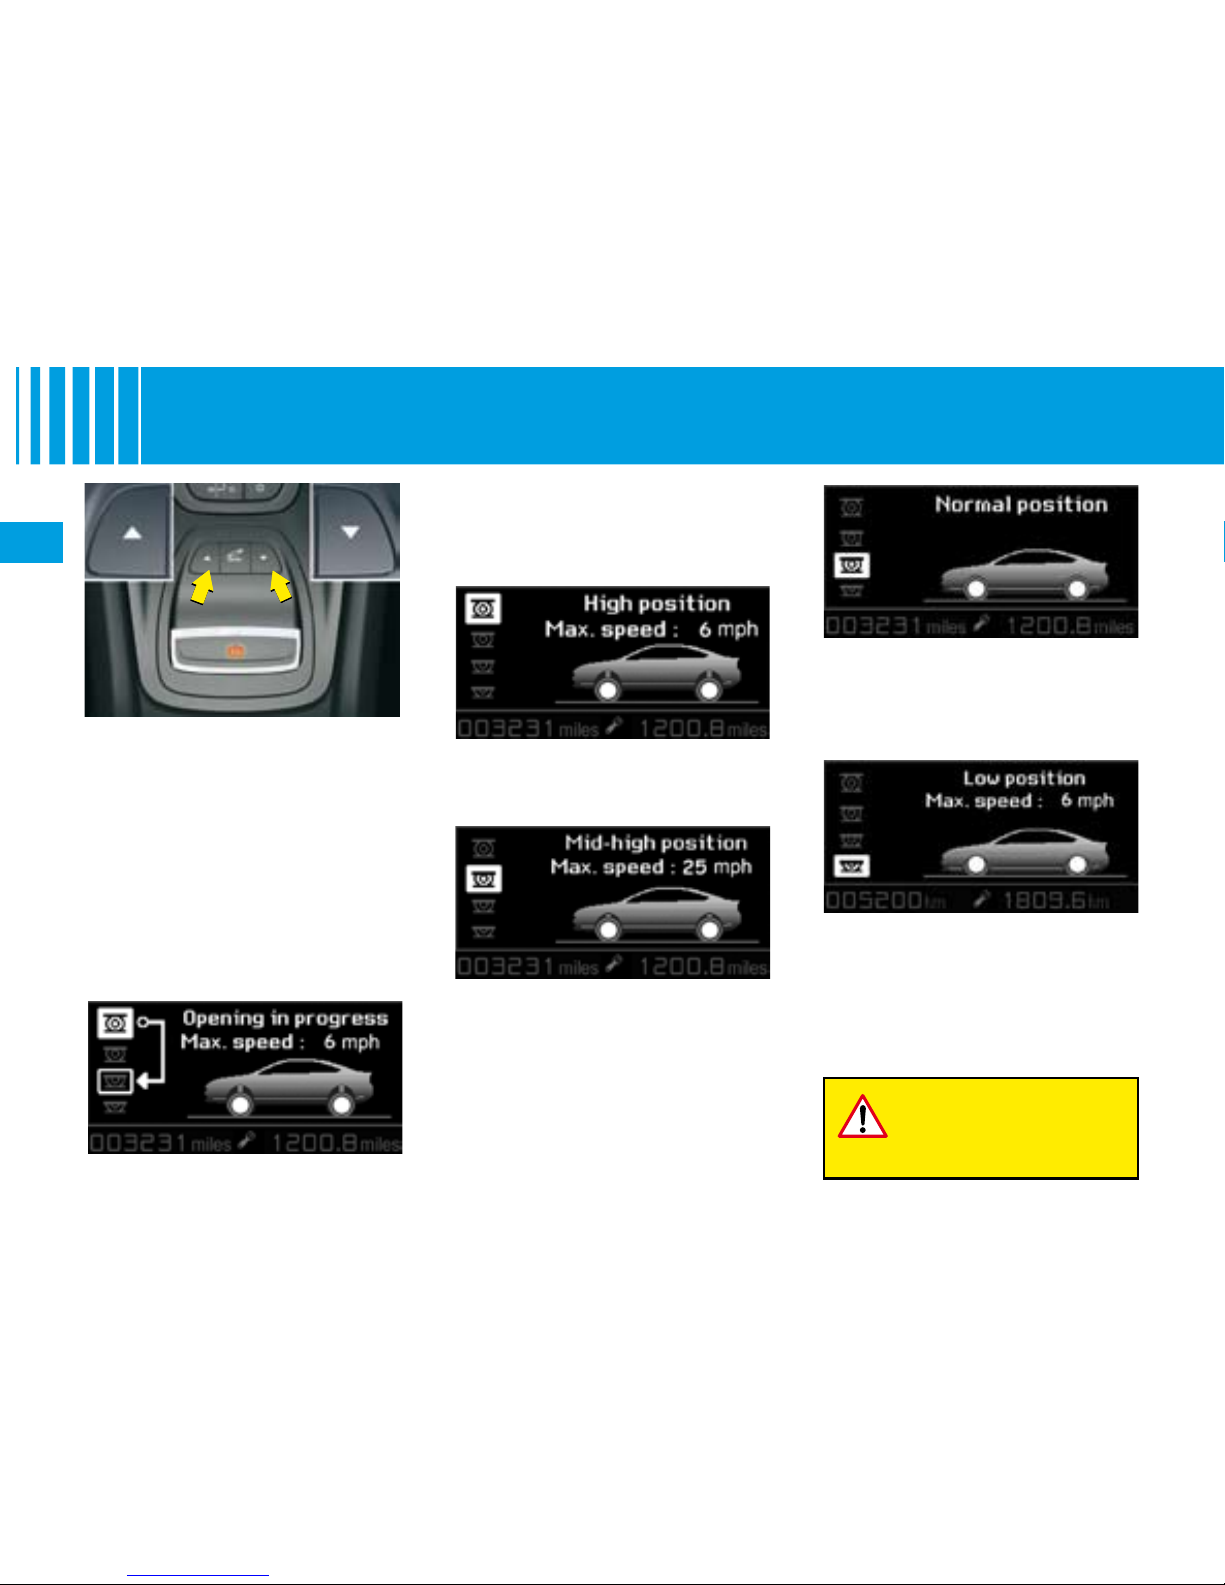
86
II
“ H Y D R A C T I V E I I I + ” S U S P E N S I O N
Position changes may only be
made when the engine is running.
Adjustable ground clearance
responds to all types of situation.
Apart from a few specic situations, driving in the normal road
position is imperative.
To change the position
Press once on one of the adjustment controls. The change in position is indicated by a message on
the instrument panel screen:
Maximum height
Changing a wheel (Not possible if
speed > 10 km/h).
Intermediate position
For an increased ground clearance
(Not possible if speed > 40 km/h).
For use on difcult roads when
travelling at reduced speed, as
well as on carpark ramps.
Normal road position
Note: If the speed authorised for a
particular position is exceeded, the
vehicle reverts automatically to the
normal road position.
Minimum height
To facilitate loading or unloading
the vehicle.
For workshop inspections.
Not to be used in normal driving
(Not possible if speed > 10 km/h).
For your safety if you are
operating underneath
the vehicle, it is obligatory to support the vehicle with axle stands.
Viewing of the position of
the vehicle
Once the adjustment has been
made, a message is displayed on
the instrument panel screen.
Page 91
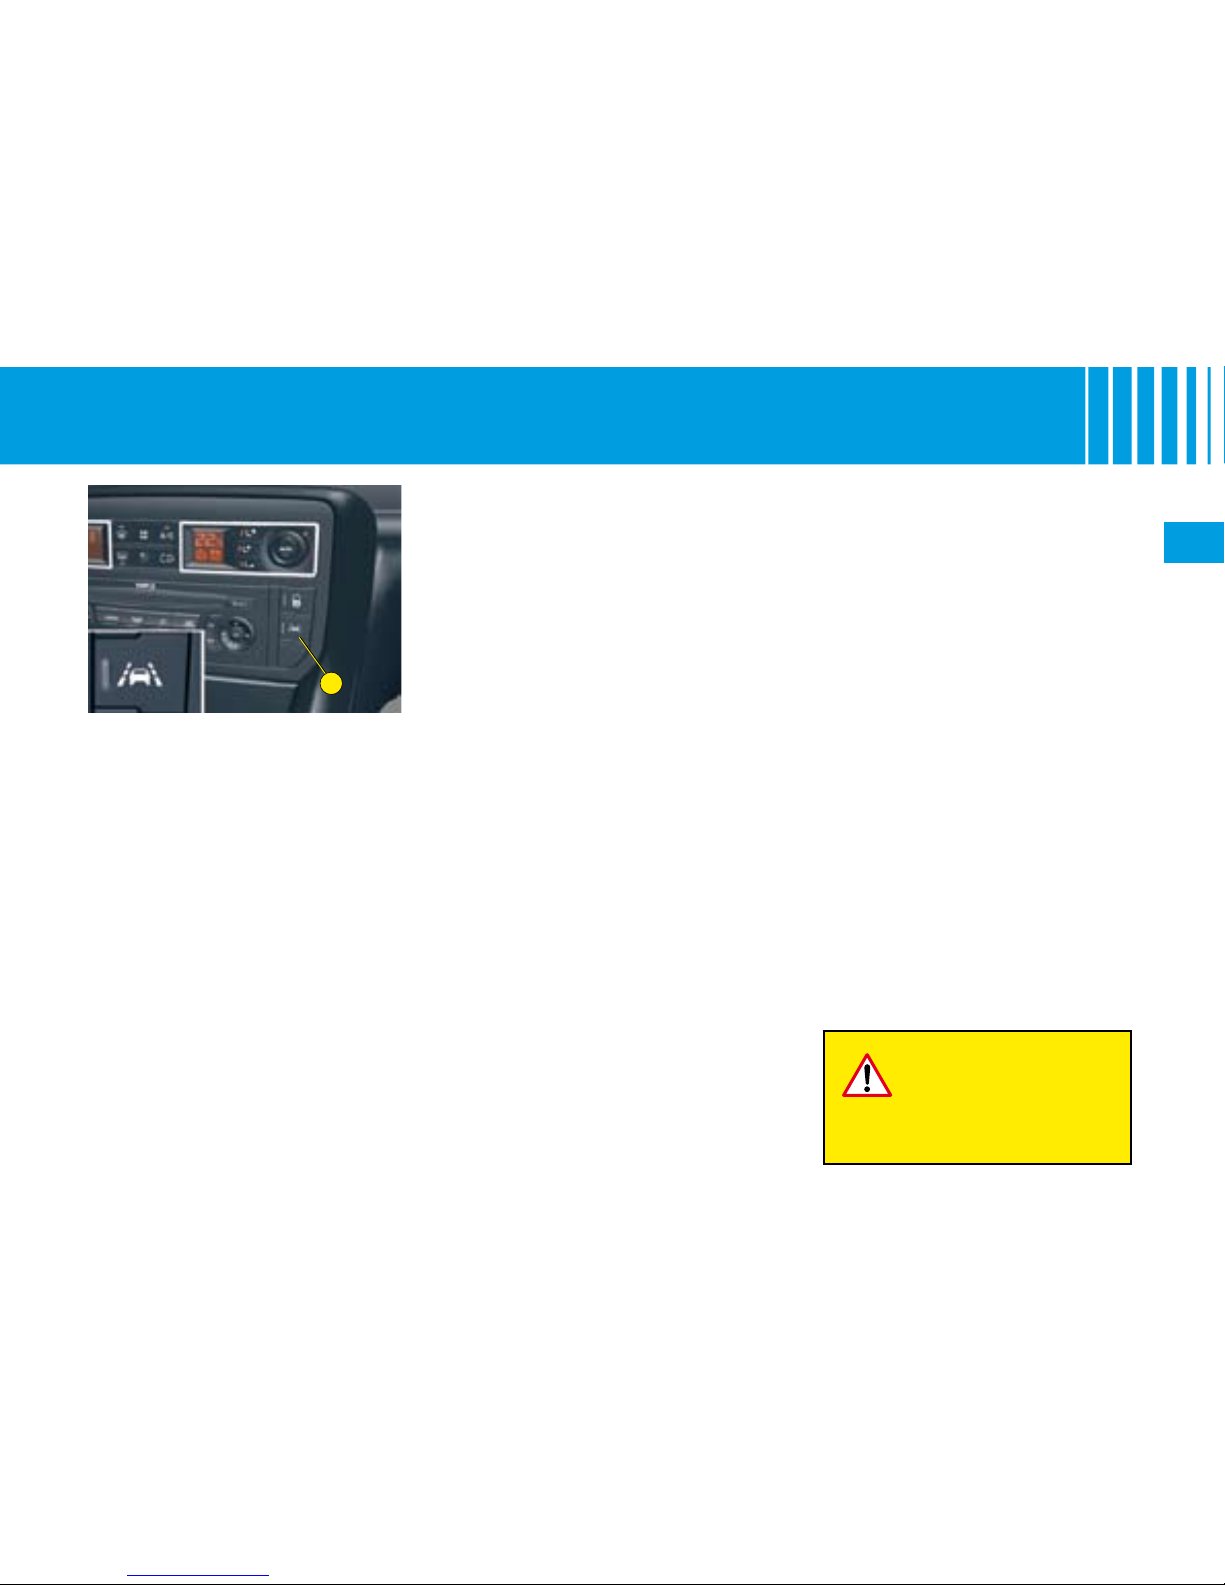
87
II
A
L A N E D E PA R T U R E WA R N I N G S Y S T E M
This driving assistance device
warns you when you unwittingly
cross a lane marking (either a continuous or a dotted line on the road
surface). It is designed for use on
motorways and dual carriageways,
operating only above speeds of
approx. 80 km/h (50 mph)..
Activation/Deactivation
A press on button A activates the
function, the warning lamp on the
button lights up.
A second press on button A deactivates the function, the warning
lamp on the button goes out.
When you start the engine, the
mode (activated/deactivated)
selected when you stopped the
engine is retained.
Operation
Above a speed of around 80 km/
h, if you cross a lane marking, you
are alerted to this by a vibration
within the cushion of your seat:
On the right hand side if you
cross a lane marking to the
right.
On the left hand side if you
cross a lane marking to the
left.
The system does not alert you if
one of your direction indicators is
operating and for approx. 20 seconds after the direction indicator
has stopped.
•
•
The driver still has to
remain attentive and
in complete control of
his vehicle.
Remarks:
This system is designed to identify
trafc lane markings.
In certain cases it may trigger an
alert that is unnecessary, for example if the vehicle passes over a
directional arrow or some unusual
road marking.
The system may be affected temporarily by conditions external to
the vehicle:
Detection of lane markings
made difcult by:
Markings being worn.
Insufcient contrast with the
general road surface.
Sensors being negated by:
Driving in snow or heavy rain.
Driving on roads that are
covered with mud or water
puddles.
If there is prolonged interference,
contact a CITROËN dealer.
•
-
-
•
-
-
Page 92
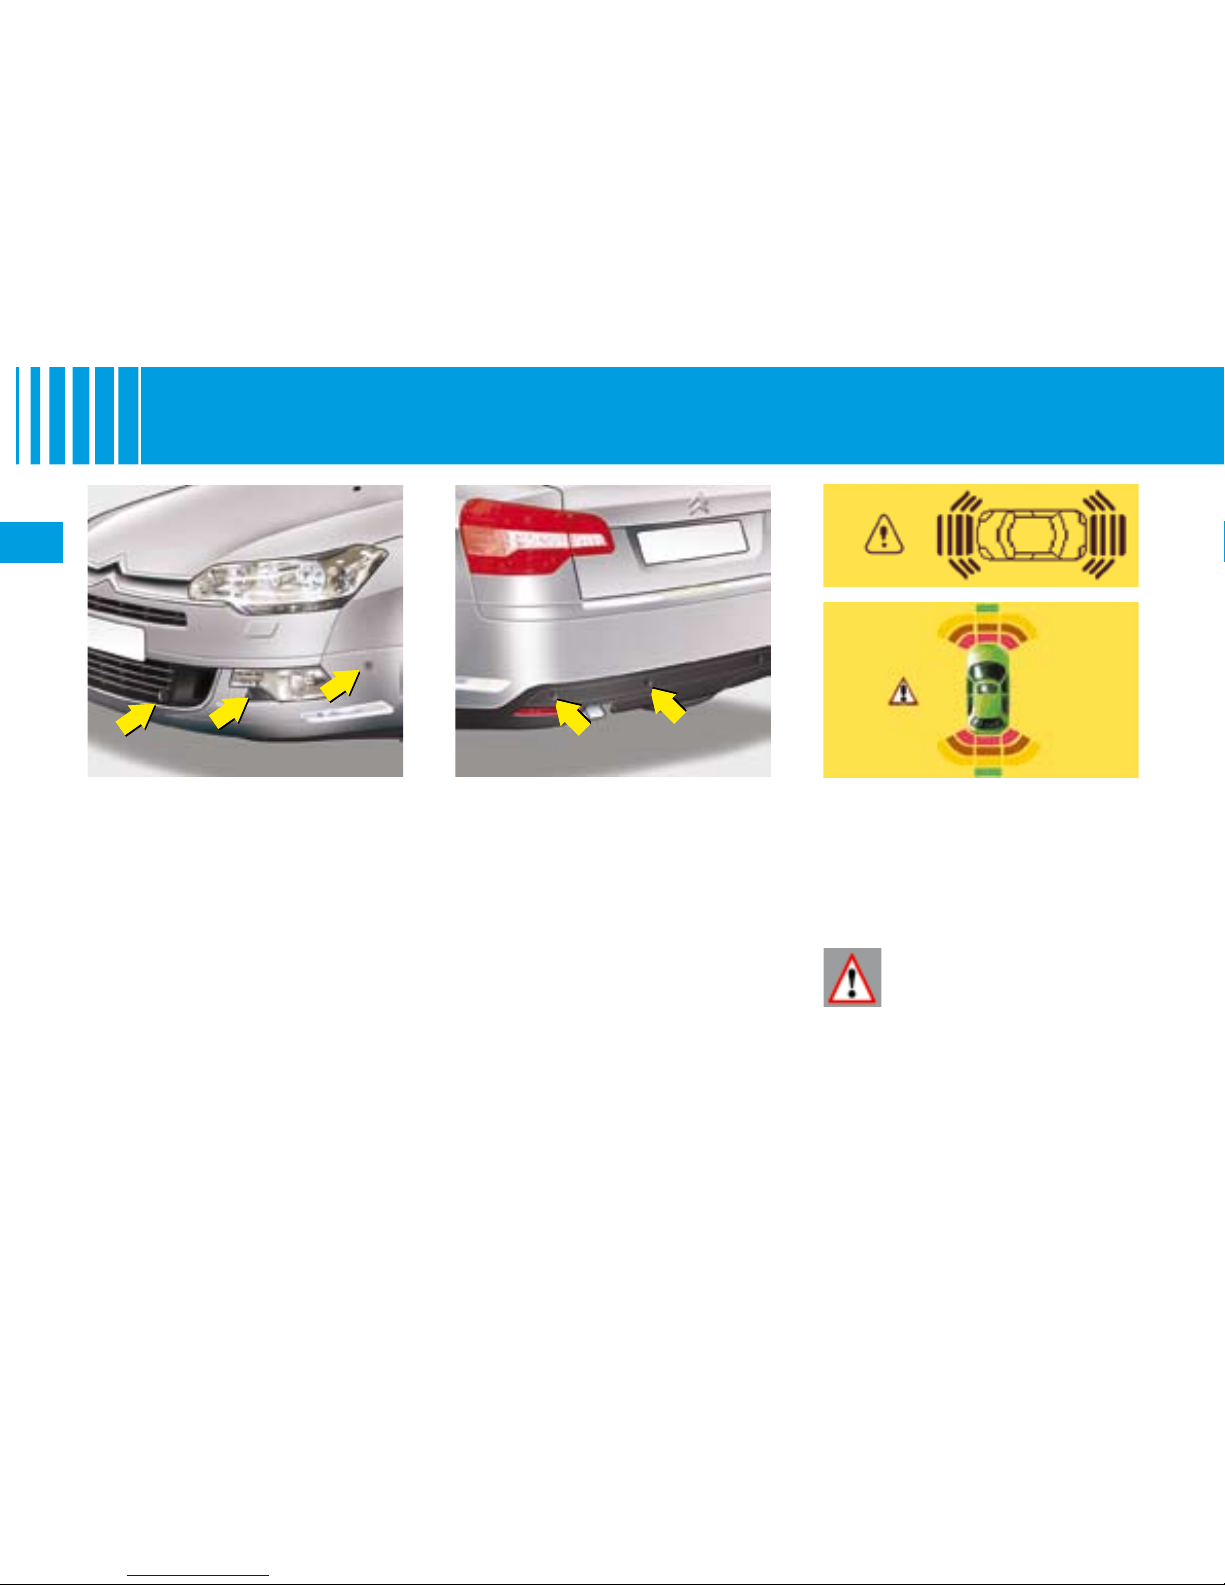
88
II
PA R K I N G A S S I S TANCE
As the vehicle approaches the
obstacle, the sound signal becomes
more and more urgent and the
shaded areas are displayed closer
and closer to the vehicle.
Proximity sensors are located in
the front and rear bumpers of
your vehicle.
When manoeuvring whether for-
wards or in reverse, at a speed
below approximately 10 km/h
(6 mph), they warn you of the pres-
ence of any obstacle located within
their detection zone, by means of:
A sound signal emitted by the
front or rear loudspeakers.
Display of the outline of your
vehicle with shading corresponding to the area where an
obstacle is detected.
•
•
Front Rear
When the obstacle is
less than approximately
25 cms from your vehicle,
the sound signal becomes
continuous and a warning
panel appears on the display.
As the vehicle approaches the
obstacle, the sound signal tells you
the position of the obstacle according to whether the sound is coming
from the front LH or RH or the rear
LH or RH loudspeakers.
Note: The sound volume of your
audio equipment reduces automatically when a signal is being
emitted.
Page 93
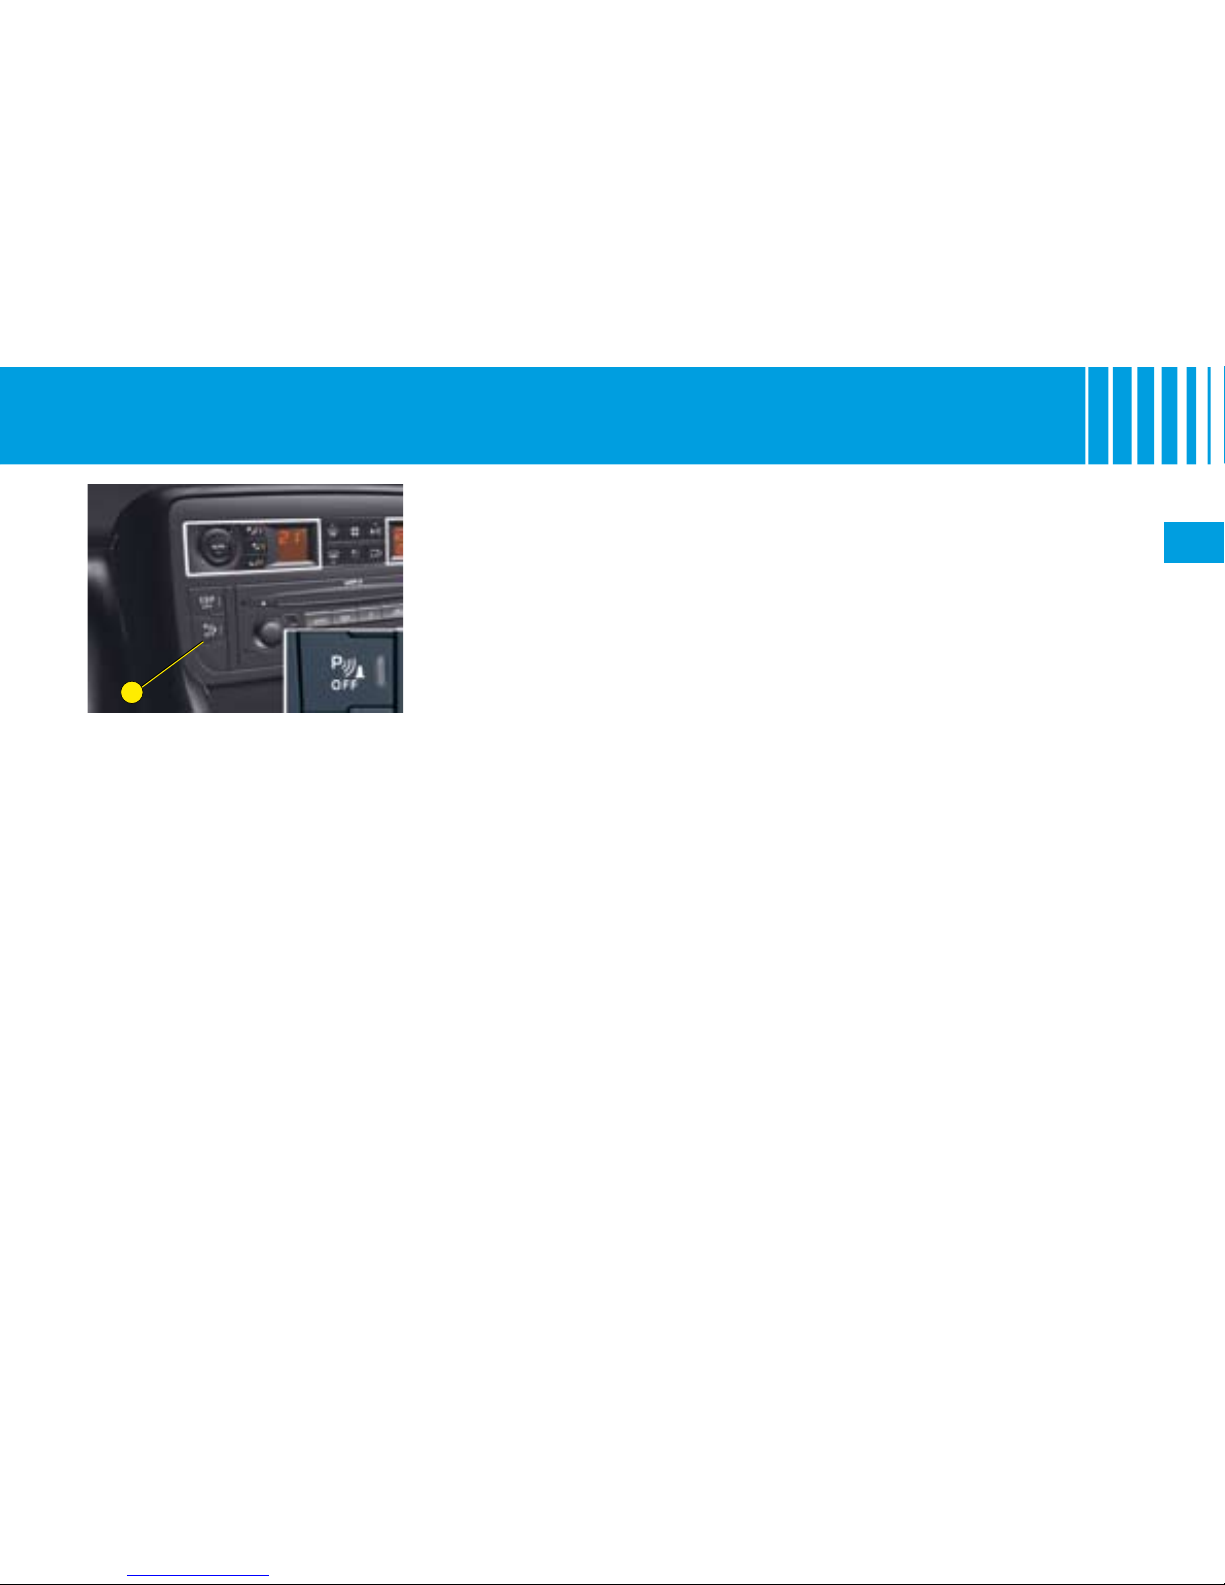
89
II
A
PA R K I N G A S S I S TANCE
Activation/Deactivation
You can activate/deactivate the
parking assistance by pressing
button A. When the parking assistance is inactive, the warning lamp
on button A is lit up.
Activation/deactivation of the parking assistance is memorised when
you stop the vehicle.
Remark: If you are towing with
a towing device not approved
by CITROËN, it is necessary to
deactivate parking assistance by
pressing on button A. The warning lamp on the button lights up.
Operation
When you engage reverse gear,
a sound signal conrms to you
that the system is active. The outline of your vehicle appears on the
screen. Any obstacles located to
the rear or to the front of the vehicle can be detected.
When going forward and at a
speed below approx. 10 km/h
(6 mph), whether in neutral or in
gear, the outline of the vehicle
appears on the display as soon
as an obstacle is detected in front
of the vehicle. Obstacles located
in front of the vehicle will be
detected.
Remarks:
The proximity sensors cannot
detect objects that are immediately under or over the bumpers.
A thin object such as a spike,
a bollard or similar, can only
be detected at the start of the
manœuvre but not when the
vehicle arrives close up to it.
In poor weather or in winter, you
need to ensure that the sensors
are not covered with mud or
with ice or snow.
•
•
•
Page 94
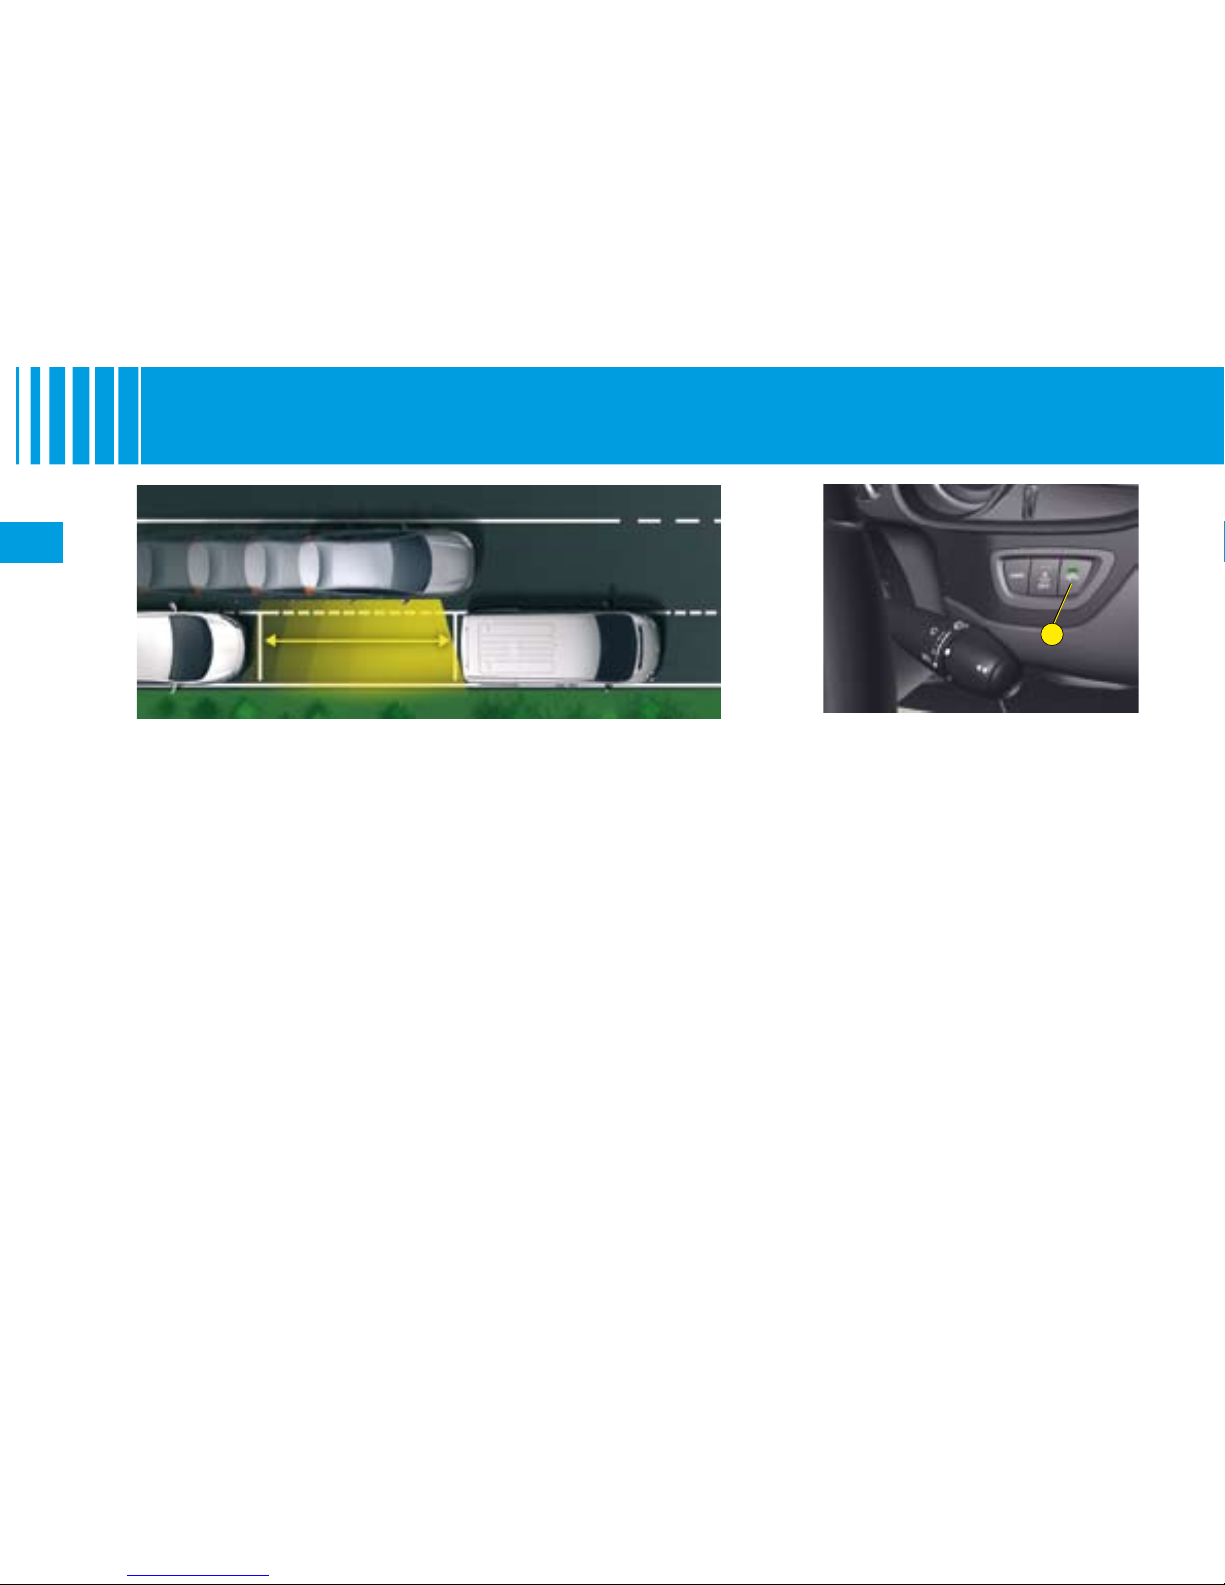
90
II
A
PA R K I N G S PA C E S E N S O R
The “Parking Space Sensor” func-
tion assists you in nding a parking
space. It measures the size of the
space and gives you information
on:
The possibility of parking in a
free space, depending on the
dimensions of your vehicle and
the space needed to manoeuvre into it.
The level of difculty of the
manoeuvre to be carried out.
Note: The system does not measure spaces which are clearly much
smaller or larger than the size of
the vehicle.
•
•
You can select the “Parking Space
Sensor” function by pressing button A.
The xed lighting of the warning
lamp indicates that this function is
selected.
Parking Space Sensor
warning lamp
The warning lamp is located on
button A. It has 3 different statuses:
Off: the function is not
selected.
Permanently on: the function
is selected but the measuring
conditions are not met (direction indicator not on, vehicle
speed too high) or the measur-
ing phase has nished.
Flashing: measuring is in
progress.
Note: During measuring, the message “Measuring in progress -
Max speed 20km/h /12 mph” is
displayed on the instrument panel
screen.
•
•
•
Page 95
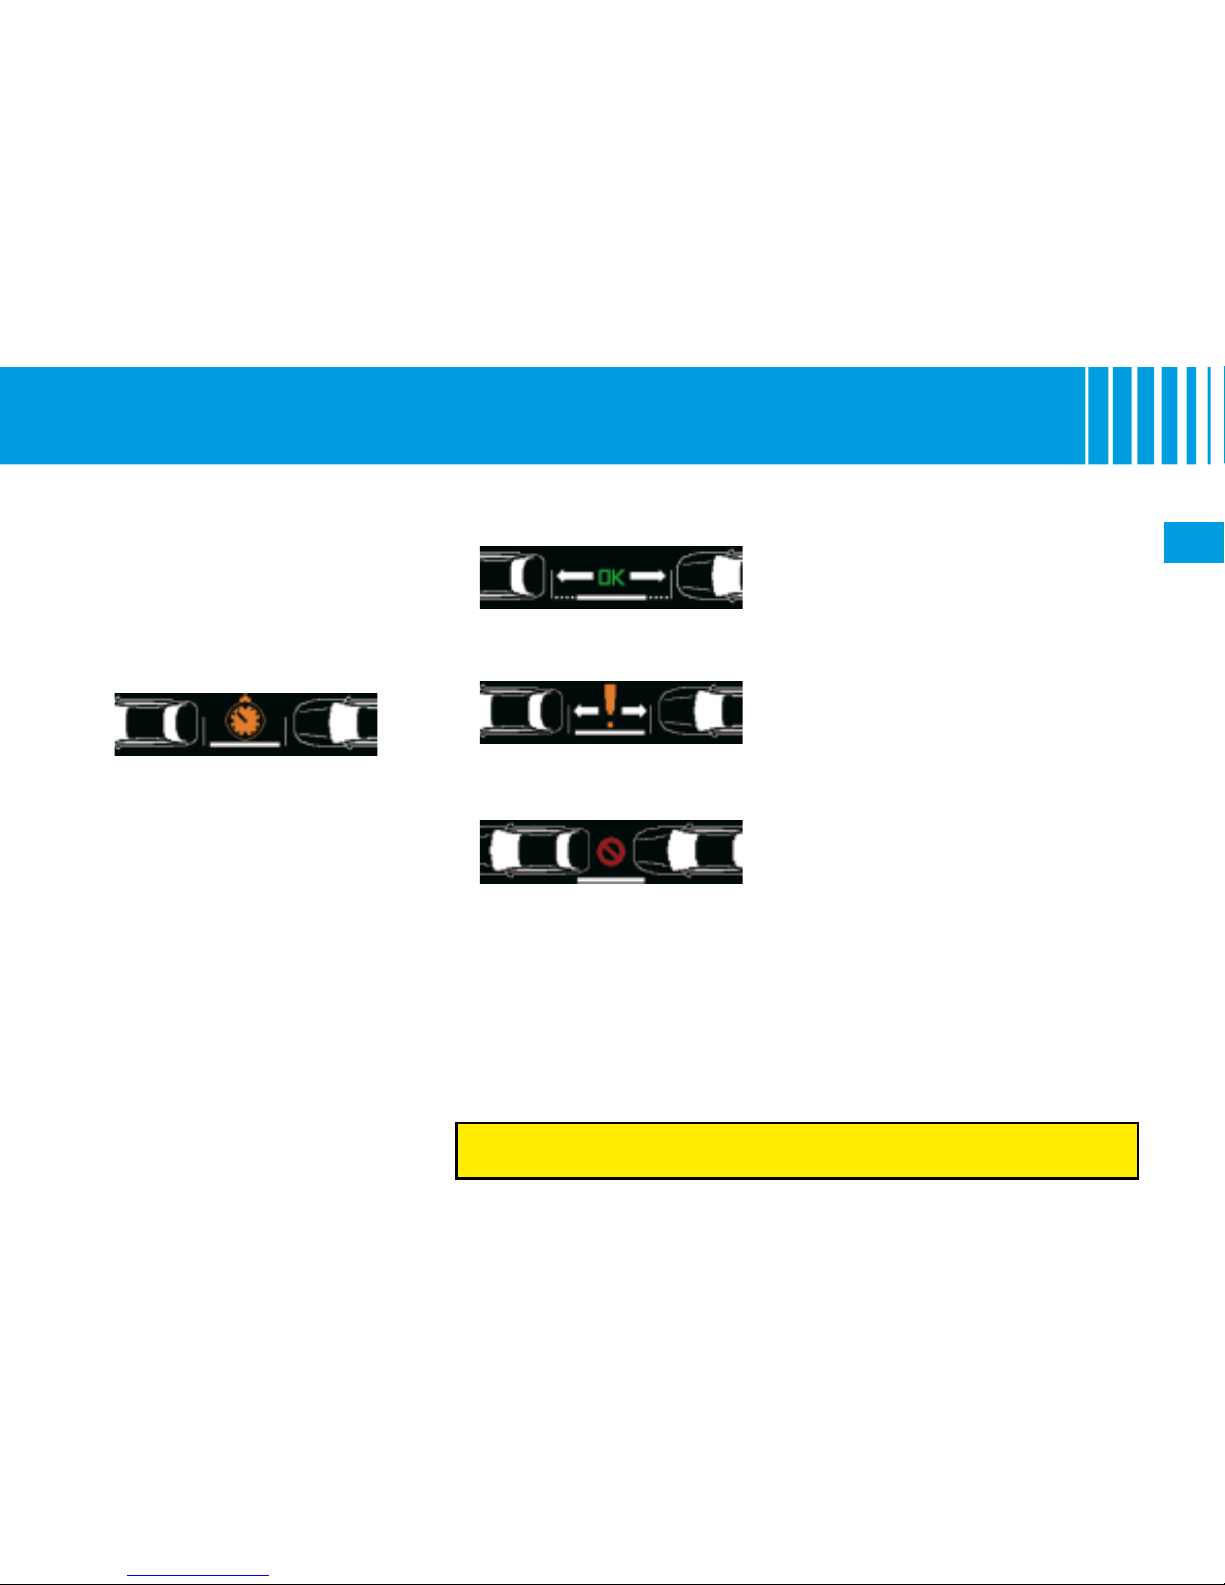
91
II
PA R K I N G S PA C E S E N S O R
In the event of a malfunction, consult a CITROËN dealer.
Operation
You have identied a parking space:
1. Press button
A to select the
function.
2.
Activate the relevant direction
indicator.
The system will measure the parking space:
Note: The function deactivates
itself automatically:
When you engage reverse
gear.
When you switch off the ignition.
If measuring is not requested
in the 5 minutes after selecting
the function.
If the vehicle speed exceeds the
threshold of 70 km/h (approx.
45 mph) for one minute.
Warning: If the distance between
your vehicle and the parking space
is over approx. 1.50 m, the system
may not be able to measure the
space.
Remarks:
The function remains available
after each measurement and
can therefore measure several
spaces in succession.
In poor weather or in winter, you
need to ensure that the sensors
are not covered with mud or
with ice or snow.
If the Parking Space Sensor
function is selected, the Parking Assistance function is deactivated.
•
•
•
•
•
•
•
The following messages may be
displayed:
Parking difcult
Parking possible
Parking not advised
3.
During measuring, go forwards the length of the space,
at a speed less than 20 km/h
(12 mph), to prepare for your
manoeuvre.
4.
The system indicates to you the
level of difculty of the manoeuvre via a message on the instrument panel screen accompanied by a gong.
5.
Depending on the message
issued by the system, you may
or may not be able to perform
the manoeuvre.
Page 96
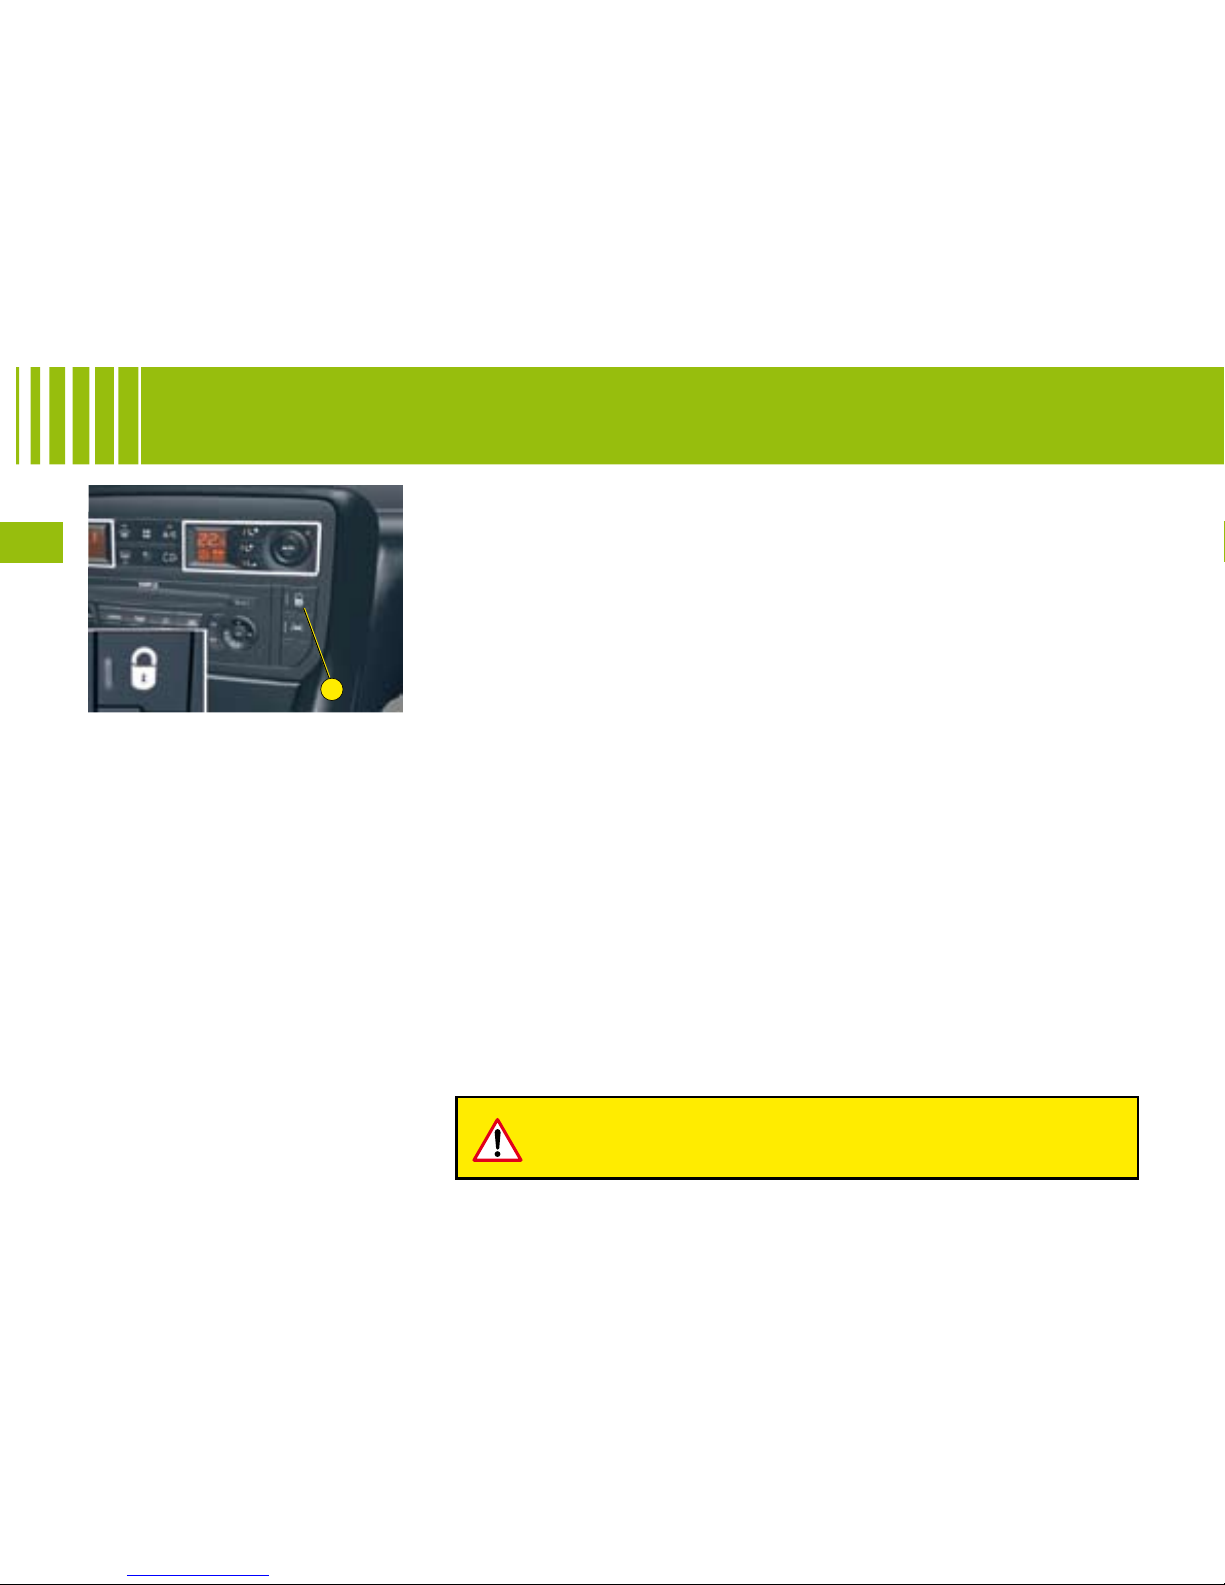
92
III
A
Locking/unlocking from the
inside
With the doors and the boot closed,
pressing button A allows you to
control the electric central locking
and unlocking.
It is still possible to open the doors
from the inside.
If one of the doors is open or not
properly closed, central locking will
not work.
A C C E S S
Anti-theft protection
On starting the vehicle, the system
automatically locks the doors as
soon as you reach approximately
10 km/h.
Note: If a door is opened, this will
automatically lock itself again when
the vehicle reaches approximately
10 km/h (6 mph).
Activation/Deactivation of
the anti-intrusion protection
After switching on the ignition,
make a long press on the central
unlocking control until a message
is displayed and a beep is heard.
Selection of doors / boot
After having selected “Plip action /
Driver” in the “Vehicle parameters /
Comfort” menu of the instrument
panel screen.
Pressing the remote control
unlocks the passenger door.
A 2nd successive press unlocks all
of the doors and the boot.
If you decide to drive with the doors locked, remember that
in the event of an accident this renders access more difcult for the emergency services.
The warning lamp associated with
the control A signals 3 statuses:
lt ashes when the ignition key
is in the stop position or when
the key is not detected and the
doors are locked.
It lights up when the vehicle is locked with the ignition
switched on.
It goes out when the doors are
not locked.
Note: Control A is inactive if the
vehicle has been locked using the
remote control or the key.
•
•
•
Page 97
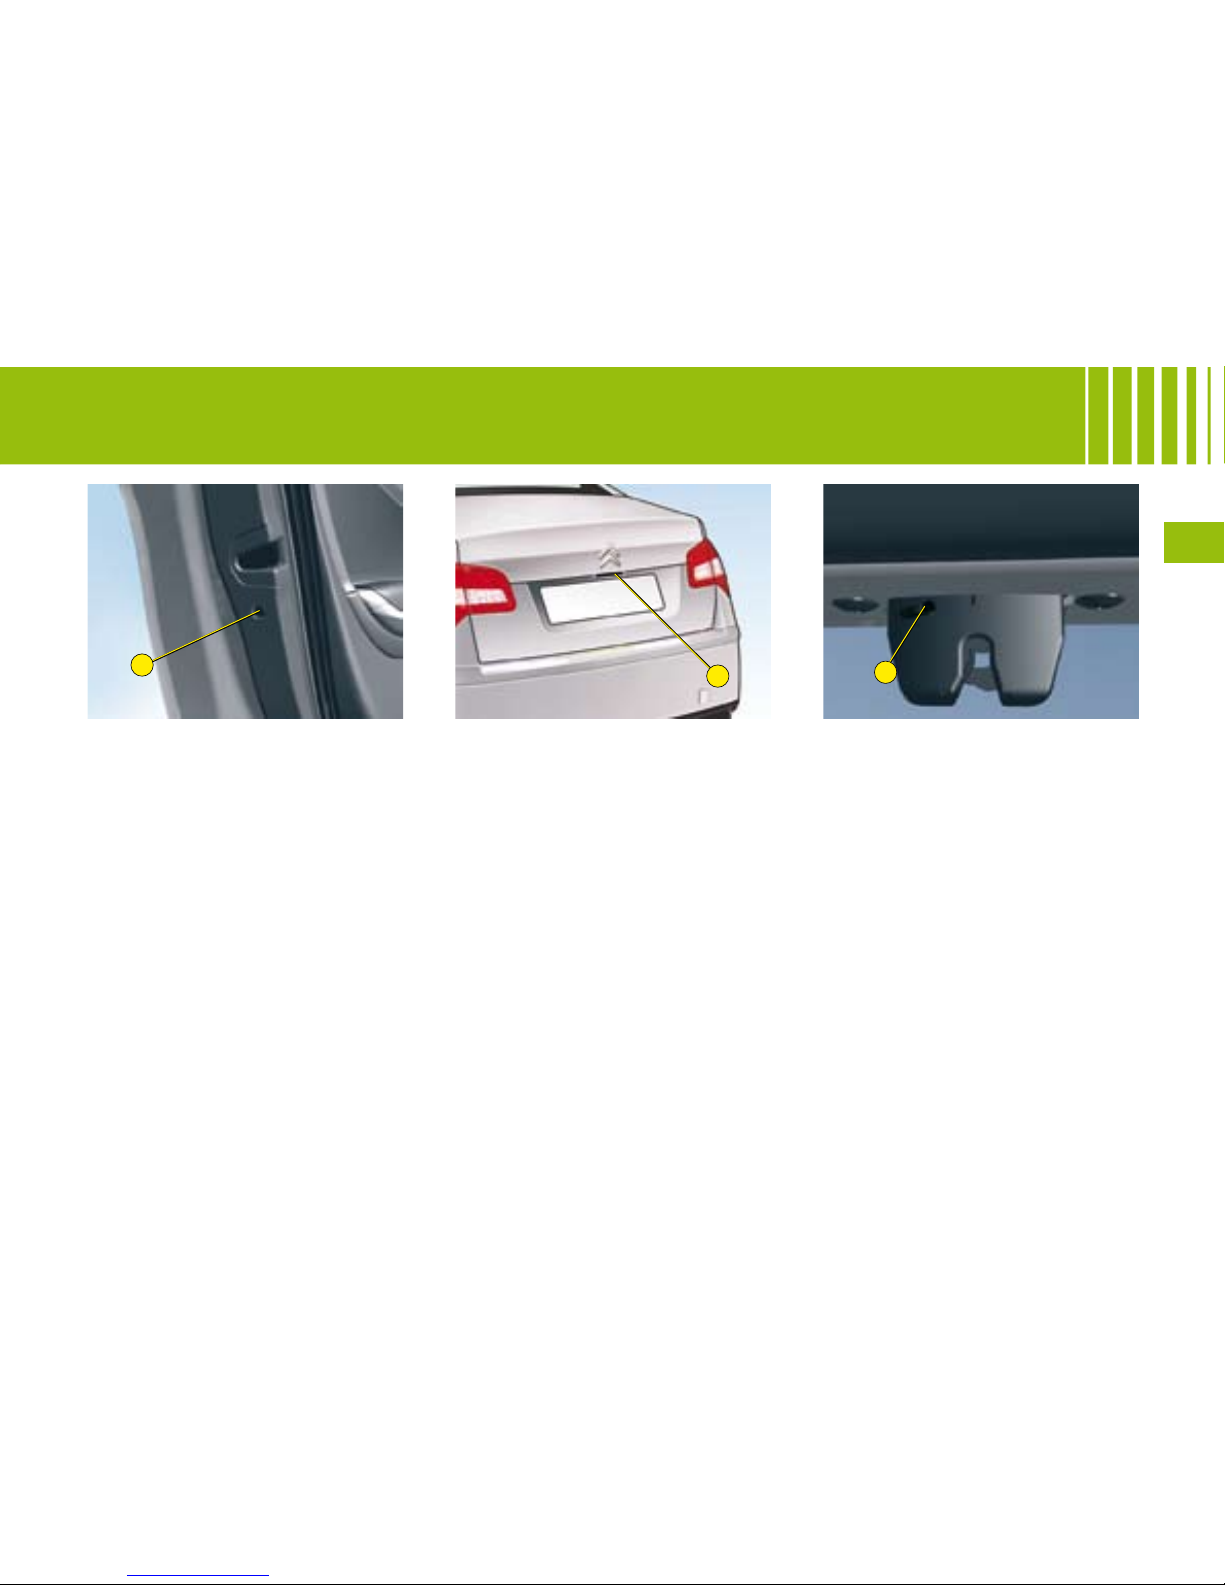
93
III
B
C
D
A C C E S S
Manual operation
(Emergency mode)
Driver's door
Insert the key into the lock to lock/
unlock the door.
Passenger doors
It is possible to lock the passenger
doors in the event of an electrical
fault by using control B on each
door:
With the door open, unclip the
plastic cover.
Insert an object, such as the
end of a key, into the cavity and
turn.
Replace the plastic cover.
Close the door.
After this operation, normal operation resumes using the central
unlocking control (inside the vehicle), the remote control or the key.
•
•
•
•
Emergency unlocking
If there is a problem with opening
the boot or if the battery is at:
Fold down the rear seats to
access the boot from inside the
vehicle.
Get into the boot.
From inside the boot, move
yourself towards the rear of the
vehicle.
Insert a screwdriver into hole
D
of the lock.
To unlock, push the white com-
ponent (located inside the lock)
to the left.
•
•
•
•
•
BOOT (SALOON)
Opening
Press upwards on lever C and lift
up the boot.
Locking/unlocking
With the vehicle stationary, this is
carried out using:
The remote control.
The key in a door lock.
The interior central locking/
unlocking control.
The boot automatically locks when
the vehicle is moving at a speed
of over 10 km/h (6 mph), even if
automatic central locking is deactivated. It is unlocked when a door
is opened or when the central locking button is pressed (speed lower
than 10 km/h (6mph)).
•
•
•
Page 98
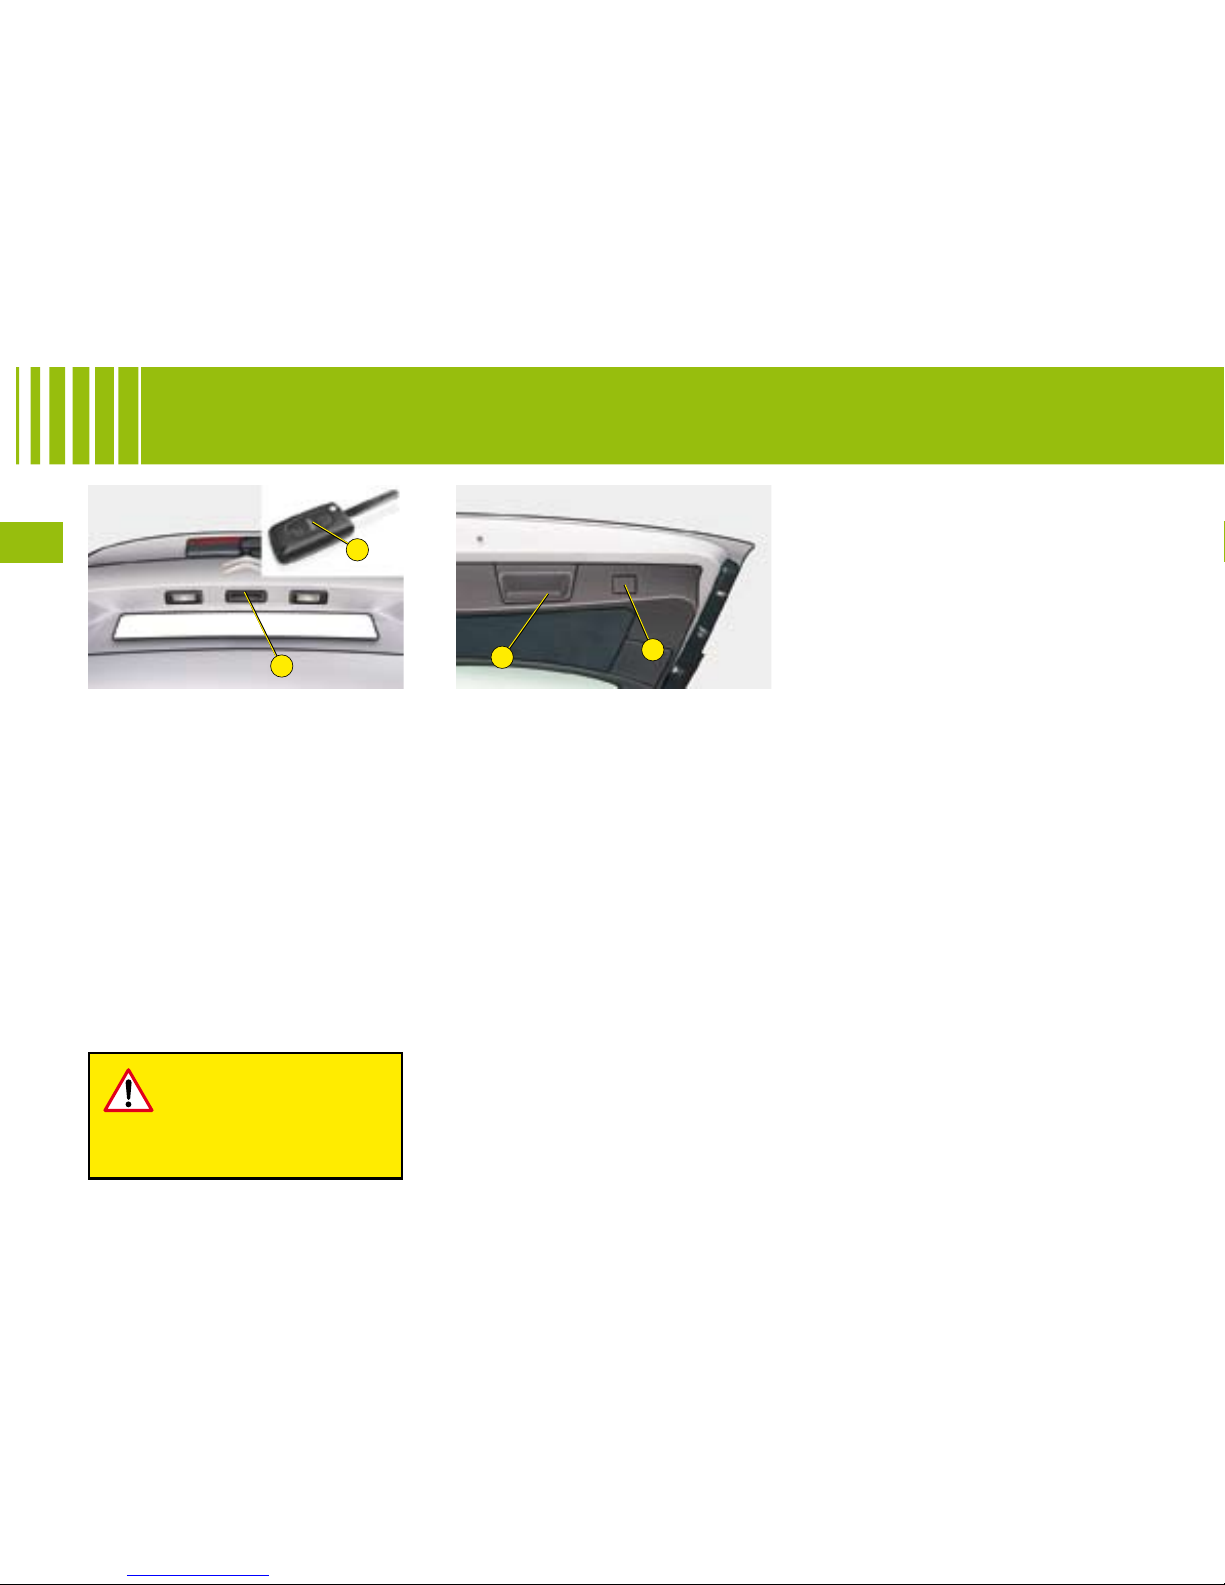
94
III
A
B
C
B
Manual closing
Lower the tailgate using the interior
handle B.
Electric closing
Press the push-button C to close
the tailgate.
Note :
do not interrupt the closing
of the tailgate ; if any obstacle prevents it closing, the operation will
stop and the tailgate will automatically rise by a few centimetres.
TAILGATE (TOURER)
Manual opening
Press upwards on lever A and lift
up the tailgate.
Electric opening
Press upwards on lever A, or press
button B of the remote control.
Locking/unlocking
With the vehicle stationary, this is
carried out using:
The remote control.
The key in a door lock.
The interior central locking/
unlocking control.
•
•
•
A C C E S S
In order to avoid risk of
injury, make sure that
no-one is in the vicinity of the boot when
carrying out an electric
opening manoeuvre.
Interrupting the opening/
closing of the tailgate
When the tailgate is being closed
electrically, you can interrupt its
movement at any point by pressing
the tailgate push-button C.
Note :
After an interruption, the
tailgate is held electrically in an
intermediate position for about
10 minutes. After this period, the
system automatically goes to
standby and releases the tailgate.
To exit the intermediate position
mode, close the tailgate electrically
or manually.
Memorisation of an
intermediate position
You can store an opening angle for
the tailgate:
Manually or automatically move
the tailgate to the required position.
Make a long press on the pushbutton C. The system emits a
beep.
Release the push-button C.
Cancelling the memorisation
With the tailgate in the intermediate position, you can cancel the
stored position :
Make a long press on the pushbutton C. The system emits a
beep.
Release the push-button C. The
tailgate reverts to the fully open
position.
•
•
•
•
•
The tailgate automatically locks
when the vehicle is moving at a
speed of over 10 km/h (6 mph),
even if automatic central locking
is deactivated. It is unlocked when
a door is opened or when the
central locking button is pressed
(at a speed of less than 10 km/h
(6 mph)).
Page 99
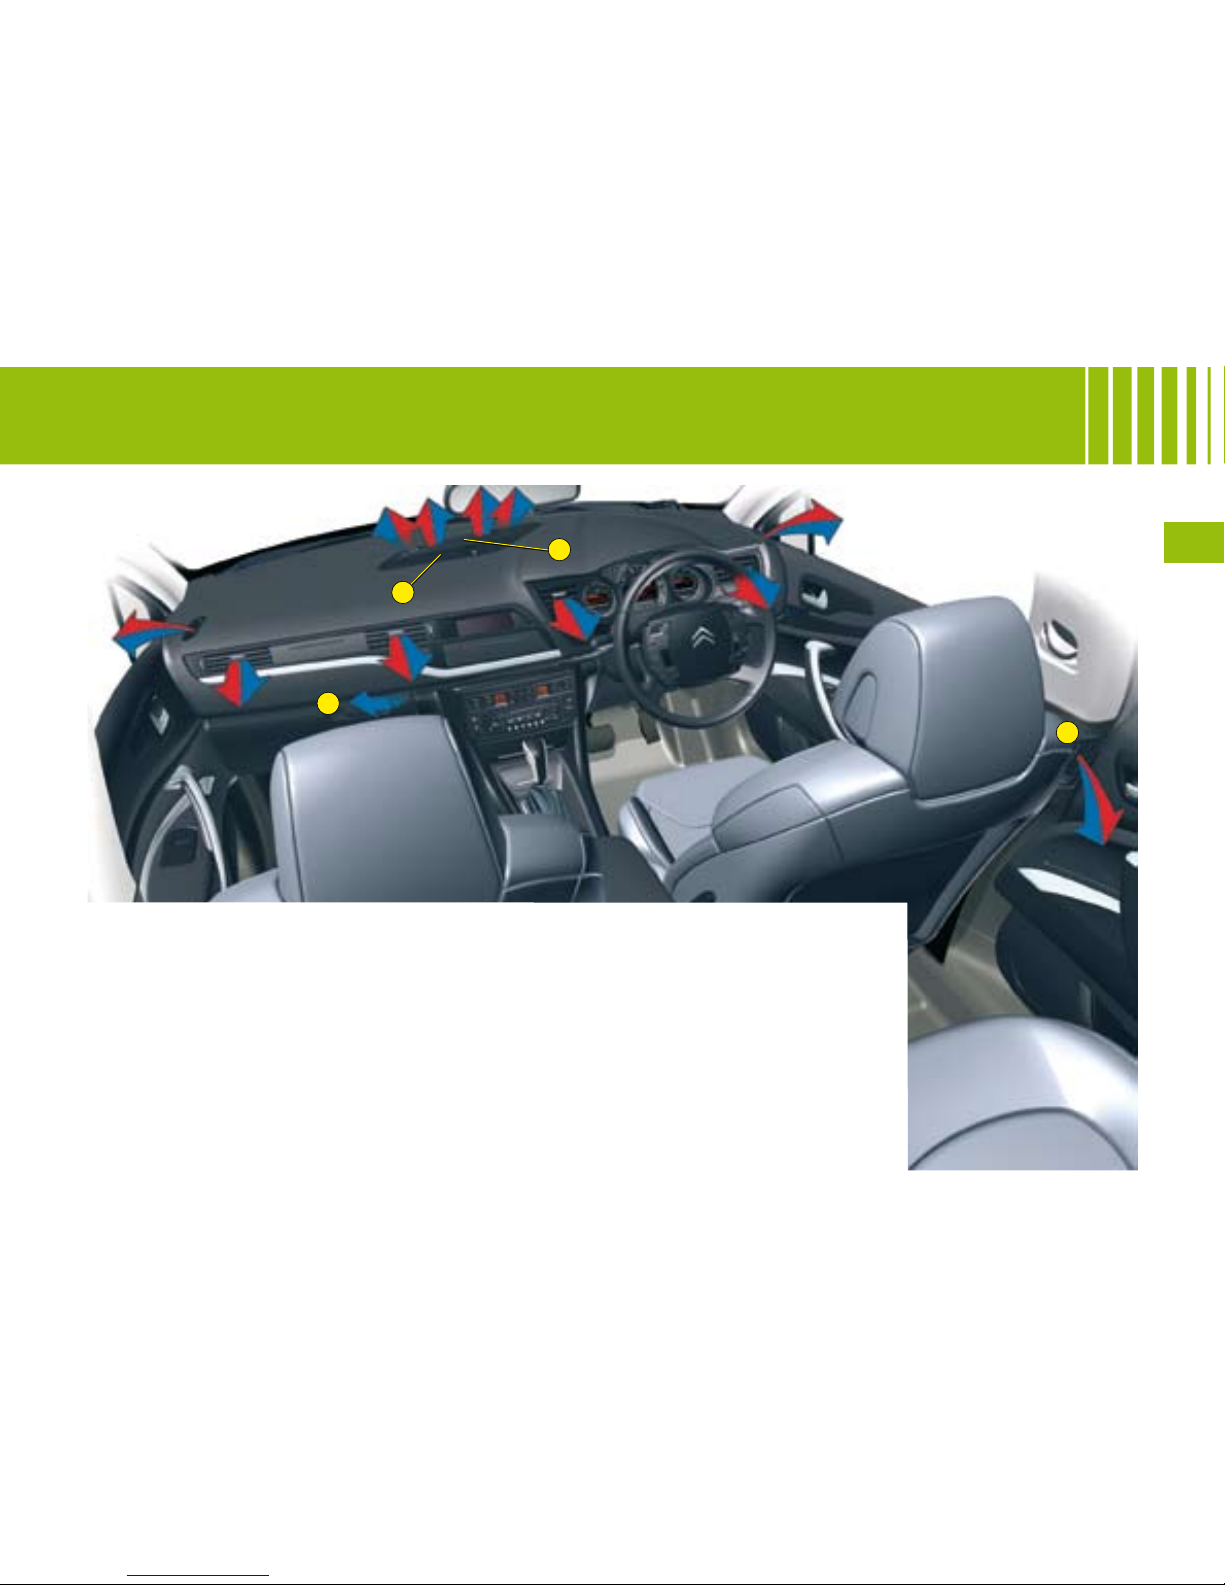
95
III
C
A
B
D
A U TOMAT I C A I R C O N D I T I O N I N G
G E N ER AL
A. Sunlight sensor.
B. Soft air conditioning diffusion grille.
The soft diffusion grille located in the centre of the dashboard provides an optimum air
distribution for the front seats.
This device eliminates unpleasant air currents whilst maintaining an optimum temperature in the passenger compartment.
To open the soft air diffusion grille, move the control knob upwards.
To close the soft air diffusion grille, move the control knob all the way down.
In very hot weather
, to improve the central and lateral ventilation, closing off the soft
diffusion air conditioning is recommended.
C. Air conditioned glovebox.
D. Rear passenger air vents.
Page 100

96
III
A U TOMAT I C A I R C O N D I T I O N I N G
G E N ER AL
You are advised to use the automatic air conditioning regulation.
This automatically regulates the
following functions for maximum
comfort : air ow, passenger compartment temperature, and air distribution, using different sensors
(external temperature, sunlight).
This avoids the need to alter any of
the settings, with the exception of
the temperature displayed.
Take care not to obstruct the sunlight sensor A.
Provided you retain automatic
mode (by pressing button “AUTO”)
and all the air vents are open, you
will maintain an optimum comfort
level, also removing humidity and
misting, whatever the ambient climatic conditions.
The temperature inside the cabin
cannot be lower than the temperature outside if the air conditioning
is not operating.
To be effective, the air conditioning
should only be used with the windows closed. If after a lengthy stop
in bright sunlight the interior temperature is excessive, air the passenger compartment by opening
the windows for a few moments,
then close them again.
Air circulation
For your comfort we advise you to
maintain a proper distribution of air
within the cabin, both at the front
and at the rear.
To obtain an even distribution of
air, ensure that you do not obstruct
the external air inlet grille located
at the base of the windscreen, the
air vents, the air outlets on the oor
underneath the front seats, and
the air extractor located behind the
aps in the boot.
The front and rear air vents are t-
ted with control knobs which allow
you to control and direct the air
ow. It is recommended to keep all
the air vents open.
Dust/pollen lter
There is a lter for excluding pollen
and dust.
This lter has to be changed accord-
ing to the vehicle maintenance schedule. See “Maintenance Guide”.
To ensure the correct operation of
the air conditioning system, it is
essential to operate the air conditioning at least once a month.
The air conditioning operates by
using power from the engine. This
results in a slight increase in fuel
consumption.
In certain extreme operating conditions (e.g. carrying a full load up
a steep gradient in high temperatures), the switching off of the air
conditioning allows more power
to be transferred to the engine,
thereby increasing the towing
capacity.
Air inlet
Check that the exterior grille for the
air inlet, at the bottom of the windscreen, is clean and free of dead
leaves, snow, etc.
If washing the vehicle with a high
pressure jet, avoid targeting the air
inlet zone.
 Loading...