

Citroën Berlingo First 2 2008, Berlingo First 2008 Owner's Manual
4 -

5
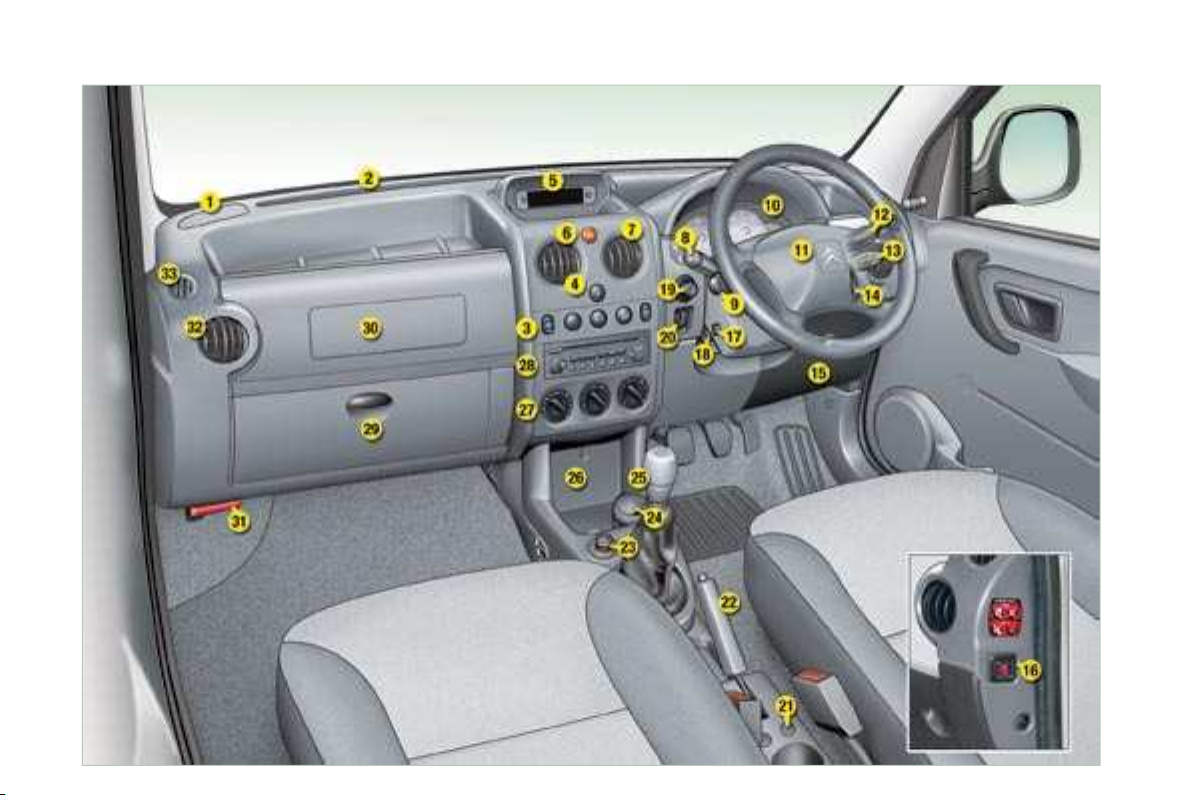
INSTRUMENTS AND CONTROLS
12. Windscreen wash-wipe stalk.
13. Audio equipment steering
wheel control.
14. Steering lock and ignition.
15. Fuse box.
16. Passenger air bag disarming
control.
17. Alarm.
18. Steering wheel adjustment
control.
19. Passenger's electric mirror
control.
20. Headlamp height adjustment.
21. Heated seats control.
22. Handbrake.
23. Lighter.
24. Removable ashtray.
25. Gear lever.
26. Storage.
27. Heating/air conditioning controls.
28. Audio RD3.
29. Lower glove box.
30. Upper glove box or passenger
air bag.
31. Bonnet release.
32. Side adjustable heating/
ventilation vents.
33. Side window de-icing/
demisting vents.
1. Speaker (tweeter).
2. Windscreen demisting vents.
3. Controls:
- Electric windows.
- Demisting of rear door
windows.
- Air conditioning.
4. Central locking button.
5. Multifunction display or clock.
6. Hazard lights button.
7. Central adjustable heating/
ventilation vents.
8. Lights and direction indicators
stalk.
9. Speed limiter/cruise control.
10. Instrument panel.
11. Driver's air bag
Horn.
-
6 -
STARTING
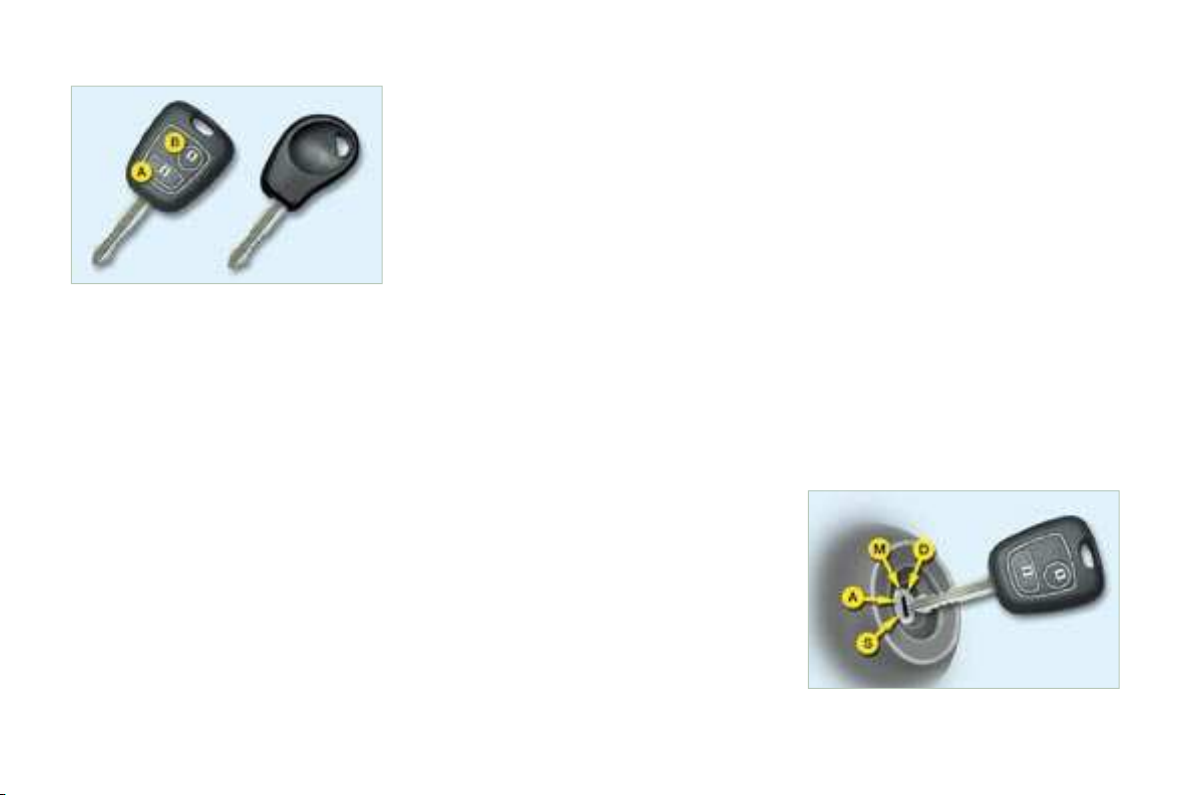
THE KEYS
The remote control
The keys allow you to switch on the
ignition and operate the passenger
air bag disarming switch, as well as
to independently operate the locks
on the doors and the fuel fi ller cap.
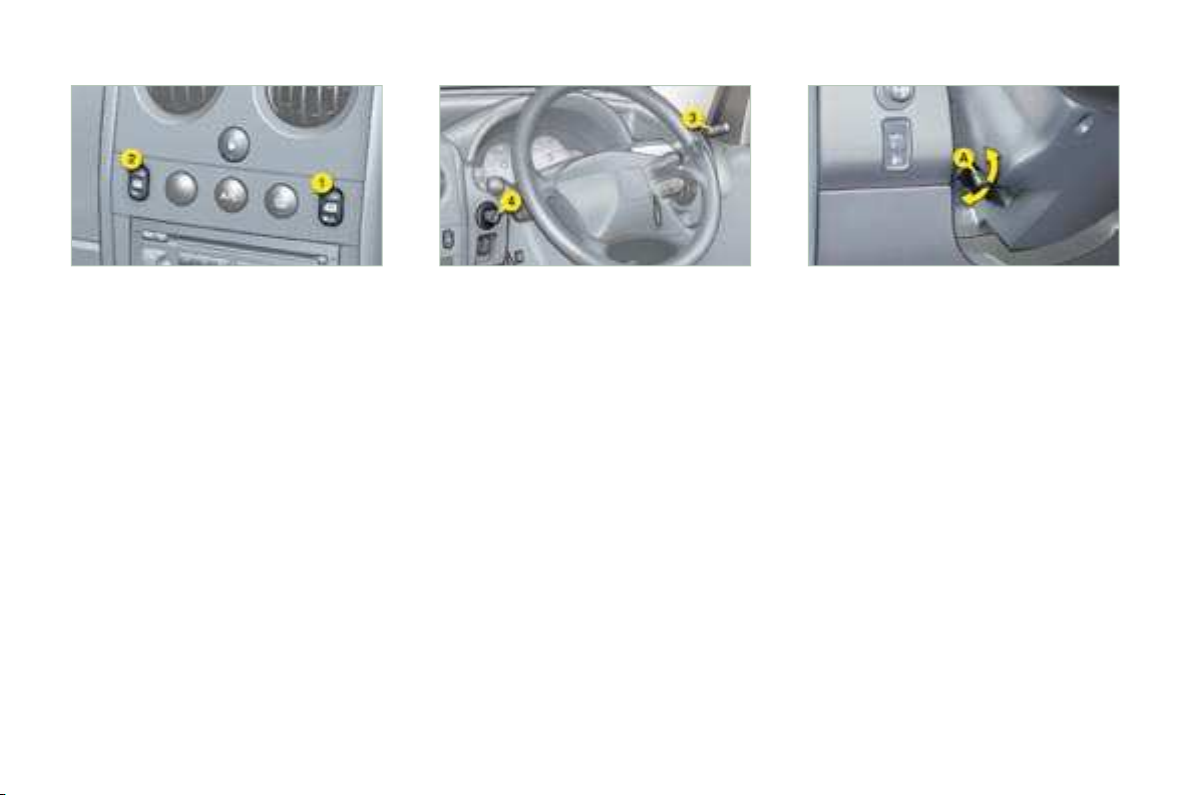
Central locking
From the front doors, the keys allow
you to lock and unlock all of the doors.
If one of the doors is open, it is impossible to operate the central locking.
The remote control performs the
same functions at a distance.
Locking
Press button A to lock the vehicle.
This is confi rmed by fi xed lighting of
the direction indicators for approximately two seconds.
Unlocking
Press button B to unlock the vehicle.
This is confi rmed by rapid fl ashing of
the direction indicators.
Locating the vehicle
To locate your vehicle, previously
locked, in a car park:
press button A , the courtesy lights
come on and the direction indica-
tors fl ash for a few seconds.
STOP position (S):
The ignition is off.
To release the steering, turn the
steering wheel slightly while turning
the key, without forcing it.
Accessories position (A):
The ignition is off but the accessories
can be used.
On position (M):
The ignition is on.
Starting position (D):
Operates the starter.
Release the key when the engine
has started. Never operate the starter
while the engine is running.
52
7
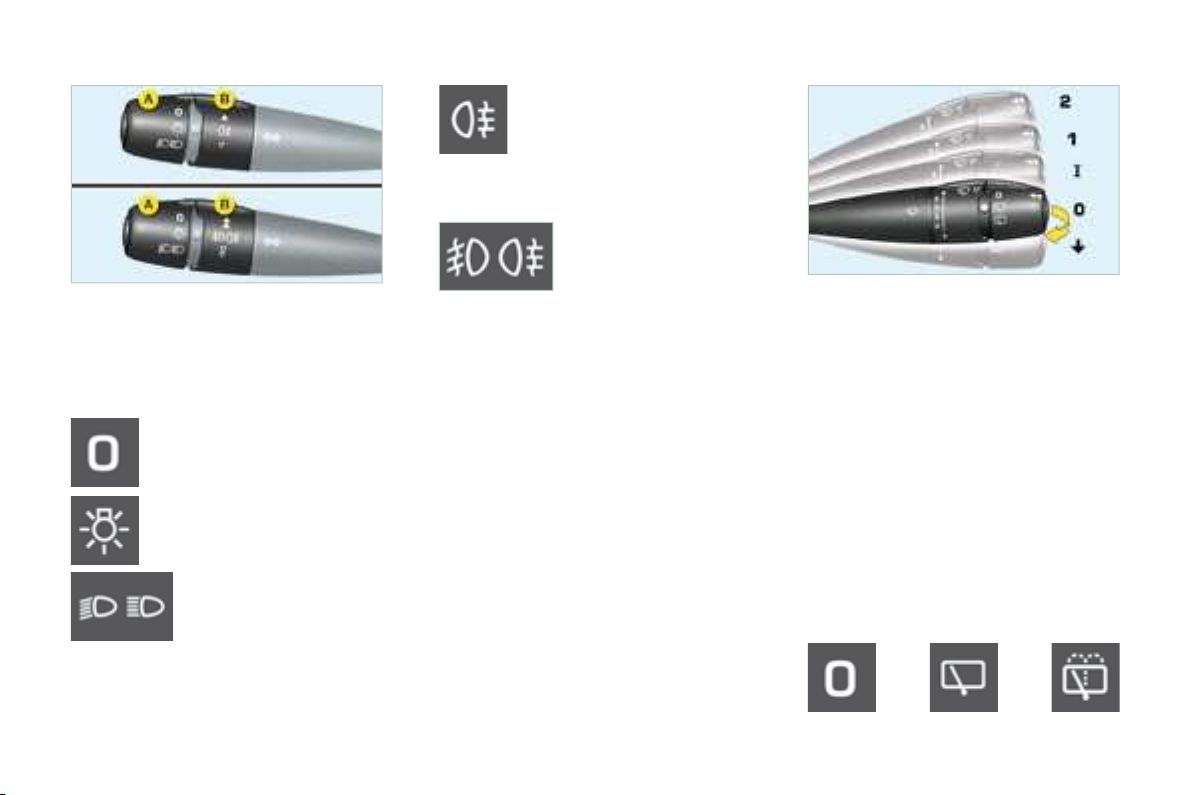
WINDSCREEN WIPERS
STEERING WHEEL STALKS
LIGHTING
Vehicles fi tted with a rear
fog lamp (ring B)
Turn the ring forwards.
Vehicles fi tted with
front fog lamps and
a rear fog lamp
(ring B)
-
Front and rear lights (ring A)
Lights off
Side lights
Dipped headlamps/
Main beam headlamps
Front fog lamps (1 st turn of the ring
forwards).
Front fog lamps and rear fog lamp
(2 nd turn of the ring forwards).
To switch off: turn the ring rearwards.
59 60
Front
2 Rapid wipe (heavy rain).
1 Normal wipe (moderate rain).
I Intermittent wipe.
0 Off.
Single wipe.
Windscreen wash-wipe: pull the stalk
towards you.
Rear
Off Wash-
Intermittent
wipe
wipe
8 -
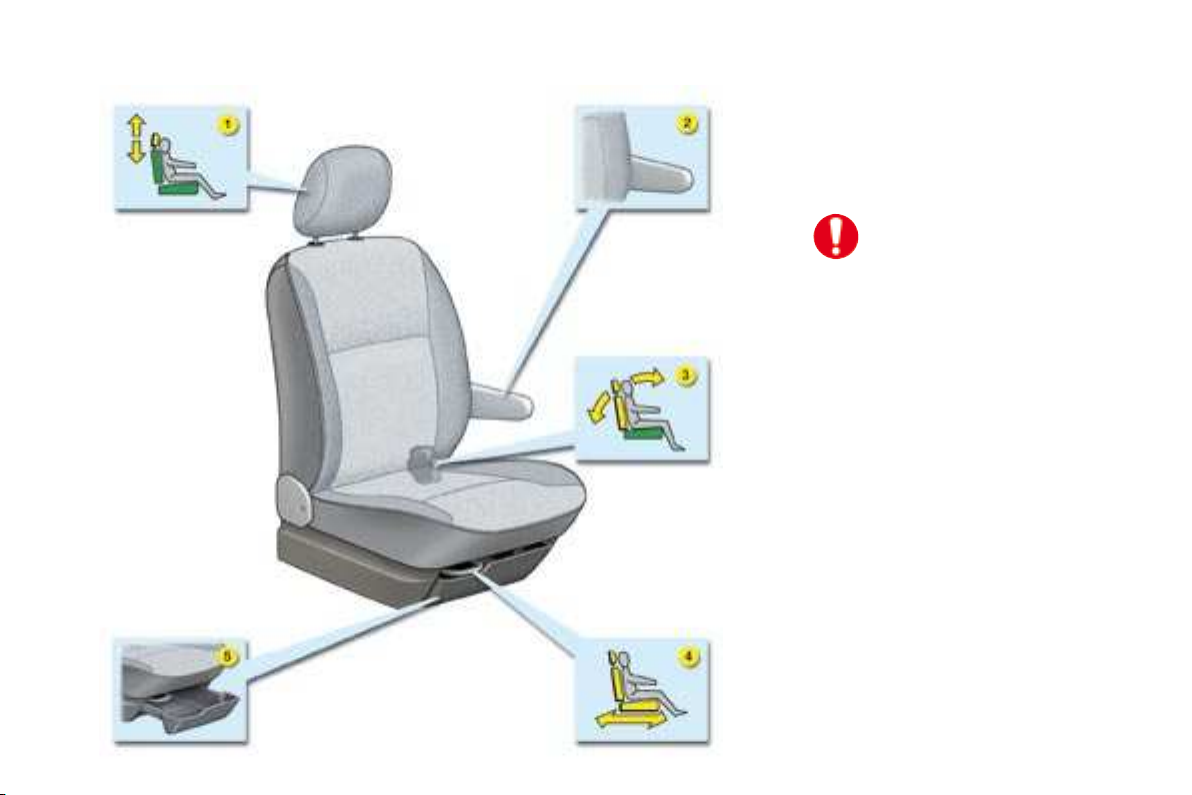
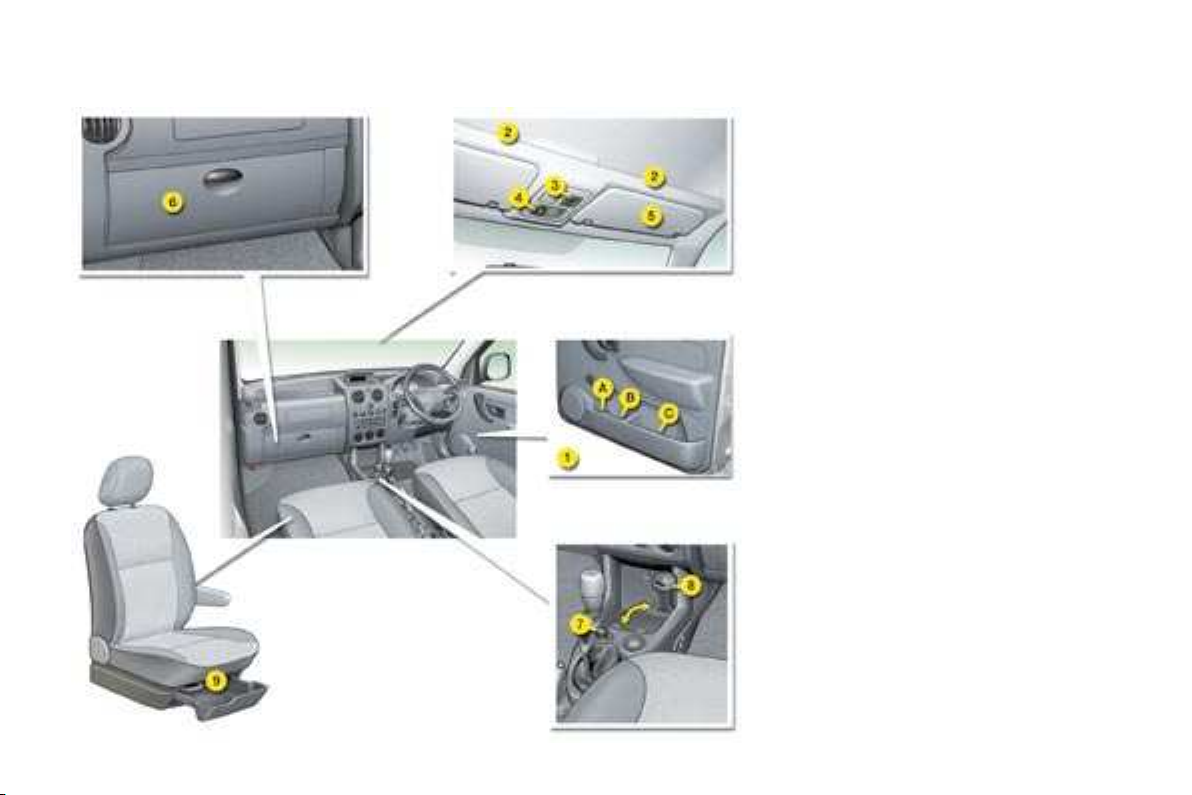
FRONT SEATS
Never travel with the head
restraints removed.
2. Armrest.
3. Seat back angle adjustment.
4. Forwards-backwards adjustment.
5. Storage drawer (passenger).
40
1. Head restraint height adjust-
ment.
9
AIR BAGS
Front air bags
These are folded in the centre of the
steering wheel for the driver and in
the fascia for the front passenger.
They are deployed simultaneously,
except in cases where the passenger
air bag is disarmed.
Precautions regarding the
passenger air bag
disarm the air bag if you install a
rear-facing child seat,
activate the air bag for an adult
passenger.
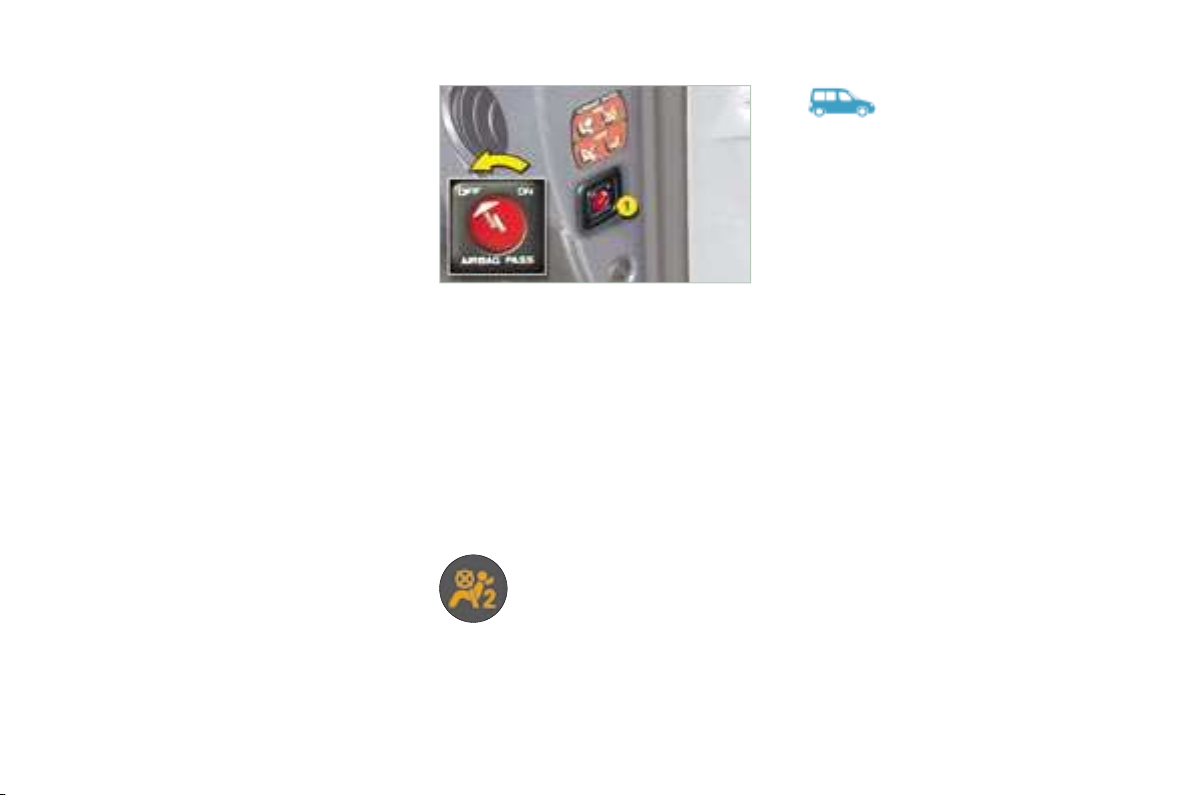
Disarming the passenger air bag
With the ignition off , insert the
ignition key into the passenger
air bag switch 1 and turn it to the
"OFF" position.
As soon as you remove the child
seat, turn the air bag switch to the
"ON" position to activate the air
bag again.
Disarming check
With the ignition switched
on (2 nd notch), illumination of this warning light
indicates that the passenger
air bag is disarmed (switch
in the "OFF" position).
The warning light remains on throughout
the duration of disarming.
Side air bags
Side air bags are incorporated into
the front seat back frame, on the
door side.
They are deployed independently of
each other, on whichever side the
collision occurs.
-
77
78
10 -
STEERING WHEEL HEIGHT
ADJUSTMENT
ELECTRIC WINDOWS
EXTERIOR MIRRORS
1. Driver's electric window.
2. Passenger's electric window.
Manual mode:
Press the switch. The window
stops as soon as the switch is
released.
Automatic mode (driver):
Press and hold the switch. One
touch completely opens or closes
the window.
Move the manual control 3 in all
four directions to adjust.
Electric control for the
passenger's side mirror
From the driver's seat, adjust in
all four directions by operating
the control 4 .
61 62 66
When stationary, push the control
A forwards to unlock the steering
wheel.
Adjust the height of the steering
wheel.
Lock it by pulling control A
towards you fully.
-
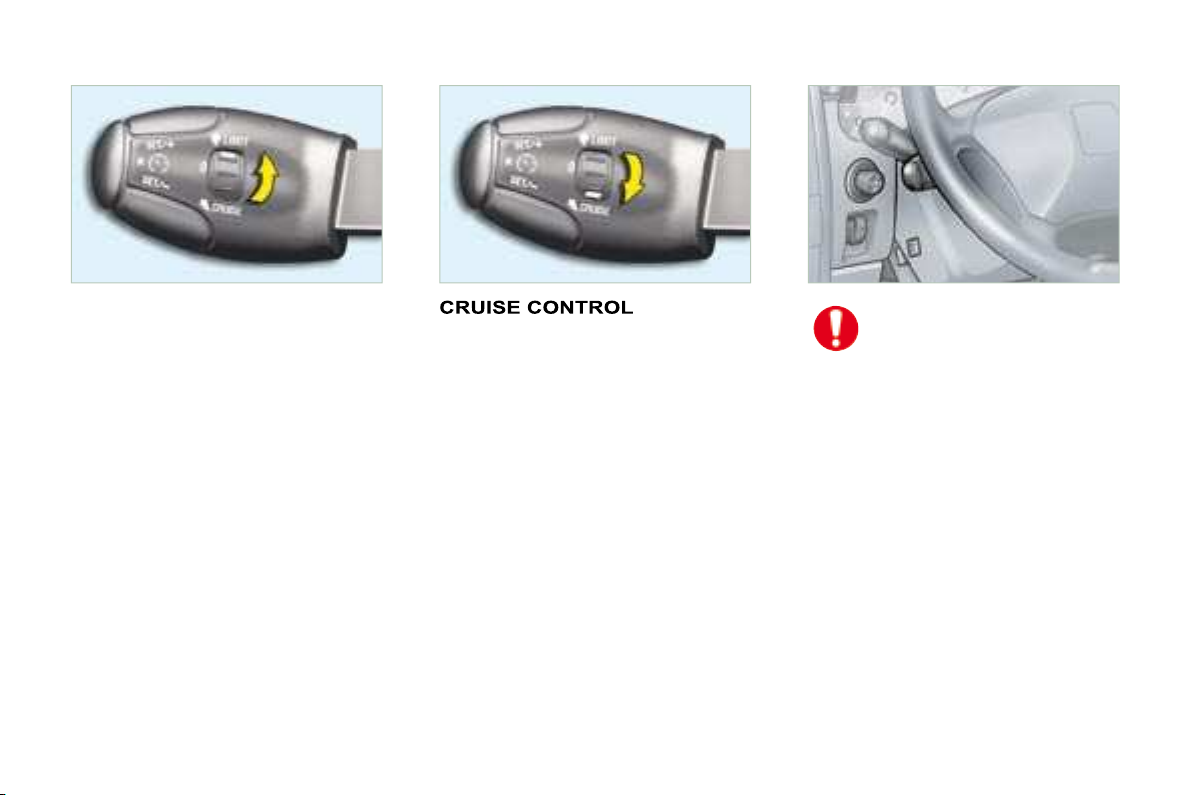
SPEED LIMITER
This limiter indicates the status
of selection of the function on the
instrument panel and displays the
programmed speed. The minimum
speed which can be programmed is
at least 18 mph (30 km/h).
It prevents exceeding of the speed
programmed by the driver, this function remains active regardless of any
action on the brake or clutch pedals.
On the other hand, pressing the accelerator pedal to the point of resistance does not have any effect.
It is possible to exceed the programmed speed temporarily by pres-
sing the accelerator fi rmly beyond this
point of resistance.
The operating actions must be car-
ried out with the engine running.
The cruise control has a display on
the instrument panel to indicate the
programmed reference speed.
It enables the vehicle to maintain the
reference speed programmed by the
driver.
In order for it to be programmed or
activated, the vehicle speed must be
greater than 25 mph (40 km/h) with
at least fourth gear engaged.
If the vehicle is fi tted with
a speed limiter and cruise
control, these functions cannot be activated at the same
time.
11
74 72

12 -
HEATING
AIR CONDITIONING
N° Symbol Function
1
2
3
4
N° Symbol Function
1 Air fl ow adjustment.
2
3
4
Air conditioning
control.
Air fl ow adjustment
and air intake
control.
Temperature
adjustment.
Air distribution
adjustment.
Air fl ow adjustment
and air intake
control.
Temperature
adjustment.
Air distribution
adjustment.
36
38
13
RECOMMENDED INTERIOR SETTINGS
I require...
Heating or Manual air conditioning
Air distribution Air fl ow
Air recirculation/
Intake of exterior air
Temperature Manual AC
-
HOT
COLD
DEMISTING
DE-ICING
14 -
FRONT LAYOUT
1. Storage compartments in the doors.
A. Bottle holder.
B. Can holder.
C. Storage compartment.
2. Overhead storage.
3. Map reading light.
4. Courtesy light.
5. Sun visors.
6. Glove box.
7. Lighter.
8. Removable ashtray.
9. Storage drawer (passenger).
65

-
REAR LAYOUT
Stowing rings
For greater safety, always
ensure that the loads
transported are secured
fi rmly.
1. Load space cover.
2. High load retaining net.
3. Stowing rings.
4. Side door storage compartment.
5. Trays between the front and rear
seats.
6. Seat back storage pockets.
15
67
68
16 -
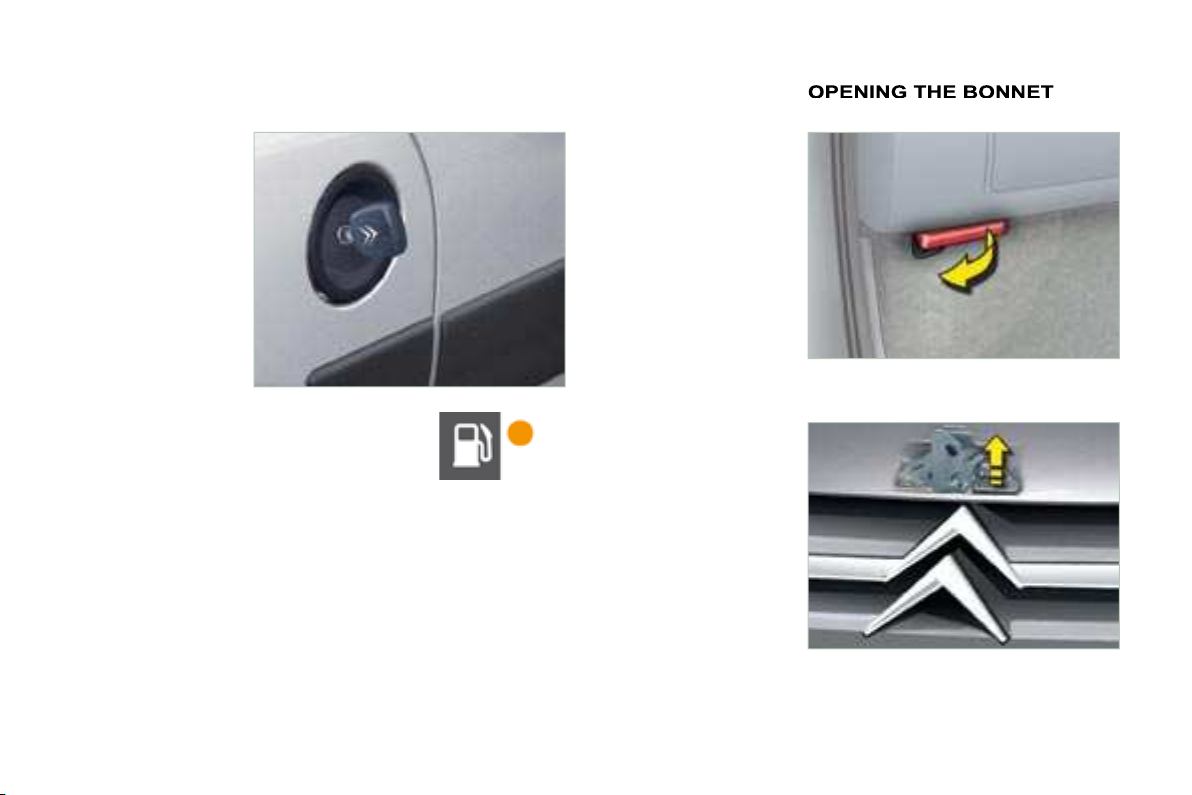
FILLING WITH FUEL
This operation must be carried out
with the engine switched off .
Insert the key then turn it to the
left.
Remove the cap.
A label indicates which type of fuel to
use.
When you fi ll your tank, do not con-
tinue after the third cut-off of the
pump. This could cause engine malfunctions.
The capacity of the tank is approxi-
mately 55 litres for petrol engines
and 60 litres for Diesel engines.
Low fuel level
warning light
From the time this light comes on,
you have enough fuel left to cover
approximately 30 miles (50 km) .
Note: the right-hand sliding side door
cannot be opened while the fuel tank
cap is removed.
Inside the vehicle: Pull the control
on the left-hand side, under the fascia panel.
Outside the vehicle: Lift the control,
raise the bonnet and secure the strut
to keep the bonnet open.
58 58
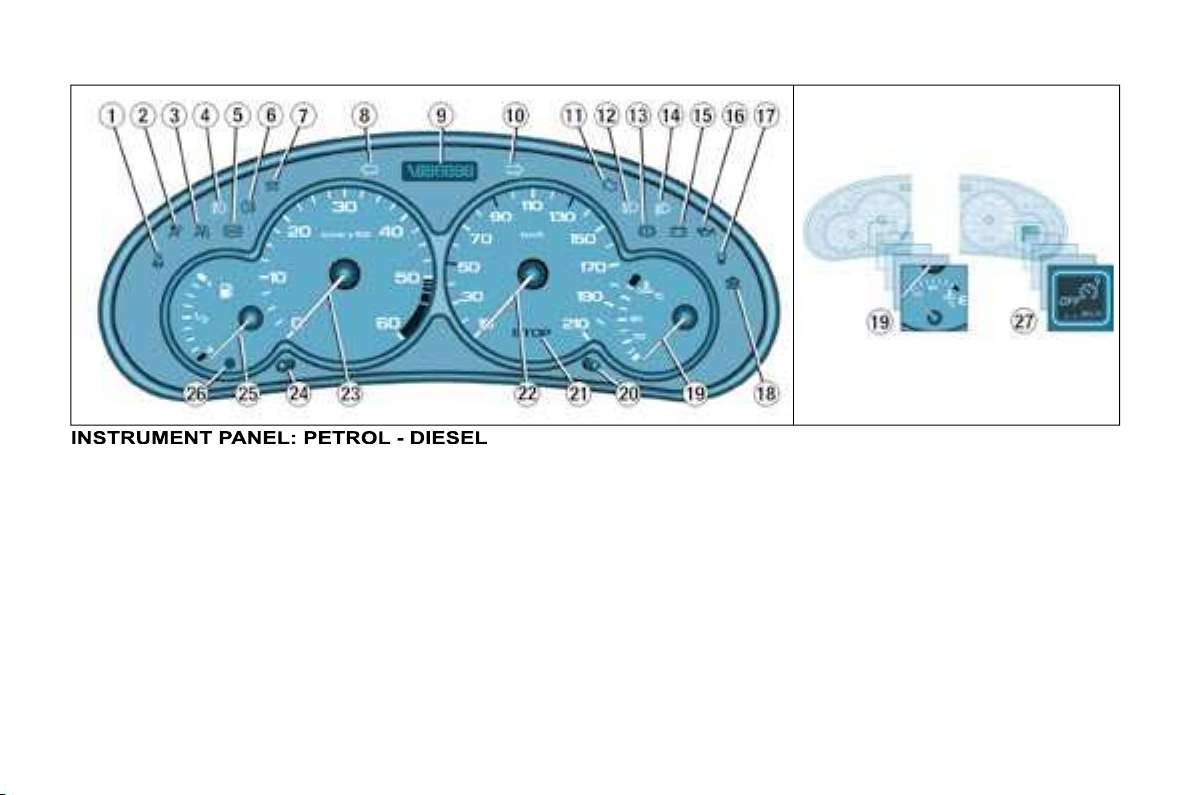
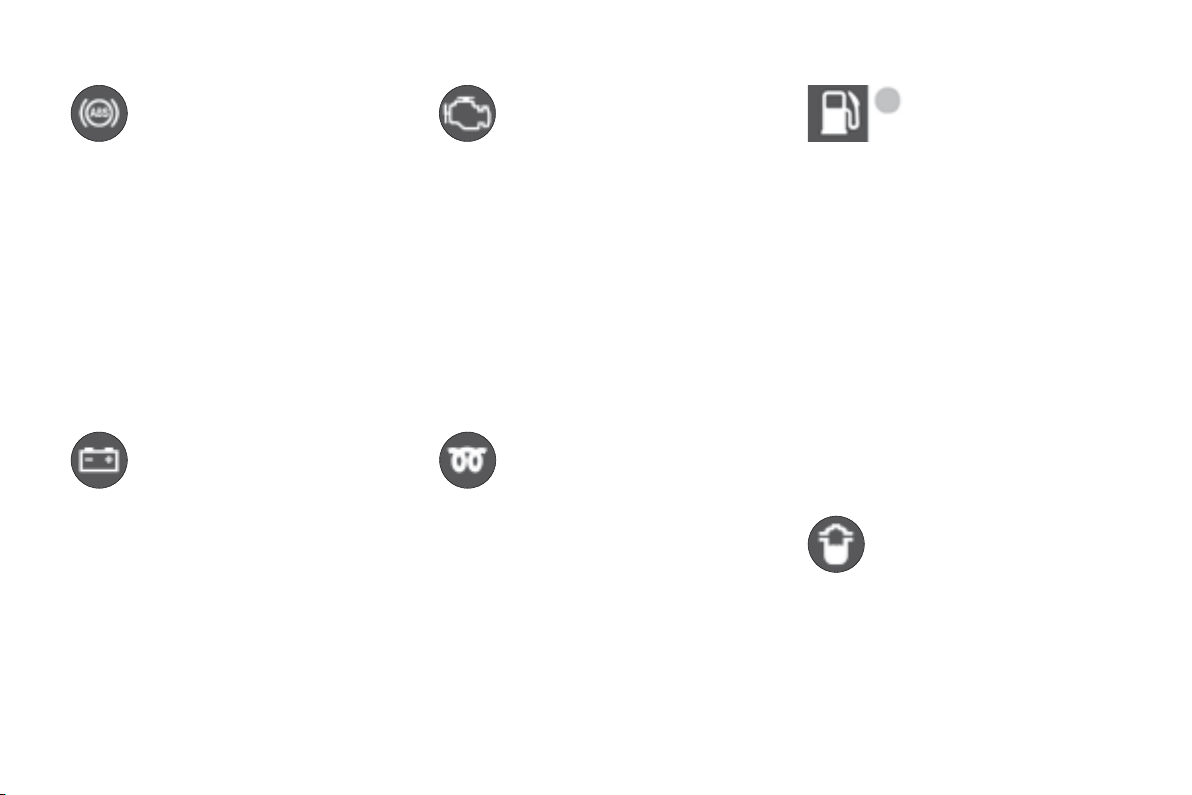
18 -
1. Seat belt not fastened warning
light
2. Front and side air bags warning
light
3. Passenger air bag disarmed
warning light
4. Front fog lamps indicator light
5. Anti-lock braking system (ABS)
warning light
6. Rear fog lamp indicator light
7. Diesel pre-heat warning light
8. Left hand direction indicator
9. Total distance recorder, service
indicator and engine oil level
indicator
10. Right hand direction indicator
11. Emission control system warning
light
Main beam headlamps indicator light
12.
13. Handbrake, low brake fl uid
level and electronic brake force
distribution warning light
14. Dipped beam headlamps
indicator light
15. Battery charge warning light
16. Engine oil pressure and
temperature warning light
17. Water in diesel fi lter warning light
18. Low coolant level warning light
19. Coolant temperature indicator
20. Total distance recorder button
21. Central (STOP) warning light
22. Speedometer *
23. Rev counter
24. Lighting rheostat button
25. Fuel level indicator
26. Low fuel level warning light
27. Speed limiter/cruise control
display
* Version indicating kilometres,
according to country.
19
INSTRUMENTS AND
-
A permanently lit warning light
or one fl ashing, with the engine
running, indicates an operating
fault of the unit concerned. The
illumination of certain warning
lights may be accompanied by an
audible signal and a message on
the display. Do not ignore this warning: consult a CITROËN dealer
as soon as possible.
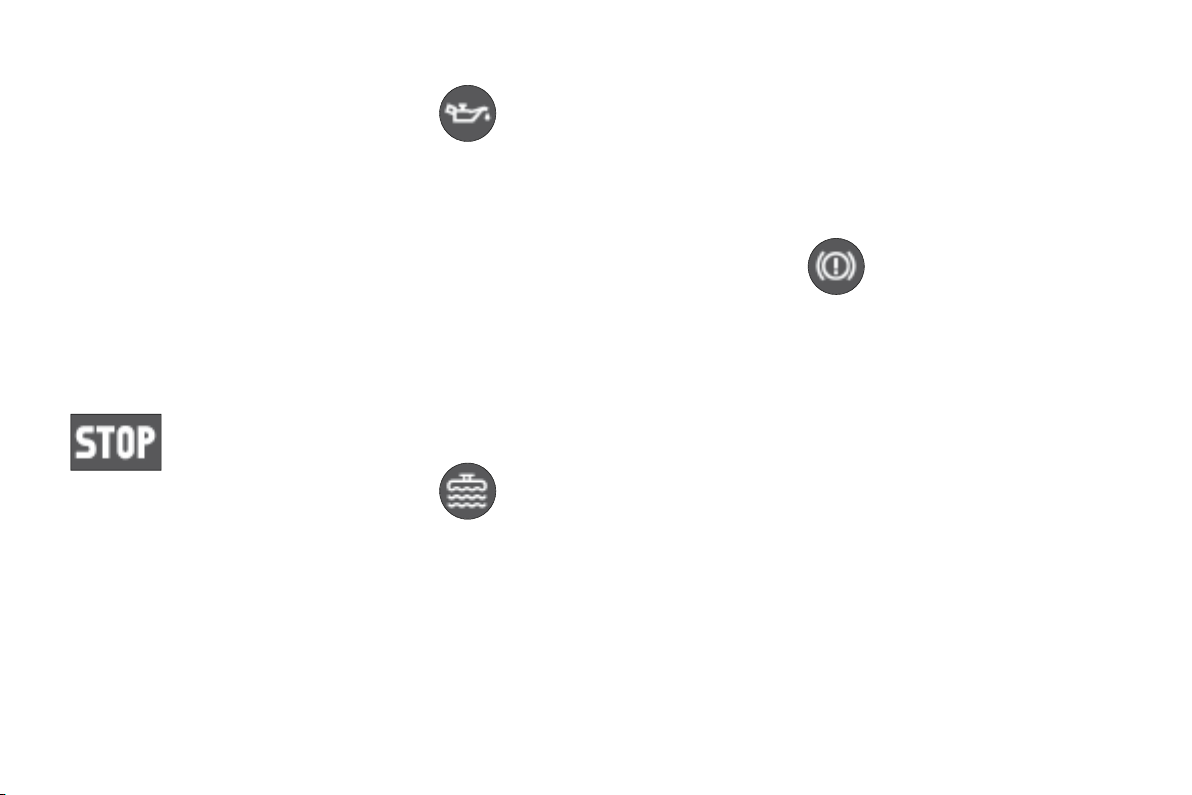
If the central STOP warning light
comes on when you are driving,
stop your vehicle immediately,
where it is safe to do so.
Central (STOP)
warning light
Linked to the warning
lights:
- ''engine oil pressure and tempera-
ture'',
- ''low coolant level'',
- 'handbrake'',
- ''low brake fl uid level'',
- ''electronic brake force distribution
system fault''.
Linked with the "coolant temperature"
indicator.
You must stop if the light fl ashes
with the engine running.
Consult a CITROËN dealer.
Engine oil pressure
and temperature
warning light
Linked to the central (STOP) warning
light.
You must stop.
This warning light indicates one of
the following:
- insuffi cient oil pressure indicated
by the message "Oil pressure
insuffi cient" on the display.
- a lack of oil in the lubrication circuit.
Top up the level.
- an oil temperature which is too high.
To lower the oil temperature, reduce
your speed.
Lighting of the warning light is acco-
mpanied by an audible signal.
Consult a CITROËN dealer.
Low engine coolant
level warning light
Linked to the central (STOP)
warning light.
This comes on for a few seconds
when the ignition is switched on.
Lighting of this warning light is acco-
mpanied by an audible signal and the
message "Top up engine fl uid level"
on the display.
You must stop.
Wait for the engine to cool before
topping up the level.
The cooling circuit is pressurised.
In the event of breakdown and to pre-
vent any risk of burns, unscrew the
cap by two turns to allow the pressure
to drop.
When the pressure has dropped, remove the cap and top up the level.
Consult a CITROËN dealer.
Handbrake, low
brake fluid level and
Electronic Brake Force
Distribution system
fault warning light
Linked to the central (STOP) warning
light.
This comes on each time the ignition
is switched on.
Lighting of this warning light is acco-
mpanied by an audible signal and a
message on the display indicating
the cause of the warning:
- "Handbrake on", if the handbrake
is applied or not fully released.
- "Brake fl uid level low" if there is
an excessive drop in brake fl uid
level (if the warning light remains
on even when the handbrake is
released).
- "Braking fault" is displayed to-
gether with the ABS warning
light, indicating a malfunction of
the Electronic Brake Force Distri-
bution system. You must stop.
Consult a CITROËN dealer.
20 -
Anti-lock braking
system (ABS) warning
light
This comes on for a few seconds each
time the ignition is switched on.
If the warning light remains on or
comes on above 8 mph (12 km/h),
this indicates an ABS malfunction.
However, the vehicle retains conven-
tional servo-assisted braking.
Lighting of this warning light, acco-
mpanied by an audible signal and the
message "ABS fault" on the display,
indicates an ABS fault.
Consult a CITROËN dealer.
Battery charge warning
light
This comes on for a few seconds when the ignition is
switched on. Lighting of this war ning
light, when the engine is running,
acco mpanied by an audible signal
and the message "Battery charge
fault" on the display, indicates one of
the following:
- faulty operation of the charging
circuit,
- slack battery or starter terminals,
- a cut or slack alternator belt,
- an alternator failure.
Consult a CITROËN dealer.
Emission control
system warning light
This comes on for a few seconds each time the ignition is
switched on.
If it comes on with the engine running,
accompanied by an audible signal
and the message on the display:
- "Antipollution fault", this indi-
cates a failure of the emission
control system
- "Catalytic converter fault", this
indicates a malfunction of the injection or ignition system. There is
a risk of damage to the catalytic
converter (petrol engine only).
Consult a CITROËN dealer.
Diesel engine pre-heat
warning light
Wait until the warning light
goes out before starting the
engine.
If the temperature is high enough,
the warning light comes on for less
than one second. You can start the
engine without waiting.
Low fuel level
warning light
This comes on for a few
seconds when the igni-
tion is switched on.
When the ignition is on, it is acco-
mpanied by an audible signal and
the message "Fuel level low" on the
display.
If it fl ashes with the fuel gauge needle
in the lowest position, when the igni-
tion is on, this indicates a malfunction
of the fuel gauge.
When this warning light fi rst comes
on, you have enough fuel left to drive
approximately 30 miles (50 km) .
Capacity of the tank:
- approximately 55 litres for petrol
engines,
- approximately 60 litres for Diesel
engines.
Water in diesel filter
indicator *
There is a risk of damage to
the injection system.
Consult a CITROËN dealer as soon
as possible.
* According to country.
21
-
Seat belt not fastened
warning light *
When the ignition is switched
on, this indicator light comes
on if the driver has not fastened his
seat belt.
Above 12 mph (20 km/h), the warn-
ing light fl ashes for two minutes.
Once the two minutes have elapsed,
the warning light remains on until the
driver fastens his seat belt.
Passenger air bag
disarmed warning
light *
Lighting of this warning light is accompanied by the message "Passenger
air bag deactivated" on the display.
If the passenger air bag is disarmed,
the warning light comes on when the
ignition is switched on and it remains
on.
Always consult a CITROËN dealer if
the warning light fl ashes.
Front and side air bags
warning light
This comes on for a few seconds when the ignition is
switched on.
With the engine running, illumination
of this warning light accompanied by
an audible signal and the message
"Air bag fault" on the multifunction
display, indicates a fault in the air
bags.
Consult a CITROËN dealer.
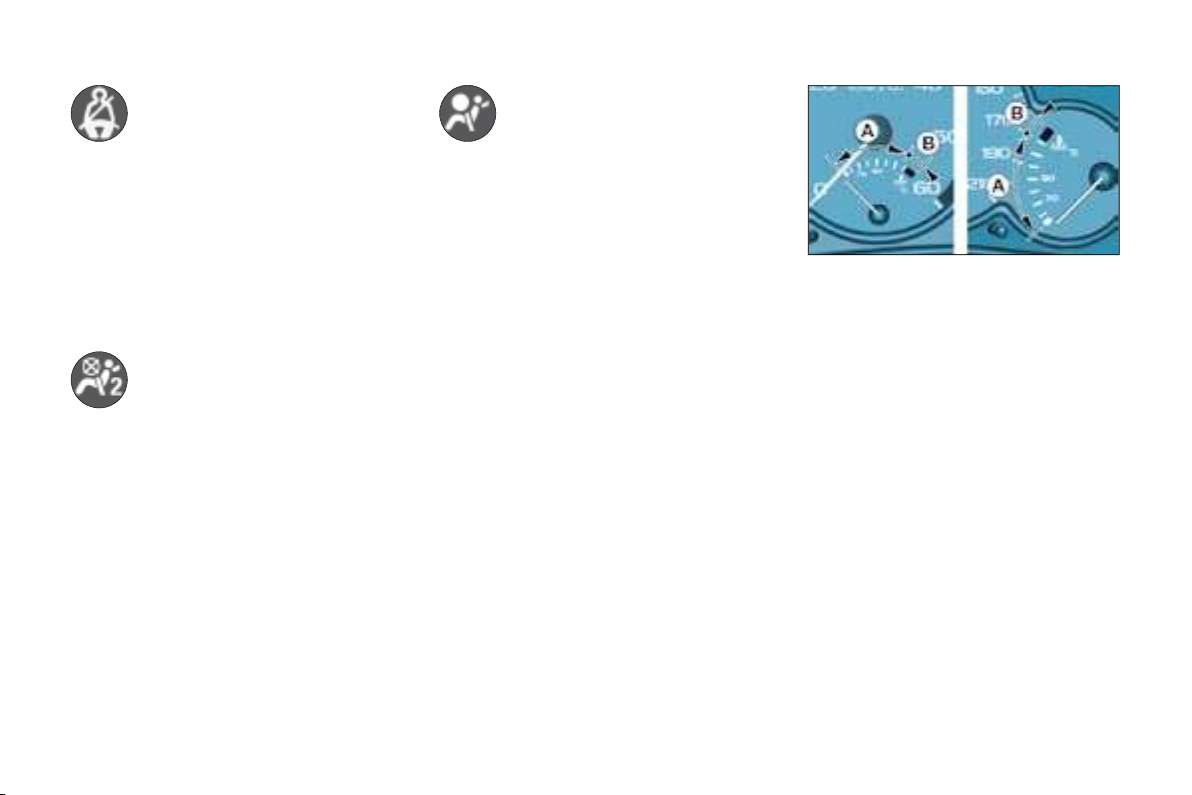
Coolant temperature indicator
- needle in zone (A) , the tempera-
ture is correct,
- needle in zone (B) , the tempera-
ture is too high. The central STOP
warning light fl ashes, accompanied by an audible signal and the
message "Engine coolant temp.
too high" on the display.
You must stop.
Consult a CITROËN dealer.
* According to country.

21
-
Seat belt not fastened
warning light *
When the ignition is switched
on, this indicator light comes
on if the driver has not fastened his
seat belt.
Above 12 mph (20 km/h), the warn-
ing light fl ashes for two minutes.
Once the two minutes have elapsed,
the warning light remains on until the
driver fastens his seat belt.
Passenger air bag
disarmed warning
light *
Lighting of this warning light is accompanied by the message "Passenger
air bag deactivated" on the display.
If the passenger air bag is disarmed,
the warning light comes on when the
ignition is switched on and it remains
on.
Always consult a CITROËN dealer if
the warning light fl ashes.
Front and side air bags
warning light
This comes on for a few seconds when the ignition is
switched on.
With the engine running, illumination
of this warning light accompanied by
an audible signal and the message
"Air bag fault" on the multifunction
display, indicates a fault in the air
bags.
Consult a CITROËN dealer.
Coolant temperature indicator
- needle in zone (A) , the tempera-
ture is correct,
- needle in zone (B) , the tempera-
ture is too high. The central STOP
warning light fl ashes, accompanied by an audible signal and the
message "Engine coolant temp.
too high" on the display.
You must stop.
Consult a CITROËN dealer.
* According to country.
22 -
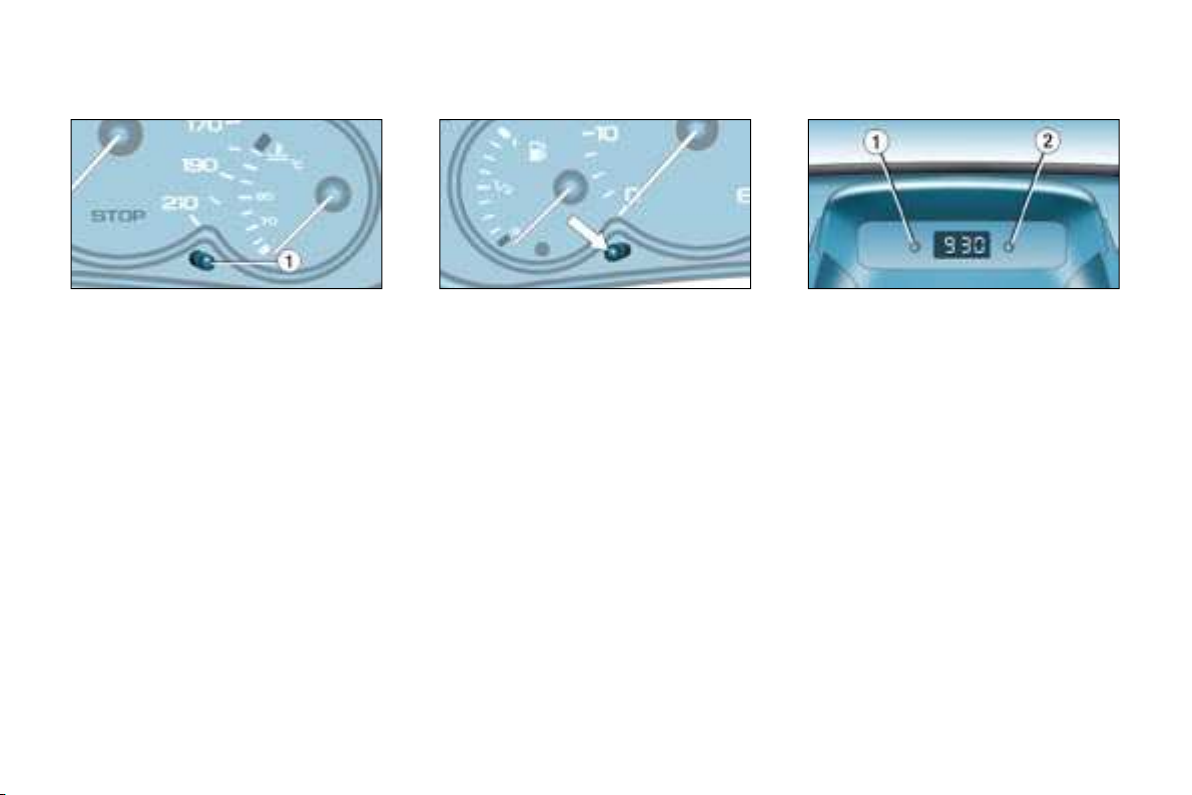
INSTRUMENT PANEL
After switching on the ignition, three
functions are shown in succession:
- service indicator,
- engine oil level indicator,
- total distance recorder/total and
trip distances.
Note : the total and trip distances are
displayed for 30 seconds when the
ignition is switched off, on opening
the driver's door, as well as on lock-
ing and unlocking the vehicle.
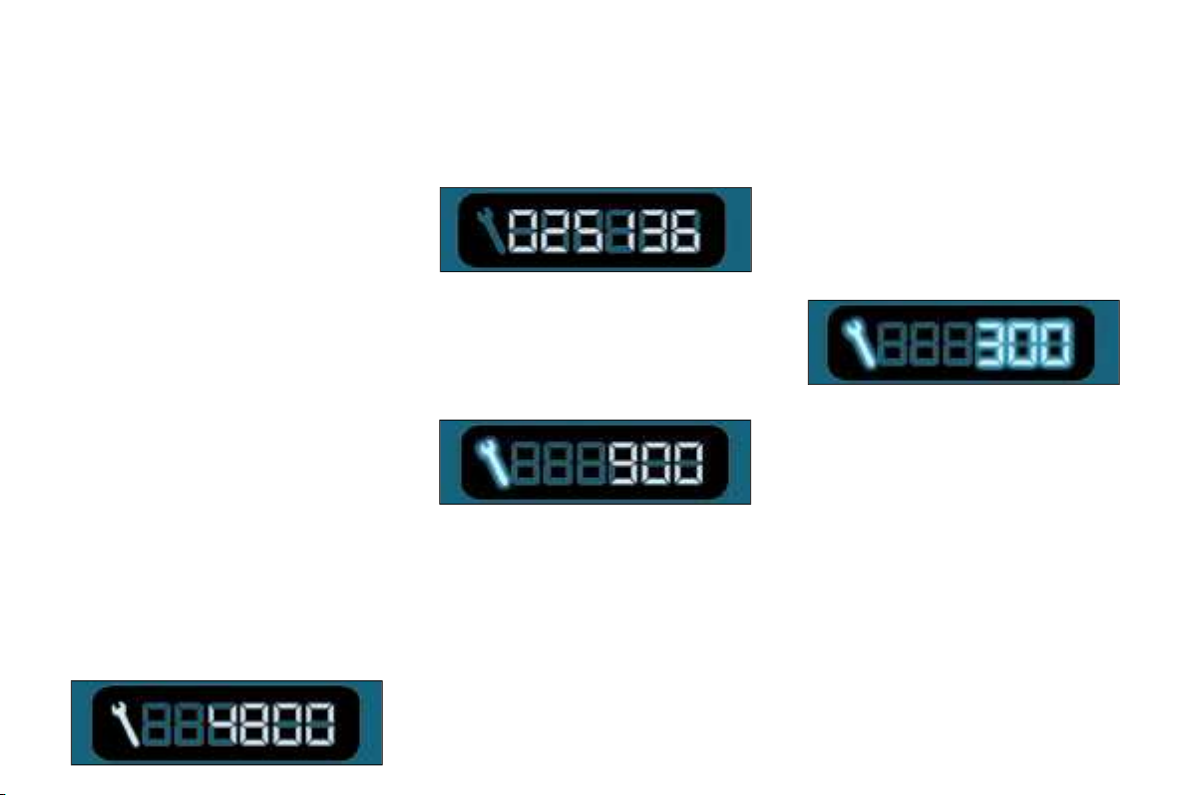
Service indicator
This is a visual reminder of when the
next service is due. This service is to
be carried out according to the manufacturer's servicing schedule.
Operation
As soon as the ignition is switched
on and for 5 seconds, the spanner
symbolising ''service operation'' is lit.
The trip recorder display shows the
distance remaining (in round fi gures)
before the next service.
Example: 4,800 miles/km remain be-
fore the next service is due. When the
ignition comes on and for 5 seconds
the display shows:
5 seconds after the ignition is switched
on, the total distance recorder resumes
normal operation and the display shows
the total or trip di stances.
The distance remaining before the next
service is less than 500 miles (1,000 km).
Example: 400 miles (900 km) remain
before the next service is due.
When switching on the ignition and
for 5 seconds, the display shows:
5 seconds after the ignition is switched
on, the total distance recorder resumes
normal operation and the symbol re-
mains lit.
This indicates that a service should
be carried out shortly. The display
shows the total or trip distances.
The service is overdue.
Each time the ignition is switched on
and for 5 seconds, the symbol and
the excess distance fl ash.
Example: the service is overdue by
300 miles/km. The service should be
carried out very shortly.
When the ignition is switched on and
for 5 seconds, the display shows:
5 seconds after the ignition is switched
on, the total distance recorder resumes
normal operation and the symbol re-
mains lit. The display shows the total or
trip distances.
Note: the spanner lights if the two-year
interval has been exceeded.
23
-
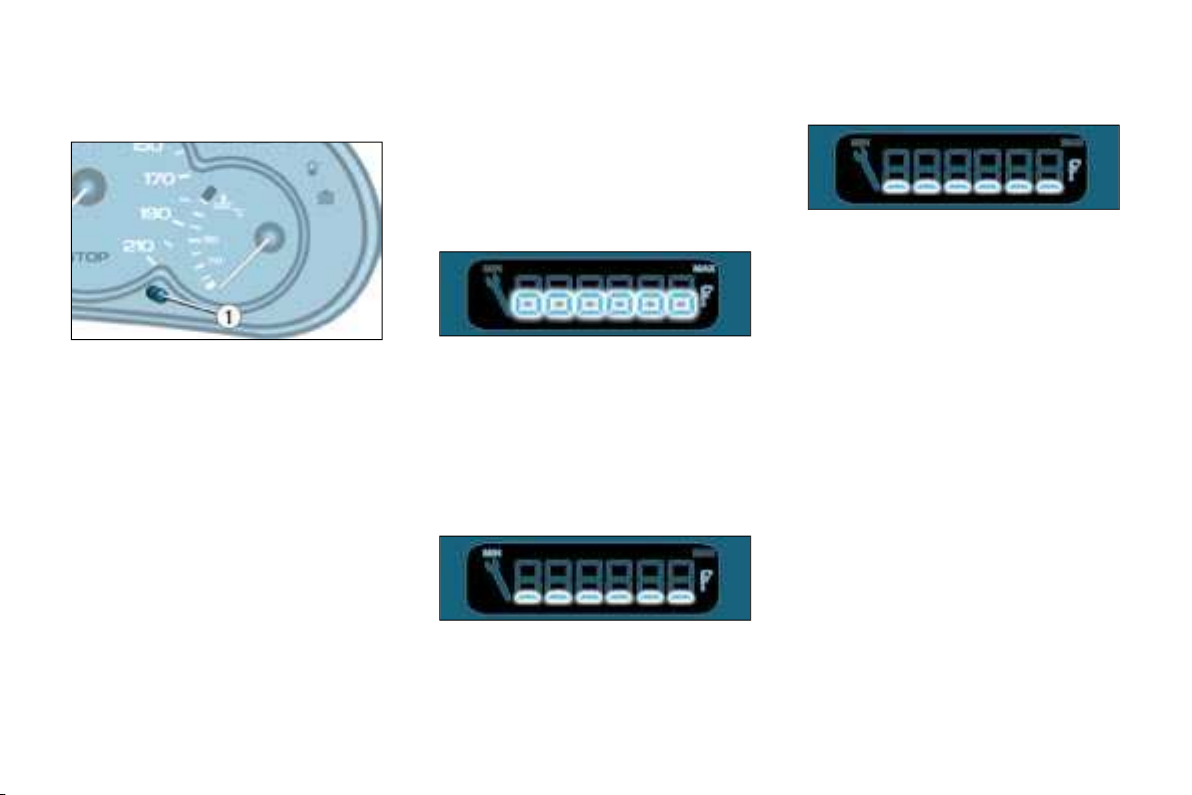
Resetting the service indicator
Your CITROËN dealer carries out
this operation after each service.
The reset procedure is as follows:
- Switch off the ignition.
- Press and hold button 1 .
- Switch on the ignition.
The display begins a 10 second count-
down.
-
Keep button 1 pressed for 10 seconds.
The display shows [= 0] and the span-
ner disappears.
Engine oil level indicator
When the ignition is switched on,
the engine oil level is indicated for
approximately 10 seconds, after the
service information.
Surplus of oil
Flashing of the six squares and displaying of "max" indicate a surplus of
oil which could damage the engine.
If the surplus of oil is confi rmed by
a check using the dipstick, contact a
CITROËN dealer without delay.
Lack of oil
Flashing of the six segments and displaying of "min" indicate a lack of oil
which could damage the engine.
If the lack of oil is confi rmed by a
check using the dipstick, it is essential
that the level is topped up.
Oil level indicator fault
Flashing of the six segments indi-
cates a malfunction of the oil level
indicator.
There is a risk of damage to the engine.
Consult a CITROËN dealer.
The level read on the dipstick or on
the indicator will only be correct if
the vehicle is on level ground and
the engine has been off for more
than 15 minutes.
24 -
LIGHTING RHEOSTAT
CLOCK
Total distance recorder
Briefl y pressing button 1 alternates
between the total and trip distance
displays.
To reset the trip recorder to zero,
when it is displayed press button 1
until zeros appear.
With the lights on, press the button
to vary the intensity of the lighting of
the instruments and controls. When
the lighting reaches the minimum (or
maximum) setting, release the but-
ton then press it again to increase (or
redu ce) the brightness.
As soon as the lighting is of the requi-
red brightness, release the button.
Button 1 : hour adjustment
Button 2 : minute adjustment
Press and hold the button for rapid
advance.

25
-
DISPLAY A
This displays the following information:
- the time,
- the date,
- the audio system displays,
- a door check (e.g.: ''left front door
open''),
- warning messages (e.g. ''remote
control battery fl at'') or information
messages (e.g. ''economy mode
active''), displayed temporarily.
Adjusting the parameters display A
Press and hold button A for two sec-
onds to access the settings; the data
fl ashes, indicating it is ready to be
modifi ed.
Then, each press of button A scrolls
through the various data in the fol-
lowing order:
- language of information displayed,
- hours (12 then 24 hour mode),
- minutes,
- year,
- month,
- day.
Pressing button B alters the value of
the parameter selected. Press and
hold for rapid advance (return to start
after the last possible value).
After 7 seconds with no action, the
standard display returns; the modifi ed
data is now recorded.

AUDIO EQUIPMENT
26 -
AUDIO RD3
Stalk movement Function
1 - Press (behind) Increase volume
2 - Press (behind) Decrease volume
1 + 2 - Simultaneous press Sound cut-off (mute); restoring of the sound by pressing any button
3 - Press Automatic search of higher frequencies (radio) Selection of the next track (CD)
4 - Press Automatic search of lower frequencies (radio) Selection of the previous track (CD)
5 - Press the end Change of source (radio/CD)
6 - Rotation (clockwise) Selection of next station stored in memory (radio)
7 - Rotation (anti-clockwise) Selection of previous station stored in memory (radio)
27
AUDIO EQUIPMENT
-
Button Function
A Radio on/off.
B - Decrease volume.
C + Increase volume.
D RDS
RDS function on/off.
Press for more than 2 seconds: regional following mode on/off.
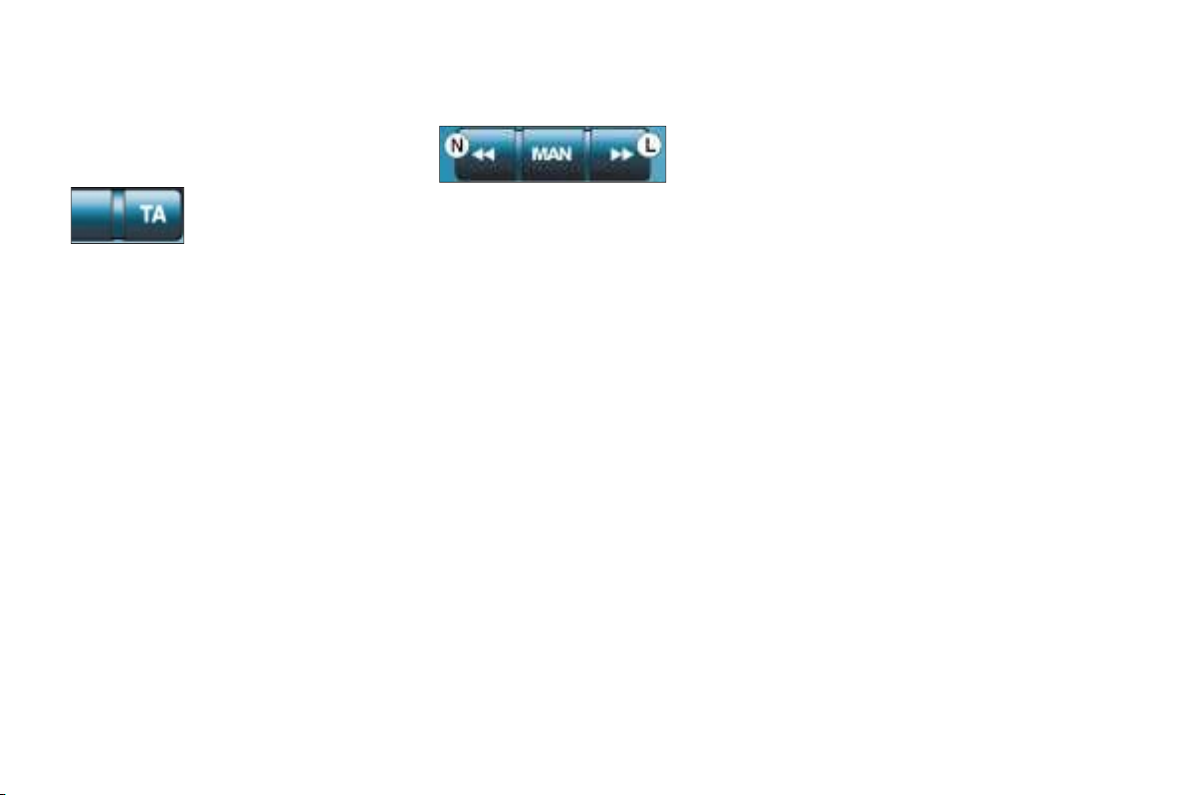
E TA
Traffi c information priority on/off.
Press for more than 2 seconds: PTY function on/off.
H
Increase the setting of the functions associated with button
I
Decrease the setting of the functions associated with button H.
J
Réglage inférieur des fonctions associées à la touche H.
L
Manual and automatic search of higher frequency.
Selection of next CD track and PTY (radio).
M MAN Manual/automatic operation of buttons L and N.
N
Manual and automatic search of lower frequency.
Selection of previous CD track and PTY (radio). Selection of previous CD track and PTY (radio).
Q CD
Selection of CD.
Press for more than 2 seconds: shuffl e.
R Radio
Selection of radio. Selection of FM1, FM2, FMast and AM wavebands.
Press for more than 2 seconds: automatic storing of stations in memory (autostore).
S
Ejection of CD.
1 to 6 12 34 56
Selection of station stored in memory.
Press for more than 2 seconds: storing of a station in memory.
AUDIO EQUIPMENT
28 -
GENERAL FUNCTIONS
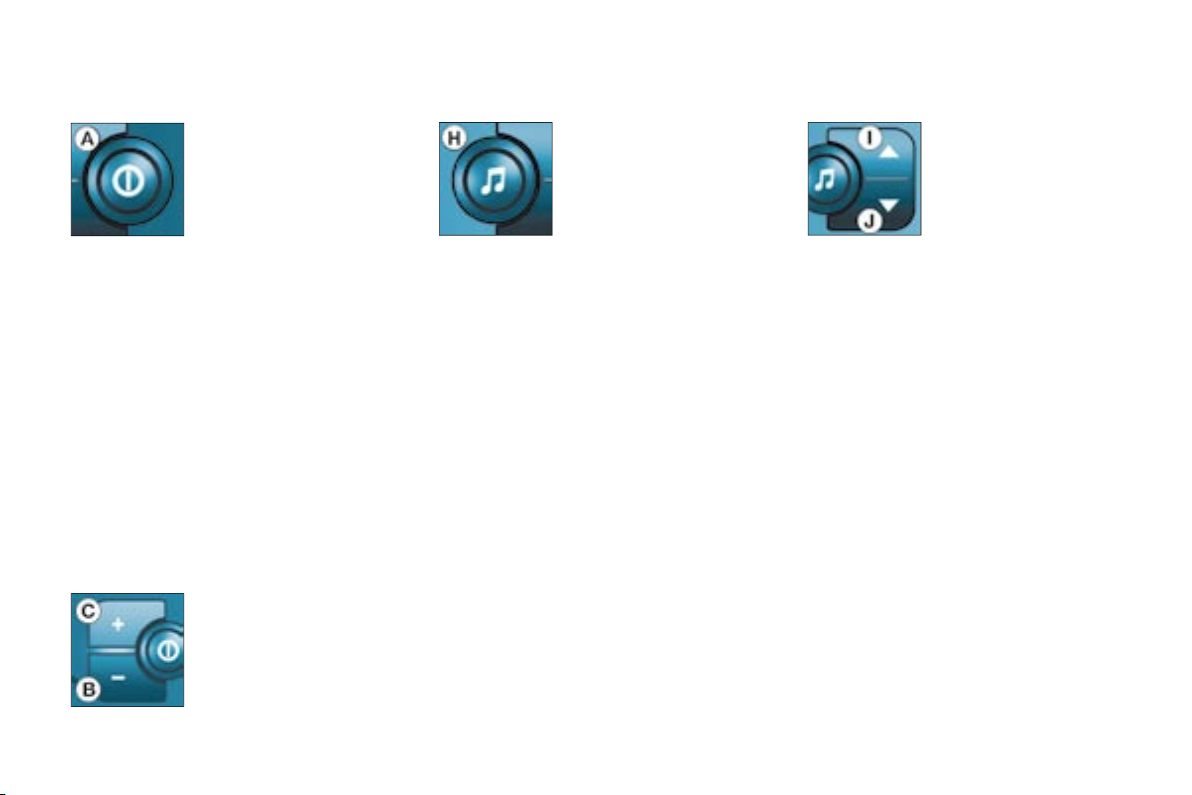
On/off
With the ignition key
in the accessories or
ignition position, press
button A to switch the
set on or off.
The set can oper-
ate for 30 minutes
without the vehicle ignition being
switched on.
Anti-theft system
The audio system is coded in such a
way that it can operate only on your
vehicle. It would not function if fi tted
to another vehicle.
The anti-theft system is automatic
and requires no action on your
part.
ADJUSTING THE VOLUME
Press button C to in-
crease the volume, or
button B to decrease it.
Continuous pressure
on buttons C and B al-
lows a gradual adjust-
ment of the volume.
AUDIO SETTINGS
Press button H several
times in succession
to access the bass
(BASS) , treble (TREB) ,
loudness (LOUD) ,
fader (FAD) , balance
(BAL) and automatic
volume correction.
Exit from audio mode is automatic after a few seconds without pressing any
button, or by pressing button H after
confi guration of the automatic volume
correction.
Note: bass and treble settings are
specifi c to each source. It is possible to
set them differently for radio, cassette
(RB3) , CD (RD3) and CD changer.
Adjusting the bass
When "BASS" is dis-
played, press button
I or J to vary the set-
ting.
- "BASS -9" for a
minimum bass setting,
- "BASS 0" for a nor-
mal setting,
- "BASS +9" for a maximum bass
setting.
Adjusting the treble
When "TREB" is displayed, press
button I or J to vary the setting.
- "TREB -9" for a minimum treble
setting,
- "TREB 0" for a normal setting,
- "TREB +9" for a maximum treble
setting.
Adjusting the loudness
This function automatically emphasises bass and treble tones. Press
button I or J to switch the function on
or off.

29
AUDIO EQUIPMENT
-
Adjusting the front/rear sound
distribution (Fader)
When "FAD" is displayed, press but-
ton I or J .
Button I increases the volume in the
front.
Button J increases the volume in the
rear.
Adjusting the right/left sound
distribution (Balance)
When "BAL" is displayed, press but-
ton I or J .
Button I increases the volume on the
right-hand side.
Button J increases the volume on the
left-hand side.
Automatic volume correction
This function enables the volume to
be automatically adjusted depending
on the level of noise produced by the
speed of the vehicle.
Press buttons I or J to switch the
function on or off.
RADIO
Your car radio is subject to phenomena which do not affect domestic radio sets. Both AM (MW/LW) and FM
reception are subject to various forms
of interference. This is no refl ection on
the quality of the equipment, but is due
to the nature of the signals and the way
in which they are transmitted.
On MW/LW, interference may be noticed when passing under high voltage
power lines or bridges, or in tunnels.
On FM, interference may be the result of increasing distance from the
transmitter, defl ection of the signals by
obstacles (mountains, hills, buildings,
etc.), or of being in an area which is
not covered by a transmitter.
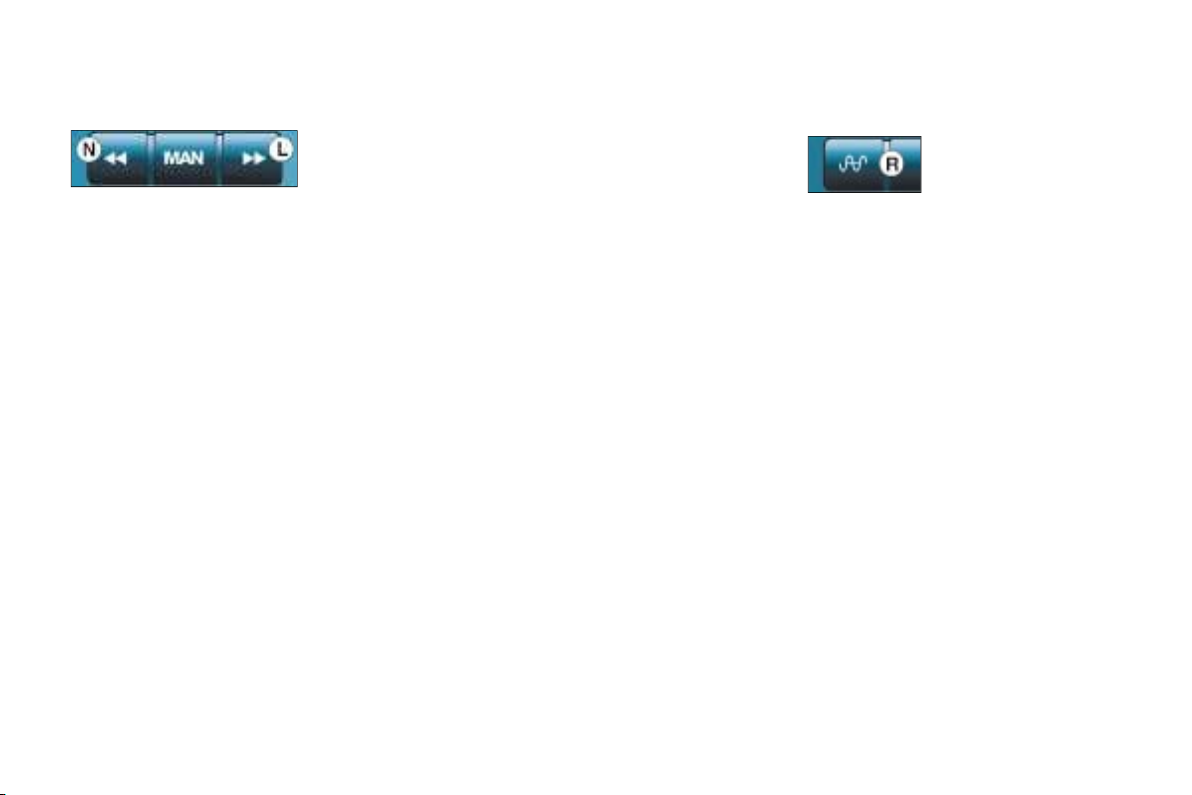
Selecting radio mode
Press button R . Notes on radio reception
Selecting a waveband
Briefl y press button R to select the FM1,
FM2, FMast and AM wavebands.

29
AUDIO EQUIPMENT
-
Adjusting the front/rear sound
distribution (Fader)
When "FAD" is displayed, press but-
ton I or J .
Button I increases the volume in the
front.
Button J increases the volume in the
rear.
Adjusting the right/left sound
distribution (Balance)
When "BAL" is displayed, press but-
ton I or J .
Button I increases the volume on the
right-hand side.
Button J increases the volume on the
left-hand side.
Automatic volume correction
This function enables the volume to
be automatically adjusted depending
on the level of noise produced by the
speed of the vehicle.
Press buttons I or J to switch the
function on or off.
RADIO
Your car radio is subject to phenomena which do not affect domestic radio sets. Both AM (MW/LW) and FM
reception are subject to various forms
of interference. This is no refl ection on
the quality of the equipment, but is due
to the nature of the signals and the way
in which they are transmitted.
On MW/LW, interference may be noticed when passing under high voltage
power lines or bridges, or in tunnels.
On FM, interference may be the result of increasing distance from the
transmitter, defl ection of the signals by
obstacles (mountains, hills, buildings,
etc.), or of being in an area which is
not covered by a transmitter.
Selecting radio mode
Press button R . Notes on radio reception
Selecting a waveband
Briefl y press button R to select the FM1,
FM2, FMast and AM wavebands.
AUDIO EQUIPMENT
30 -
Automatic station search Automatic storing of FM stations
Briefl y press button L or N to search
for the station immediately above or
below. By continuing to press the
button in the direction selected, you
will obtain continuous scrolling of the
frequency.
The scrolling stops at the fi rst sta-
tion found as soon as the button is
released.
If the TA traffi c information pro-
gramme is selected, only stations
broadcasting this type of programme
are selected.
Searching for a station occurs fi rst in
"LO" sensitivity (selection of the most
powerful transmitters) during scanning of the waveband, then in "DX"
sensitivity (selection of the weakest
and most distant transmitters).
To make a direct search in "DX" sen-
sitivity, press button L or N twice.
Manual station search
Press the "MAN" button.
Briefl y press button L or N to increase
or decrease the frequency displayed.
By continuing to press the button in
the direction selected, you will obtain
continuous scrolling of the frequency.
The scrolling stops at the fi rst station
found as soon as the button is released.
Pressing the "MAN" button again re-
turns you to automatic station search.
Manual storing of stations in the
memory
Select the station required.
Press one of the buttons "1" to "6"
for more than two seconds.
The sound stops then becomes audi-
ble again, confi rming that the station
has been stored in the memory.
in the memory (autostore)
Press and hold button
R for more than two
seconds.
Your radio automatically stores the
6 stations with the strongest signal in
FM . These stations are stored in the
FMast waveband.
If it is not possible to fi nd 6 stations,
the remaining memories are empty.
Recalling stations stored in the
memory
For each waveband, briefl y press
buttons "1" to "6" to recall the cor
responding station.
31
AUDIO EQUIPMENT
-
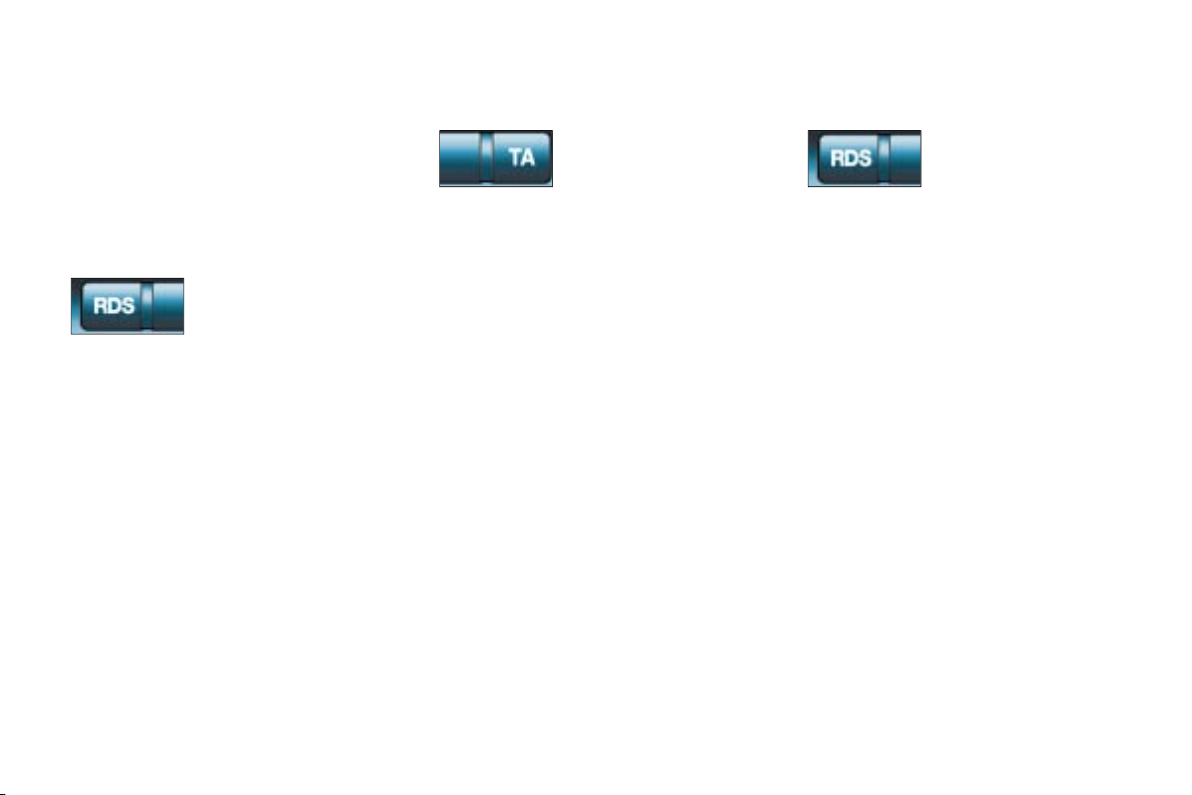
RDS
Using the RDS (Radio Data
System) function on FM
Radio Data System allows you to
continue listening to the same station, whatever frequency it is using
for the region you are going through.
Briefl y press the
"RDS" button to
switch the function on
or off.
The multi-function display will show:
- "RDS" if the function is selected.
- "(RDS)" if the function is selected
but not available.
RDS station following
The display indicates the name of the
station selected. The radio is continually searching for the station which
has the best reception and which is
transmitting the same programme.
Traffi c information programme Regional following mode (REG)
Press the "TA" button
to switch the function
on or off.
The multi-function display will show:
- "TA" if the function is selected,
- "(TA)" if the function is selected
but not available.
Any traffi c information fl ash will be
given priority, whatever source you
are listening to (radio, cassette, CD
or CD changer).
If you wish to interrupt a message,
press the "TA" button; this switches
the function off.
Note: the volume of traffi c informa-
tion announcements is independent of the volume of normal radio
listening. You can adjust it using
the volume button. The setting will
be stored and will be used when
the next messages are broadcast.
the various areas they serve. With regional following mode you can keep
listening to the same programme.
Press the "RDS" button for more
than two seconds to switch the REG
function on or off.
When they are part
of a network, certain
stations broadcast regional programmes in
AUDIO EQUIPMENT
32 -
PTY function
This allows you to listen to stations broad-
casting a specifi c type of programme
(news, culture, sport, rock, etc.).
With FM selected,
press the "TA" but-
ton for more than two
seconds to switch this
function on or off.
To search for a PTY programme:
- select the PTY function,
- briefl y press button L or N to
scroll down the list of the various
types of programmes offered,
- when the programme of your
choice is displayed, keep button
L or N pressed for more than two
seconds to carry out an automatic
search (after an automatic search
the PTY function is switched off).
In PTY mode the different types of
programmes can be stored in the
memory. To do this, press the preselection buttons "1" to "6" for more
than two seconds. Briefl y press the
corresponding button to recall the
type of programme stored in the
memory.
EON system
This connects stations which are
part of the same network. It enables
the broadcast of traffi c information,
by a station that is part of the same
network as the station to which you
are listening.
This service is available when you
have selected the TA traffi c informa-
tion programme or the PTY function.
 Loading...