

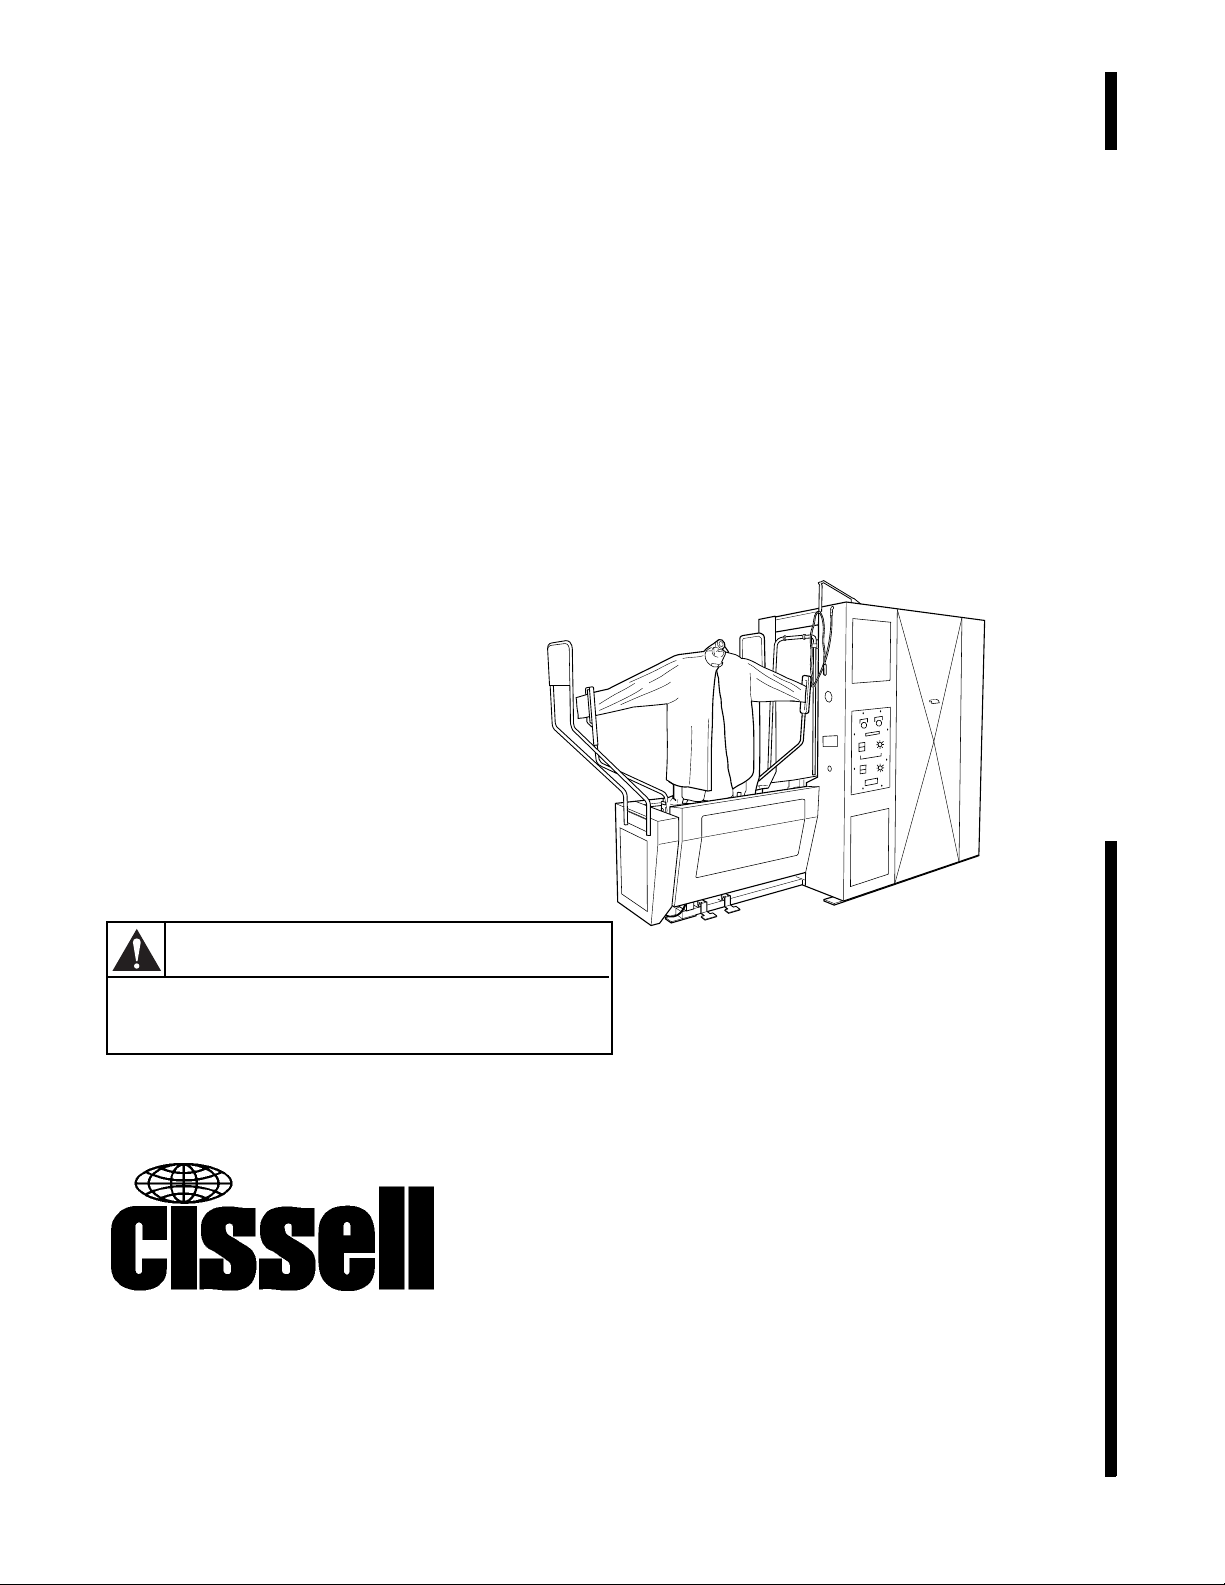
Combination
Sleever, Bosom,
Body and Yoke Press
CSBBYMV
Operation/Maintenance
WARNING
Read and understand these instructions
before operating or servicing these machines.
Keep These Instructions for Future Reference.
(If this machine changes ownership, this manual must accompany machine.)
An LSG Company
831 South First Street, P.O. Box 32270
Louisville, KY 40232-2270
Phone: (502) 587-1292
Sales Fax: (502) 585-3625
Service/Parts Fax: (502) 681-1275
www.cissellmfg.com
CAB438C
CAB438C
Part No. AJ0975
March 2004


Table of
Contents
Safety Information.............................................................................. 3
Explanation of Safety Messages........................................................... 3
Important Safety Instructions ............................................................... 3
Operation............................................................................................. 5
Front View of CSBBYMV ................................................................... 5
Rear View of CSBBYMV .................................................................... 6
Operating Controls and Indicators........................................................ 7
Operating Controls and Indicators................................................... 8
Resetting Air Circuit............................................................................. 10
Pressing Short Sleeve Shirts ................................................................. 10
Operating Instructions .......................................................................... 11
Pre-Operating Services .................................................................... 11
Post-Operating Services................................................................... 12
Cleaning Press Heads....................................................................... 12
CSBBYMV Operation Sequence..................................................... 13
Buck Dressing Instructions.............................................................. 14
Operating Tips ...................................................................................... 18
Shirt Quality..................................................................................... 18
Padding ............................................................................................ 19
Quality Troubleshooting....................................................................... 20
Maintenance ........................................................................................ 23
General.................................................................................................. 23
Periodic Inspections.............................................................................. 23
Periodic Inspections......................................................................... 24
Cleaning Air Filter ........................................................................... 25
Cleaning Steam Strainer .................................................................. 25
Cleaning Customer-Furnished Steam Traps .................................... 25
Lubrication....................................................................................... 26
Monthly Lubrication............................................................................. 28
Adjusting Air Line Lubricator Flow Rate........................................ 28
Filling Air Line Lubricator .............................................................. 29
© Copyright 2004, Alliance Laundry Systems LLC
All rights reserved. No part of the contents of this book may be reproduced or transmitted in any form or by any
means without the expressed written consent of the publisher.
AJ0975
© Copyright, Alliance Laundry Systems LLC – DO NOT COPY or TRANSMIT
1

Notes
2
© Copyright, Alliance Laundry Systems LLC – DO NOT COPY or TRANSMIT
AJ0975

Safety Information
Explanation of Safety Messages
Precautionary statements (“DANGER,” “WARNING,”
and “CAUTION”), followed by specific instructions,
are found in this manual and on machine decals. These
precautions are intended for the personal safety of the
operator, user, servicer, and those maintaining the
machine.
DANGER
Indicates an imminently hazardous
situation that, if not avoided, will cause
severe personal injury or death.
WARNING
Indicates a hazardous situation that, if not
avoided, could cause severe personal
injury or death.
Important Safety Instructions
Save These Instructions
WARNING
Failure to install, maintain, and/or operate
this machine according to manufacturer’s
instructions may result in conditions
which can produce serious injury, death
and/or property damage.
NOTE: The WARNING and IMPORTANT
instructions appearing in this manual are not
meant to cover all possible conditions and
situations that may occur. It must be understood
that common sense, caution, and carefulness are
factors which CANNOT be built into this press.
These factors MUST BE supplied by the person(s)
installing, maintaining or operating the ironer.
Always contact your dealer, distributor, service agent,
or the manufacturer on any problems or conditions you
do not understand.
CAUTION
Indicates a hazardous situation that, if not
avoided, may cause minor or moderate
personal injury or property damage.
Additional precautionary statements (“IMPORTANT”
and “NOTE”) are followed by specific instructions.
IMPORTANT: The word “IMPORTANT” is used
to inform the reader of specific procedures where
minor machine damage will occur if the procedure
is not followed.
NOTE: The word “NOTE” is used to communicate
installation, operation, maintenance or servicing
information that is important but not hazard
related.
Always contact your dealer, distributor, service agent,
or the manufacturer on any problems or conditions you
do not understand.
1. Read all instructions before using the press.
2. Refer to the GROUNDING INSTRUCTIONS in
the INSTALLATION manual for the proper
grounding of the press.
3. Do not allow children to play on or in the press.
4. Do not reach into the press while the press is in
operation.
5. Do not install or store the press where it will be
exposed to water and/or weather.
6. Do not tamper with the controls.
7. Do not repair or replace any part of the press, or
attempt any servicing unless specifically
recommended in the user-maintenance
instructions or in published user-repair
instructions that the user understands and has the
skills to carry out.
8. To reduce the risk of an electric shock or fire, DO
NOT use an extension cord or an adapter to
connect the press to the electrical power source.
AJ0975
© Copyright, Alliance Laundry Systems LLC – DO NOT COPY or TRANSMIT
3

Safety Information
9. Use press only for its intended purpose, finishing
garments.
10. ALWAYS disconnect the press from electrical
supply before attempting any service. Disconnect
the power cord by grasping the plug, not the cord.
11. Install the press according to the
INSTALLATION INSTRUCTIONS. All
connections for steam, electrical power and
grounding must comply with local codes and be
made by licensed personnel when required.
12. Replace worn power cords and/or loose plugs.
13. Never operate the press with any guards
and/or panels removed.
14. DO NOT operate the press with missing or
broken parts.
15. DO NOT bypass any safety devices.
16. Failure to install, maintain, and/or operate this
press according to the manufacturer’s
instructions may result in conditions which can
produce bodily injury and/or property damage.
NOTE: The WARNINGS and IMPORTANT
SAFETY INSTRUCTIONS appearing in this
manual are not meant to cover all possible
conditions and situations that may occur. Common
sense, caution and care must be exercised when
installing, maintaining, or operating the press.
Any problems or conditions not understood should be
reported to the dealer, distributor, service agent or the
manufacturer.
4
© Copyright, Alliance Laundry Systems LLC – DO NOT COPY or TRANSMIT
AJ0975

Front View of CSBBYMV
Operation
2
1
3
4
5
6
7
8
9
10
CAB697N
12
14
1 Left End Guard 8 Sleeve Blower
2 Sleeve Extender Arms 9 Heat Exchanger, Buck Air Bags
3 Buck 10 Heat Exchanger, Sleeves
4 Mirror 11 Electrical Control Panel
5 Safety Bars 12 Front Head
6 Water Spray Gun 13 Operator Control Buttons
7 Electrical Box 14 Adjustable Air Valves
13
11
Figure 1
CAB697N
AJ0975
© Copyright, Alliance Laundry Systems LLC – DO NOT COPY or TRANSMIT
5
Operation
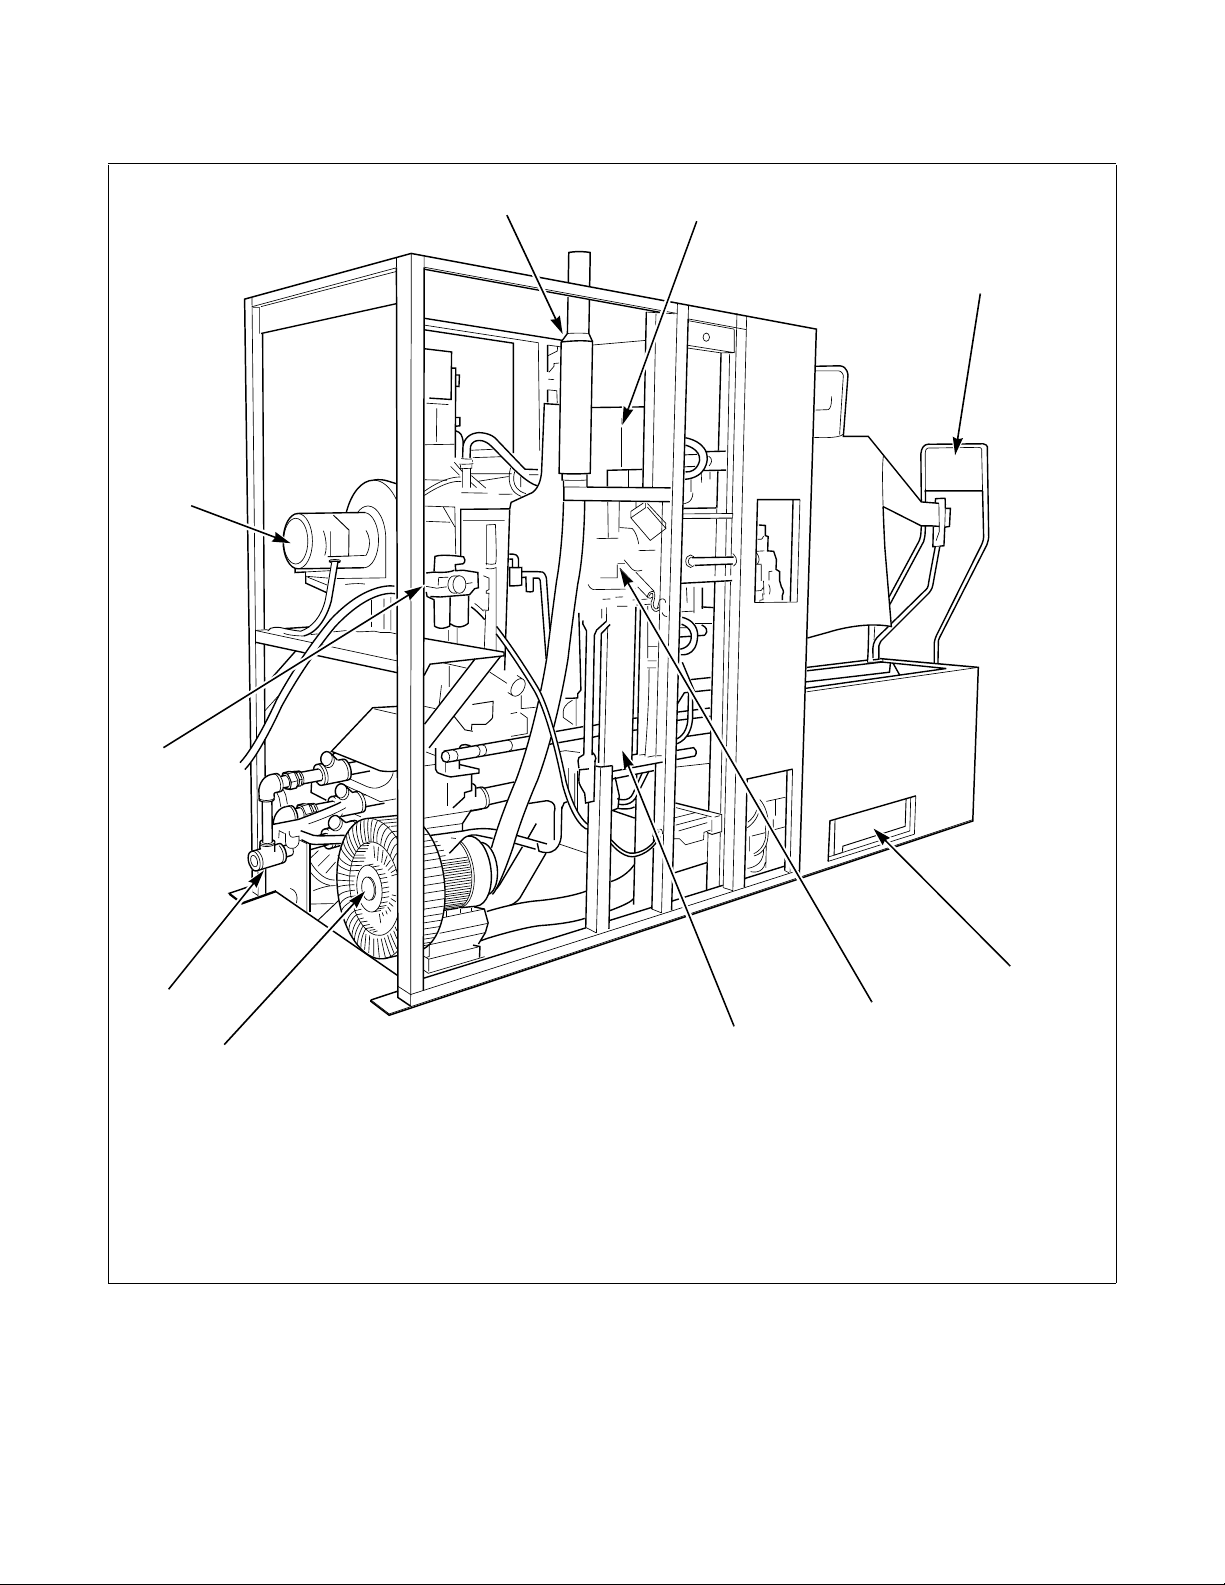
Rear View of CSBBYMV
11
9, 10
1
2
3
8
7
6
CAB83N
5
1 Exhaust Muffler 7 Blower, Buck Air Bags
2 Rear Head 8 Steam Inlet
3 Left End Guard 9 OSHA Approved Shut-Off Valve at Air Inlet
4 Air Intake Filters 10 Air Inlet, Filter, Regulator and Lubricator
5 Steam Solenoid Valve, Sleeves 11 Sleeve Blower
6 Steam Condensate Tank, Sleeves
Figure 2
6
© Copyright, Alliance Laundry Systems LLC – DO NOT COPY or TRANSMIT
4
CAB83N
AJ0975
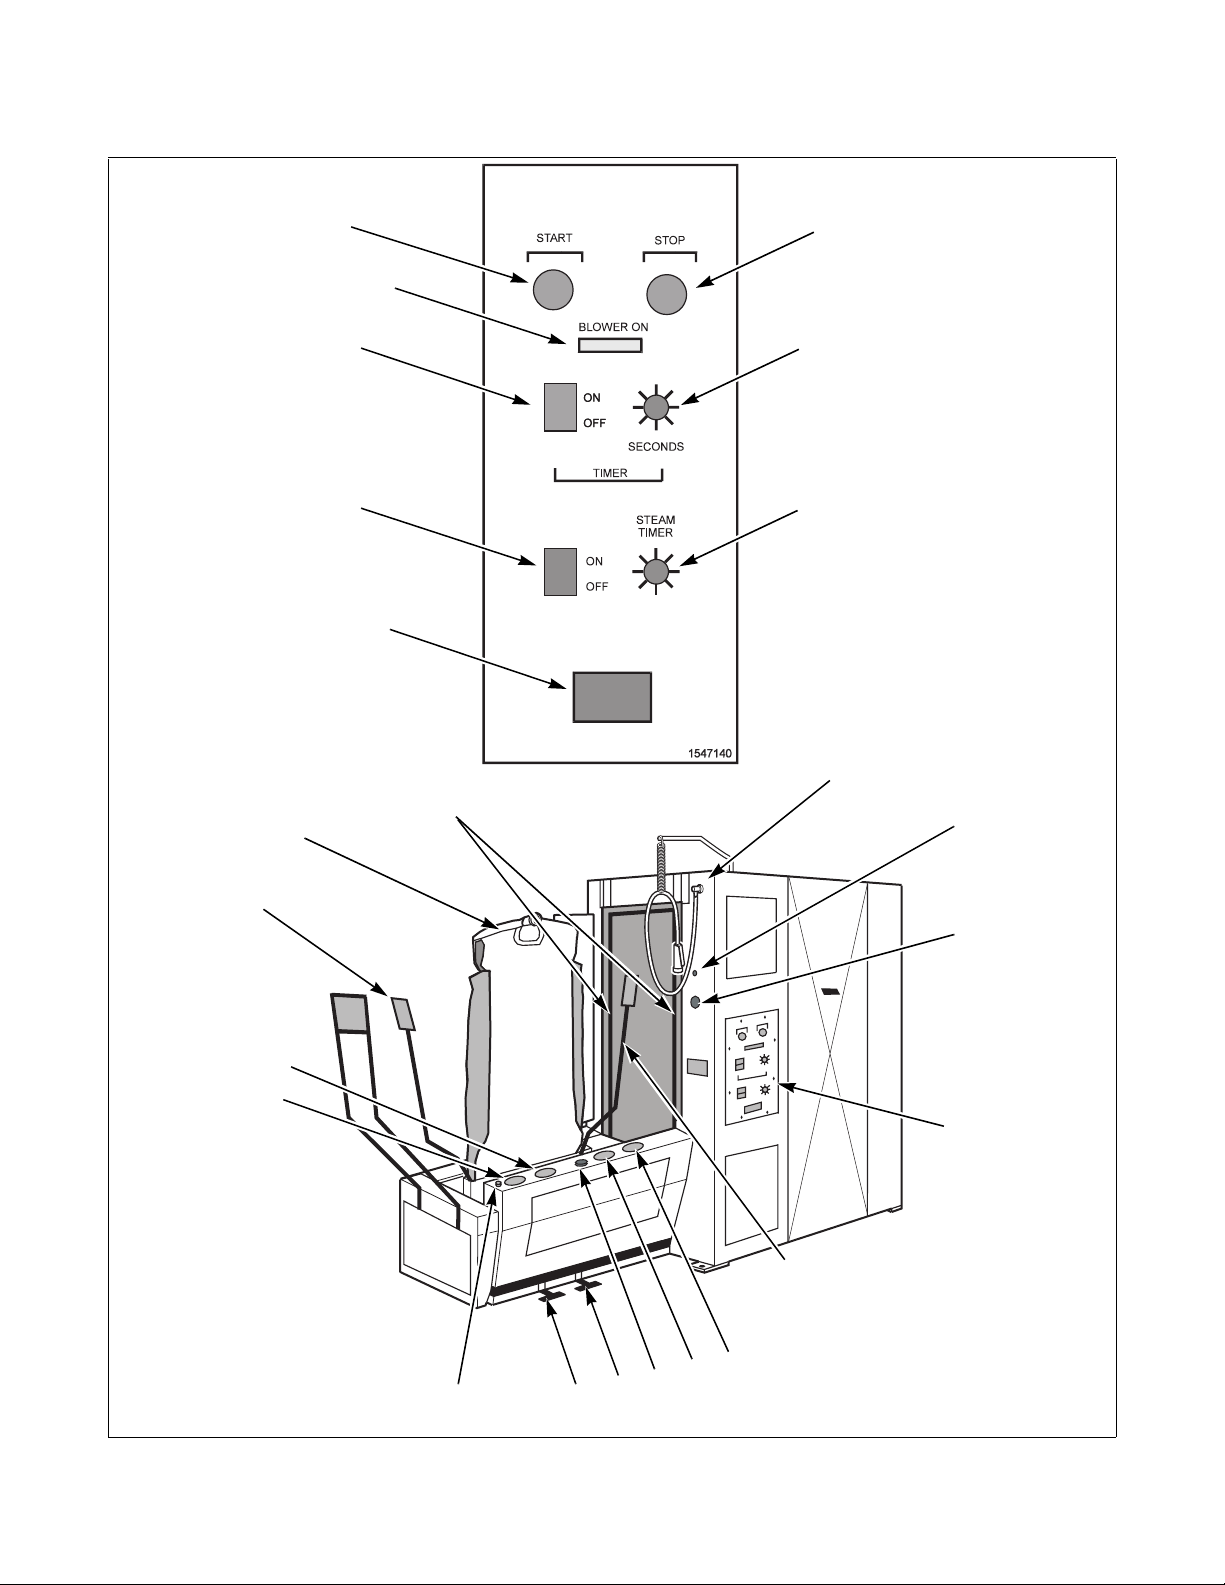
Operating Controls and Indicators
Operation
16
22
20
19
21
18
17
CAB89N
CAB89N
1
2
3
4
5
15
13
14
12
10
11
Figure 3
6
SEE DETAIL
ABOVE
15
CAB698N
CAB698N
7
8
9
AJ0975
© Copyright, Alliance Laundry Systems LLC – DO NOT COPY or TRANSMIT
7

Operation
Operating Controls and Indicators
Refer to Figure 3.
Controls or
Indicators
Function Position or Indication
1. Red stop button Stops electrical service to blowers, timers, and heat exchanger. Press to actuate.
2. Cycle timer control
knob
3. Steam timer control
knob
4. Water gun needle
valve
Determines pressing cyle time. Rotate knob to desired
setting.
Determines the length of sleeve steaming time. Normally set at
5 seconds.
Rotate knob to desired
setting.
Turns water on and off to water spray gun. Turn clockwise to turn
water off. Turn
counterclockwise to turn
water on.
5. Reset button Energizes the air power control circuit. Press must be reset if press gauge
(item 6) registers 0 psi.
With buck in the out
position, press reset
button.
6. Gauge, reset system Indicates that air power is on or off to press. When gauge shows line
pressure, air is reset to
press. When gauge shows
zero pressure, air must be
reset for press to operate.
7. Right gray buck in
button
When pressed simultaneously with the left gray buck in button
(item
13), moves buck from dressing position to pressing position inside
cabinet.
Press simultaneously
with left gray buck in
button (item 13) to
actuate.
8. Black vacuum
Turns vacuum off to buck. Press to actuate.
release button
9. Emergency Stop
button
Exhausts entire air system except for air to collar clamp air cylinder.
Stops buck travel and opens press heads or keeps press heads from
closing. Press will not operate until air circuit is reset. (Applies to
machines produced after 1997.)
Press to actuate. Turn in
direction of arrow on
button to reset. Button
will pop up after
approximately 1/8 turn.
10. Collar clamp foot
pedal
Opens clamping arm on collar clamp (item 16). Depress foot pedal to
open collar clamp.
Release foot pedal to
close collar clamp.
11. Sleeve extender/
vacuum foot pedal
12. Sleeve extender
release button
13. Left gray buck in
button
14. Red head release
button
Moves the sleeve extenders out and turns vacuum on to buck. Depress foot pedal to
actuate.
Retracts sleeve extenders, which brings them in toward the buck. Should
Press to actuate.
be actuated before dressing shirt on buck.
When pressed simultaneously with the right gray buck in button
(item
7), moves buck from dressing position to pressing position inside
cabinet.
Opens the press heads. Buck will automatically return to the dressing
Press simultaneously
with right gray buck in
button (item 7) to actuate.
Press to actuate.
position when heads open.
Table 1 (Continued)
8
© Copyright, Alliance Laundry Systems LLC – DO NOT COPY or TRANSMIT
AJ0975

Table 1 (Continued)
Operation
Controls or
Indicators
15. Sleeve extender
rods
Clamp cuffs and extend sleeves outward for high quality finish. Extend shirt sleeves via
Function Position or Indication
foot pedal (item 11).
Retract sleeve extender
arms via sleeve extender
button (item 12).
16. Collar clamp Holds shirt collar in place on buck (refer to item 10). Open and close clamp
with foot pedal (item 10).
17. Safety bars Exhausts entire air system except air to collar clamp air cylinder. Stops
Press to actuate.
buck travel, and opens press heads or keeps press heads from closing.
Press will not operate until air circuit is reset.
18. Counter Registers number of garments pressed. Works only when timer is
on.
19. Steam timer
Turns steam timer on and off. Push to on or off position.
selector switch
20. Cycle timer selector
Turns cycle timer on and off. Push to on or off position.
switch
21. Indicator lamp Indicates electrical service is on or off to blowers, timers, and heat
exchanger.
Illuminates to indicate
electrical power is
present.
22. Black start button If air is reset to press, applies electrical service to blower and timers. If
Press to actuate.
air is not reset to press, start button will not operate.
AJ0975
© Copyright, Alliance Laundry Systems LLC – DO NOT COPY or TRANSMIT
9

Operation
Resetting Air Circuit
The air circuit must be reset before press can be used.
Resetting is required if:
● Press has been shut down.
● Any safety bar or red emergency stop button has
been activated.
● Gauge indicates 0 air pressure.
To reset air to press:
Move buck to dressing position by hand.
Turn red emergency stop button in direction of arrows
until it pops up.
Press reset button. Air should reset and line pressure
(approximately 65 psi [4.48 bar]) should register on
gauge.
NOTE: If press does not reset, call a qualified
service technician.
Pressing Short Sleeve Shirts
Sleeve extender arms are not used when a short sleeve
shirt is dressed on the buck. The operator should turn
the steam timer selector switch to the off position to
stop live steam and sleeve blower air through sleeve
armhole.
CAUTION
To avoid possible injury:
• ALWAYS turn STEAM Timer Selector
switch OFF when pressing short sleeve
shirts.
• ALWAYS stand clear of live steam when
sending buck into pressing cabinet.
W441
10
© Copyright, Alliance Laundry Systems LLC – DO NOT COPY or TRANSMIT
AJ0975

Operating Instructions
These instructions will provide the best shirt pressing
quality and prolong padding life.
Pre-Operating Services
Perform the following services daily before using the
press:
1. Check condition of buck padding and air bags.
Replace if:
● Cover is scorched or torn.
Operation
WARNING
To avoid possible serious injury NEVER
use press unless BOTH safety bars are
working properly.
W375
8. Reset air to press. Send buck into cabinet. Allow
buck to travel into cabinet and heads to close.
Press emergency stop button. Press heads should
open; buck should remain stationary. Pressure
GAUGE should read 0.
● Air bags have holes.
● Flannel is hard or brittle (not springy).
2. While steam and air are off and heads are cool,
remove debris that may have fallen inside press.
Remove all lint.
3. Open shut-off valves in steam supply and return
lines. Allow 15 to 20 minutes for press to heat.
NOTE: Open shut-off valves slowly to prevent
water hammer.
4. Open valve(s) in air supply line and reset press.
CAUTION
To avoid possibly serious injury, ALWAYS
turn STEAM Timer Selector switch to OFF
position during pre-operating services.
W442
5. Turn off steam to buck steam sleeve openings by
pressing the steam timer selector switch to the off
position.
6. Simultaneously press and release both gray buck
in buttons. As buck travels into cabinet, press
safety bar located near the operator. Buck should
stop; press heads should remain open; and air
should exhaust from system. Pressure gauge
should read 0.
NOTE: It is necessary to pull buck back to dressing
position before resetting the press.
9. Reset air to press.
NOTE: Emergency stop button must be reset after
it is actuated. Turn in the direction as indicated by
the button. Continue turning until button pops up.
10. Preheat buck prior to starting production.
IMPORTANT: Preheating the buck will prevent
water build-up in sleeve blower system, as well as
provide the best shirt production. Without
preheating, water can discharge from buck on
nearby garments.
11. Mist air bags with water and send unloaded buck
into pressing cabinet. Repeat 3 or 4 times to
preheat bucks and prolong life of air bags.
NOTE: Repeat step 10 if buck has not been in
operation for more than 30 minutes.
12. Close customer-furnished electrical disconnect
switch or set circuit breaker(s).
13. Start blower by pressing black start button. Allow
blower to run for 5 minutes.
NOTE: It is necessary to pull buck back to dressing
position before resetting the press.
7. Reset air to press. Simultaneously press and
release both gray buck in buttons. Allow buck to
travel into cabinet and heads to close. Press other
safety bar. Press heads should open; buck should
remain stationary gauge should read 0.
NOTE: It is necessary to pull buck back to dressing
position before resetting the press.
AJ0975
© Copyright, Alliance Laundry Systems LLC – DO NOT COPY or TRANSMIT
11

Operation
Post-Operating Services
Perform the following services after the final operation
of the day or anytime press will be idle for an extended
period of time:
1. Turn off steam to buck sleeve openings by
pressing the steam Timer Selector switch to the
off position.
2. Mist air bags with water and send unloaded buck
into pressing cabinet (this will prolong the life of
the air bag and eliminate formation of wrinkles in
air bags). Repeat 4 times.
3. Press one safety bar to relieve air pressure and
stop blower.
4. Open customer-furnished electrical disconnect
switch or trip the circuit breaker.
5. Close steam shut-off valve.
6. Close shut-off valve at air inlet.
7. Clean buck padding with a damp cloth. Check
condition of buck padding and air bags. Replace
padding if:
● Cover is scorched or torn.
● Bags have holes.
● Flannel is hard or brittle (not springy).
8. Clean press heads if required.
Cleaning Press Heads
Press heads require cleaning if:
● Discoloration transfers from head to shirts.
● Shirts stick to heads as the heads open.
Once precautions listed in these WARNINGS have
been met, follow directions provided with surface
cleaner to clean press heads.
WARNING
To avoid possible serious injury, heads
should be cleaned ONLY by properly
trained personnel.
W376
WARNING
To avoid possible serious injury, ALWAYS
shut off services to press BEFORE
removing guards and covers to clean
press heads.
• Shut off AND lock out ALL electrical
power to press.
• Shut off AND lock out ALL air pressure
to press using the relieving shut-off
valve at air supply inlet.
• Reduce steam pressure to 0 AND lock
out steam supply to press.
• Let heated surfaces cool.
W377
12
WARNING
If using a surface cleaner which requires
heat to the press, use an industry
approved heat protective mitt or other
heat protective device as press heads are
cooling down.
© Copyright, Alliance Laundry Systems LLC – DO NOT COPY or TRANSMIT
W378
AJ0975

Operation
CSBBYMV Operation Sequence
Single Operator. Refer to Figure 4.
A typical single operator shirt station consists of:
● One CSBBYMV sleeve, bosom, body and yoke
press
● One collar and cuff press (CUCC)
● One collar post
● One damp box
To increase operator productivity (with less fatigue)
position the items listed above as shown in
Set timers as follows:
● Steam timer – 5 seconds
● Cycle timer – 35 seconds (100% cotton)
● Cycle timer – 25 seconds (Blends)
NOTE: Pressing and steam times may vary based
on:
● Steam pressure at the press. Ideally, steam
pressure at press should be 105-115 psi
(7.24-7.93 bar).
● Shirt fabric (100% cotton, blends, etc.).
● Fabric thickness and weight.
● Moisture retention in shirts should be 40% to
50%.
The sequence begins by removing a shirt from the
damp box and dressing it on the collar and cuff press.
As this shirt progresses COUNTERCLOCKWISE
through the station, other shirts will also be introduced
until there is a shirt at the collar post, the CSBBYMV
and the CUCC. The operator will then move in a
CLOCKWISE direction to keep shirts in all three
operations simultaneously.
Figure 4.
5. Unload CUCC. Hang shirt 2 on garment hook.
6. Load shirt 3 from damp box onto CUCC.
7. Remove shirt 1 from buck. Place on collar post.
Form collar and button. Leave shirt on collar post
to cure.
8. Load shirt 2 from garment hook onto buck.
9. Unload CUCC. Hang shirt 3 on garment hook.
10. Load shirt 4 from damp box onto CUCC.
11. Hang shirt 1 from collar post on finished rack.
12. Unload shirt 2 from buck. Place on collar post.
Repeat steps 7 through 12.
2
1
3
5
4
CAB416N
TYPICAL CSBBYMV LAYOUT
CAB416N
1 Collar Post
2 CSBBYMV
3 CUCC
4 Damp Box
5 Operator
Figure 4
The operation sequence for the CSBBYMV is:
1. Load shirt 1 from damp box onto CUCC.
2. Unload CUCC. Hang shirt 1 on garment hook.
3. Load shirt 2 from damp box onto CUCC.
4. Load shirt 1 from garment hook onto buck.
AJ0975
© Copyright, Alliance Laundry Systems LLC – DO NOT COPY or TRANSMIT
13

Operation
Buck Dressing Instructions
The steps listed below outline the procedure for
dressing a shirt on the buck.
1. Grasp shirt by neck band with label side facing
you. Turn to buck and swing the right arm of shirt
over the buck (at the same time you are guiding
the left side so the buck fills shirt armhole). Refer
Figure 5.
to
NOTE: This action should be as natural as putting
on your own shirt. Never lift the shirt over the buck
(this would result in unnecessary fatigue).
4. Depress collar clamp foot pedal to open collar
clamp. Slide index finger of each hand along
neck band from the top down to the points of the
collar. Guide left collar point under right point.
Butt neck band ends together. Do NOT overlap
band ends except for large size shirts. Refer to
Figure 7.
5. Hold neck band ends up in place with two fingers
placed just below button and buttonhole of neck
band. Release collar clamp foot pedal to close
clamp against shirt collar. Buttonhole must be
under clamp so that button strip will not distort it
when pulled. Refer to
Figure 8.
CAB417N
Figure 5
2. Using your right hand, bring the shirt around the
buck and let it rest in position. Grasp extreme
ends of shirt yoke with both hands. Stretch yoke
and center shirt on the buck. Refer to
Figure 6.
3. Front seam of yoke should form a straight line
across the buck when properly dressed.
CAB419N
Figure 7
CAB420N
14
CAB418N
Figure 6
© Copyright, Alliance Laundry Systems LLC – DO NOT COPY or TRANSMIT
Figure 8
AJ0975

Operation
6. Grasp one sleeve with gusset facing you. Overlap
gusset of cuff as if you are going to button cuff so
that air does not escape gusset. The sleeve end is
now closed (do not button). Refer to
Figure 9.
CAB421N
NOTE: Dress sleeve into clamp at CUFF SEAM.
Do NOT place cuff in clamp. Loading cuff into
clamp will pinch or crease the cuff. A guide on each
clamp will cause you to meet resistance if cuff is
accidentally loaded. Refer to
Figure 11
Figure 11.
CAB478N
Figure 9
7. Turn cuff so gusset is facing away from you.
Slide closed sleeve upward in the sleeve extender
just above cuff seam. Sleeve should not be
twisted between shoulder and cuff. Pleat closest
to gusset should ride top edge of sleeve. Repeat
with other sleeve. Refer to
NOTE:.
CAB422N
NOTE: Do NOT leave gap between cuff and clamp
when loading sleeve. The area of the sleeve below
clamp will NOT finish properly. Refer to
1
1 Cuff
2 Sleeve
1
2
Figure 12
Figure 12.
2
CAB479N
NOTE: Do NOT clamp short sleeve shirts. Instead,
turn STEAM Timer Selector switch to the OFF
position when pressing short sleeve shirts. Return
STEAM Timer Selector switch to the ON position
for long sleeves.
AJ0975
Figure 10
© Copyright, Alliance Laundry Systems LLC – DO NOT COPY or TRANSMIT
15

Operation
8. Press the left foot pedal to extend the sleeves and
turn the buck vacuum on.
9. Notice a natural “A” at shirt’s placket. The gap at
the bottom is related to shirt size. The larger
shirts will have a smaller gap. Refer to
CORRECT
Figure 13.
CAB423N
Figure 14
11. With thumb and first finger of both hands, grasp
the bottom of the placket and side seam at the left
side of the shirt. Gently pull downward. Pull the
placket downward in the direction of the natural
“A.” This action has straightened the front and
back of the shirt.
WRONG
WRONG
CAB254N
Figure 13
10. Using the thumb and first finger of both hands,
grasp bottom of placket and side seam on right
side of shirt. Gently pull downward. Pull placket
downward in the direction of the “A.” Refer to
Figure 13.
IMPORTANT: Do NOT attempt to fit the shirt to
the buck or placket bowing will occur. The side
seams of the shirt should roll toward back of buck.
Remember, dress the shirt LOOSELY. The air bags
will expand to fit the shirt.
12. Look in mirror to check shirt back for horizontal
or angled wrinkles from the middle of yoke
outward toward the sides. If necessary, gently
pull shirt downward in center to remove these
wrinkles. Air bags will remove vertical wrinkles
when forming shirt.
NOTE: The front and back of shirt should now be
straight.
16
© Copyright, Alliance Laundry Systems LLC – DO NOT COPY or TRANSMIT
AJ0975

13. Spray with water gun if necessary. Refer to
Figure 15.
Figure 15
14. If necessary, move your hand in an upward
direction over the pocket to remove any air
trapped inside. Refer to
Figure 16.
Operation
CAB424N
CAB425N
Figure 16
NOTE: Only excessive wrinkles must be removed
by operator.
15. Press both BUCK IN buttons at the same time to
start pressing cycle.
NOTE: Stay clear as buck enters cabinet.
CAB426N
Figure 17
17. Press right foot pedal to release collar clamp. Lift
right side of shirt. Move right shoulder clear of
buck with a slight upward then backward motion
of your hand. Do not swing your right arm over
the buck (that would be unnecessary motion).
Refer to
Figure 18.
16. When press cycle is finished and buck has
traveled out of cabinet, unclamp sleeves by
pulling both of them down at the same time.
Refer to
AJ0975
Figure 17.
© Copyright, Alliance Laundry Systems LLC – DO NOT COPY or TRANSMIT
CAB427N
Figure 18
17

Operation
18. Using your left hand, grasp the left sleeve just
next to the yoke. Pull the shirt to your left and off
the buck. As the right side of shirt clears the
buck, position the fingers of your right hand so
they catch the left side of shirt and slide to the
right of the yoke. This opens the shirt and
supports it so it can easily drape over collar form.
Refer to
Figure 19.
Operating Tips
Shirt Quality
The CSBBYMV gives a high volume professional
finish to sleeves, bosom, body, sides and yoke of
shirts. To achieve best shirt quality and volume:
● Extract shirts to obtain 40% to 50% moisture
retention.
● Keep press padding in good condition.
Too much moisture in shirts will increase pressing
cycle time, reduce shirt production and padding life.
Too little moisture will cause poor shirt finish.
Checking Moisture Retention in Shirts
Moisture retention is the percentage increase in weight
of a load of shirts after they are washed and extracted.
To check moisture retention:
● Weigh a load of dry shirts.
● Wash and extract shirts and then weigh them
again.
CAB428N
Figure 19
19. Grasp center of collar with thumb and finger of
both hands just above neck band. Run hands
along collar slightly turning the collar back.
When fingers reach the end of neck band, hold
neck band straight out and completely fold collar
over. Continue holding folded collar and polish
inside of neck band on collar form. Run the collar
from right to left while applying light tension.
20. Pull collar toward you. Place collar against collar
former and press collar firmly down against
heated collar post. Allow collar to cure on post.
21. Push sleeve extender release button to bring
sleeve rods toward buck for loading next shirt.
The percentage increase in weight is the moisture
retention for that load.
Example: A load of shirts weighs 50 pounds
kg) dry. After being washed and extracted, that
(22.68
same load weighs 70 to 75 pounds (31.75 to 34.02 kg).
The difference in weight is 20 to 25 pounds (9.07 to
kg). The percentage of added weight is the
11.34
difference over the dry weight or 20/50 and 25/50
which is 40%/50%.
Extract times required for optimum moisture retention
will vary by washer. Always test several loads of shirts
when determining extract and conditioning times.
Shirt fabric also affects moisture retention. One
hundred percent (100%) cotton shirts will hold more
moisture than cotton/poly blended shirts.
NOTE: Do NOT judge moisture by touch. Warm
shirts feel dryer than cold shirts.
Shirt Quality Troubleshooting
Most quality related problems are due to:
● Worn base pads, padding, and air bags.
● Incorrect dressing techniques (refer to Operating
Instructions).
18
● Incorrect moisture retention.
● Improper steam pressure.
Refer to Table 2 for problems and recommended
solutions.
© Copyright, Alliance Laundry Systems LLC – DO NOT COPY or TRANSMIT
AJ0975

Operation
Padding
Padding is very important to garment quality. Air bags
which are worn or made from improper material
cannot give good results. Bag and cover assemblies
purchased from different suppliers can affect shirt
quality.
Thirty ounce (30 oz.) flannel padding (manufactured
from reprocessed nylon) is originally provided with
the press. It is considered to be the best, most
economical padding available. In most cases, this
material will give quality performance for a period of
3 to 5 weeks, depending on production, type of
garment pressed, moisture retention, and chemical
residue in shirts.
NOTE: Replace worn flannel with thirty ounce
(30 oz.) flannel. Fifty ounce (50 oz.) flannel is NOT
recommended for vacuum units.
To increase the life cycle, build up padding that has
developed low areas and is producing pin wrinkles or
rough dry spots on finished shirts by:
● Cutting pieces of cotton flannel to exact size of
depression in padding.
The life cycle of nylon air bags can be extended if
sprayed with water and pressed between heads
(without a shirt on the buck) three times at every
break.
Dressing techniques used by the operator can also
produce rapid local wear or permanent distortion of air
bags.
NOTE: An operator that “saws” the collar in
dressing a buck will often wear out the yoke bag on
each side of collar clamp. If wear of this kind
occurs, spraying these local areas with silicone
spray is recommended. Silicone spray is available
in aerosol cans from most hardware stores.
● Feathering edges of the flannel.
● Fitting those pieces under padding in the
depressions.
AJ0975
© Copyright, Alliance Laundry Systems LLC – DO NOT COPY or TRANSMIT
19

Operation
Quality Troubleshooting
4
1
3
2
1
3
SHIRT QUALITY
5
7
4
Figure 20
Refer to Figure 20.
Trouble Probable Cause Solution
Damp patches
on sleeve
(item 1)
1. Cycle time too short. Increase Timer.
2. Boiler pressure too low. Adjust pressure.
3. Faulty trap or check valve in steam return
Clean, repair or replace faulty trap or check valve.
line from condensate tank.
5
7
6
CAB263N
Placket bowing
at the button
strips (item 2)
4. Steam supply coming from bottom of
Correct inlet piping. Refer to Installation Manual.
header, no riser.
1. Operator pulling shirt too tightly on buck. Dress shirt so it hangs in natural “A.” Refer to Buck
Dressing Instructions.
2. Shirt not held in place by vacuum. Fan or draft in plant blows shirt during transfer.
Redirect fan. Close window or door which causes draft.
Check for hole or collapsed hoses. Flannel padding is
too thick. Install thirty ounce (30 oz.) flannel padding.
3. Air remains in side air bags at end of
pressing cycle and distorts shirts.
4. Air to side air bags distorts shirt before
Damper to heat exchanger is not closing off or is not
closing off soon enough. Adjust as necessary.
Adjust high pressure air to buck air bags.
heads begin to press.
Table 2 (Continued)
20
© Copyright, Alliance Laundry Systems LLC – DO NOT COPY or TRANSMIT
AJ0975

Table 2 (Continued)
Trouble Probable Cause Solution
Operation
Rough dry damp
patches on sides
(item 3)
Damp patches
on front or back
of garment, OR
pin wrinkles or
rough dry spots
around front
button strip
(items 2 and 4)
1. Pressing cycle too short. Increase pressing time.
2. Shirt moisture retention is over 50%. Reduce moisture retention by increasing extract time or
speed or by increasing water temperature of final rinse.
3. Shirt moisture retention is under 40%. Increase moisture retention by decreasing extract time
or speed or by decreasing water temperature.
4. Improper air bags installed on buck. Check air pressure gauge on discharge tube when buck
is in pressing position and blower is on. If air pressure
gauge does not read between .7 and 1 psi, replace air
bag using the recommended vendor list in your
Preventative Maintenance Guide.
5. Operator is over-spraying garment. Instruct operator to use less water spray.
6. Insufficient temperature at heat exchanger. Either heat exchanger trap or check valve is faulty and
needs repair or replacement; or steam pressure to press
is lower than 115 psi (7.92 bar).
7. Collapsed hoses in blower air system. Check ALL hoses in blower air system. Check for
collapsed inner wall by removing hose from machine.
Straighten hose and look through hose from one end to
the other.
8. Air leak at discharge tube. Align discharge tube to meet up with receiving tube.
9. Holes in side air bags. Replace air bags.
1. Pressing cycle too short. Increase pressing time.
2. Shirt moisture retention is over 50%. Reduce moisture retention by increasing extract time or
speed or by increasing water temperature of final rinse.
3. Shirt moisture retention is under 40%. Increase moisture retention by decreasing extract time
or speed or by decreasing water temperature.
4. Operator is over-spraying garment. Instruct operator to lessen water spray.
5. Insufficient temperature at either front or
rear press head.
Check traps and check valves in steam return for
proper operation. Clean, repair or replace as required.
Steam pressure to press should be 115 psi (7.92 bar).
Rough, dry in
yoke area
(item 5)
AJ0975
6 . Air pressure is low. Provide 65 psi (4.48 bar) air inlet pressure.
7. Padding has sunken areas or is worn and
Replace flannel and/or steel padding.
must be replaced.
1. Same as Probable Causes 1 through 6 on
item 3.
2. Electric thermostat is set below 350°F
Take corrective action.
Set thermostat at 350°F (178°C).
(178°C).
3. Electric heater element or thermostat is
malfunctioning.
Refer to Service Manual or contact a qualified service
technician.
Table 2 (Continued)
© Copyright, Alliance Laundry Systems LLC – DO NOT COPY or TRANSMIT
21

Operation
Table 2 (Continued)
Trouble Probable Cause Solution
Middle pleat is
too long
(extends down
entire back of
shirt) (item 6)
Shirt side pleat
is distorted or
crease is pressed
into shirt
(item 7)
1. Holes in air bag do not allow air bags to fill
Replace bag and cover assembly on buck.
out shirt.
2. Collapsed hoses in blower system restrict
airflow to air bags.
Check ALL hoses in blower air system. Check for
collapsed inner wall by removing hose from machine.
Straighten hose and look through hose from one end to
another.
3. Improper air bags installed on buck. Check air pressure gauge on discharge tube when buck
is in pressing position and blower is on. If air pressure
gauge does not read between .7 and 1 psi, replace air
bag using the recommended vendor list in your
Preventative Maintenance Guide.
1. Yoke bag is not providing proper lift. Check where yoke bag is sewn into cover. It should
extend 1/2 in. (12.7 mm) beyond cover on either side.
2. Operator is pulling a twist into back of shirt. Have operator use mirror and make one slight tug in
middle of shirt toward the bottom area.
22
© Copyright, Alliance Laundry Systems LLC – DO NOT COPY or TRANSMIT
AJ0975

General
Maintenance
This section contains information and instructions
required to perform periodic inspections and lubricate
the press.
Shutdowns due to unscheduled maintenance can be
avoided or minimized by:
● performing periodic inspections as described
and
● performing lubrication services at the time
intervals specified in these instructions.
The following are recommended precautions that
service personnel must understand and apply when
performing general periodic maintenance tasks.
WARNING
To avoid possible serious injury:
• ALWAYS shut off services to press
BEFORE removing guards and covers
to do ANY maintenance, service,
set-up, adjustments or repair tasks.
• Shut off AND lock out ALL electric
power to press.
• Shut off AND lock out ALL air service to
press.
• Shut off AND lock out ALL steam
service to press.
• Let heated surfaces cool.
• Be sure moving parts are at a standstill.
• ALWAYS be careful to AVOID spring
loaded components when working
inside press.
• NEVER adjust, clean or dress buck
while indexing press.
• ALL maintenance, services, etc., MUST
be performed ONLY by qualified service
personnel.
W379
WARNING
To avoid possible serious injury ALWAYS
close air supply line shut-off valve AND
lock out air service BEFORE:
• opening filter drain cock
• removing filter bowl
• filling oil bowl
Periodic Inspections
The frequency at which inspections should be
performed, the inspection procedures to be followed,
and the corrective actions to take are listed in
If complete details for the inspections and/or
corrective actions are not listed in
referenced paragraphs for detailed instructions.
Table 3, refer to the
W380
Table 3.
AJ0975
© Copyright, Alliance Laundry Systems LLC – DO NOT COPY or TRANSMIT
23

Maintenance
Periodic Inspections
Timer Intervals Operation or Inspection Corrective Action
Daily or as required Visually inspect the air intake filters. Replace when dirty. They are
throwaway-type filters but can be
cleaned once before discarding.
Visually inspect intake air screen. Remove lint from screen.
NOTE: Do not operate blowers unless air filters are installed.
Visually inspect the sight glass in the air
line filter at the inlet.
Visually check the discharge tube gasket. Replace worn or missing gasket.
NOTE: DO NOT operate press if discharge tube gasket is missing.
Weekly Inspect air line filter for sediment. Clean as necessary.
Inspect all safety labels. See Parts
Manual for location and description of
labels.
Inspect buck stop adjustments. Shock
absorber should not bottom out.
Every 2 weeks Inspect steam strainers in steam inlet and
outlet lines and in traps.
Inspect each blower motor intake for lint
build-up.
Inspect customer-furnished steam traps
per instructions provided with traps.
Monthly Check all steam and air connections for
visual signs of leakage.
Check condition of the flexible steam
hoses.
Attempt to rock buck at operator station
back and forth; check rollers against
rails.
Every 6 months Remove all covers and check cap
screws, fittings and cylinders for security
of attachments.
Table 3
If moisture and oil are collecting in the
bowl, the auto-drain is not working.
Clean, repair or replace air filter.
Replace labels which are damaged,
missing or unreadable.
Adjust shock or bumper as required.
Clean strainers and traps.
Remove lint from motor.
Clean as necessary.
Tighten any loose connections. Replace
lines where necessary.
Steam hoses with broken braids must be
replaced.
If buck carriage rollers are loose against
rails, tighten as required. Rollers should
be snug, but not too tight.
Tighten as required.
24
© Copyright, Alliance Laundry Systems LLC – DO NOT COPY or TRANSMIT
AJ0975

Maintenance
Cleaning Air Filter
Air filters remove foreign matter and condensate from
supply air as it passes through filter. The frequency at
which the filter baffle plate and filter element should
be cleaned depends upon the amount of condensate
and foreign matter in the supply air. The condensate
level should not raise above the baffle. That is a sign of
a faulty auto-drain which would need to be cleaned,
replaced or repaired.
Erratic regulator operations or loss of regulation is
almost always due to dirt.
The following steps outline the procedure for cleaning
the air filter.
WARNING
To avoid possible serious injury ALWAYS
close air supply line shut-off valve AND
lock out air service BEFORE:
• opening filter drain cock
• removing filter bowl
• filling oil bowl
W380
1. Close and lock air service shut-off valve.
2. Remove filter bowl. Use a strap wrench if
required. Disassemble regulator, making notes as
a guide for reassembly.
Cleaning Steam Strainer
Strainer removes foreign matter from steam. The
frequency at which the strainer must be cleaned is
dependent upon the amount of foreign matter
suspended in the steam. It is recommended that the
strainer screen be removed and checked for cleanliness
after 2 weeks or 80 hours of operation. If little or no
foreign matter has collected on the screen, time
between inspections can be increased accordingly.
WARNING
To avoid possible serious injury when
cleaning or repairing traps or strainers:
• Shut off AND lock out ALL steam
service to press.
• Let heated surfaces cool.
W381
Cleaning Customer-Furnished Steam
Traps
Some steam traps are provided with internal steam
strainers. These strainers should be cleaned.
All repairable traps should be opened at least once a
year to visually check operating mechanisms.
Remove sediment and dirt from trap body. The
mechanism may require cleaning by immersing in
appropriate cleaning fluid.
3. Clean parts with household soap and blow out
body with compressed air.
IMPORTANT: DO NOT use cleansing agents such
as acetone, benzene, carbon tetrachloride, gasoline,
toluene, etc., which are damaging to the plastic
sight glass.
4. Reassemble per your notes. Make sure o-ring is
in position on the filter bowl. Tighten bowl to
filter body. Tighten slightly more than hand tight.
5. Open air service shut-off valve.
Maintenance kits available. Refer to parts manual for
numbers.
NOTE: Check instructions provided with trap or
with trap manufacturer for appropriate cleaning
fluids.
AJ0975
© Copyright, Alliance Laundry Systems LLC – DO NOT COPY or TRANSMIT
25

Maintenance
Lubrication
WARNING
To avoid possible serious injury:
• ALWAYS close air supply line shut-off
valve AND lock-out air service BEFORE
performing lubrication services.
W437
Monthly Lubrication
Refer to Figure 21, Figure 22 and Ta b l e 4 for lubrication points.
B
B
A
A
E
E
D
D
CAB542N
CAB542N
F
APPLICATION OF SYMBOL
APPLICATION OF SYMBOL
HI-TEMP
HI-TEMP
LUBRICANT
LUBRICANT
ISO VG 32
ISO VG 32
GRADE OIL
GRADE OIL
C
C
Figure 21
26
© Copyright, Alliance Laundry Systems LLC – DO NOT COPY or TRANSMIT
AJ0975

G
H
Maintenance
90
120
40
160
APPLICATION OF SYMBOL
HI-TEMP
LUBRICANT
ISO VG 32
GRADE OIL
Figure 22
CAB94N
AJ0975
© Copyright, Alliance Laundry Systems LLC – DO NOT COPY or TRANSMIT
27

Maintenance
Monthly Lubrication
Refer to Figure 21 and Figure 22.
Lubrication
Point
(A) Sleeve expander
rod cylinders
Type of Lubricant
ISO VG 32 grade oil Disconnect air line from cylinder. Dispense 4 drops of oil into air
Lubrication
Service
line. Reconnect air line and actuate cylinder to get oil inside
cylinder.
(B) Collar block Ajax hi-temp lubricant Disconnect air line from collar block at base of buck. Dispense 4
drops of oil into air line. Reconnect air line and actuate collar
block to get oil inside cylinder.
C) Buck indexing
cylinder
ISO VG 32 grade oil With buck in dressing position, remove air line from shaft end of
cylinder and dispense 6 to 8 drops of oil into air line. Reconnect
air line and push buck into pressing position. With buck in
pressing position, remove air line from tail end of cylinder and
dispense 6 to 8 drops of oil into air line. Reconnect air line and
pull buck back to dressing position.
(D) Front head closing
cylinder
ISO VG 32 grade oil With blower and timer turned off, and heads open, remove line
from bottom (end opposite shaft) of cylinder. Dispense 4 to 6
drops of oil into air line and reconnect air line. Index buck into
cabinet and allow heads to close. With heads closed, repeat
procedure for air line at shaft end of cylinder. After air line is
reconnected, press button to allow heads to open.
(E) Sleeve extender
ISO VG 32 grade oil Dispense 4 drops to ensure proper working order.
pivot point
(F) Foot Pedals ISO VG 32 grade oil Oil foot pedal at pivot point.
(G) Buck indexing
Va l ve
(H) front head closing
valve
ISO VG 32 grade oil Disconnect air line at the valve. Dispense 6-8 drops of oil into air
line. Reconnect air lines.
ISO VG 32 grade oil Disconnect air line at the valve.Dispense several drops of oil into
air line. Reconnect air line.
NOTE: Buna-N seals are used extensively throughout the valves and cylinders in the air circuit
downstream from the inline oiler. Oils containing graphite fillers, detergent, etc., and fire-resistant and
synthetic oils are not compatible with Buna-N seals. Seal swelling and valve malfunctioning will result with
use of improper oils.
Table 4
Adjusting Air Line Lubricator Flow Rate
The air system oil lubricator should be adjusted so
approximately one drop of oil every ten machine
cycles is metered into the air system. The following
steps outline the procedure for adjusting the air system
2. To increase flow rate, use a screwdriver to turn
the adjusting screw no more than a 1/8 turn in the
counterclockwise direction. Likewise, turn
clockwise to decrease oil flow. Refer to item 1,
Figure 23.
oil lubricator:
1. To initially adjust flow rate, turn on air and cycle
press. Set knob to obtain desired flow rate. After
system reaches normal operating temperature,
check drip rate again and adjust as required.
28
© Copyright, Alliance Laundry Systems LLC – DO NOT COPY or TRANSMIT
AJ0975

Filling Air Line Lubricator
IMPORTANT: To avoid o-ring leaks at the top of
the bowl, do not remove bowl. Fill through the oil
fill hole. Refer to item 2,
When oil level falls below 1/4 full, refill the bowl to
3/4 full (oil level approximately 1/2 inch [12.7 mm]
from top) with SAE 10 weight non detergent oil (refer
).
to
Figure 23.
Maintenance
WARNING
To avoid possible serious injury, ALWAYS
close air supply line shut-off valve AND
lock out air service BEFORE filling oil
bowl.
W383
IMPORTANT: Do not overfill bowl. Damage to
filter, regulator, valves and cylinders will result and
void warranty.
1
2
TOP VIEW
SIDE VIEW
1 Oil Flow Rate Adjusting Screw 3 Air Line Lubricator
2 Oil Fill Hole
Figure 23
3
1631605B
SCR103N
AJ0975
© Copyright, Alliance Laundry Systems LLC – DO NOT COPY or TRANSMIT
29

Maintenance
Notes
30
© Copyright, Alliance Laundry Systems LLC – DO NOT COPY or TRANSMIT
AJ0975
 Loading...