

Page 1
Cisco TelePresence Precision 60 and SpeakerTrack 60
Contents
Introduction
Physical interface
Connecting the camera
Appendix
Factory reset
NOVEMBER 2014
Camera guide
Precision 60
for Cisco TelePresence Precision 60 and Cisco TelePrescence SpeakerTrack 60
D15296.02 Cisco TelePresence Precision 60 and SpeakerTrack 60, November 2014.
Camera guide
1
SpeakerTrack 60
Copyright © 2014 Cisco Systems, Inc. All rights reserved.
Page 2

Cisco TelePresence Precision 60 and SpeakerTrack 60
Contents
Introduction
Physical interface
Connecting the camera
Appendix
Factory reset
Contents
Camera guide
Thank you for choosing Cisco!
Your Cisco product has been designed to give you many
years of safe, reliable operation.
This guide is supposed to make you comfortable with the
Precision 60 and SpeakerTrack 60 cameras.
We recommend to visit the Cisco web site regularly for
updated versions of the user documentation.
The user documentation can be found on:
http://www.cisco.com/go/telepresence/docs
How to use this guide
The top menu bar and the entries in the Table of contents
are all hyperlinks. You can click on them to go to the topic.
Table of Contents
Introduction ......................................................................3
About this guide
User documentation .......................................................4
Software .........................................................................4
Physical interface
Precision 60
SpeakerTrack 60
Connecting to a codec
Codec compatibility
Connect Precision 60 to SX80 Codec
Connect SpeakerTrack 60 to SX80 Codec
Connect SpeakerTrack 60 to Codec C40
Connect SpeakerTrack 60 to Codec C60
Connect SpeakerTrack 60 to Codec C90
Factory reset
Precision 60
SpeakerTrack 60
Reset the device ........................................................... 17
Reset the cameras ........................................................18
..................................................................4
.............................................................5
........................................................................6
.................................................................7
.....................................................8
............................................................9
.............................10
...................... 11
........................12
........................13
........................14
..................................................................15
......................................................................16
............................................................... 17
D15296.02 Cisco TelePresence Precision 60 and SpeakerTrack 60, November 2014.
Appendix
Technical specifications
Contact us
........................................................................ 19
................................................... 20
Precision 60 ................................................................ 20
SpeakerTrack 60 ...........................................................21
........................................................................22
2
Copyright © 2014 Cisco Systems, Inc. All rights reserved.
Page 3

Cisco TelePresence Precision 60 and SpeakerTrack 60
Contents
Introduction
Physical interface
Connecting the camera
Appendix
Factory reset
Introduction
Camera guide
CHAPTER 1
Introduction
D15296.02 Cisco TelePresence Precision 60 and SpeakerTrack 60, November 2014.
3
Copyright © 2014 Cisco Systems, Inc. All rights reserved.
Page 4

Cisco TelePresence Precision 60 and SpeakerTrack 60
Contents
Introduction
Physical interface
Connecting the camera
Appendix
Factory reset
Introduction
Camera guide
About this guide
This user guide describes the information needed to install and
use the Cisco TelePresence Precision 60 and Cisco TelePresence
SpeakerTrack 60 cameras.
User documentation
The user documentation for the Cisco TelePresence systems,
running the TC software, have several guides aimed at various
user groups.
• Video conference room primer
• Video conference room acoustics guidelines
• Getting started guide for the TelePresence systems
• User guide for the TelePresence systems
• Administrator guides for the TelePresence systems
• API reference guides for the C Series and Codec SX80
• TC Consol e user guide for th e C Se ries and Codec SX80
•
Physical interfaces guides for the C Series and Codec SX80
• Regulatory compliance and safety information guides
•
Legal and licensing information for products using TC software
Download the user documentation
Go to:http://www.cisco.com/go/telepresence/docs and select
your product to see the user documentation for your product.
Software
The camera software is automatically upgraded through the codec.
Minimum software version requirement is TC 7.1.
D15296.02 Cisco TelePresence Precision 60 and SpeakerTrack 60, November 2014.
4
Copyright © 2014 Cisco Systems, Inc. All rights reserved.
Page 5

Cisco TelePresence Precision 60 and SpeakerTrack 60
Contents
Introduction
Physical interface
Connecting the camera
Appendix
Factory reset
Physical interface
Camera guide
CHAPTER 2
Physical interface
D15296.02 Cisco TelePresence Precision 60 and SpeakerTrack 60, November 2014.
5
Copyright © 2014 Cisco Systems, Inc. All rights reserved.
Page 6
Cisco TelePresence Precision 60 and SpeakerTrack 60
Contents
Introduction
Physical interface
Connecting the camera
Appendix
Factory reset
Physical interface
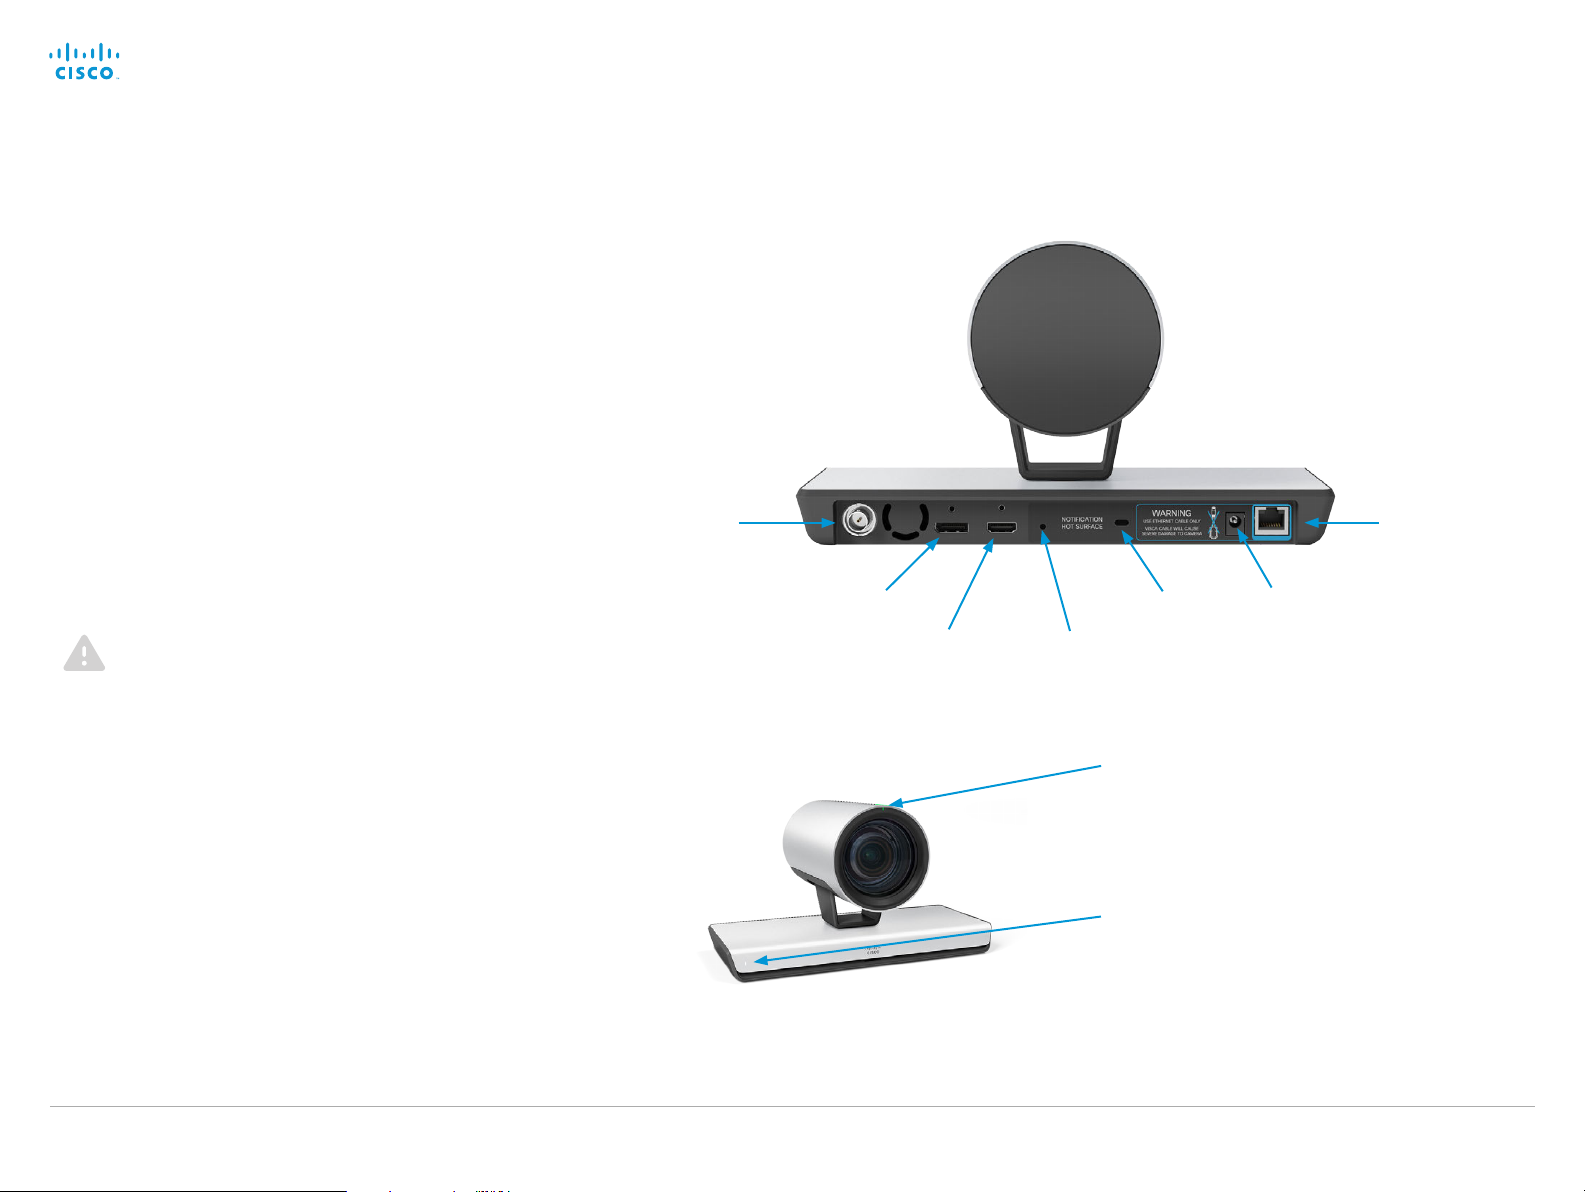
Precision 60
Video
•
HDMI is the main video source. The maximum resolution
is 1080p60.
•
3G-SDI is the secondary video source. The maximum resolution is 1080p30.
•
In multiple camera scenarios, the HDMI output should be used.
•
For long cable lengths, HDMI extenders supporting EDID
should be used. The extender must not alter the SPA address
or any EDID information incorrectly.
Power
• Connect power (12 VDC, 2.5 A).
• Always use the provided cables and adapter.
Ethernet
For camera control and software upgrades.
Do NOT connect a camera control cable to the Ethernet
codec port of the device. This will destroy the system.
3G-SDI out
Display port*
HDMI Video
out
Pin-hole for
factory reset
Kensington lock
Camera guide
Ethernet
RJ45
Power
supply
Kensington lock
The Kensington lock may be used to prevent the camera from
being moved from its place or to prevent theft.
D15296.02 Cisco TelePresence Precision 60 and SpeakerTrack 60, November 2014.
The LED is lit during a call.
The LED is continuously lit when power is
On, and flickers when receiving signals
from the remote control.
* For future use
6
Copyright © 2014 Cisco Systems, Inc. All rights reserved.
Page 7
Cisco TelePresence Precision 60 and SpeakerTrack 60
Contents
Introduction
Physical interface
Connecting the camera
Appendix
Factory reset
Physical interface
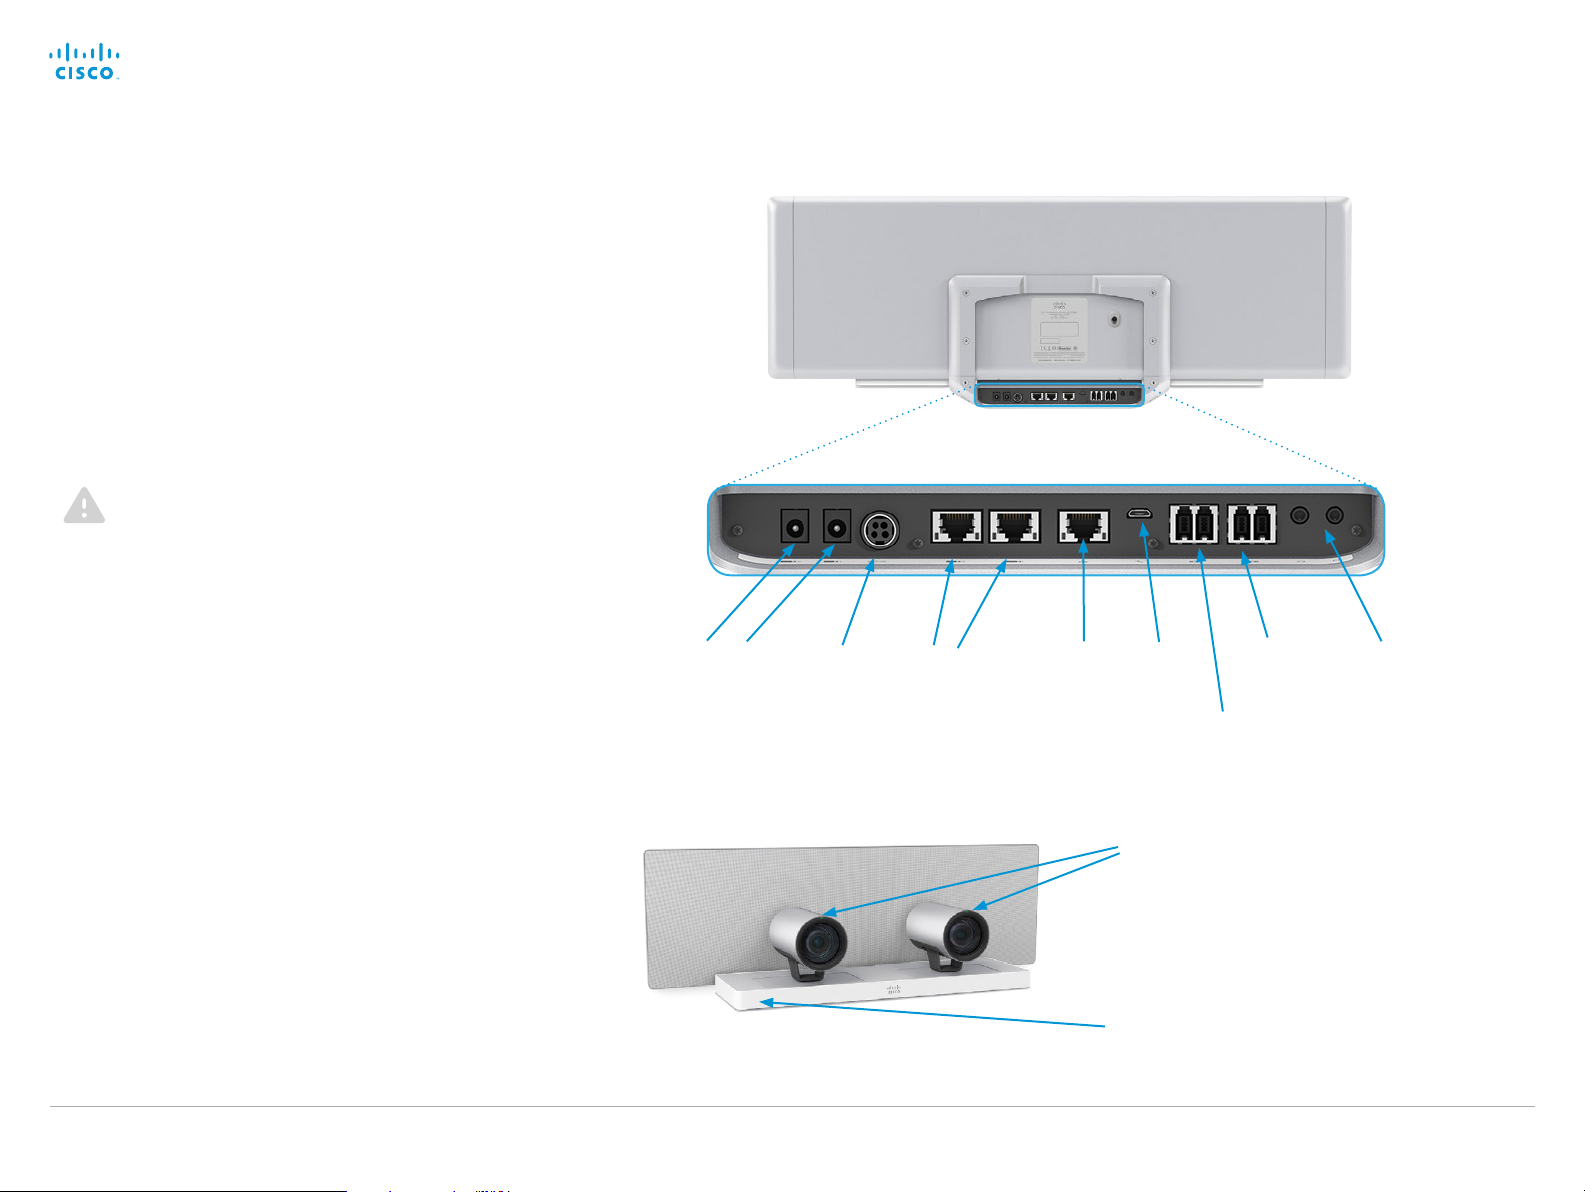
SpeakerTrack 60
Video
• Two HDMI cables from the cameras.
Power
• Power out to cameras (internal connection).
• Power in: 12 VDC, 6.5 A
Always use the provided cables and adapter.
Ethernet
Two Ethernet ports are used for the internal camera control connection. The third connector is used for connecting the codec.
Do NOT connect a camera control cable to the Ethernet
codec port of the device. This will destroy the system.
Microphone connectors
The right set is used for internal connection to the microphone
panel. The left set of connectors is intended for future use.
Camera guide
Kensington lock
The Kensington lock may be used to prevent the camera from
being moved from its place or to prevent theft.
For more information about the internal connection
setup, please see the SpeakerTrack 60 installation guide:
http://www.cisco.com/go/telepresence/docs
D15296.02 Cisco TelePresence Precision 60 and SpeakerTrack 60, November 2014.
Power out to
cameras
Power in
7
Ethernet
RJ45
camera control
Ethernet
RJ45
codec
USB*
The camera LED is lit during a call on the
camera that is currently sending the live
picture.
The status LED is continuously lit when
power is On, and flickers when receiving
signals from the remote control.
Copyright © 2014 Cisco Systems, Inc. All rights reserved.
Microphones
on panel
Additional
connectors*
Chinch
connectors*
* For future use
Page 8

Cisco TelePresence Precision 60 and SpeakerTrack 60
Contents
Introduction
Physical interface
Connecting the camera
Appendix
Factory reset
Connecting the camera
Camera guide
CHAPTER 3
Connecting to a codec
D15296.02 Cisco TelePresence Precision 60 and SpeakerTrack 60, November 2014.
8
Copyright © 2014 Cisco Systems, Inc. All rights reserved.
Page 9

Cisco TelePresence Precision 60 and SpeakerTrack 60
Contents
Introduction
Physical interface
Connecting the camera
Appendix
Factory reset
Connecting the camera
Codec compatibility
Precision 60
The Precision 60 camera is compatible with the Cisco
TelePrescence SX80 codec.
SpeakerTrack 60
The SpeakerTrack 60 system is compatible with the following
codecs:
• Cisco TelePrescence SX80 codec
• Cisco TelePrescence C90 codec
• Cisco TelePrescence C60 codec
• Cisco TelePrescence C40 codec
The codec has to run TC 7.1 software or a later version.
Camera guide
Cisco TelePrescence SX80
D15296.02 Cisco TelePresence Precision 60 and SpeakerTrack 60, November 2014.
Codec C40/C60
Codec C90
9
Copyright © 2014 Cisco Systems, Inc. All rights reserved.
Page 10

Cisco TelePresence Precision 60 and SpeakerTrack 60
Contents
Introduction
Physical interface
Connecting the camera
Appendix
Factory reset
Connecting the camera
Connect Precision 60 to SX80 Codec
•
Connect the video cable to one of the codec’s camera inputs
(HDMI). We recommend using the 1st camera input for the
main camera.
• Connect Ethernet to the codec’s 2nd or 3rd Ethernet port.
• Connect to power.
Camera guide
RJ45
HDMI
Power
(10 0 -240 VAC, 50/60 Hz)
Power
adapter
Always use the provided power cable
and adapter (12 VDC, minimum 3 A).
D15296.02 Cisco TelePresence Precision 60 and SpeakerTrack 60, November 2014.
10
Copyright © 2014 Cisco Systems, Inc. All rights reserved.
Page 11

Cisco TelePresence Precision 60 and SpeakerTrack 60
Contents
Introduction
Physical interface
Connecting the camera
Appendix
Factory reset
Connecting the camera
Connect SpeakerTrack 60 to SX80 Codec
• Connect the video cables to the codec’s camera inputs
(HDMI 1 and 2).
• Connect Ethernet to the codec’s 2nd or 3rd Ethernet port.
• Connect to power.
For further information about camera assembly and cabling,
refer to the SpeakerTrack 60 installation guide:
http://www.cisco.com/go/telepresence/docs
When using a SpeakerTrack 60 with a C Series codec, the
codec cannot be controlled with a Cisco Remote Control
TRC5. Instead, a Cisco TelePresence Touch 8 user interface
or an external control device must be used.
Camera guide
RJ45
D15296.02 Cisco TelePresence Precision 60 and SpeakerTrack 60, November 2014.
HDMI 1 HDMI 2
Power
(10 0 -240 VAC, 50/60 Hz)
Power
adapter
Always use the provided power cable
and adapter (12 VDC, minimum 3 A).
11
Copyright © 2014 Cisco Systems, Inc. All rights reserved.
Page 12

Cisco TelePresence Precision 60 and SpeakerTrack 60
Contents
Introduction
Physical interface
Connecting the camera
Appendix
Factory reset
Connecting the camera
Connect SpeakerTrack 60 to Codec C40
• Connect the video cables to the codec’s camera inputs
(HDMI 1 and 2).
• Connect Ethernet to the codec’s 2nd or 3rd Ethernet port.
• Connect to power.
For further information about camera assembly and cabling,
refer to the SpeakerTrack 60 installation guide:
http://www.cisco.com/go/telepresence/docs
When using a SpeakerTrack 60 with a C Series codec, the
codec cannot be controlled with a Cisco Remote Control
TRC5. Instead, a Cisco TelePresence Touch 8 user interface
or an external control device must be used.
Camera guide
HDMI 1 HDMI 2
RJ45
Power
(10 0 -240 VAC, 50/60 Hz)
Power
adapter
Always use the provided power cable
and adapter (12 VDC, minimum 3 A).
D15296.02 Cisco TelePresence Precision 60 and SpeakerTrack 60, November 2014.
12
Copyright © 2014 Cisco Systems, Inc. All rights reserved.
Page 13

Cisco TelePresence Precision 60 and SpeakerTrack 60
Contents
Introduction
Physical interface
Connecting the camera
Appendix
Factory reset
Connecting the camera
Connect SpeakerTrack 60 to Codec C60
• Connect the video cables to the codec’s camera inputs
(HDMI 1 and 2).
• Connect Ethernet to the codec’s 2nd or 3rd Ethernet port.
• Connect to power.
For further information about camera assembly and cabling,
refer to the SpeakerTrack 60 installation guide:
http://www.cisco.com/go/telepresence/docs
When using a SpeakerTrack 60 with a C Series codec, the
codec cannot be controlled with a Cisco Remote Control
TRC5. Instead, a Cisco TelePresence Touch 8 user interface
or an external control device must be used.
Camera guide
HDMI 1
D15296.02 Cisco TelePresence Precision 60 and SpeakerTrack 60, November 2014.
HDMI 2
RJ45
Power
(10 0 -240 VAC, 50/60 Hz)
Power
adapter
Always use the provided power cable
and adapter (12 VDC, minimum 3 A).
13
Copyright © 2014 Cisco Systems, Inc. All rights reserved.
Page 14

Cisco TelePresence Precision 60 and SpeakerTrack 60
Contents
Introduction
Physical interface
Connecting the camera
Appendix
Factory reset
Connecting the camera
Connect SpeakerTrack 60 to Codec C90
• Connect the video cables to the codec’s camera inputs
(HDMI 1 and 2).
• Connect Ethernet to the codec’s 2nd Ethernet port.
• Connect to power.
For further information about camera assembly and cabling,
refer to the SpeakerTrack 60 installation guide:
http://www.cisco.com/go/telepresence/docs
When using a SpeakerTrack 60 with a C Series codec, the
codec cannot be controlled with a Cisco Remote Control
TRC5. Instead, a Cisco TelePresence Touch 8 user interface
or an external control device must be used.
Camera guide
HDMI 1,2
RJ45
Power
(10 0 -240 VAC, 50/60 Hz)
Power
adapter
Always use the provided power cable
and adapter (12 VDC, minimum 3 A).
D15296.02 Cisco TelePresence Precision 60 and SpeakerTrack 60, November 2014.
14
Copyright © 2014 Cisco Systems, Inc. All rights reserved.
Page 15

Cisco TelePresence Precision 60 and SpeakerTrack 60
Contents
Introduction
Physical interface
Connecting the camera
Appendix
Factory reset
Factory reset
Camera guide
CHAPTER 4
Factory reset
D15296.02 Cisco TelePresence Precision 60 and SpeakerTrack 60, November 2014.
15
Copyright © 2014 Cisco Systems, Inc. All rights reserved.
Page 16

Cisco TelePresence Precision 60 and SpeakerTrack 60
Contents
Introduction
Physical interface
Connecting the camera
Appendix
Factory reset
Factory reset
Precision 60
A factory reset should only be performed by a system admin-
istrator or in contact with Cisco technical support.
The camera will be reset to factory defaults, and all configuration
and logs will be erased.
It is not possible to undo a factory reset.
To perform a factory reset:
1. Locate the pin hole button at the back of the camera.
2.
Use a pen or similar to press and hold the factory reset
button for 10 seconds.
3. The camera LED will be lit red during the factory reset.
Do not unplug power.
Camera guide
4.
When the factory reset is complete, the camera restarts and
the camera LED lights up.
D15296.02 Cisco TelePresence Precision 60 and SpeakerTrack 60, November 2014.
Pin-hole for
factory reset
16
Copyright © 2014 Cisco Systems, Inc. All rights reserved.
Page 17

Cisco TelePresence Precision 60 and SpeakerTrack 60
Contents
Introduction
Physical interface
Connecting the camera
Appendix
Factory reset
Factory reset
Camera guide
SpeakerTrack 60
Factory resetting the device
A factory reset should only be performed by a system admin-
istrator or in contact with Cisco technical support.
The device will be reset to factory defaults, and all configuration and logs will be erased.
If errors continue to occur, the cameras might have to be
reset, too. See the next page for instructions on how to reset
the cameras.
It is not possible to undo a factory reset.
To perform a factory reset:
1. Remove the top cover of the SpeakerTrack 60 device.
2.
Locate the pin hole button at the top of the SpeakerTrack 60.
3.
Use a pen or similar to press and hold the factory reset
button for 10 seconds.
4. The camera LED will be lit red during the factor y reset.
Do not unplug power.
1
2
5.
When the factory reset is complete, the device restarts
and the LED lights up.
D15296.02 Cisco TelePresence Precision 60 and SpeakerTrack 60, November 2014.
3
Pin-hole for
factory reset
17
Copyright © 2014 Cisco Systems, Inc. All rights reserved.
Page 18

Cisco TelePresence Precision 60 and SpeakerTrack 60
Contents
Introduction
Physical interface
Connecting the camera
Appendix
Factory reset
Factory reset
Camera guide
SpeakerTrack 60
Factory resetting the cameras
In order to reset the cameras, they have to be lifted from the
carrier tray, to access to the pin-hole button on the back panel
of the camera.
A factory reset should only be performed by a system administrator or in contact with Cisco technical support.
The cameras will be reset to factory defaults, and all configuration
and logs will be erased.
It is not possible to undo a factory reset.
To perform a factory reset:
1. Remove the top cover of the SpeakerTrack 60 device.
2. Unscrew the wing nut that fastens one of the cameras.
3. Locate the pin hole button at the back of the camera.
See also factory reset on Precision60.
4.
Use a pen or similar to press and hold the factory reset button
for 10 seconds.
5. The camerra LED will be lit red during the factory reset.
Do not unplug power.
1
2
When replacing the camera, make
sure the pins on the base plate
fit the holes in the camera interface plate.
6.
When the factory reset is complete, the camera restarts and
the camera LED lights up.
7.
Set the camera back to the tray and tighten the wing nut (see
picture 2 on the right).
8. Repeat steps 2-7 with the other camera.
9. Set back the top cover.
D15296.02 Cisco TelePresence Precision 60 and SpeakerTrack 60, November 2014.
3
Locate the pin-hole on the back
plate of the camera.
18
Copyright © 2014 Cisco Systems, Inc. All rights reserved.
Page 19

Cisco TelePresence Precision 60 and SpeakerTrack 60
Contents
Introduction
Physical interface
Connecting the camera
Appendix
Factory reset
Appendix
Camera guide
CHAPTER 5
Appendix
D15296.02 Cisco TelePresence Precision 60 and SpeakerTrack 60, November 2014.
19
Copyright © 2014 Cisco Systems, Inc. All rights reserved.
Page 20

Cisco TelePresence Precision 60 and SpeakerTrack 60
Contents
Introduction
Physical interface
Connecting the camera
Appendix
Factory reset
Appendix
Technical specifications
Precision 60
• 1080p60 Full High Definition
• 10 x optical zoom
• 2x digital zoom
• 20x zoom combined
• Pan range: -100° to +100°
• Tilt range: -20° to +20°
• 80° horizontal field of view
• 48.8° vertical field of view
• Focu s distan ce: 1.0 m – ∞ (wide)
• F number: 1.5
• Camera control over Ethernet
• Automatic or manual focus, brightness and white balance
• IP network features:
• DNS lookup for service configuration
• Date and Time support via NTP
• TCP/IP
• DHCP
• LAN/Ethernet (RJ45) 10/100 Mbit network interface
• HDMI and 3G-SDI video interfaces
• Power adapter:
• Input: 100-120 or 200-240 VAC; 50 or 60 Hz
• Output: 12 V / 6.5 A
• Operating temperature and humidity:
• 0°C to 40°C (32°F to 104°F)
• 10 to 90 % relative humidity
• Storing and transport temperature and humidity:
• -20°C to 60°C (-4°F to 140°F)
• 10 to 90 % relative humidity, non condensing
• Hei ght: 152 mm/6.0 in
• Wid th: 268 mm/10.6 in
• Dept h: 163 mm/6.4 in
• Weight: 2.5 kg/5.5 lbs
• Part number: CTS-CAM-P60=
Camera guide
D15296.02 Cisco TelePresence Precision 60 and SpeakerTrack 60, November 2014.
20
Copyright © 2014 Cisco Systems, Inc. All rights reserved.
Page 21

Cisco TelePresence Precision 60 and SpeakerTrack 60
Contents
Introduction
Physical interface
Connecting the camera
Appendix
Factory reset
Appendix
SpeakerTrack 60
• 1080p60 Full High Definition
• 10x optical zoom
• 2x digital zoom
• 20x zoom combined
• Pan range: -100° to +100°
• Tilt range: -20° to +20°
• 80° horizontal field of view (FoV)
• 48.8° vertical FoV
• Tracking horizontal FoV: 80°
• Focu s distan ce: 1.0 m – ∞ (wide)
• F-valu e: 1.5
• Camera control over Ethernet
• Automatic or manual focus, brightness and white balance
• IP network features:
• DNS lookup for service configuration
• Date and Time support via NTP
• TCP/IP
• DHCP
• LAN/Ethernet (RJ45) 10/100 Mbit network interface
• HDMI 1.4 video interface
• Power adapter:
• Input: 100-120 or 200-240 VAC; 50 or 60 Hz
• Output: 12 V / 6.5 A
• Operating temperature and humidity:
• 0°C to 40°C (32°F to 104°F)
• 10 to 90 % relative humidity
• Storing and transport temperature and humidity:
• -20°C to 60 °C (-4°F to 140°F)
• 10 to 90 % relative humidity, non condensing
• Compatibility information:
• Compatible with C40, C60, C90 and SX80 codecs
•
Requires a Cisco Touch 8 or Touch 10 user interface
(unless a control system is used)
• Hei ght: 292 mm/11.5 in
• Wid th: 800 mm/31.5 in
• Dept h: 210 mm/8.3 in
• Weight: 11.5 kg/25.4 lbs
• Part number: CTS-SPKER-TRACK60
Camera guide
D15296.02 Cisco TelePresence Precision 60 and SpeakerTrack 60, November 2014.
21
Copyright © 2014 Cisco Systems, Inc. All rights reserved.
Page 22

Cisco TelePresence Precision 60 and SpeakerTrack 60
Contents
Introduction
Physical interface
Connecting the camera
Appendix
Factory reset
Appendix
THE SPECIFICATIONS AND INFORMATION REGARDING THE PRODUCTS
IN THIS MANUAL ARE SUBJECT TO CHANGE WITHOUT NOTICE. ALL
STATEMENTS, INFORMATION, AND RECOMMENDATIONS IN THIS MANUAL
ARE BELIEVED TO BE ACCURATE BUT ARE PRESENTED WITHOUT
WARRANTY OF ANY KIND, EXPRESS OR IMPLIED. USERS MUST TAKE
FULL RESPONSIBILITY FOR THEIR APPLICATION OF ANY PRODUCTS.
THE SOF TWARE LICENSE AND LIMITED WARR ANT Y FOR THE
ACCOMPAN YING PRODUCT ARE SET FORTH IN THE INFORMATION
PACKET THAT SHIPPED WITH THE PRODUCT AND ARE INCORPORATED
HEREIN BY THIS REFERENCE. IF YOU ARE UNABLE TO LOCATE THE
SOFT WARE LICENSE OR LIMITED WARRANTY, CONTACT YOUR CISCO
REPRESENTATIVE FOR A COPY.
The Cisco implementation of TCP header compression is an adaptation
of a program developed by the Universit y of California, Berkeley (UCB)
as part of UCB’s public domain version of the UNIX operating system. All
rights reserved. Copyright © 1981, Regents of the University of California.
NOTWITHSTANDING ANY OTHER WARR ANT Y HEREIN, ALL DOCUMENT
FILES AND SOFTWARE OF THESE SUPPLIERS ARE PROVIDED “AS IS” WITH
ALL FAULTS. CISCO AND THE ABOVE-NAMED SUPPLIERS DISCLAIM ALL
WARRANTIES, EXPRESSED OR IMPLIED, INCLUDING, WITHOUT LIMITATION,
THOSE OF MERCHANTABILITY, FITNESS FOR A PARTICULAR PURPOSE
AND NONINFRINGEMENT OR ARISING FROM A COURSE OF DEALING,
USAGE, OR TRADE PRACTICE.
IN NO EVENT SHALL CISCO OR ITS SUPPLIERS BE LIABLE FOR ANY INDIRECT,
SPECIAL, CONSEQUENTIAL, OR INCIDENTAL DAMAGES, INCLUDING,
WITHOUT LIMITATION, LOST PROFITS OR LOSS OR DAM AGE TO DATA
ARISING OUT OF THE USE OR INABILITY TO USE THIS MANUAL, E VEN
IF CISCO OR ITS SUPPLIERS HAVE BEEN ADVISED OF THE POSSIBILITY
OF SUCH DAMAGES.
Any Internet Protocol (IP) addresses and phone numbers used in this document are not intended to be actual addresses and phone numbers. Any
examples, command display output, network topology diagrams, and other
figures included in the document are shown for illustrative purposes only.
Any use of actual IP addresses or phone numbers in illustrative content is
unintentional and coincidental.
All printed copies and duplicate sof t copies are considered un-Controlled
copies and the original on-line version should be referred to for latest version.
Cisco has more than 200 offices worldwide. Addresses, phone numbers, and
fax numbers are listed on the Cisco website at www.cisco.com/go/off ices.
TANDBERG is now a part of Cisco. TANDBERG® is a registered trademark
belonging to Tandberg ASA.
Cisco and the Cisco logo are trademarks or registered trademarks of Cisco
and/or its af filiates in the U.S. and other countries. To view a list of Cisco
trademarks, go to this URL: www.cisco.com/go/trademarks. Third-party
trademarks mentioned are the property of their respective owners. The
use of the word partner does not imply a partnership relationship between
Cisco and any other company. (1110R)
Camera guide
Contact us
Cisco contacts
On our web site you will find an over view of the worldwide Cisco contacts.
Go to: http://www.cisco.com/web/siteassets/contacts
Corporate Headquarters
Cisco Systems, Inc.
170 West Tasman Dr.
San Jose, CA 95134 USA
D15296.02 Cisco TelePresence Precision 60 and SpeakerTrack 60, November 2014.
22
Copyright © 2014 Cisco Systems, Inc. All rights reserved.
 Loading...