

Page 1
Cisco Small Business
IP Phone Models SPA50X (SPCP)
USER GUIDE
Page 2

Contents
Chapter 1: Getting Started 4
About This Document 4
Overview of the Cisco Small Business IP Phones 6
Caring for Your Phone 7
Understanding Your Phone’s Lines and Buttons 8
Phone Components 8
Softkey Buttons 10
Using Keypad Shortcuts 12
Chapter 2: Installing Your Phone 13
Before You Begin 13
Phone Connections 14
Connecting the Handset 14
Connecting the Power 15
Connecting Your Phone to the Network 15
Connecting the Phone to the Wired Network 15
Connecting the Phone to the Wireless Network 15
Connecting a PC to Your Phone (Optional) 16
Connecting a Wired or Wireless Headset (Optional) 16
Installing the Desk Stand or Wall Mount (Optional) 17
Reverse the Handset Retention Tab 18
Verifying Phone Startup 19
Upgrading Your Phone Firmware 19
Chapter 3: Using Basic Phone Functions 20
Using the Speakerphone or a Headset 21
Using the Speakerphone 21
Using the Headset with Your IP Phone 21
Adjusting Call Volume and Muting 22
Adjusting Call Volume 22
Adjusting the Ringer Volume 22
Muting a Call 22
Cisco Small Business Pro IP Phone SPA50X User Guide 1
Page 3

Contents
Placing or Answering a Call 22
Using Hold and Resume 23
Using Mute 23
Ending a Call 24
Transferring Calls 24
Performing a Transfer 24
Redialing a Number 25
Viewing and Returning Missed Calls 25
Forwarding All Calls to Another Number 26
Setting Do Not Disturb 26
Picking Up a Call from Another Extension 27
Placing a Three-Way Conference Call 27
Using the Local Directory 28
Using the Call History Lists 29
Accessing Voicemail 29
Chapter 4: Using Advanced Phone Features 30
Logging in to Your Phone 31
Creating Speed Dials 32
Adding Speed Dials 32
Editing Speed Dials 33
Deleting Speed Dials 33
Calling Speed Dials 34
Monitoring/Accessing Another Phone from Your Phone 34
Customizing Your LCD Screen 35
Changing the LCD Screen Contrast 35
Setting the Back Light Timer 35
Configuring the Phone Screen Saver 36
Turning on the Screen Saver Immediately 37
Updating Your Ring Tone 37
Cisco Small Business Pro IP Phone SPA50X User Guide 2
Page 4

Contents
Using the Cisco SPA501G Interactive Voice Response Menu 38
Advanced Procedures for Technical Support Personnel 38
Status Information and Statistics 38
Rebooting, Restarting, and Resetting a Phone 39
Chapter 5: Using the Cisco SPA500S Attendant Console 41
Connecting the Cisco SPA500S Attendant Console to the IP Phone 42
Connecting a Single Cisco SPA500S 43
Connecting a Second Cisco SPA500S 46
Configuring the Cisco SPA500S 48
Using the Cisco SPA500S 49
Appendix A: Where to Go From Here 50
Cisco Small Business Pro IP Phone SPA50X User Guide 3
Page 5

Getting Started
This chapter provides an overview of this document and basic information about
your Cisco Small Business IP phone.
• About This Document, page 4
• Overview of the Cisco Small Business IP Phones, page 6
• Understanding Your Phone Lines and Buttons, page 7
1
About This Document
This guide describes the concepts and tasks necessary to use and configure your
Cisco Small Business IP Phone.
NOTE The Cisco Small Business IP Phone features vary, depending on the type of call
control system that you are using. This document describes using the Cisco Small
Business IP Phones with a SPCP phone system, such as the Cisco Unified
Communications 500 Series. If you are using your Cisco Small Business IP Phone
with a Cisco SPA9000 Voice System or a BroadSoft or Asterisk system, see the
Cisco Small Business IP Phone SPA50X (SIP) User Guide
.
Cisco Small Business Pro IP Phone SPA50X User Guide 4
Page 6

Getting Started
About This Document
Organization
1
This table describes the contents of each chapter in this document.
Title Description
Chapter 1 Getting Started This chapter provides an
overview of this document
and basic information about
your Cisco Small Business IP
phone.
Chapter 2 Installing Your Phone This chapter provides an
overview of this document
and basic information about
your Cisco Small Business IP
phone.
Chapter 3 Using Basic Phone
Functions
Chapter 4 Using Advanced Phone
Features
Chapter 5 Using the Cisco SPA500S
Attendant Console
Appendix A Where to Go From Here Cisco provides a wide range
This chapter provides
instructions on using your
phone’s basic functions. It
includes the following
sections:
This chapter describes how
to configure advanced
features on your IP Phone.
This chapter describes how
to install and use the Cisco
SPA500S Attendant Console
with your IP Phone.
of resources to help you
obtain the full benefits of the
Cisco SPA50X phones. This
appendix provides link to
many of these resources.
Cisco Small Business IP Phone SPA50X User Guide (SPCP) 5
Page 7

Getting Started
Overview of the Cisc o Small Business IP Phones
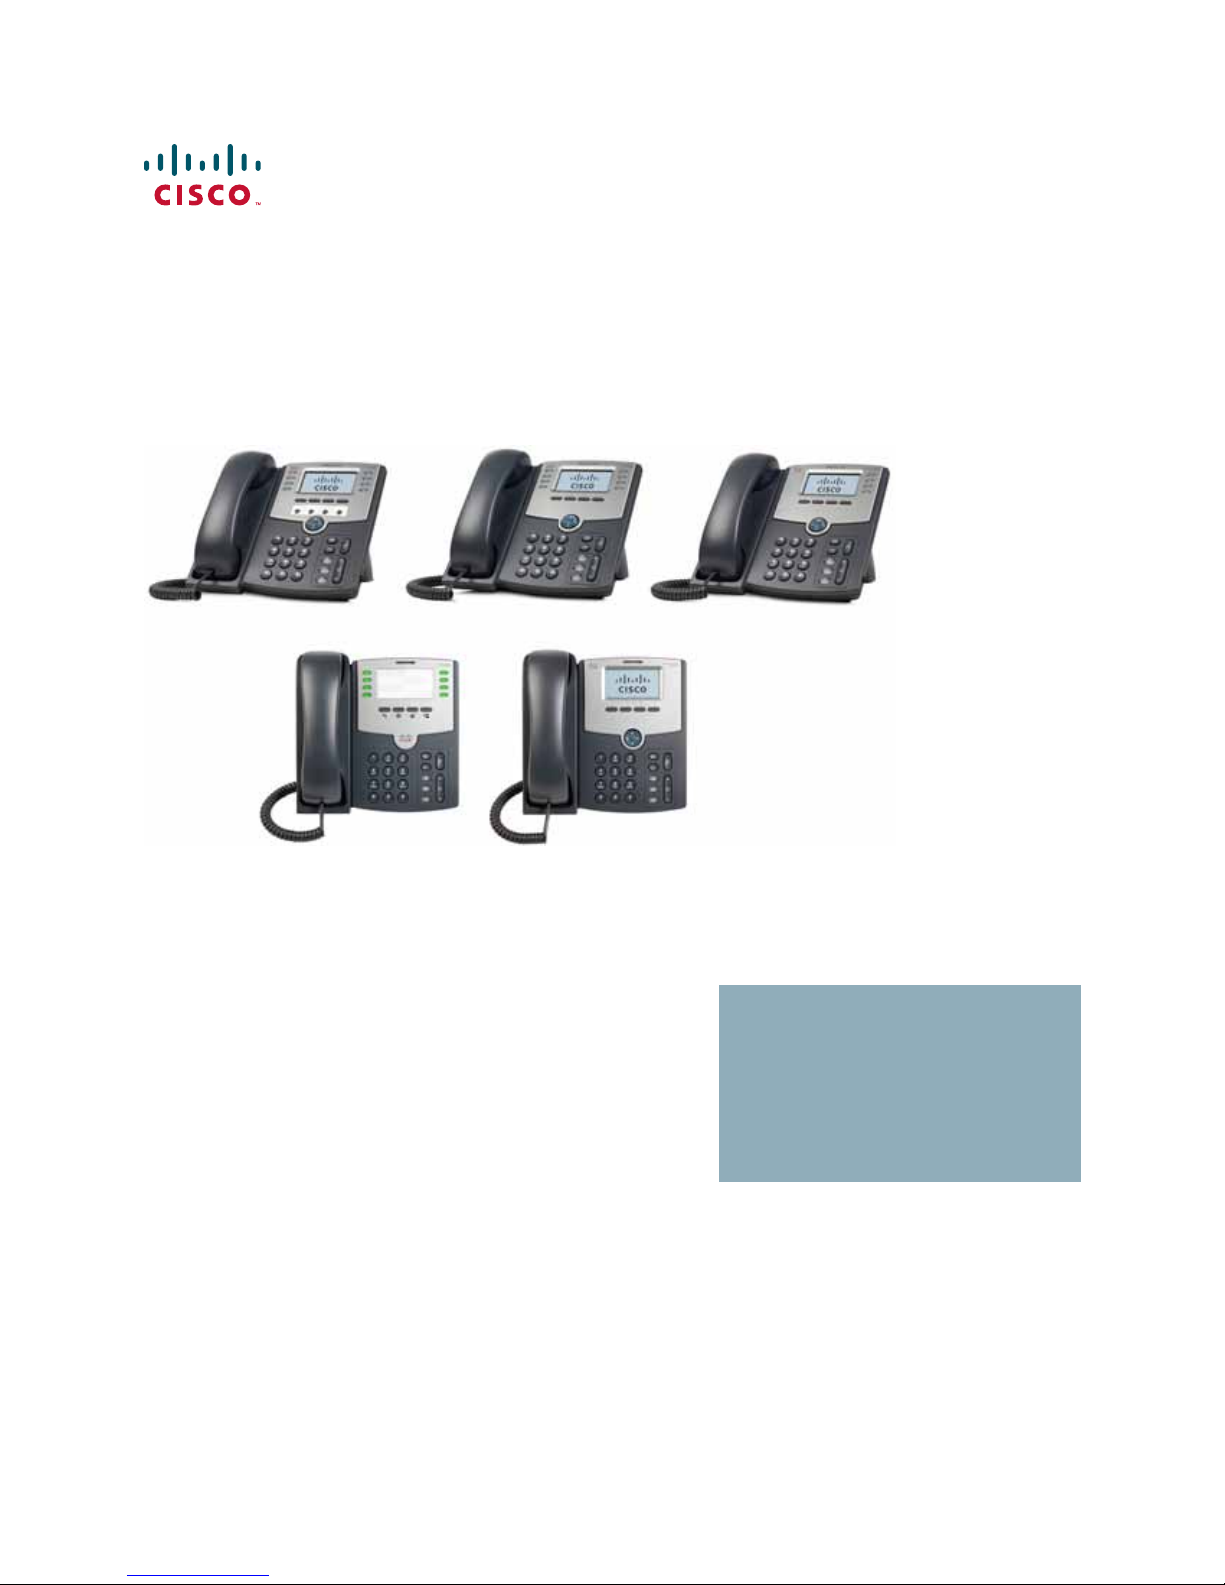
Overview of the Cisco Small Business IP Phones
The Cisco Small Business IP Phones are full-featured VoIP (Voice over Internet
Protocol) phones that provide voice communication over an IP network. The
phones provide traditional features, such as call forwarding, redialing, speed
dialing, transferring calls, conference calling and accessing voice mail. Calls can
be made or received with a handset, heads et or over a speaker.
IP phones also have special features not available in traditional phones. The Cisco
Small Business IP phones contain Ethernet ports, or ports that allow them to be
linked to the computer network. They also have additional Ethernet ports that
allow a computer to be connected to the network through the IP phone.
Unlike traditional phones, Cisco Small Business IP phones require a separate
power source. You can power the phones by conne cting them to a switch that
provides Power over Ethernet (PoE), or by using an optional PA100 power adapter.
1
The following table shows the Cisco Small Business IP Pho n es covered in this
document and their respective features:
Screen
Lines
Softkeys
Navigation
Button
Cisco
SPA501G
Paper
Labels
814812
4 fixed
(redial,
cancel,
transfer, and
conference)
None Four-way navigation key
Cisco
SPA502G
128 X 64 monochrome LCD with backlight
4 dynamic
Cisco
SPA504G
Cisco
SPA508G
Cisco
SPA509G
Caring for Your Phone
The Cisco Small Business IP phones are electronic devices that should not be
exposed to excessive heat, sun, cold or water. To clean the equipment, use a
slightly moistened paper or cloth towel. Do not spray or pour cleaning solution
directly onto the hardware unit.
Cisco Small Business IP Phone SPA50X User Guide (SPCP) 6
Page 8
Getting Started
Understanding Your Phone Lines and Buttons
Understanding Your Phone Lines and Buttons
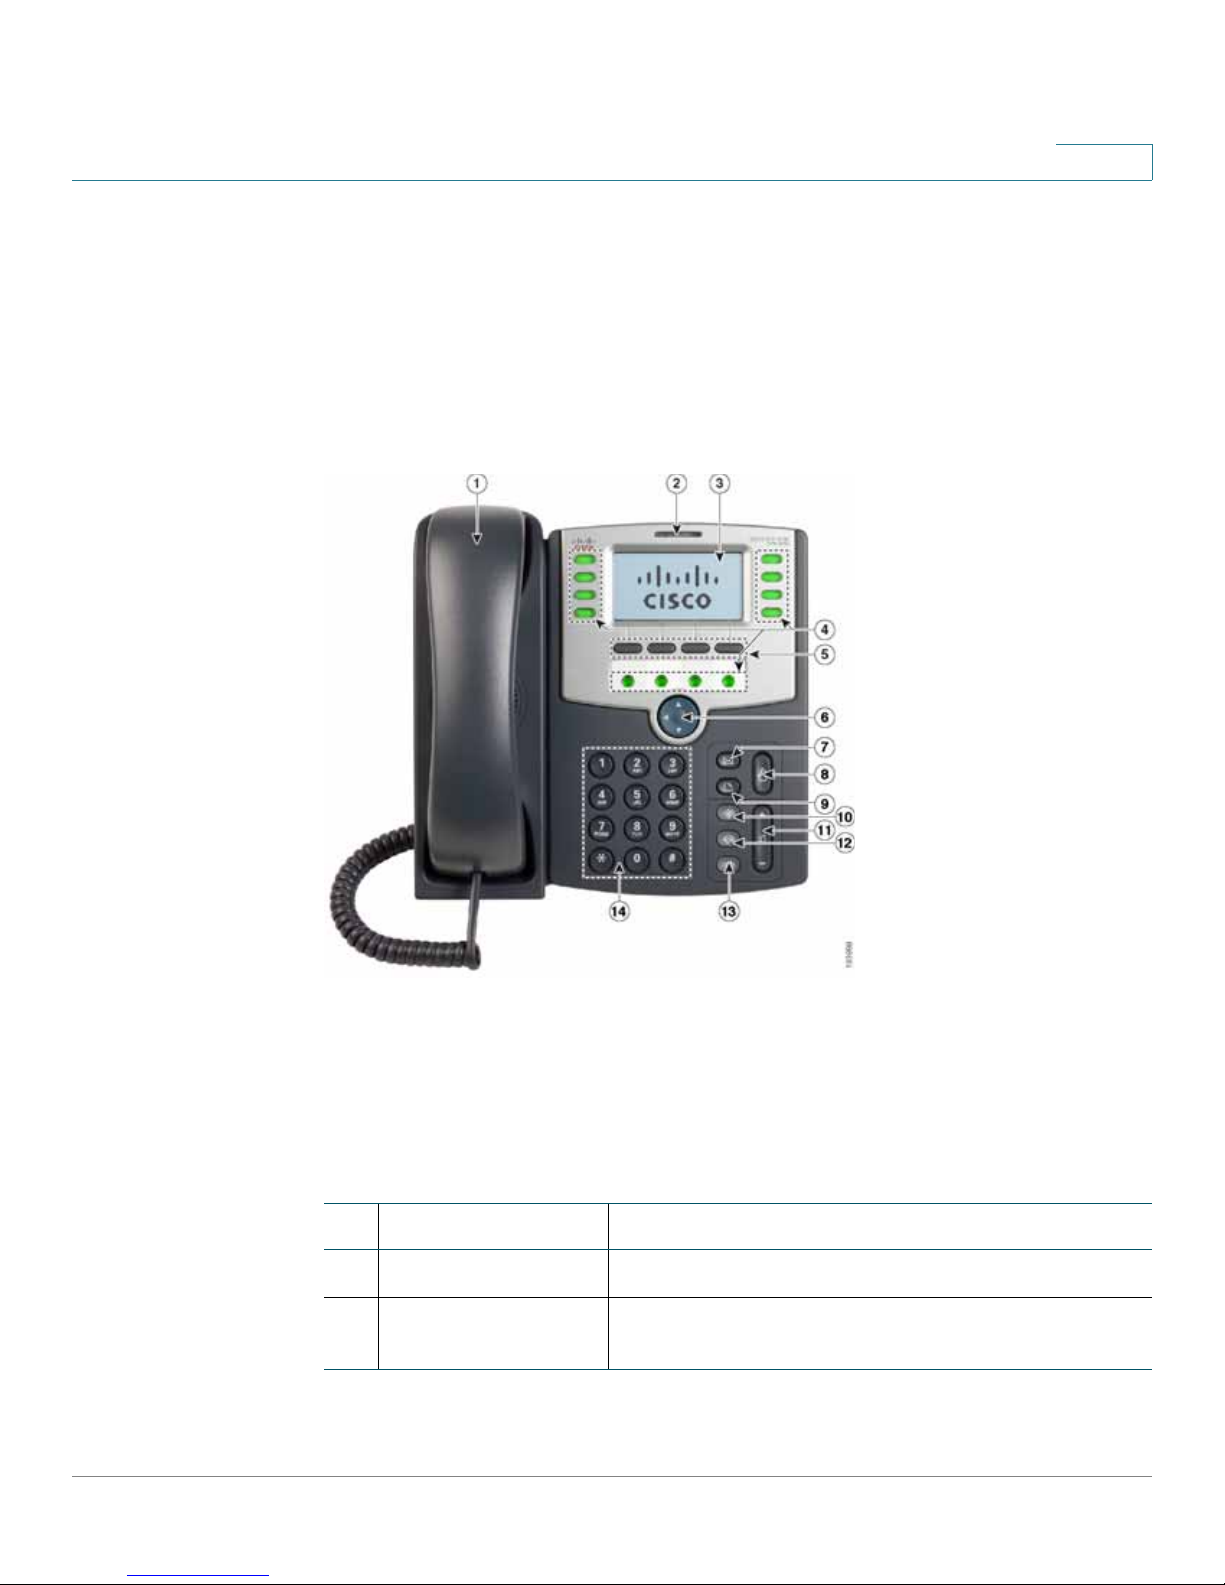
Use the following graphic and table to identify the parts of your phone.
Phone Components
Figure1 Phone Components
1
The Cisco SPA509G shown in Figure1 illustrates most of the Cisco Small
Business IP Phone physical features. Other models support different features. See
the “Overview of the Cisco Small Business IP Phones” section on page 6.
Numbered objects in Figure1 are described in the following table.
#Phone Feature Description
1 Handset Pick up to place or answer a call.
2 Message Waiting
Indicator
Cisco Small Business IP Phone SPA50X User Guide (SPCP) 7
Displays solid red when you have a new voice mail
message. Flashes red during an incoming call.
Page 9
Getting Started
Understanding Your Phone Lines and Buttons
#Phone Feature Description
3 LCD Screen Displays date and time, phone station name, line
4 Line keys Indicates phone line status. (Not available on the Cisco
1
extensions, and softkey options. (Not available on the
Cisco SPA501G.)
SPA502G.)
When lit:
Off: Line is idle.
Green: Line is active or in use.
Green (flashing): There is an inbound call.
Red (flashing): Line is on hold.
These keys can also be programmed by your phone
system administrator to perform functions such as
speed dial, call pickup, or monitoring an extension.
Additional 4 line keys available on Cisco SPA509G only.)
5 Softkey buttons Press a softkey button to perform the action shown on
the label on the LCD screen above.
Note: The Cisco SP A501 G has the following four buttons:
Redial—Dials the last number called.
Cancel—Cancels an action (such as a transfer).
Conference—While on a call, press to start a
conference call and dial another number. After
the second party answers, press Conference
again to create the conference.
Transfer—Transfers a call. See the “Transferring
Calls” section on page 24.
6 Navigation button Ability to scroll left, right, up, or down with the four-way
navigation button. (Not available on the Cisco SPA501G.)
7 Messages but ton Press to access voice mail (must be set up by your
8 Hold button Press to place a call on hold.
Cisco Small Business IP Phone SPA50X User Guide (SPCP) 8
phone system administrator).
Page 10

Getting Started
Understanding Your Phone Lines and Buttons
#Phone Feature Description
9 Setup button Press to access a menu to configure features and
10 Mute button Press to mute or unmute the phone. When phone is
11 Volume button Press + to increase the volume and - t o lower the volume
1
preferences (such as your directory and speed dials),
access your call history, and set up functions (such as
call forwarding).
For the Cisco SPA501G, accesses the Interactive Voice
Response menu, which allows you to perform tasks like
getting the IP address of the phone. See the User Guide
documents on Cisco.com for more information. (See the
list of links at the end of this document.)
muted, the button glows red. The button also glows red if
the network connection cannot be found.
of the handset, headset, speaker (when the handset is off
the phone, or ringer volume (when the handset is on the
phone).
12 Headset button Push to turn the headset on or off. When the headset is
on, the button glows green.
13 Speaker button Push to turn the speaker on or off. When the speaker is
on, the button glows green.
14 Keypad Use to dial phone numbers, enter letters, and choose
menu items.
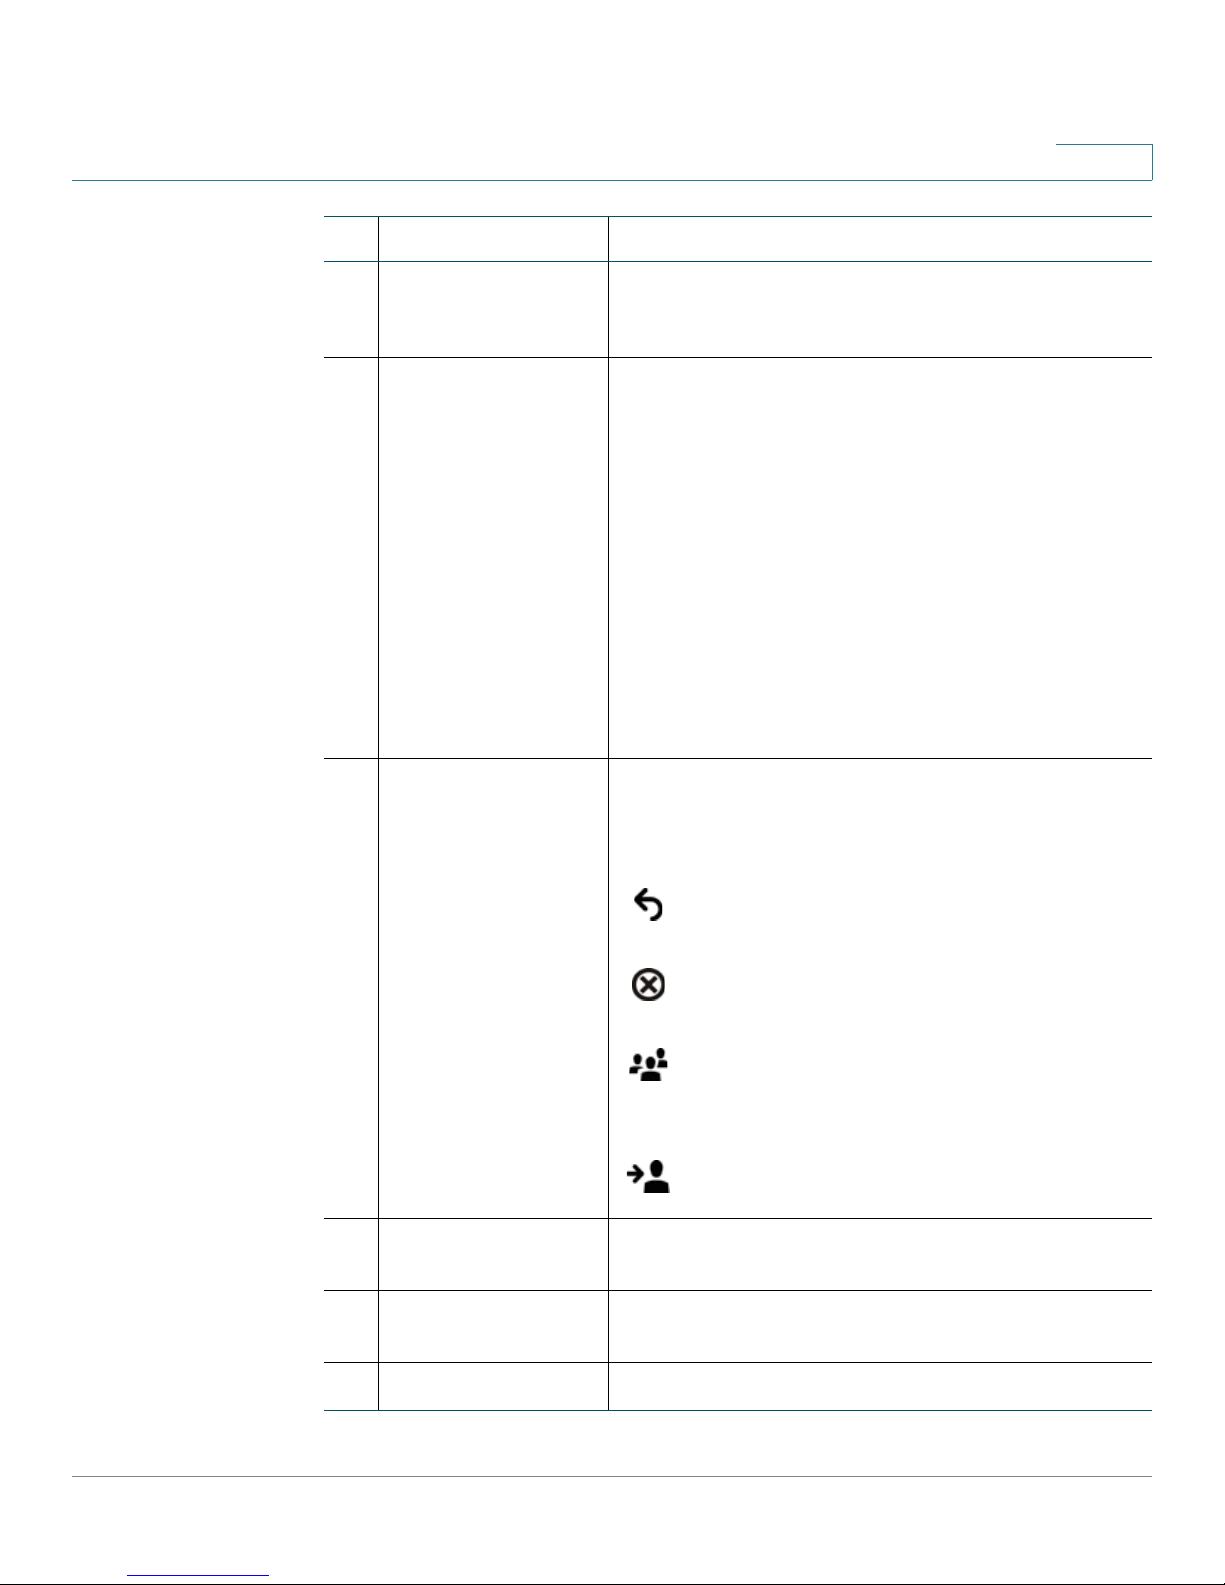
Softkey Buttons
The softkey buttons on your phone display may vary depending on your phone
model and the phone system setup. (Softkey buttons are not available on the
Cisco SPA501G.) Press the Right Arrow or Left Arrow keys on the navigation
button to view additional softkey buttons.
Below is a partial listing of softkey buttons that may be available on your phone.
You may not have all of these softkey buttons on your phone, and you may have
additional buttons that are not listed here. For example, your phone administrator
may also provide custom softkey buttons on your phone, such as buttons that
provide a speed dial to a company number, or that access a specia lized program
that runs on your phone. Contact your phone administrator for more inform ation.
Cisco Small Business IP Phone SPA50X User Guide (SPCP) 9
Page 11

Getting Started
Understanding Your Phone Lines and Buttons
Button Function
<< or >> Move left or right through an entry without deleting characters.
Cancel Cancels a conference call before the callers are joined.
CFwdAll Forwards all calls coming to your phone to a specified number.
Confrn Initiates a conference call.
Conflx Conferences active lines on the phone together.
Delchr Deletes the last number or letter.
Delete Deletes an entire item (for example, a number from the Call History list).
1
Dial Dials a number.
DnD Do Not Disturb; prevents incoming calls from ringing your phone.
Edit Opens an item so that you can edit numbers or letters, or enable or
disable a feature.
GPickUp Allows you to answer a call ringing on an extension in a group of phones.
Ignore Ignores an incoming call.
Login/
Logout
PickUp Allows you to answer a call ringing on another e xtension by ent ering the
Redial Displays a list of recently dialed numbers.
Resume Resumes a call that is on hold.
OK Saves your changes or confirms an action in response to a prompt on
Log in and out of the call system to use the Extension Mobility feature.
Extension mobility allows you to log in to any physical phone and
retrieve your personal settings and directory number to that phone.
extension number.
the screen.
Select Selects the highlighted item on the LCD screen.
Trns fer Performs a call transfer.
Y/N Enters a submenu and when pressed, toggles between Yes or No to
Cisco Small Business IP Phone SPA50X User Guide (SPCP) 10
enable or disable an option.
Page 12

Getting Started
Understanding Your Phone Lines and Buttons
Using Keypad Shortcuts
When using the phone menus, you can use the keypad to enter the number shown
next to the menu or sub-menu item on the L CD screen. (Not applicable to the Cisco
SPA501G.)
For example, on the Cisco SPA509G, to change your ring settings, press 3 for
Settings and press 2 for Ring Type.
NOTE Menus and options vary depending on phone mo del.
1
Cisco Small Business IP Phone SPA50X User Guide (SPCP) 11
Page 13

Installing Your Phone
!
This chapter describes how to install your Cisco Small Business IP Phone and
connect it to your network. It contains the following sections:
• Before You Begin, page13
• Phone Connections, page14
• Verifying Phone Startup, page19
2
Before You Begin
Before you install and connect your phone, verify with your System Administrator
(if applicable) that the network is ready for the phone, read the safety notices, and
make sure you have all the phone parts and documentation available.
CAUTION CAUTION: Do not connect a telephone by using the RJ-11 port marked AUX. It is
reserved for connection with auxiliary devices that are not supported with the
SPCP version of the telephone firmware.
• Upgrading Your Phone Firmware, page19
Cisco Small Business Pro IP Phone SPA50X User Guide 13
Page 14
Installing Your Phone
!
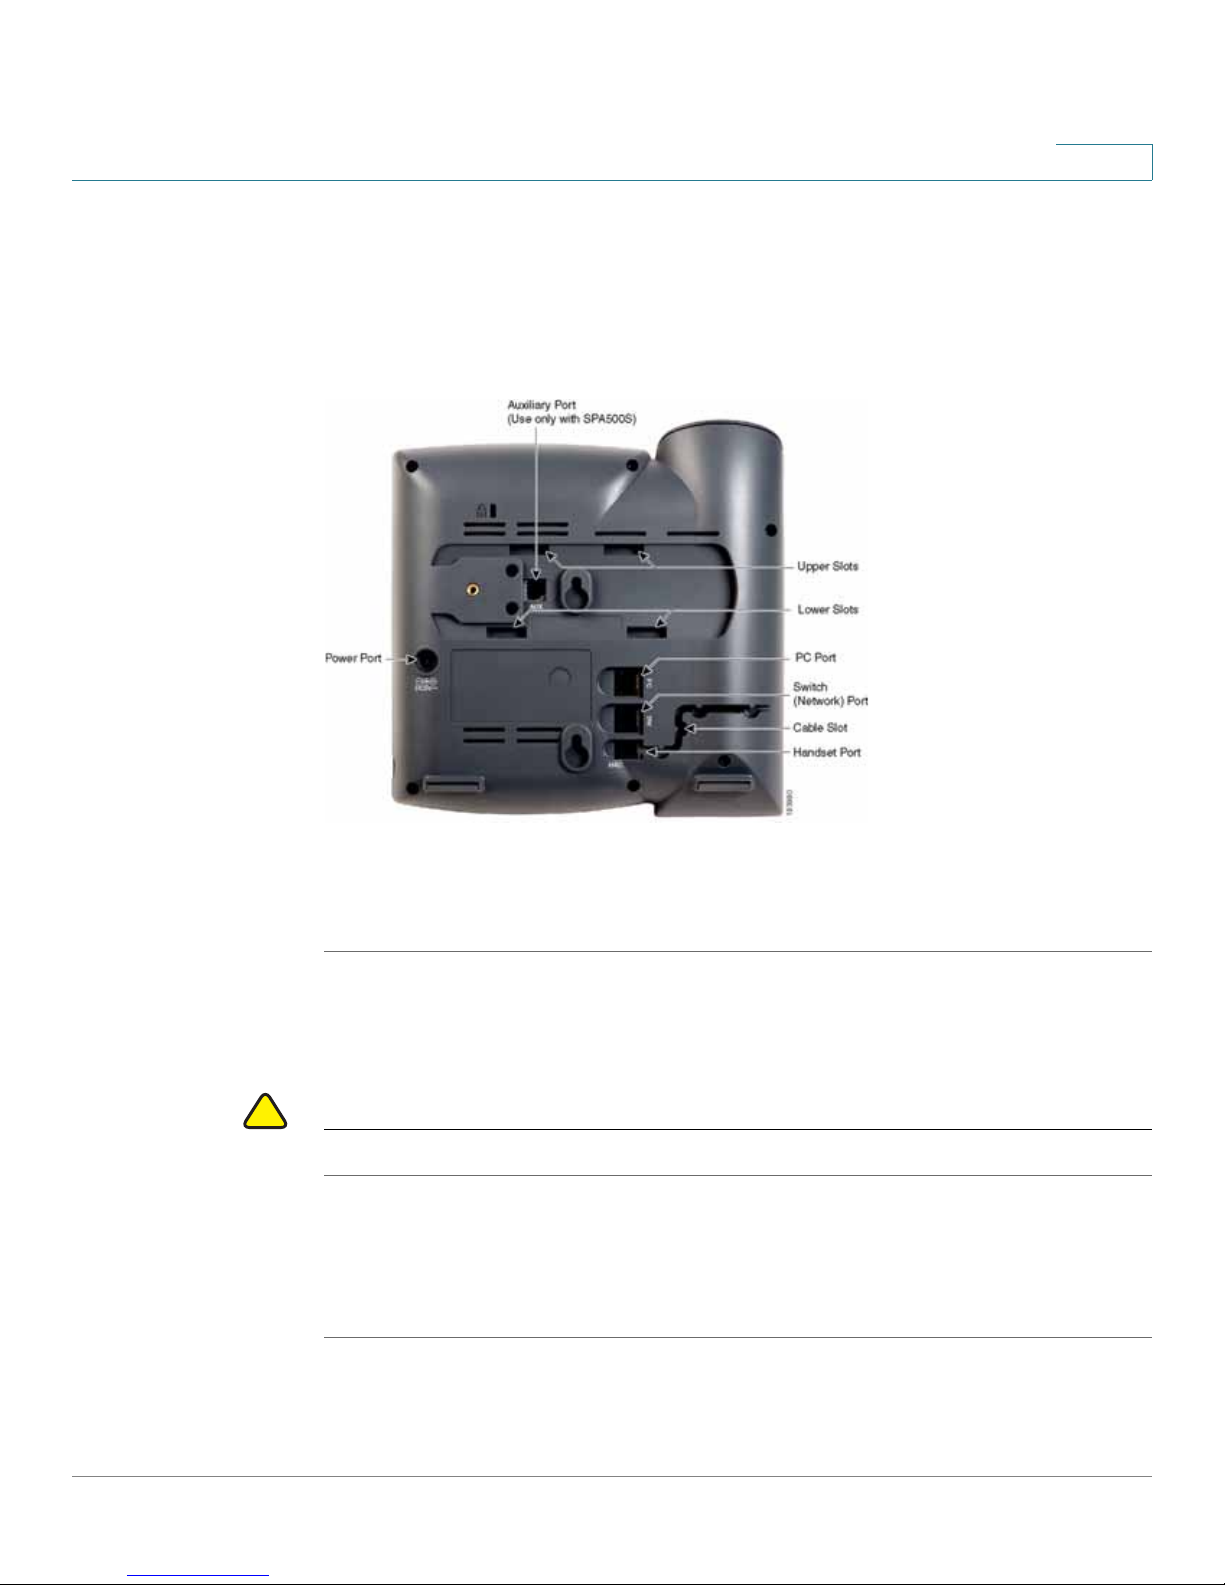
Phone Connections
Phone Connections
Figure1 shows the phone connections.
Figure1 Phone Connec tions
2
Connec ting the Handset
STEP1 Turn the phone body over to expose the ports on the back of the unit.
STEP 2 Insert the long end of the phone cord into the RJ-11 handset port on the phone
body that is marked with a phone symbol.
CAUTION Do not insert a telephone line cord into the RJ-11 AUX (auxiliary) port.
STEP 3 (Optional) Route the phone cord through the cable slot.
STEP4 Insert the other end of the phone cord into the port at the bottom of the handset
(not shown).
Cisco Small Business IP Phone SPA 50X User Guide (SPCP) 14
Page 15

Installing Your Phone
Phone Connections
2
Connec ting the Power
If you are using an external power source, insert one end of the power cord into an
outlet and insert the other end of the power cord into the power port on the phone
body.
Connec ting Your Phone to the Network
The phone can be connected to the network by using a Cat5 or higher Ethernet
cable or through a wireless network connection.
Connecting the Phone to the Wired Network
To connect the phone by using an Ethernet cable:
STEP1 Insert one end of the Ethernet cable into the network port on the RJ-45 phone port
marked “SW.”
STEP 2 Insert the other end of the Ethernet cable into the device, such as a switch.
Connecting the Phone to the Wireless Network
You can use a Cisco WBP54G Wireless-G Bridge for Phone Adapters to connect
the IP phone to a Wireless-G network. This procedure requires the optional Cisco
IP Phone PA100 power adapter to provide power to the WBP54G. Cisco does not
recommend connecting a PC to the phone when it is operating wirelessly.
To connect your phone to the Cisco WBP54G:
STEP1 Configure the Cisco WBP54G by using the Setup Wizard. See the instructions in
the
Wireless-G Bridge for Phone Adapters Quick Installation Guide
Cisco.com.
STEP 2 When instructed to do so by the Setup Wizard, insert the Ethernet cable of the
WBP54G into the RJ-45 phone port marked SW, located on the back of the IP
phone base station. (See the Figure1.)
, available on
STEP 3 Connect the power cable of the WBP54G to the power port on the phone base.
STEP4 Connect one end of the IP phone power adapter into the power port of the
WBP54G.
Cisco Small Business IP Phone SPA 50X User Guide (SPCP) 15
Page 16

Installing Your Phone
Phone Connections
STEP 5 Connect the other end of the IP phone power adapter into an electrical outlet.
STEP1 Connect one end of an Ethernet cable (not provided) to the RJ-45 port marked PC
STEP 2 Connect the other end of the Ethernet cable to the Ethernet port on your PC.
2
Connecting a PC to Your Phone (Optional)
A PC can be connected to the network through the phone. Cisco does not
recommend connecting a PC to the phone if the phone is connected to the
network wirelessly.
To connect a PC to your phone (optional):
on the back of the phone body. (See the Figure1.)
Connec ting a Wired or Wireless Headset (Optional)
Cisco IP phones support headsets from other manufacturers. For the latest
supported models, contact your reseller . Additional inf ormation can be found at the
manufacturer websites: For example:
http://www.plantronics.com
http://www.jabra.com
Each brand and type of headset might require different steps for connection.
Consult the documentation for your particular headset for more information. In
general, to connect a headset:
Connect the headset telephone cord to the RJ-11 telephone port on the back of
the IP phone.
OR
Cisco Small Business IP Phone SPA 50X User Guide (SPCP) 16
Page 17

Installing Your Phone
Phone Connections
2
Connect the 2.5mm connector from the headset into the headset port on the
right side of the IP phone as shown:
Installing the De sk Stand or Wall Mount (Optional)
The phone can be set on a flat sur face, such as a desk, or mounted to a wall. This
section describes the installation of the desk stand. If you are attaching a
Cisco SPA500S attendant console, attach the console before attaching the desk
stand.
To mount the phone to the wall, you must use the MB100 wall mount bracket kit
(available separately). Do not attach the desk stand if you intend to mount the
phone to the wall. To mount the phone on the wall, follow the instructions included
with the wall mount.
Cisco Small Business IP Phone SPA 50X User Guide (SPCP) 17
Page 18

Installing Your Phone
Phone Connections
STEP1 Connect the phone stand by lining up the tabs on the stand with the slots on the
STEP 2 Slide the bottom tabs into the lower slots on the phone body and lightly press
2
To install the desk stand:
phone body.
down on the stand. It should easily slide into the upper stand slots. Do not force it.
Reverse the Handset Retention Tab
If you mount the phone to a vertical surface, such as a wall, you must reverse the
handset retention tab on the phone body so that the handset does not fall off the
phone when it is placed on the cradle.
STEP1 Push the latch in.
STEP 2 Slide the retention tab up until it detaches from the phone.
Cisco Small Business IP Phone SPA 50X User Guide (SPCP) 18
Page 19

Installing Your Phone
Verifying Phone Startup
STEP 3 Rotate the tab 180° and re-insert into the phone base. The tab now catches the
slot in the handset when the handset is placed onto the cradle.
Verifying Phone Startup
After receiving power and network connectivity, the phone executes a boot
sequence. During this sequence, phones with LCD screens display the Cisco logo,
the message Initializing Network and all of the lights on the phone flash.
After your phone successfully conne cts to the network, it checks for and
downloads an updated configuration and firmware. When the boot process is
complete, the extension number appears on the display screen (on models with a
display screen) and the phone has a dial tone.
2
On models with screens, the phone displays the standard menu for the phone. The
date, name and number of the phone display on the top line of the LCD screen. At
the bottom of the LCD screen, softkeys are displayed over their associated soft
buttons.
On models with no screen, such as the Cisco SPA501G, the lines glow green and
you hear a dial tone when the handset is picked up or when the speaker button is
pressed.
If the phone does not start, confirm your installation and connections. If these are
correct, try unplugging the phone and plugging it back in again. Cycling the phone
connection updates the configuration and the firmware. If you still do not see the
display, then contact your phone administrator or Internet Telephony Service
Provider (ITSP).
Upgrading Your Phone Firmware
The phone firmware is upgraded automatically by the Cisco Smart Business
Communications System (SBCS), according to the administrative settings.
Cisco Small Business IP Phone SPA 50X User Guide (SPCP) 19
Page 20

Using Basic Phone Functions
This chapter provides instructions on using your phone’s basic functions. It
includes the following sections:
• Using the Speakerphone or a Headset, page 21
• Adjusting Call Volume and Muting, page 22
• Placing or Answering a Call, page 22
3
• Using Hold and Resume, page 23
• Using Mute, page 23
• Ending a Call, page 24
• Transferring Calls, page 24
• Redialing a Number, page 25
• Viewing and Returning Missed Calls, page 25
• Forwarding All Calls to Another Number, page 26
• Setting Do Not Disturb, page 26
• Picking Up a Call from Another Extension, pa ge 27
• Placing a Three-Way Conference Call, page 27
• Using the Local Directory, page 28
• Using the Call History Lists, page 29
• Accessing Voicemail, page 29
Cisco Small Business Pro IP Phone SPA50X User Guide 20
Page 21

Using Basic Phone Functions
Using the Speakerphone or a Headset
NOTE All the features of these phones can be modified by your phone system
administrator. Not all of features described in this document may be available or
they might function slightly differently on your phone. This document describes the
features as they function in factory default mode.
Using the Speakerphone or a Headset
You can use the handset, headset, or speakerphone to place or r eceive a call. And
you can switch among these devices during a call; however, only one of these
devices at a time can be used.
When switching from the handset to the speakerphone, make sure the
speakerphone or headset light is illuminated before placing the handset back on
the hook. When switching from the handset to a wireless headset, do not replace
the handset on hook or you will disconnect the call.
3
Using the Speakerphone
To use the speakerphone, press the Speaker button (the handset can be either on
or off hook).
Using the Headset with Your IP Phone
Install the headset as described in the “Connecting a Wired or Wireless Headset
(Optional)” se ction on page16
NOTE Thye steps t o install and use a headset with the IP phone can vary. Consult the user
documentation for your headset for more information.
To use a wired headset, press the Headset button on your phone and dial the
number to place a call, or press the Headset button to answer an incoming call.
To use a wireless headset, lift the handset off hook to speak and listen through the
wireless headset.
Cisco Small Business IP Phone SPA 50X User Guide (SPCP) 21
Page 22

Using Basic Phone Functions
Adjusting Call Volume and Muting
Adjusting Call Volume and Muting
Adjusting Call Volume
To adjust the volume of the handset or speaker during a call, press + on the Volume
button to increase the volume, or press - to decr ease the volume. The v olume lev e
will return to the previous level when you disconnect the call. To retain the setting,
press OK (except on the Cisco SPA501G) and the setting is saved.
Adjusting the Ringer Volume
To adjust the ringer volume, press the Volume button when the handset is on the
phone and the speaker is off. Retain the setting by pressing OK (except on the
Cisco SPA501G) and the setting is saved.
3
Muting a Call
To mute the phone microphone, speaker, or headset microphone, press the Mute
button on the phone. The button glows red. Press the Mute button again to unmut e.
Placing or Answering a Call
There are several ways to place or answer a call:
• Pick up the handset.
• Press the Speaker button.
• Press the Headset button.
• Press a configured line button (to place a call) or a green flashing line button
(to answer a call). (Not applicable to the Cisco SPA502G).
You might have to dial a number or series of numbers to reach an outside line. Ask
your phone administrator for specific information.
Cisco Small Business IP Phone SPA 50X User Guide (SPCP) 22
Page 23

Using Basic Phone Functions
Using Hold and Resume
To place a call without dialing a number:
• Press Redial to dial the last number.
• If yo u ha v e conf ig ur ed s peed d ia ls, p r ess th e a ssig ned s peed d ia l cod e an d
• To answer a call that is ringing on another phone in the phone system, press
• Choose a number from a directory. See Using the Local Directory,
• Choose a number from the Call History. See Using the Call History Lists,
3
then press AbbrDial.
Pickup. Then enter the extension number of the ringing phone.
page28.
page29.
Using Hold and Resume
To put a call on hold, press the Hold but ton. A series of b eeps or music on hold
plays for the caller to indicate that the call is on hold.
To resume the call, press the flashing red line button for the call. (On the Cisco
SPA502G, press the Resume softkey .) If you have multiple calls, all calls are put on
hold except the active call.
If you are on a call and another call comes in, press the flashing red line button or
press the Hold button to place the call on hold and answer the incoming call. To
resume the first call, press the line button for the call or select it using the Up or
Down navigation button and press the Resume softkey (Cisco SPA502G).
Using Mute
When mute is enabled you can hear other parties on a call, but they cannot hear
you. You can use this feature on the handset, speakerphone, or headset.
• To toggle mute on, press the Mute button. The button is lit.
• To toggle mute off, press the lit Mute button.
Cisco Small Business IP Phone SPA 50X User Guide (SPCP) 23
Page 24

Using Basic Phone Functions
Ending a Call
Ending a Call
To end a call:
• Press the EndCall button.
• If you are using the handset, hang up.
• If you are using the speakerphone, press the Speaker button.
• If you are using the headset, either press the Headset button (wired) or
Transferring Calls
3
replace the handset (wireless).
You can per form two types of transfers:
• Attended—You call the person to whom you are transferring the call and
speak to them before transferring the call.
• Blind— You transfer the call without speaking to the other party to whom you
are transferring the call.
Performing a Transfer
Cisco SPA502G, Cisco SPA504G, Cisco SPA508G, Cisco SPA509G:
STEP1 During an active call, press Trnsfer. The call is placed on hold and a new line is
opened to dial the number.
STEP 2 Enter the number where you want to transf er the call, then pr ess Dial or wait a fe w
seconds for the other line to ring.
Cisco Small Business IP Phone SPA 50X User Guide (SPCP) 24
Page 25

Using Basic Phone Functions
Redialing a Number
STEP 3 Do one of the following:
• To blind transfer the call, press Trnsfer after the call begins to ring and then
• To transfer after speaking privately to the other person, pr ess Trnsfer at any
Cisco SPA501G:
STEP1 During an active call, press the Transfer button.
STEP 2 Enter the number where you want to transfer the call.
3
hang up. If you hang up before the target line rings, the transfer fails and the
caller is disconnected. If you misdial, press the line button again to receive a
dial tone (not applicable to the Cisco SPA502G).
time during the conversation.
STEP 3 Press the Transfer button again.
Redialing a Number
To redial the last number called from a Cisco SPA502G, Cisco SPA504G, Cisco
SPA508G, or Cisco SPA509G, press the Redial softkey.
To redial the last number called from a Cisco SPA501G, press the Redial button.
Viewing and Returning Missed Calls
The LCD screen on your IP phone displays a Missed Calls message if any calls
were received that were not answered. (The Cisco SPA501G does not have an
LCD screen and does not support these functions.)
To return a missed call:
STEP1 Press the Setup button.
STEP 2 Select Call History.
STEP 3 Select Missed Calls.
Cisco Small Business IP Phone SPA 50X User Guide (SPCP) 25
Page 26

Using Basic Phone Functions
Forwarding All Calls to Another Number
STEP4 Scroll to the call you want to return and press Dial.
NOTE If the call was from a long distance number, you might have to edit the call before
returning it. Press the EditDial softkey to edit the call and use the softkey buttons
and keypad to edit the number.
Forwarding All Calls to Another Number
You can forward all calls to another IP phone in your phone system. For example,
calls can be forwarded to your voice mailbox or another extension. You might be
able to forward calls to an external number, such a s your home or cell phone
number, if this is allowed by your phone system administrator. For outside
numbers, be sure to include any digit that is required to access an outside line.
3
To forward calls:
STEP1 Press the CFwdAll softkey.
STEP 2 Enter a number where all calls are to be forwarded. For an outside line, be sure to
enter any access code or area code that is required to complete the call.
STEP 3 Press EndCall.The LCD screen displays Forwarde d to number.
Disable call forwarding by pressing the CFwdAll softkey.
Setting Do Not Disturb
Use the Do Not Disturb feature to prevent incoming calls from ringing your phone.
The screen indicates that the call is incoming, but the phone does not ring. The
unanswered call is handled according to your settings. These calls are not logged
to the Missed Calls list.
To activate Do Not Disturb, press more and then press DnD. The LCD screen
indicates that Do Not Disturb is turned on for your phone.
Cisco Small Business IP Phone SPA 50X User Guide (SPCP) 26
Page 27

Using Basic Phone Functions
Picking Up a Call from Another Extension
To deactivate Do Not Disturb, press the DnD softkey.
Picking Up a Call from Another Extension
You can pick up a call that is ringing at another extension. Depending on the way
your phone network is configured by your system administrator, you can pick up a
call in the following ways:
3
• To pick up a call that is ringing at an extension in your group, use the
softkey. (Not available for the Cisco SPA501G.) If only one pickup group is
configured by your system administrator, call control is transferred to your
phone. If the ringing phone and your phone are in different pickup groups,
dial the pickup group number where the phone is ringing to transfer call
control to your phone.
• To pick up a call that is ringing at specific extension, press the Pickup
softkey. (Not available for the Cisco SPA501G.)
• To pick up a call ringing at an extension that is configured on one of the line
buttons on your phone, press the flashing line button. (This functionality
requires configuration by your phone administrator.)
• To specify the extension from where the call is to be picked up, press the
PickUp softkey and enter the extension number of the phone from which
you are picking up the call.
Placing a Three-Way Conference Call
GPickUp
During an active call, you can add another caller to the conversation.
Cisco SPA502G, Cisco SPA504G, Cisco SPA508G, Cisco SPA509G:
To initiate a conference call:
STEP1 During an active call, press more and then press Confrn. The first call is placed on
hold, a second line is opened, and you hear a dial tone.
STEP 2 Dial the second telephone number.
STEP 3 When the second person answers, press the Confrn softkey again. All three
parties are connected in the conference call.
Cisco Small Business IP Phone SPA 50X User Guide (SPCP) 27
Page 28

Using Basic Phone Functions
Using the Local Directory
When you hang up, the other two parties are disconnected.
NOTE You can cancel the conference by pressing the Cancel softkey before
Cisco SPA501G:
STEP1 Press the Conference button during an active call. The first call is placed on hold, a
second line is opened, and you hear a dial tone.
STEP 2 Dial the second telephone number.
STEP 3 When the second person answers, press the Conference button again. All three
parties are connected in the conference call.
3
connecting the calls.
When you hang up, the other two parties are disconnected.
Using the Local Directory
The local directory lists the phones and extension numbers in your company.
Depending on your phone network configuration, you might have the following
directories available (not available for the Cisco SPA501G):
To display the local directory:
STEP1 Press the Setup button.
STEP 2 Scroll to Directory and press Select.
STEP 3 Scroll to Local Directory and press Select. The search form appears.
STEP4 Enter a last name, a first name, or both to search for a specific entry, or leave the
fields blank to display a complete list of all available records.
STEP 5 Click Submit to search for matching records.
Cisco Small Business IP Phone SPA 50X User Guide (SPCP) 28
Page 29

Using Basic Phone Functions
Using the Call History Lists
STEP 6 Scroll to an entry and press Dial to dial the number. Press Edit Di al to change the
number before dialing. Press Cancel to exit.
Using the Call History Lists
You can display several call history lists:
• Missed Calls—Shows the last 60 missed calls.
• Received Calls—Shows the caller ID of the last 60 answered calls.
• Placed Calls—Shows the last 60 numbers dialed from your phone.
To display the Call History lists:
3
STEP1 Press the Setup button.
STEP 2 Scroll to Call History and press Select.
STEP 3 Scroll to the Call History list that you want to view: Missed Calls, Received Calls, or
Placed Calls.
STEP4 Scroll to an entry and press Dial to dial the number. Press Edit Dial to change the
number before dialing. Press Cancel to exit.
To delete all numbers from the history lists, press the Clea r softkey.
Accessing Voicemail
To access voicemail, press the Messages button on your phone. Your system
administrator should have configured your phone with the correct voicemail
number so that pressing the Messages button automatically dials your voicemail
system.
Cisco Small Business IP Phone SPA 50X User Guide (SPCP) 29
Page 30

Using Advanced Phone Features
This chapter describes how to configure advanced features on your IP Phone. It
contains the following sections:
• Logging in to Your Phone, page 31
• Creating Speed Dials, page32
• Monitoring/Accessing Another Phone from Your Phone, page 34
4
• Customizing Y our L CD Screen, page 35
• Updating Your Ring Tone, page 37
• Using the Cisco SPA501G Interactive Voice Response Menu, page 38
• Advanced Procedures for Technical Support, page38
Cisco Small Business Pro IP Phone SPA50X User Guide 30
Page 31

Using Advanced Phone Fe ature s
Logging in to Your Phone
Logging in to Your Phone
Your phone system provides a feature called extension mobility. This feature
allows you to log in to any physical phone and assign your personal settings and
directory number to that phone. For example, if you are working at a remote
location for the day, you can log in to one of the company phones on the network
and make and receive calls from your phone number and access your voicemail.
To log in to your phone:
STEP1 If you have the Login softkey on your phone, press it. (It might be necessary to
press More and scroll through the phone screens to locate this softkey.)
If you do not have the Login softkey on your phone:
a. Press the Setup button.
4
b. Scroll to CME Services and press Select.
c. Choose Extension Mobility.
STEP 2 Enter your username.
STEP 3 Press the Down Arrow key and enter your password.
STEP4 Press Submit. The phone is loaded with your user profile (for example, your
configured speed dial buttons).
To log out of your phone:
STEP1 If you have the Logout softkey on your phone, press it. (It might be necessary to
press More and scroll through the phone screens to locate this softkey.)
If you do not have the Logout softkey on your phone:
a. Press the Setup button.
b. Scroll to CME Services and press Select.
c. Choose Extension Mobility.
STEP 2 Choose Logout.
STEP 3 Press Exit.
Cisco Small Business IP Phone SPA 50X User Guide (SPCP) 31
Page 32

Using Advanced Phone Fe ature s
Creating Speed Dials
Creating Speed Dials
You can configure up to 32 speed dials. Each spe ed dial can be a phone number,
IP address or URL. You can also co nfigure additional speed dials on unused line
buttons on your phone. System-wide speed dials can be configured by the system
administrator.
Adding Speed Dials
You can use the phone menu to add a speed dial that is not associated with a line
button.
Cisco SPA502G, Cisco SPA504G, Cisco SPA508G, Cisco SPA509G:
To add a speed dial:
4
STEP1 Press the Setup button.
STEP 2 Scroll to CME Services and press Select.
STEP 3 Scroll to My Phone Apps and press Select.
STEP4 Scroll to Speed Dial Buttons and press Select.
STEP 5 Press Add to add a new number.
STEP 6 Enter the following information:
• Label: Enter a name or other identifier for this speed dial entry.
• Number: Enter the destination number.
STEP 7 Press Submit.
Editing Speed Dials
To edit a speed dial entry:
STEP1 Press the Setup button.
STEP 2 Scroll to CME Services and press Select.
STEP 3 Scroll to My Phone Apps and press Select.
Cisco Small Business IP Phone SPA 50X User Guide (SPCP) 32
Page 33

Using Advanced Phone Fe ature s
Creating Speed Dials
STEP4 Scroll to Speed Dial Buttons and press Select.
STEP 5 Scroll to the entry that you want to change.
STEP 6 Press Change to edit the selected entry.
STEP 7 Enter the following information:
• Label: Enter a name or other identifier for this speed dial entry.
• Number: Enter the destination number.
STEP 8 Press Submit. The new entry appears in the list, along with the assigned speed
dial number.
Deleting Speed Dials
4
To delete a speed dial entry:
STEP1 Press the Setup button.
STEP 2 Scroll to CME Services and press Select.
STEP 3 Scroll to My Phone Apps and press Select.
STEP4 Scroll to Speed Dial Buttons and press Select.
STEP 5 Scroll to the entry that you want to delete.
STEP 6 Press Delete.
STEP 7 Press Submit.
Calling Speed Dials
To call one of your configured speed dial numbers:
STEP1 Open a phone line using any method you would normally use to start a new call.
STEP 2 Press the assigned number for the speed dial, then press AbbrDial. The phone
number is dialed.
Cisco Small Business IP Phone SPA 50X User Guide (SPCP) 33
Page 34

Using Advanced Phone Fe ature s
Monitoring/Accessing Another Phone from Your Phone
NOTE If you have configured an unused line button with a speed dial number, press the
button to dial.
Cisco SPA501G:
To call one of your configured speed dial numbers, press the number for the
speed dial and wait a few seconds.
Monitoring/Accessing Another Phone from Your Phone
Your system administrator might configure your phone so that you can monitor
other phones from your phone. If this feature is configured, some line buttons on
your phone are assigned to display the status of another user phone. For example,
if your line 4 is configured to display Bob’s phone line, the LED on your phone will
glow red when his monitored line is ringing.
4
In addition, if your system administrator has configured it, you can press the same
line button (4) to speed dial Bob’s extension, or to pick up a ringing call at his
extension.
NOTE Not applicable to the Cisco SPA502G.
Cisco Small Business IP Phone SPA 50X User Guide (SPCP) 34
Page 35

Using Advanced Phone Fe ature s
Customizing Your LCD Screen
Customizing Your LCD Screen
NOTE Not available on the Cisco SPA501G.
You can customize your LCD screen in several ways.
Changing the LCD Screen Contrast
To adjust the contrast of the LCD screen:
STEP1 Press the Setup button.
4
STEP 2 Scroll to Settings and press Select.
STEP 3 Scroll to Screen Contrast and press Select.
STEP4 Use the navigation button to adjust the screen contrast:
• To decrease the contrast : Press the Left navigation button.
• To increase the contrast: Pres s the Right navigation button.
STEP 5 Press OK.
Setting the Back Light Timer
You can set a timer for your screen back light so that your LCD screen becomes
dark after a specified period of idle time on the phone.
STEP1 Press the Setup button.
STEP 2 Scroll to Preferences and press Select.
STEP 3 Scroll to Back Light Timer and press Select.
STEP4 Press Option repeatedly to view the available options: Always On, Off, 10s, 20s,
and 30s.
Cisco Small Business IP Phone SPA 50X User Guide (SPCP) 35
Page 36

Using Advanced Phone Fe ature s
Customizing Your LCD Screen
STEP 5 To choose a displayed option, press OK.
Configuring the Phone Screen Saver
You can enable your phone screen saver and specif y its appearance and the
amount of time for the phone to be idle before it begins.
To configure your screen saver:
STEP1 Press the Setup button.
STEP 2 Scroll to Preferences and press Select.
STEP 3 Scroll to Screen Saver Mode and press Sele ct.
4
STEP4 To change the status of your screen saver:
a. Scroll to Enable Screen Saver and press Edit.
b. Press Y/N until the desired option appears: Yes to enable a screen saver or No
to disable this feature.
c. Press OK to save the changes.
STEP 5 To specify the amount of idle time that can elapse before the screen saver
appears:
a. Scroll to Screen Saver Wait Time and press Edit.
b. Clear the displayed time by pressing Clear.
c. Enter the idle time period in seconds by pressing numb e rs on the keypad.
d. Press OK to save your changes.
Cisco Small Business IP Phone SPA 50X User Guide (SPCP) 36
Page 37

Using Advanced Phone Fe ature s
Updating Your Ring Tone
Turning on the Screen Saver Immediately
The screen saver must be enabled to immediately activate it. To turn on your
phone screen saver without waiting for the specified Screen Saver Wait Time to
elapse:
STEP1 Press the Setup button.
STEP 2 Scroll to Screen Saver Mode.
STEP 3 Press Activate.
Updating Your Ring Tone
4
Each extension of your phone can have a different ring tone. You can also create
your own ring tones.
To change a ring tone:
STEP1 Press the Setup button.
STEP 2 Scroll to Settings and press Select.
STEP 3 Scroll to Ring Type and press Select. A list of available tones appears
STEP4 Choose the ring tone that you want to change, and press Select.
STEP 5 Scroll through the ring tones. To hear a ring tone, press Play. To choose a ring tone,
press Select.
STEP 6 Press Exit to close the screen.
Cisco Small Business IP Phone SPA 50X User Guide (SPCP) 37
Page 38

Using Advanced Phone Fe ature s
Using the Cisco SPA501G Interactive Voice Response Menu
4
Using the Cisco SPA501G Interactive Voice Response Menu
The Cisco SPA501G provides an interactive voice response (IVR) menu. You can
enter options and receive information about the phone and its operation.
To access the IVR:
STEP1 Press the Setup button.
STEP 2 Enter the IVR option by dialing the number number code for the specific option,
then press #. Some typical options that you might use are:
Option Number Action
110 The IP address of the phone.
140 The MAC address (hardware address) of the phone.
150 The version of the firmware on the phone.
Advanced Procedures for Technical Support
Technical support personnel might need to view information about your phone or
phone activities. Follow these procedures if instructed to do so by the technical
support person assisting you.
Status Information and Statistics
To view status information and statistics:
STEP1 Press the Setup button.
STEP 2 Scroll to Settings and press Select.
Cisco Small Business IP Phone SPA 50X User Guide (SPCP) 38
Page 39

Using Advanced Phone Fe ature s
Advanced Procedures for Technic a l Support
STEP 3 Choose from the following options:
• Network Configuration: Displays information about the network, including
WAN connection, DHCP server, IP address, MAC address, domain name,
subnet mask, default router, DNS servers, and TFTP se rver.
• Model Information: Displays information about the phone, including model
number, serial number, software version, and call control protocol.
• Status: Displays information about the phone activity, including status
messages, network statistics, and call statistics.
Rebooting, Restarting, and Resetting a Phone
If required, you can reboot, restart, or reset your phone. You should not do so
unless directed by your phone administrator as this can negatively affect your
phone function.
4
To reboot your phone and the firmware:
STEP1 Press the Setup button.
STEP 2 Scroll to Reboot and press Select.
STEP 3 When the confirmation message appears, press OK to confirm or press Cancel to
close the message without rebooting the phone.
To restart your phone without reloading the firmware:
STEP1 Press the Setup button.
STEP 2 Scroll to Restart and press Select.
STEP 3 When the confirmation message appears, press OK to confirm or press Cancel to
close the message without restarting the phone.
Cisco Small Business IP Phone SPA 50X User Guide (SPCP) 39
Page 40

Using Advanced Phone Fe ature s
!
Advanced Procedures for Technic a l Support
To reset your phone to the factory default values and reboot:
CAUTION If you choose factory reset, you will return the phone to the original factory settings
and will erase ALL current settings, including the directory and call logs. It is also
possible that your phone extension will change.
STEP1 Press the Setup button.
STEP 2 Scroll to Factory Reset and press Select.
STEP 3 When the confirmation message appears, press OK to confirm or press Cancel to
close the message without resetting the phone.
4
Cisco Small Business IP Phone SPA 50X User Guide (SPCP) 40
Page 41

5
Using the Cisco SPA500S Attendant Console
This chapter describes how to install and use the Cisco SPA500S Attendant
Console with your IP Phone.
The Cisco SP A500S is a 32-butt on attendant console f or the Cisco SPA500 Series
IP Phones, providing 32 three-color (red, green, and orange) programmable LEDS.
The Cisco SP A500S attaches to the IP phone with the attachment arm provided. It
obtains power directly from the IP phone and does not require a separate power
supply. Two Cisco SPA500S units can be attached to a single IP phone to monitor
a total of 64 separate lines.
Cisco Small Business IP Phone SPA 50X User Guide (SPCP) 41
Page 42

Using the Cisco SPA500S Attendant Console
Connecting the Cisco SPA500S Attendant Console to the IP Phone
5
Connecting the Cisco SPA500S Attendant Console to the IP
Phone
To connect the Cisc o SPA500S Attendant Console to the IP phone, you need the
following:
• Cisco SPA500S Attendant Console
• Attachment Arm
• Two (2) Attachment Arm Screws
• Auxiliary Interconnect Cable
• Stand
Cisco Small Business IP Phone SPA 50X User Guide (SPCP) 42
Page 43

Using the Cisco SPA500S Attendant Console
Connecting the Cisco SPA500S Attendant Console to the IP Phone
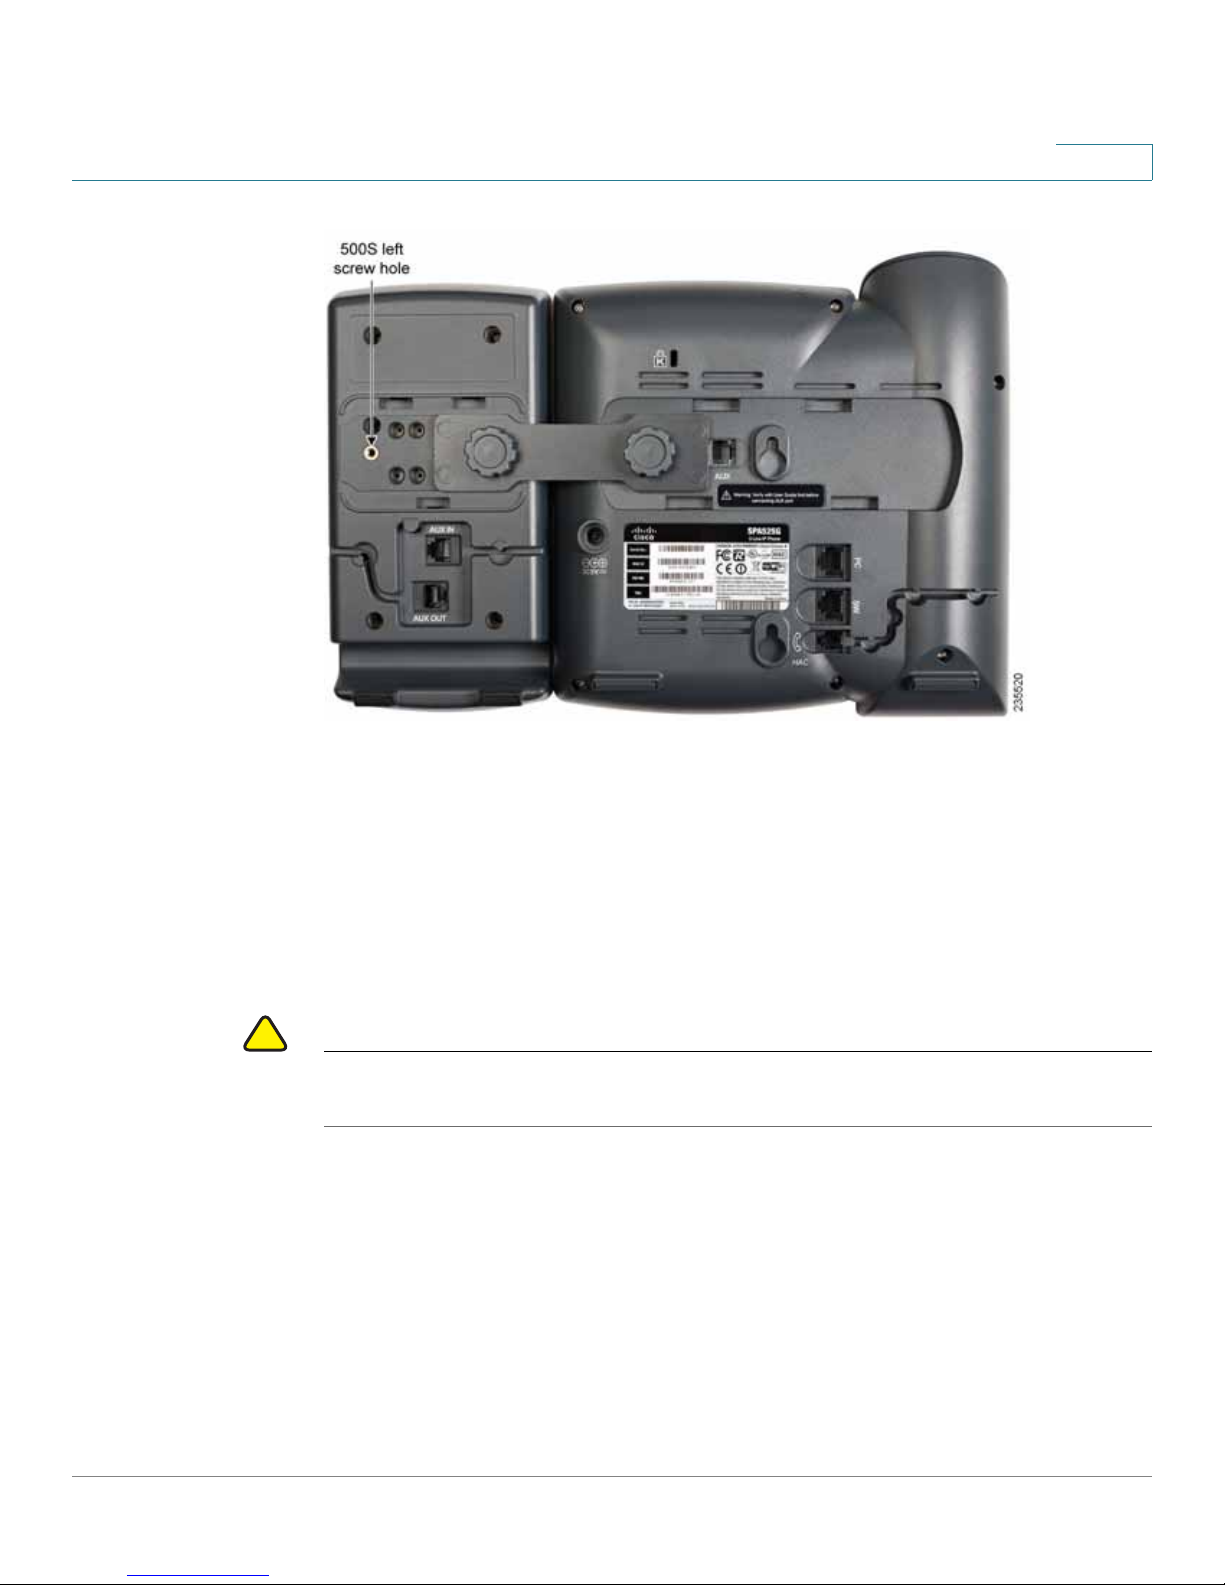
Connecting a Single Cisco SPA500S
STEP 1 Turn both the IP phone and Cisco SPA500S face down.
STEP 2 Align the screw hole in the IP phone with one of the holes on the attachment arm.
STEP 3 Insert the pegs on the attachment arm into the peg holes on the IP phone.
5
STEP 4 Using an attachment arm screw, secure the attachment arm to the IP phone.
STEP 5 Align the right screw hole in the Cisco SPA500S with the unused hole on the
attachment arm.
STEP 6 Insert the pegs on the attachment arm into the peg holes on the Cisco SPA500S.
Cisco Small Business IP Phone SPA 50X User Guide (SPCP) 43
Page 44

Using the Cisco SPA500S Attendant Console
Connecting the Cisco SPA500S Attendant Console to the IP Phone
5
STEP 7 Using an attachment arm screw , secure the attachment arm to the Cisco SPA500S.
Cisco Small Business IP Phone SPA 50X User Guide (SPCP) 44
Page 45

Using the Cisco SPA500S Attendant Console
!
Connecting the Cisco SPA500S Attendant Console to the IP Phone
CAUTION Do not plug a telephone line cord into the AUX port. Use only the auxiliary cable
provided with the Cisco SPA500S.
5
STEP 8
STEP 9 Locate the AUX port on the back of the IP phone. Connect the other end of the
STEP 10 Route the auxiliary cable inside the cable slot of the Cisco SPA500S.
Locate the AU X IN port on the back of the Cisco SP A500S. Connect one end of the
auxiliary cable to this port.
auxiliary cable to this port. The Cisco SPA500S is powered by the auxiliary cable
with the IP phone; no additional power source is required.
STEP 11 Attach the appropriate desktop stand to each unit.
Cisco Small Business IP Phone SPA 50X User Guide (SPCP) 45
Page 46

Using the Cisco SPA500S Attendant Console
Connecting the Cisco SPA500S Attendant Console to the IP Phone
5
Connecting a Second Cisc o SPA500S
A maximum of two Cisco SPA500S attendant consoles can be connected to a
Cisco SP A500 Series IP Phone. The instructions in this section are f or connecting a
second Cisco SP A5 00S. If you are not attaching a second Cisco SPA500S, skip to
“Configuring the Cisco SPA500S” on page 48.
STEP 1 Attach the first Cisco SPA500S to the IP phone and connect the auxiliary cable as
described in the “Connecting the Cisco SPA500S Attendant Co nsole to the IP
Phone” section on page 42.
STEP 2 Align the left screw hole in the first Cisco SPA500S with one of the holes on the
attachment arm.
Cisco Small Business IP Phone SPA 50X User Guide (SPCP) 46
Page 47
Using the Cisco SPA500S Attendant Console
!
Connecting the Cisco SPA500S Attendant Console to the IP Phone
5
STEP 3 Insert the pegs on the attachment arm into the peg holes on the Cisco SPA500S.
STEP 4 Using the attachment arm screw, secure the attachment arm to the first Cisco
SPA500S.
STEP 5 Insert the pegs on the attachment arm into the peg holes on the Cisco SPA500S.
STEP 6 Using the attachment arm screw, secure the attachment arm to the second Cisco
SPA500S.
CAUTION Do not plug a telephone line cord into the AUX port. Use only the auxiliary cable
provided with the Cisco SPA500S.
STEP 7 Locate the AUX OUT port on the back of the first Cisco SPA500S. Connect one
end of the auxiliary cable to this port.
STEP 8 Locate the AUX IN port on the back of the second Cisco SPA500S. Connect the
other end of the auxiliary cable to this port.
STEP 9 Route the auxiliary cable inside the cable slot. The Cisco SPA500S is powered by
the auxiliary cable with the IP phone; no additional power source is required.
Cisco Small Business IP Phone SPA 50X User Guide (SPCP) 47
Page 48

Using the Cisco SPA500S Attendant Console
Configuring the Cisco SPA500S
STEP 10 Attach the appropriate desktop stands to each unit.
5
Configuring the Cisco SPA500S
The Cisco SPA500S can b e configured to easily access other phone lines in the
system. For example, buttons on the Cisco SPA500S can be configured to monitor
and quickly dial another extension, speed dial a number, transfer calls to another
extension, and more.
NOTE The options available on the Cisco SPA500S depend on the phone system
configuration. Y our phone system might not pr ovide all of the featur es mentioned in
this document.
Configuration of the Cisco SPA500S and assignment of the line buttons is
performed by the system administrator and is not described in this document. To
configure the Cisco SP A500S, y ou can use the web user interface for the IP phone
to which the Cisco SPA500S is attached. See the Cisco SPA500 Series and
Wireless IP Phone Administration G uide on Cisco.com. See Appendix A, “Where
to Go From Here” for the link to this do cument.
Cisco Small Business IP Phone SPA 50X User Guide (SPCP) 48
Page 49

Using the Cisco SPA500S Attendant Console
Using the Cisco SPA500S
Using the Cisco SPA500S
The functions of Cisco SPA500S buttons might differ depending on configuration.
However, in general, you can:
• Monitor an extension by viewing its color. The LED color of a line button gives
you information about the line being monitored; for example, a red (steady)
LED means that the monitored line is ringing.
• Transfer an active call by pressing the line button on the Cisco SPA500S.
(This requires that the line button is configured as a speed dial for the
number to which you are transferring).
• Dial a configured extension by pressing the green line button on the Cisco
SPA500S.
5
Cisco Small Business IP Phone SPA 50X User Guide (SPCP) 49
Page 50

Where to Go From Here
Cisco provides a wide range of resources to help you obtain the full benefits of the
Cisco Small Business IP phone.
Product Resources
A
Support
Cisco Small Business
Support Community
Online Technical Supp ort
and Documentation (Login
Required)
Phone Support Contacts www.cisco.com/en/US/support/
Software Downloads
(Login Required)
Product Do cumentation
IP Phone
Accessories
Cisco Unified
Communications 500 Series
for Small Business
www.cisco.com/go/smallbizsupport
www.cisco.com/support
tsd_cisco_small_ business_support_
center_contacts.html
Go to tools.cisco.com/support/downloads, and
enter the model number in the Software Search
box.
www.cisco.com/en/US/products/ps10499/
tsd_products_support_series_home.html
http://cisco.com/en/US/products/ps10042/
tsd_products_support_series_home.html
www.cisco.com/en/US/products/ps7293/
tsd_products_support_series_home.html
Cisco Small Business IP Phone SPA 50X User Guide (SPCP) 50
Page 51

Where to Go From Here
A
Cisco Small Business
Cisco Partner Central for
Small Business (Partner
Login Requi red)
Cisco Small Business Home
Marketplace
www.cisco.com/web/partners/sell/smb
www.cisco.com/smb
www.cisco.com/go/marketplace
List of Documents
See the following documents (available at the URLs listed above) for more
information about your product.
Cisco Small Business IP Phone Model 50X Quick Start Guide
•
and initial configuration of your Cisco IP phone.
Cisco WBP54G Wireless-G Bridge for Phone Adapters User Guide
•
Installation and use of the WBP54G wireless bridge with your Cisco IP
phone.
•
Cisco Small Business S PA500 Series and WIP310 IP Phone Administration
Guide
—Administration and advanced configuration of your Cisco IP Phone.
—Installation
—
Cisco Small Business IP Phone SPA 50X User Guide (SPCP) 51
Page 52

Cisco and the Cisco logo are trademarks or registered trademarks of Cisco and/or its affiliates in the U.S. and other countries. To view a list of Cisco trademarks,
go to this URL: www.cisco.com/go/trademarks. Third-party trademarks mentioned are the property of their respective owners. The use of the word partner
does not imply a partnership relationship between Cisco and any other company. (1110R)
© 2009-2012 Cisco Systems, Inc. All rights reserved. OL-19750-02
 Loading...