

Page 1

QUICKSTART GUIDE
Page 2
- Cisco Spam & Virus Blocker -
- Quick Start Guide -
You will need the following items to get started:
A desktop or laptop computer •
Two ethernet cables (one ethernet cable is shipped with the •
Blocker, and you must provide the second).
Web browser •
Network information for “Go Live” conguration (Step 10): •
MX records. Determine where your current MX records point. •
NAT settings. Determine where your Port 25 trafc is sent. •
Firewall settings. Determine the rewall ports you may need •
to open.
Before you begin, write down the following information about
your network and administrator settings. You will need to enter
this information when running the System Setup Wizard, starting
on Step 8.
Getting Started
1
admin (non-configurable)
NETWORK SETTINGS
Blocker Hostname __________________________________________________
Blocker IP Address__________________________________________________
Subnet Mask _______________________________________________________
Gateway IP Address ________________________________________________
LOCAL DNS SERVER INFORMATION
Primary DNS Server IP Address ______________________________________
Secondary DNS Server IP Address ___________________________________
MAIL CONFIGURATION SETTINGS
Accept email for the following domains _______________________________
Mail Server _________________________________________________________
ADMINISTRATOR SETTINGS
Administrator Email _________________________________________________
Administrator Username ____________________________________________
Administrator Password _____________________________________________
box
in the
Cisco Spam & Virus Blocker • 1 Ethernet Cable
Quickstart Guide • FAQ
Rail Kit • T-Shirt • Documentation CD
Page 3
- Quick Start Guide -
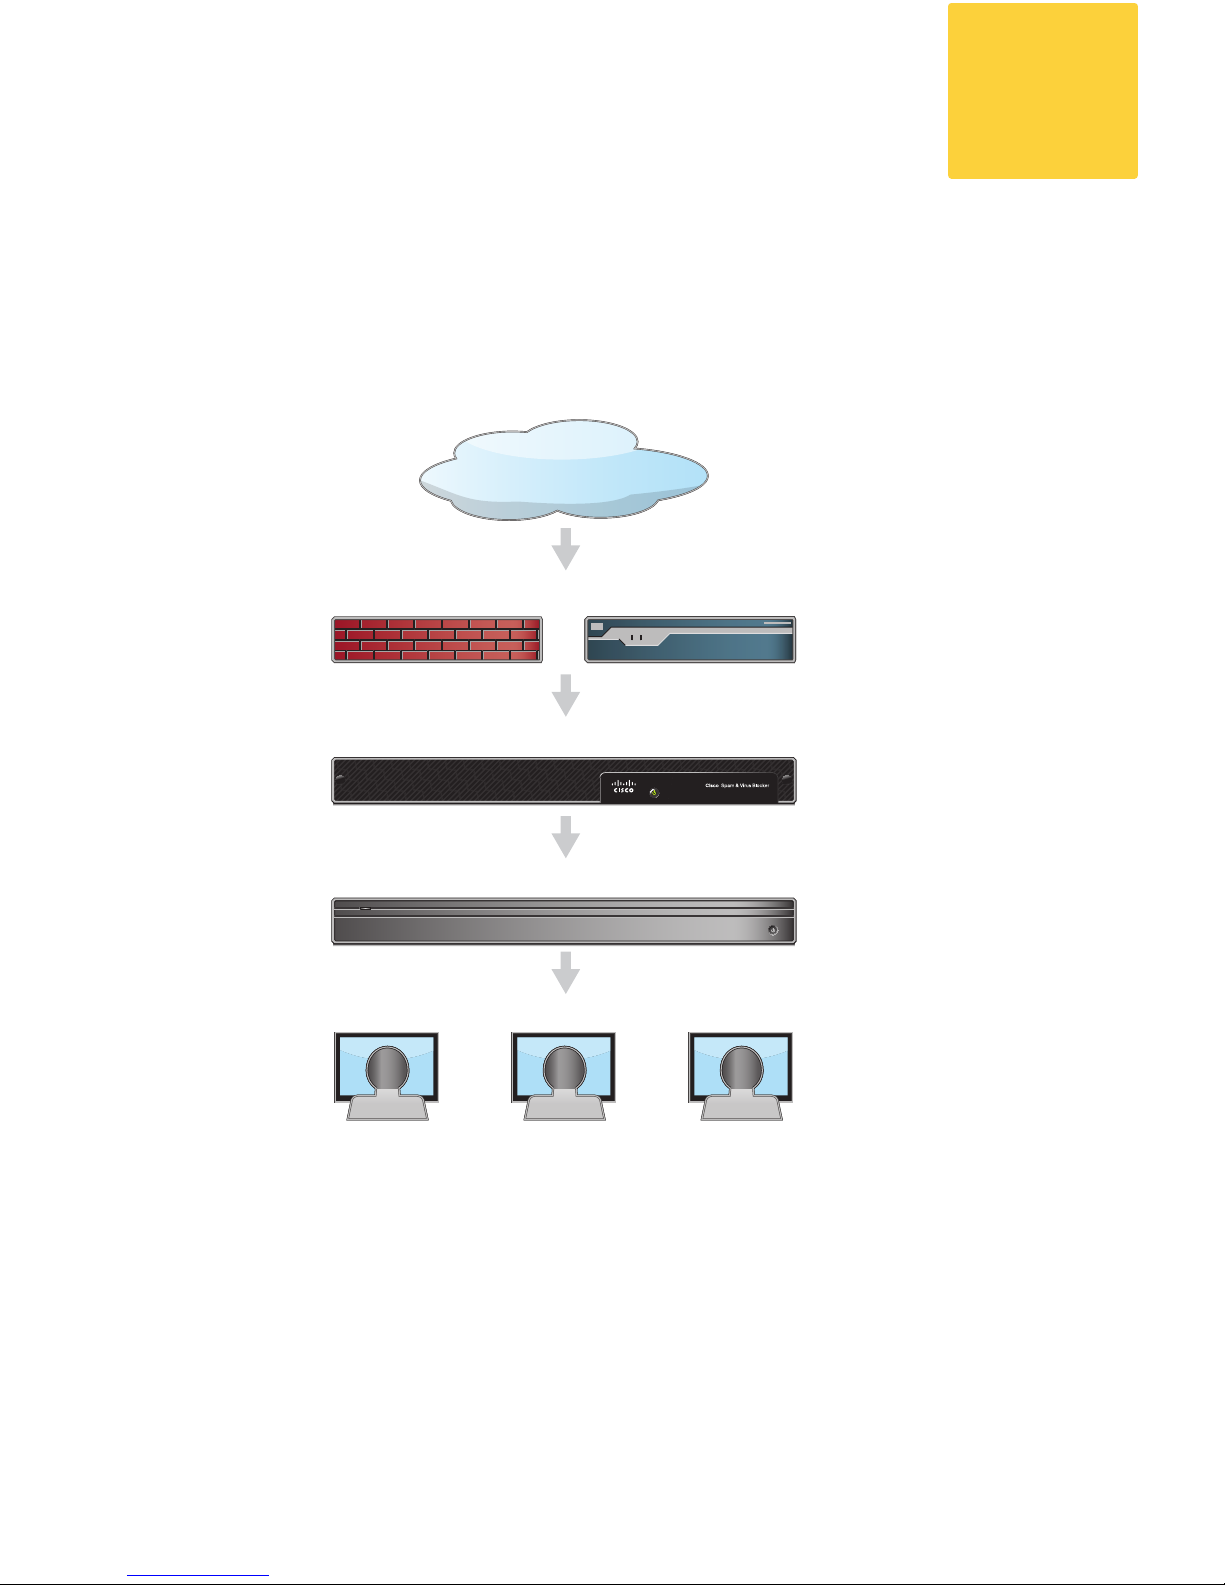
To detect spam and viruses, the Cisco Spam and Virus Blocker
Blocker must be installed at the perimeter of your network. It
needs to be the rst machine with an IP address that can access
the Internet.
Plan for your network conguration to look something like this:
Plan the Installation
Internet
Firewall or Router
Cisco Spam & Virus Blocker
Mail Server
Clients
2
Page 4
- Quick Start Guide -
- Cisco Spam & Virus Blocker -
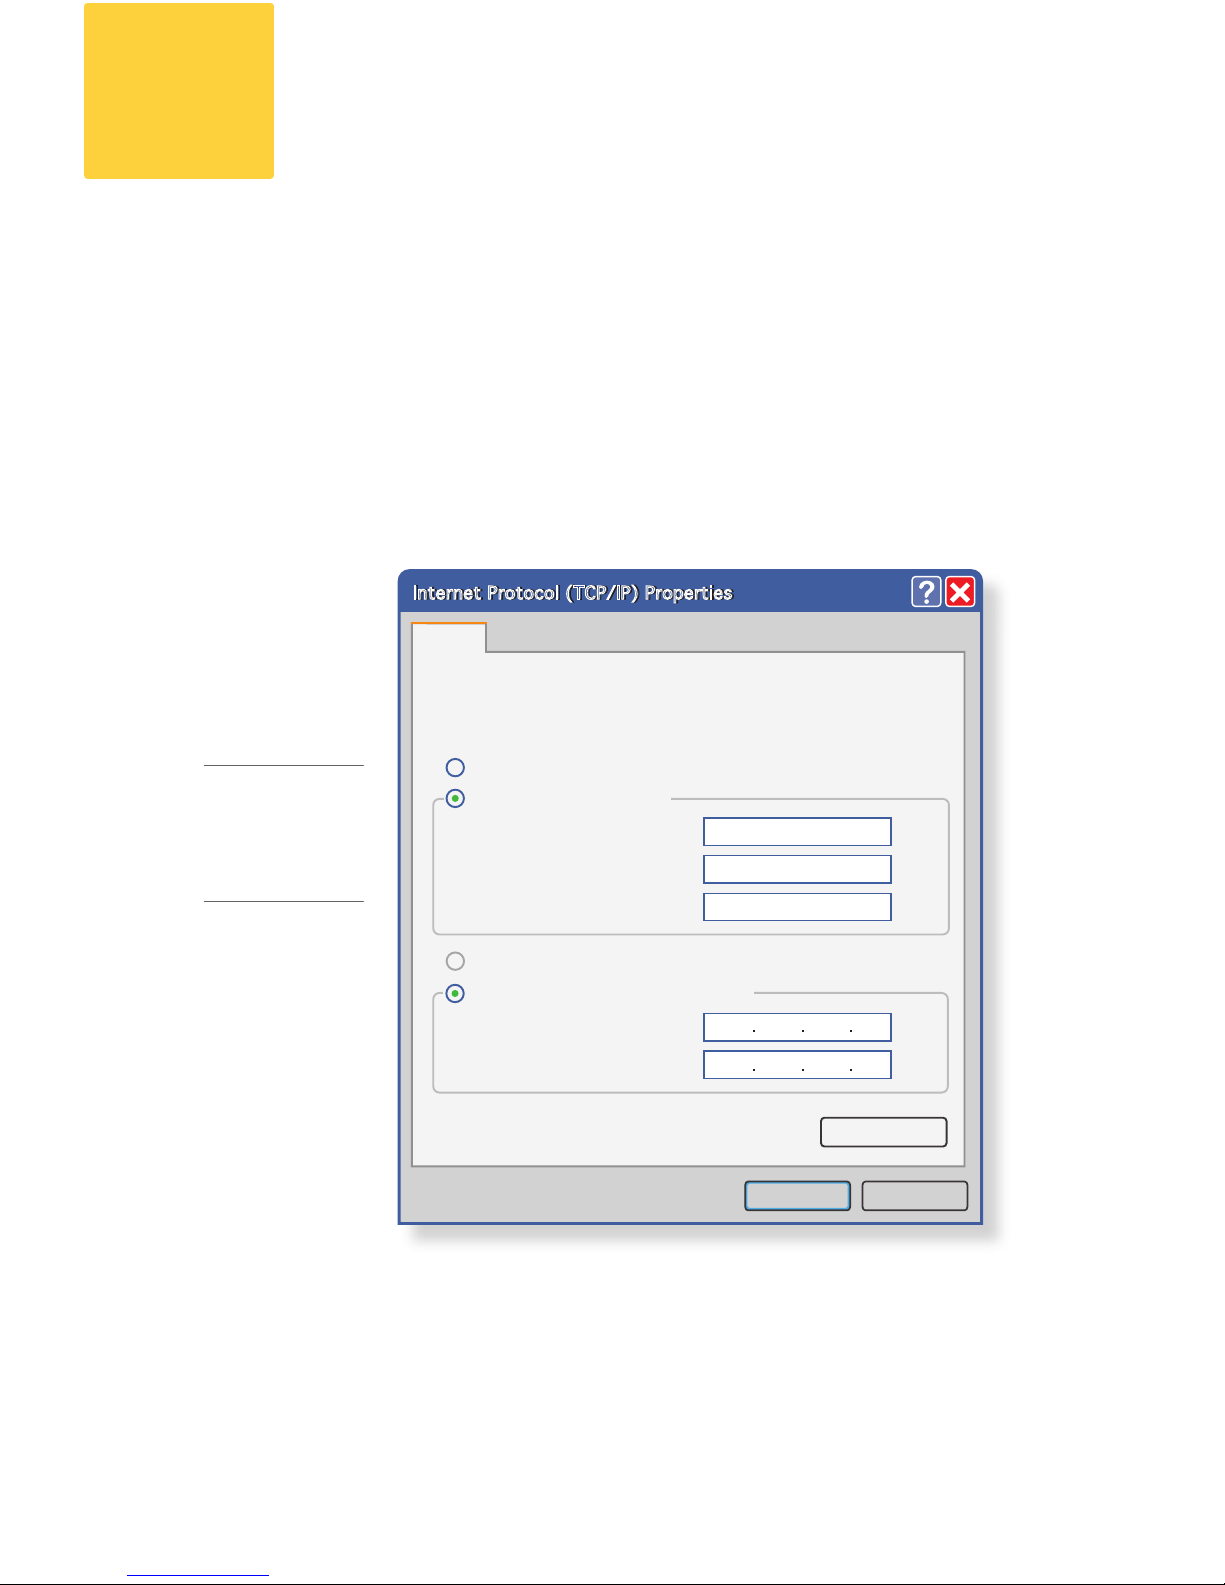
To connect to the Blocker, you will need to temporarily change the
IP address of your computer.
First, make a note of your current IP conguration settings as you will
need to revert to these settings later.
Then, make the following changes to your IP address:
IP Address: • 192.168.42.43
Subnet Mask: • 255.255.255.0
Gateway: • 192.168.42.1
Change Your IP Address
3
FOR MORE
info
On changing your
IP address in a
Windows or Mac
environment, see
Appendix A.
Internet Protocol (TCP/IP) Properties
You can get IP settings assigned automatically if your network supports
this capability. Otherwise, you need to ask your network administrator for
the appropriate IP settings.
General
Obtain an IP address automatically
Use the following IP address:
IP address:
192 . 168 . 42 . 43
Subnet mask: 255 . 255 . 255 . 0
Default gateway: 192 . 168 . 42 . 1
Obtain DNS server address automatically
Use the following DNS server addresses:
Preferred DNS server:
Alternate DNS server:
Advanced...
OK Cancel
Internet Protocol (TCP/IP) Properties
Page 5

- Quick Start Guide -
Place the Blocker in a location that provides enough air ow to
prevent overheating.
Plug the Blocker’s power cable into an electrical outlet.
Plug In
96I6H:G>6A
&
'
47-21639-01
96I6
H:G>6A
&
'
POWER INPUT
4
Page 6
- Cisco Spam & Virus Blocker -
- Quick Start Guide -
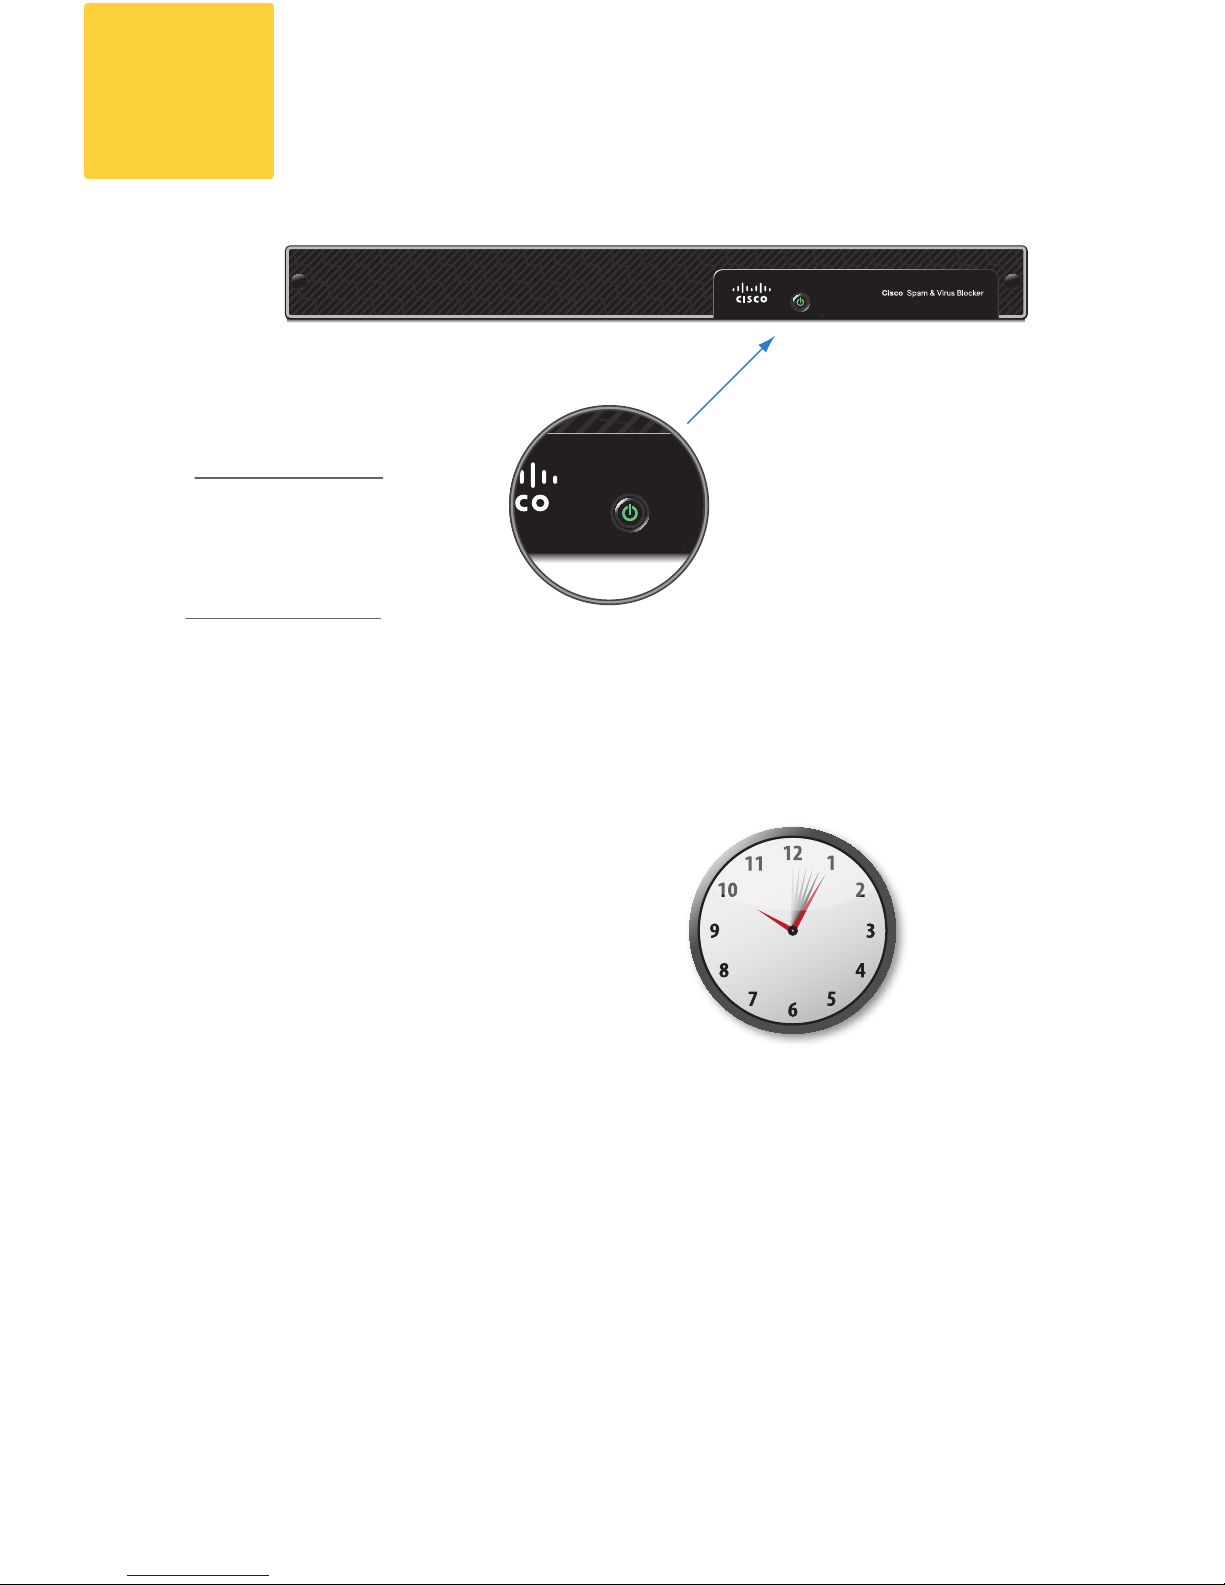
Power up by pressing the On/Off switch on the front panel of the
appliance. After the machine powers up, a solid green light indicates
that the machine is running.
Power Up
WAIT 5 MINUTES
POWER
5
important
A ashing green
power light indicates
that the machine is
plugged in but has not
yet powered up.
Page 7

- Quick Start Guide -
The Blocker has two network ports: Data 1 and Data 2.
For the purposes of setup, connect to Data 1 as your management
interface and congure incoming email on the Data 2 interface.
You can change these settings after the initial installation if you wish.
96I6
&
'
96I6
H:G>6A
&
'
Connect to the Blocker
Connect the
Data 1 port to your
computer using an
ethernet cable.
Connect the
Data 2 port to the
network using an
ethernet cable.
DATA 1
management: 192.168.42.42
6
DATA 2
incoming email
Page 8

- Cisco Spam & Virus Blocker -
- Quick Start Guide -
Go to your management interface by entering the following URL in a
web browser: http://192.168.42.42
The login page for the Blocker opens.
Enter the following login information:
Username: • admin
Password: • cisco
Log on to the Blocker
cisco.ex.com
7
Page 9

- Quick Start Guide -
The System Setup Wizard starts automatically.
The Blocker uses a self-signed certicate that may trigger a warning
from your web browser. You can simply accept the certicate and
ignore these warnings.
Don’t forget to write down your new administrator password
and keep it in a safe place!
Run the System Setup Wizard
8
Set anti-spam and anti-virus
security settings.
Enter network information
(gathered in Step 1).
Enter registration information.
Accept license.
Review the conguration
summary page.
Log back in to the appliance
with the username admin
and the new password you set
in the System Setup Wizard.
Page 10

- Cisco Spam & Virus Blocker -
- Quick Start Guide -
Almost there....
You have completed the Blocker conguration. Now, you need to
make changes in your network environment to ‘go live’ and allow the
Blocker to process email.
The following data ow diagram highlights network settings that you
may need to change.
Go Live
Internet
Firewall or Router
Cisco Spam & Virus Blocker
Mail Server
Clients
DNS (MX Records)
9
Page 11

- Quick Start Guide -
To allow the Blocker to receive email, you may need to change the
following network settings:
MX RECORDS
If your MX records point to a mail server, or if your spam and virus
solution is hosted, you will need to change your MX records to
point to the Blocker. To determine these settings, review your
DNS records. Note that it can take up to 72 hours for DNS setting
changes to propagate.
PORTS
In your rewall or router, you need to open the following ports:
PORT 25. • Ensure that Port 25 is open for inbound and outbound
trafc. You must also ensure that Port 25 trafc is directed to the
Blocker. To determine your current Port 25 settings, review the
port settings on your rewall or router.
PORT 80. • Ensure that Port 80 is open for outbound trafc. This
port is used to download important updates to your Blocker,
such as virus signatures and information about what companies
send spam to your network.
PORT 443. • Ensure that Port 443 is open for outbound trafc.
This port is used to update information about your email trafc to
Cisco. The information your Blocker shares with Cisco is used to
enhance the algorithms that determine which email is spam and
which email is legitimate.
Important: Port 443 is used to upload registration data and
download the permanent feature keys. If you do not open this
port, your feature keys cannot be downloaded.
Note: You may need to open other rewall ports in addition to those
listed above. Please see “Firewall Information” in the Cisco Spam &
Virus Blocker User Guide.
NAT SETTINGS
If your rewall or router is congured for Network Address
Translation (NAT), you need to congure port fowarding. To
determine if you need to make changes, review the NAT settings
on your router or rewall.
Configure Network Settings
10
FOR MORE
info
About your
MX records,
see
Appendix B.
FOR MORE
info
About
changing NAT
settings, see
Appendix C.
Page 12

- Cisco Spam & Virus Blocker -
- Quick Start Guide -
Use the system test to verify that the Blocker is running properly. On
the Next Steps page, enter an email address that is valid in your mail
server, and click Run System Test.
A successful system test sends a welcome email to the account you
entered during the Blocker conguration. Check this account to verify
you received the email.
FINAL TEST
Send an email from a private email account (such as Gmail or Yahoo!
Mail) to your company email account. Click Monitor > Incoming Mail
to check your mail reports. If the Blocker processed the test
message, the email domain of your personal email account appears
in the Incoming Mail report.
Test the Blocker
11
System Test
Verifying internet connection...
Verifying MX record information...
Connecting to your Exchange Server...
System test complete. Check your admin inbox for a Welcome Message.
The system test checks Blocker for internet connectivity and basic mail handling.
Enter an email address that exists in your Exchange/Mail server:
Run the Active Directory wizard so that Blocker only accepts incoming
email verified against the Active Directory server.
Send email to your company account from a personal account like Gmail
or Yahoo!
Wait for your message. Within a few minutes, you should receive your
message.
Check Mail Reports. The email domain you used to send the test
message shold be listed in the Incoming Mail Reorts.
> View Incoming Mail Reports
> Active Directory Wizard
Blocker supports configuration of other LDAP servers without a wizard.
Whatʼs next?
Is Blocker Receiving Email?
Active Directory Configuration
Just Got Easy...
If the system test
is successful, you
should see the
following message.
Page 13

- Quick Start Guide -
You can run the Active Directory Wizard to enable the Blocker to
accept email for users veried against your Active Directory server.
This adds another layer of security to your network.
To run the Active Directory Wizard, go to System Administration
LDAP. Select the “using Active Directory Wizard” checkbox, and then
click Add LDAP Server Prole.
Note: You will need the hostname and login information for your
Active Directory account to run the Active Directory Wizard.
Important: As you make conguration changes in the GUI, you must
explicitly commit those changes by clicking the Commit Changes
button. This button appears when you have uncommitted changes
that need to be saved.
Run the Active Directory Wizard
(OPTIONAL)
12
Page 14

- Cisco Spam & Virus Blocker -
- Quick Start Guide -
13
Configuration Summary
Review the following details of your conguration.
MANAGEMENT
You can manage your Blocker from the management port (Data 1)
by entering http://192.168.42.42, or via the IP address assigned to
your Data 2 interface after you have completed the System
Setup Wizard. If you reset your conguration to factory default
settings (for example, by re-running the System Setup Wizard),
you can only access the Management interface from the Data 1
port (http://192.168.42.42), so ensure you have a connection to
the Data 1 port.
Also, verify that you open rewall Ports 80 and 443 on your
management interface.
INCOMING EMAIL
After running the System Setup Wizard, your Data 2 port is
congured for inbound email and management settings are enabled
on this interface.
OUTBOUND EMAIL
After running the System Setup Wizard, your Blocker is congured
to accept inbound email. You can also congure it to relay outbound
email. For instructions on conguring outbound email, see the
Cisco Spam & Virus Blocker User Guide.
COMPUTER IP ADDRESS
Remember to change your computer IP address back to the original
settings that you noted in Step 3.
warning
You must shut down your Blocker from the
System Administration > Shutdown/Reboot
page to prevent corruption of your queue
and conguration les.
Page 15

- Quick Start Guide -
Congratulations, you have successfully installed the Cisco Spam and
Virus Blocker!
You may want to use message tracking and reporting to better
understand how the Blocker is defending your network:
MESSAGE TRACKING
You can view details about message delivery and blocking by
running queries using the Message Tracking service (in the GUI).
To access message tracking, go to Monitor > Message Tracking.
REPORTING
You can view statistics about spam and virus blocking on your
network by viewing reports available in the Email Security Monitor
(in the GUI). To access the reporting overview page, go to
vMonitor > Overview.
MORE INFORMATION
There are other features you may want to congure for your Blocker.
For more information about conguring message tracking and
reporting and for details about other available Blocker features,
see the Blocker documentation (located on the Documentation CD
shipped with your appliance).
You can nd electronic versions of user guides or request support
by visiting: http://www.cisco.com/support
Additional information about the Blocker can be found at:
www.cisco.com/go/blocker
You’re Done
!
Page 16

- Cisco Spam & Virus Blocker -
- Quick Start Guide -
Appendix
Changing Your Laptop IP Address (for Step 3)
For Windows
Go to the Start menu and click 1. Control Panel. The Control Panel opens.
Double-click 2. Network Connections. The Network Connections
window opens.
Right-click on the LAN or the correct Local Area Connection, and then 3.
click Properties.
Select4. Internet Protocol (TCP/IP), and then click Properties.
Check 5. Use the following IP Address and enter 192.168.42.43 for the IP
address, and 255.255.255.0 for subnet mask.
Click 6. OK and Close to exit the dialog box.
For Mac
Launch the Apple Menu. Select 1. System Preferences. Then click
Network Control Panels and click TCP/IP.
Select the network conguration with the green icon lit up from the TCP/2.
IP. This is your active connection. Then click Congure.
Go to 3. Ethernet settings, select Manually from the drop-down menu.
In the IP Address eld, enter 192.168.42.43, and enter 255.255.255.0 in 4.
the Subnet Mask eld.
Click 5. Apply.
a
Page 17

- Quick Start Guide -
About MX Records (for Step 10)
A DNS record is like an entry in an Internet “phone book” for your domain. It
translates a hostname (such as example.com) into an IP address. Included
in the DNS record is an A record that maps the appliance hostname to its IP
address and an MX record that directs incoming email to the correct mail
server.
If your MX record routes mail to your email server, you will need to change
your MX records to point to your Blocker appliance. If you use a NAT device,
you may be able to skip this step (see Appendix C About Network Address
Translation).
To change your MX records, locate the MX records on your DNS server. You
may have a local DNS server, or your DNS records may be hosted by a DNS
provider. The Blocker must be the rst hop in your network, so ensure that
you congure email to route through the Blocker before any other mail server.
To change your MX records, consult your DNS administrator or your DNS
provider documentation.
In the following example, the MX record pointed to the mail server originally,
and is modied to point to the Blocker:
Before
A Record: exchange.mydomain.com IN A 192.0.2.3
MX Record: mydomain.com in MX exchange.mydomain.com
After
A Record: exchange.mydomain.com IN A 192.0.2.3
A Record: mail.mydomain.com IN A 192.0.2.2
MX Record: mydomain.com in MX mail.mydomain.com
Appendix
b
Firewall or Router
192.0.2.1
Cisco Spam & Virus Blocker
192.0.2.2
mail.mydomain.com
Mail Server
192.0.2.3
Page 18

- Cisco Spam & Virus Blocker -
Appendix
c
About Network Address Translation (for Step 10)
NAT is the translation of an IP address used within one network to a
different IP address used in another network. For example, you might want
route email to a public IP address, while keeping all of your other addresses
private. If you use Network Address Translation on your router or rewall, you
may not need to change your MX records, but you may need to congure
port forwarding to ensure email gets routed to the Blocker.
For instructions on changing your NAT translation tables, consult the
documentation for your router or rewall.
In this example, the router/rewall uses NAT to route email from the
public IP address of 192.0.2.1 to the internal IP address of the mail server
at 192.168.0.7. The
MX records do not
need to be modied,
but port forwarding
must be changed to
route Port 25 trafc
to the Blocker.
Before
A Record: mail.mydomain.com IN A 192.0.2.1
MX Record: mydomain.com IN MX mail.mydomain.com
Port forwarding: Port 25 trafc to 192.168.0.7
After
A Record: mail.mydomain.com IN A 192.0.2.1
MX Record: mydomain.com IN MX mail.mydomain.com
Port forwarding: Port 25 trafc to 192.168.0.8
SMTP route between Blocker and mail server
Firewall or Router with NAT
public IP : 192.0.2.1
PORT FORWARDING
ADD SMTP ROUTES
Cisco Spam & Virus Blocker
private IP : 192.168.0.8
mail.mydomain.com
Mail Server
private IP : 192.168.0.7
Page 19

© Copyright 2008 Cisco IronPort Systems LLC ®. All rights reserved.
The Cisco logo, IronPort Systems, Cisco Spam and Virus Blocker, Virus
Outbreak Filters, Context Adaptive Scanning Engine (CASE),
and SenderBase are trademarks of Cisco IronPort Systems LLC.
Page 20

Cisco Spam & Virus Blocker
© Cisco 2008
PN 78-18833-01
 Loading...