

Cisco SPA8800 Configuring
Application Note
Revised June 10th 2009
Configuring the Cisco SPA8800 IP Telephony Gateway in
®
an Asterisk
Environment
© 2009 Cisco Systems, Inc. All rights reserved. Page 1 of 69

Configuring the Cisco SPA8800 IP Telephony Gateway in an Asterisk Environment
TableofContents
Introduction 5
Audience 5
Scope 5
Related Documents 5
Overview 6
Summary of Tasks in this Document 6
Requirements 7
Configuring Asterisk for a SPA8800 7
Summary: 7
Configuring the Asterisk Server 8
Editing the /etc/asterisk/sip.conf file 8
Editing the /etc/asterisk/extensions.conf file 10
Loading the Modified Configuration 10
Configuring the SPA8800 12
SPA8800 Ports and Connections 12
Connect the SPA8800 12
Factory Resetting the SPA8800 13
Configuring Static IP Address Addressing 13
© 2009 Cisco Systems, Inc. All rights reserved. Page 2 of 69

Configuring the Cisco SPA8800 IP Telephony Gateway in an Asterisk Environment
Upgrading the SPA8800's Firmware 15
Configuring Phone Extensions on the SPA8800 FXS Phone Ports 16
Configuring FXO Line Ports on the SPA8800 17
Configuring FXO Line Dial Plans for inbound PSTN call Routing 19
Testing the Phone System 20
T.38 Faxing 21
Codecs 23
Troubleshooting 24
Troubleshooting Rejected Because Extension not Found 25
Failing Inbound from ITSP 25
Failing Inbound from PSTN 25
SPA8800 Debug and syslog 26
SPA8800 SIP Debugging 27
Troubleshooting with Asterisk CLI Commands 29
sip show peers 29
sip show peer <PeerName> 29
sip show users 31
sip show user <UserName> 31
Sample Traces 31
Trace of Asterisk Server Registering to ITSP 32
Trace of SPA922 Registering to an Asterisk Server 33
Trace of SPA8800 Phone Ports Registering 36
© 2009 Cisco Systems, Inc. All rights reserved. Page 3 of 69

Configuring the Cisco SPA8800 IP Telephony Gateway in an Asterisk Environment
Trace of Call between SPA8800 FXS1 and FXS2 42
Trace of SPA8800 FXS Port Calling SPA922 IP Phone 49
Trace of SPA8800 FXS 1 Making Outbound Call 52
Trace of SPA8800 FXS Receiving Inbound Call 60
Trace of FAX Line Toggle Code #99 68
Gathering Information for Support 69
© 2009 Cisco Systems, Inc. All rights reserved. Page 4 of 69

Configuring the Cisco SPA8800 IP Telephony Gateway in an Asterisk Environment
Introduction
The Cisco® SPA8800 IP Telephony Gateway provides four RJ-11 FXS and four FXO ports, a
10/100BASE-T RJ-45 Ethernet interface to connect to either a router or multilayer switch, and an
auxiliary port for local administration. It also provides a single multiport RJ-21 50-pin connector.
The SPA8800 can in only a matter of minutes, be easily be configured as an Asterisk
gateway.
Calls originating from the public switched telephone network (PSTN) can be terminated by the
SPA8800's FXO ports and routed to analog or IP phones based on an Asterisk server's
configuration. Analog phones connected to the SPA8800 can make low-cost VoIP calls via an
Internet Telephony Service Provider (ITSP) or can make calls via the PSTN.
Many interesting call routing options are possible using Asterisk to control the SPA8800 gateway.
Asterisk can be configured to trunk the SPA8800's four FXO ports together into a trunk group. A
trunk group allows the PSTN lines connected to the FXO ports to be over-subscribed and shared
among all configured analog and IP phones, effectively lowering telephony costs by not requiring a
dedicated line per phone. For example, you can have 4 connected PSTN lines and share them with
any number of phones. When all 4 lines are busy, the 5
th
user will hear a congestion tone.
®
FXO
Additionally, the SPA8800's FXS ports can be used in other ways, including connecting a nalog
phones, door phones, and fax machines.
The SPA8800 supports fax with G.711 pass-through or real-time fax over IP via T.38 fax relay and
also supports the G.711 A-law, G.711
In the event that you only need FXS ports and do not need any FXO ports, consider using the
Cisco SPA8000 8-Port IP Telephony Gateway. The SPA8000 configuration is very similar to the
SPA8800.
µ-law, G.726, G.729A, G.723.1 voice codecs.
Audience
This application note is targeted at anyone who needs an FXO gateway for their Asterisk server. It
is expected that readers of this document are familiar with the administration tasks involved with
configuring VoIP in an Asterisk environment.
Scope
This scope of this document is limited to configuring the SPA8800 in an Asterisk environment and
does not address the following topics:
• Installing an Asterisk server
• Advanced Asterisk configuration
• SPA8800 localization
• Security
Refer to the Related Documents for additional configuration and background information.
Related Documents
• Asterisk: http://www.asterisk.org
• Asterisk Book from O'Reilly: http://www.asteriskdocs.org/
• Cisco SPA8800 Administration Guide
© 2009 Cisco Systems, Inc. All rights reserved. Page 5 of 69

Configuring the Cisco SPA8800 IP Telephony Gateway in an Asterisk Environment
• Cisco Small Business IP Phones Admin Guide
• Cisco Small Business IP Phones User Guide
• Cisco Community Central: Small Business Community ATA Support
Overview
Configuring the SPA8800 is a relatively trivial task and is similar to configuring any of the Sipura /
Linksys / Cisco ATA and SPA9000 Voice System devices. Troubleshooting configuration problems
due to incorrectly typed information in configuration fields requires advanced network and Asterisk
troubleshooting skills. This application note walks you through configuring a SPA8800 and also
provides sample traces that may be of use to you when you are troubleshooting your SPA8800 in
an Asterisk environment.
By the end of this document, an Asterisk phone user, analog or IP, will be able to pick up a phone
and dial out via the PSTN or ITSP, depending on the steering digit they use.
Summary of Tasks in this Document
You must complete the following tasks in order to use the SPA8800 in an Asterisk environment:
1. Gather Basic Information
2. Configure the Asterisk Server
a. Edit the sip.conf file
b. Edit the extensions.conf file
c. Connect to the Asterisk Server's console
d. Reload Asterisk modules
3. Connect the SPA8800
4. Configure the SPA8800
a. Configure static IP address and related information
b. Upgrade the SPA8800's firmware
5. Configure phone extensions on the SPA8800 FXS Phone N ports
6. Configure FXO line parameters on the SPA8800 LINE N ports
7. Configure FXO line dial plans for inbound PSTN call routing
8. Test the phone system for appropriate behavior
© 2009 Cisco Systems, Inc. All rights reserved. Page 6 of 69

Configuring the Cisco SPA8800 IP Telephony Gateway in an Asterisk Environment
Requirements
You need the following equipment and services:
• A functional Asterisk server
• A functional LAN with network connectivity to the Internet and an optional Internet Telephony
Service Provider (ITSP)
• A SPA8800
• One to four analog phones
• Optional IP phones such as the SPA525G, SPA9x2, SPA9x1, or WIP310 (wireless) IP phones
Configuring Asterisk for a SPA8800
Before you configure your Asterisk server for the SPA8000, you need to gather some basi c
information:
1. Static IP address for the SPA8800. By default, this device is a DHCP client, but will be of no
use to you if it is assigned a new dynamic IP address periodically. In this document, I use
192.168.2.237/24
2. Gateway / Default router, DNS, and NTP server IP addresses
3. Extension numbers for up to four analog phones to be connected to the SPA8800's PHONE
FXS ports 1-4. In this document, I use 101, 102, 103, and 104.
4. Decide how many PSTN lines will be connected to the SPA8800's LINE FXO ports 1-4. In this
document, I use two PSTN lines connected to FXO LINE ports 2 and 3 [UDP 5161 and 5261
respectively]
5. Decide what steering digits to use. In this document, I use 8 for PSTN and 9 for ITSP
6. Decide what phone or phones to route inbound PSTN and ITSP calls to. In this document, I will
route all inbound calls to the analog phone associated with extension 101.
7. Decide what to name the SPA8800 context group in the extensions.conf file. In this document,
I use the [fxsgroup] context.
Summary:
• SPA8800 static IP address: 192.168.2.237/24
• Gateway / Default router, DNS, and NTP server IP addresses
• Analog phones: 101-104
• PSTN lines: 2, LINE 2 [UDP 5161] and LINE 3 [UDP 5261]
• Steering digits: 8 for PSTN, 9 for ITSP
• Inbound PSTN call target: 101
• Inbound ITSP call target: 101
© 2009 Cisco Systems, Inc. All rights reserved. Page 7 of 69

Configuring the Cisco SPA8800 IP Telephony Gateway in an Asterisk Environment
Configuring the Asterisk Server
Once you have gathered all of the basic information, you can begin configuring the Asterisk server.
Editing the /etc/asterisk/sip.conf file
# vim /etc/asterisk/sip.conf
[general]
…
…
;register => <DID>@<ITSP>:<password>:<DID>@<ITSP>/101
register =>
3615551212@sip.broadvoice.com:mypassword:3615551212@sip.broadvoice.com/101
…
…
;
;SPA8800 Changes
;define SPA8800 analog phone 1 extension 101
[101]
type=friend
username=101
secret=101
qualify=yes
nat=no
host=dynamic
canreinvite=no
context=fxsgroup
regext=101
;
;define SPA8800 analog phone 2 extension 102
[102]
type=friend
username=102
secret=102
qualify=yes
nat=no
host=dynamic
canreinvite=no
context=fxsgroup
regext=102
;
;define SPA8800 analog phone 3 extension 103
[103]
type=friend
username=103
secret=103
qualify=yes
nat=no
host=dynamic
© 2009 Cisco Systems, Inc. All rights reserved. Page 8 of 69

Configuring the Cisco SPA8800 IP Telephony Gateway in an Asterisk Environment
canreinvite=no
context=fxsgroup
regext=103
;
;define SPA8800 analog phone 4 extension 104
[104]
type=friend
username=104
secret=104
qualify=yes
nat=no
host=dynamic
canreinvite=no
context=fxsgroup
regext=104
;
;define SPA8800 pstn2 user
[pstn2]
type=friend
host=192.168.2.237 ;IP address of the SPA8800
port=5161 ;5161 is the default SIP port for line 2 on the SPA8800
dtmfmode=rfc2833
context=pstn2
insecure=very
;
;define SPA8800 pstn3 user
[pstn3]
type=friend
host=192.168.2.237 ;IP address of the SPA8800
port=5261 ;5261 is the default SIP port for line 2 on the SPA8800
dtmfmode=rfc2833
context=pstn3
insecure=very
;
[itsp1]
type=peer
user=phone
host=sip.broadvoice.com
fromdomain=sip.broadvoice.com
fromuser=3612887272
secret=TitSSTQqpp
username=3612887272
insecure=very
authname=3612887272
dtmfmode=inband
dtmf=inband
canreinvite=no
qualify=yes
© 2009 Cisco Systems, Inc. All rights reserved. Page 9 of 69

Configuring the Cisco SPA8800 IP Telephony Gateway in an Asterisk Environment
nat=yes
context=itsp1
;eof
Editing the /etc/asterisk/extensions.conf file
# vim /etc/asterisk/extensions.conf
…
…
; SPA8800 Changes
;outbound dialing
[fxsgroup]
;
;
; dial 7 to explicitly use FXS3
exten => _7.,1,Dial(SIP/${EXTEN:1}@pstn3,60,r)
;
8 as a steering digit:
; dial
; if FXS2 is not available, FXS3 will be used.
; if FXS3 is not available, the user hears congestion
exten => _8.,1,Dial(SIP/${EXTEN:1}@pstn2,60,r)
exten => _8.,2,Dial(SIP/${EXTEN:1}@pstn3,60,r)
;
; dial 9 to explicitly use ITSP
exten => _9.,1,Dial(SIP/${EXTEN:1}@itsp1,30,r)
;
; r causes ringing for calling party but audio is not
; passed until called party answers call
; T allows caller to transfer with #
exten => 101,1,Dial(SIP/101,60,rT)
exten => 102,1,Dial(SIP/102,60,rT)
exten => 103,1,Dial(SIP/103,60,rT)
exten => 104,1,Dial(SIP/104,60,rT)
exten => 200,1,Dial(SIP/200,60,rT)
exten => 201,1,Dial(SIP/201,60,rT)
;
;inbound from PSTN
[pstn2]
; t allows called person to transfer with a #
exten => 101,1,Dial(SIP/101,60,rt)
[pstn3]
exten => 201,1,Dial(SIP/201,60,rt)
;inbound calls from ITSP
[itsp1]
exten => 3615551212,1,Answer
;enable ring group of extensions 101, 102, and 200
exten => 3615551212,2,Dial(SIP/101&SIP/102&SIP/200,25,rt)
exten => 3615551212,3,Hangup
;eof
…
…
Loading the Modified Configuration
1. Connect to the Asterisk console:
© 2009 Cisco Systems, Inc. All rights reserved. Page 10 of 69

Configuring the Cisco SPA8800 IP Telephony Gateway in an Asterisk Environment
$ sudo asterisk –r
*CLI>
2. Use the reload command to load the changed configuration:
*CLI> module reload
This completes the Asterisk server configuration. You must now configure the SPA8800 to register
to the Asterisk server.
© 2009 Cisco Systems, Inc. All rights reserved. Page 11 of 69
Configuring the Cisco SPA8800 IP Telephony Gateway in an Asterisk Environment
Configuring the SPA8800
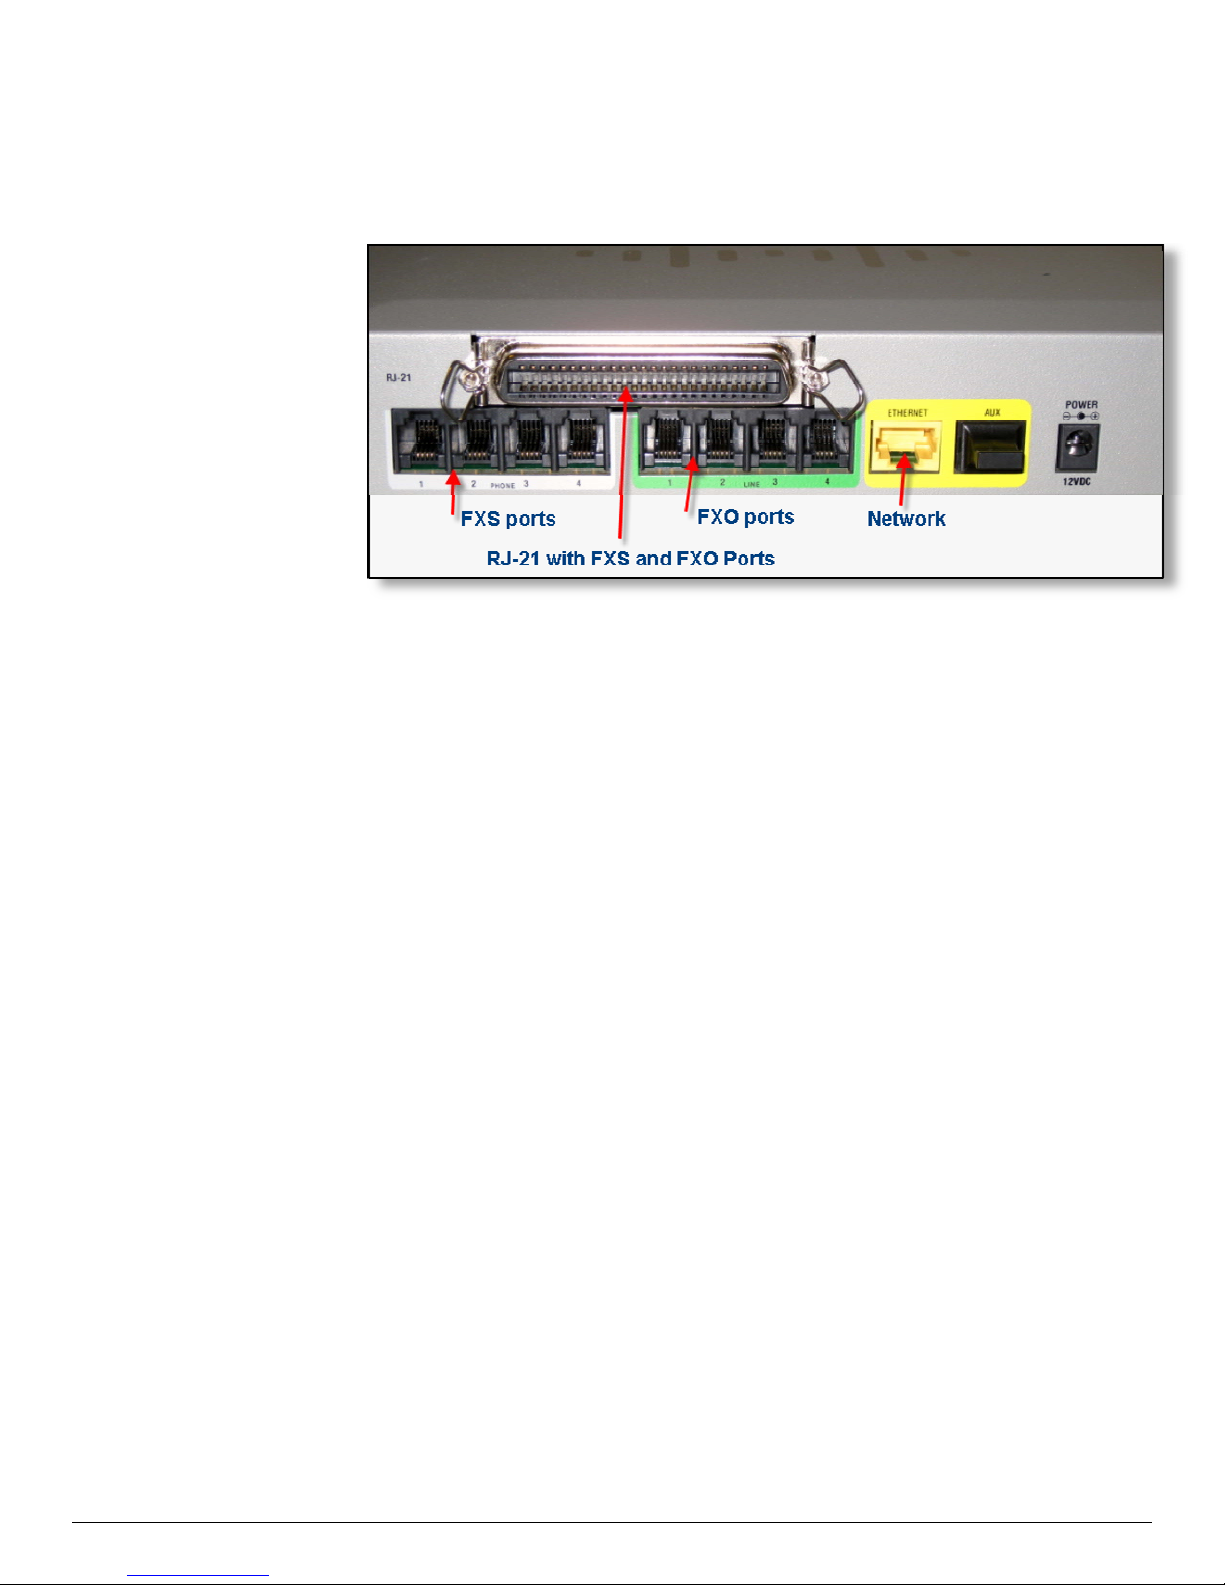
SPA8800 Ports and Connections
Figure 1The photograph shows the rear of the SPA8800 and its connections
Connect the SPA8800
a. Connect the ETHERNET port of the SPA8800 to the LAN switch.
b. Connect analog phones to the PHONE 1-4 FXS ports or use the multiport RJ-21
50-pin connector.
c. Connect PSTN lines to the LINE 1-2 F XO ports or use the multiport RJ-21 50-pin
connector.
d. Connect the power adapter.
e. Going off-hook with the analog phones will result in a fast-busy because the
SPA8800 has not yet been configured.
© 2009 Cisco Systems, Inc. All rights reserved. Page 12 of 69
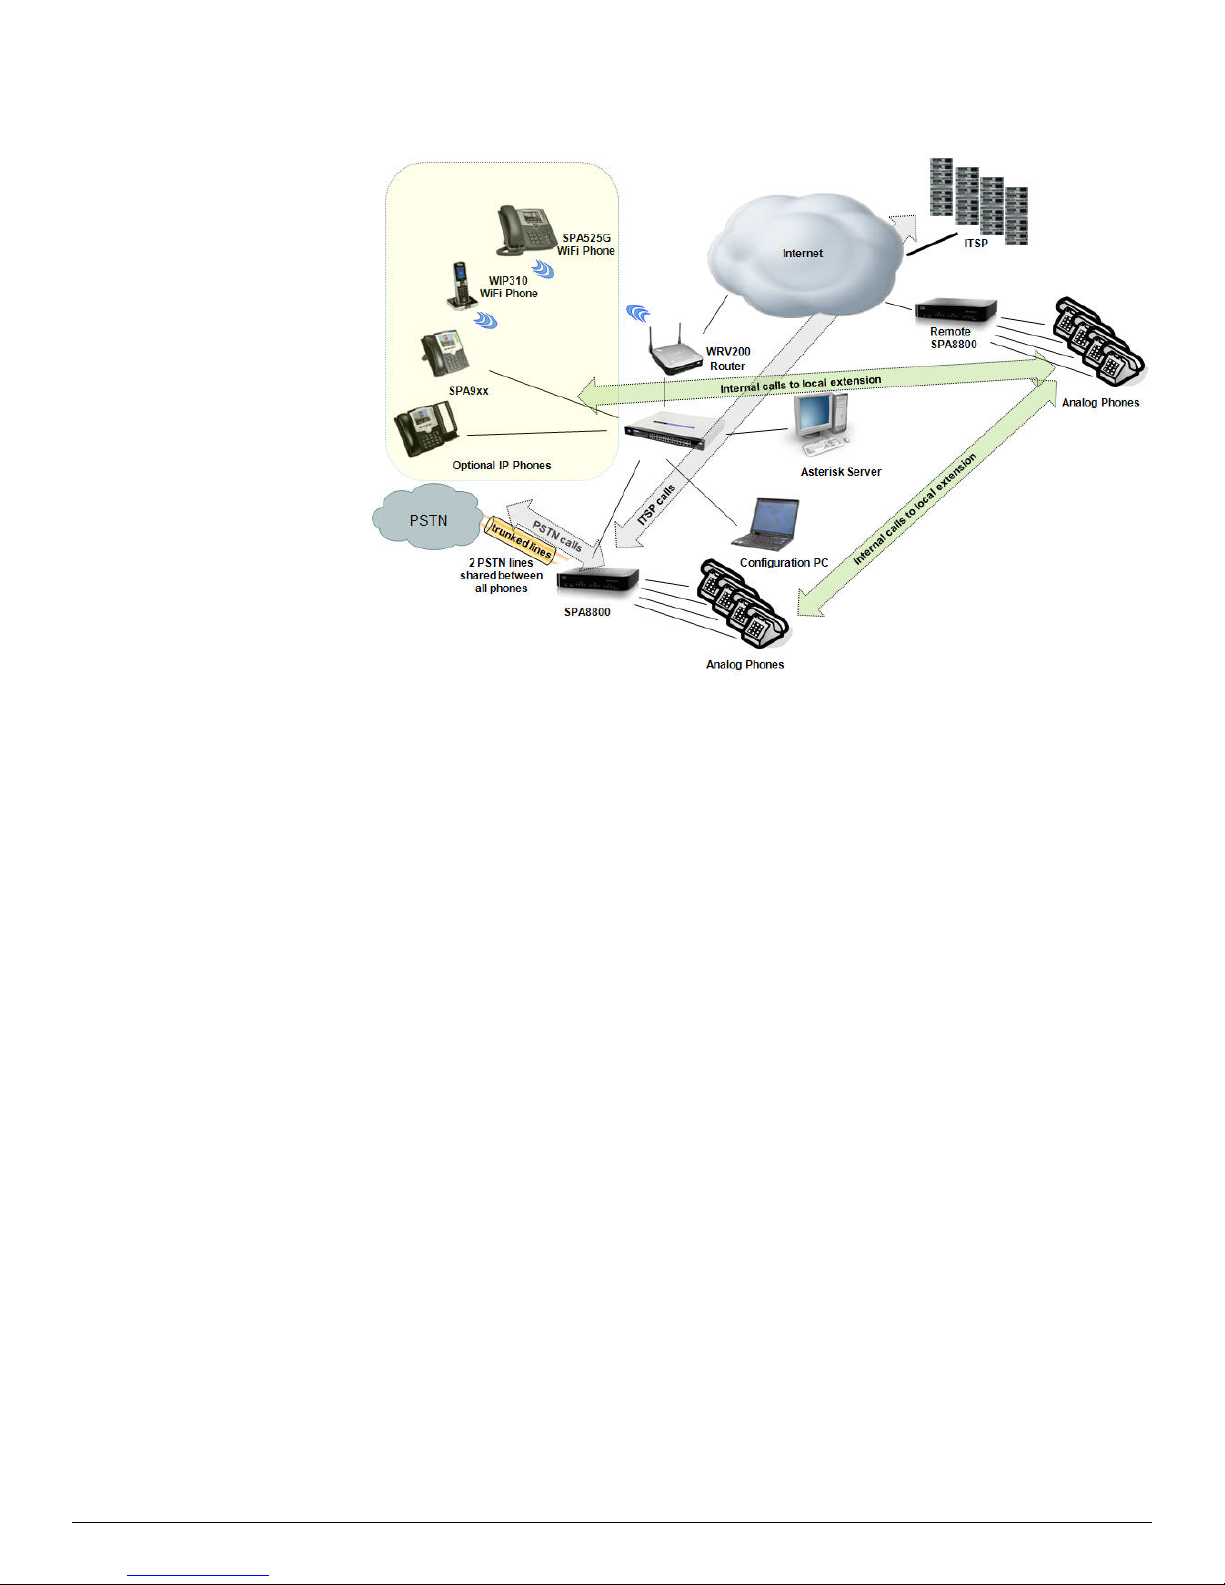
Configuring the Cisco SPA8800 IP Telephony Gateway in an Asterisk Environment
Figure 2: An example of deploying 2 SPA8800s in an Asterisk Environment
Factory Resetting the SPA8800
You should factory reset the SPA8800 so that you start from a known starting point.
f. Connect an analog phone to the SPA8800 PHONE 1 port
g. Go off-hook, ignore the fast-busy or silence
h. Dial **** [four asterisks or stars]
i. Dial 73738# when prompted
j. Press 1 to confirm reset
k. Hang up when prompted
Configuring Static IP Address Addressing
You must configure the SPA8800 with a static IP address because this address is defined in the
Asterisk Server's /etc/asterisk/sip.conf file.
l. Determine the SPA8800's Dynamically Assigned IP Address
i. Connect an analog phone to the SPA8800 PHONE 1 port
© 2009 Cisco Systems, Inc. All rights reserved. Page 13 of 69
ii. Go off-hook, ignore the fast-busy or silence
iii. Dial **** [four asterisks or stars]
iv. Dial 110# when prompted
v. Document the IP address
vi. Hang up
Configuring the Cisco SPA8800 IP Telephony Gateway in an Asterisk Environment
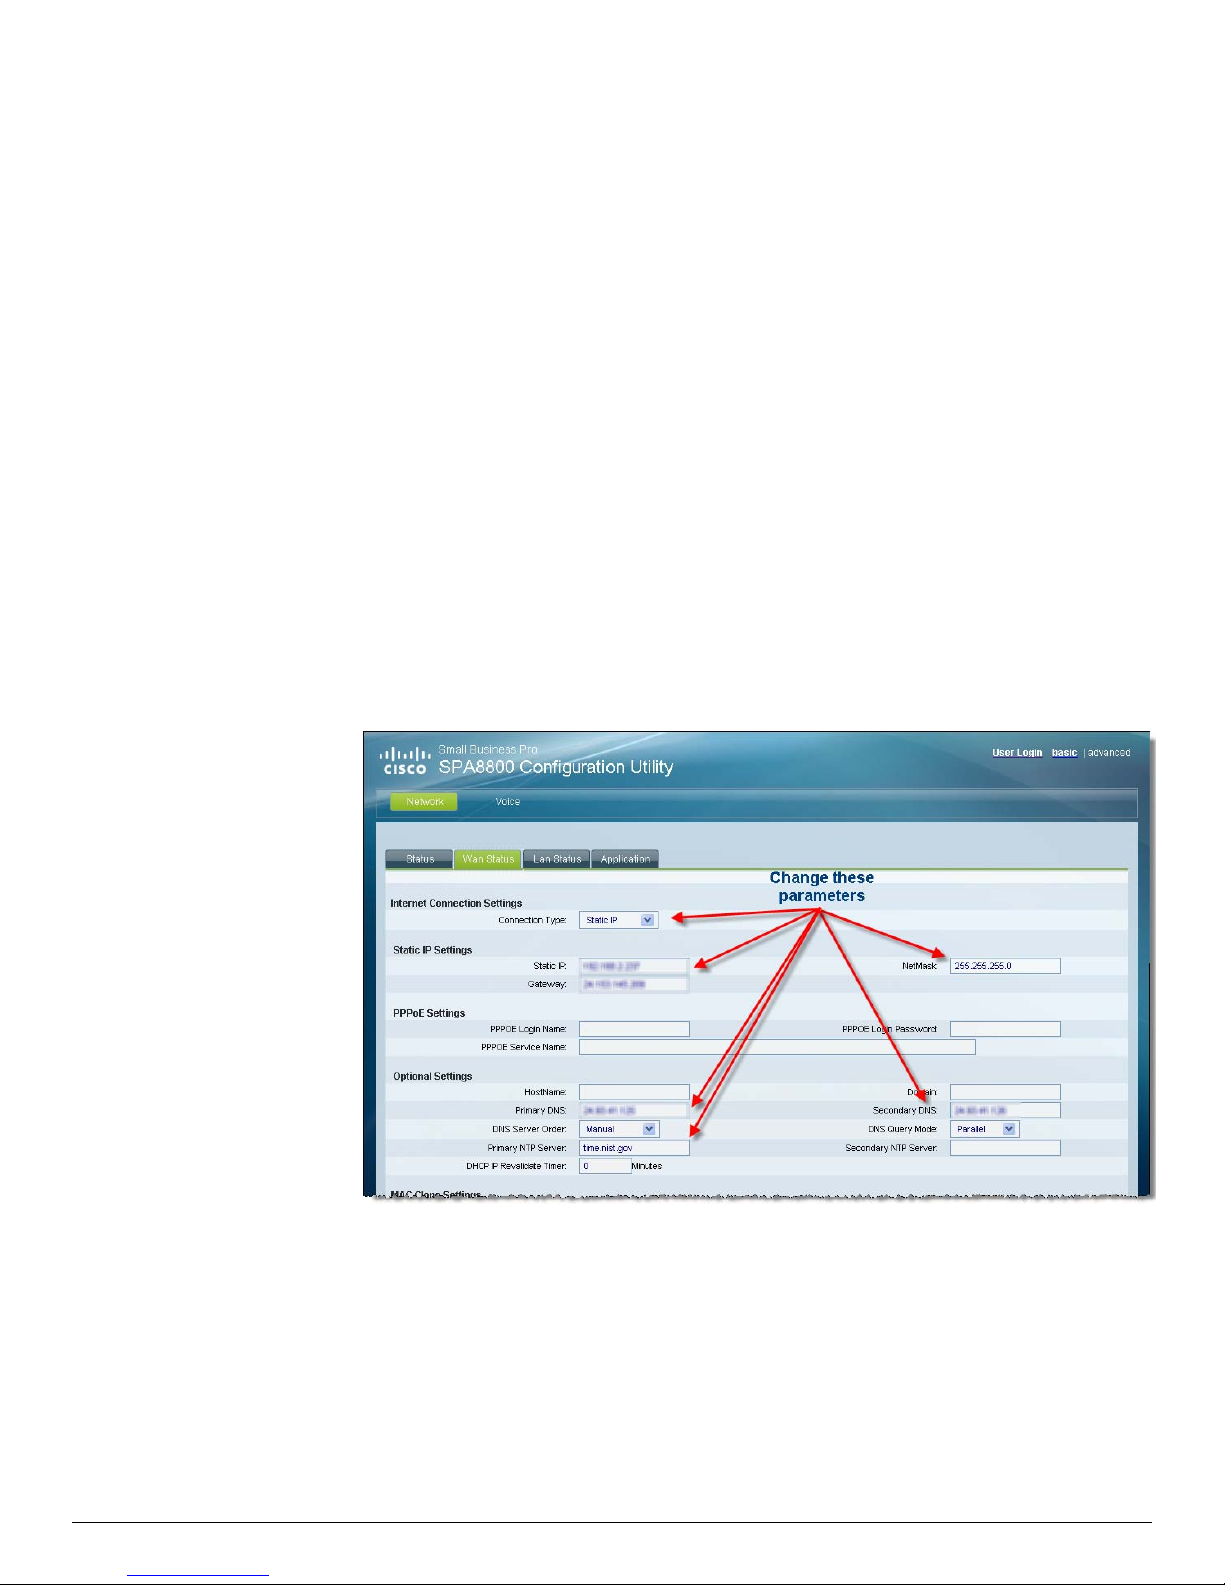
m. Direct your browser to the SPA8800's web user interface (web-ui)
http://<IP_address_of_SPA8800>/admin/advanced
n. Change the following parameters:
Network tab > Wan Status tab:
i. Internet Connection Settings > Connection Type: Static IP
ii. Static IP Settings:
1. Static IP:
2. Netmask:
3. Gateway:
iii. Optional Settings:
1. Primary DNS
2. Secondary DNS
3. Primary NTP Server
o. Click Submit All Changes
© 2009 Cisco Systems, Inc. All rights reserved. Page 14 of 69

Configuring the Cisco SPA8800 IP Telephony Gateway in an Asterisk Environment
Upgrading the SPA8800's Firmware
1. Direct your browser to the SPA8800's web user interface (web-ui)
http://<IP_address_of_SPA8800>/admin/advanced
2. Verify that Compare Network tab > Status tab > Product Information > Software Version:
is up to date with SPA8800 firmware available at the Cisco.com site. If newer firmware is
available, save it to disk and upgrade the SPA8800 as follows:
3. Copy the downloaded firmware image to your TFTP server's root directory
4. Cause the SPA8800 to retrieve the firmware by TFTP and install the new image:
http://IPADDRESSofSPA/upgrade?tftp://TFTPADDRESS/SPAFILE.bin
Where:
• IPADDRESSofSPA is the SPA8800 IP address
• TFTPADDRESS is the TFTP server's IP address
• SPAFILE.bin is the name of the downloaded firmware image
Example:
http://192.168.2.237/upgrade?tftp://192.168.2.20/spa8800-6-1-7-GW.bin
© 2009 Cisco Systems, Inc. All rights reserved. Page 15 of 69
Configuring the Cisco SPA8800 IP Telephony Gateway in an Asterisk Environment
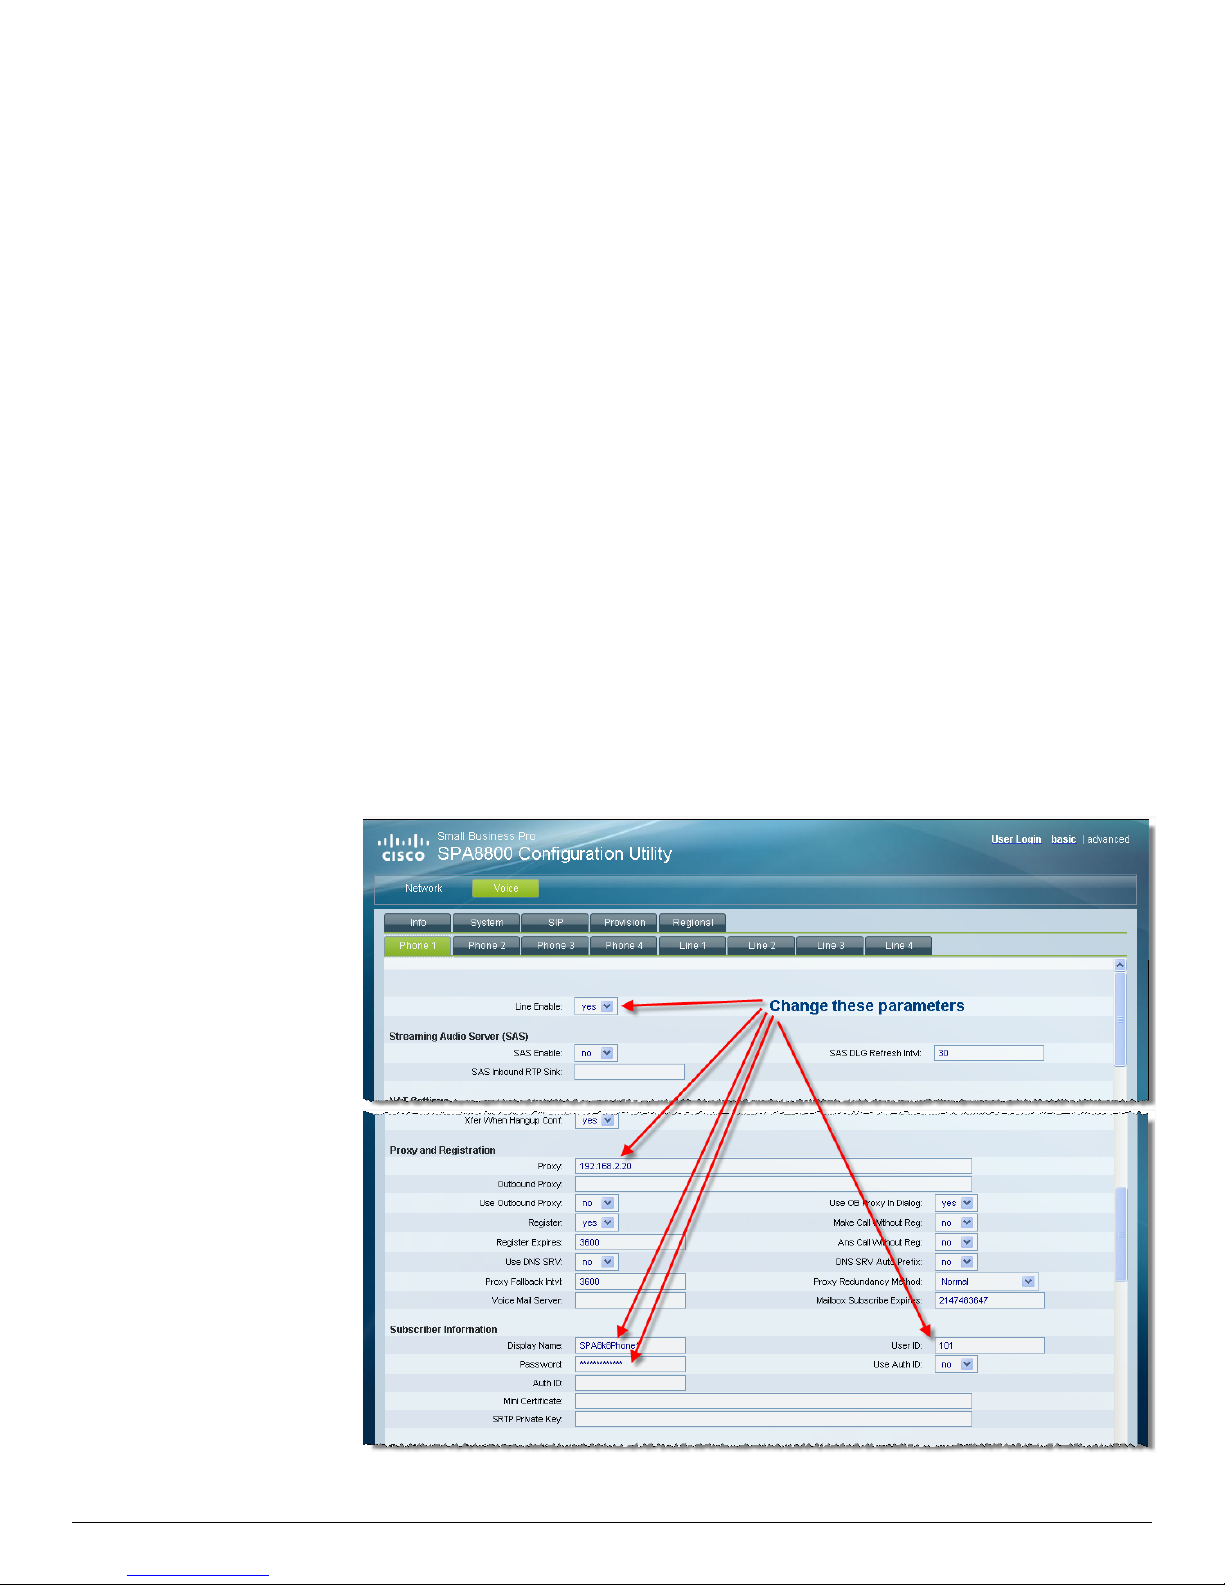
Configuring Phone Extensions on the SPA8800 FXS Phone
Ports
In this section, you will point the SPA8800 to the Asterisk Server as the SIP proxy and the provide
user credentials that you defined earlier in the sip.conf and extensions.conf Asterisk files.
This configuration defines the characteristics of the analog phone connected to the SPA8800 FXS
PHONE port.
1. Direct your browser to the SPA8800's web user interface (web-ui)
http://<IP_address_of_SPA8800>/admin/advanced
2. Voice tab > Phone 1 tab > Line Enable: yes
3. Voice tab > Phone 1 tab > Proxy and Registration > Proxy: 192.168.2.20
Where this is the IP address of the Asterisk Server
4. Voice tab > Phone 1 tab > Subscriber Information >
5. Display Name: SPA8k8Phone1
Where this name is assigned by you for easy identification
6. User ID: 101
Where 101 [username] is defined in the /etc/asterisk/sip.conf and
/etc/asterisk/extensions.conf files
7. Password: 101
Where the password [secret] is defined in the /etc/asterisk/sip.conf file
© 2009 Cisco Systems, Inc. All rights reserved. Page 16 of 69

Configuring the Cisco SPA8800 IP Telephony Gateway in an Asterisk Environment
8. Configure the remaining phones using the parameters that you defined in the
/etc/asterisk/sip.conf and /etc/asterisk/extensions.conf files.
9. Click Submit All Changes if you do not intend to complete the next step at this time.
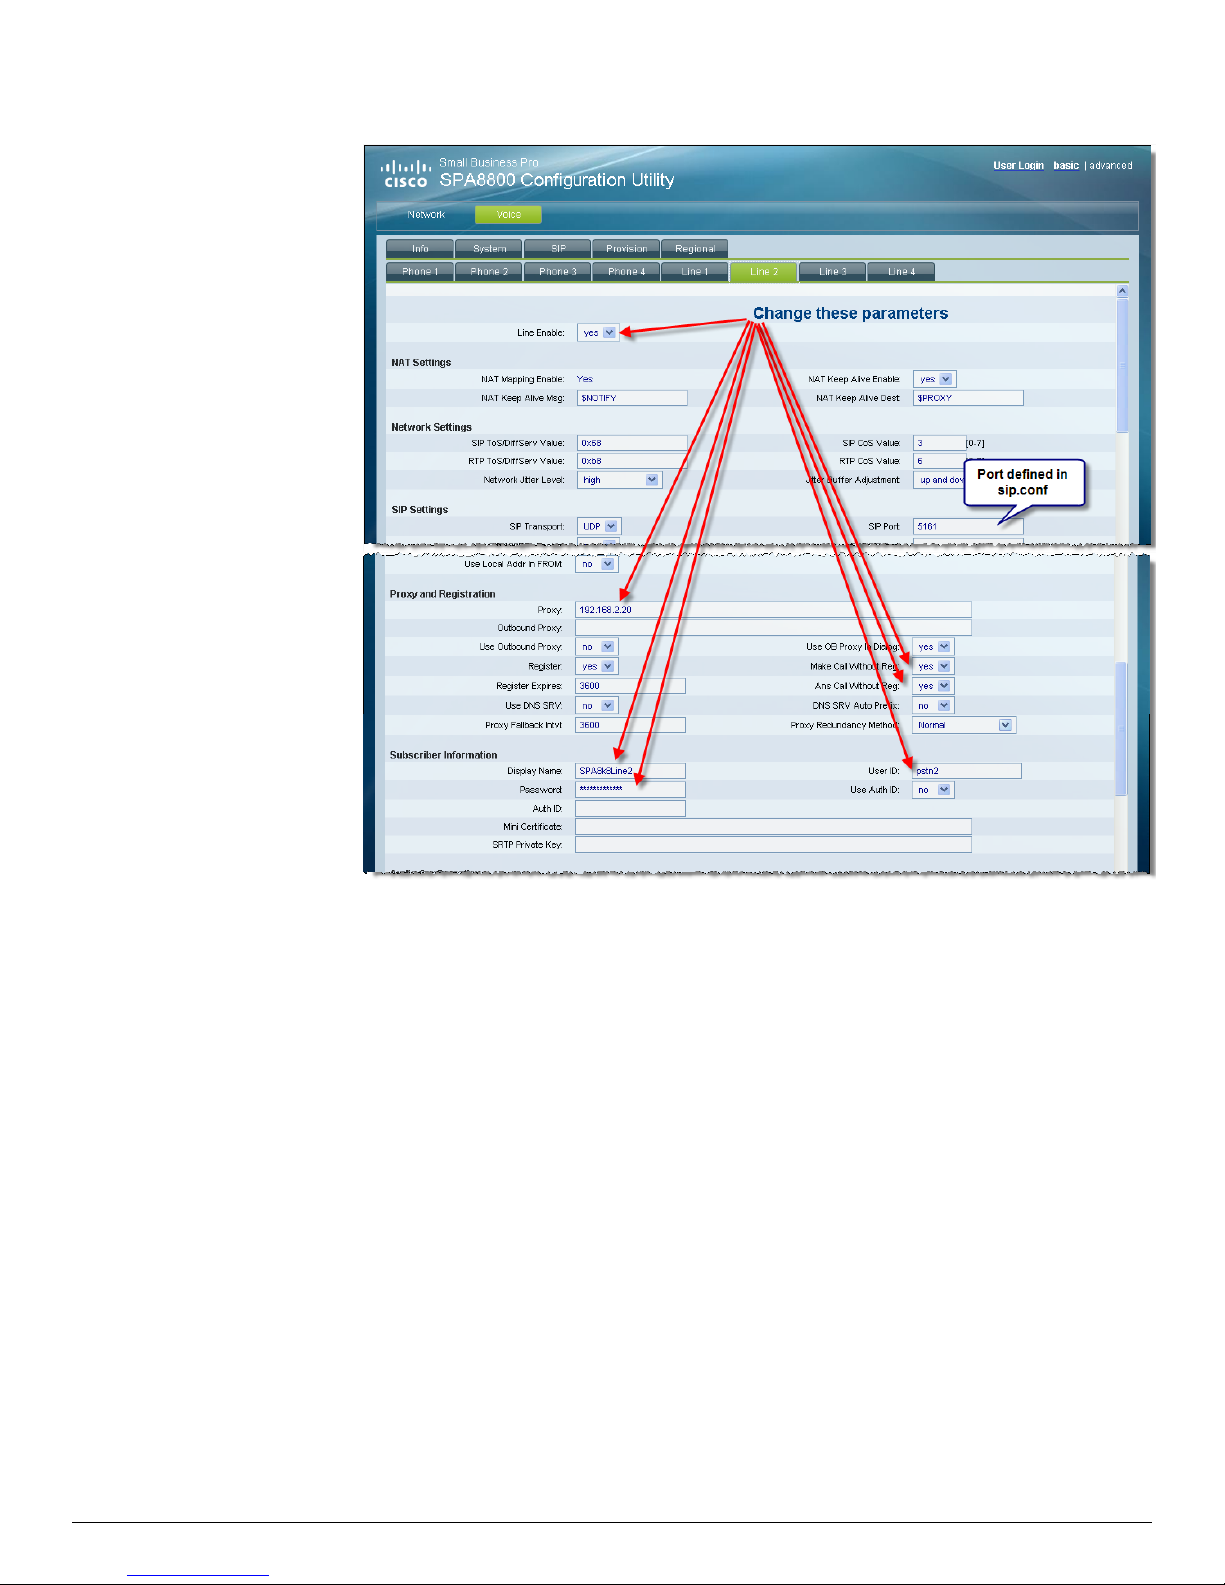
Configuring FXO Line Ports on the SPA8800
In this section, you will point the SPA8800 to the Asterisk Server as the SIP proxy for the FXO ports
and the provide user credentials that you defined earlier in the sip.conf and extensions.conf
Asterisk files. This configuration defines the characteristics of the FXO port connected to the PSTN
line.
1. Direct your browser to the SPA8800's web user interface (web-ui)
http://<IP_address_of_SPA8800>/admin/advanced
2. Voice tab > Line 2 tab > Line Enable: yes
3. Voice tab > Line N tab > Proxy and Registration >
a. Proxy: 192.168.2.20 [This field does not need to be completed, but is a good
reminder of which device is being used]
b. Make Call Without Reg: yes
c. Ans Call Without Reg: yes
4. Voice tab > Line N tab > Subscriber Information >
d. Display Name: SPA8k8Line2
e. User ID: pstn2
Where pstn2 is defined in the /etc/asterisk/sip.conf and
/etc/asterisk/extensions.conf files
f. Password: pstn2
Where the pstn2 password [secret] is defined in the
/etc/asterisk/sip.conf file
[This field does not need to be completed, the device does not need to register]
g. Configure the remaining lines using the parameters that you defined in the
/etc/asterisk/sip.conf and /etc/asterisk/extensions.conf files.
5. Click Submit All Changes if you do not intend to complete the next step at this time.
© 2009 Cisco Systems, Inc. All rights reserved. Page 17 of 69
Configuring the Cisco SPA8800 IP Telephony Gateway in an Asterisk Environment
© 2009 Cisco Systems, Inc. All rights reserved. Page 18 of 69

Configuring the Cisco SPA8800 IP Telephony Gateway in an Asterisk Environment
Configuring FXO Line Dial Plans for inbound PSTN call
Routing
In this section, you will configure FXO port dial plans. These dial plans affect inbound PSTN call
routing and work in conjunction with definitions made in the /etc/asterisk/sip.conf and
/etc/asterisk/extensions.conf files.
The [general] section of sip.conf contains the register directive which instructs the SIP proxy on
where (101) to send inbound calls:
[general]
register => 3615551212@sip.broadvoice.com:mypassword:3615551212@sip.broadvoice.com/
The [pstn2] and [pstn3] contexts of the extensions.conf file describes how inbound calls must be
routed:
[pstn2]
exten => 101,1,Dial(SIP/101,60,rt)
[pstn3]
exten => 101,1,Dial(SIP/201,60,rt
1. Direct your browser to the SPA8800's web user interface (web-ui)
101
http://<IP_address_of_SPA8800>/admin/advanced
2. Voice tab > Line 2 tab > Dial Plans >
Edit any dial plan to route inbound calls from the PSTN line connected to this FXO line. In
this example, Dial Plan 8 is edited with: (<:101@192.168.2.20>S0) where:
All inbound calls will be routed to extension 101 of the Asterisk server [192.168.2.20].
3. Voice tab > Line 2 tab > PSTN-To-VoIP Gateway Setup > PSTN Caller Default DP: 8
Where this number must match the dial plan used in the previous step.
Refer to the Failing Inbound from PSTN
in the Troubleshooting section to see a sample
Asterisk console error message that results from an incorrect dial plan entry.
© 2009 Cisco Systems, Inc. All rights reserved. Page 19 of 69

Configuring the Cisco SPA8800 IP Telephony Gateway in an Asterisk Environment
4. Repeat for Line 3.
5. Click Submit All Changes.
6. The entire configuration process is complete once the SPA8800 has reb ooted.
Testing the Phone System
Test the phone system as follows for appropriate behavior:
1. Test internal calls:
a. Verify that analog phones can call each other internally. For example
call from 101 to 102.
b. Optional: Verify that analog phones can call IP phones internally. For
example, call from 101 to 200 [if configured]
2. Test inbound calls:
a. From the PSTN, call a phone line attached to the SPA8800's FXO line.
Verify that the appropriate phone rings, analog phone 101 in this
document's example.
b. From the PSTN, call a DID associated with the Asterisk server.
Verify that the appropriate phone rings, analog phone 101 in this
document's example.
3. Test outbound calls:
a. From an analog phone, make an outbound call using the PSTN by using
the appropriate steering digit, 8 in this document's example.
b. From an analog phone, make another simultaneous outbound call usin g
the PSTN by using the appropriate steering digit, 8 in this document's
example. Verify that both calls succeed, using both configured outbound
PSTN lines.
c. From an analog pho ne, make an outbound call using the ITSP by using
the appropriate steering digit, 9 in this document's example.
© 2009 Cisco Systems, Inc. All rights reserved. Page 20 of 69

Configuring the Cisco SPA8800 IP Telephony Gateway in an Asterisk Environment
T.38 Faxing
The SPA8800 supports fax with G.711 pass-through or real-time fax over IP via T.38 fax relay.
The only change from default setting for fax pass-through is to change from the default named
signaling event (NSE) to ReINVITE:
Web-ui > Voice tab > Line N tab > Audio Configuration > FAX Passthru Method: ReINVITE
Optionally, you can change the FAX Line Toggle code from the default of #99. Predialing #99 as a
prefix forces the call to be a fax call. This will case the INVITE to indicate T.38 in the SDP without
relying on a reINVITE to switch to T.38. The default can be changed from #99 with the
web-ui > Voice tab > Regional tab > Vertical Service Activation Codes > FAX Line Toggle Code:
Refer to the
© 2009 Cisco Systems, Inc. All rights reserved. Page 21 of 69
 Loading...