

Quick Start Guide
Version française sur page 17 pour 32
Deutsche Version auf CD
Versione in italiano su CD
Versión espagñola en CD
Versão em português em CD
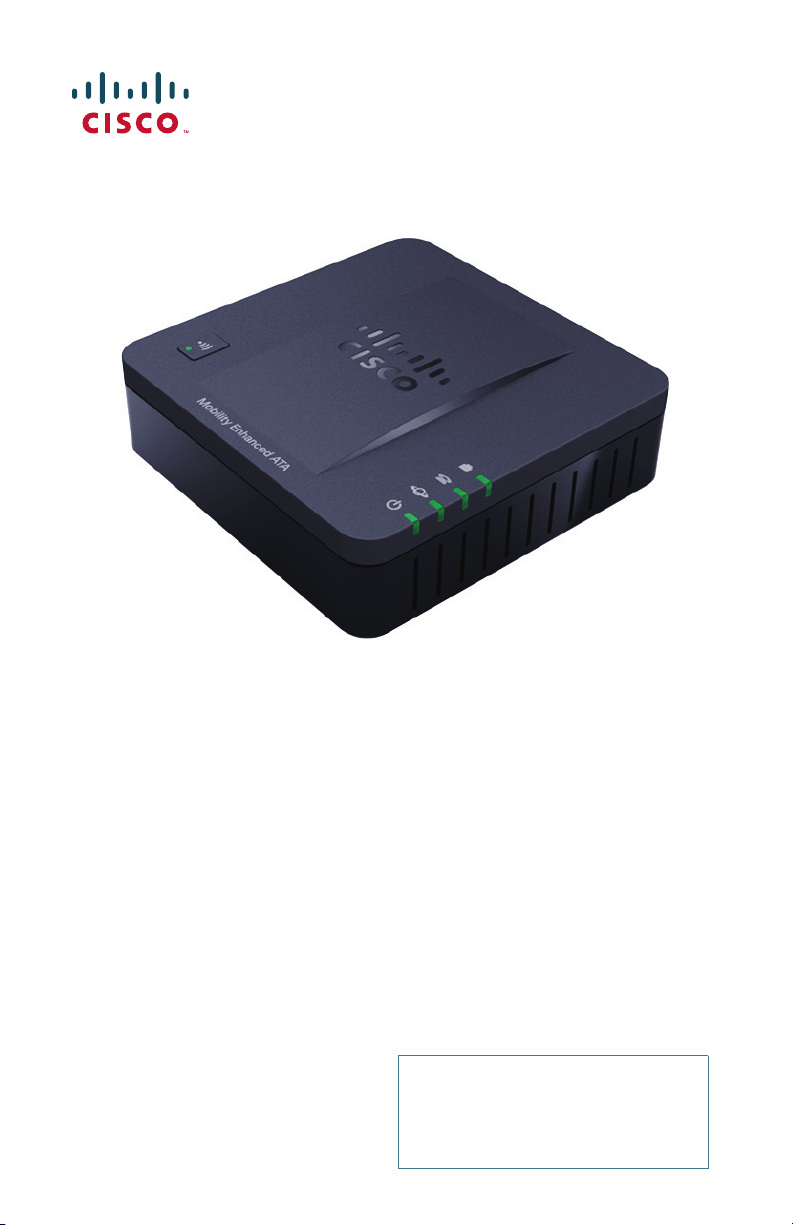
Cisco SPA232D Mobility Enhanced ATA
Package Contents
• Analog Telephone Adapter
• Ethernet Cable
• Phone Cable
• Power Adapter
• Quick Start Guide
• Product CD-ROM

Welcome
1
Thank you for choosing a Cisco SPA232D Mobility Enhanced ATA.
This guide describes how to physically install the equipment and how to
get started configuring the ATA.
This guide also explains how to register a Cisco SPA302D Mobility
Enhanced Cordless Handset with the Cisco SPA232D, which has an
integrated DECT Base Station. Cisco SPA302D handsets registered to the
Cisco SPA232D can make and receive calls through a Voice over IP (VoIP)
service provider and through the local telephone system (via the LINE
port). Only Cisco SPA302D handsets are supported with the Cisco
SPA232D.
Before You Begin
Before you begin the installation, make sure that you have the following
equipment and services:
• An active Internet account and Voice over IP account
• Ethernet cable to connect to your broadband network device
• Phone to connect to your ATA
• Phone cable to connect your phone
• Optional: Uninterruptible Power Supply (UPS) to provide backup power
• Optional: Cisco SPA302D Mobility Enhanced Cordless Handsets
2 Cisco SPA232D Quick Start Guide
Product Features
2
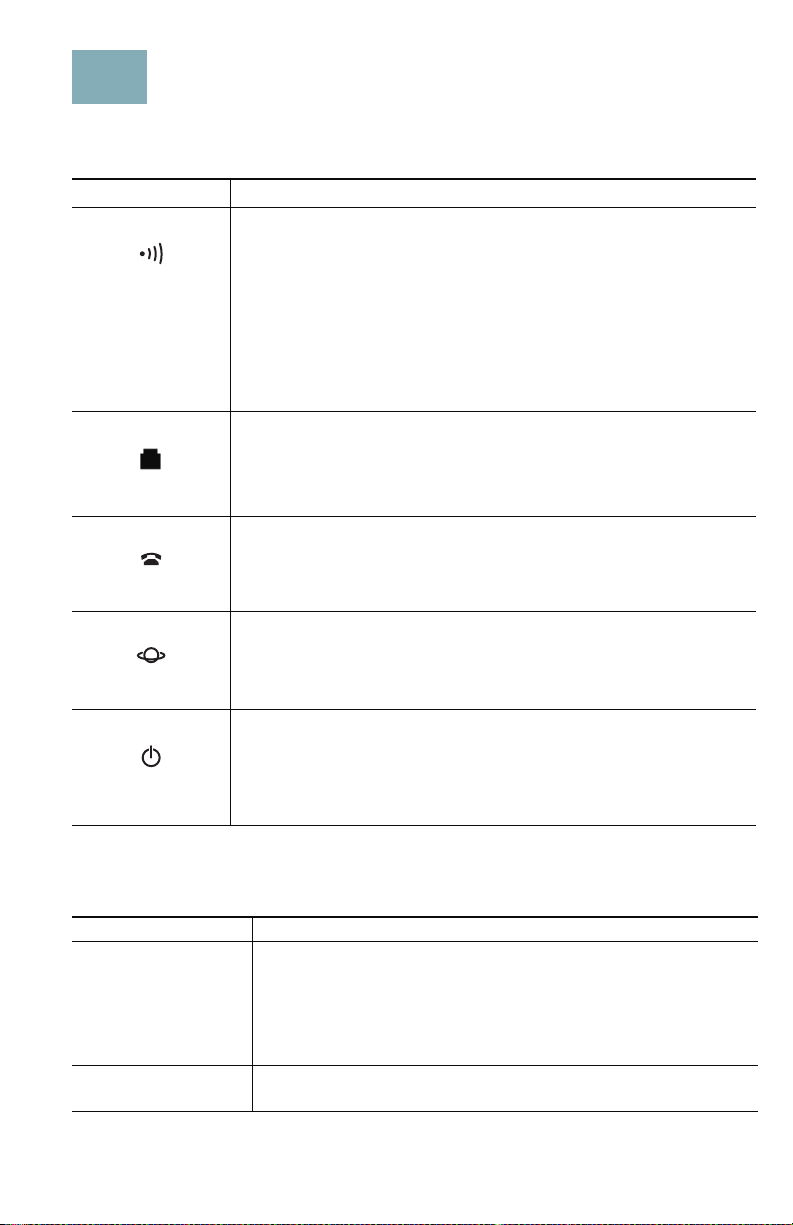
Top Panel
Feature Description
Steady green—One or more handsets is registered.
Fast flashing green—The base is in registration mode.
To activate registration mode, press the button for at
Page/
Registration
LINE
PHONE
INTERNET
SYSTEM
least 7 seconds.
Slow flashing green—The base is in paging mode or a
handset is off hook. To activate paging mode to locate a
handset, press the button for a few seconds; handsets
ring.
Off—No handset is registered to the base.
Steady green—The line is off hook and connected to
the local telephone system.
Slow flashing green—The line is off hook.
Off—The por t is not ready.
Steady green—The device is on hook and registered to
a SIP proxy.
Slow flashing green—The device is off hook.
Off—The por t is not ready.
Flashing green—Transmitting or receiving data through
the WAN port.
Off—No link.
Steady green—The system is ready.
Slow flashing green—Acquiring an IP address, if
applicable. (DHCP is used by default.)
Fast flashing green—Upgrading the firmware.
Off—There is no power or the system cannot boot up.
Back Panel
Feature Description
RESET Performs two functions:
Restart the ATA: Press quickly (less than a second)
with a paperclip or similar object.
Restore the factory default settings: Press and hold
for 10 seconds.
LINE (Green) Connects to an analog phone line, using an RJ-11
phone cable.
Cisco SPA232D Quick Start Guide 3

Feature Description
PHONE (Gray) Connects to an analog phone, using an RJ-11 phone
cable.
ETHERNET
(Yellow)
Connects to a device on your local area network (LAN),
such as a computer by using an Ethernet cable.
INTERNET (Blue) Connects to a broadband network device (DSL or
cable modem) or a network router by using an Ethernet
cable.
POWER Connects to a power by using the provided adapter.
Default Settings
Parameter Default Value
Administrator Username admin
Administrator Password admin
User Username cisco
User Password cisco
Internet Connection Type Automatic Configuration - DHCP
LAN IP Address
192.168.15.1
(Also the address for the webbased configuration utility.)
DHCP Range
192.168.15.100-149
(DHCP server enabled by default.)
Netmask 255.255.255.0
PIN for handset registration, IP
Blank
settings, and SIP settings
4 Cisco SPA232D Quick Start Guide
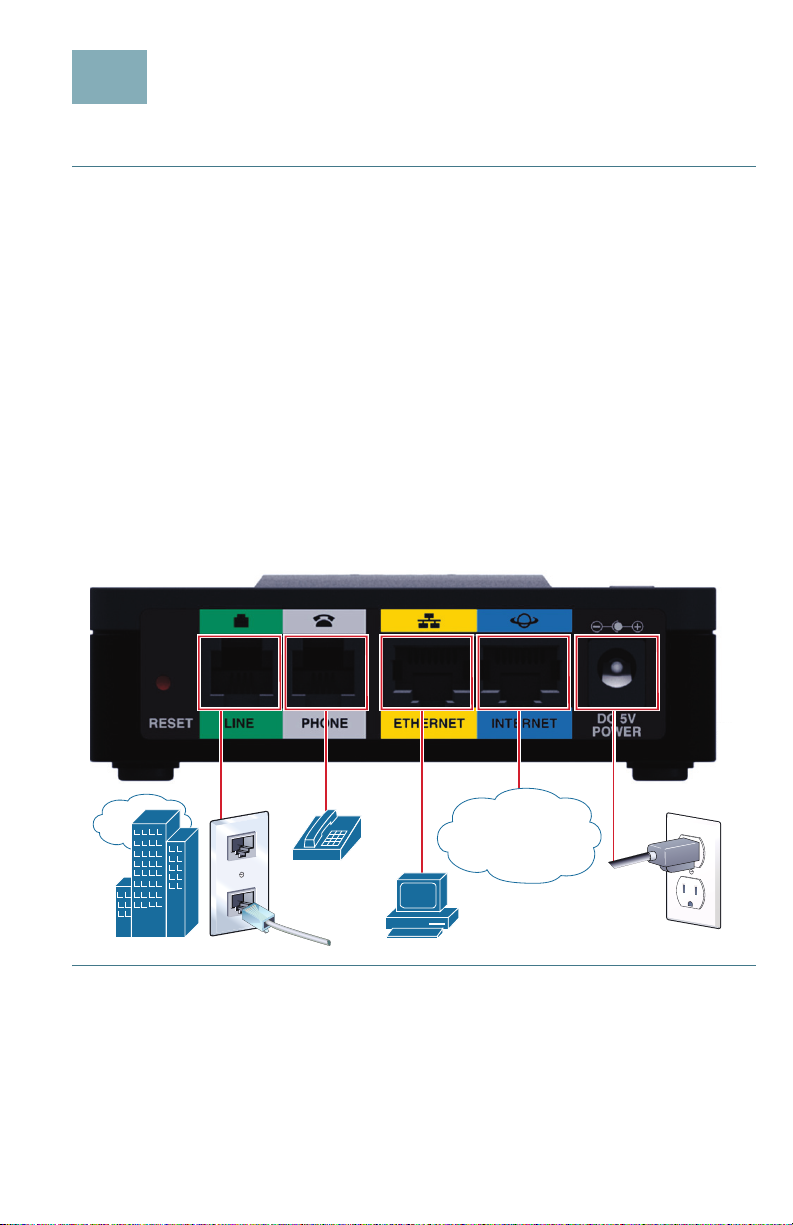
Connecting the Equipment
3
NOTE For wall-mounting instructions, see Additional Information, page 8.
STEP 1 Connect the provided Ethernet cable to the INTERNET (Blue) port.
Connect the other end of the cable directly to your broadband
network device.
STEP 2 Connect the provided phone cable to the PHONE 1 (Gray) port.
Connect the other end of the cable to your analog phone or fax
machine.
STEP 3 Optionally, connect an Ethernet network cable to the ETHERNET
(Yellow) port of the ATA. Connect the other end of the cable to a
device on your network, such as a computer.
STEP 4 Connect an analog phone line to the LINE (Green) port to connect
the ATA to your local telephone system.
STEP 5 Connect the provided power adapter to the POWER port. The unit
powers on.
WAN
Cisco SPA232D Quick Start Guide 5
239756

Configuration and Management of the ATA
4
You can use the web-based configuration utility to set up your ATA. You
also can use the built-in Interactive Voice Response (IVR) system. (See
Using the IVR for Administration, page 8.)
STEP 1 Connect the provided Ethernet network cable to the ETHERNET
(Yellow) port of the ATA. Connect the other end of the cable to the
Ethernet port of your PC.
STEP 2 Power on your computer.
NOTE: Make sure your computer’s Ethernet adapter is set to obtain
an IP address automatically (DHCP). For more information, refer to
the Help for your operating system.
STEP 3 Start a web browser on your computer.
STEP 4 In the Address bar, enter: 192.168.15.1
Note: 192.168.15.1 is the default local IP address of the ATA.
STEP 5 To log in for the first time, enter the default username, admin, and
the default password, admin. The password is case sensitive.
NOTE: A user account allows access to limited settings and status
pages. To log in as a user, enter cisco as the username and the
password.
STEP 6 Use the Quick Setup page as needed to register your VoIP
accounts in the fields for Line 1 and DECT Line1.
Your VoIP service may require only a few basic parameters to
successfully register the Cisco SPA232D. The Quick Setup page
offers a shortcut to enter the basic parameters. For a more
comprehensive listing of parameters, choose the Voice menu, and
then use the links in the navigation tree.
•Enter Proxy: Enter the domain name or URL of the service
provider’s proxy server.
•Display Name: Enter the name of the business. This name
typically is used for the Caller ID.
•User ID: Enter the user ID for your Internet account with this
service provider.
•Password: Enter the password for your Internet account.
• Dial Plan (Line 1 only): Keep the default settings
(recommended). Detailed information about the dial plan
settings is available in the online Help and the administration
guide.
6 Cisco SPA232D Quick Start Guide
Note: The Cisco SPA232D assigns DECT Line1 as the default line
5
for outgoing calls from Cisco SPA302D handsets. If needed, you
can configure additional VoIP accounts as separate “DECT Lines.”
To do so, choose the Voice menu, and then use the DECT Line
1~10 links in the navigation tree. Use the check boxes on the Quick
Setup page to associate the DECT Line(s) to each handset.
STEP 7 Click Submit to save your settings.
STEP 8 If you wish to change the PIN for handset registration, open the
Voice > System page, and then enter up to four digits in the IVR
Admin Password field. Click Submit to save your settings.
For more information, see the online Help or the administration guide.
(Documentation links are provided in Where to Go From Here, page14.)
Registering a Cisco SPA302D Handset
You can register Cisco SPA302D handsets to the integrated DECT base
station. These handsets can be purchased separately.
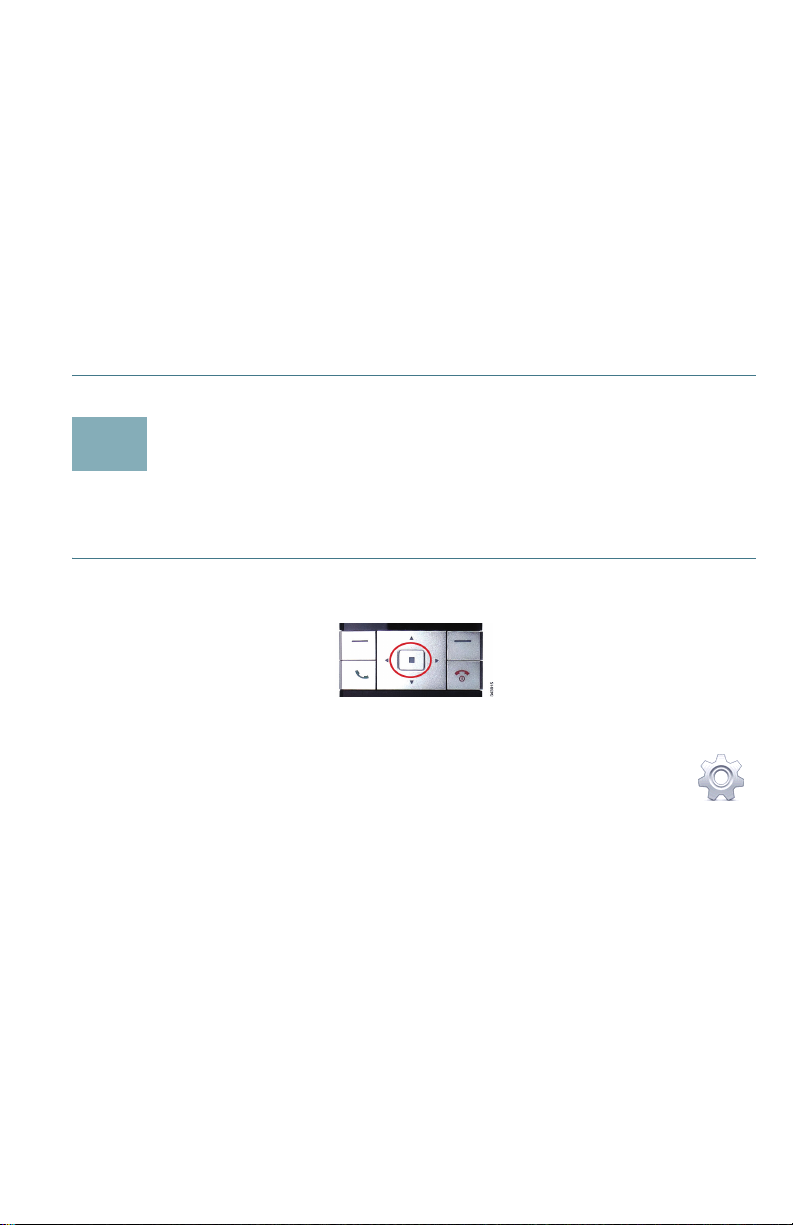
STEP 1 On the Cisco SPA302D handset, press the center Select button on
the 4-way navigation keypad.
STEP 2 Select Register.
STEP 3 Using the navigation arrows, scroll to the Settings icon
and press the center navigation button to select it.
STEP 4 Select Handset Registration.
STEP 5 On the Cisco SPA232D, press the Page/Registration button and
hold it down for at least seven seconds until the green status light
flashes quickly.
TIP: If you press the button for fewer than seven seconds, the
green status light flashes slowly, indicating the unit is in “paging”
mode and is not in registration mode. Registration will not work if
the unit is in paging mode.
STEP 6 The default PIN is blank, so do not enter a PIN. Press the left
softkey to confirm that you want to register the handset. The
“registering” message appears.
Cisco SPA232D Quick Start Guide 7

S
6
TEP 7 To verify that the handset registered to the base station, confirm
that the wireless status icon is solid and that the handset ID, such
as DECT1 or DECT 2, appears near the top right corner of the
display screen.
Additional Information
Using the IVR for Administration
An IVR system is available to help you to configure and manage your ATA.
You can use the telephone keypad to select options and to make your
entries.
To access the IVR menu:
STEP 1 Connect an analog phone to the PHONE port of the ATA.
STEP 2 Press the star key four times: ****
STEP 3 After the greeting plays, press the keys on the phone keypad to
select your options.
STEP 4 Enter the code for the desired action. See the IVR Actions table for
details.
TIPS:
• Enter the numbers slowly, listening for the audio confirmation before
entering the next number.
• After you select an option, press the # (pound) key.
• To exit the menu, hang up the telephone or enter 3948# to exit.
• After entering a value, such as an IP address, press the # (pound) key to
indicate that you have finished your selection. To save the new setting,
press 1. To review the new setting, press 2. To re-enter the new setting,
press 3. To cancel your entry and return to the main menu, press
• While entering a value, you can cancel the changes by pressing the
(star) key twice within half a second. Be sure to press the key quickly, or
the
* will be treated as a decimal point entry.
• If the menu is inactive for more than one minute, the ATA times out. You
will need to re-enter the menu by pressing the star key four times:
Your settings take effect after you hang up the telephone or exit the IVR.
The ATA may reboot at this time.
8 Cisco SPA232D Quick Start Guide
* (star).
****.
*

• To enter the decimal points in an IP address, press the * (star) key. For
example, to enter the IP address 191.168.1.105, perform the following
tasks:
–Press these keys: 191
–Press the # (pound) key to indicate that you have finished
entering the IP address.
–Press 1 to save the IP address or press the
your entry and return to the main menu.
*168*1*105.
* (star) key to cancel
IVR Actions
IVR Action Menu
Option
Enter IVR Menu ****
Check Internet Connection
Type
Set Internet Connection
Type
Check Internet IP Address
(WAN port)
Set Static IP Address (WAN) 111 Enter the IP address by using
100
101 DHCP: 0
110
Choices and Instructions
Static IP: 1
PPPoE: Press 2
numbers on the telephone
key pad. Use the * (star) key
when entering a decimal
point.
Note: This option is available
only after you choose Static
IP as the Internet Connection
Type, through option 101.
Check Network Mask 120
Set Network Mask 121 To enter the value, press
numbers on the telephone
key pad. Press the * (star) key
to enter a decimal point.
Note: This option is available
only after you choose Static
IP as the Internet Connection
Type, through option 101.
Cisco SPA232D Quick Start Guide 9

IVR Action Menu
Choices and Instructions
Option
Check Gateway IP Address 130
Set Gateway IP Address 131 To enter the value, press
numbers on the telephone
key pad. Press the * (star) key
to enter a decimal point.
Note: This option is available
only after you choose Static
IP as the Internet Connection
Type, through option 101.
Check MAC Address 140
Check Firmware Version 150
Check Primary DNS Server
160
Setting
Set Primary DNS Server 161 To enter the value, press
numbers on the telephone
key pad. Press the * (star) key
to enter a decimal point.
Note: This option is available
only after you choose Static
IP as the Internet Connection
Type, through option 101.
Check Internet web server
170
port
SPA122 only: Check LAN IP
210
address (Ethernet port)
Announce Line 1 SIP
1910
Transport
Set Line 1 SIP Transport 1911 0: UDP
1: TC P
2: TLS
Check Line 2 SIP Transport 1920
Set Line 2 SIP Transport 1921 0: UDP
1: TC P
2: TLS
Exit IVR 3948
10 Cisco SPA232D Quick Start Guide

IVR Action Menu
Option
Allow or prevent WAN
7932 1: Enable
access to the administration
web server
The system will allow WAN
access only if the default
admin username and
password have been
changed in the
Configuration Utility.
Factory Reset of Unit
WARNING: All non-default
73738
“RESET”
settings will be lost. This
includes network and
service provider data.
Reboot of Voice System 732668
“REBOOT”
Choices and Instructions
0: Disable
When prompted, press 1 to
confirm, or press * (star) to
cancel. After you hear “Option
successful,” hang up the
phone. The ATA reboots.
After you hear “Option
successful,” hang up the
phone. The ATA reboots.
Cisco SPA232D Quick Start Guide 11

Mounting the ATA
15,8 mm
You can place the ATA on a desktop or mount it on a wall.
CAUTION To prevent the ATA from overheating, do not operate it in an
area that exceeds an ambient temperature of 104°F (40°C).
Desktop Placement
Place the ATA on a flat surface near an electrical outlet.
WARNING Do not place anything on top of the ATA; excessive weight
could damage it.
Wall Mounting
The ATA has two wall-mount slots on the bottom panel. To mount the ATA
on a wall, you need mounting hardware (not included). Suggested
hardware is illustrated (not true to scale).
Recommended hardware (not included): Two number-six pan-head
tapping screws, 5/8-in. length, with anchors for sheet rock installation.
WARNING Insecure mounting might damage the ATA or cause injury. Cisco
is not responsible for damages incurred by insecure wallmounting.
12 Cisco SPA232D Quick Start Guide

To mount the unit to the wall:
STEP 1 Determine where you want to mount the unit. Verify that the surface
is smooth, flat, dry, and sturdy.
STEP 2 Drill two pilot holes into the surface 58 mm apart (about 2.28 in.).
Make sure that the holes are at the same height above the floor so
that the unit is level and secure in either of its two safety-certified
orientations.
STEP 3 Insert a screw into each hole, leaving a gap of 5 mm (0.1968 in.)
between the underside of each screw head and the surface of the
wall.
STEP 4 Place the unit wall-mount slots over the screws and slide the unit
down until the screws fit snugly into the wall-mount slots.
Cisco SPA232D Quick Start Guide 13

Support
7
Where to Go From Here
Cisco Small Business
Support Community
Cisco Small Business
Support and Resources
Cisco Small Business
Firmware Downloads
Cisco Small Business
Open Source Requests
Product Documentation
Cisco Small Business
Analog Telephone
Adapters
Cisco Small Business
Cisco Partner Central
for Small Business
(Partner Login Required)
Cisco Small Business
Home
www.cisco.com/go/smallbizsupport
www.cisco.com/go/smallbizhelp
www.cisco.com/go/software
www.cisco.com/go/smallbiz_opensource_
request
www.cisco.com/go/smallbizvoicegateways
www.cisco.com/web/partners/sell/smb
www.cisco.com/smb
14 Cisco SPA232D Quick Start Guide


Americas Headquarters
Cisco Systems, Inc.
170 West Tasman Drive
San Jose, CA 95134-1706
USA
www.cisco.com
Small Business Support, Global: www.cisco.com/go/sbsc
Cisco and the Cisco logo are trademarks or registered trademarks of Cisco and/or its affiliates
in the U.S. and other countries. To view a list of Ciscotrademarks, go to this URL:
www.cisco.com/go/trademarks. Third-party trademarks mentioned are the property of their
respective owners. The use of the word partner does not imply a partnership relationship
between Cisco and any other company. (1110R)
© 2012 Cisco Systems, Inc. All rights reserved.

Guide de démarrage rapide
Adaptateur de terminal analogique
Cisco SPA232D Mobility Enhanced
Contenu du colis
• Adaptateur de terminal analogique
• Câble Ethernet
• Câble téléphonique
• Adaptateur secteur
• Guide de démarrage rapide
• CD-ROM du produit

Bienvenue
1
Merci d'avoir choisi l'adaptateur de terminal analogique Cisco SPA232D
Mobility Enhanced.
Ce guide explique comment installer physiquement le matériel et
commencer la configuration de l'adaptateur de terminal analogique.
Il décrit également la procédure d'enregistrement d'un combiné sans fil
Cisco SPA302D Mobility Enhanced auprès d'un adaptateur
Cisco SPA232D intégrant une station de base DECT. Les combinés
Cisco SPA302D enregistrés auprès du système Cisco SPA232D
permettent de passer et de recevoir des appels par le biais d'un
fournisseur de service VoIP (Voix sur IP) et par le système téléphonique
local (via le port LINE). Seuls les combinés Cisco SPA302D sont pris en
charge par le système Cisco SPA232D.
Avant de commencer
Avant de procéder à l'installation, assurez-vous de disposer du matériel et
des services suivants :
• Un compte Internet et un compte VoIP actifs ;
• Un câble Ethernet pour la connexion à votre périphérique réseau haut
débit ;
• Un téléphone à connecter à votre adaptateur de terminal analogique ;
• Un câble téléphonique pour connecter votre téléphone ;
• Facultatif : un onduleur (UPS) pour fournir une alimentation de secours ;
• Facultatif : combinés sans fil Cisco SPA302D Mobility Enhanced.
2 Guide de démarrage rapide du système Cisco SPA232D

Fonctions du produit
2
Panneau supérieur
Fonction Description
Vert fixe : un ou plusieurs combinés sont enregistrés.
Vert clignotant rapidement : la base est en mode
d'enregistrement. Pour activer le mode
Annonce
Générale/
Enregistrement
LINE
PHONE
INTERNET
SYSTEM
d'enregistrement, appuyez sur le bouton pendant
7 secondes au moins.
Vert clignotant lentement : la base est en mode
d'annonce générale ou un combiné est décroché. Pour
activer le mode d'annonce générale afin de localiser un
combiné, appuyez sur le bouton pendant quelques
secondes. Les combinés sonnent alors.
Éteint : aucun combiné n'est enregistré dans la base.
Vert fixe : la ligne est décrochée et connectée au
système téléphonique local.
Vert clignotant lentement : la ligne est décrochée.
Éteint : le port n'est pas prêt.
Vert fixe : le périphérique est raccroché et enregistré
auprès d'un proxy SIP.
Vert clignotant lentement : le périphérique est
décroché.
Éteint : le port n'est pas prêt.
Vert clignotant : transmission ou réception de données
en cours via le port WAN.
Éteint : aucune liaison.
Vert fixe : le système est prêt.
Vert clignotant lentement : acquisition d'une adresse IP
en cours, le cas échéant. (L'option DHCP est utilisée par
défaut.)
Vert clignotant rapidement : mise à niveau du
micrologiciel en cours.
Éteint : absence d'alimentation ou le système ne
parvient pas à démarrer.
Guide de démarrage rapide du système Cisco SPA232D 3

Panneau arrière
Fonction Description
Bouton RESET
(réinitialisation)
Ce bouton a deux fonctions :
Redémarrer l'adaptateur de terminal analogique :
appuyez brièvement (moins d'une seconde) sur le
bouton à l'aide d'un trombone ou d'un objet similaire.
Restaurer les paramètres d'usine par défaut :
appuyez sur le bouton et maintenez-le enfoncé
pendant 10 secondes.
LINE (vert) Permet la connexion à une ligne téléphonique
analogique à l'aide d'un câble téléphonique RJ-11.
PHONE (gris) Permet la connexion à un téléphone analogique à l'aide
d'un câble téléphonique RJ-11.
ETHERNET
(jaune)
Permet la connexion à un périphérique de votre réseau
local (LAN), tel qu'un ordinateur, à l'aide d'un câble
Ethernet.
INTERNET (bleu) Permet la connexion à un périphérique réseau haut
débit (modem DSL ou câble) ou à un routeur réseau à
l'aide d'un câble Ethernet.
Bouton POWER
(alimentation)
Permet de connecter le système à un bloc
d'alimentation à l'aide de l'adaptateur fourni.
Paramètres par défaut
Paramètre Valeur par défaut
Administrator Username (nom
admin
d'utilisateur de l'administrateur)
Administrator Password (mot de
admin
passe de l'administrateur)
User Username (nom d'utilisateur) cisco
User Password (mot de passe
cisco
utilisateur)
Internet Connection Type (type de
connexion Internet)
4 Guide de démarrage rapide du système Cisco SPA232D
Automatic Configuration - DHCP
(configuration automatique - DHCP)

Paramètre Valeur par défaut
3
LAN IP Address
(adresse IP LAN ; également
l'adresse de l'utilitaire de
configuration Web).
DHCP Range
(plage DHCP ; le serveur DHCP est
activé par défaut).
Netmask (masque réseau) 255.255.255.0
PIN for handset registration, IP
settings, and SIP settings (code
PIN d'enregistrement des
combinés, paramètres IP et
paramètres SIP)
192.168.15.1
192.168.15.100-149
Vide
Connexion de l'équipement
REMARQUE Pour obtenir des instructions de montage mural, reportez-
vous à la section Informations supplémentaires, page 9.
ÉTAPE1 Connectez le câble Ethernet fourni au port INTERNET (bleu).
Connectez l'autre extrémité du câble directement à votre
périphérique réseau haut débit.
ÉTAPE2 Connectez le câble téléphonique fourni au port PHONE 1 (gris).
Connectez l'autre extrémité du câble à votre téléphone analogique
ou votre télécopieur.
ÉTAPE3 Connectez un câble réseau Ethernet au port ETHERNET (jaune) de
l'adaptateur de terminal analogique (facultatif). Connectez l'autre
extrémité du câble à un périphérique de votre réseau, tel qu'un
ordinateur.
ÉTAPE4 Connectez une ligne téléphonique analogique au port LINE (vert)
pour connecter l'adaptateur de terminal analogique à votre
système téléphonique local.
ÉTAPE5 Connectez l'adaptateur secteur fourni au port POWER. L'unité se
met sous tension.
Guide de démarrage rapide du système Cisco SPA232D 5

239756
4
WAN
Configuration et gestion de l'adaptateur de
terminal analogique
Pour configurer votre adaptateur de terminal analogique, vous pouvez
utiliser l'utilitaire de configuration Web. Vous pouvez également utiliser le
système de réponse vocale interactive (IVR) intégré. (Reportez-vous à la
section Utilisation du système IVR pour l'administration, page 9.)
ÉTAPE1 Connectez le câble réseau Ethernet fourni au port ETHERNET
(jaune) de l'adaptateur de terminal analogique. Connectez l'autre
extrémité du câble au port Ethernet de votre ordinateur.
ÉTAPE2 Mettez votre ordinateur sous tension.
REMARQUE : vérifiez que l'adaptateur Ethernet de votre
ordinateur est configuré pour obtenir une adresse IP
automatiquement (DHCP). Pour en savoir plus, reportez-vous à la
rubrique d'aide de votre système d'exploitation.
ÉTAPE3 Ouvrez un navigateur Web sur votre ordinateur.
6 Guide de démarrage rapide du système Cisco SPA232D

TAPE4 Dans la barre d'adresse, saisissez l'adresse suivante :
É
192.168.15.1
Remarque : 192.168.15.1 est l'adresse IP locale par défaut de
l'adaptateur de terminal analogique.
ÉTAPE5 Lors de la première connexion, saisissez le nom d'utilisateur par
défaut (admin) et le mot de passe par défaut (admin). Le mot de
passe doit respecter la casse.
REMARQUE : les comptes d'utilisateurs offrent un accès limité aux
paramètres et aux pages liées à l'état. Pour vous connecter en tant
qu'utilisateur, saisissez cisco dans les champs de nom d'utilisateur
et de mot de passe.
ÉTAPE6 Utilisez la page Quick Setup (configuration rapide) pour
enregistrer vos comptes VoIP dans les champs Line 1 (ligne1) et
DECT Line1 (ligne1 DECT).
Votre service VoIP peut ne nécessiter que quelques paramètres
de base pour permettre l'enregistrement du système
Cisco SPA232D. La page Quick Setup offre un raccourci vers les
paramètres de base. Pour obtenir une liste plus complète des
paramètres, choisissez le menu Voice (voix), puis les liens de
l'arborescence de navigation.
• Enter Proxy (saisir un proxy) : saisissez le nom de domaine ou
l'URL du serveur proxy du fournisseur de service.
• Display Name (nom d'affichage) : saisissez le nom de
l'entreprise. Ce nom est généralement utilisé en tant qu'ID
d'appel.
• User ID (ID utilisateur) : saisissez l'ID utilisateur de votre
compte Internet associé à ce fournisseur de service.
• Password (mot de passe) : saisissez le mot de passe de votre
compte Internet.
• Dial Plan (Line 1 only) (plan de numérotation (ligne1
uniquement)) : Gardez la valeur par défaut (recommandée).
Pour plus d'informations sur les paramètres de plan de
numérotation, reportez-vous à l'aide en ligne et au guide
d'administration.
Remarque : le système Cisco SPA232D affecte DECT Ligne1 en
tant que ligne par défaut pour les appels sortant des combinés
Cisco SPA302D. Si nécessaire, vous pouvez configurer des
comptes VoIP supplémentaires en tant que « DECT Lines ».
Guide de démarrage rapide du système Cisco SPA232D 7

Pour ce faire, choisissez le menu Voice, puis les liens DECT Line
5
1~10 (ligne1~10 DECT) dans l'arborescence. Utilisez les cases à
cocher de la page Quick Setup pour associer la ou les lignes
DECT aux combinés correspondants.
ÉTAPE7 Cliquez sur Submit (enregistrer) pour enregistrer vos paramètres.
ÉTAPE8 Si vous souhaitez modifier le code PIN d'enregistrement des
combinés, ouvrez la page Voice > System (voix > système), puis
saisissez jusqu'à quatre chiffres dans le champ IVR Admin
Password (mot de passe d'administrateur IVR). Cliquez sur Submit
(enregistrer) pour enregistrer vos paramètres.
Pour en savoir plus, reportez-vous à l'aide en ligne ou au guide
d'administration. (Les liens vers la documentation technique sont fournis
sous la rubrique Problèmes et solutions, page 15.)
Enregistrement d'un combiné
Cisco SPA302D
Vous pouvez enregistrer combinés Cisco SPA302D dans la station de
base DECT intégrée. Ces combinés peuvent être achetés séparément.
ÉTAPE 1 Installez le Cisco SPA302D. Pour plus d'informations, reportez-
vous au Guide de démarrage rapide du système Cisco
SPA302D.
ÉTAPE 2 Sur le combiné Cisco SPA302, appuyez sur la touche centrale de
sélection du clavier de navigation quadridirectionnel.
ÉTAPE3 À l'aide des flèches de navigation, faites défiler jusqu'à
l'icône des paramètres et appuyez sur la touche centrale
de navigation pour la sélectionner.
ÉTAPE4 Sélectionnez Enregistrement du combiné.
ÉTAPE 5 Sélectionnez Enregistrer.
ÉTAPE 6 Sur le système Cisco SPA232D, maintenez le bouton d'annonce
générale/enregistrement enfoncé pendant au moins sept
secondes, jusqu'à ce que le voyant vert clignote rapidement.
8 Guide de démarrage rapide du système Cisco SPA232D

Astuce: si vous appuyez sur le bouton pendant moins de sept
6
secondes, le voyant d'état vert clignote lentement, pour indiquer
que le système est en mode d'annonce générale et non en mode
d'enregistrement. L'enregistrement ne pourra pas se faire si le
système est en mode d'annonce générale.
ÉTAPE 7 Le code PIN par défaut est vierge. Il n'est donc pas nécessaire de
saisir un code PIN. Appuyez sur la touche gauche pour confirmer que
vous souhaitez enregistrer le combiné. Le message «Inscription…»
s'affiche.
ÉTAPE8 Pour vérifier que le combiné est enregistré par la
station de base, vérifiez que l'icône de force du signal
est allumée (et ne clignote pas) et que l'ID du
combiné (Combiné 1 ou Combiné 2) apparaît en haut
à droite de l'écran du combiné.
Informations supplémentaires
Utilisation du système IVR pour l'administration
Un système de réponse vocale interactive (IVR) est disponible pour vous
aider à configurer et gérer votre adaptateur de terminal analogique. Vous
pouvez utiliser le clavier du téléphone pour sélectionner les options et
pour saisir vos informations.
Pour accéder au menu IVR :
ÉTAPE1 Connectez un téléphone analogique au port PHONE de l'adaptateur
de terminal analogique.
ÉTAPE2 Appuyez quatre fois sur la touche étoile : ****
ÉTAPE3 Après le message d'accueil, appuyez sur les touches du clavier de
votre téléphone pour sélectionner vos options.
ÉTAPE4 Saisissez le code correspondant à l'action souhaitée. Reportez-
vous au tableau Actions IVR pour en savoir plus.
Guide de démarrage rapide du système Cisco SPA232D 9

ASTUCES :
• Saisissez le code lentement et attendez la confirmation audio entre
chaque chiffre.
• Après avoir sélectionné une option, appuyez sur la touche # (dièse).
• Pour quitter le menu, raccrochez le téléphone ou saisissez le code
3948#.
• Lorsque vous avez saisi une valeur telle qu'une adresse IP, appuyez sur
la touche # (dièse) pour indiquer que votre sélection est terminée. Pour
enregistrer le nouveau paramètre, appuyez sur 1. Pour afficher le
nouveau paramètre, appuyez sur 2. Ressaisissez le nouveau paramètre
en appuyant sur 3. Pour annuler votre saisie et revenir au menu
principal, appuyez sur la touche
• Au cours de la saisie d'une valeur, vous pouvez annuler les
modifications en appuyant deux fois sur la touche
seconde. Appuyez rapidement sur la touche pour éviter que l'étoile (
soit considérée comme un séparateur décimal.
• Si le menu est inactif pendant plus d'une minute, l'adaptateur de
terminal analogique expire. Vous devrez alors entrer à nouveau dans le
menu en appuyant quatre fois sur la touche étoile :
paramètres sont appliqués lorsque vous raccrochez le téléphone ou
quittez le système IVR. À ce moment, l'adaptateur de terminal
analogique peut redémarrer.
* (étoile).
* (étoile) en une demi-
****. Vos
*)
• Pour saisir les séparateurs décimaux dans une adresse IP, appuyez sur
la touche
procédez comme suit :
– Appuyez sur les touches suivantes : 191
– Appuyez sur la touche # (dièse) pour indiquer que la saisie de
– Appuyez sur 1 pour enregistrer l'adresse IP ou sur la touche
10 Guide de démarrage rapide du système Cisco SPA232D
* (étoile). Par exemple, pour saisir l'adresse IP 191.168.1.105,
*168*1*105.
l'adresse IP est terminée.
*
(étoile) pour annuler votre saisie et revenir au menu principal.

Actions IVR
Actions IVR Options du
menu
Entrer dans le menu IVR
Vérifier le type de connexion
Internet
Définir le type de connexion
Internet
Vérifier l'adresse IP Internet
(port WAN)
Définir l'adresse IP statique
(WAN)
Vérifier le masque réseau
Définir le masque réseau
****
100
101 DHCP : 0
110
111 Saisissez l'adresse IP à l'aide
120
121 Pour saisir la valeur, appuyez
Choix et instructions
IP statique : 1
PPPoE : appuyez sur 2.
des touches numériques du
clavier téléphonique. Utilisez
la touche * (étoile) pour saisir
un séparateur décimal.
Remarque : cette option est
disponible uniquement si
vous avez choisi le type de
connexion Internet IP statique
via l'option101.
sur les chiffres
correspondants du clavier
téléphonique. Appuyez sur la
touche * (étoile) pour saisir un
séparateur décimal.
Remarque : cette option est
disponible uniquement si
vous avez choisi le type de
connexion Internet IP statique
via l'option101.
Vérifier l'adresse IP de la
passerelle
Guide de démarrage rapide du système Cisco SPA232D 11
130

Actions IVR Options du
menu
Définir l'adresse IP de la
passerelle
Vérifier l'adresse MAC
Vérifier la version du
micrologiciel
Vérifier le paramètre du
serveur DNS principal
Définir le serveur DNS
principal
Vérifier le port du serveur Web
Internet
SPA122 uniquement : vérifier
l'adresse IP du LAN (port
Ethernet)
Vérifier le transport SIP de la
ligne 1
Définir le transport SIP de la
ligne 1
Vérifier le transport SIP de la
ligne 2
131 Pour saisir la valeur, appuyez
140
150
160
161 Pour saisir la valeur, appuyez
170
210
1910
1911 0 : UDP
1920
Choix et instructions
sur les chiffres
correspondants du clavier
téléphonique. Appuyez sur la
touche * (étoile) pour saisir un
séparateur décimal.
Remarque : cette option est
disponible uniquement si
vous avez choisi le type de
connexion Internet IP statique
via l'option101.
sur les chiffres
correspondants du clavier
téléphonique. Appuyez sur la
touche * (étoile) pour saisir un
séparateur décimal.
Remarque : cette option est
disponible uniquement si
vous avez choisi le type de
connexion Internet IP statique
via l'option101.
1: TCP
2: TLS
12 Guide de démarrage rapide du système Cisco SPA232D

Actions IVR Options du
menu
Définir le transport SIP de la
ligne 2
Quitter le menu IVR
Autoriser ou empêcher l'accès
WAN au serveur Web
d'administration
Le système autorisera l'accès
WAN seulement si le nom
d'utilisateur et le mot de passe de
l'administrateur ont été modifiés
dans l'utilitaire de configuration.
Restaurer les paramètres
d'usine
ATTENTION : tous les
paramètres seront perdus,
sauf les paramètres par
défaut. Les données relatives
au réseau et au fournisseur de
service seront donc perdues.
Redémarrer le système vocal
1921 0 : UDP
3948
7932 1 : activer
73738
«RESET»
732668
«REBOOT»
Choix et instructions
1: TCP
2: TLS
0: désactiver
À l'invite, appuyez sur 1 pour
confirmer ou sur * (étoile)
pour annuler. Après l'annonce
« Option successful » (option
appliquée), raccrochez le
téléphone. L'adaptateur de
terminal analogique
redémarre.
Après l'annonce « Option
successful » (option
appliquée), raccrochez le
téléphone. L'adaptateur de
terminal analogique
redémarre.
Montage de l'adaptateur de terminal analogique
Vous pouvez choisir d'installer l'adaptateur de terminal analogique à plat
sur un bureau ou de le fixer au mur.
AVERTISSEMENT Pour éviter tout risque de surchauffe de l'adaptateur de
terminal analogique, ne l'utilisez pas dans les lieux où la
température ambiante dépasse 40 °C.
Guide de démarrage rapide du système Cisco SPA232D 13

Installation sur un bureau
15,8 mm
Placez l'adaptateur de terminal analogique sur une surface plane, à
proximité d'une prise électrique.
ATTENTION Ne posez aucun objet sur l'adaptateur de terminal
analogique, toute charge excessive risquerait de
l'endommager.
Montage mural
Le panneau inférieur de l'adaptateur de terminal
analogique comporte deux orifices de montage mural.
Pour monter l'adaptateur de terminal analogique
contre un mur, vous aurez besoin de matériel
supplémentaire (non fourni). Nous vous suggérons
d'utiliser le matériel illustré ci-après (l'échelle n'est pas
respectée).
Matériel recommandé (non inclus) : deux vis
autotaraudeuses à tête cylindrique large n° 6, d'une
longueur de 5/8 pouce (15,8 mm), avec des brides
d'ancrage pour l'installation dans des plaques de
plâtre.
ATTENTION Tout montage non conforme peut endommager l'adaptateur
de terminal analogique ou entraîner des blessures. Cisco ne
peut en aucun cas être tenu responsable de tout dommage
découlant d'un montage mural non conforme.
Pour procéder au montage mural de l'adaptateur :
ÉTAPE1 Déterminez l'endroit où vous souhaitez l'installer. Assurez-vous que
la surface est lisse, plane, sèche et solide.
ÉTAPE2 Percez deux trous pilotes éloignés de 58 mm (environ
2,28 pouces) dans la surface. Assurez-vous que les trous sont à la
même distance du sol pour que l'adaptateur soit bien droit, puis
fixez-le dans l'une des deux positions de sécurité certifiées.
ÉTAPE3 Insérez une vis dans chaque trou, en laissant un espace d'au moins
5 mm (0,1968 pouce) entre la face inférieure de la tête de vis et la
surface du mur.
ÉTAPE4 Placez les logements de montage mural de l'adaptateur sur les vis,
puis faites glisser l'unité vers le bas jusqu'à introduire doucement
les têtes de vis dans ces logements.
14 Guide de démarrage rapide du système Cisco SPA232D

Problèmes et solutions
7
Assistance
Communauté d'assistance
Cisco Small Business
Assistance et ressources
Cisco Small Business
Téléchargements de
micrologiciels Cisco Small
Business
Requêtes Open Source
Cisco Small Business
Documentation sur les produits
Adaptateurs de terminal
analogique Cisco Small
Business
Cisco Small Business
Cisco Partner Central
pour Small Business
(Identification partenaire
obligatoire)
Accueil
Cisco Small Business
www.cisco.com/go/smallbizsupport
www.cisco.com/go/smallbizhelp
www.cisco.com/go/software
www.cisco.com/go/
smallbiz_opensource_request
www.cisco.com/go/smallbizvoicegateways
www.cisco.com/web/partners/sell/smb
www.cisco.com/smb
Guide de démarrage rapide du système Cisco SPA232D 15

Siège social pour les Amériques
Cisco Systems, Inc.
170 West Tasman Drive
San Jose, CA 95134-1706
États-Unis
www.cisco.com
Assistance internationale aux petites entreprises :
www.cisco.com/go/sbsc
78-20139-01
Cisco et le logo Cisco sont des marques commerciales ou des marques déposées de Cisco
et/ou de ses filiales aux États-Unis et dans d'autres pays. Pour consulter la liste des marques
commerciales de Cisco, rendez-vous sur : www.cisco.com/go/trademarks. Les autres
marques commerciales mentionnées sont la propriété de leurs détenteurs respectifs.
L'utilisation du terme « partenaire » n'implique pas de relation de partenariat entre Cisco et une
autre société. (1110R)
© 2012 Cisco Systems, Inc. Tous droits réservés.
Printed in China PRC
Imprimé en République populaire de Chine
78-20139-01

FCC Interference Information
This device complies with Part 15 of the FCC Rules. Operation is subject to the following two
conditions: (1) This device may not cause harmful interference; and (2) This device must
accept any interference received, including interference that may cause undesired operation.
This equipment has been tested and found to comply with the limits for a Class B digital device,
pursuant to Part 15 of the FCC Rules. These limits are designed to provide reasonable
protection against harmful interference in a residential installation.
This equipment generates, uses, and can radiate radio frequency energy and, if not installed
and used in accordance with the instructions, may cause harmful interference to radio
communications. However, there is no guarantee that interference will not occur in a particular
installation.
If this equipment does cause harmful interference to radio or te levision reception, which can be
determined by turning the equipment off and on, the user is encouraged to try to correct the
interference by one or more of the following measures:
• Reorient or relocate the receiving antenna (that is, the antenn a for radio or television that is
“ receiving” the interference).
• Reorient or relocate and increase the separation between the telecommunications
equipment and receiving antenna.
• Connect the telecommunications equipment into an outlet on a circui t different from that to
which the receiving antenna is connected
FCC RF Radiation Exposure Statement
The installation of the bas e unit should allow at leas t 20 centimeter between the base and
persons to be in compliance wit h FC C RF expo sure gui delines. For body worn operation , the
portable part (handset) has been tested and meets FCC RF exposure guidelines.
This device must not be co-located or operating in conjunction with any other antenna or
transmitter.
compliance could void the user’s authority to operate the equipment.
The changes or modifications not expressly approved by the party responsible for
CANADIAN REPRESENTATIVE & ADDRESS:
Cisco Systems Canada Co
100 Middlefield Road, Toronto, Ontario, M1S 4M6, CANADA
TEL.:416-321-7646
This device complies with Industry Canada licence-exem pt RSS standa rd(s). Operat ion is subje ct
to the following two conditions: (1) this device may not cause interference, and (2) this device
must accept any interference, includi n g interference that may cause undesired operation of t he
device.
Le présent appareil est conforme aux CNR d'Industrie Canada applicables au x a pp a reils radio
exempts de licence. L'exploi tation est autorisée aux de ux conditions suivantes : (1) l'appa reil ne
doit pas produire de brouillage, et (2) l'utilisateur de l'appareil doit accepter tout brouillage
radioélectrique subi, même si le brouillage est susceptible d'en compromettre le fonctionnement.
 Loading...