

Page 1

USER GUIDE
V3.0
Page 2

TABLE OF CONTENTS
1. CISCO 7941 HANDSET............................................................................................................................................................................... 3
1.1 PLACING A CALL ................................................................................................................................................................3
1.2 RECEIVING A CALL ............................................................................................................................................................. 3
1.3 HOLD .................................................................................................................................................................................3
1.4 MUTE ................................................................................................................................................................................. 3
1.5 THREE WAY CONFERENCING .............................................................................................................................................. 4
1.6 TRANSFERRING A CALL ......................................................................................................................................................4
1.7 VOICE MAIL........................................................................................................................................................................ 4
1.8 FORWARDING CALLS: TURN ON .........................................................................................................................................4
1.9 FORWARDING CALLS: TURN OFF ....................................................................................................................................... 4
2. POLYCOM 430 HANDSET........................................................................................................................................................................... 5
1.10 HANDSET QUICK REFERENCE .............................................................................................................................................5
1.11 PLACING A CALL ................................................................................................................................................................5
1.12 RECEIVING A CALL ............................................................................................................................................................. 6
1.13 HOLD .................................................................................................................................................................................6
1.14 MUTE ................................................................................................................................................................................. 6
1.15 THREE WAY CONFERENCING .............................................................................................................................................. 6
1.16 SPLITTING A CONFERENCE ................................................................................................................................................. 6
1.17 TRANSFERRING A CALL ......................................................................................................................................................6
1.18 VOICE MAIL........................................................................................................................................................................ 6
1.19 FORWARDING CALLS: TURN ON .........................................................................................................................................7
1.20 FORWARDING CALLS: TURN OFF ....................................................................................................................................... 7
3. POLYCOM 601 HANDSET........................................................................................................................................................................... 8
3.1. HANDSET QUICK REFERENCE .............................................................................................................................................8
3.2. PLACING A CALL ................................................................................................................................................................8
3.3. RECEIVING A CALL ............................................................................................................................................................. 9
3.4. HOLD .................................................................................................................................................................................9
3.5. MUTE ................................................................................................................................................................................. 9
3.6. THREE WAY CONFERENCING .............................................................................................................................................. 9
3.7. SPLITTING A CONFERENCE ................................................................................................................................................. 9
3.8. TRANSFERRING A CALL ......................................................................................................................................................9
3.9. VOICE MAIL...................................................................................................................................................................... 10
3.10. FORWARDING CALLS: TURN ON .......................................................................................................................................10
3.11. FORWARDING CALLS: TURN OFF ..................................................................................................................................... 10
4. TOOLBAR................................................................................................................................................................................................ 11
4.1. TOOLBAR QUICK REFERENCE........................................................................................................................................... 11
4.2. PLACING A CALL USING THE DIAL NUMBER BOX................................................................................................................ 12
4.3. PLACING A CALL FROM YOUR OUTLOOK CONTACTS.......................................................................................................... 12
4.4. RECEIVING A CALL ........................................................................................................................................................... 12
4.5. CALL FORWARDING ALWAYS............................................................................................................................................ 13
4.6. CALL FORWARDING NO ANSWER...................................................................................................................................... 13
4.7. CALL FORWARDING BUSY ................................................................................................................................................ 14
4.8. DO NOT DISTURB .............................................................................................................................................................14
4.9. WEB EXPRESS ................................................................................................................................................................. 14
4.10. COMMPILOT EXPRESS: NONE ...........................................................................................................................................15
4.11. COMMPILOT EXPRESS: AVAILABLE IN OFFICE................................................................................................................... 15
4.12. COMMPILOT EXPRESS: OUT OF OFFICE ............................................................................................................................ 15
4.13. COMMPILOT EXPRESS: BUSY ........................................................................................................................................... 16
4.14. COMMPILOT EXPRESS: UNAVAILABLE...............................................................................................................................16
4.15. SIMULTANEOUS RINGING ..................................................................................................................................................17
4.16. AUTOMATIC CALLBACK ....................................................................................................................................................17
4.17. REMOTE OFFICE............................................................................................................................................................... 17
4.18. VOICE MANAGEMENT........................................................................................................................................................ 17
4.19. TOOLBAR LINKS ...............................................................................................................................................................18
5. TELOPORTAL.......................................................................................................................................................................................... 18
5.1. LOGGING IN......................................................................................................................................................................19
5.2. EDITING YOUR PASSWORD ............................................................................................................................................... 19
5.3. CALL FORWARDING ALWAYS: TURN FORWARDING ON ..................................................................................................... 20
5.4. CALL FORWARDING ALWAYS: TURN FORWARDING OFF.................................................................................................... 21
5.5. CALL FORWARDING BUSY: TURN FORWARDING ON ..........................................................................................................21
5.6. CALL FORWARDING BUSY: TURN FORWARDING OFF ........................................................................................................ 22
5.7. CALL FORWARDING NO ANSWER: TURN FORWARDING ON ............................................................................................... 22
5.8. CALL FORWARDING NO ANSWER: TURN FORWARDING OFF.............................................................................................. 23
5.9. FEATURE ACCESS CODES SECTION.................................................................................................................................. 23
6. ADDITIONAL TELOVATIONS INFORMATION................................................................................................................................................. 24
6.1. TELOVATIONS E-MAIL....................................................................................................................................................... 25
6.2. ONLINE BILLING ...............................................................................................................................................................25
www.telovations.com
2
Page 3

1. Cisco 7941 Handset
The following chapter contains basic instructions on how to use a Cisco 7941 Handset.
1.1 Placing a Call
Lift the handset and dial the number.
For hands free speaker mode: press the SPEAKER button then dial the number.
To dial a number from your Directories:
For Missed Calls
1. Press the DIRECTORIES button.
2. Press the
missed calls is displayed on the LCD screen.
3. Press the
call list.
For Received and Placed Calls
1. Press the DIRECTORIES button.
2. Press the Scroll key to select the desired call history option: Missed Calls, Received Calls,
Placed Calls, or Personal Directory.
3. Press the
4. Press the Scroll key to scroll through the numbers listed in the selected call history list.
5. Press the
1.2 Receiving a Call
Lift the handset, OR press the SPEAKER button or the
1.3 Hold
During a call, press the Hold soft key.
To retrieve the call, press the
1.4 Mute
During a call, press the MUTE button.
To turn off Mute, press the MUTE button again.
Select soft key to select Missed Calls from the Directory menu. The call history for
Dial soft key to speed dial the highlighted number, as displayed, from the missed
Select soft key to display the selected call history list.
Dial soft key to speed dial the highlighted number from the call history list.
Answer soft key for hands free speaker mode.
Resume soft key.
www.telovations.com
3
Page 4

1.5 Three Way Conferencing
1. Place a call to the first party.
2. Press the Cnfrnc soft key to create a new call (the active call is placed on hold).
3. Dial the phone number of the second party.
4. When the second party answers, press the
conference.
Cnfrnc soft key again to join all parties in the
1.6 Transferring a Call
1. During a call, press the More soft key and then press the Trnsfer soft key (the active call is
placed on hold).
2. Dial the number to which you want to transfer the call.
3. Press the
back sound is heard or you can wait until the third party answers and talk to them before
completing the transfer.
4. Hang up if the party accepts the call. If the party refuses the call, return to the original call by
pressing the
Trnsfer soft key again to complete the transfer. This can be done as soon as the ring
Resume soft key.
1.7 Voice Mail
Received messages will be indicated by a flashing Message Waiting Indicator LED on the front of the
phone and optionally a visual notification on the display. To listen to voice messages:
1. Press
2. Your phone will ring your Voice Portal.
3. Enter your pass code, followed by the # key.
4. Follow voice prompts to listen to your messages.
1.8 Forwarding Calls: Turn ON
1. Press the CFwd soft key.
2. When the dial tone is heard, enter a number to forward all future calls to.
3. When finished dialing, verify Forwarded to xxxxxxxxxx is displayed above the soft keys on the
LCD screen.
1.9 Forwarding Calls: Turn OFF
1. Press the
CFwdALL soft key.
www.telovations.com
4
Page 5
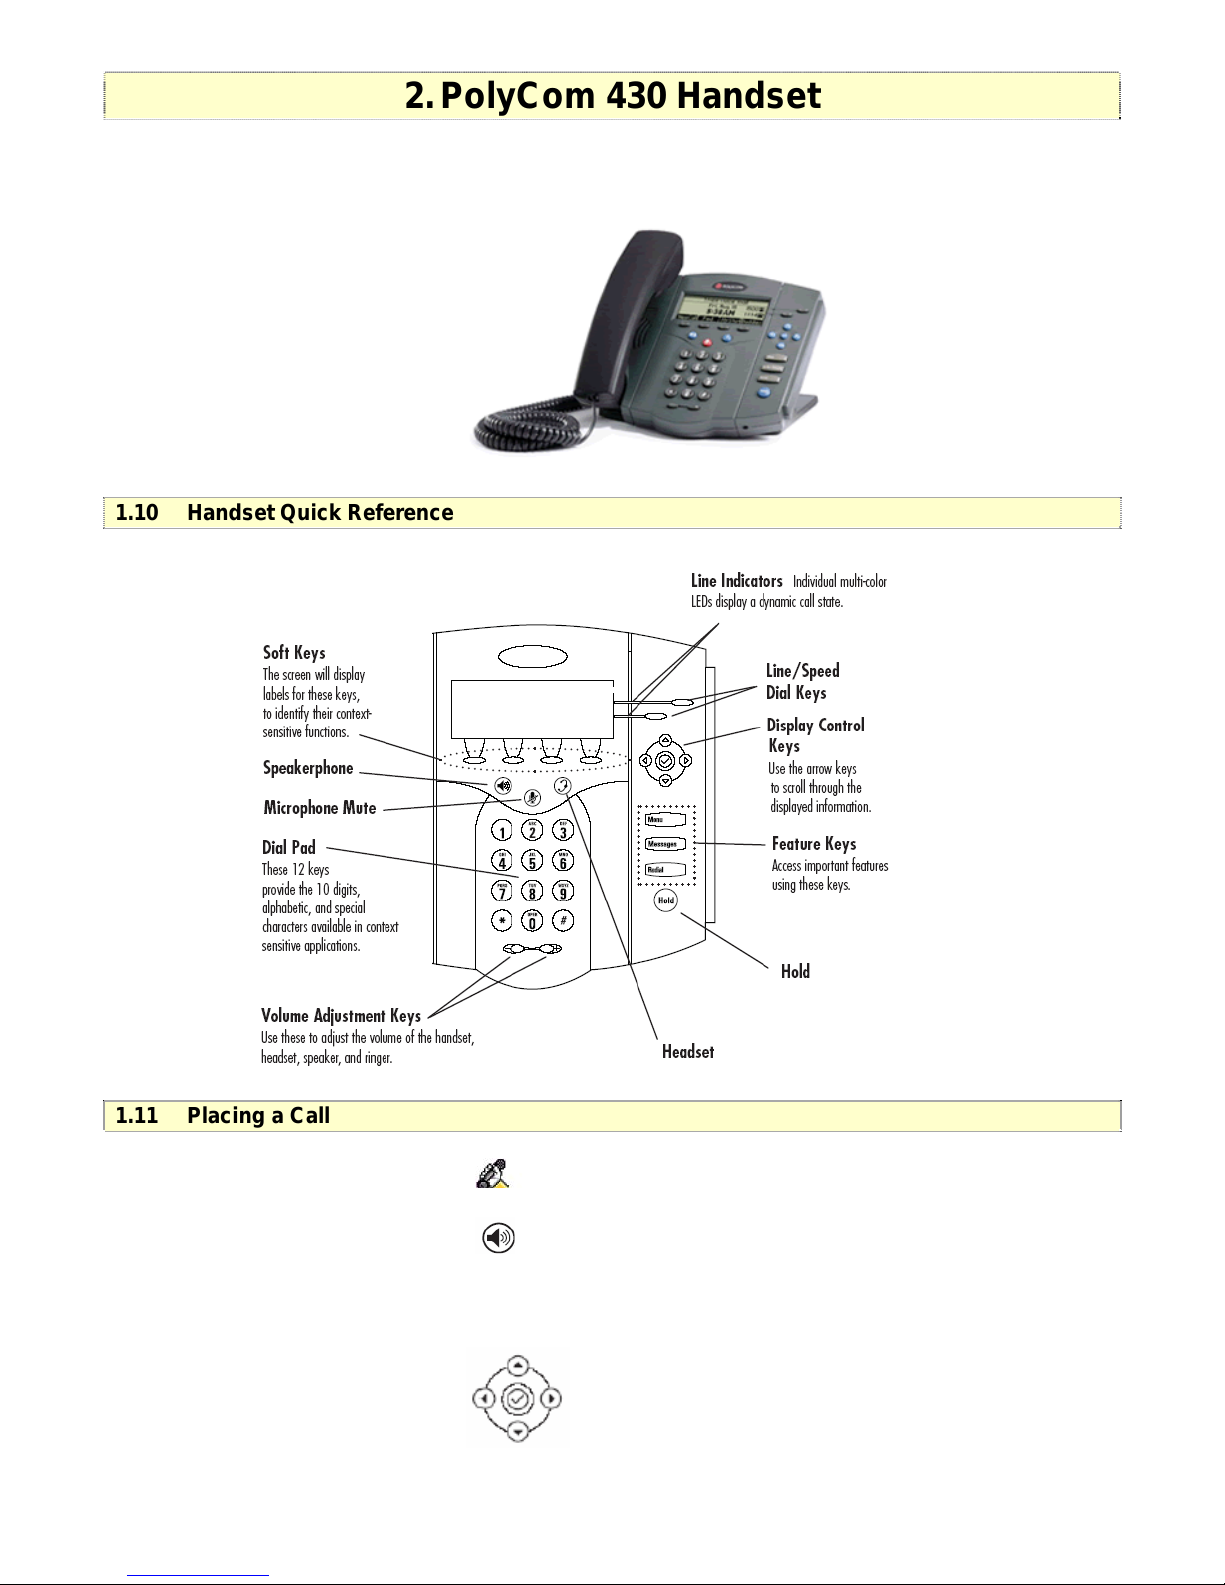
2. PolyCom 430 Handset
The following chapter contains basic instructions on how to use a PolyCom Sound Point IP 430
Handset.
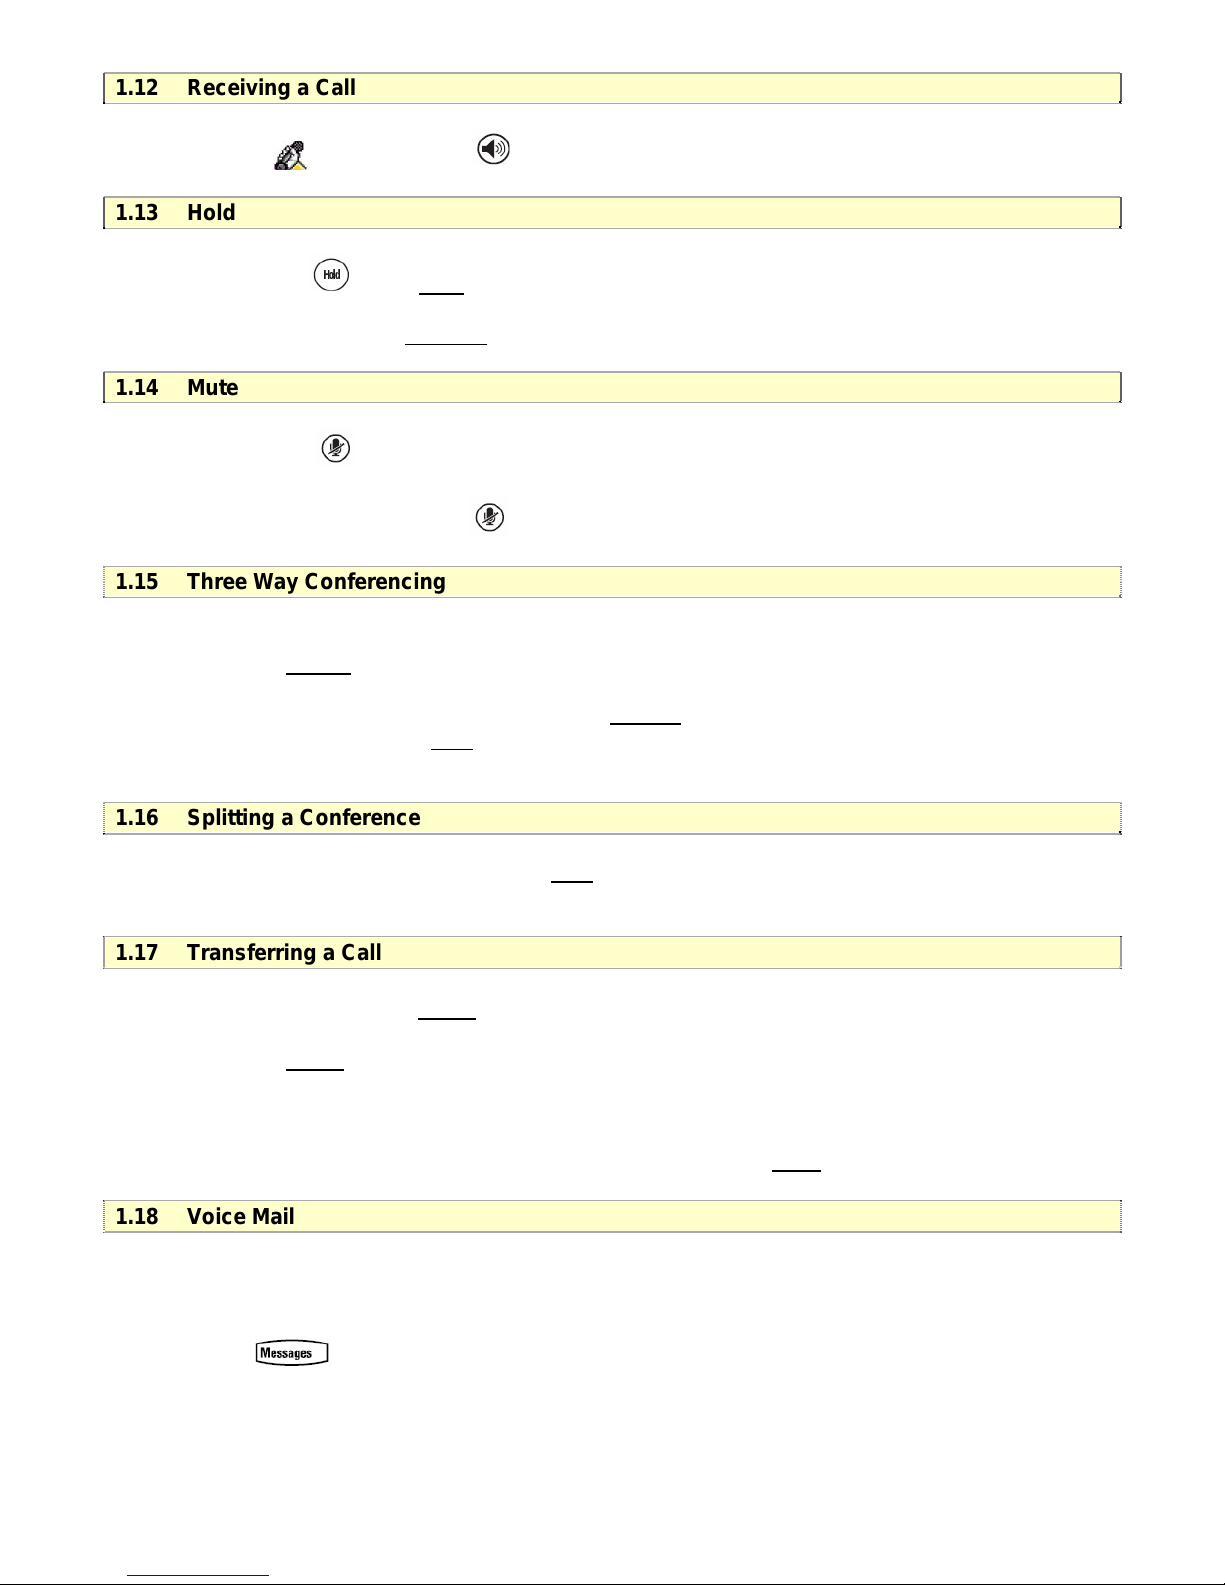
1.10 Handset Quick Reference
1.11 Placing a Call
Lift the handset and dial the number.
For hands free speaker mode: press then dial the number.
To dial a number from your call logs, use the arrow keys to find a number from your call lists or speed
dial index. Highlight the number you want to call and press the Dial key to complete the call.
Up Arrow: Speed Dial Info
Right Arrow: Placed Calls Log
Left Arrow: Received Calls Log
Down Arrow: Missed Calls Log
www.telovations.com
5
Page 6
1.12 Receiving a Call
Lift the hand OR Press set.
for hands free speaker mode.
1.13 Hold
During a call, press or the Hold soft key.
T
o retrieve the call, press the Resume
1.14 Mute
During a call, press
indicates that the oth arty cannot hear you.
To turn off Microphone Mute, press
1.15 Three Way Conferencing
the LED on the phone lights up and a flashing microphone on the display
er p
soft key.
again.
5. Place a call to the first party.
6. Press the
7. Dial the phone number of the second party.
8. When the second party answers, press the
conference, or press the
the active call.
1.16 Splitting a Conference
When a conference has been established, a Split
conference into two calls on hold.
Cnfrnc soft key to create a new call (the active call is placed on hold).
C soft key again to join all parties in the
nfrnc
Split soft key to put the first call on hold and keep the second cal
soft key is available. Pressing the key will split the
l as
1.17 Transferring a Call
5. During a call, press the Trnsfr soft key (the active call is placed on hold).
6. Dial the number to which you want to transfer the call.
7. Press the
back sound is heard or you can wait until the third party answers and talk to them before
completing the transfer.
blind transfer (without consultation) can be made by pressing the Blind
A
Trnsfr soft key again to complete the transfer. This can be done as soon as the ring
soft key.
1.18 Voice Mail
Received messages will be indicated by a flashing Message Waiting Indicator LED on the front of the
phone and optionally a visual notification on the display. To listen to voice messages:
5. Press
6. Your ph ll one wi ring your Voice Portal.
7. Enter your pass code, followed by the #
8. Follow voice prompts to listen to your message
key.
s.
www.telovations.com
6
Page 7

1.19 Forwarding Calls: Turn ON
4. Press the Fwd soft key from the phone’s idle display.
5. Enter a number or URL to forward all future calls to.
6. Press the
indicator for that line to confirm Call Forwarding enabled.
1.20 Forwarding Calls: Turn OFF
2. Press the Fwd
3. Press the
Enable soft key to confirm Call Forwarding. A moving arrow replaces the usual
soft key from the phone’s idle display.
Disabl soft key. The line indicator will now display the regular icon.
www.telovations.com
7
Page 8
3. PolyCom 601 Handset
The following chapter contains basic instructions on how to use a PolyCom Sound Point IP 601
Handset.
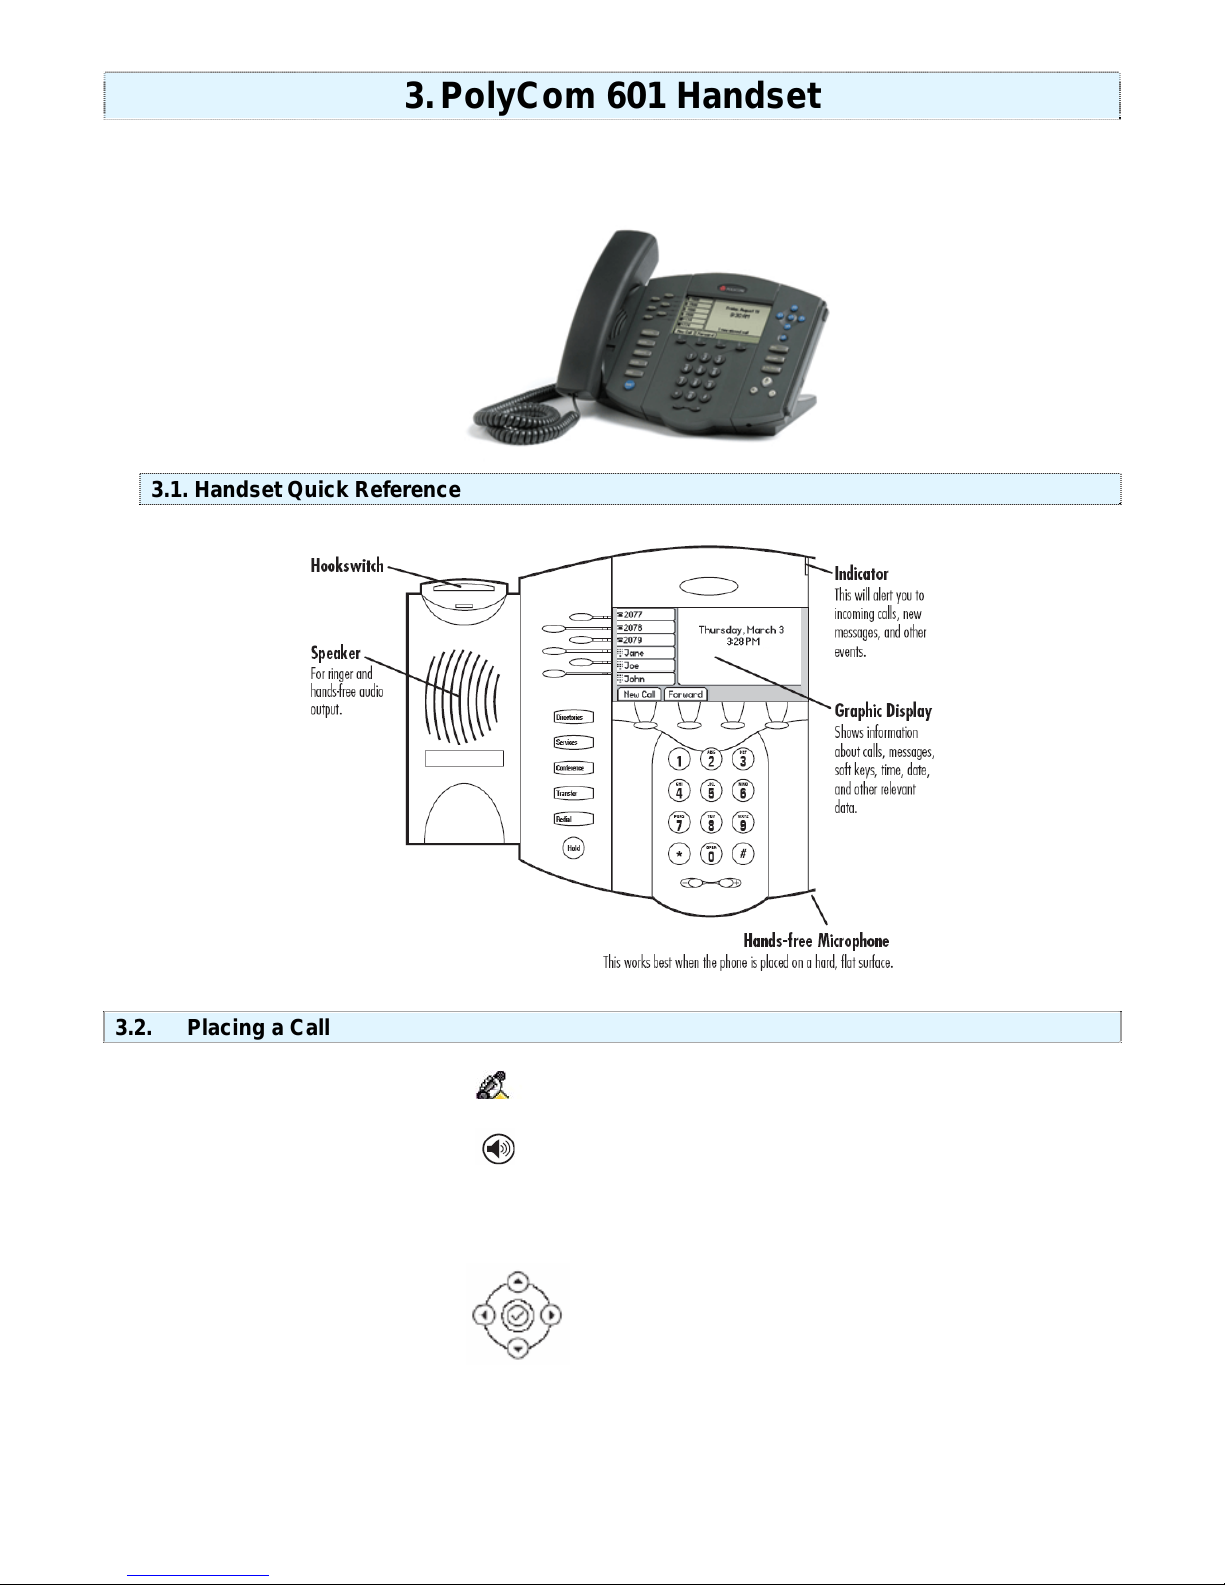
3.1. Handset Quick Reference
3.2. Placing a Call
Lift the handset and dial the number.
For hands free speaker mode: press
To dial a number from your call logs, use the arrow keys to find a number from your call lists or speed
dial index. Highlight the number you want to call and press the Dial key to complete the call.
Up Arrow: Speed Dial Info
Right Arrow: Placed Calls Log
Left Arrow: Received Calls Log
Down Arrow: Missed Calls Log
and then dial the number.
www.telovations.com
8
Page 9

3.3. Receiving a Call
Lift the handset, or press
for hands free speaker mode.
3.4. Hold
During a call, press or the Hold soft key.
To retrieve the call, press the
3.5. Mute
During a call, press
To turn off Microphone mute, press
3.6. Three Way Conferencing
. The button lights up to indicate that the other party cannot hear you.
Resume soft key.
again.
1. Place a call to the first party.
2. Press
3. Dial the phone number of the second party or use the arrow keys to access speed dial
numbers, missed, placed and received call lists. From one of these lists press the
key.
or the Confrnc soft key to create a new call (the active call is placed on hold).
Dial soft
4. When the second party answers, press
parties in the conference, or press the
second call as the active call.
A conference may be created at any time between an active call and a call which is on hold (on
the same line or another line) by pressing the
3.7. Splitting a Conference
When a conference has been established, a Split soft key is available. Pressing the key will split the
conference into two calls on hold.
Split soft key to put the first call on hold and keep the
Join soft key.
or the Confrnc soft key again to join all
3.8. Transferring a Call
1. During a call, press the Trnsfr soft key (the active call is placed on hold).
2. Dial the number to which you want to transfer the call.
3. Press the
back sound is heard or you can wait until the third party answers and talk to them before
completing the transfer.
A blind transfer (without consultation) can be made by pressing the
Trnsfr soft key again to complete the transfer. This can be done as soon as the ring
Blind soft key.
www.telovations.com
9
Page 10

3.9. Voice Mail
Received messages will be indicated by a flashing Message Waiting Indicator LED on the front of the
phone and optionally a visual notification on the display. To listen to voice messages:
9. Press
10. Your phone will ring your Voice Portal.
11. Enter your pass code, followed by the # key.
12. Follow voice prompts to listen to your messages.
3.10. Forwarding Calls: Turn ON
1. Press the Fwd soft key from the phone’s idle display.
2. Enter a number or URL to forward all future calls to.
3. Press the
indicator for that line to confirm Call Forwarding enabled.
3.11. Forwarding Calls: Turn OFF
1. Press the
2. Press the
Enable soft key to confirm Call Forwarding. A moving arrow replaces the usual
Fwd soft key from the phone’s idle display.
Disabl soft key. The line indicator will now display the regular icon.
www.telovations.com
10
Page 11

4. Toolbar
Telovations Telephony Toolbar is
Working through Microsoft
applications like Outlook and Exchange, you can easily manage all of your
everyday communications in one place. The following chapter contains basic instructions on using
your Telovations Toolbar.
4.1. Toolbar Quick Reference
a desktop communicator that works with your telephone handset.
Connect: This shows if you are logged into the Telovations platform.
Options: Where you enter login during initial set-up and configure general connection
settings.
Services: Configure call control features and Voice Messaging Options.
Remote Office: Enable a remote location (home, hotel) to act as your work phone.
Simultaneous Ringing: This allows you to set up a list of up to ten additional phone
numbers that ring each time you receive a call.
Web Express: Enable pre-configured profiles – None, In Office, Out of Office, Busy, and
Unavailable.
Call Forward Always: Turn on/off the ability to forward all incoming calls to a specified
phone number.
Call Forward No Answer: Turn on/off the ability to forward all incoming calls to a
specified phone number if your phone isn’t answered after a specified number of rings.
Call Forward Busy: Turn on/off the ability to forward all incoming calls to a specified
phone number if your phone is busy.
Do Not Disturb: Turn on/off the ability to send calls directly to voice-mail busy greeting.
Speed Dial 8/100: Click to view or call Speed Dial contacts.
Call History: View missed, dialed, and received calls.
Personal Directory: Access your personal directory.
Group Directory: Access the company-wide group directory.
Search: Perform a keyword search of directory listings.
Toolbar: Contains conferencing and informational links.
Dial Number: Remembers the last 10 dialed numbers for quick selection.
Answer answers an incoming call.
Hold: Place an active call on Hold.
Voice mail: Transfer an active call to voice mail, or dial your voice portal.
Transfer: Transfer an active call to another party.
End: Disconnect an active call.
www.telovations.com
11
Page 12

4.2. Placing a Call using the Dial Number Box
To place a call using the dialing box:
1. Highlight the Dial Number box.
2. Type in the number you wish to dial.
3. Press the Enter key.
4.3. Placing a Call from your Outlook Contacts
1. Open Outlook and click on the Contacts item in the Folder list.
2. Select the contact you wish to call from the contact list.
3. Use the Dial Contact pull down list from the Telovations Telephony Toolbar to select the
contact phone number you wish to dial (Business, Home, or Mobile).
4.4. Receiving a Call
Pick up your handset.
OR
Click on the popup notification if you have an Advanced Call Control (ACC) compliant phone.
www.telovations.com
12
Page 13

4.5. Call Forwarding Always
This option forwards all incoming calls to a specified phone number. A reminder ring can also be
played to alert the user to the call-forwarding option being selected. The settings can be changed via
the
button. When this service is activated, the icon in the toolbar changes to .
4.6. Call Forwarding No Answer
This option forwards all incoming calls to a specified phone number when your phone is not answered
after the selected number of rings occur. The settings can be changed via the
When this service is activated, the
icon in the toolbar changes to .
button.
www.telovations.com
13
Page 14

4.7. Call Forwarding Busy
This option forwards all incoming calls to a specified phone number when all the lines on the phone
are in use. The settings can be changed via the
icon in the toolbar changes to .
button. When this service is activated, the
4.8. Do Not Disturb
This feature allows all incoming calls to be forwarded to a voice messaging service, with notification of
the user when this occurs, if desired. The settings can be changed via the
button. When
this service is activated, the
icon in the toolbar changes to .
4.9. Web Express
Web Express (CommPilot Express) provides the ability to configure and manage inbound call flows.
Web Express allows you to configure up to four profiles to control inbound calls. Even when you're offsite you can still manage your profiles on the Web or on the phone. With Web Express, you can work
efficiently without unnecessary interruption and manage calls based on your schedule and
preferences.
IMPORTANT NOTE: You should not configure other services, such as Call Notify, Call Forwarding, or
Simultaneous Ring if you use Web Express.
www.telovations.com
14
Page 15

4.10. CommPilot Express: None
Selecting this option will not use any of Web Call Manager's profiles. Any other services that may be
activated will be used to handle incoming calls.
4.11. CommPilot Express: Available in Office
This profile provides the facility to indicate how calls are handled when the user is located in the
office. The user can enable incoming calls to ring at additional phones and setup voice messaging to
take calls.
4.12. CommPilot Express: Out of Office
This profile enables the user to dictate how calls are handled when he/she is out of the office, but
available to receive calls. Calls can be forwarded to different phones and notification e-mails can be
sent.
www.telovations.com
15
Page 16

4.13. CommPilot Express: Busy
With this profile users can indicate how calls are to be handled when they are busy. Calls from
selected numbers can be forwarded, calls can be sent to Voice Messaging, and an e-mail notification
can be sent when a call is received.
4.14. CommPilot Express: Unavailable
This profile enables users to specify how calls are handled when they are not available. For example
when you are on vacation, calls from selected numbers can be forwarded and users can specify a
Voice Messaging greeting to be heard by all callers.
www.telovations.com
16
Page 17

4.15. Simultaneous Ringing
This feature enables the Toolbar to alert other phones when incoming calls are received. The user
has the option of disabling this service during calls.
4.16. Automatic Callback
This feature allows a Toolbar user to monitor a busy party in your group and automatically establish a
call when the busy party is available.
4.17. Remote Office
This feature allows the use of another phone instead of the normal business phone.
4.18. Voice Management
www.telovations.com
17
Page 18

Voice Management allows users to specify how voice messages are handled. Unified messaging
allows voice messages to be captured and forwarded to a particular e-mail address. The Phone
Message Waiting Indicator is a visual reminder on the phone that a message has been recorded.
Furthermore, e-mail notifications can be made of the recorded voice message.
4.19. Toolbar Links
The drop down list allows Toolbar users to access links to other Telovations Services. Services
currently include:
• Conferencing
• VoIP Services
5. TeloPortal
www.telovations.com
18
Page 19

The TeloPortal is a Web site you can use to make changes to your phone settings and account. Many
of the features in the Teloportal can also be changed through your handset or Toolbar. If you became
a customer before 9/1/2006, you will login to the Web Portal. If you became a customer after
9/1/2006, you will login to the Teloportal.
The following chapter is a brief look into a few of the tasks for which you can use the Web site. If you
would like to read a more detailed explanation of how to use each feature, logon to
www.telovations.com and visit the support link to download the entire manual.
5.1. Logging In
Take the following steps to open your Web Interface login page:
1. Launch Microsoft Internet Explorer (version 5.0 or higher).
2. Go to Telovations Web address:
3. Click on the
Login tab.
www.telovations.com.
4. Click on the
5. Fill in your user name and password.
6. Press Login.
TeloPortal link.
5.2. Editing Your Password
www.telovations.com
19
Page 20

Use this procedure to reset your Web access or voice portal password. Note: If you reset your
password, you will need to update the new password in your Toolbar under the options section.
1. Log in using the instructions listed on the previous page.
2. Click
Profile on the Options menu.
3. On the User – Profile Menu page, click
Passwords. The User- Passwords page appears.
4. Click the radio button to indicate which password you are changing. To change the password
that gets you into the Web Interface Portal, click
password for your voice messaging options, click
Set Web access password. To change the
Set voice portal password.
5. Type your current password. Type the password exactly as you do when logging into the
system, including capitalization.
6. Type your new password. Type the password exactly as you do when logging in to the system,
including capitalization.
7. Type the new password again. Re-type the new password exactly as it was typed the first
time, including capitalization.
8. Save your changes. Click
without saving, click
OK. OK saves your changes and displays the previous page. To exit
Cancel to display the previous page. Web access passwords are
alphanumeric combinations that must begin with a letter. Voice portal passwords are numeric
characters only.
5.3. Call Forwarding Always: Turn Forwarding ON
www.telovations.com
20
Page 21

Use this procedure to redirect your calls to another number.
1. On the User – Incoming Calls menu page, click
Forwarding Always page appears.
2. For Call Forwarding Always, click “
On”.
Call Forwarding Always. The User – Call
3. Type the number to forward your calls to in the Calls Forward to text box (dashes, p arentheses, or
spaces are not necessary). If this number is not one assigned to the group, type the complete
number: +<country code> <national number>. For example, “+1” must precede long distance calls
within the U.S. This is required information when the service is on. The text box must be popula ted
with a valid phone number.
4. To cause a short ring burst to be played at your office phone when a call is f orwarded, check Play
Ring Reminder when a call is forwarded.
5. Save your changes. Click
displays the previous page. To exit without saving, select another page or click
Apply or OK. Apply saves your changes. OK Saves your changes and
Cancel to display
the previous page.
5.4. Call Forwarding Always: Turn Forwarding OFF
1. On the User – Incoming Calls menu page, click
Call Forwarding Always. The User – Call
Forwarding Always page appears.
2. For Call Forwarding Always, click “
3. Save your changes. Click
Apply or OK. Apply saves your changes. OK Saves your changes and
displays the previous page. To exit without saving, select another page or click
Off”.
Cancel to display
the previous page.
5.5. Call Forwarding Busy: Turn Forwarding ON
www.telovations.com
21
Page 22

1. On the User- Incoming Calls menu page, click Call Forwarding Busy. The User – Call Forwarding
Busy page appears.
2. Click “
On” for Call Forwarding Busy.
3. Type the number to forward your calls to in the Calls Forward to text box (dashe s, parentheses, or
spaces are not necessary) If this number is not one assigned to t he group, type the comple te
number: + <country code> <national number>. For example, “+1” must precede lo ng distance calls
within the U.S. This is required information when the service is on. The text box must be populated
with a valid phone number.
4. Save your changes. Click
displays the previous page. To exit without saving, select another page or click
Apply or OK. Apply saves your changes. OK Saves your changes and
Cancel to display
the previous page.
5.6. Call Forwarding Busy: Turn Forwarding OFF
Use this procedure if you do not want to redirect your calls to an other number when you are enga ged in a
call.
1. On the User – Incoming Calls menu page, click
Call Forwarding Busy. The User – Call F orwarding
Busy page appears.
2. Click “Off” for Call Forwarding Busy.
3. Save your changes. Click
displays the previous page. To exit without saving, select another page or click
Apply or OK. Apply saves your changes. OK Saves your changes and
Cancel to display
the previous page.
5.7. Call Forwarding No Answer: Turn Forwarding ON
www.telovations.com
22
Page 23

Use this procedure to redirect your calls to another number aft er a pre-defined number o f rings.
1. On the User – Incoming Calls menu page, click
Forwarding No Answer page appears.
2. For Call Forwarding No Answer, click “
On”.
Call Forwarding No Answer. The User – Call
3. Type the number to forward your calls to in the Calls Forward to text box (dashe s, parentheses, or
spaces are not necessary). If this number is not one assigned to the group, type the complete
number: +<country code> <national number>. For example, “+1” must precede long d istance calls
within the U.S. This is required information when the service is on. The text box must be popula ted
with a valid phone number.
4. Click the button that indicates the number of rings before forwar ding.
5. Save your changes. Click
displays the previous page. To exit without saving, select another page or click
Apply or OK. Apply saves your changes. OK saves your chang es and
Cancel to display
the previous page.
5.8. Call Forwarding No Answer: Turn Forwarding OFF
Use this procedure if you do not want to redirect your calls to another n umber after a pre- defined number of
rings.
1. On the User – Incoming Calls menu page, click
Forwarding No Answer page appears.
2. For Call Forwarding No Answer, click “
3. Save your changes. Click
Apply or OK. Apply saves your changes. OK saves your chang es and
Off”.
displays the previous page. To exit without saving, select another page or click
the previous page.
Call Forwarding No Answer. The User – Call
Cancel to display
5.9. Feature Access Codes Section
www.telovations.com
23
Page 24

You use this page to display the functions you can perform by dialing a prefix , followed by an assigned twodigit code on your handset. However, if this feature has not been assigned to you, you see this message:
You do not currently have any services which require Feature Acce ss Codes.
To perform the functions listed in the Feature Access Code section, dial the prefix (or the alternate prefix)
followed by the two-digit feature code. You can activate and deactivate any of these services by dialing one
of the allowed prefixes followed by the assigned two-digit code.
To get to the Feature Access Code Section use the following st eps:
1. Click Utilities on the Options Menu.
2. Click the Feature Access Codes Link.
3. For additional instructions or definitions cl ick on the Help link and a new page will pop u p with more
information about the codes.
6. Additional Telovations Information
www.telovations.com
24
Page 25

Telovations Contact Information:
Customer Service and Technical Support:
support@telovations.com
813.774.4370 - Option 1
Billing Department:
billing@telovations.com
813.774.4370 - Option 3
6.1. Telovations E-mail
1. Launch Microsoft Internet Explorer (version 5.0 or higher).
2. Enter the Telovations Web address:
3. Click on the Login tab.
4. Click on the
WebMail link.
www.telovations.com.
5. Fill in your Username and Password.
6. Press Login.
6.2. Online Billing
1. Launch Microsoft Internet Explorer (version 5.0 or higher).
www.telovations.com
25
Page 26

2. Enter the Telovations Web address: www.telovations.com.
3. Click on the Login tab.
4. Click on the Billing link.
5. Fill in your User ID and Password.
6. Press
Log in.
www.telovations.com
26
 Loading...