

Page 1

Quick Start Guide
Cisco PIX 506/506E Firewall
Quick Start Guide
For Cisco PIX Firewall Version 6.2 and PDM Version 2.0
1 About the Cisco PIX 506/506E Firewall 2
2 Check Items Included 3
3 Connect the Cables 4
4 Power On the PIX 506/506E 5
5 Check the LEDs 6
6 Configuring the PIX 506/506E 7
7 PDM Startup Wizard 8
8 Alternative Ways to Access the PIX 506/506E 10
9 Upgrade to DES or 3DES 11
10 Restore the Default Configuration 12
Page 2
1 About the Cisco PIX 506/506E
Hard
Sof
Firewall
The PIX 506/506E delivers enterprise-class security for
remote office/branch office environments in a robust,
reliable security appliance. Ideal for securing Internet
connections for remote/branch offices, the PIX 506/506E,
part of the market-leading Cisco PIX Firewall Series,
provides a wide range of rich security capabilities and
remote management capabilities in a cost-effective,
high-performance solution:
• Stateful inspection security based on state-of-the-art Adaptive Security Algorithm (ASA)
• Supports over 100 predefined applications, services, and protocols for flexible access control
• Virtual Private Networking (VPN) for secure remote network access using IKE/IPSec standards
• Intrusion protection from over 55 different network-based attacks
• URL filtering of outbound web traffic via industry-leading, third-party URL filtering products
PO
W
ER
ACT NETWORK
CISCO PIX 506E
FIREWALL
ware Features
• External power supply
• 200-MHz (PIX 506)/300-MHz (PIX 506E)
processor
• 32-MB RAM, 8-MB Flash memory
• 1 autosensing 10BaseT Ethernet port for an
outside connection to the Internet (port 0)
• 1 autosensing 10BaseT Ethernet port for a
connection to your internal network
• Serial console port for administrative access
• Front panel LEDs for appliance and link
status
• 20-Mbps cleartext firewall throughput
• 10 Mbps (PIX 506)/16 Mbps (PIX 506E)
VPN throughput (3DES/SHA1)
2
tware Features
• Supports PIX Firewall version 6.2 a secure,
purpose-built embedded operating system
• Includes plug-and-play default configuration
for simplified installation
• Includes Cisco PIX Device Manager (PDM)
for intuitive, web-based administration of
PIX Firewalls
• Internal DHCP server supports up to
256 DHCP address leases
• Supports up to 5 remote access, or
site-to-site, VPN peers
• Supports 56-bit DES and 168-bit 3DES, with
optional licenses. Refer to“Upgrade to DES
or 3DES” for more information.
Page 3
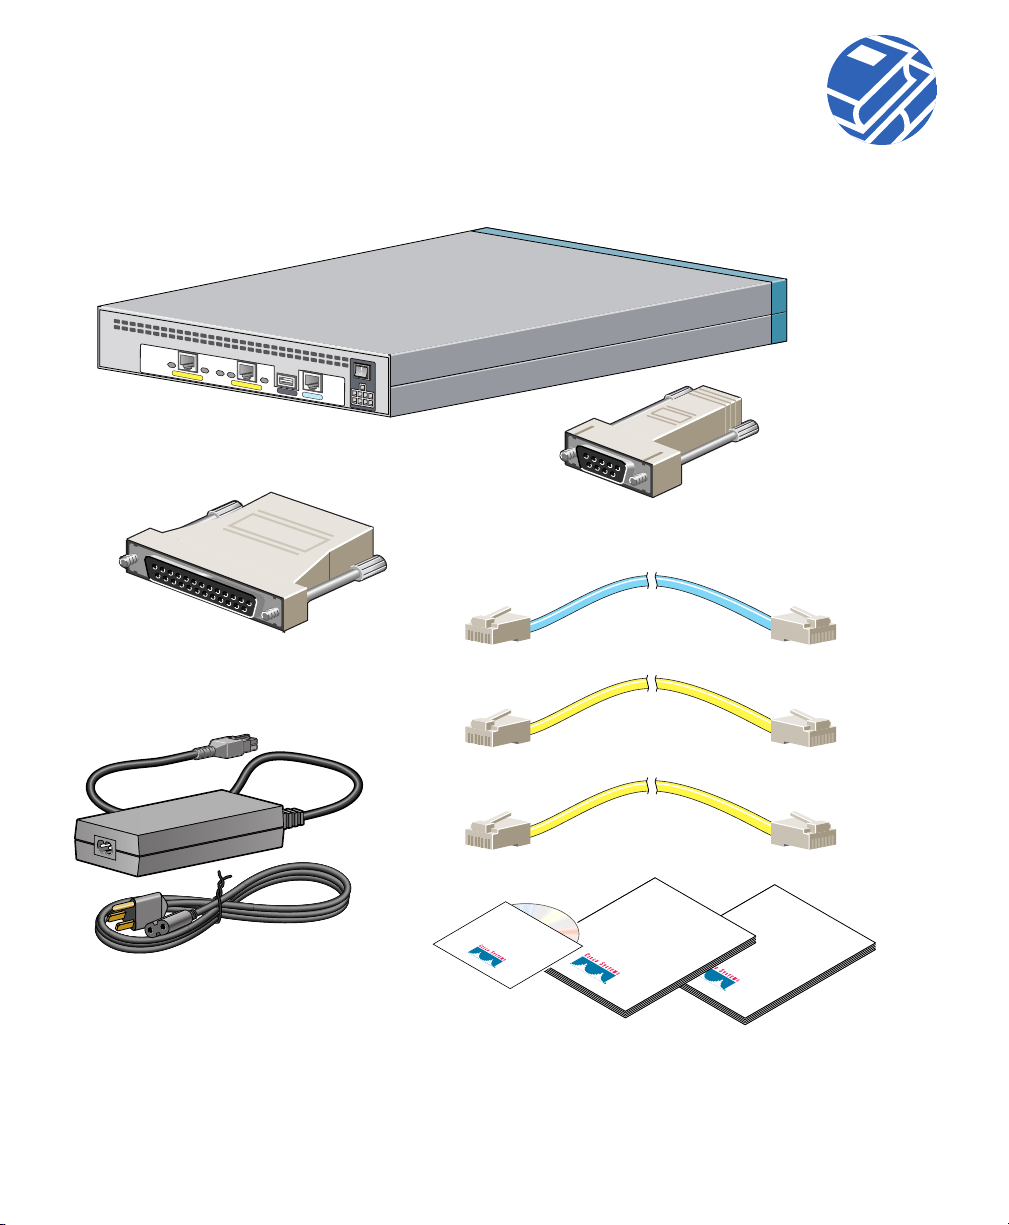
2 Check Items Included
ACT
LINK
ACT
ETHERNET 1
ETHERNET 0
LINK
USB
Cisco PIX 506E
Console cable adapter
(29-0810-01)
CONSOLE
DC
POWER
INPUT
PC terminal adapter
(74-0495-01)
Blue
console cable
(72-1259-01)
Yellow
Ethernet cable
(72-1482-01)
Power supply and cable
(US shown)
506E power supply (341-0007-01)
Cisco PIX
Firewall
Product CD
Yellow
Ethernet cable
(72-1482-01)
Safety and
Compliance
Guide
Documentation
PIX 506E
Quick Start
Guide
3
Page 4
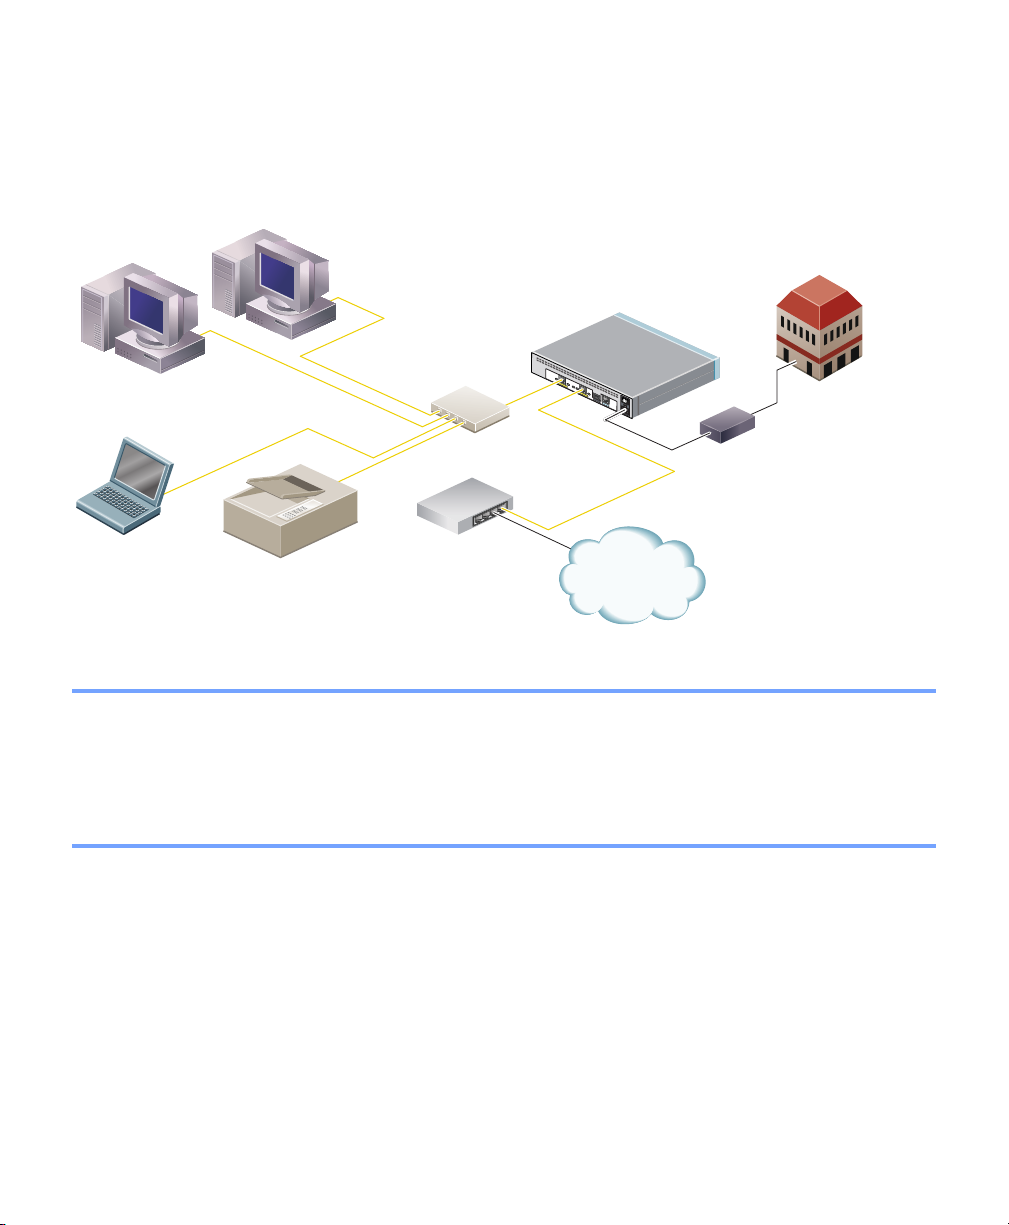
3 Connect the Cables
Computer or other
network device
Yellow
Ethernet
cables
Switch
Cisco PIX 506E
A
C
T
L
IN
K
E
T
H
E
R
N
E
T
1
A
C
T
L
I
N
E
K
T
H
E
R
N
E
T
0
U
D
S
C
B
P
O
W
E
C
R
O
I
N
N
S
P
O
U
L
T
E
Yellow
Ethernet
cable
Power
adapter
ptop computer
Printer
Router
Internet
71116
Follow these steps to connect the cables:
Step 1 Place the chassis on a flat, stable surface. The chassis is not rack mountable.
Step 2 Use the yellow Ethernet cable (72-1482-01) provided to connect the outside Ethernet
interface, Ethernet 0, to a DSL modem, cable modem, or router.
Step 3 Use the other Ethernet cable (72-1482-01) provided to connect the inside Ethernet interface,
Ethernet 1, to a switch or hub.
4
Page 5
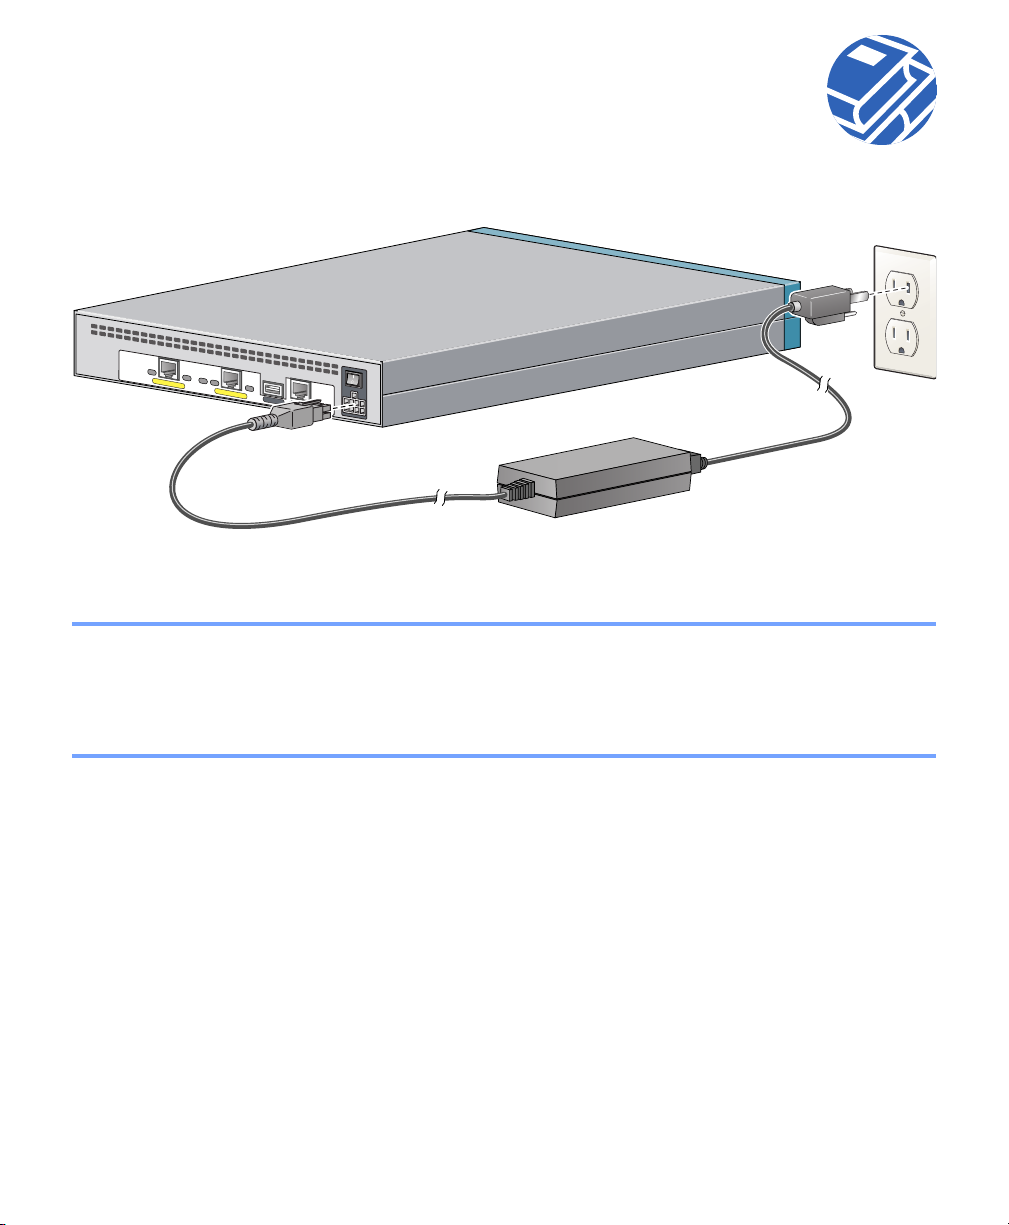
4 Power On the PIX 506/506E
ACT
LINK
ACT
ETHERNET 1
ETHERNET 0
LINK
USB
CONSOLE
Follow these steps to power on the PIX Firewall:
Step 1 Connect the small, square connector of the power supply cable to the power connector on the
rear panel.
Step 2 Connect the AC power connector of the power supply input cable to an electrical outlet.
Step 3 Set the power switch to the on (|) position.
DC
POW
ER
DC
INPUT
POWER
INPUT
Cisco PIX 506E
Power supply
5
Page 6
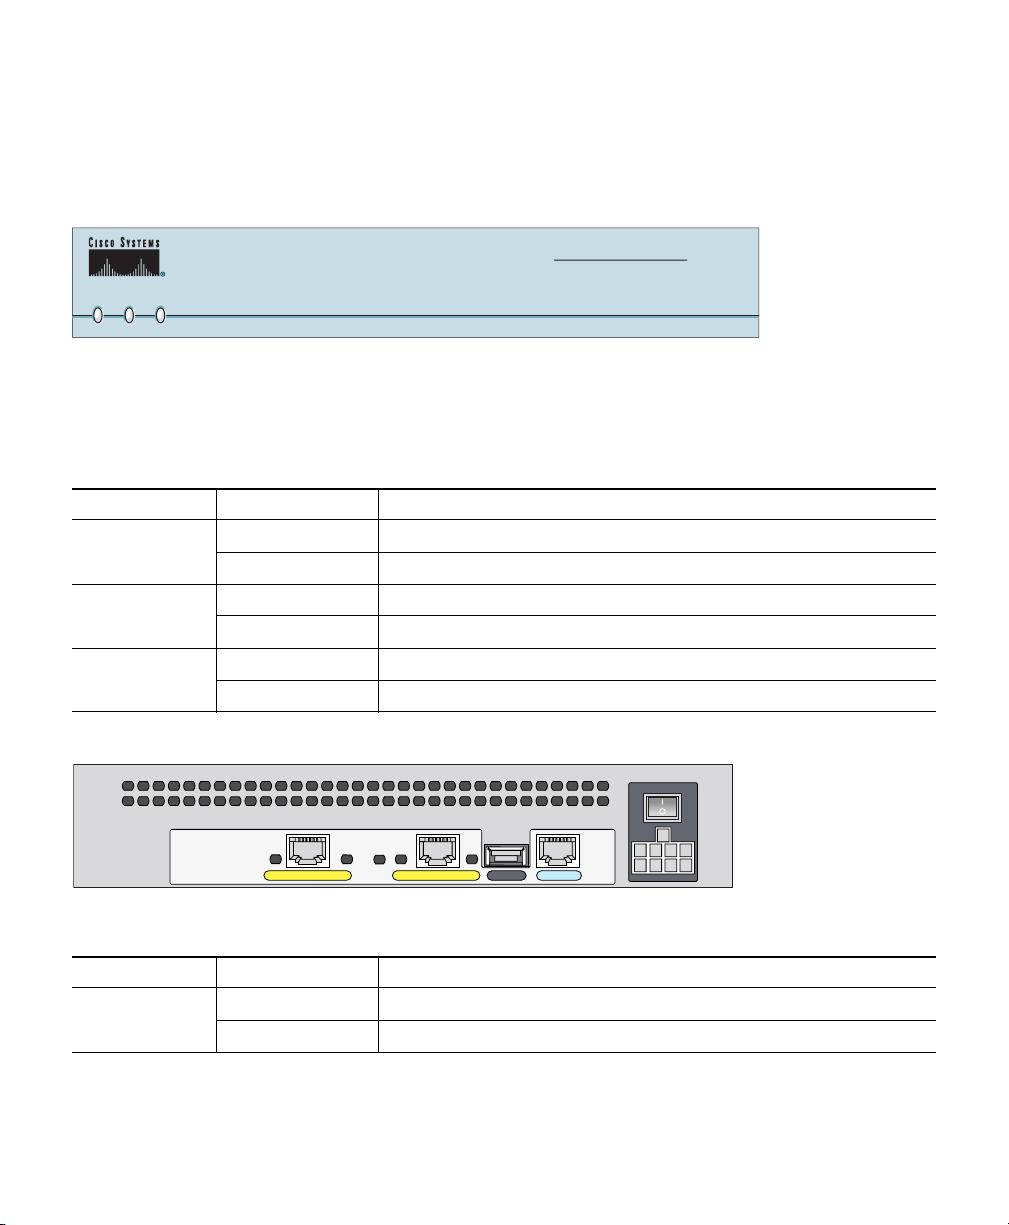
5 Check the LEDs
CISCO PIX 506E
FIREWALL
POWER ACT NETWORK
67933
If all LEDs are operating as expected (see Table 1 and Table 2), this concludes the hardware
installation. The pages that follow include instructions on running PDM and additional optional
procedures.
Table 1 PIX 506/506E Front Panel LEDs
LED State Description
POWER Green The device is powered on.
Off The device is powered off.
ACT Flashing green The software image has been loaded.
Off The device is powered off.
Network Flashing green One or more network interfaces are passing traffic.
Off No network interfaces are passing traffic.
ACT
ETHERNET 1
Insert picture of 506/506E here.
ACT
LINK
ETHERNET 0
LINK
USB
CONSOLE
Table 2 PIX 506/506E Rear Panel LEDs
LED State Description
ACT On Network activity is present on the port.
Off No network activity is present on the port.
6
DC
POWER
INPUT
78186
Page 7

Table 2 PIX 506/506E Rear Panel LEDs
LED State Description
LINK On Data is passing on the port.
Off No data is passing on the port.
6 Configuring the PIX 506/506E
The PIX 506/506E comes with a factory default configuration that meets the needs of most broadband
networking environments. The factory default configuration on the PIX 506/506E protects your inside
network from any unsolicited traffic. It is configured to use DHCP on the outside interface to acquire an
IP address. A default DHCP server address pool is included for hosts on the inside interface.
PDM contains a Startup Wizard that lets you easily change settings to suit your needs.
Instances in which it might be necessary to change or make additional changes to the default
configuration include the following:
• To create administrative and Telnet passwords
Note We highly recommend that you change the administrative and Telnet passwords from
their default settings to secure the administration of the PIX Firewall.
• To configure Point-to-Point Protocol over Ethernet (PPPoE) or a static IP address for an outside
interface
• To configure VPN and Auto Update features
7
Page 8

7 PDM Startup Wizard
The PIX 506/506E contains an integrated configuration
utility called Cisco PIX Device Manager (PDM). PDM is
a web browser-based configuration tool designed to help
you set up, configure, and monitor the PIX Firewall.
PDM is preinstalled on the PIX 506/506E. To a cce ss
PDM, make sure JavaScript and Java are enabled in
your web browser. For best performance, we
recommend that you use Microsoft Internet Explorer
5.5 or a higher release. Refer to the Cisco PIX Device
Manager Installation Guide for more information on
operating system and web browser environments
supported by PDM
.
8
Page 9

PDM version 2.0 and higher releases include a Startup Wizard for initial configuration. Follow these steps
to load PDM and use the Startup Wizard:
Step 1 Use an Ethernet cable to connect your PC to the inside port (Ethernet 1) on the rear panel of
the PIX Firewall.
Step 2 Configure your PC to use DHCP (to receive an IP address automatically from the
PIX Firewall) or assign a static IP address to your PC by selecting an address out of the
192.168.1.0 network.
Note The inside interface of the PIX Firewall is assigned 192.168.1.1, so choose a different
IP address.
Step 3 Check the ACT LED on the rear panel of the PIX Firewall (see Table 2 on page 6) to verify
that your PC has basic connectivity to the inside port (Ethernet 1). When connectivity occurs,
the ACT LED next to the port lights up solid green.
Step 4 To access the Startup Wizard, use a PC connected to the inside port and enter the URL
https://192.168.1.1/startup.html into your browser.
Note It is very important to enter the “s” in “https://192.168.1.1,” which indicates
a secure connection. If you enter “http://192.168.1.1” without the “s” in
“https,” you cannot access the PIX Firewall.
Step 5 Accept the certificates and follow the instructions in the Startup Wizard. For online help, click
the Help button at the bottom of the Startup Wizard window.
9
Page 10

8 Alternative Ways to Access the PIX 506/506E
You can use a serial terminal emulator from a PC or workstation connected to the Console port for
local administrative access.
You can also use PDM or a console to configure Telnet access to the PIX 506/506E. By default, Telnet
access is not permitted. To Telnet to the PIX 506/506E from the outside perimeter of the firewall,
configure an outside IP address and IPSec for a secure Telnet session. For more information, refer to
the Cisco PIX Firewall and VPN Configuration Guide.
67935
ACT
LINK
ACT
ETHERNET 1
ETHERNET 0
LINK
USB
CONSOLE
Blue console cable
PC terminal adapter
To connect a console for local administrative access:
DC
POWER
DC
INPUT
POWER
INPUT
Cisco PIX 506E
Step 1 Plug one end of the console cable adapter into a standard 9-pin PC serial port.
Step 2 Plug one end of the blue console cable (72-1259-01) into the PC terminal adapter.
Step 3 Plug the other end of the blue console cable into the Console port.
Step 4 Configure the PC terminal emulation software or terminal for 9600 baud, 8 data bits, no
parity, and 1 stop bit.
Refer to the Cisco PIX Firewall and VPN Configuration Guide for information about how to use the
command-line interface (CLI).
10
Page 11

9 Upgrade to DES or 3DES
Note The following instructions are applicable to PIX Firewall version 6.2 and higher releases. If
you are not running PIX Firewall version 6.2, refer to the Quick Start Guide for the version
of software installed on your PIX Firewall.
To upgrade features you did not specify at the time of
purchase, you need to use an activation key. The
activation key lets you add software features to the PIX
506/506E, such as DES or 3DES.
To request a free activation key for DES, complete the
online form at the following website:
http://www.cisco.com/cgi-bin/Software/FormManager/
formgenerator.pl?pid=221&fid=324
Note If you are unable to access this form because you do not have a CCO login, send an e-mail to
licensing@cisco.com. In the e-mail include the PIX Firewall serial number as it appears in the
show version command and request a free 56-bit DES key.
To purchase an activation key for 3DES (PIX-506-SW-3DES=), go to Cisco’s ordering website:
http://www.cisco.com/public/Ordering_root.shtml
Enter the activation key only after you have downloaded an image—not from the command line or
without rebooting first.
Note You can verify if you have the DES or 3DES feature by entering the show activation-key command.
11
Page 12

Follow these steps to use an activation key:
Step 1 Ensure that the image in Flash memory and the Running Image are the same.
Step 2 From the CLI, enter the activation-key activation-key-four-tuple command, replacing
activation-key-four-tuple with the activation key obtained from Cisco.
Note Make sure that you are in config mode to enter a new activation key.
Step 3 Reboot the PIX Firewall by powering it off and then on again.
After the key update is complete, the system reloads again to update the running image.
10 Restore the Default Configuration
Caution Entering the config factory-default command erases the current running configuration.
If you inadvertently erase the default configuration or need to restore the default configuration, you
can restore the factory default values in one of the following ways:
• Run the Startup Wizard and click Reset PIX to Factory Default Configuration from the Starting
Configuration page.
• Use PDM and click File>Reset PIX to Factory Default Configuration.
• Use PDM or a terminal emulation program and enter the following commands:
Step 1
Step 2
12
Command Description
config factory-default [<inside ip
address> [address mask]]
write memory Writes the factory default configuration to Flash
1. If the optional inside IP address and optional address mask are specified, the factory-default configuration
will reflect the specified IP address.
1
Erases the running configuration and replaces it with
the factory default configuration.
memory.
Page 13

Refer to the following website for detailed command information and configuration examples:
http://cisco.com/univercd/cc/td/doc/product/iaabu/pix/pix_62/cmd_ref/index.htm
The Cisco TAC website is available to all customers who need technical assistance. To access the TAC
Website go to:
http://www.cisco.com/tac
11 Obtaining Documentation
Cisco provides several ways to obtain documentation, technical assistance, and other technical
resources. These sections explain how to obtain technical information from Cisco Systems.
Cisco.com
You can access the most current Cisco documentation on the World Wide Web at this URL:
http://www.cisco.com/univercd/home/home.htm
You can access the Cisco website at this URL:
http://www.cisco.com
International Cisco websites can be accessed from this URL:
http://www.cisco.com/public/countries_languages.shtml
Documentation CD-ROM
Cisco documentation and additional literature are available in a Cisco Documentation CD-ROM
package, which may have shipped with your product. The Documentation CD-ROM is updated
regularly and may be more current than printed documentation. The CD-ROM package is available
as a single unit or through an annual or quarterly subscription.
Registered Cisco.com users can order a single Documentation CD-ROM (product number
DOC-CONDOCCD=) through the Cisco Ordering tool:
http://www.cisco.com/en/US/partner/ordering/ordering_place_order_ordering_tool_launch.html
All users can order annual or quarterly subscriptions through the online Subscription Store:
http://www.cisco.com/go/subscription
13
Page 14

Ordering Documentation
You can find instructions for ordering documentation at this URL:
http://www.cisco.com/univercd/cc/td/doc/es_inpck/pdi.htm
You can order Cisco documentation in these ways:
• Registered Cisco.com users (Cisco direct customers) can order Cisco product documentation from
the Networking Products MarketPlace:
http://www.cisco.com/en/US/partner/ordering/index.shtml
• Nonregistered Cisco.com users can order documentation through a local account representative
by calling Cisco Systems Corporate Headquarters (California, USA.) at 408 526-7208 or,
elsewhere in North America, by calling 800 553-NETS (6387).
Documentation Feedback
You can submit comments electronically on Cisco.com. On the Cisco Documentation home page, click
Feedback at the top of the page.
You can send your comments in e-mail to bug-doc@cisco.com.
You can submit comments by using the response card (if present) behind the front cover of your
document or by writing to the following address:
Cisco Systems
Attn: Customer Document Ordering
170 West Tasman Drive
San Jose, CA 95134-9883
We appreciate your comments.
12 Obtaining Technical Assistance
For all customers, partners, resellers, and distributors who hold valid Cisco service contracts, the
Cisco Technical Assistance Center (TAC) provides 24-hour, award-winning technical support services,
online and over the phone. Cisco.com features the Cisco TAC website as an online starting point for
technical assistance.
14
Page 15

Cisco TAC Website
The Cisco TAC website (http://www.cisco.com/tac) provides online documents and tools for
troubleshooting and resolving technical issues with Cisco products and technologies. The Cisco TAC
website is available 24 hours a day, 365 days a year.
Accessing all the tools on the Cisco TAC website requires a Cisco.com user ID and password. If you
have a valid service contract but do not have a login ID or password, register at this URL:
http://tools.cisco.com/RPF/register/register.do
Opening a TAC Case
The online TAC Case Open Tool (http://www.cisco.com/tac/caseopen) is the fastest way to open P3
and P4 cases. (Your network is minimally impaired or you require product information). After you
describe your situation, the TAC Case Open Tool automatically recommends resources for an
immediate solution. If your issue is not resolved using these recommendations, your case will be
assigned to a Cisco TAC engineer.
For P1 or P2 cases (your production network is down or severely degraded) or if you do not have
Internet access, contact Cisco TAC by telephone. Cisco TAC engineers are assigned immediately to P1
and P2 cases to help keep your business operations running smoothly.
To open a case by telephone, use one of the following numbers:
Asia-Pacific: +61 2 8446 7411 (Australia: 1 800 805 227)
EMEA: +32 2 704 55 55
USA: 1 800 553-2447
For a complete listing of Cisco TAC contacts, go to this URL:
http://www.cisco.com/warp/public/687/Directory/DirTAC.shtml
TAC Case Priority Definitions
To ensure that all cases are reported in a standard format, Cisco has established case priority
definitions.
Priority 1 (P1)—Your network is “down” or there is a critical impact to your business operations. You
and Cisco will commit all necessary resources around the clock to resolve the situation.
Priority 2 (P2)—Operation of an existing network is severely degraded, or significant aspects of your
business operation are negatively affected by inadequate performance of Cisco products. You and
Cisco will commit full-time resources during normal business hours to resolve the situation.
15
Page 16

Priority 3 (P3)—Operational performance of your network is impaired, but most business operations
remain functional. You and Cisco will commit resources during normal business hours to restore
service to satisfactory levels.
Priority 4 (P4)—You require information or assistance with Cisco product capabilities, installation, or
configuration. There is little or no effect on your business operations.
13 Obtaining Additional Publications and Information
Information about Cisco products, technologies, and network solutions is available from various
online and printed sources.
• The Cisco Product Catalog describes the networking products offered by Cisco Systems, as well
as ordering and customer support services. Access the Cisco Product Catalog at this URL:
http://www.cisco.com/en/US/products/products_catalog_links_launch.html
• Cisco Press publishes a wide range of networking publications. Cisco suggests these titles for new
and experienced users: Internetworking Terms and Acronyms Dictionary, Internetworking
Technology Handbook, Internetworking Troubleshooting Guide, and the Internetworking Design
Guide. For current Cisco Press titles and other information, go to Cisco Press online at this URL:
http://www.ciscopress.com
Packet magazine is the Cisco quarterly publication that provides the latest networking trends,
technology breakthroughs, and Cisco products and solutions to help industry professionals get the
most from their networking investment. Included are networking deployment and troubleshooting
tips, configuration examples, customer case studies, tutorials and training, certification
information, and links to numerous in-depth online resources. You can access Packet magazine at
this URL:
http://www.cisco.com/go/packet
• iQ Magazine is the Cisco bimonthly publication that delivers the latest information about Internet
business strategies for executives. You can access iQ Magazine at this URL:
http://www.cisco.com/go/iqmagazine
• Internet Protocol Journal is a quarterly journal published by Cisco Systems for engineering
professionals involved in designing, developing, and operating public and private internets and
intranets. You can access the Internet Protocol Journal at this URL:
http://www.cisco.com/en/US/about/ac123/ac147/about_cisco_the_internet_protocol_journal.html
• Training—Cisco offers world-class networking training. Current offerings in network training are
listed at this URL:
http://www.cisco.com/en/US/learning/index.html
16
Page 17

Corporate Headquarters
Cisco Systems, Inc.
170 West Tasman Drive
San Jose, CA 95134-1706
USA
www.cisco.com
Tel: 408 526-4000
800 553-NETS (6387)
Fax: 408 526-4100
European Headquarters
Cisco Systems Europe
11 Rue Camille Desmoulins
92782 Issy-les-Moulineaux
Cedex 9
France
www-europe.cisco.com
Tel: 33 1 58 04 60 00
Fax: 33 1 58 04 61 00
Americas Headquarters
Cisco Systems, Inc.
170 West Tasman Drive
San Jose, CA 95134-1706
USA
www.cisco.com
Tel: 408 526-7660
Fax: 408 527-0883
Asia Pacific Headquarters
Cisco Systems, Inc.
Capital Tower
168 Robinson Road
#22-01 to #29-01
Singapore 068912
www.cisco.com
Tel: +65 317 7777
Fax: +65 317 7799
Cisco Systems has more than 200 offices in the following countries. Addresses, phone numbers, and fax numbers are listed on the
Cisco Web site at www.cisco.com/go/offices
Argentina • Australia • Austria • Belgi um • Brazil • Bulgaria • Canada • Chile • C hina PRC • Colombia • Costa Rica • Croatia • Czech Republic • Denmark • Dubai, UAE
Finland • France • Germany • Greece • Hong Kong SAR • Hungary • India • Indonesia • Ireland • Israel • Italy • Japan • Korea • Luxembourg • Malaysia • Mexico
The Netherlands • New Zealand • Norway • Peru • Philippines • Poland • Portugal • Puerto Rico • Romania • Russia • Saudi Arabia • Scotland • Singapore • Slovakia
Slovenia • South Africa • Spain • Swed en • Switzerland • Taiwan • Thailand • Turkey • Ukraine • United Kingdom • United States • Venezuela • Vietnam • Zimbabwe
Printed in the USA on recycled paper containing 10% postconsumer waste.
78-14215-01
DOC-7814215=
Page 18

18
 Loading...