

Page 1

CHA PTER
9
Managing User Accounts
This chapter explains how to create and manage guest user accounts, describes the web authentication
process, and provides instructions for customizing the web authentication login window. It contains
these sections:
• Creating Guest User Accounts, page 9-2
• Web Authentication Process, page 9-7
• Choosing the Web Authentication Login Window, page 9-9
OL-9141-03
Cisco Wireless LAN Controller Configuration Guide
9-1
Page 2
Creating Guest User Accounts
Creating Guest User Accounts
The controller can provide guest user access on WLANs. The first step in creating guest user accounts
is to create a lobby administrator account, also known as a lobby ambassador account. Once this account
has been created, a lobby ambassador can create and manage guest user accounts on the controller. The
lobby ambassador has limited configuration privileges and access only to the web pages used to manage
the guest accounts.
The lobby ambassador can specify the amount of time that the guest user accounts remain active. After
the specified time elapses, the guest user accounts expire automatically.
The local user database is limited to a maximum of 2048 entries and is set to a default value of 512
entries (on the Security > General page). This database is shared by local management users (including
lobby ambassadors), net users (including guest users), MAC filter entries, and disabled clients. Together
these cannot exceed the configured database size.
Creating a Lobby Ambassador Account
You can create a lobby ambassador account on the controller through either the GUI or the CLI.
Chapter 9 Managing User Accounts
Using the GUI to Create a Lobby Ambassador Account
Follow these steps to create a lobby ambassador account using the controller GUI.
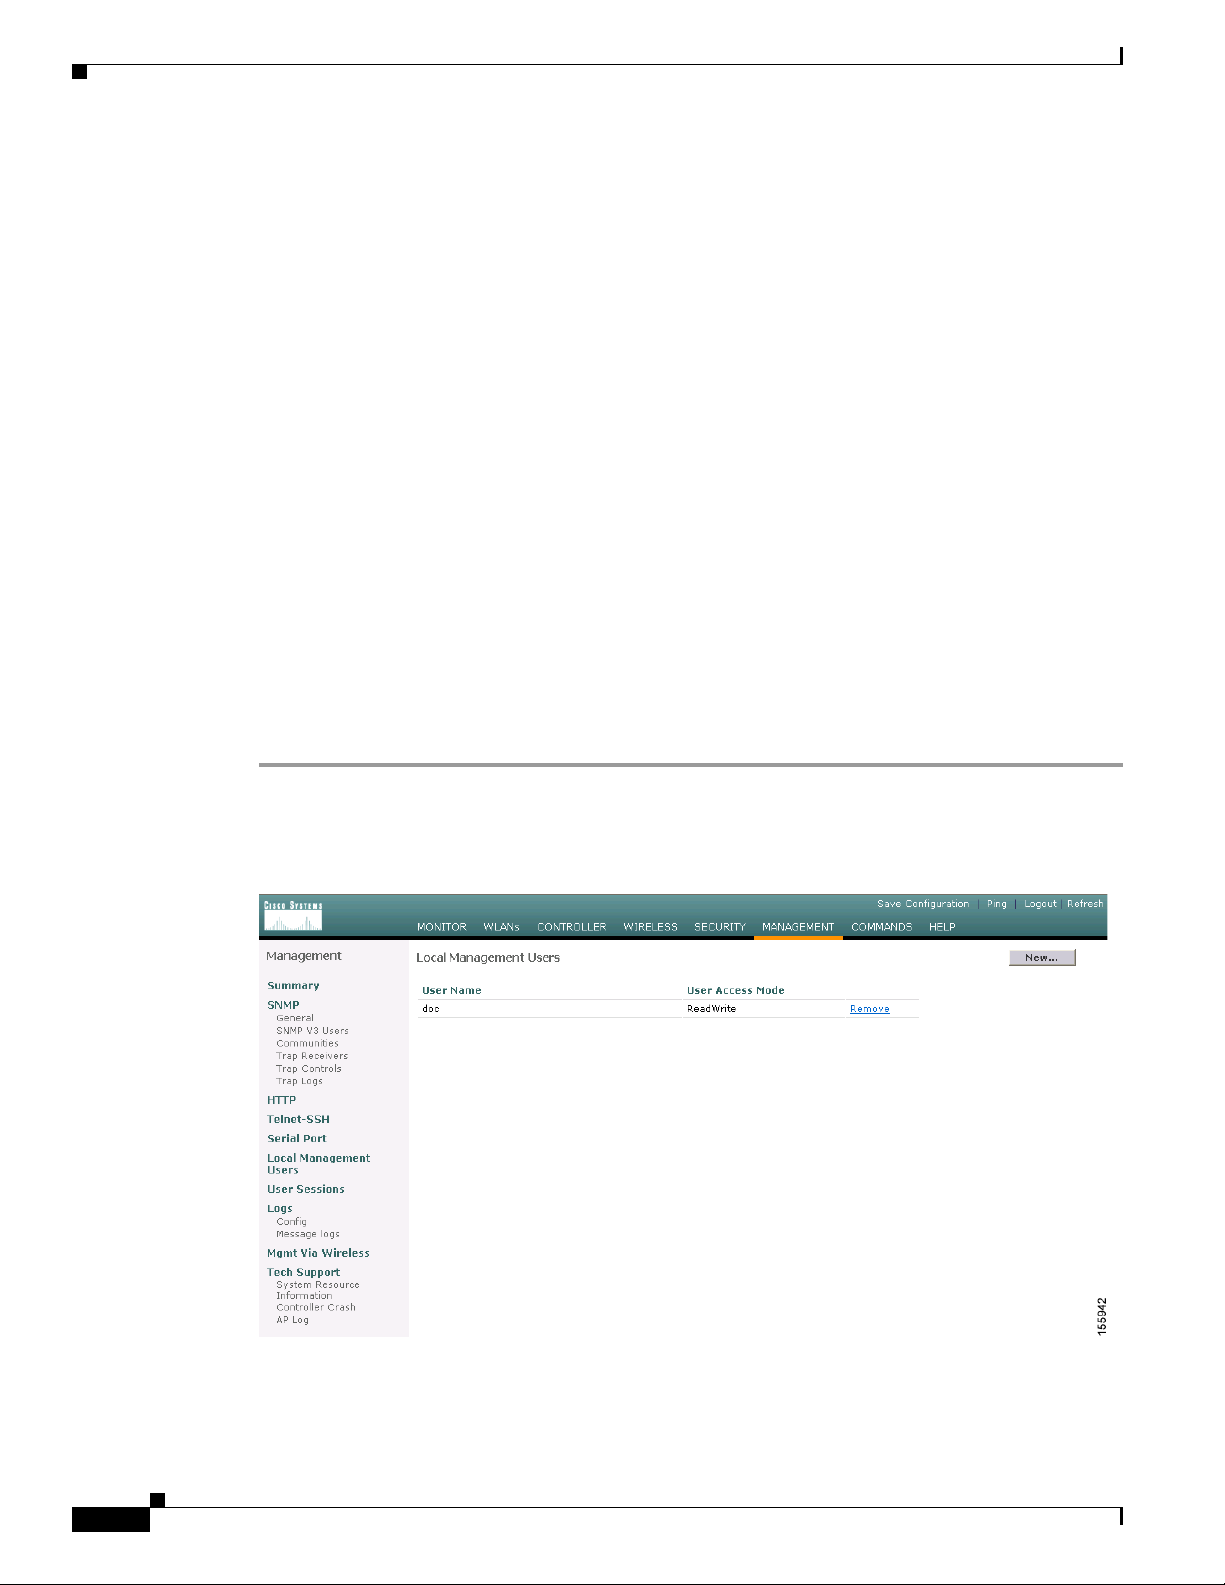
Step 1 Click Management > Local Management Users to access the Local Management Users page (see
Figure 9-1).
Figure 9-1 Local Management Users Page
9-2
Cisco Wireless LAN Controller Configuration Guide
OL-9141-03
Page 3
Chapter 9 Managing User Accounts
This page lists the names and access privileges of the local management users.
Note You can click Remove to delete any of the user accounts from the controller. However, deleting
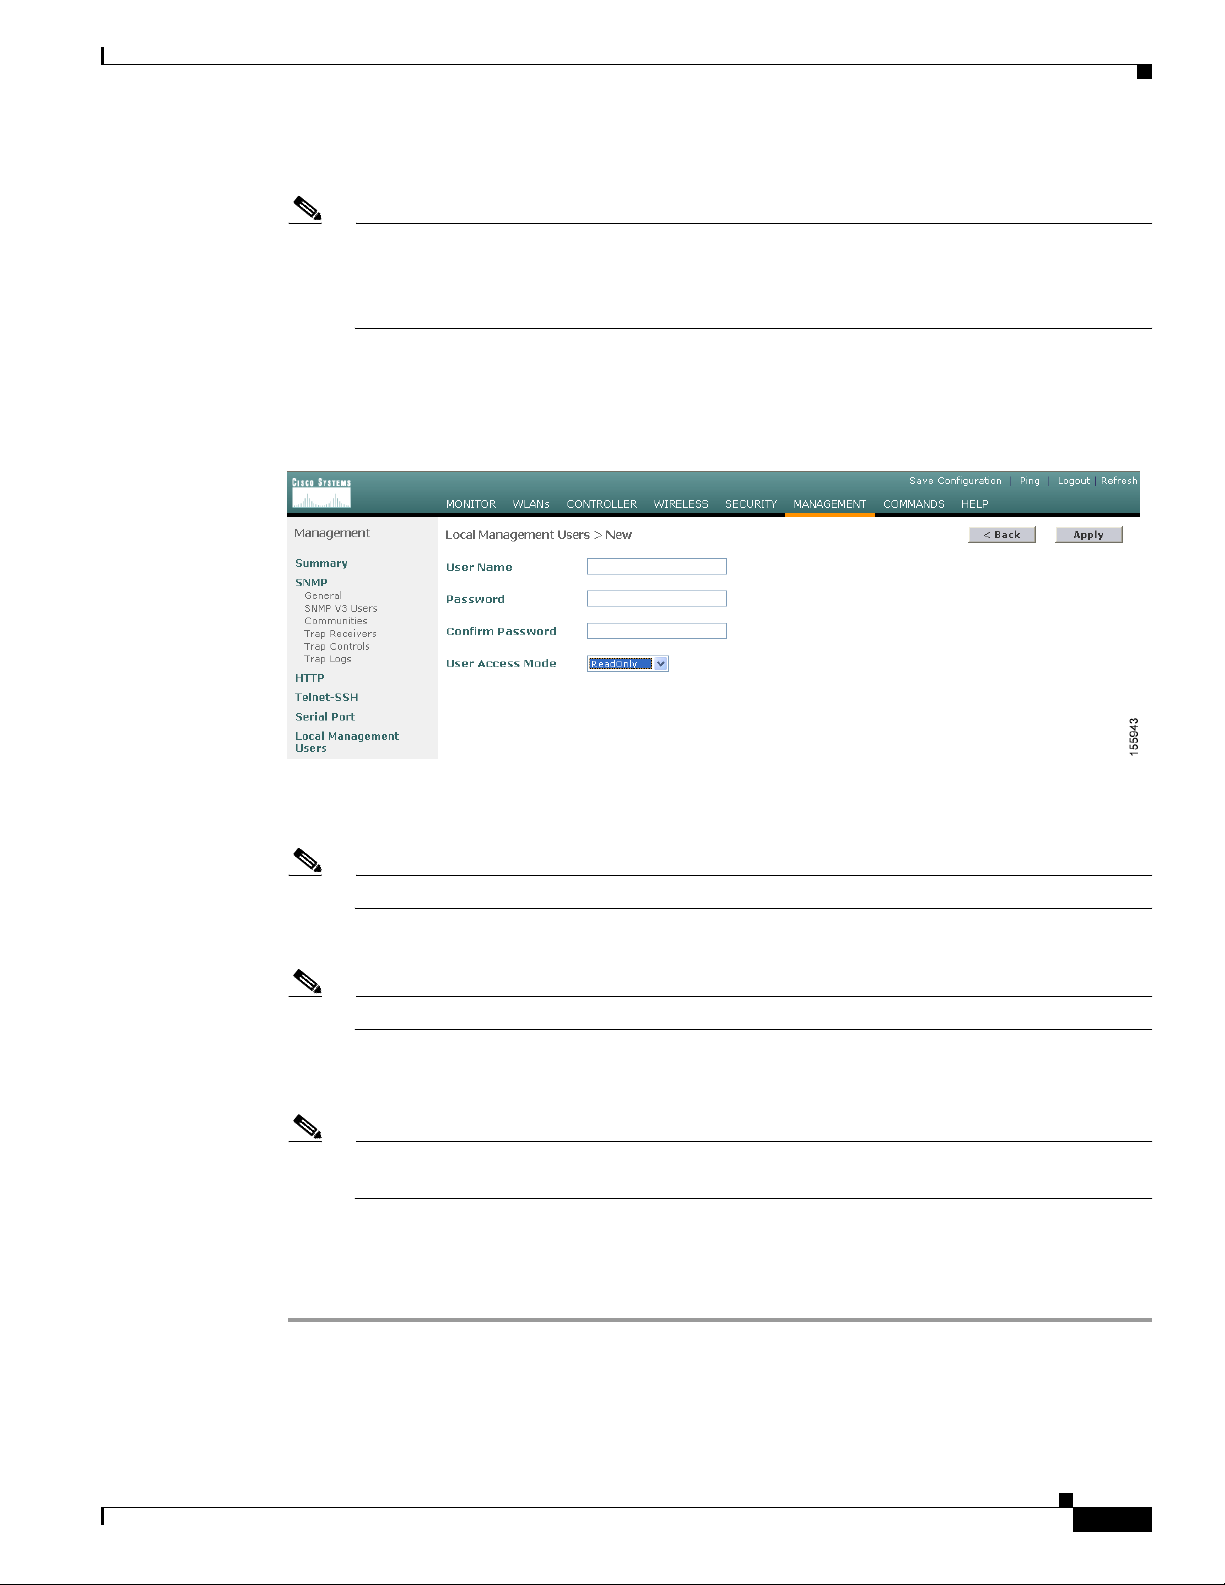
Step 2 To create a lobby ambassador account, click New under Management. The Local Management Users >
New page appears (see Figure 9-2).
Figure 9-2 Management > Local Management Users > New Page
Creating Guest User Accounts
the default administrative user prohibits both GUI and CLI access to the controller. Therefore,
you must create a user with administrative privileges (ReadWrite) before you remove the default
user.
Step 3
Step 4 In the Password and Confirm Password fields, enter a password for the lobby ambassador account.
Step 5 Choose LobbyAdmin from the User Access Mode drop-down box. This option enables the lobby
In the User Name field, enter a username for the lobby ambassador account.
Note Management usernames must be unique because they are stored in a single database.
Note Passwords are case sensitive.
ambassador to create guest user accounts.
Note The ReadOnly option creates an account with read-only privileges, and the ReadWrite option
creates an administrative account with both read and write privileges.
Step 6 Click Apply to commit your changes. The new lobby ambassador account appears in the list of local
management users.
Step 7 Click Save Configuration to save your changes.
OL-9141-03
Cisco Wireless LAN Controller Configuration Guide
9-3
Page 4
Creating Guest User Accounts
Using the CLI to Create a Lobby Ambassador Account
Enter this command to create a lobby ambassador account using the controller CLI:
config mgmtuser add lobbyadmin_username lobbyadmin_pwd lobby-admin
Note Replacing lobby-admin with read-only creates an account with read-only privileges. Replacing
lobby-admin with read-write creates an administrative account with both read and write privileges.
Creating Guest User Accounts as a Lobby Ambassador
A lobby ambassador would follow these steps to create guest user accounts.
Note A lobby ambassador cannot access the controller CLI interface and therefore can create guest user
accounts only from the controller GUI.
Chapter 9 Managing User Accounts
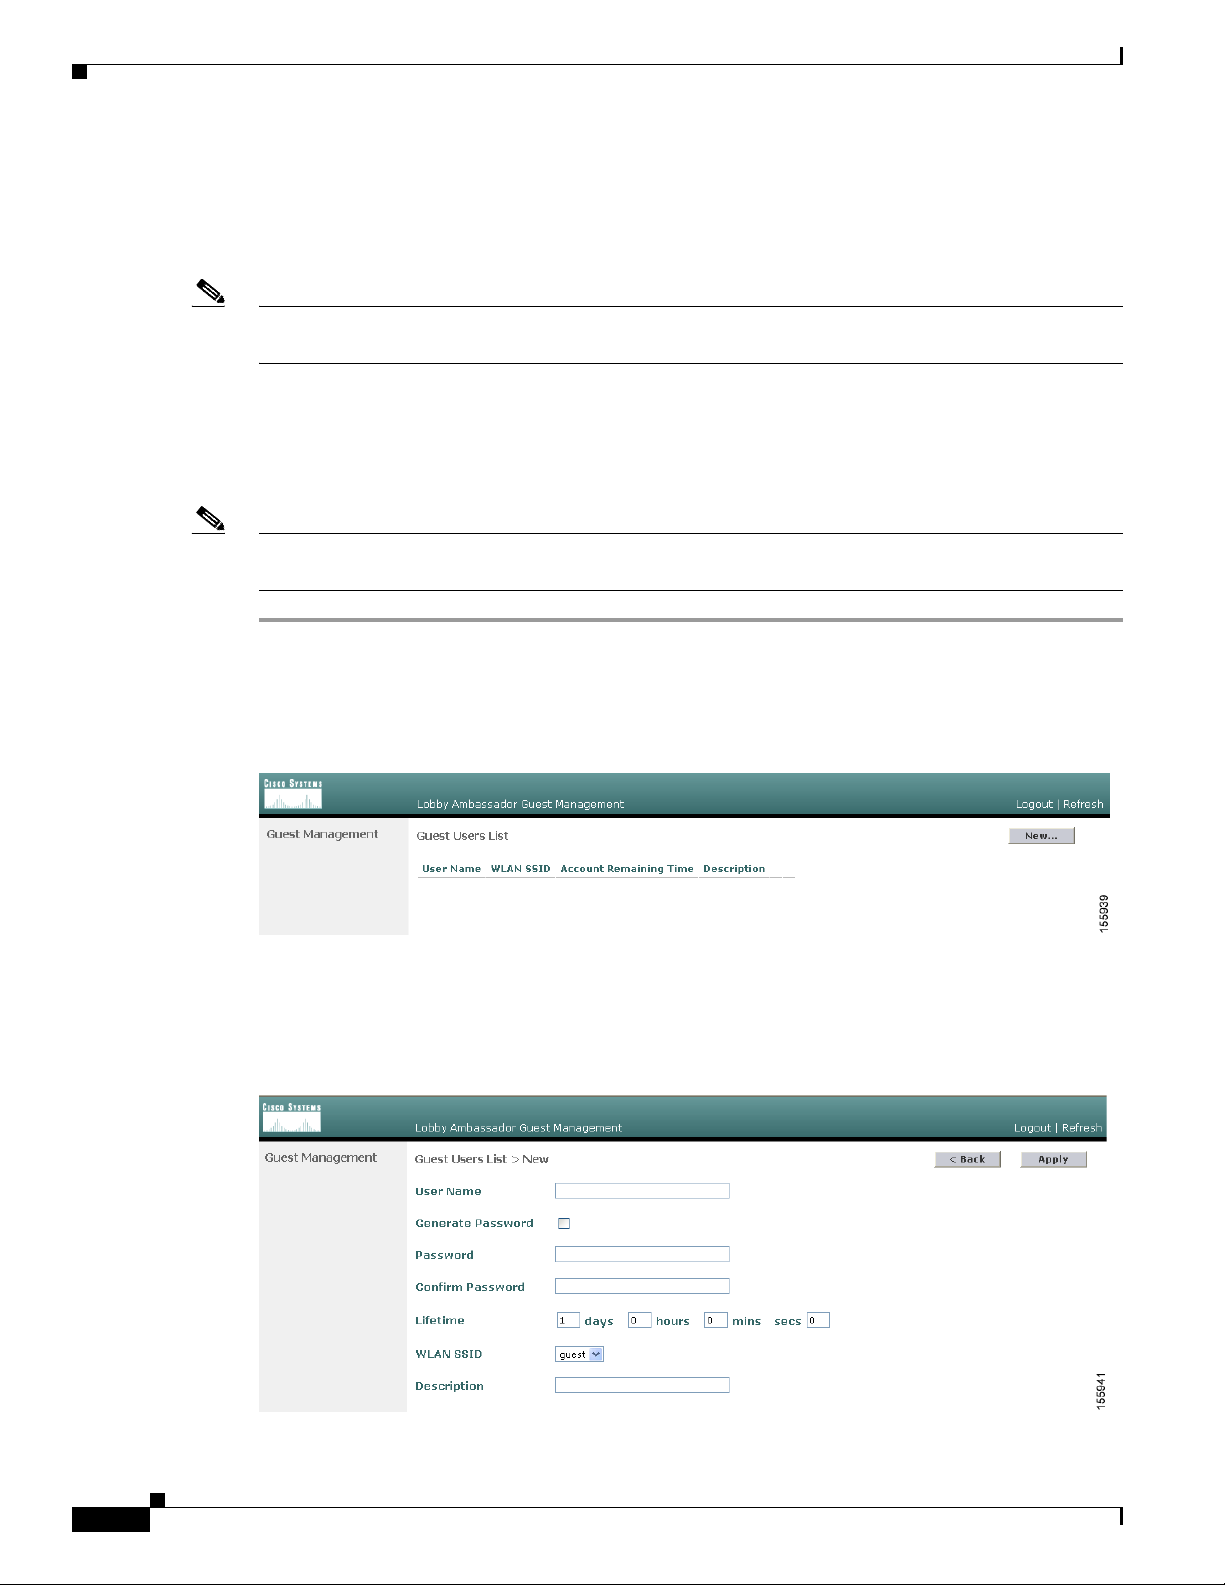
Step 1 Log into the controller as the lobby ambassador, using the username and password specified in the
“Creating a Lobby Ambassador Account” section above. The Lobby Ambassador Guest Management >
Guest Users List page appears (see Figure 9-3).
Figure 9-3 Lobby Ambassador Guest Management > Guest Users List Page
Step 2
Click New to create a guest user account. The Lobby Ambassador Guest Management > Guest Users
List > New page appears (see Figure 9-4).
Figure 9-4 Lobby Ambassador Guest Management > Guest Users List > New Page
9-4
Cisco Wireless LAN Controller Configuration Guide
OL-9141-03
Page 5
Chapter 9 Managing User Accounts
Step 3 In the User Name field, enter a name for the guest user. You can enter up to 24 characters.
Step 4 Perform one of the following:
• If you want to generate an automatic password for this guest user, check the Generate Password
check box. The generated password is entered automatically in the Password and Confirm Password
fields.
• If you want to create a password for this guest user, leave the Generate Password check box
unchecked and enter a password in both the Password and Confirm Password fields.
Note Passwords can contain up to 24 characters and are case sensitive.
Step 5 From the Lifetime drop-down boxes, choose the amount of time (in days, hours, minutes, and seconds)
that this guest user account is to remain active. A value of zero (0) for all four fields creates a permanent
account.
Default: 1 day
Range: 5 minutes to 30 days
Creating Guest User Accounts
Note The smaller of this value or the session timeout for the guest WLAN, which is the WLAN on
which the guest account is created, takes precedence. For example, if a WLAN session timeout
is due to expire in 30 minutes but the guest account lifetime has 10 minutes remaining, the
account is deleted in 10 minutes upon guest account expiry. Similarly, if the WLAN session
timeout expires before the guest account lifetime, the client experiences a recurring session
timeout that requires reauthentication.
Note You can change a guest user account with a non-zero lifetime to another lifetime value at any
time while the account is active. However, to make a guest user account permanent or to change
a permanent account to a guest account, you must delete the account and create it again.
Step 6 From the WLAN SSID drop-down box, choose the SSID that will be used by the guest user. The only
WLANs that are listed are those for which Layer 3 web authentication has been configured (under
WLAN Security Policies).
Note Cisco recommends that the system administrator create a specific guest WLAN to prevent any
potential conflicts. If a guest account expires and it has a name conflict with an account on the
RADIUS server and both are on the same WLAN, the users associated with both accounts are
disassociated before the guest account is deleted.
Step 7 In the Description field, enter a description of the guest user account. You can enter up to 32 characters.
OL-9141-03
Cisco Wireless LAN Controller Configuration Guide
9-5
Page 6
Creating Guest User Accounts
Step 8 Click Apply to commit your changes. The new guest user account appears in the list of guest users on
the Guest Users List page (see Figure 9-5).
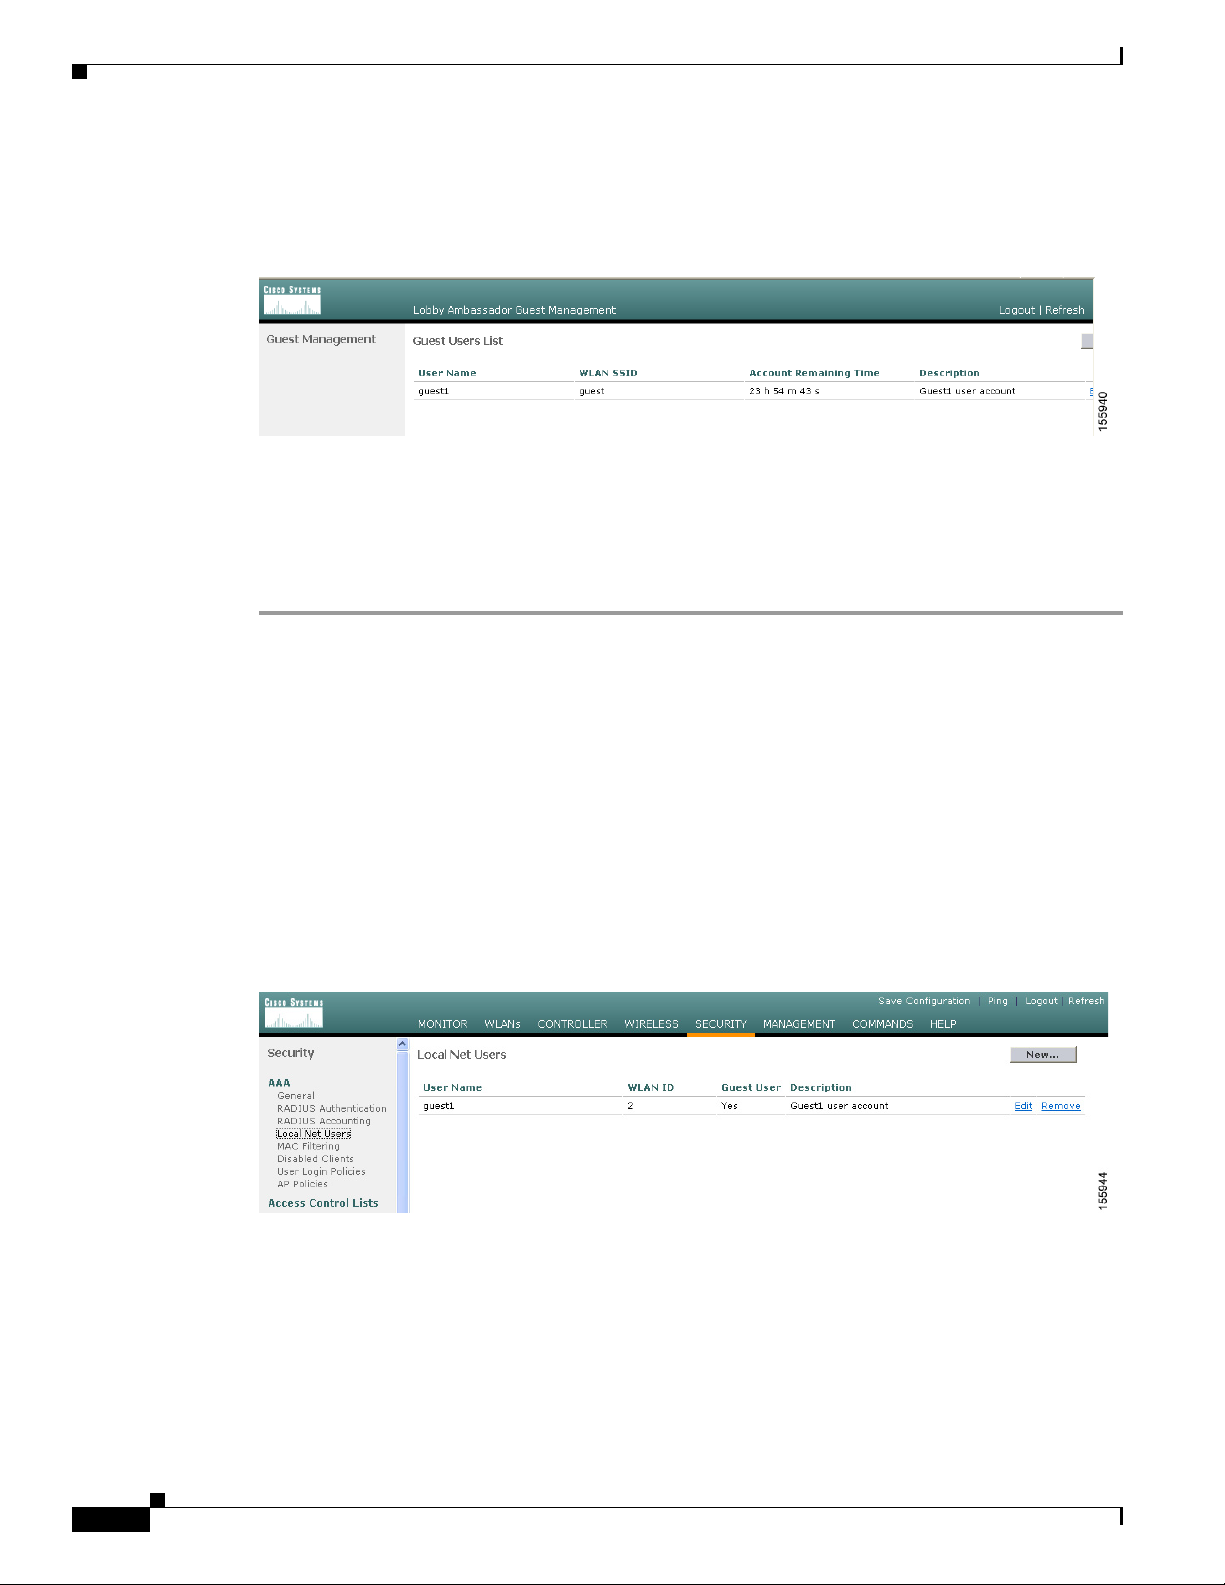
Figure 9-5 Lobby Ambassador Guest Management > Guest Users List Page
From this page, you can see all of the guest user accounts, their WLAN SSID, and their lifetime. You
can also edit or remove a guest user account. When you remove a guest user account, all of the clients
that are using the guest WLAN and are logged in using that account’s username are deleted.
Step 9 Repeat this procedure to create any additional guest user accounts.
Chapter 9 Managing User Accounts
Viewing Guest User Accounts
After a lobby ambassador has created guest user accounts, the system administrator can view them from
the controller GUI or CLI.
Using the GUI to View Guest Accounts
To view guest user accounts using the controller GUI, click Security and then Local Net Users under
AAA. The Local Net Users page appears (see Figure 9-6).
Figure 9-6 Local Net Users Page
From this page, the system administrator can see all of the local net user accounts (including guest user
accounts) and can edit or remove them as desired. When you remove a guest user account, all of the
clients that are using the guest WLAN and are logged in using that account’s username are deleted.
9-6
Cisco Wireless LAN Controller Configuration Guide
OL-9141-03
Page 7

Chapter 9 Managing User Accounts
Using the CLI to View Guest Accounts
To view all of the local net user accounts (including guest user accounts) using the controller CLI, enter
this command:
show netuser summary
Web Authentication Process
Web authentication is a Layer 3 security feature that causes the controller to not allow IP traffic (except
DHCP-related packets) from a particular client until that client has correctly supplied a valid username
and password. When you use web authentication to authenticate clients, you must define a username and
password for each client. Then when the clients attempt to join the wireless LAN, their users must enter
the username and password when prompted by a login window.
When web authentication is enabled (under WLAN Security Policies), users might receive a
web-browser security alert the first time that they attempt to access a URL. Figure 9-7 shows a typical
security alert.
Web Authentication Process
Figure 9-7 Typical Web-Browser Security Alert
After the user clicks Ye s to proceed (or if the client’s browser does not display a security alert), the web
authentication system redirects the client to a login window.
OL-9141-03
Cisco Wireless LAN Controller Configuration Guide
9-7
Page 8

Web Authentication Process
Figure 9-8 Default Web Authentication Login Window
The default login window contains a Cisco logo and Cisco-specific text. You can choose to have the web
authentication system display one of the following:
• The default login window
• A modified version of the default login window
• A customized login window that you configure on an external web server
Chapter 9 Managing User Accounts
• A customized login window that you download to the controller
The “Choosing the Web Authentication Login Window” section on page 9-9 provides instructions for
choosing how the web authentication login window appears.
When the user enters a valid username and password on the web authentication login window and clicks
Submit, the web authentication system displays a successful login window and redirects the
authenticated client to the requested URL. Figure 9-9 shows a typical successful login window.
Figure 9-9 Successful Login Window
9-8
The default successful login window contains a pointer to a virtual gateway address URL:
https://1.1.1.1/logout.html. The IP address that you set for the controller virtual interface serves as the
redirect address for the login window (see Chapter 3 for more information on the virtual interface).
Cisco Wireless LAN Controller Configuration Guide
OL-9141-03
Page 9

Chapter 9 Managing User Accounts
Choosing the Web Authentication Login Window
Choosing the Web Authentication Login Window
This section provides instructions for specifying the content and appearance of the web authentication
login window. Follow the instructions in one of these sections to choose the web authentication login
window using the controller GUI or CLI:
• Choosing the Default Web Authentication Login Window, page 9-9
• Using a Customized Web Authentication Login Window from an External Web Server, page 9-13
• Downloading a Customized Web Authentication Login Window, page 9-14
Choosing the Default Web Authentication Login Window
If you want to use the default web authentication login window as is (see Figure 9-8) or with a few
modifications, follow the instructions in the GUI or CLI procedure below.
Using the GUI to Choose the Default Web Authentication Login Window
Step 1 Click Security > Web Login Page to access the Web Login page (see Figure 9-10).
Figure 9-10 Web Login Page
OL-9141-03
Step 2
Step 3 If you want to use the default web authentication login window as is, go to Step 8. If you want to modify
From the Web Authentication Type drop-down box, choose Internal (Default).
the default login window, go to Step 4.
Cisco Wireless LAN Controller Configuration Guide
9-9
Page 10

Choosing the Web Authentication Login Window
Step 4 If you want to hide the Cisco logo that appears in the top right corner of the default window, choose the
Cisco Logo Hide option. Otherwise, click the Show option.
Step 5 If you want the user to be directed to a particular URL (such as the URL for your company) after login,
enter the desired URL (such as www.AcompanyBC.com) in the Redirect URL After Login field. You
can enter up to 254 characters.
Step 6 If you want to create your own headline on the login window, enter the desired text in the Headline field.
You can enter up to 127 characters. The default headline is “Welcome to the Cisco wireless network.”
Step 7 If you want to create your own message on the login window, enter the desired text in the Message field.
You can enter up to 2047 characters. The default message is “Cisco is pleased to provide the Wireless
LAN infrastructure for your network. Please login and put your air space to work.”
Step 8 Click Apply to commit your changes.
Step 9 Click Preview to view the web authentication login window.
Step 10 If you are satisfied with the content and appearance of the login window, click Save Configuration to
save your changes. Otherwise, repeat any of the previous steps as necessary to achieve your desired
results.
Chapter 9 Managing User Accounts
Using the CLI to Choose the Default Web Authentication Login Window
Step 1 To specify the default web authentication type, enter this command:
config custom-web webauth_type internal
Step 2 If you want to use the default web authentication login window as is, go to Step 7. If you want to modify
the default login window, go to Step 3.
Step 3 To show or hide the Cisco logo that appears in the top right corner of the default login window, enter this
command:
config custom-web weblogo {enable | disable}
Step 4 If you want the user to be directed to a particular URL (such as the URL for your company) after login,
enter this command:
config custom-web redirecturl url
You can enter up to 130 characters for the URL. To change the redirect back to the default setting, enter
clear redirecturl.
Step 5 If you want to create your own headline on the login window, enter this command:
config custom-web webtitle title
You can enter up to 130 characters. The default headline is “Welcome to the Cisco wireless network.”
To reset the headline to the default setting, enter clear webtitle.
Step 6 If you want to create your own message on the login window, enter this command:
config custom-web webmessage message
You can enter up to 130 characters. The default message is “Cisco is pleased to provide the Wireless
LAN infrastructure for your network. Please login and put your air space to work.” To reset the message
to the default setting, enter clear webmessage.
9-10
Step 7 Enter save config to save your settings.
Cisco Wireless LAN Controller Configuration Guide
OL-9141-03
Page 11

Chapter 9 Managing User Accounts
Step 8 If you want to import your own logo into the web authentication login window, follow these steps:
a. Make sure that you have a Trivial File Transfer Protocol (TFTP) server available for the file
download. Keep these guidelines in mind when setting up a TFTP server:
–
–
–
b. Enter ping ip-address to ensure that the controller can contact the TFTP server.
c. Copy the logo file (in .jpg, .gif, or .png format) to the default directory on your TFTP server. The
maximum file size is 30 kilobits. For an optimal fit, the logo should be approximately 180 pixels
wide and 360 pixels high.
d. To specify the download mode, enter transfer download mode tftp.
e. To specify the type of file to be downloaded, enter transfer download datatype image.
f. To specify the IP address of the TFTP server, enter transfer download serverip
tftp-server-ip-address.
Choosing the Web Authentication Login Window
If you are downloading through the service port, the TFTP server must be on the same subnet
as the service port because the service port is not routable.
If you are downloading through the distribution system network port, the TFTP server can be
on the same or a different subnet because the distribution system port is routable.
A third-party TFTP server cannot run on the same computer as the Cisco WCS because the WCS
built-in TFTP server and the third-party TFTP server require the same communication port.
Note Some TFTP servers require only a forward slash (/) as the TFTP server IP address, and
the TFTP server automatically determines the path to the correct directory.
g. To specify the download path, enter transfer download path absolute-tftp-server-path-to-file.
h. To specify the file to be downloaded, enter transfer download filename {filename.jpg | filename.gif
| filename.png}.
i. Enter transfer download start to view your updated settings and answer y to the prompt to confirm
the current download settings and start the download. Information similar to the following appears:
Mode........................................... TFTP
Data Type...................................... Login Image
TFTP Server IP................................. xxx.xxx.xxx.xxx
TFTP Path...................................... <directory path>
TFTP Filename..................................... <filename.jpg|.gif|.png>
This may take some time.
Are you sure you want to start? (y/n) y
TFTP Image transfer starting.
Image installed.
j. Enter save config to save your settings.
Note If you ever want to remove this logo from the web authentication login window, enter clear
webimage.
Step 9 Follow the instructions in the “Using the CLI to Verify the Web Authentication Login Window Settings”
section on page 9-17 to verify your settings.
OL-9141-03
Cisco Wireless LAN Controller Configuration Guide
9-11
Page 12
Choosing the Web Authentication Login Window
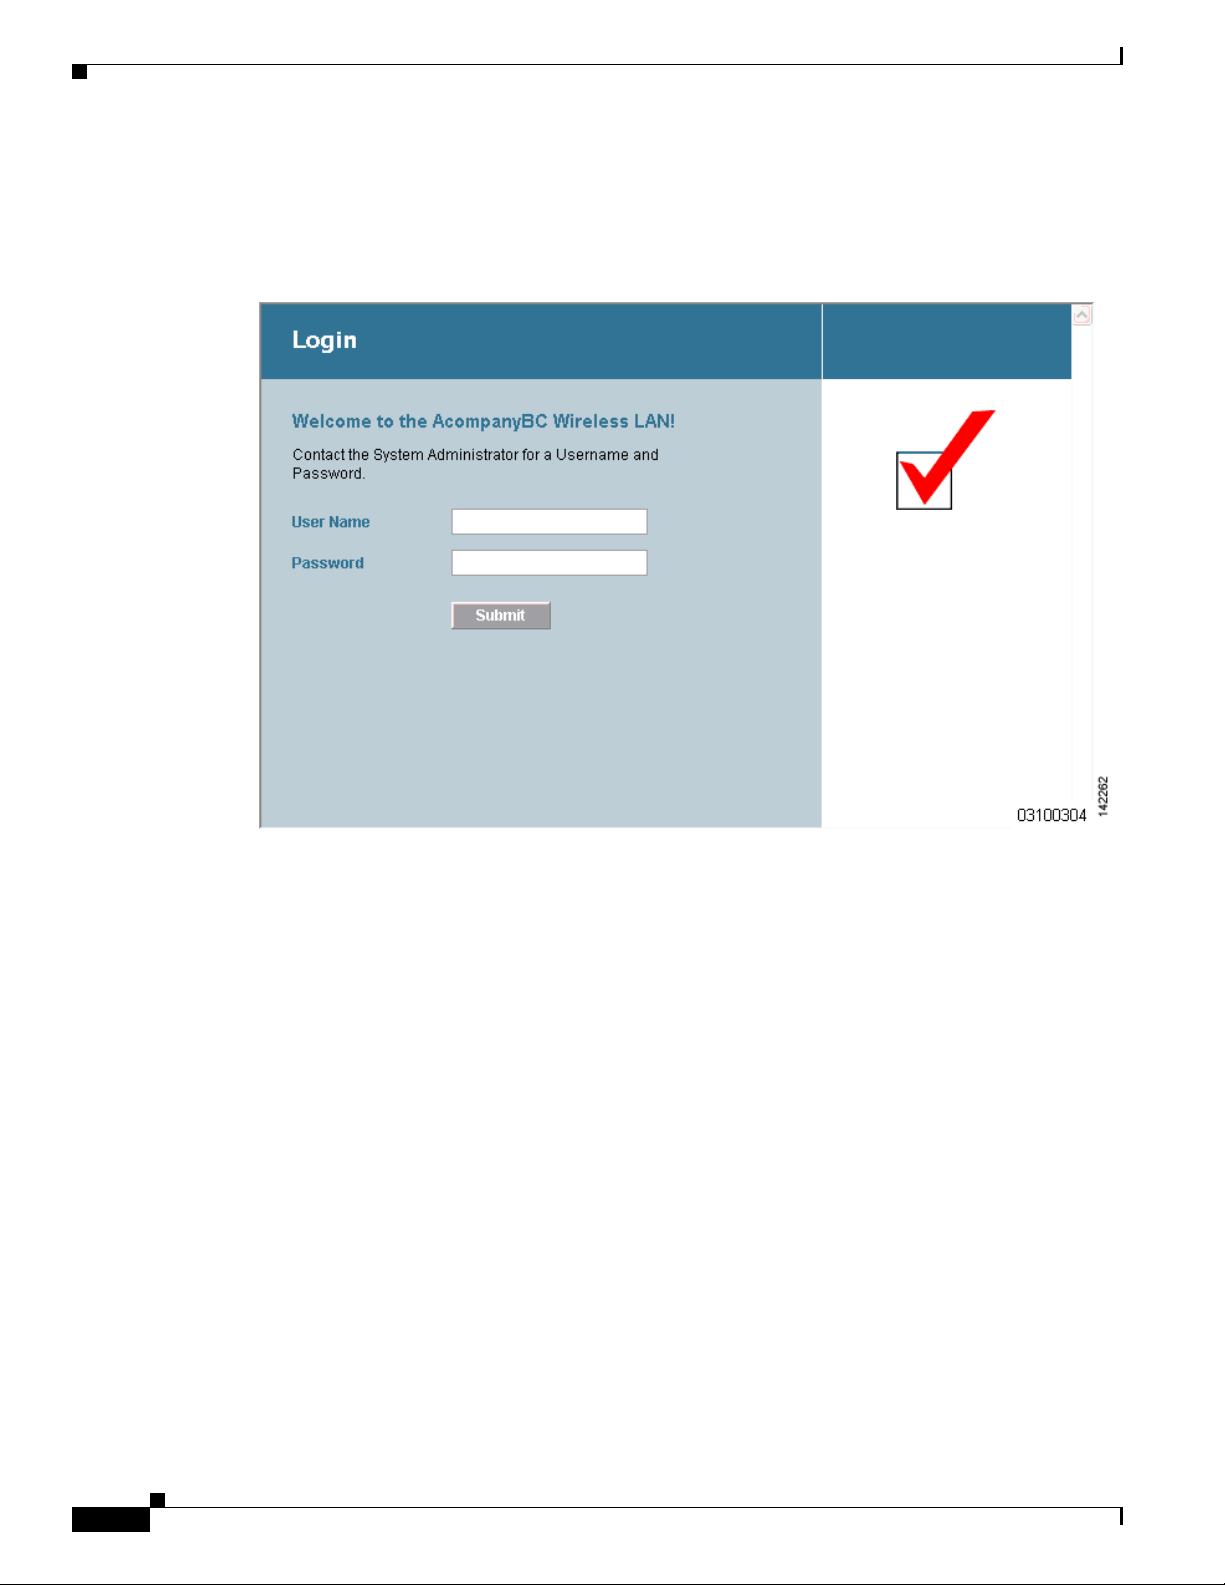
Modified Default Web Authentication Login Window Example
Figure 9-11 shows an example of a modified default web authentication login window.
Figure 9-11 Modified Default Web Authentication Login Window Example
Chapter 9 Managing User Accounts
These are the CLI commands used to create this login window:
config custom-web weblogo disable
config custom-web webtitle Welcome to the AcompanyBC Wireless LAN!
config custom-web webmessage Contact the System Administrator for a Username and Password.
transfer download start
Mode........................................... TFTP
Data Type...................................... Login Image
TFTP Server IP................................. xxx.xxx.xxx.xxx
TFTP Path...................................... /
TFTP Filename..................................... Logo.gif
This may take some time.
Are you sure you want to start? (y/n) y
TFTP Image transfer starting.
Image installed.
config custom-web redirecturl http://www.AcompanyBC.com
show custom-web
Cisco Logo.................. Disabled
CustomLogo.................. 00_logo.gif
Custom Title................ Welcome to the AcompanyBC Wireless LAN!
Custom Message ............. Contact the System Administrator for a Username and Password.
9-12
Cisco Wireless LAN Controller Configuration Guide
OL-9141-03
Page 13

Chapter 9 Managing User Accounts
Choosing the Web Authentication Login Window
Custom Redirect URL......... http://www.AcompanyBC.com
Web Authentication Mode..... Disabled
Web Authentication URL........ Disabled
Using a Customized Web Authentication Login Window from an External Web Server
If you want to use a customized web authentication login window that you configured on an external web
server, follow the instructions in the GUI or CLI procedure below. When you enable this feature, the user
is directed to your customized login window on the external web server.
Note You must configure a preauthentication access control list (ACL) on the WLAN for the external web
server and then choose this ACL as the WLAN preauthentication ACL under Security Policies > Web
Policy on the WLANs > Edit page. See Chapter 5, “Configuring Access Control Lists” for more
information on ACLs.
Using the GUI to Choose a Customized Web Authentication Login Window from an External Web Server
Step 1 Click Security > Web Login Page to access the Web Login page (see Figure 9-12).
Figure 9-12 Web Login Page
Step 2
Step 3 In the URL field, enter the URL of the customized web authentication login window on your web server.
Step 4 In the Web Server IP Address field, enter the IP address of your web server. Your web server should be
From the Web Authentication Type drop-down box, choose External (Redirect to external server).
You can enter up to 252 characters.
on a different network from the controller service port network.
OL-9141-03
Cisco Wireless LAN Controller Configuration Guide
9-13
Page 14

Chapter 9 Managing User Accounts
Choosing the Web Authentication Login Window
Step 5 Click Add Web Server. This server now appears in the list of external web servers.
Step 6 Click Apply to commit your changes.
Step 7 If you are satisfied with the content and appearance of the login window, click Save Configuration to
save your changes.
Using the CLI to Choose a Customized Web Authentication Login Window from an External Web Server
Step 1 To specify the web authentication type, enter this command:
config custom-web webauth_type external.
Step 2 To specify the URL of the customized web authentication login window on your web server, enter this
command:
config custom-web ext-webauth-url url
You can enter up to 252 characters for the URL.
Step 3 To specify the IP address of your web server, enter this command:
config custom-web ext-webserver {add | delete} server_IP_address
Step 4 Enter save config to save your settings.
Step 5 Follow the instructions in the “Using the CLI to Verify the Web Authentication Login Window Settings”
section on page 9-17 to verify your settings.
Downloading a Customized Web Authentication Login Window
You can compress the page and image files used for displaying a web authentication login window into
a tar file for download to a controller. These files are known as the webauth bundle. The maximum
allowed size of the files in their uncompressed state is 1 MB.
local TFTP server, it enters the controller’s file system as an untarred file.
Follow these guidelines when preparing the customized login window:
• Name the login page “login.html.” The controller prepares the web authentication URL based on this
name. If the does not find this file after the webauth bundle has been untarred, the bundle is
discarded, and an error message appears.
• Include input fields for both a username and password.
• Retain the redirect URL as a hidden input item after extracting from the original URL.
• Extract and set the action URL in the page from the original URL.
• Include scripts to decode the return status code.
• Make sure that all paths used in the main page (to refer to images, for example) are of relative type.
When the .tar file is downloaded from a
9-14
Cisco Wireless LAN Controller Configuration Guide
OL-9141-03
Page 15

Chapter 9 Managing User Accounts
Choosing the Web Authentication Login Window
You can download a sample login page from Cisco WCS and use it as a starting point for your
customized login page. Refer to the “Downloading a Customized Web Auth Page” section in the Using
Templates chapter of the Cisco Wireless Control System Configuration Guide, Release 4.0 for
instructions.
If you want to download a customized web authentication login window to the controller, follow the
instructions in the GUI or CLI procedure below.
Using the GUI to Download a Customized Web Authentication Login Window
Step 1 Make sure that you have a TFTP server available for the file download. See the guidelines for setting up
a TFTP server in Step 8 of the “Using the CLI to Choose the Default Web Authentication Login
Window” section on page 9-10.
Step 2 Copy the .tar file containing your login page to the default directory on your TFTP server.
Step 3 Click Commands > Download File to access the Download File to Controller page (see Figure 9-13).
Figure 9-13 Download File to Controller Page
OL-9141-03
Step 4
Step 5 In the IP Address field, enter the IP address of the TFTP server.
Step 6 In the Maximum Retries field, enter the maximum number of times the controller should attempt to
From the File Type drop-down box, choose Webauth Bundle.
download the .tar file.
Range: 1 to 254
Default: 10
Step 7 In the Timeout field, enter the amount of time in seconds before the controller times out while attempting
to download the *.tar file.
Range: 1 to 254 seconds
Default: 6 seconds
Step 8 In the File Path field, enter the path of the .tar file to be downloaded. The default value is “/.”
Step 9 In the File Name field, enter the name of the .tar file to be downloaded.
Step 10 Click Download to download the .tar file to the controller.
Step 11 Click Security > Web Login Page to access the Web Login page.
Step 12 From the Web Authentication Type drop-down box, choose Customized (Downloaded).
Cisco Wireless LAN Controller Configuration Guide
9-15
Page 16

Chapter 9 Managing User Accounts
Choosing the Web Authentication Login Window
Step 13 Click Apply to commit your changes.
Step 14 Click Preview to view your customized web authentication login window.
Step 15 If you are satisfied with the content and appearance of the login window, click Save Configuration to
save your changes.
Using the CLI to Download a Customized Web Authentication Login Window
Step 1 Make sure that you have a TFTP server available for the file download. See the guidelines for setting up
a TFTP server in Step 8 of the “Using the CLI to Choose the Default Web Authentication Login
Window” section on page 9-10.
Step 2 Copy the .tar file containing your login page to the default directory on your TFTP server.
Step 3 To specify the download mode, enter transfer download mode tftp.
Step 4 To specify the type of file to be downloaded, enter transfer download datatype webauthbundle.
Step 5 To specify the IP address of the TFTP server, enter transfer download serverip tftp-server-ip-address.
Note Some TFTP servers require only a forward slash (/) as the TFTP server IP address, and the TFTP
server automatically determines the path to the correct directory.
Step 6 To specify the download path, enter transfer download path absolute-tftp-server-path-to-file.
Step 7 To specify the file to be downloaded, enter transfer download filename filename.tar.
Step 8 Enter transfer download start to view your updated settings and answer y to the prompt to confirm the
current download settings and start the download.
Step 9 To specify the web authentication type, enter config custom-web webauth_type customized.
Step 10 Enter save config to save your settings.
Step 11 Follow the instructions in the “Using the CLI to Verify the Web Authentication Login Window Settings”
section on page 9-17 to verify your settings.
9-16
Cisco Wireless LAN Controller Configuration Guide
OL-9141-03
Page 17

Chapter 9 Managing User Accounts
Customized Web Authentication Login Window Example
Figure 9-14 shows an example of a customized web authentication login window.
Figure 9-14 Customized Web Authentication Login Window Example
Choosing the Web Authentication Login Window
Using the CLI to Verify the Web Authentication Login Window Settings
Enter show custom-web to verify your changes to the web authentication login window. This example
shows the information that appears when the configuration settings are set to default values:
Cisco Logo..................................... Enabled
CustomLogo..................................... Disabled
Custom Title................................... Disabled
Custom Message................................. Disabled
Custom Redirect URL............................ Disabled
Web Authentication Mode........................ Disabled
Web Authentication URL......................... Disabled
This example shows the information that appears when the configuration settings have been modified:
Cisco Logo..................................... Disabled
CustomLogo..................................... 00_logo.gif
Custom Title................................... Welcome to the AcompanyBC Wireless LAN!
Custom Message................................. Contact the System Administrator for a
Username and Password.
Custom Redirect URL............................ http://www.AcompanyBC.com
Web Authentication Mode........................ Internal
Web Authentication URL............................ Disabled
OL-9141-03
Cisco Wireless LAN Controller Configuration Guide
9-17
Page 18

Choosing the Web Authentication Login Window
Chapter 9 Managing User Accounts
9-18
Cisco Wireless LAN Controller Configuration Guide
OL-9141-03
 Loading...