

Page 1

CHA PT ER
4
Getting Started
This chapter provides information about starting and stopping the Cisco Mobile Wireless Transport
Manager (MWTM), and an overview of how to use the MWTM to manage your Cisco IP Transfer Point
(ITP) or Radio Access Network-Optimization (RAN-O) installation.
This chapter includes:
• Starting the MWTM Server, page 4-1
• Starting the MWTM Client, page 4-2
• Discovering Your Network, page 4-4
• Displaying the MWTM Main Window, page 4-22
• Using the MWTM Main Menu, page 4-33
• Accessing the MWTM through a Web Browser, page 4-39
• Loading and Saving MWTM Files, page 4-41
• Using the Windows Start Menu, page 4-43
• Using the Windows Start Menu, page 4-43
• Exiting the MWTM Client, page 4-44
For detailed information about the MWTM-supported platforms, and hardware and software
requirements, see the Installation Guide for the Cisco Mobile Wireless Transport Manager 6.0.
Note The default directory for installing the MWTM is /opt. In commands that call for the default directory,
if you installed the MWTM in a different directory, you must specify that directory instead of /opt.
Starting the MWTM Server
Before starting an MWTM server, verify that:
• Each node uses a supported IOS image
• The MWTM server has IP connectivity to each node
• SNMP is enabled on each node
• (Optional, but recommended) Traps are enabled on each node
• (Optional, but recommended) A trap host is defined on each node
OL-9118-03
User Guide for the Cisco Mobile Wireless Transport Manager 6.0
4-1
Page 2

Starting the MWTM Client
Tip For a definition of MWTM nodes, see What is ITP?, page 1-6 and What is RAN-O?, page 1-7.
Because the MWTM application comprises a server component and a client component, you must start
both components to run the application.
To start the MWTM server on a Solaris or Linux system:
Step 1 You must be logged in as the root user or as a superuser, or your login must have administrator privileges.
To log in as the root user, see the Becoming the Root User (Server Only), page 4-2.
Note For details on setting up administrator privileges, see Specifying a Super User (Server Only),
Step 2 Enter:
# cd /opt/CSCOsgm/bin
# ./mwtm start
Chapter 4 Getting Started
page 2-18).
Becoming the Root User (Server Only)
Some MWTM procedures require that you log in as the root user.
Caution As the root user, you can adversely affect your operating environment if you are unaware of the effects
of the commands that you use. If you are a relatively inexperienced UNIX user, limit your activities as
the root user to the tasks described in this manual.
If you are not logged in, log in as the root user:
> login: root
> Password: root-password
If you are already logged in, but not as the root user, use the su command to change your login to root:
# su
# Password: root-password
Starting the MWTM Client
This section contains:
• Before Starting the MWTM Client, page 4-3
• Starting the MWTM Client on Solaris or Linux, page 4-3
4-2
• Access the Node, page 4-4
• Starting the MWTM Client on Windows, page 4-4
User Guide for the Cisco Mobile Wireless Transport Manager 6.0
OL-9118-03
Page 3

Chapter 4 Getting Started
Before Starting the MWTM Client
When you start an MWTM client, the version and release of the client must match that of the MWTM
server.
If there is a client-server mismatch, the MWTM displays a warning message when you try to start the
client. If you have a web browser installed, the MWTM optionally opens a web page from which you
can download an allowed, matching client. See Downloading the MWTM Client from the Web, page
11-7 for more information about downloading the MWTM client.
Setting the DISPLAY Variable for Solaris or Linux Clients
If you see the following message upon client startup, you must set the DISPLAY variable:
Could not launch client: Can't connect to X11 window server using <x> as the value of the
DISPLAY variable.
The DISPLAY variable is set as part of your login environment on Solaris or Linux. However, if you use
Telnet or SSH to access a workstation, you must set the DISPLAY variable to local display by using this
command:
# setenv DISPLAY local_ws:0.0
Starting the MWTM Client
where local_ws is your local workstation.
If your shell does not support the setenv command, enter:
# export DISPLAY=local_ws:0.0
Starting the MWTM Client on Solaris or Linux
To start the MWTM client on a Solaris or Linux system on which the MWTM server is installed, ensure
that the MWTM server is running, then enter:
# cd /opt/CSCOsgm/bin
# ./mwtm client
To start the MWTM client on a Solaris or Linux system other than the one on which the MWTM server
is installed, ensure that the MWTM server is running, then enter:
# cd /opt/CSCOsgmClient/bin
# ./mwtm client
To start the MWTM client on a Solaris or Linux system other than the one on which the MWTM server
is installed, and connect to an MWTM server other than the default server, enter:
# cd /opt/CSCOsgmClient/bin
# ./mwtm client
where server_name_or_ip_address is the name or IP address of the Solaris or Linux system on which
the MWTM server is running.
server_name_or_ip_address
OL-9118-03
User Guide for the Cisco Mobile Wireless Transport Manager 6.0
4-3
Page 4

Discovering Your Network
Access the Node
You use the MWTM to link to the node by using the connection protocol (Telnet or SSH) that you set in
the Node SNMP and Credentials dialog box (see Credentials Fields, page 3-21).
To access the node, right-click a node in a window, then choose Node > Connect to from the right-click
menu.
Note If your client workstation does not have network access to the IP address of the node (that is, if the node
is behind a firewall or NAT device), you might be unable to access the node.
Starting the MWTM Client on Windows
To start the MWTM client on a Windows system, choose Start > Programs > Cisco MWTM Client >
Launch MWTM Client, or double-click the MWTM Client icon on the Windows desktop.
Chapter 4 Getting Started
Discovering Your Network
This section provides details on using the MWTM to discover your ITP or RAN-O networks. It includes:
• Discovery Overview, page 4-4
• Launching the Discovery Dialog, page 4-6
• Loading Seed Nodes and Seed Files, page 4-7
• Running Discovery, page 4-13
• Verifying Discovery, page 4-21
Discovery Overview
The MWTM uses a Discovery process to populate the MWTM database, discovering the objects in your
network.
You can run Discovery if MWTM User-Based Access is disabled; or, if it is enabled, and you are a
Network Administrator or System Administrator. (For more information about user authorization levels
in the MWTM, see Configuring MWTM User Account Levels (Server Only), page 2-5.)
To discover your network:
Step 1 Start the MWTM client, as described in Starting the MWTM Client, page 4-2.
Step 2 If you want to change SNMP settings, do so before running Discovery. See Configuring SNMP Settings,
page 3-15 for more information.
Step 3 If you want to discover ONS nodes and did not choose the option to discover your network during
installation, you must add the ONS nodes and set the credentials before running discovery (see Adding
Nodes, page 3-22 for more information.)
4-4
Step 4 Choose Network > Network Discovery from the MWTM main menu. The MWTM displays the
Discovery dialog box. See Launching the Discovery Dialog, page 4-6 for more information.
User Guide for the Cisco Mobile Wireless Transport Manager 6.0
OL-9118-03
Page 5

Chapter 4 Getting Started
Step 5 Select the Seed Settings tab, if it is not already selected. You use the Seed Settings tab to create, save,
Step 6 Select the Discovery tab, or click Next. You use the Discovery tab to discover the objects in your
Step 7 When the “Discovery In Progress” message disappears, Discovery is running. The Discovered Nodes
Step 8 Examine the Discovered Nodes table to verify that the MWTM discovered all of the nodes in the
Step 9 When you are satisfied that the MWTM discovered all of the nodes in the network, save the list of seed
Discovering Your Network
load, and delete MWTM seed files. Load one or more seed nodes, or an existing seed file, by using the
procedures in Loading Seed Nodes and Seed Files, page 4-7.
network. See Running Discovery, page 4-13 for more information.
• To specify the extent of the network discovery, check the Entire Network check box. See the
description of the Entire Network check box in Running Discovery, page 4-13 for more information.
• To specify whether the MWTM should keep or delete the existing database when discovering the
network, check the Delete Existing Data check box. See the description of the Delete Existing Data
check box in Running Discovery, page 4-13 for more information.
• To specify the maximum number of hops for discovering objects in your network, enter a value in
the Max. Hops text box. For more information, see the description of the Max. Hops text box in the
Running Discovery, page 4-13.
table within the Discovery tab (Figure 4-5) lists all nodes that were discovered by the MWTM (all nodes,
including new and excluded nodes, not just the nodes in the current view). See Discovered Nodes, page
4-17 for more information.
network. If you suspect that the MWTM did not discover all of the nodes, see Verifying Discovery, page
4-21 for troubleshooting information. You might need to add more seed nodes and run Discovery again.
nodes in a seed file. See Saving a Seed File, page 4-9 for more information.
Note (ITP only) You can run Discovery multiple times to attempt to discover additional nodes based on the IP
addresses defined in the Stream Control Transmission Protocol (SCTP) links. If you are using a separate
management VLAN to manage your nodes, but private or unreachable IP addresses for your SCTP
connectivity, uncheck the Entire Network check box in the Discovery dialog box. Otherwise, Discovery
attempts to reach those nodes continuously. Instead, enter all nodes to be discovered directly into the
seed list and do a nonrecursive Discovery.
Related Topics:
• Configuring SNMP Settings, page 3-15
• Backing Up or Restoring MWTM Files (Server Only), page 2-32
• Investigating Data Problems, page D-1
OL-9118-03
User Guide for the Cisco Mobile Wireless Transport Manager 6.0
4-5
Page 6
Discovering Your Network
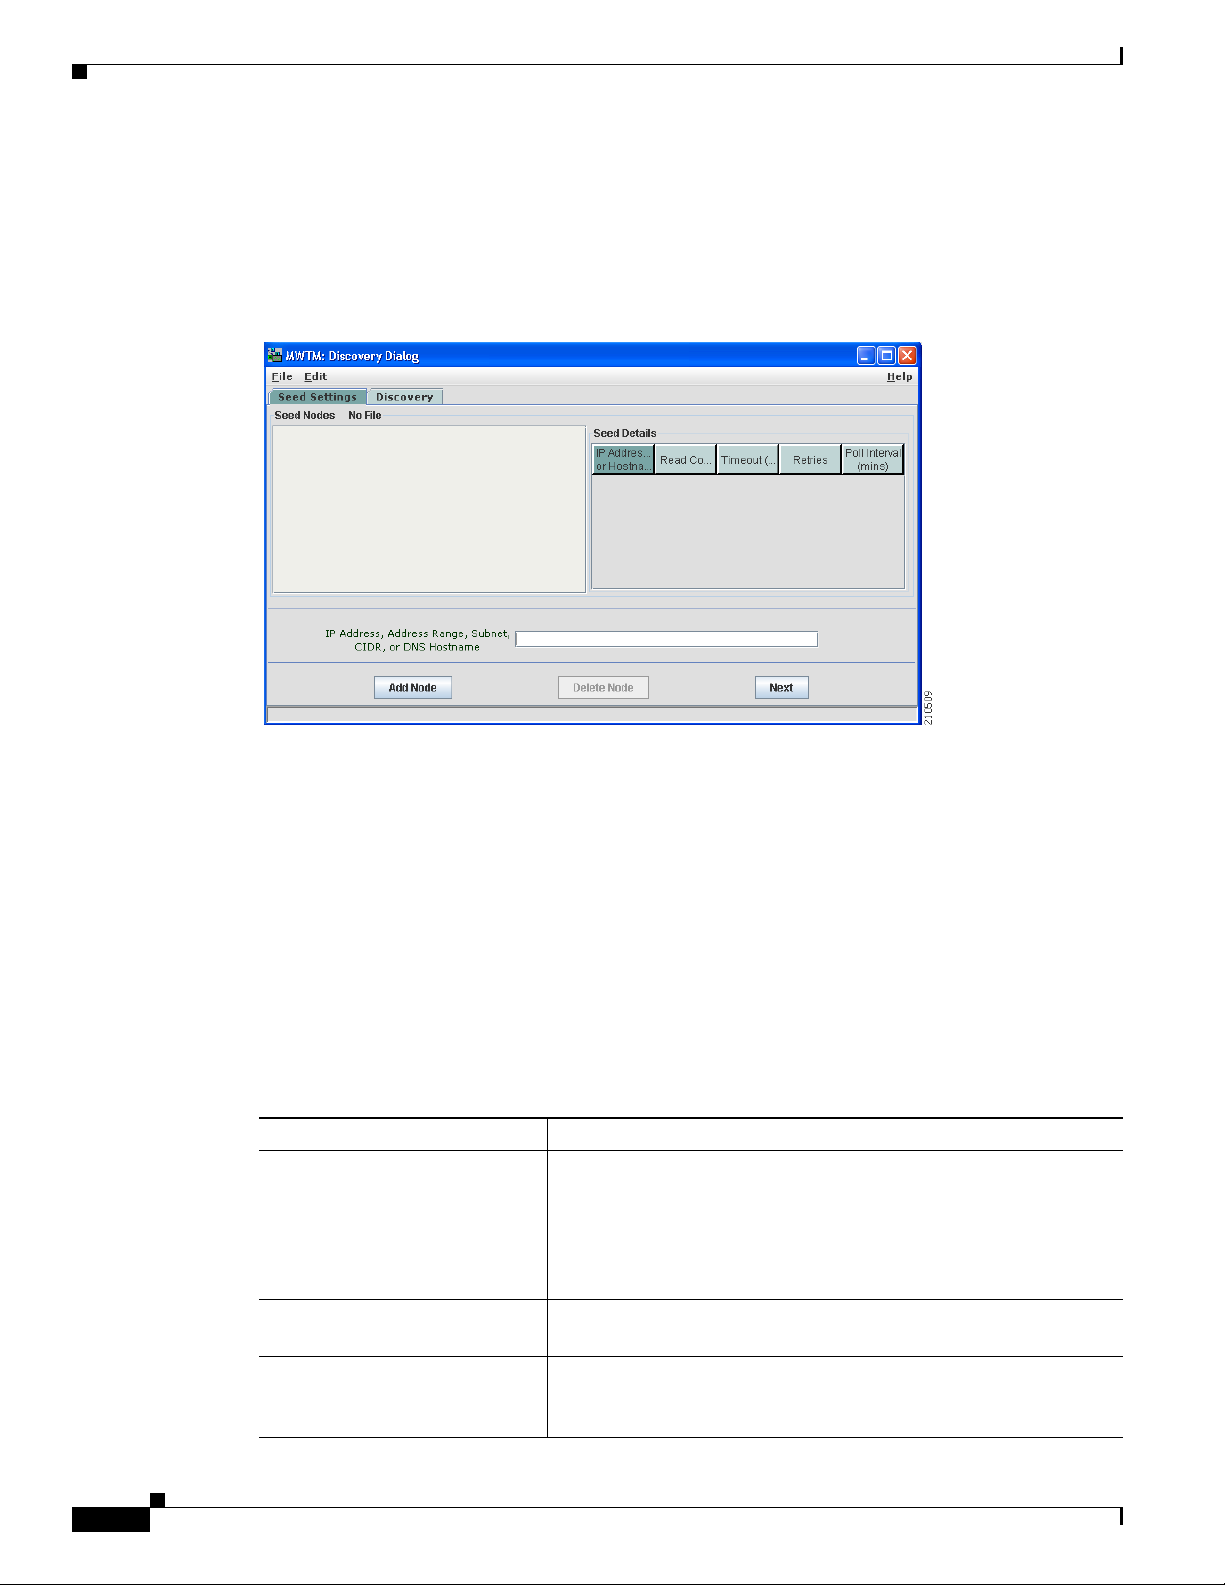
Launching the Discovery Dialog
To launch the Discovery dialog box and begin the Discovery process, choose Network > Network
Discovery from the MWTM main menu. The MWTM displays the Discovery dialog box.
Figure 4-1 Discovery Dialog with Seed Settings Displayed
Chapter 4 Getting Started
You use the Discovery dialog box to load and configure seed nodes, and use those seed nodes to discover
the objects in your network.
If you start the MWTM client and the MWTM database is empty (including the very first time you start
the MWTM client), the MWTM automatically opens the Discovery dialog box so you can run Discovery
and populate the database.
The Discovery dialog box contains:
• Discovery Dialog Menu, page 4-6
• Discovery Dialog Tabs, page 4-7
Discovery Dialog Menu
The menu on the Discovery dialog box contains:
Menu Command Description
File > Load Seeds
(Ctrl-L)
File > Save Seeds
(Ctrl-S)
File > Save As Opens the Save File Dialog: Seed File List, which you use to save
Opens the Load File Dialog: Seed File List, enabling you to load a
seed file into the MWTM:
• Enter the name of the seed file, and click OK to load it.
• Click Cancel to return to the Seed Settings tab without loading
a seed file.
Opens the Save File Dialog: Seed File List, which you use to save
changes you have made to the selected seed file.
changes you have made to the selected seed file with a new name,
or overwrite an existing seed file.
4-6
User Guide for the Cisco Mobile Wireless Transport Manager 6.0
OL-9118-03
Page 7

Chapter 4 Getting Started
Menu Command Description
File > Close
(Ctrl-W)
Edit > Node SNMP and
Credentials Editor
(Alt-D)
Help > Topics
(F1)
Help > Window
(Shift-F1)
Help > About
(F3)
Discovery Dialog Tabs
The Discovery dialog box contains these tabs:
Discovering Your Network
Closes the current window.
Opens the Node SNMP and Credentials Editor dialog box.
If you have implemented MWTM User-Based Access, this option is
available to users with authentication-level Network Administrator
(level 4) and higher.
Displays the table of contents for the MWTM online help.
Displays online help for the current window.
Displays build date, version, SSL support, and copyright
information about the MWTM application.
Tab Description
Seed Settings Displays the Seed Settings tab in the Discovery dialog box.
Discovery Displays the Discovery tab in the Discovery dialog box.
Loading Seed Nodes and Seed Files
You use the MWTM to load one or more new seed nodes; or, to create, save, load, and delete existing
MWTM seed files.
This section includes:
• Loading a Seed Node, page 4-8
• Loading a Seed File, page 4-8
• Saving a Seed File, page 4-9
• Creating a New Seed File, page 4-11
• Creating a New Seed File, page 4-11
• Creating and Changing Seed Files Using a Text Editor, page 4-13
OL-9118-03
User Guide for the Cisco Mobile Wireless Transport Manager 6.0
4-7
Page 8
Discovering Your Network
Loading a Seed Node
To load a seed node, enter the name or IP address of the seed node in the IP Address, Address range,
Subnet, CIDR, or DNS Hostname field, and click Add Node (or press Enter).
Note Follow the guidelines for IP addresses in SNMP Configuration Table, page 3-16.
The MWTM displays details of the SNMP settings for the seed nodes in the Seed Details pane. Continue
adding seed nodes until you are certain that the MWTM will be able to discover the entire network.
Loading a Seed File
If you have already created and saved one or more seed files, you can load a seed file, change the list of
seed files, and select one seed file to be loaded automatically when the MWTM client is started or the
Discovery dialog box is opened.
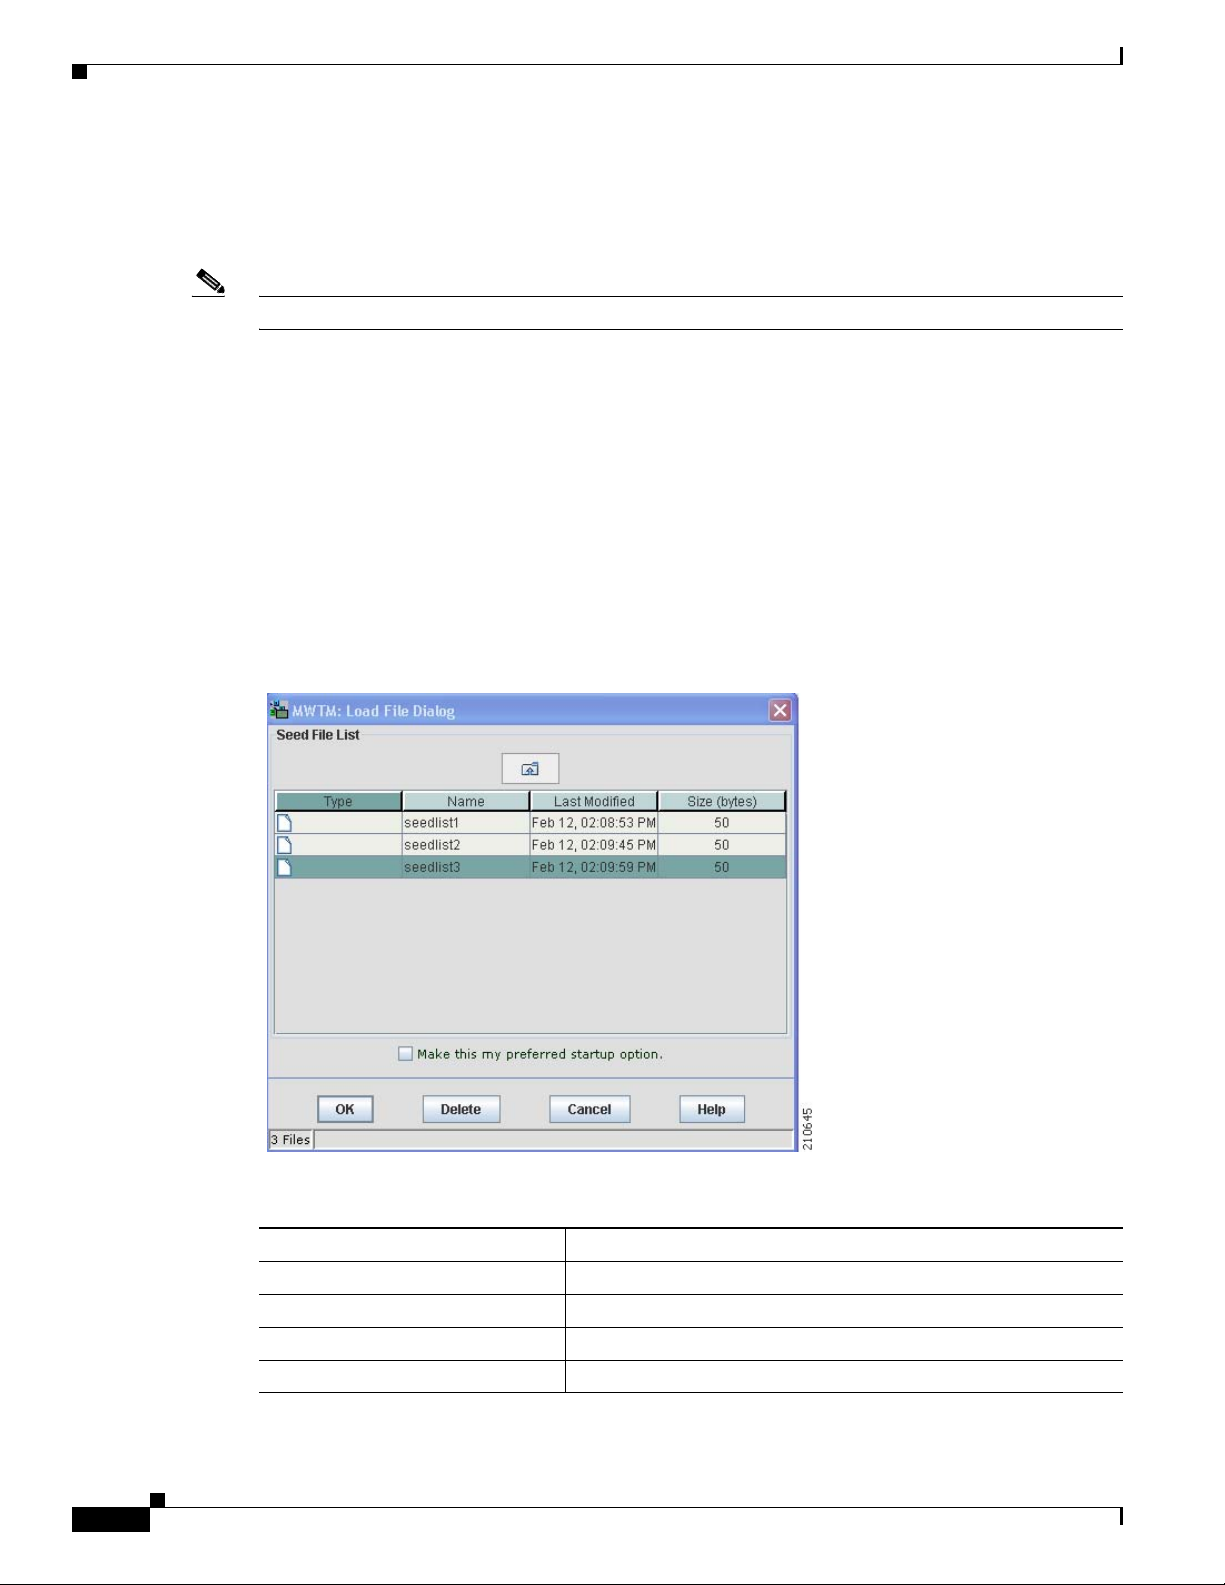
To load an existing seed file, choose File > Load Seeds from the Discovery Dialog menu. The MWTM
displays the Load File Dialog: Seed File List dialog box.
Chapter 4 Getting Started
Figure 4-2 Load File Dialog: Seed File List Dialog
The Load File Dialog: Seed File List contains:
4-8
Field or Button Description
Type Icon indicating whether the item in the table is a file or a folder.
Name Name of the seed file or folder.
Last Modified Date and time the seed file or folder was last modified.
Size (bytes) Size of the seed file or folder, in bytes.
User Guide for the Cisco Mobile Wireless Transport Manager 6.0
OL-9118-03
Page 9

Chapter 4 Getting Started
Discovering Your Network
Field or Button Description
Make this my preferred start option Specifies whether the selected seed file should be loaded
automatically whenever this MWTM client is started or the
Discovery dialog box is opened.
By default, this check box is unchecked for all seed files. That is,
no seed file is loaded automatically when the MWTM client is
started or the Discovery dialog box is opened.
Number of Files
(appears in bottom-left corner)
OK Loads the selected seed file, saves any changes you made to the
Delete Deletes the selected file from the seed file list. The MWTM issues
Cancel Closes the dialog box without loading a seed file or saving any
Help Displays online help for the dialog box.
Total number of seed files and folders.
list of files, and closes the dialog box.
To load a seed file, double-click it in the list, select it in the list
and click OK, or enter the name of the file and click OK.
The MWTM saves any changes you made to the list of files,
closes the Load File Dialog: Seed File List dialog box, loads the
seed file, and returns to the Discovery dialog box. The MWTM
lists all of the seed nodes in the seed file in the Seed Nodes pane,
and displays details of the SNMP settings for the seed nodes in the
Seed Details pane.
an informational message containing the name and location of the
deleted file.
changes to the seed file list.
Saving a Seed File
You use the MWTM to save a specific seed file, change the list of seed files, and select one seed file to
be loaded automatically when the MWTM client is started or the Discovery dialog box is opened.
When you are satisfied that the MWTM has discovered all of the nodes in the network, save the list of
seed nodes in a seed file by using one of these procedures:
• To save the changes you made to the seed file without changing the name of the file, choose File >
Save from the Discovery Dialog menu.
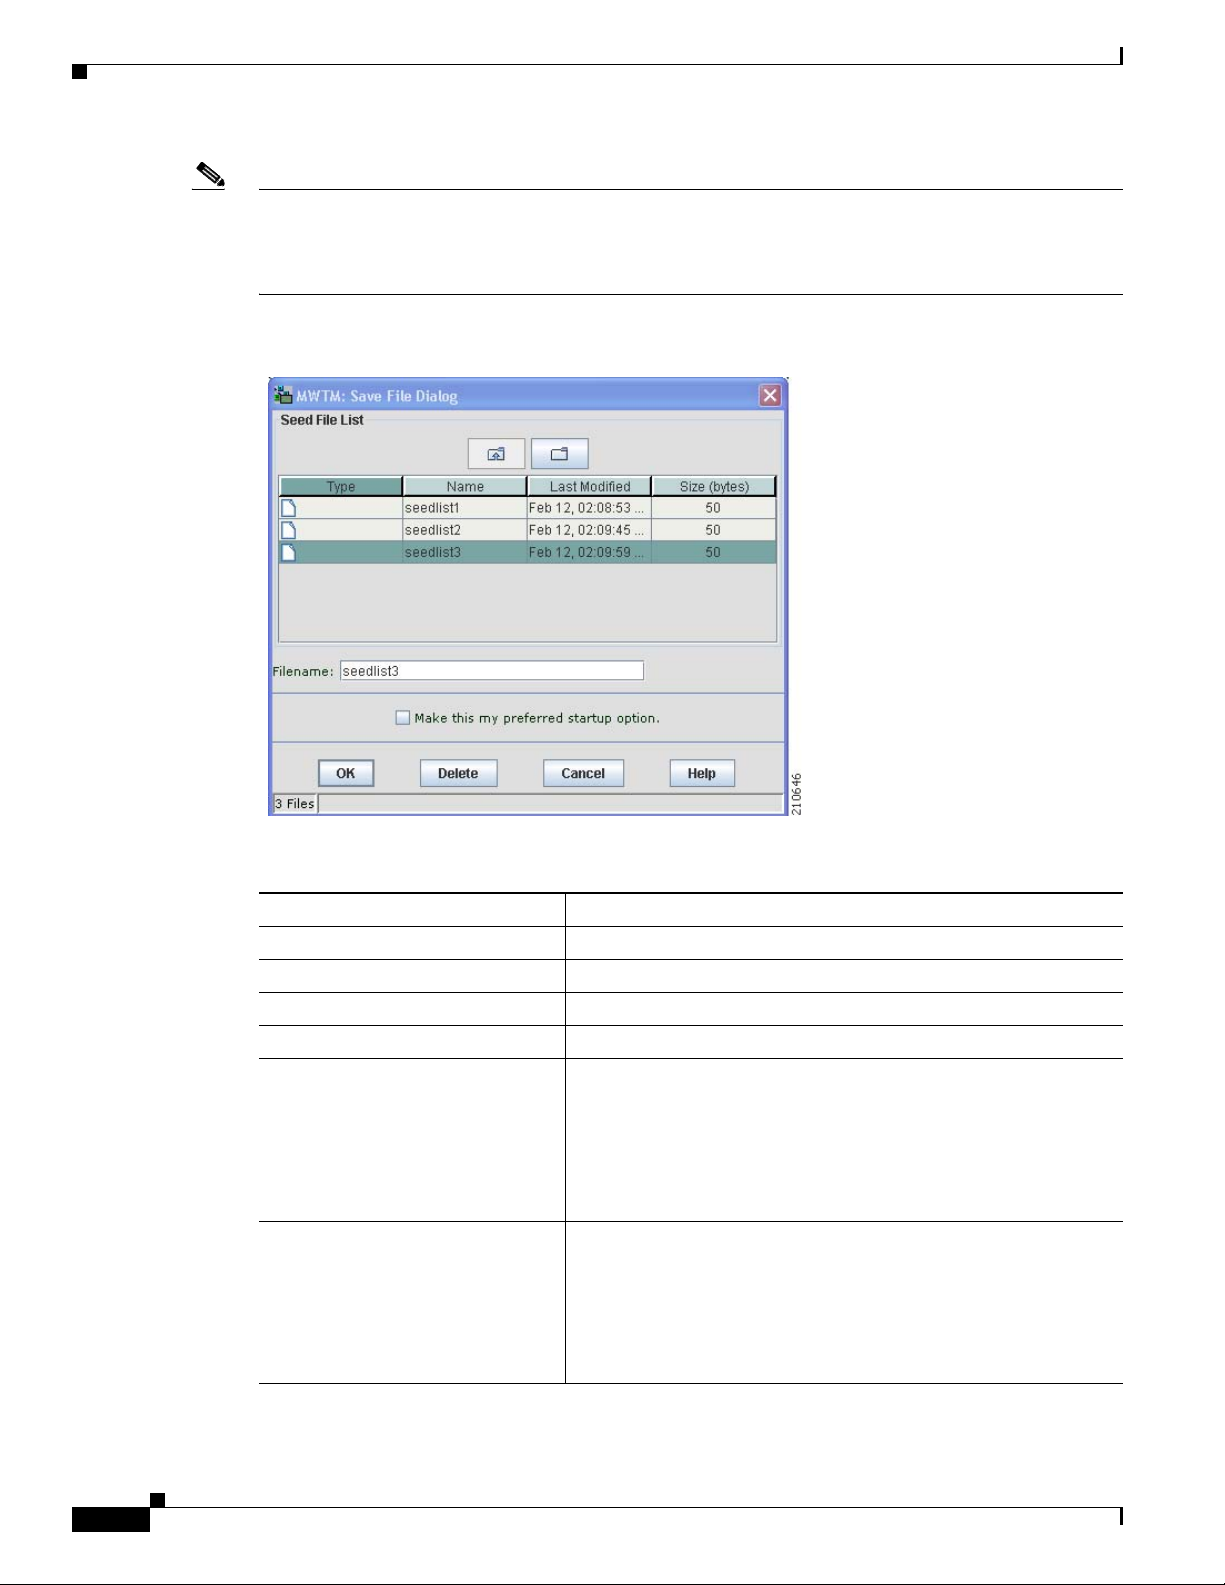
• To save the changes you have made to the seed file with a new name, choose File > Save As from
the Discovery Dialog menu. The MWTM displays the Save File Dialog: Seed File List dialog box
(Figure 4-3).
The MWTM stores the seed file in the seed file directory on the MWTM server:
• If you installed the MWTM in the default directory, /opt, then the MWTM seed file directory is
/opt/CSCOsgm/seeds.
• If you installed the MWTM in a different directory, then the MWTM seed file directory is located
in that directory.
OL-9118-03
User Guide for the Cisco Mobile Wireless Transport Manager 6.0
4-9
Page 10
Discovering Your Network
Note If another user modifies and saves the seed file before you save your changes, the MWTM asks if you
want to overwrite that user’s changes. If you choose to do so, the other user’s changes are overwritten
and lost. If you choose not to do so, your changes are lost, unless you save the seed file to a different
filename.
Figure 4-3 Save File Dialog: Seed File List Dialog
Chapter 4 Getting Started
The Save File Dialog: Seed File List contains:
Field or Button Description
Type Icon indicating whether the item in the table is a file or a folder.
Name Name of the seed file or folder.
Last Modified Date and time the seed file or folder was last modified.
Size (bytes) Size of the seed file or folder, in bytes.
Filename Name by which you want to save the seed file.
If you create a new seed filename, you can use any letters,
numbers, or characters in the name that are allowed by your
operating system. However, if you include any spaces in the new
name, the MWTM converts those spaces to hyphens. For
example, the MWTM saves file a b c as a-b-c.
Make this my preferred start option Specifies whether the selected seed file should be loaded
automatically whenever this MWTM client is started or the
Discovery dialog box is opened.
By default, this check box is unchecked for all seed files. That is,
no seed file is loaded automatically when the MWTM client is
started or the Discovery dialog box is opened.
4-10
User Guide for the Cisco Mobile Wireless Transport Manager 6.0
OL-9118-03
Page 11

Chapter 4 Getting Started
Discovering Your Network
Field or Button Description
Number of Files
(displayed in bottom left corner)
OK Saves the seed file and any changes you made to the seed file list
Delete Deletes the selected file from the seed file list. The MWTM issues
Cancel Closes the dialog box without saving the seed file or saving any
Help Displays online help for the dialog box.
Total number of seed files and folders.
and closes the dialog box.
To save the seed file with a new name, you can either save the file
with:
• A completely new name. Enter the new name and click OK.
• An existing name, overwriting an old seed file. Select the
name in the list and click OK.
The MWTM:
• Saves the seed file with the new name
• Saves any changes you made to the list of files
• Closes the Save File Dialog: Seed File List dialog
• Returns to the Discovery dialog box
an informational message containing the name and location of the
deleted file.
changes to the seed file list.
Creating a New Seed File
To create a new seed file in the MWTM, launch the Discovery dialog box, as described in Launching the
Discovery Dialog, page 4-6, then select the Seed Settings tab, if it is not already selected (Figure 4-1).
You use the Seed Settings tab within the Discovery dialog box to create, save, load, and delete MWTM
seed files.
The Seed Settings tab on the Discovery dialog box contains:
Field or Button Description
Seed Nodes Lists the seed nodes currently defined in the MWTM.
IP Address Range
or Hostname
Retries Number of times the MWTM attempts to connect to the seed node. The valid
Timeout (sec) Time, in seconds, the MWTM waits for a response from the seed node. The valid
IP address of the seed node. The default value is *.*.*.*.
Note Follow the guidelines for IP addresses in SNMP Configuration Table,
page 3-16.
range is 0 to 99. The default value is 2.
range is 0 (no timeout) to 9999. The default value is 1 second.
OL-9118-03
User Guide for the Cisco Mobile Wireless Transport Manager 6.0
4-11
Page 12

Discovering Your Network
Field or Button Description
Read Community SNMP community name for read access to the information maintained by the
Poll Interval (mins) Time, in minutes, between polls. The valid range is 0 to 9999. The default value
IP Address,
Address range,
Subnet, CIDR, or
DNS Hostname
Chapter 4 Getting Started
SNMP agent on the node. This value can be up to 32 characters in length. Do not
include special characters such as the opening single quote ('), at symbol (@),
dollar sign ($), caret (^), closing single quote ('), double quote ("), ampersand
(&), or pipe (|). This value is usually set to public (the default).
is 15 minutes.
Address or name of the selected seed node.
To create a new seed file, enter the name or address of a seed node in this field.
Examples of acceptable input include:
• IP Address: 1.2.3.4 (see the guidelines for IP addresses in SNMP
Configuration Table, page 3-16).
• Address Range: 1.2.3.2-15
• Subnet, CIDR: 1.2.3.0/24, 1.2.3.0/255.255.255.0
• DNS Hostname: mwtm.cisco.com
Add Node Adds a new seed node to the MWTM.
Delete Deletes the selected seed node. The MWTM deletes the seed node without asking
Next Displays the Discovery tab in the Discovery dialog box.
Changing an Existing Seed File
To modify an existing seed file in MWTM:
Step 1 Load the seed file as described in Loading a Seed File, page 4-8.
Step 2 To add another seed node to the seed file, enter the name or IP address of the seed node in the IP Address,
Address range, Subnet, CIDR, or DNS Hostname field, and click Add Node.
Step 3 To delete a seed node from the seed file, select the seed node and click Delete Node.
The MWTM displays details of the SNMP settings for the seed node in the Seed
Details pane.
Continue to add as many seed nodes as necessary to discover your entire network.
When you are ready to save the list of seed nodes in a new seed file, choose File
> Save As from the Discovery Dialog menu. The MWTM displays the Save File
Dialog: Seed File List dialog box (Figure 4-3). See Saving a Seed File, page 4-9
for more information about saving seed files.
for confirmation.
If you enter a seed node IP address or name in the IP Address, Address range,
Subnet, CIDR, or DNS Hostname field, then click Next, MWTM automatically
adds the seed node before displaying the Discovery tab.
4-12
Step 4 To save the modified seed file, use the procedure described in Saving a Seed File, page 4-9.
User Guide for the Cisco Mobile Wireless Transport Manager 6.0
OL-9118-03
Page 13

Chapter 4 Getting Started
Creating and Changing Seed Files Using a Text Editor
A seed file is simply an unformatted list of seed node names. To create a seed file by using a text editor,
simply create a file and list the seed node names, one on each line, with no other formatting:
new-york-a
new-york-b
chicago-c
When you save and name the seed file, remember:
• You can use any letters, numbers, or characters in the name that your operating system allows,
except blanks.
• The MWTM saves the seed file with a .see file extension.
• The MWTM saves the seed file in the MWTM server’s seed file directory, seeds:
–
If you installed the MWTM in the default directory, /opt, then the seed file directory is
/opt/CSCOsgm/seeds/.
–
If you installed the MWTM in a different directory, then the seed file directory resides in that
directory.
When the MWTM loads the seed file, it verifies the syntax of the file, deleting blank lines and extraneous
leading and trailing spaces as needed. The MWTM also verifies that each seed node name resolves to a
valid IP address. If a name does not resolve to a valid IP address, the MWTM logs the erroneous entry
and ignores it.
Discovering Your Network
For example, given this seed file:
new-york-a<space>
<space>new-york-b
zzzzzzzzzzzz
<blank line>
<tab>chicago-c<tab>
The MWTM loads these entries:
new-york-a
new-york-b
chicago-c
Running Discovery
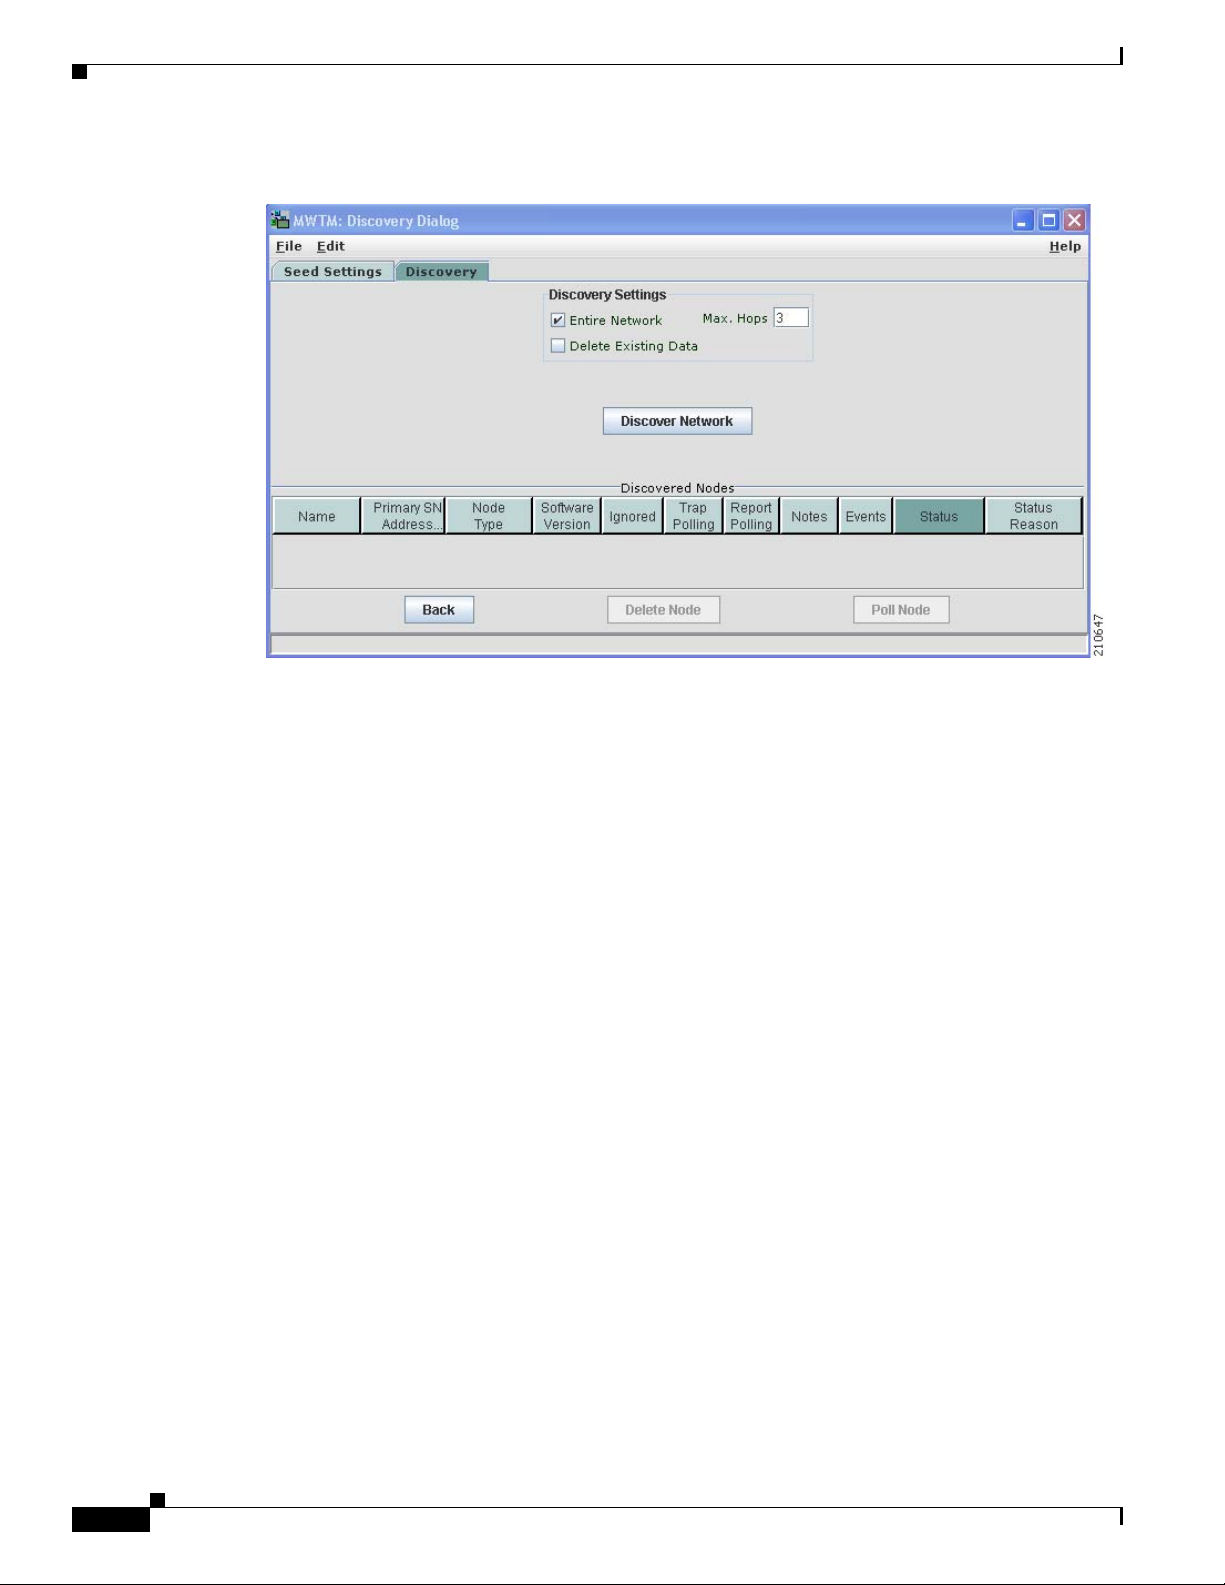
Click the Discovery tab in the Discovery dialog box to discover the objects in your network.
To display the Discovery tab, launch the Discovery dialog box, as described in Launching the Discovery
Dialog, page 4-6, then select the Discovery tab in the Discovery dialog box, or click Next in the Seed
Settings tab. (If you enter a seed node IP address or name in the IP Address, Address range, Subnet,
CIDR, or DNS Hostname field, then click Next, MWTM automatically adds the seed node before
displaying the Discovery tab.)
OL-9118-03
User Guide for the Cisco Mobile Wireless Transport Manager 6.0
4-13
Page 14
Discovering Your Network
Figure 4-4 Discovery Tab Before Discovery
Chapter 4 Getting Started
The Discovery tab comprises:
• Discovery Settings, page 4-15
• Discovered Nodes, page 4-17
Related Topics:
• Discovery Overview, page 4-4
• Polling a Node, page 8-70
4-14
User Guide for the Cisco Mobile Wireless Transport Manager 6.0
OL-9118-03
Page 15

Chapter 4 Getting Started
Discovery Settings
Discovering Your Network
The Discovery Settings pane of the Discovery tab contains:
Field or Button Description
Entire Network Check box used to specify the extent of the network discovery:
• To discover the entire network, check this check box. This is called recursive
discovery, and it is the default setting.
With this check box checked, the MWTM discovers all seed nodes and
attempts to manage them; then attempts to discover and manage all nodes that
are adjacent to those seed nodes (unless the nodes are connected by serial links
only); then attempts to discover and manage all nodes that are adjacent to those
nodes; and so on, until the Max Hops limit is reached.
• To rediscover only seed nodes, uncheck this check box. This is called
nonrecursive discovery.
With this check box unchecked, the MWTM discovers all seed nodes and
attempts to manage them, then labels all nodes that are adjacent to those seed
nodes as Unmanaged.
Delete Existing
Data
Check box used to keep or delete the existing MWTM database when discovering
the network:
• To keep all existing network data in the MWTM database before rediscovering
the network, uncheck this check box. This is the default setting.
• To delete all existing network data from the MWTM database before
rediscovering the network, check this check box. Choose this option if you
know that network elements have been deleted from your network since the last
Discovery.
If you discover the network with Delete Existing Data selected, the MWTM stops
any real-time polls that are running and issues appropriate messages.
Max Hops The maximum number of hops from the seed node to search for other nodes to
discover. Default is 3.
OL-9118-03
User Guide for the Cisco Mobile Wireless Transport Manager 6.0
4-15
Page 16

Discovering Your Network
Field or Button Description
Discover
Network
Chapter 4 Getting Started
Begins discovering the network.
Click Discover Network to begin Discovery.
If you have not defined at least one seed node in the Seed Settings tab, the MWTM
prompts you to do so.
When Discovery begins:
• The Discover Network button changes to Stop Discovery.
• The Discovery In Progress message appears in the title bar of all MWTM
client windows.
Discovery progresses in bursts. You might see a number of updates, followed by a
pause, followed by more updates. The information that MWTM windows displays
is not fully updated until Discovery is complete.
By default, Discovery times out after 600 seconds (10 minutes). To change the
Discovery timeout, change the value of the DISCOVERY_TIMELIMIT entry in the
Server.properties file:
• If you installed the MWTM in the default directory, /opt, then the location of
the Server.properties file is /opt/CSCOsgm/properties/Server.properties.
• If you installed the MWTM in a different directory, then the Server.properties
file resides in that directory.
Because the MWTM is an asynchronous system, with the MWTM server
contacting clients one at a time, and because clients might run at different speeds,
the information that MWTM clients display during Discovery might not always be
synchronized.
All other MWTM windows (Node, topology, and so on) are also populated with the
newly discovered network data.
Stop Discovery Stops the Discovery process. For example, if you click Discover Network, then you
realize that you loaded a seed node that you did not intend to load, you can click
Stop Discovery to stop the Discovery process.
Note If you stop the Discovery process, the information in the MWTM database
is incomplete and unreliable. To generate a new, complete, and reliable
MWTM database, check the Delete Existing Data check box and run
Discovery again.
This button replaces the Discover Network button when the Discovery process
begins, and changes back to the Discover Network button when the Discovery
process ends.
If you run Discovery with the Entire Network check box unchecked, and then you run Discovery with
the Entire Network check box checked, any Unmanaged nodes in the first Discovery are not rediscovered
by the second Discovery.
4-16
User Guide for the Cisco Mobile Wireless Transport Manager 6.0
OL-9118-03
Page 17

Chapter 4 Getting Started
Discovered Nodes
Discovering Your Network
To recover from this situation and generate a new, complete, and reliable MWTM database, you must
perform one of these procedures:
• Run Discovery again, with Entire Network and Delete Existing Data checked.
• Change the Unmanaged nodes to managed status. See Unmanaging and Managing Nodes or ITP
Signaling Points, page 6-38 for more information.
• Poll the nodes that were Unmanaged in the first Discovery. See Polling a Node, page 8-70 for more
information.
The Discovered Nodes table in the Discovery tab (Figure 4-5) lists all nodes that the MWTM discovered
(all nodes, including new and excluded nodes, not just the nodes in the current view). By default, this
table is sorted by Status.
Figure 4-5 Discovery Tab After Discovery, with Discovered Nodes
OL-9118-03
To see a tooltip for each column in the table, place the cursor over a column heading.
If a cell is too small to show all of its data, place the cursor over the cell to see the full text in a tooltip.
User Guide for the Cisco Mobile Wireless Transport Manager 6.0
4-17
Page 18

Discovering Your Network
You can resize each column, or sort the table based on the information in one of the columns. By default,
the MWTM displays all of the columns in the Discovered Nodes section except Internal ID, Uptime,
Reboot Reason, Process Traps, and Last Status Change.
For detailed information on working within tables, see Navigating Table Columns, page 5-23
The Discovered Nodes section contains:
Column or Button Description
Internal ID Internal ID of the event. The internal ID is a unique ID for every object that the
Name Name or IP address of the discovered node.
Primary SNMP
Address
CLLI Code (ITP
only)
Chapter 4 Getting Started
• To display hidden columns, right-click in the table heading and select the check boxes for the
columns that you want to display.
• To hide columns, right-click in the table heading and uncheck the check boxes for the columns that
you want to hide.
MWTM assigns for its own internal use. It can also be useful when the TAC is
debugging problems.
All discovered nodes are placed in a DEFAULT configuration view, which is
stored on the MWTM server and all MWTM clients share. Initially, all clients use
the DEFAULT view. Users can then create their own views, which are subsets of
the DEFAULT view, to meet their individual needs. However, you cannot modify
the DEFAULT view stored on the MWTM server. The DEFAULT view is always
available for users who need to view the entire network.
IP address of the node that SNMP uses to poll the node. (There might be other
IP addresses on the node that are not the primary SNMP address.)
COMMON LANGUAGE Location Identification Code for the node. A CLLI
code is a standardized 11-character identifier that uniquely identifies the
geographic location of the node. If the node has no CLLI code configured, this
field is blank.
4-18
User Guide for the Cisco Mobile Wireless Transport Manager 6.0
OL-9118-03
Page 19

Chapter 4 Getting Started
Discovering Your Network
Column or Button Description
Node Type Type of node. Node types can be specific to ITP, RAN-O, or generic to both.
ITP specific nodes include:
• Cisco2650XM, Cisco2651XM
• Cisco2811
• Cisco7204VXR, Cisco7206VXR
• Cisco7301
• Cisco7507, Cisco7507mx, Cisco7507z, Cisco7513, Cisco7513mx,
Cisco7513z
• Cisco7604, Cisco7606, Cisco7609, Cisco7613
RAN-O-specific nodes include:
• CiscoMWR-1941-DC-A—Cisco MWR-1941-DC-A series router
• CiscoONS15454—Cisco ONS 15454 SONET multiplexer
• Node B—The radio transmission and reception unit for communication
between radio cells.
• RAN_SVC—RAN Service Module in the Cisco ONS 15454
Generic nodes include:
• IPDevice—IP device, other than those listed previously. You can assign this
icon to an unknown node if you know that it is an IP device.
• Unknown—MWTM is unable to determine the node type.
Software Version Version of software (for example, IOS) that is installed on the node.
Uptime Time the node has been up, in days, hours, minutes, and seconds.
Reboot Reason Reason for the last reboot of the node.
Ignored Indicates whether the node should be included when aggregating and displaying
MWTM status information:
• Uncheck the check box to include the node. This is the default setting.
• Select the check box to exclude the node.
Note Not applicable for unmanaged nodes.
Users with authentication level Power User (level 2) and higher can edit this
field.
Process Traps Indicates whether the MWTM should process traps from this node:
• Check the check box if you want the MWTM to process traps from this node.
This is the default setting.
• Uncheck the check box if you do not want the MWTM to process traps from
this node.
OL-9118-03
Users with authentication level Power User (level 4) and higher can edit this
field.
User Guide for the Cisco Mobile Wireless Transport Manager 6.0
4-19
Page 20

Discovering Your Network
Column or Button Description
Trap Polling
(RAN-O only)
Report Polling Indicates whether report polling is enabled on the web interface.
Notes Indicates whether a note is associated with the node.
Events Indicates whether a recent event is associated with the node. (Even if the server
Last Status Change Date and time that the status of the node last changed.
Status Current status of the node. Possible values are:
Chapter 4 Getting Started
Indicates whether trap polling is enabled. This field is read-only. If you want to:
• Enable trap polling for the RAN-O node, set ipran-mib snmp-access to
outOfBand on the node.
• Disable trap polling for the RAN-O node, set ipran-mib snmp-access to
inBand on the node.
For ITP nodes, the default setting is enabled (check box is checked). To disable
ITP report polling, uncheck the check box.
For RAN-O nodes, the check box is read only. If you want to:
• Enable trap polling for the RAN-O node, set ipran-mib snmp-access to
outOfBand on the node.
• Disable trap polling for the RAN-O node, set ipran-mib snmp-access to
inBand on the node.
purges all of the events associated with the node, the MWTM continues to
display the event icon in this field.)
During Discovery, the MWTM might flag most nodes with an event icon (orange
triangle). If the event icons are too distracting, choose Edit > Clear All Events
from the MWTM main menu to remove them.
Active (green)
Discovering (cyan)
Polling (cyan)
Unknown (red)
Unmanaged (gray)
Waiting (gray)
Warning (yellow)
For detailed definitions of each status, see Status Definitions for Signaling
Gateway Mated Pairs, page E-7.
4-20
User Guide for the Cisco Mobile Wireless Transport Manager 6.0
OL-9118-03
Page 21

Chapter 4 Getting Started
Discovering Your Network
Column or Button Description
Status Reason Reason for the current status of the signaling gateway-mated pair.
For a full list of possible reasons, see the stateReasons.html file. If you installed
the MWTM in:
• The default directory, /opt, then the file is located at
/opt/CSCOsgm/apache/share/htdocs/eventHelp directory.
• A different directory, then the help directory and file reside in that directory.
If the cell is too small to show all of the status reason, place the cursor over the
cell to see the full text in a tooltip.
The status reasons are listed in order of decreasing severity. If two or more
reasons apply, the reason of greatest severity appears.
If the status reason is Unsupported Configuration, correct the configuration and
enter the mwtm cleandiscover command to delete all current network data and
begin a discovery of the network. If the status reason remains Unsupported
Configuration, enter the mwtm clean command to restore the MWTM server to
a state that would exist after a new installation of the MWTM, excluding the log
files, which the MWTM retains. To also remove the log files, enter the mwtm
cleanall command. For more information on the use of these commands, see the
Command Reference, page B-1.
Back Displays the Seed Settings tab in the Discovery dialog box.
Delete Deletes the selected node or nodes from the Discovery database. The MWTM
deletes the nodes without asking for confirmation.
Poll Node Begins a poll of all nodes selected within the Discovered Nodes table in the
Discovery tab.
You cannot poll a node with a Primary SNMP Address of N/A. If you select:
• A node with a Primary SNMP Address of N/A, then the Poll button is
dimmed and cannot be selected.
Verifying Discovery
After you discover the network (see Discovery Overview, page 4-4), examine the Discovered Nodes
table to verify that the MWTM discovered all of the nodes in the network. If you suspect that the MWTM
did not discover all of the nodes, verify that:
• No nodes are excluded from your current view.
• The MWTM server can ping the nodes.
• The nodes are running images that are compatible with the MWTM server.
• SNMP is enabled on the nodes.
• The MWTM is configured with the correct SNMP community name. See Launching the Discovery
Dialog, page 4-6 for details.
OL-9118-03
• More than one node, and even one of them has a Primary SNMP Address of
N/A, then the Poll button is dimmed and cannot be selected.
User Guide for the Cisco Mobile Wireless Transport Manager 6.0
4-21
Page 22

Displaying the MWTM Main Window
• (ITP only) The missing nodes are connected to the seed nodes by SCTP connections, not just serial
connections. If they are not connected by SCTP connections, you must add the missing nodes to the
seed file as seed nodes. See Changing an Existing Seed File, page 4-12 for more information.
• You selected Entire Network when you ran Discovery. If you suspect that you did not, run Discovery
again with Entire Network selected.
Displaying the MWTM Main Window
The MWTM main window (Figure 4-7) is the primary MWTM client window. It is the first window to
appear when you launch the MWTM client. It displays information about the events and objects that the
MWTM discovers. The MWTM main window is divided into two areas: the navigation tree in the left
pane and the content area in the right pane. When you select an item in the navigation tree, MWTM
displays detailed information about the item in the content area in the right pane, such as configuration
details and real-time data.
The MWTM main window contains:
Chapter 4 Getting Started
Element Description
Title Bar Displays: MWTM main window (ITP and/or RAN-O
personality) - <server name>.
MWTM main menu For details, see Using the MWTM Main Menu, page 4-33.
Alarms Displays a summary of all currently active alarms in your
network, including the current status of the associated
network object. For details, see Displaying Alarms, page
4-30.
Events Displays information about the events that the MWTM event
logger and event processor deliver for all objects in the
current network view. For details, see Chapter 9, “Managing
Events.”
Summary Lists Displays basic summary information about all discovered
network objects, including their status, the total number of
objects with that status, and the number of nodes with that
status. For details, see Displaying Summary Lists, page 4-26.
DEFAULT View (or named view) Displays the view name and all objects within that view. For
details about views, see Chapter 7, “Managing Views.”
When you start the MWTM for the first time, the MWTM displays the Discovery dialog box and the
MWTM main window.
4-22
User Guide for the Cisco Mobile Wireless Transport Manager 6.0
OL-9118-03
Page 23

Chapter 4 Getting Started
Displaying the MWTM Main Window
Figure 4-6 Discovery Dialog
Figure 4-7 MWTM Main Window
The MWTM main window is the primary window of the MWTM client interface. It is the first window
to appear when you launch the MWTM client. It displays basic information about the events and objects
that the MWTM discovers.
When you start the MWTM for the first time, if you did not configure the MWTM server to automatically
discover your network the first time the server starts after installation, the MWTM database contains no
information, and the MWTM main window is blank. The database is populated, and reflected in the
MWTM main window, when you run Discovery for the first time; the MWTM displays the Discovery
dialog box to make it easier for you to do so. In fact, any time you start the MWTM client and the
MWTM database is empty, the MWTM automatically opens the Discovery dialog box so you can run
Discovery and populate the database. For more information about Discovery, see Discovering Your
Network, page 4-4.
The events and objects that the MWTM discovers appear in the MWTM main window.
OL-9118-03
User Guide for the Cisco Mobile Wireless Transport Manager 6.0
4-23
Page 24

Displaying the MWTM Main Window
Navigational Features
To help you keep track of which view you are currently using, as well as other important information,
most MWTM windows display the name of the system on which the MWTM server is running in the title
bar. This information appears across the bottom of the window:
• A “locked padlock” symbol if the MWTM server has a security certificate. To see the certificate,
click the symbol. An “unlocked padlock” symbol if the MWTM server does not have a security
certificate.
• The number of objects currently visible in the window, if any.
• The number of files currently visible in the load or save files dialog box, if any.
• Status messages, as appropriate:
–
Informational messages are visible in black. For example:
Discovery running
–
Messages that indicate successful actions are visible in green. For example:
View Saved
Chapter 4 Getting Started
–
Error messages are visible in red. For example:
Node does not have a note
–
The MWTM contains many fields into which you can enter information, such as a new node
name or IP address. If you enter an incorrect value in the field, such as an IP address that
contains letters or is too long, the MWTM alerts you of the incorrect value and retains the
current value of the field. Check the message bar at the bottom of the window for information
and assistance.
• The text (Modified), if you have modified but not yet saved a view. You must save the view if you
want to save your changes. For details, see Saving a View, page 7-7.
• A New icon, if there is at least one newly discovered node, signaling point, or application server
process in the network that has not been added to your current view. To add or exclude the node to
your current view, see New on the Network Pane, page 7-13.
Clicking the New icon in the topology window opens the New Objects pane in the left pane. Clicking
the New icon in any other window opens the Edit View tab of the View Editor window.
• The name of the current view.
• The name of the current user, or the name of the node the user is using.
• If you have implemented MWTM user access security, the authentication level of the user.
If your personal default view has been deleted, then the next time you launch the client, the MWTM
informs you that your default view has been deleted and that your view has been reset to the DEFAULT
view. To choose another view as your default view, use the Load Dialog: View List. For details, see
Loading a Client-Specific View, page 7-15.
4-24
User Guide for the Cisco Mobile Wireless Transport Manager 6.0
OL-9118-03
Page 25

Chapter 4 Getting Started
MWTM Client Navigation Tree
The MWTM Client navigation tree displays objects in a variety of formats and views. The DEFAULT
view, and other views that you can create, display a hierarchy of the objects that the MWTM manages.
The highest objects within a view are nodes, which contain the following subtending objects:
• RAN-O nodes can contain:
–
RAN SVC—A RAN SVC node can contain a list of backhauls, a management interface folder,
and a physical folder.
–
RAN Backhaul—The end-to-end RAN connection between the BTS or Node B at the cell site
and the BSC or RNC at the aggregation site. The RAN backhaul contains one or more shorthaul
objects and an IP backhaul object.
–
IP Backhaul—The IP link that carries RAN-O traffic between the RAN-O nodes (for example,
between an MWR at the cell site and a RAN Service card in an ONS at the aggregation site).
• RAN backhauls can contain:
–
GSM Abis Shorthaul—In GSM technology, the interface between the BTS and the BSC.
–
UMTS Iub Shorthaul—In UMTS technology, the interface between the Node B and the RNC.
Displaying the MWTM Main Window
Note The MWTM does not manage BSC, BTS, RNC, or Node B objects but displays them in the
topology window to help you visualize the network.
• ITP nodes can contain:
–
Signaling Points—A signaling point object contains a list of associated linksets, links, and
other related objects.
–
Application Server Processes—An application server process object can contain application
server process associations.
• ITP and RAN-O nodes can contain:
–
Management Interfaces—A folder that contains a list of interfaces that the MWTM uses to
manage the node.
–
Physical—A folder that contains a list of the physical interfaces and cards that belong to the
node. Slot numbers precede card objects (for example, 15 - RAN_SVC or 02 - E1-42).
Note All objects in the Physical folder are ignored unless they also appear outside of the Physical
folder. The status of Physical folder-only objects does not contribute to the status of the parent
node. These objects also do not appear in the Alarms view, but they do appear in the Events view.
You can un-ignore the Physical folder, then re-ignore the objects you do not want to monitor. For
more information, see Why are objects in the Physical folder ignored?, page C-8).
You can easily navigate the features of the MWTM client with the navigation tree. To view detailed
information about an object in the navigation tree, click the object in the tree. The content area in the
right pane displays the details about the selected object. An icon just to the left of the object name
indicates whether the object has subtending objects under its domain. This icon is called a turner. To
expand the tree of objects, click the turner. Click the turner again to collapse the objects.
OL-9118-03
User Guide for the Cisco Mobile Wireless Transport Manager 6.0
4-25
Page 26

Displaying the MWTM Main Window
Note For additional features that appear only in the navigation tree of the web interface, see MWTM Web
Interface Navigation Tree, page 11-3.
MWTM Client Content Area
The content area in the right pane displays detailed information about your network, such as
configuration and historical data. To view detailed information for an object, click the object in the
navigation tree. The content area in the right pane shows the details about the selected object.
The content area formats the information in a way that is easy to interpret. Descriptive information is
usually organized into subpanes. Tabs along the top of the content area organize more complex sets of
information. Large amounts of information are organized into tables with labeled columns and multiple
rows of data.
For additional features that appear only in the content area of the MWTM web interface, see MWTM
Web Interface Content Area, page 11-4.
Chapter 4 Getting Started
Displaying Summary Lists
You use the MWTM to view basic summary information about all discovered network objects, including
their status and associated alarms and events.
• To see a summary of all network objects that the MWTM discovered, click Summary Lists in the
navigation tree. The MWTM displays the Summary Statistics window in the content area.
• Right-click Summary Lists in the navigation tree to display a menu for the summary lists. For more
information, see Right-Click Menu for the Summary Lists, page 4-29.
• For details on the right-click menu for an object within a summary list, see Viewing the Right-Click
Menu for an Object, page 8-3.
Note If an object of a given type has not been discovered, then the corresponding summary lists folder does
not appear.
To view the summary lists, select Summary Lists in the navigation tree within the MWTM main window.
The MWTM displays the Summary Statistics window.
4-26
User Guide for the Cisco Mobile Wireless Transport Manager 6.0
OL-9118-03
Page 27

Chapter 4 Getting Started
Displaying the MWTM Main Window
Figure 4-8 Summary Statistics Window
The Summary Statistics window provides basic summary information about all discovered network
objects that the MWTM discovered. For detailed information on objects within Summary Lists, see
Displaying Object Windows, page 6-2.
You can resize each column, or sort the table based on the information in one of the columns. By default,
this table is sorted by Status, with failures (red statuses) at the top, and the MWTM displays all of the
columns in the table except Signaling Points, Linksets, Links, Application Servers, Application Server
Processes, Application Server Process Associations, and Signaling Gateway Mated Pairs.
Note If you are viewing Summary Lists through the MWTM Web interface, all columns appear, assuming you
have discovered all types of objects. For example, if you have no Cards discovered, the Cards column is
not visible.
For detailed information on working within tables, see Navigating Table Columns, page 5-23.
The summary list table contains:
OL-9118-03
User Guide for the Cisco Mobile Wireless Transport Manager 6.0
4-27
Page 28

Displaying the MWTM Main Window
Column Description
Status Current status of the network objects. Possible values are:
Chapter 4 Getting Started
Unknown (red)
Unavailable (red)
Inactive (red)
Failed (red)
Down (red)
Blocked (red)
Pending (red)
Warning (yellow)
Shutdown (blue)
InhibitLoc (blue)
InhibitRem (blue)
Discovering (cyan)
Polling (cyan)
Waiting (gray)
Unmanaged (gray)
Active (green)
For detailed definitions of each status for each type of network object, see
Appendix E, “Status Definitions.”
Total Total number of network objects with the indicated status.
Objects in hidden columns are not included in the totals.
Nodes Total number of discovered nodes with the indicated status.
Signaling Points
Total number of discovered signaling points with the indicated status.
(ITP only)
Linksets
(ITP only)
Total number of discovered linksets with the indicated status.
Linksets is a count of linkset pairs, not individual linksets; therefore, this
count might differ from the number of linksets in the MWTM client
navigation tree.
Links
(ITP only)
Total number of discovered links with the indicated status.
Links is a count of link pairs, not individual linksets; therefore, this count
might differ from the number of links in the MWTM client navigation tree.
Application Servers
Total number of discovered application servers with the indicated status.
(ITP only)
Application Server
Processes
Total number of discovered application server processes with the indicated
status.
(ITP only)
Application Server
Process Associations
Total number of discovered application server process associations with the
indicated status.
(ITP only)
4-28
User Guide for the Cisco Mobile Wireless Transport Manager 6.0
OL-9118-03
Page 29

Chapter 4 Getting Started
Column Description
Signaling Gateway
Mated Pairs
(ITP only)
Interfaces Total number of discovered interfaces with the indicated status.
RAN Backhauls Total number of discovered RAN backhauls with the indicated status.
RAN Shorthauls Total number of discovered RAN shorthauls with the indicated status.
Cards Total number of discovered cards with the indicated status.
Right-Click Menu for the Summary Lists
To see the right-click menu for the summary lists, select Summary Lists or any of the objects under
Summary Lists in the navigation tree and press the right mouse button. The menu provides:
Menu Command Description
Show In New Window Opens the current window in a new window.
Back > List of Windows Navigates back to a window viewed in this session.
Forward > List of
Windows
Displaying the MWTM Main Window
Total number of discovered signaling gateway-mated pairs with the indicated
status.
The MWTM maintains a list of up to 10 Back windows.
Navigates forward to a window viewed in this session.
The MWTM maintains a list of up to 10 Forward windows.
OL-9118-03
User Guide for the Cisco Mobile Wireless Transport Manager 6.0
4-29
Page 30

Displaying the MWTM Main Window
Displaying Alarms
Note For details about viewing alarms using the MWTM web interface, see Displaying Alarms, page 11-27.
You use the MWTM to view a summary of all currently active alarms in your network, including the
current status of the associated network object. An active alarm is a network object with this status:
• A node or interface that is Warning (yellow) or worse and is not Ignored.
• A node or interface that is Pending (red) or worse and is not Ignored.
• An application server process, application server process association, link, or signaling
gateway-mated pair that is Warning (yellow) or worse and is not Ignored.
• An application server, linkset, node, or signaling point that is Pending (red) or worse and is not
Ignored.
To see a summary of all currently active alarms, click Alarms in the navigation tree. The MWTM
displays the Active Alarms window in the content area (see Figure 4-9).
• Right-click Alarms in the navigation tree to display the right-click menu for all alarms. For more
information, see Right-Click Menu for All Alarms, page 4-32.
• Right-click an alarm in the content area to display the right-click menu for a specific alarm. For
more information, see Right-Click Menu for a Specific Alarm, page 4-32.
Chapter 4 Getting Started
Figure 4-9 Active Alarms Window
The Active Alarms window provides basic information about all currently active alarms in your network
that are not excluded from your current view. The MWTM updates the information in the window at least
once every minute.
You can resize each column, or sort the table based on the information in one of the columns. By default,
this table is sorted by Age, with the most recent alarms at the top, and the MWTM displays all of the
columns in the table except Last Status Change.
See Navigating Table Columns, page 5-23 for more information about resizing, sorting, displaying, or
hiding columns.
4-30
User Guide for the Cisco Mobile Wireless Transport Manager 6.0
OL-9118-03
Page 31

Chapter 4 Getting Started
Displaying the MWTM Main Window
The active alarms table contains:
Column Description
Type Type of network object associated with the selected alarm.
To see all higher-level alarms associated with the network object, select the
turner beside the object. The MWTM displays the higher-level alarms below
the selected alarm. For example, if you select the turner beside a link, the
MWTM displays the alarms for the linkset, signaling point, and node
associated with that link.
Name Name of the network object associated with the selected alarm.
Status Current status of the network object associated with the selected alarm.
Possible values are:
Unknown (red)
Unavailable (red)
Inactive (red)
Failed (red)
Down (red)
Blocked (red)
Pending (red)
Warning (yellow)
Shutdown (blue)
InhibitLoc (blue)
InhibitRem (blue)
Discovering (cyan)
Polling (cyan)
Waiting (gray)
Unmanaged (gray)
Active (green)
For detailed definitions of each status for each type of network object, see
Appendix E, “Status Definitions.”
OL-9118-03
User Guide for the Cisco Mobile Wireless Transport Manager 6.0
4-31
Page 32

Displaying the MWTM Main Window
Column Description
Status Reason Reason for the current status of the network object associated with the
Last Status Change Date and time that the status of the network object associated with the
Age Age of the selected alarm, in days, hours, and minutes.
Chapter 4 Getting Started
selected alarm.
For a full list of possible reasons, see the stateReasons.html file. If you
installed the MWTM in:
• The default directory, /opt, then the file is located at
/opt/CSCOsgm/apache/share/htdocs/eventHelp directory.
• A different directory, then the help directory and file are located in that
directory.
If the cell is too small to show all of the status reason, place the cursor over
the cell to see the full text in a tooltip.
The status reasons are listed in order of decreasing severity. If two or more
reasons apply, the reason of greatest severity appears.
If the status reason is Unsupported Configuration, correct the configuration
and enter the mwtm cleandiscover command to delete all current network
data and begin a discovery of the network. If the status reason remains
Unsupported Configuration, enter the mwtm clean command to restore the
MWTM server to a state that would exist after a new installation of the
MWTM, excluding the log files, which the MWTM retains. To also remove
the log files, enter the mwtm cleanall command. For more information on
the use of these commands, see the Command Reference, page B-1.
selected alarm last changed.
Right-Click Menu for All Alarms
To see the right-click menu for all active alarms, select Alarms in the navigation tree and press the right
mouse button. For details on the menu options, see Right-Click Menu for the Summary Lists, page 4-29.
Right-Click Menu for a Specific Alarm
The active alarms table provides a subset of the MWTM main menu as a right-click menu. To see this
menu, select an alarm and press the right mouse button. The alarm right-click menu provides the same
options as the right-click menu for the associated network object, plus these:
Menu Command Description
Expand All Displays all higher-level alarms associated with all network objects in the active
alarms table.
Collapse All Does not display higher-level alarms in the active alarms table.
Caution The alarms that the active alarms table displays are the actual network objects in the MWTM. Options
that you select in the right-click menu affect the object in the MWTM. For example, if you delete a node
in the active alarms table, you delete that node from the MWTM database.
4-32
User Guide for the Cisco Mobile Wireless Transport Manager 6.0
OL-9118-03
Page 33

Chapter 4 Getting Started
Using the MWTM Main Menu
The MWTM main menu appears in the menu bar of most MWTM windows.
Some menu items do not appear on some windows. In addition, menu items that are dimmed are not
available on that window.
For detailed information about the menu options provided by other windows, see the descriptions of
those windows.
The MWTM main menu contains:
Menu Command Description
File > Load DEFAULT View
(Ctrl-D)
File > Load View
(Ctrl-L)
Using the MWTM Main Menu
Loads the DEFAULT view, which is the view into
which the MWTM places all discovered objects when
discovering the network. The DEFAULT view is stored
on the MWTM server and shared by all MWTM
clients, but the clients cannot modify it.
Loads an already existing view. The MWTM prompts
you for the name of the view you want to load:
• Select the name of the view, or accept the default
view name, then click OK to load the view.
• Click Cancel to close the prompt window without
loading a view.
File > Save View
(Ctrl-S)
File > Save View As Opens the Save File Dialog: View List, which you use
File > Connect to New Server
(Ctrl-O)
Saves the current view:
• If you have not already saved the current view,
opens the Save File dialog box: View List, in
which you enter or select a filename under which
to save the current view.
• If you have already saved the current view, saves
the view to that filename.
If you have implemented MWTM User-Based Access,
this option is available to users with authentication
level Power User (level 2) and higher.
to enter or select a filename under which to save the
current view.
If you have implemented MWTM User-Based Access,
this option is available to users with authentication
level Power User (level 2) and higher.
Connects to a new server. The MWTM prompts you for
the new server’s name or IP address, and UDP port
number.
The MWTM stops the MWTM client, then restarts the
client connected to the new server.
OL-9118-03
User Guide for the Cisco Mobile Wireless Transport Manager 6.0
4-33
Page 34

Using the MWTM Main Menu
Menu Command Description
File > Print
(Ctrl-P)
File > Exit
(Ctrl-Q)
Edit > Views
(Ctrl-M)
Edit > Clear All Events
(Ctrl-E)
Chapter 4 Getting Started
Opens the Print window where you can:
• Specify options for printing
• Print the current window
• Save the current window to a file
The MWTM printing options require that you define a
printer on your system. If you choose File > Print and
the Print window does not appear, ensure you have
defined a printer on your system.
Exits the MWTM application, after prompting you for
confirmation.
If you are working in a custom view (that is, not the
DEFAULT view), the MWTM automatically saves any
changes you made to the view.
Opens the View Editor window to allow you to edit any
views that you have created.
Deletes the event icon (orange triangle) from MWTM
displays for all known objects. The actual events are
not deleted from the MWTM, only the event icon for
all known objects.
Edit > Find
(Ctrl-F)
Note During Discovery, the MWTM might flag most
objects with an event icon. If the event icons
are too distracting, use the Edit > Clear All
Events menu option to remove them.
Opens the Find dialog box, in which you find a specific
object, event, or text in the window.
If you select an object in the navigation tree within the
MWTM main window, this option is dimmed and
cannot be selected.
4-34
User Guide for the Cisco Mobile Wireless Transport Manager 6.0
OL-9118-03
Page 35

Chapter 4 Getting Started
Menu Command Description
Edit > Delete
(Delete)
Deletes the currently selected element or elements
from the MWTM database. The MWTM displays the
Confirm Deletion dialog box. To:
• Delete the selected elements, click Yes. The items
are deleted from the MWTM database and the
Confirm Deletion dialog box is closed.
• Retain the selected elements, click No. The items
are kept in the MWTM database and the Confirm
Deletion dialog box closes.
• Prevent the MWTM from displaying the Confirm
Deletion dialog box, select the Do not show this
again check box.
Note If you select the Do not show this again check
box, and you later decide you want the MWTM
to begin displaying the Confirm Deletion
dialog box again, you must select the Confirm
Deletions check box in the General GUI
settings in the Preferences window. For more
information, see the description of the Confirm
Deletions check box in Startup/Exit Settings,
page 5-4.
Using the MWTM Main Menu
Edit > Preferences
(Ctrl-H)
Network> Node SNMP and Credentials
Editor
(Alt-S)
Network > Network Discovery
(Ctrl-Y)
Network > Poll Nodes > Normal Poll
(Alt-L)
To permanently delete all elements marked for deletion
from the MWTM database, you can also run the mwtm
purgedb command (see mwtm purgedb, page B-41).
If you have implemented MWTM User-Based Access,
this option is available to users with authentication
level Network Administrator (level 4) and higher.
Opens the Preferences window.
Opens the SNMP Configuration dialog box.
If you have implemented MWTM User-Based Access,
this option is available to users with authentication
level Network Administrator (level 4) and higher.
Opens the Discovery dialog box.
If you have implemented MWTM User-Based Access,
this option is available to users with authentication
level Network Administrator (level 4) and higher.
Polls all selected nodes.
If you have implemented MWTM User-Based Access,
this option is available to users with authentication
level Network Operator (level 3) and higher.
OL-9118-03
User Guide for the Cisco Mobile Wireless Transport Manager 6.0
4-35
Page 36

Using the MWTM Main Menu
Menu Command Description
Network > Poll Nodes > Clean Poll
(Alt-C)
Network > Node Archive Management Opens the Node Archive Management dialog box,
Network > Node File Management Opens the Node File Management dialog box,
Chapter 4 Getting Started
Polls all selected nodes and removes any Unknown
objects after the completion of the poll.
If you have implemented MWTM User-Based Access,
this option is available to users with authentication
level Network Operator (level 3) and higher.
allowing you to view archived GTT files, route table
files, or MLR address table files and perform various
functions on the files.
If you have implemented MWTM User-Based Access,
this option is available to users with authentication
level Network Administrator (level 4) and higher.
allowing you to view GTT files, route table files, or
MLR address table files and perform various functions
on the files.
If you have implemented MWTM User-Based Access,
this option is available to users with authentication
level Network Administrator (level 4) and higher.
View > Show Topology
Opens the topology window.
(Ctrl-T)
View > MWTM Server > Connect via Telnet
Opens a Telnet window to the server.
(Ctrl+Shift+T)
View > MWTM Server > Connect via SSH
(Ctrl+Shift+S)
Opens a Secure Shell (SSH) window to the server.
Note The key size on the SSH server must be a
minimum of 512 bits and a maximum of 2048
bits.
View > MWTM Server > Status Opens the Server Status Information window.
View > Web > Home Displays the MWTM web interface home page in a
web browser.
View > Web > Administrative Displays the MWTM web administrative page in a web
browser.
View > Web > Reports Displays the MWTM web reports main page in a web
browser.
View > Web > Archived Events > Status
Displays the archived status changes in a web browser.
Changes
View > Web > Archived Events > SNMP
Displays the archived SNMP traps in a web browser.
Traps
View > Web > Archived Events > Status
Changes and SNMP Traps
Displays both the archived status changes and archived
SNMP traps in a web browser.
View > Web > Software Versions Displays the MWTM software versions for the server
you are connected to, and which is currently running
the MWTM server, in a web browser.
View > Message of the Day Opens the Message of the Day dialog box.
4-36
User Guide for the Cisco Mobile Wireless Transport Manager 6.0
OL-9118-03
Page 37

Chapter 4 Getting Started
Using the MWTM Main Menu
Menu Command Description
View > Cisco.com Displays the Cisco.com Home Page in a web browser.
Go > Back
(Alt-Left Arrow)
Go > Forward
(Alt-Right Arrow)
1
1
Go > Back > List of Windows Navigates back to a window viewed in this session.
Go > Forward > List of Windows Navigates forward to a window viewed in this session.
Tools > Route Table > From Archive
(Alt-J)
(ITP only)
Tools > Route Table > From Node
(Alt-O)
(ITP only)
Navigates back to the last window viewed in this
session.
Navigates forward to the last window viewed in this
session.
The MWTM maintains a list of up to 10 Back
windows.
The MWTM maintains a list of up to 10 Forward
windows.
Opens the Load Route Table from Archive wizard.
If you select an Unmanaged node, this option is
dimmed and cannot be selected.
If you have implemented MWTM User-Based Access,
this option is available to users with authentication
level Network Administrator (level 4) and higher.
Opens the Route Table dialog box by using a route
table from an ITP node.
If you select an Unmanaged node, this option is
dimmed and cannot be selected.
Tools > Route Table > From File
(Alt-I)
(ITP only)
Tools > Global Title Translator Editor
(Ctrl-G)
(ITP only)
Tools > Address Table Editor
(Alt-A)
(ITP only)
If you have implemented MWTM User-Based Access,
this option is available to users with authentication
level Network Administrator (level 4) and higher.
Opens the Route Table dialog box by using a route
table from a file.
If you have implemented MWTM User-Based Access,
this option is available to users with authentication
level Network Administrator (level 4) and higher.
Launches the GTT client.
If you have implemented MWTM User-Based Access,
this option is available to users with authentication
level Network Operator (level 3) and higher.
Launches the Address Table Editor, which you use to
create new address table files, load existing address
table files, perform semantic checks, save address
table files, and deploy address table files to an ITP.
If you have implemented MWTM User-Based Access,
this option is available to users with authentication
level Network Operator (level 3) and higher.
OL-9118-03
User Guide for the Cisco Mobile Wireless Transport Manager 6.0
4-37
Page 38

Using the MWTM Main Menu
Menu Command Description
Tools > Event Editor
(Alt-B)
Tools > Event Sounds
(Ctrl-U)
Tools > Virtual RAN Backhaul Editor
(Ctrl-B)
Tools > CiscoWorks > Device Center
(Ctrl-2)
Chapter 4 Getting Started
Launches the Event Editor, which you use to:
• Customize the visible category, severity, color,
and message associated with events
• Configure sounds for the MWTM to play for
different types of events
• Load, save, and deploy customized event
configurations.
If you have implemented MWTM User-Based Access,
this option is available to users with authentication
level Network Operator (level 3) and higher.
Opens the Event Sound Filters dialog box, which you
use to define sounds that the MWTM client should
play when specific events are logged.
Launches the Virtual RAN Backhaul Editor, which you
use to create a virtual RAN backhaul by grouping real
backhauls.
Links to the CiscoWorks Device Center, which
provides a number of web-based functions, including
reachability trends, response time trends, interface
status, Syslog browsing, and detailed inventory. The
MWTM prompts you for a CiscoWorks user ID and
password before linking to CiscoWorks.
The link to CiscoWorks has these prerequisites.
CiscoWorks must:
• Be installed somewhere in the network.
• Monitor the specific device.
This option is dimmed if the selected node is not an
ITP or RAN-O node, or in Unmanaged status or has a
Device Type of Unknown. (CiscoWorks cannot
monitor a non-ITP, Unmanaged, or Unknown node.)
This option is not visible if you did not specify a
CiscoWorks server during installation. See the
“Installing MWTM on Solaris” and “Installing
MWTM on Windows” chapters of the Installation
Guide for the Cisco Mobile Wireless Transport
Manager 6.0 for more information.
4-38
User Guide for the Cisco Mobile Wireless Transport Manager 6.0
OL-9118-03
Page 39

Chapter 4 Getting Started
Accessing the MWTM through a Web Browser
Menu Command Description
Tools > CiscoWorks > CiscoView
(Ctrl-3)
Help > Topics
(F1)
Help > Window
(Shift-F1)
Help > About
(F3)
1. In the UNIX environment (Solaris or Linux), this key combination can be mapped to a different function based on the
Common Desktop Environment (CDE) that a user might have. For example, in Solaris CDE, Alt-Left Arrow and Alt-Right
Arrow combinations are typically mapped to move back and forward through the different desktops. To remap the keys for
use with the MWTM, see your UNIX Desktop Environment guide.
Links to CiscoView, which provides a real-time,
color-coded, graphical representation of Cisco objects.
You can use CiscoView to quickly identify an incorrect
status on a port or interface.
This option is dimmed if the selected node is not an
ITP or RAN-O node, or in Unmanaged status or has a
Device Type of Unknown. (CiscoWorks cannot
monitor Unmanaged or Unknown nodes or nodes that
are not ITP or RAN-O nodes.)
This option is not visible if you did not specify a
CiscoWorks server during installation. See the
“Installing MWTM on Solaris” and “Installing
MWTM on Windows” chapters of the Installation
Guide for the Cisco Mobile Wireless Transport
Manager 6.0 for more information.
Displays the table of contents for the MWTM online
help.
Displays online help for the current window.
Displays build date, version, SSL support, and
copyright information about the MWTM application.
Accessing the MWTM through a Web Browser
You can manage network nodes through one of two graphical user interfaces:
• MWTM client interface—The standard interface for accessing MWTM data. (This interface is
described in Displaying the MWTM Main Window, page 4-22.)
• MWTM web interface—A browser interface for accessing MWTM data. (This interface is
introduced here and fully described in Chapter 11, “Accessing Data from the Web Interface.”)
A comparison of the GUI features supported in each interface is shown in this matrix:
GUI Features Web Interface Client Interface Notes
Main window X X Slight differences exist between the
interfaces (in the navigation tree and content
area displays).
Discovery window X Client-only feature, but the nodes that appear
in the web interface are refreshed after a
discovery is performed in the client
interface.
OL-9118-03
User Guide for the Cisco Mobile Wireless Transport Manager 6.0
4-39
Page 40

Accessing the MWTM through a Web Browser
GUI Features Web Interface Client Interface Notes
Historical Data X You enter a start and stop time for the data
Real-time Data X The MWTM periodically polls the node for
Topology X Client-only feature.
High-level editors X These editors appear under the Tools menu
Provisioning X Web-only feature for ITP objects.
Chapter 4 Getting Started
you are interested in, and the MWTM
retrieves the data from its database. You can
access the web interface display from the
right-click menus in the client interface.
real-time data, and updates the charts and
graphs as new data is received.
of the MWTM main window:
• Route Table Editor
• GTT Title Editor
• Address Table Editor
• Event Editor
To launch web provisioning from the
MWTM client, select the ITP object in the
navigation tree and choose the Provision
option from the right-click menu.
You access the web interface using one of two methods:
• Open a browser and enter http://server_name:1774 in the Address field.
• From the MWTM client interface, choose View > MWTM Server > Home Page.
The web interface window opens in the browser window.
4-40
User Guide for the Cisco Mobile Wireless Transport Manager 6.0
OL-9118-03
Page 41

Chapter 4 Getting Started
Loading and Saving MWTM Files
Figure 4-10 MWTM Web Interface
For detailed information about the MWTM web interface, see Chapter 11, “Accessing Data from the
Web Interface.”
Loading and Saving MWTM Files
You use the MWTM to quickly and easily load and save MWTM files. The files are on the MWTM server
and you can load them on any connected MWTM client.
To display a Load File dialog box, use one of these procedures:
Launched From Choose Window Launched Notes
Address Table Editor
(ITP only)
Discovery dialog box File > Load Seeds Load File Dialog: Seed
Event Filter dialog box Load Load File Dialog: Load
GTT Editor (ITP only) File > Load Load File Dialog: GTT
File > Load > Load
from File
Load File Dialog:
Address Table File List
File List
Filter
File List
See Loading an Existing
Address Table File,
page 15-8.
See Loading Seed
Nodes and Seed Files,
page 4-7.
See Loading an Existing
Event Filter, page 9-16.
See Loading an Existing
GTT File, page 14-33.
OL-9118-03
User Guide for the Cisco Mobile Wireless Transport Manager 6.0
4-41
Page 42

Loading and Saving MWTM Files
Launched From Choose Window Launched Notes
Preferences window File > Load System
Route Table dialog box File > Load Load File Dialog: Route
View Editor window File > Load Load File Dialog: View
Note To load the DEFAULT network view, choose File > Load DEFAULT View from the MWTM main
menu. The MWTM loads the DEFAULT view.
To display a Save File dialog box, use one of these procedures:
Default Prefs
Chapter 4 Getting Started
None See Displaying the
Preferences Menu, page
5-3.
See Loading an Existing
Table F ile Li st
List
Route Table File, page
13-12.
See Loading a
Client-Specific View,
page 7-15.
Launched From Choose Window Launched Notes
Address Table Editor
(ITP only)
Discovery dialog box File > Save As Save File Dialog: Seed
Event Filter dialog box File > Save As Save File Dialog: Save
GTT Editor (ITP only) File > Save As Save File Dialog: GTT
Route Table dialog box File > Save As Save File Dialog: Route
View Editor window File > Save As Save File Dialog: View
File > Save As Save File Dialog:
Address Table File List
File List
Filter
File List
Table F ile Li st
List
See Saving an Address
Table File, page 15-23.
See Saving a Seed File,
page 4-9.
See Saving an Event
Filter File, page 9-17.
See Saving a GTT File,
page 14-46.
See Saving a Route
Table File, page 13-14.
See Closing the View
Editor Window, page
7-15.
4-42
User Guide for the Cisco Mobile Wireless Transport Manager 6.0
OL-9118-03
Page 43

Chapter 4 Getting Started
Using the Windows Start Menu
This section includes:
• Changing the Default MWTM Server Name, page 4-43
• Launching the MWTM Client, page 4-43
• Launching the MWTM DOS Prompt, page 4-44
• Launching the MWTM Event Editor, page 4-44
• Launching the MWTM SSL Certificate Tool, page 4-44
• Displaying the MWTM README File, page 4-44
• Uninstalling the MWTM, page 4-44
Changing the Default MWTM Server Name
If the IP address or hostname to which your MWTM client is bound fails, you can change the default
MWTM server name from the Windows Start menu.
To change the default MWTM server name:
Using the Windows Start Menu
Step 1 Close all open MWTM windows.
Step 2 Choose Start > Programs > Cisco MWTM Client > Modify Default MWTM Server Name. The
MWTM opens a DOS window, and asks you to enter the name of the new default MWTM server.
Step 3 Type the name of the new default MWTM server, and press Enter. The MWTM sets the default server
to the new name that you entered.
Tip See Connecting to a New Server, page 5-42 for more information about changing the default MWTM
server name.
Launching the MWTM Client
To launch the MWTM Client, choose Start > Programs > Cisco MWTM Client > MWTM Client
from the Windows Start menu, or double-click the MWTM icon on the desktop. The MWTM launches
the MWTM Client.
OL-9118-03
User Guide for the Cisco Mobile Wireless Transport Manager 6.0
4-43
Page 44

Exiting the MWTM Client
Launching the MWTM DOS Prompt
To launch a DOS prompt for the MWTM from the Windows Start menu, choose Start > Programs >
Cisco MWTM Client > MWTM DOS Prompt. The MWTM opens a DOS window, starting in the \bin
directory:
• If you installed the MWTM client in the default directory, C:\Program Files, then the DOS prompt
starts at C:\Program Files\MWTMClient\bin.
• If you installed the MWTM client in a different directory, then the \bin directory is located in that
directory.
Launching the MWTM Event Editor
To launch the MWTM Event Editor, choose Start > Programs > Cisco MWTM Client >
Launch MWTM Event Editor from the Windows Start menu. The MWTM launches the MWTM Event
Editor.
Chapter 4 Getting Started
Launching the MWTM SSL Certificate Tool
To launch the MWTM SSL Certificate Tool from the Windows Start menu, choose Start > Programs >
Cisco MWTM Client > MWTM SSL Certificate Tool.
Displaying the MWTM README File
The MWTM README file contains late-breaking information about the MWTM that might not be
found in the other product documentation. To open the MWTM README file from the Windows Start
menu, choose Start > Programs > Cisco MWTM Client > Readme.
Uninstalling the MWTM
You can uninstall the MWTM from the Windows Start menu. For details, see the “Uninstalling the
MWTM Client” section of the Installation Guide for the Cisco Mobile Wireless Transport Manager 6.0.
Exiting the MWTM Client
When you are finished monitoring network performance statistics, you can exit the MWTM client:
4-44
Step 1 From the MWTM main menu, choose File > Exit. The Exit MWTM confirmation window appears.
Step 2 Click Ye s to close the MWTM client application.
User Guide for the Cisco Mobile Wireless Transport Manager 6.0
OL-9118-03
 Loading...