

Page 1

CHAPTER
4
Using Service Manager
Cisco Mobile Wireless Home Agent is the anchor point for mobile terminals for which mobile or proxy
mobile services are provided. The Home Agent maintains mobile user registrations and tunnels packets
that are destined for the mobile node to the PDSN or FA. The Home Agent supports reverse tunneling,
and can securely tunnel packets to the PDSN by using IPSec.
You can use the HA Service Manager to manage various Home Agent services for users with homed or
virtually homed IP addresses on the router.
Note Some of the Sync Report functions require Network Operator and Network Administrator privileges.
This chapter provides information about:
• Service Manager Tasks, page 4-2
• Selecting an HA Device Group, page 4-3
• Displaying an HA Configuration, page 4-5
• Generating Sync Reports, page 4-6
• Activating Services on HA Devices, page 4-12
• Managing Batch Configurations, page 4-36
OL-6918-01
User Guide for Cisco Home Agent Service Manager
4-1
Page 2

Service Manager Tasks
Service Manager Tasks
You can use the Service Manager tab to perform these tasks:
Table 4-1 Home Agent Service Manager Tasks
Option Task Topic
Select Group Select a device group Selecting an HA Device Group, page 4-3
Display Config Display HA configuration
commands of a device
Sync Report Check thelatest status of the master
device and other devices in a group,
from RME or DCR.
Generate a Sync report. Generating a Diff Report, page 4-7
Display the differences in
HA-specificconfigurationsbetween
any two devices of the group.
Service
Activation
Batch
Configuration
Activate various services Activating Services on HA Devices, page 4-12
Configure local IP pools Local IP Pools, page 4-12
Configure virtual networks Working With Virtual Networks, page 4-17
Assign home addresses with NAI Assigning Home Addresses With NAI, page
Assign home addresses without
NAI
Configure security associations for
the mobile host, Home Agent, or
Foreign Agent
Configure VRF support on HA
devices
Enable Hot-Lining Hot-Lining, page 4-34
Manage batch configurations Managing Batch Configurations, page 4-36
Chapter 4 Using Service Manager
Displaying an HA Configuration, page 4-5
Checking Device Status, page 4-7
Comparing the Configurations of Two Devices,
page 4-11
4-19
Assigning Home Addresses Without NAI, page
4-23
Security Associations, page 4-26
VRF Support on HA, page 4-30
4-2
User Guide for Cisco Home Agent Service Manager
OL-6918-01
Page 3

Chapter 4 Using Service Manager
Selecting an HA Device Group
Before you enable service-activation,you must categorize device entities into a logical group. After you
select a group, you can download the service-activation configurations to all the devices in the group.
Note All devices in the group must be fully managed and monitored by Resource Manager Essentials (RME).
To select a HA device group:
Step 1 Choose HA Service Manger > Service Manager > Select Group.
The Group Selection window appears. (See Figure 4-1 on page 4-3.)
Figure 4-1 Group Selection window
Selecting an HA Device Group
Step 2 Choose a group from the list.
Step 3 Click View to see the devices in the group.
A popup window displays the following information about the devices:
Field Description
Display Name Display name of the device.
Host Name Name of the host for the device.
IP Address IP address of the device.
The master device is designated by an asterisk (*).
Step 4 Check the Fetch Config check box to obtain the running configuration of the devices in this group.
Help Desk and Approver operators do not have the privilege to do Fetch Config.
Note Fetch Config fetches the configuration from the device and uploads it to the RME archive. The
HA SM then obtains that configuration from RME, rather than directly from the device. If the
RME archive already contains the running configuration of the device,you need not select Fetch
Config.If you have modifiedthe running configuration on the device, run Fetch Configto ensure
that the RME has the latest configuration for the HA SM to use.
OL-6918-01
User Guide for Cisco Home Agent Service Manager
4-3
Page 4

Selecting an HA Device Group
Step 5 Enter your CiscoWorks password, then click Connect.
If you check the Fetch Configcheck box, this task will take a few minutes to complete. The time depends
on the number of devices in the selected group and the size of the configuration.
A task status window indicates progress.
Step 6 A confirmation window appears, and confirms that this HA device group is selected. The information in
the window varies depending on whether you check or uncheck Fetch Config.
• If you check Fetch Config, the confirmation window displays a list of all devices in the group with:
Click the column heading to sort the list. Click Close to close this window.
• If you uncheck Fetch Config, the confirmation window displays a list of all devices in the group
with the following information:
Click Close to close this window.
The name of the device group appears in the upper-right corner of the window.
–
Device Name
–
Connection Status
–
Cause of any errors
–
Display Name
–
Host Name
–
IP Address
Chapter 4 Using Service Manager
4-4
User Guide for Cisco Home Agent Service Manager
OL-6918-01
Page 5
Chapter 4 Using Service Manager
Displaying an HA Configuration
You can view the HA-specific configurations commands of specified devices in the selected group by
using the HA Configuration Viewer.
To display an HA-specific configuration:
Step 1 Choose a device group (Choose Service Manager > Select Group). For more information, see Selecting
an HA Device Group, page 4-3.
Step 2 Choose Service Manager > Display Config.
The Display Config window appears.
Step 3 Choose a device from the Device drop-down list, then click Display Config.
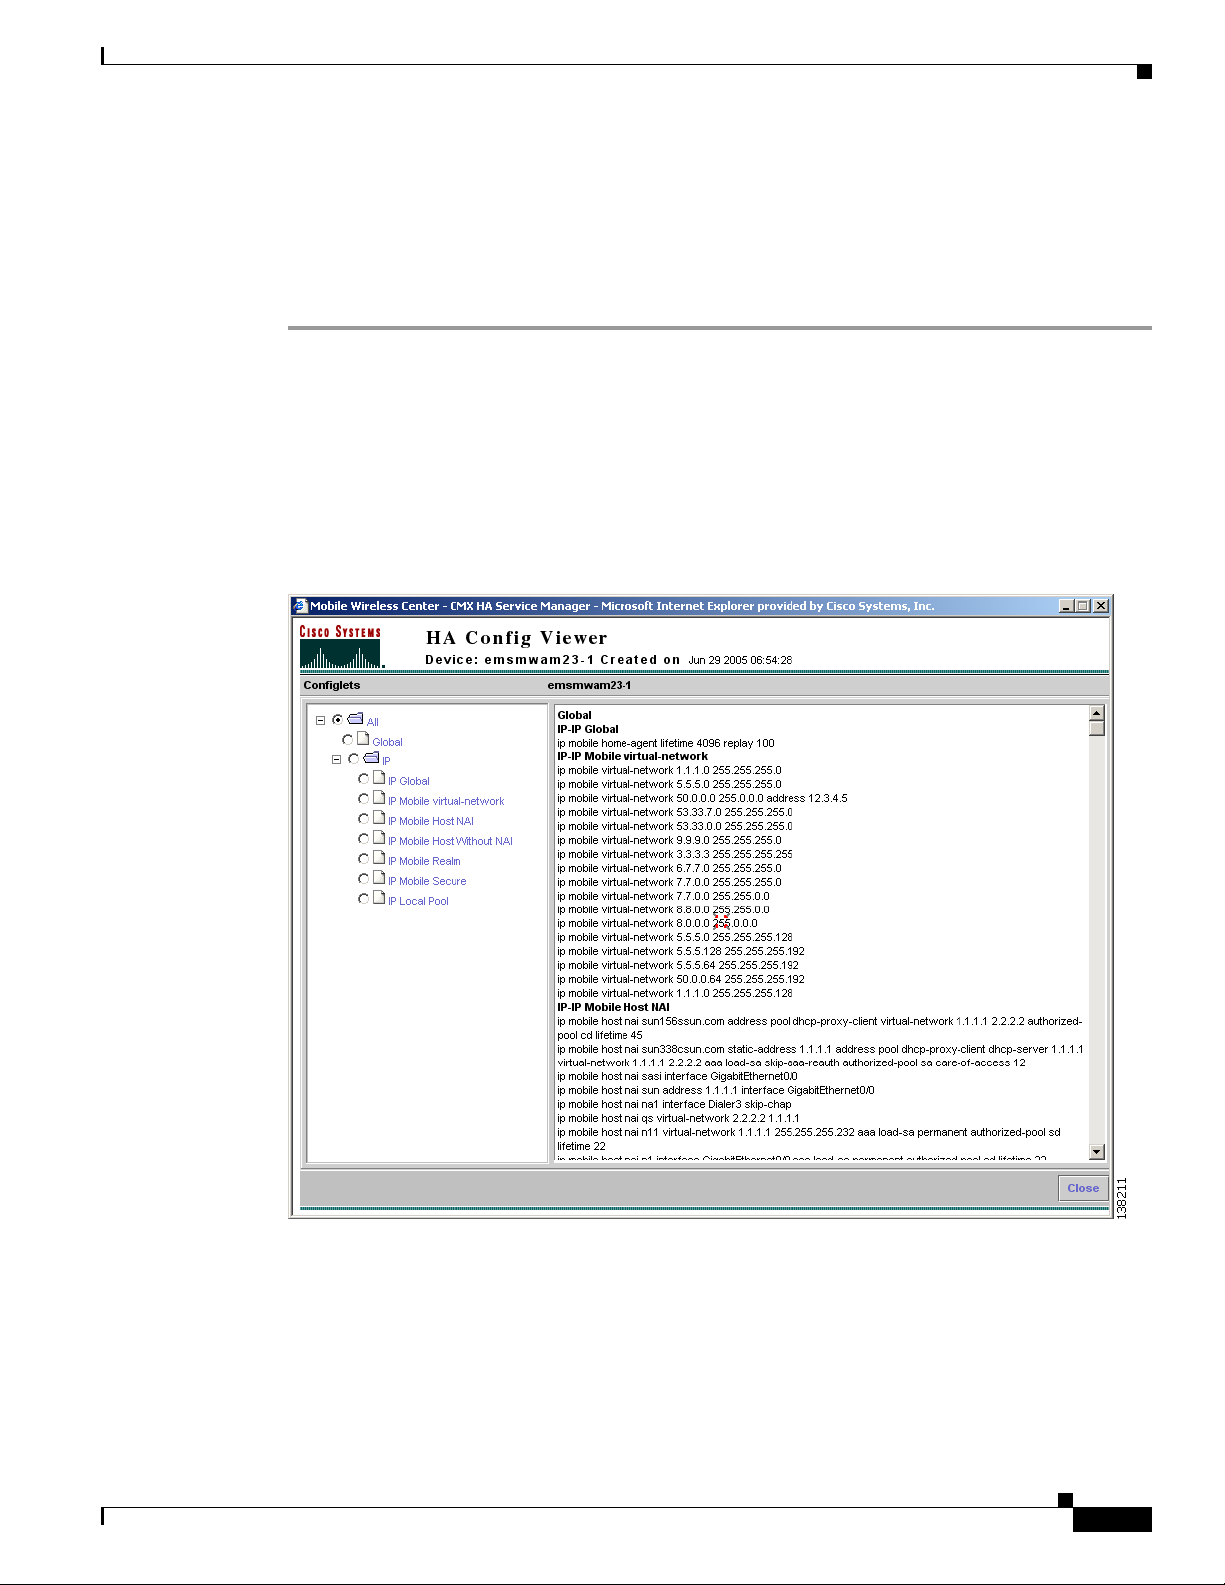
The HA Config Viewer appears. (See Figure 4-2 on page 4-5.)
Figure 4-2 HA Config Viewer Window
Displaying an HA Configuration
OL-6918-01
User Guide for Cisco Home Agent Service Manager
4-5
Page 6

Generating Sync Reports
The HA Config Viewer window displays:
• Left pane—Displays all the configlets that the configuration comprises. Click any folder to expand
the tree and display descendant configlets. Choose any configlet to see the required commands.
• Right pane—Displays all the configuration commands corresponding to each configlet in
alphanumeric order.
Step 4 Click Close to exit the HA Config Viewer.
Generating Sync Reports
You can use the Sync Report to compare the HA-specific configurations of the master device and those
of the other devices in the group, and two selected devices.
The Sync Report tab displays:
• Sync Report Dashboard—Displays the latest status of the master device and other devices in a
group, from RME or DCR. Generates a list of differences between the HA-specific configurations
of the master device and those of any other device in the group.
• Compare Config—Displays the differences in HA-specific configurations between any two devices
of the group.
To generate a sync report:
Chapter 4 Using Service Manager
Step 1 Choose a device group (Choose Service Manager > Select Group). See Selecting an HA DeviceGroup,
page 4-3.
Step 2 Choose Service Manager > Sync Report. The overview page appears with the table of contents in the
left pane. From here you can go to:
• Sync Report Dashboard—See Using Sync Report Dashboard, page 4-7.
• Compare Config—See Comparing the Configurations of Two Devices, page 4-11.
4-6
User Guide for Cisco Home Agent Service Manager
OL-6918-01
Page 7

Chapter 4 Using Service Manager
Using Sync Report Dashboard
The Sync Report Dashboard provides the latest status of the master device and other devices in a group,
from RME or DCR. It also polls all the devices in the group and creates a Diff report.
Checking Device Status
When you launch the Sync Report Dashboard, the latest status of the master device from RME or DCR
appears automatically. You can get the latest information about the other devices in a group only when
you click Generate Diff.
When you use the Generate Diff function, the Sync Report Dashboard checks whether the device:
• Is reachable through Telnet and SNMP.
The Sync Report Dashboard does not check the Telnet credentials of the device.
• Display Name, Host Name, or IP Address are changed.
• Exists in RME or DCR.
• Is in Suspended state.
An appropriate message and color appears in the Status field, under the Report pane, depending on the
status of the devices.
All the previous checks are performed on the master device when you launch the Sync Report
Dashboard. HA SM uses the archived configurations of a device from RME rather than the real time
configurations from the device.
Generating Sync Reports
Note The Master Device Status is the current status of the master device at time T1, where T1 is the time that
you launch Sync Report Dashboard. The Device Status is the status of the device at time T2, where T2
is the time that you click Generate Diff.
Generating a Diff Report
To generate a list of differences between the HA-specific configurations of the master device and those
of any other device in the group, and to display the latest status of the devices:
Step 1 Choose a device group (Choose Service Manager > Select Group). See Selecting an HA DeviceGroup,
page 4-3.
Step 2 Choose Service Manager > Sync Report > Sync Report Dashboard.
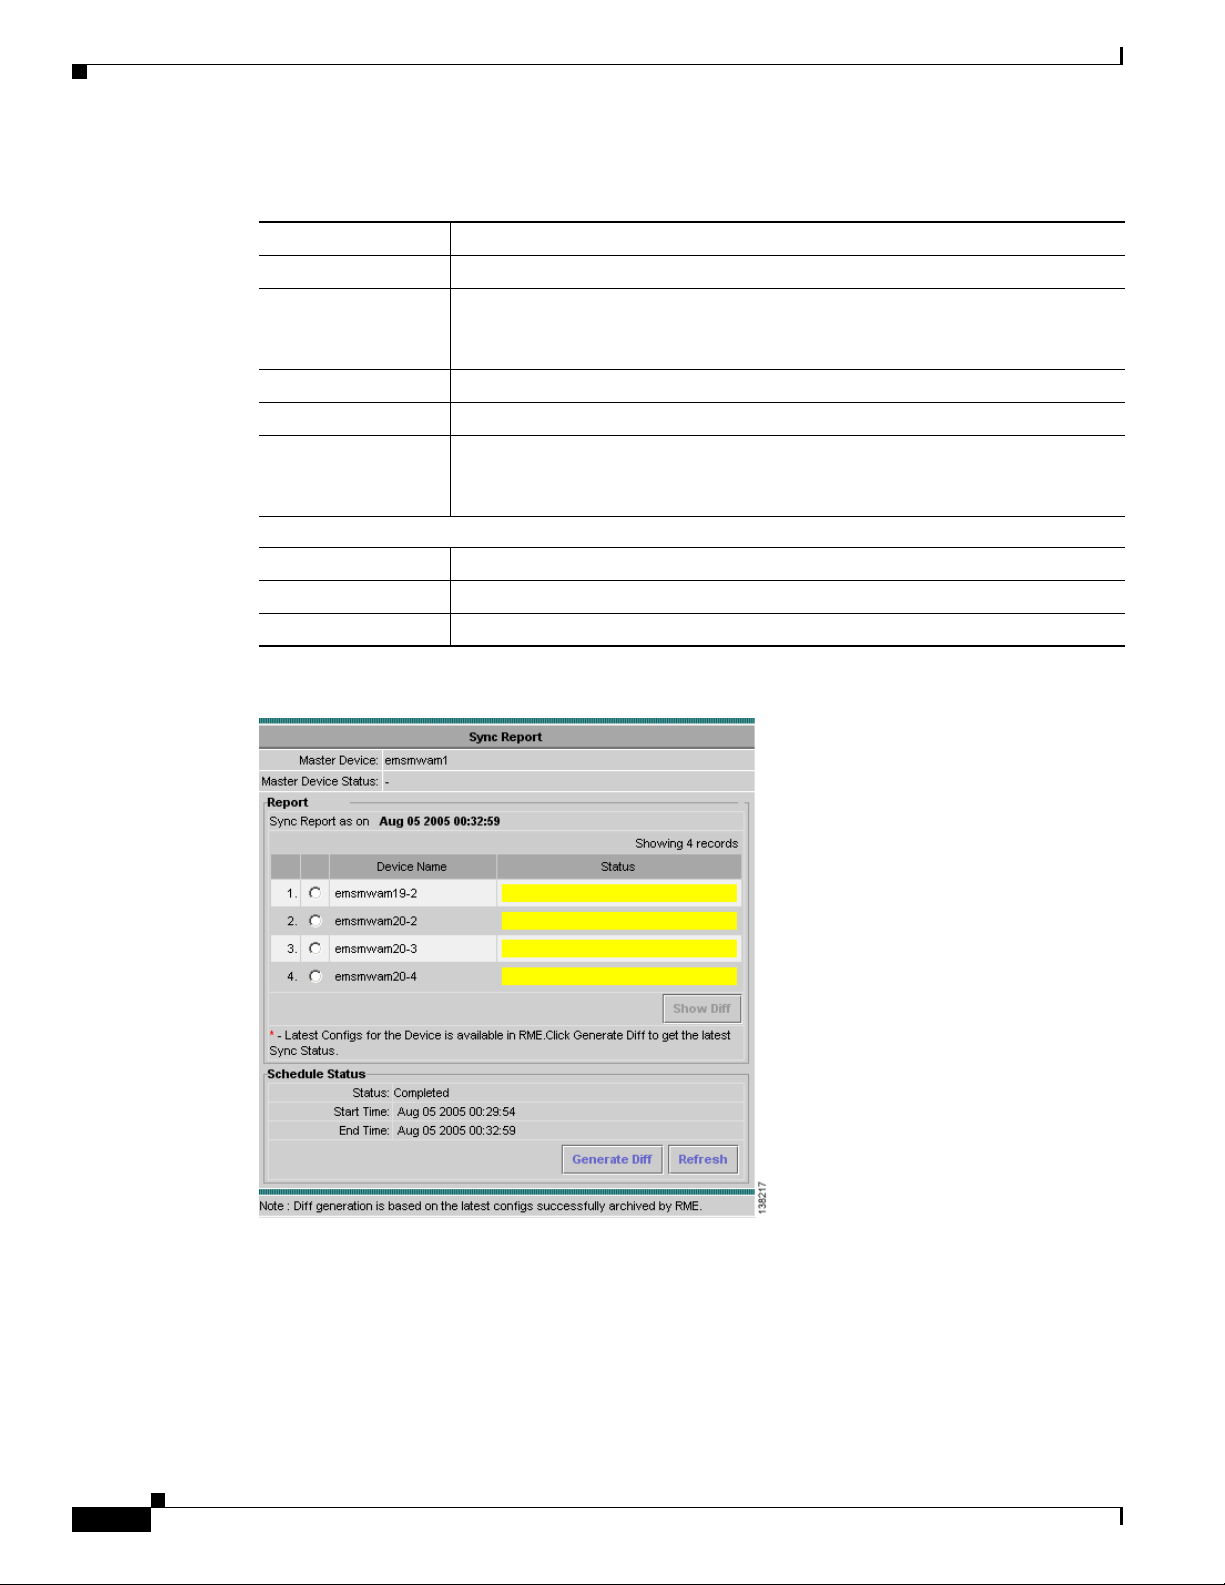
The Sync Report Dashboard window appears. (See Figure 4-3 on page 4-8.)
Step 3 Click Generate Diff to poll all the devices in the group and create a Diff report. The current status of
the operation is automatically updated.
If you have device groups with large numbers of devices, the diff process will take a few minutes. The
window refreshes every fiveseconds while the report is in the Running state. To update status manually,
click Refresh. The process is complete when the Status changes to Completed.
OL-6918-01
User Guide for Cisco Home Agent Service Manager
4-7
Page 8
Generating Sync Reports
The Sync Report Dashboard window contains:
Field Description
Master Device Displays the master device of the selected group.
Master Device Status Current status of the master device at time T1, where T1 is the time you launch
Report
Device Name Displays the devices in the selected group.
Status Displays the status of the device at time T2, where T2 is the time you click
Schedule Status
Status Displays the status of the Diff process. It can be Running or Completed.
Start Time Time at which the Diff process starts.
End Time Time at which the Diff process ends.
Chapter 4 Using Service Manager
Sync Report Dashboard. A (–) appears by default, which indicates that there are
no errors. An appropriate message appears if there are any errors.
Lists the devices in the group and the color-coded Diff status.
Generate Diff. Table 4-2 describes the color code of the Diff Status that appears
in the Status column. An appropriate message appears if there are any errors.
Figure 4-3 Sync Report Dashboard Window
Step 4 In the Report pane, select a device to compare its configurations with the master device.
4-8
User Guide for Cisco Home Agent Service Manager
OL-6918-01
Page 9
Chapter 4 Using Service Manager
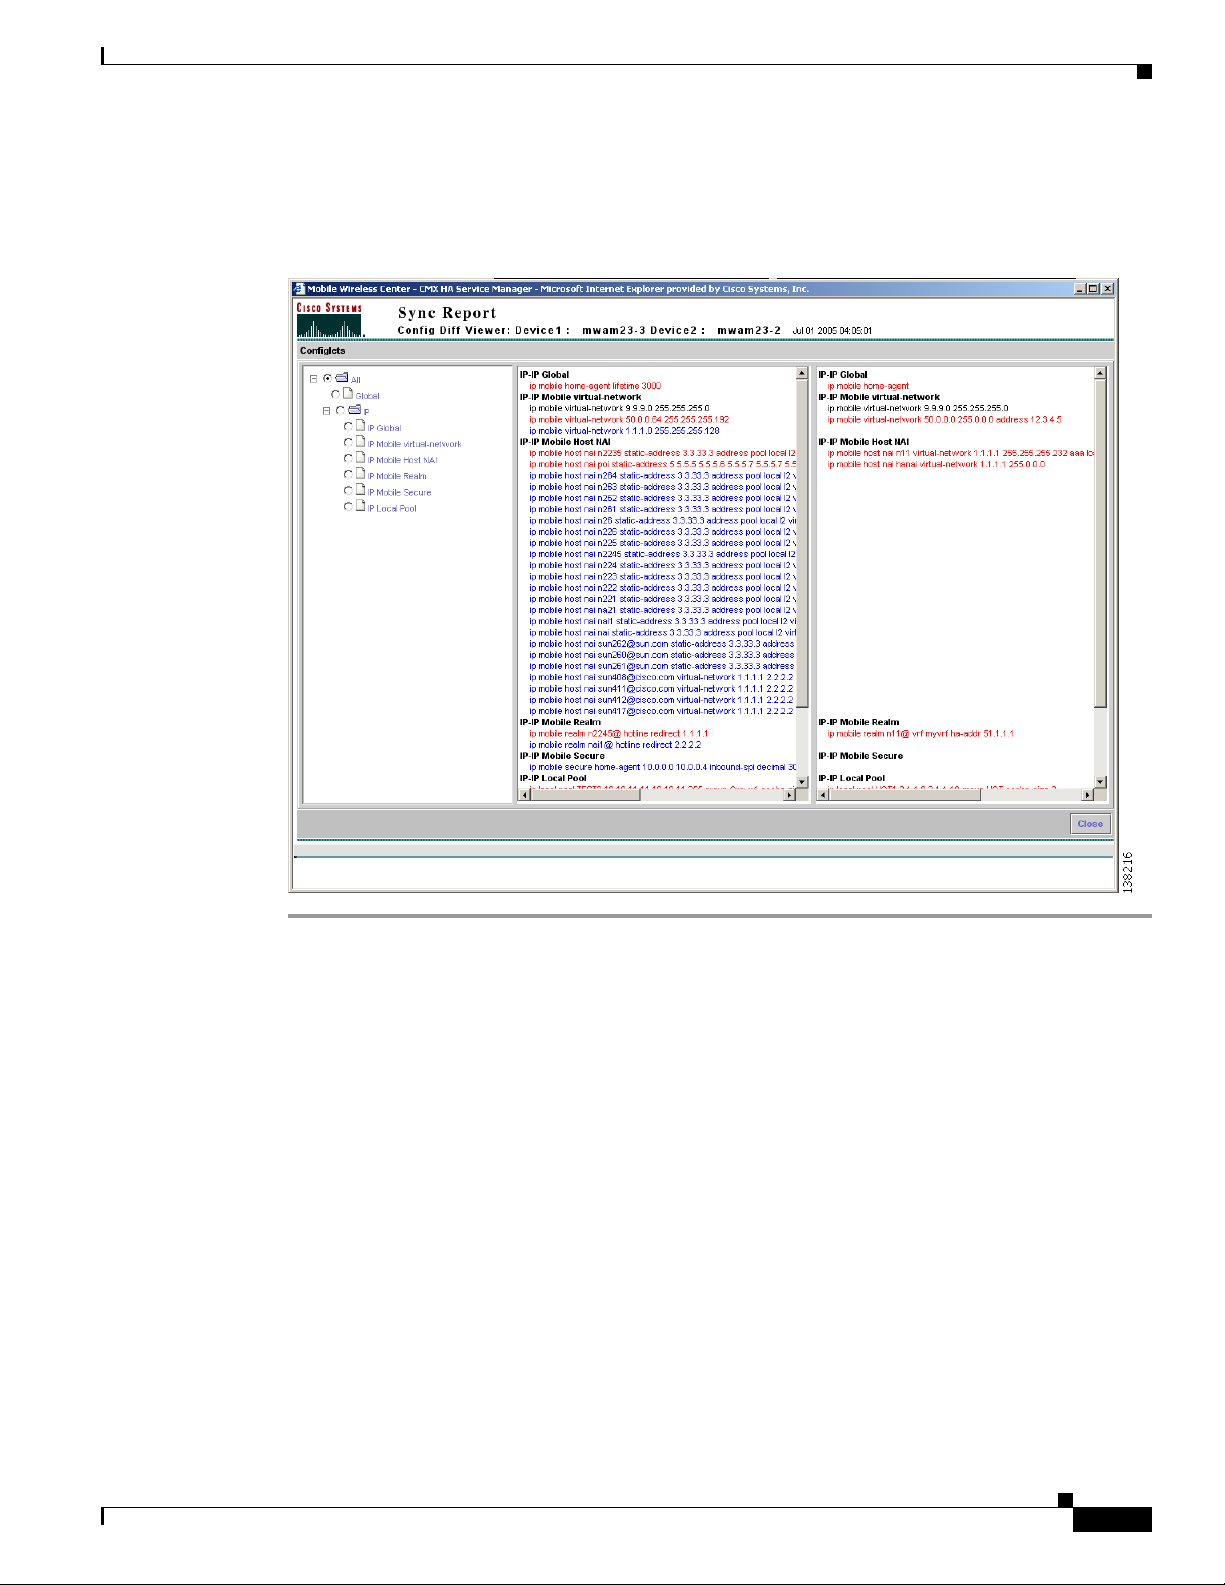
Step 5 Click Show Diff to see a detailed comparison. The Sync Report Config Diff Viewer appears. (See
Figure 4-4 on page 4-9.)
Figure 4-4 Sync Report Config Diff Viewer
Generating Sync Reports
OL-6918-01
User Guide for Cisco Home Agent Service Manager
4-9
Page 10

Generating Sync Reports
Table 4-2 Color Key to the Sync Report Dashboard
Color Meaning
Green No difference exists. The configlets of the master and selected devices are the
Yellow A difference exists. The configlets of the master and selected devices are
Red The device is not reachable.
Black One of these conditions has occurred:
Red asterisk Indicates that a more recent configurationfor this device is present in RME. You
Chapter 4 Using Service Manager
same. The Show Diff button will be disabled.
dissimilar. Click Show Diff to see a detailed comparison.
Note The Show Diff button is enabled only for devices shown in yellow.
• The RME fetch configfor that device failed. If all devices in a group appear
in black, the fetch config for the master device in that group failed.
• An error occurred in retrieving the latest configuration version from RME.
• Authorization failed.
• The devices in the group are suspended or invalid.
can obtain such updated configurations by using the Generate Diff function.
Interpreting the Sync Report Config Diff Viewer
In the Sync Report Config Diff Viewer, Device1 is the master device and Device 2 is the the device being
compared. The Sync Report Config Diff Viewer also displays the date and time that the diff is generated.
The Sync Report Config Diff Viewer has three panes:
• The left pane–Displays all the configlets that the configuration comprises. Click any folder to
expand the tree and display descendant configlets. Choose any configlet to compare the required
command between the configurations of the two devices.
• The center pane–Displays the configuration of Device 1 (master device).
• The right pane–Displays the configuration of Device 2 (selected device).
The Sync Report Diff Viewer displays colored text that highlights differences between the configlets in
the two configurations, as described in Table 4-3:
Table 4-3 Color Key to the Sync Report Config Diff Viewer
Color Description
Black These configlets are present in both devices.
Red These configlets are present on both devices, but differ.
Blue These configlets are present on one of the devices only.
4-10
User Guide for Cisco Home Agent Service Manager
OL-6918-01
Page 11

Chapter 4 Using Service Manager
Comparing the Configurations of Two Devices
To display the differences in HA-specific configurations between any two devices of the group:
Step 1 Choose Service Manager > Sync Report > Compare Config.
The Sync Report window appears.
Step 2 Choose the devices that you want to compare from the drop-down lists for Device1 and Device2.
Step 3 Click Compare. The Sync Report Config Diff Viewer appears. (See Figure 4-4 on page 4-9.)
Interpreting the Sync Report Config Diff Viewer
The Sync Report Config Diff Viewer displays that the date and time the diff is generated, and the
configurations.
The Sync Report Config Diff Viewer has three panes:
• The left pane–Displays all the configlets that the configuration comprises. Click any folder to
expand the tree and display descendant configlets. Choose any configlet to compare the required
command between the configurations of the two devices.
• The center pane–Displays the configuration of Device 1.
• The right pane–Displays the configuration of Device 2.
The Sync Report Diff Viewer displays colored text that highlights the differences between the configlets
in the two configurations, as described in Table 4-4:
Generating Sync Reports
Table 4-4 Color Key to the Sync Report Config Diff Viewer
Color Description
Black These configlets are present in both devices.
Red These configlets are present on both devices, but differ.
Blue These configlets are present on one of the devices only.
OL-6918-01
User Guide for Cisco Home Agent Service Manager
4-11
Page 12

Activating Services on HA Devices
Activating Services on HA Devices
You can use the HA Service Manager to manage and activate services on the Home Agent devices in the
selected device groups.
Service activation entails the following tasks:
• Configuring Local IP Pools, page 4-13
• Configuring Virtual Networks, page 4-18
• Assigning Home Addresses With NAI, page 4-19
• Assigning Home Addresses Without NAI, page 4-23
• Configuring Security Associations, page 4-27
• Configuring VRF Support on HA Devices, page 4-31
• Enabling Hot-Lining, page 4-35
To invoke Service Activation in HA Service Manager:
Step 1 Choose a device group (Choose Service Manager > Select Group). See Selecting an HA DeviceGroup,
page 4-3.
Step 2 Select HA Service Manager > Service Activation.
The left pane displays the Service Activation table of contents. Choose the required service to activateit.
Chapter 4 Using Service Manager
Local IP Pools
Step 1 Choose a device group (Choose Service Manager > Select Group). See Selecting an HA DeviceGroup,
Step 2 Choose HA Service Manager > Service Activation > Local IP Pool.
Step 3 Choose the default pool from the list, then click Execute, to configure a default pool.
To configure Home Agent functionality on your router, you must determine IP addresses or subnets for
which enables roaming service.
Home Agent (HA) dynamically assigns a home address to the mobile node (MN) from address pools that
are configured locally. HA obtains the IP address by accessing the DHCP or AAA server, and allocates
the addresses from the pool on a first come, first serve basis. The MN will keep the address as long as it
has an active binding in the HA. When the binding expires this address is immediately returned to the
pool.
To display a list of the local IP pools that are configured in the HA Service Manager:
page 4-3.
The Local IP Pool dialog box appears with a list of all the local IP pools in the selected group.
If no default pool is configured on the device, a default pool that is designated by an asterisk (*) appears
in the display. You can view or delete a default pool only after you configure one on the device.
4-12
User Guide for Cisco Home Agent Service Manager
OL-6918-01
Page 13

Chapter 4 Using Service Manager
Step 4 From the Local IP Pool dialog box, you can:
• Click Execute without selecting a group to create a new local IP pool.
• Choose a pool and:
–
Click Execute to modify its configuration.
–
Click List to see its current configuration.
–
Click Delete. to delete it. You can also delete one or more pools at the same time.
When you select one or more pools, the Execute and List buttons will be disabled.
For more information on configuring IP pools, see Configuring Local IP Pools, page 4-13.
Configuring Local IP Pools
You can configure local and default IP pools using a Local IP Pool wizard.
You can configure overlapping IP address pool groups to create different address spaces and
concurrently use the same IP addresses in different address spaces. This feature improves flexibility in
assigning IP addresses dynamically and can be used in Multiprotocol Label Switching (MPLS) Virtual
Private Network (VPN) environments where multiple IP address spaces are supported.
To launch the Local IP Pool wizard:
Activating Services on HA Devices
Step 1 Choose a device group (Choose Service Manager > Select Group). See Selecting an HA DeviceGroup,
page 4-3.
Step 2 Choose HA Service Manager > Service Activation > Local IP Pool.
The Local IP Pool dialog box displays all the local IP pools in the selected group. The default IP pool
appears at the top of the list.
If no default pool is configured on the device, a default pool that is designated by an asterisk (*) appears
in the display. You can view or delete a default pool only after you configure one on the device.
Step 3 Perform one of these actions:
• To create a local IP pool, click Execute without selecting one.
• Choose the pool that you want to modify, then click Execute.
• Choose the default pool from the list, then click Execute, to configure a default pool.
The first window of the Local IP Pool wizard displays:
Field Description
Name Name of the local IP address pool.
Start IP First IP address in the defined range of addresses in this pool.
End IP Last IP address in the defined range of addresses in this pool.
OL-6918-01
User Guide for Cisco Home Agent Service Manager
4-13
Page 14

Activating Services on HA Devices
Field Description
Cache-Size (Optional) Specify the number of IP address entries on the free list that the
Local IP Pool Group (Optional) Specify a pool group to associate it with the local IP address pool.
Click any column heading to sort the list. From this window:
• Click Add Row to add more address pools.
• Select any row and click Delete Row to delete the address pool, or extra rows.
Step 4 Enter the information and click Next.
The Local IP Pool Configurations window appears and displays the generated configuration commands.
Step 5 Click Add To Batch to execute the configuration in a batch mode if you do not want to download them
immediately. The Batch Mode window appears. You must leave the Batch Mode window open to add
multiple service-activation commands to the same batch.
From the Batch Mode window, you can:
• Click Save to save the configuration in a batch file and download it later. A popup window appears
where you can specify a name for the batch file, or add the configuration to an existing batch file.
• Click Download to save it to the work queue.
HA SM schedules a new job. A notification message displays the Job ID. After the job completes,
you can view the details of the job in the Job Details window. See Viewing Job Details, page 4-15,
for more information on the job details.
• Click Clear to clear the batch profile.
• Click Close to close this window.
If you do not save the batch file, a message prompts you to save it. Click OK to save and Cancel to
exit the window.
Step 6 Perform one of these actions:
• Click Finish to complete the configuration.
HA SM schedules a new job. A notification message displays the Job ID. After the job completes,
you can view the details of the job in the Job Details window. See Viewing Job Details, page 4-15,
for more information on the job details.
• Click Cancel to exit the wizard.
• Click Back to edit the configuration.
Chapter 4 Using Service Manager
system checks before assigning a new IP address. The range is from 0 to 100,
and the default is 20.
You can associate an IP address pool with only one group.
You can configure overlapping IP address pool groups to create different
address spaces and concurrently use the same IP addresses in different address
spaces.
4-14
User Guide for Cisco Home Agent Service Manager
OL-6918-01
Page 15

Chapter 4 Using Service Manager
Viewing Job Details
You can learn more about any job by viewing its details.
The Job Details window appears (Figure 4-5 on page 4-15), and displays the day, date, and time details
in the header at the top of the report. The Job ID and the Status appear in the header of the report.
Figure 4-5 Job Details Window
Activating Services on HA Devices
OL-6918-01
The Job Details popup contains two panes:
• The left pane contains a table of contents with several options to view the job results.
• The right pane displays the results.
By default, the Job Details popup appears with the Job Details list tree in the left pane and the Execution
Summary, in the right pane.
User Guide for Cisco Home Agent Service Manager
4-15
Page 16

Activating Services on HA Devices
The left pane contains:
• Job Details—Expand this folder to display Execution Summary and Device Details for the
scheduled job.
• Execution Summary—Click this folder to view the following information for the job.
–
–
• Device Details—Click a device to display the job CLI output on the right panel.
Table 4-5 lists the elements of the Job Details Window.
Table 4-5 Job Details Window Field Description
Field Description
Execution Summary
Status Status of the job.
Start Time Time the job started.
End Time Time the job ended.
Device Summary
Successful Lists the devices for which the download operation was successful. Click a
Failed Lists the devices for which a download of one or more commands failed. Click
Partially Successful Lists the devices for which download was partially successful.
Devices Not
Attempted
Unknown Devices Implies that the HA SM was unable to interpret the job output results because
Chapter 4 Using Service Manager
Execution Summary—Displays the status, start time, and end time of the job.
Device Summary—Displays a summary of the number of devices for which the download
operation was successful, partially successful, failed, or not attempted.
Summary of the number of devices for which the download operation was
successful, partially successful, failed, or not attempted. Click a device to
display the job CLI output on the right panel.
device to display the job CLI output on the right pane.
a device to display the job CLI output on the right panel.
Lists devices for which a download was not attempted. This status usually
means that RME is not currently managing the device. That is, the device is in
suspended state or does not exist in the RME database.
it was not in the expected format. Click a device to display the entire job output.
4-16
Caution This state should not occur under normal conditions. Report any
incidents of this type to Cisco’s Technical Assistance Center.
User Guide for Cisco Home Agent Service Manager
OL-6918-01
Page 17

Chapter 4 Using Service Manager
Working With Virtual Networks
You can support mobility of a Mobile Node (MN) beyond the bounds of a physical home network by
defining virtual networks on the Home Agent. The virtual network acts like a home network when you
associate a mobile node with it. When using virtual networks, the MN is always considered roaming; it
can never be attached to its home network.
Virtual networks are configured and referenced by a network number and mask pair. You can also
associate the virtual network with a Home Agent address for redundancy purposes.
To display a list of virtual networks that are configured in the HA Service Manager:
Step 1 Choose a device group (Choose Service Manager > Select Group). See Selecting an HA DeviceGroup,
page 4-3.
Step 2 Choose HA Service Manager > Service Activation > Virtual Networks.
The Virtual Networks dialog box appears and displays a list of all the virtual networks that are
configured in the selected group. It contains:
Activating Services on HA Devices
Field Description
Network Address Specifies the IP address of virtual network.
Mask Specifies the network mask associated with the IP address of the virtual
network.
Click any column heading to sort the list.
Step 3 From the Virtual Networks dialog box, you can:
• Click Execute without selecting a group to create a virtual network.
• Choose a virtual network and:
–
Click Execute to modify its configuration.
–
Click List to see its current configuration.
–
Click Delete to delete it. You can also delete one or more virtual networks at the same time.
When you select one or more virtual network, the Execute and List buttons will be disabled.
For more information, see Configuring Virtual Networks, page 4-18.
OL-6918-01
User Guide for Cisco Home Agent Service Manager
4-17
Page 18

Activating Services on HA Devices
Configuring Virtual Networks
If you intend to support roaming for mobile devices without having a physical home location, you must
identify the subnets for which to allow this service and place these virtual networks appropriately within
your network on the HA. You can configure virtual networks using a Virtual Network wizard.
To launch the Virtual Network wizard:
Step 1 Choose a device group (Choose Service Manager > Select Group). See Selecting an HA DeviceGroup,
page 4-3.
Step 2 Choose HA Service Manager > Service Activation > Virtual Networks.
Step 3 The Virtual Networks dialog box appears and displays a list of all the virtual networks configured in the
selected group.
Step 4 Perform one of these actions:
• To create a virtual network, click Execute without selecting one.
• Choose the virtual network you want to modify, then click Execute.
The first window of the Virtual Networks wizard displays:
Chapter 4 Using Service Manager
Field Description
Network IP Address IP address of virtual network.
Network Mask Network mask associated with the IP address of the virtual network.
Home Agent IP
Address
(Optional) IP address of a Home Agent on a virtual network. You can associate
the virtual network with a Home Agent address for redundancy purposes.
Click any column heading to sort the list.
Step 5 Enter the information and click Next.
The Virtual Networks Configurations window appears and displays the generated configuration
commands.
Step 6 Click Add To Batch to execute the configuration in a batch mode if you do not want to download them
immediately. The Batch Mode window appears. You must leave the Batch Mode window open to add
multiple service-activation commands to the same batch.
From the Batch Mode window, you can:
• Click Save to save the configuration in a batch file and download it later. A popup window appears
where you can specify a name for the batch file, or add the configuration to an existing batch file.
• Click Download to save it to the work queue.
HA SM schedules a new job. A notification message displays the Job ID. After the job completes,
you can view the details of the job in the Job Details window. See Viewing Job Details, page 4-15,
for more information on the job details.
• Click Clear to clear the batch profile.
• Click Close to close this window.
If you do not save the batch file, a message prompts you to save it. Click OK to save and Cancel to
exit the window.
4-18
User Guide for Cisco Home Agent Service Manager
OL-6918-01
Page 19

Chapter 4 Using Service Manager
Step 7 Perform one of these actions:
• Click Finish to complete the configuration.
HA SM schedules a new job. A notification message displays the Job ID. After the job completes,
you can view the details of the job in the Job Details window. See Viewing Job Details, page 4-15,
for more information on the job details.
• Click Cancel to exit the wizard.
• Click Back to edit the configuration.
Home Address Assignment
You can statically or dynamically assign IP addresses to a mobile station. A static IP address is an
address that is pre-assigned to the mobile station, and sometimes pre-configured at the mobile device.
The Home Agent can assign a home address to the mobile node based on the user Network Access
Identifier (NAI) received during Mobile IP registration, or without using an NAI.
• Assigning Home Addresses With NAI, page 4-19
• Assigning Home Addresses Without NAI, page 4-23
Activating Services on HA Devices
Assigning Home Addresses With NAI
The Home Agent can assign a home address to the mobile node based on the user NAI that was received
during mobile IP registration. The NAI is the user ID that the client submits during PPP authentication
and is with the syntax username@realm. You can define an NAI string for a single user
(username@realm) or a domain (@realm). The NAI identifies the user as well as assists the routing of
the authentication request. Static home addressing can be used in conjunction with NAI to support a
NAI-based authorization and other services.
You must be authorized to use an address before the registration will be accepted. Addresses can be
authorized locally, or through an AAA server. If an MN requests an address that is already associated
with a binding that has a different NAI, the Home Agent will attempt to return another address from the
pool; unless the command is set.
To display a list of home addresses with NAI configured in the HA Service Manager:
Step 1 Choose a device group (Choose Service Manager > Select Group). See Selecting an HA DeviceGroup,
page 4-3.
Step 2 Choose HA Service Manager > Service Activation > Home Address Assignment > With NAI.
OL-6918-01
User Guide for Cisco Home Agent Service Manager
4-19
Page 20

Activating Services on HA Devices
The Home Address Assignment–With NAI dialog box displays a list of all the hosts, which are
configured with an NAI, in the selected group. It contains:
Field Description
NAI String Specifies the network access identifier. The NAI can be a unique identifier
Home Link Specifies either:
Click any column heading to sort the list.
Step 3 From the Home Address Assignment–With NAI dialog box, you can:
• Click Execute without selecting a host to create a host configured with an NAI in the selected group.
• Choose a host and:
–
–
–
When you select one or more hosts, the Execute and List buttons will be disabled.
For more information, see Configuring Home Addresses With NAI, page 4-20.
Chapter 4 Using Service Manager
(username@realm) or a group identifier (realm).
• Interface to which the mobile node belongs.
• Virtual network in which the mobile node resides.
Click Execute to modify its configuration.
Click List to see its current configuration.
Click Delete to delete it. You can also delete one or more hosts at the same time.
Configuring Home Addresses With NAI
You can assign home addresses to a mobile node in the selected group by using NAI with a Home
Address Assignment wizard. The Home Agent does not permit simultaneous registrations for different
NAIs with the same IP address, regardless of whether it is statically or dynamically assigned.
You can also specify the interface on the network or a virtual network to which the mobile node belongs,
its security associations, or download them from an AAA server. All hosts must have security
associations for registration authentication. They can have more than one security association. The
Home Agent can control where the mobile nodes roam by specifying the care-of-address (CoA) access
list.
To launch the Home Address Assignment With NAI Configurations wizard:
Step 1 Choose a device group (Choose Service Manager > Select Group). See Selecting an HA DeviceGroup,
page 4-3.
Step 2 Choose HA Service Manager > Service Activation > Home Address Assignment > With NAI.
The Home Address Assignment–With NAI dialog box displays a list of all the hosts, which are
configured with an NAI, in the selected group.
Step 3 Perform one of these actions:
• To create a host configured with an NAI, click Execute without selecting one.
• Choose the host you that want to modify, then click Execute.
4-20
User Guide for Cisco Home Agent Service Manager
OL-6918-01
Page 21

Chapter 4 Using Service Manager
The first window of the Home Address Assignment–With NAI wizard contains:
Field Description
Mobile Station Identifier
NAI String Network access identifier. The NAI can be a unique identifier
Mobile Node IP Address
Authorized Static
Address
Static Address Choose Static Address from the drop-down list to specify one or more IP
Local-Pool Choose Local-Pool from the drop-down list to assign static IP addresses from
Allocate Dynamic IP
Address
Home Link
Interface Click the Interface radio button to specify the interface to which the mobile
Virtual Network
Address
Mask Network mask associated with the IP address of the virtual network.
Skip Chap (Optional) When you check this check box, the Home Agent will not send
Activating Services on HA Devices
(username@realm) or a group identifier (@realm).
You can assign static or dynamic home addresses. Choose Static Address or
Local-Pool from the drop-down list to assign one or more static IP addresses,
or use a local pool of addresses.
addresses to be assigned to the mobile node.
a local pool. Enter the name of the local pool of addresses to assign a static IP
address to this NAI.
Choose the required option from the drop-down list to indicate that a dynamic
IP address is to be assigned to the flows on this NAI.
You can choose:
• IP Address—Specify a fixed address for the NAI. This address is assigned
to the mobile node (MN) each time it registers.
• Local-Pool—Specify the local pool to assign dynamic IP addresses. The
MN will keep the address as long as it has an active binding in the HA.
• DHCP/ODAP Pool—Specify the DHCP or On-Demand Address Pool
(ODAP) pool to assign dynamic IP addresses on a per-subnet basis. The
ODAP manager assigns addresses to clients from these subnets, and
dynamically increases or decreases the subnet pool size, depending on
address utilization.
• DHCP Server—Specify the IP address of the DHCP server to allocate the
home addresses.
• DHCP Proxy Client—Specify the pool to be used from a DHCP client.
In this pane, you can specify the home network (physical or virtual) of the MN.
Click the Interface or Virtual Network radio buttons to specify their details.
node belongs.
To select an interface from a list, click Fetch. A popup appears with a list of
interface types. Choose an interface type and click Select.
Click the Virtual Network radio button to specify the virtual network in which
the mobile node resides.
access requests to the AAA server, for authentication of mobile IP registration
requests.
This action will disable all the check boxes related to security associations and
AAA authentication.
OL-6918-01
User Guide for Cisco Home Agent Service Manager
4-21
Page 22

Activating Services on HA Devices
Field Description
Security
Associations on
AAA
Download Security
Associations
Cache Security
Associations
Skip AAA
Authentication
Authorized-pool (Optional) Verifies if the assigned IP address of the mobile node is within the
Care-of Address
Access-list
Mobile Host
Lifetime
Chapter 4 Using Service Manager
(Optional) When you check this check box, the Home Agent retrieves security
associations from a AAA (TACACS+ or RADIUS) server.
(Optional) Check this check box to download security associations from an
AAA server.
(Optional) Check this check box to store security associations in memory after
retrieval. You can check either the Cache Security Associations check box or
the Skip AAA Authentication check box.
(Optional) When you check this check box, the Home Agent will not send
access requests to the AAA server for authentication for mobile IP
reregistration requests.
When you uncheck this check box, the Home Agent will send access requests
for all mobile IP registration requests.
specified local IP pool.
(Optional) Controls which care-of addresses (CoAs) in registration request are
permitted by the Home Agent. By default, all CoAs are permitted. The access
list can be a string or number from 1 to 99.
(Optional) The registration lifetime granted to the mobile node or group (in
seconds). The range is from 3 to 65535. The Foreign Agent uses this
information to control the duration of registration.
Click any column heading to sort the list.
Step 4 Enter the information and click Next.
The Home Address Assignment With NAI Configurations window appears with the generated
configuration commands.
Step 5 Click Add To Batch to execute the configuration in a batch mode if you do not want to download them
immediately. The Batch Mode window appears. You must leave the Batch Mode window open to add
multiple service-activation commands to the same batch.
From the Batch Mode window, you can:
• Click Save to save the configuration in a batch file and download it later. A popup window appears
where you can specify a name for the batch file, or add the configuration to an existing batch file.
• Click Download to save it to the work queue.
HA SM schedules a new job. A notification message displays the Job ID. After the job completes,
you can view the details of the job in the Job Details window. See Viewing Job Details, page 4-15,
for more information on the job details.
• Click Clear to clear the batch profile.
4-22
User Guide for Cisco Home Agent Service Manager
OL-6918-01
Page 23

Chapter 4 Using Service Manager
• Click Close to close this window.
If you do not save the batch file, a message prompts you to save it. Click OK to save and Cancel to
exit the window.
Step 6 Perform one of these actions:
• Click Finish to complete the configuration.
HA SM schedules a new job. A notification message displays the Job ID. After the job completes,
you can view the details of the job in the Job Details window. See Viewing Job Details, page 4-15,
for more information on the job details.
• Click Cancel to exit the wizard.
• Click Back to edit the configuration.
Assigning Home Addresses Without NAI
When the Home Agent assigns a home address without using an NAI, the home IP address serves as the
user name for authentication. Static addressing is beneficial because it allows each device to keep the
same address all the time; regardless of where it is attached to the network. You can use this method to
run mobile terminated services without updating the DNS, or some other form of address resolution. It
is also easy to manage MNs with static addressing because the home address and the Home Agent are
always the same. However, provisioning and maintenance are much more difficultwith static addressing
because address allocation must be handled manually, and the Home Agent and MN must be updated.
To display a list of home addresses without NAI configured in the HA Service Manager:
Activating Services on HA Devices
Step 1 Choose a device group (Choose Service Manager > Select Group). See Selecting an HA DeviceGroup,
page 4-3.
Step 2 Choose HA Service Manager > Service Activation > Home Address Assignment > Without NAI.
The Home Address Assignment - Without NAI dialog box appears with a list of all the hosts that are
configured without a NAI, in the selected group. It contains:
Field Description
Home Address SpecifiesIP address of the mobile node. It can also specify the address pool for
a mobile node or mobile node group.
Home Link Specifies either:
• Interface to which the mobile node belongs.
• Virtual network in which the mobile node resides.
Click any column heading to sort the list.
Step 3 From the Home Address Assignment–Without NAI dialog box, you can:
• Click Execute without selecting a host to create a host configured without an NAI in the selected
group.
• Choose a host and:
–
Click Execute to modify its configuration.
OL-6918-01
User Guide for Cisco Home Agent Service Manager
4-23
Page 24

Activating Services on HA Devices
–
Click List to see its current configuration.
–
Click Delete to delete it. You can also delete one or more hosts at the same time.
When you select one or more hosts, the Execute and List buttons will be disabled.
For more information, see Configuring Home Addresses Without NAI, page 4-24.
Configuring Home Addresses Without NAI
You can assign home addresses to a mobile node in the selected group (without using NAI) by using a
Home Address Assignment wizard. You can configure a range of home addresses for the mobile host or
mobile node group to be assigned by the Home Agent. You can also specify the interface on the network
or a virtual network to which the mobile node belongs, its security associations, or download them from
an AAA server. All hosts must have security associations for registration authentication. They can have
more than one security association. The Home Agent can control where the mobile nodes roam by
specifying the care-of-address (CoA) access list.
To launch the Home Address Assignment wizard:
Chapter 4 Using Service Manager
Step 1 Choose a device group (Choose Service Manager > Select Group). See Selecting an HA DeviceGroup,
page 4-3.
Step 2 Choose HA Service Manager > Service Activation > Home Address Assignment > Without NAI.
Step 3 The Home Address Assignment–Without NAI dialog box displays a list of all the hosts configured
without a NAI, in the selected group.
Step 4 Perform one of these actions:
• To create a host configured without an NAI, click Execute without selecting one.
• Choose the host you want to modify, then click Execute.
The first window of the Home Address Assignment-Without NAI wizard contains:
Field Description
Home Address
Lower Range Lower IP address of the range of IP addresses for a mobile host or
mobile node group. If you specify only this address, it is taken as
the IP address of the MN.
When used with DHCP, this specifies the address pool from which
the DHCP server should select the address.
Upper Range (Optional) Upper IP address of the range of IP addresses for a
mobile host or mobile node group.
Home Link
In this pane, you can specify the home network (physical or virtual)
of the MN.
Click the Interface or Virtual Network radio buttons to specify
their details.
4-24
User Guide for Cisco Home Agent Service Manager
OL-6918-01
Page 25

Chapter 4 Using Service Manager
Field Description
Interface Click the Interface radio button to specify the interface to which
Virtual Network Address Click the Virtual Network radio button to specify the virtual
Mask Network mask associated with the IP address of the virtual network.
Skip Chap (Optional) When you check this check box, the Home Agent will
Security Associations on AAA (Optional) When you check this check box, the Home Agent
Download Security Associations (Optional) Select this check box to download security associations
Authorized-pool (Optional) Verifies if the assigned IP address of the mobile node is
Care-of Address Access-list (Optional) Controls which care-of addresses (CoAs) in registration
Mobile Host Lifetime (Optional) The registration lifetime granted to the mobile node or
Activating Services on HA Devices
the mobile node belongs.
Click Fetch to select an interface from a list. A popup appears with
a list of interface types. Choose an interface type and click Select.
network in which the mobile node resides.
not send access requests to the AAA server for authentication of
mobile IP registration requests.
retrieves security associations from an AAA (TACACS+ or
RADIUS) server.
from an AAA server.
in the specified local IP pool.
request are permitted by the home agent. By default, all CoAs are
permitted. The access list can be a string or a number from 1 to 99.
group (in seconds). The range is from 3 to 65535. The Foreign
Agent uses this information to control the duration of registration.
Click any column heading to sort the list.
Step 5 Enter the information and click Next.
The Home Address Assignment Without NAI Configurations window appears with the generated
configuration commands.
Step 6 Click Add To Batch to execute the configuration in a batch mode if you do not want to download them
immediately. The Batch Mode window appears. You must leave the Batch Mode window open to add
multiple service-activation commands to the same batch.
From the Batch Mode window, you can:
• Click Save to save the configuration in a batch file and download it later. A popup window appears
where you can specify a name for the batch file, or add the configuration to an existing batch file.
• Click Download to save it to the work queue.
HA SM schedules a new job. A notification message displays the Job ID. After the job completes,
you can view the details of the job in the Job Details window. See Viewing Job Details, page 4-15,
for more information on the job details.
• Click Clear to clear the batch profile.
• Click Close to close this window.
If you do not save the batch file, a message prompts you to save it. Click OK to save and Cancel to
exit the window.
OL-6918-01
User Guide for Cisco Home Agent Service Manager
4-25
Page 26

Activating Services on HA Devices
Step 7 Perform one of these actions:
• Click Finish to complete the configuration.
HA SM schedules a new job. A notification message displays the Job ID. After the job completes,
you can view the details of the job in the Job Details window. See Viewing Job Details, page 4-15,
for more information on the job details.
• Click Cancel to exit the wizard.
• Click Back to edit the configuration.
Security Associations
All registration messages between an MN and a HA are authenticated in Mobile IP to prevent
denial-of-service and replay attacks. Security associations are used to authenticate the mobile device. A
security association is a collection of security contexts between a pair of nodes, which may be applied
to Mobile IP protocol messages that are exchanged between them. Each context indicates an
authentication algorithm and mode, a secret (a shared key or appropriate public or private key pair), and
a style of replay protection in use.
Message Digest 5 (MD5) is an algorithm that takes the registration message and a key to compute the
smaller chunk of data, called a message digest, plus a secret key. The MN and HA have a copy of the
key, called a symmetric key, and authenticate each other by comparing the results of the computation.
The authentication process begins when an MN sends the registration request. The MN adds the time
stamp, computes the message digest, and appends the Mobile-Home Authentication Extension (MHAE)
to the registration request. The HA receives the request, checks if the time stamp is valid, computes the
message digest using the same key, and compares the message digest results. If the results match, the
request is successfully authenticated. For the registration reply, the HA adds the time stamp, computes
the message digest, and appends the Mobile-Home Authentication Extension MHAE to the registration
reply. The MN authenticates the registration reply upon arrival from the HA.
Replay protection is enabled on the registration packets to protect the network from replay attacks. A
replay attack occurs when an individual records an authentic message that was previously transmitted
and replays it at a later time.
To display a list of security associations for the MN, Home Agent, or Foreign Agent that is configured
in the HA Service Manager:
Chapter 4 Using Service Manager
4-26
Step 1 Choose a device group (Choose Service Manager > Select Group). See Selecting an HA DeviceGroup,
page 4-3.
Step 2 Choose HA Service Manager > Service Activation > Security Associations.
User Guide for Cisco Home Agent Service Manager
OL-6918-01
Page 27

Chapter 4 Using Service Manager
The Home Agent Security Associations dialog box displays a list of configured security associations for
the mobile node, Home Agent, or Foreign Agent, in the selected group. It contains:
Field Description
Peer Type Specifies the peer type. It can be one of the following:
Peer Identity Specifies the NAI string or the home IP address of the mobile node.
SPI Specifies the Security parameter index (SPI). This is used to authenticate a
Click any column heading to sort the list.
Step 3 From the Home Agent Security Associations dialog box, you can:
• Click Execute without selecting a peer type to configure a new security association in the selected
group.
• Choose a peer type and:
–
–
–
When you select one or more security associations, the Execute and List buttons will be disabled.
For more information, see Configuring Security Associations, page 4-27.
Activating Services on HA Devices
• Host
• Home Agent
• Foreign Agent
mobile user during mobile IP registration.
Click Execute to modify its security association.
Click List to see its current security association.
Click Delete to delete it. Youcan also delete one or more security associations at the same time.
Configuring Security Associations
You can configure the security associations for the MN, Home Agent, or Foreign Agent using a Security
Associations wizard.
To launch the Security Associations wizard:
Step 1 Choose a device group (Choose Service Manager > Select Group). See Selecting an HA DeviceGroup,
page 4-3.
Step 2 Choose HA Service Manager > Service Activation > Security Associations.
The Home Agent Security Associations dialog box displays a list of configured security associations for
the MN, Home Agent, or Foreign Agent in the selected group.
Step 3 Perform one of these actions:
• To create a security association for a peer type, click Execute without selecting one.
• Select the security association you want to modify, then click Execute.
OL-6918-01
User Guide for Cisco Home Agent Service Manager
4-27
Page 28

Activating Services on HA Devices
The first window of the Security Associations wizard contains:
Field Description
Peer Type Choose a peer type from the drop-down list. It can be one of the
Mobile Node Identity
IP Address Click the IP Address radio button to specify the IP address of the
Lower IP address of the host, Home Agent, Foreign Agent, or the lower
Higher (Optional) Upper range of the IP addresses pool.
Host NAI String Specify the network access identifier of the mobile node. It is a
Bidirectional SPI ClicktheBidirectionalSPIradio buttonto specify the bidirectional
Unidirectional SPI Click the Unidirectional SPI radio button to specify the inbound
Inbound Select Decimal or Hex from the drop-down list and specify the SPI
Outbound Select the format of the SPI (Decimal or Hex) from the drop-down
Security Key Select the format of the key (ASCII or Hex) from the drop-down
Chapter 4 Using Service Manager
following:
• Host
• Home Agent
• Foreign Agent
Click the IP Address or Host NAI String radio button to specify
the NAI string or the home IP address of the mobile node.
mobile node.
range of IP address pool.
unique identifier with the syntax username@realm.
Click Fetch to select a NAI string from a list. A popup appears with
a list of NAIstrings. Choose a NAI string and click Select. Click the
column heading to sort the list.
This radio button is disabled if you choose Home Agent or Foreign
Agent as the peer type.
SPI. The range is from 256 to 4294967295 (decimal) or 0 to ffffffff
(hex).
and outbound SPIs. If Home Agent receives an inbound SPI, then
outbound SPI will be used when sending a response.
to authenticate the inbound registration packets. The range is from
256 to 4294967295 (decimal) or 0 to ffffffff (hex )
list, and specify the SPI to authenticate the outbound registration
packets. The range is from 256 to 4294967295 (decimal) or 0 to
ffffffff (h ex)
list, and specify the shared secret key for the security associations.
The key is used to wrap the registration information for
authentication and calculate the message digest.
You cannot use spaces in the string.
4-28
User Guide for Cisco Home Agent Service Manager
OL-6918-01
Page 29

Chapter 4 Using Service Manager
Field Description
Replay Time Stamp Specify the replay protection time stamp (in seconds) to protect the
Enable Authentication (Optional) Choose the Enable Authenticationcheck box to enable
Select Authentication Algorithm (Optional) Select an authentication algorithm to authenticate
Ignore SPI (Optional) Select the Ignore SPI check box to disable the
Activating Services on HA Devices
registration packets from replay attacks. The time stamp validates
the incoming packets to ensure that they are not being replayed by
a hacker. The time stamp allows the sender and receiver to be
synchronized. The range is from 1 to 255. If a registration fails
because the time stamp value is out of bounds, the Home Agent
returns its timestamp so the mobile node can re-register with a
timestamp value that is closer to the that of the Home Agent, if
desired.
authentication and select an authentication algorithm.
messages during registration.
You can select md5 (message–digest 5) or hmac–md5 (HMAC
used with MD5, where HMAC is a mechanism for message
authentication that uses cryptographic hash functions)
authentication algorithm.
authentication of a home agent that uses SPI. This check box is
enabled only for Home Agents.
Click any column heading to sort the list.
Step 4 Enter the information and click Next.
The Security Associations Configurations window appears with the generated configuration commands.
Step 5 Click Add To Batch to execute the configuration in a batch mode if you do not want to download them
immediately. The Batch Mode window appears. You must leave the Batch Mode window open to add
multiple service-activation commands to the same batch.
From the Batch Mode window, you can:
• Click Save to save the configuration in a batch file and download it later. A popup window appears
where you can specify a name for the batch file, or add the configuration to an existing batch file.
• Click Download to save it to the work queue.
HA SM schedules a new job. A notification message displays the Job ID. After the job completes,
you can view the details of the job in the Job Details window. See Viewing Job Details, page 4-15,
for more information on the job details.
• Click Clear to clear the batch profile.
• Click Close to close this window.
If you do not save the batch file, a message prompts you to save it. Click OK to save and Cancel to
exit the window.
Step 6 Perform one of these actions:
• Click Finish to complete the configuration.
HA SM schedules a new job. A notification message displays the Job ID. After the job completes,
you can view the details of the job in the Job Details window. See Viewing Job Details, page 4-15,
for more information on the job details.
OL-6918-01
User Guide for Cisco Home Agent Service Manager
4-29
Page 30

Activating Services on HA Devices
• Click Cancel to exit the wizard.
• Click Back to edit the configuration.
VRF Support on HA
Mobile nodes can share a common IP address across different realms on the same Home Agent. This
feature is based on the Multi-VPN Routing and Forwarding (VRF) Customer Edge (CE) network
architecture to support multiple VPNs (and, therefore, multiple customers) per Customer Edge (CE)
device.This reduces the amount of equipment required and simplifiesadministration, while allowing the
use of overlapping IP addresses within the CE network. Separate VRF table are maintained for each
realm. Multiple IP addresses are used at the Home Agent to indicate different enterprise connections or
VRFs to the PDSN. Thus, one mobile IP tunnel runs between the PDSN and the HA per realm or VRF.
A typical scenario with VRF enabled on Home Agent:
When a Mobile IP registration requests (RRQ) arrives at the Home Agent, it will read the NAI field of
the incoming RRQ and select a pre-configured IP address. This forms a mobile IP tunnel back to the
PDSN with this IP address as the source address of the tunnel. The Home Agentt adds a host route that
corresponds to the IP address that is assigned for the mobile in the routing table of the VRF that is
definedfor the realm. The tunnel end-point at Home Agent is also inserted in the VRF routing table. This
feature enables the mobile nodes to share common IP address across different realms on the same Home
Agent.
To display a list of all realms that are configured with VRF in the HA Service Manager:
Chapter 4 Using Service Manager
Step 1 Choose a device group. (Choose Service Manager > Select Group.) See Selecting an HA Device
Group, page 4-3.
Step 2 Choose HA Service Manager > Service Activation > HA VRF.
The Home Agent VRF dialog box displays a list of VRF configuredrealms, in the selected device group.
It contains:
Field Description
Realm Name Specifies the realm name. It is a unique identifier with the syntax @realm.
VRF Name Specifies a unique name to identify the VRF for a specific group.
Virtual HA IP
Specifies the IP address of the Home Agent.
Address
Click any column heading to sort the list.
Step 3 From the Home Agent VRF dialog box, you can:
• Click Execute without selecting a realm to configure its VRF.
• Choose a realm and:
–
Click Execute to modify its VRF configuration.
–
Click List to view its current configuration.
–
Click Delete to delete it. You can also delete one or more VRF configurations at the same time.
4-30
User Guide for Cisco Home Agent Service Manager
OL-6918-01
Page 31

Chapter 4 Using Service Manager
When you select one or more VRF configurations,the Execute and List buttons will be disabled. For
more information, see Configuring VRF Support on HA Devices, page 4-31.
Configuring VRF Support on HA Devices
You can configure VRF support on home agent devices by using the Home Agent VRF Configuration
wizard.
To launch the Home Agent VRF Configuration wizard:
Step 1 Choose a device group (Choose Service Manager > Select Group). See Selecting an HA DeviceGroup,
page 4-3.
Step 2 Choose HA Service Manager > Service Activation >HA VRF.
The Home Agent VRF dialog box displays a list of VRF configuredrealms, in the selected device group.
Step 3 Perform one of these actions:
• To create the VRF for a realm, click Execute without selecting a realm.
• Choose a realm, then click Execute to modify its VRF configuration.
The first window of the Home Agent VRF Configuration wizard contains:
Activating Services on HA Devices
Field Description
Realm Name Specifies the realm name. It is a unique identifier with the syntax @realm.
Click Fetch to select a realm from a list. A popup appears with a list of realms.
Choose a realm and click Select. Click the column heading to sort the list.
VRF for Realm
VRF Name Specifies a unique name to identify the VRF for a specific group. You can:
• Click Fetch to select a configured VRF from a list. A popup appears with a
list of configured VRFs. Choose a VRF and click Select. Click any column
heading to sort the list.
• Click Define to configure a new VRF routing table. See VRF Definition
Dialog Box Field Descriptions, page 4-33, for more details.
Virtual Home Agent
IP Address Specifies the IP address of the Home Agent. Click Assign to Loopback to
configure a loopback interface. This action provides a stable address to
minimize the impact of a physical interface going down. See Loopback
Interface Dialog Box Field Descriptions, page 4-33, for more details.
AAA Group
You can define AAA accounting and, or authentication servers.
Accounting Group (Optional) Specifies an AAA accounting group. When you define an AAA
accounting server group, all accounting records for the users of the realm will
be sent to the specified group.
Authentication
Group
(Optional) Specifies an AAA authentication group. When you define an AAA
authentication group, the Home Agent sends access requests for mobile IP
registration requests, to the AAA servers that are defined in the group.
OL-6918-01
User Guide for Cisco Home Agent Service Manager
4-31
Page 32

Activating Services on HA Devices
Click any column heading to sort the list.
Step 4 Enter the information and click Next.
The HA-VRF Configurations window displays the generated configuration commands.
Step 5 Click Add To Batch to execute the configuration in a batch mode if you do not want to download them
immediately. The Batch Mode window appears. You must leave the Batch Mode window open to add
multiple service-activation commands to the same batch.
From the Batch Mode window, you can:
• Click Save to save the configuration in a batch file and download it later. A popup window appears
where you can specify a name for the batch file, or add the configuration to an existing batch file.
• Click Download to save it to the work queue.
HA SM schedules a new job. A notification message displays the Job ID. After the job completes,
you can view the details of the job in the Job Details window. See Viewing Job Details, page 4-15,
for more information on the job details.
• Click Clear to clear the batch profile.
• Click Close to close this window.
If you do not save the batch file, a message prompts you to save it. Click OK to save and Cancel to
exit the window.
Step 6 Perform one of these actions:
• Click Finish to complete the configuration.
HA SM schedules a new job. A notification message displays the Job ID. After the job completes,
you can view the details of the job in the Job Details window. See Viewing Job Details, page 4-15,
for more information on the job details.
• Click Cancel to exit the wizard.
• Click Back to edit the configuration.
Chapter 4 Using Service Manager
4-32
User Guide for Cisco Home Agent Service Manager
OL-6918-01
Page 33

Chapter 4 Using Service Manager
VRF Definition Dialog Box Field Descriptions
When you click Define in the VRF for Realm pane, the VRF Definition dialog box appears. You can
use this dialog box to configure a new VRF routing table from this dialog box. It displays:
Field Description
VRF Info
Instance Name Specifies a unique name by which to identify the VRF for a specific group.
Description Describes the VRF.
Route Distinguisher Specify a route distinguisher after you create a VRF. Otherwise, the VRF will
Activating Services on HA Devices
not operate.
A route distinguisher (RD) creates routing and forwarding tables for a VPN. RD
includes an autonomous system number and an arbitrary number, or it is
IP-address-relative (includes an IP address and an arbitrary number).
You can enter an RD in one of these formats:
• 16-bit AS number: your 32-bit number.
For example, 101:3
• 32-bit IP address: your 16-bit number
For example, 192.168.122.15:1
Loopback Interface Dialog Box Field Descriptions
When you click Assign to Loopback in the Virtual Home Agent pane, the Loopback Interface dialog
box appears. Itdisplays:
Field Description
Loopback Interface Information
IP Address Assign an IP network address to the interface.
Subnet Mask Assign a network mask to the interface
Loopback Interface No. Specify the number of the loopback interface that you want to create or
Assign as Secondary IP Check the Assign as Secondary IP check box to assign the above IP address
Enter the required information and click Submit.
configure. There is no limit on the number of loopback interfaces you can
create.
as a secondary address on the loopback interface.
OL-6918-01
User Guide for Cisco Home Agent Service Manager
4-33
Page 34

Activating Services on HA Devices
Hot-Lining
You use the Hot-lining feature to monitor upstream user traffic by using two different scenarios: active
and new session. When Hot-lining is active for a particular user, the upstream IP packets from the mobile
are re-directed to the redirect server that is configured for this particular realm. This is achieved by
changing the IP packet destination address to the redirect server address.
To display a list of all realms that are configured with hot-lining in the HA Service Manager:
Step 1 Choose a device group (Choose Service Manager > Select Group). See Selecting an HA DeviceGroup,
page 4-3.
Step 2 Choose HA Service Manager > Service Activation > Hot Lining.
The Hot Lining dialog box displays a list of realms that are configured with hot–lining, in the selected
device group. It contains:
Field Description
Realm Name Specifies the realm name. It is a unique identifier with the syntax @realm.
Redirect Server Specifies the IP address of the redirect server.
Chapter 4 Using Service Manager
Click any column heading to sort the list.
Step 3 From the Hot-lining dialog box, you can:
• Click Execute without selecting a realm to configure hot-lining.
• Choose a realm and:
–
Click Execute to modify its hot-lining configuration.
–
Click List to view its current configuration.
–
Click Delete to delete it. You can also delete one or more hot-lining configurations at the same
time.
When you choose one or more hot-lining configurations, the Execute and List buttons will be
disabled.
For more information, see Configuring VRF Support on HA Devices, page 4-31.
4-34
User Guide for Cisco Home Agent Service Manager
OL-6918-01
Page 35

Chapter 4 Using Service Manager
Enabling Hot-Lining
You can configure hot-lining on home agent devices by using the Hot Lining wizard.
To launch the Hot Lining wizard:
Step 1 Choose a device group (Choose Service Manager > Select Group). See Selecting an HA DeviceGroup,
page 4-3.
Step 2 Choose HA Service Manager > Service Activation > Hot Lining.
The Hot Lining dialog box displays a list of Hot-lining configured realms, in the selected device group.
Step 3 Perform one of these actions:
• Click Execute without selecting a realm to configure hot-lining.
• Choose a realm, then click Execute to modify its hot-lining configuration.
The first window of the Hot Lining wizard displays:
Field Description
Realm Name Specify the realm name. It is a unique identifier with the syntax @realm.
Redirect Server Specify the IP address of the redirect server.
Activating Services on HA Devices
Click Fetch to select a realm from a list. A popup appears with a list of realms.
Choose a realm and click Select. Click the column heading to sort the list.
Click any column heading to sort the list.
Step 4 Enter the information and click Next.
The Hot Lining Configurations window displays the generated configuration commands.
Step 5 Click Add To Batch to execute the configuration in a batch mode if you do not want to download them
immediately. The Batch Mode window appears. You must leave the Batch Mode window open to add
multiple service-activation commands to the same batch.
From the Batch Mode window, you can:
• Click Save to save the configuration in a batch file and download it later. A popup window appears
where you can specify a name for the batch file, or add the configuration to an existing batch file.
• Click Download to save it to the work queue.
HA SM schedules a new job. A notification message displays the Job ID. After the job completes,
you can view the details of the job in the Job Details window. See Viewing Job Details, page 4-15,
for more information on the job details.
• Click Clear to clear the batch profile.
• Click Close to close this window.
If you do not save the batch file, a message prompts you to save it. Click OK to save and Cancel to
exit the window.
Step 6 Perform one of these actions:
• Click Finish to complete the configuration.
HA SM schedules a new job. A notification message displays the Job ID. After the job completes,
you can view the details of the job in the Job Details window. See Viewing Job Details, page 4-15,
for more information on the job details.
OL-6918-01
User Guide for Cisco Home Agent Service Manager
4-35
Page 36

Managing Batch Configurations
• Click Cancel to exit the wizard.
• Click Back to edit the configuration.
Managing Batch Configurations
You can use HA Service Manager to apply multiple service-activation configurations to the device by
using batch mode. You can save the generated configuration commands and download them later.
Use the Batch Config function to manage batch configurations.You can display, start, or delete the batch
configurations.
To open the Batch Config window:
Step 1 Choose Service Manager > Batch Config.
The Batch Config window appears. (See Figure 4-6 on page 4-36.)
Step 2 Click any column heading to sort the list.
Chapter 4 Using Service Manager
Figure 4-6 Batch Config window
From this point, you can:
• Display the contents of a batch configuration file–Select a file from the list, then click Open. You
can display the details of one batch config at a time.
• Delete a batch configuration file–Select one or more batch configurations from the list, then click
Delete.
Note The HA SM does not test for configuration dependencies.
4-36
User Guide for Cisco Home Agent Service Manager
OL-6918-01
Page 37

Chapter 4 Using Service Manager
Starting a Batch Configuration
To start a batch job:
Step 1 Choose Service Manager > Batch Config.
In the Batch Configwindow, select a batch configuration from the list. The Batch Config display appears.
Step 2 Click Open to display the contents of the job file.
Step 3 Click Download.
.
Managing Batch Configurations
OL-6918-01
User Guide for Cisco Home Agent Service Manager
4-37
Page 38

Managing Batch Configurations
Chapter 4 Using Service Manager
4-38
User Guide for Cisco Home Agent Service Manager
OL-6918-01
 Loading...