

Page 1
RSA Keon Ready Implementation Guide
For PKI 3rd Party Applications
Last Modified May 3, 2004
1. Partner Information
Partner Name Cisco Systems, Inc.
Web Site www.cisco.com
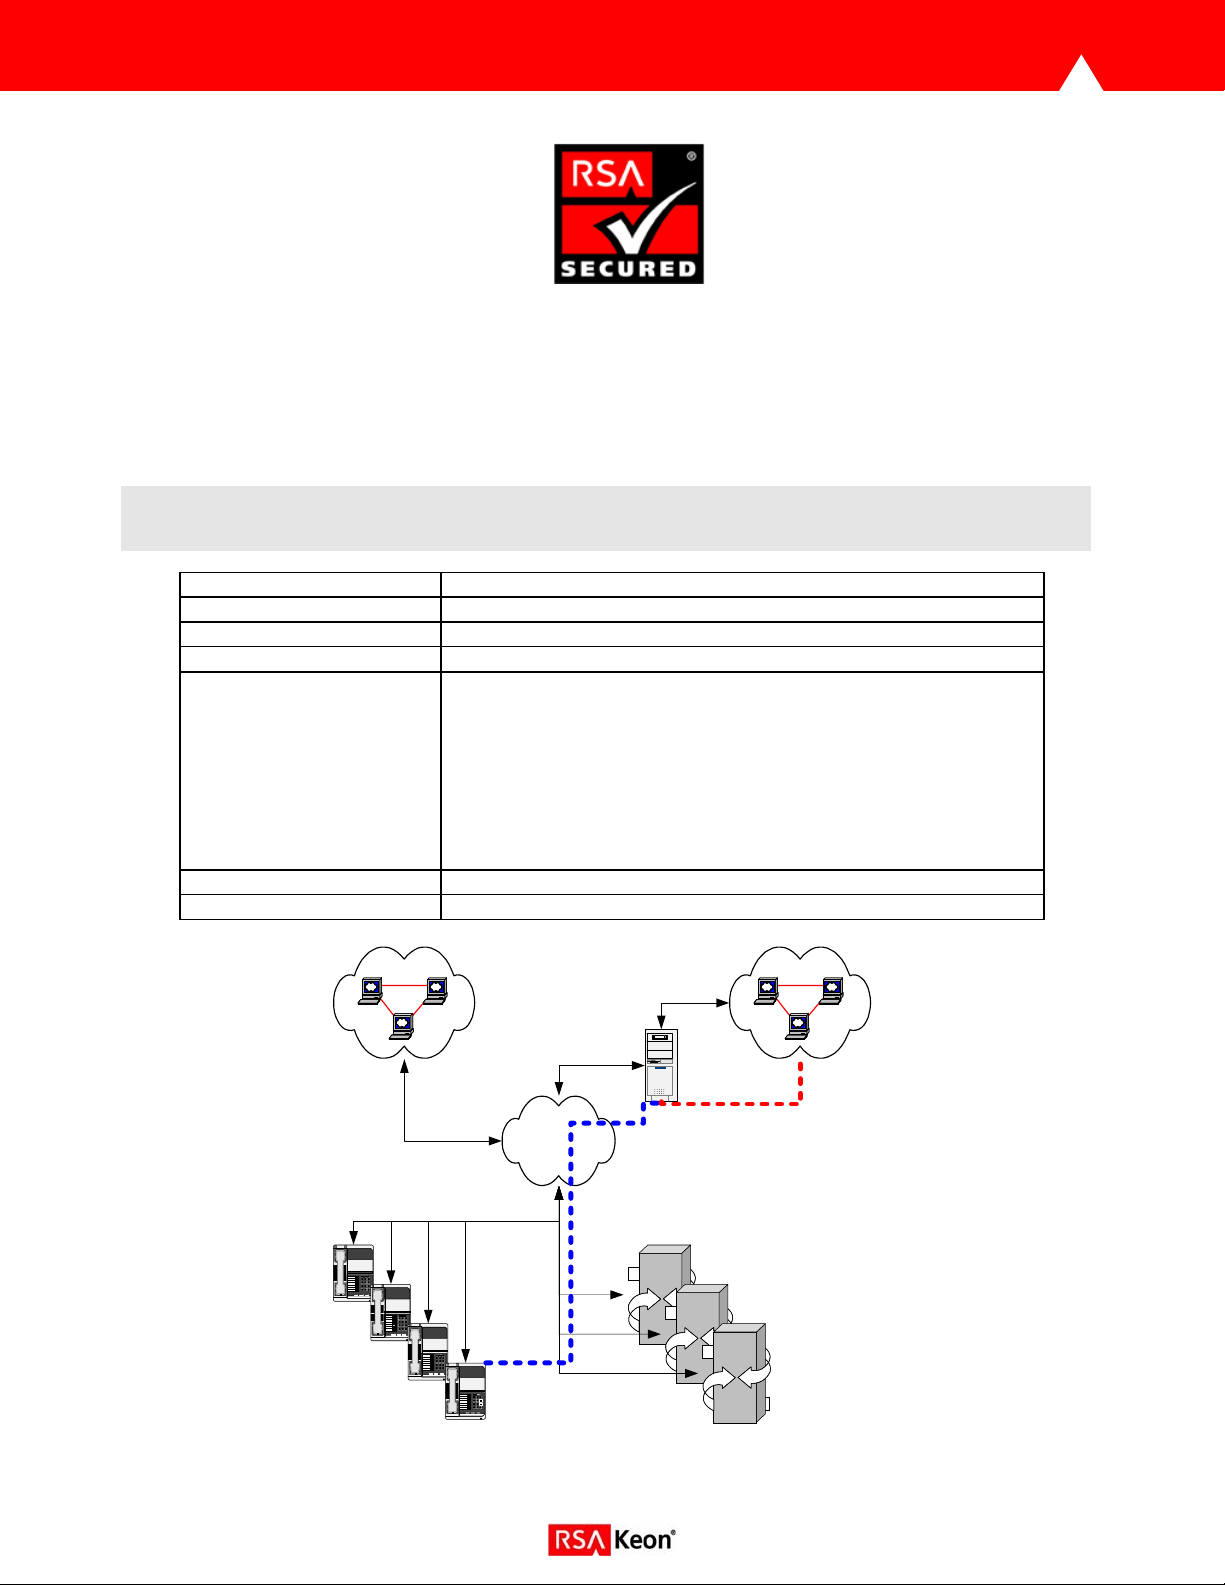
Product Name Cisco Certificate Authority Proxy Function (CAPF)
Version & Platform CAPF Version 1.0(1) CallManager Version 4.0(1)
Product Description CAPF Communicates with the Certificate Authority (CA) server
on behalf of the phone. CAPF implements parts of the certificate
generation procedure that are too processing-intensive for the
phone, and it interacts with the phone for key generation and
certificate installation. The CAPF server can be configured to
request certificates from customer-specified certificate authorities
on behalf of the phone, or it can be configured to generate
certificates locally.
Product Category Networks and Comunications
RSA Product Interaction RSA Keon Certificate Authority
123
456
789
8#
*
123
456
789
8#
*
123
456
789
8#
*
123
456
789
8#
*
Page: 1
Page 2
2. Contact Information
Sales contact Support Contact
Email tac@cisco.com
Phone 1-800-553-NETS 1-800-553-2447
Web www.cisco.com www.cisco.com/en/US/support/index.htm
l
3. Product Requirements
Hardware requirements
Component Name: CAPF
CAPF Cisco CallManager (7815, 7825, 7835, 7845, 7855, 7865)
Software requirements
Component Name: CAPF
Operating System Version (Patch-level)
Windows 2000 Server SP4
Page: 2
Page 3

4. Product Configuration
Using CAPF to Generate Phone Certificates
Perform the following procedure to use the Certificate Authority Proxy Function, and install a certificate on
a 7940 or 7960 IP Phone.
Procedure
Step 1 Perform one of the following tasks:
• Choose Start > Programs > CAPF.
• On the desktop, double-click the CAPF icon.
Step 2 A Command Line Interface displays. Enter your username.
Step 3 Enter your password.
Tip CAPF displays the default or existing configured parameters. If this is the first time that you have used
CAPF, the utility automatically generates a 1024-bit key pair and a self-signed certificate for CAPF;
the self-signed certificate automatically gets added to C:\Program Files\Cisco\Certificates on all
servers in the cluster. If this is not your first time to use CAPF, be aware that a key pair/certificate is
not generated unless you enter an explicit command during the configuration.
Step 4 If you want to change the existing parameters that display, for example, the listening port for the
phone, enter the appropriate commands.
Step 5 If the CAPF CLI continues to display, go to Step 10.
Step 6 If CAPF utility does not display because you rebooted the server after you updated the CTL file,
perform one of the following tasks:
• Choose Start > Programs > CAPF.
• On the desktop, double-click the CAPF icon.
Step 7 A Command Line Interface displays. Enter your username.
Step 8 Enter your password.
Step 9 Perform the following tasks, depending on the method for issuing certificates for the phones:
• If the CAPF utility will issue the certificates, go to Step 11.
• If a Cisco-approved, third-party certificate authority will issue certificates, enter issue cert ca,
press Enter.
• Enter set ca-server [user<name> password<passwd>] [type<CA type>] <ip<address> |
dns<name>>, press Enter. The user and password are optional and the type should be
“keon”..Example set ca-server type keon ip 10.100.1.10
• Enter set jurisdiction-ID <jurisdiction ID for CA Server>, press Enter.
Note: The default port for SCEP is 446. This will become configurable in a later Cisco release.
• Go to Step 11.
Step 10 At the CAPF prompt, enter get phone-info. If you add phones to the database after the initial
retrieval from the Cisco CallManager database, you must issue this command again.
Step 11 At the CAPF prompt, enter set cert upgrade all, press Enter. This command configures all
devices for the certificate upgrade. To configure a specific phone for upgrade, issue the following
command: set cert upgrade id <device name>
Page: 3
Page 4

Step 12 At the CAPF prompt, perform the following task, depending on what you want to accomplish:
• If you plan to use the authentication string that the get phone-info command creates, go to Step
14.
• If you want to generate an authentication string for a specific phone, issue the following
command: set auth-string id <device name>
Caution If you want to set the authentication string to Null or if you want to generate new authentication
strings, enter the command, set auth-string <id | all > <value> [<type>], at the CAPF prompt;
press Enter. Cisco strongly recommends that you use null authentication only in closed, secure
environments.
Step 13 At the next CAPF prompt, enter show auth-string all, press Enter.
The phone information from the database displays for each phone. If thousands of phones exist
in the cluster, all phones may not display in the CLI. The CAPF utility logs the phone record
information in C:\ProgramFiles\Cisco\CAPF\Trace\CAPF.csv. If you have access to software that
converts CSV files, such as Microsoft Excel, you can convert the CAPF.csv file and view the
records by using that software. The utility also writes the entries to the log file. To display a
single device name and authentication string, issue the following
command: show auth-string id <device name>
Step 14 Determine the phone user that is associated with the Device Name by performing the following
procedure:
a. On the server where you installed the CAPF utility, obtain the CSV file, CAPF.csv, from
C:\Program Files\Cisco\CAPF\Trace.
b. By using software that converts CSV files, export this file to a format in which you can view the
phone record information.
Page: 4
Page 5

5. Product Operation
Install the locally significant certificate on the phone.
Step 1 Obtain the CAPF authentication string that was set when the CAPF utility was configured.
Step 2 On the Cisco IP Phone 7960 and 7940, press the Settings button to access the Settings menu.
Step 3 Scroll to the Certificate option; press the Select softkey.
Step 4 Scroll to the Update Certificates option; press the Select softkey.
Step 5 Choose the Auth. String option; press the Select softkey. The phone prompts you for an
authentication string.
Step 6 Enter the authentication string for your phone and press the Validat. softkey.
The phone installs, updates, or remove the certificate, depending on the current CAPF
configuration.
Monitor the progress of the certificate installation by viewing the messages in the status line on the
phone. When the phone successfully completes the process, the phone displays a successful
message. If the phone displays a failure message, you entered the wrong authentication string or
did not enable the phone for upgrade.
At any time, you can stop the process by choosing the Cancel Operation option on the Certificates
menu.
You can verify that the certificate installed on the phone by choosing Settings > Model
Information and viewing the LSC setting.
Page: 5
Page 6

6. Certification Checklist for 3rd Party Applications
Date Tested: January 15, 2004
Product Tested Version
RSA Keon Certificate Authority 6.5.1
CAPF 1.0(1)
Test Case Result
Certificate Enrollment
P10 Certificate Request N/A
P7 Response installed correctly N/A
CMP Certificate Request N/A
CMP Response installed correctly N/A
SCEP Certificate Request Pass
SCEP Response installed correctly Pass
Import Certificate
Import PKCS#12 envelope N/A
Import via cut & paste N/A
Install Root Certificate via cut/paste N/A
Install SubCA Certificate via cut/paste N/A
Install Root Certificate via SCEP Pass
Install SubCA Certificate via SCEP N/A
Verify Certificate chain is installed N/A
Certificate Usage
S/MIME N/A N/A
Document and Files N/A N/A
SSL Client Authentication Pass
LDAP Support
Name lookup N/A
Certificate retrieval N/A
Status Check of Certificate
Success with a valid certificate N/A N/A N/A
Fails with a revoked certificate N/A N/A N/A
Fails with a suspended certificate N/A N/A N/A
Pass with a re-instated certificate N/A N/A N/A
RSA Keon Web Passport / RSA SecurID Passage Support Passage KWP
Access certificates via MS CAPI (Internet Explorer) N/A N/A
Access certificates via PKCS#11 (Netscape) N/A N/A
PAR/SWA *P=Pass or Yes F=Fail N/A=Non-available function
Sign Encrypt SSL
OCSP CRL Other
Page: 6
Page 7

7. Known Issues
1. No known issues.
Page: 7
 Loading...