

Page 1

Cisco Nexus 9000 Series NX-OS Fundamentals Configuration Guide, Release 7.x
First Published: 2015-02-01
Last Modified: 2017-06-16
Americas Headquarters
Cisco Systems, Inc.
170 West Tasman Drive
San Jose, CA 95134-1706
USA
http://www.cisco.com
Tel: 408 526-4000
800 553-NETS (6387)
Fax: 408 527-0883
Page 2

THE SPECIFICATIONS AND INFORMATION REGARDING THE PRODUCTS IN THIS MANUAL ARE SUBJECT TO CHANGE WITHOUT NOTICE. ALL STATEMENTS,
INFORMATION, AND RECOMMENDATIONS IN THIS MANUAL ARE BELIEVED TO BE ACCURATE BUT ARE PRESENTED WITHOUT WARRANTY OF ANY KIND,
EXPRESS OR IMPLIED. USERS MUST TAKE FULL RESPONSIBILITY FOR THEIR APPLICATION OF ANY PRODUCTS.
THE SOFTWARE LICENSE AND LIMITED WARRANTY FOR THE ACCOMPANYING PRODUCT ARE SET FORTH IN THE INFORMATION PACKET THAT SHIPPED WITH
THE PRODUCT AND ARE INCORPORATED HEREIN BY THIS REFERENCE. IF YOU ARE UNABLE TO LOCATE THE SOFTWARE LICENSE OR LIMITED WARRANTY,
CONTACT YOUR CISCO REPRESENTATIVE FOR A COPY.
The Cisco implementation of TCP header compression is an adaptation of a program developed by the University of California, Berkeley (UCB) as part of UCB's public domain version
of the UNIX operating system. All rights reserved. Copyright©1981, Regents of the University of California.
NOTWITHSTANDING ANY OTHER WARRANTY HEREIN, ALL DOCUMENT FILES AND SOFTWAREOF THESE SUPPLIERS ARE PROVIDED “AS IS" WITH ALL FAULTS.
CISCO AND THE ABOVE-NAMED SUPPLIERS DISCLAIM ALL WARRANTIES, EXPRESSED OR IMPLIED, INCLUDING, WITHOUT LIMITATION, THOSE OF
MERCHANTABILITY, FITNESS FOR A PARTICULAR PURPOSE AND NONINFRINGEMENT OR ARISING FROM A COURSE OF DEALING, USAGE, OR TRADE PRACTICE.
IN NO EVENT SHALL CISCO OR ITS SUPPLIERS BE LIABLE FOR ANY INDIRECT, SPECIAL, CONSEQUENTIAL, OR INCIDENTAL DAMAGES, INCLUDING, WITHOUT
LIMITATION, LOST PROFITS OR LOSS OR DAMAGE TO DATA ARISING OUT OF THE USE OR INABILITY TO USE THIS MANUAL, EVEN IF CISCO OR ITS SUPPLIERS
HAVE BEEN ADVISED OF THE POSSIBILITY OF SUCH DAMAGES.
Any Internet Protocol (IP) addresses and phone numbers used in this document are not intended to be actual addresses and phone numbers. Any examples, command display output, network
topology diagrams, and other figures included in the document are shown for illustrative purposes only. Any use of actual IP addresses or phone numbers in illustrative content is unintentional
and coincidental.
This product includes cryptographic software written by Eric Young (eay@cryptsoft.com).
This product includes software developed by the OpenSSL Project for use in the OpenSSL Toolkit. (https://www.openssl.org/)
This product includes software written by Tim Hudson (tjh@cryptsoft.com).
Cisco and the Cisco logo are trademarks or registered trademarks of Cisco and/or its affiliates in the U.S. and other countries. To view a list of Cisco trademarks, go to this URL: https:/
/www.cisco.com/go/trademarks. Third-party trademarks mentioned are the property of their respective owners. The use of the word partner does not imply a partnership
relationship between Cisco and any other company. (1110R)
©
2016-2017 Cisco Systems, Inc. All rights reserved.
Page 3

CONTENTS
Preface
CHAPTER 1
CHAPTER 2
Preface xi
Audience xi
Document Conventions xi
Related Documentation for Cisco Nexus 9000 Series Switches xii
Documentation Feedback xii
Obtaining Documentation and Submitting a Service Request xiii
New and Changed Information 1
New and Changed Information 1
Overview 3
Software Image 3
Software Compatibility 3
Spine/Leaf Topology 3
Modular Software Design 4
Serviceability 4
Switched Port Analyzer 4
Ethanalyzer 4
Smart Call Home 5
Online Diagnostics 5
Embedded Event Manager 5
Manageability 5
Simple Network Management Protocol 5
Configuration Verification and Rollback 5
Role-Based Access Control 6
Cisco NX-OS Device Configuration Methods 6
Programmability 6
Cisco Nexus 9000 Series NX-OS Fundamentals Configuration Guide, Release 7.x
iii
Page 4

Contents
Python API 6
Tcl 6
Cisco NX-API 7
Bash Shell 7
Broadcom Shell 7
Traffic Routing, Forwarding, and Management 7
Ethernet Switching 7
IP Routing 8
IP Services 8
IP Multicast 8
Quality of Service 9
Network Security Features 9
Licensing 10
CHAPTER 3
CHAPTER 4
Supported Standards 10
Using the Cisco NX-OS Setup Utility 15
About the Cisco NX-OS Setup Utility 15
Prerequisites for the Setup Utility 17
Setting Up Your Cisco NX-OS Device 17
Additional References for the Setup Utility 21
Related Documents for the Setup Utility 21
Using PowerOn Auto Provisioning 23
About PowerOn Auto Provisioning 23
Network Requirements for POAP 24
POAP Configuration Script 24
Using the POAP Script and POAP Script Options 25
Setting up the DHCP Server without DNS for POAP 27
Downloading and Using User Data, Agents, and Scripts as part of POAP 28
POAP Process 28
Power-Up Phase 31
DHCP Discovery Phase 31
POAP Dynamic Breakout 33
Script Execution Phase 33
Post-Installation Reload Phase 33
Cisco Nexus 9000 Series NX-OS Fundamentals Configuration Guide, Release 7.x
iv
Page 5

Contents
Guidelines and Limitations for POAP 33
Setting Up the Network Environment to Use POAP 34
Configuring a Switch Using POAP 34
Creating md5 Files 35
Verifying the Device Configuration 37
Troubleshooting for POAP 37
Managing the POAP Personality 37
POAP Personality 37
Backing Up the POAP Personality 38
Configuring the POAP Personality 38
Restoring the POAP Personality 40
POAP Personality Sample Script 40
CHAPTER 5
Understanding the Command-Line Interface 43
About the CLI Prompt 44
Command Modes 44
EXEC Command Mode 44
Global Configuration Command Mode 45
Interface Configuration Command Mode 45
Subinterface Configuration Command Mode 46
Saving and Restoring a Command Mode 46
Exiting a Configuration Command Mode 47
Command Mode Summary 47
Special Characters 48
Keystroke Shortcuts 49
Abbreviating Commands 52
Completing a Partial Command Name 52
Identifying Your Location in the Command Hierarchy 53
Using the no Form of a Command 53
Configuring CLI Variables 54
About CLI Variables 54
Configuring CLI Session-Only Variables 55
Configuring Persistent CLI Variables 55
Command Aliases 56
About Command Aliases 56
Cisco Nexus 9000 Series NX-OS Fundamentals Configuration Guide, Release 7.x
v
Page 6

Contents
Defining Command Aliases 57
Configuring Command Aliases for a User Session 57
Command Scripts 58
Running a Command Script 58
Echoing Information to the Terminal 58
Delaying Command Action 59
Context-Sensitive Help 60
Understanding Regular Expressions 62
Special Characters 62
Multiple-Character Patterns 62
Anchoring 63
Searching and Filtering show Command Output 63
Filtering and Searching Keywords 64
diff Utility 65
grep and egrep Utilities 66
less Utility 67
Mini AWK Utility 67
sed Utility 67
sort Utility 67
Searching and Filtering from the --More-- Prompt 68
Using the Command History 69
Recalling a Command 69
Controlling CLI History Recall 70
Configuring the CLI Edit Mode 70
Displaying the Command History 70
Enabling or Disabling the CLI Confirmation Prompts 71
Setting CLI Display Colors 71
Sending Commands to Modules 72
Sending Command Output in Email 73
BIOS Loader Prompt 74
Examples Using the CLI 74
Using the System-Defined Timestamp Variable 74
Using CLI Session Variables 75
Defining Command Aliases 75
Running a Command Script 76
Cisco Nexus 9000 Series NX-OS Fundamentals Configuration Guide, Release 7.x
vi
Page 7

Contents
Sending Command Output in Email 76
Additional References for the CLI 77
Related Documents for the CLI 77
CHAPTER 6
Configuring Terminal Settings and Sessions 79
About Terminal Settings and Sessions 79
Terminal Session Settings 79
Console Port 80
Virtual Terminals 80
Licensing Requirements for Terminal Settings and Sessions 80
Default Settings for File System Parameters 81
Configuring the Console Port 81
Configuring Virtual Terminals 82
Configuring the Inactive Session Timeout 82
Configuring the Session Limit 83
Clearing Terminal Sessions 84
Displaying Terminal and Session Information 85
Additional References for Terminal Settings and Sessions 85
Related Documents for Terminal Settings and Sessions 85
CHAPTER 7
Basic Device Management 87
About Basic Device Management 87
Device Hostname 87
Message-of-the-Day Banner 88
Device Clock 88
Clock Manager 88
Time Zone and Summer Time (Daylight Saving Time) 88
User Sessions 88
Licensing Requirements for Basic Device Management 88
Default Settings for Basic Device Parameters 89
Changing the Device Hostname 89
Configuring the MOTD Banner 90
Configuring the Time Zone 90
Configuring Summer Time (Daylight Saving Time) 91
Manually Setting the Device Clock 92
Cisco Nexus 9000 Series NX-OS Fundamentals Configuration Guide, Release 7.x
vii
Page 8

Contents
Setting the Clock Manager 93
Managing Users 94
Displaying Information about the User Sessions 94
Sending a Message to Users 94
Verifying the Device Configuration 94
Additional References for Basic Device Management 95
Related Documents for Basic Device Management 95
CHAPTER 8
Using the Device File Systems, Directories, and Files 97
About the Device File Systems, Directories, and Files 97
File Systems 97
Directories 98
Files 98
Licensing Requirements for File Systems, Directories, and Files 99
Default Settings for File System Parameters 99
Configuring the FTP, HTTP, or TFTP Source Interface 99
Working with Directories 100
Identifying the Current Directory 100
Changing the Current Directory 100
Creating a Directory 101
Displaying Directory Contents 101
Deleting a Directory 101
Accessing Directories on the Standby Supervisor Module 102
Working with Files 102
viii
Moving Files 102
Copying Files 103
Deleting Files 104
Displaying File Contents 104
Displaying File Checksums 105
Compressing and Uncompressing Files 105
Displaying the Last Lines in a File 105
Redirecting show Command Output to a File 106
Finding Files 106
Working with Archive Files 107
Creating an Archive File 107
Cisco Nexus 9000 Series NX-OS Fundamentals Configuration Guide, Release 7.x
Page 9

Contents
Appending Files to an Archive File 108
Extracting Files from an Archive File 108
Displaying the Filenames in an Archive File 109
Examples of Using the File System 109
Accessing Directories on Standby Supervisor Modules 109
Moving Files 110
Copying Files 110
Deleting a Directory 110
Displaying File Contents 111
Displaying File Checksums 111
Compressing and Uncompressing Files 112
Redirecting show Command Output 112
CHAPTER 9
Finding Files 112
Additional References for File Systems 113
Related Documents for File Systems 113
Working with Configuration Files 115
About Configuration Files 115
Types of Configuration Files 115
Licensing Requirements for Configuration Files 116
Managing Configuration Files 116
Saving the Running Configuration to the Startup Configuration 116
Copying a Configuration File to a Remote Server 117
Downloading the Running Configuration From a Remote Server 117
Downloading the Startup Configuration From a Remote Server 118
Copying Configuration Files to an External Flash Memory Device 120
Copying the Running Configuration from an External Flash Memory Device 120
Copying the Startup Configuration From an External Flash Memory Device 121
Copying Configuration Files to an Internal File System 122
Rolling Back to a Previous Configuration 123
Removing the Configuration for a Missing Module 123
Erasing a Configuration 124
Clearing Inactive Configurations 125
Configuration Archive and Configuration Log 126
Information About Configuration Archive 126
Cisco Nexus 9000 Series NX-OS Fundamentals Configuration Guide, Release 7.x
ix
Page 10

Contents
Configuring the Characteristics of the Configuration Archive 126
Information About Configuration Log 128
Displaying Configuration Log Entries 129
Verifying the Device Configuration 130
Examples of Working with Configuration Files 130
Copying Configuration Files 130
Backing Up Configuration Files 130
Rolling Back to a Previous Configuration 131
Additional References for Configuration Files 131
Related Documents for Configuration Files 131
Cisco Nexus 9000 Series NX-OS Fundamentals Configuration Guide, Release 7.x
x
Page 11

Preface
This preface includes the following sections:
Audience, page xi
•
Document Conventions, page xi
•
Related Documentation for Cisco Nexus 9000 Series Switches, page xii
•
Documentation Feedback, page xii
•
Obtaining Documentation and Submitting a Service Request, page xiii
•
Audience
This publication is for network administrators who install, configure, and maintain Cisco Nexus switches.
Document Conventions
Command descriptions use the following conventions:
DescriptionConvention
bold
Italic
[x | y]
{x | y}
Bold text indicates the commands and keywords that you enter literally
as shown.
Italic text indicates arguments for which the user supplies the values.
Square brackets enclose an optional element (keyword or argument).[x]
Square brackets enclosing keywords or arguments separated by a vertical
bar indicate an optional choice.
Braces enclosing keywords or arguments separated by a vertical bar
indicate a required choice.
Cisco Nexus 9000 Series NX-OS Fundamentals Configuration Guide, Release 7.x
xi
Page 12

Related Documentation for Cisco Nexus 9000 Series Switches
Preface
DescriptionConvention
[x {y | z}]
variable
string
Examples use the following conventions:
italic screen font
Nested set of square brackets or braces indicate optional or required
choices within optional or required elements. Braces and a vertical bar
within square brackets indicate a required choice within an optional
element.
Indicates a variable for which you supply values, in context where italics
cannot be used.
A nonquoted set of characters. Do not use quotation marks around the
string or the string will include the quotation marks.
DescriptionConvention
Terminal sessions and information the switch displays are in screen font.screen font
Information you must enter is in boldface screen font.boldface screen font
Arguments for which you supply values are in italic screen font.
Nonprinting characters, such as passwords, are in angle brackets.< >
Default responses to system prompts are in square brackets.[ ]
!, #
An exclamation point (!) or a pound sign (#) at the beginning of a line
of code indicates a comment line.
Related Documentation for Cisco Nexus 9000 Series Switches
The entire Cisco Nexus 9000 Series switch documentation set is available at the following URL:
http://www.cisco.com/en/US/products/ps13386/tsd_products_support_series_home.html
Documentation Feedback
To provide technical feedback on this document, or to report an error or omission, please send your comments
to nexus9k-docfeedback@cisco.com. We appreciate your feedback.
xii
Cisco Nexus 9000 Series NX-OS Fundamentals Configuration Guide, Release 7.x
Page 13

Preface
Obtaining Documentation and Submitting a Service Request
Obtaining Documentation and Submitting a Service Request
For information on obtaining documentation, using the Cisco Bug Search Tool (BST), submitting a service
request, and gathering additional information, see What's New in Cisco Product Documentation at: http://
www.cisco.com/c/en/us/td/docs/general/whatsnew/whatsnew.html.
Subscribe to What's New in Cisco Product Documentation, which lists all new and revised Cisco technical
documentation as an RSS feed and delivers content directly to your desktop using a reader application. The
RSS feeds are a free service.
Cisco Nexus 9000 Series NX-OS Fundamentals Configuration Guide, Release 7.x
xiii
Page 14

Obtaining Documentation and Submitting a Service Request
Preface
xiv
Cisco Nexus 9000 Series NX-OS Fundamentals Configuration Guide, Release 7.x
Page 15

New and Changed Information
This chapter provides release-specific information for each new and changed feature in the Cisco Nexus
9000 Series NX-OS Fundamentals Guide, Release 7.x.
New and Changed Information, page 1
•
New and Changed Information
This table summarizes the new and changed features for the Cisco Nexus 9000 Series NX-OS Fundamentals
Configuration Guide, Release 7.x and tells you where they are documented.
Table 1: New and Changed Features for Cisco NX-OS Release 7.x
CHAPTER 1
POAP
POAP
Support for Configuration
Archive and Archive Log
Command-line interface
DescriptionFeature
the md5 checksum files.
Introduced a single POAP
script and the ability to start a
service on boot across all Cisco
Nexus 9000 Series switches
and the Cisco Nexus 3164Q,
31128PQ, 3232C, and 3264Q
switches.
configuration archive and
archive log.
variables to contain hyphens
and underscores.
in
Release
7.0(3)I6(1)Added procedure to re-create
7.0(3)I5(1)Added support for
7.0(3)I4(1)Enabled Cisco NX-OS CLI
Where DocumentedChanged
Creating md5 Files, on page
35
Using PowerOn Auto
Provisioning, on page 23
Configuration Archive and
Configuration Log, on page
126
Configuring CLI Session-Only
Variables, on page 55 and
Configuring Persistent CLI
Variables, on page 55
Cisco Nexus 9000 Series NX-OS Fundamentals Configuration Guide, Release 7.x
1
Page 16

New and Changed Information
New and Changed Information
POAP
copy command
DescriptionFeature
personality and dynamic
breakout features.
file system.
in
Release
7.0(3)I4(1)Introduced the POAP
Where DocumentedChanged
Using PowerOn Auto
Provisioning, on page 23
Copying Files, on page 1037.0(3)I1(1)Added support for the HTTPS
Cisco Nexus 9000 Series NX-OS Fundamentals Configuration Guide, Release 7.x
2
Page 17

Overview
This chapter contains the following sections:
Software Image, page 3
•
Software Compatibility, page 3
•
Serviceability, page 4
•
Manageability, page 5
•
Programmability, page 6
•
Traffic Routing, Forwarding, and Management, page 7
•
Quality of Service, page 9
•
Network Security Features, page 9
•
Licensing, page 10
•
Supported Standards, page 10
•
CHAPTER 2
Software Image
The Cisco NX-OS software consists of one NXOS software image (for example, n9000-dk9.6.1.2.I1.1.bin).
This image runs on all Cisco Nexus 9000 Series switches.
Software Compatibility
The Cisco NX-OS software interoperates with Cisco products that run any variant of the Cisco IOS software.
The Cisco NX-OS software also interoperates with any networking operating system that conforms to the
IEEE and RFC compliance standards.
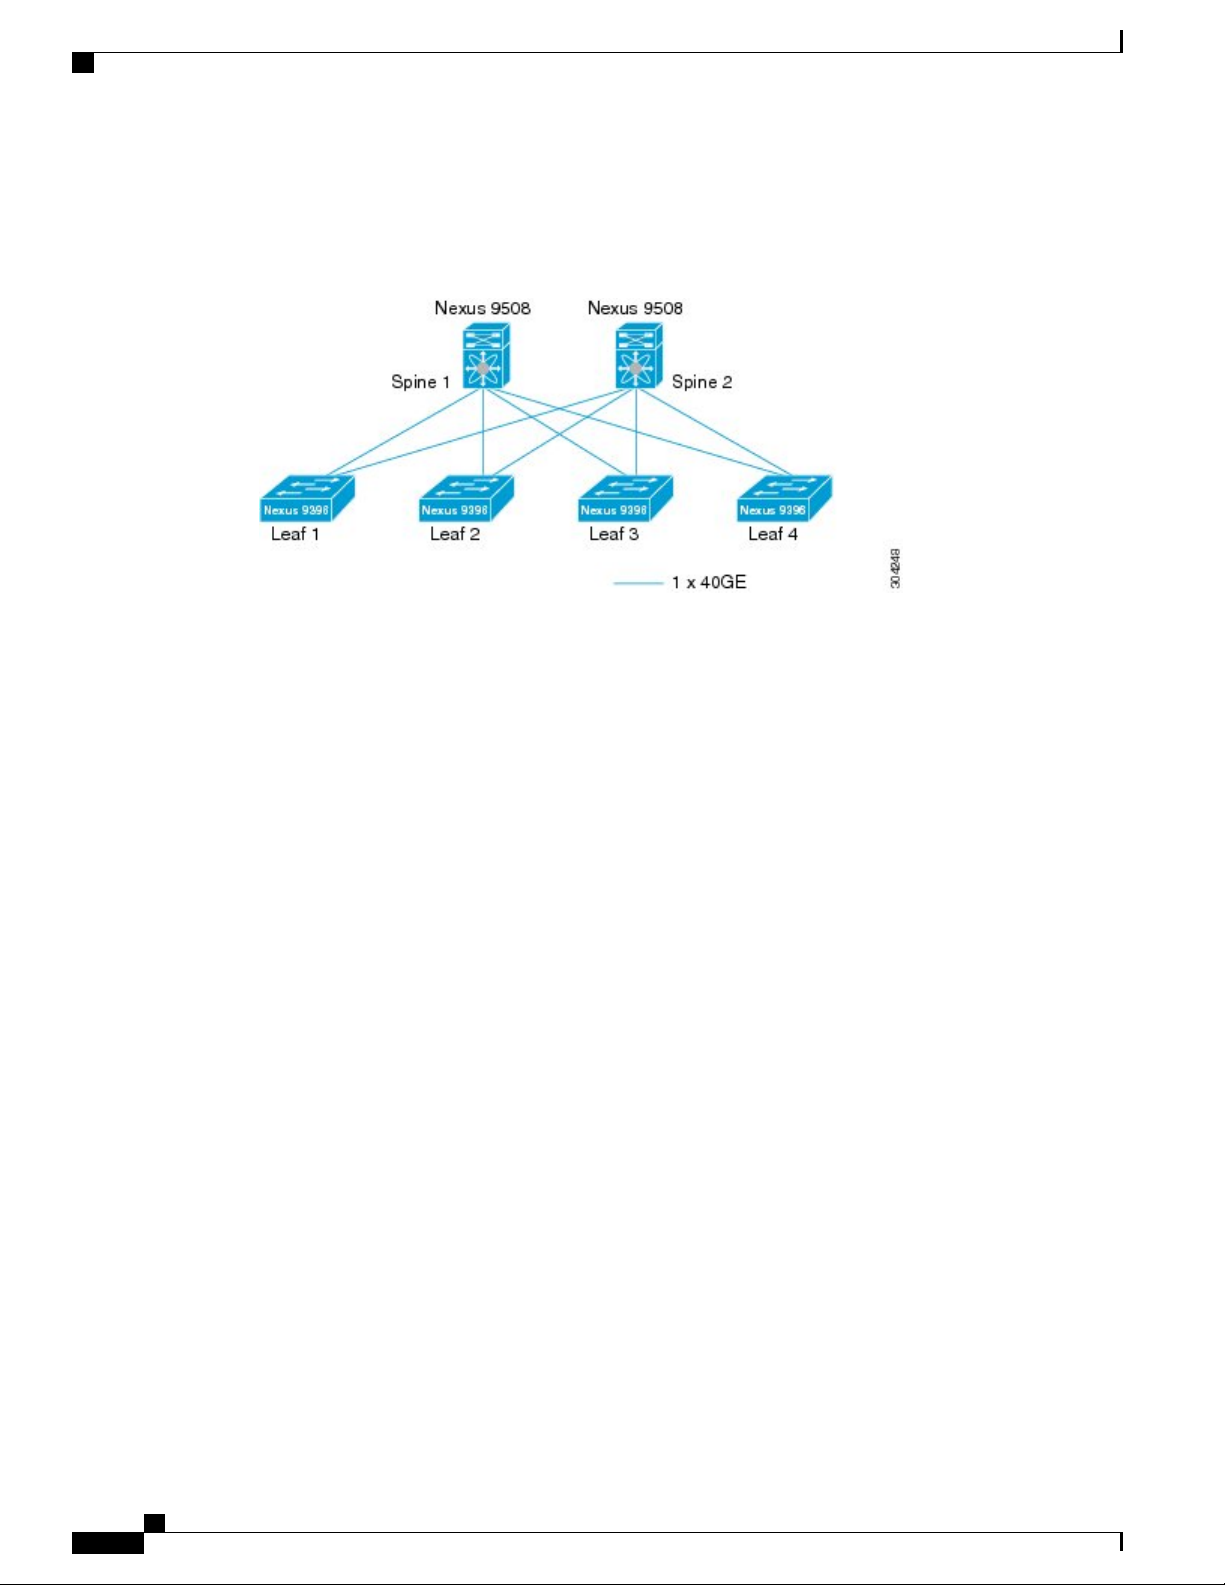
Spine/Leaf Topology
The Cisco Nexus 9000 Series switches support a two-tier spine/leaf topology.
Cisco Nexus 9000 Series NX-OS Fundamentals Configuration Guide, Release 7.x
3
Page 18
Modular Software Design
This figure shows an example of a spine/leaf topology with four leaf switches (Cisco Nexus 9396 or 93128)
connecting into two spine switches (Cisco Nexus 9508) and two 40G Ethernet uplinks from each leaf to each
spine.
Figure 1: Spine/Leaf Topology
Overview
Modular Software Design
The Cisco NX-OS software supports distributed multithreaded processing on symmetric multiprocessors
(SMPs), multi-core CPUs, and distributed data module processors. The Cisco NX-OS software offloads
computationally intensive tasks, such as hardware table programming, to dedicated processors distributed
across the data modules. The modular processes are created on demand, each in a separate protected memory
space. Processes are started and system resources are allocated only when you enable a feature. A real-time
preemptive scheduler helps to ensure the timely processing of critical functions.
Serviceability
The Cisco NX-OS software has serviceability functions that allow the device to respond to network trends
and events. These features help you with network planning and improving response times.
Switched Port Analyzer
The Switched Port Analyzer (SPAN) feature allows you to analyze all traffic between ports (called the SPAN
source ports) by nonintrusively directing the SPAN session traffic to a SPAN destination port that has an
external analyzer attached to it. For more information about SPAN, see the Cisco Nexus 9000 Series NX-OS
System Management Configuration Guide.
Ethanalyzer
Cisco Nexus 9000 Series NX-OS Fundamentals Configuration Guide, Release 7.x
4
Ethanalyzer is a Cisco NX-OS protocol analyzer tool based on the Wireshark (formerly Ethereal) open source
code. Ethanalyzer is a command-line version of Wireshark for capturing and decoding packets. You can use
Ethanalyzer to troubleshoot your network and analyze the control-plane traffic. For more information about
Ethanalyzer, see the Cisco Nexus 9000 Series NX-OS Troubleshooting Guide.
Page 19

Overview
Smart Call Home
The Call Home feature continuously monitors hardware and software components to provide e-mail-based
notification of critical system events. A versatile range of message formats is available for optimal compatibility
with pager services, standard e-mail, and XML-based automated parsing applications. It offers alert grouping
capabilities and customizable destination profiles. You can use this feature, for example, to directly page a
network support engineer, send an e-mail message to a network operations center (NOC), and employ Cisco
AutoNotify services to directly generate a case with the Cisco Technical Assistance Center (TAC). For more
information about Smart Call Home, see the Cisco Nexus 9000 Series NX-OS System Management Configuration
Guide.
Online Diagnostics
Cisco generic online diagnostics (GOLD) verify that hardware and internal data paths are operating as designed.
Boot-time diagnostics, continuous monitoring, and on-demand and scheduled tests are part of the Cisco GOLD
feature set. GOLD allows rapid fault isolation and continuous system monitoring. For information about
configuring GOLD, see the Cisco Nexus 9000 Series NX-OS System Management Configuration Guide.
Smart Call Home
Embedded Event Manager
Cisco Embedded Event Manager (EEM) is a device and system management feature that helps you to customize
behavior based on network events as they happen. For information about configuring EEM, see the Cisco
Nexus 9000 Series NX-OS System Management Configuration Guide.
Manageability
This section describes the manageability features for the Cisco Nexus 9000 Series switches.
Simple Network Management Protocol
The Cisco NX-OS software is compliant with Simple Network Management Protocol (SNMP) version 1,
version 2, and version 3. A large number of MIBs is supported. For more information about SNMP, see the
Cisco Nexus 9000 Series NX-OS System Management Configuration Guide.
Configuration Verification and Rollback
The Cisco NX-OS software allows you to verify the consistency of a configuration and the availability of
necessary hardware resources prior to committing the configuration. You can preconfigure a device and apply
the verified configuration at a later time. Configurations also include checkpoints that allow you to roll back
to a known good configuration as needed. For more information about rollbacks, see the Cisco Nexus 9000
Series NX-OS System Management Configuration Guide.
Cisco Nexus 9000 Series NX-OS Fundamentals Configuration Guide, Release 7.x
5
Page 20

Role-Based Access Control
Role-Based Access Control
With role-based access control (RBAC), you can limit access to device operations by assigning roles to users.
You can customize access and restrict it to the users who require it. For more information about RBAC, see
the Cisco Nexus 9000 Series NX-OS Security Configuration Guide.
Cisco NX-OS Device Configuration Methods
You can use these methods to configure Cisco NX-OS devices:
The CLI from a Secure Shell (SSH) session, a Telnet session, or the console port. SSH provides a secure
•
connection to the device. The CLI configuration guides are organized by feature. For more information,
see the Cisco NX-OS configuration guides. For more information about SSH and Telnet, see the Cisco
Nexus 9000 Series NX-OS Security Configuration Guide.
The XML management interface, which is a programmatic method based on the NETCONF protocol
•
that complements the CLI. For more information, see the Cisco NX-OS XML Interface User Guide.
Overview
The Cisco Data Center Network Management (DCNM) client, which runs on your local PC and uses
•
web services on the Cisco DCNM server. The Cisco DCNM server configures the device over the XML
management interface. For more information about the Cisco DCNM client, see the Cisco DCNM
Fundamentals Guide.
Programmability
This section describes the programmability features for the Cisco Nexus 9000 Series switches.
Python API
Python is an easy-to-learn, powerful programming language. It has efficient high-level data structures and a
simple but effective approach to object-oriented programming. Python's elegant syntax and dynamic typing,
together with its interpreted nature, make it an ideal language for scripting and rapid application development
in many areas on most platforms. The Python interpreter and the extensive standard library are freely available
in source or binary form for all major platforms from the Python website: http://www.python.org/. The Python
scripting capability gives programmatic access to the CLI to perform various tasks and Power-On Auto
Provisioning (POAP) or Embedded Event Manager (EEM) actions. For more information about the Python
API and Python scripting, see the Cisco Nexus 9000 Series NX-OS Programmability Guide.
Tcl
Tool Command Language (Tcl) is a scripting language. With Tcl, you gain more flexibility in your use of the
CLI commands on the device. You can use Tcl to extract certain values in the output of a show command,
perform switch configurations, run Cisco NX-OS commands in a loop, or define EEM policies in a script.
Cisco Nexus 9000 Series NX-OS Fundamentals Configuration Guide, Release 7.x
6
Page 21

Overview
Cisco NX-API
Cisco NX-API
The Cisco NX-API provides web-based programmatic access to the Cisco Nexus 9000 Series switches. This
support is delivered through the NX-API open-source web server. The Cisco NX-API exposes the complete
configuration and management capabilities of the command-line interface (CLI) through web-based APIs.
You can configure the switch to publish the output of the API calls in either XML or JSON format. For more
information about the Cisco NX-API, see the Cisco Nexus 9000 Series NX-OS Programmability Guide.
Note
NX-API performs authentication through a programmable authentication module (PAM) on the switch.
Use cookies to reduce the number of PAM authentications and thus reduce the load on PAM.
Bash Shell
The Cisco Nexus 9000 Series switches support direct Linux shell access. With Linux shell support, you can
access the Linux system on the switch in order to use Linux commands and manage the underlying system.
For more information about Bash shell support, see the Cisco Nexus 9000 Series NX-OS Programmability
Guide.
Broadcom Shell
The Cisco Nexus 9000 Series switch front-panel and fabric module line cards contain several Broadcom
ASICs. You can use the CLI to access the command-line shell (bcm shell) for these ASICs. The benefit of
using this method to access the bcm shell is that you can use Cisco NX-OS command extensions such as pipe
include and redirect output to file to manage the output. In addition, the activity is recorded in the system
accounting log for audit purposes, unlike commands entered directly from the bcm shell, which are not recorded
in the accounting log. For more information about Broadcom shell support, see the Cisco Nexus 9000 Series
NX-OS Programmability Guide.
Caution
Use Broadcom shell commands with caution and only under the direct supervision or request of Cisco
Support personnel.
Traffic Routing, Forwarding, and Management
This section describes the traffic routing, forwarding, and management features supported by the Cisco NX-OS
software.
Ethernet Switching
The Cisco NX-OS software supports high-density, high-performance Ethernet systems and provides the
following Ethernet switching features:
IEEE 802.1D-2004 Rapid and Multiple Spanning Tree Protocols (802.1w and 802.1s)
•
Cisco Nexus 9000 Series NX-OS Fundamentals Configuration Guide, Release 7.x
7
Page 22

IP Routing
IP Routing
Overview
IEEE 802.1Q VLANs and trunks
•
IEEE 802.3ad link aggregation
•
Unidirectional Link Detection (UDLD) in aggressive and standard modes
•
For more information, see the Cisco Nexus 9000 Series NX-OS Interfaces Configuration Guide and the Cisco
Nexus 9000 Series NX-OS Layer 2 Switching Configuration Guide.
The Cisco NX-OS software supports IP version 4 (IPv4) and IP version 6 (IPv6) and the following routing
protocols:
Open Shortest Path First (OSPF) Protocol Versions 2 (IPv4) and 3 (IPv6)
•
Intermediate System-to-Intermediate System (IS-IS) Protocol (IPv4 and IPv6)
•
Border Gateway Protocol (BGP) (IPv4 and IPv6)
•
IP Services
Enhanced Interior Gateway Routing Protocol (EIGRP) (IPv4 only)
•
Routing Information Protocol Version 2 (RIPv2) (IPv4 only)
•
The Cisco NX-OS software implementations of these protocols are fully compliant with the latest standards
and include 4-byte autonomous system numbers (ASNs) and incremental shortest path first (SPF). All unicast
protocols support Non-Stop Forwarding Graceful Restart (NSF-GR). All protocols support all interface types,
including Ethernet interfaces, VLAN interfaces, subinterfaces, port channels, and loopback interfaces.
For more information, see the Cisco Nexus 9000 Series NX-OS Unicast Routing Configuration Guide.
The following IP services are available in the Cisco NX-OS software:
Virtual routing and forwarding (VRF)
•
Dynamic Host Configuration Protocol (DHCP) helper
•
Hot Standby Router Protocol (HSRP)
•
Enhanced object tracking
•
Policy-based routing (PBR)
•
Unicast graceful restart for all protocols in IPv4 unicast graceful restart for OPSFv3 in IPv6
•
IP Multicast
Cisco Nexus 9000 Series NX-OS Fundamentals Configuration Guide, Release 7.x
8
For more information, see the Cisco Nexus 9000 Series NX-OS Unicast Routing Configuration Guide.
The Cisco NX-OS software includes the following multicast protocols and functions:
Protocol Independent Multicast (PIM) Version 2 (PIMv2)
•
Page 23

Overview
Quality of Service
PIM sparse mode (Any-Source Multicast [ASM] for IPv4)
•
Anycast rendezvous point (Anycast-RP)
•
Multicast NSF for IPv4
•
RP-Discovery using bootstrap router (BSR) (Auto-RP and static)
•
Internet Group Management Protocol (IGMP) Versions 1, 2, and 3 router role
•
IGMPv2 host mode
•
IGMP snooping
•
Multicast Source Discovery Protocol (MSDP) (for IPv4)
•
The Cisco NX-OS software does not support PIM dense mode.Note
For more information, see the Cisco Nexus 9000 Series NX-OS Multicast Routing Configuration Guide.
Quality of Service
The Cisco NX-OS software supports quality of service (QoS) functions for classification, marking, queuing,
policing, and scheduling. Modular QoS CLI (MQC) supports all QoS features. You can use MQC to provide
uniform configurations across various Cisco platforms. For more information, see the Cisco Nexus 9000 Series
NX-OS Quality of Service Configuration Guide.
Network Security Features
The Cisco NX-OS software includes the following security features:
Control Plane Policing (CoPP)
•
Message-digest algorithm 5 (MD5) routing protocol authentication
•
Authentication, authorization, and accounting (AAA)
•
RADIUS and TACACS+
•
SSH Protocol Version 2
•
SNMPv3
•
Policies based on MAC and IPv4 addresses supported by named ACLs (port-based ACLs [PACLs],
•
VLAN-based ACLs [VACLs], and router-based ACLs [RACLs])
Traffic storm control (unicast, multicast, and broadcast)
•
For more information, see the Cisco Nexus 9000 Series NX-OS Security Configuration Guide.
Cisco Nexus 9000 Series NX-OS Fundamentals Configuration Guide, Release 7.x
9
Page 24

Licensing
Licensing
The Cisco NX-OS software licensing feature allows you to access premium features on the device after you
install the appropriate license for that feature. Any feature not included in a license package is bundled with
the Cisco NX-OS software and is provided to you at no extra charge.
You must purchase and install a license for each device.
For detailed information about Cisco NX-OS software licensing, see the Cisco NX-OS Licensing Guide.
For information about troubleshooting licensing issues, see the Cisco Nexus 9000 Series NX-OS Troubleshooting
Guide.
Supported Standards
This table lists the IEEE compliance standards.
Table 2: IEEE Compliance Standards
Overview
DescriptionStandard
MAC Bridges802.1D
Class of Service Tagging for Ethernet frames802.1p
VLAN Tagging802.1Q
Multiple Spanning Tree Protocol802.1s
Rapid Spanning Tree Protocol802.1w
1000Base-T (10/100/1000 Ethernet over copper)802.3ab
Link aggregation with LACP802.3ad
10-Gigabit Ethernet802.3ae
This table lists the RFC compliance standards. For information on each RFC, see www.ietf.org.
Table 3: RFC Compliance Standards
DescriptionStandard
BGP
RFC 1997 BGP Communities Attribute
RFC 2385
Cisco Nexus 9000 Series NX-OS Fundamentals Configuration Guide, Release 7.x
10
Protection of BGP Sessions via the
TCP MD5 Signature Option
Page 25

Overview
Supported Standards
DescriptionStandard
BGP Route flap dampingRFC 2439
RFC 2519
RFC 2858
RFC 3065
RFC 3392
RFC 4273
RFC 4486
RFC 4724
A Framework for Inter-Domain
Route Aggregation
Multiprotocol Extensions for
BGP-4
Autonomous System
Confederations for BGP
Capabilities Advertisement with
BGP-4
BGP version 4RFC 4271
BGP4 MIB - Definitions of
Managed Objects for BGP-4
BGP Route reflectionRFC 4456
Subcodes for BGP cease
notification message
Graceful Restart Mechanism for
BGP
RFC 4893
ietf-draft
ietf-draft
ietf-draft
IP Multicast
RFC 2236
RFC 3376
BGP Support for Four-octet AS
Number Space
Bestpath transition avoidance
(draft-ietf-idr-avoid-transition-05.txt)
Peer table objects
(draft-ietf-idr-bgp4-mib-15.txt)
Dynamic Capability
(draft-ietf-idr-dynamic-cap-03.txt)
Internet Group Management
Protocol, Version 2
Internet Group Management
Protocol, Version 3
Cisco Nexus 9000 Series NX-OS Fundamentals Configuration Guide, Release 7.x
11
Page 26

Supported Standards
Overview
DescriptionStandard
RFC 3446
RFC 3569
RFC 3618
RFC 4601
RFC 4610
RFC 6187
ietf-draft
Anycast Rendezvous Point (RP)
mechanism using Protocol
Independent Multicast (PIM) and
Multicast Source Discovery
Protocol (MSDP)
An Overview of Source-Specific
Multicast (SSM)
Multicast Source Discovery
Protocol (MSDP)
ASM - Sparse Mode (PIM-SM):
Protocol Specification (Revised)
Source-Specific Multicast for IPRFC 4607
Anycast-RP Using Protocol
Independent Multicast (PIM)
X.509v3 Certificates for Secure
Shell Authentication
Mtrace server functionality, to
process mtrace-requests,
draft-ietf-idmr-traceroute-ipm-07.txt
IP Services
RFC 768 UDP
TFTPRFC 783
IPRFC 791
ICMPRFC 792
TCPRFC 793
ARPRFC 826
TelnetRFC 854
FTPRFC 959
Proxy ARPRFC 1027
NTP v3RFC 1305
Cisco Nexus 9000 Series NX-OS Fundamentals Configuration Guide, Release 7.x
12
Page 27

Overview
Supported Standards
DescriptionStandard
CIDRRFC 1519
BootP relayRFC 1542
DNS clientRFC 1591
IPv4 routersRFC 1812
DHCP HelperRFC 2131
VRRPRFC 2338
IS-IS
RFC 1142 (OSI 10589)
RFC 1195
RFC 2763
RFC 2966
RFC 3277
RFC 3373
OSI 10589 Intermediate system to
intermediate system intra-domain
routing exchange protocol
Use of OSI IS-IS for routing in
TCP/IP and dual environment.
Dynamic Hostname Exchange
Mechanism for IS-IS
Domain-wide Prefix Distribution
with Two-Level IS-IS
IS-IS Mesh GroupsRFC 2973
IS-IS Transient Blackhole
Avoidance
Three-Way Handshake for IS-IS
Point-to-Point Adjacencies
IS-IS Cryptographic AuthenticationRFC 3567
Restart Signaling for IS-ISRFC 3847
ietf-draft
OSPF
Internet Draft Point-to-point
operation over LAN in link-state
routing protocols
(draft-ietf-isis-igp-p2p-over-lan-06.txt)
OSPF Version 2RFC 2328
OSPF Opaque LSA OptionRFC 2370
Cisco Nexus 9000 Series NX-OS Fundamentals Configuration Guide, Release 7.x
13
Page 28

Supported Standards
Overview
DescriptionStandard
OSPF for IPv6 (OSPF version 3)RFC 2740
RFC 3101
RFC 3509
Per-Hop Behavior (PHB)
RIP
OSPF Not-So-Stubby-Area
(NSSA) Option
OSPF Stub Router AdvertisementRFC 3137
Alternative Implementations of
OSPF Area Border Routers
Graceful OSPF RestartRFC 3623
OSPF Version 2 MIBRFC 4750
Assured Forwarding PHB GroupRFC 2597
An Expedited Forwarding PHBRFC 3246
RIPv2 MIB extensionRFC 1724
RIPv2 MD5 AuthenticationRFC 2082
SNMP
RFC 2579
RFC 2863
RFC 3413
RFC 3417
RIP Version 2RFC 2453
Textual Conventions for SMIv2
The Interfaces Group MIB
Simple Network Management
Protocol (SNMP) Applications
Transport Mappings for the Simple
Network Management Protocol
(SNMP)
Cisco Nexus 9000 Series NX-OS Fundamentals Configuration Guide, Release 7.x
14
Page 29

Using the Cisco NX-OS Setup Utility
This chapter contains the following sections:
About the Cisco NX-OS Setup Utility, page 15
•
Prerequisites for the Setup Utility, page 17
•
Setting Up Your Cisco NX-OS Device, page 17
•
Additional References for the Setup Utility, page 21
•
About the Cisco NX-OS Setup Utility
The Cisco NX-OS setup utility is an interactive command-line interface (CLI) mode that guides you through
a basic (also called a startup) configuration of the system. The setup utility allows you to configure only
enough connectivity for system management.
The setup utility allows you to build an initial configuration file using the System Configuration Dialog. The
setup starts automatically when a device has no configuration file in NVRAM. The dialog guides you through
initial configuration. After the file is created, you can use the CLI to perform additional configuration.
You can press Ctrl-C at any prompt to skip the remaining configuration options and proceed with what you
have configured up to that point, except for the administrator password. If you want to skip answers to any
questions, press Enter. If a default answer is not available (for example, the device hostname), the device
uses what was previously configured and skips to the next question.
CHAPTER 3
Cisco Nexus 9000 Series NX-OS Fundamentals Configuration Guide, Release 7.x
15
Page 30
About the Cisco NX-OS Setup Utility
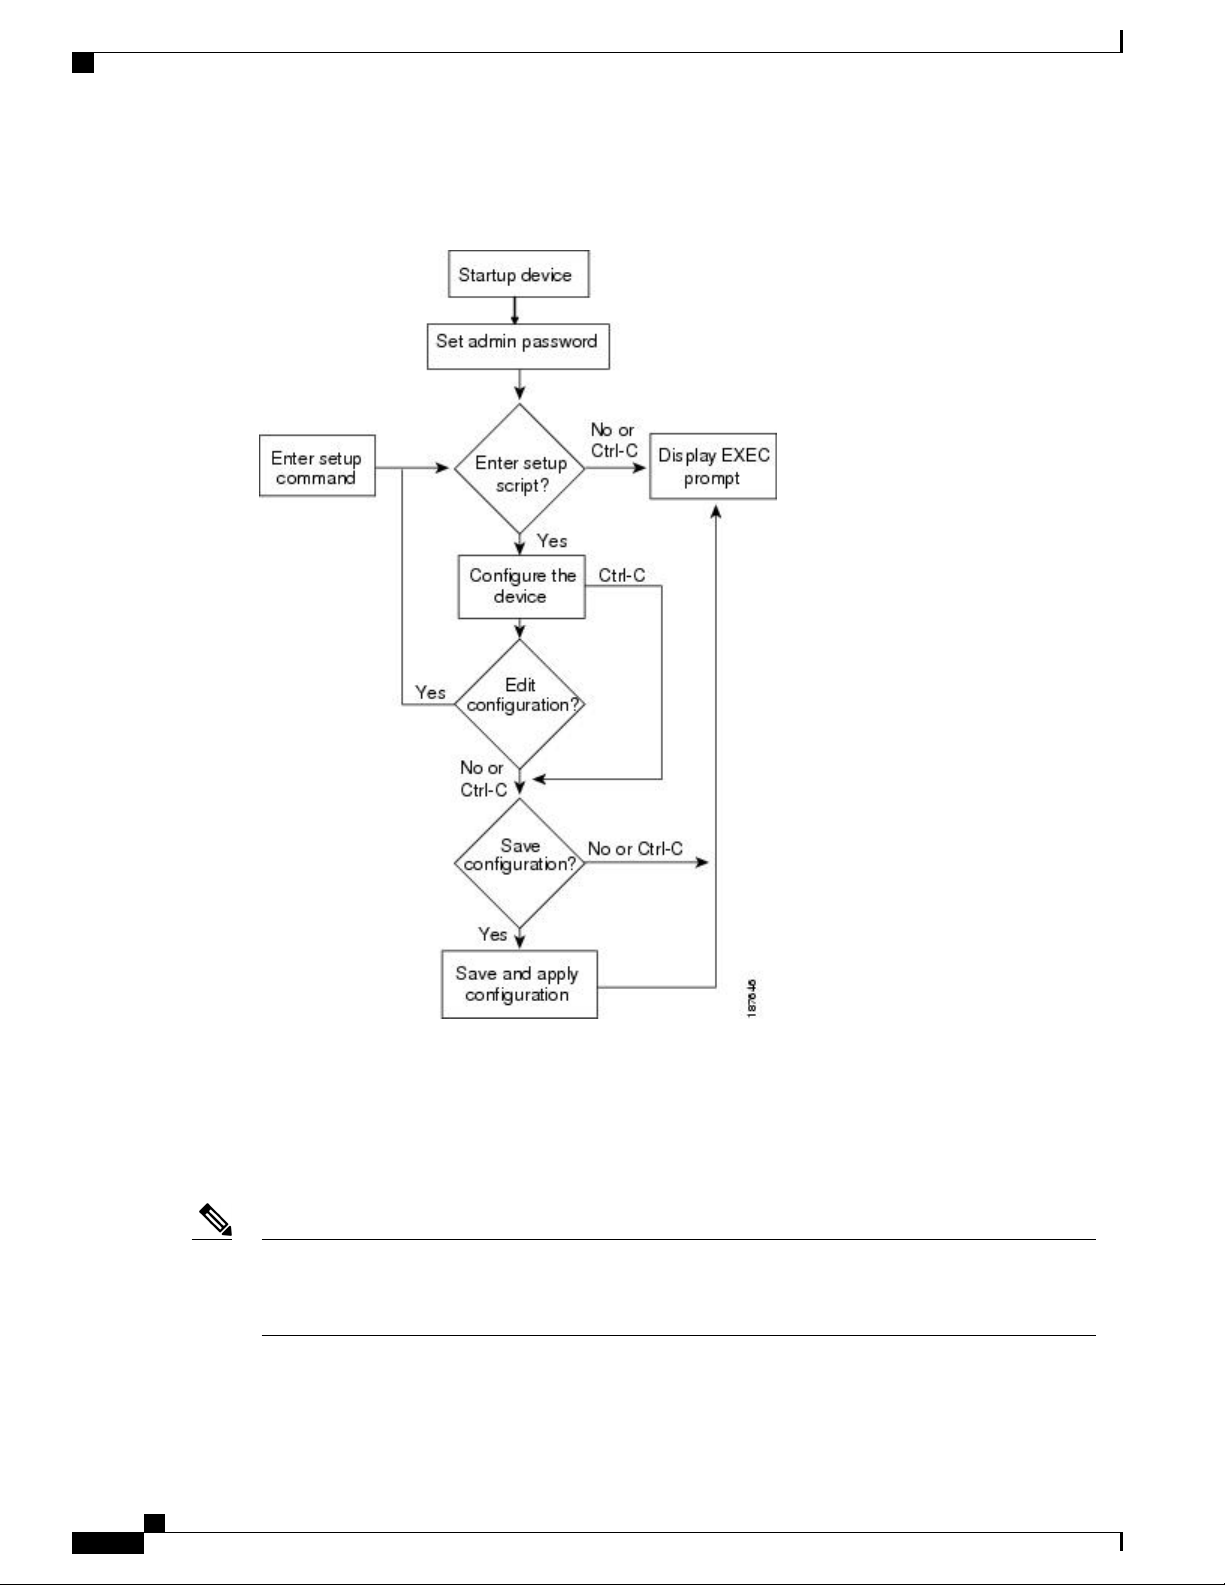
This figure shows how to enter and exit the setup script.
Figure 2: Setup Script Flow
Using the Cisco NX-OS Setup Utility
You use the setup utility mainly for configuring the system initially, when no configuration is present. However,
you can use the setup utility at any time for basic device configuration. The setup utility keeps the configured
values when you skip steps in the script. For example, if you have already configured the mgmt0 interface,
the setup utility does not change that configuration if you skip that step. However, if there is a default value
for the step, the setup utility changes to the configuration using that default, not the configured value. Be sure
to carefully check the configuration changes before you save the configuration.
Note
Be sure to configure the IPv4 route, the default network IPv4 address, and the default gateway IPv4 address
to enable SNMP access. If you enable IPv4 routing, the device uses the IPv4 route and the default network
IPv4 address. If IPv4 routing is disabled, the device uses the default gateway IPv4 address.
Cisco Nexus 9000 Series NX-OS Fundamentals Configuration Guide, Release 7.x
16
Page 31

Using the Cisco NX-OS Setup Utility
The setup script only supports IPv4.Note
Prerequisites for the Setup Utility
The setup utility has the following prerequisites:
Have a password strategy for your network environment.
•
Connect the console port on the supervisor module to the network. If you have dual supervisor modules,
•
connect the console ports on both supervisor modules to the network.
Connect the Ethernet management port on the supervisor module to the network. If you have dual
•
supervisor modules, connect the Ethernet management ports on both supervisor modules to the network.
Prerequisites for the Setup Utility
Setting Up Your Cisco NX-OS Device
To configure basic management of the Cisco NX-OS device using the setup utility, follow these steps:
Procedure
Step 1
Step 2
Power on the device.
Enable or disable password-strength checking.
A strong password has the following characteristics:
At least eight characters long
•
Does not contain many consecutive characters (such as "abcd")
•
Does not contain many repeating characters (such as "aaabbb")
•
Does not contain dictionary words
•
Does not contain proper names
•
Contains both uppercase and lowercase characters
•
Contains numbers
•
Example:
Step 3
---- System Admin Account Setup ----
Do you want to enforce secure password standard (yes/no) [y]: y
Enter the new password for the administrator.
Note
If a password is trivial (such as a short, easy-to-decipher password), your password configuration is
rejected. Passwords are case sensitive. Be sure to configure a strong password that has at least eight
characters, both uppercase and lowercase letters, and numbers.
Cisco Nexus 9000 Series NX-OS Fundamentals Configuration Guide, Release 7.x
17
Page 32

Setting Up Your Cisco NX-OS Device
Example:
Enter the password for "admin": <password>
Confirm the password for "admin": <password>
---- Basic System Configuration Dialog ----
This setup utility will guide you through the basic configuration of
the system. Setup configures only enough connectivity for management
of the system.
Please register Cisco Nexus 9000 Family devices promptly with your
supplier. Failure to register may affect response times for initial
service calls. Nexus devices must be registered to receive
entitled support services.
Press Enter at anytime to skip a dialog. Use ctrl-c at anytime
to skip the remaining dialogs.
Step 4
Enter the setup mode by entering yes.
Example:
Using the Cisco NX-OS Setup Utility
Step 5
Would you like to enter the basic configuration dialog (yes/no): yes
Create additional accounts by entering yes (no is the default).
Example:
Create another login account (yes/no) [n]:yes
a) Enter the user login ID.
Example:
Enter the User login Id : user_login
Caution
Usernames must begin with an alphanumeric character and can contain only these special
characters: ( + = . _ \ -). The # and ! symbols are not supported. If the username contains
characters that are not allowed, the specified user is unable to log in.
b) Enter the user password.
Example:
Enter the password for "user1": user_password
Confirm the password for "user1": user_password
c) Enter the default user role.
Example:
Enter the user role (network-operator|network-admin) [network-operator]: default_user_role
For information on the default user roles, see the Cisco Nexus 9000 Series NX-OS Security Configuration
Guide.
Step 6
Cisco Nexus 9000 Series NX-OS Fundamentals Configuration Guide, Release 7.x
18
Configure an SNMP community string by entering yes.
Page 33

Using the Cisco NX-OS Setup Utility
Example:
Configure read-only SNMP community string (yes/no) [n]: yes
SNMP community string : snmp_community_string
For information on SNMP, see the Cisco Nexus 9000 Series NX-OS System Management Configuration Guide.
Setting Up Your Cisco NX-OS Device
Step 7
Step 8
Step 9
Step 10
Enter a name for the device (the default name is switch).
Example:
Enter the switch name: switch_name
Configure out-of-band management by entering yes. You can then enter the mgmt0 IPv4 address and subnet
mask.
Note
You can only configure IPv4 address in the setup utility. For information on configuring IPv6, see
the Cisco Nexus 9000 Series NX-OS Unicast Routing Configuration Guide.
Example:
Continue with Out-of-band (mgmt0) management configuration? [yes/no]: yes
Mgmt0 IPv4 address: mgmt0_ip_address
Mgmt0 IPv4 netmask: mgmt0_subnet_mask
Configure the IPv4 default gateway (recommended) by entering yes. You can then enter its IP address.
Example:
Configure the default-gateway: (yes/no) [y]: yes
IPv4 address of the default-gateway: default_gateway
Configure advanced IP options such as the static routes, default network, DNS, and domain name by entering
yes.
Step 11
Step 12
Example:
Configure Advanced IP options (yes/no)? [n]: yes
Configure a static route (recommended) by entering yes. You can then enter its destination prefix, destination
prefix mask, and next hop IP address.
Example:
Configure static route: (yes/no) [y]: yes
Destination prefix: dest_prefix
Destination prefix mask: dest_mask
Next hop ip address: next_hop_address
Configure the default network (recommended) by entering yes. You can then enter its IPv4 address.
The default network IPv4 address is the same as the destination prefix in the static route configuration.Note
Example:
Configure the default network: (yes/no) [y]: yes
Cisco Nexus 9000 Series NX-OS Fundamentals Configuration Guide, Release 7.x
19
Page 34

Setting Up Your Cisco NX-OS Device
Default network IP address [dest_prefix]: dest_prefix
Using the Cisco NX-OS Setup Utility
Step 13
Step 14
Step 15
Step 16
Configure the DNS IPv4 address by entering yes. You can then enter the address.
Example:
Configure the DNS IP address? (yes/no) [y]: yes
DNS IP address: ipv4_address
Configure the default domain name by entering yes. You can then enter the name.
Example:
Configure the DNS IP address? (yes/no) [y]: yes
DNS IP address: ipv4_address
Enable the Telnet service by entering yes.
Example:
Enable the telnet service? (yes/no) [y]: yes
Enable the SSH service by entering yes. You can then enter the key type and number of key bits. For more
information, see the Cisco Nexus 9000 Series NX-OS Security Configuration Guide.
Example:
Enable the ssh service? (yes/no) [y]: yes
Type of ssh key you would like to generate (dsa/rsa) : key_type
Number of key bits <768-2048> : number_of_bits
Step 17
Step 18
Step 19
Step 20
Configure the NTP server by entering yes. You can then enter its IP address. For more information, see the
Cisco Nexus 9000 Series NX-OS System Management Configuration Guide.
Example:
Configure NTP server? (yes/no) [n]: yes
NTP server IP address: ntp_server_IP_address
Specify a default interface layer (L2 or L3).
Example:
Configure default interface layer (L3/L2) [L3]: interface_layer
Enter the default switchport interface state (shutdown or no shutdown). A shutdown interface is in an
administratively down state. For more information, see the Cisco Nexus 9000 Series NX-OS Interfaces
Configuration Guide.
Example:
Configure default switchport interface state (shut/noshut) [shut]: default_state
Enter the best practices profile for control plane policing (CoPP). For more information, see the Cisco Nexus
9000 Series NX-OS Security Configuration Guide.
Cisco Nexus 9000 Series NX-OS Fundamentals Configuration Guide, Release 7.x
20
Page 35

Using the Cisco NX-OS Setup Utility
Example:
Configure best practices CoPP profile (strict/moderate/lenient/none) [strict]: policy
The system now summarizes the complete configuration and asks if you want to edit it.
Step 21
Continue to the next step by entering no. If you enter yes, the setup utility returns to the beginning of the setup
and repeats each step.
Example:
Would you like to edit the configuration? (yes/no) [y]: yes
Additional References for the Setup Utility
Step 22
Use and save this configuration by entering yes. If you do not save the configuration at this point, none of
your changes are part of the configuration the next time the device reboots. Enter yes to save the new
configuration. This step ensures that the boot variables for the nx-os image are also automatically configured.
Example:
Use this configuration and save it? (yes/no) [y]: yes
Caution
If you do not save the configuration at this point, none of your changes are part of the configuration
the next time that the device reboots. Enter yes to save the new configuration to ensure that the
boot variables for the nx-os image are also automatically configured.
Additional References for the Setup Utility
This section includes additional information related to using the setup utility.
Related Documents for the Setup Utility
Document TitleRelated Topic
Licensing
Cisco NX-OS Licensing Guide
SSH and Telnet
User roles
IPv4 and IPv6
SNMP and NTP
Cisco Nexus 9000 Series NX-OS Security
Configuration Guide
Cisco Nexus 9000 Series NX-OS Security
Configuration Guide
Cisco Nexus 9000 Series NX-OS Unicast Routing
Configuration Guide
Cisco Nexus 9000 Series NX-OS System Management
Configuration Guide
Cisco Nexus 9000 Series NX-OS Fundamentals Configuration Guide, Release 7.x
21
Page 36

Related Documents for the Setup Utility
Using the Cisco NX-OS Setup Utility
Cisco Nexus 9000 Series NX-OS Fundamentals Configuration Guide, Release 7.x
22
Page 37

CHAPTER 4
Using PowerOn Auto Provisioning
This chapter contains the following sections:
About PowerOn Auto Provisioning, page 23
•
Guidelines and Limitations for POAP, page 33
•
Setting Up the Network Environment to Use POAP, page 34
•
Configuring a Switch Using POAP, page 34
•
Creating md5 Files, page 35
•
Verifying the Device Configuration, page 37
•
Troubleshooting for POAP, page 37
•
Managing the POAP Personality, page 37
•
About PowerOn Auto Provisioning
PowerOn Auto Provisioning (POAP) automates the process of upgrading software images and installing
configuration files on devices that are being deployed in the network for the first time.
When a device with the POAP feature boots and does not find the startup configuration, the device enters
POAP mode, locates a DHCP server, and bootstraps itself with its interface IP address, gateway, and DNS
server IP addresses. The device also obtains the IP address of a TFTP server or the URL of an HTTP server
and downloads a configuration script that enables the switch to download and install the appropriate software
image and configuration file.
The DHCP information is used only during the POAP process.Note
Note
Checking for a USB device containing the configuration script file in POAP mode is not supported on the
Cisco Nexus 9000 Series switches.
Cisco Nexus 9000 Series NX-OS Fundamentals Configuration Guide, Release 7.x
23
Page 38

Network Requirements for POAP
Network Requirements for POAP
POAP requires the following network infrastructure:
A DHCP server to bootstrap the interface IP address, gateway address, and Domain Name System (DNS)
•
server.
A TFTP server that contains the configuration script used to automate the software image installation
•
and configuration process.
One or more servers that contains the desired software images and configuration files.
•
Figure 3: POAP Network Infrastructure
Using PowerOn Auto Provisioning
POAP Configuration Script
We provide a sample configuration script that is developed using the Python programming language. We
recommend using the provided script and modifying it to meet the requirements of your network environment.
The POAP script can be found at https://github.com/datacenter/nexus9000/blob/master/nx-os/poap/poap.py.
To modify the script using Python, see the Cisco NX-OS Python API Reference Guide for your platform.
Cisco Nexus 9000 Series NX-OS Fundamentals Configuration Guide, Release 7.x
24
Page 39

Using PowerOn Auto Provisioning
Using the POAP Script and POAP Script Options
Before using the POAP script, perform the following actions:
1
Edit the options dictionary at the top of the script to ensure that all relevant options for your setup are
included in the script. Do not change the defaults (in the default options function) directly.
2
Update the MD5 checksum of the POAP script as shown using shell commands.
f=poap_nexus_script.py ; cat $f | sed '/^#md5sum/d' > $f.md5 ; sed -i
"s/^#md5sum=.*/#md5sum=\"$(md5sum $f.md5 | sed 's/ .*//')\"/" $f
3
If the device has a startup configuration, perform a write erase and reload the device.
The following POAP script options can be specified to alter the POAP script behavior. When you download
files from a server, the hostname, username, and password options are required. For every mode except
personality, the target_system_image is also required. Required parameters are enforced by the script, and
the script aborts if the required parameters are not present. Every option except hostname, username, and
password has a default option. If you do not specify the option in the options dictionary, the default is used.
Using the POAP Script and POAP Script Options
username
•
The username to use when downloading files from the server.
password
•
The password to use when downloading files from the server.
hostname
•
The name or address of the server from which to download files.
mode
•
The default is serial_number.
Use one of the following options:
personality
◦
A method to restore the switch from a tarball.
serial_number
◦
The serial number of the switch to determine the configuration filename. The format for the serial
number in the configuration file is conf.serialnumber. Example: conf.FOC123456
hostname
◦
The hostname as received in the DHCP options to determine the configuration filename. The format
for the hostname in the configuration file is conf_hostname.cfg. Example: conf_3164-RS.cfg
mac
◦
The interface MAC address to determine the configuration filename. The format for the hostname
in the configuration file is conf_macaddress.cfg. Example: conf_7426CC5C9180.cfg
raw
◦
The configuration filename is used exactly as provided in the options. The filename is not altered
in any way.
Cisco Nexus 9000 Series NX-OS Fundamentals Configuration Guide, Release 7.x
25
Page 40

Using the POAP Script and POAP Script Options
location
◦
The CDP neighbors are used to determine the configuration filename. The format for the location
in the configuration file is conf_host_intf.cfg, where host is the host connected to the device over
the POAP interface, and intf is the remote interface to which the POAP interface is connected.
Example: conf_remote-switch_Eth1_8.cfg
required_space
•
The required space in KB for that particular iteration of POAP. The default is 100,000. For multi-step
upgrades, specify the size of the last image in the upgrade path of the target image.
transfer_protocol
•
Any transfer protocol such as http, https, ftp, scp, sftp, or tftp that is supported by VSH. The default is
scp.
config_path
•
The path to the configuration file on the server. Example: /tftpboot. The default is /var/lib/tftpboot.
target_system_image
•
The name of the image to download from the remote server. This is the image you get after POAP
completes. This option is a required parameter for every mode except personality. The default is "".
Using PowerOn Auto Provisioning
target_image_path
•
The path to the image on the server. Example: /tftpboot. The default is /var/lib/tftpboot.
destination_path
•
The path to which to download images and MD5 sums. The default is /bootflash.
destination_system_image
•
The name for the destination image filename. If not specified, the default will be the target_system_image
name.
user_app_path
•
The path on the server where the user scripts, agents, and user data are located. The default is
/var/lib/tftpboot.
disable_md5
•
This is True if MD5 checking should be disabled. The default is False.
midway_system_image
•
The name of the image to use for the midway system upgrade. By default, the POAP script finds the
name of any required midway images in the upgrade path and uses them. Set this option if you prefer
to pick a different midway image for a two-step upgrade. The default is "".
source_config_file
•
The name of the configuration file when raw mode is used. The default is poap.cfg.
vrf
•
The VRF to use for downloads and so on. The VRF is automatically set by the POAP process. The
default is the POAP_VRF environment variable.
destination_config
•
Cisco Nexus 9000 Series NX-OS Fundamentals Configuration Guide, Release 7.x
26
Page 41

Using PowerOn Auto Provisioning
The name to use for the downloaded configuration. The default is poap_replay.cfg.
split_config_first
•
The name to use for the first configuration portion if the configuration needs to be split. It is applicable
only when the configuration requires a reload to take effect. The default is poap_1.cfg.
split_config_second
•
The name to use for the second configuration portion if the configuration is split. The default is
poap_2.cfg.
timeout_config
•
The timeout in seconds for copying the configuration file. The default is 120. For non-legacy images,
this option is not used, and the POAP process times out. For legacy images, FTP uses this timeout for
the login process and not for the copy process, while scp and other protocols use this timeout for the
copy process.
timeout_copy_system
•
The timeout in seconds for copying the system image. The default is 2100. For non-legacy images, this
option is not used, and the POAP process times out. For legacy images, FTP uses this timeout for the
login process and not for the copy process, while scp and other protocols use this timeout for the copy
process.
Setting up the DHCP Server without DNS for POAP
timeout_copy_personality
•
The timeout in seconds for copying the personality tarball. The default is 900. For non-legacy images,
this option is not used, and the POAP process times out. For legacy images, FTP uses this timeout for
the login process and not for the copy process, while scp and other protocols use this timeout for the
copy process.
timeout_copy_user
•
The timeout in seconds for copying any user scripts and agents. The default is 900. For non-legacy
images, this option is not used, and the POAP process times out. For legacy images, FTP uses this
timeout for the login process and not for the copy process, while scp and other protocols use this timeout
for the copy process.
personality_path
•
The remote path from which to download the personality tarball. Once the tarball is downloaded and
the personality process is started, the personality will download all files in the future from locations
specified inside the tarball configuration. The default is /var/lib/tftpboot.
source_tarball
•
The name of the personality tarball to download. The default is personality.tar.
destination_tarball
•
The name for the downloaded personality tarball after it is downloaded. The default is personality.tar.
Setting up the DHCP Server without DNS for POAP
Beginning with Cisco NX-OS Release 7.0(3)I6(1), the tftp-server-name can be used without the DNS option.
To enable POAP functionality without DNS on earlier releases, a custom option of 150 must be used to specify
the tftp-server-address.
Cisco Nexus 9000 Series NX-OS Fundamentals Configuration Guide, Release 7.x
27
Page 42

Using PowerOn Auto Provisioning
Downloading and Using User Data, Agents, and Scripts as part of POAP
To use the tftp-server-address option, specify the following at the start of your dhcpd.conf file.
option tftp-server-address code 150 = ip-address;
For example:
host MyDevice {
option dhcp-client-identifier "\000SAL12345678";
fixed-address 2.1.1.10;
option routers 2.1.1.1;
option host-name "MyDevice";
option bootfile-name "poap_nexus_script.py";
option tftp-server-address 2.1.1.1;
}
Downloading and Using User Data, Agents, and Scripts as part of POAP
Under the options dictionary, you can find the download_scripts_and_agents function. If you choose to
download user scripts and data, uncomment the first poap_log line and then use a series of download_user_app
function calls to download each application. Since older Cisco NX-OS versions do not support recursive copy
of directories, such directories must be put into a tarball (TAR archive) and then unpacked once on the switch.
The parameters for the download_scripts_and_agents function are as follows:
POAP Process
source_path - The path to where the file or tarball is located. This is a required parameter. Example:
•
/var/lib/tftpboot.
source_file - The name of the file to download. This is a required parameter. Example: agents.tar,
•
script.py, and so on.
dest_path - The location to download the file on the switch. Any directories that do not exist earlier
•
will be created. This is an optional parameter. The default is /bootflash.
dest_file - The name to give the downloaded file. This is an optional parameter. The default is unchanged
•
source_file.
unpack - Indicates whether a tarball exists for unpacking. Unpacking is done with tar -xf tarfile -C
•
/bootflash. This is an optional parameter. The default is False.
delete_after_unpack - Indicates whether to delete the downloaded tarball after unpack is successful.
•
There is no effect if unpack is False. The default is False.
Using the download functionality, you can download all the agents and files needed to run POAP. To start
the agents, you should have the configuration present in the running configuration downloaded by POAP.
Then the agents, scheduler, and cron entry, along with EEM, can be used.
The POAP process has the following phases:
1
Power up
2
DHCP discovery
3
Script execution
4
Post-installation reload
Cisco Nexus 9000 Series NX-OS Fundamentals Configuration Guide, Release 7.x
28
Page 43

Using PowerOn Auto Provisioning
Within these phases, other process and decision points occur. The following illustration shows a flow diagram
of the POAP process.
Figure 4: POAP Process
POAP Process
Cisco Nexus 9000 Series NX-OS Fundamentals Configuration Guide, Release 7.x
29
Page 44

POAP Process
Using PowerOn Auto Provisioning
Cisco Nexus 9000 Series NX-OS Fundamentals Configuration Guide, Release 7.x
30
Page 45

Using PowerOn Auto Provisioning
Power-Up Phase
When you powerup the device for the first time, it loads the software image that is installed at manufacturing
and tries to find a configuration file from which to boot. When a configuration file is not found, POAP mode
starts.
During startup, a prompt appears asking if you want to abort POAP and continue with a normal setup. You
can choose to exit or continue with POAP.
POAP Process
Note
No user intervention is required for POAP to continue. The prompt that asks if you want to abort POAP
remains available until the POAP process is complete.
If you exit POAP mode, you enter the normal interactive setup script. If you continue in POAP mode, all the
front-panel interfaces are set up in the default configuration.
DHCP Discovery Phase
The switch sends out DHCP discover messages on the front-panel interfaces or the MGMT interface that
solicit DHCP offers from the DHCP server or servers. (See the following figure.) The DHCP client on the
Cisco Nexus switch uses the switch serial number in the client-identifier option to identify itself to the DHCP
server. The DHCP server can use this identifier to send information, such as the IP address and script filename,
back to the DHCP client.
POAP requires a minimum DHCP lease period of 3600 seconds (1 hour). POAP checks the DHCP lease
period. If the DHCP lease period is set to less than 3600 seconds (1 hour), POAP does not complete the DHCP
negotiation.
The DHCP discover message also solicits the following options from the DHCP server:
• TFTP server name or TFTP server address—The DHCP server relays the TFTP server name or TFTP
server address to the DHCP client. The DHCP client uses this information to contact the TFTP server
to obtain the script file.
• Bootfile name—The DHCP server relays the bootfile name to the DHCP client. The bootfile name
includes the complete path to the bootfile on the TFTP server. The DHCP client uses this information
to download the script file.
When multiple DHCP offers that meet the requirement are received, an offer is randomly chosen. The device
completes the DHCP negotiation (request and acknowledgment) with the selected DHCP server, and the
DHCP server assigns an IP address to the switch. If a failure occurs in any of the subsequent steps in the
POAP process, the IP address is released back to the DHCP server.
Cisco Nexus 9000 Series NX-OS Fundamentals Configuration Guide, Release 7.x
31
Page 46

POAP Process
Using PowerOn Auto Provisioning
If no DHCP offers meet the requirements, the switch does not complete the DHCP negotiation (request and
acknowledgment) and an IP address is not assigned.
Figure 5: DHCP Discovery Process
Cisco Nexus 9000 Series NX-OS Fundamentals Configuration Guide, Release 7.x
32
Page 47

Using PowerOn Auto Provisioning
POAP Dynamic Breakout
Beginning with Cisco NX-OS Release 7.0(3)I4(1), POAP dynamically breaks out ports in an effort to detect
a DHCP server behind one of the broken-out ports. Previously, the DHCP server used for POAP had to be
directly connected to a normal cable because breakout cables were not supported.
POAP determines which breakout map (for example, 10gx4, 50gx2, 25gx4, or 10gx2) will bring up the link
connected to the DHCP server. If breakout is not supported on any of the ports, POAP skips the dynamic
breakout process. After the breakout loop completes, POAP proceeds with the DHCP discovery phase as
normal.
For more information on dynamic breakout, see the interfaces configuration guide for your device.Note
Script Execution Phase
After the device bootstraps itself using the information in the DHCP acknowledgement, the script file is
downloaded from the TFTP server.
The switch runs the configuration script, which downloads and installs the software image and downloads a
switch-specific configuration file.
However, the configuration file is not applied to the switch at this point, because the software image that
currently runs on the switch might not support all of the commands in the configuration file. After the switch
reboots, it begins running the new software image, if an image was installed. At that point, the configuration
is applied to the switch.
Guidelines and Limitations for POAP
Note
If the switch loses connectivity, the script stops, and the switch reloads its original software images and
bootup variables.
Post-Installation Reload Phase
The switch restarts and applies (replays) the configuration on the upgraded software image. Afterward, the
switch copies the running configuration to the startup configuration.
Guidelines and Limitations for POAP
POAP configuration guidelines and limitations are as follows:
The switch software image must support POAP for this feature to function.
•
POAP does not support provisioning of the switch after it has been configured and is operational. Only
•
auto-provisioning of a switch with no startup configuration is supported.
If you use POAP to bootstrap a Cisco Nexus device that is a part of a virtual port channel (vPC) pair
•
using static port channels on the vPC links, the Cisco Nexus device activates all of its links when POAP
starts up. The dually connected device at the end of the vPC links might start sending some or all of its
Cisco Nexus 9000 Series NX-OS Fundamentals Configuration Guide, Release 7.x
33
Page 48

Setting Up the Network Environment to Use POAP
traffic to the port-channel member links that are connected to the Cisco Nexus device, which causes
traffic to get lost.
To work around this issue, you can configure Link Aggregation Control Protocol (LACP) on the vPC
links so that the links do not incorrectly start forwarding traffic to the Cisco Nexus device that is being
bootstrapped using POAP.
If you use POAP to bootstrap a Cisco Nexus device that is connected downstream to a Cisco Nexus
•
9000 Series switch through a LACP port channel, the Cisco Nexus 9000 Series switch defaults to suspend
its member port if it cannot bundle it as a part of a port channel. To work around this issue, configure
the Cisco Nexus 9000 Series switch to not suspend its member ports by using the no lacp
suspend-individual command from interface configuration mode.
Important POAP updates are logged in the syslog and are available from the serial console.
•
Critical POAP errors are logged to the bootflash. The filename format is
•
date-time_poap_PID_[init,1,2].log, where date-time is in the YYYYMMDD_hhmmss format and PID
is the process ID.
Script logs are saved in the bootflash directory. The filename format is date-time_poap_PID_script.log,
•
where date-time is in the YYYYMMDD_hhmmss format and PID is the process ID.
You can configure the format of the script log file. Script file log formats are specified in the script. The
template of the script log file has a default format; however, you can choose a different format for the
script execution log file.
Using PowerOn Auto Provisioning
The POAP feature does not require a license and is enabled by default. However for the POAP feature
•
to function, appropriate licenses must be installed on the devices in the network before the deployment
of the network.
Setting Up the Network Environment to Use POAP
Procedure
Step 1
Step 2
Step 3
Step 4
Modify the configuration script provided as necessary.
Deploy a DHCP server and configure it with the interface, gateway, and TFTP server IP addresses and a
bootfile with the path and name of the configuration script file. (This information is provided to the switch
when it first boots.)
Deploy a TFTP server to host the configuration script.
Deploy one or more servers to host the software images and configuration files.
Configuring a Switch Using POAP
Before You Begin
Make sure that the network environment is set up to use POAP.
Cisco Nexus 9000 Series NX-OS Fundamentals Configuration Guide, Release 7.x
34
Page 49

Using PowerOn Auto Provisioning
Procedure
Creating md5 Files
Step 1
Step 2
Install the switch in the network.
Power on the switch.
If no configuration file is found, the switch boots in POAP mode and displays a prompt that asks if you want
to abort POAP and continue with a normal setup.
No entry is required to continue to boot in POAP mode.
Step 3
(Optional) If you want to exit POAP mode and enter the normal interactive setup script, enter y (yes).
The switch boots, and the POAP process begins.
What to Do Next
Verify the configuration.
Creating md5 Files
Every time you make a change to the configuration script, ensure that you recalculate the MD5 checksum by
running # f=poap_fabric.py ; cat $f | sed '/^#md5sum/d' > $f.md5 ; sed -i
"s/^#md5sum=.*/#md5sum=\"$(md5sum $f.md5 | sed 's/ .*//')\"/" $f using a bash shell.
This procedure replaces md5sum in poap_fabric.py with a new value if there was any change in that
file.
Note
Steps 1-4 and 7-8 are needed only if you are using the BASH shell. If you have access to any other Linux
server, these steps are not required.
Before You Begin
Access to the BASH shell.
Procedure
PurposeCommand or Action
Step 1
Example:
switch# configure terminal
switch(config)#
Step 2
Example:
switch(config)# feature bash-shell
Enters global configuration mode.configure terminal
Enable BASH shell feature.feature bash-shell
Cisco Nexus 9000 Series NX-OS Fundamentals Configuration Guide, Release 7.x
35
Page 50

Creating md5 Files
Using PowerOn Auto Provisioning
PurposeCommand or Action
Step 3
Step 4
Step 5
Step 6
Step 7
Example:
switch(config)# exit
Example:
switch# run bash
md5sum /bootflash/nxos.release_number.bin >
/bootflash/nxos.release_number.bin.md5
Example:
bash-4.2$ md5sum /bootflash/nxos.7.0.3.I6.1.bin >
/bootflash/nxos.7.0.3.I6.1.bin.md5
md5sum /bootflash/poap.cfg > /bootflash/poap.cfg.md5
Example:
bash-4.2$ md5sum /bootflash/poap.cfg >
/bootflash/poap.cfg.md5
Example:
Exit configuration mode.exit
Open Linux BASH.run bash
Creates md5sum for the .bin
file.
Creates md5sum for the .cfg
file.
Exit the BASH shell.exit
Step 8
Step 9
switch(config)# exit
Example:
switch# dir | i .md5
65 Jun 09 12:38:48 2017
nxos.7.0.3.I6.1.bin.md5
54 Jun 09 12:39:36 2017 poap.cfg.md5
67299 Jun 09 12:48:58 2017 poap.py.md5
copy bootflash:poap.cfg.md5 scp://ip_address/
Example:
copy bootflash:poap.cfg.md5 scp://10.1.100.3/
Enter vrf (If no input, current vrf 'default' is
considered): management
Enter username: root
root@10.1.100.3's password:
poap.cfg.md5 100%
54 0.1KB/s 00:00
Copy complete.
Display the .md5 files.dir | i .md5
Uploads the files to the
Configuration and Software
Server.
Cisco Nexus 9000 Series NX-OS Fundamentals Configuration Guide, Release 7.x
36
Page 51

Using PowerOn Auto Provisioning
Verifying the Device Configuration
To verify the configuration after bootstrapping the device using POAP, use one of the following commands:
Troubleshooting for POAP
The following is a list of known issues and suggestions while using POAP:
Issue: POAP script execution fails immediately with no syslogs or output except for a "Script execution
•
failed" statement.
Verifying the Device Configuration
PurposeCommand
Displays the running configuration.show running-config
Displays the startup configuration.show startup-config
Suggestion: Use the python script-name command on the server and make sure there are no syntax
errors. The options dictionary is a Python dictionary so each entry must be comma separated and have
the key or option and the value separated by a colon.
Issue: A TypeError exception occurs at various places depending on the incorrectly used option.
•
Suggestion: Some options use integers (for example, timeouts and other numeric values). Check the
options dictionary for numeric values that are enclosed in quotes. Refer to the options list for the correct
usage.
Managing the POAP Personality
POAP Personality
The POAP personality feature, which is introduced in Cisco NX-OS Release 7.0(3)I4(1), enables user data,
Cisco NX-OS and third-party patches, and configuration files to be backed up and restored. In previous
releases, POAP can restore only the configuration.
The POAP personality is defined by tracked files on the switch. The configuration and package list in the
personality file are ASCII files.
Binary versions are recorded in the personality file, but the actual binary files are not included. Because binary
files are typically large, they are accessed from a specified repository.
The personality file is a .tar file, which would typically be extracted into a temporary folder. Here is an
example:
switch# dir bootflash: 042516182843personality # timestamp name
46985 Dec 06 23:12:56 2015 running-config Same as “show running-configuration” command.
20512 Dec 06 23:12:56 2015 host-package-list Package/Patches list
58056 Dec 06 23:12:56 2015 data.tar User Data
25 Dec 06 23:12:56 2015 IMAGEFILE Tracked image metadata
Cisco Nexus 9000 Series NX-OS Fundamentals Configuration Guide, Release 7.x
37
Page 52

Backing Up the POAP Personality
Backing Up the POAP Personality
You can create a backup of the POAP personality either locally on the switch or remotely on the server. The
personality backup taken from the switch should be restored only on a switch of the same model.
Using PowerOn Auto Provisioning
Note
If you are using the Cisco scheduler feature for backups, you can configure it to also back up the POAP
personality, as shown in the following example. For more information on the scheduler, see the Cisco
Nexus 9000 Series NX-OS System Management Configuration Guide.
switch(config)# scheduler schedule name weeklybkup
switch(config-schedule)# time weekly mon:07:00
switch(config-schedule)# job name personalitybkup
switch(config-schedule)# exit
switch(config)# scheduler job name personalitybkup
switch(config-job)# personality backup bootflash:/personality-file ; copy
bootflash:/personality-file tftp://10.1.1.1/ vrf management
Procedure
PurposeCommand or Action
Step 1
personality backup [bootflash:uri | scp:uri]
Creates a backup of the POAP
personality.
Example:
switch# personality backup bootflash:personality1.tar
Example:
switch# personality backup
scp://root@2.1.1.1/var/lib/tftpboot/backup.tar
Configuring the POAP Personality
You can specify whether the POAP personality should be derived from the running state of the system or the
committed (startup) state.
Procedure
Step 1
Example:
switch# configure terminal
switch(config)#
Step 2
Example:
switch# personality
switch(config-personality)#
Cisco Nexus 9000 Series NX-OS Fundamentals Configuration Guide, Release 7.x
38
PurposeCommand or Action
Enters global configuration mode.configure terminal
Enters personality configuration mode.personality
Page 53

Using PowerOn Auto Provisioning
Configuring the POAP Personality
PurposeCommand or Action
Step 3
track [running-state | startup-state | data
local-directories-or-files]
Example:
switch(config-personality)# track
data bootflash:myfile1
Example:
switch(config-personality)# track
data bootflash:user_scripts/*.py
Example:
switch(config-personality)# track
data bootflash:basedir/*/backup_data
Specifies how the POAP personality is derived. The
following options are available:
• running-state—Captures the following information:
the running configuration (as shown in the show
running-config command), active Cisco NX-OS
patches and third-party packages in the host system,
and the image name (as shown in the show version
command). This is the default option.
• startup-state—Captures the following information:
the startup configuration (as shown in the show
startup-config command), committed Cisco NX-OS
patches and third-party packages in the host system,
and the image name (as shown in the show version
command).
• data local-directories-or-files—Specifies a directory
or file to be backed up. You can enter this command
multiple times to back up multiple directories and
files. UNIX-style wildcard characters are supported.
In the example, one folder and two directories are
specified.
Note
Do not use this command to backup binary files
in the bootflash and do not point to the entire
bootflash.
Note
Guest Shell packages are not
tracked.
Note
Signed RPMs (which require a key) are not
supported. The POAP personality feature does
not work with signed RPMs.
Step 4
binary-location source-uri-folder
Example:
switch(config-personality)#
binary-location
scp://remote-dir1/nxos_patches/
Example:
switch(config-personality)#
binary-location
tftp://1.2.3.4/remote-dir2/packages/
Cisco Nexus 9000 Series NX-OS Fundamentals Configuration Guide, Release 7.x
Specifies the local or remote directory from which to pick
up binary files when the POAP personality is restored.
You can enter this command multiple times (in order of
priority) to specify multiple locations.
39
Page 54

Restoring the POAP Personality
Restoring the POAP Personality
During the POAP script execution phase, the personality module in the script restores the POAP personality,
provided that the currently booted switch image is Cisco NX-OS Release 7.0(3)I4(1) or later. If necessary,
upgrade the switch to the correct software image.
Using PowerOn Auto Provisioning
Note
Note
A personality restore is done with the same software image used for the personality backup. Upgrading
to a newer image is not supported through the POAP personality feature. To upgrade to a newer image,
use the regular POAP script.
If the personality script fails to execute for any reason (such as not enough space in the bootflash or a
script execution failure), the POAP process returns to the DHCP discovery phase.
The restore process performs the following actions:
1
Untars and unzips the personality file in the bootflash.
2
Validates the personality file.
3
Reads the configuration and package list files from the personality file to make a list of the binaries to be
downloaded.
4
If the current image or patches are not the same as specified in the personality file, downloads the binaries
to the bootflash (if not present) and reboots with the correct image and then applies the packages or patches.
5
Unzips or untars the user data files relative to "/".
6
Copies the configuration file in the POAP personality to the startup configuration.
7
Reboots the switch.
POAP Personality Sample Script
The following sample POAP script (poap.py) includes the personality feature:
#md5sum="b00a7fffb305d13a1e02cd0d342afca3"
# The above is the (embedded) md5sum of this file taken without this line, # can be # created
this way:
# f=poap.py ; cat $f | sed '/^#md5sum/d' > $f.md5 ; sed -i "s/^#md5sum=.*/#md5sum=$(md5sum
$f.md5 | sed 's/ .*//')/" $f # This way this script's integrity can be checked in case you
do not trust # tftp's ip checksum. This integrity check is done by /isan/bin/poap.bin).
# The integrity of the files downloaded later (images, config) is checked # by downloading
the corresponding file with the .md5 extension and is # done by this script itself.
from poap.personality import POAPPersonality import os
# Location to download system image files, checksums, etc.
download_path = "/var/lib/tftpboot"
# The path to the personality tarball used for restoration personality_tarball =
"/var/lib/tftpboot/foo.tar"
# The protocol to use to download images/config protocol = "scp"
# The username to download images, the personality tarball, and the # patches and RPMs
during restoration username = "root"
# The password for the above username
password = "passwd754"
Cisco Nexus 9000 Series NX-OS Fundamentals Configuration Guide, Release 7.x
40
Page 55

Using PowerOn Auto Provisioning
# The hostname or IP address of the file server server = "2.1.1.1"
# The VRF to use for downloading and restoration vrf = "default"
if os.environ.has_key('POAP_VRF'):
vrf = os.environ['POAP_VRF']
# Initialize housekeeping stuff (logs, temp dirs, etc.) p = POAPPersonality(download_path,
personality_tarball, protocol, username, password, server, vrf)
p.get_personality()
p.apply_personality()
sys.exit(0)
POAP Personality Sample Script
Cisco Nexus 9000 Series NX-OS Fundamentals Configuration Guide, Release 7.x
41
Page 56

POAP Personality Sample Script
Using PowerOn Auto Provisioning
Cisco Nexus 9000 Series NX-OS Fundamentals Configuration Guide, Release 7.x
42
Page 57

CHAPTER 5
Understanding the Command-Line Interface
This chapter contains the following sections:
About the CLI Prompt, page 44
•
Command Modes, page 44
•
Special Characters, page 48
•
Keystroke Shortcuts, page 49
•
Abbreviating Commands, page 52
•
Completing a Partial Command Name, page 52
•
Identifying Your Location in the Command Hierarchy, page 53
•
Using the no Form of a Command, page 53
•
Configuring CLI Variables, page 54
•
Command Aliases, page 56
•
Command Scripts, page 58
•
Context-Sensitive Help, page 60
•
Understanding Regular Expressions, page 62
•
Searching and Filtering show Command Output, page 63
•
Searching and Filtering from the --More-- Prompt, page 68
•
Using the Command History, page 69
•
Enabling or Disabling the CLI Confirmation Prompts, page 71
•
Setting CLI Display Colors, page 71
•
Sending Commands to Modules, page 72
•
Sending Command Output in Email, page 73
•
BIOS Loader Prompt, page 74
•
Examples Using the CLI, page 74
•
Cisco Nexus 9000 Series NX-OS Fundamentals Configuration Guide, Release 7.x
43
Page 58

About the CLI Prompt
Additional References for the CLI, page 77
•
About the CLI Prompt
Once you have successfully accessed the device, the CLI prompt displays in the terminal window of your
console port or remote workstation as shown in the following example:
User Access Verification
login: admin
Password:<password>
Cisco Nexus Operating System (NX-OS) Software
TAC support: http://www.cisco.com/tac
Copyright (c) 2002-2013, Cisco Systems, Inc. All rights reserved.
The copyrights to certain works contained in this software are
owned by other third parties and used and distributed under
license. Certain components of this software are licensed under
the GNU General Public License (GPL) version 2.0 or the GNU
Lesser General Public License (LGPL) Version 2.1. A copy of each
such license is available at
http://www.opensource.org/licenses/gpl-2.0.php and
http://www.opensource.org/licenses/lgpl-2.1.php
switch#
Understanding the Command-Line Interface
You can change the default device hostname.
From the CLI prompt, you can do the following:
Use CLI commands for configuring features
•
Access the command history
•
Use command parsing functions
•
Note
In normal operation, usernames are case sensitive. However, when you are connected to the device through
its console port, you can enter a login username in all uppercase letters regardless of how the username
was defined. As long as you provide the correct password, the device logs you in.
Command Modes
This section describes command modes in the Cisco NX-OS CLI.
EXEC Command Mode
When you first log in, the Cisco NX-OS software places you in EXEC mode. The commands available in
EXEC mode include the show commands that display the device status and configuration information, the
clear commands, and other commands that perform actions that you do not save in the device configuration.
Cisco Nexus 9000 Series NX-OS Fundamentals Configuration Guide, Release 7.x
44
Page 59

Understanding the Command-Line Interface
Global Configuration Command Mode
Global configuration mode provides access to the broadest range of commands. The term indicates
characteristics or features that affect the device as a whole. You can enter commands in global configuration
mode to configure your device globally or to enter more specific configuration modes to configure specific
elements such as interfaces or protocols.
Procedure
Global Configuration Command Mode
PurposeCommand or Action
Step 1
Example:
switch# configure terminal
switch(config)#
Interface Configuration Command Mode
One example of a specific configuration mode that you enter from global configuration mode is interface
configuration mode. To configure interfaces on your device, you must specify the interface and enter interface
configuration mode.
You must enable many features on a per-interface basis. Interface configuration commands modify the operation
of the interfaces on the device, such as Ethernet interfaces or management interfaces (mgmt 0).
For more information about configuring interfaces, see the Cisco Nexus 9000 Series NX-OS Interfaces
Configuration Guide.
Procedure
Step 1
Enters global configuration mode.configure terminal
Note
PurposeCommand or Action
Enters global configuration mode.configure terminal
The CLI prompt changes to indicate that you
are in global configuration mode.
Step 2
Example:
switch# configure terminal
switch(config)#
interface type number
Example:
switch(config)# interface ethernet
2/2
switch(config-if)#
Cisco Nexus 9000 Series NX-OS Fundamentals Configuration Guide, Release 7.x
Specifies the interface that you want to configure.
The CLI places you into interface configuration mode
for the specified interface.
Note
The CLI prompt changes to indicate that you
are in interface configuration mode.
45
Page 60

Subinterface Configuration Command Mode
Subinterface Configuration Command Mode
From global configuration mode, you can access a configuration submode for configuring VLAN interfaces
called subinterfaces. In subinterface configuration mode, you can configure multiple virtual interfaces on a
single physical interface. Subinterfaces appear to a protocol as distinct physical interfaces.
Subinterfaces also allow multiple encapsulations for a protocol on a single interface. For example, you can
configure IEEE 802.1Q encapsulation to associate a subinterface with a VLAN.
For more information about configuring subinterfaces, see the Cisco Nexus 9000 Series NX-OS Interfaces
Configuration Guide.
Procedure
Understanding the Command-Line Interface
PurposeCommand or Action
Step 1
Example:
switch# configure terminal
switch(config)#
Step 2
interface type number.subint
Example:
switch(config)# interface ethernet
2/2.1
switch(config-subif)#
Saving and Restoring a Command Mode
The Cisco NX-OS software allows you to save the current command mode, configure a feature, and then
restore the previous command mode. The push command saves the command mode, and the pop command
restores the command mode.
The following example shows how to save and restore a command mode:
switch# configure terminal
switch(config)# event manager applet test
switch(config-applet)# push
switch(config-applet)# configure terminal
switch(config)# username testuser password newtest
switch(config)# pop
switch(config-applet)#
Enters global configuration mode.configure terminal
Specifies the VLAN interface to be configured.
The CLI places you into a subinterface configuration
mode for the specified VLAN interface.
Note
The CLI prompt changes to indicate that you
are in subinterface configuration mode.
Cisco Nexus 9000 Series NX-OS Fundamentals Configuration Guide, Release 7.x
46
Page 61

Understanding the Command-Line Interface
Exiting a Configuration Command Mode
Procedure
Exiting a Configuration Command Mode
PurposeCommand or Action
Step 1
Step 2
Step 3
exit
Example:
switch(config-if)# exit
switch(config)#
end
Example:
switch(config-if)# end
switch#
Ctrl-Z
Example:
switch(config-if)# ^Z
switch#
Exits from the current configuration command mode and
returns to the previous configuration command mode.
Exits from the current configuration command mode and
returns to EXEC mode.
(Optional)
Exits the current configuration command mode and returns to
EXEC mode.
Caution
If you press Ctrl-Z at the end of a command line
in which a valid command has been typed, the CLI
adds the command to the running configuration
file. In most cases, you should exit a configuration
mode using the exit or end command.
Command Mode Summary
This table summarizes information about the main command modes.
Cisco Nexus 9000 Series NX-OS Fundamentals Configuration Guide, Release 7.x
47
Page 62

Special Characters
Understanding the Command-Line Interface
Table 4: Command Mode Summary
Exit MethodPromptAccess MethodMode
EXEC
Global configuration
Interface configuration
Subinterface
configuration
VRF configuration
From the login prompt,
enter your username and
password.
From EXEC mode, use
the configure terminal
command.
From global configuration
mode, specify an interface
with an interface
command.
From global configuration
mode, specify a
subinterface with an
interface command.
From global configuration
mode, use the vrf
command and specify a
routing protocol.
switch#
switch(config)#
switch(config-if)#
switch(config-subif)#
switch(config-vrf)#
To exit to the login
prompt, use the exit
command.
To exit to EXEC mode,
use the end or exit
command or press
Ctrl-Z.
To exit to global
configuration mode, use
the exit command.
To exit to EXEC mode,
use the exit command or
press Ctrl-Z.
To exit to global
configuration mode, use
the exit command.
To exit to EXEC mode,
use the end command or
press Ctrl-Z.
To exit to global
configuration mode, use
the exit command.
To exit to EXEC mode,
use the end command or
press Ctrl-Z.
EXEC for a nondefault
VRF
Special Characters
This table lists the characters that have special meaning in Cisco NX-OS text strings and should be used only
in regular expressions or other special contexts.
Cisco Nexus 9000 Series NX-OS Fundamentals Configuration Guide, Release 7.x
48
From EXEC mode, use
the routing-context vrf
command and specify a
VRF.
switch-red#
To exit to the default
VRF, use the
routing-context vrf
default command.
Page 63

Understanding the Command-Line Interface
Table 5: Special Characters
Keystroke Shortcuts
DescriptionCharacter
Percent%
Pound, hash, or number#
Ellipsis...
Vertical bar|
Less than or greater than< >
Brackets[ ]
Braces{ }
Keystroke Shortcuts
This table lists command key combinations that can be used in both EXEC and configuration modes.
Table 6: Keystroke Shortcuts
Ctrl-B
Ctrl-C
DescriptionKeystrokes
Moves the cursor to the beginning of the line.Ctrl-A
Moves the cursor one character to the left. When you
enter a command that extends beyond a single line,
you can press the Left Arrow or Ctrl-B keys
repeatedly to scroll back toward the system prompt
and verify the beginning of the command entry, or
you can press the Ctrl-A key combination.
Cancels the command and returns to the command
prompt.
Deletes the character at the cursor.Ctrl-D
Moves the cursor to the end of the line.Ctrl-E
Moves the cursor one character to the right.Ctrl-F
Ctrl-G
Exits to the previous command mode without
removing the command string.
Cisco Nexus 9000 Series NX-OS Fundamentals Configuration Guide, Release 7.x
49
Page 64

Keystroke Shortcuts
Understanding the Command-Line Interface
DescriptionKeystrokes
Ctrl-K
Ctrl-P
Ctrl-T
Ctrl-U
Ctrl-V
Deletes all characters from the cursor to the end of
the command line.
Redisplays the current command line.Ctrl-L
Displays the next command in the command history.Ctrl-N
Clears the terminal screen.Ctrl-O
Displays the previous command in the command
history.
Redisplays the current command line.Ctrl-R
Transposes the character under the cursor with the
character located to the right of the cursor. The cursor
is then moved to the right one character.
Deletes all characters from the cursor to the beginning
of the command line.
Removes any special meaning for the following
keystroke. For example, press Ctrl-V before entering
a question mark (?) in a regular expression.
Ctrl-X, H
Ctrl-Y
Ctrl-Z
Up arrow key
Deletes the word to the left of the cursor.Ctrl-W
Lists the history of commands you have entered.
When using this key combination, press and release
the Ctrl and X keys together before pressing H.
Recalls the most recent entry in the buffer (press keys
simultaneously).
Ends a configuration session, and returns you to
EXEC mode.
When used at the end of a command line in which a
valid command has been typed, the resulting
configuration is first added to the running
configuration file.
Displays the previous command in the command
history.
Displays the next command in the command history.Down arrow key
Cisco Nexus 9000 Series NX-OS Fundamentals Configuration Guide, Release 7.x
50
Page 65

Understanding the Command-Line Interface
Keystroke Shortcuts
DescriptionKeystrokes
Right arrow key
Left arrow key
Tab
Moves your cursor through the command string, either
forward or backward, allowing you to edit the current
command.
Displays a list of available commands.?
Completes the word for you after you enter the first
characters of the word and then press the Tab key.
All options that match are presented.
Use tabs to complete the following items:
Command names
•
Scheme names in the file system
•
Server names in the file system
•
Filenames in the file system
•
Example:
switch(config)# xm<Tab>
switch(config)# xml<Tab>
switch(config)# xml server
Example:
switch(config)# c<Tab>
callhome class-map clock
cdp cli control-plane
switch(config)# cl<Tab>
class-map cli clock
switch(config)# cla<Tab>
switch(config)# class-map
Example:
switch# cd bootflash:<Tab>
bootflash:///
bootflash://sup-1/
bootflash://sup-active/
bootflash://sup-local/
bootflash://module-27/
bootflash://module-28/
Example:
switch# cd bootflash://mo<Tab>
bootflash://module-27/ bootflash://module-28/
switch# cd bootflash://module-2
Note
You cannot access remote machines using
the cd command. If you are on slot 27 and
enter the cd bootflash://module-28
command, the following message appears:
"Changing directory to a non-local server is
not allowed."
Cisco Nexus 9000 Series NX-OS Fundamentals Configuration Guide, Release 7.x
51
Page 66

Abbreviating Commands
Abbreviating Commands
You can abbreviate commands and keywords by entering the first few characters of a command. The
abbreviation must include sufficient characters to make it unique from other commands or keywords. If you
are having trouble entering a command, check the system prompt and enter the question mark (?) for a list of
available commands. You might be in the wrong command mode or using incorrect syntax.
This table lists examples of command abbreviations.
Table 7: Examples of Command Abbreviations
Understanding the Command-Line Interface
AbbreviationCommand
conf tconfigure terminal
copy run startcopy running-config startup-config
int e 1/2interface ethernet 1/2
Completing a Partial Command Name
If you cannot remember a complete command name or if you want to reduce the amount of typing you have
to perform, enter the first few letters of the command, and then press the Tab key. The command line parser
will complete the command if the string entered is unique to the command mode. If your keyboard does not
have a Tab key, press Ctrl-I instead.
The CLI recognizes a command once you have entered enough characters to make the command unique. For
example, if you enter conf in EXEC mode, the CLI will be able to associate your entry with the configure
command, because only the configure command begins with conf.
In the following example, the CLI recognizes the unique string for conf in EXEC mode when you press the
Tab key:
switch# conf<Tab>
switch# configure
When you use the command completion feature, the CLI displays the full command name. The CLI does not
execute the command until you press the Return or Enter key. This feature allows you to modify the command
if the full command was not what you intended by the abbreviation. If you enter a set of characters that could
indicate more than one command, a list of matching commands displays.
For example, entering co<Tab> lists all commands available in EXEC mode beginning with co:
switch# co<Tab>
configure copy
switch# co
sh runshow running-config
Note that the characters you entered appear at the prompt again to allow you to complete the command entry.
Cisco Nexus 9000 Series NX-OS Fundamentals Configuration Guide, Release 7.x
52
Page 67

Understanding the Command-Line Interface
Identifying Your Location in the Command Hierarchy
Identifying Your Location in the Command Hierarchy
Some features have a configuration submode hierarchy nested more than one level. In these cases, you can
display information about your present working context (PWC).
Procedure
PurposeCommand or Action
Step 1
Example:
switch# configure terminal
switch(config)# interface mgmt0
switch(config-if)# where detail
mode: conf
interface mgmt0
username: admin
routing-context vrf: default
Using the no Form of a Command
Almost every configuration command has a no form that can be used to disable a feature, revert to a default
value, or remove a configuration.
This example shows how to disable a feature:
switch# configure terminal
switch(config)# feature tacacs+
switch(config)# no feature tacacs+
This example shows how to revert to the default value for a feature:
switch# configure terminal
switch(config)# banner motd #Welcome to the switch#
switch(config)# show banner motd
Welcome to the switch
Displays the PWC.where detail
switch(config)# no banner motd
switch(config)# show banner motd
User Access Verification
This example shows how to remove the configuration for a feature:
switch# configure terminal
switch(config)# radius-server host 10.10.2.2
switch(config)# show radius-server
retransmission count:0
timeout value:1
deadtime value:1
total number of servers:1
following RADIUS servers are configured:
10.10.1.1:
available for authentication on port:1812
available for accounting on port:1813
10.10.2.2:
Cisco Nexus 9000 Series NX-OS Fundamentals Configuration Guide, Release 7.x
53
Page 68

Configuring CLI Variables
switch(config)# no radius-server host 10.10.2.2
switch(config)# show radius-server
retransmission count:0
timeout value:1
deadtime value:1
total number of servers:1
following RADIUS servers are configured:
This example shows how to use the no form of a command in EXEC mode:
switch# cli var name testinterface ethernet1/2
switch# show cli variables
SWITCHNAME="switch"
TIMESTAMP="2013-05-12-13.43.13"
testinterface="ethernet1/2"
switch# cli no var name testinterface
switch# show cli variables
SWITCHNAME="switch"
TIMESTAMP="2013-05-12-13.43.13"
Understanding the Command-Line Interface
available for authentication on port:1812
available for accounting on port:1813
10.10.1.1:
available for authentication on port:1812
available for accounting on port:1813
Configuring CLI Variables
This section describes CLI variables in the Cisco NX-OS CLI.
About CLI Variables
The Cisco NX-OS software supports the definition and use of variables in CLI commands.
You can refer to CLI variables in the following ways:
Entered directly on the command line.
•
Passed to a script initiated using the run-script command. The variables defined in the parent shell are
•
available for use in the child run-script command process.
CLI variables have the following characteristics:
Cannot have nested references through another variable
•
Can persist across switch reloads or exist only for the current session
•
Cisco NX-OS supports one predefined variable: TIMESTAMP. This variable refers to the current time when
the command executes in the format YYYY-MM-DD-HH.MM.SS.
The TIMESTAMP variable name is case sensitive. All letters must be uppercase.Note
Cisco Nexus 9000 Series NX-OS Fundamentals Configuration Guide, Release 7.x
54
Page 69

Understanding the Command-Line Interface
Configuring CLI Session-Only Variables
You can define CLI session variables to persist only for the duration of your CLI session. These variables are
useful for scripts that you execute periodically. You can reference the variable by enclosing the name in
parentheses and preceding it with a dollar sign ($), for example $(variable-name).
Procedure
Configuring CLI Session-Only Variables
PurposeCommand or Action
Step 1
cli var name variable-name
variable-text
Example:
switch# cli var name
testinterface ethernet 2/1
Step 2
show cli variables
Example:
switch# show cli variables
Configuring Persistent CLI Variables
You can configure CLI variables that persist across CLI sessions and device reloads.
Procedure
Configures the CLI session variable. The variable-name
argument is alphanumeric, case sensitive, and has a maximum
length of 31 characters. The variable-text argument is
alphanumeric, case sensitive, can contain spaces, and has a
maximum length of 200 characters.
Note
Beginning with Cisco NX-OS Release 7.0(3)I4(1),
variables can include hyphens (-) and underscores
(_).
(Optional)
Displays the CLI variable configuration.
PurposeCommand or Action
Step 1
Step 2
Example:
switch# configure terminal
switch(config)#
cli var name variable-name variable-text
Example:
switch(config)# cli var name
testinterface ethernet 2/1
Cisco Nexus 9000 Series NX-OS Fundamentals Configuration Guide, Release 7.x
Enters global configuration mode.configure terminal
Configures the CLI persistent variable. The variable
name is a case-sensitive, alphanumeric string and
must begin with an alphabetic character. The
maximum length is 31 characters.
Note
Beginning with Cisco NX-OS Release
7.0(3)I4(1), variables can include hyphens
(-) and underscores (_).
55
Page 70

Command Aliases
Understanding the Command-Line Interface
PurposeCommand or Action
Step 3
Example:
switch(config)# exit
switch#
Step 4
Step 5
show cli variables
Example:
switch# show cli variables
copy running-config startup-config
Example:
switch(config)# copy running-config
startup-config
Command Aliases
This section provides information about command aliases.
About Command Aliases
Exits global configuration mode.exit
(Optional)
Displays the CLI variable configuration.
(Optional)
Copies the running configuration to the startup
configuration.
You can define command aliases to replace frequently used commands. The command aliases can represent
all or part of the command syntax.
Command alias support has the following characteristics:
Command aliases are global for all user sessions.
•
Command aliases persist across reboots if you save them to the startup configuration.
•
Command alias translation always takes precedence over any keyword in any configuration mode or
•
submode.
Command alias configuration takes effect for other user sessions immediately.
•
The Cisco NX-OS software provides one default alias, alias, which is the equivalent to the show cli
•
alias command that displays all user-defined aliases.
You cannot delete or change the default command alias alias.
•
You can nest aliases to a maximum depth of 1. One command alias can refer to another command alias
•
that must refer to a valid command, not to another command alias.
A command alias always replaces the first command keyword on the command line.
•
You can define command aliases for commands in any command mode.
•
If you reference a CLI variable in a command alias, the current value of the variable appears in the alias,
•
not the variable reference.
Cisco Nexus 9000 Series NX-OS Fundamentals Configuration Guide, Release 7.x
56
Page 71

Understanding the Command-Line Interface
You can use command aliases for show command searching and filtering.
•
Defining Command Aliases
You can define command aliases for commonly used commands.
Procedure
Defining Command Aliases
PurposeCommand or Action
Step 1
Step 2
Step 3
Step 4
Step 5
Example:
switch# configure terminal
switch(config)#
cli alias name alias-name alias-text
Example:
switch(config)# cli alias name ethint
interface ethernet
Example:
switch(config)# exit
switch#
alias
Example:
switch# alias
copy running-config startup-config
Example:
switch# copy running-config
startup-config
Enters global configuration mode.configure terminal
Configures the command alias. The alias name
is an alphanumeric string that is not case sensitive
and must begin with an alphabetic character. The
maximum length is 30 characters.
Exits global configuration mode.exit
(Optional)
Displays the command alias configuration.
(Optional)
Copies the running configuration to the startup
configuration.
Configuring Command Aliases for a User Session
You can create a command alias for the current user session that is not available to any other user on the Cisco
NX-OS device. You can also save the command alias for future use by the current user account.
Cisco Nexus 9000 Series NX-OS Fundamentals Configuration Guide, Release 7.x
57
Page 72

Command Scripts
Understanding the Command-Line Interface
Procedure
PurposeCommand or Action
Step 1
terminal alias [persist] alias-name
command-string
Example:
switch# terminal alias shintbr show
interface brief
Command Scripts
This section describes how you can create scripts of commands to perform multiple tasks.
Running a Command Script
You can create a list of commands in a file and execute them from the CLI. You can use CLI variables in the
command script.
Note
You cannot create the script files at the CLI prompt. You can create the script file on a remote device and
copy it to the bootflash: or volatile: directory on the Cisco NX-OS device.
Configures a command alias for the current user
session. Use the persist keyword to save the alias for
future use by the user account.
Note
Do not abbreviate the persist
keyword.
Procedure
Step 1
run-script [bootflash: | volatile:] filename
Example:
switch# run-script testfile
Echoing Information to the Terminal
You can echo information to the terminal, which is particularly useful from a command script. You can
reference CLI variables and use formatting options in the echoed text.
This table lists the formatting options that you can insert in the text.
PurposeCommand or Action
Executes the commands in the file on the
default directory.
Cisco Nexus 9000 Series NX-OS Fundamentals Configuration Guide, Release 7.x
58
Page 73

Understanding the Command-Line Interface
Table 8: Formatting Options for the echo Command
Delaying Command Action
DescriptionFormatting Option
Inserts back spaces.\b
\c
\nnn
Procedure
Step 1
echo [backslash-interpret] [text]
Example:
switch# echo This is a test.
This is a test.
Removes the new line character at the end of the text
string.
Inserts a form feed character.\f
Inserts a new line character.\n
Returns to the beginning of the text line.\r
Inserts a horizontal tab character.\t
Inserts a vertical tab character.\v
Displays a backslash character.\\
Displays the corresponding ASCII octal character.
PurposeCommand or Action
The backslash-interpret keyword indicates that the text
string contains formatting options. The text argument is
alphanumeric, case sensitive, and can contain blanks. The
maximum length is 200 characters. The default is a blank
line.
Delaying Command Action
You can delay a command action for a period of time, which is particularly useful within a command script.
Procedure
Step 1
sleep seconds
Example:
switch# sleep 30
PurposeCommand or Action
Causes a delay for a number of seconds. The range
is from 0 to 2147483647.
Cisco Nexus 9000 Series NX-OS Fundamentals Configuration Guide, Release 7.x
59
Page 74

Context-Sensitive Help
Context-Sensitive Help
The Cisco NX-OS software provides context-sensitive help in the CLI. You can use a question mark (?) at
any point in a command to list the valid input options.
CLI uses the caret (^) symbol to isolate input errors. The ^ symbol appears at the point in the command string
where you have entered an incorrect command, keyword, or argument.
This table shows example outputs of context sensitive help.
Understanding the Command-Line Interface
Cisco Nexus 9000 Series NX-OS Fundamentals Configuration Guide, Release 7.x
60
Page 75

Understanding the Command-Line Interface
Table 9: Context-Sensitive Help Example
Context-Sensitive Help
DescriptionExample Outputs
switch# clock ?
set HH:MM:SS Current Time
switch# clock
switch# clock set ?
WORD HH:MM:SS Current Time
switch# clock set
switch# clock set 13:32:00<CR>
% Incomplete command
switch#
switch# <Ctrl-P>
switch# clock set 13:32:00
switch# clock set 13:32:00 ?
<1-31> Day of the month
switch# clock set 13:32:00
switch# clock set 13:32:00 18 ?
April Month of the year
August Month of the year
December Month of the year
February Month of the year
January Month of the year
July Month of the year
June Month of the year
March Month of the year
May Month of the year
November Month of the year
October Month of the year
September Month of the year
switch# clock set 13:32:00 18
Displays the command syntax for the clock command
in EXEC mode.
The switch output shows that the set keyword is
required for using the clock command.
Displays the command syntax for setting the time.
The help output shows that the current time is required
for setting the clock and how to format the time.
Adds the current time.
The CLI indicates the command is incomplete.
Displays the previous command that you entered.
Displays the additional arguments for the clock set
command.
Displays the additional arguments for the clock set
command.
switch# clock set 13:32:00 18 April 13<CR>
% Invalid input detected at '^' marker.
switch# clock set 13:32:00 18 April ?
<2000-2030> Enter the year (no
abbreviation)
switch# clock set 13:32:00 18 April
switch# clock set 13:32:00 18 April 2013<CR>
switch#
Cisco Nexus 9000 Series NX-OS Fundamentals Configuration Guide, Release 7.x
Adds the date to the clock setting.
The CLI indicates an error with the caret symbol (^)
at 13.
Displays the correct arguments for the year.
Enters the correct syntax for the clock set command.
61
Page 76

Understanding Regular Expressions
Understanding Regular Expressions
The Cisco NX-OS software supports regular expressions for searching and filtering in CLI output, such as
the show commands. Regular expressions are case sensitive and allow for complex matching requirements.
Special Characters
You can also use other keyboard characters (such as ! or ~) as single-character patterns, but certain keyboard
characters have special meanings when used in regular expressions.
This table lists the keyboard characters that have special meanings.
Table 10: Special Characters with Special Meaning
Understanding the Command-Line Interface
Special MeaningCharacter
Matches any single character, including white space..
Matches 0 or more sequences of the pattern.*
Matches 1 or more sequences of the pattern.+
Matches 0 or 1 occurrences of the pattern.?
Matches the beginning of the string.^
Matches the end of the string.$
_ (underscore)
To use these special characters as single-character patterns, remove the special meaning by preceding each
character with a backslash (\). This example contains single-character patterns that match a dollar sign ($),
an underscore (_), and a plus sign (+), respectively:
\$ \_ \+
Matches a comma (,), left brace ({), right brace (}),
left parenthesis ( ( ), right parenthesis ( ) ), the
beginning of the string, the end of the string, or a
space.
Note
The underscore is only treated as a regular
expression for BGP-related commands
Multiple-Character Patterns
You can also specify a pattern that contains multiple characters by joining letters, digits, or keyboard characters
that do not have special meanings. For example, a4% is a multiple-character regular expression.
With multiple-character patterns, the order is important. The regular expression a4% matches the character a
followed by a 4 followed by a percent sign (%). If the string does not have a4%, in that order, pattern matching
Cisco Nexus 9000 Series NX-OS Fundamentals Configuration Guide, Release 7.x
62
Page 77

Understanding the Command-Line Interface
fails. The multiple-character regular expression a. (the character a followed by a period) uses the special
meaning of the period character to match the letter a followed by any single character. With this example, the
strings ab, a!, or a2 are all valid matches for the regular expression.
You can remove the special meaning of a special character by inserting a backslash before it. For example,
when the expression a\. is used in the command syntax, only the string a. will be matched.
Anchoring
You can match a regular expression pattern against the beginning or the end of the string by anchoring these
regular expressions to a portion of the string using the special characters.
This table lists the special characters that you can use for anchoring.
Table 11: Special Characters Used for Anchoring
Anchoring
DescriptionCharacter
Matches the beginning of the string.^
Matches the end of the string.$
For example, the regular expression ^con matches any string that starts with con, and sole$ matches any
string that ends with sole.
Note
The ^ symbol can also be used to indicate the logical function "not" when used in a bracketed range. For
example, the expression [^abcd] indicates a range that matches any single letter, as long as it is not a, b,
c, or d.
Searching and Filtering show Command Output
Often, the output from showcommands can be lengthy and cumbersome. The Cisco NX-OS software provides
the means to search and filter the output so that you can easily locate information. The searching and filtering
options follow a pipe character (|) at the end of the show command. You can display the options using the
CLI context-sensitive help facility:
switch# show running-config | ?
cut Print selected parts of lines.
diff Show difference between current and previous invocation (creates temp files:
egrep Egrep - print lines matching a pattern
grep Grep - print lines matching a pattern
head Display first lines
human Output in human format
last Display last lines
less Filter for paging
no-more Turn-off pagination for command output
perl Use perl script to filter output
section Show lines that include the pattern as well as the subsequent lines that are
sed Stream Editor
remove them with 'diff-clean' command and don't use it on commands with big
outputs, like 'show tech'!)
more indented than matching line
Cisco Nexus 9000 Series NX-OS Fundamentals Configuration Guide, Release 7.x
63
Page 78

Filtering and Searching Keywords
sort Stream Sorter
sscp Stream SCP (secure copy)
tr Translate, squeeze, and/or delete characters
uniq Discard all but one of successive identical lines
vsh The shell that understands cli command
wc Count words, lines, characters
xml Output in xml format (according to .xsd definitions)
begin Begin with the line that matches
count Count number of lines
end End with the line that matches
exclude Exclude lines that match
include Include lines that match
Filtering and Searching Keywords
The Cisco NX-OS CLI provides a set of keywords that you can use with the show commands to search and
filter the command output.
This table lists the keywords for filtering and searching the CLI output.
Table 12: Filtering and Searching Keywords
Understanding the Command-Line Interface
begin string
Example:
show version | begin Hardware
Example:
show running-config | count
cut [-d character] {-b | -c | -f | -s}
Example:
show file testoutput | cut -b 1-10
end string
Example:
show running-config | end interface
exclude string
Example:
show interface brief | exclude down
DescriptionKeyword Syntax
Starts displaying at the line that contains the text that
matches the search string. The search string is case
sensitive.
Displays the number of lines in the command output.count
Displays only part of the output lines. You can display
a number of bytes (-b), characters (-vcut [-d
character] {-b | -c | -f | -s}), or fields (-f). You can
also use the -d keyword to define a field delimiter
other than the tag character default. The -s keyword
suppresses the display of the line that does not contain
the delimiter.
Displays all lines up to the last occurrence of the
search string.
Displays all lines that do not include the search string.
The search string is case sensitive.
head [lines lines]
Example:
show logging logfile | head lines 50
Cisco Nexus 9000 Series NX-OS Fundamentals Configuration Guide, Release 7.x
64
Displays the beginning of the output for the number
of lines specified. The default number of lines is 10.
Page 79

Understanding the Command-Line Interface
diff Utility
DescriptionKeyword Syntax
human
Example:
show version | human
include string
Example:
show interface brief | include up
last [lines]
Example:
show logging logfile | last 50
no-more
Example:
show interface brief | no-more
sscp SSH-connection-name filename
Example:
show version | sscp MyConnection
show_version_output
wc [bytes | lines | words]
Example:
show file testoutput | wc bytes
Displays the output in normal format if you have
previously set the output format to XML using the
terminal output xml command.
Displays all lines that include the search string. The
search string is case sensitive.
Displays the end of the output for the number of lines
specified. The default number of lines is 10.
Displays all the output without stopping at the end of
the screen with the ––More–– prompt.
Redirects the output using streaming secure copy
(sscp) to a named SSH connection. You can create
the SSH named connection using the ssh name
command.
Displays counts of characters, lines, or words. The
default is to display the number of lines, words, and
characters.
diff Utility
Displays the output in XML format.xml
Example:
show version | xml
You can compare the output from a show command with the output from the previous invocation of that
command.
diff-clean [all-sessions] [all-users]
This table describes the keywords for the diff utility.
DescriptionKeyword
all-sessions
Removes diff temporary files from all sessions (past
and present sessions) of the current user.
all-users
Removes diff temporary files from all sessions (past
and present sessions) of all users.
Cisco Nexus 9000 Series NX-OS Fundamentals Configuration Guide, Release 7.x
65
Page 80

grep and egrep Utilities
The Cisco NX-OS software creates temporary files for the most current output for a show command for all
current and previous users sessions. You can remove these temporary files using the diff-clean command.
diff-clean [all-sessions | all-users]
By default, the diff-clean command removes the temporary files for the current user's active session. The
all-sessions keyword removes temporary files for all past and present sessions for the current user. The
all-users keyword removes temporary files for all past and present sessions for the all users.
grep and egrep Utilities
You can use the Global Regular Expression Print (grep) and Extended grep (egrep) command-line utilities to
filter the show command output.
The grep and egrep syntax is as follows:
{grep | egrep} [count] [ignore-case] [invert-match] [line-exp] [line-number] [next lines] [prev lines]
[word-exp] expression}]
This table lists the grep and egrep parameters.
Understanding the Command-Line Interface
Table 13: grep and egrep Parameters
ignore-case
line-number
next lines
prev lines
DescriptionParameter
Displays only the total count of matched lines.count
Specifies to ignore the case difference in matched
lines.
Displays lines that do not match the expression.invert-match
Displays only lines that match a complete line.line-exp
Specifies to display the line number before each
matched line.
Specifies the number of lines to display after a
matched line. The default is 0. The range is from 1
to 999.
Specifies the number of lines to display before a
matched line. The default is 0. The range is from 1
to 999.
Displays only lines that match a complete word.word-exp
expression
Specifies a regular expression for searching the
output.
Cisco Nexus 9000 Series NX-OS Fundamentals Configuration Guide, Release 7.x
66
Page 81

Understanding the Command-Line Interface
less Utility
You can use the less utility to display the contents of the show command output one screen at a time. You
can enter less commands at the : prompt. To display all less commands you can use, enter h at the : prompt.
Mini AWK Utility
AWK is a simple but powerful utility to summarize text output. You can use this utility after a pipe (|) to
further process the text output of a command. Cisco NX-OS supports a mini AWK, which takes an inline
program as an argument.
This example shows how the mini AWK utility can be used to summarize the text output of the show ip route
summary vrf all command:
switch# show ip route summary vrf all | grep "Total number of routes"
Total number of routes: 3
Total number of routes: 10
switch# show ip route summary vrf all | grep "Total number of routes" | awk '{ x = x + $5}
END { print x }'
13
less Utility
sed Utility
sort Utility
You can use the Stream Editor (sed) utility to filter and manipulate the show command output as follows:
sed command
The command argument contains sed utility commands.
You can use the sort utility to filter show command output.
The sort utility syntax is as follows:
sort [-M] [-b] [-d] [-f] [-g] [-i] [-k field-number[.char-position][ordering]] [-n] [-r] [-t delimiter] [-u]
This table describes the sort utiliity parameters.
Table 14: sort Utility Parameters
DescriptionParameter
Sorts by month.-M
-b
Ignores leading blanks (space characters). The default
sort includes the leading blanks.
-d
Sorts by comparing only blanks and alphanumeric
characters. The default sort includes all characters.
Folds lowercase characters into uppercase characters.-f
Cisco Nexus 9000 Series NX-OS Fundamentals Configuration Guide, Release 7.x
67
Page 82

Searching and Filtering from the --More-- Prompt
Understanding the Command-Line Interface
DescriptionParameter
Sorts by comparing a general numeric value.-g
-i
-k field-number[.char-position][ordering]
-r
-t delimiter
-u
Sorts only using printable characters. The default sort
includes nonprintable characters.
Sorts according to a key value. There is no default key
value.
Sorts according to a numeric string value.-n
Reverses order of the sort results. The default sort
output is in ascending order.
Sorts using a specified delimiter. The default delimiter
is the space character.
Removes duplicate lines from the sort results. The
sort output displays the duplicate lines.
Searching and Filtering from the --More-- Prompt
You can search and filter output from --More–- prompts in the show command output.
This table describes the --More–- prompt commands.
Table 15: --More-- Prompt Commands
[lines]<space>
[lines]z
[lines]<return>
DescriptionCommands
Displays output lines for either the specified number
of lines or the current screen size.
Displays output lines for either the specified number
of lines or the current screen size. If you use the lines
argument, that value becomes the new default screen
size.
Displays output lines for either the specified number
of lines or the current default number of lines. The
initial default is 1 line. If you use the optional lines
argument, that value becomes the new default number
of lines to display for this command.
Cisco Nexus 9000 Series NX-OS Fundamentals Configuration Guide, Release 7.x
68
Page 83

Understanding the Command-Line Interface
Using the Command History
DescriptionCommands
[lines]d or [lines]Ctrl+shift+D
q or Q or Ctrl-C
[lines]s
[lines]f
[count]/expression
Scrolls through output lines for either the specified
number of lines or the current default number of lines.
The initial default is 11 lines. If you use the optional
lines argument, that value becomes the new default
number of lines to display for this command.
Exits the --More–- prompt.
Skips forward in the output for either the specified
number of lines or the current default number of lines
and displays a screen of lines. The default is 1 line.
Skips forward in the output for either the specified
number of screens or the current default number of
screens and displays a screen of lines. The default is
1 screen.
Displays the current line number.=
Skips to the line that matches the regular expression
and displays a screen of output lines. Use the optional
count argument to search for lines with multiple
occurrences of the expression. This command sets
the current regular expression that you can use in
other commands.
[count]n
{! | :![shell-cmd]}
Using the Command History
The Cisco NX-OS software CLI allows you to access the command history for the current user session. You
can recall and reissue commands, with or without modification. You can also clear the command history.
Recalling a Command
You can recall a command in the command history to optionally modify and enter again.
Skips to the next line that matches the current regular
expression and displays a screen of output lines. Use
the optional count argument to skip past matches.
Executes the command specified in the shell-cmd
argument in a subshell.
Repeats the previous command..
Cisco Nexus 9000 Series NX-OS Fundamentals Configuration Guide, Release 7.x
69
Page 84

Controlling CLI History Recall
This example shows how to recall a command and reenter it:
switch(config)# show cli history
0 11:04:07 configure terminal
1 11:04:28 show interface ethernet 2/24
2 11:04:39 interface ethernet 2/24
3 11:05:13 no shutdown
4 11:05:19 exit
5 11:05:25 show cli history
switch(config)# !1
switch(config)# show interface ethernet 2/24
You can also use the Ctrl-P and Ctrl-N keystroke shortcuts to recall commands.
Controlling CLI History Recall
You can control the commands that you recall from the CLI history using the Ctrl-P and Ctrl-N keystroke
shortcuts. Cisco NX-OS software recalls all commands from the current command mode and higher command
modes. For example, if you are working in global configuration mode, the command recall keystroke shortcuts
recall both EXEC mode and global configuration mode commands.
Understanding the Command-Line Interface
Configuring the CLI Edit Mode
You can recall commands from the CLI history using the Ctrl-P and Ctrl-N keystroke shortcuts and edit
them before reissuing them. The default edit mode is emacs. You can change the edit mode to vi.
Procedure
Step 1
[no] terminal edit-mode vi [persist]
Example:
switch# terminal edit-mode vi
Displaying the Command History
You can display the command history using the show cli history command.
The show cli history command has the following syntax:
show cli history [lines] [config-mode | exec-mode | this-mode-only] [unformatted]
By default, the number of lines displayed is 12 and the output includes the command number and timestamp.
This example shows how to display the default number of lines of the command history:
PurposeCommand or Action
Changes the CLI edit mode to vi for the user session. The
persist keyword makes the setting persistent across
sessions for the current username.
Use the no to revert to using emacs.
switch# show cli history
Cisco Nexus 9000 Series NX-OS Fundamentals Configuration Guide, Release 7.x
70
Page 85

Understanding the Command-Line Interface
This example shows how to display 20 lines of the command history:
switch# show cli history 20
This example shows how to display only the configuration commands in the command history:
switch(config)# show cli history config-mode
This example shows how to display only the EXEC commands in the command history:
switch(config)# show cli history exec-mode
This example shows how to display only the commands in the command history for the current command
mode:
switch(config-if)# show cli history this-mode-only
This example shows how to display only the commands in the command history without the command number
and timestamp:
switch(config)# show cli history unformatted
Enabling or Disabling the CLI Confirmation Prompts
Enabling or Disabling the CLI Confirmation Prompts
For many features, the Cisco NX-OS software displays prompts on the CLI that ask for confirmation before
continuing. You can enable or disable these prompts. The default is enabled.
Procedure
PurposeCommand or Action
Step 1
[no] terminal dont-ask [persist]
Example:
switch# terminal dont-ask
Disables the CLI confirmation prompt. The persist keyword
makes the setting persistent across sessions for the current
username. The default is enabled.
Use the no form of the command to enable the CLI
confirmation prompts.
Setting CLI Display Colors
You can change the CLI colors to display as follows:
The prompt displays in green if the previous command succeeded.
•
The prompt displays in red of the previous command failed.
•
The user input displays in blue.
•
The command output displays in the default color.
•
Cisco Nexus 9000 Series NX-OS Fundamentals Configuration Guide, Release 7.x
71
Page 86

Sending Commands to Modules
The default colors are sent by the terminal emulator software.
Procedure
Understanding the Command-Line Interface
PurposeCommand or Action
Step 1
terminal color [evening] [persist]
Example:
switch# terminal color
Sending Commands to Modules
You can send commands directly to modules from the supervisor module session using the slot command.
The slot has the following syntax:
slot slot-number [quoted] command-string
By default, the keyword and arguments in the command-string argument are separated by a space. To send
more than one command to a module, separate the commands with a space character, a semicolon character
(;), and a space character.
The quoted keyword indicates that the command string begins and ends with double quotation marks ("). Use
this keyword when you want to redirect the module command output to a filtering utility, such as diff, that is
supported only on the supervisor module session.
This example shows how to display and filter module information:
switch# slot 27 show version | grep lc
Sets the CLI display colors for the terminal session. The
evening keyword is not supported. The persist keyword
makes the setting persistent across sessions for the current
username. The default setting is not persistent.
This example shows how to filter module information on the supervisor module session:
switch# slot 27 quoted "show version" | diff
switch# slot 28 quoted "show version" | diff -c
*** /volatile/vsh_diff_1_root_8430_slot__quoted_show_version.old Wed Apr 29 20:10:41
2013
--- - Wed Apr 29 20:10:41 2013
***************
*** 1,5 ****
! RAM 1036860 kB
! lc27
Software
BIOS: version 6.20
system: version 6.1(2)I1(1) [build 6.1(2)]
--- 1,5 ---! RAM 516692 kB
! lc28
Software
BIOS: version 6.20
system: version 6.1(2)I1(1) [build 6.1(2)]
***************
*** 12,16 ****
Hardware
bootflash: 0 blocks (block size 512b)
! uptime is 0 days 1 hours 45 minute(s) 34 second(s)
Cisco Nexus 9000 Series NX-OS Fundamentals Configuration Guide, Release 7.x
72
Page 87

Understanding the Command-Line Interface
--- 12,16 ---Hardware
bootflash: 0 blocks (block size 512b)
! uptime is 0 days 1 hours 45 minute(s) 42 second(s)
Sending Command Output in Email
You can use the CLI to send the output of a show command to an email address using the pipe operator (|).
The email configuration remains persistent for all show command output until it is reconfigured.Note
Procedure
Sending Command Output in Email
PurposeCommand or Action
Step 1
Step 2
Step 3
Step 4
Step 5
Step 6
Example:
switch# configure terminal
switch(config)#
Example:
switch(config)# email
switch(config-email)#
smtp-host ip-address smtp-port port
Example:
switch(config-email)# smtp-host
198.51.100.1 smtp-port 25
vrf management
Example:
switch(config-email)# vrf management
from email-address
Example:
switch(config-email)# from
admin@Mycompany.com
reply-to email-address
Enters global configuration mode.configure terminal
Enters email configuration mode.email
Specifies the SMTP host IP address and
the SMTP port number.
Specifies a VRF for the email
transmission.
Specifies the sender's email address.
Specifies the recipient's email address.
Example:
switch(config-email)# reply-to
admin@Mycompany.com
Cisco Nexus 9000 Series NX-OS Fundamentals Configuration Guide, Release 7.x
73
Page 88

BIOS Loader Prompt
Understanding the Command-Line Interface
PurposeCommand or Action
Step 7
Step 8
Step 9
Step 10
Example:
switch(config-email)# exit
switch(config)#
Example:
switch(config)# exit
switch#
Example:
switch# show email
show-command | email subject subject
email-address
Example:
switch# show interface brief | email
subject show-interface admin@Mycompany.com
Email sent
Exits email configuration mode.exit
Exits global configuration mode.exit
Displays the email configuration.show email
Uses the pipe operator (|) to send the
output of the specified show command
with a subject to an email address.
BIOS Loader Prompt
When the supervisor modules power up, a specialized BIOS image automatically loads and tries to locate a
valid nx-os image for booting the system. If a valid nx-os image is not found, the following BIOS loader
prompt displays:
loader>
For information on how to load the Cisco NX-OS software from the loader> prompt, see the Cisco Nexus
9000 Series NX-OS Troubleshooting Guide.
Examples Using the CLI
This section includes examples of using the CLI.
Using the System-Defined Timestamp Variable
This example uses $(TIMESTAMP) when redirecting show command output to a file:
switch# show running-config > rcfg.$(TIMESTAMP)
Preparing to copy....done
switch# dir
Cisco Nexus 9000 Series NX-OS Fundamentals Configuration Guide, Release 7.x
74
Page 89

Understanding the Command-Line Interface
12667 May 01 12:27:59 2013 rcfg.2013-05-01-12.27.59
Usage for bootflash://sup-local
8192 bytes used
20963328 bytes free
20971520 bytes total
Using CLI Session Variables
You can reference a variable using the syntax $(variable-name).
This example shows how to reference a user-defined CLI session variable:
switch# show interface $(testinterface)
Ethernet2/1 is down (Administratively down)
Hardware is 10/100/1000 Ethernet, address is 0000.0000.0000 (bia 0019.076c.4dac)
MTU 1500 bytes, BW 1000000 Kbit, DLY 10 usec,
reliability 255/255, txload 1/255, rxload 1/255
Encapsulation ARPA
auto-duplex, auto-speed
Beacon is turned off
Auto-Negotiation is turned on
Input flow-control is off, output flow-control is off
Auto-mdix is turned on
Switchport monitor is off
Last clearing of "show interface" counters never
5 minute input rate 0 bytes/sec, 0 packets/sec
5 minute output rate 0 bytes/sec, 0 packets/sec
L3 in Switched:
ucast: 0 pkts, 0 bytes - mcast: 0 pkts, 0 bytes
L3 out Switched:
ucast: 0 pkts, 0 bytes - mcast: 0 pkts, 0 bytes
Rx
0 input packets 0 unicast packets 0 multicast packets
0 broadcast packets 0 jumbo packets 0 storm suppression packets
0 bytes
Tx
0 output packets 0 multicast packets
0 broadcast packets 0 jumbo packets
0 bytes
0 input error 0 short frame 0 watchdog
0 no buffer 0 runt 0 CRC 0 ecc
0 overrun 0 underrun 0 ignored 0 bad etype drop
0 bad proto drop 0 if down drop 0 input with dribble
0 input discard
0 output error 0 collision 0 deferred
0 late collision 0 lost carrier 0 no carrier
0 babble
0 Rx pause 0 Tx pause 0 reset
Using CLI Session Variables
Defining Command Aliases
This example shows how to define command aliases:
cli alias name ethint interface ethernet
cli alias name shintbr show interface brief
cli alias name shintupbr shintbr | include up | include ethernet
This example shows how to use a command alias:
switch# configure terminal
switch(config)# ethint 2/3
Cisco Nexus 9000 Series NX-OS Fundamentals Configuration Guide, Release 7.x
75
Page 90

Running a Command Script
switch(config-if)#
Running a Command Script
This example displays the CLI commands specified in the script file:
switch# show file testfile
configure terminal
interface ethernet 2/1
no shutdown
end
show interface ethernet 2/1
This example displays the run-script command execution output:
switch# run-script testfile
`configure terminal`
`interface ethernet 2/1`
`no shutdown`
`end`
`show interface ethernet 2/1 `
Ethernet2/1 is down (Link not connected)
Hardware is 10/100/1000 Ethernet, address is 0019.076c.4dac (bia 0019.076c.4dac)
MTU 1500 bytes, BW 1000000 Kbit, DLY 10 usec,
reliability 255/255, txload 1/255, rxload 1/255
Encapsulation ARPA
Port mode is trunk
auto-duplex, auto-speed
Beacon is turned off
Auto-Negotiation is turned on
Input flow-control is off, output flow-control is off
Auto-mdix is turned on
Switchport monitor is off
Last clearing of "show interface" counters 1d26.2uh
5 minute input rate 0 bytes/sec, 0 packets/sec
5 minute output rate 0 bytes/sec, 0 packets/sec
Rx
0 input packets 0 unicast packets 0 multicast packets
0 broadcast packets 0 jumbo packets 0 storm suppression packets
0 bytes
Tx
0 output packets 0 multicast packets
0 broadcast packets 0 jumbo packets
0 bytes
0 input error 0 short frame 0 watchdog
0 no buffer 0 runt 0 CRC 0 ecc
0 overrun 0 underrun 0 ignored 0 bad etype drop
0 bad proto drop 0 if down drop 0 input with dribble
0 input discard
0 output error 0 collision 0 deferred
0 late collision 0 lost carrier 0 no carrier
0 babble
0 Rx pause 0 Tx pause 0 reset
Understanding the Command-Line Interface
Sending Command Output in Email
This example shows how to send the output of the show interface brief command to an email address using
the pipe operator (|):
switch<config># email
switch(config-email)# smtp-host 198.51.100.1 smtp-port 25
switch(config-email)# vrf management
switch(config-email)# from admin@Mycompany.com
Cisco Nexus 9000 Series NX-OS Fundamentals Configuration Guide, Release 7.x
76
Page 91

Understanding the Command-Line Interface
switch(config-email)# reply-to admin@Mycompany.com
switch(config-email)# exit
switch(config)# exit
switch# show email
SMTP host: 198.51.100.1
SMTP port: 25
Reply to: admin@Mycompany.com
From: admin@Mycompany.com
VRF: management
switch# show interface brief | email subject show-interface admin@Mycompany.com
Email sent
The email sent to admin@Mycompany.com with the subject "show-interface" shows the output of the command:
<snip>
--------------------------------------------------------------------Ethernet VLAN Type Mode Status Reason Speed Port
Interface Ch #
--------------------------------------------------------------------Eth1/1 -- eth trunk up none 10G (D) -Eth1/2 -- eth routed down Link not connected auto(D) -Eth1/3 -- eth routed up none 10G (D) -Eth1/4 -- eth routed down Link not connected auto (D) -Eth1/5 -- eth routed down Link not connected auto (D) -Eth1/6 -- eth routed down Link not connected auto (D) -Eth1/7 -- eth routed down Link not connected auto (D) -Eth1/8 -- eth routed down Link not connected auto (D) -Eth1/9 -- eth routed down Link not connected auto (D) -Eth1/10 -- eth routed down Link not connected auto (D) -<snip>
Additional References for the CLI
Additional References for the CLI
This section includes additional information related to the CLI.
Related Documents for the CLI
Cisco NX-OS Licensing
Document TitleRelated Topic
Cisco NX-OS Licensing Guide
Cisco Nexus 9000 Series NX-OS Fundamentals Configuration Guide, Release 7.x
77
Page 92

Related Documents for the CLI
Understanding the Command-Line Interface
Cisco Nexus 9000 Series NX-OS Fundamentals Configuration Guide, Release 7.x
78
Page 93

CHAPTER 6
Configuring Terminal Settings and Sessions
This chapter contains the following sections:
About Terminal Settings and Sessions, page 79
•
Licensing Requirements for Terminal Settings and Sessions, page 80
•
Default Settings for File System Parameters, page 81
•
Configuring the Console Port, page 81
•
Configuring Virtual Terminals, page 82
•
Clearing Terminal Sessions, page 84
•
Displaying Terminal and Session Information, page 85
•
Additional References for Terminal Settings and Sessions, page 85
•
About Terminal Settings and Sessions
This section includes information about terminal settings and sessions.
Terminal Session Settings
The Cisco NX-OS software features allow you to manage the following characteristics of terminals:
Terminal type
Name used by Telnet when communicating with remote hosts
Length
Number of lines of command output displayed before pausing
Width
Number of characters displayed before wrapping the line
Cisco Nexus 9000 Series NX-OS Fundamentals Configuration Guide, Release 7.x
79
Page 94

Console Port
Console Port
Configuring Terminal Settings and Sessions
Inactive session timeout
Number of minutes that a session remains inactive before the device terminates it
The console port is an asynchronous serial port that allows you to connect to the device for initial configuration
through a standard RS-232 port with an RJ-45 connector. Any device connected to this port must be capable
of asynchronous transmission. You can configure the following parameters for the console port:
Data bits
Specifies the number of bits in an 8-bit byte that is used for data.
Inactive session timeout
Specifies the number of minutes a session can be inactive before it is terminated.
Parity
Specifies the odd or even parity for error detection.
Speed
Specifies the transmission speed for the connection.
Stop bits
Specifies the stop bits for an asynchronous line.
Configure your terminal emulator with 9600 baud, 8 data bits, 1 stop bit, and no parity.
Virtual Terminals
You can use virtual terminal lines to connect to your device. Secure Shell (SSH) and Telnet create virtual
terminal sessions. You can configure an inactive session timeout and a maximum sessions limit for virtual
terminals.
Licensing Requirements for Terminal Settings and Sessions
The following table shows the licensing requirements for this feature:
License RequirementProduct
Cisco NX-OS
Terminal setting configuration requires no license.
Any feature not included in a license package is
bundled with the nx-os image and is provided at no
extra charge to you. For a complete explanation of
the Cisco NX-OS licensing scheme, see the Cisco
NX-OS Licensing Guide.
Cisco Nexus 9000 Series NX-OS Fundamentals Configuration Guide, Release 7.x
80
Page 95

Configuring Terminal Settings and Sessions
Default Settings for File System Parameters
Default Settings for File System Parameters
This table lists the default settings for the file system parameters.
Table 16: Default File System Settings
DefaultParameters
bootflash:Default filesystem
Configuring the Console Port
You can set the following characteristics for the console port:
Data bits
•
Inactive session timeout
•
Parity
•
Speed
•
Stop bits
•
Before You Begin
Log in to the console port.
Procedure
Step 1
Example:
switch# configure terminal
switch(config)#
Step 2
Example:
switch# line console
switch(config-console)#
Step 3
databits bits
Example:
switch(config-console)# databits 7
PurposeCommand or Action
Enters global configuration mode.configure terminal
Enters console configuration mode.line console
Configures the number of data bits per byte.
The range is from 5 to 8. The default is 8.
Cisco Nexus 9000 Series NX-OS Fundamentals Configuration Guide, Release 7.x
81
Page 96

Configuring Virtual Terminals
Configuring Terminal Settings and Sessions
PurposeCommand or Action
Step 4
Step 5
Step 6
Step 7
Step 8
Step 9
Step 10
exec-timeout minutes
Example:
switch(config-console)# exec-timeout 30
Example:
switch(config-console)# parity even
speed {300 | 1200 | 2400 | 4800 | 9600 | 38400
| 57600 | 115200}
Example:
switch(config-console)# speed 115200
Example:
switch(config-console)# stopbits 2
Example:
switch(config-console)# exit
switch(config)#
show line console
Example:
switch(config)# show line console
copy running-config startup-config
Example:
switch(config)# copy running-config
startup-config
Configures the timeout for an inactive session.
The range is from 0 to 525600 minutes (8760
hours). A value of 0 minutes disables the
session timeout. The default is 30 minutes.
Configures the parity. The default is none.parity {even | none | odd}
Configures the transmit and receive speed.
The default is 9600.
Configures the stop bits. The default is 1.stopbits {1 | 2}
Exits console configuration mode.exit
(Optional)
Displays the console settings.
(Optional)
Copies the running configuration to the startup
configuration.
Configuring Virtual Terminals
This section describes how to configure virtual terminals on Cisco NX-OS devices.
Configuring the Inactive Session Timeout
You can configure a timeout for inactive virtual terminal sessions on the device.
Cisco Nexus 9000 Series NX-OS Fundamentals Configuration Guide, Release 7.x
82
Page 97

Configuring Terminal Settings and Sessions
Procedure
Configuring the Session Limit
PurposeCommand or Action
Step 1
Step 2
Step 3
Step 4
Step 5
Step 6
Example:
switch# configure terminal
switch(config)#
Example:
switch# line vty
switch(config-line)#
exec-timeout minutes
Example:
switch(config-line)# exec-timeout 30
Example:
switch(config-line)# exit
switch(config)#
show running-config all | begin vty
Example:
switch(config)# show running-config all
| begin vty
copy running-config startup-config
Example:
switch(config)# copy running-config
startup-config
Enters global configuration mode.configure terminal
Enters line configuration mode.line vty
Configures the inactive session timeout. The
range is from 0 to 525600 minutes (8760
hours). A value of 0 minutes disables the
timeout. The default value is 30.
Exits line configuration mode.exit
(Optional)
Displays the virtual terminal configuration.
(Optional)
Copies the running configuration to the startup
configuration.
Configuring the Session Limit
You can limit the number of virtual terminal sessions on your device.
Procedure
Step 1
Example:
switch# configure terminal
switch(config)#
PurposeCommand or Action
Enters global configuration mode.configure terminal
Cisco Nexus 9000 Series NX-OS Fundamentals Configuration Guide, Release 7.x
83
Page 98

Clearing Terminal Sessions
Configuring Terminal Settings and Sessions
PurposeCommand or Action
Step 2
Step 3
Step 4
Step 5
Step 6
Example:
switch# line vty
switch(config-line)#
session-limit sessions
Example:
switch(config-line)# session-limit 10
Example:
switch(config-line)# exit
switch(config)#
show running-config all | being vty
Example:
switch(config)# show running-config all
| begin vty
copy running-config startup-config
Example:
switch(config)# copy running-config
startup-config
Enters line configuration mode.line vty
Configures the maximum number of virtual
sessions for your device. The range is from
1 to 64. The default is 32.
Exits line configuration mode.exit
(Optional)
Displays the virtual terminal configuration.
(Optional)
Copies the running configuration to the
startup configuration.
Clearing Terminal Sessions
You can clear terminal sessions on your device.
Procedure
Step 1
Step 2
show users
Example:
switch# show users
clear line name
Example:
switch# clear line pts/0
PurposeCommand or Action
(Optional)
Displays the user sessions on the device.
Clears a terminal session on a specific line. The
line name is case sensitive.
Cisco Nexus 9000 Series NX-OS Fundamentals Configuration Guide, Release 7.x
84
Page 99

Configuring Terminal Settings and Sessions
Displaying Terminal and Session Information
Displaying Terminal and Session Information
To display terminal and session information, perform one of the following tasks:
PurposeCommand
Displays terminal settings.show terminal
Displays the COM1 and console ports settings.show line
Displays virtual terminal sessions.show users
show running-config [all]
Displays the user account configuration in the running
configuration. The all keyword displays the default
values for the user accounts.
Additional References for Terminal Settings and Sessions
This section includes additional references for terminal settings and sessions on Cisco NX-OS devices.
Related Documents for Terminal Settings and Sessions
Document TitleRelated Topic
Licensing
Cisco NX-OS Licensing Guide
Cisco Nexus 9000 Series NX-OS Fundamentals Configuration Guide, Release 7.x
85
Page 100

Related Documents for Terminal Settings and Sessions
Configuring Terminal Settings and Sessions
Cisco Nexus 9000 Series NX-OS Fundamentals Configuration Guide, Release 7.x
86
 Loading...