

Page 1

Cisco Nexus 3600 NX-OS Security Configuration Guide, Release 7.x
First Published: 2017-09-27
Last Modified: 2018-02-27
Americas Headquarters
Cisco Systems, Inc.
170 West Tasman Drive
San Jose, CA 95134-1706
USA
http://www.cisco.com
Tel: 408 526-4000
800 553-NETS (6387)
Fax: 408 527-0883
Page 2

THE SPECIFICATIONS AND INFORMATION REGARDING THE PRODUCTS IN THIS MANUAL ARE SUBJECT TO CHANGE WITHOUT NOTICE. ALL STATEMENTS,
INFORMATION, AND RECOMMENDATIONS IN THIS MANUAL ARE BELIEVED TO BE ACCURATE BUT ARE PRESENTED WITHOUT WARRANTY OF ANY KIND,
EXPRESS OR IMPLIED. USERS MUST TAKE FULL RESPONSIBILITY FOR THEIR APPLICATION OF ANY PRODUCTS.
THE SOFTWARE LICENSE AND LIMITED WARRANTY FOR THE ACCOMPANYING PRODUCT ARE SET FORTH IN THE INFORMATION PACKET THAT SHIPPED WITH
THE PRODUCT AND ARE INCORPORATED HEREIN BY THIS REFERENCE. IF YOU ARE UNABLE TO LOCATE THE SOFTWARE LICENSE OR LIMITED WARRANTY,
CONTACT YOUR CISCO REPRESENTATIVE FOR A COPY.
The Cisco implementation of TCP header compression is an adaptation of a program developed by the University of California, Berkeley (UCB) as part of UCB's public domain version
of the UNIX operating system. All rights reserved. Copyright©1981, Regents of the University of California.
NOTWITHSTANDING ANY OTHER WARRANTY HEREIN, ALL DOCUMENT FILES AND SOFTWARE OF THESE SUPPLIERS ARE PROVIDED “AS IS" WITH ALL FAULTS.
CISCO AND THE ABOVE-NAMED SUPPLIERS DISCLAIM ALL WARRANTIES, EXPRESSED OR IMPLIED, INCLUDING, WITHOUT LIMITATION, THOSE OF
MERCHANTABILITY, FITNESS FOR A PARTICULAR PURPOSE AND NONINFRINGEMENT OR ARISING FROM A COURSE OF DEALING, USAGE, OR TRADE PRACTICE.
IN NO EVENT SHALL CISCO OR ITS SUPPLIERS BE LIABLE FOR ANY INDIRECT, SPECIAL, CONSEQUENTIAL, OR INCIDENTAL DAMAGES, INCLUDING, WITHOUT
LIMITATION, LOST PROFITS OR LOSS OR DAMAGE TO DATA ARISING OUT OF THE USE OR INABILITY TO USE THIS MANUAL, EVEN IF CISCO OR ITS SUPPLIERS
HAVE BEEN ADVISED OF THE POSSIBILITY OF SUCH DAMAGES.
Any Internet Protocol (IP) addresses and phone numbers used in this document are not intended to be actual addresses and phone numbers. Any examples, command display output, network
topology diagrams, and other figures included in the document are shown for illustrative purposes only. Any use of actual IP addresses or phone numbers in illustrative content is unintentional
and coincidental.
Cisco and the Cisco logo are trademarks or registered trademarks of Cisco and/or its affiliates in the U.S. and other countries. To view a list of Cisco trademarks, go to this URL: http://
www.cisco.com/go/trademarks. Third-party trademarks mentioned are the property of their respective owners. The use of the word partner does not imply a partnership
relationship between Cisco and any other company. (1110R)
©
2018 Cisco Systems, Inc. All rights reserved.
Page 3

CONTENTS
Preface
CHAPTER 1
CHAPTER 2
Preface xi
Audience xi
Document Conventions xi
Obtaining Documentation and Submitting a Service Request xii
Documentation Feedback xii
Related Documentation for Cisco Nexus 3600 Platform Switches xiii
New and Changed Information 1
New and Changed Information 1
Overview 3
Authentication, Authorization, and Accounting 3
RADIUS and TACACS+ Security Protocols 4
SSH and Telnet 4
SSH and Telnet 5
IP ACLs 5
CHAPTER 3
Configuring AAA 7
Information About AAA 7
AAA Security Services 7
Benefits of Using AAA 8
Remote AAA Services 8
AAA Server Groups 8
AAA Service Configuration Options 9
Authentication and Authorization Process for User Logins 10
Prerequisites for Remote AAA 11
Guidelines and Limitations for AAA 12
Cisco Nexus 3600 NX-OS Security Configuration Guide, Release 7.x
iii
Page 4

Contents
Configuring AAA 12
Configuring Console Login Authentication Methods 12
Configuring Default Login Authentication Methods 13
Enabling Login Authentication Failure Messages 14
Logging Successful and Failed Login Attempts 15
Configuring AAA Command Authorization 16
Enabling MSCHAP Authentication 17
Configuring AAA Accounting Default Methods 18
Using AAA Server VSAs 20
VSAs 20
VSA Format 20
Specifying Switch User Roles and SNMPv3 Parameters on AAA Servers 20
Secure Login Enhancements 21
CHAPTER 4
Secure Login Enhancements 21
Configuring Login Parameters 21
Configuration Examples for Login Parameters 22
Restricting Sessions Per User—Per User Per Login 23
Enabling the Password Prompt for User Name 24
Configuring Share Key Value for using RADIUS/TACACS+ 24
Monitoring and Clearing the Local AAA Accounting Log 25
Verifying the AAA Configuration 25
Configuration Examples for AAA 26
Default AAA Settings 26
Configuring RADIUS 29
Information About RADIUS 29
RADIUS Network Environments 29
Information About RADIUS Operations 30
RADIUS Server Monitoring 31
Vendor-Specific Attributes 31
Prerequisites for RADIUS 32
Guidelines and Limitations for RADIUS 32
Configuring RADIUS Servers 32
Configuring RADIUS Server Hosts 33
Configuring RADIUS Global Preshared Keys 34
Cisco Nexus 3600 NX-OS Security Configuration Guide, Release 7.x
iv
Page 5

Contents
Configuring RADIUS Server Preshared Keys 34
Configuring RADIUS Server Groups 35
Configuring the Global Source Interface for RADIUS Server Groups 37
Allowing Users to Specify a RADIUS Server at Login 37
Configuring the Global RADIUS Transmission Retry Count and Timeout Interval 38
Configuring Accounting and Authentication Attributes for RADIUS Servers 39
Configuring Periodic RADIUS Server Monitoring 40
Configuring the Dead-Time Interval 41
Manually Monitoring RADIUS Servers or Groups 42
Verifying the RADIUS Configuration 43
Displaying RADIUS Server Statistics 43
Clearing RADIUS Server Statistics 43
CHAPTER 5
Configuration Examples for RADIUS 44
Default Settings for RADIUS 44
Feature History for RADIUS 44
Configuring TACACS+ 45
Information About Configuring TACACS+ 45
TACACS+ Advantages 45
User Login with TACACS+ 46
Default TACACS+ Server Encryption Type and Preshared Key 46
TACACS+ Server Monitoring 47
Prerequisites for TACACS+ 47
Guidelines and Limitations for TACACS+ 48
Configuring TACACS+ 48
TACACS+ Server Configuration Process 48
Enabling TACACS+ 48
Configuring TACACS+ Server Hosts 49
Configuring TACACS+ Global Preshared Keys 50
Configuring TACACS+ Server Groups 51
Configuring the Global Source Interface for TACACS+ Server Groups 52
Configuring the Global TACACS+ Timeout Interval 52
Configuring the Timeout Interval for a Server 53
Configuring TCP Ports 53
Configuring Periodic TACACS+ Server Monitoring 54
Cisco Nexus 3600 NX-OS Security Configuration Guide, Release 7.x
v
Page 6

Contents
Configuring the Dead-Time Interval 55
Manually Monitoring TACACS+ Servers or Groups 56
Disabling TACACS+ 56
Displaying TACACS+ Statistics 57
Verifying the TACACS+ Configuration 57
Configuration Examples for TACACS+ 57
Default Settings for TACACS+ 58
CHAPTER 6
Configuring SSH and Telnet 59
Information About SSH and Telnet 59
SSH Server 59
SSH Client 59
SSH Server Keys 60
SSH Authentication Using Digital Certificates 60
Telnet Server 61
Guidelines and Limitations for SSH 61
Configuring SSH 61
Generating SSH Server Keys 61
Specifying the SSH Public Keys for User Accounts 62
Specifying the SSH Public Keys in Open SSH Format 62
Specifying the SSH Public Keys in IETF SECSH Format 63
Specifying the SSH Public Keys in PEM-Formatted Public Key Certificate Form 63
Configuring the SSH Source Interface 64
Starting SSH Sessions to Remote Devices 65
Clearing SSH Hosts 65
Disabling the SSH Server 65
Deleting SSH Server Keys 66
Clearing SSH Sessions 66
Configuration Examples for SSH 67
Configuring X.509v3 Certificate-Based SSH Authentication 68
Configuration Example for X.509v3 Certificate-Based SSH Authentication 70
Configuring Telnet 71
Enabling the Telnet Server 71
Reenabling the Telnet Server 71
Configuring the Telnet Source Interface 71
Cisco Nexus 3600 NX-OS Security Configuration Guide, Release 7.x
vi
Page 7

Contents
Starting Telnet Sessions to Remote Devices 72
Clearing Telnet Sessions 72
Verifying the SSH and Telnet Configuration 73
Default Settings for SSH 73
CHAPTER 7
Configuring IP ACLs 75
Information About ACLs 75
IP ACL Types and Applications 76
Application Order 76
Rules 76
Source and Destination 77
Protocols 77
Implicit Rules 77
Additional Filtering Options 77
Sequence Numbers 77
Logical Operators and Logical Operation Units 78
ACL TCAM Regions 78
Licensing Requirements for ACLs 79
Prerequisites for ACLs 79
Guidelines and Limitations for ACLs 80
Default ACL Settings 80
ACL Logging 81
Configuring IP ACLs 81
Creating an IP ACL 81
Configuring IPv4 ACL Logging 82
Changing an IP ACL 84
Removing an IP ACL 85
Changing Sequence Numbers in an IP ACL 86
Applying an IP ACL to mgmt0 86
Applying an IP ACL as a Port ACL 87
Applying an IP ACL as a Router ACL 87
Verifying the ACL Logging Configuration 88
About System ACLs 89
Carving a TCAM Region 90
Configuring System ACLs 90
Cisco Nexus 3600 NX-OS Security Configuration Guide, Release 7.x
vii
Page 8

Contents
Configuration and Show Command Examples for the System ACLs 90
Configuring ACL Logging 92
Configuring the ACL Logging Cache 92
Applying ACL Logging to an Interface 93
Applying the ACL Log Match Level 94
Clearing Log Files 94
Verifying the ACL Logging Configuration 94
Configuring ACL TCAM Region Sizes 95
Reverting to the Default TCAM Region Sizes 97
Configuring ACLs on Virtual Terminal Lines 97
Verifying ACLs on VTY Lines 99
Configuration Examples for ACLs on VTY Lines 99
CHAPTER 8
CHAPTER 9
Configuring Unicast RPF 101
Information About Unicast RPF 101
Unicast RPF Process 102
Global Statistics 102
Licensing Requirements for Unicast RPF 103
Guidelines and Limitations for Unicast RPF 103
Default Settings for Unicast RPF 104
Configuring Unicast RPF 104
Configuration Examples for Unicast RPF 106
Verifying the Unicast RPF Configuration 106
Additional References for Unicast RPF 107
Configuring Control Plane Policing 109
About CoPP 109
Control Plane Protection 110
Control Plane Packet Types 111
viii
Classification for CoPP 111
Rate Controlling Mechanisms 112
Dynamic and Static CoPP ACLs 112
Default Policing Policies 113
Default Class Maps - For Cisco NX-OS Release 7.0(3)I3(1) 114
Strict Default CoPP Policy - For Cisco NX-OS Release 7.0(3)I3(1) 116
Cisco Nexus 3600 NX-OS Security Configuration Guide, Release 7.x
Page 9

Contents
Moderate Default CoPP Policy - For Cisco NX-OS Release 7.0(3)I3(1) 118
Lenient Default CoPP Policy - For Cisco NX-OS Release 7.0(3)I3(1) 120
Dense Default CoPP Policy - For Cisco NX-OS Release 7.0(3)I3(1) 122
Packets Per Second Credit Limit 124
Modular QoS Command-Line Interface 124
CoPP and the Management Interface 124
Licensing Requirements for CoPP 125
Guidelines and Limitations for CoPP 125
Default Settings for CoPP 127
Configuring CoPP 127
Configuring a Control Plane Class Map 127
Configuring a Control Plane Policy Map 129
Configuring the Control Plane Service Policy 131
Configuring the CoPP Scale Factor Per Line Card 132
Changing or Reapplying the Default CoPP Policy 133
Copying the CoPP Best Practice Policy 134
Verifying the CoPP Configuration 135
Displaying the CoPP Configuration Status 137
Monitoring CoPP 137
Clearing the CoPP Statistics 138
Configuration Examples for CoPP 138
CoPP Configuration Example 138
Changing or Reapplying the Default CoPP Policy Using the Setup Utility 139
Additional References for CoPP 140
Cisco Nexus 3600 NX-OS Security Configuration Guide, Release 7.x
ix
Page 10

Contents
Cisco Nexus 3600 NX-OS Security Configuration Guide, Release 7.x
x
Page 11

Preface
This preface includes the following sections:
Audience, page xi
•
Document Conventions, page xi
•
Obtaining Documentation and Submitting a Service Request, page xii
•
Documentation Feedback, page xii
•
Related Documentation for Cisco Nexus 3600 Platform Switches, page xiii
•
Audience
This publication is for network administrators who install, configure, and maintain Cisco Nexus switches.
Document Conventions
Command descriptions use the following conventions:
DescriptionConvention
bold
Italic
[x | y]
{x | y}
Bold text indicates the commands and keywords that you enter literally
as shown.
Italic text indicates arguments for which the user supplies the values.
Square brackets enclose an optional element (keyword or argument).[x]
Square brackets enclosing keywords or arguments separated by a vertical
bar indicate an optional choice.
Braces enclosing keywords or arguments separated by a vertical bar
indicate a required choice.
Cisco Nexus 3600 NX-OS Security Configuration Guide, Release 7.x
xi
Page 12

Obtaining Documentation and Submitting a Service Request
Preface
DescriptionConvention
[x {y | z}]
variable
string
Examples use the following conventions:
italic screen font
Nested set of square brackets or braces indicate optional or required
choices within optional or required elements. Braces and a vertical bar
within square brackets indicate a required choice within an optional
element.
Indicates a variable for which you supply values, in context where italics
cannot be used.
A nonquoted set of characters. Do not use quotation marks around the
string or the string will include the quotation marks.
DescriptionConvention
Terminal sessions and information the switch displays are in screen font.screen font
Information you must enter is in boldface screen font.boldface screen font
Arguments for which you supply values are in italic screen font.
Nonprinting characters, such as passwords, are in angle brackets.< >
Default responses to system prompts are in square brackets.[ ]
!, #
An exclamation point (!) or a pound sign (#) at the beginning of a line
of code indicates a comment line.
Obtaining Documentation and Submitting a Service Request
For information on obtaining documentation, using the Cisco Bug Search Tool (BST), submitting a service
request, and gathering additional information, see What's New in Cisco Product Documentation at: http://
www.cisco.com/c/en/us/td/docs/general/whatsnew/whatsnew.html.
Subscribe to What's New in Cisco Product Documentation, which lists all new and revised Cisco technical
documentation as an RSS feed and delivers content directly to your desktop using a reader application. The
RSS feeds are a free service.
Documentation Feedback
To provide technical feedback on this document, or to report an error or omission, please send your comments
to nexus3k-docfeedback@cisco.com. We appreciate your feedback.
xii
Cisco Nexus 3600 NX-OS Security Configuration Guide, Release 7.x
Page 13

Preface
Related Documentation for Cisco Nexus 3600 Platform Switches
Related Documentation for Cisco Nexus 3600 Platform Switches
The entire Cisco Nexus 3600 platform switch documentation set is available at the following URL:
http://www.cisco.com/c/en/us/support/switches/nexus-3000-series-switches/
tsd-products-support-series-home.html
Cisco Nexus 3600 NX-OS Security Configuration Guide, Release 7.x
xiii
Page 14

Related Documentation for Cisco Nexus 3600 Platform Switches
Preface
xiv
Cisco Nexus 3600 NX-OS Security Configuration Guide, Release 7.x
Page 15

New and Changed Information
This chapter provides release-specific information for each new and changed feature in the Cisco Nexus
3600 Series NX-OS Security Configuration Guide.
New and Changed Information, page 1
•
New and Changed Information
This table summarizes the new and changed features for the Cisco Nexus 3600 Series NX-OS Security
Configuration Guide and where they are documented.
Table 1: New and Changed Features
CHAPTER 1
System ACLs
Access Control Lists
Authentication, Authorization,
and Accounting
SSH and Telnet
DescriptionFeature
system ACLs.
Control Lists (ACLs).
Authentication, Authorization,
and Accounting (AAA).
Telnet.
in
Release
7.0(3)F3(4)Added support for configuring
7.0(3)F3(1)Added support for Access
7.0(3)F3(1)Added support for SSH and
7.0(3)F3(1)Added support for TACACS+.TACACS+
7.0(3)F3(1)Added support for RADIUS.RADIUS
Where DocumentedChanged
About System ACLs, on page
89
Configuring IP ACLs, on page
75
Configuring AAA, on page 77.0(3)F3(1)Added support for
Configuring SSH and Telnet,
on page 59
Configuring TACACS+, on
page 45
Configuring RADIUS, on page
29
Cisco Nexus 3600 NX-OS Security Configuration Guide, Release 7.x
1
Page 16

New and Changed Information
New and Changed Information
DescriptionFeature
Where DocumentedChanged
in
Release
7.0(3)F3(1)Added support for unicast RPF.Unicast RPF
Configuring Unicast RPF, on
page 101
7.0(3)F3(1)Added support for CoPPControl Plane Policing (CoPP)
Configuring Control Plane
Policing, on page 109
Cisco Nexus 3600 NX-OS Security Configuration Guide, Release 7.x
2
Page 17

CHAPTER 2
Overview
The Cisco NX-OS software supports security features that can protect your network against degradation or
failure and also against data loss or compromise resulting from intentional attacks and from unintended but
damaging mistakes by well-meaning network users.
Authentication, Authorization, and Accounting, page 3
•
RADIUS and TACACS+ Security Protocols, page 4
•
SSH and Telnet, page 4
•
SSH and Telnet, page 5
•
IP ACLs, page 5
•
Authentication, Authorization, and Accounting
Authentication, authorization, and accounting (AAA) is an architectural framework for configuring a set of
three independent security functions in a consistent, modular manner.
Authentication
Provides the method of identifying users, including login and password dialog, challenge and response,
messaging support, and, depending on the security protocol that you select, encryption. Authentication
is the way a user is identified prior to being allowed access to the network and network services. You
configure AAA authentication by defining a named list of authentication methods and then applying
that list to various interfaces.
Authorization
Provides the method for remote access control, including one-time authorization or authorization for
each service, per-user account list and profile, user group support, and support of IP, IPX, ARA, and
Telnet.
Remote security servers, such as RADIUS and TACACS+, authorize users for specific rights by
associating attribute-value (AV) pairs, which define those rights, with the appropriate user. AAA
authorization works by assembling a set of attributes that describe what the user is authorized to perform.
These attributes are compared with the information contained in a database for a given user, and the
result is returned to AAA to determine the user’s actual capabilities and restrictions.
Cisco Nexus 3600 NX-OS Security Configuration Guide, Release 7.x
3
Page 18

RADIUS and TACACS+ Security Protocols
Accounting
Provides the method for collecting and sending security server information used for billing, auditing,
and reporting, such as user identities, start and stop times, executed commands (such as PPP), number
of packets, and number of bytes. Accounting enables you to track the services that users are accessing,
as well as the amount of network resources that they are consuming.
Overview
Note
You can configure authentication outside of AAA. However, you must configure AAA if you want to use
RADIUS or TACACS+, or if you want to configure a backup authentication method.
RADIUS and TACACS+ Security Protocols
AAA uses security protocols to administer its security functions. If your router or access server is acting as
a network access server, AAA is the means through which you establish communication between your network
access server and your RADIUS or TACACS+ security server.
The chapters in this guide describe how to configure the following security server protocols:
RADIUS
A distributed client/server system implemented through AAA that secures networks against unauthorized
access. In the Cisco implementation, RADIUS clients run on Cisco routers and send authentication
requests to a central RADIUS server that contains all user authentication and network service access
information.
TACACS+
A security application implemented through AAA that provides a centralized validation of users who
are attempting to gain access to a router or network access server. TACACS+ services are maintained
in a database on a TACACS+ daemon running, typically, on a UNIX or Windows NT workstation.
TACACS+ provides for separate and modular authentication, authorization, and accounting facilities.
SSH and Telnet
You can use the Secure Shell (SSH) server to enable an SSH client to make a secure, encrypted connection
to a Cisco NX-OS device. SSH uses strong encryption for authentication. The SSH server in the Cisco NX-OS
software can interoperate with publicly and commercially available SSH clients.
The SSH client in the Cisco NX-OS software works with publicly and commercially available SSH servers.
The Telnet protocol enables TCP/IP connections to a host. Telnet allows a user at one site to establish a TCP
connection to a login server at another site and then passes the keystrokes from one device to the other. Telnet
can accept either an IP address or a domain name as the remote device address.
Cisco Nexus 3600 NX-OS Security Configuration Guide, Release 7.x
4
Page 19

Overview
SSH and Telnet
You can use the Secure Shell (SSH) server to enable an SSH client to make a secure, encrypted connection
to a Cisco NX-OS device. SSH uses strong encryption for authentication. The SSH server in the Cisco NX-OS
software can interoperate with publicly and commercially available SSH clients.
The SSH client in the Cisco NX-OS software works with publicly and commercially available SSH servers.
The Telnet protocol enables TCP/IP connections to a host. Telnet allows a user at one site to establish a TCP
connection to a login server at another site and then passes the keystrokes from one device to the other. Telnet
can accept either an IP address or a domain name as the remote device address.
IP ACLs
IP ACLs are ordered sets of rules that you can use to filter traffic based on IPv4 information in the Layer 3
header of packets. Each rule specifies a set of conditions that a packet must satisfy to match the rule. When
the Cisco NX-OS software determines that an IP ACL applies to a packet, it tests the packet against the
conditions of all rules. The first match determines whether a packet is permitted or denied, or if there is no
match, the Cisco NX-OS software applies the applicable default rule. The Cisco NX-OS software continues
processing packets that are permitted and drops packets that are denied.
SSH and Telnet
Cisco Nexus 3600 NX-OS Security Configuration Guide, Release 7.x
5
Page 20

IP ACLs
Overview
Cisco Nexus 3600 NX-OS Security Configuration Guide, Release 7.x
6
Page 21

CHAPTER 3
Configuring AAA
This chapter describes how to configure authentication, authorization, and accounting (AAA) on Cisco
NX-OS devices.
Information About AAA, page 7
•
Prerequisites for Remote AAA, page 11
•
Guidelines and Limitations for AAA, page 12
•
Configuring AAA, page 12
•
Monitoring and Clearing the Local AAA Accounting Log , page 25
•
Verifying the AAA Configuration, page 25
•
Configuration Examples for AAA, page 26
•
Default AAA Settings, page 26
•
Information About AAA
AAA Security Services
The authentication, authorization, and accounting (AAA) features allows you to verify the identity of, grant
access to, and track the actions of users who manage Cisco Nexus devices. The Cisco Nexus device supports
Remote Access Dial-In User Service (RADIUS) or Terminal Access Controller Access Control device Plus
(TACACS+) protocols.
Based on the user ID and password that you provide, the switches perform local authentication or authorization
using the local database or remote authentication or authorization using one or more AAA servers. A preshared
secret key provides security for communication between the switch and AAA servers. You can configure a
common secret key for all AAA servers or for only a specific AAA server.
AAA security provides the following services:
• Authentication—Identifies users, including login and password dialog, challenge and response, messaging
support, and, encryption depending on the security protocol that you select.
• Authorization—Provides access control.
Cisco Nexus 3600 NX-OS Security Configuration Guide, Release 7.x
7
Page 22

Benefits of Using AAA
Configuring AAA
Authorization to access a Cisco Nexus device is provided by attributes that are downloaded from AAA
servers. Remote security servers, such as RADIUS and TACACS+, authorize users for specific rights
by associating attribute-value (AV) pairs, which define those rights with the appropriate user.
• Accounting—Provides the method for collecting information, logging the information locally, and
sending the information to the AAA server for billing, auditing, and reporting.
Note
The Cisco NX-OS software supports authentication, authorization, and accounting independently. For
example, you can configure authentication and authorization without configuring accounting.
Benefits of Using AAA
AAA provides the following benefits:
Increased flexibility and control of access configuration
•
Scalability
•
Standardized authentication methods, such as RADIUS and TACACS+
•
Multiple backup devices
•
Remote AAA Services
Remote AAA services provided through RADIUS and TACACS+ protocols have the following advantages
over local AAA services:
User password lists for each switch in the fabric are easier to manage.
•
AAA servers are already deployed widely across enterprises and can be easily used for AAA services.
•
The accounting log for all switches in the fabric can be centrally managed.
•
User attributes for each switch in the fabric are easier to manage than using the local databases on the
•
switches.
AAA Server Groups
You can specify remote AAA servers for authentication, authorization, and accounting using server groups.
A server group is a set of remote AAA servers that implement the same AAA protocol. A server group provides
for failover servers if a remote AAA server fails to respond. If the first remote server in the group fails to
respond, the next remote server in the group is tried until one of the servers sends a response. If all the AAA
servers in the server group fail to respond, that server group option is considered a failure. If required, you
can specify multiple server groups. If a switch encounters errors from the servers in the first group, it tries
the servers in the next server group.
Cisco Nexus 3600 NX-OS Security Configuration Guide, Release 7.x
8
Page 23
Configuring AAA
AAA Service Configuration Options
On Cisco Nexus devices, you can have separate AAA configurations for the following services:
User Telnet or Secure Shell (SSH) login authentication
•
Console login authentication
•
User management session accounting
•
The following table lists the CLI commands for each AAA service configuration option.
Table 2: AAA Service Configuration Commands
AAA Service Configuration Options
Related CommandAAA Service Configuration Option
aaa authentication login defaultTelnet or SSH login
aaa authentication login consoleConsole login
Note
aaa accounting defaultUser session accounting
You can specify the following authentication methods for the AAA services:
• RADIUS server groups—Uses the global pool of RADIUS servers for authentication.
• Specified server groups—Uses specified RADIUS or TACACS+ server groups for authentication.
• Local—Uses the local username or password database for authentication.
• None—Uses only the username.
If the method is for all RADIUS servers, instead of a specific server group, the Cisco Nexus devices choose
the RADIUS server from the global pool of configured RADIUS servers in the order of configuration.
Servers from this global pool are the servers that can be selectively configured in a RADIUS server group
on the Cisco Nexus devices.
The following table describes the AAA authentication methods that you can configure for the AAA services.
Table 3: AAA Authentication Methods for AAA Services
AAA MethodsAAA Service
Server groups, local, and noneConsole login authentication
Server groups, local, and noneUser login authentication
Server groups and localUser management session accounting
Cisco Nexus 3600 NX-OS Security Configuration Guide, Release 7.x
9
Page 24

Authentication and Authorization Process for User Logins
Configuring AAA
Note
For console login authentication, user login authentication, and user management session accounting, the
Cisco Nexus devices try each option in the order specified. The local option is the default method when
other configured options fail.
Authentication and Authorization Process for User Logins
The authentication and authorization process for user login is as occurs:
When you log in to the required Cisco Nexus device, you can use the Telnet, SSH, Fabric Manager or
•
Device Manager, or console login options.
When you have configured the AAA server groups using the server group authentication method, the
•
Cisco Nexus device sends an authentication request to the first AAA server in the group as follows:
If the AAA server fails to respond, then the next AAA server is tried and so on until the remote server
responds to the authentication request.
If all AAA servers in the server group fail to respond, the servers in the next server group are tried.
If all configured methods fail, the local database is used for authentication.
If a Cisco Nexus device successfully authenticates you through a remote AAA server, the following
•
conditions apply:
If the AAA server protocol is RADIUS, user roles specified in the cisco-av-pair attribute are downloaded
with an authentication response.
If the AAA server protocol is TACACS+, another request is sent to the same server to get the user roles
specified as custom attributes for the shell.
If your username and password are successfully authenticated locally, the Cisco Nexus device logs you
•
in and assigns you the roles configured in the local database.
Cisco Nexus 3600 NX-OS Security Configuration Guide, Release 7.x
10
Page 25
Configuring AAA
Prerequisites for Remote AAA
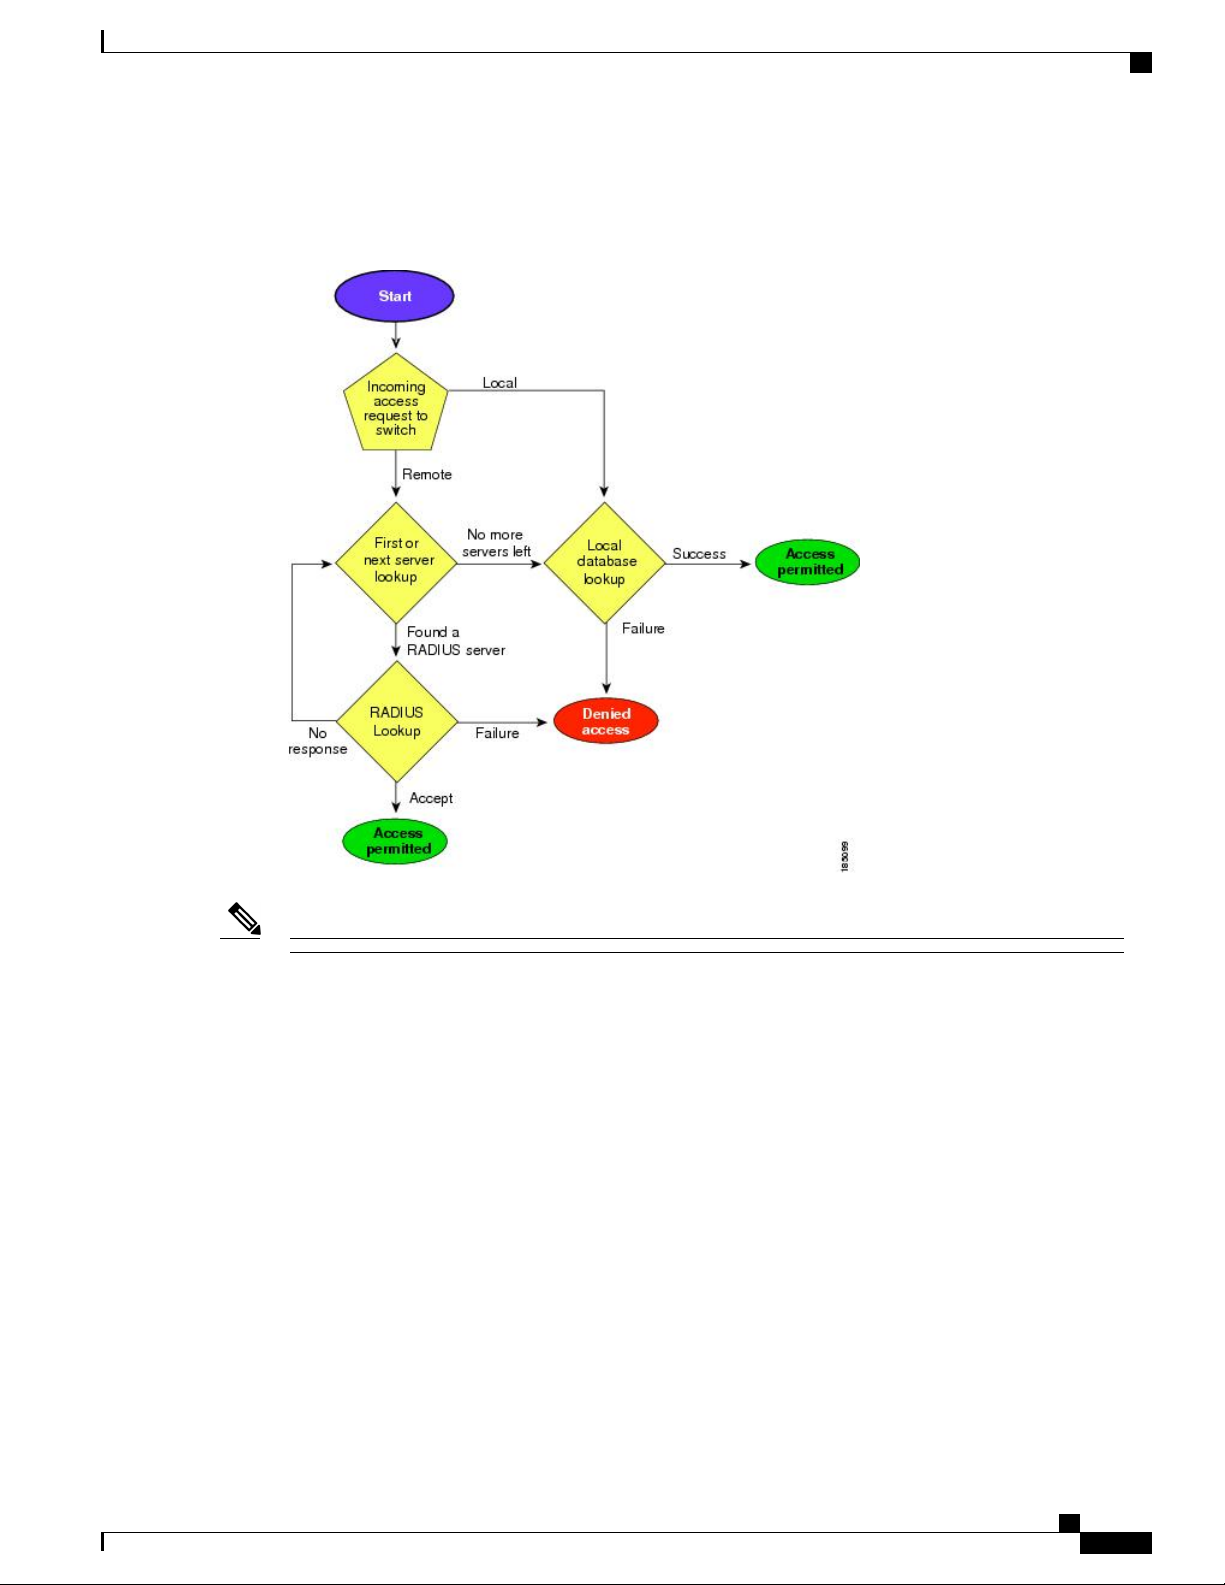
The following figure shows a flowchart of the authentication and authorization process.
Figure 1: Authentication and Authorization Flow for User Login
Note
In the figure, "No more servers left" means that there is no response from any server within this server group.
Prerequisites for Remote AAA
Remote AAA servers have the following prerequisites:
At least one RADIUS or TACACS+ server must be IP reachable.
•
The Cisco Nexus device is configured as a client of the AAA servers.
•
The preshared secret key is configured on the Cisco Nexus device and on the remote AAA servers.
•
The remote server responds to AAA requests from the Cisco Nexus device.
•
Cisco Nexus 3600 NX-OS Security Configuration Guide, Release 7.x
11
Page 26

Guidelines and Limitations for AAA
Guidelines and Limitations for AAA
The Cisco Nexus devices do not support all numeric usernames, whether created with TACACS+ or RADIUS,
or created locally. If an all numeric username exists on an AAA server and is entered during a login, the Cisco
Nexus device still logs in the user.
If you configure the AAA login authentication default group, TACACS-SERVER-GROUP, it also overrides
the login for the console. This override occurs even if aaa authentication login console local is a default
command on the switch. To prevent this, you must configure aaa authentication login console local.
You should not create user accounts with usernames that are all numeric.Caution
Configuring AAA
Configuring AAA
Configuring Console Login Authentication Methods
The authentication methods include the following:
Global pool of RADIUS servers
•
Named subset of RADIUS or TACACS+ servers
•
Local database on the Cisco Nexus device.
•
Username only none
•
The default method is local.
Note
Note
The group radius and group server-name forms of the aaa authentication command are used for a
set of previously defined RADIUS servers. Use the radius server-host command to configure the host
servers. Use the aaa group server radius command to create a named group of servers.
If you configure the AAA login authentication default group, TACACS-SERVER-GROUP, it also overrides
the login for the console. This override occurs even if aaa authentication login console local is a default
command on the switch. To prevent this, you must configure aaa authentication login console local.
Before you configure console login authentication methods, configure RADIUS or TACACS+ server groups
as needed.
Cisco Nexus 3600 NX-OS Security Configuration Guide, Release 7.x
12
Page 27

Configuring AAA
Configuring Default Login Authentication Methods
Procedure
PurposeCommand or Action
Step 1
Step 2
Step 3
Step 4
Step 5
authentication login console
{group group-list [none] | local
| none}
switch# show aaa
authentication
switch# copy running-config
startup-config
Enters global configuration mode.switch# configure terminal
Configures login authentication methods for the console.switch(config)# aaa
The group-list argument consists of a space-delimited list of
group names. The group names are the following:
• radius —Uses the global pool of RADIUS servers for
authentication.
• named-group —Uses a named subset of TACACS+ or
RADIUS servers for authentication.
The local method uses the local database for authentication.
The none method uses the username only.
The default console login method is local, which is used when
no methods are configured or when all of the configured
methods fail to respond.
Exits global configuration mode.switch(config)# exit
(Optional)
Displays the configuration of the console login authentication
methods.
(Optional)
Copies the running configuration to the startup configuration.
This example shows how to configure authentication methods for the console login:
switch# configure terminal
switch(config)# aaa authentication login console group radius
switch(config)# exit
switch# show aaa authentication
switch# copy running-config startup-config
Configuring Default Login Authentication Methods
The default method is local.
Before you configure default login authentication methods, configure RADIUS or TACACS+ server groups
as needed.
Cisco Nexus 3600 NX-OS Security Configuration Guide, Release 7.x
13
Page 28

Enabling Login Authentication Failure Messages
Procedure
Configuring AAA
PurposeCommand or Action
Step 1
Step 2
Step 3
Step 4
Step 5
authentication login default
{group group-list [none] | local
| none}
switch# show aaa authentication
switch# copy running-config
startup-config
Enters global configuration mode.switch# configure terminal
Configures the default authentication methods.switch(config)# aaa
The group-list argument consists of a space-delimited list of
group names. The group names are the following:
• radius —Uses the global pool of RADIUS servers for
authentication.
• named-group —Uses a named subset of TACACS+ or
RADIUS servers for authentication.
The local method uses the local database for authentication.
The none method uses the username only.
The default login method is local , which is used when no
methods are configured or when all of the configured methods
do not respond.
Exits configuration mode.switch(config)# exit
(Optional)
Displays the configuration of the default login authentication
methods.
(Optional)
Copies the running configuration to the startup configuration.
Enabling Login Authentication Failure Messages
When you log in, the login is processed by the local user database if the remote AAA servers do not respond.
If you have enabled the displaying of login failure messages, the following message is displayed:
Remote AAA servers unreachable; local authentication done.
Remote AAA servers unreachable; local authentication failed.
Procedure
Step 1
Step 2
Step 3
Cisco Nexus 3600 NX-OS Security Configuration Guide, Release 7.x
14
switch(config)# aaa authentication login
error-enable
PurposeCommand or Action
Enters global configuration mode.switch# configure terminal
Enables login authentication failure messages.
The default is disabled.
Exits configuration mode.switch(config)# exit
Page 29

Configuring AAA
Logging Successful and Failed Login Attempts
PurposeCommand or Action
Step 4
Step 5
switch# show aaa authentication
switch# copy running-config
startup-config
Logging Successful and Failed Login Attempts
You can configure the switch to log all successful and failed login attempts to the configured syslog server.
Procedure
PurposeCommand or Action
Step 1
Step 2
Example:
switch# configure terminal
[no] login on-failure log
Example:
switch(config)# login
on-failure log
Enters global configuration mode.configure terminal
Logs all failed authentication messages to the configured
syslog server. With this configuration, the following syslog
message appears after the failed login:
AUTHPRIV-3-SYSTEM_MSG: pam_aaa:Authentication
failed for user admin from 172.22.00.00
Note
(Optional)
Displays the login failure message configuration.
(Optional)
Copies the running configuration to the startup
configuration.
When logging level authpriv is 6, additional Linux
kernel authentication messages appear along with
the previous message. If these additional messages
need to be ignored, the authpriv value should be set
to 3.
Step 3
Step 4
[no] login on-success log
Example:
switch(config)# login
on-success log
show login on-failure log
Example:
switch(config)# show login
on-failure log
Cisco Nexus 3600 NX-OS Security Configuration Guide, Release 7.x
Logs all successful authentication messages to the configured
syslog server. With this configuration, the following syslog
message appears after the successful login:
AUTHPRIV-6-SYSTEM_MSG: pam_aaa:Authentication
success for user admin from 172.22.00.00
Note
When logging level authpriv is 6, additional Linux
kernel authentication messages appear along with
the previous message.
(Optional)
Displays whether the switch is configured to log failed
authentication messages to the syslog server.
15
Page 30
Configuring AAA Command Authorization
Configuring AAA
PurposeCommand or Action
Step 5
Step 6
show login on-successful log
Example:
switch(config)# show login
on-successful log
copy running-config startup-config
Example:
switch(config)# copy
running-config startup-config
Configuring AAA Command Authorization
When a TACACS+ server authorization method is configured, you can authorize every command that a user
executes with the TACACS+ server which includes all EXEC mode commands and all configuration mode
commands.
The authorization methods include the following:
• Group—TACACS+ server group
• Local—Local role-based authorization
• None—No authorization is performed
(Optional)
Displays whether the switch is configured to log successful
authentication messages to the syslog server.
(Optional)
Copies the running configuration to the startup configuration.
The default method is Local.
There is no authorization on the console session.Note
Before You Begin
You must enable TACACS+ before configuring AAA command authorization.
Procedure
PurposeCommand or Action
Step 1
Example:
switch# configure terminal
switch(config)#
Step 2
config-commands} {default} {{[group
group-name] | [ local]} | {[group group-name] |
[ none]}}
Enters global configuration mode.configure terminal
Configures authorization parameters.aaa authorization {commands |
Use the commands keyword to authorize EXEC
mode commandes.
Cisco Nexus 3600 NX-OS Security Configuration Guide, Release 7.x
16
Page 31

Configuring AAA
Enabling MSCHAP Authentication
PurposeCommand or Action
Use the config-commands keyword to authorize
Example:
switch(config)# aaa authorization
config-commands default group tac1
configuration mode commands.
Use the group, local, or none keywords to
identify the authorization method.
Example:
switch# aaa authorization commands default
group tac1
The following example shows how to authorize EXEC mode commands with TACACS+ server group tac1:
switch# aaa authorization commands default group tac1
The following example shows how to authorize configuration mode commands with TACACS+ server group
tac1:
switch(config)# aaa authorization config-commands default group tac1
The following example shows how to authorize configuration mode commands with TACACS+ server group
tac1:
If the server is reachable, the command is allowed or not allowed based on the server response.
•
If there is an error reaching the server, the command is authorized based on the user's local role.
•
switch(config)# aaa authorization config-commands default group tac1 local
The followng example shows how to authorize configuration mode commands with TACACS+ server group
tac1:
If the server is reachable, the command is allowed or not allowed based on the server response.
•
If there is an error reaching the server, allow the command regardless of the local role.
•
switch# aaa authorization commands default group tac1 none
The following example shows how to authorize EXEC mode commands regardless of the local role:
switch# aaa authorization commands default none
The following example shows how to authorize EXEC mode commands using the local role for authorization:
switch# aaa authorization commands default local
Enabling MSCHAP Authentication
Microsoft Challenge Handshake Authentication Protocol (MSCHAP) is the Microsoft version of CHAP. You
can use MSCHAP for user logins to a Cisco Nexus device through a remote authentication server (RADIUS
or TACACS+).
Cisco Nexus 3600 NX-OS Security Configuration Guide, Release 7.x
17
Page 32

Configuring AAA Accounting Default Methods
By default, the Cisco Nexus device uses Password Authentication Protocol (PAP) authentication between the
switch and the remote server. If you enable MSCHAP, you must configure your RADIUS server to recognize
the MSCHAP vendor-specific attributes (VSAs).
The following table describes the RADIUS VSAs required for MSCHAP.
Table 4: MSCHAP RADIUS VSAs
Configuring AAA
DescriptionVSAVendor-Type NumberVendor-ID Number
Procedure
Step 1
Step 2
MSCHAP-Challenge11311
MSCHAP-Response11211
switch(config)# aaa authentication login
mschap enable
Contains the challenge
sent by an AAA server to
an MSCHAP user. It can
be used in both
Access-Request and
Access-Challenge
packets.
Contains the response
value provided by an
MSCHAP user in
response to the challenge.
It is only used in
Access-Request packets.
PurposeCommand or Action
Enters global configuration mode.switch# configure terminal
Enables MS-CHAP authentication. The default
is disabled.
Step 3
Step 4
switch# show aaa authentication login
mschap
Step 5
switch# copy running-config
startup-config
Configuring AAA Accounting Default Methods
The Cisco Nexus device supports TACACS+ and RADIUS methods for accounting. The switches report user
activity to TACACS+ or RADIUS security servers in the form of accounting records. Each accounting record
contains accounting attribute-value (AV) pairs and is stored on the AAA server.
Cisco Nexus 3600 NX-OS Security Configuration Guide, Release 7.x
18
Exits configuration mode.switch(config)# exit
(Optional)
Displays the MS-CHAP configuration.
(Optional)
Copies the running configuration to the startup
configuration.
Page 33

Configuring AAA
Configuring AAA Accounting Default Methods
When you activate AAA accounting, the Cisco Nexus device reports these attributes as accounting records,
which are then stored in an accounting log on the security server.
You can create default method lists defining specific accounting methods, which include the following:.
• RADIUS server group—Uses the global pool of RADIUS servers for accounting.
• Specified server group—Uses a specified RADIUS or TACACS+ server group for accounting.
• Local—Uses the local username or password database for accounting.
Note
If you have configured server groups and the server groups do not respond, by default, the local database
is used for authentication.
Before You Begin
Before you configure AAA accounting default methods, configure RADIUS or TACACS+ server groups as
needed.
Procedure
PurposeCommand or Action
Step 1
Step 2
switch(config)# aaa accounting
default {group group-list |
local}
Enters global configuration mode.switch# configure terminal
Configures the default accounting method. One or more server
group names can be specified in a space-separated list.
The group-list argument consists of a space-delimited list of
group names. The group names are the following:
• radius —Uses the global pool of RADIUS servers for
accounting.
• named-group —Uses a named subset of TACACS+ or
RADIUS servers for accounting.
Step 3
Step 4
Step 5
switch# show aaa accounting
switch# copy running-config
startup-config
Cisco Nexus 3600 NX-OS Security Configuration Guide, Release 7.x
The local method uses the local database for accounting.
The default method is local, which is used when no server
groups are configured or when all the configured server group
do not respond.
Exits configuration mode.switch(config)# exit
(Optional)
Displays the configuration AAA accounting default methods.
(Optional)
Copies the running configuration to the startup configuration.
19
Page 34

Using AAA Server VSAs
Using AAA Server VSAs
VSAs
You can use vendor-specific attributes (VSAs) to specify the Cisco Nexus device user roles and SNMPv3
parameters on AAA servers.
The Internet Engineering Task Force (IETF) draft standard specifies a method for communicating VSAs
between the network access server and the RADIUS server. The IETF uses attribute 26. VSAs allow vendors
to support their own extended attributes that are not suitable for general use. The Cisco RADIUS implementation
supports one vendor-specific option using the format recommended in the specification. The Cisco vendor
ID is 9, and the supported option is vendor type 1, which is named cisco-av-pair. The value is a string with
the following format:
protocol : attribute seperator value *
The protocol is a Cisco attribute for a particular type of authorization, separator is an equal sign (=) for
mandatory attributes, and an asterisk (* ) indicates optional attributes.
When you use RADIUS servers for authentication on a Cisco Nexus device, the RADIUS protocol directs
the RADIUS server to return user attributes, such as authorization information, with authentication results.
This authorization information is specified through VSAs.
Configuring AAA
VSA Format
The following VSA protocol options are supported by the Cisco Nexus device:
• Shell— Used in access-accept packets to provide user profile information.
• Accounting—Used in accounting-request packets. If a value contains any white spaces, put it within
double quotation marks.
The following attributes are supported by the Cisco Nexus device:
• roles—Lists all the roles assigned to the user. The value field is a string that stores the list of group
names delimited by white space.
• accountinginfo—Stores additional accounting information in addition to the attributes covered by a
standard RADIUS accounting protocol. This attribute is sent only in the VSA portion of the
Account-Request frames from the RADIUS client on the switch, and it can only be used with the
accounting protocol-related PDUs.
Specifying Switch User Roles and SNMPv3 Parameters on AAA Servers
You can use the VSA cisco-av-pair on AAA servers to specify user role mapping for the Cisco Nexus device
using this format:
shell:roles="roleA roleB …"
If you do not specify the role option in the cisco-av-pair attribute, the default user role is network-operator.
Cisco Nexus 3600 NX-OS Security Configuration Guide, Release 7.x
20
Page 35

Configuring AAA
Secure Login Enhancements
Note
For information on Cisco Unified Wireless Network TACACS+ configurations and to change the user
roles, see Cisco Unified Wireless Network TACACS+ Configuration.
You can also specify your SNMPv3 authentication and privacy protocol attributes as follows:
shell:roles="roleA roleB..." snmpv3:auth=SHA priv=AES-128
The SNMPv3 authentication protocol options are SHA and MD5. The privacy protocol options are AES-128
and DES. If you do not specify these options in the cisco-av-pair attribute, MD5 and DES are the default
authentication protocols.
For additional information, see the Configuring User Accounts and RBAC chapter in the System Management
Configuration Guide for your Cisco Nexus device.
Secure Login Enhancements
Secure Login Enhancements
The following secure login enhancements are supported in Cisco NX-OS:
Configuring Login Parameters
•
Configuration Examples for Login Parameters
•
• Restricting Sessions Per User—Per User Per Login
Enabling the Password Prompt for User Name
•
Configuring Share Key Value for using RADIUS/TACACS+
•
Configuring Login Parameters
Use this task to configure your Cisco NX-OS device for login parameters that help detect suspected DoS
attacks and slow down dictionary attacks.
All login parameters are disabled by default. You must enter the login block-for command, which enables
default login functionality, before using any other login commands. After the login block-for command is
enabled, the following default is enforced:
All login attempts made through Telnet or SSH are denied during the quiet period; that is, no ACLs are
•
exempt from the login period until the login quiet-mode access-class command is entered.
Procedure
Step 1
Example:
Switch# configure terminal
PurposeCommand or Action
Enters global configuration mode.configure terminal
Cisco Nexus 3600 NX-OS Security Configuration Guide, Release 7.x
21
Page 36

Secure Login Enhancements
Configuring AAA
PurposeCommand or Action
Step 2
Step 3
Step 4
Step 5
[no] login block-for seconds attempts
tries within seconds
Example:
Switch(config)# login block-for 100
attempts 2 within 100
[no] login quiet-mode access-class
{acl-name | acl-number}
Example:
Switch(config)# login quiet-mode
access-class myacl
Example:
Switch(config)# exit
Example:
Switch# show login
Configures your Cisco NX-OS device for login
parameters that help provide DoS detection.
Note
This command must be issued before any
other login command can be used.
(Optional) Although this command is optional, it is
recommended that it be configured to specify an ACL
that is to be applied to the device when the device
switches to quiet mode. When the device is in quiet
mode, all login requests are denied and the only
available connection is through the console.
Exits to privileged EXEC mode.exit
Displays login parameters.show login failures
failures --Displays information related only to
•
failed login attempts.
Configuration Examples for Login Parameters
Setting Login Parameters Example
The following example shows how to configure your switch to enter a 100 second quiet period if 15 failed
login attempts is exceeded within 100 seconds; all login requests are denied during the quiet period except
hosts from the ACL "myacl."
Switch(config)# login block-for 100 attempts 15 within 100
Switch(config)# login quiet-mode access-class myacl
Showing Login Parameters Example
The following sample output from the show login command verifies that no login parameters have been
specified:
Switch# show login
No Quiet-Mode access list has been configured, default ACL will be applied.
Switch is enabled to watch for login Attacks.
If more than 2 login failures occur in 45 seconds or less, logins will be disabled for 70
Cisco Nexus 3600 NX-OS Security Configuration Guide, Release 7.x
22
Page 37

Configuring AAA
Secure Login Enhancements
seconds.
Switch presently in Normal-Mode.
Current Watch Window remaining time 10 seconds.
Present login failure count 0.
The following sample output from the show login failures command shows all failed login attempts on the
switch:
Switch# show login failures
Information about last 20 login failures with the device.
-------------------------------------------------------------------------------Username Line Source Appname
TimeStamp
-------------------------------------------------------------------------------admin pts/0 bgl-ads-728.cisco.com login
Wed Jun 10 04:56:16 2015
admin pts/0 bgl-ads-728.cisco.com login
Wed Jun 10 04:56:19 2015
--------------------------------------------------------------------------------
The following sample output from the show login failures command verifies that no information is presently
logged:
Switch# show login failures
*** No logged failed login attempts with the device.***
Restricting Sessions Per User—Per User Per Login
Use this task to restrict the maximum sessions per user.
Procedure
Step 1
Example:
Switch# configure terminal
Step 2
Step 3
[no] user max-logins max-logins
Example:
Switch(config)# user max-logins 1
Example:
Switch(config)# exit
PurposeCommand or Action
Enters global configuration mode.configure terminal
Restricts the maximum sessions per user. The
range is from 1 to 7. If you set the maximum login
limit as 1, then only one session (telnet/SSH) is
allowed per user.
Exits to privileged EXEC mode.exit
Cisco Nexus 3600 NX-OS Security Configuration Guide, Release 7.x
23
Page 38

Secure Login Enhancements
Enabling the Password Prompt for User Name
Procedure
Configuring AAA
PurposeCommand or Action
Step 1
Step 2
Example:
Switch# configure terminal
[no] password prompt username
Enters global configuration mode.configure terminal
Enables the login knob. If this command is enabled
and the user enters the username command without
Example:
the password option, then the password is prompted.
The password accepts hidden characters. Use the no
Switch(config)# password prompt
username
Step 3
Example:
Switch(config)# exit
form of this command to disable the login knob.
Exits to privileged EXEC mode.exit
Configuring Share Key Value for using RADIUS/TACACS+
The shared secret you configure for remote authentication and accounting must be hidden. For the radius-server
key and tacacs-server key commands, a separate command to generate encrypted shared secret can be used.
Procedure
PurposeCommand or Action
Step 1
Step 2
Example:
Switch# configure terminal
generate type7_encrypted_secret
Enters global configuration mode.configure terminal
Configures RADIUS and TACACS shared secret with
key type 7. While generating an encrypted shared
Example:
Switch(config)# generate
type7_encrypted_secret
secret, user input is hidden.
Note
You can generate encrypted equivalent of
plain text separately and can configure the
encrypted shared secret later.
Cisco Nexus 3600 NX-OS Security Configuration Guide, Release 7.x
24
Page 39

Configuring AAA
Monitoring and Clearing the Local AAA Accounting Log
PurposeCommand or Action
Step 3
Example:
Switch(config)# exit
Exits to privileged EXEC mode.exit
Monitoring and Clearing the Local AAA Accounting Log
The Cisco Nexus device maintains a local log for the AAA accounting activity.
Procedure
PurposeCommand or Action
Step 1
Step 2
switch# show accounting log [size]
[start-time year month day hh : mm
: ss]
switch# clear accounting log
Displays the accounting log contents. By default, the
command output contains up to 250,000 bytes of the
accounting log. You can use the size argument to limit
command output. The range is from 0 to 250000 bytes. You
can also specify a start time for the log output.
(Optional)
Clears the accounting log contents.
Verifying the AAA Configuration
To display AAA configuration information, perform one of the following tasks:
mschap}]
Cisco Nexus 3600 NX-OS Security Configuration Guide, Release 7.x
PurposeCommand
Displays AAA accounting configuration.show aaa accounting
Displays AAA authentication information.show aaa authentication [login {error-enable |
Displays AAA authorization information.show aaa authorization
Displays the AAA server group configuration.show aaa groups
25
Page 40

Configuration Examples for AAA
Configuring AAA
PurposeCommand
show login [failures]
show login on-failure log
show login on-successful log
show running-config aaa [all]
show running-config aaa [all]
show running-config all | i max-login
show startup-config aaa
Displays the login parameters. The failures option
displays information related only to failed login
attempts.
Note
Displays whether the switch is configured to log failed
authentication messages to the syslog server.
Displays whether the switch is configured to log
successful authentication messages to the syslog
server.
Displays the AAA configuration in the running
configuration.
Displays the AAA configuration in the running
configuration.
Displays the maximum number of login sessions
allowed per user.
Displays the AAA configuration in the startup
configuration.
The clear login failures command clears the
login failures in the current watch period.
show userpassphrase {length | max-length |
min-length}
Configuration Examples for AAA
The following example shows how to configure AAA:
switch(config)# aaa authentication login default group radius
switch(config)# aaa authentication login console group radius
switch(config)# aaa accounting default group radius
Default AAA Settings
The following table lists the default settings for AAA parameters.
Table 5: Default AAA Parameters
Displays the minimum and maximum length of the
user password.
DefaultParameters
localConsole authentication method
Cisco Nexus 3600 NX-OS Security Configuration Guide, Release 7.x
26
Page 41

Configuring AAA
Default AAA Settings
DefaultParameters
localDefault authentication method
DisabledLogin authentication failure messages
DisabledMSCHAP authentication
localDefault accounting method
250 KBAccounting log display length
Cisco Nexus 3600 NX-OS Security Configuration Guide, Release 7.x
27
Page 42

Default AAA Settings
Configuring AAA
Cisco Nexus 3600 NX-OS Security Configuration Guide, Release 7.x
28
Page 43

Configuring RADIUS
This chapter contains the following sections:
Information About RADIUS, page 29
•
Prerequisites for RADIUS, page 32
•
Guidelines and Limitations for RADIUS, page 32
•
Configuring RADIUS Servers, page 32
•
Verifying the RADIUS Configuration, page 43
•
Displaying RADIUS Server Statistics, page 43
•
Clearing RADIUS Server Statistics, page 43
•
Configuration Examples for RADIUS, page 44
•
Default Settings for RADIUS, page 44
•
Feature History for RADIUS, page 44
•
CHAPTER 4
Information About RADIUS
The Remote Access Dial-In User Service (RADIUS) distributed client/server system allows you to secure
networks against unauthorized access. In the Cisco implementation, RADIUS clients run on Cisco Nexus
device and send authentication and accounting requests to a central RADIUS server that contains all user
authentication and network service access information.
RADIUS Network Environments
RADIUS can be implemented in a variety of network environments that require high levels of security while
maintaining network access for remote users.
You can use RADIUS in the following network environments that require access security:
Networks with multiple-vendor network devices, each supporting RADIUS.
•
Cisco Nexus 3600 NX-OS Security Configuration Guide, Release 7.x
29
Page 44

Information About RADIUS Operations
For example, network devices from several vendors can use a single RADIUS server-based security
database.
Networks already using RADIUS.
•
You can add a Cisco Nexus device with RADIUS to the network. This action might be the first step
when you make a transition to an AAA server.
Networks that require resource accounting.
•
You can use RADIUS accounting independent of RADIUS authentication or authorization. The RADIUS
accounting functions allow data to be sent at the start and end of services, indicating the amount of
resources (such as time, packets, bytes, and so on) used during the session. An Internet service provider
(ISP) might use a freeware-based version of the RADIUS access control and accounting software to
meet special security and billing needs.
Networks that support authentication profiles.
•
Using the RADIUS server in your network, you can configure AAA authentication and set up per-user
profiles. Per-user profiles enable the Cisco Nexus device to manage ports using their existing RADIUS
solutions and to efficiently manage shared resources to offer different service-level agreements.
Configuring RADIUS
Information About RADIUS Operations
When a user attempts to log in and authenticate to a Cisco Nexus device using RADIUS, the following process
occurs:
1
The user is prompted for and enters a username and password.
2
The username and encrypted password are sent over the network to the RADIUS server.
3
The user receives one of the following responses from the RADIUS server:
• ACCEPT—The user is authenticated.
• REJECT—The user is not authenticated and is prompted to reenter the username and password, or
access is denied.
• CHALLENGE—A challenge is issued by the RADIUS server. The challenge collects additional
data from the user.
• CHANGE PASSWORD—A request is issued by the RADIUS server, asking the user to select a
new password.
The ACCEPT or REJECT response is bundled with additional data that is used for EXEC or network
authorization. You must first complete RADIUS authentication before using RADIUS authorization. The
additional data included with the ACCEPT or REJECT packets consists of the following:
Services that the user can access, including Telnet, rlogin, or local-area transport (LAT) connections,
•
and Point-to-Point Protocol (PPP), Serial Line Internet Protocol (SLIP), or EXEC services.
Connection parameters, including the host or client IPv4 or IPv6 address, access list, and user timeouts.
•
Cisco Nexus 3600 NX-OS Security Configuration Guide, Release 7.x
30
Page 45

Configuring RADIUS
RADIUS Server Monitoring
An unresponsive RADIUS server can cause delay in processing of AAA requests. You can configure the
switch to periodically monitor a RADIUS server to check whether it is responding (or alive) to save time in
processing AAA requests. The switch marks unresponsive RADIUS servers as dead and does not send AAA
requests to any dead RADIUS servers. The switch periodically monitors the dead RADIUS servers and brings
them to the alive state once they respond. This process verifies that a RADIUS server is in a working state
before real AAA requests are sent to the server. Whenever a RADIUS server changes to the dead or alive
state, a Simple Network Management Protocol (SNMP) trap is generated and the switch displays an error
message that a failure is taking place.
The following figure shows the different RADIUS server states:
Figure 2: RADIUS Server States
RADIUS Server Monitoring
Note
The monitoring interval for alive servers and dead servers are different and can be configured by the user.
The RADIUS server monitoring is performed by sending a test authentication request to the RADIUS
server.
Vendor-Specific Attributes
The Internet Engineering Task Force (IETF) draft standard specifies a method for communicating
vendor-specific attributes (VSAs) between the network access server and the RADIUS server. The IETF uses
attribute 26. VSAs allow vendors to support their own extended attributes that are not suitable for general
use. The Cisco RADIUS implementation supports one vendor-specific option using the format recommended
in the specification. The Cisco vendor ID is 9, and the supported option is vendor type 1, which is named
cisco-av-pair. The value is a string with the following format:
protocol : attribute separator value *
The protocol is a Cisco attribute for a particular type of authorization, the separator is an equal sign (=) for
mandatory attributes, and an asterisk (*) indicates optional attributes.
Cisco Nexus 3600 NX-OS Security Configuration Guide, Release 7.x
31
Page 46

Prerequisites for RADIUS
When you use RADIUS servers for authentication on a Cisco Nexus device, the RADIUS protocol directs
the RADIUS server to return user attributes, such as authorization information, with authentication results.
This authorization information is specified through VSAs.
The following VSA protocol options are supported by the Cisco Nexus device:
The Cisco Nexus device supports the following attributes:
Configuring RADIUS
• Shell— Used in access-accept packets to provide user profile information.
• Accounting— Used in accounting-request packets. If a value contains any white spaces, you should
enclose the value within double quotation marks.
• roles—Lists all the roles to which the user belongs. The value field is a string that lists the role names
delimited by white spaces.
• accountinginfo—Stores accounting information in addition to the attributes covered by a standard
RADIUS accounting protocol. This attribute is sent only in the VSA portion of the Account-Request
frames from the RADIUS client on the switch. It can be used only with the accounting protocol data
units (PDUs).
Prerequisites for RADIUS
RADIUS has the following prerequisites:
You must obtain IPv4 or IPv6 addresses or hostnames for the RADIUS servers.
•
You must obtain preshared keys from the RADIUS servers.
•
Ensure that the Cisco Nexus device is configured as a RADIUS client of the AAA servers.
•
Guidelines and Limitations for RADIUS
RADIUS has the following configuration guidelines and limitations:
You can configure a maximum of 64 RADIUS servers on the device.
•
Configuring RADIUS Servers
This section describes how to configure RADIUS servers.
Procedure
Step 1
Step 2
Cisco Nexus 3600 NX-OS Security Configuration Guide, Release 7.x
32
Establish the RADIUS server connections to the Cisco Nexus device.
See Configuring RADIUS Server Hosts, on page 33.
Configure the preshared secret keys for the RADIUS servers.
Page 47

Configuring RADIUS
Step 3
Step 4
Configuring RADIUS Server Hosts
See Configuring RADIUS Global Preshared Keys, on page 34.
If needed, configure RADIUS server groups with subsets of the RADIUS servers for AAA authentication
methods.
See Allowing Users to Specify a RADIUS Server at Login, on page 37 and Configuring Accounting and
Authentication Attributes for RADIUS Servers, on page 39.
If needed, configure any of the following optional parameters:
Dead-time interval. See Configuring the Dead-Time Interval, on page 41.
•
Allow specification of a RADIUS server at login. See Allowing Users to Specify a RADIUS Server at
•
Login, on page 37
Transmission retry count and timeout interval. See Configuring the Global RADIUS Transmission Retry
•
Count and Timeout Interval, on page 38.
Accounting and authentication attributes. See Configuring Accounting and Authentication Attributes
•
for RADIUS Servers, on page 39.
Step 5
If needed, configure periodic RADIUS server monitoring.
See Configuring Periodic RADIUS Server Monitoring, on page 40.
Configuring RADIUS Server Hosts
You must configure the IPv4 or IPv6 address or the hostname for each RADIUS server that you want to use
for authentication. All RADIUS server hosts are added to the default RADIUS server group. You can configure
up to 64 RADIUS servers.
Procedure
Step 1
Step 2
Step 3
Step 4
switch(config)# radius-server host
{ipv4-address | ipv6-address | host-name}
switch# show radius-server
PurposeCommand or Action
Enters global configuration move.switch# configure terminal
Specifies the IPv4 or IPv6 address or hostname for
a RADIUS server.
Exits configuration mode.switch(config)# exit
(Optional)
Displays the RADIUS server configuration.
Step 5
switch# copy running-config
startup-contig
(Optional)
Saves the change persistenetly through reboots and
restarts by copying the running configuration to the
startup configuration.
The following example shows how to configure host 10.10.1.1 as a RADIUS server:
switch# configure terminal
Cisco Nexus 3600 NX-OS Security Configuration Guide, Release 7.x
33
Page 48

Configuring RADIUS Global Preshared Keys
switch(config)# radius-server host 10.10.1.1
switch(config)# exit
switch# copy running-config startup-config
Configuring RADIUS Global Preshared Keys
You can configure preshared keys at the global level for all servers used by the Cisco Nexus device. A preshared
key is a shared secret text string between the switch and the RADIUS server hosts.
Before You Begin
Obtain the preshared key values for the remote RADIUS servers
Procedure
PurposeCommand or Action
Configuring RADIUS
Step 1
Step 2
switch(config)# radius-server
key [0 | 7] key-value
Enters global configuration move.switch# configure terminal
Specifies a preshared key for all RADIUS servers. You can
specify a clear text ( 0 ) or encrypted ( 7 ) preshared key. The
default format is clear text.
The maximum length is 63 characters.
By default, no preshared key is configured.
Step 3
Step 4
switch# show radius-server
Exits configuration mode.switch(config)# exit
(Optional)
Displays the RADIUS server configuration.
Note
The preshared keys are saved in encrypted form in
the running configuration. Use the show
running-config command to display the encrypted
preshared keys.
Step 5
switch# copy running-config
startup-contig
(Optional)
Saves the change persistenetly through reboots and restarts
by copying the running configuration to the startup
configuration.
This example shows how to configure preshared keys at the global level for all servers used by the device:
switch# configure terminal
switch(config)# radius-server key 0 QsEfThUkO
switch(config)# exit
switch# copy running-config startup-config
Configuring RADIUS Server Preshared Keys
A preshared key is a shared secret text string between the Cisco Nexus device and the RADIUS server host.
Cisco Nexus 3600 NX-OS Security Configuration Guide, Release 7.x
34
Page 49

Configuring RADIUS
Configuring RADIUS Server Groups
Before You Begin
Obtain the preshared key values for the remote RADIUS servers.
Procedure
PurposeCommand or Action
Step 1
Step 2
Step 3
Step 4
Step 5
switch(config)# radius-server
host {ipv4-address | ipv6-address
| host-name} key [0 | 7] key-value
switch# show radius-server
switch# copy running-config
startup-contig
Enters global configuration move.switch# configure terminal
Specifies a preshared key for a specific RADIUS server.
You can specify a clear text ( 0 ) or encrypted ( 7 ) preshared
key. The default format is clear text.
The maximum length is 63 characters.
This preshared key is used instead of the global preshared
key.
Exits configuration mode.switch(config)# exit
(Optional)
Displays the RADIUS server configuration.
Note
The preshared keys are saved in encrypted form in
the running configuration. Use the show
running-config command to display the encrypted
preshared keys.
(Optional)
Saves the change persistenetly through reboots and restarts
by copying the running configuration to the startup
configuration.
This example shows how to configure RADIUS preshared keys:
switch# configure terminal
switch(config)# radius-server host 10.10.1.1 key 0 PlIjUhYg
switch(config)# exit
switch# show radius-server
switch# copy running-config startup-config
Configuring RADIUS Server Groups
You can specify one or more remote AAA servers for authentication using server groups. All members of a
group must belong to the RADIUS protocol. The servers are tried in the same order in which you configure
them.
Cisco Nexus 3600 NX-OS Security Configuration Guide, Release 7.x
35
Page 50

Configuring RADIUS Server Groups
Procedure
Configuring RADIUS
PurposeCommand or Action
Step 1
Step 2
Step 3
Step 4
Step 5
switch (config)# aaa group server
radius group-name
switch (config-radius)# server
{ipv4-address | ipv6-address |
server-name}
switch (config-radius)# deadtime
minutes
switch(config-radius)#
source-interface interface
Enters global configuration move.switch# configure terminal
Creates a RADIUS server group and enters the RADIUS
server group configuration submode for that group.
The group-name argument is a case-sensitive, alphanumeric
string with a maximum of 127 characters.
Configures the RADIUS server as a member of the RADIUS
server group.
If the specified RADIUS server is not found, configure it
using the radius-server host command and retry this
command.
(Optional)
Configures the monitoring dead time. The default is 0
minutes. The range is from 1 through 1440.
Note
If the dead-time interval for a RADIUS server group
is greater than zero (0), that value takes precedence
over the global dead-time value.
(Optional)
Assigns a source interface for a specific RADIUS server
group.
The supported interface types are management and VLAN.
Note
Use the source-interface command to override the
global source interface assigned by the ip radius
source-interface command.
Step 6
Step 7
switch(config)# show
radius-server group
Exits configuration mode.switch(config-radius)# exit
(Optional)
Displays the RADIUS server group configuration.
[group-name]
Step 8
switch(config)# copy
running-config startup-contig
(Optional)
Saves the change persistenetly through reboots and restarts
by copying the running configuration to the startup
configuration.
The following example shows how to configure a RADIUS server group:
switch# configure terminal
switch (config)# aaa group server radius RadServer
switch (config-radius)# server 10.10.1.1
switch (config-radius)# deadtime 30
switch (config-radius)# use-vrf management
switch (config-radius)# exit
Cisco Nexus 3600 NX-OS Security Configuration Guide, Release 7.x
36
Page 51

Configuring RADIUS
Configuring the Global Source Interface for RADIUS Server Groups
switch (config)# show radius-server group
switch (config)# copy running-config startup-config
What to Do Next
Apply the RADIUS server groups to an AAA service.
Configuring the Global Source Interface for RADIUS Server Groups
You can configure a global source interface for RADIUS server groups to use when accessing RADIUS
servers. You can also configure a different source interface for a specific RADIUS server group.
Procedure
PurposeCommand or Action
Step 1
Step 2
switch(config)# ip radius
source-interface interface
Enters global configuration mode.switch# configure terminal
Configures the global source interface for all RADIUS
server groups configured on the device. The source
interface can be the management or the VLAN
interface.
Step 3
Step 4
switch# show radius-server
Exits configuration mode.switch(config)# exit
(Optional)
Displays the RADIUS server configuration
information.
Step 5
switch# copy running-config startup
config
(Optional)
Copies the running configuration to the startup
configuration.
This example shows how to configure the mgmt 0 interface as the global source interface for RADIUS server
groups:
switch# configure terminal
switch(config)# ip radius source-interface mgmt 0
switch(config)# exit
switch# copy running-config startup-config
Allowing Users to Specify a RADIUS Server at Login
You can allow users to specify a RADIUS server at login.
Cisco Nexus 3600 NX-OS Security Configuration Guide, Release 7.x
37
Page 52

Configuring the Global RADIUS Transmission Retry Count and Timeout Interval
Procedure
Configuring RADIUS
PurposeCommand or Action
Step 1
Step 2
switch(config)# radius-server
directed-request
Enters global configuration move.switch# configure terminal
Allows users to specify a RADIUS server to send
the authentication request when logging in. The
default is disabled.
Step 3
Step 4
Step 5
switch# show radius-server
directed-request
switch# copy running-config
startup-config
Exits configuration mode.switch(config)# exit
(Optional)
Displays the directed request configuration.
(Optional)
Copies the running configuration to the startup
configuration.
This example shows how to allow users to select a RADIUS server when logging in to a network:
switch# configure terminal
switch(config)# radius-server directed-request
switch# exit
switch# copy running-config startup-config
Configuring the Global RADIUS Transmission Retry Count and Timeout Interval
You can configure a global retransmission retry count and timeout interval for all RADIUS servers. By default,
a switch retries transmission to a RADIUS server only once before reverting to local authentication. You can
increase this number up to a maximum of five retries per server. The timeout interval determines how long
the Cisco Nexus device waits for responses from RADIUS servers before declaring a timeout failure.
Procedure
PurposeCommand or Action
Step 1
Step 2
switch(config)# radius-server
retransmit count
Enters global configuration move.switch# configure terminal
Specifies the retransmission count for all RADIUS
servers. The default retransmission count is 1 and the
range is from 0 to 5.
Step 3
switch(config)# radius-server
timeout seconds
Specifies the transmission timeout interval for
RADIUS servers. The default timeout interval is 5
seconds and the range is from 1 to 60 seconds.
Step 4
Exits global configuration mode.switch(config)# exit
Cisco Nexus 3600 NX-OS Security Configuration Guide, Release 7.x
38
Page 53

Configuring RADIUS
Configuring Accounting and Authentication Attributes for RADIUS Servers
PurposeCommand or Action
Step 5
switch# show radius-server
(Optional)
Displays the RADIUS server configuration.
Step 6
switch# copy running-config
startup-config
(Optional)
Copies the running configuration to the startup
configuration.
This example shows how to set the retry count to 3 and the transmission timeout interval to 5 seconds for
RADIUS servers:
switch# configure terminal
switch(config)# radius-server retransmit 3
switch(config)# radius-server timeout 5
switch(config)# exit
switch# copy running-config startup-config
Configuring Accounting and Authentication Attributes for RADIUS Servers
You can specify that a RADIUS server is to be used only for accounting purposes or only for authentication
purposes. By default, RADIUS servers are used for both accounting and authentication. You can also specify
the destination UDP port numbers where RADIUS accounting and authentication messages should be sent.
Procedure
Step 1
Step 2
Step 3
Step 4
switch(config)# radius-server host
{ipv4-address | ipv6-address | host-name}
acct-port udp-port
switch(config)# radius-server host
{ipv4-address | ipv6-address | host-name}
accounting
switch(config)# radius-server host
{ipv4-address | ipv6-address | host-name}
auth-port udp-port
PurposeCommand or Action
Enters global configuration move.switch# configure terminal
(Optional)
Specifies a UDP port to use for RADIUS accounting
messages. The default UDP port is 1812.
The range is from 0 to 65535.
(Optional)
Specifies that the specified RADIUS server is to be
used only for accounting purposes. The default is
both accounting and authentication.
(Optional)
Specifies a UDP port to use for RADIUS
authentication messages. The default UDP port is
1812.
The range is from 0 to 65535.
Cisco Nexus 3600 NX-OS Security Configuration Guide, Release 7.x
39
Page 54

Configuring Periodic RADIUS Server Monitoring
Configuring RADIUS
PurposeCommand or Action
Step 5
switch(config)# radius-server host
{ipv4-address | ipv6-address | host-name}
authentication
(Optional)
Specifies that the specified RADIUS server only be
used for authentication purposes. The default is both
accounting and authentication.
Step 6
Step 7
switch(config)# show radius-server
Exits configuration mode.switch(config)# exit
(Optional)
Displays the RADIUS server configuration.
Step 8
switch(config)# copy running-config
startup-config
Saves the change persistently through reboots and
restarts by copying the running configuration to the
startup configuration.
This example shows how to configure accounting and authentication attributes for a RADIUS server:
switch# configure terminal
switch(config)# radius-server host 10.10.1.1 acct-port 2004
switch(config)# radius-server host 10.10.1.1 accounting
switch(config)# radius-server host 10.10.2.2 auth-port 2005
switch(config)# radius-server host 10.10.2.2 authentication
switch # exit
switch # copy running-config startup-config
switch #
Configuring Periodic RADIUS Server Monitoring
You can monitor the availability of RADIUS servers. These parameters include the username and password
to use for the server and an idle timer. The idle timer specifies the interval during which a RADIUS server
receives no requests before the switch sends out a test packet. You can configure this option to test servers
periodically.
Note
For security reasons, we recommend that you do not configure a test username that is the same as an
existing user in the RADIUS database.
The test idle timer specifies the interval during which a RADIUS server receives no requests before the switch
sends out a test packet.
The default idle timer value is 0 minutes. When the idle time interval is 0 minutes, the switch does not perform
periodic RADIUS server monitoring.
Procedure
PurposeCommand or Action
Step 1
Step 2
switch(config)# radius-server host
{ipv4-address | ipv6-address |
Enters global configuration move.switch# configure terminal
Specifies parameters for server monitoring. The default
username is test and the default password is test.
Cisco Nexus 3600 NX-OS Security Configuration Guide, Release 7.x
40
Page 55

Configuring RADIUS
host-name} test {idle-time minutes |
password password [idle-time minutes]
| username name [password password
[idle-time minutes]]}
Configuring the Dead-Time Interval
PurposeCommand or Action
The default value for the idle timer is 0 minutes.
The valid range is from 0 to 1440 minutes.
Note
For periodic RADIUS server monitoring, you
must set the idle timer to a value greater than
0.
Step 3
switch(config)# radius-server
deadtime minutes
Specifies the number of minutes before the switch
checks a RADIUS server that was previously
unresponsive.
The default value is 0 minutes.
The valid range is 1 to 1440 minutes.
Step 4
Step 5
switch# show radius-server
Exits configuration mode.switch(config)# exit
(Optional)
Displays the RADIUS server configuration.
Step 6
switch# copy running-config
startup-contig
(Optional)
Saves the change persistenetly through reboots and
restarts by copying the running configuration to the
startup configuration.
This example shows how to configure RADIUS server host 10.10.1.1 with a username (user1) and password
(Ur2Gd2BH) and with an idle timer of 3 minutes and a deadtime of 5 minutes:
switch# configure terminal
switch(config)# radius-server host 10.10.1.1 test username user1 password Ur2Gd2BH idle-time
3
switch(config)# radius-server deadtime 5
switch(config)# exit
switch# copy running-config startup-config
Configuring the Dead-Time Interval
You can configure the dead-time interval for all RADIUS servers. The dead-time interval specifies the time
that the Cisco Nexus device waits after declaring a RADIUS server is dead, before sending out a test packet
to determine if the server is now alive. The default value is 0 minutes.
Note
When the dead-time interval is 0 minutes, RADIUS servers are not marked as dead even if they are not
responding. You can configure the dead-time interval for a RADIUS server group. See Configuring
RADIUS Server Groups, on page 35.
Cisco Nexus 3600 NX-OS Security Configuration Guide, Release 7.x
41
Page 56

Manually Monitoring RADIUS Servers or Groups
Procedure
Configuring RADIUS
PurposeCommand or Action
Step 1
Step 2
switch(config)# radius-server
deadtime
Step 3
Step 4
Step 5
switch# show radius-server
switch# copy running-config
startup-config
This example shows how to configure a deadtime of 5 minutes for a radius server:
switch# configure terminal
switch(config)# radius-server deadtime 5
switch(config# exit
switch# copy running-config startup-config
Manually Monitoring RADIUS Servers or Groups
Enters global configuration move.switch# configure terminal
Configures the dead-time interval. The default value
is 0 minutes. The range is from 1 to 1440 minutes.
Exits configuration mode.switch(config)# exit
(Optional)
Displays the RADIUS server configuration.
(Optional)
Copies the running configuration to the startup
configuration.
Procedure
PurposeCommand or Action
Step 1
switch# test aaa server radius {ipv4-address|
ipv6-address | server-name} [vrf vrf-name] username
Sends a test message to a RADIUS
server to confirm availability.
password test aaa server radius {ipv4-address |
ipv6-address | server-name} [vrf vrf-name] username
password
Step 2
switch# test aaa group group-name username password
Sends a test message to a RADIUS
server group to confirm availability.
This example shows how to send a test message to the RADIUS server and server group to confirm availability:
switch# test aaa server radius 10.10.1.1 user 1 Ur2Gd2BH
switch# test aaa group RadGroup user2 As3He3CI
Cisco Nexus 3600 NX-OS Security Configuration Guide, Release 7.x
42
Page 57

Configuring RADIUS
Verifying the RADIUS Configuration
To display AAA information, perform one of the following tasks:
Verifying the RADIUS Configuration
PurposeCommand
show running-config radius [all]
show startup-config radius
show radius-server [server-name | ipv4-address |
ipv6-address] [directed-request | groups | sorted |
statistics]
Displaying RADIUS Server Statistics
Procedure
Step 1
switch# show radius-server statistics {hostname |
ipv4-address | ipv6-address}
Displays the RADIUS configuration in the
running configuration.
Displays the RADIUS configuration in the startup
configuration.
Displays all configured RADIUS server parameters.
PurposeCommand or Action
Displays the RADIUS statistics.
Clearing RADIUS Server Statistics
You can display the statistics that the Cisco NX-OS device maintains for RADIUS server activity.
Before You Begin
Configure RADIUS servers on the Cisco NX-OS device.
Procedure
Step 1
Step 2
switch# show radius-server statistics {hostname
| ipv4-address | ipv6-address}
switch# clear radius-server statistics {hostname
| ipv4-address | ipv6-address}
Cisco Nexus 3600 NX-OS Security Configuration Guide, Release 7.x
PurposeCommand or Action
(Optional)
Displays the RADIUS server statistics on
the Cisco NX-OS device.
Clears the RADIUS server statistics.
43
Page 58

Configuration Examples for RADIUS
Configuration Examples for RADIUS
The following example shows how to configure RADIUS:
switch# configure terminal
switch(config)# radius-server key 7 "ToIkLhPpG"
switch(config)# radius-server host 10.10.1.1 key 7 "ShMoMhTl" authentication accounting
switch(config)# aaa group server radius RadServer
switch(config-radius)# server 10.10.1.1
switch(config-radius)# exit
switch(config-radius)# use-vrf management
Default Settings for RADIUS
The following table lists the default settings for RADIUS parameters.
Configuring RADIUS
Table 6: Default RADIUS Parameters
Feature History for RADIUS
Table 7: Feature History for RADIUS
DefaultParameters
Authentication and accountingServer roles
0 minutesDead timer interval
1Retransmission count
5 secondsRetransmission timer interval
0 minutesIdle timer interval
testPeriodic server monitoring username
testPeriodic server monitoring password
Feature InformationReleasesFeature Name
This feature was introduced.5.0(3)U1(1)RADIUS
IPv6 support was introduced.5.0(3)U3(1)IPv6
Cisco Nexus 3600 NX-OS Security Configuration Guide, Release 7.x
44
Page 59

CHAPTER 5
Configuring TACACS+
This chapter contains the following sections:
Information About Configuring TACACS+, page 45
•
Prerequisites for TACACS+, page 47
•
Guidelines and Limitations for TACACS+, page 48
•
Configuring TACACS+, page 48
•
Information About Configuring TACACS+
The Terminal Access Controller Access Control System Plus (TACACS+) security protocol provides centralized
validation of users attempting to gain access to a Cisco Nexus device. TACACS+ services are maintained in
a database on a TACACS+ daemon typically running on a UNIX or Windows NT workstation. You must
have access to and must configure a TACACS+ server before the configured TACACS+ features on your
Cisco Nexus device are available.
TACACS+ provides for separate authentication, authorization, and accounting facilities. TACACS+ allows
for a single access control server (the TACACS+ daemon) to provide each service (authentication, authorization,
and accounting) independently. Each service is associated with its own database to take advantage of other
services available on that server or on the network, depending on the capabilities of the daemon.
The TACACS+ client/server protocol uses TCP (TCP port 49) for transport requirements. The Cisco Nexus
device provides centralized authentication using the TACACS+ protocol.
TACACS+ Advantages
TACACS+ has the following advantages over RADIUS authentication:
Provides independent AAA facilities. For example, the Cisco Nexus device can authorize access without
•
authenticating.
Uses the TCP transport protocol to send data between the AAA client and server, making reliable transfers
•
with a connection-oriented protocol.
Cisco Nexus 3600 NX-OS Security Configuration Guide, Release 7.x
45
Page 60

User Login with TACACS+
Encrypts the entire protocol payload between the switch and the AAA server to ensure higher data
•
confidentiality. The RADIUS protocol only encrypts passwords.
User Login with TACACS+
When a user attempts a Password Authentication Protocol (PAP) login to a Cisco Nexus device using
TACACS+, the following actions occur:
1
When the Cisco Nexus device establishes a connection, it contacts the TACACS+ daemon to obtain the
username and password.
Configuring TACACS+
Note
TACACS+ allows an arbitrary conversation between the daemon and the user until the daemon receives
enough information to authenticate the user. This action is usually done by prompting for a username and
password combination, but may include prompts for other items, such as the user’s mother’s maiden name.
2
The Cisco Nexus device receives one of the following responses from the TACACS+ daemon:
• ACCEPT—User authentication succeeds and service begins. If the Cisco Nexus device requires user
authorization, authorization begins.
• REJECT—User authentication failed. The TACACS+ daemon either denies further access to the
user or prompts the user to retry the login sequence.
• ERROR—An error occurred at some time during authentication dither at the daemon or in the network
connection between the daemon and the Cisco Nexus device. If the Cisco Nexus deviceh receives
an ERROR response, the switch tries to use an alternative method for authenticating the user.
The user also undergoes an additional authorization phase, if authorization has been enabled on the Cisco
Nexus device. Users must first successfully complete TACACS+ authentication before proceeding to
TACACS+ authorization.
3
If TACACS+ authorization is required, the Cisco Nexus device again contacts the TACACS+ daemon
and it returns an ACCEPT or REJECT authorization response. An ACCEPT response contains attributes
that are used to direct the EXEC or NETWORK session for that user and determines the services that the
user can access.
Services include the following:
Telnet, rlogin, Point-to-Point Protocol (PPP), Serial Line Internet Protocol (SLIP), or EXEC services
•
◦
Connection parameters, including the host or client IP address (IPv4), access list, and user timeouts
◦
Default TACACS+ Server Encryption Type and Preshared Key
You must configure the TACACS+ that is preshared key to authenticate the switch to the TACACS+ server.
A preshared key is a secret text string shared between the Cisco Nexus device and the TACACS+ server host.
The length of the key is restricted to 63 characters and can include any printable ASCII characters (white
spaces are not allowed). You can configure a global preshared secret key for all TACACS+ server configurations
on the Cisco Nexus device to use.
Cisco Nexus 3600 NX-OS Security Configuration Guide, Release 7.x
46
Page 61

Configuring TACACS+
You can override the global preshared key assignment by using the key option when configuring an individual
TACACS+ server.
TACACS+ Server Monitoring
An unresponsive TACACS+ server can delay the processing of AAA requests. A Cisco Nexus device can
periodically monitor an TACACS+ server to check whether it is responding (or alive) to save time in processing
AAA requests. The Cisco Nexus device marks unresponsive TACACS+ servers as dead and does not send
AAA requests to any dead TACACS+ servers. The Cisco Nexus device periodically monitors dead TACACS+
servers and brings them to the alive state once they are responding. This process verifies that a TACACS+
server is in a working state before real AAA requests are sent to the server. Whenever an TACACS+ server
changes to the dead or alive state, a Simple Network Management Protocol (SNMP) trap is generated and the
Cisco Nexus device displays an error message that a failure is taking place before it can impact performance.
The following figure shows the different TACACS+ server states:
Figure 3: TACACS+ Server States
TACACS+ Server Monitoring
Note
The monitoring interval for alive servers and dead servers are different and can be configured by the user.
The TACACS+ server monitoring is performed by sending a test authentication request to the TACACS+
server.
Prerequisites for TACACS+
TACACS+ has the following prerequisites:
You must obtain the IPv4 or IPv6 addresses or hostnames for the TACACS+ servers.
•
You must obtain the preshared keys from the TACACS+ servers, if any.
•
Ensure that the Cisco Nexus device is configured as a TACACS+ client of the AAA servers.
•
Cisco Nexus 3600 NX-OS Security Configuration Guide, Release 7.x
47
Page 62

Guidelines and Limitations for TACACS+
Guidelines and Limitations for TACACS+
TACACS+ has the following configuration guidelines and limitations:
You can configure a maximum of 64 TACACS+ servers on the Cisco Nexus device.
•
Configuring TACACS+
TACACS+ Server Configuration Process
This section describes how to configure TACACS+ servers.
Procedure
Configuring TACACS+
Step 1
Step 2
Step 3
Step 4
Step 5
Enable TACACS+.
See Enabling TACACS+ , on page 48.
Establish the TACACS+ server connections to the Cisco Nexus device.
Configuring TACACS+ Server Hosts, on page 49
Configure the preshared secret keys for the TACACS+ servers.
Configuring TACACS+ Global Preshared Keys, on page 50
If needed, configure TACACS+ server groups with subsets of the TACACS+ servers for AAA authentication
methods.
Configuring TACACS+ Server Groups, on page 51
If needed, configure periodic TACACS+ server monitoring.
Configuring Periodic TACACS+ Server Monitoring, on page 54
Enabling TACACS+
Although by default, the TACACS+ feature is disabled on the Cisco Nexus device. You can enable the
TACACS+ feature to access the configuration and verification commands for authentication.
Procedure
PurposeCommand or Action
Step 1
Step 2
Step 3
Cisco Nexus 3600 NX-OS Security Configuration Guide, Release 7.x
48
Enters global configuration mode.switch# configure terminal
Enables TACACS+.switch(config)# feature tacacs+
Exits configuration mode.switch(config)# exit
Page 63

Configuring TACACS+
TACACS+ Server Configuration Process
PurposeCommand or Action
Step 4
switch# copy running-config
startup-config
Configuring TACACS+ Server Hosts
To access a remote TACACS+ server, you must configure the IPv4 or IPv6 address or the hostname for the
TACACS+ server on the Cisco Nexus device. All TACACS+ server hosts are added to the default TACACS+
server group.You can configure up to 64 TACACS+ servers.
If a preshared key is not configured for a configured TACACS+ server, a warning message is issued if a global
key is not configured. If a TACACS+ server key is not configured, the global key (if configured) is used for
that server.
(See Configuring TACACS+ Global Preshared Keys and Configuring TACACS+ Server Preshared Keys
sections for more details.)
Before you configure TACACS+ server hosts, you should do the following:
Enable TACACS+. See Enabling TACACS+ , on page 48 for more information.
•
Obtain the IPv4 or IPv6 addresses or the hostnames for the remote TACACS+ servers.
•
Procedure
(Optional)
Copies the running configuration to the startup
configuration.
Step 1
Step 2
switch(config)# tacacs-server host
{ipv4-address | ipv6-address | host-name}
Step 3
switch(config)# tacacs-server host
{ipv4-address | host-name}
Step 4
Step 5
Step 6
switch# show tacacs-server
switch# copy running-config
startup-config
You can delete a TACACS+ server host from a server group.
PurposeCommand or Action
Enters global configuration mode.switch# configure terminal
Specifies the IPv4 or IPv6 address or hostname
for a TACACS+ server.
Specifies the IPv4 address or hostname for a
TACACS+ server.
Exits configuration mode.switch(config)# exit
(Optional)
Displays the TACACS+ server configuration.
(Optional)
Copies the running configuration to the startup
configuration.
Cisco Nexus 3600 NX-OS Security Configuration Guide, Release 7.x
49
Page 64

TACACS+ Server Configuration Process
Configuring TACACS+ Global Preshared Keys
You can configure preshared keys at the global level for all servers used by the Cisco Nexus device. A preshared
key is a shared secret text string between the Cisco Nexus device and the TACACS+ server hosts.
Before you configure preshared keys, you should do the following:
Enable TACACS+.
•
Obtain the preshared key values for the remote TACACS+ servers.
•
Procedure
Configuring TACACS+
PurposeCommand or Action
Step 1
Step 2
Step 3
Step 4
Step 5
tacacs-server key [0 | 6 | 7]
key-value
Example:
switch(config)# tacacs-server
key 0 QsEfThUkO
Example:
switch(config)# tacacs-server
key 7 "fewhg”
switch# show tacacs-server
switch# copy running-config
startup-config
Enters global configuration mode.switch# configure terminal
Specifies a TACACS+ key for all TACACS+ server. You can
specify that the key-value is in clear text format (0), is type-6
encrypted (6), or is type-7 encrypted (7). The Cisco NX-OS
software encrypts a clear text key before saving it to the
running configuration. The default format is clear text. The
maximum length is 63 characters.
By default, no secret key is configured.
Note
If you already configured a shared secret using the
generate type7_encrypted_secret command, enter
it in quotation marks, as shown in the second example.
Exits configuration mode.switch(config)# exit
(Optional)
Displays the TACACS+ server configuration.
Note
The preshared keys are saved in encrypted form in
the running configuration. Use the show
running-config command to display the encrypted
preshared keys.
(Optional)
Copies the running configuration to the startup configuration.
The following example shows how to configure global preshared keys:
switch# configure terminal
switch(config)# tacacs-server key 0 QsEfThUkO
switch(config)# exit
switch# show tacacs-server
switch# copy running-config startup-config
Cisco Nexus 3600 NX-OS Security Configuration Guide, Release 7.x
50
Page 65

Configuring TACACS+
Configuring TACACS+ Server Groups
You can specify one or more remote AAA servers to authenticate users using server groups. All members of
a group must belong to the TACACS+ protocol. The servers are tried in the same order in which you configure
them.
You can configure these server groups at any time but they only take effect when you apply them to an AAA
service.
Before You Begin
You must use the feature tacacs+ command to enable TACACS+ before you configure TACACS+.
Procedure
TACACS+ Server Configuration Process
PurposeCommand or Action
Step 1
Step 2
Step 3
Step 4
Step 5
Step 6
Step 7
switch(config)# aaa group server
tacacs+ group-name
switch(config-tacacs+)# deadtime
minutes
switch(config-tacacs+)#
source-interface interface
switch(config)# show tacacs-server
groups
switch(config)# copy
running-config startup-config
Enters global configuration mode.switch# configure terminal
Creates a TACACS+ server group and enters the
TACACS+ server group configuration mode for that group.
(Optional)
Configures the monitoring dead time. The default is 0
minutes. The range is from 0 through 1440.
Note
If the dead-time interval for a TACACS+ server
group is greater than zero (0), that value takes
precedence over the global dead-time value.
(Optional)
Assigns a source interface for a specific TACACS+ server
group.
The supported interface types are management and VLAN.
Note
Use the source-interface command to override
the global source interface assigned by the ip
tacacs source-interface command.
Exits configuration mode.switch(config-tacacs+)# exit
(Optional)
Displays the TACACS+ server group configuration.
(Optional)
Copies the running configuration to the startup
configuration.
Cisco Nexus 3600 NX-OS Security Configuration Guide, Release 7.x
51
Page 66

TACACS+ Server Configuration Process
The following example shows how to configure a TACACS+ server group:
switch# configure terminal
switch(config)# aaa group server tacacs+ TacServer
switch(config-tacacs+)# server 10.10.2.2
switch(config-tacacs+)# deadtime 30
switch(config-tacacs+)# exit
switch(config)# show tacacs-server groups
switch(config)# copy running-config startup-config
Configuring the Global Source Interface for TACACS+ Server Groups
You can configure a global source interface for TACACS+ server groups to use when accessing TACACS+
servers. You can also configure a different source interface for a specific TACACS+ server group.
Procedure
PurposeCommand or Action
Configuring TACACS+
Step 1
Step 2
Step 3
Step 4
Step 5
ip tacacs source-interface interface
Example:
switch(config)# ip tacacs
source-interface mgmt 0
Example:
switch(config)# exit
switch#
show tacacs-server
Example:
switch# show tacacs-server
copy running-config startup config
Example:
switch# copy running-config
startup-config
Enters global configuration mode.configure terminal
Configures the global source interface for all
TACACS+ server groups configured on the
device. The source interface can be the
management or the VLAN interface.
Exits configuration mode.exit
(Optional)
Displays the TACACS+ server configuration
information.
(Optional)
Copies the running configuration to the startup
configuration.
Configuring the Global TACACS+ Timeout Interval
You can set a global timeout interval that the Cisco Nexus device waits for responses from all TACACS+
servers before declaring a timeout failure. The timeout interval determines how long the switch waits for
responses from TACACS+ servers before declaring a timeout failure.
Cisco Nexus 3600 NX-OS Security Configuration Guide, Release 7.x
52
Page 67

Configuring TACACS+
TACACS+ Server Configuration Process
Procedure
PurposeCommand or Action
Step 1
Step 2
Step 3
Step 4
Step 5
switch(config)# tacacs-server timeout
seconds
switch# show tacacs-server
switch# copy running-config
startup-config
Configuring the Timeout Interval for a Server
You can set a timeout interval that the Cisco Nexus device waits for responses from a TACACS+ server before
declaring a timeout failure. The timeout interval determines how long the switch waits for responses from a
TACACS+ server before declaring a timeout failure.
Procedure
Enters global configuration mode.switch# configure terminal
Specifies the timeout interval for TACACS+ servers.
The default timeout interval is 5 second and the range
is from 1 to 60 seconds.
Exits configuration mode.switch(config)# exit
(Optional)
Displays the TACACS+ server configuration.
(Optional)
Copies the running configuration to the startup
configuration.
Step 1
Step 2
Step 3
Step 4
Configuring TCP Ports
You can configure another TCP port for the TACACS+ servers if there are conflicts with another application.
By default, the Cisco Nexus device uses port 49 for all TACACS+ requests.
switch# show tacacs-server
switch# copy running-config
startup-config
PurposeCommand or Action
Enters global configuration mode.switch# configure terminal
Exits configuration mode.switch(config)# exit
(Optional)
Displays the TACACS+ server configuration.
(Optional)
Copies the running configuration to the startup
configuration.
Cisco Nexus 3600 NX-OS Security Configuration Guide, Release 7.x
53
Page 68

TACACS+ Server Configuration Process
Procedure
Configuring TACACS+
PurposeCommand or Action
Step 1
Step 2
Step 3
Step 4
switch# show tacacs-server
switch# copy running-config
startup-config
The following example shows how to configure TCP ports:
switch# configure terminal
switch(config)# tacacs-server host 10.10.1.1 port 2
switch(config)# exit
switch# show tacacs-server
switch# copy running-config startup-config
Configuring Periodic TACACS+ Server Monitoring
You can monitor the availability of TACACS+ servers. These parameters include the username and password
to use for the server and an idle timer. The idle timer specifies the interval in which a TACACS+ server
receives no requests before the Cisco Nexus device sends out a test packet.You can configure this option to
test servers periodically, or you can run a one-time only test.
Enters global configuration mode.switch# configure terminal
Exits configuration mode.switch(config)# exit
(Optional)
Displays the TACACS+ server configuration.
(Optional)
Copies the running configuration to the startup
configuration.
Note
To protect network security, we recommend that you use a username that is not the same as an existing
username in the TACACS+ database.
The test idle timer specifies the interval in which a TACACS+ server receives no requests before the Cisco
Nexus device sends out a test packet.
Note
The default idle timer value is 0 minutes. When the idle time interval is 0 minutes, periodic TACACS+
server monitoring is not performed.
Procedure
PurposeCommand or Action
Step 1
Step 2
switch(config)# tacacs-server
dead-time minutes
Cisco Nexus 3600 NX-OS Security Configuration Guide, Release 7.x
54
Enters global configuration mode.switch# configure terminal
Specifies the number minutes before the Cisco Nexus
device checks a TACACS+ server that was previously
Page 69

Configuring TACACS+
TACACS+ Server Configuration Process
PurposeCommand or Action
unresponsive. The default value is 0 minutes and the
valid range is 0 to 1440 minutes.
Step 3
Step 4
Step 5
switch# show tacacs-server
switch# copy running-config
startup-config
The following example shows how to configure periodic TACACS+ server monitoring:
switch# configure terminal
switch(config)# tacacs-server host 10.10.1.1 test username user1 password Ur2Gd2BH idle-time
3
switch(config)# tacacs-server dead-time 5
switch(config)# exit
switch# show tacacs-server
switch# copy running-config startup-config
Configuring the Dead-Time Interval
You can configure the dead-time interval for all TACACS+ servers. The dead-time interval specifies the time
that the Cisco Nexus device waits, after declaring a TACACS+ server is dead, before sending out a test packet
to determine if the server is now alive.
Exits configuration mode.switch(config)# exit
(Optional)
Displays the TACACS+ server configuration.
(Optional)
Copies the running configuration to the startup
configuration.
Note
When the dead-time interval is 0 minutes, TACACS+ servers are not marked as dead even if they are not
responding. You can configure the dead-time interval per group. See Configuring TACACS+ Server
Groups, on page 51
Procedure
PurposeCommand or Action
Step 1
Step 2
switch(config)# tacacs-server deadtime
minutes
Enters global configuration mode.switch# configure terminal
Configures the global dead-time interval. The
default value is 0 minutes. The range is from 1 to
1440 minutes.
Step 3
Step 4
switch# show tacacs-server
Exits configuration mode.switch(config)# exit
(Optional)
Displays the TACACS+ server configuration.
Cisco Nexus 3600 NX-OS Security Configuration Guide, Release 7.x
55
Page 70

TACACS+ Server Configuration Process
Configuring TACACS+
PurposeCommand or Action
Step 5
switch# copy running-config
startup-config
Manually Monitoring TACACS+ Servers or Groups
Procedure
Step 1
Step 2
The following example shows how to manually issue a test message:
switch# test aaa server tacacs+ 10.10.1.1 user1 Ur2Gd2BH
switch# test aaa group TacGroup user2 As3He3CI
switch# test aaa server tacacs+ {ipv4-address |
ipv6-address | host-name} [vrf vrf-name]
username password
switch# test aaa group group-name username
password
(Optional)
Copies the running configuration to the startup
configuration.
PurposeCommand or Action
Sends a test message to a TACACS+ server
to confirm availability.
Sends a test message to a TACACS+ server
group to confirm availability.
Disabling TACACS+
You can disable TACACS+.
When you disable TACACS+, all related configurations are automatically discarded.Caution
Procedure
Step 1
Step 2
Step 3
Step 4
switch# copy running-config
startup-config
PurposeCommand or Action
Enters global configuration mode.switch# configure terminal
Disables TACACS+.switch(config)# no feature tacacs+
Exits configuration mode.switch(config)# exit
(Optional)
Copies the running configuration to the startup
configuration.
Cisco Nexus 3600 NX-OS Security Configuration Guide, Release 7.x
56
Page 71

Configuring TACACS+
Displaying TACACS+ Statistics
To display the statistics, the switch maintains for TACACS+ activity, perform this task:
Procedure
Displaying TACACS+ Statistics
PurposeCommand or Action
Step 1
[hostname | ipv4-address | ipv6-address]
For detailed information about the fields in the output from this command, see the Command Reference for
your Nexus switch.
Verifying the TACACS+ Configuration
To display TACACS+ information, perform one of the following tasks:
show tacacs+ {status | pending | pending-diff}
show running-config tacacs [all]
show startup-config tacacs
Displays the TACACS+ statistics.switch# show tacacs-server statistics
Note
ipv6-address parameter not supported
on Nexus 3548.
PurposeCommand
Displays the TACACS+ Cisco Fabric Services
distribution status and other details.
Displays the TACACS+ configuration in the running
configuration.
Displays the TACACS+ configuration in the startup
configuration.
show tacacs-serve [host-name | ipv4-address |
ipv6-address] [directed-request | groups | sorted |
statistics]
Configuration Examples for TACACS+
This example shows how to configure TACACS+:
switch# configure terminal
switch(config)# feature tacacs+
switch(config)# tacacs-server key 7 "ToIkLhPpG"
switch(config)# tacacs-server host 10.10.2.2 key 7 "ShMoMhTl"
switch(config)# aaa group server tacacs+ TacServer
switch(config-tacacs+)# server 10.10.2.2
switch(config-tacacs+)# use-vrf management
Displays all configured TACACS+ server parameters.
Cisco Nexus 3600 NX-OS Security Configuration Guide, Release 7.x
57
Page 72

Default Settings for TACACS+
This example shows how to enable tacacs+ and how to configure the tacacs+ server preshared keys to specify
remote AAA servers to authenticate server group TacServer1:
switch# configure terminal
switch(config)# feature tacacs+
switch(config)# tacacs-server key 7 "ikvhw10"
switch(config)# tacacs-server host 1.1.1.1
switch(config)# tacacs-server host 1.1.1.2
switch(config)# aaa group server tacacs+ TacServer1
switch(config-tacacs+)# server 1.1.1.1
switch(config-tacacs+)# server 1.1.1.2
Default Settings for TACACS+
The following table lists the default settings for TACACS+ parameters.
Table 8: Default TACACS+ Parameters
Configuring TACACS+
DefaultParameters
DisabledTACACS+
0 minutesDead-time interval
5 secondsTimeout interval
0 minutesIdle timer interval
testPeriodic server monitoring username
testPeriodic server monitoring password
Cisco Nexus 3600 NX-OS Security Configuration Guide, Release 7.x
58
Page 73

CHAPTER 6
Configuring SSH and Telnet
This chapter contains the following sections:
Information About SSH and Telnet, page 59
•
Guidelines and Limitations for SSH, page 61
•
Configuring SSH, page 61
•
Configuration Examples for SSH, page 67
•
Configuring X.509v3 Certificate-Based SSH Authentication, page 68
•
Configuration Example for X.509v3 Certificate-Based SSH Authentication, page 70
•
Configuring Telnet, page 71
•
Verifying the SSH and Telnet Configuration, page 73
•
Default Settings for SSH, page 73
•
Information About SSH and Telnet
SSH Server
The Secure Shell Protocol (SSH) server feature enables a SSH client to make a secure, encrypted connection
to a Cisco Nexus device. SSH uses strong encryption for authentication. The SSH server in the Cisco Nexus
device switch interoperates with publicly and commercially available SSH clients.
The user authentication mechanisms supported for SSH are RADIUS, TACACS+, and the use of locally
stored user names and passwords.
SSH Client
The SSH client feature is an application running over the SSH protocol to provide device authentication and
encryption. The SSH client enables a switch to make a secure, encrypted connection to another Cisco Nexus
device or to any other device running an SSH server. This connection provides an outbound connection that
Cisco Nexus 3600 NX-OS Security Configuration Guide, Release 7.x
59
Page 74

SSH Server Keys
is encrypted. With authentication and encryption, the SSH client allows for a secure communication over an
insecure network.
The SSH client in the Cisco Nexus device works with publicly and commercially available SSH servers.
SSH Server Keys
SSH requires server keys for secure communications to the Cisco Nexus device. You can use SSH keys for
the following SSH options:
Be sure to have an SSH server key-pair with the appropriate version before enabling the SSH service. You
can generate the SSH server key-pair according to the SSH client version used. The SSH service accepts three
types of key-pairs for use by SSH version 2:
Configuring SSH and Telnet
SSH version 2 using Rivest, Shamir, and Adelman (RSA) public-key cryptography
•
SSH version 2 using the Digital System Algrorithm (DSA)
•
The dsa option generates the DSA key-pair for the SSH version 2 protocol.
•
The rsa option generates the RSA key-pair for the SSH version 2 protocol.
•
By default, the Cisco Nexus device generates an RSA key using 1024 bits.
SSH supports the following public key formats:
OpenSSH
•
IETF Secure Shell (SECSH)
•
If you delete all of the SSH keys, you cannot start the SSH services.Caution
SSH Authentication Using Digital Certificates
SSH authentication on CiscoNX-OS devices provide X.509 digital certificate support for host authentication.
An X.509 digital certificate is a data item that ensures the origin and integrity of a message. It contains
encryption keys for secured communications and is signed by a trusted certification authority (CA) to verify
the identity of the presenter. The X.509 digital certificate support provides either DSA or RSA algorithms for
authentication.
The certificate infrastructure uses the first certificate that supports the Secure Socket Layer (SSL) and is
returned by the security infrastructure, either through a query or a notification. Verification of certificates is
successful if the certificates are from any of the trusted CAs.
You can configure your device for SSH authentication using an X.509 certificate. If the authentication fails,
you are prompted for a password.
Beginning with Cisco NX-OS Release 7.0(3)I5(1), you can configure SSH authentication using X.509v3
certificates (RFC 6187). X.509v3 certificate-based SSH authentication uses certificates combined with a
smartcard to enable two-factor authentication for Cisco device access. The SSH client is provided by Cisco
partner Pragma Systems.
Cisco Nexus 3600 NX-OS Security Configuration Guide, Release 7.x
60
Page 75

Configuring SSH and Telnet
Telnet Server
The Telnet protocol enables TCP/IP connections to a host. Telnet allows a user at one site to establish a TCP
connection to a login server at another site, and then passes the keystrokes from one system to the other. Telnet
can accept either an IP address or a domain name as the remote system address.
The Telnet server is enabled by default on the Cisco Nexus device.
Guidelines and Limitations for SSH
SSH has the following configuration guidelines and limitations:
The Cisco Nexus device supports only SSH version 2 (SSHv2).
•
Configuring SSH
Telnet Server
Generating SSH Server Keys
You can generate an SSH server key based on your security requirements. The default SSH server key is an
RSA key that is generated using 1024 bits.
Procedure
Step 1
Step 2
[force] | rsa [bits [force]]}
Step 3
Step 4
switch# show ssh key [dsa | rsa]
[md5]
PurposeCommand or Action
Enters global configuration move.switch# configure terminal
Generates the SSH server key.switch(config)# ssh key {dsa
The bits argument is the number of bits used to generate the
key. The range is from 768 to 2048 and the default value is
1024.
Use the force keyword to replace an existing key.
Exits global configuration mode.switch(config)# exit
(Optional)
Displays the SSH server keys.
For Cisco NX-OS Release 7.0(3)I4(6) and any later 7.0(3)I4(x)
release, this command displays the fingerprint in SHA256
format by default. SHA256 is more secure than the old default
format of MD5. However, the md5 option has been added, if
you want to see the fingerprint in MD5 format for backward
compatibility.
Cisco Nexus 3600 NX-OS Security Configuration Guide, Release 7.x
61
Page 76

Specifying the SSH Public Keys for User Accounts
Configuring SSH and Telnet
PurposeCommand or Action
Step 5
switch# copy running-config
startup-config
(Optional)
Copies the running configuration to the startup configuration.
The following example shows how to generate an SSH server key:
switch# configure terminal
switch(config)# ssh key rsa 2048
switch(config)# exit
switch# show ssh key
switch# copy running-config startup-config
Specifying the SSH Public Keys for User Accounts
You can configure an SSH public key to log in using an SSH client without being prompted for a password.
You can specify the SSH public key in one of three different formats:
Open SSH format
•
IETF SECSH format
•
Public Key Certificate in PEM format
•
Specifying the SSH Public Keys in Open SSH Format
You can specify the SSH public keys in SSH format for user accounts.
Procedure
PurposeCommand or Action
Step 1
Step 2
switch(config)# username username
Enters global configuration move.switch# configure terminal
Configures the SSH public key in SSH format.
sshkey ssh-key
Step 3
Step 4
switch# show user-account
Exits global configuration mode.switch(config)# exit
(Optional)
Displays the user account configuration.
Step 5
switch# copy running-config
startup-config
(Optional)
Copies the running configuration to the startup
configuration.
The following example shows how to specify an SSH public key in open SSH format:
switch# configure terminal
switch(config)# username User1 sshkey ssh-rsa
AAAAB3NzaC1yc2EAAAABIwAAAIEAri3mQy4W1AV9Y2t2hrEWgbUEYz
Cisco Nexus 3600 NX-OS Security Configuration Guide, Release 7.x
62
Page 77

Configuring SSH and Telnet
CfTPO5B8LRkedn56BEy2N9ZcdpqE6aqJLZwfZcTFEzaAAZp9AS86dgBAjsKGs7UxnhGySr8ZELv+DQBsDQH6rZt0KR+2Da8hJD4Z
XIeccWk0gS1DQUNZ300xstQsYZUtqnx1bvm5Ninn0McNinn0Mc=
switch(config)# exit
switch# show user-account
switch# copy running-config startup-config
The username command in the example above is a single line that has been broken for legibility.Note
Specifying the SSH Public Keys in IETF SECSH Format
You can specify the SSH public keys in IETF SECSH format for user accounts.
Procedure
Specifying the SSH Public Keys for User Accounts
PurposeCommand or Action
Step 1
switch# copy server-file bootflash:
filename
Downloads the file that contains the SSH key in
IETF SECSH format from a server. The server can
be FTP, SCP, SFTP, or TFTP.
Step 2
Step 3
switch(config)# username username
Enters global configuration move.switch# configure terminal
Configures the SSH public key in SSH format.
sshkey file filename
Step 4
Step 5
switch# show user-account
Exits global configuration mode.switch(config)# exit
(Optional)
Displays the user account configuration.
Step 6
switch# copy running-config
startup-config
(Optional)
Copies the running configuration to the startup
configuration.
The following example shows how to specify the SSH public key in the IETF SECSH format:
switch#copy tftp://10.10.1.1/secsh_file.pub bootflash:secsh_file.pub
switch# configure terminal
switch(config)# username User1 sshkey file bootflash:secsh_file.pub
switch(config)# exit
switch# show user-account
switch# copy running-config startup-config
Specifying the SSH Public Keys in PEM-Formatted Public Key Certificate Form
You can specify the SSH public keys in PEM-formatted Public Key Certificate form for user accounts.
Cisco Nexus 3600 NX-OS Security Configuration Guide, Release 7.x
63
Page 78

Configuring the SSH Source Interface
Procedure
Configuring SSH and Telnet
PurposeCommand or Action
Step 1
switch# copy server-file bootflash:
filename
Step 2
Step 3
Step 4
switch# show user-account
switch# copy running-config
startup-config
The following example shows how to specify the SSH public keys in PEM-formatted public key certificate
form:
switch# copy tftp://10.10.1.1/cert.pem bootflash:cert.pem
switch# configure terminal
switch# show user-account
switch# copy running-config startup-config
Configuring the SSH Source Interface
You can configure SSH to use a specific interface.
Downloads the file that contains the SSH key in
PEM-formatted Public Key Certificate form from a
server. The server can be FTP, SCP, SFTP, or TFTP
Enters global configuration move.switch# configure terminal
(Optional)
Displays the user account configuration.
(Optional)
Copies the running configuration to the startup
configuration.
Procedure
Step 1
Step 2
Step 3
switch(config)# ip ssh source-interface
type slot/port
source-interface
PurposeCommand or Action
Enters global configuration move.switch# configure terminal
Configures the source interface for all SSH packets.
The following list contains the valid values for
interface.
ethernet
•
loopback
•
mgmt
•
port-channel
•
vlan
•
Displays the configured SSH source interface.switch(config)# show ip ssh
Cisco Nexus 3600 NX-OS Security Configuration Guide, Release 7.x
64
Page 79

Configuring SSH and Telnet
This example shows how to configure the SSH source interface:
switch(config)# configure terminal
Enter configuration commands, one per line. End with CNTL/Z.
switch(config)# ip ssh source-interface ethernet 1/7
switch(config)# show ip ssh source-interface
VRF Name Interface
default Ethernet1/7
Starting SSH Sessions to Remote Devices
You can start SSH sessions to connect to remote devices from your Cisco Nexus device.
Procedure
Starting SSH Sessions to Remote Devices
PurposeCommand or Action
Step 1
switch# ssh {hostname |
username@hostname} [vrf vrf-name]
Clearing SSH Hosts
When you download a file from a server using SCP or SFTP, you establish a trusted SSH relationship with
that server.
Procedure
Step 1
Disabling the SSH Server
By default, the SSH server is enabled on the Cisco Nexus device.
Creates an SSH session to a remote device. The
hostname argument can be an IPv4 address or a
hostname.
PurposeCommand or Action
Clears the SSH host sessions.switch# clear ssh hosts
Procedure
Step 1
Step 2
switch(config)# [no] feature ssh
Cisco Nexus 3600 NX-OS Security Configuration Guide, Release 7.x
PurposeCommand or Action
Enters global configuration move.switch# configure terminal
Enables/disables the SSH server. The default is
enabled.
65
Page 80

Deleting SSH Server Keys
Configuring SSH and Telnet
PurposeCommand or Action
Step 3
Step 4
Step 5
switch# show ssh server
switch# copy running-config
startup-config
Deleting SSH Server Keys
You can delete SSH server keys after you disable the SSH server.
To reenable SSH, you must first generate an SSH server key.Note
Procedure
Step 1
Exits global configuration mode.switch(config)# exit
(Optional)
Displays the SSH server configuration.
(Optional)
Copies the running configuration to the startup
configuration.
PurposeCommand or Action
Enters global configuration move.switch# configure terminal
Step 2
Step 3
Step 4
Step 5
Step 6
Clearing SSH Sessions
You can clear SSH sessions from the Cisco Nexus device.
switch# show ssh key
switch# copy running-config
startup-config
Disables the SSH server.switch(config)# no feature ssh
Deletes the SSH server key.switch(config)# no ssh key [dsa | rsa]
The default is to delete all the SSH keys.
Exits global configuration mode.switch(config)# exit
(Optional)
Displays the SSH server configuration.
(Optional)
Copies the running configuration to the startup
configuration.
Cisco Nexus 3600 NX-OS Security Configuration Guide, Release 7.x
66
Page 81

Configuring SSH and Telnet
Procedure
Configuration Examples for SSH
PurposeCommand or Action
Step 1
Step 2
switch# clear line vty-line
Configuration Examples for SSH
The following example shows how to configure SSH:
Procedure
Step 1
Step 2
Generate an SSH server key.
switch(config)# ssh key rsa
generating rsa key(1024 bits).....
.
generated rsa key
Enable the SSH server.
switch# configure terminal
switch(config)# feature ssh
This step should not be required because the SSH server is enabled by default.Note
Displays user session information.switch# show users
Clears a user SSH session.
Step 3
Display the SSH server key.
switch(config)# show ssh key
rsa Keys generated:Fri May 8 22:09:47 2009
ssh-rsa
AAAAB3NzaC1yc2EAAAABIwAAAIEAri3mQy4W1AV9Y2t2hrEWgbUEYzCfTPO5B8LRkedn56BEy2N9ZcdpqE6aqJLZwfZ/
cTFEzaAAZp9AS86dgBAjsKGs7UxnhGySr8ZELv+DQBsDQH6rZt0KR+2Da8hJD4ZXIeccWk0gS1DQUNZ300xstQsYZUtqnx1bvm5/
Ninn0Mc=
bitcount:1024
fingerprint:
4b:4d:f6:b9:42:e9:d9:71:3c:bd:09:94:4a:93:ac:ca
**************************************
could not retrieve dsa key information
**************************************
Cisco Nexus 3600 NX-OS Security Configuration Guide, Release 7.x
67
Page 82

Configuring X.509v3 Certificate-Based SSH Authentication
Configuring SSH and Telnet
Step 4
Step 5
Specify the SSH public key in Open SSH format.
switch(config)# username User1 sshkey ssh-rsa
AAAAB3NzaC1yc2EAAAABIwAAAIEAri3mQy4W1AV9Y2t2hrEWgbUEYz
CfTPO5B8LRkedn56BEy2N9ZcdpqE6aqJLZwfZcTFEzaAAZp9AS86dgBAjsKGs7UxnhGySr8ZELv+DQBsDQH6rZt0KR+2Da8hJD4Z
XIeccWk0gS1DQUNZ300xstQsYZUtqnx1bvm5Ninn0McNinn0Mc=
Save the configuration.
switch(config)# copy running-config startup-config
Configuring X.509v3 Certificate-Based SSH Authentication
You can configure SSH authentication using X.509v3 certificates.
Before You Begin
Enable the SSH server on the remote device.
Procedure
PurposeCommand or Action
Step 1
Step 2
Example:
switch# configure terminal
switch(config)#
username user-id [password [0 | 5]
password]
Example:
switch(config)# username jsmith
password 4Ty18Rnt
Enters global configuration mode.configure terminal
Configures a user account. The user-id argument is a
case-sensitive, alphanumeric character string with a
maximum length of 28 characters. Valid characters are
uppercase letters A through Z, lowercase letters a through
z, numbers 0 through 9, hyphen (-), period (.), underscore
(_), plus sign (+), and equal sign (=). The at symbol (@)
is supported in remote usernames but not in local
usernames.
Usernames must begin with an underscore (_), which is
supported starting with Cisco NX-OS Release 7.0(3)I2(2),
or an alphanumeric character.
The default password is undefined. The 0 option indicates
that the password is clear text, and the 5 option indicates
that the password is encrypted. The default is 0 (clear
text).
Note
If you do not specify a password, the user might
not be able to log in to the Cisco NX-OS device.
Note
If you create a user account with the encrypted
password option, the corresponding SNMP user
will not be created.
Cisco Nexus 3600 NX-OS Security Configuration Guide, Release 7.x
68
Page 83

Configuring SSH and Telnet
Configuring X.509v3 Certificate-Based SSH Authentication
PurposeCommand or Action
Step 3
Step 4
Step 5
Step 6
username user-id ssh-cert-dn dn-name
{dsa | rsa}
Example:
switch(config)# username jsmith
ssh-cert-dn "/O = ABCcompany, OU
= ABC1,
emailAddress =
jsmith@ABCcompany.com, L =
Metropolis, ST = New York, C = US,
CN = jsmith" rsa
[no] crypto ca trustpoint trustpoint
Example:
switch(config)# crypto ca
trustpoint winca
trustpoint
Example:
switch(config)# crypto ca
authentication winca
crypto ca crl request trustpoint
bootflash:static-crl.crl
Example:
switch(config)# crypto ca crl
request winca
bootflash:crllist.crl
Specifies an SSH X.509 certificate distinguished name
and DSA or RSA algorithm to use for authentication for
an existing user account. The distinguished name can be
up to 512 characters and must follow the format shown
in the examples. Make sure the email address and state
are configured as emailAddress and ST, respectively.
Configures a trustpoint.
Configures a certificate chain for the trustpoint.[no] crypto ca authentication
Configures the certificate revocation list (CRL) for the
trustpoint. The CRL file is a snapshot of the list of
revoked certificates by the trustpoint. This static CRL list
is manually copied to the device from the Certification
Authority (CA).
Note
Static CRL is the only supported revocation
check method.
Step 7
Step 8
Step 9
Step 10
show crypto ca certificates
Example:
switch(config)# show crypto ca
certificates
show crypto ca crl trustpoint
Example:
switch(config)# show crypto ca crl
winca
show user-account
Example:
switch(config)# show user-account
show users
Example:
switch(config)# show users
(Optional)
Displays the configured certificate chain and associated
trustpoint.
(Optional)
Displays the contents of the CRL list of the specified
trustpoint.
(Optional)
Displays configured user account details.
(Optional)
Displays the users logged into the device.
Cisco Nexus 3600 NX-OS Security Configuration Guide, Release 7.x
69
Page 84

Configuration Example for X.509v3 Certificate-Based SSH Authentication
Configuring SSH and Telnet
PurposeCommand or Action
Step 11
copy running-config startup-config
(Optional)
Copies the running configuration to the startup
Example:
switch(config)# copy
running-config startup-config
configuration.
Configuration Example for X.509v3 Certificate-Based SSH
Authentication
The following example shows how to configure SSH authentication using X.509v3 certificates:
configure terminal
username jsmith password 4Ty18Rnt
username jsmith ssh-cert-dn "/O = ABCcompany, OU = ABC1,
emailAddress = jsmith@ABCcompany.com, L = Metropolis, ST = New York, C = US, CN = jsmith"
rsa
crypto ca trustpoint tp1
crypto ca authentication tp1
crypto ca crl request tp1 bootflash:crl1.crl
show crypto ca certificates
Trustpoint: tp1
CA certificate 0:
subject= /CN=SecDevCA
issuer= /CN=SecDevCA
serial=01AB02CD03EF04GH05IJ06KL07MN
notBefore=Jun 29 12:36:26 2016 GMT
notAfter=Jun 29 12:46:23 2021 GMT
SHA1 Fingerprint=47:29:E3:00:C1:C1:47:F2:56:8B:AC:B2:1C:64:48:FC:F4:8D:53:AF
purposes: sslserver sslclient
show crypto ca crl tp1
Trustpoint: tp1 CRL: Certificate Revocation List (CRL):
Version 2 (0x1)
Signature Algorithm: sha1WithRSAEncryption
Issuer: /CN=SecDevCA
Last Update: Aug 8 20:03:15 2016 GMT
Next Update: Aug 16 08:23:15 2016 GMT
CRL extensions:
X509v3 Authority Key Identifier:
keyid:30:43:AA:80:10:FE:72:00:DE:2F:A2:17:E4:61:61:44:CE:78:FF:2A
show user-account
user:user1
user1; Algo: x509v3-sign-rsa
show users
NAME LINE TIME IDLE PID COMMENT
user1 pts/1 Jul 27 18:43 00:03 18796 (10.10.10.1) session=ssh
this user account has no expiry date
roles:network-operator
ssh cert DN : /C = US, ST = New York, L = Metropolis, O = cisco , OU = csg, CN =
Cisco Nexus 3600 NX-OS Security Configuration Guide, Release 7.x
70
Page 85

Configuring SSH and Telnet
Configuring Telnet
Enabling the Telnet Server
By default, the Telnet server is enabled. You can disable the Telnet server on your Cisco Nexus device.
Procedure
Configuring Telnet
PurposeCommand or Action
Step 1
Step 2
switch(config)# [no] feature telnet
Reenabling the Telnet Server
If the Telnet server on your Cisco Nexus device has been disabled, you can reenable it.
Procedure
Step 1
Configuring the Telnet Source Interface
You can configure Telnet to use a specific interface.
Enters global configuration move.switch# configure terminal
Enables/disables the Telnet server. The default
is enabled.
PurposeCommand or Action
Reenables the Telnet server.switch(config)# [no] feature telnet
Procedure
Step 1
Step 2
switch(config)# ip telnet
source-interface type slot/port
Cisco Nexus 3600 NX-OS Security Configuration Guide, Release 7.x
PurposeCommand or Action
Enters global configuration move.switch# configure terminal
Configures the source interface for all Telnet packets.
The following list contains the valid values for interface.
ethernet
•
loopback
•
mgmt
•
port-channel
•
71
Page 86

Starting Telnet Sessions to Remote Devices
This example shows how to configure the Telnet source interface:
switch# configure terminal
Enter configuration commands, one per line. End with CNTL/Z.
switch(config)# ip telnet source-interface ethernet 1/6
switch(config)# show ip telnet source-interface
VRF Name Interface
default Ethernet1/6
switch(config)#
Starting Telnet Sessions to Remote Devices
Before you start a Telnet session to connect to remote devices, you should do the following:
Configuring SSH and Telnet
PurposeCommand or Action
vlan
•
Obtain the hostname for the remote device and, if needed, obtain the username on the remote device.
•
Enable the Telnet server on the Cisco Nexus device.
•
Enable the Telnet server on the remote device.
•
Procedure
Step 1
switch# telnet hostname
The following example shows how to start a Telnet session to connect to a remote device:
switch# telnet 10.10.1.1
Trying 10.10.1.1...
Connected to 10.10.1.1.
Escape character is '^]'.
switch login:
Clearing Telnet Sessions
PurposeCommand or Action
Creates a Telnet session to a remote device. The hostname
argument can be an IPv4 address, an IPv6 address, or a device
name.
You can clear Telnet sessions from the Cisco Nexus device.
Cisco Nexus 3600 NX-OS Security Configuration Guide, Release 7.x
72
Page 87

Configuring SSH and Telnet
Procedure
Verifying the SSH and Telnet Configuration
PurposeCommand or Action
Step 1
Step 2
switch# clear line vty-line
Displays user session information.switch# show users
Clears a user Telnet session.
Verifying the SSH and Telnet Configuration
To display the SSH configuration information, perform one of the following tasks:
PurposeCommand or Action
switch# show ssh key [dsa | rsa][md5]
switch# show running-config security [all]
Displays SSH server keys.
For Cisco NX-OS Release 7.0(3)I4(6) and any later
7.0(3)I4(x) release, this command displays the
fingerprint in SHA256 format by default. SHA256 is
more secure than the old default format of MD5.
However, the md5 option has been added, if you want
to see the fingerprint in MD5 format for backward
compatibility.
Displays the SSH and user account configuration in
the running configuration. The all keyword displays
the default values for the SSH and user accounts.
switch# show crypto ca certificates
switch# show crypto ca crl trustpoint
Default Settings for SSH
The following table lists the default settings for SSH parameters.
Displays the SSH server configuration.switch# show ssh server
Displays user account information.switch# show user-account
Displays the users logged into the device.switch# show users
Displays the configured certificate chain and
associated trustpoint for X.509v3 certificate-based
SSH authentication.
Displays the contents of the CRL list of the specified
trustpoint for X.509v3 certificate-based SSH
authentication.
Cisco Nexus 3600 NX-OS Security Configuration Guide, Release 7.x
73
Page 88

Default Settings for SSH
Table 9: Default SSH Parameters
Configuring SSH and Telnet
DefaultParameters
EnabledSSH server
RSA key generated with 1024 bitsSSH server key
1024RSA key bits for generation
EnabledTelnet server
Cisco Nexus 3600 NX-OS Security Configuration Guide, Release 7.x
74
Page 89

CHAPTER 7
Configuring IP ACLs
This chapter describes how to configure IP access control lists (ACLs) on Cisco NX-OS devices.
Unless otherwise specified, the term IP ACL refers to IPv4 and IPv6 ACLs.
Information About ACLs, page 75
•
ACL TCAM Regions, page 78
•
Licensing Requirements for ACLs, page 79
•
Prerequisites for ACLs, page 79
•
Guidelines and Limitations for ACLs, page 80
•
Default ACL Settings, page 80
•
ACL Logging , page 81
•
Configuring IP ACLs, page 81
•
About System ACLs, page 89
•
Configuring ACL Logging, page 92
•
Configuring ACL TCAM Region Sizes, page 95
•
Configuring ACLs on Virtual Terminal Lines, page 97
•
Information About ACLs
An access control list (ACL) is an ordered set of rules that you can use to filter traffic. Each rule specifies a
set of conditions that a packet must satisfy to match the rule. When the switch determines that an ACL applies
to a packet, it tests the packet against the conditions of all rules. The first match determines whether the packet
is permitted or denied. If there is no match, the switch applies the applicable default rule. The switch continues
processing packets that are permitted and drops packets that are denied.
You can use ACLs to protect networks and specific hosts from unnecessary or unwanted traffic. For example,
you could use ACLs to disallow HTTP traffic from a high-security network to the Internet. You could also
use ACLs to allow HTTP traffic but only to specific sites, using the IP address of the site to identify it in an
IP ACL.
Cisco Nexus 3600 NX-OS Security Configuration Guide, Release 7.x
75
Page 90

IP ACL Types and Applications
IP ACL Types and Applications
The Cisco Nexus device supports IPv4, IPv6, and MAC ACLs for security traffic filtering. The switch allows
you to use IP access control lists (ACLs) as port ACLs, and Router ACLs as shown in the following table.
Table 10: Security ACL Applications
Configuring IP ACLs
Types of ACLs SupportedSupported InterfacesApplication
Port ACL
Router ACL
Application Order
An ACL is considered a port ACL when you apply it to
one of the following:
Ethernet interface
•
Ethernet port-channel interface
•
Physical Layer 3 interfaces
•
Layer 3 Ethernet subinterfaces
•
Layer 3 Ethernet port-channel interfaces
•
Layer 3 Ethernet port-channel subinterfaces
•
Management interfaces
•
Switched Virtual Interfaces (SVIs)
•
VTYsVTY ACL
IPv4 ACLs
IPv6 ACLs
MAC ACLs
IPv4 ACLs
IPv6 ACLs
IPv4 ACLs
IPv6 ACLs
Rules
76
When the device processes a packet, it determines the forwarding path of the packet. The path determines
which ACLs that the device applies to the traffic. The device applies the ACLs in the following order:
1
Port ACL
2
Ingress Router ACL
You can create rules in access-list configuration mode by using the permit or deny command. The switch
allows traffic that matches the criteria in a permit rule and blocks traffic that matches the criteria in a deny
rule. You have many options for configuring the criteria that traffic must meet in order to match the rule.
Cisco Nexus 3600 NX-OS Security Configuration Guide, Release 7.x
Page 91

Configuring IP ACLs
Source and Destination
In each rule, you specify the source and the destination of the traffic that matches the rule. You can specify
both the source and destination as a specific host, a network or group of hosts, or any host.
Protocols
IPv4, IPv6, and MAC ACLs allow you to identify traffic by protocol. For your convenience, you can specify
some protocols by name. For example, in an IPv4 ACL, you can specify ICMP by name.
You can specify any protocol by the integer that represents the Internet protocol number.
Implicit Rules
IP and MAC ACLs have implicit rules, which means that although these rules do not appear in the running
configuration, the switch applies them to traffic when no other rules in an ACL match.
All IPv4 ACLs include the following implicit rule:
deny ip any any
This implicit rule ensures that the switch denies unmatched IP traffic.
All IPv6 ACLs include the following implicit rule:
deny ipv6 any any
All MAC ACLs include the following implicit rule:
deny any any protocol
This implicit rule ensures that the device denies the unmatched traffic, regardless of the protocol specified in
the Layer 2 header of the traffic.
Rules
Additional Filtering Options
You can identify traffic by using additional options. IPv4 ACLs support the following additional filtering
options:
Layer 4 protocol
•
TCP and UDP ports
•
IGMP types
•
Established TCP connections
•
Sequence Numbers
The Cisco Nexus device supports sequence numbers for rules. Every rule that you enter receives a sequence
number, either assigned by you or assigned automatically by the device. Sequence numbers simplify the
following ACL tasks:
• Adding new rules between existing rules—By specifying the sequence number, you specify where in
the ACL a new rule should be positioned. For example, if you need to insert a rule between rules numbered
100 and 110, you could assign a sequence number of 105 to the new rule.
Cisco Nexus 3600 NX-OS Security Configuration Guide, Release 7.x
77
Page 92

ACL TCAM Regions
Configuring IP ACLs
• Removing a rule—Without using a sequence number, removing a rule requires that you enter the whole
rule, as follows:
switch(config-acl)# no permit tcp 10.0.0.0/8 any
However, if the same rule had a sequence number of 101, removing the rule requires only the following
command:
switch(config-acl)# no 101
• Moving a rule—With sequence numbers, if you need to move a rule to a different position within an
ACL, you can add a second instance of the rule using the sequence number that positions it correctly,
and then you can remove the original instance of the rule. This action allows you to move the rule without
disrupting traffic.
If you enter a rule without a sequence number, the device adds the rule to the end of the ACL and assigns a
sequence number that is 10 greater than the sequence number of the preceding rule to the rule. For example,
if the last rule in an ACL has a sequence number of 225 and you add a rule without a sequence number, the
device assigns the sequence number 235 to the new rule.
In addition, the device allows you to reassign sequence numbers to rules in an ACL. Resequencing is useful
when an ACL has rules numbered contiguously, such as 100 and 101, and you need to insert one or more
rules between those rules.
Logical Operators and Logical Operation Units
IP ACL rules for TCP and UDP traffic can use logical operators to filter traffic based on port numbers.
The Cisco Nexus device stores operator-operand couples in registers called logical operation units (LOUs)
to perform operations (greater than, less than, not equal to, and range) on the TCP and UDP ports specified
in an IP ACL.
ACL TCAM Regions
You can change the size of the ACL ternary content addressable memory (TCAM) regions in the hardware.
The IPv4 TCAMs are single wide.
You can create IPv6 port ACLs, router ACLs, and you can match IPv6 addresses for QoS. Cisco NX-OS
provides simultaneous support for all three TCAMs. You must remove or reduce the size of the existing
TCAMs to enable these new IPv6 TCAMs.
TCAM region sizes have the following guidelines and limitations:
To revert to the default ACL TCAM size, use the no hardware access list tcam region command. You
•
need to reload the modules when you revert to default sizes.
Depending upon the platform, each TCAM region might have a different minimum/maximum/aggregate
•
size restriction.
The total number of TCAMs is 16.
•
◦ There are 12 large TCAMs—Each has 2048 entries that are 160 bit key size.
◦ There are 4 small TCAMs—Each has 256 entries that are 160 bit key size.
The TCAM regions RACL v6, QoS, CoPP, and Multicast cannot be set to 0.
•
Cisco Nexus 3600 NX-OS Security Configuration Guide, Release 7.x
78
Page 93

Configuring IP ACLs
Redirect_v6, RACL v4 cannot share TCAM with any other features.
•
After TCAM carving, you must reload the switch.
•
Table 11: TCAM Sizes by ACL Region
Default SizeTCAM ACL Region
1024PACL_IPv4 [ifacl]
1024PACL_IPV6 [ipv6-ifacl]
2048PACL_MAC [mac-ifacl]
640IPv4 Port QOS [qos]
256IPv6 Port QOS [ipv6-qos]
1024IPv4 RACL [racl]
Licensing Requirements for ACLs
Licensing Requirements for ACLs
The following table shows the licensing requirements for this feature:
1024IPv6 RACL [ipv6-racl]
640IPv4 L3 QoS [l3qos]
256IPv6 L3 QoS [ipv6-l3qos]
96SPAN [span]
128Ingress COPP [copp]
1024Redirect v4
2048Redirect v6
License RequirementProduct
No license is required to use ACLs.Cisco NX-OS
Prerequisites for ACLs
IP ACLs have the following prerequisites:
Cisco Nexus 3600 NX-OS Security Configuration Guide, Release 7.x
79
Page 94

Guidelines and Limitations for ACLs
You must be familiar with IP addressing and protocols to configure IP ACLs.
•
You must be familiar with the interface types that you want to configure with ACLs.
•
Guidelines and Limitations for ACLs
IP ACLs have the following configuration guidelines and limitations:
As an enhancement to HTTP method match, the tcp-option-length option has been added to the ACE
•
syntax to specify the length of the TCP options header in the packets. You can configure up to 4
tcp-option-lengths in the ACEs, which includes the TCP option length of 0. If you do not configure the
tcp-option-length option, the length is considered as 0. It means that only the packets without the TCP
options header can match this ACE. This feature gives more flexibility in such a way that the HTTP
method can be matched even on the packets that have the variable length TCP options header.
We recommend that you perform ACL configuration using the Session Manager. This feature allows
•
you to verify ACL configuration and confirm that the resources required by the configuration are available
prior to committing them to the running configuration. This is especially useful for ACLs that include
more than about 1000 rules.
Configuring IP ACLs
You can configure any number of ACLs as long as TCAM space is available.
•
Packets that fail the Layer 3 maximum transmission unit check and therefore require fragmenting.
•
IPv4 packets that have IP options (additional IP packet header fields following the destination address
•
field).
When you apply an ACL that uses time ranges, the device updates the ACL entries whenever a time
•
range referenced in an ACL entry starts or ends. Updates that are initiated by time ranges occur on a
best-effort priority. If the device is especially busy when a time range causes an update, the device may
delay the update by up to a few seconds. Make sure that the time range is valid and in an active state.
To use the match-local-traffic option for all inbound and outbound traffic, you must first enable the
•
ACL in the software.
Default ACL Settings
The following table lists the default settings for IP ACLs parameters.
Table 12: Default IP ACLs Parameters
DefaultParameters
No IP ACLs exist by default.IP ACLs
Implicit rules apply to all ACLs .ACL rules
The following table lists the default settings for MAC ACLs parameters.
Cisco Nexus 3600 NX-OS Security Configuration Guide, Release 7.x
80
Page 95

Configuring IP ACLs
Table 13: Default MAC ACLs Parameters
ACL Logging
The Cisco Nexus device supports ACL logging, which allows you to monitor flows that hit specific access
control lists (ACLs). To enable the feature for the ACL entry, configure specific ACEs with the optional log
keyword.
ACL Logging
DefaultParameters
No MAC ACLs exist by default.MAC ACLs
Implicit rules apply to all ACLs .ACL rules
Configuring IP ACLs
Creating an IP ACL
You can create an IPv4 or IPv6 ACL on the switch and add rules to it.
Procedure
Step 1
Step 2
Step 3
Step 4
switch(config)# {ip | ipv6} access-list
name
switch(config)# ip access-list name
switch(config-acl)#
[sequence-number] {permit | deny}
protocol source destination
PurposeCommand or Action
Enters global configuration mode.switch# configure terminal
Creates the IP ACL and enters IP ACL configuration
mode. The name argument can be up to 64 characters.
Creates the IP ACL and enters IP ACL configuration
mode. The name argument can be up to 64 characters.
Creates a rule in the IP ACL. You can create many rules.
The sequence-number argument can be a whole number
between 1 and 4294967295.
The permit and deny commands support many ways of
identifying traffic. For more information, see the
Command Reference for the specific Cisco Nexus device.
Step 5
Step 6
switch# show {ip | ipv6} access-lists
name
switch# show ip access-lists name
Cisco Nexus 3600 NX-OS Security Configuration Guide, Release 7.x
(Optional)
Displays the IP ACL configuration.
(Optional)
Displays the IP ACL configuration.
81
Page 96

Configuring IPv4 ACL Logging
Configuring IP ACLs
PurposeCommand or Action
Step 7
switch# copy running-config
startup-config
This example shows how to create an IPv4 ACL:
switch# configure terminal
switch(config)# ip access-list acl-01
switch(config-acl)# permit ip 192.168.2.0/24 any
This example shows how to create an IPv6 ACL:
switch# configure terminal
switch(config)# ipv6 access-list acl-01-ipv6
switch(config-ipv6-acl)# permit tcp 2001:0db8:85a3::/48 2001:0db8:be03:2112::/64
Configuring IPv4 ACL Logging
To configure the IPv4 ACL logging process, you first create the access list, then enable filtering of IPv4 traffic
on an interface using the specified ACL, and finally configure the ACL logging process parameters.
Procedure
Step 1
(Optional)
Copies the running configuration to the startup
configuration.
PurposeCommand or Action
Enters global configuration mode.configure terminal
Step 2
Step 3
Step 4
Example:
switch# configure terminal
switch(config)#
ip access-list name
Example:
switch(config)# ip access-list
logging-test
switch(config-acl)#
{permit | deny} ip source-address
destination-address log
Example:
switch(config-acl)# permit ip any
10.30.30.0/24 log
exit
Example:
switch(config-acl)# exit
switch(config)#
Creates an IPv4 ACL and enters IP ACL configuration
mode. The name argument can be up to 64 characters.
Creates an ACL rule that permits or denies IPv4 traffic
matching its conditions. To enable the system to generate
an informational logging message about each packet
that matches the rule, you must include the log keyword.
The source-address and destination-address arguments
can be the IP address with a network wildcard, the IP
address and variable-length subnet mask, the host
address, or any to designate any address.
Updates the configuration and exits IP ACL
configuration mode.
Cisco Nexus 3600 NX-OS Security Configuration Guide, Release 7.x
82
Page 97

Configuring IP ACLs
Configuring IPv4 ACL Logging
PurposeCommand or Action
Step 5
Step 6
Step 7
Step 8
Step 9
Step 10
Step 11
Step 12
interface ethernet slot/port
Example:
switch(config)# interface ethernet
1/1
switch(config-if)#
ip access-group name in
Example:
switch(config-if)# ip access-group
logging-test in
exit
Example:
switch(config-if)# exit
switch(config)#
logging ip access-list cache interval
interval
Example:
switch(config)# logging ip
access-list cache interval 490
logging ip access-list cache entries
number-of-flows
Example:
switch(config)# logging ip
access-list cache entries 8001
logging ip access-list cache threshold
threshold
Example:
switch(config)# logging ip
access-list cache threshold 490
logging ip access-list detailed
Example:
switch(config)# logging ip
access-list detailed
hardware rate-limiter access-list-log
packets
Example:
switch(config)# hardware
rate-limiter access-list-log 200
Enters interface configuration mode.
Enables the filtering of IPv4 traffic on an interface using
the specified ACL. You can apply an ACL to inbound
traffic.
Updates the configuration and exits interface
configuration mode.
Configures the log-update interval (in seconds) for the
ACL logging process. The default value is 300 seconds.
The range is from 5 to 86400 seconds.
Specifies the maximum number of flows to be monitored
by the ACL logging process. The default value is 8000.
The range of values supported is from 0 to 1048576.
If the specified number of packets is logged before the
expiry of the alert interval, the system generates a syslog
message.
Enables the ACL name, the sequence number of ACE,
action, ACL direction, ACL filter type, and the ACL
applied interface are displayed in the output of the show
logging ip access-list cache command.
Configures rate limits in packets per second for packets
copied to the supervisor module for ACL logging. The
range is from 0 to 30000.
Note
Cisco Nexus NX-OS 7.0(3)F3(1) does not
support the hardware rate-limiter
access-list-log command.
Cisco Nexus 3600 NX-OS Security Configuration Guide, Release 7.x
83
Page 98

Changing an IP ACL
Configuring IP ACLs
PurposeCommand or Action
Step 13
Step 14
Changing an IP ACL
You can add and remove rules in an existing IPv4 or IPv6 ACL. You cannot change existing rules. Instead,
to change a rule, you can remove it and recreate it with the desired changes.
If you need to add more rules between existing rules than the current sequence numbering allows, you can
use the resequence command to reassign sequence numbers.
acllog match-log-level severity-level
Example:
switch(config)# acllog
match-log-level 5
show logging ip access-list cache
[detail]
Example:
switch(config)# show logging ip
access-list cache
Specifies the minimum severity level to log ACL
matches. The default is 6 (informational). The range is
from 0 (emergency) to 7 (debugging).
(Optional)
Displays information on the active logged flows, such
as source IP and destination IP addresses, source port
and destination port information, source interfaces, and
so on. If you entered the logging ip access-list detailed
command, the output also includes the ACL name, the
sequence number of ACE, action, ACL direction, ACL
filter type, and the ACL applied interface .
Procedure
Step 1
Step 2
Step 3
Step 4
Step 5
switch(config)# {ip | ipv6}ip
access-list name
switch(config)# ip access-list name
switch(config-acl)#
[sequence-number] {permit | deny}
protocol source destination
switch(config-acl)# no
{sequence-number | {permit | deny}
protocol source destination}
PurposeCommand or Action
Enters global configuration mode.switch# configure terminal
Enters IP ACL configuration mode for the ACL that you
specify by name.
Enters IP ACL configuration mode for the ACL that you
specify by name.
Creates a rule in the IP ACL. Using a sequence number
allows you to specify a position for the rule in the ACL.
Without a sequence number, the rule is added to the end
of the rules. The sequence-number argument can be a
whole number between 1 and 4294967295.
The permit and deny commands support many ways of
identifying traffic. For more information, see the Command
Reference for your Cisco Nexus device.
(Optional)
Removes the rule that you specified from the IP ACL.
Cisco Nexus 3600 NX-OS Security Configuration Guide, Release 7.x
84
Page 99

Configuring IP ACLs
Removing an IP ACL
PurposeCommand or Action
The permit and deny commands support many ways of
identifying traffic. For more information, see the Command
Reference for your Cisco Nexus device.
Step 6
Step 7
Related Topics
Changing Sequence Numbers in an IP ACL, on page 86
Removing an IP ACL
You can remove an IP ACL from the switch.
Before you remove an IP ACL from the switch, be sure that you know whether the ACL is applied to an
interface. The switch allows you to remove ACLs that are currently applied. Removing an ACL does not
affect the configuration of interfaces where you have applied the ACL. Instead, the switch considers the
removed ACL to be empty.
Procedure
switch#show ip access-lists name
switch# copy running-config
startup-config
(Optional)
Displays the IP ACL configuration.
(Optional)
Copies the running configuration to the startup
configuration.
Step 1
Step 2
Step 3
Step 4
Step 5
switch(config)# no {ip | ipv6}
access-list name
switch(config)# no ip access-list name
switch# show running-config
switch# copy running-config
startup-config
PurposeCommand or Action
Enters global configuration mode.switch# configure terminal
Removes the IP ACL that you specified by name
from the running configuration.
Removes the IP ACL that you specified by name
from the running configuration.
(Optional)
Displays the ACL configuration. The removed IP
ACL should not appear.
(Optional)
Copies the running configuration to the startup
configuration.
Cisco Nexus 3600 NX-OS Security Configuration Guide, Release 7.x
85
Page 100

Changing Sequence Numbers in an IP ACL
Changing Sequence Numbers in an IP ACL
You can change all the sequence numbers assigned to the rules in an IP ACL.
Procedure
Configuring IP ACLs
PurposeCommand or Action
Step 1
Step 2
Step 3
switch# show {ip | ipv6} access-lists name
switch# copy running-config
startup-config
Applying an IP ACL to mgmt0
You can apply an IPv4 or IPv6 ACL to the management interface (mgmt0).
Before You Begin
Ensure that the ACL that you want to apply exists and that it is configured to filter traffic in the manner that
you need for this application.
Procedure
Step 1
Enters global configuration mode.switch# configure terminal
(Optional)
Displays the IP ACL configuration.
(Optional)
Copies the running configuration to the startup
configuration.
PurposeCommand or Action
Enters global configuration mode.configure terminal
Example:
switch# configure terminal
switch(config)#
Step 2
ip access-group access-list {in | out}
Applies an IPv4 or IPv6 ACL to the Layer 3
interface for traffic flowing in the direction
specified. You can apply one router ACL per
direction.
(Optional)
Step 3
Example:
switch(config-if)#ip access-group acl-120
out
show running-config aclmgr
Displays the ACL configuration.
Example:
switch(config-if)# show running-config
aclmgr
Cisco Nexus 3600 NX-OS Security Configuration Guide, Release 7.x
86
 Loading...