

Page 1

Send documentation comments to mdsfeedback-doc@cisco.com.
Cisco MDS 9000 Family Fabric Manager
Configuration Guide, Release 2.x
Cisco MDS SAN-OS Release 2.0(1b) through Release 2.1(2b)
Cisco MDS 9000 FabricWare Release 2.1(2)
October 2005
Corporate Headquarters
Cisco Systems, Inc.
170 West Tasman Drive
San Jose, CA 95134-1706
USA
http://www.cisco.com
Tel: 408 526-4000
800 553-NETS (6387)
Fax: 408 526-4100
Text Part Number: OL-6965-03
Page 2

Send documentation comments to mdsfeedback-doc@cisco.com.
THE SPECIFICATIONS AND INFORMATION REGARDING THE PRODUCTS IN THIS MANUAL ARE SUBJECT TO CHANGE WITHOUT NOTICE. ALL
STATEMENTS, INFORMATION, AND RECOMMENDATIONS IN THIS MANUAL ARE BELIEVED TO BE ACCURATE BUT ARE PRESENTED WITHOUT
WARRANTY OF ANY KIND, EXPRESS OR IMPLIED. USERS MUST TAKE FULL RESPONSIBILITY FOR THEIR APPLICATION OF ANY PRODUCTS.
THE SOFTWARE LICENSE AND LIMITED WARRANTY FOR THE ACCOMPANYING PRODUCT ARE SET FORTH IN THE INFORMATION PACKET THAT
SHIPPED WITH THE PRODUCT AND ARE INCORPORATED HEREIN BY THIS REFERENCE. IF YOU ARE UNABLE TO LOCATE THE SOFTWARE LICENSE
OR LIMITED WARRANTY, CONTACT YOUR CISCO REPRESENTATIVE FOR A COPY.
The Cisco implementation of TCP header compression is an adaptation of a program developed by the University of California, Berkeley (UCB) as part of UCB’s public
domain version of the UNIX operating system. All rights reserved. Copyright © 1981, Regents of the University of California.
NOTWITHSTANDING ANY OTHER WARRANTY HEREIN, ALL DOCUMENT FILES AND SOFTWARE OF THESE SUPPLIERS ARE PROVIDED “AS IS” WITH
ALL FAULTS. CISCO AND THE ABOVE-NAMED SUPPLIERS DISCLAIM ALL WARRANTIES, EXPRESSED OR IMPLIED, INCLUDING, WITHOUT
LIMITATION, THOSE OF MERCHANTABILITY, FITNESS FOR A PARTICULAR PURPOSE AND NONINFRINGEMENT OR ARISING FROM A COURSE OF
DEALING, USAGE, OR TRADE PRACTICE.
IN NO EVENT SHALL CISCO OR ITS SUPPLIERS BE LIABLE FOR ANY INDIRECT, SPECIAL, CONSEQUENTIAL, OR INCIDENTAL DAMAGES, INCLUDING,
WITHOUT LIMITATION, LOST PROFITS OR LOSS OR DAMAGE TO DATA ARISING OUT OF THE USE OR INABILITY TO USE THIS MANUAL, EVEN IF CISCO
OR ITS SUPPLIERS HAVE BEEN ADVISED OF THE POSSIBILITY OF SUCH DAMAGES.
CCSP, CCVP, the Cisco Square Bridge logo, Follow Me Browsing, and StackWise are trademarks of Cisco Systems, Inc.; Changing the Way We Work, Live, Play, and Learn, and
iQuick Study are service marks of Cisco Systems, Inc.; and Access Registrar, Aironet, BPX, Catalyst, CCDA, CCDP, CCIE, CCIP, CCNA, CCNP, Cisco, the Cisco Certified
Internetwork Expert logo, Cisco IOS, Cisco Press, Cisco Systems, Cisco Systems Capital, the Cisco Systems logo, Cisco Unity, Enterprise/Solver, EtherChannel, EtherFast,
EtherSwitch, Fast Step, FormShare, GigaDrive, GigaStack, HomeLink, Internet Quotient, IOS, IP/TV, iQ Expertise, the iQ logo, iQ Net Readiness Scorecard, LightStream,
Linksys, MeetingPlace, MGX, the Networkers logo, Networking Academy, Network Registrar, Pac k et , PIX, Post-Routing, Pre-Routing, ProConnect, RateMUX, ScriptShare,
SlideCast, SMARTnet, The Fastest Way to Increase Your Internet Quotient, and TransPath are registered trademarks of Cisco Systems, Inc. and/or its affiliates in the United States
and certain other countries.
All other trademarks mentioned in this document or Website are the property of their respective owners. The use of the word partner does not imply a partnership relationship
between Cisco and any other company. (0601R)
Cisco MDS 9000 Family Fabric Manager Configuration Guide
Copyright © 2003–2005, Cisco Systems, Inc. The software includes technology under license from QLogic Corporation.
All rights reserved.
Page 3

Send documentation comments to mdsfeedback-doc@cisco.com.
CONTENTS
New and Changed Information xxvii
Preface xxxi
Audience xxxi
Organization xxxi
Document Conventions xxxiv
Related Documentation xxxv
Obtaining Documentation xxxvi
Cisco.com xxxvi
Product Documentation DVD xxxvi
Ordering Documentation xxxvi
Documentation Feedback xxxvii
Cisco Product Security Overview xxxvii
Reporting Security Problems in Cisco Products xxxvii
Obtaining Technical Assistance xxxviii
Cisco Technical Support & Documentation Website xxxviii
Submitting a Service Request xxxix
Definitions of Service Request Severity xxxix
Obtaining Additional Publications and Information xxxix
PART
1 Fabric Manager Applications
CHAPTER
1 Installation and Configuration 1-1
About Cisco Fabric Manager 1-1
Fabric Manager Server 1-2
Fabric Manager Client 1-2
Fabric Manager Server Proxy Services 1-2
Device Manager 1-3
Performance Manager 1-3
Fabric Manager Web Services 1-3
Cisco MDS 9000 Switch Management 1-3
Storage Management Solutions Architecture 1-4
In-Band Management and Out-of-Band Management 1-5
OL-6965-03, Cisco MDS SAN-OS Release 2.x
mgmt0 1-5
Cisco MDS 9000 Family Fabric Manager Configuration Guide
iii
Page 4

Contents
Send documentation comments to mdsfeedback-doc@cisco.com.
IPFC 1-5
Installing the Management Software 1-6
Before You Install 1-6
Installation Procedure 1-7
Upgrading the Management Software 1-9
Downgrading the Management Software 1-9
Downgrading to Release 2.x or Later 1-9
Downgrading to Cisco MDS SAN-OS Release 1.3(x) or Earlier 1-9
Launching the Management Software 1-10
Integrating Cisco Fabric Manager with Other Management Tools 1-11
Running Fabric Manager Behind a Firewall 1-12
Uninstalling the Management Software 1-13
CHAPTER
2 Fabric Manager Server 2-1
Fabric Manager Server Overview 2-1
Fabric Manager Server Features 2-2
Installing and Configuring Fabric Manager Server 2-2
Installing Fabric Manager Server 2-3
Unlicensed Versus Licensed Fabric Manager Server 2-3
Setting the Seed Switch 2-4
Configuring Flows and Collections with Performance Manager 2-4
Using the Performance Manager Configuration Wizard 2-4
Installing Fabric Manager Web Services 2-6
Verifying Performance Manager Collections 2-6
Fabric Manager Server Fabric Monitoring and Removal 2-7
Designating a Fabric for Continuous Monitoring 2-7
Removing a Fabric from Monitoring 2-8
Fabric Manager Server Properties File 2-8
Modifying Fabric Manager Server 2-9
Changing the Fabric Manager Server Username and Password 2-9
Changing the Polling Period and Fabric Rediscovery Time 2-9
Using Device Aliases or FC Aliases 2-10
Saving Device Aliases to the Switch 2-10
CHAPTER
iv
3 Fabric Manager Client 3-1
Fabric Manager Client Overview 3-1
Fabric Manager Advanced Mode 3-2
Launching Fabric Manager Client 3-2
Cisco MDS 9000 Family Fabric Manager Configuration Guide
OL-6965-03, Cisco MDS SAN-OS Release 2.x
Page 5

Contents
Send documentation comments to mdsfeedback-doc@cisco.com.
Using Fabric Manager Client 3-3
Multiple Fabric Display 3-4
Contents Panes 3-5
Fabric Pane 3-5
Saving the Map 3-7
Purging Down Elements 3-7
Main Menu 3-7
Toolbar 3-8
Information Pane 3-9
Logical Domains Pane 3-10
Physical Attributes Pane 3-11
Status Bar 3-11
Context Menus 3-11
Filtering 3-12
Detachable Tables 3-13
CHAPTER
Setting Fabric Manager Preferences 3-13
Network Fabric Discovery 3-15
Modifying Device Grouping 3-15
Using Alias Names as Enclosures 3-16
Control of Administrator Access with Users and Roles 3-16
Fabric Manager Wizards 3-16
Fabric Manager Troubleshooting Tools 3-17
4 Device Manager 4-1
Device Manager Overview 4-1
Device Manager Features 4-1
Launching Device Manager 4-2
Using Device Manager 4-3
Menu Bar 4-4
Toolbar Icons 4-4
Dialog Boxes 4-5
Tabs 4-5
Legend 4-6
Supervisor and Switching Modules 4-7
Context Menus 4-7
Setting Device Manager Preferences 4-8
OL-6965-03, Cisco MDS SAN-OS Release 2.x
Cisco MDS 9000 Family Fabric Manager Configuration Guide
v
Page 6

Contents
Send documentation comments to mdsfeedback-doc@cisco.com.
CHAPTER
5 Fabric Manager Web Services 5-1
Fabric Manager Web Services Overview 5-1
Filter Tree 5-2
Events 5-3
Performance 5-3
Inventory 5-3
Custom 5-4
Admin 5-4
Installing Fabric Manager Web Services 5-4
Using Fabric Manager Web Services with SSL 5-6
Launching and Using Fabric Manager Web Services 5-7
Monitoring Fabrics from Fabric Manager Web Services 5-8
Setting Up a Guest User 5-9
Recovering a Web Services Password 5-9
Creating Custom Report Templates 5-10
Generating Custom Reports 5-11
Viewing Existing Custom Reports 5-11
CHAPTER
CHAPTER
CHAPTER
6 Performance Manager 6-1
Performance Manager Architecture 6-1
Data Interpolation 6-2
Data Collection 6-2
Using Performance Thresholds 6-2
Quick Data Collector and Flow Setup Wizards 6-3
7 Authentication in Fabric Manager 7-1
Fabric Manager Authentication Overview 7-1
Best Practices for Discovering a Fabric 7-3
Setting up Discovery for a Fabric 7-3
Performance Manager Authentication 7-3
Fabric Manager Web Services Authentication 7-4
8 Cisco Traffic Analyzer 8-1
Using Cisco Traffic Analyzer with Performance Manager 8-1
Understanding SPAN 8-2
Understanding the PAA-2 8-3
Understanding Cisco Traffic Analyzer 8-3
vi
Using Cisco Traffic Analyzer with Fabric Manager Web Services 8-4
Cisco MDS 9000 Family Fabric Manager Configuration Guide
OL-6965-03, Cisco MDS SAN-OS Release 2.x
Page 7

Contents
Send documentation comments to mdsfeedback-doc@cisco.com.
Installing and Launching Cisco Traffic Analyzer 8-4
Configuring Cisco Traffic Analyzer 8-7
Discovering Cisco Traffic Analyzer from Fabric Manager Web Services 8-7
Accessing Cisco Traffic Analyzer from Fabric Manager Web Services 8-8
Configuring Cisco Traffic Analyzer for Fabric Manager Releases Prior to 2.1(2) 8-8
PART
2 Switch Software Installation and Configuration Files
CHAPTER
9 Obtaining and Installing Licenses 9-1
Licensing Terminology 9-1
Licensing Model 9-2
Licensing High Availability 9-5
Options to Install a License 9-6
Obtaining a Factory-Installed License 9-6
Performing a Manual Installation 9-6
Obtaining the License Key File 9-7
Installing the License Key File 9-8
Installing Licenses Using Fabric Manager License Wizard 9-8
Viewing License Information in Fabric Manager 9-9
Viewing Licenses Using Fabric Manager Web Services 9-10
Installing or Updating Licenses Using Device Manager 9-10
Viewing License Information in Device Manager 9-11
Uninstalling Licenses 9-11
Updating Licenses 9-12
License Expiry Alerts 9-13
Moving Licenses Between Switches 9-13
Fabric Manager Server Licensing 9-13
CHAPTER
10 Software Images 10-1
About Software Images 10-1
Essential Upgrade Prerequisites 10-2
Software Upgrade Methods 10-3
Using the Software Install Wizard 10-4
Upgrading from Cisco MDS SAN-OS 1.3(4a) to 2.0(1b) 10-6
OL-6965-03, Cisco MDS SAN-OS Release 2.x
Dependent Factors 10-1
Determining Compatibility 10-3
Recognizing Failure Cases 10-4
Cisco MDS 9000 Family Fabric Manager Configuration Guide
vii
Page 8

Contents
Send documentation comments to mdsfeedback-doc@cisco.com.
File System Manipulation 10-8
Listing the Files in a Directory 10-8
Creating a Directory 10-8
Deleting an Existing File or Directory 10-9
Copying Files 10-9
Performing Other File Manipulation Tasks 10-10
CHAPTER
11 Configuration Files 11-1
Working with Configuration Files 11-1
Saving the Configuration File 11-1
Copying the Configuration File 11-2
PART
3 Switch Configuration
CHAPTER
12 Cisco Fabric Services 12-1
About CFS 12-1
Enabling CFS for a Feature 12-3
Disabling or Enabling CFS Distribution on a Switch 12-6
CFS Merge Support 12-7
Cisco MDS SAN-OS Features Using CFS 12-1
CFS Features 12-2
Locking the Fabric 12-4
Committing Changes 12-4
Clearing a Locked Session 12-6
CHAPTER
CHAPTER
viii
A CFS Example Using Fabric Manager 12-7
A CFS Example Using Device Manager 12-9
13 VSAN Configuration 13-1
About VSANs 13-1
Default and Isolated VSANs 13-1
Default VSANs 13-2
Isolated VSANs 13-2
Configuring a VSAN 13-2
Deleting VSANs 13-3
14 Dynamic VSAN Configuration 14-1
About DPVM 14-1
DPVM Requirements 14-2
Cisco MDS 9000 Family Fabric Manager Configuration Guide
OL-6965-03, Cisco MDS SAN-OS Release 2.x
Page 9

Contents
Send documentation comments to mdsfeedback-doc@cisco.com.
DPVM Databases 14-2
DPVM Database Distribution 14-2
Config Database Activation 14-3
Copying the DPVM Database 14-3
Autolearn Entries 14-3
Using the DPVM Setup Wizard 14-4
Modifying the DPVM Database 14-4
Using the DPVM tables 14-5
CHAPTER
15 Zone Configuration 15-1
Zoning Features 15-1
Zone Implementation 15-2
Zone Configuration 15-2
Using the Zone Configuration Tool 15-3
Edit Full Zone Database Overview 15-4
Zone Database Information 15-5
Configuring a Zone 15-5
Viewing Zone Statistics 15-5
Adding Zone Members 15-5
Displaying Zone Membership Information 15-6
Alias Configuration 15-6
Creating Zones with Aliases 15-8
Viewing Aliases 15-8
Converting Zone members to pWWN-based Members 15-9
Zone Set Creation 15-9
Active and Full Zone Set Considerations 15-10
Creating Zone Sets 15-12
Adding Zones to a Zone Set 15-12
Activating Zone Sets 15-12
Deactivating Zone Sets 15-13
Creating Additional Zones and Zone Sets 15-13
Cloning Zones and Zone Sets 15-14
Deleting Zones, Zone Sets, and Aliases 15-14
Zone Enforcement 15-15
The Default Zone 15-15
Configuring the Default Zone Policy 15-16
Performing Zone Merge Analysis 15-17
Recovering from Link Isolation 15-17
Importing Zone Sets 15-18
OL-6965-03, Cisco MDS SAN-OS Release 2.x
Cisco MDS 9000 Family Fabric Manager Configuration Guide
ix
Page 10

Contents
Send documentation comments to mdsfeedback-doc@cisco.com.
Exporting Active Zone Sets 15-19
Full Zone Set Propagation 15-19
One-Time Distribution 15-19
Copying a Full Zone Database 15-20
Migrating a Non-MDS Database 15-20
Zone-Based Traffic Priority 15-20
Configuring Zone QoS and Broadcast Attributes 15-21
About LUN Zoning 15-21
Configuring a LUN-Based Zone 15-22
Assigning LUNs to Storage Subsystems 15-23
About Read-Only Zones 15-23
Guidelines to Configure Read-Only Zones 15-23
Configuring Read-Only Zones 15-24
Backing Up and Restoring Zones 15-24
CHAPTER
16 Inter-VSAN Routing Configuration 16-1
Inter-VSAN Routing 16-1
Understanding IVR 16-1
IVR Terminology 16-2
Fibre Channel Header Modifications 16-3
IVR NAT 16-3
IVR VSAN Topology 16-4
Autonomous Fabric ID 16-4
Service Groups 16-4
Using IVR NAT and Auto Topology 16-5
Transit VSAN Guidelines 16-5
Border Switch Guidelines 16-6
Service Group Guidelines 16-6
Using IVR Without IVR NAT or Auto Topology 16-6
Domain ID Guidelines 16-6
Transit VSAN Guidelines 16-7
Border Switch Guidelines 16-7
Using the IVR Zone Wizard 16-7
Modifying IVR 16-8
Modifying IVR NAT and IVR Auto Topology 16-9
Configuring Service Group 16-9
Configuring AFIDs 16-9
Enabling IVR Without NAT 16-10
Manually Creating the IVR Topology 16-11
Cisco MDS 9000 Family Fabric Manager Configuration Guide
x
OL-6965-03, Cisco MDS SAN-OS Release 2.x
Page 11

Contents
Send documentation comments to mdsfeedback-doc@cisco.com.
Activating an IVR Topology 16-12
Clearing the IVR Topology 16-12
Adding IVR Virtual Domains 16-12
IVR Zones and IVR Zone Sets 16-13
IVR Zones Versus Zones 16-13
Automatic IVR Zone Creation 16-14
Configuring IVR Zones and Zone Sets 16-14
Creating Additional IVR Zones and Zone Sets 16-15
Activating IVR Zone Sets 16-16
Deactivating IVR Zone Sets 16-16
Recovering an IVR Full Zone Database 16-16
Recovering an IVR Full Topology 16-16
Adding Members to IVR Zones 16-17
IVR Interoperability 16-17
CHAPTER
CHAPTER
17 PortChannel Configuration 17-1
PortChannel Functionality 17-1
Using the PortChannel Wizard 17-2
Modifying PortChannels 17-5
18 Interface Configuration 18-1
Fibre Channel Interfaces 18-1
About Interface Modes 18-1
E Port 18-2
F Port 18-2
FL Port 18-3
TL Port 18-3
TE Port 18-3
SD Port 18-3
ST Port 18-4
Fx Port 18-4
B Port 18-4
Auto Mode 18-4
Configuring Trunking Mode 18-4
About Interface States 18-5
Administrative States 18-5
Operational States 18-5
Reason Codes 18-5
32-Port Configuration Guidelines 18-5
OL-6965-03, Cisco MDS SAN-OS Release 2.x
Cisco MDS 9000 Family Fabric Manager Configuration Guide
xi
Page 12

Contents
Send documentation comments to mdsfeedback-doc@cisco.com.
Configuring Fibre Channel Interfaces 18-6
Configuring Gigabit Ethernet Interfaces 18-7
Enabling or Disabling Interfaces 18-7
Managing Interface Attributes for Ports 18-7
Buffer-to-Buffer Credits 18-9
Performance Buffers 18-9
Configuring Buffer-to-Buffer Credits and Performance Buffers 18-9
Identification of SFP Types 18-10
Configuring the Management Interface 18-10
Configuring Persistent FC IDs 18-10
IPFC Interface Configuration 18-10
CHAPTER
19 FCIP Configuration 19-1
About Gigabit Ethernet Interfaces 19-1
Configuring a Basic Gigabit Ethernet Interface 19-2
FCIP Configuration 19-2
FCIP and VE Ports 19-2
FCIP Links 19-3
FCIP Write Acceleration 19-4
FCIP Compression 19-5
Using the FCIP Wizard 19-5
Modifying FCIP Links 19-8
About FCIP Profiles 19-8
FCIP Interfaces 19-9
Modifying FCIP Profiles and FCIP Links 19-9
Verifying Interfaces and Extended Link Protocol 19-10
Checking Trunk Status 19-10
Modifying FCIP Write Acceleration or FCIP Compression 19-11
FCIP Tape Acceleration 19-11
Enabling FCIP Tape Acceleration 19-13
xii
Configuring Advanced FCIP Interfaces 19-13
Configuring Peers 19-13
Peer IP Address 19-13
Special Frames 19-14
Using B Port Interoperability Mode 19-15
Configuring B Ports 19-17
Configuring E Ports 19-18
FCIP High Availability 19-18
Cisco MDS 9000 Family Fabric Manager Configuration Guide
OL-6965-03, Cisco MDS SAN-OS Release 2.x
Page 13

Contents
Send documentation comments to mdsfeedback-doc@cisco.com.
Fibre Channel PortChannels 19-19
FSPF 19-19
VRRP 19-20
Ethernet PortChannels 19-20
Ethernet PortChannels and Fibre Channel PortChannels 19-21
CHAPTER
20 iSCSI Configuration 20-1
Configuring iSCSI 20-1
About iSCSI 20-1
Routing iSCSI Requests and Responses 20-4
Enabling iSCSI 20-5
Using the iSCSI Wizard 20-5
Presenting Fibre Channel Targets as iSCSI Targets 20-7
Dynamically Importing Fibre Channel Targets 20-8
Creating a Static iSCSI Virtual Target 20-9
High Availability Static Target Importing 20-10
Configuring the Trespass Feature 20-11
Presenting iSCSI Hosts as Virtual Fibre Channel Hosts 20-11
Dynamic Mapping 20-12
Static Mapping 20-12
Assigning VSAN Membership to iSCSI Hosts 20-13
Creating a Statically Mapped iSCSI Initiator 20-13
iSCSI Proxy Initiators 20-14
Configuring the iSCSI Proxy Initiator 20-16
Access Control in iSCSI 20-16
Fibre Channel Zoning-Based Access Control 20-16
iSCSI-Based Access Control 20-17
Enforcing Access Control 20-17
iSCSI User Authentication 20-17
No Authentication 20-18
Configuring an Authentication Mechanism 20-18
Restricting iSCSI Initiator Authentication 20-18
Mutual CHAP Authentication 20-19
Configuring an iSCSI RADIUS Server 20-19
Advanced iSCSI Configuration 20-20
Setting the QoS Values 20-20
iSCSI Forwarding Mode 20-21
iSCSI High Availability 20-21
Configuring iSCSI Storage Name Services 20-24
OL-6965-03, Cisco MDS SAN-OS Release 2.x
Cisco MDS 9000 Family Fabric Manager Configuration Guide
xiii
Page 14

Contents
Send documentation comments to mdsfeedback-doc@cisco.com.
iSNS Client Functionality 20-25
Creating an iSNS Profile 20-25
Modifying an iSNS Profile 20-25
Enabling the iSNS Server 20-26
Configuring the ESI Retry Count 20-26
CHAPTER
CHAPTER
21 Configuring the SAN Extension Tuner 21-1
About the SAN Extension Tuner 21-1
SAN Extension Tuner Setup 21-2
Data Pattern 21-2
Prerequisites 21-2
Using the SAN Extension Tuner Wizard 21-3
22 FICON Configuration 22-1
About FICON 22-2
MDS-Specific FICON Advantages 22-2
Fabric-Optimization with VSANs 22-2
FCIP Support 22-3
PortChannel Support 22-4
VSANs for FICON and FCP Intermixing 22-4
Cisco MDS-Supported FICON Features 22-4
FICON Port Numbering 22-6
FICON Port Numbering Guidelines 22-7
FCIP and PortChannel Port Numbers 22-8
Port Addresses 22-8
Installed and Uninstalled Ports 22-8
FC ID Allocation 22-8
FICON Cascading 22-9
FICON VSAN Prerequisites 22-9
xiv
Enabling FICON 22-10
Creating FICON VSANs and enabling FICON 22-10
Deleting FICON VSANs 22-11
Viewing FICON Director History 22-12
The code-page Option 22-12
FC ID Last Byte 22-12
FICON Host Control 22-13
Host Changes FICON Port Parameters 22-13
FICON Information Refresh Note 22-14
Configuring FICON Ports 22-14
Cisco MDS 9000 Family Fabric Manager Configuration Guide
OL-6965-03, Cisco MDS SAN-OS Release 2.x
Page 15

Contents
Send documentation comments to mdsfeedback-doc@cisco.com.
Port Blocking 22-14
Port Prohibiting 22-14
Configuring Port Blocking and Port Prohibiting 22-15
Entering FICON Port Configuration Information 22-15
Viewing FICON Port Attributes 22-16
FICON Configuration Files 22-16
Accessing FICON Configuration Files 22-17
Copying FICON Configuration Files 22-17
Editing FICON Configuration Files 22-17
Managing FICON Configuration Files In Device Manager 22-18
Port Swapping 22-18
Port Swapping Guidelines 22-19
Swapping FICON Ports 22-19
Clearing FICON Device Allegiance 22-19
CUP In-Band Management 22-20
Fabric Binding Configuration 22-20
Port Security Versus Fabric Binding 22-20
Fabric Binding Enforcement 22-21
Enabling Fabric Binding 22-21
Configuring a List of Switch WWNs In a Fabric 22-22
Activating Fabric Binding 22-22
Saving Fabric Binding Configurations 22-23
Deactivating Fabric Binding 22-23
Fabric Binding CopyActive to Config 22-23
Creating a Fabric Binding Configuration 22-24
Deleting a Fabric Binding Configuration 22-24
Viewing Fabric Binding Active Database 22-24
Viewing Fabric Binding Violations 22-24
Clearing Fabric Binding Statistics 22-25
Viewing EFMD Statistics 22-25
Displaying RLIR Information 22-25
Calculating FICON Flow Load Balance 22-25
CHAPTER
23 Configuring Intelligent Storage Services 23-1
Intelligent Storage Services 23-1
SCSI Flow Services 23-3
OL-6965-03, Cisco MDS SAN-OS Release 2.x
Enabling Intelligent Storage Services 23-2
Disabling Intelligent Storage Services 23-3
Configuring SCSI Flow Services 23-4
Cisco MDS 9000 Family Fabric Manager Configuration Guide
xv
Page 16

Contents
Send documentation comments to mdsfeedback-doc@cisco.com.
Fibre Channel Write Acceleration 23-4
Configuring Fibre Channel Write Acceleration 23-5
SCSI Flow Statistics 23-5
Enabling SCSI Flow Statistics 23-6
Viewing SCSI Flow Statistics and Clearing SCSI Flow Statistics 23-6
SANTap 23-7
Transparent Mode 23-8
Proxy Mode-1 23-9
Proxy Mode-2 23-10
Configuring SANTap 23-10
NASB 23-11
Configuring NASB 23-12
CHAPTER
24 Additional Configuration 24-1
Fibre Channel Time Out Values 24-1
The fctrace Feature 24-2
Performing an fctrace Operation 24-2
The fcping Feature 24-2
Invoking the fcping Feature 24-3
Configuring World Wide Names 24-3
Link Initialization WWN Usage 24-3
Flat FC ID Allocation 24-4
Loop Monitoring Initiation 24-4
Switch Interoperability 24-4
Interoperability Configuration 24-6
Configuring Interoperability 24-6
PART
4 Security Configuration
CHAPTER
25 Users and Common Roles 25-1
xvi
Role-Based Authorization 25-1
Configuring Common Roles 25-2
Creating Common Roles 25-2
Editing Rules For Common Roles in Device Manager 25-3
Deleting Common Roles 25-3
Configuring the VSAN Policy 25-3
Modifying the VSAN Policy 25-4
Configuring User Accounts 25-4
Cisco MDS 9000 Family Fabric Manager Configuration Guide
OL-6965-03, Cisco MDS SAN-OS Release 2.x
Page 17

Contents
Send documentation comments to mdsfeedback-doc@cisco.com.
Creating or Updating Users 25-5
Creating Strong Passwords 25-5
Adding a User 25-5
Deleting a User 25-6
Viewing User Information 25-6
Configuring SSH Services 25-6
Generating the SSH Server Key Pair and Enabling SSH 25-6
Deleting a Generated Key Pair 25-7
Recovering Administrator Password 25-7
CHAPTER
26 SNMP Configuration 26-1
About SNMP 26-1
SNMP Version 1 and Version 2c 26-2
SNMP Version 3 26-2
SNMP v3 CLI User Management and AAA Integration 26-2
CLI and SNMP User Synchronization 26-2
Software Upgrade Synchronization 26-3
Restricting Switch Access 26-3
Adding a Community String 26-3
Deleting a Community String 26-4
Adding A Community String to the communities.properties File 26-4
Understanding Users 26-4
Adding a User 26-5
Deleting a User 26-5
Viewing SNMP Community and User Information 26-5
Group-Based SNMP Access 26-6
Assigning SNMPv3 Users to Multiple Roles 26-6
Configuring SNMP Notifications 26-6
CHAPTER
27 RADIUS and TACACS+ 27-1
Authentication, Authorization, and Accounting 27-1
OL-6965-03, Cisco MDS SAN-OS Release 2.x
CLI Security Options 27-1
SNMP Security Options 27-2
Switch AAA Functionalities 27-2
Authentication 27-2
Authorization 27-2
Accounting 27-3
Remote AAA Services 27-4
Remote Authentication Guidelines 27-4
Cisco MDS 9000 Family Fabric Manager Configuration Guide
xvii
Page 18

Contents
Send documentation comments to mdsfeedback-doc@cisco.com.
Server Groups 27-4
AAA Service Configuration Options 27-4
Configuring RADIUS 27-5
Setting the RADIUS Server for Authentication and Accounting 27-5
Setting the Global Preshared Key 27-7
Defining Vendor-Specific Attributes 27-7
VSA Format 27-7
Specifying SNMPv3 on AAA Servers 27-8
Configuring TACACS+ 27-8
About TACACS+ 27-9
Enabling TACACS+ 27-9
Setting the TACACS+ Server 27-9
Defining Custom Attributes for Roles 27-9
Supported TACACS+ Servers 27-10
Configuring Server Groups 27-10
Distributing AAA server Configuration 27-11
Enabling the distribution 27-11
Starting a Distribution Session on a Switch 27-11
Committing the Distribution 27-12
Discarding the Distribution Session 27-12
Local AAA Services 27-12
Disabling AAA Authentication 27-13
CHAPTER
CHAPTER
xviii
28 IP Access Control Lists 28-1
IP-ACL Configuration Guidelines 28-1
Filter Contents 28-2
Protocol Information 28-2
Address Information 28-2
Port Information 28-2
Using the IP-ACL Wizard 28-4
Creating Complex IP-ACLs Using Device Manager 28-5
Associating IP-ACL Profiles to Interfaces 28-6
Removing Associations Between IP-ACL Profiles and Interfaces 28-6
Deleting IP Profiles 28-7
29 IPsec and IKE 29-1
Configuring IPsec Network Security 29-1
The 14/2-Port Multiprotocol Services Module 29-1
Cisco MDS 9000 Family Fabric Manager Configuration Guide
OL-6965-03, Cisco MDS SAN-OS Release 2.x
Page 19

Contents
Send documentation comments to mdsfeedback-doc@cisco.com.
IPsec Prerequisites 29-2
IPsec Compatibility 29-3
About IPsec 29-3
About IKE 29-4
IPsec and IKE Terminology 29-4
Supported IPsec Transforms 29-5
Supported IKE Transforms and Algorithms 29-6
Supported Algorithms for Windows and Linux Platforms 29-7
Enabling IPsec Using FCIP Wizard 29-7
Modifying IKE and IPsec 29-8
Crypto ACL Guidelines 29-9
Mirror Image Crypto ACLs 29-10
The any Keyword in Crypto ACLs 29-12
Configuring Crypto IP-ACLs 29-12
Transform Sets 29-12
Crypto Map Entries 29-13
SA Establishment Between Peers 29-14
The AutoPeer Option 29-14
SA Lifetime Negotiation 29-15
Perfect Forwarding Secrecy 29-15
Creating or Modifying Crypto Maps 29-15
Applying a Crypto Map Set to an Interface 29-16
IPsec Maintenance 29-17
Global Lifetime Values 29-17
CHAPTER
30 FC-SP and DHCHAP 30-1
Fibre Channel Security Protocol 30-1
Configuring DHCHAP Authentication 30-3
OL-6965-03, Cisco MDS SAN-OS Release 2.x
About DHCHAP 30-2
DHCHAP Compatibility with Existing Cisco MDS Features 30-3
Enabling DHCHAP 30-3
Configuring DHCHAP Authentication Modes 30-4
Changing the DHCHAP Hash Algorithm 30-5
Changing DHCHAP Group Settings 30-5
Configuring the DHCHAP Password 30-6
Configuring the DHCHAP Password for the Local Switch 30-7
Configuring Remote Passwords for Other Devices 30-7
Setting the DHCHAP Timeout Value 30-8
Configuring DHCHAP AAA Authentication 30-8
Cisco MDS 9000 Family Fabric Manager Configuration Guide
xix
Page 20

Contents
Send documentation comments to mdsfeedback-doc@cisco.com.
Enabling FC-SP on ISLs 30-8
CHAPTER
31 Port Security 31-1
About Port Security 31-1
About Auto-Learn 31-1
Auto-Learning Device Authorization 31-2
Port Security Enforcement 31-2
Configuring Port Security 31-3
Enabling Port Security 31-3
Activating Port Security with Auto-Learn 31-3
Displaying Activated Port Security Settings 31-4
Displaying Port Security Statistics 31-4
Displaying Port Security Violations 31-4
Turning Auto-Learning On or Off 31-5
Example of Port Security Authorization 31-5
Configuring Port Security Manually 31-6
WWN Identification 31-6
Manually Configuring Port Security 31-7
Deleting a Port Security Pair 31-7
Database Interaction 31-8
Database Scenarios 31-9
Activating the Port Security Database 31-10
Database Activation Rejection 31-10
Forceful Port Security Activation 31-11
Database Reactivation 31-11
Copying an Active Database to the Config Database 31-11
PART
5 Network and Performance Monitoring
CHAPTER
32 Network Monitoring 32-1
SAN Discovery and Topology Mapping 32-1
Device Discovery 32-1
Topology Mapping 32-1
Using the Topology Map 32-2
Saving a Customized Topology Map Layout 32-2
Using Enclosures with Fabric Manager Topology Maps 32-2
Mapping Multiple Fabrics 32-3
Inventory Management 32-3
Using the Inventory Tab from Fabric Manager Web Services 32-3
Cisco MDS 9000 Family Fabric Manager Configuration Guide
xx
OL-6965-03, Cisco MDS SAN-OS Release 2.x
Page 21

Contents
Send documentation comments to mdsfeedback-doc@cisco.com.
Configuring System Message Logging 32-4
Syslog Server Logging Facilities and Severity Levels 32-4
Configuring Message Logging 32-7
Configuring a Syslog Server 32-8
Verifying Syslog Servers from Fabric Manager Web Services 32-9
Viewing Logs from Fabric Manager Web Services 32-9
Viewing Logs from Device Manager 32-9
Health and Event Monitoring 32-10
Fabric Manager Events Tab 32-10
Event Information in Fabric Manager Web Services Reports 32-10
Events in Device Manager 32-10
CHAPTER
33 Performance Monitoring 33-1
Real-Time Performance Monitoring 33-1
Device Manager Real-Time Performance Monitoring 33-1
Fabric Manager Real-Time ISL Statistics 33-2
Historical Performance Monitoring 33-2
Creating a Flow with Performance Manager 33-3
Creating a Collection with Performance Manager 33-3
Using Performance Thresholds 33-4
Using the Performance Manager Configuration Wizard 33-5
Starting and Stopping Data Collection 33-6
Viewing Performance Manager Reports 33-6
Performance Summary 33-6
Performance Tables and Details Graphs 33-7
Viewing Performance of Host-Optimized Port Groups 33-7
Viewing Performance Manager Events 33-7
Generating Top10 Reports in Performance Manager 33-7
Generating Top10 Reports Using Scripts 33-8
Exporting Data Collections to XML Files 33-8
Exporting Data Collections in Readable Format 33-9
Configuring Performance Manager for Use with Cisco Traffic Analyzer 33-10
CHAPTER
34 Third-Party Integration 34-1
Call Home Configuration 34-1
OL-6965-03, Cisco MDS SAN-OS Release 2.x
Cisco AutoNotify 34-1
Configuring Call Home 34-2
Configuring Call Home Destination Profiles and Alert Groups 34-2
Call Home Message Severity Levels 34-3
Cisco MDS 9000 Family Fabric Manager Configuration Guide
xxi
Page 22

Contents
Send documentation comments to mdsfeedback-doc@cisco.com.
Event Triggers 34-3
Message Contents 34-5
Configuring SNMP Events 34-11
Filtering SNMP Events 34-11
Configuring SNMP Event Destinations 34-12
Configuring Event Security 34-12
Viewing the SNMP Events Log 34-13
Configuring RMON Using Threshold Manager 34-13
Enabling RMON Alarms by Port 34-13
Enabling RMON Alarms for VSANs 34-14
Enabling RMON Alarms for Physical Components 34-14
Managing RMON Events 34-15
Managing RMON Alarms 34-15
Viewing the RMON Log 34-16
PART
6 Network Troubleshooting
CHAPTER
35 Troubleshooting Your Fabric 35-1
Troubleshooting Tools and Techniques 35-1
Cisco Traffic Analyzer 35-2
Cisco Protocol Analyzer 35-3
Analyzing Switch Device Health 35-3
Online System Health Management 35-4
Loopback Test Configuration Frequency 35-4
Performing Internal Loopbacks 35-4
Performing External Loopbacks 35-5
Hardware Failure Action 35-5
Analyzing Switch Fabric Configuration 35-5
Analyzing End-to-End Connectivity 35-6
Configuring a Fabric Analyzer 35-7
About the Cisco Fabric Analyzer 35-7
Configuring the Cisco Fabric Analyzer 35-9
Displaying Captured Frames 35-10
Local Text-Based Capture 35-8
Remote Capture Daemon 35-8
GUI-Based Client 35-9
Sending Captures to Remote IP Addresses 35-9
Defining Display Filters 35-11
Capture Filters 35-11
xxii
Cisco MDS 9000 Family Fabric Manager Configuration Guide
OL-6965-03, Cisco MDS SAN-OS Release 2.x
Page 23

Contents
Send documentation comments to mdsfeedback-doc@cisco.com.
Permitted Capture Filters 35-12
Using the Ping Tool 35-12
Using Traceroute and Other Troubleshooting Tools 35-13
Analyzing the Results of Merging Zones 35-13
Issuing the Show Tech Support Command 35-14
Locating Other Switches 35-15
Getting Oversubscription Information in Device Manager 35-16
CHAPTER
36 Management Software Troubleshooting 36-1
Installation Issues 36-3
When installing Fabric Manager from windows, clicking the install button fails. 36-3
How do I install Java Web Start on a UNIX machine? 36-4
Why can’t I launch Fabric Manager on Solaris? 36-4
Why is my browser prompting to save JNLP files? 36-4
Why do I get a “Java Web Start not detected” error? 36-4
Why can’t I see my desktop shortcuts? 36-5
How do I upgrade to a newer version? 36-5
How do I downgrade Fabric Manager or Device Manager? 36-5
What do I do if my upgrade is not working? 36-5
Java Web Start hangs on download dialog. What do I do? 36-6
How can I manually configure my browser for Java Web Start? 36-6
Can I run Java Web Start from the command line? 36-6
Windows 2000 crashes (blue screen). What do I do? 36-6
How do I clear the Java Web Start cache? 36-7
Why doesn’t my login work in Fabric Manager and Device Manager? 36-7
Why can’t I install Fabric Manager or Device Manager when pcAnyWhere is running? 36-7
The Fabric Manager or the Performance Manager service shows up as “disabled” in the Services
menu.
36-7
Why can’t I install Fabric Manager or Device Manager when McAfee Internet Suite 6.0 Professional
is running?
36-8
I get an error ".sm/logon." when I downgrade from MDS SAN-OS Release 2.x (or newer) to
1.3(x).
36-8
General 36-8
Why do I get errors while monitoring Area chart graphing? 36-8
Why do I get “gen error” messages? 36-8
Why are disk images in the Device Manager Summary View not showing up? 36-8
Why can’t I set both the D_S_TOV and E_D_TOV timers in the Device Manager? 36-9
Why are the columns in the Device Manager tables too small? 36-9
Why are my fabric changes not propagated onto the map (for example, links don't disappear)? 36-9
OL-6965-03, Cisco MDS SAN-OS Release 2.x
Cisco MDS 9000 Family Fabric Manager Configuration Guide
xxiii
Page 24

Contents
Send documentation comments to mdsfeedback-doc@cisco.com.
Why does the PortChannel creation dialog become too small after several uses? 36-9
Why do I see errors when I have configured IPFC? 36-9
Why is Fabric Manager or Device Manager using the wrong network interface? 36-9
Why am I seeing display anomalies? 36-10
How do I connect the Fabric Manager client to the server across VPN? 36-10
Why is the active zone set in edit zone always shown in bold (even after successful
activation)?
Can I create a zone with prefix IVRZ and a zone set with name nozonset? 36-10
One-click license install fails, cannot connect to Cisco website. 36-10
Fabric Manager client and Device Manager cannot connect to the switch 36-10
License Wizard fails to fetch license keys, saying connect failed 36-11
How do I increase log window size in Fabric Manager Client? 36-11
Windows Issues 36-11
Text fields showing up too small, cannot enter any data 36-11
Why does CiscoWorks fail to start in the browser? 36-11
Help contents are unreadable because of highlighting 36-11
Printing causes an application crash 36-11
Windows XP hangs (or blue screen). What do I do? 36-12
Why do the Device Manager Icons Disappear Sometimes? 36-12
Why does Fabric Manager hang when I drag an existing Zone Member to a Zone? 36-12
Device Manager or Fabric Manager window content disappears in Windows XP 36-12
Why does SCP/SFTP fail when I try to copy a file from my local machine to the switch? 36-12
36-10
UNIX Issues 36-13
Why Do the Parent Menus Disappear? 36-13
Why do I keep getting a "too many open files" error? 36-13
Other 36-14
How can I set the map layout so it stays after I restart Fabric Manager? 36-14
Two switches show on my map, but I only have one switch 36-14
There is a red/orange/dotted line through the switch. What’s wrong? 36-14
Can I upgrade without losing my map settings? 36-19
How can I preserve historical data when moving Fabric Manager server to a new host? 36-20
Are There Any Restrictions When Using Fabric Manager Across FCIP? 36-20
I see “Please insure that FM server is running on localhost.” 36-20
How can I run Cisco Fabric Manager if I have multiple interfaces? 36-21
Manually specifying an interface for Fabric Manager Server 36-21
Manually specifying an interface for Fabric Manager Client or Device Manager 36-22
How can I configure an HTTP proxy server? 36-22
How can I clear the topology map? 36-23
Can I use Fabric Manager in a mixed software environment? 36-23
I Get an Error When Launching Fabric Manager 36-23
xxiv
Cisco MDS 9000 Family Fabric Manager Configuration Guide
OL-6965-03, Cisco MDS SAN-OS Release 2.x
Page 25

Contents
Send documentation comments to mdsfeedback-doc@cisco.com.
Can I Search for Devices in a Fabric? 36-24
Do I Need A License of Fabric Manager Server for Each Switch in the Fabric? 36-24
How can I Manage Multiple Fabrics? 36-24
License Expiration Causes Orange X Through Switch 36-24
APPENDIX
APPENDIX
APPENDIX
I
NDEX
A GUI/CLI Usage Chart A-1
Procedures A-1
B Interface Nonoperational Reason Codes B-1
C Managing Cisco FabricWare 1
Fibre Channel Support 1
Zone Configuration 1
Security 2
Events 2
Managing Cisco FabricWare with Fabric Manager 3
OL-6965-03, Cisco MDS SAN-OS Release 2.x
Cisco MDS 9000 Family Fabric Manager Configuration Guide
xxv
Page 26

Contents
Send documentation comments to mdsfeedback-doc@cisco.com.
xxvi
Cisco MDS 9000 Family Fabric Manager Configuration Guide
OL-6965-03, Cisco MDS SAN-OS Release 2.x
Page 27

Send documentation comments to mdsfeedback-doc@cisco.com.
New and Changed Information
The Cisco MDS 9000 Family Fabric Manager Configuration Guide provides release-specific
information for the Cisco MDS SAN-OS Release 2.x (including Release 2.0(1b) through 2.1(2b)
software) and Cisco MDS 9000 FabricWare Release 2.1(2). The latest version of this document is
available at the following Cisco Systems website:
http://www.cisco.com/univercd/cc/td/doc/product/sn5000/mds9000/index.htm
To check for additional information about this release, refer to the Cisco MDS 9000 Family Release
Notes available at the following Cisco Systems website:
http://www.cisco.com/univercd/cc/td/doc/product/sn5000/mds9000/index.htm
Table 1 summarizes the new and changed features for the Cisco MDS 9000 Family Fabric Manager
Configuration Guide, and tells you where they are documented. The table includes a brief description of
each new feature and the release in which the change occurred.
Table 1 Documented Features for the Cisco MDS 9000 Family Fabric Manager Configuration
Guide
Changed
in
Feature Description
Fabric Manager Web
Services
Enhancements
Performance
Manager
Enhancements
Cisco FabricWare Supports switches running Cisco
IVR Enhancements Supports IVR NAT, IVR auto-topology,
Network-Accelerated
Serverless Backup
Includes custom report generation,
license inventory, TACACS+
authentication, Traffic Analyzer
integration, and SNMP user
management.
Supports host-optimized port
performance analysis reports.
FabricWare.
and autonomous fabric IDs.
Offloads data movement to
Network-Accelerated Serverless
Backup (NASB) devices that use SCSI
Xcopy.
Release Where Documented
2.1(2) Chapter 5, “Fabric
Manager Web Services”
2.1(2) Chapter 6, “Performance
Manager”
2.1(2) Appendix C, “Managing
Cisco FabricWare”
2.1(1a) Chapter 16, “Inter-VSAN
Routing Configuration”
2.1(1a) Chapter 23, “Configuring
Intelligent Storage
Services”
OL-6965-03, Cisco MDS SAN-OS Release 2.x
Cisco MDS 9000 Family Fabric Manager Configuration Guide
xxvii
Page 28

New and Changed Information
Send documentation comments to mdsfeedback-doc@cisco.com.
Table 1 Documented Features for the Cisco MDS 9000 Family Fabric Manager Configuration
Guide (continued)
Changed
in
Feature Description
SANTap Integrates third-party data storage
applications into the SAN.
Performance
Manager
Enhancements
Exports Performance Manager reports
in comma-separated format.
Generates Top10 Reports in
Performance Manager.
Storage Services
Module
Introduces the Storage Services
Module or SSM (supported by Device
Manager).
Fibre Channel Write
Acceleration
Minimizes application latency or
reduces transactions per second over
long distances (supported by Fabric
Manager).
SCSI Flow Statistics Collects statistics for configured SCSI
flows (supported by Fabric Manager).
Fabric Manager
Server Enhancements
Supports multiple fabric management,
centralized discovery, continuous
health monitoring, and roaming user
profiles
Fabric Manager Web
Services
Performance Manager data, events and
inventory information can be viewed
remotely through a web browser.
Performance baseline thresholds can be
defined and monitored; custom report
periods can be defined (in addition to
day/week/month/year).
Release Where Documented
2.1(1a) Chapter 23, “Configuring
Intelligent Storage
Services”
2.1(1a) Chapter 33, “Performance
Monitoring”
2.0(2b) Chapter 4, “Device
Manager”
2.0(2b) Chapter 23, “Configuring
Intelligent Storage
Services”
2.0(2b) Chapter 23, “Configuring
Intelligent Storage
Services”
2.0(1b) Chapter 2, “Fabric
Manager Server”
2.0(1b) Chapter 5, “Fabric
Manager Web Services”
xxviii
Cisco MDS 9000 Family Fabric Manager Configuration Guide
OL-6965-03, Cisco MDS SAN-OS Release 2.x
Page 29

New and Changed Information
Send documentation comments to mdsfeedback-doc@cisco.com.
Table 1 Documented Features for the Cisco MDS 9000 Family Fabric Manager Configuration
Guide (continued)
Changed
in
Feature Description
Fabric Manager
Enhancements
Displays SANs and multiple fabrics in
Fabric pane.
View filtering.
Rearranged Logical and Physical
panes.
Detachable tables in Information pane.
Persist fabrics for monitoring by Fabric
Manager Server.
Login screen enhancements include
simple versus complex displays, ability
to load from the database, ability to
sync server to same NIC as client.
Release Where Documented
2.0(1b) Chapter 3, “Fabric
Manager Client”
Enclosures in map bring up customized
application when right-clicked.
Displays individual, segmented VSAN
islands without collapsing into a single
VSAN.
Enhanced zoning capabilities.
AES Support (authentication
algorithm).
SCSI target IDs are now associated
with storage targets.
FDMI and name server information is
collated for initiators (hosts).
Enclosures are global across SANs.
FCIP Wizard enhancements include
encryption and compression.
FICON enhancements include ability
to display FICON port numbers on
map, and ability to assign FICON ports
for FCIP PortChannels.
Zoning enhancements include aliases
treated as groups; multiple alias types;
ability to rename zone sets, zones, and
aliases; backup and restore zone
database; and enhanced zoning.
Release 2.0(1b) feature support,
including DPVM Wizard, Cisco Fabric
Services, zone-based QoS, IKE/IPsec,
port tracking, and DNS.
OL-6965-03, Cisco MDS SAN-OS Release 2.x
Cisco MDS 9000 Family Fabric Manager Configuration Guide
xxix
Page 30

New and Changed Information
Send documentation comments to mdsfeedback-doc@cisco.com.
Table 1 Documented Features for the Cisco MDS 9000 Family Fabric Manager Configuration
Guide (continued)
Changed
in
Feature Description
Device Manager
Enhancements
MPS 14/2 support.
AES support (authentication
algorithm).
FCIP interfaces displayed in Physical
View.
Release 2.0(1b) feature support,
including auto-trunk, port tracking,
DNS, tape acceleration, IPS
encryption, Cisco Fabric Services, and
DPVM.
Gigabit Ethernet TCP statistics.
Multicast root.
Release Where Documented
2.0(1b) Chapter 4, “Device
Manager”
Performance
Manager
Enhancements
FCID area allocation.
Additional (and more accurate) Flash
file manipulation capabilities.
Ability to read syslog information from
FM Server.
Summary View enhancements
including display of EtherChannel
members, which Gigabit Ethernet port
is associated with FCIP, and FCIP
compression information.
Ability to power down a line card.
Includes summary and drill down
report, Data Collector and Flow Setup
wizard enhancements include
interpolation, adaptive baseline
thresholds, and enhanced collection
capabilities
2.0(1b) Chapter 32, “Network
Monitoring”
xxx
Cisco MDS 9000 Family Fabric Manager Configuration Guide
OL-6965-03, Cisco MDS SAN-OS Release 2.x
Page 31

Send documentation comments to mdsfeedback-doc@cisco.com.
Preface
This preface describes the audience, organization, and conventions of the Cisco MDS 9000 Family
Fabric Manager Configuration Guide. It also provides information on how to obtain related
documentation.
Audience
This guide is for experienced network administrators who are responsible for configuring and
maintaining the Cisco MDS 9000 Family of multilayer directors and fabric switches.This guide includes
information for switches running Cisco MDS 9000 Family SAN-OS or Cisco MDS 9000 FabricWare.
You should be familiar with the basic concepts and terminology used in internetworking, and understand
your network topology and the protocols that the devices in your network can use. You should also have
a working knowledge of the operating system on which you are running Fabric Manager, such as
Microsoft Windows, Linux, or Solaris.
Organization
This guide describes the most commonly used features of Fabric Manager and Device Manager. Refer
to the online help available with Fabric Manager or Device Manager for details on all features.
This guide is organized as follows:
Chapter Title Description
Chapter 1 Installation and Configuration Provides a brief overview of Fabric Manager
Chapter 2 Fabric Manager Server Provides in-depth descriptions of GUI and
Chapter 3 Fabric Manager Client Provides in-depth descriptions of GUI and
Chapter 4 Device Manager Provides in-depth descriptions of GUI and
Chapter 5 Fabric Manager Web Services Provides in-depth descriptions of GUI and
OL-6965-03, Cisco MDS SAN-OS Release 2.x
components and capabilities, and information
on installation and launching the applications.
capabilities for the Fabric Manager Server.
capabilities for the Fabric Manager.
capabilities for the Device Manager.
capabilities for the Fabric Manager Web Client.
Cisco MDS 9000 Family Fabric Manager Configuration Guide
xxxi
Page 32

Preface
Organization
Send documentation comments to mdsfeedback-doc@cisco.com.
Chapter Title Description
Chapter 6 Performance Manager Provides overview of Performance Manager
architecture.
Chapter 7 Authentication in Fabric Manager Describes the authentication schemes between
Fabric Manager components and fabric
switches.
Chapter 8 Cisco Traffic Analyzer Describes installing and launching Cisco
Traffic Analyzer from Performance Manager.
Chapter 9 Obtaining and Installing Licenses Provides information on the Cisco MDS 9000
Family licensing model, license concepts, and
license installation and management.
Chapter 10 Software Images Describes how to upgrade Cisco MDS 9000
Family switches, install software image files,
use the Flash file system on the supervisor
engine, and recover a corrupted bootflash
image.
Chapter 11 Configuration Files Describes how to update configuration files.
Chapter 12 Cisco Fabric Services Describes Cisco Fabric Services, used for
distributing configuration changes through the
fabric.
Chapter 13 VSAN Configuration Describes how virtual SANs (VSANs) work,
explains the concept of default VSANs,
isolated VSANs, VSAN IDs, and attributes,
and provides details on how to create, delete,
and view VSANs.
Chapter 14 Dynamic VSAN Configuration Describes how to dynamically assign VSAN
membership to ports by assigning VSANs
based on the device WWN. This method is
referred to as the Dynamic Port VSAN
Membership (DPVM) feature.
Chapter 15 Zone Configuration Defines various zoning concepts and provides
details on configuring a zone set and zone
management features.
Chapter 16 Inter-VSAN Routing Configuration Provides details on sharing resources across
VSANs using the inter-VSAN Routing (IVR)
feature
Chapter 17 PortChannel Configuration Explains PortChannels and load balancing
concepts and provides details on configuring
PortChannels, adding ports to PortChannels,
and deleting ports from PortChannels.
Chapter 18 Interface Configuration Explains port and operational state concepts in
Cisco MDS 9000 Family switches and provides
details on configuring ports and interfaces.
Chapter 19 FCIP Configuration Provides details on extending the reach of Fibre
Channel SANs by connecting separated SAN
islands together through IP networks using
FCIP.
xxxii
Cisco MDS 9000 Family Fabric Manager Configuration Guide
OL-6965-03, Cisco MDS SAN-OS Release 2.x
Page 33

Preface
Organization
Send documentation comments to mdsfeedback-doc@cisco.com.
Chapter Title Description
Chapter 20 iSCSI Configuration Provides details on extending the reach of Fibre
Channel SANs by allowing IP hosts to access
FC storage using the iSCSI protocol.
Chapter 21 FICON Configuration Provides details on the FI-bre CON-nection
(FICON) interface, fabric binding, and the
Registered Link Incident Report (RLIR)
capabilities in Cisco MDS switches.
Chapter 22 Configuring Intelligent Storage
Services
Chapter 23 Additional Configuration Describes the advanced configuration
Chapter 24 Users and Common Roles Describes Common user roles and SSH.
Chapter 25 SNMP Configuration Describes SNMP security, notifications, and
Chapter 26 RADIUS and TACACS+ Describes RADIUS and TACACS+
Chapter 27 IPsec and IKE Describes IPsec, and configuration through
Chapter 28 FC-SP and DHCHAP Describes Fibre Channel Security Protocol and
Chapter 29 IP Access Control Lists Describes controlling network access through
Chapter 30 Port Security Describes how to control access to the fabric
Chapter 31 Network Monitoring Describes SAN topology, inventory, and event
Chapter 32 Performance Monitoring Describes real-time and historical performance
Chapter 33 Third-Party Integration Describes integrating SNMP, syslog, and Call
Chapter 34 Troubleshooting Your Fabric Provides information on using Fabric Manager
Chapter 35 Management Software
Troubleshooting
Appendix A GUI/CLI Usage Chart Provides a table of procedures, organized by
Describes the intelligent storage services
available on the Storage Services Module
(SSM), including Fibre Channel write
acceleration and SCSI flow statistics.
features—time out values, fctrace, fabric
analyzer, world wide names, flat FC IDs, loop
monitoring, and interoperating switches.
user roles.
authorization and accounting services.
Fabric Manager.
how to configure DHCHAP to work with FCSP.
IP ACLs.
through port security.
monitoring.
monitoring using Fabric Manager and
Performance Manager.
Home with third party management
applications.
to troubleshoot your fabric.
Answers some of the most frequently asked
questions about Cisco Fabric Manager.
best performed by the CLI, Fabric Manager, or
Device Manager.
OL-6965-03, Cisco MDS SAN-OS Release 2.x
Cisco MDS 9000 Family Fabric Manager Configuration Guide
xxxiii
Page 34

Preface
Document Conventions
Send documentation comments to mdsfeedback-doc@cisco.com.
Chapter Title Description
Appendix B Interface Nonoperational Reason
Codes
Explains the reason codes for why an interface
is operationally down.
Appendix C Managing Cisco FabricWare Explains Fabric Manager issues unique to
products running Cisco FabricWare.
Document Conventions
Command descriptions use these conventions:
boldface font Commands and keywords are in boldface.
italic font Arguments for which you supply values are in italics.
Screen examples use these conventions:
screen font
boldface screen font
italic screen font
< >
[ ]
!, #
Terminal sessions and information the switch displays are in screen font.
Information you must enter is in boldface screen font.
Arguments for which you supply values are in italic screen font.
Nonprinting characters, such as passwords, are in angle brackets.
Default responses to system prompts are in square brackets.
An exclamation point (!) or a pound sign (#) at the beginning of a line of code
indicates a comment line.
This document uses the following conventions:
Note Means reader take note. Notes contain helpful suggestions or references to material not covered in the
manual.
Caution Means reader be careful. In this situation, you might do something that could result in equipment
damage or loss of data.
xxxiv
Cisco MDS 9000 Family Fabric Manager Configuration Guide
OL-6965-03, Cisco MDS SAN-OS Release 2.x
Page 35

Preface
Related Documentation
Send documentation comments to mdsfeedback-doc@cisco.com.
Related Documentation
The documentation set for the Cisco MDS 9000 Family includes the following documents:
• Cisco MDS 9000 Family Release Notes for Cisco MDS SAN-OS Releases
• Cisco MDS 9000 Family Interoperability Support Matrix
• Cisco MDS SAN-OS Release Compatibility Matrix for IBM SAN Volume Controller Software for
Cisco MDS 9000
• Cisco MDS SAN-OS Release Compatibility Matrix for VERITAS Storage Foundation for Networks
Software
• Cisco MDS SAN-OS Release Compatibility Matrix for Storage Service Interface Images
• Cisco MDS 9000 Family SSM Configuration Note
• Cisco MDS 9000 Family ASM Configuration Note
• Regulatory Compliance and Safety Information for the Cisco MDS 9000 Family
• Cisco MDS 9500 Series Hardware Installation Guide
• Cisco MDS 9200 Series Hardware Installation Guide
• Cisco MDS 9216 Switch Hardware Installation Guide
• Cisco MDS 9100 Series Hardware Installation Guide
• Cisco MDS 9020 Fabric Switch Hardware Installation Guide
• Cisco MDS 9000 Family Software Upgrade and Downgrade Guide
• Cisco MDS 9000 Family Configuration Guide
• Cisco MDS 9000 Family Command Reference
• Cisco MDS 9020 Fabric Switch Configuration Guide and Command Reference
• Cisco MDS 9000 Family Fabric Manager Configuration Guide
• Cisco MDS 9000 Family Fabric and Device Manager Online Help
• Cisco MDS 9000 Family SAN Volume Controller Configuration Guide
• Cisco MDS 9000 Family Quick Configuration Guide
• Cisco MDS 9000 Family Fabric Manager Quick Configuration Guide
• Cisco MDS 9000 Family MIB Quick Reference
• Cisco MDS 9020 Fabric Switch MIB Quick Reference
• Cisco MDS 9000 Family CIM Programming Reference
• Cisco MDS 9000 Family System Messages Reference
• Cisco MDS 9020 Fabric Switch System Messages Reference
• Cisco MDS 9000 Family Troubleshooting Guide
• Cisco MDS 9000 Family Port Analyzer Adapter 2 Installation and Configuration Note
• Cisco MDS 9000 Family Port Analyzer Adapter Installation and Configuration Note
For information on VERITAS Storage Foundation™ for Networks for the Cisco MDS 9000 Family, refer
to the VERITAS website: http://support.veritas.com/
OL-6965-03, Cisco MDS SAN-OS Release 2.x
Cisco MDS 9000 Family Fabric Manager Configuration Guide
xxxv
Page 36

Preface
Obtaining Documentation
Send documentation comments to mdsfeedback-doc@cisco.com.
For information on IBM TotalStorage SAN Volume Controller Storage Software for the Cisco MDS
9000 Family, refer to the IBM TotalStorage Support website:
http://www.ibm.com/storage/support/2062-2300/
Obtaining Documentation
Cisco documentation and additional literature are available on Cisco.com. Cisco also provides several
ways to obtain technical assistance and other technical resources. These sections explain how to obtain
technical information from Cisco Systems.
Cisco.com
You can access the most current Cisco documentation at this URL:
http://www.cisco.com/techsupport
You can access the Cisco website at this URL:
http://www.cisco.com
You can access international Cisco websites at this URL:
http://www.cisco.com/public/countries_languages.shtml
Product Documentation DVD
Cisco documentation and additional literature are available in the Product Documentation DVD package,
which may have shipped with your product. The Product Documentation DVD is updated regularly and
may be more current than printed documentation.
The Product Documentation DVD is a comprehensive library of technical product documentation on
portable media. The DVD enables you to access multiple versions of hardware and software installation,
configuration, and command guides for Cisco products and to view technical documentation in HTML.
With the DVD, you have access to the same documentation that is found on the Cisco website without
being connected to the Internet. Certain products also have .pdf versions of the documentation available.
The Product Documentation DVD is available as a single unit or as a subscription. Registered Cisco.com
users (Cisco direct customers) can order a Product Documentation DVD (product number
DOC-DOCDVD=) from Cisco Marketplace at this URL:
http://www.cisco.com/go/marketplace/
Ordering Documentation
Beginning June 30, 2005, registered Cisco.com users may order Cisco documentation at the Product
Documentation Store in the Cisco Marketplace at this URL:
xxxvi
http://www.cisco.com/go/marketplace/
Cisco MDS 9000 Family Fabric Manager Configuration Guide
OL-6965-03, Cisco MDS SAN-OS Release 2.x
Page 37

Preface
Documentation Feedback
Send documentation comments to mdsfeedback-doc@cisco.com.
Nonregistered Cisco.com users can order technical documentation from 8:00 a.m. to 5:00 p.m.
(0800 to 1700) PDT by calling 1 866 463-3487 in the United States and Canada, or elsewhere by
calling 011 408 519-5055. You can also order documentation by e-mail at
tech-doc-store-mkpl@external.cisco.com or by fax at 1 408 519-5001 in the United States and Canada,
or elsewhere at 011 408 519-5001.
Documentation Feedback
You can rate and provide feedback about Cisco technical documents by completing the online feedback
form that appears with the technical documents on Cisco.com.
You can send comments about Cisco documentation to mdsfeedback-doc@cisco.com.
You can submit comments by using the response card (if present) behind the front cover of your
document or by writing to the following address:
Cisco Systems
Attn: Customer Document Ordering
170 West Tasman Drive
San Jose, CA 95134-9883
We appreciate your comments.
Cisco Product Security Overview
Cisco provides a free online Security Vulnerability Policy portal at this URL:
http://www.cisco.com/en/US/products/products_security_vulnerability_policy.html
From this site, you can perform these tasks:
• Report security vulnerabilities in Cisco products.
• Obtain assistance with security incidents that involve Cisco products.
• Register to receive security information from Cisco.
A current list of security advisories and notices for Cisco products is available at this URL:
http://www.cisco.com/go/psirt
If you prefer to see advisories and notices as they are updated in real time, you can access a Product
Security Incident Response Team Really Simple Syndication (PSIRT RSS) feed from this URL:
http://www.cisco.com/en/US/products/products_psirt_rss_feed.html
Reporting Security Problems in Cisco Products
Cisco is committed to delivering secure products. We test our products internally before we release them,
and we strive to correct all vulnerabilities quickly. If you think that you might have identified a
vulnerability in a Cisco product, contact PSIRT:
• Emergencies— security-alert@cisco.com
An emergency is either a condition in which a system is under active attack or a condition for which
a severe and urgent security vulnerability should be reported. All other conditions are considered
nonemergencies.
OL-6965-03, Cisco MDS SAN-OS Release 2.x
Cisco MDS 9000 Family Fabric Manager Configuration Guide
xxxvii
Page 38

Preface
Obtaining Technical Assistance
Send documentation comments to mdsfeedback-doc@cisco.com.
• Nonemergencies— psirt@cisco.com
In an emergency, you can also reach PSIRT by telephone:
• 1 877 228-7302
• 1 408 525-6532
Tip We encourage you to use Pretty Good Privacy (PGP) or a compatible product to encrypt any sensitive
information that you send to Cisco. PSIRT can work from encrypted information that is compatible with
PGP versions 2.x through 8.x.
Never use a revoked or an expired encryption key. The correct public key to use in your correspondence
with PSIRT is the one linked in the Contact Summary section of the Security Vulnerability Policy page
at this URL:
http://www.cisco.com/en/US/products/products_security_vulnerability_policy.html
The link on this page has the current PGP key ID in use.
Obtaining Technical Assistance
Cisco Technical Support provides 24-hour-a-day award-winning technical assistance. The Cisco
Technical Support & Documentation website on Cisco.com features extensive online support resources.
In addition, if you have a valid Cisco service contract, Cisco Technical Assistance Center (TAC)
engineers provide telephone support. If you do not have a valid Cisco service contract, contact your
reseller.
Cisco Technical Support & Documentation Website
The Cisco Technical Support & Documentation website provides online documents and tools for
troubleshooting and resolving technical issues with Cisco products and technologies. The website is
available 24 hours a day, at this URL:
http://www.cisco.com/techsupport
Access to all tools on the Cisco Technical Support & Documentation website requires a Cisco.com user
ID and password. If you have a valid service contract but do not have a user ID or password, you can
register at this URL:
http://tools.cisco.com/RPF/register/register.do
Note Use the Cisco Product Identification (CPI) tool to locate your product serial number before submitting
a web or phone request for service. You can access the CPI tool from the Cisco Technical Support &
Documentation website by clicking the Tools & Resources link under Documentation & Tools. Choose
Cisco Product Identification Tool from the Alphabetical Index drop-down list, or click the Cisco
Product Identification Tool link under Alerts & RMAs. The CPI tool offers three search options: by
product ID or model name; by tree view; or for certain products, by copying and pasting show command
output. Search results show an illustration of your product with the serial number label location
highlighted. Locate the serial number label on your product and record the information before placing a
service call.
xxxviii
Cisco MDS 9000 Family Fabric Manager Configuration Guide
OL-6965-03, Cisco MDS SAN-OS Release 2.x
Page 39

Preface
Obtaining Additional Publications and Information
Send documentation comments to mdsfeedback-doc@cisco.com.
Submitting a Service Request
Using the online TAC Service Request Tool is the fastest way to open S3 and S4 service requests. (S3
and S4 service requests are those in which your network is minimally impaired or for which you require
product information.) After you describe your situation, the TAC Service Request Tool provides
recommended solutions. If your issue is not resolved using the recommended resources, your service
request is assigned to a Cisco engineer. The TAC Service Request Tool is located at this URL:
http://www.cisco.com/techsupport/servicerequest
For S1 or S2 service requests or if you do not have Internet access, contact the Cisco TAC by telephone.
(S1 or S2 service requests are those in which your production network is down or severely degraded.)
Cisco engineers are assigned immediately to S1 and S2 service requests to help keep your business
operations running smoothly.
To open a service request by telephone, use one of the following numbers:
Asia-Pacific: +61 2 8446 7411 (Australia: 1 800 805 227)
EMEA: +32 2 704 55 55
USA: 1 800 553-2447
For a complete list of Cisco TAC contacts, go to this URL:
http://www.cisco.com/techsupport/contacts
Definitions of Service Request Severity
To ensure that all service requests are reported in a standard format, Cisco has established severity
definitions.
Severity 1 (S1)—Your network is “down,” or there is a critical impact to your business operations. You
and Cisco will commit all necessary resources around the clock to resolve the situation.
Severity 2 (S2)—Operation of an existing network is severely degraded, or significant aspects of your
business operation are negatively affected by inadequate performance of Cisco products. You and Cisco
will commit full-time resources during normal business hours to resolve the situation.
Severity 3 (S3)—Operational performance of your network is impaired, but most business operations
remain functional. You and Cisco will commit resources during normal business hours to restore service
to satisfactory levels.
Severity 4 (S4)—You require information or assistance with Cisco product capabilities, installation, or
configuration. There is little or no effect on your business operations.
Obtaining Additional Publications and Information
Information about Cisco products, technologies, and network solutions is available from various online
and printed sources.
• Cisco Marketplace provides a variety of Cisco books, reference guides, documentation, and logo
merchandise. Visit Cisco Marketplace, the company store, at this URL:
http://www.cisco.com/go/marketplace/
OL-6965-03, Cisco MDS SAN-OS Release 2.x
Cisco MDS 9000 Family Fabric Manager Configuration Guide
xxxix
Page 40

Preface
Obtaining Additional Publications and Information
Send documentation comments to mdsfeedback-doc@cisco.com.
• Cisco Press publishes a wide range of general networking, training and certification titles. Both new
and experienced users will benefit from these publications. For current Cisco Press titles and other
information, go to Cisco Press at this URL:
http://www.ciscopress.com
• Pack et magazine is the Cisco Systems technical user magazine for maximizing Internet and
networking investments. Each quarter, Packet delivers coverage of the latest industry trends,
technology breakthroughs, and Cisco products and solutions, as well as network deployment and
troubleshooting tips, configuration examples, customer case studies, certification and training
information, and links to scores of in-depth online resources. You can access Packet magazine at
this URL:
http://www.cisco.com/packet
• iQ Magazine is the quarterly publication from Cisco Systems designed to help growing companies
learn how they can use technology to increase revenue, streamline their business, and expand
services. The publication identifies the challenges facing these companies and the technologies to
help solve them, using real-world case studies and business strategies to help readers make sound
technology investment decisions. You can access iQ Magazine at this URL:
http://www.cisco.com/go/iqmagazine
or view the digital edition at this URL:
http://ciscoiq.texterity.com/ciscoiq/sample/
• Internet Protocol Journal is a quarterly journal published by Cisco Systems for engineering
professionals involved in designing, developing, and operating public and private internets and
intranets. You can access the Internet Protocol Journal at this URL:
http://www.cisco.com/ipj
• Networking products offered by Cisco Systems, as well as customer support services, can be
obtained at this URL:
http://www.cisco.com/en/US/products/index.html
• Networking Professionals Connection is an interactive website for networking professionals to share
questions, suggestions, and information about networking products and technologies with Cisco
experts and other networking professionals. Join a discussion at this URL:
http://www.cisco.com/discuss/networking
• World-class networking training is available from Cisco. You can view current offerings at
this URL:
http://www.cisco.com/en/US/learning/index.html
xl
Cisco MDS 9000 Family Fabric Manager Configuration Guide
OL-6965-03, Cisco MDS SAN-OS Release 2.x
Page 41

Send documentation comments to mdsfeedback-doc@cisco.com.
P
ART
1
Fabric Manager Applications
Page 42

Send documentation comments to mdsfeedback-doc@cisco.com.
Page 43

Send documentation comments to mdsfeedback-doc@cisco.com.
CHA P TER
1
Installation and Configuration
The Cisco Fabric Manager is a set of network management tools that supports Secure Simple Network
Management Protocol version 3 (SNMPv3). It provides a graphical user interface (GUI) that displays
real-time views of your network fabrics, and lets you manage the configuration of Cisco MDS 9000
Family devices and third-party switches.
This chapter contains the following sections:
• About Cisco Fabric Manager, page 1-1
• Installing the Management Software, page 1-6
• Upgrading the Management Software, page 1-9
• Downgrading the Management Software, page 1-9
• Launching the Management Software, page 1-10
• Integrating Cisco Fabric Manager with Other Management Tools, page 1-11
• Running Fabric Manager Behind a Firewall, page 1-12
• Uninstalling the Management Software, page 1-13
About Cisco Fabric Manager
The Cisco Fabric Manager provides an alternative to the command-line interface (CLI) for most switch
configuration commands. For information on using the CLI to configure a Cisco MDS 9000 Family
switch, refer to the Cisco MDS 9000 Family Configuration Guide or the Cisco MDS 9020 Switch
Configuration Guide and Command Reference Guide. For details on managing switches running Cisco
FabricWare, see the “Managing Cisco FabricWare with Fabric Manager” section on page C-3.
In addition to complete configuration and status monitoring capabilities for Cisco MDS 9000 switches,
Fabric Manager provides powerful Fibre Channel troubleshooting tools. These in-depth health and
configuration analysis capabilities leverage unique MDS 9000 switch capabilities: Fibre Channel Ping
and Traceroute.
The Cisco Fabric Manager includes these management applications:
• Fabric Manager (client and server)
• Device Manager
• Performance Manager
• Fabric Manager Web Services
OL-6965-03, Cisco MDS SAN-OS Release 2.x
Cisco MDS 9000 Family Fabric Manager Configuration Guide
1-1
Page 44

Chapter 1 Installation and Configuration
About Cisco Fabric Manager
Send documentation comments to mdsfeedback-doc@cisco.com.
Fabric Manager Server
The Fabric Manager server component must be started before running Fabric Manager. On a Windows
PC, the Fabric Manager server is installed as a service. This service can then be administered using the
Windows Services in the Control Panel. Fabric Manager server is responsible for discovery of the
physical and logical fabric, and for listening for SNMP traps, syslog messages, and Performance
Manager threshold events. See Chapter 2, “Fabric Manager Server.”
Fabric Manager Client
The Fabric Manager client component displays a map of your network fabrics, including Cisco MDS
9000 Family switches, third-party switches, hosts, and storage devices. The Fabric Manager Client
provides multiple menus for accessing the features of the Fabric Manager Server. See Chapter 3, “Fabric
Manager Client.”
Fabric Manager Server Proxy Services
The Fabric Manager Client and Device Manager use SNMP to communicate with the Fabric Manager
Server. In typical configurations, the Fabric Manager Server may be installed behind a firewall. The
SNMP proxy service available in Cisco Fabric Manager Release 2.1(1a) or later provides a TCP-based
transport proxy for these SNMP requests. The SNMP proxy service allows you to block all UDP traffic
at the firewall and configure Fabric Manager Client to communicate over a configured TCP port.
Fabric Manager uses the CLI for managing some features on the switches. These management tasks are
used by Fabric Manager and do not use the proxy services. Your firewall must remain open for CLI
access for the following:
• external and internal loopback test
• flash files
• create cli user
• security - iscsi users
• quiese pc
• show image version
• show tech
• switch resident reports (syslog, accounting)
• zone migration
• show cores
If you are using the SNMP proxy service and another application on your server is using port 8080, you
need to modify your workstation settings.
To modify a Windows workstation, follow these steps:
1-2
Step 1 Open Internet Explorer and select Tools > Internet Options. You see the Internet Options dialog box.
Step 2 Select the Connections tab and click LAN Settings. You see the LAN Settings dialog box.
Step 3 Check the Use a Proxy Server for your LAN check box and click Advanced.
Step 4 Add your server IP Address or localhost under the Exceptions section.
Cisco MDS 9000 Family Fabric Manager Configuration Guide
OL-6965-03, Cisco MDS SAN-OS Release 2.x
Page 45

Chapter 1 Installation and Configuration
Cisco MDS 9000 Switch Management
Send documentation comments to mdsfeedback-doc@cisco.com.
Step 5 Click OK to save your changes.
See the “Running Fabric Manager Behind a Firewall” section on page 1-12.
Device Manager
The Device Manager presents two views of a single switch.
• Device View displays a graphic representation of the switch configuration and provides access to
statistics and configuration information.
• Summary View displays a summary of xE ports (Inter-Switch Links), Fx ports (fabric ports), and Nx
ports (attached hosts and storage) on the switch, as well as Fibre Channel and IP neighbor devices.
Summary or detailed statistics can be charted, printed, or saved to a file in tab-delimited format.
See Chapter 4, “Device Manager.”
Performance Manager
Performance Manager provides detailed traffic analysis by capturing data with SNMP. This data is
compiled into various graphs and charts that can be viewed with any web browser. See Chapter 33,
“Performance Monitoring.”
Fabric Manager Web Services
The Fabric Manager Web Services allows operators to monitor and obtain reports for MDS events,
performance, and inventory from a remote location using a web browser. For information on installing
and using Fabric Manager Web Services, see Chapter 5, “Fabric Manager Web Services.”
Cisco MDS 9000 Switch Management
The Cisco MDS 9000 Family of switches can be accessed and configured in many different ways and
supports standard management protocols. Table 1-1 lists the management protocols that Fabric Manager
supports to access, monitor, and configure the Cisco MDS 9000 Family of switches .
Table 1-1 Supported Management Protocols
Management Protocol Purpose
Telnet/SSH Provides remote access to the CLI for a Cisco
FTP/SFTP/TFTP, SCP Copies configuration and software images
MDS 9000 switch.
between devices.
OL-6965-03, Cisco MDS SAN-OS Release 2.x
Cisco MDS 9000 Family Fabric Manager Configuration Guide
1-3
Page 46

Chapter 1 Installation and Configuration
Cisco MDS 9000 Switch Management
Send documentation comments to mdsfeedback-doc@cisco.com.
Table 1-1 Supported Management Protocols (continued)
Management Protocol Purpose
SNMPv1, v2c, and v3 Includes over 80 distinct Management
Information Bases (MIBs). Cisco MDS 9000
Family switches support SNMP version 1, 2, and
3 and RMON V1 and V2. RMON provides
advanced alarm and event management, including
setting thresholds and sending notifications based
on changes in device or network behavior.
By default, the Cisco Fabric Manager
communicates with Cisco MDS 9000 Family
switches using SNMPv3, which provides secure
authentication using encrypted user names and
passwords. SNMPv3 also provides the option to
encrypt all management traffic.
HTTP/HTTPS Includes HTTP and HTTPS for web browsers to
communicate with Fabric Manager Web Services
and for the distribution and installation of the
Cisco Fabric Manager software. It is not used for
communication between the Cisco Fabric
Manager server and Cisco MDS 9000 Family
switches.
XML/CIM over HTTP/HTTPS Includes CIM server support for designing storage
area network management applications to run on
Cisco SAN-OS.
ANSI T11 FC-GS-3 Provides Fibre Channel-Generic Services
(FC-GS-3) in the defining management servers in
the Fabric Configuration Server (FCS). Fabric
Manager uses the information provided by FCS on
top of the information contained in the Name
Server database and in the Fibre Channel Shortest
Path First (FSPF) topology database to build a
detailed topology view and collect information for
all the devices building the fabric.
Storage Management Solutions Architecture
Management services required for the storage environment can be divided into five layers, with the
bottom layer being closest to the physical storage network equipment, and the top layer managing the
interface between applications and storage resources.
Of these five layers of storage network management, Cisco Fabric Manager provides tools for device
(element) management and fabric management. In general, the Device Manager is most useful for device
management (a single switch), while Fabric Manager is more efficient for performing fabric
management operations involving multiple switches.
Tools for upper-layer management tasks can be provided by Cisco or by third-party storage and network
management applications. The following summarizes the goals and function of each layer of storage
network management:
Cisco MDS 9000 Family Fabric Manager Configuration Guide
1-4
OL-6965-03, Cisco MDS SAN-OS Release 2.x
Page 47

Chapter 1 Installation and Configuration
Cisco MDS 9000 Switch Management
Send documentation comments to mdsfeedback-doc@cisco.com.
• Device management provides tools to configure and manage a device within a system or a fabric.
You use device management tools to perform tasks on one device at a time, such as initial device
configuration, setting and monitoring thresholds, and managing device system images or firmware.
• Fabric management provides a view of an entire fabric and its devices. Fabric management
applications provide fabric discovery, fabric monitoring, reporting, and fabric configuration.
• Resource management provides tools for managing resources such as fabric bandwidth, connected
paths, disks, I/O operations per second (IOPS), CPU, and memory. You can use Fabric Manager to
perform some of these tasks.
• Data management provides tools for ensuring the integrity, availability, and performance of data.
Data management services include redundant array of independent disks (RAID) schemes, data
replication practices, backup or recovery requirements, and data migration. Data management
capabilities are provided by third-party tools.
• Application management provides tools for managing the overall system consisting of devices,
fabric, resources, and data from the application. Application management integrates all these
components with the applications that use the storage network. Application management
capabilities are provided by third-party tools.
In-Band Management and Out-of-Band Management
Cisco Fabric Manager requires an out-of-band (Ethernet) connection to at least one Cisco MDS 9000
Family switch. You need either mgmt0 or IP over Fibre Channel (IPFC) to manage the fabric.
mgmt0
The out-of-band management connection is a 10/100 Mbps Ethernet interface on the supervisor module,
labeled mgmt0. The mgmt0 interface can be connected to a management network to access the switch
through IP over Ethernet. You must connect to at least one Cisco MDS 9000 Family switch in the fabric
through its Ethernet management port. You can then use this connection to manage the other switches
using in-band (Fibre Channel) connectivity. Otherwise, you need to connect the mgmt0 port on each
switch to your Ethernet network.
Each supervisor module has its own Ethernet connection; however, the two Ethernet connections in a
redundant supervisor system operate in active or standby mode. The active supervisor module also hosts
the active mgmt0 connection. When a failover event occurs to the standby supervisor module, the IP
address and media access control (MAC) address of the active Ethernet connection are moved to the
standby Ethernet connection.
IPFC
You can also manage switches on a Fibre Channel network using an in-band IP connection. The Cisco
MDS 9000 Family supports RFC 2625 IP over Fibre Channel, which defines an encapsulation method
to transport IP over a Fibre Channel network.
IPFC encapsulates IP packets into Fibre Channel frames so that management information can cross the
Fibre Channel network without requiring a dedicated Ethernet connection to each switch. This feature
allows you to build a completely in-band management solution.
OL-6965-03, Cisco MDS SAN-OS Release 2.x
Cisco MDS 9000 Family Fabric Manager Configuration Guide
1-5
Page 48

Chapter 1 Installation and Configuration
Installing the Management Software
Send documentation comments to mdsfeedback-doc@cisco.com.
Installing the Management Software
To install the software for the first time, or if you want to update or reinstall the software, access the
supervisor module with a web browser. Click the Install links on the web page that is displayed. The
software running on your workstation is verified to make sure you are running the most current version
of the software. If it is not current, the most recent version is downloaded and installed on your
workstation.
Note Before upgrading or uninstalling Fabric Manager or Device Manager, make sure any instances of these
applications have been shut down.
Installation options include:
• Upgrade/Downgrade - The installer detects your current version of Fabric Manager and Device
Manager, and it provides the option to upgrade or downgrade. The default is to upgrade to the latest
version of Fabric Manager or Device Manager.
• Uninstall - If you are downgrading from Fabric Manager 2.x to Fabric Manager 1.3x or earlier, use
the Uninstall batch file or shell script. Do not delete the MDS 9000 folder as this might prevent your
installation from being upgraded in the future.
Note We recommend that you install the latest version of the Fabric Manager applications. Fabric Manager is
backward-compatible with the Cisco MDS SAN-OS and Cisco FabricWare software running on the
switches. When upgrading, upgrade the Fabric Manager software first, and then upgrade the Cisco MDS
SAN-OS or Cisco FabricWare software on the switch.
Before You Install
Before you can access the Cisco Fabric Manager, you must complete the following tasks:
• Install a supervisor module on each switch that you want to manage.
• Configure the supervisor module with the following values using the setup routine or the CLI:
–
IP address assigned to the mgmt0 interface
–
SNMP credentials (v3 user name and password or v1/v2 communities), maintaining the same
username and password for all the switches in the fabric
Cisco MDS SAN-OS Release 2.1(1a) or later supports AAA authentication using RADIUS, TACACS+
or local SNMP users.
The Cisco Fabric Manager software executable files reside on each supervisor module of each Cisco
MDS 9000 Family switch running Cisco MDS SAN-OS software in your network. The supervisor
module provides an HTTP server that responds to browser requests and distributes the software to
Windows or UNIX network management stations. You can also find Cisco Fabric Manager software pm
Cisco.com at the following website:
http://cisco.com/cgi-bin/tablebuild.pl/mds-fm
The Cisco Fabric Manager management software has been tested with the following software:
1-6
• Operating Systems
–
Windows 2000, 2003, XP
Cisco MDS 9000 Family Fabric Manager Configuration Guide
OL-6965-03, Cisco MDS SAN-OS Release 2.x
Page 49

Chapter 1 Installation and Configuration
Before You Install
Send documentation comments to mdsfeedback-doc@cisco.com.
–
Solaris 2.8
–
Redhat Linux 7.2
• Java
–
Sun JRE and JDK 1.4.0, 1.4.1, 1.4.2, and 1.5.0
Note Fabric Manager Release 2.1(2a) or later support JRE and JDK 1.5.0. Earlier Fabric Manager
releases should use JRE and JDK 1.4.2.
–
Java Web Start 1.2 and 1.0.1
• Browsers
–
Internet Explorer 5.5 or later
–
Netscape 6 or later
–
Mozilla 1.0 or later
Installation Procedure
For switches running Cisco MDS 9000 FabricWare, you need to install the Fabric Manager software
from the CD-ROM included with your switch, or download Fabric Manager from Cisco.com.
To install Fabric Manager from the CD-ROM, navigate to the Fabric Manager installation notes and
follow the directions.
To download the software from from Cisco.com, go to the following website:
http://cisco.com/cgi-bin/tablebuild.pl/mds-fm
To install Fabric Manager on your workstation, follow these steps:
Step 1 Optionally, enter the IP address or host name of the supervisor module running Cisco MDS SAN-OS in
the Address or Location field of your browser.
When you connect to the server for the first time, it checks to see if you have the correct Sun Java Virtual
Machine version installed on your workstation. If not, a link is provided to the appropriate Sun
Microsystems web page so you can install it. Fabric Manager looks for version 1.4(x) during installation.
The supervisor module HTTP server displays the installation window.
Step 2 Click the link to the Sun Java Virtual Machine software (if required) and install the software.
Using the instructions provided by the Sun Microsystems website, reconnect to the supervisor module
by reentering the IP address or host name in the Location or Address field of your browser.
Note In some cases, license validation from Cisco partners requires Java version 1.4.2_04 or later. If
you cannot install licenses from a Cisco partner, check to make sure your Java version is at least
1.4.2_04.
OL-6965-03, Cisco MDS SAN-OS Release 2.x
Cisco MDS 9000 Family Fabric Manager Configuration Guide
1-7
Page 50

Chapter 1 Installation and Configuration
Before You Install
Send documentation comments to mdsfeedback-doc@cisco.com.
Note You can run CiscoWorks on the same PC as Fabric Manager, even though the Java requirements
are different. When installing the later Java version for Fabric Manager, make sure it does not
overwrite the earlier Java version required for CiscoWorks. Both versions of Java can coexist on
your PC.
Step 3 Click on the desired installation link (Fabric Manager, Device Manager, or Fabric Manager Web
Services and Performance Manager).
Note If Performance Manager generates errors on installation make sure that Fabric Manager and
Performance Manager are installed in the same directory.
Step 4 Select an installation folder for Fabric Manager on your workstation, as shown in Figure 1-1. The default
location is C:\Program Files\Cisco Systems\MDS 9000 for Windows. On a UNIX (Solaris or Linux)
machine, the installation path name is /usr/local/cisco_mds9000 or $HOME/cisco_mds9000, depending
on the permissions of the user doing the installation.
Step 5 Check the Use Global Aliases in place of FC Aliases if you want to use global device aliases or replace
existing per VSAN FC aliases with global device aliases.
Tip After installation, you can choose to use global aliases by setting fabric.globalAlias to true in
the server.properties file. In Fabric Manager Release 2.1(2) or later, you can select Server >
Admin and check the Device Alias check box to use global aliases, or you can uncheck Device
Alias to use FC aliases.
Step 6 Check the don’t install and run FM Server if you are installing just the Fabric Manager client on a
remote workstation.
Figure 1-1 Install Options
1-8
Cisco MDS 9000 Family Fabric Manager Configuration Guide
OL-6965-03, Cisco MDS SAN-OS Release 2.x
Page 51

Chapter 1 Installation and Configuration
Upgrading the Management Software
Send documentation comments to mdsfeedback-doc@cisco.com.
A Cisco MDS 9000 program group is created under Start > Programs on Windows. This program group
contains shortcuts to batch files in the install directory. Three services are started: Fabric Manager
Server, Database, and Web Server. The Performance Manager server is installed but the service is not
started at install time, as certain setup steps must be completed first.
On a UNIX (Solaris or Linux) machine, shell scripts are created in the install directory. The shell scripts
that run the programs equivalent to the Windows services are: FMServer.sh, FMPersist.sh,
PMCollector.sh and FMWebClient.sh. All server-side data and Performance Manager data are stored
under the install directory.
Fabric Manager client cannot run without the server component, Fabric Manager Server. The server
component is downloaded and installed when you download and install Fabric Manager or Device
Manager. On a Windows machine you install the Fabric Manager Server as a service. This service can
then be administered using Services in the Microsoft Windows Control Panel. The default setting for the
Fabric Manager Server service is that the server is automatically started when the machine is rebooted.
You can change this behavior by modifying the properties in Services.
Upgrading the Management Software
If you log into a switch running Cisco MDS SAN-OS with Fabric Manager or Device Manager, and that
switch has a later version of the management software, you are prompted to install the later version. To
upgrade the Cisco MDS Fabric Manager software, follow the instructions described in the “Installing the
Management Software” section on page 1-6. You can also upgrade the software at any time by entering
the IP address or host name of the supervisor module with the later version of software in the Address
(Location) field of your browser.
Downgrading the Management Software
You can manage switches on your fabric with a later version of Fabric Manager than the version of Cisco
MDS SAN-OS or Cisco FabricWare on the switches, but you cannot manage all features on switches
with a later version of the switch software.
Downgrading to Release 2.x or Later
To downgrade from any Cisco MDS SAN-OS or Cisco FabricWare Release 2.x or later to an earlier
version of Release 2.x, follow these steps:
Step 1 Close all instances of Fabric Manager Client or Device Manager on your workstation.
Step 2 Enter the IP address or host name of the supervisor module with the lower version of software in the
Address or Location field of your browser and follow the installation steps. See the “Installing the
Management Software” section on page 1-6.
Downgrading to Cisco MDS SAN-OS Release 1.3(x) or Earlier
To downgrade the management software from any Cisco MDS SAN-OS or Cisco FabricWare Release
2.x or later to Release 1.3(x) or earlier, follow these steps:
Cisco MDS 9000 Family Fabric Manager Configuration Guide
OL-6965-03, Cisco MDS SAN-OS Release 2.x
1-9
Page 52

Chapter 1 Installation and Configuration
Launching the Management Software
Send documentation comments to mdsfeedback-doc@cisco.com.
Step 1 Close all instances of Fabric Manager Client or Device Manager on your workstation.
Step 2 Choose Start > Programs > Cisco MDS 9000 > Uninstall to uninstall Fabric Manager on Windows.
Type /usr/local/cisco_mds9000/uninstall.sh or $HOME/cisco_mds9000/uninstall.sh to uninstall
Fabric Manager on UNIX, depending on where Fabric Manager was installed.
Step 3 Enter the IP address or host name of the supervisor module with the lower version in the Address or
Location field of your browser.
Step 4 Click on the desired installation link (Fabric Manager, Device Manager, or Fabric Manager Web
Services and Performance Manager).
Step 5 Select an installation folder for Fabric Manager on your workstation.
Unless you specify a different directory on a Windows PC, the version 1.3(x) software is installed in the
default location of .\Documents and Settings\USER_ID\.cisco_mds9000. A Cisco MDS program group
is created under Start > Programs. On a UNIX (Solaris or Linux) machine, the installation path name is
/usr/local/.cisco_mds9000 or $HOME/.cisco_mds9000, depending on the permissions of the user doing
the installation.
Launching the Management Software
To launch the Fabric Manager (Fabric View) or Device Manager (Device View and Summary View),
follow these steps:
Step 1 Double-click the Fabric Manager icon or the Device Manager icon on your desktop or select the option
from the Windows Start menu.
If you started Fabric Manager, the Fabric Manager server loads You see a log-in screen for Fabric
Manager or Device Manager. (You briefly see a command-line window).
Step 2 Click Options to expand the login screen if necessary to select the seed switch and SNMP configuration.
Step 3 Enter the IP address or device name in the Device Name(s) field, or select an IP address from the list of
previously accessed devices from the drop-down menu to the right of the Device Name(s) field.
Step 4 Leave the SNMPv3 check box checked to select SNMP version 3. Otherwise, uncheck the check box to
use SNMP version 2.
Note The default authentication digest used for storing user names and passwords is MD5. In case you
selected SHA instead, the relative check box in the Fabric Manager initial login screen should
be checked.
Step 5 Enter a User Name and Password.
Step 6 If the SNMPv3 Privacy option is enabled, enter the Privacy Password used for encrypting management
traffic.
The Privacy option causes all management traffic to be encrypted while, with SNMPv3, user names and
passwords are always encrypted.
1-10
Cisco MDS 9000 Family Fabric Manager Configuration Guide
OL-6965-03, Cisco MDS SAN-OS Release 2.x
Page 53

Chapter 1 Installation and Configuration
Integrating Cisco Fabric Manager with Other Management Tools
Send documentation comments to mdsfeedback-doc@cisco.com.
Note You can create users with management traffic encryption (so a Privacy password is required) or
no management traffic encryption (no Privacy password is required). Requiring a Privacy
password, and making it different from the authentication password, ensures stronger security
but may cause AAA problems.
Step 7 Check the Use SNMP Proxy check box if you want Fabric Manager client to communicate with Fabric
Manager Server through a TCP-based proxy server. See the “Fabric Manager Server Proxy Services”
section on page 1-2.
Note Accelerate Discovery check box should remain checked for normal operation. Uncheck this only
if you have changed switch IP addresses. You may experience problems with out of sync SAN
IDs in Fabric Manager if you uncheck this check box.
Step 8 Optionally, select the Local Interface for Fabric Manager client. In Fabric Manager Release 2.1(2) or
later, Fabric Manager automatically detect the correct interface to use.
Step 9 Click Open.
You see either the Fabric Manager or the Device Manager.
Note When logging into Fabric Manager or Device Manager, the local SNMP database is checked first. If no
username entry is found, the AAA database is checked.
Note If you have an incomplete view of your fabric, rediscover the fabric with a user that has a network
administrator or network operator role.
Integrating Cisco Fabric Manager with Other Management
Tools
You can use Fabric Manager, Device Manager, and Performance Manager with other management tools.
Here is a brief description of these tools. For more information on these tools and how they work together
with the Cisco Fabric Manager management applications, see Chapter 35, “Troubleshooting Your
Fabric,”
• Cisco Traffic Analyzer—Allows you to break down traffic by VSANs and protocols and to examine
SCSI traffic at a logical unit number (LUN) level.
• Cisco Protocol Analyzer—Enables you to examine actual sequences of Fibre Channel frames easily
using the Fibre Channel and SCSI decoders Cisco developed for Ethereal.
• Cisco Port Analyzer Adapter 2—Encapsulates SPAN traffic (both Fibre Channel control and data
plane traffic) in an Ethernet header for transport to a Windows PC or workstation for analysis. Both
the Cisco Traffic Analyzer and Cisco Protocol Analyzer required the PAA to transport MDS SPAN
traffic to a Windows PC or workstation.
OL-6965-03, Cisco MDS SAN-OS Release 2.x
Cisco MDS 9000 Family Fabric Manager Configuration Guide
1-11
Page 54

Chapter 1 Installation and Configuration
Running Fabric Manager Behind a Firewall
Send documentation comments to mdsfeedback-doc@cisco.com.
Running Fabric Manager Behind a Firewall
For Windows PCs running Fabric Manager, Device Manager, and Performance Manager behind a
firewall, certain ports need to be available.
By default, Fabric Manager client component and Device Manager use the first available UDP port for
receiving SNMP responses. The UDP SNMP Trap local ports are (1162 for Fabric Manager, and 1163
or 1164 for Device Manager). Fabric Manager Client also opens TCP RMI port 9099. If Device Manager
is opened from the Fabric Manager client, it listens on the first available UDP port for Fabric Manager
requests.
In Fabric Manager Release 2.1(2) or later, you can select the UDP port that Fabric Manager client or
Device Manager uses for SNMP responses by uncommenting the following statement:
• On a Windows desktop, uncomment the following:
rem JVMARGS=%JVMARGS% -Dsnmp.localport=9001
• On a UNIX desktop, uncomment the following:
# JVMARGS=$JVMARGS -Dsnmp.localport=9001
Note UDP port 161 on the firewall must be open for incoming traffic. If the firewall blocks outgoing responses
from snmp, then you can control which local ports DM or FM should open.
The Fabric Manager Server proxy services feature, available in Cisco MDS SAN-OS Release 2.1(1a) or
later, uses a configurable TCP port (9189 by default) for SNMP communications between the Fabric
Manager client or Device Manager and Fabric Manager Server.
The Fabric Manager server component requires two predictable TCP ports to be opened on the firewall
for an incoming connection:
• java.rmi.registry.port = 9099
• java.rmi.server.remoteObjectPort = 9199
As long as these two ports are opened, the Fabric Manager client can connect to the server. There may
be other TCP ports connected to Fabric Manager Client, but they are initiated by the server, which is
behind the firewall.
Below is a list of all ports used by the Fabric Manager applications:
Common to all applications
• SSH 22 (TCP)
• TELNET 23 (TCP)
• HTTP 80 (TCP)
• TFTP 69 (UDP)
• SYSLOG 514 (UDP)
1-12
Fabric Manager Server and Performance Manager
• SNMP_TRAP 2162 (UDP)
• SNMP picks a random free local port (UDP) - (can be changed in server.properties)
• Java RMI 9099, 9199 to 9299 (TCP)
Fabric Manager Client
Cisco MDS 9000 Family Fabric Manager Configuration Guide
OL-6965-03, Cisco MDS SAN-OS Release 2.x
Page 55

Chapter 1 Installation and Configuration
Uninstalling the Management Software
Send documentation comments to mdsfeedback-doc@cisco.com.
• Java RMI 9099, 9199 to 9299 (TCP)
• SNMP picks a random free local port. (UDP) or 9189 (TCP) if SNMP proxy is enabled (can be
changed in server.properties)
Device Manager
• SNMP_TRAP 1163 to 1170 (UDP) (picks one available in this range)
• SNMP picks a random free local port (UDP) or 9189 (TCP) if SNMP Proxy is enabled (can be
changed in server.properties)
Uninstalling the Management Software
To uninstall the Fabric Manager applications on a Windows PC, follow these steps:
Step 1 Close all running instances of Fabric Manager and Device Manager.
Step 2 Select Start > Programs > Cisco MDS 9000 > Uninstall to run the uninstall.bat script.
You can also run the batch file (located in the C:\Program Files\Cisco Systems\MDS 9000 folder by
default) directly from the command line.
Note For older installations, delete the .cisco_mds9000 folder. You will have to manually delete all
desktop icons and program menu items.
On a Windows PC, this folder is created under the Documents and Settings folder (for example,
d:\Documents and Settings\Administrator\.cisco_mds9000 if you had installed it as user
Administrator). On a UNIX machine, the default installation folder is /usr/bin.
Note You cannot downgrade from Fabric Manager Release 2.x to Fabric Manager Release 1.3(x). If
you want to run Fabric Manager Release 1.3(x) on a PC that is running Fabric Manager Release
2.x, you must first uninstall Release 2.x and then install Release 1.3. Fabric Manager will not
work if you have Release 2.x and Release 1.3 installed on the same PC.
To uninstall the Fabric Manager applications on a UNIX machine, follow these steps:
Step 1 For all releases starting with Release 2.x, run the shell script
$HOME/cisco_mds9000/Uninstall.sh or /usr/local/cisco_mds9000/uninstall.sh, depending on where
Fabric Manager was installed.
Step 2 For all releases starting with Release 1.3(1), run the shell script
$HOME/.cisco_mds9000/Uninstall.sh or /usr/local/.cisco_mds9000/uninstall.sh, depending on
where Fabric Manager was installed.
Step 3 For earlier installations, delete the $HOME/.cisco_mds9000 folder.
OL-6965-03, Cisco MDS SAN-OS Release 2.x
Cisco MDS 9000 Family Fabric Manager Configuration Guide
1-13
Page 56

Chapter 1 Installation and Configuration
Uninstalling the Management Software
Send documentation comments to mdsfeedback-doc@cisco.com.
1-14
Cisco MDS 9000 Family Fabric Manager Configuration Guide
OL-6965-03, Cisco MDS SAN-OS Release 2.x
Page 57

Send documentation comments to mdsfeedback-doc@cisco.com.
CHA P TER
2
Fabric Manager Server
Fabric Manager Server is a platform for advanced MDS monitoring, troubleshooting, and configuration
capabilities. No additional software must be installed. The server capabilities are an integral part of the
Cisco Fabric Manger software.
This chapter contains the following sections:
• Fabric Manager Server Overview, page 2-1
• Fabric Manager Server Features, page 2-2
• Installing and Configuring Fabric Manager Server, page 2-2
• Fabric Manager Server Fabric Monitoring and Removal, page 2-7
• Fabric Manager Server Properties File, page 2-8
• Modifying Fabric Manager Server, page 2-9
Fabric Manager Server Overview
Install Cisco Fabric Manager Server on a computer that you want to provide centralized MDS
management services and performance monitoring. SNMP operations are used to efficiently collect
fabric information. The Cisco Fabric Manager software, including the server components requires about
20 MB of hard disk space on your workstation. Cisco Fabric Manager Server runs on Windows 2000,
2003, XP, Solaris 8.x or later, and Red Hat Linux.
Each computer configured as a Cisco Fabric Manager Server can monitor multiple Fibre Channel SAN
fabrics. Up to 16 clients (by default) can connect to a single Cisco Fabric Manager Server concurrently.
The Cisco Fabric Manager clients can also connect directly to an MDS switch in fabrics that are not
monitored by a Cisco Fabric Manager Server, which ensures you can manage any of your MDS devices
from a single console.
OL-6965-03, Cisco MDS SAN-OS Release 2.x
Cisco MDS 9000 Family Fabric Manager Configuration Guide
2-1
Page 58

Chapter 2 Fabric Manager Server
Fabric Manager Server Features
Send documentation comments to mdsfeedback-doc@cisco.com.
Fabric Manager Server Features
Cisco Fabric Manager Server has the following features:
• Multiple Fabric Management— Fabric Manager Server monitors multiple physical fabrics under the
same user interface. This facilitates managing redundant fabrics. A licensed Fabric Manager Server
maintains up-to-date discovery information on all configured fabrics so device status and
interconnections are immediately available when you open the Fabric Manager client.
Note The unlicensed Cisco Fabric Manager can only monitor and configure one fabric at a time. You
must use the Open menu to switch to a new fabric, which causes the application to stop
monitoring the previous one and to rediscover the new fabric.
• Continuous Health Monitoring—MDS health is monitored continuously, so any events that occurred
since the last time you opened the Fabric Manager client are captured.
• Roaming User Profiles—The licensed Fabric Manager Server uses the roaming user profile feature
to store your preferences and topology map layouts on the server, so that your user interface will be
consistent regardless of what computer you use to manage your storage networks.
Note You must have the same release of Fabric Manager Client and Fabric Manager Server.
Installing and Configuring Fabric Manager Server
Note Prior to running Fabric Manage Server, you should create a special Fabric Manager administrative user
on each switch in the fabric or on a remote AAA server. Use this user to discover your fabric topology.
See the “Best Practices for Discovering a Fabric” section on page 7-3.
To install Fabric Manager Server and set the initial configuration, follow these steps:
Step 1 Install Fabric Manager and Fabric Manager server on your workstation. See the “Installing Fabric
Manager Server” section on page 2-3.
Step 2 Set the seed switch. See the “Setting the Seed Switch” section on page 2-4.
Step 3 Optionally, create flows and collections for Performance Manager to monitor your fabric. See the
“Configuring Flows and Collections with Performance Manager” section on page 2-4.
Step 4 Set Fabric Manager Server to continuously monitor the fabric. See the “Fabric Manager Server Fabric
Monitoring and Removal” section on page 2-7.
Step 5 Repeat Step 2 through Step 4 for each fabric that you want to manage through Fabric Manager Server.
Step 6 Install Web Services. See the “Installing Fabric Manager Web Services” section on page 2-6.
2-2
Step 7 Verify Performance Manager is collecting data. See the “Verifying Performance Manager Collections”
section on page 2-6.
Cisco MDS 9000 Family Fabric Manager Configuration Guide
OL-6965-03, Cisco MDS SAN-OS Release 2.x
Page 59

Chapter 2 Fabric Manager Server
Installing and Configuring Fabric Manager Server
Send documentation comments to mdsfeedback-doc@cisco.com.
Installing Fabric Manager Server
When you install Fabric Manager, the basic version of the Fabric Manager Server (unlicensed) is
installed with it. After you click the Fabric Manager icon, a dialog box opens and you can enter the IP
address of a computer running the Fabric Manager Server component. If you do not see the Fabric
Manager Server IP address text box, click Options to expand the list of configuration options. If the
server component is running on your local machine, leave localhost in that field. If you try to run Fabric
Manager without specifying a valid server, you are prompted to start the Fabric Manager Server locally.
On a Windows PC, you install the Fabric Manager Server as a service. This service can then be
administered using Services in the Administrative Too. The default setting for the Fabric Manager Server
service is that the server is automatically started when the Windows PC is rebooted. You can change this
behavior by modifying the properties in Services.
Unlicensed Versus Licensed Fabric Manager Server
When you install Fabric Manager, the basic unlicensed version of Fabric Manager Server is installed
with it. To get the licensed features, such as Performance Manager, remote client support, and
continuously monitored fabrics, you need to buy and install the Fabric Manager Server package.
However, trial versions of these licensed features are available. To enable the trial version of a feature,
you run the feature as you would if you had purchased the license. You see a dialog box explaining that
this is a demo version of the feature and that it is enabled for a limited time.
If you are evaluating one of these Fabric Manager Server features and want to stop the evaluation period
for that feature, you can do that using Device Manager. See the “Fabric Manager Server Licensing”
section on page 9-13.
OL-6965-03, Cisco MDS SAN-OS Release 2.x
Cisco MDS 9000 Family Fabric Manager Configuration Guide
2-3
Page 60

Chapter 2 Fabric Manager Server
Installing and Configuring Fabric Manager Server
Send documentation comments to mdsfeedback-doc@cisco.com.
Setting the Seed Switch
When you run Fabric Manager, you must select a switch for Fabric Manager to use to discover the fabric.
Note If you have a mixed fabric of Cisco SAN-OS and Cisco FabricWare switches, we recommend that you
securely open the fabric with a Cisco SAN-OS switch using SNMPv3. The SNMPv1/v2c communities
for the Cisco FabricWare switches should be entered in the communities.properties file. See the “Addin g
A Community String to the communities.properties File” section on page 26-4.
To set the seed switch, follow these steps:
Step 1 Double-click the Fabric Manager client icon on your workstation. You see the Fabric Manager dialog
box Click Options if necessary to expand the optional settings in this dialog box.
Step 2 Set FM Server to the IP address where you installed the Fabric Manager Server or set it to localhost if
you installed Fabric Manager Server on your local workstation.
Step 3 Set the Fabric Seed Switch to the MDS 9000 family switch that you want Fabric Manager to use.
Step 4 Set the username and password as required to start Fabric Manager Client.
Configuring Flows and Collections with Performance Manager
If you are managing your fabrics with Performance Manager, you need to set up an initial set of flows
and collections on the fabric. See the “Historical Performance Monitoring” section on page 33-2 for a
full description on Performance Manager features.
To create a flow in Performance Manager, follow these steps:
Step 1 Choose Performance > Create Flows to launch the wizard.
Step 2 Choose the VSAN from which you want to create flows. Flows are defined per VSAN.
Step 3 Click the Type radio button for the flow type you want to define.
Step 4 Check the Clear old flows on modified switches check box if you want to remove old flow data.
Step 5 Click Next to review the available flows for the chosen VSAN. Remove any flows you are not interested
in.
Step 6 Click Finish to create the flow.
Using the Performance Manager Configuration Wizard
To create a collection using the Performance Manager Configuration Wizard in Fabric Manager, follow
these steps:
2-4
Step 1 Choose Performance > Create Collection to launch the Performance Manager Configuration Wizard.
Step 2 Choose the VSANs from which you want to collect data or choose All to collect statistics across all
VSANs in the fabric.
Cisco MDS 9000 Family Fabric Manager Configuration Guide
OL-6965-03, Cisco MDS SAN-OS Release 2.x
Page 61

Chapter 2 Fabric Manager Server
Installing and Configuring Fabric Manager Server
Send documentation comments to mdsfeedback-doc@cisco.com.
Step 3 Check the Type check boxes for each type of links flow or SAN element that you want included in your
collection.
Step 4 If you want to ignore flows with zero counter values, check that check box.
Step 5 If you are using Cisco Traffic Analyzer, enter the URL where it is located on your network.
Step 6 Click Next to review the collection specification data. Remove any links, flows, or SAN elements you
are not interested in.
Step 7 Click Next to configure other collection options.
Step 8 Check the appropriate check boxes if you want to include errors and discards in your collection, and if
you want to interpolate data for missing statistics.
Step 9 Check the Send event if traffic exceeds threshold check box if you want to configure threshold events
as explained in the “Using Performance Thresholds” section on page 33-4.
Step 10 Click the Use absolute values radio button if you want absolute value thresholds or click the Baseline
values over radio button if you want baseline thresholds.
Step 11 Choose the time window for baseline calculations if baseline thresholds are configured.
Step 12 Choose the Critical and Warning threshold values as a percent of link capacity (for absolute value
thresholds ) or weighted average (for baseline thresholds).
Step 13 Click Finish to create the collection configuration file. You see a dialog box asking if you want to restart
Performance Manager.
Step 14 Click Ye s to restart Performance Manager to use this new configuration file, or click No to exit the
Performance Manager Configuration Wizard without restarting Performance Manager. If you choose
No, Performance Manager will not use the new configuration file until you restart it by choosing
Performance Manager > Collector > Restart.
OL-6965-03, Cisco MDS SAN-OS Release 2.x
Cisco MDS 9000 Family Fabric Manager Configuration Guide
2-5
Page 62

Chapter 2 Fabric Manager Server
Installing and Configuring Fabric Manager Server
Send documentation comments to mdsfeedback-doc@cisco.com.
Installing Fabric Manager Web Services
You must install Fabric Manager Web Services to view Performance Manager reports through a web
browser.
For switches running Cisco MDS 9000 FabricWare, you need to install the Fabric Manager Web Services
software from the CD-ROM included with your switch, or download Fabric Manager from Cisco.com.
To install Fabric Manager Web Services from the CD-ROM, navigate to the Fabric Manager installation
notes and follow the directions.
To download the software from from Cisco.com, go to the following website:
http://cisco.com/cgi-bin/tablebuild.pl/mds-fm
To download and install the software on your workstation, follow these steps:
Step 1 Optionally, enter the IP address or host name of the supervisor module running Cisco MDS SAN-OS in
the Location or Address field of your browser. You see the installation page displayed by the HTTP
server of the supervisor module.
When you connect to the server for the first time, it checks to see if you have the correct Sun Java Virtual
Machine version installed on your workstation. If you do not have the correct version installed, a link is
provided to the appropriate web page on the Sun Microsystems website so you can install it.
a. Click the Sun Java Virtual Machine software link (if required) to install the software.
b. Using the instructions provided by the Sun Microsystems website, reconnect to the supervisor
module by reentering the IP address or host name in the Location or Address field of your browser.
Note Fabric Manager requires Java version 1.4(x). We recommend Java version 1.4.2. To change
the Java Runtime Environment (JRE) version, start Java Web Start and set the Java
preferences.
Step 2 Click the Fabric Manager Web Services installation link. You see a prompt asking for permission to
install the application on your workstation.
Step 3 Click Ye s to run the installer, which detects the installed version of the software, and prompts for
upgrades/downgrades and other options if applicable.
Note If TCP port 80 is in use, Fabric Manager Web Services checks port 8080 next. If that port is also
in use, Fabric Manager Web Services uses the next available port. You can set the TCP port that
you want Fabric Manager Web Services to use during the installation process.
Verifying Performance Manager Collections
2-6
Once Performance Manager collections have been running for five or more minutes, you can verify that
the collections are gathering data by choosing Performance Manager > Reports in Fabric Manager.
You see the first few data points gathered in the graphs and tables.
Cisco MDS 9000 Family Fabric Manager Configuration Guide
OL-6965-03, Cisco MDS SAN-OS Release 2.x
Page 63

Chapter 2 Fabric Manager Server
Fabric Manager Server Fabric Monitoring and Removal
Send documentation comments to mdsfeedback-doc@cisco.com.
Note Viewing reports requires installing Fabric Manager Web Services. See the “Installing Fabric Manager
Web Services” section on page 5-4.
Fabric Manager Server Fabric Monitoring and Removal
Fabric Manager Server can continuously monitor a fabric, whether or not an instance of Fabric Manager
(client) is monitoring that fabric. A continuously monitored fabric is automatically reloaded and
monitored by Fabric Manager Server after the server starts up. Fabrics that are monitored by Fabric
Manager Server can have their data managed by Performance Manager. Both the Continuous Monitor
feature and Performance Manager require the Fabric Manager Server license. However, you can “check
out” these features without a license for a limited time.
Designating a Fabric for Continuous Monitoring
When you quit the Fabric Manager client, you are prompted as to whether or not you would like to have
Fabric Manager Server continuously monitor that fabric. Alternatively, you can use Fabric Manager
client to select a fabric to monitor.
To continuously monitor a fabric, follow these steps:
Step 1 From Fabric Manager, select Server > Admin. You see a list of fabrics in the Server Admin dialog box.
Step 2 Check the Continuously Monitor check box next to the fabric(s) you want Fabric Manager Server to
monitor.
Step 3 Click Apply.
The Continuously Monitor feature requires the purchase of the Fabric Manager Server license package.
If you have not purchased and installed this package, you see a popup window informing you that you
are about to enable a demo license for this feature. Click Ye s to enable the demo license.
Note When you are finished trying the licensed features, you can “check in” the feature by clicking
the Check In FM button as described in the “Fabric Manager Server Licensing” section on
page 9-13.
Step 4 Click Close to close the Server Admin dialog box.
Note If you will be collecting data on these fabrics using Performance Manager, you should now configure
flows and define the data collections. These procedures are described in Chapter 32, “Network
Monitoring.”
OL-6965-03, Cisco MDS SAN-OS Release 2.x
Cisco MDS 9000 Family Fabric Manager Configuration Guide
2-7
Page 64

Chapter 2 Fabric Manager Server
Fabric Manager Server Properties File
Send documentation comments to mdsfeedback-doc@cisco.com.
Removing a Fabric from Monitoring
To remove a fabric from the Fabric Manager Server monitoring list, follow these steps:
Step 1 From Fabric Manager, choose Server > Admin. You see a list of fabrics in the Server Admin dialog box.
Step 2 Uncheck the Continuously Monitor check box next to the fabrics you no longer want Fabric Manager
Server to monitor.
Step 3 Click Apply.
Step 4 Click Close to close the Server Admin dialog box.
Fabric Manager Server Properties File
The Fabric Manager Server properties file (MDS 9000\server.properties) contains a list of properties that
determine how the Fabric Manager Server will function. You can edit this file with a text editor, or you
can set the properties through the Fabric Manager Web Services GUI, under the Admin tab.
The server properties file contains these five general sections:
• RMI SPECIFIC—Contains the settings for the RMI registry.
• SNMP SPECIFIC—Contains the settings for SNMP requests, responses, and traps.
• SNMP PROXY SERVER SPECIFIC—Contains the settings for SNMP proxy server configuration
and TCP port designation.
• GLOBAL FABRIC—Contains the settings for fabrics, such as discovery and loading.
• CLIENT SESSION—Contains the settings for Fabric Manager clients that can log into the server.
• EVENTS—Contains the settings for syslog messages.
The following are new or changed server properties for Fabric Manager Release 2.x:
• fabric.globalAlias—Specifies whether Fabric Manager Server should discover aliases from a global
alias server (deviceAlias) or a VSAN-based alias server (fcAlias). Global aliases of a fabric are
fetched if this value is set to true and a manageable global alias server exists in the fabric.
• java.rmi.data.portRange—Specifies the TCP port range that RMI uses to send/receive data. The
starting port number is also the Fabric Manager Server port, so that it should always be set to a
non-zero value. The port range is also used in configuring TCP port access on a firewall. This
property replaces the java.rmi.server.remoteObjPort property in earlier releases.
• fabric.autoReload—Specifies whether to automatically reload persistent fabrics from DB when
server starts up. The default is true if unspecified.
• fabric.loadFromDB—Specifies whether to load fabric from DB when it is opened. The default is
false if unspecified. This is equivalent to the Accelerate Discovery check box on the login dialog
box.
2-8
• proxy.autostart—Specifies whether to automatically start SNMP proxy server when Fabric Manager
Server starts. Default is true if unspecified. Note, proxy will not be started if snmp.proxy is specified as
a non-localhost.
Cisco MDS 9000 Family Fabric Manager Configuration Guide
OL-6965-03, Cisco MDS SAN-OS Release 2.x
Page 65

Chapter 2 Fabric Manager Server
Modifying Fabric Manager Server
Send documentation comments to mdsfeedback-doc@cisco.com.
• proxy.localaddress—Specifies the local network interface name, e.g. "eth0", "eth1", or a local IP
address, to bind proxy server socket on a multi-homed localhost. If IP address 0.0.0.0 is specified, proxy
will be bound to the wildcard address, an IP address chosen by the kernel.
• proxy.localport—Specifies the local TCP port to listen for client connection. If port 0 is specified, proxy
will be bound to a port chosen by the kernel. Default is 9198.
For more information on setting the server properties, see Chapter 5, “Fabric Manager Web Services.”
Modifying Fabric Manager Server
Fabric Manager Release 2.1(2) or later allows you to modify certain Fabric Manager Server settings
without stopping and starting the server. These settings include:
• Changing the Fabric Manager Server Username and Password, page 2-9
• Changing the Polling Period and Fabric Rediscovery Time, page 2-9
Changing the Fabric Manager Server Username and Password
You can modify the username or password used to access a fabric from Fabric Manager client without
restarting Fabric Manager Server.
To change the username or password used by Fabric Manager Server, follow these steps:
Step 1 In Fabric Manager, select Server > Admin. You see the Admin dialog box displayed.
Step 2 For each fabric that you are monitoring with Fabric Manager Server, set the Username or Password.
Step 3 Click Apply to save these changes or click Close to exit the dialog box without saving any changes.
Changing the Polling Period and Fabric Rediscovery Time
Fabric Manager Server periodically polls the monitored fabrics and periodically rediscoveries the full
fabric at a default interval of five cycles .You can modify these settings from Fabric Manager client
without restarting Fabric Manager Server.
To change the polling period or full fabric rediscovery setting used by Fabric Manager Server, follow
these steps:
Step 1 In Fabric Manager, select Server > Admin. You see the Admin dialog box displayed.
Step 2 For each fabric that you are monitoring with Fabric Manager Server, set the Polling Interval to configure
how frequently Fabric Manager Server polls the fabric elements for status and statistics.
Step 3 For each fabric that you are monitoring with Fabric Manager Server, set Rediscovery Cycles to configure
how often Fabric Manager Server rediscovers the full fabric.
Step 4 Click Apply to save these changes or click Close to exit the dialog box without saving any changes.
OL-6965-03, Cisco MDS SAN-OS Release 2.x
Cisco MDS 9000 Family Fabric Manager Configuration Guide
2-9
Page 66

Chapter 2 Fabric Manager Server
Modifying Fabric Manager Server
Send documentation comments to mdsfeedback-doc@cisco.com.
Using Device Aliases or FC Aliases
You can change whether Fabric Manager uses FC Aliases or global devices aliases from Fabric Manager
client without restarting Fabric Manager Server.
To change whether Fabric Manager uses FC Aliases or global devices aliases, follow these steps:
Step 1 In Fabric Manager, select Server > Admin. You see the Admin dialog box displayed.
Step 2 For each fabric that you are monitoring with Fabric Manager Server, check the Device Alias check box
to use global device aliases, or uncheck to use FC Aliases..
Step 3 Click Apply to save these changes or click Close to exit the dialog box without saving any changes.
Saving Device Aliases to the Switch
If you choose to use global device aliases on Fabric Manager Server, these changes are not reflected on
the local switch. The switch continues to use FC aliases until you save the device aliases to the switch.
To save global devices aliases on a switch using Fabric Manager, follow these steps:
Step 1 Select Switches > Hosts or Switches > Storage. You see the end devices in the Information pane.
Step 2 For each device alias that you want the switch to recognize, highlight and right-click on the Device Alias
and select Save Selected Device Aliases.
2-10
Cisco MDS 9000 Family Fabric Manager Configuration Guide
OL-6965-03, Cisco MDS SAN-OS Release 2.x
Page 67

Send documentation comments to mdsfeedback-doc@cisco.com.
CHA P TER
3
Fabric Manager Client
The Cisco Fabric Manager Client is a java based GUI application that provides easy access to the Fabric
Manager applications from a remote workstation.
This chapter contains the following sections:
• Fabric Manager Client Overview, page 3-1
• Launching Fabric Manager Client, page 3-2
• Using Fabric Manager Client, page 3-3
• Setting Fabric Manager Preferences, page 3-13
• Network Fabric Discovery, page 3-15
• Modifying Device Grouping, page 3-15
• Control of Administrator Access with Users and Roles, page 3-16
• Fabric Manager Wizards, page 3-16
• Fabric Manager Troubleshooting Tools, page 3-17
Fabric Manager Client Overview
The Cisco Fabric Manager is a Java and SNMP-based network fabric and device management tool with
a GUI that displays real-time views of your network fabric, including Cisco MDS 9000 and third-party
switches, hosts, and storage devices.
In addition to complete configuration and status monitoring capabilities for Cisco MDS 9000 switches,
Fabric Manager client provides powerful Fibre Channel troubleshooting tools. These in-depth health and
configuration analysis tools leverage unique MDS 9000 switch capabilities including Fibre Channel ping
and traceroute.
Note You must have the same release of Fabric Manager Client and Fabric Manager Server.
OL-6965-03, Cisco MDS SAN-OS Release 2.x
Cisco MDS 9000 Family Fabric Manager Configuration Guide
3-1
Page 68

Chapter 3 Fabric Manager Client
Launching Fabric Manager Client
Send documentation comments to mdsfeedback-doc@cisco.com.
Fabric Manager Advanced Mode
Fabric Manager Release 2.1(1a) introduces Advanced Mode. Advanced Mode is enabled by default and
provides the full suite of Fabric Manager features, including security, IVR, iSCSI, and FICON. Uncheck
the Advanced check box in the upper right corner of Fabric Manager client to simplify the user interface.
In this mode, you can access the basic MDS 9000 features like VSANs, zoning, and configuring
interfaces.
Launching Fabric Manager Client
To launch Fabric Manager client, follow these steps:
Step 1 Double-click the Fabric Manager icon and follow the instructions described in “Launching the
Management Software” section on page 1-10 to launch Fabric Manager Client from your desktop.
Step 2 To launch Fabric Manager Client from within a running instance of Fabric Manager, follow these steps:
a. Choose Open Fabric from the Fabric Manager File menu.
b. Click the Open Switch Fabric button from the Fabric Manager toolbar.
c. Select the IP address of the fabric seed switch you want to access. If you do not see the fabric seed
switch in the pop-up window, click the Options button to expand the pop-up window options.
d. Click Open if the fabric you want to open has the same username and password as the fabric you
already have open.
Fabric Manager displays the new fabric and adds a tab to the Fabric pane.
Step 3 Click each fabric’s tab to view the fabric.
If the fabric you want to open has a different username and password, enter the username and password
and click Open. You are prompted for whether or not you want the open fabric(s) to be monitored in the
background. That fabric is then closed on the Fabric Manager client, and the new fabric is opened.
Note Changes made using Fabric Manager are applied to the running configuration of the switches
you are managing. If you have made changes to the configuration or performed an operation
(such as activating zones), Fabric Manager prompts you to save your changes before you exit.
3-2
Cisco MDS 9000 Family Fabric Manager Configuration Guide
OL-6965-03, Cisco MDS SAN-OS Release 2.x
Page 69

Chapter 3 Fabric Manager Client
Using Fabric Manager Client
Send documentation comments to mdsfeedback-doc@cisco.com.
Using Fabric Manager Client
This section describes the Fabric Manager client interface, as shown in Figure 3-1.
Figure 3-1 Fabric Manager Main Window
1 Menu bar—Provides access to options that are organized by menus.
2 Toolbar—Provides icons that provide direct access to the most commonly used options on the
File, Tools, and Help menus.
3 Information pane—Displays information about whatever option is selected in the menu tree.
4 Status Bar (right side)—Shows the last entry displayed by the discovery process, and the possible
error message.
5 Fabric pane—Displays a map of the network fabric, including switches, hosts, and storage. It also
provides tabs for displaying log and event data.
6 Logical domains—Displays a tree of configured SAN, fabrics, VSANs and zones.
Note Fabric Manager Release 2.1(2) or later displays all fabrics under one SAN.
7 Physical attributes—Displays a tree of available configuration tasks depending on the fabric,
VSAN, or zone selected above. Lists the switches and end devices in the logical selection.
8 Status Bar (left side)—Shows short-term transient messages, such as the number of rows
displayed in a table.
OL-6965-03, Cisco MDS SAN-OS Release 2.x
Cisco MDS 9000 Family Fabric Manager Configuration Guide
3-3
Page 70

Chapter 3 Fabric Manager Client
Using Fabric Manager Client
Send documentation comments to mdsfeedback-doc@cisco.com.
Multiple Fabric Display
Fabric Manager can display multiple fabrics in the same pane (see Figure 3-2).
Figure 3-2 Fabric Manager’s Multiple Fabric Display
3-4
1 The Fabric view tab for fabric 172.23.46.152. When selected, the Fabric view displays fabric
172.23.46.152.
2 The Fabric view tab for fabric 172.23.46.153. When selected, the Fabric view displays fabric
172.23.46.153.
3 All Fabrics tab (selected), showing two fabrics.
Note The same username and password must be used to log into multiple fabrics.
The information for both fabrics is displayed, with no need to select a seed switch. To see details of a
fabric, select the tab for that fabric at the bottom of the Fabric pane, or double-click on the cloud icon
for the fabric in the All Fabrics tab.
Cisco MDS 9000 Family Fabric Manager Configuration Guide
OL-6965-03, Cisco MDS SAN-OS Release 2.x
Page 71

Chapter 3 Fabric Manager Client
Using Fabric Manager Client
Send documentation comments to mdsfeedback-doc@cisco.com.
Contents Panes
The following sections describe the panes in the Fabric Manager view. You can resize each pane by
dragging the boundaries between each region or by clicking the Minimize or Maximize controls.
Fabric Pane
The Fabric pane shows the graphical representation of your fabric. Table 3-1 explains the graphics you
may see displayed, depending on which devices you have in your fabric.
Table 3-1 Fabric Manager Graphics
Icon or Graphic Description
Director class MDS 9000.
iSAN
Non-director class MDS 9000.
Generic Fibre Channel switch.
Cisco SN5428.
An orange line through a device indicates that the
device manageable but there are operational
problems.
An orange "X" through a device or link indicates
that the device or ISL is not working properly.
A red line through a device indicates that the
device is not manageable.
A red "X" through a device or link indicates that
the device is down or that the ISL is down.
OL-6965-03, Cisco MDS SAN-OS Release 2.x
Fibre Channel HBA (or enclosure).
Fibre Channel target (or enclosure).
iSCSI host.
Cisco MDS 9000 Family Fabric Manager Configuration Guide
3-5
Page 72
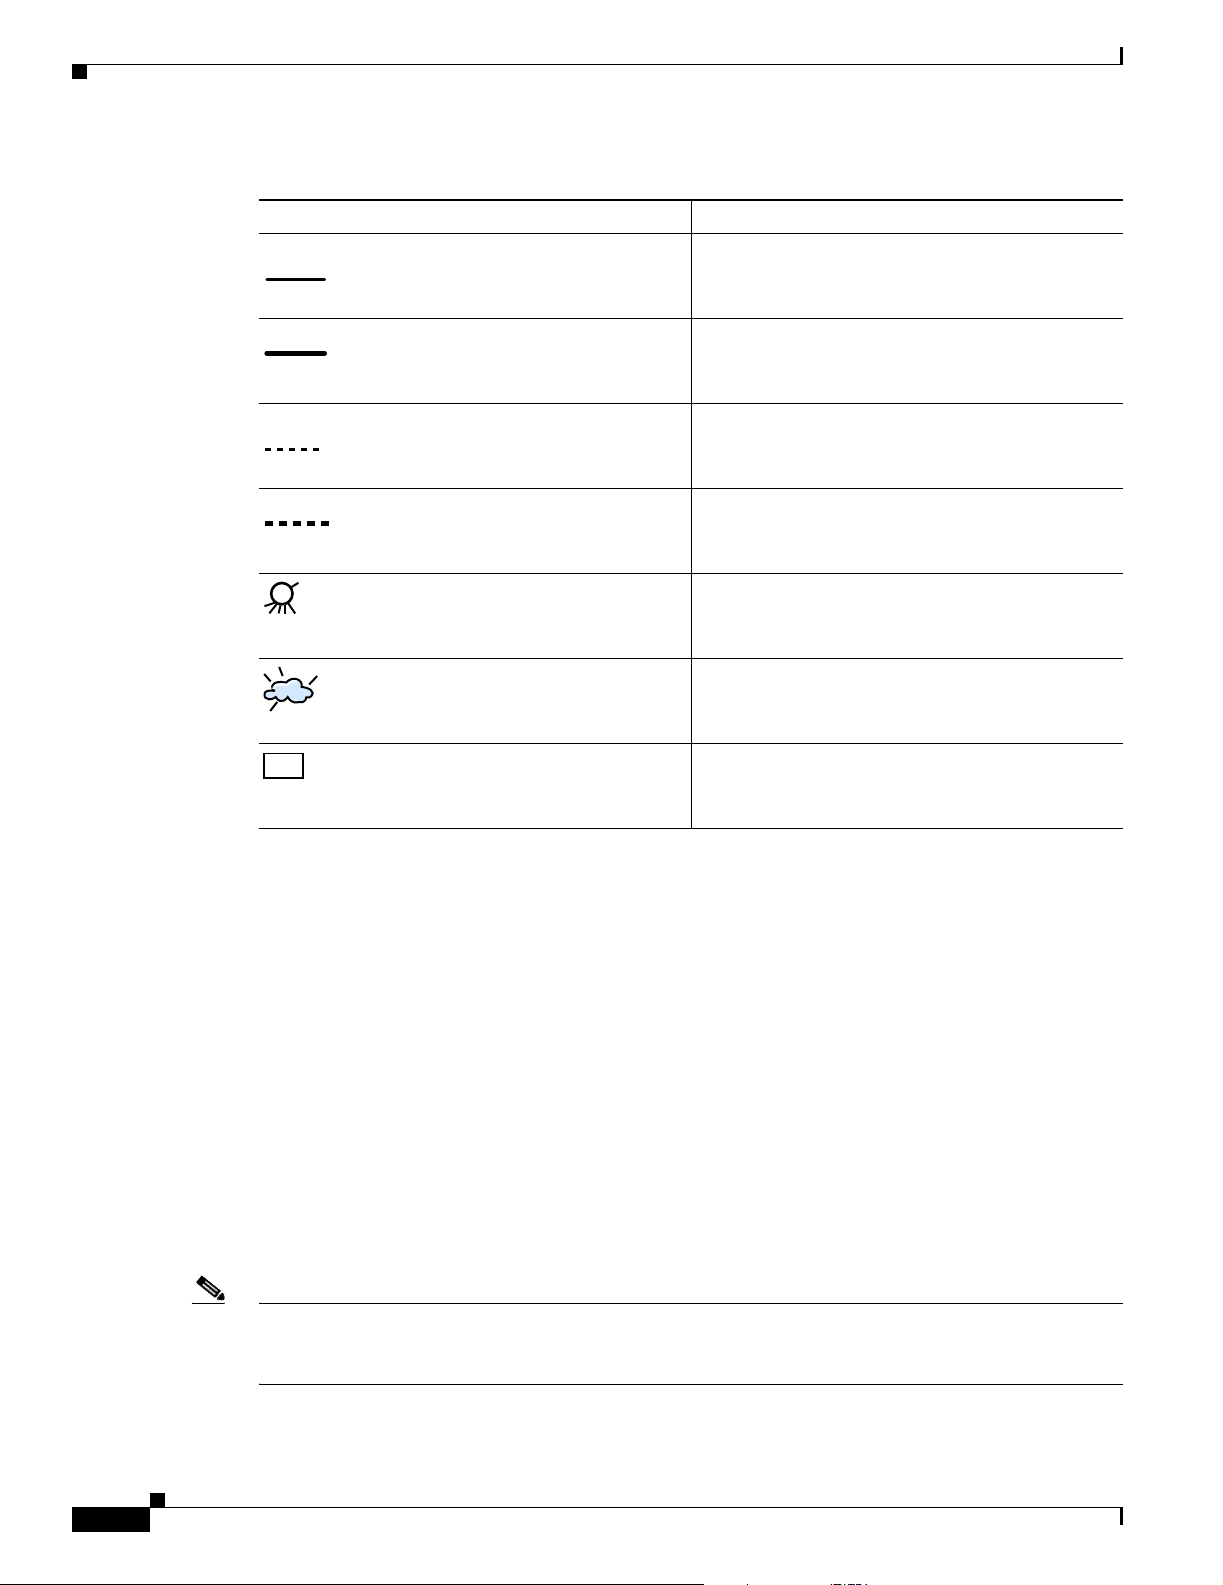
Chapter 3 Fabric Manager Client
Using Fabric Manager Client
Send documentation comments to mdsfeedback-doc@cisco.com.
Table 3-1 Fabric Manager Graphics (continued)
Icon or Graphic Description
Fibre Channel ISL and edge connection.
Fibre Channel PortChannel.
IP ISL and edge connection.
IP PortChannel.
Fibre Channel loop (storage).
IP cloud (hosts). This icon is also used to represent
a fabric when viewing a SAN (multiple fabrics) in
the Fabric Manager Fabric pane.
Any device, cloud, or loop with a box around it
means that there are hidden links attached.
If a switch or director is grayed out, Fabric Manager can no longer communicate with it.
There are multiple tabs on the bottom of the Fabric pane:
• Fabric—When displaying multiple fabrics, each fabric has its own tab. You can switch between
fabrics by clicking on their respective tabs.
• Log—Displays messages that describe Fabric Manager operations, such as fabric discovery.
• Events—Displays information about the SNMP traps received by the management station. This
includes combination events as detected by discovery and important traps like license, SNMP, and
FICON.
When viewing large fabrics in the Fabric pane, it is helpful to:
• Turn off end device labels
• Collapse loops
• Collapse expanded multiple links (collapsed multiple links are shown as very thick single lines)
• Dim or hide portions of your fabric by VSAN
3-6
Note When a VSAN, zone, or zone member is selected in the VSAN tree, the map highlighting changes to
identify the selected objects. To remove this highlighting, click the Clear Highlight button on the Fabric
pane toolbar or choose Clear Highlight from the pop-up menu.
Cisco MDS 9000 Family Fabric Manager Configuration Guide
OL-6965-03, Cisco MDS SAN-OS Release 2.x
Page 73

Chapter 3 Fabric Manager Client
Using Fabric Manager Client
Send documentation comments to mdsfeedback-doc@cisco.com.
Saving the Map
You can save the map in the Fabric Pane as an image, or in Fabric Manager Release 2.1(2) or later, as an
editable Visio diagram. You can save the map with or without labels on the links. The created Visio
diagram is editable and saved in two layers:
• Default layer that includes all switches and links in the fabric.
• End devices layer that includes the end devices and can be turned off to remove end devices from
the Visio diagram.
To save the map as a Visio diagram, select Files > Export > Visio and choose Map... or Map with link
labels.... The saved Visio diagram retains the viewing options that you selected from the Fabric Pane.
For example, if you collapse multiple links in the Map and export this as a Visio diagram, the Visio
diagram shows those as one solid link.
The Show Tech Support option from the Tools menu also supports saving the map as a Visio diagram.
Purging Down Elements
The Fabric pane allows you to refresh the map at any time by clicking the refresh map icon. In Fabric
Manager Release 2.1(2) or later, the refresh map icon redraws the map but does not purge down
elements. To purge down elements you can:
• Click Server > Purge. This purges all down elements in the fabric.
Main Menu
• Right-click on the Fabric pane and select Purge Down Elements.
• Right-click a down element and select Purge. This purges only this element from the fabric.
Note If you select an element that is not down and purge it, that element will re-appear on the next
fabric discovery cycle.
The menu bar at the top of the Fabric Manager main window provides options for managing and
troubleshooting the current fabric and for controlling the display of information on the Fabric pane. The
menu bar provides the following menus:
• File—Opens a new fabric, rediscovers the current fabric, locates switches, sets preferences, prints
the map, and clears (right-click on log) or exports the Fabric pane log.
• View—Changes the appearance of the map (these options are duplicated on the Fabric pane toolbar).
• Zone—Manages zones, zone sets, and inter-VSAN routing (IVR).
• Tools—Verifies and troubleshoots connectivity and configuration, as described in the “Fabric
Manager Troubleshooting Tools” section on page 3-17.
• Performance—Runs and configures Performance Manager and Cisco Traffic Analyzer, and generate
reports.
• Server—Runs administrative tasks on clients and fabrics. Provides Fabric Manager Server
management and a purge command. Lists switches being managed.
• Help—Displays online help topics for specific dialog boxes in the Information pane.
OL-6965-03, Cisco MDS SAN-OS Release 2.x
Cisco MDS 9000 Family Fabric Manager Configuration Guide
3-7
Page 74

Chapter 3 Fabric Manager Client
Using Fabric Manager Client
Send documentation comments to mdsfeedback-doc@cisco.com.
Toolbar
The Fabric Manager main toolbar provides buttons for accessing the most commonly used menu bar
options as shown inTab l e 3- 2 .
Table 3-2 Fabric Manager Client Main Toolbar
Icon Description
Open switch fabric.
Rediscover current fabric.
Find in the map.
Create VSAN.
Launch DPVM wizard.
Edit full zone database.
Launch IVR zone wizard.
Launch PortChannel wizard.
Launch FCIP wizard.
Launch iSCSI wizard.
3-8
Launch QoS wizard.
Configure users and roles.
Cisco MDS 9000 Family Fabric Manager Configuration Guide
OL-6965-03, Cisco MDS SAN-OS Release 2.x
Page 75
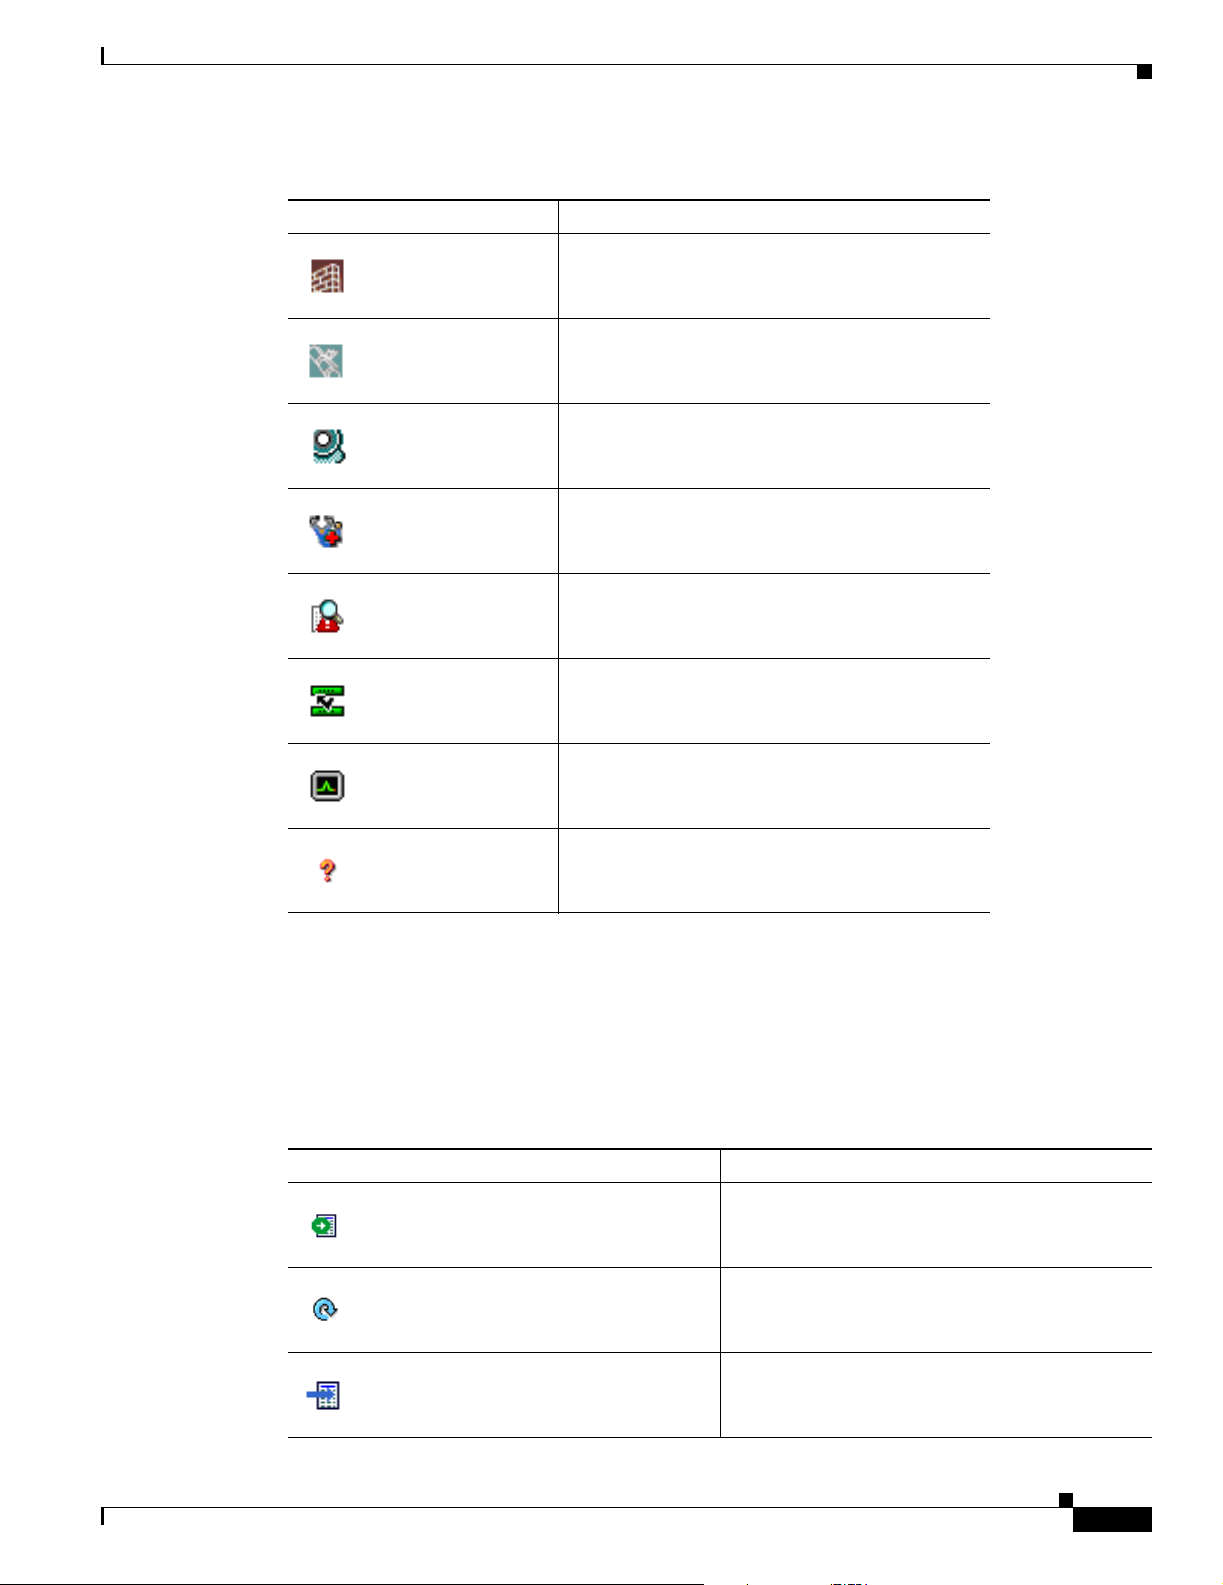
Chapter 3 Fabric Manager Client
Using Fabric Manager Client
Send documentation comments to mdsfeedback-doc@cisco.com.
Table 3-2 Fabric Manager Client Main Toolbar (continued)
Icon Description
Launch IP-ACL wizard.
Launch License Install wizard.
Launch Software Install wizard.
Perform switch health analysis.
Perform fabric configuration analysis.
Information Pane
The Information pane displays tables of information associated with the option selected from the menu
tree in the Logical Domains or Physical Attributes panes. The Information pane toolbar provides buttons
for performing one or more of the operations shown in Table 3-3.
Table 3-3 Information Pane Toolbar
Icon Description
Perform end-to-end connectivity analysis.
Monitor ISL performance.
Show on-line help.
Apply Changes Applies configuration changes.
Refresh Values Refreshes table values.
Create Row Opens the appropriate dialog box to create a new
OL-6965-03, Cisco MDS SAN-OS Release 2.x
row in the table.
Cisco MDS 9000 Family Fabric Manager Configuration Guide
3-9
Page 76

Chapter 3 Fabric Manager Client
Using Fabric Manager Client
Send documentation comments to mdsfeedback-doc@cisco.com.
Table 3-3 Information Pane Toolbar (continued)
Icon Description
Delete Row Deletes the currently hilighted rows from the
table.
Copy/Ctrl+C Copies data from one row to another.
Paste/Ctrl +V Pastes the data from one row to another.
Undo Changes/Ctrl-Z Undoes the most recent change.
Export Exports and saves information to a file.
Print Table Prints the contents of the Information pane.
Detach Table Displays a non-editable copy of the table in the
Note After making changes you must save the configuration or the changes will be lost when the device is
restarted.
Note The buttons that appear on the toolbar vary according to the option you select. They are activated or
deactivated (dimmed) according to the field or other object that you select in the Information pane.
Logical Domains Pane
Use the Logical Domains pane to manage attributes for fabrics, VSANs, and zones.
To manage these things, right-click one of the folders in the tree and click a menu item from the pop-up
menu. You see the appropriate configuration dialog box.
Information pane in its own window, which you
can move around the screen.
3-10
The default name for the fabric is the name, IP address, or WWN for the principal switch in VSAN 1.
If VSAN 1 is segmented, the default name is chosen from a principal switch with the smallest WWN. In
order, the fabric names you may see are:
• Fabric <sysName>
• Fabric <ipAddress>
• Fabric <sWWN>
Cisco MDS 9000 Family Fabric Manager Configuration Guide
OL-6965-03, Cisco MDS SAN-OS Release 2.x
Page 77

Chapter 3 Fabric Manager Client
Using Fabric Manager Client
Send documentation comments to mdsfeedback-doc@cisco.com.
Physical Attributes Pane
Use the Physical Attributes pane to display a tree of the options available for managing the switches in
the currently selected fabric, VSAN, or zone.
To select an option, click a folder to display the options available and then click the option. You see the
table with information for the selected option in the Information pane. The Physical Attributes pane
provides the following main folders:
• Switches—Views and configures hardware, system, licensing, and configuration files.
• Interfaces—Views and configures FC Physical, FC Logical, Ethernet, SVC, and PortChannel
interfaces.
• FC Services—Views and configures Fibre Channel network configurations.
• IP—Views and configures IP storage and IP services.
• Events—Views and configures events, alarms, thresholds, notifications, and informs.
• Security—Views and configures MDS management and FC-SP security.
• ISLs—Views and configures Inter-Switch Links.
• End Devices—Views and configures end devices.
Status Bar
The status bar at the bottom of the Fabric Manager window shows the last entry displayed by the
discovery process, and the possible error message on the right side. The status bar displays a message
stating that something has changed in the fabric and a new discovery is needed. The status bar shows
both short-term, transient messages (such as the number of rows displayed in the table), and long-term
discovery issues.
Context Menus
When you right-click an icon in the Fabric pane, you see a pop-up menu with options that vary depending
on the type of icon selected. The various options available for different objects include the following:
• Open an instance of Device Manager for the selected switch.
• Open a CLI session for the selected switch.
• Copy the display name of the selected object.
• Execute a ping or traceroute command for the device.
• Show or hide end devices.
• View attributes
• Quiesce and disable members for PortChannels
• Set the trunking mode for an ISL.
• Create or add to a PortChannel for selected ISLs.
The Fabric pane has its own toolbar with options for saving, printing, and changing the appearance of
the map. When you right-click on the map, a pop-up menu appears that provides options (duplicated on
the toolbar) for changing the appearance of the map.
OL-6965-03, Cisco MDS SAN-OS Release 2.x
Cisco MDS 9000 Family Fabric Manager Configuration Guide
3-11
Page 78

Chapter 3 Fabric Manager Client
Using Fabric Manager Client
Send documentation comments to mdsfeedback-doc@cisco.com.
Note You can launch web-based or non-web-based applications from the Fabric pane. To do this, you assign
an IP address to the storage port or enclosure. Then right-click to bring up the pop-up menu, and select
Device Manager.
Filtering
Fabric Manager has a built-in filtering mechanism that displays only the data you are interested in. To
filter, first select the fabric, and VSAN from the Logical Domains pane. This narrows the scope of what
is displayed in the Fabric pane. Any information that does not belong to the selected items is dimmed.
Also, any information that does not belong to the selected items is not displayed in the tables in the
Information pane. As shown in Figure 3-3, the filter you select is displayed at the top right of the Fabric
Manager window.
To further narrow the scope, select attributes from the Physical Attributes pane. The Fabric Manager
tables, display, and filter criteria change accordingly.
Figure 3-3 Fabric Manager’s Filtering Mechanism
3-12
Cisco MDS 9000 Family Fabric Manager Configuration Guide
OL-6965-03, Cisco MDS SAN-OS Release 2.x
Page 79

Chapter 3 Fabric Manager Client
Setting Fabric Manager Preferences
Send documentation comments to mdsfeedback-doc@cisco.com.
Detachable Tables
Fabric Manager Release 2.0(2b) introduced detachable tables in Fabric Manager. You can, for example,
detach tables and move them to different areas on your desktop so you can compare similar tables from
different VSANs. Or, you can keep informational tables open from one view while you examine a
different area in Fabric Manager. To detach tables, click the Detach Table icon in the Information pane
in Fabric Manager.
Setting Fabric Manager Preferences
To set your preferences for the behavior of the Fabric Manager, choose File > Preferences from the
Fabric Manager menu bar. You see the Preferences dialog box with the following tabs for setting
different components of the application:.
• General
• SNMP
• Map
The default General preferences for Fabric Manager are:
• Show Switch Name by—Displays the switches in the Fabric pane by IP address, DNS name, or
logical name. The default setting for this value is Logical Name.
• Show WorldWideName (WWN) Vendor—This displays the world wide name vendor name in any
tables or listings displayed by Fabric Manager. If Prepend Name is checked, the name is displayed
in front of the IP Address of the switch. If Replacing Vendor Bytes is checked, the name is
displayed instead of the IP address. The default setting is enabled (checked) with the Prepend Name
option.
• Show End Device Using—Displays end devices in the Fabric pane using alias or pWWN alias. The
default setting for this value is Alias.
• Append Enclosures to End Device Names—The default setting for this value is OFF.
• Show Shortened iSCSI Names—The default setting for this value is OFF.
• Show Timestamps as Date/Time—Displays timestamps in the date/time format. If this preference is
not checked, timestamps are displayed as elapsed time. The default setting is enabled (checked).
• Telnet Path—The path for the telnet.exe file on your system. The default is telnet.exe, but you will
need to browse for the correct location.
Note If you browse for a path or enter a path and you have a space in the pathname (for example,
c:\program files\telnet.exe), then the path will not work. To get the path to work, you must
manually place quotes around it (for example, "c:\program files\telnet.exe").
• Use Secure Shell instead of Telnet—Specifies whether to use SSH or Telnet when using the CLI to
communicate with the switch. If enabled, you must specify the path to your SSH application. The
default setting is disabled.
• Confirm Deletion—Displays a confirmation pop-up when you delete part of your configuration
using Fabric Manager. The default setting is enabled (checked).
• Export Tables with Format—Specifies the type of file that is created when you export a table using
Device Manager. The options are tab-delimited or XML. The default setting is Tab-Delimited.
OL-6965-03, Cisco MDS SAN-OS Release 2.x
Cisco MDS 9000 Family Fabric Manager Configuration Guide
3-13
Page 80

Chapter 3 Fabric Manager Client
Setting Fabric Manager Preferences
Send documentation comments to mdsfeedback-doc@cisco.com.
The default SNMP preferences for Fabric Manager are:
• Retry request 1 time(s) after 5 sec timeout—You can set the retry value to 0-5, and the timeout value
to 3-30.
• Trace SNMP packets in Log—The default setting for this value is OFF.
• Enable Audible Alert when Event Received—The default setting for this value is OFF.
The default Map preferences for Fabric Manager are:
• Display Unselected VSAN Members—Displays the unselected VSAN members in the Fabric pane.
The default setting for this value is ON.
• Display End Devices—Displays the fabric’s end devices in the Fabric pane. The default setting for
this value is ON.
• Display End Device Labels—Displays the fabric’s end device labels in the Fabric pane. The default
setting for this value is ON.
• Expand Loops—Displays the loops in the fabric as individual connections in the Fabric pane. The
default setting for this value is OFF.
• Expand Multiple Links—Displays multiple links in the Fabric pane as separate lines rather than as
one thick line. The default setting for this value is ON.
• Open New Device Manager Each Time—Opens a new instance of Device Manager each time you
invoke it from a switch in your fabric. The default value is OFF, which means only one instance of
Device Manager is open at a time.
• Select Switch or Link from Table—Allows you to select a switch or link in the Fabric pane by
clicking on the switch or link in a table in the information pane. The default setting for this value is
disabled (unchecked), which means clicking on a switch or link in the table does not change the
switch or link selection in the Fabric pane.
• Layout New Devices Automatically—Automatically places new devices in the Fabric pane in an
optimal configuration. The default setting for this value is OFF. In this mode, when you add a new
device, you must manually reposition it if the initial position does not suit your needs.
• Use Quick Layout when Switch has >=30 End Devices—The default setting for this value is 30. You
can enter any number in this field. Enter 0 to disable Quick Layout.
• Override Preferences for Non-default Layout—The default setting for this value is ON.
• Automatically Save Layout—If this option is enabled, any changes in layout are automatically
saved. The default setting for this value is ON.
• Detach Overview Window—Allows you to more easily center the Fabric pane on the area of the
fabric you want to see. (This is most useful for large fabrics that cannot be displayed entirely within
the Fabric pane.) Bring up the overview window by clicking the Show/Hide Overview Window
button. It overlays the fabric window and remains there until you click the Show/Hide Overview
Window button again. If you enable this preference, you can detach the overview window and move
it to one side while you access the Fabric pane. The default setting for this value is disabled
(unchecked).
In Fabric Manager Release 2.1(2) or later, you can select the SNMP port that Fabric Manager client uses
3-14
Cisco MDS 9000 Family Fabric Manager Configuration Guide
OL-6965-03, Cisco MDS SAN-OS Release 2.x
Page 81

Chapter 3 Fabric Manager Client
Network Fabric Discovery
Send documentation comments to mdsfeedback-doc@cisco.com.
Network Fabric Discovery
Cisco Fabric Manager collects information on the fabric topology through SNMP queries to the switches
connected to Fabric Manager. The switch replies after having discovered all devices connected to the
fabric by using the information coming from its FSPF technology database and the Name Server
database, and collected using the Fabric Configuration Server’s request/response mechanisms defined
by the FC-GS-3/4 standard. When you start the Fabric Manager, you enter the IP address (or host name)
of a “seed” switch for discovery.
After you start Fabric Manager and discovery completes, Fabric Manager presents you with a view of
your network fabric, including all discovered switches, hosts, and storage devices.
Modifying Device Grouping
Because not all devices are capable of responding to FC-GS-3 requests, different ports of a single server
or storage subsystem may be displayed as individual end devices on the Fabric Manager map. Fabric
Manager Release 2.1(2a) auto-creates enclosures based on the OUI and vendor name for the devices.
Note Two devices in isolated fabrics with the same alias name may cause Fabric Manager to link the two
devices in the same enclosure and show the isolated fabrics as linked. Turn off auto-creation or manually
modify the enclosure to create unique names in each fabric to show the fabrics as isolated in Fabric
Manager.
To turn off auto-creation, edit the server.properties file to set fabric.autoAlias to false and then restart
Fabric Manager Server.
To manually group end devices in a single enclosure to have them represented by a single icon on the
map, follow these steps:
Step 1 Select Storage or Hosts from the Fabric Manager’s Physical tree in the Navigation pane.
You see the end devices displayed in the Information pane.
Step 2 Click one of the devices or the Name field that you want to be in the enclosure.
Step 3 Enter a name to identify the new enclosure’s icon on the Fabric Manager Fabric pane.
Step 4 Click once on the Name field for that device. To select more than one name, hold down the Shift key and
click each of the other names.
Step 5 Press Ctrl-C to copy the selected name(s).
Step 6 Press Ctrl-V to paste the name into the Name field for that device.
Note To remove devices from an enclosure, triple click on the name of the device and press Delete.
To remove an enclosure, repeat this step for each device in the enclosure.
OL-6965-03, Cisco MDS SAN-OS Release 2.x
Cisco MDS 9000 Family Fabric Manager Configuration Guide
3-15
Page 82

Chapter 3 Fabric Manager Client
Control of Administrator Access with Users and Roles
Send documentation comments to mdsfeedback-doc@cisco.com.
Using Alias Names as Enclosures
To create an enclosure that uses the alias name as the name of the enclosure, follow these steps:
Step 1 Select Hosts or Storage from the Physical Attributes pane. You see the list of devices in the Information
pane.
Step 2 Select the NxPorts tab.
Step 3 Right-click the enclosure names that you want to convert to use alias names and select Alias >
Enclosure.
Step 4 Click Apply Changes to save these changes or click Undo Changes to discard any unsaved changes.
Control of Administrator Access with Users and Roles
Cisco MDS 9000 Family switches support role-based management access whether using the CLI or the
Cisco Fabric Manager. This lets you assign specific management privileges to particular roles and then
assign one or more users to each role.
Cisco Fabric Manager uses SNMPv3 to establish role-based management access. After completing the
setup routine, a single role, user name, and password are established. The role assigned to this user
allows the highest level of privileges, which includes creating users and roles. Use the Cisco Fabric
Manager to create roles and users, and to assign passwords as required for secure management access in
your network.
Fabric Manager Wizards
Fabric Manager client provides a series of wizards to facilitate common configuration tasks. These
wizards include:
• VSAN—Creates VSANs on multiple switches in the fabric and sets VSAN attributes including
interop mode, load balancing, and FICON.
• Zone Edit Tool —Creates zone sets, zones, and aliases. Adds members to zones, and edits zone
database.
• IVR Zone—Creates IVR zone sets, zones, and aliases. Enables IVR NAT and auto-topology. Adds
members to IVR zones, and edits IVR zone database.
• PortChannel—Creates PortChannels from selected ISLs either manually or automatically. Sets
PortChannel attributes like channel ID and trunking mode.
• FCIP —Creates FCIP links between Gigabit Ethernet ports. Enables Fibre Channel Write
Acceleration and IP compression
• DPVM—Establishes dynamic port VSAN membership, enables auto learning, and activates the
DPVM database.
• iSCSI—Zones iSCSI initiators and adds VSAN to target allowed VSAN list.
• QoS—Sets QoS attributes for zones in the selected VSAN.
• IP ACL—Creates ordered IP access control lists and distributes to selected switches in the fabric.
3-16
Cisco MDS 9000 Family Fabric Manager Configuration Guide
OL-6965-03, Cisco MDS SAN-OS Release 2.x
Page 83

Chapter 3 Fabric Manager Client
Fabric Manager Troubleshooting Tools
Send documentation comments to mdsfeedback-doc@cisco.com.
• License Install—Facilitates download and installation of licenses in selected switches in the fabric.
• Software Install—Verifies image compatibility and installs software images on selected switches in
the fabric.
Fabric Manager Troubleshooting Tools
Fabric Manager has several troubleshooting tools available from the toolbar or Tools menu. Procedures
for using these tools are described in Chapter 35, “Troubleshooting Your Fabric.” Here is a brief
description of each tool.
• Zone Merge Analysis—The zone merge analysis tool (available from the Zone menu) enables you
to determine if zones will merge successfully when two Cisco MDS switches are interconnected. If
the interconnected switch ports allow VSANs with identical names or contain zones with identical
names, then Fabric Manager verifies that the zones contain identical members. The merge analysis
tool can be run before attempting a merge or after fabrics are interconnected to determine zone
merge failure causes.
• End-to-End Connectivity—Fabric Manager’s end-to-end connectivity analysis tool uses FC Ping to
verify interconnections between Cisco MDS switches and end-device (HBAs and storage devices)
in a particular VSAN. In addition to basic connectivity, Fabric Manager can optionally verify that:
–
Paths are redundant.
–
Zones contain at least two members.
End devices are connected to a manageable switch (have an currently active in-band or out-of-band
management path.)
• Switch Health Analysis—You can run an in-depth switch health analysis with Fabric Manager. It
verifies the status of all critical Cisco MDS switches, modules, ports, and Fibre Channel services.
Over 40 conditions are checked. This tool provides a very fast, simple, and thorough way to assess
Cisco MDS switch health.
• Fabric Configuration Analysis—Fabric Manager includes a fabric configuration analysis tool. It
compares the configurations of all Cisco MDS switches in a fabric to a reference switch or a policy
file. You can define what functions to check and what type of checks to perform. The analysis can
look for mismatched values, and missing or extra values. If all configuration checking is performed
for all functions, over 200 checks are performed for each Cisco MDS switch.
After the analysis is run, the results are displayed with details about the issues that were discovered. You
can automatically resolve configuration differences by selecting them and clicking the Resolve button.
Fabric Manager automatically changes the configuration to match the reference switch or policy file.
OL-6965-03, Cisco MDS SAN-OS Release 2.x
Cisco MDS 9000 Family Fabric Manager Configuration Guide
3-17
Page 84

Chapter 3 Fabric Manager Client
Fabric Manager Troubleshooting Tools
Send documentation comments to mdsfeedback-doc@cisco.com.
3-18
Cisco MDS 9000 Family Fabric Manager Configuration Guide
OL-6965-03, Cisco MDS SAN-OS Release 2.x
Page 85

Send documentation comments to mdsfeedback-doc@cisco.com.
Device Manager
This chapter contains descriptions of, and instructions for using, the Cisco MDS 9000 Device Manager.
This chapter contains the following sections:
• Device Manager Overview, page 4-1
• Device Manager Features, page 4-1
• Launching Device Manager, page 4-2
• Using Device Manager, page 4-3
• Setting Device Manager Preferences, page 4-8
Device Manager Overview
Device Manager provides a graphic representation of a Cisco MDS 9000 Family switch chassis,
including the installed switching modules, the supervisor modules, the status of each port within each
module, the power supplies, and the fan assemblies.
The tables in the Fabric Manager Information pane basically correspond to the dialog boxes that appear
in Device Manager. However, while Fabric Manager tables show values for one or more switches, a
Device Manager dialog box shows values for a single switch. Also, Device Manager provides more
detailed information for verifying or troubleshooting device-specific configuration than what is available
from Fabric Manager.
CHA P TER
4
Device Manager Features
Device Manager provides two views: Device View and Summary View. You can use Summary View to
monitor all of the interfaces on the switch. You can use the Device View to perform any switch-level
configuration task including the following:
• Manage ports, PortChannels, and trunking.
• Manage SNMPv3 security access to switches.
• Manage CLI security access to switch.
• Manage alarms, events, and notifications.
OL-6965-03, Cisco MDS SAN-OS Release 2.x
Cisco MDS 9000 Family Fabric Manager Configuration Guide
4-1
Page 86

Chapter 4 Device Manager
Launching Device Manager
Send documentation comments to mdsfeedback-doc@cisco.com.
• Save and copy configuration files and software image.
• View hardware configuration.
• View chassis, module, port status and statistics.
Launching Device Manager
You can launch Device Manager in two ways.
To launch Device Manager from your desktop, double-click the Device Manager icon and follow the
instructions described in the “Launching the Management Software” section on page 1-10.
To launch Device Manager from Fabric Manager, follow these steps:
Step 1 Right-click the switch you want to manage on the Fabric Manager Fabric pane and click Device
Manager from the pop-up menu that appears.
Step 2 Double-click a switch in the Fabric Manager Fabric pane.
Step 3 Select a switch in the Fabric Manager Map pane and choose Tools > Device Manager.
4-2
Cisco MDS 9000 Family Fabric Manager Configuration Guide
OL-6965-03, Cisco MDS SAN-OS Release 2.x
Page 87

Chapter 4 Device Manager
Using Device Manager
Send documentation comments to mdsfeedback-doc@cisco.com.
Using Device Manager
This section describes the Device Manager interface, as shown in Figure 4-1.
Figure 4-1 Device Manager, Device Tab
1 Menu bar 5 Status
2 Toolbar 6 Supervisor modules
3 Ta bs 7 Switching or services modules
4 Legend
OL-6965-03, Cisco MDS SAN-OS Release 2.x
Cisco MDS 9000 Family Fabric Manager Configuration Guide
4-3
Page 88

Chapter 4 Device Manager
Using Device Manager
Send documentation comments to mdsfeedback-doc@cisco.com.
Menu Bar
The menu bar at the top of the Device Manager main window provides options for managing and
troubleshooting a single switch. The menu bar provides the following options:
• Device—Opens an instance of Device Manager, sets management preferences, sets the page layout,
opens a Telnet/SSH session with the current switch, and closes the Device Manager application.
• Physical—Allows you to view and manage inventory, modules, temperature sensors, power
supplies, fans, and the entire system.
• Interface—Allows you to configure and manage PortChannels, as well as Fibre Channel, Ethernet,
iSCSI, and FICON ports. Also provides diagnostic, management and monitoring capabilities, as
well as SPAN and port tracking.
• FC—Allows you to configure and manage VSAN, domain, and name server characteristics. Also
provides advanced configuration capabilities.
• FICON—Allows you to configure and manage FICON VSANs, configure RLIR ERL information,
and swap selected FICON ports.
• IP—Allows you to configure and manage the following types of information: FCIP, iSCSI, iSNS,
routes, VRRP, and CDP.
Toolbar Icons
• Security—Allows you to configure and manage FC -SP, port security, iSCSI security, SNMP
security, common roles, SSH, AAA, and IP ACLs.
• Admin—Allows you to save, copy, edit, and erase the switch configuration, monitor events,
manipulate Flash files, manage licenses, configure NTP, use CFS, and reset the switch. Also enables
you to use the show tech support, show cores, and show image commands.
• Logs—Shows the various logs: message, hardware, events, and accounting. Also displays FICON
link incidents, and allows you to configure the syslog setup.
• Help—Displays online help topics for specific dialog boxes in the Information pane.
The Device Manager toolbar provides quick access to many Device Manager features. Once the icon is
selected, a dialog box may open that allows configuration of the feature. The toolbar provides the main
Device and Summary View icons as shown in Table 4-1.
Table 4-1 Device Manager Main Toolbar
Icon Description
Open Device Opens the Device Manager view for another
switch, with the option to open this view in a
separate window.
4-4
Refresh Display Communicates with the switch and displays the
information in the Device Manager view.
Command Line
Interface
Cisco MDS 9000 Family Fabric Manager Configuration Guide
Opens a separate CLI command window to the
switch.
OL-6965-03, Cisco MDS SAN-OS Release 2.x
Page 89

Chapter 4 Device Manager
Using Device Manager
Send documentation comments to mdsfeedback-doc@cisco.com.
Table 4-1 Device Manager Main Toolbar (continued)
Icon Description
Configure Selected Opens a configuration dialog box for the selected
component (line card or port).
SysLog Opens a window that lists the latest system
messages that occurred on the switch.
Threshold Manager Opens the Threshold Manager dialog box that
provides statistical monitoring and event reporting
for the switch.
VSANs Opens the VSAN dialog box that provides VSAN
configuration for the switch.
Dialog Boxes
SNMP Users and
Roles
Save Configuration Saves the current running configuration to the
Copy Copies configuration file between server and
Toggle
FICON/Interface
Port Labels
Help Accesses online help for Device Manager.
If a toolbar icon is selected, a dialog box may open that allows configuration of the selected feature. The
dialog box may include table manipulation icons. See the “Information Pane” section on page 3-9 for
descriptions of these icons.
Opens the SNMP configuration dialog box for
SNMP users and roles.
startup configuration.
switch
Toggles the FICON and interface port labels.
Tabs
Click the Device tab on the Device Manager main window to see a graphical representation of the switch
chassis and components.
Click the Summary tab on the Device Manager main window to see a summary of active interfaces on
a single switch, as well as Fibre Channel and IP neighbor devices. The Summary View also displays port
speed, link utilization, and other traffic statistics. There are two buttons in the upper left corner of the
Summary View tab used to monitor traffic. To monitor traffic for selected objects, click the Monitor
OL-6965-03, Cisco MDS SAN-OS Release 2.x
Cisco MDS 9000 Family Fabric Manager Configuration Guide
4-5
Page 90

Chapter 4 Device Manager
Using Device Manager
Send documentation comments to mdsfeedback-doc@cisco.com.
Selected Interface Traffic Util% button. To display detailed statistics for selected objects, click the
Monitor Selected Interface Traffic Details button. You can set the poll interval, the type or Rx/Tx
display, and the thresholds.
Legend
The legend at the bottom right of the Device Manager indicates port status, as follows:
Colors
• Green—The port is up.
• Brown—The port is administratively down.
• Red—The port is down or has failed.
• Amber—The port has a minor fault condition.
• Gray—The port is unreachable.
Labels
• X—Link Failure
• E—ISL
• TE—Multi-VSAN ISL
• F—Host/Storage
• FL—F Loop
• I— iSCSI
4-6
Cisco MDS 9000 Family Fabric Manager Configuration Guide
OL-6965-03, Cisco MDS SAN-OS Release 2.x
Page 91

Chapter 4 Device Manager
Using Device Manager
Send documentation comments to mdsfeedback-doc@cisco.com.
• SD—Span Destination
• CH—Channel
• CU—Control Unit
Note For a detailed table describing the legend, see the “There is a red/orange/dotted line through the switch.
What’s wrong?” section on page 36-14.
Supervisor and Switching Modules
In the Device View, you can right-click on an object and get information on it, or configure it. If you
right-click on a module, the menu shows the module number and gives you the option to configure or
reset the module. If you right-click on a port, the menu shows the port number and gives you the option
to configure, monitor, enable ,disable, set beacon mode, or perform diagnostics on the port.
Tip You can select multiple ports in Device Manager and apply options to all the selected ports at one time.
Either select the ports by clicking the mouse and dragging it around them, or hold down the Control key
and click on each port.
To enable or disable a port, right-click the port and click Enable or Disable from the pop-up menu. To
enable or disable multiple ports, drag the mouse to select the ports and then right-click the selected ports.
Then click Enable or Disable from the pop-up menu.
To manage trunking on one or more ports, right-click the ports and click Configure. In the dialog box
that appears, right-click the current value in the Trunk column and click nonTrunk, trunk, or auto from
the pull-down list.
To create PortChannels using Device Manager, click PortChannels from the Interface menu. For
detailed instructions, see Chapter 17, “PortChannel Configuration.” You can also use Fabric Manager to
conveniently create a PortChannel.
Note To create a PortChannel, all the ports on both ends of the link must have the same port speed, trunking
type, and administrative state.
Context Menus
Context menus are available in both Device Manager views by right-clicking on a device or table.
From Device View:
• Device—Right-click a system, module, or power supply to bring up a menu that gives you the option
to configure or reset the device.
• Port— Right-click a port to bring up a menu that shows you the number of the port you have clicked,
and to give you the option to configure, monitor, enable, disable, set beacon mode, or perform
diagnostics on the port.
OL-6965-03, Cisco MDS SAN-OS Release 2.x
Cisco MDS 9000 Family Fabric Manager Configuration Guide
4-7
Page 92

Chapter 4 Device Manager
Setting Device Manager Preferences
Send documentation comments to mdsfeedback-doc@cisco.com.
From Summary View:
• Table— Right-click the table header to show a list of which columns to display in that table:
Interface, Description, VSANs, Mode, Connected To, Speed (Gb), Rx, Tx, Errors, Discards, and
Log. Click the Description field to bring up the appropriate configuration dialog box for the port
type.
Setting Device Manager Preferences
To set your preferences for the behavior of the Device Manager application, choose Device >
Preferences from the Device menu. You can set the following preferences:
• Retry requests x time(s) after x sec timeout—Allows you to set the retry request values. The default
settings are 1 time after a 5-second timeout.
• Enable status polling every x secs—Allows you to set the status polling value. The default setting is
enabled (checked) with a time of 40 seconds.
• Trace SNMP packets in Message Log—Allows you to set whether Device Manager traces SNMP
packets and logs the trace. The default setting is disabled (unchecked).
• Register for Events after Open, listen on Port 1163—Allows you to register this switch so that events
are logged once you open Device Manager. The default setting is enabled (checked).
• Confirm Deletion—Displays a popup confirmation when you delete part of your configuration using
Device Manager. The default setting is enabled (checked).
• Show WorldWideName (WWN) Vendor—Displays the world wide name vendor name in any table
or listing displayed by Device Manager. If Prepend is checked, the name is displayed in front of the
IP address of the switch. If Replace is checked, the name is displayed instead of the IP address. The
default setting is enabled (checked) with the Prepend option.
• Show Timestamps as Date/Time—Displays timestamps in the date/time format. If this preference is
not checked, timestamps are displayed as elapsed time. The default setting is enabled (checked).
• Telnet Path—Sets the path for the telnet.exe file on your system. The default is telnet.exe, but you
need to browse for the correct location.
Note If you browse for a path or enter a path and you have a space in the pathname (for example,
c:\program files\telnet.exe, then the path will not work. To get the path to work, manually
place quotes around it (for example, "c:\program files\telnet.exe").
• Use Secure Shell instead of Telnet—Specifies whether to use SSH or Telnet when using the CLI to
communicate with the switch. If enabled, you must specify the path to your SSH application. The
default setting is disabled.
• CLI Session Timeout x secs (0= disable)—Specifies the timeout interval for a CLI session. Enter 0
to disable (no timeout value). The default setting is 30 seconds.
• Show Tooltips in Physical View—Determines whether tooltips are displayed in Physical (Device)
View. The default setting is enabled (checked).
• Label Physical View Ports With:—Specifies the type of label to assign to the ports when you are in
Physical (Device) View. The options are FICON and Interface. The default setting is Interface.
4-8
• Export Table—Specifies the type of file that is created when you export a table using Device
Manager. The options are Tab-Delimited or XML. The default setting is Tab-Delimited.
Cisco MDS 9000 Family Fabric Manager Configuration Guide
OL-6965-03, Cisco MDS SAN-OS Release 2.x
Page 93

Send documentation comments to mdsfeedback-doc@cisco.com.
Fabric Manager Web Services
With Fabric Manager Web Services you can monitor Cisco MDS switch events, performance, and
inventory from a remote location using a web browser. This chapter contains the following sections:
• Fabric Manager Web Services Overview, page 5-1
• Installing Fabric Manager Web Services, page 5-4
• Launching and Using Fabric Manager Web Services, page 5-7
Fabric Manager Web Services Overview
Using Fabric Manager Web Services, you can monitor MDS switch events, performance, and inventory,
and perform minor administrative tasks.
Fabric Manager Web Services provides the following features:
CHA P TER
5
• Summary and drill down reports—The Performance Manager summary report provides a high-level
view of your network performance. These reports list the average and peak throughput and provides
hot-links to additional performance graphs and tables with additional statistics. Both tabular and
graphical reports are available for all interconnections monitored by Performance Manager.
Performance Manager also analyzes daily, weekly, monthly and yearly trends. These reports are
only available if you create a collection using Performance Manager and start the collector. See the
“Historical Performance Monitoring” section on page 33-2.
• Zero maintenance database for statistics storage—No maintenance is required to maintain
Performance Manager’s round-robin database, because its size does not grow over time. At
prescribed intervals the oldest samples are averaged (rolled-up) and saved. A full two days of raw
samples are saved for maximum resolution. Gradually the resolution is reduced as groups of the
oldest samples are rolled up together.
OL-6965-03, Cisco MDS SAN-OS Release 2.x
Cisco MDS 9000 Family Fabric Manager Configuration Guide
5-1
Page 94
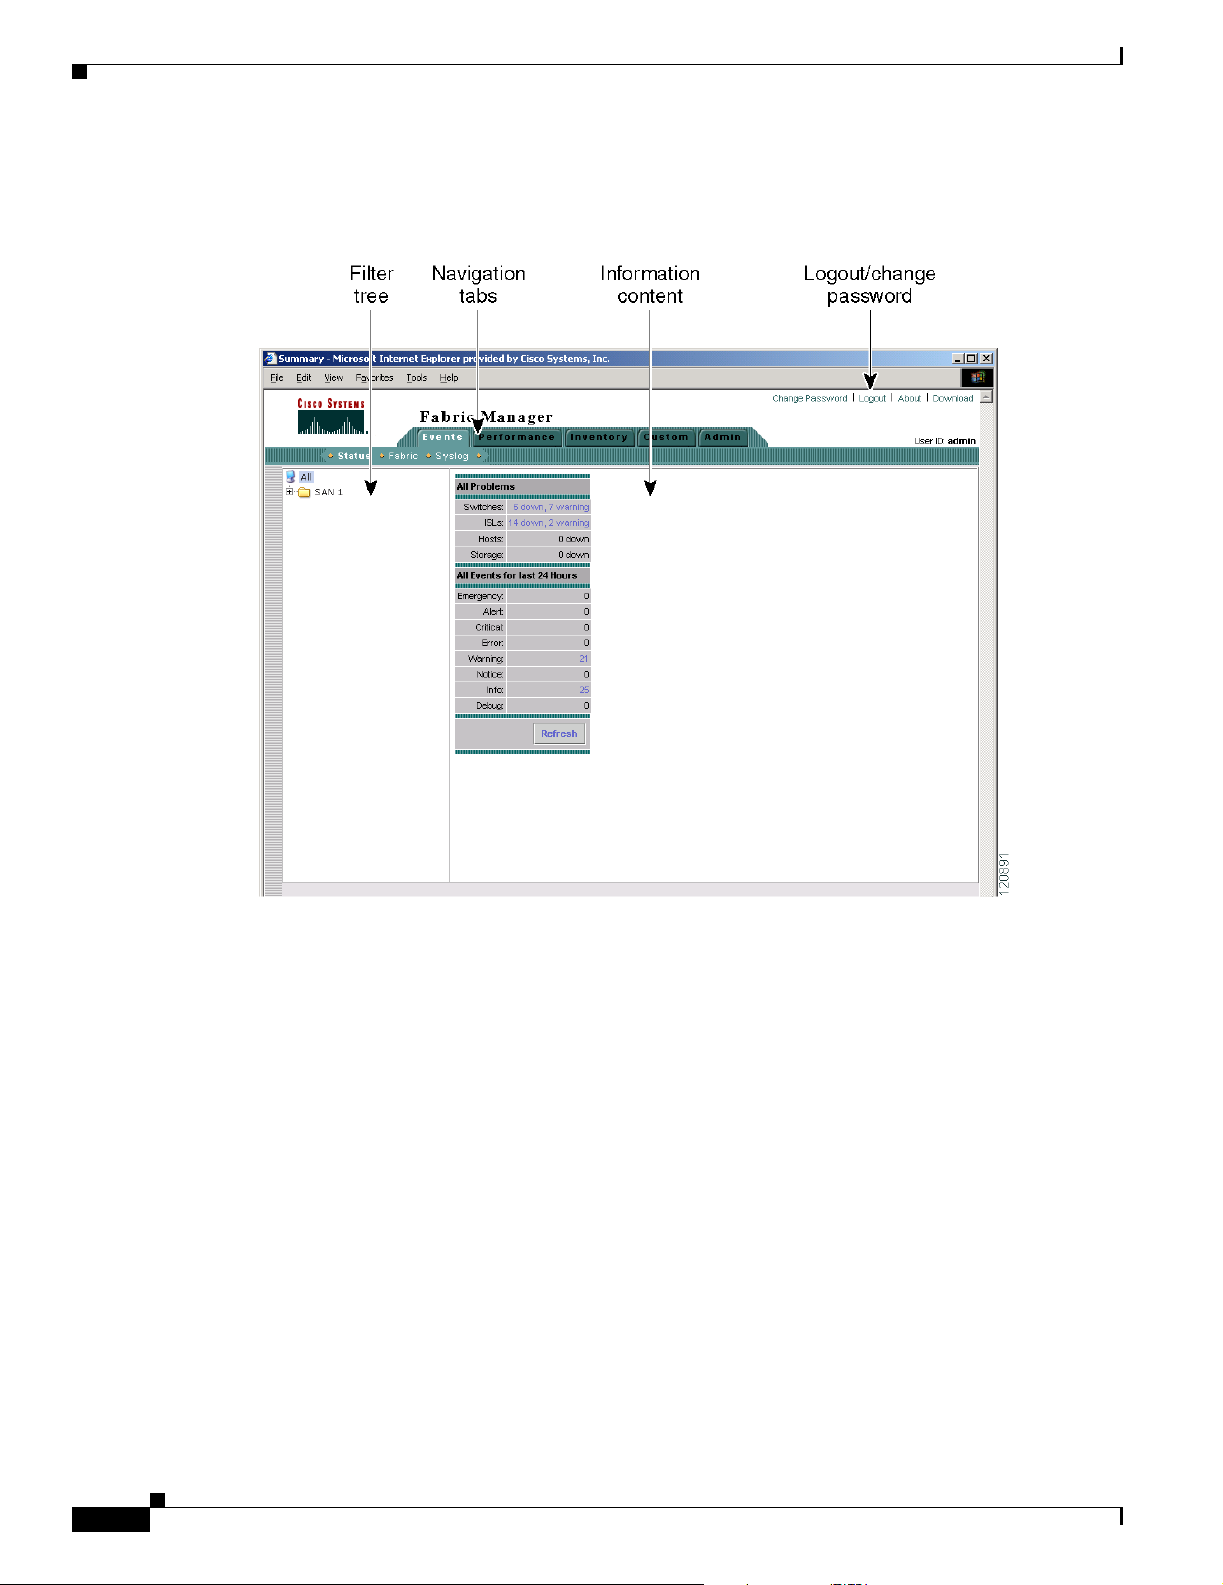
Chapter 5 Fabric Manager Web Services
Fabric Manager Web Services Overview
Send documentation comments to mdsfeedback-doc@cisco.com.
Fabric Manager Web Services displays in a web browser as shown in Figure 5-1.
Figure 5-1 Fabric Manager Web Services.
Filter Tree
Cisco MDS 9000 Family Fabric Manager Configuration Guide
5-2
This section contains the following features:
• Filter Tree, page 5-2
• Performance, page 5-3
• Inventory, page 5-3
• Custom, page 5-4
• Admin, page 5-4
Fabric Manager Web Services uses a filter navigation tree on the left pane to control the scope of the
features in Fabric Manager Web Services. The filter tree expands or collapses based on clicking the + or
- icons. Select the scope you want to access by expanding or collapsing the filter tree and then clicking
on the file or folder that represents your desired scope. You can select All, or a specific SAN, fabric or
VSAN from the filter tree in the left pane. The features accessible from the tabs are limited to the scope
of what you select in the filter tree.
OL-6965-03, Cisco MDS SAN-OS Release 2.x
Page 95

Chapter 5 Fabric Manager Web Services
Fabric Manager Web Services Overview
Send documentation comments to mdsfeedback-doc@cisco.com.
Events
The Events tab shows events and issues for the selected items, persistent across user sessions.
The Events tab contains the following subtabs:
• Summary—Shows a summary of events and problems for All SANs, or a selected SAN, fabric, or
switch. You can click on any of the blue links for more information about that item.
• Fabric—Shows a detailed list of events and hardware, or accounting. You can filter these events by
severity, date, and type of event.
• Syslog—Shows a detailed list of system messages. You can filter these events by severity, date, and
type of event.
Performance
The Performance tab shows an overview of the average throughput and link utilization of SAN
components. You see pie charts for the throughput and utilization. You can click on a pie chart to view
a table of the data. In these tables, clicking on a blue link will display a graph of that data, if applicable.
The Filter drop-down menu at the top right of the screen allows you to filter the data based on various
periods of time.
The Performance tab contains the following subtabs:
• Summary—Shows the total utilization and throughput in summary form.
Inventory
• Snapshots—Creates a snapshot of the historical performance at the time you generate the report.
• End Devices—Shows a detailed list of end device (host or storage) port traffic and errors.
• ISLs—Shows a detailed list of ISL traffic and errors.
• Flows —Shows a detailed list of host-to-storage traffic.
• Traffic Analyzer—Shows a summary of SPAN ports configured in the SAN and any Traffic
Analyzers configured.
Note Performance Manager shows statistics for fabrics that you have configured collections for using the
Collection Wizard. See the “Historical Performance Monitoring” section on page 33-2.
The Inventory tab shows an inventory of the selected SAN, fabric, or switch. You can export this
information to an ASCII file in comma-separated value format, that can be read by applications such as
Microsoft Excel. You can set the number of rows and columns per page.
The Inventory tab contains the following subtabs:
• Summary—Shows VSANs, switches, ISLs, and ports.
• VSANs—Shows details about VSANs.
• Licenses—Shows details about the licenses in use in the fabric.
• Modules—Shows details for MDS switching and services modules, fans, and power supplies.
• End Devices—Shows the host and storage ports.
OL-6965-03, Cisco MDS SAN-OS Release 2.x
Cisco MDS 9000 Family Fabric Manager Configuration Guide
5-3
Page 96

Chapter 5 Fabric Manager Web Services
Installing Fabric Manager Web Services
Send documentation comments to mdsfeedback-doc@cisco.com.
• ISLs—Shows the Inter-Switch Links.
• Zones—Shows the active zone members (including those in inter-VSAN zones).
Custom
The Custom tab allows you to create customized reports based on the historical performance, events, and
inventory information gathered by Fabric Manager Server. You can create aggregate reports with
summary and detailed views. You can also view previously saved reports.
The Custom tab contains the following subtabs:
• View—Views previously saved reports.
• Generate—Generates a custom report based on the selected report template.
• Edit—Edits an existing report template.
• Create—Creates a report template, allowing you to select any combination of events, performance
categories, and inventory.
See the “Creating Custom Report Templates” section on page 5-10.
Admin
The Admin tab allows you to perform minor administrative and configuration tasks on the Fabric
Manager Server sending data to your web client.
The Admin tab contains the following subtabs:
• Status—Displays the status of, and allows you to start and stop the Database Server, Fabric Manager
Server, and Performance Collector services on your server. You should only need to restart services
if something is not working properly, or if too large a percentage of system resources are being
consumed.
• Configure—Allows you to configure various parameters for Fabric Manager Server.
• Logs—Allows you to view all the logs from the various services running on the Fabric Manager
Server.
• Web Users—Allows you to configure Fabric Manager Web Services local or RADIUS user
authentication.
• Events—Allows you to view the configuration settings for traps and syslog messages.
Note If you see a database file lock error in the database log, you can fix it by shutting down and restarting
the database server using the Web Client.
Installing Fabric Manager Web Services
If you are installing the Fabric Manager Web Services software for the first time, or if you want to update
or reinstall the software, you access the supervisor module of the switch using a web browser. Install
Fabric Manager Web Services on the same workstation where you installed Fabric Manager Server.
You must install Fabric Manager Web Services to view Performance Manager reports through a web
browser.
Cisco MDS 9000 Family Fabric Manager Configuration Guide
5-4
OL-6965-03, Cisco MDS SAN-OS Release 2.x
Page 97

Chapter 5 Fabric Manager Web Services
Installing Fabric Manager Web Services
Send documentation comments to mdsfeedback-doc@cisco.com.
For switches running Cisco MDS 9000 FabricWare, you need to install the Fabric Manager Web Services
software from the CD-ROM included with your switch, or download Fabric Manager from Cisco.com.
To install Fabric Manager Web Services from the CD-ROM, navigate to the Fabric Manager installation
notes and follow the directions.
To download the software from from Cisco.com, go to the following website:
http://cisco.com/cgi-bin/tablebuild.pl/mds-fm
To download and install the software on your workstation, follow these steps:
Step 1 Optionally, enter the IP address or host name of the supervisor module running Cisco MDS SAN-OS in
the Location or Address field of your browser. You see the installation page displayed by the HTTP
server of the supervisor module.
When you connect to the server for the first time, it checks to see if you have the correct Sun Java Virtual
Machine version installed on your workstation. If you do not have the correct version installed, a link is
provided to the appropriate web page on the Sun Microsystems website so you can install it.
a. Click the Sun Java Virtual Machine software link (if required) to install the software.
b. Using the instructions provided by the Sun Microsystems website, reconnect to the supervisor
module by reentering the IP address or host name in the Location or Address field of your browser.
Note Fabric Manager requires Java version 1.4(x). We recommend Java version 1.4.2. To change
the Java Runtime Environment (JRE) version, start Java Web Start and set the Java
preferences.
Step 2 Click the Fabric Manager Web Services installation link. You see a prompt asking for permission to
install the application on your workstation.
Step 3 Click Ye s to run the installer, which detects the installed version of the software, and prompts for
upgrades/downgrades and other options if applicable.
Note If TCP port 80 is in use, Fabric Manager Web Services checks port 8080 next. If that port is also
in use, Fabric Manager Web Services uses the next available port. You can set the TCP port that
you want Fabric Manager Web Services to use during the installation process.
Unless you specify a different directory on a Windows PC, the software is installed in the default location
of C:\Program Files\Cisco Systems\MDS 9000. A Cisco MDS 9000 program group is created under
Start > Programs. This program group contains shortcuts to Fabric Manager and Device manager.
On a UNIX (Solaris or Linux) machine, the installation path is /usr/local/cisco_mds9000. If this directory
is not writable by the user, which is the case for non-root users, the default is set to $HOME/cisco_mds9000.
Shell scripts are created in the bin directory.
Note On a Windows PC, you install Fabric Manager Web Services as a service. This service can then be
administered using the Services Panel from the Windows Control Panel. By default the Fabric Manager
Web Services automatically starts when the workstation is rebooted. You can change this behavior by
modifying the properties in the Services Panel.
OL-6965-03, Cisco MDS SAN-OS Release 2.x
Cisco MDS 9000 Family Fabric Manager Configuration Guide
5-5
Page 98

Chapter 5 Fabric Manager Web Services
Installing Fabric Manager Web Services
Send documentation comments to mdsfeedback-doc@cisco.com.
Using Fabric Manager Web Services with SSL
Fabric Manager Web Services uses TCP port 80 by default. If you want to install SSL certificates and
use Fabric Manager Web Services over HTTPS (using TCP port 443 or another custom port), you need
a certificate for each external IP address that accepts secure connections. You can purchase these
certificates from a well-known Certificate Authority (CA).
To modify Fabric Manager Web Services to use SSL, follow these steps:
Step 1 Stop Fabric Manager Web Services if you have already launched it. If you installed this on Windows,
you can stop the service using Windows Services under Administrative Tools.
Step 2 Open \tomcat\conf\server.xml from the directory that you installed Fabric Manager Web Services, using
a text editor. You see the following lines in the beginning after some copyright information.:
<Connector className="org.apache.catalina.connector.http.HttpConnector"
port="80" minProcessors="5" maxProcessors="75"
enableLookups="false" redirectPort="8443"
acceptCount="10" debug="0" connectionTimeout="60000"/>
<!-- Define an SSL HTTP/1.1 Connector on port 8443 -->
<!- <Connector className="org.apache.catalina.connector.http.HttpConnector"
port="8443" minProcessors="5" maxProcessors="75"
enableLookups="true"
acceptCount="10" debug="0" scheme="https" secure="true">
<Factory className="org.apache.catalina.net.SSLServerSocketFactory"
clientAuth="false" protocol="TLS"/>
</Connector>
-->
Step 3 Comment the first <Connector> element and uncomment the second one. Note that changes in port from
8443 to 443 and the addition of keystore and keypass. Your file should look like the following example:
<!- <Connector className="org.apache.catalina.connector.http.HttpConnector"
port="80" minProcessors="5" maxProcessors="75"
enableLookups="false" redirectPort="8443"
acceptCount="10" debug="0" connectionTimeout="60000"/>
-->
<!-- Define an SSL HTTP/1.1 Connector on port 8443 -->
<Connector className="org.apache.catalina.connector.http.HttpConnector"
port="443" minProcessors="5" maxProcessors="75"
enableLookups="true"
acceptCount="10" debug="0" scheme="https" secure="true">
<Factory className="org.apache.catalina.net.SSLServerSocketFactory"
clientAuth="false" protocol="TLS"
keystoreFile="C:\Program Files\Cisco Systems\MDS 9000\keystore"
keystorePass="changeit"/>
</Connector>
Step 4 Save this file.
Step 5 Restart Fabric Manager Web Services.
5-6
Cisco MDS 9000 Family Fabric Manager Configuration Guide
OL-6965-03, Cisco MDS SAN-OS Release 2.x
Page 99

Chapter 5 Fabric Manager Web Services
Launching and Using Fabric Manager Web Services
Send documentation comments to mdsfeedback-doc@cisco.com.
Launching and Using Fabric Manager Web Services
Before you can use Fabric Manager Web Services to monitor a switch, the service must be started on the
server you are connecting through. The browser does not have to be on the same workstation where
Fabric Manager Web Services is installed.
To launch Fabric Manager Web Services, follow these steps:
Step 1 If you are on the same workstation where you installed Fabric Manager Web Services, then open your
browser and in the Location field enter http://localhost:PORT. Enter your port number if you specified
a different port during installation. You can omit the port number if you used port 80 by default.
If you are on a different workstation from where you installed Fabric Manager Web Services, then open
your browser and in the location field enter http://<yourServerAddress>:PORT, where
<yourServerAddress> is the address where you installed Fabric Manager Web Services, and PORT is 80
by default. Enter your port number if you specified a different port during installation.
Tip Select the Windows Start > Control Panel > Services to verify that Fabric Manager Web
Services is started or start Fabric Manager Web Services.
On a UNIX workstation, use the following command:
$ /usr/local/cisco_mds9000/bin/FMWebClient.sh status
You see the login screen for Fabric Manager Web Services (see Figure 5-2). The text field at the bottom
shows the Message of the Day from the server you log into.
Figure 5-2 Fabric Manager Web Services Login Screen
OL-6965-03, Cisco MDS SAN-OS Release 2.x
Cisco MDS 9000 Family Fabric Manager Configuration Guide
5-7
Page 100
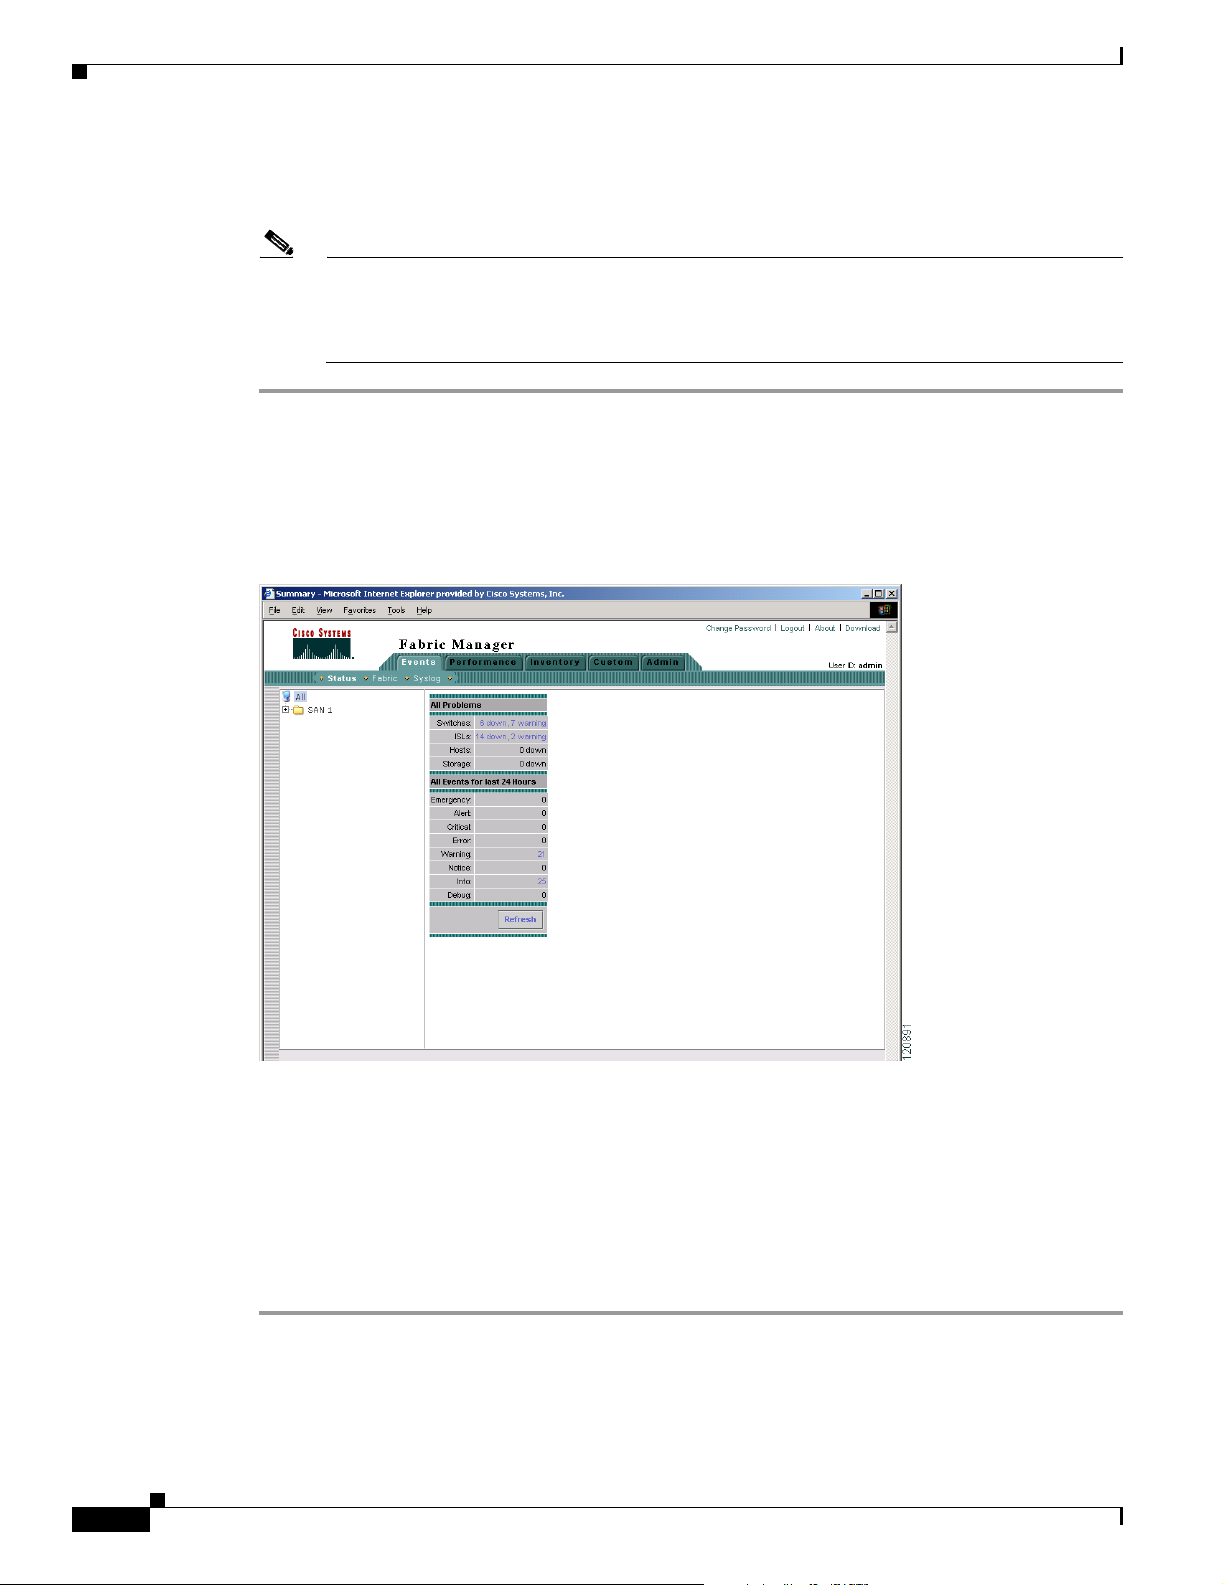
Chapter 5 Fabric Manager Web Services
Launching and Using Fabric Manager Web Services
Send documentation comments to mdsfeedback-doc@cisco.com.
Step 2 Enter your user name and password.
Step 3 Click the Login button.
Note When attempting to log in, you may see “No valid ID - server cannot find ID.” This happens if
no discovery is done for that fabric using FM Server, so no username or password is recorded.
To resolve this issue, open Fabric Manager and discover the fabric. Performance Manager will
record the username and password. Then log in to Fabric Manager Web Services again.
After launching Fabric Manager Web Services, you see the initial screen, which is the Events > Summary
screen (see Figure 5-3). Fabric Manager Web Services polls the Fabric Manager Server database to
display the managed devices in the left pane.
Figure 5-3 Events > Summary Screen
Monitoring Fabrics from Fabric Manager Web Services
Fabric Manager Web Services reports information gathered by Fabric Manager server on any fabrics
known to Fabric Manager server.
To start or stop monitoring a fabric from Fabric Manager server using Fabric Manager Web Services,
follow these steps:
Step 1 Choose Admin > Configure. You see the Configuration options
Step 2 Click Fabrics from the left navigation pane. You see the list of fabrics monitored by Fabric Manager
server.
Step 3 Select a fabric and click Stop Monitoring to discontinue data collection for that fabric.
Cisco MDS 9000 Family Fabric Manager Configuration Guide
5-8
OL-6965-03, Cisco MDS SAN-OS Release 2.x
 Loading...