


user guide

User Guide |
Table of Contents |
|
|
|
|
|
|
|
Contents
Chapter 1: Valet.. . . . . . . . . . . . . . . . . . . . . . . . . . . . . . . . . . . . . . . . . . . . . . . . . . . . . . 1
Chapter 2: Cisco Connect.. . . . . . . . . . . . . . . . . . . . . . . . . . . . . . . . . . . . . . . . . . . . . 4
Chapter 3: Advanced Configuration. . . . . . . . . . . . . . . . . . . . . . . . . . . . . . . . . .14
Appendix A: Troubleshooting .. . . . . . . . . . . . . . . . . . . . . . . . . . . . . . . . . . . . . . .36
Appendix B: Specifications.. . . . . . . . . . . . . . . . . . . . . . . . . . . . . . . . . . . . . . . . . .37
|
i |

User Guide |
Chapter 1: Valet |
|
|
|
|
|
|
|
Chapter 1: Valet
Thank you for choosing a Cisco Valet wireless hotspot. This Quick Reference Guide covers both the Valet and Valet Plus models. Valet will be used as a general reference to both models and all details in this Quick Reference Guide apply to both models unless Valet Plus is noted.
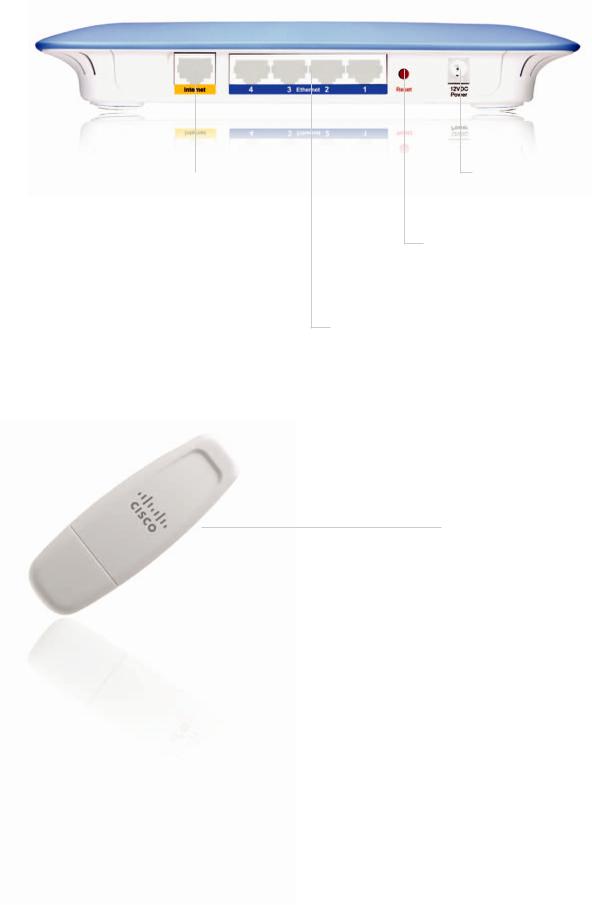
Top
LEDs |
(1-4) light up once |
the Valet is |
connected |
to a device using a network (Ethernet) |
cable. The |
||
LED |
flashes when there is |
activity over |
that port. |
Valet Plus lights up green when connected to a device at gigabit speed or blue when connected to a device at 10/100 speed.
The Wi-Fi Protected Setup Button doesn’t need to be used if you use the Easy Setup Key to connect devices to your network.
If you have client devices, such as wireless adapters, that support Wi-Fi Protected Setup™, then you can use the Wi-Fi Protected Setup button to automatically configure wireless security for your wireless network(s)..
To use Wi-Fi Protected Setup, refer to “Wi-Fi Protected Setup” on page 21..
The Power LED lights up when the Valet |
||
is powered on. It is normal for this to flash |
||
during startup.. |
|
|
The Internet LED |
lights up |
when connected |
to the Internet and |
flashes to |
indicate activity. |
Valet Plus lights up green when connected to a device at gigabit speed or blue when connected to a device at 10/100 speed..
The Wireless LED lights up when wireless is on. It flashes when the Valet sends or receives data over the wireless network..
1
User Guide |
Chapter 1: Valet |
|
|
|
|
|
|
|
Back
The Internet Port connects to the network (Ethernet) cable from your Internet connection. In most cases you will be connecting one end of the network cable to the Ethernet port on your cable or DSL modem and the other end to the Internet port on your Valet.
Easy Setup Key
The Power Port connects the power adapter..
The Reset Button resets the Valet to its factory default settings when held for approximately ten seconds..
Ethernet Ports connect the Valet to computers or other devices that have Ethernet ports such as gaming consoles, HDTVs, Blu-ray disc players, or printers using network (Ethernet) cables.
The Easy Setup Key is used to install the Cisco Connect software on your computer(s). Be sure to store it in a safe place so that you can add additional computers in the future..
2
|
/ |
|
Chapter 1: Valet |
|
|
|
|||
|
|
|
|
|
|
|
|
|
|
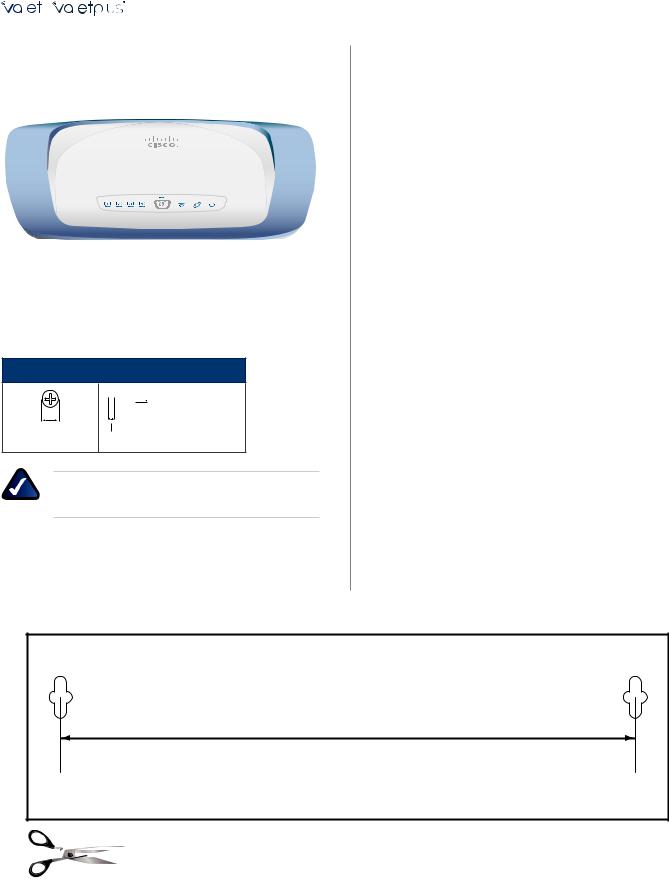
Horizontal Placement
The Valet has four rubber feet on its bottom panel. Place the Valet on a level surface near an electrical outlet..
Wall-Mounting Placement
The Valet has two wall-mount slots on its bottom panel. The distance between the slots is 152 mm.
Two screws are needed to mount the Valet..
Suggested Mounting Hardware


 2..5-3..0 mm
4-5 mm |
1-1..5 mm |
NOTE: Cisco is not responsible for damages incurred by unsecured wall-mounting hardware.
Follow these instructions:
1.Determine where you want to mount the Valet. Make sure that the wall you use is smooth, flat, dry, and sturdy. Also make sure the location is within reach of an electrical outlet..
2.Drill two holes into the wall. Make sure the holes are 152 mm apart..
3.Insert a screw into each hole and leave 3 mm of its head exposed..
4.Position the Valet so the wall-mount slots line up with the two screws..
5.Place the wall-mount slots over the screws and slide the Valet down until the screws fit snugly into the wall mount slots..
Wall-Mounting Template
152 mm
Print this page at 100% size.
Cut along the dotted line, and place on the wall to drill precise spacing..
3

User Guide |
Chapter 2: Cisco Connect |
|
|
|
|
|
|
|
Chapter 2: Cisco Connect
During installation, the setup software installs the Cisco Connect software on your computer. Cisco Connect offers options to connect additional computers or devices to your Valet and allows you to modify the Valet’s settings..
Installation
To install the Valet:
1.Insert the Easy Setup Key into a USB port on your computer..
Windows XP
a.Go to Start > My Computer and select Easy Setup Key..
b.Double-click Connect.exe..
Mac OS X
a.Double-click the USB drive on your desktop..
b.Double-click Connect..
3. Read the Software End User License Agreement. To accept the agreement and continue with the installation, click Next..
Insert Easy Setup Key
2. Click Connect to your Cisco Valet..


 Always do this for software a
AutoPlay

 Connect your Cisco Install or run program


 Always do this for software and games:
Install or run program |
Connect to your Cisco Valet |
Published by Cisco Consumer Products LLC |
|
Connect to your Cisco Valet |
Published by Cisco Consume |
General options |
Open folder to view files using Windows Explorer
Speed up my system
using Windows ReadyBoost General options
Set AutoPlay defaults in Control Panel
Open folder to view files using Windows Explorer
Speed up my system
Connect to your Cisco Valet
If you do not see this, open the Easy Setup Key folder and double-click Connect. To do so, perform the following steps for your specific operating system:
Windows 7
a.Go to Start > Computer..
b.Double-click Easy Setup Key in the list of available drives..
c.Double-click Connect.exe..
Windows Vista
a.Go to Start > Computer..
b.Double-click Easy Setup Key in the list of available drives..
c.Double-click Connect.exe..
License Agreement
4. The connection steps are displayed..
Connection Overview
a.Plug the power cord into the Power port on the back of the Valet..
|
|
|
|
|
|
|
|
|
|
|
|
|
|
|
|
|
|
|
|
|
|
|
|
|
|
|
|
|
|
|
|
|
|
|
|
|
|
|
|
|
|
|
|
|
|
|
|
|
|
|
|
|
|
|
|
|
|
|
|
|
|
|
|
|
|
|
|
|
|
|
|
|
|
|
|
|
|
|
|
|
Internet |
|
4 |
|
|
|
|
|
3 Ethernet 2 |
1 |
|
Reset |
12VDC |
||||||||||||||
|
|
|
|
|
|
|
|
|
|
|
|
|
|
|
|
|
|
|
|
|
|
|
|
|
|
Power |
Connect to Power Port
4

User Guide |
Chapter 2: Cisco Connect |
|
|
|
|
|
|
|
b. Plug the power adapter into an electrical outlet..
6.When you see the Congratulations screen, your computer is connected to the Internet. Remove your Easy Setup Key and keep it in a safe place. You can use it to connect additional computers to your Valet’s local network. Click OK..
Connect to Electrical Outlet
c.Plug one end of a network cable into the yellow port labeled Internet on the back of the Valet.
The other end of the network cable should plug in to your broadband modem or existing gateway/ router. Click Next..
Internet |
4 |
3 Ethernet 2 |
1 |
Reset |
12VDC |
|
|
|
|
|
Power |
Connect Network Cable
NOTE: You can view detailed connection steps by clicking  in the setup software..
5. Please wait while your Valet is being set up..
Please Wait
Installation is Complete
NOTE: If you have any trouble during the
installation |
process, |
refer |
to |
the |
FAQs in |
the setup |
software |
or |
use |
a |
computer |
with an active Internet connection to visit www.thevalet.com/support..
Main Menu
The main menu offers four options: Computers and Devices, Parental Controls, Guest Access, and Valet Settings. To select an option, click on it..
Main Menu
Local Access versus Guest Access
You can connect computers or devices to your Valet by giving them local access (Computers and Devices option) or Guest Access (Guest Access option).
Computers and devices with local access will have access to the Internet and to other devices on your local network, including shared computers and printers which are connected to the Valet. Local access can be given to a wired or wireless device. Refer to “Computers and Other Devices” on page 6 for more information..
5
User Guide |
Chapter 2: Cisco Connect |
||
|
|
|
|
|
|
|
|
|
|
|
|
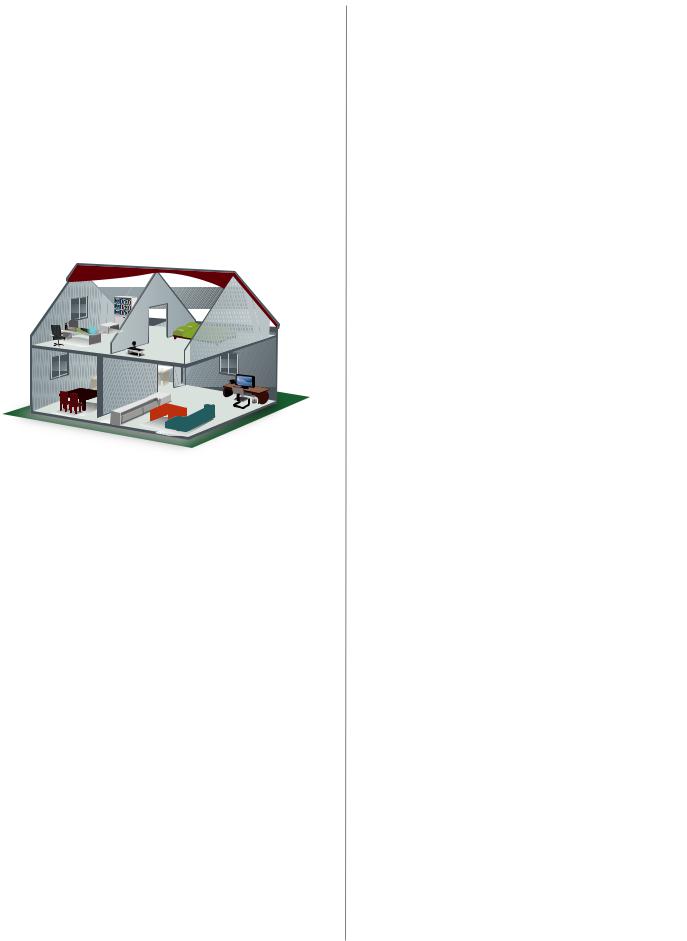
Guest Access allows you to provide guests visiting your home with Internet access. Your guests will not have access to your other computers or personal data. Provide your guest with the Guest Network name and password. Guest computers must connect to your network using a wireless network connection. Refer to “Main Menu – Guest Access” on page 6 and “Guest Access Settings” on page 11 for more information.
The following diagram shows a typical example of how local access and guest access are used in the same home..
Guest Access versus Local Access Diagram
Internet
Printer |
Family Laptop |
Modem
 Valet
Valet
Guest Laptop
 Guest Access (Internet Access Only)
 Local Access
Main Menu – Computers and Devices
Use this option to connect other computers or devices to your Valet’s local network, one at a time.
There is(are) x device(s) connected to your Valet The number of devices connected to the Valet is displayed.
Add device To connect another computer or device to the Valet, click Add device and go to “Computers and Other Devices” on page 6..
Main Menu – Parental Controls
Parental controls restrict Internet access for up to five computers. For the computers you select, you can block or limit Internet access to specific times. You can also block specific websites.
Parental controls restrictions are being applied to x device(s) The number of devices with parental controls restrictions is displayed..
Change To enable parental controls or change settings, click Change and go to “Parental Controls” on page 9..
Main Menu – Guest Access
The guest network provides Internet access only. To grant Internet access to friends or family, provide the guest network name and password displayed on this screen..
NOTE: Guest Access provides Internet access only; it does not provide access to your local network and its resources or your personal information. For example, the guest computer cannot print to a printer on the local network or access files on a computer on the local network. Guest access helps minimize exposure of your local network and your family’s private information..
Guests can connect to x-guest using the password xyz When a guest wants Internet access in your home, have the guest do the following:
1.Connect to the wireless guest network, which is the name of your wireless network followed by -guest.
2.Open a web browser..
3.On the login screen, enter the guest access password and click Login..
Change To disable guest access or change settings, click Change and go to “Guest Access Settings” on page 11..
Main Menu – Valet Settings
Use this option to personalize the Valet’s settings.. Valet name is x The name of the Valet is displayed..
Safe Web Surfing Displays the on/off status of the Safe Web Surfing option..
Change To change settings, click Change and go to “Valet Settings” on page 12..
Computers and Other Devices
The computers or devices you connect will have access to the Internet and your local network, including computers or other devices, such as a printer, connected to the Valet. If you have a guest visiting your home, you can provide Internet access only (no access to your local network) through the guest access feature. Refer to “Guest Access Settings” on page 11 for more information..
Computers and Other Devices
Computer Click this option to connect another computer in your home. Go to “Computer” on page 7..
6
User Guide |
Chapter 2: Cisco Connect |
|
|
|
|
|
|
|
Wireless printer Click this option to connect a wireless printer. Go to “Wireless printer” on page 8..
Other devices Click this option to connect a device that is not a computer, such as a smartphone or game console. Go to “Device” on page 9..
Computer
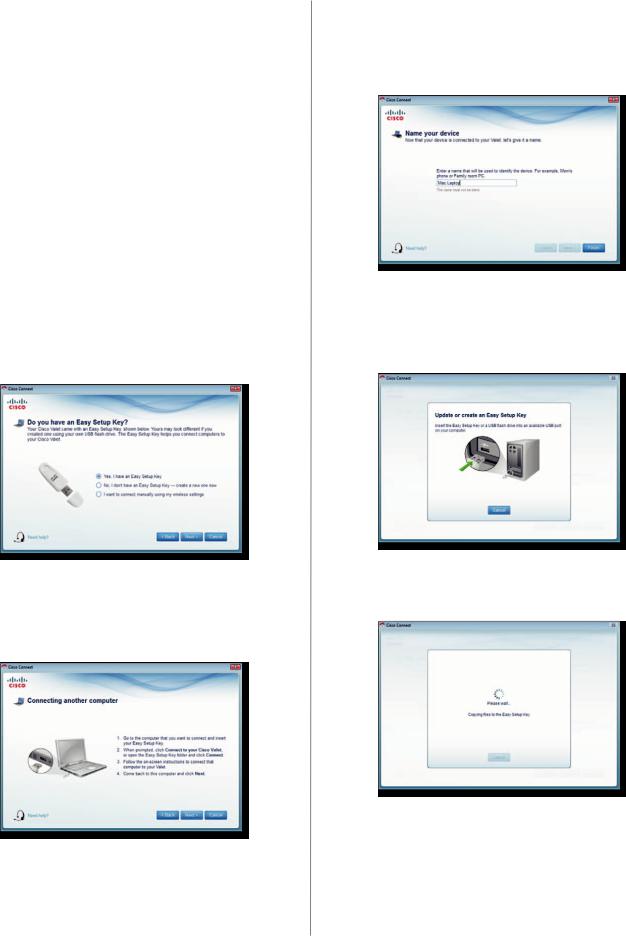
Your Cisco Valet came with an Easy Setup Key. The Easy Setup Key holds the settings for the Valet. There are three options available when you choose to add a computer..
••Yes, I have an Easy Setup Key If you already have an Easy Setup Key, select this option. Click Next and go to “Connect with the Easy Setup Key” on page 7..
••No, I don’t have an Easy Setup Key — create a new one now If you want to create or update an Easy Setup Key, select this option. Click Next and go to “Update or create an Easy Setup Key” on page 7.
••I want to connect manually using my wireless settings If you want to connect manually (without an Easy Setup Key), select this option. Click Next and go to “Connect without the Easy Setup Key” on page 8..
Do You Have an Easy Setup Key?
Connect with the Easy Setup Key
1.Insert the Easy Setup Key into an available USB port on the computer that you want to connect to the Valet..
Connecting Another Computer
2.On that computer, click Connect to your Cisco Valet. If you do not see this, open the Easy Setup Key folder and double-click Connect..
3.Follow the on-screen instructions to connect that computer to your Valet..
4.Return to the original computer running the Cisco Connect software and enter a name that will be used to identify the device. Click Finish..
Name Your Device
Update or create an Easy Setup Key
1.Insert the Easy Setup Key or your own USB flash drive into an available USB port on your computer..
Update or Create an Easy Setup Key
2.Please wait while the settings are copied to the Easy Setup Key..
Copying Files to the Easy Setup Key
7

User Guide |
Chapter 2: Cisco Connect |
|
|
|
|
|
|
|
3.Remove the Easy Setup Key and click Close. You can now use it to connect other computers to the Valet. Refer to“Connect with the Easy Setup Key”on page 7
to complete the process of adding another computer.
3.Enter a name that will be used to identify this device.. Then click Finish.
Easy Setup Key Has Been Updated
Connect without the Easy Setup Key
1.Enter the Network name (SSID), Security Key, and
Security Type settings on your wireless device. To print this information, click Print these settings..
Connecting a Device – Wireless Network Settings
2. After connecting your device, click Next..
Waiting for New Device or Computer to Connect to Your Valet
Name Your Device
Wireless printer
1.Refer to your printer’s documentation to learn how to connect it to a wireless network.
2.Enter the Network name (SSID), Security Key, and
Security Type settings on your wireless device. To print this information, click Print these settings..
Connecting a Wireless Printer – Wireless Network Settings
3.Wait until your printer connects. On the Connecting a wireless printer screen, click Next.
4.Enter a name that will be used to easily identify your printer.
Name Your Printer
8
User Guide |
Chapter 2: Cisco Connect |
|
|
|
|
|
|
|
Device
1.Enter the Network name (SSID), Security Key, and
Security Type settings on your wireless device. To print this information, click Print these settings..
Parental Controls
For the computers you select, you can block or limit Internet access to specific times. You can also block specific websites.
Connecting a Device – Wireless Network Settings
2. After connecting your device, click Next..
Waiting for New Device or Computer to Connect to Your Valet
3.Enter a name that will be used to identify the device and click Finish.
Name Your Device
Parental Controls Password
First-Time Access of Parental Controls
1.The first time you access parental controls, you will be asked to create a parental controls password. Complete the following:
••Parental controls password Create a password that protects access to parental controls..
••Verify password Re-enter the password..
••Secret question Create a secret question and answer pair. If you forget the password, you can reset it by correctly answering the secret question. Enter your question..
••Answer Enter the answer to your secret question..
Click OK to save your settings..
2.Select the computer that you want to set up parental controls for. Then click OK..
Set Up Parental Controls For
9

User Guide |
Chapter 2: Cisco Connect |
|
|
|
|
|
|
|
3. The Parental controls main screen appears..
Manage Parental Controls
You have the following options:
Restrict Internet access on The list of computer(s) you have selected for parental controls is displayed. To add, remove, or rename computers on this list, refer to “Restrict Internet Access List” on page 10. To set up parental controls on a computer, refer to“Set Up Parental Controls” on page 10..
Change parental controls password Click this option to change the password that protects access to parental controls. Refer to “Change Parental Controls Password” on page 11..
Restrict Internet Access List
Select the computer whose parental controls you want to set up. Then click OK..
Remove If there is a computer that should not have parental controls applied, select the computer and click
Remove..
Rename To give a computer a new name, select the computer and click Rename, and the Rename the device screen appears..
Rename the Device
Enter the new name. Then click Rename..
Set Up Parental Controls
To set up parental controls for a computer, follow these instructions:
1.Select the computer from the Restrict Internet access on list. (If the computer is not listed, click Add to select the computer..)
Parental Controls
Add If you want to apply parental controls to additional computers, click Add, and the Set up parental controls for screen appears..
Set Up Parental Controls For
Parental Controls
2. The Block Internet access option offers the following:
••Always To always block Internet access, select this option..
••Specific times To block Internet access during specific days and times, select this option and set the schedule:
––School nights Select the appropriate start and end times..
–– Weekends Select the appropriate start and end times
••Never To never block (always allow) Internet access, keep the default, Never..
10
 Loading...