

Page 1

Cisco LRE CPE Hardware
Installation Guide
May 2003
Corporate Headquarters
Cisco Systems, Inc.
170 West Tasman Drive
San Jose, CA 95134-1706
USA
http://www.cisco.com
Tel: 408 526-4000
800 553-NETS (6387)
Fax: 408 526-4100
Customer Order Number: DOC-7811469=
Text Part Number: 78-11469-04
Page 2

THE SPECIFICATIONS AND INFORMATION REGARDING THE PRODUCTS IN THIS MANUAL ARE SUBJECT TO CHANGE WITHOUT
NOTICE. ALL STATEMENTS, INFORMATION, AND RECOMMENDATIONS IN THIS MANUAL ARE BELIEVED TO BE ACCURATE BUT
ARE PRESENTED WITHOUT WARRANTY OF ANY KIND, EXPRESS OR IMPLIED. USERS MUST TAKE FULL RESPONSIBILITY FOR
THEIR APPLICATION OF ANY PRODUCTS.
THE SOFTWARE LICENSE AND LIMITED WARRANTY FOR T HE A CCOMPANYING PRODUCT ARE SET FOR TH IN T HE INFORMATION
PACKET THAT SHIPPED WITH THE PRODUCT AND ARE INCORPORATED HEREIN BY THIS REFERENCE. IF YOU ARE UNABLE TO
LOCATE THE SOFTWARE LICENSE OR LIMITED WARRANTY, CONTACT YOUR CISCO REPRESENTATIVE FOR A COPY.
The following information is for FCC compliance of Class A devices: This equipment has been tested and found to comply with the limits for a Class
A digital device, pursuant to part 15 of the FCC rules. These limits are designed to provide reasonable protection against harmful interference when
the equipment is operated in a commercial environment. This equipment generates, uses, and can radiate radio-frequency energy and, if not installed
and used in accordance with the instruction manual, may cause harmful interference to radio communications. Operation of this equipment in a
residential area is likely to cause h armful interference, in which case users will be required to correct the interference at their own expense.
The following information is for FCC comp liance of Cl ass B devices: The equipm ent descr ibed in thi s manual gener ates and may radi ate
radio-frequency energy. If it is not installed in accordance with Cisco’s installation instructions, it may cause interference with radio and television
reception. This equipment has been tested and found to comply with the limits for a Class B digital device in accordance with the specifications in
part 15 of the FCC rules. These specifications are designed to provide reasonable protection against such interference in a residential installation.
However, there is no guarantee that interference wi ll not occur in a particular installation.
Modifying the equipm ent wit hout C isco’s written autho rizatio n may re sul t in the equipm ent no lon ger comply ing with FC C re quirem ents for Class
A or Class B digital devices. In that event, your right to use the equ ipment m ay be limit ed by FCC regulati ons, and yo u may be r equi red t o correct
any interference to radio or television communi cations at you r own expense.
You can det ermine wh ether your equipmen t is causing interf erence by turning it off. If the interference stop s, it was probabl y caused by the Cisco
equipment or one of its peripheral devices. If the equipment causes interference to radio or television reception, try to correct the interference by
using one or more of the following measures :
• Turn the television or radio antenna until the interfe rence stops .
• Move the equipment to one side or the other of the te levision or radio .
• Move the equipment farther away from the television or radio.
• Plug the equipment into an outlet that is on a different circuit from the television or radio. (That is , make certain the equi pment and the television
or radio are on circuits controlled by different circuit br eakers or fuses.)
Modifications to this product no t authori zed by Cisco Syst ems, Inc. could void the FCC app roval and negate your authori ty to oper ate the product.
The Cisco implementation of TCP header com pression i s an adap tati on o f a pr ogr am d eveloped by the University of California, Berkeley (UCB) as
part of UCB’s public domain version of the UNIX operating system. All rights reserved. Copyright © 1981, Regents of the University of California.
NOTWITHSTANDIN G ANY OTHER WA RRANTY HEREIN, AL L DOCUMENT FILE S AND SOFTWARE OF THESE SUPPLIERS ARE
PROVIDED “AS IS” WITH ALL FAULTS. CISCO AND THE ABOVE-NAMED SUPPLIERS DISCLAIM ALL WARRANTIES, EXPRESSED
OR IMPLIED, INCLUDING, WITHOUT LIMITATION, THOSE OF MERCHANTABILITY, FITNESS FOR A PARTICU LAR PURPOSE AND
NONINFRINGEMENT OR ARISING FROM A COURSE OF DEALING, USAGE, OR TRADE PRACTICE.
IN NO EVENT SHALL CISCO OR ITS SUPPLIERS BE LIABLE FOR ANY INDIRECT, SPECIAL, CONSEQUENTIAL, OR INCIDENTAL
DAMAGES, INCLUDING, WITHOUT LIMITATION, LOST PROFITS OR LOSS OR DAMAGE TO DATA ARISING OUT OF THE USE OR
INABILITY TO USE THIS MANUAL, EVEN IF CISCO OR ITS SUPPLIERS HAVE BEEN ADVISED OF THE POSSIBILITY OF SUCH
DAMAGES.
Page 3

CCIP, CCSP, the Cisco Arrow logo, the Cisco Powered Network mark, the Cisco Systems Verified logo, Cisco Unity, Follow Me Browsing, FormShare,
iQ Net Readiness Scorecard, Networking Academy, and ScriptShare are trademarks of Cisco Systems, Inc.; Changing the Way We Work, Live, Play, and
Learn, The Fastest Way to Increase Your Internet Quotient, and iQuick Study are service marks of Cisco Systems, Inc.; and Aironet, ASIST , BPX,
Catalyst, CCDA, CCDP, CCIE, CCNA, CCNP, Cisco, the Cisco Certified Internetwork Expert logo, Cisco IOS, the Cisco IOS logo, Cisco Press, Cisco
Systems, Cisco Systems Capital, the Cisco Systems logo, Empowering the Internet Generation, Enterprise/Solver, EtherChannel, EtherSwitch, Fast Step,
GigaStack, Internet Quotient, IOS, IP/TV, iQ Expertise, the iQ logo, LightStream, MGX, MICA, the Networkers logo, Network Registrar, Packet, PIX,
Post-Routing, Pre-Routing, RateMUX, Registrar, SlideCast, SMARTnet, StrataView Plus, Stratm, SwitchProbe, TeleRouter, TransPath, and VCO are
registered trademarks of Cisco Systems, Inc. and/or its affiliates in the U.S. and certain other countries.
All other trademarks mentioned in this document or Web site are the property of their respective owners. The use of the word partner does not imply a
partnership relationship between Cisco and any other company. (0303R)
Cisco LRE CPE Hardware Installation Guide
Copyright © 2001–2003, Cis co System s, Inc.
All rights reserved.
Page 4

Page 5

CONTENTS
Cisco Limit e d Li fe time Hardwa r e Wa rr a nt y Ter m s ix
Preface xiii
Audience xiii
Purpose xiii
Conventions xiv
Related Publications xxi
Obtaining Documentation xxiii
Cisco.com xxiii
Documentation CD-ROM xxiv
CHAPTER
Ordering Documentation xxiv
Documentation Feedback xxiv
Obtaining Technical Assistance xxv
Cisco.com xxv
Technical Assistance Center xxvi
Obtaining Additional Publi cations and Information xxvii
1 Overview 1-1
Features 1-1
Front-Panel Description 1-5
Rear-Panel Description 1-8
Cisco TAC Website xxvi
Cisco TAC Escalation Center xxvii
78-11469-04
Cisco LRE CPE Hardware Installation Guide
v
Page 6

Contents
CHAPTER
2 Installation 2-1
Preparing for Installati on 2-2
Warnings 2-2
EMC Regulatory Statements 2-4
U.S.A. 2-4
FCC Requirements 2-4
Labeling Requirements 2-4
Canada ICES 003, Issue 3 2-4
Japan VCCI 2-5
Korea 2-5
Australian Te le c om munications Compliance 2-5
Warnings for Norw ay and Sweden 2-6
Cisco 575 Ether net Connection Warni ng for Norway and Sweden 2-6
Cisco 576 LRE 997 Et hernet Connection Warning for Nor way and
Sweden
Germany 2-8
2-7
Sicherheitshinweise 2-8
Safety Instructions 2-9
Verifying Package Contents 2-10
Installing the CPE 2-11
Installing the CPE on a Desk (without Mounting Screws) 2-11
Installing the CPE on a Desk (with Mounting Screws) 2-12
Installing the CPE Under a Desk 2-15
Installing the CPE on a Wall 2-18
Connecting to a 10/100 Port 2-21
Connecting to a Wall-Mounted Telephone Jack 2-23
Connecting to a Telephone 2-24
Connecting the Power Cord 2-27
Cisco LRE CPE Hardware Installation Guide
vi
78-11469-04
Page 7

Attaching the Cable Lock 2-29
Powering On the CPE 2-33
Where to Go Next 2-33
Contents
CHAPTER
APPENDIX
APPENDIX
APPENDIX
3 Troubleshooting 3-1
A Technical Specifications A-1
B Connector and Cable Specifications B-1
Connector Specifications B-1
10/100 Ports B-1
WALL Port B-2
PHONE Port B-3
Cable Specifications B-5
Ethernet Straight-Through Cable Pinouts B-5
Telephone Str aight-Through and Rollover Cable Pinouts B-6
Identifying a Telephone Rollover Cable B-7
C Translated Safety Warnings C-1
Qualified Personnel Warning C-1
Installation Warning C-2
Jewelry Rem o va l W a rn in g C-4
Main Disconnecting Device C-6
Overheating Prevention Warning C-7
TN Power War n in g C-9
Circuit Break e r W ar ni ng C-10
Voltage Warn ing C-12
78-11469-04
Cisco LRE CPE Hardware Installation Guide
vii
Page 8

Contents
Lightning Activity Warning C-14
Product Disposal Warning C-15
No On/Off Switch Warning C-17
Cisco LRE CPE Hardware Installation Guide
viii
78-11469-04
Page 9

Cisco Limited Lifetime Hardware
Warranty Terms
There are special terms applicable to you r hardware warranty and v arious services
that you can use during the warranty period. Follow these steps to access and
download the Cisco Information Packet an d y our warr an ty do cume nt fro m
Cisco.com.
1. Launch your br owser, and go to thi s U RL :
http://www.cisco.com/univercd/cc/td/doc/es_inpck/cetrans.htm
The Warranties an d Lice nse Ag reem ents page ap pear s.
2. To read th e Cisco Informatio n Packet, follow these steps:
a. Click the Information Pack et Number field, and make sure that the part
number 78-5235-02F0 i s highlight ed.
b. Select the langu age in which you would like to read the do cume nt.
c. Click Go.
The Cisco Limited Warranty and Software License page fr om the
Information Packet appears.
d. Read the docum en t onl ine , o r cl ick th e PDF icon to downlo ad an d pr int
the document in Adobe Portable Document Format (PDF).
Note You must have Adobe Acrobat Reader to view and print PDF
files. You can download the reade r from Adob e’s website:
http://www.adobe.com
78-11469-04
Cisco LRE CPE Hardware Installation Guide
ix
Page 10

Cisco Limited Li fetime Hardware Warranty Terms
3. To re ad transla ted and lo calized wa rranty info rmat ion abou t your produc t,
follow these s teps :
a. Enter this part number in the Warranty Document Number field:
78-6310-02C0
b. Select the language in which you would like to view the document.
c. Click Go.
The Cisc o warr an t y p ag e ap pe ar s.
d. Read the docum en t onl ine , o r cl ick th e PDF icon to downlo ad an d pr int
the document in Adobe Portable Document Format (PDF).
You can also conta ct the Cisco ser vice and support websi te for assista nce:
http://www.cisco.com/public/Support_root.shtml.
Duration of Hardware Warranty
A Cisco produc t h ardwa re warra nty i s s uppo rte d fo r a s lon g a s the or igi nal end
user continues to own or use the product, provided that the fan and power supply
warranty is limited to five (5) years. In the event of a discontinuance of product
manufacture, the Cisco warranty support is limited to five (5) years from the
announcemen t of t he d i sco nti nuanc e.
Replacement, Repair, or Refund Policy for Hardware
Cisco or its service center will use commercially reasonable efforts to ship a
replacement part within ten (1 0) working da ys after receipt of the Return
Materials Authorization (RMA) request. Actual delivery times can vary,
depending on t he cu sto mer loc ation.
Cisco reserves the right to refu nd the purc hase price as its exclusive warranty
remedy.
To Receive a Return Materials Authorization (RMA) Number
Contact the company from whom you purchased the product. If you purchased the
product directly from Cisco, contact your Cisco Sales and Service Representative.
Cisco LRE CPE Hardware Installation Guide
x
78-11469-04
Page 11

Cisco Limited Lifetime Hardware Warranty Terms
Complete the information below, and keep it for reference.
Company produc t pu rc hased fr om
Company telep hone num be r
Product model num ber
Product serial num ber
Maintenance contract number
78-11469-04
Cisco LRE CPE Hardware Installation Guide
xi
Page 12

Cisco Limited Li fetime Hardware Warranty Terms
Cisco LRE CPE Hardware Installation Guide
xii
78-11469-04
Page 13

Audience
Preface
This guide is for the networking or computer technician responsible for installing
a Cisco LRE CPE, a Long -Re ach E th er net (L RE ) cu stome r pr em is es eq ui pmen t
(CPE) device. W e assume that you are familiar with the concepts and terminology
of Ethernet a nd loc al a rea n etworki ng .
Purpose
78-11469-04
The Cisco LRE CPE Hard ware Installatio n Guide describes the hardware features
of the Cisco LRE CPE devices. It describes the physi cal an d performa nce
characteristics of the CPEs, explains how to install a CPE, and provides
troubleshooting information and specifications.
Cisco LRE CPE Hardware Installation Guide
xiii
Page 14

Conventions
Conventions
This guide uses these conventions to convey instructions and information.
Notes, tips, cautions, and warnings use these conventions and symbols:
Note Means reader take note. Notes contain helpful suggestions or references to
materials not co ntained i n this manu al.
Tip Means the following information will help you solve a problem. The tips
information mi g ht no t be troub lesh ooti ng or even an act ion, but cou ld b e useful
information.
Preface
Caution Means rea de r b e ca ref ul. In this situation, you might do something that could
result in equipment dam age or loss of dat a.
Warning
IMPORTANT SAFETY INSTRUCTIONS
This warning symbol means danger. You are in a situation that could cause
bodily injury. Before you work on any equipment, be aware of the hazards
involved with electrical circuitry and be familiar with standard practices for
preventing accidents. To see translati ons of the warnings that appear in this
publication, refer to the translated safety warnings that accompanied this
device.
Note: SAVE THESE INSTRUCTIONS
Note: This documentation is to be used in conjunction with the specific
product installation guide that shipped with the product. Please refer to the
Installation Guide, Configuration Guide, or other encl osed additional
documentation for further details.
Cisco LRE CPE Hardware Installation Guide
xiv
78-11469-04
Page 15

Preface
Conventions
Waarschuwing
Varoitus
BELANGRIJKE VEILIGHEIDSIN S TR UC TIE S
Dit waarschuwingssymbool betekent gevaar. U verkeert in een situatie die
lichamelijk letsel kan veroorzaken. Voordat u aan enige apparatuur gaat
werken, dient u zich bewust te zijn van de bij elektrische schakelingen
betrokken risico's en dient u op de hoogte te zijn van de standaard praktijken
om ongelukken te voorkomen. Voor een vertaling van de waarschuwingen die
in deze publicatie verschijnen, dient u de vertaalde
veiligheidswaarschuwingen te raadplegen die bij dit apparaat worden
geleverd.
Opmerking BEWAAR DEZE INSTRUCTIES.
Opmerking Deze documentatie dient gebruikt te worden in combinatie met de
installatiehandleiding voor het specifieke product die bij het product wordt
geleverd. Raadpleeg de installatiehandleiding, configuratiehandleiding of
andere verdere ingesloten documentatie voor meer informatie.
TÄRKEITÄ TURVALLISUUTEEN LIITTYVIÄ OHJEITA
Tämä varoitusmerkki merkitsee vaaraa. Olet tilanteessa, joka voi johtaa
ruumiinvammaan. Ennen kuin työskentelet minkään laitteiston parissa, ota
selvää sähkökytkentöihin liittyvistä vaaroista j a tavanomaisista
onnettomuuksien ehkäisykeinoista. Tässä asiakirjassa esitettyjen varoitusten
käännökset löydät laitteen mukana toimitetuista ohjeista.
78-11469-04
Huomautus SÄILYTÄ NÄMÄ OHJEET
Huomautus Tämä asiakirja on tarkoitettu käytettäväksi yhdessä tuotteen
mukana tulleen asennusoppaan kanssa. Katso lisätietoja asennusoppaasta,
kokoonpano-oppaasta ja muista mukana toimitetuista asiakirjoista.
Cisco LRE CPE Hardware Installation Guide
xv
Page 16

Conventions
Preface
Attention
Warnung
IMPORTANTES INFORMATIONS DE SÉ CU RI TÉ
Ce symbole d'avertissement indique un danger. Vous vous trouvez dans une
situation pouvant causer des blessures ou des dommages corporels. A vant de
travailler sur un équipement, soyez conscient des dangers posés par les
circuits électriques et familiarisez-vous avec les procédures couramment
utilisées pour éviter les accidents. Pour prendre connaissance des
traductions d'avertissements figurant dans cette publication, consultez les
consignes de sécurité traduites qui accompagnent cet appareil.
Remarque CONSERVEZ CES INFORMATIONS
Remarque Cette documentation doit être utilisée avec le guide spécifique
d'installation du produit qui accompagne ce dernier . Ve uillez vous reporter au
Guide d'installation, au Guide de configuration, ou à toute autre
documentation jointe pour de plus amples renseignements.
WICHTIGE SI CHER HEITS ANWEI SUNG EN
Dieses Warnsymbol bedeutet Gefahr. Sie befinden sich in einer Situation, die
zu einer Körperverletzung führen könnte. Bevor Sie mit der Arbeit an
irgendeinem Gerät beginnen, seien Sie sich der mit elektrischen
Stromkreisen verbundenen Gefahren und der Standardpraktiken zur
Vermeidung von Unfällen bewusst. Übersetzungen der in dieser
Veröffentlichung enthaltenen Warnhinweise sind im Lieferumfang des Geräts
enthalten.
xvi
Hinweis BEWAHREN SIE DIESE SICHERHEITSANWEISUNGEN AUF
Hinweis Dieses Handbuch ist zum Gebrauch in Verbindung mit dem
Installationshandbuch für Ihr Gerät bestimmt, das dem Gerät beiliegt.
Entnehmen Sie bitte alle weiteren Informationen dem Handbuch
(Installations- oder Konfigurationshandbuch o. Ä.) für Ihr spezifisches Gerät.
Cisco LRE CPE Hardware Installation Guide
78-11469-04
Page 17

Preface
Conventions
Figyelem!
Avvertenza
FONTOS BIZTONSÁGI ELÕÍRÁSOK
Ez a figyelmezetõ jel veszélyre utal. Sérülésveszélyt rejtõ helyzetben van.
Mielõtt bármely berendezésen munkát végezte, legyen figyelemmel az
elektromos áramkörök okozta kockázatokra, és ismerkedjen meg a szokásos
balesetvédelmi eljárásokkal. A kiadványban szereplõ figyelmeztetések
fordítása a készülékhez mellékelt biztonsági figyelmeztetések között
található.
Megjegyzés ÕRIZZE MEG EZEKET AZ UTASÍTÁSOKAT!
Megjegyzés Ezt a dokumentációt a készülékhez mellékelt üzembe helyezési
útmutatóval együtt kell használni. További tudnivalók a mellékelt Üzembe
helyezési útmutatóban (Installation Guide), Konfigurációs útmutatóban
(Configuration Guide) vagy más dokumentumban találhatók.
IMPORTANTI ISTRUZIONI SULLA SICUREZZA
Questo simbolo di avvertenza indica un peri colo. La s ituazione potrebbe
causare infortuni alle persone. Prima di intervenire su qualsiasi
apparecchiatura, occorre essere al corrente dei pericoli relativi ai circuiti
elettrici e conoscere le procedure standard per la prevenzione di incidenti.
Per le traduzioni delle avvertenze riportate in questo documento, vedere le
avvertenze di sicurezza che accompagnano questo dispositivo.
78-11469-04
Nota CONSERVARE QUESTE ISTRUZIONI
Nota La presente documentazione va usata congiuntamente alla guida di
installazione specifica spedita con il prodotto. Per maggiori informazioni,
consultare la Guida all'installazione, la Guida alla configurazione o altra
documentazione acclusa.
Cisco LRE CPE Hardware Installation Guide
xvii
Page 18

Conventions
Preface
Advarsel
Aviso
VIKTIGE SIKKERHETSINSTRUKSJONER
Dette varselssymbolet betyr fare. Du befinner deg i en situasjon som kan
forårsake personskade. Før du utfører arbeid med utstyret, bør du være
oppmerksom på farene som er forbundet med elektriske kretssystemer, og du
bør være kjent med vanlig praksis for å unngå ulykker. For å se oversettelser
av advarslene i denne publikasjonen, se de oversatte sikkerhetsvarslene som
følger med denne enheten.
Merk TA VARE PÅ DISSE INSTRUKSJONENE
Merk Denne dokumentasjonen skal brukes i forbindelse med den spesifikke
installasjonsveiledningen som fulgte med produktet. Vennligst se
installasjonsveiledningen, konfigureringsveiledningen eller annen vedlagt
tilleggsdokumentasjon for detaljer.
INSTRUÇÕES IMPORTANTES DE SEGURANÇA
Este símbolo de aviso significa perigo. O utilizador encontra-se numa
situação que poderá ser causadora de lesões corporais. Antes de iniciar a
utilização de qualquer equipamento, tenha em atenção os perigos envolvidos
no manuseamento de circuitos eléctricos e familiarize-se com as práticas
habituais de prevenção de acidentes. Para ver traduções dos avisos incluídos
nesta publicação, consulte os avisos de segurança traduzidos que
acompanham este dispositivo.
xviii
Nota GUARDE ESTAS INSTRUÇÕES
Nota Esta documentação destina-se a ser utilizada em conjunto com o
manual de instalação incluído com o produto específico. Consulte o manual
de instalação, o manual de configuração ou outra documentação adicional
inclusa, para obter mais informações.
Cisco LRE CPE Hardware Installation Guide
78-11469-04
Page 19

Preface
Conventions
¡Advertencia!
Varning!
INSTRUCCIONES IMPORTANTES DE SEGURIDAD
Este símbolo de aviso indica peligro. Existe riesgo para su integridad física.
Antes de manipular cualquier equipo, considere los riesgos de la corriente
eléctrica y familiarícese con los procedimientos estándar de prevención de
accidentes. Vea las traducciones de las advertencias que acompañan a este
dispositivo.
Nota GUARDE ESTAS INSTRUCCIONES
Nota Esta documentación está pensada para ser utilizada con la guía de
instalación del producto que lo acompaña. Si necesita más detalles, consulte
la Guía de instalación, la Guía de configuración o cualquier documentación
adicional adjunta.
VIKTIGA SÄKERHETSANVISNINGAR
Denna varningssignal signalerar fara. Du befinner dig i en situation som kan
leda till personskada. Innan du utför arbete på någon utrustning måste du vara
medveten om farorna med elkretsar och känna till vanliga förfaranden för att
förebygga olyckor . Se översättningarna av de varningsmeddelanden som finns
i denna publikation, och se de översatta säkerhetsvarningarna som medföljer
denna anordning.
78-11469-04
OBS! SPARA DESSA ANVISNINGAR
OBS! Denna dokumentation ska användas i samband med den specifika
produktinstallationshandbok som medföljde produkten. Se
installationshandboken, konfigurationshandboken eller annan bifogad
ytterligare dokumentation för närmare detaljer.
Cisco LRE CPE Hardware Installation Guide
xix
Page 20
Conventions
Preface
Cisco LRE CPE Hardware Installation Guide
xx
78-11469-04
Page 21

Preface
Related Publications
These documents provid e complete information about the switch and ar e available
from these Cisco.com sites:
http://www.cisco.com/univercd/cc/td/doc/product/lan/c2900xl/index.htm
http://www.cisco.com/univercd/cc/td/doc/product/lan/cat2950/index.htm
You can order printed copies of documents with a DOC-xxxxxx= number from the
Cisco.com sites and fr om the t el ephone num be rs liste d in the “Ordering
Documentation” section on page xxiv.
For information about th e Catalyst 2900 XL and Catalyst 3500 XL switches, refer
to these documents:
• Release Notes for the Catalyst 2900 Series XL and Catalyst 3500 Series XL
Switches (not orderable but is available on C isco. c om)
Relate d Publicatio ns
Note Switch requiremen ts and procedu res for in itial con figurations an d software
upgrades tend to c ha ng e an d th er efor e ap pear on l y in t he r ele as e note s. Be fore
installing, configuring, or upgrading the switch, refer to the release notes on
Cisco.com for the latest information.
• Catalyst 2900 Series XL Hard ware Installation Guide (order number
DOC-786461=)
• Catalyst 3500 Series XL Hard ware Installation Guide (order number
DOC-786456=)
• Catalyst 2900 Series XL Modules Installation Guide (order number
DOC-CAT2900 -IG= )
• Catalyst 2900 Series XL ATM Modules Installation and Configuration Guide
(order number DOC-785472=)
• Catalyst 2900 Series XL and Catalyst 3500 Series XL Software Configuration
Guide (previously titled Cisco IOS Desktop Switching Software
Configuration Guide) (order number DOC-786511=)
• Catalyst 2900 Seri es X L an d Catal yst 3500 Se ries XL Comman d R eference
(previously titled Cisco IOS Desktop Switching Command Reference)
(order number DOC-7812155=)
78-11469-04
Cisco LRE CPE Hardware Installation Guide
xxi
Page 22

Related Publications
Note Switch requiremen ts and procedu res for in itial con figurations an d software
Preface
For information about the Catalyst 2950 switches, refer to these documents:
• Release Notes for the Catalyst 2950 and Catalyst 2955 Switches (not
orderable but is available on Cisco.com )
• Release Notes for the Catalyst 2950 LRE Switches (not orderable but is
available on Cisco.com)
upgrades tend to c ha ng e an d th er efor e ap pear on l y in t he r ele as e note s. Be fore
installing, configuring, or upgrading the switch, refer to the release notes on
Cisco.com for the latest information.
For hardware information for the Catalyst 2950 switches, refer to the
Catalyst 2950 Desktop Switch Hardware Installation Guide (order number
DOC-7811157=)
For information about the Catalyst 2950 LRE switches, refer to these documents:
• Catalyst 2950 Des ktop Sw itch Software Configuration G uide (order number
DOC-7814982=)
• Catalyst 2950 D esktop Sw itch Comm and Refe rence (order number
DOC-7814984=)
• Catalyst 2950 Desktop Switch System Message Guide (or der numbe r
DOC-7814981=)
• Release Notes for the Catalyst 2950 LRE Switch (not orderable but available
on Cisco.co m)
For software information for the Catalyst 2950 switches, refer to these
documents:
• Catalyst 2950 an d C ataly st 29 55 Switch So ftw are Configuration Guide
(order number DOC-7811380= )
• Catalyst 2950 and Catalyst 2955 Switch Command Reference (order numb er
DOC-7811381=)
• Catalyst 2950 and Catalyst 2955 Switch Switch System Message Guide (order
number DOC-78142 33=)
Cisco LRE CPE Hardware Installation Guide
xxii
78-11469-04
Page 23

Preface
Obtain in g Documentation
For other information ab out rel ated produc ts, refe r to these document s:
• Catalyst GigaStack Gigabit Interfa ce Converter Har dware Installa tion Guide
(order number DOC-786460=)
• Cisco RPS 300 Redundant Power System Hardware Installation Guide (order
number DOC-78103 72=)
• Cisco RPS 675 Redundant Power System Hardware Installation Guide (order
number DOC-78152 01=)
• Cluster Management Suite (CMS) online help (available only from the switch
CMS software)
• CWDM Passive Optical System Installation Note (not orderable but is
available on Cisco.com)
• 1000BASE-T Gigabit Interface Converter Installation Note (not orderable but
is available on Cisco.com)
Obtaining Documentation
Cisco provides several ways to obtain d ocume nta tion, tec hni cal assi stan ce, a nd
other technical resources. These sections explain how to obtain technical
information from Cisc o Systems.
Cisco.com
You can access the most current Cisco do cumentation on the World Wide Web at
this URL:
http://www.cisco.com/univercd/home/home.htm
You can access the Cisco website at this URL:
http://www.cisco.com
You can access international Cisco websites from this URL:
http://www.cisco.com/public/countries_languages.shtml
78-11469-04
Cisco LRE CPE Hardware Installation Guide
xxiii
Page 24

Obtaining Documentation
Documentation CD-ROM
Cisco documentation and additional literature are available in a Cisco
Documentation CD -ROM package, whic h may have shipped with you r product .
The Docume ntation CD-ROM is updated monthly and may be more current than
printed document ation . The CD-ROM package is available as a single unit or
through an annual subscription.
Registered Cisco.com users can order the Documentation CD-ROM (product
number DOC-CONDOCCD=) through the online Subscription Store:
http://www.cisco.com/go/subscription
Ordering Documentation
Preface
You can find i ns truc tio ns for or de ring do cu ment atio n a t th is U RL:
http://www.cisco.com/univercd/cc/td/doc/es_inpck/pdi.htm
You can order Cisco doc umen tation in these ways:
• Register ed Cisco.co m users (Cis co direct cus tomers) can order Cisco product
documentation from the Ne twork ing Prod ucts Mar ketPlac e:
http://www.cisco.com/en/US/partner/ordering/index.shtml
• Registered Cisco.com user s can order the Documentation CD-ROM
(Customer Order Number DOC-CONDOCCD=) through the online
Subscr ip ti o n S t o re :
http://www.cisco.com/go/subscription
• Nonregistered Cisco.com users can orde r documen tation thro ugh a loca l
account representa tive by calling Cisco Systems Corpor ate Head quarte rs
(California, U.S.A .) at 408 526-7208 or, elsewhere in Nort h Ameri ca, by
calling 800 553-NETS (6387).
Documentation Feedback
You can submit comments electronically on Cisco.com. On the Cisco
Documentatio n home page , click Feedback at the top of the page.
You can e-mai l your comm ents t o bug-doc@c isco.com.
Cisco LRE CPE Hardware Installation Guide
xxiv
78-11469-04
Page 25

Preface
You can submit yo ur comm ents by mail by using the respon se card beh ind the
front cover of your document or by writing to the following address:
Cisco Systems
Attn: Customer Docu ment Orde ring
170 West Tasman Drive
San Jose, CA 951 34- 988 3
We ap prec iate yo ur comm ents .
Obtaining Technical Ass istance
Cisco prov ides Cisco .com, w hich incl udes the Cis co Technical Assis tance Cente r
(TAC) Website, as a star tin g point for all tec hni cal ass istan ce. Cu sto mers an d
partners can ob tain onl ine d oc ument at ion, tro uble shoo ting t ips , and sa mp le
configurations from t he C is co TAC web si te. Ci sco. co m regis tere d use rs have
complete access to the technical support resources on the Cisco TAC website,
including TAC tools and utilities.
Obtaining Technical Assistance
Cisco.com
Cisco.com offers a suite of interactive, networked services that let you access
Cisco information, networking solutions, services, programs, and resources at any
time, from anywhere in the world.
Cisco.com provides a broad range of features and services to help you with these
tasks:
• Streamline business processes and impr ove productivity
• Resolve technical issues with online support
• Download and t e st so ft ware pa ck ag es
• Order Cisco lea rning m ateria ls and merc handi se
• Register for online skill assessment, training, and certification programs
T o obtain customized information and service, you can self-register on Cisco.com
at this URL:
http://www.cisco.com
78-11469-04
Cisco LRE CPE Hardware Installation Guide
xxv
Page 26

Obtaining Technical Assistance
Technical Assistance Center
The Cisco TAC is available to all customers who need technic al a ssistance with a
Cisco product, t ec hnolo gy, or solution. Two levels of support ar e available: the
Cisco TAC website and the Cisco TAC Escalation Ce nter. The avenue of support
that you choose dep ends on th e p rior ity of t he pr oble m a nd the c ond ition s st ate d
in service contracts, when applicable.
We cat egorize Cisco TAC i nq uirie s ac cordi ng t o urgency:
• Priority level 4 (P4)—You need information or assistance concerning Cisco
product capabilitie s, product installati on, or basi c product con figuration.
• Priority level 3 (P3)—You r network perf ormance is degraded. Network
functionality is noticeably impaired, but most business operations continue.
• Priority level 2 (P2)—You r produc tion netwo rk is severely degraded,
affecting significant aspects of busine ss operatio ns. No workar ound is
available.
Preface
Cisco TAC Website
You can use the Cisco TAC websi te to resolve P3 and P4 issues yourself , saving
both cost and time. The site provides around-the-clock access to online tools,
knowledge bases, and software. T o access the Cisco T A C website, go to this URL:
http://www.cisco.com/tac
All customers, partners, and resellers who have a valid Cisco service contract have
complete access to the technical support resources on the Cisco TAC website.
Some services on the Cisco TAC webs ite require a Ci sco.com logi n ID and
password. If you have a valid service contract but do not have a login ID or
password, go to this URL to register :
http://tools.cisco.com/RPF/register/register.do
If you are a Cisco.com registered use r, and you cannot resolve your tec hnica l
issues by using the Cisco TAC website, you ca n open a c ase onli ne a t t his URL:
• Priority lev el 1 (P1)—Your production network is down, and a critical impact
to business operations will occur if serv ice is not rest ored quickl y. No
workaround is available.
http://www.cisco.com/en/US/support/index.html
Cisco LRE CPE Hardware Installation Guide
xxvi
78-11469-04
Page 27

Preface
If you have Internet access, we recommend that you open P3 and P4 cases through
the Cisco TAC website so that you ca n descr ibe the situa ti on i n your own words
and attach any necessary files.
Cisco TAC Escalation Center
The Cisco TAC Escalation Center addresses priority level 1 or priority level 2
issues. These classifications are assigned when severe network degradation
significantly impacts business opera tions . When you conta ct the TAC Esca lati on
Center with a P1 or P2 problem, a Cisco T A C engineer automatically opens a case.
To obtain a directory of toll-free Cisco TAC telephone numbers for your country,
go to this URL :
http://www.cisco.com/warp/public/687/Directory/DirTAC.shtml
Before calling, please check with your network operations center to determ ine the
level of Cisco support services to which your company is entitled: for example,
SMARTnet, SMARTne t Onsite , or Network Supp orted Acc ounts (NSA). When
you call the center , pl ease hav e ava ilable your service agreement numbe r and your
product serial n umb er.
Obtaining Additional Publications and Inform ation
Obtaining Additional Publication s and In formation
Information abo ut C isco pr odu cts, tech nol ogies, a nd ne twork solu tio ns is
available from various online and printed sources.
• The Cisco Product Catalog desc ribes t he ne tworking prod uc ts offered by
Cisco Systems as well as ordering and customer support services. Access the
Cisco Product Catalog at this URL:
http://www.cisco.com/en/US/products/products_catalog_links_launch.html
• Cisco Press publi shes a wide r ange of n etworking pu bli cations. Cisc o
suggests these ti tles for new and experience d users: Interne tworking Terms
and Acronyms Dictionary, Internetworking Technology Handbook,
Internetworking Troubleshooting Guide, and the Internetwor king Design
Guide. For current Cisco Press titles and other information, go to Cisco Press
online at this URL:
http://www.ciscopress.com
Cisco LRE CPE Hardware Installation Guide
78-11469-04
xxvii
Page 28

Obtaining Additional Publications and Information
• Pa cket magaz ine is the Cisc o monthl y periodic al that provide s industry
professionals with the latest information about the field of networking. You
can access Packet magazine at thi s URL:
http://www.cisco.com/en/US/about/ac123/ac114/about_cisco_packet_
magazine.html
• iQ Magazine is the Cisco monthly periodical that provides business leaders
and decision makers with the latest information about the networking
industry. You can access iQ Magazine at this URL:
http://business.cisco.com/prod/tree.taf%3fasset_id=44699&public_view=
true&kbns=1.html
• Internet Protocol Journal is a qua rte rly jour nal pub lished by Ci sco Syste ms
for engineering professionals involved in the design, deve lopment, and
operation of public an d private internets and intrane ts. Yo u can access t he
Internet Protocol Journal at this URL:
Preface
http://www.cisco.com/en/US/about/ac123/ac147/about_cisco_the_internet_
protocol_journal .html
• Training—Cisco offers world-c la ss networ king tra ining, wi th curre nt
offerings in network training listed at th is URL:
http://www.cisco.com/en/US/learning/le31/learning_recommended_training
_list.html
Cisco LRE CPE Hardware Installation Guide
xxviii
78-11469-04
Page 29

Features
CHAPTER
1
Overview
This chapter describes the Cisco LRE CPE, a Long-Reach Ethernet (LRE)
customer premis es equipm ent (CPE) device and has the se topics:
• Features
• Front-panel descript ion
• Rear-panel des cript ion
78-11469-04
A Cisco LRE CPE device, hereafter referred to as the CPE, is based on
very-high-data-rate digital subscriber line (VDSL) technology. The CPE connects
a computer or laptop to a Catalys t LRE sw itch at dist ances of up t o 4921 feet
(1500 meters) by using LRE techn ology over ordinar y telephon e lines.
Note A CPE connects a computer or LAN to an LRE switch that transmits a high-sp eed
signal over a telephone d ata c on necti on. A Ci sco LRE CPE converts a
VDSL-based signal on the telephone line to an Ethernet signal to the computer.
The Cisco 575 LRE CPE, Cisco 576 LRE 997 CPE, and the Cisco 585 LRE CPE
have these features:
• IEEE 802.3 10BASE-T com pli ance
• On the 575 L RE CPE a nd 57 6 LRE 99 7 CPE, o ne aut onegoti at ing
10/100BASE-T Ethernet p ort
Cisco LRE CPE Hardware Installation Guide
1-1
Page 30

Features
Chapter 1 Overview
• On the 585 L RE CPE , four au to negoti ating 10 /1 00BASE-T Et he rnet p or ts
• Status LEDs showing Ethernet activity and LRE l ink status
• Data rates of u p to 15 M bp s a t di sta nces of u p to 49 21 feet (15 00 me ters )
Note Data rates are r educed for lo nger distan ces . Data r ates ar e conf ig ured
through a Catalyst LRE switch. Refer to the switch hardware
installation guide and the switch software configuration guide for
your switch model for more informa tion.
• An internal splitter that allows regular telephone services, such as voice or
Integrated Services Digital Network (ISDN), to travel on the same lines as
LRE traffic.
Certain Cisco LRE CPE devices are not supported by cert ain Catalyst 2950 LRE
switches. In Table 1-1, Yes means that the CPE is supported by the switch; No
means that the CPE is not supported by the switch.
Table 1-1 LRE Switch and CPE Compatibility Matrix
LRE Devices
Cisco 575 LRE
Catalyst 2950ST-8 LRE
switch
Yes Yes No
Catalyst 2950ST-24 LRE
switch
CPE
Cisco 576 LRE 997
No No Yes
CPE
Cisco 585 LRE
Yes Yes No
CPE
Catalyst 2950ST-24 LRE 997
switch
Cisco LRE CPE Hardware Installation Guide
1-2
78-11469-04
Page 31

Chapter 1 Overview
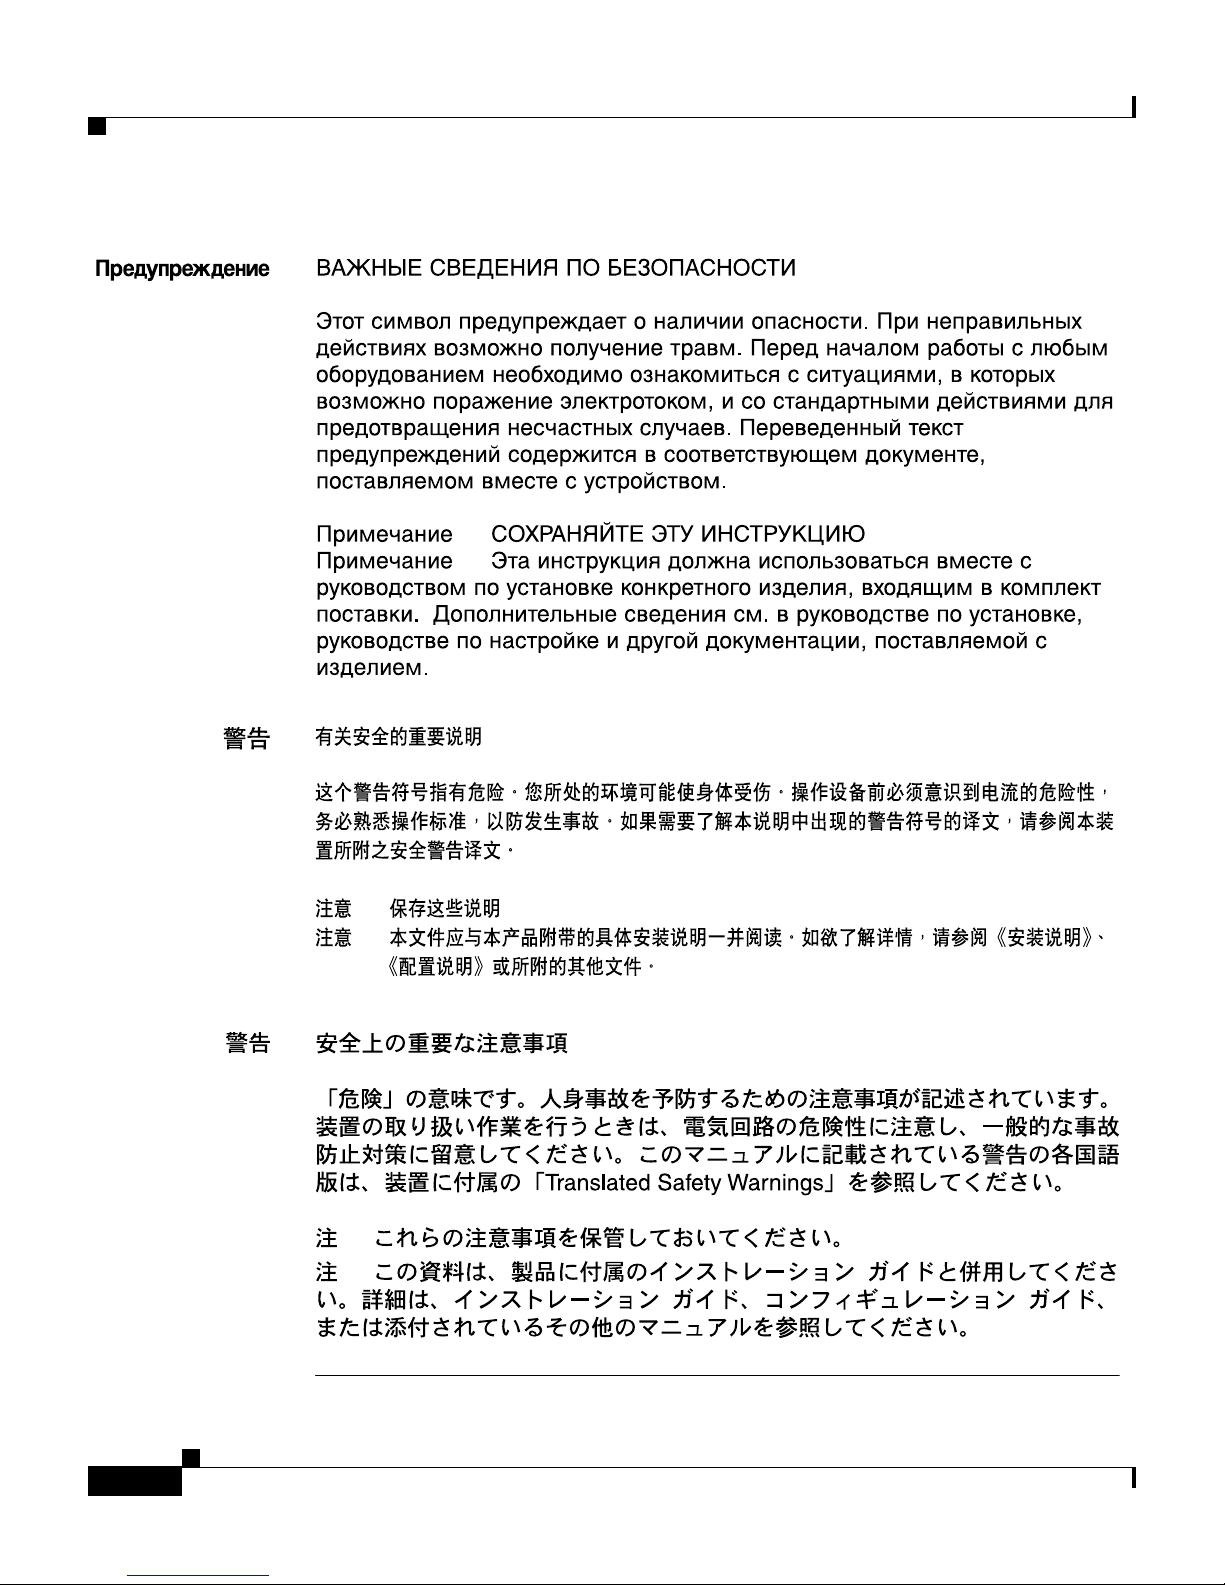
Figure 1-1 shows the Cisco LRE CPE models.
Figure 1-1 Cisco LRE CPE models
Version Number Description
Features
575 LRE CPE 1 fixed autosensing
10/100 port
576 LRE 997 CPE 1 fixed autosensing
10/100 port
585 LRE CPE 4 fixed autosensing
10/100 ports
If additional telephone services such as voice or ISDN traffic will be carried on
the same telephone lines, a plain old telephone servic e (POTS) splitter can be
installed to separate LRE traffic from other telephone services. The splitter routes
the high-freque ncy L RE d ata to t he sw it ch a nd the low-freque ncy te lep hone
services to the private branch exchange (PBX) swit ch or public switche d
telephone network ( PSTN) .
C
i
s
c
o
5
7
5
W
A
C
A
C
T
I
V
I
T
Y
E
T
H
E
R
W
A
C
A
C
T
I
V
I
T
Y
E
T
H
E
R
R
E
A
D
Y
E
T
H
1
E
T
H
2
-
L
R
N
E
T
P
C
N
E
T
P
E
T
H
3
E
O
W
E
R
i
s
c
o
5
7
5
-
L
R
E
O
W
E
R
C
i
s
c
o
5
8
5
-
L
R
E
T
H
4
E
P
O
W
E
R
89371
For limitations and restrictions on when you use a POTS splitter with the
Catalyst 2950 LRE switches and Cisco LRE CPE devices, see the “Connecting to
a Telephone” sect ion on page 2-24.
In a typical installati on, a CPE is installed in each room o f a mul tidwelling t enant
building. The CPE data rates and profile settings are controlled by a
Catalyst 2950 LRE switch. Figure 1-2 shows a typical LRE installation.
78-11469-04
Cisco LRE CPE Hardware Installation Guide
1-3
Page 32

Features
Chapter 1 Overview
Figure 1-2 Typical LRE Installation
CPEs
installed in separate
building units
Up to 4921 feet
(1500 meters)
existing
telephone wire
CPE CPE CPE CPE CPE CPE
CPE
Internet
router
Management
Cisco 575 LRE
CPE
POTS
Telephone
CPE CPE CPE CPE CPE
Cisco
LRE 48 POTS
gateway
Splitter
1-4
Internet PSTN
For installations wher e telephone services will be routed to a PBX switch, you ca n
install a Cisco LRE POTS Splitter (PS-1M-LRE-48). For more inform ation abo ut
this POTS splitter, refer to the Installation and Warranty Notes for the Cisco
LRE 48 POTS Splitter.
If the building does not use a PBX and telephone services are sent directly to an
outside PSTN, you must provide a homologated POTS splitter. For more
information about hom ologated POTS splitters, contact your Cisco sales
representative.
Cisco LRE CPE Hardware Installation Guide
Catalyst LRE
switch
PBX
50148
78-11469-04
Page 33

Chapter 1 Overview
For more information about installing a Catalyst LRE switch, refer to the switch
hardware installation guide.
Front-Panel Description
Each Cisco LRE CPE has a READY LED and a POWER LED. The
Cisco 575 LRE CPE and Cisco 576 LRE 997 CPE also have an ACT LED and an
ETH LED. The Cisco 585 LRE CPE also has four LEDs, lab eled ET H1 t hroug h
ETH4.
Figure 1-3 to Figure 1-5 show the front panels of the CPEs. Table 1-2 and
Table 1-3 list the front-panel LEDs and their meanings.
Figure 1-3 Front Panel of the Cisco 575 LRE CPE
Front-Panel Description
78-11469-04
Cisco 575 LRE
ER
W
PO
ETH
ACT
Y
D
A
E
R
Cisco LRE CPE Hardware Installation Guide
45066
1-5
Page 34

Front-Panel Description
Figure 1-4 Front Panel of the Cisco 576 LRE 997 CPE
R
L
6
7
5
o
c
s
i
C
PO
ETH
ACT
Y
D
A
E
R
Chapter 1 Overview
7
9
9
E
ER
W
89370
Table 1-2 Cisco 575 LRE CPE and Cisco 576 LRE 997 CPE Front-Panel LEDs
LED LED Color Meaning
READY
ACT
ETH
POWER
Green CPE link to LRE switch present
Flashing green Ethernet activity
Green Ethernet link present
Green Power i ndic a tor
Cisco LRE CPE Hardware Installation Guide
1-6
78-11469-04
Page 35

Chapter 1 Overview
Figure 1-5 Front Panel of the Cisco 585 LRE CPE
ETH3
ETH2
ETH1
Y
D
A
E
R
Front-Panel Description
Cisco 585 LRE
ER
W
PO
ETH4
65642
Table 1-3 Cisco 585 LRE CPE Front-Panel LEDs
LED
READY
ETH1
LED Color Meaning
Green CPE link to LRE switch present
Green Ethernet link to Ethernet port 1 present
Flashing green Ethernet activity on Ethernet port 1
ETH2
Green Ethernet link to Ethernet port 2 present
Flashing green Ethernet activity on Ethernet port 2
ETH3
Green Ethernet link to Eth ern et port 3 p res en t
Flashing green Ethernet activity on Ethernet port 3
ETH4
Green Ethernet link to Ethernet port 4 present
Flashing green Ethernet activity on Ethernet port 4
POWER
Green Power i ndic a tor
78-11469-04
Cisco LRE CPE Hardware Installation Guide
1-7
Page 36

Rear-Panel Descr ipt ion
Rear-Panel Description
The LRE CPE rear pan els have a power connector, two RJ-11 connectors, and,
depending on t h e mod el, e ith er o ne or four RJ- 45 Eth erne t c onn ect ors.
Figure 1-6 and Figure 1-7 show th e rear panels of the CPEs. Table 1-4 and
Table 1-5 list the rear-panel connectors and their descriptions.
Figure 1-6 Rear Panel of the Cisco 575 LRE CPE and Cisco 576 LRE 997 CPE
PWR
ENET
WALL PHONE
Chapter 1 Overview
E
R
L
-
5
7
5
R
E
o
W
c
s
O
i
P
C
T
E
N
R
E
H
T
E
Y
T
I
V
I
T
C
A
N
A
W
44722
Table 1-4 Cisco 575 LRE CPE and Cisco 576 LRE 997 CPE Rear-Panel
Connectors
Connector Label Connector D escription
PWR
ENET
WALL
PHONE
Power connector
RJ-45 connector for the Ethernet port
RJ-11 connector for the telephone wall jack
RJ-11 connector for a telephone
Cisco LRE CPE Hardware Installation Guide
1-8
78-11469-04
Page 37

Chapter 1 Overview
Figure 1-7 Rear Panel of the Cisco 585 LRE CPE
E
R
L
-
5
8
5
R
o
E
c
W
s
i
O
C
Rear-Panel Description
P
4
H
T
E
3
H
T
E
2
H
T
E
1
H
T
E
Y
D
A
E
R
PWR ETH4
ETH3
ETH2
ETH1
WALL PHONE
Table 1-5 Cisco 585 LRE CPE Rear-Panel Connectors
PWR Power connector
ETH4
ETH3
ETH2
ETH1
WALL
PHONE
RJ-45 connector for the Ethernet port 4
RJ-45 connector for the Ethernet port 3
RJ-45 connector for the Ethernet port 2
RJ-45 connector for the Ethernet port 1
RJ-11 connector for the telephone wall jack
RJ-11 connector for a telephone
65641
78-11469-04
Cisco LRE CPE Hardware Installation Guide
1-9
Page 38

Rear-Panel Descr ipt ion
Chapter 1 Overview
Cisco LRE CPE Hardware Installation Guide
1-10
78-11469-04
Page 39

CHAPTER
2
Installation
This chapter describ es how to install your cu stomer prem ises equi pmen t (CPE)
device and how to interpret the LEDs to ensure proper operation. Read the topics,
and perform thes e proced ures in this ord er:
• Preparing for Installation, page 2-2
• Verifying Package C ontents, pa ge 2-10
• Installing the CPE, page 2-11
• Connecting to a 10/100 Port , page 2-21
• Connecting to a Wall-Mounted Telephone Jack, page 2-23
78-11469-04
• Connecting to a Telephone, page 2-24
• Connecting the Power Cord, page 2-27
• Attaching the Ca ble Loc k, page 2-29
• Powering On the CPE, page 2-33
• Where to Go Next, page 2-33
Cisco LRE CPE Hardware Installation Guide
2-1
Page 40

Preparing for Inst al la tion
Preparing for Installation
Note If you mount the CPE under a desk or on a wall, use the screws supplied w ith the
CPE.
Caution There ar e no se rvic eab le part s ins id e t he un i t. R emoving screws, c over, or
otherwise dismantling the unit voids the warranty.
Certain CPE devices are not supported by certain Catalyst 2950 LRE switches.
See T able 1-1 on page 1-2 to determine which CPEs are suppo rted by which L RE
switches.
Chapter 2 Installation
Warnings
Warning
Warning
Warning
These warnings are transla ted in to several language s in Appendix C, “Translated
Safety Warnings.”
Only trained and qualified personnel should be allowed to install or replace this
equipment.
Read the installation instructions before you connect the system to its power
source.
Before working on equipment that is connected to power lines, remove jewelry
(including rings, necklaces, and watches). Metal objects will heat up when
connected to power and ground and can cause serious burns or weld the metal
object to the terminals.
Cisco LRE CPE Hardware Installation Guide
2-2
78-11469-04
Page 41

Chapter 2 Inst allation
Preparing for Installation
Warning
Warning
Warning
Warning
Warning
The plug-socket combination must be accessible at all times because it serves
as the main disconnecting device.
To prevent the system from overheating, do not operate it in an area that
exceeds the maximum recommended ambient temperature of 104°F (40°C).
The device is designed to work with TN power systems.
This product relies on the building’s installation for short-circuit (overcurrent)
protection. Ensure that a fuse or circuit breaker no larger than 120 VAC, 15A U.S.
(240 VAC, 10A international) is used on the phase conductors (all
current-carrying conductors).
A voltage mismatch can cause equipment damage and may pose a fire hazard.
If the voltage indicated on the label is different from the power outlet voltage,
do not connect the chassis to that receptacle.
Warning
Do not work on the system or connect or disconnect cables during periods of
lightning activity.
Warning
Ultimate disposal of this product should be handled according to all national
laws and regulations.
Warning
Unplug the power cord before you work on a sy ste m that does not have an on/off
switch.
78-11469-04
Cisco LRE CPE Hardware Installation Guide
2-3
Page 42

Preparing for Inst al la tion
EMC Regulatory Statements
U.S.A.
U.S. regulatory information for this product is in the front matter of this manual.
FCC Requirements
"Modifying the equipment without Cisco's authorization may result in the
equipment no longer complying with FCC requirements for Class A or Class B
digital devices. In that event, your right to use the equipment may be limited by
FCC regulations, and you may be required to c orrect any interference to radio or
television communicati on s at yo ur own expense .”
Chapter 2 Installation
Labeling Requirements
This device complies with Part 15 of the FCC Rules. Operation is subject to the
following two conditions: (1) this de vice may not cau se harmful inter ference, and
(2) this device must accept any interference received, including interference that
may cause undesired oper ation.
Canada ICES 003, Issue 3
French
Cet appareil numérique de la classe B est conforme à la norme N M B-003 du
Canada.
English
This Class B digi ta l a ppara tus co mplie s wi th Can adi an IC ES- 003.
Cisco LRE CPE Hardware Installation Guide
2-4
78-11469-04
Page 43

Chapter 2 Inst allation
Japan VCCI
Korea
Preparing for Installation
This is a Class B produc t based on the standard of Volunt ary Control Council for
Interference from Information Technology Equipment (VCCI). If this is used near
a radio or t elevision re c eiver in a domest ic environment, it m ay c au se radi o
interference. Install and use the equipment according to the instruction manual.
Class B Device. This device is registered for EM C requir ement s for reside ntial
use. This device can be used not only in residential areas but in all other areas.
Australian Telecommunications Compliance
To r educ e the risk o f ele ctric s hoc k in Aust ral ian L on g-Re ach Et herne t ( LRE )
installations, use only an Australian Communications Authority (A CA)-approv ed
telephone and handset with a Cisco 575 LRE, 576 LRE 997, or 585 LRE customer
premises equipm ent (CPE) device.
78-11469-04
Cisco LRE CPE Hardware Installation Guide
2-5
Page 44

Preparing for Inst al la tion
Warnings for Norw ay and S wede n
Cisco 575 Ethernet Connection Warning for Norway and Sweden
To reduce the risk of electric shock in Norwegian and Swedish LRE installations
with a Cisco 575 L RE CPE d evice, do not con ne ct the Eth ern et po rt o f th e
Cisco 575 LRE CPE to port s of othe r equi pme nt a s d escrib ed in thi s warnin g:
Chapter 2 Installation
Warning
Advarsel
Varning!
To reduce the risk of electrical shock, do not connect the Ethernet port of the
Cisco 575 Long-Reach Ethernet (LRE) customer premises equipment (CPE)
device to ports of other equipment if those ports have protective earth
conductors.
For å redusere risikoen for elektrisk støt, skal Ethernet-porten på Cisco 575
Long-Reach Ethernet (LRE)-kundeutstyr (CPE) ikke tilkoples porter på
annet utstyr, hvis disse portene er utstyrt med vernejordingsledere.
För att minska risken för elektrisk stöt, får inte Ethernet-porten på
Cisco 575 LRE (Long-Reach Ethernet) CPE-enheter (customer premises
equipment) anslutas till portar på annan utrustning om dessa portar är
försedda med skyddsjordledare.
Cisco LRE CPE Hardware Installation Guide
2-6
78-11469-04
Page 45

Chapter 2 Inst allation
Preparing for Installation
Cisco 576 LRE 997 Ethernet Connection Warning for Norway and Sweden
To reduce the risk of electric shock in Norwegian and Swedish LRE installations
with a Cisco 576 L RE 99 7 C PE device, do no t c onnec t t he E t herne t p ort of th e
Cisco 576 LRE 997 CPE to ports of other equipment as described in this warning:
Warning
Advarsel
Varning!
To reduce the risk of electrical shock, do not connect the Ethernet port of the
Cisco 576 Long-Reach Ethernet (LRE) 997 customer premises equipment (CPE)
device to ports of other equipment if those ports have protective earth
conductors.
For å redusere risikoen for elektrisk støt, skal Ethernet-porten på Cisco 576
Long-Reach Ethernet (LRE)-kundeutstyr 997 (CPE) ikke tilkoples porter på
annet utstyr, hvis disse portene er utstyrt med vernejordingsledere.
För att minska risken för elektrisk stöt, får inte Ethernet-porten på
Cisco 576 LRE (Long-Reach Ethernet) 997 CPE-enheter (customer premises
equipment) anslutas till portar på annan utrustning om dessa portar är
försedda med skyddsjordledare.
78-11469-04
Cisco LRE CPE Hardware Installation Guide
2-7
Page 46

Preparing for Inst al la tion
Germany
Sicherheitshinweise
Lesen Sie diese Sicherheitshinweise sorgfältig durch.
• Lesen Sie alle Sicher heitshin weise und Warnungen auf dem Gerät.
• Stellen Sie das Gerät zur Insta llat ion auf ei ne flac he, st abi le Ober fläche.
• Stellen Sie sicher, dass das Gerät mit der korrekten Spannung versorgt wird.
• Bei Geräten mit Netzanschlusskabel sollte sich die Steckdose in unmittel-
• Das Netzkabel sollte so verlegt werden, dass niemand darauf treten kann.
Chapter 2 Installation
Durch ein Umfallen oder Herunterfallen des Geräts können Personen ver letzt
werden.
barer Nähe des Geräts befinden und gut zugänglich sein.
Stellen oder legen Sie kein e G egenstände auf das Netzkabe l.
• Ziehen Sie vor der Reinigung des Geräts den Netzst ecker. Benutzen Sie zur
Reinigung keine Flüssig- oder Spr ühreiniger. Verwenden Sie zur Rei nigu ng
ein leicht ange fe ucht ete s o der tr ockene s Tuch.
• Schützen Sie da s Gerät vor Feuchtigkeit.
• Die Gehäuseöffnungen dienen zur freien Lu ftzirkul ation und schützen das
Gerät vor Überhitzung. Sorgen Sie daf ür, dass die Öffnungen frei sind.
• Ziehen Sie den Netzs te ck e r, wenn Sie das Gerät für einen längeren Zeitraum
nicht benutzen, um Schäden durch tra nsient e Übe rsp annun g z u verme iden.
• Schütten Sie keine Flüssigkeiten in die Gehäuseöffnungen. Dadurch kann es
zu Bränden und Elektroschocks komme n.
• Öffnen Sie das Gerät nicht. Aus Sicherheitsgründen sollte das Gerät nur
durch qualifizie rte s Fach pe rson al ge öffn e t w e r d e n .
• Lassen Sie das Gerät in folgenden Fällen vom Kundendienstpersonal
überprüfen:
–
Netzkabel oder Ne tzste cker si nd b esch ädigt.
–
Es ist Flüssigkeit ins Geräteinnere gelangt.
–
Das Gerät war Feuchtigkeit ausgesetzt.
Cisco LRE CPE Hardware Installation Guide
2-8
78-11469-04
Page 47

Chapter 2 Inst allation
Safety Instructions
Preparing for Installation
–
Das Gerät funktioniert nicht richtig bzw. funktioniert nicht, wie im
Benutzerhandbuch beschrie ben.
–
Das Gerät wurde fallen gelassen oder beschädigt.
–
Das Gerät wurde offensichtlich beschädigt.
• Sorgen Sie dafür, dass das Gerät n ich t ung eei gnet en U m gebungspar am ete rn
ausgesetzt ist. Temperaturen über 45°C (113°F) können zur Be schädigung
des Geräts führen.
• Der Schallleistungspegel ist in Bedienerp osition in Übereinstimmung mit
IEC 704-1: 1982 kleiner ode r gleich 70 dB (A ).
• Bewahren Sie das Hardware-Inst alla tio nshandbuch für spätere
Nachschlagezwecke auf.
Read these safety instructions carefully.
• Read all c auti on s an d warni n gs o n th e eq ui pm en t.
• Place this equipment on a flat, stable surface when installing. A drop or fall
could cause injury.
• Make sure the correct voltage is connected to the equipment.
• For pluggable equipment, the socket-out let shall be in stalled nea r the
equipment and shal l be easily accessible.
• Place the power cord where people cannot step on it. Do not place anything
over the power cord.
• Disconnect this equipment from the A/C outlet before cleaning it. Do not use
liquid or sprayed detergent for cleaning. Use moisture sheet or cloth for
cleaning.
• Keep this equipm ent away fr om hu midi ty.
• The openings on the encl osure are for ai r convection and prot ect the
equipment from overheating. Do not cover the openi ngs.
• If the equipment will not be use d for a lon g period of time, disconnec t the
equipment fr om A/ C p ower to avoid any dama ge by tr ans ient overvoltage.
• Do not pour any liquid into opening. This could cause fire or electrical shock.
78-11469-04
Cisco LRE CPE Hardware Installation Guide
2-9
Page 48

Verifying Package Contents
• Do not open the equipment. F or safety reas ons, the equipment sh ould only be
• If one of the following situations arises, get the equipment checked by a
• Do not leave this equipment in an unconditioned environment. Temperatures
Chapter 2 Installation
opened by qualified service personnel.
service personnel :
–
The power cord or plug is dama ged.
–
Liquid has entered the equipment.
–
The equipmen t has been exposed t o moistur e.
–
The equipmen t does not work well, or you c annot get it to work
according to user’s manual.
–
The equipmen t has been dropp ed or dam aged.
–
The equipmen t has o bvious si gn s of b re akag e.
above 4 5°C (113 °F) can damage the equip ment.
• The sound pressure level at the operat or’s position, according to IEC 704-1:
1982, is equal or less than 70 dB (A).
• Keep this hardware installat ion guide for later refe rence .
Verifying Package Contents
When you unpack the CPE, be sure that the pa ckage contains the items in this list.
If any items are missing, notify your authorized Cisco sales representative.
• Cisco 575 LRE, 576 LRE 997, or 585 LRE CP E
• AC power adapter and power cord
• Mounting kit containing these items:
–
Four rubber feet for install ing the CPE on a des ktop
–
Cable lock for securi ng cabl es to th e CPE
–
Three number-8 Phillips pan -head scr ews for mounting the CPE under a
desk or on a wall and attaching cable lock to the CPE
–
Screw template for aligning screws
Cisco LRE CPE Hardware Installation Guide
2-10
78-11469-04
Page 49

Chapter 2 Inst allation
• One RJ-45-to-R J-45 , str aig ht-thr oug h Et hern et ca ble (C isco 57 5 LR E CPE
and Cisco 576 LRE 997 CPE only)
• Product ownership registration car d
Note The CPE is sold individually or in multipackages of 6 and 24. T he m ultip ackages
include only one hardware installation guide, one screw template, and one product
ownership registration ca rd f or every six CPE d evices.
Installing the CPE
You can install the CPE on or under a desk or on a wall. Before y ou begin the
installation, decide where to mount the CPE by revie wing the illustrations in these
sections:
Insta lli n g th e CP E
• Installing the CPE on a De sk (wit hout Mo unting Sc rews), pa ge 2-11
• Installing the CPE on a Desk (wi th Mounti ng Screws), page 2-12
• Installing the CPE U nder a D esk, page 2-15
• Installing the CPE on a Wall, page 2-18
Installing the CPE on a Desk (without Mounting Screws)
The CPE can be installed on top of a desk with mounting screws or just placed on
the desk. If you do not wish to install the CPE with mounting scre ws, follo w th ese
steps:
Step 1 Locate the adhesive strip with the rubber feet in the CPE mounting kit.
Step 2 Remove the fou r rubbe r feet fro m th e adhe sive strip, and atta ch the m to th e
recessed areas on the bottom of the unit. This prevents the CPE from slid ing on
the desktop.
Step 3 Place the CPE on the desktop.
78-11469-04
Cisco LRE CPE Hardware Installation Guide
2-11
Page 50

Chapter 2 Installation
Installing the CPE
Installing the CPE on a Desk (with Mounting Screws)
If you wish to secure the CPE on a desktop, you can use mounting screws. Follow
these step s:
Step 1 Position the desk so that it is at least 1/2 inch (12.7 millimeters) from the wall to
allow space for cabling between the wall and the desk. (See Figure 2-1.)
Step 2 Locate the screw templa te. The template is used to align the mounting scre w holes
and is also used as a guid e t o m ake su re th e sc rews ar e i ns ta ll ed in to th e d esk to p
with proper clearance.
Step 3 Position the screw template on t op of the desk so that the two side-by-side slots
face the front of the desk ( S ee Figure 2-1.) This ensures that the cables will face
the rear of the desk after the CPE is installed.
Note Do not attach the screw template to the desk yet.
Note Allow a minimum of three inches (7.6 centimeters) between the rear of
the desk and the screw template so that ther e is enou gh room fo r the
cables to c lea r th e wa ll .
Cisco LRE CPE Hardware Installation Guide
2-12
78-11469-04
Page 51

Chapter 2 Inst allation
Figure 2-1 Installing the Mounting Screws on Top of a Desk
Screw
Screw
Cable
lock hole
Insta lli n g th e CP E
Wall
Screw template
3 in.
(7.6 cm)
Adhesive
Desktop
at least
1/2 in.
(12.7 mm)
65643
Note The template has adhesive to hold it in place while you drill holes on the
desktop. If you ha ve pu rchased a 6- or 24-multipack, y ou will be usin g the
same screw template to install each CPE. Do not use the adhesive.
Instead, hold the template against the top of the desk while you drill the
screw holes and insert the screws.
Step 4 (Optional) Peel the adhesi ve strip off the bottom of the sc re w template, a nd attach
it to the top of the desk.
Step 5 Use a 0.144-inch (3.7-millimeters) or a #27 drill bit to drill 1/2-inch
(12.7-millimeters) holes in the two screw template slots.
78-11469-04
Cisco LRE CPE Hardware Installation Guide
2-13
Page 52

Installing the CPE
Step 6 (Optional) If you wish to attach the cable lock after the cables are installed, drill
another 1/2-inch (12.7-m illim eters) hole in the ca ble lock hol e. For more
information, see the “At tach ing th e Cabl e Lock” section on page 2-29.
Step 7 Insert two screws in the slots on the screw template, and tighten until they touch
the top of the screw template.
Step 8 Remove the screw template from the desk top.
Step 9 Slide the CPE onto the mounting screws until it locks in place. (See Figure 2-2.)
Figure 2-2 Mounting the CPE On Top of a Desk
Chapter 2 Installation
Slides on
this way
CPE
Wall
Desktop
W
15˚
A
C
A
C
T
I
V
I
T
C
i
s
c
o
5
7
5
-
Y
E
T
H
E
R
N
E
T
L
R
P
O
W
E
E
R
at least
1/2 in.
(12.7 mm)
Screws
mounted
to desk
Note Figure 2-2 shows a Cisco 575 LRE CPE being mounted on top of a desk. Follow
the same procedure to mount a Cisco 576 LRE 997 or Cisco 585 LRE CPE on top
of a desk.
65644
Note The Cisco 575 LRE CPE, Cisco 576 LRE 997 CPE, and the Cisco 585 LRE CPE
use the same screw template and mounting screws. One CPE model can be
replaced with anothe r, and the same mounting scr ews can be used.
Cisco LRE CPE Hardware Installation Guide
2-14
78-11469-04
Page 53

Chapter 2 Inst allation
Installing the CPE Under a Desk
Tip We recommend that you attach the Ethernet, telephone, and power cables to the
CPE before mounting it under a desk because the connectors are hidden from view
after the CPE is installed. For more information, see the connection procedures
beginning on pag e 2-1 7.
Follow these steps to install the CPE under a desk:
Step 1 Position the desk so that it is at least 1/2 inch (12.7 millimeters) from the wall to
allow space for cabling between the wall and the desk. (See Figure 2-3,
Figure 2-4, an d Figure 2-8.)
Step 2 Locate the screw templa te. The template is used to align the mounting scre w holes
and is also used as a guide to make sure the screws are installed under the desk
with proper clearance.
Insta lli n g th e CP E
Step 3 Position the screw template underneath the desk so that the two side-by-side slots
face the front of the desk ( S ee Figure 2-3.) This ensures that the cables will face
the rear of the desk after the CPE is installed.
Note Do not attach the screw template to the desk yet.
Note Allow a minimum of three inches (7.6 centimeters) between the rear of
the desk and the screw template so that ther e is enou gh room fo r the
cables to cl ea r t he wa ll. ( See F igu re 2-3.)
78-11469-04
Cisco LRE CPE Hardware Installation Guide
2-15
Page 54

Installing the CPE
Figure 2-3 Installing the Mounting Screws Under a Desk
Desktop
Chapter 2 Installation
Wall
at least
1/2 in.
(12.7 mm)
Screw template
Screw
Note The template has adhesive to hold it in place while you drill holes
Screw
Cable
lock hole
Adhesive
3 in.
(7.6 cm)
underneath the desktop. If you have purchased a 6- or 24-multipack, you
will be using the sam e screw template to install seve ra l CPE s. D o not use
the adhesive. Instead, hold the template against the bottom of the desk
while you drill the screw holes and insert the screws.
Step 4 (Optional) Peel the adhesi ve strip off the bottom of the sc re w template, a nd attach
it to the underside of the de sk.
Step 5 Use a 0.144-inch (3.7-millimeters) or a #27 drill bit to drill 1/2-inch
(12.7-millimeters) holes in the two screw template slots.
Step 6 (Optional) If you wish to attach the cable lock after the cables are installed, drill
a 1/2-inch (12.7-millimeters) hole in the cable lock hole. For more information,
see the “Attaching the Cable Lock” section on page 2-29.
47502
Step 7 Insert two screws in the slots on the screw template, and tighten until they touch
the top of the screw template.
Step 8 Remove the screw template from underneath the desk.
Step 9 Slide the CPE onto the mounting screws until it locks in place. (See Figure 2-4.)
Cisco LRE CPE Hardware Installation Guide
2-16
78-11469-04
Page 55

Chapter 2 Inst allation
Figure 2-4 Mounting the CPE Under a Desk
Desktop
Screws mounted to
underside of desk
15˚
Insta lli n g th e CP E
Wall
at least
1/2 in.
(12.7 mm)
Slides on
this way
Note Figure 2-4 shows a Cisco 575 LR E CPE being mounted under a desk. Follow the
CPE
53024
same procedure to mount a Cisco 576 LRE 997 CPE or Cisco 585 LRE CPE under
a desk.
78-11469-04
Cisco LRE CPE Hardware Installation Guide
2-17
Page 56

Installing the CPE
Installing the CPE on a Wall
Tip We recommend that you attach the Ethernet, telephone, and power cables to the
CPE before moun tin g it on wall b ec ause the con ne ctor s m ight be hidd en from
view after the CPE is installed. For more information, see the connection
procedures beginning w ith the “Connecting to a 10/100 Port ” section on
page 2-21.
Step 1 Locate the screw template. The template is used to align the mounting screw
holes.
Note The template has adhesive to hold it in place while you drill holes in the
wall. If you have purchased a 6- or 24-multipack, you will be using the
same screw template to install each CPE. Do not use the adhesive.
Instead, hold the template ag ainst the wall while you drill the scre w holes
and insert the screws.
Chapter 2 Installation
Step 2 Position the screw template so that the cable lock hole is facing toward the floor.
(See Figure 2-5.) This ensures that the cables will face to w ard th e floor after the y
are connect ed.
Note Do not attach the screw template to the wall yet.
Cisco LRE CPE Hardware Installation Guide
2-18
78-11469-04
Page 57

Chapter 2 Inst allation
Insta lli n g th e CP E
Figure 2-5 Installing the Mounting Screws on a Wall
Screw
Screw
P/N 700-09589-01
SCREW TEMPLATE
MOUNTING SURFACE
THIS SIDE AWAY FROM
SIDE
CABLE ENTRY
SIDE
CABLE ENTRY
47503
Screw
template
Cable
lock hole
Step 3
(Optional) Peel the adhesive strip off the bottom of the screw template.
Note The template has adhesive to hold it in place while you drill holes in the
wall. If you have purchased a 6- or 24-multipack, you will be using the
same screw template to install several CPEs. Do not use the adhesive.
Instead, hold the template ag ainst the wall while you drill the scre w holes
and insert the screws.
Step 4 Attach the screw template to the wall.
Step 5 Use a 0.144-inch (3.7-millimeters) or a #27 drill bit to drill 1/2-inch
(12.7-millimeters) holes in the two screw template slots.
78-11469-04
Cisco LRE CPE Hardware Installation Guide
2-19
Page 58

Installing the CPE
Step 6 (Optional) If you wish to attach the cable lock after the cables are installed, drill
Step 7 Insert two screws in the slots on the screw template, and tighten until they touch
Step 8 Remove the screw template from the wall.
Step 9 Slide the CPE onto the screws until it locks in place. (See Figure 2-6.)
Chapter 2 Installation
a 1/2-inch (12.7-millimeters) hole in the screw template hole. For more
information, see the “At tach ing th e Cabl e Lock” section on page 2-29.
the top of the screw template.
Figure 2-6 Installing the CPE On a Wa ll
15˚
CPE
W
E
O
R
P
T
E
N
R
E
H
T
E
Y
T
I
V
I
T
C
A
N
A
W
L
5
R
7
E
5
o
c
s
i
C
this way
Screw
Screw
53023
CPE slides on
Note Figure 2-6 sh ows a Cisco 575 L RE CPE b eing m ount ed on a wall. Follow the
same procedure to mount a Cisco 576 LRE 997 CPE or Cisco 585 LRE CPE on a
wall.
Cisco LRE CPE Hardware Installation Guide
2-20
78-11469-04
Page 59

Chapter 2 Inst allation
Connecting to a 10/100 Port
The LRE CPE 10/100 por ts configure themse lves to opera te at the spee d of the
attached devices. Conn ect ing devices that do not autonegot iate or th at have had
speed and duplex parameters manually set can reduce performance or result in no
linkage.
If the attache d por ts do not su pport aut onegotia tion, yo u can explici tly se t t he
speed and duplex pa rame te rs.
Note The LRE CPE 10/100 ports are configured through a Catalyst LRE switch. Refer
to the switch hardware installation guide and the switch software configuration
guide for your switch model for more information.
Connecting to a 10/100 Port
Note The Cisco 575 LRE CPE and Cisco 576 LRE 997 CPE have only one 10/100 port.
Follow these steps to conn ec t to 10BASE-T and 1 00BASE-T d evices:
Step 1 Connect a stra ight-thr ough Cat egory 5 cable to th e ENET por t on the Cisco 575
LRE CPE or Cisco 576 LRE 997 CPE . Connect a st raight- through Ca tegory 5
cable to on e of the E TH1 thro ugh E TH4 po rts o n t h e Cisco 5 85 LRE C PE. ( See
Figure 2-7.)
Note Ethernet cable s are not in cluded with th e Cisco 585 LRE CPE.
Figure 2-7 Connecting to a 10/100 LRE Port
E
R
L
-
5
7
5
R
E
o
W
c
s
O
i
P
C
T
E
N
R
E
H
T
E
Y
T
I
V
I
T
C
A
N
A
W
PWR
ENET
WALL PHONE
65645
78-11469-04
Cisco LRE CPE Hardware Installation Guide
2-21
Page 60

Connecting to a 10/100 Port
Step 2 Connect th e other en d of the cab le to the R J-45 con nector of the othe r device.
If you are installing a Cisc o 585 LRE CP E and a re con necti ng several devices to
it, repeat Steps 1 and 2 until all devices are connected.
Note If you are installing a CPE in a hotel room where Internet services will be
provided to hotel g ue st s, lapto p o r desktop c omp uter s m ight not be available. If
this is the case, connect one end of the Ethernet cable to the CPE, and leave the
other end of the Ether net cable on to p of the desk. (See Figure 2-8.)
Figure 2-8 Ethernet Cable Lying on a Desktop
Connect
to PC
Desktop
Chapter 2 Installation
CPE
attached under
a desk
Wall
1/2 in.
(12.7 mm)
from wall
45783
Cisco LRE CPE Hardware Installation Guide
2-22
78-11469-04
Page 61

Chapter 2 Inst allation
Connecting to a Wall-Mounted Telephone Jack
Connecting to a Wall-Mounted Telep hone Jack
The CPE connects to a Cat alyst LR E switc h through th e teleph one wirin g of a
building. Follow these steps to connect the CPE to an LRE switch:
Step 1 Connect one end of a telephone cord (not included) to the WALL port of the CPE.
(See Figure 2- 9.)
Caution To reduce the risk of fire, use only num ber 26 Ame ric an Wire Gaug e (AWG) or
larger telephone cable.
Caution Always discon nect all te leph one lines fro m the wall outle t be fo re se rv icing or
disassembling this equipment.
Figure 2-9 Connecting to a WALL port
E
R
L
-
5
7
5
R
E
o
W
c
s
O
i
P
C
T
E
N
R
E
H
T
E
Y
T
I
V
I
T
C
A
N
A
W
PWR
ENET
WALL PHONE
65646
Note We recommend usin g a telepho ne cab le that ha s a three- pair, rollover
configuration.
Step 2 Connect th e other en d of the teleph one cor d to the wall teleph one jac k.
78-11469-04
Cisco LRE CPE Hardware Installation Guide
2-23
Page 62

Connecting to a Telephone
Connecting to a Telephone
These limitations an d restrict ions appl y when you use a plain old tele phone
service (POTS) splitter with the Cat alyst 2950 LRE switch es and Cisco LRE CPE
devices:
• The Catalyst 2950ST-8 LRE switch, Catalyst 2950ST-24 LRE swit ch,
Cisco 575 LRE CPE, and Cisco 585 LRE CPE are designed to share lines
with analog, Integrated Services Digital Network ( I SDN) , an d di git al pr ivate
branch exchange (PB X) sw it ch t el ephone s that use the 0 to 70 0 kHz
frequency rang e.
Digital telephones connected to digital PBX switches that use frequencies
above 700 k Hz do n ot w ork wh en sh aring a line w ith LRE sign als . Due to the
proprietary nature of digital PBX switches, some digital PBX switch services
use frequencies above 700 kH z.
Chapter 2 Installation
• You can use a Cisco LRE 48 POTS Splitter with a Cata lyst 2950ST-8 LRE
switch, Catalyst 2950ST-24 LRE switch, Cisco 575 LRE CPE, and Cisco 585
LRE CPE. For installatio n instructions, refer to the Installation and W arranty
Notes for the Cisco LRE 48 POTS Splitter.
• The Catalyst 2950ST-24 LRE 997 switch and Cisc o 576 LRE 99 7 C PE ar e
designed to shar e li nes wi th a nal og and ISD N t eleph one s th at use the 0
to 120 kHz fr eque ncy ran ge.
• We re comm end tha t you do not use a Cisco LRE 48 POTS Splitter with a
Catalyst 2950ST-24 LRE 997 switch and a Cisco 576 LRE 997 CPE as shown
in Figure 2-10. Only traffic in a spec ific fre quency r a nge c an b e sent to an d
from the devices attached to the CPE.
In Figure 2-10 , only traffic from 0 to 120 kHz can pass from a device attached
to the CPE, such as a computer or telephone, to the CPE, a splitter, and a
switch. In th e reverse dir ect ion, tra ffic from 0 to 7 00 kHz c an p ass thro ugh
the switch and splitter to the CPE, but o nly traf fic from 0 to 120 kHz can pass
through the C PE to a c om pute r or a te leph one .
For more informati on, refe r to the Installation and Warranty Notes for the
Cisco LRE 48 POTS Splitter.
Cisco LRE CPE Hardware Installation Guide
2-24
78-11469-04
Page 63

Chapter 2 Inst allation
Connecting to a Telephone
Figure 2-10 Limitations Using a Cisco LRE 48 POTS Splitter with a
Catalyst 2950ST-24 LRE 997 Switch and C isco 576 LRE CPE
PC
Cisco 576 LRE
997 CPE
POTS Telephone
Cisco LRE 48
POTS splitter
Catalyst 2950ST-24
LRE 997 switch
Traffic from
0 to 120 kHz
Traffic from 0 to 700 kHz
89860
Follow these steps to connect the CPE to a telephone:
Step 1 Connect one end of a telephone cord (not included) to the PHONE port of the
CPE. (See Figure 2-11.)
Caution To reduce the risk of fire, use only num ber 26 AWG or larger telephone cabl e.
Caution Always discon nect all te leph one lines fro m the wall outle t be fo re se rv icing or
disassembling this equipment.
Note Use a standard telephone cord with RJ-1 1 conne ctors on bot h ends.
78-11469-04
Cisco LRE CPE Hardware Installation Guide
2-25
Page 64

Connecting to a Telephone
Step 2 Connect th e other en d of the teleph one cor d to a telephone .
Figure 2-11 Wall Jack to Telephone Connection through an LRE CPE
Note If you are connecting a Cisco 585 LRE CPE to a Cisco IP Phone, connect
Chapter 2 Installation
E
R
L
-
5
7
5
R
E
o
W
c
s
O
i
P
C
T
E
N
R
E
H
T
E
Y
T
I
V
I
T
C
A
N
A
W
PWR
ENET
one end of a straight-through Ethernet cable to one of the 10/100 ports on
the CPE and the other end of the cable to the Cisco IP Phone.
WALL PHONE
65647
Note If you have other tele ph ones t hat s har e th e sa me lin e but t hat are no t conn ec ted
through the C P E, w e re c omme nd co nnec tin g tho se t eleph one s thr ou gh a
microfilter with a 300-ohm termination. Microfilters can improve voice call
quality when voice and data equipment are using the same telephone line. They
also prevent nonf iltered telephon e rings or nonfiltered telephone transitio ns (such
as on-hook t o o ff-hook) from i nte rrupt ing th e L RE conne c tion. For more
information about microfilters, contact your Cisco sales representative.
Cisco LRE CPE Hardware Installation Guide
2-26
78-11469-04
Page 65

Chapter 2 Inst allation
Connecting the Power Cord
Follow these steps to connect the power cord to the CPE:
Step 1 Connect th e power cord to th e power connec tor on the CPE rear pane l. (See
Figure 2-12.)
Figure 2-12 Connecting the Power Cord
PWR
ENET
WALL PHONE
Connecting the Power Cord
E
R
L
-
5
7
5
R
E
o
W
c
s
O
i
P
C
T
E
N
R
E
H
T
E
Y
T
I
V
I
T
C
A
N
A
W
65648
Caution Use only the AC power cord and adapter shipped with the CPE.
Step 2 Slide the power cor d under the hooks on th e bottom of the CPE. (See Figure 2- 13.)
78-11469-04
Cisco LRE CPE Hardware Installation Guide
2-27
Page 66

Connecting the Power Cord
Chapter 2 Installation
Figure 2-13 Securing a Power Cord to the Bottom of the CPE
To electric
outlet
Hooks
2-28
45782
Caution Do not connect the AC adapter into a wall power outlet yet. Refer to the
“Powering On the CPE” section on page 2-33.
Cisco LRE CPE Hardware Installation Guide
78-11469-04
Page 67

Chapter 2 Inst allation
Attaching the Cable Lock
The optional cable lock provides extra security to prevent someone from easily
removing the CPE from a d esk or wall .
To install the cable lock, follow these steps:
Step 1 Locate the cable lock in the accessory kit.
Step 2 Slide the cable lock onto the CPE until it clicks in place. (See Figure 2-14 and
Figure 2-15.)
Attaching the Cable Lock
78-11469-04
Cisco LRE CPE Hardware Installation Guide
2-29
Page 68

Attaching the Cable Lock
Chapter 2 Installation
Figure 2-14 Attaching the Cable Lock
Cable lock
Note Figure 2-14 shows a cable lock being installed on a Cisco 575 LRE CPE. Follow
the same proce dure t o in stall a c abl e l ock on a Ci sco 5 76 LR E 997 CPE o r
Cisco 585 LRE CPE.
Cisco LRE CPE Hardware Installation Guide
2-30
46014
78-11469-04
Page 69

Chapter 2 Inst allation
Figure 2-15 Cable Lock Installed on CPE (Side View)
Attaching the Cable Lock
To electric
outlet
46775
Step 3
Cable lock
Insert the supplied screw into the cable-lock mounting hole. (See Figure 2-1 6.)
Note Figure 2-16 shows a cable lock be ing secur ed to a Cisco 575 LR E CPE. Follow
the same procedure t o secure a ca ble lock t o a Cisco 576 LRE 997 CPE or
Cisco 585 LRE CPE .
78-11469-04
Cisco LRE CPE Hardware Installation Guide
2-31
Page 70

Attaching the Cable Lock
Chapter 2 Installation
Figure 2-16 Securing the Cable Lock to a Desk- or Wall-Mounted CPE with
Mounting Screw
W
E
R
O
P
H
T
E
T
C
A
Y
D
A
E
R
L
5
R
7
E
5
o
c
s
i
C
2-32
Screw
Cisco LRE CPE Hardware Installation Guide
48001
CPE
Cable lock
78-11469-04
Page 71

Chapter 2 Inst allation
Powering On the CPE
Follow these steps to connect the CPE to AC power:
Step 1 Connect the AC cord to a power outlet.
Step 2 Ensure th at the power LED is green. If it is not gre en, see Cha pter 3,
“Troubleshooting,” to determine a course of action.
The ETH link LED (on the Cisco 575 LRE CPE or Cisco 576 LRE 997 CPE), the
ETH1 through ETH4 LEDs (on the Cisco 585 LRE CPE), and the READY LED
turn on when th e a ppropr i ate e quip me nt i s co nnec ted.
Powering On the CPE
Where to Go Next
CPE configuration, dat a spe ed se ttin gs, a nd moni toring a re c ontr olled from a
Catalyst LRE switch. For more information, refer to the switch hardware
installation guide and the switch software configuration guide for your switch
model.
78-11469-04
Cisco LRE CPE Hardware Installation Guide
2-33
Page 72

Where to Go Next
Chapter 2 Installation
Cisco LRE CPE Hardware Installation Guide
2-34
78-11469-04
Page 73

CHAPTER
3
Troubleshooting
The LEDs on th e custo mer pr emis es eq uipmen t (CPE ) device provid e
troubleshooting information. They show power-related problems,
port-connectivity pro bl ems, an d overall C PE pe rfor ma nce. For a fu ll d escri p tio n
of the LEDs, see the “Front-Panel Description” section on page 1-5.
The Long-Reac h Ethern et (LRE) link betw een the CPE and the Cata lyst LRE
switch can be monitored from the switch. Refer to the switch hardware
installation guide and the switch software configuration guide for your switch
model for more info rmation.
Table 3-1 lists the CPE problems that you might encounter and their solutions.
Table 3-1 Common Problems and Their Solutions
Symptom Possible Caus e Resolution
POWER LED not on AC power adapter and cable is loose or
not connected prope rly.
Defective AC power adapter and cable.
Note Do not attempt to open or repair
the power adapter. Replace the
AC power adapter and cable
only with a n ew one o rdere d
from your Cisco sales
representative.
Cisco LRE CPE Hardware Installation Guide
78-11469-04
Reconnect the power adapter and
cable into the w all outle t and th e
CPE.
Replace the AC power adapter
and cable.
3-1
Page 74

Table 3-1 Common Problems and Their Solutions (continued)
Symptom Possible Caus e Resolution
Chapter3 Troubleshooting
READY LED not on Telephone cable is loos e or is not
connected prope rly.
Telephone cable is de fec tive. Rep lac e the te leph one cabl e.
Cable trunking i s d efec tive. Repair the ca ble trun ki ng, o r
1. CPE is not communicating with
LRE switc h.
2. CPE might be attempting to exceed
the rate or reach selected by the
LRE switc h.
ETH LED or ETHn
LED not on
Ethernet cable is loose or is not
connected prope rly.
CPE is not communicating with the
Ethernet ca rd i n the 1 0/100 device.
Incorrect or defective Ethernet cable.
• A crossover cable was used instead
of the includ ed st rai ght- throu gh
cable.
Reconnect the phone cable into
the phone wall jack and the CPE.
select an a lte rn at ive pair.
Verify swit ch a nd ups trea m
network status.
Reconnect the Ethernet cable to
the CPE and your PC or your
laptop.
Reboot the device.
• For the correc t pi n outs and
the proper use of
straight-through c ables , see
the “Ethernet
Straight-Through Ca ble
Pinouts” section on
page B-5.
• The Ethernet cable is wired
incorrectly or is defective.
ACTIVITY LED or
ETHn LED not
Data is not bein g tr an sferr ed bet wee n
the CPE and the 10/100 device.
blinking
Cisco LRE CPE Hardware Installation Guide
3-2
• Replace w ith a t es ted go od
cable.
Verify laptop or PC net work
configuration.
78-11469-04
Page 75

Chapter 3 Troubleshooting
Table 3-1 Common Problems and Their Solutions (continued)
Symptom Possible Caus e Resolution
No connectivity Incorrect or bad Ethernet cable.
No connectivity to
telephone
• A crossover cable was used when a
straight-through cable was required
or the reverse.
• For the correc t pi n outs and
the proper use of
straight-through c ables , see
the “Ethernet
Straight-Through Ca ble
Pinouts” section on
page B-5.
• The Ethernet cable is wired
incorrectly or is defective.
• Replace w ith a t es ted go od
cable.
Data service is unavailable. Verify switch and upstream
network status.
Incorrect or bad c able.
• Incorrect or defe ctive rollover or
straight-through t elephone cable.
• A rollover cable was use d when a
straight-through cable was required
or the reverse.
• Replace w ith a t es ted go od
cable.
• For the correc t pi n outs and
the proper use of rollover
and straight-through
telephone cables, see the
“Telephone
Straight-Through a nd
Rollove r Cable Pi nouts ”
section on page B- 6.
Telephone is sens itive to pola rity
inversion.
78-11469-04
Ensure that the CPE PHONE
jack pinouts match the wal l jac k
pinouts.
Cisco LRE CPE Hardware Installation Guide
3-3
Page 76

Table 3-1 Common Problems and Their Solutions (continued)
Symptom Possible Caus e Resolution
Chapter3 Troubleshooting
No connectivity to
telephone (continued)
Telephone uses signa ls a bove 700 kHz. Verify that te leph one re quire s
frequencies above 700 kHz. If so,
there is no resolution. Contact
the Cisco Technical Assistance
Center (TAC).
Telephone uses signa ls a bove 120 kHz
(Cisco 576 LRE 99 7 C PE only)
Verify that te leph one requi res
frequencies above 120 kHz. If so,
there is no resolution. Contact
the Cisco Technical Assistance
Center (TAC).
Cisco LRE CPE Hardware Installation Guide
3-4
78-11469-04
Page 77

APPENDIX
A
Technical Specifications
Table A-1 lists the technical specifications for the Cisco 575 LRE CPE and the
Cisco 576 LRE 997 CPE. Table A-2 lists the technical specifications for the
Cisco 585 LRE CPE. Table A-3 and Table A-4 list the agency approvals for EMI
and safety.
Table A-1 Technical Specifications for the Cisco 575 LRE CPE and
Cisco 576 LRE 997 CPE
Environmental Ranges
Operating temperature 32 to 113°F (0 to 45°C)
78-11469-04
Storage te mpe ratu re –13 to 158°F (–25 to 70°C)
Relative humidity 10 to 85% (nonc on densi ng)
Operating altitude Up to 10,000 ft (3000 m)
Storage altitude Up to 15,000 ft (4570 m)
Power Requi re m en t s
DC input voltages +5V @1A
AC input voltage 100–240 VAC, 50–60 Hz
Physical Dimensions
Wei gh t 0.5 lb (0.2 k g)
Dimensions (H x W x D) 1.7 x 5 x 6 in. (4.3 x 12.7 x 15.2 cm)
Cisco LRE CPE Hardware Installation Guide
A-1
Page 78

Appendix A Technical Specific ati ons
Table A-2 Technical Specifications for the Cisco 585 LRE CPE
Environmental Ranges
Operating temperature 32 to 113°F (0 to 45°C)
Storage temperature –13 to 158°F (–25 to 70°C)
Relative humidity 1 0 to 85 % (non co ndensi ng )
Operating altit ude U p to 10,000 ft (3000 m)
Storage altitude Up to 15,000 ft (4570 m)
Power Requi re m en t s
DC input voltages +12V @1A
AC input voltage 1 00–240 VAC, 50–60 Hz (worldwide)
108-132 VAC, 60 Hz (USA)
90-110 VAC, 50 Hz (Jap an)
198-242 VAC, 50 Hz (China )
216-264 VAC, 50 Hz (UK, A u stralia )
207-253 VAC, 50 Hz (Eu rop e)
192-242 VAC, 60 HZ (Korea)
Physical Dimensions
Weight 0.75 lb (0.3 kg)
Dimensions (H x W x D) 1 .7 x 5.9 x 6.8 in. (4.2 x 15 x 17.3 cm )
Cisco LRE CPE Hardware Installation Guide
A-2
78-11469-04
Page 79

Appendix A Technical Specific ati ons
Table A-3 Agency Approvals for Cisco 575 LRE CPE and 585 LRE CPE
Safety EMI
UL/CSA 60950 FCC Part 15 Class B
IEC 60950/EN 6 095 0 EN 55022 Class B (CISPR 22 Cla ss B)
AS/NZS 3260, TS001 VCCI Class B
CE AS/NZS 3548 Class B
Table A-4 Agency Approvals for Cisco 576 LRE 997 CPE
BCIQ
CE
Safety EMI
UL/CSA 60950 FCC Part 15 Class B
IEC 60950/EN 6 095 0 EN 55022 Class B (CISPR 22 Cla ss B)
CE EN 55024: I TE Imm uni ty Stand ard . (C E Ma rk), 19 98
CE
78-11469-04
Cisco LRE CPE Hardware Installation Guide
A-3
Page 80

Appendix A Technical Specific ati ons
Cisco LRE CPE Hardware Installation Guide
A-4
78-11469-04
Page 81

Connector and Cable Specifications
This appendix describes the and customer premises equipment (CPE) connectors
and the cables th at you use to connect the CPE to other devices.
Connector Specifications
10/100 Ports
APPENDIX
B
78-11469-04
The CPE 10/100 ports (t he ENET po rt on the Cisco 575 LRE CPE an d the
Cisco 576 LRE 997 CPE and on the EN ET 1 th ro ugh EN E T4 p orts on the
Cisco 585 LRE CPE) use RJ-45 connectors with Ethernet pinouts. The ports have
the transmit (TD) and receive (RD) signals internally crossed so that a
straight-through Ethernet cable (included only with t he Cisco 575 LRE CPE and
Cisco 576 LRE 997 CPE) can be attache d to the port. Figure B- 1 shows the
pinouts.
Cisco LRE CPE Hardware Installation Guide
B-1
Page 82

Connector Specification s
Appendix B Connector and Cable Specifications
Figure B-1 RJ-45 Connector Pinouts
231 45678Pin Label
WALL Port
1
2
3
4
5
6
7
8
RD+
RDTD+
NC
NC
TDNC
NC
When connecting a CPE 10/1 00 port to a PC or lapt op, you must use a
straight-throu gh Ethe rn et cabl e wir ed for 10BASE-T or 10 0BASE-T. Figure B-5
shows the straight-through cable schemati cs.
The WALL port uses an RJ-11 telephone connector to connect to the Long-Reach
Ethernet (LRE) swi tch. See Figure B-2 for the connec tor pinout s.
54968
Cisco LRE CPE Hardware Installation Guide
B-2
78-11469-04
Page 83

Appendix B Connector and Cable Sp eci fi cations
Figure B-2 WALL Port Connector Pinouts
Connector Specifications
PHONE Port
Pin Label
1
2
3
4
5
6
Pass-through 6
Pass-through 5
LRE and phone ring
LRE and phone tip
Pass-through 2
Pass-through 1
123456
The PHONE port uses an RJ-11 connector. LRE operation only requires one wire
pair (pins 3 an d 4 ) to c arry L RE tra ffic. Therefo re , you c an us e one-, two- , or
three-pair t elepho ne cab le. However, you must use a two - o r th ree- pa ir cabl e fo r
telephones tha t c arry power or o ther se rvic es. We recommend usin g a thre e-pa ir
telephone cable to connect a telephon e to the CPE . (See Figure B-6 and
Figure B-7.)
60542
Note Pins 3 and 4 are internally crossed between the CPE WALL port and the CPE
PHONE port on the Cisc o 575 LRE CPE, th e Cisco 576 LRE 997 CPE, and the
Cisco 585 LRE CPE devices.
Pins 1, 2, 5, a nd 6 on t he WALL port of t he Ci sco 5 75 LR E CPE an d the
Cisco 576 LRE 997 CPE are internally connected to the corresponding pins of the
PHONE po rt. (Se e Figure B-3.)
78-11469-04
Cisco LRE CPE Hardware Installation Guide
B-3
Page 84

Connector Specification s
Appendix B Connector and Cable Specifications
Figure B-3 Cisco 575 LRE CPE and Cisco 576 LRE 997 CPE PHONE Port
Connector Pinouts
Pin Label
1
2
3
4
5
6
Pass-through 1
Pass-through 2
Phone tip
Phone ring
Pass-through 5
Pass-through 6
123456
Pins 1, 2, 5, a nd 6 on t he WALL port of t he Ci sco 5 85 LR E CPE ar e int erna ll y
crossed. ( See Figure B-4.)
Figure B-4 Cisco 585 LRE CPE PHONE Port Connector Pinouts
Pin Label
123456
74242
B-4
1
2
3
4
5
6
Pass-through 6
Pass-through 5
Phone tip
Phone ring
Pass-through 2
Pass-through 1
Note Some single-line or multiline telephones are sensitive to polarity inversion. In
these cases, pay special attention to the CPE PHONE port pinouts.
Cisco LRE CPE Hardware Installation Guide
78-11469-04
60543
Page 85

Appendix B Connector and Cable Sp eci fi cations
Cable Specifications
This section describes the cables that you use to connect the CPE to other devices.
Ethernet Straight-Through Cable Pinouts
The schematics of a strai ght-throu gh Ethe rnet ca ble (incl uded with the
Cisco 575 LRE CPE and the Cisc o 5 76 LRE 997 CPE) are shown in Figure B-5 .
Figure B-5 Ethernet Straight-Through Cable Pinouts
Cable Specifications
Switch
3 TD+
6 TD–
1 RD+
2 RD–
Switch
3 RD+
6 RD–
1 TD+
2 TD–
H5578
78-11469-04
Cisco LRE CPE Hardware Installation Guide
B-5
Page 86

Appendix B Connector and Cable Specifications
Cable Specific ations
Telephone Straight-Through and Rollover Cable Pinouts
The schematic s o f stra ight-t hr ough a nd r ollover tel ephone cabl es a re sh own in
Figure B-6 and Fi gure B-7.
Figure B-6 Telephone Straight-Through Cable Schematic
Pin
1
2
3
Pair 1
Pair 2
Pair 3
Figure B-7 Telephone Rollover Cable Schematic
4
5
6
Pin
1
2
3
Pair 1
4
Pin
1
2
3
4
5
6
Pin
1
2
3
4
60544
Pair 2
Pair 3
Cisco LRE CPE Hardware Installation Guide
B-6
5
6
5
6
60545
78-11469-04
Page 87

Appendix B Connector and Cable Sp eci fi cations
Identifying a Telephone Rollover Cable
You can identify a telephone rollover cable by comparing the two RJ-21
connectors at e ach end of the ca ble. H old the cab le ends si de-b y-side, with the tab
facing away from you. The wire conne cted to the pin on the ou tsid e of the left
RJ-21 connecto r s hou ld be the sam e co lo r as the wi re conn ected to the pin on the
outside of the rig ht RJ- 21 conn ect or. (See Figure B- 8.)
Figure B-8 Identifying a Telephone Rollover Cable
Pin 1 on one connector and
pin 6 on the other connector
should be the same color.
Cable Specifications
Pin 1
Pin 6
60539
78-11469-04
Cisco LRE CPE Hardware Installation Guide
B-7
Page 88

Cable Specific ations
Appendix B Connector and Cable Specifications
Cisco LRE CPE Hardware Installation Guide
B-8
78-11469-04
Page 89

Translated Safety Warnings
This appendix repeats in multiple languages the warnings in this guide.
Qualified Personnel Warning
Warning
Only trained and qualified personnel should be allowed to install or replace
this equipment.
APPENDIX
C
Waarschuwing
Varoitus
Avertissement
Achtung
Figyelem!
78-11469-04
Installatie en reparaties mogen uitsluitend door getraind en bevoegd
personeel uitgevoerd worden.
Ainoastaan koulutettu ja pätevä henkilökunta saa asentaa tai vaihtaa tämän
laitteen.
Tout i nstallation ou remplacement de l'appareil doit être réalisé par du
personnel qualifié et compétent.
Gerät nur von geschultem, qualifiziertem Personal installieren oder
auswechseln lassen.
A berendezést csak szakképzett személy helyezheti üzembe és cserélheti ki.
Cisco LRE CPE Hardware Installation Guide
C-1
Page 90

Installatio n Warn in g
Appendix C Translated Safety Warni ngs
Avvertenza
Advarsel
Aviso
¡Atención!
Varning
Solo personale addestrato e qualificato deve essere autorizzato ad installare
o sostituire questo apparecchio.
Kun kvalifisert personell med riktig opplæring bør montere eller bytte ut dette
utstyret.
Este equipamento deverá ser instalado ou substituído apenas por pessoal
devidamente treinado e qualificado.
Estos equipos deben ser instalados y reemplazados exclusivamente por
personal técnico adecuadamente preparado y capacitado.
Denna utrustning ska endast installeras och bytas ut av utbildad och
kvalificerad personal.
Installation Warning
Warning
Waarschuwing
Cisco LRE CPE Hardware Installation Guide
C-2
Read the installation instructions before connecting the system to the power
source.
Raadpleeg de installatie-instructies voordat u het systeem op de voedingsbron
aansluit.
78-11469-04
Page 91

Append ix C Translated Safety W a r nings
Installation Warning
Varoitus
Attention
Warnung
Figyelem!
Avvertenza
Advarsel
Aviso
¡Advertencia!
Lue asennusohjeet ennen järjestelmän yhdistämistä virtalähteeseen.
Avant de brancher le système sur la source d'alimentation, consulter les
directives d'installation.
Vor dem Anschließen des Systems an die Stromquelle die
Installationsanweisungen lesen.
Mielõtt áramforráshoz csatlakoztatná a rendszert, olvassa el az üzembe
helyezési útmutatót!
Consultare le istruzioni di installazione prima di collegare il sistema
all'alimentatore.
Les installasjonsinstruksjonene før systemet kobles til strømkilden.
Leia as instruções de instalação antes de ligar o sistema à fonte de energia.
Lea las instrucciones de instalación antes de conectar el sistema a la red de
alimentación.
Varning!
Läs installationsanvisningarna innan du kopplar systemet till
strömförsörjningsenheten.
78-11469-04
Cisco LRE CPE Hardware Installation Guide
C-3
Page 92

Jewelry Removal Warning
Jewelry Removal Warning
Appendix C Translated Safety Warni ngs
Warning
Waarschuwing
Varoitus
Attention
Before working on equipment that is connected to power lines, remove
jewelry (including rings, necklaces, and watches). Metal objects will heat up
when connected to power and ground and can cause serious burns or weld the
metal object to the terminals.
Alvorens aan apparatuur te werken die met elektrische leidingen is
verbonden, sieraden (inclusief ringen, kettingen en horloges) verwijderen.
Metalen voorwerpen worden warm wanneer ze met stroom en aarde zijn
verbonden, en kunnen ernstige brandwonden veroorzaken of het metalen
voorwerp aan de aansluitklemmen lassen.
Ennen kuin työskentelet voimavirtajohtoihin kytkettyjen laitteiden parissa,
ota pois kaikki korut (sormukset, kaulakorut ja kellot mukaan lukien).
Metalliesineet kuumenevat, kun ne ovat yhteydessä sähkövirran ja maan
kanssa, ja ne voivat aiheuttaa vakavia palovammoja tai hitsata metalliesineet
kiinni liitäntänapoihin.
Avant d’accéder à cet équipement connecté aux lignes électriques, ôter tout
bijou (anneaux, colliers et montres compris). Lorsqu’ils sont branchés à
l’alimentation et reliés à la terre, les objets métalliques chauffent, ce qui peut
provoquer des blessures graves ou souder l’objet métallique aux bornes.
Warnung
Figyelem!
Cisco LRE CPE Hardware Installation Guide
Vor der Arbeit an Geräten, die an das Netz angeschlossen sind, jeglichen
Schmuck (einschließlich Ringe, Ketten und Uhren) abnehmen.
Metallgegenstände erhitzen sich, wenn sie an das Netz und die Erde
angeschlossen werden, und können schwere Verbrennungen verursachen
oder an die Anschlußklemmen angeschweißt werden.
Mielõtt hálózati feszültséghez csatlakozó készülékkel kezd el dolgozni, vegye
le magáról az ékszereket (például gyûrût, nyakláncot, órát). A fém tárgyak
felmelegszenek, ha hálózati feszültséghez és földhöz érnek, és súlyos égési
sérülést okozhatnak, illetve a fém tárgyak hozzáforrhatnak a csatlakozókhoz.
C-4
78-11469-04
Page 93

Append ix C Translated Safety W a r nings
Jewelry Removal Warning
Avvertenza
Advarsel
Aviso
¡Advertencia!
Prima di intervenire su apparecchiature collegate alle linee di alimentazione,
togliersi qualsiasi monile (inclusi anelli, collane, braccialetti ed orologi). Gli
oggetti metallici si riscaldano quando sono collegati tra punti di
alimentazione e massa: possono causare ustioni gravi oppure il metallo può
saldarsi ai terminali.
Fjern alle smykker (inkludert ringer , halskjeder og klokker) før du skal arbeide
på utstyr som er koblet til kraftledninger. Metallgjenstander som er koblet til
kraftledninger og jord blir svært varme og kan forårsake alvorlige
brannskader eller smelte fast til polene.
Antes de trabalhar em equipamento que esteja ligado a linhas de corrente,
retire todas as jóias que estiver a usar (incluindo anéis, fios e relógios). Os
objectos metálicos aquecerão em contacto com a corrente e em contacto com
a ligação à terra, podendo causar queimaduras graves ou ficarem soldados
aos terminais.
Antes de operar sobre equipos conectados a líneas de alimentación, quitarse
las joyas (incluidos anillos, collares y relojes). Los objetos de metal se
calientan cuando se conectan a la alimentación y a tierra, lo que puede
ocasionar quemaduras graves o que los objetos metálicos queden soldados a
los bornes.
78-11469-04
Varning!
Tag av all a smycken (inklusive ringar, halsband och armbandsur) innan du
arbetar på utrustning som är kopplad till kraftledningar. Metallobjekt hettas
upp när de kopplas ihop med ström och jord och kan förorsaka allvarliga
brännskador; metallobjekt kan också sammansvetsas med kontakterna.
Cisco LRE CPE Hardware Installation Guide
C-5
Page 94

Main Disconnecting Device
Main Disconnecting Device
Appendix C Translated Safety Warni ngs
Warning
Waarschuwing
Varoitus
Attention
Warnung
Figyelem!
Avvertenza
The plug-socket combination must be accessible at all times, because it
serves as the main disconnecting device.
De combinatie van de stekker en het elektrisch contactpunt moet te allen tijde
toegankelijk zijn omdat deze het hoofdmechanisme vormt voor verbreking van
de aansluiting.
Pistoke/liitinkohta toimii pääkatkaisumekanismina. Pääsy siihen on pidettävä
aina esteettömänä.
La combinaison de prise de courant doit être accessible à tout moment parce
qu'elle fait office de système principal de déconnexion.
Der Netzkabelanschluß am Gerät muß jederzeit zugänglich sein, weil er als
primäre Ausschaltvorrichtung dient.
A dugaszolóaljzat és a dugasz együttesének mindig hozzáférhetõnek kell
lennie, mivel ez szolgál fõmegszakítóként.
Il gruppo spina-presa deve essere sempre accessibile, poiché viene utilizzato
come dispositivo di scollegamento principale.
Cisco LRE CPE Hardware Installation Guide
C-6
78-11469-04
Page 95

Append ix C Translated Safety W a r nings
Overheating Prevention Warning
Advarsel
Aviso
¡Advertencia!
Varning!
Kombinasjonen støpsel/uttak må alltid være tilgjengelig ettersom den
fungerer som hovedfrakoplingsenhet.
A combinação ficha-tomada deverá ser sempre acessível, porque funciona
como interruptor principal.
El conjunto de clavija y toma ha de encontrarse siempre accesible ya que
hace las veces de dispositivo de desconexión principal.
Man måste alltid kunna komma åt stickproppen i uttaget, eftersom denna
koppling utgör den huvudsakliga frånkopplingsanordningen.
Overheating Prevention Warning
Warning
Waarschuwing
78-11469-04
To prevent the system from overheating, do not operate it in an area that
exceeds the maximum recommended ambient temperature of:
40°C (104°F)
Om te voorkomen dat het systeem oververhit raakt, dient u het niet te
gebruiken in een ruimte waar de maximaal aanbevolen
omgevingstemperatuur van
40°C (104°F) wordt overschreden.
Cisco LRE CPE Hardware Installation Guide
C-7
Page 96

Overheating Prevent io n Warning
Appendix C Translated Safety Warni ngs
Varoitus
Attention
Warnung
Figyelem!
Avvertenza
Jotta järjestelmä ei kuumentuisi liikaa, sitä ei saa käyttää liian kuumassa
ympäristössä. Suosituksen mukainen käyttölämpötila on enintään
40°C (104°F)
Pour éviter toute surchauffe du système, il est recommandé de maintenir une
température ambiante inférieure à
40°C (104°F)
Um das System vor Überhitzung zu schützen, vermeiden Sie dessen
Verwendung in einem Bereich, in dem die Umgebungstemperatur das
empfohlene Maximum von
40°C (104°F) überschreitet.
A túlmelegedés megelõzése végett ne üzemeltesse a rendszert olyan
területen, ahol a hõmérséklet meghaladja a
40°C (104°F) maximális ajánlott környezeti hõmérsékletet.
Per evitare che il sistema si surriscaldi, non utilizzatelo dove la temperatura
ambiente sia superiore alla temperatura massima raccomandata di
40°C (104°F)
Advarsel
Aviso
¡Advertencia!
Varning!
For å hindre at syst emet blir overopphetet, må det ikke brukes på et sted der
temperaturen overstiger den maksimalt anbefalte temperaturen på
40°C (104°F)
Para evitar o sobreaquecimento do sistema, não o opere em áreas que
excedam a temperatura ambiente máxima recomendada de
40°C (104°F)
Para impedir que el sistema se recaliente, no lo utilice en zonas en las que la
temperatura ambiente llegue a los
40°C (104°F)
Förhindra att systemet överhettas genom att inte använda det på en plats där
den rekommenderade omgivningstemperaturen överstiger
40°C (104°F)
Cisco LRE CPE Hardware Installation Guide
C-8
78-11469-04
Page 97

Append ix C Translated Safety W a r nings
40°C (104°F)
40°C (104°F)
40°C (104°F)
TN Power Warning
TN Power Warning
Warning
Waarschuwing
Varoitus
Attention
Warnung
Figyelem!
Avvertenza
The device is designed to work with TN power systems.
Het apparaat is ontworpen om te functioneren met TN energiesystemen.
Koje on suunniteltu toimimaan TN-sähkövoimajärjestelmien yhteydessä.
Ce dispositif a été conçu pour fonctionner avec des syst èmes d'alimentation
TN.
Das Gerät ist für die Verwendung mit TN-Stromsystemen ausgelegt.
A készülék TN tápellátással mûködik.
Il dispositivo è stato progettato per l’uso con sistemi di alimentazione TN.
Advarsel
78-11469-04
Utstyret er utfomet til bruk med TN-strømsystemer.
Cisco LRE CPE Hardware Installation Guide
C-9
Page 98

Circuit Breaker Warning
Appendix C Translated Safety Warni ngs
Aviso
¡Advertencia!
Varning!
O dispositivo foi criado para operar com sistemas de corrente TN.
El equipo está diseñado para trabajar con sistemas de alimentación tipo TN.
Enheten är konstruerad för användning tillsammans med elkraftssystem av
TN-typ.
Circuit Breaker Warning
Warning
Waarschuwing
Varoitus
C-10
This product relies on the building’s installation for short-circuit (overcurrent)
protection. Ensure that the protective device is rated not greater than:
15A minimum, 60VDC
Dit product is afhankelijk van de installatie van het gebouw voor beveiliging
tegen kortsluiting (overstroom). Controleer of de beschermingsinrichting niet
meer dan:
15A minimum, 60VDC is.
Tämä tuote on riippuvainen rakennukseen asennetusta
oikosulkusuojauksesta (ylivirtasuojauksesta). Varmista, että suojalaitteen
mitoitus ei ole yli:
15A minimum, 60VDC
Cisco LRE CPE Hardware Installation Guide
78-11469-04
Page 99

Append ix C Translated Safety W a r nings
Circuit Breaker Warning
Attention
Warnung
Figyelem!
Avvertenza
Advarsel
Pour ce qui est de la protection contre les courts-circuits (surtension), ce
produit dépend de l'installation électrique du local. Vérifiez que le courant
nominal du dispositif de protection n'est pas supérieur à :
15A minimum, 60VDC
Dieses Produkt ist darauf angewiesen, dass im Gebäude ein Kurzschlussbzw. Überstromschutz installiert ist. Stellen Sie sicher , dass der Nennwert d er
Schutzvorrichtung nicht mehr als:
15A minimum, 60V DC betr ägt.
A termék védelmi rendszerének része az épület kábelezésébe épített
rövidzárlat (túláram) elleni védelem is. Gondoskodjon róla, hogy a készüléket
védõ eszköz legfeljebb
15A minimum, 60VDC áramerõsségre legyen méretezve.
Questo prodotto dipende dall'impianto dell'edificio per quanto riguarda la
protezione contro cortocircuiti (sovracorrente). Assicurarsi che il dispositivo
di protezione non abbia un rating superiore a:
15A minimum, 60VDC
Dette produktet er avhengig av bygningens installasjoner av kortslutnings
(overstrøm)-beskyttelse. Påse at verneenheten ikke er merket høyere enn:
15A minimum, 60VDC
¡Advertencia!
78-11469-04
Aviso
Varning!
Este produto depende das instalações existentes para proteção contra
curto-circuito (sobrecarga). Assegure-se de que o fusível ou disjuntor não
seja superior a:
15A minimum, 60VDC
Este equipo utiliza el sistema de protección contra cortocircuitos (o sobrecorr ientes)
del edificio. Asegúrese de que el dispositivo de protección no sea super ior a:
15A minimum, 60VDC
Denna produkt är beroende av i byggnaden installerat kortslutningsskydd
(överströmsskydd). Kontrollera att skyddsanordningen inte har högre
märkvärde än:
15A minimum, 60VDC
Cisco LRE CPE Hardware Installation Guide
C-11
Page 100

Voltage Warning
Appendix C Translated Safety Warni ngs
15A minimum, 60VDC
15A minimum, 60VDC
15A minimum, 60VDC
Voltage Warning
Warning
Waarschuwing
Varoitus
Attention
A voltage mismatch can cause equipment damage and may pose a fire hazard.
If the voltage indicated on the label is different from the power outlet voltage,
do not connect the chassis to that receptacle.
Aansluiting op een verkeerd voedingsvoltage kan beschadiging van de
apparatuur veroorzaken en tot brandgevaar leiden. Het chassis mag niet
aangesloten worden als de spanning die op het label staat aangegeven,
anders is dan de spanning van het stopcontact.
Erisuuruisten jännitteiden yhdistäminen voi aiheuttaa laitevaurion ja
tulipalon vaaran. Jos tarraan merkitty jännite eroaa pistorasian jännitteestä,
älä yhdistä asennuspohjaa pistorasiaan.
Une erreur de voltage risque d'endommager l'appareil et constitue un risque
d'incendie. Si la tension indiquée sur l'étiquette est différente de la tension
de l'alimentation, ne connectez en aucun cas le châssis à la prise.
Cisco LRE CPE Hardware Installation Guide
C-12
78-11469-04
 Loading...