

Page 1
Quick Installation Guide
Wireless Home Audio
Stereo Speaker Kit
Wired Accessory
DMSPK50
UK
English
DK
Dansk
DE
Deutsch
NL
Nederlands
Page 2

Page 3

Table of Contents
iStereo Speaker Kit
Table of Contents
English ............................................................1
Installation Overview ........................................2
Connecting the Speakers ....................................3
Enhancing Your Sound . . . . . . . . . . . . . . . . . . . . . . . . . . . . . . . . . . . . . . 4
Troubleshooting . . . . . . . . . . . . . . . . . . . . . . . . . . . . . . . . . . . . . . . . . . . . 6
Dansk .............................................................7
Installationsoversigt .........................................8
Tilslutning af højttalerne . . . . . . . . . . . . . . . . . . . . . . . . . . . . . . . . . . . . 9
Forbedring af lyden . . . . . . . . . . . . . . . . . . . . . . . . . . . . . . . . . . . . . . . .10
Fejlnding . . . . . . . . . . . . . . . . . . . . . . . . . . . . . . . . . . . . . . . . . . . . . . . . .12
Deutsch ..........................................................13
Installation – Übersicht .....................................14
Anschließen der Lautsprecher . . . . . . . . . . . . . . . . . . . . . . . . . . . . . .15
Der optimale Klang . . . . . . . . . . . . . . . . . . . . . . . . . . . . . . . . . . . . . . . .16
Fehlerbehebung . . . . . . . . . . . . . . . . . . . . . . . . . . . . . . . . . . . . . . . . . . .18
Nederlands .......................................................19
Overzicht installatie ........................................20
De luidsprekers aansluiten . . . . . . . . . . . . . . . . . . . . . . . . . . . . . . . . .21
Uw geluid verbeteren . . . . . . . . . . . . . . . . . . . . . . . . . . . . . . . . . . . . . .22
Problemen oplossen . . . . . . . . . . . . . . . . . . . . . . . . . . . . . . . . . . . . . . .24
Page 4

Page 5

1Stereo Speaker Kit
English
English
Thank you for making a great decision and choosing to purchase the
Linksys by Cisco Stereo Speaker Kit.
The speakers can be used with most stereo audio amplifiers and receivers,
but are designed to be a perfect match for the Linksys Director (DMC250).
Wireless Home Audio Product Family
†
Conductor
(DMC350)
Director
(DMC250)
Player
(DMP100)
Speakers
(DMSPK50)
Controller
(DMRW1000)
Remote Control
(DMRIR500)
Docking Station for
iPod (MCCI40)
Package Contents
2 Speakers 2 16 AWG Two-Wire Speaker Cables Quick Installation Guide
Front Back
Tweeter
Woofer
Vented Port
Opening
Red Coded Input
Terminal (+)
Black Coded
Input Terminal (-)
NOTE: Do not block the vented port opening, as it
will reduce the bass and/or create a rattling sound.
Page 6
2 Stereo Speaker Kit
Installation Overview English
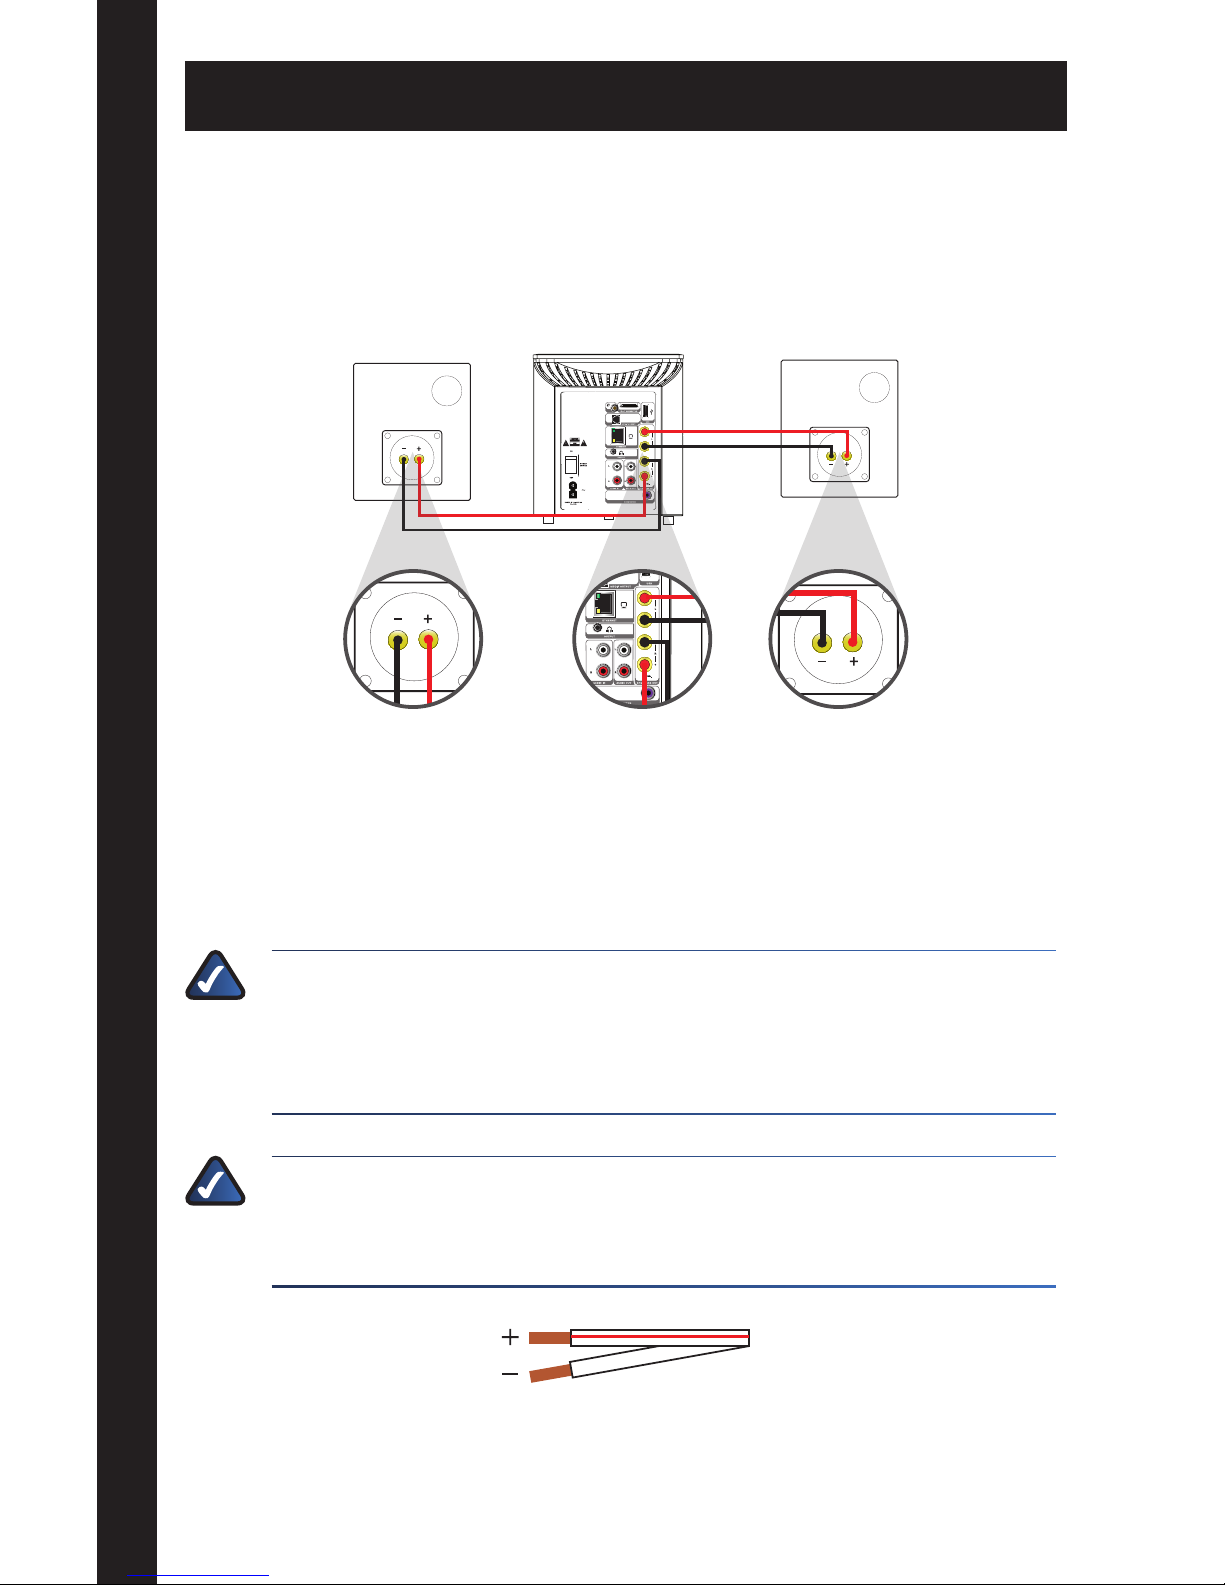
Installation Overview
This Quick Installation Guide will guide you through connecting each
two-wire cable to a speaker at one end, and your audio amplifier at the
other end. For each channel (Left and Right), you will connect the red
coded input terminal on the speaker to the red coded output terminal of
the audio amplifier, and equivalently the black to the black.
Connecting the Speakers to the Director
To ensure proper operation and sound quality, the cables must be
connected to the speakers correctly. Do not allow any cable strands to
touch the other polarity or the rear panel of the amplifier. Make sure that
the speakers are connected to the correct Left and Right outputs.
NOTE: If the colors are not matching at both ends, the speakers
will play out-of-phase, resulting in the reduction of dynamics and
bass and the elimination of the position of the music or vocals in
between the two speakers.
NOTE: The speakers are interchangeable and can be used as either
the left or right speaker. The terminals and the cables are color
coded for correct polarity.
Page 7
3Stereo Speaker Kit
Connecting the SpeakersEnglish
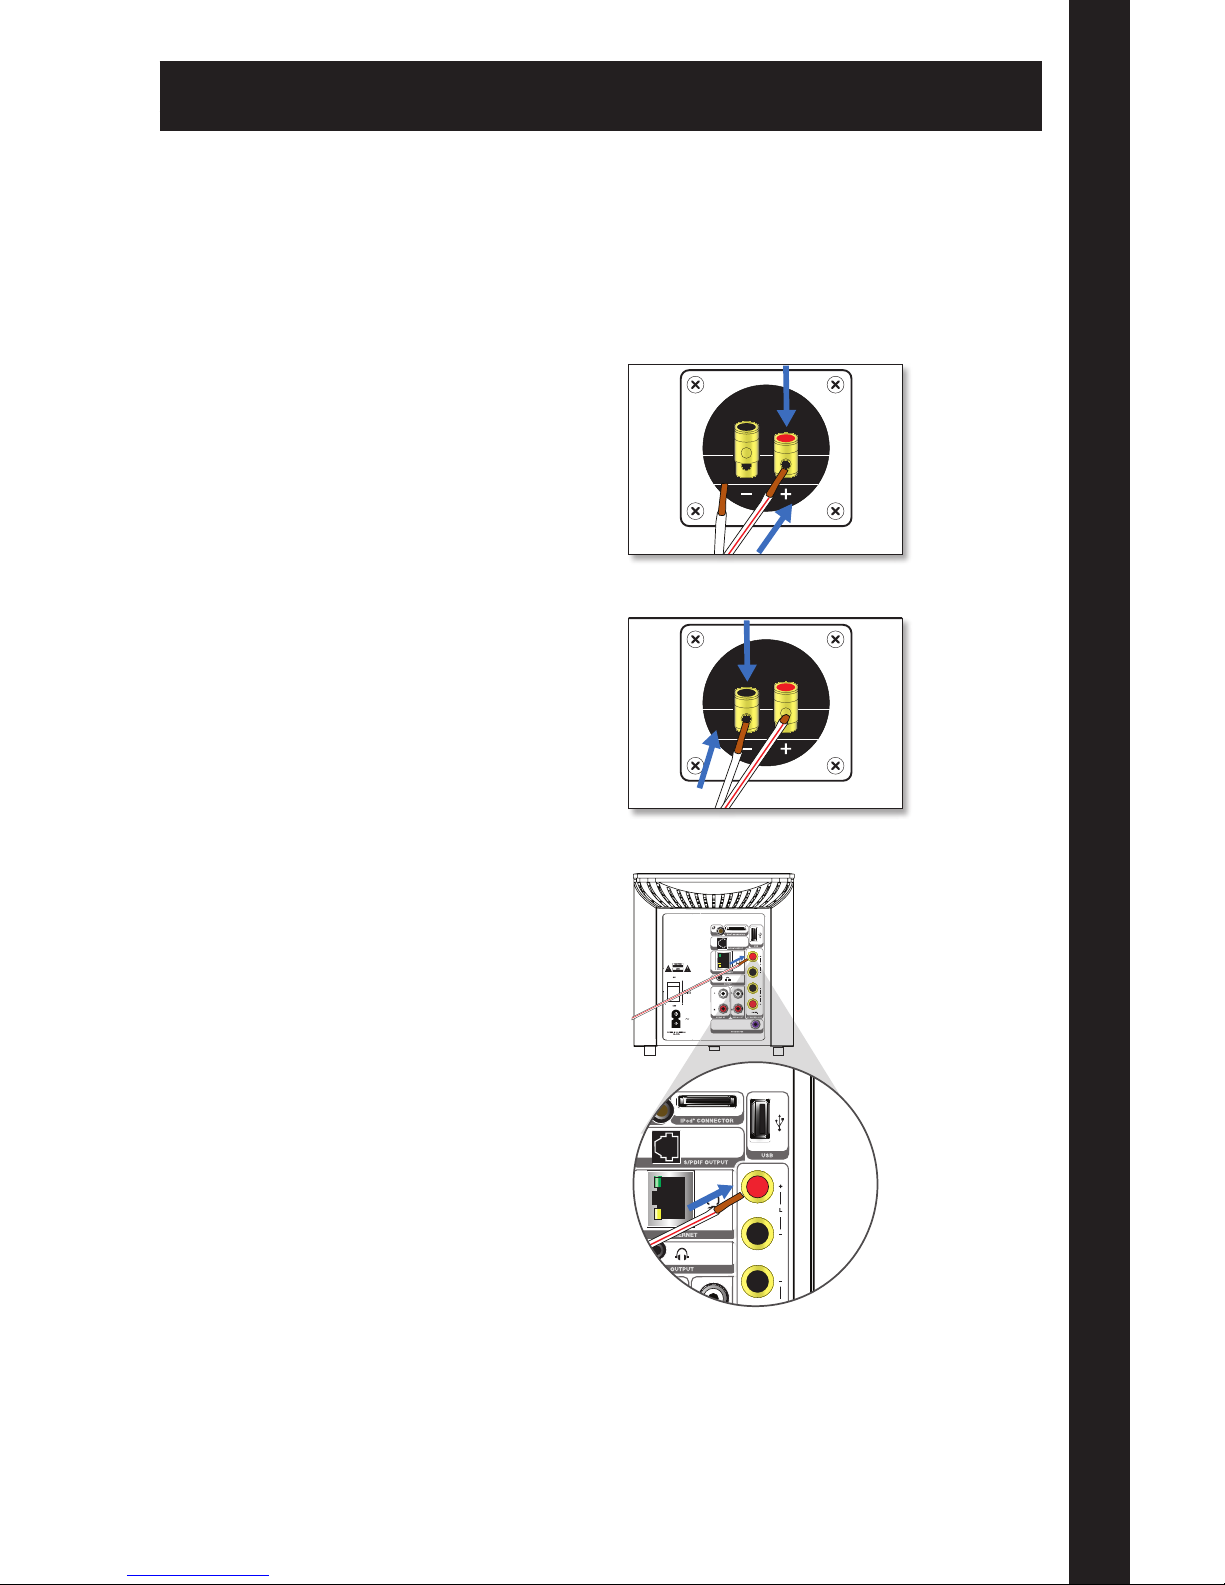
Connecting the Speakers
Power off your Director (or other audio amplifier).A.
Locate the two-wire speaker cables provided. Each two-wire cable is B.
color coded with a red line on one of the wires, so it is easy to identify
at both ends.
C. Press down on the red coded
input terminal on the back
of the speaker and insert the
speaker wire with the red line.
D. Press down on the black coded
input terminal on the back
of the speaker and insert the
speaker wire without a marking.
E. Connect the other end of the
speaker wire with the red line
to the appropriate L (left) or
R (right) red coded output
terminal on the Director.
Connect the other end of the speaker wire without any marking to the F.
L (left) or R (right) black coded output that pairs up with the terminal
used in the previous step.
Repeat steps C-F to connect the other speaker. G.
Page 8
4 Stereo Speaker Kit
Enhancing Your Sound English
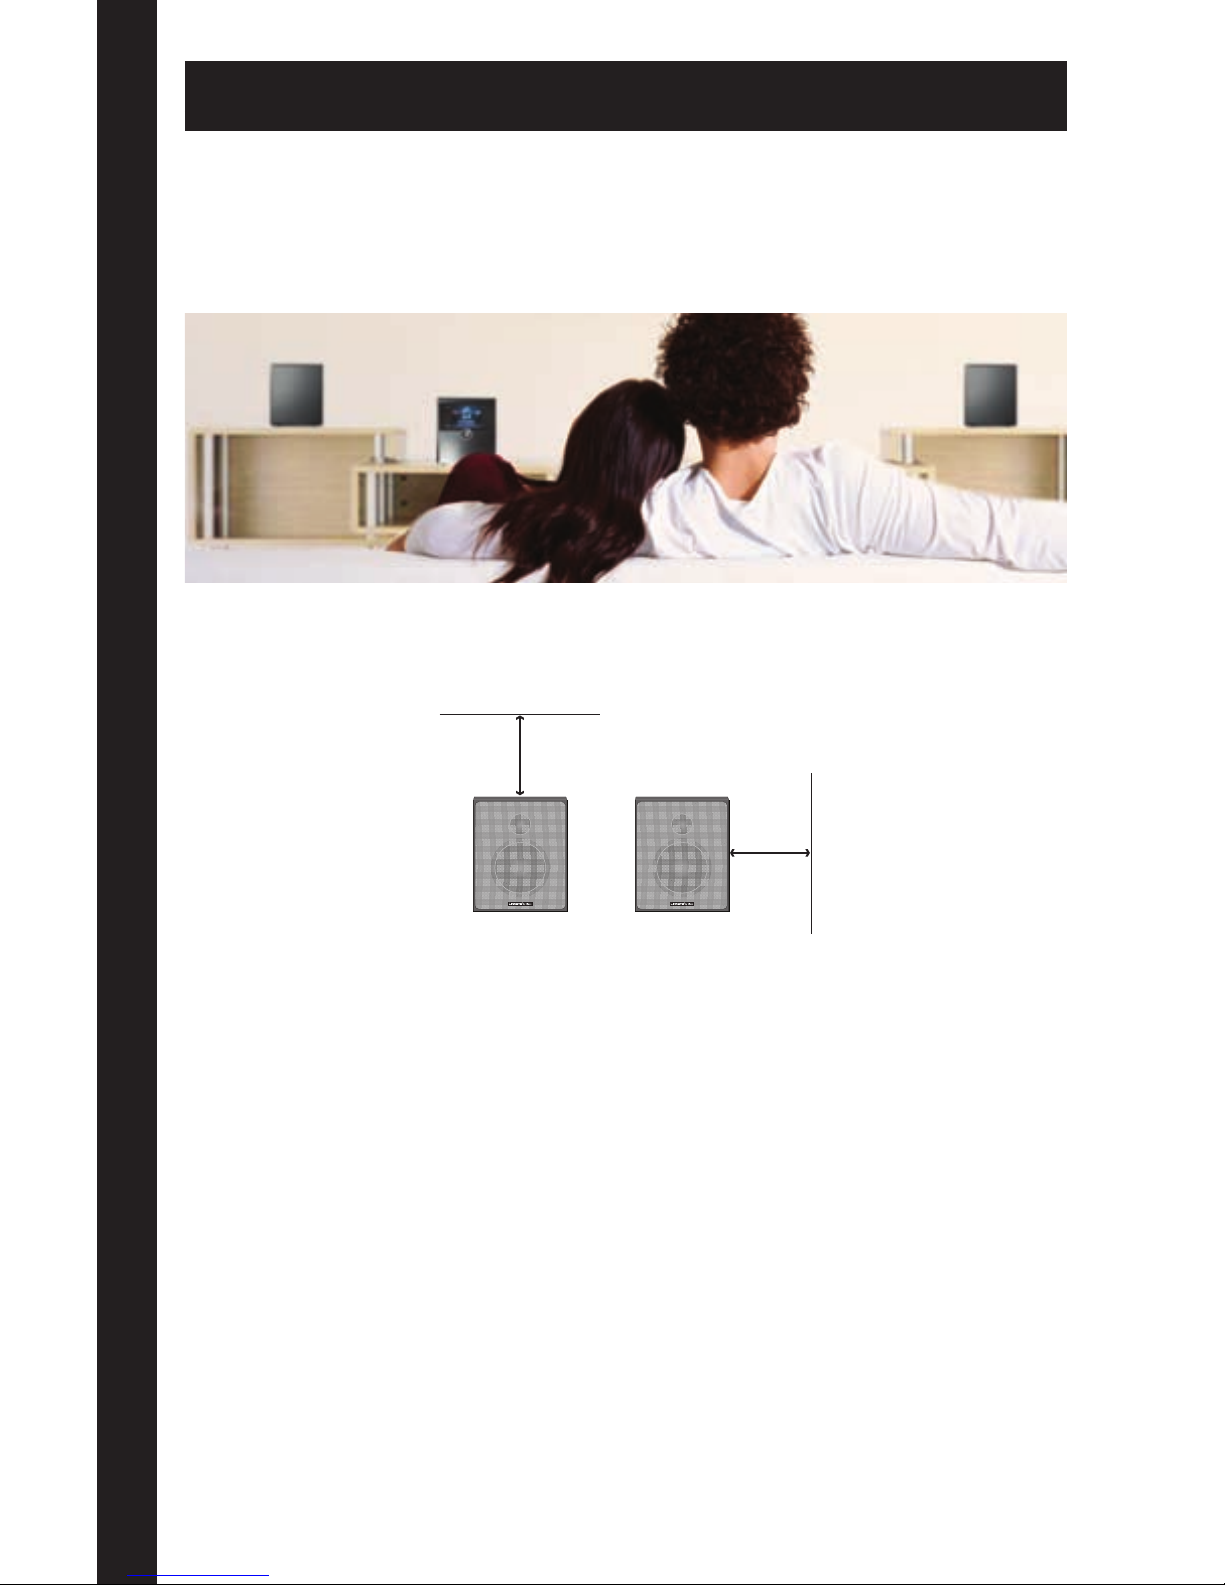
Enhancing Your Sound
The speakers can be placed on stands, in bookshelves or on cabinets.
A larger stereo image can be created by separating the position of the
speakers. Ideally the speakers should be placed at listening height, in a
symmetrical triangle with the listening position.
Place the speakers approximately 1 foot (0.3 m) from the rear wall or object.
The speakers should be placed a minimum of 3 feet (1m) away from the
side walls and the ceiling above to reduce reflections.
1m/3ft
1m/3ft
Minimum Clear Space to Ceiling and Side Walls
Avoid sound reflections in front of the speaker by aligning the front edge
of the speaker with the edge of the surface it has been placed on. The back
of the speakers have a vented port opening. Do not block the vented port
opening, as it will reduce the bass and/or create a rattling sound.
An equal distance to the corners and side walls for both speakers will give
the most natural and precise reproduction. Optimize the listening distance
to the speakers depending on the room acoustics and reflecting walls.
Page 9
5Stereo Speaker Kit
Enhancing Your SoundEnglish
Optimizing High Frequencies
Adjust the angle of the speakers towards the center listening position for
preferred high frequency level and soundstage depth.
Optimizing Bass Level
To increase your bass response, place your speakers closer to the walls and
corners.
Notes on Speaker Terminals and Cabling
The input terminals on the speakers accept high performance cables with
a thickness of up to 4 mm/10AWG. Your speakers come with a pair of
1.5 mm/16AWG speaker cables matching the speaker terminals and most
amplifiers. If you need longer cables, consult your salesperson or retail store
for advice on which cables best match your listening environment.
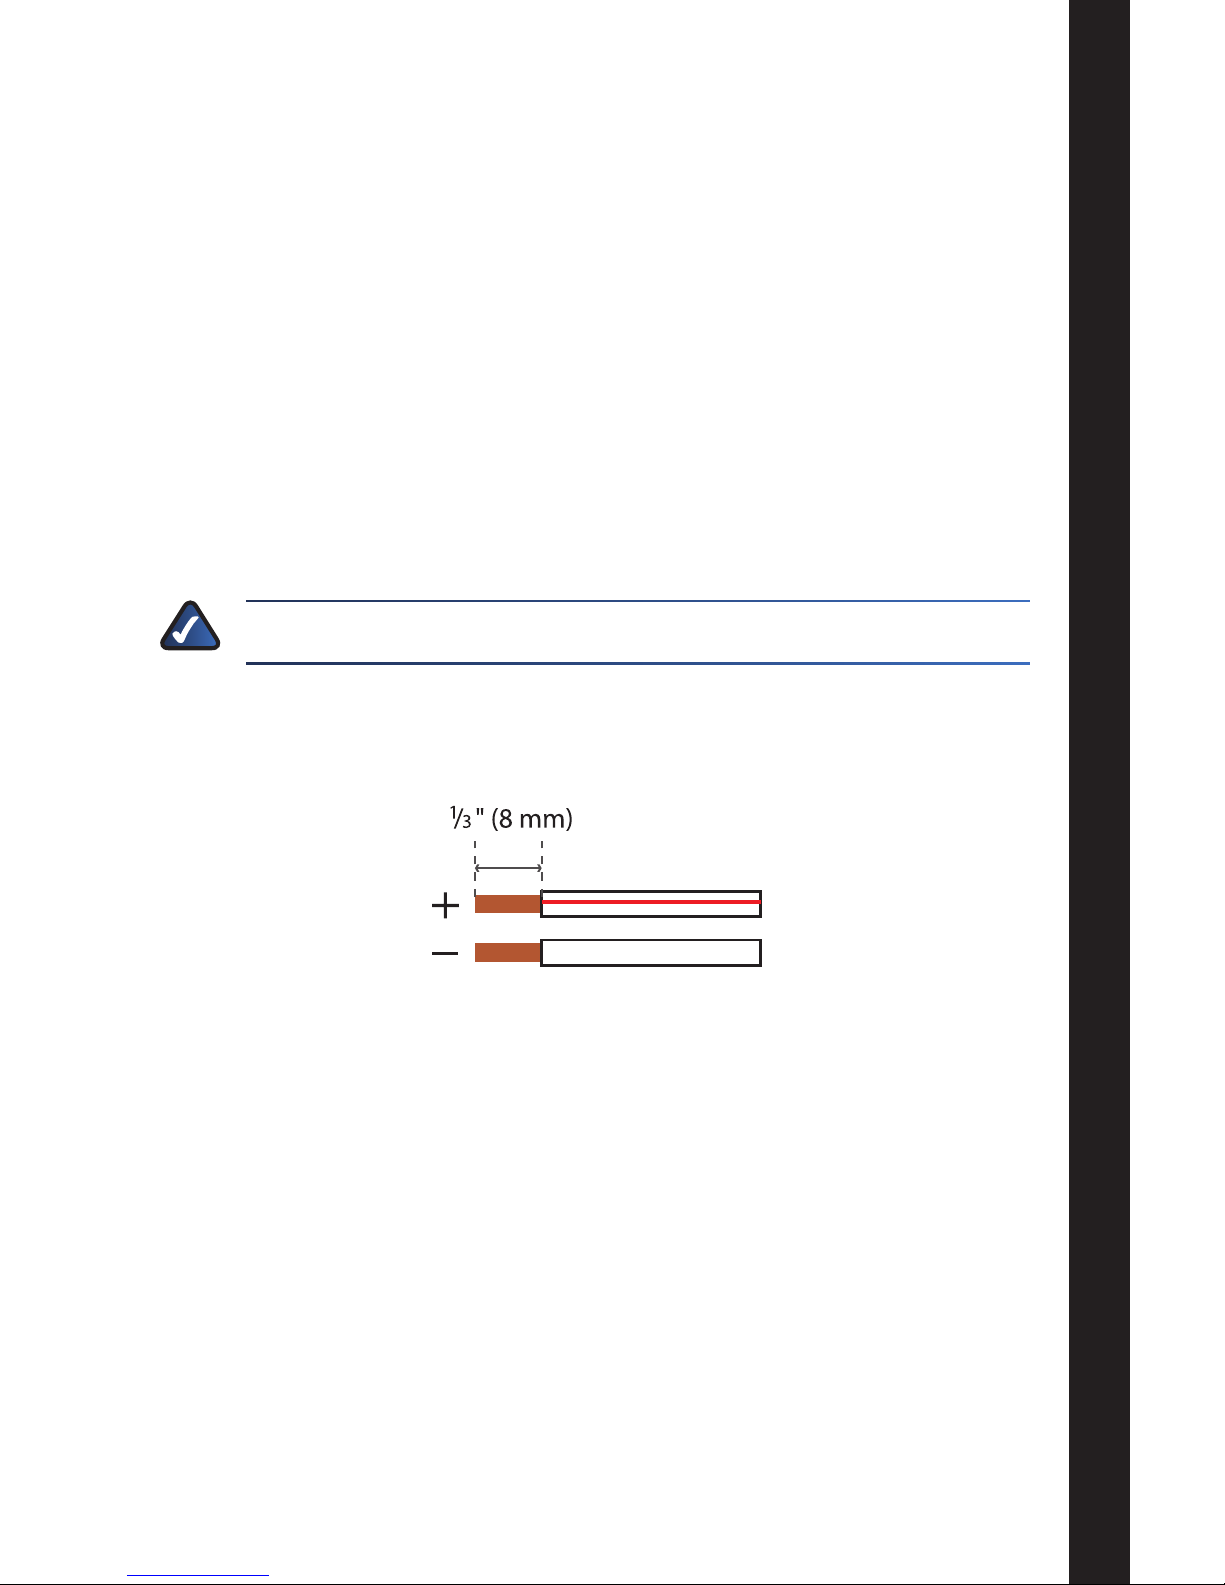
NOTE: The Director accepts a maximum 1.5 mm/16AWG cable.
The exposed wires at each end should be 1/3” (8 mm), and the strands may
not be split up. The strands should all be inserted into the terminal.
Congratulations! Installation is complete.
Page 10

6 Stereo Speaker Kit
Troubleshooting English
Troubleshooting
I am not hearing any sound.
Make sure that the speaker wires are properly inserted into the speaker •
terminals and the amplifier connections.
Verify that the amplifier is plugged in and powered on. •
Make sure that the amplifier is not muted and that the volume is up. •
Check the documentation for the amplifier for additional troubleshooting •
tips.
Sound is only coming out of one speaker.
Make sure that the L/R balance on your amplifier is adjusted correctly. •
Check the cabling between the speaker and the amplifier. •
The vocal or music positioning seems out of place.
Make sure that the speaker cables are properly connected. They should be •
going from a red output terminal on the amplifier to a red input terminal
on the speakers and from a black output terminal on the amplifier to a
black input terminal on the speakers.
Make sure you’ve followed all of the guidelines for placement and •
positioning.
Check the documentation for the amplifier for additional troubleshooting •
tips.
WEB: If you need additional support, contact us on the web at
www.linksysbycisco.com/support
Page 11

7Stereo-højttalersæt
Dansk
Dansk
Tak fordi du valgte Linksys-Cisco Stereo-højttalersæt.
Højttalerne kan bruges med de fleste stereoforstærkere og receivere, men
er designet så de passer perfekt til Linksys Director (DMC250).
Wireless Home Audio-produktserien
†
Conductor
(DMC350)
Director
(DMC250)
Player
(DMP100)
Højttalere
(DMSPK50)
Controller
(DMRW1000)
Fjernbetjening
(DMRIR500)
Dockingstation til
iPod (MCCI40)
Pakkens indhold
2 højttalere 2 16 AWG
totrådshøjttalerkabler
Installationsvejledning
Forside Bagside
Tweeter
Woofer
Ventileret
portåbning
Rødt indgangsstik
(+)
Sort indgangsstik
(-)
BEMÆRK: Den ventilerede portåbning må ikke blokeres, da det
vil reducere bassen og/eller give en raslelyd.
Page 12

8 Stereo-højttalersæt
Installationsoversigt Dansk
Installationsoversigt
Denne installationsguide viser, hvordan du forbinder hvert-totrådskabel
til en højttaler i den ene ende og din forstærker i den anden ende. For
hver kanal (venstre og højre) skal du tilslutte det røde indgangsstik på
højttaleren til det røde udgangsstik på forstærkeren og tilsvarende sort til
sort.
Tilslutning af højttalerne til Director
Kablerne skal tilsluttes korrekt til højttalerne for at sikre korrekt funktion og
lydkvalitet. Lad ikke nogen løse kabelender røre den anden polaritet eller
forstærkerens bagpanel. Kontroller, at højttalerne er tilsluttet det korrekte
venstre og højre udgangsstik.
BEMÆRK: Hvis farverne ikke svarer til hinanden i begge ender,
vil højttalerne spille ude af fase, hvilket reducerer dynamikken og
bassen, samt eliminerer placeringen af musikken og stemmerne
mellem de to højttalere.
BEMÆRK: Højttalerne er ens og kan bruges som enten venstre
eller højre højttaler. Stik og kabler er farvekodet for at sikre korrekt
polaritet.
Page 13

9Stereo-højttalersæt
Tilslutning af højttalerneDansk
Tilslutning af højttalerne
Sluk for din Director (eller anden forstærker).A.
Find de medfølgende højttalerkabler med to ledninger. Hvert B.
to-ledningskabel er farvekodet med en rød streg på en af ledningerne,
så den er let at genkende i begge ender.
C. Tryk ned på det røde
indgangsstik på bagsiden
af højttaleren, og isæt
højttalerledningen med den
røde streg.
D. Tryk ned på det sorte
indgangsstik på bagsiden
af højttaleren, og isæt
højttalerledningen uden streg.
E. Slut den anden ende af
højttalerledningen med en
rød streg til det rette røde
L- (venstre) eller R- (højre)
indgangsstik på din Director..
Slut den anden ende af højttalerledningen uden en rød streg til det F.
sorte L- (venstre) eller R- (højre) udgangsstik, der sidder sammen med
det stik, der blev brugt i trin E.
Gentag trin C-F for at tilslutte den anden højttaler.G.
Page 14

10 Stereo-højttalersæt
Forbedring af lyden Dansk
Forbedring af lyden
Højttalerne kan stilles på holdere, i en reol eller på et skab. Du kan få større
stereolydbillede ved at stille højttalerne et stykke fra hinanden. Ideelt
set skal højttalerne placeres i lyttehøjde, i en symmetrisk trekant med
lyttepositionen.
Stil højttalerne ca. 0,3 m fra væggen (eller andet) bagved. Højttalerne skal
helst placeres mindst 1 m fra vægge på siden og fra loftet for at undgå
refleksion.
1m/3ft
1m/3ft
Min. afstand til loft og sidevægge
Undgå lydrefleksioner foran højttaleren ved at placere den forreste kant af
højttaleren langs kanten på den overflade, højttaleren står på. På bagsiden
af højttalerne er der en ventileret portåbning. Den ventilerede portåbning
må ikke blokeres, da det vil reducere bassen og/eller give en raslelyd.
Lige stor afstand til hjørner og sidevægge for begge højttalere giver den
mest naturlige og præcise gengivelse. Optimer lytteafstanden til højttalerne
i forhold til rummets akustik og reflekterende vægge.
Page 15

11Stereo-højttalersæt
Forbedring af lydenDansk
Optimering af høje frekvenser
Ret vinklen på højttalerne imod den midterste lytteposition for at opnå det
foretrukne højfrekvensniveau og dybde i lydbilledet.
Optimering af basniveau
Hvis du vil øge basvirkningen, skal du placere højttalerne tættere på vægge
og hjørner.
Bemærkninger vedrørende højttalerstik og kabler
Indgangsstikkene på højttalerne accepterer højtydende kabler med en
tykkelse på op til 4 mm/10 AWG. Højttalerne leveres med et par 1,5 mm
2/16 AWG højttalerkabler, der passer til højttalerstikkene og til de fleste
forstærkere. Hvis du har brug for længere kabler, skal du kontakte den
sælger eller butik, du købte højttalerne af, for at få gode råd om, hvilke
kabler der passer bedst til dit udstyr.
BEMÆRK: Director accepterer max. 1,5 mm/16 AWG-kabel.
Den ubeskyttede del af ledningerne i hver ende bør være 1/3” (8 mm), og
de enkelte tråde må ikke være skilt fra hinanden. Enkelttrådene skal alle
sættes i samme stik.
Tillykke! Installationen er færdig.
Page 16

12 Stereo-højttalersæt
Fejlfinding Dansk
Fejlfinding
Jeg kan slet ikke høre nogen lyd.
Sørg for, at højttalerkablet er korrekt forbundet med højttalerstikkene og •
forstærkeren.
Kontroller, at forstærkeren er tilsluttet og tændt. •
Sørg for, at mute-funktionen ikke er slået til på forstærkeren, og at der er •
skruet op for lydstyrken.
Du kan finde flere fejlfindingstip i dokumentationen til forstærkeren. •
Der kommer kun lyd ud af en af højttalerne.
Sørg for, at højre/venstrebalancen på din forstærker er indstillet korrekt. •
Kontroller kabelføringen mellem højttaler og forstærker. •
Stemme- eller musikpositionering er tilsyneladende forkert.
Sørg for, at højttalerkablerne er tilsluttet korrekt. De bør gå fra et rødt •
udgangsttik på forstærkeren til et rødt indgangsstik på højttalerne
og fra et sort udgangsstik på forstærkeren til et sort indgangsstik på
højttalerne.
Sørg for, at du har fulgt alle retningslinier for placering. •
Du kan finde flere fejlfindingstip i dokumentationen til forstærkeren. •
INTERNET: Hvis du har brug for yderligere support, kan du
kontakte os på internettet på www.linksys.com/support
Page 17

13Stereolautsprecher-Set
Deutsch
Deutsch
Vielen Dank, dass Sie sich für den Kauf des Linksys by Cisco
Stereolautsprecher-Set entschieden haben. Die Lautsprecher können mit
fast allen Stereo-Audioverstärkern und -empfängern verwendet werden,
sind jedoch als perfekte Ergänzung auf den Linksys Director (DMC250)
abgestimmt.
Wireless Home Audio – Produktserie
†
Conductor
(DMC350)
Director
(DMC250)
Player
(DMP100)
Lautsprecher
(DMSPK50)
Controller
(DMRW1000)
Fernbedienung
(DMRIR500)
Dockingstation für
iPod (MCCI40)
Lieferumfang
2 Lautsprecher 2 zweidrahtige 1,5 mm/16 AWG-
Lautsprecherkabel
Kurzanleitung
Vorderseite Rückseite
Tweeter
Woofer
Belüftungseinlass
Eingang mit roter
Markierung (+)
Eingang mit
schwarzer
Markierung (-)
HINWEIS: Achten Sie darauf, dass der Belüftungseinlass frei bleibt,
da sonst die Bassleistung reduziert wird und/oder ein blechernes
Klangbild auftreten kann.
Page 18

14 Stereolautsprecher-Set
Installation – Übersicht Deutsch
Installation – Übersicht
Diese Kurzanleitung hilft Ihnen dabei, die beiden zweidrahtigen
Lautsprecherkabel jeweils mit dem Lautsprecher und dem Audioverstärker
zu verbinden. Verbinden Sie für beide Kanäle (links und rechts) den rot
gekennzeichneten Eingang des Lautsprechers mit dem rot gekennzeichneten
Ausgang des Audioverstärkers. Verbinden Sie analog den schwarz
gekennzeichneten Eingang mit dem schwarz gekennzeichneten Ausgang.
Anschließen der Lautsprecher an den Director
Um fehlerfreien Betrieb und gute Tonqualität sicherzustellen, müssen die Kabel
korrekt an die Lautsprecher angeschlossen werden. Achten Sie darauf, dass
Kabelstränge nicht in Kontakt mit der jeweils anderen Polarität oder mit der
Rückseite des Verstärkers kommen. Stellen Sie sicher, dass die Lautsprecher an
die richtigen Ausgänge (links und rechts) angeschlossen sind.
HINWEIS: Wenn die Farben an beiden Enden nicht
übereinstimmen, erfolgt die Wiedergabe durch die Lautsprecher
phasenverschoben. Dies vermindert Dynamik und Bässe und führt
dazu, dass die Position des Klangs oder Gesangs nicht mehr mittig
zwischen den beiden Lautsprechern liegt.
HINWEIS: Die Lautsprecher können austauschbar rechts oder links
eingesetzt werden. Zur Gewährleistung der richtigen Polarität sind
die Kabel und die Eingänge farblich gekennzeichnet.
Page 19

15Stereolautsprecher-Set
Anschließen der LautsprecherDeutsch
Anschließen der Lautsprecher
Trennen Sie den Director (oder anderen Verstärker) vom Stromnetz ab.A.
Entnehmen Sie die mitgelieferten zweidrahtigen Lautsprecherkabel. B.
Jedes der zweidrahtigen Kabel ist auf einem
der Drähte durch eine rote
Linie farblich gekennzeichnet, damit
sich die Anschlüsse an beiden
Enden leicht zuordnen lassen.
C. Drücken Sie auf der Rückseite
des Lautsprechers auf den
roten Eingang, und führen Sie
das Drahtende mit der roten
Markierung ein.
D. Drücken Sie auf der Rückseite
des Lautsprechers auf den
schwarzen Eingang, und
führen Sie das Drahtende ohne
Markierung ein.
E. Stecken Sie analog den
Draht am anderen Ende des
Lautsprecherkabels mit der
roten Linie in den jeweiligen
rot gekennzeichneten Ausgang
L (Links) oder R (Rechts) am
Director.
Verbinden Sie jeweils die Drahtenden ohne Markierung in der im F.
letzten Schritt beschriebenen Weise mit den schwarzen
Ausgängen L
(Links) bzw. R (Rechts) der zugehörigen Eingänge.
Wiederholen Sie Schritt C bis F, um den anderen Lautsprecher G.
anzuschließen.
Page 20

16 Stereolautsprecher-Set
Der optimale Klang Deutsch
Der optimale Klang
Die Lautsprecher können auf Standfüßen befestigt oder in Bücherregalen
oder auf Schränken platziert werden. Ein breiteres Stereobild lässt sich
erzielen, wenn Sie die Lautsprecher auseinander stellen. Idealerweise
sollten die Lautsprecher in einem symmetrischen Dreieck zur Sitzposition
auf Ohrhöhe platziert werden.
Halten Sie einen Abstand von ca. 30 cm von der rückwärtigen Wand
oder von Objekten, die sich hinter dem Lautsprecher befinden. Zu
den Seitenwänden und zur Decke sollte ein Mindestabstand von 1 m
eingehalten werden, um Schallreflexionen zu vermeiden.
1m/3ft
1m/3ft
Mindestabstand zur Decke und zu Seitenwänden
Vermeiden Sie Schallreflexionen vor dem Lautsprecher, indem Sie
die Vorderkante des Lautsprechers auf Höhe der Kante der Unterlage
ausrichten. Auf der Rückseite der Lautsprecher befindet sich ein
Belüftungseinlass. Achten Sie darauf, dass der Belüftungseinlass frei bleibt,
da sonst die Bassleistung reduziert wird und/oder ein blechernes Klangbild
auftreten kann.
Die natürlichste und genaueste Klangwiedergabe wird erzielt, wenn
beide Lautsprecher denselben Abstand zu Ecken und Seitenwänden
haben. Optimieren Sie den Hörabstand zu den Lautsprechern gemäß der
Raumakustik und Reflexion der Wände.
Page 21

17Stereolautsprecher-Set
Der optimale KlangDeutsch
Optimieren hoher Frequenzen
Um die Klangwiedergabe hoher Frequenzen und die Klangtiefe zu
verändern, justieren Sie den Winkel, in dem die Lautsprecher zur
Hörposition stehen.
Optimieren der Basstöne
Zur Verstärkung der Bässe positionieren Sie die Lautsprecher näher an den
Wänden oder weiter in der Ecke.
Hinweise zu den Lautsprechereingängen und -kabeln
An den Lautsprechereingängen können Hochleistungskabel mit einer
Drahtstärke von bis zu 4 mm/10 AWG angeschlossen werden. Im
Lieferumfang der Lautsprecher ist ein Kabelpaar mit einer Drahtstärke von
1,5 mm2/16 AWG enthalten, die mit den Lautsprechereingängen und den
meisten Verstärkern kompatibel sind. Falls Sie längere Kabel benötigen,
erkundigen Sie sich im Einzelhandel, welches Kabel am besten für Ihre
Hörumgebung geeignet ist.
HINWEIS: An den Director lassen sich nur Kabel mit einer
maximalen Drahtstärke von 1,5 mm/16 AWG anschließen.
An jedem Kabelende sollte ein ca. 8-mm-Drahtstück freiliegen. Die
einzelnen Drahtadern dürfen nicht weiter aufgeteilt werden. Alle
Drahtadern müssen in den Eingang eingeführt sein.
Gratulation! Die Installation ist abgeschlossen.
Page 22

18 Stereolautsprecher-Set
Fehlerbehebung Deutsch
Fehlerbehebung
Aus den Lautsprechern kommt kein Ton.
Überprüfen Sie, ob die Drähte des Lautsprecherkabels ordnungsgemäß •
mit den Lautsprechereingängen und den Ausgängen am Verstärker
verbunden sind.
Überprüfen Sie, ob der Verstärker ans Stromnetz angeschlossen und •
eingeschaltet ist.
Stellen Sie sicher, dass der Verstärker nicht stummgeschaltet oder die •
Lautstärkeregelung auf 0 gestellt ist.
Weitere Tipps zur Fehlerbehebung finden Sie in der Bedienungsanleitung •
des Verstärkers.
Der Ton kommt nur aus einem Lautsprecher.
Überprüfen Sie, ob der L/R-Regler am Verstärker richtig eingestellt ist. •
Überprüfen Sie die Kabelverbindungen zwischen Lautsprecher und •
Verstärker.
Der Gesang/Klang scheint falsch positioniert zu sein.
Überprüfen Sie, ob die Lautsprecherkabel in der richtigen Weise •
angeschlossen sind. Sie sollten jeweils von einem roten Ausgang am
Verstärker in einen roten Eingang am Lautsprecher und analog von einem
schwarzen Ausgang in einen roten Eingang führen.
Stellen Sie sicher, dass Sie alle Richtlinien zur Aufstellung und •
Positionierung der Lautsprecher beachtet haben.
Weitere Tipps zur Fehlerbehebung finden Sie in der Bedienungsanleitung •
des Verstärkers.
INTERNET: Zusätzlichen Support erhalten Sie im Internet unter
www.linksysbycisco.com/support
Page 23

19Stereoluidsprekerkit
Nederlands
Nederlands
Bedankt dat u hebt gekozen voor de Stereoluidsprekerkit van Linksys
by Cisco. De luidsprekers kunnen in combinatie met de meeste stereoaudioversterkers en -ontvangers worden gebruikt, maar zijn speciaal
ontworpen voor de Linksys Director (DMC250).
Assortiment van draadloze Home Audio-producten
†
Conductor
(DMC350)
Director
(DMC250)
Player
(DMP100)
Luidsprekers
(DMSPK50)
Controller
(DMRW1000)
Afstandbediening
(DMRIR500)
Dockingstation voor
iPod (MCCI40)
Inhoud van de verpakking
2 luidsprekers 2 tweeaderige
luidsprekerkabels (16 AWG)
Snelhandleiding
Front Back
Tweeter
Woofer
Luchtopening
Rode ingang (+)Zwarte ingang (-)
OPMERKING: zorg ervoor dat de luchtopening van de luidspreker
niet wordt geblokkeerd, omdat in dat geval de hoeveelheid bas
vermindert en/of er een ratelend geluid kan ontstaan.
Page 24

Overzicht installatie
20 Stereoluidsprekerkit
Nederlands
Overzicht installatie
In deze snelhandleiding leest u hoe u elk van beide tweeaderige kabels
met het ene uiteinde op de luidspreker en met het andere uiteinde op
uw audioversterker dient aan te sluiten. Sluit voor elk kanaal (links en
rechts) de rode ingang van de luidspreker aan op de rode uitgang van
de audioversterker en doe hetzelfde met de zwarte ingang en de zwarte
uitgang.
De luidsprekers aansluiten op de Director
Zorg ervoor dat de kabels op de juiste manier op de luidsprekers zijn
aangesloten voor de juiste bediening en geluidskwaliteit. Zorg dat
kabeluiteinden geen contact kunnen maken met de andere polariteit op
het achterpaneel van de versterker. Zorg dat de luidsprekers op de juiste
linker- en rechteruitgangen zijn aangesloten.
OPMERKING: als de kleuren van de beide uiteinden niet
overeenkomen, lopen de luidsprekers uit de pas waardoor de dynamiek
en de lage tonen worden verminderd en de muziek/zang niet meer op
de juiste positie tussen de twee luidsprekers wordt afgespeeld.
OPMERKING: de luidsprekers zijn onderling uitwisselbaar en kunnen
zowel voor links als rechts worden gebruikt. De ingangen en kabels
hebben een kleurcodering om de juiste polariteit te verzekeren.
Page 25

De luidsprekers aansluiten
21Stereoluidsprekerkit
Nederlands
De luidsprekers aansluiten
Schakel uw Director (of andere audioversterker) uit.A.
Pak de meegeleverde tweeaderige luidsprekerkabels Elk van de twee B.
kabels heeft een rode lijn op een van de aders, zodat deze aan beide
uiteinden duidelijk herkenbaar is.
C. Druk het klemmetje van de
rode ingang aan de achterzijde
van de luidspreker naar
beneden en plaats de ader met
de rode lijn.
D. Druk het klemmetje van
de zwarte ingang aan de
achterzijde van de luidspreker
naar beneden en plaats de ader
zonder kleurmarkering.
E. Sluit het andere uiteinde van
de ader met de rode lijn aan
op de overeenkomende rode L
(links)- of R (rechts)-uitgang van
de Director.
Sluit de ader zonder gekleurde lijn aan op de F. zwarte L (links)- of R
(rechts)-uitgang naast de bij de vorige stap genoemde aansluiting.
Herhaal stap C-F om de andere luidspreker aan te sluiten. G.
Page 26

Uw geluid verbeteren
22 Stereoluidsprekerkit
Nederlands
Uw geluid verbeteren
De luidsprekers kunnen op een standaard, op een boekenplank of in
een kast worden geplaatst. U krijgt een beter stereogeluid door de
luidsprekers verder uit elkaar te plaatsen. Idealiter zouden de luidsprekers
op luisterhoogte moeten staan en samen met de luisterpositie een
symmetrische driehoek moeten vormen.
Plaats de luidsprekers op ongeveer 0,3 m van de achtermuur of een object.
De luidsprekers moeten op minimaal 1 m van de zijmuren en het plafond
worden geplaatst om geluidsweerkaatsing te verminderen.
1m/3ft
1m/3ft
Minimale afstand tot plafond en zijmuren
U voorkomt geluidsweerkaatsing aan de voorzijde van de luidspreker door
de voorzijde van de luidspreker op één lijn te brengen met de rand van
het oppervlak waarop de luidspreker is geplaatst. Aan de achterzijde van
de luidsprekers zit een luchtopening. Zorg ervoor dat deze luchtopening
niet worden geblokkeerd, omdat in dat geval de hoeveelheid bas wordt
verminderd en/of er een ratelend geluid ontstaat.
Door de beide luidsprekers op gelijke afstand van hoeken en zijmuren te
plaatsen bevordert u een natuurlijke en nauwkeurige muziekweergave. Stel
de optimale luisterafstand tot de luidsprekers in op basis van de akoestiek
van de kamer en de positie van de muren.
Page 27

Uw geluid verbeteren
23Stereoluidsprekerkit
Nederlands
Hoge frequenties optimaliseren
Richt de luidsprekers naar het midden van de luisterpositie om hoge
frequenties te benadrukken en de diepte van het muzikale panorama naar
smaak in te stellen.
Basniveau optimaliseren
Plaats de luidsprekers dichter bij muren en hoeken om de basrespons te
verbeteren.
Opmerkingen betreffende luidsprekeringangen en kabels
De luidsprekeringangen zijn geschikt voor hoogwaardige kabels met een
dikte van maximaal 4 mm/10 AWG. Bij uw luidsprekers worden twee kabels
geleverd met een dikte van 1,5 mm2/16 AWG, speciaal afgestemd op de
luidsprekeringangen en geschikt voor de meeste versterkers. Als u langere
kabels nodig hebt, vraag dan uw verkoper of leverancier welke kabels het
beste bij uw luisteromgeving passen.
OPMERKING: de Director is geschikt voor kabels met een
maximale dikte van 1,5 mm/16 AWG.
De gestripte kabeluiteinden moeten 8 mm lang zijn en mogen niet worden
gesplitst. De gestripte kabeluiteinden moeten volledig in de ingang worden
geplaatst.
Gefeliciteerd! De installatie is voltooid.
Page 28

Problemen oplossen
24 Stereoluidsprekerkit
Nederlands
Problemen oplossen
Ik hoor geen geluid.
Controleer of de luidsprekerkabels juist zijn aangesloten op de ingangen •
van de luidsprekers en de versterker.
Controleer of de versterker is aangesloten op het stopcontact en is •
ingeschakeld.
Controleer of het versterkergeluid niet gedempt is en of het volume niet •
op minimaal staat.
Raadpleeg de documentatie van de versterker voor meer tips voor het •
oplossen van problemen.
Er komt maar uit één luidspreker geluid.
Controleer of de L/R-balans op uw versterker juist is ingesteld. •
Controleer de kabel tussen de luidspreker en de versterker. •
De zang of muziek lijkt niet op de juiste positie te worden afgespeeld.
Controleer of de luidsprekerkabels juist zijn aangesloten. Deze moeten •
van een rode versterkeruitgang naar een rode luidsprekeringang en van
een zwarte versterkeruitgang naar een zwarte luidsprekeringang lopen.
Zorg ervoor dat u alle aanwijzingen voor het positioneren hebt •
opgevolgd.
Raadpleeg de documentatie van de versterker voor meer tips voor het •
oplossen van problemen.
INTERNET: als u meer ondersteuning nodig hebt, ga dan naar
www.linksysbycisco.com/support
Page 29

Thank you for purchasing the Linksys by Cisco Stereo
Speaker Kit. We hope you enjoy hours of rich, quality sound.
Tak, fordi du købte dette Linksys-Cisco-højttalersæt.
Vi håber, at du vil nyde timevis af lyd i høj kvalitet.
Vielen Dank, dass Sie sich für das Lautsprecher-Set von
Linksys by Cisco entschieden haben. Wir wünschen Ihnen
viele Stunden hochwertigen Hörvergnügens.
Hartelijk dank voor uw aanschaf van deze luidsprekerkit van
Linksys by Cisco. Wij hopen dat u urenlang zult genieten van
een rijk geluid van hoge kwaliteit.
Page 30

Make your music fun again.
Gør det sjovt at lytte til musik igen.
So macht Musik wieder Spaß.
Geniet weer van uw muziek.
Page 31

Page 32

User Guides
www.linksysbycisco.com/wirelesshomeaudio/ug
Website
www.linksysbycisco.com/international
Support Site
www.linksysbycisco.com/support
† The maximum performance for wireless is derived from IEEE Standard 802.11 specifications. Actual performance can vary, including lower wireless network
capacity, data throughput rate, range and coverage. Performance depends on many factors, conditions and variables, including distance from the access point,
volume of network traffic, building materials and construction, operating system used, mix of wireless products used, interference and other adverse conditions.
† Den maksimale ydeevne for trådløse produkter er baseret på specifikationerne i IEEE 802.11-standarden. Den faktiske ydeevne kan variere, herunder lavere
kapacitet i det trådløse netværk, datagennemløbshastighed, område og dækning. Ydeevne afhænger af mange faktorer, forhold og variabler, herunder afstanden
fra access point’et, mængden af netværkstrafik, bygningsmaterialer og- konstruktion, det anvendte operativsystem, sammensætningen af de anvendte trådløse
produkter, forstyrrelser samt andre ugunstige forhold.
† Die optimale Leistung der Wireless-Verbindung wird durch die Spezifikationen nach dem IEEE-Standard 802.11 ermöglicht. Die tatsächliche Leistung kann
variieren und zu geringeren Kapazitäten des Wireless-Netzwerks, geringerer Datendurchsatzrate und Reichweite sowie geringerem Empfangsbereich führen.
Die Leistung hängt von vielen Faktoren, Umständen und Einflussgrößen ab, z. B. der Entfernung vom Access Point, dem Volumen des Datenverkehrs im Netzwerk,
den Baumaterialien und der Bauweise, dem verwendeten Betriebssystem, den verschiedenen verwendeten Wireless-Produkten, möglichen Interferenzen sowie
anderen sich negativ auswirkenden Umständen.
† De maximumprestaties voor draadloze gegevensoverdracht zijn afgeleid van de IEEE 802.11-standaard. De werkelijke prestaties, waaronder capaciteit,
verwerkingssnelheid, bereik en dekking van het draadloze netwerk, kunnen variëren. De prestaties zijn afhankelijk van een groot aantal factoren, condities
en variabelen, waaronder afstand tot het toegangspunt, hoeveelheid netwerkverkeer, gebruikte bouwmaterialen en constructie, gebruikt besturingssysteem,
combinatie van gebruikte draadloze producten, interferentie en andere nadelige invloeden.
Linksys, Cisco and the Cisco Logo are registered trademarks or trademarks of Cisco Systems, Inc. and/or its affiliates in the U.S. and certain other countries.
iPod is a trademark of Apple, Inc., registered in the U.S. and other countries.
Other brands and product names are trademarks or registered trademarks of their respective holders.
Copyright © 2009 Cisco Systems, Inc. All rights reserved.
09013010NC-RR
3240-00489
 Loading...