

Page 1

CHAP T E R
6
Installing IPS-4260
This chapter describes IPS-4260 and how to install it. It also describes the accessories and how to install
them. This chapter contains the following sections:
• Introducing IPS-4260, page 6-1
• Supported PCI Cards, page 6-2
• Hardware Bypass, page 6-3
• Front and Back Panel Features, page 6-5
• Specifications, page 6-8
• Accessories, page 6-8
• Rack Mounting, page 6-9
• Installing IPS-4260, page 6-14
• Removing and Replacing the Chassis Cover, page 6-17
• Installing and Removing PCI Cards, page 6-19
• Installing and Removing the Power Supply, page 6-21
Caution The BIOS on IPS-4260 is specific to IPS-4260 and must only be upgraded under instructions from Cisco
with BIOS files obtained from the Cisco website. Installing a non-Cisco or third-party BIOS on
IPS-4260 voids the warranty. For more information on how to obtain instructions and BIOS files from
the Cisco website, see Obtaining Cisco IPS Software, page 11-1.
Introducing IPS-4260
IPS-4260 delivers 1 Gigabit of intrusion prevention performance. You can use IPS-4260 to protect both
Gigabit subnets and aggregated traffic traversing switches from multiple subnets. IPS-4260 is a
purpose-built device that provides support for both copper and fiber NIC environments providing
flexibility of deployment in any environment.
OL-8677-01
Installing Cisco Intrusion Prevention System Appliances and Modules 5.1
6-1
Page 2

Supported PCI Cards
Note Only expansion slots 2 and 3 are supported at this time.
Chapter 6 Installing IPS-4260
IPS-4260 has two built-in Gigabit Ethernet network ports and six expansion slots. The network port
numbers increase from right to left and the expansion slot numbers increase from bottom to top and from
right to left as shown in Figure 6-4 on page 6-6. Slots 2 and 3 are PCI-Express connectors and the other
expansion slots are PCI-X slots. Slots 1 through 3 are full-height slots and slots 4 though 6 are
half-height slots. The built-in management port is called Management0/0 and the built-in sensing
interface is Gigabit-Ethernet0/1. For more information on sensor interfaces, see Sensor Interfaces,
page 1-3.
For improved reliability, IPS-4260 uses a flash device for storage rather than a hard-disk drive. IPS-4260
supports two optional network interface cards, the 2SX Fiber card, and the 4GE bypass interface card
that contains the hardware-bypass feature. Initially IPS-4260 supports only the built-in interfaces and
these two interface cards. For more information on the 4GE bypass interface card, see Hardware Bypass,
page 6-3.
IPS-4260 monitors greater than 1 Gbps of aggregate network traffic on multiple sensing interfaces and
is also inline ready. It replaces IDS-4250-XL. It supports both copper and fiber interfaces.
Note The 1-Gbps performance for IPS-4260 is based on the following conditions: 10,000 new TCP
connections per second, 100,000 HTTP transactions per second, average packet size of 450 bytes, and
the system running Cisco IPS 5.1 software. The 1-Gbps performance is traffic combined from all sensing
interfaces.
IPS-4260 ships with one power supply, but it supports redundant power supplies. For more information,
see Installing and Removing the Power Supply, page 6-21.
Note IPS-4260 operates in load-sharing mode when the optional redundant power supply is installed.
Supported PCI Cards
IPS-4260 supports the following PCI cards:
• 4GE bypass interface card (part number IPS-4GE-BP-INT=)
Provides four 10/100/1000BASE-T (4GE) monitoring interfaces (allowing up to 9 total monitoring
interfaces). The 4GE bypass interface card support hardware bypass.
Installing Cisco Intrusion Prevention System Appliances and Modules 5.1
6-2
OL-8677-01
Page 3
Chapter 6 Installing IPS-4260
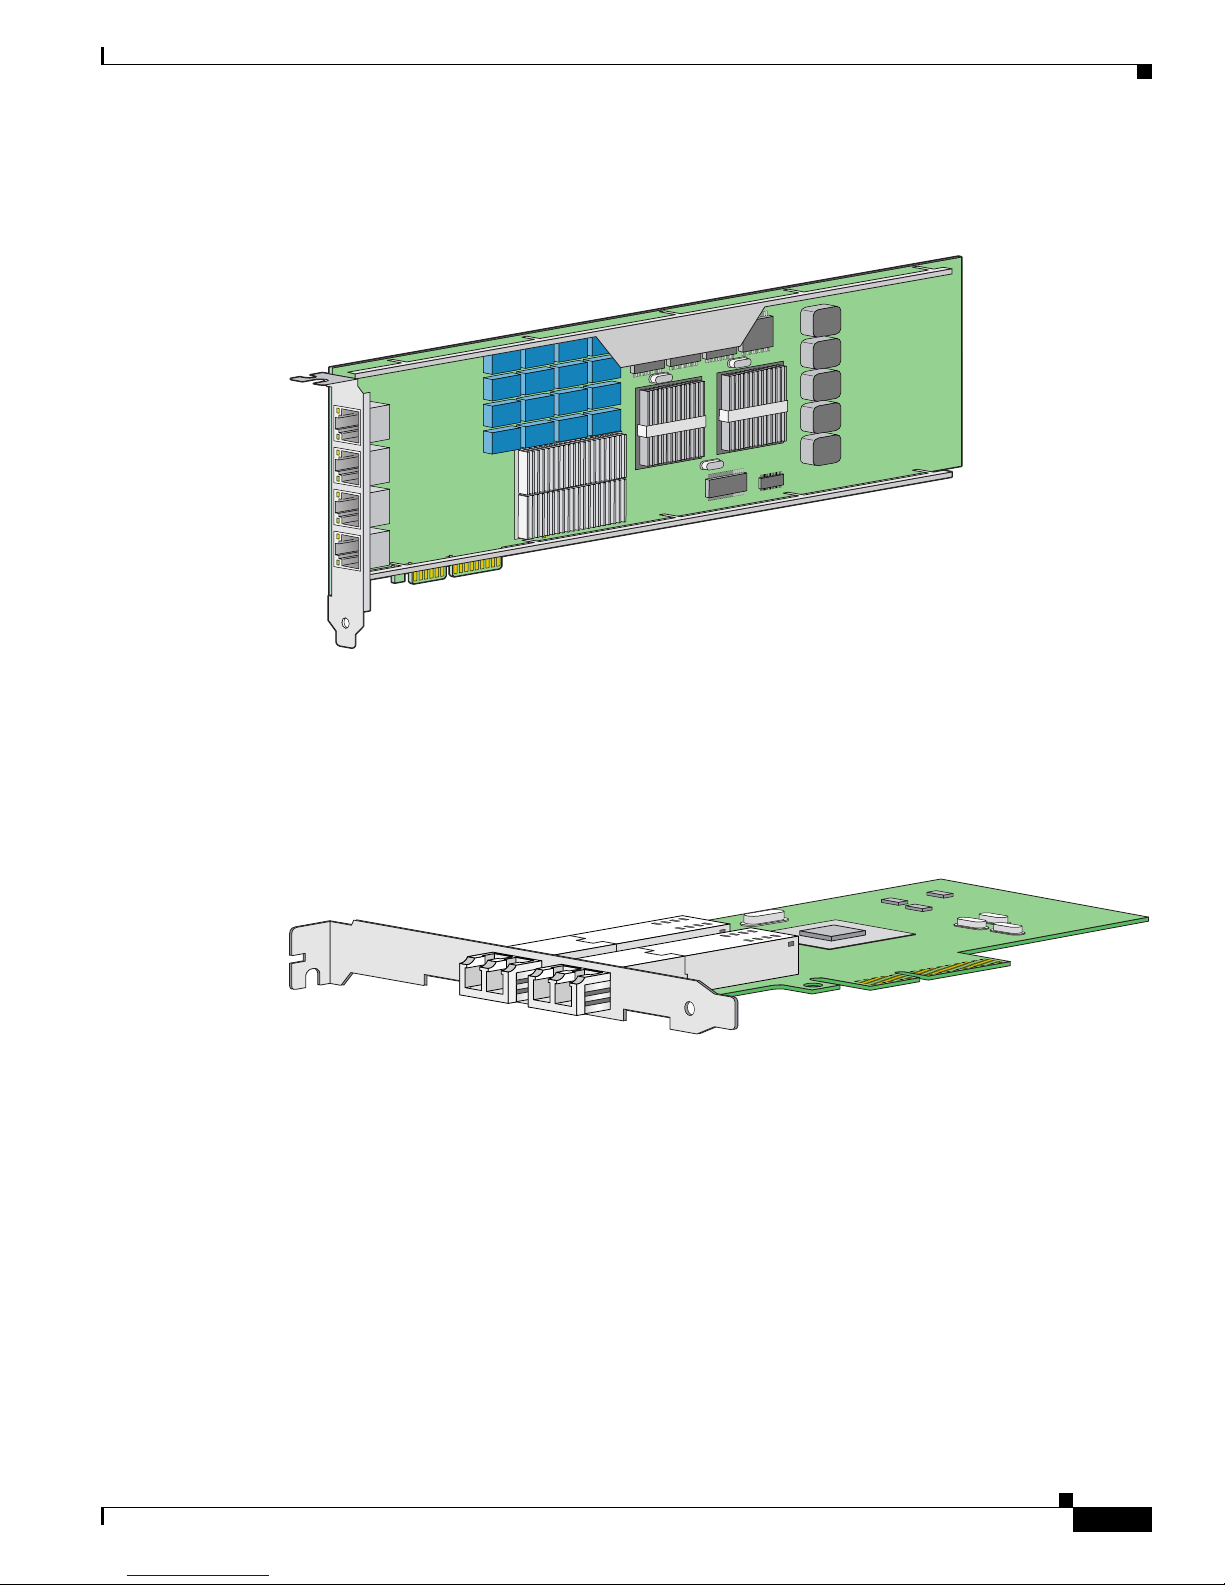
Figure 6-1 shows the 4GE bypass interface card.
Figure 6-1 4GE Bypass Interface Card
Hardware Bypass
153325
• 2SX Card (part number IPS-2SX-INT=)
Provides two 1000BASE-SX (fiber) monitoring interfaces (allowing up to 4 total fiber monitoring
interfaces). The 2SX interface cards does not support hardware bypass.
Figure 6-2 shows the 2SX card.
Figure 6-2 2SX Interface Card
Hardware Bypass
This section describes the 4GE bypass interface card and its configuration restrictions. For the procedure
for installing and removing the 4GE bypass interface card, see Installing and Removing PCI Cards,
page 6-19.
This section contains the following topics:
• 4GE Bypass Interface card, page 6-4
190474
• Hardware Bypass Configuration Restrictions, page 6-4
OL-8677-01
Installing Cisco Intrusion Prevention System Appliances and Modules 5.1
6-3
Page 4

Hardware Bypass
4GE Bypass Interface card
IPS-4260 supports the 4-port GigabitEthernet card (part number IPS-4GE-BP-INT=) with hardware
bypass. This 4GE bypass interface card supports hardware bypass only between ports 0 and 1 and
between ports 2 and 3. Figure 6-1 on page 6-3 shows the 4GE bypass interface card.
Hardware bypass complements the existing software bypass feature in IPS 5.1. For more information on
software bypass mode, refer to Configuring Bypass Mode. The following conditions apply to hardware
bypass and software bypass on IPS-4260:
• When bypass is set to OFF, software bypass is not active.
For each inline interface for which hardware bypass is available, the component interfaces are set to
disable the fail-open capability. If SensorApp fails, the sensor is powered off, reset, or if the NIC
interface drivers fail or are unloaded, the paired interfaces enter the fail-closed state (no traffic flows
through inline interface or inline VLAN subinterfaces).
• When bypass is set to ON, software bypass is active.
Software bypass forwards packets between the paired physical interfaces in each inline interface and
between the paired VLANs in each inline VLAN subinterface. For each inline interface on which
hardware bypass is available, the component interfaces are set to standby mode. If the sensor is
powered off, reset, or if the NIC interfaces fail or are unloaded, those paired interfaces enter
fail-open state in hardware (traffic flows unimpeded through inline interface). Any other inline
interfaces enter fail-closed state.
• When bypass is set to AUTO (traffic flows without inspection), software bypass is activated if
sensorApp fails.
Chapter 6 Installing IPS-4260
For each inline interface on which hardware bypass is available, the component interfaces are set to
standby mode. If the sensor is powered off, reset, or if the NIC interfaces fail or are unloaded, those
paired interfaces enter fail-open state in hardware. Any other inline interfaces enter the fail-closed
state.
Note To test fail-over, set the bypass mode to ON or AUTO, create one or more inline interfaces and power
down the sensor and verify that traffic still flows through the inline path.
Hardware Bypass Configuration Restrictions
To use the hardware bypass feature on the 4GE bypass interface card, you must pair interfaces to support
the hardware design of the card. If you create an inline interface that pairs a hardware-bypass-capable
interface with an interface that violates one or more of the hardware-bypass configuration restrictions,
hardware bypass is deactivated on the inline interface and you receive a warning message similar to the
following:
Hardware bypass functionality is not available on Inline-interface pair0.
Physical-interface GigabitEthernet2/0 is capable of performing hardware bypass only when
paired with GigabitEthernet2/1, and both interfaces are enabled and configured with the
same speed and duplex settings.
Installing Cisco Intrusion Prevention System Appliances and Modules 5.1
6-4
OL-8677-01
Page 5
Chapter 6 Installing IPS-4260
The following configuration restrictions apply to hardware bypass:
• The 4-port bypass card is only supported on IPS-4260.
• Fail-open hardware bypass only works on inline interfaces (interface pairs), not on inline VLAN
• Fail-open hardware bypass is available on an inline interface if all of the following conditions are
• Autonegotiation must be set on MDI/X switch ports connected to IPS-4260.
Front and Back Panel Features
pairs.
met:
–
Both of the physical interfaces support hardware bypass.
–
Both of the physical interfaces are on the same interface card.
–
The two physical interfaces are associated in hardware as a bypass pair.
–
The speed and duplex settings are identical on the physical interfaces.
–
Both of the interfaces are administratively enabled.
You must configure both the sensor ports and the switch ports for autonegotiation for hardware
bypass to work. The switch ports must support MDI/X, which automatically reverses the transmit
and receive lines if necessary to correct any cabling problems. The sensor is only guaranteed to
operate correctly with the switch if both of them are configured for identical speed and duplex,
which means that the sensor must be set for autonegotiation too.
Front and Back Panel Features
This section describes the IPS-4260 front and back panel features and indicators.
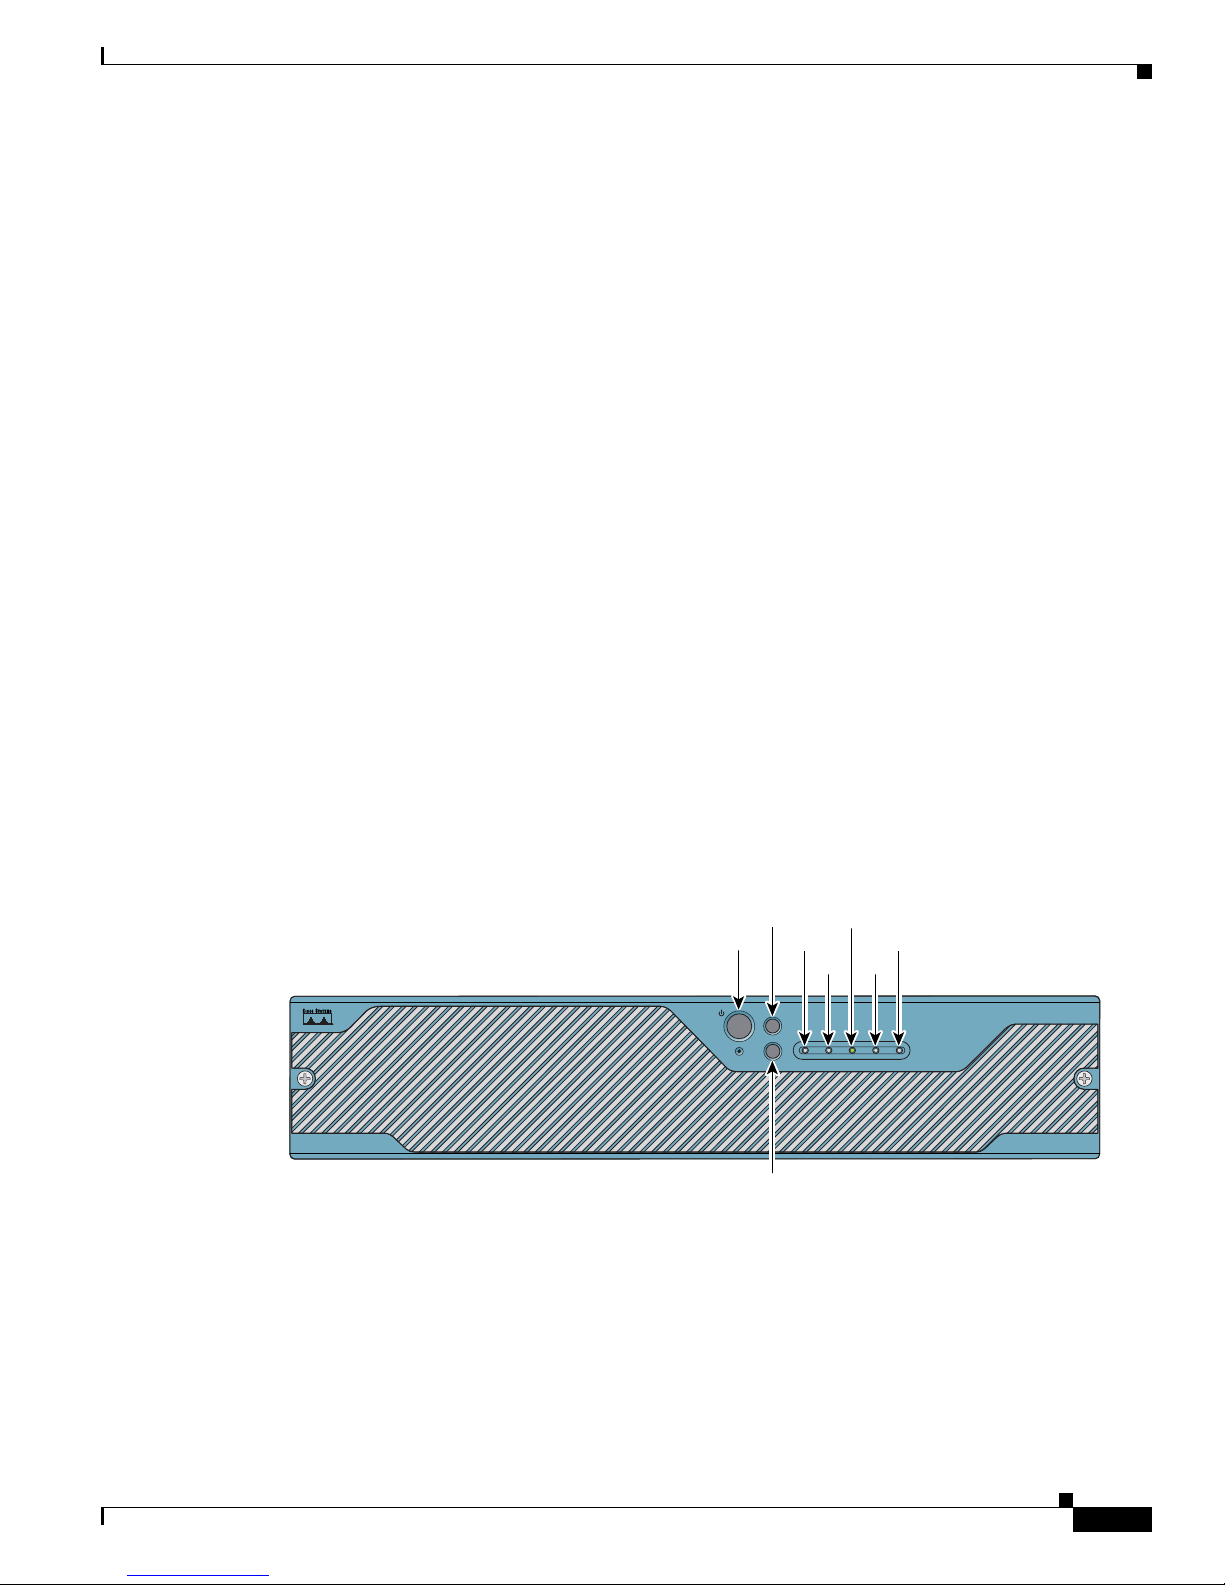
Figure 6-3 shows the front view of IPS-4260.
Figure 6-3 IPS-4260 Front Panel Features
There are three switches on the front panel of IPS-4260:
• Power—Toggles the system power.
• Reset—Resets the system.
• ID—Toggles the system ID indicator.
RESET
POWER
RESET
ID
Power
ID
NIC
ID NIC
ID
Flash
POWER STATUSFLASH
Status
Cisco IPS 4260 series
Intrusion Prevention Sensor
153095
OL-8677-01
Installing Cisco Intrusion Prevention System Appliances and Modules 5.1
6-5
Page 6
Front and Back Panel Features
(
)
Table 6-1 describes the front panel indicators on IPS-4260.
Table 6-1 Front Panel Indicators
Indicator Description
ID (blue) Continuously lit when activated by the front panel ID switch.
NIC (green) Indicates activity on either the GigabitEthernetO/1 or MGMT interfaces.
Power (green) When continuously lit, indicates DC power. The indicator is off when power is
Flash (green/amber) Off when the compact flash device is not being accessed. Blinks green when the
Status (green/amber) Blinks green while the power-up diagnostics are running or the system is
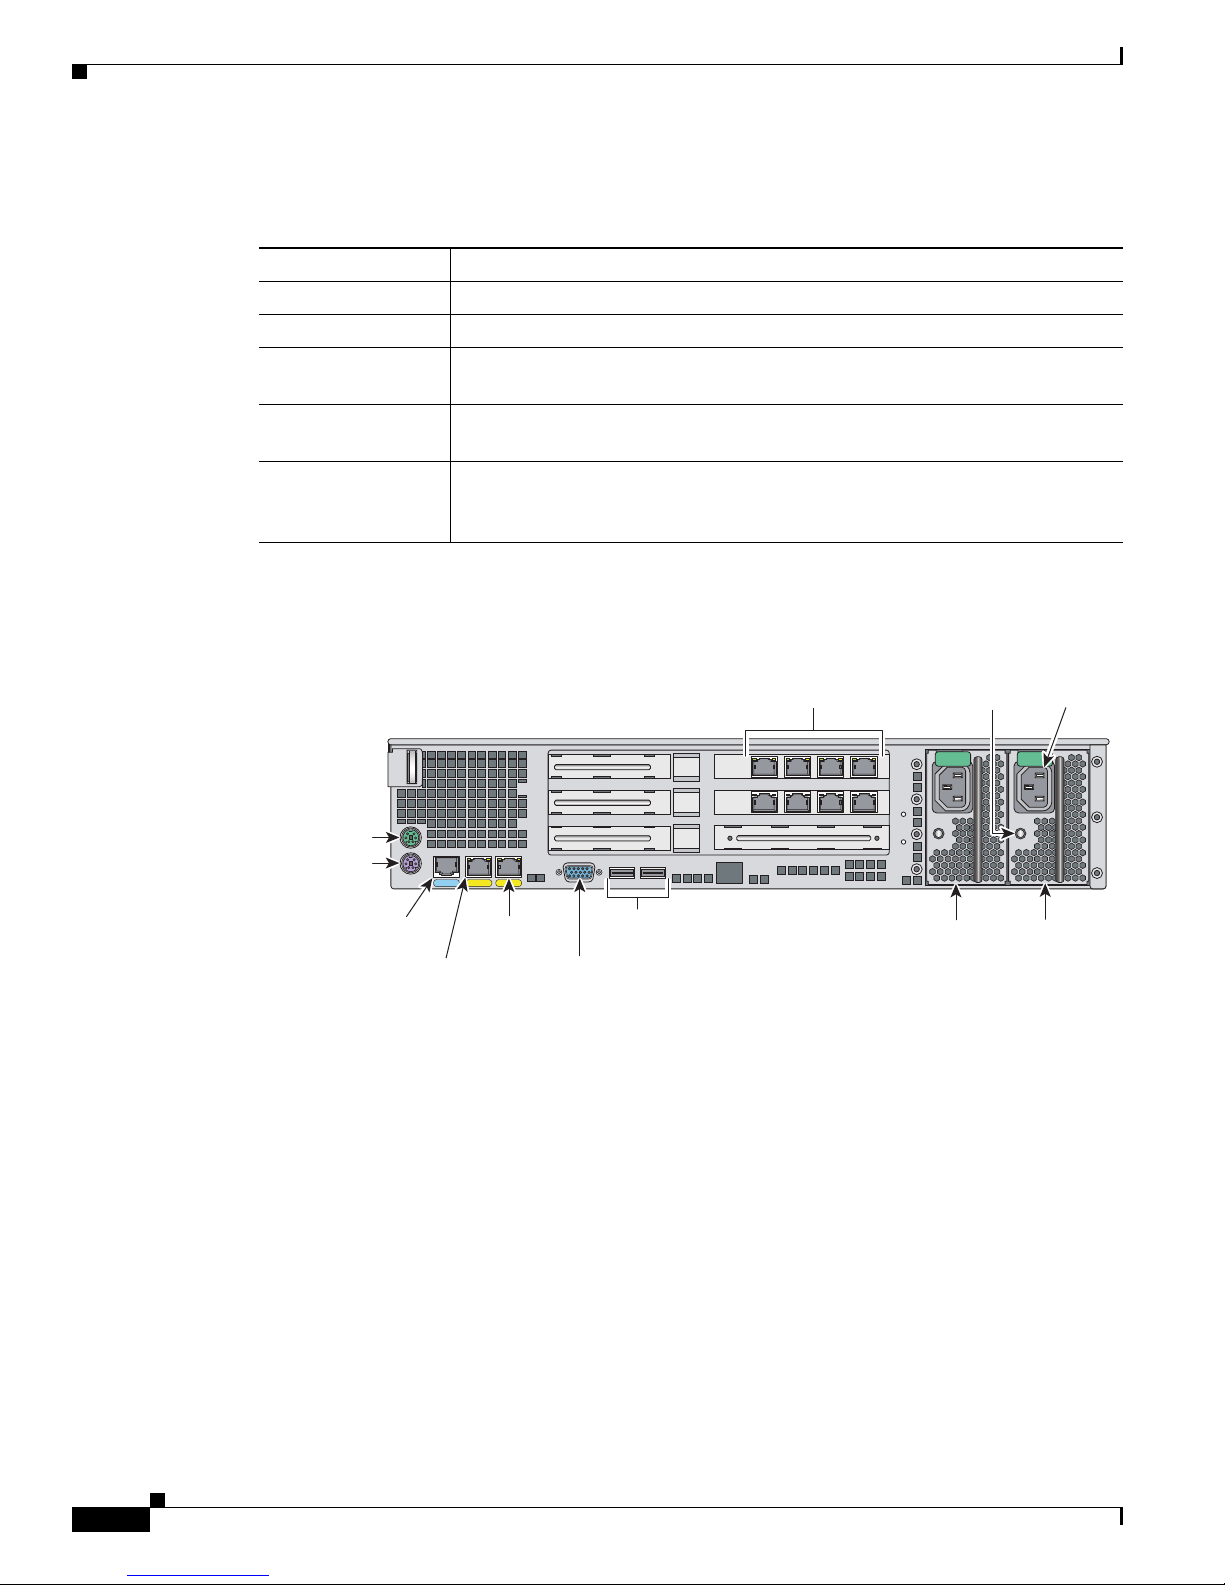
Figure 6-4 shows the back view of the IPS-4260.
Chapter 6 Installing IPS-4260
turned off or the power source is disrupted.
compact flash device is being accessed. Solid amber when a device has failed.
booting. Solid green when the system has passed power-up diagnostics. Solid
amber when the power-up diagnostics have failed.
Figure 6-4 IPS-4260 Back Panel Features
6
Mouse
connector
(not supported)
Keyboard
connector
(not supported)
Console
port
Ethernet 0/1
GE 0/1CONSOLE
Management
Gigabit
5
4
MGMT
0/0
connector
not supported
USB ports
(not used)
Video
Sensing interface
expansion slots
3
2
1
Indicator
Powe r
supply 2
light
Powe r
connector
153094
Powe r
supply 1
Installing Cisco Intrusion Prevention System Appliances and Modules 5.1
6-6
OL-8677-01
Page 7
Chapter 6 Installing IPS-4260
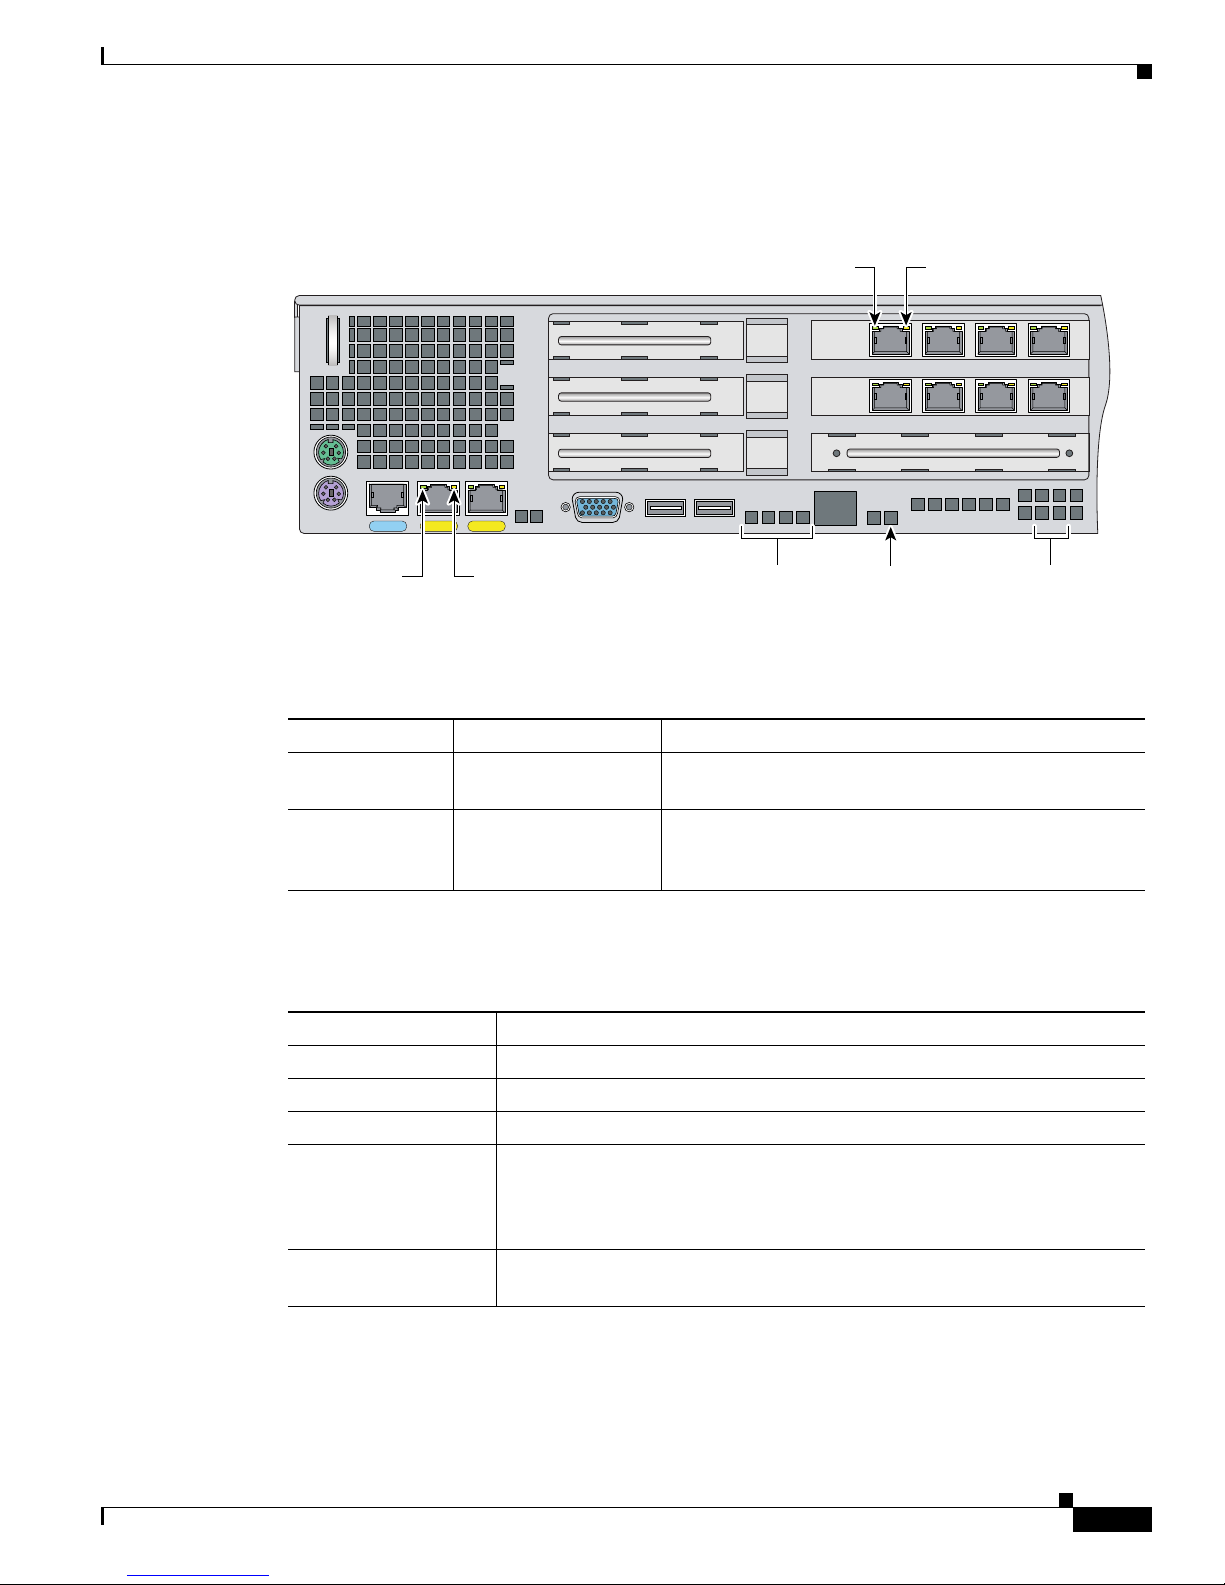
Figure 6-5 shows the two built-in Ethernet ports, which have two indicators per port.
Figure 6-5 Ethernet Port Indicators
Front and Back Panel Features
6
5
4
LNK
SPD indicator
"SPD"
SPD
GE 0/1CONSOLE
LNK
SPD
MGMT
Link/ACT indicator
"LINK"
Diagnostic
(for TAC use)
Table 6-2 lists the back panel indicators.
Table 6-2 Back Panel Indicators
Indicator Color Description
Left side Green solid
Green blinking
Right side Not lit
Green
Amber
Physical link
Network activity
10 Mbps
100 Mbps
1000 Mbps
SPD indicator
indicators
System ID
indicator
Link/ACT indicator
153308
Status
indicator
OL-8677-01
Table 6-3 lists the power supply indicator.
Table 6-3 Power Supply Indicators
Color Description
Off No AC power to all power supplies.
Green solid Output on and ok.
Green blinking AC present, only 5Vsb on (power supply off).
Amber No AC power to this power supply (for 1+1 configuration)
or
power supply critical event causing a shutdown: failure, fuse blown (1+1
only), OCP 12 V, OVP 12 V, or fan failed.
Amber blinking Power supply warning events where the power supply continues to operate:
high temperature, high power/high current, or slow fan.
Installing Cisco Intrusion Prevention System Appliances and Modules 5.1
6-7
Page 8

Specifications
Specifications
Table 6-4 lists the specifications for IPS-4260.
Table 6-4 IPS-4260 Specifications
Dimensions and Weight
Height 3.45 in. (87.6 cm)
Width 17.14 in. (435.3 cm)
Depth 20 in. (508 cm)
Weight 40.0 lb (18.14 kg)
Form factor 2 RU, standard 19-inch rack-mountable
Power
Autoswitching 100V to 240V AC
Frequency 47 to 63 Hz, single phase
Operating current 8.9 A
Steady state 588 W max continuous
Maximum peak 657 W
Maximum heat dissipation 648 BTU/hr
Environment
Temperature Operating +32°F to +104°F (+0°C to +40°C)
Relative humidity Operating 10% to 85% (noncondensing)
Altitude Operating 0 to 9843 ft (3000 m)
Shock Operating Half-sine 2 G, 11 ms pulse, 100 pulses
Vibration 2.2 Grms, 10 minutes per axis on all three axes
Chapter 6 Installing IPS-4260
Nonoperating -104°F to +158°F (-40°C to +70°C)
Nonoperating 5% to 95% (noncondensing)
Nonoperating 0 to 15,000 ft (4750 m)
Nonoperating 25 G, 170 inches/sec delta V
Accessories
Warning
Installing Cisco Intrusion Prevention System Appliances and Modules 5.1
6-8
IMPORTANT SAFETY INSTRUCTIONS
This warning symbol means danger. You are in a situation that could cause bodily injury. Before you
work on any equipment, be aware of the hazards involved with electrical circuitry and be familiar
with standard practices for preventing accidents. Use the statement number provided at the end of
each warning to locate its translation in the translated safety warnings that accompanied this device.
Statement 1071
SAVE THESE INSTRUCTIONS
OL-8677-01
Page 9

Chapter 6 Installing IPS-4260
Rack Mounting
Warning
Only trained and qualified personnel should be allowed to install, replace, or service this equipment.
Statement 1030
IPS-4260 accessories kit contains the following:
• DB25 connector
• DB9 connector
• Rack mounting kit—screws, washers, and metal bracket
• RJ45 console cable
• Two 6-ft Ethernet cables
Rack Mounting
You can rack mount IPS-4260 in a 2- or 4-post rack. This section describes how to rack mount IPS-4260
and contains the following topics:
• Installing IPS-4260 in a 4-Post Rack, page 6-9
• Installing IPS-4260 in a 2-Post Rack, page 6-12
Installing IPS-4260 in a 4-Post Rack
To rack mount IPS-4260 in a 4-post rack, follow these steps:
Step 1 Attach each inner rail to each side of the chassis with three 8-32x1/4” SEMS screws.
RESET
ID
ID
NIC
PO
W
ER STATUS
FLASH
Cisco IPS 4260 series
In
tru
s
io
n
P
re
v
e
n
tio
n
S
e
n
s
o
r
153314
OL-8677-01
Installing Cisco Intrusion Prevention System Appliances and Modules 5.1
6-9
Page 10

Rack Mounting
Step 2 Attach the front-tab mounting bracket to the chassis with two 8-32x1/4’ SEMS screws. You can flip the
bracket to push the system forward in the rack.
RESET
ID
ID
NIC
POW
ER STATUS
FLA
SH
Cisco IPS 4260 series
In
tru
s
Chapter 6 Installing IPS-4260
io
n
P
r
ev
e
n
tio
n
S
en
s
o
r
153315
Step 3 Using the four inner studs, install the mounting brackets to the outer rail with four 8-32 KEPS nuts. Insert
four thread covers over the four outer studs on each side.
153316
Installing Cisco Intrusion Prevention System Appliances and Modules 5.1
6-10
OL-8677-01
Page 11

Chapter 6 Installing IPS-4260
Step 4 Install the two outer rail subassemblies in the rack using eight 10-32x1/2” SEMS screws. You can use
four bar nuts if necessary.
Note Adjust the mounting brackets based on rack depth.
Rack Mounting
153317
Step 5 Slide IPS-4260 into the rack making sure the inner rail is aligned with the outer rail.
RESET
ID
ID
NIC
C
isc
o
IP
S
4
P
O
W
E
R
F
L
A
S
H
2
6
0
se
rie
In
tru
S
T
A
T
U
S
s
sio
n
Preven
tion
S
en
so
r
Step 6 Install two 10-32x1/2” SEMS screws to hold the front-tab mounting bracket to the rail.
RESET
ID
ID
C
isc
o
NIC
P
O
W
IP
S
4
2
E
R
F
L
A
S
H
6
0
serie
Intru
S
T
A
T
U
S
s
sion
P
rev
entio
n
S
en
sor
153318
153319
OL-8677-01
Installing Cisco Intrusion Prevention System Appliances and Modules 5.1
6-11
Page 12

Rack Mounting
Installing IPS-4260 in a 2-Post Rack
To rack mount IPS-4260 in a 2-post rack, follow these steps:
Step 1 Attach the inner rail to each side of the chassis with three 8-32x1/4” SEMS screws.
RESET
ID
ID
NIC
Step 2 Using the four inner studs, install the mounting brackets to the outer rail with four 8-32 KEPS nuts. Insert
four thread covers over the four outer studs on each side.
POW
ER STA
FLASH
TU
S
Cisco IPS 4260 series
Chapter 6 Installing IPS-4260
In
t
ru
sio
n
P
re
v
e
n
tio
n
S
en
s
o
r
153320
153321
Step 3 Install the two outer rail subassemblies in the rack using twelve 10-32x1/2” SEMS screws or whatever
rack hardware is necessary.
Note Adjust the mounting brackets based on the rack-channel depth.
Installing Cisco Intrusion Prevention System Appliances and Modules 5.1
6-12
OL-8677-01
Page 13

Chapter 6 Installing IPS-4260
Rack Mounting
153322
Step 4 Slide IPS-4260 into the rack making sure the inner rail is aligned with the outer rail.
R
E
S
E
T
ID
ID
Cisco IPS 4260 series
N
I
C
P
O
W
E
R
F
L
A
S
H
In
tr
S
T
u
A
s
T
U
io
S
n
P
r
e
v
e
n
tio
n
S
e
n
s
o
r
153323
Step 5 Install four 8-32x7/16” SEMS screws through the clearance slots in the side of each outer rail assembly
into the inner rail.
OL-8677-01
Installing Cisco Intrusion Prevention System Appliances and Modules 5.1
6-13
Page 14

Installing IPS-4260
Chapter 6 Installing IPS-4260
RESET
ID
ID NIC
Cisco IPS 4260 series
P
O
W
E
R
F
L
A
S
H
In
tru
S
T
A
sion
T
U
S
Prev
e
ntion
S
e
nso
r
153324
Installing IPS-4260
Warning
Caution Follow proper safety procedures when performing these steps by reading the safety warnings in
Step 1 Position IPS-4260 on the network.
Step 2 Attach the grounding lugs to the back of IPS-4260.
Only trained and qualified personnel should be allowed to install, replace, or service this equipment.
Statement 1030
Regulatory Compliance and Safety Information for the Cisco Intrusion Prevention System 4200 Series
Appliance Sensor. For more information on working with electrical power and in an ESD environment,
see Site and Safety Guidelines, page 1-23.
To install IPS-4260 on the network, follow these steps:
Installing Cisco Intrusion Prevention System Appliances and Modules 5.1
6-14
OL-8677-01
Page 15

Chapter 6 Installing IPS-4260
SPD
C
O
N
S
O
LNK
LE
SPD
G
E
0
LNK
/1
M
G
M
T
Installing IPS-4260
!
!
153309
Note Use 8-32 locknuts to connect a copper standard barrel grounding lug to the holes. The appliance requires
a lug where the distance between the center of each hole is 0.56 inches. The ground lug must be NRTL
listed or recognized. In addition, the copper conductor (wires) must be used and the copper conductor
must comply with the NEC code for ampacity. A lug is not supplied with the appliance.
Step 3 Place IPS-4260 in a rack, if you are rack mounting it.
For the procedure, see Rack Mounting, page 6-9.
Step 4 Attach the power cord to IPS-4260 and plug it in to a power source (a UPS is recommended).
Step 5 Connect the cable as shown in Step 6 so that you have either a DB-9 or DB-25 connector on one end as
required by the serial port for your computer, and the other end is the RJ-45 connector.
Note Use the console port to connect to a computer to enter configuration commands. Locate the serial
cable from the accessory kit. The serial cable assembly consists of a 180/rollover cable with
RJ-45 connectors (DB-9 connector adapter PN 74-0495-01 and DB-25 connector adapter PN
29-0810-01).
Note You can use a 180/rollover or straight-through patch cable to connect the appliance to a port on
a terminal server with RJ-45 or hydra cable assembly connections. Connect the appropriate cable
from the console port on the appliance to a port on the terminal server. For the instructions for
setting up a terminal server, see Setting Up a Terminal Server, page 1-14.
OL-8677-01
Installing Cisco Intrusion Prevention System Appliances and Modules 5.1
6-15
Page 16

Installing IPS-4260
Step 6 Connect the RJ-45 connector to the console port and connect the other end to the DB-9 or DB-25
Chapter 6 Installing IPS-4260
connector on your computer.
MGMTCONSOLE
Console
port (RJ-45)
RJ-45 to
DB-9 or DB-25
serial cable
(null-modem)
Step 7 Attach the network cables.
LNK
SPD
GE 0/1CONSOLE
LNK
SPD
MGMT
Computer serial port
DB-9 or DB-25
153309
SPD indicator
Link/ACT indicator
6
5
4
153308
SPD indicator
"SPD"
IPS-4260 has the following interfaces:
• GigabitEthernet0/1 (GE 0/1) is the sensing port.
• Management0/0 (MGMT) is the command and control port.
• GigabitEthernet2/0 through GigabitEthernet2/3 and GigabitEthernet3/0 through 3/3 are the
additional expansion port slots.
Caution Management and console ports are privileged administrative ports. Connecting them to an untrusted
network can create security concerns.
Step 8 Power on IPS-4260.
Installing Cisco Intrusion Prevention System Appliances and Modules 5.1
6-16
Link/ACT indicator
"LINK"
Diagnostic
indicators
(for TAC use)
System ID
indicator
Status
indicator
OL-8677-01
Page 17

Chapter 6 Installing IPS-4260
Step 9 Initialize IPS-4260.
For the procedure, see Initializing the Sensor, page 10-2.
Step 10 Upgrade IPS-4260 with the most recent Cisco IPS software.
For the procedure, see Obtaining Cisco IPS Software, page 11-1.
You are now ready to configure intrusion prevention on IPS-4260.
For More Information
• For the procedure for using HTTPS to log in to IDM, refer to Logging In to IDM.
• For the procedures for configuring intrusion prevention on your sensor, refer to the following
Removing and Replacing the Chassis Cover
documents:
–
Installing and Using Cisco Intrusion Prevention System Device Manager 5.1
–
Configuring the Cisco Intrusion Prevention System Sensor Using the Command Line Interface
5.1
Removing and Replacing the Chassis Cover
Warning
Warning
Warning
Warning
This product relies on the building’s installation for short-circuit (overcurrent) protection. Ensure that
the protective device is rated not greater than 120 VAC, 20 A U.S. (240 VAC, 16-20 A International).
Statement 1005
This equipment must be grounded. Never defeat the ground conductor or operate the equipment in the
absence of a suitably installed ground conductor. Contact the appropriate electrical inspection
authority or an electrician if you are uncertain that suitable grounding is available. Statement 1024
Blank faceplates and cover panels serve three important functions: they prevent exposure to
hazardous voltages and currents inside the chassis; they contain electromagnetic interference (EMI)
that might disrupt other equipment; and they direct the flow of cooling air through the chassis. Do not
operate the system unless all cards, faceplates, front covers, and rear covers are in place. Statement
1029
This unit might have more than one power supply connection. All connections must be removed to
de-energize the unit. Statement 1028
Caution Follow proper safety procedures when removing and replacing the chassis cover by reading the safety
warnings in Regulatory Compliance and Safety Information for the Cisco Intrusion Prevention System
4200 Series Appliance Sensor.
OL-8677-01
Installing Cisco Intrusion Prevention System Appliances and Modules 5.1
6-17
Page 18

Removing and Replacing the Chassis Cover
Note Removing the appliance chassis cover does not affect your Cisco warranty. Upgrading IPS-4260 does
not require any special tools and does not create any radio frequency leaks.
To remove and replace the chassis cover, follow these steps:
Step 1 Log in to the CLI.
Step 2 Prepare IPS-4260 to be powered off:
sensor# reset powerdown
Wait for the power down message before continuing with Step 3.
Note You can also power down IPS-4260 using IDM. For the procedure, refer to Resetting the
Appliance.
Step 3 Power off IPS-4260.
Step 4 Remove the power cord and other cables from IPS-4260.
Chapter 6 Installing IPS-4260
Step 5 If rack-mounted, remove IPS-4260 from the rack.
For the procedure, see Rack Mounting, page 6-9.
Step 6 Place IPS-4260 in an ESD-controlled environment.
For more information, see Working in an ESD Environment, page 1-25.
Step 7 Press the blue button on the top of the chassis cover and slide the chassis cover back.
153311
!
!
Caution Do not operate IPS-4260 without the chassis cover installed. The chassis cover protects the internal
components, prevents electrical shorts, and provides proper air flow for cooling the electronic
components.
Step 8 To replace the chassis cover, position it at the back of the chassis and slide it on until it snaps into place.
Step 9 Reattach the power cord and other cables to IPS-4260.
For the procedure, see Installing IPS-4260, page 6-14.
Installing Cisco Intrusion Prevention System Appliances and Modules 5.1
6-18
OL-8677-01
Page 19

Chapter 6 Installing IPS-4260
Step 10 Reinstall IPS-4260 on a rack, desktop, or table.
If you are reinstalling in a rack, see Rack Mounting, page 6-9.
Step 11 Power on IPS-4260.
Installing and Removing PCI Cards
IPS-4260 has 6 expansion card slots, three full-height and three half-height slots. You can install the
optional network interface cards in the two top full-height slots, slots 2 and 3. IPS-4260 supports up to
two network interface cards. For an illustration of the expansion card slots, see Figure 6-5 on page 6-7.
For an illustration of the supported PCI cards, see Supported PCI Cards, page 6-2.
Note We recommend that you install the 4GE bypass interface card in slot 2 if you are installing only one 4GE
bypass card. This improves accessibility to the RJ45 cable connectors.
To install and remove PCI cards, follow these steps:
Installing and Removing PCI Cards
Step 1 Log in to the CLI.
Step 2 Prepare IPS-4260 to be powered off:
sensor# reset powerdown
Wait for the power down message before continuing with Step 3.
Note You can also power down IPS-4260 using IDM. For the procedure, refer to Resetting the
Appliance.
Step 3 Power off IPS-4260.
Step 4 Remove the power cord and other cables from IPS-4260.
Step 5 If rack-mounted, remove IPS-4260 from the rack.
For the procedure, see Rack Mounting, page 6-9.
Step 6 Place IPS-4260 in an ESD-controlled environment.
For more information, see Working in an ESD Environment, page 1-25.
Step 7 Remove the chassis cover.
For the procedure, see Removing and Replacing the Chassis Cover, page 6-17.
OL-8677-01
Installing Cisco Intrusion Prevention System Appliances and Modules 5.1
6-19
Page 20

Installing and Removing PCI Cards
Step 8 Remove the card carrier by pulling up on the two blue release tabs. Use equal pressure and lift the card
carrier out of the chassis.
Chapter 6 Installing IPS-4260
153312
!
!
Step 9 With a screw driver, remove the screw from the desired slot cover.
Step 10 Remove the slot cover by pressing on it from inside the chassis.
If the card is full length, use a screw driver to remove the blue thumb screw from the card support at the
back of the card carrier.
Step 11 Carefully align the PCI card with the PCI-Express connector and alignment grooves for the appropriate
slot. Apply firm even pressure until the card is fully seated in the connector.
190471
!
!
Step 12 Reinstall the slot cover screw to hold the card to the carrier. If necessary, reinstall the card support at the
back of the card carrier.
Step 13 Replace the card carrier in the chassis.
Step 14 Replace the chassis cover.
Installing Cisco Intrusion Prevention System Appliances and Modules 5.1
6-20
OL-8677-01
Page 21

Chapter 6 Installing IPS-4260
Installing and Removing the Power Supply
IPS-4260 ships with one power supply, but you can order it with two power supplies so that you have a
redundant power supply.
To install and remove power supplies, follow these steps:
Step 1 Log in to the CLI.
Step 2 Prepare IPS-4260 to be powered off:
sensor# reset powerdown
Wait for the power down message before continuing with Step 3.
Note You can also power down IPS-4260 using IDM. For the procedure, refer to Resetting the
Appliance.
Step 3 Power off IPS-4260.
Step 4 Remove the power cord and other cables from IPS-4260.
Installing and Removing the Power Supply
Note Power supplies are hot-swappable. You can replace a power supply while IPS-4260 is running,
if you are replacing a redundant power supply.
Step 5 Squeeze the tabs to remove the filler plate.
!
OL-8677-01
Installing Cisco Intrusion Prevention System Appliances and Modules 5.1
6-21
Page 22

Installing and Removing the Power Supply
Step 6 Install the power supply.
Step 7 To remove the power supply, push down the green tab and pull out the power supply.
Chapter 6 Installing IPS-4260
!
!
!
!
Step 8 After installing or removing the power supply, replace the power cord and other cables.
Step 9 Power on IPS-4260.
Installing Cisco Intrusion Prevention System Appliances and Modules 5.1
6-22
OL-8677-01
 Loading...